
Operating Instructions
Bedienungsanleitung
ENGLISHSVENSKASUOMI DANSK NORSK


Table of contents
Table of contents
1 For your safety ……………………………………………………………………………………………………… 5
1.1 Symbols used ……………………………………………………………………………………………… 6
1.2 Proper use ……………………………………………………………………………………………………. 6
1.3 Danger from electric current ……………………………………………………………………. 6
1.4 Risk of burns and scalds…………………………………………………………………………….. 7
1.5 General safety……………………………………………………………………………………………… 7
2 Overview of the appliance …………………………………………………………………………………. 8
2.1 Appliance at a glance ………………………………………………………………………………… 8
2.2 Control panel at a glance …………………………………………………………………………10
3 First steps ……………………………………………………………………………………………………………..11
3.1 Unpacking the appliance ………………………………………………………………………… 11
3.2 Checking the delivery contents ……………………………………………………………… 11
3.3 Installing the appliance …………………………………………………………………………… 12
3.4 Connecting the appliance ………………………………………………………………………. 12
3.5 Switching on the appliance for the rst time ……………………………………….12
4 Basic operation ……………………………………………………………………………………………………14
4.1 Switching the appliance on and o ……………………………………………………….14
4.2 Using the control panel ……………………………………………………………………………15
4.3 Navigating in the menu ……………………………………………………………………………15
4.4 Filling coee beans into the bean container ………………………………………..17
4.5 Filling with water ……………………………………………………………………………………….18
4.6 Adjusting the outlet ………………………………………………………………………………….19
4.7 Using milk ………………………………………………………………………………………………….. 20
4.8 Emptying the drip tray and coee grounds container ………………………..22
5 Preparing beverages ………………………………………………………………………………………….23
5.1 Preparing Espresso and Café Crème ………………………………………………………23
5.2 Preparing Cappuccino ……………………………………………………………………………..24
5.3 Preparing Latte Macchiato ………………………………………………………………………24
5.4 Preparing milk foam or warm milk …………………………………………………………25
5.5 Preparing hot water ………………………………………………………………………………….25
5.6 Preparing further beverage specialities with recipes ………………………….25
5.7 Changing beverage settings before and during preparation ……………27
5.8 Stopping beverage preparation ……………………………………………………………..28
5.9 Preparing two beverages simultaneously …………………………………………….28
6 Permanently changing beverage settings …………………………………………………….29
6.1 Changing default settings ………………………………………………………………………. 29
ENGLISH
3

ENGLISH
Table of contents
7 Changing basic settings ……………………………………………………………………………………. 30
7.1 Setting the language ……………………………………………………………………………….. 30
7.2 Setting Auto OFF ……………………………………………………………………………………….30
7.3 Setting energy save mode ……………………………………………………………………….31
7.4 Resetting the appliance to the factory settings……………………………………31
7.5 Information on the appliance status ……………………………………………………..32
7.6 Setting the grinding neness …………………………………………………………………. 33
8 Care and maintenance ……………………………………………………………………………………….34
8.1 General cleaning ………………………………………………………………………………………. 34
8.2 Rinsing the coee system ………………………………………………………………………..34
8.3 Removing and cleaning the brewing unit …………………………………………….35
8.4 Using the «Easy Cleaning» programme ………………………………………………….36
8.5 Using the «Cleaning milk system» programme …………………………………….36
8.6 Using the «Cleaning coee system» programme …………………………………38
8.7 Using the «Descaling» programme …………………………………………………………38
8.8 Setting the water hardness ……………………………………………………………………..39
8.9 Using a water lter …………………………………………………………………………………….40
9 Problems ……………………………………………………………………………………………………………….42
10 Transport, storage and disposal ………………………………………………………………………43
10.1 Venting the appliance ………………………………………………………………………………43
10.2 Transporting the appliance ……………………………………………………………………..43
10.3 Disposing of the appliance ………………………………………………………………………44
11 Technical data ……………………………………………………………………………………………………..45
4

Dear Customer,
Thank you for purchasing the Caeo®Passione® fully automatic coee
maker.
The operating instructions will help you discover the diverse options
oered by the appliance and enjoy your coee to the full.
Read through the operating instructions carefully. This helps avoid personal
injury and material damage. Store the operating instructions carefully. If
you pass on the appliance, include the operating instructions with it.
Melitta accepts no liability for damage caused by failure to observe the
operating instructions.
If you require further information or have any questions on the appliance,
contact Melitta or visit our website at:
www.melitta.de
We hope you enjoy using your appliance.
1 For your safety
The appliance conforms to the following European directives:
ū 2006 / 95 / EC (low voltage),
ū 2004 / 108 / EC (electromagnetic compatibility),
ū 2011 / 65 / EU (RoHS),
ū 2009 / 125 / EC (eco-design / ErP).
The appliance has been built using the latest technology. Nevertheless,
some residual dangers remain.
Observe the safety instructions to avoid dangers. Melitta accepts no liability
for damage caused by failure to observe the safety instructions.
For your safety
ENGLISH
5
ENGLISH
For your safety
1.1 Symbols used
The following symbols indicate particular risks in using the appliance or
provide useful tips.
CAUTION
The signal word CAUTION indicates possible injuries.
ATTENTION
The signal word ATTENTION indicates possible damage to the appliance.
Information
The signal word «Information» indicates additional notes and tips on using
the appliance.
1.2 Proper use
The appliance is used to prepare beverages made from
coee beans, and to heat milk and water.
The appliance is intended for use in private households.
Any other use is regarded as improper and may lead to
personal injury and material damage. Melitta accepts no
liability for damage that arises due to improper use of
the appliance.
1.3 Danger from electric current
If the appliance or the power cable is damaged, there is a
risk of fatal electric shock.
Observe the following safety instructions to avoid danger from electric current:
ū Do not use a damaged power cable.
ū A damaged power cable may only be replaced by the
manufacturer, its customer service or its service partner.
ū Do not open any covers rmly screwed onto the appli-
ance housing.
ū Only use the appliance when it is in a technically aw-
less condition.
6

ū A defective appliance may only be repaired by an
authorised workshop. Do not repair the appliance
yourself.
ū Do not undertake any changes to the appliance, its
components or its accessories.
ū Do not immerse the appliance in water.
1.4 Risk of burns and scalds
Escaping uids and steam can be very hot. Parts of the
appliance can also become very hot.
Observe the following safety instructions to avoid scalds
and burns:
ū Avoid escaping uids and steam coming into contact
with the skin.
ū Do not touch the nozzles on the outlet during and
immediately after dispensing a beverage. Wait until
the components have cooled down.
1.5 General safety
Observe the following safety instructions to avoid personal injury and material damage:
For your safety
ENGLISH
ū Do not reach into the interior of the appliance during
operation.
ū Keep the appliance and its power cable out of the
reach of children under 8 years of age.
ū This appliance may be used by children over 8 years of
age and by persons with reduced physical, sensory or
mental capabilities or a lack of experience and knowledge if they are supervised or have been instructed in
using the appliance safely and understand the resulting risks.
ū Children must not play with the appliance. Cleaning
and maintenance must not be undertaken by children
younger than 8 years of age. Children over 8 years of
age must be supervised during cleaning and maintenance.
ū Disconnect the appliance from the power supply
when left unsupervised for a long time.
7

Overview of the appliance
2 Overview of the appliance
ENGLISH
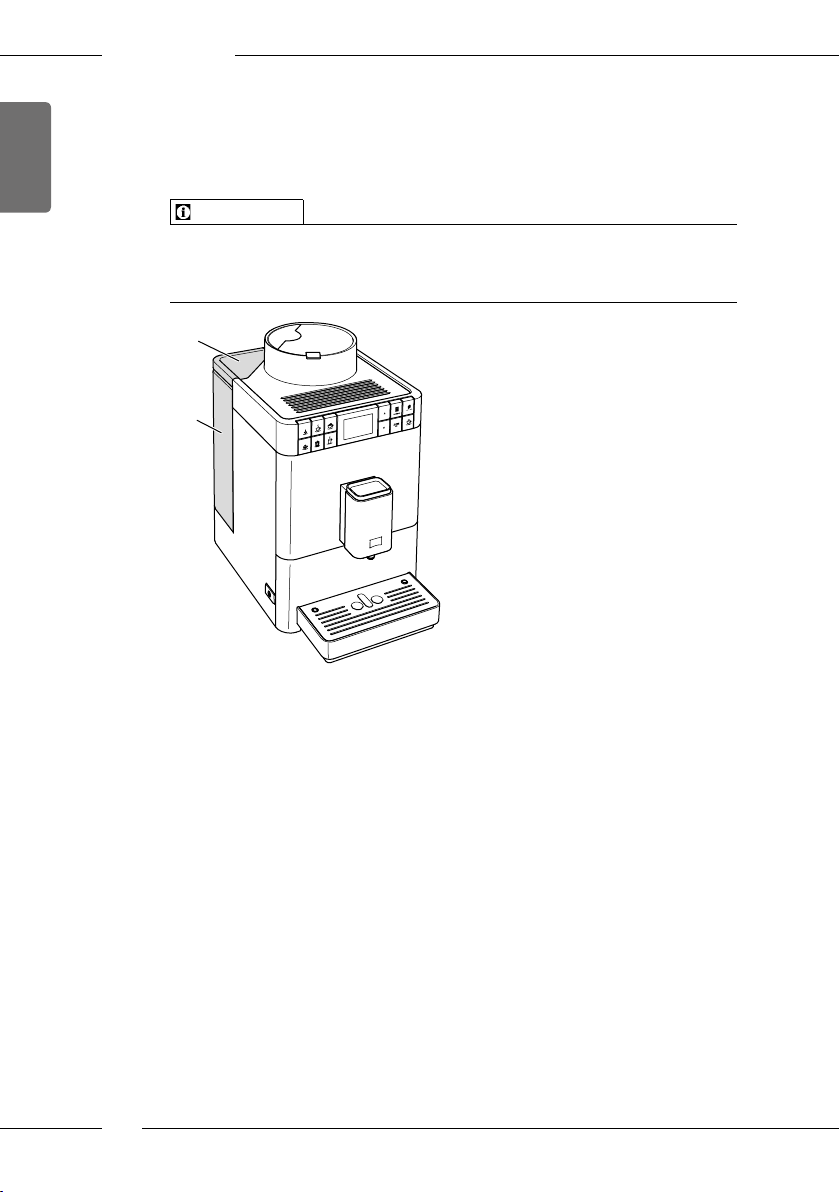
2.1 Appliance at a glance
1
10
9
2
3
4
5
6
7
Fig. 1: Front left of the appliance
1 Water tank with lid 6 Height-adjustable outlet with 2 coee
2 Lid of the bean container 7 Coee grounds container (inner)
3 Bean container 8 Drip tray
4 Cup rest 9 ON/OFF button
5 Control panel 10 «Grinding neness adjustment» lever
8
8
nozzles, 1 milk nozzle,
1 hot water nozzle, cup illumination
(inner)
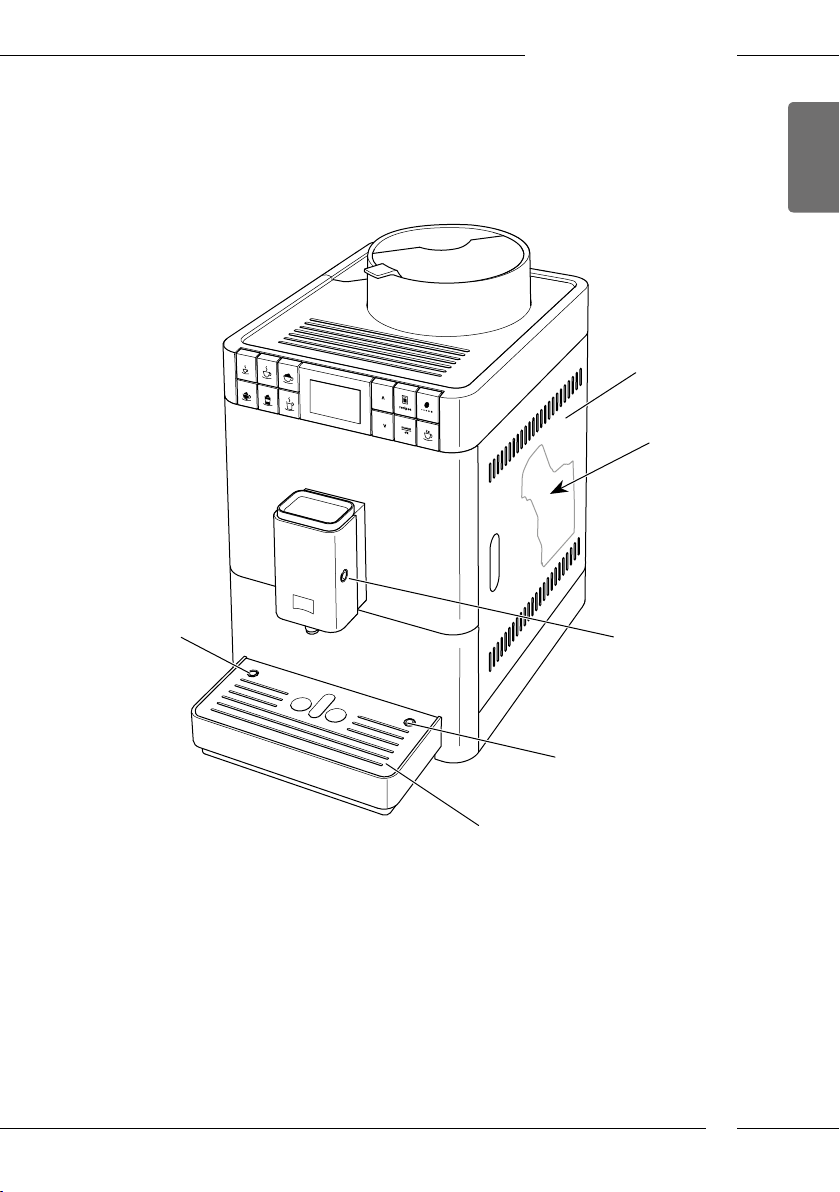
Overview of the appliance
11
12
ENGLISH
16
15
13
14
Fig. 2: Front right of the appliance
11 Cover 14 Milk hose connection at the drip tray
12 Brewing unit (inner) 15 Cup plate
13 Milk hose connection at the
outlet
16 Float
9
ENGLISH
Overview of the appliance
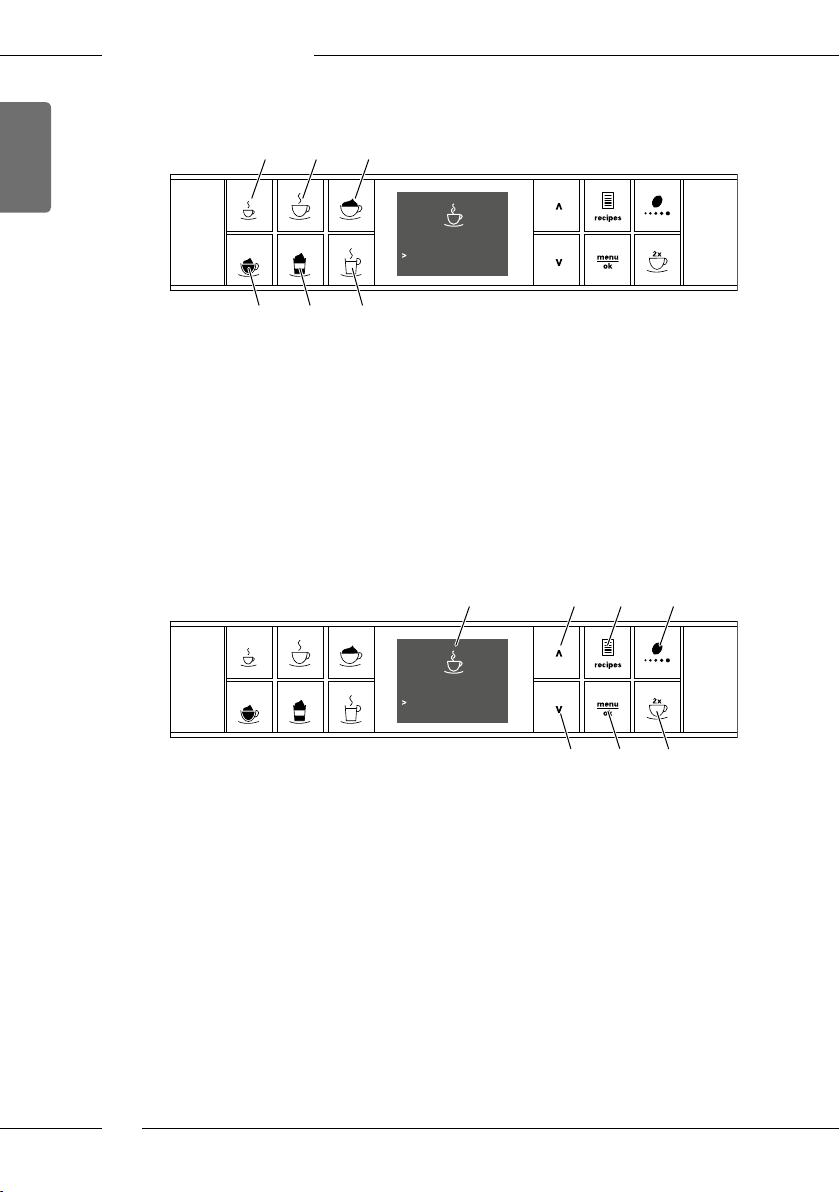
2.2 Control panel at a glance
191817
Please select beverage
20 21 22
Fig. 3: Direct keys
Item Designation Function
17 Espresso Preparing Espresso
18 Café Crème Preparing Café Crème
19 Cappuccino Preparing Cappuccino
20 Milk foam/Warm
milk
21 Latte Macchiato Preparing Latte Macchiato
22 Hot water Preparing hot water
Preparing milk foam and warm milk
09:52
23 24 25 26
Fig. 4: Display and buttons
Item Designation Function
23 Display Display of current menus and messages
24 Up arrow
button
25 Recipes Selecting and preparing recipes
26 Coee strength Setting the coee strength
27 Down arrow
button
28 menu/ok Calling up the menu or conrming inputs
29 Two cups Two-cup dispensing
10
09:52
Please select beverage
Example: Ready symbol
Navigating up in the menu
or increasing the quantity
Navigating down in the menu
or reducing amount
27 28 29
3 First steps
This chapter describes how to prepare your appliance for use.
3.1 Unpacking the appliance
In addition to the appliance, there are further accessories in the packaging
such as cleaning aids and agents.
CAUTION
Contact with cleaning agents may lead to eye and skin irritation.
Keep the supplied cleaning agents out of the reach of children.
Unpack the appliance. Remove the packaging material, the adhesive
strips and the protective lms from the appliance.
Keep the packaging material for transport and possible return ship-
ments.
Information
The appliance may contain traces of coee and water. The appliance has
been tested in the factory to ensure that it functions perfectly.
3.2 Checking the delivery contents
Check the completeness of delivery using the following list. If parts are
missing, contact your retailer.
ū Screw-in aid for the water lter
ū Long milk hose
ū Cleaning brush
ū Fully automatic coee makers cleaner
ū Milk system cleaning agent
ū Fully automatic coee makers descaling agent
ū Water lter
ū Test strip for determining the water hardness.
Depending on the version, also with a
ū milk container with short milk hose.
First steps
ENGLISH
11

ENGLISH
First steps
3.3 Installing the appliance
Observe the following instructions:
ū Do not install the appliance in damp rooms.
ū Install the appliance on a stable, at and dry surface.
ū Do not install the appliance in the vicinity of sinks or the like.
ū Do not install the appliance on hot surfaces.
ū Install the appliance at a sucient distance (approx. 10cm) from the
wall and other objects. The space above the appliance should be at least
20cm.
ū Route the power cable so it cannot be damaged by edges or hot sur-
faces.
3.4 Connecting the appliance
Observe the following instructions:
ū Check that the supply voltage matches the operating voltage specied
in the technical data (see the Technical data on page45 table).
ū Only connect the appliance to a properly installed earthing contact
socket. If in doubt, consult a specialist electrician.
ū The protective contact socket must have a fuse of at least 10 A.
3.5 Switching on the appliance for the rst time
During initial start-up, the language, the time and the water hardness can
be set. The settings can be changed at a later point in time (see chapter 7
Changing basic settings on page30 and chapter 8.8 Setting the water
hardness on page39).
Use the enclosed test strips to determine the water hardness. Observe the
instructions on the test strip packaging and in Table Water hardness range
on page45.
12
Information
ū We recommend pouring away the rst two cups of coee after initial
start-up.
ū If you want to use a water lter, only insert this after starting up for the
rst time.

First steps
9
Fig. 5: ON/OFF button
Requirement: The appliance has been installed and connected.
1. Place a vessel beneath the outlet.
2. Press the ON/OFF button.
» The welcome display appears on the appliance.
» The request to carry out the setup appears: Please set up the machine.
3. Conrm with «menu/ok».
» The Language menu appears.
4. Select your language with the arrow buttons. Conrm with «menu/ok».
» The Water hardness menu appears.
5. Select the determined water hardness range with the arrow buttons or
conrm the default value with «menu/ok».
» The request Please rell and insert water tank appears.
6. Remove the water tank. Rinse the water tank out with clean water. Fill
the water tank with fresh water and insert it.
» The appliance heats up and performs automatic rinsing.
» The ready symbol appears on the display.
7. Fill coee beans into the bean container. To do this, read section4.4
Filling coee beans into the bean container on page17.
» As required, a water lter can now be inserted (see section 8.9 Using a
water lter on page40).
ENGLISH
13

ENGLISH
Basic operation
4 Basic operation
This chapter describes basic operating steps for using the appliance on a
daily basis.
4.1 Switching the appliance on and o
Before switching on after starting up the appliance for the rst time, read
section3.5 Switching on the appliance for the rst time on page12.
Information
ū When switched on and o, the appliance performs automatic rinsing.
ū During rinsing, rinsing water is also conducted into the drip tray.
Switching on the appliance
1. Place a vessel beneath the outlet.
2. Press the ON/OFF button (9).
» The welcome display appears on the appliance.
» The appliance heats up and performs automatic rinsing.
» The ready symbol appears on the display.
Information
If the appliance was only switched o briey, there is no automatic rinsing
after switching on.
Switching o the appliance
1. Place a vessel beneath the outlet.
2. Press the ON/OFF button (9).
» The appliance performs automatic rinsing.
» The appliance switches o.
Information
ū The appliance switches o automatically when it is not operated for a
long time. Automatic rinsing is also carried out in this case.
ū The o time can be set in the Auto OFF menu, see section 7.2 Setting
Auto OFF on page30.
ū If no beverage has been prepared since switching on or if the water tank
is empty, no rinsing takes place.
14
4.2 Using the control panel
The essential programmes can be accessed using the control panel.
Press the required button. Use the following actions to operate the buttons:
Brief press
Briey press a button to select a programme.
Long press
2s
Press a button for longer than 2 seconds to select a second
programme that may be available.
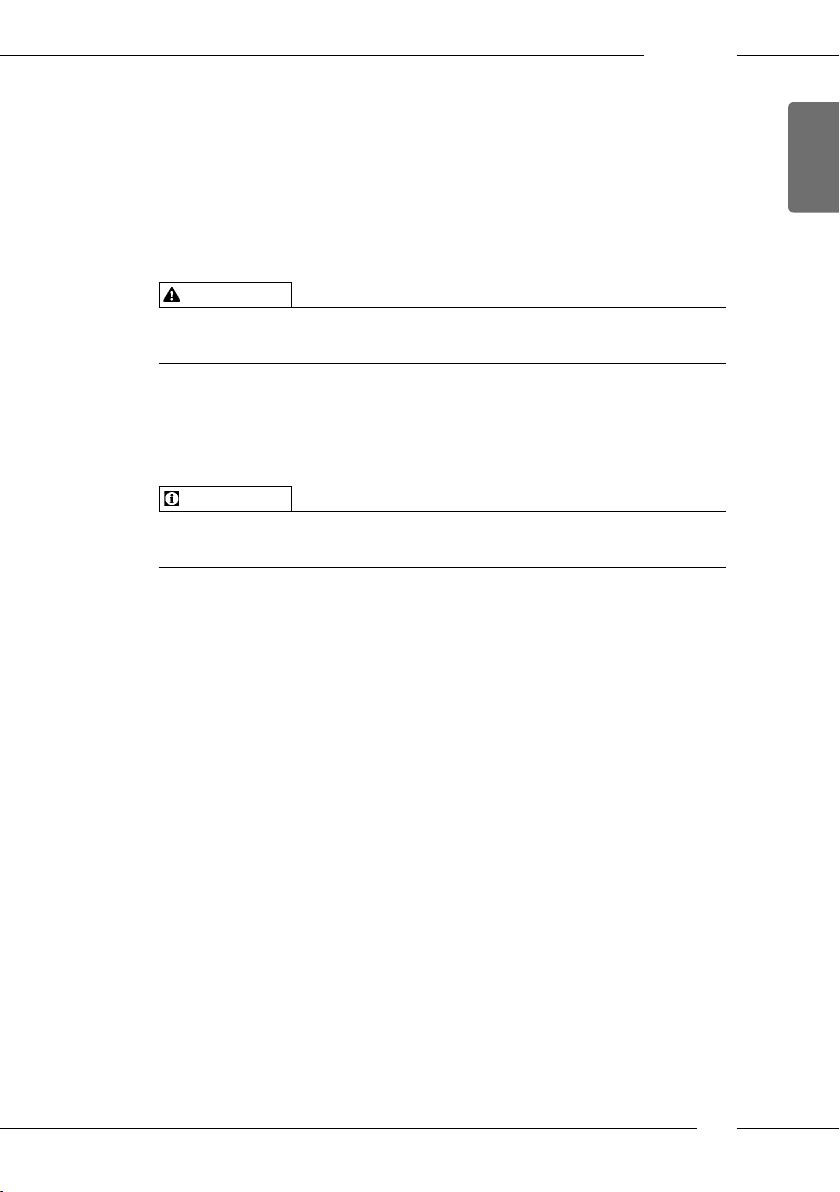
4.3 Navigating in the menu
To set individual beverages and for maintenance and care, call up the menu
on the display and navigate in the menu.
Observe the instructions on the display.
Direct keys
Espresso
Coffee strength
Strong
Confirm with OK:
Basic operation
ENGLISH
Fig. 6: Display (example) and buttons for navigation
Use the following options to navigate in the menu:
Calling up the menu and conrming the selection
Press the «menu/ok» button for longer than 2 seconds to call up the
menu.
Briey press the «menu/ok» button to conrm your selection.
15
ENGLISH
Basic operation
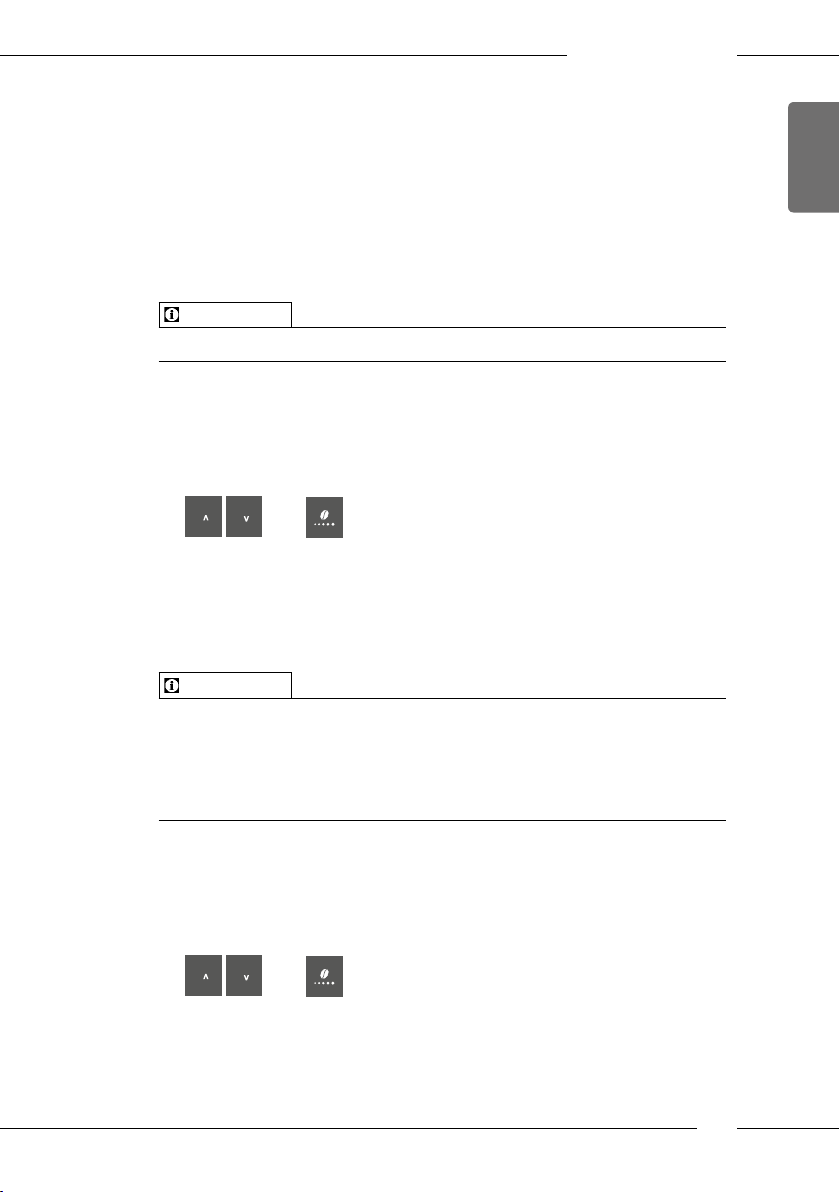
Navigating in the menu or changing a numerical value
Press the arrow buttons to navigate down or up in the menu.
Press the arrow buttons to increase or decrease a numerical value.
Press and hold an arrow button to quickly reach the required position or numerical value.
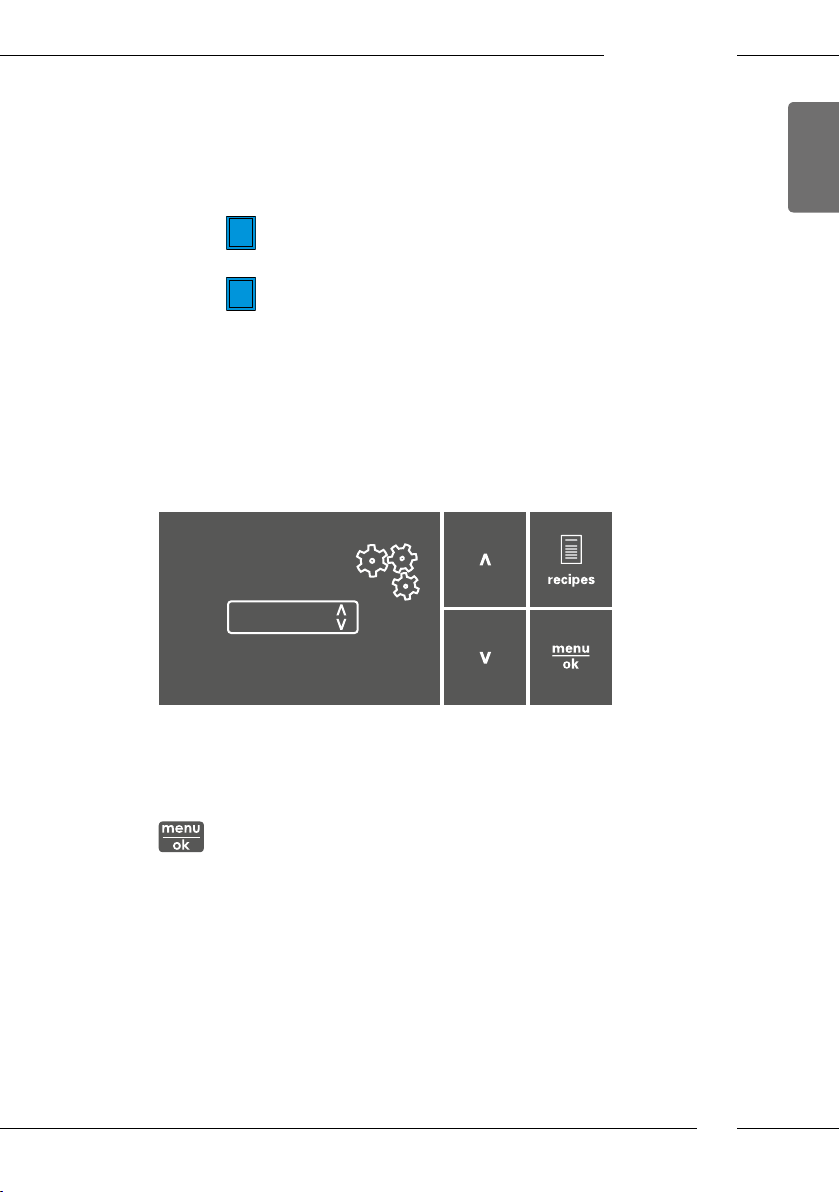
Exiting a menu
Select the Exit command with the arrow buttons and conrm with
«menu/ok» to exit a menu.
Exit submenus that only display information and where no settings
are made with «menu/ok».
Calling up submenus
Certain of the appliance’s programmes are reached by calling up several
submenus in succession.
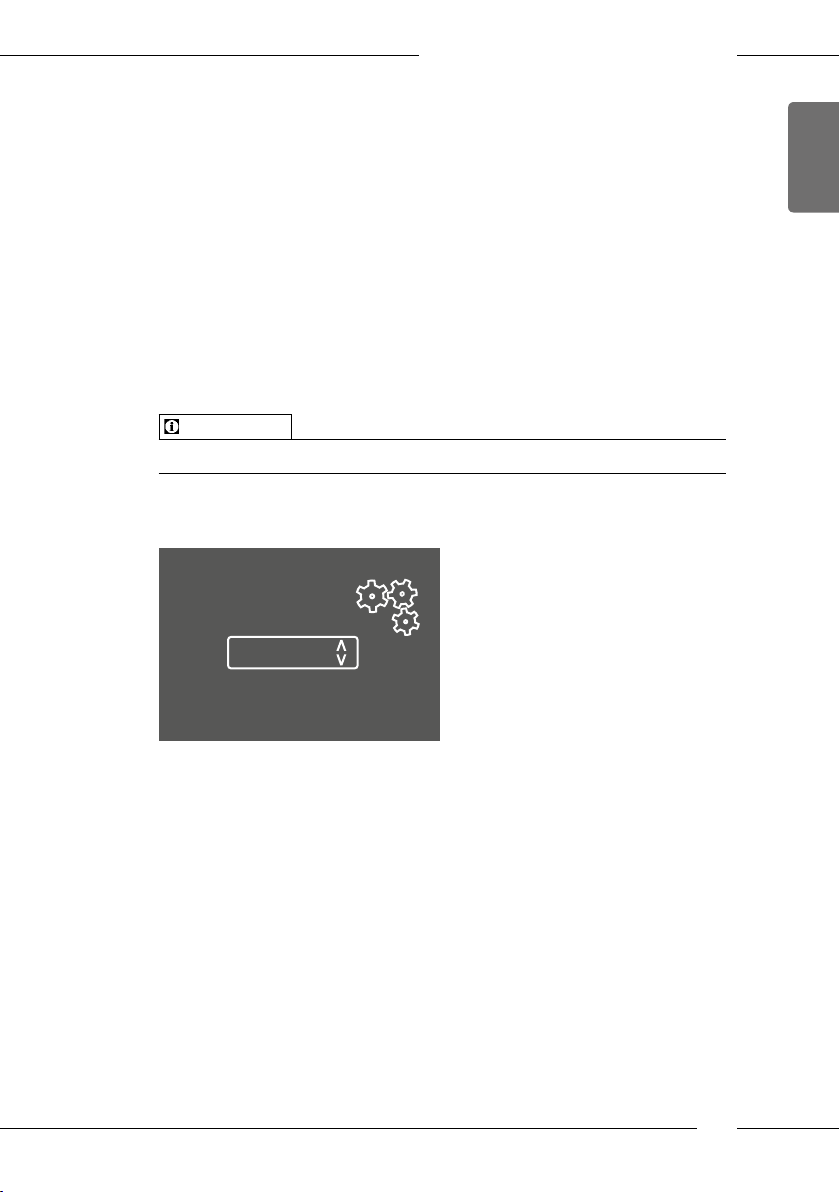
Submenus are always called up in a similar manner. Navigation to the Des-
caling programme is described here as an example.
Care
Exit
Rinsing
Easy cleaning
Cleaning milk system
Cleaning coffee system
Descaling
Filter
Fig. 7: Navigating to the Descaling programme
1. Press the «menu/ok» button for 2 seconds.
» The menu appears on the display.
2. Use the arrow buttons to select Care and conrm with
«menu/ok».
3. Use the arrow buttons to select Descaling and conrm with «menu/ok».
The selection of a programme is always shown in shortened form in these
operating instructions:
Navigate to the Care > Descaling menu.
16
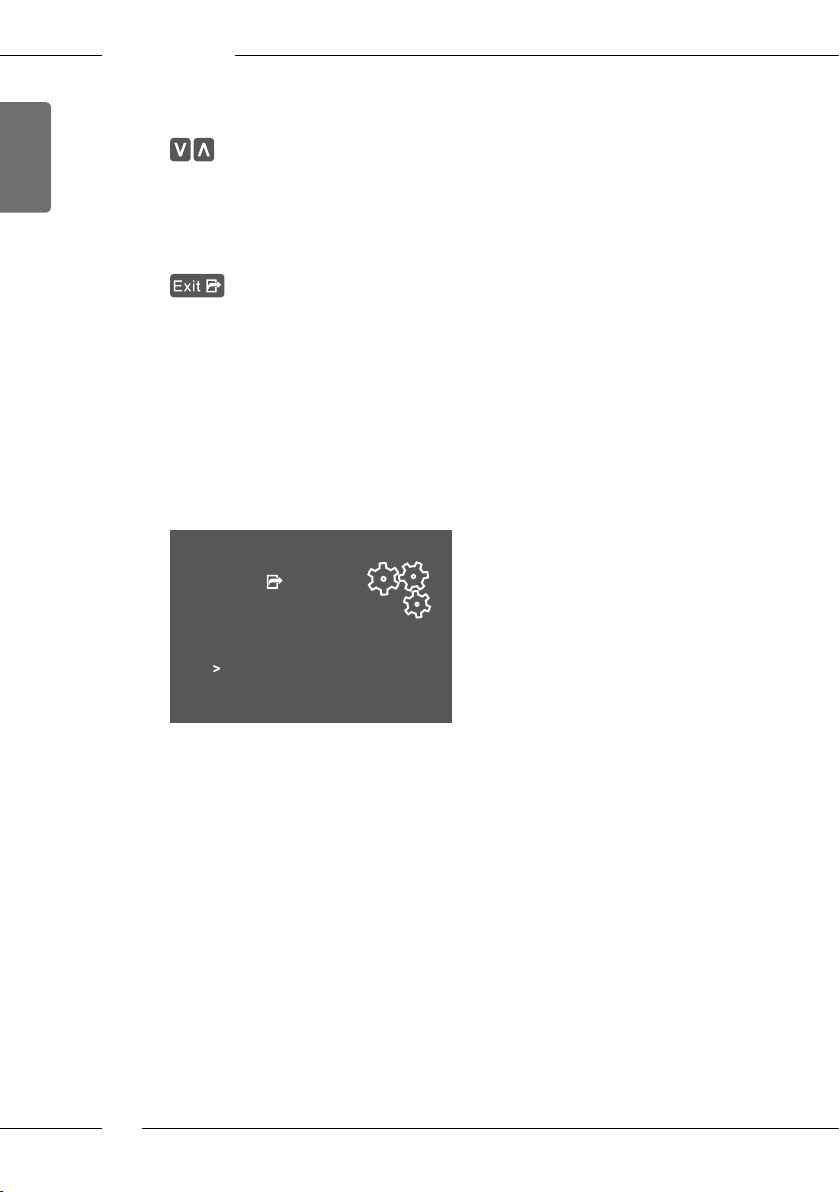
4.4 Filling coee beans into the bean container
Roasted coee beans lose their aroma. Only ll the bean container with as
many coee beans as you will consume over the next 3 to 4days.
ATTENTION
The use of unsuitable types of coee can lead to clogging of the grinder.
Do not use freeze-dried or caramelised coee beans.
Do not use any coee powder or instant products.
2
Basic operation
ENGLISH
Fig. 8: Opening the lid of the bean container.
1. Open the lid(2) of the bean container.
2. Fill coee beans into the bean container.
3. Close the lid of the bean container.
17
ENGLISH
Basic operation
4.5 Filling with water
Only use fresh, cold water without carbon dioxide for optimum coee
enjoyment. Change the water daily.
Information
The quality of the water largely determines the avour of the coee.
Therefore, use a water lter (see section 8.8 Setting the water hardness on
page39 and section 8.9 Using a water lter on page40).
30
1
Fig. 9: Water tank
1. Open the lid of the water tank(30) and pull the water tank(1) upwards
out of the appliance by the handle.
2. Fill the water tank with water.
3. Insert the water tank into the appliance from above and close the lid.
18
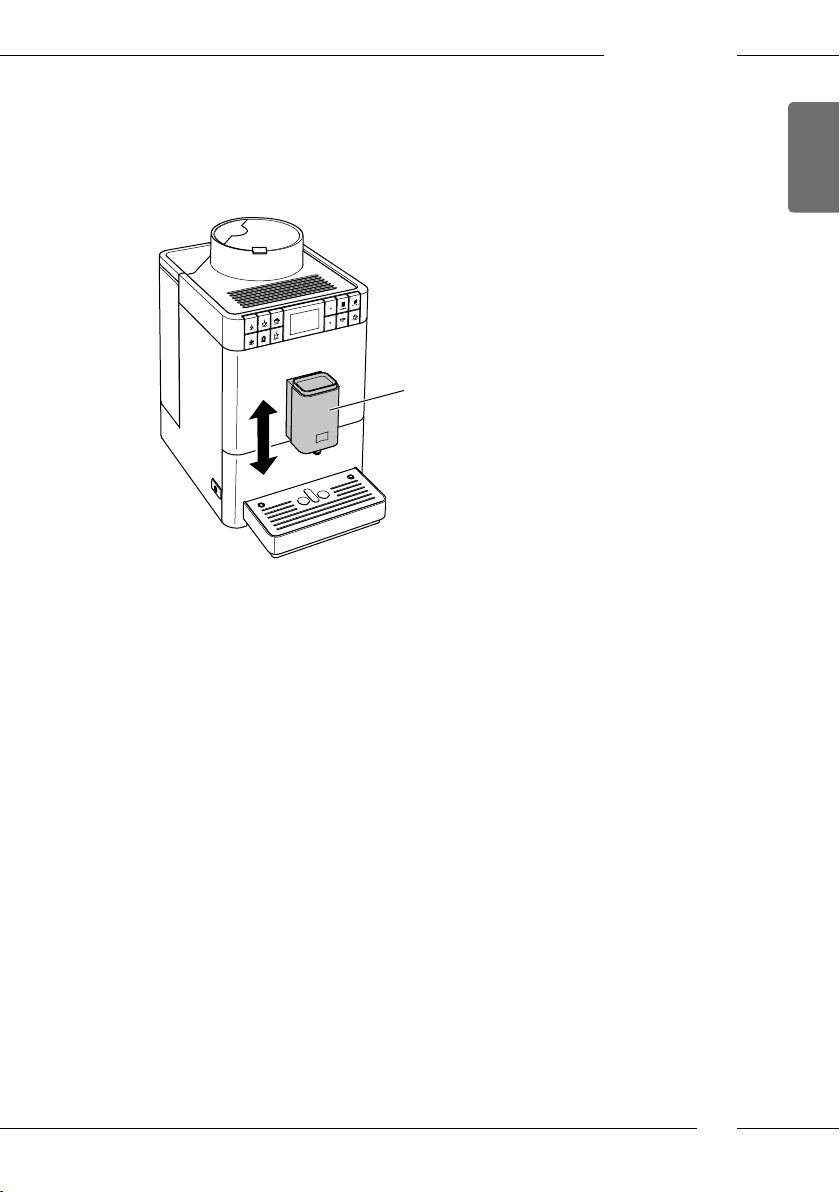
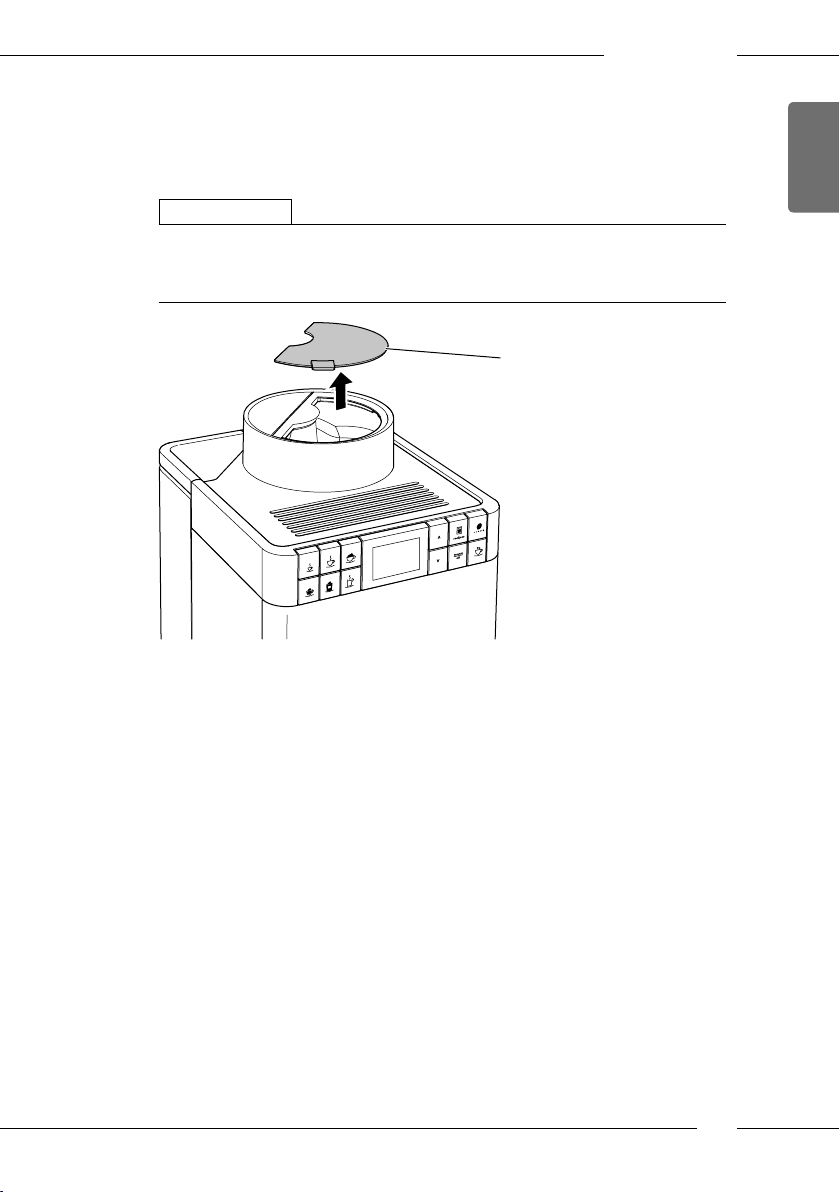
4.6 Adjusting the outlet
The outlet (6) is height-adjustable. Set the greatest possible distance
between the outlet and the vessel. Depending on the vessel, push the
outlet up or down.
6
Fig. 10: Adjusting the outlet
Basic operation
ENGLISH
19
ENGLISH
Basic operation
4.7 Using milk
Use cooled milk for optimum coee enjoyment. Depending on the version
of the appliance, use the long milk hose supplied or the milk container
supplied.
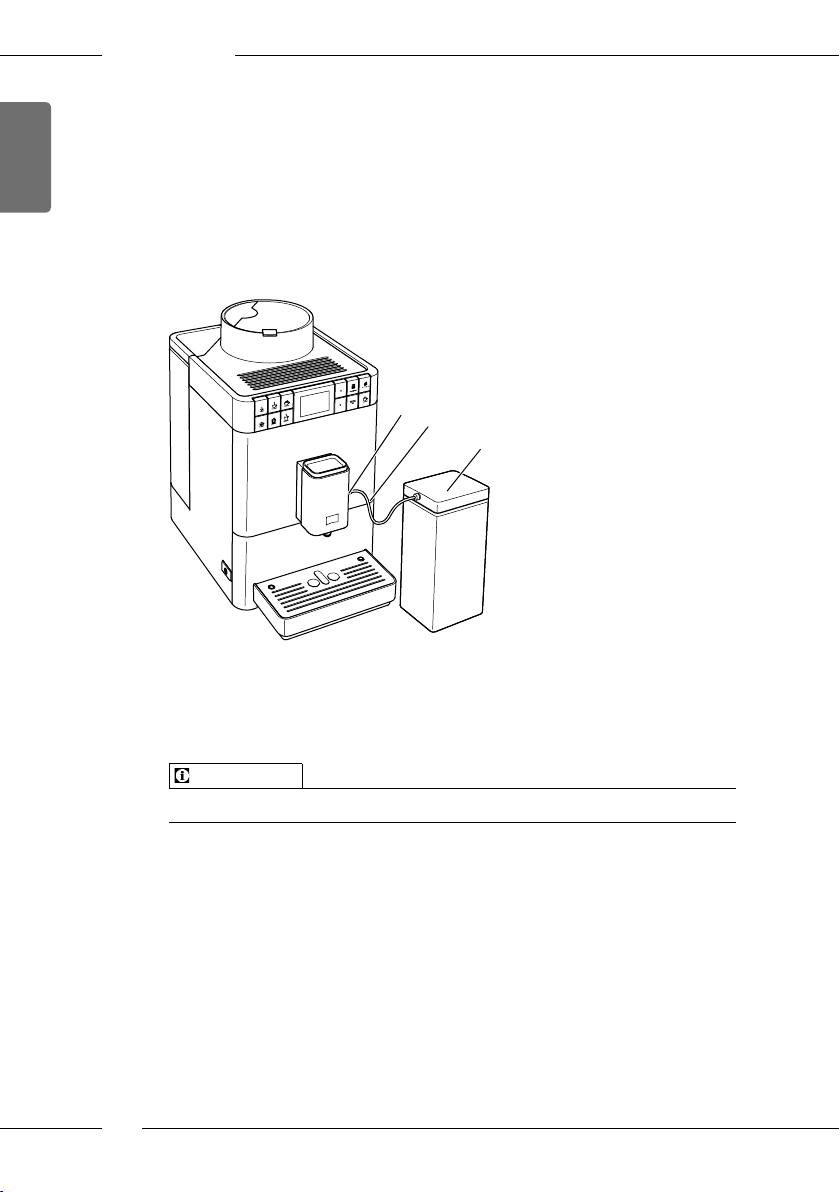
Connecting the milk container
A milk container is not available for all versions of the Caeo® Passione®.
13
31
32
Fig. 11: Connected milk container
1. Connect the milk hose(31) to the connection at the outlet(13).
2. Connect the free end of the milk hose to the milk container (32).
Information
Store the lled milk container in the refrigerator.
20
Basic operation
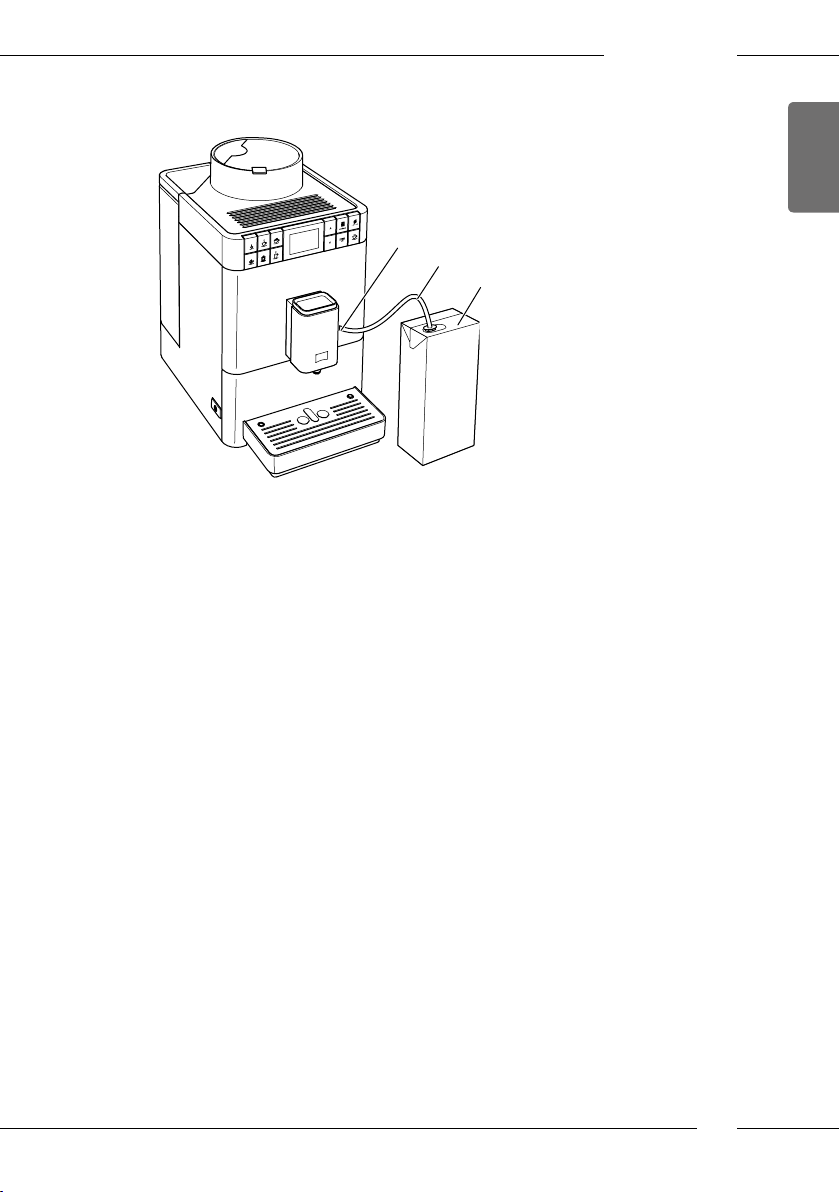
Connecting the milk pack
13
33
34
Fig. 12: Connected commercial milk pack
1. Connect the long milk hose(33) to the connection at the outlet(13).
2. Insert the free end of the milk hose into a commercial milk pack (34).
ENGLISH
21
ENGLISH
Basic operation
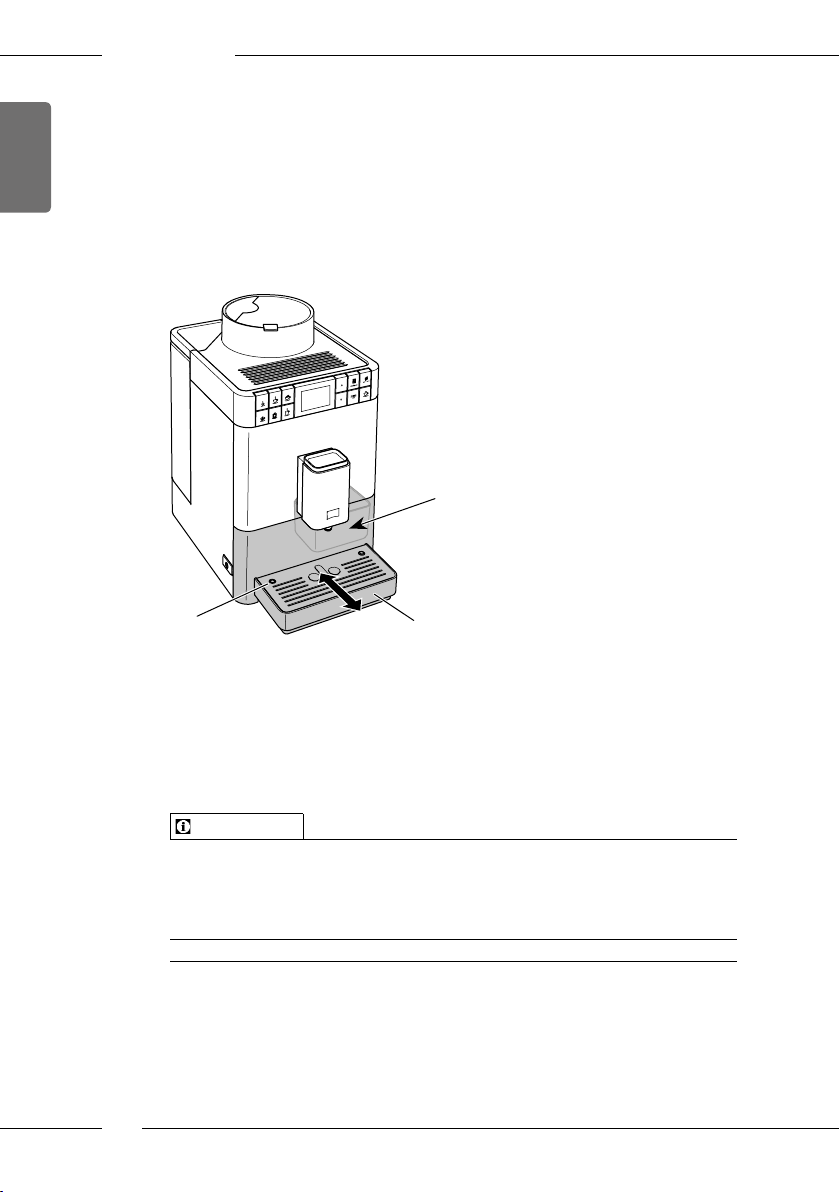
4.8 Emptying the drip tray and coee grounds container
After dispensing several beverages, the drip tray(8) and the coee grounds
container(7) can become full. The projecting oat(16) indicates the current
lling level of the drip tray.
After a specied number of beverage have been dispensed, the appliance
also shows that the drip tray and coee grounds container are full.
Always empty the drip tray and coee grounds container.
7
16
Fig. 13: Emptying the drip tray and coee grounds container
1. Pull the drip tray (8) forwards out of the appliance.
2. Remove the coee grounds container (7) and empty it.
3. Empty the drip tray.
4. Insert the coee grounds container.
5. Push the drip tray into the appliance up to the stop.
Information
If you empty the drip tray and the coee grounds container while the appliance is switched o, the appliance does not register this process. Therefore,
it is possible that you are requested to empty the containers although the
drip tray and the coee grounds container are not yet full.
22
8

5 Preparing beverages
There are two options for preparing beverages:
ū Standard dispensing as described below,
ū Selection and preparation of a recipe (see section 5.6 Preparing further
beverage specialities with recipes on page25).
Information
The default settings for standard dispensing or for a recipe can be permanently changed (see section 6.1 Changing default settings on page29).
Note:
ū There should always be sucient water in the water tank. If the lling
level is too low, the appliance requests you to rell it.
ū There should always also be sucient coee beans in the bean con-
tainer. If there are no longer any coee beans present, the appliance
stops the preparation of a coee beverage.
ū The appliance does not indicate a lack of milk.
ū The vessels for the beverages should be suciently large (see Table
Factory settings on page45).
5.1 Preparing Espresso and Café Crème
Requirement: The ready symbol appears on the display.
1. Place a vessel beneath the outlet.
2. Press the «Espresso» or «Café Crème» button.
» The grinding process and beverage dispensing start.
» Beverage dispensing is ended automatically.
3. Remove the vessel.
» The ready symbol appears on the display.
Preparing beverages
ENGLISH
23

ENGLISH
Preparing beverages
5.2 Preparing Cappuccino
Requirement: The display shows the ready symbol and milk is connected.
1. Place a vessel beneath the outlet.
2. Press the «Cappuccino» direct key.
» The grinding process and coee dispensing start.
» Coee dispensing is ended automatically.
» Milk dispensing begins.
» Beverage dispensing is ended automatically.
3. Remove the vessel.
» The display shows: Easy Cleaning? (OK for start).
4. You can execute the Easy Cleaning programme or prepare further bev-
erages.
a) Execute the Easy Cleaning programme. To do so, follow the instruc-
tions on the display. Information on this is available in section8.4
Using the «Easy Cleaning» programme on page36.
b) Prepare further beverages and execute the Easy Cleaning programme
later.
» The ready symbol appears on the display.
5.3 Preparing Latte Macchiato
Requirements: The ready symbol appears on the display and milk is con-
nected.
1. Place a vessel beneath the outlet.
2. Press the «Latte Macchiato» direct key.
» Milk dispensing begins.
» Milk dispensing is ended automatically.
» The grinding process and coee dispensing start.
» Beverage dispensing is ended automatically.
3. Remove the vessel.
» The display shows: Easy Cleaning? (OK for start).
4. You can execute the Easy Cleaning programme or prepare further bev-
erages.
a) Execute the Easy Cleaning programme. To do so, follow the instruc-
tions on the display. Information on this is available in section8.4
Using the «Easy Cleaning» programme on page36.
b) Prepare further beverages and execute the Easy Cleaning programme
later.
» The ready symbol appears on the display.
24

Preparing beverages
5.4 Preparing milk foam or warm milk
The preparation of milk foam and warm milk is similar.
Requirement: The ready symbol appears on the display and milk is con-
nected.
1. Place a vessel beneath the outlet.
2. Press the «Milk foam/Warm milk» direct key.
a) Milk foam = briey press button
b) Warm milk = press the button for longer (2 seconds)
» Milk dispensing begins.
» Beverage dispensing is ended automatically.
3. Remove the vessel.
» The display shows: Easy Cleaning? (OK for start).
4. You can execute the Easy Cleaning programme or prepare further beverages.
a) Execute the Easy Cleaning programme. To do so, follow the instruc-
tions on the display. Information on this is available in section8.4
Using the «Easy Cleaning» programme on page36.
b) Prepare further beverages and execute the Easy Cleaning programme
later.
» The ready symbol appears on the display.
5.5 Preparing hot water
Requirement: The ready symbol appears on the display.
1. Place a vessel beneath the outlet.
2. Press the «Hot water» direct key.
» Hot water dispensing begins.
» Beverage dispensing is ended automatically.
3. Remove the vessel.
» The ready symbol appears on the display.
ENGLISH
5.6 Preparing further beverage specialities with recipes
In addition to standard dispensing, you can select Recipes for further
beverage specialities in the menu. The following beverage specialities are
available here:
Beverage specialities without milk:
ū Ristretto
ū Lungo
ū Americano
25

ENGLISH
Preparing beverages
Beverage specialities with milk:
ū Espresso Macchiato
ū Caè Latte
ū Café au Lait
Preparing Ristretto, Lungo or Americano
The preparation of Ristretto, Lungo und Americano is similar. The selection
of a Ristretto is described as an example.
Requirement: The ready symbol appears on the display.
1. Place a vessel beneath the outlet.
2. Press the «Recipes» button.
» The Recipes menu appears on the display.
3. Use the arrow buttons to select Ristretto.
4. Conrm your selection with «menu/ok».
» The grinding process and beverage dispensing start.
» Beverage dispensing is ended automatically.
5. Remove the vessel.
» The ready symbol appears on the display.
Preparing Espresso Macchiato, Caè Latte or Café au Lait
The preparation of Espresso Macchiato, Caè Latte and Café au Lait is similar. The preparation of an Espresso Macchiato is described as an example.
Requirement: The ready symbol appears on the display and milk is connected.
1. Place a vessel beneath the outlet.
2. Press the «Recipes» button.
» The Recipes menu appears on the display.
3. Use the arrow buttons to select Espresso Macchiato.
4. Conrm your selection with «menu/ok».
» The grinding process and coee dispensing start.
» Coee dispensing is ended automatically.
» Milk dispensing begins.
» Beverage dispensing is ended automatically.
5. Remove the vessel.
» The display shows: Easy Cleaning? (OK for start).
6. You can execute the Easy Cleaning programme or prepare further bev-
erages.
a) Execute the Easy Cleaning programme. To do so, follow the instruc-
tions on the display. Information on this is available in section8.4
Using the «Easy Cleaning» programme on page36.
26
Preparing beverages
b) Prepare further beverages and execute the Easy Cleaning programme
later.
» The ready symbol appears on the display.
5.7 Changing beverage settings before and during
preparation
Beverage settings can be changed before and during beverage preparation.
Information
The following settings only apply to the current beverage preparation.
Changing beverage settings before preparation
The total beverage amount and the coee strength can be changed before
selecting a beverage.
Before selecting a beverage, use the arrow buttons to set a beverage
amount.
Before selecting a beverage, use the «Coee strength» button to set the
coee strength.
ENGLISH
Information
ū When preparing mixed beverages, the total beverage amount is sub-
divided according to a specied ratio. This applies to mixed beverages
made from coee with milk or hot water.
ū If a beverage is not prepared within 1 minute, the appliance switches to
the default settings.
Changing beverage settings during preparation
The beverage quantity and the coee strength can be changed during
beverage preparation.
27
ENGLISH
Preparing beverages
During beverage dispensing, use the arrow buttons to set the relevant
beverage amount.
During the grinding process, use the «Coee strength» button to set the
coee strength.
5.8 Stopping beverage preparation
To stop beverage preparation prematurely, press any direct key.
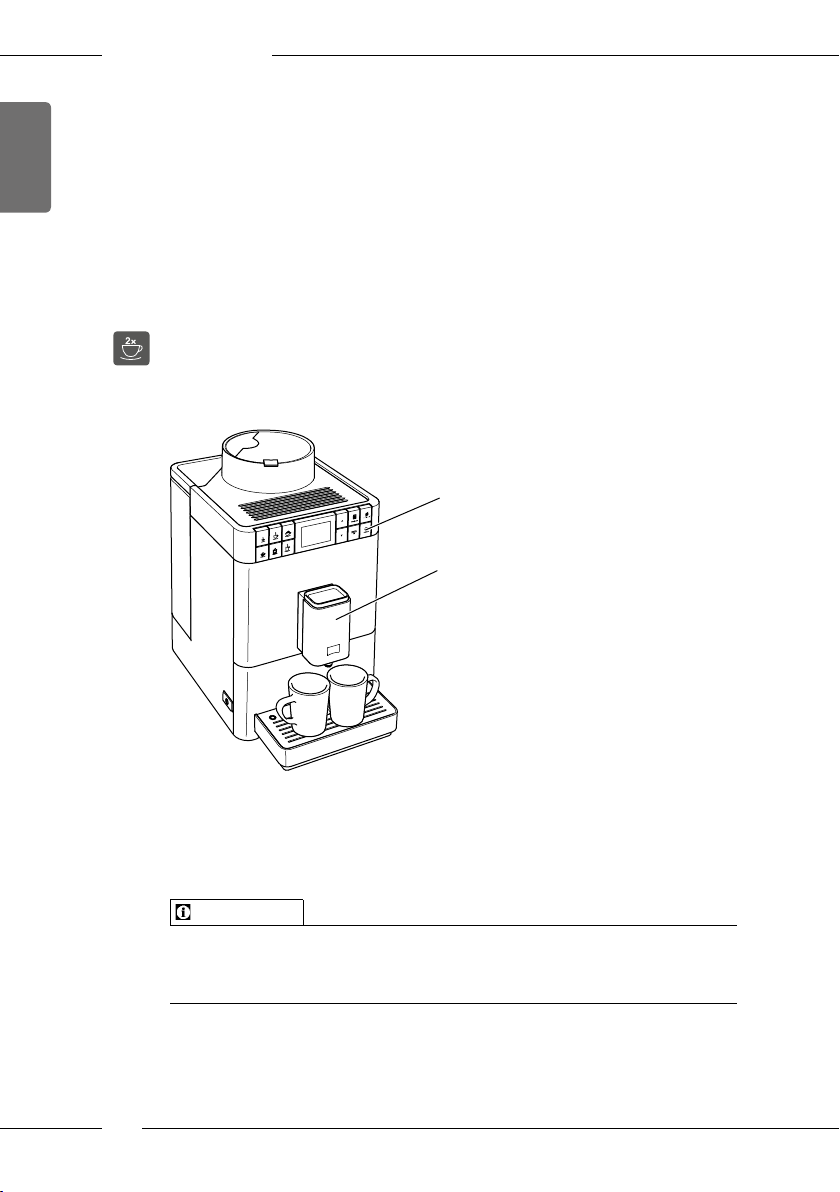
5.9 Preparing two beverages simultaneously
The «Two cups» button is used to prepare two beverages simultaneously.
Two-cup dispensing is only possible with pure coee dispensing, such as
Espresso, Café Crème, Ristretto. Two-cup dispensing is not possible with the
preparation of hot water, hot milk and all mixed beverages.
29
6
Fig. 14: Two-cup dispensing
1. Place two vessels beneath the outlet(6).
2. Press the «Two cups» button(29).
3. Continue as described for preparation of the relevant beverage.
Information
ū The setting only applies to a single beverage that is prepared.
ū If a beverage is not prepared within 1 minute, the appliance switches to
single-cup dispensing.
28
Permanently changing beverage settings
6 Permanently changing beverage settings
The appliance oers further options for preparing coee specialities.
Default recipes can be used or the beverage settings can be permanently
changed.
6.1 Changing default settings
Depending on the beverage, the following default settings can be changed:
ū Coee amount: 25 ml to 220 ml
ū Milk amount or milk froth amount: 25 ml to 220 ml
ū Hot water amount: 25 ml to 220 ml
ū Coee strength: Very mild, mild, normal, strong, very strong
ū Temperature: Low, normal, high
Information
Changed default settings remain valid until they are changed again.
Changing the beverage settings is similar for all beverages. Changing the
coee strength for an Espresso is described here as an example.
Direct keys
Espresso
Coffee strength
Strong
Confirm with OK:
ENGLISH
Fig. 15: Setting the coee strength
Requirement: The ready symbol appears on the display.
1. Press the «menu/ok» button for longer than 2 seconds.
» The menu appears on the display.
2. Navigate to the Direct keys > Espresso > Coee strength menu.
3. Use the arrow buttons to select the desired coee strength and conrm
with «menu/ok».
4. Repeatedly select the Exit command to exit the menu.
» The ready symbol appears on the display.
» The newly selected coee strength is used the next time an Espresso is
prepared.
29
ENGLISH
Changing basic settings
7 Changing basic settings
Operating steps that change the appliance’s basic settings are described in
the following chapter.
7.1 Setting the language
The display text language can be set.
Requirement: The ready symbol appears on the display.
1. Press the «menu/ok» button for longer than 2 seconds.
» The menu appears on the display.
2. Navigate to the Language menu.
3. Use the arrow buttons to select a language and conrm with «menu/ok».
4. Exit the menu with the Exit command.
» The ready symbol appears on the display.
7.2 Setting Auto OFF
If the appliance is not operated for a long time, it switches o automatically
after a specied time. This time can be set in the Auto O menu.
Setting the duration for Auto OFF
Requirement: The ready symbol appears on the display.
1. Press the «menu/ok» button for longer than 2 seconds.
» The menu appears on the display.
2. Navigate to the Auto OFF menu.
3. Use the arrow buttons to select a time and conrm with «menu/ok».
4. Exit the menu with the Exit command.
» The ready symbol appears on the display.
Information
Auto OFF cannot be deactivated completely. After 8 hours without being
operated at the latest, the appliance switches o.
30
Loading…
Приложение Melitta® Companion®
Бесплатное приложение поможет вам в управлении вашей полностью автоматической кофеваркой. Будь то
практические руководства, интересная информация о кофе или удобные функции обслуживания. Загрузите
приложение и откройте для себя множество возможностей!
Auto Cappuccinatore
Удобный автоматический капучинатор гарантирует идеальную молочную пену. Но он способен и на большее: при желании можно подогреть молоко и воду, например, для приготовления вкусного какао или чая.
Best Aroma System
Функция Bean to Cup позволяет использовать необходимое количество свежемолотых зерен и сразу приступать к приготовлению порции кофе. Контейнер для зерен оснащен специальной герметичной крышкой Aromasafe®, которая гарантирует подлинное наслаждение свежим ароматом кофе от чашки к чашке.
Компактная конструкция, современный дизайн
Caffeo® Passione® устанавливает новые стандарты компактности. Ее кубическая форма не только привлекает внимание, но и занимает так мало пространства, что для нее везде найдется подходящее место.
Режим двух чашек
Удобный двойной розлив, также регулируемый по высоте, позволяет вам готовить 2 чашки кофе одновремменно.
Регулируемый по высоте дозатор для кофе
Для одной или двух чашек, кружек или стаканов латте макиато – дозатор для кофе регулируется по высоте до 135 мм.
Съемная заварочная группа
Заварочная группа легко очищается, благодаря практичному и удобному для пользователя съемному механизму. Это
позволяет очистить внутренние элементы кофемашины.
Фильтр для воды
Полностью автоматическая кофемашина может работать с фильтром для воды Melitta® Claris Pro Aqua. Это
означает, что перед каждым приготовлением кофе вода проходит предварительную фильтрацию. Попробуйте и
насладитесь непревзойденным вкусом и идеальным ароматом. Фильтр также помогает защитить автоматическую
кофеварку от накипи.
Автоматическая программа очистки и удаления накипи
Эта автоматическая кофемашина Melitta® автоматически сообщает на дисплее о необходимости очистки или
удаления накипи.
Энергосберегающие функции
Помимо программируемого режима энергосбережения, полностью автоматические кофеварки Melitta® оснащены
удобной функцией Auto-OFF. Она позволяет определить момент автоматического отключения кофеварки. Конечно,
можно отключить прибор от сети вручную с помощью выключателя 0 Вт.

МИССИЯ “Eco & Care”
Выбирайте осознанное потребление. Ради сохранения окружающей среды. Мы разработали собственную маркировку,
которая служит реальным руководством при выборе подходящего устройства.
Кофемашина MELITTA Caffeo F 530-101 выполняет полный комплекс операций. Она может работать с зернами и молотым кофе. С таким оборудованием получится приготовить кофе по разным рецептам. В ней есть капучинатор, с помощью которого получится взбить молоко в крепкую пену и насладиться капучино или латте.
Размер порций можно регулировать и устанавливать необходимый. Кофемашина MELITTA Caffeo F 530-101 способна готовить две порции одновременно. Наличие регулировки жесткости воды является еще одним преимуществом. Температуру напитка можно регулировать. Дренажный отсек для капель является съемным.
Приложение Melitta® Companion®
Бесплатное приложение поможет вам в управлении вашей полностью автоматической кофеваркой. Будь то
практические руководства, интересная информация о кофе или удобные функции обслуживания. Загрузите
приложение и откройте для себя множество возможностей!
Auto Cappuccinatore
Удобный автоматический капучинатор гарантирует идеальную молочную пену. Но он способен и на большее: при желании можно подогреть молоко и воду, например, для приготовления вкусного какао или чая.
Best Aroma System
Функция Bean to Cup позволяет использовать необходимое количество свежемолотых зерен и сразу приступать к приготовлению порции кофе. Контейнер для зерен оснащен специальной герметичной крышкой Aromasafe®, которая гарантирует подлинное наслаждение свежим ароматом кофе от чашки к чашке.
Компактная конструкция, современный дизайн
Caffeo® Passione® устанавливает новые стандарты компактности. Ее кубическая форма не только привлекает внимание, но и занимает так мало пространства, что для нее везде найдется подходящее место.
Режим двух чашек
Удобный двойной розлив, также регулируемый по высоте, позволяет вам готовить 2 чашки кофе одновременно.
Регулируемый по высоте дозатор для кофе
Для одной или двух чашек, кружек или стаканов латте макиато – дозатор для кофе регулируется по высоте до 135 мм.
Семная заварочная группа
Заварочная группа легко очищается, благодаря практичному и удобному для пользователя съемному механизму. Это
позволяет очистить внутренние элементы кофемашины.
Фильтр для воды
Полностью автоматическая кофемашина может работать с фильтром для воды Melitta® Claris Pro Aqua. Это
означает, что перед каждым приготовлением кофе вода проходит предварительную фильтрацию. Попробуйте и
насладитесь непревзойденным вкусом и идеальным ароматом. Фильтр также помогает защитить автоматическую
кофеварку от накипи.
Автоматическая программа очистки и удаления накипи
Эта автоматическая кофемашина Melitta® автоматически сообщает на дисплее о необходимости очистки или
удаления накипи.
Энергосберегающие функции
Помимо программируемого режима энергосбережения, полностью автоматические кофеварки Melitta® оснащены
удобной функцией Auto-OFF. Она позволяет определить момент автоматического отключения кофеварки. Конечно,
можно отключить прибор от сети вручную с помощью выключателя 0 Вт.
Преимущества

Отличное угощение кофе

Оптимальный вкус кофе

Удобное управление „в одно касание“

10 рецептов кофе – оригинально приготовленного
Автоматическая декальцинация
-
Да
Автоматическая система очистки и удаления накипи
-
Да
Габариты В/Ш/Г в см
-
39×25,3×38
Индикация
-
Включения
, -
Уровня воды
Используемый кофе
-
Зерновой
Максимальная мощность
-
1450 Вт
Объем контейнера для воды, л
-
1,2
Объем контейнера для зерна, г
-
125
Переключатель на 0 ватт
-
Да
Приготовление 2 чашек одновременно
-
Да
Регулирование крепости кофе
-
Да
Регулировка жесткости воды
-
Да
Регулировка степени помола
-
Да
Регулировка температуры кофе
-
Да
Регулируемый по высоте дозатор для вывода кофе
-
Да
Система вспенивания молока
-
Auto Cappuccinatore
Совместимость с фильтрами для воды
-
Да
Съемный заварочный блок
-
Да
Тип капучинатора
-
С капучинатором
Тип нагревателя
-
Термоблок
Управление с помощью смартфона
-
приложение «Companion»
Найти похожие
Инструкция по эксплуатации автоматическая кофемашина Melitta F 530-101 Caffeo Passione (insrukciya-melitta-passione_530_101.pdf, 20,392 Kb) [Скачать]
-
Contents
-
Table of Contents
-
Bookmarks
-
Svenska
-
1 Säkerhetsinformation
-
Symboler I Bruksanvisningen
-
Fara På Grund Av Elektrisk StröM
-
Risk För Bränn- Och Skållskador
-
-
2 Översikt
-
Översikt Över Manöverpanelen
-
Översikt Över Cappuccinatore
-
3 Komma Igång
-
Kontrollera Leveransomfånget
-
Sätta På Och Avlufta Maskinen Första Gången
-
4 Grundläggande Användning
-
Sätta På Och Stänga Av Maskinen
-
Fylla På Kaffebönor I Bönbehållaren
-
Ställa in Utloppet För Kaffedrycker
-
Tömma Droppskålen Och Behållaren För Kaffesump
-
-
5 Använda Funktionen My Bean Select
-
Fylla På Kaffebönor För Funktionen My Bean Select
-
-
6 Tillreda Drycker
-
Tillreda Två Kaffedrycker Samtidigt
-
Tillreda Mjölkskum Eller Varm Mjölk
-
7 Ändra Grundinställningar
-
Ställa in Energisparprogrammet
-
Ställa in Automatisk Avstängning
-
Ställa in Bryggtemperatur
-
Återställa Maskinen Till Fabriksinställningar
-
8 Skötsel Och Underhåll
-
Utföra Rengöringsprogrammet
-
Utföra Avkalkningsprogrammet
-
9 Åtgärder VID Fel
-
10 Transport, Lagring Och Avfallshantering
-
11 Tekniska Data
-
-
Norsk
-
1 For Din Sikkerhet
-
Fare På Grunn Av Elektrisk StrøM
-
Fare for Brannskader Og Skolding
-
2 Oversikt over Apparatet
-
Apparatene I Et Overblikk
-
Betjeningsfeltet I Et Overblikk
-
Oversikt over Cappuccinatore
-
-
3 De Første Trinn
-
Slå På Og Lufte Apparatet Første Gang
-
4 Grunnleggende Om Betjening
-
Håndtering Av Betjeningsfeltet
-
Fylle Kaffebønner I Bønnebeholderen
-
Stille Inn Utløpet for Kaffedrikker
-
Tilkopling Av Cappuccinatore
-
Tømme Dryppskål Og Kaffegrutbeholder
-
5 Bruke My Bean Select®-Funksjonen
-
Fylle På Kaffebønner for My Bean Select®-Funksjonen
-
-
6 Tilberede Drikker
-
Tilberede to Kaffedrikker Samtidig
-
Avbryte Kaffetilberedelse
-
Tilberede Melkeskum Og Varm Melk
-
7 Endre Grunninnstillinger
-
Stille Inn Energispareprogrammet
-
Stille Inn Automatisk Utkopling
-
Stille Inn Bryggetemperatur
-
Tilbakestille Apparatet Til Fabrikkinnstillingene
-
8 Pleie Og Vedlikehold
-
Gjennomføre Rengjøringsprogrammet
-
Gjennomføre Avkalkingsprogrammet
-
9 Feil
-
10 Transport, Lagring Og Avfallsbehandling
-
10.2 Transportere Apparatet
-
10.3 Kassering Av Apparatet
-
11 Tekniske Data
-
-
Dansk
-
1 For Din Sikkerhed
-
Fare Gennem Elektrisk StrøM
-
Risiko for Forbrændinger Og Skoldninger
-
2 Apparatoversigt
-
Oversigt over Apparaterne
-
Oversigt over Betjeningsfeltet
-
Oversigt over Cappuccinatoren
-
-
3 Første Trin
-
Kontrollere Leveringsomfanget
-
Tænde Og Udlufte Apparatet Første Gang
-
4 Grundlæggende Betjening
-
Tænde Og Slukke for Apparatet
-
Håndtering Af Betjeningsfeltet
-
Fylde Kaffebønner Ind I Bønnebeholderen
-
Indstille Udløb Til Kaffedrikke
-
Tømme Drypbakke Og Kaffegrumsbeholder
-
-
5 Anvende My Bean Select®-Funktionen
-
Påfylde Kaffebønner Til My Bean Select®-Funktionen
-
-
6 Tilberede Drikke
-
Tilberede to Kaffedrikke Samtidig
-
Afbryde Kaffetilberedning
-
Tilberede Mælkeskum Eller Varm Mælk
-
7 Ændre Grundindstillinger
-
Indstille Energispareprogram
-
Indstille Automatisk Sluk
-
Tilbagestille Apparatet Til Fabriksindstillinger
-
8 Pleje Og Vedligeholdelse
-
Gennemføre Rengøringsprogram
-
Gennemføre Afkalkningsprogram
-
9 Fejl
-
10 Transport, Opbevaring Og Bortskaffelse
-
10.2 Transportere Apparatet
-
10.3 Bortskaffe Apparatet
-
11 Tekniske Data
-
-
Suomi
-
1 Turvallisuutesi Vuoksi
-
Sähkövirran Aiheuttamat Vaarat
-
2 Laitteiden Yleiskuva
-
Yleiskuva Käyttöpaneelista
-
Yleiskuva Cappuccinatoresta
-
3 Ensiaskeleet
-
Laitteen Purkaminen Pakkauksesta
-
Toimituslaajuuden Tarkastaminen
-
Laitteen Sijoittaminen Paikalleen
-
Laitteen Kytkeminen Sähköverkkoon
-
Laitteen Ensimmäinen Päällekytkentä Ja Ilmaus
-
-
4 Peruskäyttö
-
Laitteen Kytkeminen Päälle Ja Pois Päältä
-
Kahvipapujen Lisääminen Kahvipapusäiliöön
-
Kahvijuomien Suuttimen Säätäminen
-
Cappuccinatoren Kytkeminen
-
Tippa-Astian Ja Kahvinporosäiliön Tyhjentäminen
-
-
5 My Bean Select® -Toiminnon Käyttäminen
-
Kahvipapujen Lisääminen My Bean Select® -Toimintoa Varten
-
-
6 Juomien Valmistaminen
-
Kahvin Vahvuuden Asettaminen
-
Kahvijuomien Valmistaminen
-
Kahden Kahvijuoman Valmistaminen Yhtä Aikaa
-
Kahvin Valmistuksen Keskeyttäminen
-
Maitovaahdon Tai Lämpimän Maidon Valmistaminen
-
Kuuman Veden Valmistaminen
-
-
7 Perusasetusten Muuttaminen
-
Huoltotilan Kutsuminen Esiin
-
Energiansäästöohjelman Asettaminen
-
Automaattisen Virrankatkaisun Asettaminen
-
Veden Kovuuden Asettaminen
-
Suodatuslämpötilan Asettaminen
-
Laitteen Tehdasasetusten Palauttaminen
-
Jauhatusasteen Säätäminen
-
-
8 Hoito Ja Huolto
-
Suodatusyksikön Puhdistaminen
-
Cappuccinatoren Puhdistaminen
-
Puhdistusohjelman Suorittaminen
-
Kalkinpoisto-Ohjelman Suorittaminen
-
Vesisuodattimen Käyttäminen
-
9 Häiriöt
-
10 Kuljetus, Varastointi Ja Hävittäminen
-
10.2 Laitteen Kuljettaminen
-
10.3 Laitteen Hävittäminen
-
11 Tekniset Tiedot
-
Operating Instructions
Bedienungsanleitung