
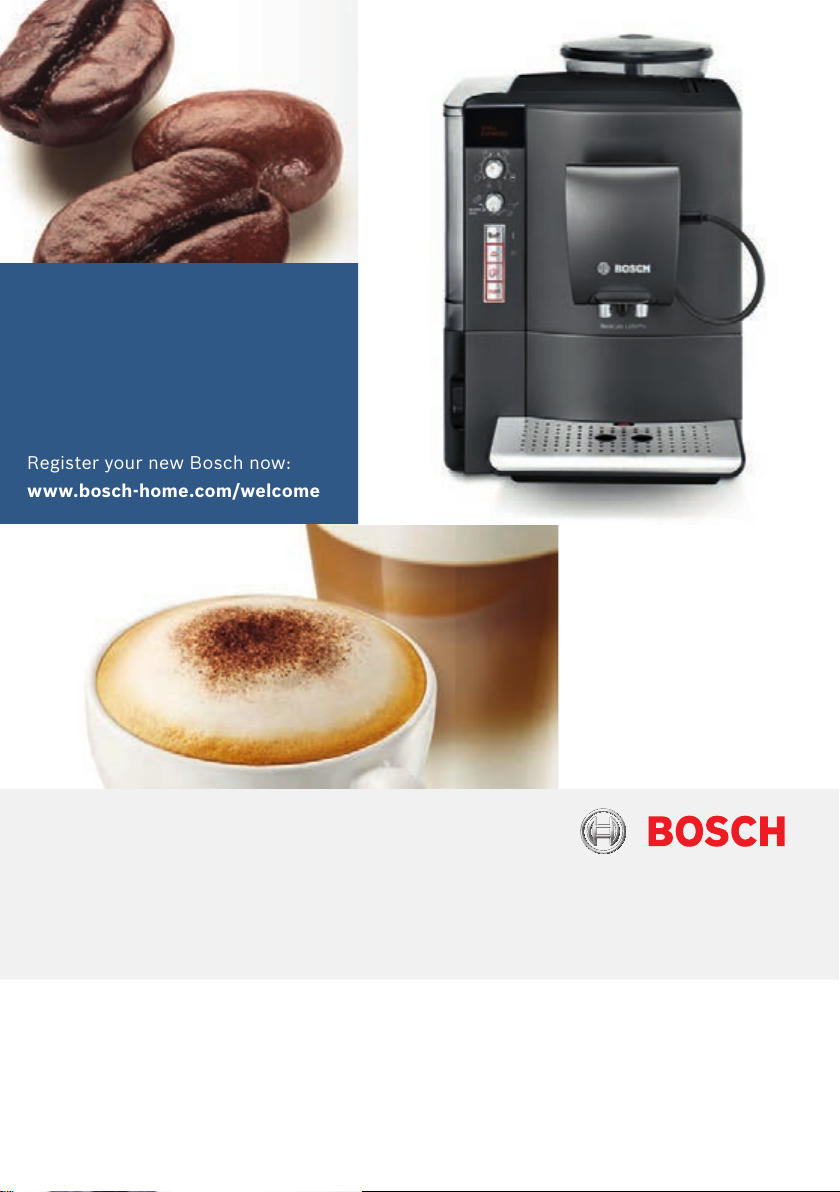
Register your new Bosch now:
www.bosch—home.com/welcome
Moodpic 1
63,2 x 50,25mm
CMYK & GREY
Moodpic 2
98,6 x 46,7mm
CMYK & GREY
TES 515..
en Instruction manual
fr Mode d’emploi
pl Instrukcjaobsługi
nl Gebruiksaanwijzing
cs Návodkpoužití
ru Инструкцияпоэксплуатации
A
5
4
6
9
1 2 3
7
10
11
12
13
14
15
16
17
18
8
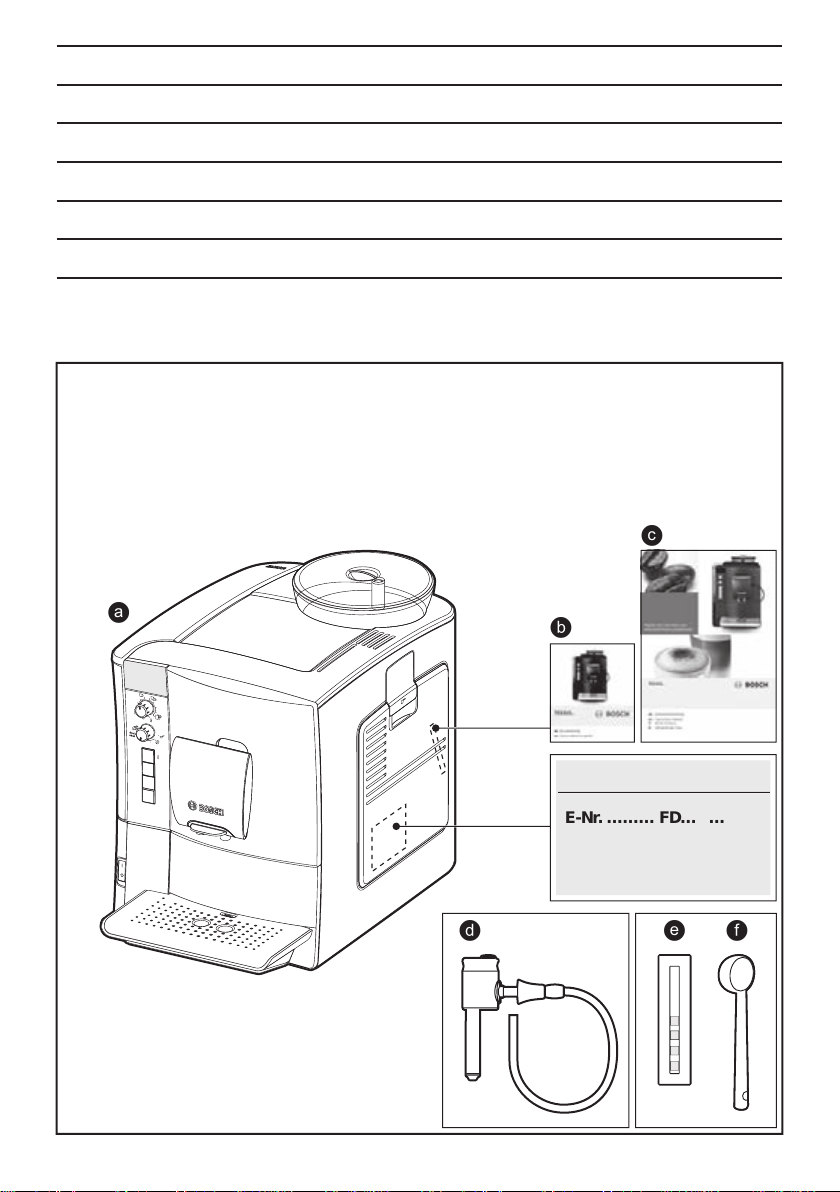
E-Nr. ……… FD… …
d e f
a
b
c
en English 2
fr Français 21
pl Polski 41
nl Nederlands 61
cs Čeština 81
ru Pycckий 100
Included in delivery (see page 2)
Contenu de l’emballage (voir page 21)
Zakres dostawy (patrz strona 41)
Leveringsomvang (zie pagina 61)
Součást dodávky (viz strana 81)
Объем поставки (см. стр. 100)
A
5
4
6
9
1 2 3
7
10
11
12
13
14
15
16
17
18
8
B
C D
19
8d
8c
8b
2021
8e
8a
6f
6a
6d
6b
6c
6e
6g
1.
2.
2.
1.
E
5b
5f
5a
5c
5d
5e

en Contents
Contents
Included in delivery ……………………………….2
Intended use ………………………………………..3
Important safety information ………………….. 3
Overview……………………………………………..5
Controls ………………………………………………5
Display messages ………………………………..6
aromaDouble Shot………………………………..6
Before using for the rst time………………….7
Water lter …………………………………………..8
Menu settings ………………………………………9
Adjusting the grinding unit ……………………..9
Preparation using coffee beans …………….10
Preparation using ground coffee ………….10
Dispensing hot water ………………………….. 11
Preparing milk froth …………………………….11
Maintenance and daily cleaning ……………12
Tips on energy saving …………………………14
Service Programmes ………………………….. 14
Frost protection…………………………………..17
Accessories ……………………………………….17
Disposal …………………………………………….18
Guarantee………………………………………….18
Technical data…………………………………….18
Simple troubleshooting ……………………….. 19
Dear Coffee Connoisseur,
congratulations on purchasing this fully
automatic espresso machine from Bosch.
These instructions describe various models
with different features.
Please also note the enclosed quick
reference guide. It can be kept in the
special storage compartment (5c) until it is
needed.
Included in delivery
(see overview image at the start of the
instructions)
a Fully automatic espresso machine
b Quick reference guide
c Instruction manual
d Milk frother
e Water hardness testing strip
f Measuring spoon
2

Intended use
en
Intended use
Intended use
This appliance is designed for
processing normal household
quantities in the home or similar
quantities in non-industrial
applications.
Only use the appliance indoors
at room temperature and up to
2000 m above sea level.
Important safety information
Important safety information
Please read and follow the
operating instructions carefully
and keep them for later reference! Enclose these instructions
when you give this appliance to
someone else.
This appliance can be used
by children aged from 8 years
and above and by persons with
reduced physical, sensory or
mental capabilities or lack of
experience and knowledge if
they have been given supervision or instruction concerning
use of the appliance in a safe
way and if they understand the
hazards involved. Keep children
under 8 years of age away from
the appliance and connecting
cable and do not allow them
to use the appliance. Children
shall not play with the appliance.
Cleaning and user maintenance
shall not be made by children
unless they are older than
8 years and supervised.
3

en Intended use
W Warning
Risk of electric shock!
■ The appliance may only be
connected to a power supply
with alternating current via
a correctly installed socket
with earthing. Ensure that the
protective conductor system
of the domestic supply has
been correctly installed.
■ Connect and operate the
appliance only in accordance
with the speci cations on the
rating plate.
■ Do not use the appliance if
the power cord and/or appli-
ance are damaged.
■ Only our customer service
may repair the appliance,
e.g. by replacing a damaged
power cord, in order to avoid
hazards.
■ Never immerse the appliance
or mains cord in water.
■ If there is a fault, pull out the
mains plug immediately or
switch off the power supply.
W Warning
Hazard due to magnetism!
The appliance contains permanent magnets which can affect
electronic implants such as
pacemakers or insulin pumps.
Persons wearing electronic
implants must maintain a
minimum distance of 10 cm
from the appliance and from the
following parts upon removal:
milk container, water tank and
brewing unit.
W Warning
Risk of suffocation!
Do not allow children to play
with packaging material. Store
small parts safely as they can be
easily swallowed.
W Warning
Risk of injury!
■ Do not reach into the grinding
unit!
■ Improper use of this appliance
may result in injury.
W Warning
Risk of burns!
The milk frother gets very hot.
After use, always let it cool down
before you touch it.
W Warning
Risk of scalding!
Only use the appliance when the
milk frother is completely assem-
bled and tted.
4

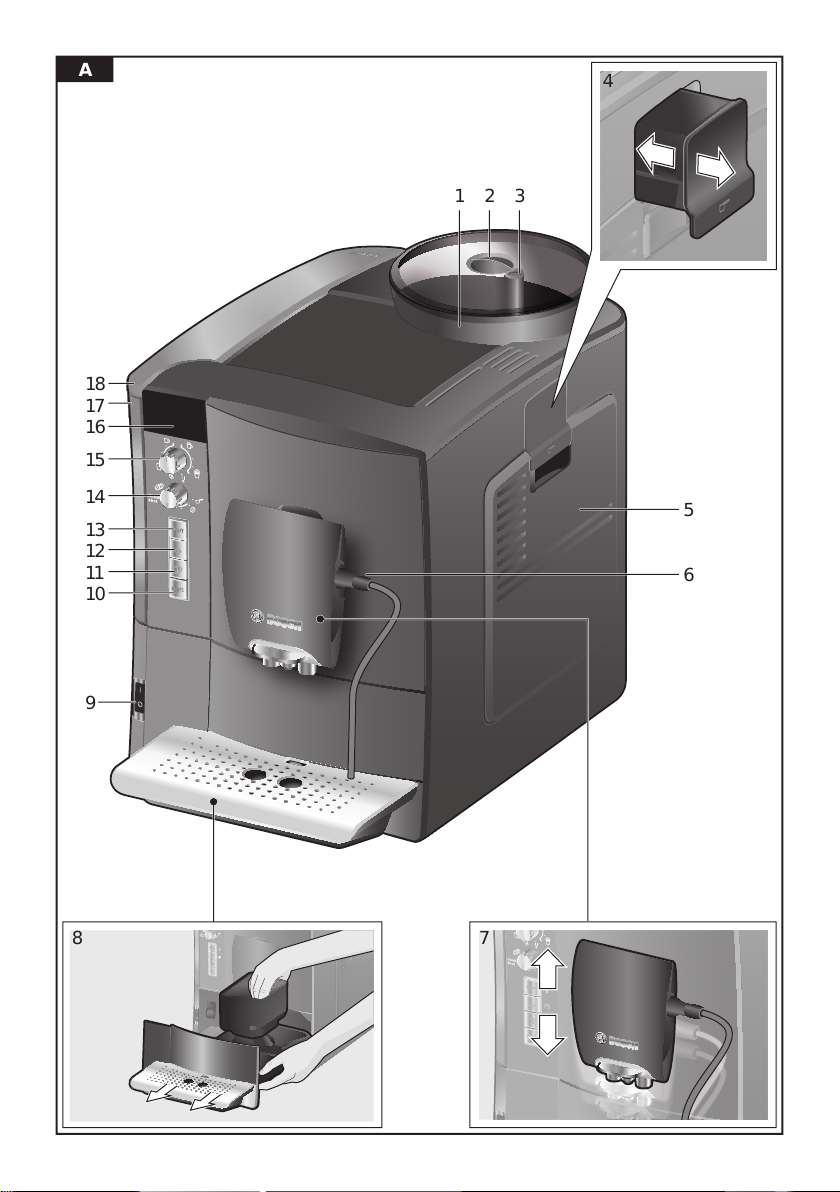
Overview
en
Overview
(see overview images A, B, C, D and E at
the beginning of this instruction manual)
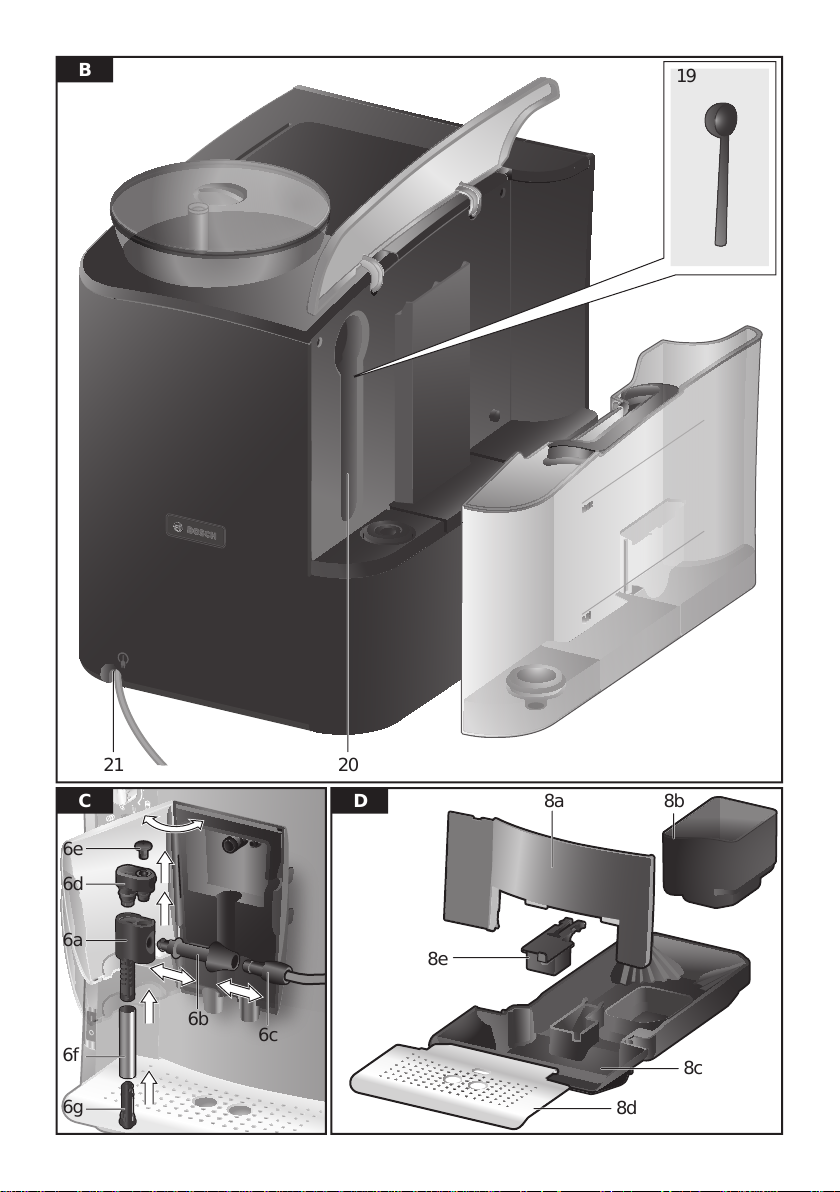
1 Bean container
2 Aroma cover
3 Selector for grind setting
4 Drawer (ground coffee/cleaning tablet)
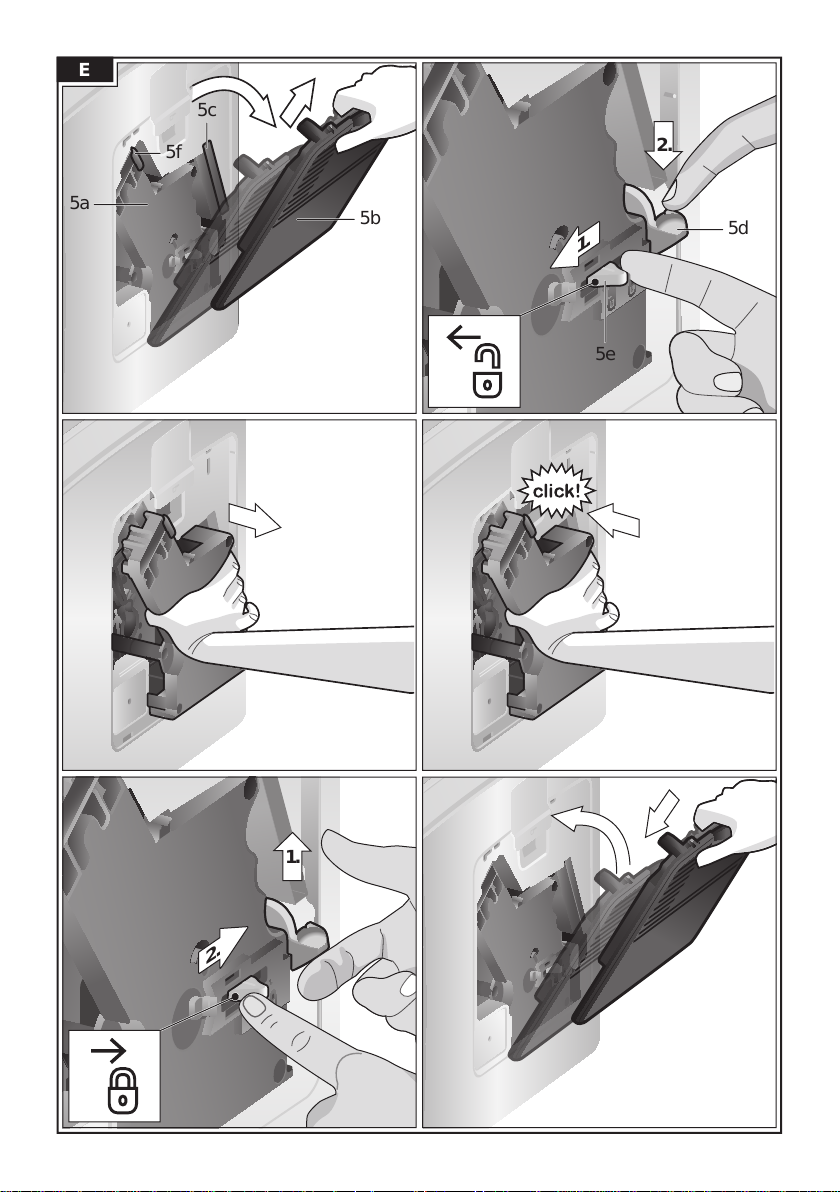
5 Brewing unit (Fig. E)
a Brewing unit
b Door
c Storage compartment for
quick reference guide
d Eject lever for brewing unit
e Lock
f Cover
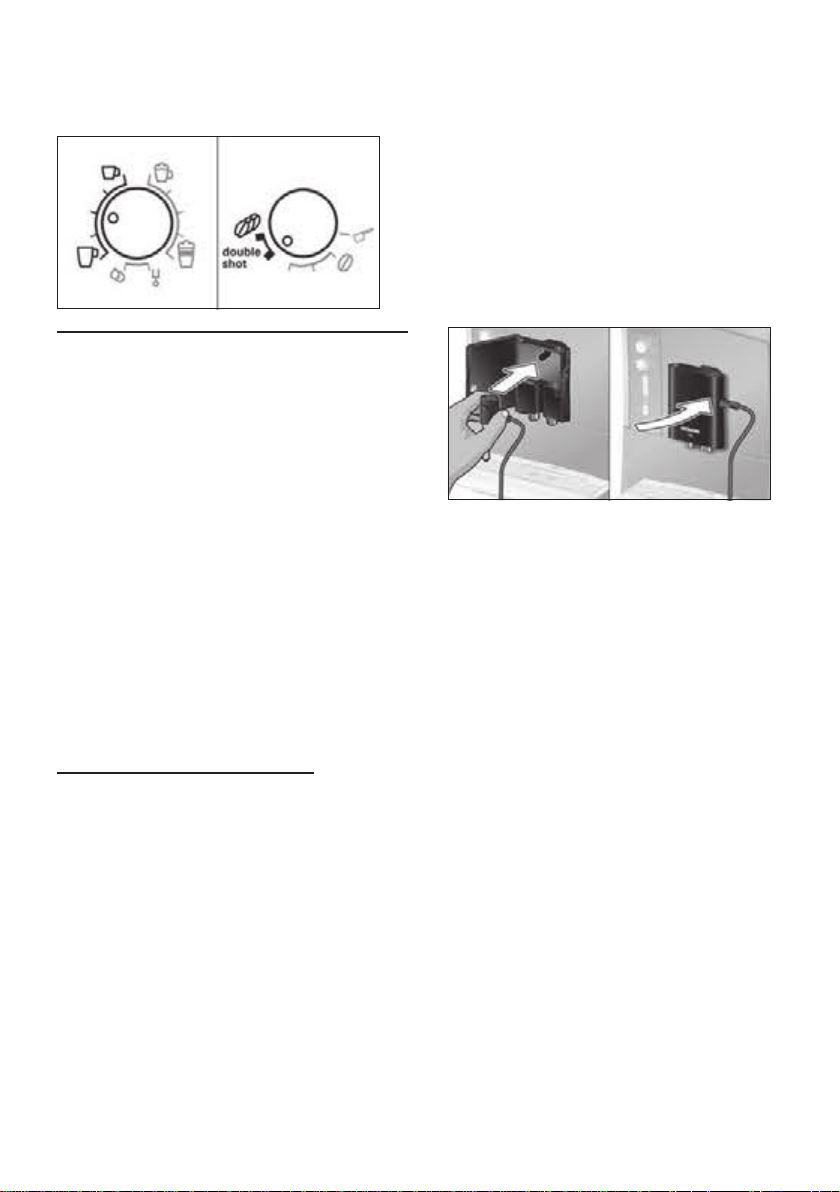
6 Milk frother (Fig. C) removable
a Outlet
b Connection (milk tube)
c Milk tube with adapter
d Upper part
e Air nozzle
f Sleeve
g Nozzle tip
7 Coffee outlet, height-adjustable
8 Drip tray (Fig. D)
a Drip tray panel
b Coffee grounds container
c Drip tray for coffee outlet
d Grate for coffee outlet
e Float
9 Power on/off switch O / I
10 start button
button
11 a
12 l / m button
13 k off / i button
14 “Coffee strength” rotary knob
15 “Drink selection” rotary knob
16 Display
17 Removable water tank
18 Lid for water tank
19 Measuring spoon
(insertion aid for water lter)
20 Storage compartment for
measuring spoon
21 Power cable with storage compartment
Controls
Power on/off switch O / I
The power switch O / I (9) is used to switch
the appliance on or to switch it off fully
(power supply off).
Important: Before switching off, run the
cleaning programme or use the k off / i
button (13) to switch off.
a button
Press the a button (11) to prepare
two cups of the selected drink at the
same time. The button can be activated
for drinks without milk and without the
aromaDouble Shot function.
k off / i button
When the k off / i button (13) is pressed
briey, the appliance rinses and switches
off. Pressing and holding down the k off / i
button (13) displays the user settings or
starts the descaling and cleaning function.
l / m button
Press the button l / m (12) to generate
steam for preparing milk froth.This button is
also used to dispense hot water.
start button
Press the start button (10) to begin drink
preparation or to start a service programme.
Press the start button (10) again during
drink preparation to cut the dispensing
process short.
5
en Display messages
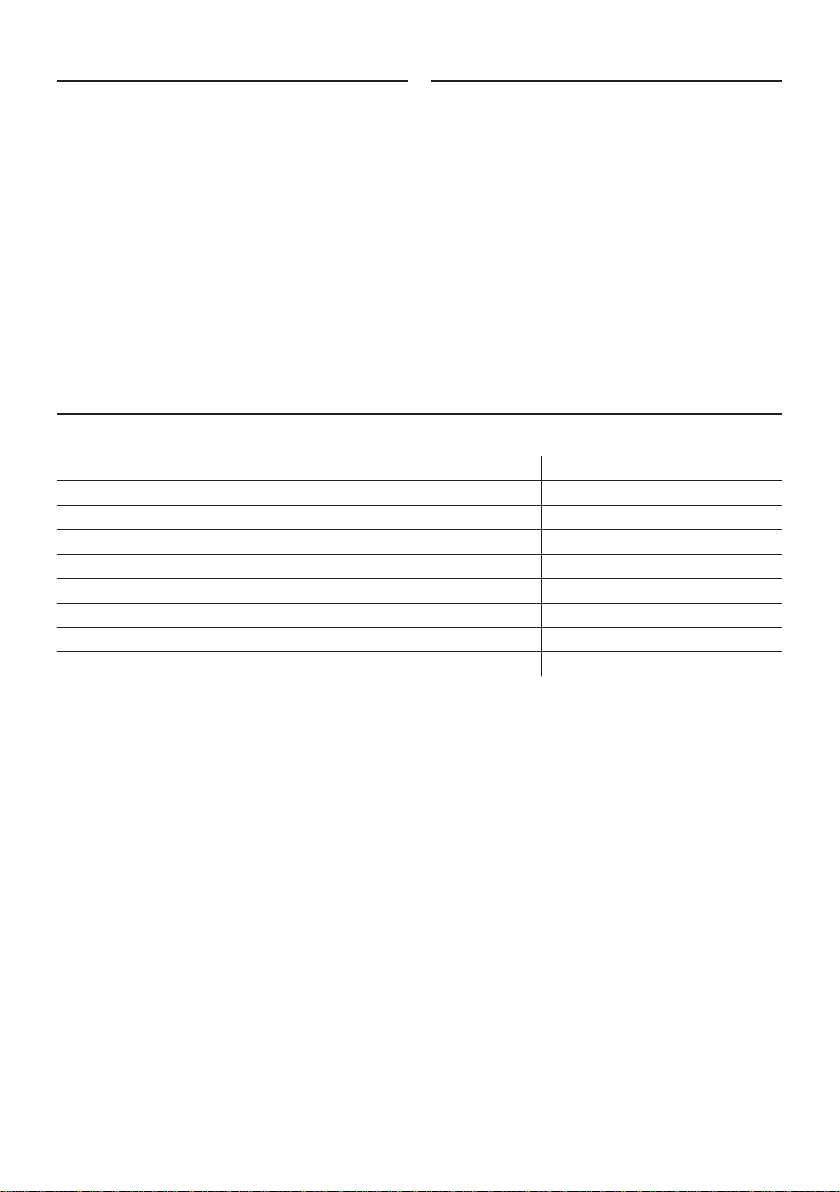
“Coffee strength” rotary knob
This rotary knob (14) is for
adjusting the coffee strength
or when using pre-ground
coffee.
b
c
to
d
“Drink selection” rotary knob
e
to
f
g
to
h
k
Ground coffee
Mild
Regul ar
Strong
DoubleShotstrong +
DoubleShotstrong ++
With these coffee strengths
the coffee is brewed in
2 stages.
See “aromaDouble Shot”.
This rotary knob (15) is used
to select the required drink
and the per-cup quantity. It
is also used to change user
settings.
Coffee-based drinks without
milk:
Small Espresso
Espresso
Small Café Crème
Café Crème
Large Café Crème
Coffee-based drinks with
milk:
Small Cappuccino
Large Cappuccino
Small Macchiato
Macchiato
Large Macchiato
Rinse machine
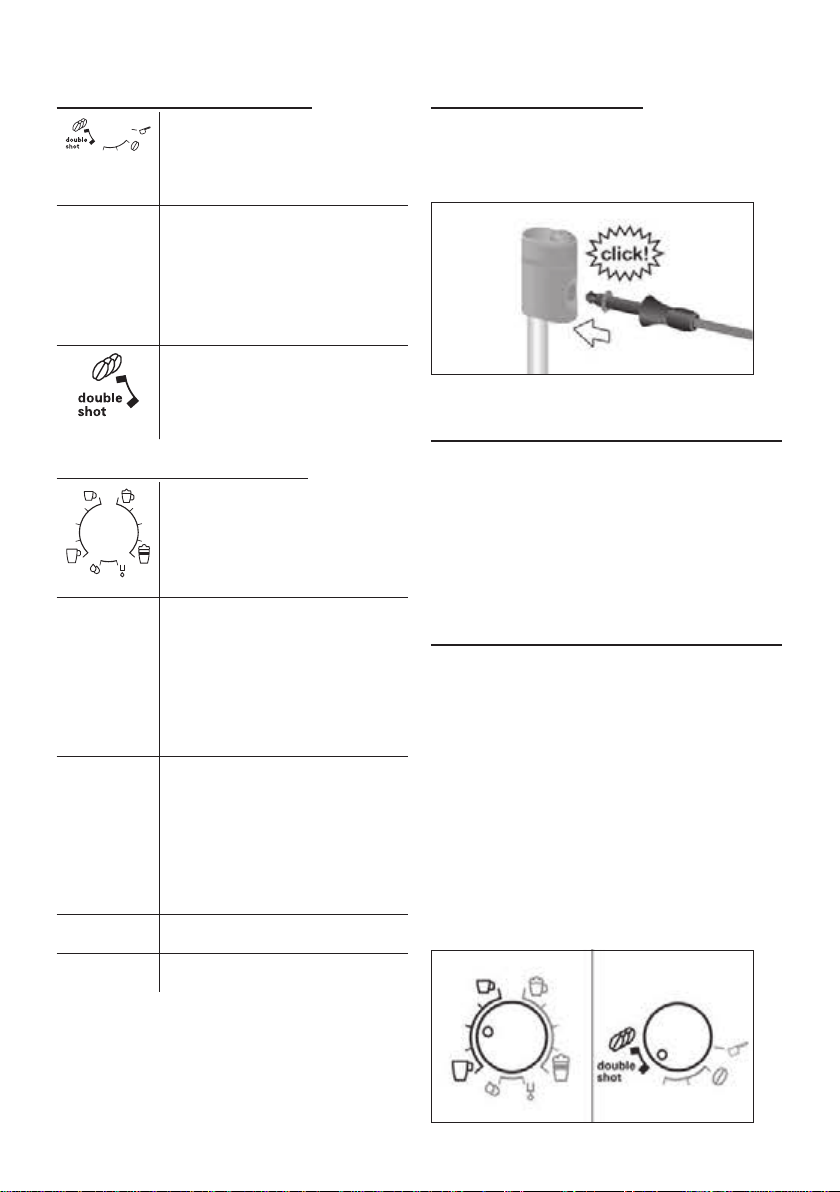
Connection for milk tube
To produce milk froth – for example for latte
macchiato or cappucino – the connection
and the milk tube must be properly secured
to the milk frother.
Important: This is also necessary when
dispensing hot water.
Display messages
The display (16) shows not only the current
operating status, but also various messages that give you status information or
let you know when you need to take action.
As soon as you have taken the necessary
action, the message disappears and the
menu for drink selection is displayed again.
aromaDouble Shot
The longer the coffee is brewed, the more
bitter substances and undesired aromas
are released. This has a negative effect on
the taste and makes the coffee less easily
digestible. So for extra strong coffee the
TES51… has a special aromaDouble Shot
function. When half the quantity has been
prepared, coffee is ground and brewed
again so that only the pleasant, aromatic
scents are released.
The aromaDouble Shot function is activated
with the following settings:
j
N.B.: If a drink is selected that cannot be
prepared, Invalid combination appears in
the display. Change the coffee strength or
the selected drink.
6
Rinse milk system
Before using for the rst time
en
Before using for
the rst time
General
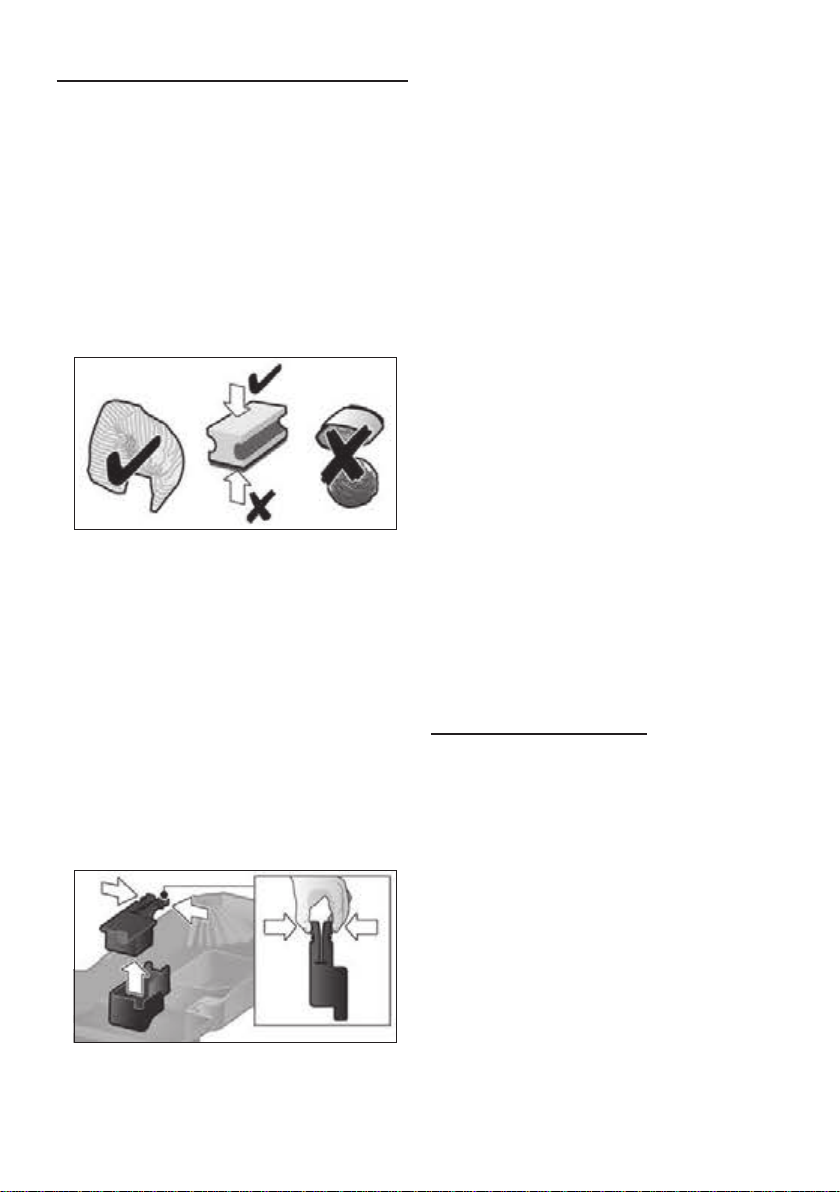
Fill the appropriate container using only
pure, cold, uncarbonated water and solely
roasted beans. Do not use coffee beans
that have been glazed, caramelised or
treated with other additives containing
sugar, since they will block the brewing unit.
The water hardness setting can be adjusted
on this appliance. The factory default setting
for the water hardness is 4. Check the
water hardness with the enclosed test strip.
If the check reveals a value other than 4,
change the setting on the appliance accordingly after switching on (see “Menu settings”
Water hardness).
Switching on the appliance
■ Remove the protective lm.
■ Place the fully automatic espresso
machine on a at, water-resistant surface
that can take its weight. Make sure that
the machine’s ventilation slots remain
unobstructured.
Important: Only use the appliance in
frost-free rooms. If the appliance has been
transported or stored at temperatures below
0 °C, wait at least 3 hours before operation.
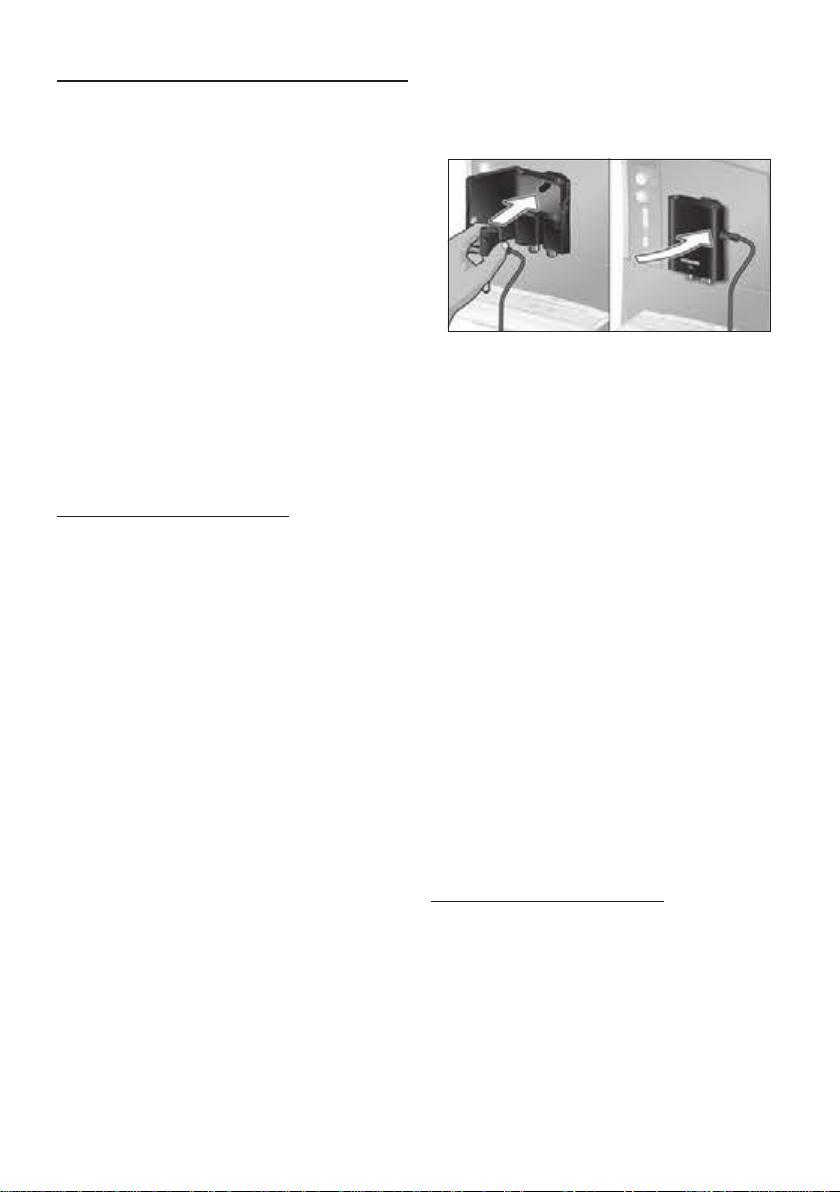
■ Install the milk frother. Operate the
machine only after the milk frother (6) has
been fully assembled and installed.
■ Lift the lid of the water tank (18).
■ Remove and rinse the water tank (17)
and ll it with fresh cold water.
Do not ll above the max mark.
■ Replace the water tank (17) and push it
rmly downward into place.
■ Close the lid of the water tank (18) again.
■ Fill the bean container (1) with coffee
beans (for preparation using ground
coffee, see “Preparation using
ground coffee”).
■ Press the power switch O / I (9). The
display (16) shows the menu for setting
the display language.
■ Select the required display language with
the upper rotary knob (15).
■ Place a receptacle under outlet (6a).
■ Press the start button (10).
The language you selected is saved.
■ Pull the power cord out of the storage com-
partment (21) and plug in. Adjust the length
of the cable by pushing it back in or pulling
it out. The easiest way to do this is to place
the appliance so that its back is ush with
the edge of the counter and either pull the
cable downward or push it upward.
7
The appliance heats up and rinses. Some
water will run out of the coffee outlet.
When the drink selection menu is shown in
the display, the appliance is ready for use.
Switching off the appliance
The factory settings of the fully automatic
espresso machine are programmed for
optimal performance. The appliance
switches off automatically after a specic
time (time span can be programmed, see
“Menu settings” Shut off).
Exception: The appliance switches off
without rinsing if only hot water or steam
were dispensed.
en Water lter
To switch the appliance off manually before
this, press the k off / i button (13).
The appliance rinses and switches off.
N.B.: If the appliance is being used for the
rst time, a service program has been run,
or the appliance has not been operated
for a long period, the rst beverage will
not have the full aroma and should not be
consumed.
When using the espresso machine for the
rst time, you will achieve a suitably thick
and stable “crema” only after the rst few
cups have been dispensed.
After extended use, water droplets may
form on the ventilation slots. This is normal.
Water lter
A water lter can prevent scale buildup.
Before a new water lter is used, it must be
rinsed. To do this, proceed as follows:
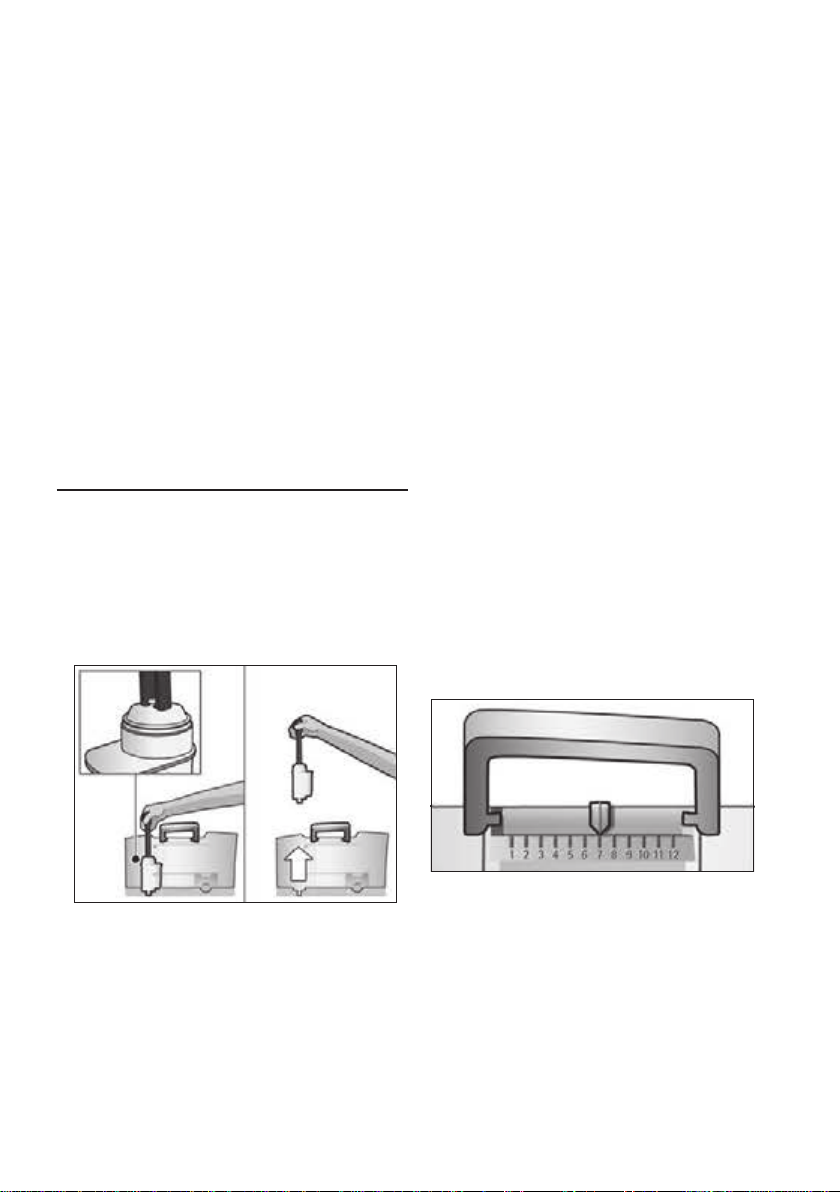
■ Press the water lter rmly into the
water tank with the aid of the measuring
spoon (19).
■ Place a receptacle with a capacity of
0.5 litres under the outlet (6a).
■ Press the start button (10).
■ Water will now ow through the lter to
rinse it.
■ Empty the container.
The appliance is ready to use once more.
Note: Rinsing the lter simultaneously
activates the setting for the Change filter!
display.
The lter is no longer effective when the
Change filter! display appears, or at
the latest after 2 months. It needs to be
replaced for reasons of hygiene and so
that there is no build-up of limescale (this
could damage the appliance). Replacement
lters can be obtained from retailers or from
customer service (see “Accessories”). If
no new lter is used, turn the filter setting
to No / Old.
Note: You can use the lter indicator to
mark the month in which you inserted the
lter. You can also mark the month in which
you will need to replace the lter next (at
the latest after two months).
■ Fill the water tank (17) with water up to
the max mark.
■ Press and hold the k off / i button (13)
for at least three seconds. The menu
opens.
■ Press the k off / i button (13) repeatedly
until the display shows No/Oldfilter.
■ Select Activate filter with the upper
rotary knob (15).
■ Press the start button (10).
8
Note: If the appliance has not been used
for a prolonged period (e.g. vacation) the
lter should be rinsed before the appliance
is used again. To do so, dispense a cup of
hot water and pour it away.
Menu settings
en
Menu settings
You can adapt the appliance to your
individual needs in the menu settings.
■ Hold the k off / i button (13) down for at
least 3 seconds.
■ Press the k off / i button (13) repeatedly
until the required menu item appears in
the display.
■ Select the required setting with the upper
rotary knob (15).
■ Conrm by pressing the start button (10).
To leave the menu without making any
changes, turn the rotary selector to Exit and
press the start button (10).
You can set the following:
Shut off: Here you can set the time
span after which the appliance automatically switches off following the last drink
preparation. A time between 15 minutes and
4 hours can be set. The default time can be
shortened to save energy.
To save power you can specify a shorter
period.
Filter: Here you can set whether a water
lter is being used. If a water lter is not
being used, turn the setting to No / Old. If a
water lter is being used, turn the setting to
Activate filter. New water lters have to be
rinsed before use (see “Water lter”).
Start Calc‘n‘Clean: The service programmes (Calc‘n‘Clean / descaling /
cleaning) can be selected manually
here. Press the start button (10) and run
the selected programme (see “Service
Programmes”).
Water hardness: The water hardness
setting can be adjusted on this appliance.
It is important to set the water hardness
correctly, so that the appliance indicates
accurately when the descaling programme
should be run. The factory setting for the
water hardness is 4.
You can check the water hardness using
the enclosed test strip or by asking your
local water supplier. If a water softening
system is installed in the house, please
select the Softening system.
Dip the test strip briey in water, gently
shake off any drips, and check the result
after one minute.
Level Water hardness
German (°dH) French (°fH)
1
2
3
4
Drink counter: This displays how many
drinks have been dispensed since the
appliance was rst put into operation.
1-7
8-14
15-21
22-30
1-13
14-25
26-38
39-54
Adjusting the grinding unit
The rotary selector (3) adjusts the grind
settings from coarse to ne.
W Warning!
Adjust the grinding unit only while it is
running! Otherwise the appliance may
be damaged. Do not reach into the
grinding unit.
■ While the grinding unit is running, adjust
the rotary selector (3) from ne (a: Turn
anticlockwise) to coarse (b: Turn
clockwise) as required.
Temp.: The brewing temperature (high /
middle / low) can be set here.
Language: The display language can be set
here.
9

en Preparation using coffee beans
Note: The new setting will not become
apparent until after the second cup of coffee.
Note: If the message Adjust coarseness!
appears in the display, the grind setting
for the coffee beans is too ne. Adjust the
grinding unit to a coarser setting.
Tip: For dark roast coffee beans, choose a
ner grind, for lighter beans a coarser grind.
Preparation using
coffee beans
This fully automatic espresso machine
grinds beans freshly for each brew.
The appliance must be ready for use. To
make coffee drinks with milk, rst insert
the milk tube in a milk container and secure
to the milk frother with the connection.
Important: Dried milk residue is difcult
to remove, so the milk frother (6) must be
cleaned with lukewarm water immediately
after use and rinse using the Clean milk
system programme.
Tip: For optimum quality, store the beans in
a cool place in sealed containers.
■ Select the required coffee strength by
turning the lower rotary knob (14). The
selected coffee strength is shown in the
display. To prepare two cups at the same
time, press the a button (11) (only for
drinks without milk and without the aro-
maDouble Shot function).
■ Press the start button (10).
Coffee is brewed and then poured into the
cup(s).
N.B.: With some settings the coffee is
prepared in two stages (see “aromaDouble
Shot”). Wait until the procedure is fully
completed.
Press the start button (10) again to cut the
brewing process short.
Preparation using
ground coffee
This fully automatic espresso machine can
also be operated with ground coffee (not
instant coffee powder).
The appliance must be ready for use. To
make coffee drinks with milk, rst insert the
milk tube in a milk container and secure to
the milk frother with the connection.
Important: Fill the water tank with fresh,
uncarbonated, cold water every day. The
tank (17) should always contain sufcient
water for operating the appliance.
Preparation
■ Place the pre-warmed cup(s) under the
coffee outlet (7).
Tip: For a small espresso, always
preheat the cup, e.g. using hot water.
■ Select the required coffee and the
required per-cup quantity by turning the
upper rotary knob (15). The selected
coffee and the per-cup quantity are
shown in the display.
10
N.B.: The aromaDouble Shot function
cannot be used when coffee is prepared
using ground coffee.
Important: Dried milk residue is difcult
to remove, so the milk frother (6) must be
cleaned with lukewarm water immediately
after use and rinse using the Clean milk
system programme.
Important: Fill the water tank with fresh,
uncarbonated, cold water every day. The
tank (17) should always contain sufcient
water for operating the appliance.

Dispensing hot water
en
Preparation
■ Open the drawer (4).
■ Pour in no more than 2 level measuring
spoons of ground coffee.
Warning: Do not use whole beans or
instant coffee.
■ Close the drawer (4).
■ Select the required drink by turning the
upper rotary knob (15) (only one cup
possible).
■ Set the lower rotary knob to
b Groundcoffee.
■ Press the start button (10).
Coffee is brewed and then poured into
the cup.
N.B.: Repeat the procedure for another
cup of coffee.
Dispensing hot water
W Risk of burns!
The milk frother (6) gets very hot. After use,
always let it cool down before you touch it.
Before dispensing hot water the milk frother
must be cleaned and the milk tube secured
with the connection.
The appliance must be ready for use.
■ Place the pre-warmed cup or glass under
the outlet of the milk frother (6).
■ Press and hold the l / m button (12) for
approx. 3 seconds. The appliance heats
up. Hot water runs out of the milk frother
outlet (6) for about 40 seconds.
■ Press the l / m button (12) again to cut
the process short.
Preparing milk froth
W Risk of burns!
The milk frother (6) gets very hot. After use,
always let it cool down before you touch it.
Tip: You can foam the milk rst and then
dispense coffee, or foam the milk separately
and pour it onto the coffee.
The appliance must be ready for use.
■ Place a pre-warmed cup under
outlet (6a).
■ Insert the milk tube (6c) into a milk
container.
■ Press the l / m button (12).
The l / m button (12) ashes and
the appliance now heats up for approx.
20 seconds.
W Risk of burns!
Milk froth comes out of the milk frother
(6) at high pressure. Splashes of milk can
scald. Do not touch the outlet (6a) or aim it
at anyone.
■ End the process by pressing the
l / m button (12).
Important: Dried milk residue is difcult
to remove, so the milk frother (6) must be
cleaned with lukewarm water immediately
after use and rinse using the Clean milk
system programme.
11
en Maintenance and daily cleaning
Maintenance and
daily cleaning
W Risk of electric shock!
Unplug the appliance before cleaning it.
Never immerse the appliance in water.
Do not use a steam cleaner.
■ Wipe the outside of the appliance with a
soft, damp cloth.
■ Do not use abrasive cloths or cleaning
agents.
■ Always remove any limescale, residues
of coffee or milk, cleaning or descaling
solution immediately. Such residue can
cause corrosion.
■ New sponge cloths may contain salts.
Salts can cause rust lm on stainless
steel and must therefore be washed out
thoroughly before use.
■ Pull the drip tray (8c) with the coffee
grounds container (8b) forward and
out. Remove the panel (8a) and the
grate (8d). Empty and clean the drip tray
and coffee grounds container.
■ Remove the oat (8e) and clean with a
damp cloth.
■ Wipe out the inside of the appliance
(holder, trays) and the drawer for ground
coffee (this cannot be removed).
Do not put the following items in
the dishwasher: drip tray panel (8a),
L
brewing unit (5a).
The following items are dishwashersafe: drip tray for coffee outlet (8c),
M
coffee grounds container (8b), grate
for coffee outlet (8d), aroma cover
(2), all parts of the milk frother (6) and
powder spoon (19).
■ Wipe out the inside of the appliance (tray
holders and drawer).
Important: The drip tray and coffee
grounds container should be emptied and
cleaned every day in order to prevent
deposits.
N.B.: If the appliance is cold when switched
on with the power switch O / I (9) or if it
switches off automatically after coffee has
been dispensed, it rinses automatically. In
other words the system cleans itself.
Important: If the appliance has not been
used for a prolonged period of time (e.g.
after a vacation), clean the entire appliance
thoroughly, including the milk system and
brewing unit.
Cleaning the milk system
If the milk system was not cleaned after
milk has been dispensed, after a certain
amount of time the message Clean milk
system! will appear on the display.
Clean the milk system immediately after use!
To pre-clean the milk system automatically:
■ Select j by turning the rotary knob (15).
■ Place a tall, empty container under the
outlet (6a).
■ Push the outlet as close as possible to
the container.
■ Place the end of the milk tube (6c) into
the container.
■ Press the start button (10).
The machine automatically releases water
into the container and vacuums it up again
via the milk tube to rinse the milk system.
12
Maintenance and daily cleaning
en
The rinse procedure stops automatically
after about 1 minute.
■ Empty the container and clean the milk
tube (6c).
In addition to this, clean the milk system
thoroughly at regular intervals (by hand or
in the dishwasher).
W Risk of burns!
The milk frother (6) gets very hot. After use,
always let it cool down before you touch it.
Dismantling the milk system for cleaning:
■ Pull the milk frother (6) forward out of the
appliance.
■ Dismantle the milk frother into its
individual parts (6a to 6d) (see gure C
at the start of the operating instructions).
■ Rinse all parts with clear water and dry
them.
N.B.: All the parts of the milk frother and the
milk tube can also be put in the dishwasher.
■ Reassemble all the parts and replace fully
in the appliance.
W Risk of scalding!
Use this appliance only after the milk frother
(6) has been fully assembled and installed.
Cleaning the brewing unit
Clean the brewing unit regularly!
To pre-clean the brewing unit automatically:
■ Select k by turning the rotary knob (15).
■ Place an empty glass under outlet (6a).
■ Press the start button (10).
The appliance rinses.
In addition to the automatic cleaning
programme, the brewing unit (5a) should
be removed regularly for cleaning. (See
gure E at the start of the operating
instructions.)
■ Switch the appliance off at the power on/
off switch O / I (9). No buttons are lit.
■ Clean the individual parts with a detergent
solution and a soft brush. If necessary,
soak in a warm detergent solution.
13
■ Open the door (5b) to the brewing unit.
■ Slide the red lock (5e) on the brewing unit
(5a) completely to the left.
■ Press the eject lever (5d) down fully. The
brewing unit is released.
■ Grasp the brewing unit (5a) by the
recessed grips and remove carefully.
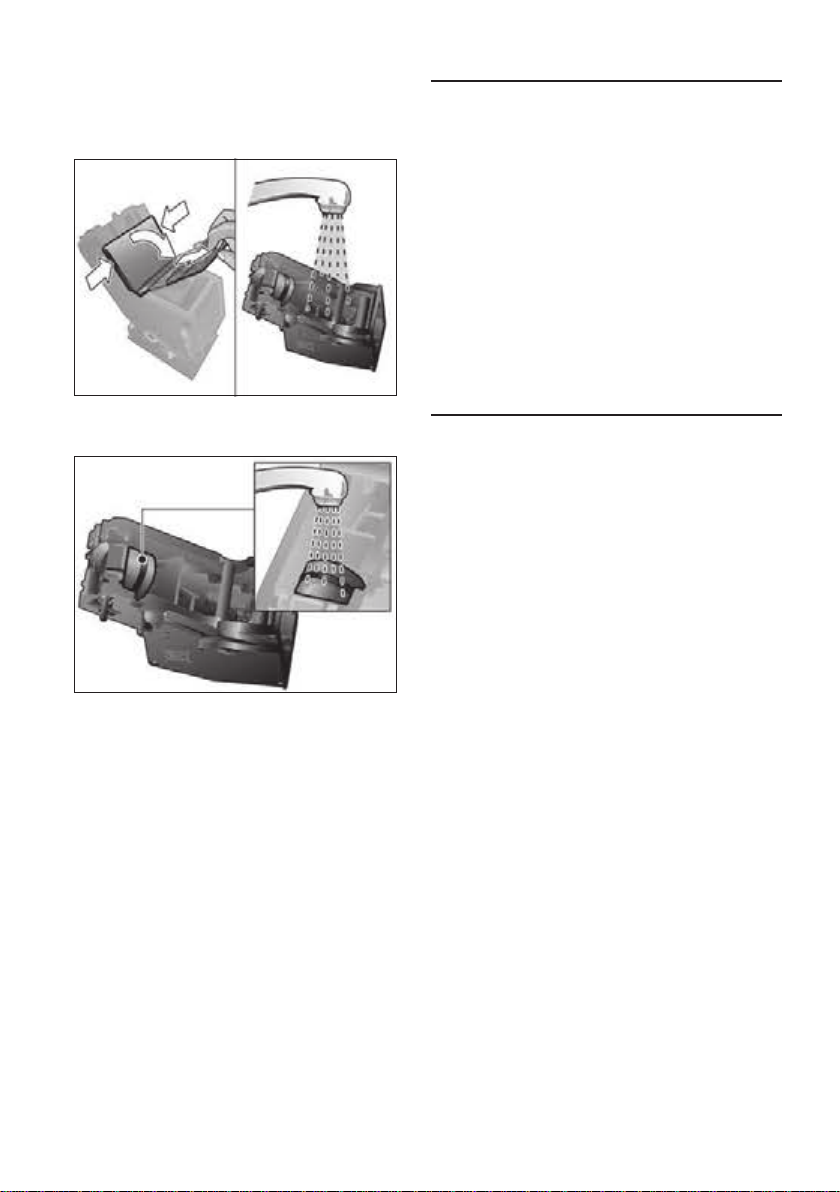
en Tips on energy saving
■ Remove the cover (5f) of the brewing unit
and rinse the brewing unit (5a) thoroughly
under running water.
■ Thoroughly clean the brewing unit sieve
under the running water.
Important: Do not clean with detergent or
other cleaning agents and do not put it in
the dishwasher.
■ Wipe out the inside of the appliance
thoroughly with a damp cloth and remove
any coffee residues.
■ Allow the brewing unit (5a) and the inside
of the appliance to dry.
■ Replace the cover (5f) on the brewing unit
and reinsert the brewing unit (5a) fully
into the appliance.
■ Press the eject lever (5d) up fully.
■ Slide the red lock (5e) fully to the right
and close the door (5b).
Tips on energy saving
■ Switch off the fully automatic espresso
machine when not in use. To do this,
press the k off / i button (13). The
appliance rinses and switches off.
■ If possible, do not interrupt coffee or
milk froth dispensing. Cutting the coffee
or milk froth dispensing process short
results in higher energy consumption and
in more residual water collecting in the
drip tray.
■ Descale the appliance regularly to avoid
a build-up of limescale. Limescale residue
results in higher energy consumption.
Service Programmes
Tip: Refer also to the quick reference guide
in the storage compartment (5c).
Depending on usage, the following
messages will appear on the display at
certain intervals:
Descale required!
or
Clean required!
or
Calc‘n‘Clean required!
The appliance should be cleaned or
descaled immediately using the corre-
sponding programme. You also have the
option of combining both processes with the
Calc‘n‘Clean function (see “Calc‘n‘Clean”).
If the service programme is not run as
instructed, the appliance may be damaged.
W Warning!
Each time you run the service programme,
you should follow the instructions for using
the descaling and cleaning agents. Please
observe the safety instructions on the
packaging of the cleaning agent.
Never interrupt the service programme!
Do not drink the liquids!
Never use vinegar, vinegar-based products,
citric acid or citric acid-based products!
14

Service Programmes
en
Never put descaling tablets or other
descaling agents in the ground coffee
drawer or the drawer for cleaning tablets (4)!
Before starting the service programme
(Descale, Clean or Calc’nClean), remove
the brewing unit, clean as instructed and
re-insert.
Specially developed descaling and
cleaning tablets are available from
retailers or customer service (see
“Accessories”).
Descaling
Duration: approx. 25 minutes.
Important: If there is a lter in the water
tank (17), it needs to be removed before the
descaling programme is run.
If the message Descale required! appears
on the display, press the k off / i button
(13) for 3 seconds and then press the start
button (10). The descaling programme
will start. To descale the appliance before
being prompted, press the k off / i button
(13) for at least 3 seconds. Then press the
k off / i button (13) briey twice. Turn the
upper rotary knob (15) until Start descaling
appears in the display. To start the descaling procedure, press the start button (10).
The display will guide you through the
programme.
Empty drip tray
Insert drip tray
■ Empty drip tray (8) and replace them.
N.B.: If the water lter is activated, the
display will prompt you to remove the lter
and then press the start button (10) again.
Remove the lter now if you have not
already done so. Press the start button (10).
Fill descaler
Press start
■ Pour lukewarm water into the empty
water tank (17) up to the 0.5 l mark and
then dissolve 1 Bosch descaling tablet
TCZ8002 in it.
■ Press the start button (10).
Place container
Press start
■ Place a receptacle with a capacity of at
least 0.5 litres under the outlet (6a).
■ Press the start button (10).
Descale in progress
The descaling pro gramme will now run for
about 20 minutes.
Clean / Fill water tank
Press start
■ Rinse the water tank (17) and rell it with
fresh water up to the max mark.
■ Press the start button (10).
Descale in progress
The descaling pro gramme now runs for
about 3 minutes and rinses the appliance.
Empty drip tray
Insert drip tray
■ Empty drip tray (8) and replace them.
Replace the lter if one is being used. The
appliance has completed descaling and is
ready for use again.
Important: Wipe down the appliance using
a soft, damp cloth to immediately remove
any descaler residue. Such residue can
cause corrosion. New sponge cloths may
contain salts. Salts can cause rust lm
on stainless steel and must therefore be
washed out thoroughly before use.
15

en Service Programmes
Cleaning
Duration: approx. 10 minutes.
If the message Clean required! appears
on the display, press the k off / i button
(13) for 3 seconds and then press the start
button (10).
The cleaning programme will start.
To clean the appliance before being
prompted, press the k off / i button (13)
for at least 3 seconds. Then press the
k off / i button (13) briey twice. Turn the
upper rotary knob (15) until Start cleaning
appears in the display. To start the
cleaning procedure, press the start button
(10). The display will guide you through the
programme.
Empty drip tray
Insert drip tray
■ Empty drip tray (8) and replace them.
Open drawer
■ Open the drawer (4).
Fill cleaner
Press start
■ Drop a Bosch cleaning tablet in the
drawer (4) and close.
■ Press the start button (10).
Cleaning in progress
The cleaning pro gramme will now run for
about 8 minutes.
Calc‘n‘Clean
Duration: approx. 35 minutes.
Calc‘n‘Clean combines the separate func-
tions of descaling and cleaning. If both
programmes are due to be run soon, the
espresso machine automatically suggests
this service programme.
Important: If there is a lter in the water
tank (17), it needs to be removed before the
service programme is run.
If the message Calc‘n‘Clean required!
appears on the display, press the k off / i
button (13) for 3 seconds and then press
the start button (10). The service pro—
gramme will start.
To run Calc‘n‘Clean before being prompted,
press the k off / i button (13) for at least
3 seconds. Then press the k off / i button
(13) briey twice. Turn the upper rotary
knob (15) until Start Calc‘n‘Clean appears
in the display. To start Calc‘n‘Clean, press
the start button (10).
The display will guide you through the
programme.
Empty drip tray
Insert drip tray
■ Empty drip tray (8) and replace them.
Open drawer
■ Open the drawer (4).
Empty drip tray
Insert drip tray
■ Empty drip tray (8) and replace them.
The appliance has nished cleaning is
ready for use again.
16
Fill cleaner
Press start
■ Drop a Bosch cleaning tablet in the
drawer (4) and close.
■ Press the start button (10).
N.B.: If the water lter is activated, the display
will prompt you to remove the lter and then
press the start button (10) again. Remove the
lter now if you have not already done so.
Press the start button (10).

Frost protection
en
Fill descaler
Press start
■ Pour lukewarm water into the empty
water tank (17) up to the 0.5 l mark and
then dissolve 1 Bosch descaling tablet
TCZ8002 in it.
■ Press the start button (10).
Place container
Press start
■ Place a receptacle with a capacity of at
least 1 litre under the outlet (6a).
■ Press the start button (10).
Calc‘n‘Clean in progress
The descaling pro gramme will now run for
about 22 minutes.
Clean / Fill water tank
Press start
■ Rinse the water tank (17) and rell it with
fresh water up to the max mark.
■ Press the start button (10).
Calc‘n‘Clean in progress
The descaling pro gramme now runs for
about 10 minutes and rinses the appliance.
Empty drip tray
Insert drip tray
■ Empty drip tray (8) and replace them.
Replace the lter if one is being used. The
appliance has nished cleaning is ready for
use again.
Frost protection
W To avoid damage from low
temperatures during transport and
storage, the appliance must be
completely emptied rst.
Note: The appliance must be ready for use
and the water tank (17) lled.
■ Place a large receptacle under outlet (6a).
■ Press the l / m button (12) and
allow the appliance to steam for about
15 seconds.
■ Switch the appliance off at the power on/
off switch O / I (9).
■ Empty the water tank (17) and the
drip tray (8).
Accessories
The following accessories can be obtained
from retailers and customer service.
Accessories Ordering number
Retail /
Customer service
Cleaning tablets TCZ8001 / 00311808
Descaling tablets TCZ8002 / 00576694
Water lter TCZ7003 / 00575491
Care set TCZ8004 / 00576331
Milk container with
“Fresh Lock” lid
TCZ8009N / 00576165
Important: Wipe down the appliance using
a soft, damp cloth to immediately remove
any descaler residue. Such residue can
cause corrosion. New sponge cloths may
contain salts. Salts can cause rust lm
on stainless steel and must therefore be
washed out thoroughly before use.
17
en Disposal
J
Dispose of packaging in an environ-
electronic appliances (waste electrical
The guarantee conditions for this appliance
are as de ned by our representative in the
country in which it is sold. Details regarding
these conditions can be obtained from
the dealer from whom the appliance was
purchased. The bill of sale or receipt must
be produced when making any claim under
the terms of this guarantee.
Changes reserved.
Disposal
mentally-friendly manner. This
appliance is labelled in accordance
with European Directive 2012/19/EU
concerning used electrical and
and electronic equipment – WEEE).
The guideline determines the framework for the return and recycling
of used appliances as applicable
throughout the EU. Please ask your
specialist retailer about current
disposal facilities.
Guarantee
Technical data
Power connection (voltage – frequency) 220-240 V~ 50/60 Hz
Heater wattage 1600 W
Maximum static pump pressure 15 bar
Maximum water tank capacity (without lter) 1.7 liters
Maximum capacity of the coffee bean container 300 grams
Length of power cable 100 cm
Dimensions (H x W x D) 385 x 280 x 479 mm
Weight, empty 9.3 kg
Type of grinding unit Ceramic
18

Simple troubleshooting
en
Simple troubleshooting
Problem Cause Solution
Too little or no milk froth or
the milk frother (6) does
not draw the milk in.
No hot water dispensed. The milk frother (6) is
Coffee dispensing slows
to a trickle or stops
completely.
Coffee has no “crema”. Unsuitable type of coffee. Use a type of coffee with a higher
Coffee is too “acidic”. The grinding setting is too
Coffee is too “bitter”. The grinding setting is
Coffee or milk froth quality
varies considerably.
The coffee grounds are not
compact and are too wet.
Water dripped onto the
inner oor of the appliance
when the drip tray (8) was
removed.
The water lter does not
stay in position in the
water tank (17).
If you are unable to solve the problem, always call the hotline!
You will nd the telephone numbers at the back of these instructions.
The milk frother (6) is
soiled.
Milk unsuitable for frothing. Use low-fat milk (1.5 % fat).
The milk frother (6) is not
correctly assembled.
Build-up of limescale in the
appliance.
soiled.
Coffee is ground too nely.
Pre-ground coffee is too
ne.
Build-up of limescale in the
appliance.
The beans are no longer
fresh.
The grinding setting is not
suitable for the beans.
coarse or the pre-ground
coffee is too coarse.
Unsuitable type of coffee. Use a darker roast.
too ne or the pre-ground
coffee is too ne.
Unsuitable type of coffee. Change type of coffee used.
Build-up of limescale in the
appliance.
The grinding setting is too
ne or too coarse, or not
enough ground coffee has
been used.
Drip tray (8) removed too
early.
The water lter is not
mounted correctly.
Clean the milk frother (6), see
“Maintenance and daily cleaning”.
Wet the milk frother parts and
press together rmly.
Descale the appliance as
described in the instructions.
Clean the milk frother (6), see
“Maintenance and daily cleaning”.
Adjust the grinding unit to a
coarser setting. Use coarser
pre-ground coffee.
Descale the appliance as
described in the instructions.
proportion of robusta beans.
Use fresh beans.
Adjust grinding setting to ne.
Adjust the grinding unit to a ner
setting or use ner pre-ground
coffee.
Adjust the grinding unit to a
coarser setting or use coarser
pre-ground coffee.
Descale the appliance as
described in the instructions.
Adjust the grinding unit to a
coarser or ner setting, or use
2 level measuring spoons of
ground coffee.
Wait a few seconds after the
last drink was dispensed before
removing the drip tray (8).
Firmly press the water lter
straight down into the tank
connection.
19

en Simple troubleshooting
Problem Cause Solution
Restore the unit to its
original factory settings
(“Reset”).
Display shows
Refill beans! although the
bean container (1) is full,
or the grinding unit does
not grind the beans.
Display shows
Insert brewing unit
Display shows
Clean brewing unit
Display shows
Check water tank
Display shows
Restart required
Display shows
Error
Call hotline
If you are unable to solve the problem, always call the hotline!
You will nd the telephone numbers at the back of these instructions.
You changed some
settings and want to
discard them.
Beans are not falling into
the grinding unit
(beans too oily).
Brewing unit (5) is missing
or was not recognised.
Brewing unit (5) is soiled. Clean brewing unit (5).
Too much pre-ground
coffee in the brewing
unit (5).
The brewing unit’s
mechanism is stiff.
Water tank wrongly
inserted.
Carbonated water i n th e
water tank.
Float is stuck in the water
tank.
New water lter did not
rinse according to the
instructions.
Air in the water lter. Dip the water lter into water
Water lter is old. Insert a new water lter.
Appliance is too warm. Leave the appliance to cool down.
Brewing unit is soiled. Clean the brewing unit.
The appliance has a fault. Please call the hotline.
Turn off the unit with the power
on/off switch O / I (9). Press and
hold the k off / i (13) and the l
(12) button and turn the appliance
on with the power on/off switch
O / I (9). Conrm by pressing the
start button start (10). The factory
settings are now activated.
Gently tap the bean container (1).
Change the type of coffee if
necessary.
When the bean container (1) is
empty, wipe it with a dry cloth.
Switch off the appliance with the
brewing unit (5) in place, wait
three seconds and switch on the
appliance.
Clean brewing unit (5).
Pour in no more than 2 level
measuring spoons of ground
coffee.
Remove and clean the brewing
unit, see “Maintenance and daily
cleaning”.
Insert water tank correctly.
Fill the water tank wit h f re sh tap
water.
Remove the tank and clean
thoroughly.
Rinse the water lter according to
instructions and then switch on.
until no more air bubbles escape,
replace the lter.
20

Sommaire
fr
Sommaire
Contenu de l’emballage ……………………….21
Conformité dʼutilisation ………………………..22
Consignes de sécurité importantes ……….22
Présentation ………………………………………24
Eléments de commande ………………………24
Messages à l’écran……………………………..25
aromaDouble Shot………………………………25
Avant la première utilisation …………………26
Filtre eau……………………………………………27
Réglages menu ………………………………….28
Régler la nesse de la mouture …………….29
Préparation avec du café en grains ……….29
Préparation à partir de café moulu ……….30
Préparer de l’eau chaude …………………….30
Préparation de mousse de lait ………………30
Entretien et nettoyage quotidien ……………31
Conseils pour économiser l’énergie ………34
Programmes de maintenance ………………34
Protection contre le gel ………………………..37
Accessoires ……………………………………….37
Mise au rebut ……………………………………..37
Garantie …………………………………………….37
Caractéristiques techniques …………………37
Eliminer soi-même les
problèmes simples ……………………………..38
Chère amatrice de café,
cher amateur de café.
Félicitation pour avoir choisi la cafetière
Bosch.
Ce mode d’emploi décrit différents modèles
qui se différencient par leur niveau
d’équipe ment.
Veuillez également tenir compte du
Mémento fourni. Un logement (5c) a été
prévu pour le conserver à portée de main
dans la machine.
Contenu de l’emballage
(voir l’illustration gurant au début du
présent Mode d’emploi)
a Machine à café
b Mémento
c Mode d’emploi
d Mousseur lait
e Bandelette pour déterminer
la dureté de l’eau
f Cuillère-dose
21

fr Conformité dʼutilisation
Conformité dʼutilisation Consignes de sécurité
Conformité dʼutilisation
Cet appareil est destiné à la
préparation de quantités habituellement nécessaires dans un
foyer, ou dans des applications
non professionnelles similaires à
celles dʼun foyer.
Nʼutiliser lʼappareil quʼà lʼintérieur
de pièces, à température
ambiante, et jusquʼà 2 000 m
au-dessus du niveau de la mer.
Consignes de sécurité
importantes
importantes
Veuillez lire la notice dʼutilisa-
tion attentivement, respecter
les instructions et la conserver
soigneusement ! Si lʼappa-
reil change de propriétaire,
remettez-lui cette notice.
Les enfants de 8 ans et plus,
les personnes souffrant dʼun
handicap physique, sensoriel
ou mental ou ne détenant pas
lʼexpérience et/ou les connais-
sances nécessaires pourront
utiliser cet appareil à condition
de le faire sous surveillance,
ou que son utilisation sûre leur
ait été enseignée et quʼils aient
compris les dangers qui en
émanent. Maintenir les enfants
de moins de 8 ans à lʼécart de
lʼappareil et du cordon dʼalimen-
tation secteur et ne pas leur
permettre dʼutiliser lʼappareil.
Ne pas laisser les enfants jouer
avec lʼappareil. Le nettoyage et
lʼentretien incombant à lʼutilisa-
teur ne doivent pas être effec-
tués par des enfants sauf sʼils
sont âgés de 8 ans et plus et
sʼils agissent sous surveillance.
22

Conformité dʼutilisation
fr
W Avertissement
Risque dʼélectrocution !
■ Lʼappareil doit être branché
uniquement sur un réseau à
courant alternatif par lʼintermédiaire dʼune prise secteur
installée de manière conforme
et disposant dʼune connexion
à la terre. Assurez-vous que
le système à conducteur de
protection de lʼinstallation
électrique de votre maison est
conforme.
■ Branchez et utilisez lʼappareil
uniquement en conformité
avec les indications gurant
sur la plaque signalétique.
■ Nʼutilisez lʼappareil que si
son cordon dʼalimentation
et lʼappareil lui-même ne
présentent aucun dommage.
■ A n dʼécarter tout danger,
seul notre service aprèsvente est habilité à réparer
lʼappareil, comme par
exemple procéder au
remplacement dʼun cordon
dʼalimentation endommagé.
■ Ne plongez jamais lʼappareil
ou le cordon dʼalimentation
dans lʼeau.
■ En cas de défaut, débran-
chez immédiatement la che
secteur ou coupez la tension
du réseau.
W Avertissement
Danger par magnétisme !
Lʼappareil renferme des aimants
permanents susceptibles dʼagir
sur des implants électroniques,
par exemple des stimulateurs
cardiaques ou des pompes à
insuline. Les personnes portant
des implants électroniques sont
priées de rester à au moins
10 cm de lʼappareil et des pièces
suivantes, lors de leur retrait :
réservoir à lait, réservoir dʼeau et
unité de percolation.
W Avertissement
Risque dʼasphyxie !
Ne laissez jamais les enfants
jouer avec les emballages.
Rangez les petites pièces de
manière sûre, elles pourraient
être avalées.
W Avertissement
Risque de blessures !
■ Nʼintroduisez jamais les doigts
dans le moulin.
■ Lʼutilisation inappropriée de
lʼappareil peut entraîner des
blessures.
W Avertissement
Risque de brûlure !
Le mousseur de lait est très
chaud. Après utilisation, lais-
sez-le refroidir avant de le
toucher.
W Avertissement
Risque de brûlures !
N’utiliser l’appareil que lorsque
le mousseur de lait est complè-
tement assemblé et monté.
23

fr Présentation
Présentation
(voir les illustrations de vue d’ensemble
A, B, C, D et E au début de la notice)
1 Bac à café
2 Couvercle préservateur d’arôme
3 Sélecteur de réglage de nesse de
mouture
4 Tiroir à café
(café en poudre/pastille de nettoyage)
5 Unité de percolation (gure E)
a Unité de percolation
b Volet
c Logement du Mémento
d Levier d’éjection pour
l’unité de percolation
e Verrouillage
f Couvercle de protection
6 Mousseur de lait amovible (gure C)
a Embout
b Raccordement (exible de lait)
c Flexible de lait avec adaptateur
d Partie supérieure
e Buse à air
f Douille
g Pointe de la buse
7 Bec verseur du café,
réglable en hauteur
8 Bac collecteur (gure D)
a Support des bacs collecteurs
b Récipient pour marc de café
c Bac collecteur du bec verseur du café
d Grille bec verseur du café
e Flotteur
9 Interrupteur électrique O / I
10 Touche start
11 Touche a
12 Touche l / m
13 Touche k off / i
14 Sélecteur rotatif « Arôme du café »
15 Sélecteur rotatif
« Sélection de la boisson »
16 Ecran
17 Réservoir d’eau amovible
18 Couvercle du réservoir d’eau
19 Cuillère-dose (sert de poignée pour
placer le ltre d’eau)
20 Logement de la cuillère-dose
21 Cordon électrique et logement
Eléments de commande
Interrupteur électrique O / I
L’interrupteur réseau O / I (9) permet de
mettre en marche et d’arrêter entièrement la
machine (alimentation électrique coupée).
Important : Avant d’arrêter la machine,
lancer un programme de rinçage ou bien
utiliser la touche k off / i (13).
Touche a
Appuyer sur la touche a (11) pour
préparer simultanément deux tasses de
la boisson sélectionnée. La touche est
utilisable pour les boissons sans lait et sans
fonction aromaDouble Shot.
Touche k off / i
Appuyer brièvement sur la touche
k off / i (13) pour effectuer un rinçage et
arrêter la machine. Appuyer de manière
prolongée sur la touche k off / i (13)
pour afcher les réglages utilisateur ou
pour lancer un cycle de détartrage et de
nettoyage.
Touche l / m
Appuyer sur la touche l / m (12) pour
créer de la vapeur qui sert à préparer la
mousse de lait. Cette touche permet également de prélever de l’eau chaude.
Touche start
Appuyer sur la touche start (10) pour
lancer la préparation d’une boisson ou pour
effectuer un programme de Service.
Pour réduire la quantité de boisson appuyer
de nouveau sur la touche start (10) en
cours de préparation.
24

Messages à l’écran
fr
Sélecteur rotatif « Arôme du café »
Ce bouton rotatif (14) permet
de régler l’intensité du
café ou l’utilisation de café
en poudre.
b
c
à
d
Sélecteur rotatif
« Sélection de la boisson »
e
à
f
g
à
h
k
j
Remarque : Lorsqu’il est sélectionné une
boisson impossible à préparer, l’écran
afche Combinaison non valide. Modier
l’arôme du café ou la sélection de la
boisson.
Comp. poudre
Doux
Normal
Fort
DoubleShot fort +
DoubleShot fort ++
Avec ces réglages de
l’arôme, le café est préparé
en 2 étapes. Voir point
« aromaDouble Shot ».
Le sélecteur (15) permet de
sélectionner la boisson et
la quantité. Il permet aussi
de modier les réglages de
l’utilisateur.
Boisson café sans lait :
Petit espresso
Espresso
Petit café crème
Café crème
Grand café crème
Boisson café avec lait :
Petit cappuccino
Grand cappuccino
Petit macchiato
Macchiato
Grand macchiato
Rinçage machine
Rincer syst.de lait
Raccordement pour le exible de lait
Pour lancer la préparation de mousse de
lait, par exemple pour un latte macchiato ou
un cappucino, le raccordement et le exible
de lait doivent être xés correctement sur le
mousseur de lait.
Important : ceci est également nécessaire
pour la préparation d’eau chaude.
Messages à l’écran
En plus de l’état de fonctionnement actuel,
l’écran (16) afche également différents
messages qui correspondent à des informations d’état ou qui vous demandent
d’intervenir. Dès que vous avez effectué
l’opération nécessaire, le message dispa-
raît et le menu de sélection des boissons
s’afche de nouveau.
aromaDouble Shot
Plus la percolation du café dure longtemps,
plus les substances amères et les arômes
indésirables sont prononcés. Cela a un effet
négatif sur le goût et rend le café moins
digeste. La TES51… dispose donc d’une
fonction spéciale, aromaDouble Shot pour
préparer un café très fort. Une fois que
la moitié de la quantité a été préparée,
la machine moud de nouveau du café et
effectue une percolation. Cela permet de
ne développer que les arômes parfumés et
très digestes du café.
25
fr Avant la première utilisation
Pour activer la fonction aromaDouble Shot,
procéder comme indiqué ci-après :
Avant la première utilisation
Généralités
Ne verser, dans les conteneurs correspondants, que de l’eau pure, froide, sans
gaz carbonique et uniquement du café en
grains torréé. Ne pas employer des grains
de café avec glaçage, des grains caramélisés ou enrobés d’une substance sucrée
quelconque ; ils encrassent et obturent l’unité
de percolation. Sur cette machine, il existe
un réglage de la dureté de l’eau. En usine,
la machine est réglée sur la dureté 4. Se
servir de la bandelette fournie pour détermi-
ner la dureté de l’eau.
Si le contrôle donne une valeur différente
de 4, il faut programmer la machine en
conséquence après la mise en service (voir
Eau Dureté point « Réglages menu »).
Mise en service de la machine
■ Retirer le lm de protection existant.
■ Placer la machine à café sur un plan
horizontal, sufsamment solide pour
supporter son poids et résistant à l’eau.
Assurez-vous que la fente de ventilation
de la machine n’est pas obstruée.
Important : Utiliser l’appareil uniquement
dans des locaux hors gel. Dans le cas où
l’appareil a été transporté ou entreposé
à des températures en dessous de 0 °C,
attendre au moins 3 heures avant la mise
en service de l’appareil.
■ Extraire du logement (21) la longueur de
cordon électrique nécessaire et brancher
dans une prise. Pour ajuster la longueur
du cordon, il suft de le tirer ou de le
repousser à l’intérieur. Pour cela, placer
la machine sur un bord de table, par ex.,
et tirer le câble vers le bas ou le pousser
vers le haut.
■ Installez le mousseur de lait. N’utilisez la
machine que lorsque le mousseur de lait
(6) est entièrement monté et installé.
■ Rabattre vers le haut le couvercle du
réservoir d’eau (18).
■ Retirer le réservoir d’eau (17), le rincer et
le remplir d’eau froide. Ne pas dépasser
le repère max.
■ Placer le réservoir d’eau (17) bien vertical
et appuyer pour le faire descendre.
■ Refermer le couvercle du réservoir
d’eau (18).
■ Remplir de café en grains le bac à
café (1) (pour la préparation à partir de
café moulu, voir point « Préparation à
partir de café moulu »).
■ Appuyer sur l’interrupteur électrique
O / I (9). L’écran (16) afche le menu de
réglage de la langue d’afchage.
■ A l’aide du sélecteur (15), choisir la
langue d’afchage souhaitée. Placer un
récipient sous l’embout (6a).
■ Appuyer sur la touche start (10). La
langue sélectionnée est enregistrée.
La machine chauffe et effectue un rinçage.
Un peu d’eau s’écoule à partir du bec
verseur du café. Lorsque la sélection de
boisson apparaît à l’écran, la machine est
prête à fonctionner.
26
Loading…
Код: 50099
Извините, товара сейчас нет в наличии
Бесплатная доставка
по Красноярску
Извините, товара сейчас нет в наличии
Новости интернет-магазина «Лаукар»:
Дополнительная информация в категории Кофемашина:
В интернет-магазине бытовой техники «Лаукар» Вы можете скачать инструкцию к товару Кофемашина Bosch TES 51523RW Gray совершенно бесплатно.
Все инструкции, представленные на сайте интернет-магазина бытовой техники «Лаукар», предоставляются производителем товара.
Перед началом использования товара рекомендуем Вам ознакомиться с инструкцией по применению.
Для того чтобы скачать инструкцию, Вам необходимо нажать на ссылку «скачать инструкцию», расположенную ниже, а в случае, если ссылки нет,
Вы можете попробовать обратиться к данной странице позднее,
возможно специалисты интернет-магазина бытовой техники «Лаукар» еще не успели загрузить для скачивания инструкцию к товару:
Кофемашина Bosch TES 51523RW Gray.

Фирма-производитель оставляет за собой право на внесение изменений в конструкцию, дизайн и комплектацию товара: Кофемашина Bosch TES 51523RW Gray. Пожалуйста, сверяйте информацию о товаре с информацией на
официальном сайте компании производителя.
Скачать
Register your new Bosch now:
www.bosch-home.com/welcome
Moodpic 1
63,2 x 50,25mm
CMYK & GREY
Moodpic 2
98,6 x 46,7mm
CMYK & GREY
TES 515..
en Instruction manual
fr Mode d’emploi
pl Instrukcja obsługi
nl Gebruiksaanwijzing
cs Návod k použití
ru Инструкция по
эксплуатации
Содержание
- Кофемашина bosch tes51523rw инструкция
- Кофеварка DELONGHI ECZ 351.W: инструкция по эксплуатации
- Кофеварка Polaris PCM 1526E Adore Crema: инструкция по эксплуатации
- Руководство по эксплуатации кофемашиной Philips HD8654/59
- Кофемашина Nivona CafeRomatica 626: инструкция по эксплуатации
- Saeco GranBaristo Avanti HD 8969: руководство пользователя
- Кофемашина Rommelsbacher EKS 3000: инструкция по эксплуатации
- Кофемашина Philips HD 8828/09: инструкция по эксплуатации
- Кофемашина Bosch TES 51523RW: инструкция по эксплуатации
- Кофемашина Melitta Caffeo Barista: инструкция по эксплуатации
- инструкции на русском
- Кофемашина Bosch TES51523RW
- Bosch TES51523RW инструкция на русском скачать бесплатно
- Bosch TES51523RW характеристика
- Кофемашина Bosch TES51523RW видео
- Обзор функций кофемашины Bosch TES-51523
- Особенности кофемашины Bosch TES 51523 RW Verocafe Latte
- Чертежи и инструкция для кофемашины Bosch TES 51521 и 51523 RW
- Преимущества и недостатки кофемашина Bosch TES 51521
- Инструкции для кофемашин Bosch
- Мы ремонтируем кофемашины всех брендов
Кофемашина bosch tes51523rw инструкция
Предлагаем ознакомиться с подробной инструкцией по эксплуатации к кофемашине Saeco Lirika One Touch Cappuccino.
Кофеварка DELONGHI ECZ 351.W: инструкция по эксплуатации
Подробная инструкция по эксплуатации и установке для электрической рожковой кофеварке DELONGHI ECZ 351.W.Текст ссылки
Кофеварка Polaris PCM 1526E Adore Crema: инструкция по эксплуатации
Руководство пользователя – часть комплектации рожковой кофеварки Polaris PCM 1526E. Язык брошюры – русский. Вся представленная на страницах информация сгруппирована по тематическим разделам, таким как: общие указания по безопасности, сфера использования, описание прибора, подготовка к работе, чистка и уход, неисправности и их устранение и т.д.
Руководство по эксплуатации кофемашиной Philips HD8654/59
В этом руководстве даны пояснения по самым важным условиям эксплуатации, подключению, установке, настройках, очистке, уходе за кофемашиной Philips HD8654/59 и другие, благодаря которым использование будет приятным и долговечным.
Кофемашина Nivona CafeRomatica 626: инструкция по эксплуатации
Руководство пользователя, получаемое покупателями вместе с кофеваркой Nivona CafeRomatica 626. Мануал написан на русском языке. Содержит разделы, объясняющие как правильно вводить аппарат в эксплуатацию, как готовить кофе, как осуществлять чистку и уход. Есть также все необходимые рисунки, схемы, таблицы.
Saeco GranBaristo Avanti HD 8969: руководство пользователя
Saeco GranBaristo Avanti HD 8969: руководство пользователя
Кофемашина Rommelsbacher EKS 3000: инструкция по эксплуатации
Руководство по эксплуатации с подробными схемами и фотографиями к комбинированной кофемашине Rommelsbacher EKS 3000.
Кофемашина Philips HD 8828/09: инструкция по эксплуатации
Руководство пользователя, включённое в комплектацию автоматической кофемашины Philips HD 8828/09. Информация на страницах брошюры представлена полностью на русском языке. Особое внимание уделяется таким моментам как: технические характеристики, установка, подготовка аппарата к работе, поддерживаемые функции, чистка, уход, устранение неисправностей. Поясняющие рисунки, схемы прилагаются.
Кофемашина Bosch TES 51523RW: инструкция по эксплуатации
Руководство пользователя, прилагаемое производителем к кофемашине Bosch TES 51523RW. Брошюра содержит информативные разделы на нескольких языках, включая русский, начинающийся с 106 страницы. Есть содержание с перечислением всех пунктов и указанием соответствующих им страниц. В местах, где это необходимо, прилагаются поясняющие рисунки, схемы, таблицы.
Кофемашина Melitta Caffeo Barista: инструкция по эксплуатации
Руководство пользователя, предлагаемое производителем вместе с автоматической кофемашиной Melitta Caffeo Barista для подробного ознакомления со всеми её особенностями, включая: технические данные, поддерживаемые функции, назначение кнопок панели управления. На страницах брошюры находится также рекомендации по приготовлению кофе, уходу за аппаратом, самостоятельному устранению неисправностей.
Источник
инструкции на русском
Инструкцию для Bosch TES51523RW на русском языке, в формате pdf можно скачать с нашего сайта. Наш каталог предоставляем Вам инструкцию производителя фирмы Bosch, которая была взята из открытых источников. Ознакомившись с руководством по эксплуатации от Bosch, Вы на все 100% и правильно сможете воспользоваться всеми функциями устройства.
Кофемашина Bosch TES51523RW
- Скачать инструкцию Bosch TES51523RW
- Видео инструкция Bosch TES51523RW
- Характеристика Bosch TES51523RW
- Оставить отзыв
Bosch TES51523RW инструкция на русском скачать бесплатно
Описание к инструкции:
- Тип устройства: Кофемашина
- Фирма производитель: Bosch
- Модель: Bosch TES51523RW
- Инструкция на русском языке
- Формат файла: pdf
- Размер файла: 667 Kb
Bosch TES51523RW характеристика
Кофемашина Bosch TES51523RW видео
Видео скоро будет добавлено на сайт
Для сохранения инструкции «Кофемашина Bosch TES51523RW» на русском языке на вашем компьютере либо телефоне, нажмите кнопку «Скачать инструкцию». Если активна кнопка «Инструкция онлайн», то Вы можете просмотреть документ (manual), в своём браузере онлайн.
Если у Вас нет возможности скачать инструкцию по эксплуатации либо просмотреть её, Вы можете поделиться ссылкой на эту страницу в социальных сетях и при удобном моменте скачать инструкцию. Либо добавьте эту страницу в закладки Вашего браузера, нажав кнопку «Добавить страницу в закладки браузера».
Источник
Обзор функций кофемашины Bosch TES-51523
Согласно последним видео обзорам и большинству положительных отзывов покупателей реально уточнить, что кофемашина Bosch TES-51523 уже давно считается одной из самых лучших среди профессиональных. Дело в том, что она способна приготовить ароматный кофе в кратчайшие сроки, хотя стоит не слишком дорого.

Кофемашина Bosch TES-51523
Кофемашина Bosch TES-51523 имеет несколько дополнительных функций, которые выгодно отличают ее от других моделей таких же или подобных кофейных машин. Кстати, многие из них различны лишь по цвету — серому или же серебристому, а также, по техническим характеристикам, которые можно отыскать в инструкции или качественных чертежах.
Стоит отметить, что современная кофемашина Bosch TES 51523 RW Pro способна работать не только на качественных кофейных зернах, но и на растворимом содержимом. Итак, кофемашина Bosch TES-51523 относится к керамическим и зерновым вариантам, которые позволяют приготовить кофе за несколько секунд.

Кофе на свидании
Особенности кофемашины Bosch TES 51523 RW Verocafe Latte
Кофемашина Bosch TES 51521 и 51523 RW Verocafe Latte аналогичны по своим техническим параметрам, о чем доступно рассказано в инструкции. Дело в том, что первый агрегат окрашен в серебристый цвет, а вот второй отличается темно-серым цветом.

Чертежи и инструкция для кофемашины Bosch TES 51521 и 51523 RW
Фирменная кофемашина Bosch TES-51523 Verocafe Latte Pro отличается:
- капучинатором, который регулирует высоту молочной пенки;
- способность нагрева молока без образования пенки;
- наличие подогревателя чашек пассивного типа;
- наличие светодиодной подсветки для чашек во время приготовления;
- наличие поддона для капель с датчиком наполнения;
- наличие выдвижного резервуара под молотый кофе.

Кофемашина Bosch TES-51523 Verocafe Latte способна обеспечить шести ступенчатый помол зерен, от которого зависит вкус, аромат и крепость полученного напитка.
Согласно последнему обзору керамическая кофемашина Bosch TES 51523 RW Verocafe Latte способна приготовить кофе и коктейли сразу в двух чашках, которые будут отличаться по крепости и температуре. Кстати, доступно не только эспрессо двойного типа, но и обычное кипяченное молоко с пенкой и без него.

Кофемашина на кухне
TES-51523 RW Verocafe Latte имеет автоматическую систему очистки капучинатора и молочной системы, что значительно облегчает уход за ней.
Преимущества и недостатки кофемашина Bosch TES 51521
Опираясь на результаты обзора и на данные инструкции, можно уточнить, что кофемашина TES-51521 RW довольно достойный бюджетный вариант техники для дома и офиса.

Обзор кофемашины Bosch TES 51521 и 51523 RW Pro в ведущих изданиях и многочисленных отзывах позволяет выделить много положительных сторон:
- наличие бака для воды на 1.7 литра;
- наличие резервуара для отходов на двенадцать порций;
- приемлемая стоимость и высокое качество;
- способность самостоятельно регулировать высоту молочной пены;
- наличие автоматического капучинатора;
- способность приготовления двух чашек кофе одновременно;
- способность приготовить эспрессо и макиято, молочный коктейль и молоко без пенки;
- способность засасывать молоко из любой емкости;
- стильный дизайн согласно чертежам;
- полный спектр регулирования свойств напитка по инструкции, в том числе, крепости, температуры, объема.

Приятно выпить кофе
При этом кофемашина Bosch TES-51523, как и TES-51521 RW, имеет некоторые недостатки:
- неудобно расположенный бачок для воды;
- громоздкость;
- неспособность к офисным нагрузкам;
- необходимость постоянной чистки механизма;
- необходимость приобретения качественного сырья;
- наличие неудобного перевода на дисплее.
Однако, практически все пользователи в обзорах настоятельно советуют приобретать для дома кофемашину TES-51523 RW, поскольку ее положительные стороны смягчают негатив.
Источник
Инструкции для кофемашин Bosch
Все инструкции для кофемашин Bosch закачаны на Google Диск. Скачать можно абсолютно бесплатно, без каких либо регистраций и SMS. Инструкции по эксплуатации с пометкой (ALL) — являются мультиязычными, (ENG) — на английском языке, (RUS) — на русском языке. Для удобства вы можете просматривать руководство по эксплуатации кофемашины, прямо в окне браузера. А также нажав в новом открывшемся окне сверху на соответствующий значок «скачать».
Прежде чем скачать инструкцию посмотрите этот ролик, который научит вас как выполнять все необходимые чистки кофемашин Bosch практически любой модели TES.
Bosch CTL 636E (Встраиваемая, новая модель) (RUS)
Bosch TCA 5201 / 52.. (Benvenuto Classic) (RUS)
Bosch TCA 5309 / 53.. (Benvenuto Classic) (ALL)
Bosch TCA 5401 / 54.. (Benvenuto Classic) (RUS)
Bosch TCA 5601 / 56.. (Benvenuto Venezia Collection) (ALL)
Bosch TCA 5802 / 58.. (Benvenuto Classic) (ALL)
Bosch TCA 6701 / 67.. (Benvenuto B60 / B65) (ALL)
Bosch TCA 6801 / 68.. (Benvenuto B70 / B75) (ALL)
Bosch TES 55236RW / 552.. (VeroCappuccino 200) (ALL)
Bosch TES 556M1RU / 556.. / 559.. (VeroCappuccino 600 / 900) (ALL)
Bosch TES 71221RW / 712.. / 715.. (VeroBar AromaPro 100 / 300) (ALL)
Bosch TES 80329RW / 803.. / 805.. / 807.. (VeroSelection 300 / 500) (ALL)
Мы ремонтируем кофемашины всех брендов
Практически все пользователи кофемашин начинают искать инструкцию, когда что-то пошло не так. Появились посторонние звуки, перестала молоть кофемолка или чего хуже вообще не включается. В некоторых случаях стоит сразу позвонить сервисным инженерам, коими мы являемся. Профессиональный ремонт кофемашин Bosch в Москве это вид деятельности, которым мы занимаемся не один год. Обратившись в нашу компанию, вы получите не только бесплатную консультацию, но и квалифицированный ремонт.
Источник