Lessons
Sam Salvador
Lessons
Sam Salvador
How To Play The Kalimba
Read More

Lessons
Sam Salvador
Lessons
Sam Salvador
How to Make DIY Kalimba Tine Stickers
Read More

Sam Salvador
Sam Salvador
How To Tune Your Kalimba
Read More

Sam Salvador
Sam Salvador
How To Read Number Tabs
Read More

Sam Salvador
Sam Salvador
Best Kalimbas for Beginners
Read More

Guides
Sam Salvador
Guides
Sam Salvador
Things To Know Before You Buy a Kalimba
Read More

Sam Salvador
Sam Salvador
How To Buy Your First Kalimba
Read More

Sam Salvador
Sam Salvador
Where the Kalimba Came From
Read More
In 2016 we started selling coconut thumb piano kalimbas and to provide more value to you, our team started creating kalimba tabs on our website and play-along videos on our YouTube channel. These articles and videos were made so that you can learn to play the kalimba and to take it a step further we have created these free online kalimba lessons which form a complete course for any passionate musician or hobbyist.
Before you know it you will be able to play your kalimba live to an audience. This course has been broken up into musical knowledge, and practical. Assuming that you have yourself a kalimba let’s get started.
Lesson 1 — The basics
In the first lesson you will be introduced to the Kalimba and we will go through all of the basics involved in learning to play the instrument. We cover topics such as the parts of the instrument, how to hold your kalimba, how to tune your Kalimba, how to play it and more.
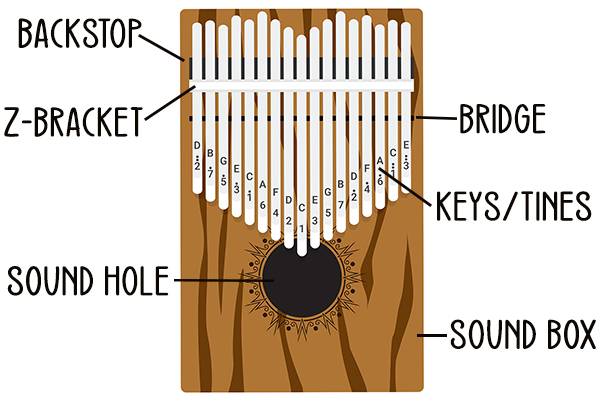
The parts explained
To make things easier, we have created a digram which clearly labels parts of the kalimba such as the metal tines, vibrating bar, nut cylinder, saddle, body, the front and rear sound hole. Whilst you may not need to know all of these things, it can be helpful when trying identify parts.

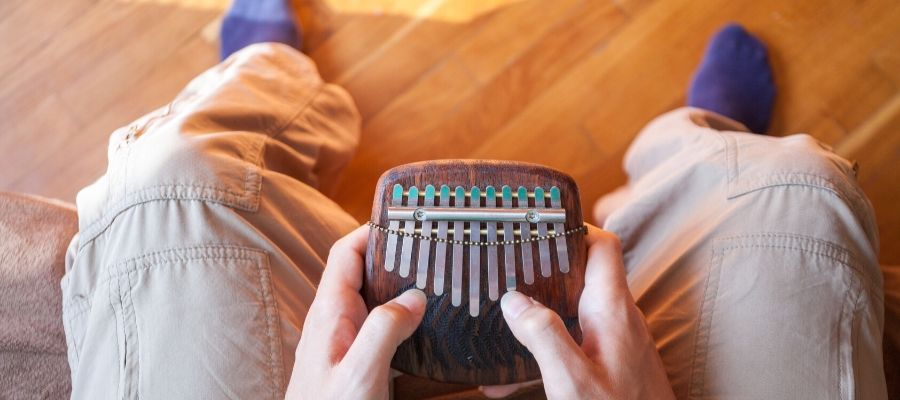
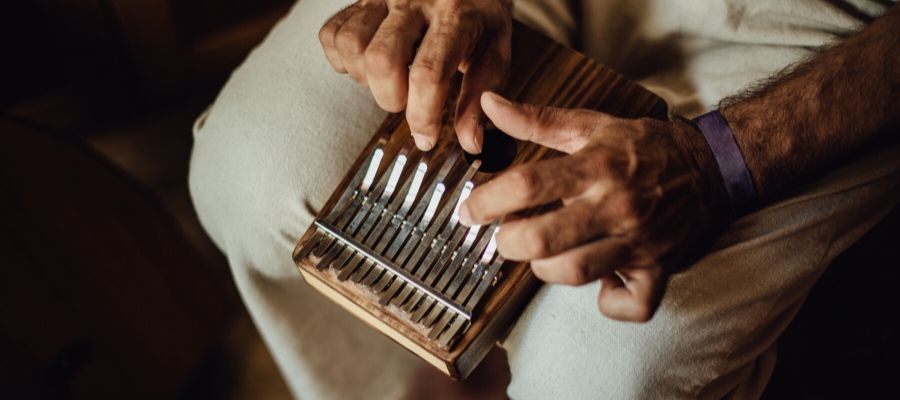
How to hold the kalimba
To hold your kalimba comfortably, using two hands, you will need to put your fingers around the back of the instrument. As the instrument is played by plucking the metal tines with your thumbs you should make sure that you are not holding the instrument too tight as it will make it more difficult to move when playing notes.
You should also not cover the sound holes on the front or back as this is how the sound will be amplified unless you are using technique to create a tremolo / vibrato effect. This effect can be achieved by covering and uncovering the back sound hole quickly whilst playing. Assuming that your ready to play play each tine one by one and if the notes dont sound right and you suspect that the instrument is out of tune follow the video below.
How to tune the kalimba
Despite the video below being how to tune the thumb piano. The concept is exactly the same with the only different being the key positioning. When your instrument arrives it should already be in tune but if something sounds wrong you can refer to the note that it says on each tine. Download the kalimba tuning app and turn your microphone.
Play the C note and if it comes up as C on the app then that note is in tune. You will need to do this for every note just to ensure that it is right. Any notes that are not matching will need tuning. Some people find it easy to do this by hand whilst others prefer to use a tuning hammer to adjust the position of the note.
How to play the kalimba
Now that your instrument is in tune, it is time to play. We are not expecting you to be able to play the instrument well on your first lesson but a great way to feel more comfortable with the instrument is by starting at the note C/1 and work your way up the scale by alternating the thumbs. For example: C/1 — D/2 — E/3 — F/4 — G/5 — A/6 — B/7 — C°/1° — D°/2° — E°/3° — F°/4° — G°/5° — A°/6° — B°/7° C°°/1°° and so on. The first time you play, your thumb may get a little bit sore which they will get used too. If you find it too uncomfortable you can get silicone thumb guards.
When referring to tablature or tabs for short we try to steer clear of traditional tablature because it isn’t always universal and is usually suited to a specific kalimba with the G starting in the middle as the lowest note, whilst other instruments may start with the C or could even contain sharp notes. This is why we like to write our tabs in a simplistic way so that anyone can pick up the instrument and be able to play their favourite songs in an instant.
Lesson 2 — how to play chords
As you become more comfortable holding the music instrument you will be ready to learn some kalimba chords for beginners. The kalimba work in a very similar way to a piano and learning chords will allow you to play your favourite songs.
When playing chords, you can play them two ways, the first way is by playing the chords open which is when more than one note is played at the same time. For example, (C,E,G). The other way is by playing the chords broken, this means to play the notes one after the other. For example C, E, G. Below are some chords that you can play to help you practice.
- C Major — (C, E, G)
- D Minor — (D, F, A)
- E Major — (E, A, D)
- F Major — (F, A, C)
- G Minor — (G, D, F)
- A Minor — (A, C, E)
- B Major — (B, D, F)
Lesson 3 — Physical practice
If you want to get good at playing your favourite songs then you should practise playing them. It’s a simple concept, either look at kalimba tabs on our website or watch our kalimba tab YouTube videos and play along with us at the same time. Don’t worry if you are not good at playing it straight away, practise makes perfect.
Part of practising and getting better is knowing how to practice. A great way to practice is by playing up the scale to get used to the positioning of each note, and then alternating the pattern. If you can comfortably play the notes, put a video on and try to play along with us. Don’t worry if you get it wrong, part of getting good at something is making mistakes.
The Only Kalimba Guide You’ll Ever Need!

The Complete Kalimba Player eBook is a 62-page resource packed with tuning guides, diagrams, exclusive tips, and 37 easy songs for all skill levels. Save time with this all-in-one guide—the only resource you’ll ever need! Get instant access to a quality-checked, printable PDF full of variety.
Was £10, now £5—offer ends soon, get yours now and start your kalimba journey today!

Как настроить калимбу?
Калимбы April Yang поставляются предварительно настроенными и готовыми к игре прямо из коробки. Вместо того, чтобы сразу настраивать инструмент, рекомендуется поиграть на нем некоторое время, чтобы познакомиться с его звучанием и ощущениями. Подумайте о настройке только в том случае, если вы заметили, что он расстроен, или если вы хотите поэкспериментировать с разными гаммами. Для новичков этот подход позволяет наслаждаться инструментом таким, какой он есть, и сначала сосредоточиться на игре.
Настройка калимбы — это важная часть получения наилучшего звука от вашего инструмента. В этом руководстве мы проведем вас через шаги настройки калимбы и дадим советы по поддержанию ее высоты.
Что вам понадобится
Для настройки калимбы вам понадобятся следующие инструменты:
-
Настроечный молоток : небольшой металлический молоток, используемый для регулировки зубцов.
-
Приложение для настройки или хроматический тюнер : приложение для смартфона или специальный тюнер, который поможет вам проверить высоту тона каждого зубца.
-
Таблица калимбы (необязательно): Здесь показаны правильные ноты для вашей конкретной калимбы, что может быть полезно, если вы не уверены, как должен звучать каждый зубец.
Понимание вашего калимба
Перед настройкой важно понять расположение зубцов калимбы (металлических клавиш). Обычно стандартная калимба с 17 клавишами настраивается на тональность C Major (C4 to E6). Центральный зубец обычно настраивается на C4, а окружающие зубцы чередуются слева и справа, повышая высоту тона.
Как работает настройка калимбы
Настройка калимбы заключается в регулировке длины каждого металлического зубца. Если зубец слишком длинный, высота звука будет ниже; если он слишком короткий, высота звука будет выше. Настройка выполняется путем легкого нажатия зубца вверх или вниз для достижения желаемой высоты звука.
Пошаговый процесс настройки
-
Загрузите приложение для настройки или используйте хроматический тюнер : существует множество бесплатных приложений для настройки, доступных как для iOS, так и для Android, например gStrings , Pano Tuner или DaTuner . Хроматический тюнер определит высоту тона, которую вы играете, и скажет вам, является ли она высокой или низкой.
-
Проверьте текущую настройку : Начните с того, что защипните каждый зубец и сравните его с соответствующей нотой на тюнере или в приложении. Это поможет вам определить, какие зубцы расстроены.
-
Отрегулируйте зубцы с помощью настроечного молотка :
- Если зубец слишком низкий (плоский), используйте молоток, чтобы осторожно постучать по нижней части зубца, слегка подталкивая его вверх. Это укоротит длину зубца, увеличив шаг.
- Если зубец слишком высокий (острый), постучите по его верхней части, чтобы сместить его вниз, удлинив зубец и понизив высоту тона.
-
Тонкая настройка каждого зубца : после настройки снова дерните зубец и проверьте тюнер, чтобы убедиться, что он настроен. Повторяйте процесс, пока нота не станет идеальной.
-
Настройте всю калимбу : пройдитесь по каждому зубцу один за другим, убедившись, что все ноты настроены точно. Стандартная настройка для калимбы с 17 клавишами в C Major выглядит следующим образом:
- C4 (средний зубец)
- Д4
- Е4
- Ф4
- Г4
- А4
- В4
- С5
- Д5
- Е5
- Ф5
- Г5
- А5
- В5
- С6
- Д6
- Е6
-
Сыграйте несколько аккордов или мелодий, чтобы проверить настройку : После настройки сыграйте простую мелодию или последовательность аккордов, чтобы проверить, все ли звучит гармонично. Иногда вам может потребоваться внести небольшие коррективы.
Варианты настройки калимбы
Хотя C Major является наиболее распространенной настройкой, калимбы можно настраивать и в других гаммах в зависимости от ваших музыкальных предпочтений. Например:
-
Соль мажор : Вы можете понизить ноты F до F#, чтобы перейти в соль мажор.
-
Пентатонические гаммы : удалите определенные ноты, чтобы создать пентатоническую гамму, идеально подходящую для медитативной или импровизационной игры.
Изменение настройки калимбы позволяет создавать разное настроение или стиль, поэтому смело экспериментируйте с другими настройками!
Советы по настройке
-
Будьте осторожны : при использовании настроечного молоточка избегайте слишком сильных ударов. Обычно для исправления высоты тона достаточно небольших корректировок.
-
Частая настройка : Калимбы могут расстраиваться из-за изменений температуры, влажности или даже регулярной игры. Проверяйте настройку каждые несколько недель или перед выступлением или записью.
-
Правильно храните : хранение калимбы в футляре или в контролируемых условиях поможет сохранить стабильность ее настройки.
Заключение
Настройка калимбы может показаться сложной поначалу, но с практикой это станет вашей второй натурой. Хорошо настроенная калимба издает чистые, красивые звуки, которые улучшат ваши игровые ощущения. Обязательно настраивайте свой инструмент регулярно и не стесняйтесь экспериментировать с различными настройками, чтобы открыть для себя новые музыкальные возможности. Удачной настройки!
Вернуться к Руководства
You may also like
-

The Kalimba: What Is It and Why Is This Instrument Gaining Popularity?
-

My Kalimba Adventure with KalimbaGo Plus
-

Where did the kalimba originate


How to play the Kalimba
It’s so easy to play the Kalimba, and so much fun to hear the beautiful notes and songs that you can play after just a short amount of time spent learning.
Here is a diagram of a Kalimba showing all the parts.
Hold your Kalimba loosely and comfortably using both hands at a level where both of your thumbs are hovering over the ends of the keys and have enough stretch to cover all the keys so you can move back and forth.
You will pluck the keys on the left hand side of your Kalimba with your left thumb and the keys on the right hand side of your Kalimba with your right thumb.
Simply pluck the ends of the keys to create sweet and melodious notes.
You can play notes one at a time or two, or even three at a time, to create really harmonous chords.
It’s fun to just dive in and start playing. You can also download plenty of Kalimba sheet music from various sources around the internet. It’s very easy indeed to read Kalimba music, keep reading for our next section about how to read Kalimba tablature.
How to read Kalimba Tablature
Tablature, or ‘tabs’ for short, is sheet music and is incredibly easy to read even for the extreme beginner. You don’t need any former experience reading music. Kalimba tablature is basically just an image of the instrument itself.
In this example we are ready tablature for a 17 key Kalimba, the most popular type.
This tablature below is for the song ‘Twinkle Twinkle Little Star’.
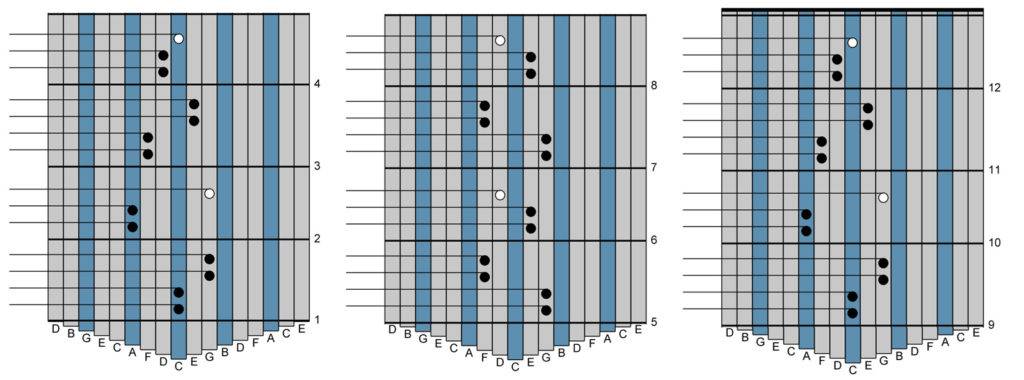
You can see that the tabs contain 17 vertical columns. These refer to each of the Kalimba’s keys, or notes. Every third key is a different colour to make it easier to differentiate the notes on the fly.
In the accessories pack that you receive with your Kalimba there will be some coloured stickers that you can place on the keys on your Kalimba so that it matches the tablature, making it super quick and easy to find which note to play.
You read Kalimba tabs from the bottom to the top. This is easy to remember by following the direction of the small numbers written to the right of the tablature (1, 2, 3, 4 etc). These numbers represent the bars of the music. Each bar in a song contains the same number of beats, also known as a time signature.
Reading from top to bottom, whenever you see a note on one or more keys, you pluck them in sequence.
There are different notes representing different lengths of time each note is held.
For this example let’s say we are reading a tab in four-four time (4/4), which is very common. This means there are four beats for each bar of the music.
These four beats could be made up of four equal length beats. These are known as crotchets or quarter notes. Or it could be made up of longer or shorter length notes like half notes or eighth notes, and even rests where you skip a beat, or beats, without playing any notes.
You can identify the types of each note by whether or not it’s body is solid or not, and by the line extended to the left of each note.
The images below show what each type of note looks like in Kalimba tablature and how each fits into a single bar with a time signature of 4/4 (meaning 4 beats per bar).
Semibreve
The semibreve, or whole note, is held for four beats.
Minim
The minim, or half note, is held for two beats.
Crotchet
The crotchet, or quarter note, is held for one beat.
Quaver
The quaver, or eighth note, is held for half a beat.
Semiquaver
The semiquaver, or sixteenth note, is held for a quarter of a beat.
Dotted Note
Where you see a dotted note, you hold it for 1.5 times longer than it’s basic note length.
Tied Notes
Where you see two notes tied together like this you just play the first note and then hold it for as long as the second note.
Triplet Notes
Where you see three notes tied together with a little number 3 you should play all three notes within the basic note length. In this example you play all three notes in the same length as a single crotchet note.
Multiple Notes on same row
When there are multiple notes on the same row you simply play them all at the same time. In this example the first note you play is A, C & E all together at once.
RESTS
Whole Rest
Where you see this small rectangle aligned to the left of a tyne you need to take a rest for the equivalent of 4 beats, or a full bar.
Half Rest
Where you see this small rectangle aligned to the right of a tyne you need to take a rest for the equivalent of 2 beats, or half a bar.
Quarter Rest
Where you see these little squiggly lines you need to take a rest for the equivalent of 1 beat, or a quarter of a bar.
Eighth Rest
Where you see this small symbol you need to take a rest for the equivalent of half a beat, or an eighth of a bar.
Sixteenth Rest
Where you see this small symbol you need to take a rest for the equivalent of a quarter of a beat, or a sixteenth of a bar.
See how easy it is to read Kalimba tabs?
You’ll be playing full songs in no time at all. Even the most novice musician will easily be able to follow Kalimba tabs.
With a bit of practice playing your favourite songs you’ll soon learn how to play without needing to refer to the tabs at all.
The Kalimba truly is the easiest instrument to learn!
Kalimba, mbira, or thumb piano is a fun little instrument with growing popularity. The reason why people love it is that it’s easy to play, and you won’t need to know much about music theory to learn it. While you will still need to practice playing, it is one of the easiest instruments you could learn.
Before You Start
To learn how to play this instrument, you will need to buy it first. There are so many types of thumb piano available on the market, and you can choose the number of tines, material, shape, and almost anything else.
Some variations of this instrument are simpler and more beginner-friendly. So if you never had experience with music or instruments before, getting a small eight-key kalimba might be a perfect idea.
But fear not, even if you are an absolute beginner, you can still get a common 17-key kalimba, and you’ll find it easy to use and learn. So, don’t limit yourself and start practicing.
Anatomy Of Kalimba

Once you get your hands on a new instrument, you will need to know your way around it. Each kalimba has a board or a resonator. The ones with the resonator are louder and can create better tones. Furthermore, on kalimba, there will be a number of metal pins or tines that you will pluck with your finger.
Each kalimba is tuned to a specific key, and you will get an instrument tuned in that way. For example, the C major kalimba has all notes from the C major scale, and some offer a couple of octaves.
It is also possible to find a thumb piano with internal pickup, which will allow you to plug it into a speaker or an amplifier so you can hear better what you’re playing.
Tuning The Instrument

As with other instruments you will need to ensure that it’s always in tune so you can play it properly. If you bought a new one, or if your kalimba has been sitting around for a while, there is a chance that it will go out of tune. But fear not, the process of tuning kalimba is simple. You will need a chromatic tuner and a tuning hammer.
If you don’t have a tuner already, you can download one for your smartphone, which will allow you to easily know which notes you’re playing.
Once your tuner is ready, just play the note and lightly tap the tine either from the top or bottom to move the tine into the right position. Tapping from the top will cause it to get lower while tapping from the bottom will do the opposite.
Kalimba can go months without re-tuning, and you should always ensure that everything is set-up before you start playing or practicing.
Most kalimbas come with a tuning chart, so you won’t have to worry about which notes are the right ones. You can also find any info you’re missing online.
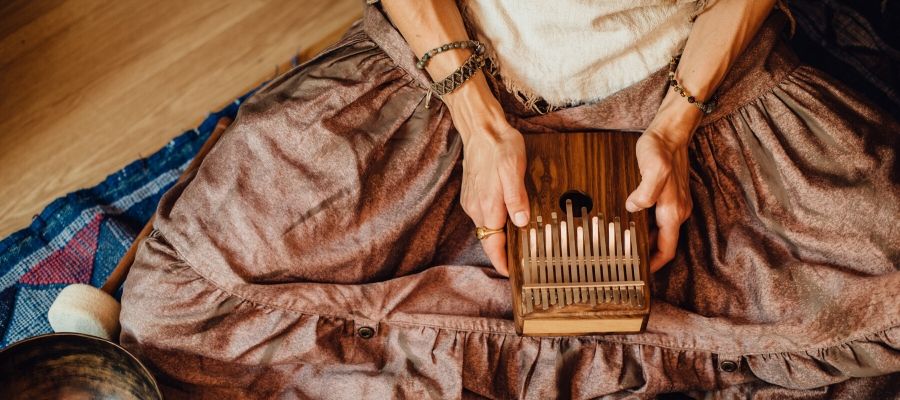
How To Hold Kalimba
Once your tuning is set-up, you can start practicing. To hold kalimba properly, you will take it in both hands and hold it with the inner sides of your palms.
Thumbs of both hands will go over and you will use them to pluck tines. In the beginning, you can use the rest of your fingers to improve the grip on the instrument.
However, there are some techniques that require you to use other fingers as well. But if you are a beginner, your thumbs will do the work and they are enough for you to start practicing and learning more about this exciting African instrument.
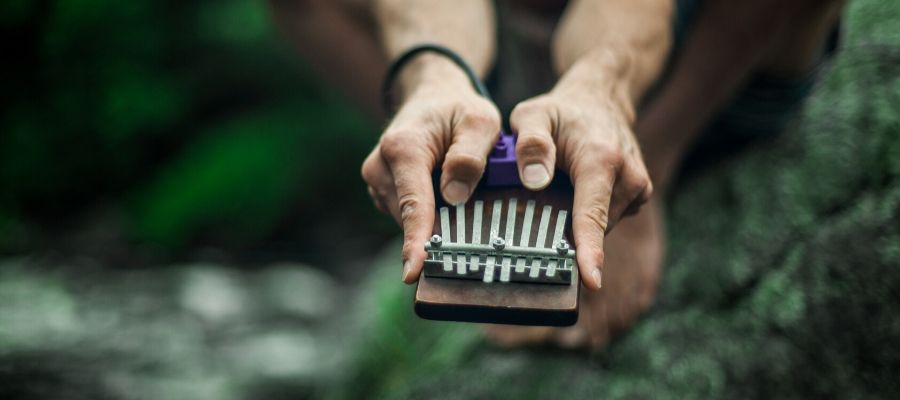
If your instrument has two holes on the back, do not cover them with your hands or it will not sound right. The same applies to the middle hole. There are some techniques you can use later, but for beginners focus on playing the right notes and plucking properly before you experiment with other things.
How To Correctly Pluck Tines
To play kalimba, you will need to know how to pluck tines. For beginners, you will use your thumbs, and alternate between your left and the right one. It is a good idea to memorize which tine represents which note in the scale.
Usually, the longest one is the root note, but this is not always the case, so check if any charts or guides came along with your instrument.
Notes on the kalimba alternate from left to right. The second note from the root is located on one side, and the third one is on the other. This is not the case with many other instruments, and on a regular piano, notes go from left to right.
You will progress through scale by alternating from left to right, and you can use both thumbs to navigate your way through the scale. To pluck a note, you will use either your fingertip or thumbnail.
Gently push the tine downwards and release to hear the note. Take your time, it does require a bit of practice, but you won’t need to spend hours like with some other instruments.
Practice a bit flicking the tine with your nail until it resonates and creates a perfect sound.
How To Play Chords

If you take a look at two adjacent tines, there is a three-note difference between the two. Since they are one third apart from each other, this means that they can create a chord or diad.
Plucking two notes at the same time with your thumb will create a chord. You can combine any two adjacent notes for different chords, and you can experiment with them as much as you like.
Needless to say, you might need a bit of practice to hit them both at the same time and make them sound equal, but you will get there.
Take Your Time

Since playing the instrument requires you to use your nails, it’s not always easy. You probably never experienced this type of pressure on your fingertips and nails, and it can get a bit painful at the beginning.
Over time, your fingernails will get used to this and you will be able to practice as much as you like without any problems.
Some players use a pick to pluck tines, and you also get protectors for your thumbs. This way, you will be able to cover your fingertips and avoid the painful part of the learning.
Experiment

By combining individual notes and chords, you can create music on your own. This is a lot easier than you would expect. Since each kalimba is tuned to a specific key, let’s say C major, you won’t have any note that’s out of key.
Furthermore, it is perfect for beginners since there are almost no “wrong notes.” You can have as much fun as you like without leaving the scale and playing out of key.
Practice Different Techniques

Playing individual notes is fun, but you will soon long for something more. Two or even three adjacent tines will create a chord. But how exactly should you play this? On the harp, there is a technique called a glissando, to achieve this, a person will run their fingers across two or three adjacent notes.
On the kalimba, you will play a single note, and run your fingers across the adjacent ones. To do this, simply drag your thumb across the neighboring notes after plucking the first one.
Naturally, it will be a lot easier if you have a longer thumbnail, but even if you don’t you can find thumb picks that are designed to help you achieve this.
You can also add more fingers to your technique, and try something different like plucking the note upwards with your index finger.
Another exciting thing kalimba players love is the percussive quality of the thumb piano. Since your other fingers are free, you can use them to add a bit of rhythm to your playstyle.
Moreover, I previously mentioned the hole at the center of the instrument, and covering it will change the resonating qualities if kalimba. However, you can use this to your advantage, and covering and uncovering the hole will create an effect that’s similar to a wah pedal.
Similarly, two holes on the back can create a vibrato effect using the same technique. So take your time and experiment to see all the different notes you can create.
How To Find Songs You Want To Play

In essence, you can play any song you like. However, to play it accurately you might need to retune your instrument. Since each kalimba has a single scale and key, you won’t be able to play songs in different keys unless you change them a bit.
It is a great option to start your learning experience by practicing songs that are already the same key as your kalimba.
For example, if you have a C major instrument, just google songs that are in C major (or A minor). In music theory, C major and A minor are relative keys since both have the same notes. The only thing that’s different is the root note.
This way you can experiment with these two signatures before you start arranging other songs for your key.
How To Read Tabs

As with any other instrument you can find sheet music. Since the very nature of kalimba is to have fun without tons of music theory, standard sheet music might be a problem. Fortunately, you can find tabs for thumb piano as well.
These tabs are also known as ktabs, and they show you exactly which tines you need to pluck to get the desired note.
Similarly to guitar tabs, they are a visual representation of the instrument, and you don’t need to know music theory to read them. As you can imagine, ktabs are rather popular since anyone can both read and write them.
To read tabs, all you have to do is follow the notes that are on the bottom and work your way upwards. Similarly to the game Guitar Hero, the next note you need to play is above the previous one. Another thing that can be handy is that each note has a visual representation of its length.
This means that you will see quarter notes, half notes, and so on. To avoid any confusion, you will see numbers that represent each bar, and you will simply start from the bottom or number one and work your way up.
To make everything easier, search for kalimba tabs according to the type of instrument you own. If you have 17-note kalimba, simply search for “17-note kalimba tabs”
Use Your Ears

Training your ears can be difficult, but with enough practice, you’ll make it. Listen to what you’re playing and try to find the notes you need. This way, you can rely less on tabs, and play music by ear.
Training ears is not an easy process, but it’s achievable with enough practice. One of the things you can try is to listen to the song you like, and then try to play it on the kalimba. Don’t feel bad if you’re not able to play it instantly.
However, with enough practice, you’ll be able to learn it and you will memorize how each tine sounds. This will allow you to easily find the note you’re looking for.
Start Slow And Build Your Way Up
One of the best pieces of advice when it comes to music is to take your time. It is much more important to learn how to play properly than fast. Speed will come with time and practice, and if you learn correctly, your knowledge will only improve.
Many agree that if you learn slowly you will forget slow, and healthy learning is more important than rushing over lessons. So take your time and enjoy the journey of learning new instruments.
Music Theory

Music theory can be scary. There’s no doubt about it. But learning a bit can significantly help you along the way. This doesn’t mean that you will have to go to a music academy and learn everything there is to know about theory.
However, learning basics can improve the learning speed and help you understand better what you’re doing.
As I previously mentioned some ktabs have note lengths marked on each tine you need to play, and it is a good idea to know what it means. Furthermore, learning about music theory can’t hurt, but it can help you a lot along the way.
By understanding how everything works, you can adjust your instrument to your wishes and desires. You can also change the key of your kalimba, and experiment with different types of tunings once you get bored of that single key.
This can also save you some money because you won’t need to buy several instruments for each key you might need. Investing in your knowledge is an excellent way to improve your playing skills and understanding of the music in general.
Practice

There is no other way around it. You will need to practice if you want to be good at it. Even though kalimba is one of the easiest instruments you can learn, you will still need to practice it if you are looking to enjoy and improve.
Whether you find ktabs, learn by ear, or have a book that will help you, you will need dedication and practice to become good at it. Start with simple songs like “happy birthday” or “twinkle twinkle.” After that, you can proceed to songs that are more complex and require additional techniques and playstyles.
The important thing is to have fun and enjoy playing. You should dictate your own tempo and learn songs and techniques that you enjoy. In time, and with enough practice, you will learn how to play kalimba like a pro.
Conclusion
Playing the kalimba is easy, but you will still need to practice before you’re good at it. The best way to learn is to explore and listen to music. While it is not necessary, you can always learn more about music theory.
It will help you understand better, and know why you should play in a specific way. There are so many great channels on YouTube, and there are tabs which will show you exactly which notes to play.
In the end, it all comes to practice, and if you invest time, you will become a master of kalimba.
If you found this article useful you may want to save this pin below to your Kalimba board