
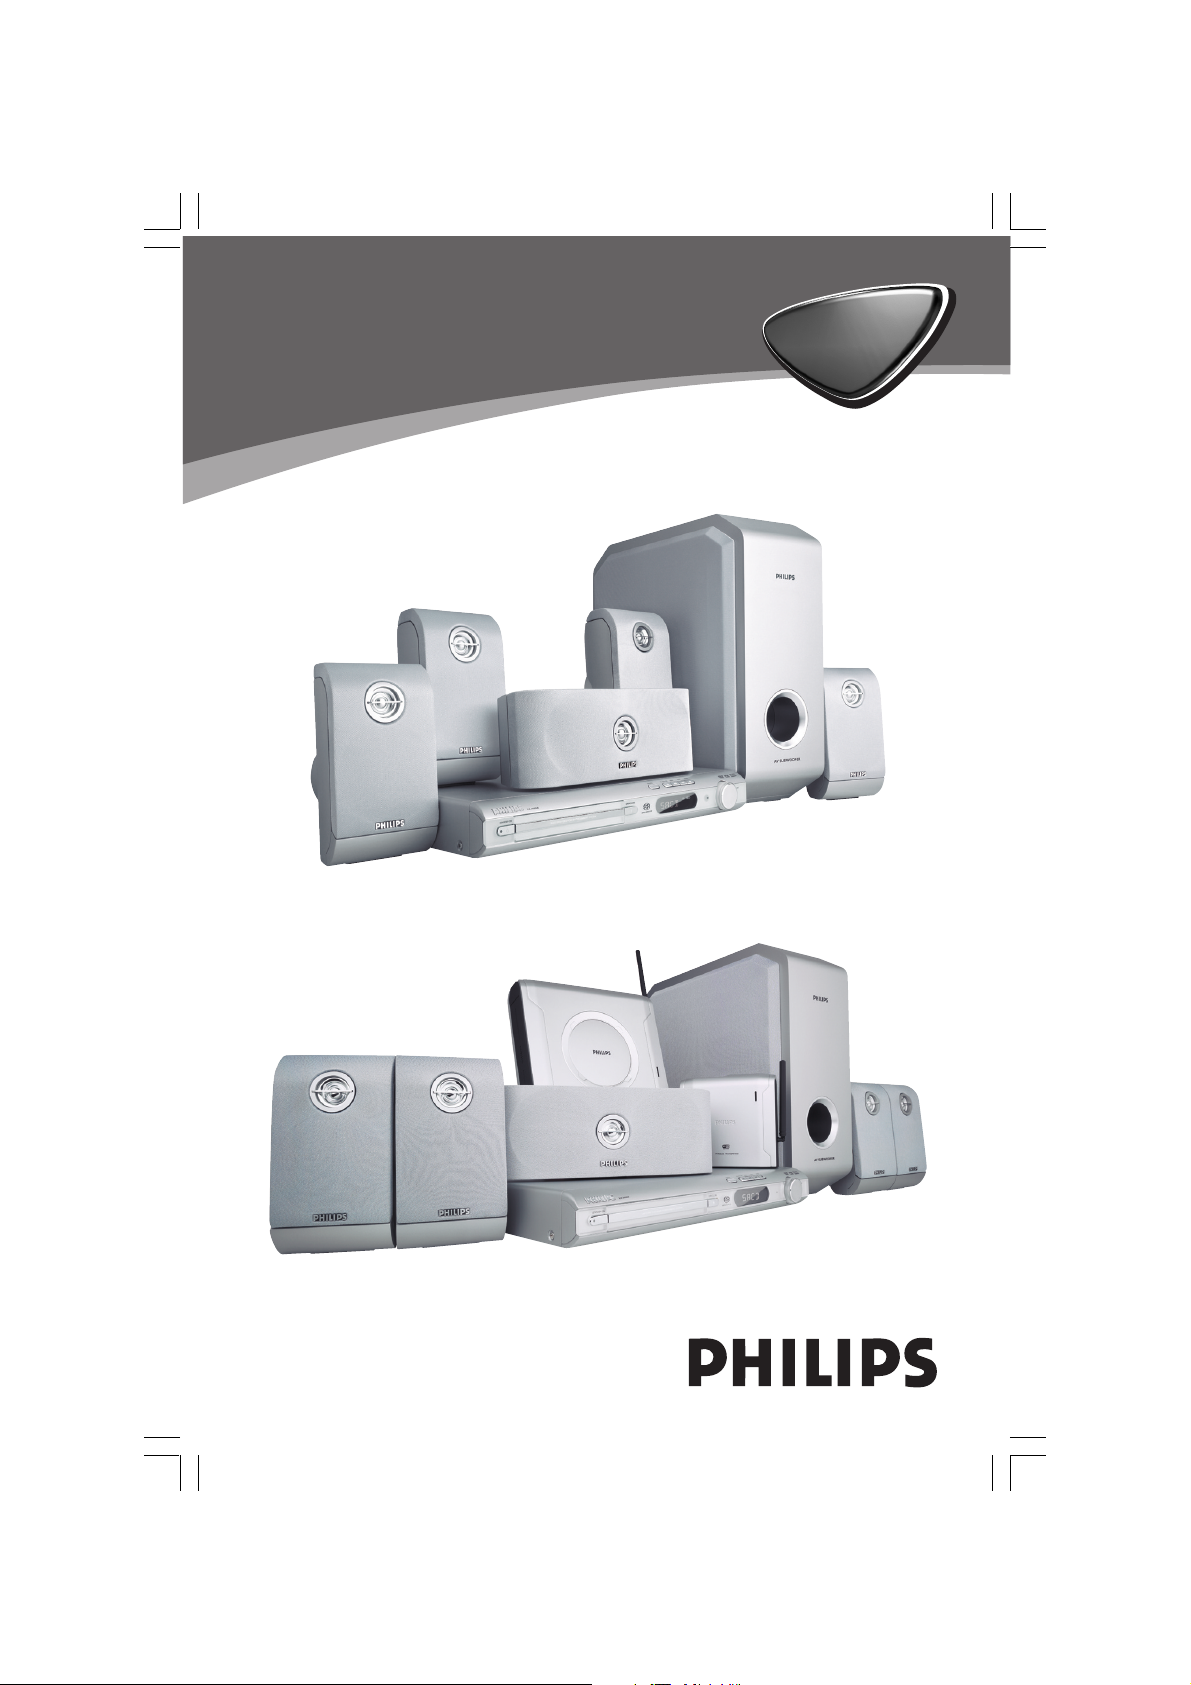
DVD VIDEO / SACD
HOME THEATRE SYSTEM
LX3900SA • LX3950W
LX3900SA
DVD HOME
DVD HOME
THEATRE
THEATRE
SYSTEM
SYSTEM
LX3950W
001-039-LX39-93-EngFinal 08/04/2004, 01:48 PM1
Language Code
Abkhazian 6566
Afar 6565
Afrikaans 6570
Amharic 6577
Arabic 6582
Armenian 7289
Assamese 6583
Avestan 6569
Aymara 6589
Azerhaijani 6590
Bahasa Melayu 7783
Bashkir 6665
Belarusian 6669
Bengali 6678
Bihari 6672
Bislama 6673
Bokmål, Norwegian 7866
Bosanski 6683
Brezhoneg 6682
Bulgarian 6671
Burmese 7789
Castellano, Español 6983
Catalán 6765
Chamorro 6772
Chechen 6769
Chewa; Chichewa; Nyanja 7889
9072
Chuang; Zhuang 9065
Church Slavic; Slavonic 6785
Chuvash 6786
Corsican 6779
Česky 6783
Dansk 6865
Deutsch 6869
Dzongkha 6890
English 6978
Esperanto 6979
Estonian 6984
Euskara 6985
6976
Faroese 7079
Français 7082
Frysk 7089
Fijian 7074
Gaelic; Scottish Gaelic 7168
Gallegan 7176
Georgian 7565
Gikuyu; Kikuyu 7573
Guarani 7178
Gujarati 7185
Hausa 7265
Herero 7290
Hindi 7273
Hiri Motu 7279
Hrwatski 6779
Ido 7379
Interlingua (International)7365
Interlingue 7365
Inuktitut 7385
Inupiaq 7375
Irish 7165
Íslenska 7383
Italiano 7384
Ivrit 7269
Japanese 7465
Javanese 7486
Kalaallisut 7576
Kannada 7578
Kashmiri 7583
Kazakh 7575
Kernewek 7587
Khmer 7577
Kinyarwanda 8287
Kirghiz 7589
Komi 7586
Korean 7579
Kuanyama; Kwanyama 7574
Kurdish 7585
Lao 7679
Latina 7665
Latvian 7686
Letzeburgesch; 7666
Limburgan; Limburger 7673
Lingala 7678
Lithuanian 7684
Luxembourgish; 7666
Macedonian 7775
Malagasy 7771
Magyar 7285
Malayalam 7776
Maltese 7784
Manx 7186
Maori 7773
Marathi 7782
Marshallese 7772
Moldavian 7779
Mongolian 7778
Nauru 7865
Navaho; Navajo 7886
Ndebele, North 7868
Ndebele, South 7882
Ndonga 7871
Nederlands 7876
Nepali 7869
Norsk 7879
Northern Sami 8369
North Ndebele 7868
Norwegian Nynorsk; 7878
Occitan; Provencal 7967
Old Bulgarian; Old Slavonic 6785
Oriya 7982
Oromo 7977
Ossetian; Ossetic 7983
Pali 8073
Panjabi 8065
Persian 7065
Polski 8076
Português 8084
Pushto 8083
Russian 8285
Quechua 8185
Raeto-Romance 8277
Romanian 8279
Rundi 8278
Samoan 8377
Sango 8371
Sanskrit 8365
Sardinian 8367
Serbian 8382
Shona 8378
Shqip 8381
Sindhi 8368
Sinhalese 8373
Slovensky 8373
Slovenian 8376
Somali 8379
Sotho; Southern 8384
South Ndebele 7882
Sundanese 8385
Suomi 7073
Swahili 8387
Swati 8383
Svenska 8386
Tagalog 8476
Tahitian 8489
Tajik 8471
Tamil 8465
Tatar 8484
Telugu 8469
Thai 8472
Tibetan 6679
Tigrinya 8473
Tonga (Tonga Islands) 8479
Tsonga 8483
Tswana 8478
Türkçe 8482
Turkmen 8475
Twi 8487
Uighur 8571
Ukrainian 8575
Urdu 8582
Uzbek 8590
Vietnamese 8673
Volapuk 8679
Walloon 8765
Welsh 6789
Wolof 8779
Xhosa 8872
Yiddish 8973
Yoruba 8979
Zulu 9085
2
001-039-LX39-93-EngFinal 08/04/2004, 01:48 PM2
3139 115 23431
Due to the inconsistency of disc formats provided
by various disc manufacturers, your DVD system/
player/recorder may require a playability
enhancement or upgrade. As DVD technology
advances, these enhancement will become
common and will be easy to complete.
Go to www. p4c.philips.com for software upgarde.
Index
English ———————————————— 4
——————————————————— 40
English
Manufactured under license from Dolby
Laboratories. “Dolby”, “Pro Logic” and
the double-D symbol are trademarks of
Dolby Laboratories.
Manufactured under license from
Digital Theater Systems, Inc. U.S. Pat.
Noís. 5,451,942; 5,956,674; 5,974,380;
5,978,762; 6,226,616; 6,487,535 and
other U.S. and world-wide patents
issued and pending. “DTS” and “DTS
Digital Surround” are registered
trademarks of Digital Theater Systems,
Inc. All Rights Reserved.
DivX®, DivX Certified, and
associated logos are
trademarks of
DivXNetworks, Inc and are
used under license.
‘CONSUMERS SHOULD NOTE THAT NOT ALL HIGH
DEFINITION TELEVISION SETS ARE FULLY
COMPATIBLE WITH THIS PRODUCT AND MAY CAUSE
ARTIFACTS TO BE DISPLAYED IN THE PICTURE. IN
CASE OF 525 OR 625 PROGRESSIVE SCAN PICTURE
PROBLEMS, IT IS RECOMMENDED THAT THE USER
SWITCH THE CONNECTION TO THE ‘STANDARD
DEFINITION’ OUTPUT. IF THERE ARE QUESTIONS
REGARDING OUR TV SET COMPATIBILITY WITH THIS
MODEL 525p AND 625p DVD PLAYER, PLEASE
CONTACT OUR CUSTOMER SERVICE CENTRE’.
LASER
Type Semiconductor
laser GaAlAs
Wave length 650 nm (DVD)
780 nm (VCD/CD)
Output Power 7 mW (DVD)
10 mW (VCD/CD)
Beam divergence 60 degree
CAUTION
Use of controls or adjustments or
performance of procedures other
than herein may result in hazardous
radiation exposure or other unsafe
operation.
Deu
001-039-LX39-93-EngFinal 08/04/2004, 01:48 PM3
3
3139 115 23431

Contents
English
Language Code ……………………………….. 2
General Information
Supplied accessories …………………………….. 6
Care and safety information ………………… 6
Connections
Step 1: Placing the speakers and
subwoofer …………………………………………….. 7
Step 2: Connecting speakers and
subwoofer …………………………………………….. 7
Step 3: Connecting TV ………………………….. 8
Using Composite Video jack (CVBS) . 8
Using Component Video jacks
(Y Pb Pr)…………………………………………… 8
Using S-Video jack …………………………… 9
Using an accessory RF modulator …… 9
Step 4: Connecting FM/MW antennas . 10
Step 5: Connecting the power cord ….. 10
Connections (optional)
Connecting a VCR or Cable /
Satellite Box ……………………………………….. 11
Viewing and listening to the
playback ………………………………………….. 11
Using the VCR for recording
DVD playback ………………………………… 11
Connecting digital audio equipment ….. 11
Listening to the playback ……………….. 11
Functional Overview
Main unit and remote control ……………. 12
Control buttons available on
the remote only……………………….. 12–13
Getting Started
Step 1: Inserting batteries into the
remote control …………………………………… 14
Using the remote control to
operate the system ………………………… 14
Step 2: Setting the TV …………………………. 14
Selecting the colour system that
corresponds to your TV ………………… 15
Setting the TV Display ……………………. 15
Step 3: Setting language preferences….. 16
On-Screen Display (OSD) language. 16
Audio, Subtitle and Disc menu
languages ………………………………………… 16
Step 4: Setting the speakers’ channels .. 17
Disc Operations
Playable discs ………………………………………. 18
Playing discs ………………………………………… 18
Auto Eco Power standby mode…….. 19
Basic playback controls ………………………. 19
Selecting various repeat/shuffle
functions ……………………………………………… 19
Repeat play mode ………………………….. 19
Repeating a section within a
chapter/track …………………………………. 19
Other operations for video playback
(DVD/ VCD /SVCD) …………………………… 20
Using the Disc Menu ………………………20
Zooming in …………………………………….. 20
Using the OSD Menu …………………….. 20
Resuming playback from the last
stopped point …………………………………. 21
Advancing by frame ……………………….. 21
Changing sound track language ……… 21
Changing subtitle language
(DVD only) …………………………………….. 21
Viewing from another angle
(DVD only) …………………………………….. 21
Selecting a title (DVD only) …………… 21
Playback Control (PBC) (VCD only) 22
Preview Function (VCD only) ……….. 22
Playing MP3/ JPEG /DivX/MPEG-4 disc 23
Playing MP3 music and JPEG
picture simultaneously …………………… 23
Playing Super Audio CD (SACD) ……….. 24
Special features for picture
disc playback……………………………………….. 24
Preview Function……………………………. 24
Zoom picture …………………………………. 24
Playback with multi-angles …………….. 24
Scan Effect ………………………………………. 24
001-039-LX39-93-EngFinal 08/04/2004, 01:48 PM4

Contents
DVD Setup Menu Options
General Setup Menu…………………………… 25
Locking/Unlocking the disc
for viewing ……………………………………… 25
Dimming system’s display screen…… 25
Programming disc tracks (not
for Picture CD/ MP3/SACD) …… 25–26
OSD language ………………………………… 26
Screen Saver – turning on/off ……….. 26
DivX(R) VOD registration code ……. 26
Audio Setup Menu ……………………………… 27
Setting the analogue output …………… 27
Speaker Setup ………………………………… 27
Night mode – turning on/off ………… 27
Video Setup Menu………………………………. 28
TV Type …………………………………………… 28
TV Display ……………………………………… 28
Progressive feature — turning on/off . 28
Picture Setting………………………….. 28–29
Preference Setup Menu ……………………… 29
Audio, Subtitle, Disc Menu ……………..29
Restricting playback by Parental
Control …………………………………….. 29–30
PBC ………………………………………………… 30
MP3/JPEG Navigator – turning
on/off ……………………………………………… 30
Changing the Password………………….. 31
Restoring to original settings ………… 31
Sound and Volume Controls
Sound Control ……………………………………. 34
Selecting surround sound………………. 34
Selecting digital sound effects ………… 34
Volume Control………………………………….. 34
Other Functions
Switching on/off …………………………………. 35
Switching to an active mode………….. 35
Switching to Eco Power standby
mode ……………………………………………….35
Using the remote to operate your
‘Philips’ television ……………………………….. 35
Recording to an external device………… 35
Setting the Sleep timer ………………………. 35
Troubleshooting ……………………. 36–37
Specifications ………………………………..38
Glossary ……………………………………………. 39
English
Tuner Operations
Tuning to radio stations ……………………… 32
Presetting radio stations …………………….. 32
Using the Plug and Play ………………….. 32
Automatic presetting …………………….. 32
Manual presetting …………………………… 33
Selecting a preset radio station …………. 33
Deleting a preset radio station ……… 33
001-039-LX39-93-EngFinal 08/04/2004, 01:48 PM5
General Information
10 cm
(4 inches)
10 cm
(4 inches)
10 cm
(4 inches)
DVD Home Cinema System
PHILIPS
English
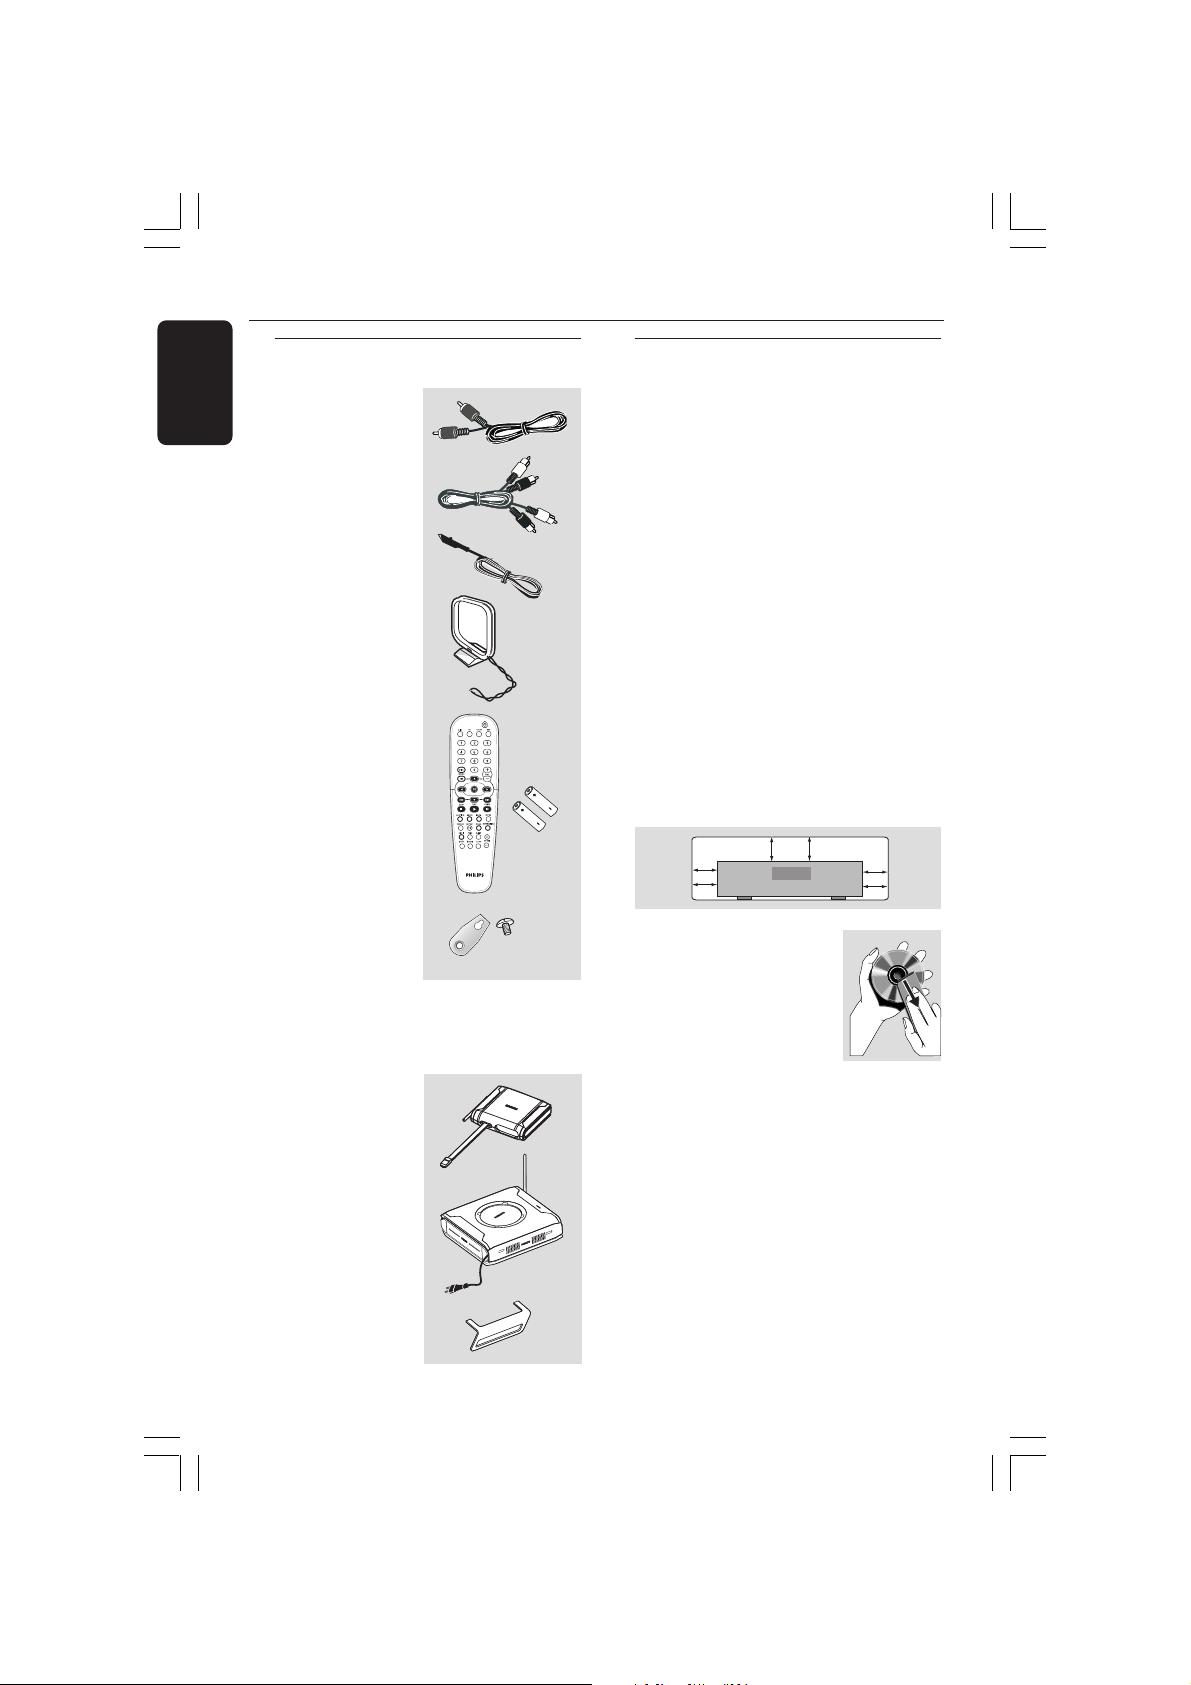
Supplied accessories
Composite video
cable (yellow)
Audio cables
(red/white)
FM wire antenna
MW loop antenna
Remote control
and two batteries
(12nc: 3139 258 70031)
Care and safety information
Avoid high temperatures, moisture,
water and dust
– Do not expose the system, batteries
or discs to humidity, rain, sand or
excessive heat (caused by heating
equipment or direct sunlight). Always
keep the disc tray closed to avoid getting
dust on the lens.
Avoid condensation problem
– The lens may cloud over when the
player is suddenly moved from cold to
warm surroundings, making it impossible
to play a disc. Leave the player in the
warm environment until the moisture
evaporates.
Do not block the vents
– Do not operate the DVD system in an
enclosed cabinet and allow about 10 cm
(4 inches) of free space all around the
player for adequate ventilation.
Speaker brackets
and screws
Additional accessories (only for
LX3950W)
Wireless
transmitter
Wireless receiver
Table stand for
wireless receiver
001-039-LX39-93-EngFinal 08/04/2004, 01:48 PM6
(5x)
Care of disc
– To clean a CD, wipe it in a
straight line from the centre
toward the edge using a soft,
lint-free cloth. Do not use
cleaning agent, as they may
damage the disc.
– Write only on the printed side of a
CD-R/CD-RW and only with a soft felttipped pen.
– Handle the disc by its edge, do not
touch the surface.
Care of the cabinet
– Use a soft cloth slightly moistened
with a mild detergent solution. Do not
use a solution containing alcohol, spirits,
ammonia or abrasives.
Finding a suitable location
– Place the player on a flat, hard, stable
surface.

Connections
TV IN AUX IN LINE OUT
L
R
L
R
Step 1: Placing the speakers
and subwoofer
DVD System Centre speaker
4
Subwoofer
2
Front Speaker
(Right)
Rear speaker
(Right)
2
Front Speaker
(Left)
1
3
Rear speaker
(Left)
For best possible surround sound, all the
speakers (except subwoofer) should be
placed at the same distance from the
listening position.
Step 2: Connecting speakers
and subwoofer
English
Front Right
Centre
1
3
Rear Right
Rear Left
Connect the supplied speaker systems
using the fixed speaker cables by
matching the colours of the jacks and
speaker cables.
Front Left
Subwoofer
1 Place the front left and right speakers at
equal distances from the TV and at an
angle of approximately 45 degrees from
the listening position.
2 Place the centre speaker above the TV or
the DVD system so that the centre
channel’s sound is localised.
3 Place the rear speakers at normal
listening ear level facing each other or
hang on the wall.
4 Place the subwoofer on the floor near
the TV.
Helpful Hints:
– To avoid magnetic interference, do not
position the front speakers too close to your
TV.
– Allow adequate ventilation around the
DVD system.
001-039-LX39-93-EngFinal 08/04/2004, 01:48 PM7
For LX3950W wireless system
connection, please refer to the
separate ‘Quick Use Guide’.
The wireless transmitter and receiver
give you the option for wireless speaker
connection.
Helpful Hints:
– Ensure that the speaker cables are
correctly connected. Improper connections
may damage the system due to short-circuit.
– To prevent unwanted noise, do not place
the wireless transmitter and receiver too
close to the DVD system, AC power adaptor,
TV or other radiation sources.
Connections
English
Step 3: Connecting TV
Option 1
L
R
TV IN AUX IN LINE OUT
2
L
R
Pr
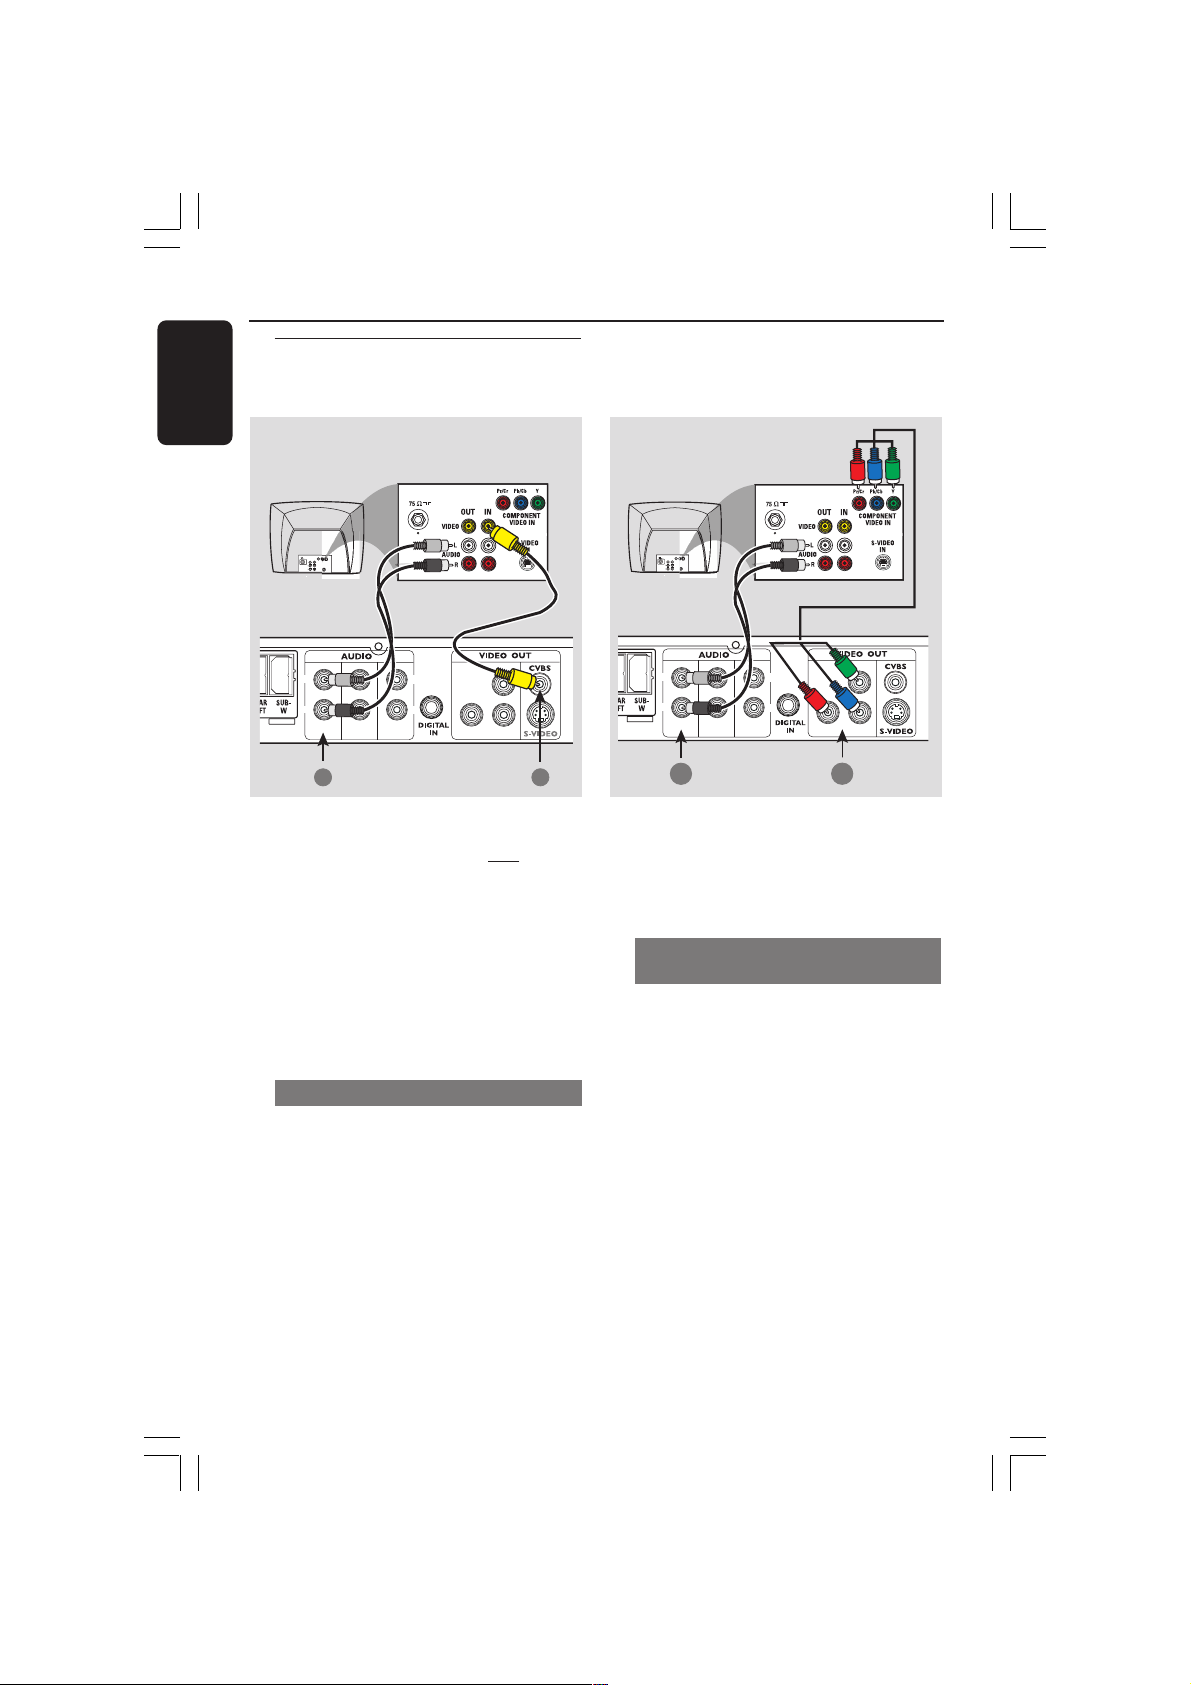
IMPORTANT!
– You only need to make one video
connection from the following
options, depending on the
capabilities of your TV.
– S-Video or Component Video
connection provides higher picture
quality. These options must be
available on your TV.
– Connect the DVD system directly
to the TV.
Using Composite Video jack (CVBS)
1 Use the supplied composite video cable
(yellow) to connect the DVD system’s
CVBS jack to the video input jack (or
labelled as A/V In, Video In, CVBS,
Composite or Baseband) on the TV.
2 To hear the TV channels through this
DVD system, use the supplied audio
cables (white/red) to connect AUDIO-
TV IN jacks to the corresponding
AUDIO OUT jacks on the TV.
Option 2
Y
Pb
1
L
R
TV IN AUX IN LINE OUT
2
L
R
Y
Pr
Pb
1
IMPORTANT!
The progressive scan video quality is
only possible when using Y Pb Pr, and
a progressive scan TV is required.
Using Component Video jacks
(Y Pb Pr )
1 Use a component video cables (red/blue /
green — not supplied) to connect the
DVD system’s Y Pb Pr jacks to the
corresponding Component video input
jacks (or labelled as Y Pb /Cb Pr/Cr or
YUV) on the TV.
2 To hear the TV channels through this
DVD system, use the supplied audio
cables (white/red) to connect AUDIO-
TV IN jacks to the corresponding
AUDIO OUT jacks on the TV.
3 If you are using a Progressive Scan TV
(TV must indicate Progressive Scan or
ProScan capability ), refer to page 28 for
proper progressive scan video output
setup.
001-039-LX39-93-EngFinal 08/04/2004, 01:48 PM8
Option 3
L
R
TV IN AUX IN LINE OUT
2
Connections
English
Option 4
ANT IN
2
VIDEO
IN
AUDIO IN
R L
CH3 CH4
1
TO TVINT IN
3
L
R
Y
Y
Pr
Pb
Pr
1
Pb
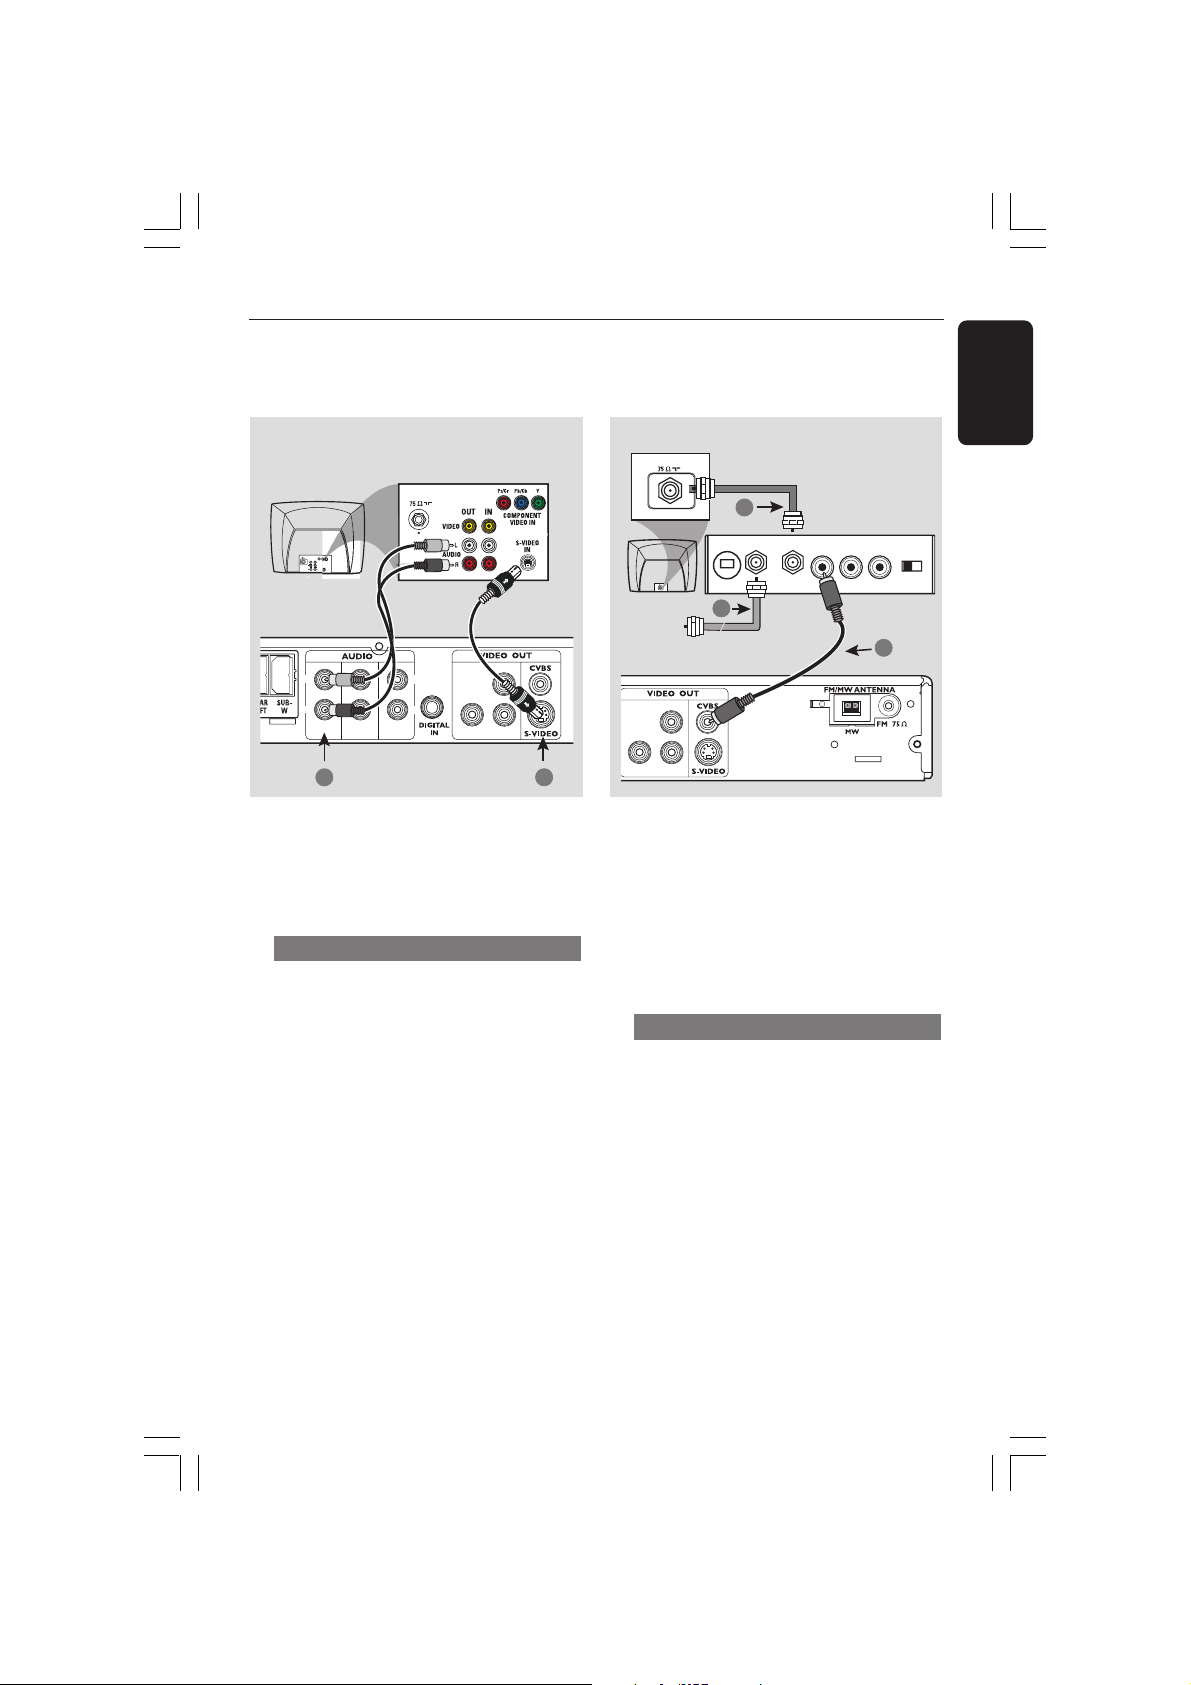
IMPORTANT!
If S-Video is used for DVD playback,
the system’s VIDEO OUT setting will
need to be changed accordingly.
Using S-Video jack
1 Use an S-video cable (not supplied) to
connect the DVD system’s S-VIDEO
OUT jack to the S-Video input jack
(or labelled as Y /C or S-VHS) on the TV.
2 To hear the TV channels through this
DVD system, use the supplied audio
cables (white/red) to connect AUDIO-
TV IN jacks to the corresponding
AUDIO OUT jacks on the TV.
IMPORTANT!
If your TV only has a single Antenna In
jack (labelled as 75 ohm or RF In),
you will need an RF modulator in
order to view DVD playback on the
TV. See your electronics retailer or
contact Philips for details on RF
modulator availability and operations.
Using an accessory RF modulator
1 Use the supplied composite video cable
(yellow) to connect the DVD system’s
CVBS jack to the video input jack on the
RF modulator.
2 Use an RF coaxial cable (not supplied) to
connect ANTENNA OUT or TO TV jack
on the RF modulator to the ANTENNA
IN jack on the TV.
3 Connect the Antenna or Cable TV
service signal to the ANTENNA IN or
RF IN jack on the RF modulator. (It may
have been connected to your TV
previously. Disconnect it from the TV).
001-039-LX39-93-EngFinal 08/04/2004, 01:48 PM9

Connections
P
TV IN AUX IN LINE OUT
L
R
L
R
~ AC MAINS
English
Step 4: Connecting FM/MW
antennas
fix the claw into
the slot
➠
MW
antenna
Y
Pr
Pb
Connect the supplied MW loop antenna
1
to the MW jack. Place the MW loop
antenna on a shelf or attach it to a stand
or wall.
2 Connect the supplied FM antenna to the
FM jack. Extend the FM antenna and fix
its ends to the wall.
For better FM stereo reception, connect
an external FM antenna (not supplied).
Step 5: Connecting the
power cord
FM
antenna
1
2
After everything is connected
properly, Plug in the AC power cord
to the power outlet.
Never make or change any connections
with the power switched on.
Helpful Hint:
– Refer to the type plate on the rear or
bottom of the system for identification and
supply ratings.
Helpful Hints:
– Adjust the position of the antennas for
optimal reception.
– Position the antennas as far as possible
from your TV, VCR or other radiation source
to prevent unwanted interference.
001-039-LX39-93-EngFinal 08/04/2004, 01:48 PM10
Connections (Optional)
Pr
TV IN AUX IN LINE OUT
L
R
L
R
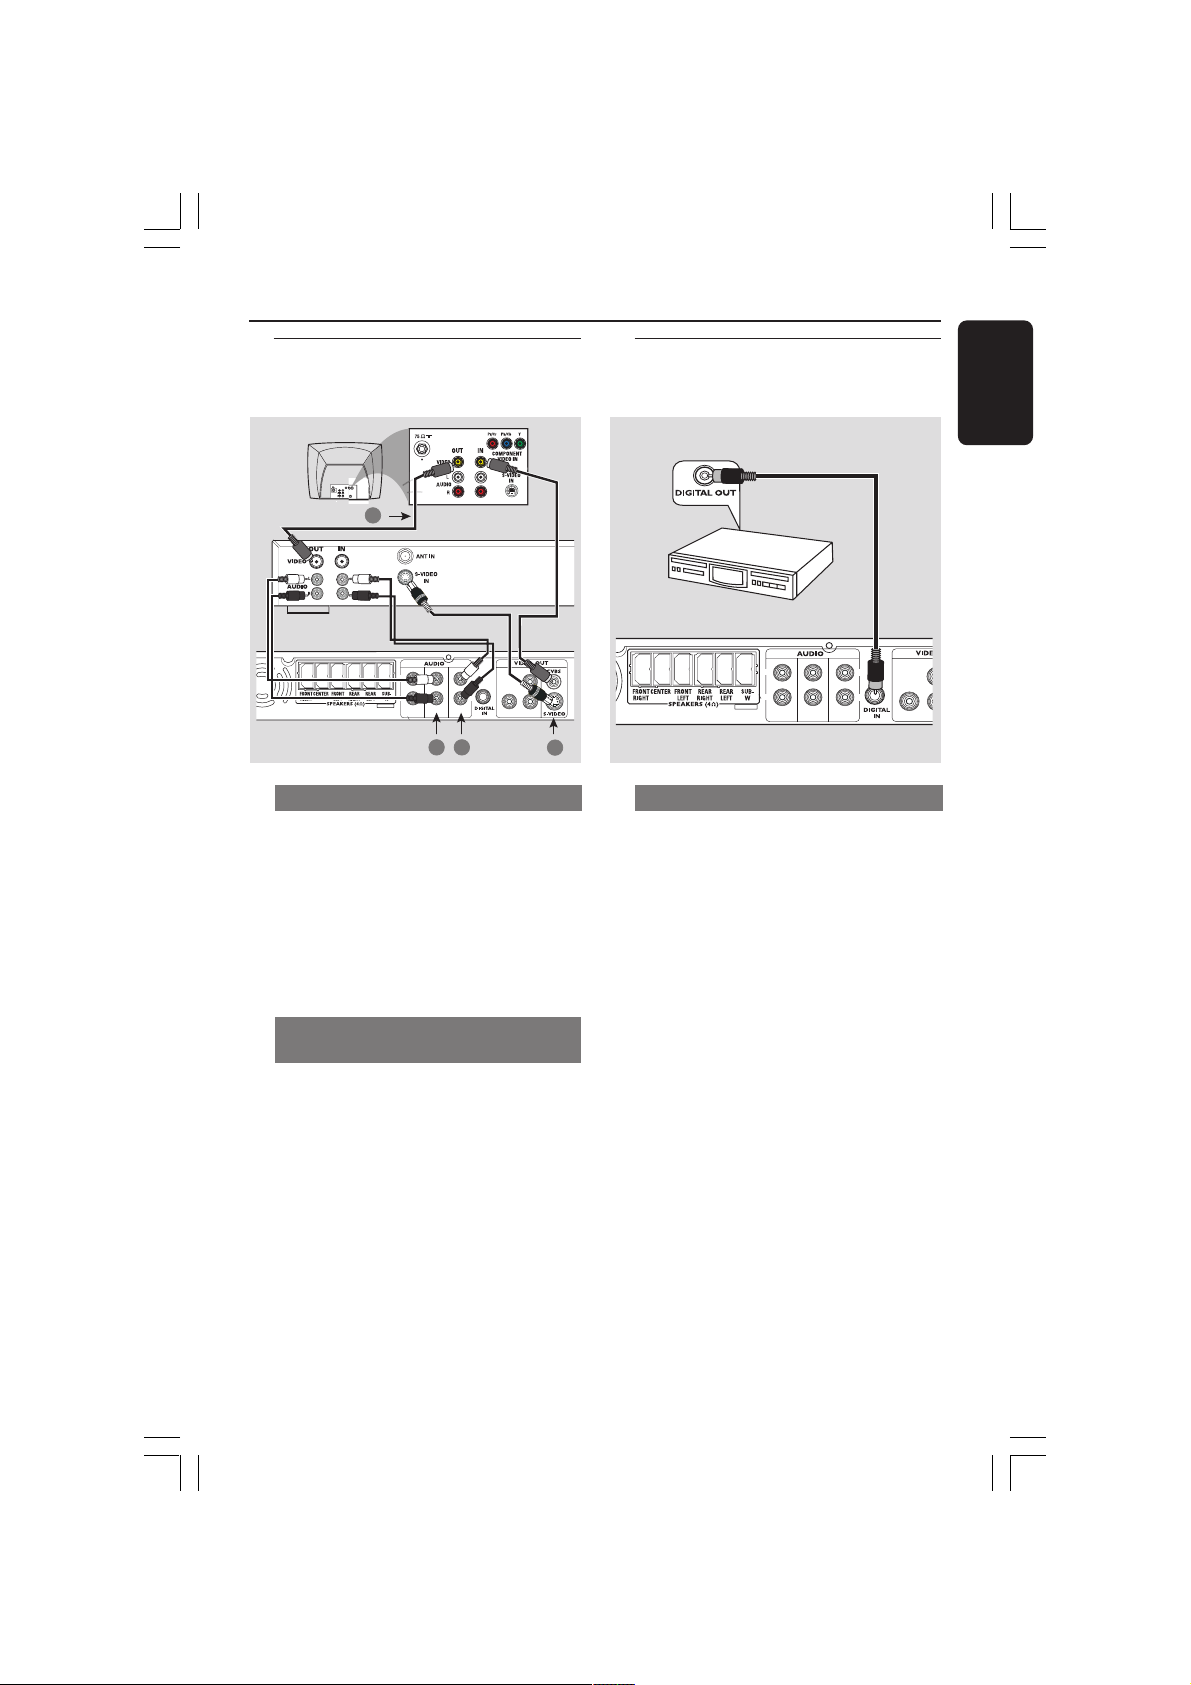
Connecting a VCR or
Cable/Satellite Box
1
VCR or Cable/
Satellite Box
L
R
TV IN AUX IN LINE OUT
2
4
Y
L
R
Pr
Pb
3
Viewing and listening to the playback
1 Connect the VCR or Cable/Satellite Box
to the TV as shown.
2 Connect the DVD system’s AUX IN
(R/L) jacks to the AUDIO OUT jacks on
the VCR or cable/satellite box.
Before starting operation, press AUX/DI
on the remote to select “AUX” in order
to activate the input source.
Using the VCR for recording DVD
playback
Some DVDs are copy-protected. You cannot
record or dub protected discs using a VCR.
3 Connect the DVD system’s S-VIDEO
jack to the S-VIDEO IN jack on the VCR.
4 Connect the DVD system’s LINE OUT
(R/L) jacks to the AUDIO IN jacks on
the VCR.
This will allow you to make analogue stereo
(two channel, right and left) recordings.
Connecting digital audio
equipment
English
(for example)
CD Recorder
Listening to the playback
● Connect the DVD system’s DIGITAL
IN jack to the DIGITAL OUT jack on a
digital audio device.
Before starting operation, press AUX/DI
on the remote to select “DI” in order to
activate the input source.
Helpful Hints:
– Some DVDs are copy-protected. You
cannot record the disc through a VCR or
digital recording device.
– You cannot hear or record the SACD or
MP3-CD playback if you use the digital
connection.
– For your playback through DIGITAL IN
connection, set the digital output of that
player to PCM format.
– Always refer to the owner’s manual of the
other equipment for complete connection
and use details.
To view DVD playback while recording,
you must connect the DVD system to
your TV using CVBS (as shown above)
connection.
001-039-LX39-93-EngFinal 08/04/2004, 01:48 PM11

Functional Overview
English
Main unit and remote control
2
1 STANDBY ON (B)
– Switches to Eco Power standby mode or
turns on the system.
– Led ON in Eco Power standby mode.
2 Disc tray
3 OPEN•CLOSE 0
– Opens/Closes the disc tray.
4 System display panel
5 SOURCE
– Selects the relevant active source mode:
DISC, TV, TUNER or AUX/DI.
– DISC: switches to DISC source mode.
– TV: switches to TV source mode and/or
*to turn on the Philips TV (only on the
remote control).
– TUNER: toggles between FM and MW
band.
– AUX/DI: toggles between AUX and
DIGITAL IN source mode.
6 ÉÅ PLAY•PAUSE
– DISC: starts/pauses playback.
– TUNER: starts preset radio station
installation in Plug & Play mode (only on
the main unit).
S PREV / NEXT T
– DISC: *searches backward/forward or
selects a track.
– TV: selects previous/next channel (Philips
TV only).
– TUNER: tunes the radio frequency up/
down.
3 5
4
– Exits an operation.
– DISC: stops playback.
– TUNER: *erases a preset radio station.
7 iR
– Point the remote control towards this
8 VOLUME (VOL +-)
– Adjusts the volume level.
9 DISC MENU (DISC source mode only)
– Enters or exits disc contents menu.
– For VCD version 2.0 only;
0 OSD MENU (DISC source mode only)
– Enters or exits on-screen display.
! 1 2 3 4
– Selects movement direction in the
– Use 1 2 to select a preset radio
– Use 3 4 to select auto tuning in Tuner
6
7
➠
Ç STOP
sensor.
Control buttons available on the
remote only
In stop mode, turns on/off playback
control (PBC) mode.
During playback, returns to main menu.
menu.
station.
source mode.
* = Press and hold the button for more than two seconds.
001-039-LX39-93-EngFinal 08/04/2004, 01:48 PM12
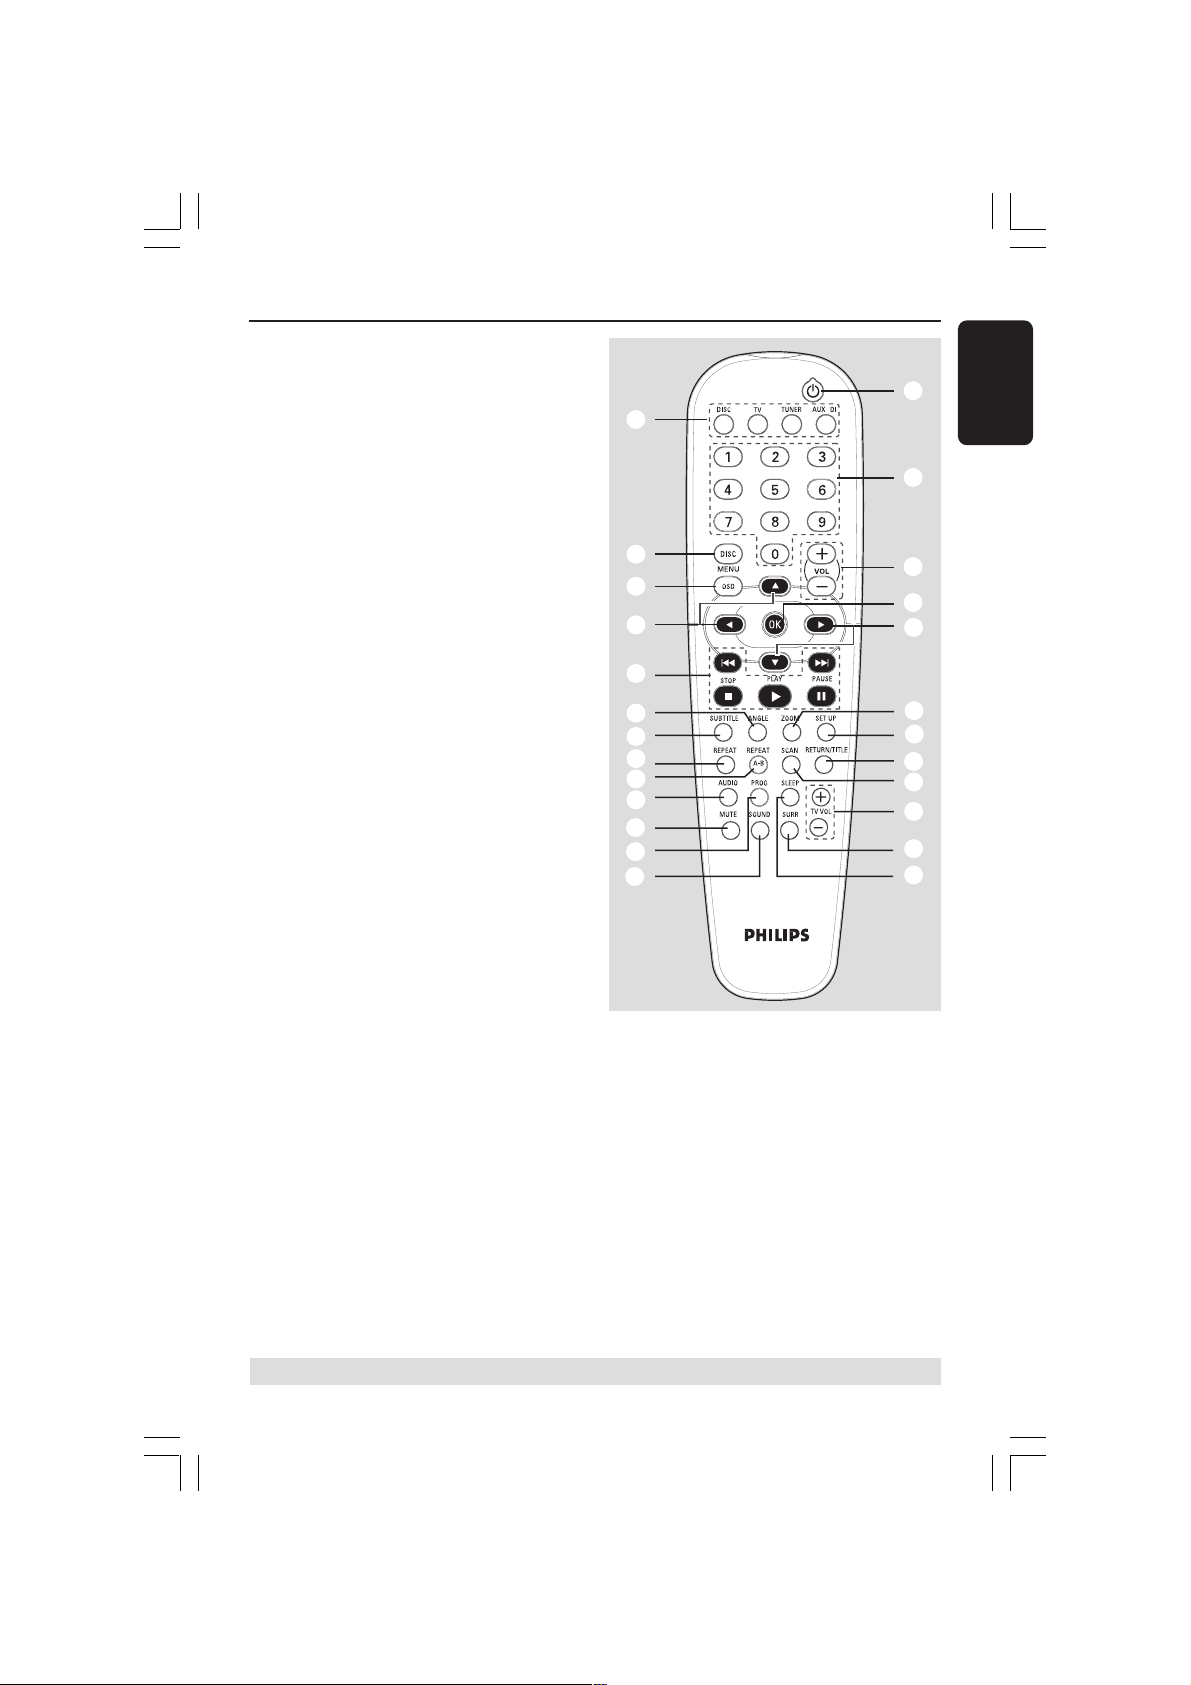
@ ANGLE
– Select a DVD disc camera angle (if
available).
# SUBTITLE
– Selects a subtitle language.
$ REPEAT
– Selects various repeat modes.
% REPEAT A-B
– Repeats a specific section on a disc.
^ AUDIO
– Selects an audio language (DVD) or an
audio channel (CD).
& MUTE
– Mutes or restores the volume.
* PROG
– DISC: starts programming.
– TUNER: starts *automatic/ manual preset
programming.
( SOUND
– Selects a sound effect.
) SLEEP
– Sets the sleep timer function.
¡ SURR
– Selects multichannel surround or stereo
mode.
™ TV VOL +-
– Adjusts TV volume (Philips TV only).
£ SCAN
– Plays the first few seconds of each track/
chapter within a disc.
≤ RETURN/TITLE
– To go back to previous menu.
– Displays the disc’s Title menu (if available).
∞ SETUP
– Enters or exits system setup menu.
§ ZOOM
– Enlarges a picture on the TV screen.
Functional Overview
5
/
9
0
!
6
@
#
$
%
^
&
*
(
≥ OK
– Confirms a selection.
• Numeric Keypad (0-9)
– Enters a track/title number of the disc.
– Enters a number of a preset radio station.
ª B
– Switches to Eco Power standby mode.
– In TV mode, *switches Philips TV on/off.
ª
•
8
≥
!
§
∞
≤
£
™
¡
)
English
* = Press and hold the button for more than two seconds.
001-039-LX39-93-EngFinal 08/04/2004, 01:48 PM13
Loading…
Пошаговое плетение корзин из ивы для начинающих
Содержание
- Особенности
- Необходимые инструменты и материалы
- Как подготовить лозу?
- Мастер-класс для начинающих
- Чем покрасить?
Узнать, как плести из лозы красивые и аккуратные корзинки своими руками, хотят многие любители домашнего рукоделия, только осваивающие этот вид творчества. Не имея представления о том, где взять и как заготовить лозу, чем покрасить ее по завершении работы, сложно справиться с поставленной задачей. Простой мастер-класс с инструкцией по пошаговому плетению простых круглых корзин из ивы поможет во всем разобраться даже только начинающим изучать это искусство людям.
Особенности
Плетение корзин из ивы — популярное ремесло, издревле востребованное на Руси. Доступность сырья, его прочность и долговечность стали главными достоинствами этого вида материала. Сплести корзинку из прутьев для грибов или для пикника вполне по силам и современной рукодельнице. Способы создания таких изделий довольно разнообразны, они варьируются в зависимости от региона. Из веток опытный мастер легко может создать корзинку круглой, овальной, конической или прямоугольной формы, желаемого размера и назначения.

Изделия из лозы имеют ряд очевидных особенностей, которыми не обладают другие хозяйственные емкости.
Кора и ветви ивы отличаются высоким содержанием дубильных веществ. Помещенные в сплетенную из них корзину грибы, ягоды, овощи дольше сохраняют «товарный» вид, естественная вентиляция препятствует их порче. Используемая лоза соединяется без дополнительных приспособлений или крепежа, исключительно благодаря мастерскому плетению. Срок службы готового изделия может исчисляться десятками лет.

Необходимые инструменты и материалы
Лозоплетение — вид рукоделия, в котором используются природные материалы. Для обработки большого количества сырья может потребоваться специальный станок, но в большинстве случаев можно обойтись и без него. На разных этапах изготовления корзины мастеру пригодятся следующие инструменты:
- секатор;
- ручной или электрический лобзик;
- острый нож со скошенным лезвием;
- портновские или садовые ножницы;
- дрель;
- вместительные емкости для вымачивания прутьев;
- плоскогубцы;
- прочные прищепки для белья;
- пинцет;
- кисти, лак, морилка.
Основной материал, который нужен для изготовления корзины — ивовые прутья. Их легко добыть самостоятельно, некоторые мастера даже выращивают сырье на своем участке, подбирая лучшие сорта и виды кустарника. Купить подготовленные материалы можно и в магазине. При самостоятельной заготовке следует учитывать ряд базовых рекомендаций.
- Лучшее сырье получают на суглинистых и песчаных почвах. Выбирать следует молодые, здоровые кусты с длинными прямыми побегами.
- Для заготовки используется секатор. Следует отбирать наиболее длинные побеги, не имеющие большого количества боковых ответвлений.
- Срез делается под углом. Важно оставить несколько почек под линией, по которой выполняется заготовка сырья.
- Используются только ветви с узкой плотной сердцевиной. Рыхлая средняя часть свидетельствует о том, что материал слишком старый для лозоплетения.
- Проверять сырье при заготовке. Для этого 1 ветку срезают, полученный материал сгибают на 180 градусов. Если она выдерживает нагрузку без треска и перелома, лоза считается пригодной для плетения.
- Учитывать рекомендованную толщину. Для донной части корзин берут цельные прутья, для стенок материал расщепляют на более тонкие элементы.

Оптимальное время для заготовки подходящих прутьев — когда сокодвижение минимально.
Срезанные в марте-апреле побеги легко очищаются от коры без дополнительных усилий. Собранный в другое время материал перед обработкой придется вымачивать или зашпаривать. Стоит учесть, что после такой обработки побеги приобретут глянцевый блеск, будут надежно защищены от потемнения, воздействия влаги. Не подвергавшиеся вывариванию прутья постепенно потемнеют, утратят декоративность.

Как подготовить лозу?
Мало просто заготовить лозу. Все материалы, срезанные не ранней весной, придется дополнительно обработать. Их вымачивают в проточном водоеме или бочке, корыте, ежедневно меняя жидкость. Перед погружением в реку, ручей прутья стоит взять и связать в пучки, а затем поместить под гнет. Выдерживают сырье в воде от 7 до 14 дней. Сократить сроки подготовки прутьев можно путем выпаривания. В этом случае процесс обработки подразумевает использование одного из следующих способов.
- Побеги помещают в емкость, заливают холодной водой, ставят на огонь. После закипания прутья вывариваются еще 60-120 минут. По истечении этого времени сырье вынимают, остужают, затем приступают к удалению коры.
- Лозу можно сразу залить кипящей водой. После этого ее можно вываривать всего 30 минут. После остывания кора легко сойдет с поверхности веток.
Важно не ждать, пока лоза высохнет. Ее начинают очищать с комля — области, близкой к основанию, вновь укладывая прутья в воду в перерывах между этапами работы. Зачистку проводят вручную или острым ножом. Окоренные побеги сортируют по размерам, отправляют сушиться на солнце.
Не каждый сорт ивы подходит для плетения. Лучше отдавать предпочтение кустарниковым формам, обладающим более гибкими побегами. Плакучие ивы с длинными слабыми ветвями тоже не подойдут для работы. Они слишком тонкие, изделие не будет держать форму. Считается, что для плетения лучше всего подходят веточки диаметром 0,5-1 см, покрытые красной или оранжевой корой.
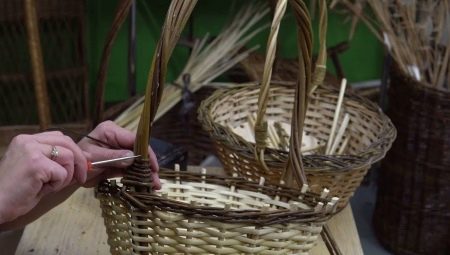
Мастер-класс для начинающих
Перед первым плетением подготовленные прутья, инструменты и материалы помещаются в зоне доступа. Важно, чтобы все необходимое было под рукой. Прутья сортируют на более толстые — спицы, а также на вязку в виде тонких и гибких элементов. После того как каркасные части переводятся из горизонтального положения в вертикальное, их уже именуют стойками.
Простая инструкция поможет разобраться в том, как пошагово, своими руками изготовить корзинку квадратной или округлой формы. Пригодятся шаблоны, задающие конфигурацию изделия. Техника плетения может быть любой — начинающим подойдет белорусская, довольно простая и понятная.
Базовая схема создания простой корзинки в этом случае будет включать последовательное формирование дна, боковин, ручки. Порядок действий стоит рассмотреть более подробно.
Базовый этап
Начало работ требует от мастера наибольших физических усилий. Базовый этап подразумевает нарезку материалов на нужное количество прутьев.
- Для дна берут довольно толстые ветки длиной 35-40 см.
- На боковины заготавливают длинные пруты в числе 24 штук.
- Стойки и стенки делают из тонкой лозы. Понадобится 50 штук — по 25 на каждую часть.
Работа ведется при помощи секатора. На кромках срез делается прямым, без скосов и заострений. Качественное сырье не создаст проблем в дальнейшем плетении. Стоит учесть, что материал может быть пересушен. В этом случае его опрыскивают водой из пульверизатора или на некоторое время погружают в воду, чтобы вернуть прутьям былую эластичность.
Плетение дна
Плетение донышка начинается с подбора равных по длине прутьев. Их должно быть 6 или 8, диаметром 0,5-0,7 см. При переплетении важно добиваться максимально плотного прилегания отдельных элементов лозы.
- Подготовленные материалы нужно поделить пополам. В 4 прутьях по центру проделывают прорези.
- Вставить оставшиеся отрезки в полученные заготовки так, чтобы получился равносторонний крест.
- Тонкие прутья продевают в прорезь. Ими обвивают основание в 2 ряда.
- 3 рядом спицы разводят в стороны, оплетают отдельно. При этом гибкие тонкие прутья пропускаются сверху и снизу основных элементов, перекрещиваются между собой.
Плетение продолжают до самого края донышка. Как только один отрезок лозы подходит к концу, его наращивают другим, стараясь, чтобы такие участки не совпадали. Сращивание выполняется путем вплетания заостренного края прутка в просвет между 2 ближайшими рядами. Плетение продолжается уже новой лозой, кромку старой обрезают.
При создании дна важно следовать определенному порядку. Витое плетение используют только на первых 5 рядах. Затем работа продолжается прямым способом. Каждая спица обходится внутри и снаружи, до самого края. Для того чтобы получился круг, придется вставить дополнительную спицу, чтобы получить нечетное количество элементов.
Для того чтобы корзина сохраняла хорошую устойчивость, ее важно обеспечить вогнутым донышком. Для этого, по достижении диаметра в 70-80 мм, плетение плотно обхватывается руками, направляется вверх. Нужно как бы вытолкнуть центральную область наружу. После этого плетение продолжается, пока дно не достигнет диаметра, выбранного для корзины.

Разбивка основания
В готовом донышке для перехода от горизонтального к вертикальному плетению нужно разместить стойки. Их делают из прямых побегов ивы средней толщины. Каждую такую опору заостряют на конце, продевают между спицами. Торчащие элементы лозы донышка обрезают. Количество прутьев в разбивке должны быть равно тому, что использовалось в основании.
При формировании разбивки обязательно учитывается естественное направление изгиба лозы. Каждый прут из подготовленных 24 нужно обязательно обрезать по толстому краю. Должен получиться длинный скос, направленный внутрь или наружу.
Для того чтобы вставить новые стойки, придется отверткой с узким жалом или шилом расширить участки плетения возле спиц. После этого, с каждой стороны старого элемента каркаса помещают по 1 новому. Важно выполнить вставку внутренней стороной вниз, иначе лоза постепенно будет разъезжаться. Сформировать излом на опорах можно, просто надавив на них ногтем у основания, отступив около 5 мм от края плетения донышка.
Собираем донышко и стенки
Соединение элементов стойки не составляет труда. Их берут, пересекают с 2 другими, затем загибают по направлению вверх. То же самое повторяется абсолютно со всеми стойками, пока не получится направленный вертикально каркас. На этом этапе хорошо использовать обруч или трафарет, позволяющий сформировать корзину, также можно просто связать свободные концы лозы.

На этом этапе важно брать самые мягкие и тонкие прутики. Подойдет материал до 5 мм толщиной. На формирование перехода хватит 3 прутьев. Работать с корзиной на этапе вертикального плетения проще всего, поместив ее на поверхность стола или колени. Кончики лозы вставляются в переплетения, примыкающие к вертикальным стойкам, погружаются на глубину около 50 мм.
Расположенные друг за другом 3 прутика последовательно оплетают боковые стойки витым способом.
Двигаться нужно по направлению слева направо, повторяя действия с каждой лозой. Плетение нужно плотно затягивать, обеспечивая изделию приобретение красивой формы. Прут, находящийся в работе, всегда располагается поверх 3 других. Новые элементы вводятся постепенно, в том же направлении — обычно на переход хватает 2-3 рядов оплетки.
Плетение стенок
Процесс выплетания стенок изделия начинается с 4-5 рядов витого соединения. Затем процесс работы протекает в обычном порядке. Стенки формируются на нужную высоту. Важно учесть, что при нечетном количестве стоек можно выполнять оплетку в 1 лозу. При их парном расположении применяют по 2 прута, с их прохождением изнутри и снаружи с перекрещиванием после каждого витка.
Если до этого момента все еще применяется обруч, его снимают по достижении высоты оплетки около 10 см.
Слишком длинные прутья будут рассыпаться, их можно подрезать или оставить скрепленными. Следующие 3 ряда плетутся по аналогии с местом соединения стоек и донышка. Это чередование сохраняется до полного набора нужной высоты.
Делаем загибку
Этот этап предусматривает завершение в плетении основной части корзины. Крайняя стойка загибается вниз, размещаясь за 2 последующими. Остальные элементы прячутся точно так же. Концы сначала убирают внутрь, потом выводят наружу и обрезают как можно ближе к основанию. В завершение вся корзина осматривается, секатором обрезаются любые торчащие края прутьев — изделие должно выглядеть аккуратно.
Ручка
Изготовление ручки завершает процесс изготовления корзины. Ее основанием становится толстый ивовый побег, который обрезают до нужной длины. Концы заостряют так, чтобы их можно было легко воткнуть в боковины. После этого нужно действовать так.
- Взять 4-5 прутьев. Их втыкают в плетение в месте, где крепится ручка.
- Основание ручки оплетается несколько раз. Затем те же прутья вводятся с другого конца.
- Процесс повторяется, берутся новые тонкие и гибкие побеги.
- Последний прут втыкают, с его помощью оплетается основание. Лоза затягивается в узел. Свободный край отрезается острым ножом.
Ручка готова. Корзину остается лишь покрыть соответствующим декоративно-защитным составом. После этого изделием можно пользоваться по назначению.
О том, как сплести ручку, смотрите в видео.
Чем покрасить?
Финишная обработка лозы — неотъемлемый этап изготовления корзины. При обработке, а также в процессе плетения лоза покрывается шероховатостями, микротрещинами, царапинами. Конечно, можно оставить все как есть, но если изделие хочется довести до идеального состояния, стоит приложить усилия для дополнительной обработки поверхности. Процесс удаления изъянов происходит поэтапно.
- Шлифовка. При помощи наждачной бумаги с самыми мелкими показателями зернистости обрабатываются все поверхности плетения. Особенно тщательно нужно обработать верхний край, ручку и наружные стенки.
- Полировка. Она выполняется при помощи мягкой шерстяной или суконной ткани. Нужно натереть все поверхности до гладкости и блеска.

Последующая финишная обработка подразумевает нанесение декоративной отделки на поверхность корзины. Большинство мастеров предпочитает использовать здесь комбинацию из морилки на водной основе с лаком. Это позволяет окрасить светлую окоренную лозу практически в любые тона — от благородных светлых или темных до ярких оранжевых, красных. Морение заключается в нанесении состава кистью или губкой, работы следует вести в перчатках и респираторе.
Окончательная обработка корзины осуществляется при помощи прозрачного лака.
Изделие с таким покрытием имеет эффектный внешний вид, хорошо защищено от воды и механических повреждений. В качестве покрытия для ивовой лозы хорошо подходит прозрачный глянцевый или матовый лак. Самым прочным и долговечным в этом случае будет полиуретановое яхтенное покрытие, но оно довольно дорогостоящее. Компромиссным решением можно считать лишенный неприятного запаха акриловый лак на водной основе.
При лакировании корзины рекомендуется соблюдать следующие рекомендации:
- наливать состав в отдельную емкость;
- использовать кисть средней ширины;
- сложные в обработке участки покрывать более тонким инструментом;
- наносить лак только на наружные борта, часть дна и ручку.

Даже после нанесения декоративного покрытия лоза продолжает сохнуть. Именно поэтому лак не наносят на внутренние поверхности изделия. Полностью высохнуть прутья могут спустя 2-3 месяца. Держать корзину в это время нужно в сухом месте, без контакта с солнечным светом, при комнатной температуре.
Важно обеспечить именно естественные условия сушки. Это благотворно повлияет на последующую эксплуатацию изделия. При необходимости пользоваться корзинкой можно еще в процессе ее высыхания. Поначалу она будет иметь значительный вес. По мере устранения влаги из ветвей изделие станет легче.

Небольшую декоративную корзинку вполне можно окрасить в один или несколько тонов.
Работа выполняется художественной кистью, начиная со дна, а затем постепенно поднимаясь к ручке. Нельзя наносить краску на уже пролакированную корзину. Самый простой и натуральный вариант тонирования — нанесение чайной заварки, в зависимости от крепости можно варьировать гамму изделия. Кроме того, готовые анилиновые краски любых цветов и оттенков также можно приобрести в магазине.
FAQ: Types of Manuals and Their Contents
Philips LX3900SA Manuals come in various types, each serving a specific purpose to help users effectively operate and maintain their devices. Here are the common types of Philips LX3900SA User Guides and the information they typically include:
- User Manuals: Provide comprehensive instructions on how to use the device, including setup, features, and operation. They often include troubleshooting tips, safety information, and maintenance guidelines.
- Service Instructions: Designed for technicians and repair professionals, these manuals offer detailed information on diagnosing and repairing issues with the device. They include schematics, parts lists, and step-by-step repair procedures.
- Installation Guides: Focus on the installation process of the device, providing detailed instructions and diagrams for proper setup. They are essential for ensuring the device is installed correctly and safely.
- Maintenance Manuals: Provide guidance on routine maintenance tasks to keep the device in optimal condition. They cover cleaning procedures, part replacements, and regular servicing tips.
- Quick Start Guides: Offer a concise overview of the essential steps needed to get the device up and running quickly. They are ideal for users who need immediate assistance with basic setup and operation.
Each type of Philips LX3900SA instruction is designed to address specific needs, ensuring users have the necessary information to use, maintain, and repair their devices effectively.
Related Instructions for Philips LX3900SA:
1
BTB2462
Short user manual User Guide: Philips BTB2462 (4IS8Y9, Upd.11th Oct 2024)
2
1423
342
8
SHM6100 — Headset — Behind-the-neck
Manual Philips Headsets Manual (File: philips-shm6100-headset-behind-the-neck-manual-2, 25.01.2025)
2
1062
160
Home Cinema speakers Devices by Other Brands:
|
Yamaha NS-P230 Service Manual Home Cinema speakers #QIS5FG SERVICE MANUAL 19 Oct 2024 | 4 |
|
|
Philips HTB5544D Quick Start Manual PDF User Guide (@5X58AT), Philips HTB5544D Speakers (02nd May 2025) HTB5544D 02 May 2025 | 14 |
|
|
Philips HTS4562/12 Service Manual HTS4562/12 (Home Theater System ePDF Guide, #39W93W) 1 — 1 28 Apr 2025 | 46 |
|
|
Panasonic SC-BTT270 Easy Setting Manual Blu-ray Player #5W8V7U VQC8348 10 Jan 2025 | 2 |
Categories:
Home theatre
Home theater
Cordless phones
5.1 home theater
Photo frame
Display
Philips LX3900SA Home Theater System PDF User Guides and Manuals for Free Download: Found (7) Manuals for Philips LX3900SA Device Model (Manual , Quick Use Manual, Specifications)
The Philips LX3900SA is a versatile and feature-rich home theater system that promises an immersive audio experience for movie buffs and music lovers alike. As a product that brings advanced technology to the forefront, it caters to various entertainment preferences with its innovative design and functionality. This review delves into its numerous features and performance aspects, helping consumers make an informed decision regarding this system.
One of the standout attributes of the Philips LX3900SA is its outstanding sound quality. The system is equipped with multiple speakers that deliver rich, crisp sound across various frequencies. Whether you are watching an action-packed film or listening to your favorite music genre, the audio clarity is remarkable. The system supports various sound formats, providing a truly versatile listening experience. Users have praised its ability to fill large living spaces with sound, creating a cinema-like atmosphere right at home.
The user interface of the Philips LX3900SA is intuitive and easy to navigate. The remote control thoughtfully places all functions within easy reach, allowing users to switch between modes or settings seamlessly. The on-screen menu is user-friendly, making setup and adjustments straightforward, even for those who may not be tech-savvy. This aspect ensures that users can maximize the features without a steep learning curve.
Wireless connectivity is another significant advantage of the Philips LX3900SA, enabling users to stream music directly from their smartphones, tablets, or computers. This feature adds considerable convenience, allowing for spontaneous listening sessions without the need for traditional cables. The inclusion of Bluetooth technology enhances versatility, appealing to the modern entertainment lifestyle.
In terms of design, the Philips LX3900SA stands out with its sleek and modern aesthetic. The compact size of the system makes it an ideal addition to various types of living spaces. It can fit comfortably in smaller environments while still delivering powerful performance. Users appreciate not only the aesthetic appeal but also the practicality of its design, which allows for easy placement and integration with existing home decor.
When discussing the features of the Philips LX3900SA, it is essential to highlight the broad range of supported playback formats. The system plays DVDs, CDs, and even has a USB port for direct playback of digital files. This versatility ensures that users can enjoy their favorite content without restrictions. Additionally, the system supports various audio formats, catering to diverse listening preferences.
To summarize, the Philips LX3900SA is a comprehensive home theater solution that excels in sound quality, user-friendliness, connectivity, and design. Below is a concise list of the key features and benefits of this system:
- Outstanding Sound Quality: Clear, dynamic audio performance with multiple speakers.
- User-Friendly Interface: Intuitive controls and easy navigation on remote and menu.
- Wireless Streaming: Bluetooth connectivity for easy access to music from devices.
- Sleek Design: Compact and modern appearance fits well in any room.
- Versatile Playback: Support for DVDs, CDs, and USB files ensures diverse content options.
Overall, the Philips LX3900SA home theater system is a commendable choice for those seeking an impressive multimedia experience. It effectively combines quality, convenience, and accessibility, making it suitable for a wide range of consumers. Whether you prioritize music, movies, or both, this system is designed to elevate your entertainment routine.
Philips LX3900SA
DVD VIDEO DIGITAL SURROUND SYSTEM
LX3900SA • LX3950W
DVD HOME
CINEMA
SYSTEM
DVD HOME
CINEMA
SYSTEM
LX3900SA
LX3950W
001-041-LX39-22-Eng1 12/12/2003, 10:20 AM1
View the manual for the Philips LX3900SA here, for free. This manual comes under the category home cinema sets and has been rated by 12 people with an average of a 8.4.
This manual is available in the following languages: English. Do you have a question about the Philips LX3900SA or do you need help?
Ask your question here
Product Images (3)

Philips LX3900SA specifications
Below you will find the product specifications and the manual specifications of the Philips LX3900SA.
The Philips LX3900SA is a home cinema set that offers a powerful audio experience. With an RMS rated power of 300 W, it delivers clear and immersive sound. The set includes satellite speakers, a center speaker, and a subwoofer, providing a complete audio solution for any home theater setup.
The satellite speakers and center speaker have an impedance of 4 Ω, ensuring efficient power utilization and accurate sound reproduction. The center speaker weighs 1.3 g, while the surround speakers have a weight of 0.7 g, making them lightweight and easy to position.
The subwoofer, with its 4 Ω impedance, adds depth and richness to the audio by delivering deep bass frequencies. It has a weight of 4.2 g, which helps maintain stability and enhances the overall audio experience.
The Philips LX3900SA comes with one optical disc, allowing you to enjoy your favorite movies and music with high-quality audio. The dimensions of the set are 325 mm in depth and 55 mm in height, making it compact and suitable for various room sizes.
When it comes to packaging, the home cinema set has a weight of 13.8 g. This ensures that it is securely packaged and protected during transportation.
In conclusion, the Philips LX3900SA is a well-equipped home cinema set that offers a powerful and immersive audio experience. Its high RMS rated power, efficient impedance, and thoughtful design make it a reliable choice for anyone seeking a comprehensive home theater solution.
Satellite speaker frequency range
120 — 20.000 Hz
Center speaker frequency range
120 — 20.000 Hz
Center speaker weight
1.3 g
Subwoofer frequency range
30 — 120 Hz
Surround speaker weight
0.7 g
General
| Brand | Philips |
| Model | LX3900SA | LX3900SA/01 |
| Product | home cinema set |
| EAN | 8710895784856 |
| Language | English |
| Filetype | User manual (PDF), Quickstart Guide (PDF) |
Audio
| RMS rated power | 300 W |
| MP3 bit rates | 32 — 256 Kbit/s |
| Signal-to-Noise Ratio (SNR) | 95 dB |
Satellite speakers
| Satellite speaker frequency range | 120 — 20.000 Hz |
| Satellite speaker impedance | 4 Ω |
Center speaker
| Center speaker frequency range | 120 — 20.000 Hz |
| Center speaker impedance | 4 Ω |
Weight & dimensions
| Center speaker weight | 1.3 g |
| Subwoofer weight | 4.2 g |
| Center speaker dimensions (WxDxH) | 92 x 68 x 245 mm |
| Subwoofer dimensions (WxDxH) | 361 x 350 x 154 mm |
| Satellite speaker dimensions (WxDxH) | 170 x 64 x 92 mm |
Subwoofer
| Subwoofer frequency range | 30 — 120 Hz |
| Subwoofer impedance | 4 Ω |
| Subwoofer driver diameter (imperial) | 6.5 « |
Other features
| Surround speaker weight | 0.7 g |
| Depth | 325 mm |
| Height | 55 mm |
| Set weight | 3000 g |
| Set width | 360 mm |
| Channels quantity | 20 channels |
| Center speaker driver diameter | 1 « |
| Satellite speaker driver diameter | 1 « |
| Center speaker depth | 68 mm |
| Center speaker height | 92 mm |
| Center speaker width | 245 mm |
| Subwoofer depth | 350 mm |
| Subwoofer height | 361 mm |
| Subwoofer width | 154 mm |
| Surround speaker depth | 64 mm |
| Surround speaker height | 170 mm |
| Surround speaker width | 92 mm |
| Weight | 3000 g |
| Width | 360 mm |
| Auto digital tuning | Yes |
| Auto store | Yes |
| Image formats supported | JPEG |
Optical drive
| Number of optical discs | 1 discs |
| Disc loading type | Tray |
Packaging data
| Package weight | 13.8 g |
| Package depth | 397 mm |
| Package height | 354 mm |
| Package width | 570 mm |
Technical details
| Frequency range | 30 — 20.000 Hz |
| Number of discs | 1 discs |
Power
| Power consumption (standby) | 2 W |
show more
Frequently Asked Questions
Can’t find the answer to your question in the manual? You may find the answer to your question in the FAQs about the Philips LX3900SA below.
How do I connect the Philips LX3900SA to my TV?
To connect your Philips LX3900SA to your TV, you can use an HDMI cable to ensure high-quality audio and video transmission. Locate the HDMI output on the back of the Philips LX3900SA and connect it to an available HDMI input on your TV.
How do I set up the surround sound speakers?
To set up the surround sound speakers of the Philips LX3900SA, position the front left, front right, rear left, and rear right speakers in the recommended locations around your room. Connect the speaker wires to the corresponding speaker terminals on the back of the main unit, ensuring correct polarity.
How do I adjust the audio settings to optimize sound quality?
To adjust the audio settings of the Philips LX3900SA, access the audio menu on the main unit or through its remote control. From there, you can adjust settings such as bass, treble, surround sound effects, and speaker levels to optimize the sound quality according to your preferences.
How can I troubleshoot if the subwoofer is not producing sound?
If the subwoofer of your Philips LX3900SA is not producing sound, check the following: 1) Make sure the subwoofer is connected properly to the main unit and the power outlet. 2) Ensure that the subwoofer is powered on and the volume is not set to minimum. 3) Verify that the subwoofer’s audio settings are correctly configured in the main unit’s menu.
How can I program the remote control to operate other devices?
To program the remote control of the Philips LX3900SA to operate other devices, locate the «Set up» or «Menu» button on the remote control. Press it and navigate to the «Device Setup» or similar option. Follow the on-screen instructions to select the type of device you want to control (e.g., TV, DVD player) and enter the appropriate code for that device, if required. Once programmed, you can use the remote control to operate multiple devices.
What is the RMS rated power of the Philips LX3900SA?
The RMS rated power of the Philips LX3900SA is 300 W. This means that the home cinema set has a high power output, allowing for a loud and immersive audio experience.
What is the impedance of the satellite speaker?
The satellite speaker impedance of the Philips LX3900SA is 4 Ω. This means that the speaker has a relatively low impedance, which can result in a higher power transfer and better sound quality.
How many optical discs can the Philips LX3900SA hold?
The Philips LX3900SA can hold 1 disc. This means that users can only play one optical disc at a time without having to change or switch between discs.
What is the size of the center speaker in the Philips LX3900SA?
The center speaker in the Philips LX3900SA has dimensions of 92 x 68 x 245 mm. This indicates that the center speaker is compact and can easily fit into most home cinema setups.
What is the signal-to-noise ratio of the Philips LX3900SA?
The signal-to-noise ratio of the Philips LX3900SA is 95 dB. This indicates that the home cinema set has a high S/N ratio, resulting in a clear and low noise audio playback.
What is the weight of the Philips LX3900SA?
The Philips LX3900SA has a weight of 3000 g.
What is the height of the Philips LX3900SA?
The Philips LX3900SA has a height of 55 mm.
What is the width of the Philips LX3900SA?
The Philips LX3900SA has a width of 360 mm.
What is the depth of the Philips LX3900SA?
The Philips LX3900SA has a depth of 325 mm.
What is HDMI?
HDMI stands for High-Definition Multimedia Interface. An HDMI cable is used to transport audio and video signals between devices.
How can I best clean my home cinema set?
A slightly damp cleaning cloth or soft, dust-free cloth works best to remove fingerprints. Dust in hard-to-reach places is best removed with compressed air.
Wat is Dolby Atmos?
Dolby Atmos is a technology that ensures that the sound is reflected from the ceiling to where you are listening. This makes it possible to create a 5.1 effect with only 1 speaker.
Is the manual of the Philips LX3900SA available in English?
Yes, the manual of the Philips LX3900SA is available in English .
Is your question not listed? Ask your question here