
Manuals JVC MX-D4T Files size: 4691 KB, Language: English, Format: pdf, Platform: Windows/Linux, Date: 2015-10-25
On this page you can download the manuals JVC MX-D4T. We suggest you familiarize yourself with the user management, service and repair instructions.
Here you will also find a list of ordering numbers for parts and components JVC MX-D4T.
All files are provided exclusively for introductory purposes. And they are not a repair guide, but are only aimed at helping you to familiarize yourself with the principle of building a device in more detail.
The contents of the guidelines presented here require you to know the technical English language.
If you are going to download service management manual JVC MX-D4T, In other words, the manual service, you are long to possess at least minimal knowledge in the field of electronics and understanding the basic principles of the operation of electromechanical devices.
To view the manuals, you will need Adobe Acrobat Reader version 9 and above or another program for viewing PDF files.
Due to the popularity of the information presented on the site and its free provision of the final user, a convincing request to use special software products for multi-threaded download downloads.
List of manuals for JVC MX-D4T
- Guide to use (User manual)
- Guide to service (Service manual)
- Guide to repair (Repair manual)
- The list of parts and components (PartList)
CA-D501T, MX-D401T specifications
The JVC CA-D501T and JVC MX-D401T are both remarkable examples of compact audio systems that have made a significant impact on the personal entertainment landscape. While they each have unique features, they share a commitment to delivering high-quality sound and versatile functionality.
The JVC CA-D501T is designed with an emphasis on delivering robust audio performance without sacrificing style or compactness. This system features a high-powered output, enabling users to achieve rich and dynamic sound, whether they are listening to music, watching movies, or enjoying games. One of the standout features of the CA-D501T is its integrated CD player, which supports various disc formats, ensuring compatibility with a wide array of music collections.
Additionally, the system’s dual cassette deck allows for both playback and recording, providing a nostalgic touch for users who still enjoy cassette tapes. The CA-D501T also includes an AM/FM radio tuner, giving users access to a variety of stations and the convenience of preset options, making it easy to switch between their favorite channels.
On the other hand, the JVC MX-D401T leans into modern technological conveniences without relinquishing the essence of traditional audio enjoyment. It boasts a sleek design that fits seamlessly into any living space while offering impressive sound capabilities. The MX-D401T features a digital amplifier that enhances sound clarity and reduces distortion, even at higher volumes.
Similar to the CA-D501T, the MX-D401T includes a CD player and FM/AM tuner, but it takes it a step further by incorporating Bluetooth connectivity. This feature allows users to stream music directly from their smartphones or tablets, making it an ideal choice for those who prioritize wireless convenience. The system also includes USB ports, allowing users to play back music stored on flash drives or other devices easily.
Both systems share several technological advancements like sound enhancement technologies that optimize audio performance, making them suitable for various listening preferences. They also offer equalizer settings, enabling users to tailor their sound experience according to their tastes.
Ultimately, whether one chooses the JVC CA-D501T or the MX-D401T, both systems provide a satisfying audio experience with their robust features, modern conveniences, and exceptional sound quality, proving to be excellent choices for both retro enthusiasts and tech-savvy users alike.
Инструкция музыкального центра JVC MX-D4T Размер: 4998 KB, Язык: Английский, Расширение: .pdf, Платформа: Adobe Acrobat, Дата: 2015-11-11
Руководство пользователя содержит основные технические характеристики устройства.
Комплект поставки может отличаться от описанного в руководстве.
Отдельная глава руководства пользователя посвящена условиям эксплуатации устройства. Описаны всевозможные варианты монтажа и установки.
Подробно описаны функции и особенности органов управления устройством.
Инструкция JVC MX-D4T предназначена для технически образованных людей и при детальном изучении гарантирует безопасную и долговременную работу устройства.
Руководство пользователя музыкального центра JVC MX-D4T содержит описание процедуры первоначальной настройки и подключения устройства и выполнение процедур сервисного обслуживания и подготовки расходных материалов.
Для изучения файла вам необходимо обладать хотя бы минимальным знанием английского языка, так как инструкция на русском для музыкального центра JVC MX-D4T пока еще не выпущена.
Описание специальных функций описано в отдельной главе инструкции.
Последняя глава руководства по эксплуатации содержит описание основных неисправностей музыкального центра и перечень основных действий по их устранению.
Пожалуйста используйте специальное программное обеспечение для скачивания файлов и по возможности дождитесь окончания загрузки первого файла перед началом загрузки второго.
Перечень основных разделов руководства пользователя музыкального центра JVC MX-D4T
- Технические характеристики
- Варианты монтажа
- Безопасность
- Органы управления
- Настройка устройства
- Стандартные функции
- Основные неисправности музыкального центра JVC MX-D4T
For Customer Use:
Enter below the Model No. and Serial
No. which are located either on the rear,
bottom or side of the cabinet. Retain this
information for future reference.
Model No.
Serial No.
PART No.
FMUN9002-181M
[ U, UT, US, UB ]
INSTRUCTIONS
MANUAL DE INSTRUCCIONES
INSTRUÇÕES
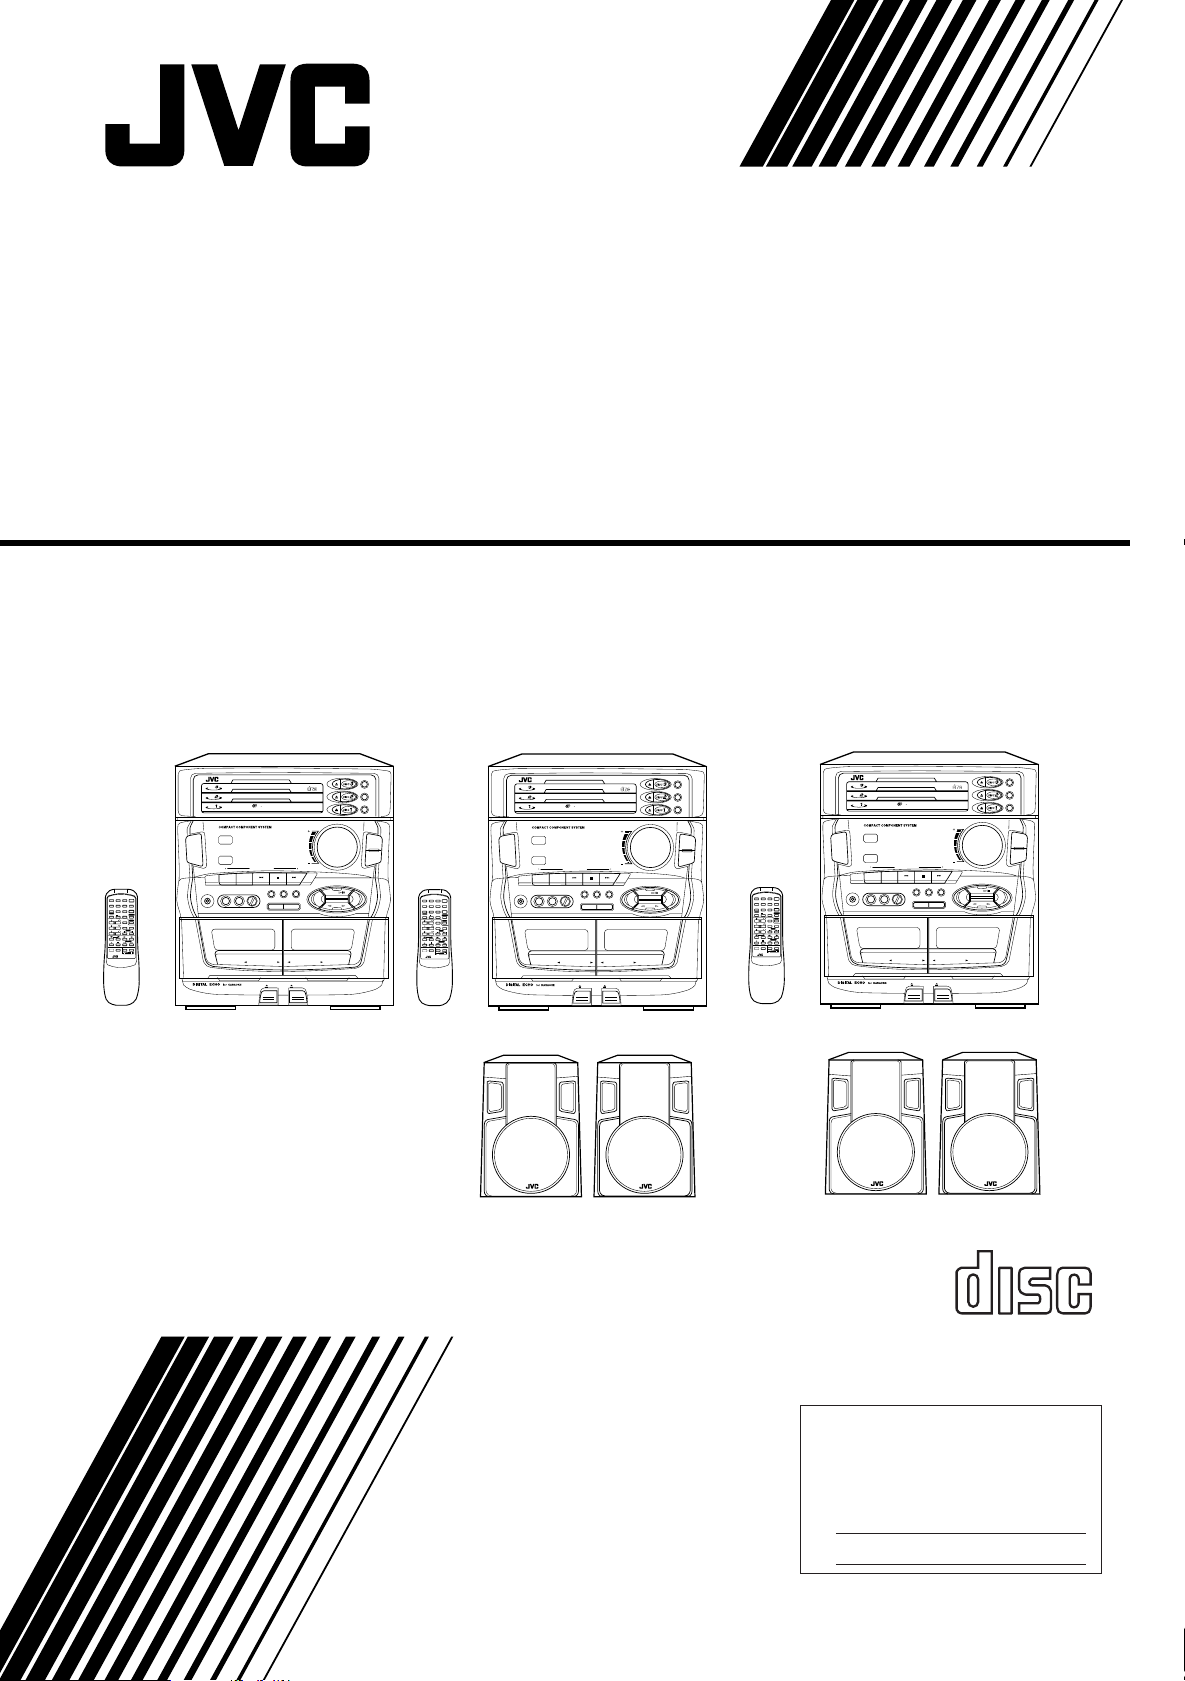
COMPACT COMPONENT SYSTEM
SISTEMA DE COMPONENTES COMPACTO
SISTEMA DE COMPONENTE COMPACTO
CA-D501T/MX-D401T/MX-D301T
Consists of CA-D401T and SP-D401
Consists of CA-D301T and SP-D311
Consta del CA-D401T el SP-D401
Consta del CA-D301T el SP-D311
Consta do CA-D401T e SP-D401
Consta do CA-D301T e SP-D311
COMPACT
DIGITAL AUDIO
PLAY & EXCHANGE SYSTEM
DISC
DISC
DISC
DISC
3
TRIPLE TRAY
COMPACT
DIGITAL AUDIO
REPEAT
RANDOM
CONTINUE
SOUND
MODE
ACTIVE
BASS EX.
MULTI CONTROL
VOLUME
EJECT
STANDBY
SENSOR
P. UP
P. DOWN
TUNING
UP
TUNING
DOWN
CD REC START
DUBBING
START/STOP
REC
DECK A/B
REVERSE MODE
PHONES
CD
TAPE
AUX
FM
/AM
EJECT
PLAY
REC/PLAY
A
B
AUTO REVERSE
AUTO REVERSE
FULL-LOGIC CONTROL
AUTO TAPE SELECTOR
MIC 1
MIC 2
MIC LEVEL
MIN
MAX
POWER
MX-D501T
1
2
3
4
5
6
7
8
9
ACTIVE
BASS EX.
REC PAUSE
10
10
FM/AM
A
B
DISC
FM MODE
PLAY MODE
7
/CLEAR
£
/
8
DISC
DISC
VOLUME
SHIFT
SOUND
MODE
SLEEP
ECHO
POWER
RM-SED50TXU
REMOTE CONTROL
AUX
C D
DECK
CLOCK
TIMER
SET
– SELECT +
PLAY & EXCHANGE SYSTEM
DISC
DISC
DISC
DISC
3
TRIPLE TRAY
COMPACT
DIGITAL AUDIO
REPEAT
RANDOM
CONTINUE
SOUND
MODE
ACTIVE
BASS EX.
MULTI CONTROL
VOLUME
EJECT
STANDBY
SENSOR
P. UP
P. DOWN
TUNING
UP
TUNING
DOWN
CD REC START
DUBBING
START/STOP
REC
DECK A/B
REVERSE MODE
PHONES
CD
TAPE
AUX
FM
/AM
EJECT
PLAY
REC/PLAY
A
B
AUTO REVERSE
AUTO REVERSE
FULL-LOGIC CONTROL
AUTO TAPE SELECTOR
MIC 1
MIC 2
MIC LEVEL
MIN
MAX
POWER
MX-D401T
1
2
3
4
5
6
7
8
9
ACTIVE
BASS EX.
REC PAUSE
10
10
FM/AM
A
B
DISC
FM MODE
PLAY MODE
7
/CLEAR
£
/
8
DISC
DISC
VOLUME
SHIFT
SOUND
MODE
SLEEP
ECHO
POWER
RM-SED50TXU
REMOTE CONTROL
AUX
C D
DECK
CLOCK
TIMER
SET
– SELECT +
PLAY & EXCHANGE SYSTEM
DISC
DISC
DISC
DISC
3
TRIPLE TRAY
COMPACT
DIGITAL AUDIO
REPEAT
RANDOM
CONTINUE
SOUND
MODE
ACTIVE
BASS EX.
MULTI CONTROL
VOLUME
EJECT
STANDBY
SENSOR
P. UP
P. DOWN
TUNING
UP
TUNING
DOWN
CD REC START
DUBBING
START/STOP
REC
DECK A/B
REVERSE MODE
PHONES
CD
TAPE
AUX
FM
/AM
EJECT
PLAY
REC/PLAY
A
B
AUTO REVERSE
AUTO REVERSE
FULL-LOGIC CONTROL
AUTO TAPE SELECTOR
MIC 1
MIC 2
MIC LEVEL
MIN
MAX
POWER
MX-D301T
1
2
3
4
5
6
7
8
9
ACTIVE
BASS EX.
REC PAUSE
10
10
FM/AM
A
B
DISC
FM MODE
PLAY MODE
7
/CLEAR
£
/
8
DISC
DISC
VOLUME
SHIFT
SOUND
MODE
SLEEP
ECHO
POWER
RM-SED50TXU
REMOTE CONTROL
AUX
C D
DECK
CLOCK
TIMER
SET
– SELECT +
CA-D501T
MX-D401T
MX-D301T
CA-D401T
CA-D301T
SP-D401
SP-D311
CA-D301T/401T/501T/Cover-1
97.7.15, 6:48 PM
1
For Customer Use:
Enter below the Model No. and Serial
No. which are located either on the rear,
bottom or side of the cabinet. Retain this
information for future reference.
Model No.
Serial No.
COMP ACT COMPONENT SYSTEM
SISTEMA DE COMPONENTES COMPACTO
SISTEMA DE COMPONENTE COMPACTO
CA-D501T/MX-D401T/MX-D301T
Consists of CA-D401T and SP-D401 Consists of CA-D301T and SP-D311
Consta del CA-D401T el SP-D401 Consta del CA-D301T el SP-D311
Consta do CA-D401T e SP-D401 Consta do CA-D301T e SP-D311
CA-D501T MX-D401T MX-D301T
DIGITAL AUDIO
VOLUME
COMPACT
FM
/AM
CD
AUX
TAPE
FULL-LOGIC CONTROL
AUTO TAPE SELECTOR
REPEAT
RANDOM
CONTINUE
SOUND
MODE
ACTIVE
BASS EX.
CLOCK TIMER
REC PAUSE
SOUND
MODE
1
456
– SELECT +
789
ECHO
10
DISC
DISC
DISC
A
REPEAT
TRIPLE TRAY
MULTI CONTROL
COMPACT
DIGITAL AUDIO
RANDOM
VOLUME
FM
/AM
CD
AUX
TAPE
FULL-LOGIC CONTROL
AUTO TAPE SELECTOR
CONTINUE
SOUND
MODE
ACTIVE
BASS EX.
POWER
23
1
CLOCK TIMER
SLEEP
456
– SELECT +
SHIFT
789
SET
ECHO
FM/AM
FM MODE
10
10
DISC
AUX
PLAY MODE
DISC
7
/CLEAR
£/8
C D
DISC
A
B
DECK
REC PAUSE
VOLUME
ACTIVE
SOUND
BASS EX.
MODE
RM-SED50TXU
REMOTE CONTROL
DISC
3
PLAY & EXCHANGE SYSTEM
MX-D501T
P. UPP. DOWN
CD REC STARTDUBBING
REC
START/STOP
DECK A/B REVERSE MODE
EJECT
EJECT
DISC
DISC
DISC
DISC
3
TRIPLE TRAY
PLAY & EXCHANGE SYSTEM
STANDBY
POWER
SENSOR
PHONES
MX-D401T
MULTI CONTROL
TUNINGUPTUNING
DOWN
MIC 1 MIC 2 MIC LEVEL
AB
PLAY REC/PLAY
P. UPP. DOWN
CD REC STARTDUBBING
REC
START/STOP
DECK A/B REVERSE MODE
MIN MAX
AUTO REVERSE AUTO REVERSE
EJECT
EJECT
DISC
DISC
DISC
STANDBY
POWER
SENSOR
TUNINGUPTUNING
DOWN
MIC 1 MIC 2 MIC LEVEL
POWER
23
SLEEP
SHIFT
SET
FM/AM
FM MODE
10
AUX
PLAY MODE
7
/CLEAR
£/8
C D
B
DECK
VOLUME
ACTIVE
BASS EX.
RM-SED50TXU
REMOTE CONTROL
PHONES
MIN MAX
AB
PLAY REC/PLAY
AUTO REVERSE AUTO REVERSE
DIGITAL AUDIO
VOLUME
COMPACT
FM
/AM
CD
AUX
TAPE
FULL-LOGIC CONTROL
AUTO TAPE SELECTOR
REPEAT
RANDOM
CONTINUE
SOUND
MODE
ACTIVE
BASS EX.
POWER
23
1
CLOCK TIMER
SLEEP
456
– SELECT +
SHIFT
789
SET
ECHO
FM/AM
FM MODE
10
10
DISC
AUX
PLAY MODE
DISC
7
/CLEAR
£/8
C D
DISC
A
B
DECK
REC PAUSE
VOLUME
ACTIVE
SOUND
BASS EX.
MODE
RM-SED50TXU
REMOTE CONTROL
DISC
DISC
DISC
DISC
3
TRIPLE TRAY
PLAY & EXCHANGE SYSTEM
STANDBY
POWER
SENSOR
PHONES
MX-D301T
MULTI CONTROL
TUNINGUPTUNING
DOWN
MIC 1 MIC 2 MIC LEVEL
AB
PLAY REC/PLAY
P. UPP. DOWN
CD REC STARTDUBBING
REC
START/STOP
DECK A/B REVERSE MODE
MIN MAX
AUTO REVERSE AUTO REVERSE
EJECT
EJECT
CA-D401T CA-D301T
SP-D401 SP-D311
COMPACT
DIGITAL AUDIO
INSTRUCTIONS
MANUAL DE INSTRUCCIONES
INSTRUÇÕES
PART No. FMUN9002-181M
[ U, UT, US, UB ]

Warnings, Cautions and Others
Avisos, precauciones y otras notas
Advertências, precauções e outras notas
IMPORTANT for the U.K.
DO NOT cut off the mains plug from this equipment. If the
plug fitted is not suitable for the power points in your home
or the cable is too short to reach a power point, then obtain
an appropriate safety approved extension lead or consult
your dealer.
BE SURE to replace the fuse only with an identical approved
type, as originally fitted.
If nontheless the mains plug is cut off ensure to remove the
fuse and dispose of the plug immediately, to avoid a possible
shock hazard by inadvertent connection to the mains supply.
If this product is not supplied fitted with a mains plug then
follow the instructions given below:
IMPORTANT.
DO NOT make any connection to the terminal which is
marked with the letter E or by the safety earth symbol or
coloured green or green-and-yellow.
The wires in the mains lead on this product are coloured in
accordance with the following code:
Blue : Neutral
Brown : Live
As these colours may not correspond with the coloured
markings identifying the terminals in your plug proceed as
follows:
The wire which is coloured blue must be connected to the
terminal which is marked with the letter N or coloured black.
The wire which is coloured brown must be connected to the
terminal which is marked with the letter L or coloured red.
IF IN DOUBT — CONSULT A COMPETENT ELECTRICIAN.
Caution –– POWER switch!
Disconnect the mains plug to shut the power off completely. The
POWER switch in any position does not disconnect the mains
line. The power can be remote controlled.
¡Atención –– Interruptor POWER!
Desconectar el cable de alimentación para desactivar la
alimentación totalmente. Cualquier que sea la posición de ajuste
del interruptor POWER, la alimentación no es cortada
completamente. La alimentación puede ser controlada
remotamente.
Atenção –– Interruptor POWER!
Desconecte o cabo de alimentação para interromper a alimentação completamente. Qualquer que seja a posição de ajuste do
interruptor POWER, a alimentação não é completamente cortada. A alimentação pode ser controlada remotamente.
CAUTION
To reduce the risk of electrical shocks, fire, etc.:
1. Do not remove screws, covers or cabinet.
2. Do not expose this appliance to rain or moisture.
PRECAUCIÓN
Para reducir riesgos de choques eléctricos, incendio, etc.:
1. No extraiga los tornillos, los cubiertas ni la caja.
2. No exponga este aparato a la lluvia o a la humedad.
PRECAUÇÃO
Para reduzir riscos de choques elétricos, incêndio, etc.:
1. Não remova parafusos e tampas ou desmonte a
caixa.
2. Não exponha este aparelho à chuva nem à umidade.
G-1
IMPORTANT FOR LASER PRODUCTS / IMPORTANTE PARA PRODUCTOS LÁSER / IMPOTANTE
PARA PRODUTOS LASER /
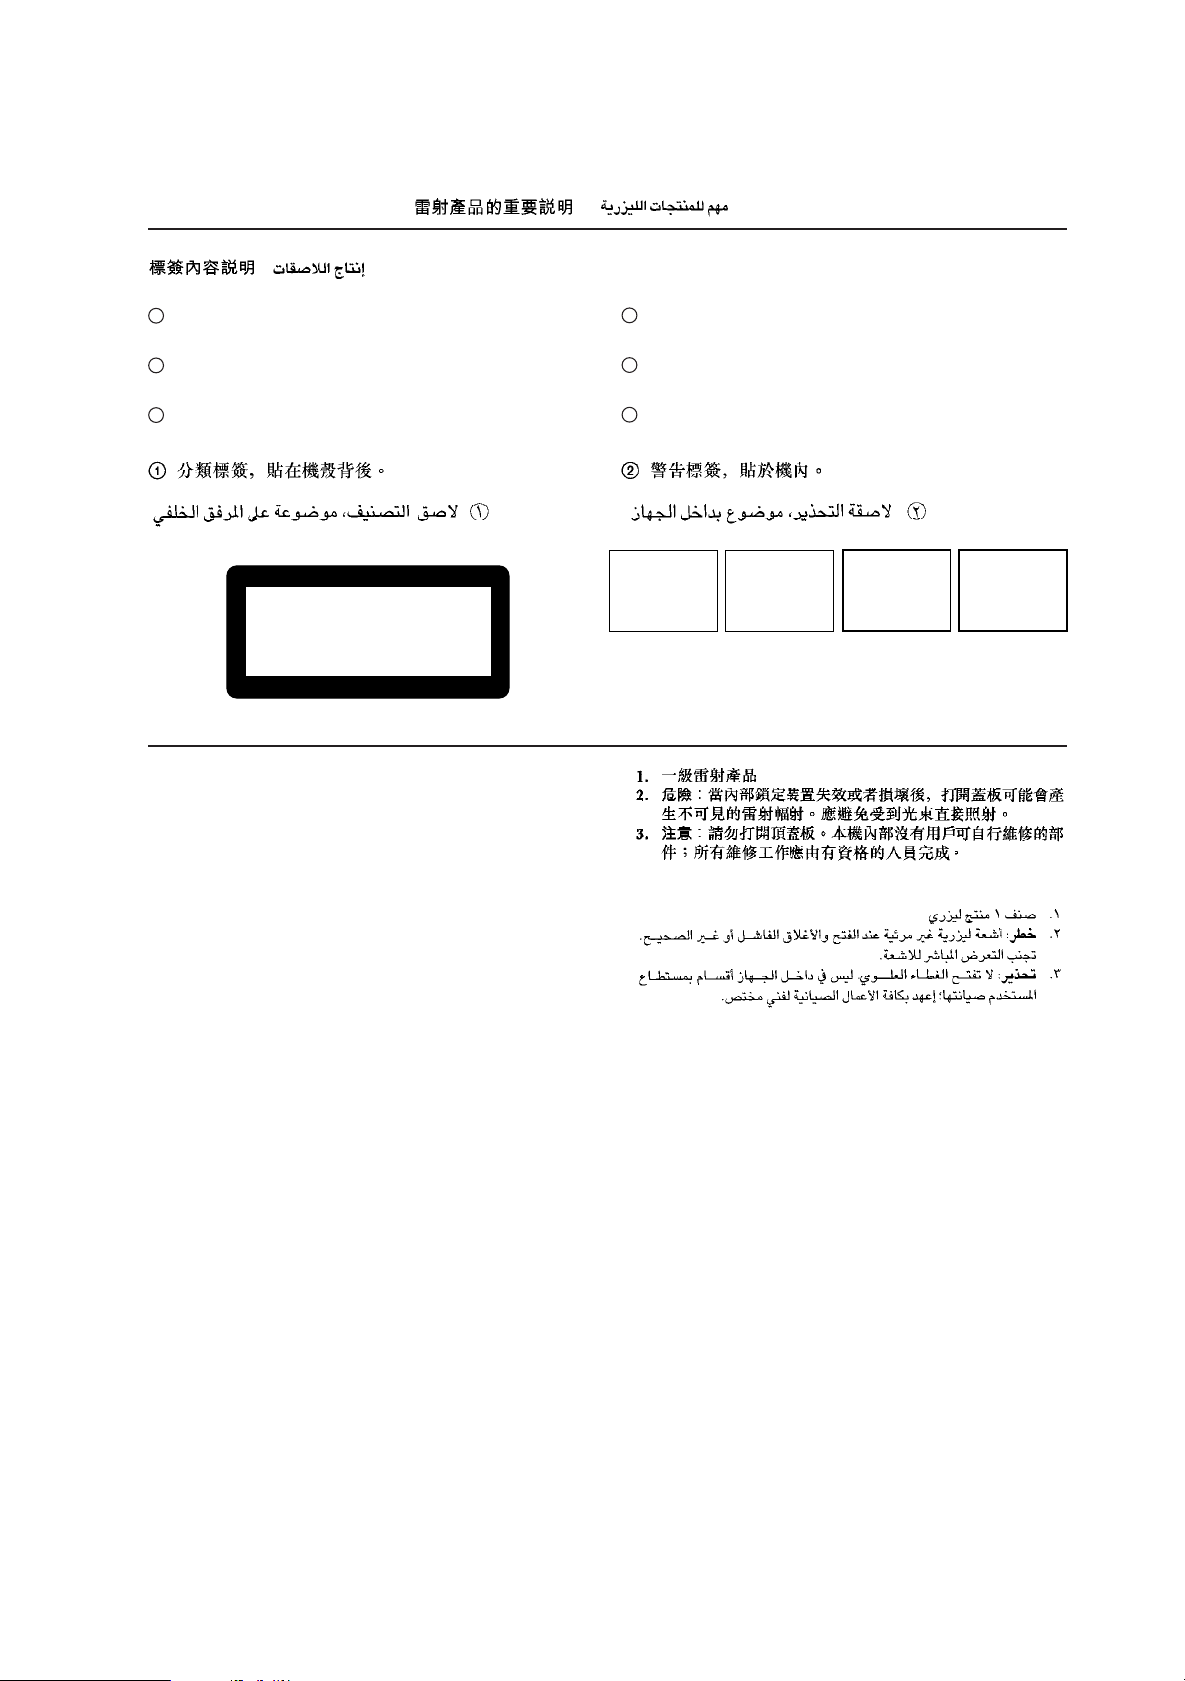
REPRODUCTION OF LABELS / REPRODUCCIÓN DE ETIQUETAS / REPRODUÇÃO DE ETIQUETAS
/
/
1 CLASSIFICATION LABEL, PLACED ON REAR ENCLO-
SURE
1 ETIQUETA DE CLASIFICACIÓN, PEGADA EN LA PARTE
POSTERIOR DE LA CAJA
1 ETIQUETA DE CLASSIFICAÇÃO LOCALIZADA NA PARTE
POSTERIOR DA CAIXA DO APARELHO.
CLASS 1
LASER PRODUCT
1. CLASS 1 LASER PRODUCT
2. DANGER: Invisible laser radiation when open and interlock
failed or defeated. Avoid direct exposure to beam.
3. CAUTION: Do not open the top cover. There are no user
serviceable parts inside the Unit; leave all servicing to qualified service personnel.
2 WARNING LABEL, PLACED INSIDE THE UNIT
2 ETIQUETA DE ADVERTENCIA, PEGADA EN EL INTE-
RIOR DE LA UNIDAD
2 ETIQUETA DE ADVERTÊNCIA LOCALIZADA NA PARTE
INTERNA DA UNIDADE.
DANGER: Invisible laser
radiation when open and
interlock failed or defeated.
AVOID DIRECT EXPOSURE
TO BEAM. (e)
VARNING: Osynlig laserstrålning när denna del är
öppnad och spärren är
urkopplad. Betrakta ej
strålen. (s)
ADVARSEL: Usynlig laserstråling ved åbning, når
sikkerhedsafbrydere er ude
af funktion. Undgå udsættelse for stråling (d)
VARO: Avattaessa ja suojalukitus ohitettaessa olet
alttiina näkymättömälle
lasersäteilylle. Älä katso
säteeseen. (f)
1. PRODUCTO LÁSER CLASE 1
2. PELIGRO: En el interior hay radiación láser invisible. Evite el
contacto directo con el haz.
3. PRECAUCIÓN: No abra la tapa superior. En el interior de la
unidad no existen piezas reparables por el usuario; deje todo
servicio técnico en manos de personal calificado.
1. PRODUTO LASER CLASSE 1
2. PERIGO: O laser emite uma rediação invisível que é perigosa,
caso o aparelho esteja aberto e a trava inoperante ou
danificada. Evite exposição direta ao feixe dos raios.
3. CUIDADO: Não abra a caixa do aparelho. Não existem
peças reparáveis pelo usuário na parte interna da unidade.
Solicite assistência técnica somente a pessoal técnico
qualificado.
G-2
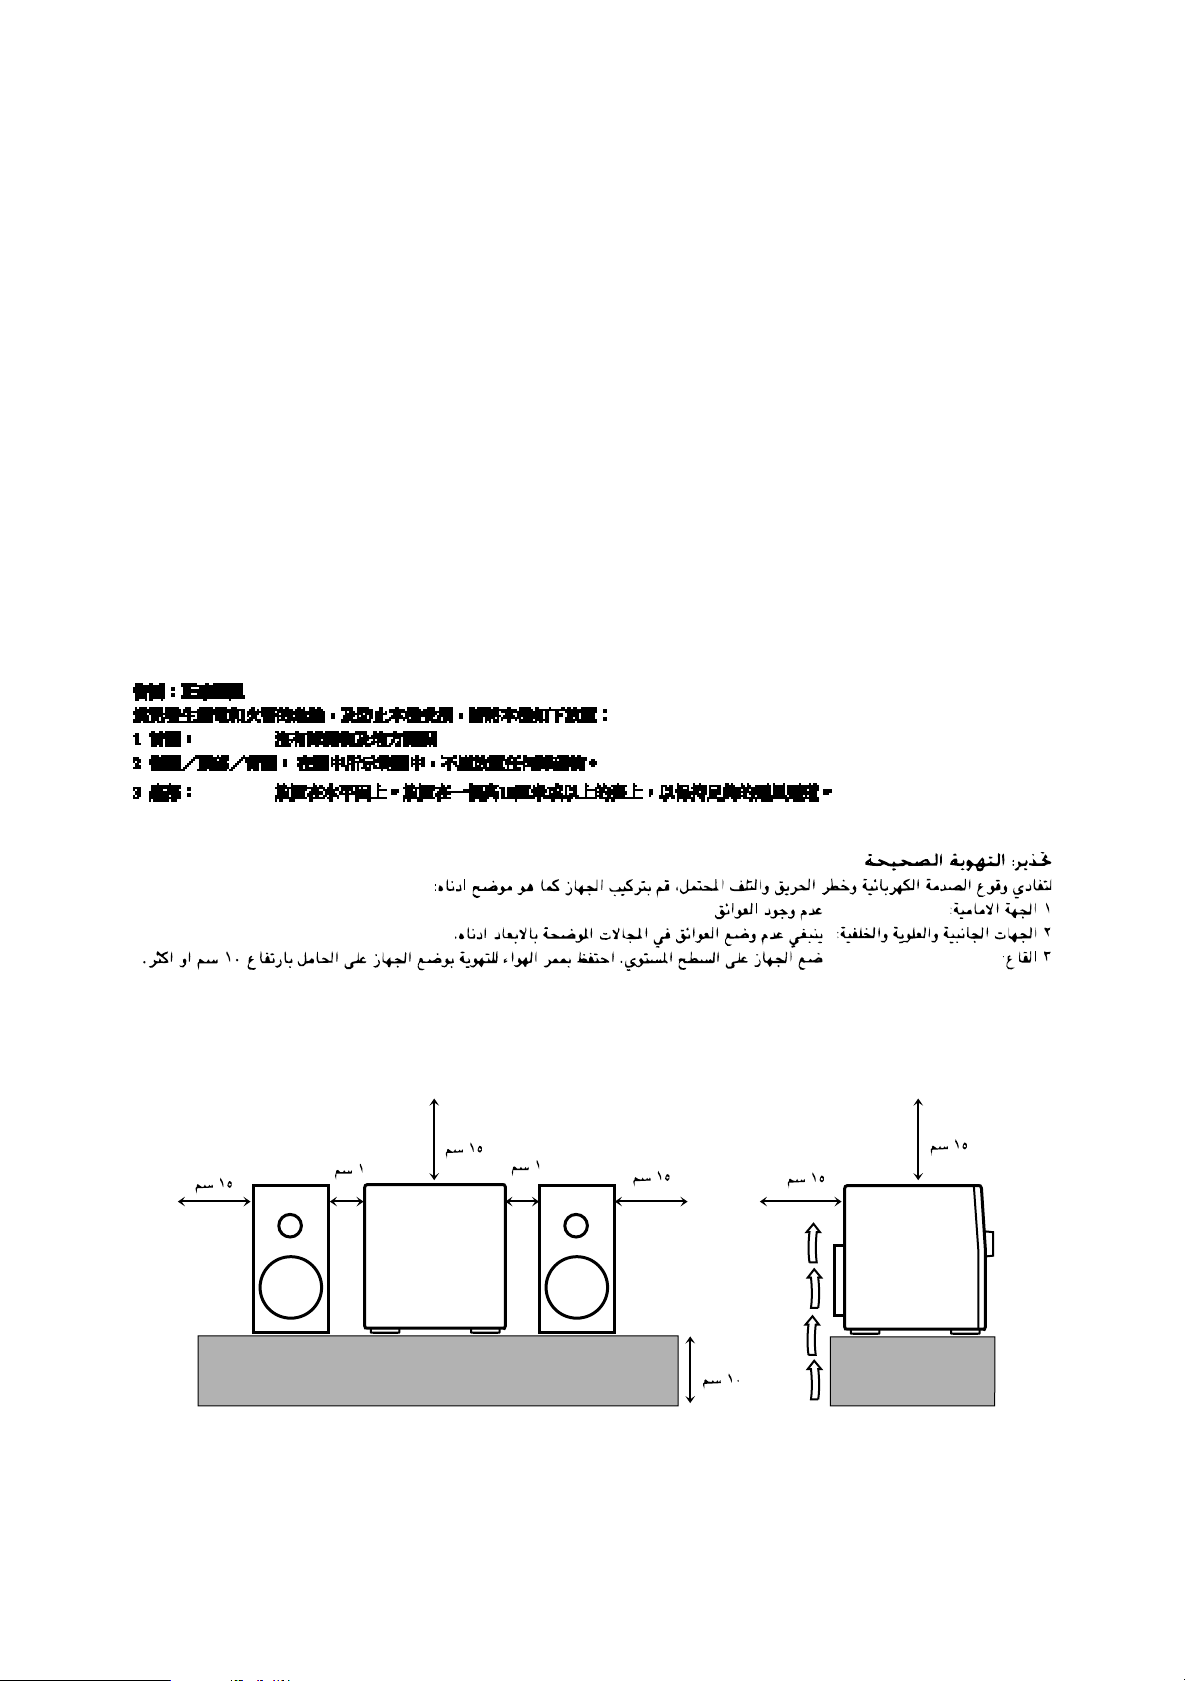
Caution: Proper Ventilation
To avoid risk of electric shock and fire, and to prevent damage, locate the apparatus as follows:
1 Front: No obstructions and open spacing.
2 Sides/ Top/ Back: No obstructions should be placed in the areas shown by the dimensions below.
3 Bottom: Place on the level surface. Maintain an adequate air path for ventilation by placing on a stand with a height of
Precaución: el aparato debe estar bien ventilado
Para evitar posibles riesgos de descargas eléctricas e incendios y prevenir cualquier posible daño, coloque el aparato del modo
siguiente:
1 Parte delantera: No ponga nada delante, deje el espacio libre.
2 Laterales/ parte superior/ parte trasera: No se debería colocar nada en las áreas y las distancias que se detallan a
3 Parte inferior: Coloque el aparato sobre una superficie recta. Debe haber buena circulación de aire; para ello, coloque el
Precaução: Ventilação adequada
Para evitar riscos de choques elétricos e incêndios, e prevenir avarias, instale o aparelho como segue:
1 Parte frontal: Sem obstruções e espaços abertos.
2 Partes laterais/Tampa/Posterior: Nenhuma obstrução deverá ser colocada entre as áreas cujas dimensões são indicadas
3 Parte inferior: Instale-o sobre uma superfície plana. Deverá ser mantido espaço suficiente para a ventilação se este for
10 cm or more.
continuación.
aparato sobre una base a una altura mínima de 10 cm.
abaixo.
instalado numa posição que tenha uma altura de 10 cm ou mais.
G-3
15 cm
15 cm
15 cm 15 cm
1 cm
15 cm 15 cm
CA-D701T
CA-D501T/
CA-D401T/
CA-D301T
1 cm
1 cm1 cm
15 cm
10 cm
10 cm
15 cm
15 cm
15 cm
CA-D501T/
CA-D701T
CA-D3SCA-D3S
CA-D401T/
CA-D301T

Thank you for purchasing the JVC Compact Component System.
We hope it will be a valued addition to your home, giving you years of enjoyment.
Be sure to read this instruction manual carefully before operating your new stereo system.
Here you will find all the information you need to set up and use the system.
For questions that are not be answered in the manual, please contact your dealer.
Features
English
Easy operation
Great sound
Triple T ray
Sing Along
Here are some of the things that make your System powerful and easy to use.
o The controls and operations have been redesigned to make them very easy to use, so you can spend
your time listening to music.
• With the One Touch Operation feature of JVC’s COMPU PLAY you can turn on the System and
start the radio, the Cassette Deck, or the CD Player with a single touch.
o To get such great sound from such a compact package the System has:
• Programmed sound mode includes live surround effects D. CLUB, HALL, and STADIUM. It
also includes S.E.A (Sound Effect Amplifier) effects ROCK, CLASSIC, and POP.
o CD changer function can operate 3 discs.
• Discs can be changed during play using the TRIPLE TRA Y.
• Continuous, random or program play of 3 discs.
Includes a timer for recording broadcasts while you are out, and an easy-to-use Sleep timer.
You can use conventional tapes and CDs for Karaoke with the voice masking system. With an
optional microphone, you can replace the lead singer’s voice on your favorite songs with your own.
• Digital Echo applied to your voice through the microphone gives you a professional sound.
How This Manual Is Organized
In this manual we have incorporated some special features:
• Basic information that is the same for many different functions is grouped in one place, and not
repeated in each procedure. For instance, in the section on playing a CD, we do not repeat the
information about setting the volume and the sound conditions, which are discussed in the Common
Operations section.
• Name of buttons and controls are written in all capital letters like this: SOUND MODE.
• When we are talking about the Function, rather than the BUTTON or DISPLAY, only the first letter is
capitalized.
The manual has a table of contents to help you quickly look up what you want to know.
We’ve enjoyed making this manual for you, and hope you will use it to enjoy the sound and many
features built into your System.
IMPORTANT CAUTIONS
1. Installation of the Unit
• Select a place which is level, dry and neither too hot nor too cold. (Between 5°C and 35°C or
41°F and 95°F.)
• Leave sufficient distance between the Unit and a TV.
• Do not use the Unit in a place subject to vibrations.
2. Power cord
• Do not handle the power cord with wet hands!
• Some power (12 watts) is always consumed as long as the power cord is connected to the wall
outlet.
• When unplugging the Unit from the wall outlet, always pull the plug, not the power cord.
3. Malfunctions, etc.
• There are no user serviceable parts inside. If anything goes wrong, unplug the power cord and
consult your dealer.
• Do not insert any metallic object into the Unit.
1

Table of Contents
English
Features…………………………………………………………….1
How This Manual Is Organized…………………………… 1
IMPORTANT CAUTIONS ………………………………… 1
Getting Started ………………………………………… 3
Accessories ……………………………………………………….3
Set the VOLTAGE SELECTOR Switch………………..3
How To Put Batteries In the Remote Control …………3
Using the Remote Control …………………………………..3
Connecting the FM Antenna………………………………..4
Connecting the AM Antenna ………………………………. 4
Connecting the Speakers
Connecting the Speakers
Connecting Auxiliary Equipment …………………………6
COMPU PLAY ………………………………………………….6
Common Operations………………………………… 7
Turning the Power On and Off …………………………….7
Turning the System On…………………………………..7
Turning the System Off …………………………………. 7
Adjusting the Volume …………………………………………8
Reinforcing the Bass Sound ………………………………..8
Sound Modes …………………………………………………….8
Listening to Auxiliary Equipment ………………………..9
Using the T uner ……………………………………… 10
Setting the AM Tuner Interval Spacing…………..10
One Touch Radio…………………………………………10
Tuning In a Station ………………………………………….. 11
Switching between Frequency Bands…………….. 11
Three ways to select a station………………………..11
Presetting Stations ……………………………………………11
To Change the FM Reception Mode……………………11
Using the CD Player……………………………….. 12
The Quickest Way To Start a CD Is With the
One Touch Operation ……………………………….13
To Insert Discs …………………………………………………13
Basics of Using the CD Player — Normal Play……14
To Play a Disc……………………………………………..14
To Select a Disc, Track Or Passage
Within a Track ………………………………………… 14
Locating a Track With the Remote Control
Directly …………………………………………………..14
To Change Discs While Playing……………………. 14
Continuous Play……………………………………………….15
Programming the Playing Order of the Tracks……..15
Random Play …………………………………………………..16
(CA-D501T) ………………………… 5
(MX-D401T/MX-D301T) ……… 5
Repeating a Selection or the Discs …………………….. 17
Tray Lock Function …………………………………………. 17
Locking the Electronic Lock ………………………… 17
Unlocking the Electronic Lock……………………… 17
Using the Cassette Deck
(Listening to a T ape)…………………………… 18
One Touch Play …………………………………………..18
Regular Play ……………………………………………………18
Fast Left and Fast Right ……………………………….19
Music Scan ……………………………………………………..19
T o Find the Beginning of the Current Selection ….19
To Find the Beginning of the Next Selection …..19
Reverse Mode ………………………………………………….19
Using the Cassette Deck (Recording) ……… 20
Things To Know Before You Start Recording….20
Standard Recording ………………………………………….21
To Record Any Sound Source To Tape…………… 21
CD Direct Recording ………………………………………..22
Tape to Tape Recording (Dubbing) …………………….22
How to Use the DUBBING Button ………………..22
Using the Timer ……………………………………… 23
Setting the Clock ……………………………………………..23
Setting the Timer ……………………………………………..24
Setting the SLEEP Timer………………………………….. 25
Using the Microphone ……………………………. 26
Karaoke (Sing Along)……………………………………….26
Singing Along with Karaoke ………………………… 26
Digital Echo……………………………………………….. 27
To Record Your Singing ……………………………….27
Microphone Mixing………………………………………….28
To Record Microphone Mixing ……………………..28
Playing the Microphone Sound through
the Speaker …………………………………………………28
Recording from the Microphone ……………………
Care And Maintenance …………………………… 29
Troubleshooting …………………………………….. 30
Specifications………………………………………… 31
28
2
Getting Started
Accessories
Check that you have all of the following items, which are supplied with the System.
AM Loop Antenna (1)
Remote Control (1)
Batteries (2)
FM Wire Antenna (1)
AC Plug Adaptor (except for Hong Kong) (1)
If any of these items is missing, contact your dealer immediately.
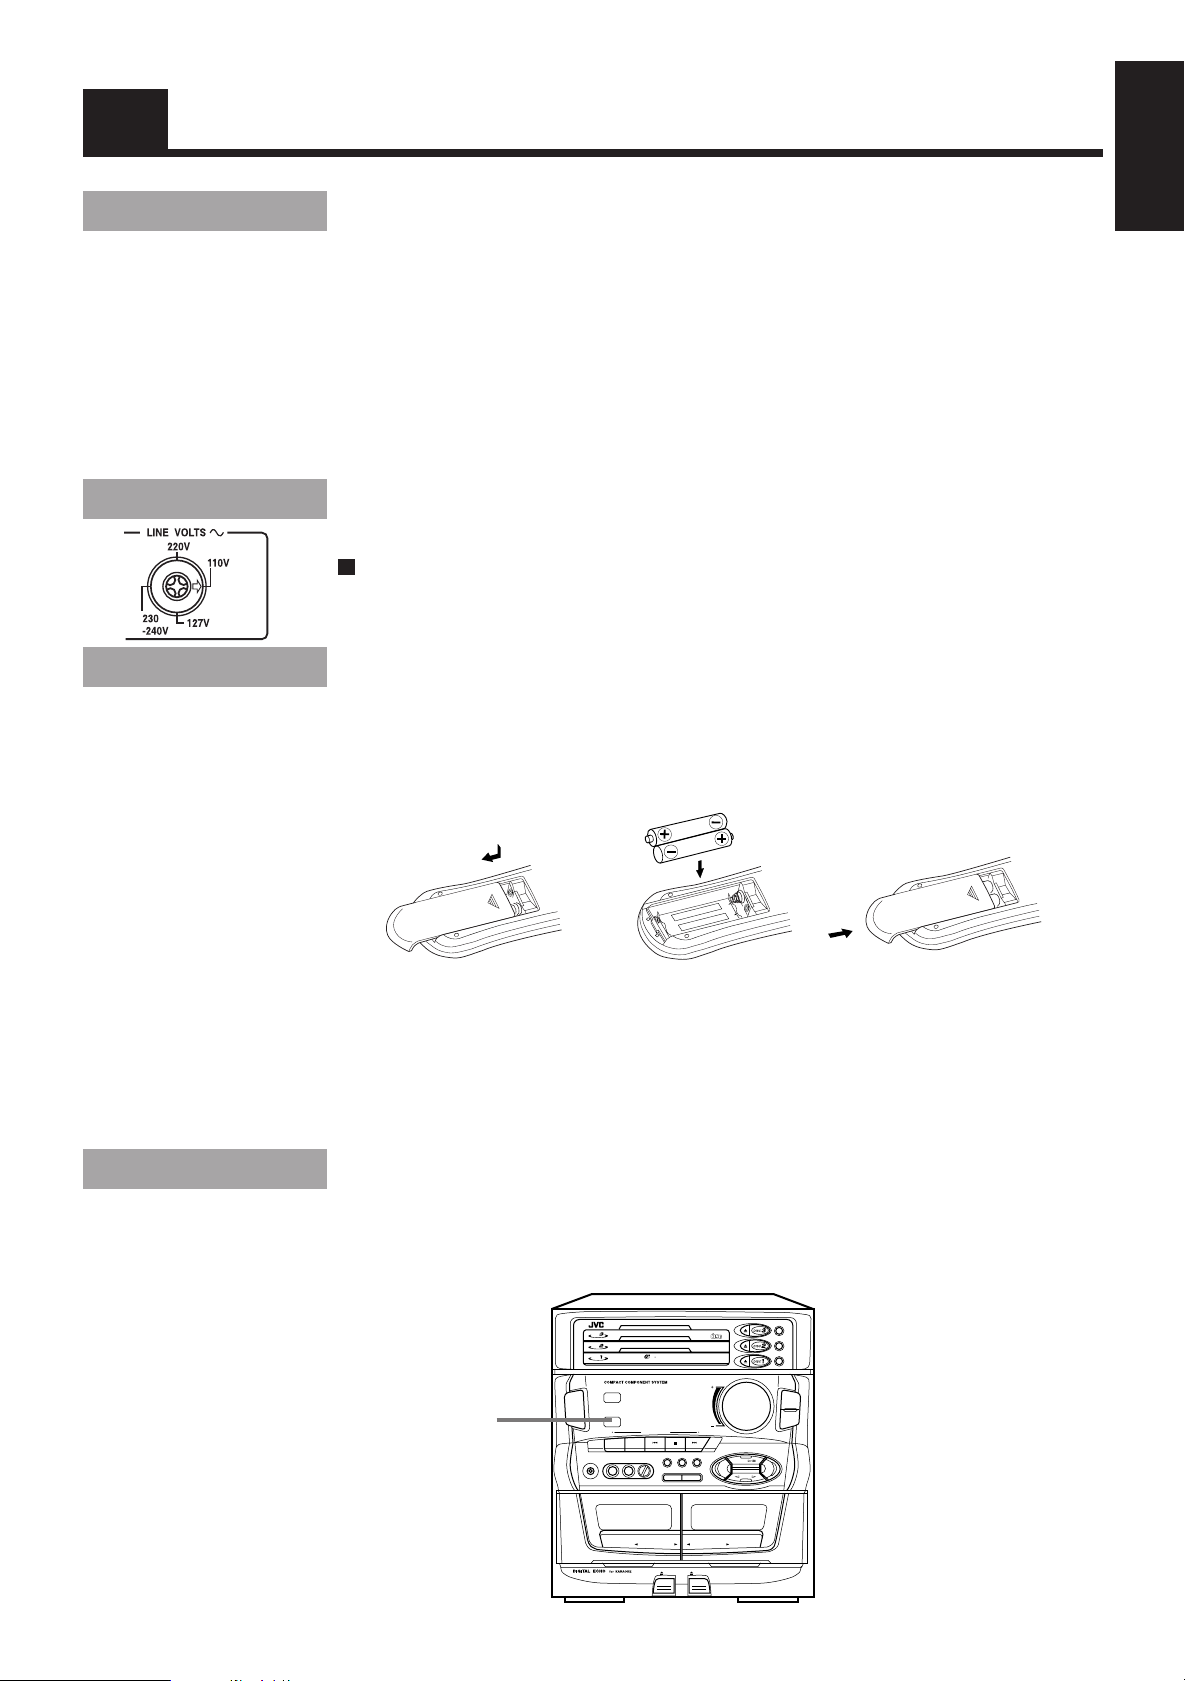
Set the VOLTAGE SELECTOR Switch
To avoid damaging the System, set the voltage before plugging in the Unit.
o Set the correct voltage for your area with the VOLTAGE SELECTOR switch on the back panel of the
System. Use a screwdriver to rotate the selector so the number the arrow is pointed at is the same as
the voltage.
How To Put Batteries In the Remote
English
Control
Match the polarity (+ and –) on the batteries with the + and – markings in the battery compartment.
R6P (SUM-3)/AA (15F)
CAUTION: Handle batteries properly.
To avoid battery leakage or explosion:
• Remove batteries when the Remote Control will not be used for a long time.
• When you need to replace the batteries, replace both batteries at the same time with new ones.
• Don’t use an old battery with a new one.
• Don’t use different types of batteries together.
Using the Remote Control
The Remote Control makes it easy to use many of the functions of the System from a distance of up to 7m
(23 feet) away.
You need to point the Remote Control at the remote sensor on the System’s front panel.
Remote sensor
FM
/AM
CD
AUX
TAPE
FULL-LOGIC CONTROL
AUTO TAPE SELECTOR
REPEAT
RANDOM
CONTINUE
SOUND
MODE
ACTIVE
BASS EX.
DISC
MX-D401T
START/STOP
DECK A/B REVERSE MODE
EJECT
PLAY & EXCHANGE SYSTEM
P. UPP. DOWN
CD REC STARTDUBBING
REC
EJECT
COMPACT
DIGITAL AUDIO
VOLUME
DISC
DISC
DISC
3
TRIPLE TRAY
STANDBY
POWER
SENSOR
MULTI CONTROL
TUNINGUPTUNING
DOWN
MIC 1 MIC 2 MIC LEVEL
PHONES
MIN MAX
AB
PLAY REC/PLAY
AUTO REVERSE AUTO REVERSE
3
English
CAUTION: Make all connections before plugging the Unit into an AC power outlet.
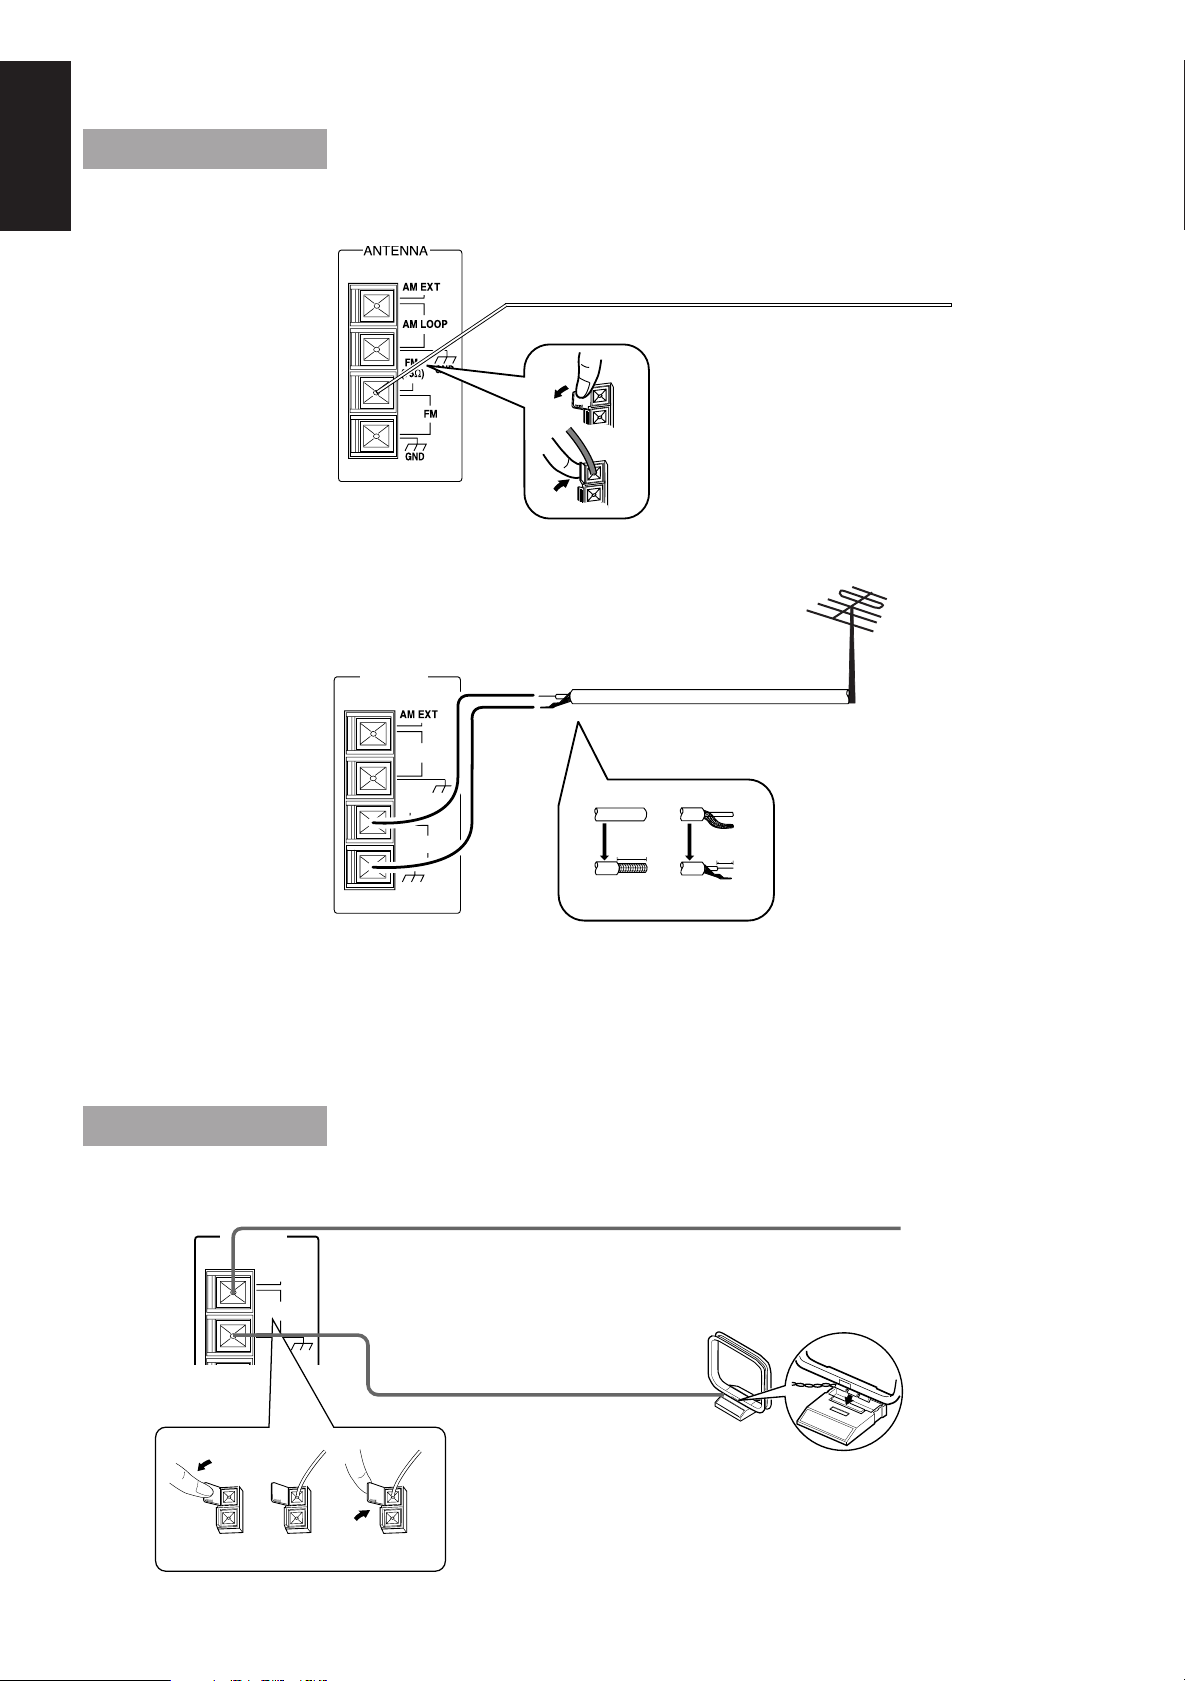
Connecting the FM Antenna
Using the Supplied Wire Antenna
FM Wire Antenna
Extend the supplied FM Wire Antenna
horizontally.
Using an FM 75-Ohm Antenna Wire (Not Supplied)
If reception is poor, connect the outside antenna.
ANTENNA
Outside FM antenna wire
AM LOOP
FM
(75Ω)
GND
GND
FM
20 mm
13
2
10 mm
Before attaching a 75 ohm coaxial lead (the kind with a round wire going to an outside antenna),
disconnect the supplied FM Wire Antenna.
CAUTION: To avoid noise, keep antennas away from metallic parts of the System, connecting cord and the AC power cord.
Connecting the AM Antenna
AM antenna wire (Not supplied) If reception is poor, connect the outside antenna.
ANTENNA
AM EXT
AM LOOP
FM
(75Ω)
GND
Note: Even when connecting
an outside AM antenna,
keep the indoor AM loop
connected.
4
FM
AM Loop Antenna
123
GND
Turn the loop until you
have the best reception
Snap the tabs on the loop
into the slots of the base to
attach the AM Loop.
CAUTION: Make all connections before plugging the Unit into an AC power outlet.
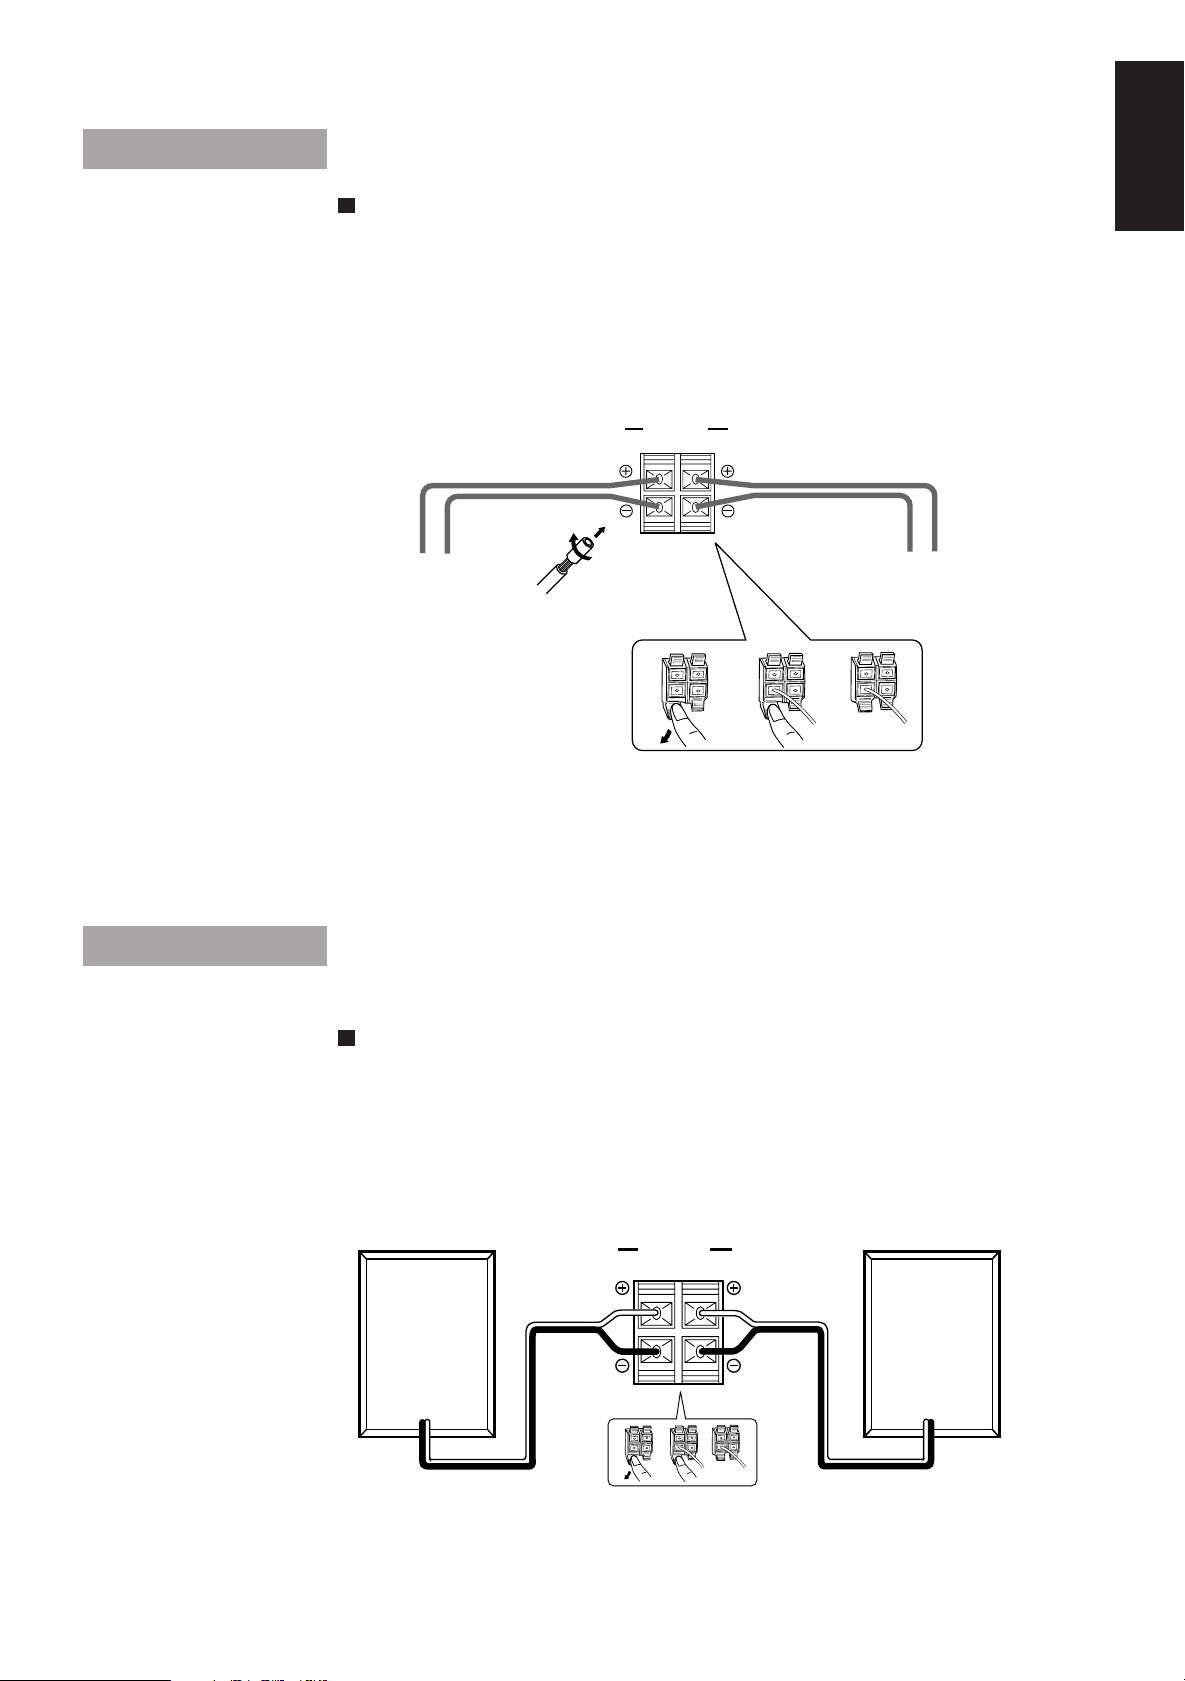
Connecting the Speakers (CA-D501T)
Please refer to instructions for speakers as well when you connect speakers.
For each speaker, connect one end of the speaker wire to the speaker terminals on the back of the
CA-D501T and the other end to the speaker.
1. Open each of the terminals and insert the speaker wires firmly (be sure to remove the insulation at the
end of each wire first), then close the terminals.
2. Connect the red (+) and black (–) terminals of the right side speaker to the red (+) and black (–)
terminals marked RIGHT on the CA-D501T.
Connect the red (+) and black (–) terminals of the left side speaker to the red (+) and black (–)
terminals marked LEFT on the CA-D501T.
SPEAKERS
RIGHT LEFT
English
Right speaker
Left speaker
IMPORTANT: Use speakers with the correct impedance only. The correct impedance is
indicated on the back panel.
CAUTION: If a TV is installed near speakers, the TV may display irregular colours. In this
case, set the speakers away from the TV.
Connecting the Speakers (MX-D401T/
MX-D301T)
Please refer to instructions for speakers as well when you connect speakers.
For each speaker, connect one end of the speaker wire to the speaker terminals on the back of the System.
1. Open each of the terminals and insert the speaker wires firmly, then close the terminals.
2. Connect the red (+) and black (–) terminals of the right side speaker to the red (+) and black (–)
terminals marked RIGHT on the System.
Connect the red (+) and black (–) terminals of the left side speaker to the red (+) and black (–)
terminals marked LEFT on the System.
SP-D401/SP-D311 RIGHT
SP-D401/SP-D311 LEFT
IMPORTANT: Use speakers with the correct impedance only. The correct impedance is
indicated on the back panel.
CAUTION: If a TV is installed near speakers, the TV may display irregular colours. In this
case, set the speakers away from the TV.
5
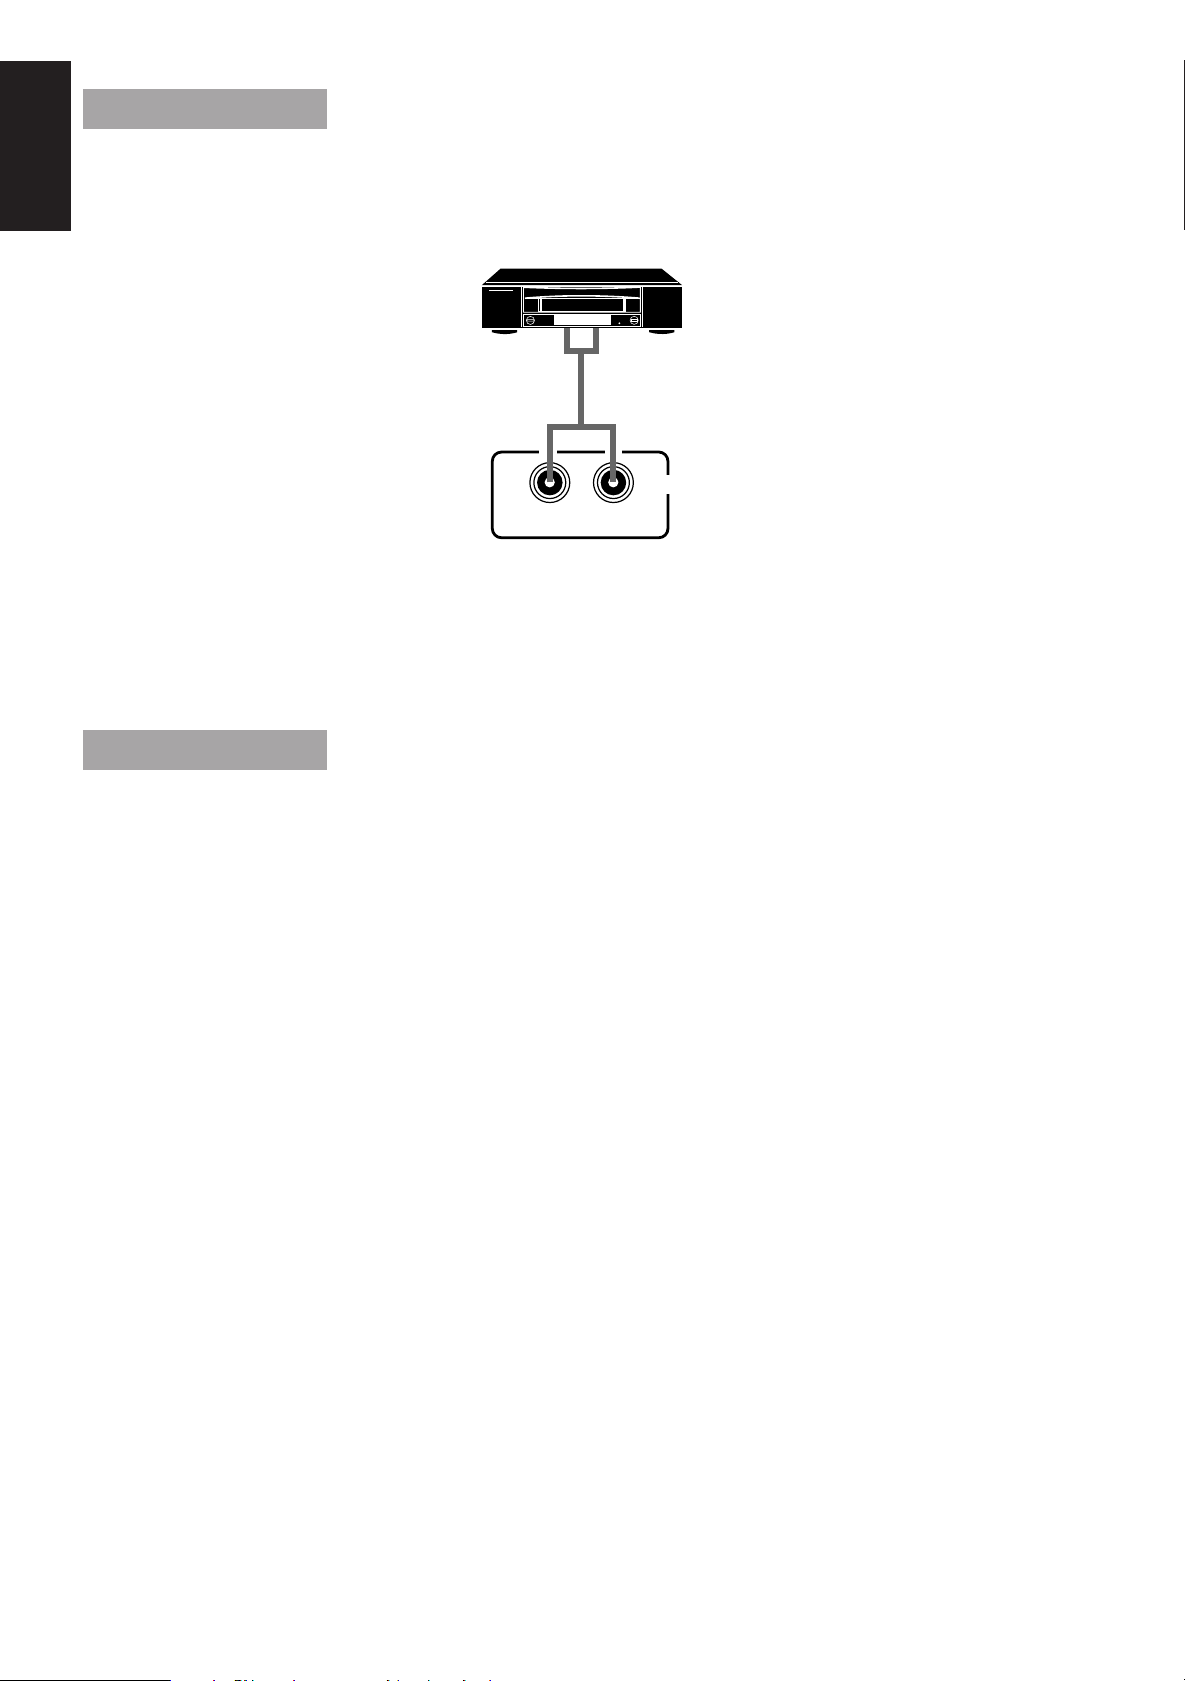
Connecting Auxiliary Equipment
English
VCR or other equipment
To listen to this source, press the AUX
button.
AUX
RIGHT LEFT
Now you can plug the AC power cord into the wall outlet, and your System is
at your command!
COMPU PLAY
COMPU PLAY is JVC’s feature that lets you control the most frequently used functions of the System
with a single touch.
One Touch Operation starts playing a CD, turns on the radio, plays a tape, etc. with a single press of the
play button for that function. What One Touch Operation does for you is to turn the power on, then start
the function you have specified. If the Unit is not ready, such as no CD or tape in place, the Unit still
powers on so you can insert a CD or tape.
How One Touch Operation works in each case is explained in the section dealing with that function.
The COMPU PLAY buttons are:
On the Unit
CD ‹/8 button
CD Player DISC-1 to DISC-3 buttons
CD Player Open/Close (0) buttons
FM/AM button
¤ T APE ‹ button
AUX button
On the Remote Control
FM/AM button
AUX button
CD control £/8 button
CD control DISC 1 to DISC 3 buttons
CD control Open/Close (0) buttons
Deck control ™, £ buttons
6
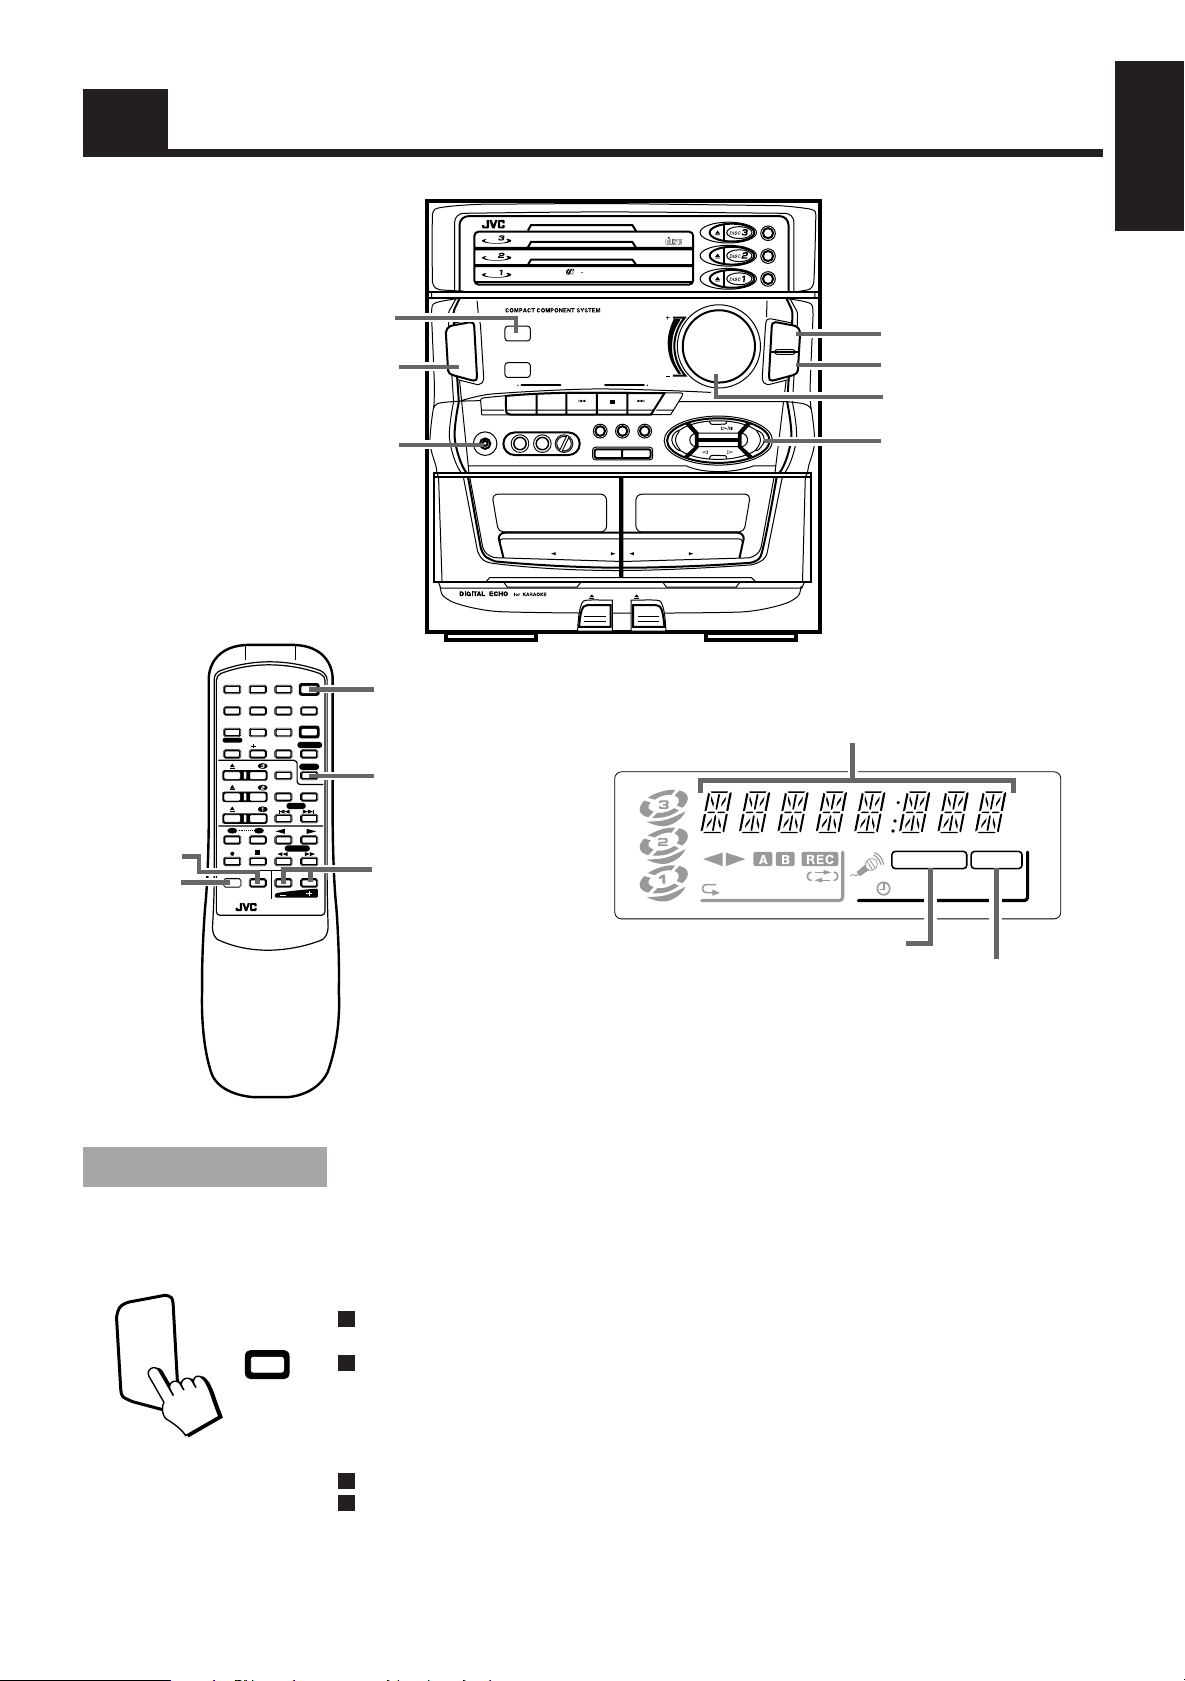
Common Operations
English
ACTIVE
BASS EX.
SOUND
MODE
ST ANDBY indicator
POWER
PHONES
POWER
23
1
CLOCK TIMER
456
– SELECT +
789
ECHO
10
DISC
DISC
DISC
A
REC PAUSE
SOUND
MODE
SET
ACTIVE
BASS EX.
10
B
FM MODE
PLAY MODE
7
/CLEAR
DECK
VOLUME
RM-SED50TXU
REMOTE CONTROL
SLEEP
SHIFT
FM/AM
AUX
£/8
C D
POWER
POWER
AUX
VOLUME –, +
REPEAT
RANDOM
CONTINUE
CD
AUX
TAPE
FULL-LOGIC CONTROL
AUTO TAPE SELECTOR
BASS EX.
SOUND
MODE
ACTIVE
PLAY & EXCHANGE SYSTEM
P. UPP. DOWN
CD REC STARTDUBBING
REC
START/STOP
EJECT
COMPACT
DIGITAL AUDIO
VOLUME
FM
/AM
DISC
DISC
DISC
STANDBY
SENSOR
TUNING
DOWN
MIC 1 MIC 2 MIC LEVEL
PHONES
AB
PLAY REC/PLAY
DISC
3
TRIPLE TRAY
MULTI CONTROL
TUNING
UP
DECK A/B REVERSE MODE
MIN MAX
AUTO REVERSE AUTO REVERSE
EJECT
Display
Source, Sound Mode Volume Level etc.
RANDOM
CONT.
ALL PRGM
SOUND MODE
ACTIVE BASS EX.
VOLUME
AUX
kHz
MHz
A.BASS EX S.MODE
REC
SLEEP MONO
STCLOCK
POWER
or
POWER
ACTIVE BASS EX. indicator
SOUND MODE indicator
When the System is being used, the display shows other items as well.
However, we have only shown the items described in this section.
Turning the Power On and Off
Turning the System On ——————————————————
Press the POWER button.
The display comes on and the STANDBY indicator goes out.
The System comes on ready to continue in the mode it was in when the power was last turned off.
o If the last thing you were doing was listening to a tape in Deck B, you are now ready to listen to a
tape again in Deck B, or you can change to another source.
o If you were listening to the Tuner last, the Tuner comes on playing the station it was last set to.
Turning the System Off ——————————————————
Press the POWER button again.
The STANDBY indicator lights up and the display is blank, except for the clock display.
o Some power (12 watts) is always consumed even though power is turned off (called Standby Mode).
o To switch off the Unit completely, unplug the AC power cord from the AC outlet. When you unplug
the AC power cord, the clock will be reset to 0:00 immediately, and preset Tuner stations will be
erased after a few days.
7
Adjusting the Volume
SOUND
MODE
ACTIVE
BASS EX.
English
VOLUME
or
VOLUME
or
ACTIVE
BASS EX.
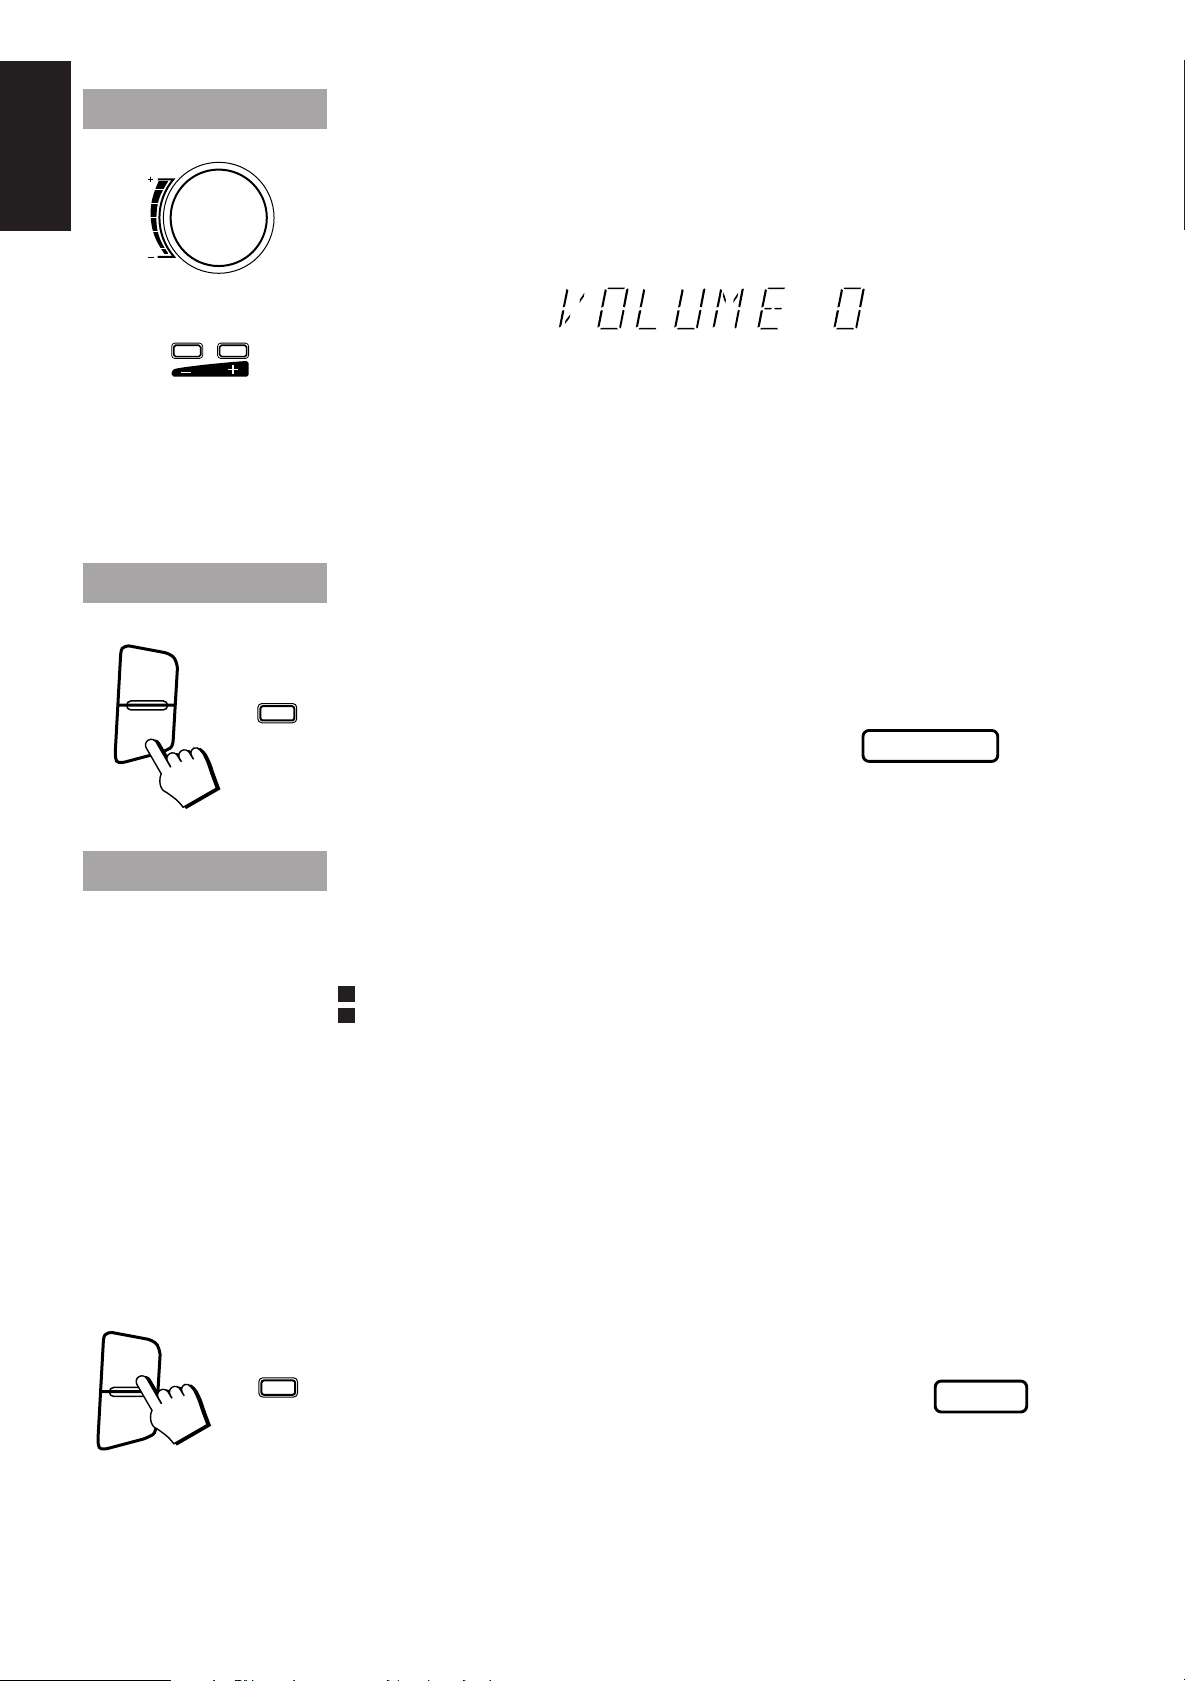
Turn the VOLUME control clockwise to increase the volume or anticlockwise to decrease it.
Turning the VOLUME control quickly also adjusts the volume level quickly.
When using the Remote Control, press the VOLUME + button to increase the volume or press the
VOLUME – button to decrease it.
You can adjust the volume level between 0 and 50.
CAUTION: The Volume cannot be adjusted while the Unit is in STANDBY
mode. DO NOT turn on the Unit and/or start playing any source without
setting the VOLUME control to 0; otherwise, the sudden blast of sound
can damage your hearing, speakers and/or headphones.
For private listening
Connect a pair of headphones to the PHONES jack. No sound comes out of the speakers.
Be sure to turn down the volume before connecting or putting on headphones.
Reinforcing the Bass Sound
The richness and fullness of the bass sound is maintained regardless of how low you set the volume.
You can use this effect only for playback.
To get the effect, press the ACTIVE BASS EX. (Active Bass Extension) button.
The frame around the “A. BASS EX” indicator lights up.
A.BASS EX
SOUND
MODE
ACTIVE
BASS EX.
or
SOUND
MODE
To cancel the effect, press the button again.
The frame around the “A. BASS EX” indicator goes out.
A.BASS EX
Sound Modes
The System has some preset sound effects that give you control of the way your music sounds, so you can
tailor it for your room and for the quality of the source. We can give you some idea of how each one
affects the music, but the only way to really tell is to try them yourself.
o The preset sound modes include modes using surround effects and modes using S.E.A. effects.
o Sound Mode effects cannot be recorded.
Surround effect modes
D. CLUB (Dance Club) Increases resonance and bass.
HALL Adds depth and brilliance to the sound, like in a concert hall.
STADIUM Adds clarity and spreads the sound, like in an outdoor stadium.
S.E.A. effect modes
ROCK Boosts low and high frequencies.
CLASSIC Set for wide and dynamic sound stereo systems.
POP Good for vocal music.
KARAOKE mode
KARAOKE The vocal on tapes or CDs is masked for karaoke.
To get an effect, press the SOUND MODE button repeatedly until the Sound Mode you want appears
in the display. The frame around the “S.MODE” indicator lights up.
Each time you press the SOUND MODE button, the display changes
as shown below:
S.MODE
8
= D. CLUB = HALL = STADIUM = ROCK = CLASSIC = POP = KARAOKE = FLAT =
(back to the beginning)
To cancel an effect, press the SOUND MODE button until “FLAT” appears
on the display. The frame around the “S. MODE” indicator goes out.
S.MODE
To recall the previous Sound Mode, press the SOUND MODE button again.
Loading…