

MONITOR WITH DVD RECEIVER
MONITOR MIT DVD-RECEIVER
MONITEUR AVEC RÉCEPTEUR DVD
MONITOR MET DVD-ONTVANGER
KW-AV60BT/KW-AV60
For canceling the display demonstration, see page 7.
Zum Abbrechen der Displaydemonstration siehe Seite 7.
Pour annuler la démonstration des affichages, référez-vous à la page 7.
Zie bladzijde 7 voor het annuleren van de displaydemonstratie.
ENGLISHDEUTSCHFRANÇAIS
NEDERLANDS
For installation and connections, refer to the separate manual.
Für den Einbau und die Anschlüsse siehe das eigenständige Handbuch.
Pour l’installation et les raccordements, se référer au manuel séparé.
Bijzonderheden over de installatie en aansluiting van het apparaat vindt u in de desbetreffende handleiding.
INSTRUCTIONS
BEDIENUNGSANLEITUNG
MANUEL D’INSTRUCTIONS
GEBRUIKSAANWIJZING
LVT2294-001B
A
[E]
Thank you for purchasing a JVC product.
Please read all instructions carefully before operation, to ensure your complete understanding and to obtain the best
possible performance from the unit.
IMPORTANT FOR LASER PRODUCTS
1. CLASS 1 LASER PRODUCT
ENGLISH
2. CAUTION: Do not open the
top cover. There are no user
serviceable parts inside the
unit; leave all servicing to
qualified service personnel.
3. CAUTION: Visible and/or invisible class 1M laser radiation when open. Do not view directly with optical
instruments.
4. REPRODUCTION OF LABEL: CAUTION LABEL, PLACED OUTSIDE THE UNIT.
Information for Users on Disposal of Old Equipment and Batteries
[European Union only]
These symbols indicate that the product and the battery with this symbol should not be
disposed as general household waste at its end-of-life.
If you wish to dispose of this product and the battery, please do so in accordance with applicable
national legislation or other rules in your country and municipality.
By disposing of this product correctly, you will help to conserve natural resources and will help
prevent potential negative effects on the environment and human health.
Notice:
The sign Pb below the symbol for batteries indicates that this battery contains lead.
Products
Battery
WARNINGS: (To prevent accidents and damage)
• DO NOT install any unit or wire any cable in a location
where;
– it may obstruct the steering wheel and gearshift
lever operations.
– it may obstruct the operation of safety devices
such as air bags.
– it may obstruct visibility.
• DO NOT operate the unit while driving.
If you need to operate the unit while driving, be sure
to look around carefully.
• The driver must not watch the monitor while driving.
• The driver must not put on the headphones while
driving.
2

Cautions on the monitor:
• The monitor built in this unit has been produced with
high precision, but it may have some ineffective dots.
This is inevitable and is not considered defective.
• Do not expose the monitor to direct sunlight.
• Do not operate the touch panel using a ball-point
pen or similar tool with the sharp tip.
Touch the buttons on the touch panel with your
finger directly (if you are wearing a glove, take it off).
• When the temperature is very cold or very hot…
Chemical changes occur inside, causing malfunction.
–
– Pictures may not appear clearly or may move
slowly. Pictures may not be synchronized with
the sound or picture quality may decline in such
environments.
For safety…
• Do not raise the volume level too much, as this will
make driving dangerous by blocking outside sounds,
and may cause hearing loss.
• Stop the car before performing any complicated
operations.
Temperature inside the car…
If you have parked the car for a long time in hot or cold
weather, wait until the temperature in the car becomes
normal before operating the unit.
For security reasons, a numbered ID card is provided
with this unit, and the same ID number is imprinted on
the unit’s chassis. Keep the card in a safe place, as it will
help the authorities to identify your unit if stolen.
How to reset your unit
ENGLISH
• Your preset adjustments will also be erased (except
the registered Bluetooth devices).
How to forcibly eject a disc
Press SRC/ and 0 at the same time.
+
• Be careful not to drop the disc when it ejects.
• If this does not work, reset your unit. (☞ above)
How to read this manual:
• Illustrations of KW-AV60BT are mainly used for explanation.
• This manual mainly explains operations using the buttons on the monitor panel and touch panel. For
operations using the remote controller (RM-RK252P: separately purchased) , ☞ page 57.
• < > indicates the variable screens/menus/operations/settings that appear on the touch panel.
• [ ] indicates the buttons on the touch panel.
• Indication language: English indications are used for the purpose of explanation. You can select the
indication language from the <Settings> menu. (☞ page 43 )
3

Contents
How to reset your unit ……………………………………. 3
How to forcibly eject a disc ………………………………3
INTRODUCTIONS
ENGLISH
Detaching/attaching the monitor panel …5
Component names and functions …………6
Initial settings …………………………………7
Setting the clock ………………………………8
Common operations ………………………….9
Turning on the power ……………………………………. 9
Turning off the power …………………………………….. 9
Adjusting the volume …………………………………….9
Turning off the screen ……………………………………. 9
Turning on/off the AV source …………………………10
Touch screen operation …………………………………. 10
Switching screens …………………………..11
AV SOURCE OPERATIONS
Selecting the playback source ……………12
Listening to the radio ………………………13
Disc operations……………………………….18
Playing a disc………………………………………………. 18
Playable disc types ……………………………………….19
Playback operations ……………………………………..20
Settings for disc playback ………………………………24
USB operations……………………………….25
Playing a USB device ……………………………………. 25
Listening to the iPod/iPhone device ……27
Preparation …………………………………………………27
Setting iPod control mode …………………………….. 28
Selecting preference settings for iPod/iPhone
playback …………………………………………………….. 28
iPod/iPhone playback operations for
<Head> mode ……………………………………………. 29
iPod/iPhone playback operations for
<iPod Out> mode ………………………………………. 30
Using an App of iPod touch/iPhone ………………… 31
Using other external components ……….33
Front AUX ……………………………………………………33
AV-IN ………………………………………………………….33
Sound adjustment ………………………….. 34
Using the sound equalization ………………………… 34
Adjusting the crossover frequency ………………….. 35
Changing display design …………………..36
Setting for video playback ………………..38
Adjusting the picture ……………………………………. 38
Changing the aspect ratio …………………………….. 39
Zooming the picture …………………………………….. 39
Using a rear view camera ………………….40
Setting menu items …………………………41
Memorizing/recalling the settings ………………… 44
Updating the system …………………………………….45
Adjusting the touch position ………………………… 45
BLUETOOTH OPERATIONS
Information for using Bluetooth®
devices……………………………………46
Bluetooth operations for KW-AV60BT ….46
Connecting Bluetooth devices ………………………..47
Using the Bluetooth mobile phone …………………. 49
Using the Bluetooth audio player …………………… 54
Bluetooth device settings ……………………………… 55
Bluetooth operations for KW-AV60 ……..56
Using the Bluetooth mobile phone ………………… 56
Using the Bluetooth audio player …………………..56
REFERENCE
Using the remote controller ………………57
Operations using the remote controller ………….. 57
Maintenance …………………………………60
More about this unit ………………………..61
Troubleshooting ……………………………..64
Specifications…………………………………68
4

INTRODUCTIONS
Detaching/attaching the monitor panel
Cautions
• Hold the monitor panel securely so as not to drop it accidentally.
• Fit the monitor panel onto the attaching plate until it is firmly locked.
Turn off the power before detaching the monitor panel.
(☞ page 9)
1
2
3
ENGLISH
AttachingDetaching
Soft case (supplied)
5
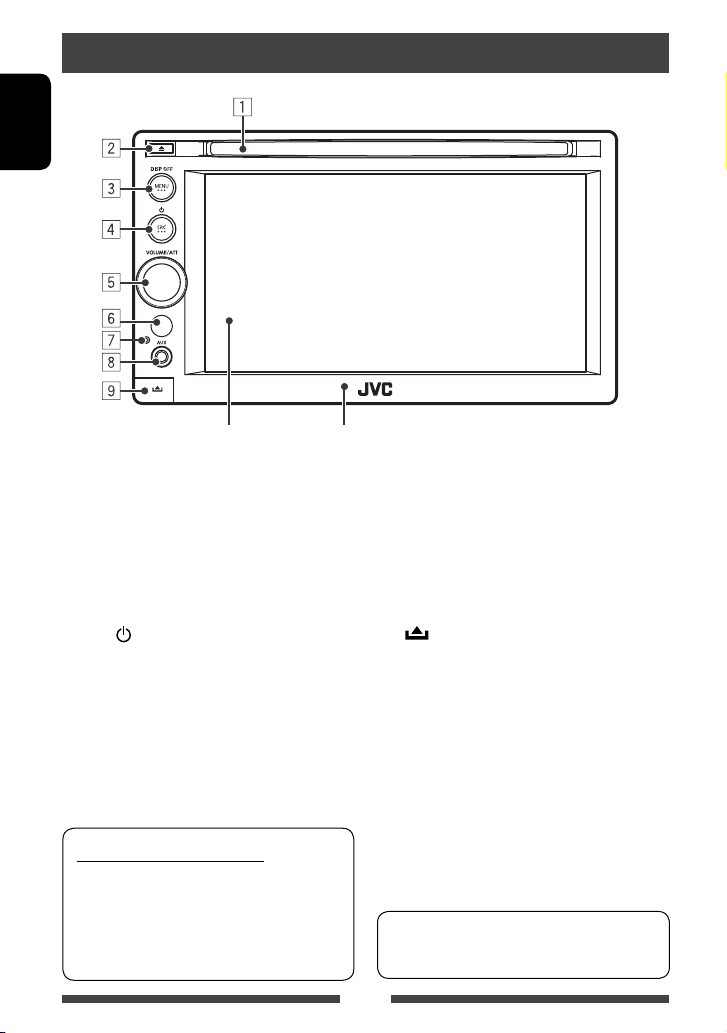
Component names and functions
ENGLISH
Screen (touch panel) Monitor panel
1 Loading slot
2 0 (Eject) button
Ejects the disc.
3 MENU/DISP OFF button
• Displays <AV Menu> screen. (Press)
(☞ page 11)
• Turns off/on the screen. (Hold) (☞ page 9)
4 SRC /
button
• Turns off the power. (Hold) (☞ page 9)
• Turns on the power. (☞ page 9)
• Selects the AV source. (Press) (☞ page 12)
Caution on volume setting:
Digital devices (CD/USB/iPod) produce very little
noise compared with other sources. Lower the
volume before playing these digital sources to
avoid damaging the speakers by sudden increase
of the output level.
5 VOLUME/ATT knob. (☞ page 9)
• Attenuates the sound. (Press)
• Adjusts the audio volume. (Turn)
6 Remote sensor
7 Reset button
Resets the unit. (☞ page 3 )
8 AUX input jack
(Detach) button
9
Detaches the monitor panel. (☞ page 5)
You can change the color of the buttons on the
monitor panel. (☞ page 36)
6
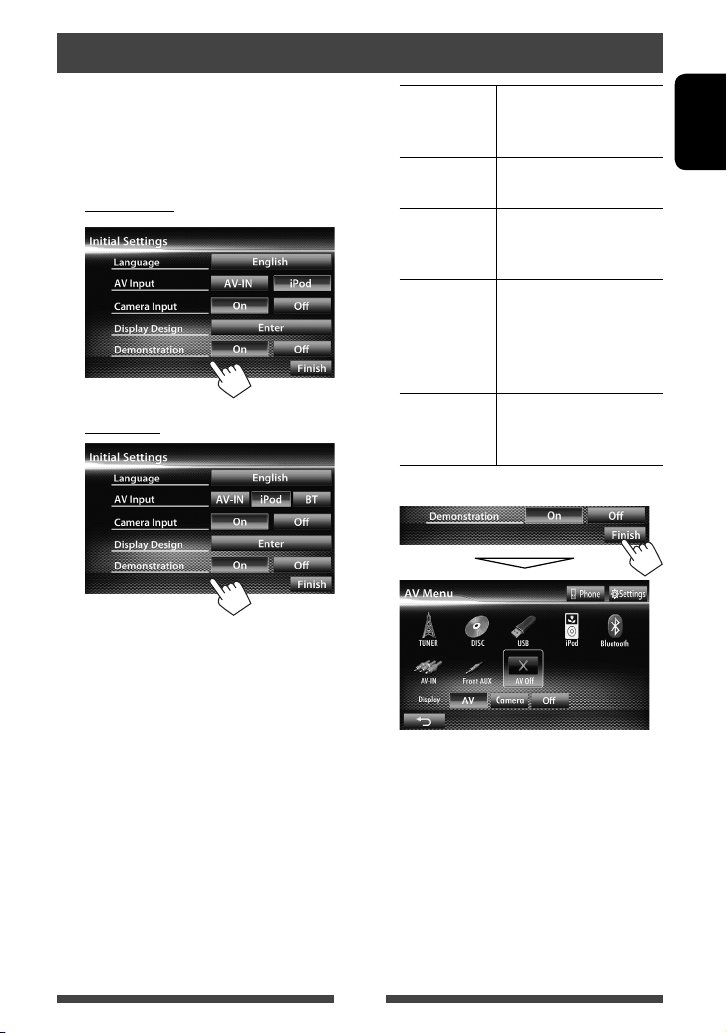
Initial settings
When you power on the unit for the first time or reset
the unit, the initial setting screen appears.
• You can also change the settings on the <Settings>
screen. (☞ page 41 )
1 For KW-AV60BT
For KW-AV60
Language Select the text language used
for on-screen information.
(☞page 43 )
AV Input Select an external component
to play. (☞page 42 )
Camera Input Select <On> when
connecting the rear view
camera. (☞page 43 )
Display
Design
Demonstration
Select the background
and the colors of the text,
touch panel buttons and
the monitor panel buttons.
(☞page 36)
Activate or deactivate the
display demonstration.
(☞page 42 )
2 Finish the procedure.
ENGLISH
<AV Menu> screen is displayed.
• <AV Off> is selected initially. Select the
playback source. (☞page 12)
7
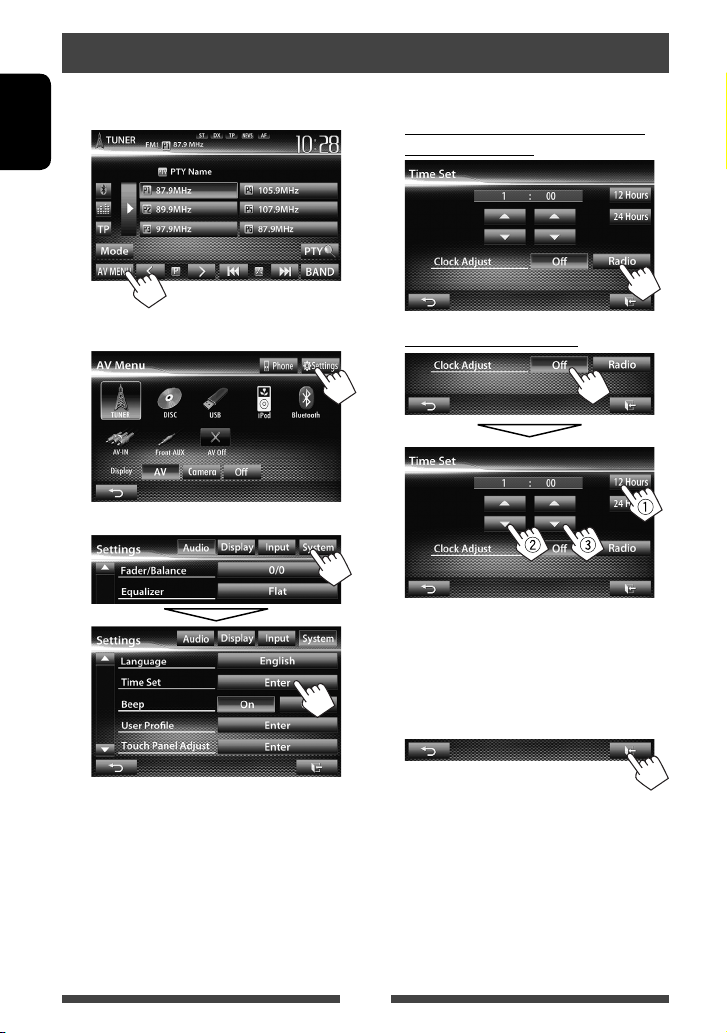
Setting the clock
1 Display <AV Menu> screen.
On the source control screen:
ENGLISH
2 Display <Settings> screen.
3
4 Set the clock time.
To synchronize the clock time with
Radio Data System
To set the clock manually
Select the time display format
1
Adjust the hour
2
Adjust the minute
3
5 Finish the procedure.
8
Common operations
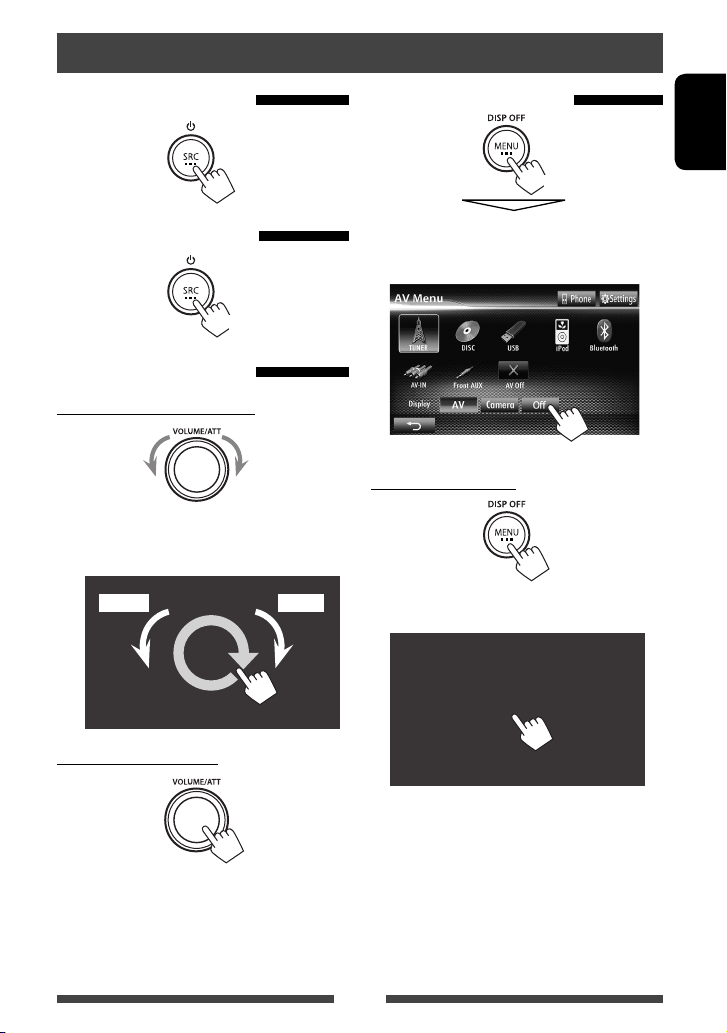
Turning on the power
Turning off the power
(Hold)
Adjusting the volume
To adjust the volume (00 to 50)
IncreaseDecrease
• On the source control screen, you can also adjust the
volume by moving your finger on the touch panel as
illustrated.
IncreaseDecrease
Turning off the screen
ENGLISH
(Hold)
The screen is turned off.
• You can also turn off the screen on <AV Menu>
screen.
To turn on the screen
or
Touch the screen to display <AV Menu> screen.
To attenuate the sound
The ATT indicator lights up.
To cancel the attenuation, press the VOLUME/ATT
knob.
9
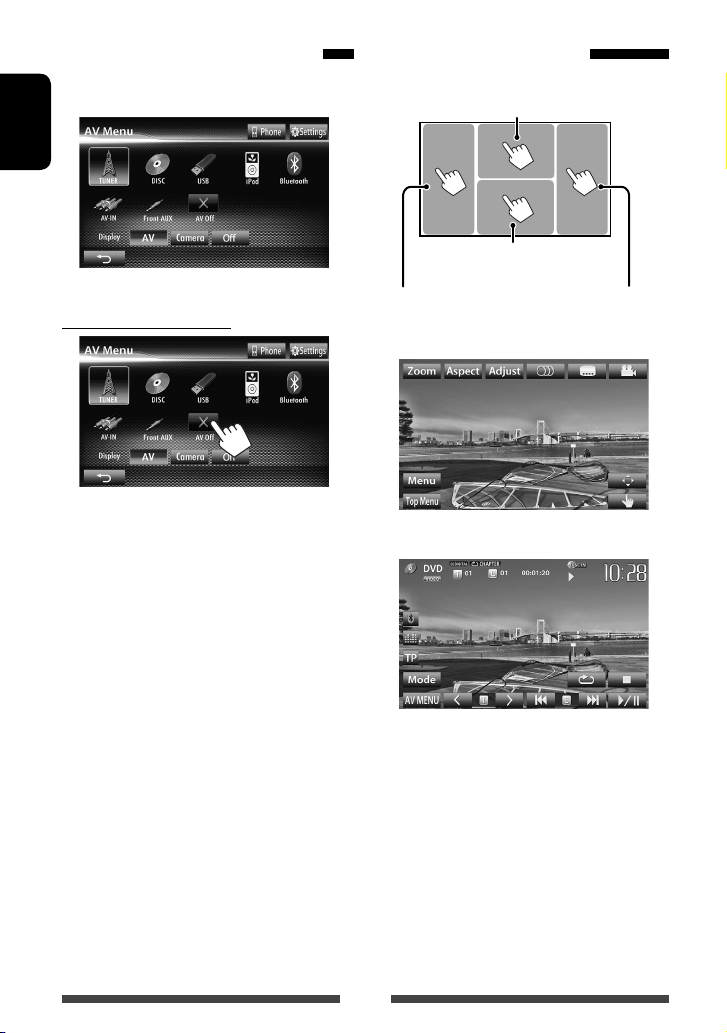
Turning on/off the AV source
You can activate the AV func tion by selecting source on
<AV Menu> screen.
ENGLISH
To turn off the AV source
AV source is turned off.
Touch screen operation
A Displays the video control menu while
playing a video.
B Displays the source control
screen while playing a video.
Goes to the previous
chapter/track.*
A Video control menu
B S ource control screen for video playback
Goes to the next
chapter/track.*
• The operation buttons disappear by touching the
screen or when no operation is done for about 10
seconds.
* Not available for video from an external component.
Dragging your finger to left or right functions in the
same way as touching.
10
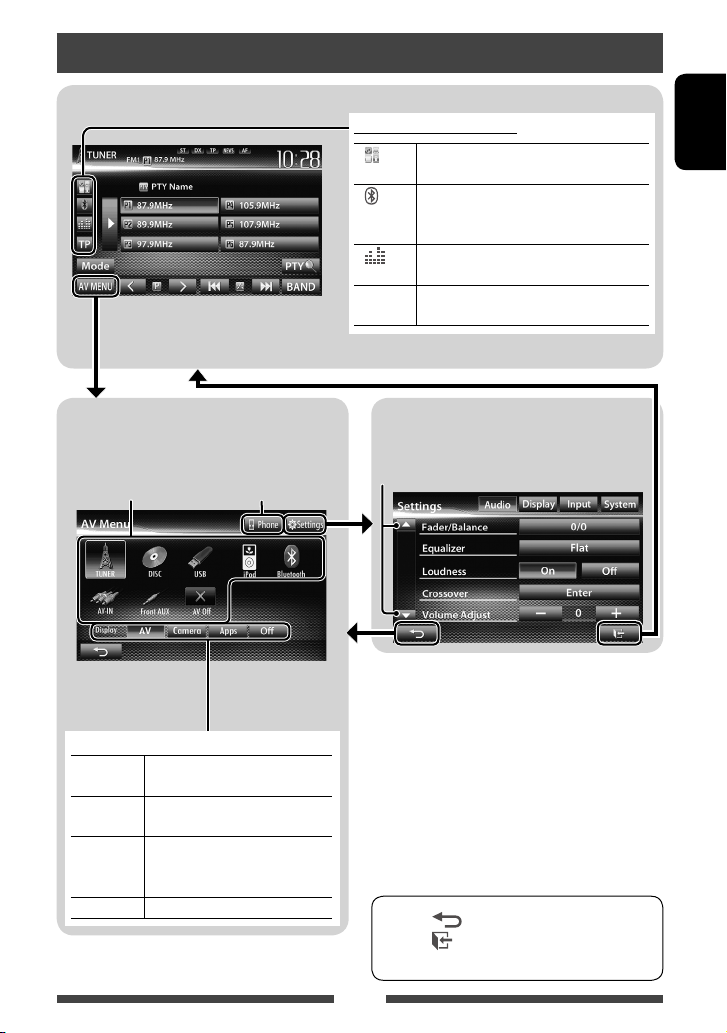
Switching screens
Source control screen
• Pressing MENU on the monitor panel also
displays <AV Menu>.
Common operating buttons
1
[ ] *
[ ]*2*
[
[TP] Activates/deactivates TA standby reception
Displays the screen of App from connected
iPod touch/iPhone. (☞ page 31)
3
• Displays the phone control screen. (Press)
• Switches to the last connected mobile
phone. (Hold) (
Displays the sound adjustment screen.
]
(
☞ page 34)
mode. (☞ page 16 )
☞ page 48)
ENGLISH
<AV Menu> screen
Displays source control screen/settings screen and
changes picture source.
☞ page 12
Select an item to display on the screen.
[AV] Displays the source control screen.
(☞above)
[Camera] Displays the picture from the rear
view camera. (☞page 40)
[Apps]*1Displays the screen of App from
connected iPod touch/iPhone.
(☞page 31)
[Off]
Turns off the screen. (
Displays the phone
control screen *
☞page 9)
<Settings> screen
Changes the detailed settings. (☞ page 41)
Changes the page
2
*1 Appears when <Input> setting in <Navigation
Input> screen is set to <iPhone>. (☞ page 31)
2
Only for KW-AV60BT.
*
3
The icon varies depending on the connection status of
*
the Bluetooth device (☞ page 46).
• Press [ ] to return to the previous screen.
• Press [
] to display the current source control
screen.
11
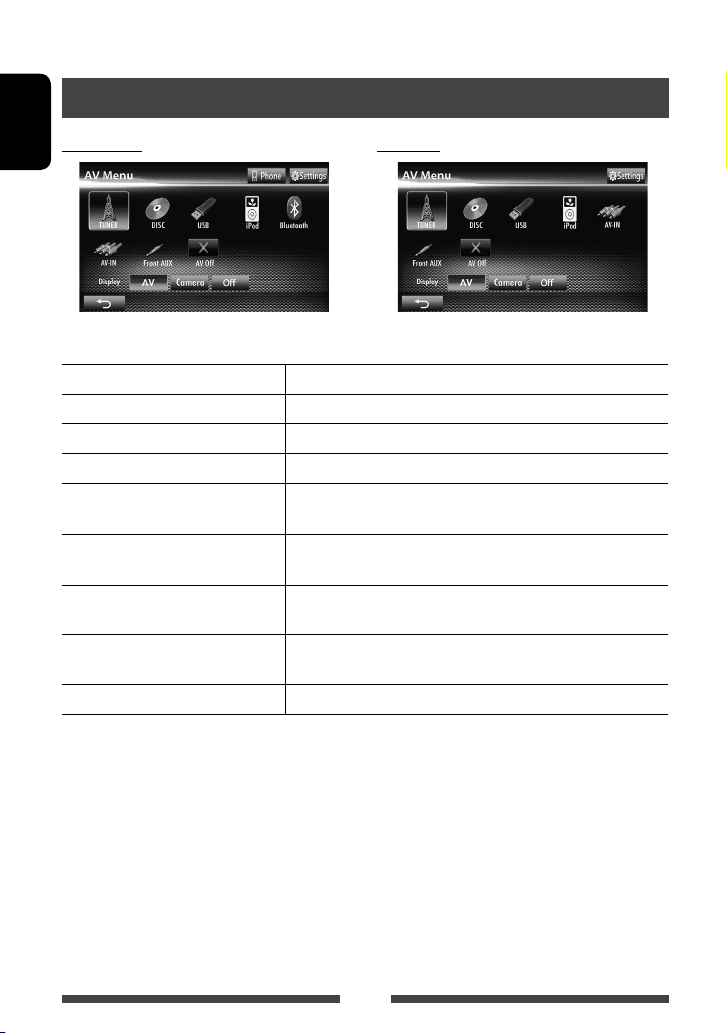
AV SOURCE OPERATIONS
Selecting the playback source
KW-AV60BT KW-AV60
ENGLISH
• Pressing SRC on the monitor panel repeatedly also selects the playback source.
TUNER
(☞ page 13 )
DISC
(☞ page 18)
USB
(☞ page 25)
iPod
(☞ page 27)
Bluetooth
☞ page 54/ KW-AV60: ☞ page 56)
AV-IN
Apps
*1 ( KW-AV60BT:
*2 (☞ page 33)
*3 (☞ page 31)
Switches to the radio broadcast.
Plays a disc.
Plays files on a USB device.
Plays an iPod/iPhone.
• KW-AV60BT: Plays a Bluetooth audio player.
• KW-AV60: Operates a Bluetooth device.
Switches to an external component connected to LINE IN/VIDEO IN jacks
on the rear panel.
Switches to the screen of App from the connected iPod touch/
iPhone.
Front AUX
AV Off
1
*
2
*
3
*
(☞ page 33)
(☞ page 10)
For KW-AV60 : Appears only when <AV Input> is set to <BT>. (☞ page 42)
Appears only when <AV Input> is set to <AV-IN>. (☞ page 42)
Appears only when <AV Input> is set to <iPod>. (☞ page 42)
Switches to an external component connected to AUX input terminal on
the monitor panel.
Turns off the AV source.
12
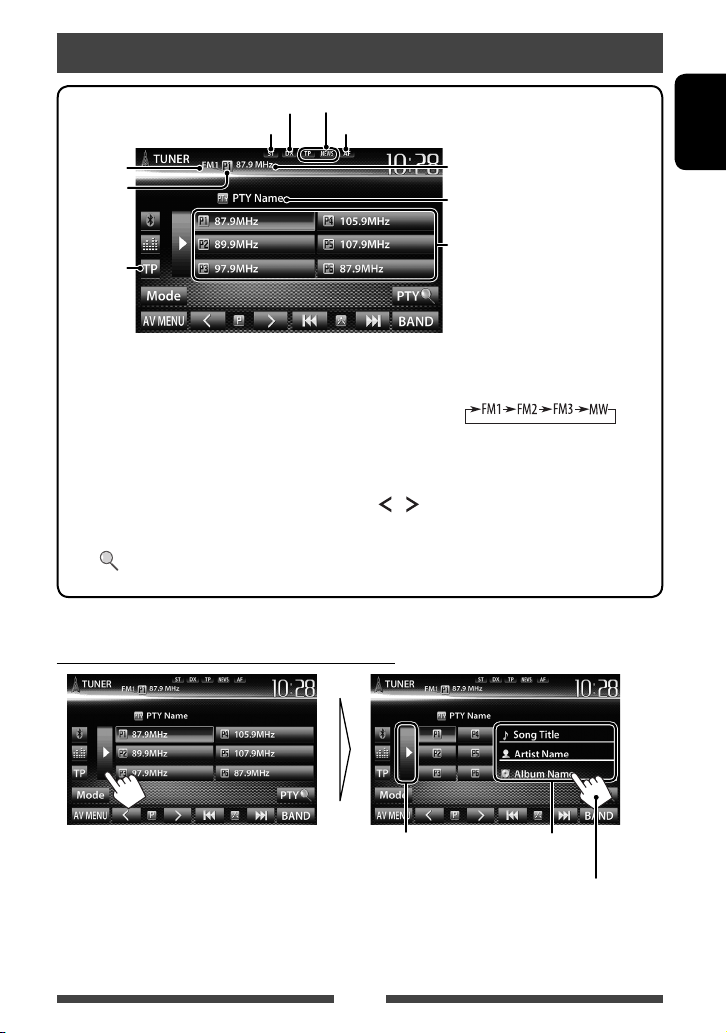
Listening to the radio
DX/LO indicator
ST/MO indicator
Band
Preset no.
☞ page 16
Standby reception indicators
AF indicator
The station frequency currently tuned
in/PS (station name) for FM Radio Data
System when PS signal is coming in
PTY code for FM Radio Data System
Preset list
• The ST indicator lights up when receiving an FM stereo broadcast with sufficient signal strength.
[P1] – [P6] • Tunes in the preset station.
[BAND] Selects the band.
(Press)
• Presets the currently tuned
station. (Hold)
Activates/deactivates TA standby
reception mode. (
☞ page 16)
[TP]*
[3] Displays/hides the information of
[PTY
the current station (
Enters FM Radio Data System
]*
program search mode. (
☞ below).
☞ page 15)
[4] [¢] Searches for a station.
• Auto search (Press)
• Manual search (Hold)
] [ ]
[
[Mode]*
Selects a preset station.
Displays tuner setting screen.
(☞ pages 14 – 17)
[AV MENU] Displays <AV Menu> screen.
* Appears only when FM is selected as the source.
Displaying the information of the current station
ENGLISH
Hides the text
information
13
Text information (only for
Radio Text Plus)
Scrolls the text information
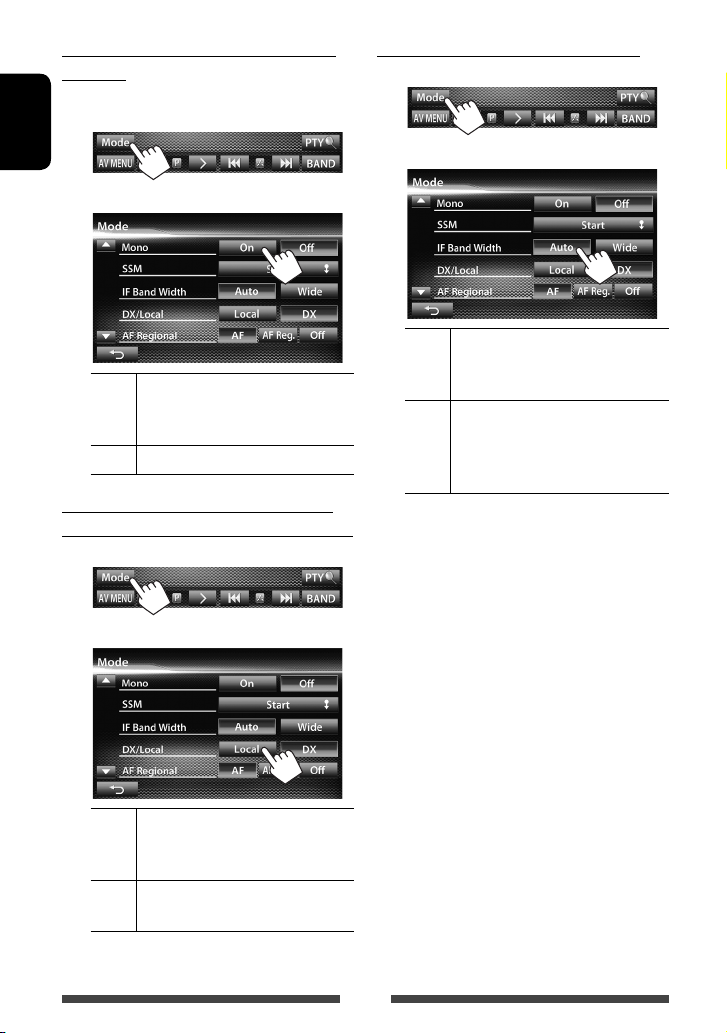
When an FM stereo broadcast is hard to
receive…
Activate monaural mode for better reception.
1
ENGLISH
2
On Activate monaural mode to improve FM
reception, but the stereo effect will be
lost. The MO indicator lights up.
Off Restore the stereo effect.
To tune in FM stations only with strong
signals—LO/DX (Local/ Distance-extreme)
1
When the FM reception is interfered…
1
2
Auto Increases the tuner selectivity to reduce
interference noises between adjacent
stations. (Stereo effect may be lost.)
Wide Subject to the interference from
adjacent stations, but sound quality
will not be degraded and the stereo
effect will remain.
2
Local Select this to tune in only to stations
with sufficient signal strength. The LO
indicator lights up.
DX Deactivate the function. The DX
indicator lights up.
14
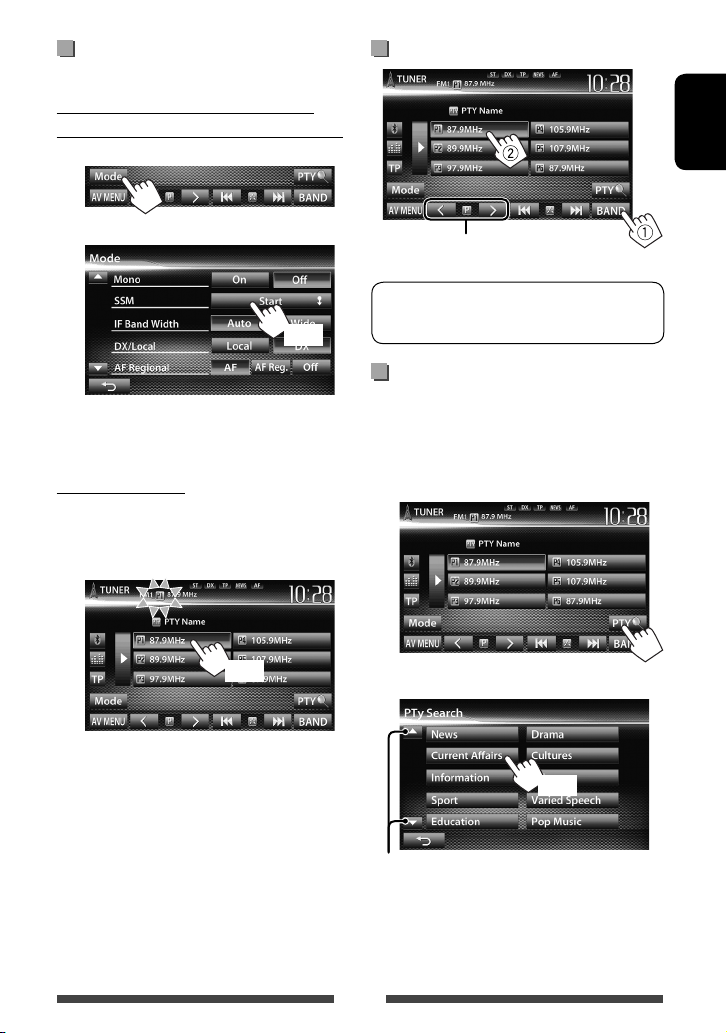
Storing stations in memory
You can preset six stations for each band.
Automatic presetting — SSM (Strongstation Sequential Memory) (For FM only)
1
Selecting a preset station
ENGLISH
2
(Hold)
Local stations with the strongest signals are searched
and stored automatically.
Manual presetting
1 Tune in to a station you want to preset.
(☞ page 13)
2 Select a preset number.
(Hold)
The station selected in step 1 is stored.
Also changes preset stations
The following features are available only for FM
Radio Data System stations.
Searching for FM Radio Data System
program—PTY Search
You can search for your favorite programs being
broadcast by selecting the PTY code for your favorite
programs.
1
2 Select a PTY code.
(Hold)
Changes the page
PTY Search starts.
If there is a station broadcasting a program of the
same PTY code as you have selected, that station
is tuned in.
15
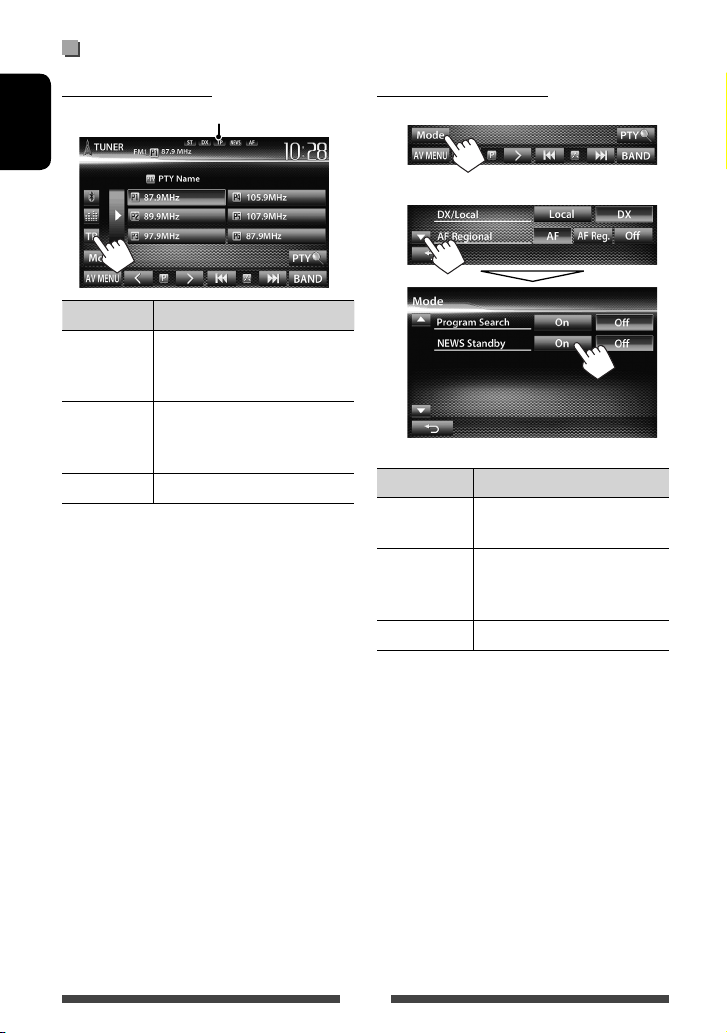
Activating/deactivating TA/News Standby Reception
TA Standby Reception
TP indicator
ENGLISH
TP indicator TA Standby Reception
Lights up The unit will temporarily switch
to Traffic Announcement (TA) if
available.
Flashes Not yet activated. Tune in to another
station providing the Radio Data
System signals.
Goes off Deactivated.
• The volume adjustment for Traffic Announcement
is automatically memorized. The next time the unit
switches to Traffic Announcement, the volume is set
to the previous level.
News Standby Reception
1
2
NEWS indicator News Standby Reception
Lights up The unit will temporarily switch to
News Program if available.
Flashes Not yet activated. Tune in to
another station providing the
Radio Data System signals.
Goes off Deactivated.
• The volume adjustment while receiving News is
automatically memorized. The next time the unit
switches to News, the volume is set to the previous
level.
16

Tracing the same program
—Network-Tracking Reception
When driving in an area where FM reception is not
sufficient enough, this unit automatically tunes in to
another FM Radio Data System station of the same
network, possibly broadcasting the same program with
stronger signals.
Program A broadcasting on different frequency
areas (01 – 05)
When shipped from the factory, Network-Tracking
Reception is activated.
To change the Network-Tracking
Reception setting
1
Automatic station selection—
Program Search
Usually when you select preset stations, the preset
station is tuned in.
If the signals from the preset FM Radio Data System
station are not sufficient for good reception, this
unit, using the AF data, tunes in to another station
broadcasting the same program as the original preset
station is broadcasting.
To activate Program Search
1
2
ENGLISH
2
AF Switches to another station. The program
may differ from the one currently received
(the AF indicator lights up).
AF Reg. Switches to another station broadcasting
the same program (the AF indicator
lights up).
Off Cancels.
• The unit takes some time to tune in to another
station using program search.
To deactivate, select <Off>.
17
Disc operations
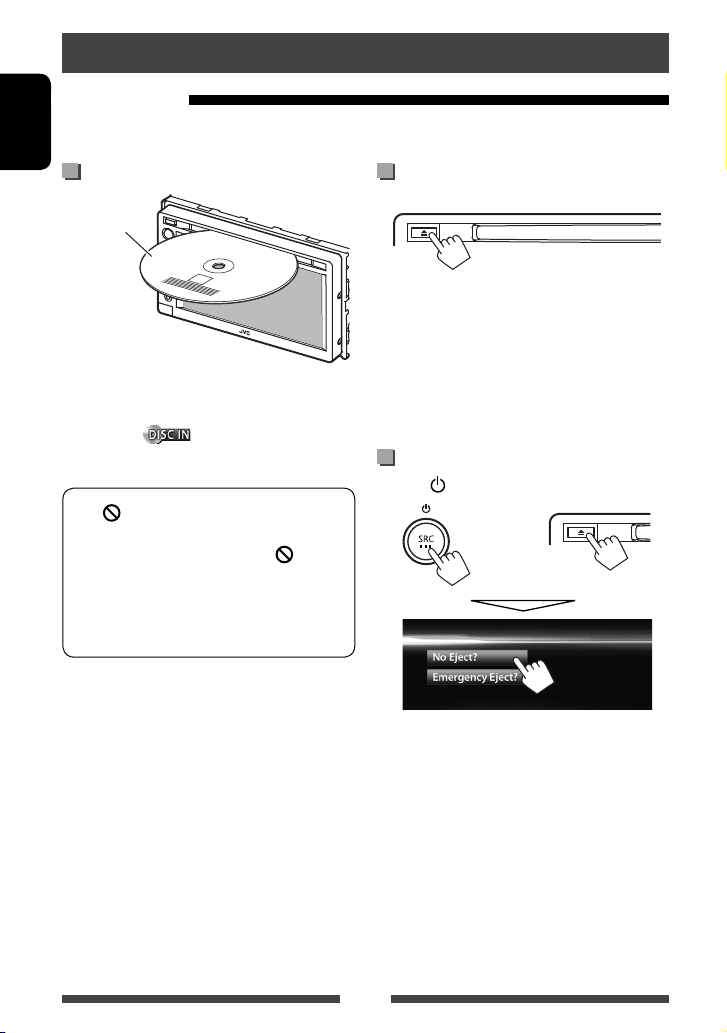
Playing a disc
• If a disc does not have any disc menu, all tracks on it will be played repeatedly until you change the source or eject
the disc.
ENGLISH
Inserting a disc
Label side
The source changes to “
• The DISC IN (
disc is inserted.
• If “
” appears on the screen, the unit cannot
accept the operation you have tried to do.
– In some cases, without showing “
operations will not be accepted.
• When playing back a multi-channel encoded
disc, the multi-channel signals are downmixed
to stereo.
DISC
” and playback starts.
) indicator lights up while a
,”
To eject a disc
• You can eject a disc when playing another AV source.
• If the ejected disc is not removed within 15 seconds,
the disc is automatically inserted again into the
loading slot to protect it from dust.
• If the disc cannot be ejected, ☞ page 3 .
When removing a disc, pull it horizontally.
To prohibit disc ejection
Press SRC/ and 0 at the same time.
+
To cancel the prohibition, repeat the same procedure
to select <Eject OK?>.
18

Playable disc types
Disc type Recording format, file type, etc. Playable
DVD
• DTS sound cannot be
reproduced or emitted from
this unit.
DVD Recordable/Rewritable
(DVD-R/-RW *
2
, +R/+RW *3)
• DVD Video: UDF bridge
• DVD-VR
/MPEG1/MPEG2/JPEG/
• DivX
MP3/WMA/WAV : ISO 9660 level
1, level 2, Romeo, Joliet
DVD-Video *
Region Code: 2
DVD-Audio/DVD-ROM
DVD-Video
DVD-VR *
DivX /MPEG1/MPEG2
JPEG
MP3/WMA/WAV
MPEG4/AAC/DVD+VR/DVD-RAM
Dual Disc DVD side
Non-DVD side
CD/VCD Audio CD/CD Text (CD-DA)
VCD (Video CD)
DTS-CD/SVCD (Super Video CD)/CD-ROM/CD-I(CD-I Ready)
CD Recordable/Rewritable
(CD-R/-RW)
• ISO 9660 level 1, level 2,
Romeo, Joliet
CD-DA
VCD (Video CD)
DivX
JPEG
MP3/WMA/WAV
MPEG4/AAC
*1 If you insert a DVD Video disc of an incorrect Region Code, “Region Code Error” appears on the screen.
2
DVD-R recorded in multi-border format is also playable (except for dual layer discs). DVD-RW dual layer discs are not
*
playable.
3
It is possible to play back finalized +R/+RW (Video format only) discs. “DVD” is selected as its disc type when a
*
+R/+RW disc is loaded. +RW double layer discs are not playable.
4
This unit cannot play back contents protected with CPRM (Content Protection for Recordable Media).
*
Caution for DualDisc playback
The Non-DVD side of a “DualDisc” does not comply with the “Compact Disc Digital Audio” standard. Therefore, the use
of Non-DVD side of a DualDisc on this product may not be recommended.
1
4
/MPEG1/MPEG2
ENGLISH
19
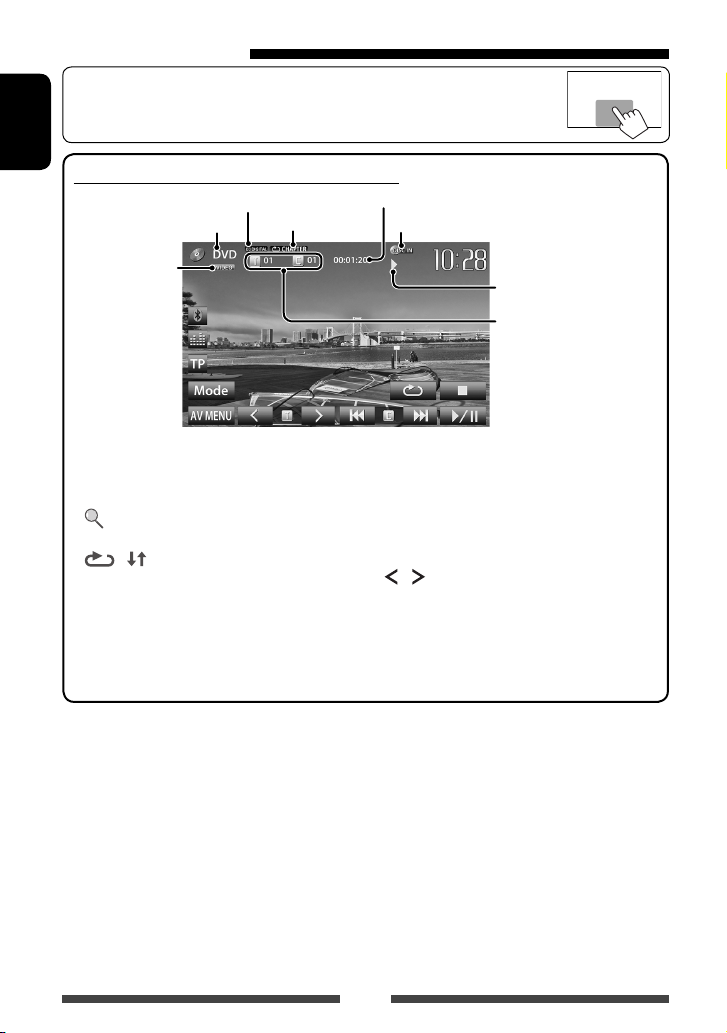
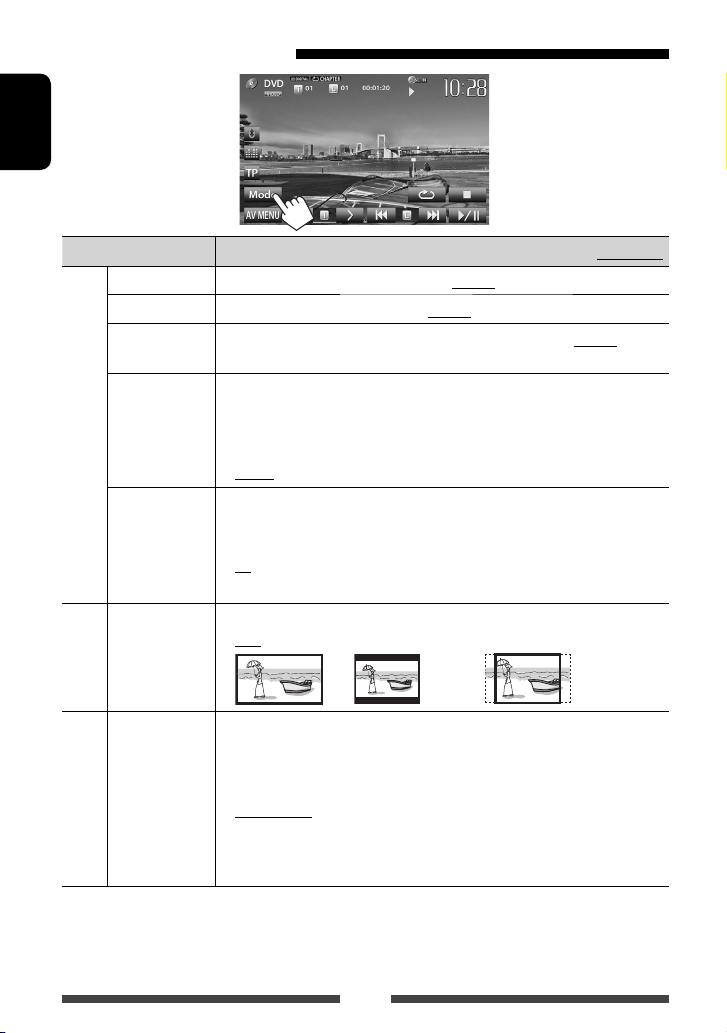
Playback operations
• When the operation buttons are not displayed on the screen, touch the area shown on
the illustration.
ENGLISH
For DVD/DVD-VR/VCD/DivX/MPEG1/MPEG2/JPEG
Audio format
Media type
Playback mode
(☞page 23)
Playing time
DISC IN indicator
Video format/
video playback
mode—VIDEO/
VR-PRG (program)/
VR-PLAY (playlist)/
DivX/MPEG/PBC
[7]*
[
[
2
3
]*
] [ ]*
Stops playback.
Displays folder/track list. (☞
page 21)
4
Selects playback mode. (☞
page 23)
[4] [¢]*5• Selects chapter/track.
[
] [ ]*5 *7
[6] Starts/pauses playback.
7
[Mode]*
1
*
To display the Original Program/Playlist screen, ☞page22.
2
Appears only for DVD/DVD-VR/VCD.
*
3
Does not appear for DVD/DVD-VR/VCD.
*
4
Does not appear for DVD/DVD-VR/JPEG.
*
5
The icon displayed between the buttons varies depending on the type of disc or file.
*
6
Search speed varies depending on the type of disc or file.
*
7
Does not appear for VCD.
*
[AV MENU] Displays <AV Menu> screen.
Playback status
(3: play / 8: pause / 7: stop)
• DVD Video: Title no./
Chapter no.
• DVD-VR: Program no. (or
Playlist no.)/Chapter no.*
• DivX/MPEG1/MPEG2:
Folder no./Track no.
• JPEG: Folder no./File no.
• VCD: Track no.
(Press)
• Reverse/forward search.*
(Hold)
Selects title (DVD)/program or
playlist (DVD-VR)/folder(DivX/
MPEG1/MPEG2/JPEG). *
1
Changes the settings for disc
playback. (☞ page 24)
1
6
20
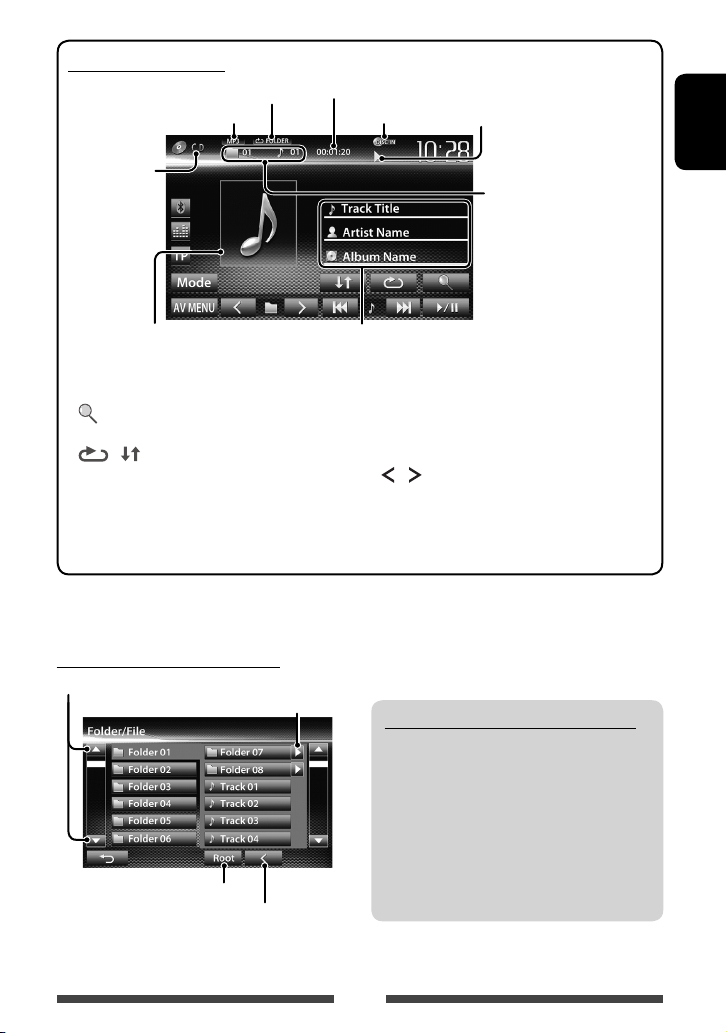
For CD/MP3/WMA/WAV
Playback mode (☞ page 23)
Audio format
Playing time
DISC IN indicator
Playback status
(3: play / 8: pause )
Media type
While playing, the jacket picture is
shown if the file has the tag data
including the jacket picture.
[ ]*
1
Displays folder/track list.
(☞below)
[
] [ ]
Selects playback mode.
(☞page23)
[6] Star ts/pauses playback.
1
*
Does not appear for CD.
2
Search speed varies depending on the type of disc or file.
*
Selecting folder/track on the list
Changes the page
Plays tracks/files in the folder
Returns to the root folder
Returns to the upper layer
• MP3/WMA/WAV: Folder
no./Track no.
• CD: Track no.
Track/file information
• Touching an information bar scrolls the text if not all of the
text is shown.
[4] [¢] • Selects track. (Press)
• Reverse/forward search.*
(Hold)
] [ ]*1
[
[Mode]*
Selects folder.
1
Changes the settings for disc
playback. (☞ page 24)
[AV MENU] Displays <AV Menu> screen.
Playing Recordable/Rewritable discs
• This unit can recognize a total of 5 000 files and
250 folders (a maximum of 999 files per folder).
• Use only “finalized” discs.
• This unit can play back multi-session discs;
however, unclosed sessions will be skipped
while playing.
• Some discs or files may not be played back due
to their characteristics or recording conditions.
ENGLISH
2
21
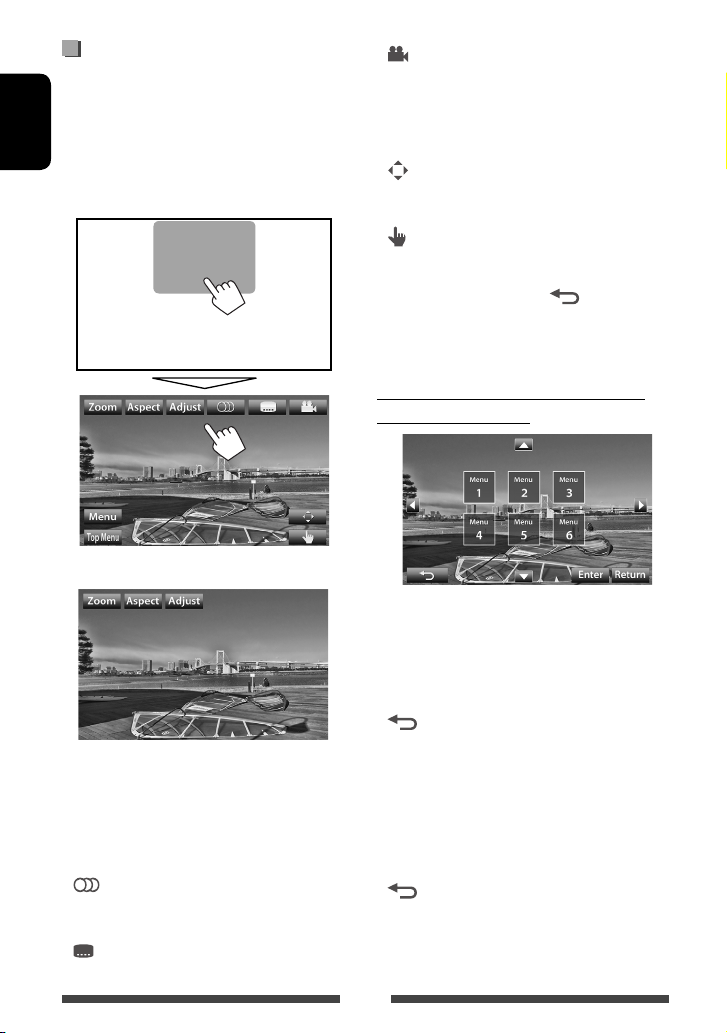
Video menu operations
You can display the video menu screen while watching
the playback pictures on the screen.
• Available items on the screen differ depending on the
types of the loaded disc and playback files.
ENGLISH
• The operation buttons disappear by touching the
screen or when no operation is done for about 10
seconds.
• The screen for MPEG1/MPEG2 differs from the above.
[Zoom] Displays the picture size selecting
screen. (☞ page 39)
[Aspect]
[Adjust] Displays picture adjustment screen.
[
[
Selects aspect ratio. (☞ page 39)
(☞ page 38)
] Selects the audio type.
• For DVD-VR: Selects the audio
channel (ST: stereo, L: left, R: right).
] Selects the subtitle type.
[ ]
[Menu] Displays the disc menu (DVD)/playlist
[Top Menu] Displays the disc menu (DVD)/original
[
[
• Touching any position other than operation buttons
displays the source control screen.
Selects view angle.
(DVD-VR).
program (DVD-VR).
Displays the menu/playlist/original
]
program/scene selecting screen.
(☞ below)
Switches to the direct menu selection
]
mode. Touch the target item to select.
• To exit from the menu selecting
screen, press [
].
Using menu/playlist/original program/
scene selecting screen
[5] [∞]
[2] [3]
[Enter] Confirms the selection.
[Return] Returns to the menu screen of the
[
• For DivX only
[2] [3] Skips back or forward by about 5
[Return] Returns to the previous screen.
[
Selects an item.
previous layer.
Displays the menu screen of the top
]
layer when several menu screens exist
on the disc.
minutes.
Exits from the scene selecting screen.
]
22
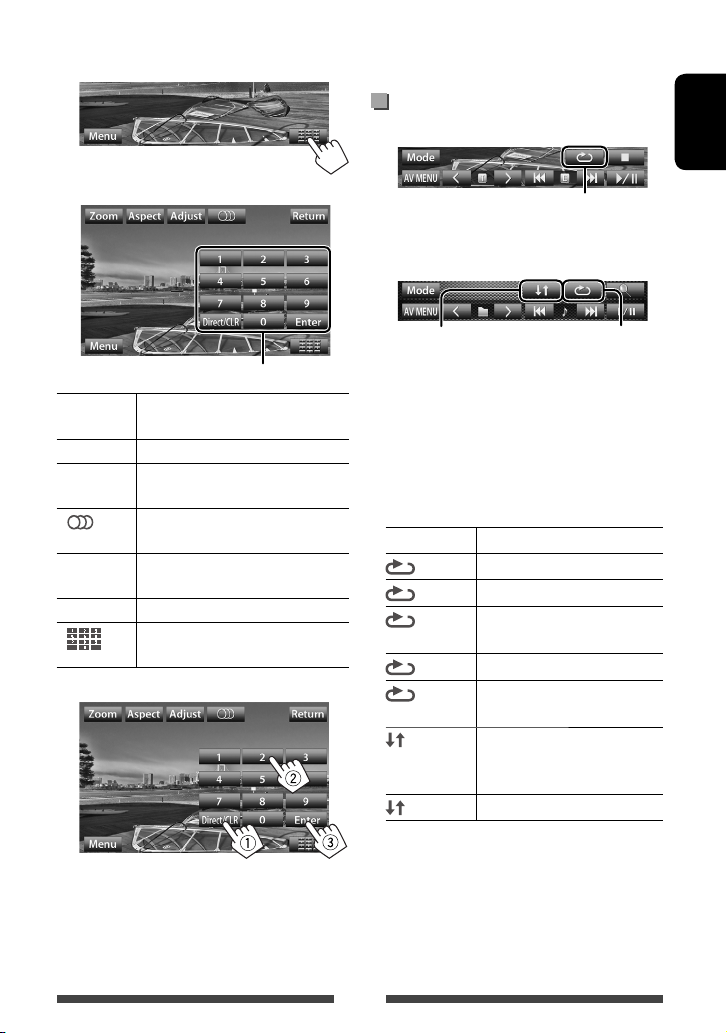
Only for VCD
1
• To deactivate the PBC function, press [7] then the
direct selecting buttons to select a track number.
Selecting playback mode
For DVD/DVD-VR
ENGLISH
2
Direct selecting buttons (☞ below)
[Zoom] Displays the picture size selecting
screen. (☞ page 39)
[Aspect]
[Adjust] Displays picture adjustment screen.
[
[Return] Displays the previous screen or the
[Menu] Displays the disc menu.
[ ]
• To select a track directly
Selects aspect ratio. (☞ page 39)
(☞ page 38)
] Selects the audio channel (ST: stereo,
L: left, R: right).
menu.
Displays/hides the direct selecting
buttons. (☞ below)
Selects Repeat playback mode
For VCD (without PBC)/CD/DivX/MPEG1/MPEG2/MP3/
WMA/WAV
Selects Random
playback mode*
* You cannot activate the repeat mode and the random
mode at the same time.
• Each time you press the button, the playback mode
changes. (The corresponding indicator lights up.)
– Available items differ depending on the types of
loaded disc and playback file.
Indicator Playback mode
CHAPTER
TITLE
PROGRAM
SONGS
FOLDER
FOLDER
ALL
Repeats current chapter.
Repeats current title.
Repeats current program (not
available for Playlist playback).
Repeats current track.
Repeats all tracks of the current
folder.
Randomly plays all tracks of
current folder, then tracks of next
folders.
Randomly plays all tracks.
Selects Repeat
playback mode*
– To switch between chapter/track entry and title/
folder entry, press [Direct/CLR].
– When you enter a wrong number, press [Direct/
CLR] to delete the last entry.
To cancel, press the button repeatedly until the
indicator disappears.
23
Settings for disc playback
ENGLISH
Disc Setup items Selectable setting/item Initial: Underlined
Menu Language
Audio Language
Subtitle
Down Mix When playing back a multi-channel disc, this setting affec ts the signals reproduced
For DVD/DVD-VR/DivX
D. (Dynamic)
Range Compres.
(Compression)
Monitor Type Select the monitor type to watch a wide screen picture on the external monitor.
VCD/CD
For discs except
File Type Select the playback file type when a disc contains different types of files.
video/picture files
For discs containing audio/
Select the initial disc menu language; Initial English (☞ page 62).
Select the initial audio language; Initial English (☞ page 62).
Select the initial subtitle language or erase the subtitle (Off) ; Initial English (☞
page 62).
through the FRONT OUT/REAR OUT jacks.
♦ Dolby Surround : Select this to enjoy multi-channel surround audio by
connecting an amplifier compatible with Dolby Surround.
♦ Stereo : Normally select this.
You can change the dynamic range while playing Dolby Digital software.
♦ Off : Selec t this to enjoy a powerful sound at a low volume
level with its full dynamic range.
♦ On : Selec t this to reduce the dynamic range a little.
♦ Dialog : Select this to reproduce the movie dialog more clearly.
♦ 16:9
♦ Audio
♦ Still Picture
♦ Video
♦ Audio&Video
• For playable file types, ☞ page 19.
• If the disc contains no files of the selected type, the existing files are played in the
following priority: audio, video, then still picture.
♦ 4:3 LB (Letterbox) ♦ 4:3 PS (PanScan)
: Plays back audio files.
: Plays back JPEG files.
: Plays back DivX/MPEG1/MPEG2 files.
: Plays back audio files and DivX/MPEG1/MPEG2 files.
24
USB operations
Playing a USB device
• This unit can play JPEG/MPEG1/MPEG2 */MP3/WMA/
WAV files stored in a USB mass storage class device.
• This unit can recognize a total of 5 000 files and 250
folders (a maximum of 999 files per folder).
• Make sure all important data has been backed up to
avoid losing the data.
* Except for MPEG2 files recorded by JVC Everio
camcorder (extension code <.mod>).
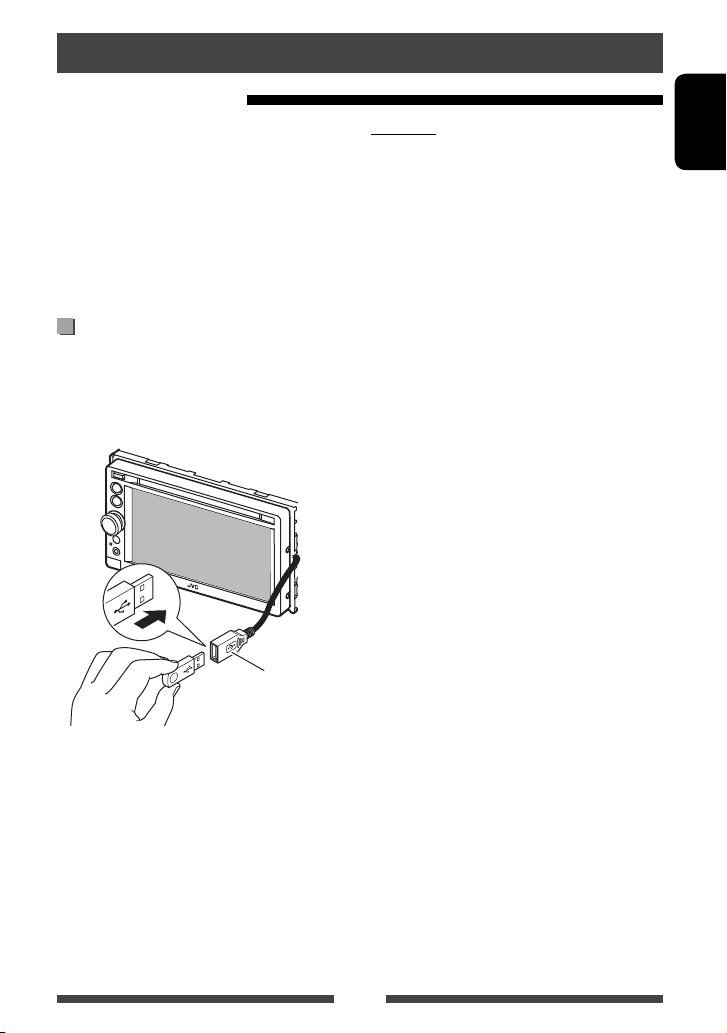
Connecting a USB device
You can connect a USB mass storage class device such as
a USB memory, Digital Audio Player etc. to the unit.
• You cannot connect a computer or portable HDD to
the USB cable from the rear of the unit.
USB cable from the
rear of the unit
The source changes to “
• All tracks in the USB device will be played repeatedly
until you change the source.
USB
” and playback starts.
Cautions:
• This unit may not play back files in a USB device
properly when using a USB extension cord.
• USB devices equipped with special functions such as
data security functions cannot be used with the unit.
• Do not use a USB device with 2 or more partitions.
• Depending on the shape of the USB devices and
connection ports, some USB devices may not be
attached properly or the connection might be loose.
• This unit cannot recognize a USB device whose rating
is other than 5 V and exceeds 1 A.
• This unit may not recognize a memory card inserted
into the USB card reader.
• Connect only one USB device to the unit at a time. Do
not use a USB hub.
• When connecting with a USB cable, use the USB 2.0
cable.
• The maximum number of characters for (when the
characters are 1 byte):
– Folder names: 50 characters
– File names: 50 characters
• Avoid using the USB device if it might effect driving
safety.
• Do not pull out and connect the USB device
repeatedly while “Now Reading” is shown on the
screen.
• Electrostatic shock at connecting a USB device may
cause abnormal playback of the device. In this case,
disconnect the USB device then reset this unit and
the USB device.
• Operation and power supply may not work as
intended for some USB devices.
• Do not leave a USB device in the car, or expose
to direct sunlight or high temperature to avoid
deformation or damage to the device.
ENGLISH
25
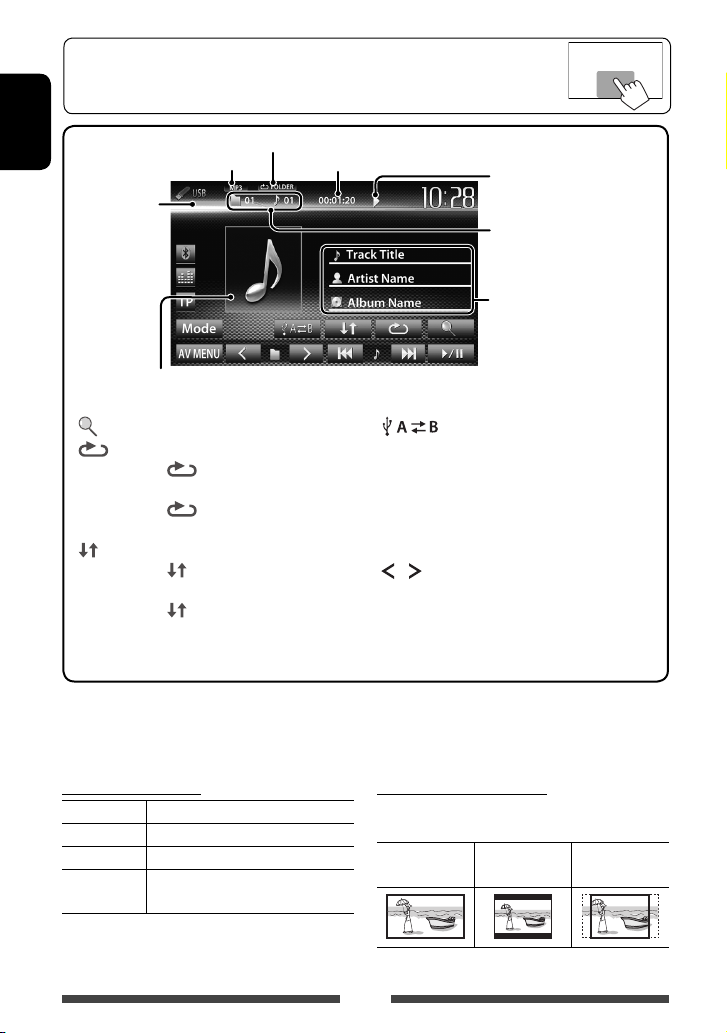
• When the operation buttons are not displayed on the screen, touch the area shown on
the illustration.
• To change settings for video playback, ☞ page 38.
ENGLISH
Video format—
MPEG/JPEG
While playing, the jacket picture is shown if the file has the tag
data including the jacket picture.
[ ]
[
]
] Selects random playback mode. *1 *
[
Playback mode (☞ below)
Audio format
Playing time
Displays folder/track list. (☞ page 21)
Selects repeat playback mode. *
1 *2
• SONGS: Repeats current
track.
FOLDER: Repeats all tracks of
•
the current folder.
• FOLDER: Randomly plays all
tracks of the folder.
ALL: Randomly plays all tracks.
•
[
Switches between the internal and
]
external memory source of the
connected device (such as mobile
phone).
[6] Starts/pauses playback.
[4] [¢]*3• Selects track. (Press)
2
[
] [ ]
• Reverse/forward search.*
Selects folder.
[Mode] Changes the settings for <File Type>
and <Monitor Type>. (☞below)
[AV MENU] Displays <AV Menu> screen.
• Available items differ depending on the types of playback file.
*1 To cancel random or repeat mode, press the button repeatedly until the indicator disappears.
2
You cannot activate the repeat mode and the random mode at the same time.
*
3
The icon displayed between the buttons varies depending on the file type.
*
4
Search speed varies depending on the file type.
*
Setting <File Type>
Audio Plays back audio files.
Still Picture Plays back JPEG files.
Video Plays back MPEG1/MPEG2 files.
Setting <Monitor Type>
Select the monitor type to watch a wide screen picture
on the external monitor.
16:9 4:3 LB
Audio&Video Plays back audio files and MPEG1/
MPEG2 files.
• If the USB device contains no files of the selected
type, the existing files are played in the following
priority: audio, video, then still picture.
26
Playback status
(3: play / 8: pause)
• MP3/WMA/WAV: Folder no./
Track no.
• JPEG: Folder no./File no.
Track/file information (for MP3/
WMA/WAV)
• Touching an information bar
scrolls the text if not all of the
text is shown.
4
(Hold)
4:3 PS
(Letterbox)
(PanScan)
Listening to the iPod/iPhone device
• To use App of iPod touch/iPhone , ☞ page 31.
Preparation
iPod/iPhone that can be connected to this unit:
Made for
– iPod with video (5th Generation)
– iPod classic
– iPod nano (6th Generation)
– iPod nano (5th Generation)
– iPod nano (4th Generation)
– iPod nano (3rd Generation)
– iPod nano (2nd Generation)
– iPod nano (1st Generation)
– iPod touch (4th Generation)
– iPod touch (3rd Generation)
– iPod touch (2nd Generation)
– iPod touch (1st Generation)
– iPhone 4
– iPhone 3GS
– iPhone 3G
– iPhone
Connecting iPod/iPhone
Connect your iPod/iPhone using the appropriate cable
according to your purpose.
• To listen to music: USB 2.0 cable (accessory of the
iPod/iPhone)
To iPod/iPhone
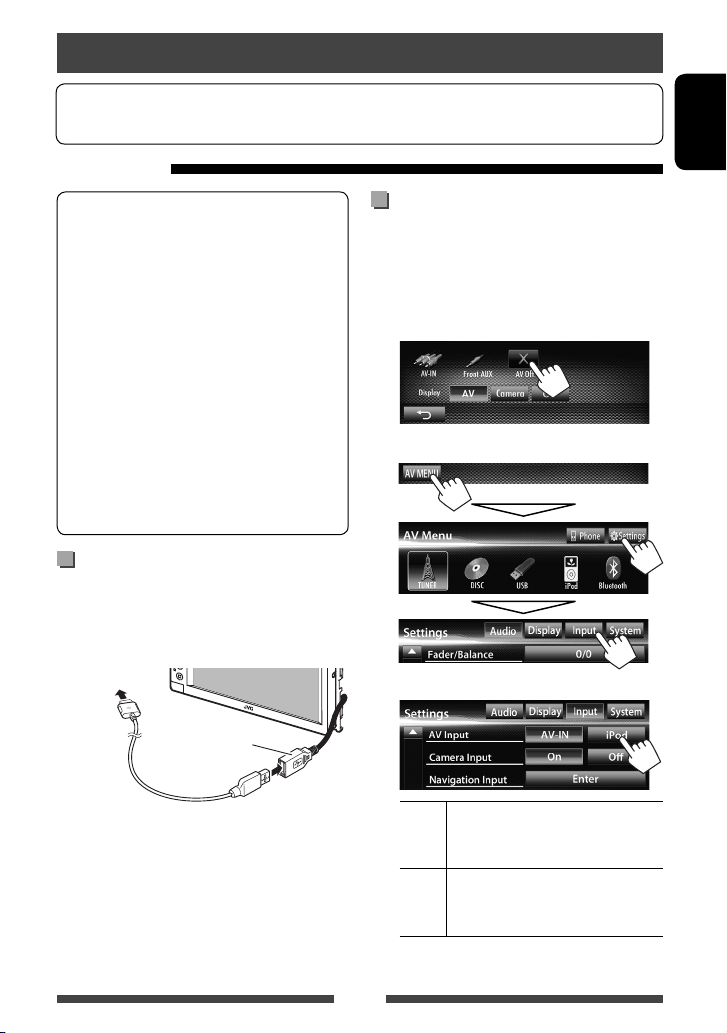
Setting <AV Input> for iPod/iPhone
playback
Select appropriate input setting for <AV Input>
according to the connection method of the iPod/iPhone.
1 Turn off the AV source.
On <AV Menu> screen:
2 Display <Input> setting screen.
3
ENGLISH
USB cable from the
rear of the unit
• To watch video and listen to music: USB
Audio and Video cable for iPod/iPhone—KS-U30
(separately purchased) (☞Installation/Connection
Manual)
Caution:
• Video is not displayed on the screen if connected with
any cable other than KS-U30.
AV-IN Selec t this when the iPod/iPhone is
connected by using USB 2.0 cable
(accessory of the iPod/iPhone).
iPod Select this when the iPod/iPhone is
connected by using KS-U30 (separately
purchased).
27
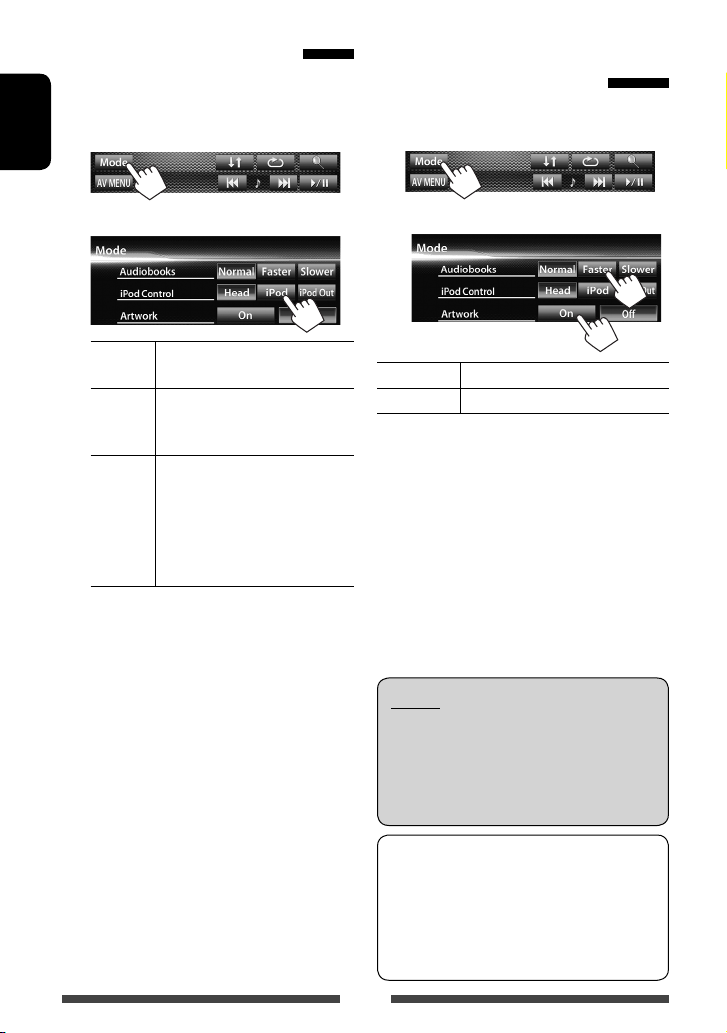
Setting iPod control mode
Select the unit controlling iPod/iPhone playback.
When the source is “
1
ENGLISH
iPod
”…
Selecting preference settings
for iPod/iPhone playback
When the source is “
1
iPod
”…
2
Head Controls playback from this unit.
(☞ page 29)
iPod Controls audio/video playback from
the iPod/iPhone.
• Playback information is shown.
iPod
Out *
• When using iPod nano (1st Generation) or iPod
with video (5th Generation) with <iPod> selected
for <iPod Control>, select <iPod> for <AV
Input> and connect iPod using KS-U30 (separately
purchased). (☞page 27)
* <iPod Out> is available only for the following iPod/
iPhone models:
– iPod nano (6th Generation)
– iPod touch (4th Generation)
– iPod touch (3rd Generation)
– iPod touch (2nd Generation)
– iPhone 4
– iPhone 3GS
– iPhone 3G
Displays the menu and playback
screen output from iPod/iPhone.
(☞page 30)
• You can control playback from
this unit in the same way as on
the iPod/iPhone.
2
Audiobooks Selec t the speed of audio books.
Artwork Shows/hides the iPod artwork.
Notice:
When operating an iPod/iPhone, some operations
may not be performed correctly or as intended. In
this case, visit the following JVC web site: <http://
www3.jvckenwood.com/english/car/> (English
website only)
For some iPod/iPhone models, the performance
may be abnormal or unstable during operation. In
this case, disconnect the iPod/iPhone device, then
check its condition.
If the performance is not improved or slow, reset
your iPod/iPhone.
28
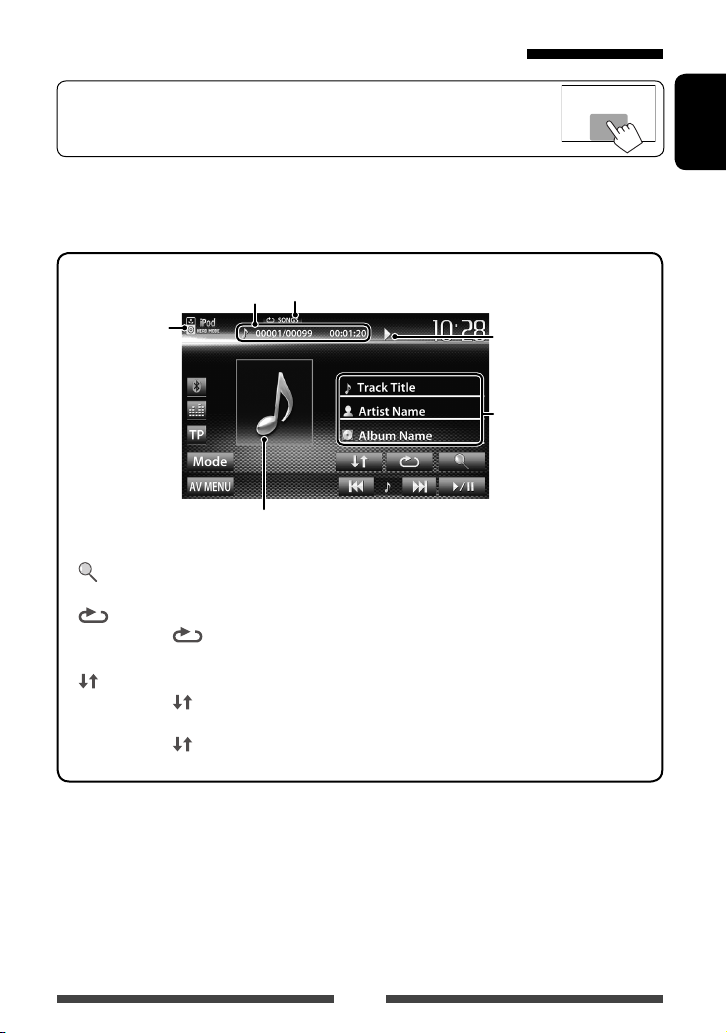
iPod/iPhone playback operations for <Head> mode
• When the operation buttons are not displayed on the screen, touch the area shown on
the illustration.
• To change settings for video playback, ☞ page 38.
• Select “
iPod
” as the source. (☞ page 12)
• Make sure to select <Head> for <iPod Control>. (☞ page 28)
• When you turn on this unit, the iPod/iPhone is charged through the unit.
ENGLISH
Track no./Total track number/
iPod control mode
(☞ page 28)
While playing, Artwork (the picture displayed on the screen of iPod/iPhone) is shown if the song
contains the Artwork (☞ page 28).
[ ]
Playing time
Displays the Music/Video menu on
the iPod/iPhone. (☞ page 30)
[
Selects Repeat playback mode. *
]
• SONGS: Functions the
same as “Repeat One.”
[
] Selects R andom playback mode. *
• SONGS: Functions the same
as “Shuffle Songs.”
ALBUMS: Functions the
•
Playback mode (☞ below)
[6] Starts/pauses playback.
[4] [¢]
1
[Mode] Changes the settings for iPod
1
[AV MENU] Displays <AV Menu> screen.
• Selects a track/video. *2 (Press)
• Reverse/forward search. (Hold)
playback. (☞ page 28)
same as “Shuffle Albums.”
• To watch the video, select an item on the list of the Video menu. (☞ page 30)
1
*
To cancel random and repeat mode, press the button repeatedly until the indicator disappears.
2
You cannot resume playback for video sources.
*
Playback status ( 3:
play/8: pause)
Song/video information
• Touching an information bar
scrolls the text if not all of
the text is shown.
29
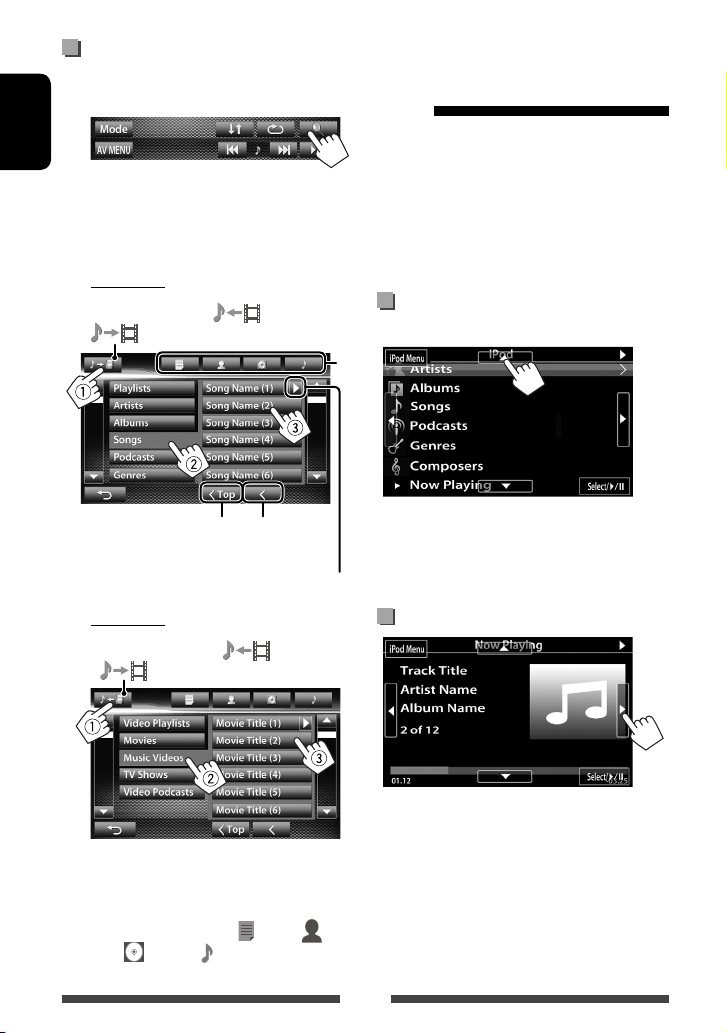
Selecting a track/video from menu
on the iPod/iPhone
1
ENGLISH
2 Select the menu (Music or Video) (1), a
category (2), then a desired item (3).
• Select the item in the selected layer until a
desired track starts playing.
Music menu:
Switches between Music ( ) and Video
( )
iPod/iPhone playback
operations for <iPod Out>
mode
• Connect the iPod touch/iPhone using KS-U30
(separately purchased). (☞ Installation/Connection
Manual)
• Select <iPod> for <AV Input> setting. (☞page 27)
• Make sure to select <iPod Out> for <iPod
Control>. (☞ page 28)
iPod
• Select “
*
” as the source. (☞ page 12)
Selecting a track from the menu on
the iPod/iPhone
Returns to the top layer
Video menu:
Switches between Music ( ) and Video
( )
• Available categories differ depending on the type of
your iPod/iPhone.
* You can switch to the top of the category by pressing
the corresponding tab: Playlist (
Albums (
) or Songs( ).
Returns to the
previous layer
Plays all items in the layer
), Artist ( ),
[5] [∞] Selects a category.
[Select/6] Confirms the selection.
[iPod Menu] Returns to the previous layer.
Operations during playback
[2] [3] Skips to the previous/next track.
[Select/6] Starts/pauses playback.
[iPod Menu] Displays the menu.
30
Loading…
41
Р
УC
CKИЙ
Изменение форматного
соотношения
Вы можете изменить форматное соотношение
воспроизводимого видеоизображения.
1
2
Сигнал 4:3
Сигнал 16:9
Full* :
Для изображений
16:9
Panorama:
Просмотр
изображений 4:3 в
широкоэкранном
режиме
Regular*:
Для изображений 4:3
Auto:
• Только
для
“DISC”/“USB”: Формат
выбирается автоматически
в соответствии с
поступающим сигналом.
* Если видеоизображение DivX воспроизводится с
настройкой <Monitor Type>, установленной
на значение <16:9> (☞ стр. 24), формат
изображения не устанавливается правильно.
Масштабирование картинки
Вы можете масштабировать картинку (<Full>, от
<Zoom1> до <Zoom3>).
• Когда для параметра <Aspect> установлено
значение <Panorama> или <Auto>
(☞ левая колонка), изображение
масштабируется с форматным соотношением
настройки <Full>.
1
2
[
5] [∞] [2] [3]* : Перемещение рамки
масштабирования.
* Не отображается, когда выбрано <Full>.
• Для некоторых видеоисточников функция
масштабирования использоваться не может.
RU_KW-AV60_EE_f.indb 41
RU_KW-AV60_EE_f.indb 41
12/8/11 11:27:45 AM
12/8/11 11:27:45 AM

42
Р
УC
CKИЙ
Включение камеры заднего вида
1
На экране <AV Menu>:
2
Для деактивации, выберите <Оff>.
Отображение картинки с камеры
заднего вида
Экран заднего вида отображается при
переключении коробки передач на задний ход (R).
Использование камеры заднего вида
• Чтобы использовать камеру заднего вида, необходимо подсоединение провода REVERSE GEAR SIGNAL.
Подсоединение камеры заднего вида: ☞ Руководство по установке/подключению.
Отображение картинки с камеры
заднего вида вручную
На экране <AV Menu>:
Чтобы отменить экран заднего вида
При отображении изображения с камеры заднего
вида вручную, вы можете изменить настройку
картинки. (
☞
cтр. 40)
RU_KW-AV60_EE_f.indb 42
RU_KW-AV60_EE_f.indb 42
12/13/11 11:02:29 AM
12/13/11 11:02:29 AM

43
Р
УC
CKИЙ
Элементы меню настройки
• При изменении настроек для <Amplifier Gain>, <AV Input> и настройки <Input> в <Navigation Input>
выключайте источник аудио/видео. Другие настройки изменяйте, когда источник аудио/видео включен.
Элемент меню
Настройки/элементы,
доступные для выбора
По умолчанию: Подчеркнуто
Audio (А
удио)
Fader/Balance (Фэйдер/
Баланс)
Fader : Настройка баланса выходного сигнала для передних и задних
динамиков.
♦
от F6 до R6; По умолчанию 0
• При использовании системы с двумя динамиками установите для
микшера среднее значение (0).
Balance : Настройка баланса выходного сигнала для левых и правых
динамиков.
♦
от L6 до R6; По умолчанию 0
Нажмите [
5/∞/2/3 ] или перетащите [ ], чтобы выполнить
настройку.
• Чтобы очистить настройку, нажмите [Center].
Equalizer (Эквалайзер)
Изменение режима звучания или настройка и сохранение настроек
эквалайзера для каждого источника. (☞ cтр. 36)
♦
Flat/Natural/Dynamic/Vocal Boost/Bass Boost/Vibrant/User
Loudness (Громкость)
Вы можете включать или выключать усиление звука.
♦
On
♦
Off
: Увеличьте низкие и высокие частоты для получения
хорошо сбалансированного звучания при низком
уровне громкости.
: Отмена.
Crossover (Кроссовер)
Настройка частоты разделения каналов. (☞ cтр. 37)
Volume Adjust (Настр.
Громкости)
Настройка и сохранение автоматической настройки уровня громкости
для каждого источника. (Для дисков настройка сохраняется для
каждой из следующих категорий: DVD/DVD-VR, VCD/CD и DivX/
MPEG1/MPEG2/MP3/WMA/WAV.) Уровень громкости автоматически
увеличивается или уменьшается при смене источника.
♦
от –15 до +6; По умолчанию0
Amplifier Gain (Коэф.
Усиления) *
♦
On
: Включение встроенного усилителя.
♦
Off
: Деактивация встроенного усилителя.
Speaker Select (Динамики
Выбор)
Выбор размера подсоединенного динамика.
♦
Standard/Narrow/Middle/Wide
* Чтобы изменить эту настройку, предварительно выключите источник аудио/видео нажатием [AV Off]
на экране <AV Menu>.
RU_KW-AV60_EE_f.indb 43
RU_KW-AV60_EE_f.indb 43
12/13/11 11:02:30 AM
12/13/11 11:02:30 AM

44
Р
УC
CKИЙ
Элемент меню
Настройки/элементы,
доступные для выбора
По умолчанию: Подчеркнуто
D
ispla
y (Дисплей)
Dimmer
(Регулятор
Освещ.)
♦
Auto
♦
On
♦
Off
♦
Dimmer
Time Set
: Затемнение экрана и подсветки кнопок при включении фар.
• Необходимо подключение провода ILLUMI.
(☞ Pуководство по установке/подключению)
: Включение
затемнения.
: Отмена.
: Настройка времени включения (
) или выключения (
) затемнения.
• Нажмите
[
5] или [∞], чтобы установить время.
Display Design
(Оформление
Дисп.)
Измените дизайн индикации (фон, цвет текста, кнопки на сенсорной панели и кнопки на
панели монитора). (☞ cтр. 38)
OSD Clock (Часы
OSD)
♦
On
♦
Off
: Отображение часов во время воспроизведения источника видео.
: Отмена.
Demonstration
(Демонстрация)
♦
On
♦
Off
: Включение демонстрации на экране.
: Отмена.
Scroll
(Прокрутка)
♦
Auto
♦
Once
♦
Off
: Повтор
прокрутки.
: Однократная прокрутка отображаемой информации.
: Отмена.
• При касании информационной строки выполняется прокрутка текста вне зависимости от
данной настройки.
GUI Adjust (GUI
Настройка)
Настройка яркости и черного цвета экрана.
Нажмите [Enter], чтобы отобразить экран настройки, выберите Затемнение включено (
)/
выключено (
), а затем измените следующие настройки:
♦
Brightness
♦
Black
: Настройка яркости (от –15 до +15; По умолчанию 00 для Затемнение
включено/+15 для Затемнение выключено).
: Настройка черного цвета (от –15 до +15; По умолчанию 00).
NTSC/PAL
(NTSC/PAL)
Выберите цветовую систему внешнего монитора.
♦
NTSC, PAL
Input (
Вход
)
AV Input (Аудио/
Видео Вход) *
1
Можно определить использование гнездовых разъемов LINE IN и VIDEO IN.
♦
AV-IN*
2
: Выбирайте для использования внешнего компонента, подсоединенного
к разъемам LINE IN и VIDEO IN, или iPod/iPhone, подсоединенного с
помощью кабеля USB 2.0. (☞ стр. 27 и 33)
♦
iPod
♦
BT*
2
*
3
: Выбирайте для использования iPod/iPhone, подсоединенного с помощью
JVC KS-U30. (☞ cтр. 27)
: Выбирайте данную опцию при воспроизведении аудиопроигрывателя
Bluetooth с использованием адаптера Bluetooth (KS-BTA100). (☞ cтр. 58)
*
1
Чтобы изменить эту настройку, предварительно выключите источник аудио/видео нажатием [AV Off]
на экране <AV Menu>. Настройку <AV Input> можно изменить, только когда для настройки <Input>
в <Navigation Input> установлено значение <RGB> или <Off>.
*
2
Когда для параметра <AV Input> установлено значение <AV-IN> или <BT>, видеоизображение с iPod/
iPhone не отображается на экране.
*
3
Только для KW-AV60.
RU_KW-AV60_EE_1.indb 44
RU_KW-AV60_EE_1.indb 44
11/21/11 4:00:19 PM
11/21/11 4:00:19 PM

45
Р
УC
CKИЙ
Элемент меню
Настройки/элементы,
доступные для выбора
По умолчанию: Подчеркнуто
Input (
Вход
)
Camera Input
(Камера Вход)
♦
On
♦
Off
: Отображение картинки с камеры заднего вида при
переключении коробки передач на задний ход (R).
: Отмена.
Navigation Input
(Навигация Вход)
Изменение настроек для отображения экрана приложения с подключенного iPod
touch/iPhone/внешнего блока навигации. (☞ стр. 31 и 35)
• Когда для настройки <Input> установлено значение <iPhone>, функция
<Navigation Mute> не работает.
Sy
st
em (Сис
тема)
Language (Язык)
Выбор языка текста, используемого для отображения информации на экране.
♦
English/Español/Français/Deutsch/Italiano/Nederlands/Svenska/Dansk/
Руccĸий/Português
• При изменении настройка появляется сообщение “Please Power Off”. Выключите
питание, а затем включите его снова, чтобы изменение вступило в силу.
♦
GUI
Language
: Выберите язык (<English> или <Local>: выбранный
выше язык) для использования для отображения кнопок
управления и элементов меню.
Time Set (Уст.
Времени)
Настройте время на часах. (☞ cтр. 
Beep (Звук
Сигнала)
♦
On
♦
Off
: Включение звука нажатия кнопки.
: Отмена.
User Profile
(Профиль
пользователя)
Вы можете сохранять в памяти, вызывать из памяти или очищать выполненные
настройки. (☞ cтр. 46)
Touch Panel Adjust
(Настр. Панели)
Регулировка позиции касания кнопок на экране. (☞ cтр. 47)
Initialize (Начальн
Настрой.)
Инициализируйте все выполненные настройки. Удерживайте [Enter] для
инициализации настроек.
• После инициализации настроек отрегулируйте настройки на экране <Initial
Settings>. (☞ cтр. 7)
Serial Number
(Серийный Номер)
Отображение серийного номера.
DivX® VOD (DivX®
VOD)
У данного устройства имеется собственный регистрационный код. В целях охраны
авторского права при воспроизведении файла с записанным регистрационным
кодом выполняется перезапись регистрационного кода устройства.
• Нажмите [Enter] для отображения информации.
• Для возврата к предыдущему экрану нажмите [OK].
System Information
(Системная
информация)
Отображение информации о версии программного обеспечения. Вы можете
обновить программное обеспечение. (☞ стр. 47)
RU_KW-AV60_EE_f.indb 45
RU_KW-AV60_EE_f.indb 45
12/8/11 11:27:49 AM
12/8/11 11:27:49 AM

46
Р
УC
CKИЙ
Запоминание выполненных настроек
1
На экране <Settings>:
2
3
Выберите элемент (<User1>,
<User2> или <User3>), чтобы
сохранить настройки в памяти.
Появляется сообщение для подтверждения.
Нажмите [Yes].
4
Завершите
процедуру.
Вызов настроек из памяти
• Предварительно выключите источник аудио/
видео нажатием [AV Off] на экране <AV Menu>.
1
На экране <User Profile> (☞ действие
2
в
левой колонке):
Появляется сообщение для подтверждения.
Нажмите [Yes].
2
Завершите
процедуру.
Удаление настроек
1
На экране <User Profile> (☞ действие
2
в
левой колонке):
2
Появляется сообщение для подтверждения.
Нажмите [Yes].
3
Завершите
процедуру.
Запоминание/вызов из памяти настроек
Вы можете сохранить следующие настройки в памяти:
• Настройки на экране <Settings>: Fader/Balance, Equalizer, Loudness, Crossover (HPF/LPF/SW Level),
Volume Adjust, Speaker Select, Dimmer, Display Design, AV Input, Camera Input, Navigation
• Настройки для
“AV-IN”: AV-IN Name
Удаление всех настроек, сохраненных в
<
User1
>,
User2
> и <
User3
>
RU_KW-AV60_EE_1.indb 46
RU_KW-AV60_EE_1.indb 46
11/21/11 4:00:20 PM
11/21/11 4:00:20 PM

47
Р
УC
CKИЙ
Обновление системы
Вы можете выполнить обновление системы,
подсоединив USB-устройство, содержащее файл
обновления.
1
Создайте файл обновления, скопируйте
его на USB-устройство и подсоедините
его к данному устройству.
• Чтобы подсоединить USB-устройство, ☞ стр. 25.
2
На экране <Settings>:
3
Это может занять некоторое время.
Если обновление успешно завершится,
отобразится сообщение “Update Completed”.
Перенастройте приемник.
• Если при выполнении обновления произойдет
ошибка, выключите и снова включите питание,
затем попробуйте выполнить обновление еще раз.
• Даже если вы выключили питание во время
выполнения обновления, вы можете возобновить
выполнение обновления после включения
питания. Обновление будет выполняться с самого
начала.
Регулировка позиции касания
Вы можете отрегулировать позицию касания
на сенсорной панели, если позиция касания и
выполняемая операция не совпадают.
1
На экране <Settings>:
2
Коснитесь центра меток в нижней
левой и в верхней правой части
экрана, как показано ниже.
• Для отмены текущей операции нажмите
[Cancel].
• Чтобы выполнить сброс на настройки по
умолчанию, нажмите [Reset].
RU_KW-AV60_EE_f.indb 47
RU_KW-AV60_EE_f.indb 47
12/13/11 7:05:40 PM
12/13/11 7:05:40 PM

48
Р
УC
CKИЙ
Операции Bluetooth
для KW-AV60BT
Bluetooth — это технология мобильной радиосвязи с малым радиусом действия между мобильными
устройствами (например сотовыми телефонами), портативными компьютерами и другими устройствами.
Соединение и обмен данными между устройствами Bluetooth осуществляется без использования кабелей.
• Список стран, в которых возможно использование функции Bluetooth® приведен на страницах i и ii в конце
руководства.
Информация относительно использования устройств Bluetooth®
ОПЕРАЦИИ BLUETOOTH
При поставке изготовителем адаптер Bluetooth
(KS-UBT1) установлен.
• Держите адаптер Bluetooth установленным
на устройстве при использовании функции
Bluetooth.
• Данный порт предназначен только для
использования с KS-UBT1. Другие адаптеры
Bluetooth или устройства USB использоваться
не могут.
Профили Bluetooth
Данное устройство поддерживает следующие
профили Bluetooth:
• HFP (Hands-Free Profile—профиль громкой связи) 1.5
• OPP (Object Push Profile—профиль пересылки
объектов) 1.1
• A2DP (Advanced Audio Distribution Profile—профиль
расширенного распространения звука) 1.2
• AVRCP (Audio/Video Remote Control Profile—
профиль удаленного управления звуком и
видеоизображением) 1.3
• PBAP (Phone Book Access Profile—профиль доступа
к телефонной книге) 1.0
Значки для кнопки Bluetooth
: Не подсоединено устройство.
: Аудиопроигрыватель
Bluetooth
подключен.
: Мобильный телефон Bluetooth
подключен.
: Одновременно
подключены
мобильный телефон и
аудиопроигрыватель Bluetooth.
• В зависимости от версии Bluetooth устройства, не
все устройства Bluetooth могут быть подключены
к устройству.
• Данное устройство может не работать с
некоторыми устройствами Bluetooth.
• Качество соединения может зависеть от условий
окружающей среды.
• Некоторые устройства Bluetooth отсоединяются
при выключении данного аппарата.
Информация о Bluetooth: Дополнительные
сведения о функциях Bluetooth можно найти
на веб-сайте JVC по адресу: <http://www3.
jvckenwood.com/english/car/> (только веб-сайт
на английском языке)
Адаптер Bluetooth
(KS-UBT1)
RU_KW-AV60_EE_1.indb 48
RU_KW-AV60_EE_1.indb 48
11/21/11 4:00:20 PM
11/21/11 4:00:20 PM

49
Р
УC
CKИЙ
Первое подключение нового
устройства Bluetooth
При первом подключении устройства Bluetooth
к приемнику выполните сопряжение между
приемником и устройством. Сопряжение необходимо
для обмена данными между устройствами Bluetooth.
Чтобы выполнить сопряжение, возможно, потребуется
ввести PIN-код (Личный идентификационный номер)
подключаемого устройства Bluetooth.
• После установления соединения оно регистрируется
в устройстве, даже если выполняется перезапуск
устройства. Всего можно зарегистрировать до 5
устройств.
• Одновременно могут быть подключены только
одно устройство для телефона Bluetooth и одно
устройство для аудиопроигрывателя Bluetooth.
• Для использования функции Bluetooth ее
необходимо включить в устройстве.
1
Отобразите экран настройки Bluetooth.
На экране <AV Menu>:
Для подключения мобильного телефона
Bluetooth
Отображает экран настройки телефона.
Для подключения аудиопроигрывателя
Bluetooth
Отобразится экран <Mode>.
Подключение устройств Bluetooth
2
Смените
PIN-код.
• Если изменение PIN-кода пропускается,
перейдите к действию
3
.
3
4
5
Управляйте устройством Bluetooth
для установления соединения.
Появится сообщение “Connected”. Нажмите [OK]
для подтверждения операции.
Соединение установлено, теперь можно
использовать устройство Bluetooth с помощью
приемника.
Удаление последнего введенного символа
PIN-код (По умолчанию: 0000)
Отмена
Аудиопроигрыватель
Мобильный телефон
RU_KW-AV60_EE_f.indb 49
RU_KW-AV60_EE_f.indb 49
12/13/11 11:02:37 AM
12/13/11 11:02:37 AM

50
Р
УC
CKИЙ
Подключение и отключение
зарегистрированного устройства
Bluetooth
1
Отобразите экран настройки
Bluetooth.
(☞ cтр. 49)
• Для мобильного телефона Bluetooth: Экран
настройки телефона
• Для аудиопроигрывателя Bluetooth: Экран
<Mode>
2
Чтобы подсоединить
Выберите устройство, с которым необходимо
установить соединение.
Появится сообщение “Connected”. Нажмите [OK]
для подтверждения операции.
• Все зарегистрированные
устройства (мобильный телефон и
аудиопроигрыватель) приводятся в списке
<Connect Device>.
– Доступные выбору элементы зависят от
управляемого устройства.
• Когда подсоединен мобильный телефон,
удержание [
] на экране управления
источником переключает между
последним подключавшимся и текущем
подключенным телефонами.
Чтобы отсоединить
Появляется сообщение для подтверждения.
Нажмите [Yes].
Удаление зарегистрированного
устройства Bluetooth
1
На экране <Connect Device> (☞ Шаг
2
в
левой колонке)
:
2
Выберите устройство, которое
необходимо удалить из числа
зарегистрированных.
Появляется сообщение для подтверждения.
Нажмите [Yes].
Отключение адаптера Bluetooth
“JVC”
• Храните адаптер Bluetooth в прилагаемом
чехле.
• Повторно вставляя адаптер Bluetooth,
устанавливайте его надежно, логотипом JVC
вверх.
RU_KW-AV60_EE_1.indb 50
RU_KW-AV60_EE_1.indb 50
11/21/11 4:00:21 PM
11/21/11 4:00:21 PM

16:34
JVC KW-AV60BT Review — Toyota 4Runner
11:01
Видеообзор головного устройства JVC KW-AVX646U
02:13
jvc KW-AV60BT 11/02/2017
18:10
Автомагнитола JVC KW-AV60BT
02:48
WAZE iPHONE APP WORKING WITH JVC KW-AV60BT
08:19
Небольшой обзор автомагнитолы JVC KW-AV51ee
Нажмите на кнопку для помощи

1
KW-AV60BT/KW-AV60
Installation/Connection Manual
Einbau/Anschlußanleitung
Manuel d’installation/raccordement
Handleiding voor installatie/aansluiting
Parts list for installation and
connection
If any item is missing, consult your JVC IN-CAR
ENTERTAINMENT dealer immediately.
ENGLISH
This unit is designed to operate on 12 V DC,
NEGATIVE ground electrical systems. If your
vehicle does not have this system, a voltage inverter
is required, which can be purchased at JVC IN-CAR
ENTERTAINMENT dealers.
WARNINGS
• DO NOT install any unit or wire any cable in a
location where;
– it may obstruct the steering wheel and gearshift
lever operations, as this may result in a traffic
accident.
– it may obstruct the operation of safety devices
such as air bags, as this may result in a fatal
accident.
– it may obstruct visibility.
• DO NOT operate any unit while manipulating the
steering wheel, as this may result in a traffic accident.
• The driver must not watch the monitor while driving.
It may lead to carelessness and cause an accident.
• If you need to operate the unit while driving,
be sure to look around carefully or you may be
involved in a traffic accident.
• If the parking brake is not engaged, “Parking
Brake” appears on the monitor, and no playback
picture will be shown.
– This warning appears only when the parking
brake lead is connected to the parking brake
system built in the car.
To prevent short circuits, we recommend that you
disconnect the battery’s negative terminal and make
all electrical connections before installing the unit.
• Be sure to ground this unit to the car’s
chassis again after installation.
• Be sure any cable is not caught on the car’s chassis
or under seats.
Notes on electrical connections:
•
Replace the fuse with one of the specified rating.
If the fuse blows frequently, consult your JVC
IN-CAR ENTERTAINMENT dealer.
• It is recommended to connect speakers with
maximum power of more than 50 W (both at the
rear and at the front, with an impedance of 4 Ω to
8 Ω).
•
To prevent short circuits, cover the terminals of
the UNUSED leads with insulating tape.
•
The heat sink becomes very hot after use. Be
careful not to touch it when removing this unit.
• At the time of installation, be sure to fix all wires
(wires both from this unit and from the car itself)
in a way that no wires can come into contact with
heat sinks on the rear and side of the unit.
Heat sink
Abstrahlblech
Dissipateur de
chaleur
Warmte-opnemer
LVT2294-003A
[E]
1211EHHMDWJEIN
EN, GE, FR, NL
© 2011 JVC KENWOOD Corporation
Round head screws (M5
× 8 mm)
Rundkopfschrauben (M5 × 8 mm)
Vis à tête ronde (M5
× 8 mm)
Schroeven met ronde kop (M5 × 8 mm)
Flat head screws (M5
× 8 mm)
Flachkopfschrauben (M5 × 8 mm)
Vis à tête plate (M5
× 8 mm)
Schroeven met platte kop (M5 × 8 mm)
Liste des pièces pour l’installation
et raccordement
Si quelque chose manquait, consultez votre
revendeur autoradio JVC immédiatement.
FRANÇAIS
Cet appareil est conçu pour fonctionner sur des
sources de courant continu de 12 V à masse
NEGATIVE. Si votre véhicule n’offre pas ce type
d’alimentation, il vous faut un convertisseur
de tension, que vous pouvez acheter chez un
revendeur d’autoradios JVC.
AVERTISSEMENTS
• N’INSTALLEZ aucun appareil ni aucun câble
dans un endroit où:
– où il peut gêner l’accès au volant ou au levier
de vitesse car cela peut entraîner un accident
de la circulation.
– où il peut gêner la manipulation de dispositifs
de sécurité tels que les airbags car cela peut
entraîner un accident fatal.
– où il peut gêner la visibilité.
• NE COMMANDEZ pas l’appareil lors de la
manipulation du volant car cela peut entraîner
un accident de la circulation.
• Le conducteur ne doit pas regarder le moniteur
lorsqu’il conduit. Cela peut lui faire perdre sa
concentration et causer un accident.
• Si vous souhaitez opérer l’appareil pendant
que vous conduisez, assurez-vous de bien
regarder autour de vous afin de ne pas causer
un accident de la circulation.
• Si le frein à main n’est pas engagé, “Parking
Brake (Frein à Main)” s’affiche sur le moniteur et
aucune image de lecture n’apparaît.
– Cet avertissement apparaît uniquement
quand le fil du frein de stationnement
est connecté au système de frein de
stationnement intégré à la voiture.
Pour éviter tout court-circuit, nous vous
recommandons de débrancher la borne négative
de la batterie et d’effectuer tous les raccordements
électriques avant d’installer l’appareil.
• Assurez-vous de raccorder de nouveau la
mise à la masse de cet appareil au châssis de
la voiture après l’installation.
• Assurez-vous qu’aucun câble n’est coincé sur
châssis de la voiture ou sous les sièges.
Remarques sur les connexions électriques:
• Remplacer le fusible par un de la valeur
précisée. Si le fusible saute souvent, consulter
votre revendeur d’autoradios JVC.
• Il est recommandé de connecter des enceintes
avec une puissance de plus de 50 W (les
enceintes arrière et les enceintes avant, avec
une impédance comprise entre 4 Ω et 8 Ω).
• Pour éviter les court-circuits, couvrir les bornes
des fils qui ne sont PAS UTILISÉS avec de la
bande isolante.
• Le dissipateur de chaleur devient très chaud
après usage. Faire attention de ne pas le
toucher en retirant cet appareil.
• Au moment de l’installation, assurez-vous de
fixer tous les fils (les fils de cet appareil et aussi
de la voiture elle-même) de façon qu’aucun fil ne
puisse entrer en contact avec les dissipateurs de
chaleur situés à l’arrière et sur le côté de l’appareil.
DEUTSCH
Dieses Gerät ist für einen Betrieb in elektrischen
Anlagen mit 12 V Gleichstrom und (–) Erdung
ausgelegt. Verfügt Ihr Fahrzeug nicht über diese
Anlage, ist ein Spannungsinverter erforderlich, der
bei JVC Autoradiohändler erworben werden kann.
WARNHINWEISE
• Installieren Sie keine Komponenten und verdrahten
Sie Kabel NICHT an den folgenden Orten;
– an denen sie die Bewegungen des Lenkrads und
des Ganghebels behindern könnten. Anderenfalls
führt diese Behinderung möglicherweise zu
ernsten Verkehrsunfällen.
– an denen sie den Betrieb von Sicherheit
seinrichtungen, z.B. Airbags, behindern
könnten. Anderenfalls führt diese Behinderung
möglicherweise zu ernsten Verkehrsunfällen.
– an denen sie die Sicht behindern.
• Betätigen Sie beim Fahren KEINE Geräte.
Anderenfalls führt dies möglicherweise zu einem
ernste Verkehrsunfall.
• Der Fahrer darf während der Fahrt auf keinen Fall
auf den Monitor sehen. Dies könnte den Fahrer
ablenken und zu Unfällen führen.
• Wenn Sie das Gerät beim Fahren bedienen müssen,
dürfen Sie nicht den Blick von der Straße nehmen,
da sonst die Gefahr von Verkehrsunfällen besteht.
• Wenn die Feststellbremse nicht verriegelt ist,
erscheint „Parking Brake (Feststellbremse)“ auf dem
Monitor und es wird kein Wiedergabebild angezeigt.
– Diese Warnung wird nur angezeigt, wenn das
Feststellbremskabel an das in das Fahrzeug
eingebaute Feststellbremssystem angeschlossen ist.
Zur Vermeidung von Kurzschlüssen empfehlen wir,
daß Sie den negativen Batterieanschluß abtrennen
und alle elektrischen Anschlüsse herstellen, bevor das
Gerät eingebaut wird.
• Sicherstellen erneut, daß das Gerät nach dem
Einbau Chassis des Fahrzeugs geerdet wird.
• Sicherstellen, dass sich kein Kabel am Chassis oder
unter den Sitzen des Fahrzeugs verfangen hat.
Hinweise zu elektrischen Anschlüssen:
• Die Sicherung mit einer der entsprechenden
Nennleistung ersetzen. Brennt die Sicherung
häufig durch, wenden Sie sich an ihren JVC
Autoradiohändler.
• Es wird empfohlen, Lautsprecher mit einer
Maximalleistung von mehr als 50 W anzuschließen
(sowohl hinten als auch vorne, mit einer Impedanz
von 4 Ω bis 8 Ω).
• Zur Vermeidung eines Kurzschlusses die
Anschlußklemmen der NICHT VERWENDETEN
Leitungen mit Isolierklebeband umwickeln.
• Das Abstrahlblech wird nach dem Gebrauch sehr
heiß. Beim Ausbau des Geräts darauf achten, das
Abstrahlblech nicht zu berühren.
• Bei der Installation befestigen Sie alle Drähte
(Drähte von diesem Gerät und dem Fahrzeug
selbst) so an, dass die Drähte nicht in Berührung
mit Kühlkörpern an der Rückseite und den Seiten
des Geräts in Berührung kommen.
NEDERLANDS
Dit apparaat mag worden gebruikt bij elektrische
systemen die werken op 12 V gelijkstroom met
negatieve aarding. Als uw auto niet is uitgerust
met een dergelijk systeem, is een spanningsomzetter
vereist. Dit instrument kan worden aangeschaft bij
JVC car audio dealers.
WAARSCHUWING
• Installeer toestellen en aansluitkabels NIET op
plaatsen waar;
– dit een gevaar vormt voor het bedienen van
het stuur of de versnelling, aangezien elke
belemmering van de juiste werking van het stuur
en de versnelling tot een ongeluk kan lijden.
– dit een gevaar vormt voor de airbag, aangezien
elke belemmering van de werking van de airbag
tot een dodelijk ongeluk kan lijden.
– dit het uitzicht belemmert.
• Bedien GEEN enkele eenheid terwijl u uw handen
aan het stuur nodig hebt, aangezien dit anders tot
een ongeluk kan lijden.
• De bestuurder dient tijdens het rijden niet naar
de monitor te kijken. De aandacht wordt anders
afgeleid met mogelijk ongelukken als gevolg.
• Voorkom ongelukken en kijk derhalve uitermate
goed uit indien u het toestel tijdens het besturen
van de auto wilt bedienen.
• Als de handrem niet is aangehaald, verschijnt
“Parking Brake (Handrem)” op de monitor en is
afspelen onmogelijk.
– Deze waarschuwing verschijnt uitsluitend
indien het handremdraad met het in de auto
ingebouwde handremsysteem is verbonden.
Om kortsluiting te voorkomen adviseren wij u om de
minpool van de accu los te maken en alle elektrische
verbindingen tot stand te brengen voordat u het
apparaat in de auto installeert.
• Aard dit toestel beslist weer op het chassis
van de auto na het installeren.
• Let goed op dat kabels niet in of door het chassis
van de auto of onder stoelen bekneld raken.
Opmerkingen voor de elektrische verbindinge:
• Vervang de zekering door een exemplaar met
het aangegeven vermogen. Als de zekering
vaak doorslaat, moet u uw JVC car audio dealer
raadplegen.
• Sluit bij voorkeur luidsprekers met een hoger
maximaal vermogen dan 50 W (zowel achter als
voor, met een impedantie van 4 Ω t/m 8 Ω) aan.
• Om kortsluiting te voorkomen, moet u de
aansluitklemmen van ONGEBRUIKTE gekleurde
draden met isolatieband bedekken.
• De warmte-opnemer kan na gebruik erg heet
worden. Raak de warmte-opnemer niet aan
wanneer u dit apparaat van zijn plaats haalt.
• Leid en bevestig bij het installeren alle draden en
snoeren (van zowel dit apparaat als van de auto)
zodanig dat deze niet in contact met de hitte-
panelen (warmte-opnemers) aan de achter- en
zijkanten van het apparaat kunnen komen.
Teileliste für den Einbau und
Anschluß
Falls ein Artikel fehlt, wenden Sie sich sofort an
Ihren JVC-Autoradiohändler.
Lijst van onderdelen die u bij
installatie en aansluiting nodig hebt
Raadpleeg direct uw JVC auto-audiohandelaar
indien er iets ontbreekt.
Power cord
Stromkabel
Cordon d’alimentation
Stroomkabel
Use these screws when installing the unit without the
supplied sleeve. (See page 2.)
Verwenden Sie diese Schrauben, wenn Sie das Gerät ohne
die mitgelieferte Halterung einbauen. (Siehe Seite 2.)
Utilisez ces vis lors de l’installation de l’appareil sans le
manchon fourni. (Voir page 2.)
Gebruik deze schroeven wanneer u het toestel zonder de
bijgeleverde huls installeert. (Zie bladzijde 2.)
Monitor panel and soft case
Monitorfeld und weiches Gehäuse
Panneau du moniteur et étui souple
Monitorpaneel en zachte hoes
Main unit/Sleeve/Trim plate
Hauptgerät/Halterung/Frontrahmen
Appareil principal/Manchon/Plaque d’assemblage
Hoofdtoestel/Huls/Sierplaat
Crimp connector
Crimpanschlüsse
Raccord à sertir
Krimpaansluiting
Handles
Griffe
Poignées
Hendels
Mounting bolt—M4
× 20 mm
Befestigungsschraube—M4 × 20 mm
Boulon de montage—M4 x 20 mm
Bevestigingsbout—M4 x 20 mm
Rubber cushion
Gummipuffer
Amortisseur en caoutchouc
Rubberdop
Washer (ø5)
Unterlegscheibe (ø5)
Rondelle (ø5)
Sluitring (ø5)
Lock nut (M5)
Sicherungsmutter (M5)
Ecrou d’arrêt (M5)
Contra- moer (M5)
Only for KW-AV60BT / Nur für KW-AV60BT /
Uniquement pour le KW-AV60BT / Alleen voor de KW-AV60BT
Microphone
Mikrofon
Microphone
Microfoon
Bag for storing the adapter
Tasche zum Ablegen des Adapters
Sac pour ranger l’adaptateur
Zakje voor het bewaren van de adapter
KS-UBT1
Bluetooth Adapter (attached)
Bluetooth-Adapter (eingesetzt)
Adaptateur Bluetooth (inséré)
Bluetooth adapter (geplaatst)
Extension lead
Rückwärtsgangsignal-skabel
Fil prolongateur
Verlengsnoer
Install_KWAV60[E].indb 1
Install_KWAV60[E].indb 1
11.11.9 2:09:00 PM
11.11.9 2:09:00 PM
JVC KW-AV60BT
ENGLISHDEUTSCHFRANÇAIS
NEDERLANDS
For canceling the display demonstration, see page 7. Zum Abbrechen der Displaydemonstration siehe Seite 7. Pour annuler la démonstration des affichages, référez-vous à la page 7. Zie bladzijde 7 voor het annuleren van de displaydemonstratie.For installation and connections, refer to the separate manual.Für den Einbau und die Anschlüsse siehe das eigenständige Handbuch.Pour l’installation et les raccordements, se référer au manuel séparé.Bijzonderheden over de installatie en aansluiting van het apparaat vindt u in de desbetreffende handleiding.
INSTRUCTIONS
BEDIENUNGSANLEITUNGMANUEL D’INSTRUCTIONSGEBRUIKSAANWIJZINGLVT2294-001B
[E]
MONITOR WITH DVD RECEIVER
MONITOR MIT DVD-RECEIVER
MONITEUR AVEC RÉCEPTEUR DVD
MONITOR MET DVD-ONTVANGER
A
Manual
View the manual for the JVC KW-AV60BT here, for free. This manual comes under the category not categorized and has been rated by 1 people with an average of a 9.
This manual is available in the following languages: English. Do you have a question about the JVC KW-AV60BT or do you need help?
Ask your question here
Index
- Contents
- How to reset your unit
- How to forcibly eject a disc
- INTRODUCTIONS
- AV SOURCE OPERATIONS
- BLUETOOTH OPERATIONS
- REFERENCE
- The countries where you may use the Bluetooth® function (For KS-UBT1)
Product Images (1)
JVC KW-AV60BT specifications
Below you will find the product specifications and the manual specifications of the JVC KW-AV60BT.
The JVC KW-AV60BT is a car audio system that offers a wide range of features and functionalities. This device is specially designed for vehicles and provides various options for audio playback and connectivity.
With its built-in 6.1-inch touchscreen display, the JVC KW-AV60BT allows users to easily navigate through menus and settings. It supports various audio formats, including CD, DVD, MP3, and WMA, providing flexibility in music playback.
In terms of connectivity, the JVC KW-AV60BT offers Bluetooth capabilities, allowing users to wirelessly connect their smartphones or other devices for hands-free calling and audio streaming. It also includes USB and AUX inputs, providing additional options for connecting external devices.
Equipped with a built-in AM/FM tuner, this car audio system allows users to tune in to their favorite radio stations. It also features a 13-band graphic equalizer, allowing users to customize their audio settings for an enhanced listening experience.
The JVC KW-AV60BT is designed with user convenience in mind. It features a remote control for easy operation even from a distance. Additionally, it includes a steering wheel control interface, which enables users to control the audio system directly from their car’s steering wheel buttons.
In terms of installation, the JVC KW-AV60BT is designed to be compatible with a wide range of vehicles, offering a custom-fit solution. This ensures that the device is properly installed, maximizing its performance and minimizing any potential issues.
Overall, the JVC KW-AV60BT is a versatile car audio system that offers a variety of features and connectivity options. Its user-friendly interface and compatibility with different vehicles make it a convenient choice for those looking to upgrade their car’s audio system.
General
Frequently Asked Questions
Can’t find the answer to your question in the manual? You may find the answer to your question in the FAQs about the JVC KW-AV60BT below.
How do I operate the JVC KW-AV60BT?
To operate the JVC KW-AV60BT, follow these steps:
1. Make sure the Bluetooth adapter (KS-UBT1) is attached to the unit. This adapter allows you to connect Bluetooth devices wirelessly.
2. Register (pair) a Bluetooth device with the KS-UBT1 adapter. Refer to the instructions manual supplied with the adapter for detailed instructions.
3. Set the AV Input to «BT» by selecting it in the menu. This will enable the Bluetooth function on the unit.
4. If you want to use a Bluetooth mobile phone, adjust the microphone volume to your preference. You can choose from high, normal, or low volume levels.
5. To receive a call, simply answer it when it comes in. To make a call, use your phone’s dialing function. You can also switch between handsfree mode and phone mode during a call.
6. To use a Bluetooth audio player, select «Bluetooth» as the source on the unit. You can start playback, pause, select tracks, and fast-forward or reverse tracks using the controls on the unit or the Bluetooth audio player.
Please note that the specific operations may vary depending on the connected device. For more information, you can visit the JVC website for Bluetooth-related information.
What precautions should I take when using the JVC KW-AV60BT?
When using the JVC KW-AV60BT, it is important to take the following precautions:
1. Ensure that the unit is installed and mounted securely in your vehicle. This will prevent it from moving or falling during use, which could cause damage or injury.
2. Avoid exposing the unit to extreme temperatures, both hot and cold. High temperatures can cause malfunctions or damage to the internal components, while low temperatures can affect the performance of the display.
3. Do not insert any foreign objects into the unit’s disc slot or USB port. This can cause damage to the unit or the inserted media.
4. When cleaning the unit, use a soft, dry cloth to remove any dust or fingerprints. Avoid using harsh chemicals or abrasive materials, as they can damage the surface of the unit.
5. Do not disassemble or modify the unit yourself. This should only be done by qualified technicians, as improper handling can lead to damage or electric shock.
6. If you experience any problems or malfunctions with the unit, refer to the troubleshooting section of the manual or contact JVC customer support for assistance.
By following these precautions, you can ensure the safe and proper use of the JVC KW-AV60BT in your vehicle.
How do I dispose of old equipment and batteries for the JVC KW-AV60BT?
When disposing of old equipment and batteries for the JVC KW-AV60BT, please follow these guidelines:
1. Do not dispose of the product and batteries as general household waste at the end of their life. These items should be handled separately to ensure proper disposal.
2. Check the applicable national legislation or rules in your country and municipality for specific instructions on how to dispose of electronic equipment and batteries. Follow these guidelines to comply with environmental regulations and prevent potential negative effects on the environment and human health.
3. Take note of the symbol on the product and battery indicating that they should not be disposed of with regular household waste.
4. Dispose of the product and batteries in accordance with the recommended methods in your area. This may include recycling programs, designated collection points, or returning them to the manufacturer or authorized service centers.
By following these steps, you can ensure the proper disposal of old equipment and batteries for the JVC KW-AV60BT, contributing to the conservation of natural resources and minimizing environmental impact.
Which countries support the Bluetooth® function of the JVC KW-AV60BT?
The countries where you can use the Bluetooth® function of the JVC KW-AV60BT are mentioned in the manual. Unfortunately, I don’t have access to the specific page numbers or content of the manual. However, you can refer to the manual provided with the product or visit the JVC website for more information on the countries where the Bluetooth® function is supported. The JVC website should have a dedicated section or page that provides details about the Bluetooth® compatibility and supported countries for the JVC KW-AV60BT.
Is the manual of the JVC KW-AV60BT available in English?
Yes, the manual of the JVC KW-AV60BT is available in English .
Is your question not listed? Ask your question here
JVC KW-AV60BT Receiver PDF User Guides and Manuals for Free Download: Found (5) Manuals for JVC KW-AV60BT Device Model (Instructions Manual, Important Notice, Specification Sheet)
If you’re in the market for an advanced multimedia receiver, the JVC KW-AV60BT deserves your consideration. This model is designed to provide a perfect balance of connectivity, sound quality, and user convenience. The KW-AV60BT is more than just a basic car stereo; it integrates modern features with functionality, making your driving experience enjoyable and engaging. Here’s a detailed review of this impressive product.
One of the standout features of the JVC KW-AV60BT is its excellent multimedia compatibility. It offers support for a wide range of audio and video formats, allowing you to enjoy your favorite media without hassle. Whether you are using CDs, USB drives, or streaming audio from your smart device, this receiver has you covered. Its 6.8-inch touchscreen display provides clear visibility and intuitive controls, enhancing ease of use while driving.
When it comes to connectivity, the KW-AV60BT excels with built-in Bluetooth technology. This allows drivers to make hands-free calls and stream music directly from their smartphones without the tangle of wires. The Bluetooth pairing process is straightforward, thanks to JVC’s user-friendly interface. Additionally, the unit supports two Bluetooth devices simultaneously, making it convenient for shared use.
The sound quality produced by the JVC KW-AV60BT is commendable. The receiver features a built-in 50W x 4 amplifier, which ensures that your audio remains clear and powerful regardless of volume levels. The adjustable EQ settings allow for customized sound profiles tailored to individual listening preferences. Some key audio features include:
- 19 Band Equalizer for precise tuning.
- Crossover settings that enhance bass response.
- Subwoofer control for those who crave deep low-end sound.
An additional highlight is the easy installation process of the KW-AV60BT. The unit comes with a straightforward wiring harness and installation kit, which is great for both professional installers and DIY enthusiasts. While some may require additional accessories for certain vehicle types, the overall installation is user-friendly.
The JVC KW-AV60BT also features a rear camera input, which is a fantastic addition for safety-conscious drivers. When connected, it provides a clear view of the area behind the vehicle, significantly improving parking and reversing safety. This makes it an ideal choice for drivers looking to upgrade their car’s safety features without heavy modifications.
Despite its many advantages, there are a few potential drawbacks to consider. Some users have reported that the interface could be a bit sluggish at times, particularly when loading larger media libraries. Additionally, while the touchscreen is responsive, it may take some practice to navigate through menus smoothly while on the go.
In conclusion, the JVC KW-AV60BT presents an excellent option for those seeking a reliable and feature-packed multimedia receiver. With its strong sound performance, versatile connectivity options, and user-friendly interface, it meets the needs of modern drivers. The minor shortcomings are outweighed by its benefits, making it a worthy investment for anyone looking to enhance their driving experience.