

KD-X152M
DIGITAL MEDIA RECEIVER
INSTRUCTION MANUAL
ЦИФРОВОЙ МЕДИА-РЕСИВЕР
ИHCTPУKЦИЯ ПO ЭKCПЛУATAЦИИ
DİJİTAL MEDYA ALICISI
KULLANIM KILAVUZU
ENGLISH
РУCCKИЙ
TÜRKÇE
B5A-2131-00 [M2]
Information on Disposal of Old Electrical and Electronic Equipment and Batteries (applicable
for countries that have adopted separate waste collection systems)
Products and batteries with the symbol (crossed-out wheeled bin) cannot be disposed as household waste.
Old electrical and electronic equipment and batteries should be recycled at a facility capable of handling
these items and their waste byproducts.
Contact your local authority for details in locating a recycle facility nearest to you. Proper recycling and
waste disposal will help conserve resources whilst preventing detrimental effects on our health and the
environment.
Notice: The sign “Pb” below the symbol for batteries indicates that this battery contains lead.
For Turkey
Bu ürün 28300 sayılı Resmi Gazete’de yayımlanan Atik Elektrikli ve Elektronik Eşyalarin Kontrolü
Yönetmeliğe uygun olarak üretilmiştir.
Eski Elektrik ve Elektronik Ekipmanların İmha Edilmesi Hakkında Bilgi (atık yan ürün toplama
sistemlerini kullanan ülkeleri için uygulanabilir)
Sembollü (üzerinde çarpı işareti olan çöp kutusu) ürünler ev atıkları olarak atılamaz.
Eski elektrik ve elektronik ekipmanlar, bu ürünleri ve ürün atıklarını geri
dönüştürebilecek bir tesiste değerlendirilmelidir. Yaşadığınız bölgeye en yakın geri
dönüşüm tesisinin yerini öğrenmek için yerel makamlara müracaat edin. Uygun geri
dönüşüm ve atık imha yöntemi sağlığımız ve çevremiz üzerindeki zararlı etkileri
önlerken kaynakların korunmasına da yardımcı olacaktır.
For Israel
Дата изготовления (месяц/год) находится на этикетке устройства.
Условия хранения:
Температура: от –30°C до +85°C
Влажность: от 0% до 90%
i

Declaration of Conformity with regard to the RE Directive 2014/53/EU
Declaration of Conformity with regard to the RoHS Directive 2011/65/EU
Manufacturer:
JVC KENWOOD Corporation
3-12, Moriya-cho, Kanagawa-ku, Yokohama-shi, Kanagawa, 221-0022, JAPAN
EU Representative:
JVCKENWOOD Deutschland GmbH
Konrad-Adenauer-Allee 1-11, 61118 Bad Vilbel, GERMANY
English
Hereby, JVCKENWOOD declares that the radio equipment “KD-X152M” is in compliance with Directive
2014/53/EU.
The full text of the EU declaration of conformity is available at the following internet address:
http://www.jvc.net/cs/car/eudoc/
Декларация соответствия относительно Директивы RE 2014/53/EU
Декларация соответствия относительно Директивы RoHS 2011/65/EU
Производитель:
JVC KENWOOD Corporation
3-12, Moriya-cho, Kanagawa-ku, Yokohama-shi, Kanagawa, 221-0022, JAPAN
Представительство в ЕС:
JVCKENWOOD Deutschland GmbH
Konrad-Adenauer-Allee 1-11, 61118 Bad Vilbel, GERMANY
Русский
JVCKENWOOD настоящим заявляет, что радиооборудование «KD-X152M» соответствует Директиве
2014/53/EU.
Полный текст декларации соответствия ЕС доступен по следующему адресу в сети Интернет:
http://www.jvc.net/cs/car/eudoc/
RE Direktifi 2014/53/EU uyarınca Uygunluk Beyanı
RoHS Yönergesi 2011/65/EU’ya göre Uygunluk Bildirimi
Üretici:
JVC KENWOOD Corporation
3-12, Moriya-cho, Kanagawa-ku, Yokohama-shi, Kanagawa, 221-0022, JAPAN
AB Temsilcisi:
JVCKENWOOD Deutschland GmbH
Konrad-Adenauer-Allee 1-11, 61118 Bad Vilbel, GERMANY
Turkish
Burada, JVCKENWOOD “KD-X152M” radyo ekipmanının 2014/53/AB Direktifine uygun olduğunu bildirir.
AB uyumluluk deklarasyonunun tam metni aşağıdaki internet adresinde mevcuttur.
http://www.jvc.net/cs/car/eudoc/
ii
CONTENTS BEFORE USE
BEFORE USE 2
BASICS 3
GETTING STARTED 4
1 Cancel the demonstration
2 Set the clock and date
3 Set the basic settings
RADIO 5
USB/ANDROID 7
AUX 9
AUDIO SETTINGS 9
DISPLAY SETTINGS 12
REFERENCES 13
Maintenance
More information
TROUBLESHOOTING 14
INSTALLATION/
CONNECTION 15
SPECIFICATIONS 18
IMPORTANT
•
To ensure proper use, please read through this manual before using this product. It is especially important that you read and observe
Warning and Caution in this manual.
•
Please keep the manual in a safe and accessible place for future reference.
WARNING
•
Do not operate any function that takes your attention away from safe driving.
•
Do not ingest the battery, Chemical Burn Hazard
The remote control supplied with this product contains a coin/button cell battery.
If the coin/button cell battery is swallowed, it can cause severe internal burns in just 2 hours and can lead to death.
Keep new and used batteries away from children.
If the battery compartment does not close securely, stop using the product and keep it away from children.
If you think batteries might have been swallowed or placed inside any part of the body, seek immediate medical attention.
Caution
Volume setting:
•
Adjust the volume so that you can hear sounds outside the car to prevent accidents.
•
Lower the volume before playing digital sources to avoid damaging the speakers by the sudden increase of the output level.
General:
•
Avoid using the external device if it might hinder safe driving.
•
Make sure all important data has been backed up. We shall bear no responsibility for any loss of recorded data.
•
Never put or leave any metallic objects (such as coins or metal tools) inside the unit to prevent a short circuit.
•
Depending on the types of cars, the antenna will automatically extend when you turn on the unit with the antenna control wire connected
( 17)
. Turn off the unit when parking at a low ceiling area.
Remote control (RM-RK52):
•
Do not leave the remote control in hot places such as on the dashboard.
•
The Lithium battery is in danger of explosion if replaced incorrectly. Replace it only with the same or equivalent type.
•
The battery pack or batteries shall not be exposed to excessive heat such as sunshine, fire or the like.
How to read this manual
•
Operations are explained mainly using buttons on the faceplate.
•
English indications are used for the purpose of explanation. You can select the display language from the menu.
•
[XX]
indicates the selected items.
•
( XX)
indicates references are available on the stated page.
( 5)
2
ENGLISH
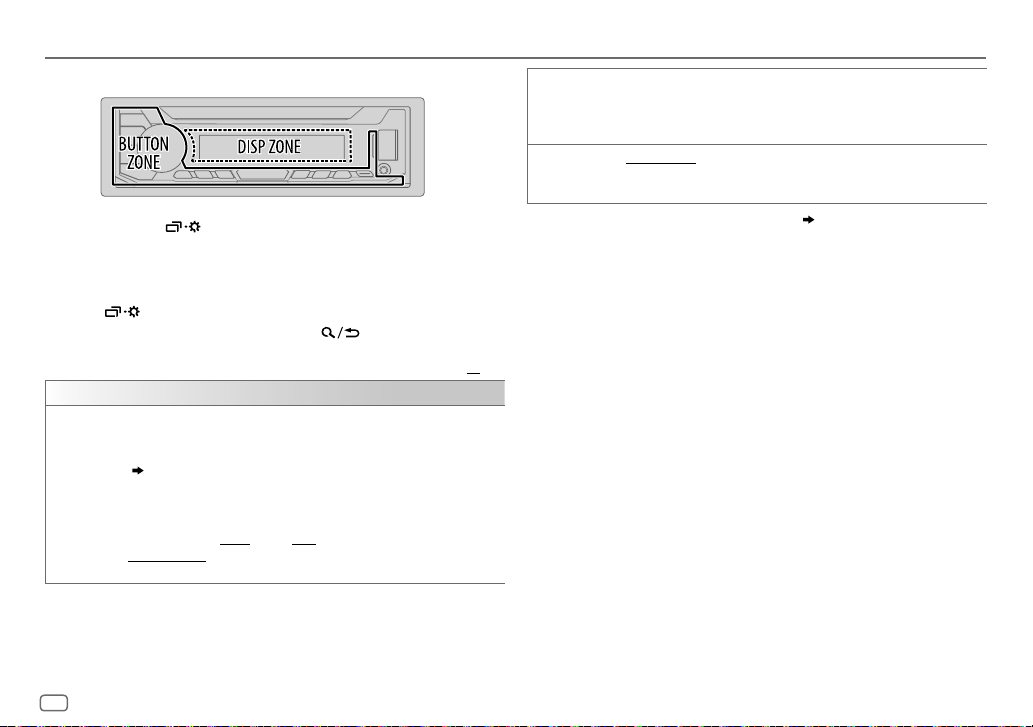
BASICS
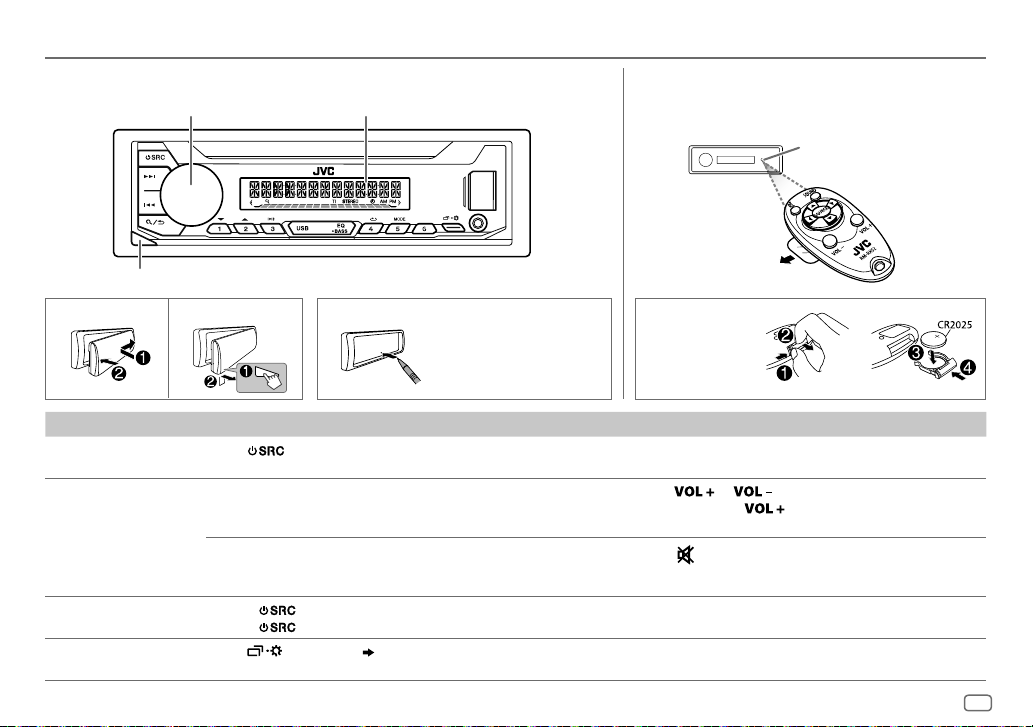
Faceplate
Volume knob
Detach button
Attach How to resetDetach
To On the faceplate On the remote control
Turn on the power Press .
Adjust the volume Turn the volume knob. Press
Select a source • Press
Change the display
information
• Press and hold to turn off the power.
Press the volume knob to mute the sound or pause playback.
• Press again to cancel. The volume level returns to the previous
level before muting or pause.
• Press
Press
Display window
Your preset adjustments
will be erased except
stored radio stations.
repeatedly.
, then turn the volume knob within 2 seconds.
repeatedly.
( 13)
Remote control (RM-RK52)
This unit can be remotely controlled with an
optionally purchased remote control.
Pull out the insulation
sheet when using for
the first time.
How to replace
the battery
( Not available )
• Press and hold
volume to 15.
Press
• Press again to cancel.
Press SOURCE repeatedly.
( Not available )
or .
to mute the sound or pause playback.
Remote sensor
(Do not expose to bright
sunlight.)
to continuously increase the
ENGLISH
3

GETTING STARTED
1
Cancel the demonstration
When you turn on the power for the first time (or after you reset the unit),
the display shows: “CANCEL DEMO”
1 Press the volume knob.
[YES]
is selected for the initial setup.
2 Press the volume knob again.
“DEMO OFF” appears.
2
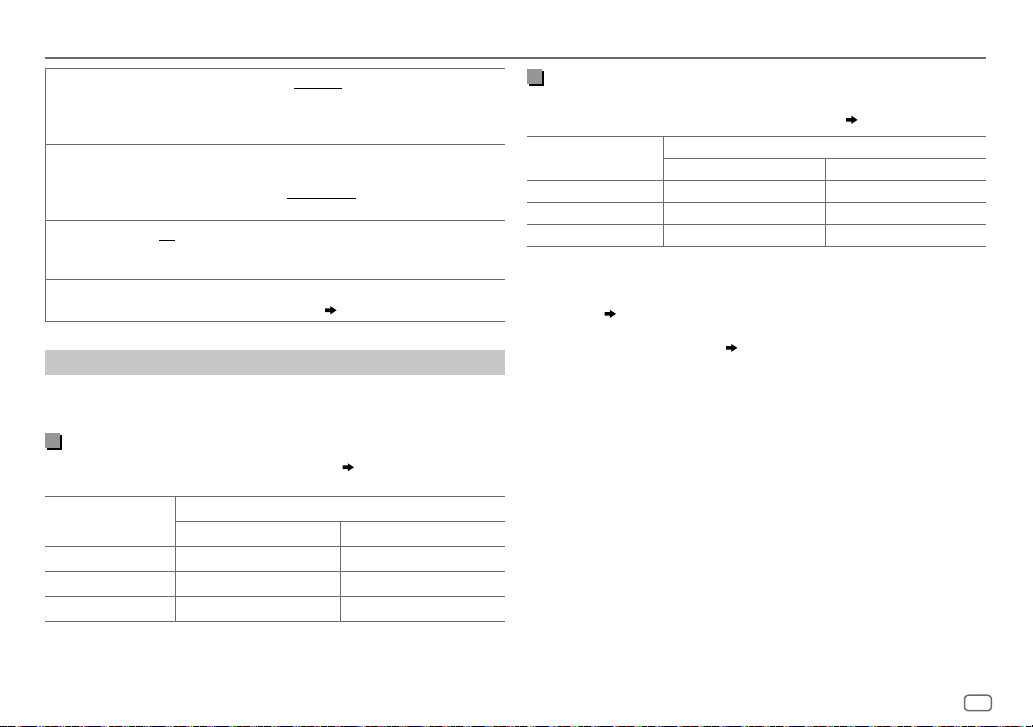
Set the clock and date
1
Press and hold .
2 Turn the volume knob to select
To adjust the clock
3 Turn the volume knob to select
4 Turn the volume knob to make the settings, then press the knob.
Hour
Minute
5 Turn the volume knob to select
6 Turn the volume knob to select
To set the date
7 Turn the volume knob to select
8 Turn the volume knob to make the settings, then press the knob.
Day
Month Year
9 Press to exit.
To return to the previous setting item, press .
“PRESS” “VOLUME KNOB”
[CLOCK]
, then press the knob.
[CLOCK ADJUST]
[CLOCK FORMAT]
[12H]
[DATE SET]
, then press the knob.
, then press the knob.
or
[24H]
, then press the knob.
, then press the knob.
3
Set the basic settings
1
Press and hold .
2 Turn the volume knob to select an item (see the following table),
then press the knob.
3 Repeat step 2 until the desired item is selected or activated.
4 Press to exit.
To return to the previous setting item, press .
Default:
SYSTEM
KEY BEEP
SOURCE SELECT
AM SRC
BUILT-IN AUX
F/W UPDATE
UPDATE SYSTEM
F/W UP xxxx
*
Not displayed when the corresponding source is selected.
ON
:Activates the keypress tone.;
*
ON
:Enables AM in source selection.;
*
ON
:Enables AUX in source selection.;
YES
:Starts upgrading the firmware.; NO:Cancels (upgrading is not
activated).
For details on how to update the firmware, see:
<http://www.jvc.net/cs/car/>.
OFF
:Deactivates.
OFF
OFF
:Disables.
:Disables.
( 5)
( 9)
XX
4
ENGLISH
GETTING STARTED
CLOCK
TIME SYNC
CLOCK DISPLAY ON
ENGLISH
РУССКИЙ
ESPANOL
ON
:The clock time is automatically set using the
Clock Time (CT) data in FM Radio Data System
signal.;
:The clock time is shown on the display even
when the unit is turned off.;
Select the display language for menu and music
information if applicable.
By default,
OFF
:Cancels.
ENGLISH
is selected.
OFF
:Cancels.
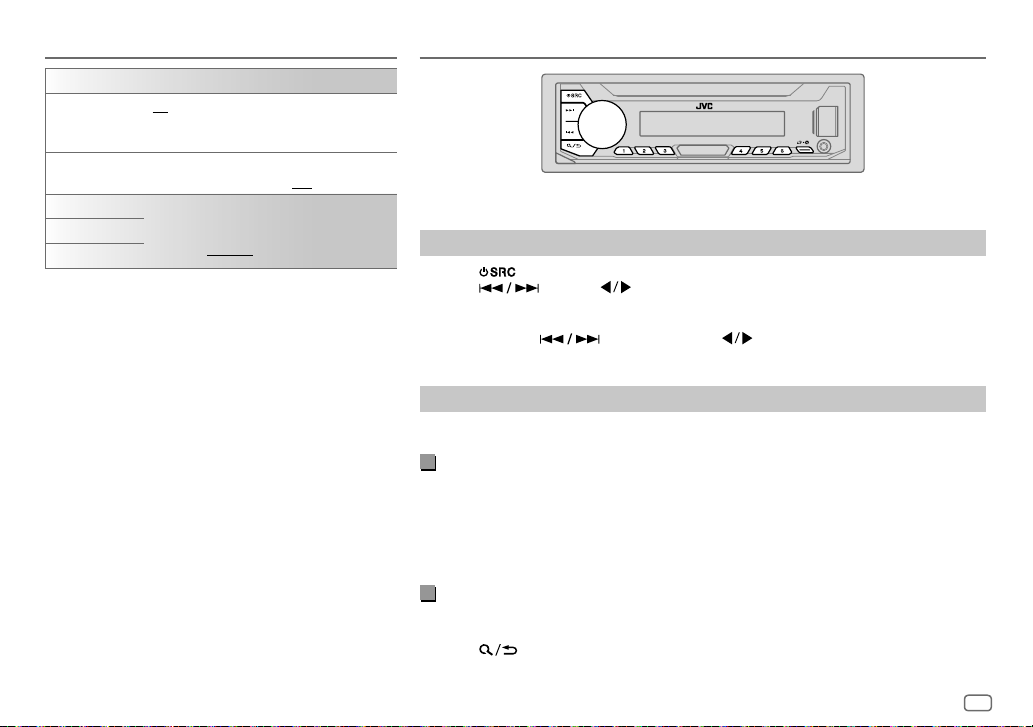
RADIO
“STEREO” lights up when receiving an FM stereo broadcast with sufficient signal strength.
Search for a station
1
Press repeatedly to select FM or AM.
2 Press (or press on the remote control) to search for a station
automatically.
(or)
Press and hold (or press and hold on the remote control) until “M”
flashes, then press repeatedly to search for a station manually.
Settings in memory
You can store up to 18 stations for FM and 6 stations for AM.
Store a station
While listening to a station….
Press and hold one of the number buttons (1 to 6).
(or)
1 Press and hold the volume knob until “PRESETMODE” flashes.
2 Turn the volume knob to select a preset number, then press the knob.
The preset number flashes and “MEMORY” appears.
Select a stored station
Press one of the number buttons (1to6).
(or)
1 Press .
2 Turn the volume knob to select a preset number, then press the knob.
ENGLISH
5
RADIO
Other settings
1
Press and hold .
2 Turn the volume knob to select an item
(
see the following table),
then press the knob.
3 Repeat step 2 until the desired item is selected/activated or follow
the instructions stated on the selected item.
4 Press to exit.
To return to the previous setting item, press .
Default:
TUNER SETTING
RADIO TIMER
Turns on the radio at a specific time regardless of the current source.
1 ONCE/DAILY/WEEKLY/OFF
:Select how often the timer will be turned
on.
2 FM/AM
:Select the band.
3 01
to 18 (for FM)/01 to 06 (for AM):Select the preset station.
4
Set the activation day
“
M
” lights up when complete.
1
*
and time.
Radio Timer will not activate for the following cases.
•
The unit is turned off.
•
[OFF]
SSM
is selected for
AM is selected.
SSM 01–06/SSM 07–12/SSM 13–18
( 4)
[AM SRC]
in
[SOURCE SELECT]
: Automatically presets up to 18
after Radio Timer for
stations for FM. “SSM” stops flashing when the first 6 stations are stored.
Select
LOCAL SEEK ON
SSM 07–12/SSM 13–18
:Searches only FM stations with good reception.;
•
Settings made are applicable only to the selected source/station. Once you
to store the following 12 stations.
OFF
:Cancels.
change the source/station, you need to make the settings again.
IF BAND AUTO
:Increases the tuner selectivity to reduce interference noises from
adjacent FM stations. (Stereo effect may be lost.);
WIDE
interference noises from adjacent FM stations, but sound quality will not be
degraded and the stereo effect will remain.
MONO SET ON
NEWS SET
REGIONAL
XX
AF SET
2
*
:Improves the FM reception, but the stereo effect will be lost.;
OFF
:Cancels.
2
*
ON
:The unit will temporarily switch to News Programme if available.;
OFF
:Cancels.
2
*
ON
: Switches to another station only in the specific region using the “AF”
control.;
OFF
:Cancels.
ON
: Automatically searches for another station broadcasting the same
program in the same Radio Data System network with better reception
TI ON
when the current reception is poor.;
: Allows the unit to temporarily switch to Traffic Information if available
OFF
: Cancels.
(“TI” lights up) while listening to all sources except in AM.;
2
PTY SEARCH
*
Select a PTY code (see below).
If there is a station broadcasting a program of the same PTY code as you
have selected, that station is tuned in.
1
*
Selectable only when
2
*
Only for FM source.
[ONCE]
or
[WEEKLY]
is selected in step 1.
PTY code
NEWS, AFFAIRS, INFO, SPORT, EDUCATE, DRAMA, CULTURE, SCIENCE, VARIED, POP
M
(music),
ROCK M
(music),
EASY M
(music),
LIGHT M
M
(music),
WEATHER, FINANCE, CHILDREN, SOCIAL, RELIGION, PHONE IN, TRAVEL
LEISURE, JAZZ, COUNTRY, NATION M
(music),
(music),
OLDIES, FOLK M
(music),
:Subjects to
OFF
:Cancels.
CLASSICS, OTHER
DOCUMENT
,
6
ENGLISH

USB/ANDROID
Start playback
The source changes automatically and
playback starts.
USB input terminal
USB
To directly select USB/ANDROID source, press .
1
USB 2.0 cable
*
(commercially available)
2
ANDROID
USB cable
*
1
*
(commercially available)
To On the faceplate On the remote control
3
Reverse/Fast-forward
Select a file Press
Select a folder
Repeat play
*
Random play
1
*
Do not leave the cable inside the car when not using.
2
*
When connecting an Android device, “Press [VIEW] to install JVC MUSIC PLAY APP” is shown. Follow the instructions to install the
*
Press and hold .
.
4
*
3
Press . Press .
Press repeatedly.
TRACK REPEAT/FOLDER REPEAT/ALL REPEAT
ONE REPEAT/ALL REPEAT/REPEAT OFF
3
*
Press repeatedly.
: ANDROID
FOLDER RANDOM/ALL RANDOM/RANDOM OFF
SONG RANDOM/ALL RANDOM/RANDOM OFF
Press and hold
Press
.
: MP3/WMA/WAV/FLAC file
: MP3/WMA/WAV/FLAC file
: ANDROID
.
application. You can also install the latest version of JVC MUSIC PLAY application on your Android device before connecting. For
more information, visit <http://www.jvc.net/cs/car/>.
3
*
For ANDROID: Applicable only when
4
*
Only for MP3/WMA/WAV/FLAC files. This does not work for ANDROID.
[AUTO MODE]
is selected.
( 
ENGLISH
7
USB/ANDROID
Select control mode
While in ANDROID source, press repeatedly.
AUTO MODE
AUDIO MODE
: Control Android device from this unit via JVC MUSIC PLAY
application installed in the Android device.
: Control Android device using the Android device itself via
other media player applications installed in the Android
device. However, you can still play/pause or file skip from
this unit.
Select music drive
While in USB source, press repeatedly.
Stored songs in the following drive will be played back.
• Selected internal or external memory of a smartphone (Mass Storage
Class).
• Selected drive of a multiple drives device.
Select a file from a folder/list
For ANDROID, applicable only when
[AUTO MODE]
is selected.
1 Press .
2 Turn the volume knob to select a folder/list, then press the knob.
3 Turn the volume knob to select a file, then press the knob.
Quick search
If you have many files, you can search through them quickly.
Turn the volume knob quickly to browse through the list quickly.
Alphabet search
You can search for a file according to the first character.
(applicable only for ANDROID source)
1 Press to enter character search.
2 Turn the volume knob to select the desired character.
^A^ : Upper case letters (A to Z)
_A_ : Lower case letters (a to z)
-0- : Numbers (0 to 9)
-OTHERS- : Character other than AtoZ, 0to9
3 Press the volume knob to start searching.
• To return to the previous setting item, press
• To cancel, press and hold
.
.
8
ENGLISH
AUX
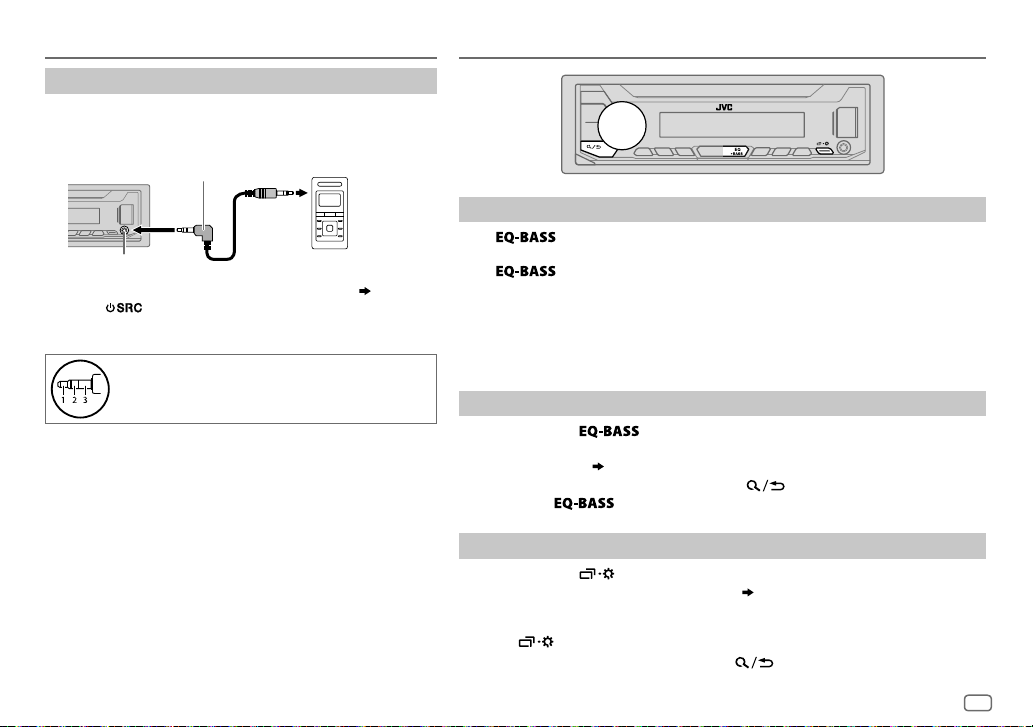
Use a portable audio player
1
Connect a portable audio player (commercially
available).
3.5mm stereo mini plug with “L” shaped connector
(commercially available)
Auxiliary input jack
2 Select
[ON]
for
[BUILT-IN AUX]
3 Press repeatedly to select AUX.
4 Turn on the portable audio player and start playback.
Use a 3-core plug head stereo mini plug for
optimum audio output.
Portable audio player
in
[SOURCE SELECT]. ( 4)
AUDIO SETTINGS
Select a preset equalizer directly
Press repeatedly.
(or)
Press
Preset equalizer:
FLAT
(default),
VOCAL BOOST, BASS BOOST, CLASSICAL, DANCE
• Drive equalizer (
signal to reduce the noise heard from outside the car or running noise of the tyres.
Store your own sound settings
1
Press and hold to enter EASY EQ setting.
2 Turn the volume knob to select an item, then press the knob.
Refer to
• To return to the previous setting item, press .
• To exit, press
Other settings
1
Press and hold .
2 Turn the volume knob to select an item
3 Repeat step 2 until the desired item is selected/activated or follow the
instructions stated on the selected item.
4 Press to exit.
To return to the previous setting item, press .
, then turn the volume knob within 5seconds.
DRVN 3, DRVN 2, DRVN 1, HARD ROCK, HIP HOP, JAZZ, POP, R&B, TALK, USER
DRVN 3/DRVN 2/DRVN 1
[EASY EQ] ( 10)
for setting and the result is stored to
.
) boosts specific frequencies in the audio
[USER]
.
( 10)
, then press the knob.
,
ENGLISH
9
AUDIO SETTINGS
EQ SETTING
PRESET EQ
EASY EQ
PRO EQ
Select a preset equalizer suitable to the music genre.
•
Select
[USER]
FLAT/DRVN 3/DRVN 2/DRVN 1/HARD ROCK/HIP HOP/JAZZ/POP/R&B/TALK
USER/VOCAL BOOST/BASS BOOST/CLASSICAL/DANCE
Adjust your own sound settings.
•
The settings are stored to
•
The settings made may affect the current settings of
SUB.W SP
*1*
SUB.W
BASS
:
MID
:
TRE
:
1 BASS/MIDDLE/TREBLE
2
Adjust the sound elements of the selected sound tone.
•
The settings are stored to
•
The settings made may affect the current settings of
BASS Frequency:
Level:
Q:
MIDDLE Frequency:
Level:
Q:
TREBLE Frequency:
Level:
Q:
to use the settings made in
[USER]
.
2
*1*
: 00to
+06
3
:
(Default:
–08
to
+08
LVL–06
to
LVL+06
LVL–06
to
LVL+06
LVL–06
to
LVL+06
:Select a sound tone.
[USER]
.
60HZ/80HZ/100HZ/200HZ
LVL–06
to
LVL+06
Q1.0/Q1.25/Q1.5/Q2.0
0.5KHZ/1.0KHZ/1.5KHZ/2.5KHZ
LVL–06
to
LVL+06
Q0.75/Q1.0/Q1.25
10.0KHZ/12.5KHZ/15.0KHZ/17.5KHZ
LVL–06
to
LVL+06
Q FIX
Default:
[EASY EQ]
or
[PRO EQ]
.
[PRO EQ]
.
+03
00
[EASY EQ]
(Default:
.
(Default:
(Default:
LVL 00
LVL 00
LVL 00
80HZ
LVL 00
Q1.0
)
1.0KHZ
LVL 00
Q1.25
10.0KHZ
LVL 00
Q FIX
XX
AUDIO CONTROL
BASS BOOST
LEVEL +01
bass boost level.;
LOUDNESS LEVEL 01/LEVEL 02
/
SUB.W LEVEL
well-balanced sound at low volume.;
1
*
SPK-OUT
PRE-OUT
)
SUBWOOFER SET
SUBWOOFERLPF
3
*
ON
: Turns on the subwoofer output.;
1
*
FRQ THROUGH
FRQ 55HZ/FRQ 85HZ/FRQ 120HZ
lower than 55Hz/85Hz/120Hz are sent to the subwoofer.
4
SUB.W PHASE
*1*
REVERSE
output to be in line with the speaker output for optimum
performance.
FADER POSITION R06
)
BALANCE
*
and rear speaker output balance.
5
POSITION L06
and right speaker output balance.
)
1
*
Displayed only when
2
*
Displayed only when
3
*
Displayed only when
( 11)
4
*
Selectable only if a setting other than
[SUBWOOFER LPF]
5
*
This adjustment will not affect the subwoofer output.
[SUBWOOFER SET]
[SPK/PRE OUT]
[SPK/PRE OUT]
.
to
LEVEL +05(LEVEL +01
OFF
:Cancels.
): Selects your preferred
:Boosts low or high frequencies to produce a
OFF
:Cancels.
2
*
SUB.W 00
to
SUB.W +06(SUB.W +03
the output level of the subwoofer connected via
3
*
speaker lead.
SUB.W –08
( 17)
to
SUB.W +08(SUB.W 00
the output level of the subwoofer connected to the
lineout terminals (REAR/SW) through an external
amplifier.
( 17)
OFF
: Cancels.
:All signals are sent to the subwoofer;
:Audio signals with frequencies
(180°)/
NORMAL
(0°):Selects the phase of the subwoofer
to
POSITION F06(POSITION 00
to
POSITION R06(POSITION 00
is set to
[ON]
is set to
is set to
[FRQ THROUGH]
.
[SUB.W/SUB.W]. ( 11)
[REAR/SUB.W]
is selected for
):Adjusts the front
):Adjusts the left
or
[SUB.W/SUB.W]
):Adjusts
):Adjusts
.
10
ENGLISH
AUDIO SETTINGS
VOLUME ADJUST LEVEL –15
AMPGAIN LOW POWER
D.T.EXPANDER
(Digital Track
Expander)
SPK/PRE OUT
to
of each source (compared to the FM volume level). Before adjustment,
select the source you want to adjust. (“VOLADJFIX” appears if FM is
selected.)
the maximum power of each speaker is less than 50W to prevent
damaging the speakers.);
is 35.
ON
components and restoring the rise-time of the waveform that are lost
in audio data compression.;
Depending on the speaker connection method, select the appropriate
setting to get the desired output. (
LEVEL +06(LEVEL 00
:Limits the maximum volume level to 25. (Select if
HIGH POWER
:Creates realistic sound by compensating the high-frequency
OFF
:Cancels.
Speaker output settings
Select the output setting for the speakers
speaker connection method.
[SPK/PRE OUT]
Connection via lineout terminals
For connections through an external amplifier.
Setting on
[SPK/PRE OUT]
REAR/REAR
REAR/SUB.W
SUB.W/SUB.W
Front speakers output Rear speakers output
(default) Front speakers output Subwoofer output
Front speakers output Subwoofer output
Audio signal through lineout terminal
FRONT REAR/SW
):Preset the initial volume level
:The maximum volume level
Speaker output settings
, base on the
( 17)
Connection via speaker leads
For connections without using an external amplifier. However, with this
settings you can also enjoy the subwoofer output.
Setting on
[SPK/PRE OUT]
REAR/REAR
REAR/SUB.W
SUB.W/SUB.W
If
[SUB.W/SUB.W]
–
)
[FRQ 120HZ]
available.
–
[POSITION R01]
[POSITION R06]
is selected in
( 10)
Rear speakers output Rear speakers output
Rear speakers output Rear speakers output
Subwoofer output (Mute)
is selected:
is selected in
to
[POSITION 00]. ( 10)
Audio signal through rear speaker lead
L (left) R (right)
[SUBWOOFER LPF]
[FADER]
and
[FRQ THROUGH]
and selectable range is
( 17)
is not
ENGLISH
11
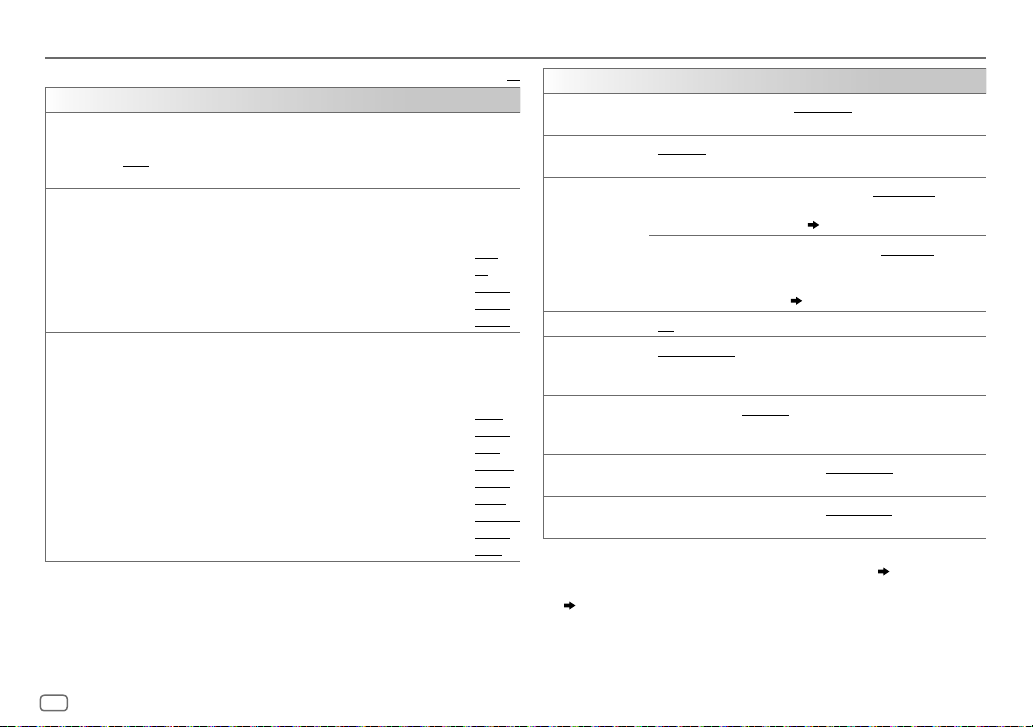
DISPLAY SETTINGS
Zone identification for brightness setting
1 Press and hold .
2 Turn the volume knob to select an item (see the following
table), then press the knob.
3 Repeat step 2 until the desired item is selected/activated or
follow the instructions stated on the selected item.
4 Press to exit.
To return to the previous setting item, press .
Default:
DISPLAY
DIMMER
Dim the illumination.
OFF
:Dimmer is turned off. Brightness changes to
ON
:Dimmer is turned on. Brightness changes to
(
[BRIGHTNESS]
DIMMER TIME
1
Turn the volume knob to adjust the
2
Turn the volume knob to adjust the
(Default:
DIMMER AUTO
on the car headlights.
)
:Set the dimmer on and off time.
[ON]: 18:00
;
[OFF]: 6:00
:Dimmer turns on and off automatically when you turn off or
1
*
[DAY]
[NIGHT]
[ON]
time, then press the knob.
[OFF]
time, then press the knob.
)
setting.
setting.
BRIGHTNESS
TEXT SCROLL
1
*
The illumination control wire connection is required.
2
*
Some characters or symbols will not be shown correctly (or will be blanked).
XX
Set the brightness for day and night separately.
1 DAY/NIGHT
2
Select a zone. (See the illustration on the left column.)
3 LEVEL 00
2
*
SCROLL ONCE
SCROLL AUTO
SCROLL OFF
:Select day or night.
to
LEVEL 31
: Set the brightness level.
:Scrolls the display information once.;
:Repeats scrolling at 5-second intervals.;
:Cancels.
( 17)
12
ENGLISH
REFERENCES
Maintenance
Cleaning the unit
Wipe off dirt on the faceplate with a dry silicone or soft cloth.
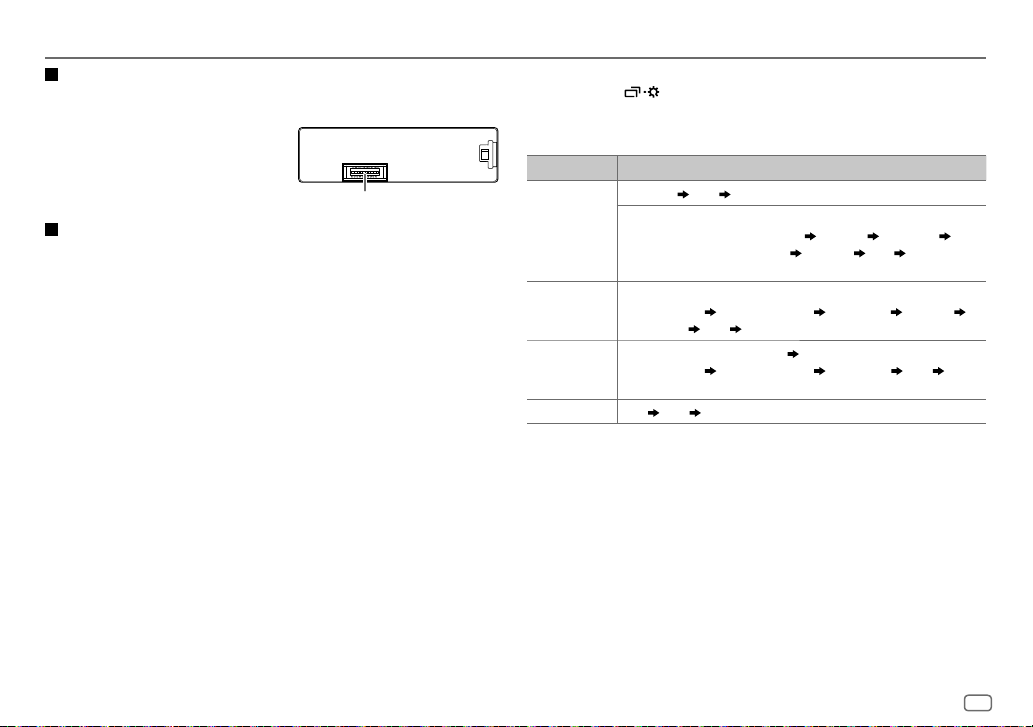
Cleaning the connector
Detach the faceplate and clean the connector
gently with a cotton swab, being careful not to
damage the connector.
More information
For: – Latest firmware updates and latest compatible item list
– Any other latest information
Visit <http://www.jvc.net/cs/car/>.
Playable files
•
For detailed information and notes about the playable audio files, visit
<http://www.jvc.net/cs/car/>.
•
Playable audio file: MP3 (.mp3), WMA (.wma), WAV (.wav), FLAC (.flac)
•
Playable USB device file system: FAT12, FAT16, FAT32
Even when audio files comply with the standards listed above, playback may be impossible
depending on the types or conditions of media or device.
About USB devices
•
You cannot connect a USB device via a USB hub.
•
Connecting a cable whose total length is longer than 5m may result in abnormal playback.
•
This unit cannot recognize a USB device whose rating is other than 5V and exceeds 1A.
About Android device
•
This unit supports Android OS 4.1 and above.
•
Some Android devices (with OS4.1 and above) may not fully support Android Open Accessory
(AOA)2.0.
•
If the Android device supports both mass storage class device and AOA2.0, this unit always
playback via AOA2.0 as priority.
Connector (on the reverse
side of the faceplate)
Change the display information
Each time you press , the display information changes.
•
If the information is unavailable or not recorded, “NO TEXT”, “NO NAME”, or other
information (eg. station name) appears or display will be blank.
Source name Display information
FM
or
AM
USB (For MP3/WMA/WAV/FLAC files)
ANDROID
AUX
Frequency Clock (back to the beginning)
(For FM Radio Data System stations only)
Station name (PS)/Program type (PTY) Radio text Radio text+
Radio text+ title/Radio text+ artist Frequency Clock (back to the
beginning)
Song title/Artist Album name/Artist Folder name File name
Playing time
When
Song title/Artist
to the beginning)
AUX Clock (back to the beginning)
Clock (back to the beginning)
[AUTO MODE]
is selected (8):
Album name/Artist Playing time Clock (back
ENGLISH
13
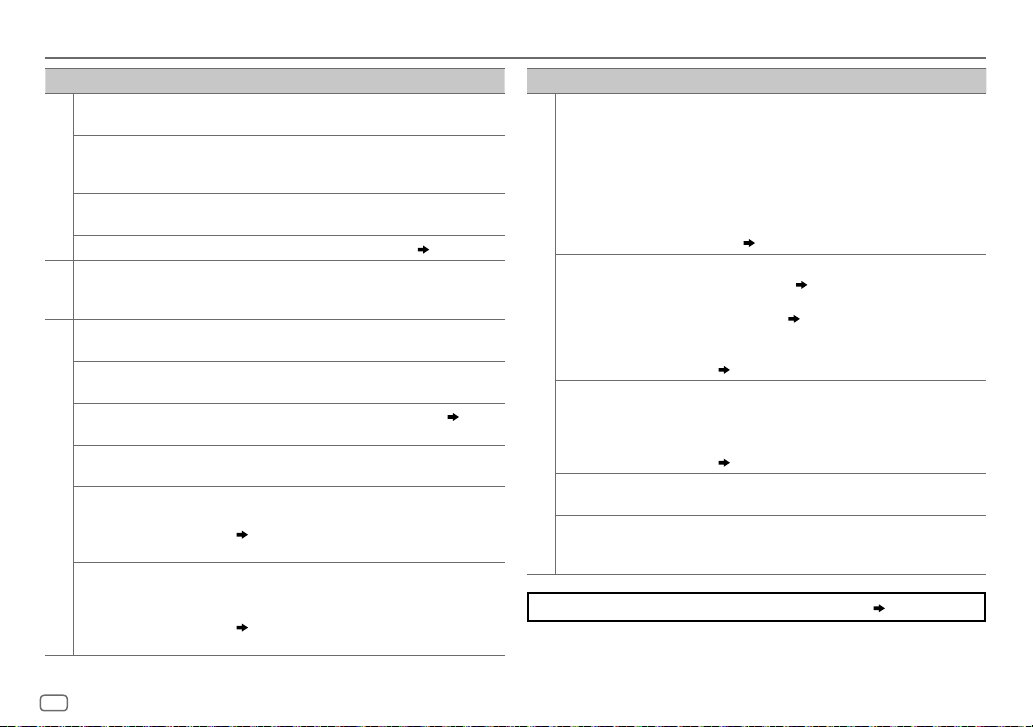
TROUBLESHOOTING
Symptom Remedy
Sound cannot be heard.
“MISWIRING CHECK
WIRING THEN PWR ON”
appears.
General
“PROTECTING SEND
SERVICE” appears.
Source cannot be selected.
•
Radio reception is poor.
•
Static noise while
Radio
listening to the radio.
Playback order is not as
intended.
Elapsed playing time is not
correct.
“NOT SUPPORT” appears
and file skips.
“READING” keeps flashing.• Do not use too many hierarchical levels and folders.
USB
“CANNOT PLAY” flashes
and/or connected device
cannot be detected.
Correct characters are not
displayed.
•
Adjust the volume to the optimum level.
•
Check the cords and connections.
Turn the power off, then check to be sure the terminals
of the speaker wires are insulated properly. Turn the
power on again.
Send the unit to the nearest service center.
Check the
[SOURCE SELECT]
Connect the antenna firmly.
The playback order is determined by the file name .
This depends on the recording process earlier.
Check whether the file is a playable format.
•
Reattach the USB device.
•
Check whether the connected device is compatible with
this unit and ensure the files are in supported formats.
( 13)
•
Reattach the device.
•
This unit can only display uppercase letters, numbers,
and a limited number of symbols.
•
Depending on the display language you have selected
( 5)
, some characters may not be displayed
correctly.
setting.
( 4)
( 13)
Symptom Remedy
•
Sound cannot be heard
during playback.
•
Sound output only from
the Android device.
Cannot playback at
[AUTO MODE]
ANDROID
“NO DEVICE” or “READING”
keeps flashing.
Playback is intermittent or
sound skips.
“CANNOT PLAY”
.
If you still have troubles, reset the unit.
•
Reconnect the Android device.
•
If in
[AUDIO MODE]
application on the Android device and start playback.
•
If in
[AUDIO MODE]
application or use another media player application.
•
Restart the Android device.
•
If this does not solve the problem, the connected
Android device is unable to route the audio signal to
unit.
( 13)
•
Make sure JVC MUSIC PLAY APP is installed on the
Android device.
•
Reconnect the Android device and select the appropriate
control mode.
•
If this does not solve the problem, the connected
Android device does not support
( 13)
•
Switch off the developer options on the Android device.
•
Reconnect the Android device.
•
If this does not solve the problem, the connected
Android device does not support
( 13)
Turn off the power saving mode on the Android device.
•
Make sure Android device contains playable audio files.
•
Reconnect the Android device.
•
Restart the Android device.
, launch any media player
, relaunch the current media player
( 7)
(
[AUTO MODE]
[AUTO MODE]
( 3)
.
.
14
ENGLISH
INSTALLATION/CONNECTION
Warning
•
The unit can only be used with a 12V DC power supply, negative ground.
•
Disconnect the battery’s negative terminal before wiring and mounting.
•
Do not connect Battery wire (yellow) and Ignition wire (red) to the car chassis or Ground wire
(black) to prevent a short circuit.
•
To prevent short circuit:
–
Insulate unconnected wires with vinyl tape.
–
Be sure to ground this unit to the car’s chassis again after installation.
–
Secure the wires with cable clamps and wrap vinyl tape around the wires that comes into
contact with metal parts to protect the wires.
Caution
•
For safety’s sake, leave wiring and mounting to professionals. Consult the car audio dealer.
•
Install this unit in the console of your vehicle. Do not touch the metal parts of this unit during
and shortly after use of the unit. Metal parts such as the heat sink and enclosure become hot.
•
Do not connect the wires of speakers to the car chassis or Ground wire (black), or connect
them in parallel.
•
Connect speakers with a maximum power of more than 50W. If the maximum power of
the speakers is lower than 50W, change the
speakers.
( 11)
•
Mount the unit at an angle of less than 30º.
•
If your vehicle wiring harness does not have the ignition terminal, connect Ignition wire (red)
to the terminal on the vehicle’s fuse box which provides 12 V DC power supply and is turned
on and off by the ignition key.
•
Keep all cables away from heat dissipate metal parts.
•
After the unit is installed, check whether the brake lamps, blinkers, wipers, etc. on the car are
working properly.
•
If the fuse blows, first make sure the wires are not touching car’s chassis, then replace the old
fuse with one that has the same rating.
[AMP GAIN]
setting to avoid damaging the
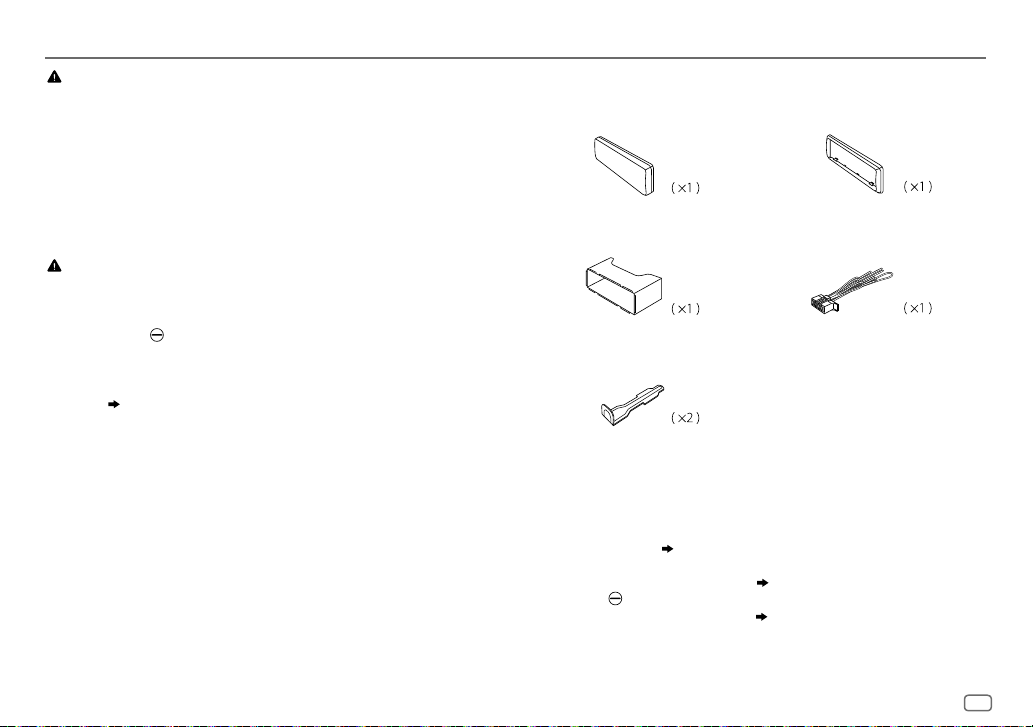
Part list for installation
(B)
(A)
Faceplate
(C)
Mounting sleeve
(E)
Extraction key
Trim plate
(D)
Wiring harness
Basic procedure
1
Remove the key from the ignition switch, then disconnect the [ terminal of the car
battery.
2
Connect the wires properly.
See Wiring connection.
3
Install the unit to your car.
See Installing the unit (in-dash mounting).
4
Connect the terminal of the car battery.
5
Detach the faceplate and reset the unit.
( 17)
( 16)
( 3)
ENGLISH
15

INSTALLATION/CONNECTION
Installing the unit (in-dash mounting)
Hook on the top side
Orientate the trim plate as
illustrated before fitting.
Do the required wiring.
( 17)
Dashboard of your car
Bend the appropriate tabs to
hold the sleeve firmly in place.
1
Remove the mounting sleeve and trim plate from the unit.
2
Align the holes in the unit (on both sides) with the vehicle mounting bracket and secure
the unit with screws (commercially available).
Use only the specified screws. Using wrong screws might damage the unit.
16
ENGLISH
How to remove the unitWhen installing without the mounting sleeve
Loading…
KW-V220BTQ
2DIN USB/DVD/CD мультимедиа ресивер 6,2″, 3RCA с поддержкой Bluetooth
-
Подробно
KW-M24BT
2DIN USB мультимедиа ресивер, с укороченной базой и Bluetooth
-
Подробно
KD-AV31Q
AV-ресивер размера 1-DIN
-
Подробно
KW-V230BT
2DIN DVD/CD/USB мультимедиа ресивер 6,2″, 3RCA
-
Подробно
KW-V11E
2DIN USB мультимедиа ресивер 6,2″, 3RCA
-
Подробно
KW-V12Q
2DIN USB мультимедиа ресивер, 6,8″ емкостной дисплей, 3RCA
-
Подробно
KD-T702BT
2019 1-DIN CD-ресивер
-
Подробно
KD-X33MBTE
Цифровой медиа-ресивер
-
Подробно
KD-X143
Цифровой медиа-ресивер с входами USB и AUX на передней панели
-
Подробно
KD-X341BT
Цифровой медиа-ресивер
-
Подробно
KD-X351BT
Цифровой медиа-ресивер
-
Подробно
KD-X352BT
Цифровой медиа-ресивер
-
Подробно
KD-X342BT
Цифровой медиа-ресивер
-
Подробно
Код: 101347
Извините, товара сейчас нет в наличии
Бесплатная доставка
по Красноярску
Извините, товара сейчас нет в наличии
Новости интернет-магазина «Лаукар»:
Дополнительная информация в категории Автомагнитола:
В интернет-магазине бытовой техники «Лаукар» Вы можете скачать инструкцию к товару Автомагнитола JVC KD-X152 совершенно бесплатно.
Все инструкции, представленные на сайте интернет-магазина бытовой техники «Лаукар», предоставляются производителем товара.
Перед началом использования товара рекомендуем Вам ознакомиться с инструкцией по применению.
Для того чтобы скачать инструкцию, Вам необходимо нажать на ссылку «скачать инструкцию», расположенную ниже, а в случае, если ссылки нет,
Вы можете попробовать обратиться к данной странице позднее,
возможно специалисты интернет-магазина бытовой техники «Лаукар» еще не успели загрузить для скачивания инструкцию к товару:
Автомагнитола JVC KD-X152.

Фирма-производитель оставляет за собой право на внесение изменений в конструкцию, дизайн и комплектацию товара: Автомагнитола JVC KD-X152. Пожалуйста, сверяйте информацию о товаре с информацией на
официальном сайте компании производителя.
Report abuse
Libble takes abuse of its services very seriously. We’re committed to dealing with such abuse according to the laws in your country of residence. When you submit a report, we’ll investigate it and take the appropriate action. We’ll get back to you only if we require additional details or have more information to share.
Product:
Get your user manual by e-mail
Enter your email address to receive the manual of JVC KD-X152 in the language / languages: English, Dutch, Portuguese, Spanish as an attachment in your email.
The manual is 1,24 mb in size.
You will receive the manual in your email within minutes. If you have not received an email, then probably have entered the wrong email address or your mailbox is too full. In addition, it may be that your ISP may have a maximum size for emails to receive.
The manual is sent by email. Check your email
If you have not received an email with the manual within fifteen minutes, it may be that you have a entered a wrong email address or that your ISP has set a maximum size to receive email that is smaller than the size of the manual.
Your question is posted on this page
Would you like to receive an email when new answers and questions are posted? Please enter your email address.