
48 страниц подробных инструкций и пользовательских руководств по эксплуатации на русском на английском
Панель управления пульт дистанционного управления, Начало работы, Операции с радиоприемником операции с fm rds, Операции с дисками или usb- пам Чат поддержки
- Изображение
- Текст
РУCCKИЙ
3
Как пользоваться данным
руководством
• Операции, выполняемые с использованием
кнопок, в основном обозначаются рисунками,
приведенными в следующей таблице.
• Некоторые советы и примечания приведены
в разделе “Дополнительная информация о
приемнике” (см. стр. 22 – 25).
Нажать кратковременно.
Нажать неоднократно.
Нажать любую
из указанных.
Нажать и удерживать до
получения необходимого
результата.
Нажмите и удерживайте
нажатыми обе кнопки
одновременно.
Используются следующие обозначения…
: Операции с встроенным
проигрывателем компакт-дисков.
: Операции с внешним устройством
автоматической смены компакт-
дисков.
: Операции с внешней USB-памятью.
: Индикатор, отображаемый при
соответствующем действии.
Предупреждение:
Если приемник используется во время
поездки на автомобиле, следует, не
отвлекаясь, следить за дорогой, иначе
может произойти дорожно-транспортное
происшествие.
Предостережение, касающееся
настройки громкости:
По сравнению с другими источниками
звука диски создают незначительный
шум. Уменьшите громкость перед
воспроизведением диска, чтобы
предотвратить повреждение динамиков из-
за внезапного повышения уровня громкости
на выходе.
CОДЕРЖАНИЕ
Панель управления …………………… 4
Пульт дистанционного управления
—
RM-RK50
……………………………….. 5
Начало работы ………………………….. 7
Основные операции …………………………………….. 7
Операции с радиоприемником ……. 8
Операции с FM RDS …………………….. 9
Поиск любимой программы FM RDS ……………… 9
Операции с дисками или USB-
памятью ……………………………….. 11
Воспроизведение диска в приемнике …………… 11
Воспроизведение дисков с помощью устройства
автоматической смены компакт-дисков … 11
Воспроизведение из USB-памяти …………………. 12
Настройки звучания …………………… 15
Общие настройки — PSM ……………. 16
Присвоения названия ………………… 18
Операции проигрывателя
iPod®/D. …………………………………. 19
Другие операции с внешним
устройством …………………………… 20
Операции с тюнером DAB ……………. 21
Дополнительная информация о
приемнике …………………………….. 22
Обслуживание …………………………… 25
Устранение проблем ………………….. 26
Технические характеристики ………. 29
Для Вашей безопасности…
• Не повышайте слишком сильно громкость,
поскольку в результате этого заглушаются
внешние звуки, что делает опасным
управление автомобилем.
• Остановите автомобиль перед тем, как
выполнять любые сложные операции.
Температура внутри автомобиля…
Если Вы припарковали Ваш автомобиль на
длительное время в жаркую или холодную
погоду, перед тем, как включать это устройство,
подождите до тех пор, пока температура в
автомобиле не придет в норму.
RU02-07_KD-G727[EE]f.indd 3
RU02-07_KD-G727[EE]f.indd 3
12/10/05 6:32:49 PM
12/10/05 6:32:49 PM

4
РУCCKИЙ
1
Кнопка BAND
2
• Диск управления
• Кнопка
(резервный/
работающий аттенюатор)
3
Кнопка DISP (дисплей)
4
Телеметрический датчик
• НЕ подвергайте телеметрический
датчик воздействию яркого света
(прямых солнечных лучей или
искусственного освещения).
5
Окно дисплея
6
Кнопки
5 (вверх) / ∞ (вниз)
7
Кнопка T/P (программа движения
транспорта/тип программы)
8
Кнопка
0 (извлечение)
Расположение кнопок
Панель управления
9
Вход USB (универсальная последовательная
шина)
p
Кнопка SRC (источник звука)
q
Кнопка
(снятие панели управления)
w
Кнопка SEL (выбор)
e
Кнопка MODE
r
Кнопка EQ (эквалайзер)
t
Кнопка MO (монофонический)
y
Кнопка SSM (Strong-station Sequential
Memory—последовательная память для
радиостанций с устойчивым сигналом)
u
Нумерованные кнопки
i
Кнопка RPT (повторное)
o
Кнопка RND (произвольное)
;
Кнопки
4/¢
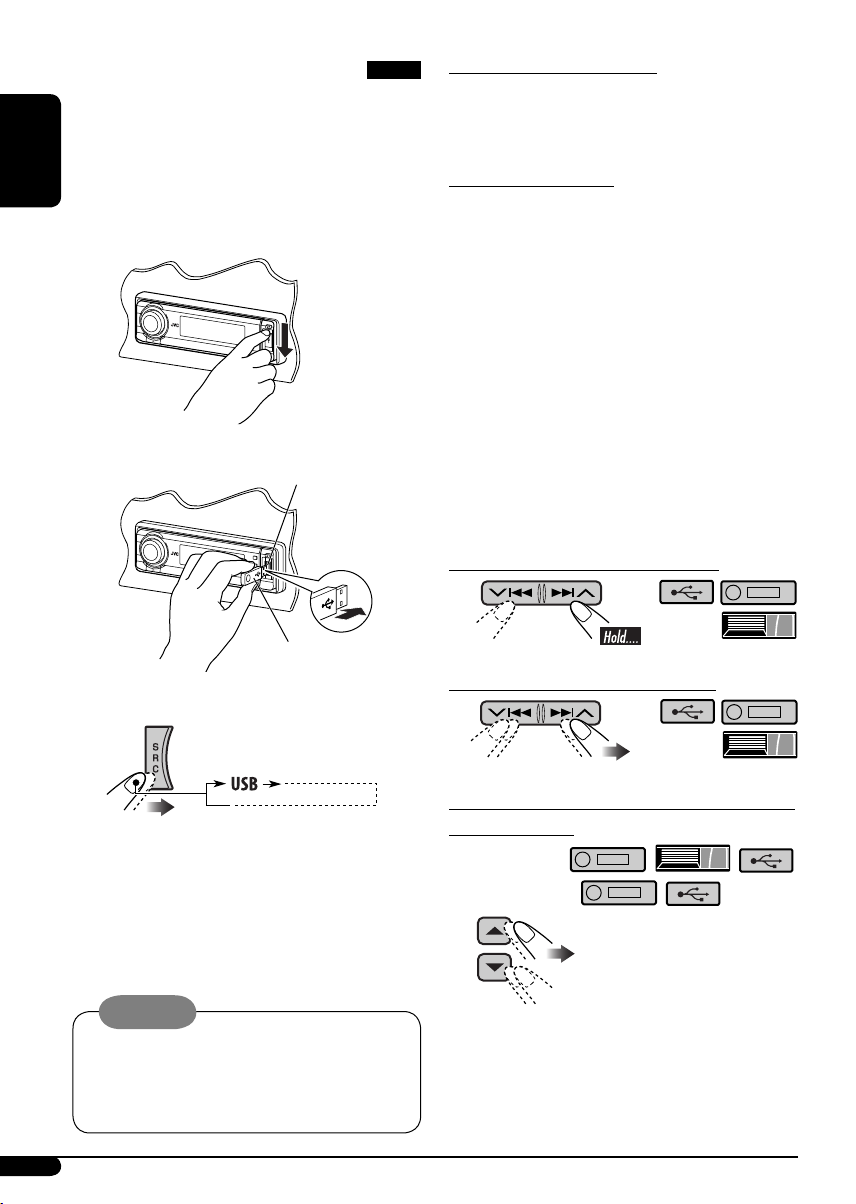
Отсоединение и подключение панели управления
Отсоединение…
Подключение…
ВНИМАНИЕ:
Рычаг появляется при нажатии кнопки
0, если панель
снята. В этом случае нажмите на рычаг для его установки в
заблокированное положение перед присоединением панели.
Рычаг
RU02-07_KD-G727[EE]f.indd 4
RU02-07_KD-G727[EE]f.indd 4
12/13/05 10:58:17 AM
12/13/05 10:58:17 AM

РУCCKИЙ
5
a
Индикаторы информации дорожек — TAG
(тег ID3 Tag),
(дорожка/файл),
(папка)
s
Индикаторы приема тюнера—ST (стерео),
MO (монофонический)
d
Индикаторы RDS—TP, PTY, AF, REG
f
Основной дисплей
g
Индикатор Tr (дорожка)
h
Индикатор LOUD (громкость)
j
Отображение источника / Индикатор
уровня громкости
k
Индикаторы режима / объекта
воспроизведения—RND (произвольное),
(диск),
(папка), RPT (повторное)
Окно дисплея
Внимание:
Пульт дистанционного управления —
RM-RK50
Установка литиевой батареи-
таблетки (CR2025)
Направьте пульт дистанционного управления
непосредственно на телеметрический датчик
приемника. Убедитесь в том, что между ними
нет никаких препятствий.
Продолжение не следующей странице
l
Индикаторы типов дорожек*—WMA, MP3
/
Индикаторы источников воспроизведения*—
CH (устройство автоматической смены
компакт-дисков), DISC (встроенный
проигрыватель компакт-дисков)
z
Индикатор EQ (эквалайзер)
x
Индикаторы режимов звучания (C-EQ:
настраиваемый эквалайзер)—USER, ROCK,
CLASSIC, POPS, HIP HOP, JAZZ
•
также служит индикатором
обратного отсчета времени и уровня во
время воспроизведения (см. стр. 17).
*
загорается для выбранного элемента.
RU02-07_KD-G727[EE]f.indd 5
RU02-07_KD-G727[EE]f.indd 5
12/10/05 6:32:54 PM
12/10/05 6:32:54 PM

6
РУCCKИЙ
Предупреждение:
• Не устанавливайте никаких
аккумуляторных батарей, кроме CR2025
или эквивалентных, в противном случае
может произойти взрыв.
• Во избежание несчастных случаев храните
аккумуляторную батарею в недоступном
для детей месте.
• Во избежание перегрева или
растрескивания батареи, а также риска
возникновения пожара соблюдайте
следующие указания:
– Не перезаряжайте, не укорачивайте, не
разбирайте и не нагревайте батарею, а
также не подвергайте ее воздействию
огня.
– Не оставляйте аккумуляторную батарею
рядом с другими металлическими
материалами.
– Не разбирайте аккумуляторную батарею
с помощью пинцета или аналогичного
инструмента.
– При утилизации батареи или
помещении ее на хранение оберните
батарею изоляционной лентой и
изолируйте ее полюса.
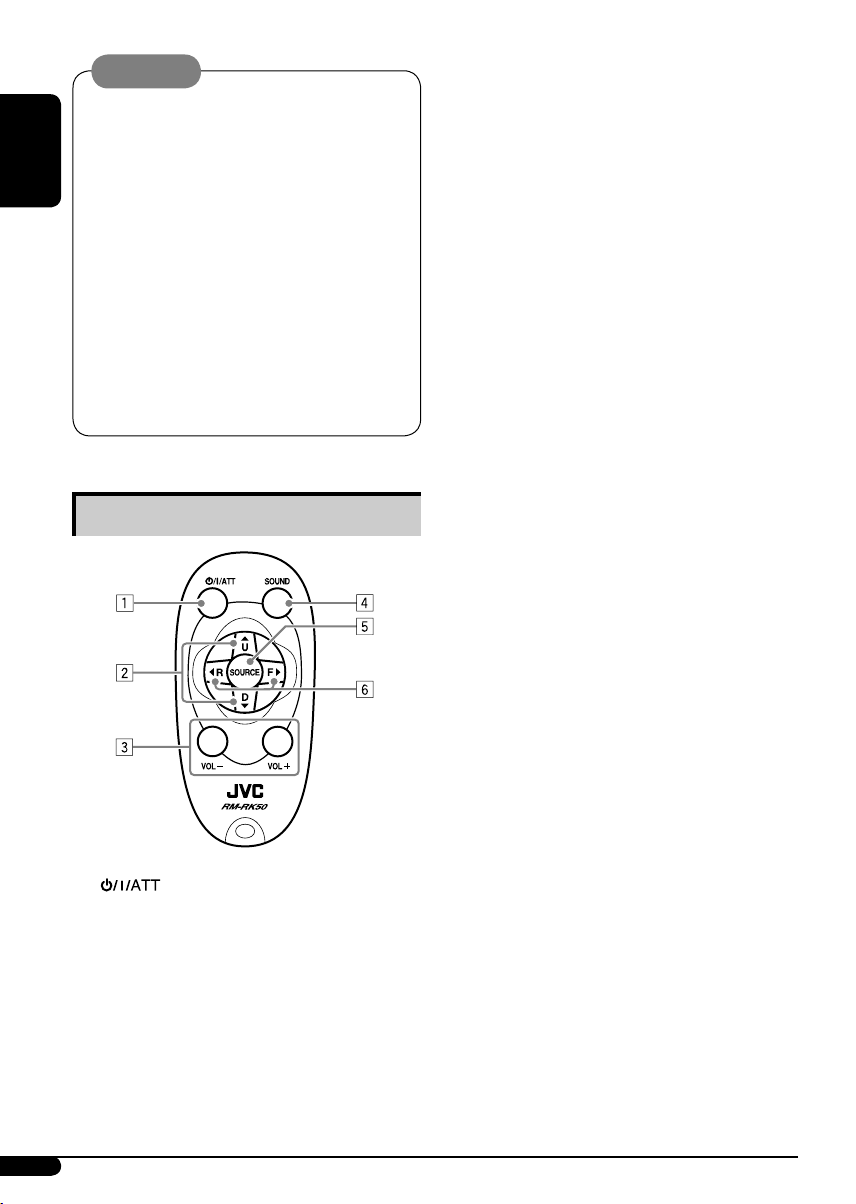
Основные элементы и функции
1
Кнопка
(резервный/работающий/
аттенюатор)
• Включение питания при кратковременном
нажатии или ослабление звука при
включенном питании.
• Отключение питания при нажатии и
удерживании.
2
Кнопки
5 U (вверх) / D (вниз) ∞
• Смена диапазонов FM/AM/DAB с
помощью
5 U.
• Смена запрограммированных
радиостанций (или служб) с помощью D
∞.
• Изменение папки MP3/WMA/USB.
• При воспроизведении диска
MP3 с помощью устройства
автоматической смены компакт-дисков,
поддерживающего формат MP3:
– Смена диска при кратковременном
нажатии.
– Смена папки при нажатии и
удерживании нажатой.
• При прослушивании проигрывателя
Apple iPod
®
или JVC D.:
– С помощью кнопки D
∞ можно
приостановить/остановить или
возобновить воспроизведение.
– Войдите в главное меню с помощью
кнопки
5 U.
(Теперь меню можно выбрать с
помощью кнопок
5 U/D ∞/2 R/F 3 .)*
3
Кнопки VOL – / VOL +
• Настройка уровня звука.
4
Кнопка SOUND
• Выбор режимов звучания (C-EQ:
настраиваемый эквалайзер).
5
Кнопка SOURCE
• Осуществляет выбор источника звука.
6
Кнопки
2 R (назад) / F (вперед) 3
• Поиск радиостанций (или служб) при
кратковременном нажатии.
• Поиск блоков трансляции при нажатии и
удерживании нажатой.
• Быстрая перемотка дорожки вперед
или назад при нажатии и удерживании
нажатыми.
• Смена дорожек при кратковременном
нажатии.
• При прослушивании проигрывателя
iPod или D. (в режиме выбора меню для
воспроизведения):
– Выбор элемента при кратковременном
нажатии. (Затем нажмите D
∞ для
подтверждения выбора.)
– Пропуск сразу 10 элементов при
нажатии и удерживании нажатой.
*
5 U : Возврат к предыдущему меню.
D
∞ : Подтверждение выбора.
RU02-07_KD-G727[EE]f.indd 6
RU02-07_KD-G727[EE]f.indd 6
12/10/05 6:32:56 PM
12/10/05 6:32:56 PM

РУCCKИЙ
7
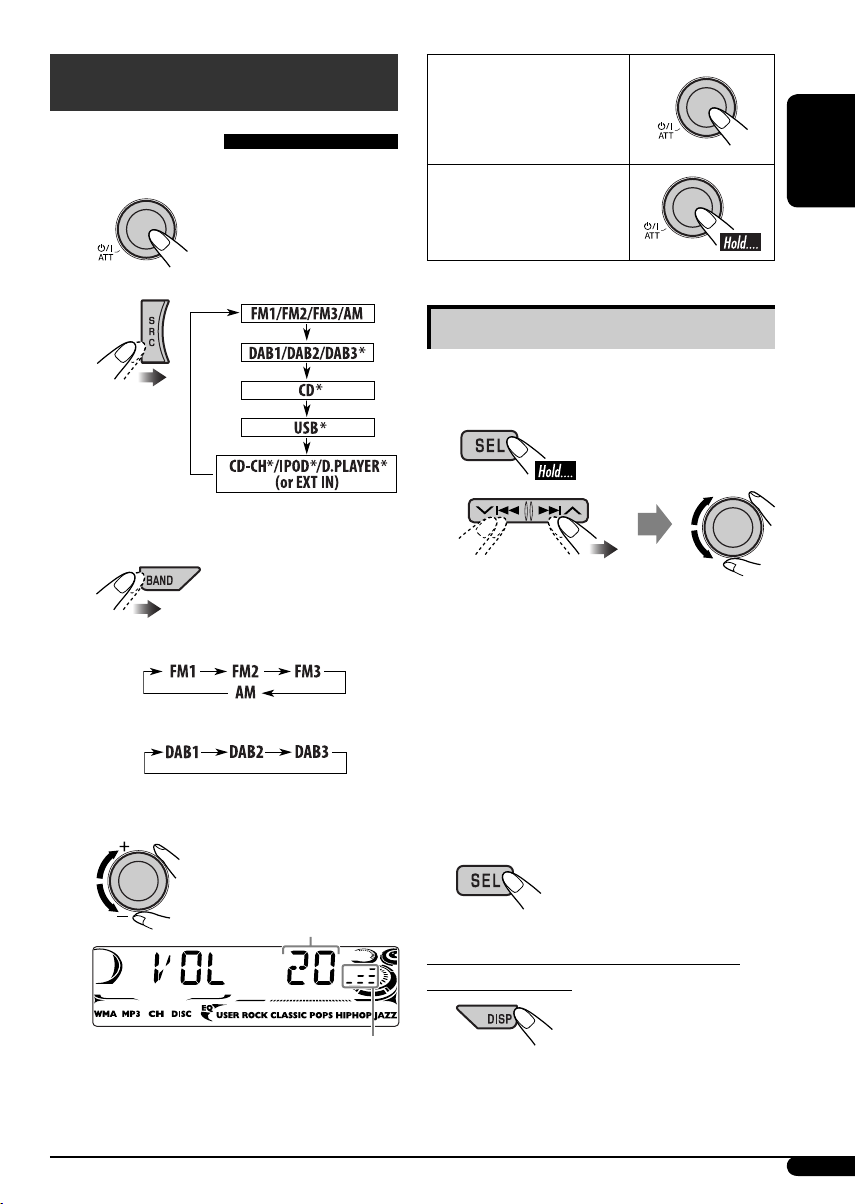
Начало работы
Основные операции
~
Включение питания.
Ÿ
*
Если эти источники не готовы или не
подключены, их невозможно выбрать.
!
Для тюнера FM/AM
Для тюнера DAB
⁄
Настройте громкость.
@
Настройка необходимого звука.
(См. стр. 15.)
Отображается уровень громкости.
Индикатор уровня громкости
Мгновенное снижение
громкости (ATT)
Для восстановления
звука нажмите еще раз.
Выключение питания
Основные настройки
• См. также раздел “Общие настройки — PSM”
на стр. 16 – 18.
1
2
1 Отмена демонстрации функций
дисплея
Выберите “DEMO”, затем “DEMO OFF”.
2 Настройка часов
Выберите “CLOCK H” (час) и настройте
час.
Выберите “CLOCK M” (минута) и
настройте минуту.
Выберите “24H/12H”, затем “24H” (час)
или “12H” (час).
3
Завершите процедуру.
Просмотр текущего времени на часах при
выключенном питании
RU02-07_KD-G727[EE]f.indd 7
RU02-07_KD-G727[EE]f.indd 7
12/10/05 6:33:00 PM
12/10/05 6:33:00 PM

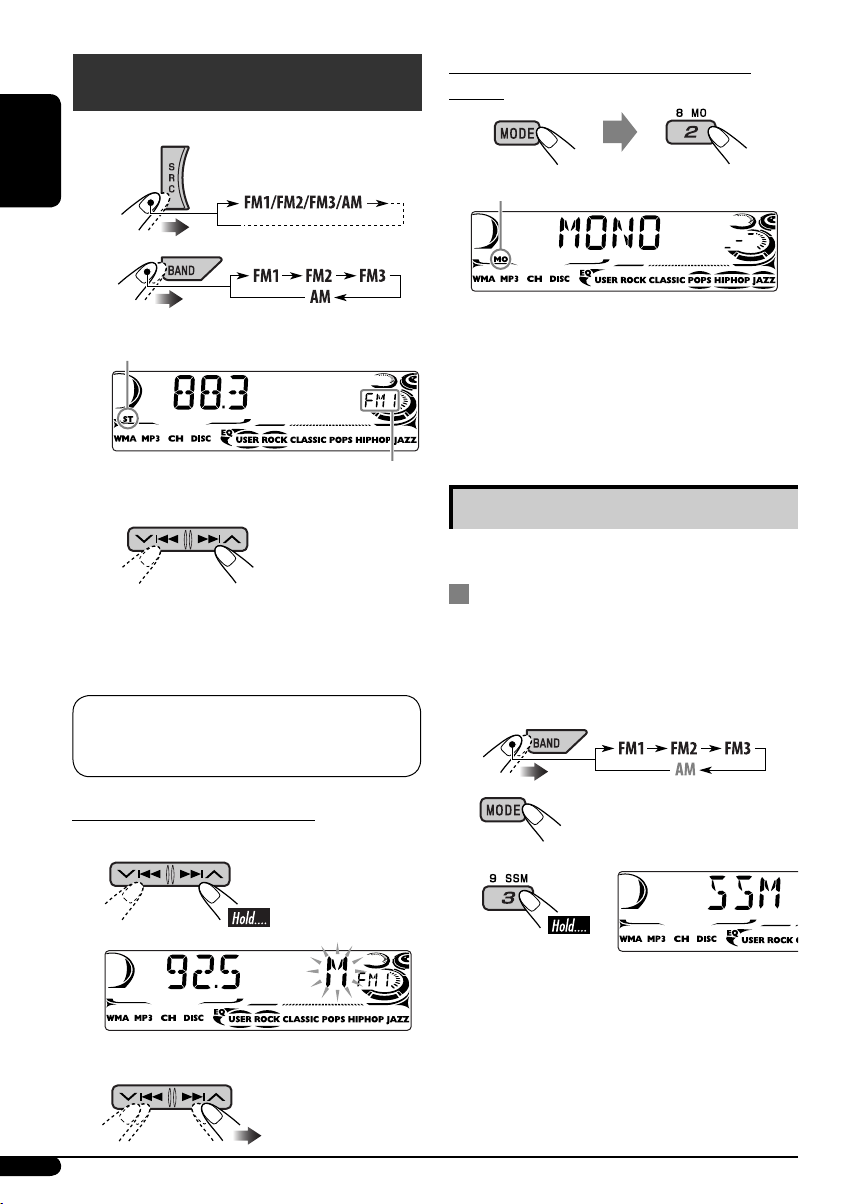
8
РУCCKИЙ
Операции с
радиоприемником
~
Ÿ
!
Начните поиск радиостанции.
При обнаружении радиостанции поиск
прекращается.
Чтобы остановить поиск,
нажмите эту
же кнопку еще раз.
Лpимечaние
FM1 и FM2:
87,5 МГц – 108,0 МГц
FM3:
65,00 МГц – 74,00 МГц
Настройка на радиостанцию вручную
В действии
!
выше…
1
2
Выберите частоты желаемых
радиостанций.
Данный индикатор отображается при приеме
стереосигнала FM-передачи достаточной силы.
Появится выбранный диапазон.
При слабом стереофоническом
радиовещании на частоте FM
Прием улучшается, но стереоэффект будет
потерян.
Для восстановления эффекта стерео
повторите данную процедуру. Появляется
надпись “MONO OFF”, а индикатор MO исчезает.
Сохранение радиостанций
Для каждого диапазона частот можно
запрограммировать 6 радиостанций.
Автоматическое программирование
FM-радиостанций—SSM (Strong-
station Sequential Memory—
последовательная память для
радиостанций с устойчивым
сигналом)
1
Выберите необходимый диапазон
FM (FM1 – FM3) для сохранения.
2
3
На дисплее появляется индикация
“SSM”, которая исчезает по завершении
автоматического программирования.
Осуществляется поиск местных FM-
радиостанций с наиболее сильными сигналами и
их автоматическое сохранение в диапазоне FM.
Загорается при включении монофонического режима.
RU08-17_KD-G727[EE]f.indd 8
RU08-17_KD-G727[EE]f.indd 8
12/10/05 7:07:37 PM
12/10/05 7:07:37 PM

РУCCKИЙ
9
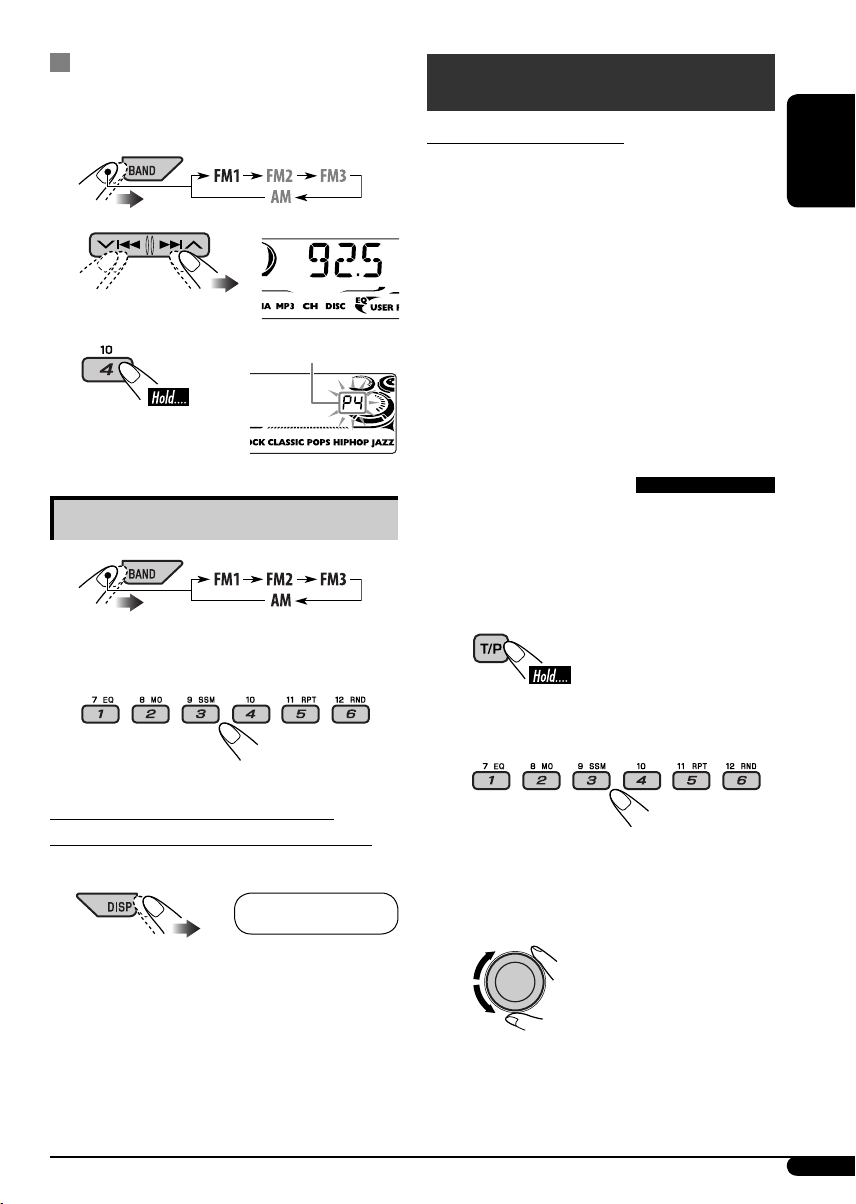
Программирование вручную
Пример: Сохранение FM-радиостанции
с частотой 92,5 МГц для
запрограммированного канала с
номером 4 диапазона FM1.
1
2
3
Прослушивание
запрограммированной
радиостанции
1
2
Выберите необходимую
радиостанцию (1 – 6).
Просмотр текущего времени на часах во
время прослушивания радиостанции FM
(не RDS) или AM
• Информацию для радиостанций FM RDS см.
на стр. 11.
Запрограммированный номер
мигает некоторое время.
Частота
Ô
Часы
Операции с FM RDS
Что можно делать с помощью RDS
Система RDS (Radio Data System)
позволяет FM-радиостанциям отправлять
дополнительный сигнал вместе с обычными
сигналами программ.
При приеме данных RDS приемник может
выполнять следующие операции:
• Поиск типа программы (PTY) (см. далее)
• Прием сообщений о движении на дорогах
(TA) и любимой программы (PTY) (см. стр.
10 и 16)
• Автоматическое отслеживание той же
программы—сеть-отслеживающий прием
(см. стр. 11)
• Поиск программы (см. стр. 17)
Поиск любимой программы FM
RDS
Посредством поиска кода PTY можно
настроиться на радиостанцию, передающую
Вашу любимую программу.
• Информацию о сохранении любимой
программы см. на стр. 10.
~
Появляется последний
выбранный код PTY.
Ÿ
Выберите один из типов
любимых типов программ.
или
Выберите один из кодов PTY (см.
стр. 10).
Продолжение не следующей странице
RU08-17_KD-G727[EE]f.indd 9
RU08-17_KD-G727[EE]f.indd 9
12/10/05 7:07:45 PM
12/10/05 7:07:45 PM

Руcckий, Сохранение любимых программ, Использование функции резервного приема
Резервный прием ta, Резервный прием pty Чат поддержки
- Изображение
- Текст
10
РУCCKИЙ
!
Запустите поиск любимой
программы.
Если есть радиостанция, передающая
в эфир программу того же кода PTY,
что был Вами выбран, осуществляется
настройка на эту радиостанцию.
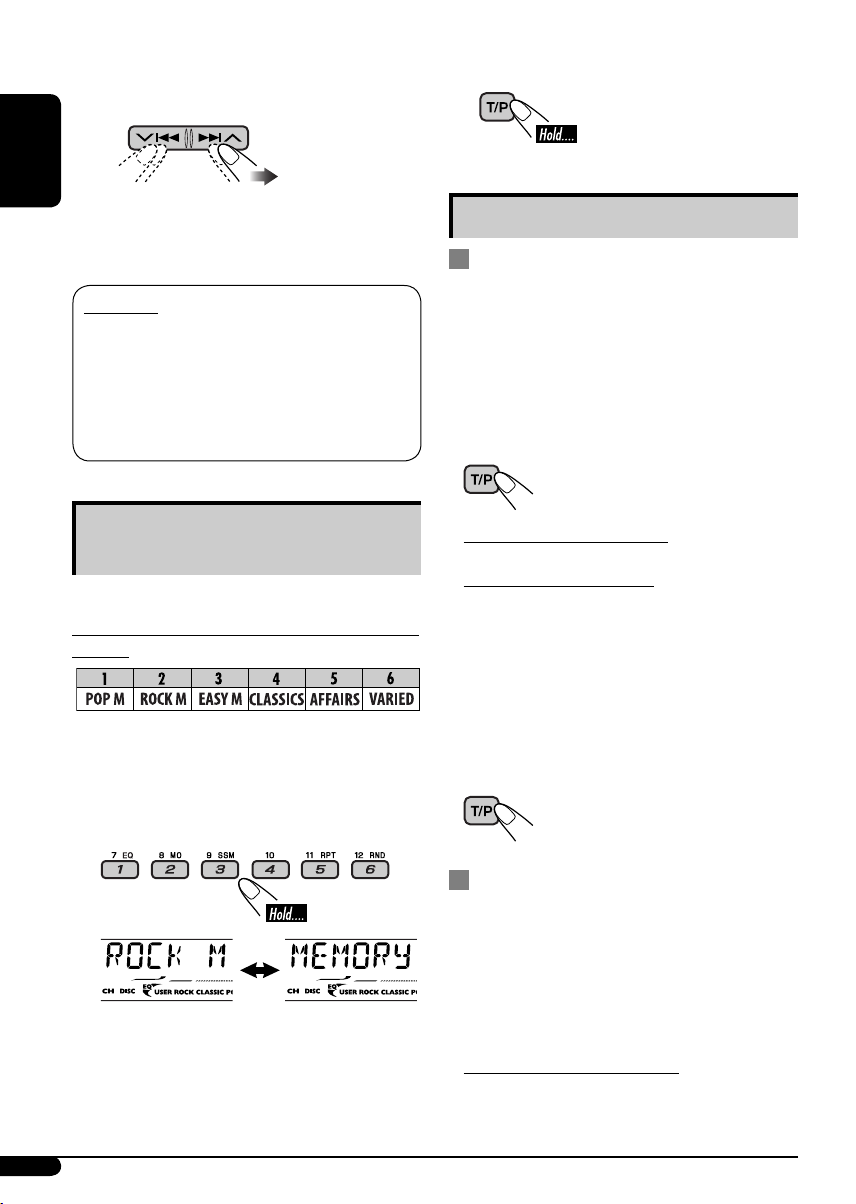
Коды PTY
NEWS, AFFAIRS, INFO, SPORT, EDUCATE, DRAMA, CULTURE,
SCIENCE, VARIED, POP M (музыка), ROCK M (музыка), EASY M
(музыка), LIGHT M (музыка), CLASSICS, OTHER M (музыка),
WEATHER, FINANCE, CHILDREN, SOCIAL, RELIGION, PHONE
IN, TRAVEL, LEISURE, JAZZ, COUNTRY, NATION M (музыка),
OLDIES, FOLK M (музыка), DOCUMENT
Сохранение любимых программ
Можно сохранить шесть типов любимых
программ.
Для программирования типов программ
используйте нумерованные кнопки (1 – 6):
1
Выберите код PTY (см. стр. 9).
2
Выберите запрограммированный
номер (1 – 6) для которого
необходимо выполнить сохранение.
3
Повторите действия 1 и 2 для
сохранения других кодов PTY для
других запрограммированных
номеров.
Пример: Если выбрано “ROCK M”
4
Завершите процедуру.
Использование функции
резервного приема
Резервный прием TA
Резервный прием TA позволяет временно
переключаться на передачу сообщений о
движении на дорогах (TA) с любого источника,
кроме радиостанции AM.
Громкость устанавливается на
запрограммированный уровень TA, если
текущий уровень ниже запрограммированного
(см. стр. 17).
Включение функции резервного
приема TA
Индикатор TP (программа о
движении на дорогах) либо
загорается, либо мигает.
• Если индикатор TP загорается, функция
резервного приема TA включена.
• Если индикатор TP мигает, функция
резервного приема TA еще не включена.
(Это происходит при прослушивании
FM-радиостанции без RDS-сигналов,
необходимых для резервного приема TA).
Для включения функции резервного
приема TA настройте приемник на
другую радиостанцию, обеспечивающую
соответствующие сигналы. Индикатор TP
прекратит мигать и будет гореть.
Отключение функции резервного
приема TA
Индикатор TP гаснет.
Резервный прием PTY
Резервный прием PTY позволяет приемнику
временно переключаться на любимую
программу PTY с любого источника, кроме
радиостанции AM.
Информацию об активации и выборе
предпочитаемого кода PTY для функции
резервного приема PTY см. на стр. 16.
Индикатор PTY либо загорается, либо мигает.
• Если индикатор PTY загорается, функция
резервного приема PTY включена.
RU08-17_KD-G727[EE]f.indd 10
RU08-17_KD-G727[EE]f.indd 10
12/12/05 2:48:17 PM
12/12/05 2:48:17 PM

РУCCKИЙ
11
• Если индикатор PTY мигает, функция
резервного приема PTY еще не включена.
Для включения функции резервного
приема PTY настройте приемник на
другую радиостанцию, обеспечивающую
соответствующие сигналы. Индикатор PTY
прекратит мигать и будет гореть.
Для отключения резервного приема PTY
выберите “OFF” для кода PTY (см. стр. 16).
Индикатор PTY гаснет.
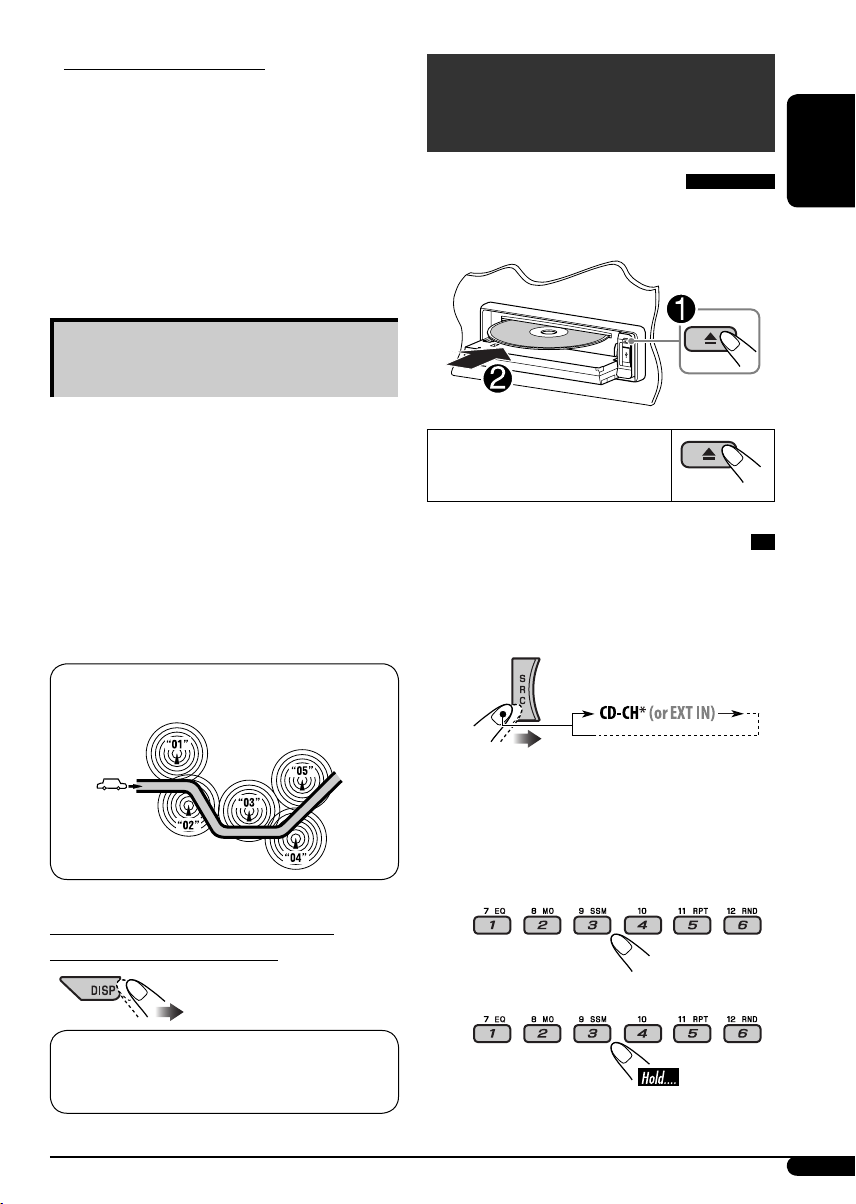
Отслеживание той же программы
(сеть-отслеживающий прием)
При поездке по региону, где невозможен
качественный прием в диапазоне FM, данный
приемник автоматически настраивается
на другую радиостанцию FM RDS в той же
сети, которая может передавать в эфир ту же
программу с помощью более сильных сигналов
(см. иллюстрацию ниже).
В настройках, установленных на заводе-
изготовителе, сеть-отслеживающий прием
включен.
Для получения информации об изменении
параметров сеть-отслеживающего приема см.
“AF-REG” на стр. 16.
Радиовещание программы А в других диапазонах частот
(01 – 05)
Просмотр текущего времени на часах во
время прослушивания радиостанции FM RDS
Операции с дисками или
USB-памятью
Воспроизведение диска в
приемнике
Все дорожки будут воспроизводиться
последовательно до тех пор, пока не произойдет
смена источника или не будет извлечен диск.
Останов воспроизведения и
извлечение диска
Воспроизведение дисков с помощью
устройства автоматической смены
компакт-дисков
Все диски в загрузочном механизме будут
воспроизводиться последовательно, пока не
произойдет смена источника.
• Воспроизведение также будет остановлено
при извлечении загрузочного механизма.
~
*
Если настройка внешнего входа изменена
на “EXT IN” (см. стр. 17), невозможно
выбрать устройство автоматической
смены компакт-дисков.
Ÿ
Выберите диск.
Для дисков с номерами 01 – 06:
Для дисков с номерами 07 – 12:
Продолжение не следующей странице
Название радиостанции (PS)
= Частота
радиостанции
= Тип программы (PTY) = Часы =
(возврат в начало)
RU08-17_KD-G727[EE]f.indd 11
RU08-17_KD-G727[EE]f.indd 11
12/10/05 7:07:51 PM
12/10/05 7:07:51 PM

12
РУCCKИЙ
Воспроизведение из USB-
памяти
Данное устройство может воспроизводить
дорожки MP3/WMA, сохраненные в USB-памяти.
Многократное воспроизведение всех дорожек
из USB-памяти осуществляется вплоть до
смены источника.
• Воспроизведение также будет остановлено
при извлечении USB-памяти.
~
Ÿ
Если USB-память подключена…
Воспроизведение начинается с того места, где
оно ранее было остановлено.
• При подключении другой USB-памяти
воспроизведение начинается с начала.
Для извлечения USB-памяти просто извлеките
ее из устройства.
Внимание:
• Не используйте USB-память, если это
может помешать безопасному вождению.
• Во избежание потери данных убедитесь
в том, что создана резервная копия всех
важных данных.
О дисках MP3 и WMA
“Дорожки” MP3 и WMA (слова “файл”
и “дорожка” взаимозаменяемы в данном
руководстве) записываются в “папки”.
Об устройстве автоматической смены
компакт-дисков
Для подключения к данному приемнику
рекомендуется использовать устройство
автоматической смены компакт-дисков
компании JVC, совместимое с MP3.
• Возможно также подключение MP3-
совместимых устройств автоматической смены
компакт-дисков. Однако эти устройства не
поддерживают воспроизведение дисков MP3.
• С данным устройством нельзя использовать
устройства автоматической смены компакт-
дисков серии CH-X99, CH-X100 и KD-MK.
• Невозможно воспроизводить диски WMA с
помощью устройства автоматической смены
компакт-дисков.
• Текстовая информация о дисках, записанная
с помощью функции “CD Text”, может
отображаться, если подключено устройство
автоматической смены компакт-дисков JVC,
поддерживающее функцию “CD Text”.
• Информацию о подключении см. в
Руководство по установке/подключению (в
отдельном издании).
Быстрая перемотка дорожки вперед или
назад
Переход к следующим или предыдущим
дорожкам
Переход к следующей или предыдущей
папке (только для MP3/WMA/USB)
Для дорожек MP3:
Для дорожек WMA:
Вход USB
USB-память
RU08-17_KD-G727[EE]f.indd 12
RU08-17_KD-G727[EE]f.indd 12
12/10/05 7:07:55 PM
12/10/05 7:07:55 PM

07:36
Выводим AUX на любой магнитоле. (Слушаем музыку с телефона или плеера)
04:21
AUX магнитолы KD-G807
11:16
Делаем мини джек на обычной магнитоле JVC KD G327
23:34
Обзор автомагнитолы JVC KD-R472. Дисковый бюджетник.
22:38
Ремонт панели магнитолы JVC KD 7407
Нажмите на кнопку для помощи

CD RECEIVER
РЕСИВЕР С ПРОИГРЫВАТЕЛЕМ КОМПАКТ-ДИСКОВ
KD-G727
В соответствии с Законом Российской Федерации “О защите прав потре бителей” срок службы
(годности) данного товара “по истечении которого он может представлять опасность для жизни,
здоровья потребителя, причинять вред его имуществу или окружающей среде” составляет семь (7)
лет со дня производства. Этот срок является временем, в течение которого потребитель данного
товара может безопасно им пользоваться при условии соблюдения ин струк ции по эксплуатации
данного товара, проводя необходимое обслуживание, включающее замену расходных материалов
и/или соответствующее ремонтное обеспечение в специализированном сервисном центре.
Дополнительные косметические материалы к данному товару, поставляе мые вместе с ним, могут
храниться в течение двух (2) лет со дня его производства.
Срок службы (годности), кроме срока хранения дополнительных космети ческих материалов,
упомянутых в предыдущих двух пунктах, не затрагивает никаких других прав потребителя, в
частности, гарантийного свидетельства JVC, которое он может получить в соответствии с законом о
правах потребителя или других законов, связанных с ним.
ENGLISHРУCCKИЙ
For canceling the display demonstration, see page 7.
Информацию об отмене демонстрации функций дисплея см. на стр. 7.
For installation and connections, refer to the separate manual.
Указания по установке и выполнению соединений приводятся в отдельной инструкции.
INSTRUCTIONS
ИНСТРУКЦИИ ПО ЭКСПЛУАТАЦИИ
GET0358-001A
[EE]
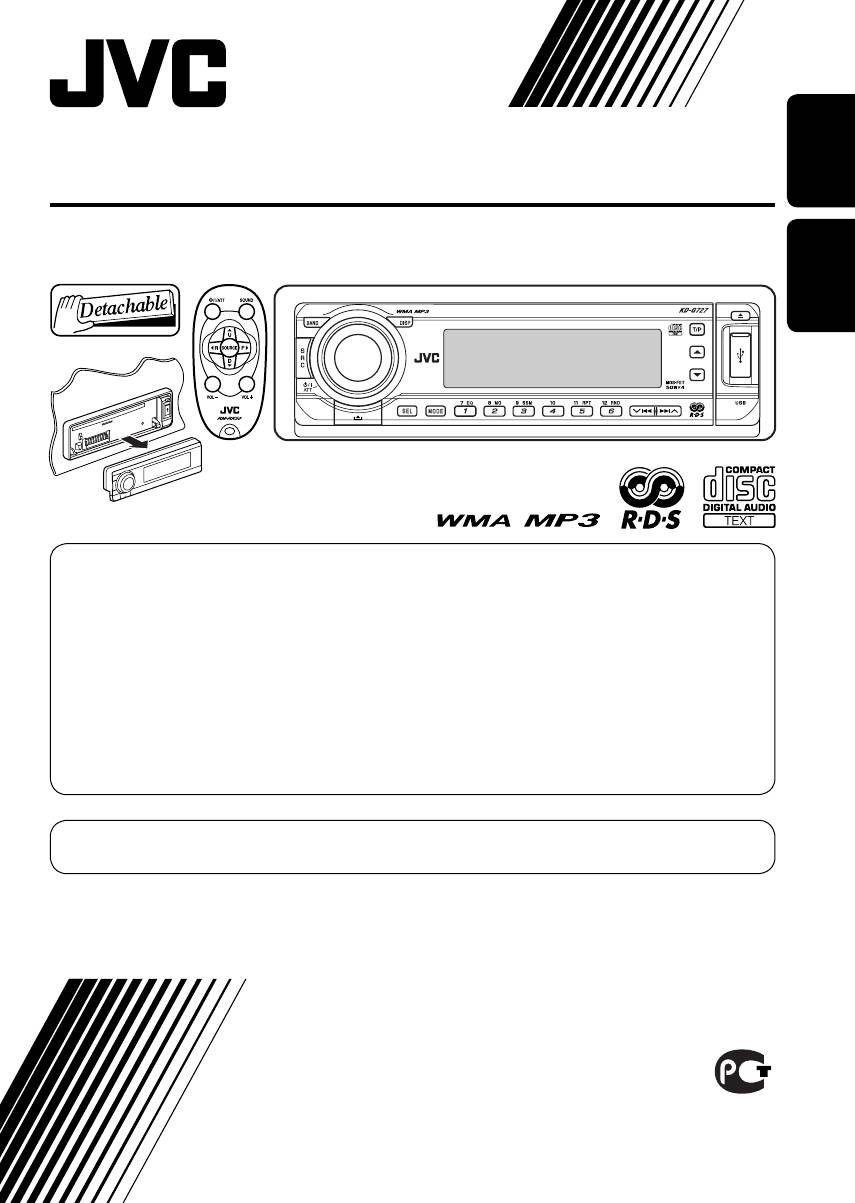
Thank you for purchasing a JVC product.
Please read all instructions carefully before operation, to ensure your complete understanding and to
obtain the best possible performance from the unit.
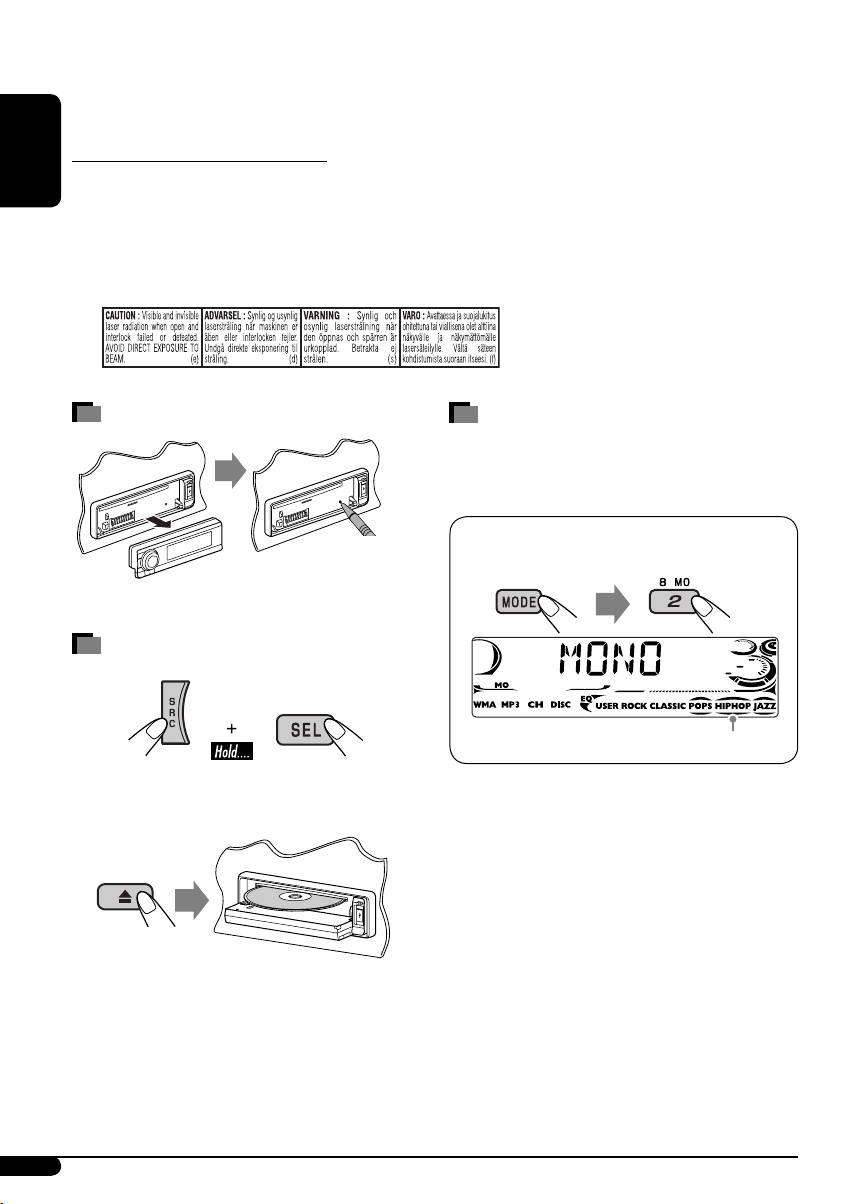
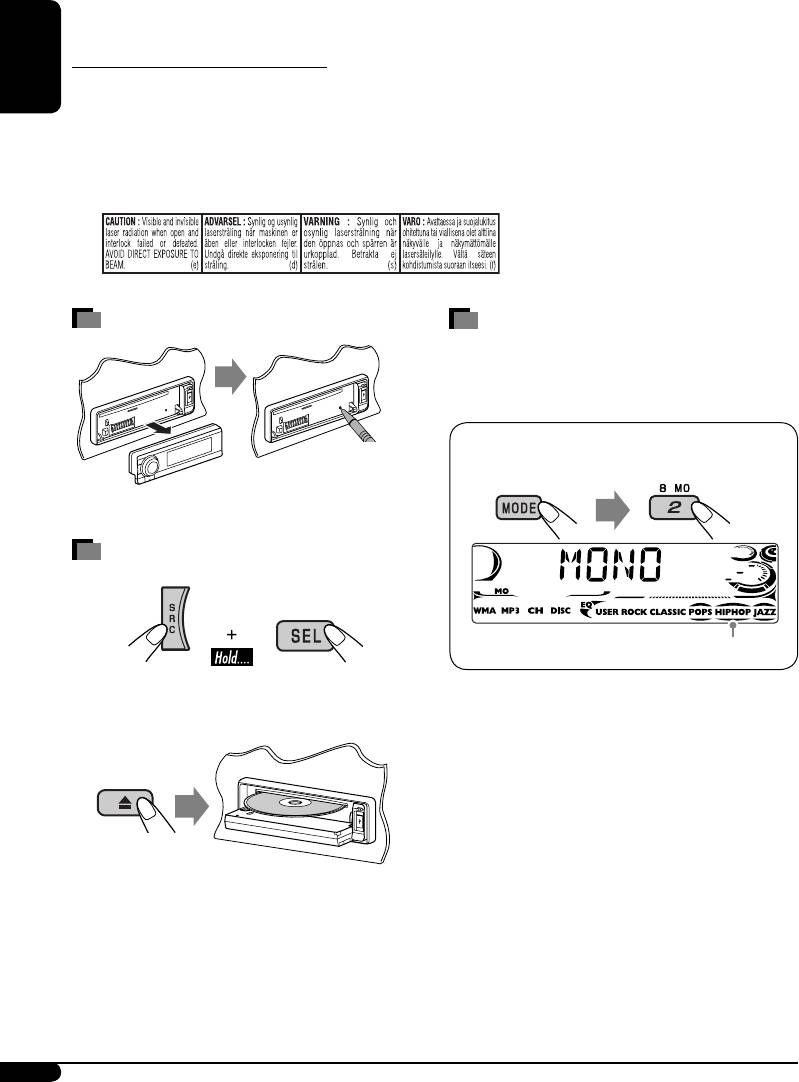
IMPORTANT FOR LASER PRODUCTS
1. CLASS 1 LASER PRODUCT
ENGLISH
2. CAUTION: Do not open the top cover. There are no user serviceable parts inside the unit; leave
all servicing to qualified service personnel.
3. CAUTION: Visible and invisible laser radiation when open and interlock failed or defeated.
Avoid direct exposure to beam.
4. REPRODUCTION OF LABEL: CAUTION LABEL, PLACED OUTSIDE THE UNIT.
How to reset your unit
• Your preset adjustments will also be erased.
How to forcibly eject a disc
“PLEASE” and “EJECT” appear alternately on
the display.
• If this does not work, reset your unit.
• Be careful not to drop the disc when it ejects.
How to use the MODE button
If you press MODE, the unit goes into functions
mode, then the number buttons and 5/∞
buttons work as different function buttons.
Ex.: When number button 2 works as
MO (monaural) button.
Time countdown indicator
To use these buttons for their original
functions again after pressing MODE, wait for
5 seconds without pressing any of these buttons
until the functions mode is cleared or press
MODE again.
2
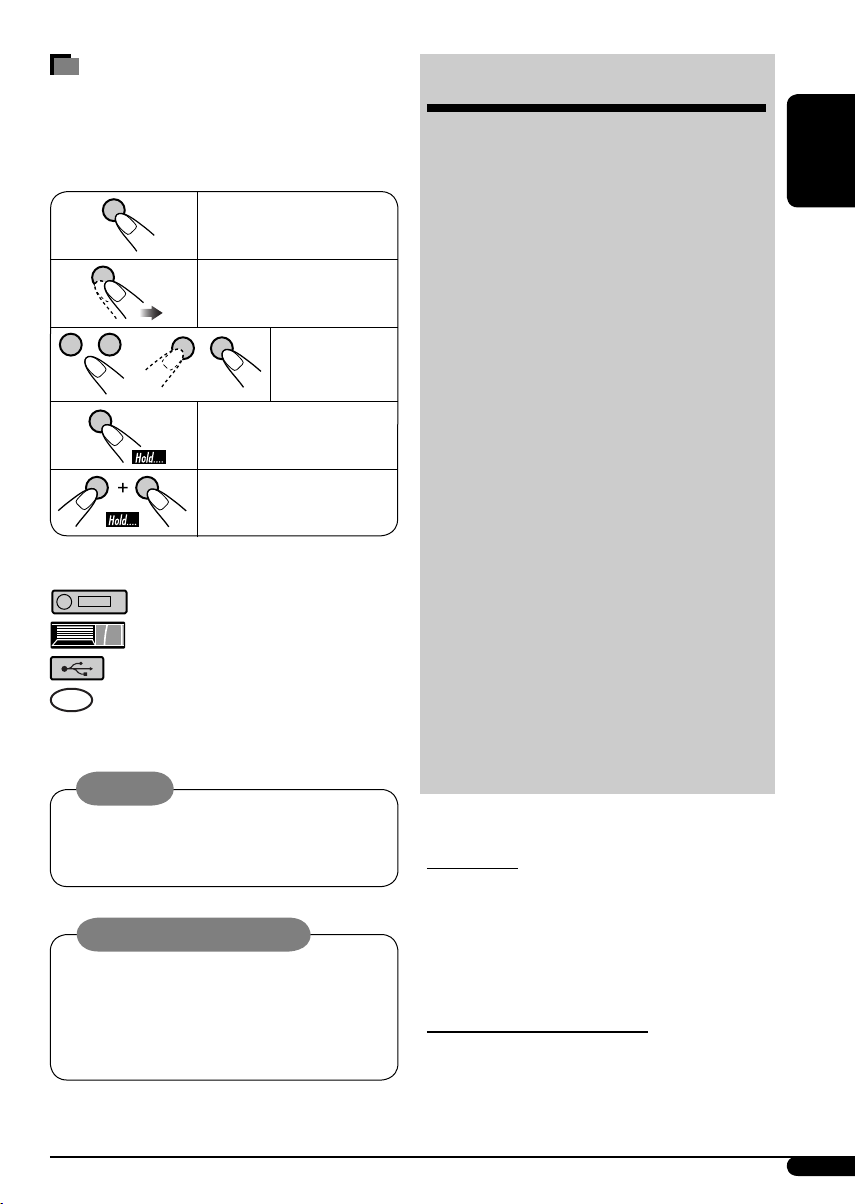
How to read this manual
• Button operations are mainly explained with
the illustrations in the table below.
• Some related tips and notes are explained in
“More about this unit” (see pages 22 – 25).
Press briefly.
Press repeatedly.
Press either
one.
Press and hold until your
desired response begins.
Press and hold both
buttons at the same time.
The following marks are used to indicate…
: Built-in CD player operations.
: External CD changer operations.
: External USB memory operations.
: Indicator displayed for the
corresponding operation.
Warning:
If you need to operate the unit while driving,
be sure to look ahead carefully or you may be
involved in a traffic accident.
Caution on volume setting:
Discs produce very little noise compared
with other sources. Lower the volume
before playing a disc to avoid damaging
the speakers by the sudden increase of the
output level.
CONTENTS
Control panel …………………………….. 4
Remote controller —
Getting started …………………………… 7
Basic operations ……………………………………………. 7
Radio operations ………………………… 8
FM RDS operations ………………………. 9
Searching for your favorite FM RDS programme … 9
Disc/USB memory operations …………. 11
Playing a disc in the unit ………………………………… 11
Playing discs in the CD changer ……………………….. 11
Playing from a USB memory …………………………… 12
Sound adjustments ……………………… 15
General settings — PSM ………………. 16
Title assignment …………………………. 18
iPod®/D. player operations ……………. 19
Other external component operations
DAB tuner operations …………………… 21
More about this unit ……………………. 22
Maintenance ……………………………… 25
Troubleshooting …………………………. 26
Specifications …………………………….. 29
For safety…
• Do not raise the volume level too much, as
this will block outside sounds, making driving
dangerous.
• Stop the car before performing any
complicated operations.
Temperature inside the car…
If you have parked the car for a long time in hot
or cold weather, wait until the temperature in
the car becomes normal before operating the
unit.
RM-RK50
…………… 5
….. 20
ENGLISH
3
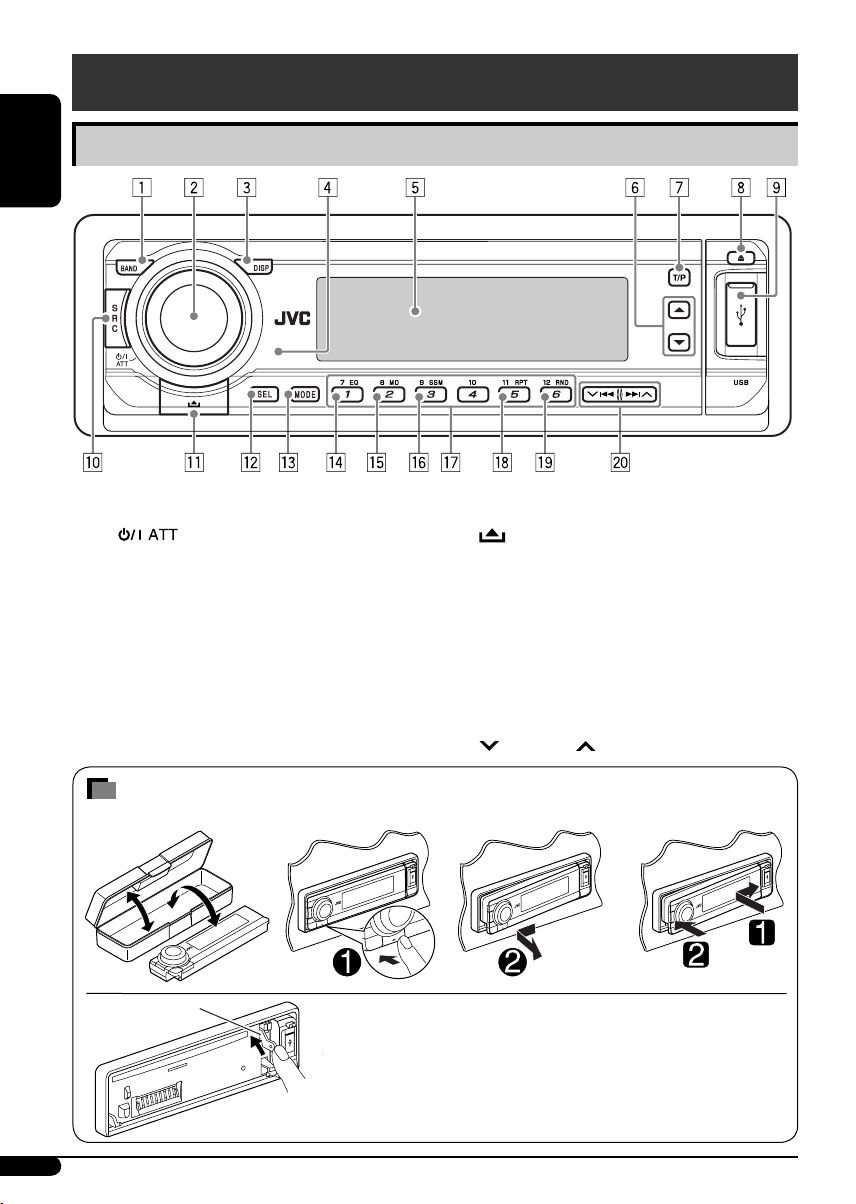
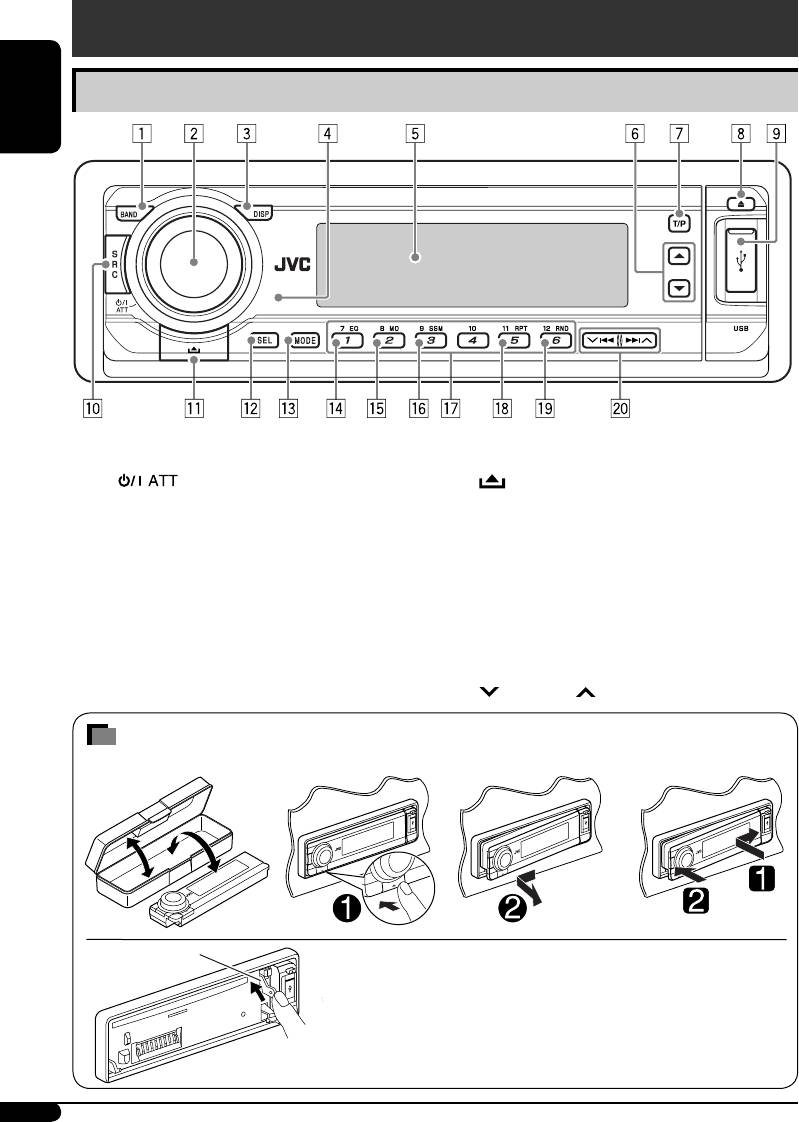
Control panel
ENGLISH
Parts identification
1 BAND button
2 • Control dial
•
3 DISP (display) button
4 Remote sensor
• DO NOT expose the remote sensor to
strong light (direct sunlight or artificial
lighting).
5 Display window
6 5 (up) / ∞ (down) buttons
7 T/P (traffic programme/programme type)
button
8 0 (eject) button
(standby/on attenuator) button
How to detach/attach the control panel
Detaching… Attaching…
Lever
CAUTION:
The lever comes out if you pressed the 0 button while the
panel is detached. If this happens, push the lever back into lock
position before attaching the panel.
9 USB (Universal Serial Bus) input terminal
p SRC (source) button
(control panel release) button
q
w SEL (select) button
e MODE button
r EQ (equalizer) button
t MO (monaural) button
y SSM (Strong-station Sequential Memory)
button
u Number buttons
i RPT (repeat) button
o RND (random) button
4/¢ buttons
;
4
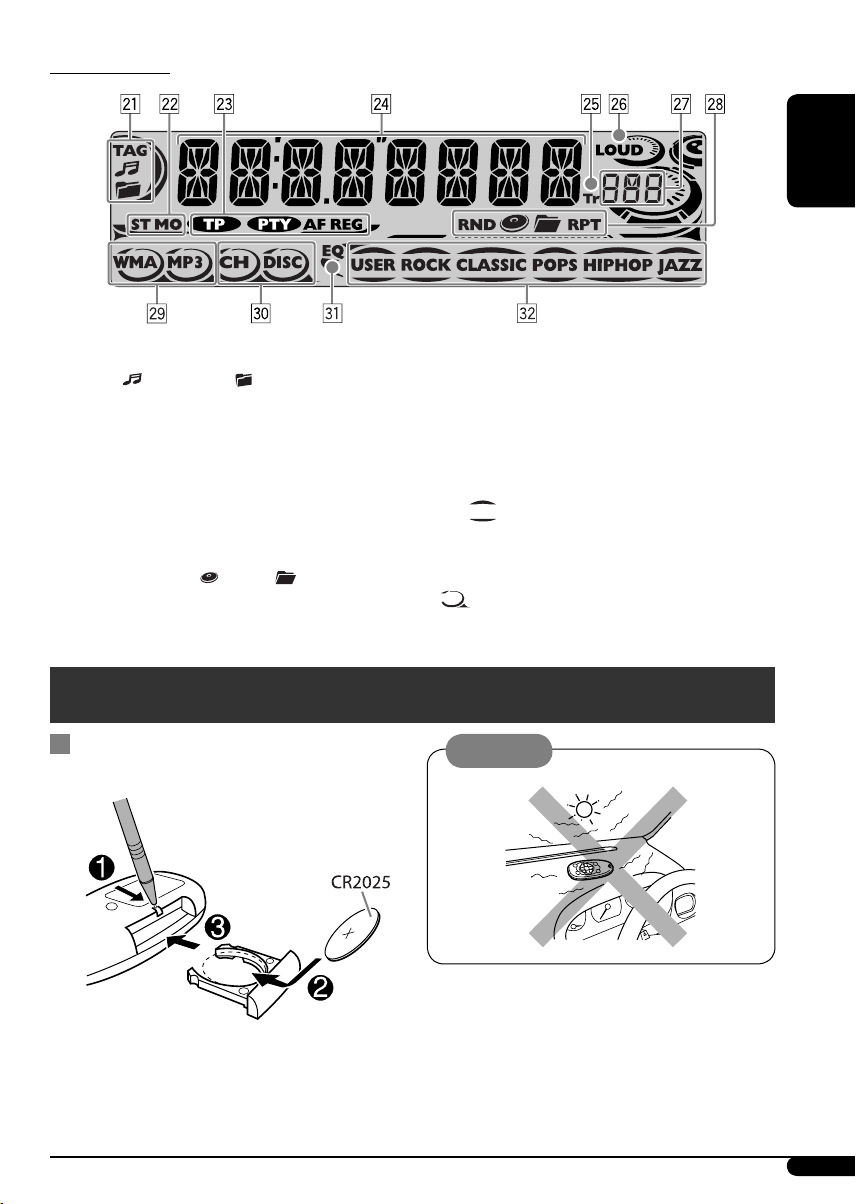
Display window
ENGLISH
a Track information indicators—TAG (ID3
Tag),
s Tuner reception indicators—ST (stereo),
MO (monaural)
d RDS indicators—TP, PTY, AF, REG
f Main display
g Tr (track) indicator
h LOUD (loudness) indicator
j Source display / Volume level indicator
k Playback mode / item indicators—
RND (random),
RPT (repeat)
(track/file), (folder)
(disc), (folder),
Remote controller — RM-RK50
Installing the lithium coin battery
(CR2025)
l Tracks type indicators*—WMA, MP3
/ Playback source indicators*—CH (CD
changer), DISC (built-in CD player)
z EQ (equalizer) indicator
x Sound mode (C-EQ: custom equalizer)
indicators—USER, ROCK, CLASSIC,
POPS, HIP HOP, JAZZ
•
*
also works as the time countdown
indicator and level meter during play (see
page 17).
lights up for the selected item.
Caution:
Aim the remote controller directly at the
remote sensor on the unit. Make sure there is
no obstacle in between.
Continued on the next page
5
Warning:
• Do not install any battery other than
CR2025 or its equivalent; otherwise, it may
explode.
• Store the battery in a place where children
cannot reach to avoid risk of accident.
ENGLISH
• To prevent the battery from over-heating,
cracking, or starting a fire:
– Do not recharge, short, disassemble,
heat the battery, or dispose of it in a fire.
– Do not leave the battery with other
metallic materials.
– Do not poke the battery with tweezers or
similar tools.
– Wrap the battery with tape and insulate
when throwing away or saving it.
Main elements and features
• Changes the folder of the MP3/WMA/
USB.
• While playing an MP3 disc on an
MP3-compatible CD changer:
– Changes the disc if pressed briefly.
– Changes the folder if pressed and held.
• While listening to an Apple iPod
JVC D. player:
– Pauses/stops or resumes playback with
D ∞.
– Enter the main menu with 5 U.
(Now 5 U/D ∞/2 R/F 3 work as the
menu selecting buttons.)*
3 VOL – / VOL + buttons
• Adjusts the volume level.
4 SOUND button
• Selects the sound mode (C-EQ: custom
equalizer).
5 SOURCE button
• Selects the source.
6 2 R (reverse) / F (forward) 3 buttons
• Searches for stations (or services) if
pressed briefly.
• Searches for ensembles if pressed and
held.
• Fast-forwards or reverses the track if
pressed and held.
• Changes the tracks if pressed briefly.
• While listening to an iPod or a D. player
(in menu selecting mode):
– Selects an item if pressed briefly. (Then,
press D ∞ to confirm the selection.)
– Skips 10 items at a time if pressed and
held.
or a
®
1 (standby/on/attenuator) button
• Turns the power on if pressed briefly or
attenuates the sound when the power is
on.
• Turns the power off if pressed and held.
2 5 U (up) / D (down) ∞ buttons
• Changes the FM/AM/DAB bands with
5 U.
• Changes the preset stations (or services)
with D ∞.
6
*
5 U : Returns to the previous menu.
D ∞ : Confirms the selection.
Getting started
Basic operations
~ Turn on the power.
To drop the volume in a
moment (ATT)
To restore the sound,
press it again.
To turn off the power
ENGLISH
Ÿ
* You cannot select these sources if they
are not ready or not connected.
!
For FM/AM tuner
For DAB tuner
⁄ Adjust the volume.
Basic settings
• See also “General settings — PSM” on pages
16 – 18.
1
2
1 Canceling the display
demonstrations
Select “DEMO,” then “DEMO OFF.”
2 Setting the clock
Select “CLOCK H” (hour), then adjust
the hour.
Select “CLOCK M” (minute), then
adjust the minute.
Select “24H/12H,” then “24H” (hour) or
“12H” (hour).
3 Finish the procedure.
Volume level appears.
Volume level indicator
@ Adjust the sound as you want. (See
page 15.)
To check the current clock time while the
power is turned off
7
Radio operations
~
When an FM stereo broadcast is hard to
receive
ENGLISH
Ÿ
Lights up when receiving an FM stereo
broadcast with sufficient signal strength.
Start searching for a station.
!
When a station is received, searching
stops.
To stop searching, press the same button
again.
Note:
FM1 and FM2: 87.5 MHz – 108.0 MHz
FM3: 65.00 MHz – 74.00 MHz
Lights up when monaural mode is activated.
Reception improves, but stereo effect will be
lost.
To restore the stereo effect, repeat the same
procedure. “MONO OFF” appears and the MO
indicator goes off.
Selected band appears.
Storing stations in memory
You can preset six stations for each band.
FM station automatic presetting —
SSM (Strong-station Sequential
Memory)
1 Select the FM band (FM1 – FM3) you
want to store into.
To tune in to a station manually
In step ! above…
1
2 Select a desired station frequency.
8
2
3
“SSM” appears, then disappears when
automatic presetting is over.
Local FM stations with the strongest signals are
searched and stored automatically in the FM
band.
Manual presetting
Ex.: Storing FM station of 92.5 MHz into preset
number 4 of the FM1 band.
1
2
3
Listening to a preset station
Preset number flashes for a while.
1
FM RDS operations
What you can do with RDS
RDS (Radio Data System) allows FM stations
to send an additional signal along with their
regular programme signals.
By receiving the RDS data, this unit can do the
following:
• Programme Type (PTY) Search (see the
following)
• TA (Traffic Announcement) and PTY
Standby Receptions (see pages 10 and 16)
• Tracing the same programme automatically
—Network-Tracking Reception (see page 11)
• Programme Search (see page 17)
Searching for your favorite
FM RDS programme
You can tune in to a station broadcasting your
favorite programme by searching for a PTY
code.
• To store your favorite programme types, see
page 10.
ENGLISH
2 Select the preset station (1 – 6) you
want.
To check the current clock time while
listening to an FM (non-RDS) or AM station
• For FM RDS stations, see page 11.
Frequency Ô Clock
~ The last selected PTY
code appears.
Ÿ Select one of your favorite
programme types.
or
Select one of the PTY codes (see
page 10).
Continued on the next page
9
! Start searching for your favorite
programme.
ENGLISH
If there is a station broadcasting a
programme of the same PTY code as you
have selected, that station is tuned in.
PTY codes
NEWS, AFFAIRS, INFO, SPORT, EDUCATE, DRAMA, CULTURE,
SCIENCE, VARIED, POP M (music), ROCK M (music), EASY
M (music), LIGHT M (music), CLASSICS, OTHER M (music),
WEATHER, FINANCE, CHILDREN, SOCIAL, RELIGION, PHONE
IN, TRAVEL, LEISURE, JAZZ, COUNTRY, NATION M (music),
OLDIES, FOLK M (music), DOCUMENT
Storing your favorite programme
types
You can store six favorite programme types.
Preset programme types in the number buttons
(1 to 6):
1 Select a PTY code (see page 9).
2 Select the preset number (1 – 6) you
want to store into.
4 Finish the procedure.
Using the standby receptions
TA Standby Reception
TA Standby Reception allows the unit to switch
temporarily to Traffic Announcement (TA)
from any source other than AM.
The volume changes to the preset TA volume
level if the current level is lower than the preset
level (see page 17).
To activate TA Standby Reception
The TP (Traffic Programme)
indicator either lights up or
flashes.
• If the TP indicator lights up, TA Standby
Reception is activated.
• If the TP indicator flashes, TA Standby
Reception is not yet activated. (This occurs
when you are listening to an FM station
without the RDS signals required for TA
Standby Reception.)
To activate TA Standby Reception, tune in to
another station providing these signals. The
TP indicator will stop flashing and remain lit.
To deactivate the TA Standby Reception
The TP indicator goes off.
Ex.: When “ROCK M” is selected
3 Repeat steps 1 and 2 to store other
PTY codes into other preset numbers.
10
PTY Standby Reception
PTY Standby Reception allows the unit to
switch temporarily to your favorite PTY
programme from any source other than AM.
To activate and select your favorite PTY code
for PTY Standby Reception, see page 16.
The PTY indicator either lights up or flashes.
• If the PTY indicator lights up, PTY Standby
Reception is activated.
• If the PTY indicator flashes, PTY Standby
Reception is not yet activated.
To activate PTY Standby Reception, tune in
to another station providing these signals. The
PTY indicator will stop flashing and remain
lit.
To deactivate the PTY Standby Reception,
select “OFF” for the PTY code (see page 16).
The PTY indicator goes off.
Tracing the same programme—
Network-Tracking Reception
When driving in an area where FM reception
is not sufficient enough, this unit automatically
tunes in to another FM RDS station of the
same network, possibly broadcasting the same
programme with stronger signals (see the
illustration below).
When shipped from the factory, NetworkTracking Reception is activated.
To change the Network-Tracking Reception
setting, see “AF-REG” on page 16.
Programme A broadcasting on different frequency areas
(01 – 05)
Disc/USB memory
operations
Playing a disc in the unit
All tracks will be played repeatedly until you
change the source or eject the disc.
To stop play and eject the disc
Playing discs in the CD changer
All discs in the magazine will be played
repeatedly until you change the source.
• Ejecting the magazine will also stop playback.
~
ENGLISH
To check the current clock time while
listening to an FM RDS station
Station name (PS) = Station Frequency =
Programme type (PTY) = Clock = (back to the
beginning)
* If you have changed the external input
setting to “EXT IN” (see page 17), you
cannot select the CD changer.
Ÿ Select a disc.
For disc number from 01 – 06:
For disc number from 07 – 12:
Continued on the next page
11
Playing from a USB memory
This unit can play MP3/WMA tracks stored in a
USB memory.
All tracks in the USB memory will be played
repeatedly until you change the source.
• Removing the USB memory will also stop
ENGLISH
playback.
~
Ÿ
USB input terminal
About MP3 and WMA tracks
MP3 and WMA “tracks” (words “file” and
“track” are used interchangeably) are recorded
in “folders.”
About the CD changer
It is recommended to use a JVC
MP3-compatible CD changer with your unit.
• You can also connect MP3-incompatible
CD changers. However, these units are not
compatible with MP3 discs.
• You cannot use the CH-X99, CH-X100, and
KD-MK series CD changers with this unit.
• You cannot play any WMA disc in the CD
changer.
• Disc text information recorded in the CD
Text can be displayed when a JVC CD Text
compatible CD changer is connected.
• For connection, see Installation/Connection
Manual (separate volume).
To fast-forward or reverse the track
USB memory
If a USB memory has been attached…
Playback starts from where it has been stopped
previously.
• If a different USB memory is currently
attached, playback starts from the beginning.
To eject the USB memory, straightly pull it out
from the unit.
Cautions:
• Avoid using the USB memory if it might
hinder your safety driving.
• Make sure all important data has been
backed up to avoid losing the data.
12
To go to the next or previous tracks
To go to the next or previous folders (only for
MP3/WMA/USB)
For MP3 tracks:
For WMA tracks:

To locate a particular track (for CD) or folder
(for MP3/ WMA/USB) directly
2
To select a number from 01 – 06:
To select a number from 07 – 12:
• To use direct folder access on MP3/WMA/
USB, it is required that folders are assigned
with 2-digit numbers at the beginning of their
folder names—01, 02, 03, and so on.
To select a particular track in a folder (for
MP3/WMA/USB):
Other main functions
Skipping tracks quickly during play
Each time you press the button, you can
skip 10 tracks.
• After the last track, the first track will be
selected and vice versa.
3
Prohibiting disc ejection
You can lock a disc in the loading slot.
To cancel the prohibition, repeat the same
procedure.
ENGLISH
Only possible on JVC
MP3-compatible CD changer
• For MP3/WMA/USB, you can skip tracks
within the same folder.
Ex.: To select track 32 while playing a track
whose number is a single digit (1 to 9)
1
13
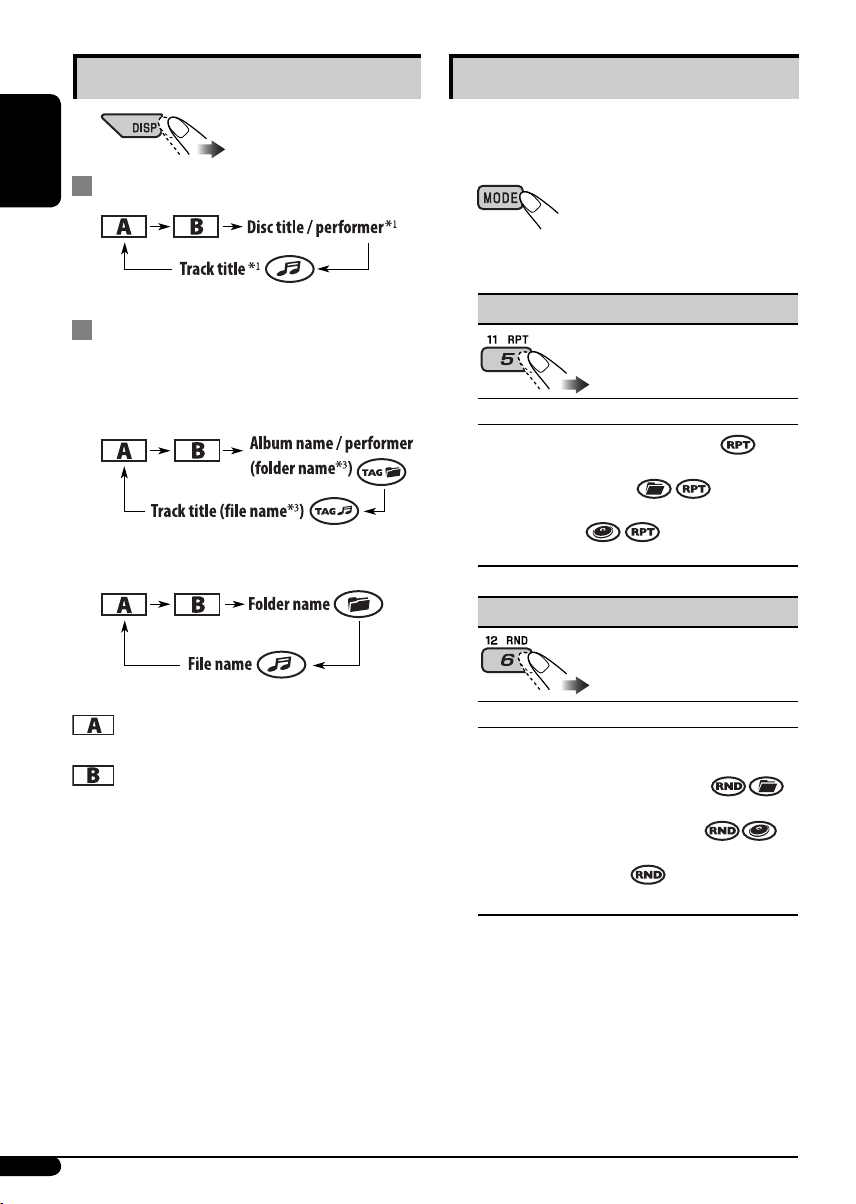
Changing the display information
While playing an audio CD or a CD Text
ENGLISH
Selecting the playback modes
You can use only one of the following playback
modes at a time.
1
2 Select your desired playback mode.
2
While playing an MP3/WMA
*
disc or a
USB memory
• When “TAG DISP” is set to “TAG ON”
(see page 18)
• When “TAG DISP” is set to “TAG OFF”
: Elapsed playing time with the current
track number
: Clock with the current track number
1
If the current disc is an audio CD,
*
“NO NAME” appears.
2
*
Only for the built-in CD player and external
USB memory.
3
*
If an MP3/WMA file does not have Tag
information, folder name and file name
appear. In this case, the TAG indicator will
not light up.
7 Repeat play
Mode Plays repeatedly
TRK RPT : The current track.
FLDR RPT*4 : All tracks of the current
folder.
DISC RPT*5 : All tracks of the current disc.
RPT OFF : Cancels.
7 Random play
Mode Plays at random
FLDR RND*4 : All tracks of the current
folder, then tracks of the next
folder and so on.
DISC RND : All tracks of the current disc
or USB memory.
MAG RND*5 : All tracks of the inserted
discs.
RND OFF : Cancels.
*4 Only while playing a media (MP3/WMA/
USB).
5
*
Only while playing discs in the CD
changer.
14
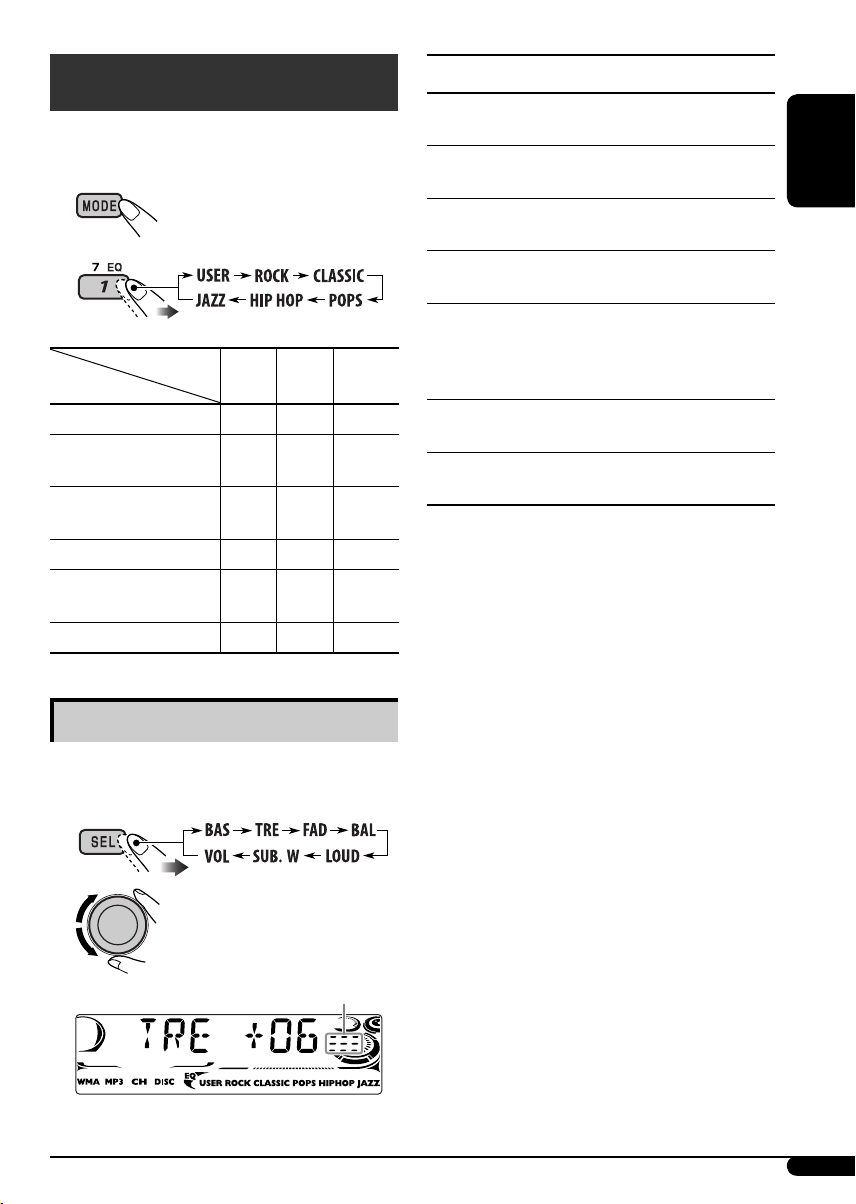
Sound adjustments
You can select a preset sound mode suitable to
the music genre (C-EQ: custom equalizer).
1
2
Preset values
Indication (For)
USER (Flat sound)
ROCK
(Rock or disco music)
CLASSIC
(Classical music)
POPS (Light music)
HIP HOP
(Funk or rap music)
JAZZ (Jazz music)
Adjusting the sound
BAS TRE LOUD
(bass) (treble) (loudness)
00 00 OFF
+03 +01 ON
+01 –02 OFF
+04 +01 OFF
+02 00 ON
+02 +03 OFF
Indication, [Range]
BAS*1 (bass), [–06 to +06]
Adjust the bass.
1
TRE*
(treble), [–06 to +06]
Adjust the treble.
2
FAD*
(fader), [R06 to F06]
Adjust the front and rear speaker balance.
BAL (balance), [L06 to R06]
Adjust the left and right speaker balance.
1
LOUD*
(loudness), [LOUD ON or
LOUD OFF]
Boost low and high frequencies to produce a
well-balanced sound at low volume level.
SUB.W*
Adjust the subwoofer output level.
VOL (volume), [00 to 30 or 50*4]
Adjust the volume.
*1 When you adjust the bass, treble, or loudness,
*
*
*
3
(subwoofer), [00 to 08]
the adjustment you have made is stored for
the currently selected sound mode (C-EQ)
including “USER.”
2
If you are using a two-speaker system, set the
fader level to “00.”
3
This takes effect only when a subwoofer is
connected.
4
Depending on the amplifier gain control
setting. (See page 18 for details.)
ENGLISH
You can adjust the sound characteristics to your
preference.
1
2
Indication pattern changes
as you adjust the level.
Ex.: When “TRE” is selected
15
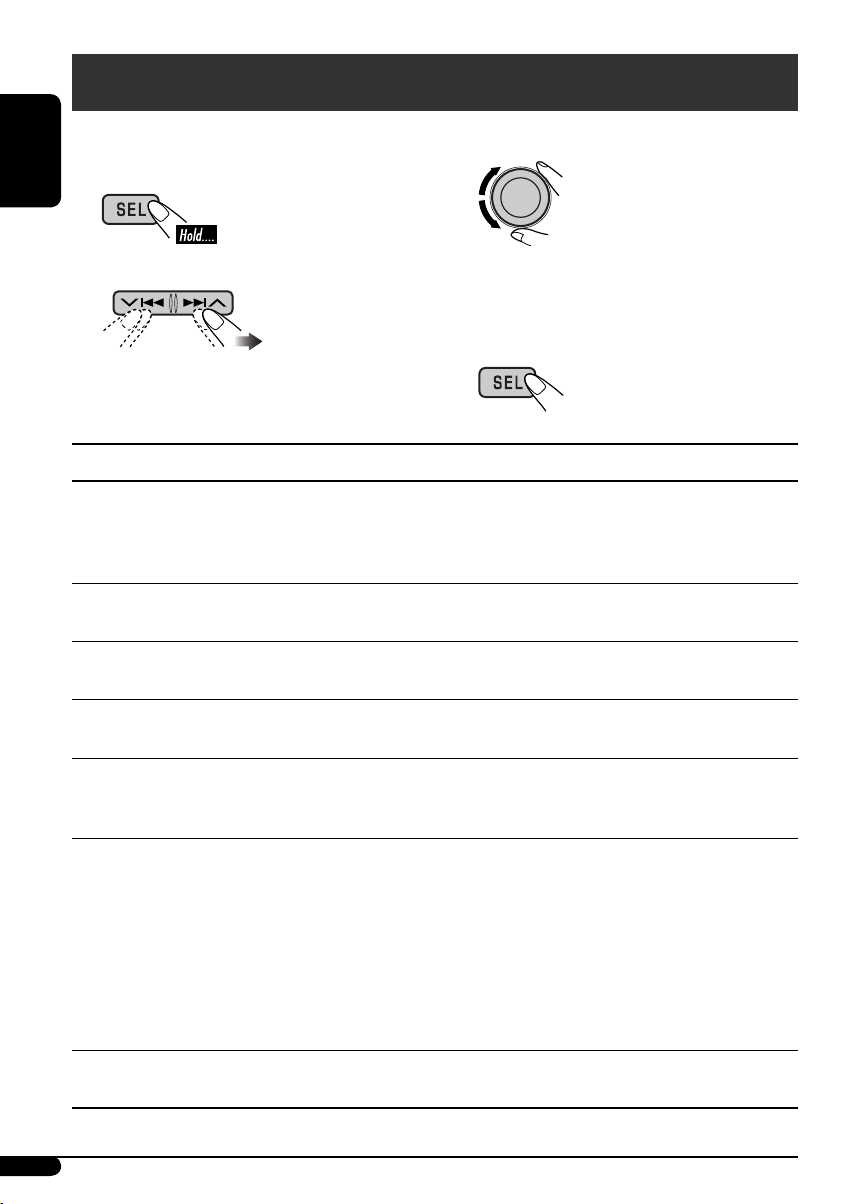
General settings — PSM
You can change PSM (Preferred Setting Mode)
items listed in the table that follows.
ENGLISH
1
2 Select a PSM item.
3 Adjust the PSM item selected.
4 Repeat steps 2 and 3 to adjust the
5 Finish the procedure.
Indications Selectable settings, [reference page]
DEMO
Display demonstration
CLOCK H
Hour adjustment
CLOCK M
Minute adjustment
DEMO ON : [Initial]; Display demonstration will be activated
automatically if no operation is done for about
20 seconds, [7].
DEMO OFF : Cancels.
0 – 23 (1 – 12), [7]
[Initial: 0 (0:00)]
00 – 59, [7]
[Initial: 00 (0:00)]
other PSM items if necessary.
24H/12H
Time display mode
CLK ADJ
Clock adjustment
AF-REG
Alternative frequency/
regionalization
reception
PTY-STBY
PTY standby
16
12H O 24H, [7]
[Initial: 24H]
AUTO : [Initial]; The built-in clock is automatically adjusted
using the CT (clock time) data in the RDS signal.
OFF : Cancels.
When the received signals from the current FM RDS station become
weak…
AF : [Initial]; Switches to another station (the programme
may differ from the one currently received), [11].
• The AF indicator lights up.
AF REG : Switches to another station broadcasting the same
programme.
• The AF and REG indicators light up.
OFF : Cancels (not selectable when “DAB AF” is set to “AF ON”).
Activates PTY Standby Reception with one of the PTY codes, [10].
OFF [Initial] = PTY codes, [10] = (back to the beginning)

Indications Selectable settings, [reference page]
TA VOL
Traffic announcement
volume
P-SEARCH
Programme search
DAB AF*
2
Alternative frequency
reception
DAB VOL*
2
DAB volume
adjustment
LEVEL
Audio level meter
DIMMER
Dimmer
TEL
Telephone muting
SCROLL*
3
Scroll
WOOFER
Subwoofer cutoff
frequency
4
EXT IN*
External input
1
*
Depends on the amplifier gain control (see page 18).
2
*
Displayed only when DAB tuner is connected.
3
*
Some characters or symbols will not be shown correctly (or will be blanked) on the display.
*4 Displayed only when one of the following sources is selected—FM, AM, CD, or USB.
[Initial: VOL 15]; VOL 00 — VOL 30 or 50*1, [10]
ON : Using the AF data, the unit tunes in to another frequency
broadcasting the same programme as the original
preset RDS station is if the preset station signals are not
sufficient.
OFF : [Initial]; Cancels.
AF ON : [Initial]; Traces the programme among DAB services
and FM RDS stations, [11, 22].
AF OFF : Cancels.
You can adjust the volume level (VOL –12 — VOL +12) of DAB tuner
to match the FM sound level and store it in memory.
[Initial: VOL 00]
ON : [Initial]; Activates the audio level indicator.
OFF : Cancels; sound mode indicator is shown.
AUTO : [Initial]; Dims the display when you turn on the
headlights.
ON : Activates dimmer.
OFF : Cancels.
MUTING 1/MUTING 2 : Select either one which mutes the sounds
while using a cellular phone.
OFF : [Initial]; Cancels.
ONCE : [Initial]; Scrolls the track information once.
AUTO : Repeats scrolling (5-second intervals in between).
OFF : Cancels.
• Pressing DISP for more than one second can scroll the display
regardless of the setting.
LOW : Frequencies lower than 90 Hz are sent to the subwoofer.
MID : [Initial]; Frequencies lower than 135 Hz are sent to the
subwoofer.
HIGH : Frequencies lower than 180 Hz are sent to the subwoofer.
CHANGER : [Initial]; To use a JVC CD changer, [11], an Apple iPod
or a JVC D. player, [19].
EXT IN : To use any other external component than the above,
[20].
ENGLISH
Continued on the next page
17
Indications Selectable settings, [reference page]
TAG DISP
Tag display
AMP GAIN
ENGLISH
Amplifier gain control
IF BAND
Intermediate frequency
filter
TAG ON : [Initial]; Shows the Tag information while playing MP3/
TAG OFF : Cancels.
You can change the maximum volume level of this unit.
LOW PWR : VOL 00 – VOL 30 (Select this if the maximum power of
HIGH PWR : [Initial]; VOL 00 – VOL 50
AUTO : [Initial]; Increases the tuner selectivity to reduce
WIDE : Subject to interference noises from adjacent stations, but
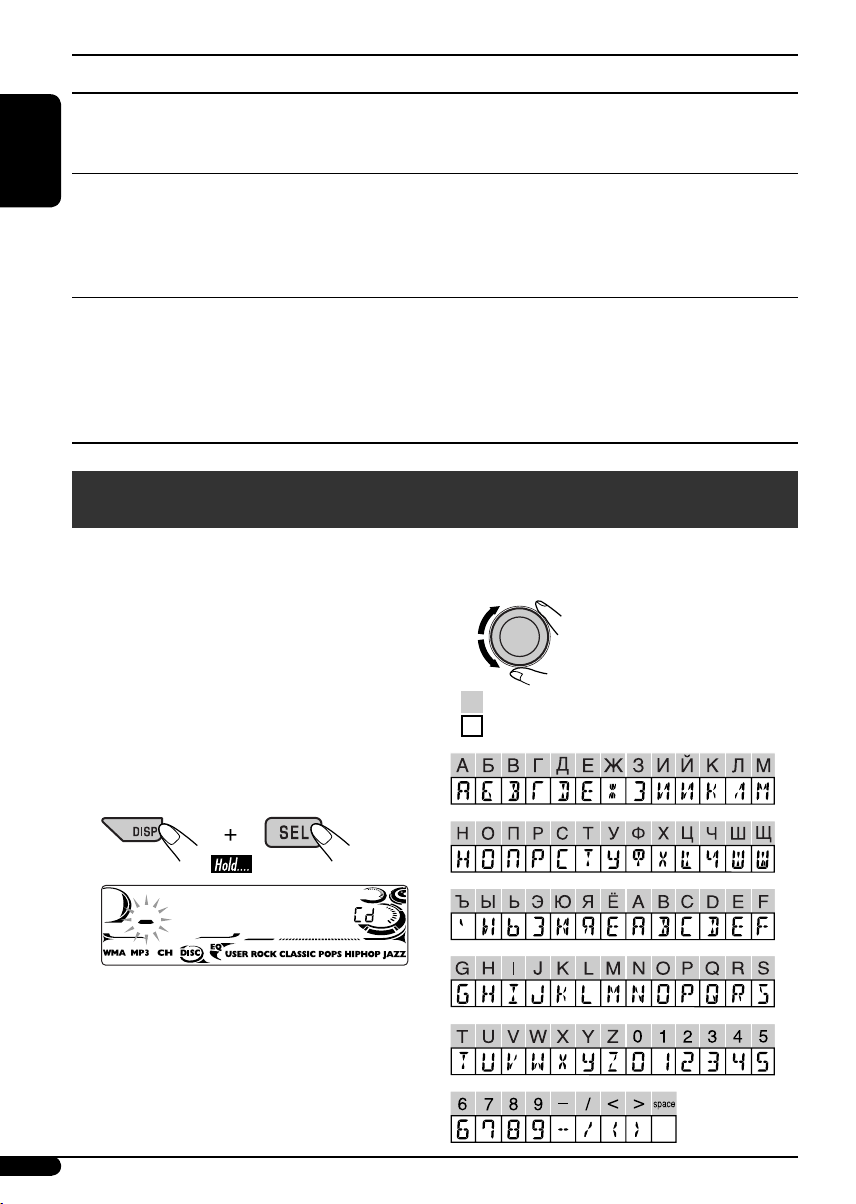
Title assignment
You can assign titles to CDs (both in the unit
and the CD changer). You can assign up to 30
discs and each title up to 32 characters.
• You cannot assign a title to a CD Text, an
MP3/WMA disc, or a USB memory.
1 Select the sources.
• For CDs in this unit: Insert a CD.
• For CDs in the CD changer: Select
“CD-CH,” then select a disc number.
WMA tracks, [14].
the speaker is less than 50 W to prevent them from being
damaged.)
interference noises between close stations. (Stereo effect
may be lost.)
sound quality will not be degraded and the stereo effect
will remain.
3 Assign a title.
1 Select a character.
Available characters
Display indications
2 Enter the title assignment mode.
Ex.: When “CD“ is selected as the source
18
Loading…
CD RECEIVER
РЕСИВЕР С ПРОИГРЫВАТЕЛЕМ КОМПАКТ-ДИСКОВ
ENGLISHРУCCKИЙ
KD-G727
В соответствии с Законом Российской Федерации “О защите прав потре бителей” срок службы
(годности) данного товара “по истечении которого он может представлять опасность для жизни,
здоровья потребителя, причинять вред его имуществу или окружающей среде” составляет семь (7)
лет со дня производства. Этот срок является временем, в течение которого потребитель данного
товара может безопасно им пользоваться при условии соблюдения ин струк ции по эксплуатации
данного товара, проводя необходимое обслуживание, включающее замену расходных материалов
и/или соответствующее ремонтное обеспечение в специализированном сервисном центре.
Дополнительные косметические материалы к данному товару, поставляе мые вместе с ним, могут
храниться в течение двух (2) лет со дня его производства.
Срок службы (годности), кроме срока хранения дополнительных космети ческих материалов,
упомянутых в предыдущих двух пунктах, не затрагивает никаких других прав потребителя, в
частности, гарантийного свидетельства JVC, которое он может получить в соответствии с законом о
правах потребителя или других законов, связанных с ним.
For canceling the display demonstration, see page 7.
Информацию об отмене демонстрации функций дисплея см. на стр. 7.
For installation and connections, refer to the separate manual.
Указания по установке и выполнению соединений приводятся в отдельной инструкции.
INSTRUCTIONS
ИНСТРУКЦИИ ПО ЭКСПЛУАТАЦИИ
GET0358-001A
[EE]
Cover_KD—G727_001A_1.indd 2Cover_KD-G727_001A_1.indd 2 11/30/05 9:48:02 AM11/30/05 9:48:02 AM
Thank you for purchasing a JVC product.
Please read all instructions carefully before operation, to ensure your complete understanding and to
obtain the best possible performance from the unit.
IMPORTANT FOR LASER PRODUCTS
1. CLASS 1 LASER PRODUCT
ENGLISH
2. CAUTION: Do not open the top cover. There are no user serviceable parts inside the unit; leave
all servicing to qualified service personnel.
3. CAUTION: Visible and invisible laser radiation when open and interlock failed or defeated.
Avoid direct exposure to beam.
4. REPRODUCTION OF LABEL: CAUTION LABEL, PLACED OUTSIDE THE UNIT.
How to reset your unit
How to use the MODE button
If you press MODE, the unit goes into functions
mode, then the number buttons and 5/∞
buttons work as different function buttons.
Ex.: When number button 2 works as
MO (monaural) button.
• Your preset adjustments will also be erased.
How to forcibly eject a disc
Time countdown indicator
“PLEASE” and “EJECT” appear alternately on
To use these buttons for their original
the display.
functions again after pressing MODE, wait for
5 seconds without pressing any of these buttons
until the functions mode is cleared or press
MODE again.
• If this does not work, reset your unit.
• Be careful not to drop the disc when it ejects.
2
EN02—07_KD—G727_001A_1.indd 2EN02-07_KD-G727_001A_1.indd 2 11/30/05 9:49:27 AM11/30/05 9:49:27 AM

How to read this manual
CONTENTS
• Button operations are mainly explained with
the illustrations in the table below.
• Some related tips and notes are explained in
Control panel …………………………….. 4
“More about this unit” (see pages 22 – 25).
Remote controller —
RM-RK50
…………… 5
ENGLISH
Getting started …………………………… 7
Press briefly.
Basic operations ……………………………………………. 7
Radio operations ………………………… 8
Press repeatedly.
FM RDS operations ………………………. 9
Searching for your favorite FM RDS programme … 9
Press either
Disc/USB memory operations …………. 11
one.
Playing a disc in the unit ………………………………… 11
Playing discs in the CD changer ……………………….. 11
Press and hold until your
Playing from a USB memory …………………………… 12
desired response begins.
Sound adjustments ……………………… 15
Press and hold both
General settings — PSM ………………. 16
buttons at the same time.
Title assignment …………………………. 18
The following marks are used to indicate…
iPod®/D. player operations ……………. 19
: Built-in CD player operations.
Other external component operations
….. 20
: External CD changer operations.
DAB tuner operations …………………… 21
: External USB memory operations.
More about this unit ……………………. 22
: Indicator displayed for the
Maintenance ……………………………… 25
corresponding operation.
Troubleshooting …………………………. 26
Specifications …………………………….. 29
Warning:
If you need to operate the unit while driving,
be sure to look ahead carefully or you may be
For safety…
involved in a traffic accident.
• Do not raise the volume level too much, as
this will block outside sounds, making driving
dangerous.
Caution on volume setting:
• Stop the car before performing any
Discs produce very little noise compared
complicated operations.
with other sources. Lower the volume
before playing a disc to avoid damaging
Temperature inside the car…
the speakers by the sudden increase of the
If you have parked the car for a long time in hot
output level.
or cold weather, wait until the temperature in
the car becomes normal before operating the
unit.
3
EN02—07_KD—G727_001A_1.indd 3EN02-07_KD-G727_001A_1.indd 3 11/28/05 6:42:54 PM11/28/05 6:42:54 PM
Control panel
Parts identification
ENGLISH
1 BAND button
9 USB (Universal Serial Bus) input terminal
2 • Control dial
p SRC (source) button
•
(standby/on attenuator) button
q
(control panel release) button
3 DISP (display) button
w SEL (select) button
4 Remote sensor
e MODE button
• DO NOT expose the remote sensor to
r EQ (equalizer) button
strong light (direct sunlight or artificial
t MO (monaural) button
lighting).
y SSM (Strong-station Sequential Memory)
5 Display window
button
6 5 (up) / ∞ (down) buttons
u Number buttons
7 T/P (traffic programme/programme type)
i RPT (repeat) button
button
o RND (random) button
8 0 (eject) button
;
4/¢ buttons
How to detach/attach the control panel
Detaching… Attaching…
Lever
CAUTION:
The lever comes out if you pressed the 0 button while the
panel is detached. If this happens, push the lever back into lock
position before attaching the panel.
4
EN02—07_KD—G727_001A_1.indd 4EN02-07_KD-G727_001A_1.indd 4 12/9/05 4:22:49 PM12/9/05 4:22:49 PM
ENGLISHРУCCKИЙ
CD RECEIVER
РЕСИВЕР С ПРОИГРЫВАТЕЛЕМ КОМПАКТ-ДИСКОВ
KD-G727
For installation and connections, refer to the separate manual.
Указания по установке и выполнению соединений приводятся в отдельной инструкции.
INSTRUCTIONS
ИНСТРУКЦИИ ПО ЭКСПЛУАТАЦИИ
GET0358-001A
[EE]
For canceling the display demonstration, see page 7.
Информацию об отмене демонстрации функций дисплея см. на стр. 7.
В соответствии с Законом Российской Федерации “О защите прав потре бителей” срок службы
(годности) данного товара “по истечении которого он может представлять опасность для жизни,
здоровья потребителя, причинять вред его имуществу или окружающей среде” составляет семь (7)
лет со дня производства. Этот срок является временем, в течение которого потребитель данного
товара может безопасно им пользоваться при условии соблюдения ин струк ции по эксплуатации
данного товара, проводя необходимое обслуживание, включающее замену расходных материалов
и/или соответствующее ремонтное обеспечение в специализированном сервисном центре.
Дополнительные косметические материалы к данному товару, поставляе мые вместе с ним, могут
храниться в течение двух (2) лет со дня его производства.
Срок службы (годности), кроме срока хранения дополнительных космети ческих материалов,
упомянутых в предыдущих двух пунктах, не затрагивает никаких других прав потребителя, в
частности, гарантийного свидетельства JVC, которое он может получить в соответствии с законом о
правах потребителя или других законов, связанных с ним.
Cover_KD-G727_001A_1.indd 2Cover_KD-G727_001A_1.indd 2 11/30/05 9:48:02 AM11/30/05 9:48:02 AM
Downloaded from Caradio-Manual.com Manuals
JVC CD Receiver KD-G727 Car Stereo System PDF User Guides and Manuals for Free Download: Found (2) Manuals for JVC CD Receiver KD-G727 Device Model (Instructions Manual, Instruction Manual)
The JVC CD Receiver KD-G727 is a product that opens the door to an enhanced audio experience for any car owner. With its sleek design and user-friendly interface, it promises to satisfy both casual listeners and serious audiophiles. In this review, we will explore the features, performance, and overall value of the JVC CD Receiver KD-G727 to help you decide if it’s the right choice for your vehicle.
One of the standout features of the JVC CD Receiver KD-G727 is its compatibility with various audio formats. Whether you prefer listening to CDs, MP3, or WMA files, this receiver offers versatile playback options. Its capacity to read multiple formats ensures that you can enjoy your favorite music without having to worry about compatibility issues. Moreover, this receiver is equipped with a front USB input, allowing you to connect your smartphone or USB drive for easy access to your digital music library.
Another essential aspect of the JVC CD Receiver KD-G727 is its sound quality. Integrated with a powerful amplifier, it delivers clear and robust audio performance. The diverse equalizer settings enable customization of sound profiles to suit different musical genres, ensuring that you get the best experience while listening. Additionally, the 4-channel output can deliver sufficient power for your speakers, enhancing your overall auditory enjoyment.
Moreover, the JVC CD Receiver KD-G727 offers convenient connectivity features that are highly appreciated in today’s fast-paced world. The Bluetooth capability stands out, providing wireless streaming directly from your smartphone. This feature not only allows for hands-free calls but also lets you enjoy your music without dealing with tangled wires. The receiver’s built-in microphone ensures clear call quality, making it easier to communicate while driving.
In terms of design, the JVC CD Receiver KD-G727 boasts an aesthetically pleasing look. The illuminated display is bright and easy to read, even in direct sunlight, which is a significant advantage for on-the-road use. The controls are intuitive, allowing users to navigate through their music collections effortlessly. Furthermore, the unit fits in most standard car stereo slots, making installation a straightforward process for most users.
When assessing the value for money, the JVC CD Receiver KD-G727 stands tall in its category. Its combination of features, sound quality, and reliability makes it a worthwhile investment for anyone looking to upgrade their car audio system. Priced competitively, this receiver provides an impressive mix of function and performance, which is appealing to both novices and audio enthusiasts alike.
Summarizing the strengths of the JVC CD Receiver KD-G727:
- Multiple format compatibility (CD, MP3, WMA)
- Robust sound quality and customizable EQ settings
- Bluetooth capability for hands-free calls and wireless streaming
- User-friendly interface and clear display
- Competitive pricing
In conclusion, if you’re in the market for a reliable and feature-rich car audio solution, the JVC CD Receiver KD-G727 is certainly worth considering. Its extensive functionalities, user-oriented design, and commendable sound quality collectively create a well-rounded product that promises to elevate your driving experience. Whether it’s long road trips or daily commuting, this receiver ensures that your musical needs are thoroughly met.