
ENGLISH
21
EXTERNAL DEVICES
Listening to the CD changer
Change the display information
(see page 13)
It is recommended to use a JVC MP3-compatible CD
changer with your unit.
• You can only play conventional CDs (including CD
Text) and MP3 discs.
~
Select “CD-CH.”
Ÿ
Select a disc to start playing.
Press: For selecting disc number 1 – 6.
Hold: For selecting disc number 7 – 12.
Press: Select track
Hold: Reverse/fast-forward track
MP3: Select folders
After pressing
, press the following buttons to…
Skip 10 tracks
(MP3: within the same folder)
TRK RPT: Repeat current track
FLDR RPT: MP3: Repeat all tracks of
current folder
DISC RPT: Repeat all tracks of the
current disc
FLDR RND: MP3: Randomly play all
tracks of the current folder,
then tracks of the next
folder
DISC RND: Randomly play all tracks of
current disc
MAG RND: Randomly play all tracks of
the inserted discs
• To cancel repeat play or random play, select
“RPT OFF” or “RND OFF.”
EN14-21_KD-DV5307[EE]2.indd 21
EN14-21_KD-DV5307[EE]2.indd 21
11/13/06 7:28:55 PM
11/13/06 7:28:55 PM

ENGLISH
22
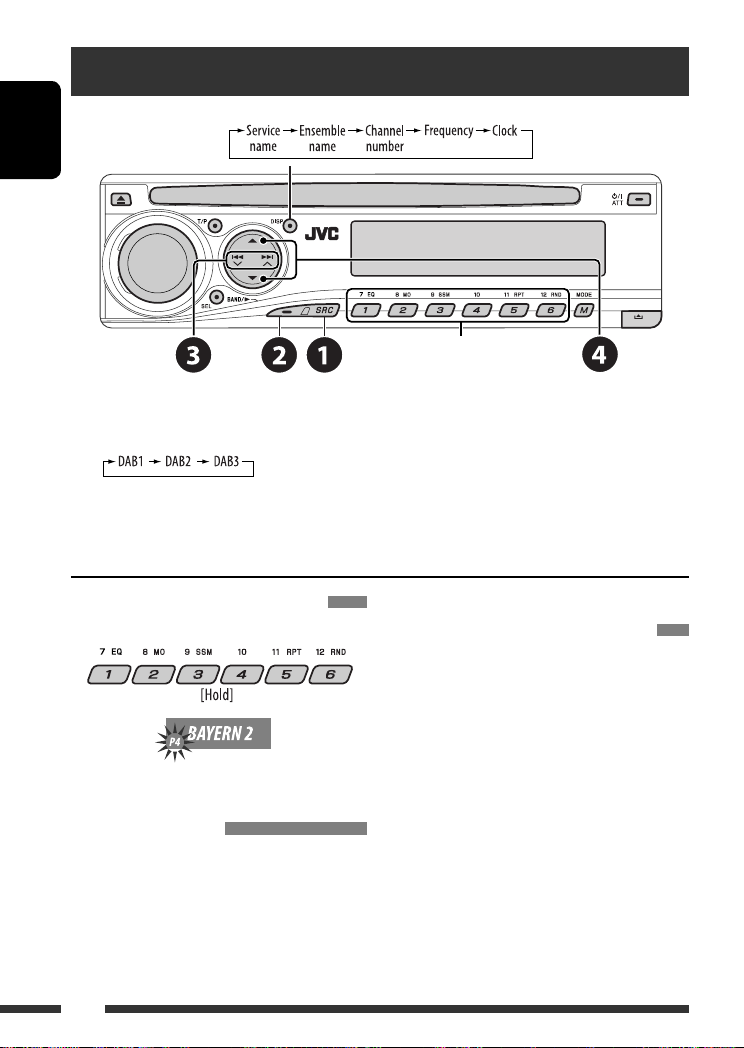
Listening to the DAB tuner
Change the display information
Select preset service.
~
Select “DAB.”
Ÿ
Select the bands.
!
Searching for an ensemble.
Manual Search: Hold either one of the buttons until “MANU” flashes on the display, then press it repeatedly.
⁄
Select a service (either primary or secondary) to listen to.
Storing DAB services in memory
While listening to a DAB service…
Activating/deactivating TA/PTY
Standby Reception
• Operations are exactly the same as explained on page
12 for FM RDS stations.
• You cannot store PTY codes separately for the DAB
tuner and for the FM tuner.
Tracing the same programme—
Alternative Frequency Reception
• While receiving a DAB service:
When driving in an area where a service cannot be
received, this unit automatically tunes in to another
ensemble or FM RDS station, broadcasting the same
programme.
• While receiving an FM RDS station:
When driving in an area where a DAB service is
broadcasting the same programme as the FM RDS
station is broadcasting, this unit automatically tunes
in to the DAB service.
When shipped from the factory, Alternative Frequency
Reception is activated.
To deactivate the Alternative Frequency
Reception, see page 28.
EN22-29_KD-DV5307[EE]2.indd 22
EN22-29_KD-DV5307[EE]2.indd 22
11/13/06 7:30:29 PM
11/13/06 7:30:29 PM

ENGLISH
23
EXTERNAL DEVICES
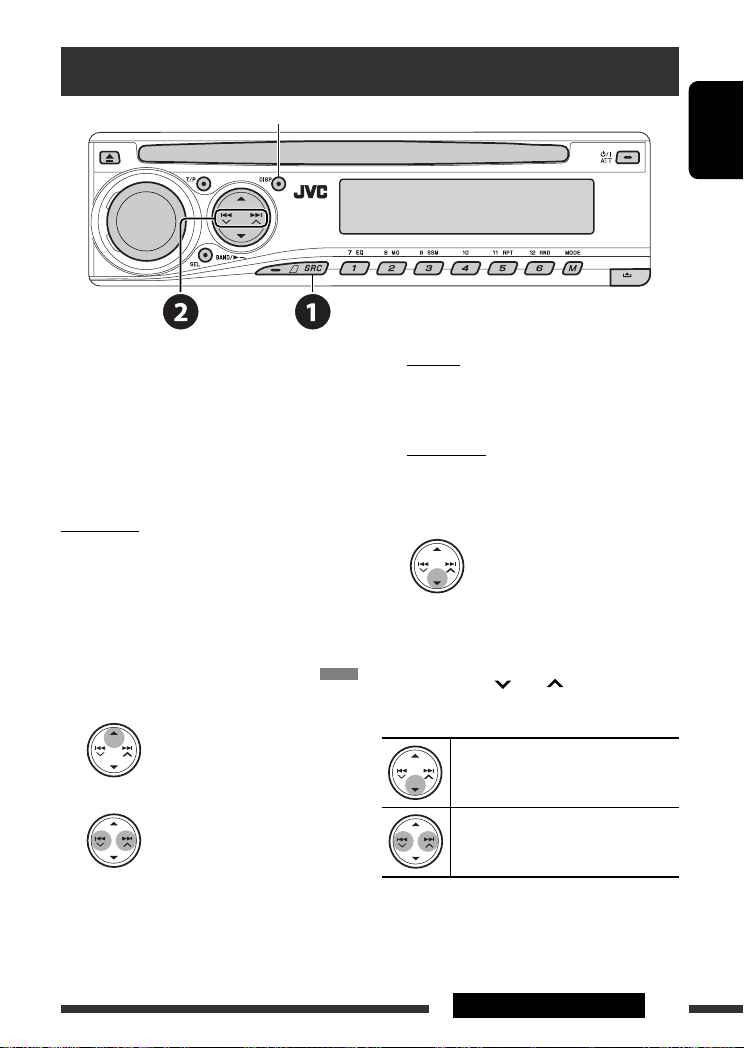
Listening to the iPod / D. player
Change the display information
Before operating, connect either one of the following
(separately purchased) to the CD changer jack on the
rear of this unit.
• Interface adapter for iPod—KS-PD100 for
controlling an iPod.
• D. player interface adapter—KS-PD500 for
controlling a D. player.
Preparations
Make sure “CHANGER” is selected for the external input
setting, see page 28.
~
Select “IPOD” or “D. PLAYER.”
Ÿ
Select a song to start playing.
Selecting a track from the menu
1
Enter the main menu.
• This mode will be canceled if no
operations are done for about
5 seconds.
2
Select the desired menu.
For iPod:
PLAYLIST
Ô
ARTISTS
Ô
ALBUMS
Ô
SONGS
Ô
GENRES
Ô
COMPOSER
Ô
(back to the
beginning)
For D. player:
PLAYLIST
Ô
ARTIST
Ô
ALBUM
Ô
GENRE
Ô
TRACK
Ô
(back to the beginning)
3
Confirm the selection.
• To move back to the previous menu, press
5
.
• If a track is selected, playback starts
automatically.
• Holding
4
/
¢
can skip 10 items at
a time.
Pause/stop playback
• To resume playback, press the button
again.
Press: Select tracks
Hold: Reverse/fast-forward track
Continued on the next page
EN22-29_KD-DV5307[EE]2.indd 23
EN22-29_KD-DV5307[EE]2.indd 23
11/13/06 7:30:31 PM
11/13/06 7:30:31 PM

ENGLISH
24
EXTERNAL DEVICES
After pressing
, press the following buttons to…
ONE RPT:
Functions the same as “Repeat One” or “Repeat Mode
=
One.”
ALL RPT:
Functions the same as “Repeat All” or “Repeat Mode
=
All.”
ALBM RND*:
Functions the same as “Shuffle Albums” of the iPod.
SONG RND/RND ON: Functions the same as “Shuffle Songs” or “Random Play
=
On.”
• To cancel repeat play or random play, select “RPT OFF” or “RND OFF.”
* iPod: Functions only if you select “ALL” in “ALBUMS” of the main “MENU.”
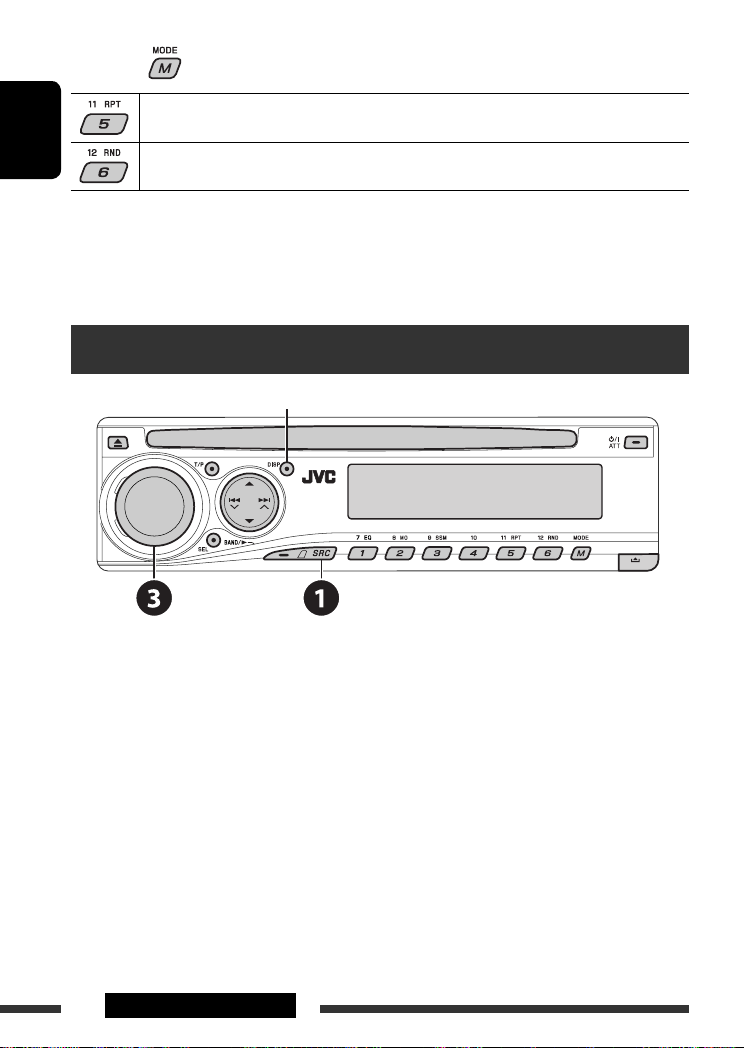
Listening to the other external components
Change the display information
You can connect an external component to the CD changer jack on the rear using the Line Input Adapter—KS-U57
(not supplied) or AUX Input Adapter—KS-U58 (not supplied). Make sure “EXT IN” is selected for the external input
setting, see page 28.
~
Select “EXT IN.”
Ÿ
Turn on the connected component and start playing the source.
!
Adjust the volume.
⁄
Adjust the sound as you want (see pages 25 and 26).
EN22-29_KD-DV5307[EE]2.indd 24
EN22-29_KD-DV5307[EE]2.indd 24
11/13/06 7:30:32 PM
11/13/06 7:30:32 PM

ENGLISH
25
EXTERNAL DEVICES & SETTINGS
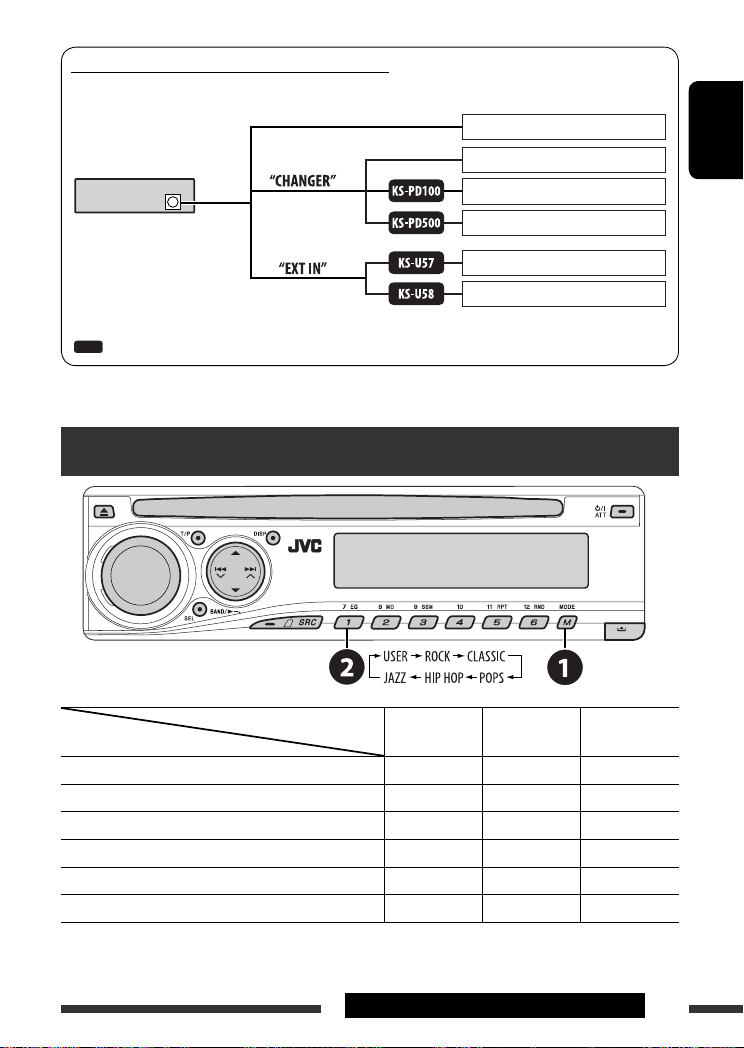
Concept diagram of the external device connection
• For connection, see Installation/Connection manual (separate volume).
JVC CD changer, [21]
Apple iPod, [23]
JVC D. player, [23]
Unit
CD changer jack
(see page 28 of the
”EXT IN” setting)
(see page 28 of the
”EXT IN” setting)
MD player, etc., [24]
: Adapter (separately purchased)
MD player, etc., [24]
JVC DAB tuner, [22]
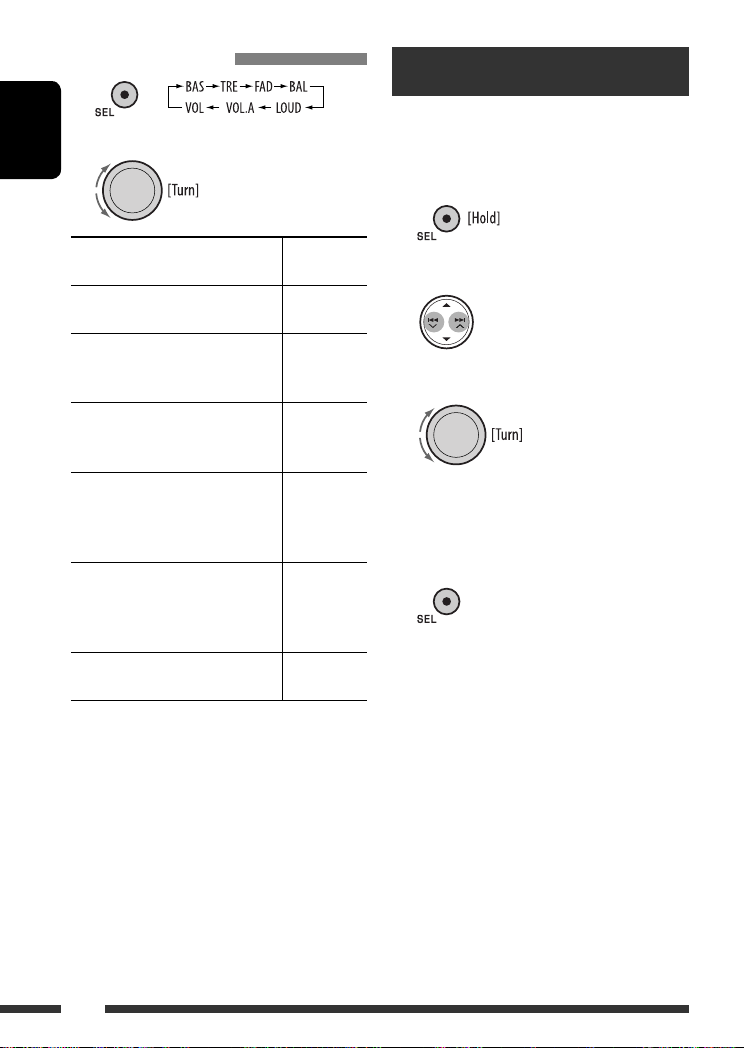
Selecting a preset sound mode
Indication (For)
BAS (bass)
TRE (treble)
LOUD (loudness)
USER (Flat sound)
00
00
OFF
ROCK (Rock or disco music)
+03
+01ON
CLASSIC (Classical music)
+01–02
OFF
POPS (Light music)
+04
+01OFF
HIP HOP (Funk or rap music)
+02
00
ON
JAZZ (Jazz music)
+02
+03
OFF
Preset values
EN22-29_KD-DV5307[EE]f.indd 25
EN22-29_KD-DV5307[EE]f.indd 25
12/14/06 7:17:23 PM
12/14/06 7:17:23 PM

ENGLISH
26
General settings — PSM
You can change PSM (Preferred Setting Mode) items
listed in the table on pages 27 and 28.
1
Enter the PSM settings.
2
Select a PSM item.
3
Select or adjust the selected PSM item.
4
Repeat steps
2 and 3 to adjust other
PSM items if necessary.
5
Finish the procedure.
Adjusting the sound
1
2
Adjust the level.
BAS
*
1
(bass)
Adjust the bass.
–06 to +06
TRE
*
1
(treble)
Adjust the treble.
–06 to +06
FAD
*
2
(fader)
Adjust the front and rear speaker
balance.
R06 to F06
BAL (balance)
Adjust the left and right speaker
balance.
L06 to R06
LOUD
*
1
(loudness)
Boost low and high frequencies to
produce a well-balanced sound at low
volume level.
LOUD ON or
LOUD OFF
VOL.A
*
3
(volume adjust)
Adjust and store auto-adjustment
volume level for each source,
comparing to the FM volume level.
–05 to +05;
initial: 00
VOL (volume)
Adjust the volume.
00 to 30
(or 50)
*
4
*
1
When you adjust the bass, treble, or loudness, the
adjustment you have made is stored for the currently
selected sound mode (C-EQ) including “USER.”
*
2
If you are using a two-speaker system, set the fader
level to “00.”
*
3
You cannot make an adjustment for FM. “FIX”
appears.
*
4
Depending on the amplifier gain control setting. (See
page 28 for details.)
EN22-29_KD-DV5307[EE]2.indd 26
EN22-29_KD-DV5307[EE]2.indd 26
11/11/06 10:53:16 AM
11/11/06 10:53:16 AM

ENGLISH
27
SETTINGS
Continued on the next page
Indication
Item
( : Initial)
Setting, [reference page]
DEMO
Display demonstration
• DEMO ON
• DEMO OFF
: Display demonstration will be activated automatically if no
operation is done for about 20 seconds, [5].
: Cancels.
CLK DISP
*
1
Clock display
• ON
• OFF
: Clock time is shown on the display at all times when the power is
turned off.
: Cancels; pressing DISP will show the clock time for about 5 seconds
when the power is turned off, [5].
CLOCK H
Hour adjustment
0 – 23
(1 – 12)
: Initial: 0 (0:00), [5].
CLOCK M
Minute adjustment
00 – 59
: Initial: 00 (0:00), [5].
24H/12H
Time display mode
• 12H
• 24H
: See also page 5 for setting.
CLK ADJ
Clock adjustment
• AUTO
• OFF
: The built-in clock is automatically adjusted using the CT (clock time)
data in the RDS signal.
: Cancels.
AF-REG
*
2
Alternative frequency/
regionalization
reception
• AF
• AF REG
• OFF
: When the currently received signals become weak, the unit switches
to another station or service (the programme may differ from the
one currently received), [12].
: When the currently received signals become weak, the unit switches
to another station broadcasting the same programme.
: Cancels (not selectable when “DAB AF” is set to “AF ON”).
PTY-STBY
PTY standby
OFF, PTY codes
(see page 11)
: Activates PTY Standby Reception with one of the PTY codes, [11, 12].
TA VOL
Traffic announcement
volume
VOL 00 – VOL
30 or 50
*
3
: Initial: VOL 15, [12].
P-SEARCH
*
2
Programme search
• ON
• OFF
: Activates Programme Search, [12].
: Cancels.
*
1
If the power supply is not interrupted by turning off the ignition key of your car, it is recommended to select “OFF” to
save the car’s battery.
*
2
Only for RDS FM stations.
*
3
Depending on the “AMP GAIN” setting.
EN22-29_KD-DV5307[EE]f.indd 27
EN22-29_KD-DV5307[EE]f.indd 27
12/13/06 3:36:47 PM
12/13/06 3:36:47 PM

ENGLISH
28
Indication
Item
( : Initial)
Setting, [reference page]
DAB AF
*
4
Alternative frequency
reception
• AF ON
• AF OFF
: Traces the programme among DAB services and FM RDS stations,
[22].
: Cancels.
DIMMER
Dimmer
• ON
• OFF
: Dims the display illumination.
: Cancels.
TEL
Telephone muting
• MUTING 1/
MUTING 2
• OFF
: Select either one which mutes the playback sounds while using a
cellular phone.
: Cancels.
SCROLL
*
5
Scroll
• ONCE
• AUTO
• OFF
: Scrolls the track information once.
: Repeats scrolling (at 5-second intervals).
: Cancels. (Holding DISP can scroll the display regardless of the
setting.)
EXT IN
*
6
External input
• CHANGER
• EXT IN
: To use a JVC CD changer, [21], or an Apple iPod/a JVC D. player, [23].
: To use any other external component, [24].
TAG DISP
Tag display
• TAG ON
• TAG OFF
: Shows the tag while playing MP3/WMA/WAV tracks.
: Cancels.
AMP GAIN
Amplifier gain control
• LOW PWR
• HIGH PWR
: VOL 00 – VOL 30 (Select if the maximum power of each speaker is
less than 50 W to prevent damaging the speaker.)
: VOL 00 – VOL 50
IF BAND
Intermediate
frequency band
• AUTO
• WIDE
: Increases the tuner selectivity to reduce interference noises between
adjacent stations. (Stereo effect may be lost.)
: Subject to interference noises from adjacent stations, but sound
quality will not be degraded and the stereo effect will remain.
*
4
Displayed only when DAB tuner is connected.
*
5
Some characters or symbols will not be shown correctly (or will be blanked) on the display.
*
6
Displayed only when one of the following sources is selected—FM, AM, DAB, or DISC.
EN22-29_KD-DV5307[EE]f.indd 28
EN22-29_KD-DV5307[EE]f.indd 28
1/9/07 4:08:09 PM
1/9/07 4:08:09 PM

ENGLISH
29
SETTINGS
Menu
Item
Setting
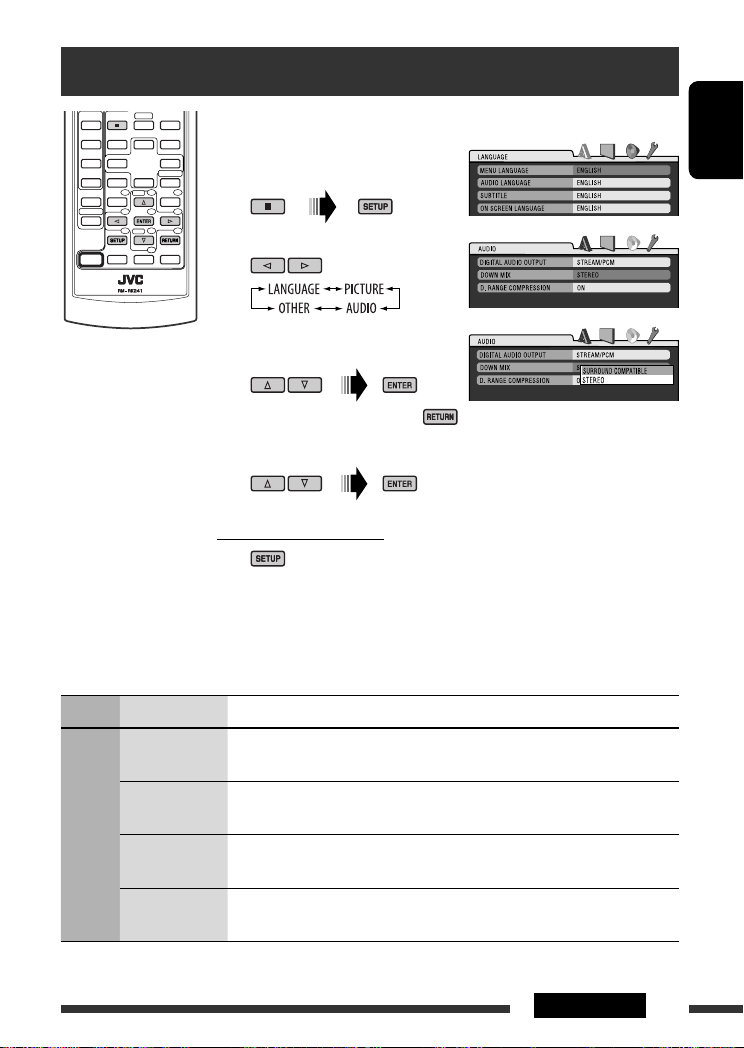
LANGUAGE
MENU
LANGUAGE
Select the initial disc menu language. Refer also to “Language codes” on page 36.
AUDIO
LANGUAGE
Select the initial audio language. Refer also to “Language codes” on page 36.
SUBTITLE
Select the initial subtitle language or remove the subtitle (OFF). Refer also to
“Language codes” on page 36.
ON SCREEN
LANGUAGE
Select the language for the on screen display.
Disc setup menu
These operations are possible on the monitor using the remote controller.
~
Enter the disc setup menu
while stop.
Ÿ
Select a menu.
!
Select an item you want to set
up.
• To cancel pop-up menu, press
.
⁄
Select an option.
To return to normal screen
Continued on the next page
EN22-29_KD-DV5307[EE]f.indd 29
EN22-29_KD-DV5307[EE]f.indd 29
12/20/06 2:11:52 PM
12/20/06 2:11:52 PM

ENGLISH
30
SETTINGS
Menu
Item
Setting
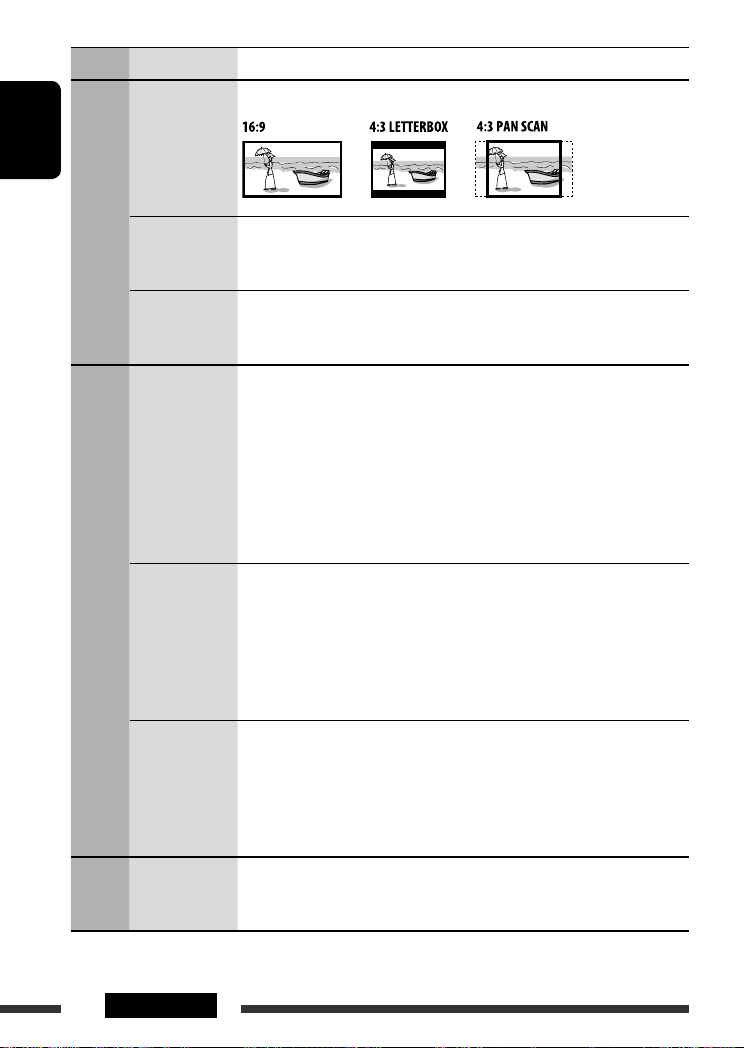
PICTURE
MONITOR TYPE
Select the monitor type to watch a wide screen picture on your monitor.
OSD POSITION
Select the on-screen bar position on the monitor.
• 1
: Higher position
• 2
: Lower position (Guidance below the disc setup menu will disappear.)
FILE TYPE
Select the file type to play.
• AUDIO
: Play MP3/WMA/WAV files.
• VIDEO
: Play DivX/MPEG Video files.
AUDIO
DIGITAL AUDIO
OUTPUT
Select the signal format to be emitted through the DIGITAL OUT (Optical) terminal.
• OFF
: Cancels.
• PCM ONLY
: Select for an amplifier or a decoder incompatible
with Dolby Digital, DTS, MPEG Audio, or when
connecting to a recording device.
• DOLBY DIGITAL/PCM
: Select for an amplifier or a decoder compatible
with Dolby Digital.
• STREAM/PCM
: Select for an amplifier or a decoder compatible
with Dolby Digital, DTS, and MPEG Audio.
DOWN MIX
When playing back a multi-channel disc, this setting affects the signals
reproduced through the LINE OUT jacks (and through the DIGITAL OUT terminal
when “PCM ONLY” is selected for “DIGITAL AUDIO OUTPUT”).
• SURROUND COMPATIBLE : Select to enjoy multi-channel surround audio by
connecting an amplifier compatible with Dolby
Surround.
• STEREO
: Normally select this.
D. RANGE
COMPRESSION
You can enjoy a powerful sound at low or middle volume levels while playing a
Dolby Digital software.
• AUTO
: Select to apply the effect to multi-channel
encoded software (excluding 1-channel and
2-channel software).
• ON
: Select to always use this function.
OTHER
DivX
REGISTRATION
This unit has its own Registration Code. Once you have played back a disc in which
the Registration Code recorded, this unit’s Registration Code is overwritten for
copyright protection.
EN30-35_KD-DV5307[EE]f.indd 30
EN30-35_KD-DV5307[EE]f.indd 30
12/20/06 2:12:54 PM
12/20/06 2:12:54 PM

04:21
AUX магнитолы KD-G807
06:05
CD-Ресивер JVC KD-R207 и видеообращение в конце
08:16
Видеообзор автомагнитолы JVC KD-R442
08:35
Как подключить автомагнитолу?
12:49
Видеообзор автомагнитолы JVC KD-X50BT
Нажмите на кнопку для помощи
ENGLISHРУCCKИЙУКРАЇНА
DVD/CD RECEIVER
ПРИЕМНИК ДЛЯ ВОСПРОИЗВЕДЕНИЯ ДИСКОВ DVD И КОМПАКТ-ДИСКОВ
ПРИЙМАЧ З ПРОГРАВАЧЕМ DVD/CD-ДИСКІВ
KD-DV5308/KD-DV5307
For canceling the display demonstration, see page 5.
Информацию об отмене демонстрации функций дисплея см. на стр. 5.
Інформацію щодо відміни демонстрації функцій дисплею див. на стор. 5.
For installation and connections, refer to the separate manual.
Указания по установке и выполнению соединений приводятся в отдельной инструкции.
Вказівки по встановленню та виконанню підключень наведені у окремій інструкції.
INSTRUCTIONS
ИНСТРУКЦИИ ПО ЭКСПЛУАТАЦИИ
ІНСТРУКЦІЇ
GET0443-001A
[EE]
Thank you for purchasing a JVC product.
Please read all instructions carefully before operation, to ensure your complete understanding and to obtain the best
possible performance from the unit.
IMPORTANT FOR LASER PRODUCTS
ENGLISH
1. CLASS 1 LASER PRODUCT
2. CAUTION: Do not open the top cover. There are no user serviceable parts inside the unit; leave all servicing to
qualified service personnel.
3. CAUTION: Visible and/or invisible class 1M laser radiation when open. Do not view directly with optical
instruments.
4. REPRODUCTION OF LABEL: CAUTION LABEL, PLACED OUTSIDE THE UNIT.
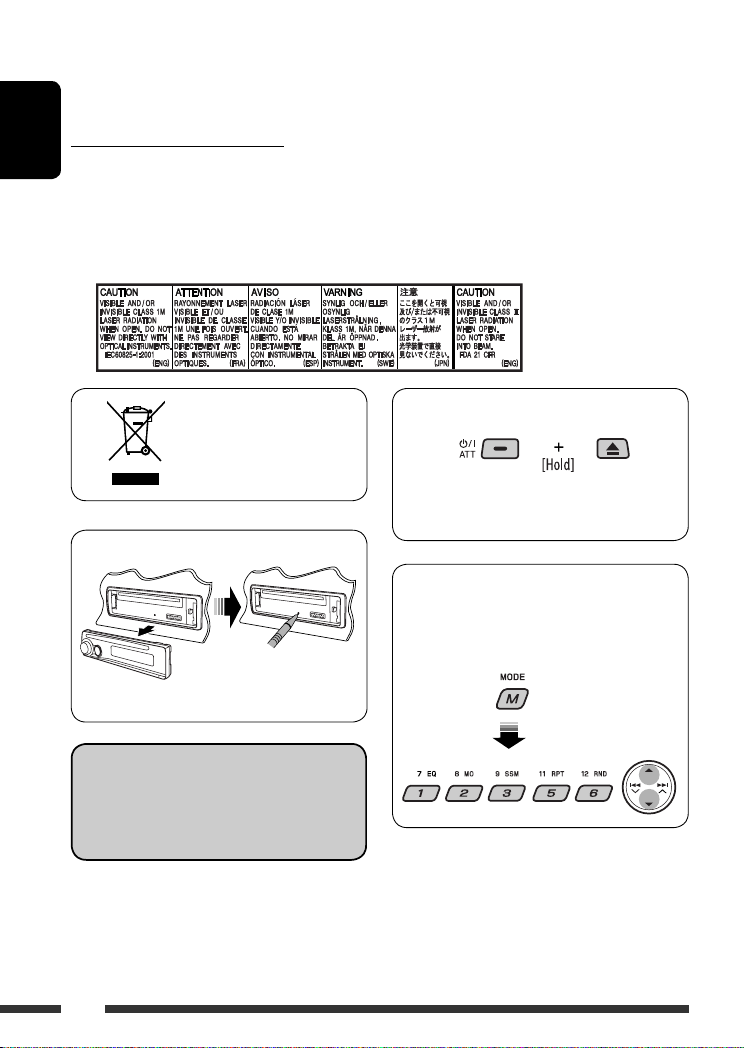
How to forcibly eject a disc
[European Union only]
• Be careful not to drop the disc when it ejects.
• If this does not work, reset your unit.
How to reset your unit
How to use functions mode
If you press M MODE, the unit goes into functions
mode, then the number buttons and
work as different function buttons.
5/∞ buttons
• Your preset adjustments will also be erased.
Indication language:
In this manual, English indications are used
for purposes of explanation. You can select
the indication language on the monitor on the
“LANGUAGE” setting (see page 29).
2
[Within 5 seconds…]
WARNINGS:
To prevent accidents and damage
• DO NOT install any unit in locations where;
– it may obstruct the steering wheel and
gearshift lever operations.
– it may obstruct the operation of safety
devices such as air bags.
– it may obstruct visibility.
• DO NOT operate the unit while driving.
• If you need to operate the unit while
driving, be sure to look ahead carefully.
• The driver must not watch the monitor
while driving.
If the parking brake is not engaged,
“DRIVER MUST NOT WATCH THE MONITOR
WHILE DRIVING.” appears on the monitor,
and no playback picture will be shown.
– This warning appears only when the
parking brake wire is connected to the
parking brake system built in the car
(refer to the Installation/Connection
Manual).
This product incorporates copyright protection
technology that is protected by U.S. patents and
other intellectual property rights. Use of this
copyright protection technology must be authorized
by Macrovision, and is intended for home and
other limited viewing uses only unless otherwise
authorized by Macrovision. Reverse engineering or
disassembly is prohibited.
For safety…
• Do not raise the volume level too much, as this will
block outside sounds, making driving dangerous.
• Stop the car before performing any complicated
operations.
Temperature inside the car…
If you have parked the car for a long time in hot or cold
weather, wait until the temperature in the car becomes
normal before operating the unit.
CONTENTS
INTRODUCTIONS
Playable disc type ……………………………… 4
Preparation …………………………………….. 5
OPERATIONS
Basic operations
• Control panel ………………………………. 6
• Remote controller (RM-RK241) ………… 7
Listening to the radio …………………………. 10
Searching for FM RDS programmes
—PTY Search ………………………………… 11
Disc operations …………………………………. 13
EXTERNAL DEVICES
Listening to the CD changer …………………. 21
Listening to the DAB tuner …………………… 22
Listening to the iPod / D. player …………….. 23
Listening to the other external
components ………………………………….. 24
SETTINGS
Selecting a preset sound mode ……………… 25
General settings — PSM …………………….. 26
Disc setup menu ………………………………… 29
REFERENCES
Maintenance ……………………………………. 31
More about this unit ………………………….. 32
Troubleshooting ……………………………….. 37
Specifications …………………………………… 40
ENGLISH
3
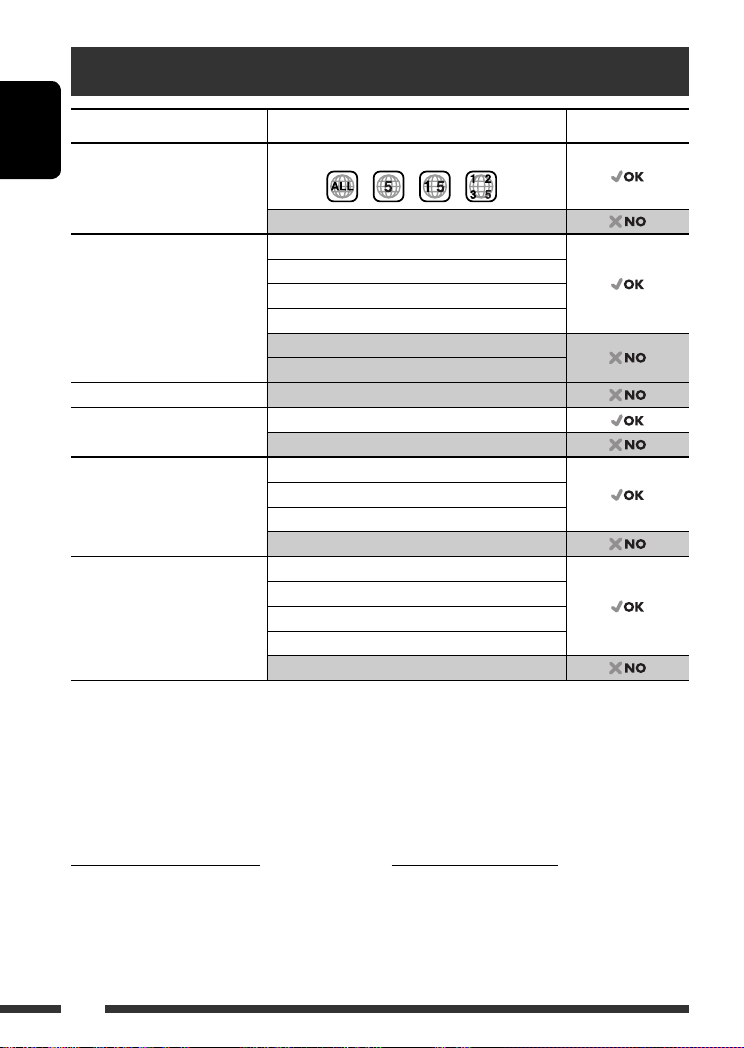
Playable disc type
Disc type Recording format, file type, etc Playable
DVD DVD-Video (Region Code numbers include “5”) *
ENGLISH
DVD-Audio/DVD-ROM
DVD Recordable/Rewritable
(DVD-R *2/-RW, +R/+RW *3)
DVD-RAM All
Dual Disc DVD side
CD/VCD Audio CD (CD-DA)/DTS-CD *
CD Recordable/Rewritable
(CD-R/-RW)
• Compliant to ISO 9660 level 1,
level 2, Romeo, Joliet
*1 If you insert a DVD Video disc of an incorrect Region Code, “REGION CODE ERROR!” appears on the monitor.
*2 DVD-R recorded in multi-border format is also playable (except for dual layer discs).
*3 It is possible to play back finalized +R/+RW (Video format only) discs. However, the use of +R double layer disc on
this unit is not recommended.
*4 To reproduce DTS sound, use the DIGITAL OUT terminal (see also pages 30 and 35).
DVD-Video
DivX Video
MPEG-1/MPEG-2 Video
MP3/WMA/WAV
JPEG/MPEG4
DVD-VR, +VR
Non-DVD side
4
VCD (Video CD)
CD-Text
CD-ROM/CD-I (CD-I Ready)
CD-DA
DivX Video, VCD (Video CD)
MPEG-1/MPEG-2 Video
MP3/WMA/WAV
JPEG/MPEG4
1
Caution for DualDisc playback
The Non-DVD side of a “DualDisc” does not comply with
the “Compact Disc Digital Audio” standard. Therefore,
the use of Non-DVD side of a DualDisc on this product
may not be recommended.
4
Caution on volume setting
Discs produce very little noise compared with other
sources. Lower the volume before playing a disc to
avoid damaging the speakers by the sudden increase of
the output level.
Preparation
Cancel the display demonstration and set the clock
• See also page 27.
When the power is turned off: Check the current clock time
When the power is turned on: Change the display information
~ Turn on the power.
Ÿ Enter the PSM settings.
! ] ⁄ Cancel the display demonstrations
Select “DEMO,” then “DEMO OFF.”
Set the clock
Select “CLOCK H” (hour), then adjust the hour.
Select “CLOCK M” (minute), then adjust the minute.
Select “24H/12H,” then “24H” (hour) or “12H” (hour).
@ Finish the procedure.
ENGLISH
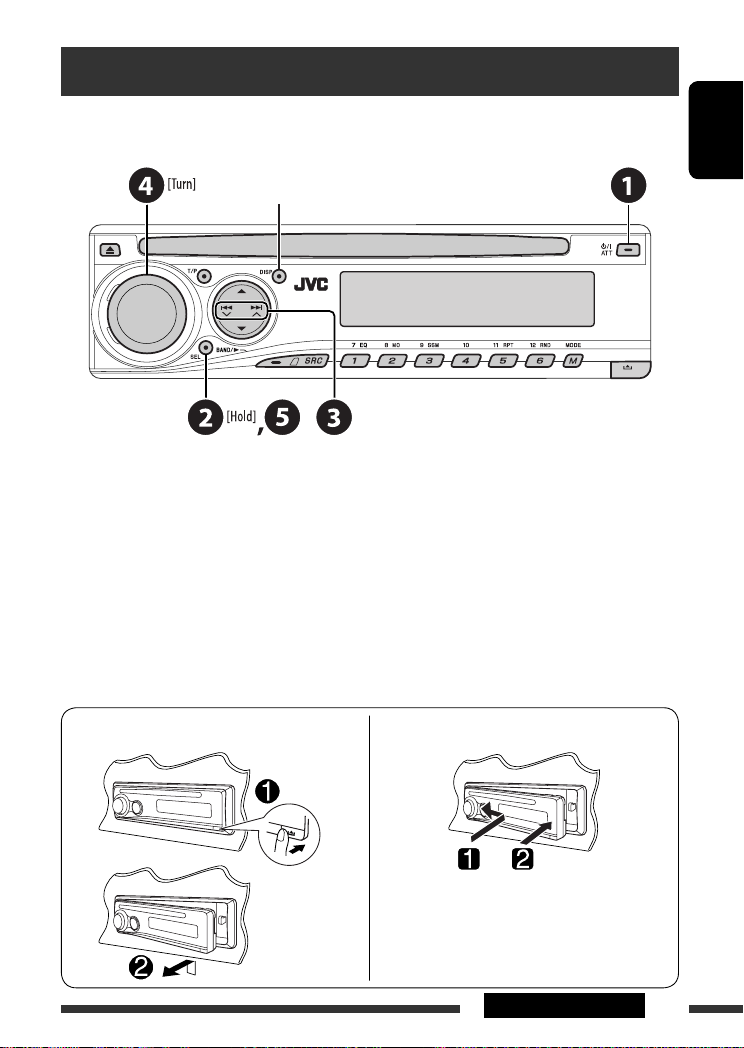
Detaching the control panel
Attaching the control panel
5INTRODUCTIONS
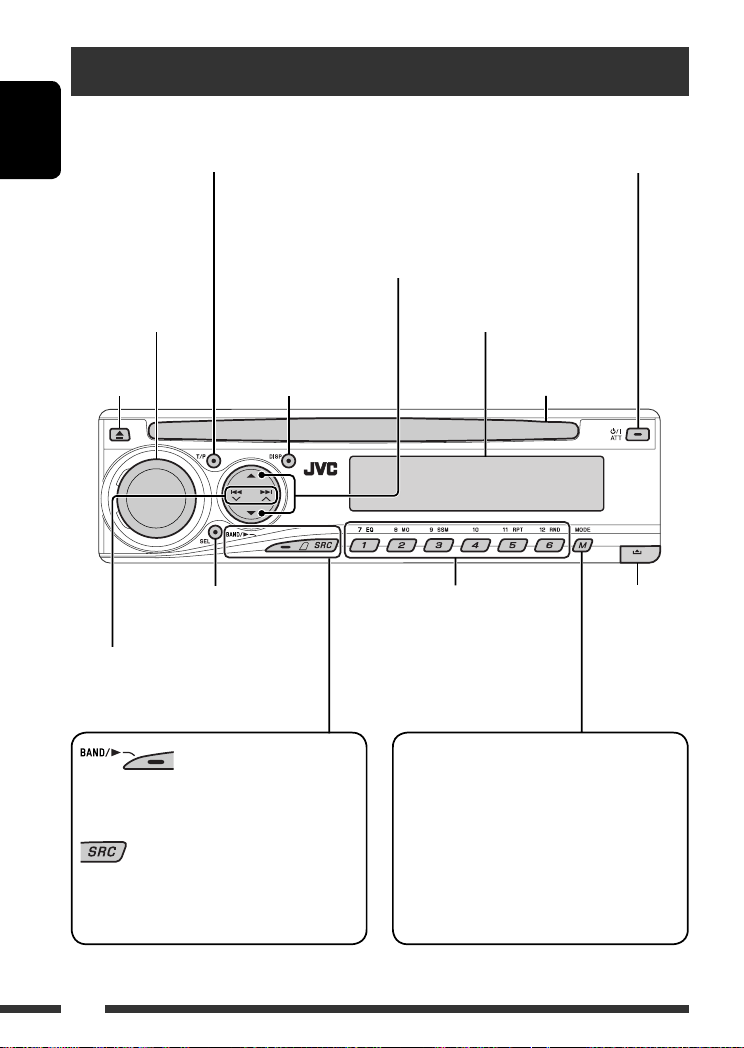
Basic operations — Control panel
• Activate/deactivate TA Standby Reception.
• Enter RDS programme search [Hold].
ENGLISH
Volume control [Turn]
Change the display
Eject disc.
• Adjust the sound mode.
• Enter the PSM settings [Hold].
• FM/AM/DAB: Search for station/
ensemble.
• DISC: Select chapter/track.
• IPOD/D.PLAYER: Select track.
information.
• Turn on the power.
• Turn off the power [Hold].
• Attenuate the sound (if the power is on).
• DISC: Select title/folder.
• IPOD/D.PLAYER: Enter the main menu/
Pause or stop playback/Confirm selection.
• DAB: Select service.
Display window
Loading slot
• FM/AM/DAB: Select preset station/
service.
• DISC: Select chapter/title/folder/
track/disc (for CD changer).
Detach the
panel.
Enter functions mode.
• FM/AM/DAB: Select the bands.
• DISC: Start playback.
Select the source.
= DAB * = DISC * = CD-CH */IPOD */
FM/AM
D.PLAYER * (or EXT IN) = (back to the beginning)
* You cannot select these sources if they are not ready or not connected.
Press M MODE, then one of the following buttons
(within 5 seconds)…
EQ : Select the sound mode.
MO : Turn on/off monaural reception.
SSM : Automatic station presetting [Hold].
RPT : Select repeat play.
RND : Select random play.
5/∞ : Skip 10 chapters/tracks.
6
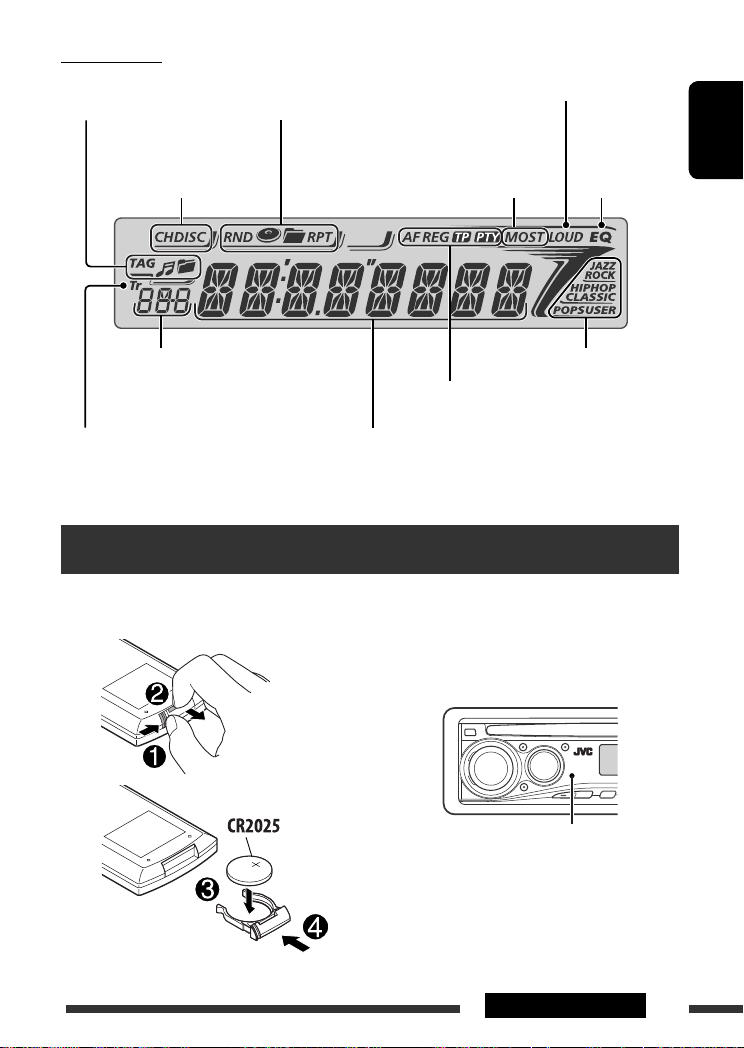
Display window
Track information
indicators
Playback mode/item indicators
(Random/Repeat)
Loudness indicator
Playback source
indicators
Source display/Preset No./Track No./Folder
No./Disc No./Chapter No./Channel No.
Track indicator
Tuner reception indicators
RDS indicators
Main display
(Time, menu, playback information)
Basic operations — Remote controller (RM-RK241)
Installing the lithium coin battery
(CR2025)
Before using the remote controller:
• Aim the remote controller directly at the remote
sensor on the unit.
• DO NOT expose the remote sensor to bright light
(direct sunlight or artificial lighting).
Equalizer
indicator
Sound mode indicators
ENGLISH
Remote sensor
Continued on the next page
7OPERATIONS
Warning:
To prevent accidents and damage
• Do not install any battery other than CR2025 or
its equivalent.
• Do not leave the remote controller in a place
ENGLISH
(such as dashboards) exposed to direct sunlight
for a long time; otherwise, it may explode.
• Store the battery in a place where children
cannot reach.
• Do not recharge, short, disassemble, heat the
battery, or dispose of it in a fire.
• Do not leave the battery with other metallic
materials.
• Do not poke the battery with tweezers or similar
tools.
• Wrap the battery with tape and insulate when
throwing away or saving it.
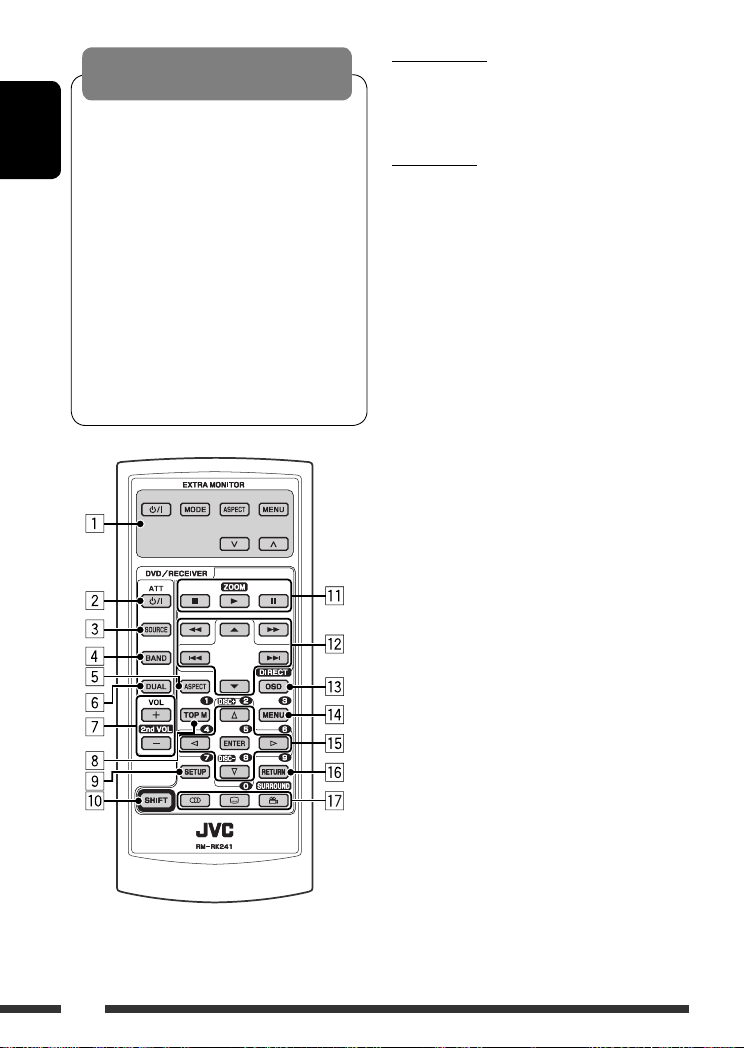
EXTRA MONITOR
1 Monitor control buttons
• Used for a JVC monitor—KV-MR9010 or
KV-MH6510.
DVD/RECEIVER
2 • Turns the power on if pressed briefly or
attenuates the sound when the power is on.
• Turns the power off if pressed and held.
3 Selects the source.
4 Selects the FM/AM/DAB bands.
5 Not applicable for this unit.
6 Not applicable for this unit.
7 Adjusts the volume level.
• 2nd VOL: Not applicable for this unit.
1
8 *
• DVD-Video/DivX: Shows disc menu.
• VCD: Starts PBC playback.
1
9 *
Enters disc setup menu.
p SHIFT button
q 7 (stop), 3 (play), 8 (pause)
• 3 (play) also function as ZOOM button when
pressed with SHIFT button (see page 17).
• Not applicable for CD changer/iPod/D. player
operations.
w For advanced disc operations:
5 / ∞ :
•
DVD-Video: Selects the titles.
DivX/MPEG Video/MP3/WMA/WAV: Selects
the folders if included.
•
4 / ¢ :
– Reverse skip/forward skip if pressed briefly.
– Reverse search/forward search if pressed
and held.
1 / ¡ : Reverse search/forward
•
search. *
2
For FM/AM tuner operations:
• 5 / ∞ : Changes the preset stations.
• 4 / ¢ :
– Searches for stations automatically if
pressed briefly.
– Searches for stations manually if pressed
and held.
8

For DAB tuner operations:
• 5 / ∞ : Changes the preset services.
• 4 / ¢ :
– Changes the service if pressed briefly.
– Searches for ensembles if pressed and held.
For Apple iPod/JVC D. player operations:
∞ : Pauses/stops or resumes playback.
•
5 : Enters the main menu.
(Now 5/∞/4 / ¢ work as the
menu selecting buttons.) *
3
• 4 / ¢ (in menu selecting mode):
– Selects an item if pressed briefly. (Then,
press ∞ to confirm the selection.)
– Skips 10 items at a time if pressed and held.
• 4 / ¢ :
– Reverse skip/forward skip if pressed briefly.
– Reverse search/forward search if pressed
and held.
e Shows the on-screen bar.
• Also functions as DIRECT button when pressed
with SHIFT button. *
1
r *
• DVD-Video/DivX: Shows disc menu.
4
• VCD: Starts PBC playback.
1
t *
• Makes selection/settings.
• @ / # : DivX: Searches for index during play.
• DISC +/–: Changes discs when the source is
“CD-CH.”
1
y *
RETURN button
u • DVD-Video: Selects audio language ( ),
subtitles ( )*1, angle ( )*5.
• DivX: Selects audio language ( ),
subtitles ( ).
• VCD: Selects audio channel ( ).
How to select a number
ENGLISH
An input screen appears…
How to select a preset station/service
*1 Functions as number buttons when pressed with
SHIFT button.
– FM/AM/DAB: Selects preset stations/services.
– DISC: Selects chapter/title/folder/track
after entering search mode by
pressing SHIFT and DIRECT.
*2 Not applicable for CD changer operations.
*3 5 : Returns to the previous menu.
∞ : Confirms the selection.
*4 You can directly select title/chapter/folder/track using
the number buttons (see pages 15 and 16).
*5 Functions as SURROUND button when pressed with
SHIFT button (not applicable for this unit).
9OPERATIONS
Listening to the radio
Change the display information (for non-RDS station)
ENGLISH
Select preset station.
~ Select “FM/AM.”
Ÿ Select the bands.
! Search for a station to listen—Auto Search.
Manual Search: Hold either one of the buttons until “M”
flashes on the display, then press it repeatedly.
When an FM stereo broadcast is
hard to receive
1
2
Reception improves, but stereo effect will be lost.
• MO indicator lights up.
FM station automatic presetting —
SSM (Strong-station Sequential
Memory)
You can preset six stations for each band.
1
2
Lights up when receiving an FM stereo
broadcast with sufficient signal strength.
Note:
FM1 and FM2: 87.5 MHz – 108.0 MHz
FM3: 65.00 MHz – 74.00 MHz
3
Local FM stations with the strongest signals are
searched and stored automatically in the FM band.
Manual presetting
Ex.: Storing FM station of 92.5 MHz into preset number
4 of the FM1 band.
1
2
3
10
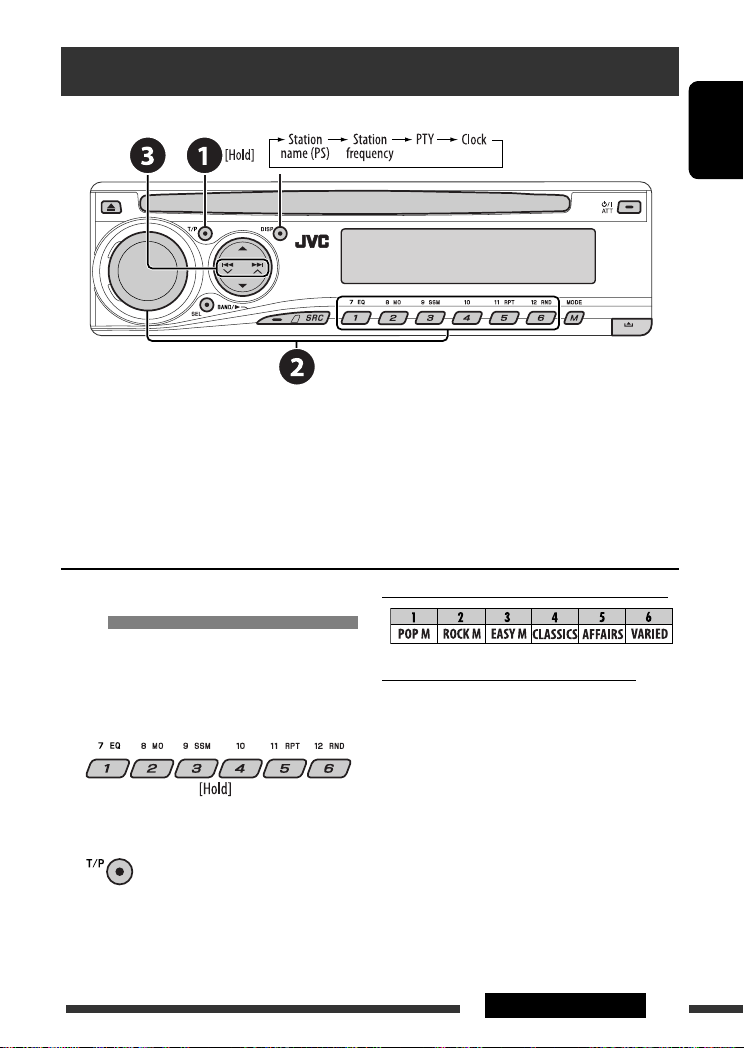
Searching for FM RDS programme — PTY Search
Change the display information
~ Activate PTY Search.
Ÿ Select one of the PTY codes (programme types).
See the following for details.
! Start searching.
If there is a station broadcasting a programme of the same PTY code as you have selected, that station is tuned
in.
ENGLISH
Storing your favorite programme
types
You can store your favorite PTY codes into the number
buttons.
1 Select a PTY code (see right column).
2 Select a preset number.
3 Repeat steps 1 and 2 for storing other
PTY codes.
4
Preset PTY codes in the number buttons (1 to 6):
PTY codes (available with the control dial):
NEWS, AFFAIRS, INFO, SPORT, EDUCATE, DRAMA,
CULTURE, SCIENCE, VARIED, POP M (music), ROCK M
(music), EASY M (music), LIGHT M (music), CLASSICS,
OTHER M (music), WEATHER, FINANCE, CHILDREN,
SOCIAL, RELIGION, PHONE IN, TRAVEL, LEISURE, JAZZ,
COUNTRY, NATION M (music), OLDIES, FOLK M (music),
DOCUMENT
11OPERATIONS
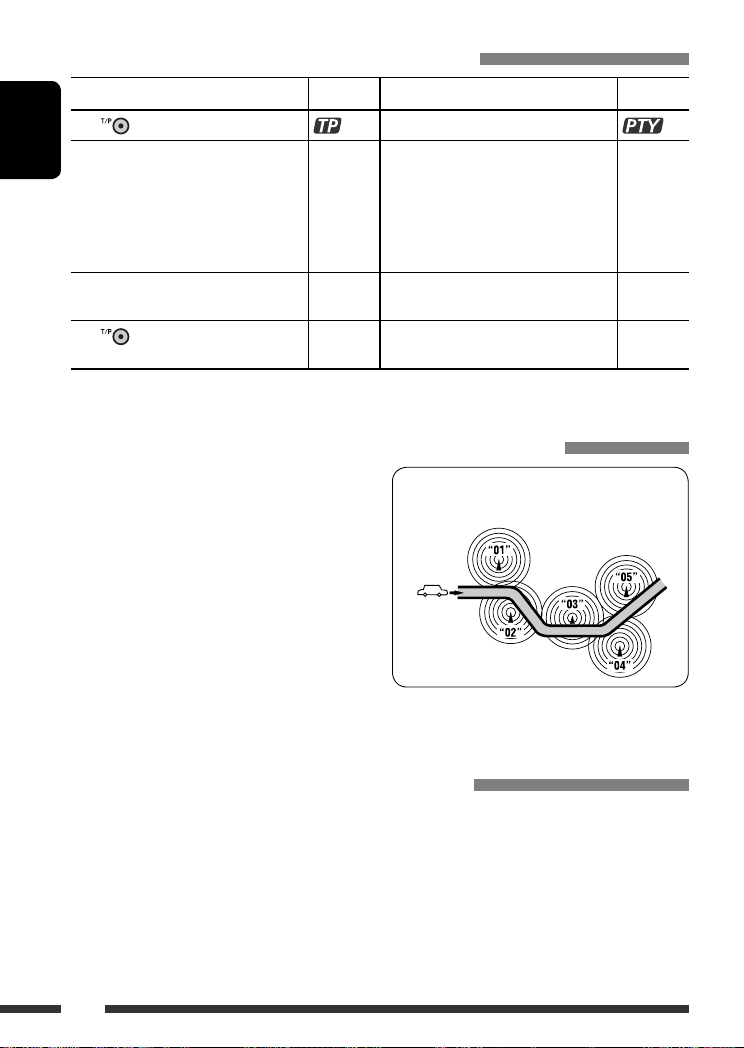
Activating/deactivating TA/PTY Standby Reception
TA Standby Reception Indicator PTY Standby Reception Indicator
to activate.
Press
The unit temporarily will switch to Traffic
ENGLISH
Announcement (TA), if available, from any
source other than AM and FM3.
The volume changes to the preset TA
volume level if the current level is lower
than the preset level (see page 27).
Not yet activated. Tune in to another
station providing the RDS signals.
to deactivate.
Press
• When a DAB tuner is connected, TA/PTY Standby Reception also searches for services. (See also pages 22 and 27.)
Lights up The unit temporarily will switch to your
Flashes Not yet activated. Tune in to another
Goes off Select “OFF” for the PTY code (see page 27)
See page 27.
Lights up
favorite PTY programme from any source
other than AM and FM3.
Flashes
station providing the RDS signals.
Goes off
to deactivate.
Tracing the same programme—Network-Tracking Reception
When driving in an area where FM reception is not
sufficient enough, this unit automatically tunes in to
another FM RDS station of the same network, possibly
broadcasting the same programme with stronger
signals (see the illustration on the right).
When shipped from the factory, Network-Tracking
Reception is activated.
To change the Network-Tracking Reception
setting, see “AF-REG” on page 27.
• When the DAB tuner is connected, refer to “Tracing
the same programme—Alternative Frequency
Reception” on page 22.
Programme A broadcasting on different frequency
areas (01 – 05)
Automatic station selection—Programme Search
Usually when you press the number buttons, the preset station is tuned in.
If the signals from the FM RDS preset station are not sufficient for good reception, this unit, using the AF data, tunes
in to another frequency broadcasting the same programme as the original preset station is broadcasting.
• The unit takes some time to tune in to another station using programme search.
• See also page 27.
12
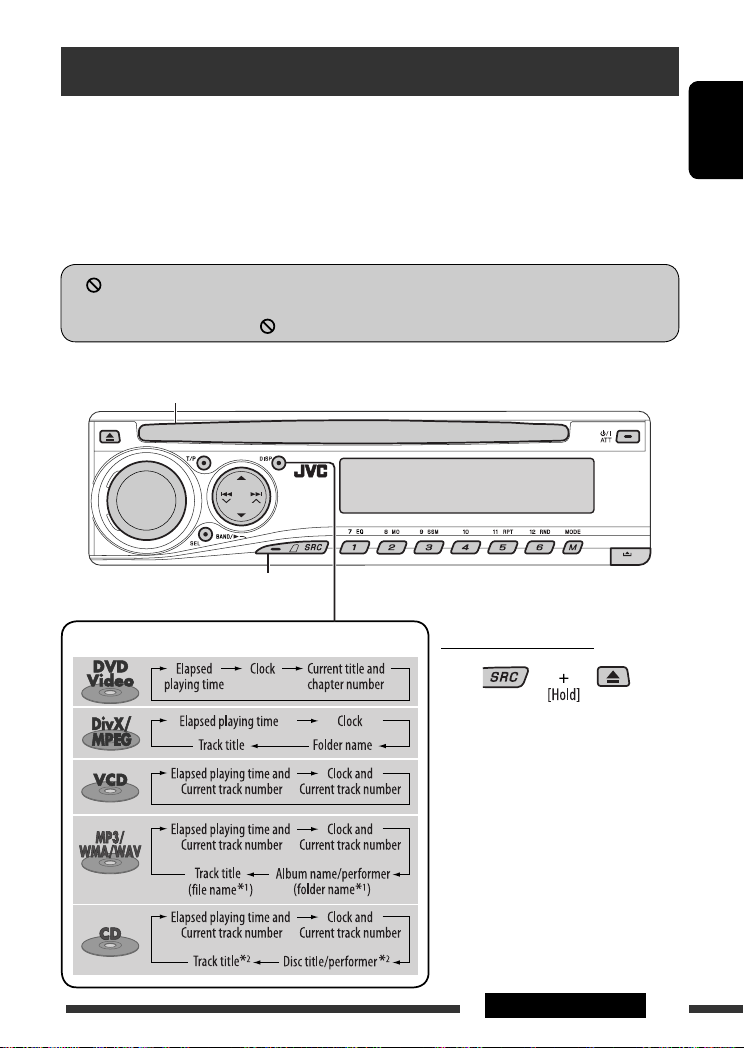
Disc operations
Before performing any operations…
Turn on the monitor to watch the playback picture. If you turn on the monitor, you can also control playback of other
discs by referring to the monitor screen. (See pages 17 – 20.)
The disc type is automatically detected, and playback starts automatically (for DVD: automatic start depends on its
internal program).
If the current disc does not have any disc menu, all tracks will be played repeatedly until you change the source or
eject the disc.
” appears on the monitor when pressing a button, the unit cannot accept the operation you have tried to
If “
do.
• In some cases, without showing “ ,” operations will not be accepted.
Insert the disc.
Playback starts automatically.
Start playback if necessary.
ENGLISH
Change the display information
Prohibiting disc ejection
To cancel the prohibition, repeat the
same procedure.
*1 If the file does not have Tag information or
“TAG DISP” is set to “TAG OFF” (see page
28), folder name and file name appear.
TAG indicator will not light up.
*2 “NO NAME” appears for an audio CD.
13OPERATIONS
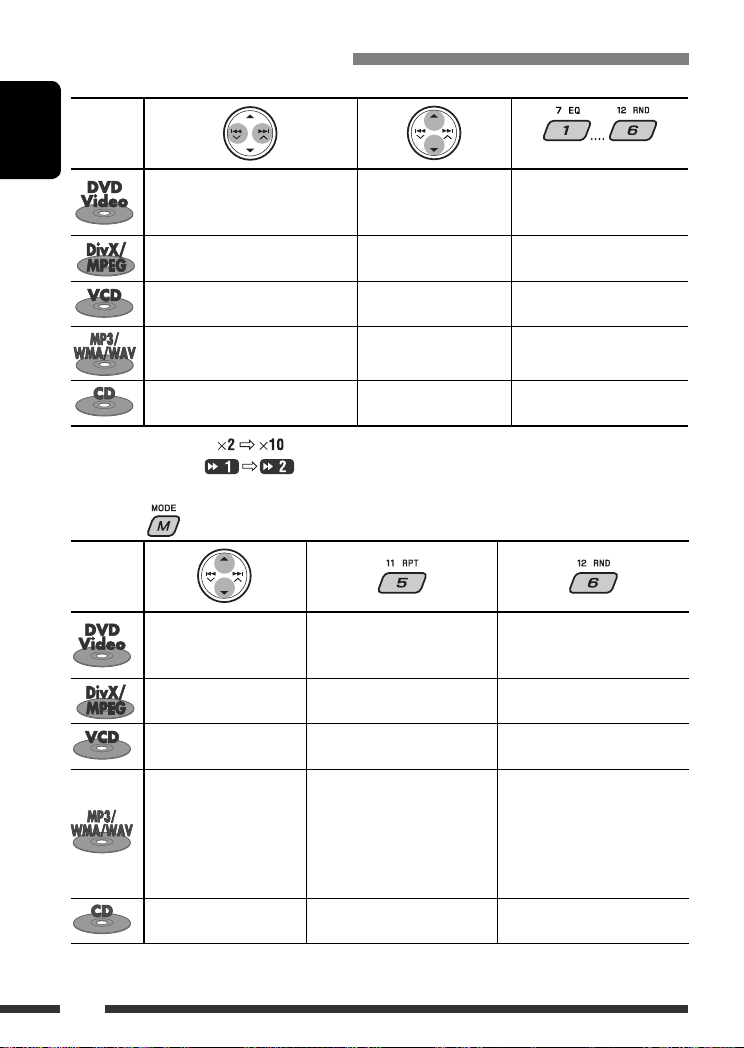
Operations using the control panel
Pressing (or holding) the following buttons allows you to…
Disc type
ENGLISH
Press: Select chapter
Hold: Reverse/fast-forward
1
chapter *
Press: Select track
Hold: Reverse/fast-forward track *
Press: Select track
Hold: Reverse/fast-forward track *
Press: Select track
Hold: Reverse/fast-forward track *
Press: Select track
Hold: Reverse/fast-forward track *
1
Search speed changes to on the monitor.
*
*2 Search speed changes on the monitor.
*3 Press to select number 1 to 6; hold to select number 7 to 12.
After pressing , press the following buttons to…
Disc type
Skip 10 chapters (during
play or pause)
Skip 10 tracks (within the
same folder)
Skip 10 tracks (PBC not in
use)
Skip 10 tracks (within the
same folder)
Skip 10 tracks TRK RPT: Repeat current track DISC RND: Randomly play all
• To cancel repeat play or random play, select “RPT OFF” or “RND OFF.”
Select title During stop: Locate title
Select folder Locate particular folder directly
2
—
1
Select folder Locate particular folder directly
1
—
1
CHP RPT: Repeat current
chapter
TIT RPT: Repeat current title
TRK RPT: Repeat current track
FLDR RPT: Repeat current folder
TRK RPT: Repeat current track
(PBC not in use)
TRK RPT: Repeat current track
FLDR RPT: Repeat current folder
(Number buttons) *
3
During play/pause: Locate
chapter
Locate particular track directly
(PBC not in use)
Locate particular track directly
—
—
DISC RND: Randomly play all
tracks (PBC not in use)
FLDR RND: Randomly play all
tracks of current
folder, then tracks of
next folders
DISC RND: Randomly play all
tracks
tracks
14
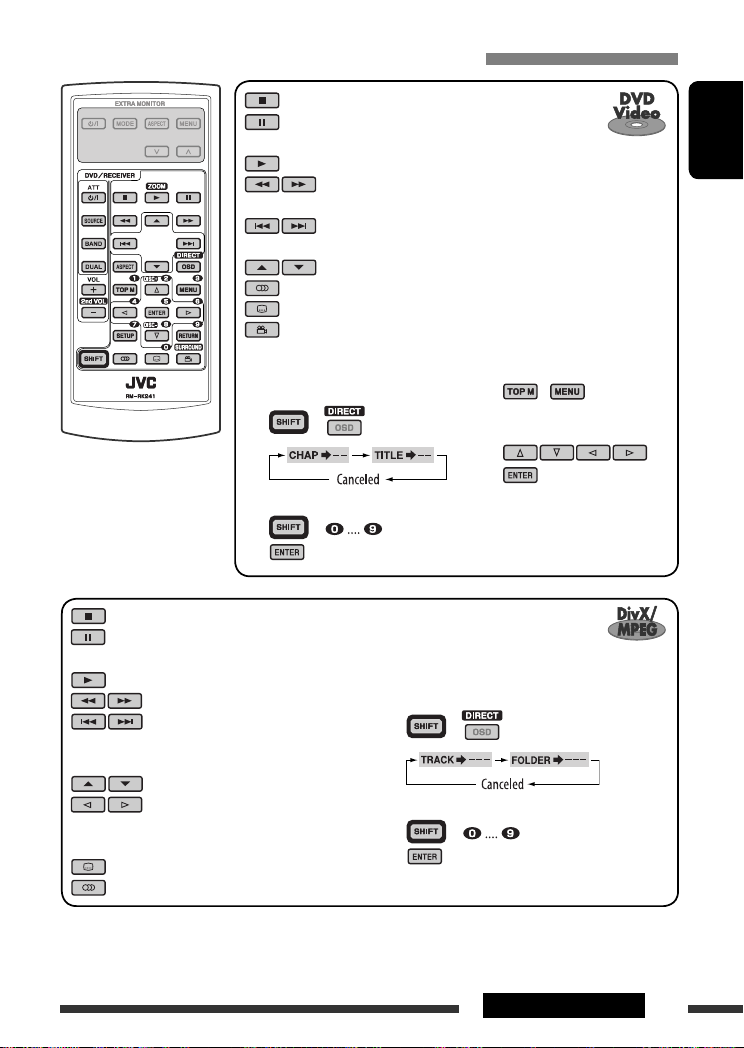
Operations using the remote controller—RM-RK241
: Stop play
: Pause (Frame by frame playback if pressed during
pause.)
: Start play
: Reverse/forward chapter search *1
• Slow motion *2 during pause. No sound can be heard.
: Press: Select chapter (during play or pause)
Hold: Reverse/fast-forward chapter search *
: Select title
: Select audio language
: Select subtitle language
: Select view angle
ENGLISH
3
To search for chapter/title directly
1 Select chapter/title search.
1, 2, 3, 4, 5
*
: See page 16.
2 Enter the desired number.
3
: Stop play
: Pause (Frame by frame playback if
pressed during pause.)
: Start play
: Reverse/forward track search *
: Press: Select track
Hold: Reverse/fast-forward track
5
search *
: Select folder
: • Return/advance the scenes by
about 5 minutes (Index search).
• Select chapter.
: DivX: Select subtitles language
: DivX: Select audio language
Using menu driven features…
1 /
+
2 Select an item you want to
start play.
3
+
To search for track (within the same folder)/
folder directly
4
1 Select track/folder search.
2 Enter the desired number.
3
+
+
Continued on the next page
15OPERATIONS
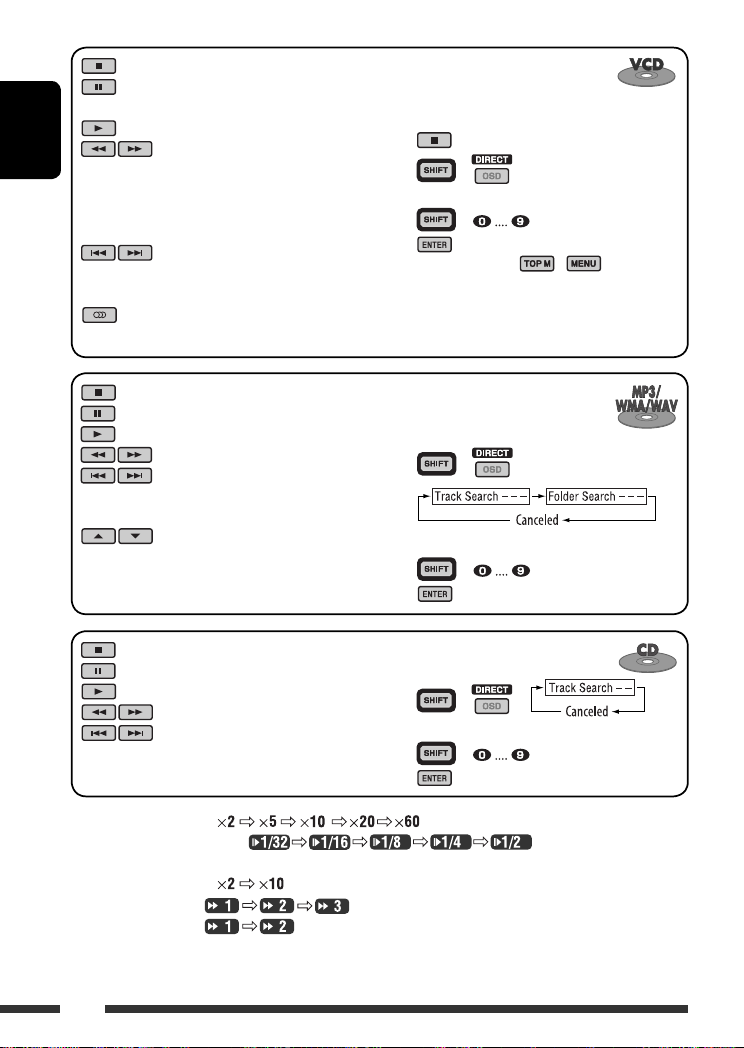
: Stop play
: Pause (Frame by frame playback if
pressed during pause.)
: Start play
ENGLISH
: Reverse/forward track search *1
• Forward slow motion *2 during
pause. No sound can be heard.
(Reverse slow motion does not
work.)
: Press: Select track
Hold: Reverse/fast-forward track
3
search *
: Select audio channel
(ST: stereo, L: left, R: Right)
Canceling the PBC playback…
1
2 +
3 Enter the desired number.
4
+
• To resume PBC, press / .
: Stop play
: Pause
: Start play
: Reverse/forward track search *
: Press: Select tracks
To search for track (within the
same folder)/folder directly
1 Select track/folder search.
1
+
Hold: Reverse/fast-forward track
3
search *
: Select folder
: Stop play
: Pause
: Start play
: Reverse/forward track search *
: Press: Select tracks
Hold: Reverse/fast-forward track
3
search *
2 Enter the desired number.
3
To search for track directly
1 Select track search.
1
2 Enter the desired number.
3
+
+
+
*1 Search speed changes to on the monitor if pressed repeatedly.
*2 Slow motion speed changes to on the monitor if pressed
repeatedly.
*3 Search speed changes to on the monitor.
*4 Search speed changes on the monitor if pressed repeatedly.
*5 Search speed changes on the monitor.
16
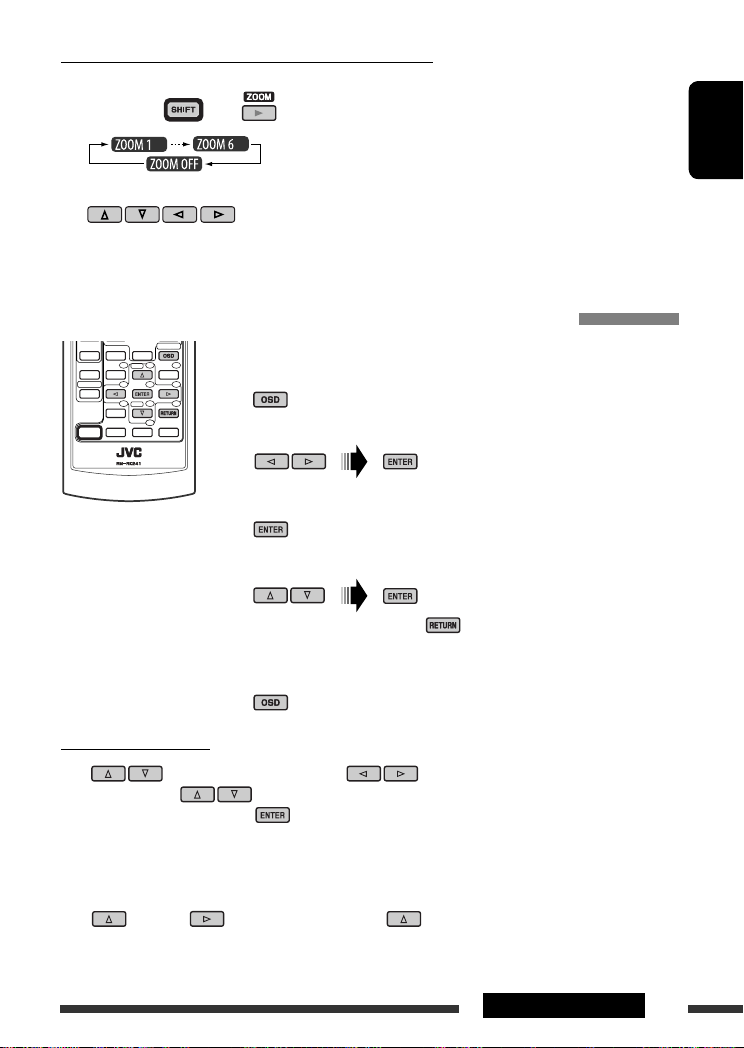
Enlarging the view—Zoom in (DVD/DivX/MPEG Video/VCD)
During moving picture playback…
1 While holding , press repeatedly.
2 Move the enlarged portion.
• To cancel zoom, select “ZOOM OFF.”
Operations using the on-screen bar (DVD/DivX/MPEG Video/VCD)
These operations are possible on the monitor using the remote controller.
~ Show the on-screen bar (see page 18).
(twice)
Ÿ Select an item.
! Make a selection.
If pop-up menu appears…
• To cancel pop-up menu, press .
• For entering time/numbers, see the following.
⁄ Remove the on-screen bar.
ENGLISH
Entering time/numbers
Press to change the number, then press to move to the next entry.
• Each time you press , the number increases/decreases by one value.
• After entering the numbers, press .
• It is not required to enter the zero and tailing zeros (the last two digits in the example below).
Ex.: Time search
DVD: _:_ _:_ _ (Ex.: 1:02:00)
Press once, then twice to go to the third entry, twice, then press ENTER.
17OPERATIONS
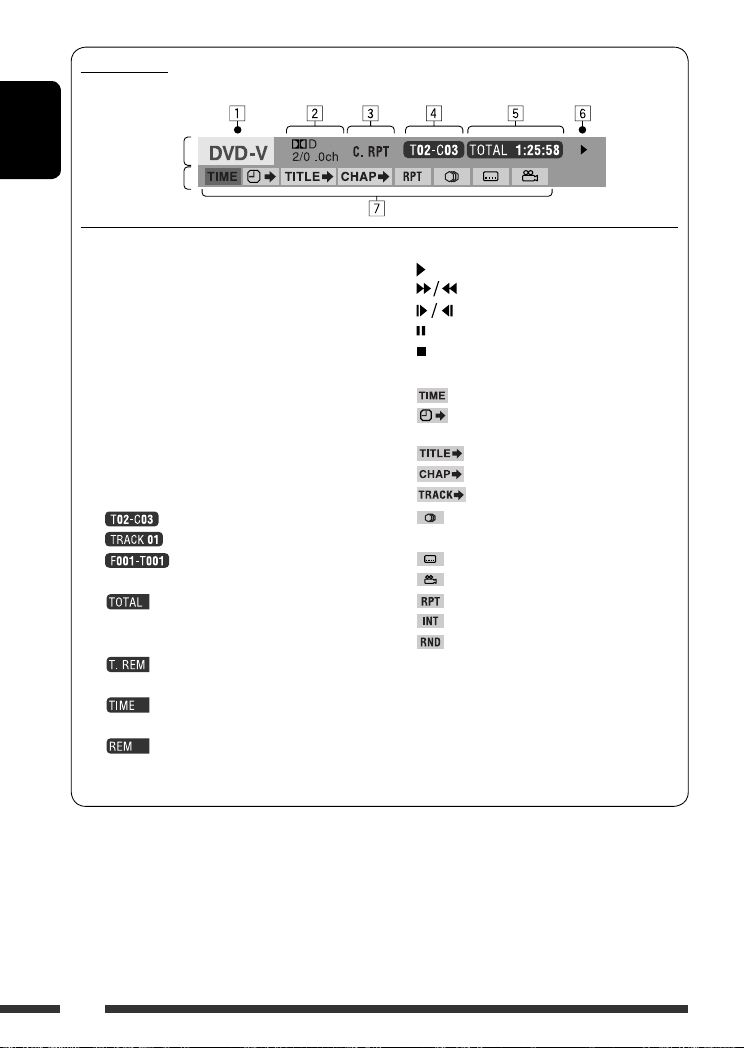
On-screen bar
Ex.: DVD-Video
ENGLISH
Information
Operation
1 Disc type
2 • DVD-Video/DTS-CD: Audio signal format type
and channel
• VCD: PBC
3 Playback mode *
1
DVD-Video: T. RPT: Title repeat
C. RPT: Chapter repeat
DivX/MPEG Video: T. RPT: Track repeat
F. RPT: Folder repeat
VCD *2: T. RPT: Track repeat
D. RND: Disc random
T. INT: Track intro *
4 Playback information
Current title/chapter
Current track
Current folder/track
5 Time indication
Elapsed playing time of the disc
(For DVD-Video, elapsed playing
time of the current title.)
DVD-Video: Remaining title time
VCD: Remaining disc time
Elapsed playing time of the current
chapter/track
Remaining time of the current
chapter/track
6 Playback status
Play
Forward/reverse search
Forward/reverse slow-motion
Pause
Stop
7 Operation icons
Change time indication (see 5)
Time Search (Enter the elapsed playing
time of the current title or of the disc.)
Title Search (by its number)
3
Chapter Search (by its number)
Track Search (by its number)
Change the audio language or audio
channel
Change the subtitle language
Change the view angle
Repeat play *
Intro play *
Random play *
1
3
1
*1 For repeat play/random play, see also page 14.
*2 While PBC is not in use.
*3 Plays the beginning 15 seconds of…
TRACK INTRO : All tracks of the current disc.
FOLDER INTRO : First tracks of all folders of the
current disc.
18
Operations using the control screen (DivX/MPEG Video/MP3/WMA/WAV/CD)
These operations are possible on the monitor using the remote controller.
~ Show the control screen.
DivX/MPEG Video: Press during play.
MP3/WMA/WAV/CD: Automatically appear during play.
Ÿ Select “Folder” column or “Track” column (except for CD).
! Select a folder or track.
⁄ Start playback.
DivX/MPEG Video: Press .
MP3/WMA/WAV/CD: Playback starts automatically.
ENGLISH
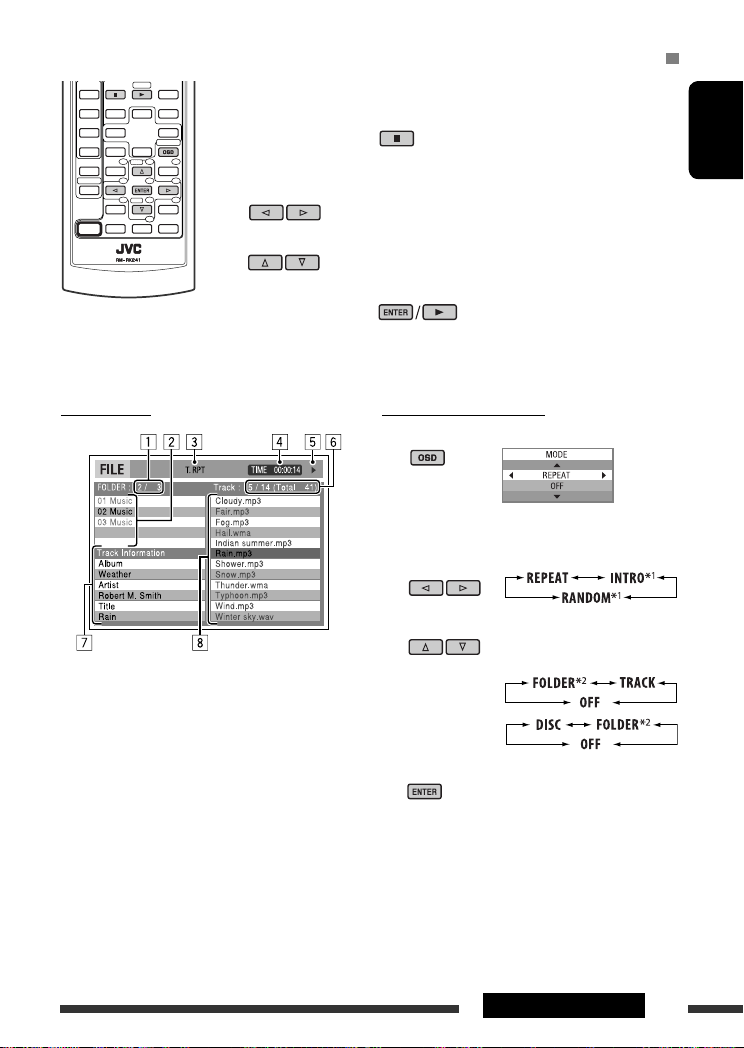
Control screen
Ex.: MP3/WMA/WAV disc
1 Current folder number/total folder number
2 Folder list with the current folder selected
3 Selected playback mode
4 Elapsed playing time of the current track
5 Operation mode icon ( 3, 7, 8, ¡, 1 )
6 Current track number/total number of tracks in the
current folder (total number of tracks on the disc)
7 Track information
8 Track list with the current track selected
To select a playback mode
1 While control screen is displayed…
Playback mode selection screen appears on the
folder list section of the control screen.
2 Select a playback mode.
3 Select an item.
REPEAT/INTRO:
RANDOM:
4 Confirm the selection.
*1 Not selectable for DivX/MPEG Video
*2 Not selectable for CD
Continued on the next page
19OPERATIONS
Mode Playback functions
F. RPT (folder repeat): Repeat current folder
T. RPT (track repeat): Repeat current track
F. INT (folder intro): Plays the beginning 15 seconds of first tracks of all folders of the current disc
ENGLISH
T. INT (track intro): Plays the beginning 15 seconds of all tracks of the current disc
D. RND (disc random): Randomly play all tracks
F. RND (folder random): Randomly play all tracks of current folder, then tracks of next folders
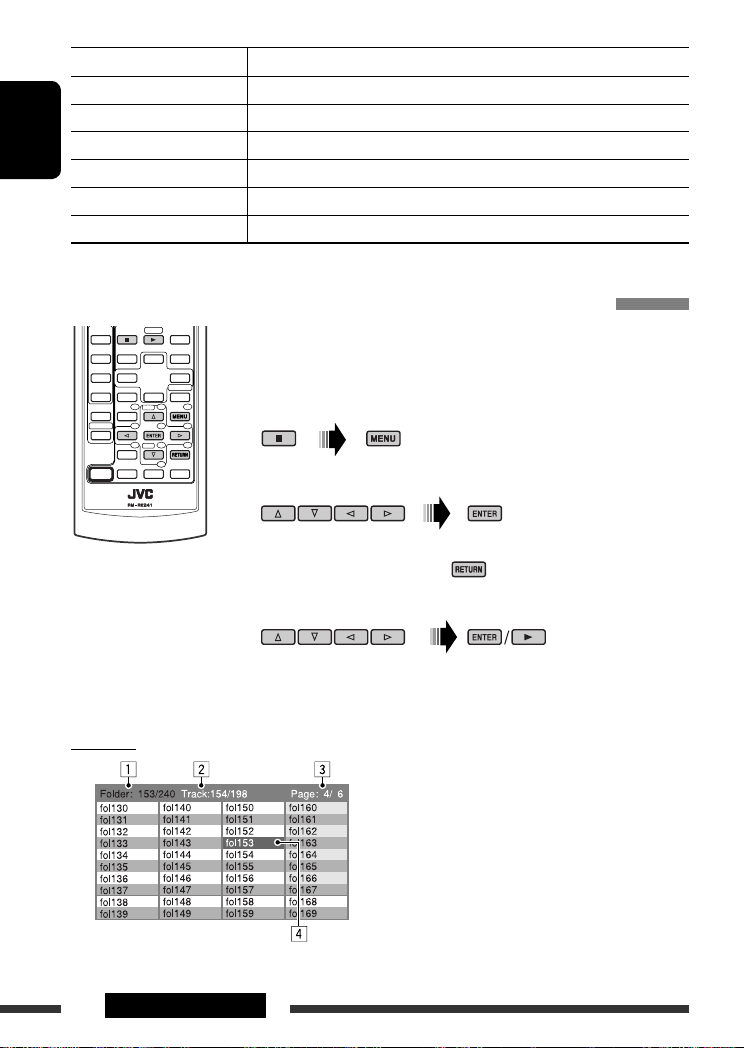
Operations using the list screen (DivX/MPEG Video/MP3/WMA/WAV)
These operations are possible on the monitor using the remote controller.
Before playing, you can display the folder list/track list to confirm the contents and
start playing a track.
~ Display the folder list while stop.
Ÿ Select an item from the folder list.
• Track list of the selected folder appears.
• To go back to the folder list, press .
! Select a track to start playing.
List screen
Ex.: Folder list
20 OPERATIONS
• MP3/WMA/WAV: Control screen appears (see page 19).
1 Current folder number/total folder number
2 Current track number/total number of tracks in the
current folder
3 Current page/total number of the pages included
in the list
4 Current folder/track (highlighted bar)
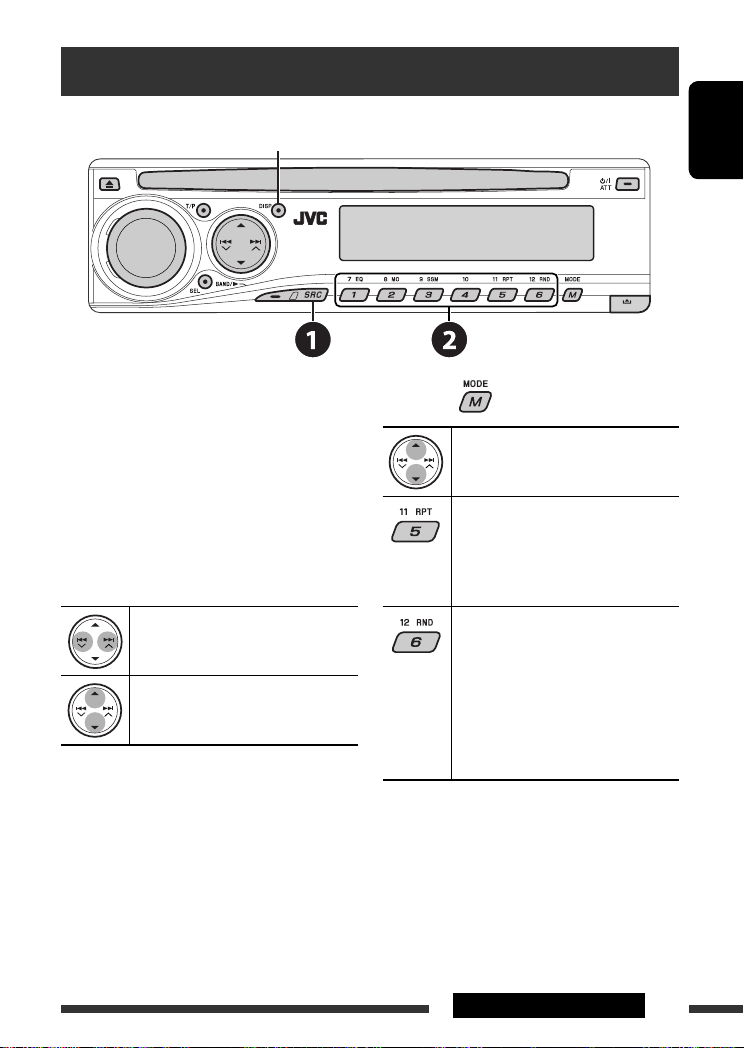
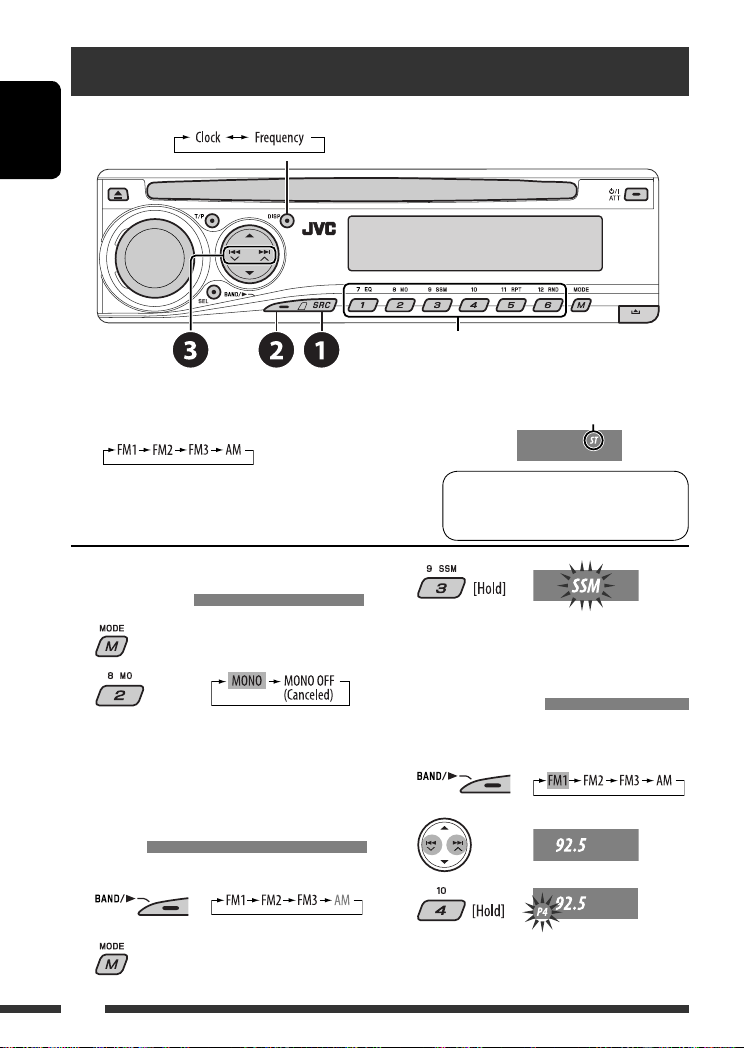
Listening to the CD changer
Change the display information
(see page 13)
ENGLISH
It is recommended to use a JVC MP3-compatible CD
changer with your unit.
• You can only play conventional CDs (including CD
Text) and MP3 discs.
~ Select “CD-CH.”
Ÿ Select a disc to start playing.
Press: For selecting disc number 1 – 6.
Hold: For selecting disc number 7 – 12.
Press: Select track
Hold: Reverse/fast-forward track
MP3: Select folders
After pressing , press the following buttons to…
Skip 10 tracks
(MP3: within the same folder)
TRK RPT: Repeat current track
FLDR RPT: MP3: Repeat all tracks of
current folder
DISC RPT: Repeat all tracks of the
current disc
FLDR RND: MP3: Randomly play all
tracks of the current folder,
then tracks of the next
folder
DISC RND: Randomly play all tracks of
current disc
MAG RND: Randomly play all tracks of
the inserted discs
• To cancel repeat play or random play, select
“RPT OFF” or “RND OFF.”
21EXTERNAL DEVICES
Listening to the DAB tuner
Change the display information
ENGLISH
Select preset service.
~ Select “DAB.”
Ÿ Select the bands.
! Searching for an ensemble.
Manual Search: Hold either one of the buttons until “MANU” flashes on the display, then press it repeatedly.
⁄ Select a service (either primary or secondary) to listen to.
Storing DAB services in memory
While listening to a DAB service…
Activating/deactivating TA/PTY
Standby Reception
• Operations are exactly the same as explained on page
12 for FM RDS stations.
• You cannot store PTY codes separately for the DAB
tuner and for the FM tuner.
22
Tracing the same programme—
Alternative Frequency Reception
• While receiving a DAB service:
When driving in an area where a service cannot be
received, this unit automatically tunes in to another
ensemble or FM RDS station, broadcasting the same
programme.
• While receiving an FM RDS station:
When driving in an area where a DAB service is
broadcasting the same programme as the FM RDS
station is broadcasting, this unit automatically tunes
in to the DAB service.
When shipped from the factory, Alternative Frequency
Reception is activated.
To deactivate the Alternative Frequency
Reception, see page 28.
Listening to the iPod / D. player
Change the display information
ENGLISH
Before operating, connect either one of the following
(separately purchased) to the CD changer jack on the
rear of this unit.
• Interface adapter for iPod—KS-PD100 for
controlling an iPod.
• D. player interface adapter—KS-PD500 for
controlling a D. player.
Preparations
Make sure “CHANGER” is selected for the external input
setting, see page 28.
~ Select “IPOD” or “D. PLAYER.”
Ÿ Select a song to start playing.
Selecting a track from the menu
1 Enter the main menu.
• This mode will be canceled if no
operations are done for about
5 seconds.
2 Select the desired menu.
For iPod:
PLAYLIST Ô ARTISTS Ô ALBUMS Ô SONGS
Ô GENRES Ô COMPOSER Ô (back to the
beginning)
For D. player:
PLAYLIST
Ô ARTIST Ô ALBUM Ô GENRE
Ô TRACK Ô (back to the beginning)
3 Confirm the selection.
• To move back to the previous menu, press 5.
• If a track is selected, playback starts
automatically.
• Holding
4 /¢ can skip 10 items at
a time.
Pause/stop playback
• To resume playback, press the button
again.
Press: Select tracks
Hold: Reverse/fast-forward track
Continued on the next page
23EXTERNAL DEVICES
After pressing , press the following buttons to…
ONE RPT: Functions the same as “Repeat One” or “Repeat Mode
ALL RPT: Functions the same as “Repeat All” or “Repeat Mode = All.”
ENGLISH
• To cancel repeat play or random play, select “RPT OFF” or “RND OFF.”
* iPod: Functions only if you select “ALL” in “ALBUMS” of the main “MENU.”
ALBM RND*: Functions the same as “Shuffle Albums” of the iPod.
SONG RND/RND ON: Functions the same as “Shuffle Songs” or “Random Play
= One.”
= On.”
Listening to the other external components
Change the display information
You can connect an external component to the CD changer jack on the rear using the Line Input Adapter—KS-U57
(not supplied) or AUX Input Adapter—KS-U58 (not supplied). Make sure “EXT IN” is selected for the external input
setting, see page 28.
~ Select “EXT IN.”
Ÿ Turn on the connected component and start playing the source.
! Adjust the volume.
⁄ Adjust the sound as you want (see pages 25 and 26).
24 EXTERNAL DEVICES
Concept diagram of the external device connection
• For connection, see Installation/Connection manual (separate volume).
Unit
(see page 28 of the
CD changer jack
: Adapter (separately purchased)
”EXT IN” setting)
(see page 28 of the
”EXT IN” setting)
Selecting a preset sound mode
JVC DAB tuner, [22]
JVC CD changer, [21]
Apple iPod, [23]
JVC D. player, [23]
MD player, etc., [24]
MD player, etc., [24]
ENGLISH
Preset values
Indication (For)
USER (Flat sound) 00 00 OFF
ROCK (Rock or disco music) +03 +01 ON
CLASSIC (Classical music) +01 –02 OFF
POPS (Light music) +04 +01 OFF
HIP HOP (Funk or rap music) +02 00 ON
JAZZ (Jazz music) +02 +03 OFF
BAS (bass) TRE (treble) LOUD (loudness)
25EXTERNAL DEVICES & SETTINGS
Adjusting the sound
1
2 Adjust the level.
ENGLISH
General settings — PSM
You can change PSM (Preferred Setting Mode) items
listed in the table on pages 27 and 28.
1 Enter the PSM settings.
BAS *1 (bass)
Adjust the bass.
1
TRE *
(treble)
Adjust the treble.
2
(fader)
FAD *
Adjust the front and rear speaker
balance.
BAL (balance)
Adjust the left and right speaker
balance.
1
(loudness)
LOUD *
Boost low and high frequencies to
produce a well-balanced sound at low
volume level.
3
VOL.A *
(volume adjust)
Adjust and store auto-adjustment
volume level for each source,
comparing to the FM volume level.
VOL (volume)
Adjust the volume.
*1 When you adjust the bass, treble, or loudness, the
adjustment you have made is stored for the currently
selected sound mode (C-EQ) including “USER.”
*2 If you are using a two-speaker system, set the fader
level to “00.”
*3 You cannot make an adjustment for FM. “FIX”
appears.
*4 Depending on the amplifier gain control setting. (See
page 28 for details.)
–06 to +06
–06 to +06
R06 to F06
L06 to R06
LOUD ON or
LOUD OFF
–05 to +05;
initial: 00
00 to 30
4
(or 50) *
2 Select a PSM item.
3 Select or adjust the selected PSM item.
4 Repeat steps 2 and 3 to adjust other
PSM items if necessary.
5 Finish the procedure.
26

Indication Item
Setting, [reference page]
( : Initial)
DEMO
Display demonstration
CLK DISP *
1
Clock display
• DEMO ON
• DEMO OFF
• ON
• OFF
: Display demonstration will be activated automatically if no
operation is done for about 20 seconds, [5].
: Cancels.
: Clock time is shown on the display at all times when the power is
turned off.
: Cancels; pressing DISP will show the clock time for about 5 seconds
when the power is turned off, [5].
CLOCK H
Hour adjustment
CLOCK M
0 – 23
: Initial: 0 (0:00), [5].
(1 – 12)
00 – 59 : Initial: 00 (0:00), [5].
Minute adjustment
24H/12H
Time display mode
CLK ADJ
Clock adjustment
2
AF-REG *
Alternative frequency/
regionalization
reception
• 12H
• 24H
• AUTO
• OFF
• AF
• AF REG
: See also page 5 for setting.
: The built-in clock is automatically adjusted using the CT (clock time)
data in the RDS signal.
: Cancels.
: When the currently received signals become weak, the unit switches
to another station or service (the programme may differ from the
one currently received), [12].
: When the currently received signals become weak, the unit switches
to another station broadcasting the same programme.
PTY-STBY
PTY standby
TA VOL
Traffic announcement
• OFF
OFF, PTY codes
(see page 11)
VOL 00 – VOL
30 or 50 *
: Cancels (not selectable when “DAB AF” is set to “AF ON”).
: Activates PTY Standby Reception with one of the PTY codes, [11, 12].
: Initial: VOL 15, [12].
3
volume
P-SEARCH *
2
Programme search
1
*
If the power supply is not interrupted by turning off the ignition key of your car, it is recommended to select “OFF” to
• ON
• OFF
: Activates Programme Search, [12].
: Cancels.
save the car’s battery.
*2 Only for RDS FM stations.
3
Depending on the “AMP GAIN” setting.
*
ENGLISH
Continued on the next page
27SETTINGS

Indication Item
Setting, [reference page]
( : Initial)
DAB AF *
Alternative frequency
reception
ENGLISH
DIMMER
Dimmer
TEL
Telephone muting
SCROLL *
Scroll
4
5
• AF ON
• AF OFF
• ON
• OFF
• MUTING 1/
MUTING 2
• OFF
• ONCE
• AUTO
• OFF
: Traces the programme among DAB services and FM RDS stations,
[22].
: Cancels.
: Dims the display illumination.
: Cancels.
: Select either one which mutes the playback sounds while using a
cellular phone.
: Cancels.
: Scrolls the track information once.
: Repeats scrolling (at 5-second intervals).
: Cancels. (Holding DISP can scroll the display regardless of the
setting.)
6
EXT IN *
External input
TAG DISP
Tag display
AMP GAIN
Amplifier gain control
IF BAND
Intermediate
frequency band
• CHANGER
• EXT IN
• TAG ON
• TAG OFF
• LOW PWR
• HIGH PWR
• AUTO
• WIDE
: To use a JVC CD changer, [21], or an Apple iPod/a JVC D. player, [23].
: To use any other external component, [24].
: Shows the tag while playing MP3/WMA/WAV tracks.
: Cancels.
: VOL 00 – VOL 30 (Select if the maximum power of each speaker is
less than 50 W to prevent damaging the speaker.)
: VOL 00 – VOL 50
: Increases the tuner selectivity to reduce interference noises between
adjacent stations. (Stereo effect may be lost.)
: Subject to interference noises from adjacent stations, but sound
quality will not be degraded and the stereo effect will remain.
4
*
Displayed only when DAB tuner is connected.
*5 Some characters or symbols will not be shown correctly (or will be blanked) on the display.
6
Displayed only when one of the following sources is selected—FM, AM, DAB, or DISC.
*
28
Disc setup menu
These operations are possible on the monitor using the remote controller.
~ Enter the disc setup menu
Ÿ Select a menu.
! Select an item you want to set
⁄ Select an option.
To return to normal screen
while stop.
up.
• To cancel pop-up menu, press .
ENGLISH
Menu Item Setting
MENU
LANGUAGE
AUDIO
LANGUAGE
SUBTITLE Select the initial subtitle language or remove the subtitle (OFF). Refer also to
LANGUAGE
ON SCREEN
LANGUAGE
Select the initial disc menu language. Refer also to “Language codes” on page 36.
Select the initial audio language. Refer also to “Language codes” on page 36.
“Language codes” on page 36.
Select the language for the on screen display.
Continued on the next page
29SETTINGS
Menu Item Setting
MONITOR TYPE Select the monitor type to watch a wide screen picture on your monitor.
ENGLISH
OSD POSITION Select the on-screen bar position on the monitor.
PICTURE
FILE TYPE Select the file type to play.
DIGITAL AUDIO
OUTPUT
DOWN MIX When playing back a multi-channel disc, this setting affects the signals
AUDIO
D. RANGE
COMPRESSION
DivX
REGISTRATION
OTHER
• 1 : Higher position
• 2 : Lower position (Guidance below the disc setup menu will disappear.)
• AUDIO : Play MP3/WMA/WAV files.
• VIDEO : Play DivX/MPEG Video files.
Select the signal format to be emitted through the DIGITAL OUT (Optical) terminal.
• OFF : Cancels.
• PCM ONLY : Select for an amplifier or a decoder incompatible
with Dolby Digital, DTS, MPEG Audio, or when
connecting to a recording device.
• DOLBY DIGITAL/PCM : Select for an amplifier or a decoder compatible
with Dolby Digital.
• STREAM/PCM : Select for an amplifier or a decoder compatible
with Dolby Digital, DTS, and MPEG Audio.
reproduced through the LINE OUT jacks (and through the DIGITAL OUT terminal
when “PCM ONLY” is selected for “DIGITAL AUDIO OUTPUT”).
• SURROUND COMPATIBLE : Select to enjoy multi-channel surround audio by
connecting an amplifier compatible with Dolby
Surround.
• STEREO : Normally select this.
You can enjoy a powerful sound at low or middle volume levels while playing a
Dolby Digital software.
• AUTO : Select to apply the effect to multi-channel
encoded software (excluding 1-channel and
2-channel software).
• ON : Select to always use this function.
This unit has its own Registration Code. Once you have played back a disc in which
the Registration Code recorded, this unit’s Registration Code is overwritten for
copyright protection.
30 SETTINGS
Loading…
- Topics
- manualsbase, manuals,
- Collection
- manuals_jvc; manuals; additional_collections
- Language
- English
- Item Size
- 42.6M
- Addeddate
- 2020-07-27 04:51:19
- Identifier
- manualsbase-id-127642
- Identifier-ark
- ark:/13960/t0ns9rj66
- Ocr
- ABBYY FineReader 11.0 (Extended OCR)
- Page_number_confidence
- 96.72
- Ppi
- 300
- Scanner
- Internet Archive Python library 1.9.3
comment
Reviews
There are no reviews yet. Be the first one to
.
110
Views
DOWNLOAD OPTIONS
download 1 file
ABBYY GZ download
Temporarily Unavailable
DAISY
For users with print-disabilities
Temporarily Unavailable
EPUB
download 1 file
FULL TEXT download
download 1 file
ITEM TILE download
download 1 file
PAGE NUMBERS JSON download
download 1 file
PDF download
download 1 file
SINGLE PAGE PROCESSED JP2 ZIP download
download 1 file
TORRENT download
download 12 Files
download 6 Original
SHOW ALL
IN COLLECTIONS
Manuals: JVC (Japan Victor Corporation) Manuals
The Manual Library
Additional Collections
Uploaded by
chris85
on
-
Страница 1
ENGLISH РУCCKИЙ УКРАЇНА DVD/CD RECEIVER ПРИЕМНИК ДЛЯ ВОСПРОИЗВЕДЕНИЯ ДИСКОВ DVD И КОМПАКТ-ДИСКОВ ПРИЙМАЧ З ПРОГРАВАЧЕМ DVD/CD-ДИСКІВ KD-DV5308/KD-DV5307 For installation and connections, refer to the separate manual. Указания по установке и вып?[…]
-
Страница 2
ENGLISH 2 How to forcibly eject a disc • Be careful not to drop the disc when it ejects. • If this does not work, reset your unit. How to use functions mode If you press M MODE, the unit goes into functions mode, then the number buttons and 5 / ∞ buttons work as different function buttons. Thank you for purchasing a JVC product. Please read a[…]
-
Страница 3
ENGLISH 3 WARNINGS: To prevent accidents and damage • DO NOT install any unit in locations where; – it may obstruct the steering wheel and gearshift lever operations. – it may obstruct the operation of safety devices such as air bags. – it may obstruct visibility. • DO NOT operate the unit while driving. • If you need to operate the uni[…]
-
Страница 4
ENGLISH 4 Playable disc type Disc type Recording format, file type, etc Playable DVD DVD-Video (Region Code numbers include “5”) * 1 DVD-Audio/DVD-ROM DVD Recordable/Rewritable (DVD-R * 2 /-RW, +R/+RW * 3 ) DVD-Video DivX Video MPEG-1/MPEG-2 Video MP3/WMA/WAV JPEG/MPEG4 DVD-VR, +VR DVD-RAM All Dual Disc DVD side Non-DVD side CD/VCD Audio CD (CD[…]
-
Страница 5
ENGLISH 5 INTRODUCTIONS Preparation Cancel the display demonstration and set the clock • See also page 27. ~ Turn on the power. Ÿ Enter the PSM settings. ! ] ⁄ Cancel the display demonstrations Select “DEMO,” then “DEMO OFF.” Set the clock Select “CLOCK H” (hour), then adjust the hour. Select “CLOCK M” (minute), then adjust the[…]
-
Страница 6
ENGLISH 6 Basic operations — Control panel • FM/AM/DAB: Select the bands. • DISC: Start playback. Select the source. FM/AM = DAB * = DISC * = CD-CH * /IPOD * / D.PLAYER * (or EXT IN ) = (back to the beginning) Display window • DISC: Select title/folder. • IPOD/D.PLAYER: Enter the main menu/ Pause or stop playback/Confirm selection. • DA[…]
-
Страница 7
ENGLISH 7 OPERATIONS Before using the remote controller: • Aim the remote controller directly at the remote sensor on the unit. • DO NOT expose the remote sensor to bright light (direct sunlight or artificial lighting). Display window Basic operations — Remote controller (RM-RK241) Installing the lithium coin battery (CR2025) Continued on the[…]
-
Страница 8
ENGLISH 8 Warning: To prevent accidents and damage • Do not install any battery other than CR2025 or its equivalent. • Do not leave the remote controller in a place (such as dashboards) exposed to direct sunlight for a long time; otherwise, it may explode. • Store the battery in a place where children cannot reach. • Do not recharge, short,[…]
-
Страница 9
ENGLISH 9 OPERATIONS For DAB tuner operations: • 5 / ∞ : Changes the preset services. • 4 / ¢ : – Changes the service if pressed briefly. – Searches for ensembles if pressed and held. For Apple iPod/JVC D. player operations: • ∞ : Pauses/stops or resumes playback. 5 : Enters the main menu. (Now 5 / ∞ / 4 / ¢ work as the menu selec[…]
-
Страница 10
ENGLISH 10 When an FM stereo broadcast is hard to receive 1 2 Reception improves, but stereo effect will be lost. • MO indicator lights up. FM station automatic presetting — SSM (Strong-station Sequential Memory) You can preset six stations for each band. 1 2 Listening to the radio Change the display information (for non-RDS station) ~ Select ?[…]
-
Страница 11
ENGLISH 11 OPERATIONS Storing your favorite programme types You can store your favorite PTY codes into the number buttons. 1 Select a PTY code (see right column). 2 Select a preset number. 3 Repeat steps 1 and 2 for storing other PTY codes. 4 Searching for FM RDS programme — PTY Search Change the display information Preset PTY codes in the number[…]
-
Страница 12
ENGLISH 12 Activating/deactivating TA/PTY Standby Reception TA Standby Reception Indicator PTY Standby Reception Indicator Press to activate. See page 27. The unit temporarily will switch to Traffic Announcement (TA), if available, from any source other than AM and FM3. The volume changes to the preset TA volume level if the current level is lower […]
-
Страница 13
ENGLISH 13 OPERATIONS Disc operations Before performing any operations… Turn on the monitor to watch the playback picture. If you turn on the monitor, you can also control playback of other discs by referring to the monitor screen. (See pages 17 – 20.) The disc type is automatically detected, and playback starts automatically (for DVD: automati[…]
-
Страница 14
ENGLISH 14 Operations using the control panel Pressing (or holding) the following buttons allows you to… Disc type (Number buttons) * 3 Press : Select chapter Hold : Reverse/fast-forward chapter * 1 Select title During stop: Locate title During play/pause: Locate chapter Press : Select track Hold : Reverse/fast-forward track * 2 Select folder Loc[…]
-
Страница 15
ENGLISH 15 OPERATIONS To search for chapter/title directly 1 Select chapter/title search. + 2 Enter the desired number. + 3 : Stop play : Pause (Frame by frame playback if pressed during pause.) : Start play : Reverse/forward track search * 4 : Press : Select track Hold : Reverse/fast-forward track search * 5 : Select folder : • Return/advance th[…]
-
Страница 16
ENGLISH 16 To search for track (within the same folder)/folder directly 1 Select track/folder search. + 2 Enter the desired number. + 3 Canceling the PBC playback… 1 2 + 3 Enter the desired number. + 4 • To resume PBC, press / . : Stop play : Pause (Frame by frame playback if pressed during pause.) : Start play : Reverse/forward track search * […]
-
Страница 17
ENGLISH 17 OPERATIONS Operations using the on-screen bar (DVD/DivX/MPEG Video/VCD) These operations are possible on the monitor using the remote controller. ~ Show the on-screen bar (see page 18). (twice) Ÿ Select an item. ! Make a selection. If pop-up menu appears… • To cancel pop-up menu, press . • For entering time/numbers, see the follow[…]
-
Страница 18
ENGLISH 18 Information Operation On-screen bar Ex.: DVD-Video 1 Disc type 2 • DVD-Video/DTS-CD: Audio signal format type and channel • VCD: PBC 3 Playback mode * 1 DVD-Video: T. RPT : Title repeat C. RPT : Chapter repeat DivX/MPEG Video: T. RPT : Track repeat F. RPT : Folder repeat VCD * 2 : T. RPT : Track repeat D. RND : Disc random T. INT : T[…]
-
Страница 19
ENGLISH 19 OPERATIONS Control screen 1 Current folder number/total folder number 2 Folder list with the current folder selected 3 Selected playback mode 4 Elapsed playing time of the current track 5 Operation mode icon ( 3 , 7 , 8 , ¡ , 1 ) 6 Current track number/total number of tracks in the current folder (total number of tracks on the disc) 7 T[…]
-
Страница 20
ENGLISH 20 OPERATIONS List screen These operations are possible on the monitor using the remote controller. Before playing, you can display the folder list/track list to confirm the contents and start playing a track. ~ Display the folder list while stop. Ÿ Select an item from the folder list. • Track list of the selected folder appears. • To […]
-
Страница 21
ENGLISH 21 EXTERNAL DEVICES Listening to the CD changer Change the display information (see page 13) It is recommended to use a JVC MP3-compatible CD changer with your unit. • You can only play conventional CDs (including CD Text) and MP3 discs. ~ Select “CD-CH.” Ÿ Select a disc to start playing. Press : For selecting disc number 1 – 6. Ho[…]
-
Страница 22
ENGLISH 22 Listening to the DAB tuner Change the display information Select preset service. ~ Select “DAB.” Ÿ Select the bands. ! Searching for an ensemble. Manual Search: Hold either one of the buttons until “MANU” flashes on the display, then press it repeatedly. ⁄ Select a service (either primary or secondary) to listen to. Storing DA[…]
-
Страница 23
ENGLISH 23 EXTERNAL DEVICES Listening to the iPod / D. player Change the display information Before operating, connect either one of the following (separately purchased) to the CD changer jack on the rear of this unit. • Interface adapter for iPod —KS-PD100 for controlling an iPod. • D. player interface adapter —KS-PD500 for controlling a D[…]
-
Страница 24
ENGLISH 24 EXTERNAL DEVICES After pressing , press the following buttons to… ONE RPT : Functions the same as “Repeat One” or “Repeat Mode = One.” ALL RPT : Functions the same as “Repeat All” or “Repeat Mode = All.” ALBM RND *: Functions the same as “Shuffle Albums” of the iPod. SONG RND/RND ON : Functions the same as “Shuffl[…]
-
Страница 25
ENGLISH 25 EXTERNAL DEVICES & SETTINGS Concept diagram of the external device connection • For connection, see Installation/Connection manual (separate volume). JVC CD changer, [21] Apple iPod, [23] JVC D. player, [23] Unit CD changer jack (see page 28 of the ”EXT IN” setting) (see page 28 of the ”EXT IN” setting) MD player, etc., [24[…]
-
Страница 26
ENGLISH 26 General settings — PSM You can change PSM (Preferred Setting Mode) items listed in the table on pages 27 and 28. 1 Enter the PSM settings. 2 Select a PSM item. 3 Select or adjust the selected PSM item. 4 Repeat steps 2 and 3 to adjust other PSM items if necessary. 5 Finish the procedure. Adjusting the sound 1 2 Adjust the level. BAS * […]
-
Страница 27
ENGLISH 27 SETTINGS Continued on the next page Indication Item ( : Initial) Setting, [reference page] DEMO Display demonstration • DEMO ON • DEMO OFF : Display demonstration will be activated automatically if no operation is done for about 20 seconds, [5]. : Cancels. CLK DISP * 1 Clock display • ON • OFF : Clock time is shown on the display[…]
-
Страница 28
ENGLISH 28 Indication Item ( : Initial) Setting, [reference page] DAB AF * 4 Alternative frequency reception • AF ON • AF OFF : Traces the programme among DAB services and FM RDS stations, [22]. : Cancels. DIMMER Dimmer • ON • OFF : Dims the display illumination. : Cancels. TEL Telephone muting • MUTING 1/ MUTING 2 • OFF : Select either[…]
-
Страница 29
ENGLISH 29 SETTINGS Menu Item Setting LANGUAGE MENU LANGUAGE Select the initial disc menu language. Refer also to “Language codes” on page 36. AUDIO LANGUAGE Select the initial audio language. Refer also to “Language codes” on page 36. SUBTITLE Select the initial subtitle language or remove the subtitle (OFF). Refer also to “Language code[…]
-
Страница 30
ENGLISH 30 SETTINGS Menu Item Setting PICTURE MONITOR TYPE Select the monitor type to watch a wide screen picture on your monitor. OSD POSITION Select the on-screen bar position on the monitor. • 1 : Higher position • 2 : Lower position (Guidance below the disc setup menu will disappear.) FILE TYPE Select the file type to play. • AUDIO : Play[…]
-
Страница 31
ENGLISH 31 REFERENCES How to clean the connectors Frequent detachment will deteriorate the connectors. To minimize this possibility, periodically wipe the connectors with a cotton swab or cloth moistened with alcohol, being careful not to damage the connectors. Moisture condensation Moisture may condense on the lens inside the unit in the following[…]
-
Страница 32
ENGLISH 32 General Turning on the power • By pressing SRC on the unit, you can also turn on the power. If the source is ready, playback starts. Turning off the power • If you turn off the power while listening to a disc, disc play will start automatically, next time you turn on the power. FM/AM/RDS Storing stations in memory • During SSM sear[…]
-
Страница 33
ENGLISH 33 REFERENCES Playing MP3/WMA/WAV files • The maximum number of characters for folder and file names is 25 characters; 128 characters for MP3/ WMA/WAV tag information. • This unit can play back files with the extension code <.mp3>, <.wma>, or <.wav> (regardless of the letter case—upper/lower). • This unit can show […]
-
Страница 34
ENGLISH 34 iPod or D. player • When you turn on this unit, the iPod or D. player is charged through this unit. • While the iPod or D. player is connected, all operations from the iPod or D. player are disabled. Perform all operations from this unit. • The text information may not be displayed correctly. • If the text information includes mo[…]
-
Страница 35
ENGLISH 35 REFERENCES Continued on the next page About sounds reproduced through the rear terminals • Through the analog terminals (Speaker out/LINE OUT): 2-channel signal is emitted. When playing a multi-channel encoded disc, multi-channel signals are downmixed. DTS sound cannot be reproduced. (AUDIO—DOWN MIX: see page 30.) • Through DIGITAL[…]
-
Страница 36
ENGLISH 36 Language codes Code Language Code Language Code Language Code Language Code Language AA Afar FA Persian KL Greenlandic OC Occitan ST Sesotho AB Abkhazian FI Finnish KM Cambodian OM (Afan) Oromo SU Sundanese AF Afrikaans FJ Fiji KN Kannada OR Oriya SW Swahili AM Ameharic FO Faroese KO Korean (KOR) PA Panjabi TA Tamil AR Arabic FY Frisian […]
-
Страница 37
ENGLISH 37 REFERENCES Troubleshooting What appears to be trouble is not always serious. Check the following points before calling a service center. Symptom Remedy/Cause General • Sound cannot be heard from the speakers. • Adjust the volume to the optimum level. • Check the cords and connections. • The unit does not work at all. Reset the un[…]
-
Страница 38
ENGLISH 38 Symptom Remedy/Cause DivX/MPEG Video/MP3/WMA/WAV • Disc cannot be played back. • Change the disc. • Record the tracks using a compliant application in the appropriate discs (see page 4). • Add the extension code <.divx>, <.div>, <.avi>, <.mpg>, <.mpeg>, <.mp3>, <.wma>, or <.wav> to […]
-
Страница 39
ENGLISH 39 REFERENCES Symptom Remedy/Cause iPod/D. player • The iPod or D. player does not turn on or does not work. • Check the connecting cable and its connection. • Charge the battery. • Update the firmware version. • The sound is distorted. Deactivate the equalizer either on this unit or the iPod/D. player. • “NO IPOD” or “NO […]
-
Страница 40
ENGLISH 40 Specifications AUDIO AMPLIFIER SECTION Maximum Power Output: Front/Rear: 50 W per channel Continuous Power Output (RMS): Front/Rear: 19 W per channel into 4 Ω, 40 Hz to 20 000 Hz at no more than 0.8% total harmonic distortion Load Impedance: 4 Ω (4 Ω to 8 Ω allowance) Tone Control Range: Bass: ±12 dB at 100 Hz Treble: ±12 dB at[…]
-
Страница 41
ENGLISH 41 REFERENCES DVD/CD PLAYER SECTION Signal Detection System: Non-contact optical pickup (semiconductor laser) Number of Channels: 2 channels (stereo) Frequency Response: DVD, fs=48 kHz/96 kHz: 16 Hz to 22 000 Hz CD, fs=44.1 kHz: 16 Hz to 20 000 Hz Dynamic Range: 96 dB Signal-to-Noise Ratio: 98 dB Wow and Flutter: Less than measurable limit […]
-
Страница 42
РУCCKИЙ 2 Принудительное извлечение диска • Будьте осторожны, не уроните диск при извлечении. • Если это не поможет, попробуйте перенастроить приемник. Использование режима настройки функций[…]
-
Страница 43
РУCCKИЙ 3 ПРЕДУПРЕЖДЕНИЯ: Предотвращение несчастных случаев и повреждений • НЕ устанавливайте устройство в местах, где: – оно может помешать рулевому управлению и переключению передач; – оно[…]
-
Страница 44
РУCCKИЙ 4 Типы воспроизводимых дисков Тип диска Формат записи, тип файла и т.д. Поддерживаемые DVD Видео DVD (код региона содержит цифру “5”) * 1 Звуковые DVD-диски/DVD-ROM (данные) DVD-диск однократной или […]
-
Страница 45
РУCCKИЙ 5 ВВЕДЕНИЕ Подготовка Отмена демонстрации функций дисплея и настройка часов • См. также стр. 27. ~ Включение питания. Ÿ Войдите в настройки PSM. ! ] ⁄ Отмена демонстрации функций дисплея Выб[…]
-
Страница 46
РУCCKИЙ 6 Основные операции — Панель управления • FM/AM/DAB: Выберите диапазон частот. • DISC: Начало воспроизведения. Осуществляет выбор источника звука. FM/AM = DAB * = DISC * = CD-CH * /IPOD * / D.PLAYER * (или EXT IN ) = (во?[…]
-
Страница 47
РУCCKИЙ 7 ОПЕРАЦИИ Перед использованием пульта дистанционного управления выполните следующие действия: • Направьте пульт дистанционного управления непосредственно на телеметрический датч?[…]
-
Страница 48
РУCCKИЙ 8 Предупреждение: Предотвращение несчастных случаев и повреждений • Устанавливайте только аккумуляторную батарею CR2025 или эквивалентную ей. • Не оставляйте пульт дистанционного упра[…]
-
Страница 49
РУCCKИЙ 9 ОПЕРАЦИИ Для операций с тюнером DAB: • 5 / ∞ : Смена запрограммированных служб. • 4 / ¢ : – При кратковременном нажатии выполняется изменение службы. – Поиск блоков трансляции при нажатии[…]
-
Страница 50
РУCCKИЙ 10 При слабом стереофоническом радиовещании на частоте FM 1 2 Прием улучшается, но стереоэффект будет потерян. • Загорается индикатор MO. Автоматическое программирование FM-радиостанций—[…]
-
Страница 51
РУCCKИЙ 11 ОПЕРАЦИИ Сохранение любимых программ Предпочитаемые коды PTY можно назначить нумерованным кнопкам. 1 Выберите код PTY (см. столбец справа). 2 Выберите запрограммированный номер. 3 Повтор?[…]
-
Страница 52
РУCCKИЙ 12 Включение или выключение функции резервного приема сообщений о движении на дорогах (TA) или PTY Резервный прием TA Индикатор PTY Резервный прием Индикатор Индикатор для включения. См. стр.[…]
-
Страница 53
РУCCKИЙ 13 ОПЕРАЦИИ Операции с дисками Перед выполнением любых операций выполните следующие действия… Включите монитор для просмотра воспроизводимого изображения. Если монитор включен, восп[…]
-
Страница 54
РУCCKИЙ 14 Операции с помощью панели управления Нажатие (или удерживание нажатыми) следующих кнопок позволяет выполнять следующие операции… Тип диска (Нумерованные кнопки) * 3 Нажать : Выбор ра?[…]
-
Страница 55
РУCCKИЙ 15 ОПЕРАЦИИ Непосредственный поиск раздела или названия 1 Выберите поиск раздела или названия. + 2 Введите требуемый номер. + 3 : Останов воспроизведения : Пауза (покадровое воспроизведени[…]
-
Страница 56
РУCCKИЙ 16 Непосредственный поиск дорожки (в той же папке) или папки 1 Выберите поиск дорожки или папки. + 2 Введите требуемый номер. + 3 Отмена воспроизведения PBC… 1 2 + 3 Введите требуемый номер. + 4 •[…]
-
Страница 57
РУCCKИЙ 17 ОПЕРАЦИИ Операции с помощью строки состояния (DVD/DivX/MPEG Video/VCD) Эти операции можно выполнять на мониторе с помощью пульта дистанционного управления. ~ Отобразите строку состояния на экр?[…]
-
Страница 58
РУCCKИЙ 18 Информация Управление Строки состояния Пример: Видео DVD-диск 1 Тип диска 2 • Видео DVD-диск/DTS-CD: Тип формата и канал звукового сигнала • VCD: PBC 3 Режим воспроизведения * 1 Видео DVD-диск: T. RPT : […]
-
Страница 59
РУCCKИЙ 19 ОПЕРАЦИИ Экран управления 1 Номер текущей папки/общее число папок 2 Список папок с выбранной текущей папкой 3 Выбранный режим воспроизведения 4 Истекшее время воспроизведения текущей[…]
-
Страница 60
РУCCKИЙ 20 ОПЕРАЦИИ Экран списка Эти операции можно выполнять на мониторе с помощью пульта дистанционного управления. Перед воспроизведением можно отобразить список папок или список дорожек, […]
-
Страница 61
РУCCKИЙ 21 ВНЕШНИЕ УСТРОЙСТВА Прослушивание с устройства автоматической смены компакт-дисков Изменение отображаемой информации (см. стр. 13) Для подключения к данному приемнику рекомендуется и[…]
-
Страница 62
РУCCKИЙ 22 Прослушивание тюнера DAB Изменение отображаемой информации Выбор запрограммированной службы. ~ Выберите “DAB”. Ÿ Выберите диапазон частот. ! Поиск блока трансляции. Поиск вручную: Удер[…]
-
Страница 63
РУCCKИЙ 23 ВНЕШНИЕ УСТРОЙСТВА Прослушивание с проигрывателя iPod или D. Изменение отображаемой информации Перед включением устройства подключите одно из следующих устройств (приобретаются отде[…]
-
Страница 64
РУCCKИЙ 24 ВНЕШНИЕ УСТРОЙСТВА После нажатия , нажмите следующие кнопки для выполнения следующих операций… ONE RPT : Функционирует аналогично “Repeat One” или “Режим повтора = Один трек”. ALL RPT : Функци[…]
-
Страница 65
РУCCKИЙ 25 ВНЕШНИЕ УСТРОЙСТВА И НАСТРОЙКИ Устройство автоматической смены компакт-дисков JVC, [21] Apple iPod, [23] проигрывателя JVC D. [23]. Устройство Разъем устройства автоматической смены компакт-диско?[…]
-
Страница 66
РУCCKИЙ 26 Общие настройки—PSM Можно изменять параметры PSM (предпочитаемый режим настройки), которые перечислены в таблице на стр. 27 и 28. 1 Войдите в настройки PSM. 2 Выберите параметр PSM. 3 Выберите и?[…]
-
Страница 67
РУCCKИЙ 27 НАСТРОЙКИ Продолжение не следующей странице Индикатор Элемент ( : По умолчанию) Настройки, [страница для справки] DEMO Демонстрация функций дисплея • DEMO ON • DEMO OFF : Если в течение 20 секун?[…]
-
Страница 68
РУCCKИЙ 28 Индикатор Элемент ( : По умолчанию) Настройки, [страница для справки] DAB AF * 4 Поиск альтернативной частоты • AF ON • AF OFF : Oтслеживание программы среди служб DAB и радиостанций FM RDS, [22]. : Отме?[…]
-
Страница 69
РУCCKИЙ 29 НАСТРОЙКИ Меню Элемент Настройка ЯЗЬIK MEHЮ ЯЗЬIKOВ Выбор исходного языка для меню диска. См. также раздел “Коды языков” на стр. 36. ЯЗЬIK ДЛЯ ОЗBУЧИBAНИЯ Выбор исходного языка звучания. См. ?[…]
-
Страница 70
РУCCKИЙ 30 НАСТРОЙКИ Меню Элемент Настройка ИЗОБРАЖЕНИЕ ТИП MОHИТOPA Выбор типа монитора для просмотра широкоэкранного изображения на мониторе. ПОЗИЦИЯ ОЅD Выбор положения строки состояния на м?[…]
-
Страница 71
РУCCKИЙ 31 СПРАВОЧНАЯ ИНФОРМАЦИЯ Очистка разъемов При частом отсоединении разъемы загрязняются. Чтобы снизить уровень загрязнения, периодически проводите очистку разъемов с помощью ватных в?[…]
-
Страница 72
РУCCKИЙ 32 Общие сведения Включение питания • Для включения питания приемника также можно использовать кнопку SRC. Если источник готов, воспроизведение также начинается. Выключение питания • Е[…]
-
Страница 73
РУCCKИЙ 33 СПРАВОЧНАЯ ИНФОРМАЦИЯ Воспроизведение файлов MP3/WMA/WAV • Максимальное количество символов для названий папок и файлов составляет 25 символов, для информации тега MP3/WMA/WAV – 128 символов. ?[…]
-
Страница 74
РУCCKИЙ 34 Проигрыватель iPod или D. • При включении этого устройства проигрыватель iPod или D. заряжается через него. • При подключении проигрывателя iPod или D. все операции из проигрывателя iPod или D. […]
-
Страница 75
РУCCKИЙ 35 СПРАВОЧНАЯ ИНФОРМАЦИЯ Продолжение не следующей странице О звуках, воспроизводимых через задние терминалы • Через аналоговые терминалы (выход для динамиков/LINE OUT): передается двухка?[…]
-
Страница 76
РУCCKИЙ 36 Коды Языков Код Язык Код Язык Код Язык Код Язык Код Язык AA Афарский FA Персидский KL Гренландский OC Окитан ST Сесотхo AB Абхазский FI Финский KM Камбоджийский OM (Афан) Оромо SU Суданский AF Афри[…]
-
Страница 77
РУCCKИЙ 37 СПРАВОЧНАЯ ИНФОРМАЦИЯ Устранение проблем Не всякое нарушение в работе устройства является результатом его неисправности. Перед обращением в сервисный центр проверьте следующее. Си[…]
-
Страница 78
РУCCKИЙ 38 Симптомы Способы устранения/Причины DivX/MPEG Video/MP3/WMA/WAV • Диск не воспроизводится. • Смените диск. • Запишите дорожки на подходящие диски, используя совместимое приложение (см.стр.4). • Д[…]
-
Страница 79
РУCCKИЙ 39 СПРАВОЧНАЯ ИНФОРМАЦИЯ Симптомы Способы устранения/Причины Проигрыватель iPod или D. • Проигрыватель iPod или D. не включается или не работает. • Проверьте соединительный кабель и подклю?[…]
-
Страница 80
РУCCKИЙ 40 Технические характеристики БЛОК УСИЛИТЕЛЕЙ ЗВУКА Максимальная выходная мощность: Передние/Задние: 50 Вт на каждый канал Длительная выходная мощность (RMS): Передние/Задние: 19 Вт на кана[…]
-
Страница 81
РУCCKИЙ 41 СПРАВОЧНАЯ ИНФОРМАЦИЯ БЛОК ПРОИГРЫВАТЕЛЯ DVD/КОМПАКТ-ДИСКОВ Система обнаружение сигнала: бесконтактное оптическое считывание (полупроводниковый лазер) Число каналов: 2 канала (стере?[…]
-
Страница 82
2 УКРАЇНА Примусове виймання диску • Виймаючи диск, не впустіть його на підлогу. • Якщо цей спосіб не спрацьовує, перезавантажте пристрій. Користування режимом функцій При натисненні кнопки […]
-
Страница 83
3 УКРАЇНА ПОПЕРЕДЖЕННЯ: Щоб запобігти нещасним випадкам та пошкодженням • НЕ встановлюйте даний пристрій у місцях, де він може – заважати повороту керма або переміщенню ручки переключення п[…]
-
Страница 84
УКРАЇНА 4 Типи дисків, які можна програвати Тип диску Формат запису, тип файлу и т.і. Можливість відтворення DVD DVD-Video (включає код країни “5”) * 1 DVD-Audio/DVD-ROM DVD Одноразового/ багаторазового запису ([…]
-
Страница 85
УКРАЇНА 5 ПЕРЕДМОВА Підготовка Відміна демонстрації функцій дисплею та встановлення часу на годиннику. • Див. також стор. 27. ~ Увімкніть живлення. Ÿ Увійдіть у режим налаштування PSM. ! ] ⁄ Відмі?[…]
-
Страница 86
6 УКРАЇНА Основні функції — Панель керування • FM/AM/DAB: Вибір діапазонів. • DISC: Початок відтворення. Вибір джерела. FM/AM = DAB * = DISC * = CD-CH * /IPOD * / D.PLAYER * (або EXT IN ) = (назад до початку) Вікно дисплея • DISC: ?[…]
-
Страница 87
7 РОБОТА УКРАЇНА Перед використанням пульту дистанційного керування: • Націльте дистанційний блок керування прямо на дистанційний датчик пристрою. • НЕ ЗАЛИШАЙТЕ дистанційний датчик при с?[…]
-
Страница 88
8 УКРАЇНА Обережно: Щоб запобігти нещасним випадкам та пошкодженням • Не встановлюйте ніякі інші батареї, окрім CR2025 або її еквіваленту. • Не залишайте пульт дистанційного керування у місцях […]
-
Страница 89
9 РОБОТА УКРАЇНА При роботі з тюнером DAB: • 5 / ∞ : Заміна запрограмованих сервісів. • 4 / ¢ : – При короткочасному натисненні змінюється сервіс. – При натисканні та утриманні — пошук груп. Для роб[…]
-
Страница 90
10 УКРАЇНА Коли прийом радіостанції FM- стерео утруднений 1 2 Прийом покращується, але стереоефект буде втрачено. • Загорається індикатор МО. Автоматичне запам’ятання FM- станцій — SSM (Послідовн[…]
-
Страница 91
11 РОБОТА УКРАЇНА Занесення у пам’ять улюблених типів програм Коди ваших улюблених PTY програм можна зберігати на цифрових кнопках. 1 Виберіть код PTY (дивіться стовпець праворуч). 2 Виберіть циф?[…]
-
Страница 92
12 УКРАЇНА Вмикання та вимикання прийому програм TA/PTY у режимі очікування Прийом повідомлень про стан дорожнього руху у режимі очікування Індикатор Прийом вибраних програм у режимі очікуванн[…]
-
Страница 93
13 РОБОТА УКРАЇНА Робота з дисками Перед виконанням будь-яких операцій… Увімкніть монітор для перегляду зображення що відтворюється. Якщо монітор увімкнено, можна також керувати програванн?[…]
-
Страница 94
14 УКРАЇНА Дії, що виконуються за допомогою панелі керування Щоби виконати наступні дії, потрібно натиснути (або утримувати) наступні кнопки… Тип диску (Цифрові кнопки) * 3 Натисніть : Вибір роз[…]
-
Страница 95
15 РОБОТА УКРАЇНА Безпосередній пошук розділу/назви 1 Вибрати розділ або назву для пошуку. + 2 Ввести бажаний номер. + 3 : Зупинити відтворення : Пауза (Послідовне відтворення окремих кадрів, якщо […]
-
Страница 96
16 УКРАЇНА Скасування відтворення у режимі PBC… 1 2 + 3 Ввести бажаний номер. + 4 • Щоб повернутися до відтворення у режимі PBC, натисніть кнопку / . : Зупинити відтворення : Пауза (Послідовне відтворе?[…]
-
Страница 97
17 РОБОТА УКРАЇНА Дії, що виконуються за допомогою екранного рядка (DVD/DivX/MPEG Video/VCD) Ці операції можна виконувати за допомогою пульта дистанційного керування, а слідкувати за ними на моніторі. ~ В[…]
-
Страница 98
18 УКРАЇНА Інформація Дії Екранний рядок Напр.: DVD-Video 1 Тип диску 2 • DVD-Video/DTS-CD: Тип формату та канал аудіосигналу • VCD: PBC 3 Режим відтворення * 1 DVD-Video: T. RPT : Повторення назви C. RPT : Повторення розділ?[…]
-
Страница 99
19 РОБОТА УКРАЇНА Екран керування 1 Поточний номер папки/загальна кількість папок 2 Список папок з поточною папкою, яку було вибрано 3 Вибраний режим відтворення 4 Час, що минув з початку відтво?[…]
-
Страница 100
20 РОБОТА УКРАЇНА Відображення списку на екрані Ці операції можна виконувати за допомогою пульта дистанційного керування, а слідкувати за ними на моніторі. Перед відтворенням, можна вивести ?[…]
-
Страница 101
21 ЗОВНІШНІ ПРИСТРОЇ УКРАЇНА Прослуховування через пристрій зміни CD-дисків Зміна інформації, що відображається на дисплеї (див. стор. 13) Для вашого пристрою рекомендовано користуватися прист?[…]
-
Страница 102
22 УКРАЇНА Прослуховування тюнера DAB (цифрового радіомовлення) Зміна інформації, що відображається на дисплеї Вибір сервісу, який було занесено у пам’ять. ~ Виберіть пункт “DAB”. Ÿ Вибір діапаз[…]
-
Страница 103
23 УКРАЇНА ЗОВНІШНІ ПРИСТРОЇ Прослуховування програвачів iPod/D. player Зміна інформації, що відображається на дисплеї Перед роботою приєднайте один з даних пристроїв (який було придбано окремо) д?[…]
-
Страница 104
24 УКРАЇНА ЗОВНІШНІ ПРИСТРОЇ Після натиснення , натисніть наступні кнопки, щоби… ONE RPT : Функція працює аналогічно функціям “Repeat One” або “Repeat Mode = One”. ALL RPT : Функція працює аналогічно функціям ?[…]
-
Страница 105
25 ЗОВНІШНІ ПРИСТРОЇ ТА НАЛАШТУВАННЯ УКРАЇНА Пристрій зміни CD-дисків JVC, [21] Apple iPod, [23] Програвач JVC D. player, [23] Пристрій Гніздо пристрою зміни CD-дисків (див. стор. 28 для налаштування “EXT IN”) (див. сто?[…]
-
Страница 106
26 УКРАЇНА Загальні параметри — PSM Можна змінювати режими PSM (режим преференційних налаштувань), що наведені у таблиці на сторінках 27 і 28. 1 Увійдіть у режим налаштування PSM. 2 Виберіть режим PSM. 3 ?[…]
-
Страница 107
27 НАЛАШТУВАННЯ УКРАЇНА Продовження на наступній сторінці Індикація Режим ( : Первісна) Налаштування, [посилання на сторінку] DEMO Демонстрація функцій дисплею • DEMO ON • DEMO OFF : Демонстраційний ре[…]
-
Страница 108
28 УКРАЇНА Індикація Режим ( : Первісна) Налаштування, [посилання на сторінку] DAB AF * 4 Прийом інших частот • AF ON • AF OFF : Виконує простеження програми між сервісіми DAB та станціями FM RDS, [22]. : Відміня?[…]
-
Страница 109
29 НАЛАШТУВАННЯ УКРАЇНА Меню Режим Налаштування LANGUAGE MENU LANGUAGE Виберіть первісну мову меню диску. Див. також “Коди мов” на стор. 36. AUDIO LANGUAGE Виберіть первісну мову для аудіо. Див. також “Коди мов?[…]
-
Страница 110
30 НАЛАШТУВАННЯ УКРАЇНА Меню Режим Налаштування PICTURE MONITOR TYPE Виберіть тип монітору для перегляду у широкому форматі зображення. OSD POSITION Виберіть розташування екранного рядка на моніторі. • 1 : ?[…]
-
Страница 111
31 ДОВІДКОВА ІНФОРМАЦІЯ УКРАЇНА Як чистити з’єднувачі Часте від’єднання з’єднувачів погіршує їх стан. Для виключення цієї можливості протирайте з’єднувачі періодично з обережністю бавов?[…]
-
Страница 112
32 УКРАЇНА Загальна інформація Включення живлення • Живлення можна також включити натиском на кнопку SRC в системі. Якщо джерело програвання готове, почнеться його програвання. Відключення жи[…]
-
Страница 113
33 УКРАЇНА ДОВІДКОВА ІНФОРМАЦІЯ Відтворення файлів MP3/WMA/WAV • Максимальна кількість символів для назв папок і файлів становить 25 символів; 128 символів — для інформації тегу MP3/WMA/WAV. • Пристрій мо[…]
-
Страница 114
34 УКРАЇНА Програвач iPod або D. player • Коли ви вмикаєте цей пристрій, iPod або D. програвач заряджаються через цей пристрій. • Доки iPod або D. програвач приєднанні, усі функції iPod або D. програвача вимк?[…]
-
Страница 115
35 УКРАЇНА ДОВІДКОВА ІНФОРМАЦІЯ Продовження на наступній сторінці Вихідні сигнали через рознімання DIGITAL OUT Вихідні сигнали можуть бути різними в залежності від значення налаштування “DIGITAL AUD[…]
-
Страница 116
36 УКРАЇНА Коди мов Код Мова Код Мова Код Мова Код Мова Код Мова AA Афар FA Перська KL Гренландська OC Окситанська ST Сесото AB Абхазька FI Фінська KM Камбоджійська OM (Афан) Оромо SU Суданська AF Африканс F[…]
-
Страница 117
37 ДОВІДКОВА ІНФОРМАЦІЯ УКРАЇНА Пошук та усунення несправностей Те, що здається проблемою, не завжди виявляється серйозним. Перш ніж телефонувати до сервісного центру, перевірте наступне: Си?[…]
-
Страница 118
38 УКРАЇНА Симптом Засоби виправлення/Причини DivX/MPEG Video/MP3/WMA/WAV • Диск не програється • Змініть диск. • Застосовуйте засоби запису, що відповідають вимогам. Те ж стосується й дисків (див. стор. 4)[…]
-
Страница 119
39 ДОВІДКОВА ІНФОРМАЦІЯ УКРАЇНА Симптом Засоби виправлення/Причини iPodD. player • iPod або D. програвач не працюють або не вмикаються. • Перевірте кабель з’єднання та його приєднання. • Заpядіть ба?[…]
-
Страница 120
40 УКРАЇНА Характеристики АУДІО ПІДСИЛЮВАЧ Максимальна вихідна потужність: Передня/задня колонка: 50 Вт на канал Тривала вихідна потужність (ефективна): Передня/задня колонка: 19 Вт на канал на 4[…]
-
Страница 121
41 ДОВІДКОВА ІНФОРМАЦІЯ УКРАЇНА СЕКЦІЯ ПРОГРАВАЧА DVD/CD ДИСКІВ Система виявлення сигналу: Безконтактне оптичне знімання (напівпровідниковим лазером) Кількість каналів: 2-канальний (стерео) Час[…]
-
Страница 122
EN, RU, UK 0107DTSMDTJEIN Having TROUBLE with operation? Please reset your unit Refer to page of How to reset your unit Затруднения при эксплуатации? Пожалуйста, перезагрузите Ваше устройство Для получения информации о перезагрузке Вашего уст?[…]
-
Страница 123
Instructions DVD/CD RECEIVER KD-DV5308/KD-DV5307[…]
Инструкция
Посмотреть инструкция для JVC KD-DV5307 бесплатно. Руководство относится к категории автомагнитолы, 3 человек(а) дали ему среднюю оценку 6.1. Руководство доступно на следующих языках: русский, английский. У вас есть вопрос о JVC KD-DV5307 или вам нужна помощь?
Задайте свой вопрос здесь
Ниже вы найдете технические характеристики изделия и руководства по эксплуатации JVC KD-DV5307.
JVC KD-DV5307 — автомобильный радиоприемник, предлагающий широкий спектр функций и возможностей. Он оборудован цветным ЖК-дисплеем, который позволяет легко читать информацию о текущем треке или радиостанции. Кроме того, этот радиоприемник поддерживает воспроизведение DVD и CD дисков, а также воспроизведение файлов с USB-накопителей.
Благодаря встроенному FM/AM-тюнеру, JVC KD-DV5307 позволяет легко настраивать предпочитаемые радиостанции и наслаждаться качественным звуком. Звуковая система предлагает возможность настройки равномерности уровней звука и баланса для достижения оптимального звукового качества.
Этот автомобильный радиоприемник также оснащен функцией Bluetooth, что позволяет легко и быстро подключаться к мобильным устройствам и воспроизводить музыку без проводов. Кроме того, JVC KD-DV5307 имеет встроенный слот для SD-карты, что обеспечивает дополнительные возможности для воспроизведения медиафайлов.
Стильный и современный дизайн JVC KD-DV5307 подходит к большинству автомобилей, добавляя элегантности и функциональности в салон. Установка этого радиоприемника становится проще благодаря удобному креплению и соответствующим интерфейсам. JVC KD-DV5307 — это надежное и прочное устройство, которое будет служить в течение долгого времени, обеспечивая превосходное качество звука и широкий набор функций для приятных поездок на дороге.
Главная
| Бренд | JVC |
| Модель | KD-DV5307 |
| Изделие | автомагнитола |
| Язык | русский, английский |
| Тип файла | Руководство пользователя (PDF) |
Часто задаваемые вопросы
Не можете найти ответ на свой вопрос в руководстве? Вы можете найти ответ на свой вопрос ниже, в разделе часто задаваемых вопросов о JVC KD-DV5307.
Что такое Bluetooth?
Bluetooth — это способ обмена данными по беспроводной сети между электронными устройствами с помощью радиоволн. Расстояние между двумя устройствами обменивающимися данными в большинстве случаев составляет не более десяти метров.
Автомобильный радиоприемник не включается, что делать?
Если автомобильный радиоприемник не включен, на него не будет подаваться питание. Убедитесь, что красный провод подключен к контактному источнику питания, а желтый провод — к источнику питания постоянной мощности.
Когда звук считается слишком громким?
Уровень звука выше 80 децибел может нанести вред слуху. Уровень звука выше 120 децибел может нанести прямое повреждение слуху. Вероятность повреждения слуха зависит от частоты и продолжительности прослушивания.
Как лучше всего выполнять чистку автомагнитола?
Для удаления отпечатков пальцев лучше всего использовать слегка влажную салфетку для уборки или мягкую чистую ткань. Пыль в труднодоступных местах лучше всего удаляется потоком сжатого воздуха.
В чем разница между FM и AM?
FM означает «частотная модуляция», AM — «амплитудная модуляция». Основная разница между FM- и AM-радиостанциями состоит в качестве звука.
Инструкция JVC KD-DV5307 доступно в русский?
Да, руководствоJVC KD-DV5307 доступно врусский .
Не нашли свой вопрос? Задайте свой вопрос здесь