
0 Комментарии
gesha13
-
Просмотр профиля
-
Сообщения форума
-
Личное сообщение
-
Записи в дневнике
-
Просмотр статей
, 06.04.2017 в 17:01 (1569 Просмотров)
Сообщение от *Серый*
Axis
Составлял знакомому инструкцию, может сгодится для начала:спойлер
Кратко о кнопках:
спойлер
Для прошивки 1.0.3:
спойлер
Метки:
инструкция
- Категории
-
Без категории
Что представляет собой Istick Pico Kit 75w? Какой конструкцией обладает такая электронная сигарета? В чем заключаются преимущества данного варианта? Получить ответы на эти и прочие вопросы поможет наш небольшой обзор представленного девайса.
Общие сведения
Istick Pico 75W TC – компактная система, рассчитанная на начинающих пользователей. Мощности устройства вполне достаточно для формирования густых облаков ароматного пара. Покупка прибора выглядит отличным решением на пути к использованию более продвинутых и дорогостоящих вариантов.
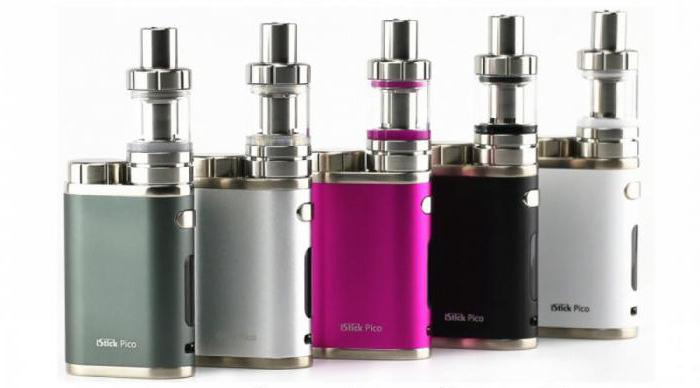
Istick Pico 75W предлагается пользователям в нескольких расцветках. На рынке представлены модели серебристого, черного, пурпурного и белого оттенка. Поэтому начинающий вейпер имеет возможность выбрать вариант, который наиболее соответствует его стилю.
Eleaf Istick Pico 75W TC удобно удерживать в руке. Девайс без проблем помещается в ладони. Кнопка для активизации устройства располагается на округленной, узкой части корпуса. Система содержит небольшой дисплей прямоугольной формы, на который выводятся основные показатели. Чуть ниже размещаются клавиши регулировки мощности «минус» и «плюс». На корпусе имеется отверстие для подключения зарядного устройства типа USB, а также отверстие, предназначенное для вывода газа.
Сверху имеется коннектор из стали и панель, что прикрывает аккумулятор. Указанные компоненты возвышаются над корпусом на пару сантиметров. В целом же, устройство отличается компактными параметрами.
К Istick Pico 75W прилагается понятная инструкция. Поэтому разобраться в управлении девайсом оказывается по силам даже тем пользователям, которые никогда не держали в руке электронную сигарету.
Параметры
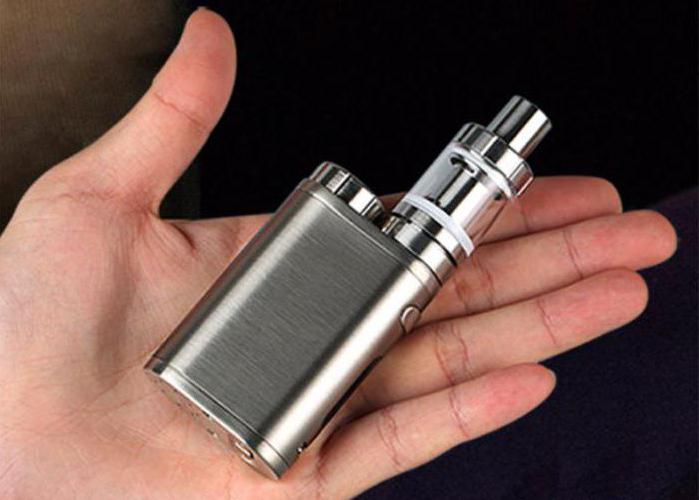
В переводе на русский язык Istick означает «спичечный коробок». Действительно, электронная сигарета подтверждает свое название. Ведь корпус запросто помещается в небольшой ладони, а его высота составляет каких-то 7 сантиметров. Что касается ширины приспособления, равняется параметр 23 миллиметрам. Вес электронной сигареты без аккумулятора – 114 грамм, а с батареей составляет 159 грамм.
Комплектация
Модель комплектуется стандартными для подобного рода электронных сигарет дополнительными аксессуарами. В коробке с устройством можно увидеть USB-кабель, с помощью которого приспособление подключается к компьютеру для зарядки и изменения прошивок. Также здесь имеется подробная инструкция по эксплуатации, где присутствуют описания на русском языке.
Дисплей
Istick Pico 75W обладает продуманным OLED-дисплеем, с которого удобно считывать информацию не только в темноте, но также при ярком солнечном освещении. На экране отображаются показатели напряжения, заряда аккумулятора, температуры. При необходимости дисплей может быть полностью отключен. Также предусмотрена функция переворота изображения на 180 градусов.
Клиромайзер
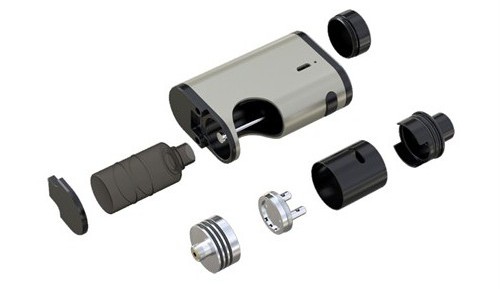
Электронную сигарету дополняет новый клиромайзер Eleaf 3 Melo. Istick Pico 75W благодаря этому приобретает более стильное внешнее оформление и обзаводится солидным функционалом. Элемент производится из металла и стекла. Клиромайзер имеет полностью разборную конструкцию. При необходимости можно заменить его коннектор либо стекло.
Главной особенностью клиромайзера Eleaf 3 Melo выступает заправка жидкостью через верх. В данных целях снимается крышка, после чего ароматное вещество заполняет бак, стекая по стенкам. При этом нет необходимости в отсоединении элемента от корпуса электронной сигареты.
Другим моментом является наличие невидимых для глаза отверстий, с помощью которых происходит регулировка силы затяжек. Спрятаны они под специальным колечком. Его вращение приводит к уменьшению либо увеличению тяги. Здесь нет никаких обозначений. По этой причине настраивать параметр приходится, ориентируясь на собственные ощущения.
Аккумулятор

В Istick Pico 75W предусмотрен аккумулятор типа 18650, который легко извлекается из корпуса устройства. Изготовитель электронной сигареты советует использовать батарейки с силой тока в 25 Ампер. Устанавливаются такие элементы в специальный подпружиненный отсек, что содержит плюсовой контакт, изготовленный из латуни.
Для зарядки аккумуляторной батареи может быть использован USB-порт. Подсоединение системы в сеть возможно также при помощи стандартного штепсельного устройства. Производителем не было заявлено об эксплуатации электронной сигареты в ходе зарядки. Поэтому не стоит прибегать к таким действиям, чтобы лишний раз не рисковать.
Нужно отметить, что аккумуляторная батарея не идет в комплекте с Istick Pico 75W. Приобретать представленный элемент необходимо отдельно. Подбирать батарейку рекомендуется, исходя из желаемого времени автономной работы системы.
Защита системы
Электронная сигарета Istick Pico 75W защищена от следующего:
- Коротких замыканий.
- Перегрева платы.
- Перепадов напряжения при зарядке аккумулятора.
- Перегрева испарителя.
- Чрезмерной перезарядки.
- Скопления газов в середине устройства.
Istick Pico 75W: прошивка
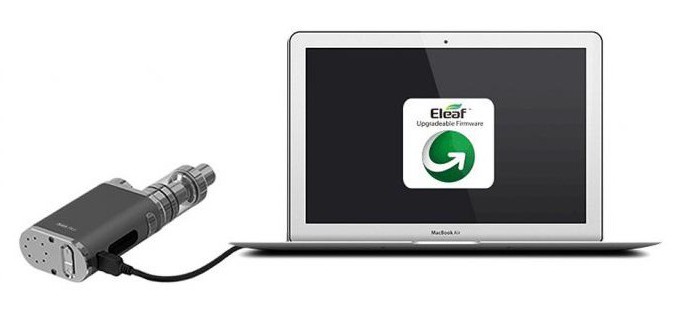
Устройство поддерживает обновляемую прошивку, в ходе которой добавляются новые функции и устраняются недочеты в работе приспособления. В данных целях электронная система подключается к компьютеру через USB-шнур, который имеется в комплекте. Прошивки скачиваются непосредственно с сайта изготовителя девайса.
На данный момент последними выступают изменения версии 1.03. Такая прошивка вносит в функционирование системы Istick Pico 75W следующие улучшения:
- На дисплее начинает отображаться количество выполненных затяжек.
- Пользователю становится доступна информация о времени, затраченном на затяжки.
- Согласно просьбе фанатов устройства, прошивка возвращает изначальный вид интерфейса, который был представлен в базовой модели.
Инструкция по эксплуатации
Для включения электронной сигареты Istick Pico 75W необходимо пять раз быстро нажать на клавишу, что отвечает за питание. Автоматический запуск системы произойдет, если к корпусу присоединяется аккумулятор. Чтобы отключить устройство, следует повторить вышеуказанные действия.
Переход в меню происходит благодаря 3-кратному нажатию на клавишу питания. Кнопки «плюс» и «минус» позволяют изменять функции приспособления и переключаться между отдельными режимами работы. В целях подтверждения нужного варианта следует еще раз нажать на клавишу питания.
В модели также предусмотрена возможность блокировки. Для этого на несколько секунд зажимается одновременно кнопка «плюс» и «минус». Затем на дисплее должна появиться надпись Lock. Разблокировать систему можно, повторив операцию.
Преимущества
Eleaf Istick Pico 75W обладает целым рядом достоинств. Среди таковых стоит отметить:
- Компактные размеры и незначительный вес.
- Достаточно высокую мощность.
- Качественную сборку.
- Абсолютную безопасность эксплуатации.
- Тонкую регулировку температурных режимов.
- Возможность установки отдельных прошивок.
Недостатки
Сравнительным минусом электронной сигареты Eleaf Istick Pico 75W выступает несколько непривычное расположение кнопок для управления. Кроме того, на устройство можно устанавливать далеко не все баки для жидкости. Впрочем, такие недостатки выглядят не столь существенными после продолжительного знакомства с эксплуатацией системы.
В заключение
Как видно, электронная сигарета Eleaf Istick Pico 75W TC выглядит довольно неплохим вариантом для начинающих пользователей. Радует здесь наличие широкого ряда расцветок, интуитивно понятное управление, возможность обновления прошивок. Очевидными плюсами также выступает защита устройства от перегрева, скачков напряжения, коротких замыканий. В целом же, устройство не разочарует людей, которые только знакомятся с культурой вейпинга.

Подготовка к использованию:
1. Извлеките из упаковки батарейный блок, атомайзер и испаритель.
2. Потяните картридж вверх, чтобы извлечь его из базы.
3. Извлеките испаритель из упаковки и вставьте его в отверстие снизу картриджа. Обратите внимание, что испаритель может быть корректно установлен только в одном положении.
4. Вставьте картридж в базу. Картридж может быть правильно установлен только в одном положении.
5. Откройте силиконовую заглушку на картридже, вставьте носик флакона с жидкостью в отверстие заправки и заправьте картридж.

6. Плотно закройте заглушку и дайте картриджу постоять минимум 5 минут.
7. Открутите крышку аккумуляторного отсека и установите аккумулятор формата 18650. При установке соблюдайте полярность. Используйте только качественные аккумуляторы с токоотдачей не менее 25А. Закрутите крышку аккумуляторного отсека.

8. Вкрутите картридж с базой в коннектор батарейного блока.
9. Включите iStick Pico Le быстрым пятикратным нажатием на кнопку Fire.
10. При помощи кнопок + и – установите рекомендуемую для испарителя мощность. Рекомендуемая мощность указана на нижней части испарителя.
11. Eleaf iStick Pico Le готов к использованию. Для парения делайте затяжку одновременно с нажатием на кнопку Fire.
Настройка Eleaf iStick Pico Le:
- Чтобы включить или выключить iStick Pico Le быстро нажмите на кнопку Fire 5 раз.
- Чтобы сделать затяжку iStick Pico Le более тугой или свободной, вращайте кольцо регулировки затяжки на базе под картриджем.
- Чтобы изменить режим работы iStick Pico Le войдите в меню настройки путем быстрого трехкратного нажатия на кнопку Fire. С помощью кнопок + и – выберете желаемый режим работы и подтвердите выбор нажатием на кнопку Fire. Power – вариватт, позволяющий устанавливать мощность в ваттах. TEMP Ni – режим температурного контроля для испарителей и намоток из никеля, позволяет задавать максимальную температуру нагрева намотки. TEMP Ti — режим температурного контроля для испарителей и намоток из титана. TEMP SS — режим температурного контроля для испарителей и намоток из нержавеющей стали. TEMP M1 – режим температурного контроля с ручной установкой температурного коэффициента сопротивления намотки.
- Для входа в меню дополнительных настроек быстро нажмите на кнопку Fire 3 раза и выберите пункт SYSTEM. SCRN on/off – позволяет включать или отключать дисплей во время использования. Preheat – преднагрев, повышающий мощность на 35% в течение первых 3 сек. затяжки. Over Time – позволяет задать ограничение времени на затяжку. M1 Set – позволяет задать температурный коэффициент сопротивления для режима TEMP M1. VERN Check – отображает информацию о версии ПО и чипсета. DEFAULT – позволяет выполнить сброс настроек до заводских установок. VPW SET – выбор отображения дополнительной информации на дисплее.
- Чтобы включить или выключить функцию AST, одновременно нажмите и удерживайте кнопки Fire и +. AST работает только с совместимыми испарителями, уберегая их от перегорания при недостаточном количестве жидкости в картридже.
- Чтобы заблокировать или разблокировать кнопки регулировки iStick Pico Le, одновременно нажмите и удерживайте кнопки + и -.
Зарядка Eleaf iStick Pico Le:
Чтобы зарядить Eleaf iStick Pico Le подключите Type-C кабель к разъему зарядки на батарейном блоке, а второй конец кабеля подключите к сетевому адаптеру или компьютеру. Не используйте адаптеры с выходным напряжением больше 5V. Во время зарядки на дисплее Eleaf iStick Pico Le будет отображаться значок батареи, по окончании зарядки дисплей погаснет.
Возможные проблемы в работе Eleaf iStick Pico Le:
- На дисплее Eleaf iStick Pico Le отображается надпись Check Coil. Отсутствует контакт с испарителем. Убедитесь, что испаритель корректно установлен, картридж правильно вставлен в базу и база до конца вкручена в коннектор батарейного блока.
- На дисплее Eleaf iStick Pico Le отображается надпись Max Power. Достигнута максимальная допустимая для намотки мощность. Например, при установке испарителя с сопротивлением выше 1.0 Ом, мощность не может быть установлена выше 20 Вт.
- На дисплее Eleaf iStick Pico Le отображается надпись Low Volt. Низкий заряд аккумулятора. Вейп необходимо зарядить.
- На дисплее Eleaf iStick Pico Le отображается надпись Short. Короткое замыкание на испарителе. Убедитесь, что картридж и испаритель установлены корректно и контакты испарителя, базы и коннектора не загрязнены. Если это не помогает, попробуйте использовать новый испаритель.
- На дисплее Eleaf iStick Pico Le отображается надпись Over 10S. При затяжке дольше 10 сек. Подача питания автоматически прекращается во избежание перегрева и выхода испарителя из строя. Постарайтесь делать более короткие затяжки.
- На дисплее Eleaf iStick Pico Le отображается надпись Too Hot. Это происходит при длительном и активном использовании устройства и связано с перегревом. Прекратите использование вейпа и дайте ему остыть 15-20 минут.
- На дисплее Eleaf iStick Pico Le отображается надпись Weak Power. Это может быть вызвано низким зарядом аккумулятора или низкой токоотдачей, когда аккумулятор не может выдать необходимую мощность. Попробуйте зарядить аккумулятор, если проблема остается, аккумулятор необходимо заменить на новый с токоотдачей не менее 25А.
Используйте следующие испарители для Eleaf iStick Pico Le:
- Eleaf GX-K Coil 0.2Ω. Испаритель Eleaf GX-K (сетка, кантал, 0.2 Ом, 50-80 Вт, свободная затяжка).
- Eleaf GX Coil 0.5Ω. Испаритель Eleaf GX (сетка, AST, 0.5 Ом, 25-45 Вт, свободная затяжка).
- Eleaf GX Coil 0.2Ω. Испаритель Eleaf GX (сетка, AST, 0.2 Ом, 50-80 Вт, свободная затяжка).
The iStick Pico – Get to know your new box mod!
The Eleaf iStick Pico is a box mod with 510 threading and a wattage range from 1 to 75W for compatibility with nearly every 510 attachment. It has temperature control modes for nichrome, titanium and stainless steel heating elements with a range of 200-600 degrees Fahrenheit. Temperature information, battery life, resistance and wattage are all displayed on the Pico’s crisp OLED screen along with other alerts. The Pico’s body is built from corrosion resistant aluminum-zinc alloy and stainless steel to be durable and long lasting. The Pico is powered by a single 18650 battery and charges through standard micro-USB for convenience. Firmware upgrades are also available through Eleaf’s website and add additional settings and allow changes to be made to the logo and display layout. We suggest pairing it with a Saionara Vaporizer or the Saionara Top Airflow Vaporizer for some awesome clouds and great flavor!

Starting off with your iStick Pico!
You’ll need a high-amperage 18650 battery for your new iStick Pico! We recommend a Samsung 25R, but if you choose to pick out a different battery, you’ll want to be sure it has a flat top and not a button top so that it fits correctly. You’ll also want to make sure that the discharge current is above 20A (amps), and if it’s a previously used battery, make sure to check the wrap for tears or other damage! Once you’ve got a spiffy battery to use, you can get started! Simply remove the battery cap and pop your new battery into the iStick Pico with the positive (less exposed) terminal facing down into the device, and the negative end (more exposed) pointing out towards you! Screw on the battery cap and now you can power on the device by pressing the fire button 5 times. Before you start vaping, set your wattage within the range for the atomizer you’re using. If you purchased a Saionara Attachment from us, and you’re using Wattage mode, we recommend starting at 10 Watts and working your way up as needed (but not exceeding 20 Watts). Once you have it set, you’re good to hold down the fire button and take a draw. We recommend shorter three to five second button presses (also called “pulsing” the button) for the best experience! If you’d like to change your temperature display to Celsius from Fahrenheit, you can do so by lowering your temperature to 200 degrees F and continue holding the down button. The temperature display will then change to the highest Celsius temperature option. To switch back to Fahrenheit simply press the up button until you’ve gone beyond the highest Celsius temperature option and the display will switch back to the lowest Fahrenheit temperature option.

Get to know some of the safety settings and alerts!
The Pico is built to protect your atomizer and will shut off output if a vaping time is longer than ten seconds. It will also display an alert on the screen to let you know! For Saionara atomizers, shorter button pulses will provide the tastiest clouds in our experience! If your coil’s resistance is lower than 0.1 ohm in VW or Bypass mode or lower than 0.05ohm in any of the TC modes the iStick Pico will let you know with an “Atomizer low” message. When an atomizer short-circuits, the Eleaf Pico will show an “Atomizer Short” message or “No Atomizer” if an atomizer isn’t connected. If you receive either of these errors, we recommend checking your coil’s connection, or trying out a new coil! When the voltage of the battery cell goes below 3.1 V the iStick Pico mod will show a “Battery Low” message, then a “lock” message and you will need to charge the 18650 cell to unlock it. In TC modes your Pico will show a “Temp Protection” alert to let you know that your coil has reached your set temperature. If the temperature of the devices goes over the alert temperature then the output will shut off automatically for safety and the Eleaf Pico will show “Device Too Hot” to let you know. You can go back to using it once it’s cooled off! In any mode when the iStick Pico is working with an atomizer and the voltage drops below 2.9V, the Pico will show “Weak Battery” and the output power will be reduced. We recommend trying a new 18650 battery to fix this error!

SAFETY FIRST!
Don’t ever attempt to repair your iStick Pico by yourself! This not only voids your warranty, but also risks your personal safety! Don’t leave the Pico in high temperatures or damp areas. Don’t attempt to repair your iStick Pico or try to use parts for your Eleaf Pico that are from other brands. We also don’t recommend letting your kiddos play with it! We recommend inspecting your 18650 batteries often! If you notice any nicks, tears or other damage to the wrap, immediately discontinue use of that battery! Batteries can be rewrapped if their wraps are damaged, though we highly recommend researching the process beforehand, as it can be dangerous if performed incorrectly! Many local vape stores will also rewrap batteries as a service if needed!

Settings!
Your Pico has a stealth mode that you can turn on or off by pressing the fire button and the down button at the same time while your unit is turned on. Stealth mode allows you to vape with the LED screen off. If you want to check your screen in stealth mode, just press the fire button once. Your Pico also allows you to lock and unlock your adjustment buttons to avoid unintentional button pushing and to help keep your iStick Pico lasting for even longer. You can do this by pressing up and down at the same time for about 2 seconds while the unit is on. The screen will display the words “lock” or “unlock” to show you’ve done it correctly. We recommend locking the device before you toss it in your pocket or bag! Need to flip your screen to see it better? Press the up and down buttons together while the device is off and the display will flip 180 degrees.

Vaping Modes
Your iStick Pico has a few vaping modes to choose from. You can see your current mode by pressing the fire button 3 times quickly while the device is on and swap between the modes by pressing the up or down buttons to scroll through and then press the fire button to confirm your mode. The mode options are VW, Bypass, TC-Ni, TC-Ti, TC-SS, TCR-M1, TCR-M2, and TCR-M3. The M1, M2 and M3 modes are user-adjustable temperature control profiles, which you can set up to fit the coil you’re using!

VW Mode — Variable Wattage in your cottage!
VW mode allows you to use a coil that has a resistance within a range of 0.1ohm-3.5ohm. You can adjust the output wattage from 1W to 75W using the up and down buttons. If you hold either button you can increase or decrease the wattage mode more quickly.

Bypass Mode
Bypass Mode also allows you to use a coil that has a resistance within a range of 0.1ohm-3.5ohm but direct output voltage system is applied. The more charged the battery is, the higher the output voltage will be. 18650 battery cells start off around 4.2V and they lose power around 3.4V.

TC-NI, TC-TI, TC-SS, TCR-M1, TCR-M2, and TCR-M3
When you’re using any of these modes your device can separately support Nickel 200, Titanium, and Stainless Steel 316 coils. In TCR mode, your unit supports different temperature control coils within different TCR value ranges. You can set the TCR at different values within a resistance range of 0.05ohm-1.5ohm.

TCR Mode (M1, M2, and M3) — Temperature Control!
When your Pico is turned off, press the fire button and up button together to enter the TCR menu. You can press the up or down button to choose between M1, M2, and M3 modes and select one by pressing the fire button a single time. Once you’ve selected your mode, push the up or down buttons to increase or decrease the TCR values depending on your coil’s material and then press the fire button to confirm the value. These modes are 3 custom temperature control modes that can store your favorite 3 settings. TCR values are dependent on the coils you use. Nickel coils have a range of 600-700. Titanium coils have a range of 300-400. A nickel and iron alloy will have a range of 300-400 and a Stainless Steel 303, 304, 316, or 317 coil will have a range of 80-200. If you’re using the default titanium bucket coil with your Top Airflow Saionara, we recommend a TCR of 166, and for quartz bucket coils, we recommend a TCR value of 200! If you ever need a reference, we have our recommended settings for each coil on their respective listings!
Adjusting the Istick PICO Wattage
You can adjust your wattage in this mode from 1w to 75w by pressing the fire button 4 times to enter the menu, then using the up and down buttons to select your wattage level. You may also adjust your temperature from 200 degrees Fahrenheit to 600 degrees Fahrenheit by using the up and down buttons to move in ten-degree increments. If you hold either the up and down button, you can scroll through these temperatures more quickly. In this mode you can lock and unlock your resistance when the Pico is on by pressing the fire button and up button at the same time for a couple of seconds. This will lock or unlock the atomizer base resistance. If your resistance is locked, a lock sign will be displayed and an ohm symbol will be displayed when it is unlocked. You’ll want to lock the resistance when your coil is at room temperature for the best results. If you take your coil out and replace it or place a new one, the Eleaf Pico may maintain the same base resistance even if the coil resistance has increased from a rise in temperature. When you take your coil out in unlock mode and then replace it you may see a message saying “New coil up, same down” since coil resistance can increase within a certain range. If you’re using the same coil, you’ll want to press the down button or press the up button if it’s a new coil. Always unlock the resistance if you’re changing an atomizer or swapping a coil out for one of a different resistance. If you use a common coil or a coil with a resistance above 1.5 ohm in this mode by accident, your iStick Pico will switch back to VW mode automatically.

Let us know what you think!
Feel free to leave us a comment below and let us know if you found these instructions helpful!
Step One
Gather your iStick Pico, Atomizer and 18650 Battery.
The iStick Pico is a 75w maximum output device powered by a single 18650 Battery and supports the following modes: Variable Wattage, Bypass, TC-Ni, TC-Ti, TC-SS and TCR.
Depending on your Atomizer and Coil, you will be using the Variable Wattage, TC-Ni, or TC-SS modes only.
Please make sure you are using a proper high-drain 18650 cell. If you received your battery directly from MaxVapor, you received a Sony VTC5 or equivalent.
Step Two
Screw off the battery cap, put one high-drain 18650 Battery into the iStick Pico with the positive end facing down, then screw the battery cap back on.
You can turn the device on / off by pressing the Fire button 5 times in succession. Make sure the device is turned on for the next steps.
Before connecting the Atomizer, we are going to set the iStick Pico into a safe range to ensure we do not damage any of our coils.
First, put your iStick into Wattage mode by pressing the Fire button 3 times in quick succession, the iStick will show the current mode. Press the Up or Down button until Wattage is displayed, then press the Fire button.
Now use the Down button to set the wattage to around 10.0w. This should be a safe setting for any of the coils we will be using in the guide.
Step Three
Screw the Saionara or Divine Crossing v3 Atomizer onto the 510 threaded connector on the iStick Pico. Make sure you have a coil installed.
The Atomizer and Coil that you are using will determine which Vaping Mode and Power Level you need to be using to ensure the best vaping experience.
If you followed Step Two, you should currently be in Wattage Mode and set to 10.0w. Once you screw on the Atomizer you should see the resistance displayed on the screen.
We are using a Saionara Atomizer with a brand new Miracle A Coil that reads at 0.56 ohms. If you see No Atomizer on the screen, make sure everything is screwed down tight.
Each coil resistance can vary slightly, so do not worry if yours is not exactly the same.
Step Four
Now we need to put your iStick into the correct Vaping Mode for the coil you are using.
Saionara Wax Coil, Miracle Coils:
If you are using the Saionara Atomizer with the Original Wax Coil, Miracle Coil A, or Miracle Coil B you do not need to change modes as these coils run in Wattage Mode Only.
Saionara Black Ceramic / Stainless Steel:
If you are using the Saionara Atomizer with the Black Ceramic / Stainless Steel coil, you will need to put the iStick into Stainless Steel Temperature Control Mode. Press the Fire button 3 times in quick succession, the iStick will show the current mode. Press the Up or Down button until Temperature SS is displayed, then press the Fire button. If you are asked «New Coil Up, Same Down», press Up.
Divine Crossing v3:
If you are using the Divine Crossing v3 Atomizer, y ou will need to put the iStick into Nickel Temperature Control Mode. Press the Fire button 3 times in quick succession, the iStick will show the current mode. Press the Up or Down button until Temperature Ni is displayed, then press the Fire button. If you are asked «New Coil Up, Same Down», press Up.
Coil Settings
Now that you are in the correct Vaping Mode, find the correct settings below for the coil you are using. Note that these settings are recommendations only so feel free to experiment with what works best for you. If you are unsure, start low and work your way up.
Original Wax Coil: 15-28 Watts.
Miracle A: 7-15 Watts.
Miracle B: 7-15 Watts.
Black Ceramic / Stainless Steel: 15 Watts @ 320-440 Fahrenheit. (SS mode)
DC v3 10mm Donut: 30 Watts @ 300 — 340 Fahrenheit. (Ni mode)
DC v3 13mm Donut: 25 Watts @ 350-420 Fahrenheit. (Ni mode)
Temperature Control
For coils which support Temperature Control, you will need to adjust both the Wattage and Temperature.
Adjust Wattage:
Press the Fire button 4 times in quick succession to enter the wattage settings menu. Press Up or Down to increase or decrease the wattage level. Chose the appropriate settings based on the recommendations above.
Adjust Temperature:
The temperature can be adjusted from 100-315 Celcius or 200-600 Fahrenheit by pressing the Up or Down button. If you increase the temperature past 315 Celcius, you will enter Fahrenheit mode.
Resistance Lock:
Temperature Control works best when you lock the resistance of your coil. This should be done when you first install your new coil and when the device is at room temperature. Locking your resistance lets your device know the correct baseline so that temperature calculations work more accurately.
To Lock / Unlock resistance, press and hold the Fire button and Up button simultaneously for two seconds. The Lock or Ohm sign will appear depending on the current setting. Always make sure to Lock/Unlock resistance when changing to a new coil.
Loading and Using
Place a rice-grain or larger sized piece of concentrate directly into the atomizer, the best place to load will depend on the type of coil you are using. Pulse the Fire button lightly to melt the concentrate onto your coil and replace your atomizer cap.
For Wattage Mode Coils: You will need to pulse your Fire button to ensure you do not overheat your concentrate while vaping. Most users report a 5-4-4 pattern works well, this means holding the button for approximately 5 seconds, letting go of the button for a half second, fire for 4 seconds, etc.
For Temperature Mode Coils: No instructions are necessary for Temperature Control coils. Simply hold the Fire button down and inhale, your iStick will internally pulse your Atomizer to maintain proper temperatures.
Note: there is still a 10 second automatic cutoff in TC mode