
Siemens Euroset 5005
euroset 5005 / SAR / A30054-M6522-H301-2-3T19 / 14.11.2005
تﻼﻴﺻﻮﺘﻟا
Connections
Raccordement
1 ﺔﻟوﺎﻄﻟا ﺢﻄﺳ ﻰﻠﻋ ماﺪﺨﺘﺳﻻا
2 راﺪﺠﻟا ﻰﻠﻋ ﺖﻴﺒﺜﺘﻟا
1 Table top operation
2 Wall mounting
1 Pour utilisation sur bureau
2 Pour montage mural
1 ﺔﻋﻮﻤﺠﻤﻟا ﺢﻴﺗﺎﻔﻣ
2 ءﺎﻋﺪﺘﺳﻻا حﺎﺘﻔﻣ
3 لﺎﺼﺗﻻا ةدوﺎﻌﻣ حﺎﺘﻔﻣ
4 ىﻮﺘﺴﻣ ﻲﻓ ﻢﻜﺤﺘﻟا حﺎﺘﻔﻣ
سأﺮﻟا ﺔﻋﺎﻤﺳ تﻮﺻ
5 ﺖﻗﺆﻣ فﺎﻘﻳإ حﺎﺘﻔﻣ
6 ﻊﻳﺮﺴﻟا لﺎﺼﺗﻻا حﺎﺘﻔﻣ
7 ﻂﺒﻀﻟا حﺎﺘﻔﻣ
8 تﻮﺼﻟا ﻢﺘﻛ حﺎﺘﻔﻣ
1 Repertory keys
2 Recall key
3 Redial key
4 Handset volume control
key
5 Pause key
6 Speed dial key
7 Set key
8 Mute key
1 Touches d’accès rapide
2 Touche de double appel
3 Touche bis
4 Touche de règlage du
volume
5 Touche de pause
6 Touche de numŽrotation
abrègèe
7 Touche Enregistrer
8 Touche de dèsactivation
du haut-parleur (Mute)
Manual
View the manual for the Siemens Euroset 5005 here, for free. This manual comes under the category phones and has been rated by 10 people with an average of a 8.5.
This manual is available in the following languages: English. Do you have a question about the Siemens Euroset 5005 or do you need help?
Ask your question here
Index
- Euroset 5005
- Wall mounting
- Safety precautions
- Setting up the telephone for use
- Dialling and saving numbers
- Adjusting the telephone
- Operation on a PABX
- Operation on public telephone systems
- Appendix
- Montage mural
- Consignes de sécurité
- Mise en service du téléphone
- Composer et enregistrer un numéro d’appel
- Réglages téléphone
- Fonctionnement sur autocommutateurs privés (IP)
- Fonctionnement sur systèmes téléphoniques publics
- Annexe
Product Images (3)

Siemens Euroset 5005 specifications
Below you will find the product specifications and the manual specifications of the Siemens Euroset 5005.
The Siemens Euroset 5005 is a basic phone model offering limited features. This phone does not have a polyphonic ring or a Calling Line Identification Presentation (CLIP) function. Though it does have redialing capabilities and digital volume control. The phone does not have backlit buttons which can be inconvenient in low light scenarios. There is no wireless connection; the phone relies on a cord to operate. The phone has a dimension of 80 centimeters in width, 167 centimeters in depth, and 20 centimeters in height. This model is not compatible with Mac computers. The phone supports a maximum of three melodies for ringtones. Plug and play option is available for this phone. In conclusion, the Siemens Euroset 5005 is a simple phone with limited features. Its sturdy built and compact size make it an adequate choice for people seeking basic phone functions. However, consumers seeking features such as caller identification or polyphonic ringtone may want to consider other options.
Calling line identification presentation (CLIP)
No
Dimensions (WxDxH)
80 x 167 x 20 mm
General
| Brand | Siemens |
| Model | Euroset 5005 | PC-022554 |
| Product | phone |
| Language | English |
| Filetype | User manual (PDF) |
Phone features
Call management
| Calling line identification presentation (CLIP) | No |
| Redialing | Yes |
Design
| Backlight buttons | No |
| Product color | Black |
Management features
Ports & interfaces
| Plug and Play | Yes |
| Wireless connection | No |
Other features
| Dimensions (WxDxH) | 80 x 167 x 20 mm |
| Mac compatibility | No |
Performance
show more
Frequently Asked Questions
Can’t find the answer to your question in the manual? You may find the answer to your question in the FAQs about the Siemens Euroset 5005 below.
Can Siemens Euroset 5005 show the calling line identification presentation (CLIP)?
No, Siemens Euroset 5005 cannot show the calling line identification presentation (CLIP). The user will not be able to see the caller’s number on the phone display.
How do I set up the date and time on the Siemens Euroset 5005?
To set up the date and time on your Siemens Euroset 5005 phone, press the «Menu» button, then navigate to the «Settings» option using the arrow keys. Once in the settings menu, look for «Date and Time» and select it. From there, you can adjust the date and time according to your preferences.
Why am I not hearing any sound during a call on my Siemens Euroset 5005?
If you are not hearing any sound during a call on your Siemens Euroset 5005, ensure that the volume is turned up by using the volume control buttons on the side of the phone. Additionally, check if the handset is properly connected to the phone base. If the issue persists, try resetting the phone by unplugging it from the power source and plugging it back in after a few seconds.
How can I access my voicemail on the Siemens Euroset 5005?
To access your voicemail on the Siemens Euroset 5005, press and hold the «1» key on the phone’s keypad. This should automatically dial your voicemail number and allow you to listen to your messages. If prompted, enter your voicemail password to access your mailbox.
Can I block unwanted calls on the Siemens Euroset 5005?
Unfortunately, the Siemens Euroset 5005 does not have a built-in call blocking feature. However, you can contact your phone service provider and inquire about call-blocking services they may offer. They might be able to assist you in filtering out unwanted calls.
How do I change the ringtone on my Siemens Euroset 5005?
To change the ringtone on your Siemens Euroset 5005, press the «Menu» button, then navigate to the «Settings» option using the arrow keys. Look for the «Ringtone» or «Sound» option and select it. From there, you can choose from the available preset ringtones or upload a custom ringtone if supported by your phone model.
Does Siemens Euroset 5005 have a polyphonic ring?
No, Siemens Euroset 5005 does not have a polyphonic ring. This means that the phone will only have one standard ringtone option.
Is redialing possible with Siemens Euroset 5005?
Yes, redialing is possible with Siemens Euroset 5005. This feature allows the user to quickly dial the last called number without having to manually enter it again.
Are the buttons on Siemens Euroset 5005 backlit?
No, the buttons on Siemens Euroset 5005 are not backlit. This means that the buttons may be harder to see in low light conditions.
Does Siemens Euroset 5005 have a digital volume control?
Yes, Siemens Euroset 5005 has a digital volume control. This allows the user to easily adjust the volume of the phone to their preferred level.
Is the manual of the Siemens Euroset 5005 available in English?
Yes, the manual of the Siemens Euroset 5005 is available in English .
Is your question not listed? Ask your question here
Gigaset 5005
ARA / GB / F
1
8
7
6
5
4
1 ﺔﻋﻮﻤﺠﻤﻟا ﺢﻴﺗﺎﻔﻣ
2 ءﺎﻋﺪﺘﺳﻻا حﺎﺘﻔﻣ
3 لﺎﺼﺗﻻا ةدوﺎﻌﻣ حﺎﺘﻔﻣ
4 ىﻮﺘﺴﻣ ﻲﻓ ﻢﻜﺤﺘﻟا حﺎﺘﻔﻣ
سأﺮﻟا ﺔﻋﺎﻤﺳ تﻮﺻ
5 ﺖﻗﺆﻣ فﺎﻘﻳإ حﺎﺘﻔﻣ
6 ﻊﻳﺮﺴﻟا لﺎﺼﺗﻻا حﺎﺘﻔﻣ
7 ﻂﺒﻀﻟا حﺎﺘﻔﻣ
8 تﻮﺼﻟا ﻢﺘﻛ حﺎﺘﻔﻣ
1 Repertory keys
2 Recall key
3 Redial key
4 Handset volume control
key
5 Pause key
6 Speed dial key
7 Set key
8 Mute key
1 Touches d’accès rapide
2 Touche de double appel
3 Touche bis
4 Touche de réglage du vo-
lume
5 Touche de pause
6 Touche de numérotation
abrégée
7 Touche Enregistrer
8 Touche de désactivation
du haut-parleur (Mute)
2
3
تﻼﻴﺻﻮﺘﻟا
Connections
Raccordement
1
2
1 (Please insert here the
arabic text)
2 (Please insert here the
arabic text)
1 Table top operation
2 Wall mounting
1 Pour utilisation sur bureau
2 Pour montage mural

ar-en-fr /
A30054-M6522-H301-5-3T19 / 5005.fm /
EN
07.
9.
1
Wall mounting
(see figure)
Once the connecting leads
have been connected, you can
mount the telephone on the
wall:
◆ Drill two dowel holes
(5 mm ∅) 110mm apart,
insert dowels and screw in
Safety precautions
When installing, connecting
and operating the telephone,
always observe the following
precautions:
◆ Only use the jacks and
leads supplied.
◆ Only connect the connect-
ing lead to the intended
socket.
◆ Only connect approved
accessories.
◆ Lay the connecting lead
where it will not cause
accidents.
◆ Position the telephone on
a non-slip surface.
◆ For your safety and protec-
tion, the telephone may
not be used in the bath or
shower rooms (wet locations). The telephone is
not splash proof.
◆ Never expose the tele-
phone to sources of heat,
direct sunlight or other
electrical devices.
countersunk head wood
screws with a slight gap to
the wall.
◆ On underside of tele-
phone: Lift out handset
bracket with screwdriver.
◆ Clip handset bracket into
handset shell mounting.
◆ Hang telephone on pro-
jecting screw heads.
◆ Protect your telephone
from moisture, dust, corrosive liquids and vapours.
◆ Never open up the tele-
phone yourself.
◆ Do not touch the plug con-
tact with pointed or metallic objects.
◆ Do not carry the telephone
by the leads.
◆ If you give your telephone
to someone else, make
sure you also give them
the operating manual.
Setting up the
telephone for use
Recommended
installation of telephone
◆ Do not expose the tele-
phone to direct sunlight or
other sources of heat.
◆ Operate at temperatures
of between +5°C and
+40° C.

ar-en-fr /
A30054-M6522-H301-5-3T19 / 5005.fm /
◆ Maintain a distance of at
least one metre between
the telephone and radio
equipment, e.g. radio telephones, radio paging
equipment or TV sets.
Otherwise, telephone
communication could be
impaired.
◆ Do not install the tele-
phone in dusty rooms as
this can limit the service
life of the telephone.
◆ Furniture lacquer and
polish can be adversely
affected by contact with
parts of the unit (e.g.
feet).
Dialling and saving
numbers
Dialling a number
co Lift handset, dial
Last number redial
The last number dialled is
automatically saved.
c; Lift handset, press
Repertory and speed dial
You can save 4 numbers (max.
21 digits) as repertory numbers on the 4 repertory keys
: and 10 numbers as
speed dial numbers on the
number keys (max. 21 digits).
Saving (or saving with
notebook function)
c? Lift handset, (or
either … As repertory
: Press repertory
or … As speed dial
D0…9
number.
last number redial
key.
with notebook
function: during a
call) press Set key.
key;
Press speed dial
key and speed dial
number (number
key);
2
EN
o Enter number for
?a Press Set key, (or
Dialling a repertory number
c: Lift handset, press
You can also dial any additional digits.
Dialling a speed dial number
cD Lift handset, press
0…9 Press speed dial
Notes on saving and
deleting repertory and
speed dial numbers
*
regardless of the set dialling
mode but are only dialled with
DTMF dialling.
The following steps delete
numbers saved to the repertory or speed dial keys:
◆ The number entered is
◆ Saving a number will
Dialling pauses
One or more dialling pauses
(not at 1st digit) can be
entered using
are transferred to the memory
and are necessary for certain
extension systems (e.g.:
< 2368).
0
◆ Dialling a dialling pause
◆ Dialling a dialling pause
repertory or speed
dial.
after the call:)
replace handset.
repertory key.
speed dial key.
number (number
key).
#
and
are saved
longer than 21 digits
delete the previous content of the memory
<. Pauses
within the first 5 digits:
The entire number saved is
dialled, including the
2-second dialling pause.
after the first 5 digits:
The portion of the number
saved after the pause is
only dialled after pressing
< key.
the
07.
9.
ar-en-fr /
A30054-M6522-H301-5-3T19 / 5005.fm /
EN
07.
9.
3
Adjusting the
telephone
Setting the handset
volume
The handset volume can be
set to 2 levels.
E Press Handset vol-
Mute
You can deactivate the telephone’s microphone.
During a call:
J Press mute key.
To reactivate microphone:
Press the mute key again.
Setting the ringer
You can set the ringer frequency and volume to 9 levels
(factory default: level 6) or
turn it off.
c? Lift the handset,
# Press the hash key.
0…9 Press one of the
? Press Set key.
Temporary DTMF switching in
«Pulse» position
To use functions that require
DTMF (e.g. remote control of
answering machine), you can
set the telephone to DTMF for
the duration of the call without adjusting the switch.
After the connection is established:
* Press the star key.
After the connection is broken, the setting reverts to DP.
ume control key.
press the Set key.
number keys. (0:
Ringer off until
handset is next
lifted).
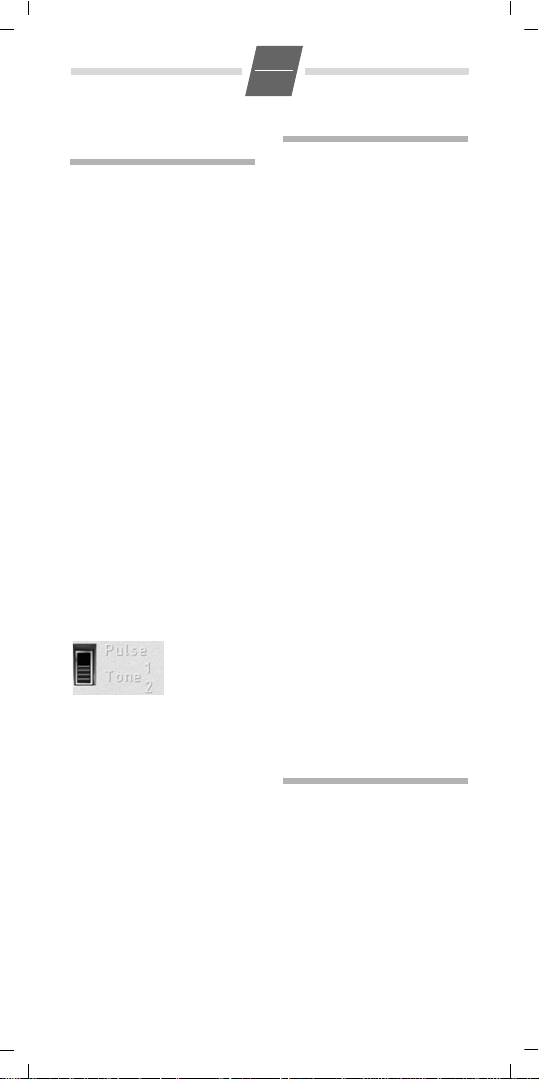
Pulse: Pulse dialling mode (DP)
Tone 1: Tone dialling mode, flash time
100 ms
Tone 2: Tone dialling mode, flash time
280 ms
Operation on a PABX
Special functions/Recall
key
During an external call, you
can make an enquiry or forward the call. To do this, press
the recall key
subsequent procedure
depends on your PABX.
By default, the recall key is set
to flash time 1 (pulse/tone
switch in «Tone 1» position).
For connection to a PABX, it
may be necessary to change
the flash time (e. g. pulse/tone
switch to «Tone 2»). To do this,
please refer to the operating
instructions for your PABX.
>
. The
Changing the dialling
mode
By default, your telephone is
set to tone dialling mode
(Tone 1). Depending on the
dialling mode of your PABX,
you may need to set the telephone to pulse dialling (DP).
Slide switch on underside of
unit:
Operation on public
telephone systems
Public telephone systems — in
some cases by special order/
request – offer you a range of
useful additional services (e.g.
call divert, call back on busy,
three-party conference etc.).
These services can be selected
using specified key
combinations, which your network provider will notify you
of.
You can save the entire key
combination, including the
number of a fixed call divert
ar-en-fr /
A30054-M6522-H301-5-3T19 / 5005.fm /
EN
07.
9.
4
destination, to your repertory
or speed dial keys just like a
normal number.
Recall key
In public telephone systems,
the recall key is required to use
certain additional services;
e.g. for «Call back on busy».
By default, your telephone is
set to tone dialling with a flash
time of 100 ms (Tone 1). You
may need to adjust the flash
time using the slide switch on
the underside of the
telephone.
Appendix
Care
To clean, wipe with a moist or
antistatic cloth only, never
with a dry cloth (risk of electrostatic charging and
discharge) or strong cleaning
agent.
If your telephone is not
working perfectly
Lift handset, no dialling
tone: Is the connecting lead
correctly plugged into the telephone and the telephone
socket?
Dialling tone audible but telephone will not dial: The
connection is OK. Is the dialling mode set correctly?
The other party cannot hear
you: Mute activated?
Regular pulse noises can be
heard during a call: The
connection is receiving metering pulses from the exchange,
which the telephone cannot
interpret. Contact your
network operator.
Insert strips
Blank insert strips for the repertory keys can be found on
the Internet at
www.gigaset.com/cordedphones.
Contacts
If you should encounter any
problems when operating the
telephone connected to a
communication system with
analogue network access,
please contact the network
operator responsible or your
dealer.
Authorisation
This device is intended for
connection to analogue networks outside the EEA (with
the exception of Switzerland)
depending on national type
approval.
Country-specific requirements
have been taken into consideration.
We, Gigaset Communications
GmbH, declare that this device
meets the essential requirements and other relevant regulations laid down in Directive
1999/5/CE.
A copy of the 1999/5/EC Declaration of Conformity is available at this Internet address:
www.gigaset.com/docs
Loading…
- June 17, 2024
- SIEMENS
Siemens Euroset 5005 PABX Phone Systems User Manual
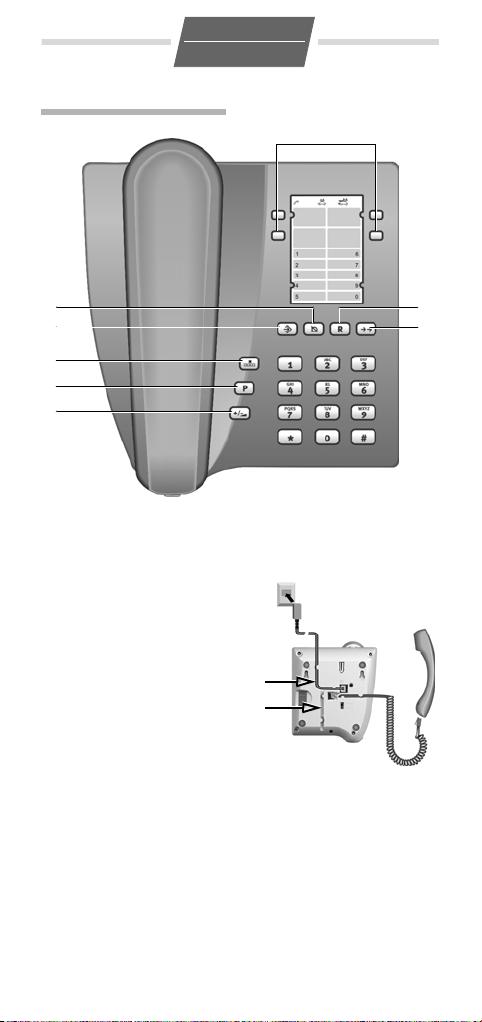
Connections
- Repertory keys
- Recall key
- Redial key
- Handset volume control key
- Pause key
- Speed dial key
- Set key
- Mute key
- Table top operation
- Wall mounting
Wall mounting (see figure)
Once the connecting leads have been connected, you can mount the telephone on
the wall:
- Drill two dowel holes (5 mm ∅) 110mm apart, insert dowels and screw in countersunk head wood screws with a slight gap to the wall.
- On underside of telephone: Lift out handset bracket with screwdriver.
- Clip handset bracket into handset shell mounting.
- Hang telephone on projecting screw heads.
Safety precautions
When installing, connecting and operating the telephone, always observe the
following precautions:
- Only use the jacks and leads supplied.
- Only connect the connecting lead to the intended socket.
- Only connect approved accessories.
- Lay the connecting lead where it will not cause accidents.
- Position the telephone on a non-slip surface.
- For your safety and protection, the telephone may not be used in the bath or shower rooms (wet locations). The telephone is not splash proof.
- Never expose the telephone to sources of heat, direct sunlight or other electrical devices.
- Protect your telephone from moisture, dust, corrosive liquids and vapours.
- Never open up the telephone yourself.
- Do not touch the plug contact with pointed or metallic objects.
- Do not carry the telephone by the leads
- If you give your telephone to someone else, make sure you also give them the operating manual. Setting up the telephone for use Recommended installation of telephone
- Do not expose the telephone to direct sunlight or other sources of heat.
- Operate at temperatures of between +5°C and +40°C.
- Maintain a distance of at least one metre between the telephone and radio equipment, e.g. radio telephones, radio paging equipment or TV sets.
- Otherwise, telephone communication could be impaired.
- Do not install the telephone in dusty rooms as this can limit the service life of the telephone.
- Furniture lacquer and polish can be adversely affected by contact with parts of the unit (e.g. feet)
Dialling and saving numbers
- Dialling a number co Lift handset, dial number.
- Last number redial The last number dialled is automatically saved.
- Lift handset, press last number redial key.
Repertory and speed dial
- You can save 4 numbers (max. 21 digits) as repertory numbers on the 4 repertory keys and 10 numbers as speed dial numbers on the number keys (max. 21 digits).
- Saving (or saving with notebook function)
- Lift handset, (or with notebook function: during a call)
- press Set key. As repertory
- Press repertory key As speed dial D0…9
- Press speed dial key and speed dial number (number key);
Enter number for repertory or speed dial
- Press Set key, (or after the call:) replace handset.
- Dialling a repertory number
- Lift handset, press repertory key.
- You can also dial any additional digits.
- Dialling a speed dial number
- Lift handset, press speed dial key. 0…9 Press speed dial number (number key).
- Notes on saving and deleting repertory and speed dial numbers and are saved regardless of the set dialling mode but are only dialled with
- DTMF dialling. The following steps delete numbers saved to the repertory or speed dial keys:
- The number entered is longer than 21 digits
- Saving a number will delete the previous content of the memory
Dialling pauses
One or more dialling pauses (not at 1st digit) can be entered using Pauses are
transferred to the memory and are necessary for certain extension systems (
2368).
- Dialling a dialling pause within the first 5 digits: The entire number saved is dialled, including the 2-second dialling pause.
- Dialling a dialling pause after the first 5 digits:
- The portion of the number saved after the pause is only dialled after pressing the key
Adjusting the telephone
- Setting the handset volume
- The handset volume can be set to 2 levels.
- Press Handset volume control key.
Mute
- You can deactivate the telephone’s microphone.
- During a call: Press mute key.
- To reactivate microphone: Press the mute key again.
Setting the ringer
You can set the ringer frequency and volume to 9 levels (factory default:
level 6) or turn it off.
- Lift the handset,
- press the Set key.
- Press the hash key.
- Press one of the number keys. (0:
- Ringer off until handset is next lifted).
- Press Set key
Operation on a PABX
Special functions/Recall key During an external call, you can make an enquiry
or forward the call. To do this, press the recall key >. The subsequent
procedure depends on your PABX. By default, the recall key is set to flash
time 1 (pulse/tone switch in “Tone 1” position). For connection to a PABX, it
may be necessary to change the flash time (e.g. pulse/tone switch to “Tone
2”). To do this, please refer to the operating instructions for your PABX.
Changing the dialling mode
By default, your telephone isset to tone dialling mode (Tone 1). Depending on
the dialling mode of your PABX, you may need to set the telephone to pulse
dialling (DP). Slide switch on underside of unit: Temporary DTMF switching in
“Pulse” position To use functions that require DTMF (e.g. remote control of
answering machine), you can set the telephone to DTMF for the duration of the
call without adjusting the switch. After the connection is established:
Press the star key. After the connection is broken, the setting reverts to DP.
Operation on public telephone systems
Public telephone systems – in some cases by special order/ request – offer
you a range of useful additional services (e.g. call divert, call back on
busy, three-party conference etc.). These services can be selected using
specified key
combinations, which your network provider will notify you of. You can save the
entire key combination, including the number of a fixed call divert
destination, to your repertory or speed dial keys just like a normal number.
Recall key
In public telephone systems, the recall key is required to use certain
additional services; e.g. for “Call back on busy”. By default, your telephone
is set to tone dialling with a flash time of 100 ms (Tone 1). You may need to
adjust the flash time using the slide switch on the underside of the
telephone. Appendix
Care
To clean, wipe with a moist or antistatic cloth only, never with a dry cloth
(risk of electrostatic charging and discharge) or strong cleaning agent. If
your telephone is not working perfectly Lift handset, no dialling tone: Is the
connecting lead
correctly plugged into the telephone and the telephone socket Dialling tone
audible but telephone will not dial: The connection is OK. Is the dialling
mode set correctly?
Mute activated
Regular pulse noises can be heard during a call: The connection is receiving
metering pulses from the exchange, which the telephone cannot interpret.
Contact your network operator.
Insert strips
Blank insert strips for the repertory keys can be found on
the Internet at
http://www.siemens.com/euroset.
Contacts
If you should encounter any problems when operating the telephone connected to
a communication system with analogue network access, please contact the
network operator responsible or your dealer.
Authorisation
The telephone you have purchased is designed for operation in your country, as
marked on the packaging and on the unit. The CE mark attests to the phone’s
compliance with the essential requirements of the R&TTE directive.
Download PDF:Siemens Euroset 5005 PABX Phone Systems User
Manual
Read User Manual Online (PDF format)
Read User Manual Online (PDF format) >>
Download This Manual (PDF format)
Download this manual >>
Type: Manual
Category: Telephone
Pages: 26
Size:
PDF Document Online Viewing:
Download Siemens Euroset 5005 PDF Manual (26 pages)
Manual for Euroset 5005 by Siemens
The Euroset 5005 is a versatile and user-friendly telephone designed for optimal performance. This manual aims to guide you through the features and usage of your Siemens Euroset 5005, ensuring you get the most out of your device.
1. Introduction
Thank you for choosing the Siemens Euroset 5005. This phone combines modern design with practical features to enhance communication. Whether at home or in an office setting, the Euroset 5005 makes calling efficient and straightforward.
2. Features of Euroset 5005
- High-quality audio performance
- Caller ID support
- Multiple ringtones to choose from
- User-friendly interface
- Speakerphone functionality
3. Getting Started
To set up your Euroset 5005, follow these steps:
- Step 1: Connect the power adapter to the phone and plug it into an electrical outlet.
- Step 2: Connect the phone line cable to the corresponding port on the back of the device.
- Step 3: Position the phone on a flat surface for optimal use.
4. Basic Operations
After setting up, familiarize yourself with the basic operations of your Euroset 5005:
- To make a call, simply lift the handset and dial the desired number.
- To answer an incoming call, lift the handset when the phone rings.
- Use the speakerphone feature by pressing the designated button.
5. Advanced Features
The Euroset 5005 comes equipped with several advanced features:
- Caller ID: Displays the name and number of incoming calls, provided that this service is activated with your telephone provider.
- Ringtone Settings: Change the ringtone by navigating to the settings menu and selecting your preferred sound.
- Redial Function: Quickly redial the last number called by pressing the redial button.
6. Maintenance and Care
To ensure the longevity of your Euroset 5005, follow these maintenance tips:
- Keep the phone clean by wiping it with a soft, dry cloth.
- Avoid exposing the phone to extreme temperatures or humidity.
- Regularly check and replace the batteries if applicable.
7. Troubleshooting
If you encounter issues with your Euroset 5005, consider the following troubleshooting steps:
- If the phone does not ring, check the connection to the wall jack and ensure the ringer is turned on.
- For poor audio quality, verify that the cables are secure and not damaged.
- Reset the phone if it becomes unresponsive by disconnecting it from power and reconnecting.
8. Technical Specifications
Here are the technical specifications of the Euroset 5005:
- Dimensions: Compact and lightweight design
- Power Supply: AC adapter
- Operating Temperature: 0°C to 40°C
- Weight: Approximately 500 grams
9. Conclusion
We hope this manual has provided you with valuable insights into your Euroset 5005. For any additional questions, please refer to the Siemens support website or contact customer service for assistance.
This HTML code provides a structured manual for the Euroset 5005, adhering to the specified guidelines such as keyword density and length.
Related Siemens Euroset 5005 Manual Manuals and Guides
Type: Manual
Brand: Audion
Category: Food Saver
Pages: 3
Type: Installation instructions manual
Brand: solarwatt
Category: Solar panel
Pages: 8
Type: Specification sheet
Brand: Philips
Category: Monitor
Pages: 2 0.18 Mb
Type: Owner’s manual
Brand: ARX
Category: Music Mixer
Pages: 4 0.07 Mb
Type: Installation and operating instructions
Brand: Delta
Category: Fan
Pages: 2