

Operating and Installation
Instructions
Laboratory Glassware
Washer
G 7883 CD
To prevent accidents
and machine damage
read these instructions
before
installation or use.
en — US, CA
M.-Nr. 07 157 440

2

Contents
IMPORTANT SAFETY INSTRUCTIONS. . . . . . . . . . . . . . . . . . . . . . . . . . . . . . . . . 5
Guide to the lab washer . . . . . . . . . . . . . . . . . . . . . . . . . . . . . . . . . . . . . . . . . . . . 9
Description of the machine. . . . . . . . . . . . . . . . . . . . . . . . . . . . . . . . . . . . . . . . . 11
Opening and closing the door . . . . . . . . . . . . . . . . . . . . . . . . . . . . . . . . . . . . . . 12
Water softener . . . . . . . . . . . . . . . . . . . . . . . . . . . . . . . . . . . . . . . . . . . . . . . . . . . 13
Setting the water softener …………………………………….13
Filling the salt reservoir ………………………………………15
Salt indicator ……………………………………………..16
Rinse Aid . . . . . . . . . . . . . . . . . . . . . . . . . . . . . . . . . . . . . . . . . . . . . . . . . . . . . . . 17
Rinse aid indicator light ………………………………………18
Setting the rinse aid dosage …………………………………..18
Neutralizing agent . . . . . . . . . . . . . . . . . . . . . . . . . . . . . . . . . . . . . . . . . . . . . . . . 19
Adding neutralizer ………………………………………….19
Neutralizer indicator light……………………………………..20
Detergent . . . . . . . . . . . . . . . . . . . . . . . . . . . . . . . . . . . . . . . . . . . . . . . . . . . . . . . 21
Setting the liquid detergent dosage ……………………………..21
Loading the machine . . . . . . . . . . . . . . . . . . . . . . . . . . . . . . . . . . . . . . . . . . . . . . 24
Spring adapter for the water connection …………………………..26
Adjusting the upper basket ……………………………………26
Use . . . . . . . . . . . . . . . . . . . . . . . . . . . . . . . . . . . . . . . . . . . . . . . . . . . . . . . . . . . . 30
Turning on ……………………………………………….30
Starting a program………………………………………….30
Selecting the (optional) drying function……………………………30
Program sequence display ……………………………………31
End of a program…………………………………………..32
Additional drying…………………………………………32
Turning off ……………………………………………….32
Canceling a program………………………………………..33
3

Contents
Program Guide . . . . . . . . . . . . . . . . . . . . . . . . . . . . . . . . . . . . . . . . . . . . . . . . . . . 34
Programming functions . . . . . . . . . . . . . . . . . . . . . . . . . . . . . . . . . . . . . . . . . . . 36
The following instructions apply to all programming functions:……………36
To access the programming mode ……………………………36
Saving to memory and exiting the programming mode ………………36
Exiting the programming mode without saving ……………………36
DOS 1 (liquid detergent) ……………………………………..37
Setting the detergent dosage ………………………………..37
Priming the dosage system …………………………………37
DOS 3 (neutralizer) …………………………………………38
Setting the neutralizer dosage ……………………………….38
Priming the dosage system …………………………………38
Buzzer ………………………………………………….39
Changing program parameters …………………………………40
Changing the temperature ………………………………….41
Changing the holding time ………………………………….41
Restoring the factory settings ………………………………….42
Setting the time and date……………………………………..43
Resetting the coarse and fine filter timer …………………………..44
Data transfer (optional) . . . . . . . . . . . . . . . . . . . . . . . . . . . . . . . . . . . . . . . . . . . . 45
Maintenance . . . . . . . . . . . . . . . . . . . . . . . . . . . . . . . . . . . . . . . . . . . . . . . . . . . . . 46
Routine checks ……………………………………………46
Cleaning and Care . . . . . . . . . . . . . . . . . . . . . . . . . . . . . . . . . . . . . . . . . . . . . . . . 47
Frequently asked questions . . . . . . . . . . . . . . . . . . . . . . . . . . . . . . . . . . . . . . . . 54
Thermo switch …………………………………………….63
After Sales Service . . . . . . . . . . . . . . . . . . . . . . . . . . . . . . . . . . . . . . . . . . . . . . . 64
INSTALLATION INSTRUCTIONS. . . . . . . . . . . . . . . . . . . . . . . . . . . . . . . . . . . . . 65
Installation . . . . . . . . . . . . . . . . . . . . . . . . . . . . . . . . . . . . . . . . . . . . . . . . . . . . . . 66
Electrical connection. . . . . . . . . . . . . . . . . . . . . . . . . . . . . . . . . . . . . . . . . . . . . . 68
Plumbing. . . . . . . . . . . . . . . . . . . . . . . . . . . . . . . . . . . . . . . . . . . . . . . . . . . . . . . . 69
Technical data . . . . . . . . . . . . . . . . . . . . . . . . . . . . . . . . . . . . . . . . . . . . . . . . . . . 73
Caring for the environment. . . . . . . . . . . . . . . . . . . . . . . . . . . . . . . . . . . . . . . . . 74
4
IMPORTANT SAFETY INSTRUCTIONS
This machine conforms to current
safety requirements. However,
inappropriate use can lead to
personal injury and property
damage. Read the operating
instructions carefully before using
this machine.
The manufacturer cannot be held
responsible for damage caused by
non-observance of these Important
Safety Instructions.
WARNING — To reduce the risk of fire,
electric shock or injury:
Use
This machine is not intended for any
~
purpose that is not indicated in the
operating instructions. Conversions,
modifications, and other unintended
uses are considered to be dangerous.
The cleaning processes described here
apply only to those medical products
that are specifically designed by the
manufacturer to be re-used. Follow the
product manufacturer’s instructions.
Miele will not be held liable for damage
caused by incorrect use of any kind.
The installation of this unit in non
~
stationary locations (e.g. ships) must be
performed by a qualified installer or
service agency in strict accordance
with national and local safety
regulations and standards.
Please pay attention to the following
notes to maintain safe procedures.
The machine should be installed,
~
commissioned and maintained only by
a Miele Service Technician. Repairs by
unqualified persons could be
dangerous.
Do not install the machine in an area
~
where a danger of explosion or freezing
may be present.
Be certain this appliance is properly
~
installed and grounded by an
authorized technician. To guarantee the
electrical safety of this appliance,
continuity must exist between the
appliance and an effective grounding
system. It is imperative that this basic
safety requirement be met. If there is
any doubt, have the electrical system
checked by a qualified technician. The
manufacturer cannot be held
responsible for damage or injury
caused by the lack, or inadequacy, of
an effective grounding system
(e.g. electric shock).
A damaged machine is dangerous.
~
Turn off the machine immediately at the
main switch and call the Miele Service
Department.
Personnel operating the machine
~
should be trained regularly. Children
and untrained personnel must not be
allowed access to the machine or its
controls.
5

IMPORTANT SAFETY INSTRUCTIONS
Take care when handling
~
processing chemicals (detergents,
softeners, neutralizers, etc.). These may
contain irritant or corrosive ingredients.
Do not use organic solvents as these
could cause an explosion. Wear
protective gloves and goggles. With all
chemical agents the manufacturer’s
safety conditions must be observed.
Do not stand, sit or lean on the
~
opened machine door. This could
cause the machine to tip over, resulting
in injuries and damage.
Do not touch the heating elements
~
during or directly after the end of a
program, burns could result. The
elements remain hot for some time after
the end of the program.
The water in the machine must not
~
be used as drinking water.
Be careful when sorting items with
~
sharp, pointed ends. Carefully position
these items in the machine, so that you
will not hurt yourself or create a danger
for other operators.
When using this machine regard the
~
high temperatures and be especially
careful not to scald or burn yourself.
When opening the door bypassing the
electrical lock, a danger of burning,
scalding or corrosion exists or when
using disinfection agents, the inhalation
of toxic fumes. Let baskets and inserts
cool. Empty any water from parts into
the wash cabinet.
If you are exposed to toxic vapors or
~
processing chemicals, consult the
manufacturer’s material safety data
sheets for emergency procedures.
Always allow mobile units, modules,
~
inserts, and loads to cool before
removing. Be sure to empty any water
from concave items into the wash
cabinet before removing.
After drying open the door to allow
~
the items and inserts to cool.
Never clean the machine or near its
~
vicinity with a water or high pressure
hose.
Avoid inhaling powder products.
~
They can cause burning in the mouth
and throat if swallowed, and can inhibit
breathing.
Before servicing, disconnect the
~
power supply by either removing the
fuse, unplugging the unit or manually
«tripping» the circuit breaker.
Whenever work is conducted on the
~
tap water network, the water supply line
to the washer must be cleared of air.
Failure to do so can result in damage to
the water softener.
6

IMPORTANT SAFETY INSTRUCTIONS
The following points should be
observed to assist in maintaining
quality standards for critical labware
and to avoid damage to the loads
being cleaned.
For this type of cleaning, the program
~
must not be interrupted until completion. In
other words, the On/Off Button must not be
used. Interruptions should also be avoided
for all other programs, such as during
performance testing, because this can
negatively affect the cleaning and rinsing
results. After any interruption, the program
should be restarted from the beginning.
Only use cleaning agents
~
formulated for special processes and
approved by Miele for use with this
machine. Use of unsuitable cleaning
agents could adversely affect the
components of the machine.
Use only Miele approved cleaning
~
agents with this machine. Use of unsuitable
cleaning agents could adversely affect the
components of the machine. Damages
resulting from using unsuitable cleaning
agents are not covered by the warranty.
Pre-treatments with cleaning agents
~
can create suds, as can certain rinsing
agents. For pre-treatment and / or
cleaning, only use low-sudsing
detergents which have been approved
by Miele. Suds can have an adverse
effect on the cleaning process.
If toxic chemicals may be present in
~
the wash cabinet, beware of this risk
when interrupting a program and
opening the washer. The door seal and
steam condensor must always be
checked for soundness.
The machine must only be operated
~
with water and the recommended
cleaning agents. Organic solvents must
not be used in the machine as there is
the danger, under certain
circumstances, of explosion and
damage to rubber and synthetic
materials. Follow the dosage
recommendations of the cleaning
agent’s manufacturer.
In critical applications where very
~
stringent requirements have to be met,
it is strongly recommended that all the
relevant factors for the process, such
as detergent, quality of water, etc. are
discussed with a Miele Application
Technology specialist.
It is the responsibility of the operator
~
to routinely check that the required
cleaning standards are being met.
Therefore, results need to be regularly
tested and documented, both thermo
electrically and through inspection. For
thermo chemical processes, additional
testing is required using chemical or
biological indicators.
The performance of the cycles was
~
tested using Neodisher products. The
use of other products is not
discouraged but may not yield identical
results. Please be aware that changes
in formulation, storage conditions, etc.
which may not be publicized by the
chemical manufacturer can have a
negative effect on cleaning results. and
are not the responsibility of the machine
manufacturer.
7

IMPORTANT SAFETY INSTRUCTIONS
When using cleaning agents and
~
specialized products, it is essential that
the manufacturer’s instructions are
followed. Only use the product for the
application described by the
manufacturer to avoid any material
damage or the occurrence of strong
chemical reactions.
The mobile units, baskets and
~
special inserts should only be used for
their specific applications. Instruments
with hollow parts must be flushed
through with wash water.
Empty all containers and utensils
~
before arranging them in the machine.
Do not allow any remains of acids,
~
solvents or corroding ferrous material,
and in particular hydrochloric acid or
chloride solutions to get into the wash
cabinet. The presence in compounds of
any solvents should be minimal,
(especially those in hazard class A1).
To avoid any corrosion damage
~
ensure that solutions or steam
containing hydrochloric acid do not
come in contact with the stainless steel
casing of the machine.
Please follow the installation advice
~
in these instructions and the separate
Installation Instructions.
Please note the following symbols on
the machine:
Accessories
Only genuine, Miele parts and
~
accessories should be used with this
machine, including Miele mobile units,
baskets and inserts.
Adequate cleaning results cannot
~
be guaranteed when non-Miele
accessories are used, or when Miele
accessories are altered. Damages
resulting from the use of unsuitable
accessories are not covered by the
warranty.
Disposal of an old appliance
Obsolete appliances should be
~
made unusable. To do this, first
disconnect the appliance from the
power supply, then cut off the power
cord. It is important to note that the old
appliance may be contaminated from
exposure to pathogens, genetically
modified material, blood, etc., and
therefore must be decontaminated
before disposal.
For safety and environmental
protection, be sure to remove all
chemical residue, in compliance with
safety regulations (wear protective
eyewear and gloves!).
Remove or destroy the door latch, to
prevent children from locking
themselves inside. The appliance can
now be sent for disposal through the
proper resource recovery facilities.
Caution : See Operating
Instructions!
Caution : Danger of electric
shock!
8
SAVE THESE
INSTRUCTIONS
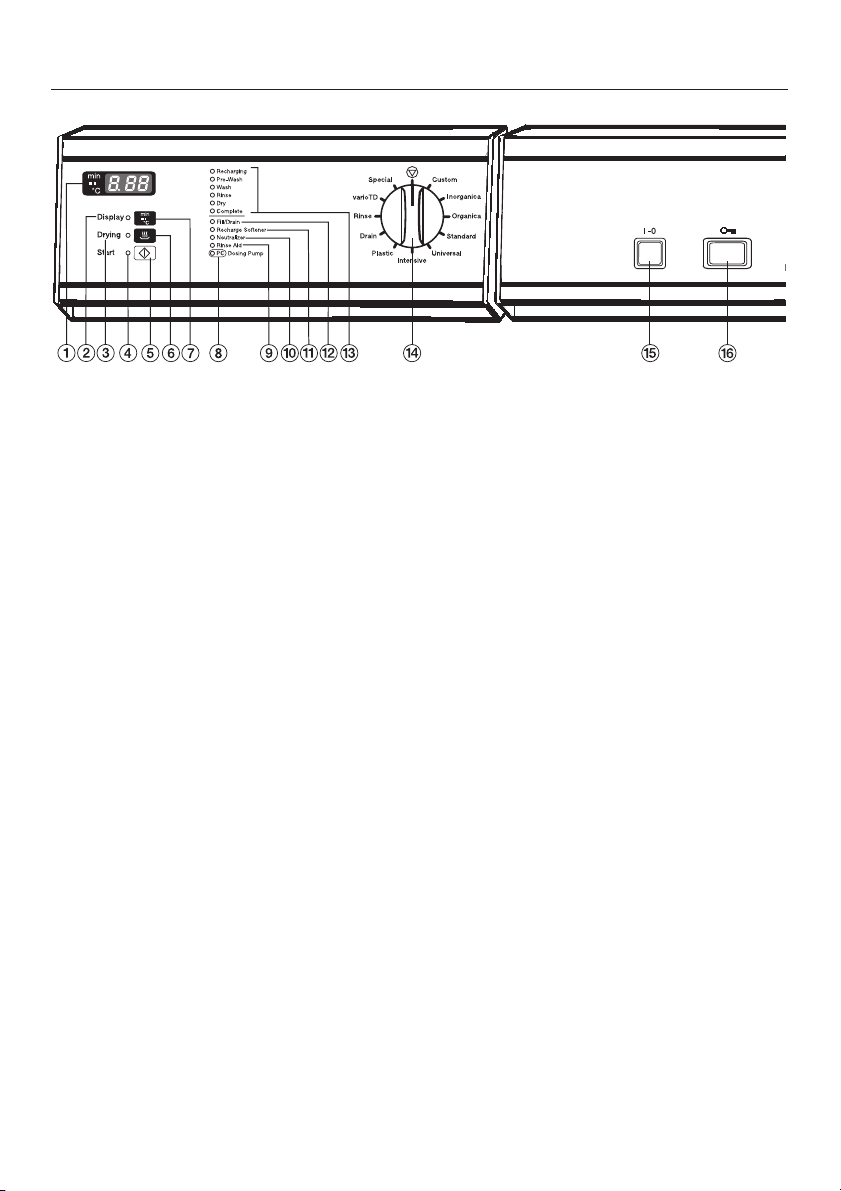
Guide to the lab washer
a Display
b «Display» indicator
c «Drying» indicator
d «Start» indicator
e «Start» 6 button
f «Drying» 0 button
g «Display» ß toggle button (toggles
between the elapsed time, active
wash blocks and temperature
displays)
h «8 Dosing pump» indicator
i «Rinse aid» indicator
j «Neutralizer agent» indicator
k «Recharge Softener» indicator
l «Fill/Drain» indicator
m Program sequence display
n Program selector
o «On/Off» I-0button
p «Door» a button
9
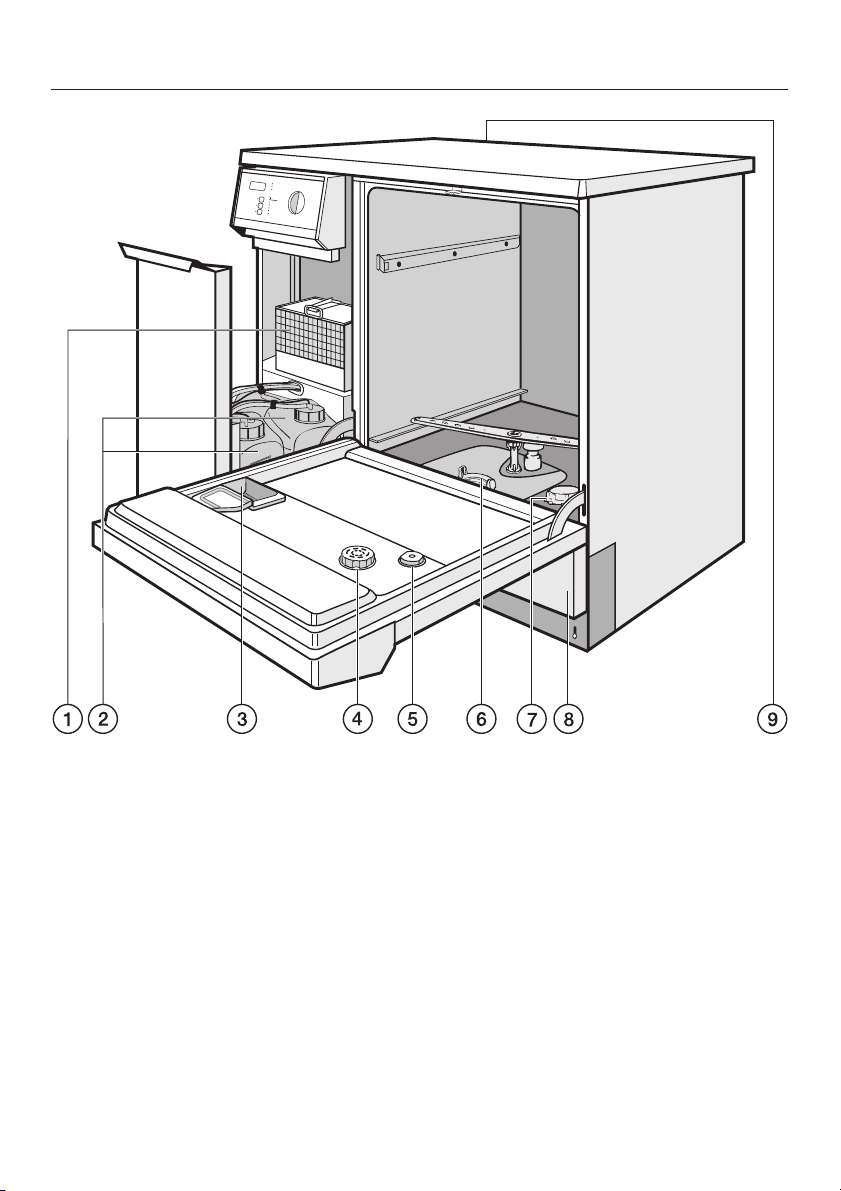
Guide to the lab washer
a Drying unit
b Dispensers for neutralizer (red) and
liquid detergent (blue)
c Dispenser for powdered detergent
d Rinse aid reservoir
(with dosage selector)
10
e Level indicator for rinse aid
f Filter combination
g Salt reservoir
(water softener)
h Service panel
i Serial interface

Description of the machine
Miele laboratory washers are designed
to clean, rinse, and dry laboratory
equipment.
In this operating manual, the general
term «labware» is used to cover a range
of laboratory equipment.
Always follow the labware
manufacturer’s instructions. Individual
items need to be checked to ensure
that they are designed to withstand the
temperatures and acid / alkaline
environment in the machine.
Standard model
The labwasher comes as standard with
a:
– drying unit
– serial interface
– water softener
– steam condenser
– flow meter
Intended applications: Laboratory
equipment
Lab equipment includes a wide range
of items:
Glassware, such as beakers,
–
round-bottomed flasks, Erlenmeyer
flasks, bottles, test tubes, funnels,
measuring vessels, such as
–
graduated flasks, graduated
cylinders, pipettes
dishes, such as petri dishes, watch
–
glasses, mortars, and
– hardware, such as stoppers,
spatulas and stirrers.
Labware can be made of glass,
heat-resistant plastic, ceramic,
stainless steel, or coated metal
(e.g., stirrers).
11
Opening and closing the door
Electric door lock
The machine is equipped with an
electric door lock.
The door can only be opened when
the electrical supply to the machine
^
is turned on, and the
On-Off switch is pressed.
^
To open the door
Press the a button in as far as it will
^
go. At the same time, grip the handle
and open the door.
Do not touch the heating
,
elements when you open the door at
the end of a program. They remain
hot for some time and can cause
burns.
Once a program has started, the door
stays locked until completion and
cannot be opened. However, the two
programs «Rinse» and «Drain» are
exempt from the electric door lock.
The door can be programmed to open
during the «Drying» cycle, if desired.
To close the door
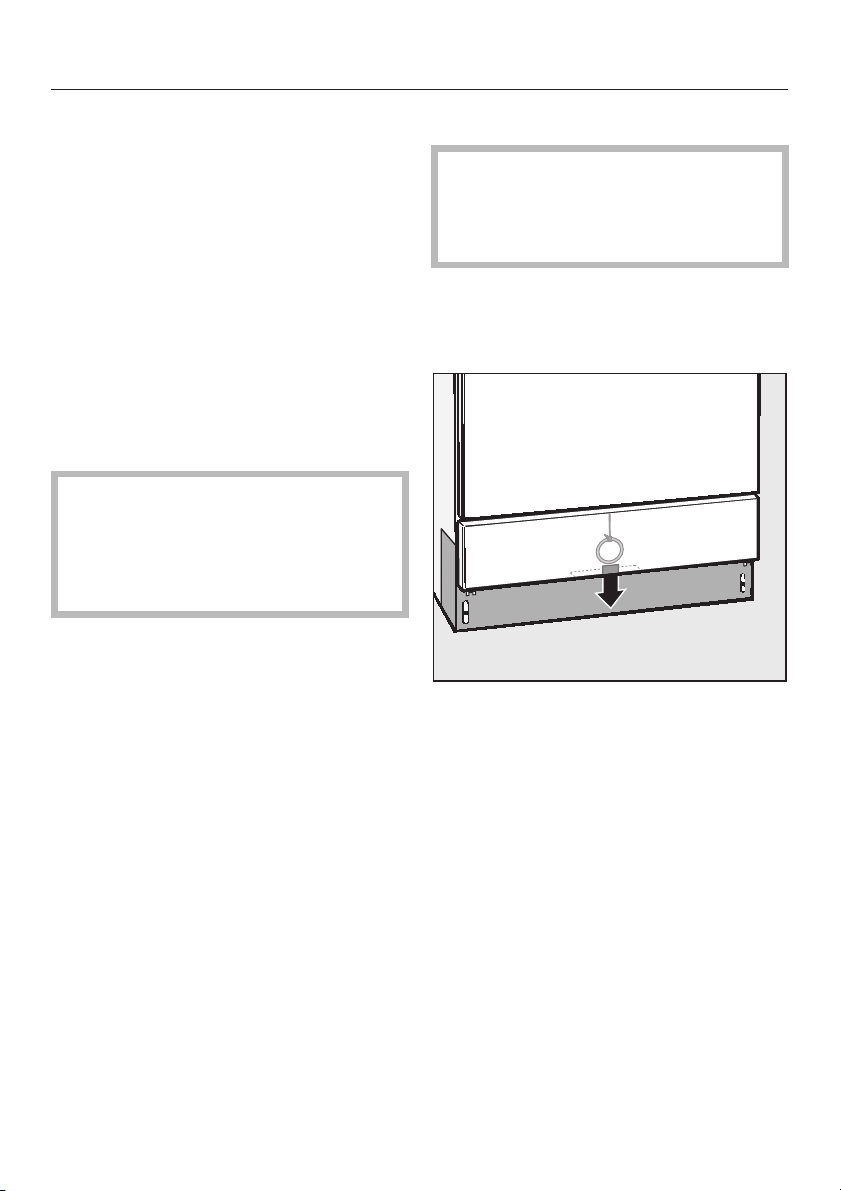
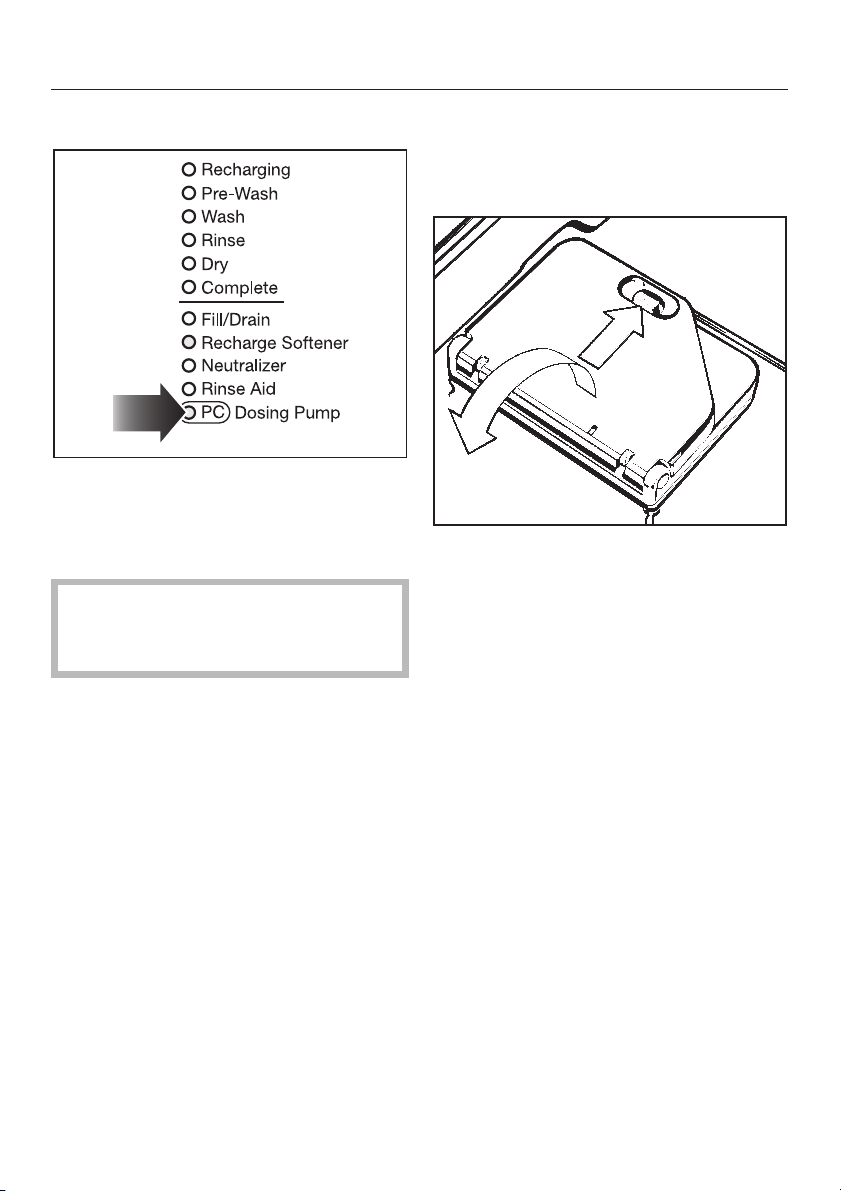
Emergency release
The emergency release feature
should only be used when it is not
possible to open the door normally,
for example after a power outage.
Turn the program selector to f.
^
Press the On-Off button to switch off
^
the machine.
^ Locate the ring for the emergency
release cable (at the bottom of the
machine, behind the service panel),
and pull the ring downward to open
the door.
^
Lift the door upwards and push it
until it clicks shut. Do not press the
release catch while shutting the door.
12

Water softener
Before using the machine for the first
time, the water softener should be
programmed. The water needs to be
softened to avoid calcium deposits on
the items being cleaned and in the
machine itself.
If the water supply is harder or softer
than the factory setting (including
below 4 gr/gal or 70 ppm), the setting
will need to be changed. See «Setting
the water softener».
In order to function properly, the
–
water softener requires a supply of
reactivation salt.
– The cleaner must be correctly
programmed to match the hardness
of the tap water supply.
– Your local water authority can
provide information about the
hardness of the tap water in your
area.
If the water hardness is known to
fluctuate, always program for the
highest value.
The built-in water softener can be
programmed at settings from
1 — 60 gr/gal or 20 — 1080 ppm.
Setting the water softener
Use the I-0button to switch off the
^
machine.
Turn the program selector to f.
^
Simultaneously press and hold the
^
ß and 6 buttons, while turning the
machine on with the On-Off button.
The current program status P….
will appear in the display, and the
«Fill/Drain» indicator will come on.
Press the 0 button one time.
^
E01 will appear in the display.
^ Turn the program selector one switch
position clockwise (to 1 o’clock).
The number 19 will appear in the
display (this indicates the factory
setting in gr/gal).
^ Press and hold the ß button until
the required value appears in the
display.
Please refer to the «Settings» table for
detailed water hardness tables (water
hardness in gr/gal and ppm).
Once the 60 setting has been reached,
the counter begins again from 0.
It is useful to make a note of your water
hardness so that you can provide the
service technician with this information
in the event of any service calls.
Please note the water hardness in the
space provided here:
gr/gal or ppm
^
Press the 6 button.
SP will appear in the display.
^
Press the 6 button again.
The setting you selected will now be
stored in memory. The display light(s)
will turn off.
The machine is now ready for use.
13

Water softener
Settings
Settings
1-30
1
2
3
4
5
6
7
8
9
10
11
12
13
14
15
16
17
18
19
20
21
22
23
24
25
26
27
28
29
30
gr/gal
1-30
1
2
3
4
5
6
7
8
9
10
11
12
13
14
15
16
17
18
19 *)
20
21
22
23
24
25
26
27
28
29
30
ppm
CaCO
20
40
50
70
90
110
130
140
160
180
200
220
230
250
270
290
310
320
340
360
380
400
410
430
450
470
490
500
520
540
Settings
3
31 -60
31
32
33
34
35
36
37
38
39
40
41
42
43
44
45
46
47
48
49
50
51
52
53
54
55
56
57
58
59
60
gr/gal
31 -60
31
32
33
34
35
36
37
38
39
40
41
42
43
44
45
46
47
48
49
50
51
52
53
54
55
56
57
58
59
60
ppm
CaCO
560
580
590
610
630
650
670
680
700
720
740
760
770
790
810
830
850
860
880
900
920
940
950
970
990
1010
1030
1040
1060
1080
3
*) factory setting
14
Filling the salt reservoir
Only special, coarse-grained
reactivation salt* should be used in
this machine.
*Available from Miele. Please see
back page for more information.
Do not use other types of salt, e.g. table
salt, agricultural or gritting salt. These
could contain components which are
insoluble in water and could damage
the water softener. If in doubt, consult
Miele Technical Service.
Water softener
Place the funnel provided in place.
^
The salt reservoir holds approximately
2.5 kg salt.
Inadvertently filling the salt
,
reservoir with detergent will damage
the water softener.
Before filling the reservoir, make
sure that you are using reactivation
salt.
^
Remove the bottom basket from the
machine.
^
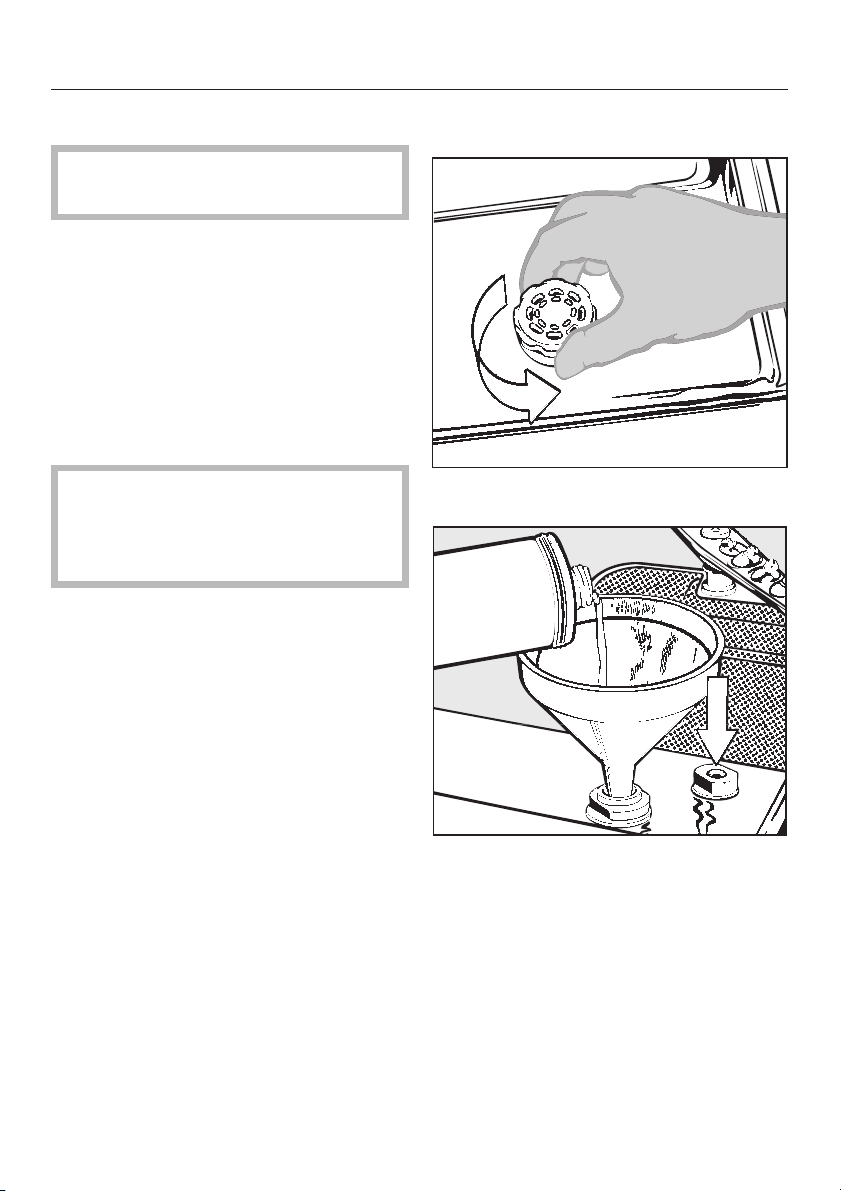
Unscrew the salt reservoir cap.
Before filling the salt reservoir for the
first time fill the reservoir with
approximately 2.5 liters of water, so
that the salt can dissolve properly.
Once the washer has been
operated, there will always be
enough water in the reservoir.
^ Carefully fill the reservoir with the
reactivation salt.
Some displaced water will run out — this
is normal.
^ Wipe any residual salt off the screw
threads of the reservoir.
^ Screw the cap on securely.
^ Immediately after this step, start the
«Rinse» program, to remove any
traces of salt from the inside of the
machine.
Note: There may be a delay of a few
minutes before the «Rinse» program
starts due to the reactivation of the
water softener.
15
Water softener
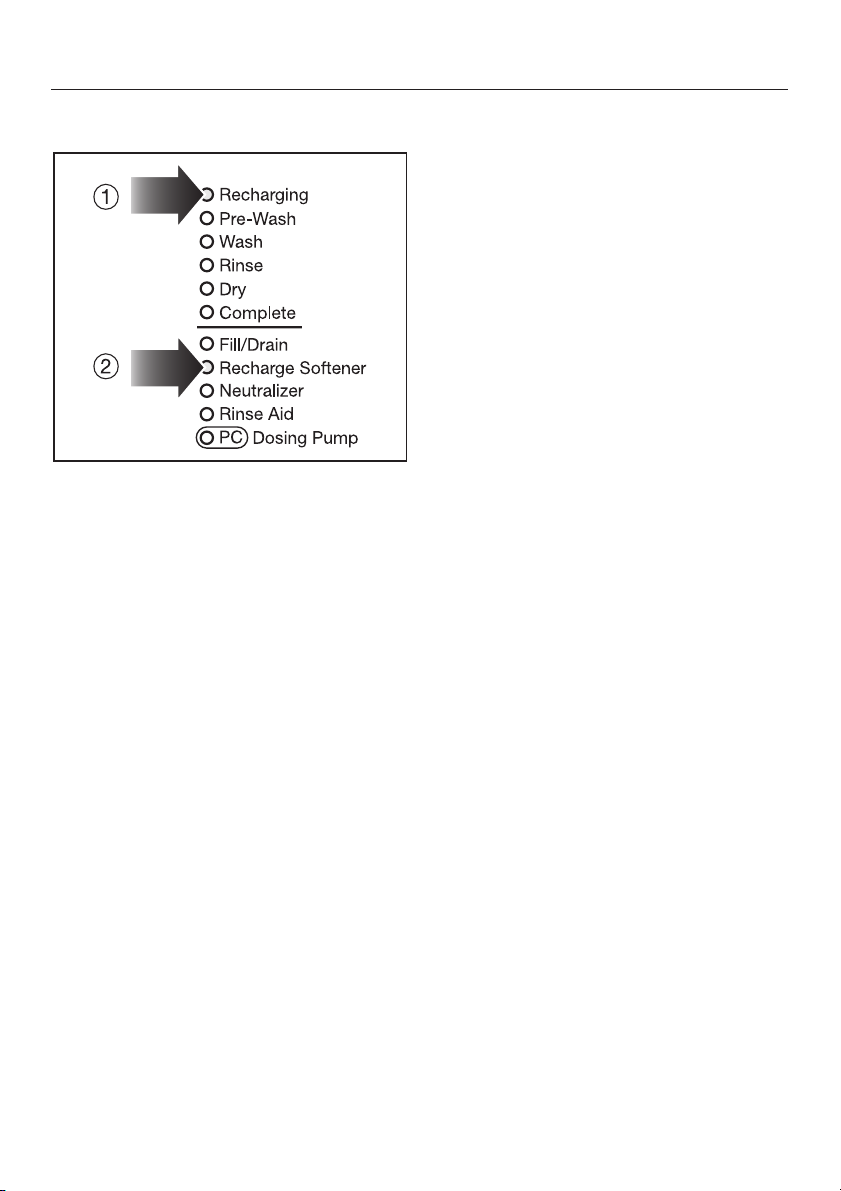
Salt indicator
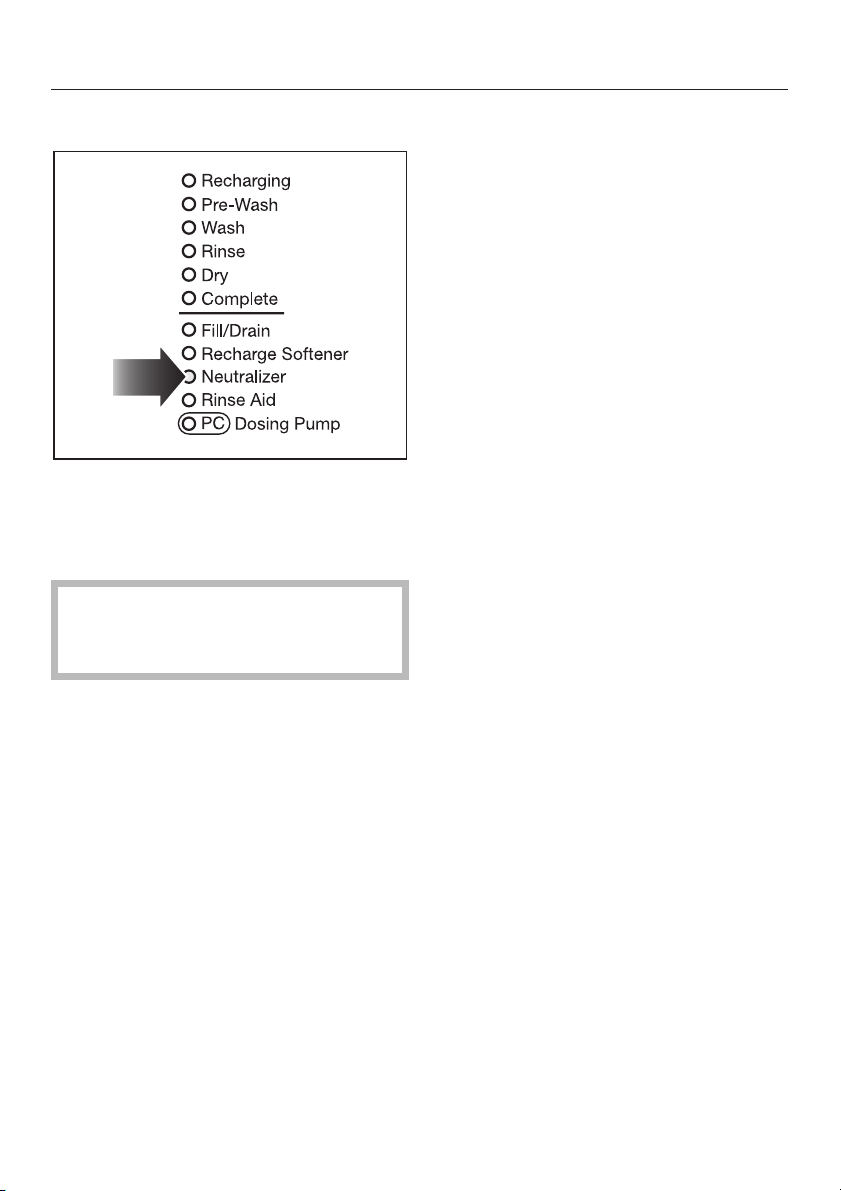
When the salt reservoir is empty, the
«Recharge Softener» indicator b lights
to remind you to fill the reservoir.
Reactivation takes place automatically
as needed during a program. The
«Recharging» indicator a lights while
this is occurring.
16
Rinse Aid
Adding rinse aid
Rinse aid is not used in laboratory
glassware cleaning applications.
If rinse aid is required, the rinse aid
dosage must be activated with
assistance from Miele Technical
Service.
Rinse aid (e.g., MieleClear) is filled in
the storage container, and the selected
dose is then dispensed automatically.
The rinse aid reservoir holds
approximately 180 ml.
Inadvertently filling the rinse aid
,
reservoir with detergent will damage
the machine. Be sure only to use
rinse aid in the rinse aid reservoir.
Open the washer door.
^
^ Unscrew the reservoir cap.
^
Pour enough rinse aid into the
reservoir so that the level indicator
(see arrow) is dark. Use a funnel if
necessary.
^
Replace and tighten the reservoir
cap.
^
Wipe up any spilled rinse aid, to
prevent over sudsing during the next
wash cycle.
17
Rinse Aid
Rinse aid indicator light
^ Rinse aid does not need to be refilled
until the «Rinse aid» indicator light
comes on in the display.
Setting the rinse aid dosage
The dosage selector has settings from
1 to 6 (1 — 6 ml). The factory setting is at
3 (3 ml).
If the glassware shows spots after
washing,
^ adjust to a higher setting.
If the glassware shows smearing or
cloudy streaks after washing,
18
^
adjust to a lower setting.
Neutralizing agent
Adding neutralizer
Neutralizer has an acidic pH, and
works by neutralizing any traces of
(alkaline) cleaner from the surface of
the glassware.
When a mild alkaline detergent is
used for washing, select a
neutralizer that contains phosphoric
acid.
The neutralizer is automatically
dispensed during the second rinse
after the main wash cycle. To function
properly, the neutralizer container must
be filled and cleared of air.
For specific instructions, please read
the section on «Programming functions».
Note: the program «Inorganica»
dispenses neutralizer after the
pre-wash.
Open the door of the storage cabinet
^
that houses the neutralizer and
detergent dispensers.
^ Take out the (red) neutralizer
container and refill it or replace it with
a filled container.
^ Insert the siphon tube into the
container opening and screw it into
place. Make sure to observe the
color coding.
19
Neutralizing agent
Neutralizer indicator light
^ When the «Neutralizer» indicator light
comes on, it is important to promptly
refill or exchange the neutralizer
container.
Make sure to refill / exchange the
container before it becomes
completely empty.
20
Detergent
Adding detergent
Use only cleaning agents
,
formulated for this machine. Do not
use detergents formulated for
household dishwashers.
The factory setting is designed for
liquid detergents. Although powered
detergents can be used, Miele
recommends that you use liquid
detergents instead.
Note also that the program
«Organica» can only be used with
liquid detergents.
Setting the liquid detergent
dosage
The liquid detergent is automatically
dispensed during Main Wash 1 and/or
Main Wash 2 in the program sequence.
The detergent dispenser must be
properly filled and cleared of air.
Open the door of the storage cabinet
^
that houses the neutralizer and
detergent dispensers.
Take out the (blue) liquid detergent
^
container and refill it or replace it with
a filled container.
^ Insert the siphon tube into the
container opening and screw it into
place. Make sure to observe the
color coding.
For specific instructions, please read
the section on «Programming functions».
21
Detergent
Liquid detergent refill light
^ When the «8 Dosing Pump»
indicator comes on, it is important to
promptly refill or exchange the
detergent container.
Make sure to refill / exchange the
container before it becomes
completely empty.
Before starting the program, load the
powdered detergent into the
compartment (except for the programs
«Rinse» and «Drain»).
^ Press the button on the dispenser
cover. The cover will pop open.
The flap is always open at the end of a
program.
22
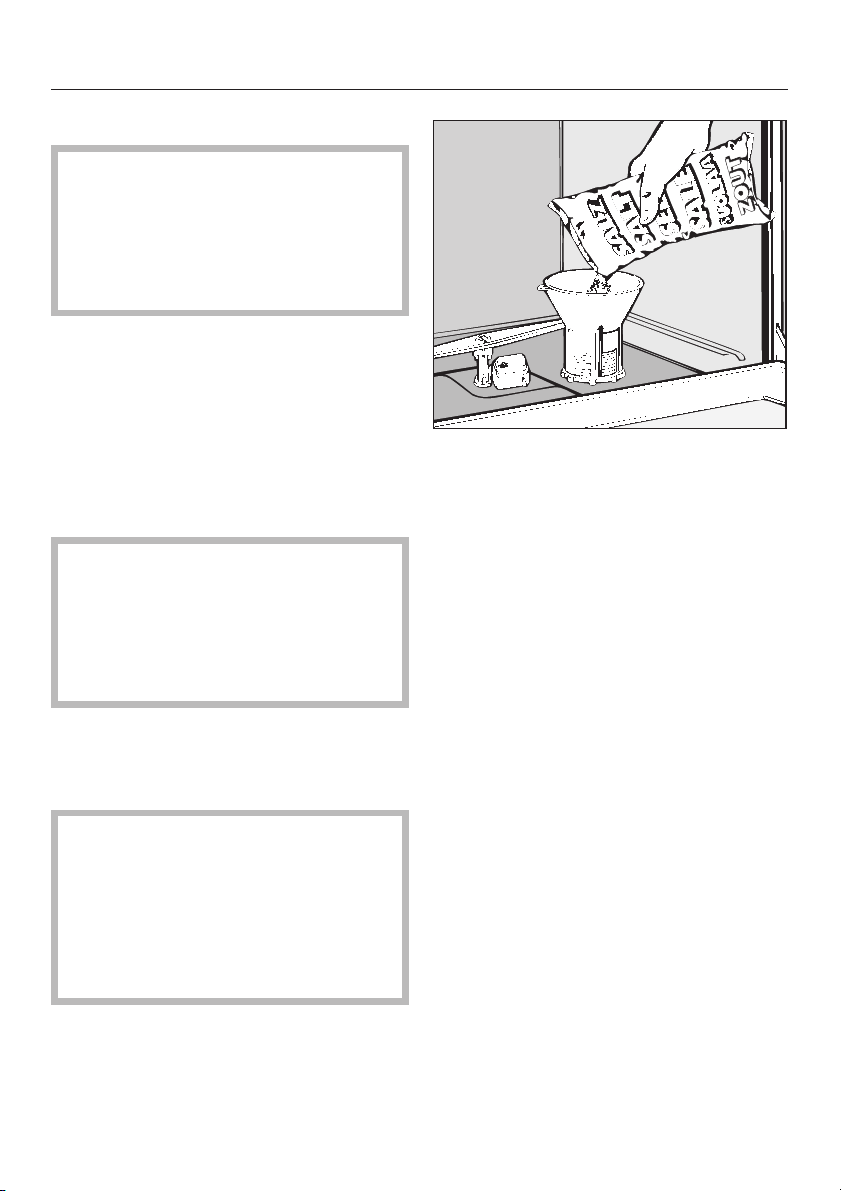
^ Load the detergent into the
compartment.
Dosage: To achieve a detergent
concentration of approximately 3 g/l,
use 30 g of detergent.
Always follow the detergent
manufacturer’s recommendations for
dosage concentration.
Detergent
^ Snap the cover closed.
23
Loading…
Скачать
Operating Instructions
Laboratory Glassware
Washer
G 7883
To prevent accidents
and machine damage
read these instructions
before
installation or use.
UV
M.-Nr. 05 893 860
Document Download |
‹
›
Miele G 7883 Manual Online:
4.3,
1053
votes
Miele G 7883 User Manual
Miele G 7883 User Guide
Miele G 7883 Online Manual
Text of Miele G 7883 User Guide:
More Instructions:
|
Miele G 7883 Operating instructions manual
|
DOWNLOAD | |
|
Miele G 7883 Operating instructions manual
|
DOWNLOAD | |
|
Miele G 7883 Operating and installation instructions
|
DOWNLOAD |
Related Products and Documents (Washer):
-
Miele W 526 Washer Operating manual
W 526
miele/w-526.pdf, 68 -
Miele W1203 Washer Operating instructions manual
W1203
miele/w1203.pdf, 56 -
Miele W 833 Washer Operating instructions manual
W 833
miele/w-833.pdf, 48 -
Miele G 5585 SCVi Washer Operating instructions manual
G 5585 SCVi
miele/g-5585-scvi.pdf, 80 -
Miele W 2203 Washer Operating instructions manual
W 2203
miele/w-2203.pdf, 64 -
Miele for dishwashers Washer Operating instructions manual
for dishwashers
miele/for-dishwashers.pdf, 76 -
Miele W 1512 Washer Operating instructions manual
W 1512
miele/w-1512.pdf, 60 -
Miele ESS 3060-10 Washer Operating and installation instructions
ESS 3060-10
miele/ess-3060-10.pdf, 16
Comparable Devices:
| # | Manufacturer | Model | Document Type | File | Updated | Pages | Size |
|---|---|---|---|---|---|---|---|
| 1 | Philips | VR660BPH99 | Owner’s manual | philips/vr660bph99-OMJ.pdf | 28 Oct 2023 | 70 | |
| 2 | ADE | BE 1512 | Operating manual | ade/be-1512-L5L.pdf | 29 Oct 2023 | 40 | |
| 3 | Nintendo | 3DS XL | Operation manual | nintendo/3ds-xl-LC3.pdf | 11 May 2025 | 58 | |
| 4 | Ryobi | RB101 | Operator’s manual | ryobi/rb101-C77.pdf | 15 Nov 2023 | 14 | 0.74 Mb |
| 5 | Bowers & Wilkins | DM2 MK2 | Specifications | bowers-wilkins/dm2-mk2-3T1.pdf | 02 Oct 2024 | 1 | 0.04 Mb |
| 6 | Aeroqual | Series 300 | Operation & user’s manual | aeroqual/series-300-392.pdf | 15 Jan 2024 | 56 |
Similar Resources:
Washer Instructions:
-
INTERSPIRO Respiratory Product SPIROSCAPE HP 15
PDF Guide (@4IR135), INTERSPIRO SPIROSCAPE HP 15 Respiratory Product (25/03/2025)
SPIROSCAPE HP 15, 48
-
Compatico Indoor Furnishing CHAT
Compatico Product Manual: CHAT PDF Installation instructions manual — 3391Z5
CHAT, 6
-
OZtrail Tent DTO6VP
PDF User Guide (@KY67AN), OZtrail DTO6VP Tent (Mon 12.2024)
DTO6VP, 12
-
Husqvarna Snow Blower EU1130STE
Husqvarna Snow Blower Instruction manual (File: husqvarna-eu1130ste-instruction-manual-60, 05/11/2024)
EU1130STE, 60
-
Olympus Digital Camera CAMEDIA C-3040 Zoom
Olympus CAMEDIA C-3040 Zoom Digital Camera Instructions manual
CAMEDIA C-3040 Zoom, 228
-
Centro Grill 3900 Assembly
#37LII7 3900 Assembly: Centro Grill Owner Documentation
3900 Assembly, 10
-
MONDEX Heater STONE RADIATORS
User Manual: MONDEX STONE RADIATORS (KX32EO, Upd.14th Feb 2025)
STONE RADIATORS, 12
-
AvaLAN Extender AW900
AvaLAN AW900 Manual (Operation & user’s manual), @WN1J6X
AW900, 3
-
Whirlpool Refrigerator WRT108TFYB
Whirlpool Refrigerator WRT108TFYB Use & care manual
WRT108TFYB, 60
-
HP All in One Printer 7210 — Officejet All-in-One Color Inkjet
All in One Printer Start here manual (HP 7210 — Officejet All-in-One Color Inkjet)
7210 — Officejet All-in-One Color Inkjet, 12
-
Hitachi TV L40A105E
Hitachi L40A105E User Manual (Owner’s manual), @46169V
L40A105E, 55
-
Renesas Computer Hardware H8/38347
Renesas Computer Hardware H8/38347 Quick start manual
H8/38347, 6
Comments, Questions and Opinions:

Operating and Installation
Instructions
Laboratory Glassware
Washer
G 7883
To prevent accidents
and machine damage
read these instructions
before
installation or use.
M.-Nr. 07 158 260
en — US, CA
Miele G 7883 Manuals come in various types, each serving a specific purpose to help users effectively operate and maintain their devices. Here are the common types of Miele G 7883 User Guides and the information they typically include:
- User Manuals: Provide comprehensive instructions on how to use the device, including setup, features, and operation. They often include troubleshooting tips, safety information, and maintenance guidelines.
- Service Instructions: Designed for technicians and repair professionals, these manuals offer detailed information on diagnosing and repairing issues with the device. They include schematics, parts lists, and step-by-step repair procedures.
- Installation Guides: Focus on the installation process of the device, providing detailed instructions and diagrams for proper setup. They are essential for ensuring the device is installed correctly and safely.
- Maintenance Manuals: Provide guidance on routine maintenance tasks to keep the device in optimal condition. They cover cleaning procedures, part replacements, and regular servicing tips.
- Quick Start Guides: Offer a concise overview of the essential steps needed to get the device up and running quickly. They are ideal for users who need immediate assistance with basic setup and operation.
Each type of Miele G 7883 instruction is designed to address specific needs, ensuring users have the necessary information to use, maintain, and repair their devices effectively.