
OPEL Corsa
Owner’s Manual


OPEL Corsa
Operation, Safety, Maintenance

Data specific to your vehicle
Please enter your vehicle’s data here so that it is readily accessible. Please refer to the sections «Servicing and maintenance» and «Technical
data» and the identification plate.
Fuel
Designation
Engine oil
Grade
Viscosity
Tyre pressure
Tyre size Front
Rear
Summer tyres
Winter tyres
Weights
Gross vehicle weight rating
– EC kerb weight
=Loading

Introduction
Your vehicle is an intelligent combination
of forward-looking technology, impressive
safety, environmental friendliness and
economy.
It now lies with you to drive your vehicle
safely and to see it performs p erfectly. This
Owner’s Manual provides you with all the
necessary information to that end.
Make sure your passengers are aware of
the possible risk of accident and injury
which may result from improper use of the
vehicle.
You must always comply with the specific
laws of the country that you are in. These
laws may differ from the information in this
Owner’s Manual.
When this Manual refe rs to a workshop visit,
we recommend your Opel Service Partner.
All Opel Service Partners provide first-class
service at reasonable prices. Experienced
mechanics trained by Opel work according
to specific Opel instructions.
The Owner’s Manual, infotainment system
instructions and the vehicle Service and
Warranty Booklet should always be kept
ready to hand in the vehicle glove
compartment.
Make use of the Owner’s Manual
z The «In Brief» section will give you an
initial overview.
z The table of contents at the beginning of
the owner’s manual and within the
individual chapters will show you where
everything is.
z Its index will help you find what you
want.
z Yellow arrows in the illustrations serve as
points of reference or indicate some
action to be performed.
z Black arrows in the illustrations indicate
a reaction or a second action to be
performed.
z This Owner’s Manual depicts left-hand
drive vehicles. Right-hand drive vehicles
are operated in the same way.
z The Owner’s Manual uses the internal
engine codes. The corresponding sales
designations are found in the chapter
«Technical data».
z Directional data, e.g. left or right, or
front or back, in the descriptions always
relate to the direction of travel.
Symbols
6 Continue reading on next page.
3 signifies equipment not fitted to all
vehicles (model variants, engine options,
models specific to one country, optional
equipment, Genuine Opel Parts and
Accessories).
Page references are indicated with 3 .
3 means «see page».
9
Danger, 9 Warning, Caution
Safe driving!
Adam Opel GmbH
9 Danger
Text marked 9 Danger provides
information on risk of endangering life.
Failure to comply with the instructions
could endanger life.
9 Warning
Text marked 9 Warning provides
information on risk of accident or injury.
Failure to comply with the instructions
could lead to injury.
Caution
Text marked Caution provides
information on possible damage to the
vehicle Failure to comply with the
instructions could lead to vehicle
damage.


Contents
In Brief ………………………………………………. 2
Keys, doors, windows, sun roof ………… 26
Seats, Interior …………………………………… 48
Instruments, controls ………………………… 84
Lighting …………………………………………. 108
Infotainment system ………………………. 118
Climate control ……………………………… 120
Driving and operation …………………… 136
Self-help, vehicle care …………………….. 190
Opel Service, maintenance …………….. 231
Technical Data ……………………………… 250
Index ……………………………………………… 270
2In Brief
In Brief
Picture no: 18398s.tif
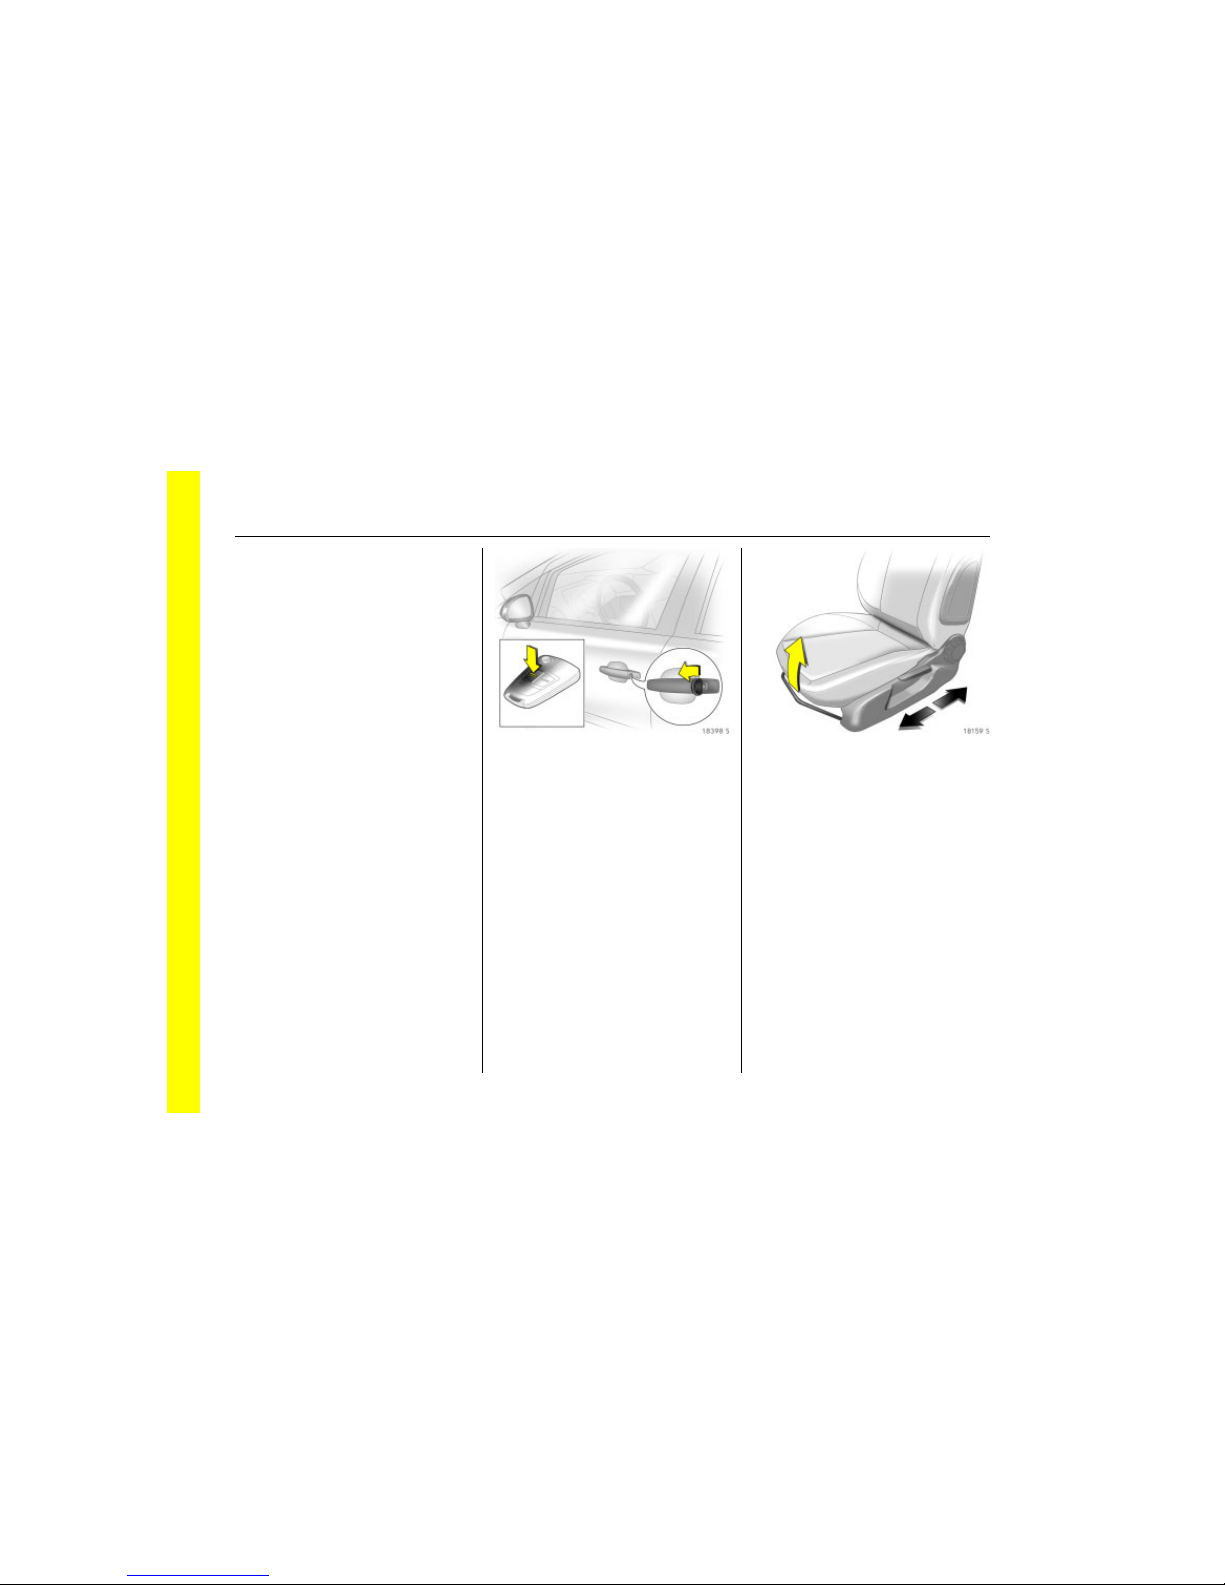
Unlocking the car: Turn the key in
the driver’s door lock towards the
front or press the button q
Open the door by pulling on the door
handle. To open the tailgate, press in the
button under the handle recess and pull
the tailgate upwards.
Key 3 26,
Electronic immobiliser 3 27,
Personalised key 3 39,
Central locking with key 3 32,
Remote control 3 31,
Central locking 3 32,
Anti-theft device 3 3 33,
Alarm system 3 37,
Child lock 3 39.
Picture no: 18159s.tif
To adjust front seat leg room:
Pull handle, slide seat,
release handle
Seats 3 48, Seat position 3 50.
3In Brief
Picture no: 18160s.tif
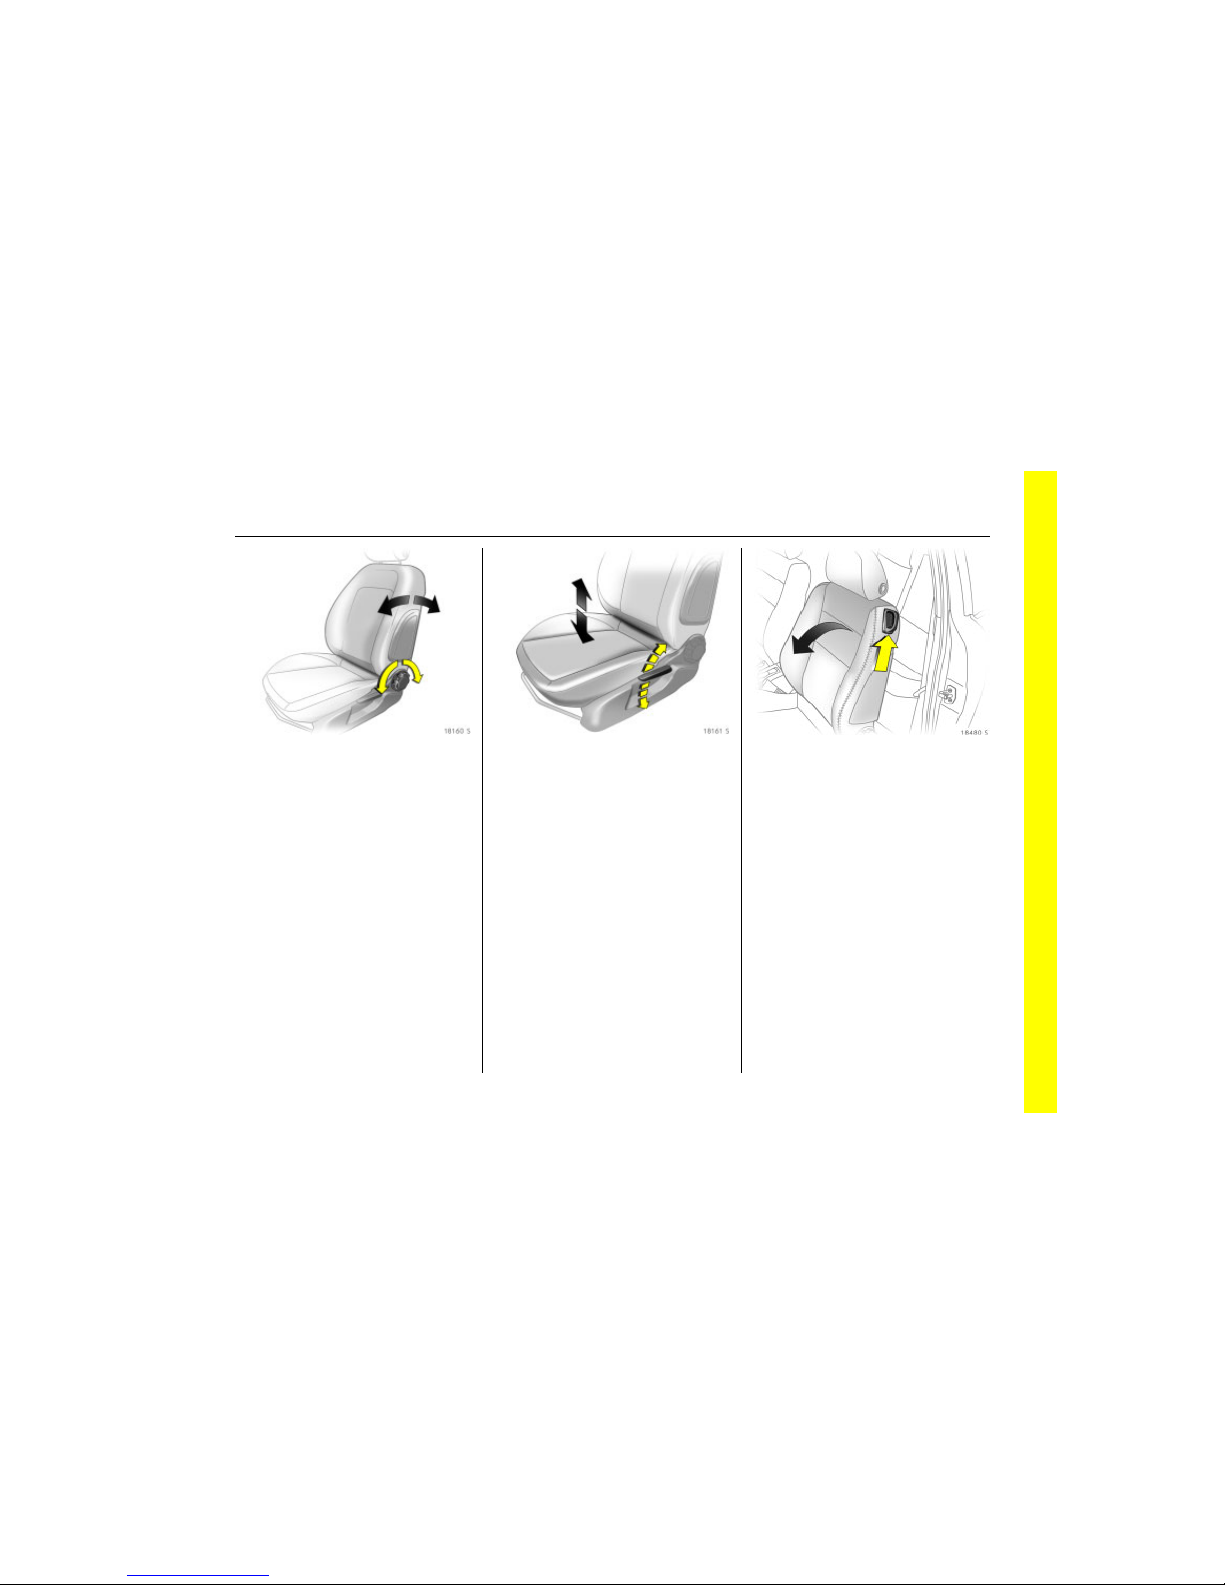
To adjust front seat backrests:
Turn handwheel
Do not lean on seat backrest whilst
adjusting it.
Seats 3 48,
Seat position 3 50,
Folding down the front passenger
seat 3 49.
Picture no: 18161s.tif
Front seat height 3: Operate lever
on the door side of seat
Pump action of lever
Seats 3 49, Seat position 3 50.
Picture no: 18480s.tif
To fold the front seat backrests
forward 3: Lift the locking lever,
fold the backrest forward, lower
the locking lever, backrest
engages folded forward 3,
slide the seat forward 3
To push the seat back to upright, it
engages in its original position 3. Lift the
locking lever 3, move the backrest back to
upright, lower the locking lever, backrest
engages.
Folding the backrest forwards is possible
only when the backrest is in an upright
position.
Front seats 3 48.
Upwards: Seat higher
Downwards: Seat lower
4In Brief
Picture no: 16976t.tif
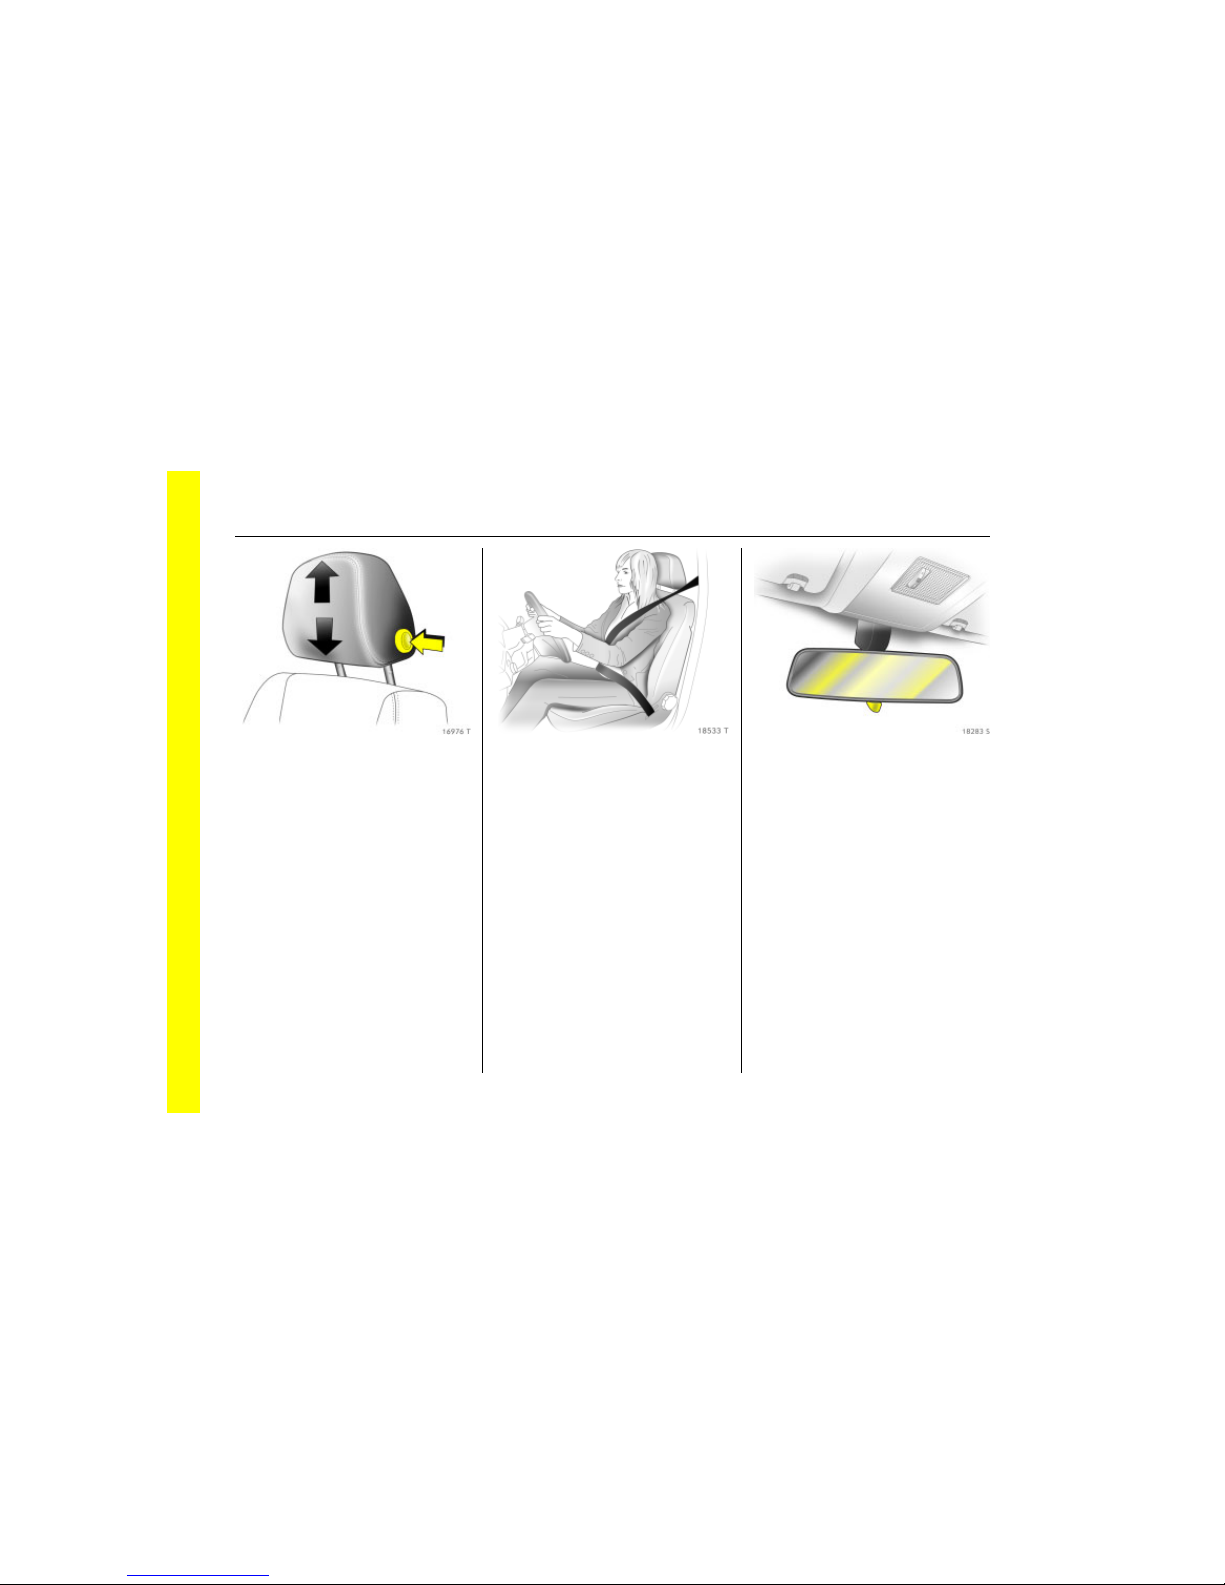
To adjust front seat head
restraint height: press button to
unlock, adjust height, engage
Head restraint 3 51,
rear head restraint adjustment 3 52,
head restraint position 3 52.
Picture no: 18533t.tif
Extend the seat belt and clip it
into the buckle
The seat belt must not be twisted and must
lie snugly against the body. The backrest
must not be tilted back too far (maximum
approx. 25).
To release belt, press red button on belt
buckle.
Three-point seat belts 3 59,
Airbag system 3 69,
Seat position 3 50.
Picture no: 18283s.tif
To adjust interior mirror by
swivelling
Swivel lever on underside of mirror housing
to reduce dazzle at night.
Mirrors 3 42,
Autodimming interior mirror 3 44.
5In Brief
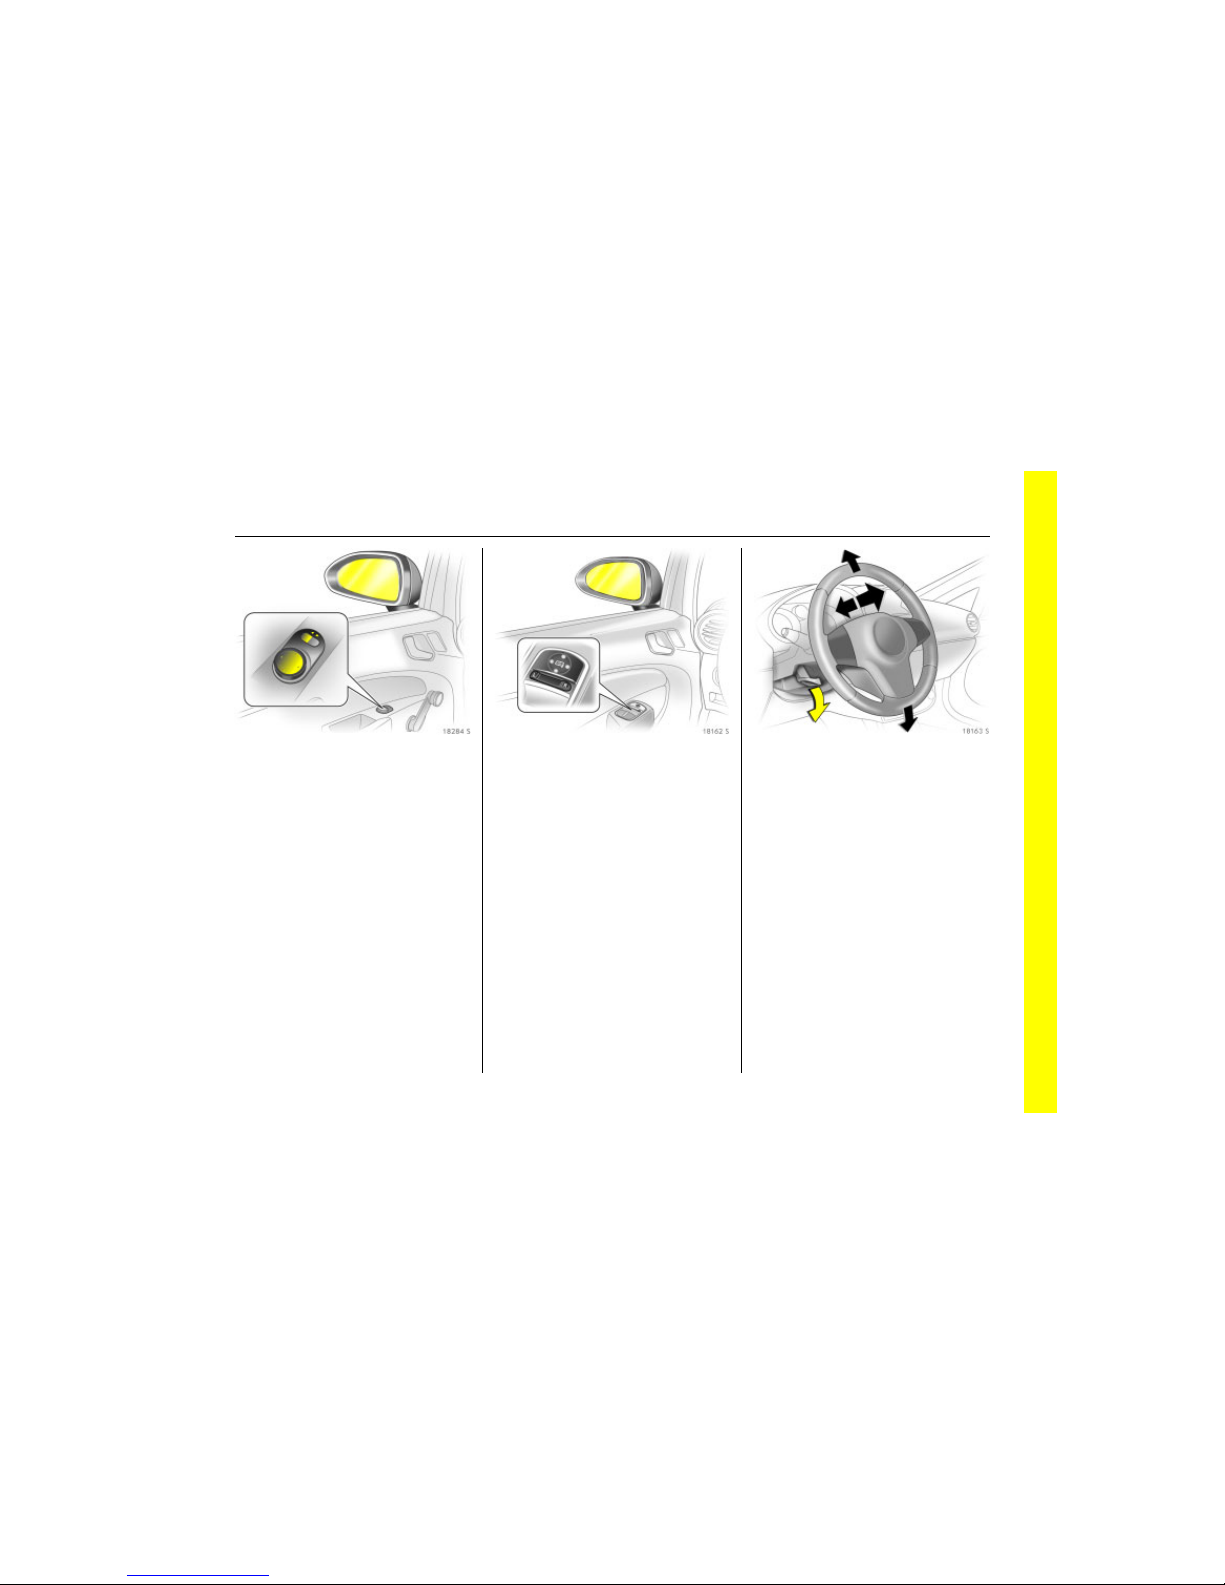
Picture no: 18284s.tif
Exterior mirror adjustment
Select the mirror to be adjusted using the
rocker switch and adjust using the
four-way switch.
Mirror 3 42,
Aspherical exterior mirrors 3 42,
Swinging in exterior mirrors 3 42,
Heated exterior mirrors 3 13, 3 43.
Picture no: 18162s.tif
Exterior mirror adjustment on
vehicle fitted with electronic
windows 3
Select the mirror to be adjusted using the
rocker switch and adjust using the
four-way switch.
Mirror 3 42,
Aspherical exterior mirrors 3 42,
Swinging in exterior mirrors 3 42,
Heated exterior mirrors 3 13, 3 43.
Picture no: 18163s.tif
Steering wheel adjustment:
Swivel lever down, adjust height
and distance, swivel lever up,
engage
Adjust steering wheel only when vehicle is
stationary and steering column lock is
released.
Airbag system 3 69

7In Brief
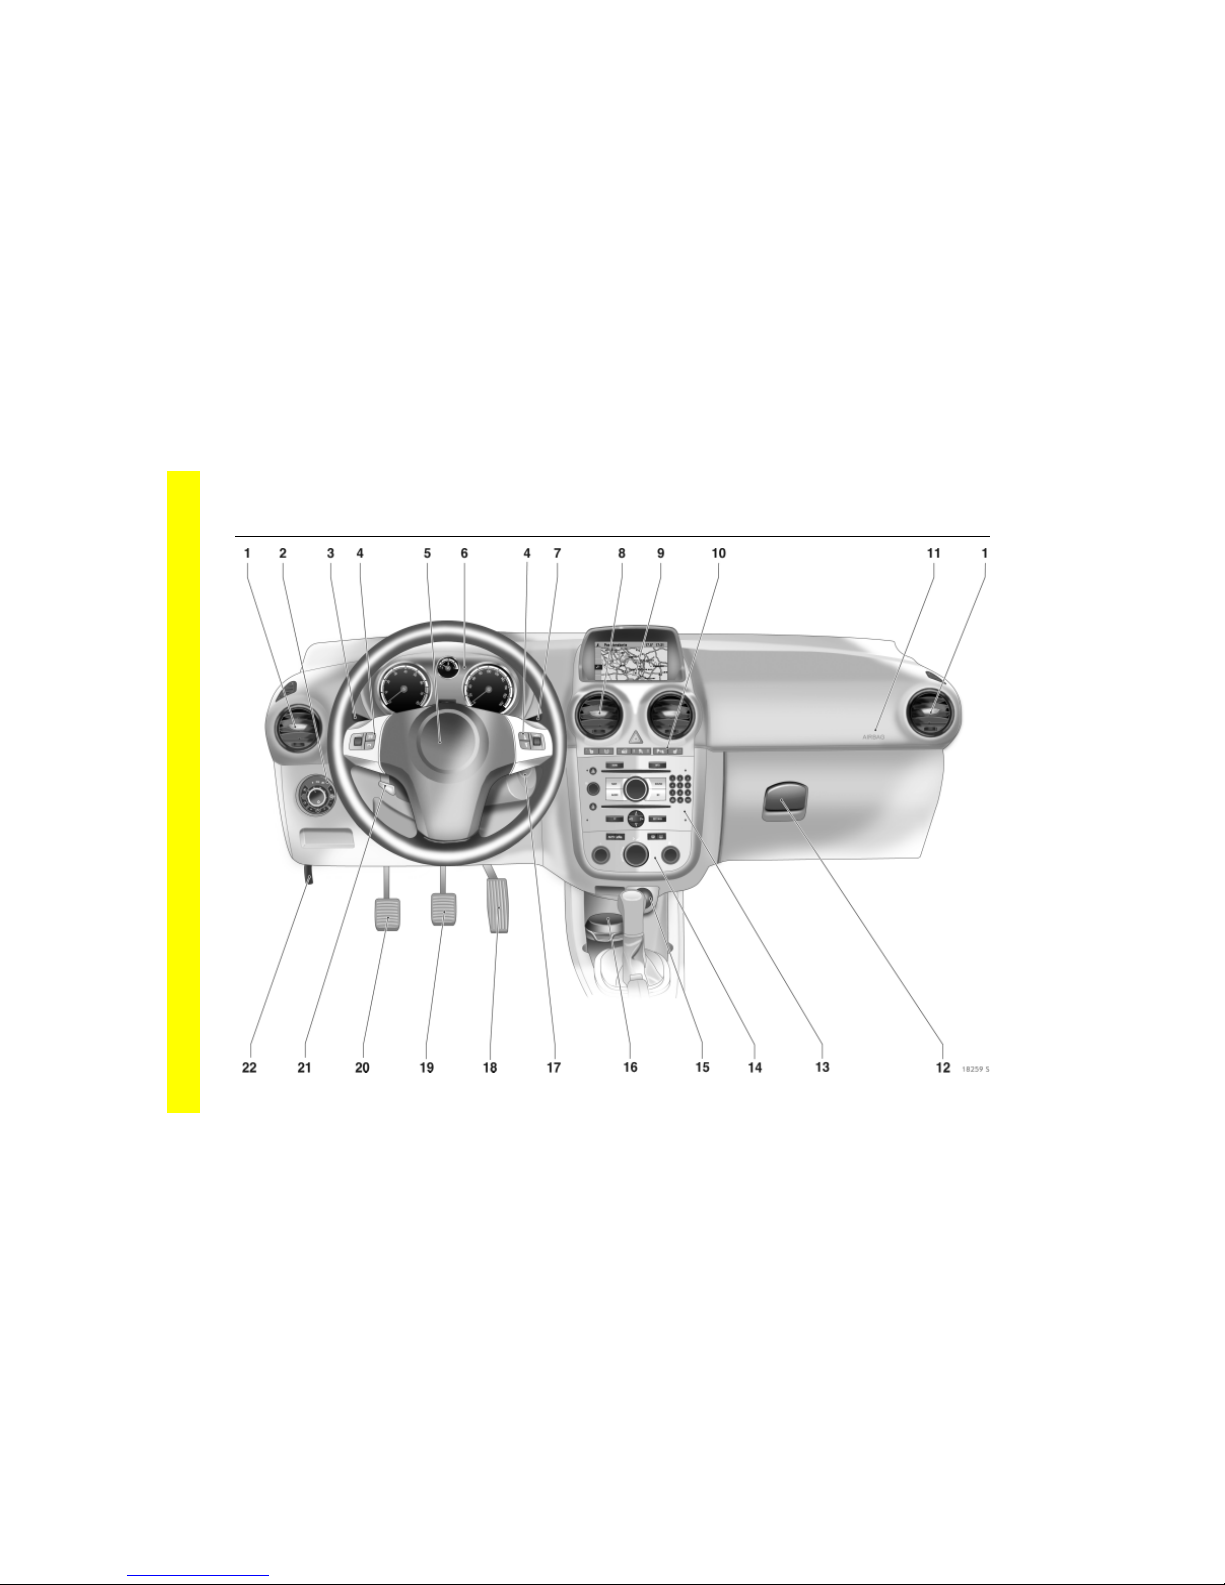
1 Side air vents ………………………… 3 120
2 Parking lamps, dipped beam … 3 106
Instrument illumination ………….. 3 112
Fog tail lamp ………………………… 3 108
Fog lamps 3 …………………………. 3 108
Headlamp range
adjustment 3 ………………………… 3 109
3 Turn signal ……………………………….3 11
Headlamp flash
dipped beam, main beam ………. 3 11
Interior lighting 3 …………………… 3 111
Parking lamps 3 ……………………. 3 112
Cruise control 3 …………………….. 3 158
4 Steering wheel
remote control 3……………………. 3 116
5 Horn …………………………………………3 12
Driver’s airbag ………………………….3 67
6 Instruments ………………………………3 82
7 Windscreen wipers,
windscreen washer system,
rear window washer system ………3 12
Trip computer 3 ……………………….3 99
8 Centre air vents …………………….. 3 120
9 Central information display for
time, date, outside temperature,
infotainment system 3,
check control 3 ……………………….. 3 92
Trip computer 3 ………………………. 3 99
Climate control system 3 ………. 3 126
10 Left seat
heater 3 ……………………. 3 48
Steering wheel heater 3……………. 3 49
Tyre pressure loss
monitoring system 3 ……………….3 162
Central locking button ……………… 3 32
Warning lights ………………………….3 12
Passenger airbag off switch ……..3 73
Ultrasonic parking sensor ……….3 160
Electronic stability 3 ……………….3 157
Right seat heater 3 …………………..3 48
11 Front passenger airbag ………….. 3 67
12 Glove compartment ………………… 3 80
13 Infotainment system 3…………… 3 116
14 Climate control …………………….. 3 118
15 Accessory socket 3 ………………….. 3 78
Cigarette lighter 3 ………………….. 3 78
16 Ashtray ………………………………….. 3 79
17 Ignition switch …………………………………
with steering wheel lock ………….. 3 16
18 Accelerator pedal ……….. 3 147, 3 148
19 Brake pedal …….. 3 148, 3 163, 3 165
20 Clutch pedal 3 ………………………. 3 142
21 Steering wheel adjustment ……….. 3 5
22 Rel
easing the bonnet ………………3 188


9In Brief
1 Side air vents ………………………… 3 120
2 Front passenger airbag …………… 3 67
3 Left seat heater 3 …………………….3 48
Steering wheel heater 3…………….3 49
Tyre deflation
detection system 3 ………………… 3 162
Central locking button ………………3 32
Warning light ……………………………3 12
Passenger airbag off switch ………3 73
Ultrasonic parking sensor ……… 3 160
Electronic stability3 ………………. 3 157
Right seat heater 3……………………3 48
4 Central information display for
time, date, outside temperature,
infotainment system 3,
check control 3 ………………………..3 92
Trip computer 3 ………………………3 99,
Climate control system 3 ……… 3 126
5 Centre air vents ……………………. 3 120
6 Turn signal ……………………………….3 11
Headlamp flash
dipped beam, main beam ………. 3 11
Ambient lighting 3…………………. 3 111
Parking lamps 3 ……………………. 3 112
Cruise control 3 …………………….. 3 158
7 Steering wheel
remote control 3……………………..3 116
8 Instruments …
……………………………3 82
9 Horn…………………………………………3 12
Driver’s airbag …………………………3 67
10 Windscreen wipers,
windscreen washer system,
rear window washer system ……… 3 12
Trip computer 3 ………………………. 3 99
11 Parking lamps, dipped beam ….3 106
Instrument illumination …………..3 112
Fog tail lamp ………………………….3 108
Fog lamps 3 …………………………..3 108
Headlamp range
adjustment 3 …………………………3 109
12 Ignition switch
with steering wheel lock ………….. 3 16
13 Accelerator pedal ……….. 3 147, 3 148
14 Brake pedal …….. 3 148, 3 163, 3 165
15 Clutch pedal 3 ………………………. 3 142
16 Steering wheel adjustment ……….. 3 5
17 Ashtray ………………………………….. 3 79
18 Accessory socket 3 ………………….. 3 78
Cigarette lighter 3 ………………….. 3 78
19 Climate control …………………….. 3 118
20 Infotainment system 3 ………….. 3 116
21 Glove compartment ……………….. 3 80
22 Rel
easing the bonnet ………………3 188

10 In Brief
Control indicators
w
Deflation detection system 3,
3 84, 3 164.
r
Ultrasonic parking sensors 3,
fault,
3 162.
B
Adaptive driving light 3, fault,
3 112, 3 117.
j
Manual transmission
automated 3, starting the
engine 3,
3 85, 3 137.
!
Preheating system 3,
Diesel particle filter 3,
3 85.
Z
Exhaust gases 3,
3 85, 3 156.
A
Engine electronics, transmission
electronics 3, immobiliser, diesel
fuel filter 3, fault,
3 27, 3 86, 3 142, 3 148, 3 156.
S
Engine oil level 3,
3 86, 3 242.
I
Engine oil pressure,
3 86.
p
Alternator,
3 87.
p
Electro-hydraulic power
assisted steering,
3 87.
O
Turn signal lamps,
3 11, 3 87.
Y
Fuel level,
3 87, 3 90.
C
Main beam,
3 11, 3 87.
W
Coolant temperature,
3 87, 3 244.
*
Deactivate front passenger
airbag systems,
3 75.
T
Winter setting for automatic
transmission 3 or automated
transmission 3,
3 140, 3 146.
1
Manual transmission
automated SPORT mode 3,
3 139, 3 146.
q
Headlamp range adjustment,
3 75.
8
Exterior lights,
3 88, 3 108.
>
Fog lamps 3,
3 88, 3 110.
v
Airbag systems, belt tensioners,
3 61, 3 74.
X
Seat belt 3,
3 89, 3 62.
r
Fog tail lamp,
3 88, 3 110.
R
Brake system, clutch system,
3 89, 3 167, 3 246.
u
Anti-lock brake system,
3 166.
v
Electronic Stability Programme
(ESP®
Plus
) 3,
3 151.
m
Cruise control 3,
3 161.
11In Brief
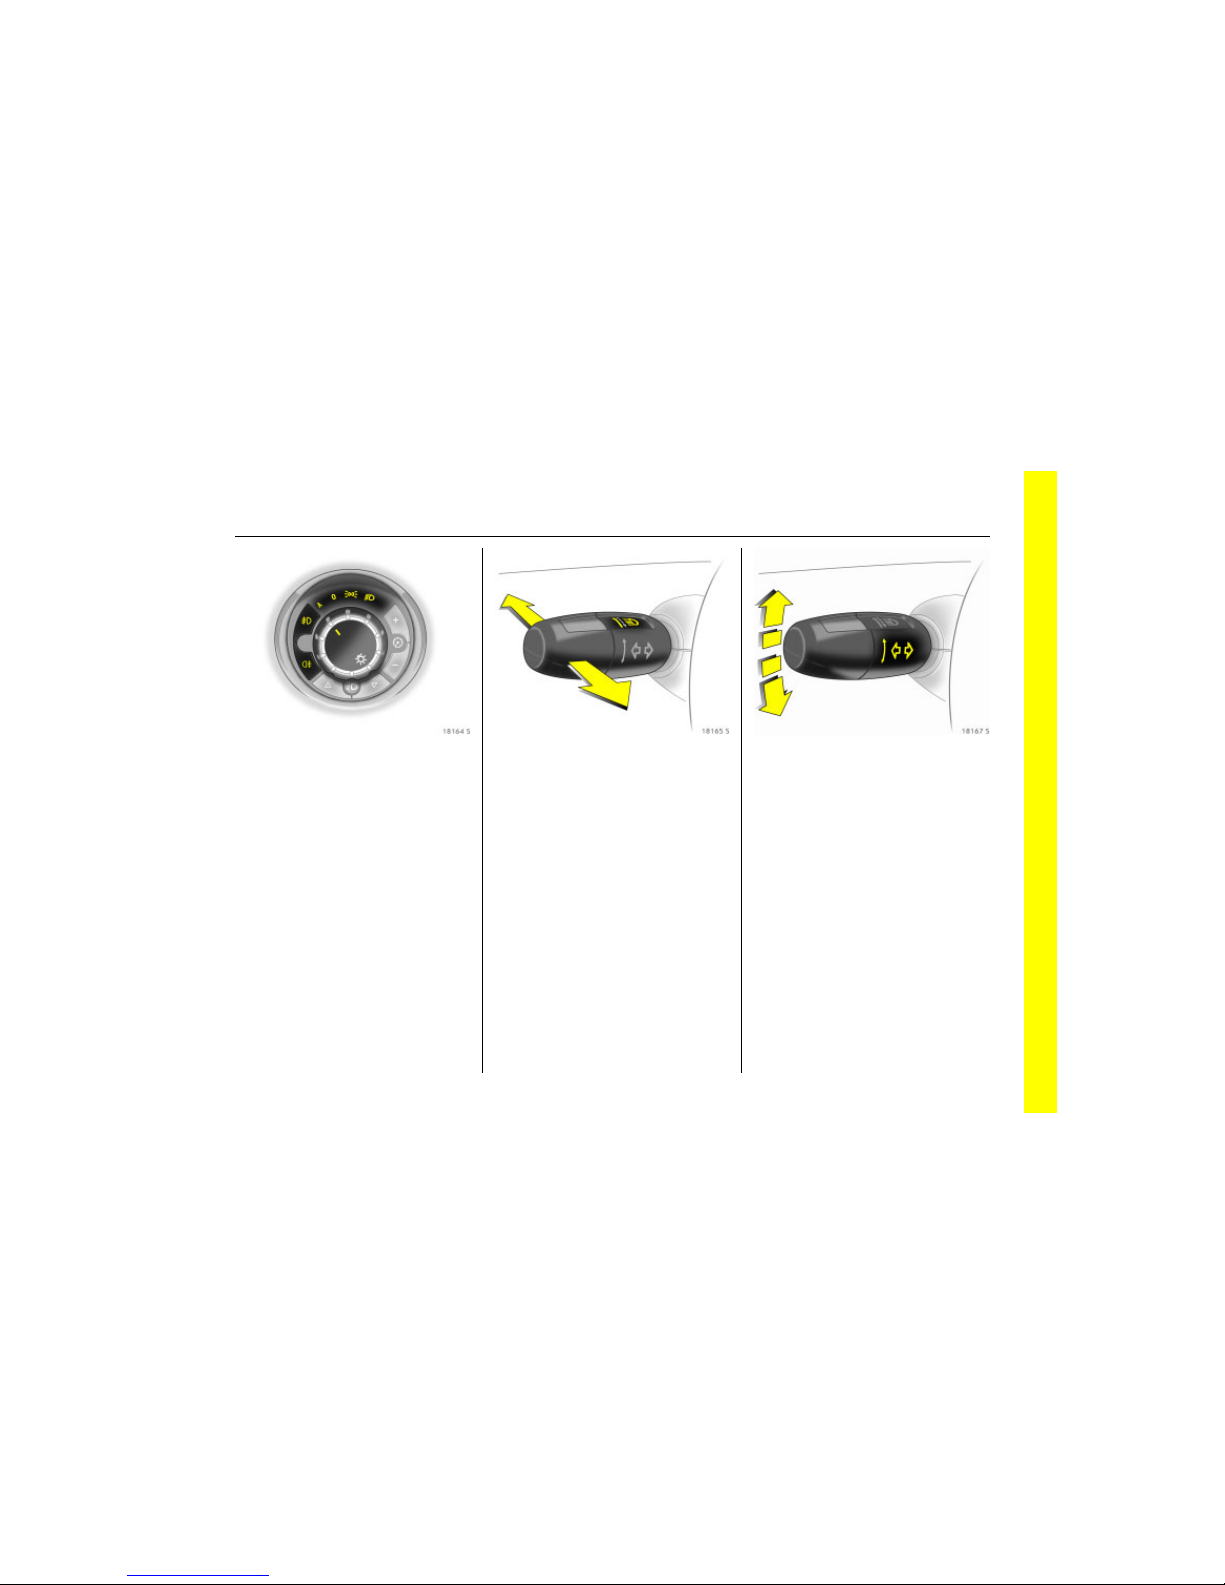
Picture no: 18164s.tif
Exterior lights
Rotate
Press
Lighting 3 108,
headlamp warning device 3 105.
Picture no: 18165s.tif
Headlamp flash, main beam and
dipped beam
Main beam, headlamp flash 3 109.
Picture no: 18167s.tif
Switch turn signal on
Turn signals 3 109.
7 =Off
8 = Parking lamps
9 = Dipped or main beam
A Automatic dipped beam
activation 3
> =Fog lamps 3
r = Fog tail lamp
Headlamp flash = Pull stalk towards
steering wheel
Main beam = Push stalk forwards
Dipped beam = Lever forward again
or toward steering
wheel
Right = Lever upwards
Left = Lever downwards
12 In Brief
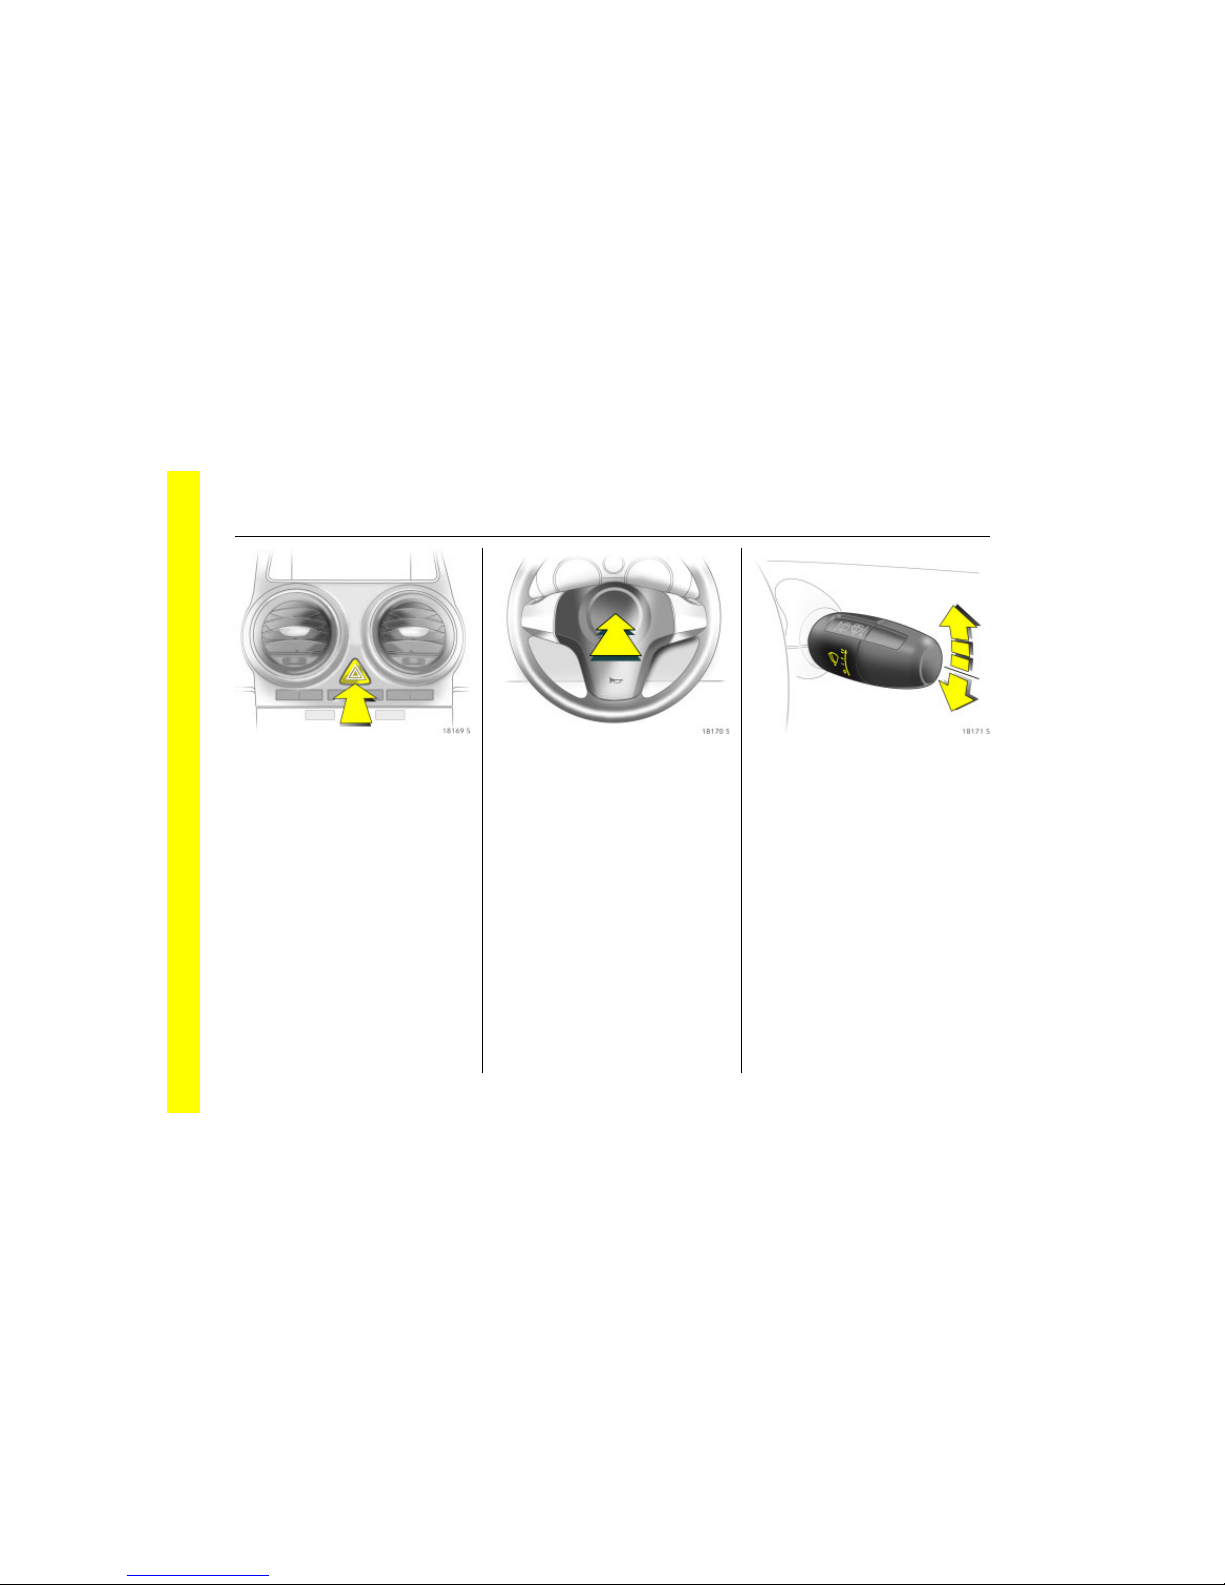
Picture no: 18169s.tif
Hazard warning flashers
Operated with the ¨ button.
Hazard warning lamps 3 111.
Picture no: 18170s.tif
Activate horn:
Press j in centre of steering wheel
Airbag system 3 69,
Steering wheel remote control 3 3 118.
Picture no: 18171s.tif
Windscreen wiper:
Gently tap lever upwards
For a single swipe when the windscreen
wipers are off, press the stalk down.
Windscreen wipers 3 106,
adjustable intermittent setting 3 106,
further information 3 228, 3 248,
trip computer 3 92.
& =Fast
% =Slow
$ = Timed interval wipe or automatic
wiping with rain sensor 3
§ =Off
13In Brief
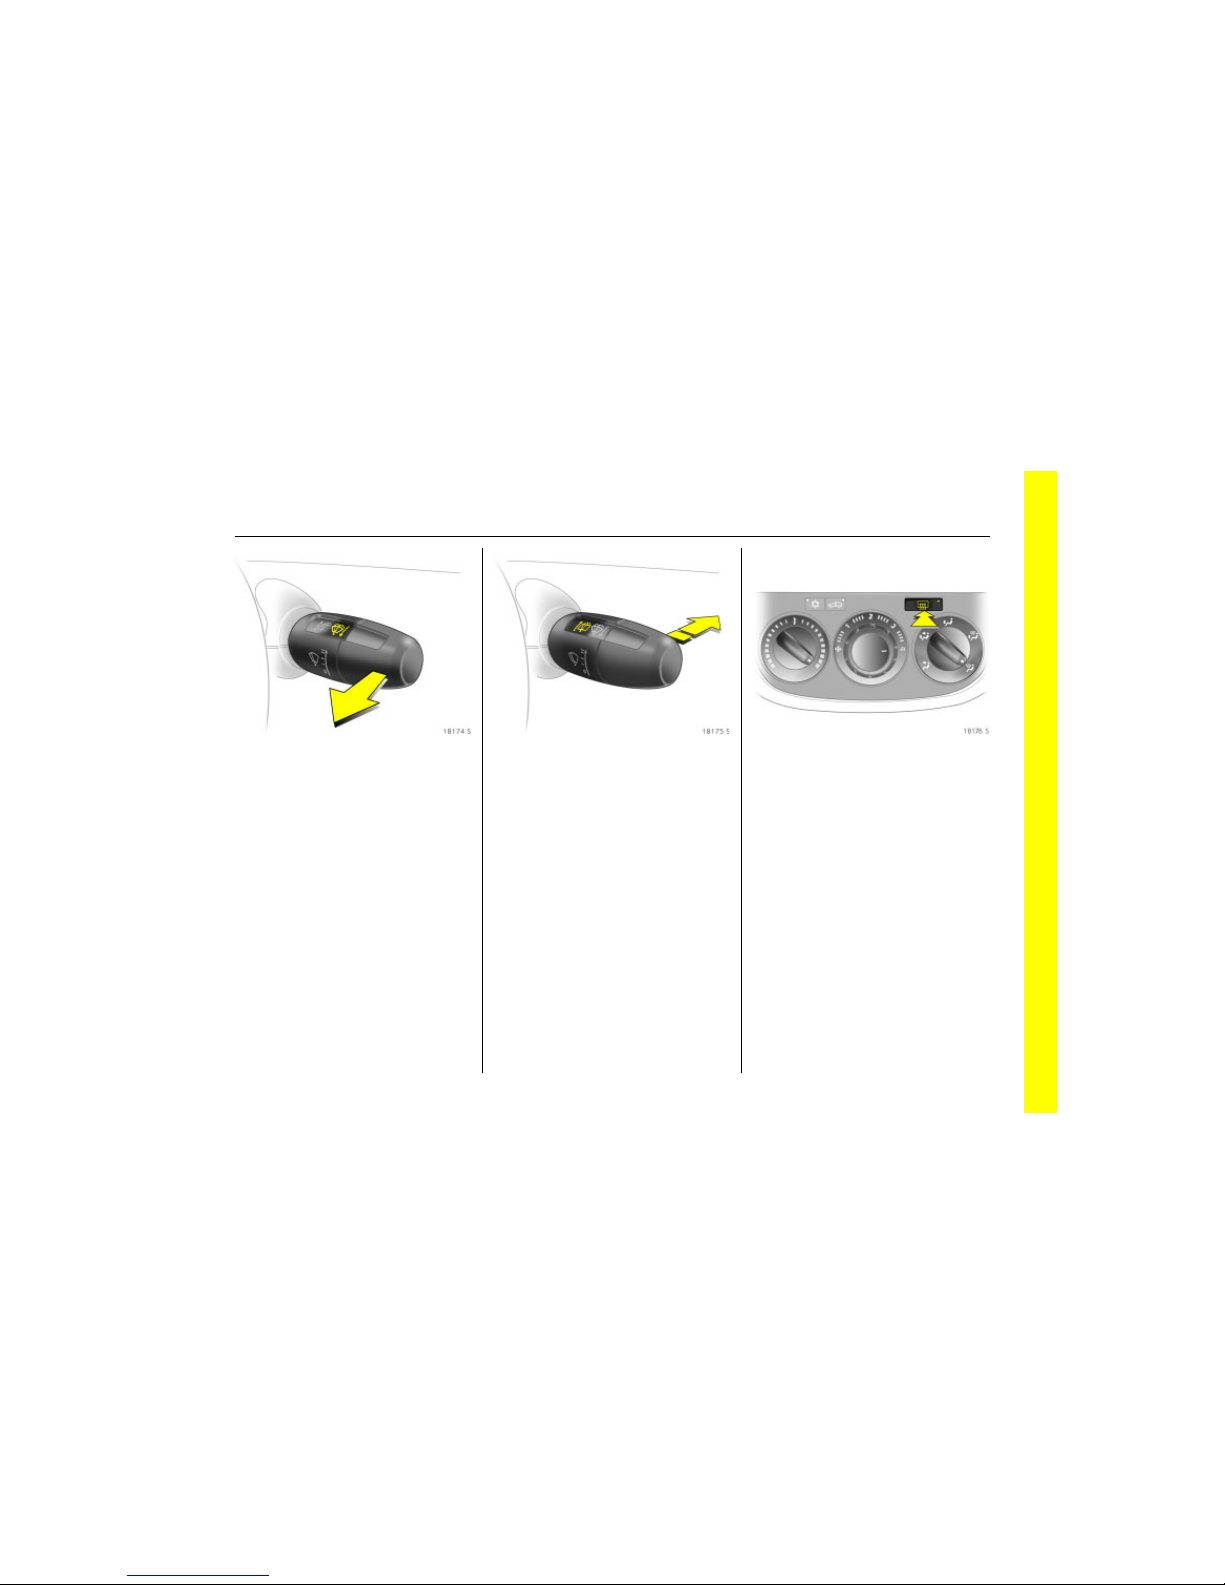
Picture no: 18174s.tif
Operating windscreen washer
system: Stalk toward steering
wheel
Windscreen washer system 3 248,
further information 3 228, 3 248.
Picture no: 18175s.tif
Rear window wiper 3 and
Rear window washer system 3
operation
Rear window wipers and rear window
washer system 3 107,
further information 3 228, 3 248.
Picture no: 18176s.tif
Heated rear window, heated
exterior mirrors
Operated with the Ü button.
Climate control 3 120,
heated rear window 3 46.
Wiper on = Push stalk forwards
Wiper off = Push stalk forwards
again
Washing = Push lever forward
and hold
14 In Brief
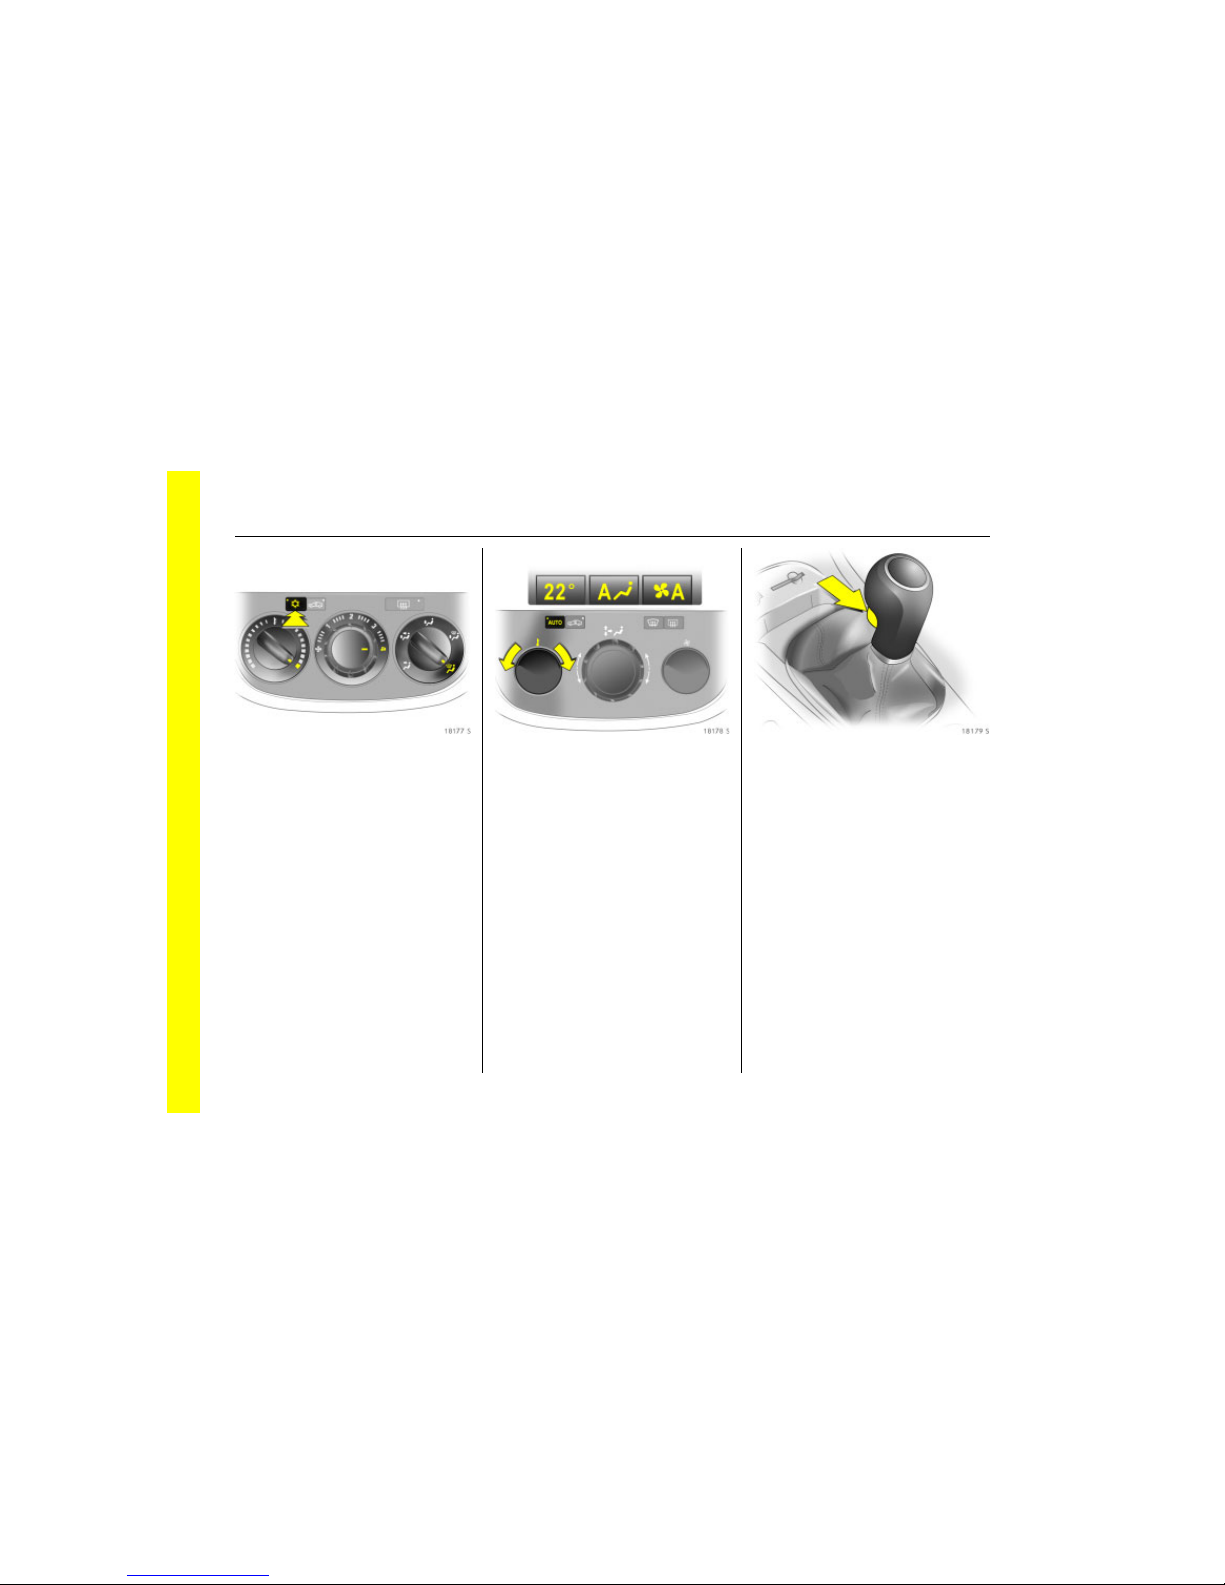
Picture no: 18177s.tif
To clear fogged or icy windows
Air distribution to l, turn rotary switch for
temperature and air flow; climate control 3:
Button n must also be pressed; automatic
climate control 3: button V must also be
pressed.
Climate control 3 3 120.
Picture no: 18178s.tif
To set automatic mode of climate
control system 3
Press AUTO button, select temperature
with rotary knob, open air vents.
6 Climate control system 3 3 128.
Picture no: 18179s.tif
Manual transmission
Reverse gear: With vehicle stationary, wait
3 seconds after depressing the clutch, then
lift the ring below the gear knob and
engage gear.
If the gear does not engage, set the lever in
neutral, release the clutch pedal and
depress again; then repeat gear selection.
Manual transmission 3 144.
15In Brief
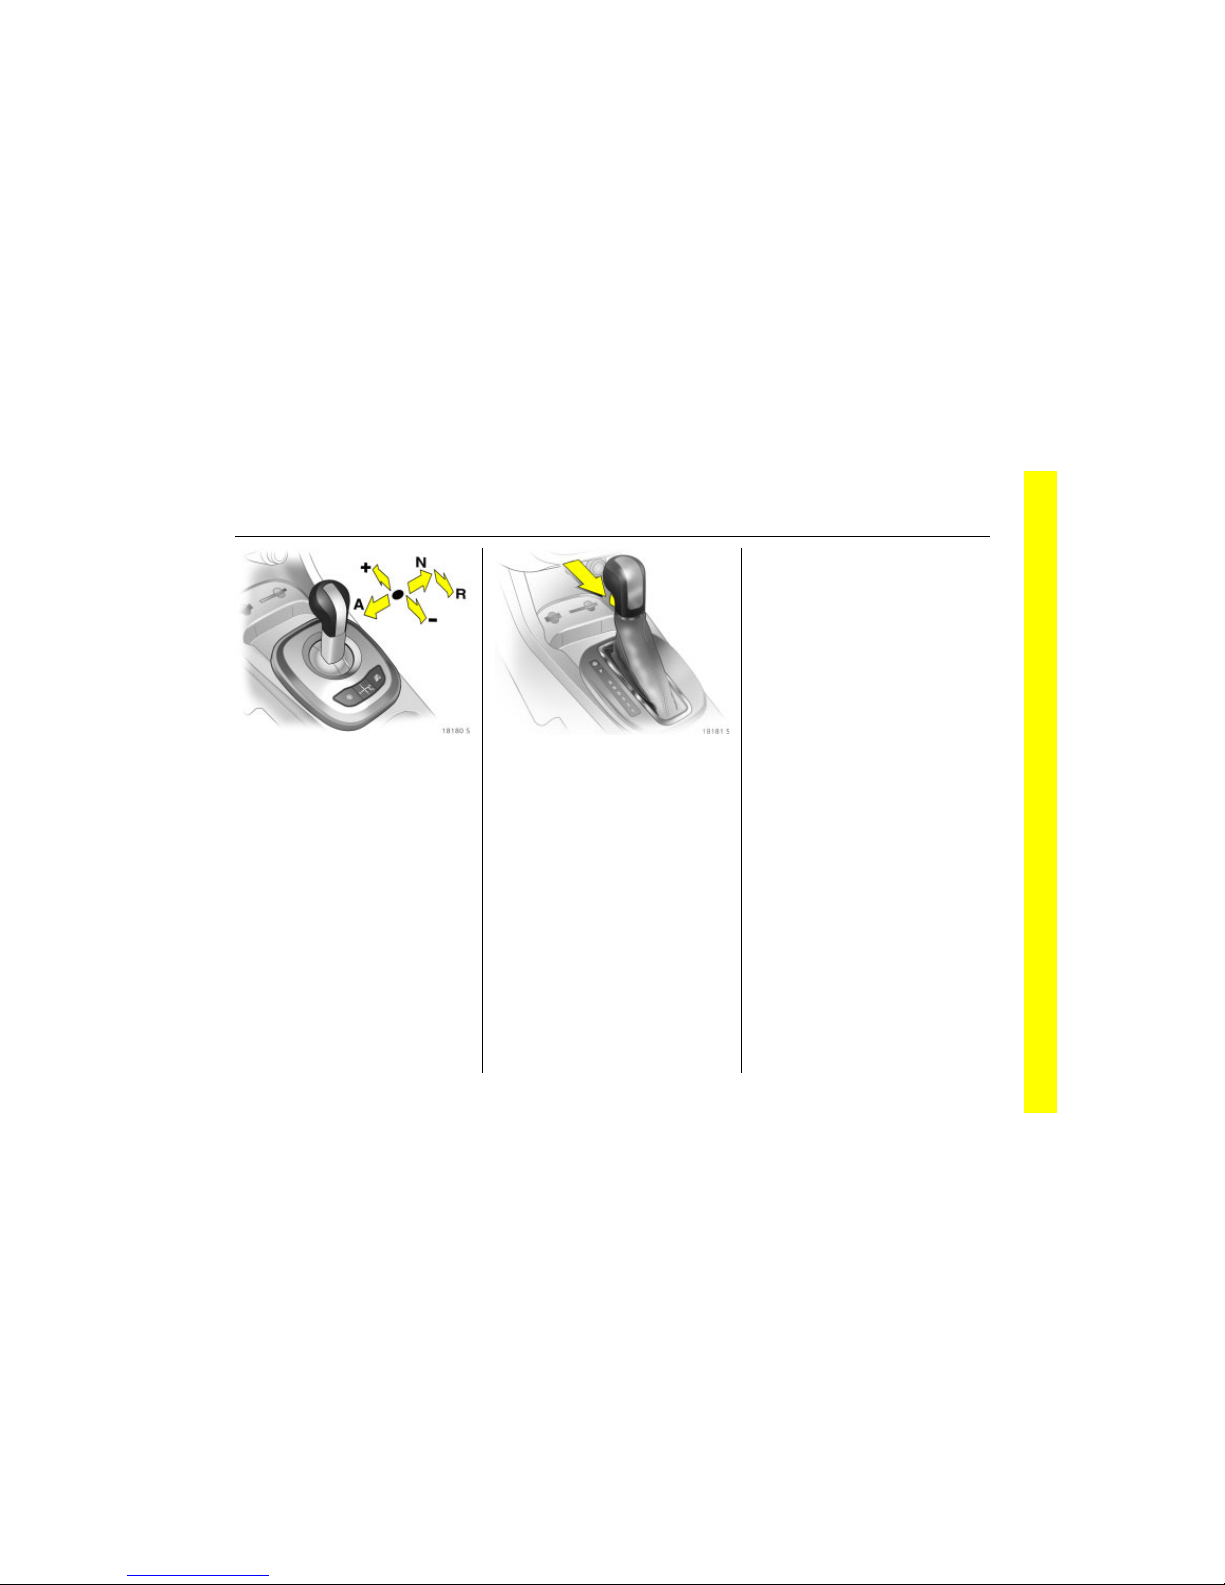
Picture no: 18180s.tif
Automated manual
transmission 3
Always move the selector lever in the
appropriate direction right up to the stop.
It will automatically return to the neutral
position after each operation.
The foot brake must be depressed when
starting.
Automated manual transmission 3 3 136.
Picture no: 18181s.tif
Automatic transmission 3
Only start engine in P or N. To come out
of P, turn the ignition, operate the foot
break and press the button.
Deactivate the selector lever lock by
pressing the button.
6 Automatic transmission 3 3 144.
Before starting off, check
z Tyre pressure and tyre condition 3 169,
3 264.
z Engine oil level and fluid levels in engine
compartment, 3 241 to 3 248.
z All windows, mirrors, exterior lighting
and number plates are free from dirt,
snow and ice and operational.
z Seats, seat belts and mirrors are
correctly adjusted 3 48, 3 58, 3 42.
z Check brake function at low speed,
particularly if the brakes are wet.
N = Idling
o =Driving position
+ =Higher gear
— =Lower gear
A = Switch between Automatic and
Manual mode
R = Reverse gear (with selector lever
lock)
P
= Park position
R
= Reverse gear
N
= Neutral (idling)
D
= Automatic gear selection
3
=1st to 3rd gear
2
= 1st and 2nd gear
1
=1st gear

16 In Brief
Picture no: 16982t.tif
Steering wheel lock and ignition
Turn key to position 1. Move the steering
wheel slightly to release the steering wheel
lock.
Picture no: 17005t.tif
Starting the engine
Depress clutch and brake pedals, select 3
P or N for automatic transmission, 3 N for
manual transmission automated. Do not
press the accelerator, in the case of diesel
engines, release the key in position 2 until
the warning light ! goes out, turn the key
to position 3 and release once the engine is
running.
Before restarting or switching off the
engine, turn key back to 0.
To switch on the ignition, only turn the
key to 2.
Picture no: 18183s.tif
Releasing the hand brake:
Raise lever slightly,
press release button,
lower lever fully
Hand brake 3 167.
0
=Ignition off
1
= Steering free, ignition off
2
= Ignition on, with diesel engine:
pre-heating
3
=Starting

17In Brief
Parking the vehicle
z Apply hand brake firmly without
operating release button. On a downhill
or uphill slope, apply as firmly as
possible. Apply foot brake at same time
to reduce operating force.
z Switch off engine and ignition. Turn the
ignition key to position 0 and pull it out.
Turn the steering wheel until it is clear
that the steering lock has engaged
(anti-theft protection).
On vehicles with automatic
transmission 3, the key can only be
removed when the selector lever is in
the P position.
On vehicles with manual transmission
automated 3, control indicator R
flashes for a few seconds after the
ignition is switched off if the hand brake
has not been applied.
z If the vehicle is standing on a level
surface or a hill, select first gear before
switching the ignition off with manual
transmission automated 3, and with
automatic transmission 3 move selector
lever to P. Also turn front wheels away
from kerb if parked on an uphill slope.
If the vehicle is parked on a slope, with
manual transmission or manual
transmission automated, 3 select
reverse gear before switching the
ignition off, and with automatic
transmission 3 move selector lever to
position P. Also turn front wheels
towards the kerb.
z Lock vehicle with key in lock or button p
on the remote key fob.
To activate the anti-theft locking
system 3 and anti-theft alarm system 3,
press button p twice.
Advice when parking
z Do not park the vehicle on an easy
flammable surface. The high
temperature of the exhaust system
could ignite the surface.
z Close the windows and sun roof 3.
z The engine cooling fans may run after
the engine has been switched off 3 241.
z After running at high engine speeds or
with high engine loads, operate the
engine briefly at a low load or run in
neutral for approx. 30 seconds before
switching off in order to protect the
turbocharger 3.
Remote control 3 31,
Central locking system 3 32,
Anti-theft alarm system 3 3 37,
Vehicle decommissioning 3 249.
18 In Brief
Interesting functions
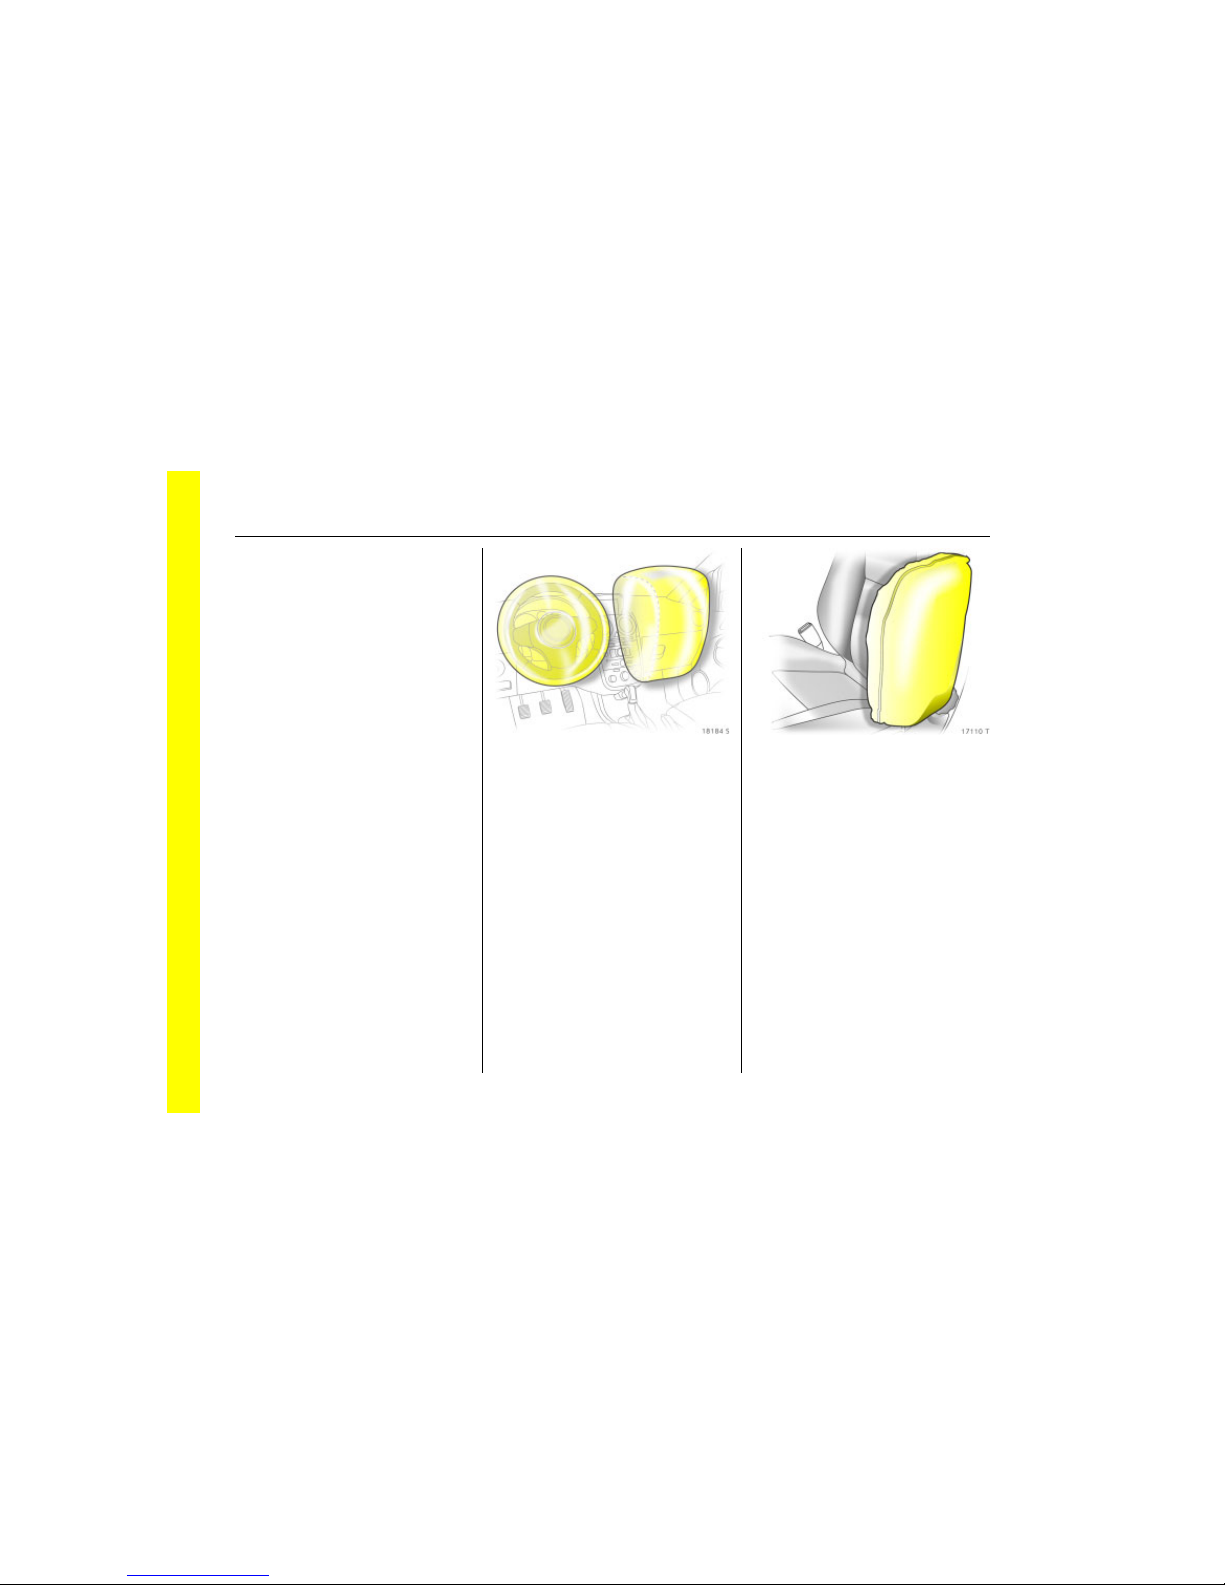
Picture no: 18184s.tif
Airbag system
The airbag system consists of several
internal systems.
Front airbag system 3
The front airbag system will be triggered in
the event of a serious accident involving a
frontal impact and forms safety cushions
for the driver and front passenger 3. The
forward movement of the driver and front
passenger is checked and the risk of
injuries to the upper body and head
thereby substantially reduced.
Picture no: 17110t.tif
Side airbag system 3
The side airbag is triggered in the event of
a side-on collision to form a safety cushion
for the driver or front passenger in the
respective door area. This substantially
reduces the risk of injury to the upper body
and pelvis.
19In Brief
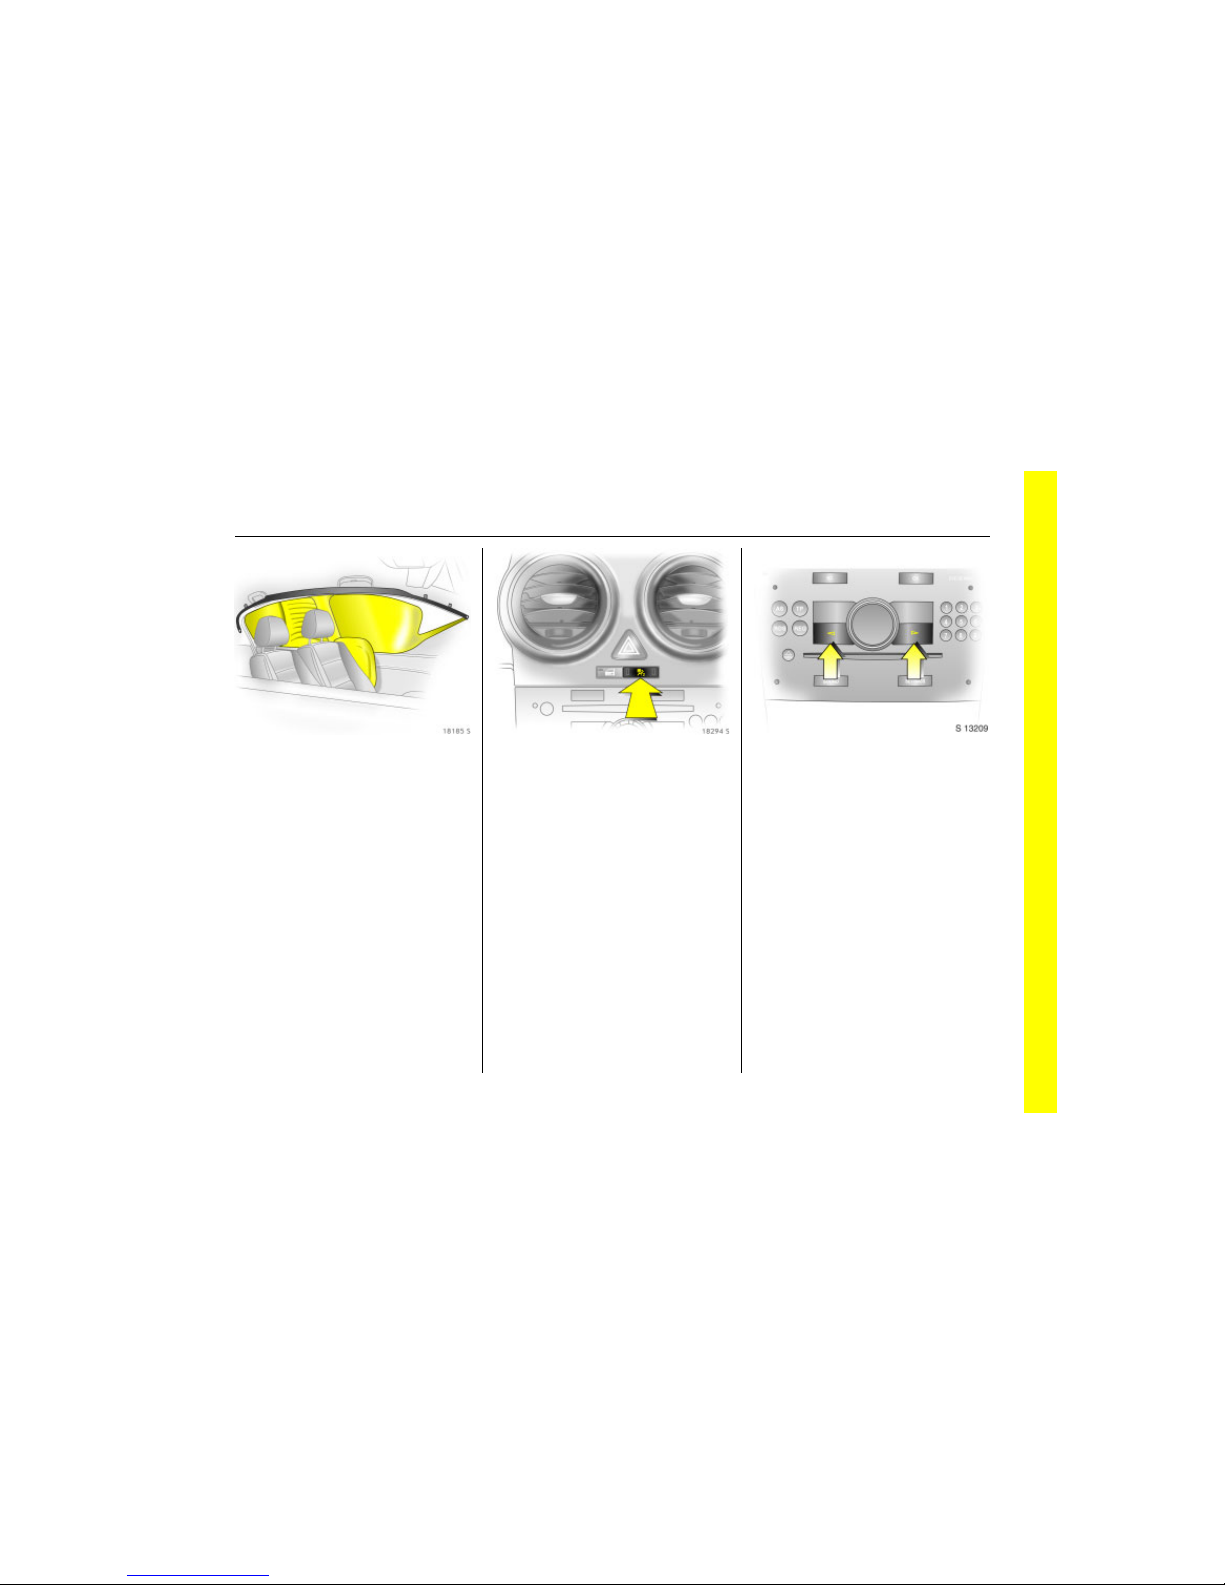
Picture no: 18185s.tif
Curtain airbag system 3
The curtain airbag system triggers in case
of a side-on collision and provides a safety
barrier in the head area on the respective
side of the vehicle. This reduces the risk of
injury to the head considerably in case of a
side-on collision.
Airbag system 3 69.
Picture no: 18294s.tif
Airbag systems which can be
deactivated for the front
passenger * 3
The front and side airbag systems 3 for
the front passenger must be deactivated
if a child restraint system is to be fitted
to the passenger seat. The curtain airbag
system 3, the belt tensioners and all driver
airbag systems remain active when the
systems for the front passenger are
deactivated. The passenger airbag
systems are active in the as-delivered
condition.
Airbag systems which can be
deactivated 3 75.
Picture no: S0013209.tif
Operating menus via the
information display 3
The menu options are selected via the
menus and the arrow keys or the
multifunction button of the infotainment
system 3 or the left adjusting wheel 3 on
the steering wheel. The relevant menu
options appear on the display.
Selection using arrow keys 3:
Press right or left arrow key.
20 In Brief
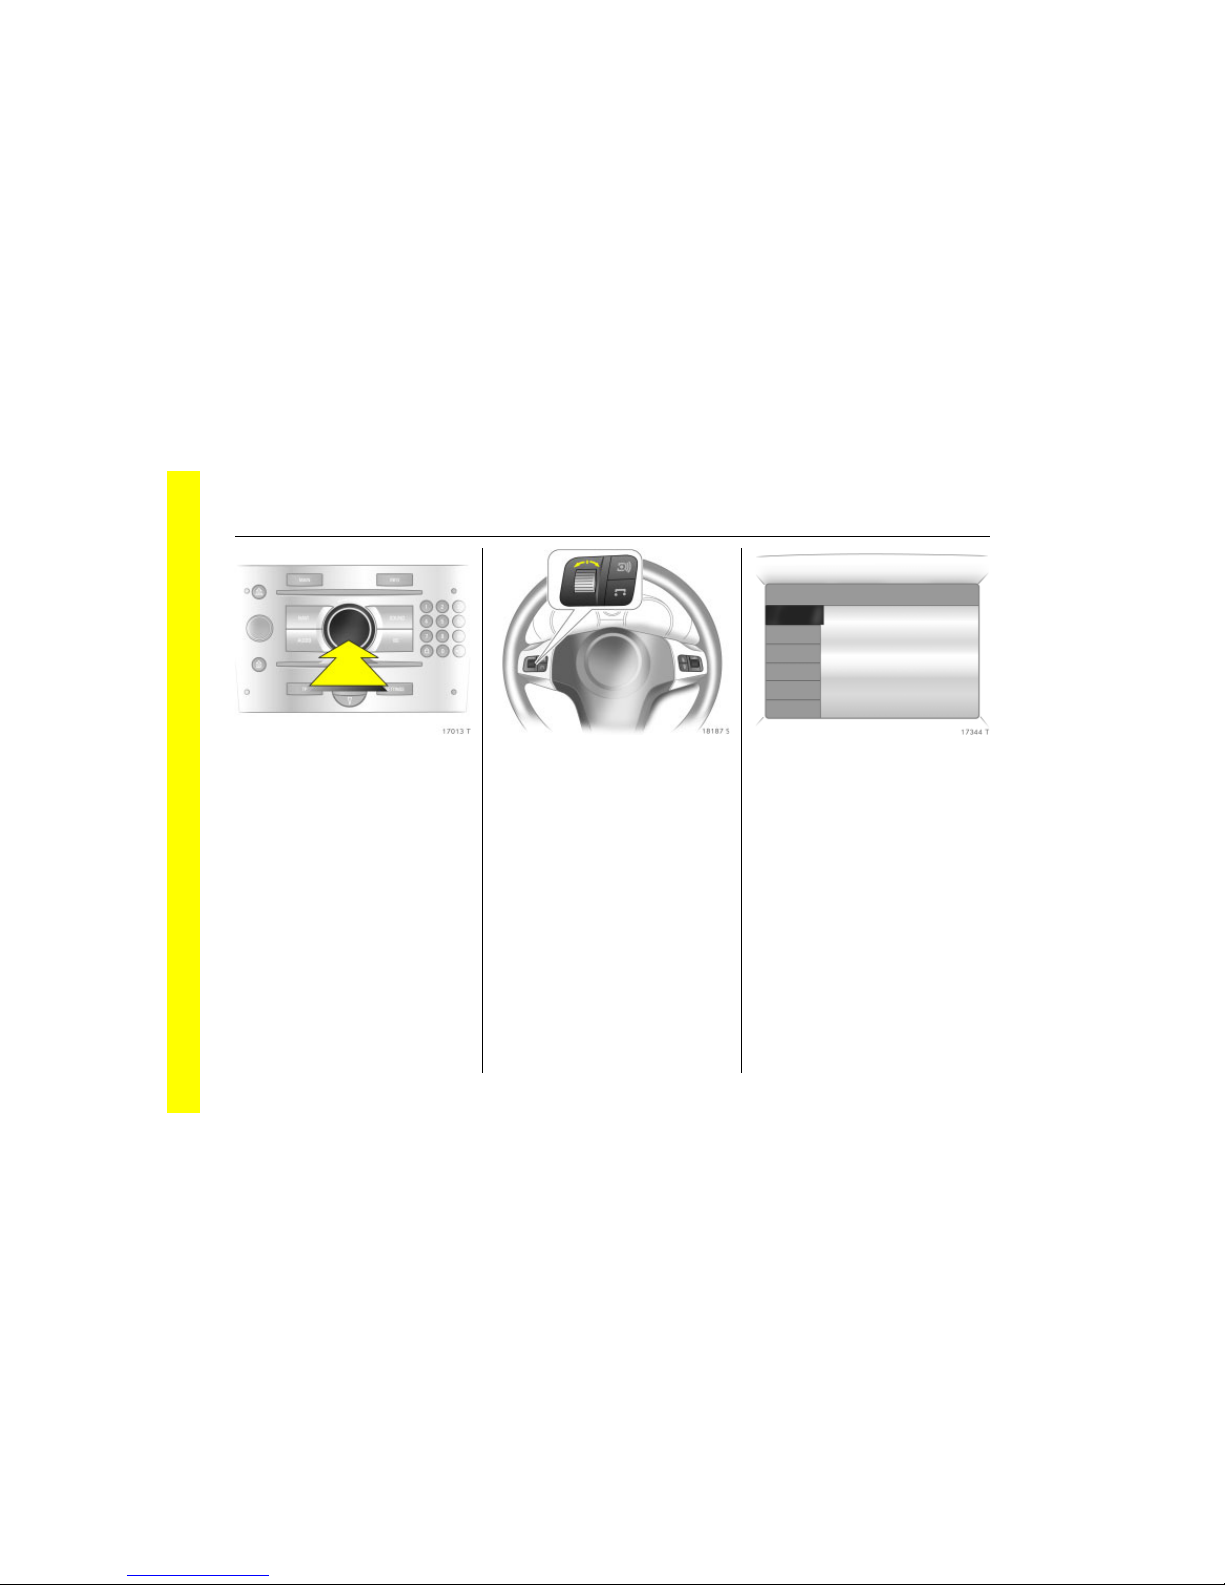
Picture no: 17013t.tif
Selection using multifunction button 3:
rotate and press multifunction button.
To exit a menu, turn the multifunction
button left or right to Return or Main and
select.
Picture no: 18187s.tif
Selection using left adjusting wheel on
steering wheel 3: Rotate and press knurled
wheel.
Information display 3 94.
Picture no: 17344t.tif
Trip computer 3
Functions:
z Range
z Instantaneous consumption
z Distance travelled
z Average speed
z Effective consumption
z Average consumption
z Stop watch
Trip computer 3 3 101.
Ü Board Computer19,5° 19:36
BC 1 All values
BC 2
257.0 km
Timer
Ø40km/h
31.0 Ltr.
Ø 7.0 L/100km
1
8
21In Brief
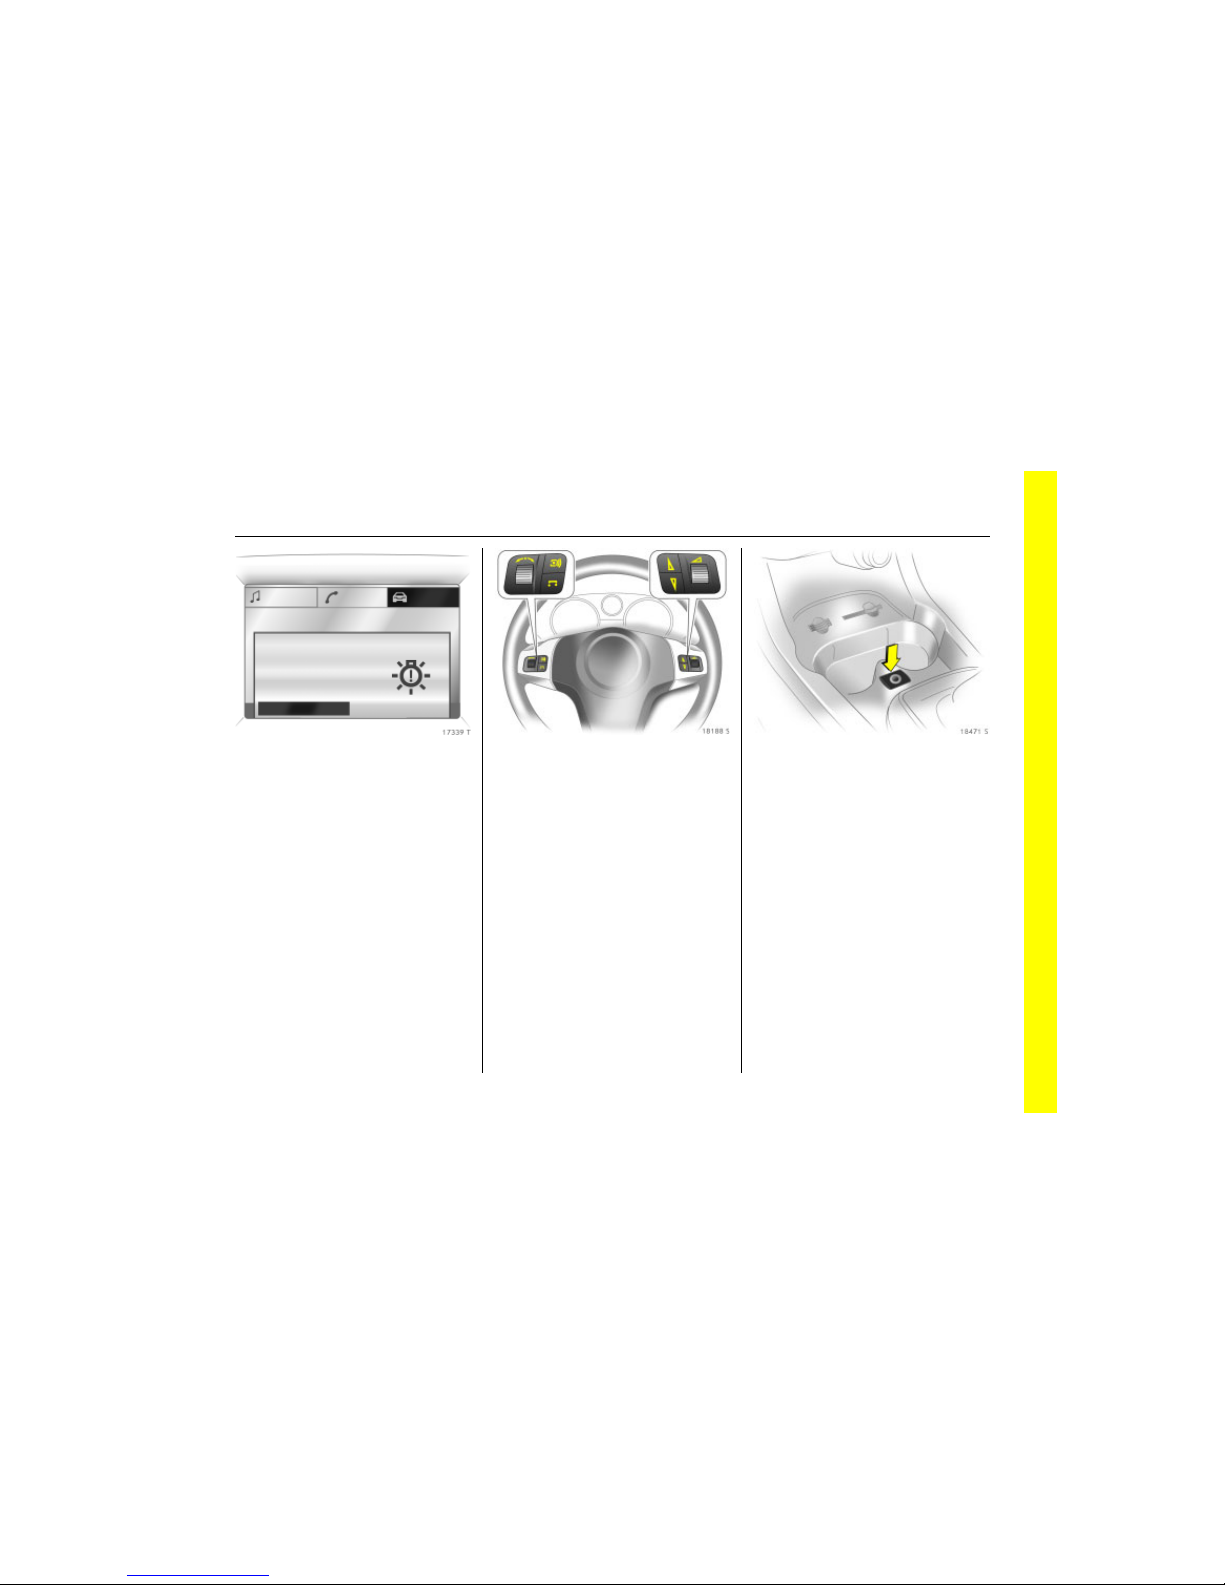
Picture no: 18435s.tif
Check control 3
The check control software monitors
z Remote control battery.
z Important exterior lighting lamps,
including cables and fuses.
Check control 3 3 104.
Picture no: 18188s.tif
Steering wheel remote control 3
The functions of the infotainment system 3
and the information display can be
operated using the buttons and adjusting
wheels on the steering wheel.
Further information is available in the
infotainment system operating
instructions.
Steering wheel remote control 3 3 118,
Infotainment system 3 118.
Picture no: 18471s.tif
AUX input 3
An external audio source such as a
portable CD player can be connected via
the AUX input with a 3.5 mm jack plug.
AUX input 3 3 119.
Brakelight
check right
OK
22 In Brief
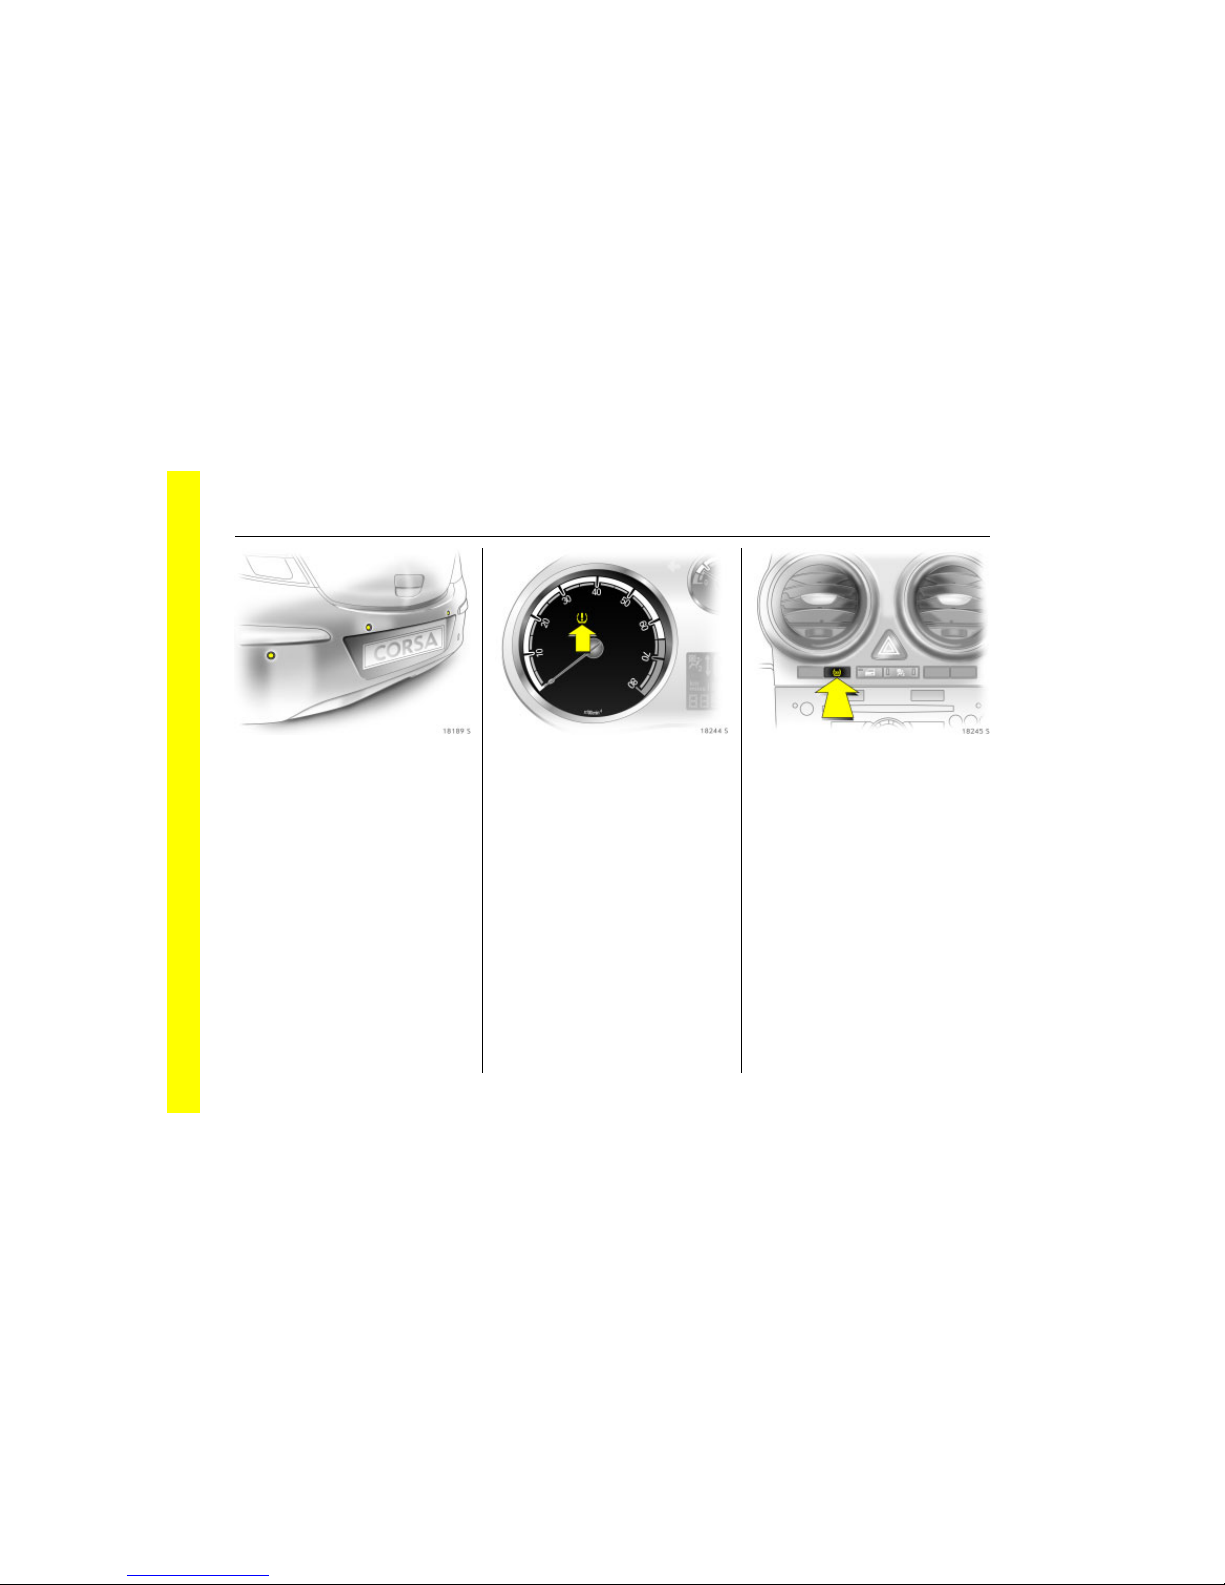
Picture no: 18189s.tif
Ultrasonic parking sensors 3
When reverse gear is selected, the park
pilot switches itself on automatically.
Manual activation is possible at speed
below 25 km/h by using the r button in
the instrument panel.
An acoustic warning sounds when the
vehicle approaches an obstacle behind.
Ultrasonic parking sensors 3 – page 3 162.
Picture no: 18244s.tif
Tyre pressure loss monitoring
system (DDS = Deflation Detection
System) 3
If a tyre loses pressure, it grows smaller. It
then rotates at a different speed than the
other tyres. If the system detects a
difference in speed, control indicator w
illuminates red.
Picture no: 18245s.tif
After tyre pressure is corrected or a tyre or
wheel is changed, the system must be
initialised by pressing the DDS button.
Deflation detection system 3 3 164.

23In Brief
Picture no: 18577j.tif
Adaptive Forward Lighting (AFL) 3
ensures better illumination of
z bends (curve lighting),
z crossings and narrow bends
(cornering light).
Curve lighting (1)
The light beam pivots based on
steering wheel position and speed
(from approx. 10 km/h).
Cornering light (2)
An additional lamp throws a beam
approx. 90 to the left or right, if the
steering-wheel is turned approx. 90, the
turn signal is activated and the speed is
below approx. 40 km/h.
Reversing function
If the lights are on, reverse gear is
engaged, and the turn signal is activated,
the cornering light on the appropriate side
is switched on.
Adaptive headlight 3 112.
Picture no: 18399s.tif
Personalised key
If the vehicle is used by a number of drivers,
each driver can store his or her own
preferred settings and vehicle functions
using their key. These settings and
functions are then activated when the
relevant key is used.
A total of up to five vehicle keys can be
programmed separately and used.
Personalised key 3 39.
24 In Brief
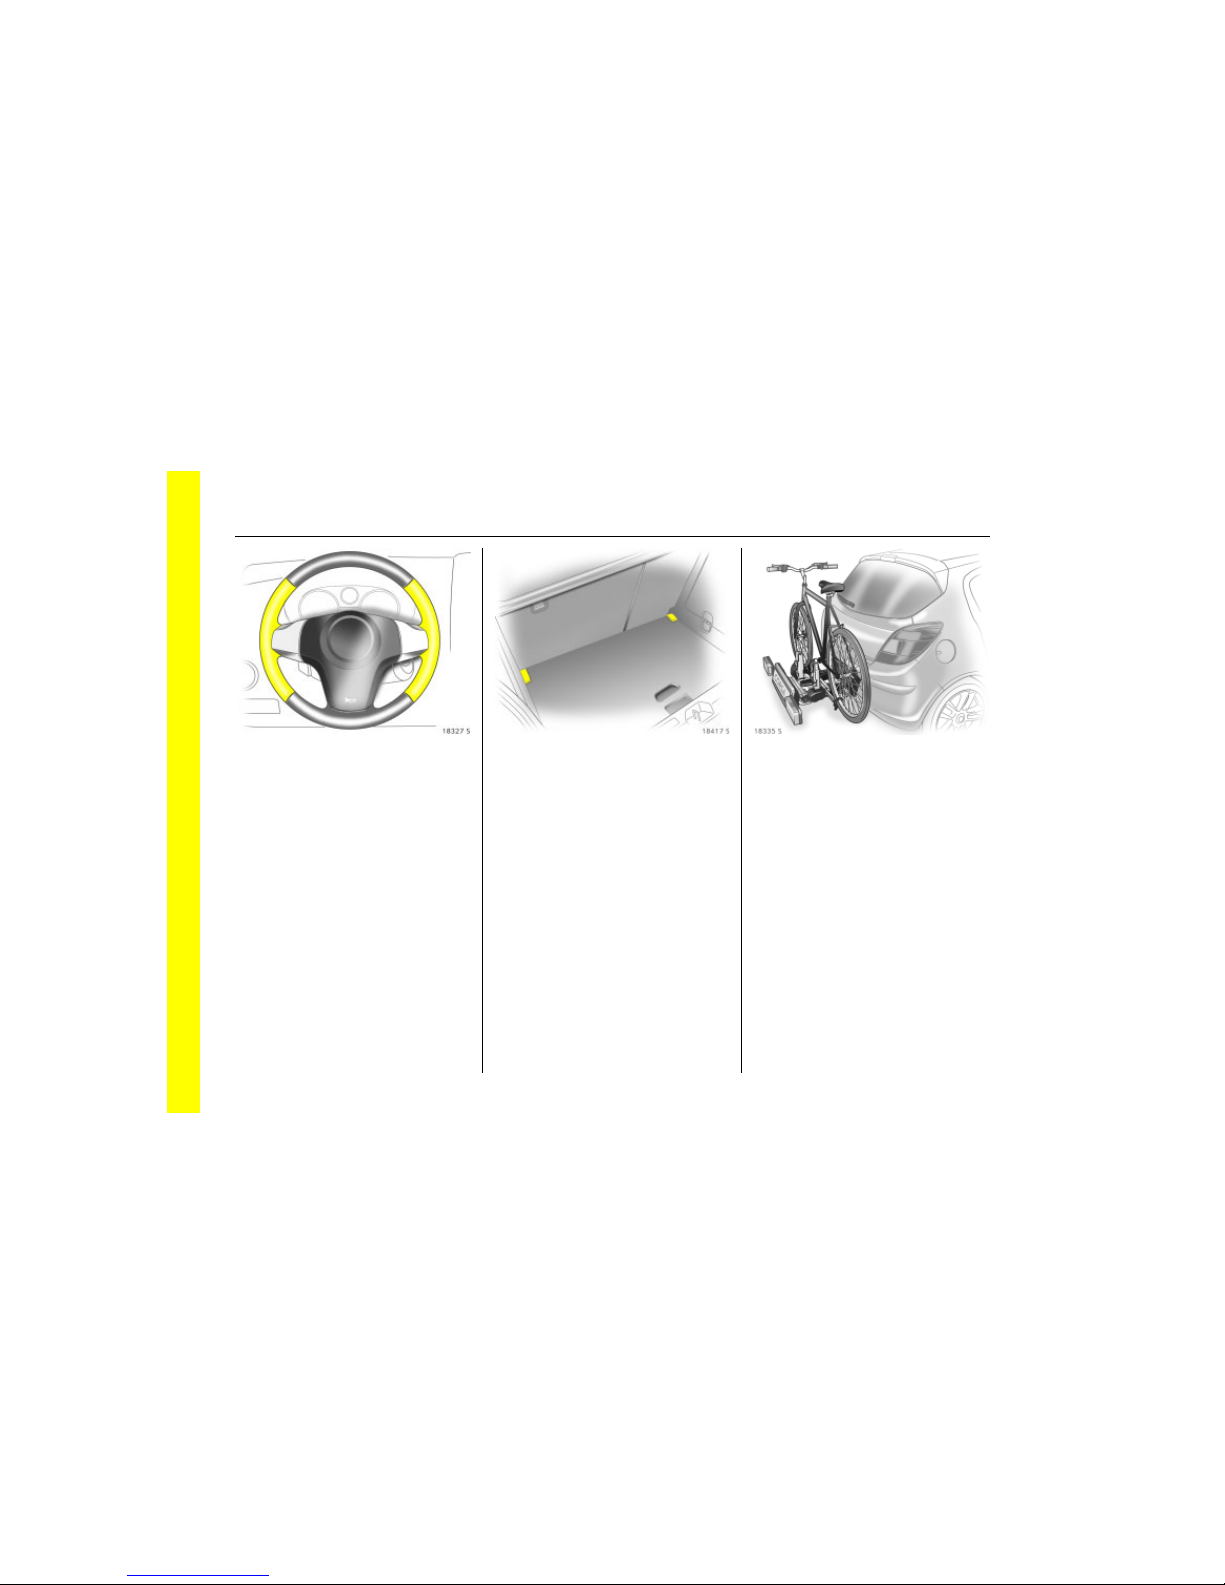
Picture no: 18327s.tif
Heated steering wheel 3
Heating of the steering wheel and of the
driver’s seat is switched on by a single, or
repeated (as appropriate) activation of the
switch ß —.
Heating of the steering wheel — the section
marked out in the illustration.
Heated steering wheel 3 51.
Picture no: 18417s.tif
Double load-bay floor 3
Double load-bay floor, which can be
inserted in the baggage compartment in
two positions.
If mounted in the upper position, the space
between the load-bay floor and the spare
wheel well cover 3 can be used as a
stowage compartment.
In this position, if the rear seat backrests
are folded forwards, an almost completely
flat load bay is created.
Double load-bay floor 3 82.
Picture no: 18335s.tif
Flex-Fix system 3
The Flex-Fix system allows two bikes to be
attached to a pull-out carrier integrated
into the vehicle floor.
If not in use, the Flex-Fix system can be
collapsed back into the vehicle floor.
Flex-Fix system 3 174.
Loading…
- Машины
- Opel
- Corsa
- D
- Opel Corsa
3 декабря 2019
G73
Был 3 часа назад
Игорь живу за МКАДом, 46 лет
Я езжу на Opel Vectra Две трубы, значит дизель (до этого — 8 машин)
Ульяновск, Россия
Подписаться
Сообщение

Opel Corsa D обслуживание и ремонт(изд. Арус)
346 стр, чб, качество хорошее.
3 декабря 2019
Метки: просто так
11
Ранее Помыл машину в праздник.
Далее Литература для скачки 2.Opel Corsa D.
Разместить рекламу
Реклама
Машины в продаже

Шахты
Opel Corsa, 2009
760 000 ₽

Шахты
Opel Corsa, 2008
550 000 ₽

Шахты
Opel Corsa, 2012
849 000 ₽

Шахты
Opel Corsa, 2011
499 000 ₽
Посмотреть больше машин на Дроме
Комментарии
11
Войдите или зарегистрируйтесь, чтобы писать комментарии, задавать вопросы и участвовать в обсуждении.
Войти
Зарегистрироваться
JMachikin
Я езжу на Opel Astra H GTC
и Opel Corsa D
Благодарю!
4 года
G73
Автор
Я езжу на Opel Vectra C
(до этого — Opel Corsa D)
О, у меня и такая есть?!
4 года
dentaku
Я езжу на Chevrolet Lacetti 5D
и Opel Corsa D
Хорошая книга.
5 лет
Viorel077
Я езжу на Opel Corsa D
Красава.
А где можно найти такую же книгу только с дизельным двигателем?
5 лет
G73
Автор
Я езжу на Opel Vectra C
(до этого — Opel Corsa D)
она вроде на английском, завтра будет пост
5 лет
Viorel077
Я езжу на Opel Corsa D
ооооооооооооо буду ждать
5 лет
G73
Автор
Я езжу на Opel Vectra C
(до этого — Opel Corsa D)
домашний интернет плоховат
5 лет
Nikolai796
Я езжу на Opel Corsa D
🤝
Спасибо
5 лет
G73
Автор
Я езжу на Opel Vectra C
(до этого — Opel Corsa D)
Особо и не на чем.
5 лет
AlgDandi
Я езжу на Geely Monjaro
(до этого — Opel Corsa D)
Спасибо тебе добрый человек, я уже был близок к ее покупке =)
5 лет
G73
Автор
Я езжу на Opel Vectra C
(до этого — Opel Corsa D)
на днях будут ещё 3-ри книги. Интернет подвел, не смог загрузить их в «облако»
5 лет
OPEL CORSA
Инструкция по эксплуатации
Введение
3
Технические данные
автомобиля
Запишите параметры Вашего авто‐
мобиля на предыдущей странице
и храните их в легко доступном
месте. Найти эту информацию
можно в разделах «Техническое об‐
служивание» и «Технические дан‐
ные», а также на типовой табличке
автомобиля.
Введение
Ваш автомобиль — это оптимальное
сочетание передовой технологии,
безопасности, экологичности и эко‐
номии.
Настоящее Руководство пользова‐
теля содержит всю необходимую
для уверенного и эффективного
управления Вашим автомобилем
информацию.
Кроме Вас, и пассажиры тоже
должны знать о возможных при не‐
правильной эксплуатации автомо‐
биля несчастных случаях и трав‐
мах. Расскажите им об этом.
Обязательно выполняйте дей‐
ствующие законы и предписания
той страны, в которой находитесь.
Соответствующее законодатель‐
ство может отличаться от приве‐
денной в настоящем Руководстве
информации.
При необходимости посещения
станции техобслуживания, мы ре‐
комендуем обращаться к Автори‐
зованному сервисному центру
Opel. Для обслуживания автомоби‐
лей с газобаллонным оборудова‐
нием рекомендуется обращаться
на фирменные станции техниче‐
ского обслуживания Opel, автори‐
зованные для обслуживания газо‐
топливных систем.
Все Авторизованные сервисные
центры Opel предложат Вам пер‐
воклассный сервис по умеренным
ценам. Опытные специалисты,
прошедшие обучение на фирме
Opel, обслужат Ваш автомобиль,
руководствуясь оригинальными
технологическими инструкциям
компании.
Пакет с литературой для клиента
должен всегда находиться в авто‐
мобиле.
Как пользоваться
настоящим
Руководством
■ В настоящем руководстве опи‐
саны все опции и оборудование
данной модели. Описание
отдельных элементов и функций
меню может быть неприменимо
к вашему автомобилю ввиду
различия модификаций
и исполнений для разных
регионов, а также отсутствия или
наличия дополнительного
оборудования и аксессуаров.
■ Предварительный обзор Вы най‐
дете в главе «Коротко».
■ В содержании в начале данного
руководства и в каждом разделе
указано местоположение инфор‐
мации.
■ Конкретную информацию можно
найти с помощью Алфавитного
указателя.
Назад
к
обзору
4
Введение
■ В настоящем Руководстве поль‐
зователя описаны автомобили
с левым расположением руле‐
вого колеса. Обслуживание авто‐
мобилей с правым расположе‐
нием рулевого колеса выполня‐
ется аналогично.
■ В Руководстве пользователя ис‐
пользованы заводские обозначе‐
ния двигателя. Соответствую‐
щие торговые обозначения при‐
ведены в разделе «Технические
данные».
■ Указания направления, напри‐
мер, влево — вправо или вперед —
назад всегда приводятся относи‐
тельно направления движения.
■ На дисплеях информационной
системы автомобиля информа‐
ция может не отображаться на
вашем родном языке.
■ Отображаемые информацион‐
ной системой сообщения и над‐
писи в салоне автомобиля в тек‐
сте настоящего руководства вы‐
делены жирным шрифтом.
Опасность,
Предупреждение
и Внимание
9 Опасность
Текст, отмеченный
9 Опасность, содержит инфор‐
мацию, связанную с риском
смертельного исхода. Прене‐
брежение этими сведениями
может оказаться опасным для
жизни.
9 Предупреждение
Текст, помеченный
9 Предупреждение, содержит
информацию, связанную с рис‐
ком несчастного случая или
травмы. Пренебрежение этими
сведениями может стать причи‐
ной травмы.
Внимание
Текст, помеченный Внимание,
информирует о том, что автомо‐
биль может быть поврежден.
Пренебрежение этой информа‐
цией может привести к повреж‐
дению автомобиля.
Символы
Ссылки на страницы обозначаются
с помощью 3. 3 означает «см. стр.».
Желаем Вам счастливого пути.
Adam Opel AG
Назад
к
обзору
6
Коротко
Коротко
Исходные сведения,
необходимые при
вождении
Отпирание автомобиля
Поверните ключ в замке двери во‐
дителя по направлению к передней
части автомобиля, либо нажмите
на кнопку q, чтобы разблокиро‐
вать двери и багажный отсек. От‐
кройте двери, потянув за ручки.
Чтобы открыть заднюю багажную
дверь, потяните за кнопку под мол‐
дингом.
Пульт дистанционного управления
3
22, центральный замок 3 23,
багажное отделение 3 27.
Регулировка сидений
Установка сиденья
в требуемое положение
Потяните ручку, сдвиньте сиденье,
отпустите ручку.
Регулировка сиденья 3 40, поло‐
жение сиденья 3 39.
Назад
к
обзору
Коротко
7
9 Опасность
Чтобы избежать травмирования
во время срабатывания по‐
душки безопасности, не придви‐
гайтесь к рулевому колесу
ближе чем на 25 см.
Спинки сидений
Поверните рукоятку. Во время ре‐
гулировки не откидывайтесь на
спинку.
Регулировка сиденья 3 40, поло‐
жение сиденья 3 39, складыва‐
ние спинки сиденья переднего пас‐
сажира 3 41.
Высота сиденья
Для изменения высоты сиденья
выполните рычагом качающие дви‐
жения
вверх = поднять
вниз = опустить
Сиденья 3 40, положение си‐
денья 3 39.
Назад
к
обзору
8
Коротко
Регулировка
подголовника
Нажмите на разблокирующую
кнопку, отрегулируйте высоту, за‐
блокируйте подголовник.
Подголовники 3 38.
Ремень безопасности
Вытяните ремень безопасности
и зафиксируйте его в замке. Ре‐
мень безопасности не должен быть
перекручен и должен плотно при‐
легать к телу. Нельзя откидывать
спинку слишком далеко (не бо‐
лее 25°).
Для того чтобы снять ремень, на‐
жмите красную кнопку на его замке.
Ремни безопасности 3 43, по‐
душки безопасности 3 46, поло‐
жение сиденья 3 39.
Регулировка зеркал
Внутреннее зеркало
Для уменьшения риска ослепления
поверните рычаг в нижней части
зеркала.
Внутреннее зеркало 3 32, авто‐
матическое неослепляющее внут‐
реннее зеркало 3 33.
Назад
к
обзору
Коротко
9
Наружные зеркала
Настройка при помощи
четырехпозиционного
переключателя в системе с ручным
управлением положением зеркал
Сначала выберите зеркало, кото‐
рое нужно настроить, потом отре‐
гулируйте его положение с по‐
мощью ручки управления.
Настройка при помощи
четырехпозиционного
переключателя в системе
с электронным управлением
положением зеркал
Сначала выберите зеркало, кото‐
рое нужно настроить, потом отре‐
гулируйте его положение с по‐
мощью ручки управления.
Электронная регулировка 3 30,
выпуклые наружные зеркала
3
30, складывающиеся наружные
зеркала 3 31, наружные зеркала
с обогревом 3 32.
Регулировка положения
рулевого колеса
Отоприте рычаг, отрегулируйте ру‐
левое колесо, затем зафиксируйте
рычаг и убедитесь, что он полно‐
стью заблокирован. Выполняйте
регулировку только на стоящем ав‐
томобиле с разблокированным ру‐
левым колесом.
Подушки безопасности 3 46, по‐
ложения зажигания 3 125.
Назад
к
обзору
Нажмите на кнопку для помощи
Are you looking for the manual for Opel Corsa 2008? You are in the right place. Below the document viewer for Opel Corsa 2008 manual in PDF format. To save your time, we say that the most common problems with Opel Corsa 2008 can be found in the manual in the «Troubleshooting» section. Check the appropriate page number in the table of contents, and then enter it in the page number box on the right side of the document viewer for Opel Corsa 2008.
If you have questions about the Opel Corsa 2008 device, use the form at the bottom of the page and ask our community a question.
Remember! Reading the Opel Corsa 2008 user manual and adhering to the rules of using the device provided there, greatly help in its effective use. It is important to correctly configure Opel Corsa 2008, it will save resources needed to use it. In case of problems, you will also find recommended companies that can properly fix Opel Corsa 2008. One of the most important reasons why you should read the Opel Corsa 2008 user manual is that to take advantage of the warranty provided on Opel Corsa 2008 — the device must be used in accordance with the manufacturer’s recommendations presented in user manual.
If you want to download Opel Corsa 2008 manual, use the «Download» button below. You can easily view the downloaded version and print selected manual pages Opel Corsa 2008. All manuals on our website are available in PDF format, which is the most universal format that is as easy to use as possible on all operating systems.
Хорошее руководство по эксплуатации
Законодательство обязывает продавца передать покупателю, вместе с товаром, руководство по эксплуатации Opel Corsa D 2008. Отсутствие инструкции либо неправильная информация, переданная потребителю, составляют основание для рекламации в связи с несоответствием устройства с договором. В законодательстве допускается предоставлении руководства в другой, чем бумажная форме, что, в последнее время, часто используется, предоставляя графическую или электронную форму инструкции Opel Corsa D 2008 или обучающее видео для пользователей. Условием остается четкая и понятная форма.
Что такое руководство?
Слово происходит от латинского «instructio», тоесть привести в порядок. Следовательно в инструкции Opel Corsa D 2008 можно найти описание этапов поведения. Цель инструкции заключается в облегчении запуска, использования оборудования либо выполнения определенной деятельности. Инструкция является набором информации о предмете/услуге, подсказкой.
К сожалению немного пользователей находит время для чтения инструкций Opel Corsa D 2008, и хорошая инструкция позволяет не только узнать ряд дополнительных функций приобретенного устройства, но и позволяет избежать возникновения большинства поломок.
Из чего должно состоять идеальное руководство по эксплуатации?
Прежде всего в инструкции Opel Corsa D 2008 должна находится:
— информация относительно технических данных устройства Opel Corsa D 2008
— название производителя и год производства оборудования Opel Corsa D 2008
— правила обслуживания, настройки и ухода за оборудованием Opel Corsa D 2008
— знаки безопасности и сертификаты, подтверждающие соответствие стандартам
Почему мы не читаем инструкций?
Как правило из-за нехватки времени и уверенности в отдельных функциональностях приобретенных устройств. К сожалению само подсоединение и запуск Opel Corsa D 2008 это слишком мало. Инструкция заключает ряд отдельных указаний, касающихся функциональности, принципов безопасности, способов ухода (даже то, какие средства стоит использовать), возможных поломок Opel Corsa D 2008 и способов решения проблем, возникающих во время использования. И наконец то, в инструкции можно найти адресные данные сайта Opel, в случае отсутствия эффективности предлагаемых решений. Сейчас очень большой популярностью пользуются инструкции в форме интересных анимаций или видео материалов, которое лучше, чем брошюра воспринимаются пользователем. Такой вид инструкции позволяет пользователю просмотреть весь фильм, не пропуская спецификацию и сложные технические описания Opel Corsa D 2008, как это часто бывает в случае бумажной версии.
Почему стоит читать инструкции?
Прежде всего здесь мы найдем ответы касательно конструкции, возможностей устройства Opel Corsa D 2008, использования отдельных аксессуаров и ряд информации, позволяющей вполне использовать все функции и упрощения.
После удачной покупки оборудования/устройства стоит посвятить несколько минут для ознакомления с каждой частью инструкции Opel Corsa D 2008. Сейчас их старательно готовят или переводят, чтобы они были не только понятными для пользователя, но и чтобы выполняли свою основную информационно-поддерживающую функцию.