
USER’S GUIDE 2568
Getting Acquainted
Congratulations upon your selection of this CASIO watch. To get the most out of your
purchase, be sure to carefully read this manual and keep it on hand for later reference
when necessary.
Expose the watch to bright light to charge its battery before using it.
You can use this watch even as its battery is being charged by exposure to bright
light.
••
• Be sure to read “Battery” of this manual for important information you need
••
to know when exposing the watch to bright light.
If the display of the watch is blank…
If the Power Saving on (S) indicator flashes on the
display, it means that the display is blank because the
watch’s Power Saving function has turned off the
display to conserve power. Power Saving automatically
turns off the display and puts the watch into a sleep state
whenever your watch is left for a certain period where it
is dark.
• The initial factory default setting is Power Saving on.
• The watch recovers from the sleep state if you move it
to a well-lit area
angle the watch towards your face for reading.
It can take up to five seconds for the display to turn on.
*
••
• See “Power Saving function” for more information.
••
, if you press any button, or if you
*
General Guide
• Press C to change from mode to mode.
• In any mode (except when a setting screen is on the display), press B to illuminate
the display.
Countdown
Timer Mode
▲
Timekeeping Mode
▲
Press C.
Stopwatch Mode
▲
About This Manual
World Time Mode
▲
Day Counter Mode
• Button operations are indicated using the letters shown
in the illustration.
• Each section of this manual provides you with the
information you need to perform operations in each
mode. Further details and technical information can be
found in the “Reference” section.
Data Bank Mode
▲
▲
Alarm Mode
▲
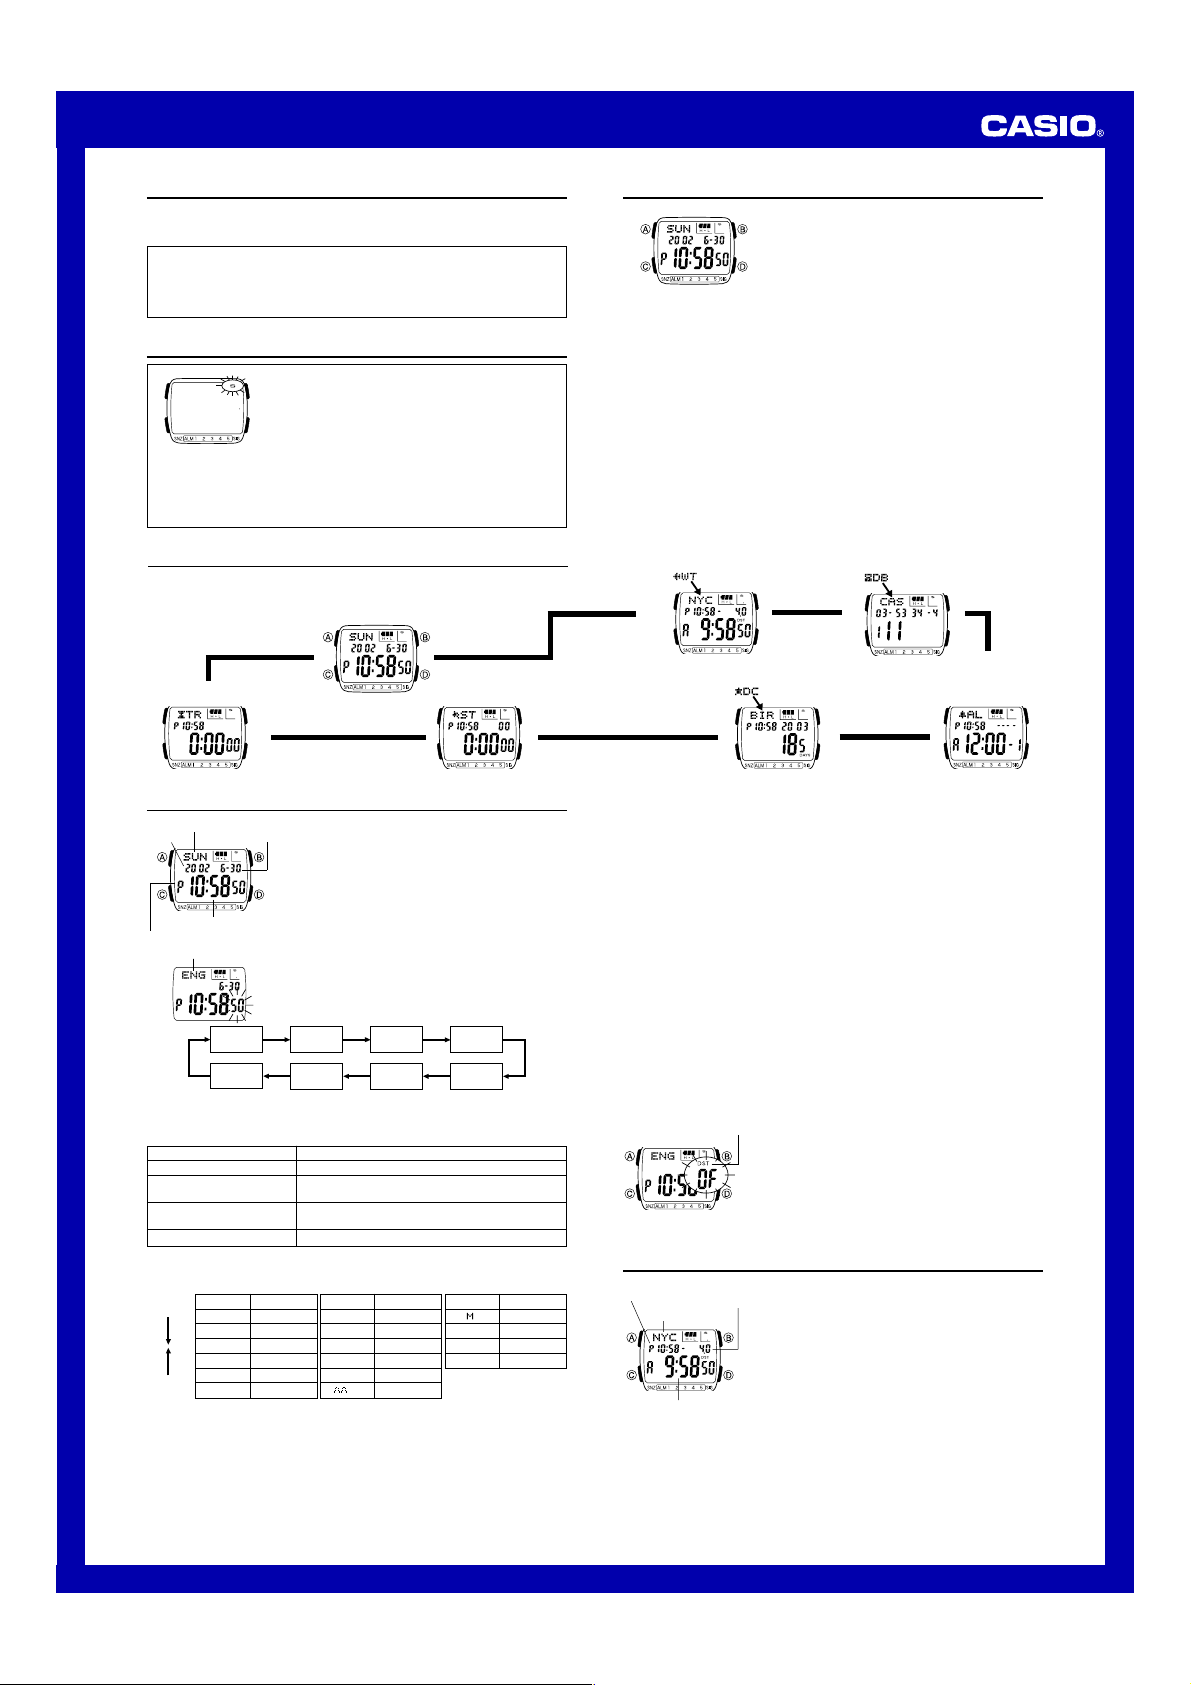
Timekeeping
Day of week
Year
PM indicator
• The currently selected language indicator flashes on the display while the
3. When the setting you want to change is flashing, use B and D to change it as
described below.
Seconds
DST on/off
Hour, Minutes, Year,
Month, Day
Language
• While the language indicator is flashing on the display, use B and D to cycle
Press D.
Press B.
4. Press A to exit the setting screen.
• The day of the week is automatically displayed in accordance with the date (year,
month, and day) settings.
• See the “Day of the Week List” for information on abbreviations used.
Month – Day
Hour : Minutes Seconds
Language indicator
Seconds DST on/off Hour Minutes
Language
Language (setting) is selected in the above sequence.
To change this setting
through the language indicators as shown below, until the one for the language
you want to select is displayed.
Indicator Language
ENx English
POR Portuguese
ESP Spanish
FRA French
NED Dutch
DAN Danish
Use the Timekeeping Mode to set the time and date.
Note
This watch is capable of displaying text for the day of the
week in any one of 16 different languages (English,
Portuguese, Spanish, French, Dutch, Danish, German,
Italian, Czech, Swedish, Polish, Greek, Romanian,
Turkish, Russian, and Japanese).
To set the time and date
1.In the Timekeeping Mode, hold down A until the
seconds start to flash, which indicates the setting
screen.
2.Use C to move the flashing in the sequence shown
below to select other settings.
Day Month Year
Perform this button operation
Press D to reset to 00.
Press D to toggle between Daylight Saving Time
(ON displayed) and standard time (OF displayed).
Use D (+) and B (–) to change the setting.
Use B and D to change the language setting.
Indicator Language
DEU German
ITA Italian
CES Czech
SVE Swedish
POL Polish
E
Greek
Indicator Language
RO Romanian
T)R Turkish
PUC Russian
JPN Japanese
• In addition to the day of the week display, the language setting also affects the type
of characters you can input for the name in the Data Bank Mode and the text in the
Day Counter Mode.
• Holding down A in the Timekeeping Mode displays the indicator for the currently
selected language. Keeping A depressed for about two seconds changes to the
Timekeeping Mode setting screen (indicated by the seconds flashing). If you
accidentally display the setting screen, press A again to exit.
To toggle between 12-hour and 24-hour timekeeping
In the Timekeeping Mode, press D to toggle between 12-hour timekeeping (indicated
by A or P on the display), or 24-hour timekeeping.
• With the 12-hour format, the P (PM) indicator appears on the display for times in the
range of noon to 11:59 p.m. and the A (AM) indicator appears for times in the range
of midnight to 11:59 a.m.
• With the 24-hour format, times are displayed in the range of 0:00 to 23:59, without
any indicator.
• The 12-hour/24-hour timekeeping format you select in the Timekeeping Mode is
applied in all modes.
Daylight Saving Time (DST)
Daylight Saving Time (summer time) advances the time setting by one hour from
Standard Time. Remember that not all countries or even local areas use Daylight
Saving Time.
To toggle the Timekeeping Mode time between DST and Standard Time
DST indicator
1.In the Timekeeping Mode, hold down A until the
seconds start to flash, which indicates the setting
screen.
2.Press C to move the flashing to the DST on/off setting.
3.Press D to toggle between Daylight Saving Time (ON
displayed) and standard time (OF displayed).
4.Press A to exit the setting screen.
• The DST indicator appears on the display to indicate
that Daylight Saving Time is turned on in the
Timekeeping, Alarm, and Day Counter Mode.
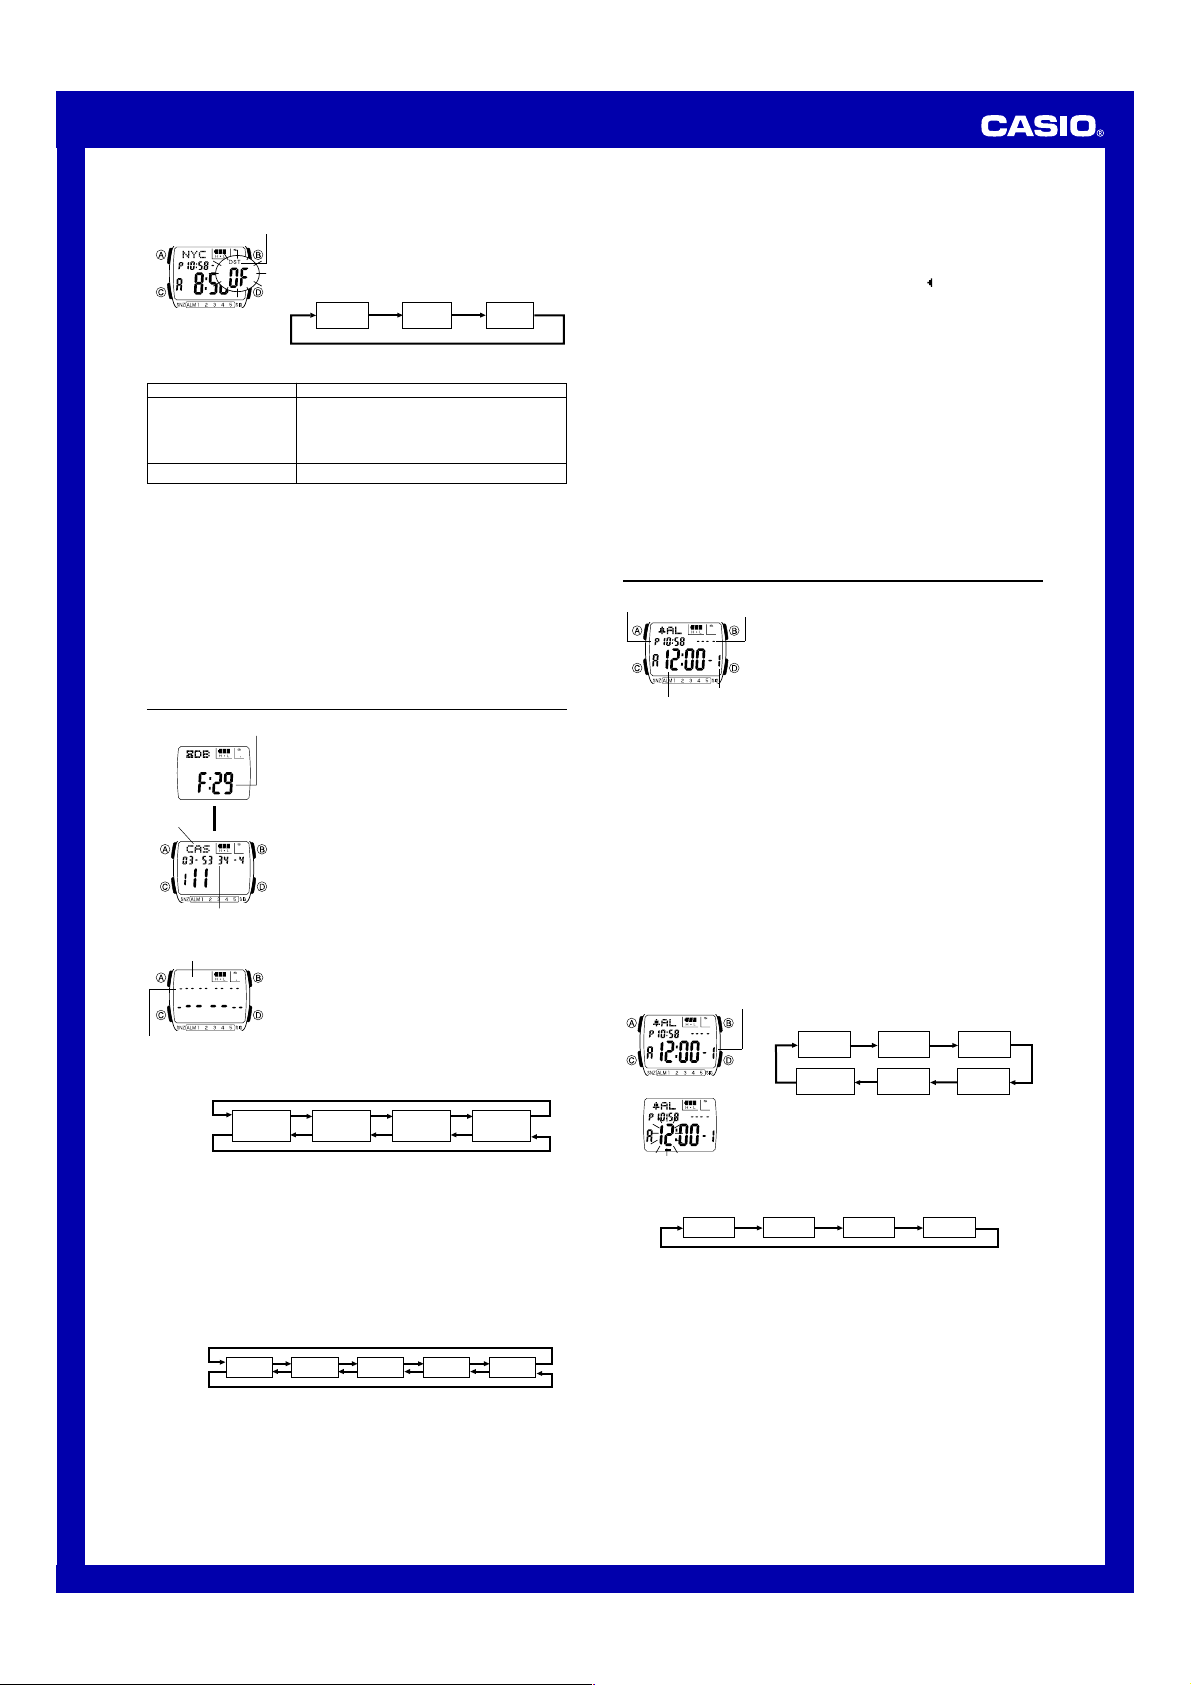
World Time
Timekeeping
mode time
City code
Current time in
the selected city
code
UTC
differential
The World Time shows the current time in 28 cities (29
time zones) around the world.
• The time settings of the Timekeeping Mode and the
World Time Mode are independent from each other, so
you must make separate settings for each.
• Whenever you change the time setting for any city in the
World Time Mode, the settings of all other cities are
changed accordingly.
• The UTC differential value indicates the number of hours
difference in time between the currently selected time
zone and UTC.
• All of the operations in this section are performed in the
World Time Mode, which you enter by pressing C.
1
USER’S GUIDE 2568
To set the current time in the World Time Mode
DST indicator
4. When the setting you want to change is flashing, use B and D to change it as
described below.
To change this setting
DST on/off
Hour, Minutes
• While the settings are flashing on the display, pressing B and D at the same
time changes the DST on/off, hour, and minutes settings so they match the
Timekeeping Mode time.
• When setting the world time using the 12-hour format, take care to set the time
correctly as a.m. (A indicator) or p.m. (P indicator).
5. Press A to exit the setting screen.
• The DST indicator appears on the display to indicate that Daylight Saving Time is
turned on in the World Time Mode.
• Note that you cannot make settings for individual city codes. Daylight Saving Time
(summer time) advances the time setting by one hour from Standard Time .
Remember that not all countries or even local areas use Daylight Saving Time.
To view the time in another city code
In the World Time Mode, press D to scroll city codes (time zones).
• For full information on city codes, see the “City Code Table”.
1.In the World Time Mode, use D to select the city code
whose time you want to set.
2.After you select a city code, hold down A until the DST
on/off setting of the World time starts to flash, which
indicates the setting screen.
3.Use C to move the flashing in the sequence shown
below to select other settings.
HourDST on/off
Perform this button operation
Press D to toggle between Daylight Saving Time
(ON displayed) and standard time (OF displayed).
• The above operation toggles all World Time city
codes between Daylight Saving Time and Standard
Time.
Use D (+) and B (–) to change the setting.
Minutes
Data Bank
Remaining memory
Name
L
Telephone number
To create a new Data Bank record
Name area
Number area
New Data Screen
Press D.
Press B.
• The above character sequence is for English input. See “Character List” for the
character sequences of other languages.
4. When the character you want is at the cursor position, press C to move the cursor
to the right.
5. Repeat steps 3 and 4 until the name is complete.
• Y ou can input up to eight characters for the name.
6. After you input the name, press C as many times as necessary to move the cursor
to the number area.
• When the cursor is located at the eighth space of the name area, moving the
cursor to the right causes it to jump to the first digit of the number. When the
cursor is at the 16th digit of the number, moving it to the right (by pressing C)
causes it to jump to the first character in the name.
7. In the number area, use B and D to cycle through numbers and symbols
(hyphen, brackets, space) at the cursor position. The characters cycle in the
sequence shown below.
Press D.
Press B.
8. When the character you want is at the cursor position, press C to move the cursor
to the right.
9. Repeat steps 7 and 8 until you complete number input.
• You can input up to 16 digits for the number.
• The number initially contains all hyphens. You can leave the hyphens as they are
or replace them with numbers or other symbols (brackets, space).
The Data Bank Mode lets you store up to 30 records,
each containing name and telephone number data.
Records are automatically sorted based on the characters
of the name. You can recall records by scrolling through
them on the display.
• The characters you can input for the name depend on
the language you select in the Timekeeping Mode. See
“To set the time and date” for more information.
Changing the language setting does not affect names
that are already stored.
• See “Sort Table” for details on how the watch sorts
records.
• All of the operations in this section are performed in the
Data Bank Mode, which you enter by pressing C.
1.In the Data Bank Mode, use D to display the new data
screen.
• To jump directly to the new data screen, press B and
D at the same time.
• If the new data screen does not appear when you
press D, it means that memory is full. To store
another record, you will first have to delete some of
the records stored in memory.
2.Hold down A until the flashing cursor (_) appears in
the name area of the display.
3.In the name area, use B and D to cycle through
characters at the cursor position. The characters cycle
in the sequence shown below.
(space)
x
0 to 9
A to Z
(alphabet)
@ to —
(symbol)
[ ]
0 to 9
(number)
(space)
10.Press A to store your data and return to the Data Bank record screen (without
the cursor).
• When you press A to store data, the name and number you input flash for about
one second as Data Bank records are sorted. After the sort operation is complete,
the Data Bank record screen appears.
• The name can show only three characters at a time, so longer text scrolls continuously
from right to left. The last character is indicated b y the symbol
To recall Data Bank records
In the Data Bank Mode, use D to scroll through Data Bank records on the display.
To edit a Data Bank record
1. In the Data Bank Mode, use D to scroll through the records and display the one
you want to edit.
2. Hold down A until the flashing cursor appears on the display.
3. Use C to move the flashing to the character you want to change.
4. Use D (forward) and B (back) to change the character.
5. After making the changes that you want, press A to store them and return to the
Data Bank record screen.
To delete a Data Bank record
1. In the Data Bank Mode, use D to scroll through the records and display the one
you want to delete.
2. Hold down A until the flashing cursor appears on the display.
3. Press B and D at the same time to delete the record.
• The message CLR appears to indicate that the record is being deleted. After the
record is deleted, the cursor appears on the display, ready for input.
4. Input data or press A to return to the Data Bank record screen.
after it.
Alarms
Timekeeping
Mode time
Alarm time
(Hour : Minutes)
Alarm Types
The alarm type is determined by the settings you make, as described below.
• Daily alarm
Set the hour and minutes for the alarm time. This type of setting causes the alarm to
sound everyday at the time you set.
• Date alarm
Set the month, day, hour and minutes for the alarm time. This type of setting causes
the alarm to sound at the specific time, on the specific date you set.
• 1-Month alarm
Set the month, hour and minutes for the alarm time. This type of setting causes the
alarm to sound everyday at the time you set, only during the month you set.
• Monthly alarm
Set the day, hour and minutes for the alarm time. This type of setting causes the alarm
to sound every month at the time you set, on the day you set.
Alarm date
(month – Day)
Alarm number
To set an alarm time
Alarm number
3. Use C to move the flashing in the sequence shown below to select other settings.
Hour
4. While a setting is flashing, use D (+) and B (–) to change it.
• To set an alarm that does not include a month (Daily alarm, Monthly alarm), set x
for the month. Use D and B until the x mark appears (between 12 and 1) while
month setting is flashing.
• To set an alarm that does not include a day (Daily alarm, 1-Month alarm), set xx
for the day. Use D and B until the xx mark appears (between the end of the
month and 1) while the day setting is flashing.
• When setting the alarm time using the 12-hour format, take care to set the time
correctly as a.m. (A indicator) or p.m. (P indicator).
5. Press A to exit the setting screen.
Alarm Operation
The alarm tone sounds at the preset time for 10 seconds, regardless of the mode the
watch is in. In the case of the snooze alarm, the alarm operation is performed a total
of seven times, every five minutes, until you turn the alarm off or change it to a onetime alarm.
• Pressing any button stops the alarm tone operation.
• Performing any one of the following operations during a 5-minute interval between
snooze alarms cancels the current snooze alarm operation.
Displaying the Timekeeping Mode setting screen
Displaying the alarm
You can set up to five independent multi-function alarms
with hour, minutes, month, and day. When an alarm is
turned on, the alarm tone sounds when the alarm time is
reached. One of the alarms can be configured as a
snooze alarm or a one-time alarm, while the other four are
one-time alarms.
You can also turn on an Hourly Time Signal that causes
the watch to beep twice every hour on the hour.
• There are five alarms numbered 1 through 5. You can
configure Alarm 1 as a snooze alarm or a one-time
alarm. Alarms 2 through 5 can be used as one-time
alarms only.
• Alarm settings (and Hourly Time Signal settings) are
available in the Alarm Mode, which you enter by
pressing C.
1.In the Alarm Mode, use D to scroll through the alarm
screens until the one whose time you want to set is
displayed.
Alarm1 Alarm 2 Alarm 3
Hourly Time
Signal
• Each of the five alarm screens has an alarm number.
The Hourly Time Signal screen does not have an
alarm number.
2.After you select an alarm, hold down A until the hour
setting of the alarm time starts to flash, which indicates
the setting screen.
• This operation automatically turns on the alarm.
Minutes
1
setting screen
Alarm 5 Alarm 4
Month Day
2
Timekeeping Mode
USER’S GUIDE 2568
Getting Acquainted
Congratulations upon your selection of this CASIO watch. To get the most out of your purchase, be sure to carefully read this manual and keep it on hand for later reference when necessary.
Expose the watch to bright light to charge its battery before using it.
You can use this watch even as its battery is being charged by exposure to bright light.
•Be sure to read “Battery” of this manual for important information you need to know when exposing the watch to bright light.
If the display of the watch is blank…
If the Power Saving on (S) indicator flashes on the display, it means that the display is blank because the watch’s Power Saving function has turned off the display to conserve power. Power Saving automatically turns off the display and puts the watch into a sleep state whenever your watch is left for a certain period where it is dark.
•The initial factory default setting is Power Saving on.
•The watch recovers from the sleep state if you move it
to a well-lit area*, if you press any button, or if you angle the watch towards your face for reading.
*It can take up to five seconds for the display to turn on.
•See “Power Saving function” for more information.
General Guide
•Press Cto change from mode to mode.
•In any mode (except when a setting screen is on the display), press Bto illuminate
the display.
|
Press C. |
|
|
▲ |
|
|
Countdown |
Stopwatch Mode |
|
Timer Mode |
|
|
▲ |
▲ |
Timekeeping
About This Manual
•Button operations are indicated using the letters shown
in the illustration.
• Each section of this manual provides you with the information you need to perform operations in each mode. Further details and technical information can be found in the “Reference” section.
|
World Time Mode |
Data Bank Mode |
|
▲ |
▲ |
|
▲ |
|
|
Day Counter Mode |
Alarm Mode |
|
▲ |
Day of week
|
Year |
Month – Day |
||
Hour : Minutes Seconds
PM indicator
Language indicator
Use the Timekeeping Mode to set the time and date.
Note
This watch is capable of displaying text for the day of the week in any one of 16 different languages (English, Portuguese, Spanish, French, Dutch, Danish, German, Italian, Czech, Swedish, Polish, Greek, Romanian, Turkish, Russian, and Japanese).
To set the time and date
1.In the Timekeeping Mode, hold down Auntil the seconds start to flash, which indicates the setting screen.
2.Use Cto move the flashing in the sequence shown below to select other settings.
•In addition to the day of the week display, the language setting also affects the type of characters you can input for the name in the Data Bank Mode and the text in the Day Counter Mode.
•Holding down Ain the Timekeeping Mode displays the indicator for the currently selected language. Keeping Adepressed for about two seconds changes to the
Timekeeping Mode setting screen (indicated by the seconds flashing). If you accidentally display the setting screen, press Aagain to exit.
To toggle between 12-hour and 24-hour timekeeping
In the Timekeeping Mode, press Dto toggle between 12-hour timekeeping (indicated by A or P on the display), or 24-hour timekeeping.
•With the 12-hour format, the P (PM) indicator appears on the display for times in the range of noon to 11:59 p.m. and the A (AM) indicator appears for times in the range of midnight to 11:59 a.m.
•With the 24-hour format, times are displayed in the range of 0:00 to 23:59, without any indicator.
•The 12-hour/24-hour timekeeping format you select in the Timekeeping Mode is applied in all modes.
|
Seconds |
DST on/off |
Hour |
Minutes |
|||||||||
|
Language |
Day |
Month |
Year |
|||||||||
•The currently selected language indicator flashes on the display while the Language (setting) is selected in the above sequence.
3.When the setting you want to change is flashing, use B and Dto change it as described below.
|
To change this setting |
Perform this button operation |
|
|
Seconds |
Press D to reset to 00. |
|
|
DST on/off |
Press Dto toggle between Daylight Saving Time |
|
|
(ON displayed) and standard time (OF displayed). |
||
|
Hour, Minutes, Year, |
Use D(+) and B(–) to change the setting. |
|
|
Month, Day |
||
|
Language |
Use Band Dto change the language setting. |
|
|
• While the language indicator is flashing on the display, use B and D to cycle |
|
through the language indicators as shown below, until the one for the language |
Daylight Saving Time (DST)
Daylight Saving Time (summer time) advances the time setting by one hour from Standard Time. Remember that not all countries or even local areas use Daylight Saving Time.
To toggle the Timekeeping Mode time between DST and Standard Time
1. In the Timekeeping Mode, hold down Auntil the
DST indicator seconds start to flash, which indicates the setting screen.
2.Press Cto move the flashing to the DST on/off setting.
3.Press Dto toggle between Daylight Saving Time (ON displayed) and standard time (OF displayed).
4.Press Ato exit the setting screen.
•The DST indicator appears on the display to indicate that Daylight Saving Time is turned on in the Timekeeping, Alarm, and Day Counter Mode.
World Time
you want to select is displayed.
|
Press D. |
Indicator |
Language |
Indicator |
Language |
Indicator |
Language |
|
|
ENx |
English |
DEU |
German |
RO |
Romanian |
||
|
POR |
Portuguese |
ITA |
Italian |
T)R |
Turkish |
||
|
ESP |
Spanish |
CES |
Czech |
PUC |
Russian |
||
|
FRA |
French |
SVE |
Swedish |
JPN |
Japanese |
||
|
NED |
Dutch |
POL |
Polish |
||||
|
Press B. |
DAN |
Danish |
E |
Greek |
4. Press A to exit the setting screen.
•The day of the week is automatically displayed in accordance with the date (year, month, and day) settings.
•See the “Day of the Week List” for information on abbreviations used.
Timekeeping
mode time UTC differential
City code
Current time in the selected city code
The World Time shows the current time in 28 cities (29 time zones) around the world.
•The time settings of the Timekeeping Mode and the World Time Mode are independent from each other, so you must make separate settings for each.
•Whenever you change the time setting for any city in the World Time Mode, the settings of all other cities are changed accordingly.
•The UTC differential value indicates the number of hours difference in time between the currently selected time zone and UTC.
•All of the operations in this section are performed in the World Time Mode, which you enter by pressing C.
1
Document Download |
‹
›
Casio 2568 Manual Online:
4.1,
2662
votes
Casio 2568 User Manual
Casio 2568 User Guide
Casio 2568 Online Manual
Text of Casio 2568 User Guide:
Related Products and Documents (Watch):
-
Casio 2519 Watch Operation & user’s manual
2519
casio/2519.pdf, 2 -
Casio 5274 Watch Operation manual
5274
casio/5274.pdf, 3 -
Casio 3136 Watch Operation manual
3136
casio/3136.pdf, 2 -
Casio 4709 Watch Operation manual
4709
casio/4709.pdf, 5 -
Casio 3271 Watch Operation manual
3271
casio/3271.pdf, 6 -
Casio 2430 Watch Operation & user’s manual
2430
casio/2430.pdf, 2 -
Casio 2572 Watch Operation & user’s manual
2572
casio/2572.pdf, 4 -
Casio 2172 Watch Manual
2172
casio/2172.pdf, 11
Comparable Devices:
| # | Manufacturer | Model | Document Type | File | Updated | Pages | Size |
|---|---|---|---|---|---|---|---|
| 1 | Aphex | Xciter 1401 | Instruction manual | aphex/xciter-1401-GV8.pdf | 25 May 2024 | 13 | |
| 2 | Thermador | WD27ES | Installation manual | thermador/wd27es-D4V.pdf | 15 Feb 2024 | 28 | 0.67 Mb |
| 3 | Sanyo | VCC-HD2100 — Full HD 1080p Network Camera | Specifications | sanyo/vcc-hd2100-full-hd-1080p-network-camera-355.pdf | 20 Mar 2025 | 7 | 0.09 Mb |
| 4 | Sansui | HDLCDVD225A | Owner’s manual | sansui/hdlcdvd225a-24C.pdf | 15 Mar 2025 | 39 | 3.34 Mb |
| 5 | Planet Audio | P9734B | Operation & user’s manual | planet-audio/p9734b-F5O.pdf | 16 Jan 2024 | 10 | |
| 6 | Shindaiwa | EC7600W EC1 | Parts catalog | shindaiwa/ec7600w-ec1-492.pdf | 10 Feb 2024 | 23 | 0.7 Mb |
Similar Resources:
Watch Instructions:
-
Panasonic Security Camera WV-SW314
Specification for Panasonic WV-SW314 Security Camera
WV-SW314, 2
-
Tripp Lite Network Cable N546-15M
N546-15M (Network Cable ePDF Guide, #1K4S52)
N546-15M, 2
-
Endress+Hauser Measuring Instruments Levelflex M FMP40
#1J3W9Q Levelflex M FMP40: Endress+Hauser Measuring Instruments Owner Documentation
Levelflex M FMP40, 52
-
Samsung Home Theater System CHT-420
#1OBX81: CHT-420 Home Theater System Manual de instrucciones
CHT-420, 32
-
iDROID Cell Phone IKON Z5
iDROID IKON Z5 User Manual (Operation & user’s manual), @N238O7
IKON Z5, 21
-
HUSKY LINERS Automobile Accessories 5622
HUSKY LINERS Product User Manual: 5622 PDF Installation instructions — CUV6MN
5622, 2
-
Acer Laptop TravelMate 290
Acer Laptop TravelMate 290 Manuel d’utilisation
TravelMate 290, 84
-
RedLeaf IP Camera RLC-BF2050
Operation & user’s manual for RedLeaf RLC-BF2050 IP Camera
RLC-BF2050, 33
-
Rane Music Mixer CM 86
#8H77M1: CM 86 Music Mixer Schematic diagram
CM 86, 4
-
Trust Keyboard EASY SCROLL SILVERLINE
User Guide: Trust EASY SCROLL SILVERLINE (N42KU1, Upd.Wed 02.2025)
EASY SCROLL SILVERLINE, 10
-
Automationdirect.com Network Router SE-SW8U
Automationdirect.com Product Manual: SE-SW8U PDF Datasheet — WW98IC
SE-SW8U, 2
-
Philips Indoor Furnishing Innergize HB933
Philips Indoor Furnishing Innergize HB933 Operation & user’s manual
Innergize HB933, 56
Comments, Questions and Opinions:

USER’S GUIDE 2568
1
Getting Acquainted
Congratulations upon your selection of this CASIO watch. To get the most out of your
purchase, be sure to carefully read this manual and keep it on hand for later reference
when necessary.
Expose the watch to bright light to charge its battery before using it.
You can use this watch even as its battery is being charged by exposure to bright
light.
••••• Be sure to read “Battery” of this manual for important information you need
to know when exposing the watch to bright light.
If the display of the watch is blank…
If the Power Saving on (
S
) indicator flashes on the
display, it means that the display is blank because
the
watch’s Power Saving function has turned off the
display to conserve power.
Power Saving automatically
turns off the display and puts the watch into a sleep state
whenever your watch is left for a certain period where it
is dark.
•
The initial factory default setting is Power Saving on.
•
The watch recovers from the sleep state if you move it
to a well-lit area
*
, if you press any button, or if you
angle the watch towards your face for reading.
*
It can take up to five seconds for the display to turn on.
••••• See “Power Saving function” for more information.
About This Manual
•
Button operations are indicated using the letters shown
in the illustration.
•
Each section of this manual provides you with the
information you need to perform operations in each
mode. Further details and technical information can be
found in the “Reference” section.
General Guide
•
Press
C
to change from mode to mode.
•
In any mode (except when a setting screen is on the display), press
B
to illuminate
the display.
Data Bank Mode
Countdown
Timer Mode
World Time Mode
▲
▲
▲
Alarm Mode
Timekeeping Mode
▲
Press
C
.
▲
▲
▲
Stopwatch Mode
Day Counter Mode
Timekeeping
Use the Timekeeping Mode to set the time and date.
Note
This watch is capable of displaying text for the day of the
week in any one of 16 different languages (English,
Portuguese, Spanish, French, Dutch, Danish, German,
Italian, Czech, Swedish, Polish, Greek, Romanian,
Turkish, Russian, and Japanese).
To set the time and date
1. In the Timekeeping Mode, hold down
A
until the
seconds start to flash, which indicates the setting
screen.
2. Use
C
to move the flashing in the sequence shown
below to select other settings.
Day of week
Month – Day
Hour : Minutes Seconds
PM indicator
Year
Language indicator
•
The currently selected language indicator flashes on the display while the
Language (setting) is selected in the above sequence.
3. When the setting you want to change is flashing, use
B
and
D
to change it as
described below.
Seconds
DST on/off
Hour
Minutes
Day
Month
Year
Language
To change this setting
Seconds
DST on/off
Hour, Minutes, Year,
Month, Day
Language
Perform this button operation
Press
D
to reset to
00
.
Press
D
to toggle between Daylight Saving Time
(
ON
displayed) and standard time (
OF
displayed).
Use
D
(+) and
B
(–) to change the setting.
Use
B
and
D
to change the language setting.
•
While the language indicator is flashing on the display, use
B
and
D
to cycle
through the language indicators as shown below, until the one for the language
you want to select is displayed.
4. Press
A
to exit the setting screen.
•
The day of the week is automatically displayed in accordance with the date (year,
month, and day) settings.
•
See the “Day of the Week List” for information on abbreviations used.
Indicator
Language
ENx
English
POR
Portuguese
ESP
Spanish
FRA
French
NED
Dutch
DAN
Danish
Press
D
.
Press
B
.
Indicator
Language
DEU
German
ITA
Italian
CES
Czech
SVE
Swedish
POL
Polish
E
Greek
Indicator
Language
RO
Romanian
T)R
Turkish
PUC
Russian
JPN
Japanese
•
In addition to the day of the week display, the language setting also affects the type
of characters you can input for the name in the Data Bank Mode and the text in the
Day Counter Mode.
•
Holding down
A
in the Timekeeping Mode displays the indicator for the currently
selected language. Keeping
A
depressed for about two seconds changes to the
Timekeeping Mode setting screen (indicated by the seconds flashing). If you
accidentally display the setting screen, press
A
again to exit.
To toggle between 12-hour and 24-hour timekeeping
In the Timekeeping Mode, press
D
to toggle between 12-hour timekeeping (indicated
by
A
or
P
on the display), or 24-hour timekeeping.
•
With the 12-hour format, the
P
(PM) indicator appears on the display for times in the
range of noon to 11:59 p.m. and the
A
(AM) indicator appears for times in the range
of midnight to 11:59 a.m.
•
With the 24-hour format, times are displayed in the range of 0:00 to 23:59, without
any indicator.
•
The 12-hour/24-hour timekeeping format you select in the Timekeeping Mode is
applied in all modes.
Daylight Saving Time (DST)
Daylight Saving Time (summer time) advances the time setting by one hour from
Standard Time. Remember that not all countries or even local areas use Daylight
Saving Time.
To toggle the Timekeeping Mode time between DST and Standard Time
1. In the Timekeeping Mode, hold down
A
until the
seconds start to flash, which indicates the setting
screen.
2. Press
C
to move the flashing to the DST on/off setting.
3. Press
D
to toggle between Daylight Saving Time (
ON
displayed) and standard time (
OF
displayed).
4. Press
A
to exit the setting screen.
•
The
DST
indicator appears on the display to indicate
that Daylight Saving Time is turned on in the
Timekeeping, Alarm, and Day Counter Mode.
DST indicator
World Time
The World Time shows the current time in 28 cities (29
time zones) around the world.
•
The time settings of the Timekeeping Mode and the
World Time Mode are independent from each other, so
you must make separate settings for each.
•
Whenever you change the time setting for any city in the
World Time Mode, the settings of all other cities are
changed accordingly.
•
The UTC differential value indicates the number of hours
difference in time between the currently selected time
zone and UTC.
•
All of the operations in this section are performed in the
World Time Mode, which you enter by pressing
C
.
UTC
differential
Current time in
the selected city
code
Timekeeping
mode time
City code