
1) All intellectual property contained in this library — including owner’s manuals and product literature — is the sole property of KORG Inc. Duplication of contents of owner’s manuals and/or product literature in part or in whole without the permission of the Company for the purposes of sharing, mass-producing, posting online, or personal gain of any kind is prohibited by copyright law. Users are permitted to create one (1) copy for their personal non-commercial use.
2) Materials such as owner’s manuals and related product information are intended for the use of customers who purchase and use the product (End User). The Company assumes that this material is utilized by the End User. Please be aware that the Company may not be able to respond to inquiries regarding owner’s manuals made public in this library from anyone other than customers who have purchased the products.
3) This library does not provide owner’s manuals and product information for all of the products sold by the Company. Owner’s manuals or product information may not be available for all products indefinitely or at all, and may be permanently discontinued at the Company’s discretion.
4) Contents of owner’s manuals and content as found on korg.com may differ. Information on korg.com may be updated as necessary based on changes to the product specification, operating system, included contents, and so on. Additionally, owner’s manuals may be updated to reflect these and other changes with updated production of the product.
5) Company takes no responsibility for any loss including but not limited to loss of data, financial loss, or personal loss) that might arise from the use of, or the inability to use, the manual library or the specified software.
6) Please be aware that this service may be modified or terminated at any time by the Company without specific notice.
7) Contacts for questions regarding the product, as well as other addresses, phone numbers, or email addresses listed in the owner’s manuals are current as of the date the manual was produced. For the latest contact information, please refer to the Korg.com website.
 Cautions regarding the use of the product are stated at the beginning and end of each owner’s manual. Because these cautions were based on the laws and societal understandings at the time when each manual was produced, they might not be appropriate for the present time. It is advised that End User review and strictly adhere to these Cautions.
Reference Guide
ENGLISH | OS Ver. 1.0
1E

Important safety instructions
• Read these instructions.
• Keep these instructions.
• Heed all warnings.
• Follow all instructions.
• Do not use this apparatus near water.
• Clean only with dry cloth.
• Do not block any ventilation openings, install in accordance with the manufacturer’s instructions.
• Do not install near any heat sources such as radiators, heat registers, stoves, or
other apparatus (including amplifiers) that produce heat.
• Protect the power cord from being walked on or pinched particularly at plugs,
convenience receptacles, and the point where they exit from the apparatus.
• Only use attachments/accessories specified by the manufacturer.
• Unplug this apparatus during lightning storms or when unused for long periods of time.
• Refer all servicing to qualified service personnel. Servicing is required when
the apparatus has been damaged in any way, such as power-supply cord or
plug is damaged, liquid has been spilled or objects have fallen into the apparatus, the apparatus has been exposed to rain or moisture, does not operate normally, or has been dropped.
• Turning off the power switch does not completely isolate this product from
the power line so remove the plug from the socket if not using it for extended
periods of time, or before cleaning. Please ensure that the mains plug or appliance couple remains readily accessible.
• Mains powered apparatus shall not be exposed to dripping or splashing and that
no objects filled with liquids, such as vases, shall be placed on the apparatus.
• Install this product near the wall socket and keep the power plug easily accessible.
• Do not install this equipment on the far position from wall outlet and/or convenience receptacle.
• WARNING – Date/time Lithium button cell battery inside. Danger of explosion if battery is incorrectly replaced. Replace only with the same or equivalent type. The internal date/time Lithium button cell battery is user
replaceable.
• Do not expose batteries to excessive heat, such as direct sunshine, fire or the like.
• Dispose of used batteries according to the battery manufacturer’s instructions.
• Do not install this equipment in a confined space such as a box for the conveyance or similar unit.
• When a cart is used, use caution when moving the cart/apparatus combination to avoid injury from tip-over.
The lightning flash with arrowhead symbol within an equilateral triangle, is intended to alert the user to the presence of
uninsulated “dangerous voltage” within the product’s enclosure that may be of sufficient magnitude to constitute a risk
of electric shock to persons.
The exclamation point within an equilateral triangle is
intended to alert the user to the presence of important operating and maintenance (servicing) instructions in the literature accompanying the product.
THE FCC REGULATION WARNING (for U.S.A.)
This equipment has been tested and found to comply with the limits for a Class B
digital device, pursuant to Part 15 of the FCC Rules. These limits are designed to
provide reasonable protection against harmful interference in a residential
installation. This equipment generates, uses, and can radiate radio frequency energy
and, if not installed and used in accordance with the instructions, may cause
harmful interference to radio communications. However, there is no guarantee that
interference will not occur in a particular installation. If this equipment does cause
harmful interference to radio or television reception, which can be determined by
turning the equipment off and on, the user is encouraged to try to correct the
interference by one or more of the following measures:
• Reorient or relocate the receiving antenna.
• Increase the separation between the equipment and receiver.
• Connect the equipment into an outlet on a circuit different from that to which the
receiver is connected.
• Consult the dealer or an experienced radio/TV technician for help.
Unauthorized changes or modification to this system can void the user’s authority to
operate this equipment.
CE mark for European Harmonized Standards
CE mark which is attached to our company’s products of AC mains operated
apparatus until December 31, 1996 means it conforms to EMC Directive (89/336/
EEC) and CE mark Directive (93/68/EEC).
And, CE mark which is attached after January 1, 1997 means it conforms to EMC
Directive (89/336/EEC), CE mark Directive (93/68/EEC) and Low Voltage Directive
(73/23/EEC).
Also, CE mark which is attached to our company’s products of Battery operated
apparatus means it conforms to EMC Directive (89/336/EEC) and CE mark
Directive (93/68/EEC).
Notice regarding disposal (EU only)
If this symbol is shown on the product, manual, battery, or package, you
must dispose of it in the correct manner to avoid harm to human health
or damage to the environment. Contact your local administrative body
for details on the correct disposal method. If the battery contains heavy
metals in excess of the regulated amount, a chemical symbol is displayed
below the symbol on the battery or battery package.
Perchlorate (California, USA only)
Perchlorate Material – special handling may apply.
See www.dtsc.ca.gov/hazardouswaste/perchlorate.
IMPORTANT NOTICE TO CONSUMERS
This product has been manufactured according to strict specifications and voltage
requirements that are applicable in the country in which it is intended that this
product should be used. If you have purchased this product via the internet, through
mail order, and/or via a telephone sale, you must verify that this product is intended
to be used in the country in which you reside.
WARNING: Use of this product in any country other than that for which it is
intended could be dangerous and could invalidate the manufacturer’s or distributor’s
warranty.
Please also retain your receipt as proof of purchase otherwise your product may be
disqualified from the manufacturer’s or distributor’s warranty.

Further notices
Automatic Power-Off
To avoid wasting power, Pa600 will by default automatically turn
off after two hours of non-active use (playing, pressing buttons
or using the touch-screen). Please save your data (Performances,
Styles, Songs, and so on) before taking a prolonged pause.
Data Handling
Data in memory may sometimes be lost due to incorrect user
action. Be sure to save important data to the internal memory or
to an external USB device. Korg will not be responsible for damages caused by data loss.
Example screens
Some pages of the manuals show LCD screens along with an
explanation of functions and operations. All sound, style, song
or parameter names, as well as shown values, are merely examples and may not always match the actual display you are working on.
Cleaning the display
Use a soft cotton cloth to clean the screen. Some materials, such
as paper towels, could cause scratches and damage it. Computer
wipes are also suggested, provided they are specifically designed
for LCD screens.
Do not spray any liquid on the LCD screen directly. Always
apply the solution to your cloth first, then clean the screen.
Trademarks
Open Source notice
Portions of this product’s software are copyright ©2007 “The
FreeType Project” (www.freetype.org). All rights reserved.
Disclaimer
The information contained in this manual have been carefully
revised and checked through. Due to our constant efforts to
improve our products, the specifications might differ to those in
the manual. Korg is not responsible for any eventual differences
found between the specifications and the contents of the instruction manual – all specifications being subject to change without
prior notice.
Liability
Korg products are manufactured under strict specifications and
voltages required by each country. These products are warranted
by the Korg distributor only in each country. Any Korg product
not sold with a warranty card or carrying a serial number disqualifies the product sold from the manufacturer’s/distributor’s
warranty and liability. This requirement is for your own protection and safety.
Service and User’s Assistance
For service, please contact your nearest Authorized Korg Service
Center. For more information on Korg products, and to find
software and accessories for your keyboard, please contact your
local Authorized Korg distributor. For up-to-date information,
please point your web browser to our web site.
Acrobat and PDF are registered trademarks of Adobe Systems
Incorporated. Mac is a registered trademark of Apple, Inc.
MS-DOS and Windows are registered trademarks of Microsoft
Corporation. All other trademarks or registered trademarks are
the property of their respective holders.
Keep your keyboard up-to-date
Your instrument can be constantly updated as new versions of
the operating system are released by Korg. You can download
the operating system from our web site. Please, read the instructions supplied with the operating system.
Copyright © 2012 KORG Italy Spa.

Table of Contents
Table of Contents
1
Reference
Selecting elements . . . . . . . . . . . . . . . . . . . . . . . . . . . . . . . . . . . 6
Style Select window . . . . . . . . . . . . . . . . . . . . . . . . . . . . . . . . . . . . . .6
Sound Select window . . . . . . . . . . . . . . . . . . . . . . . . . . . . . . . . . . . .7
Performance Select window . . . . . . . . . . . . . . . . . . . . . . . . . . . . . .8
Pad Select window . . . . . . . . . . . . . . . . . . . . . . . . . . . . . . . . . . . . . .8
STS Select . . . . . . . . . . . . . . . . . . . . . . . . . . . . . . . . . . . . . . . . . . . . . .9
Song Select window . . . . . . . . . . . . . . . . . . . . . . . . . . . . . . . . . . . . .9
Style Play operating mode . . . . . . . . . . . . . . . . . . . . . . . . . . . 12
Start-up settings . . . . . . . . . . . . . . . . . . . . . . . . . . . . . . . . . . . . . . 12
How Styles, Variations, Performances and STSs are
linked together . . . . . . . . . . . . . . . . . . . . . . . . . . . . . . . . . . . . . . 12
Styles and Pads . . . . . . . . . . . . . . . . . . . . . . . . . . . . . . . . . . . . . . . 12
Master Volume and Balance . . . . . . . . . . . . . . . . . . . . . . . . . . . . 12
Factory, Favorite and User Styles . . . . . . . . . . . . . . . . . . . . . . . . 12
Main page . . . . . . . . . . . . . . . . . . . . . . . . . . . . . . . . . . . . . . . . . . . . 13
STS Name panel . . . . . . . . . . . . . . . . . . . . . . . . . . . . . . . . . . . . . . 15
Volume panel . . . . . . . . . . . . . . . . . . . . . . . . . . . . . . . . . . . . . . . . 15
Pad panel . . . . . . . . . . . . . . . . . . . . . . . . . . . . . . . . . . . . . . . . . . . . 17
Split panel . . . . . . . . . . . . . . . . . . . . . . . . . . . . . . . . . . . . . . . . . . . . 18
Sub-Scale panel . . . . . . . . . . . . . . . . . . . . . . . . . . . . . . . . . . . . . . . 18
Edit menu . . . . . . . . . . . . . . . . . . . . . . . . . . . . . . . . . . . . . . . . . . . . 19
Edit page structure . . . . . . . . . . . . . . . . . . . . . . . . . . . . . . . . . . . . 19
Mixer/Tuning: Volume/Pan . . . . . . . . . . . . . . . . . . . . . . . . . . . . 19
Mixer/Tuning: FX Send . . . . . . . . . . . . . . . . . . . . . . . . . . . . . . . . 20
Mixer/Tuning: EQ Gain . . . . . . . . . . . . . . . . . . . . . . . . . . . . . . . . 21
Mixer/Tuning: EQ Control . . . . . . . . . . . . . . . . . . . . . . . . . . . . . 21
Mixer/Tuning: Tuning . . . . . . . . . . . . . . . . . . . . . . . . . . . . . . . . . 22
Mixer/Tuning: Sub Scale . . . . . . . . . . . . . . . . . . . . . . . . . . . . . . . 22
Effects: A/B FX Configuration . . . . . . . . . . . . . . . . . . . . . . . . . . 24
Effects: Master 1, 2 . . . . . . . . . . . . . . . . . . . . . . . . . . . . . . . . . . . . 25
Track Controls: Mode . . . . . . . . . . . . . . . . . . . . . . . . . . . . . . . . . 25
Track Controls: Drum Edit . . . . . . . . . . . . . . . . . . . . . . . . . . . . . 26
Track Controls: Easy Edit . . . . . . . . . . . . . . . . . . . . . . . . . . . . . . 27
Keyboard/Ensemble: Key/Velocity Range . . . . . . . . . . . . . . . . 28
Keyboard/Ensemble: Ensemble . . . . . . . . . . . . . . . . . . . . . . . . . 29
Keyboard/Ensemble: Keyboard Control . . . . . . . . . . . . . . . . . . 30
Pad/Switch: Pad . . . . . . . . . . . . . . . . . . . . . . . . . . . . . . . . . . . . . . . 30
Pad/Switch: Switch . . . . . . . . . . . . . . . . . . . . . . . . . . . . . . . . . . . . 31
Style Controls: Drum/Fill . . . . . . . . . . . . . . . . . . . . . . . . . . . . . . 31
Style Controls: Keyboard Range On/Off / Wrap Around . . . . 32
Page menu . . . . . . . . . . . . . . . . . . . . . . . . . . . . . . . . . . . . . . . . . . . 32
Write Performance dialog box . . . . . . . . . . . . . . . . . . . . . . . . . . 33
Write Single Touch Setting dialog box . . . . . . . . . . . . . . . . . . . 34
Write Style Settings dialog box . . . . . . . . . . . . . . . . . . . . . . . . . . 34
The Favorite banks . . . . . . . . . . . . . . . . . . . . . . . . . . . . . . . . . . . . 35
Style/Pad Record mode . . . . . . . . . . . . . . . . . . . . . . . . . . . . . . 36
Recording Styles and Pads . . . . . . . . . . . . . . . . . . . . . . . . . . . . . . 36
Style/Pad Import/Export . . . . . . . . . . . . . . . . . . . . . . . . . . . . . . . 38
Entering the Style/Pad Record mode . . . . . . . . . . . . . . . . . . . . . 38
Exit by saving or deleting changes . . . . . . . . . . . . . . . . . . . . . . . 38
Listening to the Style while in Edit mode . . . . . . . . . . . . . . . . . 38
List of recorded events . . . . . . . . . . . . . . . . . . . . . . . . . . . . . . . . . 39
Main page — Record 1 . . . . . . . . . . . . . . . . . . . . . . . . . . . . . . . . . . 39
Main page — Record 2/Cue . . . . . . . . . . . . . . . . . . . . . . . . . . . . . . 43
Main page — Guitar Mode . . . . . . . . . . . . . . . . . . . . . . . . . . . . . . 44
Style/Pad Record procedure . . . . . . . . . . . . . . . . . . . . . . . . . . . . 48
Edit menu . . . . . . . . . . . . . . . . . . . . . . . . . . . . . . . . . . . . . . . . . . . . 50
Edit page structure . . . . . . . . . . . . . . . . . . . . . . . . . . . . . . . . . . . . 50
Event Edit: Event Edit . . . . . . . . . . . . . . . . . . . . . . . . . . . . . . . . . . 51
Event Edit: Filter . . . . . . . . . . . . . . . . . . . . . . . . . . . . . . . . . . . . . . 53
Style/Pad Edit: Quantize . . . . . . . . . . . . . . . . . . . . . . . . . . . . . . . . 54
Style/Pad Edit: Transpose . . . . . . . . . . . . . . . . . . . . . . . . . . . . . . . 54
Style/Pad Edit: Velocity . . . . . . . . . . . . . . . . . . . . . . . . . . . . . . . . 55
Style/Pad Edit: Cut . . . . . . . . . . . . . . . . . . . . . . . . . . . . . . . . . . . . 56
Style/Pad Edit: Delete . . . . . . . . . . . . . . . . . . . . . . . . . . . . . . . . . . 56
Style/Pad Edit: Delete All . . . . . . . . . . . . . . . . . . . . . . . . . . . . . . . 57
Style/Pad Edit: Copy from Style . . . . . . . . . . . . . . . . . . . . . . . . . 57
Style/Pad Edit: Copy from Pad . . . . . . . . . . . . . . . . . . . . . . . . . . 58
Style Element Track Controls: Sound/Expression . . . . . . . . . . 59
Style Element Track Controls: Keyboard Range . . . . . . . . . . . . 60
Style Element Track Controls: Noise/Guitar . . . . . . . . . . . . . . . 60
Pad Track Controls: Sound/Expression . . . . . . . . . . . . . . . . . . . 61
Style Element/Pad Chord Table: Chord Table . . . . . . . . . . . . . 62
Style Track Controls: Type/Trigger/Tension . . . . . . . . . . . . . . 62
Import: Import Groove . . . . . . . . . . . . . . . . . . . . . . . . . . . . . . . . 63
Import: Import SMF . . . . . . . . . . . . . . . . . . . . . . . . . . . . . . . . . . . 63
Export SMF . . . . . . . . . . . . . . . . . . . . . . . . . . . . . . . . . . . . . . . . . . 65
Page menu . . . . . . . . . . . . . . . . . . . . . . . . . . . . . . . . . . . . . . . . . . . 66
Write Style/Pad dialog box . . . . . . . . . . . . . . . . . . . . . . . . . . . . . . 67
Copy Key/Chord dialog box . . . . . . . . . . . . . . . . . . . . . . . . . . . . 68
Copy Sounds dialog box . . . . . . . . . . . . . . . . . . . . . . . . . . . . . . . . 68
Copy Expression dialog box . . . . . . . . . . . . . . . . . . . . . . . . . . . . . 68
Copy Key Range dialog box . . . . . . . . . . . . . . . . . . . . . . . . . . . . . 68
Copy Chord Table dialog box . . . . . . . . . . . . . . . . . . . . . . . . . . . 69
Overdub Step Recording window . . . . . . . . . . . . . . . . . . . . . . . . 69
Song Play operating mode . . . . . . . . . . . . . . . . . . . . . . . . . . . 71
MIDI Clock . . . . . . . . . . . . . . . . . . . . . . . . . . . . . . . . . . . . . . . . . . 71
Tempo Lock . . . . . . . . . . . . . . . . . . . . . . . . . . . . . . . . . . . . . . . . . . 71
Master Volume, Balance . . . . . . . . . . . . . . . . . . . . . . . . . . . . . . . . 71
Track parameters . . . . . . . . . . . . . . . . . . . . . . . . . . . . . . . . . . . . . . 71
Standard MIDI Files and Sounds . . . . . . . . . . . . . . . . . . . . . . . . 71
Keyboard, Pad and Player tracks . . . . . . . . . . . . . . . . . . . . . . . . . 72
Main page (Normal view) . . . . . . . . . . . . . . . . . . . . . . . . . . . . . . 72
STS Name panel . . . . . . . . . . . . . . . . . . . . . . . . . . . . . . . . . . . . . . . 75
Volume panel . . . . . . . . . . . . . . . . . . . . . . . . . . . . . . . . . . . . . . . . . 75
Pad panel . . . . . . . . . . . . . . . . . . . . . . . . . . . . . . . . . . . . . . . . . . . . 75
Split panel . . . . . . . . . . . . . . . . . . . . . . . . . . . . . . . . . . . . . . . . . . . . 75
Sub-Scale panel . . . . . . . . . . . . . . . . . . . . . . . . . . . . . . . . . . . . . . . 76
Jukebox panel . . . . . . . . . . . . . . . . . . . . . . . . . . . . . . . . . . . . . . . . . 76
Edit menu . . . . . . . . . . . . . . . . . . . . . . . . . . . . . . . . . . . . . . . . . . . . 77
Edit page structure . . . . . . . . . . . . . . . . . . . . . . . . . . . . . . . . . . . . 77
Mixer/Tuning: Volume/Pan . . . . . . . . . . . . . . . . . . . . . . . . . . . . 77
Mixer/Tuning: FX Send . . . . . . . . . . . . . . . . . . . . . . . . . . . . . . . . 77
Mixer/Tuning: EQ Gain . . . . . . . . . . . . . . . . . . . . . . . . . . . . . . . . 78
Mixer/Tuning: EQ Control . . . . . . . . . . . . . . . . . . . . . . . . . . . . . 79
Mixer/Tuning: Tuning . . . . . . . . . . . . . . . . . . . . . . . . . . . . . . . . . 79
Effects: A/B FX Configuration . . . . . . . . . . . . . . . . . . . . . . . . . . . 79
Effects: Master 1, 2 . . . . . . . . . . . . . . . . . . . . . . . . . . . . . . . . . . . . . 80
Track Controls: Mode . . . . . . . . . . . . . . . . . . . . . . . . . . . . . . . . . . 80
Track Controls: Drum Edit . . . . . . . . . . . . . . . . . . . . . . . . . . . . . 80
Track Controls: Easy Edit . . . . . . . . . . . . . . . . . . . . . . . . . . . . . . . 80
Keyboard/Ensemble: Key/Velocity Range . . . . . . . . . . . . . . . . . 80
Keyboard/Ensemble: Ensemble . . . . . . . . . . . . . . . . . . . . . . . . . . 80
Keyboard/Ensemble: Keyboard Control . . . . . . . . . . . . . . . . . . 80
Pad/Switch: Pad . . . . . . . . . . . . . . . . . . . . . . . . . . . . . . . . . . . . . . . 80
Pad/Switch: Assignable Switch . . . . . . . . . . . . . . . . . . . . . . . . . . 81
Introduction

2
Jukebox Editor . . . . . . . . . . . . . . . . . . . . . . . . . . . . . . . . . . . . . . . . 81
Page menu . . . . . . . . . . . . . . . . . . . . . . . . . . . . . . . . . . . . . . . . . . . . 82
Sequencer operating mode . . . . . . . . . . . . . . . . . . . . . . . . . .84
Standard MIDI Files and MP3 . . . . . . . . . . . . . . . . . . . . . . . . . . . 84
Sequencer Play — Main page . . . . . . . . . . . . . . . . . . . . . . . . . . . . . 84
Entering Record mode . . . . . . . . . . . . . . . . . . . . . . . . . . . . . . . . . 86
Record mode: Multitrack Sequencer page . . . . . . . . . . . . . . . . . 87
Record mode: Step Record page . . . . . . . . . . . . . . . . . . . . . . . . . 89
Record mode: Backing Sequence (Quick Record) page . . . . . . 91
Record mode: Step Backing Sequence page . . . . . . . . . . . . . . . . 94
Edit menu . . . . . . . . . . . . . . . . . . . . . . . . . . . . . . . . . . . . . . . . . . . . 96
Edit page structure . . . . . . . . . . . . . . . . . . . . . . . . . . . . . . . . . . . . . 96
Mixer/Tuning: Volume/Pan . . . . . . . . . . . . . . . . . . . . . . . . . . . . . 97
Mixer/Tuning: FX Send . . . . . . . . . . . . . . . . . . . . . . . . . . . . . . . . 97
Mixer/Tuning: EQ Gain . . . . . . . . . . . . . . . . . . . . . . . . . . . . . . . . 97
Mixer/Tuning: EQ Control . . . . . . . . . . . . . . . . . . . . . . . . . . . . . 97
Mixer/Tuning: Tuning . . . . . . . . . . . . . . . . . . . . . . . . . . . . . . . . . 98
Mixer/Tuning: Sub Scale . . . . . . . . . . . . . . . . . . . . . . . . . . . . . . . . 98
Effects: A/B FX Configuration . . . . . . . . . . . . . . . . . . . . . . . . . . . 98
Effects: Master 1, 2 . . . . . . . . . . . . . . . . . . . . . . . . . . . . . . . . . . . . . 99
Track Controls: Mode . . . . . . . . . . . . . . . . . . . . . . . . . . . . . . . . . .99
Track Controls: Drum Edit . . . . . . . . . . . . . . . . . . . . . . . . . . . . . 99
Track Controls: Easy Edit . . . . . . . . . . . . . . . . . . . . . . . . . . . . . . . 99
Event Edit: Event Edit . . . . . . . . . . . . . . . . . . . . . . . . . . . . . . . . . . 99
Event Edit: Filter . . . . . . . . . . . . . . . . . . . . . . . . . . . . . . . . . . . . . 101
Song Edit: Quantize . . . . . . . . . . . . . . . . . . . . . . . . . . . . . . . . . . . 101
Song Edit: Transpose . . . . . . . . . . . . . . . . . . . . . . . . . . . . . . . . . . 102
Song Edit: Velocity . . . . . . . . . . . . . . . . . . . . . . . . . . . . . . . . . . . . 102
Song Edit: Cut/Insert Measures . . . . . . . . . . . . . . . . . . . . . . . . . 103
Song Edit: Delete . . . . . . . . . . . . . . . . . . . . . . . . . . . . . . . . . . . . . 103
Song Edit: Copy . . . . . . . . . . . . . . . . . . . . . . . . . . . . . . . . . . . . . . 104
Song Edit: Move . . . . . . . . . . . . . . . . . . . . . . . . . . . . . . . . . . . . . . 104
Song Edit: RX Convert . . . . . . . . . . . . . . . . . . . . . . . . . . . . . . . .104
Page menu . . . . . . . . . . . . . . . . . . . . . . . . . . . . . . . . . . . . . . . . . . . 105
Song Select window . . . . . . . . . . . . . . . . . . . . . . . . . . . . . . . . . . .106
Save Song window . . . . . . . . . . . . . . . . . . . . . . . . . . . . . . . . . . . . 106
Sound Edit operating mode . . . . . . . . . . . . . . . . . . . . . . . . 108
The MIDI channel . . . . . . . . . . . . . . . . . . . . . . . . . . . . . . . . . . . . 108
How to select oscillators . . . . . . . . . . . . . . . . . . . . . . . . . . . . . . . 108
Sounds, Drum Kits . . . . . . . . . . . . . . . . . . . . . . . . . . . . . . . . . . . 108
Main page . . . . . . . . . . . . . . . . . . . . . . . . . . . . . . . . . . . . . . . . . . . 108
Edit menu . . . . . . . . . . . . . . . . . . . . . . . . . . . . . . . . . . . . . . . . . . . 110
Edit page structure . . . . . . . . . . . . . . . . . . . . . . . . . . . . . . . . . . . . 110
Basic: Sound Basic . . . . . . . . . . . . . . . . . . . . . . . . . . . . . . . . . . . . 110
Basic: OSC Basic . . . . . . . . . . . . . . . . . . . . . . . . . . . . . . . . . . . . . . 112
Basic: Vel/Key Zone . . . . . . . . . . . . . . . . . . . . . . . . . . . . . . . . . . . 114
Basic: Damper Mode . . . . . . . . . . . . . . . . . . . . . . . . . . . . . . . . . .114
Basic: Damper Trigger . . . . . . . . . . . . . . . . . . . . . . . . . . . . . . . . . 115
Basic: EQ . . . . . . . . . . . . . . . . . . . . . . . . . . . . . . . . . . . . . . . . . . . . 116
DrumKit: Sample Setup (Drum Kits) . . . . . . . . . . . . . . . . . . . .116
DrumKit: EQ (Drum Kits) . . . . . . . . . . . . . . . . . . . . . . . . . . . . . 118
DrumKit: Voice Mixer (Drum Kits) . . . . . . . . . . . . . . . . . . . . .118
Pitch: Pitch Mod . . . . . . . . . . . . . . . . . . . . . . . . . . . . . . . . . . . . . 119
Pitch: Pitch EG . . . . . . . . . . . . . . . . . . . . . . . . . . . . . . . . . . . . . . .121
Filter: Filter Type . . . . . . . . . . . . . . . . . . . . . . . . . . . . . . . . . . . . . 123
Filter: Filter Mod . . . . . . . . . . . . . . . . . . . . . . . . . . . . . . . . . . . . . 124
Filter: Filter LFO . . . . . . . . . . . . . . . . . . . . . . . . . . . . . . . . . . . . . 125
Filter: Filter EG . . . . . . . . . . . . . . . . . . . . . . . . . . . . . . . . . . . . . . . 126
Amp: Amp Level/Pan . . . . . . . . . . . . . . . . . . . . . . . . . . . . . . . . . 128
Amp: Amp Mod . . . . . . . . . . . . . . . . . . . . . . . . . . . . . . . . . . . . . . 128
Amp: Amp EG . . . . . . . . . . . . . . . . . . . . . . . . . . . . . . . . . . . . . . . 129
LFO: LFO1 . . . . . . . . . . . . . . . . . . . . . . . . . . . . . . . . . . . . . . . . . .131
LFO: LFO2 . . . . . . . . . . . . . . . . . . . . . . . . . . . . . . . . . . . . . . . . . . .132
Effects: “B” FX Config . . . . . . . . . . . . . . . . . . . . . . . . . . . . . . . . .132
Effects: Master 1 / Reverb . . . . . . . . . . . . . . . . . . . . . . . . . . . . . .132
Effects: Master 2 / Chorus . . . . . . . . . . . . . . . . . . . . . . . . . . . . . .133
User PCM Samples: User Samples . . . . . . . . . . . . . . . . . . . . . . .133
Page menu . . . . . . . . . . . . . . . . . . . . . . . . . . . . . . . . . . . . . . . . . . .134
Write Sound dialog box . . . . . . . . . . . . . . . . . . . . . . . . . . . . . . . .135
Copy Oscillator dialog box . . . . . . . . . . . . . . . . . . . . . . . . . . . . .135
Copy Drum Kit dialog box . . . . . . . . . . . . . . . . . . . . . . . . . . . . .135
AMS (Alternate Modulation Source) list . . . . . . . . . . . . . . . . .136
Global mode . . . . . . . . . . . . . . . . . . . . . . . . . . . . . . . . . . . . . . 138
Overview on the Global mode . . . . . . . . . . . . . . . . . . . . . . . . . .138
Main page . . . . . . . . . . . . . . . . . . . . . . . . . . . . . . . . . . . . . . . . . . .138
Edit menu . . . . . . . . . . . . . . . . . . . . . . . . . . . . . . . . . . . . . . . . . . .138
Edit page structure . . . . . . . . . . . . . . . . . . . . . . . . . . . . . . . . . . . .138
General Controls: Basic . . . . . . . . . . . . . . . . . . . . . . . . . . . . . . . .139
General Controls: Interface . . . . . . . . . . . . . . . . . . . . . . . . . . . . .140
General Controls: Lock . . . . . . . . . . . . . . . . . . . . . . . . . . . . . . . .141
General Controls: Clock & Power . . . . . . . . . . . . . . . . . . . . . . .142
Mode Preferences: Style . . . . . . . . . . . . . . . . . . . . . . . . . . . . . . . .143
Mode Preferences: Song & Sequencer . . . . . . . . . . . . . . . . . . . .145
Mode Preferences: Media . . . . . . . . . . . . . . . . . . . . . . . . . . . . . .145
Controllers: Hand Controllers . . . . . . . . . . . . . . . . . . . . . . . . . .146
Controllers: Foot Controllers . . . . . . . . . . . . . . . . . . . . . . . . . . .146
Tuning: Basic . . . . . . . . . . . . . . . . . . . . . . . . . . . . . . . . . . . . . . . . .147
Tuning: Transpose Control . . . . . . . . . . . . . . . . . . . . . . . . . . . . .147
Tuning: Scale . . . . . . . . . . . . . . . . . . . . . . . . . . . . . . . . . . . . . . . . .148
MIDI: General Controls . . . . . . . . . . . . . . . . . . . . . . . . . . . . . . .149
MIDI: MIDI In Controls . . . . . . . . . . . . . . . . . . . . . . . . . . . . . . .150
MIDI: MIDI In Channels . . . . . . . . . . . . . . . . . . . . . . . . . . . . . .151
MIDI: MIDI Out Channels . . . . . . . . . . . . . . . . . . . . . . . . . . . . .151
MIDI: Filters . . . . . . . . . . . . . . . . . . . . . . . . . . . . . . . . . . . . . . . . .152
Audio & EQ: MP3 / Speakers . . . . . . . . . . . . . . . . . . . . . . . . . . .152
Audio & EQ: Limiter . . . . . . . . . . . . . . . . . . . . . . . . . . . . . . . . . .152
Audio & EQ: Master EQ . . . . . . . . . . . . . . . . . . . . . . . . . . . . . . .153
Touch Panel Calibration . . . . . . . . . . . . . . . . . . . . . . . . . . . . . . .154
Page menu . . . . . . . . . . . . . . . . . . . . . . . . . . . . . . . . . . . . . . . . . . .154
Write Quarter Tone SC Preset dialog box . . . . . . . . . . . . . . . .155
Write Midi Preset dialog box . . . . . . . . . . . . . . . . . . . . . . . . . . .155
Write Limiter Preset dialog box . . . . . . . . . . . . . . . . . . . . . . . . .155
Write Master EQ Preset dialog box . . . . . . . . . . . . . . . . . . . . . .155
Media mode . . . . . . . . . . . . . . . . . . . . . . . . . . . . . . . . . . . . . . . 156
Storage devices and internal memory . . . . . . . . . . . . . . . . . . . .156
Supported device . . . . . . . . . . . . . . . . . . . . . . . . . . . . . . . . . . . . .156
Selecting and deselecting files . . . . . . . . . . . . . . . . . . . . . . . . . . .156
Searching files . . . . . . . . . . . . . . . . . . . . . . . . . . . . . . . . . . . . . . . .156
Preferences . . . . . . . . . . . . . . . . . . . . . . . . . . . . . . . . . . . . . . . . . . .156
File types . . . . . . . . . . . . . . . . . . . . . . . . . . . . . . . . . . . . . . . . . . . .157
Media structure . . . . . . . . . . . . . . . . . . . . . . . . . . . . . . . . . . . . . . .158
Main page . . . . . . . . . . . . . . . . . . . . . . . . . . . . . . . . . . . . . . . . . . .159
Page structure . . . . . . . . . . . . . . . . . . . . . . . . . . . . . . . . . . . . . . . .159
Navigation tools . . . . . . . . . . . . . . . . . . . . . . . . . . . . . . . . . . . . . .159
Load . . . . . . . . . . . . . . . . . . . . . . . . . . . . . . . . . . . . . . . . . . . . . . . .160
Save . . . . . . . . . . . . . . . . . . . . . . . . . . . . . . . . . . . . . . . . . . . . . . . . .163
Copy . . . . . . . . . . . . . . . . . . . . . . . . . . . . . . . . . . . . . . . . . . . . . . . .167
Delete . . . . . . . . . . . . . . . . . . . . . . . . . . . . . . . . . . . . . . . . . . . . . . .168
Format . . . . . . . . . . . . . . . . . . . . . . . . . . . . . . . . . . . . . . . . . . . . . .169
Utility . . . . . . . . . . . . . . . . . . . . . . . . . . . . . . . . . . . . . . . . . . . . . . .169
USB . . . . . . . . . . . . . . . . . . . . . . . . . . . . . . . . . . . . . . . . . . . . . . . . .171
Page menu . . . . . . . . . . . . . . . . . . . . . . . . . . . . . . . . . . . . . . . . . . .172
Care of mass storage devices . . . . . . . . . . . . . . . . . . . . . . . . . . . .173
Merging PCM Samples from various sources . . . . . . . . . . . . .173

3
SongBook . . . . . . . . . . . . . . . . . . . . . . . . . . . . . . . . . . . . . . . . . 174
Book . . . . . . . . . . . . . . . . . . . . . . . . . . . . . . . . . . . . . . . . . . . . . . . 174
Custom List . . . . . . . . . . . . . . . . . . . . . . . . . . . . . . . . . . . . . . . . . 176
List Edit . . . . . . . . . . . . . . . . . . . . . . . . . . . . . . . . . . . . . . . . . . . . 177
Book Edit 1 . . . . . . . . . . . . . . . . . . . . . . . . . . . . . . . . . . . . . . . . . . 178
Book Edit 2 . . . . . . . . . . . . . . . . . . . . . . . . . . . . . . . . . . . . . . . . . . 179
Book Edit 3 . . . . . . . . . . . . . . . . . . . . . . . . . . . . . . . . . . . . . . . . . . 180
Info . . . . . . . . . . . . . . . . . . . . . . . . . . . . . . . . . . . . . . . . . . . . . . . . 181
Page menu . . . . . . . . . . . . . . . . . . . . . . . . . . . . . . . . . . . . . . . . . . 181
Lyrics, Score, Markers . . . . . . . . . . . . . . . . . . . . . . . . . . . . . . 183
Lyrics page . . . . . . . . . . . . . . . . . . . . . . . . . . . . . . . . . . . . . . . . . . 183
Score page . . . . . . . . . . . . . . . . . . . . . . . . . . . . . . . . . . . . . . . . . . 185
Markers page . . . . . . . . . . . . . . . . . . . . . . . . . . . . . . . . . . . . . . . . 186
MIDI . . . . . . . . . . . . . . . . . . . . . . . . . . . . . . . . . . . . . . . . . . . . . . . 187
What is MIDI? . . . . . . . . . . . . . . . . . . . . . . . . . . . . . . . . . . . . . . . 187
What is MIDI Over USB? . . . . . . . . . . . . . . . . . . . . . . . . . . . . . 187
Standard MIDI Files . . . . . . . . . . . . . . . . . . . . . . . . . . . . . . . . . . 188
The General MIDI standard . . . . . . . . . . . . . . . . . . . . . . . . . . . 188
The Global channel . . . . . . . . . . . . . . . . . . . . . . . . . . . . . . . . . . . 188
The Chord 1 and Chord 2 channels . . . . . . . . . . . . . . . . . . . . . 188
The Control channel . . . . . . . . . . . . . . . . . . . . . . . . . . . . . . . . . . 188
MIDI Presets . . . . . . . . . . . . . . . . . . . . . . . . . . . . . . . . . . . . . . . . 188
Connecting Pa600 to a Master keyboard . . . . . . . . . . . . . . . . . 189
Connecting Pa600 to a MIDI accordion . . . . . . . . . . . . . . . . . 189
Connecting Pa600 to an external sequencer . . . . . . . . . . . . . . 190
Playing another instrument with Pa600 . . . . . . . . . . . . . . . . . 191
Appendix
Factory data . . . . . . . . . . . . . . . . . . . . . . . . . . . . . . . . . . . . . . . 194
Styles . . . . . . . . . . . . . . . . . . . . . . . . . . . . . . . . . . . . . . . . . . . . . . . 194
Style Elements . . . . . . . . . . . . . . . . . . . . . . . . . . . . . . . . . . . . . . . 198
Style and Player controls . . . . . . . . . . . . . . . . . . . . . . . . . . . . . . 198
Single Touch Settings (STS) . . . . . . . . . . . . . . . . . . . . . . . . . . . 198
Sounds (Bank order) . . . . . . . . . . . . . . . . . . . . . . . . . . . . . . . . . 199
Sounds (Program Change order) . . . . . . . . . . . . . . . . . . . . . . . 211
Drum Kits . . . . . . . . . . . . . . . . . . . . . . . . . . . . . . . . . . . . . . . . . . . 221
Multisamples . . . . . . . . . . . . . . . . . . . . . . . . . . . . . . . . . . . . . . . . 222
Drum Samples . . . . . . . . . . . . . . . . . . . . . . . . . . . . . . . . . . . . . . . 227
Pads . . . . . . . . . . . . . . . . . . . . . . . . . . . . . . . . . . . . . . . . . . . . . . . . 234
Effects . . . . . . . . . . . . . . . . . . . . . . . . . . . . . . . . . . . . . . . . . . . . . . 237
MIDI Preset . . . . . . . . . . . . . . . . . . . . . . . . . . . . . . . . . . . . . . . . . 239
Assignable parameters . . . . . . . . . . . . . . . . . . . . . . . . . . . . .240
List of Pedal/Footswitch functions . . . . . . . . . . . . . . . . . . . . . . 240
List of Assignable Switches functions . . . . . . . . . . . . . . . . . . . . 241
Scales . . . . . . . . . . . . . . . . . . . . . . . . . . . . . . . . . . . . . . . . . . . . . . . 242
Effects . . . . . . . . . . . . . . . . . . . . . . . . . . . . . . . . . . . . . . . . . . . . .243
Dynamic Modulation sources . . . . . . . . . . . . . . . . . . . . . . . . . . 243
Dynamics (Dynamic) . . . . . . . . . . . . . . . . . . . . . . . . . . . . . . . . . 244
EQ and Filters (EQ/Filter) . . . . . . . . . . . . . . . . . . . . . . . . . . . . . 247
Overdrive, Amp models, and Mic models (OD Amp Mic) . 254
Chorus, Flanger, and Phaser (Cho/Fln Phaser) . . . . . . . . . . . 259
Modulation and Pitch Shift (Mod./P.Shift) . . . . . . . . . . . . . . . 265
Delay . . . . . . . . . . . . . . . . . . . . . . . . . . . . . . . . . . . . . . . . . . . . . . . 276
Reverb and Early Reflections (Reverb ER) . . . . . . . . . . . . . . . 286
Mono-Mono Serial (Mono-Mono) . . . . . . . . . . . . . . . . . . . . . . 288
Double Size . . . . . . . . . . . . . . . . . . . . . . . . . . . . . . . . . . . . . . . . . . 305
Installing the Korg USB MIDI Driver . . . . . . . . . . . . . . . . . .314
Connecting Pa600 to a personal computer . . . . . . . . . . . . . . . 314
KORG USB-MIDI Driver system requirements . . . . . . . . . . . 314
Please note before use . . . . . . . . . . . . . . . . . . . . . . . . . . . . . . . . . 314
Windows: Installing the KORG USB-MIDI Driver . . . . . . . . 314
Mac OS X: Installing the KORG USB-MIDI Driver . . . . . . . 314
MIDI Data . . . . . . . . . . . . . . . . . . . . . . . . . . . . . . . . . . . . . . . . . .316
MIDI Controllers . . . . . . . . . . . . . . . . . . . . . . . . . . . . . . . . . . . . . 316
Recognized chords . . . . . . . . . . . . . . . . . . . . . . . . . . . . . . . . . 317
Shortcuts . . . . . . . . . . . . . . . . . . . . . . . . . . . . . . . . . . . . . . . . . .319
Troubleshooting . . . . . . . . . . . . . . . . . . . . . . . . . . . . . . . . . . .320
Index . . . . . . . . . . . . . . . . . . . . . . . . . . . . . . . . . . . . . . . . . . . . . .321
Introduction

4

6
Selecting elements
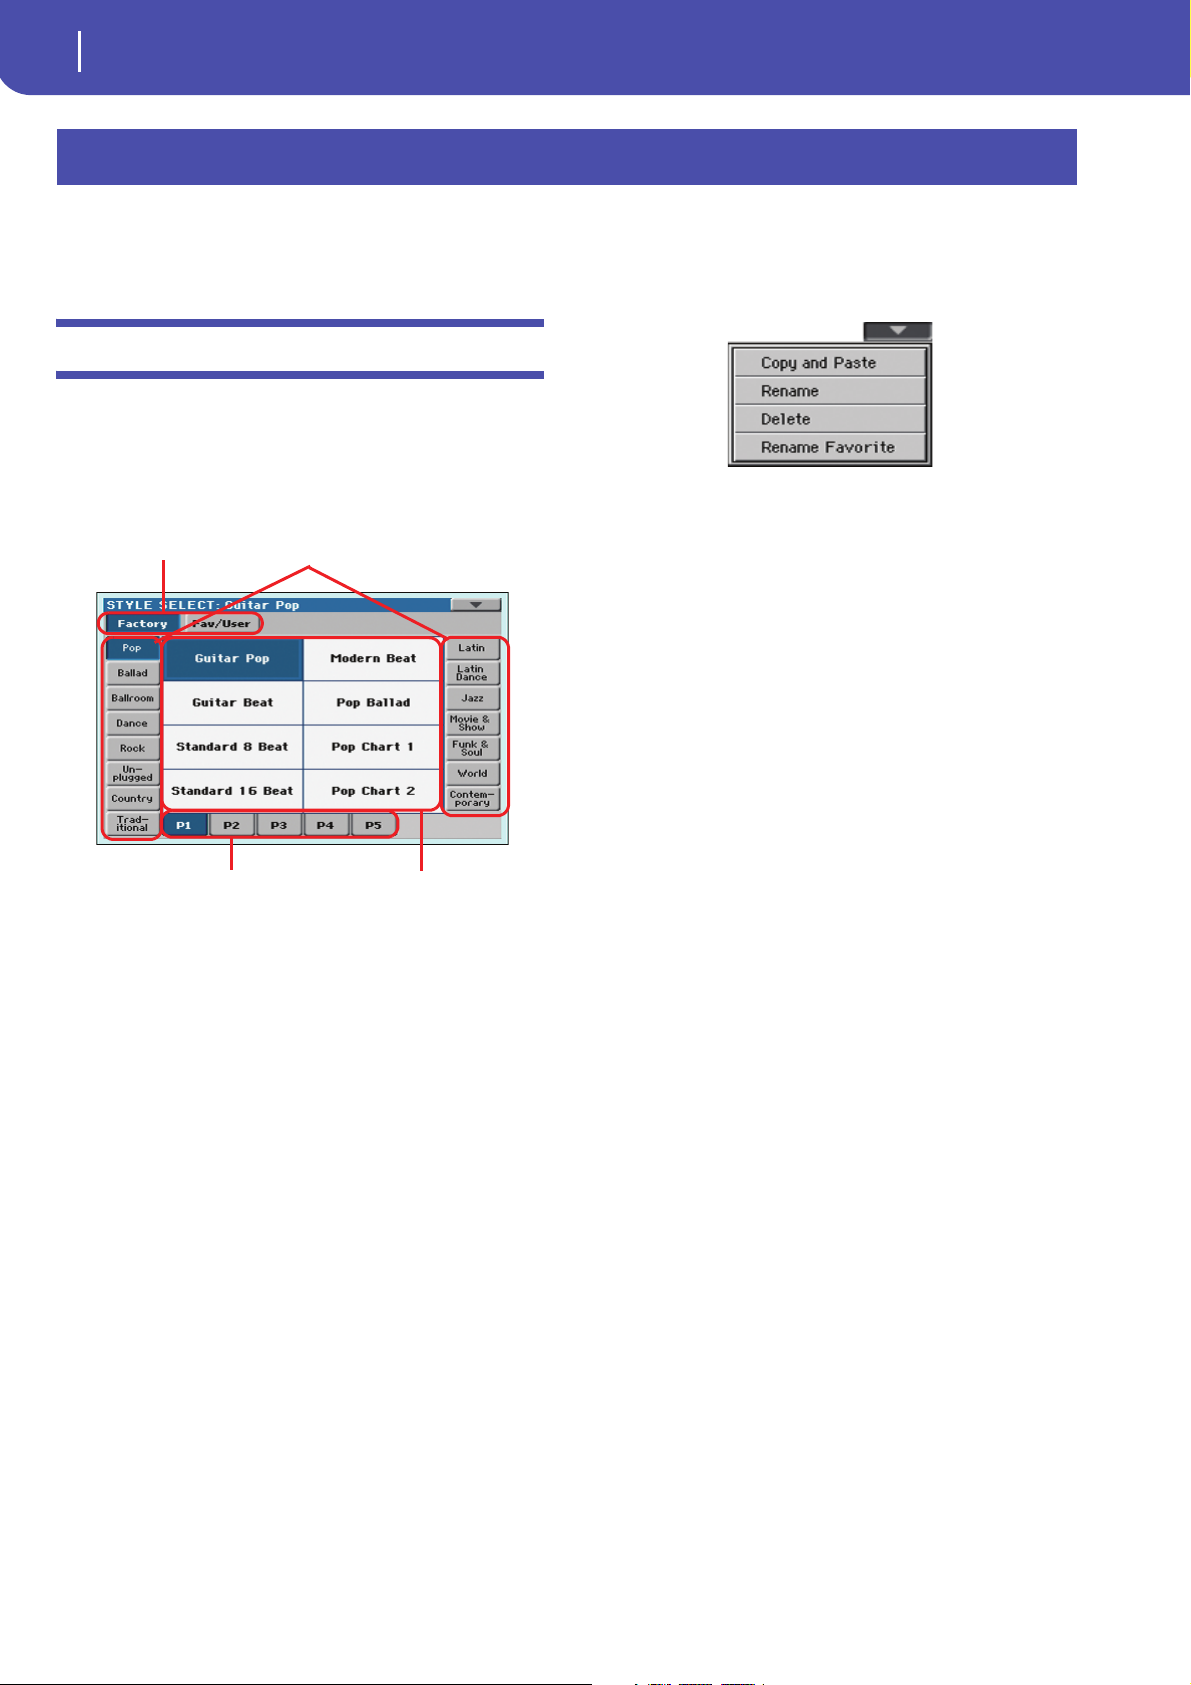
Style Select window
Side tabs (banks)
Lower tabs (pages)
Style sets
Styles
Selecting elements
The following windows are shown in the various operating
modes, whenever you try to select a Sound, Performance, Style
or Song.
Style Select window
To open the Style Select window, touch the Style area whereas it
appears in the display, or the STYLE button in the SELECTION
section on the control panel.
Press EXIT to exit from this page and go back to the previous
page without selecting any Style.
Style Select page menu
Touch the page menu icon to open the menu. Touch a command
to select it. Touch anywhere in the display to close the menu
without selecting a command.
Copy and Paste
Use this command to copy the selected Style to a different selection,
1. Select the Style to be copied. To select more items, keep the
SHIFT button and touch all the item to be selected for
copying. Hint: You can deselect one of the selected items by
touching it while still keeping the SHIFT button pressed.
2. Choose the Copy and Paste command.
3. Select the target location. In case you are copying more
than a single item, all subsequent items will sequentially
follow the first one. Wa r n in g : Any Style already existing at
the target location will be overwritten!
Note: Depending on the status of the “Auto Select” parameter (see
page 140), a Style may be immediately selected when pressing one
of the STYLE SELECT buttons. The latest selected Style for that
bank will be selected.
Style sets
Selected set of Styles. Factory Styles are Styles supplied as stan-
dard. Fav/User are Favorite Styles (locations for custom-made
Styles with editable names) and User Styles (locations for cus-
tom-made Styles with fixed names).
Side tabs (banks)
Use these tabs to select a bank of Styles. Favorite tabs can be
renamed (see “Renaming the Favorite banks” on page 35).
Lower tabs (pages)
Use these tabs to select one of the available pages in the selected
bank.
Styles
Touch one of these buttons in the display to select a Style. Unless
the “Display Hold” parameter (see page 140) is turned on, the
window automatically closes shortly after you select a Style.
After selecting a Style from this window, and another Style is
playing, the name of the new Style name begins to flash, meaning it is ready to start playing at the beginning of the next measure.
Delete
Choose this command from the page menu, and delete the
selected item. Please keep in mind that you can only delete nonprotected items.
1. Select the Style to be deleted,
2. Choose the Delete command, and confirm deletion. Wa r n —
ing: Unless you have a copy of it, the deleted item will be gone
forever!
Rename
Choose this command from the page menu, and edit the name
of the selected item. Please keep in mind that you can only
rename non-protected items.
1. Select the Style to be renamed,
2. Choose the Rename command, and use the virtual key-
board to edit the name.
3. When done, touch OK to confirm.

7
Selecting elements
Sound Select window
Side tabs (banks)
Lower tabs (pages)
Sound sets
Sounds
If more than five pages are
available, the Previous/Next
tabs are shown in this area
Rename Favorite
Choose this command from the page menu, and edit the name
of the Favorite Style banks.
The assigned name can be spanned over two lines, by separating
them with the paragraph character (¶). For example, to write
“World Music” on two lines, enter “World¶Music”.
In any case, the Pa600 will try to automatically put on two lines
two words separated by two spaces.
Be careful not to write words exceeding the width of the side tabs
of the Style Select window.
1. Choose the Rename Favorites command.
2. Touch the (Text Edit) symbol next to the bank to be
renamed.
3. Use the virtual keyboard to edit the name.
4. When done, touch OK to confirm.e
Sound sets
Selected set of Sounds. Factory Sounds are the Sounds supplied
as standard. Legacy Sounds are Sounds compatible with older
Pa-Series models. GM are Drum Kits mapped according to the
General MIDI 2 or XG standards. User Sounds are custom-created or edited Sounds.
Side tabs (banks)
Use these tabs to select a bank of Sounds.
Lower tabs (pages)
Use these tabs to select one of the available pages in the selected
bank.
Previous/Next tabs
Scroll the lower tabs to the left or the right, when additional tabs
are available but cannot be seen in the display.
Sounds
Touch one of these buttons in the display to select a Sound.
Unless the “Display Hold” parameter (see page 140) is turned
on, the window automatically closes shortly after you select a
Sound.
Program Change
Program Change number. Shown only when the “Show” parameter is turned on in Global mode. (See page 140).
Sound Select window
To open the Sound Select window, touch the Sound area whereas
it appears in the display, or the SOUND button in the SELECTION section of the control panel.
Press EXIT to exit from this page and go back to the previous
page without choosing any Sound.
Sound Select page menu
Touch the page menu icon to open the menu. Touch a command
to select it. Touch anywhere in the display to close the menu
without selecting a command.
The commands are the same seen for the Style Select window’s
page menu, apart for a difference with the Delete command.
Delete
When deleting a Sound based on User PCM Samples, you are
asked if you want to delete the Samples and Multisamples. Confirm deletion only if you don’t plan to reuse the same Samples
and Multisamples for some other new User Sounds. Choosing to
delete them frees PCM Sample memory for other data.
Hint: In case you need more free PCM Sample memory, and you
know there are unused Samples and Multisamples in memory, use
the “Delete Non-assigned User PCM Samples” command in the
Sound > User PCM Sample page to clean memory (see page 133).
Reference
8
Selecting elements
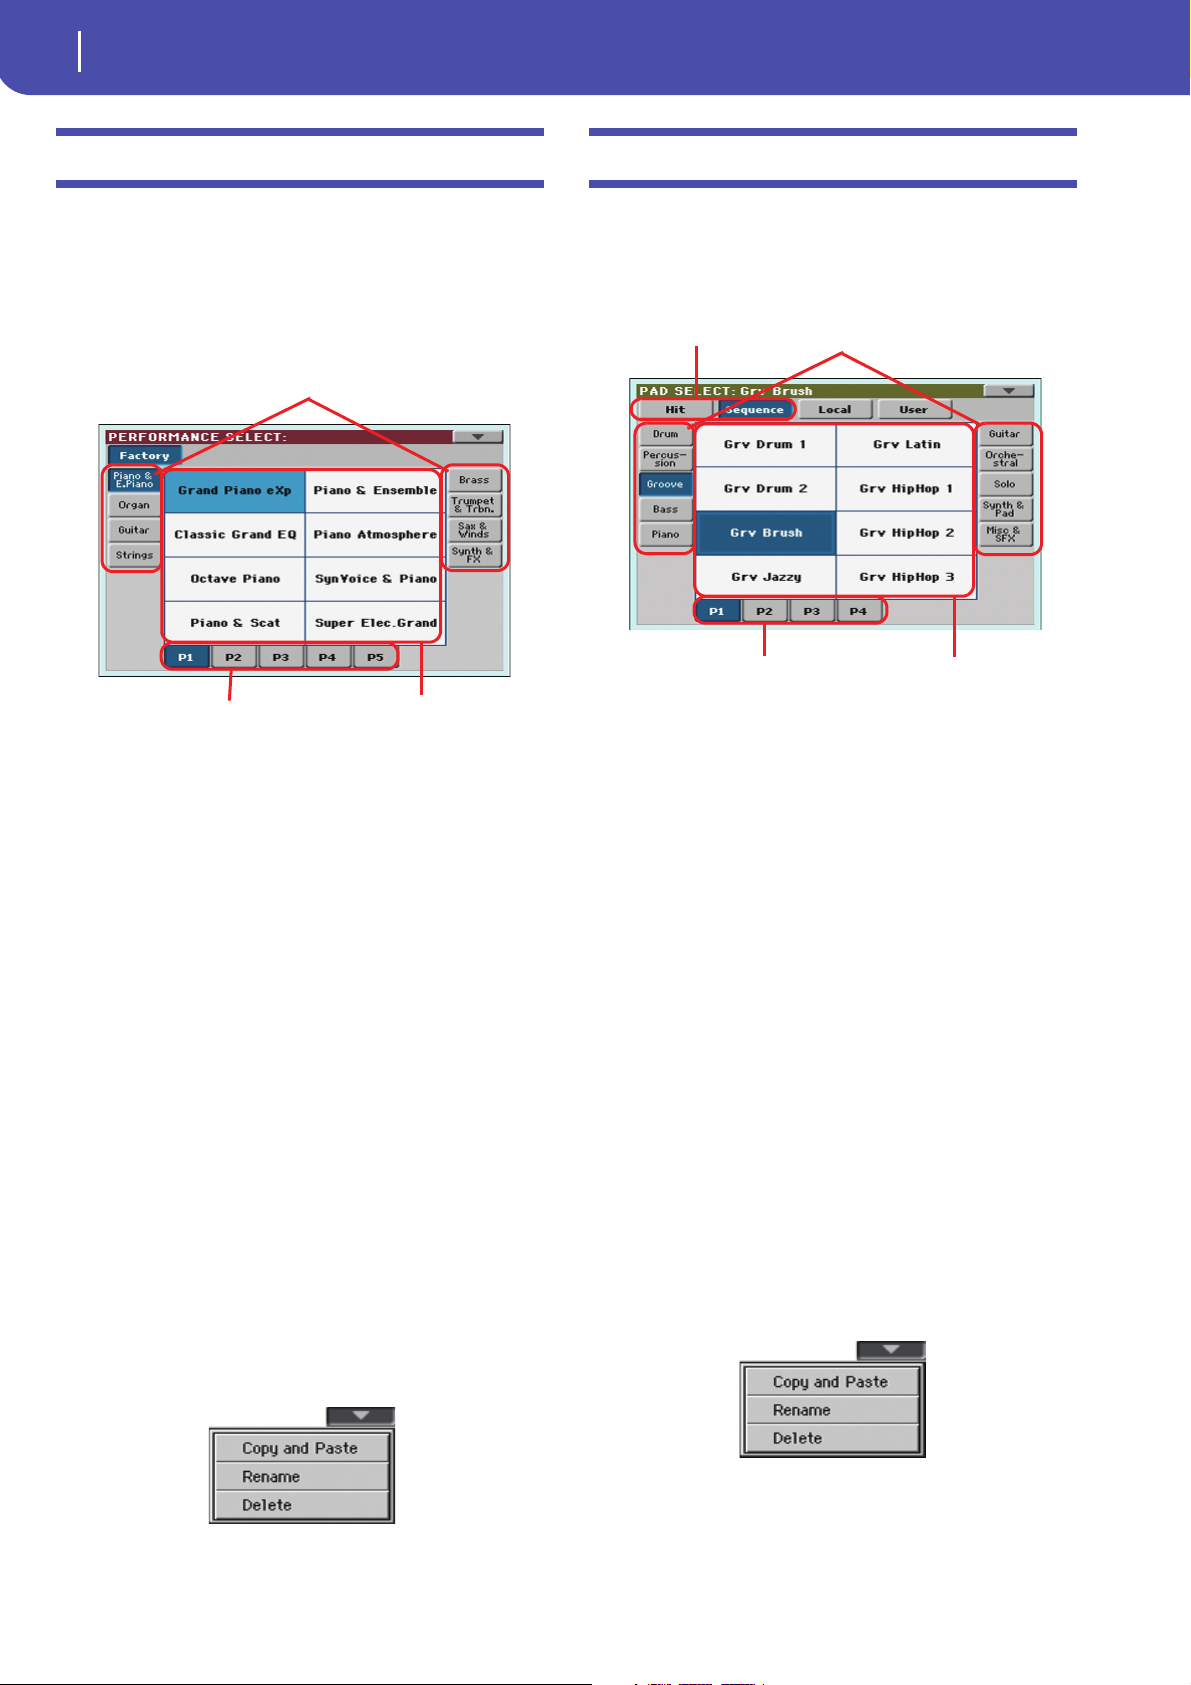
Performance Select window
Side tabs (banks)
Lower tabs (pages) Performances
Side tabs (banks)
Lower tabs (pages)
Pad sets
Pads
Performance Select window
To open the Performance Select window, touch the Performance
area whereas it appears in the display, or one of the PERFORMANCE buttons on the control panel,. Use the PERFORMANCE buttons to go directly to the selected bank.
Press EXIT to exit from this page and go back to the previous
page without selecting any Performance.
Note: Depending on the status of the “Auto Select” parameter (see
page 140), a Performance may be immediately selected when
pressing one of the PERFORMANCE buttons. The latest selected
Performance for that bank will be selected.
Side tabs (banks)
Use these tabs to select a bank of Performance. Each tab corresponds
to one of the PERFORMANCE buttons on the control panel.
Lower tabs (pages)
Use these tabs to select one of the available pages in the selected bank.
If you press again the same PERFORMANCE button on the control panel, the next page in the same bank is selected. This way,
you do not need to touch one of the corresponding tabs in the
display in order to select a different page.
Performances
Touch one of these buttons in the display to select a Performance. Unless the “Display Hold” parameter (see page 140) is
turned on, the window automatically closes shortly after you
select a Performance.
Performance Select page menu
Touch the page menu icon to open the menu. Touch a command
to select it. Touch anywhere in the display to close the menu
without selecting a command.
Pad Select window
Touch the Pad area whereas it appears in the display, to open the
Pad Select window.
Press EXIT to exit from this page and go back to the previous
page without selecting any Pad.
Pad sets
Selected set of Pads. Hit are single-note, pre-programmed factory Pads. Sequence are sequence-based, pre-programmed fac-
tory Pads. Locale are like Factory Pads, but contain Pads
customized for the music of your Country. User can be either
single-note or sequence-based Pads, and can be user-recorded or
modified.
Side tabs (banks)
Use these tabs to select a bank of Pads.
Lower tabs (pages)
Use these tabs to select one of the available pages in the selected
bank.
Pad
Touch one of these buttons in the display to select a Pad. Unless
the “Display Hold” parameter (see page page 140) is turned on,
the window automatically closes short after you select a Pad.
Sound Select page menu
Touch the page menu icon to open the menu. Touch a command
to select it. Touch anywhere in the display to close the menu
without selecting a command.
The commands are the same seen for the Style Select window’s
page menu.
The commands are the same seen for the Style Select window’s
page menu.
Selecting elements
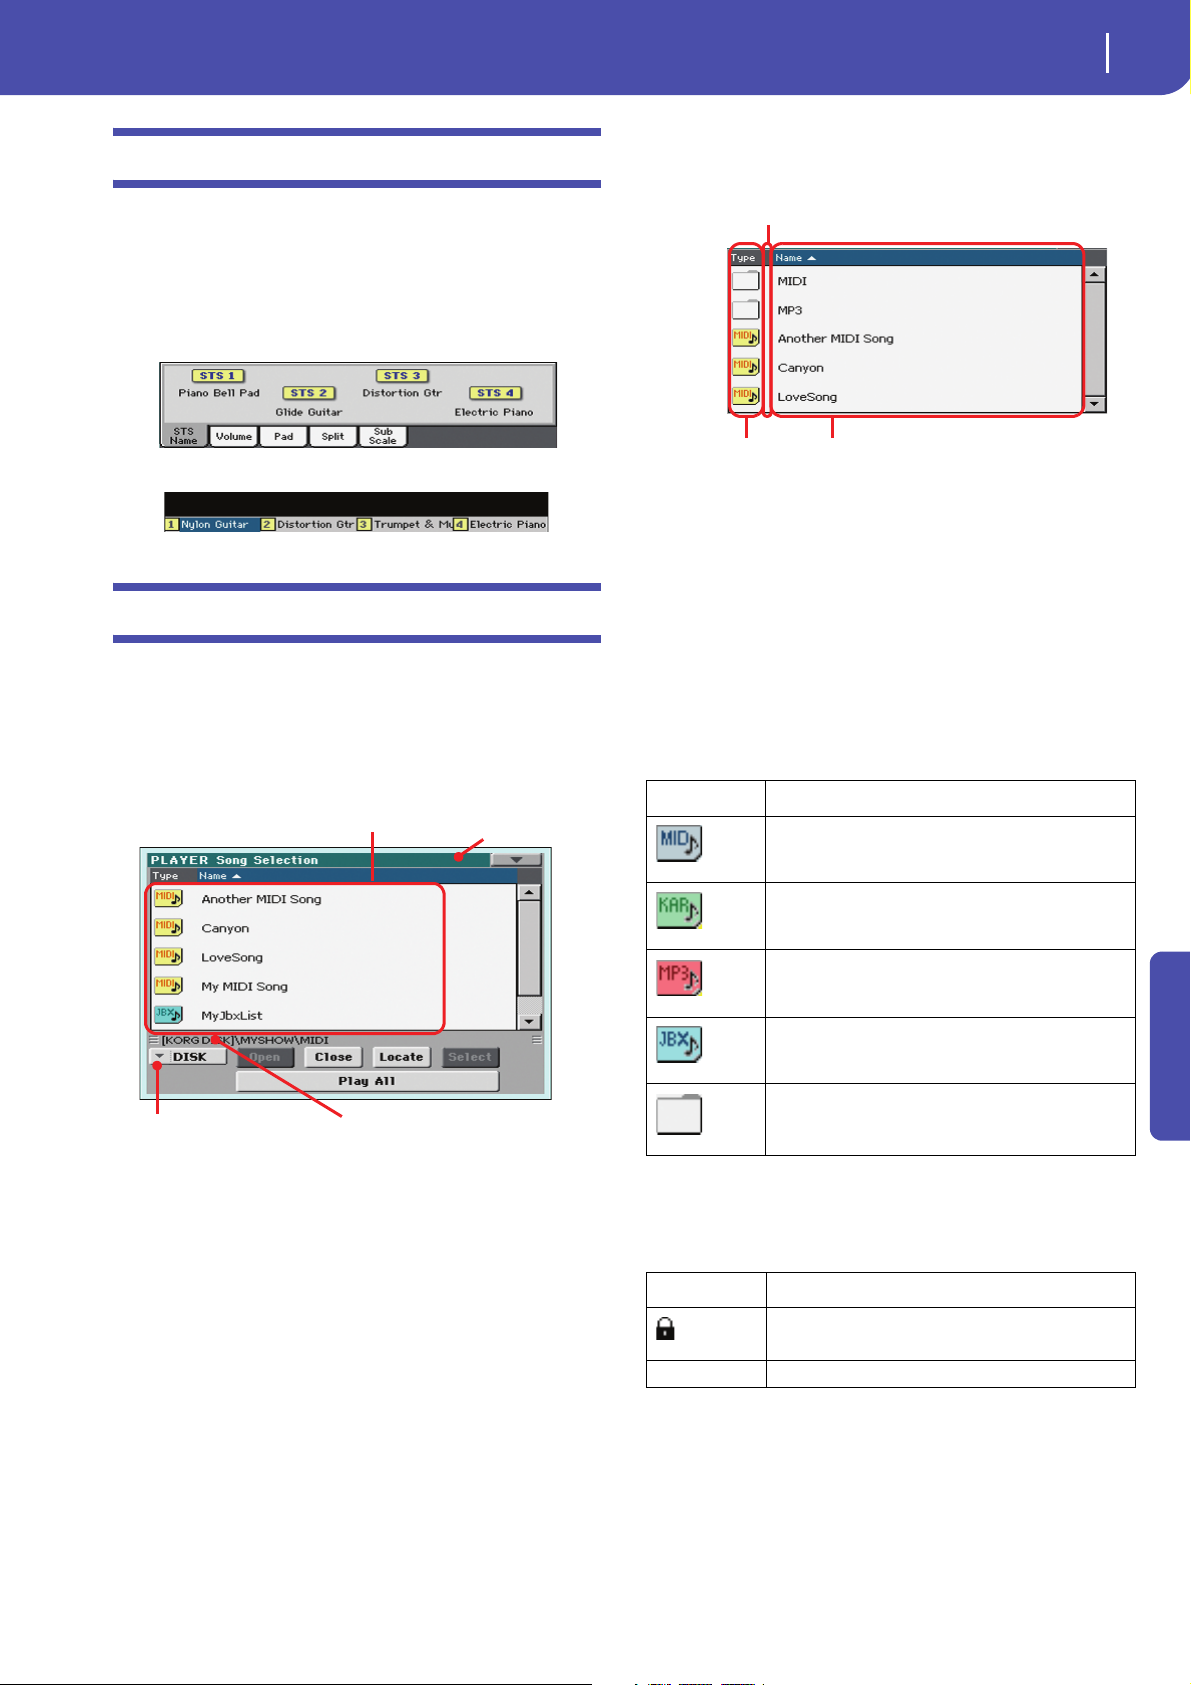
STS Select
STS Select
Song path
Directory
Storage device
Page menu
Type of the file
or folder
File status
File or folder
name
To select one of the four STS associated with the current Style or
the selected SongBook entry, use the four STS buttons on the
control panel.
As an alternative, touch the STS name tab in the main page of
the Style Play or Song Play mode, where you can see the name of
the available STSs.
The STS’s name can also be seen in the Lyrics and Markers page:
Song Select window
This page appears when you touch the Song name in the display,
or press the SONG buttons in the SELECTION section on the
control panel.
Press EXIT to exit from this page and go back to the main page
of the Song Play operating mode without selecting a Song.
9
Directory
This is the list of the selected device’s content.
Use the scrollbar to scroll the list items. As an alternative, you
can scroll the list using the VALUE dial.
When the Name label is selected on top of the list, keep the
SHIFT button pressed and touch one of the arrows to jump to
the previous or next alphabetical section.
You can touch one of the labels on top of the list, to reorder the
list items accordingly. By touching the label again, the order of
the files will switch between ascending and descending.
A list can contain several different types of files or folders.
Type icon File/folder type
Standard MIDI File (MID)
While in this page, you can select a Standard MIDI File, Karaoke, MP3 or Jukebox file.
Karaoke file (KAR)
MPEG Layer 3 (MP3)
Jukebox file (JBX)
Folde r
A file or folder may be in one of the following status. (See “Protect” and “Unprotect” on page 172 for information on how to
change the file status).
Status icon File/folder status
Protected
– Unprotected
Page menu icon
Touch the page menu icon to open the menu. See “Song Select
page menu” on page 10 for more information.
Reference
10
Selecting elements
Song Select window
Storage device
Use this menu to select one of the available storage devices.
Device Type
DISK Internal memory
USB Device connected to the rear USB Host port
The actual name (label) of the device appears within square
brackets ([]).
Song path
This line shows the current device path.
Open
Opens the selected folder (item whose icon looks like this one:
).
Close
Closes the current folder, returning to the parent (“upper”)
folder.
Locate
Touch this button to go back to the folder containing the selected
Song. This is useful to quickly locate it, after you have browsed
through long directories and “dug” into different folders.
Select
Selects the highlighted item in the display. If a Song is already
playing, it stops, and the new Song is ready to play. You will
return to the main page.
Play All
When you touch this button, all Standard MIDI Files and MP3
files contained in the current directory are added to a new Jukebox list, that is automatically assigned to the Player. The order in
which they are played depends on the current sorting method,
i.e., how the files are shown in the display.
You can use this Jukebox list as any other list of this type (i.e.,
start the playback with PLAY/STOP, jump to the next Song in
the list with SHIFT + >>, edit it in the Jukebox page…).
Note: A Jukebox list can include up to 127 Songs. If your folder
contains more items, only the first 127 will be considered.
Hint: If you don’t want the list to be deleted when turning the
instrument off, go to the Jukebox page and save it as a “.JBX” file.
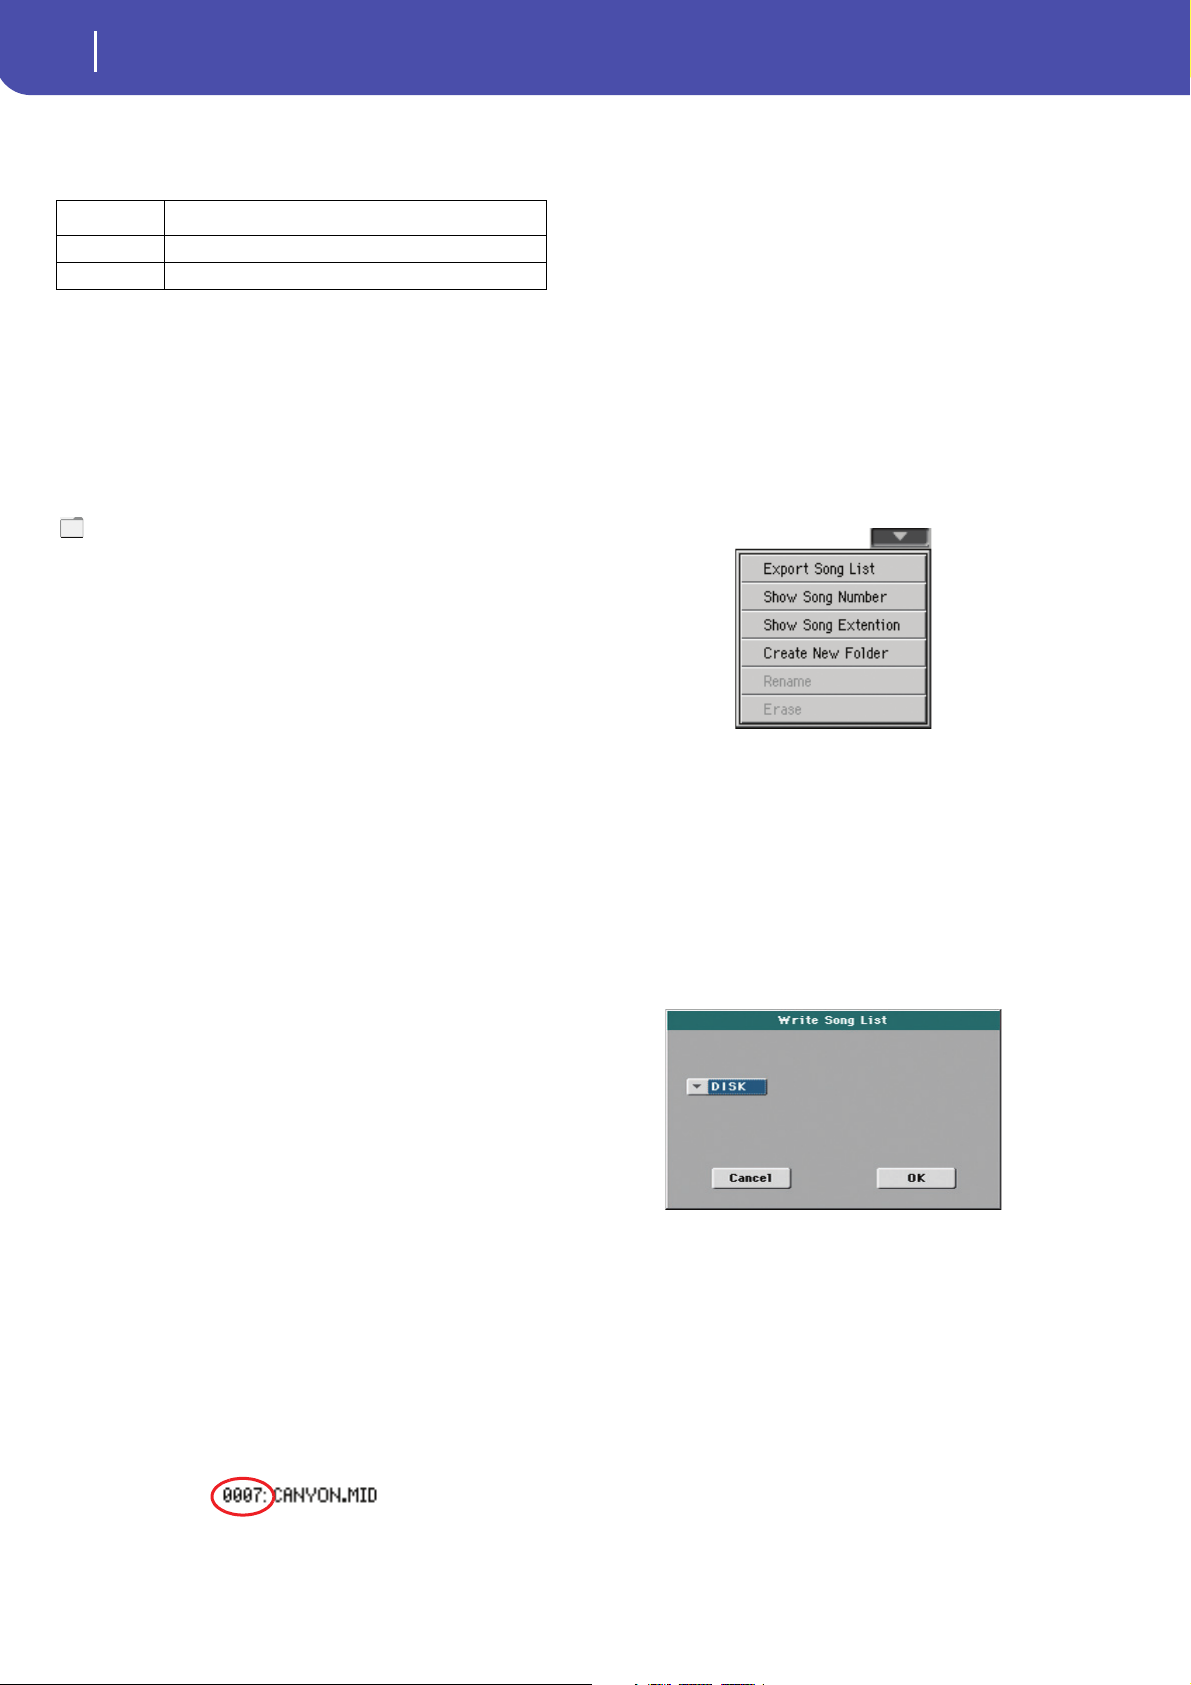
Selecting a Song by its ID number
Each Song in a folder on a device (up to 9,999) has a progressive
ID number assigned. When the “Show Song Number” option is
selected in the Song Select page menu (see below), you can see
this number before the Song’s name in the Song Select window.
You can use this number to select the Song by composing the
corresponding number, speeding up the Song retrieval when you
are using an hard disk filled with midifiles.
While in the Song Select window, press the SONG button in the
SELECTION section to open the keypad, and enter the number
corresponding to the Song to be selected.
While in any page of the Song Play mode, press the SONG button in the SELECTION section twice to open the keypad.
Note: If no Song corresponds to the dialed number, the “Song not
available” message will appear.
Wa r ni n g : While the directory may contain more than 9999 files,
you can’t select Songs outside the 0001-9999 range when using the
numeric keypad.
Song Select page menu
Touch the page menu icon to open the menu. Touch a command
to select it. Touch anywhere in the display to close the menu
without selecting a command.
Export Song List
Select this command to save the current list as a text file. This
way, you will be able to print a list of Songs, to see which number
matches each Song.
1. While in the Song Select window, select the folder whose
Song list you wish to save as a text file.
2. Select the Export Song List command from the page menu.
3. A dialog box will appear, asking you to select either the
internal storage memory or the HOST USB ports.
4. Select one of the options, and touch OK to confirm.
Note: The text file will contain a list of “*.mid”, “*.kar”, “.mp3”
and “*.jbx” files only. Folders and other types of files will not be
included.
When saved, the text file will be named after the selected folder.
For example, a folder named “Dummy” will generate a
“Dummy.txt” file. If a file with the same name already exists in the
target, it will be overwritten without waiting for any confirmation.
A file containing the list of all valid files contained into the root of
the disk will generate a “Root.txt” file.
The list will include the progressive number assigned to each Song,
the file names, the total number of files in the list.
To correctly display and print the list on a personal computer, use a
fixed size (i.e., non-proportional) character in your text editor.
11
Selecting elements
Song Select window
Show Song Number
Check this option to make the Song’s progressive ID number
appear in the list, next to each Song.
Show Song Extension
Check this option to make the file extension (“*.mid”, “*.kar”,
“*.jbx”, “*.mp3”) appear in the list, at the end of each Song’s
name.
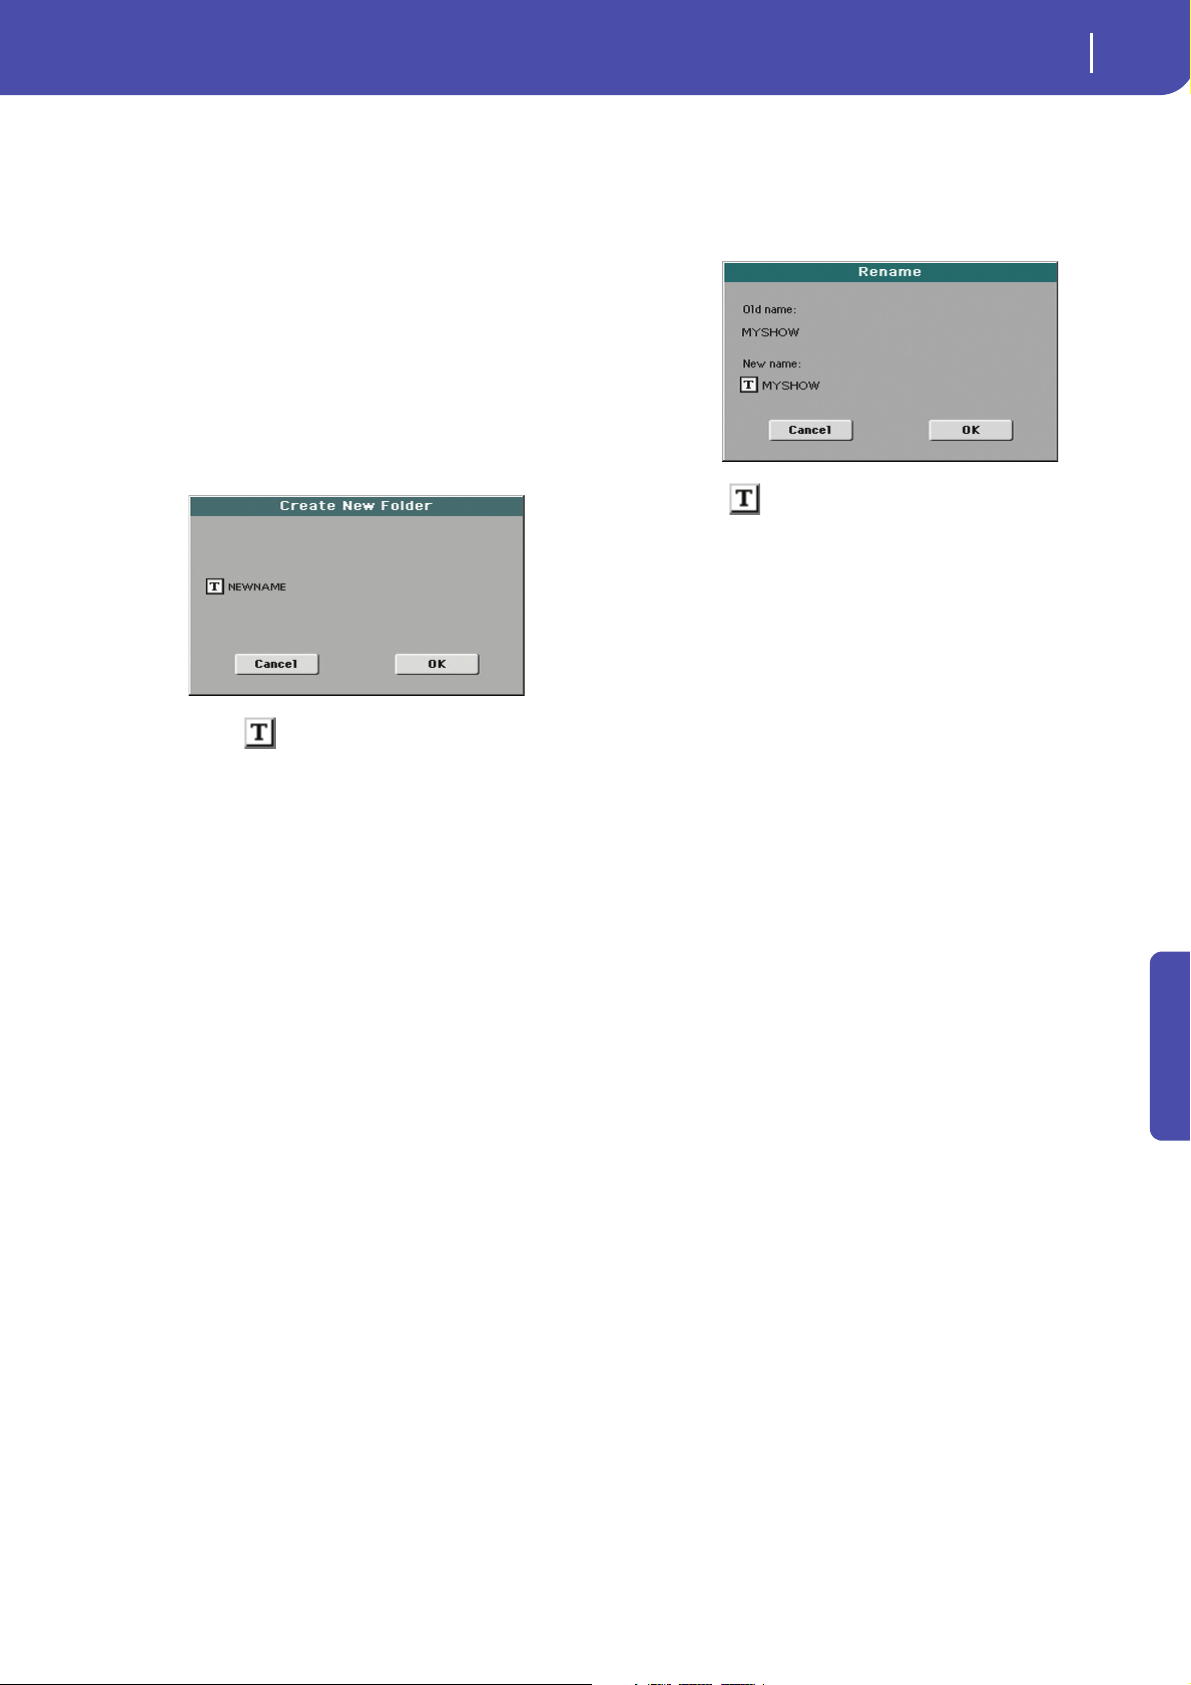
Create New Folder
This command will let you create a new generic folder in the
root of any device, or inside any other generic folder. You can’t
create a “.SET” folder with this command, since this type of
folder is reserved to the Save operations (and can be created with
the New SET button in any Save page).
Rename
Available only when an item is selected in a list.
Use this function to change the name of an existing file or folder.
You cannot change the 3-character extension of files and “.SET”
folders, since they are used to identify the type of file or folder.
Touch the (Text Edit) button to open the Text Edit window.
Enter the new name, then touch OK to confirm and close the
Text Edit window.
Delete
Use this command to delete the selected file or folder.
By touching the (Text Edit) button you can open the Text
Edit window. Enter the name, then touch OK to confirm and
close the Text Edit window.
Reference
12
Style Play operating mode
Start-up settings
Overall instrument’s
volume
Balance of Style and
Pad tracks against the
Keyboard tracks
Style Play operating mode
The Style Play mode is the boot-up operating mode. When in
this mode, you can play with Styles (i.e. automatic accompaniments), while playing with one to four tracks (Upper 1-3 and
Lower) on the keyboard. You can choose different Sounds and
Effects by selecting Performances and STSs. Four Pads will provide single-shot sounds or repeating patterns in sync with the
Style. You can also use the SongBook to automatically select
Styles suited for a particular song.
Start-up settings
Since the “My Setting” Performance is automatically selected
when turning the instrument on, you can save to it your preferred start-up settings.
Select the Sounds, Effects, and other settings you would like to
see automatically selected when turning the instrument on.
Then keep the MY SETTING button pressed for about one second. When the Write Startup Settings window appears, confirm
by touching OK.
Note: If you like some settings to be preserved even when choosing
different Performances, STSs and Styles, turn on the desired
“locks” to avoid changes to the selected parameters (see “General
Controls: Lock” on page 141).
Styles and Pads
Each Style includes four Pads. Each time you select a Style, the
four Pads are assigned to the four PAD buttons. The Style and
the Pads will play using the same Tempo value.
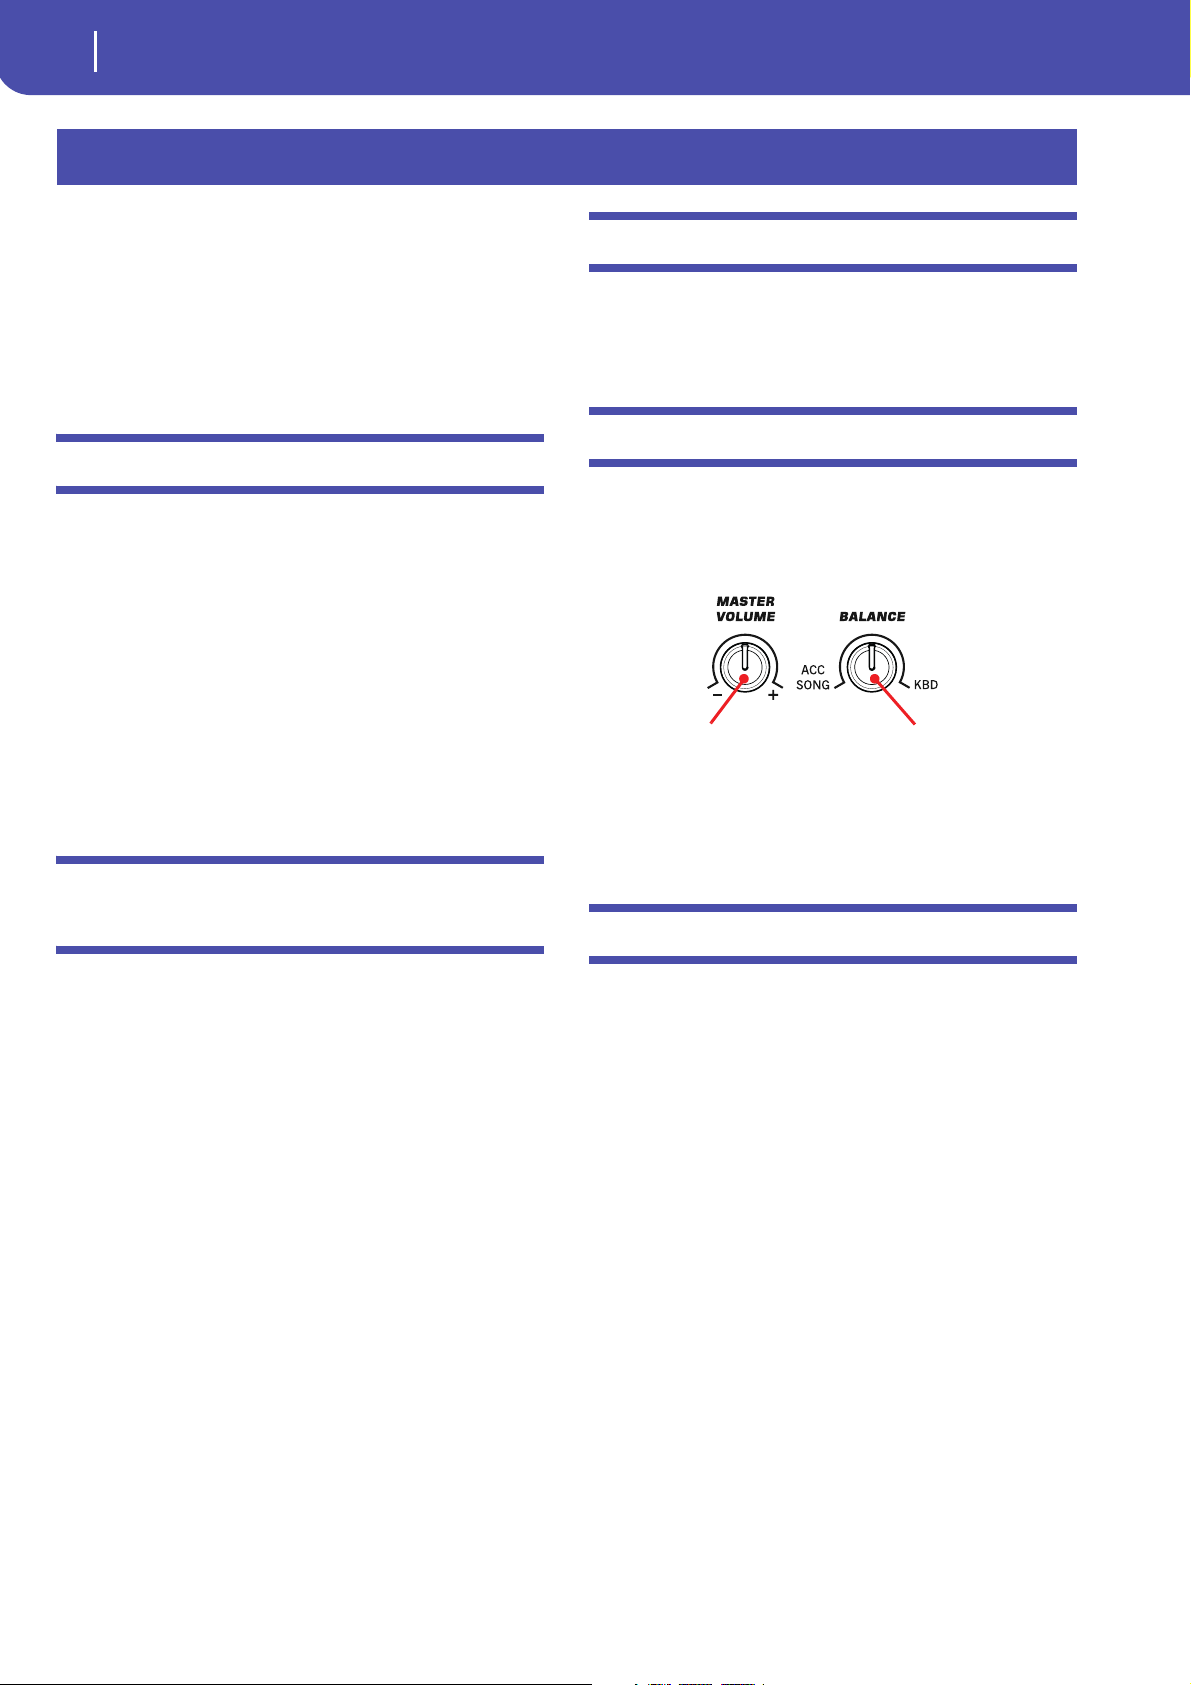
Master Volume and Balance
While the MASTER VOLUME knob controls the general volume of the instrument, you can use the BALANCE knob to balance the Style Accompaniment and Pad tracks against the
Keyboard tracks.
Note: As an alternative, the BALANCE knob can also work as a
volume control. See “Balance Slider” on page 146.
How Styles, Variations, Performances and
STSs are linked together
Styles, Variations, Performances and STSs are linked in many
ways.
• When the STS MODE LED is steadily on or blinking, selecting
a Style also changes the Keyboard tracks (STS 1 is automatically
selected). Performance settings are overridden.
• When the STS MODE LED is blinking, selecting a Variation
also select the corresponding STS.
• When the STYLE CHANGE LED is on, selecting a Performance also selects a Style (the one memorized with the Performance).
• Current track settings can be saved either to a Performance, an
STS, or the Style Settings, depending on the page menu command you select.
Factory, Favorite and User Styles
There are three different types of Style locations:
• Factory Style banks are the preloaded Styles, that you can’t
usually edit (unless you don’t want to do so, by turning the
protection off, see “Factory Style and Pad Protect” on
page 145).
• Favorite Style banks are Styles loaded from an external
device, created or edited by yourself. You can rename the
tabs in the Style Select window to create places for custom
banks, or for additional music genres that are not already
included among the supplied banks. See “The Favorite
banks” on page 35 for information on how to manage these
Styles.
• User Style banks are, like the Favorite banks, Styles loaded
from an external device, created or edited by yourself (the
User). These are banks conceived as a ‘workbench’ – a place
where to manage Styles and banks before saving them to a
final location. See the “Style/Pad Record mode” chapter for
information on how to edit or create Styles.

Style Play operating mode
Main page
Main page
Style area Page header Page menu icon
Song
area
Perfor-
mance/
STS area
Keyboard
tracks area
Panel s
Operating mode Master Transpose (in
semitones)
Recognized chord
Style name
Style Element meter
Style bank
Measure length/number
Current
Tem po
Current beat
This is the page you see after you turn the instrument on.
To access this page from another operating mode, press the
STYLE PLAY button.
To return to this page from one of the Style Play edit pages, press
the EXIT button.
13
Recognized chord
Displays the recognized chord, when you play a chord on the
keyboard. If no chord abbreviation is shown, check if the
ACCOMP LED is turned on.
You can choose how chords are recognized by using the “Chord
Recognition” parameter in the Global > Style page (see
page 143).
Page menu icon
Touch the page menu icon to open the menu. See “Page menu”
on page 32 for more information.
Style area
This is where the Style name is shown, together with its Tempo
and Meter (Time Signature) parameters.
Details on individual tracks can be seen by pressing the Volume tab. Use the TRACK SELECT button to switch between
Normal view (Keyboard tracks, grouped Style tracks) and
Style view (individual Style tracks). (See “Volume panel”
starting from
page 15).
Page header
This line shows the current operating mode, transposition and
recognized chord.
Operating mode name
Name of the current operating mode.
Master transpose
Master transpose value in semitones. This value can be changed
using the TRANSPOSE buttons on the control panel.
Note: Transpose may be automatically changed when selecting a
different Performance or Style. It may also be changed when loading a Standard MIDI File generated with an instrument of the
Korg Pa series.
To avoid transposition, the Master Transpose is “locked” by
default. If you want to lock or unlock it, change the Master Transpose Lock parameter’s status (see “General Controls: Lock” on
page 141).
Style name
Currently selected Style. Touch the Style name (or press the
STYLE button in the SELECTION section) to open the Style
Select window.
Style bank
Bank the current Style belongs to.
Style Element meter
Meter (time signature) of the current Style Element.
Measure length/number
While the Style is playing, an ‘M’ appears, to show the current
measure number of the current Style Element playing. While it is
in stop, an ‘L’ appears, to show the length (total number of measures) of the current Style Element.
Current beat
Beat number currently playing.
Current Tempo
Metronome Tempo (from 30 to 250). Use the TEMPO buttons to
change the Tempo.
As an alternative, keep the SHIFT button pressed and use the
VALUE DIAL to change the Tempo. Also, you can touch the
Tempo field and drag it with your finger, or change it with the
VAL U E DI A L.
To recall the Tempo stored in the current Style, press the
TEMPO– and + buttons together.
Reference
14
Style Play operating mode
Main page
Selected Performance
or STS
Sound
name
Track name
Track’s octave transpose
Sound bank’s
icon
Track status
You can prevent the Tempo from changing by turning the
TEMPO LOCK LED on.
Note: Tempo may change while a Style Element is playing. Each
Style Element may contain Tempo Change data.
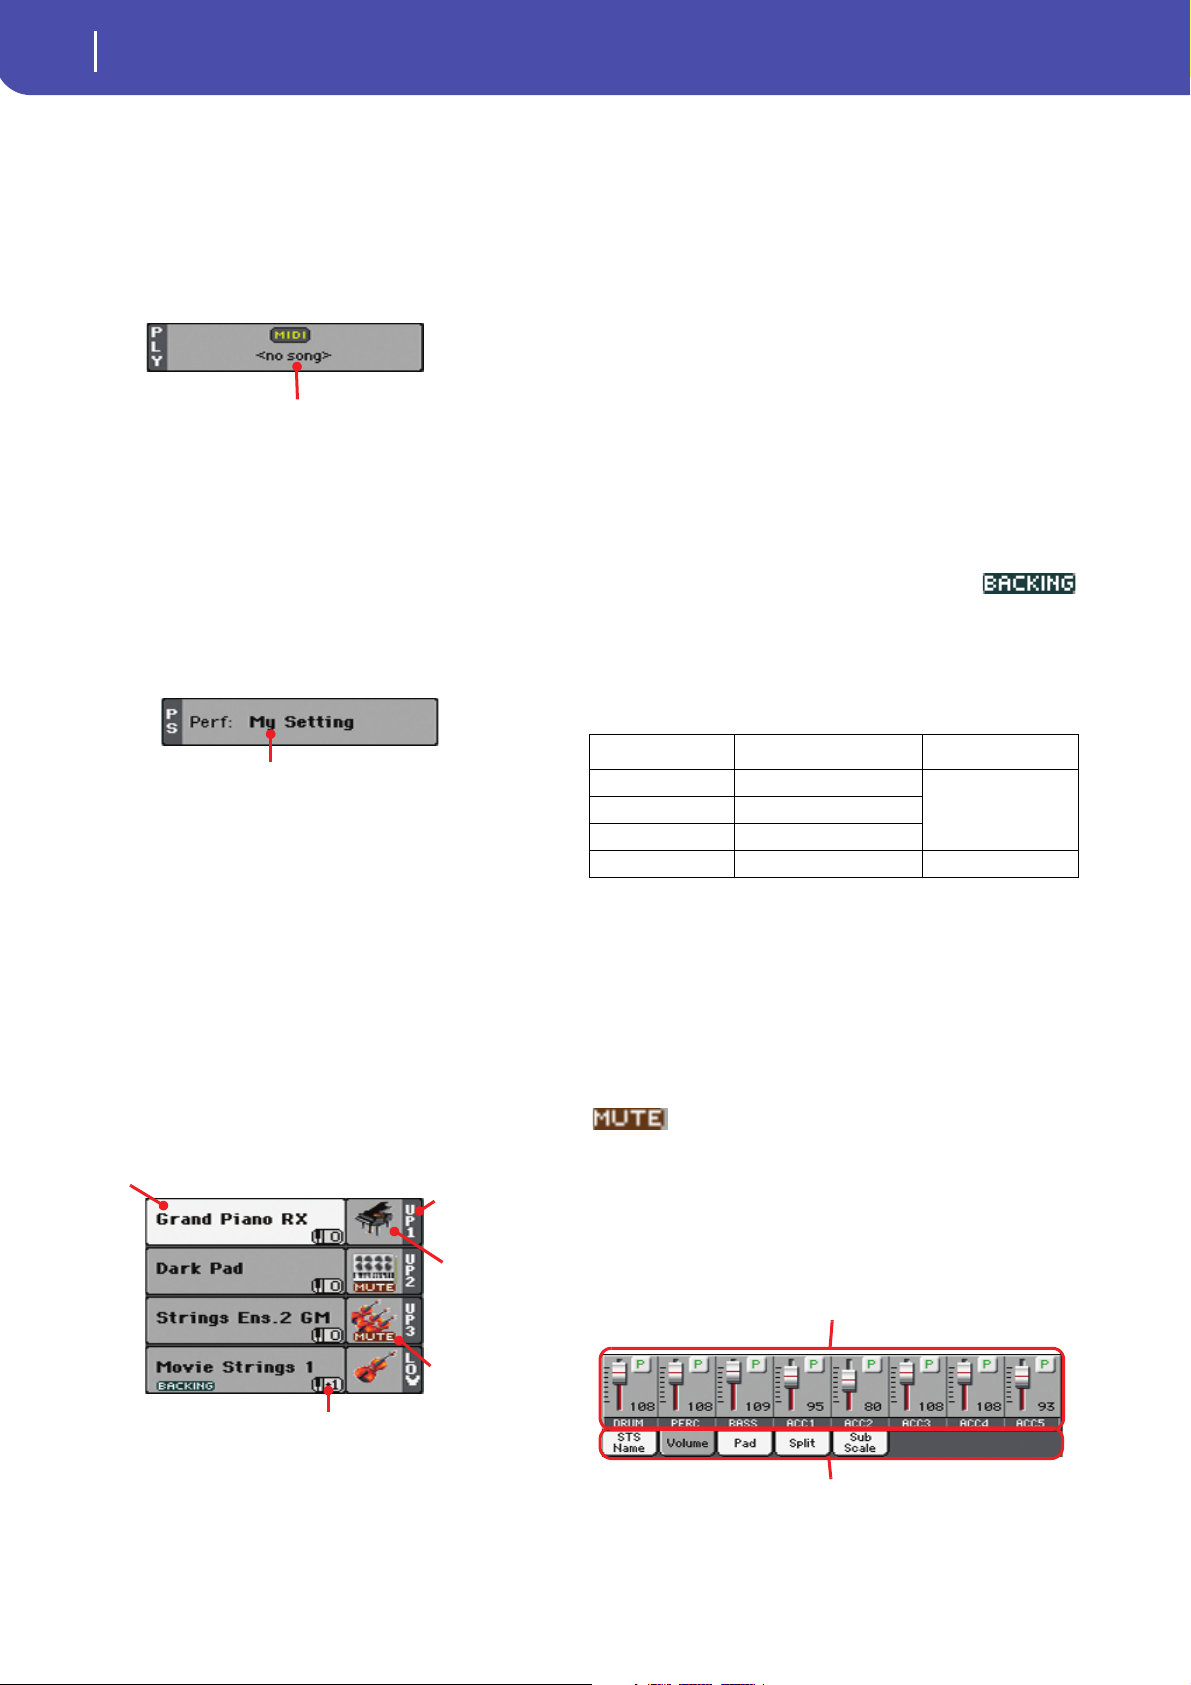
Song area
This is where the Song assigned to the onboard Player is shown.
Song name
Name of Song assigned to the Player. You can select Songs while
playing Styles, to have them ready when switching to Song Play
mode.
Performance/STS area
This is where the latest selected Performance or STS name is
shown.
• If the track is already selected (white background), touch the
Sound name to open the Sound Select window.
• If the track is not selected (dark background), first select it,
then touch the Sound name to open the Sound Select window.
You can also open the Sound Select window by using the
SOUND button in the SELECTION section of the control panel.
For more information about the Sound Select window, see
“Sound Select window” on page 7.
Keyboard track octave transpose
Non editable. Octave transpose of the corresponding track. To
individually edit the octave transpose for each track, go to the
“Mixer/Tuning: Tuning” edit page (see page 22).
You can also transpose all Upper tracks by using the UPPER
OCTAVE buttons on the control panel.
Bass & Lower Backing icon
When the Bass & Lower Backing function is
active, the Backing icon appears in the Lower
track Sound area (see “Bass & Lower Backing” on page 144).
Keyboard track name
Non editable. Name of the corresponding track:
Selected Performance or STS
This is the latest selected Performance (Perf) or Single Touch
Setting (STS#).
Touch the name to open the Performance Select window (see
“Performance Select window” on page8). As an alternative, use
the PERFORMANCE section to select a different Performance.
To select a different STS, use the four STS buttons under the display, or the STS panel.
Keyboard tracks area
This is where Keyboard tracks are shown.
Abbreviation Track Hand
UP1 Upper 1 Right hand
UP2 Upper 2
UP3 Upper 3
LOW Lower Left hand
Sound bank’s icon
This picture illustrates the bank the current Sound belongs to.
Keyboard track status
Play/mute status of the current track. Select the track, then touch
this area to change the track status.
No icon Play status. The track can be heard.
Mute status. The track cannot be heard.
Panels
The lower half of the main page contains the various panels, you
can select by touching the corresponding tabs. See more information in the relevant sections, starting from page 15.
Sound name
Name of the Sound assigned to the corresponding Keyboard
track.
15
Style Play operating mode
STS Name panel
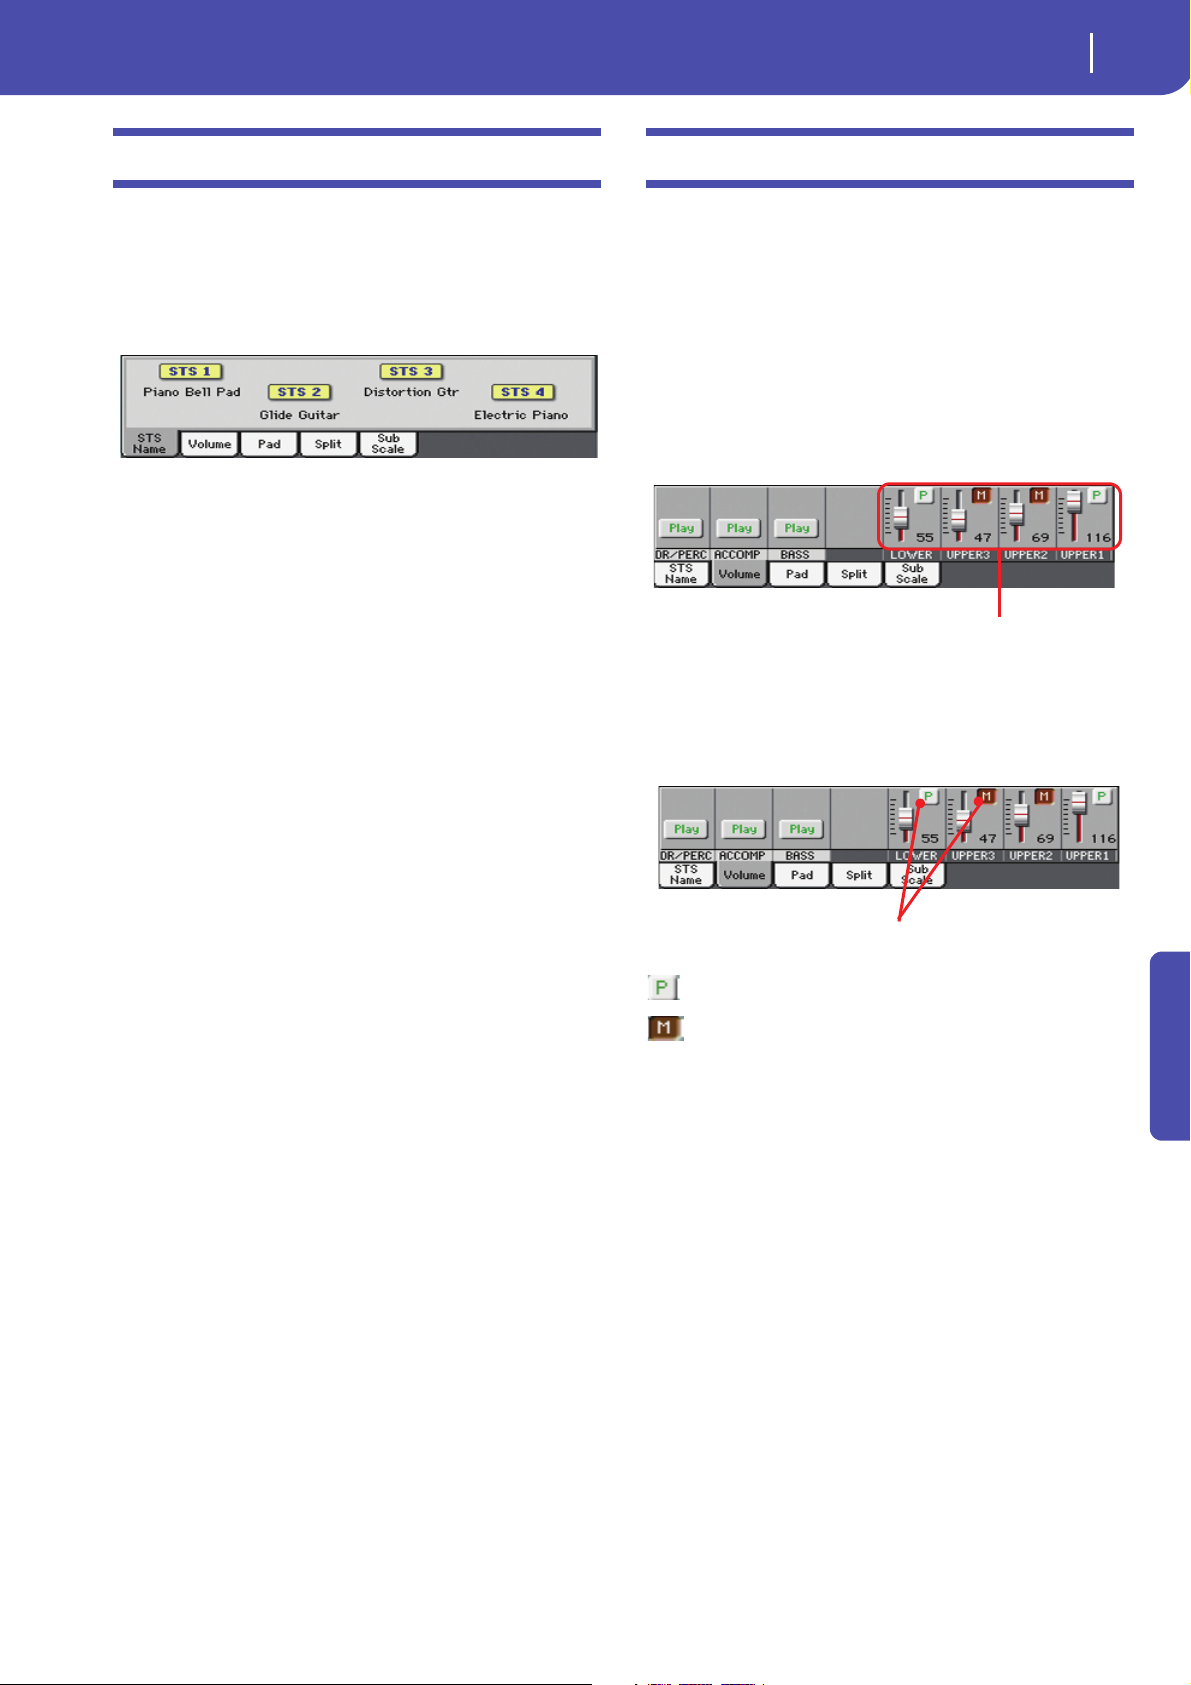
STS Name panel
Touch the STS Name tab to select this panel. Single Touch Settings (STS) are memory locations intended for quickly choosing
Keyboard Sounds, contained in each Style or SongBook entry.
While in this panel, you can see the name of the four STSs
belonging to the latest selected Style or SongBook entry. Touch
one of the names to select the corresponding STS.
Note: You cannot edit the STS names in this panel. To edit a name,
select the STS to be renamed, then select the Write Single Touch
Setting command from the page menu (see “Write Single Touch
Setting dialog box” on page 34).
Volume panel
Touch the Volume tab to select this panel. This is where you can
set the volume of each track, and mute/unmute them.
Note: The volume of the Keyboard tracks may be saved to a Performance or STS. The volume of the separate Style tracks (Style
Tracks view) can be memorized to the current Style Settings.
Changing the tracks’ volume
You can change the volume of each track by dragging the sliders
in the display. You can also change the volume by touching a
track’s slider, then using the VALUE DIAL.
Changing the Play/Mute status
Play/mute status of the current track. Select the track, then touch
this area to change its status.
Play status. The track can be heard.
Mute status. The track cannot be heard.
Saving the track’s volume and play/mute
status
Each set of tracks can be saved into a different structure. This
allows for a great flexibility when mixing Keyboard and Accompaniment tracks through the use of Performances, STSs and
Styles.
• The volume and play/mute status of the Keyboard tracks can
be saved to a Performance or STS (see “Write Performance” on
page 32 and “Write Single Touch Setting” on page 32).
• The volume and play/mute status of the separate Style tracks
can be saved to the current Style Settings (see “Write Current
Style Settings” on page 32).
• The offset volume of the grouped Style tracks is automatically
saved to the Global.
Reference
16
Style Play operating mode
Volume panel
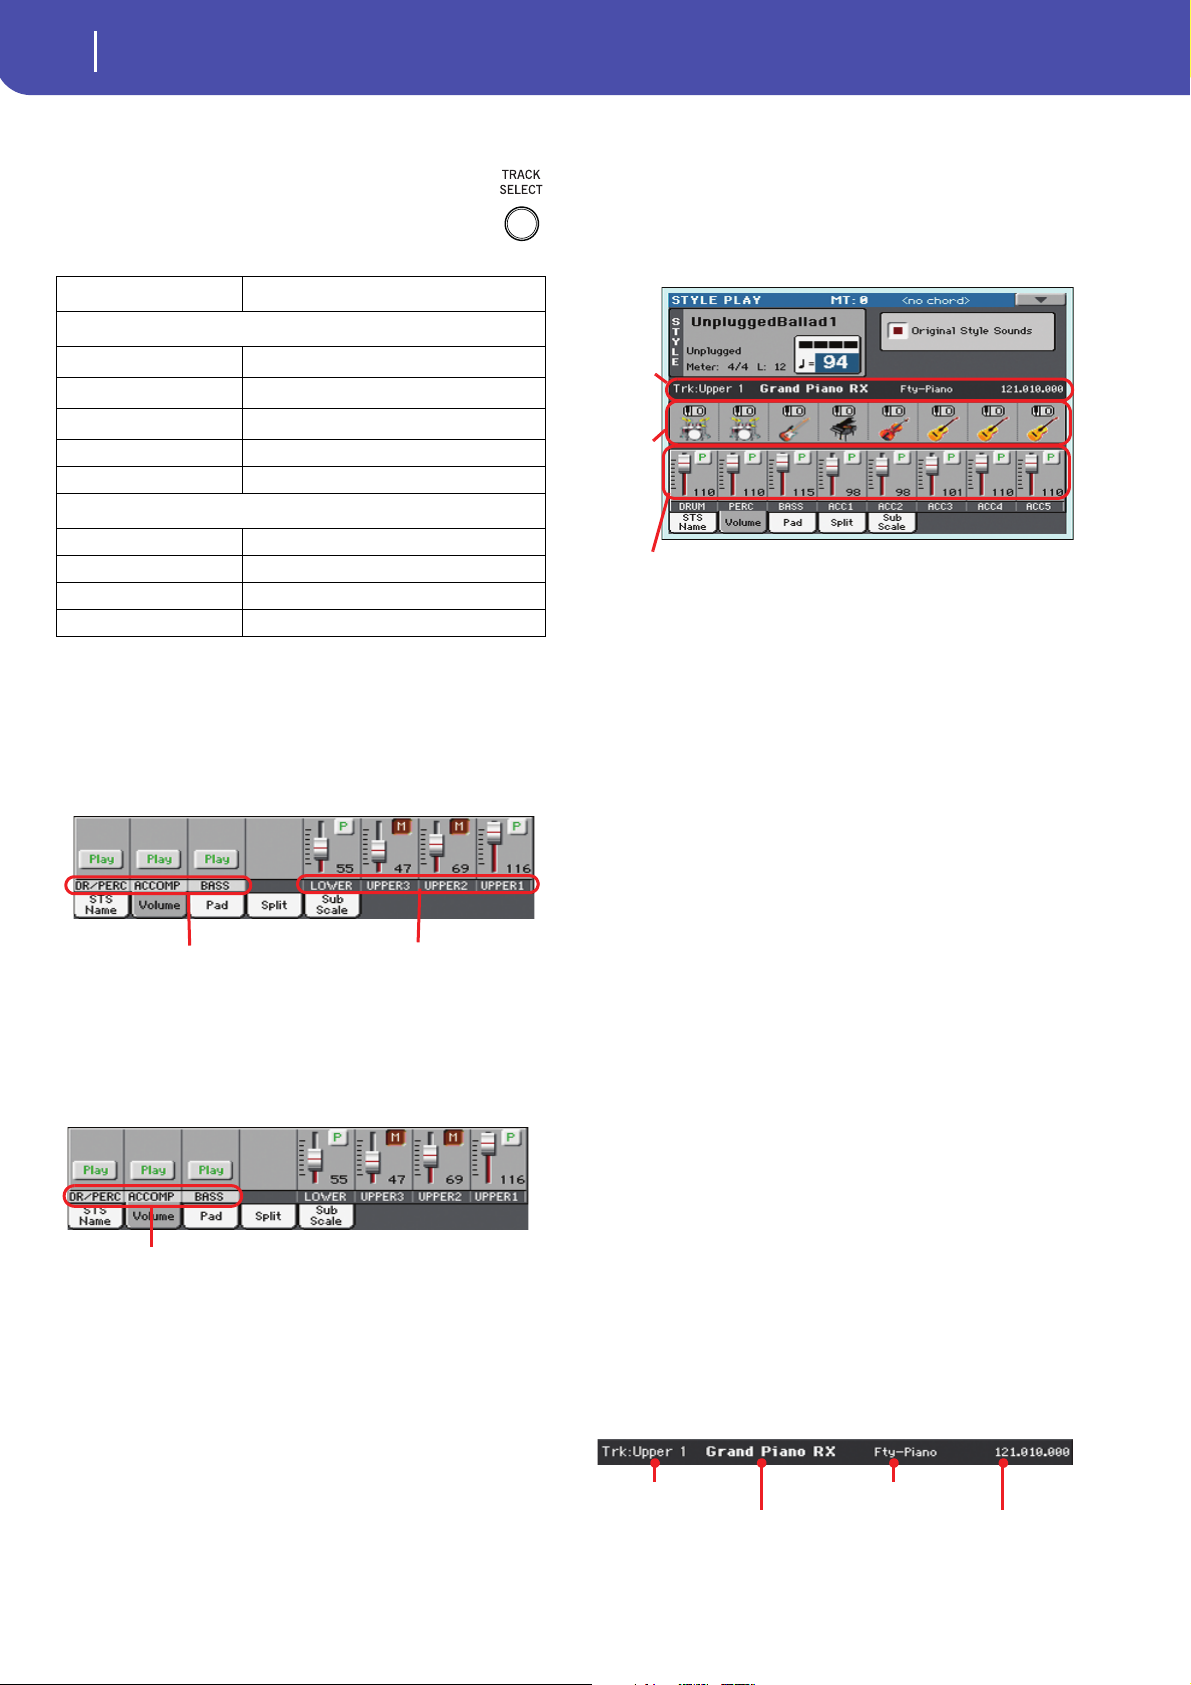
Grouped Style tracks
Keyboard tracks
Selected
track
info area
Sounds
area
Style tracks Volume
Track name
Sound name
Sound bank
Program Change sequence
Track names
Under the sliders, a label for each track is shown. Use
the TRACK SELECT button to switch between the Nor-
mal (grouped Style tracks, Keyboard tracks) and the
Style Tracks view (separate Style tracks).
Track Description
Normal View
(*)
DR/PERC
(*)
ACCOMP
(*)
BASS
LOWER Lowe r track.
UPPER1…3 Upper tracks.
Style Tracks View
DRUM Drum Style track.
PERC Percussion Style track.
BASS Bass Style track.
ACC1…5 Accompaniment Style tracks.
(*).Volume for these grouped tracks is a global offset, that can be adjusted in
the Global > Mode Preferences > Style page.
Grouped Drum and Percussion tracks.
Grouped Accompaniment tracks (Acc1-5).
Grouped Bass Style track.
Normal view
In Normal view you can see the grouped Style tracks (Play/Mute
only), and the separate controls for the Keyboard tracks:
Grouped Style tracks
In the Normal view, Style tracks are grouped together (Dr/Perc,
Accomp, Bass groups), to allow for instant play/mute of several
tracks at the same time.
Changing the volume of the grouped Style tracks can be done (as
a general control) in the Global mode > Mode Preferences >
Style page (see “Style Tracks Global Volume” on page 144).
Keyboard tracks
Here you can separately control the volume and play/mute status
of each Keyboard track.
Style Tracks view
Press the TRACK SELECT button to switch from the Normal
view to the Style Tracks view. In this view, individual Style tracks
are shown in the lower half of the display, while the upper half of
the main page changes to show parameters for the selected Style
track.
Press TRACK SELECT again to return to the Normal view (Keyboard tracks, grouped Style tracks, Mic/In controls).
Style tracks Volume
Here you can change the volume and play/mute status of each of
the individual Style tracks.
Original Style Sounds
This parameter lets you choose if the Style has to play the
Sounds saved in the Performance or Style Settings, or the ones
saved in each Style Element.
Note: When assigning a Sound to a Style track, the “Original Style
Sounds” parameter is automatically turned off.
Note: This parameter can be saved with the Performance or Style
Settings.
On Style tracks always use the original Sounds
recorded in each Style Element. If you assign a
different Sound to a Style track, this parameter is
automatically set to Off.
Off You can assign different Sounds to each Style
track, and save them in a Performance or Style
Settings. The selected Sounds are the same for all
Style Elements (there are no different Sounds for
each Style element).These Sounds can be saved
into a Performance or Style Settings with the
“Write Performance” or “Write Current Style Settings” commands (see page 32). Assigned Sounds
are shown in the Sounds area of this page.
Selected Track Info area
This line lets you see the Sound assigned to the selected track. It
appears both in the main page, and in several edit pages.
Style Play operating mode
Pad panel
Track name
Style track’s octave transpose icon
Sound bank’s icon
Name of the selected track.
17
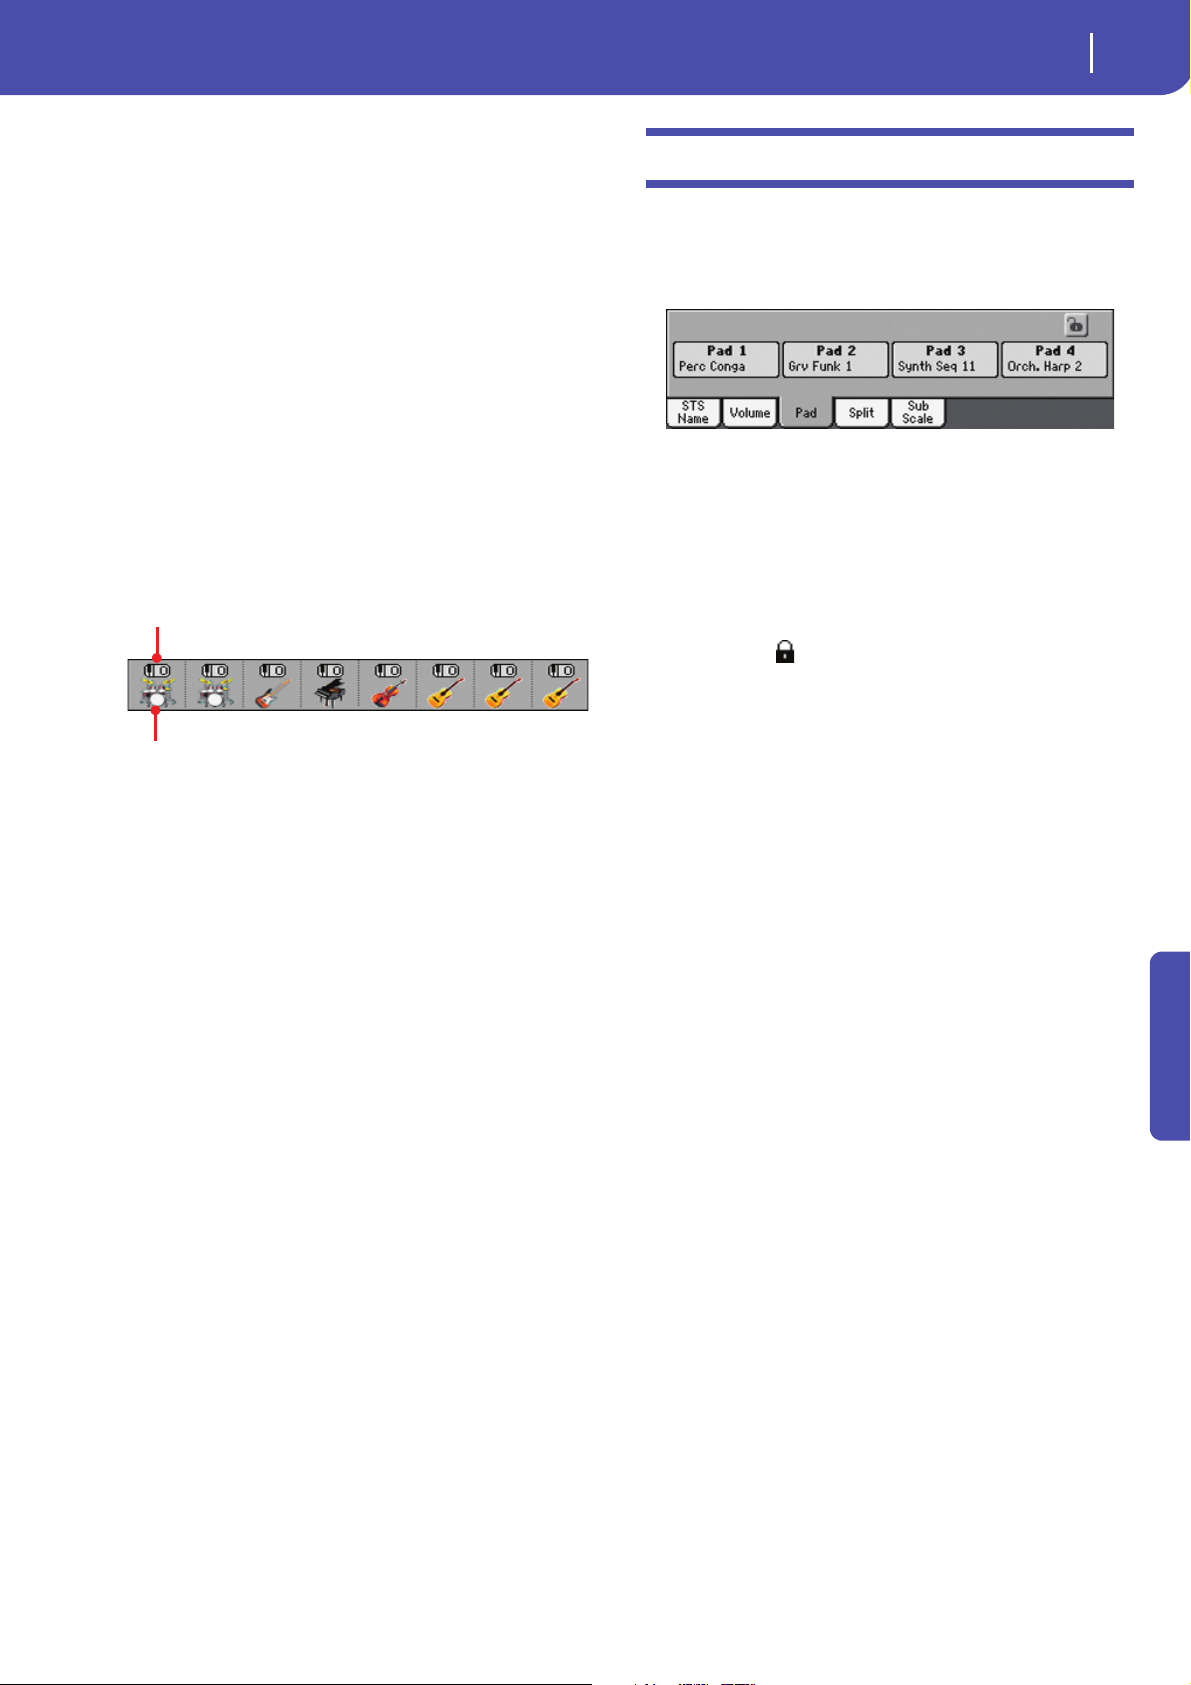
Pad panel
Sound name
Sound assigned to the selected track. Touch anywhere in this
area to open the Sound Select window, and select a different
Sound.
Sound bank
Bank of the selected Sound.
Program Change
Program Change number sequence (Bank Select MSB, Bank
Select LSB, Program Change).
Sounds area
This area lets you see the Sound bank’s icon and octave transposition for the eight Style tracks.
Touch the Pad tab to select this panel. This is where you can
assign a different Hit or Sequence Pad to each of the four pads,
and see at a glance how pads are programmed. For more options,
go to the “Pad/Switch: Pad” page (see page 30).
Pad assignment
Name of the Hit or Sequence assigned to each Pad. Touch the
box to make the Pad Select window appear (see “Pad Select window” on page 8).
When the Lock is open, Pads can be changed when choosing a
Style or SongBook entry.
Pads lock icon ( )
Close this lock to prevent Pads from changing when choosing a
different Style or SongBook entry.
Style track’s octave transpose icon
Non editable. Octave transpose of the corresponding track. To
change the octave transpose, use the UPPER OCTAVE buttons,
or go to the “Mixer/Tuning: Tuning” edit page (see page 22).
Sound bank’s icon
This picture illustrates the bank the current Sound belongs to.
Touch an icon a first time to select the corresponding track
(detailed information are shown on the Selected Track Info area,
see above). Touch it a second time to open the Sound Select window.
Reference
18
Style Play operating mode
Split panel
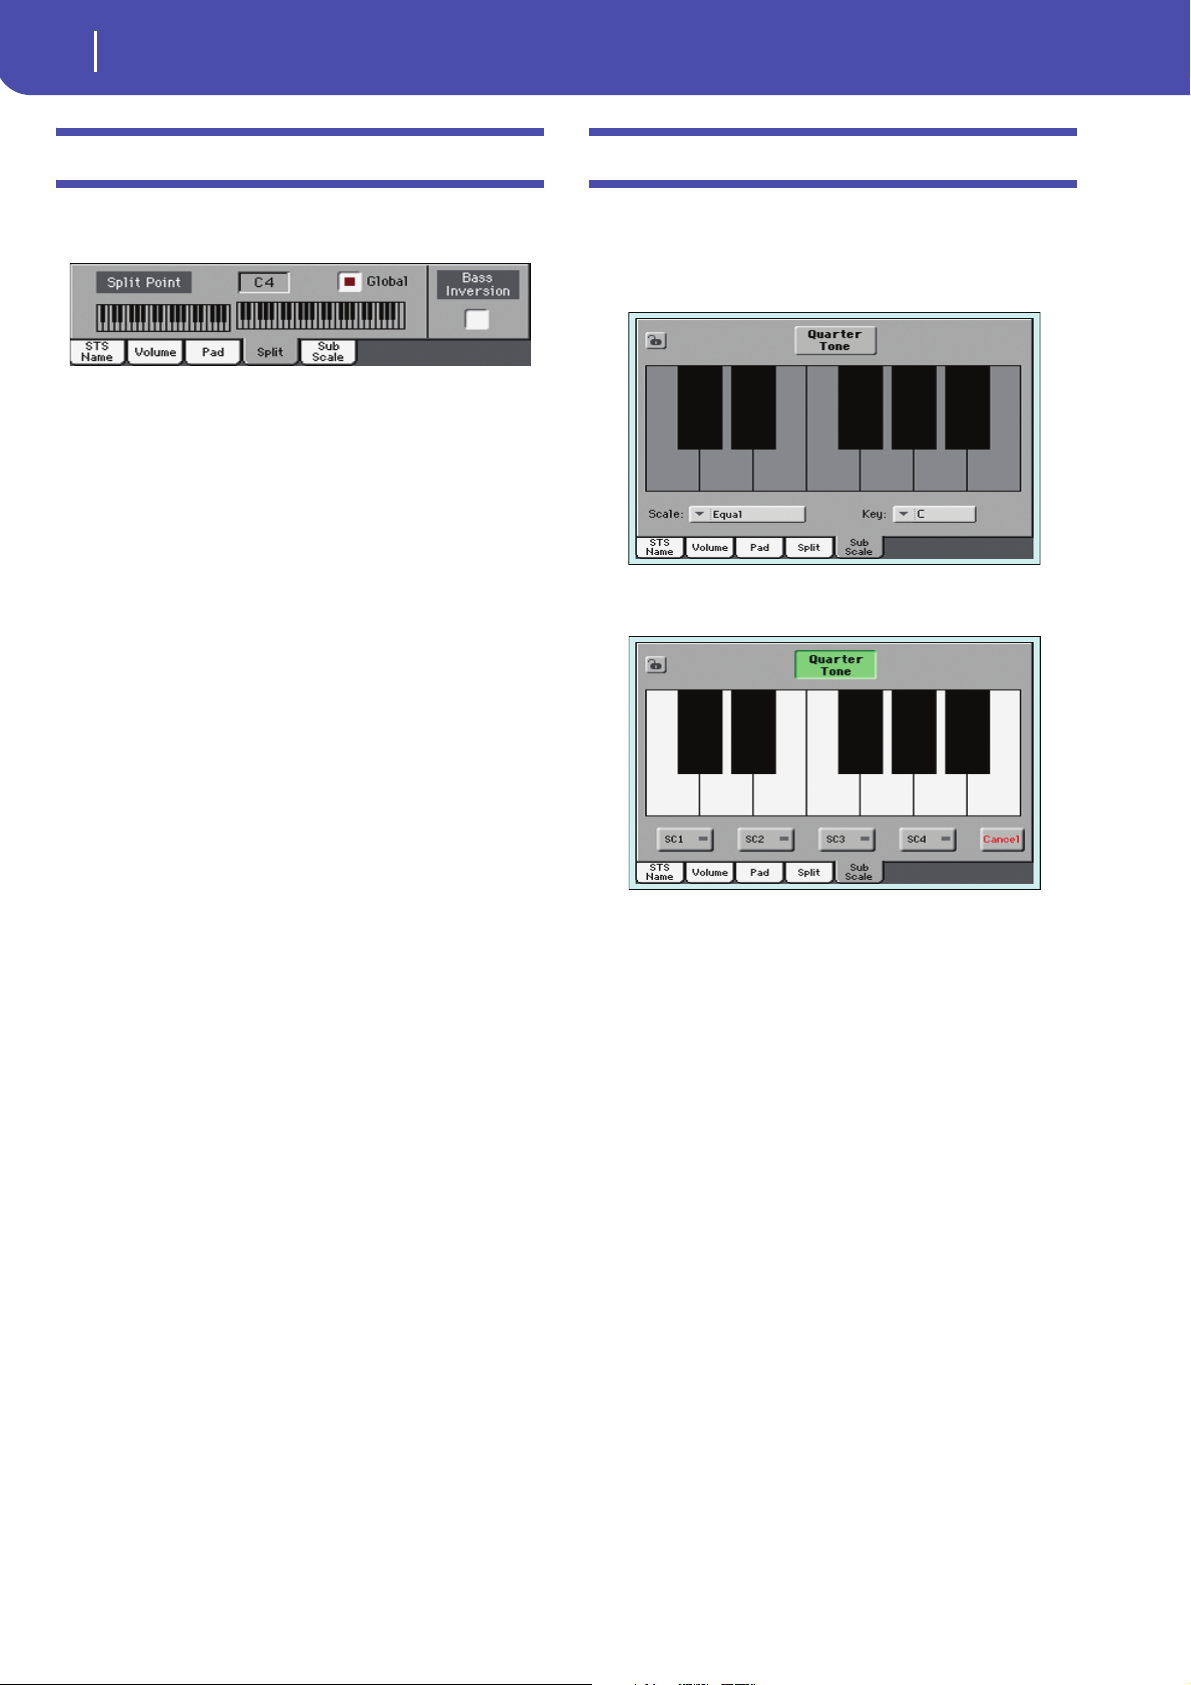
Split panel
Touch the Split tab to select this panel. This is where you can set
the split point and activate the Bass Inversion.
Split Point
Use this parameter to select a different split point. A full-range
piano keyboard is shown in the display, divided at the selected
split point. Upper tracks play on the right of this point, while the
Lower track plays on the left.
Keyboard diagram
Touch anywhere on the keyboard diagram. A message will
appear, asking you to press the new split point on the keyboard
of your Pa600 (or to press the EXIT button to close the message
with no changes).
Global
There is a global split point, and “local” one, that can be memorized into the Performances and STSs.
On You are editing the global split point. The global
split point is considered when selecting a Performance or STS that does not contain a local split
point.
Off You are editing the “local” split point memorized
in the current Performance or STS.
Sub-Scale panel
Touch the Sub-Scale tab to select this panel. This panel replicates
the “Mixer/Tuning: Sub Scale” edit page (see page 22). When the
Quarter Tone button is pressed, it corresponds to the QUARTER
TONE section on the control panel (Pa600 Quarter tone only).
With the “Quarter Tone” button non-pressed
With the “Quarter Tone” button pressed
Bass Inversion
Use this parameter to turn the Bass Inversion function on or off.
On The lowest note of a chord played in inverted
form will always be detected as the root note of
the chord. Thus, you can specify to the arranger
composite chords such as “Am7/G” or “F/C”.
Off The lowest note is scanned together with the
other chord notes, and is not always considered
as the root note.
Note: This function can be automatically activated by playing the
keyboard harder. See “Velocity Control” on page 144.
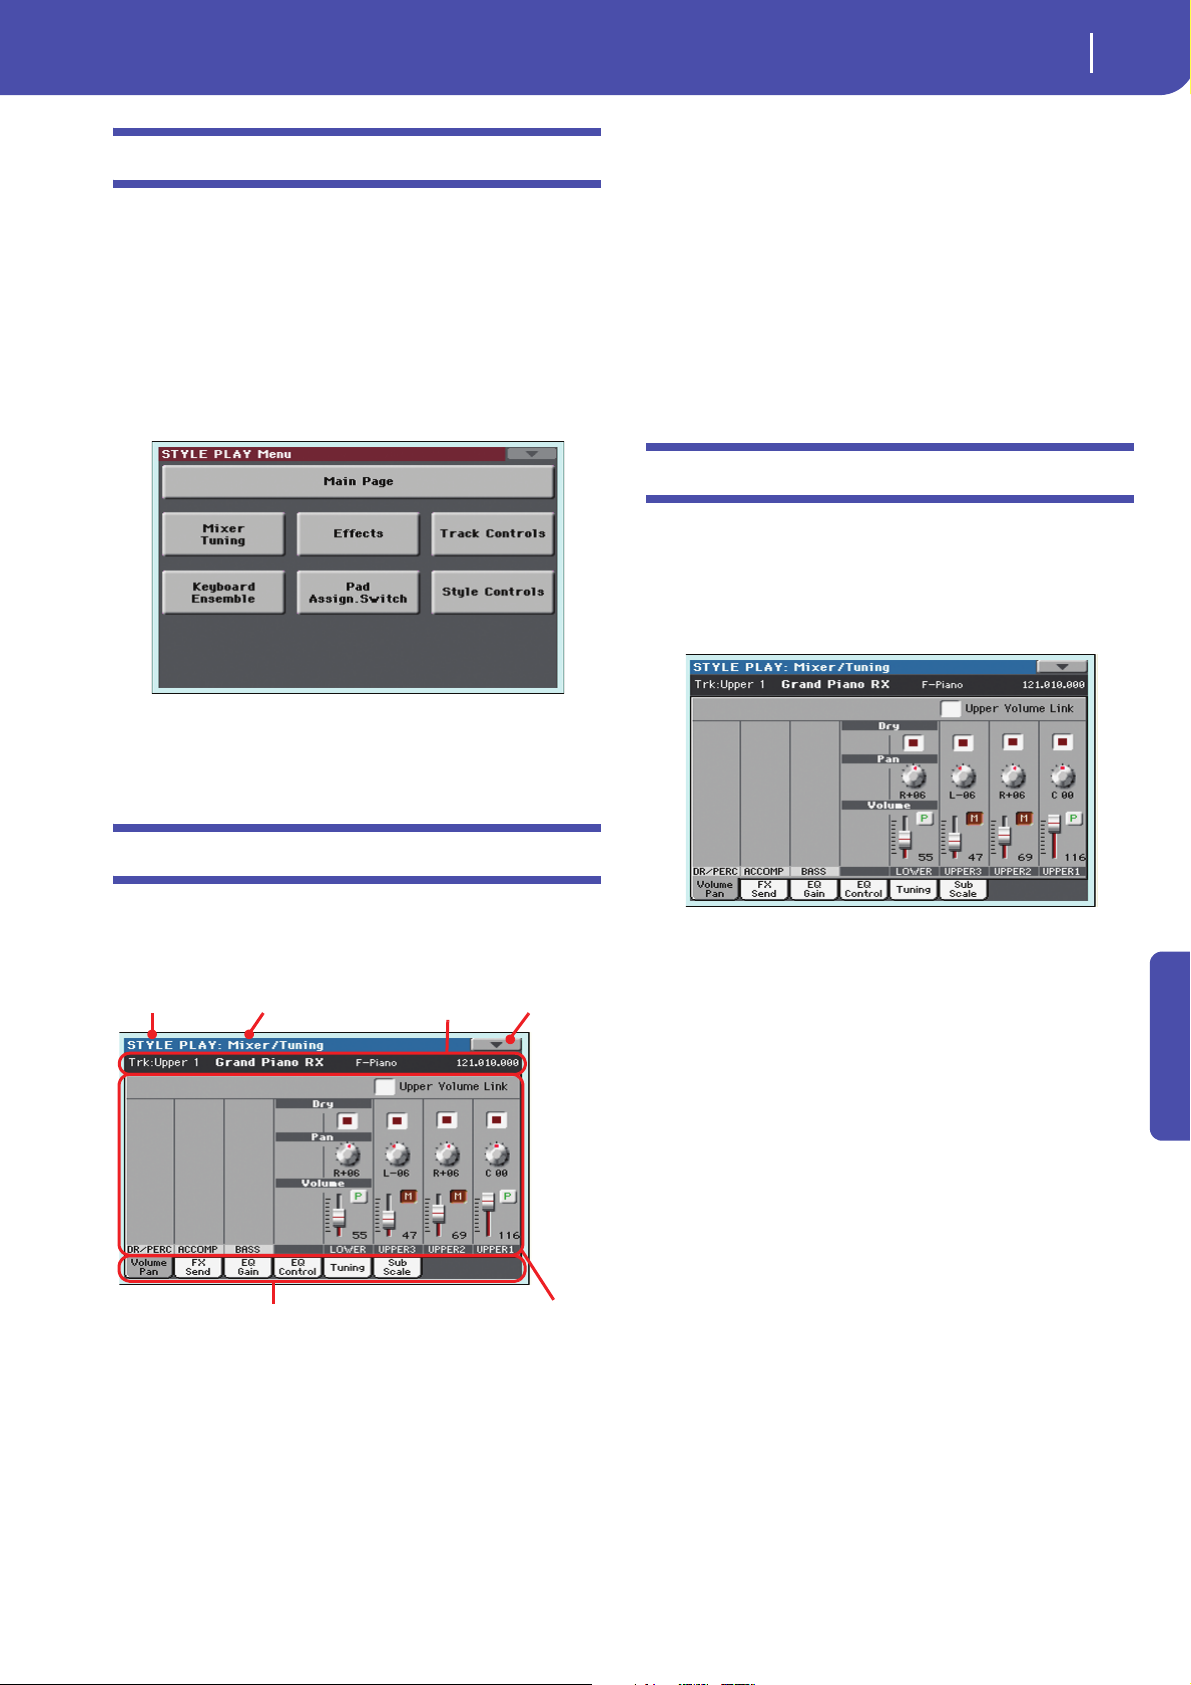
Style Play operating mode
Edit menu
Edit menu
Operating mode Edit section
Selected
track info
Page menu
icon
Parameters
area
Tab s
From any page, press the MENU button to open the Style Play
edit menu. This menu gives access to the various Style Play edit
sections.
When in the menu, select an edit section, or press EXIT or
STYLE PLAY to exit the menu and return to the main page. To
return to the main page, you can also select the Main Page menu
item.
When in an edit page, press EXIT or the STYLE PLAY button to
return to the main page of the Style Play operating mode.
19
Page menu icon
Touch this icon to open the page menu (see “Page menu” on
page 32).
Parameters area
Each page contains various parameters. Use the tabs to select
one of the available pages. For detailed information on the various types of parameters, see sections starting below.
Ta bs
Use tabs to select one of the edit pages of the current edit section.
Mixer/Tuning: Volume/Pan
This page lets you set the volume and pan for each of the Keyboard or Style tracks. Volume settings are the same as in the Volume panel of the main page.
Use the TRACK SELECT button to switch from the Keyboard to
the Style tracks, and vice versa.
Each item in this menu corresponds to an edit section. Each edit
section groups various edit pages, that may be selected by touching the corresponding tab on the lower part of the display.
Edit page structure
All edit pages share some basic elements.
Upper Volume Link
With this parameter, you define if changing the volume of one of
the Upper tracks also proportionally changes the volume of the
other Upper tracks.
On When changing the volume of one of the Upper
tracks, volume for the other Upper tracks changes
in proportion.
Off When changing the volume of one of the Upper
tracks, only that track’s volume is changed. Other
Upper tracks are left unchanged.
Reference
Operating mode
This indicates that the instrument is in Style Play mode.
Edit section
This identifies the current edit section, corresponding to one of
the items of the edit menu (see “Edit menu” on page 19).
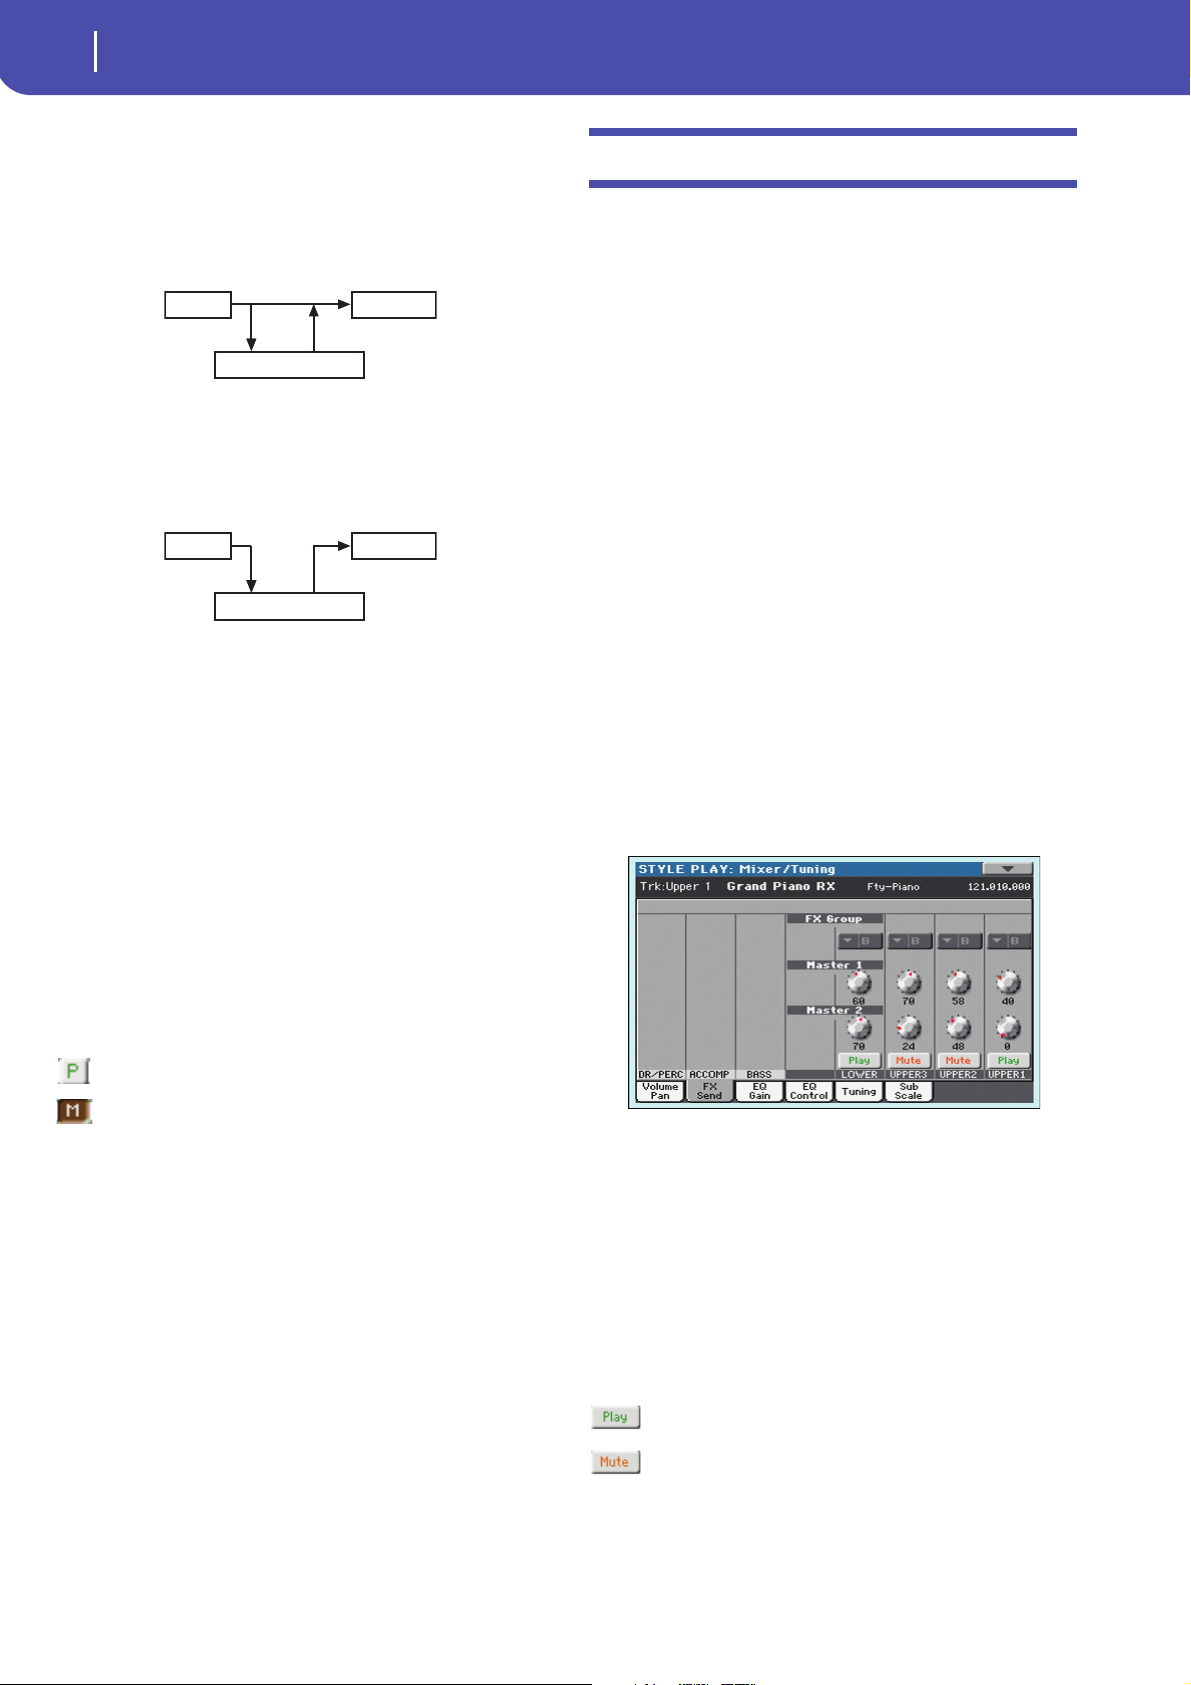
20
Style Play operating mode
Mixer/Tuning: FX Send
Dry
Use this checkbox to turn the dry (direct) track signal on or off
from the outputs.
On When checked, the direct signal coming from the
track is sent to the output, mixed with the Master
FXs.
Off When unchecked, the direct signal coming from
the track is removed from the audio output, and
only sent to the Master FXs. The effected signal
will still be panned (in stereo FXs only) according
to the Pan value.
Pan
Track position in the stereo field.
L-64…L-1 Left stereo channel.
C 00 Center.
R+1…R+63 Right stereo channel.
Volum e
Track’s volume. This is the volume of each track, as saved in the
Style (Style Settings), Performance or STS. It may change when
choosing a different Style, Performance or STS.
0…127 MIDI value of the track’s volume.
Mixer/Tuning: FX Send
Pa600 includes two groups of effects (FX A and FX B). While in
Style Play mode, the A group is reserved to the Style and Pad
tracks, the B group to the Keyboard tracks.
Choosing and editing the effects is done in the dedicated Effect
section (see “Effects: A/B FX Configuration” on page 24).
This page lets you set the level of the track’s signal going to the
Master FX processors. The Master FX processors are connected
in parallel with the dry/direct signal, so you can decide the
amount of direct signal that will be sent to the Master FX processors.
In case you do not want to hear the direct signal, just set the Dry
parameter to Off (see “Dry” above).
You can assign to the Master FXs any kind of available effects,
but we found it convenient to arrange them in the following way,
for most of the Styles, STS and Performances included with the
Pa600:
A-Master 1 Reverb processor for the Style and Pad tracks.
A-Master 2 Modulating FX processor for the Style and Pad
tracks.
B-Master 1 Reverb processor for the Keyboard tracks.
B-Master 2 Modulating FX processor for the Keyboard
tracks.
Use the TRACK SELECT button to switch from Keyboard to
Style tracks, and vice-versa.
Play/Mute icon
Track’s play/mute status.
Play status. The track can be heard.
Mute status. The track cannot be heard.
FX Group
This indicates the FX group (A or B) assigned to the group of
tracks shown.
Send level (Master 1, Master 2)
0…127 Level of the track (direct) signal sent to the corre-
sponding Master FX effect processor.
Play/Mute icon
Track’s play/mute status.
Play status. The track can be heard.
Mute status. The track cannot be heard.
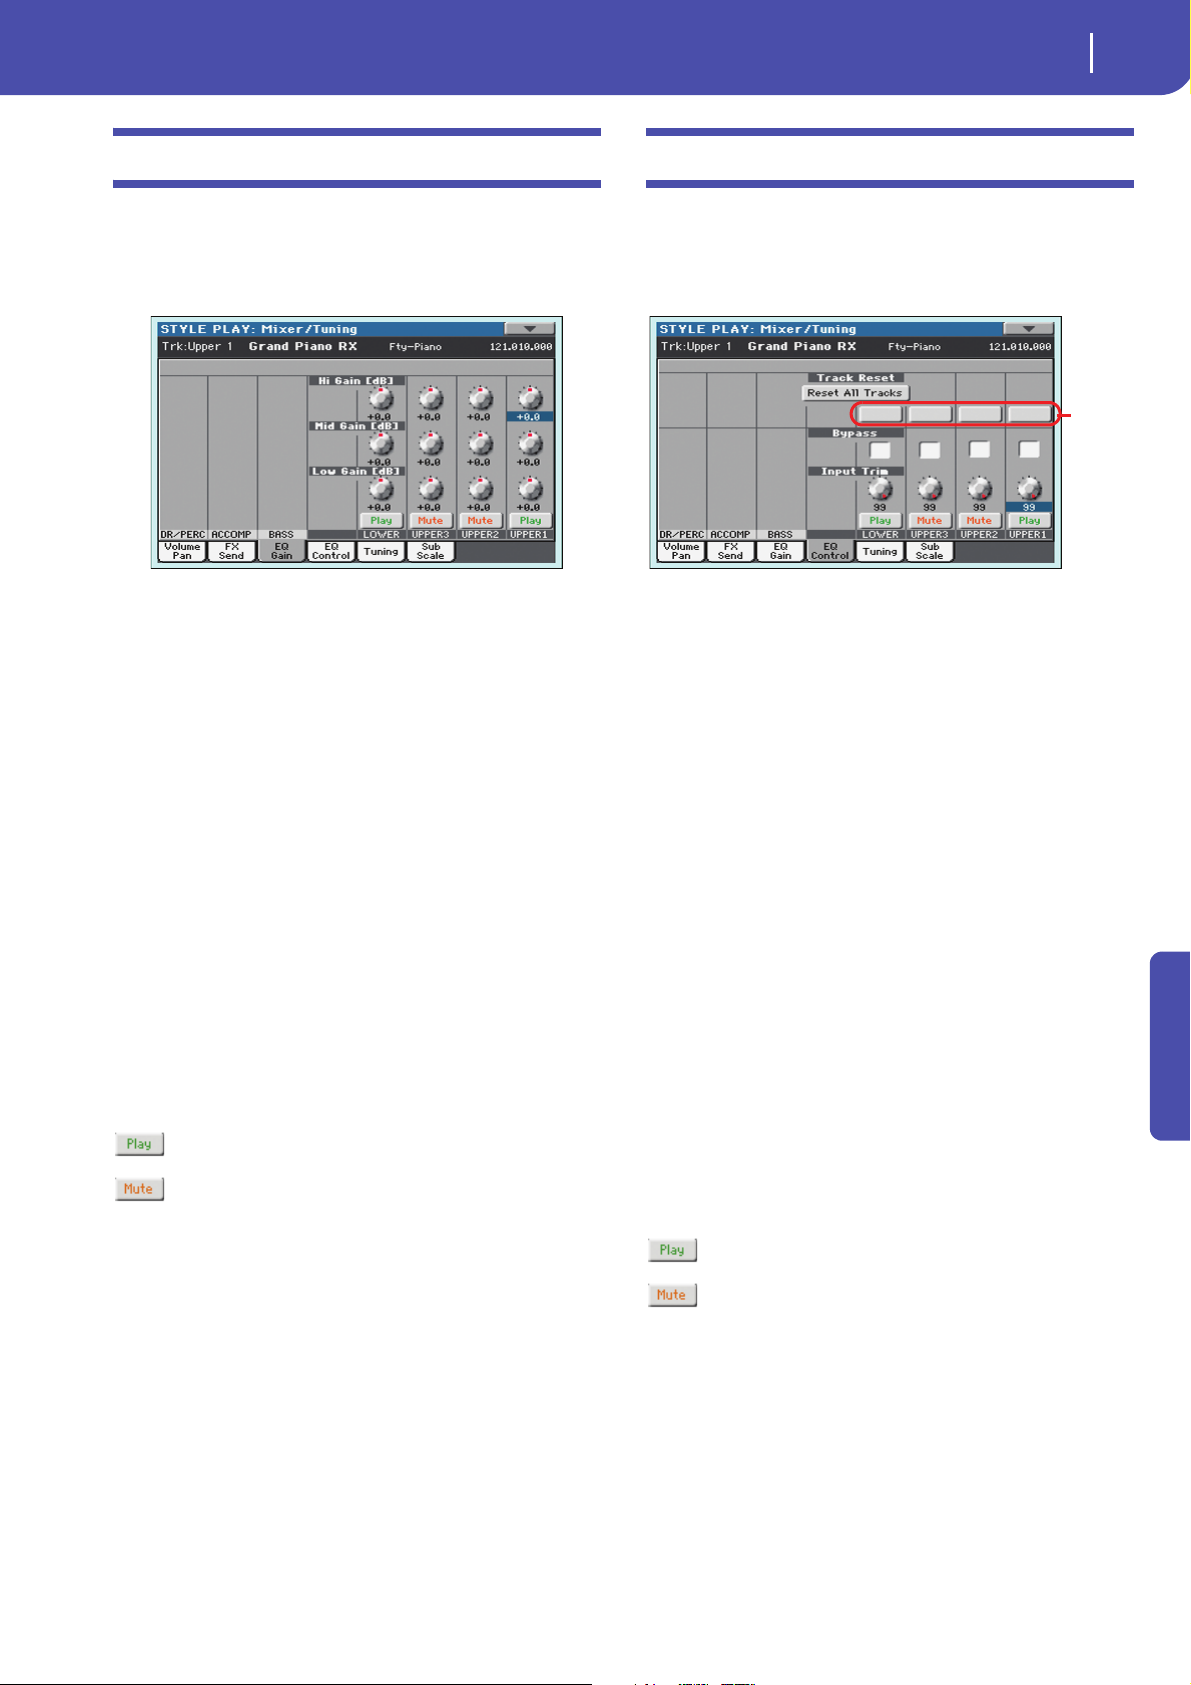
21
Style Play operating mode
Mixer/Tuning: EQ Gain
Mixer/Tuning: EQ Gain
In this page you can set the three-band equalization (EQ) for
each individual track.
Use the TRACK SELECT button to switch from the Keyboard to
the Style tracks, and vice-versa.
Hi (High) Gain
This parameter lets you adjust the high frequencies equalization
on each individual track. This is a shelving curve filter. Values
are shown in decibels (dB).
-18…+18dB High gain value in decibels.
Mid (Middle) Gain
This parameter lets you adjust the middle frequencies equalization on each individual track. This is a bell curve filter. Values
are shown in decibels (dB).
-18…+18dB Middle gain value in decibels.
Low Gain
This parameter lets you adjust the low frequencies equalization
on each individual track. This is a shelving curve filter. Values
are shown in decibels (dB).
-18…+18dB Low gain value in decibels.
Play/Mute icon
Track’s play/mute status.
Play status. The track can be heard.
Mute status. The track cannot be heard.
Mixer/Tuning: EQ Control
This page lets you reset or bypass the track’s equalization, programmed in the previous page.
Use the TRACK SELECT button to switch from the Keyboard to
the Style tracks, and vice-versa.
Reset All Tracks button
Touch this button to reset (i.e., “flatten”) equalization for all
tracks (both Realtime and Style tracks).
Track Reset buttons
Use these buttons to reset (i.e., “flatten”) equalization for the corresponding track.
Bypass
Check any of these checkboxes to bypass the equalization for the
corresponding track. When bypassed, equalization has no effect on
the track, but all parameters are preserved. When the box is
unchecked, equalization is activated again.
On The bypass function is engaged, so no equaliza-
tion is active on the corresponding track.
Off The bypass function is not engaged, so the equal-
ization is active on the corresponding track.
Input Trim
This knob allows you to limit the level of the signal passing
through the equalizer. Extreme equalization values can overload
the audio circuits and lead to distortion. This control lets you set
equalization as desired, and at the same time avoid overloading.
0…99 Limiting value. The higher, the most effective it is.
Play/Mute icon
Track’s play/mute status.
Reference
Play status. The track can be heard.
Mute status. The track cannot be heard.
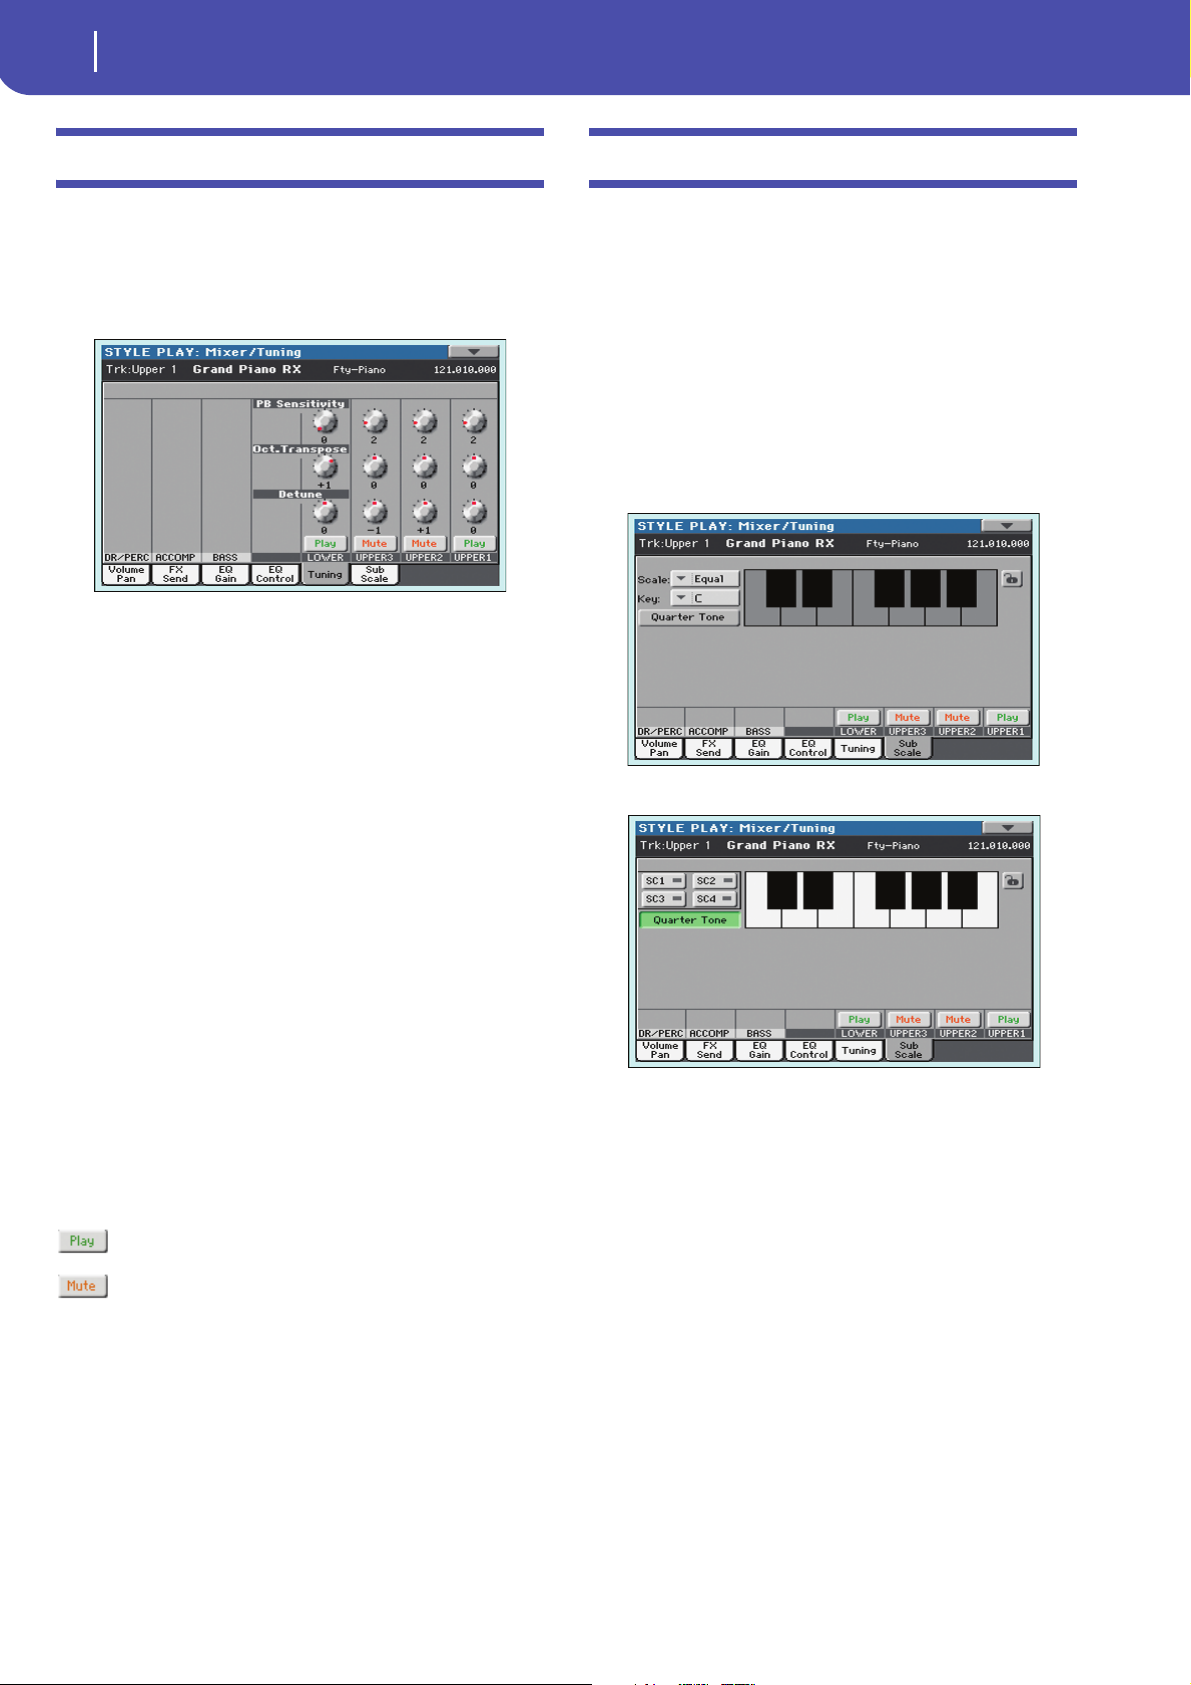
22
Style Play operating mode
Mixer/Tuning: Tuning
Mixer/Tuning: Tuning
This page is where you can set the octave transpose and fine tuning for each track. Plus, you can program the Pitch Bend range
for each track.
Use the TRACK SELECT button to switch from the Keyboard to
the Style tracks, and vice-versa.
PB Sensitivity
These parameters show the Pitch Bend range for each track, in
semitones.
1…12 Maximum up/down pitch bend range (in semi-
tones). 12 = ±1 octave.
0 No pitch bend allowed.
Mixer/Tuning: Sub Scale
You can assign a different scale (a sub-scale) to the Keyboard
tracks, the Upper tracks or all tracks. This will allow, for example, to play a solo with a particular Quarter Tone tuning, while
the backing tracks play in the Equal tuning.
This page is where you can program the sub-scale for the
selected tracks; a different sub-scale can be associated to each
Performance or STS. Track selection is general, and can be done
with the “Scale Mode” parameter of the Global > Mode Preferences > Style page (see page 144).
The remaining tracks will use the basic scale set in the Global
> Tuning > Scale page (see “Main Scale” on page 148). This is
the “standard” scale of the instrument.
With the “Quarter Tone” button non-pressed
Octave Transpose
This is the octave transpose value.
-3 Lowest octave.
0 Standard tuning.
+3 Highest octave.
Detune
This is the fine tuning value.
-64 Lowest pitch.
00 Standard tuning.
+63 Highest pitch.
Play/Mute icon
Track’s play/mute status.
Play status. The track can be heard.
Mute status. The track cannot be heard.
With the “Quarter Tone” button pressed
Note: Quarter Tone selection can be received by MIDI (i.e., by an
external sequencer or controller). Conversely, selection of Quarter
Tone settings can be sent by the Pa600 to an external MIDI
recorder as System Exclusive data.
Scale
Selected scale. See “Scales” on page 242 for a list of the available
scales. When selecting the User scale, the keyboard diagram
becomes active, letting you program a custom scale (see “How to
create a custom scale by fine-tuning each note of the User scale”
below).
Key
This parameter is needed by some scales to set the preferred
key (see
“Scales” on page 242).

23
Style Play operating mode
Mixer/Tuning: Sub Scale
Quarter Tone
Pa600 Quarter Tone only: When this option is turned on, this page
corresponds to the QUARTER TONE section of the control panel.
You can program the Quarter Tone scale on the display, or by using
the keys on the control panel. The controls on the control panel
remain functional, even when going to a different page.
Press the Quarter Tone button to make the keyboard diagram
active (Pa600 Quarter Tone only: this also activates the QUAR-
TER TONE section of the control panel). In the display, touch any
note you want to lower a quarter tone, making a big dot appear
on the note diagram. Touch the note again to make the dot disappear.
Touch one of the four SC Preset buttons to recall the corresponding preset, and touch any note you want to lower a quarter
tone down, making a big dot appear on the detuned note in the
diagram. Touch the note again to make the dot disappear.
Scale alteration made in this page is momentary and is not
memorised. It is only meant to allow for fast scale alteration
while playing.
To make realtime changes faster, you can also assign the Quarter
Tone function to the footswitch or an Assignable Switch (see
below “How to use the Quarter Tone function with a footswitch
or Assignable Switch” for more information).
The use of SC Presets allows for immediate recall of previously
programmed Quarter Tone scales (see below “How to use the
Quarter Tone function with the SC Presets” for more information).
SC Preset buttons
These buttons appear only when the “Quarter Tone” parameter is
checked. Use these buttons to recall the corresponding custom
scale presets. See “How to use the Quarter Tone function with
the SC Presets” below for information on how to use them.
Keyboard diagram
When “Quarter Tone” is checked, this diagram allows for lowering each note of a quarter tone. When a User scale is selected, it
allows you to fine-tune each note’s pitch.
Scale lock icon
When locked, Scale parameters remain unchanged when selecting a different Performance or STS.
For more information on parameter locks, see “General Controls: Lock” on page 141.
How to create a custom scale by fine-tuning
each note of the User scale
way, you can create a custom scale, that you can save to a Performance or STS.
After having selected the User scale, touch a note in the keyboard diagram, and use VALUE DIAL to adjust the selected note
tuning in cents.
Note: These settings can be saved to a Performance or STS, as
described below.
How to use the Quarter Tone function with
the SC Presets
When the “Quarter Tone” button is pressed, four “SC Preset”
buttons appear, and you can select one of four SC Presets to
recall a preset custom scale. (Pa600 Quarter Tone: these buttons
correspond to the SC buttons in the QUARTER TONE section of
the control panel.)
1. Program and save a custom scale into an SC Preset.
To do so, go to the Global mode, and reach the “Tuning:
Scale” page. When programming is done, choose the
“Write SC Preset” command from the page menu, then
select one of the preset locations where to save the current
settings (see “Write Quarter Tone SC Preset dialog box” on
page 155).
2. Return to this page, and touch the “Quarter Tone” button to
make the “SC Preset” buttons appear.
3. Touch one of the “SC Preset” buttons to recall a preset cus-
tom scale.
Each preset contains custom detuning of each note of the
scale, and memorizes the selected degree(s) of the scale.
When no preset is selected, the default scale is automatically recalled. This scale assigns a -50 cent value to all
notes, and turns all scale degrees off.
You can also select an SC Preset by assigning the relevant
function to an Assignable Switch (see “Pad/Switch: Switch”
on page 31) or Assignable Footswitch (see “Controllers:
Foot Controllers” on page 146).
4. Use the keyboard diagram to turn the note detuning on or
off.
Make a big dot appear to detune the corresponding note, or
make it disappear to reset tuning.
5. Reset the original scale.
Touch the “Quarter Tone button again, to deselect it and
recall the main scale.
Reference
When the User scale is selected, the keyboard diagram becomes
active. You can then change each note tuning in cents of a semitone (within a range of ±99 cents, referred to Equal tuning). This
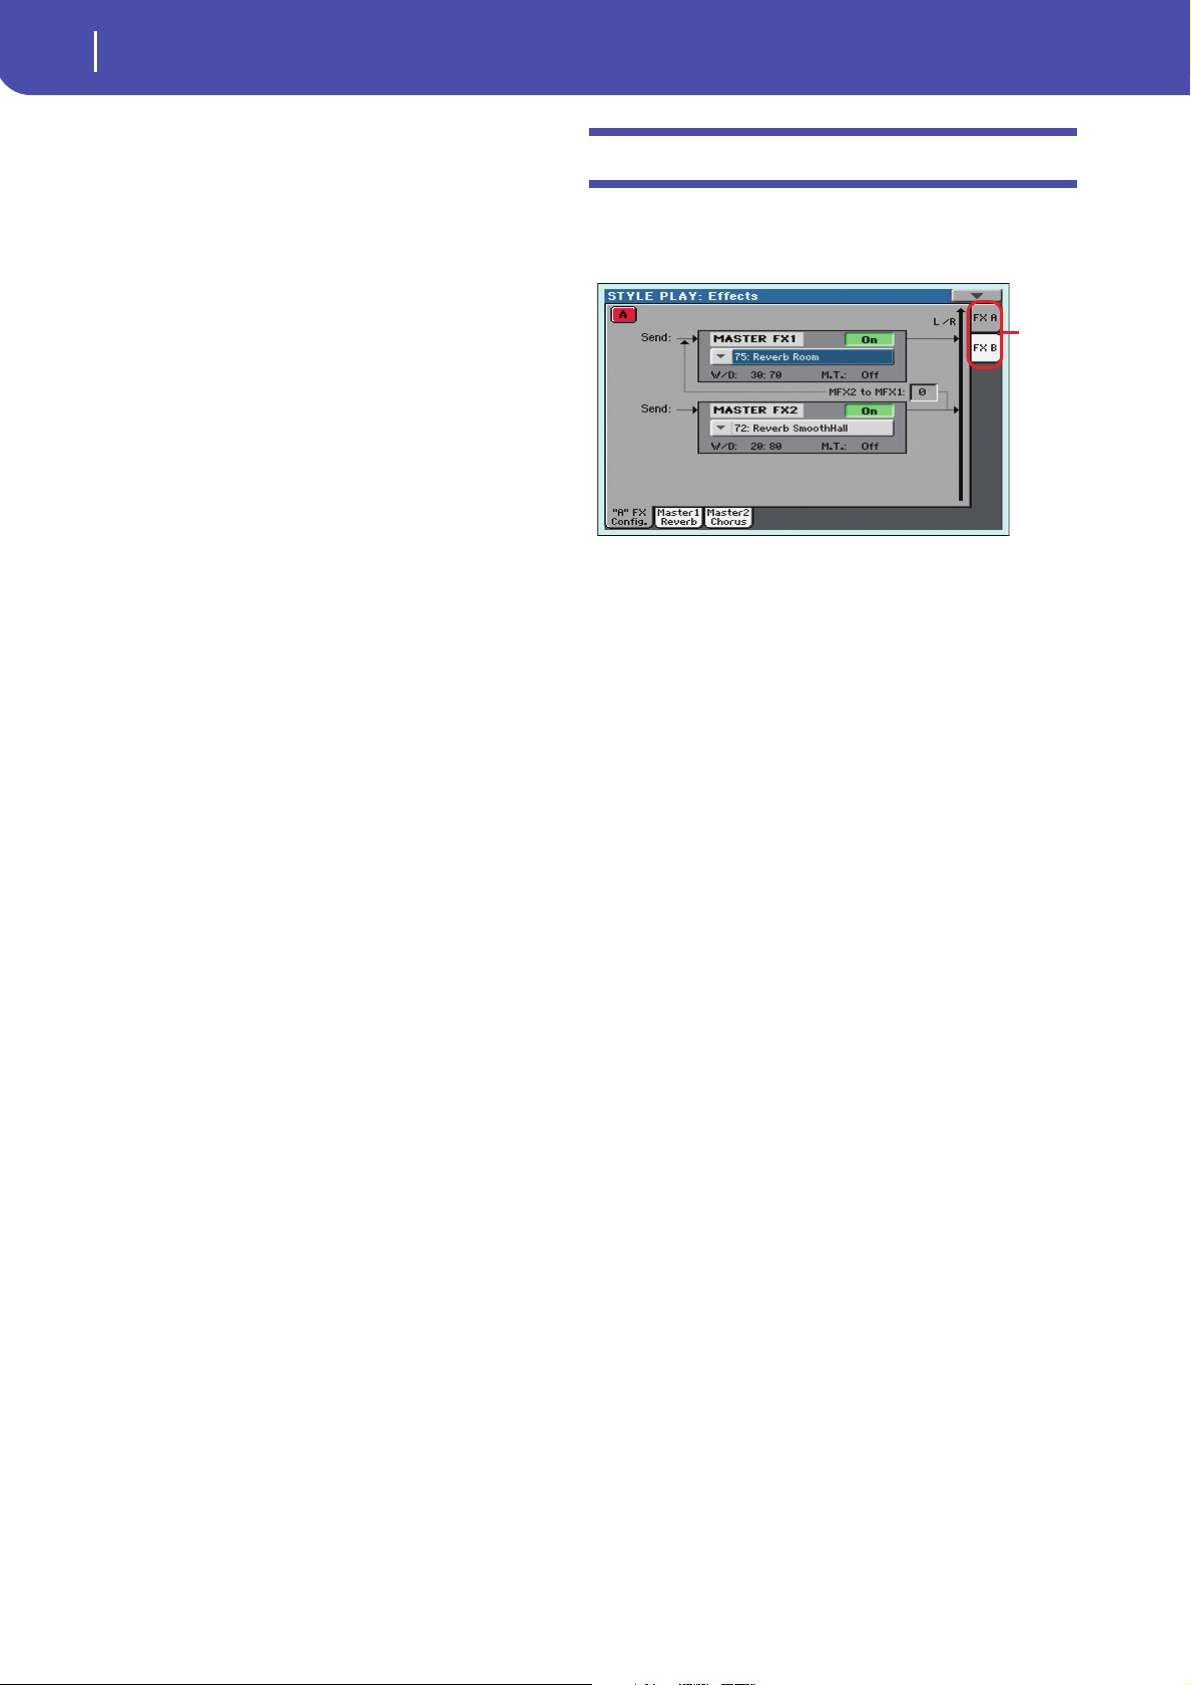
24
Style Play operating mode
Effects: A/B FX Configuration
How to use the Quarter Tone function with a
footswitch or Assignable Switch
Effects: A/B FX Configuration
You can assign the “Quarter Tone” function to a footswitch or an
Assignable Switch, to program a custom scale in realtime, for
example to allow for those sudden scale changes typical of the
Arabic music. These changes are not saved anywhere, so the
scale is easily “wiped-out” when selecting a different Performance or STS, or when pressing the Quarter Tone pedal again.
Note: While in Style Play mode, you can create a custom scale, to
be assigned to a Performance or STS, simply by selecting and editing a User scale, and saving any change to a Performance or STS.
See “How to create a custom scale by fine-tuning each note of the
User scale” above.
While in Global mode, you can create a custom scale and save it to
one of the four SC Presets, and recall it by touching one of the SC
Preset buttons in the display. Then, you can start your realtime
scale editing from the selected preset. See “How to use the Quarter
Tone function with the SC Presets” above.
1. Program the footswitch or an Assignable Switch to be the
Quarter Tone switch.
Simply go to the Global mode, and reach the “Controllers:
Foot Controllers” page. There, you will find the “Pedal/
Footswitch” parameter, to which you can assign the Quarter Tone function.
2. Lower some note pitches.
Keep the Quarter Tone pedal pressed. The keyboard will
not play at this time. Press the notes you want to lower a
quarter tone. Release the pedal.
3. Play with your new scale.
Notes you pressed on step 2 are now lowered of a quarter
tone.
4. Reset the original scale.
Press and release the Quarter Tone pedal again, without
playing any note. All pitches will be reset, and the scale
selected by the Performance or STS will be recalled.
This page allows you to select the A (Style and Pads) and B (Keyboard) groups of effects. Please use the “FX A” and “FX B” side
tabs to switch from one group to the other one.
FX Groups (FX A, FX B)
Pa600 includes two groups of effects (FX A and FX B). There are
two master FXs for group. In Style Play mode, the A group is
reserved to the Style and Pad tracks, the B group to the Realtime
(Keyboard) tracks.
Master FX 1, 2
Effects assigned to the corresponding effect processors. Usually,
FX1 are reverbs, while FX2 are modulating effects (chorus,
flanger, delay…). For a list of the available effects, see in the
Appendix.
Effects assigned to both FX groups can be saved to a Performance. Effect assigned to the FX A group (Style and Pad tracks)
can be saved to the Style Settings. Effects assigned to the FX B
group (Keyboard tracks) can be saved to an STS.
W/D
Use this parameter to set the amount of the effect (Wet) against
the non-effected (Dry) signal coming from the track.
MFX2 to MFX1
Amount of the MFX2 effect going back to the input of the MFX1
effect.
M.T. (Modulating Track)
Source track for modulating MIDI messages. You can modulate
an effect parameter with a MIDI message generated by an internal physical controller.
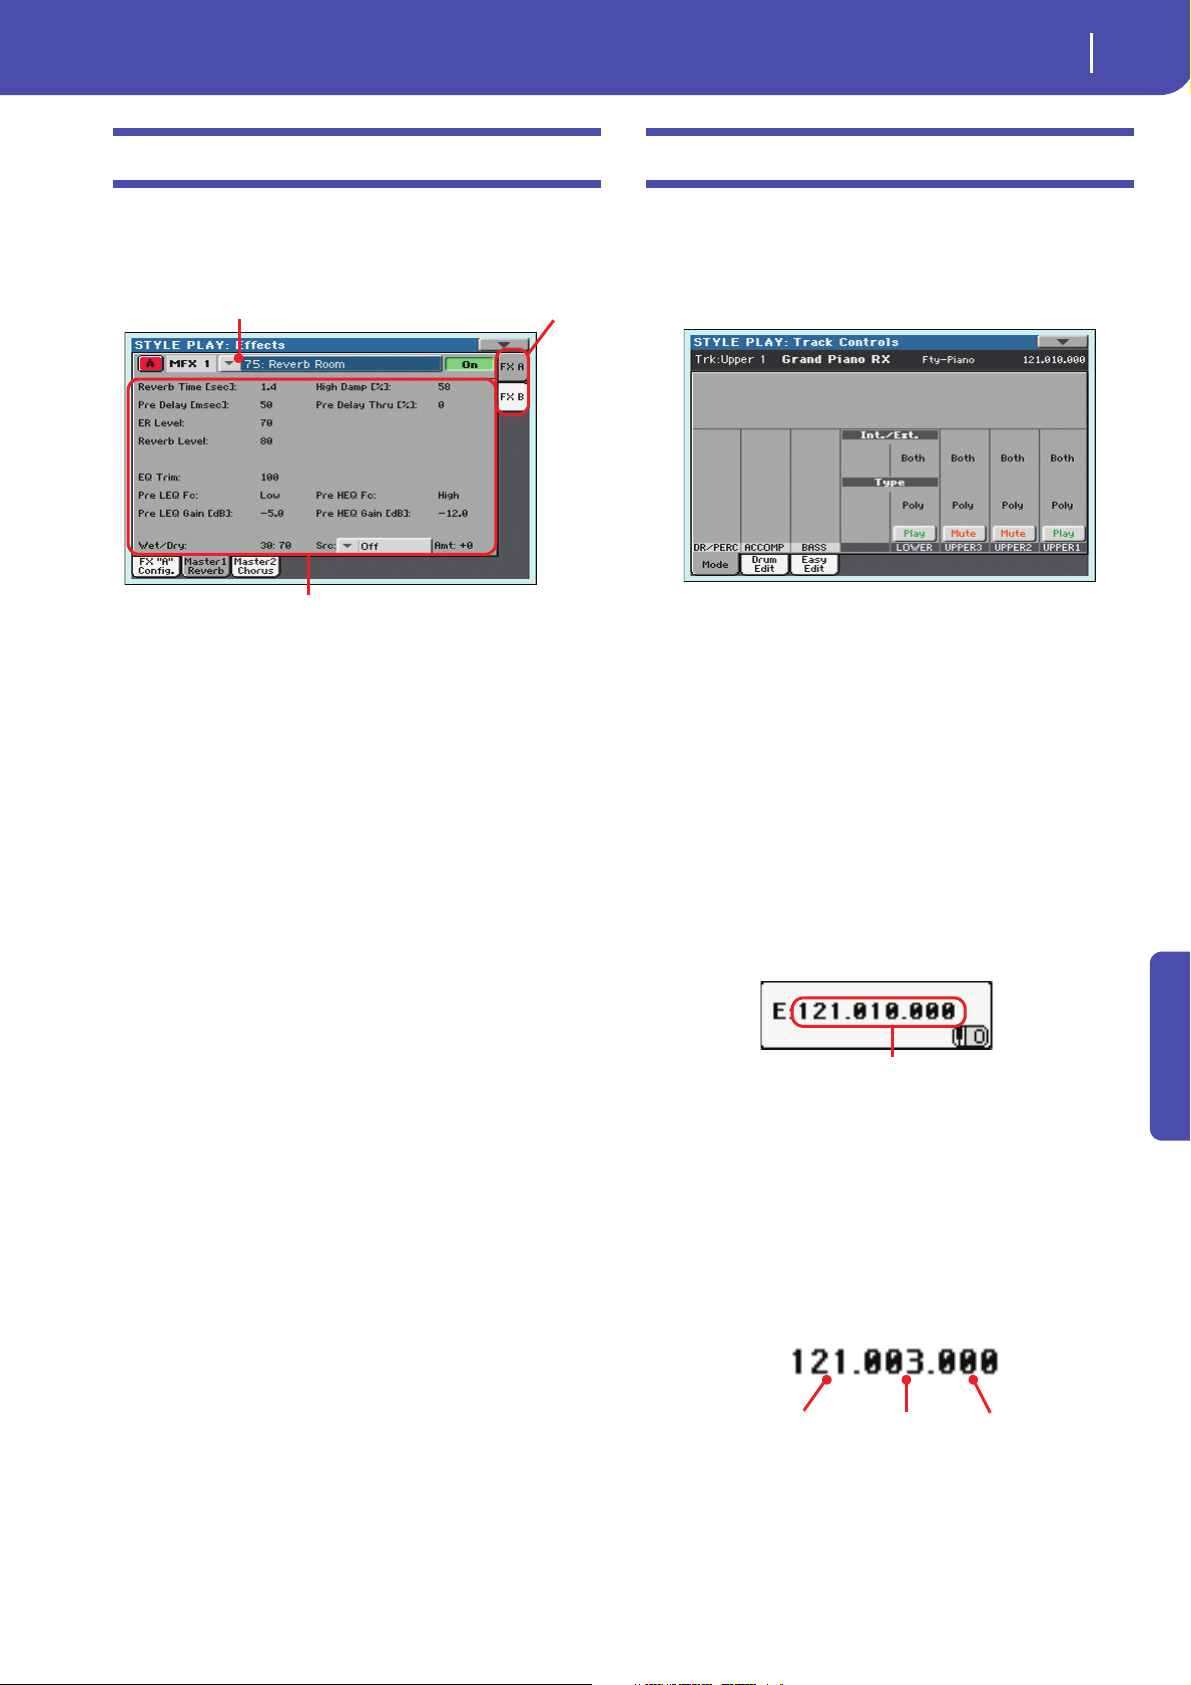
25
Style Play operating mode
Effects: Master 1, 2
Selected effect
FX parameters
FX group
Control Change/Program Change area
CC#0 value
CC#32 value
PC value
Effects: Master 1, 2
These pages contain the editing parameters for the four effect
processors. Here is an example of the FX A page, with the Reverb
Wet P la te ef f ect a ss i gne d .
Selected effect
Select one of the available effects from this pop-up menu.
Note: Effects can be different for each one of the editing pages.
FX parameters
Parameters may be different, depending on the selected effect.
See the relevant chapter in the Appendix for a list of the available
parameters for each effect type.
Wet /Dr y
Use this parameter to set the amount of the effect (Wet) against
the non-effected (Dry) signal coming from the track.
Track Controls: Mode
This page lets you connect each track to the internal sound generator and to external MIDI devices. This is very useful to let a
Style track drive an external expander, or play a digital piano
with one of Pa600’s Keyboard tracks. In addition, here you can
set the polyphony mode for each track.
Int./Ext. (Internal/External)
Internal The track plays the sounds generated by the
internal sound engine. It does not play an external instrument connected to the MIDI OUT.
External The track plays an external instrument connected
to the MIDI OUT. The connected device must
receive on the MIDI channel associated with this
track on the Pa600 (see “MIDI: MIDI Out Channels” on page 151).
A track set to this status cannot play the internal
sounds.
Instead of the assigned Sound name, the
<E: aaa.bbb.ccc> indicator is shown on a track’s
area in the Main page:
Src (Source)
Modulation source. To select the track generating this message,
see the “M.T. (Modulating Track)” parameters found in the
“Effects: A/B FX Configuration” page (see above). See the relevant chapter in the Appendix for a list of the modulation
sources.
Reference
This indicator begins with a remark saying the
track is in External (”E”) mode, and continues
with a strings of transmitted Control Change and
Program Change data. This will let you know
what the track is transmitting to the MIDI OUT.
In the following example, CC#0 is the Control
Change 0 (Bank Select MSB), CC#32 is the Control Change 32 (Bank Select LSB), PC is the Program Change:
When touching the Sound area, the numeric keypad appears, instead of the Sound Select window.
You can enter the Control Change/Program
Change bundle shown above, separating the three
parts with a dot (.).
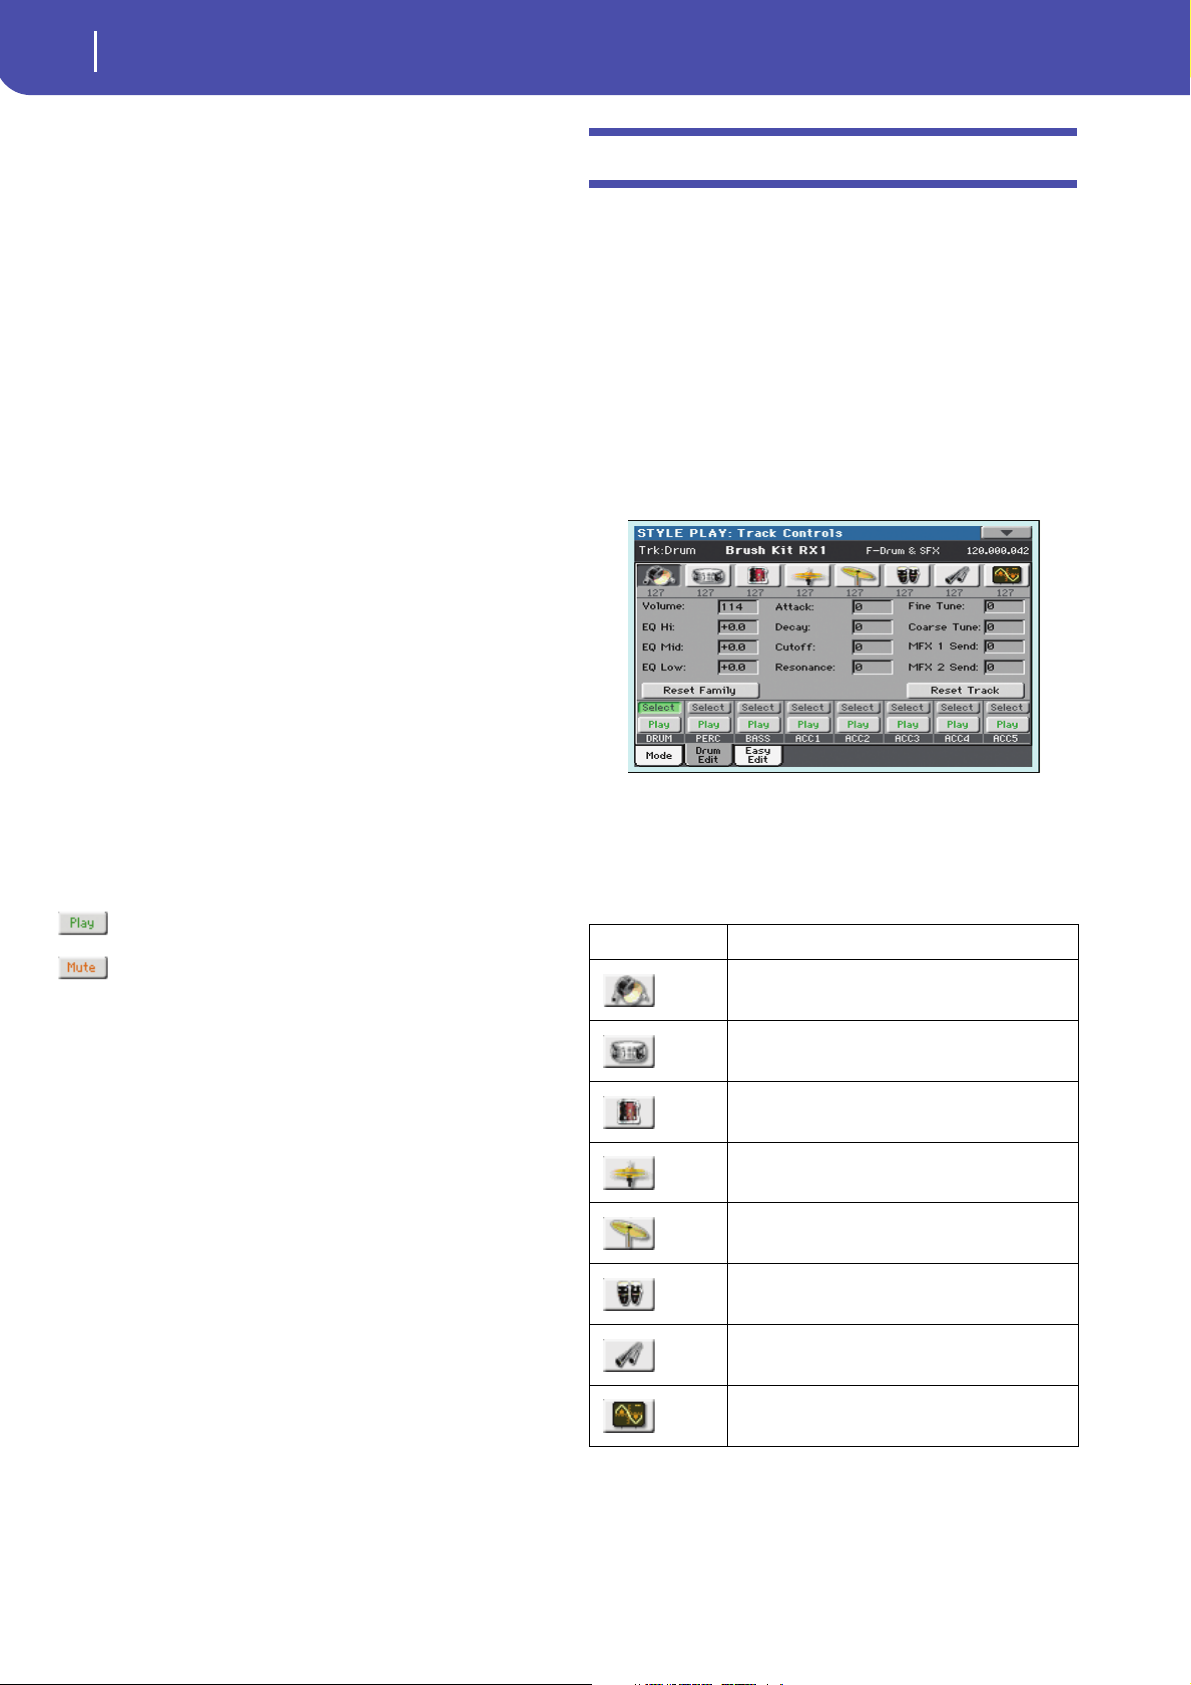
26
Style Play operating mode
Track Controls: Drum Edit
Both The track plays both the internal sounds and an
external instrument connected to the MIDI OUT.
Typ e
Drum Drum/Percussion track. Set a track to Drum
mode if you wish to separately adjust the volume
and set a different output for each percussive
family of the assigned Drum Kit Sound. (See
“Track Controls: Drum Edit” on page 26).
Note: Tracks set to Drum or Percussion mode while
in Style Record (see “Track Type” on page 62) cannot be edited here. This option appears in grey.
Other Style tracks cannot be set to Drum mode
here.
Note: Drum Kits are not affected by transpose
whichever the type of track they are assigned to.
Hint: Set any track to Drum mode, if you don’t
want the assigned Sound to be transposed (it will
behave as a Drum Kit).
Poly Tracks of this kind are polyphonic, i.e. they can
play more than one note at the same time.
Mono Tracks of this kind are monophonic, i.e. each new
note stops the previous note.
Mono Right A Mono track, but with priority assigned to the
rightmost (highest) note.
Mono Left A Mono track, but with priority assigned to the
leftmost (lowest) note.
Play/Mute icon
Track’s play/mute status.
Track Controls: Drum Edit
In this page you can adjust the volume and edit the main parameters for each family of Drum and Percussion instrument for the
selected track. A list of families is shown below.
These parameters can be accessed only on tracks set to the Drum
mode (see above). Use them on tracks with a Drum Kit assigned,
or you will not be able to hear any change.
Hint: Use the TRACK SELECT button to cycle between the track
groups. After selecting a track, choose the “Solo Track” command
from the page menu to avoid listening to the other tracks during
editing.
Note: All values are offsets referred to the value of the original
Sounds.
Family Select
Use these icons/buttons to select the drum family you want to
edit. These buttons are only accessible when you select a Drum
track.
Play status. The track can be heard.
Mute status. The track cannot be heard.
Drum family icon Drum family
Kick drums
Snare drums
Tom s
Hi-Hat cymbals
Ride, Crash and other cymbals
Low-pitched percussions
High-pitched percussions
Special effects
Overview of the current parameter
Under the icons of the Drum families you can see the value of
the selected parameter for all the families. This will let you compare the value of the selected family with all the others. The values are shown in grey (non editable).
Loading…
View the manual for the Korg Pa600 here, for free. This user manual comes under the category keyboards and has been rated by 28 people with an average of a 9. This manual is available in the following languages: English. Do you have a question about the Korg Pa600?
Ask your question here
Korg Pa600 specifications
Below you will find the product specifications and the manual specifications of the Korg Pa600.
The Korg Pa600 is a keyboard that is highly praised for its advanced features and functionality. It has a sleek design and is relatively lightweight, making it a suitable option for performers on the go. One of the notable features of this keyboard is its extensive sound library, which includes over 950 sounds covering a wide range of musical styles. These sounds can be easily accessed through the keyboard’s intuitive interface or through the large color display.
This keyboard also has a variety of accompaniment styles built-in, allowing performers to create full arrangements with ease. The styles cover a range of genres, from jazz to pop to world music, and can be further customized to suit individual needs. Additionally, the Pa600 has a variety of effects and processing capabilities, including reverb, chorus, EQ, and more.
Other notable features of the Korg Pa600 include its 16-track sequencer, which allows users to record and edit their musical ideas, as well as its connectivity options, which include USB, MIDI, and SD card slots. Overall, the Korg Pa600 is a versatile and reliable keyboard that is popular among performers and producers alike.
General
| Brand | Korg |
| Model | Pa600 | PA600 |
| Product | keyboard |
| Language | English |
| Filetype | User manual (PDF), Installation Guide (PDF) |
Frequently asked questions
Can’t find the answer to your question in the manual? You may find the answer to your question in the FAQs about the Korg Pa600 below.
How can I best clean my keyboard?
A slightly damp cleaning cloth or soft, dust-free cloth works best to remove fingerprints. Dust in hard-to-reach places is best removed with compressed air.
Is the manual of the Korg Pa600 available in English?
Yes, the manual of the Korg Pa600 is available in English .
Is your question not listed? Ask your question here
Русский
- Bedienungsanleitung Korg PA600
- Korg PA600 User Manual
- Manual Usuario Korg PA600
- Mode d’emploi Korg PA600
- Istruzioni Korg PA600
- инструкция Korg PA600
- Korg PA600の取扱説明書
- Handleiding Korg PA600
- Manual de uso Korg PA600
Вам нужна инструкция? Мы поможем Вам ее найти и сэкономить Ваше время.
- 100 stron
- 37.53 mb
Изделие Korg PA600, а также другие, которыми Вы пользуетесь ежедневно, наверняка вы получили в комплекте с инструкцией обслуживания. Из опыта наших пользователей мы знаем, что большинство из Вас не уделили этому особого внимания. Большая часть инструкций, сразу же после покупки попадает в корзину для мусора вместе с коробкой — это ошибка. Ознакомьтесь с информацией, касающейся инструкции Korg PA600, которая поможет Вам в будущем сэкономить нервы и избежать головной боли.
Важная подсказка — не забывайте хотя бы раз прочитать инструкцию Korg PA600
Если вы не хотите каждый раз читать информационные брошюры, касающиеся, тех или Korg PA600 иных изделий, достаточно, прочитать их раз — сразу же после покупки устройства. Вы получите основное знания, касающиеся поддержания изделия Korg PA600 в хорошем эксплуатационном состоянии, так, чтобы без проблем достигнуть его планируемого цикла работы. Затем инструкцию можно отложить на полку и вернуться к ней только в случае, если вы не уверены, правильно ли проводится техобслуживание изделия. Правильный уход является необходимым элементом Вашего удовольствия Korg PA600.
Раз в году пересмотрите шкафчик, в котором держите инструкции для всех устройств, — выбросите те, которыми вы уже не пользуетесься. Это поможет Вам сохранять порядок в своей домашней базе инструкций обслуживания.
Summary of Contents for Korg PA600
Что находится в инструкции Korg PA600? Почему стоит ее прочитать?
- Гарантия и подробности, касающиеся техобслуживания изделия
Хорошей идеей будет прикрепить чек к странице инструкции. Если что-то плохое случится во время использования Korg PA600, у вас будет комплект документов, необходимый для гарантийного ремонта. В этой части инструкции вы найдете информацию об авторизованных сервисных центрахKorg PA600 а также, как самостоятельно правильно ухаживать за оборудованием — так, чтобы не потерять гарантийных прав. - Указания по монтажу и Setup
Не терять нервов и времени на самостоятельную попытку установки и первого запуска изделия. Воспользуйтесь рекомендациями производителя Korg PA600 чтобы правильно запустить изделие, без лишнего риска повреждения оборудования. - Информация, касающаяся дополнительных запчастей (входящих в комплект а также являющихся опцией)
Пересматривая эту часть документа вы сможете проверить, доставлен ли ваш Korg PA600 с полним комплектом аксессуаров. Вы также сможете узнать, какие дополнительные запчасти или аксессуары для Korg PA600 Вы сможете найти и докупить к своему устройству. - Troubleshooting
Самые частые проблемы, касающиеся Korg PA600 и методы их решения. Это очень полезная часть руководства по обслуживанию — она позволит Вам сэкономить много времени на поиск решений. 90% проблем с Korg PA600 повторяется у многих пользователей. - Требования, касающиеся питания и энергетический класс
Информация, касающаяся количества потребляемой энергии, а также рекомендации, касающиеся установки и питания Korg PA600. Прочитайте, чтобы оптимально пользоваться Korg PA600 и не использовать большего количества ресурсов, нежели это необходимо для правильной работы изделия. - Специальные функции Korg PA600
Здесь вы можешь узнать, как персонализировать изделие Korg PA600. Вы узнаете, какие дополнительные функции могут помочь Вам удобно использовать продукт Korg PA600 а также, какие функции Вашего устройства оптимальны для выполнения конкретной деятельности.
Как видите в инструкции вы найдете информацию, которая реально поможет Вам в использовании Вашего изделия. Стоит с ней ознакомиться, чтобы избежать разочарований, возникающих из более короткого, нежели предусматривалось, периода исправности изделия Korg PA600. Если все же вы не хотите копить инструкции в своем доме, наш сайт поможет Вам в этом — вы должны найти у нас руководство по обслуживанию большинства из своих устройств, а также Korg PA600.
Комментарии (0)
Are you looking for the manual for Korg PA600? You are in the right place. Below the document viewer for Korg PA600 manual in PDF format. To save your time, we say that the most common problems with Korg PA600 can be found in the manual in the «Troubleshooting» section. Check the appropriate page number in the table of contents, and then enter it in the page number box on the right side of the document viewer for Korg PA600.
If you have questions about the Korg PA600 device, use the form at the bottom of the page and ask our community a question.
Remember! Reading the Korg PA600 user manual and adhering to the rules of using the device provided there, greatly help in its effective use. It is important to correctly configure Korg PA600, it will save resources needed to use it. In case of problems, you will also find recommended companies that can properly fix Korg PA600. One of the most important reasons why you should read the Korg PA600 user manual is that to take advantage of the warranty provided on Korg PA600 — the device must be used in accordance with the manufacturer’s recommendations presented in user manual.
If you want to download Korg PA600 manual, use the «Download» button below. You can easily view the downloaded version and print selected manual pages Korg PA600. All manuals on our website are available in PDF format, which is the most universal format that is as easy to use as possible on all operating systems.