Если вы видите это сообщение, значит, произошла проблема с загрузкой файлов в стилей (CSS) нашего сайта. Попробуйте сбросить кэш браузера (Ctrl+F5).
Если это не поможет, а вы находитесь в регионе, где возможны ограничения интернет-трафика с российских серверов — воспользуйтесь VPN.
Как нарисовать автомобиль БМВ?Как нарисовать «Бумер» карандашом поэтапно?


Должно получиться нечто подобное. 
автор вопроса выбрал этот ответ лучшим Peres 10 лет назад Если не имеешь навыков в рисовании и нет этой творческой искры художника,то нарисовать автомобиль БМВ поможет руководство на картинке и оно поэтапное.А нам нужен будет лист бумаги,карандаши и ластик,чтобы стирать. 
И для начала мы рисуем макет выделяя основные линии красным карандашом. Это овал и постамент под овалом.Затем выделяем место под колеса для авто. Затем нужно выделить лобовое стекло и зеркало заднего вида. А также боковое окно и бамперы.После этого мы должны прорисовывать колеса автомобиля и колеса с деталями. Затем обводим макет темными линиями и стираем лишние детали.Можно раскрасить наш рисунок цветными фломастерами. CooLW 11 лет назад Нарисовать BMW достаточно просто. Предлагаю еще один поэтапный вариант рисования такого автомобиля. Сначала рисуем базовые линии. Затем рисуем основные линии кузова и колёса. После этого прорисовываем более детально переднюю и боковую часть автомобиля. Далее переходим к передним фарам, колесным дискам и ручкам на дверях. Затем удаляем вспомогательные линии и автомобиль готов. При желании его можно разукрасить. 
Solnc 11 лет назад Вот машина марки БМВ. Правда не черный бумер как поется в песне. А вот такая классная маленькая машина. Мечта любого человека. Итак берем карандаш и лист бумаги. Начинаем рисовать с овала. 
Затем рисуем перед нашей машины. 
Далее колеса и прорисовываем детали. 


начинаем штриховать 


Все машина готова дольф 10 лет назад Можно посмотреть видео ниже Можно скачать рисунок ниже и перевести его с помощью стекла. Можно перерисовывать просто, глядя на рисунок. 1 определите форму и размер БМВ. 2 Прорисуйте кузов. Все рисуем легко, не нажимая особо на карандаш. 3 Обвести контур всего БМВ. 4 Дорисовать детали. 
pisto 10 лет назад Из нескольких вариантов для рисования бмв, мне очень понравился вот такой вариант. Я вообще рисую плохо, но как ни странно у меня получилось нарисовать бмв. Надеюсь, что и вам подойдет этот способ. Удачи! Смотрите фото. 
-Irink 8 лет назад Для того, чтобы нарисовать автомобиль BMW, можно обратиться к подробному рисунку и срисовывать с него. Вот схема рисунка данного автомобиля. На нём видно с чего начать, как лучше разделить лист бумаги, чтобы в дальнейшем нарисовать машину. 
Сначала легче будет нарисовать эскиз, на котором нарисовать колеса, багажник, капот, крышу и дверки автомобиля. На этом эскизе мы определим местонахождение каждой детали. В дальнейшем приступим к мелким деталям рисунка. Ещё одним способом будет просмотр видео урока и рисунок поэтапно с помощью паузы. Гывис 9 лет назад Машину можно рисовать объемную, можно нарисовать профиль Любой рисунок автомобиля начинается с колес Нужно нарисовать объемные шины, прорисовать каждую мелочь, включая фары. Затем начинаете рисовать сам автомобиль — начать лучше с лобового стекла. Затем прорисовать крышу, двери, низ автомобиля и конечно же окна. В конечном итоге получится автомобиль, если делать все аккуратно и не спеша. Знаете ответ? |
Смотрите также: Как нарисовать сову на ветке сосны, карандашом гуашью поэтапно МК детям? Как нарисовать сексуальную Снегурочку карандашами, красками поэтапно? Принцесса Моана, как нарисовать поэтапно карандашом? Как нарисовать поэтапно карандашом, красками, ручкой певца Стаса Пьеху? Как нарисовать поэтапно карандашом, красками, ручкой певца Стаса Михайлова? Как нарисовать поэтапно карандашом, красками, ручкой Верку Сердючку? Как нарисовать поэтапно Капитана Салазара, врага Джека Воробья? Инструкция? Как нарисовать поэтапно динозавра Рики? Как нарисовать поэтапно акулу Дестини (Судьба) из мультика В поисках Дори? Как нарисовать поэтапно Крэнга из фильма Черепашки Ниндзя? Кто такой Крэнг? |
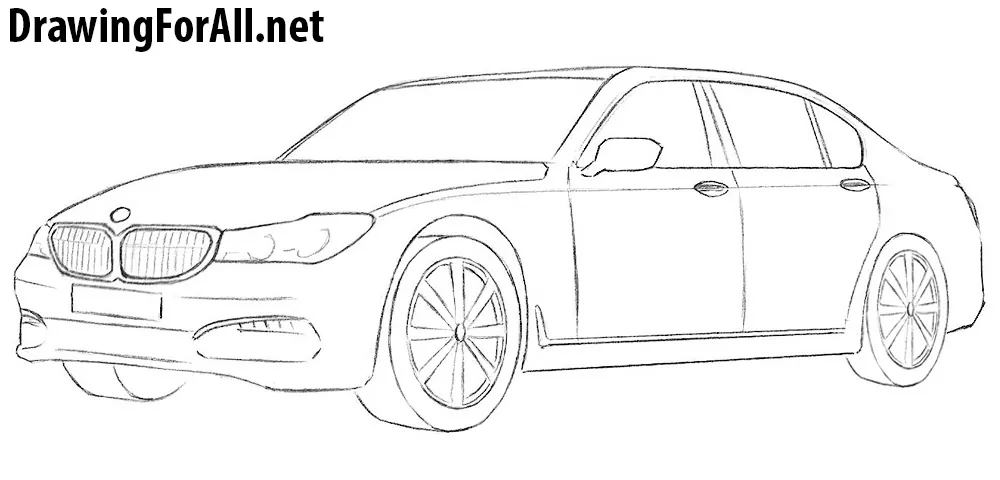
Hello everyone and welcome to the drawing lesson on how to draw a BMW 7 series step by step! BMW is one of the most common brands in the world,which for many years is one of the favorite brands of many people and the main competitor of another well-known German company – Mercedes-Benz.
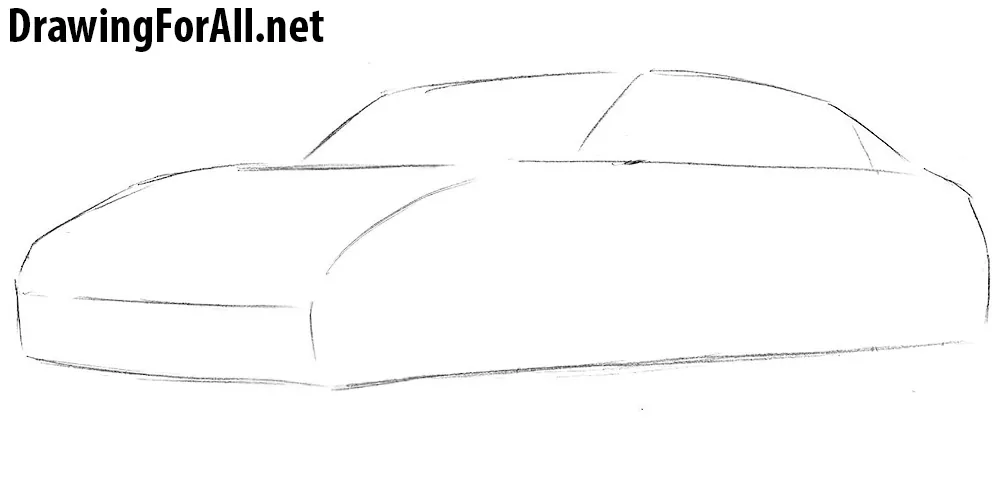
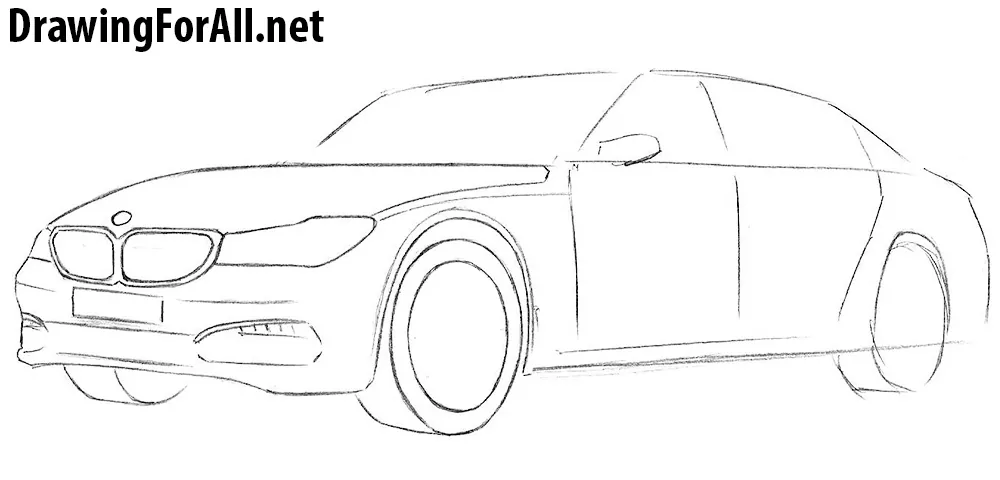
Step 1
First of all sketch out the main outlines of the BMW as in our example. Here you must use very light lines. Also note that the lines should not be perfectly even.
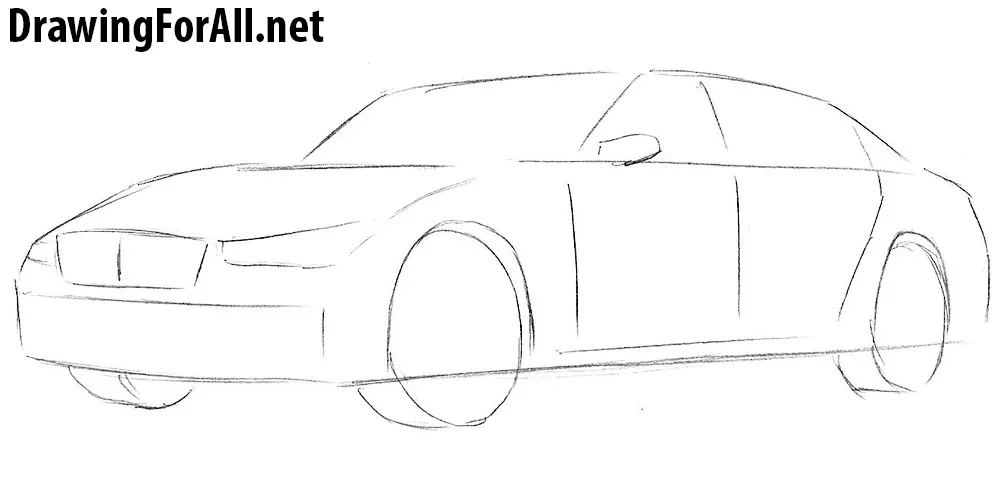
Step 2
In front of the car sketch out long headlights and the famous grille of BMW. Next sketch out wheel arches, wheels, windows and doors. Here all lines also should be the very light.
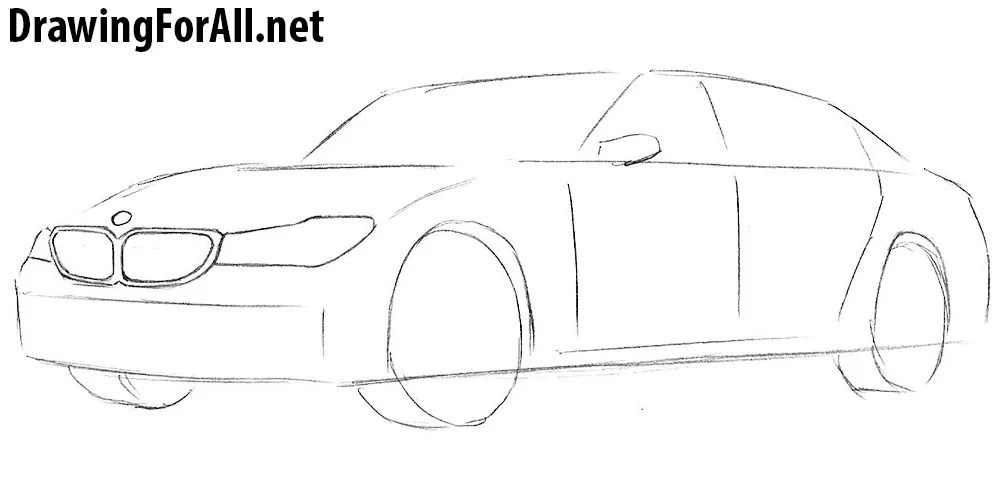
Step 3
And now carefully draw out the headlights and grille. As you know the grille of BMW is divided into two parts and looks something like a nostrils.
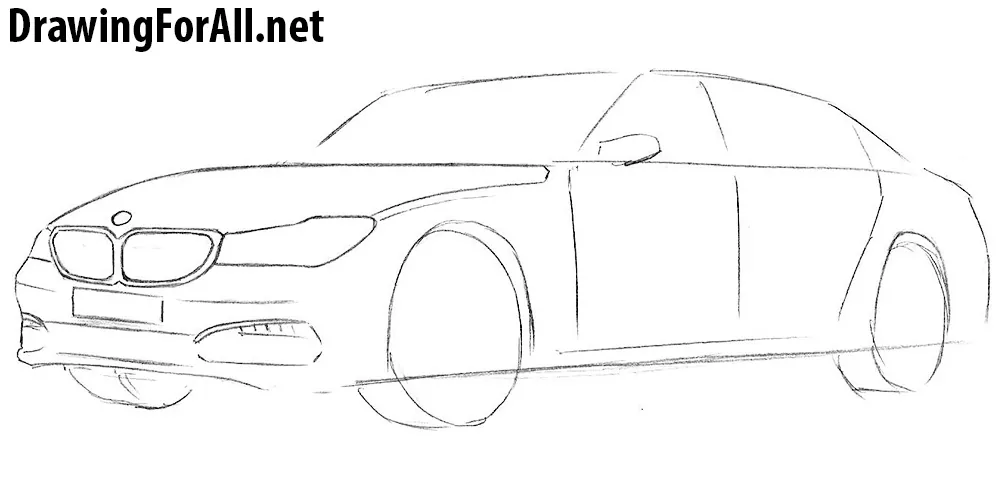
Step 4
Using a long and curved line draw out the hood. Draw the bumper, fog lamps and license plate. Do not forget to erase all the guidelines from the first two steps, that the drawing was clean and beautiful.
Step 5
Continue the drawing lesson about how to draw a BMW 7 series. Draw the wheel arch in the shape of a semi-oval and a wheel in a shape of an oval. Inside the wheel draw the rim in a shape of another oval.
Step 6
Draw the roof of the car, try to draw these lines smooth and clean. Split the windows as in our example and draw the rearview mirror.
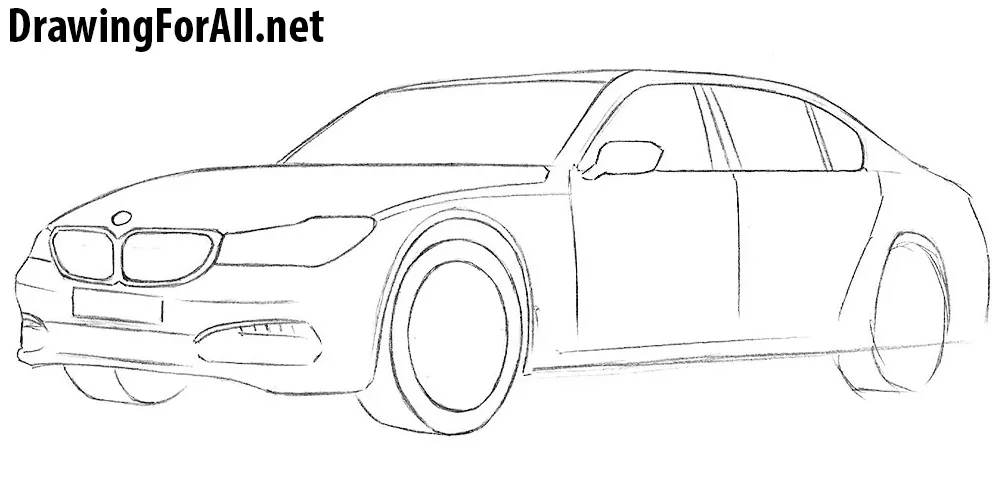
Step 7
Carefully draw out the doors and handles. Draw the lower part of the car and molding. Draw the back of our BMW and the wheel, which is drawn just like we drew the front wheel.
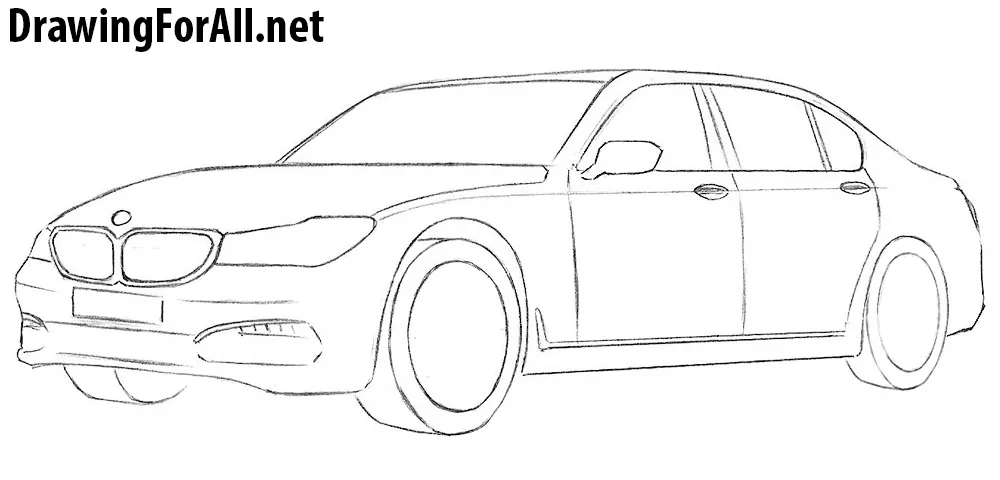
Step 8
So we got to the last step of drawing BMW. Here we have to draw the wheels (of course you can choose any shape), the details inside the headlights and the lines inside the radiator grille.
You can leave your BMW as in the last step of this lesson or add shadows, and how to do it look in the lessons about Lamborghini and Ford Mustang. You can also visit the category “Cars” to learn more about how to draw cars. So, don’t forget to share this and other our lessons and check our website for updates.
Professional artist, photographer and sculptor. Co-founder and co-owner of Drawing For All. Has been drawing and studying art since childhood, and is an expert in the field of fine arts. Has been teaching drawing since 2013.
Добрый день! С Вами художественная школа Империя Пикчер и сегодня я покажу Вам как нарисовать БМВ простым карандашом.
Ну а мы начинаем!

Рисуем мы в нашем классном скетчбуке от «Империя Пикчер».

В наборе у нас есть непромокайка для маркеров, которую мы сейчас
использовать не будем, потому что рисуем карандашиком.

Приобрести наши скетчбуки можно на Вайлдбериз
https://www.wildberries.ru/catalog/158710687/detail.aspx?targetUrl=GP

Для наброска я беру карандашик мягкости НВ.

Немного под наклоном намечаю окружность.

Слегка её делая в перспективе, то есть она не будет ровно
круглой, идеально круглой.

А уже будет похожа на эллипс, но широкий довольно всё еще.

Подправляем края нашего эллипса.

Стераем ластиком лишнее.

Затем, в центре делаем более малый эллипс.

И делим его на четыре ровные части.

Делим так же линии по диагонали, не ровно.

Заштриховываем до средне-серого тона по форме весь логотип,
всю эмблему БМВ.

Не выходя за край.

А если случайно вышли, то ластиком всё подчищаем.

Чтобы наш рисунок оставался чистым и аккуратным.

В верхней части пишем слово «BMW».

После, берём карандашик помягче.

И начинаем тональную проработку.

Пройдёмся ближе к контуру более тёмным тоном, отступая немного от края.

Оставляя там по контуру светлую полоску.

И начинаем на несколько тонов сильнее затемнять пространство,
где у нас написаны буквы.

И получается такой как бубличек тёмненький.

Штрихуем по форме, закругляя штришочки.

При этом, стараемся не делать большую разницу тональную.

То есть, чтобы тон был у нас равномерный.

Использую карандашик 2В.

Немного на него надавливая, чтобы взять нужный тон.

На немного светлее мы выполняем в центральной части два треугольничка.

Два кусочка от окружности, лежащих напротив друг друга.

Тоже равномерно его заштриховывая.

Тон должен быть светлее, чем мы брали перед этим.

Вот такой БМВ крандашом в классном скетчбуке от «Империя Пикчер»
у нас с Вами получился!


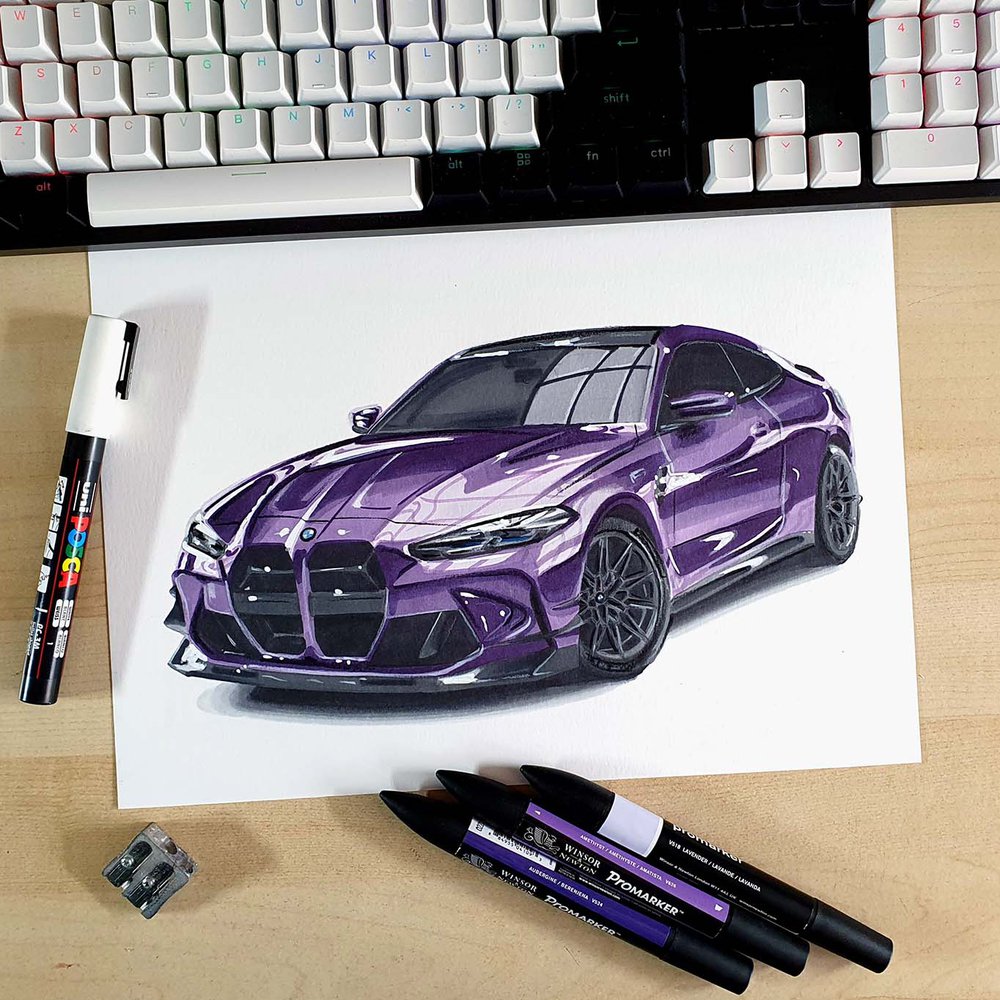
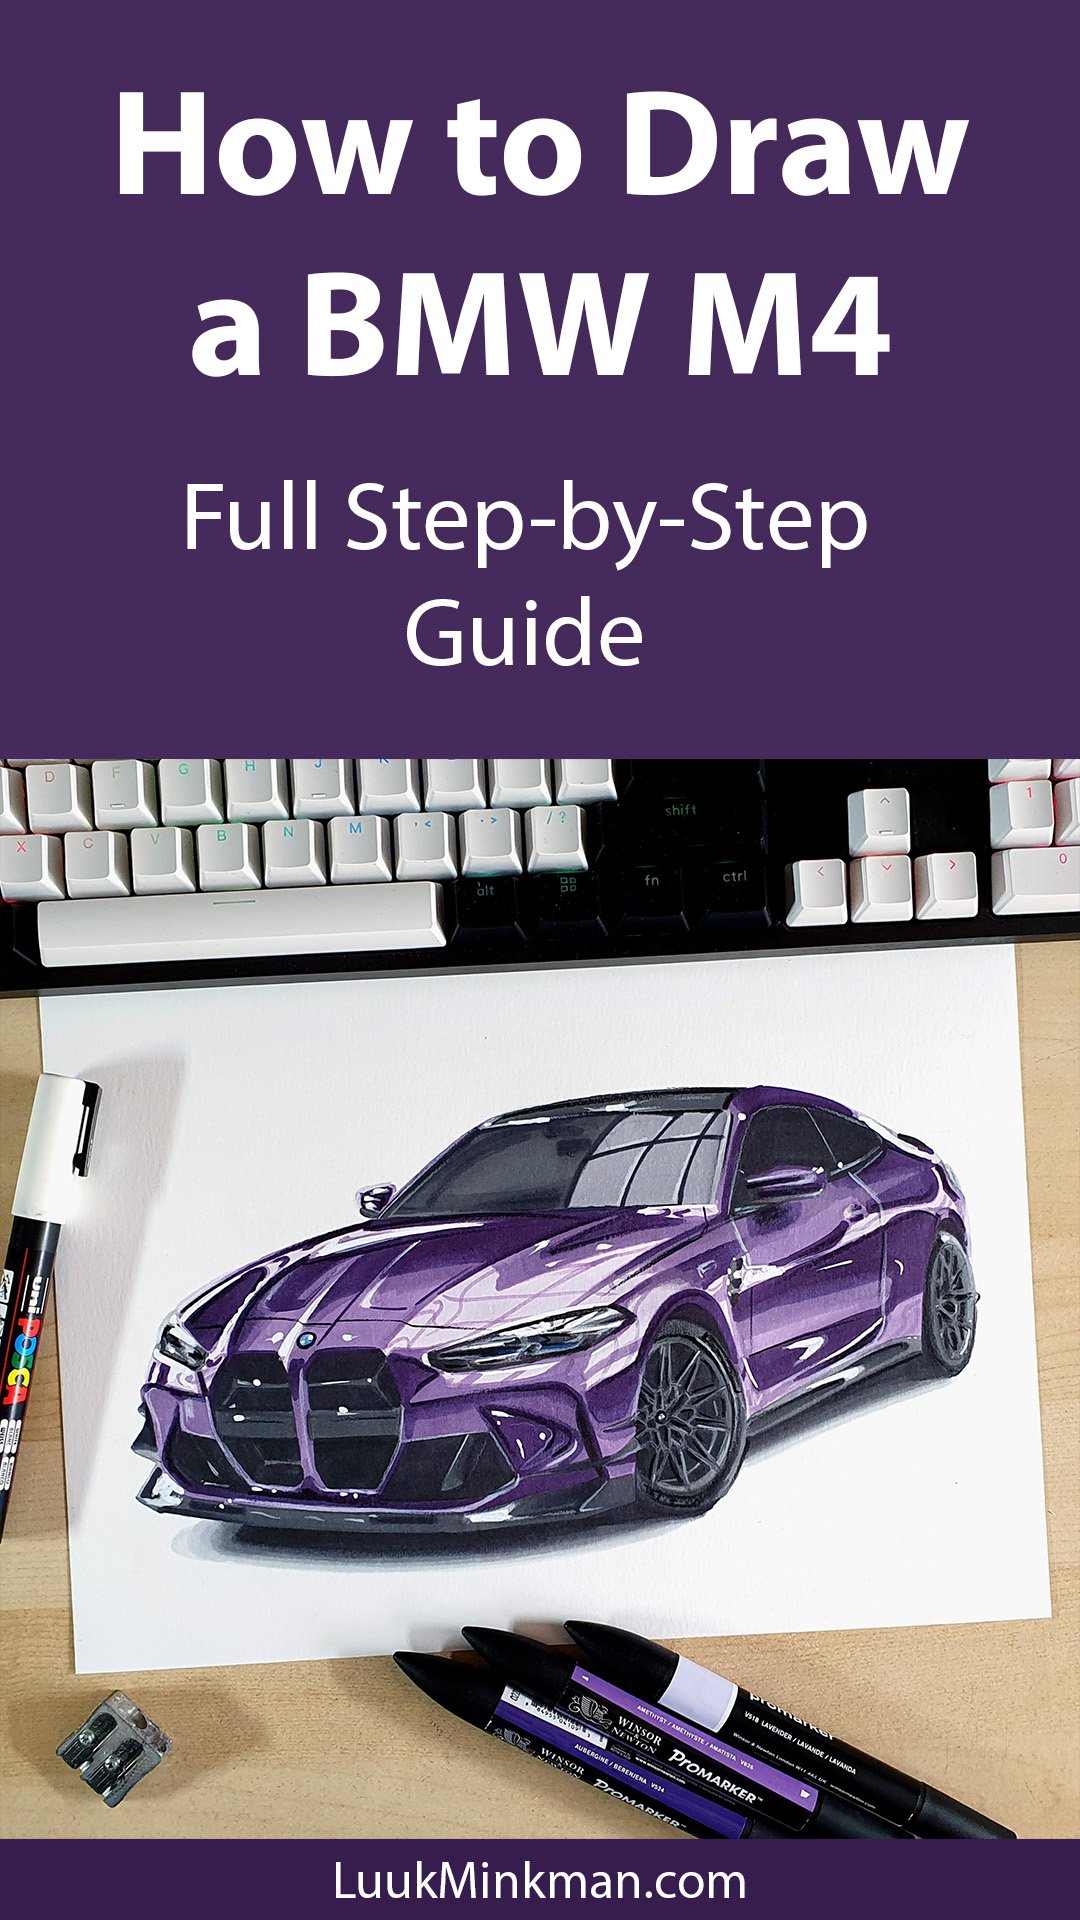
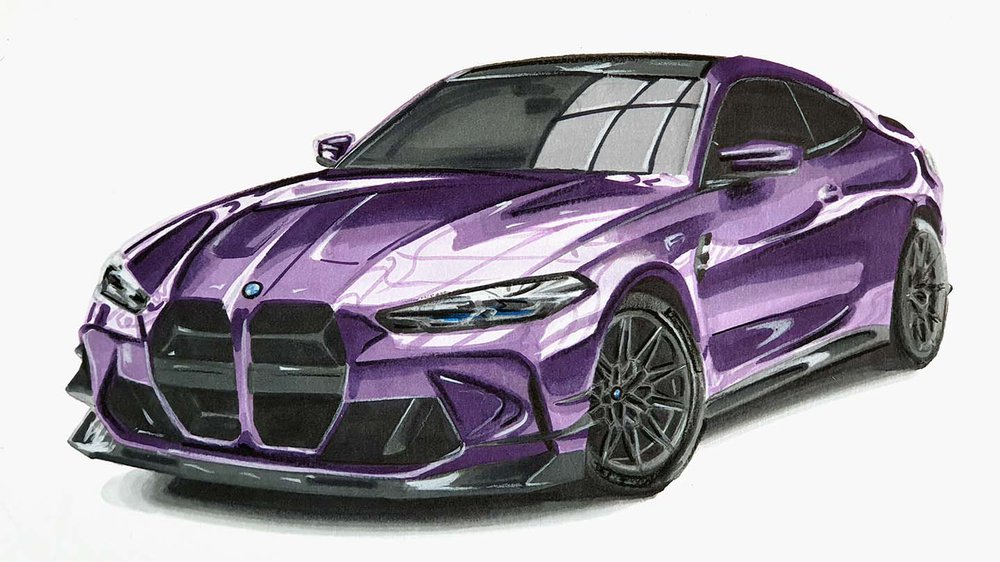
In this week’s car drawing tutorial, I’m going to show you step-by-step how I drew this beautiful purple BMW M4.
A purple BMW M4 has been on my list for soooo long! I finally decided to draw one and OMG it turned out so well!
Here’s exactly how I made it! Explained as simple and straightforward as possible.
Disclaimer: In the name of full transparency, please be aware that this blog post contains affiliate links and any purchases made through such links will result in a small commission for me (at no extra cost for you).
Drawing Supplies I Used in this Tutorial
To draw the BMW M4, I used the following art supplies:
- A4-sized Canson Illustration Manga paper (by far the best paper for alcohol markers in my opinion);
- A graphite pencil, a ruler, a kneaded eraser, and a regular eraser;
- Winsor & Newton Promarkers in the colors Ice Grey 1 (IG1), Ice Grey 2 (IG2), Ice Grey 4 (IG4), Ice Grey 7 (IG7), Blue Black (XBB), Black (XB), Lavender (V518), Amethyst (V626), and Aubergine (V524);
- Derwent Coloursoft pencils in the colors White, Dove Grey, Black, and Electric Blue;
- And a white Posca PC-3M.
Reference Photos I Used to Draw this BMW M4
To make this drawing, I used 2 reference photos. 1 for the proportions and the perspective and 1 for the lighting and the reflections.
I used this photo for the perspective.
And I used this photo for the reflections.
If you’d like to know how I make sure I pick good reference photos so my drawings turn out realistic, I highly recommend you check out this guide I wrote on how to pick the perfect reference photos for your car art!
How to Draw a Realistic BMW M4?
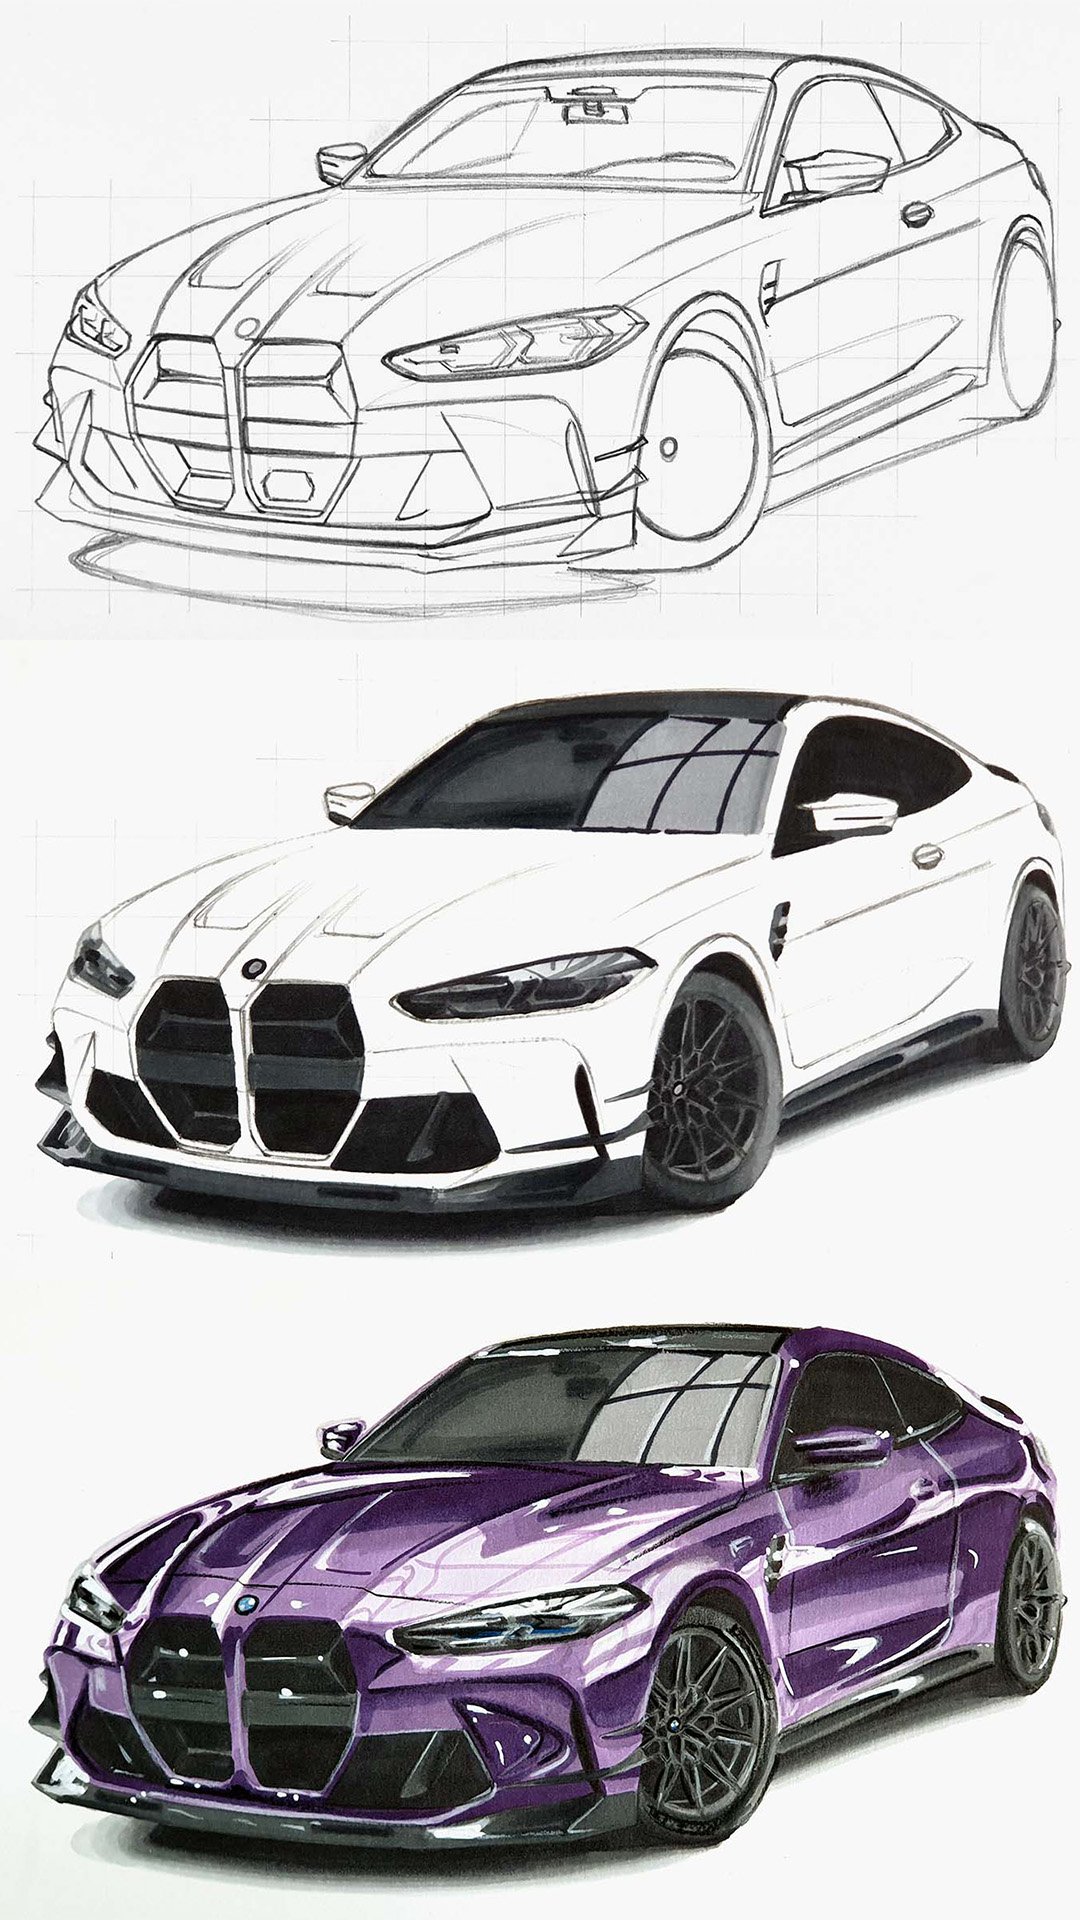
To make a realistic drawing of a BMW M4, I first gathered a few reference photos for the perspective, proportions, lighting, reflections, and color.
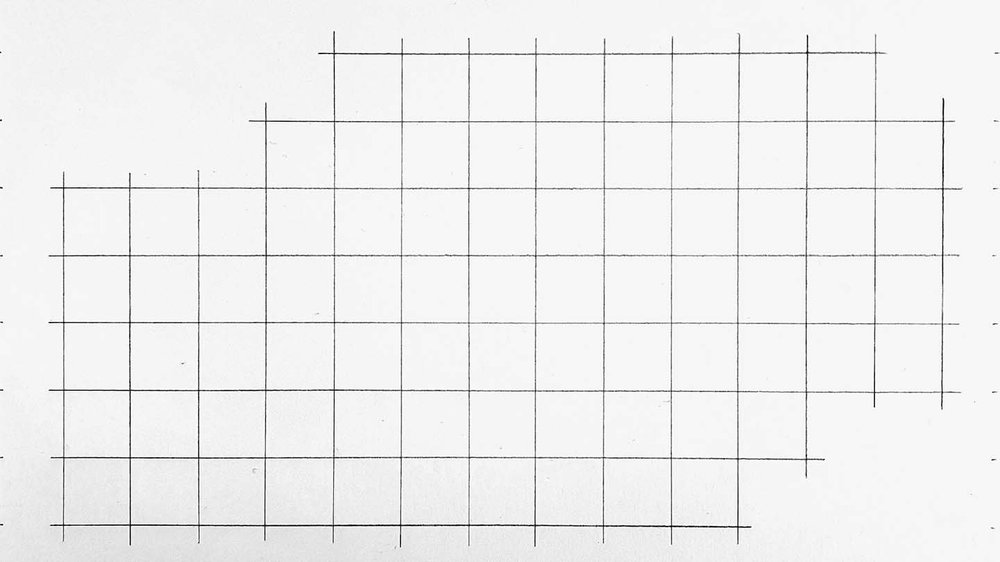
After that, I created a sketch of the outline of the car using the grid method.
Next, I color the car with alcohol markers starting with the black and the grey parts, before moving on to the main body of the car.
Lastly, I added some details with colored pencils and highlights with a Posca paint marker.
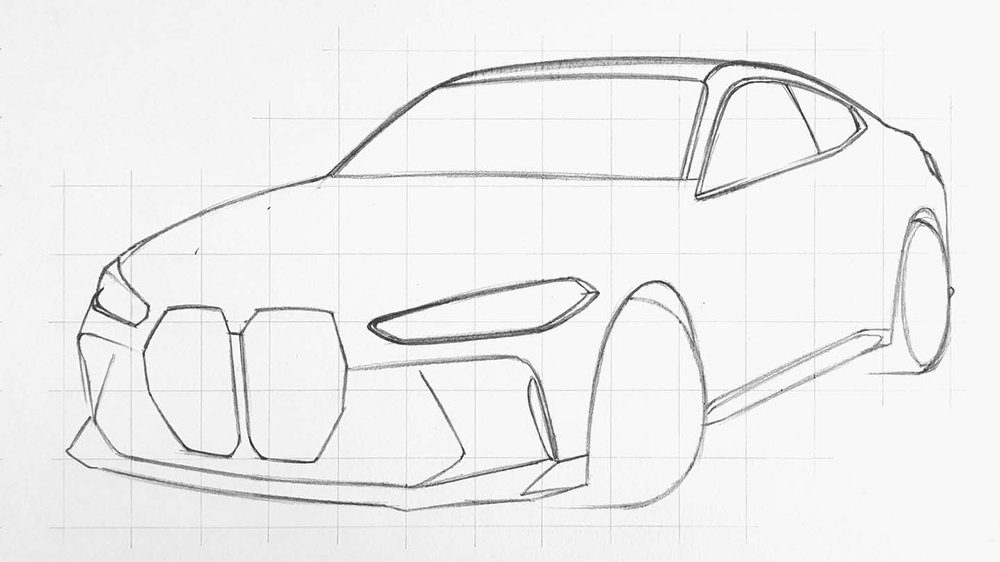
Step 1: Sketch the Basic Outline of the BMW M4
Sketching cars like the BMW M4 can be quite difficult and daunting, at least if you’re trying to freehand it.
But there are other techniques you can use to sketch the car like the grid method for example which is the technique I’ll be using in this tutorial. This technique makes sketching cars with accurate proportions a lot easier. You can find more on how to use this technique here.
I start by overlaying a grid over the reference photo for the perspective that I resized to A4 size. The grid I’m using for this drawing is 15 by 10.5 squares with squares of 2 by 2 cm which works well for A4-sized paper.
With my grid overlay tool, you can easily add a grid overlay on your reference photo.
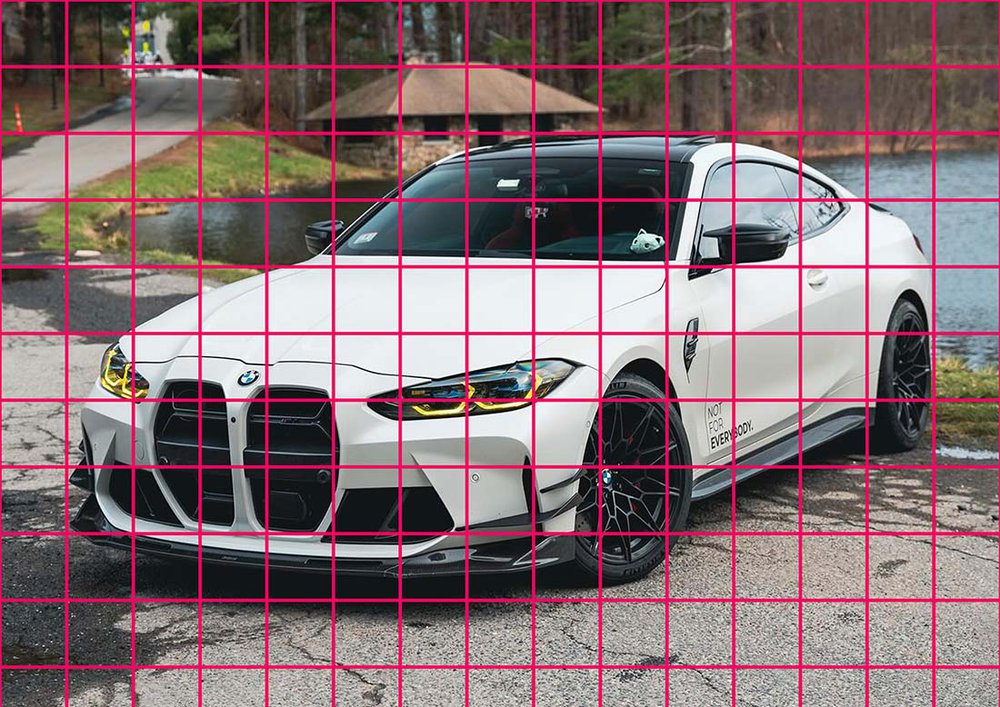
Once I’m done with that I recreate that same grid on my piece of paper.
Now it’s time to start sketching.
I like to sketch the general outline of the car first. This makes it easier to add in all the details later.
I usually start on the left and work my way up and around the car until I have sketched the full outline and the basic shapes of the BMW M4.
It’s important to make sure the shape of the car is as accurate as possible, otherwise your drawing won’t look realistic in the end.
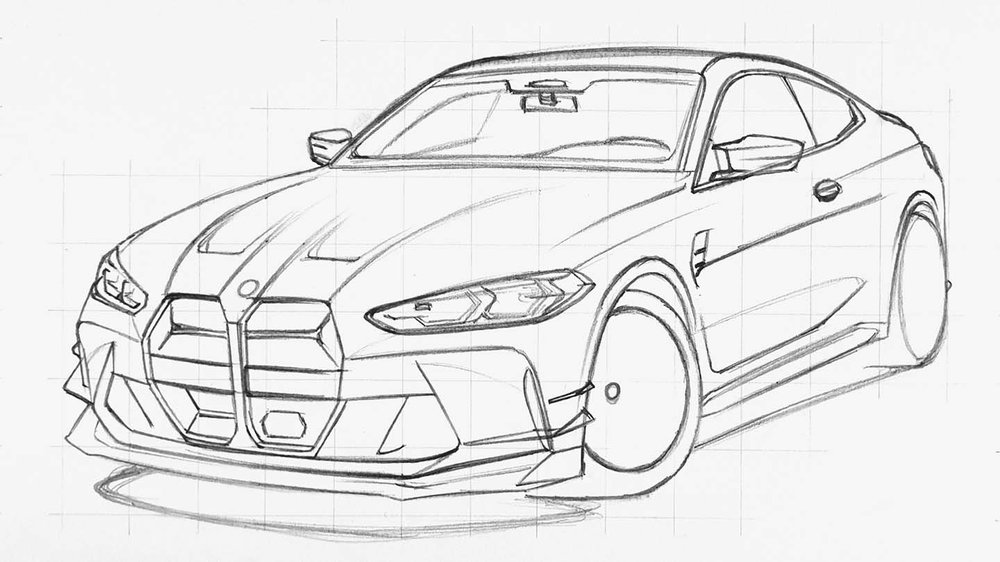
Step 2: Sketch the Details of the BMW M4
Now that the basic shape of the car is done, it’s time to sketch all the details of the BMW M4.
This might seem like a big step, but with the basic shapes already in place it’s just a case of slowly adding detail after detail to the shapes that you’ve already sketched.
I started adding details on the front first. Next, I added the body lines on the hood and on the side. Then I sketched the windshield and the headlights. And so on.
I haven’t sketched the wheels yet as I wanted to explain how I sketched them in more detail.
Take your time.
A good sketch is way easier to color in than a sketch made in a hurry.
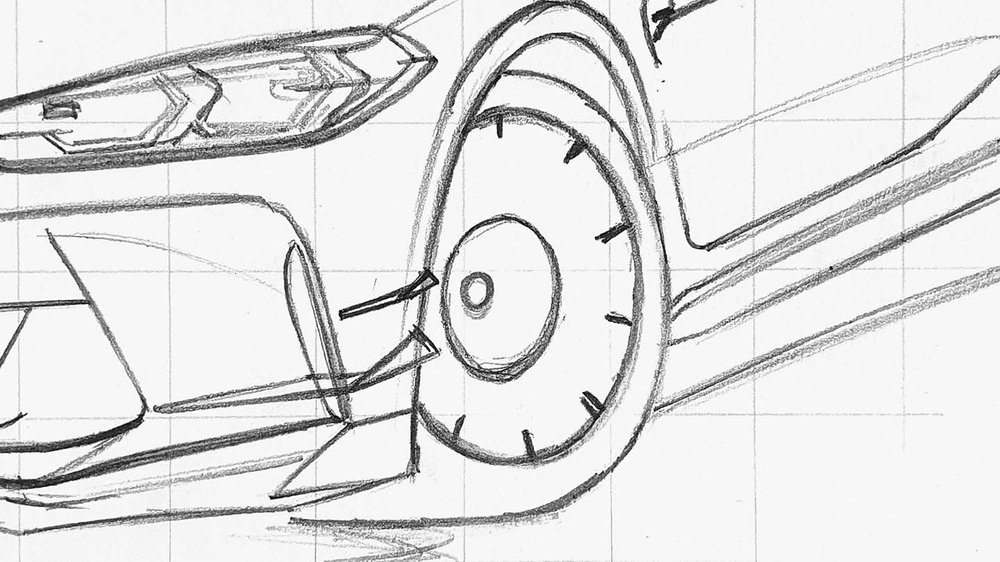
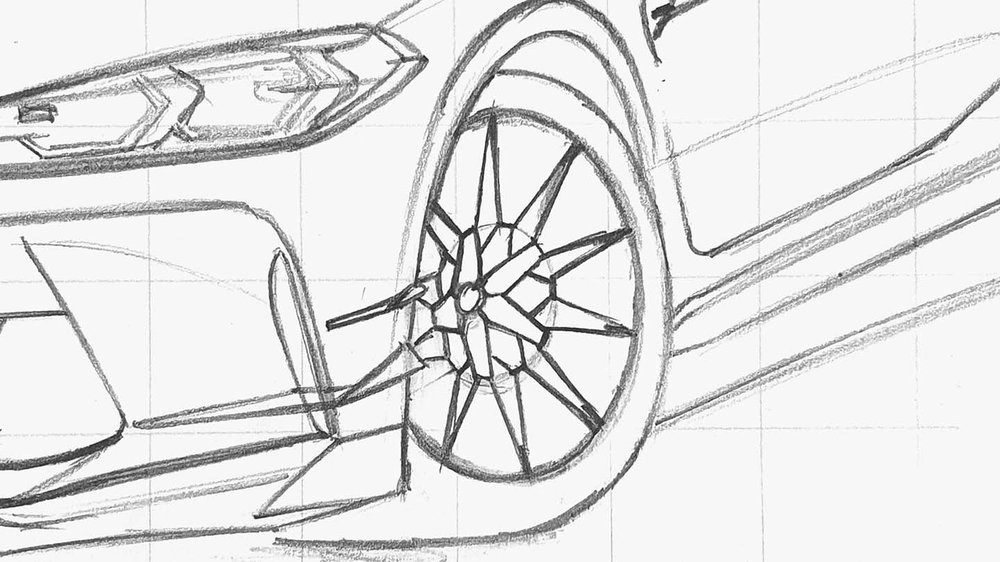
Step 3: Sketch the Wheels of the BMW M4
All that’s left to sketch now are the wheels. And they aren’t the easiest ones…
I had already marked where the center of the wheel is when adding the details as well as the outer rim of the wheel. The center of the wheel is closer to the left side of the wheel as we’re viewing the wheel from an angle and the center is a bit inset into the wheel.
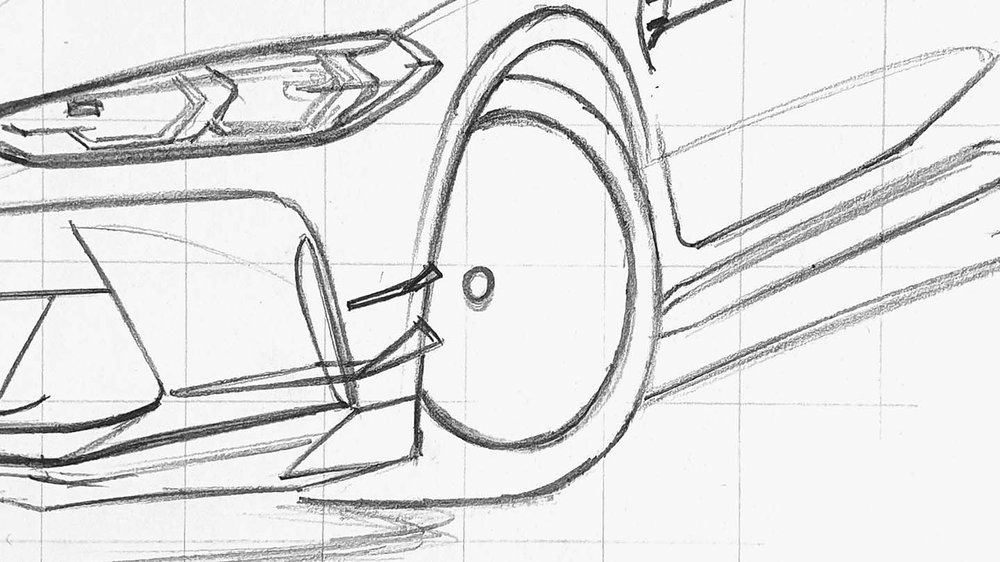
I started sketching the wheel by marking where each of the spokes attaches to the outer rim. I also sketched a smaller circle around the center of the wheel. The center is also closer to the left of this circle as it’s inset into the wheel a bit.
Next, I marked 10 short lines on the smaller circle we just sketched.
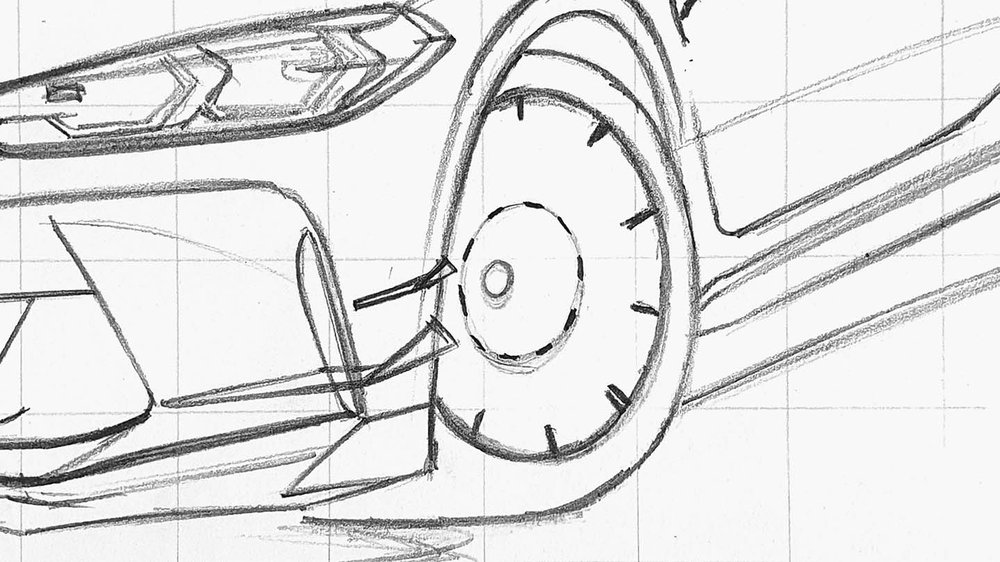
After that, I sketched the spokes connecting the short lines to the outer rim.
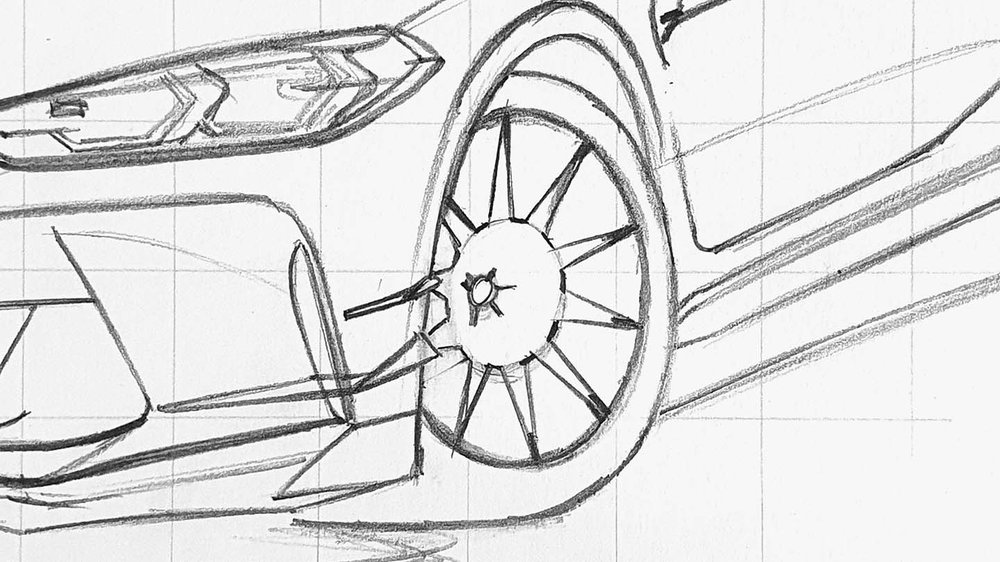
Next, I sketched 5 short lines starting from the center each pointing to one of the lines on the small circle we sketched before.
Then, I sketched 2 diagonal lines from each end of those short lines and connected them to an end of a line on the smaller circle.
After that, I sketched in the last bits of the spokes. These bits start at the ends of short lines on the smaller circle that do not have a line attached to them yet and attach to the center of the longest lines within the smaller circle.
And that’s all spokes sketched! I hope it was somewhat understandable…
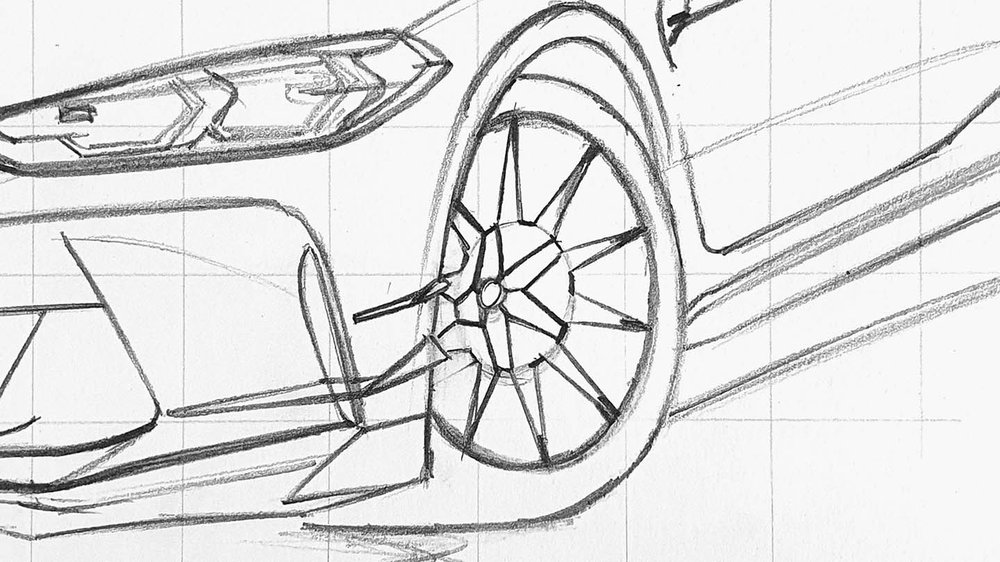
The wheels aren’t done yet though.
I added some depth to the spokes by adding a line to the left of each spoke. I also added more rim lines and the brake disc.
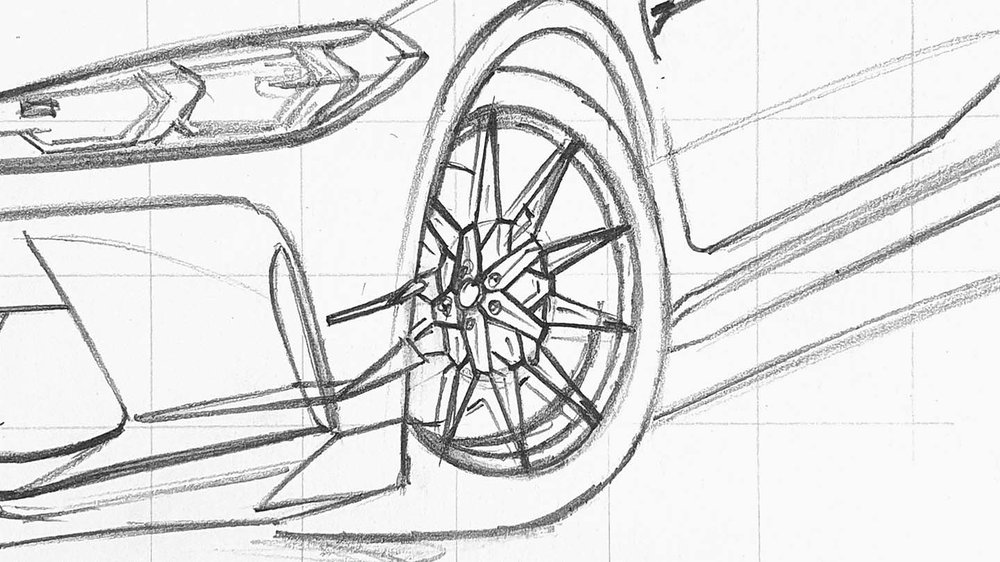

The most difficult part of the BMW M4 drawing is now done.
Step 4: Color All Pure Black Parts of the BMW M4
Now it’s finally time to start coloring the BMW.
But before you actually color any part of the car, you will need to erase that part of your sketch first until you can only barely see it. This helps prevent the sketch from sketch and grid lines from showing through the ink of the markers.
To make the coloring process easier I like to start by coloring all pure black parts first with the Black Promarker.

Step 5: Color the Wheels of the BMW M4
Next up it’s time to color the wheels. Yes, coloring the wheels is a lot easier than sketching them.
I first used Ice Grey 4 to color the lightest parts.

After that, I used Ice Grey 7 to color the darker parts and add some depth to the lighter parts. And to make the tire look smooth I went over the edge of the IG4 and 7 with Ice Grey 4 and blended the 2 colors together.

Step 6: Color the Front Grills and Splitter of the BMW M4
Next, I colored the grey and black bits on the front of the car which include the front splitter, the grills, and the canards.
I first colored the lightest parts with Ice Grey 2. These parts are mostly on the far left and a small bit more to the right.

Next, I used Ice Grey 7 to color the rest. I also colored the logo with Ice Grey 2.

Lastly, I used Blue Black to add some darker tones to the splitter and the canards.

Step 7: Color the Side Skirt of the BMW M4
After that, I colored the side skirt.
I first colored the top edge with Ice Grey 4 and I colored the light reflection in the middle with Ice Grey 2. I also colored the right half of the air vent to the top right of the front wheel with IG2.

Then, I colored the rest with Ice Grey 7 and I added some darker tones with Blue Black.
I also colored the left half of the air vent next to the wheel with IG7.

Step 8: Color the Shadow of the BMW M4
Now it’s time to color the shadow underneath the BMW M4.
I first colored the whole shadow with Ice Grey 1.

Next, I colored an edge of Ice Grey 4 between the light grey and the black.

Lastly, I blended all the shades of grey into a smooth gradient. I first blended the IG1 into the IG4 by going over the edge where the 2 colors meet with IG1. Next, I blended the IG4 into IG7 and I blended the IG7 into the black.

Step 9: Color the Headlights of the BMW M4
Next, I colored the headlights of the BMW M4.
I started by coloring the top half of both headlights with Ice Grey 1.

After that, I colored the bottom half with Ice Grey 2 and I added some reflections and details in the top half.

Lastly, I used Ice Grey 4 and 7 to add more depth and darker a few bits. I also used these markers to add a few reflections to the headlights.

Step 10: Color the Windshield and the Roof of the BMW M4
After that, I color the windshield and the roof of the BMW.
I started by coloring the roof and the left half of the windshield with Ice Grey 7. I colored the right half of the window with Ice Grey 2.

Next, I added some reflections and details. I layered more of the IG7 and Blue Black on the left side to add more details like the rearview mirror and I darkened the A-pillar. and on the right side, I used Blue Black to add some reflections.

Step 11: Color the Wing Mirror Arms and the Tail Light
Then, I colored the door mirror arms with Ice Grey 7 and I colored the taillight with Ice Grey 2 and 4.


Step 12: Color the Main Body of the BMW M4
Now that all grey and black parts are done, it’s time to color the main body of the BMW M4.
For this drawing, I started by coloring the mid-toned parts first. And for that I used Amethyst.

After that, I colored the remaining parts with Lavender. I also colored the darker parts and for that I used Aubergine. And to finish it off, I added some Amethyst-colored reflections on the lightest parts.

Step 13: Add Details to your BMW M4 Drawing
The whole BMW M4 is fully colored now, but it’s missing a lot of details. And that’s what we’re going to add in this step.
I used the White Derwent Coloursoft pencil to add some highlights and reflections all over the car, but mainly on panel edges and the headlights.
I used Dove Grey to refine the spokes of the wheels and to refine the headlights a bit more.
I used Black to add more depth to the headlights, add the panel gaps, and refine the wheels more.
And to color the BMW logo I used Electric Blue.
Step 14: Add White Highlights to Make your BMW M4 Drawing Come to Life
To make the drawing really come to life I added a few pure white highlights all over the car with my Posca PC-3M paint marker.
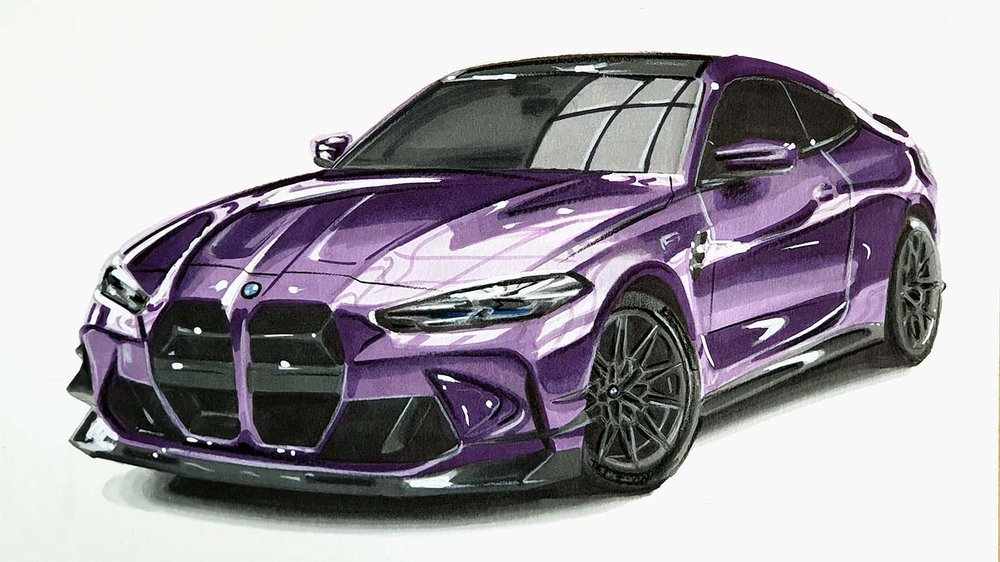
And That’s How I Draw Cars Like the BMW M4
It’s done!! This drawing turned out so well! I hope yours did too!
I hope you found this helpful! If so, I’d really appreciate it if you’d share this tutorial with other people who might like it. It would help me out a lot!
And if you followed along with my tutorial and decide to share your drawing, please tag me on Instagram (@luukminkman). I’d love to see it!
Have a nice day!