
GPS-enabled dog tracking system
™
Astro
owner’s manual

© 2008 Garmin Ltd. or its subsidiaries
Garmin International, Inc.
1200 East 151st Street,
Olathe, Kansas 66062, USA
Tel. (913) 397.8200 or (800) 800.1020
Fax (913) 397.8282
All rights reserved. Except as expressly provided herein, no part of this manual may be reproduced, copied, transmitted, disseminated, downloaded or
stored in any storage medium, for any purpose without the express prior written consent of Garmin. Garmin hereby grants permission to download a
single copy of this manual onto a hard drive or other electronic storage medium to be viewed and to print one copy of this manual or of any revision
hereto, provided that such electronic or printed copy of this manual must contain the complete text of this copyright notice and provided further that
any unauthorized commercial distribution of this manual or any revision hereto is strictly prohibited.
Information in this document is subject to change without notice. Garmin reserves the right to change or improve its products and to make changes in
the content without obligation to notify any person or organization of such changes or improvements. Visit the Garmin Web site (www.garmin.com)
for current updates and supplemental information concerning the use and operation of this and other Garmin products.
Garmin®, AutoLocate®, TracBack®, BlueChart®, MotionBased®, City Navigator®, and MapSource® are registered trademarks and Astro™ is a
trademark of Garmin Ltd. or its subsidiaries and may not be used without the express permission of Garmin.
This product includes technology owned by SiRF Technology, Inc. SiRF’s technology is protected by U.S. and foreign patents pending and
issued. SiRF, SiRFstar and the SiRF logo are registered trademarks of SiRF Technology, Inc. SiRFstarIII and SiRF Powered are trademarks
of SiRF Technology, Inc.
Windows® is a registered trademark of Microsoft Corporation in the United States and/or other countries. Macintosh® is a registered trademarks of
Apple Computer, Inc. microSD™ is a trademark of The SD Card Association. TransFlash™ is a trademark of SanDisk Corporation. Other trademarks
and trade names are those of their respective owners.
May 2008 Part Number 190-00714-10 Rev. A Printed in Taiwan
Garmin (Europe) Ltd.
Liberty House
Hounsdown Business Park,
Southampton, Hampshire, SO40 9RB UK
Tel. +44 (0) 870.8501241 (outside the UK)
0808 2380000 (within the UK)
Fax +44 (0) 870.8501251
Garmin Corporation
No. 68, Jangshu 2nd Road,
Shijr, Taipei County, Taiwan
Tel. 886/2.2642.9199
Fax 886/2.2642.9099

Introduction
Introduction
This manual provides user information for the Garmin
Astro™ 220 Dog Tracking System.
Contact Garmin
Contact Garmin if you have any questions while using
®
your Astro 220. In the USA contact Garmin Product
Support by phone: (913) 397-8200 or (800) 800-1020, or
go to www.garmin.com/support/.
Tips and Shortcuts
Press MENU twice to return to the Main Menu from
•
any page.
Press BACK to move backward through your steps.
•
•
To extend battery life of the Astro 220, turn the unit
off when you are not using it, and decrease the level of
the display backlight (page 4).
•
To extend the DC 30 battery life, turn the unit off
when you are not tracking a dog, or decrease the
update rate (page 13).
Product Registration
Help us better support you by completing our online
registration today! Connect to our Web site at
www.my.garmin.com. Keep the original sales receipt, or a
photocopy, in a safe place.
Astro Dog Tracking System Owner’s Manual i
In Europe, contact Garmin (Europe) Ltd. at +44 (0)
870.8501241 (outside the UK) or 0808 2380000 (within
the UK).
myGarmin
Go to www.my.garmin.com to access the latest services
for your Garmin products.
Subscribe to online services for Points of Interest
•
(POIs) and other useful items.
Unlock optional maps.
•
Access MotionBased® Web-based activity tracker
•
where you can view your saved tracks.
Download geocaches to your unit.
•

Introduction
Table of Contents
Introduction …………………………………………………….i
Tips and Shortcuts ………………………………………………. i
Product Registration ……………………………………………. i
Contact Garmin ………………………………………………….. i
myGarmin ………………………………………………………….. i
DC 30 Battery Warnings …………………………………….. iv
Getting Started ……………………………………………….1
Unit Overview ……………………………………………………. 1
Installing the Batteries in the Astro 220 …………………. 2
Using the Astro 220 Keypad Functions …………………. 3
Turning the Astro 220 On …………………………………….4
Charging the DC 30 ……………………………………………. 4
Acquiring GPS Satellite Signals …………………………… 5
Calibrating the Astro 220 Compass ………………………. 6
Operating the Astro 220 ……………………………………… 6
Manual Conventions …………………………………………… 7
On-Screen Messages …………………………………………. 7
Dog Tracking ………………………………………………….8
Communicating with the DC 30 ……………………………. 8
Tracking a Dog ………………………………………………… 10
Main Menu ……………………………………………………14
Mark Location ………………………………………………15
Averaging a Marked Location …………………………….. 16
Projecting a Location ………………………………………… 16
Map Page ……………………………………………………..17
Map Page Options ……………………………………………. 17
Data Fields ……………………………………………………… 18
Measuring Distance ………………………………………….. 19
Find Features ……………………………………………….20
Item Information Page Options …………………………… 22
Using Optional Detailed Maps ……………………………. 22
POI Loader and Custom Points of Interest …………… 23
GPS Applications …………………………………………24
Using the Trip Computer …………………………………… 24
Using the Compass Page ………………………………….. 25
Using the Altimeter Page …………………………………… 28
Using Tracks ……………………………………………………. 30
Creating Routes ……………………………………………….34
Using the Highway Page …………………………………… 37
Using Proximity Locations …………………………………. 37
Using Turn Preview ………………………………………….. 38
Using Active Route …………………………………………… 39
Using the Satellite Page ……………………………………. 39
ii Astro Dog Tracking System Owner’s Manual

Accessories …………………………………………………41
Calendar …………………………………………………………. 41
Calculator ……………………………………………………….. 42
Stopwatch ……………………………………………………….. 42
Sunrise/Sunset ………………………………………………… 42
Hunting Almanac ……………………………………………… 43
Games ……………………………………………………………. 43
Settings ……………………………………………………….44
System Setup ………………………………………………….. 44
Dog List Setup …………………………………………………. 45
Dog Alerts Setup ……………………………………………… 45
Display Setup ………………………………………………….. 45
Tones Setup …………………………………………………….46
Main Menu Setup …………………………………………….. 46
Map Setup ………………………………………………………. 46
Routing Setup ………………………………………………….. 49
Geocache Setup ………………………………………………. 51
Marine Alarms Setup ………………………………………… 51
Time Setup ……………………………………………………… 51
Units Setup ……………………………………………………… 52
Heading Setup …………………………………………………. 52
Calibration Setup ……………………………………………… 53
Altimeter Setup ………………………………………………… 53
Introduction
Appendix ……………………………………………………..54
Specications ………………………………………………….. 54
Optional Accessories ………………………………………… 56
Transferring Data ……………………………………………… 56
Caring for the Astro 220 System ………………………… 60
Software License Agreement …………………………….. 61
Index ……………………………………………………………64
Astro Dog Tracking System Owner’s Manual iii
Introduction
See the Important Safety and Product Information
guide in the product box for product warnings and
other important information.
NOTICE REGARDING LEGAL RESTRICTIONS; SPECIAL
NOTICE TO USERS IN CALIFORNIA AND ALASKA:
State law in California prohibits the use of GPS dog collars for
the pursuit of mammals. Alaska law prohibits guides from using
GPS devices to assist in the taking of big game animals. This is not
intended to be an exhaustive list of applicable laws and ordinances,
and Garmin makes no such guarantees or warranties that this list is
complete. Check your state and local laws and ordinances to ensure
you fully understand any restrictions applicable to this product in your
jurisdiction prior to purchase and/or use. Garmin does not assume any
responsibility for any nes, penalties, or damages that may be incurred
as a result of any state or local law or ordinance relating to use of the
product.
DC 30 Battery Warnings
If these guidelines are not followed, the internal lithium-ion battery
may experience a shortened life span or may present a risk of damage
to the DC 30, re, chemical burn, electrolyte leak, or injury.
Contact your local waste department to properly dispose of the
•
unit/battery.
Do not leave the unit exposed to a heat source or in a
•
iv Astro Dog Tracking System Owner’s Manual
high-temperature location, such as in the sun in an unattended
vehicle on a hot day. To prevent damage, remove the unit from the
vehicle or store it out of direct sunlight, such as in the glove box.
Do not incinerate the DC 30 or the battery.
•
•
When storing the unit for a limited length of time, store within
the following temperature range: from -4˚F to 104˚F (from -20˚ to
40˚C). When storing the unit for an extended time, store within the
following temperature range: from 32˚F to 77˚F (from 0˚ to 25˚C).
•
Do not operate the unit outside of the following temperature range:
from -4˚ to 140˚F (from -20˚ to 60˚C).
•
Recharge the unit within the following temperature range: from
32˚F to 113˚F (from 0˚ to 45˚C).
The DC 30 contains a replaceable, rechargeable lithium-ion battery,
the following warnings also apply:
•
Do not recharge the battery outside of the unit or disassemble the
battery.
•
Keep the used battery away from children. Do not disassemble,
puncture, or damage the battery.
•
Replace the battery with a Garmin lithium-ion battery pack. Using
another battery presents a risk of re or explosion. To purchase a
replacement battery, see your Garmin dealer or the Garmin Web site
(www.garmin.com).
•
Do not leave the DC 30 where a dog may attempt to chew on it. If
the battery cell is punctured, electrolyte can be released that can be
harmful to the dog.
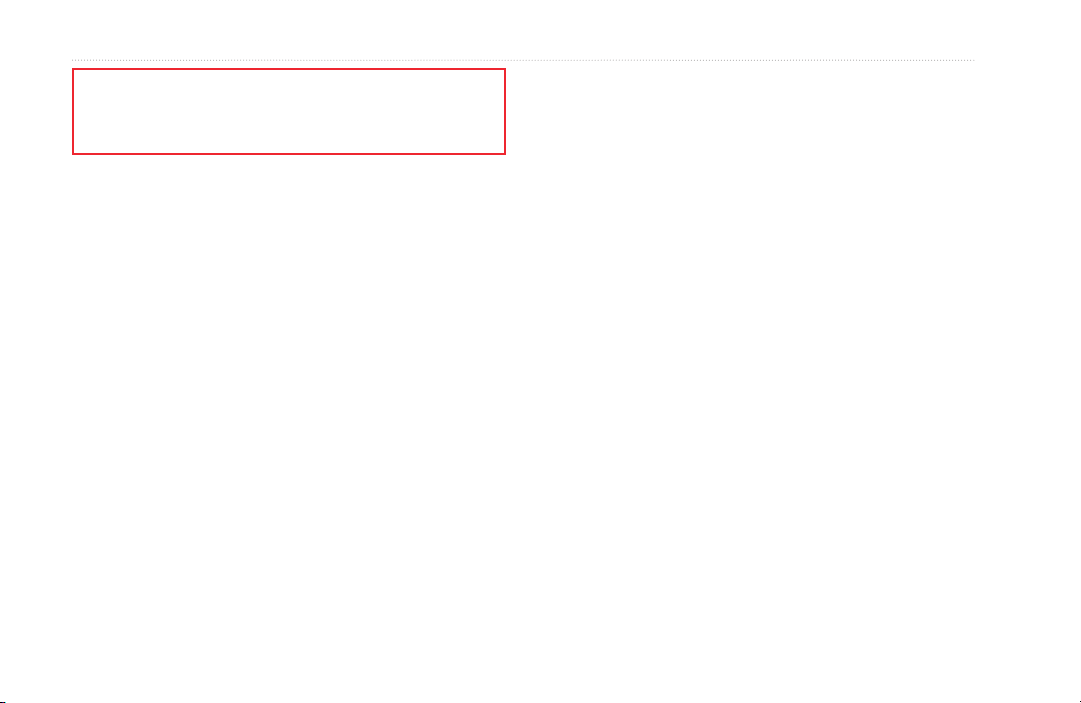
Unit Overview
Getting Started
Getting Started
Belt clip button
attachment
Power
key
LCD
screen
Battery compartment
Battery compartment
Keypad
Astro Dog Tracking System Owner’s Manual 1
cover and access to
Wrist strap
attachment slot
locking D-ring
the microSD™ card
tray
VHF
antenna
GPS
antenna
USB port
(under
weather cap)
DC 30Battery
charging port

Getting Started
Battery
Compartment
Battery
Compartment
Installing the Batteries in the
2. Route the strap through the loop and pull the end of
Astro 220
The Astro 220 operates on two AA alkaline, lithium
or NiMH batteries (not included). See page 44 for
information on setting the battery type.
To install the batteries:
1. Turn the D-ring ¼ turn counter-
clockwise and remove the battery
cover.
2. Insert the batteries, observing the
proper polarity.
3. Reinstall the battery cover.
Remove the batteries from your
Astro 220 when you do not expect to use
the unit for several months. When you
remove the batteries, data is not lost.
To install the wrist strap:
1. Place the small loop of the wrist strap through the slot
on the back of the unit.
See page 57 to install or remove the microSD data card in
the battery compartment.
the strap.
Belt clip button
installation (tighten
the button securely
by turning it
clockwise)
Wrist strap
installation
Belt clip
2 Astro Dog Tracking System Owner’s Manual
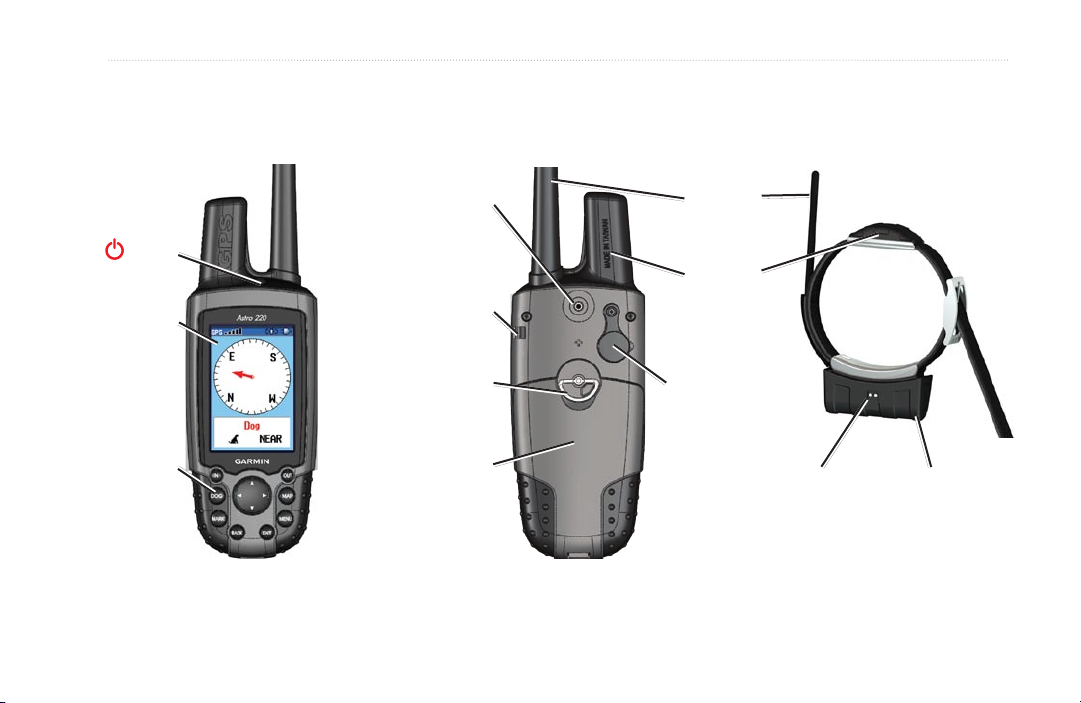
Using the Astro 220 Keypad Functions
IN/OUT zoom–Press to zoom in or
out on the Map page. Press to scroll
up or down a list on any other page.
Getting Started
DOG–Press at any time to view
the Dog Tracker page.
MARK–Press to mark your
current location.
BACK–Press to cancel data entry or
move backward to the Main Menu.
Astro Dog Tracking System Owner’s Manual 3
MAP–Press to view the Map page.
Rocker–Press up, down, left, or right to
highlight options and to enter data, or to move
the map-panning arrow.
MENU–Press to view page options. Press
twice to view the Main Menu.
ENT (Enter)–Press to enter highlighted
options, select data, or conrm on‑screen
messages.
Getting Started
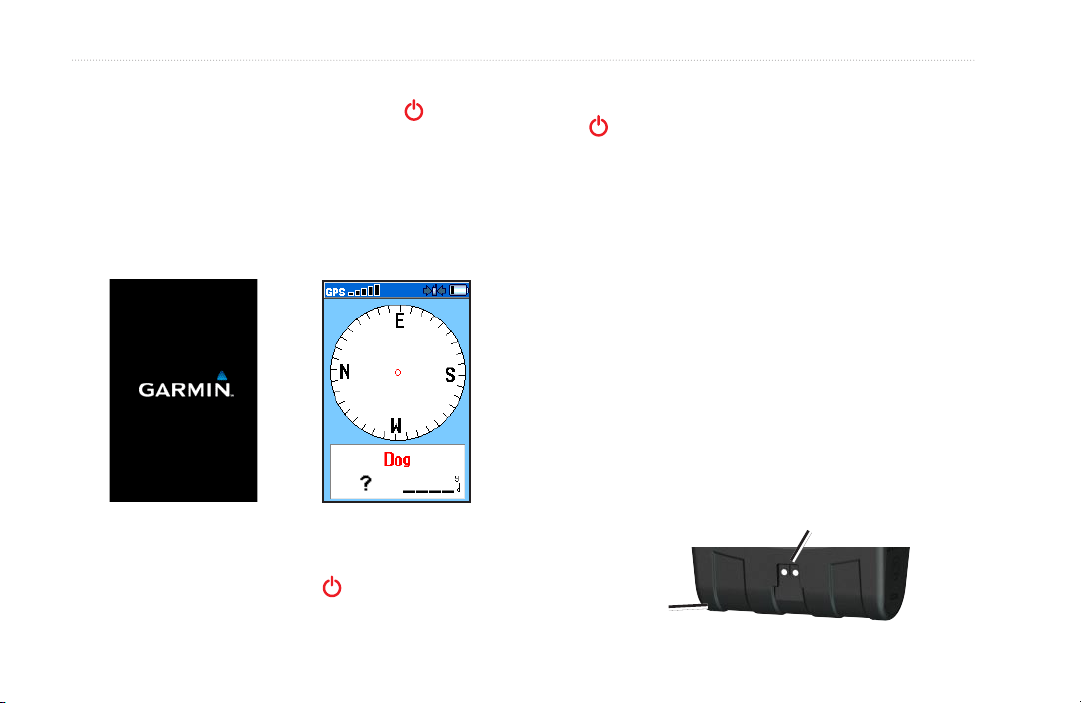
Turning the Astro 220 On
2. Press the
To turn the Astro 220 on, press and hold the Power
key.
The rst time you turn the Astro 220 on, a message
appears followed by a prompt. Thereafter, when you turn
the Astro 220 on, the Garmin Logo appears, followed by
the Dog Tracker page.
3. Press ENTER to select a brightness level.
See page 45 to change the display colors and backlight
timeout.
Charging the DC 30
Fully charge the DC 30 before using it on a hunt. DC 30
charging temperature range is 32°F-113°F (0°C-45°C).
To charge the DC 30:
1. Connect the vehicle power cable or the AC adapter to
2. Slide the connector into the battery charging port on
Garmin Logo Dog Tracker Page
To adjust the backlight level:
1. Press and quickly release the Power key.
Rocker up arrow or down arrow to adjust
the brightness levels. Or, press and quickly release
the Power key to cycle through the brightness
levels.
an appropriate electrical source.
the side of the DC 30.
Battery charging port
Blue LED
4 Astro Dog Tracking System Owner’s Manual
3. Charge the DC 30 until the blue LED on the bottom of
the unit turns off.
NOTE: Charging a fully-depleted DC 30 battery requires
4½ hours.
Acquiring GPS Satellite Signals
Before the Astro 220 can nd your current location and
the location of the DC 30, both units must acquire GPS
signals.
Getting Started
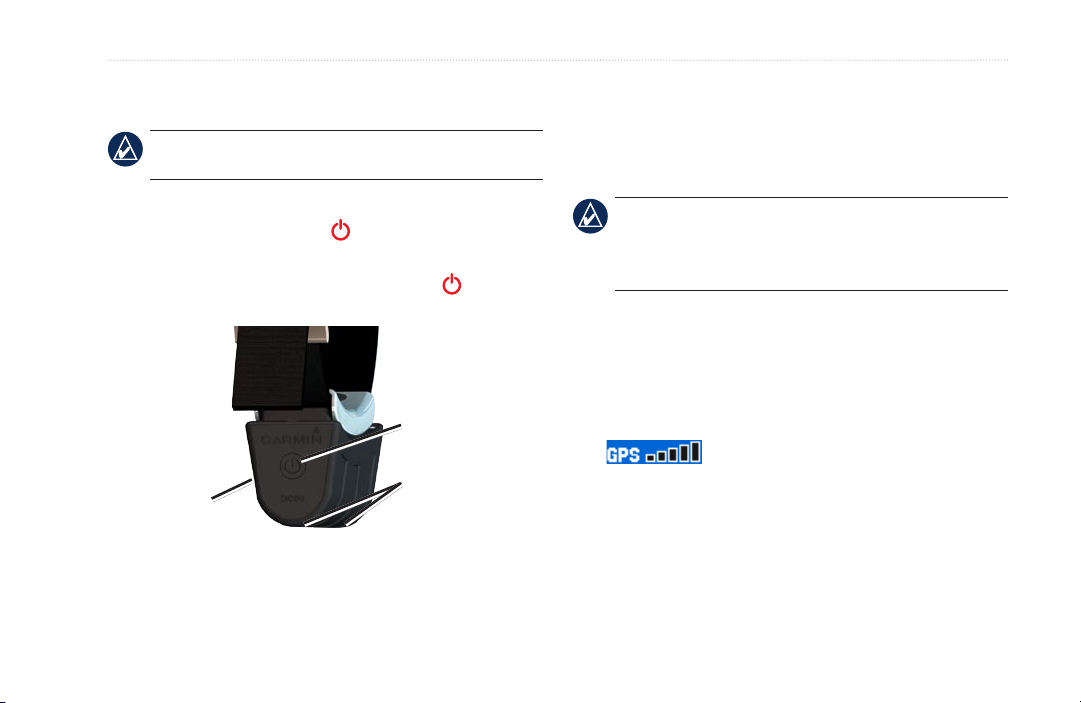
To turn the DC 30 on and off:
1. Press and hold the DC 30 Power key. The red
LEDs blink at a steady rate.
2. To turn the DC 30 off, press and hold the Power
key.
DC 30
Power key
NOTE: The DC 30 does not transmit its location to
the Astro 220, and the Astro 220 will not indicate the
location of the DC 30, until both units have acquired
satellite signals.
To acquire GPS satellite signals:
1. Go outdoors to an open area, away from tall buildings
and trees.
2. Turn the Astro 220 and DC 30 on. Acquiring satellite
signals can take a few minutes.
The bars on the Astro 220 indicate satellite
Battery
charging port
LEDs blink red
when power is on
strength. When the bars are black, the Astro 220 has
acquired satellite signals. The two red LEDs on the
DC 30 double blink at each pulse when a location x is
achieved.
Astro Dog Tracking System Owner’s Manual 5
Getting Started
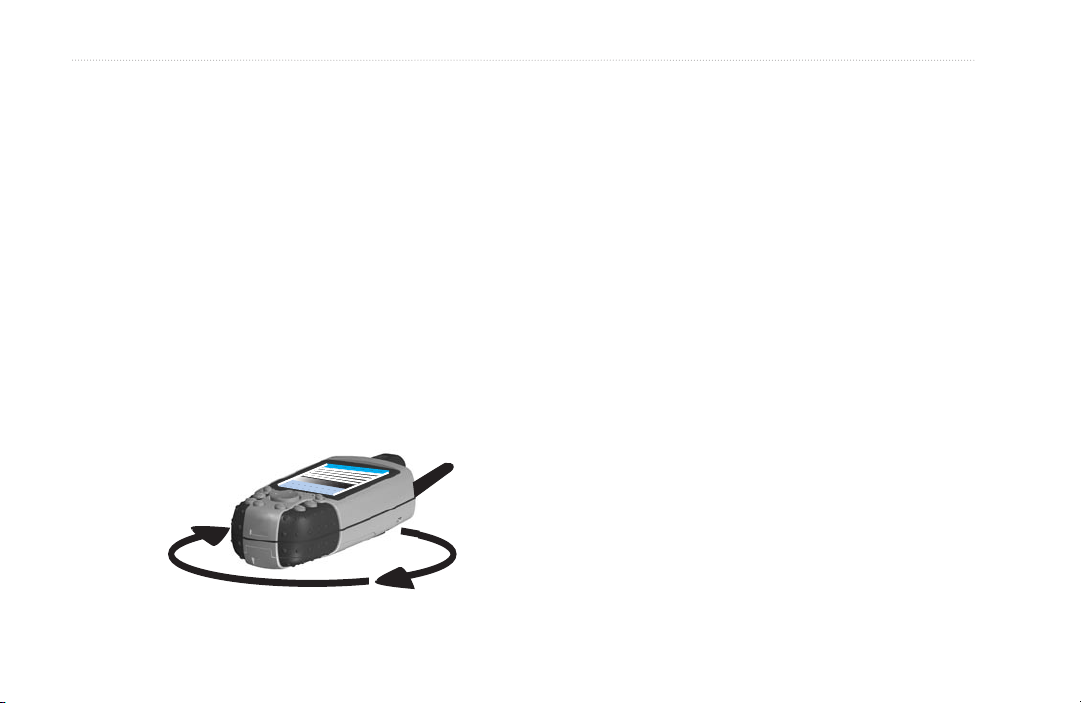
Calibrating the Astro 220 Compass
•
Calibrate the Astro 220 electronic compass the rst
time you use it, after periods of storage, after you install
new batteries, or when the unit has been exposed to
•
temperature changes of greater than 20°F (11°C).
Calibrate the compass outdoors. Hold the compass level
•
and away from objects that generate magnetic elds, such
as cars or buildings.
Operating the Astro 220
The following terms are used throughout this manual:
“Just Right,” “Too Fast,” or “Too Slow” appears,
notifying you to adjust your turning speed. Hold the
unit level while turning.
When “Calibration Successful” appears, press
ENTER.
If “Calibration Failed” appears, repeat the process.
To calibrate the electronic compass:
1. On the Dog Tracker page (page 4), press MENU.
2. Select Calibrate Compass, and press ENTER.
3. Select Start, press ENTER, and follow the on-screen
directions.
Hold the unit
level and turn
slowly.
Select–move the highlighted area on the screen up, down,
left, or right with the Rocker to select individual elds.
Field–the location on a page where data or an option can
be shown and entered. A highlighted eld appears yellow.
On-screen button–an option on the screen. Use the
Rocker to select a button, and press ENTER.
Scroll bar–a bar that appears on the right side of a list
that is too long to t on the screen. Use the Rocker to
scroll through a list. Press IN or OUT to scroll a set of
items.
6 Astro Dog Tracking System Owner’s Manual
Default–the saved factory settings. You can change the
settings, but you can revert to the factory settings by
selecting Restore Defaults.
Wizard–an on-screen guide to performing functions that
require multiple steps and options.
•
•
•
•
Manual Conventions
In this manual, small arrows (>) indicate that you
should highlight a series of items on the screen using the
Rocker, and press the ENTER key after each item. For
example, if you see “select Dog > Show Info,” highlight
Dog, press ENTER, highlight Show Info, and press
ENTER again.
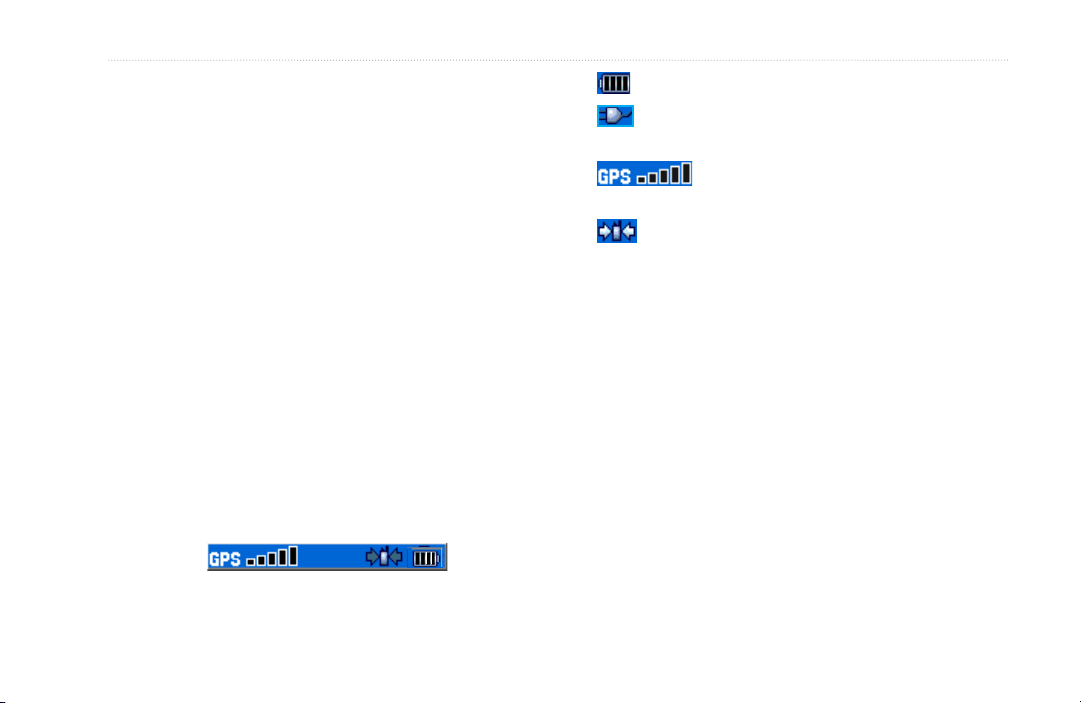
Using the Status Bar
The status bar at the top of each Astro 220 page provides
status information.
On-Screen Messages
When an on-screen message appears, press ENTER to
acknowledge the message and close the window.
Messages also indicate temporary conditions, such as
“Calculating Route.” The message window closes as soon
as the process is completed.
Getting Started
–indicates the remaining battery power.
–appears when the Astro 220 is powered by an
external source.
–indicates the strength of acquired
satellite signals.
–blinks when the unit detects a signal (for
example, a DC 30) on the channel it is receiving.
Astro Dog Tracking System Owner’s Manual 7

Dog Tracking
Dog Tracking
This section describes communications between the
DC 30 and the Astro, tracking dogs on the map, and
adding dogs to the Dog List.
When communicating with the DC 30, the Dog Tracker
page indicates the direction of the dog, the distance away
from you, and the status of the dog. The Astro 220 can
keep track of ten dogs. Use the Rocker to scroll through
the list of dogs.
Communicating with the DC 30
The DC 30 that was packaged with your Astro 220
Dog pointer
(direction to
the dog)
System was linked with the Astro 220 at the factory. If
you are using a DC 30 that you ordered separately, follow
the instructions for adding a new dog on page 12 to
establish communications with the Astro 220.
To view communication status with the DC 30:
Press DOG to view the Dog Tracker page. The dog
name is listed in the Name eld.
NOTE: The DC 30 does not transmit its location to
the Astro 220, and the Astro 220 will not indicate the
location of the DC 30, until both units have acquired
satellite signals.
8 Astro Dog Tracking System Owner’s Manual
Dog status
icon
Dog Tracker Page
To view details about a selected dog:
1. Use the Rocker to select a dog on the list.
2. Press ENTER to view the Dog Information page.
Distance to
the dog
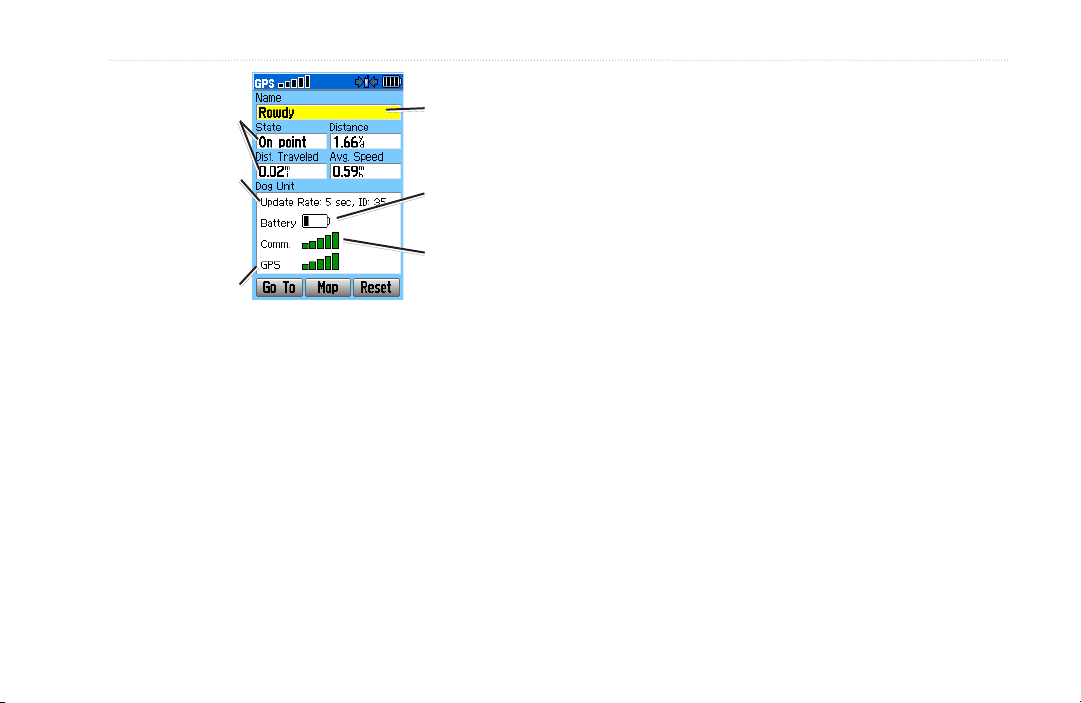
Dog status
elds
Position update
rate and dog
communication
ID number
(page 13)
DC 30 GPS
signal strength
Dog Information Page
Dog name
eld
DC 30 battery
capacity
DC 30
communication
signal strength
The Dog Information page displays the status of the dog
(Running, Sitting, Treed, On point, or Unknown?), the
distance from your location, the distance traveled, and the
average speed.
Naming the Dog
The Astro 220 assigns a name such as Dog or Dog 1 to
every Dog Unit (DC 30) linked to it.
To change the name of the dog:
1. On the Dog Information page, highlight the Name eld
and press ENTER.
2. Use the Rocker and ENTER to spell the name of the
dog.
3. Select OK > ENTER when you are nished.
Using Go To, Map, and Reset
Select Go To to navigate to your dog.
•
Select Map to view the location and movement of
•
your dog.
Select Reset to reset the dog statistics and the track
•
log (page 30) for that dog.
Dog Tracking
Astro Dog Tracking System Owner’s Manual 9

Dog Tracking
Dog Information Page Options
On the Dog Information page, press MENU to access
additional dog information options.
Stop (or Start) Tracking–stops (or starts) tracking the
•
dog.
Identify Dog Unit–displays the DC 30 software
•
version on the Astro and causes the DC 30 LEDs to
blink rapidly for ten seconds.
Change Comm. Settings–allows you to assign a new
•
ID number (page 13) to a dog to avoid conicting
signals and/or the rate of reporting (5, 10, or 30
seconds).
Transfer Dog Unit Track–transfers detailed tracks
•
from the DC 30 to a computer (page 60).
Delete Dog Unit Track–deletes the track log for the
•
dog.
Change Dog Unit Type–allows you to identify the
•
dog type so that the appropriate dog status symbols
are shown. Choose from Auto, Pointing Dog, Treeing
Dog, or Pet.
Upgrade Dog Unit–downloads software updates to
•
the DC 30 (page 59).
Tracking a Dog
Attach the DC 30 with the collar to your dog’s neck with
the VHF antenna (page 1) pointing up.
To ensure maximum compass accuracy, calibrate your
compass (page 6) and hold the Astro 220 level.
Tracking a Dog on the Dog Tracker Page
The Dog Tracker page shows the direction and distance
of the dog from the Astro 220, and the status of the dog.
10 Astro Dog Tracking System Owner’s Manual
To view the Dog Tracker page:
Press DOG.
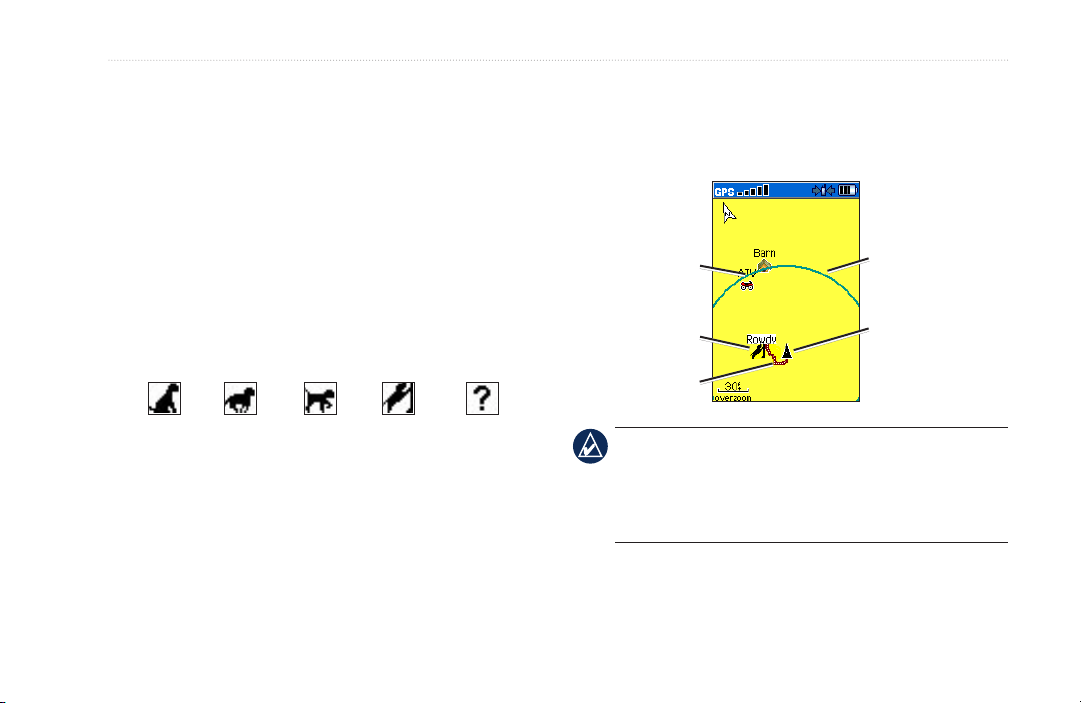
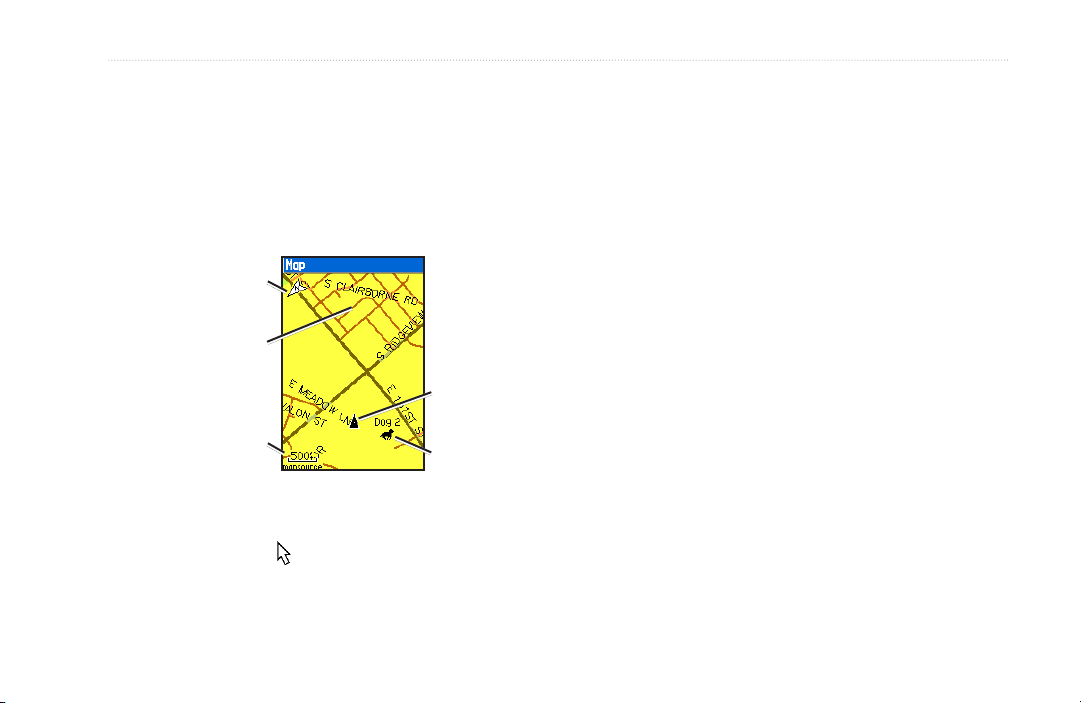
The Map page indicates the following:
•
The dog you are tracking is identied and the dog pointer
indicates its direction from you. The dog pointer is most
•
accurate when you are holding the Astro 220 level and
the dog is farther than 30 feet (9.1 meters) away. At less
than that distance, a NEAR message appears, and the dog
pointer is shortened. When you are close to the dog, the
dog pointer may be inaccurate.
To change the color of your dog’s pointer, see page 31.
Dog Status Icons
Dog status icon
Dog Tracking
The location of the dog, its name, and a track
showing its movements
Your location and track
Marked
locations on
map
Dog track
Accuracy circle
Your position is
indicated by the
position pointer
Sitting TreedRunning On point Unknown
The Unknown status symbol [?], indicates that the DC 30
has not acquired a satellite signal and that the Astro 220
cannot determine the location of the dog.
To track a dog on the Map page:
Press MAP.
Astro Dog Tracking System Owner’s Manual 11
NOTE: When the Map page is in the Track Up
orientation mode, objects on the map appear to rotate
around your position. As you move, the entire map
reorients in the direction you are facing. To stabilize the
objects, set the orientation to North Up (page 47).
For more information about the Map page features and
custom settings, refer to page 46.

Dog Tracking
Dog Tracker Page Options Menu
To open the Dog Tracker page Options menu:
On the Dog Tracker page, press MENU.
Show Info–opens the Dog Information page for the
•
selected dog.
Pause (or Resume) All Tracking–pauses tracking
•
of all dogs.
Calibrate Compass–calibrates the compass
•
(page 6).
View Dog List–opens the Dog List to add or
•
remove dogs.
Small Numbers (or Big Numbers)–changes the
•
size of the dog descriptions on the Dog Tracker
page. Press the left or right arrows on the Rocker
to scroll through multiple dogs in the Big Numbers
mode.
Adding Dogs to the Dog List
If you purchase additional DC 30 units, you can link them
to the Astro 220 using the setup wizard in the Dog List.
To link, the Astro 220 must be close enough to the DC 30
to touch it, or you must know the DC 30 ID number.
To add a new dog to the list:
1. On the Dog Tracker page, press MENU > Dog List >
<Add New> > ENTER to open the setup wizard.
2. Use the Rocker and ENTER to select and conrm
options. By default, the new dog is named “Dog” and
an ID number is randomly assigned.
NOTE: The setup wizard may indicate that there is a
conict with the ID number of another dog. To resolve
the conict, follow the instructions in the setup wizard
and in “Conicting Dog Signals.”
Conicting Dog Signals
Each dog you track has its own ID number. If two dogs
within range of the Astro 220 have the same ID, the
Astro 220 warns you of a conicting ID signal. It then
opens a setup wizard to guide you through the process of
resolving the conict.
If necessary, you can manually assign a new ID number
to a dog. When possible, you should allow the Astro 220
to automatically assign IDs.
12 Astro Dog Tracking System Owner’s Manual
To assign a new ID number to a dog and change
the update rate:
1. On the Dog Information page, press MENU > Change
Comm. Settings.
2. Select an unassigned and nonconicting ID > OK.
3. Change the update rate, if desired. Both 10-second
and 30-second updates reduce battery drain, but
they create a less-detailed dog track and collected
statistics.
4. Ensure that the Astro 220 is within a few feet of the
DC 30.
5. Complete the setup wizard instructions.
Tips for Successful Tracking
Use a fully charged DC 30. A fully charged DC 30
•
operates for approximately 17 hours when using
5-second interval reporting.
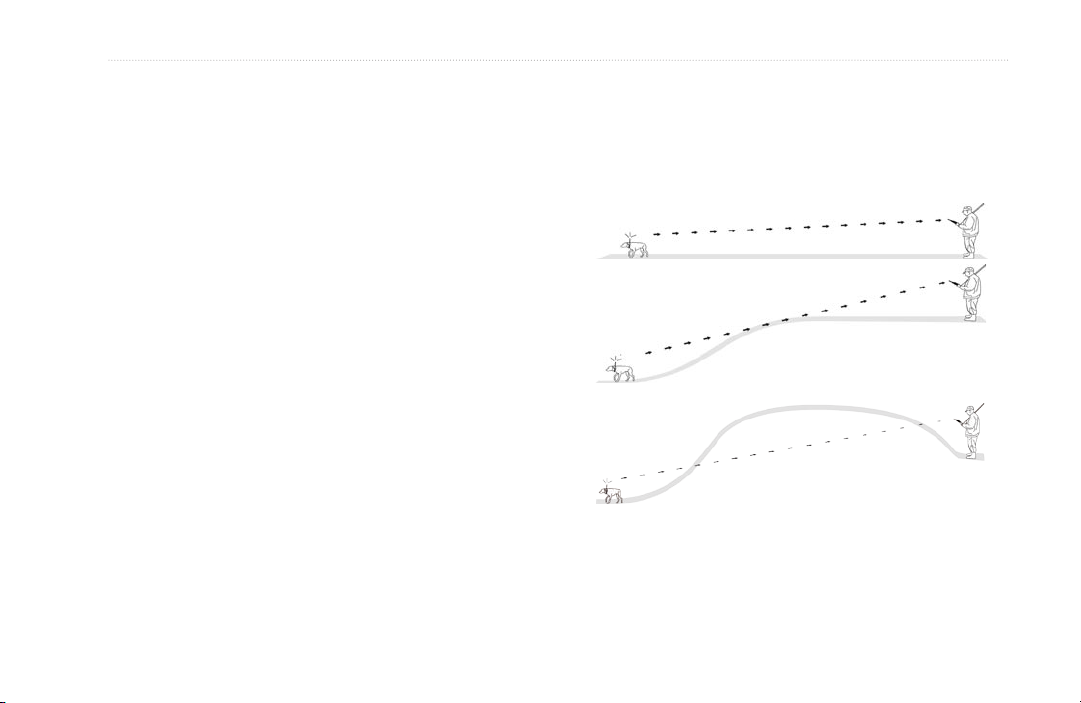
•
Use line-of-sight radio communication. The Astro 220
and DC 30 use radio signals to communicate. Objects
in the path of radio signals degrade the quality of
the signals. Keeping an unobstructed line of sight
Dog Tracking
between you and your dog’s DC 30 produces the best
communication signal. Obstructed radio waves result
in a poor signal. To achieve the best line-of-sight
conditions, move to the highest elevation point in your
area (for example, on the top of a hill).
BEST
GOOD
POOR
Line-of-Sight Radio Communication
Astro Dog Tracking System Owner’s Manual 13
Main Menu
Main Menu
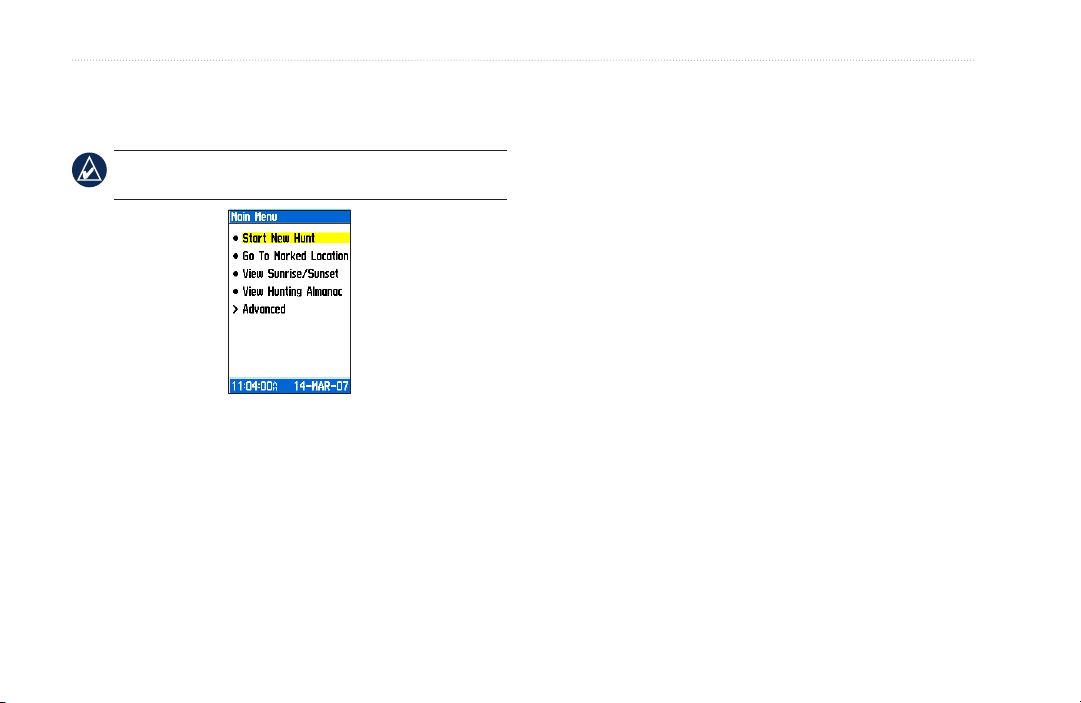
To open the Main Menu, press MENU > MENU.
NOTE: Items shown on the Main Menu can be moved,
deleted, or added as described on page 46.
•
•
View Hunting Almanac–provides predicted best times
for hunting and shing for a specic date and location.
•
•
Main Menu
Start New Hunt–resets dog statistics and track logs, and
marks your starting location.
Go To Marked Location–provides directions to a
location you have marked (page 15).
View Sunrise/Sunset–shows the time of sunrise, sunset,
moonrise, and moonset, and current relative positions of
Advanced–displays advanced options.
•
•
•
•
the sun and moon.
To view the rise and set times for a different date or
location, select the Date eld to open the on-screen
keypad or select the New Location menu.
To view positions of the sun and moon at a different
time, select the Time eld.
To view predictions for a different date, select the
Date eld.
To view predictions for a different location, select the
Location eld > Use Map and select a point using
the Rocker. Select Use Find Menu to view locations
stored on the map.
Find (page 20)
GPS Applications (page 24)
Accessories (page 41)
Settings (page 44)
14 Astro Dog Tracking System Owner’s Manual

Mark Location
Locations are landmarks that you record and store in your
Astro 220.
To mark your vehicle location:
When beginning a hunt, select Start New Hunt
(page 14) while you are near your vehicle to mark the
location. After the hunt, you can use your Astro 220 to
navigate back to your starting location.
To mark your current location:
1. Press MARK > New to view the Mark Location page.
2. Select OK to mark the location.
To mark a specic hunting location:
1. Press MARK.
2. Select a name and hunting-related symbol to describe
the location, and press ENTER.
NOTE: The Mark Covey option allows you to enter the
estimated number of birds ushed and the number taken.
3. To edit location information, select the appropriate
eld, and press ENTER to open the on-screen
keypad. After entering and conrming your changes,
select OK (on the keypad).
4. Select OK to mark the location.
To mark a location using the Map page:
1. Press MAP. Use the Rocker to move the map pointer
to the map item you want to mark as a location.
2. Press ENTER. If the map item selected contains no
information, a “No map information at this point. Do
you want to mark a location here?” message appears.
Select Yes.
3. To edit location information, select the appropriate
eld, and press ENTER to open the on-screen
keypad. After entering and conrming your changes,
select OK (on the keypad).
4. Select OK to mark the location.
Mark Location
Astro Dog Tracking System Owner’s Manual 15

Mark Location
To edit a marked location:
1. Press MENU > MENU > Advanced > Find > Marked
Locations to open the Location page.
2. Select the location you want to edit.
3. Select the appropriate eld to open the on-screen
keypad. After entering and conrming your changes,
select OK (on the keypad).
To move a marked location on the Map page:
1. Press MENU > MENU > Advanced > Find > Marked
Locations.
2. Select the marked location you want to edit.
3. Select Map to show the marked location on the map.
4. Press ENTER to place a MOVE marker next to the
marked location.
5. Use the Rocker to move the marked location to a new
location on the map, and press ENTER.
Averaging a Marked Location
You can average a marked location for more accuracy.
When averaging, the Astro 220 takes several readings at
the same location and uses the average value to provide
more accuracy.
To calculate your current average location:
1. Press MARK > New > Avg to begin averaging.
2. When the Estimated Accuracy eld reaches the level
Projecting a Location
You can create a new location by projecting the distance
and bearing from a marked location to a new location.
To project a location:
1. Press MENU > MENU > Advanced > Find > Marked
2. Select the location > MENU > Project Location.
3. Enter the bearing and distance to the projected
of accuracy you want, select Save > OK.
Locations.
location in the appropriate elds at the bottom of the
page. To navigate to the location, select Go To.
16 Astro Dog Tracking System Owner’s Manual
Map Page
Press IN and OUT to change the map scale. An accuracy
circle represents the area containing your current location.
The Astro 220 includes a preloaded basemap that
includes cities, interstates, state and county highways,
exit information, and lake and river outlines. The standard
basemap can be enhanced using MapSource
®
detailed
mapping data as shown below.
Map orientation
arrow
Map details from
Garmin MapSource
City Navigator®
North America NT
Map scale
Map Page
Your current
location
Dog location
Map Page Options
Customize the Map page using the Map page Options
menu. On the Map page press MENU.
•
•
•
•
•
Press MAP to display the Map page. Use the Rocker to
move the map pointer away from your current location.
As you pan past the edge of the current map display, the
•
screen scrolls to provide continuous map coverage.
Map Page
Stop (or Resume) Navigation–stops or resumes
navigation.
Recalculate–recalculates an automotive route while
navigating.
Data Fields–congures up to four data elds at the
top of the page (page 18).
Change Data Fields–changes the type of data
displayed in the data elds (page 18).
Guidance Text–displays useful information on
the screen above the map when navigating to a
destination.
Setup Map–customizes the map to your preferences
(page 47).
Astro Dog Tracking System Owner’s Manual 17
Loading…
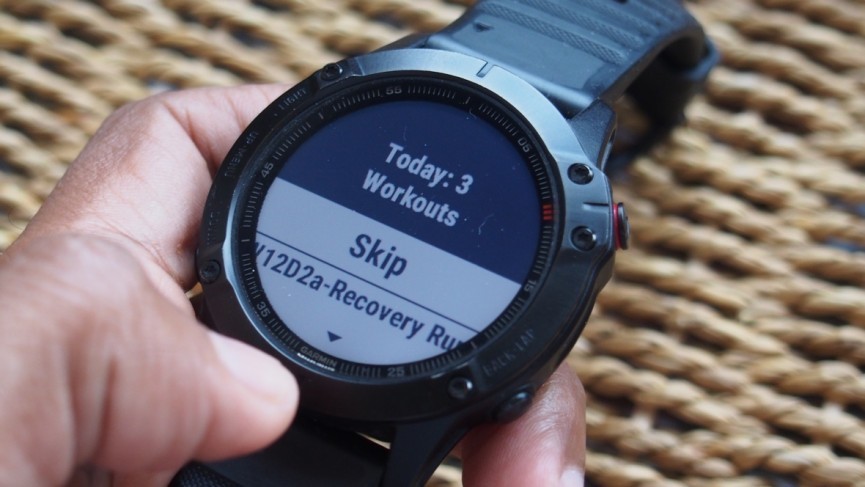
После приобретения смарт-часов от компании «Гармин» многие пользователи стараются разобраться в том, как настроить индивидуальные тренировки Garmin, как проводить синхронизацию Garmin Connect и Google Fit, подходят ли имеющиеся упражнения для тренеров и пр.
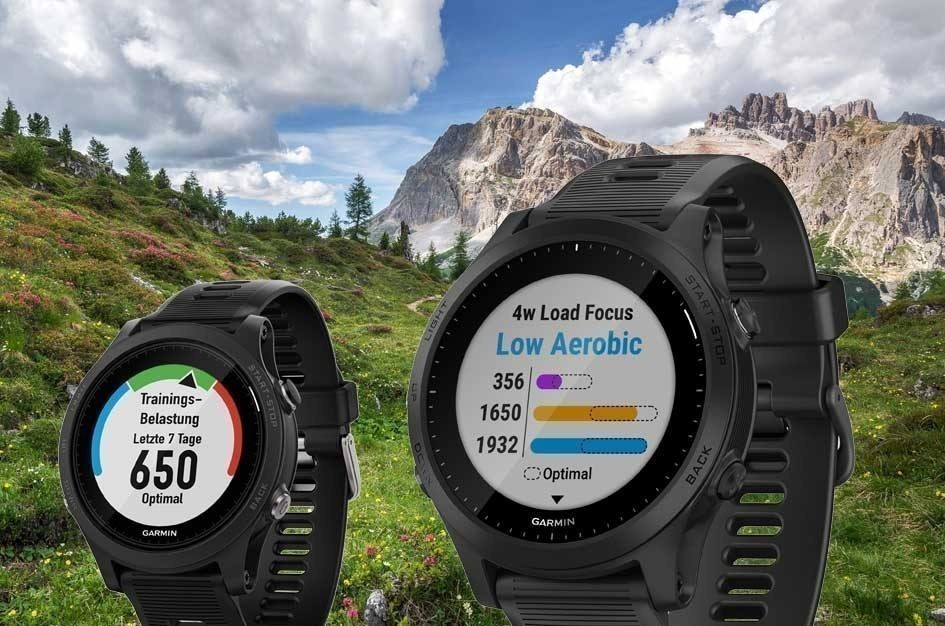
Чтобы облегчить задачу владельцам «умных часов», мы собрали основную информацию по этой теме и ответили на распространенные вопросы.
5%скидка
Для читателей нашего блога
скидка 5% на весь
ассортимент
Ваш промокод:BLOGСмотреть все часы
Основная информация
Создать план тренировок и загрузить определенные упражнения на свои часы — это довольно простой процесс. Для начала потребуется завести учетную запись в приложении Garmin Connect, а после этого провести сопряжение гаджета с совестимым смартфоном.

Затем потребуется выполнить ряд действий:
1. Открыть приложение, найти строку «Занятие» в левом вертикальном меню.
2. Нажать на пункт «Тренировки».
3. Выбрать желаемый тип занятий и нажать на кнопку «Создать тренировку».
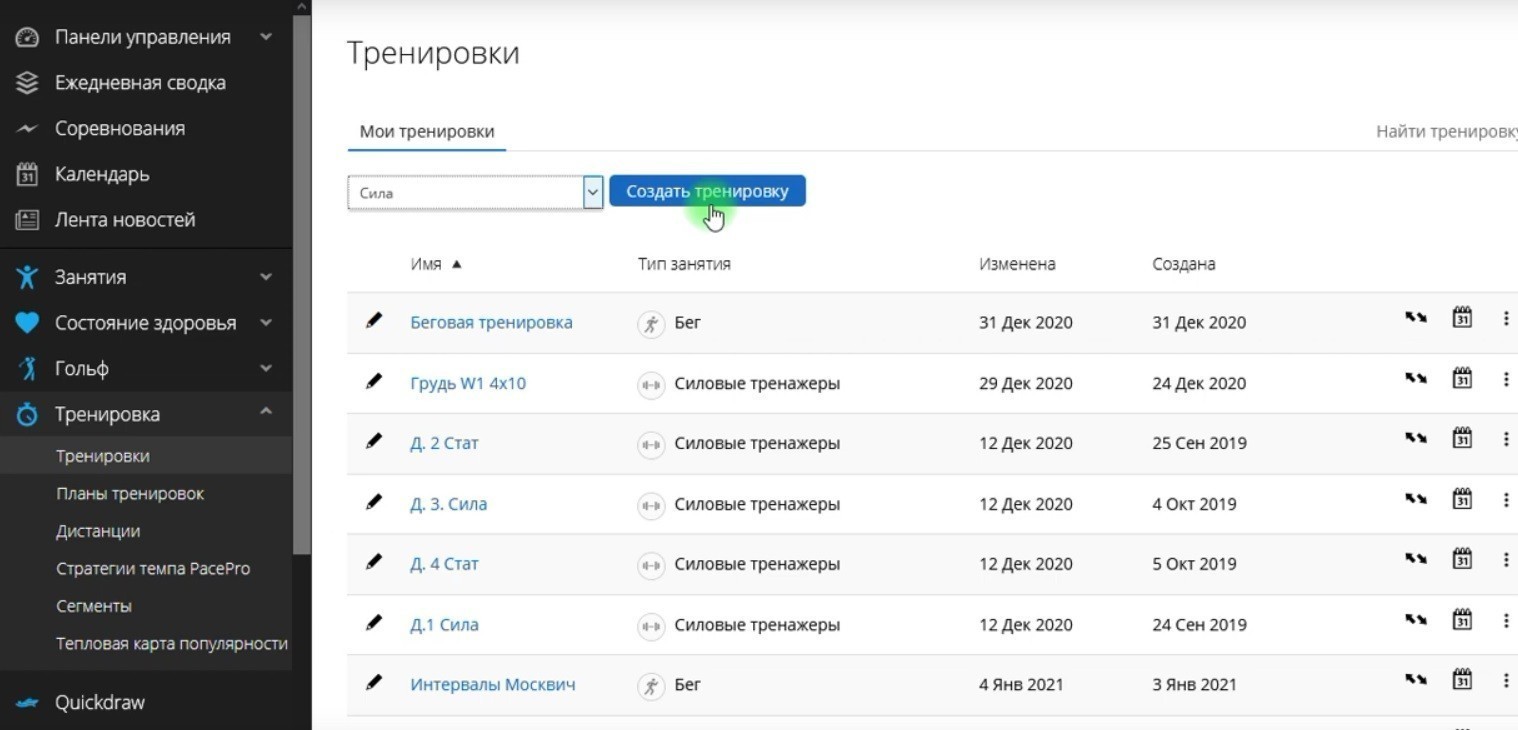
4. Когда откроется новое окно, создать свою личную тренировку и дать ей имя, после чего сохранить.
5. Отправить созданный план упражнений в «Календарь тренировок», нажав на иконку , расположенную справа от названия новой тренировки.
6. Отправить готовый список упражнений на свой гаджет (часы), воспользовавшись иконкой .
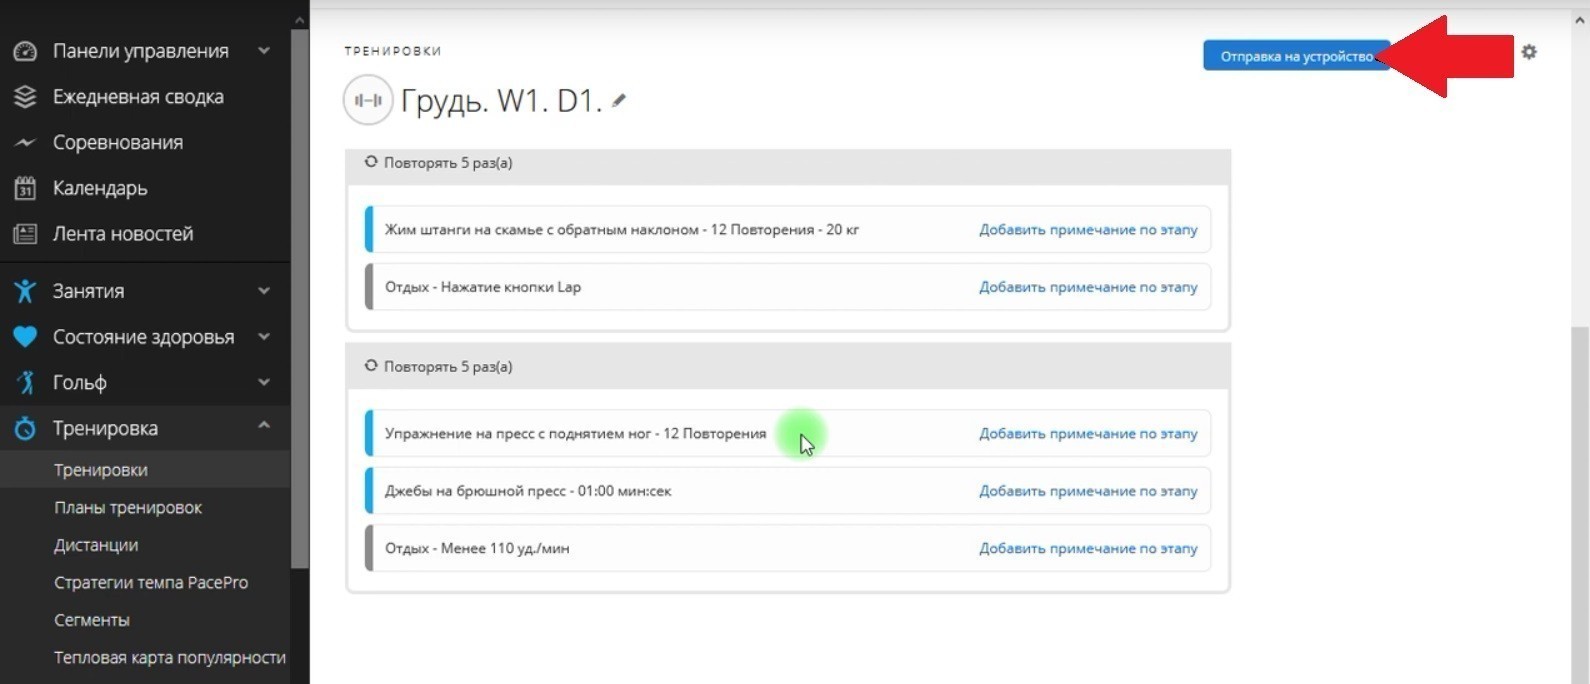
Теперь после очередной синхронизации часов с приложением каждая тренировка будет в них загружаться.
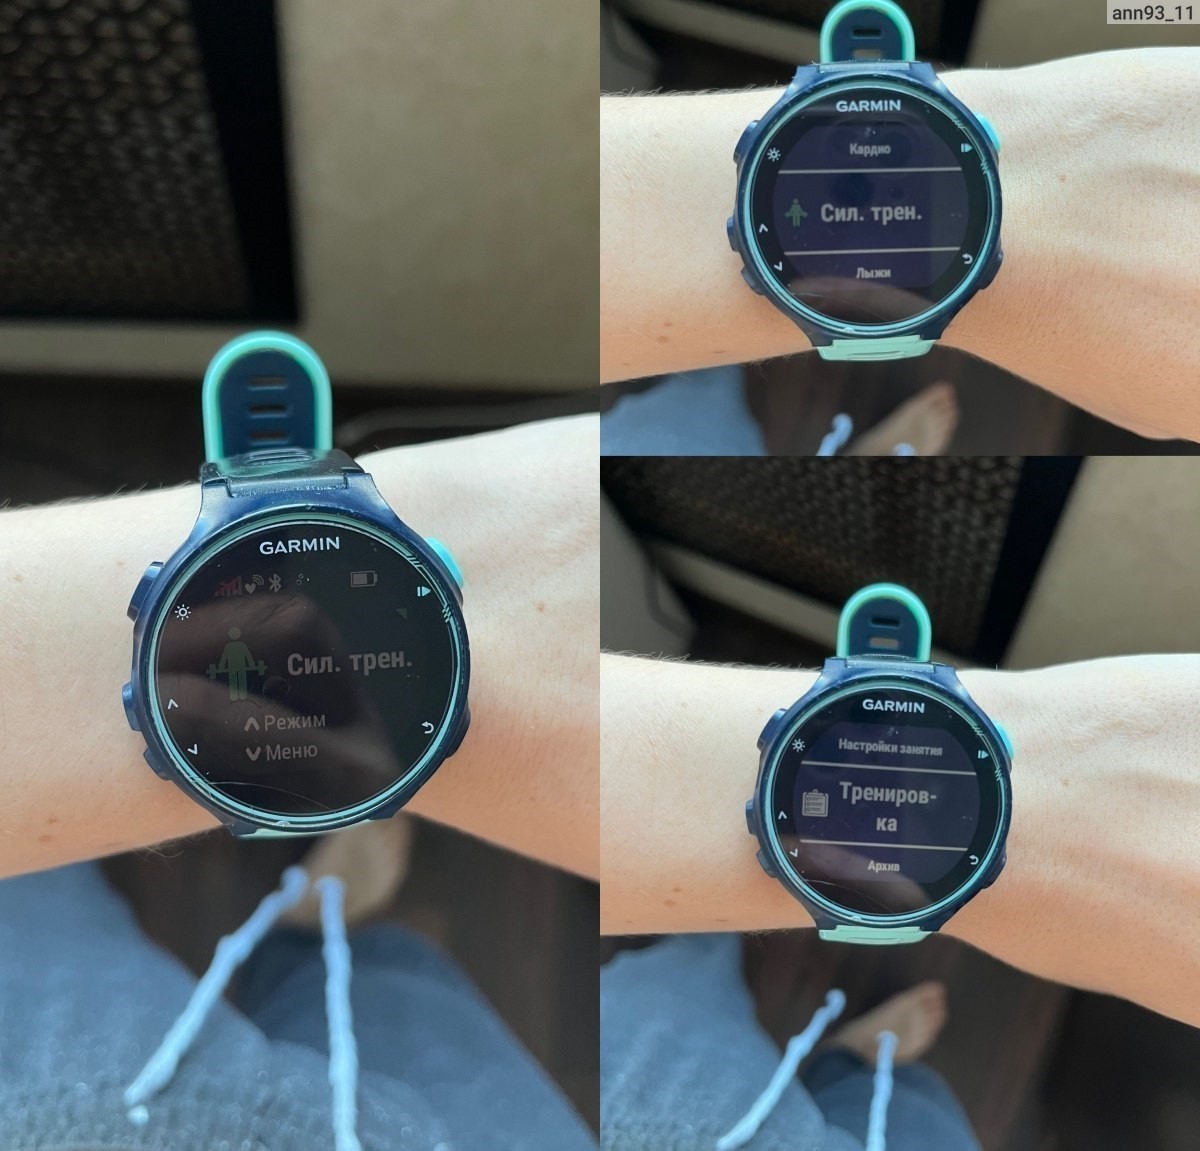
Где найти упражнения
После того как созданная тренировка была загружена в смарт-часы, ее нужно найти. Для этого потребуется сделать следующее (данный алгоритм прописан на основе часов Garmin Fenix 5X, но он примерно одинаковый для всех моделей):
1. Нажать на кнопку START.
2. С помощью кнопок DOWN и UP выбрать нужный вид спорта.
3. Зажать кнопку Menu (средняя левая).
4. Пролистать до пункта «Тренировка», выбрать его при помощи кнопки START.
5. Пролистать до раздела «Календарь тренировок» и снова выбрать его кнопкой START — здесь и будут сохранены созданные упражнения.
Для начала занятий потребуется еще раз нажать на START.
Как провести синхронизацию Garmin Connect и Google Fit
Чтобы синхронизировать «Гармин Коннект» с Google Fit, необходимо сначала скачать на смартфон с ОС Android приложения MyFitnessPal и Strava.
После этого:
1. Запустить Garmin Connect и создать новую учетную запись, указав свое имя, адрес электронной почты и пароль.
2. Открыть приложение MyFitnessPal и здесь тоже создать новую учетную запись.
3. В MyFitnessPal нажать на пункт «Установить на телефоны» и добавить источники с названием Garmin, используя приложение «Гармин», а затем нажать кнопку «Включено».

4. Начнется процесс аутентификации. Для его завершения нужно подключить Garmin, войдя в свою учетную запись этого приложения.
5. Добавить пункт назначения с именем Google Fit и нажать на кнопку «Включить».

6. Нажать на значок вверху и завершить процесс аутентификации с адресом электронной почты, который синхронизируется в течение нескольких секунд.
7. Перейти к настройкам приложения Strava, нажать на пункт «Другие услуги» и подключить его к Google Fit и MyFitnessPal.
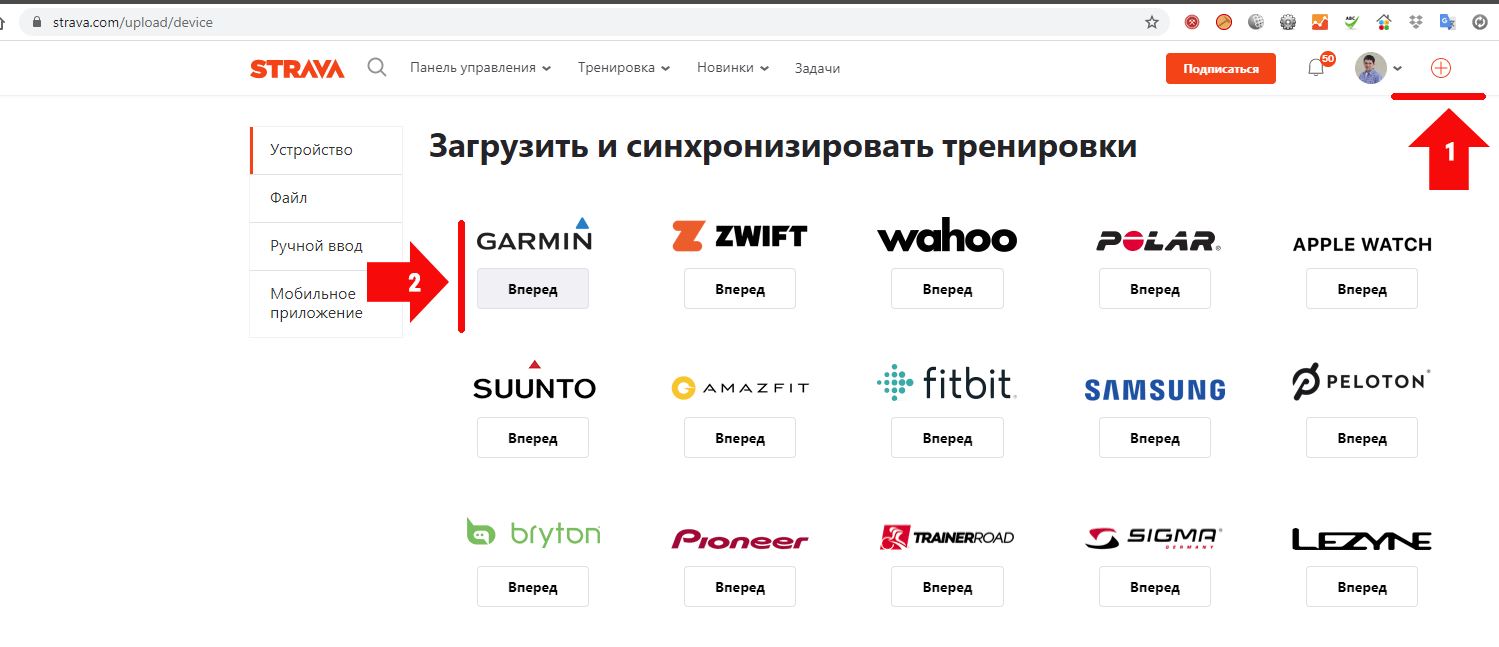
8. В веб-браузере войти в аккаунт Strava и нажать на знак «+» в правом верхнем углу.
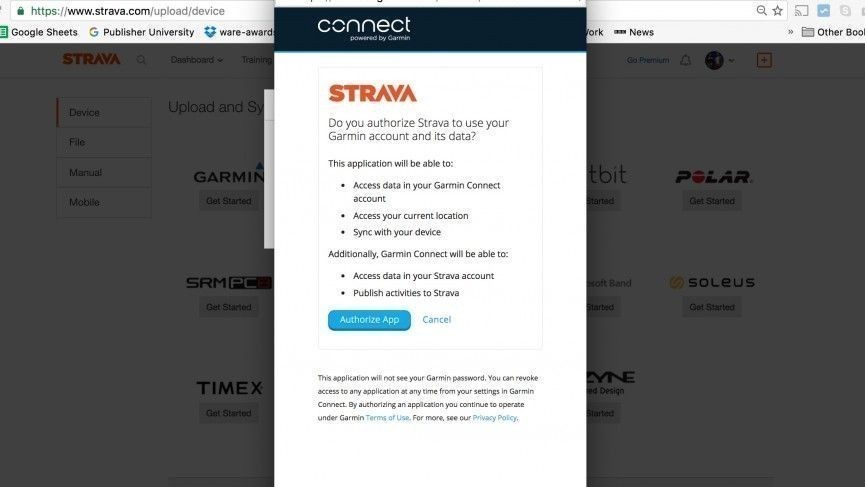
9. Найти ссылку, заявленную Garmin, и поле с надписью «Начать» — нажать на него и следовать дальнейшим инструкциям. После этого появится всплывающее окно Gamin, где будет разрешение на синхронизацию со Strava.
На этом синхронизация Garmin Connect и Google Fit завершена.
Как создать цель
Функция цели занятия задействуется совместно с Virtual Partner, что дает возможность пользователям ставить перед собой конкретную задачу по времени, расстоянию и дистанции, скорости или темпу.
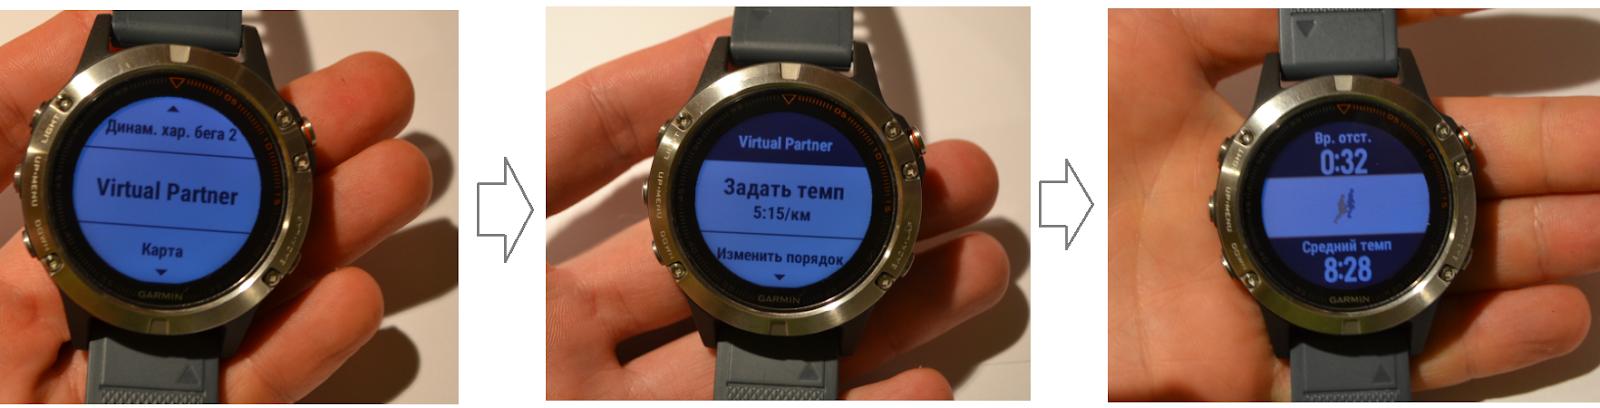
Чтобы создать цель в «Гармин Коннект», необходимо (на примере часов MARQ Drive):
1. Нажать кнопку START в режиме отображения времени.
2. Найти и выбрать подходящее занятие.
3. Зажать кнопку Menu.
4. Выбрать пункт «Тренировка», а затем «Задать цель».
5. Нажать на один из представленных вариантов: «Только расстояние» (для выбора одной из дистанций в списке или постановки целевого значения), «Расстояние и время», «Расстояние и скорость» или «Расстояние и темп». После этого откроется экран цели тренировки, где будет указано расчетное время финиша.
6. Нажать на кнопку Start, чтобы запустить таймер тренировки.
Теперь во время занятий часы в реальном времени будут отображать прогресс в достижении поставленной цели.
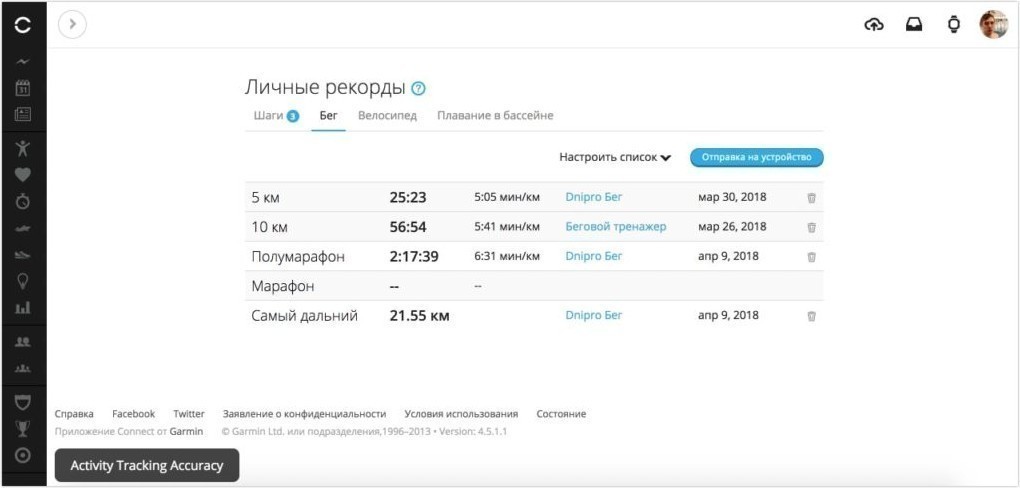
Где посмотреть личные рекорды
Рекорды в Garmin Connect устанавливаются как автоматически при помощи проведения устройством измерения и отслеживания определенных этапов занятий, так и вручную самим пользователем. Просмотреть свои личные достижения можно в смарт-часах после тренировки.
Для этого следует (на примере часов Venu, но подходит и для других моделей):
1. Нажать и удерживать кнопку Menu в режиме отображения времени.
2. Выбрать пункт «Архив», затем «Рекорды».
3. Выбрать вид спорта.
4. Найти и нажать на нужный рекорд.
5. Нажать пункт «Просмотреть рекорд».
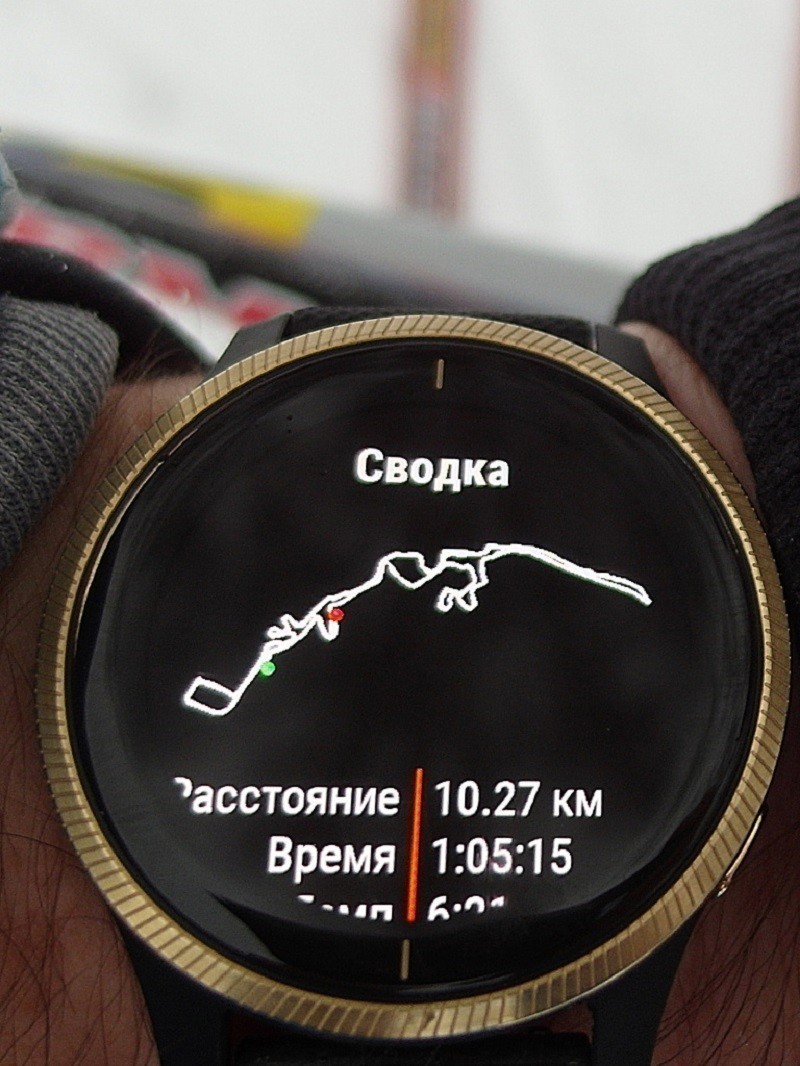
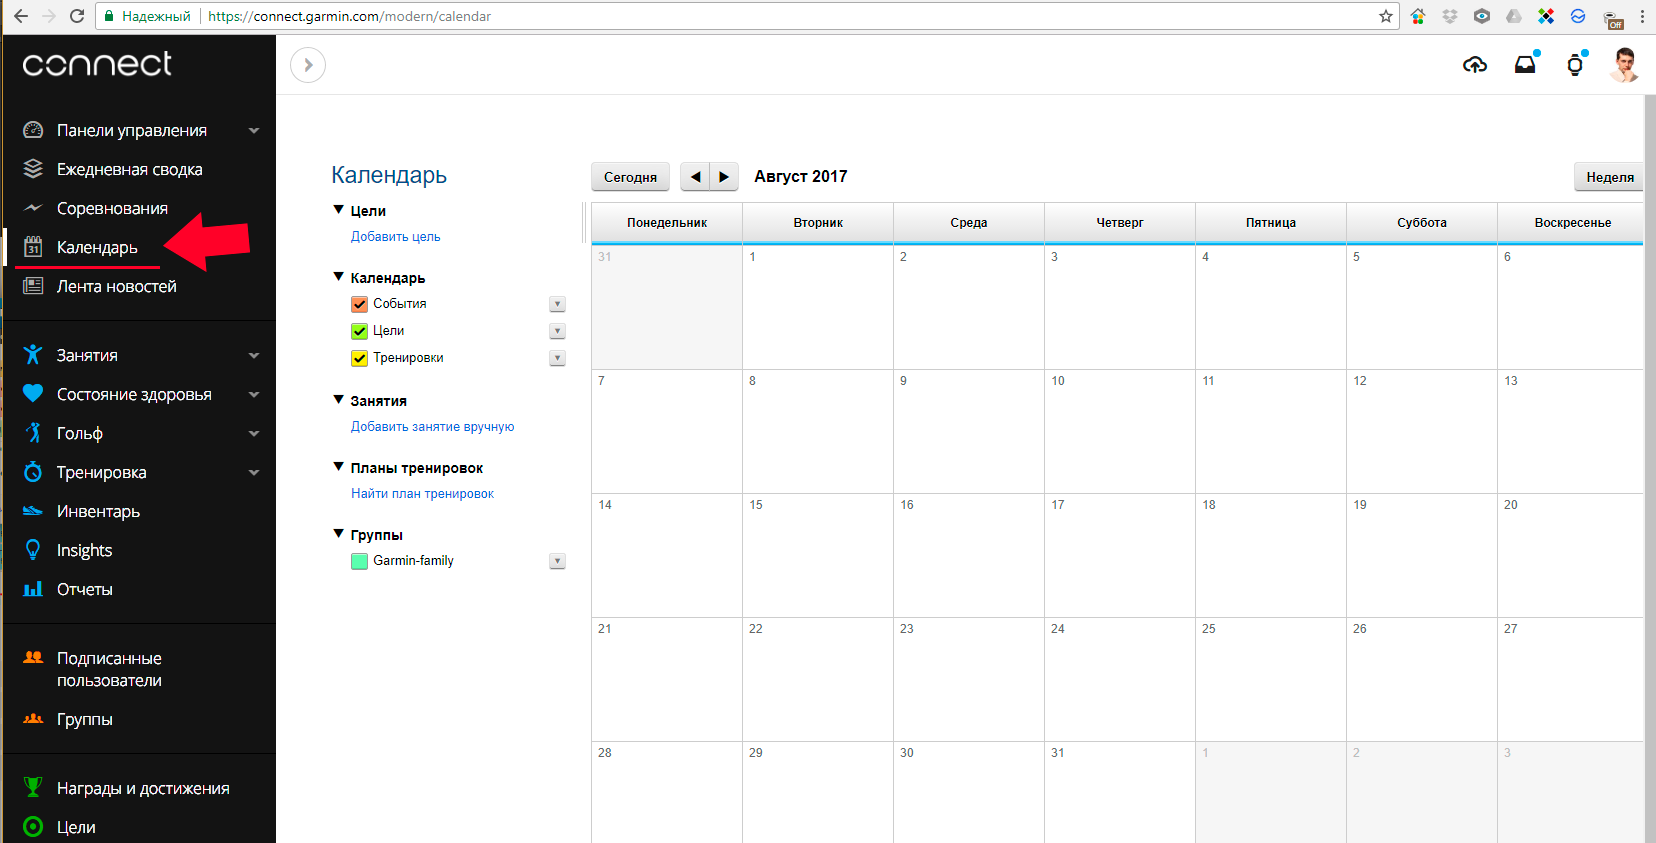
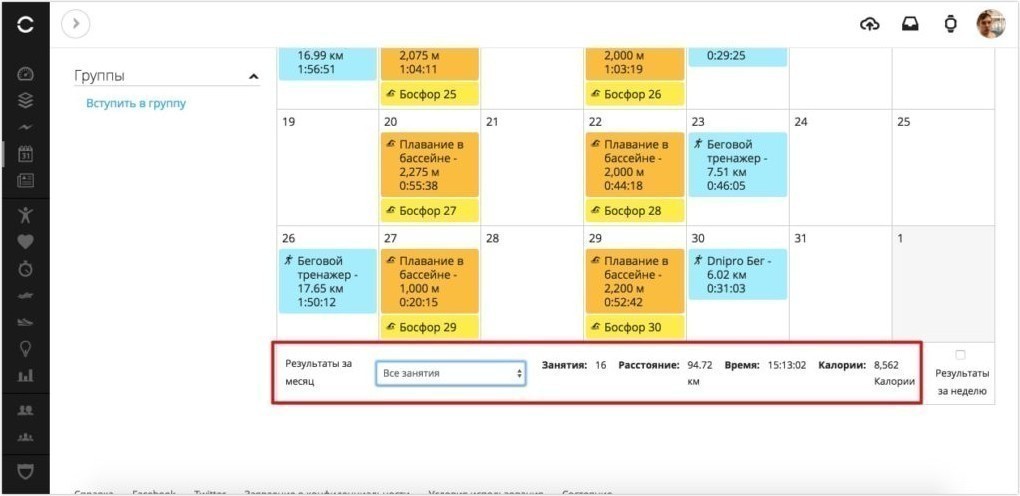
Если есть желание посмотреть свою статистику занятий на смартфоне или ПК, то необходимо в приложении Garmin Connect зайти в «Календарь тренировок», где под самим календарем выводится быстрая статистика за месяц или неделю как по всем видам занятий, так и по каждому отдельно.
Как остановить функцию «Статус тренировки»
Каждый владелец умных часов Garmin может приостановить свой статус тренировки. Чтобы это сделать, необходимо последовать одному из двух алгоритмов:
1. После открытия меню статуса тренировки на часах зажать кнопку Menu, после чего выбрать пункт «Опции», а затем «Приост. «Статус тренировки»».
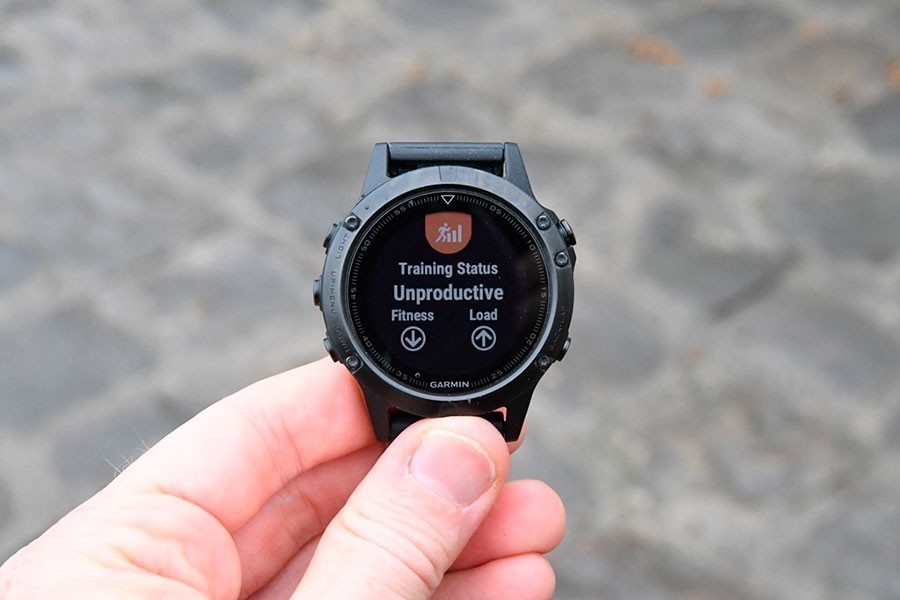
2. В настройках приложения Garmin Connect выбрать пункт «Статистика показателей» → «Статус тренировки» → «Приостановить действие функции «Статус тренировки»».
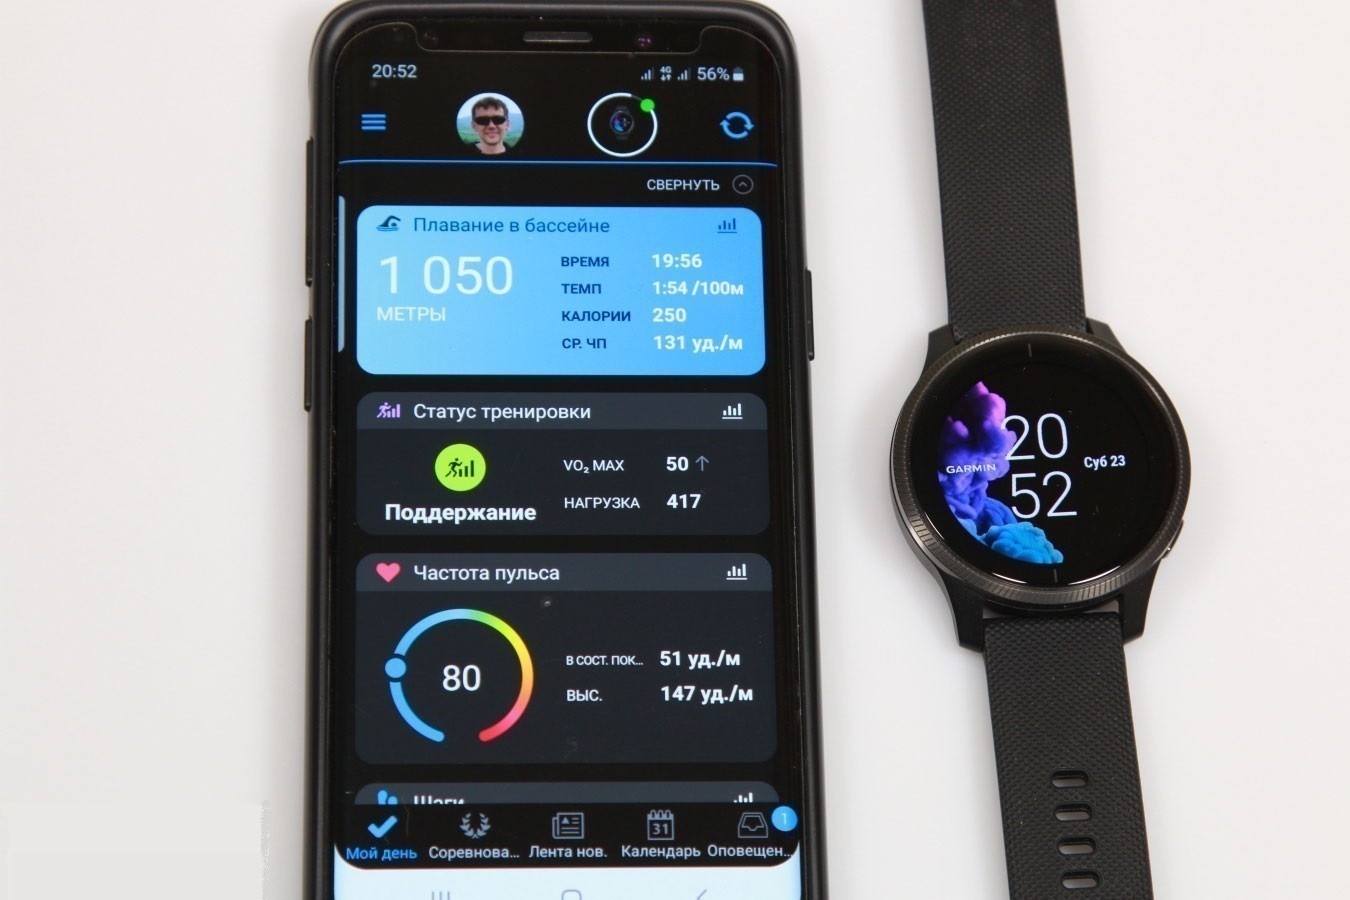
При этом пользователь может продолжать записывать занятия, однако на время приостановки статуса рекомендации по выполнению упражнений и отзыв о восстановлении будут отключены.
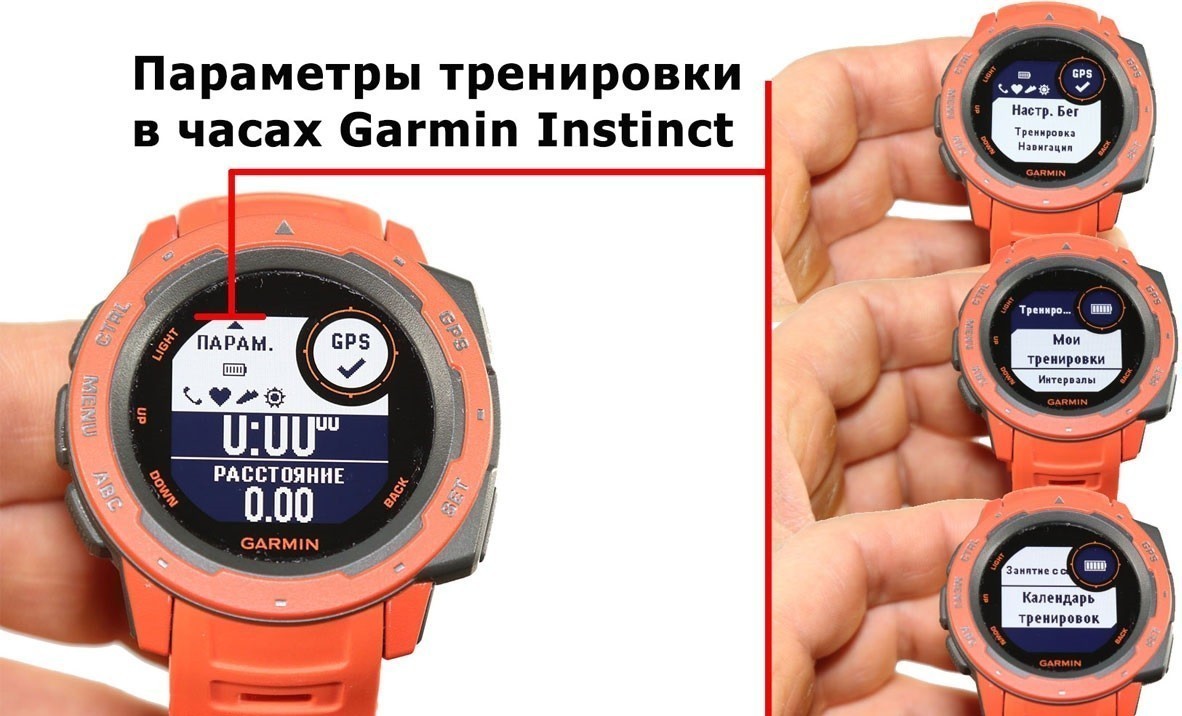
Как удалить и добавить тренировку
Чтобы изменить список тренировок, удалив ненужный комплекс занятий, необходимо (на примере часов Instinct):
1. В режиме отображения циферблата нажать и удерживать кнопку Menu.
2. Выбрать поочередно пункты: «Настройки» → «Занятия и приложения».
3. Найти нужное занятие.
4. Удалить его, используя один из следующих вариантов:
- выбрать пункт «Удалить из Избранного», чтобы тренировка не отображалась в списке избранных;
- выбрать пункт «Убрать», чтобы удалить занятие из общего списка.

Теперь список занятий изменен, и можно добавлять новые, актуальные тренировки.
Как изменить расписание
Если есть желание пропустить, перенести, обрезать занятие, то в Garmin Connect это возможно. Причем программа сама изменит расписание по факту пропущенной тренировки.
Если планируется пропустить занятие, то сообщить об этом Garmin Coach можно при помощи часов.
Если же выполнение упражнений нужно перенести на другой день, тогда потребуется:
- Зайти в приложение Garmin Connect.
- Перейти к личному тренеру (Garmin Coach).
- Выбрать предстоящую тренировку.
- Выбрать другую дату занятия при помощи меню в верхнем правом углу.
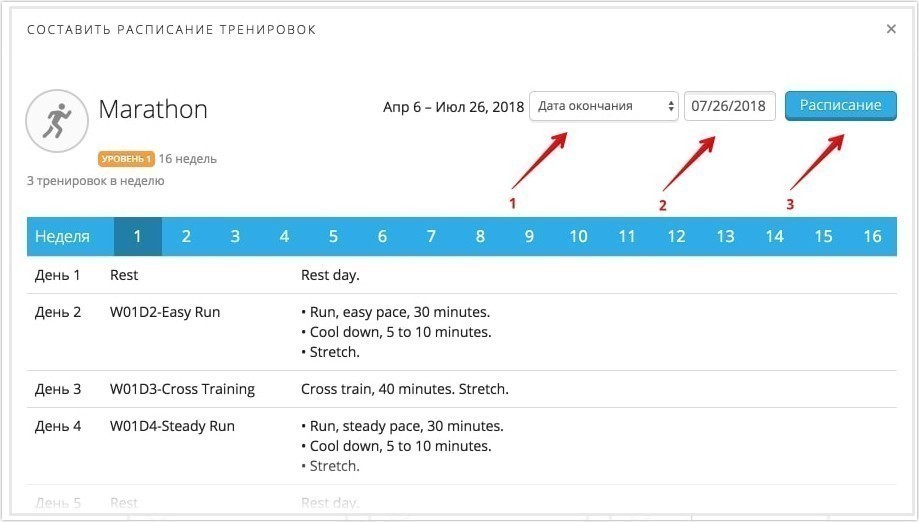
В случае слишком частого переноса тренировок программа Garmin Coach может предложить пользователю на время приостановить занятия.
Что такое Garmin Coach
Garmin Coach — бесплатная тренинг-платформа, которая подготавливает пользователей к пяти- и десятикилометровым забегам и полумарафонам.

Такой компьютерный «тренер» может определить уровень подготовки пользователя, составить индивидуальный план занятий с учетом возможностей владельца часов, задавать цели.
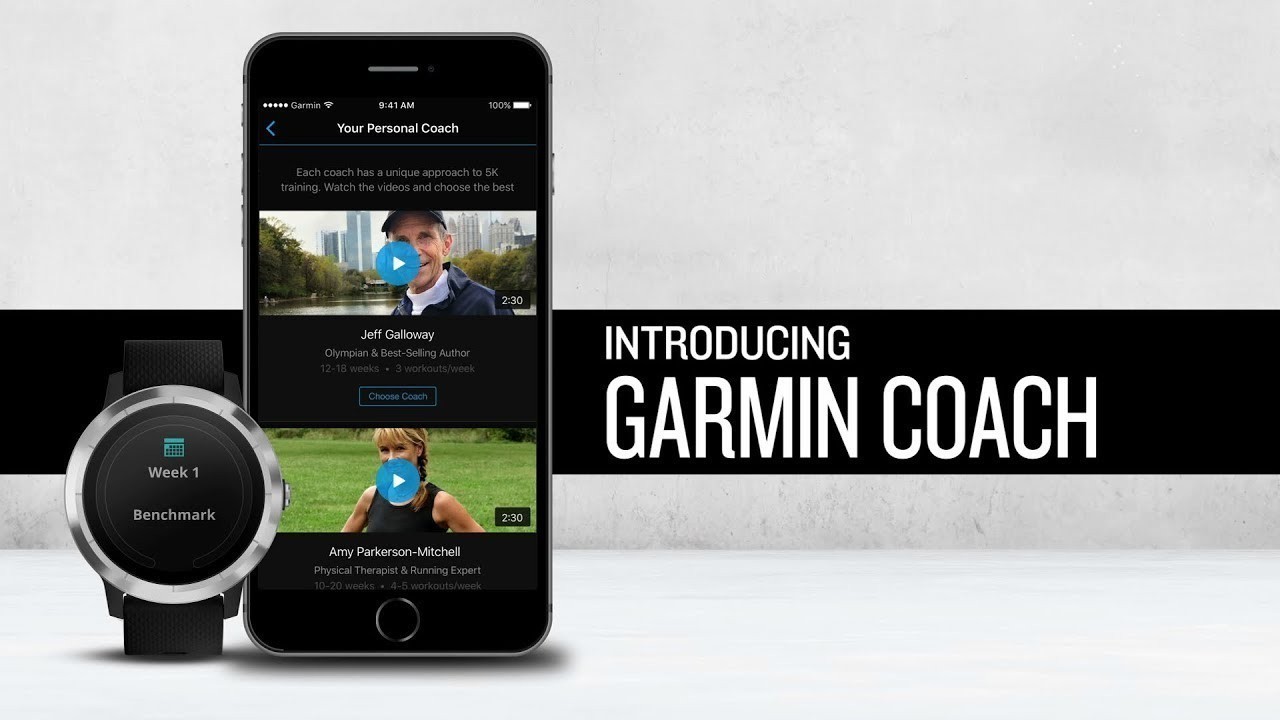
При этом Garmin Coach следит за тем, как выполняются упражнения. Если пользователь справился с заданием быстро и легко, программа может предложить дополнительные занятия и увеличит нагрузку (например, в часах Garmin Fenix 6 предусмотрена силовая тренировка).
Кроме того, что пользователь получит план тренировок, ему будут предоставлены и анимированные упражнения к каждому занятию, а также полезные статьи о подготовке к длительным забегам, о правильном питании.
Такая программа подходит как тренерам, профессиональным спортсменам, так и новичкам в области пробежек — для каждого занятия подбираются отдельно (так, во многих часах предусмотрен обычный, кроссовый, маховый бег).

Что такое «Шкала подв сбр» Garmin?
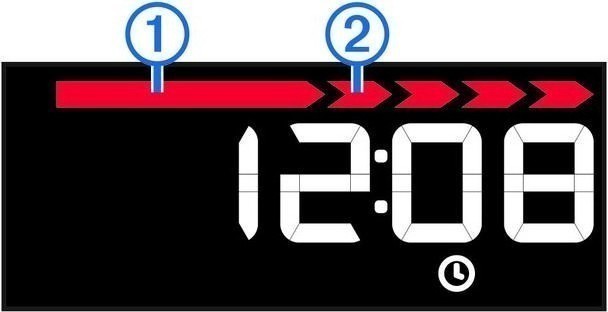
Владельцы смарт-часов Garmin, разбираясь с функционалом гаджета, нередко могут заметить всплывающее уведомление «Шкала подв. сбр.», появляющееся на экране одновременно с короткой вибрацией.
Данное сообщение связано с функцией трекера активности. На английском языке она звучит так: «Move bar cleared», что можно перевести на русский как «Шкала подвижности сброшена».
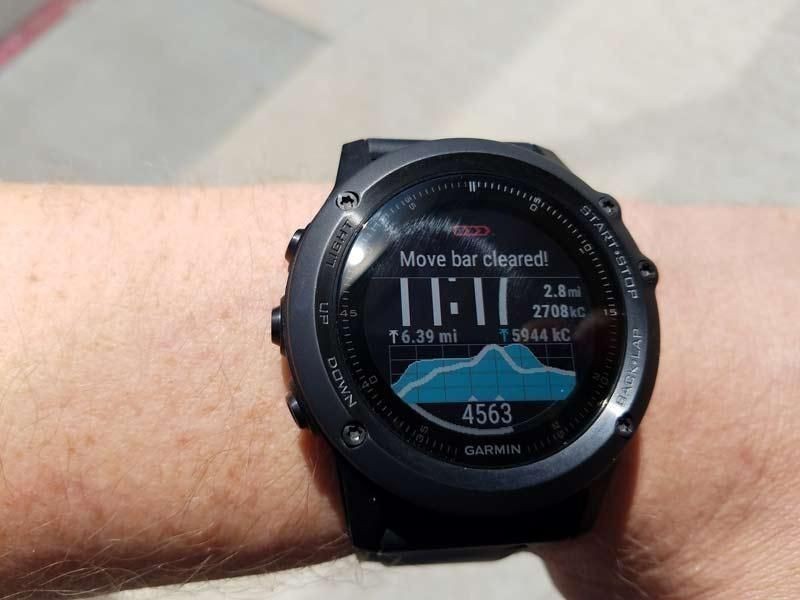
Дело в том, что если пользователь в течение одного часа остается на одном месте, часы начинают вибрировать, а на экране высвечивается надпись «Вперед!». После этого шкала подвижности, имеющая вид полоски, начинает постепенно заполняться — по одному сегменту каждые 15 мин. Когда пользователь встает и передвигается, она сбрасывается и высвечивается соответствующее уведомление: «Шкала подв. сбр.».
Эта функция выступает в качестве напоминания о необходимости быть активным.
Используемые в часах Garmin программы для тренировок
В большинство моделей смарт-часов Garmin встроено несколько различных программ, необходимых для занятий спортом:
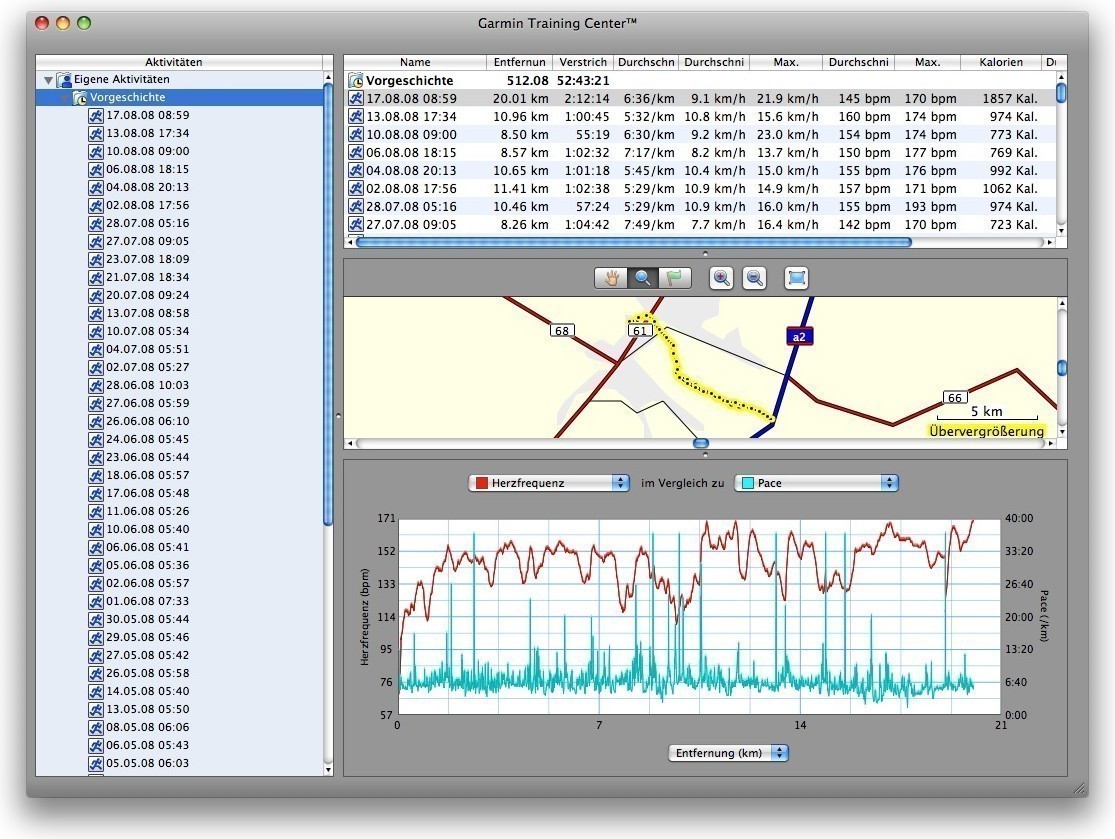
1. Training Center. Это программа для работы со спортивными навигаторами «Гармин». Основными ее возможностями являются составление тренировок, таблица результатов показаний, просмотр пройденного трека на карте, отображение графиков показателей высоты, скорости, темпа, пульса, уровня стресса и т.п.
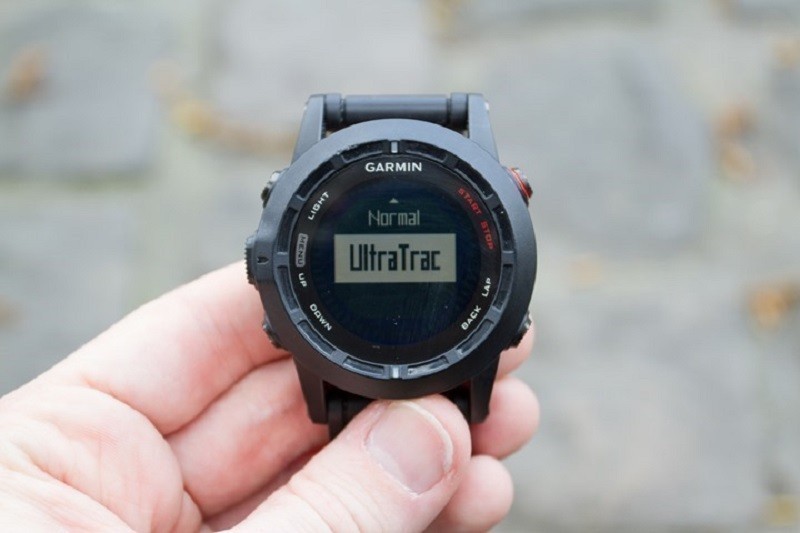
2. UltraTrac. Данный режим выступает настройкой GPS, которая обеспечивает периодическое отключение навигатора для экономии заряда аккумулятора. В таком случае для расчета расстояния и скорости используется акселерометр.
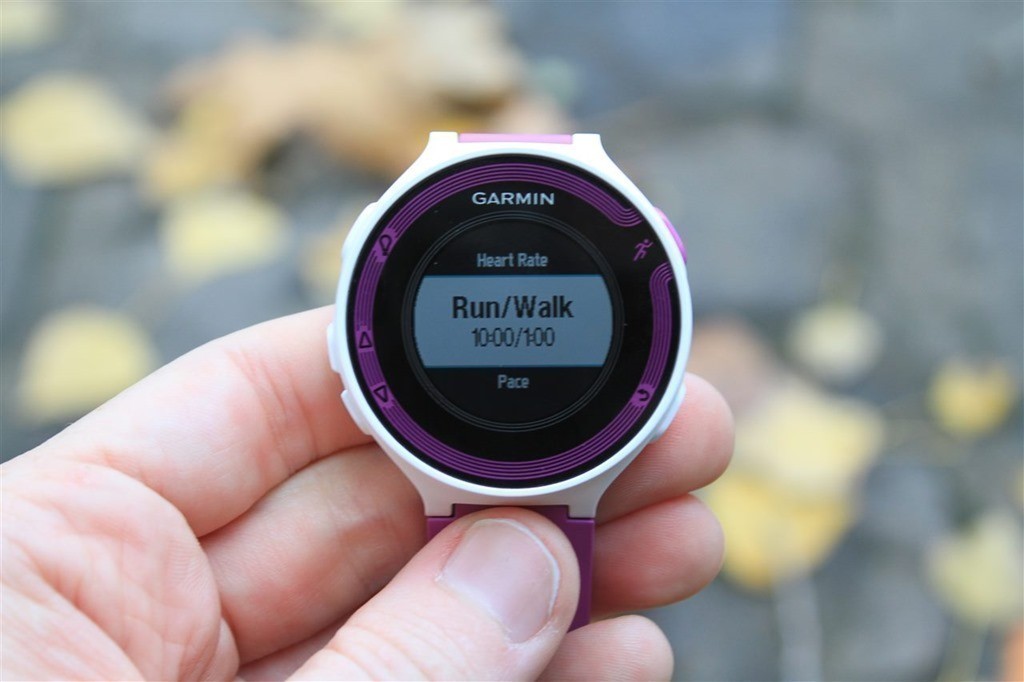
3. Run Walk Run. Это особая стратегия Garmin, представляющая собой чередование бега и ходьбы, что позволяет добиться значительных результатов в подготовке к забегу на дальние дистанции.
Теперь разобраться с созданием тренировок, изменением расписания, синхронизацией устройств и просмотром личных рекордов станет гораздо проще. В целом, интерфейс у большинства часов Garmin довольно простой. Если внимательно прочитать инструкцию, настройка занятий не вызовет затруднений.
User manual
View the manual for the Garmin Astro 220 here, for free. This manual comes under the category GPS devices and has been rated by 20 people with an average of a 8.6. This manual is available in the following languages: English. Do you have a question about the Garmin Astro 220 or do you need help?
Ask your question here
Garmin Astro 220 specifications
Below you will find the product specifications and the manual specifications of the Garmin Astro 220.
The Garmin Astro 220 is a gps device designed for outdoor activities such as hunting and hiking. With a battery life of up to 24 hours, it runs on AA batteries and weighs 185 g. The device has a width of 57 mm, depth of 32 mm, and height of 159 mm.
The Astro 220 features a high-sensitivity GPS receiver that allows tracking of up to 10 dogs at once, with a range of up to 7 kilometers. It also offers a convenient way to track distances travelled and elevation changes. The device’s bright, sunlight-readable color display allows for easy viewing even in harsh outdoor lighting conditions.
The Astro 220 is compatible with optional map data, allowing you to add detailed maps to enhance your hunting or hiking experience. It also features a microSD™ card slot, allowing you to store additional maps or other data.
Overall, the Garmin Astro 220 is a durable and reliable gps device that provides advanced tracking features for outdoor activities. Its lightweight and compact design make it easy to carry and use on the go.
General
| Brand | Garmin |
| Model | Astro 220 | 010-00548-00 |
| Product | GPS device |
| EAN | 753759063931, 7537590639318, 0753759063931 |
| Language | English |
| Filetype | User manual (PDF) |
Battery
Weight & dimensions
| Weight | 185 g |
| Width | 57 mm |
| Depth | 32 mm |
| Height | 159 mm |
show more
Frequently Asked Questions
Can’t find the answer to your question in the manual? You may find the answer to your question in the FAQs about the Garmin Astro 220 below.
What is the weight of the Garmin Astro 220?
The Garmin Astro 220 has a weight of 185 g.
What is the height of the Garmin Astro 220?
The Garmin Astro 220 has a height of 159 mm.
What is the width of the Garmin Astro 220?
The Garmin Astro 220 has a width of 57 mm.
What is the depth of the Garmin Astro 220?
The Garmin Astro 220 has a depth of 32 mm.
Is the manual of the Garmin Astro 220 available in English?
Yes, the manual of the Garmin Astro 220 is available in English .
Is your question not listed? Ask your question here
Can You Chip In?
Dear Patron: Please don’t scroll past this. The Internet Archive is a nonprofit fighting for universal access to quality information. We build and maintain all our own systems, but we don’t charge for access, sell user information, or run ads. We’d be deeply grateful if you’d join the one in a thousand users that support us financially.
We understand that not everyone can donate right now, but if you can afford to contribute this Friday, we promise it will be put to good use. Our resources are crucial for knowledge lovers everywhere—so if you find all these bits and bytes useful, please pitch in.
Can You Chip In? Dear Patron: Please don’t scroll past this. The Internet Archive is working to keep the record straight by recording government websites, news publications, historical documents, and more. If you find our work useful, please pitch in.