
Сформировать заявку на ремонт можно по телефонам с 8 до 22 часов ежедневно:
+7 (495) 215 – 14 – 41
+7 (903) 722 – 17 – 03
или в любое время суток посредством online-заявки на сайте. В разговоре с менеджером сообщите, пожалуйста, следующую информацию:
- Марку и модель вашей стиралки.
- Признаки неисправности. Например, стиральная машина долго набирает воду, плохо отжимает белье или от нее пахнет горелым.
- Подходящие вам день и время ремонта.
- Ваши имя, адрес и телефон.
В день ремонта мастер свяжется с вами по указанному номеру, чтобы повторно согласовать время ремонта.
Если ваша Miele WT 2670 WPM неисправна, использовать ее категорически не рекомендуется! Поломка одной детали может спровоцировать перегрузку и выход из строя других элементов. Обнаружив неисправность стиральной машины, лучше сразу доверьте ее специалистам «РемБытТех»! Наш мастер приедет в любое удобное вам время в течение суток после вызова и отремонтирует стиралку с гарантией так, что ваша техника прослужит вам ещё долгие годы.
Сушка (без стирки)
Отдельная сушка необходима, если
не все выстиранные текстильные
изделия подлежат машинной сушке
или если партия белья превышает
максимальную загрузку для сушки.
^ Перед сушкой проверьте, какой
символ сушки указан на этикетке
изделия:
q для сушки при нормальной
температуре
r для сушки при низкой температуре
(выбрать дополнительную функ-
цию
Щадящая)
sне допускается машинная сушка.
Если символ отсутствует, то следуй-
те следующим правилам:
– Хлопок/лен и синтетика сушатся с
соответствующей степенью сушки.
– Текстильные изделия из чувстви-
тельных материалов, например,
акрила, сушатся при низкой тем-
пературе (дополнительно выбери-
те функцию
Щадящая).
Советы по проведению сушки
Не сушите мокрые текстильные из-
делия, т.е. если с них капает вода!
После стирки отжимайте изделия в
течение не менее 30 секунд.
– Шерстяные и полушерстяные из-
делия могут сваляться и дать
усадку. Сушите такие изделия
только в программе
Шерсть.
– Внутренняя тонкая ткань в издели-
ях с наполнением из пуха может, в
зависимости от качества, дать
усадку. Сушите такие изделия
только в программе
Деликатная.
– Изделия из чистого льна сушите
только в том случае, если есть со-
ответствующее указание изгото-
вителя на этикетке по уходу. В
противном случае ткань может
стать шероховатой. Сушите такие
изделия только в программе
Деликатная.
– Трикотажные изделия (например,
футболки, нижнее белье) при пер-
вой стирке часто садятся. Поэтому
не пересушивайте их, чтобы избе-
жать дальнейшей усадки. При не-
обходимости покупайте трикотаж-
ные изделия на один или два раз-
мера больше.
– Накрахмаленное белье можно су-
шить. Для более сильного эффек-
та используйте двойную дозу
крахмала.
– Образование складок у текстиль-
ных изделий, требующих особого
ухода происходит тем сильнее, чем
больше величина загрузки машины.
В первую очередь это относится к
очень чувствительным тканям (на-
пример, у рубашек, блуз).Поэтому
рекомендуется уменьшать величи-
ну загрузки или использовать про-
грамму
Рубашки.
– Не допускается сушка новых тек-
стильных изделий темного цвета
вместе со светлыми. Существует
опасность, что изделия могут ок-
раситься или на них могут осесть
ворсинки другого цвета.
СУШКА
31

A Подготовить белье
^ Отсортируйте текстильные изде-
лия в зависимости от
типа волокон/ткани и остаточной
влажности, насколько это возмож-
но. Таким образом, Вы получите
равномерно высушенное белье.
B Включить стирально-сушиль-
ную машину
Включается освещение барабана.
C Выбрать программу
^ Выберите нужную программу суш-
ки с помощью переключателя.
На дисплее высвечивается выбран-
ная программа.
Хлопок/Лен
Доп. программы:
При выборе переключателем поло-
жения
Доп. программы список этих
программ появляется на дисплее.
E
Темное белье
Рубашки
Джинсы
H
^ Выделите нужную программу и
подтвердите выбор кнопкой ОК.
^ Нажимайте кнопку
Стирка/Сушка
столько раз, пока не будет гореть
только индикатор «Сушка».
Индикатор
Стирка не должен го-
реть, иначе перед сушкой начнет-
ся соответствующая программа
стирки.
1600 об/мин
В шкаф
Длится:
1:28 ч
или
Джинсы
900 об/мин
В шкаф
Длится:
1:15 ч
^ С помощью кнопок – или + Вы мо-
жете изменить выделенный пара-
метр — термоотжим. Подвердите
выбор кнопкой OK, индикация на
дисплее переходит к параметру
«Степень сушки».
^ С помощью кнопок – или + Вы мо-
жете изменить степень сушки.
Термоотжим не выполняется при
выборе программы
Деликатная
или времени сушки.
^ Выберите дополнительную функ-
цию
Щадящая, если нужно.
Термоотжим не выполняется при
выборе функции
Щадящая (исклю-
чение: программа
Экспресс).
^ Если нужно, выберите время от-
срочки старта.
СУШКА
32

D Загрузить бельем стирально-
сушильную машину
^ Откройте дверцу люка.
^ Уложите расправленное белье в
барабан.
Учитывайте данные о максималь-
ной загрузке белья в главе «Сушка»,
разделе «Обзор программ». При
перегрузке машины текстильные
изделия изнашиваются, а
результат сушки ухудшается.
E Закрыть дверцу люка
Следите за тем, чтобы между
дверцей и уплотнением не заще-
милось белье.
При сушке в белье не должны на-
ходиться средства для дозирова-
ния, например, пакетики или плас-
тиковые шарики. Эти предметы
могут расплавиться при сушке и
повредить машину и белье.
При сушке также должен быть от-
крыт водопроводный кран.
F Запустить выполнение програм-
мы
^ Нажмите мигающую кнопку
Старт/
Стоп.
На дисплее появляется предполага-
емая продолжительность программы.
Она зависит от остаточной влажнос-
ти белья, которая постоянно опреде-
ляется снова. В некоторых случаях в
связи с этим возможны скачки в
показаниях времени. Обратный от-
счет остаточного времени идет по ми-
нутам. Кроме того, высвечивается ин-
дикация хода программы и
достигнутой степени сушки.
Освещение барабана выключается
после запуска программы.
G Завершение программы — вынуть
белье
В режиме защиты от сминания попе-
ременно появляется индикация:
Защита от сминания
и
i
Конец программы.
Перед выключением
выньте бель¸.
^ Поверните переключатель про-
грамм в положение
Стоп.
^ Откройте дверцу люка.
^ Достаньте белье.
Не оставляйте белье в барабане!
Оставшееся в барабане белье мо-
жет быть повреждено в результа-
те пересушивания.
Важно! Перед выключением
стирально-сушильной машины все-
гда вынимайте из нее белье.
Только в этом случае будет обес-
печено безупречное функциониро-
вание индикации загрузки.
^ Отключите стирально-сушильную
машину.
Учитывайте указания главы «По-
сле каждой стирки или сушки».
СУШКА
33

Дополнительные функции 34, Щадящая 34, Термоотжим 34
Добавление или извлечение белья 34, Сушка, Дополнительные функции, Добавление или извлечение белья Чат поддержки
- Изображение
- Текст
Дополнительные функции
Щадящая
Во время сушки температура пони-
жается.
Выполняется более бережная сушка
чувствительных текстильных изде-
лий, например, из акрила (символ по
уходу
r).
При выборе функции «Щадящая» тер-
моотжим не выполняется (исключе-
ние: программа
Экспресс).
Из-за уменьшения температуры при
использовании функции
Щадящая
увеличивается продолжительность
программы.
Дополнительная функция
Щадящая действенна только при
сушке.
Термоотжим
В программах
Хлопок/Лен, Синтети-
ка, Экспресс, Автоматическая,
Темное белье, Рубашки, Джинсы,
Спортивное белье и Верхняя одежда
для уменьшения расхода электро-
энергии при сушке проводится тер-
моотжим.
Исключение: если включена допол-
нительная функция
Щадящая, то
термоотжим проводится только в
программе
Экспресс.
Исключение: термоотжим не про-
водится, если в программе сушки вы-
брана
сушка по времени или про-
грамма
Деликатная.
Максимальная скорость вращения
барабана при проведении термоот-
жима соответствует допустимой ско-
рости окончательного отжима в со-
ответствующей программе стирки.
Добавление или извлечение
белья
^ Нажмите кнопку
Дверца, чтобы от-
крылась дверца люка.
,
Не касайтесь металлической
крышки, которая находится вну-
три на стекле дверцы, и задней
стороны барабана. Существует
опасность получения ожога из-за
высоких температур.
^ Добавьте или извлеките часть бе-
лья.
^ Закройте дверцу люка.
Выполнение программы будет про-
должено автоматически.
Оставшееся время сушки,
отображающееся после этого на дис-
плее, может отличаться от факти-
ческого.
Дверца люка не открывается,
если:
– температура выше 70°C.
– машина достигла этапа программы
Отжим.
– включена электронная блокиров-
ка программы.
СУШКА
34

Обзор программ
Хлопок/Лен
макс. 2,5 кг*
Экстрасушка, В шкаф+, В шкаф**, Сушка по времени
1)
Вид текстиля Однослойные и многослойные или однородные текстильные из-
делия из хлопка, например, футболки, нижнее белье, махровые
полотенца, байковое постельное белье, белье для младенцев.
Указание
Трикотажные изделия (например, футболки, нижнее белье)
нельзя сушить в программе
Экстрасушка — они могут дать усад-
ку.
Дополнитель-
ные функции
Щадящая, термоотжим (макс. 1600 об/мин)
Под утюг r, Под утюг rr, В глад. машину, Сушка по времени
1)
Вид текстиля Хлопковая или льняная ткань, например, столовое и по-
стельное белье, накрахмаленное белье.
Указание
Сверните белье, предназначенное для обработки в гладильной
машине, до глажения, при этом оно будет оставаться влажным.
Дополнитель-
ные функции
Щадящая, термоотжим (макс. 1600 об/мин)
Синтетика
макс. 1,25 кг*
В шкаф+, В шкаф**, Сушка по времени
1)
Вид текстиля Требующие особого ухода текстильные изделия из синтети-
ки или смесовых тканей, например, пуловеры, платья, брю-
ки, блузки, спецовки, скатерти.
Дополнитель-
ные функции
Щадящая, термоотжим (макс. 1200 об/мин)
Под утюг r, Сушка по времени
1)
Вид текстиля Требующие особого ухода текстильные изделия из хлопка
или смесовых тканей, например, хлопок/синтетика. Например:
блузы, спецовки, скатерти, которые нужно гладить.
Дополнитель-
ные функции
Щадящая, термоотжим (макс. 1200 об/мин)
* Вес сухого белья
** Указание для испытательных организаций: настройка программы для испытания по норме
EN 61121
СУШКА
35

Тонкое белье
макс. 1,0 кг*
8 минут
Вид текстиля Текстильные изделия из синтетики, смесовых тканей, искусст-
венного шелка или обработанного хлопка, например, блузки.
Указание
Текстильные изделия лишь «разрыхляются», но не высушивают-
ся до конца. Их следует вынуть сразу по окончании программы.
Шерсть
макс. 1,0 кг*
3 минут
Вид текстиля Текстильные изделия из чистой шерсти или шерсти с други-
ми волокнами.
Указание
Изделия сушатся за короткое время, при этом они расправ-
ляются и становятся пушистыми. Однако они не будут высу-
шены полностью. Изделия следует вынуть из машины сразу
по окончании программы.
Экспресс
макс. 2,5 кг*
Экстрасушка, В шкаф+, В шкаф
Под утюг r, Под утюг rr, В глад. машину, Сушка по времени
1)
Вид текстиля Небольшая партия белья, которую можно сушить в програм-
ме Хлопок/Лен.
Дополнитель-
ные функции
Щадящая, термоотжим (макс. 1600 об/мин)
Автоматическая
макс. 2,5 кг*
В шкаф+, В шкаф, Под утюг r, Сушка по времени
1)
Вид текстиля Смешанная загрузка из цветного белья и изделий, требу-
ющих особого ухода.
Дополнитель-
ные функции
Термоотжим (макс. 1200 об/мин)
Темное белье
макс. 2,5 кг*
В шкаф+, В шкаф, Под утюг r, Сушка по времени
1)
Изделия
Темное белье из хлопка или смесовых тканей.
Дополнитель-
ные функции
Щадящая, термоотжим (макс. 1200 об/мин)
* Вес сухого белья
СУШКА
36

Рубашки
макс. 1,0 кг*
В шкаф+, В шкаф, Под утюг r, Сушка по времени
1)
Изделия
Рубашки и блузки
Дополнительные функции Термоотжим (макс. 600 об/мин)
Джинсы
макс. 2,5 кг*
Экстрасушка, В шкаф+, В шкаф
Под утюг r, Под утюг rr, В глад. машину, Сушка по времени
1)
Дополнительные функ-
ции
Термоотжим (макс. 900 об/мин)
Спортивное белье
макс. 2,0 кг*
В шкаф+, В шкаф, Под утюг r, Сушка по времени
1)
Изделия
Пригодная для сушки спортивная одежда.
Дополнительные функции Термоотжим (макс. 1200 об/мин)
Верхняя одежда
макс. 1,0 кг*
В шкаф+, В шкаф, Под утюг r, Сушка по времени
1)
Изделия
Верхняя одежда из пригодного для машинной
сушки материала.
Дополнительные функции Термоотжим (макс. 800 об/мин)
Пропитка
макс. 1,5 кг*
Под утюг r
Изделия
Для дополнительной термической обработки
текстильных изделий, пригодных для сушки, ко-
торые были обработаны средством пропитки.
Дополнительные функции Щадящая
* Вес сухого белья
1)
Сушка по времени: белье можно высушить теплым воздухом в програм-
мах
Хлопок/Лен, Синтетика, Экспресс, Автоматическая, Темное белье,
Рубашки, Джинсы, Спортивное белье и Верхняя одежда; для этого можно
выбрать время от 15 минут до 2 часов). При этом температура сушки будет
согласована с соответствующей программой.
Также в этих программах для уменьшения образования складок можно вы-
брать программу
Деликатная (текстильные изделия не будут высушены до
конца).
СУШКА
37

Деликатная
макс. 2,5 кг*
8 минут
Вид текстиля
Изделия из хлопка или льна. Требующие особого ухода тек-
стильные изделия из хлопка, смесовых тканей или синтети-
ки, например, брюки из хлопка, спортивные куртки с
капюшоном, рубашки.
Указание
Для уменьшения образования складок после предшеству-
ющего отжима, если текстильные изделия будут вынуты из
машины сразу по окончании программы и высушены на воз-
духе.
Теплый обдув
макс. 2,5 кг*
От 15 минут до 2 часов
Вид текстиля
Сушка или проветривание отдельных изделий.
Указание
Не выбирайте сразу самое продолжительное время сушки.
Методом проб установите оптимальное время сушки.
Холодный обдув
макс. 2,5 кг*
От 15 минут до 2 часов
Вид текстиля
Любые текстильные изделия, которые необходимо только
проветрить.
* Вес сухого белья
СУШКА
38

Стирка и сушка без
перерыва
Стирка и сушка без перерыва ре-
комендуется всегда в том случае,
если имеется равное количество
белья как для стирки, так и для
сушки, и не превышается макси-
мально допустимая загрузка для
сушки.
Обязательно прочитайте главы
«Стирка» и «Сушка».
A Подготовить и рассортировать
белье
B Включить стирально-сушиль-
ную машину
C Выбрать программу
^ Установите переключатель про-
грамм на желаемую программу.
Синтетика
^ Нажимайте кнопку
Стирка/сушка
столько раз, пока не загорятся ин-
дикаторы
Стирка и Сушка.
40°C
900 об/мин
В шкаф
Длится:
1:26 ч
^ Выберите нужную температуру и
скорость отжима, подтвердите
значения с помощью кнопки OK.
При непрерывной стирке и сушке
во избежание прилипания белья
после стирки выполняется отжим с
максимальной скоростью 1200 об/
мин.
^ Выберите нужную степень сушки
или время сушки.
Джинсы
40°C
900 об/мин ~
Длится:
2:15 ч
При выборе пункта
Доп. программы
стрелка на дисплее (за значением
скорости отжима) указывает на то,
что далее следует индикация соот-
ветствующей степени сушки в про-
грамме.
^ По желанию или необходимости
задайте другие дополнительные
функции.
Для термоотжима будет использо-
вана указанная скорость отжима
для стирки.
Термоотжим не выполняется при
выборе функции
Щадящая
(исключение: программа
Экс-
пресс).
^ Если нужно, выберите время от-
срочки старта.
СТИРКА И СУШКА
39

D Загрузить бельем стирально-
сушильную машину
^ Откройте дверцу люка и положите
белье в барабан.
Принимайте во внимание индика-
цию величины загрузки.
При сушке и стирке в белье не
должны находиться средства для
дозирования, например, пакетики
или пластиковые шарики. Эти
предметы могут расплавиться при
сушке и повредить машину и белье.
E Закрыть дверцу люка
F Загрузить моющее средство
Примите во внимание рекоменда-
цию по дозированию.
G Запустить программу на выпол-
нение
^ Нажмите кнопку
Старт/Стоп.
H Завершение программы — вынуть
белье
^ Поверните переключатель про-
грамм в положение
Стоп.
^ Откройте дверцу люка и выньте
белье.
Учитывайте указания главы «По-
сле каждой стирки или сушки».
СТИРКА И СУШКА
40

09:03
Miele SoftTronic WT2670
18:18
Miele WT2670 Washer Dryer Review & Demonstration
02:11
Стиральная машина +сушка Miele WT 2670
12:15
Miele Softtronic WT2670 WPM Waschtrockner
27:16
Miele Softtronic W2670 WPM Waschtrockner
03:42
Miele WT 2670 WASHER/DRYER.(dryer not working)
Нажмите на кнопку для помощи
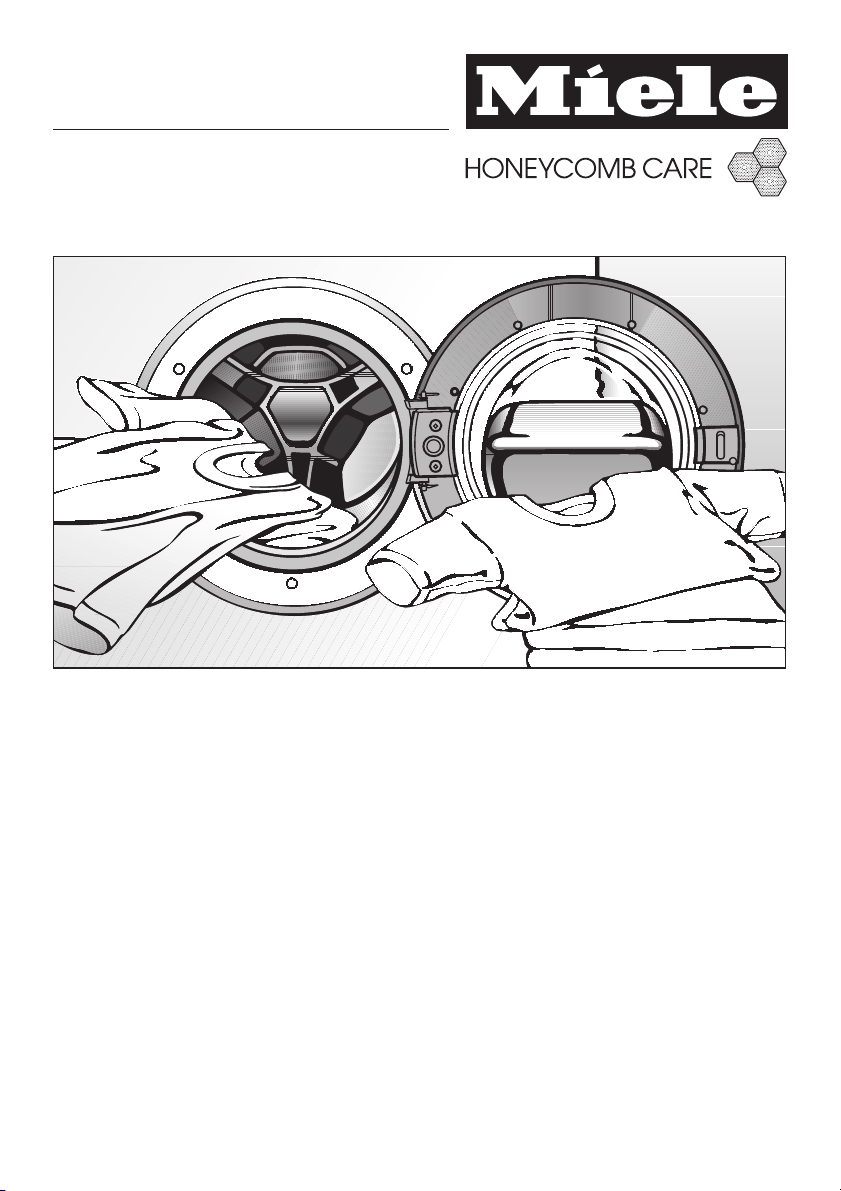
Operating instructions
Washer-dryer
WT 2670
To avoid the risk of accidents
or damage to the machine
it is essential to read
these instructions before it is
installed and used for the first time.
G
M.-Nr. 06 717 280
Caring for the environment
Disposal of the packing material
The transport and protective packing
has been selected from materials which
are environmentally friendly for disposal
and can normally be recycled.
Ensure that any plastic wrappings,
bags etc. are disposed safely and kept
out of the reach of babies and young
children. Danger of suffocation!
Rather than just throwing these
materials away, please ensure they are
offered for recycling.
Disposal of your old appliance
Electrical and electronic appliances
often contain materials which, if
handled or disposed of incorrectly,
could be potentially hazardous to
human health and to the environment.
They are, however, essential for the
correct functioning of your appliance or
machine. Please do not therefore
dispose of it with your household waste.
Please dispose of it at your local
community waste collection / recycling
centre and ensure that it presents no
danger to children while being stored
for disposal.
It should be unplugged or disconnected
from the mains electricity supply by a
competent person. The plug must be
rendered useless and the cable cut off
directly behind it to prevent misuse.
See the «Warning and Safety» section of
this booklet for further details.
2

Contents
Caring for the environment . . . . . . . . . . . . . . . . . . . . . . . . . . . . . . . . . . . . . . . . . . 2
Disposal of the packing material . . . . . . . . . . . . . . . . . . . . . . . . . . . . . . . . . . . . 2
Disposal of your old appliance. . . . . . . . . . . . . . . . . . . . . . . . . . . . . . . . . . . . . . 2
Warning and Safety instructions . . . . . . . . . . . . . . . . . . . . . . . . . . . . . . . . . . . . . 6
Guide to the machine. . . . . . . . . . . . . . . . . . . . . . . . . . . . . . . . . . . . . . . . . . . . . . 10
Control panel . . . . . . . . . . . . . . . . . . . . . . . . . . . . . . . . . . . . . . . . . . . . . . . . . . . . . 10
Display . . . . . . . . . . . . . . . . . . . . . . . . . . . . . . . . . . . . . . . . . . . . . . . . . . . . . . . . . . 11
Use. . . . . . . . . . . . . . . . . . . . . . . . . . . . . . . . . . . . . . . . . . . . . . . . . . . . . . . . . . . . . 11
Before using for the first time. . . . . . . . . . . . . . . . . . . . . . . . . . . . . . . . . . . . . . . 12
Calibrating the load size sensor to zero . . . . . . . . . . . . . . . . . . . . . . . . . . . . . . 13
Washing and drying environmentally . . . . . . . . . . . . . . . . . . . . . . . . . . . . . . . . 14
WASHING . . . . . . . . . . . . . . . . . . . . . . . . . . . . . . . . . . . . . . . . . . . . . . . . . . . . . . . 15
Brief instructions . . . . . . . . . . . . . . . . . . . . . . . . . . . . . . . . . . . . . . . . . . . . . . . . . . 15
Separate washing . . . . . . . . . . . . . . . . . . . . . . . . . . . . . . . . . . . . . . . . . . . . . . . . . 15
Extra options . . . . . . . . . . . . . . . . . . . . . . . . . . . . . . . . . . . . . . . . . . . . . . . . . . . . . 20
Pre-wash. . . . . . . . . . . . . . . . . . . . . . . . . . . . . . . . . . . . . . . . . . . . . . . . . . . . . . 20
Soak . . . . . . . . . . . . . . . . . . . . . . . . . . . . . . . . . . . . . . . . . . . . . . . . . . . . . . . . . 20
Short . . . . . . . . . . . . . . . . . . . . . . . . . . . . . . . . . . . . . . . . . . . . . . . . . . . . . . . . . 20
Water plus. . . . . . . . . . . . . . . . . . . . . . . . . . . . . . . . . . . . . . . . . . . . . . . . . . . . . 20
Buzzer. . . . . . . . . . . . . . . . . . . . . . . . . . . . . . . . . . . . . . . . . . . . . . . . . . . . . . . . 20
Adding or removing laundry after a programme has started . . . . . . . . . . . . . . . . 21
Spinning. . . . . . . . . . . . . . . . . . . . . . . . . . . . . . . . . . . . . . . . . . . . . . . . . . . . . . . . . 22
Rinse and interim spin . . . . . . . . . . . . . . . . . . . . . . . . . . . . . . . . . . . . . . . . . . . 22
To omit the final spin (Rinse hold). . . . . . . . . . . . . . . . . . . . . . . . . . . . . . . . . . . 22
To omit rinse and interim spin and the final spin . . . . . . . . . . . . . . . . . . . . . . . 22
Programme chart . . . . . . . . . . . . . . . . . . . . . . . . . . . . . . . . . . . . . . . . . . . . . . . . . . 23
Programme sequence . . . . . . . . . . . . . . . . . . . . . . . . . . . . . . . . . . . . . . . . . . . . . . 27
Garment care label symbols . . . . . . . . . . . . . . . . . . . . . . . . . . . . . . . . . . . . . . . . . 29
Detergent . . . . . . . . . . . . . . . . . . . . . . . . . . . . . . . . . . . . . . . . . . . . . . . . . . . . . . . . 29
Water softeners. . . . . . . . . . . . . . . . . . . . . . . . . . . . . . . . . . . . . . . . . . . . . . . . . 30
Washing with several components. . . . . . . . . . . . . . . . . . . . . . . . . . . . . . . . . . 30
Fabric conditioners or liquid starch . . . . . . . . . . . . . . . . . . . . . . . . . . . . . . . . . 31
Automatic dispensing of fabric conditioner or liquid starch to laundry at
the end of a programme. . . . . . . . . . . . . . . . . . . . . . . . . . . . . . . . . . . . . . . . . . 31
Adding fabric conditioner separately . . . . . . . . . . . . . . . . . . . . . . . . . . . . . . . . 31
3

Contents
Adding starch separately . . . . . . . . . . . . . . . . . . . . . . . . . . . . . . . . . . . . . . . . . 31
Colour run and dye removers / dyes . . . . . . . . . . . . . . . . . . . . . . . . . . . . . . . . 31
DRYING . . . . . . . . . . . . . . . . . . . . . . . . . . . . . . . . . . . . . . . . . . . . . . . . . . . . . . . . . 32
Separate drying . . . . . . . . . . . . . . . . . . . . . . . . . . . . . . . . . . . . . . . . . . . . . . . . . . . 32
Extra option . . . . . . . . . . . . . . . . . . . . . . . . . . . . . . . . . . . . . . . . . . . . . . . . . . . . . . 35
Low temperature. . . . . . . . . . . . . . . . . . . . . . . . . . . . . . . . . . . . . . . . . . . . . . . . 35
Thermospin. . . . . . . . . . . . . . . . . . . . . . . . . . . . . . . . . . . . . . . . . . . . . . . . . . . . 35
Adding or removing laundry after a programme has started . . . . . . . . . . . . . . . . 35
Programme chart . . . . . . . . . . . . . . . . . . . . . . . . . . . . . . . . . . . . . . . . . . . . . . . . . . 36
WASHING AND DRYING . . . . . . . . . . . . . . . . . . . . . . . . . . . . . . . . . . . . . . . . . . . 40
Washing and drying in a continuous sequence . . . . . . . . . . . . . . . . . . . . . . . . . . 40
After each washing or drying programme. . . . . . . . . . . . . . . . . . . . . . . . . . . . . 42
Rinse out fluff programme . . . . . . . . . . . . . . . . . . . . . . . . . . . . . . . . . . . . . . . . 42
Changing the programme sequence . . . . . . . . . . . . . . . . . . . . . . . . . . . . . . . . . 43
Cancelling a programme . . . . . . . . . . . . . . . . . . . . . . . . . . . . . . . . . . . . . . . . . 43
Interrupting a programme. . . . . . . . . . . . . . . . . . . . . . . . . . . . . . . . . . . . . . . . . 43
Altering a programme. . . . . . . . . . . . . . . . . . . . . . . . . . . . . . . . . . . . . . . . . . . . 43
Electronic programme locking . . . . . . . . . . . . . . . . . . . . . . . . . . . . . . . . . . . . . 44
Delay start. . . . . . . . . . . . . . . . . . . . . . . . . . . . . . . . . . . . . . . . . . . . . . . . . . . . . . . 45
Cleaning and care . . . . . . . . . . . . . . . . . . . . . . . . . . . . . . . . . . . . . . . . . . . . . . . . 46
Cleaning the machine . . . . . . . . . . . . . . . . . . . . . . . . . . . . . . . . . . . . . . . . . . . . . . 46
Cleaning the filter in the water inlet . . . . . . . . . . . . . . . . . . . . . . . . . . . . . . . . . . . . 48
Problem solving guide. . . . . . . . . . . . . . . . . . . . . . . . . . . . . . . . . . . . . . . . . . . . . 49
What to do, if . . . . . . . . . . . . . . . . . . . . . . . . . . . . . . . . . . . . . . . . . . . . . . . . . . . . . 49
The programme does not start. . . . . . . . . . . . . . . . . . . . . . . . . . . . . . . . . . . . . . . . 49
Fault messages in the display . . . . . . . . . . . . . . . . . . . . . . . . . . . . . . . . . . . . . . . . 50
Problems with the load size indicator . . . . . . . . . . . . . . . . . . . . . . . . . . . . . . . . . . 51
General problems . . . . . . . . . . . . . . . . . . . . . . . . . . . . . . . . . . . . . . . . . . . . . . . . . 52
An unsatisfactory wash result . . . . . . . . . . . . . . . . . . . . . . . . . . . . . . . . . . . . . . . . 53
An unsatisfactory drying result . . . . . . . . . . . . . . . . . . . . . . . . . . . . . . . . . . . . . . . 54
The drum door cannot be opened by pressing the
After sales service . . . . . . . . . . . . . . . . . . . . . . . . . . . . . . . . . . . . . . . . . . . . . . . . 59
Future updates (PC) . . . . . . . . . . . . . . . . . . . . . . . . . . . . . . . . . . . . . . . . . . . . . 59
Appliance guarantee . . . . . . . . . . . . . . . . . . . . . . . . . . . . . . . . . . . . . . . . . . . . 59
Optional accessories . . . . . . . . . . . . . . . . . . . . . . . . . . . . . . . . . . . . . . . . . . . . 59
button. . . . . . . . . . . . . . 55
4

Contents
Installation and connection . . . . . . . . . . . . . . . . . . . . . . . . . . . . . . . . . . . . . . . . 60
Front view. . . . . . . . . . . . . . . . . . . . . . . . . . . . . . . . . . . . . . . . . . . . . . . . . . . . . . . . 60
Rear view . . . . . . . . . . . . . . . . . . . . . . . . . . . . . . . . . . . . . . . . . . . . . . . . . . . . . . . . 61
Installation surface. . . . . . . . . . . . . . . . . . . . . . . . . . . . . . . . . . . . . . . . . . . . . . . . . 62
Installing the washer-dryer. . . . . . . . . . . . . . . . . . . . . . . . . . . . . . . . . . . . . . . . . . . 62
Removing the transit fittings . . . . . . . . . . . . . . . . . . . . . . . . . . . . . . . . . . . . . . . . . 62
Levelling the machine . . . . . . . . . . . . . . . . . . . . . . . . . . . . . . . . . . . . . . . . . . . . . . 64
Screwing out and adjusting the feet. . . . . . . . . . . . . . . . . . . . . . . . . . . . . . . . . 65
Building under a continous worktop / in a kitchen run . . . . . . . . . . . . . . . . . . . 65
The Miele water protection system . . . . . . . . . . . . . . . . . . . . . . . . . . . . . . . . . . . . 66
Connection to the water supply . . . . . . . . . . . . . . . . . . . . . . . . . . . . . . . . . . . . . . . 67
Connection to the drainage system. . . . . . . . . . . . . . . . . . . . . . . . . . . . . . . . . . . . 68
Electrical connection U.K. . . . . . . . . . . . . . . . . . . . . . . . . . . . . . . . . . . . . . . . . . . . 69
Consumption data . . . . . . . . . . . . . . . . . . . . . . . . . . . . . . . . . . . . . . . . . . . . . . . . 70
Note for test institutes: . . . . . . . . . . . . . . . . . . . . . . . . . . . . . . . . . . . . . . . . . . . 70
Technical data . . . . . . . . . . . . . . . . . . . . . . . . . . . . . . . . . . . . . . . . . . . . . . . . . . . 71
Settings menu J. . . . . . . . . . . . . . . . . . . . . . . . . . . . . . . . . . . . . . . . . . . . . . . . . . 74
Language J . . . . . . . . . . . . . . . . . . . . . . . . . . . . . . . . . . . . . . . . . . . . . . . . . . . . . . 74
Time of day
Water plus T . . . . . . . . . . . . . . . . . . . . . . . . . . . . . . . . . . . . . . . . . . . . . . . . . . . . 75
Gentle action U . . . . . . . . . . . . . . . . . . . . . . . . . . . . . . . . . . . . . . . . . . . . . . . . . . 76
Suds cooling R . . . . . . . . . . . . . . . . . . . . . . . . . . . . . . . . . . . . . . . . . . . . . . . . . . 76
Door release Ü . . . . . . . . . . . . . . . . . . . . . . . . . . . . . . . . . . . . . . . . . . . . . . . . . . 76
Distribution controller
Alter time . . . . . . . . . . . . . . . . . . . . . . . . . . . . . . . . . . . . . . . . . . . . . . . . . . . . . . . . 77
Lock X . . . . . . . . . . . . . . . . . . . . . . . . . . . . . . . . . . . . . . . . . . . . . . . . . . . . . . . . . 78
Temperature S . . . . . . . . . . . . . . . . . . . . . . . . . . . . . . . . . . . . . . . . . . . . . . . . . . . 79
Buzzer O . . . . . . . . . . . . . . . . . . . . . . . . . . . . . . . . . . . . . . . . . . . . . . . . . . . . . . . 79
Keypad tones P . . . . . . . . . . . . . . . . . . . . . . . . . . . . . . . . . . . . . . . . . . . . . . . . . . 79
Display contrast . . . . . . . . . . . . . . . . . . . . . . . . . . . . . . . . . . . . . . . . . . . . . . . . . . . 79
Display brightness . . . . . . . . . . . . . . . . . . . . . . . . . . . . . . . . . . . . . . . . . . . . . . . . . 79
Standby Q. . . . . . . . . . . . . . . . . . . . . . . . . . . . . . . . . . . . . . . . . . . . . . . . . . . . . . . 80
Memory V . . . . . . . . . . . . . . . . . . . . . . . . . . . . . . . . . . . . . . . . . . . . . . . . . . . . . . 80
Set extended cool-down . . . . . . . . . . . . . . . . . . . . . . . . . . . . . . . . . . . . . . . . . . . . 80
Y. . . . . . . . . . . . . . . . . . . . . . . . . . . . . . . . . . . . . . . . . . . . . . . . . . . . 75
g . . . . . . . . . . . . . . . . . . . . . . . . . . . . . . . . . . . . . . . . . . . . 77
5

Warning and Safety instructions
Technical safety
To avoid the risk of accidents and
damage to the machine please read
these instructions carefully before
using it for the first time. They
contain important information on its
safety, installation, use and
maintenance.
Keep these operating instructions in
a safe place and ensure that new
users are familiar with the content.
Pass them on to any future owner of
the machine.
Correct usage
This washer-dryer must only be
used:
– to wash items which are specified by
the manufacturer to be washable on
the care label.
– to dry textiles which have been
washed in a water solution, marked on
the manufacturer’s care label as being
suitable for tumble drying. «Dry
cleaning kits» for freshening up
garments in a tumble dryer are
increasingly available on the market. If
using, do so at your own risk, and
follow the instructions provided on the
packaging.
Any other applications may be dange
rous. The manufacturer cannot be held
liable for damage caused by improper
or incorrect use of the appliance.
damage. Do not install or use a
damaged machine.
the data plate (voltage and connected
load) matches the mains electricity
supply. If in any doubt, consult a
qualified electrician.
when continuity is complete between
the machine and an effective earthing
system which complies with local and
national safety regulations.
It is most important that this basic
safety requirement is present and
regularly tested and where there is any
doubt the household wiring system
should be inspected by a qualified
electrician.
The manufacturer cannot be held liable
for the consequences of an inadequate
earthing system (e.g. electric shock).
extension lead. Extension leads do not
guarantee the required safety of the
—
appliance (e.g. danger of overheating).
Before setting up the machine,
check it for any externally visible
Before connecting the machine,
ensure that the connection data on
The electrical safety of this
machine can only be guaranteed
Do not connect the appliance to
the mains electricity supply by an
6

Warning and Safety instructions
The machine is built in accordance
with current safety requirements.
Unauthorised repairs could result in
unforeseen dangers for the user, for
which the manufacturer cannot accept
liability. Repairs should only be
undertaken by a Miele approved
technician.
Ensure current is not supplied to the
machine until after maintenance or
repair work has been carried out.
The machine is only completely
isolated from the electricity supply
when:
– it is switched off at the wall socket
and the plug is withdrawn, or
– it is switched off at the mains, or
– the mains fuse is withdrawn, or
– the screw-out fuse is removed in
countries where this is applicable.
This machine must only be
connected to the on-site water
supply using a new hose kit. Old hoses
must not be re-used. Check the hose
regularly for signs of wear and tear.
Change in good time to avoid the risk of
leaks and subsequent damage.
approved service technician to
protect the user from danger.
In countries where there are areas
which may be subject to infestation
by cockroaches or other vermin, pay
particular attention to keeping the
appliance and its surroundings in a
clean condition at all times. Any
damage which may be caused by
cockroaches or other vermin will not be
covered by the appliance guarantee.
Use
This equipment may only be used
in mobile installations such as
ships, caravans, aircraft etc. if a risk
assessment of the installation has been
carried out by a suitably qualified
engineer.
Do not install your machine in
rooms where temperatures below
freezing may occur. Frozen hoses may
burst under pressure.The reliability of
the electronic control unit may be
impaired at temperatures below
freezing point.
If a fault has been identified, the
machine must be examined by a
competent person before further use,
and repaired if necessary.
–
Faulty components must only be
exchanged for Miele original spare
parts. Only when these parts are
fitted can the safety standards of the
machine be guaranteed.
–
If the connection cable is faulty it
must only be replaced by a Miele
7

Warning and Safety instructions
Before using the machine for the
first time, check that the transit
fittings at the rear of the machine have
been removed (see section on
«Installation»). During spinning, a transit
fitting which is still in place may result in
damage to both the machine and
adjacent furniture or appliances.
Turn off the stopcock if the
machine is to be left for any length
of time (e.g. holiday), especially if there
is no floor drain (gully) in the immediate
vicinity.
Flooding danger. If hooking the
drain hose into a wash basin,
check that the water can drain off
quickly enough to prevent the sink from
overflowing. Make sure the drain hose
is secure, so that the force of the water
flowing out of the hose does not
dislodge it.
Take care to ensure that foreign
objects (e.g. nails, pins, coins,
paper clips) do not find their way into
the machine with the laundry. These
may damage components of the
machine (e.g. suds container, drum),
which in turn can result in damage to
the laundry.
If the correct amount of detergent
is dispensed, the machine should
not need to be descaled. If, however,
you do wish to descale the machine
only use proprietary non-corrosive
descaling agents and strictly observe
the instructions on the packaging. If in
doubt contact the Miele Customer Ser
vice Dept. or your Miele Dealer.
Textiles which have been
pre-treated in solvent based
cleaning agents must be thoroughly
rinsed in clean water before being
washed in the machine.
Never use solvent based cleaning
agents in this machine, as this may
result in damage to component parts
and create toxic fumes. Such
detergents also pose a fire and
explosion hazard.
Only use dyes specified by the
manufacturer as being suitable for
use in a domestic washing machine.
Always observe the manufacturer’s
instructions carefully.
Colour run and dye removers
contain sulphur compounds which
can cause damage such as corrosion.
Do not use these products in this
machine.
—
Always make sure the drum is
stationary before reaching in to
remove laundry. Reaching into a
moving drum is extremely dangerous.
8

Warning and Safety instructions
To prevent the risk of fire the
following textiles must not be dried
in this machine:
fabrics which contain a large
–
proportion of rubber, foam rubber or
rubber like materials.
items which contain padding or
–
fillings (e.g. pillows, jackets).
items which have been treated with
–
inflammable cleaning agents.
items which have been splashed with
–
hair lacquer, hair spray, nail varnish
remover or similar substances.
– items which have been soiled with
oils or residues containing grease
(kitchen oils, cosmetics etc.).
– items soiled with wax or other
chemicals (e.g. mops and floor
cloths).
– items which have not been
thoroughly cleaned and which are
still soiled with grease or oil, e.g.
workwear. Such clothing may require
a heavy duty detergent to get them
clean. If necessary, consult the
detergent manufacturer for advice.
Make sure that any dispensing
balls etc. are removed from laundry
before the drying programme. These
dispensers can melt during the drying
programme and cause damage to the
machine and the laundry. Do not use
liquid dispenser balls or similar if you
are planning to wash and then dry in
one continuous sequence.
Take care, the metal cap is hot
after drying. Open the door wide
after the drying cycle. Do not touch the
metal cap located on the inside of the
door glass. It will still be hot and could
cause a burn.
Accessories
Accessory parts may only be fitted
when expressly approved by Miele.
If other parts are used, guarantee,
performance and product liability
claims will be invalidated.
Safety with children
This machine is not a toy! To avoid
the risk of injury do not allow
children to play on or near it or to play
with its controls. Supervise its use by
the elderly or infirm, and supervise
children whilst you are operating the
machine.
Disposal of your old machine
Before discarding an old machine,
switch it off at the wall socket and
unplug it. Render the plug useless. Cut
off the cable directly behind the
machine to prevent misuse. This should
be done by a competent person.
The manufacturer cannot be held
liable for damage caused by
non-compliance with these Warning
and Safety instructions.
9
Guide to the machine
Control panel
a Start/Stop button
For starting the programme selected
and cancelling a programme once it
has started.
b Display with – , OK, + and
Load/Detergent buttons
See the following page for more
details.
c m button
For selecting delay start and
setting the time of day.
d PC / Optical interface
This is used by service technicians
to run diagnostic checks on your
machine and can also be used to
update programming data in the
future.
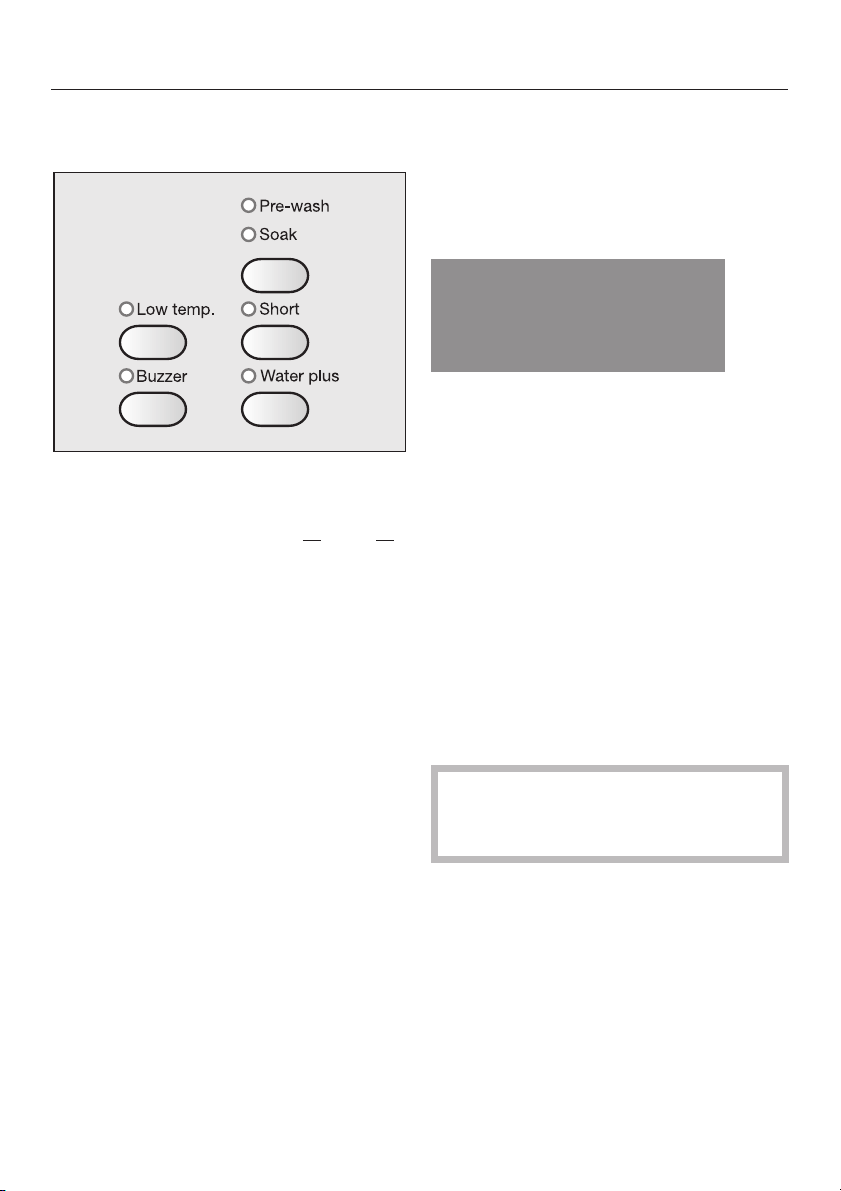
e Extra option buttons
with indicator lights
Various extra options can be added
to the programmes.
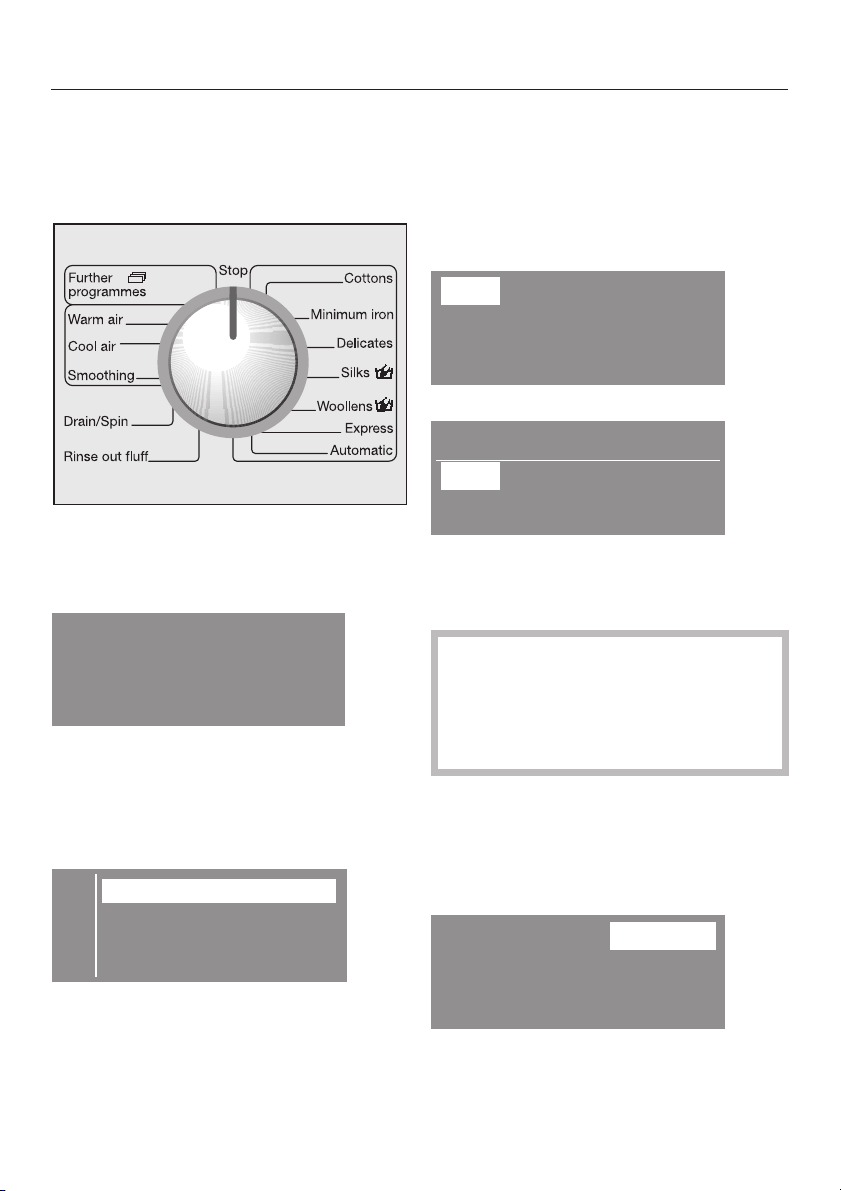
f Programme selector
For selecting washing and drying
programmes. The programme
selector can be turned clockwise or
anti-clockwise.
g Washing/Drying button
for selecting:
– Washing
– Drying
– Washing and Drying.
h I-On/0-Off button
For switching the washer-dryer on
and off.
i Door button
Opens the machine door.
10
Guide to the machine
Display
When a programme is selected the
display can be used to select and
change programme parameters.
— / + buttons
For altering the parameters highlighted
in the display:
— decreases the parameter or moves
the highlighting upwards
+ increases the parameter or moves
the highlighting downwards.
OK button
For confirming the parameter selected
and choosing the next parameter.
Load/Detergent button
For calling up the load size and the
detergent amount.
With the programme selector at the
Further programmes
select the following programmes via the
display:
Dark garments,Shirts,Denim
Sportswear,Outerwear,Proofing
Curtains,Separate rinse
Delay start and the soak time are
selected via the display.
The display shows the duration of the
programmes and the current time of
day.
The
Settings
via the display.
J menu is also operated
position, you can
,
and
Starch
.
,
Use
This washer-dryer can be used:
– to wash separately
max. load 5 kg (depending on
programme);
– to dry separately
max. load 2.5 kg (depending on
programme);
or
–
to wash and dry in a continuous
sequence
max. load 2.5 kg (depending on
programme).
11

Before using for the first time
Before using the machine for the first
time ensure that it is correctly
installed and connected. See
«Installation and connection». Also
check that the drain filter is securely
tightened to prevent the risk of water
leaks during use.
The washer-dryer has a sensor which
measures the amount of laundry in the
drum. This determines the amount of
detergent required. To allow the load
size indicator to function correctly, you
must first run a wash programme
without any laundry
detergent.
and without
Setting the language
C èeština
F dansk
deutsch
Use the – and + buttons to select the
^
language you want and confirm your
selection by pressing the OK button.
Setting the time of day
The display for setting the time will
appear.
12:00
H
^ Open the stopcock.
^ Press the
If the washer-dryer is being switched on
for the first time, the welcome screen
will appear.
I-On/0-Off
button in.
M
Willkommen
The welcome screen will not appear
again once a programme lasting
longer than 1 hour has been
completed.
After a few seconds the display will
change to show the screen for
selecting your language.
Set the time
^ Set the hour with the – and + buttons
and confirm your setting by pressing
the OK button. Now set the minutes.
After you have confirmed the minute
setting, the display will change to
show the reminder to remove the
transport struts.
12

Before using for the first time
Reminder to remove transport struts
To avoid the risk of damage, the
transport struts must be removed
before the washer-dryer is used for
the first time. See «Installation and
connection» for instructions on how
to do this.
Remove transport
struts
i
OK
After removing the transport struts (if
^
this has not already been done by
your fitter) press the OK button.
Running your first programme
Your washer-dryer is now ready for the
first programme to be run.
15:00
Select programme
Calibrating the load size sensor to
zero
Switch the machine on.
^
Open the drum door.
^
Turn the programme selector to the
^
Cottons
Press and hold the
^
position.
Load/Detergent
button pressed in until the following
message appears in the display:
Zero setting
OK
i
^ Turn the programme selector to
Stop
and switch off the washer-dryer.
The machine is now ready for use.
^
Turn the programme selector to the
Cottons
^
Press the
^
When the programme has finished,
position.
Start/Stop
button.
turn the programme selector to
and switch off the washer-dryer.
The load sensor must then be
calibrated to zero as you would with
bathroom scales.
Stop
13

Washing and drying environmentally
Energy and water consumption
Water consumption and energy
–
usage are determined by the size of
the load.
To make the most out of your
machine, load the maximum dry load
for the programme you are using.
Use the
–
programmes for small loads.
When smaller amounts of laundry are
–
washed using the
programmes, the automatic load
recognition system will reduce the
amount of water, time and energy
used. This may mean that the
programme duration is adjusted
during the course of the wash
programme.
– Using the
instead of the
programme will give energy savings
of between 35% and 45%. This is
sufficient for most levels of soiling.
For stubborn or old stains, use the
Soak
Automatic
Cottons
extra option.
and
Express
Cottons
60°C programme
Cottons
95°C
Detergent
Do not exceed the amounts of
–
detergent recommended by the
manufacturer on the packaging.
Reduce the amount of detergent for
–
smaller loads. Use the
Detergent
Choosing the correct extra option
(Pre-wash, Soak, Short)
Select:
A wash programme together with the
Short
soiling where there are no obvious
marks.
A wash programme without any extra
options for normal to heavy soiling
A wash programme together with the
Soak
laundry.
– Use the extra option
Pre-wash
ately by a main wash, the same suds
are used.
button.
extra option for light to normal
option for heavily soiled
. If Soak is followed immedi-
Load/
Soak
instead of
.
14
When drying straight afterwards
–
Select a high spin speed for the
wash programme, as well as for the
Thermospin, if tumble drying this
laundry afterwards. This saves time
and energy.
Brief instructions
The headings numbered A, B, C, . . .
show the operating sequence and can
be used as brief instructions.
Separate washing
A Sort the laundry
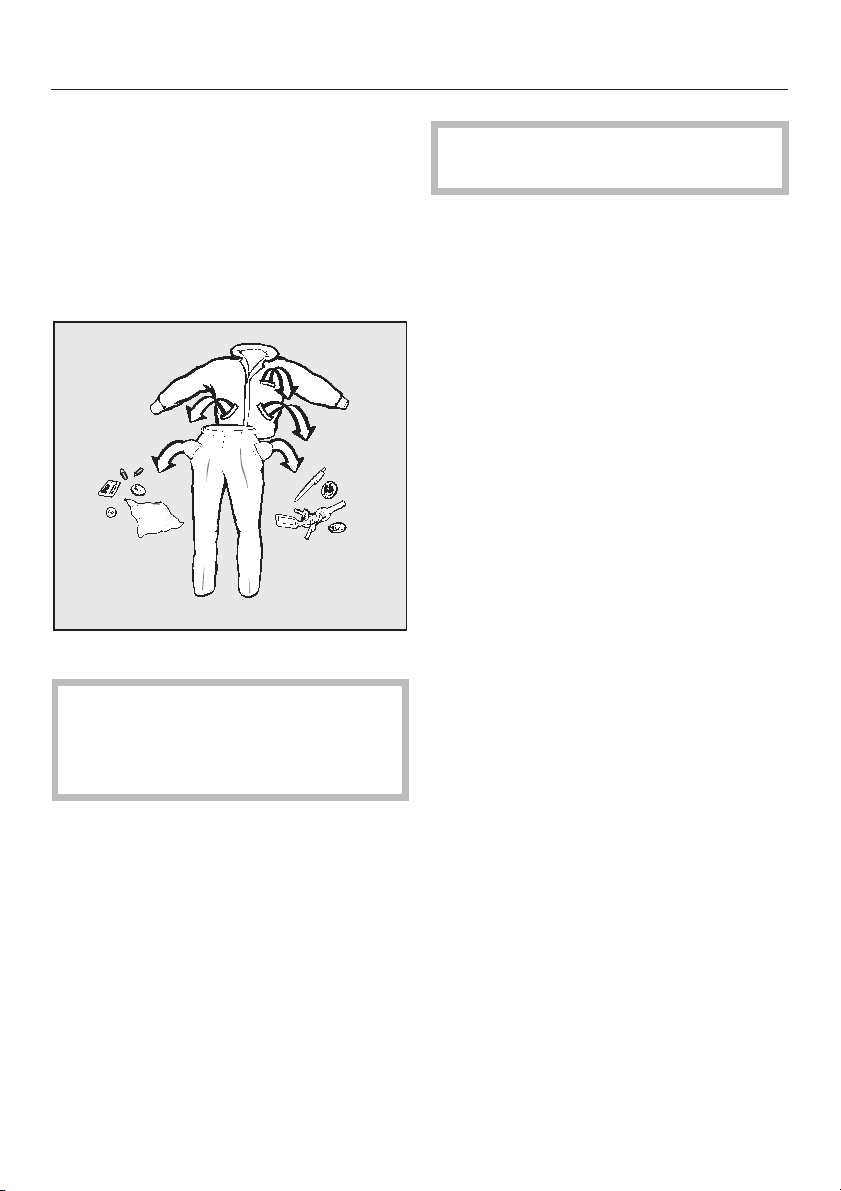
^ Empty all pockets.
,
Foreign objects (e.g. nails,
coins, paper clips, etc.) can cause
damage to garments and
components in the machine.
^
Badly soiled areas, stains etc. should
be cleaned as soon as possible,
preferably whilst still fresh. Spillages
should be carefully dabbed off using
a soft colourfast cloth. Do not rub!
Badly soiled areas can be pre-treated
with liquid detergent, stain removers
etc. first, following the manufacturer’s
instructions. With particularly stubborn
stains ask your dry cleaner for advice.
WASHING
Do not use solvent-based
,
cleaning agents in this machine.
Sort the laundry by colour and by
^
care label. Most garments have a
textile care label in the collar or side
seam.
Dark textiles often contain excess dye
and should be washed separately
several times before being included in
a mixed load. Always wash whites and
coloureds separately.
Curtains: Remove lead weights first
–
or place in a laundry bag.
– Underwiring and collar stiffeners:
Any loose wiring in bras, shirt collar
stiffeners, etc. should be removed or
sewn in.
– Knitted garments, trousers and
jeans, T-shirts and sweat shirts: Turn
inside out, if recommended by the
manufacturer.
–
Close any zips, fasten hooks and
eyes etc before washing.
–
Fasten duvet covers and pillow
cases to prevent small items from
being trapped inside them.
Do not wash any items in this machine
which are specified by the
manufacturer as non-machine
washable on the care label. (h
symbol)
15
WASHING
B Switch the machine on
The interior drum lighting will come on.
C Select a programme
^ Select the programme you want.
The programme selected will appear in
the display.
Minimum iron
Further programmes:
When you turn the programme selector
to
Further programmes
, a list of these
programmes will appear in the display.
Dark garments
E
Denim
Shirts H
Use the — or + button to highlight the
^
programme you wish to select and
confirm your selection by pressing
the OK button.
Wait until the display switches to show
the menu for the programme selected.
40°C 900 rpm
Duration: 1:00 h
or
Denim
40°C 900 rpm
Duration: 1:00 h
^ Press the
Washing/Drying
button
repeatedly until only the Washing
indicator light is lit up.
The
Drying
indicator light must not
be lit up as well as this would mean
that the washing programme would
be followed immediately by the
drying programme.
^
You can alter the highlighted
temperature with the — or + buttons.
Press the OK button to confirm the
temperature you want and move on
to the spin speed.
30°C 900 rpm
16
Duration 0:57 h
^
You can then alter the highlighted
spin speed with the — or + buttons.
WASHING
You can select any extras options
^
with the extra option buttons.
^ Each press of the top right hand
button selects the extra option in the
following order:
no option is selected.
Not all the extra options are suitable for
use with every wash programme.
You can only select extra options which
are compatible with the basic
programme being used.
^
Select Delay start, if required.
Pre-washorSoak
or
D Load the drum
Press the
^
drum door.
The load size indicator display will
appear.
Door
button to open the
Load <25%
B
The display shows the amount of
laundry loaded in the drum as a % (in
25% steps) of the maximum load
permissible for the programme
selected.
^ Unfold the laundry and load loosely
in the drum. Mixing both large and
small items gives better wash results
and also helps distribute the load
evenly during spinning.
The most efficient use of energy and
water is achieved when a full load is
washed. However, do not overload as
this causes creases and reduces
cleaning efficiency.
Make sure that no garments are
caught between the drum door and
seal.
^
Shut the door with a gentle swing.
17
WASHING
E Add detergent
The load size indicator display will be
replaced with the detergent percentage
display.
Detergent 75%
A
40%
Add slightly less than half the
amount recommended . . .
50%
Add half the amount
recommended . . .
60%
Add slightly more than half the
amount recommended . . .
75%
Add three quarters of the
amount recommended . . .
100%
Add the full amount
You also need to take the level of
soiling and water hardness into
account.
too little detergent results in:
–
Laundry not getting properly clean
and with time it may become grey
and hard to the touch.
–
Greasy particles clinging to the
laundry.
–
Limescale deposits on the heater
elements.
too much detergent results in:
High water consumption (an
–
additional rinse cycle will
automatically switch in).
A burden to the environment.
–
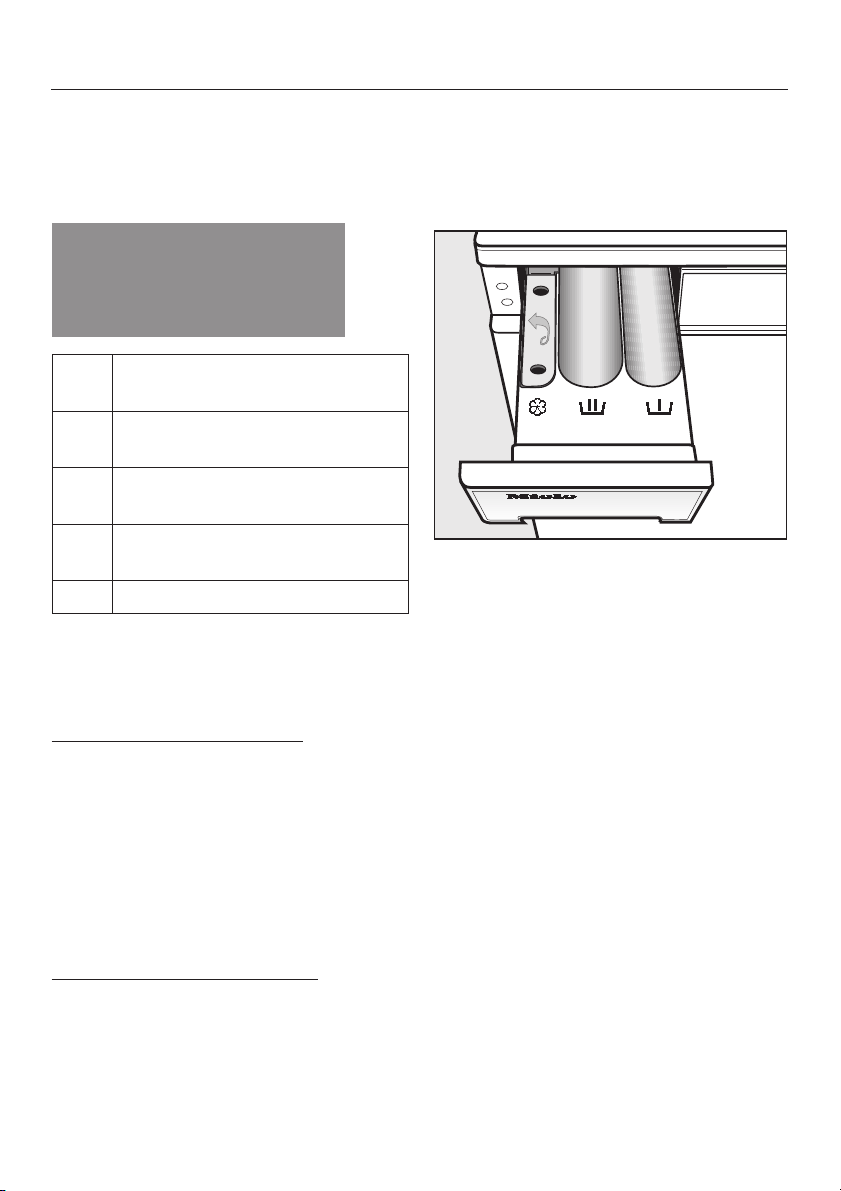
^ Pull out the detergent drawer and
add detergent to the compartments
as follows:
i = Detergent for the pre-wash
1
(
/4of the total amount
recommended). This
compartment is also used for
starch formulations when
starching separately.
j = Detergent for the main wash
including Soak
§ = Fabric conditioner or liquid
starch
^
Close the detergent drawer.
See «Detergent» for further information.
–
Excessive foam which causes a low
level of agitation and poor wash,
rinse and spin results.
18

WASHING
F Start the programme
Press the flashing
^
Start/Stop
button.
The estimated programme duration will
count down in the display in one minute
steps. During the first 10 minutes the
machine measures how much water is
being absorbed by the laundry. The
programme duration may be longer or
shorter depending on this absorbency
rate.
The programme sequence is also
shown in the display. The washer-dryer
shows you when each section of the
programme is reached.
The drum lighting switches off once the
programme has started.
G Remove the laundry when the
programme has finished
In the anti-crease phase after the
programme has finished, the following
will appear alternately in the display:
Anti-crease
and
Remove the laundry.
^
Only remove laundry from the
machine once the drum has
stopped turning. Reaching into a
moving drum is extremely
dangerous and could result in injury.
Check that all items have been
removed from the drum. Items left in
the drum could discolour other items
in the next wash or become
discoloured themselves.
Important! Always remove the
laundry before switching the machine
off. This is important to ensure that
the load size indicator works
correctly.
^ Switch the machine off with the
0-Off
button.
I-On/
See «After each washing or drying
programme» for further information.
Programme finished.
Remove laundry, then
i
switch the machine off.
^
Turn the programme selector to the
Stop
position. Press the
Door
to open the drum door.
button
After washing a full load
If you have washed a full load of
laundry and you wish to dry the
laundry in the washer-dryer
afterwards you will have to remove
half the load. Carry out the drying
procedure in two batches.
19

WASHING
Extra options
You can use the
augment the basic wash programmes.
Pre-wash
For laundry with large amounts of dirt
(e.g. dust, sand).
Soak
For heavily soiled and stained items
with protein stains (e.g. blood, fats
and oils, cocoa).
A length of time of between 30 minutes
and 6 hours can be chosen, in 30
minute periods for the «Soak» process.
To select the soak time
^ After selecting a programme, press
the
Pre-wash/Soak
until the
on.
Extra option
button repeatedly
Soak
indicator light comes
15:06
buttons to
Short
For light to nomal soiling with no
visible staining.
The duration of the main wash is
reduced.
Water plus
The machine is set at the factory so
that the water level in the main wash
and rinses will be increased if the
Water plus
extra option is selected.
However, you can select other settings
Water plus
for
«
Settings
. These are described in
menu J«.
Buzzer
An audible tone sounds repeatedly at
the end of a programme or when
Rinse hold is reached.
The buzzer will sound repeatedly until
the machine is switched off.
Finish:
Soak:
17:04
0.30 h
Use the – and + buttons to enter the
soak time. The display will also show
the corresponding finishing time for the
washing programme. Press the OK
button to confirm the soak time you
want.
To delete the soak time
^
Set the soak time to 0.00 h and
confirm this with the OK button.
20
Once switched on, the buzzer is active
in all programmes until it is switched off
again.
You can switch the buzzer off by
pressing the buzzer button. You can
also change the volume of the buzzer.
These are described in «Settings J«.
The buzzer will always sound when
there is a fault, even if the buzzer has
been switched off.

WASHING
Adding or removing laundry
after a programme has started
Laundry can be added or removed
after the programme has started when
using the following programmes:
Cottons
–
Minimum iron
–
Automatic
–
Express
–
Starch
–
Press the
^
drum door.
,
machine will be very hot and
could cause burning or scalding.
^ Add or remove items.
^ Close the drum door.
The programme will continue
automatically.
Door
button to open the
Warning: The water in the
The door cannot be opened, if:
the suds temperature is above a
–
certain temperature (see «Settings
menu — Door release»).
the water is above a certain level
–
(e.g. when the
option has been selected).
the programme has reached the
–
Final spin
the electronic programme locking
–
has been activated.
stage.
Water plus
extra
Please note:
Once a programme has started the
machine cannot recognise any
adjustment to the load.
For this reason, if laundry is added or
removed after the start of a programme,
the machine will always complete the
programme cycle assuming a full load
which can lead to an increase in the
programme duration shown in the
display.
21
WASHING
Spinning
The maximum final spin speed
depends on the programme chosen.
Programme rpm
Cottons 1600
Minimum iron 1200
Delicates 600
Silks 400
Woollens 1200
Express 1600
Automatic 1200
Dark garments 1200
Shirts 600
Denim 900
Sportswear 1200
Outerwear 800
Proofing 1000
Curtains 600
Separate rinse 1200
Starch 1500
Drain/Spin 1600
You can reduce the final spin speed.
However, you cannot select a final spin
speed higher than that shown in the
chart above.
Rinse and interim spin
There is a spin after the main wash and
between the rinses. A reduction in the
final spin speed will also reduce the
interim spin speed. If a spin speed of
less than 700 rpm is selected for a
Cottons
is introduced.
programme, an additional rinse
To omit the final spin (Rinse hold)
Select the
^
Rinse hold
setting. The
laundry will not be spun and will
remain suspended in the final rinse
water. This reduces creasing if the
laundry is not going to be removed
from the drum immediately after the
end of the programme.
To start the final spin
–
:
The machine will display the
maximum spin speed possible. You
can select a spin speed lower than
this. Start the final spin by pressing
the
Start/Stop
– To end the programme
Press the
drain away. Press the
button.
:
Door
button. The water will
Door
button
again to open the door.
To omit rinse and interim spin and
the final spin
^ Select the
Without spin
setting. The
laundry is not spun after the final
rinse. The water will drain away and
the machine will go straight into the
anti-crease stage. An additional rinse
is introduced if this setting is selected
with the
Express
Cottons,Minimum iron
and
Automatic
programmes.
,
22

WASHING
Programme chart
Cottons 30°C to 95°C 9876 max. 5.0 kg
Fabric type Cottons, linens or cotton mix fabrics.
Extra options Pre-wash or Soak, Short, Water plus
Detergent Powder detergent, detergent for coloured fabrics, liquid
detergent, tablet detergent and liquid tab detergent.
Minimum iron 30°C to 60°C 876421 max. 2.5 kg
Fabric type Synthetics, mixed fibres and easy care cottons. If fabrics have a
high proportion of man-made fibres it is advisable to programme
the machine for «Gentle action». See «Settings menu J.
Extra options Pre-wash or Soak, Short, Water plus
Detergent Powder detergent, detergent for coloured fabrics, liquid
detergent, detergent for delicates, tablet detergent and liquid tab
detergent.
Delicates cold to 60°C 421 max. 1.0 kg
Fabric type For delicate garments made of synthetic fibres, mixed fibres,
rayon and easy care cottons.
Extra options Pre-wash or Soak, Short
Detergent Liquid detergent for delicates.
23

WASHING
Silks / cold to 30°C c max. 1.0 kg
Fabric type Silks and other handwashable fabrics with no wool content, e.g.
satin, lace and silk.
Note Place socks, tights, bras etc. in a washing bag.
Extra option Water plus
Detergent Liquid detergent for delicates.
Woollens / cold to 40°C ac max. 2.0 kg
Fabric type Machine-washable or hand-washable wool or wool blend fabrics.
If the care label does not specify a temperature, wash using the
cold setting.
Detergent Liquid detergent for machine-washable woollens.
Express cold to 40°C 76 max. 2.5 kg
Fabric type Small loads of items which require freshening up and which can
be washed in the
Extra option Water plus
Detergent Powder detergent, detergent for coloured fabrics, liquid detergent.
Cottons
programme.
24

WASHING
Automatic cold to 40°C 7621 max. 2.5 kg
Fabric type Mixed loads of garments suitable for the
Minimum iron
programmes. Sort according to colour.
Cottons
Extra option Pre-wash or Soak, Short, Water plus
Detergent Powder detergent, detergent for coloured fabrics, liquid
detergent.
Dark garments cold to 40°C max. 2.5 kg
Garment Dark garments made from cotton or mixed fibres.
Note Wash inside out.
Detergent Liquid detergent for coloured fabrics.
Shirts cold to 60°C max. 2.0 kg
Notes – Pre-treat collars and cuffs if necessary.
Silks
– Wash silk garments in the
programme.
Detergent Powder detergent, detergent for coloured fabrics, liquid
detergent.
Denim cold to 40°C max. 2.5 kg
Notes – Wash denim inside out.
– Denim often contains excess dye and will run during the first
few washes. Wash light and dark coloured items separately.
Detergent Liquid detergent for coloured fabrics.
Sportswear 30°C to 60°C max. 2.0 kg
Garment Lightly soiled sports garments which require washing or
freshening up.
Detergent Powder detergent, detergent for coloured fabrics, liquid
detergent.
Outerwear cold to 40°C max. 2.0 kg
Garment Outerwear made from micro-fibres such as Gore-Tex
®
, WINDSTOPPER®etc.
Notes
SYMPATEX
–
Zip up jackets before washing.
–
Do not use fabric conditioner.
Detergent Specialist or liquid detergent for delicates.
and
®
,
25
WASHING
Proofing 40°C max. 3.0 kg
Item For treating microfibre fabrics, skiwear, fine, closeweave
cotton garments (poplin) or tablecloths to provide a water
and dirt resistant finish.
Notes
Proofing agent
Curtains cold to 40°C max. 2.0 kg
Item Curtains, including net curtains, specified as
Note For curtains which crease easily, reduce the spin speed or
Extra option Water plus
Detergent All purpose powder detergent, powder detergent for coloured
Separate rinse max. 5.0 kg
Extra option Rinse hold
Starch max. 5.0 kg
Note The laundry (table cloths, napkins, overalls) should be
Starching agent Liquid starch, starch formulations, viscous liquid starch,
Drain/Spin max. 5.0 kg
Note For spinning fabrics. Please make sure you select the
The items should be freshly washed and spun or dried
–
before proofing.
For best results, the items should be heat-treated
–
afterwards, either in a tumble dryer or by ironing.
Only use proofing agents which are stated by the
–
manufacturer as being «suitable for use on membrane
textiles» as these consist of fluorochemical compounds.
Do not use proofing agents which contain paraffin.
Add proofing agents to compartment j.
–
machine-washable by the manufacturer. A Pre-rinse without
detergent is carried out automatically to remove dust.
select Without spin.
fabrics or detergent specifically designed for washing
curtains.
washed but not treated with fabric conditioner.
starch
appropriate spin speed.
Drain only: Select
Without spin
. Do not use for woollens.
26
Loading…
Report abuse
Libble takes abuse of its services very seriously. We’re committed to dealing with such abuse according to the laws in your country of residence. When you submit a report, we’ll investigate it and take the appropriate action. We’ll get back to you only if we require additional details or have more information to share.
Product:
Get your user manual by e-mail
Enter your email address to receive the manual of Miele wt 2670 wpm in the language / languages: English as an attachment in your email.
The manual is 1,55 mb in size.
You will receive the manual in your email within minutes. If you have not received an email, then probably have entered the wrong email address or your mailbox is too full. In addition, it may be that your ISP may have a maximum size for emails to receive.
The manual is sent by email. Check your email
If you have not received an email with the manual within fifteen minutes, it may be that you have a entered a wrong email address or that your ISP has set a maximum size to receive email that is smaller than the size of the manual.
- Addeddate
- 2021-07-02 15:20:43
- Identifier
- manualzilla-id-7318585
- Identifier-ark
- ark:/13960/t1nh6fz3s
- Ocr
- tesseract 5.0.0-alpha-20201231-10-g1236
- Ocr_autonomous
- true
- Ocr_detected_lang
- en
- Ocr_detected_lang_conf
- 1.0000
- Ocr_detected_script
- Latin
- Ocr_detected_script_conf
- 1.0000
- Ocr_module_version
- 0.0.13
- Ocr_parameters
- -l eng+deu+lat+Latin
- Page_number_confidence
- 86.75
comment
Reviews
There are no reviews yet. Be the first one to
write a review.
96
Views
DOWNLOAD OPTIONS
Temporarily Unavailable
DAISY
For users with print-disabilities
Uploaded by
chris85
on