
Indesit
Loading…
W
- WIE107EX3
- WIE1279
- WIE 127 X3
- WIE 127 XS2
- WIE 128
- WIE137 S
- WIE 1472
- WIE 147 X
- WIE 147 X (EX)
- WIE 148
- WIE 157 S
- WIE1672
- WIE 168
- WIE 872
- WIL 10
- WIL 1000 OT3
- WIL 101
- WIL 101 (TK)
- WIL 102
- WIL1032
- WIL 1055
- WIL 105 EX
- WIL105S
- WIL 105X
- WIL 105 X (EX)
- WIL 1062
- WIL 106 SP
- WIL10Y
- WIL11
- WIL 113
- WIL113UK
- WIL 12
- WIL 123 S2
- WIL 124
- WIL1252
- WIL 125 EX
- WIL 125X
- WIL 1262
- WIL13
- WIL 133
- WIL14
- WIL1400
- WIL 143
- WIL 143 S
- WIL143UK
- WIL 144
- WIL 144 SP
- WIL1452
- WIL 145 X (EX)
- WIL 146
- WIL 153
- WIL 163
- WIL 163 S
- WIL 163 S — ANNEXE 918
- WIL163UK
- WIL 164
- WIL165
- WIL 166
- WIL 623
- WIL 8
- WIL 822
- WIL 82 X
- WIL 83
- WIL 858
- WIL 85X
- WIL 86
- WILB 12
- WILD126S
- Will 10
- WIN 100
- WIN 100 (TK)
- WIN1013
- WIN 1024
- win 110
- WIN1212
- WIN 122
- WIN 500
- WIN 60
- WIN 6002
- win 602
- WIN 62
- WIN 702
- WIN 80
- WIN 812
- WIN 822
- WIN9
- WIS 62
- WIS 62 EX
- WISA 101
- WISA 61
- WISA 81
- WISE 102
- WISE 107
- WISE 107 S
- WISE 107 X EX
- WISE 12
- WISE 1272
- WISE 127 X4
- WISE 82
- WISE 87
Loading…
Loading…
Nothing found
WIL 85
Instructions For Use Manual
72 pgs1.41 Mb0
Instructions For Use Manual
24 pgs501.8 Kb0
User Manual
12 pgs236.17 Kb0
User manual
60 pgs1.24 Mb0
User Manual
39 pgs4.4 Mb0
User Manual [cz]
16 pgs137.2 Kb0
User Manual [fr]
72 pgs1.76 Mb0
User Manual [ru]
60 pgs1.26 Mb0
Table of contents
Loading…
…
Indesit User manual
Download
Specifications and Main Features
Frequently Asked Questions
User Manual


Loading…
+ 42 hidden pages
You need points to download manuals.
1 point = 1 manual.
You can buy points or you can get point for every manual you upload.
Buy points
Upload your manuals

Ðóêîâîäñòâî ïî ýêïóàòàöèè
ÑÒÈÐÀËÜÍÀß ÌÀØÈÍÀ
Ñîäåðæàíèå
CIS
Óñòàíîâêà, 2-3
Ðàñïàêîâêà è âûðàâíèâàíèå, 2
CIS
BG
SB
Ïîäêëþ÷åíèå ê âîäîïðîâîäíîé è ýëåêòðè÷åñêîé
ñåòè, 2—3
ÐÓÑÑÊÈÉ, 1
ÁÚËÃÀÐÑÊÈ,13
ÑÐÏÑÊÈ,25
Ïðîáíûé öèêë ñòèðêè, 3
Òåõíè÷åñêèå õàðàêòåðèñòèêè, 3
Îïèñàíèå ñòèðàëüíîé ìàøèíû, 4-5
HR
SL
Ïàíåëü óïðàâëåíèÿ, 4
Èíäèêàòîðû, 5
Hrvatski,37
Slovenèina,49
Çàïóñê ìàøèíû. Ïðîãðàììû, 6
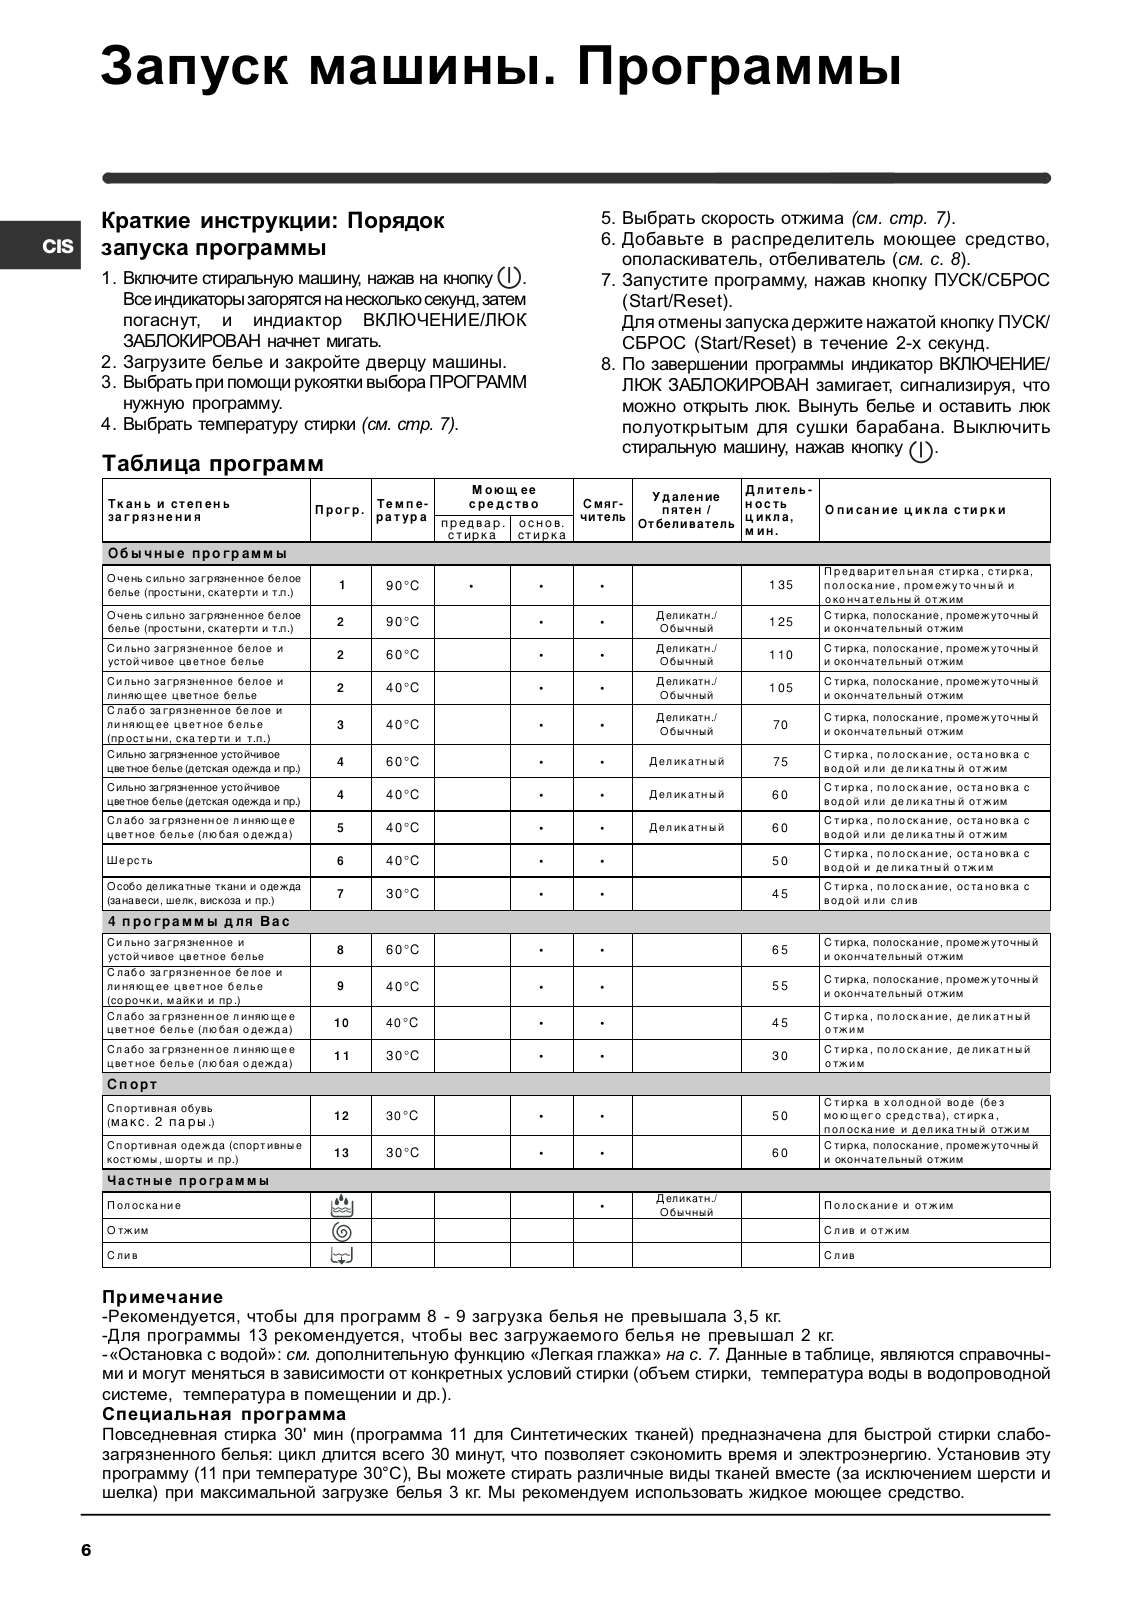
Êðàòêèå èíñòðóêöèè: Ïîðÿäîê çàïóñêà ïðîãðàììû, 6
Òàáëèöà ïðîãðàìì, 6
Ïåðñîíàëèçàöèÿ ñòèðêè, 7
Âûáîð òåìïåðàòóðû, 7
Âûáîð ñêîðîñòè îòæèìà, 7
Ôóíêöèè, 7
WIL 85
Ìîþùèå ñðåäñòâà è áåëüå, 8
Ðàñïðåäåëèòåëü ìîþùèõ ñðåäñòâ, 8
Îòáåëèâàíèå, 8
Ïîäãîòîâêà áåëüÿ, 8
Îñîáåííîñòè ñòèðêè îòäåëüíûõ èçäåëèé, 8
Ïðåäóïðåæäåíèÿ è ðåêîìåíäàöèè, 9
Îáùèå ïðàâèëà áåçîïàñíîñòè, 9
Óòèëèçàöèÿ, 9
Ýêîíîìèÿ è îõðàíà îêðóæàþùåé ñðåäû, 9
Îáñëóæèâàíèå è óõîä, 10
Îòêëþ÷åíèå âîäû è ýëåêòðè÷åñòâà, 10
Óõîä çà ñòèðàëüíîé ìàøèíîé, 10
Óõîä çà ðàñïðåäåëèòåëåì ìîþùèõ ñðåäñòâ, 10
Óõîä çà äâåðöåé ìàøèíû è áàðàáàíîì, 10
×èñòêà íàñîñà, 10
Ïðîâåðêà çàëèâíîãî øëàíãà, 10
Óñòðàíåíèå íåèñïðàâíîñòåé, 11
Ñåðâèñíîå îáñëóæèâàíèå, 12
1
Óñòàíîâêà
Ñîõðàíèòå äàííîå ðóêîâîäñòâî. Îíî äîëæíî áûòü
Ïðàâèëüíîå âûðàâíèâàíèå îáîðóäîâàíèÿ ïîìîæåò
CIS
â êîìïëåêòå ñî ñòèðàëüíîé ìàøèíîé â ñëó÷àå ïðî-
èçáåæàòü øóìà, âèáðàöèé è ñìåùåíèé âî âðåìÿ ðà-
äàæè, ïåðåäà÷è îáîðóäîâàíèÿ èëè ïðè ïåðååçäå
áîòû ìàøèíû.
íà íîâóþ êâàðòèðó, ÷òîáû íîâûé âëàäåëåö îáîðó-
Åñëè ñòèðàëüíàÿ ìàøèíà ñòîèò íà ïîëó, ïîêðûòîì
äîâàíèÿ ìîã îçíàêîìèòüñÿ ñ ïðàâèëàìè åãî ôóíê-
êîâðîì, óáåäèòåñü, ÷òî åå îñíîâàíèå âîçâûøàåò-
öèîíèðîâàíèÿ è îáñëóæèâàíèÿ.
ñÿ íàä êîâðîì.  ïðîòèâíîì ñëó÷àå âåíòèëÿöèÿ
áóäåò çàòðóäíåíà èëè âîâñå íåâîçìîæíà.
Âíèìàòåëüíî ïðî÷èòàéòå ðóêîâîäñòâî: â íåì ñî-
äåðæàòñÿ âàæíûå ñâåäåíèÿ ïî óñòàíîâêå è áåçî-
ïàñíîé ýêñïëóàòàöèè ñòèðàëüíîé ìàøèíû.
Ïîäêëþ÷åíèå ê âîäîïðîâîäíîé è
Ðàñïàêîâêà è âûðàâíèâàíèå
ýëåêòðè÷åñêîé ñåòè
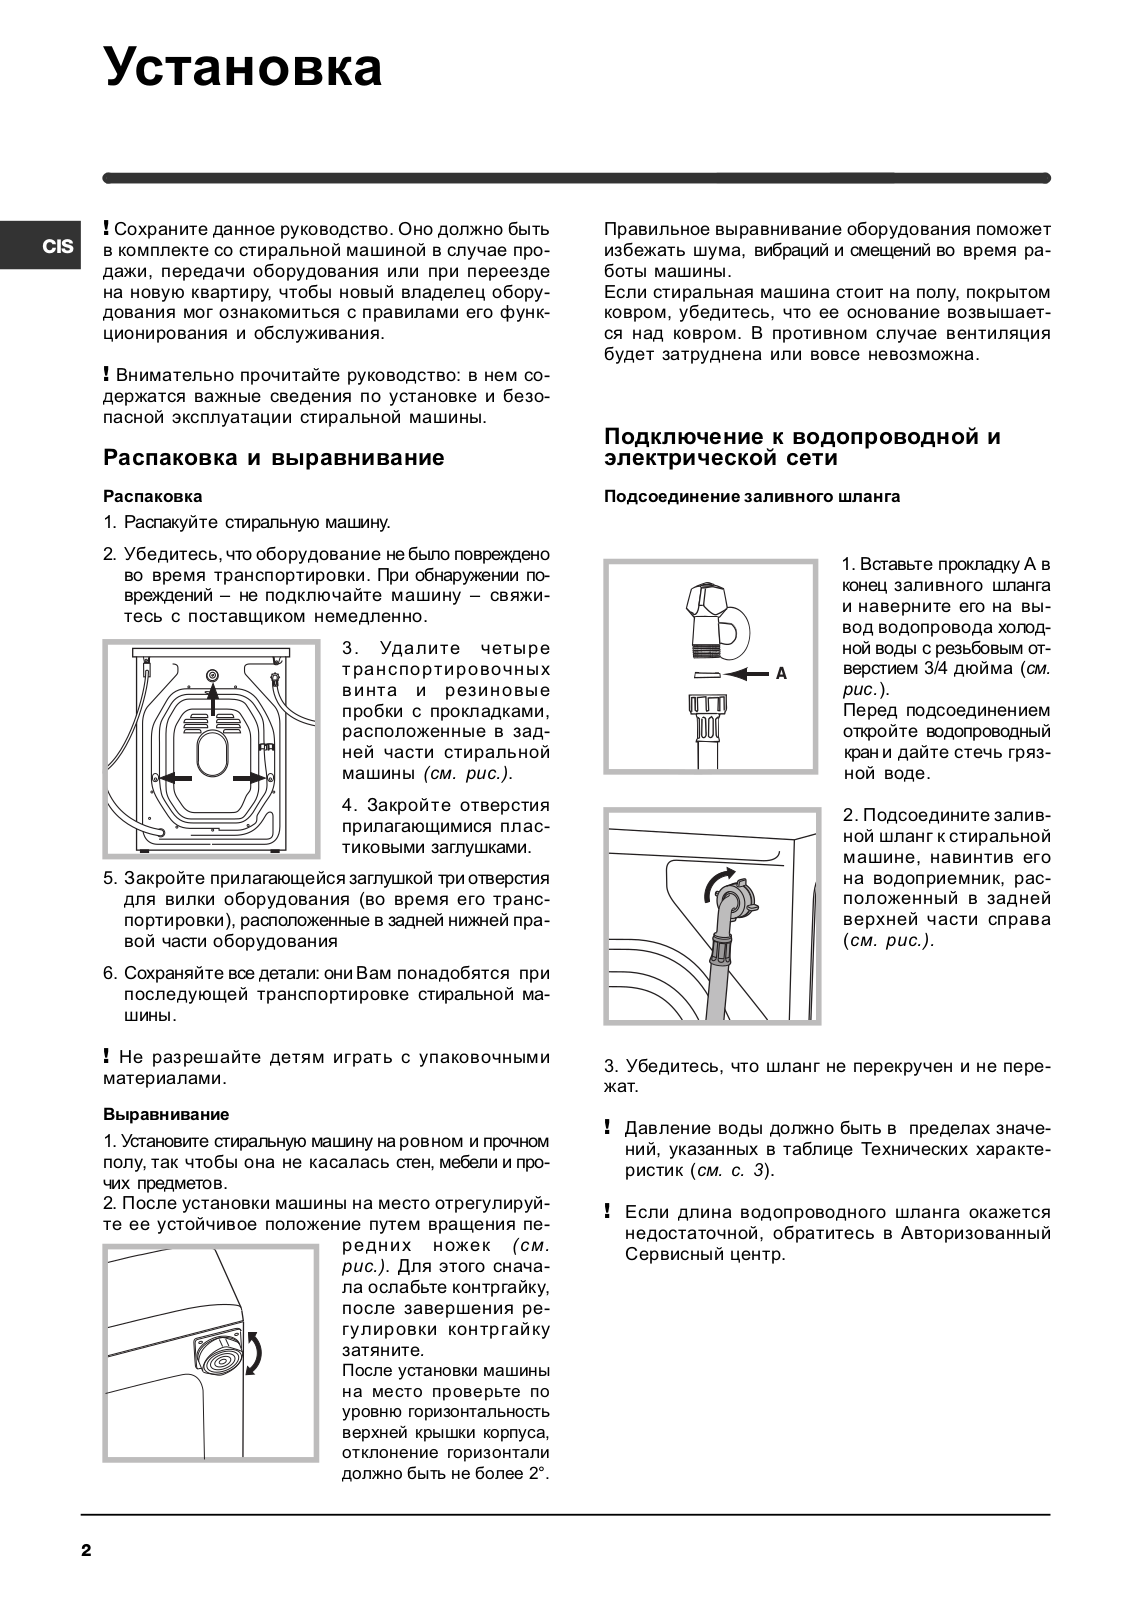
Ðàñïàêîâêà
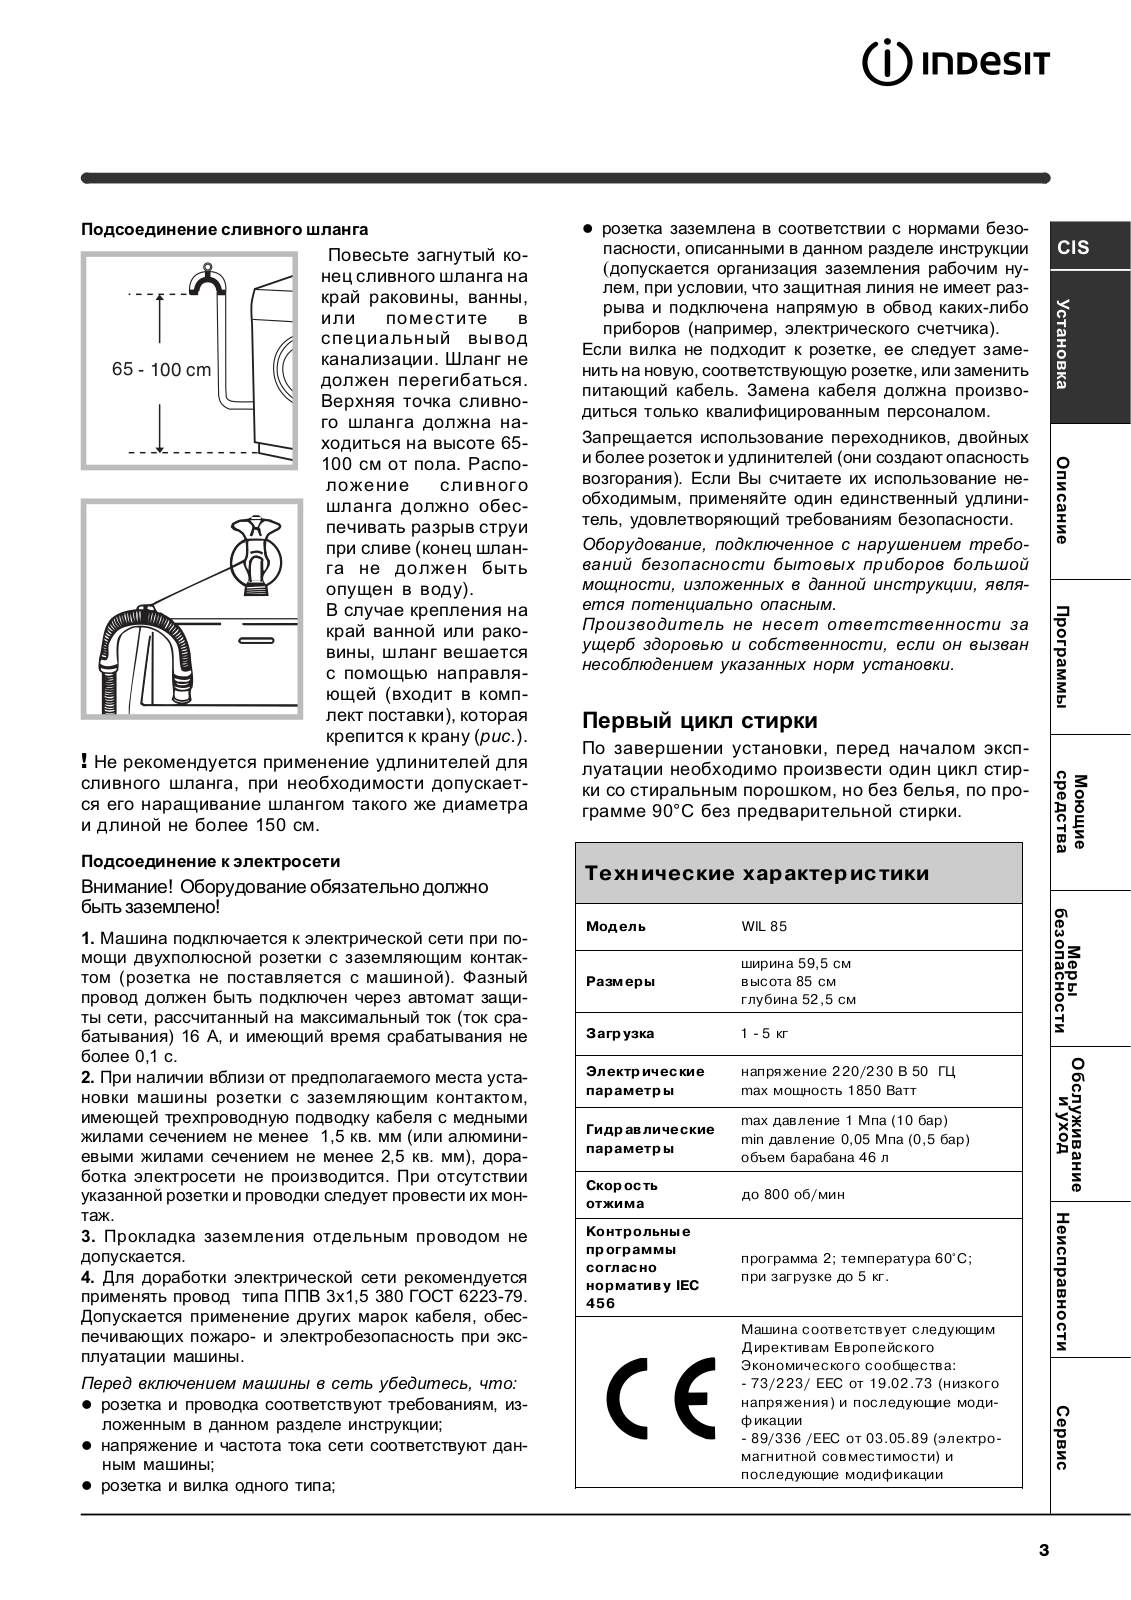
Ïîäñîåäèíåíèå çàëèâíîãî øëàíãà
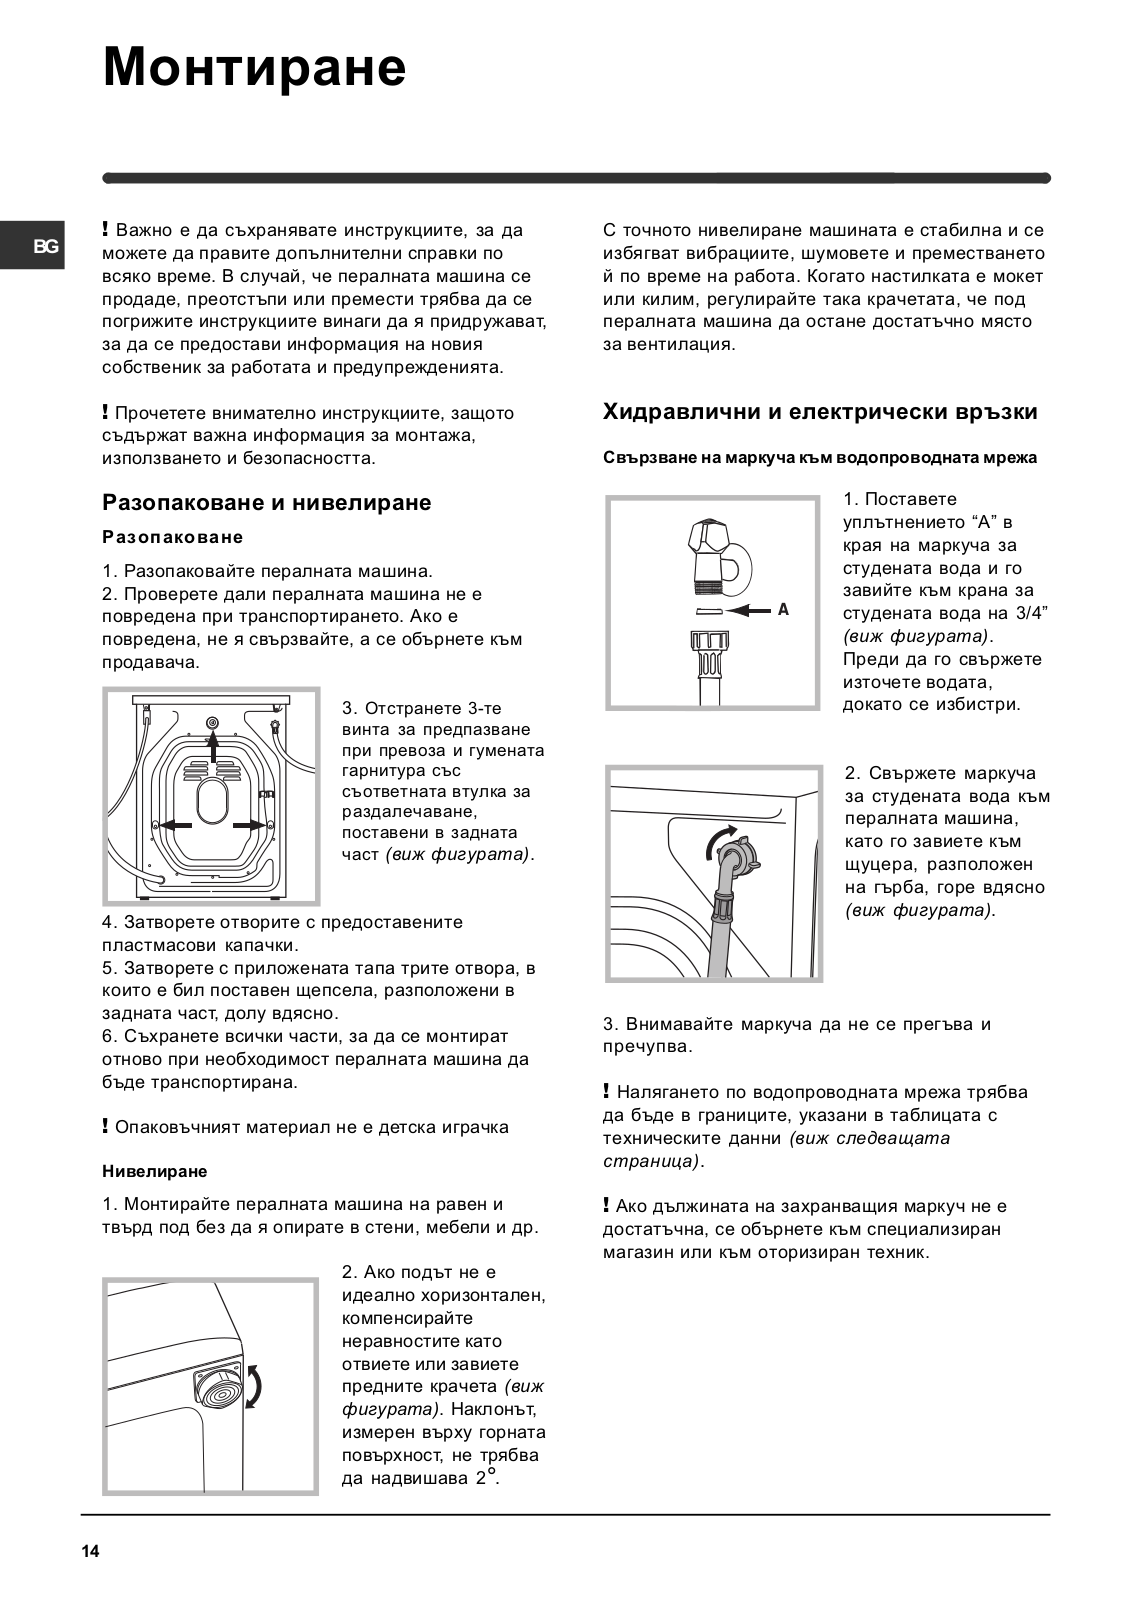
1. Ðàñïàêóéòå ñòèðàëüíóþ ìàøèíó.
2. Óáåäèòåñü, ÷òî îáîðóäîâàíèå íå áûëî ïîâðåæäåíî
1. Âñòàâüòå ïðîêëàäêó À â
âî âðåìÿ òðàíñïîðòèðîâêè. Ïðè îáíàðóæåíèè ïî-
êîíåö çàëèâíîãî øëàíãà
âðåæäåíèé íå ïîäêëþ÷àéòå ìàøèíó ñâÿæè-
è íàâåðíèòå åãî íà âû—
òåñü ñ ïîñòàâùèêîì íåìåäëåííî.
âîä âîäîïðîâîäà õîëîä-
3. Óäàëèòå ÷åòûðå
íîé âîäû ñ ðåçüáîâûì îò-
òðàíñïîðòèðîâî÷íûõ
A
âåðñòèåì 3/4 äþéìà (ñì.
âèíòà è ðåçèíîâûå
ðèñ.).
ïðîáêè ñ ïðîêëàäêàìè,
Ïåðåä ïîäñîåäèíåíèåì
ðàñïîëîæåííûå â çàä-
îòêðîéòå âîäîïðîâîäíûé
íåé ÷àñòè ñòèðàëüíîé
êðàí è äàéòå ñòå÷ü ãðÿç-
ìàøèíû (ñì. ðèñ.).
íîé âîäå.
4. Çàêðîéòå îòâåðñòèÿ
2. Ïîäñîåäèíèòå çàëèâ-
ïðèëàãàþùèìèñÿ ïëàñ-
íîé øëàíã ê ñòèðàëüíîé
òèêîâûìè çàãëóøêàìè.
ìàøèíå, íàâèíòèâ åãî
5. Çàêðîéòå ïðèëàãàþùåéñÿ çàãëóøêîé òðè îòâåðñòèÿ
íà âîäîïðèåìíèê, ðàñ-
äëÿ âèëêè îáîðóäîâàíèÿ (âî âðåìÿ åãî òðàíñ-
ïîëîæåííûé â çàäíåé
ïîðòèðîâêè), ðàñïîëîæåííûå â çàäíåé íèæíåé ïðà-
âåðõíåé ÷àñòè ñïðàâà
âîé ÷àñòè îáîðóäîâàíèÿ
(ñì. ðèñ.).
6. Ñîõðàíÿéòå âñå äåòàëè: îíè Âàì ïîíàäîáÿòñÿ ïðè
ïîñëåäóþùåé òðàíñïîðòèðîâêå ñòèðàëüíîé ìà-
øèíû.
Íå ðàçðåøàéòå äåòÿì èãðàòü ñ óïàêîâî÷íûìè
3. Óáåäèòåñü, ÷òî øëàíã íå ïåðåêðó÷åí è íå ïåðå-
ìàòåðèàëàìè.
æàò.
Âûðàâíèâàíèå
Äàâëåíèå âîäû äîëæíî áûòü â ïðåäåëàõ çíà÷å-
1. Óñòàíîâèòå ñòèðàëüíóþ ìàøèíó íà ðîâíîì è ïðî÷íîì
íèé, óêàçàííûõ â òàáëèöå Òåõíè÷åñêèõ õàðàêòå-
ïîëó, òàê ÷òîáû îíà íå êàñàëàñü ñòåí, ìåáåëè è ïðî-
ðèñòèê (ñì. ñ. 3).
÷èõ ïðåäìåòîâ.
2. Ïîñëå óñòàíîâêè ìàøèíû íà ìåñòî îòðåãóëèðóé-
Åñëè äëèíà âîäîïðîâîäíîãî øëàíãà îêàæåòñÿ
òå åå óñòîé÷èâîå ïîëîæåíèå ïóòåì âðàùåíèÿ ïå-
íåäîñòàòî÷íîé, îáðàòèòåñü â Àâòîðèçîâàííûé
ðåäíèõ íîæåê (ñì.
Ñåðâèñíûé öåíòð.
ðèñ.). Äëÿ ýòîãî ñíà÷à-
ëà îñëàáüòå êîíòðãàéêó,
ïîñëå çàâåðøåíèÿ ðå-
ãóëèðîâêè êîíòðãàéêó
çàòÿíèòå.
Ïîñëå óñòàíîâêè ìàøèíû
íà ìåñòî ïðîâåðüòå ïî
óðîâíþ ãîðèçîíòàëüíîñòü
âåðõíåé êðûøêè êîðïóñà,
îòêëîíåíèå ãîðèçîíòàëè
äîëæíî áûòü íå áîëåå 2°.
2
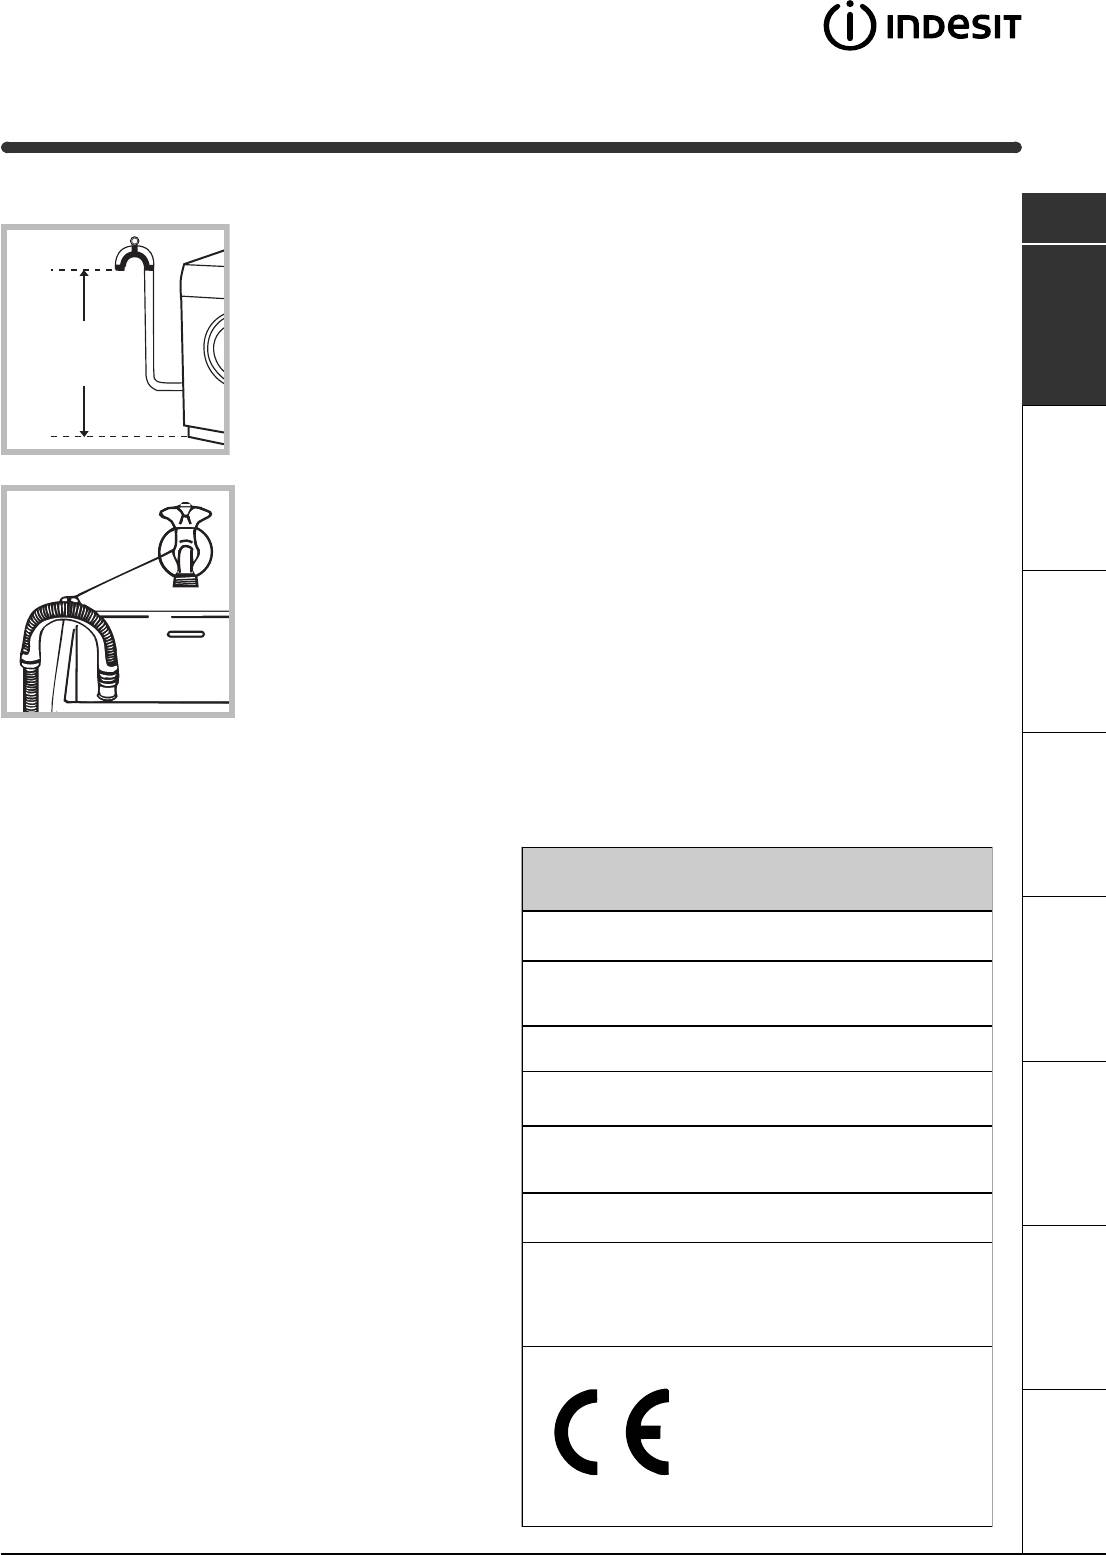
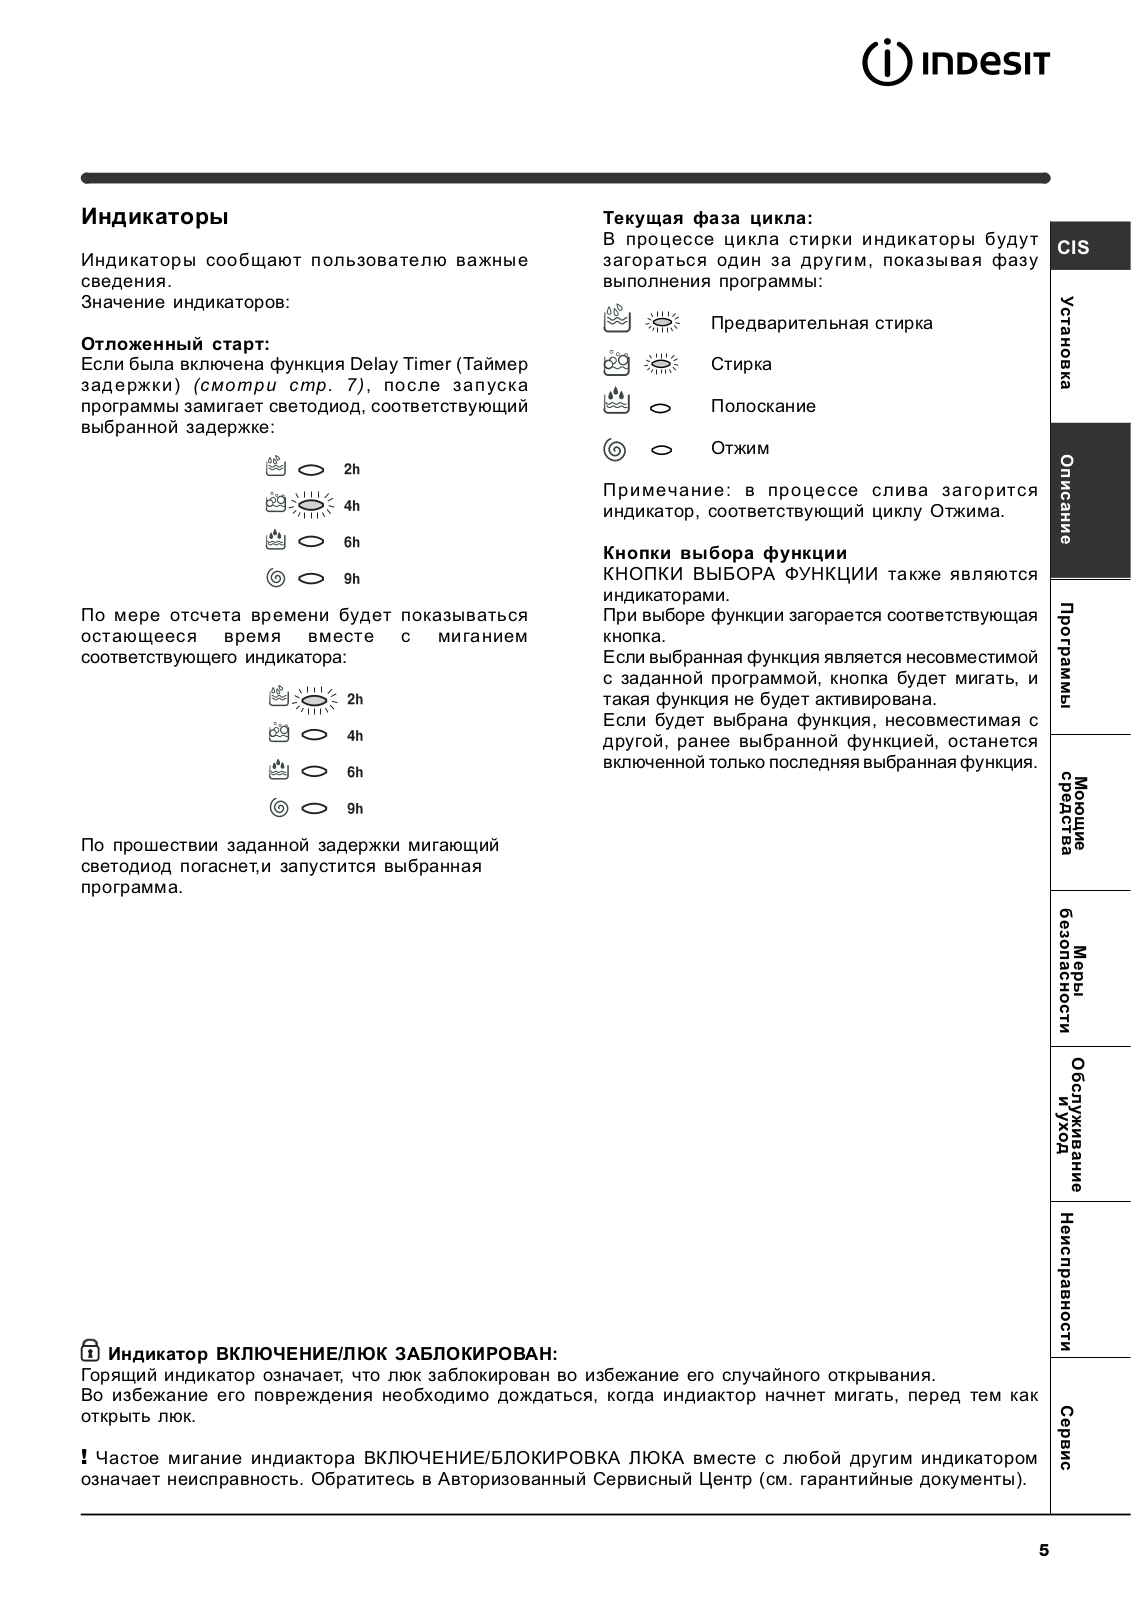
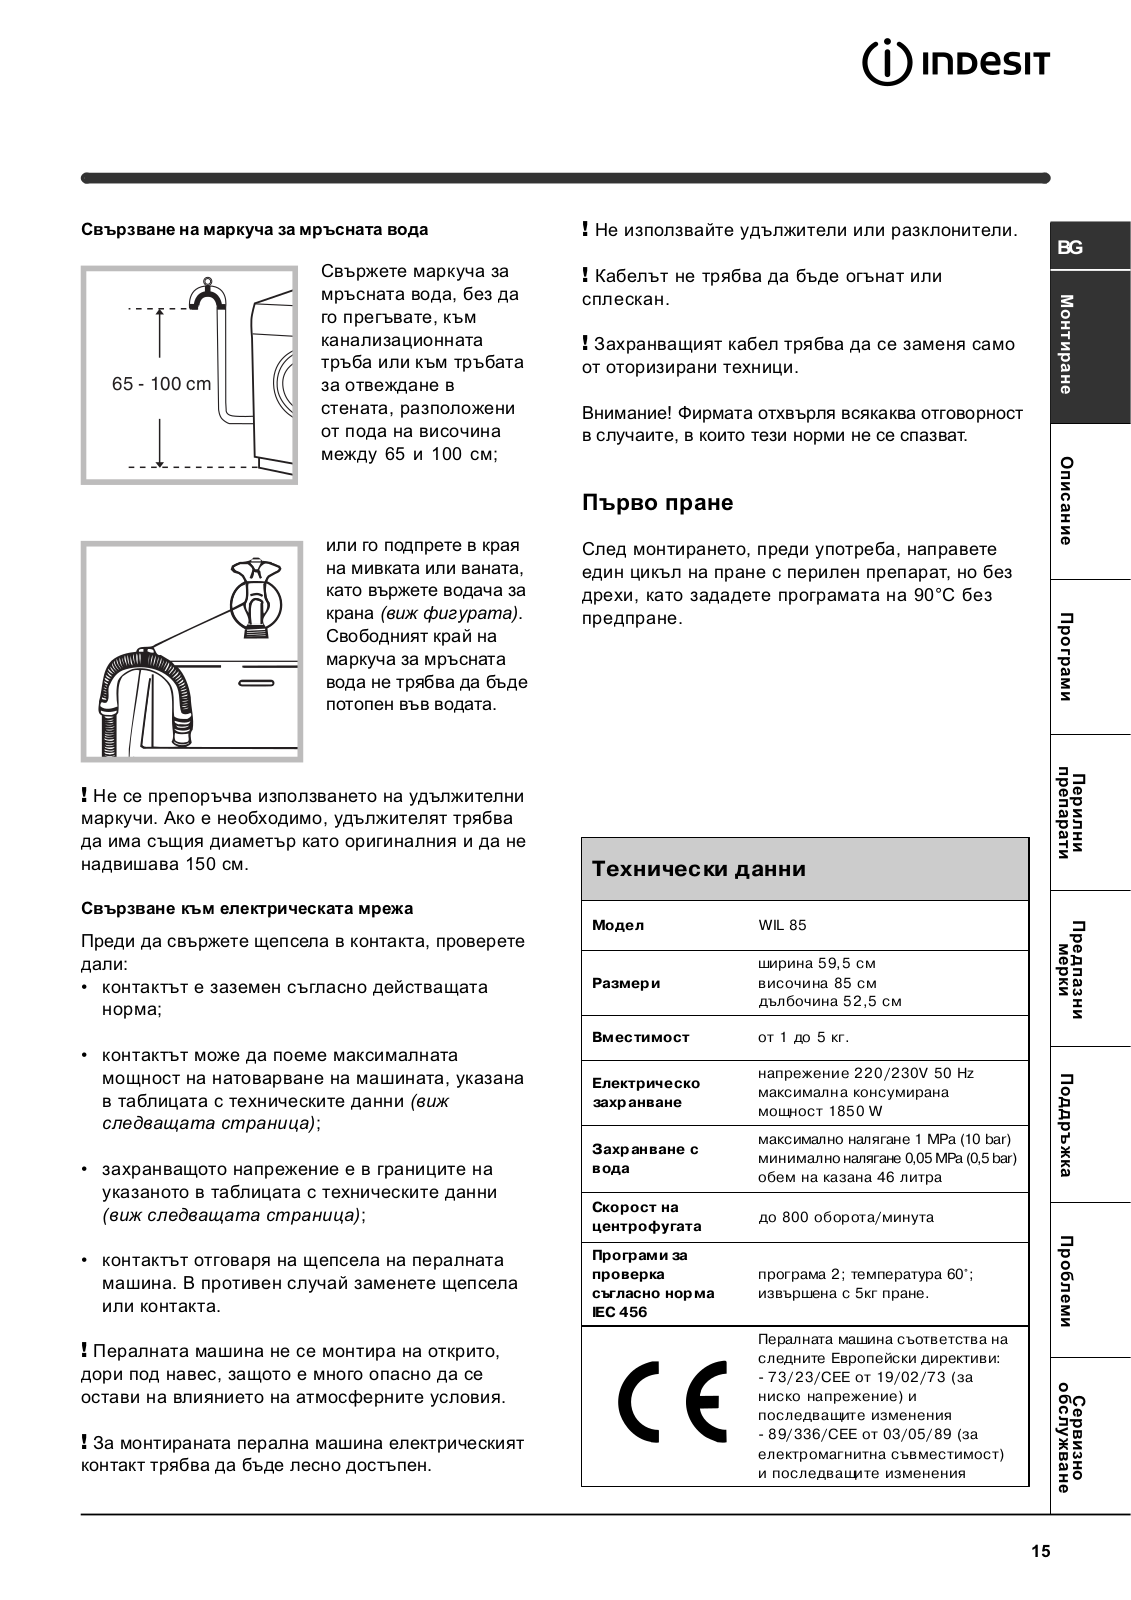
Ïîäñîåäèíåíèå ñëèâíîãî øëàíãà
l ðîçåòêà çàçåìëåíà â ñîîòâåòñòâèè ñ íîðìàìè áåçî-
ïàñíîñòè, îïèñàííûìè â äàííîì ðàçäåëå èíñòðóêöèè
CIS
Ïîâåñüòå çàãíóòûé êî-
äîïóñêàåòñÿ îðãàíèçàöèÿ çàçåìëåíèÿ ðàáî÷èì íó-
íåö ñëèâíîãî øëàíãà íà
ëåì, ïðè óñëîâèè, ÷òî çàùèòíàÿ ëèíèÿ íå èìååò ðàç-
êðàé ðàêîâèíû, âàííû,
Óñòàíîâêà Îïèñàíèå
ðûâà è ïîäêëþ÷åíà íàïðÿìóþ â îáâîä êàêèõ-ëèáî
èëè ïîìåñòèòå â
ïðèáîðîâ (íàïðèìåð, ýëåêòðè÷åñêîãî ñ÷åò÷èêà).
ñïåöèàëüíûé âûâîä
Åñëè âèëêà íå ïîäõîäèò ê ðîçåòêå, åå ñëåäóåò çàìå-
êàíàëèçàöèè. Øëàíã íå
65 — 100 cm
íèòü íà íîâóþ, ñîîòâåòñòâóþùóþ ðîçåòêå, èëè çàìåíèòü
äîëæåí ïåðåãèáàòüñÿ.
ïèòàþùèé êàáåëü. Çàìåíà êàáåëÿ äîëæíà ïðîèçâî-
Âåðõíÿÿ òî÷êà ñëèâíî-
äèòüñÿ òîëüêî êâàëèôèöèðîâàííûì ïåðñîíàëîì.
ãî øëàíãà äîëæíà íà-
Çàïðåùàåòñÿ èñïîëüçîâàíèå ïåðåõîäíèêîâ, äâîéíûõ
õîäèòüñÿ íà âûñîòå 65-
è áîëåå ðîçåòîê è óäëèíèòåëåé (îíè ñîçäàþò îïàñíîñòü
100 ñì îò ïîëà. Ðàñïî-
âîçãîðàíèÿ). Åñëè Âû ñ÷èòàåòå èõ èñïîëüçîâàíèå íå-
ëîæåíèå ñëèâíîãî
îáõîäèìûì, ïðèìåíÿéòå îäèí åäèíñòâåííûé óäëèíè-
øëàíãà äîëæíî îáåñ-
òåëü, óäîâëåòâîðÿþùèé òðåáîâàíèÿì áåçîïàñíîñòè.
ïå÷èâàòü ðàçðûâ ñòðóè
ïðè ñëèâå (êîíåö øëàí-
Îáîðóäîâàíèå, ïîäêëþ÷åííîå ñ íàðóøåíèåì òðåáî-
ãà íå äîëæåí áûòü
âàíèé áåçîïàñíîñòè áûòîâûõ ïðèáîðîâ áîëüøîé
ìîùíîñòè, èçëîæåííûõ â äàííîé èíñòðóêöèè, ÿâëÿ-
îïóùåí â âîäó).
Ïðîãðàììû
åòñÿ ïîòåíöèàëüíî îïàñíûì.
 ñëó÷àå êðåïëåíèÿ íà
Ïðîèçâîäèòåëü íå íåñåò îòâåòñòâåííîñòè çà
êðàé âàííîé èëè ðàêî-
óùåðá çäîðîâüþ è ñîáñòâåííîñòè, åñëè îí âûçâàí
âèíû, øëàíã âåøàåòñÿ
íåñîáëþäåíèåì óêàçàííûõ íîðì óñòàíîâêè.
ñ ïîìîùüþ íàïðàâëÿ-
þùåé (âõîäèò â êîìï-
ëåêò ïîñòàâêè), êîòîðàÿ
Ïåðâûé öèêë ñòèðêè
êðåïèòñÿ ê êðàíó (ðèñ.).
Ïî çàâåðøåíèè óñòàíîâêè, ïåðåä íà÷àëîì ýêñï-
Íå ðåêîìåíäóåòñÿ ïðèìåíåíèå óäëèíèòåëåé äëÿ
ñðåäñòâà
ëóàòàöèè íåîáõîäèìî ïðîèçâåñòè îäèí öèêë ñòèð-
Ìîþùèå
ñëèâíîãî øëàíãà, ïðè íåîáõîäèìîñòè äîïóñêàåò-
êè ñî ñòèðàëüíûì ïîðîøêîì, íî áåç áåëüÿ, ïî ïðî-
ñÿ åãî íàðàùèâàíèå øëàíãîì òàêîãî æå äèàìåòðà
ãðàììå 90°C áåç ïðåäâàðèòåëüíîé ñòèðêè.
è äëèíîé íå áîëåå 150 ñì.
Ïîäñîåäèíåíèå ê ýëåêòðîñåòè
Òåõíè÷åñêèå õàðàêòåðèñòèêè
Âíèìàíèå! Îáîðóäîâàíèå îáÿçàòåëüíî äîëæíî
áåçîïàñíîñòè
áûòü çàçåìëåíî!
Ìîäåëü
WIL 85
1. Ìàøèíà ïîäêëþ÷àåòñÿ ê ýëåêòðè÷åñêîé ñåòè ïðè ïî-
Ìåðû
ìîùè äâóõïîëþñíîé ðîçåòêè ñ çàçåìëÿþùèì êîíòàê-
øèðèíà 5 9 , 5 ñ ì
òîì (ðîçåòêà íå ïîñòàâëÿåòñÿ ñ ìàøèíîé). Ôàçíûé
Ðàçìåðû
âûñîòà 85 ñì
ïðîâîä äîëæåí áûòü ïîäêëþ÷åí ÷åðåç àâòîìàò çàùè-
ãëóáèíà 52,5 ñì
òû ñåòè, ðàññ÷èòàííûé íà ìàêñèìàëüíûé òîê (òîê ñðà-
áàòûâàíèÿ) 16 À, è èìåþùèé âðåìÿ ñðàáàòûâàíèÿ íå
Çàãðóçêà
1 — 5 êã
áîëåå 0,1 ñ.
Îáñëóæèâàíèå
Ýëåêòðè÷åñêèå
íàïðÿæåíèå 220/2 30 Â 50 ÃÖ
2. Ïðè íàëè÷èè âáëèçè îò ïðåäïîëàãàåìîãî ìåñòà óñòà-
ïàðàìåòðû
max ìîùíîñòü 1850 Âàòò
è óõîä
íîâêè ìàøèíû ðîçåòêè ñ çàçåìëÿþùèì êîíòàêòîì,
èìåþùåé òðåõïðîâîäíóþ ïîäâîäêó êàáåëÿ ñ ìåäíûìè
max äàâëåíèå 1 Ìïà (10 áàð)
Ãèäðàâëè÷åñêèå
æèëàìè ñå÷åíèåì íå ìåíåå 1,5 êâ. ìì (èëè àëþìèíè-
min äàâëåíèå 0,05 Ìïà (0,5 áàð)
ïàðàìåòðû
åâûìè æèëàìè ñå÷åíèåì íå ìåíåå 2,5 êâ. ìì), äîðà-
îáúåì áàðàáàíà 46 ë
áîòêà ýëåêòðîñåòè íå ïðîèçâîäèòñÿ. Ïðè îòñóòñòâèè
Ñêîðîñòü
óêàçàííîé ðîçåòêè è ïðîâîäêè ñëåäóåò ïðîâåñòè èõ ìîí-
äî 800 îá/ìèí
îòæèìà
òàæ.
Kîíòðîëüíûå
3. Ïðîêëàäêà çàçåìëåíèÿ îòäåëüíûì ïðîâîäîì íå
ïðîãðàììû
äîïóñêàåòñÿ.
ïðîãðàììà 2; òåìïåðàòóðà 60°Ñ;
ñîãëàñíî
4. Äëÿ äîðàáîòêè ýëåêòðè÷åñêîé ñåòè ðåêîìåíäóåòñÿ
ïðè çàãðóçêå äî 5 êã.
íîðìàòèâó IEC
ïðèìåíÿòü ïðîâîä òèïà ÏÏÂ 3õ1,5 380 ÃÎÑÒ 6223-79.
456
Äîïóñêàåòñÿ ïðèìåíåíèå äðóãèõ ìàðîê êàáåëÿ, îáåñ-
Ìàøèíà ñîîòâåòñòâóåò ñëåäóþùèì
ïå÷èâàþùèõ ïîæàðî- è ýëåêòðîáåçîïàñíîñòü ïðè ýêñ-
Äèðåêòèâàì Åâðîïåéñêîãî
ïëóàòàöèè ìàøèíû.
Ýêîíîìè÷åñêîãî ñîîáùåñòâà:
Ïåðåä âêëþ÷åíèåì ìàøèíû â ñåòü óáåäèòåñü, ÷òî:
— 73/223/ ÅÅÑ îò 19.02.73 (íèçêîãî
l ðîçåòêà è ïðîâîäêà ñîîòâåòñòâóþò òðåáîâàíèÿì, èç-
íàïðÿæåíèÿ) è ïîñëåäóþùèå ìîäè—
ÑåðâèñÍåèñïðàâíîñòè
ôèêàöèè
ëîæåííûì â äàííîì ðàçäåëå èíñòðóêöèè;
— 89/336 /ÅÅÑ îò 03.05.89 (ýëåêòðî-
l íàïðÿæåíèå è ÷àñòîòà òîêà ñåòè ñîîòâåòñòâóþò äàí-
ìàãíèòíîé ñîâìåñòèìîñòè) è
íûì ìàøèíû;
ïîñëåäóþùèå ìîäèôèêàöèè
l ðîçåòêà è âèëêà îäíîãî òèïà;
3
Перейти к контенту
Стиральные машины Indesit
- Размер инструкции: 1.18 Мб
- Формат файла: pdf
Если вы потеряли инструкцию от стиральной машины Indesit WIL 85, можете скачать файл для просмотра на компьютере или печати.
Инструкция для стиральной машины Indesit WIL 85 на русском языке. В руководстве описаны возможности и полезные функции, а также правила эксплуатации. Перед использованием внимательно ознакомьтесь с инструкцией.
Чтобы не читать всю инструкцию вы можете выполнить поиск по содержимому внутри инструкции и быстро найти необходимую информацию. Рекомендации по использованию помогут увеличить срок службы стиральной машины Indesit WIL 85. Если у вас появилась проблема, то найдите раздел с описанием неисправностей и способами их решения. В нем указаны типичные поломки и способы их решения.
Страницы и текст этой инструкции
Инструкция стиральной машины Indesit WIL 85
Информация отображена на картинке
Информация отображена на картинке
Информация отображена на картинке
Информация отображена на картинке
Как использовать наш сайт инструкций OnlineManuals.ru
Наша цель состоит в том, чтобы предоставить вам быстрый доступ к содержанию инструкции для стиральной машины Indesit WIL 85.
С помощью онлайн просмотра, Вы можете быстро просмотреть содержимое инструкции и найти решение проблемы с стиральной машины Indesit WIL 85.
Для Вашего удобства
Если листать руководство пользователя стиральной машины Indesit WIL 85 прямо на сайте, не очень удобно для Вас, есть два возможных решения:
• Просмотр в полноэкранном режиме — легко просмотреть руководство пользователя (без загрузки его на свой компьютер), Вы можете использовать режим полноэкранного просмотра.
Для просмотра инструкции пользователя стиральной машины Indesit WIL 85 на полном экране, используйте кнопку «Открыть в Pdf-viewer».
• Загрузка на компьютер — Вы можете также скачать Инструкция стиральной машины Indesit WIL 85 на свой компьютер и сохранить его в файлах.
Многие люди предпочитают читать документы не на экране, а в печатной версии.
Возможность печати руководства пользователя также была предусмотрена на нашем сайте,
и вы можете использовать ее, нажав на иконку «печать» в Pdf-viewer.
Нет необходимости печатать все руководство стиральной машины Indesit WIL 85, можно выбрать только нужные страницы инструкции.
- June 12, 2024
- INDESIT
Table of Contents
- Indesit Standard WIL 85 Washing Machine
- Installation
- Unpacking and levelling
- Electric and water connections
- Technical details
- Washing machine description
- Starting and Programmes
- Personalisations
- Functions
- Detergents and laundry
- Preparing your laundry
- Special items
- Care and maintenance
- Troubleshooting
- Service
- FAQ’s
- Read User Manual Online (PDF format)
- Download This Manual (PDF format)
Indesit Standard WIL 85 Washing Machine

Installation
! Keep this instruction manual in a safe place for future reference. Should
the appliance be sold, transferred or moved, make sure the instruction manual
accompanies the washing machine to inform the new owner as to its operation
and features.
! Read these instructions carefully: they contain vital information on
installation, use and safety.
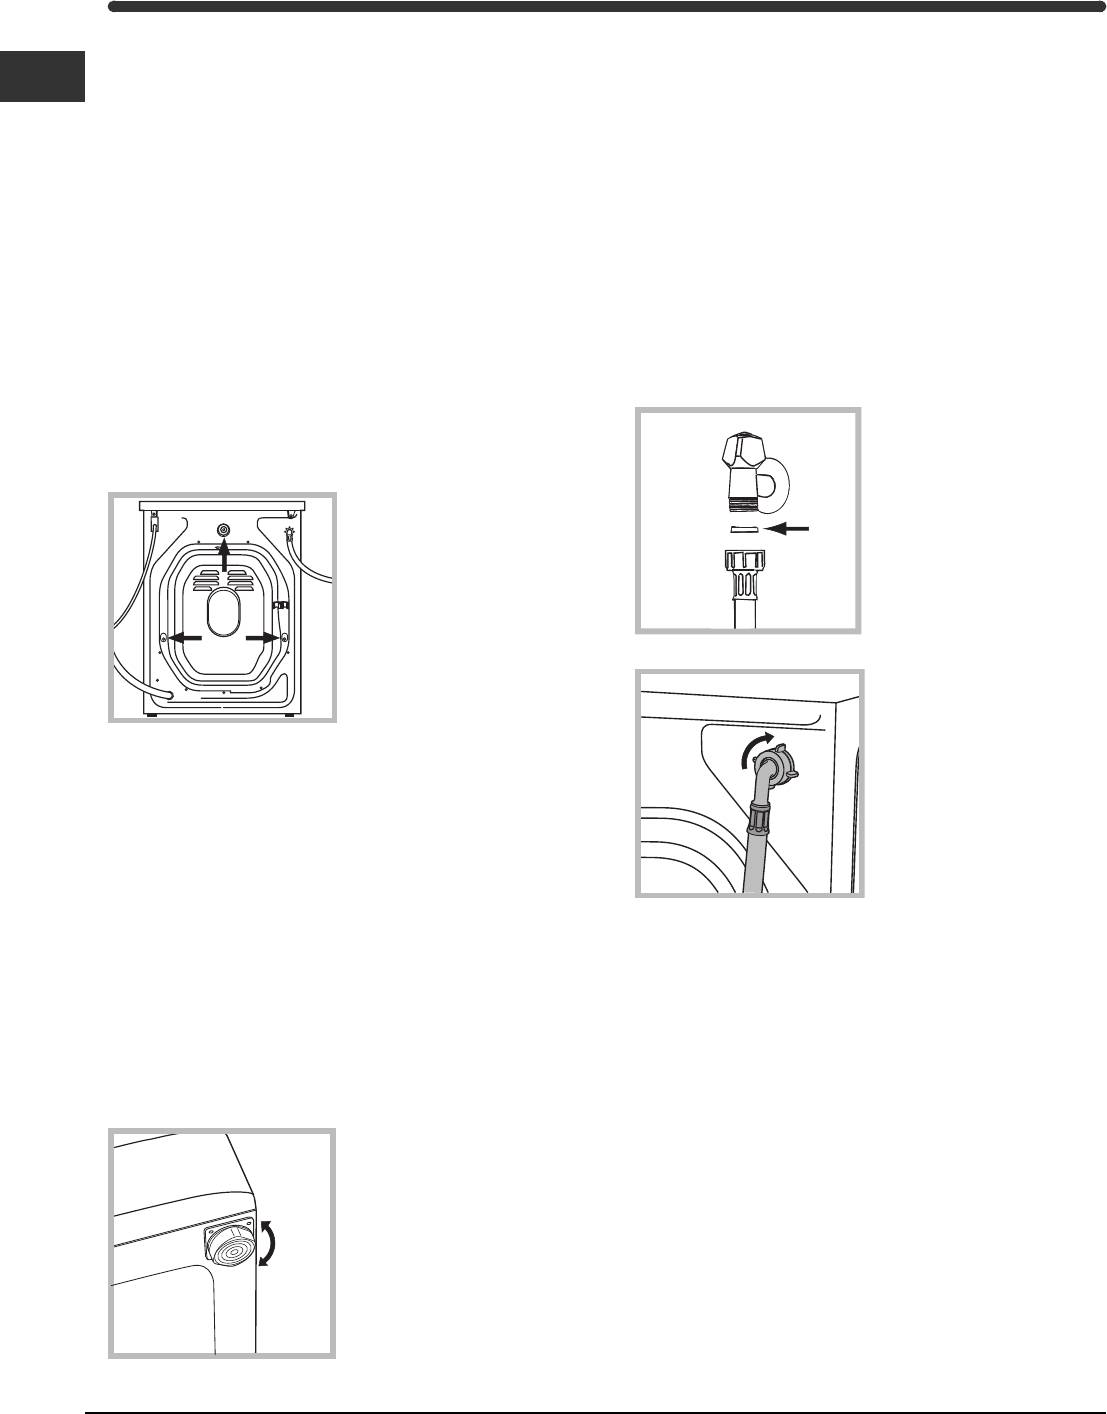
Unpacking and levelling
Unpacking
- Unpack the washing machine.
- Check whether the washing machine has been damaged during transport. If this is the case, do not install it and contact your retailer.
- Remove the 3 protective screws and the rubber washer with the respaztive spacer, situated on the rear of the appliance (see figure).
- Seal the gaps using the plastic plugs provided.
- Keep all the parts: you will need them again if the
washing machine needs to be moved to another location.
! Packaging materials are not children’s toys.
Levelling
- Install the washing machine on a flat sturdy floor, without resting it up against walls, furniture cabinets or other.
- If the floor is not perfectly level, compensate for any unevenness by tightening or loosening the adjustable front feet (see figure); the angle of inclination, measured according to the worktop, must not exceed 20.
Levelling your appliance correctly will provide it with stability and avoid
any vibrations, noise and shifting during operation. If it is placed on a
fitted or loose carpet, adjust the feet in such a way as to allow enough room
for ventilation beneath the washing
machine.
Electric and water connections
Connecting the water inlet hose
-
Insert seal A into the end of the inlet hose and screw the latter onto a cold water tap with a 3/4 gas threaded mouth (see figure).
Before making the connection, allow the water to run freely until it is
perfectly clear. -
Connect the other end of the water inlet hose to the washing machine, screwing it onto the appliance’s cold water inlet, situated on thc top right-hand side on the rear of the appliance (see figure).
-
Make sure there are no kinks or bends in the hose.
! The water pressure at the tap must be within the values indicated in the
Technical details table (on the next page).
! If the water inlet hose is not long enough, contact a specialist store or an
authorised serviceman.
! Never use hoses that have already been used.
Connecting the drain hose
- Connect the drain hose, without bending it, to a draining duct or a wall drain situated between 65 and 100 cm from the floor;
- alternatively, place it over the edge of a basin, sink or tub, fastening the duct supplied to the tap (see figure). The free end of the hose should not be underwater.
! We advise against the use of hose extensions; in case of absolute need, the
extension must have the same diameter as the original hose and must not exceed
150 cm in length.
Electric connection
Before plugging the appliance into the mains socket, make sure that:
- the socket is earthed and in compliance with the applicable law; the socket is able to sustain the appliance’s maximum power load indicated in the Technical details table (on the right); the supply voltage is included within the values i ndicated on the Technical details table (on the right); the socket is compatible with the washing machine’s plug. If this is not the case, replace the socket or the plug.
- ! The washing machine should not be installed in an outdoor environment, not even when the area is sheltered, because it may be very dangerous to leave it exposed to rain and thunderstorms.
- ! When the washing machine is installed, the mains socket must be within easy reach. Do not use extensions or multiple
- ! The power supply cable must never be or dangerously compressed.
- ! The power supply cable must only replaced by an authorised serviceman.
Warning! The company denies all liability if and when these norms are not
respected.
The first wash cycle
Once the appliance has been installed, and before you use it for the first
time, run a wash cycle with detergent and no laundry, setting the 900C without
a pre-wash cycle.
Technical details
| Technical | details |
|---|
Model
|
WIL 85
Dimensions
| 59.5 cm wide 85 cm high
52.5 cm deep
Capacity
|
from 1 to 5 kg
Electric connections| please refer to the technical data plate fixed to the
machine
Water connections
| maximum pressure 1 MPa (10 bar)
minimum pressure 0.05 MPa (0.5 bar) drum capacity 46 litres
Spin speed
|
up to 800 rpm
Control|
programmes|
| programme 2; temperature 60°C;
EN 60456| run with a load of 5 kg.
directive|
This appliance is compliant with the following European Community Directives:
– 89/336/CEE of 03/05/89
(Electromagnetic Compatibility) and subsequent amendments
– 2006/95/CE (Low Voltage)
– 2002/96/CE
Washing machine description
Control panel

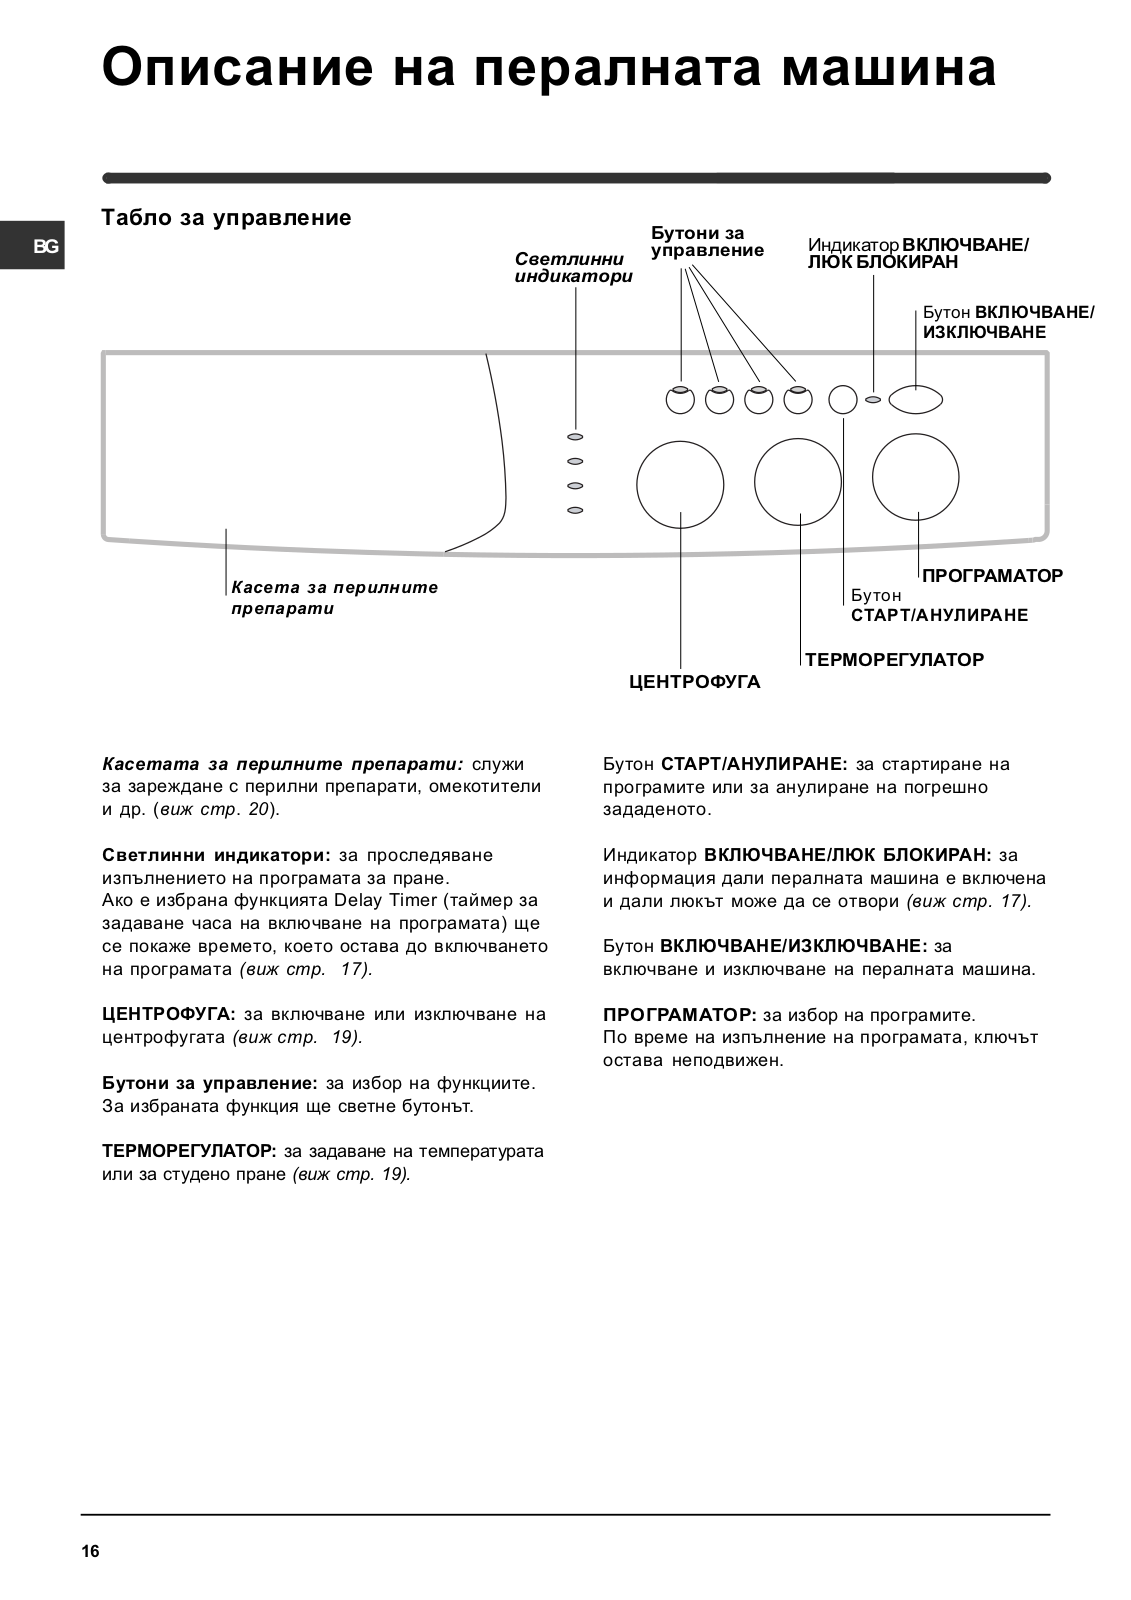
Detergent dispenser: to add detergent and fabric softener (see page 32).
-
LEDS: to find out which wash cycle phase is under way.
-
If the Delay Timer function has been set, the time left until the programme starts will be indicated (see page 29).
-
SPIN SPEED knob: to set the spin speed or exclude the spin cycle completely (see page 31).
-
FUNCTION buttons: to select the functions available. The button corresponding to the function selected will remain on
-
TEMPERATURE knob: to set the temperature or the cold wash cycle (see page 31).
-
START/RESET button: to start the programmes or cancel any incorrect settings.
-
ON-OFF/DOOR LOCK Led: to find out whether the washing machine is on and if the appliance door can be opened (see page 29).
-
ON/OFF
button: to turn the washing machine on and off. -
PROGRAMME
knob: to select the wash programmes. The knob stays still during the cycle.
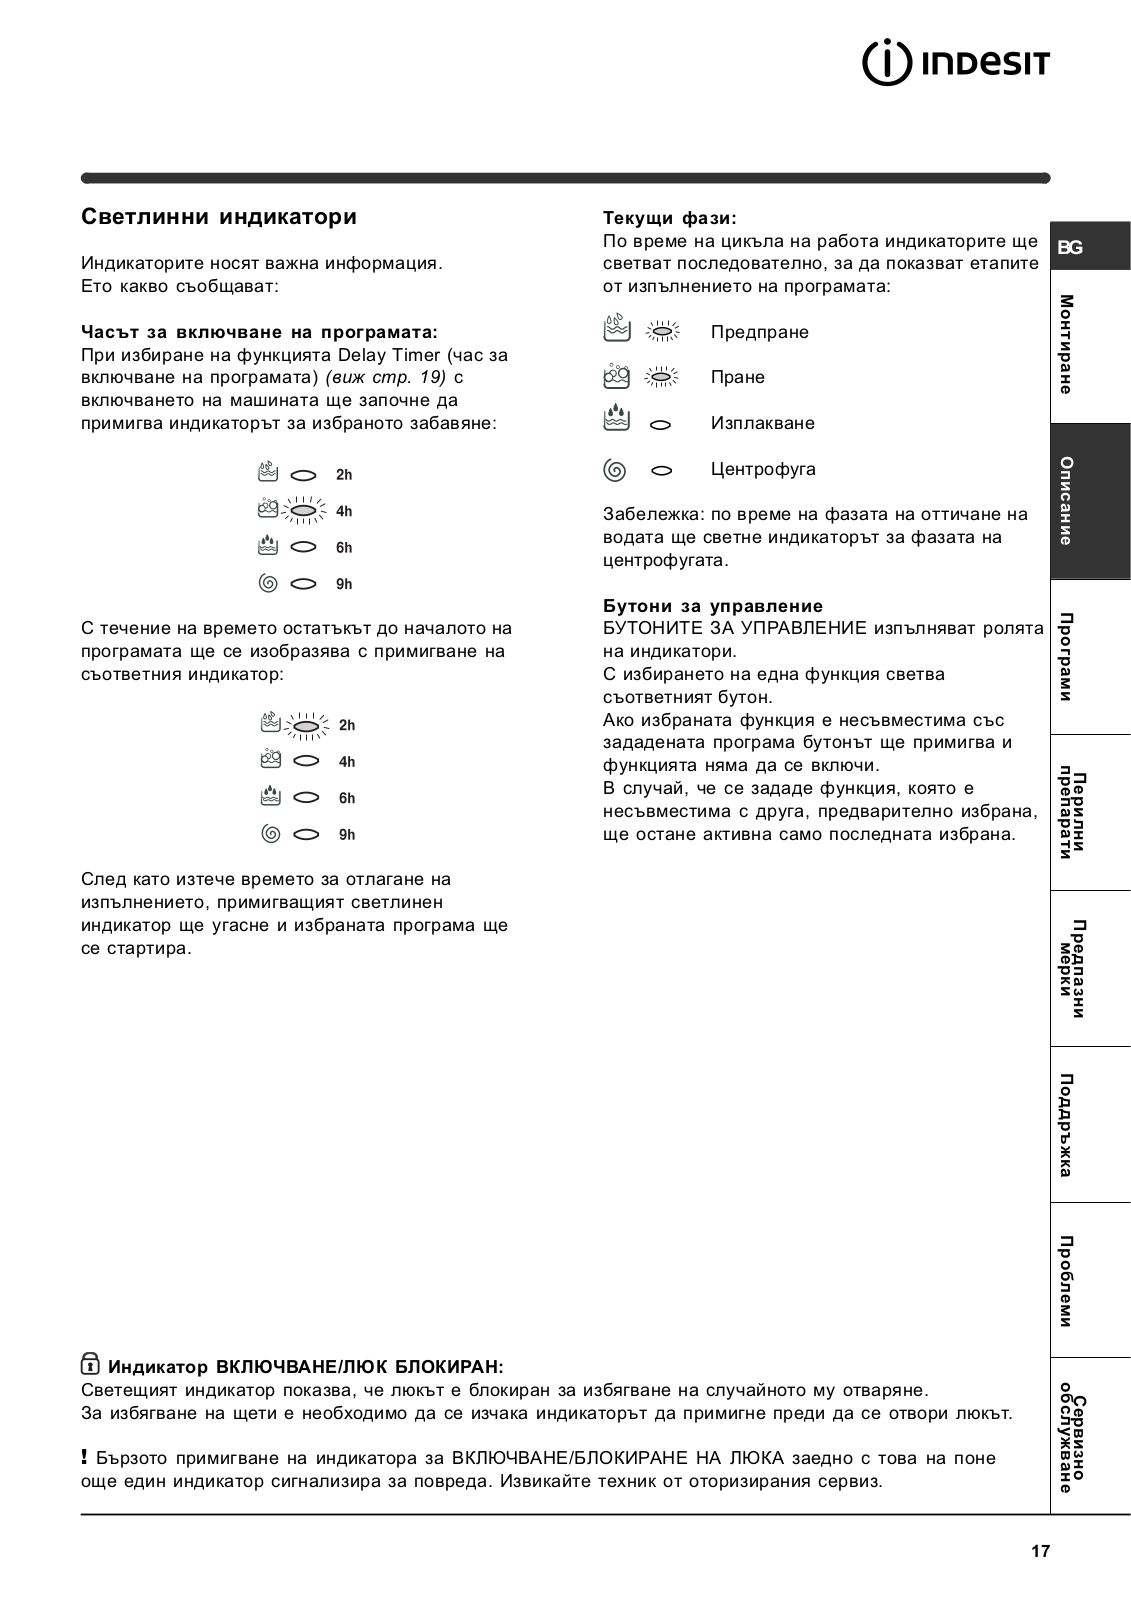
Leds
The LEDS provide important information.
This is what they can tell you:
Delay set:
If the Delay Timer function has been enabled (see page. 31), once you have
started the programme, the LED corresponding to the delay set will begin to
flash:
-
As time passes, the remaining delay will be displayed, and the corresponding LED will flash:
-
Once the set delay is complete, the flashing LED will turn off and the programme set will start.
Cycle phase under way:
- During the wash cycle, the LEDs gradually illumnate on to indicate the cycle phase underway:
Note: during draining, the LED corresponding to the Spin cycle phase will be
turned on.
Function buttons
- The FUNCTION BUTTONS also act like LEDS.
- When a function is selected, the corresponding button is illuminated.
- If the function selected is incompatible with the
- programme set, the button will flash and the function will not be enabled.
- If you set a function that is incompatible with another function you selected previously, only the last one selected will be enabled.
ON-OFF/DOOR LOCK led:
If this LED is on, the appliance door is locked to prevent it from being
opened accidentally; to avoid any damages, wait for the LED to flash before
you open the appliance door.
! The rapid flashing of the ON-OFF/DOOR LOCK Led together with the flashing of
at least one other LED indicates there is an abnormality (see page 35).
Starting and Programmes
Briefly: starting a programme
-
Switch the washing machine on by pressing button
All the LEDS will light up for a few seconds and the ON-OFF/DOOR LOCK Led will
begin to flash. -
Load your laundry into the washing machine and shut the appliance door.
-
Set the PROGRAMME knob to the programme required.
-
Set the wash temperature (see page 31).
-
Set the spin speed (see page 31).
-
Add the detergent and any fabric softener (see page 32).
-
Start he programme by pressing the START/RESET button.
To cancel it, keep the START/RESET button pressed for at 2 seconds. -
When the programme is finished, the ON-OFF/ DOOR LOCK Led will flash to indicate that the appliance door can be opened. Take out your laundry and leave the appliance door ajar to allow the drum to dry thoroughly. Turn the washing machine off by pressing button
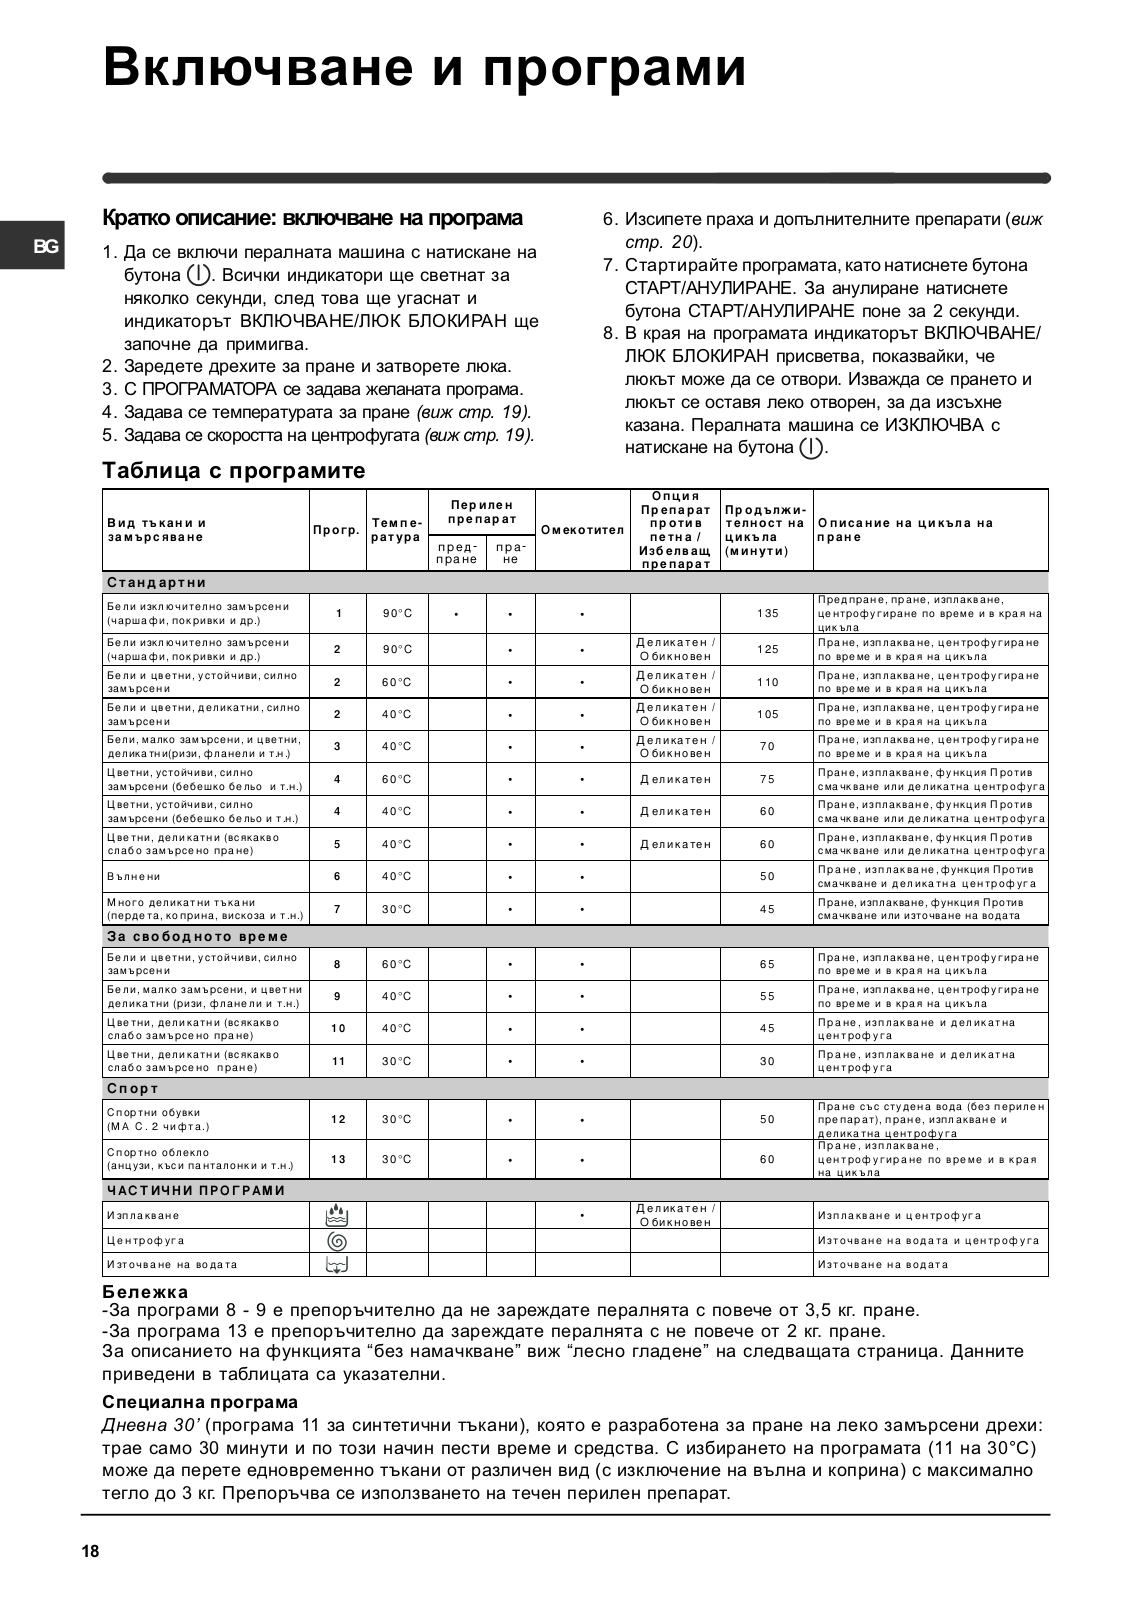
Programme table
T p ab a d d
|
a m m
|
T m p –
a
|
D
|
Fab
|
a m va
p b a
|
(m )
|
D p a
—|—|—|—|—|—|—|—
pre- wash| wash
S tandard
Extremely soiled whites (sheets, tablecloths, etc.)| | 90°C| •| •| •| |
167| Pre-wash, wash cycle, rinse cycles, intermediate and final spin cycles
Extremely soiled whites (sheets, tablecloths, etc.)| | 90°C| | •| •|
Delicate/ Tradition al| 152| Wash cycle, rinse cycles, intermediate and final
spin cycles
eavily soiled whites and fast colours| | 60°C| | •| •| Delicate/
Tradition al| 158| Wash cycle, rinse cycles, intermediate and final spin
cycles
eavily soiled whites and delicate colours| | 40°C| | •| •| Delicate/
Tradition al| 143| Wash cycle, rinse cycles, intermediate and final spin
cycles
Slightly soiled w hites and delicate colours (shirts, jumpers, etc.)|
3
|
40°C
| |
•
|
•
| Delicate/ Tradition al|
99
| Wash cycle, rinse cycles, intermediate and final spin cycles
eavily soiled fast colours (baby linen, etc.)| | 60°C| | •| •|
Delicate| 80| Wash cycle, rinse cycles, anti- crease or delicate spin cycle
eavily soiled fast colours (baby linen, etc.)| | 40°C| | •| •|
Delicate| 71| Wash cycle, rinse cycles, anti- crease or delicate spin cycle
Delicate colours (all types of slightly soiled garments)| | 40°C| | •|
•| Delicate| 71| Wash cycle, rinse cycles, anti- crease or delicate spin cycle
Wool| | 40°C| | •| •| | 50| Wash cycle, rinse cycles an d delicate spin
cycle
Very delicate fabrics (cu rtain s, s ilk, viscose, etc.)| | 30°C| | •| •|
| 52| Wash cycle, rinse cycles , an ti- crease or drain in g cycle
Tim e 4 yo u
eavily soiled whites and fast colours| | 60°C| | •| •| | 60| Wash
cycle, rinse cycles, intermediate and final spin cycles
Slightly soiled w hites and delicate colours (shirts,
jumpers, etc.)
|
9
|
40°C
| |
•
|
•
| |
50
| Wash cycle, rinse cycles, intermediate and final spin cycles
Delicate colours (all types of slightly soiled garments)| | 40 °C| | •|
•| | 40| Wash cycle, rinse cycles, delicate spin cycle
Delicate colours (all types of slightly soiled garments)| | 30°C| | •|
•| | 30| Wash cycle, rinse cycles an d delicate spin cycle
Sport
Sports shoes (MA . 2 pairs)
|
|
30 °C
| |
•
|
•
| |
50
| Cold w ash (w ithout detergents),
w ash cycle, rinse cycles, and delicate spin cycle
Fabrics for sportswear (Tracksuits, shorts, etc.)| 3| 30°C| | •| •| | 63|
Wash cycle, rinse cycles, intermediate and final spin cycles
PAR TIAL PR OGR AM M ES
Rinse| | | | | •| Delicate/ Tradition al| | R inse cycles an d spin cycle
Spin cycle| | | | | | | | Draining and spin cycle
Drain| | | | | | | | Draining
Notes
- -For programmes 8 and 9, we advise against exceeding a wash load of 3.5 kg.
-For programme 13 we advise against exceeding a wash load of 2 kg.
-For the anti-crease function: see Easy iron, opposite page. The information contained in the table is purely indicative.
Special programme
Daily (programme 1 1 for Synthetics) is designed to wash lightly soiled
garments in a short amount of time: it only lasts
30 minutes and allows you to save on both time and energy. By setting this
programme (1 1 at 300C), you can wash
different fabrics together (except for woollen and silk items), with a maximum
load of 3 kg.
We recommend the use of liquid detergent.
Personalisations
Setting the temperature
Turn the TEMPERATURE knob to set the wash temperature (see Programme table on
page 30).
The temperature can be lowered, or even set to a cold wash (9).
Setting the spin speed
Turn the SPIN SPEED knob to set the spin speed for the programme selected.
The maximum spin speeds for each programme are as follows:
Programmes
- Cottone
- Synthetics
- Wool
- Silk
Maximum spin speed
- 800 rpm
- 800 rpm
- 600 rpm
The spin speed can be lowered, or the spin cycle can be excluded altogether by
selecting symbol
The washing machine will automatically prevent you from selecting a spin speed
higher than the maximum speed for each programme.
Note: to avoid excessive vibrations, before every spin cycle the machine
distributes the load in a uniform manner by continuously rotating the drum at
a speed which is slightly faster than the normal washing speed.
When, despite repeated attempts, the load is still not evenly distributed, the
machine spins at a lower speed than the set frequency.
If the load is excessively unbalanced, the machine attempts to distribute it
instead of spinning.
The balancing attempts may extend the total duration of the cycle, up to a
maximum of 10 minutes.
Functions
To enable a function:
- 1. press the button corresponding to the desired function, according to the table below;
2. the function is enabled when the corresponding button is illuminated.
Note: The rapid flashing of the button indicates that the corresponding
function cannot be selected for the programme set.

Detergents and laundry
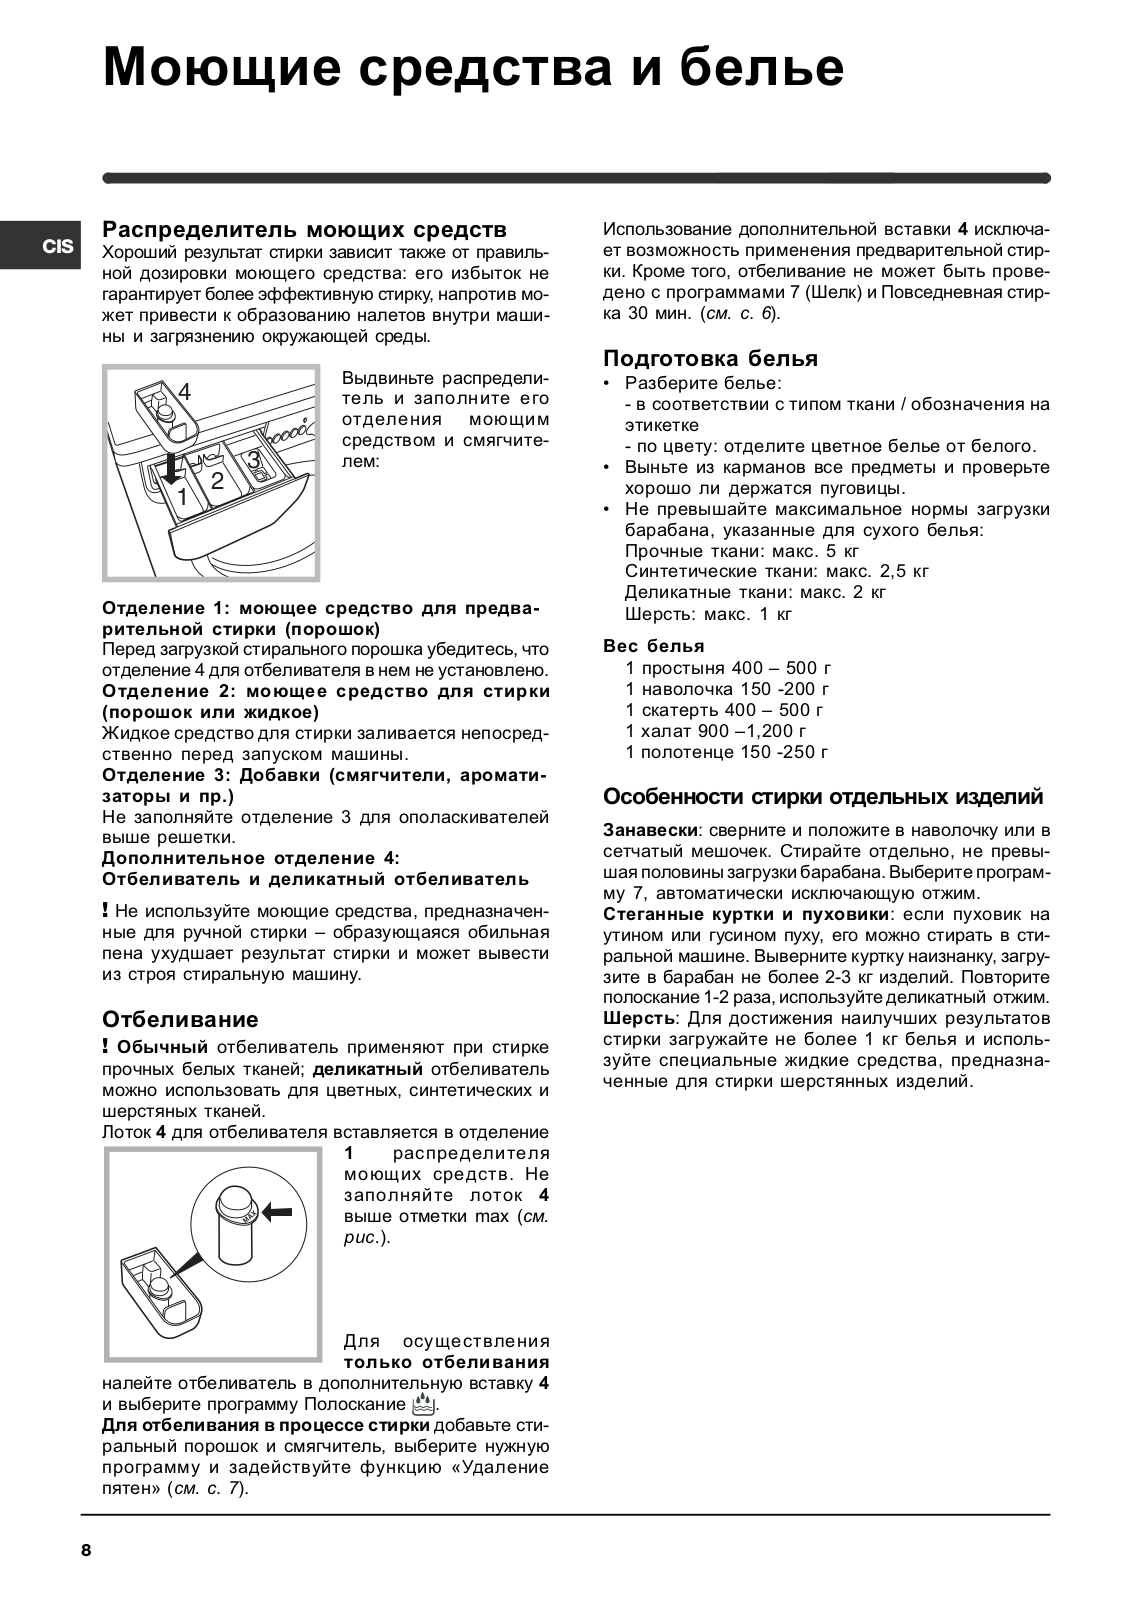
Detergent dispenser
Good washing results also depend on the correct dose of detergent: adding too
much detergent won’t neæssarily make for a more efficient wash, and may in
fact cause build up on the interior of your appliance and even pollute the
environment.
Open up the detergent dispenser and pour in the detergent and fabric softener,
as follows.
-
compartment 1: Detergent for pre-wash (powder) Before pouring in the detergent, make sure that extra compartment 4 has been removed.
-
compartment 2: Detergent for the wash cycle (powder or liquid) Liquid detergent should only be poured in immediately prior to the wash cycle start.
-
compartment 3: Additives (fabric softeners, etc.)
The fabric softener should not overflow from the grid. -
extra compartment 4: Bleach ! Do not use hand wash detergent because it may form too much foam.
Bleach cycle
! Traditional bleach should be used on sturdy white fabrics, and delicate
bleach for coloured fabrics, synthetics and for wool.
Place extra compartment 4, provided, into compartment 1.
When pouring in the bleach, careful not to excæd the “max” level on the æntral
pivot (see figure).
To run the bleach cycle alone, the blæch into
extra compartment 4, set the Rinse programme and enable the Stain removal
option (see page 31). To bleach during a wash cycle, pour in the detergent and
fabric softener, set the desired programme and enable the Stain removal option
(see page 31).
The use of extra compartment 4 excludes the possibility of using the pre-wash
cycle.
Preparing your laundry
Divide your laundry according to:
- the type of fabric/the symbol on the label.
- the colours: separate coloured garments from whites.
- Empty all pockets and check for loose buttons.
- Do not exceed the weight limits stated below,
which refer to the weight when dry:
- Sturdy fabrics: max 5 kg
- Synthetic fabrics: max 2.5 kg
- Delicate fabrics: max 2 kg
- Wool: max 1 kg
How much does your laundry weigh?
- 1 sheet 400-500 g
- 1 pillow case 150-200 g
- 1 tablecloth 400-500 g
- 1 bathrobe 900-1 ,200 g
- 1 towel 150-250 g
Special items
-
Curtains: fold curtains and place them in a pillowcase or mesh bag. Wash them separately without exceeding half the appliance load. Use programme 7 which excludes the spin cycle automatically.
-
Quilted coats and windbreakers:
if they are padded with goose or duck down, they can be machine-washed. Turn
the garments inside out and load a maximum of 2-3 kg, repeating the rinse
cycle once or twice and using the delicate spin cycle. -
wool: tor best results, use a specific detergent, taking care not to exceed a load of 1 kg.
The washing machine was designed and built n cornpliance With the applicable
nternatönal safety regulations. The following information is for your safety
and should consequently read carefuøy.
General safety
- This appliance has been designed for non-professional, household use and its functions must not be changed.
- This washing machine should only be used by adults and in accordance with the instructions provided this manual.
- Never touch the washing machine when barefoot Or with wet Or damp hands Or feet.
- DO not pull on the power supply cable to unplug the appliance from the electricity socket. Pull the plug Out yourself.
- DO not open the detergent dispenser while the appliance is in operation.
- DO not touch the drain water as it could reach very high temperatures.
- Never force the washing machine door: this could damage the safety lock mechanism designed to prevent any accidental openings.
- In the event Of a malfunction, do not under any circumstances touch internal parts in Order to atternpt repairs.
- Always keep children well away frorn the appliance while in operation.
- The appliance door tends to get quite hot during the wash cycle.
- Should it have to be moved, proceed with the help Of two Or three people and handle it with the utmost care. Never try to do this alone, because the appliance is very heavy.
- Before loading your laundry into the washing machine, make Sure the drum is empty.
Disposal
- Disposing of the packaging material:
observe local rOJlations, so the packaging can
be re-used.
The Directive 2002/96/EC on Waste
Electrical Electronic Equipment, requres that
appliances must not be
dispowd of in the normal unsorted municoal waste
stream. Old appliances must be collected
separately order to the recovery and
of the materials they contain reduce the impact on human health and the
environment.
The crossed out bin• symbol on the
prcxiuct reminds you of your obligation, that when
you dispose of the appliance it must separately
collected.
Consumers should contact their local authority or
retailer for information conærning the
disposal of their old appliance.
Saving energy and respecting the environment
Environmentally-friendly technology
If you only see a little water through your appliance
door, this is because thanks to the latest Indesit
technology, your washing machine only needs less
than half the amount of water to get the best results:
an objective reached to respect the environment.
Saving on detergent, water, energy and time
- To avoid wasting resources, the washing machine should be used with a full bad. A full load instead of two half loads allows you to save up to 50% on energy.
- The pre-wash cycle is only necessary on extremely soiled garments. Avoiding it will save on detergent, time, water and between 5 and 15% energy.
- Treating stains with a stain remover or leaving them to soak before washing will cut down the need to wash them at high temperatures. A programme at 600C instead of 900C or one at 400C instead of 600C will save up to 50% on energy.
- Use the correct quantity of detergent depending on the water hardness, how soiled the garments are and the amount of laundry you have, to avoid wastage and to protect the environment: despite being biodegradable, detergents do contain ingredients that alter the natural balance of the environment. In addition, avoid using fabric softener as much as possible.
- If you use your washing machine from late in the afternoon until the early hours of the morning, you will help reduce the electricity board’s peak load.
- The Delay Timer option (see page 31) helps to organise your wash cycles accordingly.
- If your laundry has to be dried in a tumble dryer, select a high spin speed. Having the least water possible in your laundry will save you time and energy in the drying process.
Care and maintenance
Cutting off the water or electricity supply
- Turn off the water tap after every wash. This will limit the wear of your appliance’s water system and also prevent leaks.
- Unplug your appliance when cleaning it and during all maintenance operations.
Cleaning your appliance
The exterior and rubber parts of your appliance can be cleaned with a soft
cloth soaked in lukewarm soapy water. Do not use solvents or abrasives.
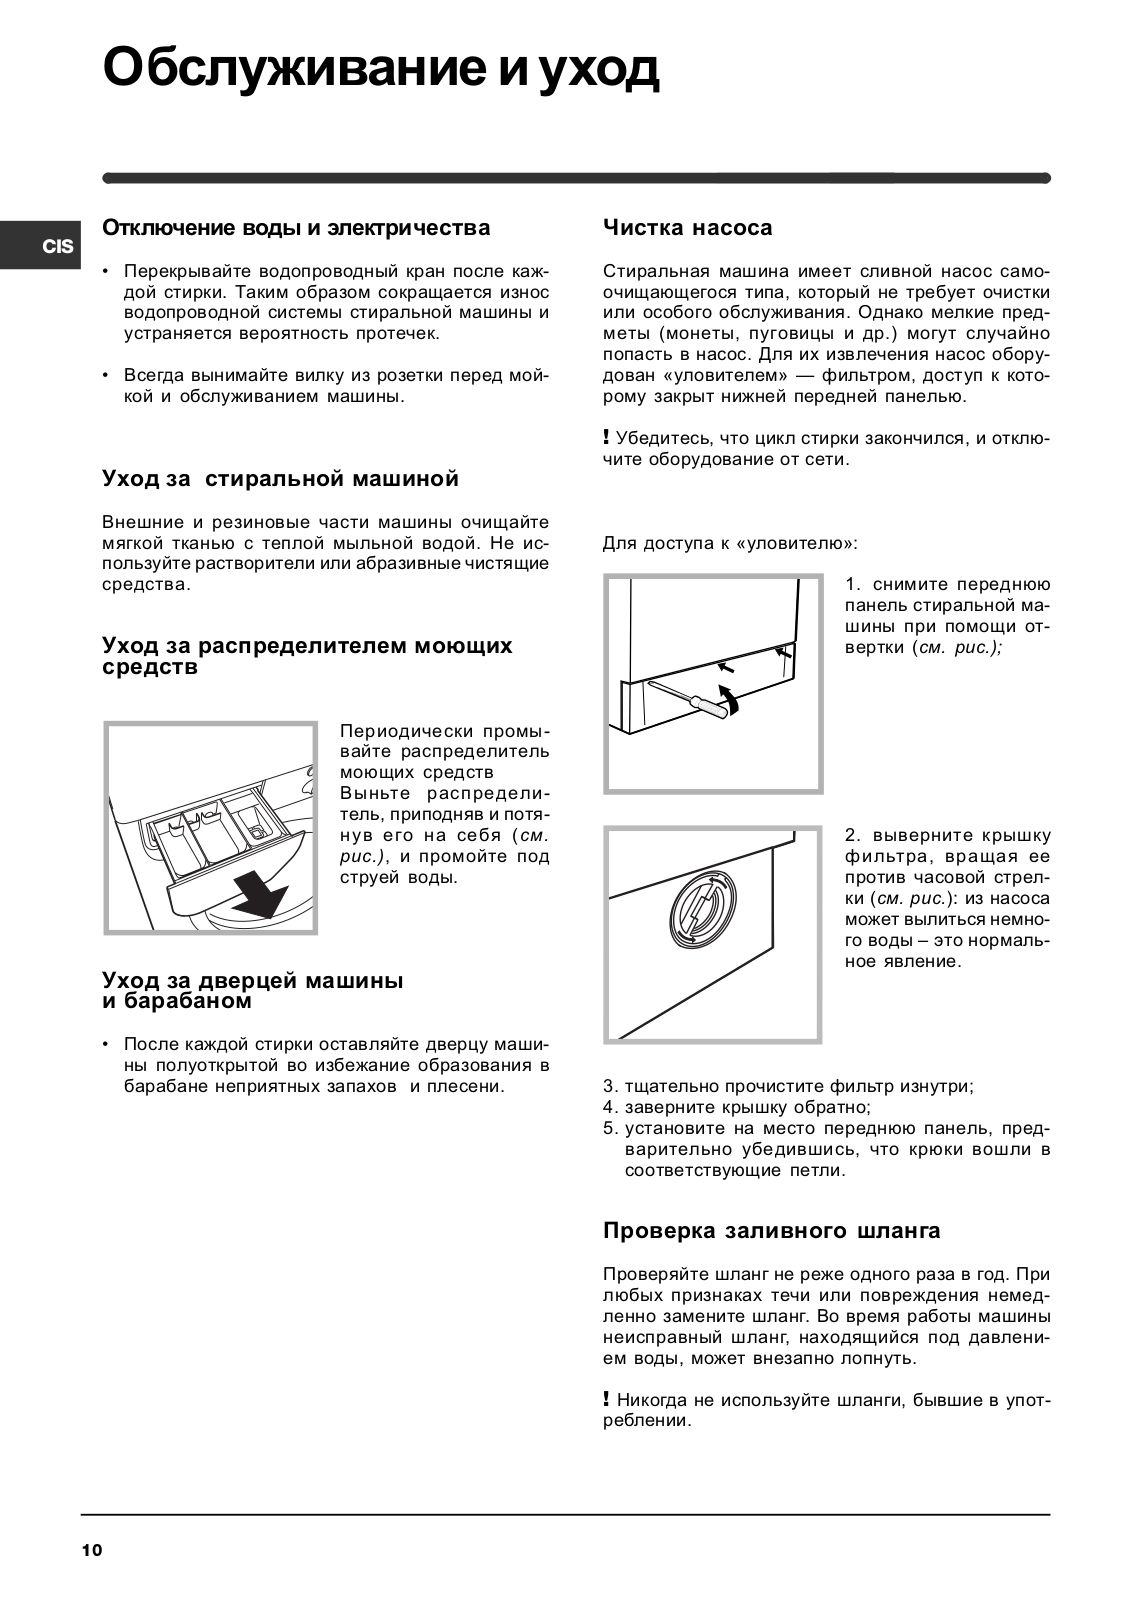
Cleaning the detergent dispenser
Remove the dispenser by pulling it out (see figure).
Wash it under running water; this operation should be repeated frequently.
Caring for your appliance door and drum
Always leave the appliance door ajar to prevent unpleasant odours from
forming.
Cleaning the pump
The washing machine is fitted with a self-cleaning pump that does not require
any maintenance.
Sometimes, small items (such as coins or buttons) may fall into the pre-
chamber that protects the pump, situated in the lower part of the same.
! Make sure the wash cycle has ended and unplug the appliance.
To access the pre-chamber:
- using a screwdriver, remove the cover panel on the lower front of the washing machine (see figure);
- unscrew the lid rotating it anti- clockwise (see figure): a little water may trickle out. This is perfectly normal;
- clean the interior thoroughly;
- screw the lid back on;
- reposition the panel, making sure the hooks are securely in place before you push it onto the appliance.
Checking the water inlet hose
Check the water inlet hose at least once a year. If you see any cracks,
replace it immediately: during the wash cycles, water pressure is very strong
and a cracked hose could easily split open.
! Never use hoses that have already been used.
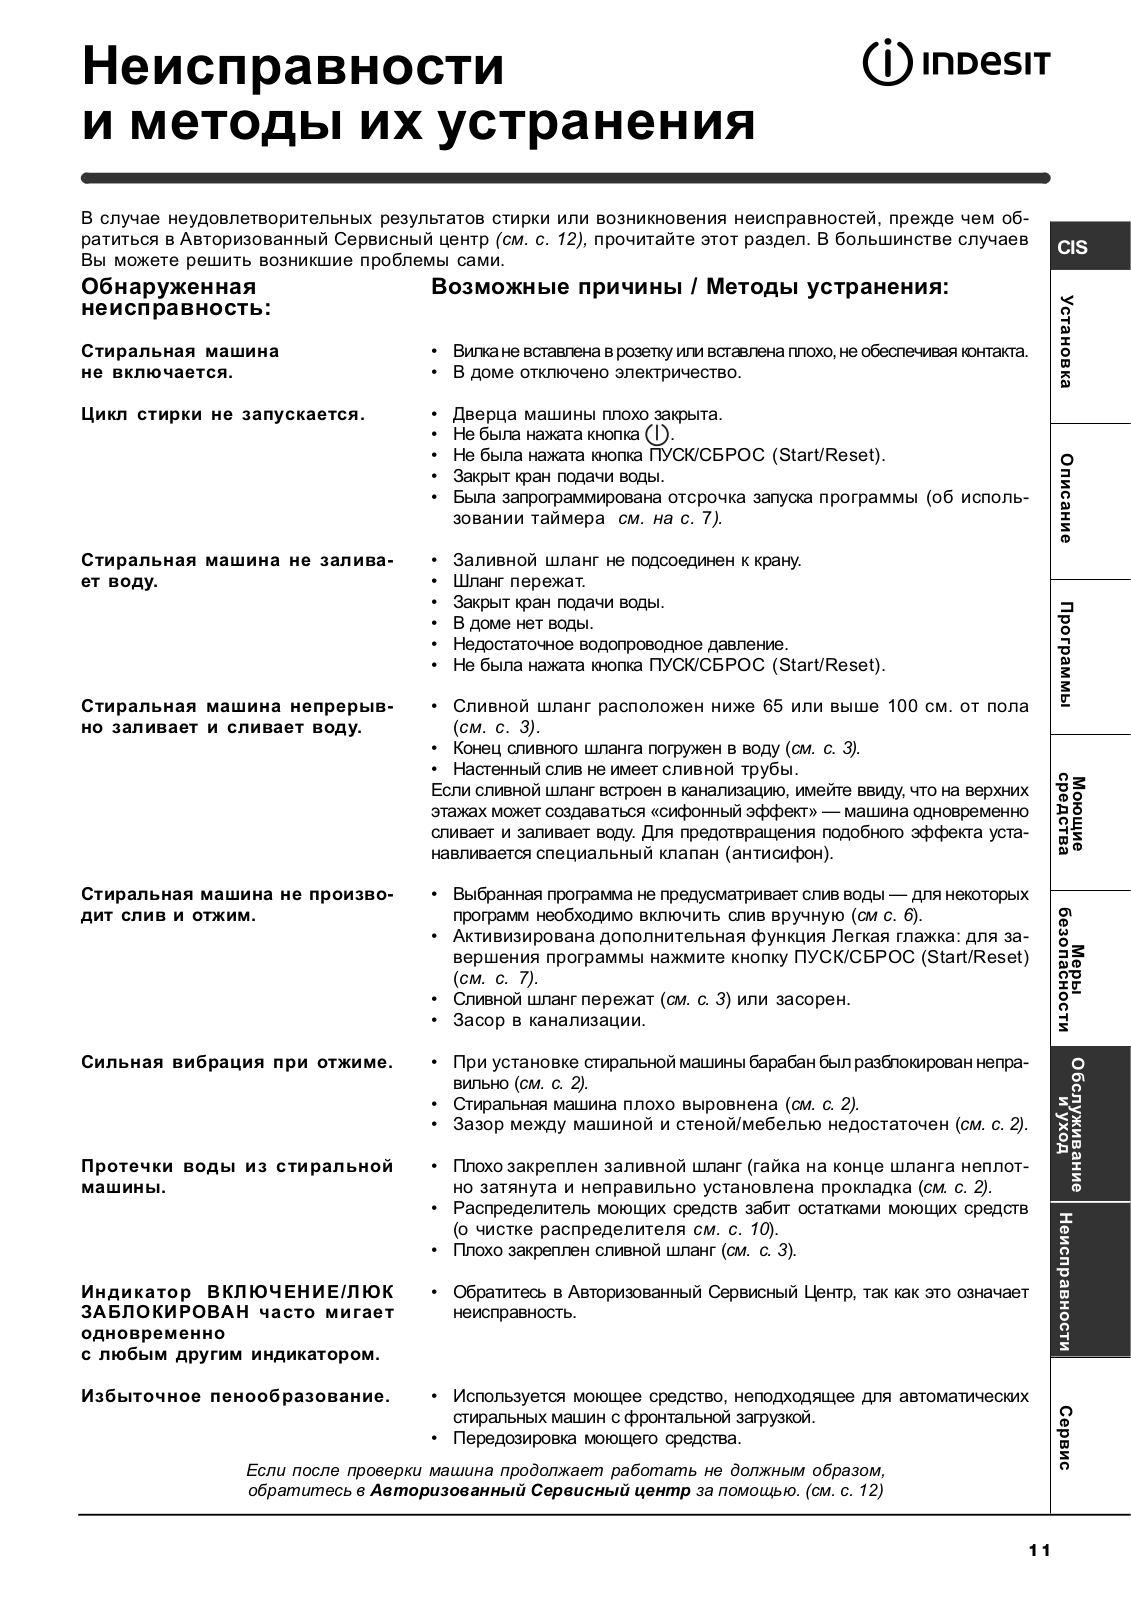
Troubleshooting
Your washing machine could fail to work. Before calling for Assistance (see
page 36), make sure the problem can’t easily be solved by consulting the
following list.

Service
Before calling for Assistance:
- Check whether you can solve the problem on your own (see page 35);
- Restart the programme to check whether the problem has been solved;
- If this is not the case, contact an authorised Technical Service Centre on the telephone number provided on the guarantee certificate.
! Aways request the assistance ot authorised servicemen.
Notify the operator Of:
- the of problem;
- the appliance model (Mod.);
- the serial number (SIN).
This information can be found on the data plate on the rear of the washing
machine.
FAQ’s
kilograms.” image-0=”” headline-1=”p” question-1=”What type of washing
programs does the Indesit WIL 85 offer?” answer-1=”The Indesit WIL 85 Washing
Machine features a variety of washing programs, including [specific programs],
catering to different laundry needs.” image-1=”” headline-2=”p” question-2=”
Is the Indesit WIL 85 Washing Machine front-loading or top-loading?”
answer-2=”The Indesit WIL 85 Washing Machine is a front-loading washing
machine.” image-2=”” headline-3=”p” question-3=”What is the spin speed of the
Indesit WIL 85 Washing Machine?” answer-3=”The washing machine offers a
maximum spin speed of [specific spin speed] revolutions per minute.”
image-3=”” headline-4=”p” question-4=”Can I delay the start of a wash cycle on
the Indesit WIL 85?” answer-4=”Yes, the washing machine allows you to delay
the start of a wash cycle, providing flexibility in scheduling.” image-4=””
headline-5=”p” question-5=”Does the Indesit WIL 85 have a quick wash option?”
answer-5=”Yes, the washing machine features a quick wash option for faster
cleaning of lightly soiled garments.” image-5=”” headline-6=”p”
question-6=”What type of detergent should I use with the Indesit WIL 85
Washing Machine?” answer-6=”You can use standard liquid or powder laundry
detergent suitable for front-loading washing machines.” image-6=””
headline-7=”p” question-7=”Is the Indesit WIL 85 Washing Machine energy-
efficient?” answer-7=”The energy efficiency of the washing machine can be
found on its energy label, providing information on its energy consumption.”
image-7=”” headline-8=”p” question-8=”Can I pause a wash cycle on the Indesit
WIL 85 to add more clothes?” answer-8=”Yes, most wash cycles can be paused on
the Indesit WIL 85 Washing Machine to add more clothes.” image-8=””
headline-9=”p” question-9=”How do I clean the lint filter in the Indesit WIL
85 Washing Machine?” answer-9=”The washing machine’s user manual will provide
instructions on how to locate and clean the lint filter properly.” image-9=””
headline-10=”p” question-10=”Does the Indesit WIL 85 have a child lock
feature?” answer-10=”Yes, the washing machine may offer a child lock feature
to prevent settings from being changed during a wash cycle.” image-10=””
headline-11=”p” question-11=”What warranty does the Indesit WIL 85 Washing
Machine come with?” answer-11=”The warranty details for the Indesit WIL 85
Washing Machine should be specified in the product documentation or provided
by the retailer.” image-11=”” count=”12″ html=”true” css_class=””]
Reference Link: Indesit Standard WIL 85 Washing Machine Instructions
Manual
Read User Manual Online (PDF format)
Read User Manual Online (PDF format) >>
Download This Manual (PDF format)
Download this manual >>