
CASIO Модуль 3358 3368
Руководство пользователя
Прежде всего прочтите эту важную информацию
Батарея
• В приобретенных вами часах батарея питания устанавливается на фабрике и должна
быть немедленно заменена при первых признаках недостаточности питания (не
включается подсветка, тусклый дисплей) у ближайшего к вам дилера или
дистрибьютора фирмы «CASIO».
Защита от воды
• Часы классифицируются по разрядам (с I по V) в соответствии со степенью их
защищенности от воды. Уточните разряд ваших часов с помощью приведенной ниже
таблицы, для правильной эксплуатации ваших часов.
Раз
ряд
Маркировка на
корпусе
Брызги,
дождь и т.п.
Плавание, мытье
машины и т.п.
Подводное
плавание,
ныряние и
т.п.
Ныряние
с
акваланг
ом
I
—
Нет
Нет
Нет
Нет
II
WATER
RESISTANT
Да
Нет
Нет
Нет
III
50M
WATER
RESISTANT
Да
Да
Нет
Нет
IV
100M
WATER
RESISTANT
Да
Да
Да
Нет
V
200M
WATER
RESISTANT
300M WATER
RESISTANT
Да
Да
Да
Да
Примечания для соответствующих разделов:
I. Часы не защищены от воды. Избегайте попадания любой влаги.
II. Не вытаскивайте коронку, если часы мокрые.
III. Не нажимайте кнопки часов под водой.
IV. Если часы подверглись воздействию соленой воды, то тщательно промойте их и
вытрите насухо.
V. Часы могут использоваться при погружении с аквалангом (за исключением таких
глубин, при которых требуется гелиево-кислородная смесь).
• Особенностью некоторых защищенных от воды часов является наличие у них
кожаных ремешков. Не надевайте эти часы во время плавания или какой-либо другой
деятельности, при которой ремешок погружается в воду.
Уход за вашими часами
• Никогда не пытайтесь вскрывать корпус и снимать заднюю крышку.
• Замена резиновой прокладки, защищающей часы от попадания воды и пыли, должна
осуществляться через каждые 2-3 года.
• Если внутрь часов попадет влага, то немедленно проверьте их у ближайшего к вам
дилера или дистрибьютора фирмы CASIO.
• Не подвергайте часы воздействию предельных температур.
• Хотя часы рассчитаны на использование их в обычных условиях, тем не менее вы
должны избегать грубого обращения с ними и не допускать их падения.
• Не пристегивайте ремешок слишком сильно. Между вашим запястьем и ремешком
должен проходить палец.
• Для очистки часов и ремешка используйте сухую мягкую ткань, либо мягкую ткань,
смоченную в водном растворе мягкого нейтрального моющего средства. Никогда не
используйтесь легко испаряющимися средствами (например такими, как бензин,
растворители, распыляющиеся чистящие средства и т.п.).
• Когда вы не пользуетесь вашими часами, храните их в сухом месте.
• Избегайте попадания на часы бензина, чистящих растворителей, аэрозолей из
распылителей, клеящих веществ, краски и т.п. Химические реакции, вызываемые
этими материалами, приводят к повреждению прокладок, корпуса и полировки
часов.
• Особенностью некоторых моделей часов является наличие на их ремешке
изображений, выполненных шелкографией. Будьте осторожны при чистке таких
ремешков, чтобы не испортить эти рисунки.
Для часов с пластмассовыми ремешками…
• Вы можете обнаружить белесое порошкообразное вещество на ремешке. Это
вещество не вредно для вашей кожи или одежды и может быть легко удалено путем
простого протирания куском ткани.
• Попадание на пластмассовый ремешок пота или влаги, а также хранение его в
условиях высокой влажности может привести к повреждению, разрыву или
растрескиванию ремешка. Для того, чтобы обеспечить длительный срок службы
пластмассового ремешка, при первой возможности протирайте его от грязи и воды с
помощью мягкой ткани.
Для часов с флуоресцентными корпусами и ремешками…
• Длительное облучение прямыми солнечным светом может привести к постепенному
исчезновению флуоресцентной окраски.
• Длительный контакт с влагой может вызвать постепенное исчезновение
флуоресцентной окраски. В случае попадания на поверхность часов любой влаги,
как можно скорее сотрите ее.
• Длительный контакт с любой другой намоченной поверхностью может привести к
обесцвечиванию флуоресцентной окраски. Следите за отсутствием влаги на
флуоресцентной поверхности и избегайте ее контакта с другими поверхностями.
• Сильное трение поверхности, имеющей нанесенную флуоресцентную краску, о
другую поверхность может привести к переносу флуоресцентной краски на эту
поверхность.

Фирма «CASIO COMPUTER CO., LTD» не несет ответственности за какой бы то ни было
ущерб, который может возникнуть при использовании этих часов, и не принимает
никаких претензий со стороны третьих лиц.
ОБЩЕЕ ОПИСАНИЕ РЕЖИМОВ РАБОТЫ
На рисунке изображен общий вид часов в Режиме Текущего Времени.
Последовательное нажатие кнопки “С” обеспечивает переход из разряда в разряд
в следующей последовательности: Режим Текущего Времени – Режим Мирового
Времени – Режим Таймера Обратного Отсчета – Режим Секундомера – Режим Звукового
Сигнала – Режим Аналогового Времени – Режим Текущего Времени.
• Для включения подсветки в любом режиме нажмите кнопку “В”.
РЕЖИМ ТЕКУЩЕГО ВРЕМЕНИ
• Нажатие кнопки “D” переключает представление дня недели – изображение
месяца/даты – представление текущего времени (часы/минуты).
Установка времени и даты
1. Нажмите кнопку и удерживайте “А” в Режиме Текущего Времени. При этом начнет
мигать индикация секунд.
2. Нажимайте кнопку “С” для перехода из разряда в разряд в следующей
последовательности: Секунды – DST (Режим Летнего Времени) – Код города – Часы –
Минуты – 12/24 часовой формат представления времени – Год – Месяц – Число –
Продолжительность включения подсветки.
3. Если вы выбрали для коррекции секунды (изображение секунд мигает), нажмите
кнопку “D” для сброса значения счетчика секунд в 00. Если вы нажмете кнопку “D”
при значении счетчика секунд между 30 и 59, то значение счетчика установится в 00 и
1 прибавится к счетчику минут, если значение счетчика секунд будет между 00 и 29,
то изменение счетчика минут не произойдет.
4. Для изменения значений минут и т.д., используйте кнопки “B” и “D”.
5. Для переключения 12/24 часового формата нажмите кнопку “D” . При выбранном 12-
ти часовом формате представления времени индикация “P” обозначает значение
времени после полудня.
6. Для выбора названия города нажимайте кнопки “D” и “B”.
7. Для включения (“ON”)/выключения (“OFF”) летнего времени нажмите кнопку “D”.
8. Для переключения продолжительности включения подсветки дисплея: 1 секунда – 3
секунды нажимайте кнопку “D”.
• Удерживание кнопки в нажатом состоянии позволяет изменять значения с большей
скоростью.
• День недели устанавливается автоматически в соответствии с датой.
• Значение даты может быть установлено в диапазоне от 1 января 2000г. до 31
декабря 2039г.
9. После установки даты и времени нажмите кнопку “А”.
Подсветка
В любом режиме нажмите кнопку “В” для включения подсветки.
Подсветка часов автоматически включается при звучании любых звуковых
сигналов.
• Подсветка этих часов выполнена на электролюминесцентных (ЕL) элементах,
мощность которых падает после длительного срока использования.
• Во время освещения дисплея часы испускают слышимый сигнал. Это
происходит потому, что элементы подсветки вибрируют, это не является
показателем неисправности часов.
• Подсветку трудно разглядеть, если на часы падают прямые солнечные лучи.
• Частое использование подсветки сокращает жизнь элемента питания.
• Для переключения продолжительности включения подсветки дисплея: 1
секунда – 3 секунды нажимайте кнопку “D” в Режиме Текущего Времени.
Автоподсветка
Вы можете включить или выключить функцию автоподсветки нажатием кнопки “В” в
течение 2-х секунд в Режиме Текущего Времени.
Автоподсветка включается автоматически каждый раз, когда ваша рука расположена
под углом 40
° градусов относительно земли.
Не используйте функцию автоподсветки, когда свет может повредить вам или отвлечь
ваше внимание. Например, при управлении мотоциклом или велосипедом.
РЕЖИМ АНАЛОГОВОГО ВРЕМЕНИ
В данных часах аналоговое время синхронизировано со значением текущего
времени. Поэтому нет необходимости его устанавливать.
• Тем не менее, если по какой – либо причине значение аналогового времени не
совпадает со значением текущего, вам следует произвести следующие
установки:
1. В Режиме Аналогового Времени нажмите и удерживайте кнопку “A”.
2. Используйте кнопку “D” для установки значения текущего времени.
• Каждое нажатие кнопки “D” увеличивает значение времени на 20 секунд.
• Нажатие кнопки “B” во время нажатия кнопки “D”, позволяет изменять
значения с большей скоростью. Для остановки быстрого изменения значений
нажмите любую кнопку.
3. По окончании установок нажмите кнопку “A”.
РЕЖИМ МИРОВОГО ВРЕМЕНИ
В данном режиме вы можете просмотреть местное время любого из 27 городов
мира (29 часовых поясов).

Просмотр значения времени в другом часовом поясе
В Режиме Мирового Времени нажимайте кнопку “D” для выбора города, значение
времени которого вы хотите просмотреть.
• Для включения/выключения летнего времени в другом городе выберите название
города и удерживайте кнопку “A”. При включенном режиме летнего времени на дисплее
появляется индикация “DST” рядом с названием города.
РЕЖИМ ТАЙМЕРА
Таймер с обратным отсчетом времени может быть установлен в диапазоне от 1
до 60 минут.
• Когда обратный отсчет времени достигает нуля, раздается длинный звуковой сигнал.
Последние 10 секунд отсчета короткий сигнал будет звучать каждую секунду.
• В режиме автоповтора по достижении нуля раздастся звуковой сигнал, и обратный
отсчет времени немедленно начнется снова с ранее установленного значения. Так
может повторяться до 8 раз.
• Вы также можете установить звуковой сигнал для процесса обратного отсчета. В
начале каждой пятой минуты и за 30 секунд до окончания отсчета прозвучат 4 коротких
сигнала. Затем сигнал прозвучит каждую секунду в течение последних 10 секунд.
• Если стартовое время таймера – 6 минут или более, звуковой сигнал будет звучать
каждую секунду в течение последних 10-ти секунд до 5-ти минутного значения. По
достижении 5-ти минутной отметки прозвучат 4 коротких сигнала.
Установка режимов Таймера
1. В Режиме Таймера при изображении на дисплее часов значения стартового
времени нажмите и удерживайте кнопку “A”. Изображение стартового времени
будет мигать.
2. Нажимайте кнопку “C” для перехода из разряда в разряд в следующей
последовательности: Значение стартового времени – Режим Автоповтора –
Звуковой сигнал.
3. Для ввода значений стартового и повторного времени используйте кнопки “D” и
“B”.
•
Вы можете ввести значение стартового времени в диапазоне от 1 до 60
минут с шагом в 1 минуту.
•
Для включения (“ON”) и выключения (“OFF”) звукового сигнала
используйте кнопку “D”.
•
Для включения (“ON”) и выключения (“OFF”) автоповтора используйте
кнопку “D”.
4. По окончании установок нажмите кнопку “A”.
РЕЖИМ СЕКУНДОМЕРА
Режим Секундомера позволяет регистрировать отдельные отрезки времени,
время с промежуточным результатом и время двойного финиша.
Рабочий диапазон Общего Измеряемого Времени ограничен 59 минутами 59.99
секундами.
а) Измерение отдельных отрезков времени
D (Старт) – D (Стоп) – D (Повторный старт) – D (Стоп) – A (Сброс)
б) Измерение времени с промежуточным результатом
D (Старт) – A (Промежуточный результат) – A (Продолжить) – D (Стоп) – A (Сброс)
в) Двойной финиш
D (Старт) – A (Разделение. Первый финиш. На дисплее результат 1-го финиша) – D
(Второй финиш.) – A (Отмена разделения. На дисплее результат 2-го финиша) – A
(Сброс)
РЕЖИМ ЗВУКОВОГО СИГНАЛА
Вы можете установить различные ежедневные звуковые сигналы. В
установленное время звуковой сигнал включится на 20 секунд.
•
Если включен режим индикации начала часа, короткий звуковой сигнал
будет подаваться в начале каждого часа.
•
Если включен будильник с повтором по достижении установленного
времени звуковой сигнал будет повторяться каждые 5 минут.
Установка будильника
1. В Режиме Звукового Сигнала нажимайте кнопку “D” для выбора типа
звукового сигнала в следующей последовательности: AL1
→ AL2 → AL3 →
AL4
→ SNZ (сигнал с повтором) → SIG (индикация начала часа).
2. После выбора типа звукового сигнала нажмите и удерживайте кнопку “А”.
Цифровое значение в разряде часов начнет мигать, так как оно выбрано для
установки. В этот момент будильник автоматически включается.
3. Нажмите кнопку “С” для перехода из разряда в разряд в следующей
последовательности:
Часы – Минуты – Часы.
4. Нажимайте кнопку “D” для увеличения и кнопку “B” для уменьшения
выбранного значения. Удержание кнопки в нажатом состоянии позволяет
изменять показания в ускоренном режиме.
• Формат (12-часовой или 24-часовой) соответствует формату, выбранному Вами при
установке текущего времени.
• Когда Вы пользуетесь 12-часовым форматом, будьте внимательны, чтобы
правильно установить время до полудня или после полудня.
5. По окончании установок нажмите кнопку “А” для возврата в Режим Звукового
Сигнала.
Проверка звучания будильника
В Режиме Звукового Сигнала нажмите кнопку “D” для проверки звучания сигнала.

Включение/выключение звукового сигнала
1. В Режиме Звукового Сигнала нажимайте кнопку “D” для выбора типа сигнала.
2. После выбора типа сигнала нажимайте кнопку “A” для включения или
выключения выбранного типа сигнала.
• При выбранном любом из 4 сигналов на дисплее появляется индикация “AL”.
• При выбранном будильнике с повтором на дисплее появляется индикация “SNZ”.
• При выбранной индикации начала часа на дисплее появится индикация “SIG”.
ТЕХНИЧЕСКИЕ ХАРАКТЕРИСТИКИ
Точность хода при нормальной температуре +-15сек. в месяц
Режим текущего времени
час, минуты, секунды, «До полудня»/ «После
полудня» (Р), год, месяц, число, день недели.
Календарная система
Автоматический календарь с 2000г. по 2039г.
Прочее
12/24 формат представления времени, DST
(режим летнего времени).
Режим мирового времени
текущее время в 27 городах (29 часовых
поясах)
Прочее
DST (режим летнего времени).
Режим аналогового времени
Режим звукового сигнала
4
ежедневных звуковых сигнала, будильник с
повтором, индикация начала часа.
Режим Таймера
Диапазон измерений
1 – 60 минут.
Режимы
Автоповтор, звуковой сигнал.
Режим секундомера
Максимальный диапазон измерений 59
мин. 59,99 сек.
Режимы измерений
отдельные
отрезки
времени,
время
с
разделением, режим двойного финиша.
Прочее
подсветка
(электролюминесцентные
элементы),
автоподсветка,
изменение
продолжительности подсветки.
Элемент питания
CTL1616

04:10
Настройка Casio AQ-180WD
03:54
Часы Casio Illuminator AQ-230A-1D [AQ-230A-1DVEF] — видео обзор от PresidentWatches.Ru
07:05
Часы Casio Illuminator AQ-164WD-1A — Инструкция, как настроить от PresidentWatches.Ru
03:41
Настройка часов Casio AQ-S810W
07:07
Обзор часов Casio AQ-S810W с механизмом 5208 на ремне.
03:18
CASIO EDIFICE EFA-115 battery replacement (where is AC, how to start watch with new battery)
08:13
Casio AQ-163W-1B1VDF digital anlalog modeli inceleme ayarlama [Türkçe]
Нажмите на кнопку для помощи
1
Operation Guide 3358/3368/3798
MA0504-EB
About This Manual
•
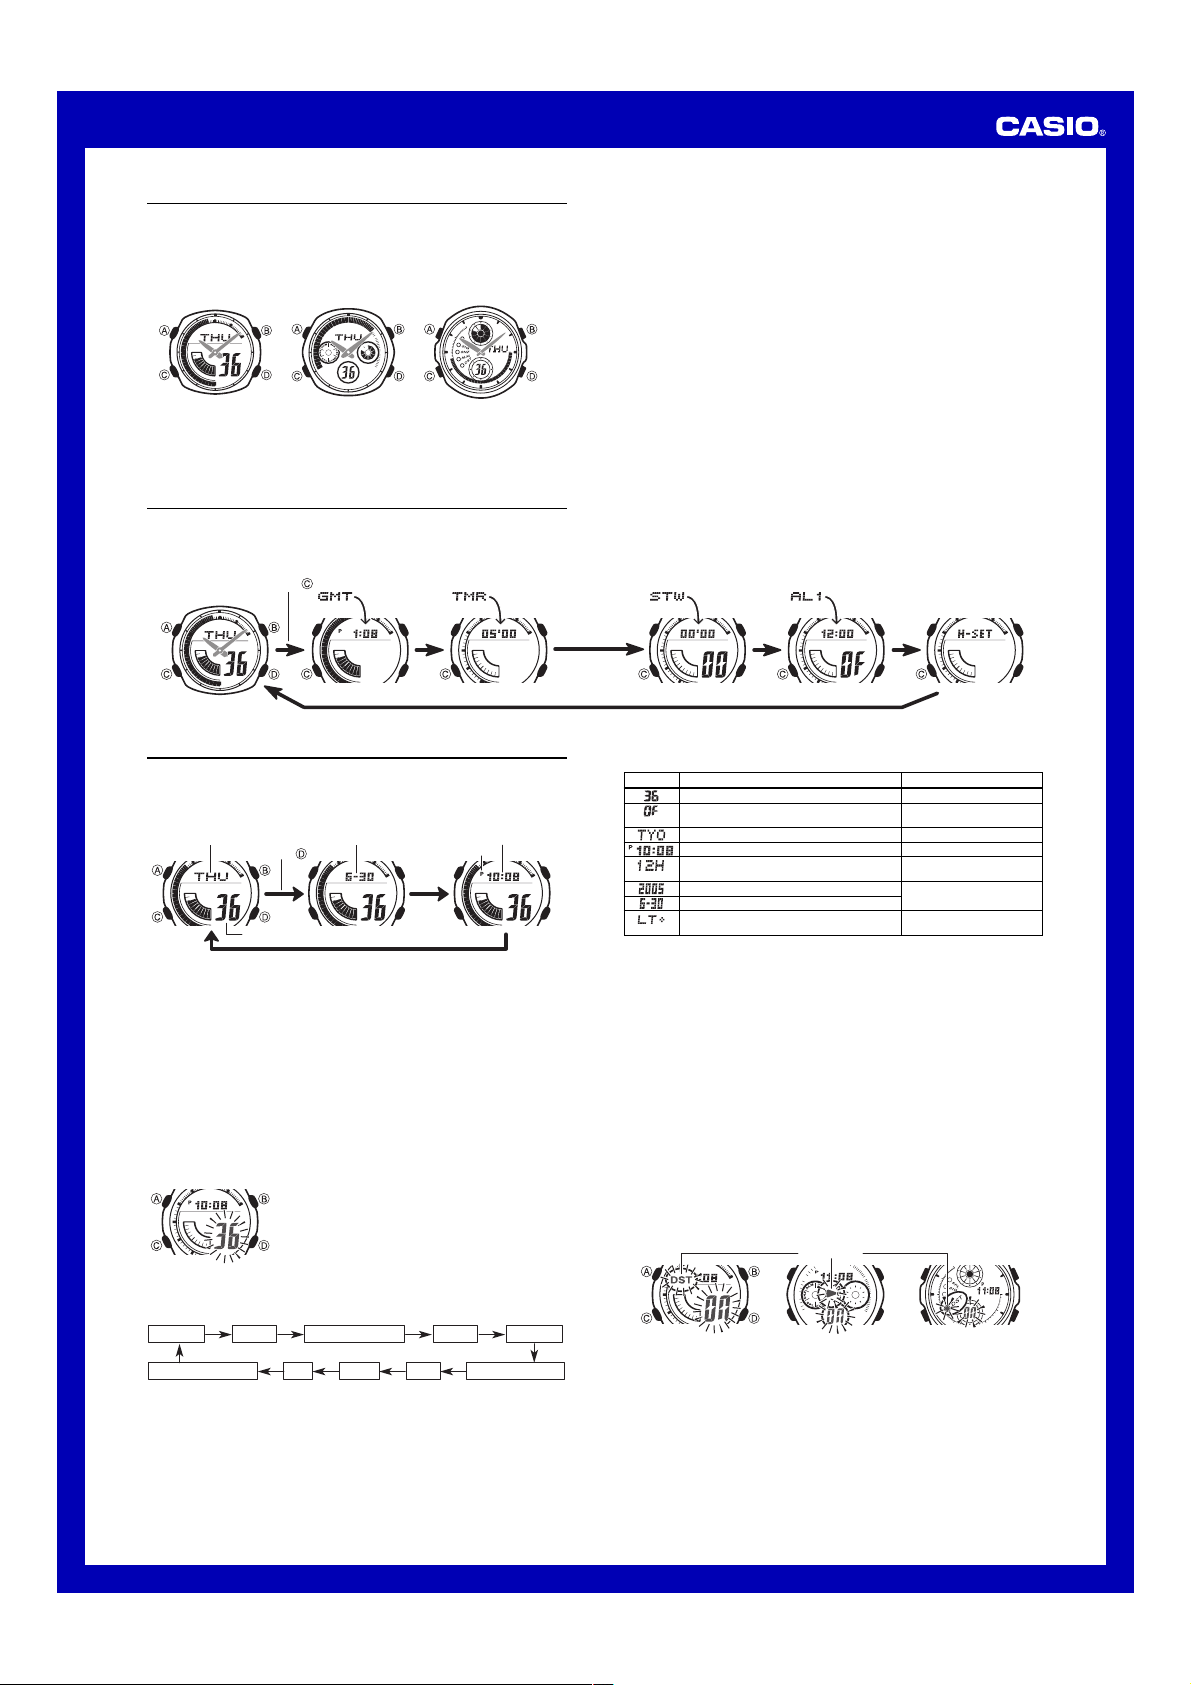
The operational procedures for Modules 3358, 3368 and 3798 are identical. All of
the illustrations in this manual show Module 3358.
•
Button operations are indicated using the letters shown in the illustration.
•
All of the displays in this manual show black-on-white.
•
For the sake of simplicity, the sample displays in this manual do not show the analog
hands of the watch.
Module 3368
Module 3358
Module 3798
•
Each section of this manual provides you with the information you need to perform
operations in each mode. Further details and technical information can be found in
the “Reference” section.
Press .
Timekeeping Mode
World Time Mode
Countdown Timer Mode
Stopwatch Mode
Alarm Mode
Hand Setting Mode
General Guide
•
Press
C
to change from mode to mode.
•
In any mode (except when a setting screen is on the display), press
B
to illuminate
the display.
Timekeeping
This watch features separate digital and analog timekeeping. The procedures for
setting the digital time and analog time are different.
•
In the Timekeeping Mode, you can press
D
to change the display format as shown
below.
Day of week
Seconds
Month – Day
Hour : Minutes
PM indicator
Press .
Day of the Week
Hour : Minutes
Month – Day
Digital Time and Date
Use the Timekeeping Mode to set and view a digital display of the current time and date.
When setting the digital time, you can also configure settings for summer time
(Daylight Saving Time or DST), your Home City code (the code for the city where you
normally use the watch), the 12/24-hour format, and the illumination duration.
•
This watch is preset with a number of city codes, each of which represents the time
zone where that city is located. When setting the digital time, it is important that you
select the correct city code for your Home City. If your location is not included in the
preset city codes, select the preset city code that is in the same time zone as your
location.
•
Note that all of the times for the World Time Mode city codes are displayed in
accordance with the digital time and date settings you configure in the Timekeeping
Mode.
•
After you correctly set your Home City time and date, you can set the watch up for
timekeeping with a different city code simply by changing the Home City code in the
Timekeeping Mode.
To set the digital time and date
1. In the Timekeeping Mode, hold down
A
until the
seconds start to flash, which indicates the setting
screen.
2. Press
C
twice to move the flashing to the Home City
code setting (see the illustration below), and then use
B
and
D
to select the code you want.
•
Make sure you select your Home City code before
changing any other setting.
•
For full information on city codes, see the “City Code
Table”.
3. Press
C
to move the flashing in the sequence shown below to select the other settings.
Seconds
DST
Home City Code
Hour
Minutes
Day
Month
Year
12/24-Hour Format
Illumination Duration
Screen
To do this:
Reset the seconds to
00
Toggle between Daylight Saving Time (
ON
) and
Standard Time (
OF
)
Change the Home City code
Change the hour or minutes
Toggle between 12-hour (
12H
) and 24-hour
(
24H
) timekeeping
Change the year
Change the month or day
Select three seconds or one second as the
illumination duration
Do this:
Press
D
.
Press
D
.
Use
D
(east) and
B
(west).
Use
D
(+) and
B
(–).
Press
D
.
Use
D
(+) and
B
(–).
Press
D
.
4. When the setting you want to change is flashing, use
B
and
D
to change it as
described below.
5. Press
A
to exit the setting screen.
•
Resetting the seconds only (without changing the DST, Home City code, hour, or
minute setting) causes the analog minute hand setting to be adjusted to match the
seconds count automatically. If you change any of the other settings, you will have
to adjust the hand setting manually.
•
See “Digital Time Daylight Saving Time (DST) Setting” below for details about the
DST setting.
•
The 12-hour/24-hour timekeeping format you select in the Timekeeping Mode is
applied in all modes.
•
For details about illumination duration, see “Illumination”.
Digital Time Daylight Saving Time (DST) Setting
Daylight Saving Time (summer time) advances the digital time setting by one hour
from Standard Time. Remember that not all countries or even local areas use Daylight
Saving Time.
To toggle the Timekeeping Mode digital time between DST and Standard Time
1. In the Timekeeping Mode, hold down
A
until the seconds start to flash, which
indicates the setting screen.
2. Press
C
once to display the DST setting screen.
3. Press
D
to toggle between Daylight Saving Time (
ON
displayed) and Standard
Time (
OF
displayed).
4. Press
A
to exit the setting screen.
•
The DST indicator appears on the Timekeeping, Alarm, and Hand Setting Mode to
indicate that Daylight Saving Time is turned on.
Module 3358
Module 3368
Module 3798
DST indicator
MA0504-EB
Operation Guide 3358/3368/3798
About This Manual
• The operational procedures for Modules 3358, 3368 and 3798 are identical. All of
the illustrations in this manual show Module 3358.
• Button operations are indicated using the letters shown in the illustration.
• All of the displays in this manual show black-on-white.
• For the sake of simplicity, the sample displays in this manual do not show the analog
hands of the watch.
Module 3368Module 3358 Module 3798
• Each section of this manual provides you with the information you need to perform
operations in each mode. Further details and technical information can be found in
the “Reference” section.
General Guide
• Press C to change from mode to mode.
• In any mode (except when a setting screen is on the display), press B to illuminate
the display.
Timekeeping Mode World Time Mode Countdown Timer Mode Stopwatch Mode Alarm Mode Hand Setting Mode
Press .
Timekeeping
This watch features separate digital and analog timekeeping. The procedures for
setting the digital time and analog time are different.
• In the Timekeeping Mode, you can press D to change the display format as shown
below.
Day of the Week Hour : MinutesMonth – Day
Day of week
Digital Time and Date
Use the Timekeeping Mode to set and view a digital display of the current time and date.
When setting the digital time, you can also configure settings for summer time
(Daylight Saving Time or DST), your Home City code (the code for the city where you
normally use the watch), the 12/24-hour format, and the illumination duration.
• This watch is preset with a number of city codes, each of which represents the time
zone where that city is located. When setting the digital time, it is important that you
select the correct city code for your Home City. If your location is not included in the
preset city codes, select the preset city code that is in the same time zone as your
location.
• Note that all of the times for the World Time Mode city codes are displayed in
accordance with the digital time and date settings you configure in the Timekeeping
Mode.
• After you correctly set your Home City time and date, you can set the watch up for
timekeeping with a different city code simply by changing the Home City code in the
Timekeeping Mode.
Press .
Seconds
To set the digital time and date
3. Press C to move the flashing in the sequence shown below to select the other settings.
Seconds DST Home City Code Hour Minutes
Month – Day Hour : Minutes
1. In the Timekeeping Mode, hold down A until the
seconds start to flash, which indicates the setting
screen.
2. Press C twice to move the flashing to the Home City
code setting (see the illustration below), and then use
B and D to select the code you want.
• Make sure you select your Home City code before
changing any other setting.
• For full information on city codes, see the “City Code
Table”.
Day Month Year 12/24-Hour FormatIllumination Duration
PM indicator
4. When the setting you want to change is flashing, use B and D to change it as
described below.
Screen To do this:
Reset the seconds to
Toggle between Daylight Saving Time (ON) and
Standard Time (OF)
Change the Home City code
Change the hour or minutes
Toggle between 12-hour (12H) and 24-hour
(24H) timekeeping
Change the year
Change the month or day
Select three seconds or one second as the
illumination duration
5. Press A to exit the setting screen.
• Resetting the seconds only (without changing the DST, Home City code, hour, or
minute setting) causes the analog minute hand setting to be adjusted to match the
seconds count automatically. If you change any of the other settings, you will have
to adjust the hand setting manually.
• See “Digital Time Daylight Saving Time (DST) Setting” below for details about the
DST setting.
• The 12-hour/24-hour timekeeping format you select in the Timekeeping Mode is
applied in all modes.
• For details about illumination duration, see “Illumination”.
Digital Time Daylight Saving Time (DST) Setting
Daylight Saving Time (summer time) advances the digital time setting by one hour
from Standard Time. Remember that not all countries or even local areas use Daylight
Saving Time.
To toggle the Timekeeping Mode digital time between DST and Standard Time
1. In the Timekeeping Mode, hold down A until the seconds start to flash, which
indicates the setting screen.
2. Press C once to display the DST setting screen.
3. Press D to toggle between Daylight Saving Time (
OF
Time (
displayed).
4. Press A to exit the setting screen.
• The DST indicator appears on the Timekeeping, Alarm, and Hand Setting Mode to
indicate that Daylight Saving Time is turned on.
Module 3358 Module 3368 Module 3798
00
DST indicator
Do this:
Press D.
Press D.
Use D (east) and B (west).
Use D (+) and B (–).
Press D.
Use D (+) and B (–).
Press D.
ON
displayed) and Standard
1
Operation Guide 3358/3368/3798
Setting the Analog Time
Perform the procedure below when the time indicated by the analog hands does not
match the time of the digital display.
To adjust the analog time
• If you need to advance the analog time setting a long way, hold down D until the
time starts advancing at high speed, and then press B. This locks the highspeed hand movement, so you can release the two buttons. High-speed hand
movement continues until you press any button. It will also stop automatically
after the time advances 12 hours or if an alarm (daily alarm, Hourly Time Signal,
or countdown beeper) starts to sound.
4. Press A to exit the setting screen.
• The watch will automatically adjust the minute hand slightly to match its internal
second count when you exit the setting screen.
• To return to the Timekeeping Mode, press C.
1. In the Timekeeping Mode, press C five times to enter
the Hand Setting Mode.
2. Hold down A until the current digital time starts to
flash, which indicates the analog setting screen.
3. Press D to advance the analog time setting by
20 seconds.
• Holding down D advances the analog time setting at
high speed.
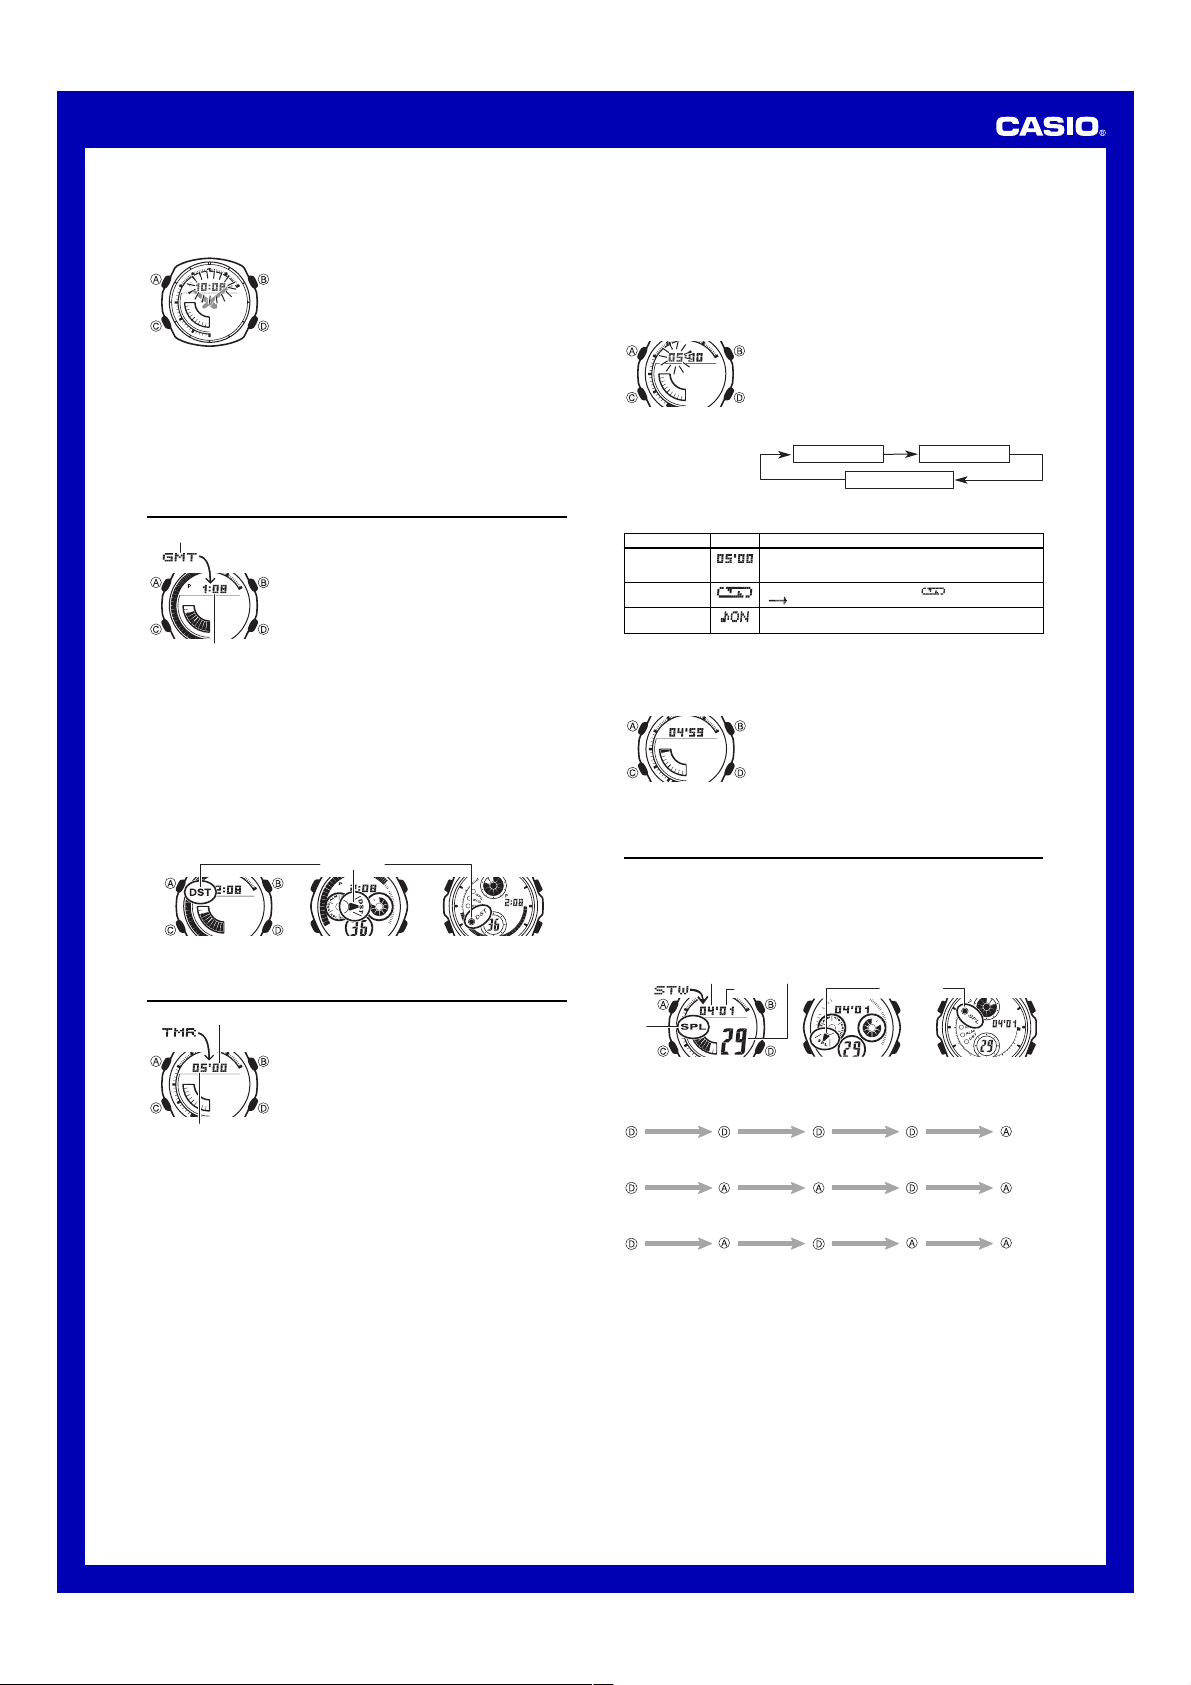
World Time
City code
Current time for
the selected city code
To toggle a city code time between Standard Time and Daylight Saving Time
1. In the World Time Mode, use D to display the city code whose Standard Time/
Daylight Saving Time setting you want to change.
2. Hold down A for about two seconds to toggle between Daylight Saving Time (DST
indicator displayed) and Standard Time (DST indicator not displayed).
• The DST indicator is on the display whenever you display a city code for which
Daylight Saving Time is turned on.
• Note that the DST/Standard Time setting affects only the currently displayed city
code. Other city codes are not affected.
• Note that you cannot switch between Standard Time and Daylight Saving Time while
GMT is selected as the city code.
Module 3358 Module 3368 Module 3798
World Time digitally displays the current time in 27 cities
(29 time zones) around the world.
• All of the operations in this section are performed in the
World Time Mode, which you enter by pressing C.
To view the time in another city
In the World Time Mode, press D to scroll eastwardly
through city codes.
• For full information about city codes, see the “City Code
Table”.
• If the current time shown for a city is wrong, it probably
means there is a problem with your Timekeeping Mode
time and/or Home City code settings. Go to the
Timekeeping Mode and make the necessary
adjustments.
DST indicator
Countdown Timer
Seconds
Minutes
Auto-repeat
When auto-repeat is turned on, the countdown automatically restarts from the
countdown start time when it reaches zero. If left running, the countdown is repeated
a total of eight times, after which it stops automatically.
When auto-repeat is turned off, the countdown stops when it reaches zero and the
display shows the original countdown start time.
• Pressing D while an auto-repeat countdown is in progress pauses the current
countdown. You can resume the auto-repeat countdown by pressing D, or you can
press A to reset to the countdown time starting value.
Countdown Timer Beeper Operations
The watch beeps at various times during a countdown so you can keep informed
about the countdown status without looking at the display. The following describes the
types of beeper operations the watch performs during a countdown.
Countdown End Beeper
The countdown end beeper lets you know when the countdown reaches zero.
• When the progress beeper is turned off, the countdown end beeper sounds for
about 10 seconds, or until you press any button to stop it.
• When the progress beeper is turned on, the countdown end beeper sounds for
about one second.
The countdown timer can be set within a range of one
minute to 60 minutes. An alarm sounds when the
countdown reaches zero. The countdown timer also has
an auto-repeat feature and a progress beeper that signals
the progress of the countdown.
• All of the operations in this section are performed in the
Countdown Timer Mode, which you enter by pressing
C.
Configuring the Countdown Timer
The following are the settings you should configure before
actually using the countdown timer.
Countdown start time; Auto-repeat on/off; Progress
beeper on/off
• See “To configure the countdown timer” for information
about setting up the timer.
Progress Beeper
When the progress beeper is turned on, the watch uses beeps to signal countdown
progress as described below.
• Starting from five minutes before the end of the countdown, the watch emits four
short beeps at the top of each countdown minute.
• 30 seconds before the end of the countdown, the watch emits four short beeps.
• The watch emits a short beep for each of the last 10 seconds of the countdown.
• If the countdown start time is six minutes or greater, the watch emits a short beep for
each second of the final 10 seconds before the five-minute point is reached. Four
short beeps are emitted to signal when the five-minute point is reached.
To configure the countdown timer
Setting
Start Time
Auto-repeat
Progress Beeper
4. Press A to exit the setting screen.
• You can also perform steps 1 and 2 of the above procedure whenever you need to
view the current auto-repeat and progress beeper settings.
To use the countdown timer
1. While the countdown start time is on the display in the
Countdown Timer Mode, hold down A until the current
countdown start time starts to flash, which indicates the
setting screen.
• If the countdown start time is not displayed, use the
procedure under “To use the countdown timer” to
display it.
2. Press C to move the flashing in the sequence shown
below to select other settings.
Start Time
Progress Beeper
3. When the setting you want to change is flashing, use
B and D to change it as described below.
Screen Button Operation
Use D (+) and B (–) to change the setting.
• You can set a start time in the range of 1 to 60 minutes in
1-minute increments.
Press D to toggle auto-repeat on ( displayed) and off
( displayed).
Press D to toggle the progress beeper on (ON) and off
(OF).
Press D while in the Countdown Timer Mode to start the
countdown timer.
• The countdown timer operation continues even if you
exit the Countdown Timer Mode.
• Press D while a countdown operation is in progress to
pause it. Press D again to resume the countdown.
• To completely stop a countdown operation, first pause it
(by pressing D), and then press A. This returns the
countdown time to its starting value.
Auto-repeat
Stopwatch
The stopwatch lets you measure elapsed time, split times, and two finishes.
• The display range of the stopwatch is 59 minutes, 59.99 seconds.
• The stopwatch continues to run, restarting from zero after it reaches its limit, until
you stop it.
• The stopwatch measurement operation continues even if you exit the Stopwatch Mode.
• Exiting the Stopwatch Mode while a split time is frozen on the display clears the split
time and returns to elapsed time measurement.
• All of the operations in this section are performed in the Stopwatch Mode, which you
enter by pressing C.
Split
indicator
To measure times with the stopwatch
Elapsed Time
Start
Split Time
Start
Two Finishes
Start
Minutes 1/100 second
Seconds
Module 3358 Module 3368 Module 3798
Stop Re-start Stop
Split
(Split indicator
displayed)
Split Stop Split release Clear
First runner
finishes.
Display time of
first runner.
Split release Stop Clear
Second runner
finishes.
Split indicator
Display time of
second runner.
Clear
2
English
- Bedienungsanleitung Casio 3368
- Casio 3368 User Manual
- Manual Usuario Casio 3368
- Mode d’emploi Casio 3368
- Istruzioni Casio 3368
- инструкция Casio 3368
- Casio 3368の取扱説明書
- Handleiding Casio 3368
- Manual de uso Casio 3368
Need user manual? We will help you to find it and save your time.
- 4 pages
- 0.91 mb
The Casio 3368 and other products you use every day were certainly offered in the manual set. We know from our users’ experience that most of people do not really attach importance to these manuals. Many instructions, immediately after the purchase, go into the trash along with the box, which is a mistake. Get acquainted with the information concerning the manual for Casio 3368, which will help you to avoid troubles in the future.
Important note — be sure to read the Casio 3368 at least once
If you do not want to read brochures every time concerning a Casio 3368 or other products, it is enough to read them once only — just after buying the device. You will then acquire basic knowledge to maintain Casio 3368 in good operating condition to make it easily reach the intended life cycle. Then you can put away the manual on a shelf and use it again only in a situation where you’re not sure whether you perform maintenance of the product appropriately. Proper maintenance is a necessary part of your satisfaction from Casio 3368.
Once a year, clean the closet where you keep all your devices manuals and throw out the ones that you don’t use. This will help you maintain order in your home base of manuals.
Summary of Contents for Casio 3368
What does the Casio 3368 manual include? Why is it worth reading?
- Warranty and details concerning the maintenance of the product
It is a good idea to attach a document of purchase of the device to this page of the manual. If something bad happens while using a Casio 3368, you will have a set of documents that are required to obtain warranty repairs. It is in this part of the manual that you will also find information about the authorized service points of Casio 3368 as well as how you can properly maintain the device by yourself so as not to lose the warranty for the product. - Assembly guidelines and Setup
Do not lose your nerves and time for trying to assembly the product and launch it on your own. Use the instructions of the Casio 3368 manufacturer to run the product properly, without unnecessary risk of damage to the equipment. - Information concerning additional parts (included in the set and optional)
By looking through this part of the document, you will be able to verify whether your Casio 3368 has been delivered to you with a full set of accessories. You will also be able to find out what optional parts or accessories to Casio 3368 you will be able to find and buy to your device. - Troubleshooting
The most common problems that concern Casio 3368 and how to solve them. This is a very useful part of the manual which will save you a lot of time related to finding a solution. 90% of the problems with a Casio 3368 are common to many users. - Power requirements and energy class
Information concerning the amount of energy used as well as recommendations regarding the installation and supply for Casio 3368. Read to optimally use the Casio 3368 and not to consume more power than is necessary for the proper operation of the product. - Special functions of the Casio 3368
Here you can learn how to customize the product Casio 3368. You will learn what additional features can help you use the product Casio 3368 in a comfortable way and what functions of your device are the best to perform specific tasks.
As you can see, in the manual you will find information that will really help you use your product. It is good to get acquainted with it to avoid disappointments resulting from a shorter exploitation time of the product Casio 3368 than expected. However, if you cannot be convinced to collect manuals at your home, our website will provide you with help. You should find here the manuals for most of your devices, including Casio 3368.
Comments (0)
MA0504-EB
Operation Guide 3358/3368/3798
About This Manual
•The operational procedures for Modules 3358, 3368 and 3798 are identical. All of the illustrations in this manual show Module 3358.
•Button operations are indicated using the letters shown in the illustration.
•All of the displays in this manual show black-on-white.
•For the sake of simplicity, the sample displays in this manual do not show the analog hands of the watch.
Module 3358 |
Module 3368 |
Module 3798 |
•Each section of this manual provides you with the information you need to perform operations in each mode. Further details and technical information can be found in the “Reference” section.
General Guide
•Press C to change from mode to mode.
•In any mode (except when a setting screen is on the display), press B to illuminate the display.
Timekeeping Mode |
World Time Mode |
Countdown Timer Mode |
Stopwatch Mode |
Alarm Mode |
Hand Setting Mode |
Press .
Timekeeping
This watch features separate digital and analog timekeeping. The procedures for setting the digital time and analog time are different.
•In the Timekeeping Mode, you can press D to change the display format as shown below.
Day of the Week |
Month – Day |
Hour : Minutes |
|
Day of week |
Month – Day |
Hour : Minutes |
|
Press . |
PM indicator |
Seconds
Digital Time and Date
Use the Timekeeping Mode to set and view a digital display of the current time and date. When setting the digital time, you can also configure settings for summer time (Daylight Saving Time or DST), your Home City code (the code for the city where you normally use the watch), the 12/24-hour format, and the illumination duration.
•This watch is preset with a number of city codes, each of which represents the time zone where that city is located. When setting the digital time, it is important that you select the correct city code for your Home City. If your location is not included in the preset city codes, select the preset city code that is in the same time zone as your location.
•Note that all of the times for the World Time Mode city codes are displayed in accordance with the digital time and date settings you configure in the Timekeeping Mode.
•After you correctly set your Home City time and date, you can set the watch up for timekeeping with a different city code simply by changing the Home City code in the Timekeeping Mode.
To set the digital time and date
1. In the Timekeeping Mode, hold down A until the seconds start to flash, which indicates the setting screen.
2. Press C twice to move the flashing to the Home City code setting (see the illustration below), and then use B and D to select the code you want.
• Make sure you select your Home City code before changing any other setting.
•For full information on city codes, see the “City Code Table”.
3.Press Cto move the flashing in the sequence shown below to select the other settings.
|
Seconds |
DST |
Home City Code |
Hour |
Minutes |
||||||||
Illumination Duration Day Month Year 12/24-Hour Format
4.When the setting you want to change is flashing, use B and D to change it as described below.
Screen |
To do this: |
Do this: |
|
Reset the seconds to 00 |
Press D. |
|
|
Toggle between Daylight Saving Time (ON) and |
Press D. |
|
|
Standard Time (OF) |
||
|
Change the Home City code |
Use D (east) and B (west). |
|
|
Change the hour or minutes |
Use D (+) and B (–). |
|
|
Toggle between 12-hour (12H) and 24-hour |
Press D. |
|
|
(24H) timekeeping |
||
|
Change the year |
Use D (+) and B (–). |
|
|
Change the month or day |
||
|
Select three seconds or one second as the |
Press D. |
|
|
illumination duration |
5. Press A to exit the setting screen.
•Resetting the seconds only (without changing the DST, Home City code, hour, or minute setting) causes the analog minute hand setting to be adjusted to match the seconds count automatically. If you change any of the other settings, you will have to adjust the hand setting manually.
•See “Digital Time Daylight Saving Time (DST) Setting” below for details about the DST setting.
•The 12-hour/24-hour timekeeping format you select in the Timekeeping Mode is applied in all modes.
•For details about illumination duration, see “Illumination”.
Digital Time Daylight Saving Time (DST) Setting
Daylight Saving Time (summer time) advances the digital time setting by one hour from Standard Time. Remember that not all countries or even local areas use Daylight Saving Time.
To toggle the Timekeeping Mode digital time between DST and Standard Time
1.In the Timekeeping Mode, hold down A until the seconds start to flash, which indicates the setting screen.
2.Press C once to display the DST setting screen.
3.Press D to toggle between Daylight Saving Time (ON displayed) and Standard Time (OF displayed).
4.Press A to exit the setting screen.
•The DST indicator appears on the Timekeeping, Alarm, and Hand Setting Mode to indicate that Daylight Saving Time is turned on.
DST indicator
|
Module 3358 |
Module 3368 |
Module 3798 |
1