
Denon
Loading…
A
- AVR-10003
- AVR-10825
- AVR-10836
- AVR-11002
- AVR-1100RD2
- AVR-1150
- AVR-1160
- AVR-1170
- AVR-1180
- AVR-13063
- AVR-13118
- AVR-1311XP
- AVR-131216
- AVR-14002
- AVR-14036
- AVR-1403/483
- AVR-14044
- AVR-1404/484
- AVR-1420
- AVR-1483
- AVR-15053
- AVR-15065
- AVR-150714
- AVR-150823
- AVR-150911
- AVR-15139
- AVR-1517
- AVR-15194
- AVR-1589
- AVR-16004
- AVR-1600RD
- AVR-16018
- AVR-160215
- AVR-160310
- AVR-16031
- AVR-16045
- AVR-1604,MV
- AVR-1610B — AVR 1610 AV Receiver
- AVR-1610E2
- AVR-161114
- AVR-161213
- AVR-16136
- AVR-16206
- AVR-16215
- AVR-16223
- AVR-1630
- AVR-1682
- AVR-16832
- AVR-1685
- AVR-17005
- AVR-170512
- AVR-170612
- AVR-170713
- AVR-170821
- AVR-170919
- AVR-17127
- AVR-171311
- AVR-1713BK
- AVR-17232
- AVR-1787
- AVR-18019
- AVR-180212
- AVR-1802/8822
- AVR-180310
- AVR-180412
- AVR-1806
- AVR-1807
- AVR-1816
- AVR-1817
- AVR-1880
- AVR-18822
- AVR-1884
- AVR-190513
- AVR-1905/785
- AVR 2805 — AV Receiver
- AVR 2807 — AV Receiver
- AVR 2808CI — AV Receiver4
- AVR 2809CI16
- AVR 2809CI — AV Receiver2
- AVR 380211
- AVR 4308CI — AV Network Receiver5
- AVR 4308 — Sony Bravia 40″» TV
- AVR 587 — AV Receiver
- AVR 588 — AV Receiver2
- AVR 58915
- AVR 589 — AV Receiver2
- AVR 687 — AV Receiver
- AVR 688 — AV Receiver2
- AVR 689 — AV Receiver2
- AVR 787 — AV Receiver
- AVR 788 — AV Receiver2
- AVR 789 — AV Receiver2
- AVR 887 — AV Receiver2
- AVR 888 — AV Receiver3
- AVR 889 — AV Receiver
- AVR 987 — AV Receiver
- AVR 988 — AV Receiver3
- AVR 989 — AV Receiver
- AVR X3200
- AVR X550BT9
Loading…
Loading…
Nothing found
AVR-1509
Owner Manual
56 pgs5.21 Mb0
Owner’s Manual
56 pgs5.09 Mb0
Owners Manual [de]
56 pgs5.67 Mb0
Owners Manual [th]
45 pgs1.04 Mb0
Service Bulletin
2 pgs28.81 Kb1
Service Bulletin
8 pgs344.8 Kb1
Service Manual
148 pgs25.77 Mb6
Service Manual
148 pgs32.68 Mb0
User Manual
56 pgs9.75 Mb0
User Manual
56 pgs4.38 Mb0
User Manual [fr]
56 pgs6.1 Mb0
Table of contents
Loading…
…
Denon User Manual
Download
Specifications and Main Features
Frequently Asked Questions
User Manual


Loading…
+ 39 hidden pages
You need points to download manuals.
1 point = 1 manual.
You can buy points or you can get point for every manual you upload.
Buy points
Upload your manuals
Manual
View the manual for the Denon AVR-1509 here, for free. This user manual comes under the category receivers and has been rated by 9 people with an average of a 8.5. This manual is available in the following languages: English. Do you have a question about the Denon AVR-1509?
Ask your question here
Frequently asked questions
Can’t find the answer to your question in the manual? You may find the answer to your question in the FAQs about the Denon AVR-1509 below.
Can bluetooth devices of different brands be connected to each other?
Yes, bluetooth is a universal method that allows different devices equipped with bluetooth to connect to each other.
What is bluetooth?
Bluetooth is a way of exchanging data wirelessly between electronic devices via radio waves. The distance between the two devices that exchange data can in most cases be no more than ten metres.
What is HDMI?
HDMI stands for High-Definition Multimedia Interface. An HDMI cable is used to transport audio and video signals between devices.
When is my volume too loud?
A volume above 80 decibels can be harmful to hearing. When the volume exceeds 120 decibels, direct damage can even occur. The chance of hearing damage depends on the listening frequency and duration.
How can I best clean my receiver?
A slightly damp cleaning cloth or soft, dust-free cloth works best to remove fingerprints. Dust in hard-to-reach places is best removed with compressed air.
Wat is Dolby Atmos?
Dolby Atmos is a technology that ensures that the sound is reflected from the ceiling to where you are listening. This makes it possible to create a 5.1 effect with only 1 speaker.
Is the manual of the Denon AVR-1509 available in English?
Yes, the manual of the Denon AVR-1509 is available in English .
Is your question not listed? Ask your question here
- June 17, 2024
- Denon
Table of Contents
- SAFETY PRECAUTIONS
- NOTE ON USE
- Getting Started
- Cautions on Handling
- Part Names and Functions
- Rear Panel
- Remote Control Unit
- Connections
- Speaker Connections
- References
- Read User Manual Online (PDF format)
- Download This Manual (PDF format)
AV SURROUND RECEIVER
AVR-1509
Owner’s Manual
SAFETY PRECAUTIONS
CAUTION:
TO REDUCE THE RISK OF ELECTRIC SHOCK, DO NOT REMOVE COVER (OR BACK). NO USER-
SERVICEABLE PARTS INSIDE.
REFER SERVICING TO QUALIFIED SERVICE PERSONNEL.
The lightning flash with arrowhead symbol, within an equilateral triangle, is
intended to alert the user to the presence of uninsulated “dangerous voltage”
within the product’s enclosure that may be of sufficient magnitude to
constitute a risk of electric shock to persons.
The exclamation point within an equilateral triangle is intended to alert the
user to the presence of important operating and maintenance (servicing)
instructions in the literature accompanying the appliance.
WARNING:
TO REDUCE THE RISK OF FIRE OR ELECTRIC SHOCK, DO NOT EXPOSE THIS APPLIANCE TO
RAIN OR MOISTURE.
DECLARATION OF CONFORMITY
We declare under our sole responsibility that this product, to which this
declaration relates, is in conformity with the following standards:
EN60065, EN55013, EN55020, EN61000-3-2 and EN61000-3-3.
Following the provisions of 2006/95/EC and 2004/108/EC Directive.
CAUTION:
To completely disconnect this product from the mains, disconnect the plug from
the wall socket outlet.
The mains plug is used to completely interrupt the power supply to the unit
and must be within easy access by the user.
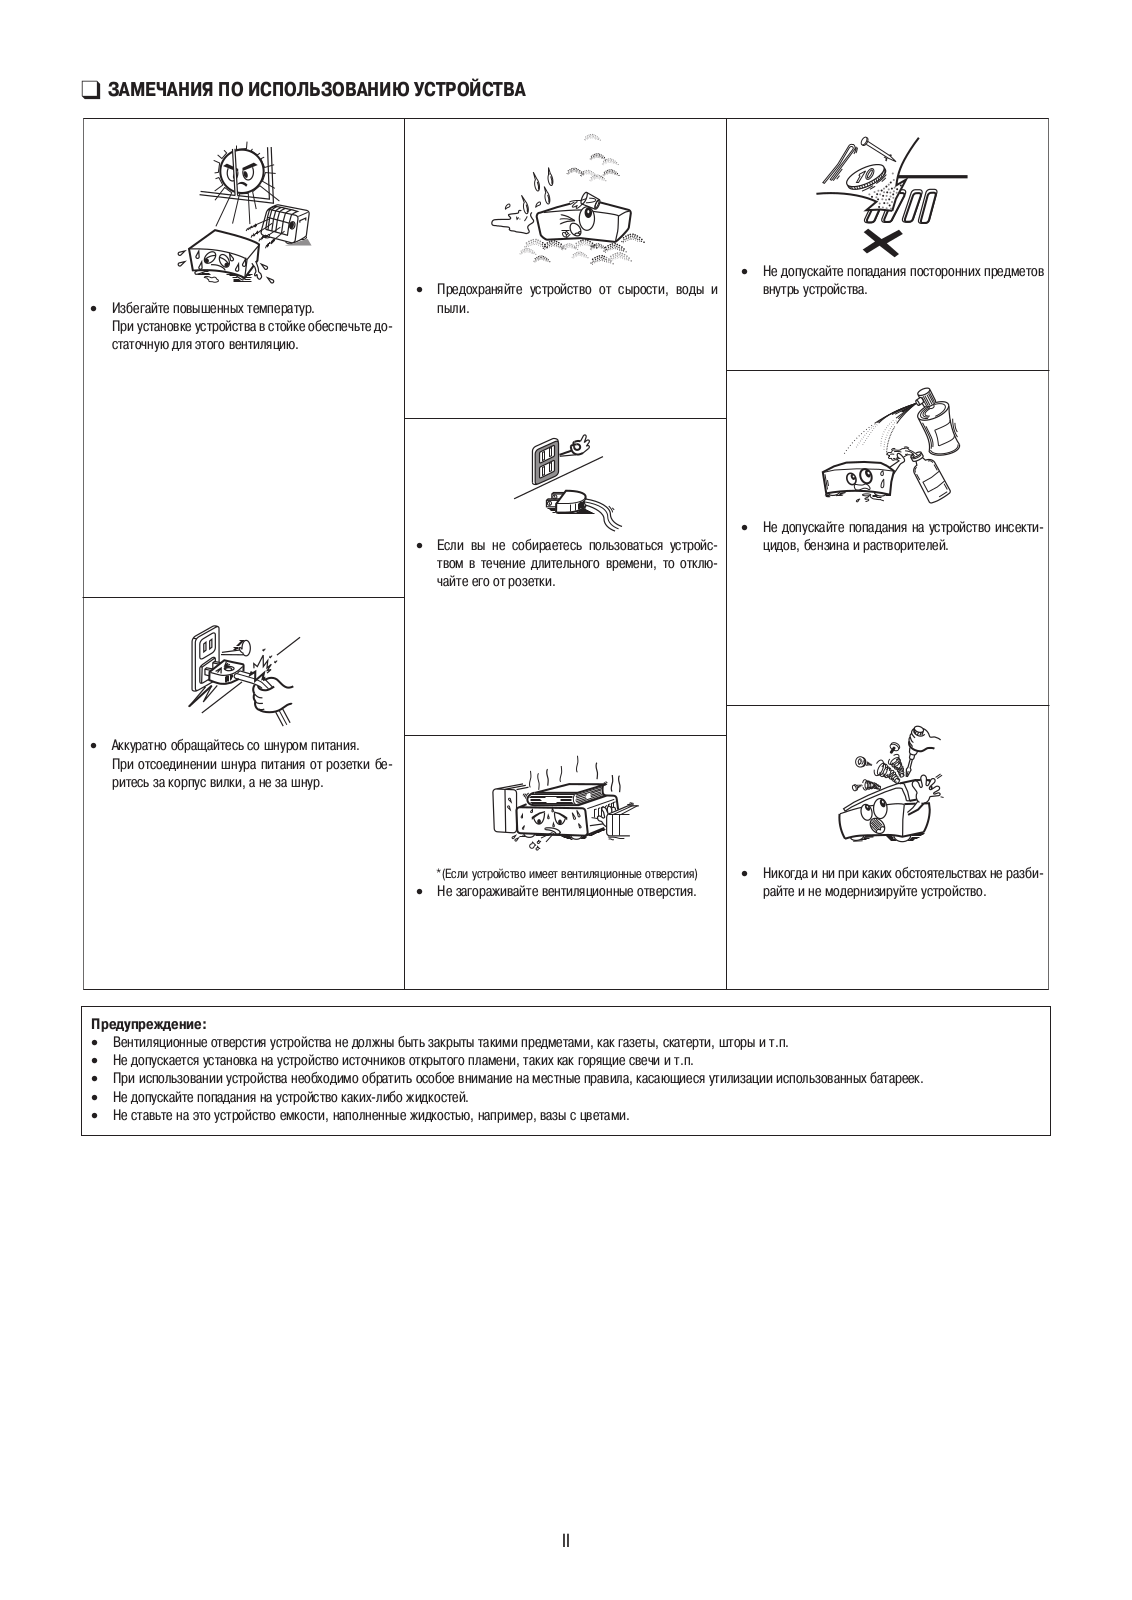
NOTE ON USE
-
Avoid high temperatures.
Allow for sufficient heat dispersion when installed in a rack. -
Handle the power cord carefully.
Hold the plug when unplugging the cord. -
Keep the unit free from moisture, water, and dust.
-
Unplug the power cord when not using the unit for long periods of time.
-
(For apparatuses with ventilation holes)
-
Do not obstruct the ventilation holes.
-
Do not let foreign objects into the unit.
-
Do not let insecticides, benzene, and thinner come in contact with the unit.
-
Never disassemble or modify the unit in any way.
-
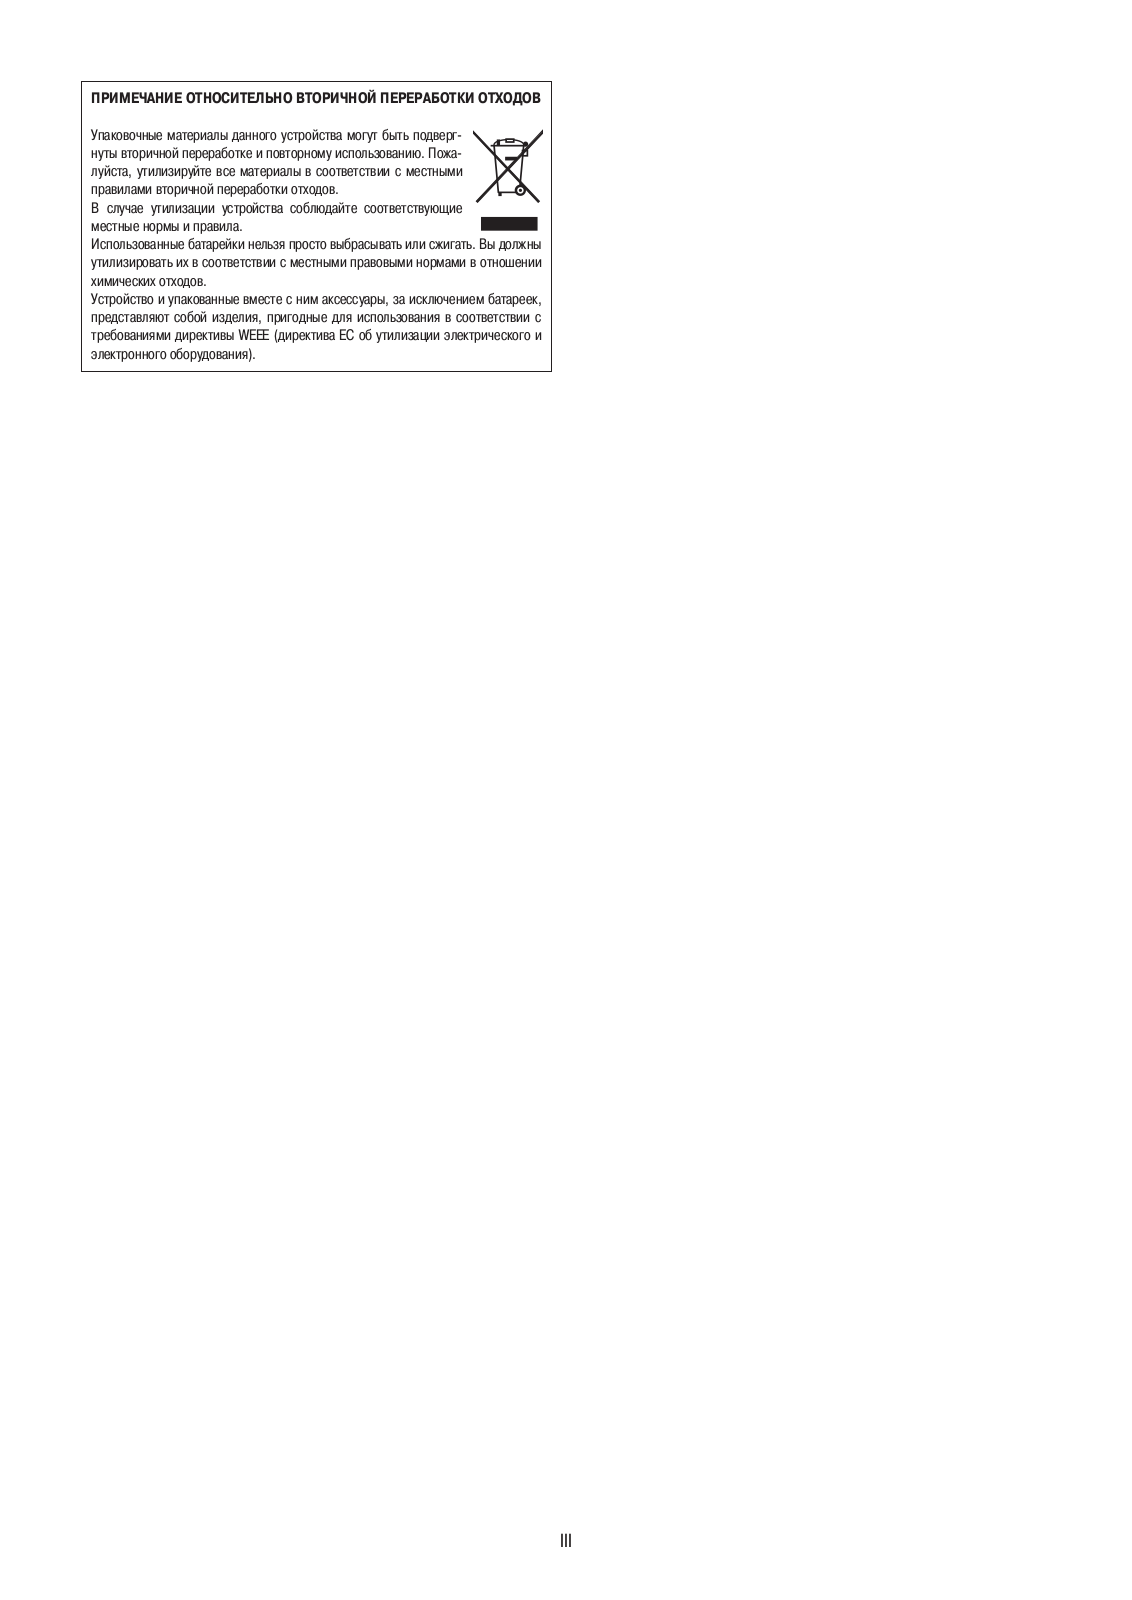
A NOTE ABOUT RECYCLING:
This product’s packaging materials are recyclable and can be reused. Please
dispose of any materials in accordance with the local recycling regulations.
When discarding the unit, comply with local rules or regulations.
Batteries should never be thrown away or incinerated but disposed of in
accordance with the local regulations concerning battery disposal.
This product and the supplied accessories, excluding the batteries, constitute
the applicable product according to the WEEE directive.
Getting Started
Thank you for purchasing this DENON product. To ensure proper operation,
please read this owner’s manual carefully before using the product.
After reading them, be sure to keep them for future reference.
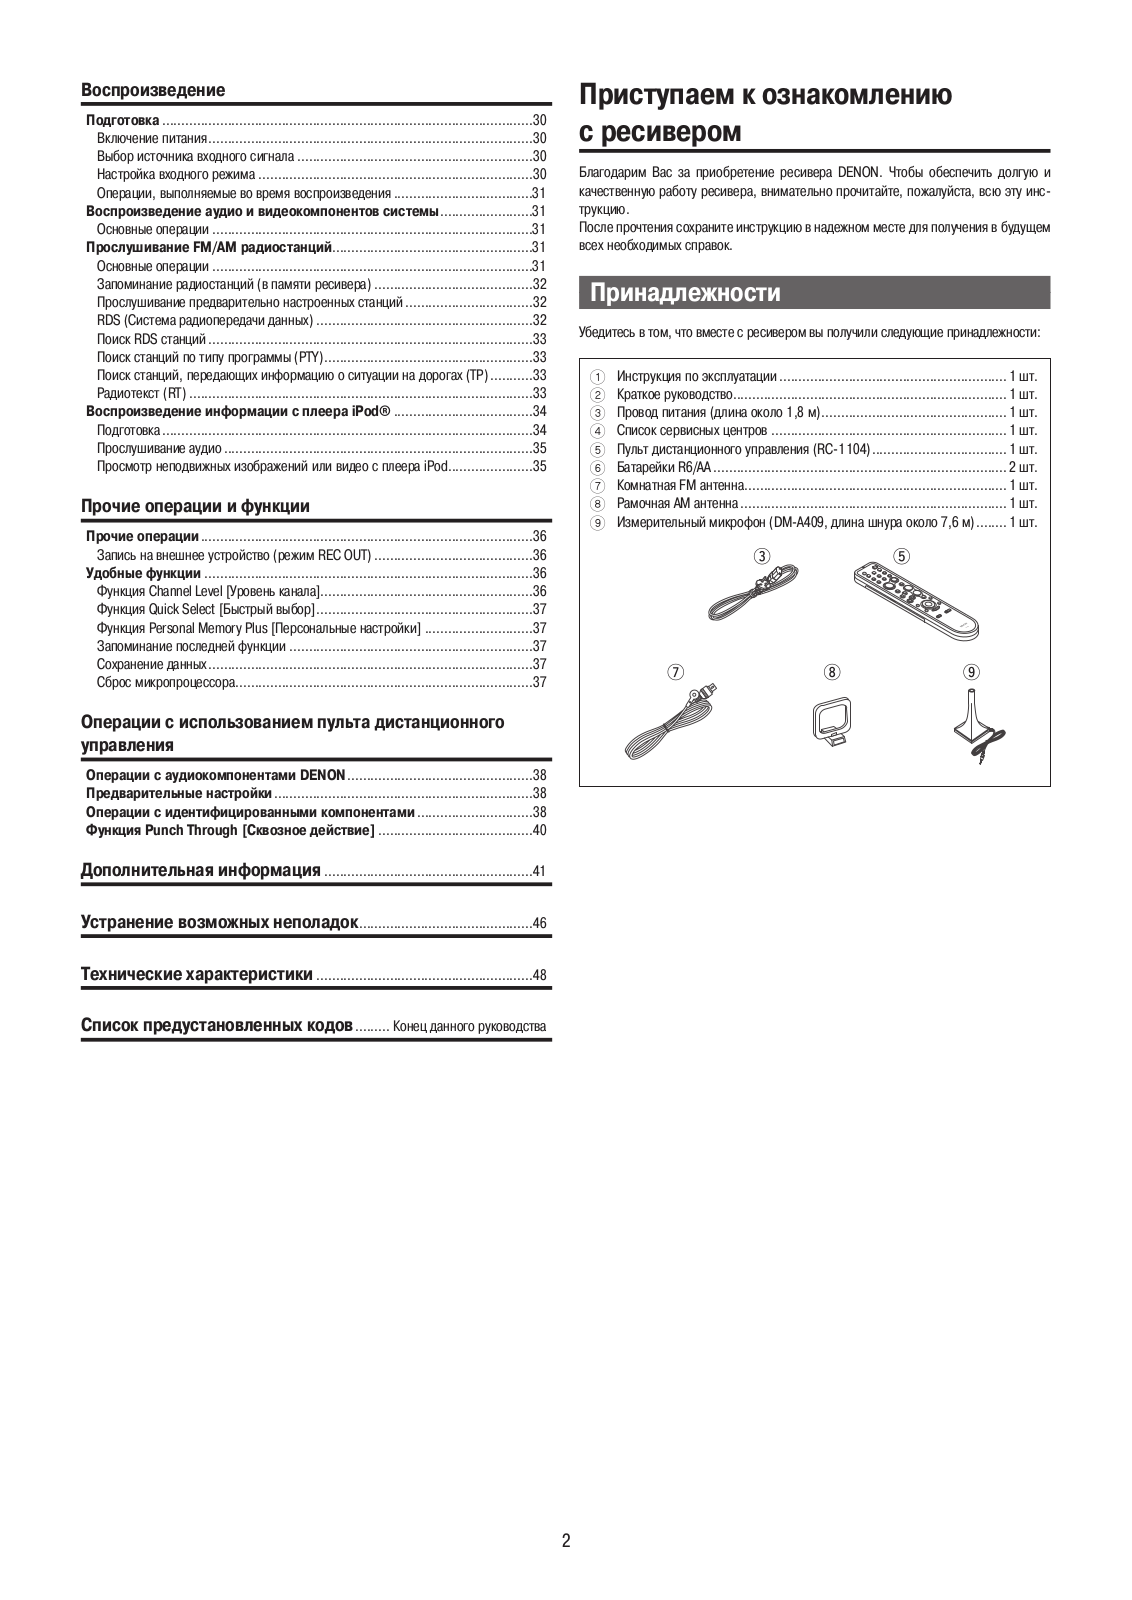
Accessories
Check that the following parts are supplied with the product.
- Owner’s manual ……………………………………………………………. 1
- Getting started ……………………………………………………………… 1
- Power cord (Cord length: Approx. 1.8 m) ………………………….. 1
- Service station list …………………………………………………………. 1
- Remote control (RC-1104)……………………………………………….. 1
- R6/AA batteries …………………………………………………………….. 2
- FM indoor antenna ………………………………………………………… 1
- AM loop antenna …………………………………………………………… 1
- Setup microphone
(DM-A409, Cord length: Approx. 7.6 m) ……………………………. 1

Cautions on Handling
-
Before turning the power switch on
Check once again that all connections are correct and that there are no
problems with the connection cables. -
Power is supplied to some of the circuitry even when the unit is set to the standby mode. When traveling or leaving home for long periods of time, be sure to unplug the power cord from the power outlet.
-
About condensation
If there is a major difference in temperature between the inside of the unit
and the surroundings, condensation (dew) may form on the operating parts
inside the unit, causing the unit not to operate properly.
If this happens, let the unit sit for an hour or two with the power turned off
and wait until there is little difference in temperature before using the
unit. -
Cautions on using mobile phones
Using a mobile phone near this unit may result in noise. If so, move the
mobile phone away from this unit when it is in use. -
Moving the unit
Turn off the power and unplug the power cord from the power outlet.
Next, disconnect the connection cables to other system units before moving the
unit. -
Note that the illustrations in these instructions may differ from the actual unit for explanation purposes.
Cautions on Installation
Note:
For proper heat dispersal, do not install this unit in a confined space, such
as a bookcase or similar enclosure.

About the Remote Control Unit
In addition to the AVR-1509, the included remote control unit (RC-1104) can
also be used to operate the equipment listed below.
- DENON system components
- Non-DENON system components
• By setting the preset memory ( page 38 ~ 40)
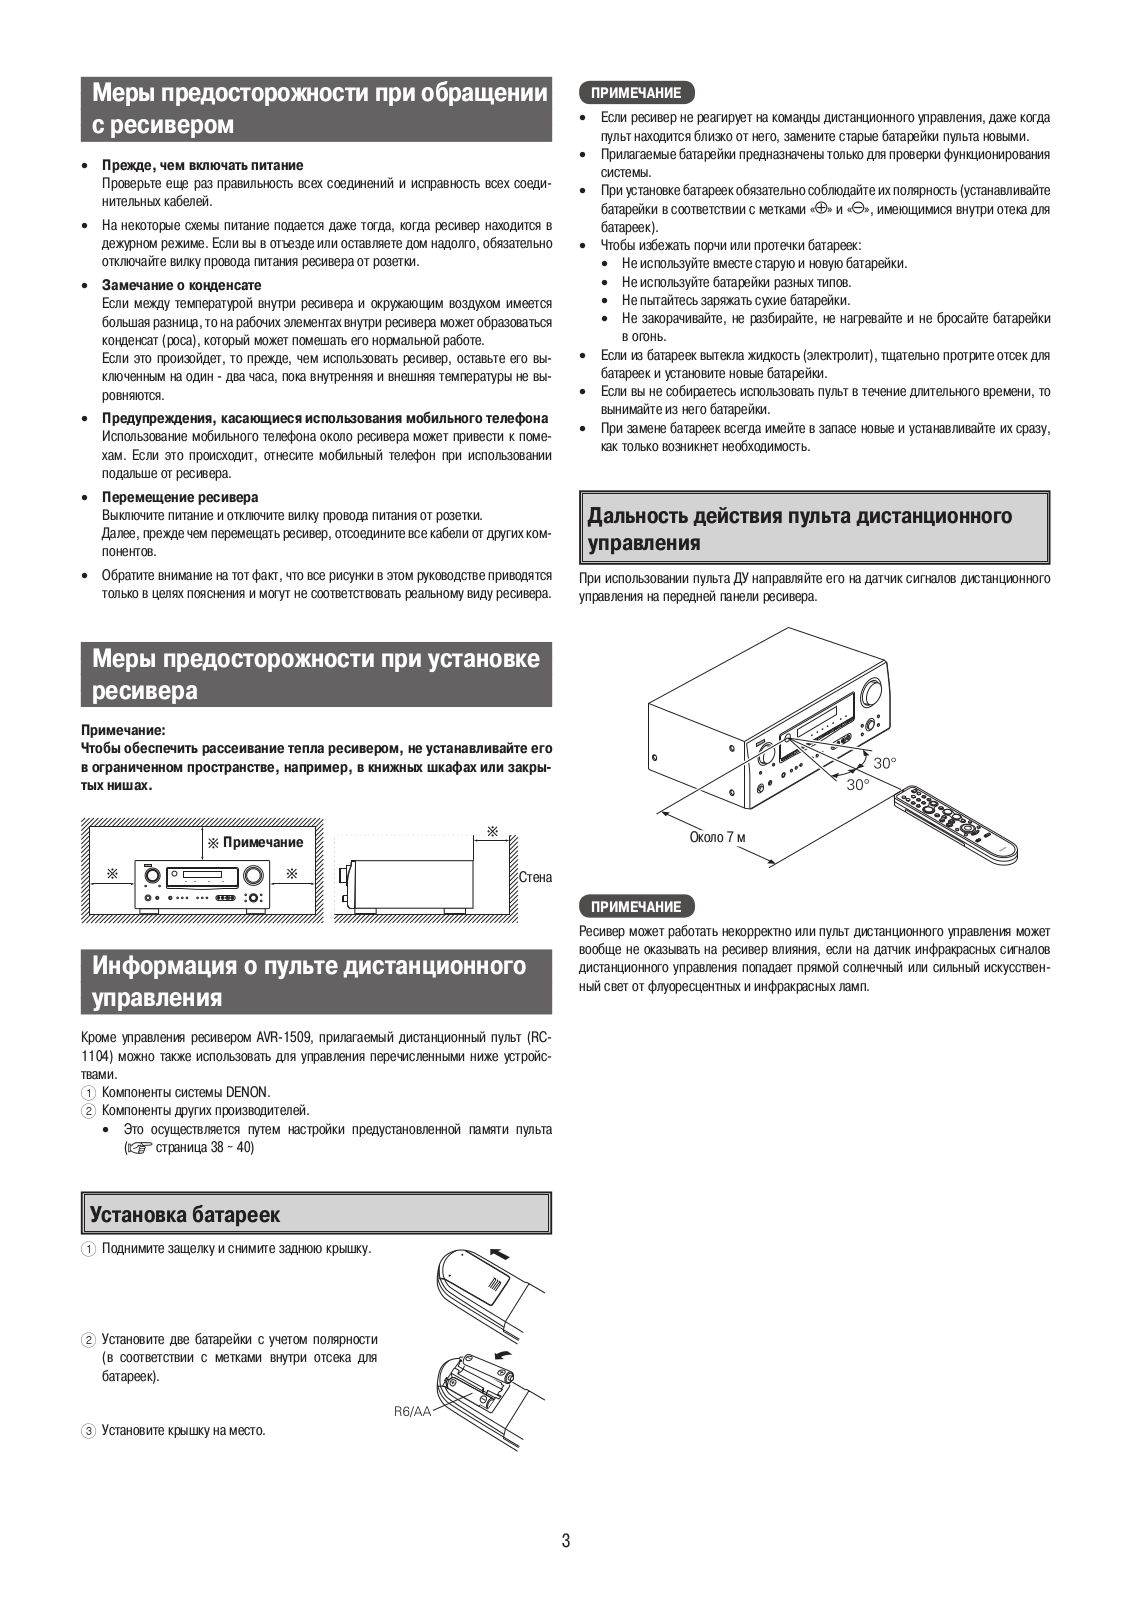
Inserting the Batteries
-
Lift the clasp and remove the rear cover.
-
Load the two batteries properly as indicated by the marks in the battery compartment.
-
Put the rear cover back on.
NOTE
- Replace the batteries with new ones if the set does not operate even when the remote control unit is operated close to the unit.
- The supplied batteries are only for verifying operation.
- When inserting the batteries, be sure to do so in the proper direction, following the “q” and “w” marks in the battery compartment.
- To prevent damage or leakage of battery fluid:
- Do not use a new battery together with an old one.
- Do not use two different types of batteries.
- Do not attempt to charge dry batteries.
- Do not short-circuit, disassemble, heat or dispose of batteries in flames.
- If the battery fluid should leak, carefully wipe the fluid off the insideof the battery compartment and insert new batteries.
- Remove the batteries from the remote control unit if it will not be in use for long periods.
- When replacing the batteries, have the new batteries ready and insert them as quickly as possible.
Operating Range of the Remote Control Unit
Point the remote control unit at the remote sensor when operating it.

NOTE
The set may function improperly or the remote control unit may not operate if
the remote control sensor is exposed to direct sunlight, strong artificial
light from an inverter type fluorescent lamp or infrared light.
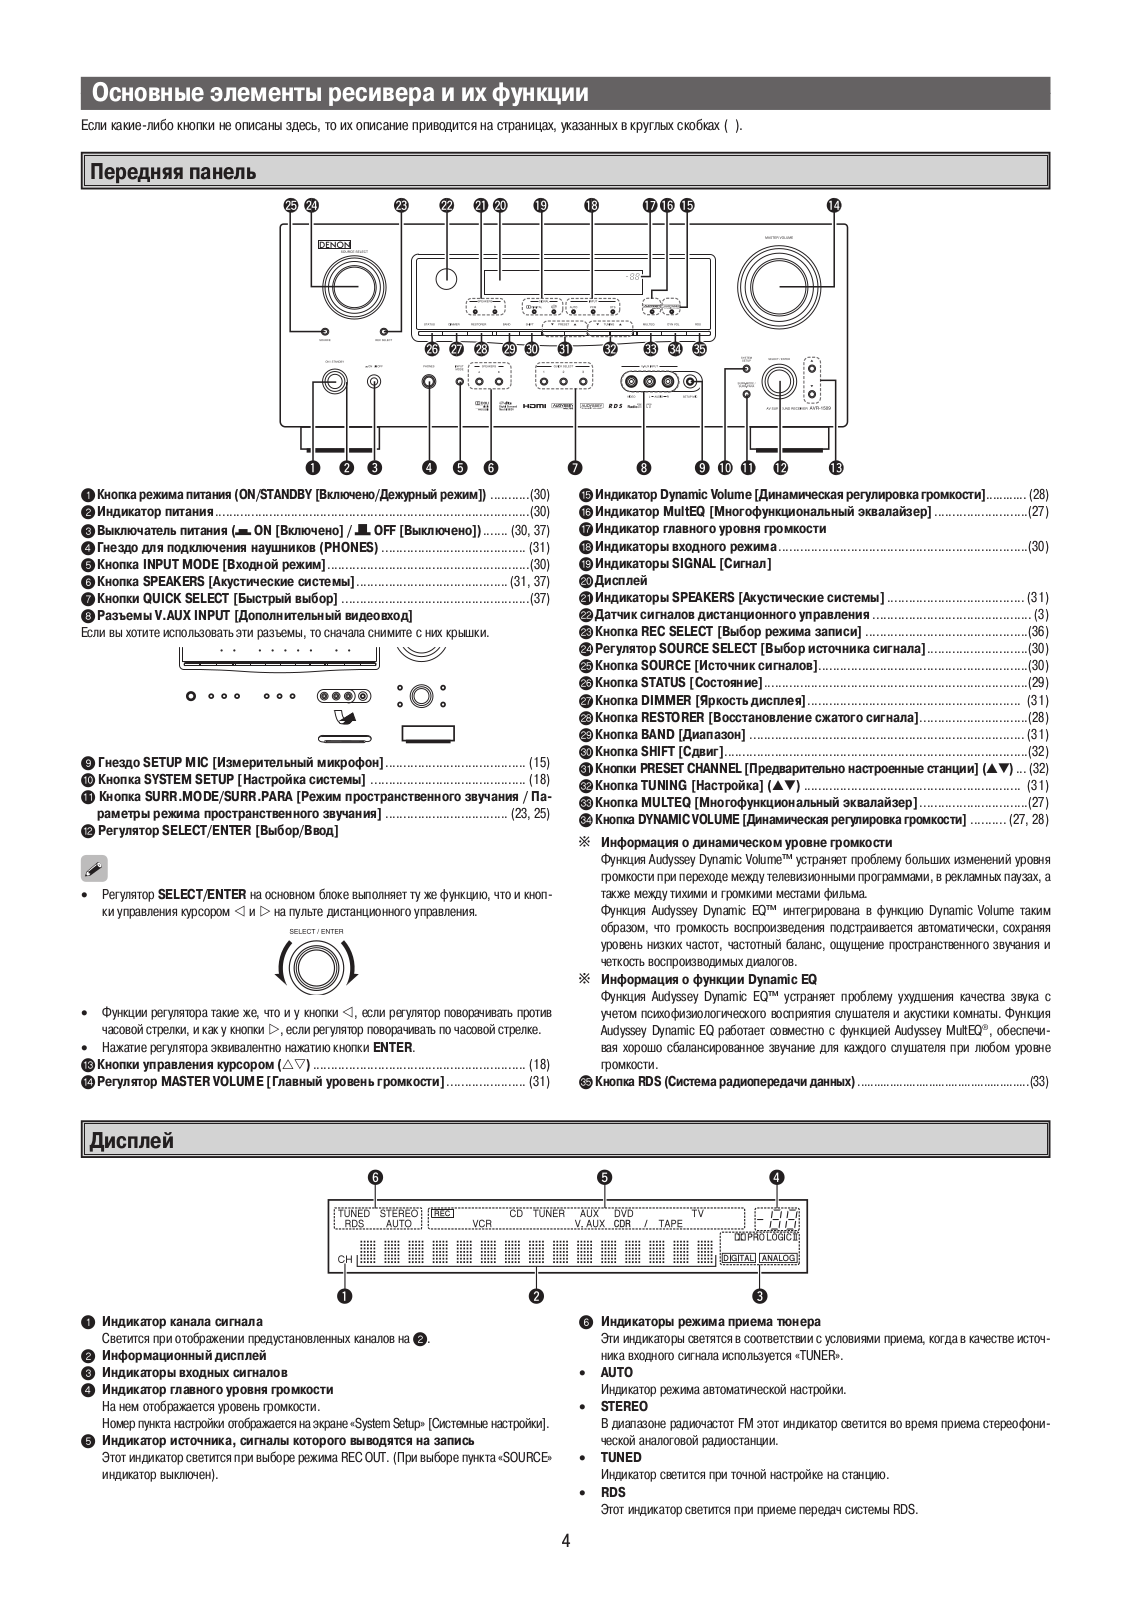
Part Names and Functions
For buttons not explained here, see the page indicated in parentheses ( ).
Front Panel

-
Power operation button
(ON/STANDBY) ·········································· (30) -
Power indicator ·········································· (30)
-
Power switch (hON jOFF) ··············· (30, 37)
-
Headphone jack (PHONES) ························ (31)
-
INPUT MODE button ·································· (30)
-
SPEAKERS button ································ (31, 37)
-
QUICK SELECT buttons ····························· (37)
-
V. AUX INPUT connectors
Remove the cap covering the connectors when -
SETUP MIC jack ·········································· (15)
-
SYSTEM SETUP button ····························· (18)
-
SURR. MODE / SURR. PARA button ·· (23, 25)
-
SELECT/ENTER knob
• The SELECT/ENTER knob on the main unit operates in the same way as the
cursor ▶ and ◀ buttons on the remote control unit.
• The control functions in the same way as the cursor ▶button◀ when turned
counterclockwise, as the cursor p button when turned clockwise.
• The control functions in the same way as the ENTER button when pressed the
knob. -
Cursor buttons (ui) ································· (18)
-
MASTER VOLUME control knob ··············· (31)
-
Dynamic Volume indicator ························ (28)
-
MultEQ indicator ········································ (27)
-
Master volume indicator
-
INPUT mode indicators ······························ (30)
-
SIGNAL indicators
-
Display
-
SPEAKERS indicators ································· (31)
-
Remote control sensor ································ (3)
-
REC SELECT button ··································· (36)
-
SOURCE SELECT knob ······························ (30)
-
SOURCE button ·········································· (30)
-
STATUS button ·········································· (29)
-
DIMMER button ·········································· (31)
-
RESTORER button ······································ (28)
-
BAND button ·············································· (31)
-
SHIFT button ··············································· (32)
-
PRESET CHANNEL buttons (▲▼) ·············· (32)
-
TUNING buttons (▲▼) ································ (31)
-
MULTEQ button ········································· (27)
-
DYNAMIC VOLUME button ··················(27, 28)
About Dynamic Volume
Audyssey Dynamic Volume™ solves the problem of large variations in volume
level between television programs, commercials, and between the soft and loud
passages of movies. Audyssey Dynamic EQ™ is integrated into Dynamic Volume so
that as the playback volume is adjusted automatically, the perceived bass
response, tonal balance, surround impression, and dialog clarity remain the
same.
About Dynamic EQ
Audyssey Dynamic EQ solves the problem of deteriorating sound quality as
volume is decreased by taking into account human perception and room
acoustics. Audyssey Dynamic EQ works in tandem with Audyssey MultEQ® to
provide wellbalanced sound for every listener at any volume level. -
RDS button ················································· (33)
Display

-
Signal channel indicator
Lights when the preset channel is displayed at 2. -
Information display
-
Input signal indicators
-
Master volume indicator
This displays the volume level.
The Setup item number is displayed in System Setup. -
Recording output source indicator
This lights when the REC OUT mode is selected. (This indicator is off when
“SOURCE” is selected.) -
Tuner reception mode indicators
These light according to the reception conditions when the input source is set
to “TUNER”.
• AUTO
This lights when in the auto tuning mode.
• STEREO
In the FM mode, this lights when receiving analog stereo broadcasts.
• TUNED
This lights when the broadcast is properly tuned in.
• RDS
This lights when receiving RDS broadcasts.
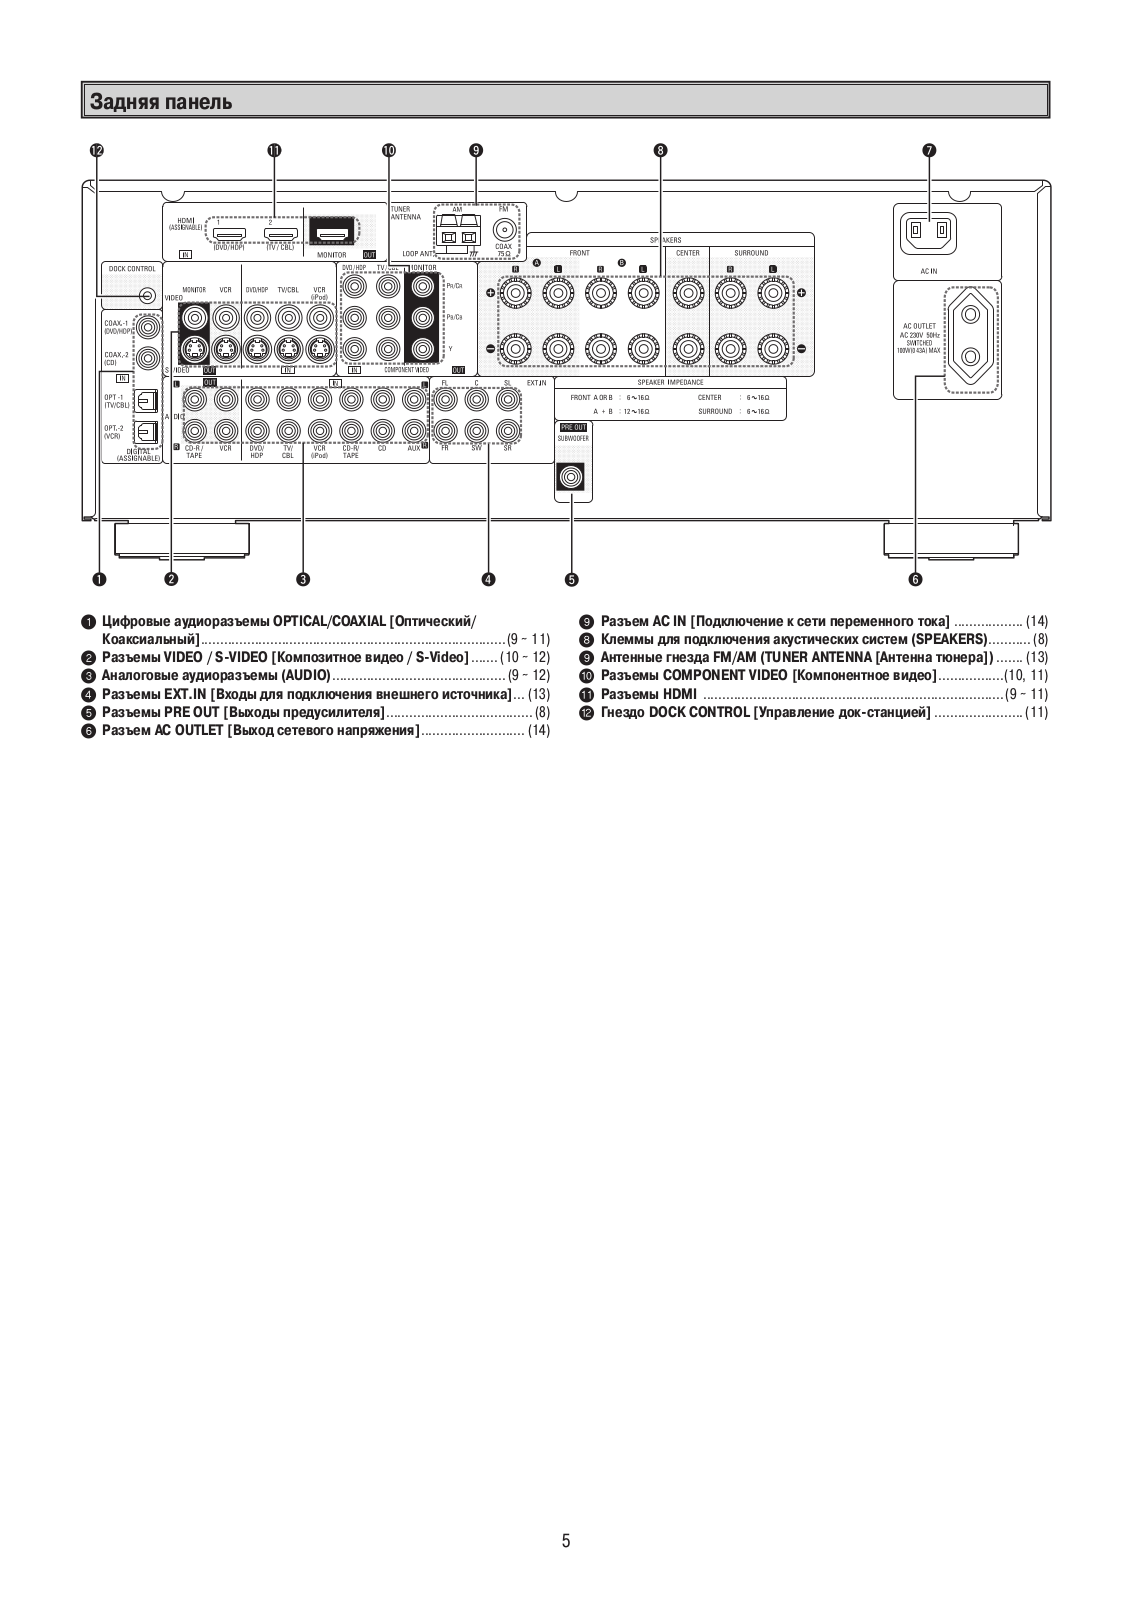
Rear Panel

-
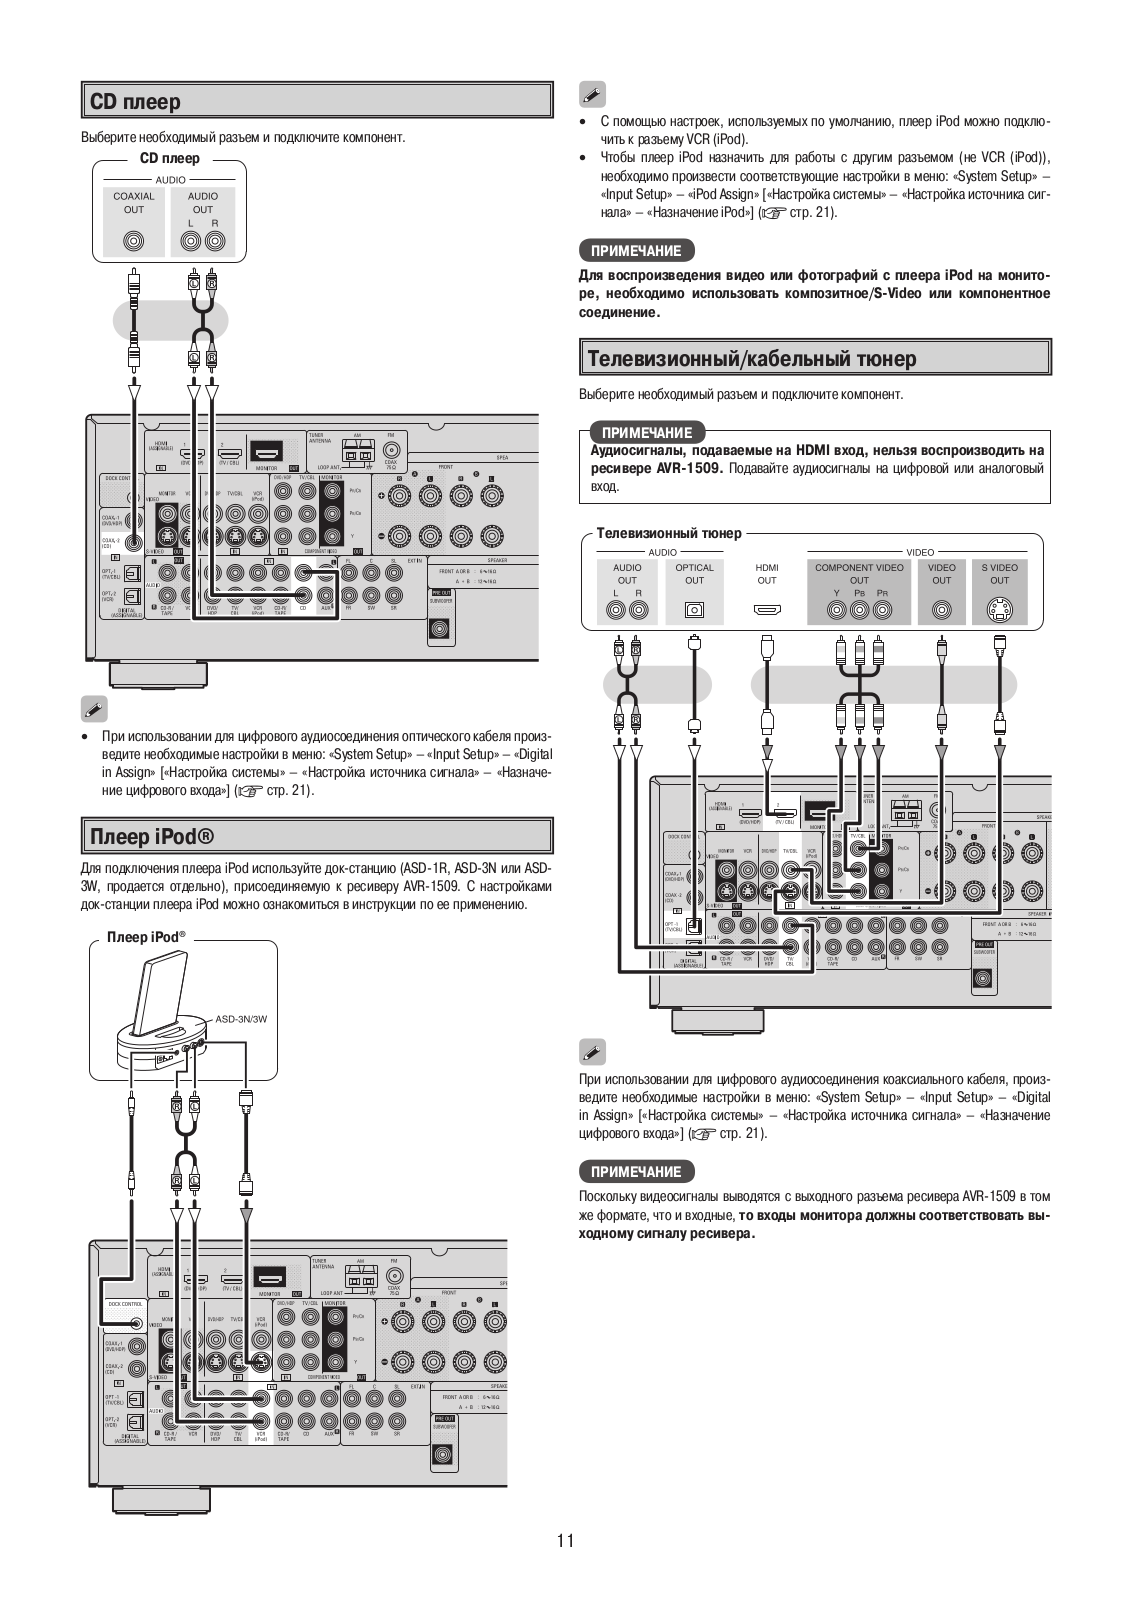
Digital audio connectors
(OPTICAL / COAXIAL) ·························· (9 ~ 11) -
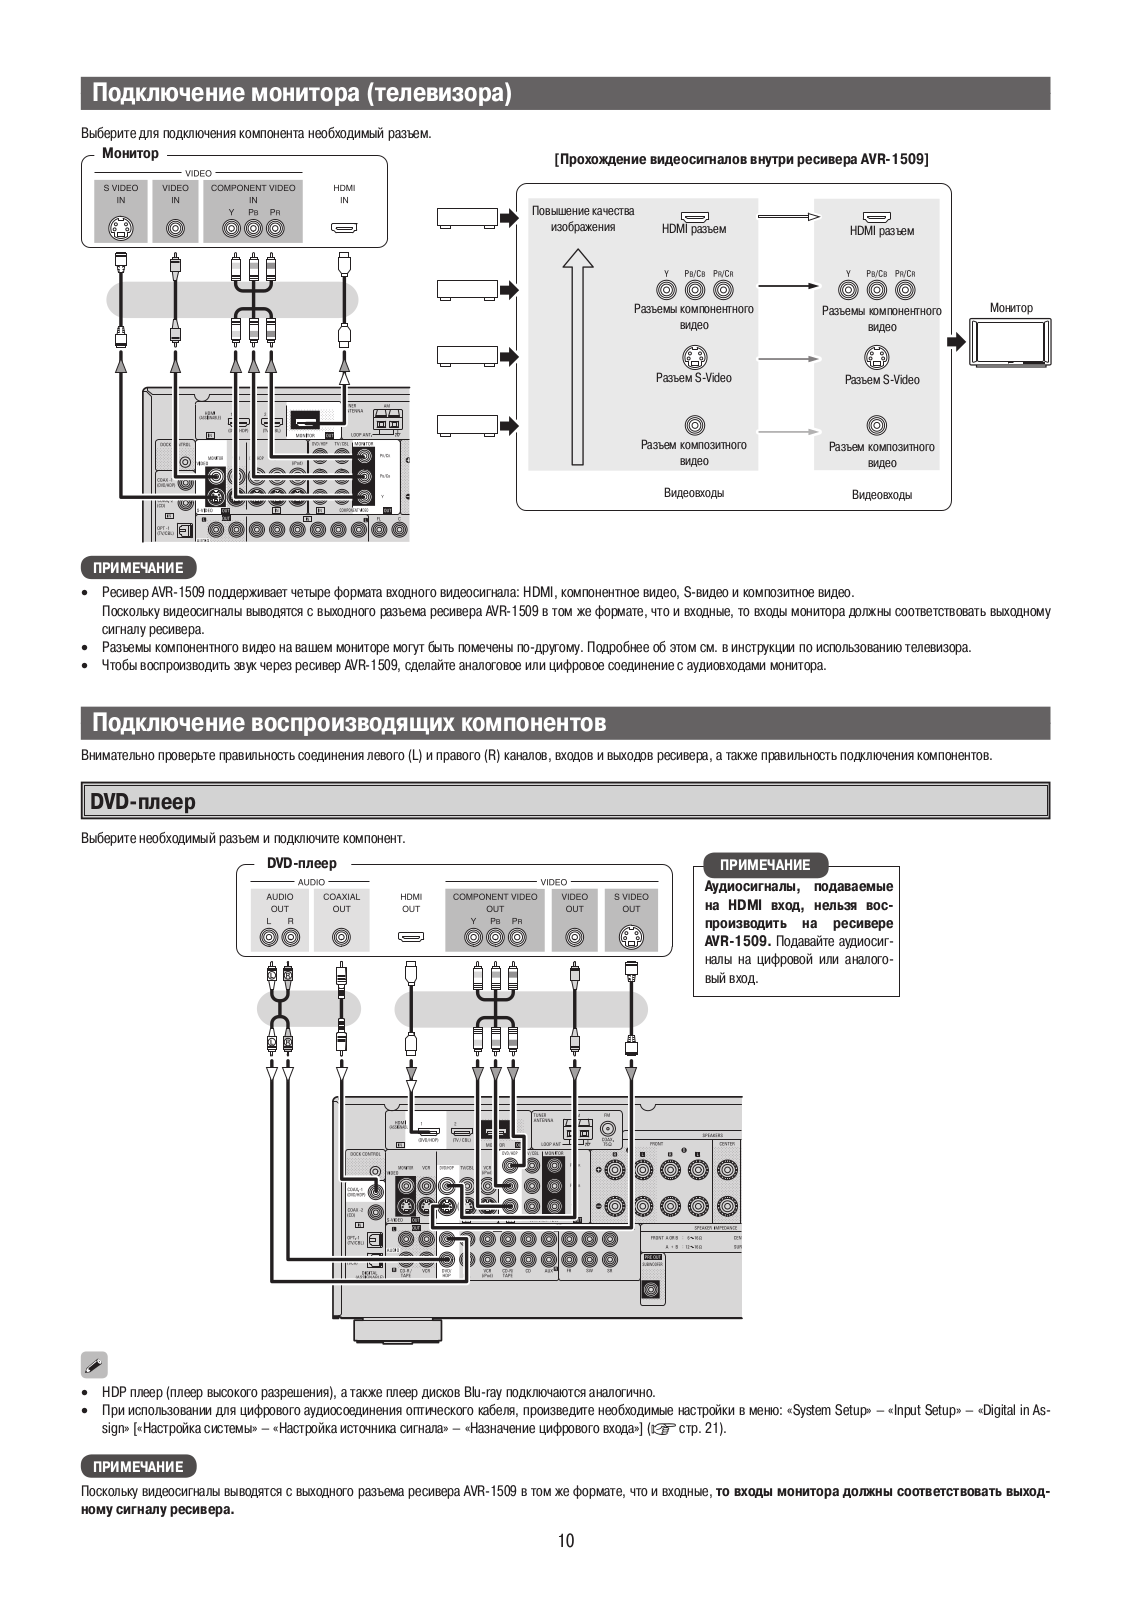
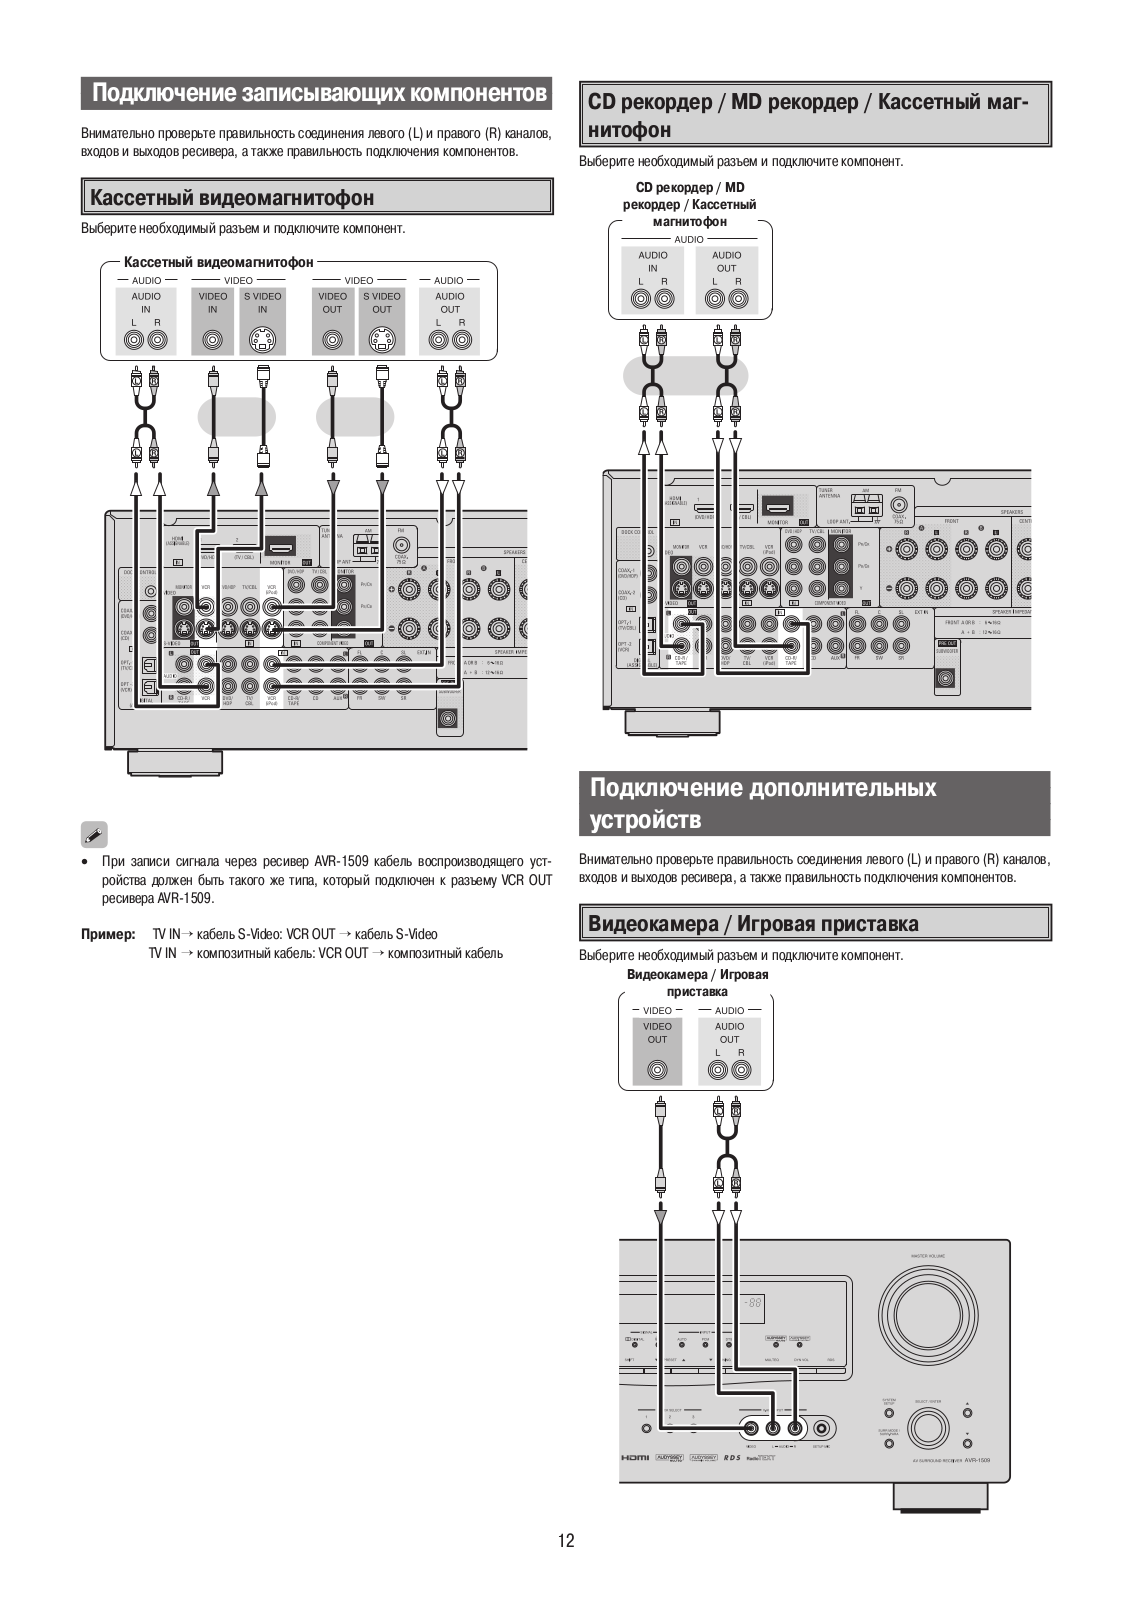
VIDEO / S-VIDEO connectors ············ (10 ~ 12)
-
Analog audio connectors
(AUDIO) ·················································(9 ~ 12) -
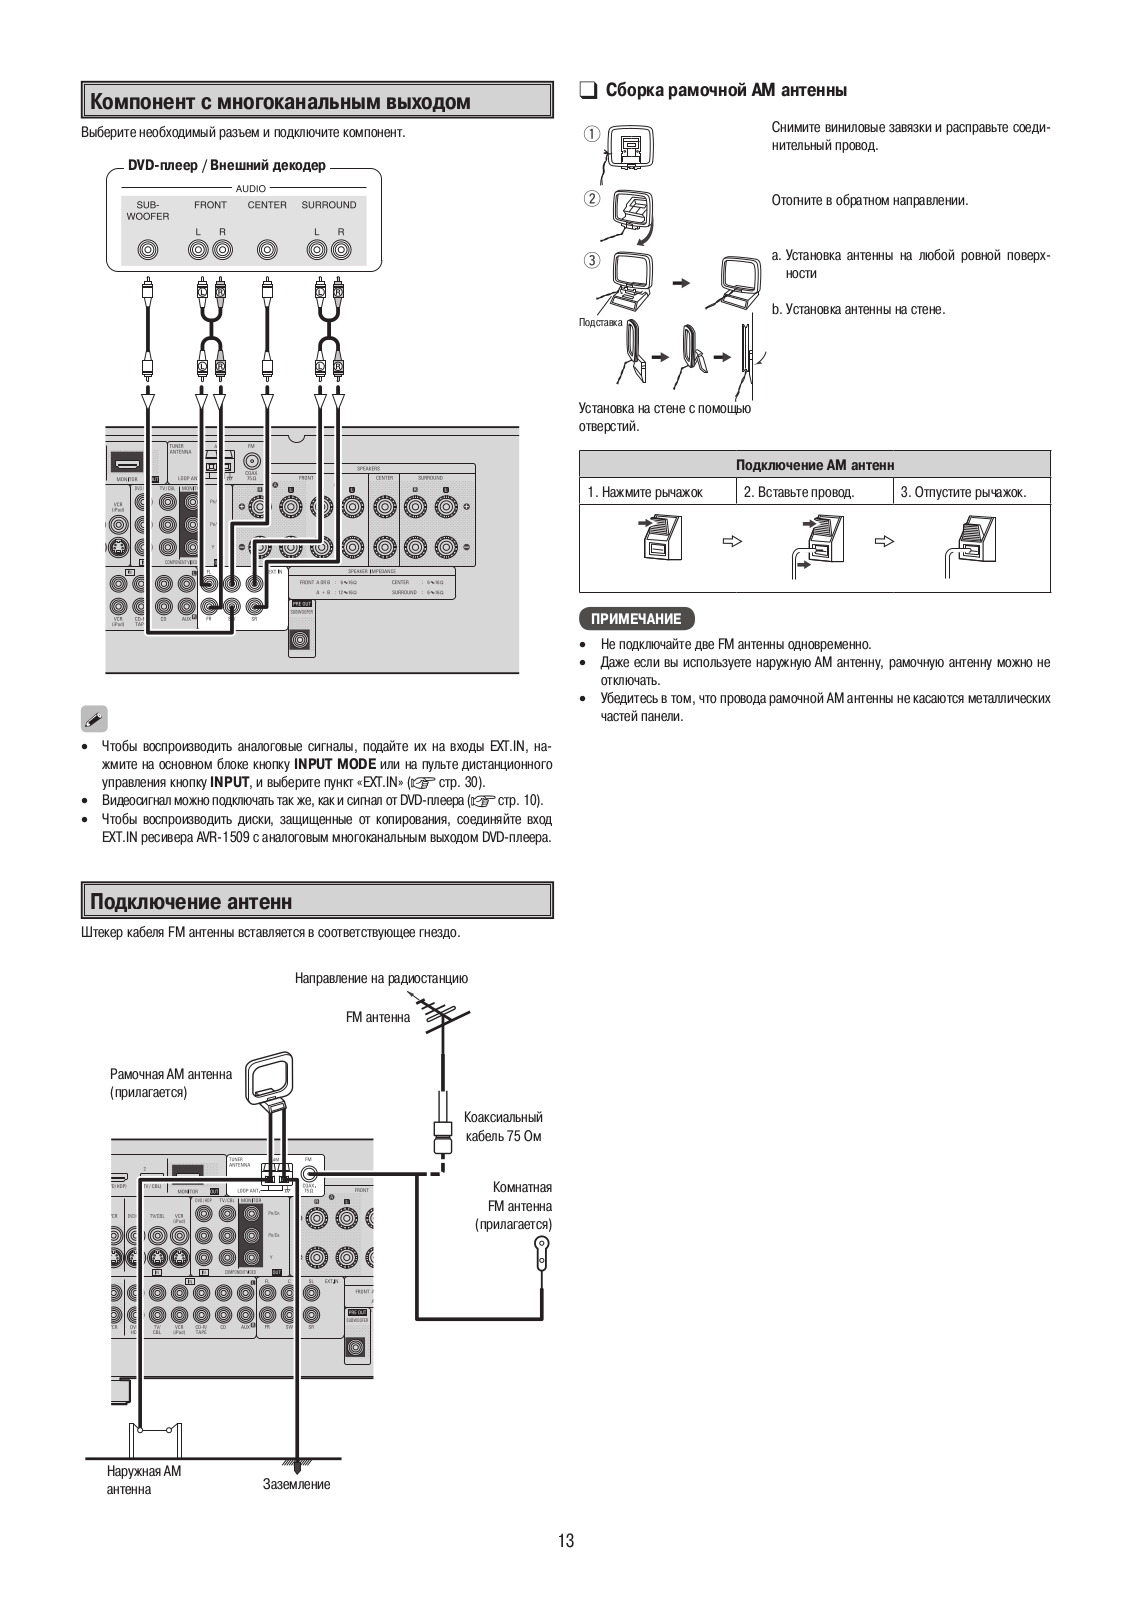
EXT. IN connectors ····································· (13)
-
PRE OUT connector ······································ (8)
-
AC OUTLET ················································· (14)
-
AC inlet (AC IN) ··········································· (14)
-
Speaker terminals (SPEAKERS) ·················· (8)
-
FM/AM antenna terminals
(TUNER ANTENNA) ···································· (13) -
COMPONENT VIDEO connectors ·········(10, 11)
-
HDMI connectors ·································· (9 ~ 11)
-
DOCK CONTROL jack ··································(11)
Remote Control Unit
- Indicator ······················································ (38)
- Power buttons ············································ (30)
- QUICK SELECT buttons ····························· (37)
- Source select buttons ································ (30)
- System buttons ···································· (35, 39)
- AUDIO DELAY button ································ (21)
- Cursor buttons (uio p) ························· (18)
- DYNAMIC VOLUME button ··················(27, 28)
- RESTORER button ······································ (28)
- SOURCE CONTROL switches ···················· (31)
- Remote control signal transmitter
- Master volume control buttons ················ (31)
- MUTING button ·········································· (31)
- NIGHT button ············································· (29)
- MULTEQ button ········································· (27)
- Channel select (CH SEL) /ENTER button ······································· (18, 36)
- Power buttons ······································ (38, 40)
- Source select buttons ································ (30)
- Video select button (V.SEL) ······················ (31)
- Tuner system buttons ·························· (31, 32)
- Test tone button (TEST) ···························· (20)
- Surround mode buttons ················ (23, 24, 26)
- System setup button (SYSTEM) ··············· (18)
- Surround parameter button (PARA) ··· (23, 25)
- Enter button (ENT) ····································· (18)
- Input mode button (INPUT) ······················· (30)
- Cursor buttons (uio p) ························· (18)
NOTE
- The SAT TU button cannot be used.
- If buttons on the front or rear are pressed strongly, the button on the opposite side will be activated too.
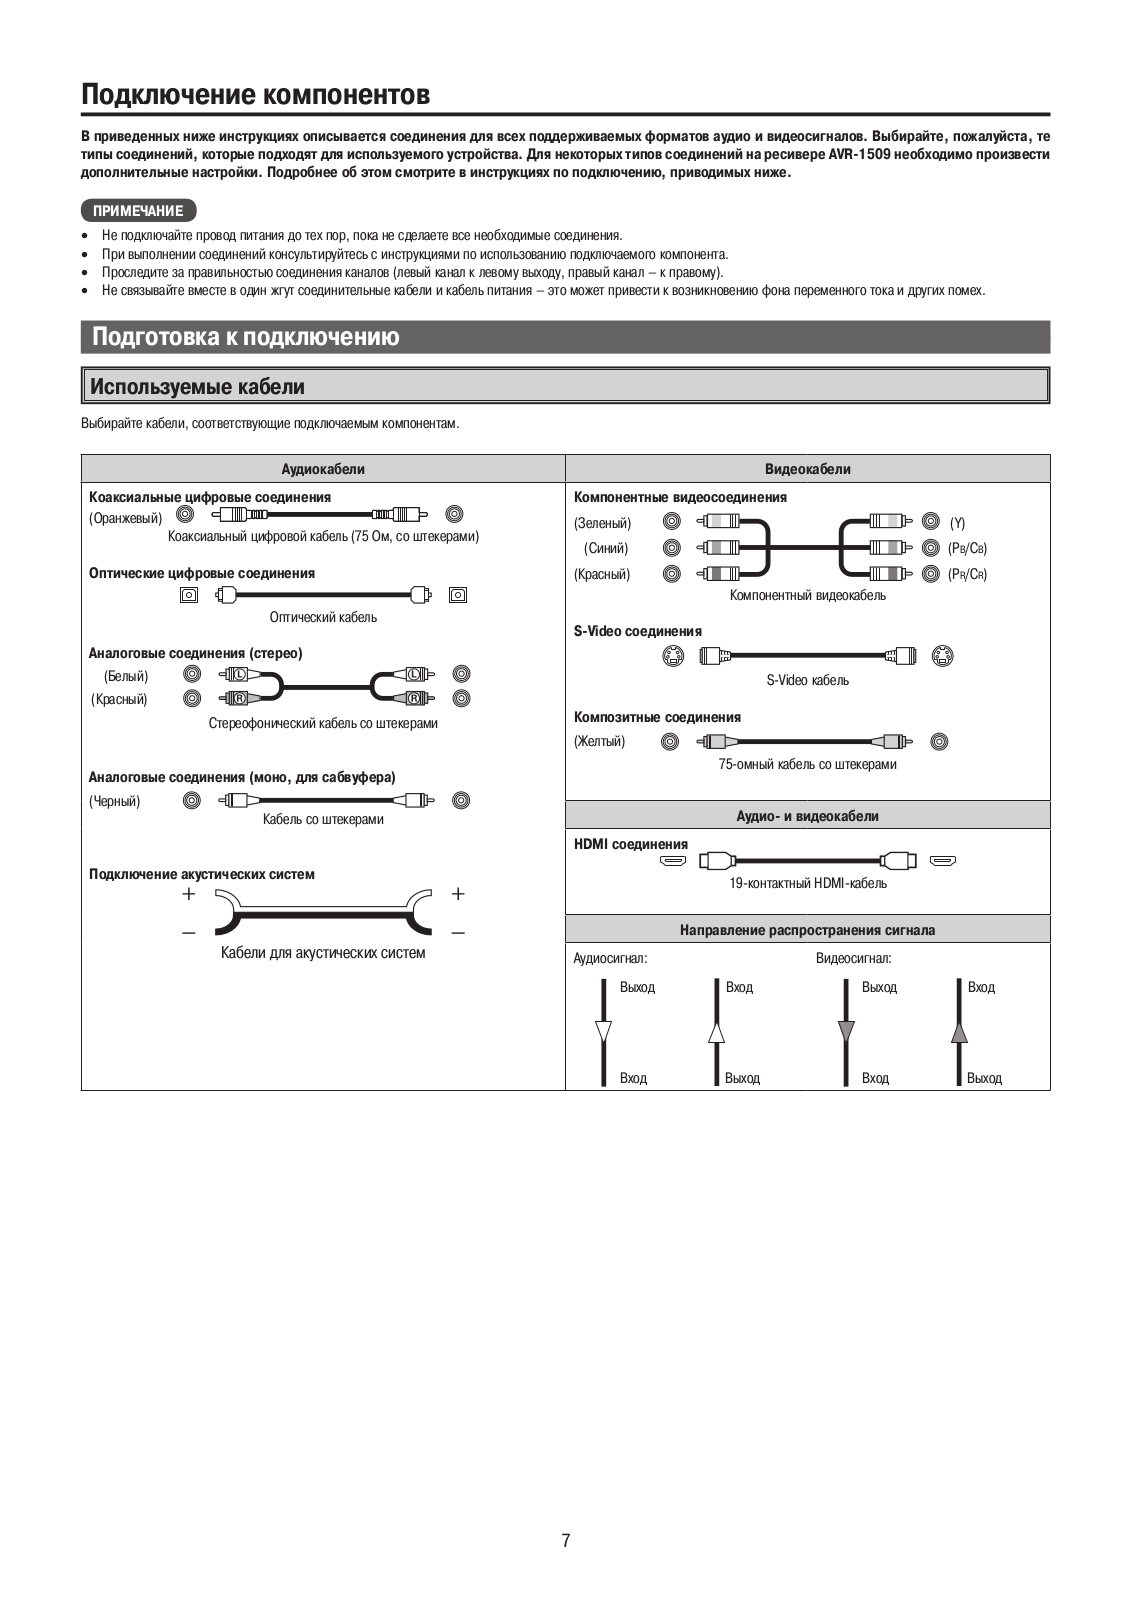
Connections
Connections for all compatible audio and video signal formats are described in
this owner’s manual. Please select the types of connections suited for the
equipment you are connecting.
With some types of connections, certain settings must be made on the AVR-1509.
For details, refer to the instructions for the respective connection items
below.
NOTE
- Do not plug in the power cord until all connections have been completed.
- When making connections, also refer to the operating instructions of the other components.
- Be sure to connect the left and right channels properly (left with left, right with right).
- Do not bundle power cords together with connection cables. Doing so can result in humming or noise.
Preparations
Cables Used for Connections
Select the cables according to the equipment being connected.

Speaker Connections
Speaker Installation
The illustration below shows a basic example of installation of the amplifier
combined with 6 speakers and a monitor.

The table below shows a typical speaker configuration for the AVR-1509.
| FRONT| CENTER| SURROUND| SUBWOOFER
—|—|—|—|—
L| R| L| R
5.1-channels| 0| 0| 0| 0| 0| 0
3.1-channels| 0| 0| 0| –| –| 0
2.1-channels| 0| 0| –| –| –| 0
2-channels| 0| 0| –| –| –| –
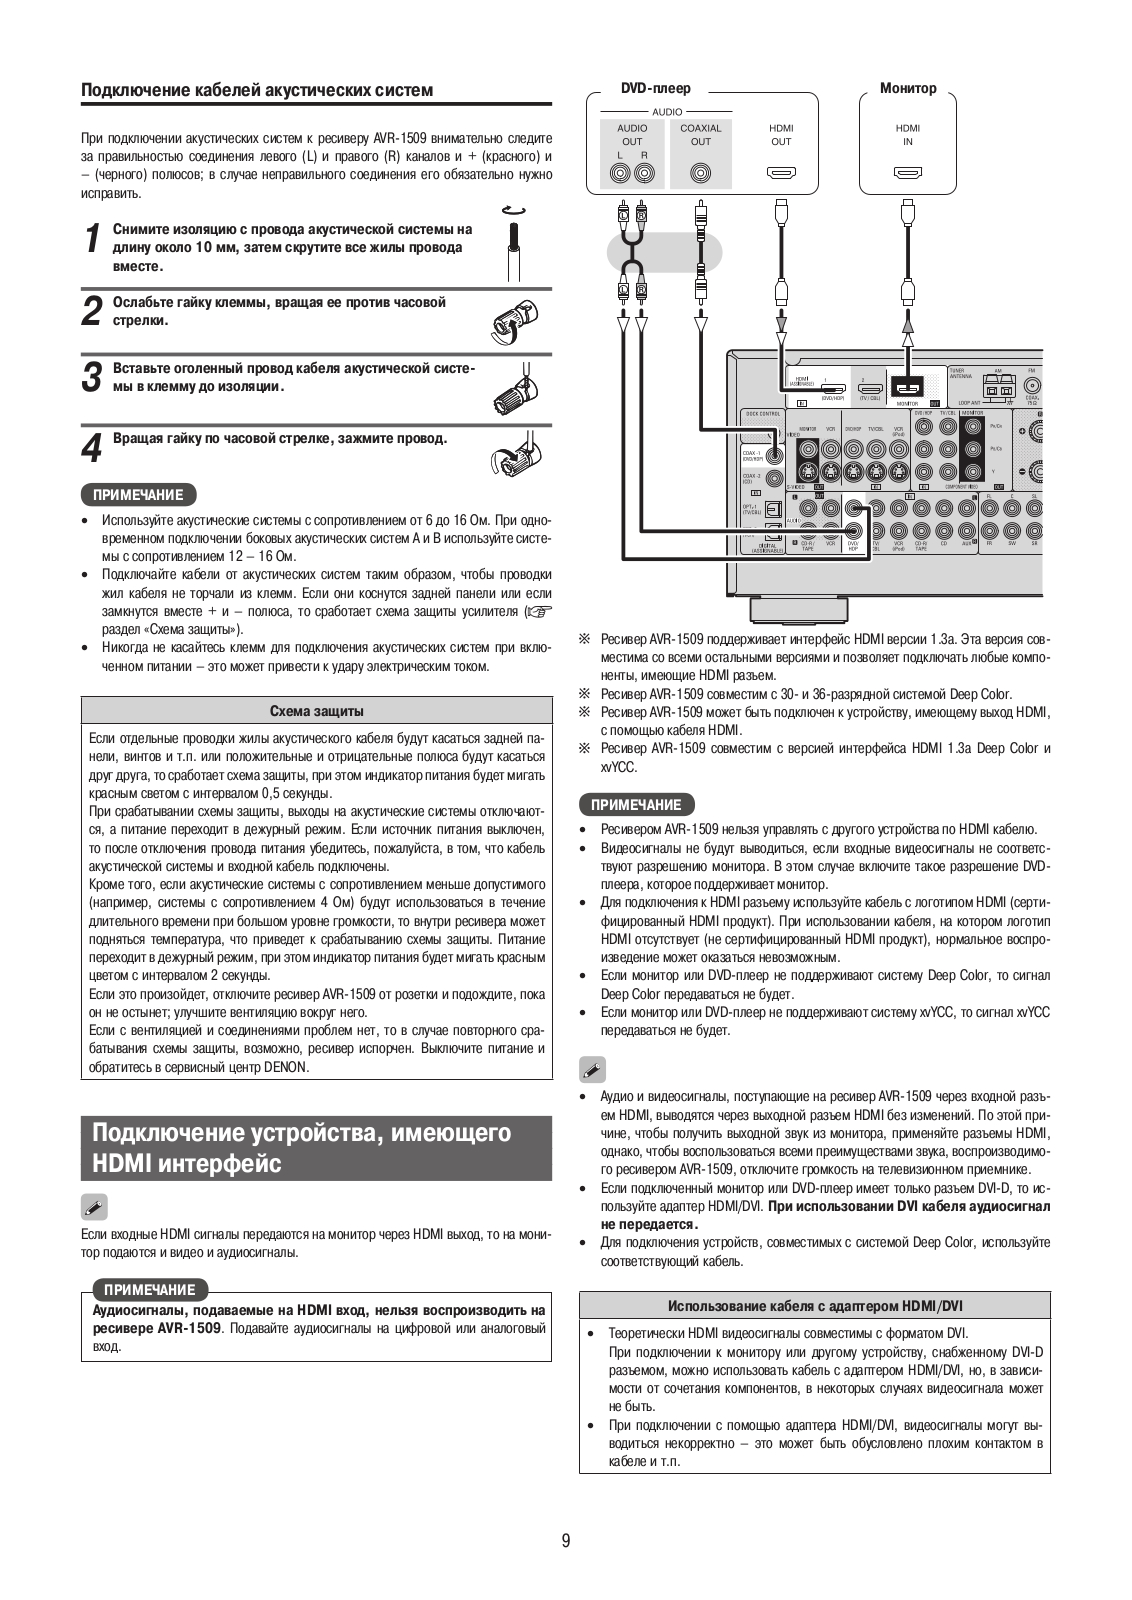
Speaker Connections
Example: 5.1-channels

Connecting the Speaker Cables
Carefully check the left (L) and right (R) channels and + (red) and –(black)
polarities on the speakers being connected to the AVR-1509, and be sure to
interconnect the channels and polarities correctly.
****www.denon.com
Denon Brand Company, D&M Holdings Inc.
Printed in China 5411 10039 109D
References
- denon.com
- Manual-Hub.com – Free PDF manuals!
Read User Manual Online (PDF format)
Read User Manual Online (PDF format) >>
Download This Manual (PDF format)
Download this manual >>
Русский
- Bedienungsanleitung Denon AVR-1509
- Denon AVR-1509 User Manual
- Manual Usuario Denon AVR-1509
- Mode d’emploi Denon AVR-1509
- Istruzioni Denon AVR-1509
- инструкция Denon AVR-1509
- Denon AVR-1509の取扱説明書
- Handleiding Denon AVR-1509
- Manual de uso Denon AVR-1509
Вам нужна инструкция? Мы поможем Вам ее найти и сэкономить Ваше время.
- 56 stron
- 0 mb
Изделие Denon AVR-1509, а также другие, которыми Вы пользуетесь ежедневно, наверняка вы получили в комплекте с инструкцией обслуживания. Из опыта наших пользователей мы знаем, что большинство из Вас не уделили этому особого внимания. Большая часть инструкций, сразу же после покупки попадает в корзину для мусора вместе с коробкой — это ошибка. Ознакомьтесь с информацией, касающейся инструкции Denon AVR-1509, которая поможет Вам в будущем сэкономить нервы и избежать головной боли.
Важная подсказка — не забывайте хотя бы раз прочитать инструкцию Denon AVR-1509
Если вы не хотите каждый раз читать информационные брошюры, касающиеся, тех или Denon AVR-1509 иных изделий, достаточно, прочитать их раз — сразу же после покупки устройства. Вы получите основное знания, касающиеся поддержания изделия Denon AVR-1509 в хорошем эксплуатационном состоянии, так, чтобы без проблем достигнуть его планируемого цикла работы. Затем инструкцию можно отложить на полку и вернуться к ней только в случае, если вы не уверены, правильно ли проводится техобслуживание изделия. Правильный уход является необходимым элементом Вашего удовольствия Denon AVR-1509.
Раз в году пересмотрите шкафчик, в котором держите инструкции для всех устройств, — выбросите те, которыми вы уже не пользуетесься. Это поможет Вам сохранять порядок в своей домашней базе инструкций обслуживания.
Summary of Contents for Denon AVR-1509
Что находится в инструкции Denon AVR-1509? Почему стоит ее прочитать?
- Гарантия и подробности, касающиеся техобслуживания изделия
Хорошей идеей будет прикрепить чек к странице инструкции. Если что-то плохое случится во время использования Denon AVR-1509, у вас будет комплект документов, необходимый для гарантийного ремонта. В этой части инструкции вы найдете информацию об авторизованных сервисных центрахDenon AVR-1509 а также, как самостоятельно правильно ухаживать за оборудованием — так, чтобы не потерять гарантийных прав. - Указания по монтажу и Setup
Не терять нервов и времени на самостоятельную попытку установки и первого запуска изделия. Воспользуйтесь рекомендациями производителя Denon AVR-1509 чтобы правильно запустить изделие, без лишнего риска повреждения оборудования. - Информация, касающаяся дополнительных запчастей (входящих в комплект а также являющихся опцией)
Пересматривая эту часть документа вы сможете проверить, доставлен ли ваш Denon AVR-1509 с полним комплектом аксессуаров. Вы также сможете узнать, какие дополнительные запчасти или аксессуары для Denon AVR-1509 Вы сможете найти и докупить к своему устройству. - Troubleshooting
Самые частые проблемы, касающиеся Denon AVR-1509 и методы их решения. Это очень полезная часть руководства по обслуживанию — она позволит Вам сэкономить много времени на поиск решений. 90% проблем с Denon AVR-1509 повторяется у многих пользователей. - Требования, касающиеся питания и энергетический класс
Информация, касающаяся количества потребляемой энергии, а также рекомендации, касающиеся установки и питания Denon AVR-1509. Прочитайте, чтобы оптимально пользоваться Denon AVR-1509 и не использовать большего количества ресурсов, нежели это необходимо для правильной работы изделия. - Специальные функции Denon AVR-1509
Здесь вы можешь узнать, как персонализировать изделие Denon AVR-1509. Вы узнаете, какие дополнительные функции могут помочь Вам удобно использовать продукт Denon AVR-1509 а также, какие функции Вашего устройства оптимальны для выполнения конкретной деятельности.
Как видите в инструкции вы найдете информацию, которая реально поможет Вам в использовании Вашего изделия. Стоит с ней ознакомиться, чтобы избежать разочарований, возникающих из более короткого, нежели предусматривалось, периода исправности изделия Denon AVR-1509. Если все же вы не хотите копить инструкции в своем доме, наш сайт поможет Вам в этом — вы должны найти у нас руководство по обслуживанию большинства из своих устройств, а также Denon AVR-1509.
Комментарии (0)
Denon Brand Company, D&M Holdings lnc.
e
Ver. 1
SERVICE MANUAL
AV SURROUND RECEIVER
MODEL JP E3 E2 EK E2A E1C EA
AVR-1709
33 3
AVR-1609
3
AVR-1519
3
AVR-1509
33
AVR-689
33
AVR-589
33
AVC-1509
3
●
For purposes of improvement, specifications and
design are subject to change without notice.
●
Please use this service manual with referring to the
operating instructions without fail.
●
Some illustrations using in this service manual are
slightly different from the actual set.
注 意
サービスをおこなう前に、このサービスマニュアル
を必ずお読みください。本機は、火災、感電、けが
などに対する安全性を確保するために、さまざまな
配慮をおこなっており、また法的には「電気用品安
全法」にもとづき、所定の許可を得て製造されてお
ります。従ってサービスをおこなう際は、これらの
安全性が維持されるよう、このサービスマニュアル
に記載されている注意事項を必ずお守りください。
●
本機の仕様は性能改良のため、予告なく変更すること
があります。
●
補修用性能部品の保有期間は、製造打切後 8 年です。
●
修理の際は、必ず取扱説明書を参照の上、作業を行っ
てください。
●
本文中に使用しているイラストは、説明の都合上現物
と多少異なる場合があります。
X0382 V.01 DE/CDM 0806
w
w
w
.
x
i
a
o
y
u
1
6
3
.
c
o
m
Q
Q
3
7
6
3
1
5
1
5
0
9
9
2
8
9
4
2
9
8
T
E
L
1
3
9
4
2
2
9
6
5
1
3
9
9
2
8
9
4
2
9
8
0
5
1
5
1
3
6
7
3
Q
Q
TEL 13942296513 QQ 376315150 892498299
TEL 13942296513 QQ 376315150 892498299
http://www.xiaoyu163.com
http://www.xiaoyu163.com