
Перейти к контенту
Русские электронные инструкции по эксплуатации
Постоянно обновляемый большой каталог документации по эксплуатации и использованию современных устройств и оборудования на русском языке. Бесплатное скачивание файлов.
Поиск:
Главная
♥ В закладки
Просмотр инструкции в pdf
Инструкция по эксплуатации стиральной машины Candy Smart CS4 1051D1-2-07.
Скачать инструкцию к стиральной машине Candy Smart CS4 1051D1-2-07 (7,52 МБ)
Инструкции по эксплуатации стиральных машин Candy
« Инструкция к стиральной машине Beko MVB 59001 M
» Инструкция к стиральной машине Whirlpool AWE 6080
Вам также может быть интересно
Инструкция к стиральной машине Candy Aqua 135D2-07

Инструкция к кондиционеру Candy AC-09HTA103-R2

Инструкция к посудомоечной машине Candy CDCP 6-ES-07

Инструкция к стиральной машине Candy GVS34116TC2-2-07 Grand O Vita Smart
Инструкция к стиральной машине Candy CSS4 1072D1-2-07

Инструкция к встраиваемой электрической варочной панели Candy CH642X

Инструкция к посудомоечной машине Candy CDCP 6-E-07

Инструкция к посудомоечной машине Candy CDPH 2D1149W-08
Добавить комментарий
Имя *
Email *
Сайт
Комментарий
Сохранить моё имя, email и адрес сайта в этом браузере для последующих моих комментариев.
- Добавить инструкцию
- Заказать инструкцию
- Политика конфиденциальности


Grazie per aver scelto una lavatrice Candy
che, siamo certi, sarà un prezioso alleato
per lavare in tutta tranquillità la biancheria
di tutti i giorni, anche la più delicata.
È possibile registrare il prodotto su
www.registercandy.com per poter accedere
più rapidamente ai servizi integrativi riservati
solo ai clienti più fedeli.
La lettura completa di questo libretto
permetterà un utilizzo corretto e sicuro
dell’apparecchiatura e darà anche utili
consigli sulla manutenzione più efficiente.
Mettere in funzione la lavatrice solo
dopo aver letto attentamente le istruzioni. Si
consiglia di tenere sempre il manuale a
portata di mano e di conservarlo con cura
per eventuali futuri proprietari.
Si raccomanda di controllare che al
momento della consegna la macchina sia
dotata di libretto di istruzioni, certificato di
garanzia, indirizzi di assistenza ed etichetta
di efficienza energetica. Verificare inoltre di
avere tappi, curva per tubo di scarico e
bacinella per detersivo liquido o
candeggiante (presente solo su alcuni
modelli). Si consiglia di conservare tutti
questi componenti.
Ogni prodotto è identificato da un codice
univoco di 16 caratteri, definito anche
“numero di serie”, che si trova nell’adesivo
applicato sull’elettrodomestico (zona oblò) o
nella busta documenti posta all’interno del
prodotto. Questo codice è una sorta di carta
d’identità specifica per il prodotto che
servirà per registrare il prodotto e se fosse
necessario contattare il Centro Assistenza
Tecnica Candy.
Questo elettrodomestico è marcato
conformemente alla Direttiva Europea
2012/19/UE sui Rifiuti da
Apparecchiature Elettriche ed
Elettroniche (RAEE).
I RAEE contengono sia sostanze inquinanti
(che possono avere un impatto negativo
sull’ambiente) sia materie prime (che possono
essere riutilizzate). E’ perciò necessario
sottoporre i RAEE ad apposite operazioni di
trattamento, per rimuovere e smaltire in modo
sicuro le sostanze inquinanti ed estrarre e
riciclare le materie prime. Ogni cittadino può
giocare un ruolo decisivo nell’assicurare che i
RAEE non diventino un problema ambientale;
basta seguire qualche semplice regola:
! i RAEE non vanno mai buttati nella
spazzatura indifferenziata;
! i RAEE devono essere consegnati ai Centri di
Raccolta (chiamati anche isole ecologiche,
riciclerie, piattaforme ecologiche …) allestiti dai
Comuni o dalle Società di igiene urbana; in
molte località viene anche effettuato il servizio
di ritiro a domicilio dei RAEE ingombranti.
In molte nazioni, quando si acquista una nuova
apparecchiatura, si può consegnare il RAEE al
negoziante, che è tenuto a ritirarlo gratuitamente
(ritiro «uno contro uno») a patto che il nuovo
apparecchio sia dello stesso tipo e svolga le
stesse funzioni di quello reso.
1. NORME GENERALI DI SICUREZZA
2. INSTALLAZIONE
3. CONSIGLI PRATICI
4. PULIZIA E MANUTENZIONE ORDINARIA
5. GUIDA RAPIDA ALL’USO
6. COMANDI E PROGRAMMI
7. RISOLUZIONE PROBLEMI E GARANZIA

1. NORME GENERALI DI
SICUREZZA
!
Questo apparecchio è destinato
ad uso in ambienti domestici e
simili come per esempio:
− aree di ristoro di negozi, uffici
o altri ambienti di lavoro;
− negli agriturismo;
− dai clienti di hotel, motel o
altre aree residenziali simili;
− nei bed & breakfast.
Un utilizzo diverso da quello tipico
dell’ambiente domestico, come
l’uso professionale da parte di
esperti o di persone addestrate, è
escluso anche dagli ambienti
sopra descritti. Un utilizzo non
coerente con quello riportato, può
ridurre la vita del prodotto e può
invalidare la garanzia del
costruttore. Qualsiasi danno
all’apparecchio o ad altro, derivante da
un utilizzo diverso da quello domestico
(anche quando l’apparecchio è
installato in un ambiente domestico)
non sarà ammesso dal costruttore
in sede legale.
!
Questo apparecchio può essere
utilizzato da bambini di 8 anni e
oltre e da persone con capacità
fisiche, sensoriali o mentali ridotte
o con mancanza di esperienza e
di conoscenza a patto che siano
supervisionate o che siano date
loro istruzioni in merito all’utilizzo
sicuro dell’apparecchio e che
capiscano i pericoli del suo utilizzo.
Evitare che i bambini giochino
con la lavatrice o che si occupino
della sua pulizia e manutenzione
senza supervisione.
! I bambini dovrebbero essere
supervisionati per assicurarsi che
non giochino con l’apparecchio.
! I bambini di età inferiore a 3 anni
devono essere tenuti lontano
dalla macchina, a meno che non
vengano continuamente sorvegliati.
!
Se il cavo di alimentazione risulta
danneggiato, deve essere sostituito
dal produttore, da un tecnico
specializzato o da una persona
qualificata per evitare qualsiasi
pericolo. Si consiglia di utilizzare un
componente originale, che può essere
richiesto al Centro Assistenza Tecnica.
! Utilizzare unicamente il tubo di carico
fornito con l’apparecchio per il
collegamento alla rete idrica. I vecchi
tubi non devono essere riutilizzati.
!
La pressione idrica deve essere
compresa tra un minimo di 0,05
MPa ed un massimo di 0,8 Mpa.
! Assicurarsi che nessun tappeto
ostruisca la base della lavatrice
né i condotti di ventilazione.
! La lavatrice risulta “spenta” solo
se l’apposito segnale sulla
manopola o sul pannello di
controllo è in posizione verticale.
In qualsiasi altra posizione, la
macchina risulta ancora “accesa”
(solo per modelli con programmi
selezionabili con manopola).

!
Dopo l’installazione, l’apparecchio
deve essere posizionato in modo
che la spina sia raggiungibile.
! La massima capacità di carico
di biancheria asciutta differisce
a seconda del modello (fare
riferimento al cruscotto).
! Per ulteriori informazioni sul
prodotto o per consultare la
scheda tecnica fare riferimento
al sito internet del produttore.
! Prima di qualsiasi intervento di
pulizia e manutenzione della
lavatrice, togliere la spina e
chiudere il rubinetto dell’acqua.
! Assicurarsi che l’impianto
elettrico sia provvisto di messa a
terra, in caso contrario richiedere
l’intervento di personale qualificato.
!
In generale è sconsigliabile l’uso
di adattatori, prese multiple e/o
prolunghe.
!
Prima di aprire l’oblò, assicurarsi
che non ci sia acqua nel cestello.
! Non tirare il cavo di
alimentazione o l’apparecchio
stesso per staccare la spina
dalla presa di corrente.
! Non lasciare la lavatrice
esposta a pioggia, sole o ad
altri agenti atmosferici.
! In caso di trasloco, non sollevare
la lavatrice dalle manopole né
dal cassetto del detersivo;
durante il trasporto, non
appoggiare mai l’oblò al carrello.
Si consiglia di sollevare la
lavatrice in due persone.
! In ogni caso di guasto e/o di
malfunzionamento, si consiglia di
spegnere la lavatrice, chiudere
il rubinetto dell’acqua e non
manomettere l’apparecchio.
Contattare immediatamente il
Centro
Assistenza Tecnica,
richiedendo solo ricambi originali.
Il mancato rispetto di quanto
sopra, può compromettere la
sicurezza dell’apparecchio.
Apponendo la marcatura
su
questo prodotto, dichiariamo,
sotto la nostra responsabilità,
di ottemperare a
tutti i requisiti
relativi alla tutela di
sicurezza,
salute e ambiente previsti
dalla
legislazione europea in essere
per questo prodotto.
Prescrizioni di sicurezza
ATTENZIONE:
durante il lavaggio, l’acqua
può raggiungere temperature
molto elevate.
! Tagliare le fascette ferma-tubo,
prestando attenzione a non
danneggiare il tubo e il cavo
elettrico.
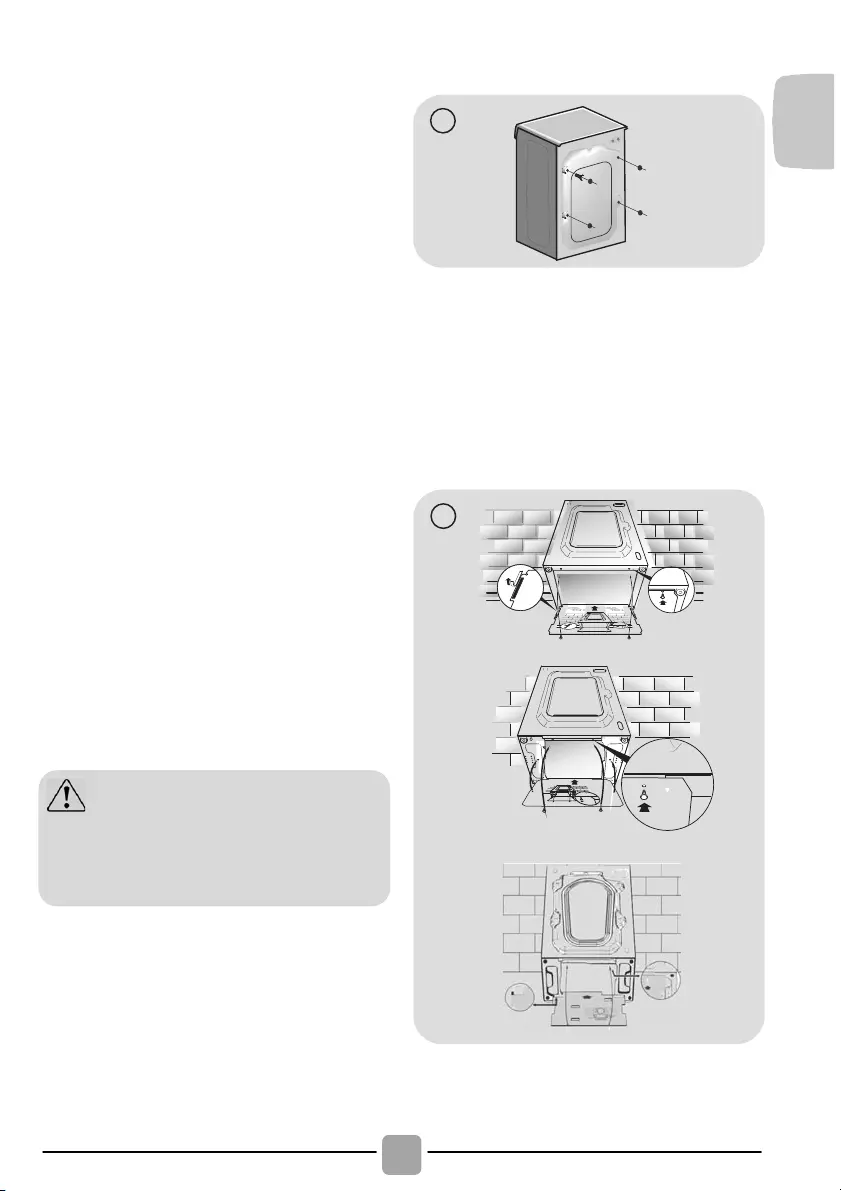
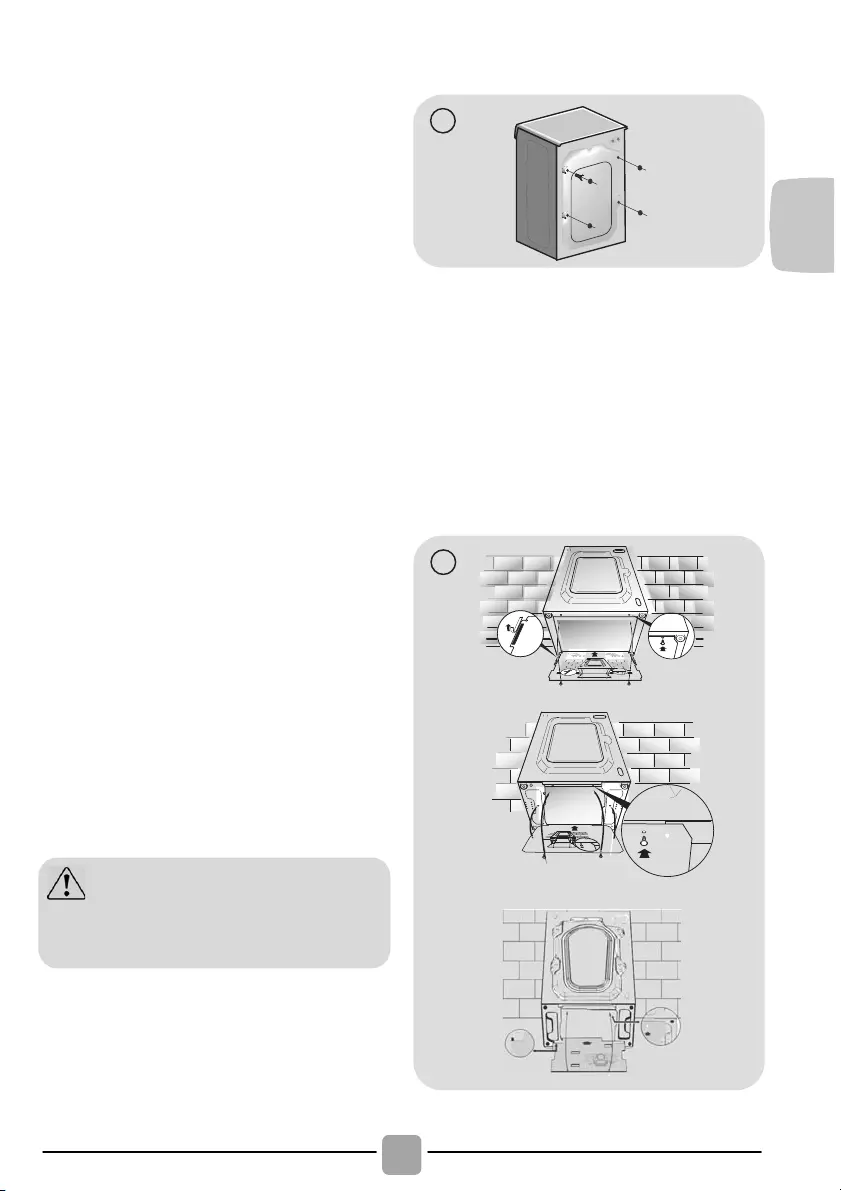
!
Svitare le 2 o 4 viti (A) sul lato
posteriore e rimuovere i 2 o 4
distanziali (B) come in figura 1.
!
Richiudere i 2 o 4 fori utilizzando
i tappi contenuti nella busta
istruzioni.
!
Se la lavatrice è da incasso,
dopo aver tagliato le fascette
ferma—tubo, svitare le 3 o 4 viti (A)
e rimuovere i 3 o 4 distanziali (B).
!
In alcuni modelli, 1 o più
distanziali cadranno all’interno
della macchina: inclinare avanti
la lavatrice per rimuoverli.
Richiudere i fori utilizzando i
tappi contenuti nella busta.
! Applicare il foglio polionda sul
fondo come mostrato in figura 2
(a seconda del modello,
considerare la versione A, B o C).
ATTENZIONE:
non lasciare gli elementi
dell’imballaggio a portata dei
bambini.
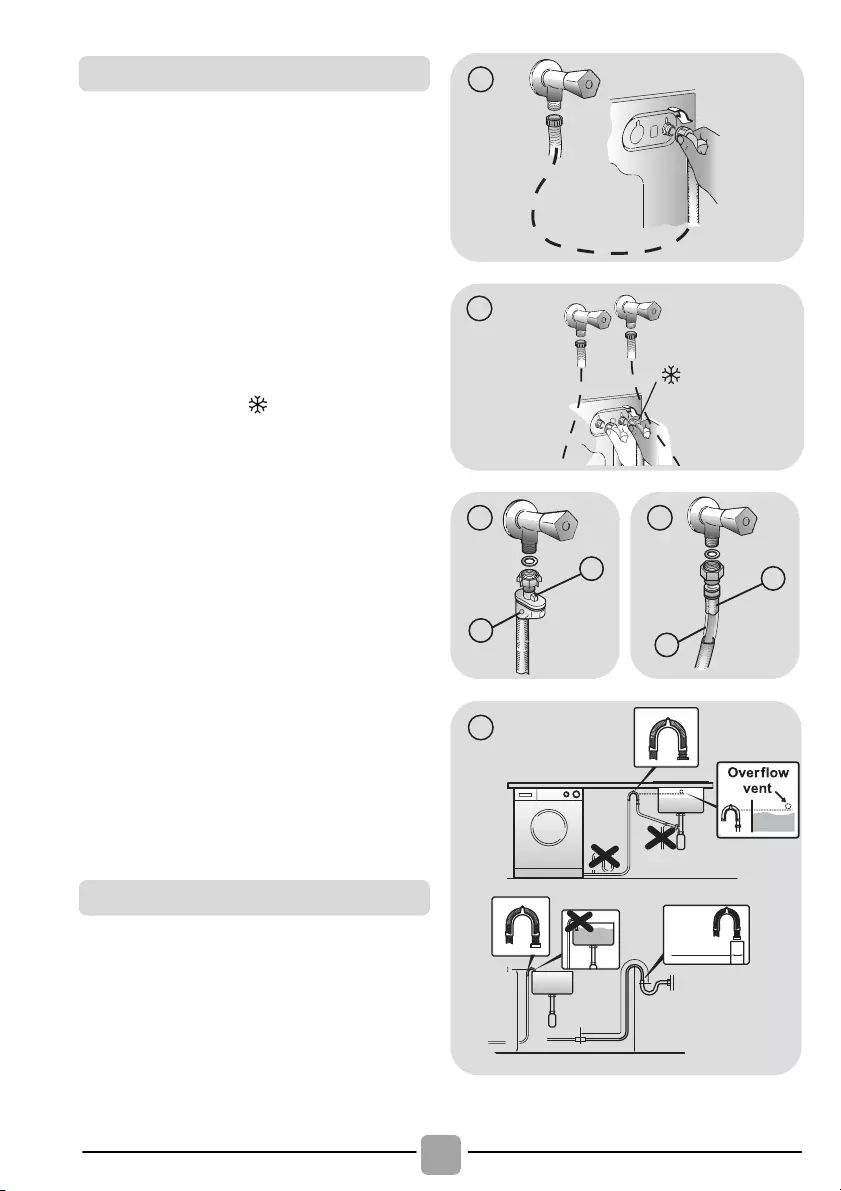
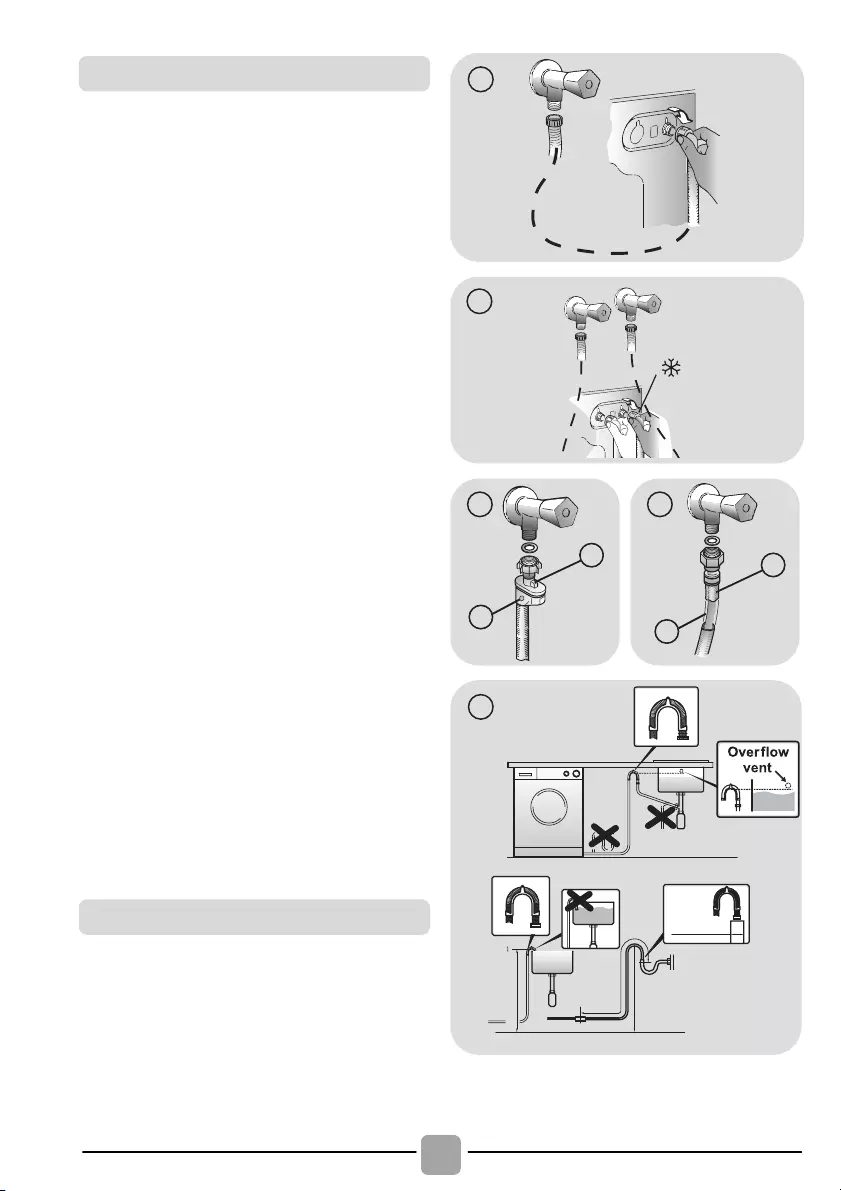
! Allacciare il tubo dell’acqua al rubinetto
(fig. 3) utilizzando solamente il tubo
fornito con l’apparecchio (i vecchi tubi non
devono essere riutilizzati).
! In alcuni modelli, potrebbero essere
presenti una o più delle seguenti
caratteristiche:
! HOT&COLD (fig. 4): predisposizione al
collegamento alla rete idrica con acqua
calda e fredda per un maggiore risparmio
energetico.
Collegare il tubo grigio al rubinetto
dell’acqua fredda e quello rosso al
rubinetto dell’acqua calda. La macchina può
essere comunque collegata anche solo
all’acqua fredda: in tal caso, l’inizio di alcuni
programmi sarà ritardato di alcuni minuti.
! AQUASTOP (fig. 5): dispositivo posizionato
sul tubo di carico che blocca l’afflusso
dell’acqua se il tubo si deteriora; in tal caso,
apparirà una tacca rossa nella finestrella “A”
e sarà necessario sostituire il tubo. Per
svitare la ghiera, premere il dispositivo di
antisvitamento “B”.
! AQUAPROTECT — TUBO DI CARICO
CON PROTEZIONE (fig. 6): in caso di
perdita d’acqua dal tubo primario interno
“A”, la guaina di contenimento trasparente
“B” conterrà l’acqua, permettendo di
terminare il lavaggio. Finito il ciclo,
sostituire il tubo di carico contattando il
Centro Assistenza Tecnica.
! Accostare la lavatrice al muro, facendo
attenzione che il tubo non abbia curve o
strozzature e allacciare il tubo di scarico a
bordo della vasca o, preferibilmente, ad
uno scarico fisso di altezza minima 50 cm
e di diametro superiore al tubo della
lavatrice (fig. 7).
min 50 cm
max 85 cm
+2,6 mt
max
max 100 cm
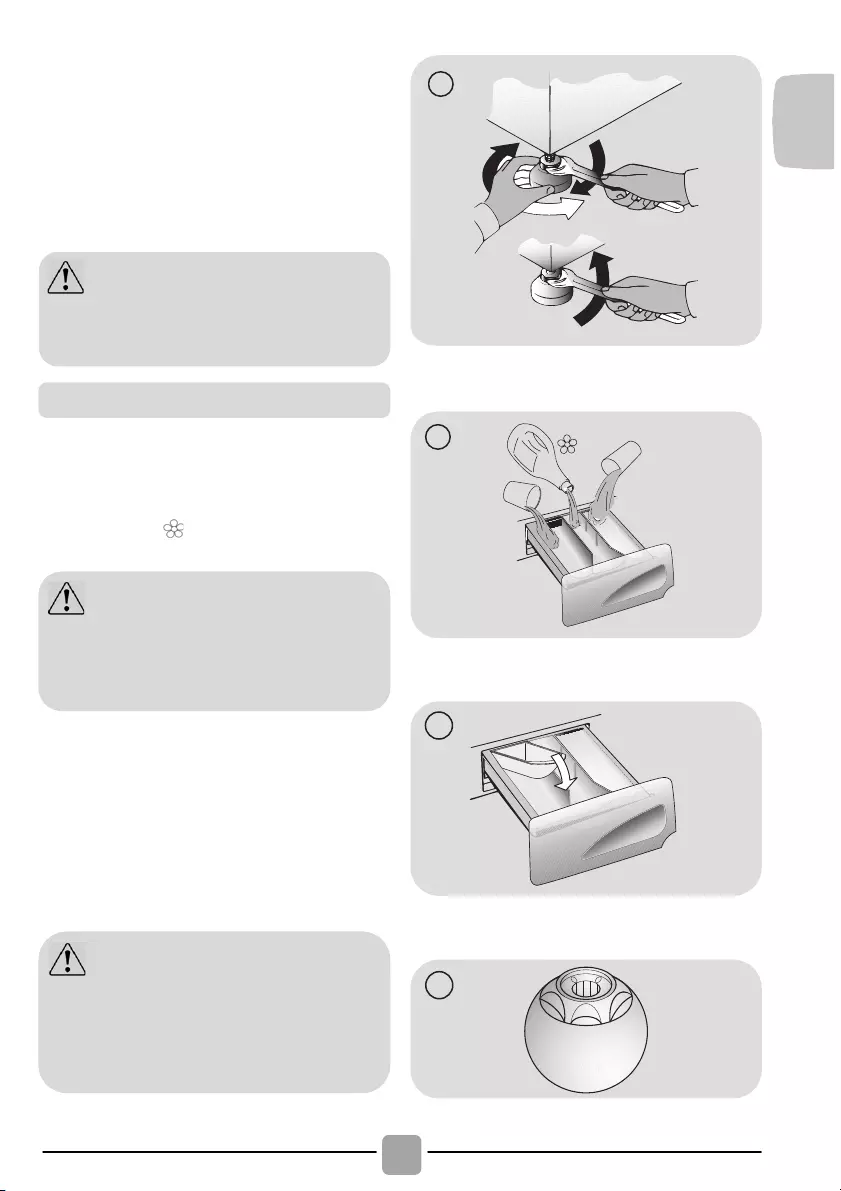
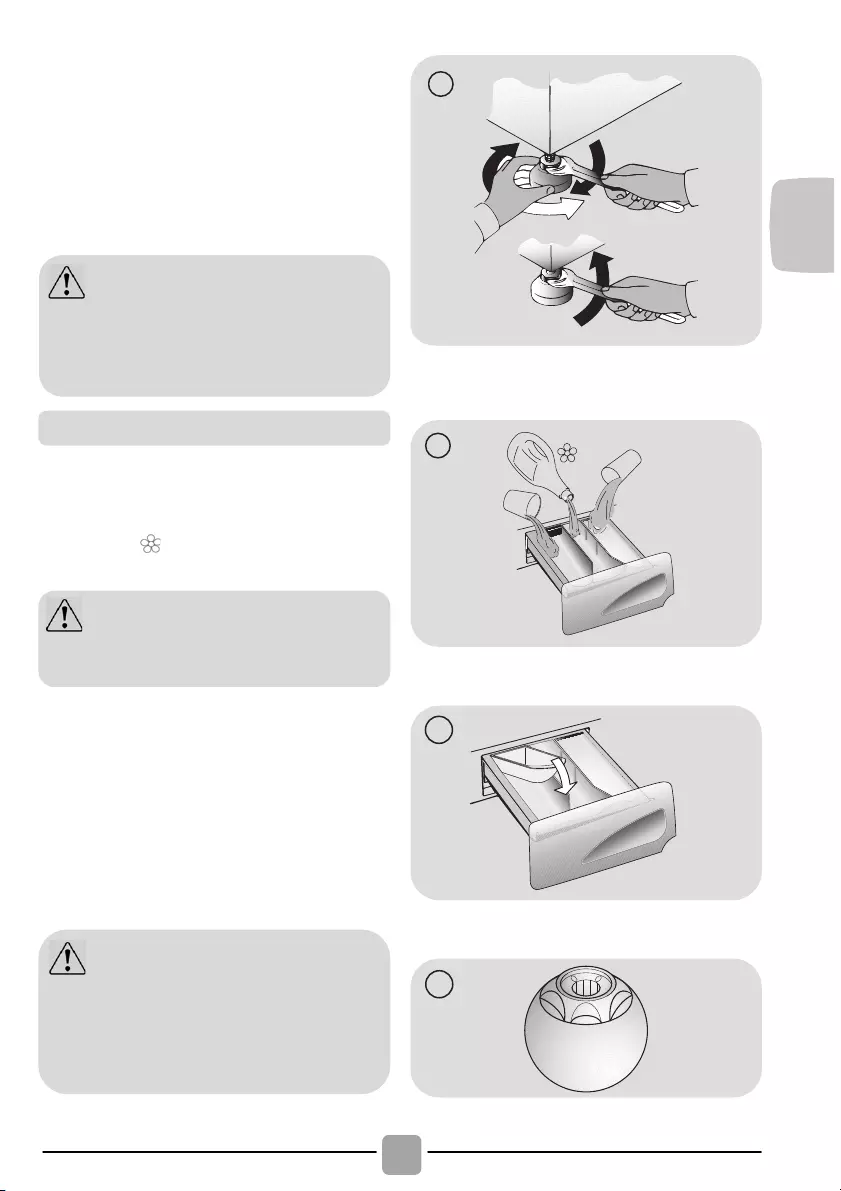
! Livellare la macchina agendo sui piedini
come in figura 8:
a.girare in senso orario il dado per
sbloccare la vite;
b.ruotare il piedino e farlo salire o
scendere finché non aderisce al suolo;
c.bloccare infine il piedino, riavvitando il dado,
fino a farlo aderire al fondo della lavatrice.
! Inserire la spina.
Il cassetto detersivo è suddiviso in 3
vaschette come mostrato in figura 9:
! vaschetta “1”: per il detersivo del
prelavaggio;
! vaschetta “ ”: per additivi speciali,
ammorbidenti, profumi inamidanti, ecc;
! vaschetta “2”: per il detersivo di lavaggio.
IN ALCUNI MODELLI è presente anche la
bacinella per il detersivo liquido (fig. 10).
Per utilizzarla, introdurla nella vaschetta
“2”. In questo modo, il detersivo liquido
andrà nel cesto solo nel momento
opportuno. Questa bacinella è utile anche
se si desidera candeggiare, scegliendo il
programma “Risciacqui”.
ATTENZIONE:
nel caso si renda necessario sostituire il
cavo di alimentazione, si consiglia di
chiamare il Centro Assistenza Tecnica.
ATTENZIONE:
mettere solo prodotti liquidi; la
lavatrice è predisposta al prelievo
automatico degli additivi in ogni ciclo
durante l’ultimo risciacquo.
ATTENZIONE:
alcuni detersivi sono di difficile
asportazione. In questo caso è
consigliabile l’uso di un apposito
contenitore da porre nel cestello
(esempio in figura 11).

3. CONSIGLI PRATICI
ATTENZIONE: durante la selezione del
bucato, assicurarsi:
— di avere eliminato dalla biancheria oggetti
metallici, come fermagli, spille, monete;
— di aver abbottonato federe, chiuso le
cerniere lampo, annodato cinghie sciolte e
lunghi nastri di vestaglie;
— di aver tolto dalle tendine anche i rulli di
scorrimento;
— di aver osservato attentamente le indicazioni
dei tessuti sulle etichette;
— di aver rimosso eventuali macchie persistenti
con un apposito detersivo.
! In caso si debbano lavare tappeti,
copriletto o altri indumenti pesanti, si
consiglia di evitare la centrifuga.
! In caso si debba lavare biancheria di
lana, assicurarsi che il capo sia idoneo
controllando che sia contrassegnato dal
simbolo “Pura Lana Vergine” e che sia
presente l’indicazione “Non infeltrisce”
oppure “Lavabile in lavatrice”.
Brevi suggerimenti per un utilizzo del
proprio elettrodomestico nel rispetto
dell’ambiente e con il massimo risparmio.
Caricare al massimo la propria
lavabiancheria
! Per eliminare eventuali sprechi di energia,
acqua o detersivo si raccomanda di utilizzare
la massima capacità di carico della propria
lavabiancheria. È possibile infatti risparmiare
fino al 50% di energia con un carico pieno
effettuato con un unico lavaggio rispetto a
due lavaggi a mezzo carico.
Quando serve veramente il prelavaggio?
! Solamente per carichi particolarmente
sporchi! Si risparmia dal 5 al 15% di energia
evitando di selezionare l’opzione prelavaggio
per biancheria normalmente sporca.
Quale temperatura di lavaggio selezionare?
! L’utilizzo di smacchiatori prima del
lavaggio in lavabiancheria riduce la
necessità di lavare a temperature
superiori a 60°C. È possibile risparmiare
fino al 50% utilizzando la temperatura di
lavaggio di 60°C anziché 90°C.
Di seguito, viene riportata una breve guida
con consigli e raccomandazioni sull’uso
del detersivo alle varie temperature. In
ogni caso, controllare sempre le indicazioni
riportate sul detersivo per il corretto uso e
dosaggio.
Consigli utili per gli utenti
Per lavaggi con programmi cotone a
temperature da 60°C in su di capi
bianchi resistenti molto sporchi, si
consiglia l’utilizzo di un detersivo in
polvere normale (heavy—duty) che
contiene agenti sbiancanti e che a
temperature medio—alte fornisce ottime
prestazioni.
Per lavaggi con programmi a
temperature tra 60°C e 40°C, la scelta
del detersivo deve essere fatta in base
al tessuto, ai colori e al grado di sporco.
In generale, per capi bianchi resistenti
con un grado di sporco elevato, si
raccomanda un detersivo in polvere
normale; per capi colorati e in assenza
di macchie difficili, si consiglia un
detersivo liquido o in polvere indicato per
la protezione dei colori.
Per lavaggi a basse temperature fino
a 40°C, è consigliabile l’utilizzo di
detersivi liquidi o polvere specifici per le
basse temperature.
Per lana e seta, utilizzare esclusivamente
prodotti specifici.

4. PULIZIA E
MANUTENZIONE
ORDINARIA
Per la pulizia del mobile esterno della
lavatrice, utilizzare un panno umido,
evitando abrasivi, alcol e/o diluenti. La
lavatrice ha bisogno di poche accortezze
per una pulizia ordinaria: pulizia vaschette e
pulizia filtro; di seguito vengono indicati
anche suggerimenti in caso di traslochi o
lunghi periodi di fermo macchina.
! E’ consigliabile pulire la vaschetta per
evitare l’accumulo di residui di detersivo e
additivi.
! Per farlo, estrarre con leggera forza il
cassettino, pulirlo con un getto d’acqua e
reinserirlo nella propria sede.
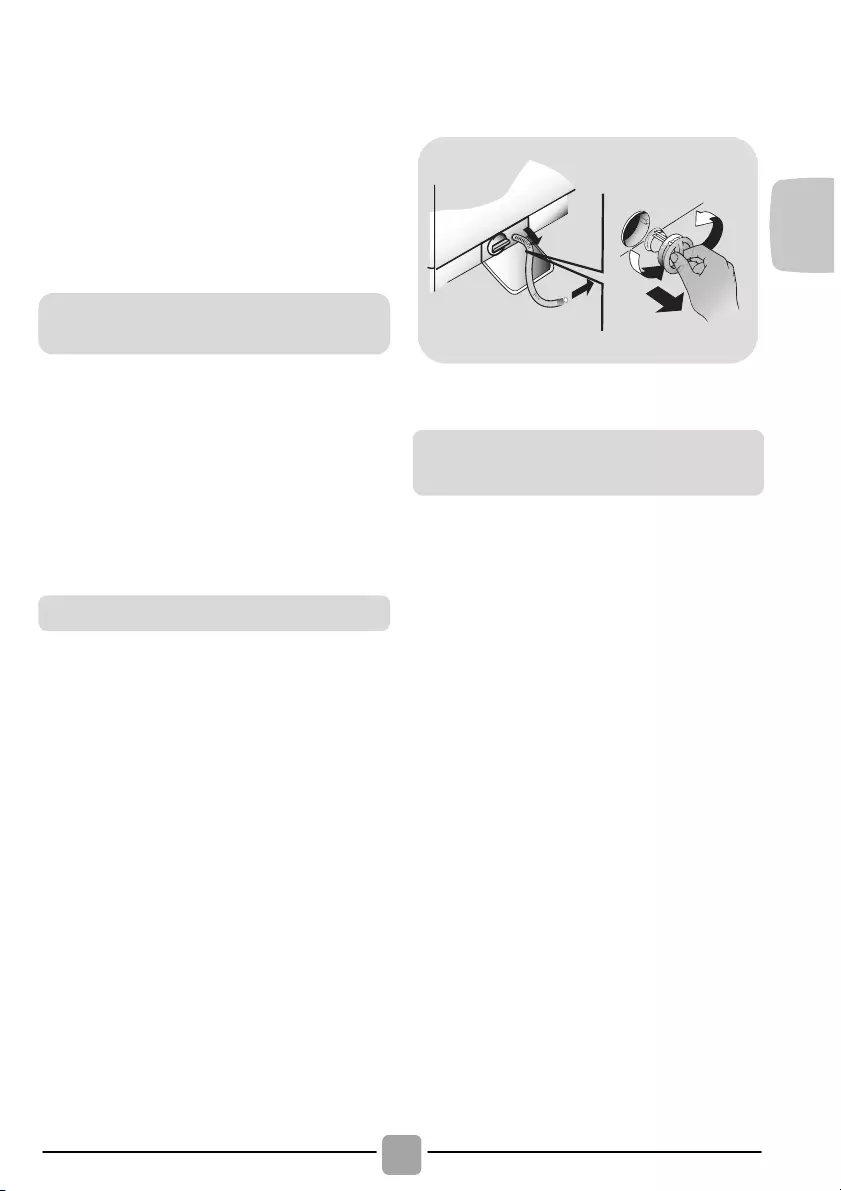
! La lavatrice è dotata di uno speciale filtro
in grado di trattenere i residui più grossi
che potrebbero bloccare lo scarico, come
ad esempio bottoni o monete.
! Solo su alcuni modelli: estragga il
tubicino, tolga il tappo e raccolga l’acqua
in un contenitore.
! Prima di svitare il filtro, è consigliabile
collocare sotto di esso un panno assorbente
onde evitare che l’acqua residua bagni il
pavimento.
! Ruotare il filtro in senso antiorario fino
all’arresto, in posizione verticale.
! Estrarre il filtro e pulirlo; successivamente
riposizionarlo e girarlo in senso orario.
! Ripetere le precedenti istruzioni all’inverso
per rimontare tutti gli elementi.
! Nel caso la lavatrice resti in un luogo non
riscaldato per molto tempo, è necessario
svuotare completamente i tubi da ogni
residuo d’acqua.
! Scollegare la lavatrice dalla presa di
corrente.
! Staccare il tubo dalla fascetta e portare il
tubo verso il basso, svuotando l’acqua
completamente in un catino.
! Fissare infine il tubo di scarico
all’apposita fascetta.
Suggerimenti in caso di
traslochi o periodi di fermo

5. GUIDA RAPIDA ALL’USO
Questa lavatrice è in grado di adattare
automaticamente il livello dell’acqua al tipo
e alla quantità della biancheria. Questo
sistema porta ad una diminuzione dei
consumi d’energia e ad una riduzione
sensibile dei tempi di lavaggio.
! Accendere la lavatrice e selezionare il
programma desiderato.
! Eventualmente modificare la temperatura
di lavaggio e premere i tasti “opzione”
desiderati.
! Premere il tasto AVVIO/PAUSA per avviare
il programma.
Se dovesse mancare la corrente durante il
funzionamento della lavatrice, una speciale
memoria conserverà l’impostazione effettuata
e, al ritorno della corrente, la macchina
ripartirà dal punto in cui si era fermata.
! Alla fine del programma, sul display viene
visualizzata la scritta “End” oppure in
alcuni modelli si illumineranno tutte le
spie delle fasi di lavaggio.
! Spegnere la lavatrice.
Per qualsiasi tipo di lavaggio consultare la
tabella dei programmi e seguire la
sequenza delle operazioni come indicato.
Pressione dell’impianto idraulico:
min 0,05 Mpa / max 0,8 Mpa
Giri di centrifuga:
vedere targhetta dati.
Potenza Assorbita/ Ampere fusibile /
Tensione:
vedere targhetta dati.
6. COMANDI E
PROGRAMMI
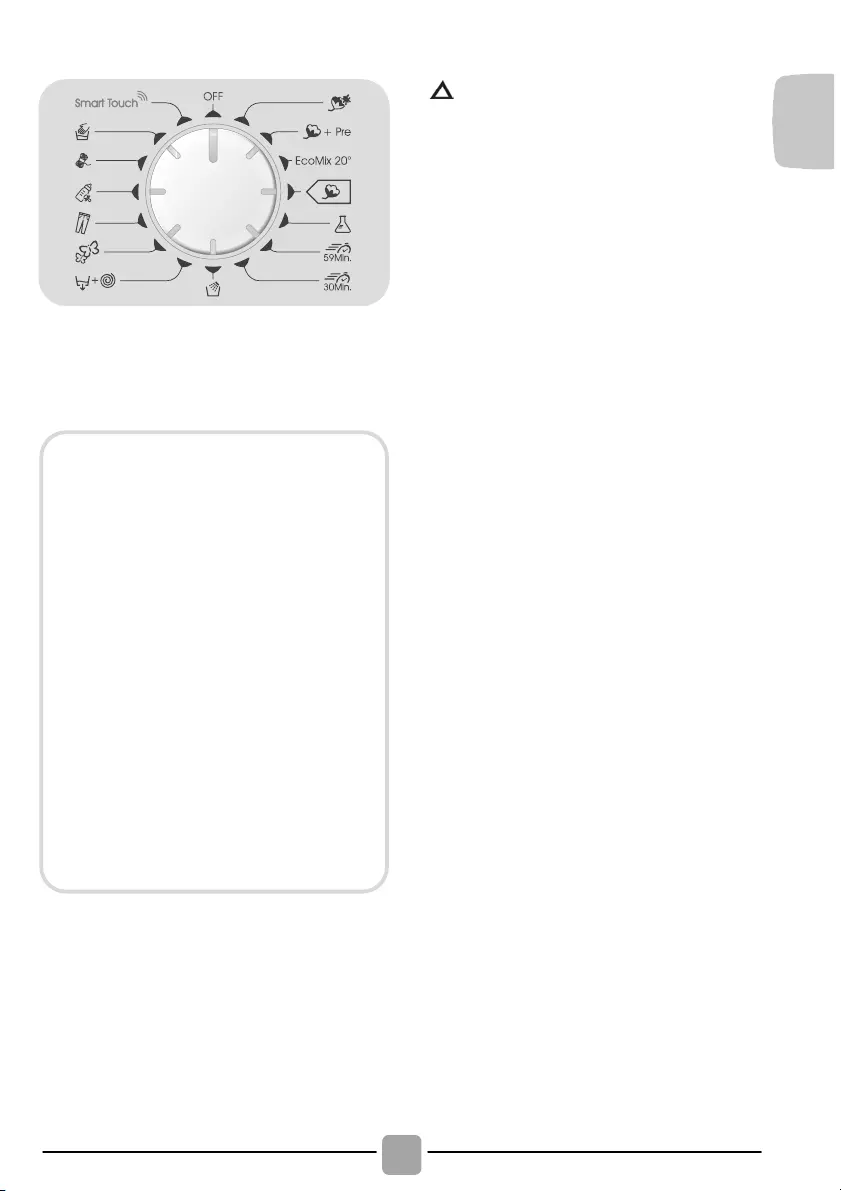
Manopola programmi con
posizione di OFF
Tasto SELEZIONE TEMPERATURA
Tasto SELEZIONE CENTRIFUGA
Spie TEMPO PARTENZA DIFFERITA/
FASI DI LAVAGGIO
Spie SELEZIONE TEMPERATURA
Spie SELEZIONE CENTRIFUGA
Attendere lo spegnimento della spia
oblò bloccato: circa 2 minuti dalla fine
del programma.

! Premere il tasto AVVIO/PAUSA per iniziare
il ciclo di lavaggio.
! Il ciclo di lavaggio avverrà con la manopola
programmi ferma sul programma
selezionato sino alla fine del lavaggio.
! A fine ciclo spegnere la lavabiancheria
portando la manopola programmi in
posizione OFF.
! Premere per avviare il ciclo impostato con
la manopola programmi (a seconda del
ciclo impostato si illuminerà una delle
spie delle fasi di lavaggio).
AGGIUNGERE O TOGLIERE CAPI DOPO
L’AVVIO DEL PROGRAMMA (PAUSA)
! Tenere premuto il tasto AVVIO/PAUSA
per circa 2 secondi (alcune spie
lampeggeranno, indicando che la macchina
è in pausa).
! Attendere DUE minuti affinché il
dispositivo di sicurezza sblocchi l’oblò e
ne permetta l’apertura.
! Dopo aver aggiunto o tolto i capi,
chiudere l’oblò e premere il tasto
AVVIO/PAUSA (il programma ripartirà
dal punto in cui era stato interrotto).
CANCELLAZIONE PROGRAMMA IMPOSTATO
! Per annullare il programma, portare il
selettore in posizione OFF.
! Questo tasto permette di programmare
l’avvio del ciclo di lavaggio con un ritardo
di 3, 6 o 9 ore.
! Per impostare la partenza ritardata
procedere nel seguente modo:
— Impostare il programma desiderato.
Uno speciale dispositivo di sicurezza
impedisce che l’oblò possa venire
aperto immediatamente dopo la fine
di un ciclo di lavaggio.
Dopo 2 minuti dalla fine del lavaggio
la spia si spegne per indicare che è
possibile aprire l’oblò.
Manopola programmi con posizione
di OFF
Quando si seleziona un programma,
si illumineranno le spie relative alla
temperatura e ai giri centrifuga
preimpostati per quel ciclo di lavaggio.
N.B.: Per spegnere la macchina ruotare
la manopola programmi sulla posizione
OFF.
La manopola programmi deve essere
sempre portata in posizione di OFF
alla fine di un lavaggio e prima di
selezionarne uno nuovo.
Chiudere l’oblò PRIMA di premere il
tasto AVVIO/PAUSA.
Dopo avere avviato la lavabiancheria
con il tasto AVVIO/PAUSA si dovrà
attendere alcuni secondi affinché la
macchina inizi il programma.
Controllare che il livello dell’acqua sia
al di sotto dell’oblò prima di aprirlo,
per evitare allagamenti.

— Attendere che le spie relative alla
temperatura e ai giri centrifuga preimpostati
per quel ciclo di lavaggio si accendano.
— Premere il pulsante (ad ogni pressione
si potrà impostare una partenza
ritardata rispettivamente di 3, 6 o 9 ore
e la spia corrispondente al tempo scelto
inizierà a lampeggiare).
! Confermare premendo il tasto AVVIO/PAUSA
(la spia corrispondente al tempo scelto
rimarrà accesa) per iniziare il conteggio,
alla fine del quale il programma inizierà
automaticamente.
! È possibile annullare la partenza ritardata,
portando la manopola programmi in
posizione OFF.
Se dovesse mancare la corrente durante
il funzionamento della lavabiancheria,
una speciale memoria conserverà
l’impostazione effettuata e, al ritorno
della corrente, la macchina ripartirà dal
punto in cui si era fermata.
! Questa opzione permette di aggiungere
un risciacquo alla fine del ciclo di lavaggio
ed è stata studiata appositamente per le
persone con pelle delicata e sensibile,
per le quali anche un minimo residuo di
detersivo può causare irritazioni o allergie.
! Si consiglia di utilizzare questa funzione
anche per i capi dei bambini e per tessuti
molto sporchi, per i quali è necessario
utilizzare più detersivo, oppure nel
lavaggio di capi di spugna le cui fibre
tendono maggiormente a trattenere il
detersivo.
! Questo tasto permette di cambiare la
temperatura dei cicli di lavaggio.
!
Per la salvaguardia dei tessuti, non è
possibile aumentare la temperatura oltre
la massima prevista per ogni programma.
! Se si vuole eseguire un programma di
lavaggio a freddo le spie devono essere
tutte spente.
! Premendo questo tasto, si può ridurre la
massima velocità di centrifuga possibile per
il programma selezionato, fino alla sua
completa esclusione.
! Se l’etichetta non riporta alcuna
indicazione è possibile centrifugare alla
massima velocità prevista dal programma.
! Per riattivare la centrifuga, è sufficiente
premere nuovamente il tasto, fino al
raggiungimento della velocità scelta.
! È possibile modificare la velocità della
centrifuga in qualsiasi momento, anche
senza portare la macchina in PAUSA.
I tasti opzione devono essere selezionati
prima di premere il tasto AVVIO/PAUSA.
Nel caso l’opzione non sia compatibile
con il programma scelto, la relativa
spia prima lampeggerà e poi si
spegnerà.
Tasto SELEZIONE TEMPERATURA
Tasto SELEZIONE CENTRIFUGA
Per la salvaguardia dei tessuti, non
è possibile aumentare la velocità
oltre la massima prevista per ogni
programma.
Un sovradosaggio di detersivo può
causare un’eccessiva formazione
di schiuma. Se la lavatrice rileva
un’eccessiva presenza di schiuma,
può escludere la centrifuga o
prolungare la durata del programma
e aumentare il consumo d’acqua.

! Premendo il tasto PARTENZA DIFFERITA
le spie indicheranno la selezione del tempo
scelto (3, 6 o 9 ore) e l’avanzamento del
conteggio, fino al suo termine.
! Durante lo svolgimento di un programma,
le spie si illumineranno sequenzialmente
per indicare la fase in corso:
! La spia indica la chiusura dell‘oblò.
! Dopo aver premuto il tasto AVVIO/PAUSA,
inizialmente la spia lampeggia per poi
diventare fissa sino alla fine del lavaggio.
! Uno speciale dispositivo di sicurezza
impedisce che l’oblò possa venire aperto
immediatamente dopo la fine di un ciclo
di lavaggio. Attendere 2 minuti che la
spia si spenga e quindi spegnere
la macchina portando la manopola
programmi in posizione di OFF.
Si accende quando il rispettivo tasto viene
premuto.
Nel caso in cui l’opzione non sia
compatibile con il programma scelto, la spia
prima lampeggerà e poi si spegnerà.
Indicano la temperatura di lavaggio del
programma selezionato che può essere
cambiata (dove previsto) tramite il relativo
tasto.
Se si vuole eseguire un programma di
lavaggio a freddo le spie devono essere
tutte spente.
Indicano la velocità di centrifuga del
programma selezionato che può essere
variata o annullata, tramite l’apposito tasto.
Il modello è dotato di un particolare
dispositivo elettronico che impedisce
la partenza della centrifuga con carichi
particolarmente sbilanciati. Questo serve
a ridurre le vibrazioni e a migliorare la
silenziosità, salvaguardando la durata
della lavabiancheria.
Spie TEMPO PARTENZA DIFFERITA /
FASI DI LAVAGGIO
Chiudere l’oblò PRIMA di premere il
tasto AVVIO/PAUSA.
Nel caso in cui l’oblò non venga chiuso
correttamente la spia continuerà a
lampeggiare per circa 7 secondi,
dopodiché il comando d’avvio si
cancellerà automaticamente. In tal
caso, chiudere correttamente l’oblò
e premere nuovamente il tasto
AVVIO/PAUSA.
Spie SELEZIONE TEMPERATURA
Spie SELEZIONE CENTRIFUGA

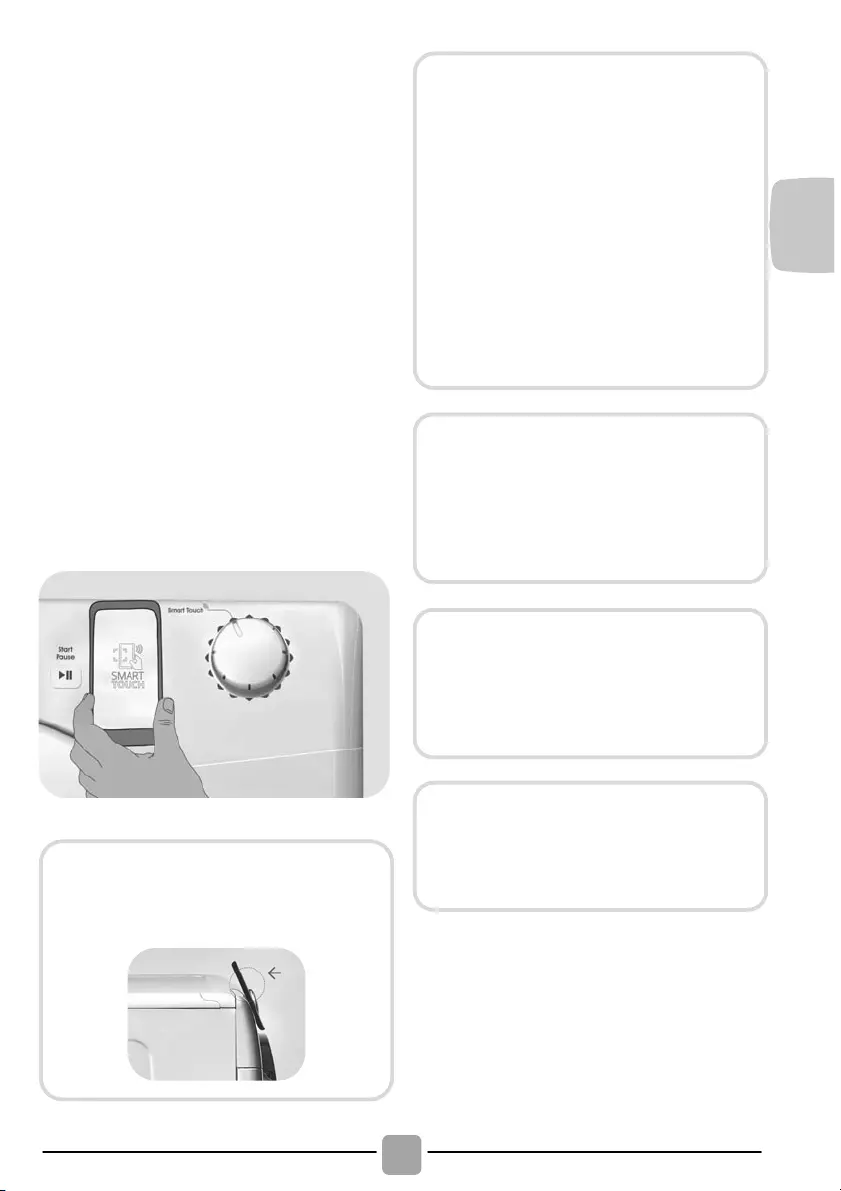
Questo apparecchio è equipaggiato di
tecnologia Smart Touch che consente di
interagire, tramite App, con gli smartphone
basati sul sistema operativo Android e
dotati della funzione NFC (Near Field
Communication).
! Scaricare l’App Candy simply—Fi sul
proprio smartphone.
FUNZIONI
Le principali funzioni attivabili mediante
l’App sono:
! Voice Assistant – Guida alla scelta del ciclo
ideale tramite inserimento di tre input vocali
(capi/tessuti, colore, grado di sporco).
! Cycles – Possibilità di scaricare e avviare
nuovi programmi di lavaggio.
! Smart Care – Cicli di Smart Check-up,
Auto—Clean e guida alla risoluzione dei
problemi.
! My Statistics – Statistiche di lavaggio e
suggerimenti per un utilizzo più efficiente
della macchina
COME USARE SMART TOUCH
PRIMA VOLTA – Registrazione macchina
su App
! Accedere al menu «Impostazioni» del
proprio smartphone Android e attivare la
funzione NFC all’interno di «Wireless e
Reti».
! Ruotare la manopola nella posizione
Smart Touch per abilitare il sensore sul
cruscotto.
! Aprire l’App, creare il profilo utente e
registrare l’elettrodomestico seguendo le
indicazioni sul display del telefono o la
procedura descritta nella «Quick Guide»
allegata alla macchina.
L’App Candy simply—Fi è disponibile
sia per dispositivi con sistema
operativo Android che per iOS, sia per
tablet che per smartphone; è tuttavia
possibile interagire con la macchina e
sfruttare le potenzialità offerte da
Smart Touch solo con smartphone
Android dotati di tecnologia NFC,
secondo il seguente schema:
Smartphone Android
con tecnologia NFC
Interazione con la
macchina + contenuti
Smartphone Android
senza tecnologia NFC
Per scoprire tutti i dettagli delle
funzioni Smart Touch, esplora i menu
accedendo in modalità DEMO o
andare su:
www.candysmarttouch.com
In relazione al modello dello
smartphone impiegato e alla versione
del sistema operativo Android, il
processo di attivazione della funzione
NFC potrebbe essere differente.
Consultare il relativo manuale per
maggiori dettagli.
Ulteriori informazioni, le F.A.Q. ed il
video per una facile registrazione del
prodotto sono disponibili su:
www.candysmarttouch.com/how—to
VOLTE SUCCESSIVE – Utilizzo abituale
! Ogni volta che si intende operare con l’App
sulla macchina, occorre prima abilitare la
modalità Smart Touch ruotando la
manopola nell’omonima posizione.
! Assicurarsi di avere sbloccato lo schermo
del telefono (acceso e senza codice) e
attivata la funzione NFC; in caso
contrario, seguire la procedura descritta
in precedenza.
! Se si vuole avviare un ciclo di lavaggio,
caricare la biancheria, il detersivo e
chiudere l’oblò.
! Selezionare la funzione desiderata
sull’App (es: avvio di un programma,
Smart Check-up, aggiornamento
statistiche, ecc…).
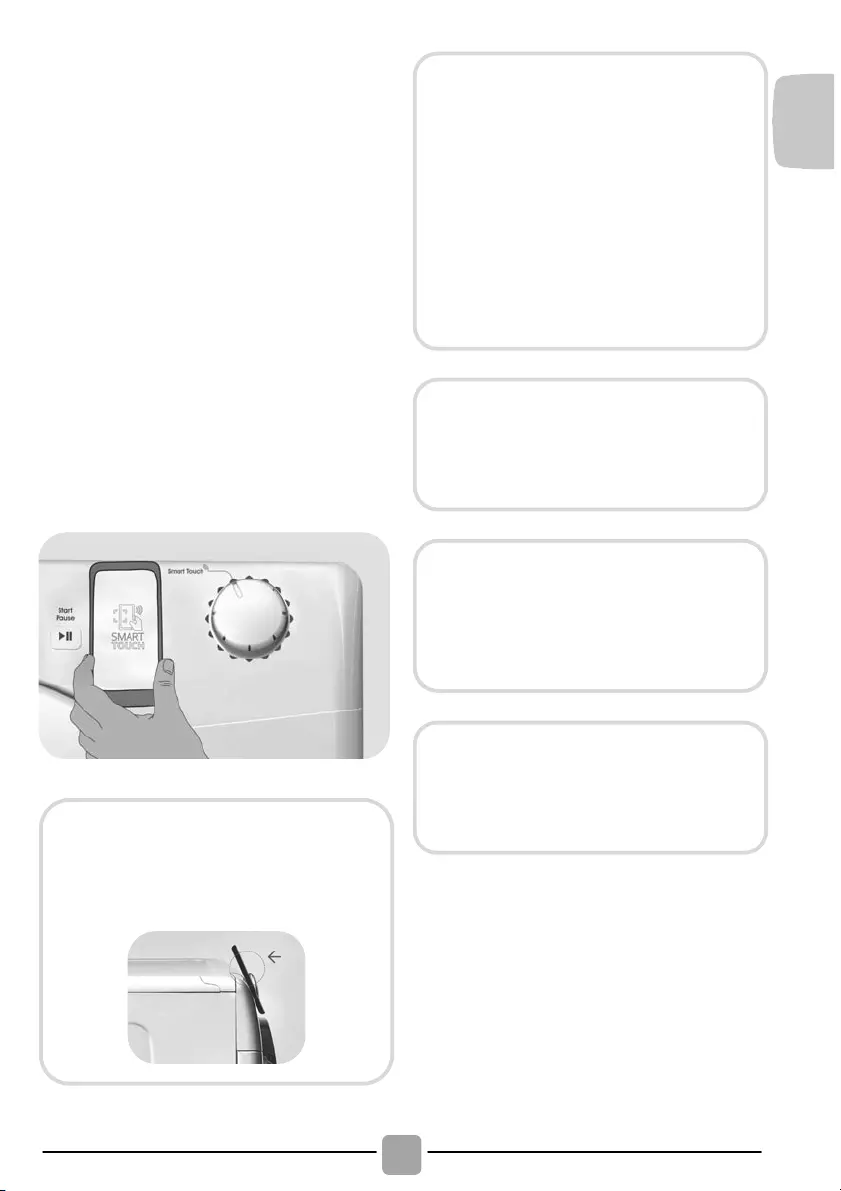
!
Seguire le istruzioni sul display del
telefono, APPOGGIANDOLO al logo
Smart Touch quando indicato dall’App.
NOTE:
Posizionare lo smartphone in modo
che l’antenna NFC sul retro dello
stesso sia in corrispondenza del logo
Smart Touch sul cruscotto della
macchina.
Se non si conosce la posizione
dell’antenna NFC, spostare leggermente
lo smartphone con movimento circolare
sul logo Smart Touch fino a quando
l’App segnala l’avvenuta connessione.
Affinchè il trasferimento di dati vada a
buon fine è fondamentale MANTENERE
IL
TELEFONO APPOGGIATO SUL
CRUSCOTTO DURANTE TUTTA LA
PROCEDURA (pochi secondi); una
schermata sul dispositivo informerà
sull’esito dell’operazione e quando sarà
possibile allontanare lo smartphone.
Custodie spesse o adesivi metallici sullo
smartphone potrebbero influenzare o
impedire la trasmissione dei dati fra
macchina e telefono. Se necessario,
rimuoverli.
La sostituzione di alcuni componenti
dello smartphone (es: cover posteriore,
batteria, ecc…) con altri non originali,
potrebbe comportare la rimozione
dell’antenna NFC, impedendo l’utilizzo
completo dell’App.
La gestione ed il controllo della macchina
tramite App avviene solo “per prossimità”:
non è quindi possibile eseguire
un’operazione da remoto (es: da
un’altra stanza, fuori casa).

(fare riferimento al cruscotto)
Posizione «riscrivibile» della manopola da selezionare per interagire con l’App per smartphone
e trasferire i cicli download (fare riferimento al paragrafo dedicato). In fabbrica viene caricato il
ciclo Auto—Clean, studiato per la sanificazione della macchina.
Note da considerare
* La massima capacità di carico di
biancheria asciutta differisce a seconda
del modello (fare riferimento al cruscotto).
(Solo per i modelli dotati di
bacinella per il detersivo liquido)
Quando solo alcuni capi presentano
macchie che richiedono un trattamento
con prodotti candeggianti liquidi, si può
procedere ad una smacchiatura
preliminare in lavatrice.
Introdurre nello scomparto «2» del
cassetto detersivo l’apposita vaschetta
in dotazione nella quale versare
il candeggiante ed impostare il
programma RISCIACQUI. Finito
questo trattamento, riportare la
manopola programmi in posizione
OFF, aggiungere ai capi candeggiati il
resto della biancheria e procedere al
bucato normale con il programma più
adatto.
Quando si seleziona un programma,
s’illuminerà la spia relativa alla
temperatura consigliata che può
essere cambiata (dove previsto)
tramite il relativo tasto, ma non può
essere aumentata oltre la massima
prevista.
** PROGRAMMI COTONE DI PROVA
SECONDO (EU) No 1015/2010 e No
1061/2010.
PROGRAMMA COTONE CON
TEMPERATURA DI 60°C
PROGRAMMA COTONE CON
TEMPERATURA DI 40°C
Questi programmi sono indicati per
lavare capi di cotone normalmente
sporchi e sono i più efficienti in termine
di consumo combinato di acqua e
energia per lavaggi di biancheria in
cotone.
Questi programmi sono stati sviluppati
per essere conformi con le temperature
di lavaggio delle etichette degli
indumenti e la temperatura effettiva
dell’acqua potrebbe differire leggermente
da quella dichiarata dal ciclo.

Per trattare i vari tipi di tessuto e le varie
gradazioni di sporco, la lavatrice è dotata di
programmi specifici, adatti ad ogni esigenza
di lavaggio (vedere tabella programmi).
Cotone Resistente
Realizzato per sviluppare il massimo grado di
lavaggio. La centrifuga finale alla massima
velocità assicura un’ottima strizzatura.
Cotone + Prelavaggio
Programma studiato per eliminare le macchie dai
capi bianchi resistenti in cotone. La fase di
prelavaggio assicura la rimozione dello sporco
più ostinato. Aggiungere nello scomparto «1»
una quantità di detersivo pari al 20% di quella
utilizzata per il lavaggio principale.
EcoMix 20°
Questo innovativo programma consente di
lavare insieme diversi tessuti quali cotone, misti e
sintetici alla temperatura di 20°C, con prestazioni
ottimali. Consente inoltre di trattare diversi colori
temporaneamente. Il consumo risulta essere
circa il 40% di un programma Cotone 40°C.
Cotone
Questo programma è indicato per lavare capi di
cotone normalmente sporchi ed è il più efficiente
in termini di consumo combinato di acqua e
energia per lavaggi di biancheria in cotone.
Sintetici
Il lavaggio ed il risciacquo sono ottimizzati nei
ritmi di rotazione del cesto e nei livelli di acqua.
La centrifuga ad azione delicata, assicura una
ridotta formazione di pieghe sui tessuti.
Quotidiano 59 Min.
Questo programma è stato studiato per
avere la massima qualità di lavaggio ma con il
grande vantaggio di una consistente riduzione
della durata del tempo di lavaggio.
Il ciclo di lavaggio è pensato per essere
utilizzato con un carico ridotto (vedi tabella
programmi).
Rapido 30 Min.
Questo programma esegue un completo
ciclo di lavaggio (lavaggio, risciacquo e
centrifuga). È particolarmente indicato per
capi di cotone e tessuti misti poco sporchi.
Con questo programma si raccomanda di
utilizzare solo il 20% della normale dose di
detersivo per evitare sprechi.
Risciacqui
Questo programma effettua 3 risciacqui della
biancheria con centrifuga intermedia
(eventualmente riducibile o annullabile tramite
l’apposito tasto). E’ utilizzabile per risciacquare
qualsiasi tipo di tessuto, ad esempio dopo un
lavaggio effettuato a mano.
Scarico + Centrifuga
Tramite questo programma la macchina
effettuerà direttamente lo scarico dell’acqua
e una centrifuga ad alta velocità. Qualora si
voglia effettuare solo lo scarico o ridurre
l’intensità della centrifuga, sarà sufficiente
agire sul tasto SELEZIONE CENTRIFUGA.
Delicati
Questo programma alterna momenti di lavoro a
momenti di pausa ed è particolarmente indicato
per il lavaggio di tessuti molto delicati. Il lavaggio
e i risciacqui sono eseguiti con alto livello di
acqua per assicurare le migliori prestazioni.
Jeans
Questo programma è stato studiato per avere
la massima qualità di lavaggio su tessuti
resistenti come i jeans: ideale per rimuovere lo
sporco senza intaccare l’elasticità delle fibre.
Baby
Questo programma permette di lavare i capi
del bambino, ottenendo un pulito perfetto e
igienizzando il bucato impostando una
temperatura di 60°C.
Per ottimizzare il risultato igienizzante si
consiglia l’utilizzo di un detersivo in polvere.
Lana
Questo programma effettua un ciclo di
lavaggio dedicato ai tessuti in «Lana
lavabile in lavatrice» o per i capi da lavare
esclusivamente a mano.
Lava a Mano
Programma per capi lavabili solo a mano, il
programma termina con 3 risciacqui e una
centrifuga delicata.

Smart Touch
Posizione «riscrivibile» della manopola da
selezionare ogni volta che si vuole trasferire
un comando dall’App alla macchina e per
scaricare e/o avviare un ciclo download (per
il dettaglio sulle funzioni attivabili, fare
riferimento al paragrafo dedicato e alle
istruzioni sull’App). In fabbrica la posizione
Smart Touch viene scritta con il ciclo
«Auto—Clean», studiato per l’igienizzazione del
cestello, rimuovere i cattivi odori e assicurare
lunga durata alla lavatrice. Il programma va
eseguito a macchina vuota, utilizzando solo
detersivo in polvere e avendo cura di lasciare
l’oblò aperto al termine per asciugare il cesto.
Raccomandato ogni 50 lavaggi.
7. RISOLUZIONE PROBLEMI E GARANZIA
Nel caso si pensi che la lavatrice non funzioni in modo corretto, consultare la breve guida
sotto riportata, con alcuni suggerimenti pratici per risolvere le anomalie più comuni.
SEGNALAZIONE ERRORI
E2 (con display)
2 lampeggìi delle spie
(senza display)
La macchina non carica acqua.
Verificare che il rubinetto dell’acqua sia aperto.
Appurare che il tubo di carico non sia piegato o schiacciato.
Tubo scarico non ad altezza corretta (vedere sezione istallazione).
Chiudere il rubinetto, svitare il tubo di carico dal retro della lavatrice e
verificare che il filtro «antisabbia» non sia intasato.
E3 (con display)
3 lampeggìi delle spie
(senza display)
La macchina non scarica l’acqua.
Verificare che il filtro non sia intasato.
Appurare che il tubo di scarico non sia piegato, schiacciato o
ostruito.
Verificare che l’impianto di scarico a muro non sia intasato, provando
a far scaricare la macchina nel lavandino.
E4 (con display)
4 lampeggìi delle spie
(senza display)
La macchina ha rilevato eccessiva schiuma e/o acqua.
Verificare di non aver usato dosi eccessive di detersivo oppure un
prodotto non adatto al lavaggio in lavatrice.
E7 (con display)
7 lampeggìi delle spie
(senza display)
Verificare la corretta chiusura dell’oblò. Assicurarsi che non vi siano
panni all’interno del cesto che possano ostacolarne la chiusura.
Se l’oblò è bloccato, staccare la spina ed attendere 2—3 minuti prima
di riprovare ad aprirlo.
Qualsiasi altro codice
d’errore
Spegnere la lavatrice, staccare la spina e attendere un minuto.
Accendere nuovamente la macchina e avviare un programma. Se
l’errore dovesse ripresentarsi, contattare un Centro Assistenza
Tecnica Autorizzato, comunicando l’errore visualizzato.
SOLO PER I MODELLI DOTATI DI TECNOLOGIA SMART TOUCH
Grazie al ciclo Smart Check—up all’interno dell’App Candy simply—Fi e con uno
smartphone Android dotato di tecnologia NFC, è possibile verificare in ogni
momento la corretta funzionalità della macchina. Maggiori dettagli sull’App.
In caso di errore sul display della macchina (segnalato tramite codice o
lampeggio delle spie), aprendo l’App e appoggiando lo smartphone Android
dotato di NFC al logo Smart Touch sul cruscotto, è possibile avviare la guida alla
risoluzione del problema.
! Modelli dotati di display: gli errori verranno visualizzati tramite un numero
preceduto da una «E» (esempio: Errore 2 = E2).
! Modelli senza display: gli errori verranno indicati tramite il lampeggìo di tutte le spie
per un numero di volte pari al codice dell’errore, seguiti da una pausa di 5 secondi
(esempio: Errore 2 = 2 lampeggìi, pausa di 5 secondi, 2 lampeggìi, ecc…).
Possibili cause e soluzioni pratiche
La lavatrice non
funziona / non parte
Verificare che la spina sia inserita in modo corretto.
Controllare che non manchi l’alimentazione elettrica.
Appurare che la presa di corrente funzioni, provandola con un altro
apparecchio come ad esempio una lampada.
Verificare la corretta chiusura dell’oblò.
Verificare di aver selezionato e avviato correttamente il programma
di lavaggio.
Assicurarsi che la macchina non sia stata messa erroneamente in
pausa.
Presenza di acqua sul
pavimento vicino alla
lavatrice
È possibile che sia dovuto ad una perdita dalla guarnizione posta tra
rubinetto e tubo di carico. Verificare il corretto serraggio del tubo ed
eventualmente sostituire la guarnizione.
Assicurarsi che il filtro sia chiuso correttamente.
La lavatrice non
centrifuga
In alcuni condizioni di disposizione non ottimale della biancheria nel
cesto, la lavatrice potrebbe:
• Aumentare il tempo d’esecuzione della centrifuga nel tentativo di
ridistribuire in maniera omogenea il carico.
• Abbassare la velocità di centrifuga per ridurre le vibrazioni e
migliorare la silenziosità.
• Escludere la centrifuga per salvaguardare la durata della
lavabiancheria.
Assicurarsi che il carico sia distribuito in modo uniforme; in caso
contrario, riposizionarlo e riavviare la macchina.
Potrebbe essere dovuto al fatto che l’acqua non sia ancora stata
scaricata completamente: attendere alcuni minuti. Se il problema
persiste, vedere descrizione Errore 3.
In alcuni modelli, è presente la funzione «esclusione centrifuga»:
verificare che non sia stata attivata.
Verificare che non siano state selezionate opzioni che modifichino la
centrifuga.
Un eccessivo utilizzo di detersivo può impedire l’esecuzione della
centrifuga: ridurre il quantitativo per i successivi lavaggi.
Si sentono forti
vibrazioni / rumore
durante la centrifuga
La lavatrice potrebbe non essere completamente in piano: in caso,
regolare i piedini come indicato nell’apposita sezione.
Verificare di aver disimballato correttamente la macchina
rimuovendo tutte le viti, i gommini e i distanziali presenti sul retro
della stessa.
Assicurarsi che non vi siano corpi estranei nel cesto (monete,
cerniere, bottoni, ecc…).
La garanzia convenzionale copre difetti elettrici e/o meccanici del prodotto
attribuibili ad un’azione o omissione del produttore.
Se un difetto riscontrato è imputabile a fattori esterni, uso scorretto, errata
installazione o mancato rispetto di quanto riportato nelle istruzioni d’uso, i costi
per l’eventuale riparazione saranno a carico del cliente.

L’utilizzo di detersivi ecologici senza fosfati
può produrre i seguenti effetti:
— acqua di scarico dei risciacqui più
torbida: è un effetto legato alla presenza
di zeoliti in sospensione che non ha effetti
negativi sull’efficacia del risciacquo.
— presenza di polvere bianca (zeoliti) sul
bucato al termine del lavaggio: è un
effetto normale, la polvere non si ingloba
nei tessuti e non ne altererà il loro colore.
Per rimuoverla, effettuare un ciclo di
risciacqui. Provare ad utilizzare meno
detersivo per i futuri lavaggi.
— presenza di schiuma nell’acqua
dell’ultimo risciacquo: non è
necessariamente indice di un cattivo
risciacquo. Provare ad utilizzare meno
detersivo per i futuri lavaggi.
— vistosa formazione di schiuma: è
spesso dovuta ai tensioattivi anionici
presenti nella formulazione dei detersivi
che difficilmente sono allontanabili dalla
biancheria stessa.
In questi casi, non è necessario eseguire
più cicli di risciacquo per eliminare questi
effetti: non si otterrà alcun beneficio.
Se l’inconveniente persiste o se si pensi che
ci sia un malfunzionamento, contattare
immediatamente un nostro Centro Assistenza
Tecnica Autorizzato.
Si consiglia di utilizzare sempre ricambi
originali, disponibili presso i nostri Centri
Assistenza Tecnica Autorizzati.
La ditta costruttrice declina ogni
responsabilità per eventuali errori di stampa
contenuti nel libretto presente in questo
prodotto. Si riserva inoltre il diritto di
apportare le modifiche che si renderanno
utili ai proprio prodotti senza compromettere
le caratteristiche essenziali.
Garanzia
Il prodotto è garantito alle condizioni e nei
termini riportati sul certificato inserito nel
prodotto. Il certificato di garanzia dovrà
essere conservato, debitamente compilato,
per essere mostrato ad un nostro Centro
Assistenza Tecnica Autorizzato, in caso di
necessità.


Wir freuen uns, dass Sie sich für ein Gerät
aus unserem Hause entschieden haben –
es soll die tägliche Arbeit im Haushalt und
damit Ihren Alltag erleichtern. Wir
wünschen Ihnen allzeit viel Freude mit Ihrer
Candy Waschmaschine.
Sie können Ihr Gerät unter
www.registercandy.com kostenpflichtig
registrieren, um auch nach Ablauf der
Garantie einen erweiterten Schutz sowie
umfangreichen und schnellen Service zu
genießen.
Bitte nehmen Sie sich vor der
Installation und vor dem ersten Gebrauch
unbedingt ausreichend Zeit, um die vorliegende
Gebrauchsanleitung aufmerksam zu lesen und
sich in Ruhe mit der Bedienung des Gerätes
vertraut zu machen. Dadurch schützen Sie
sich und verhindern Schäden an der
Waschmaschine. Die Anleitung enthält wichtige
Hinweise — bitte daher für evtl. Rückfragen
unbedingt aufbewahren bzw. bei der
Weitergabe des Gerätes an Nachbesitzer
mitgeben.
Bitte überprüfen Sie weiterhin nach dem
Auspacken des Gerätes, ob das komplette
Zubehör wie z.B. die passende
Gebrauchsanleitung, die Garantiebescheinigung,
das Energielabel, der Einsatz für
Flüssigwaschmittel (nur einige Modelle) und der
Bogen für die ordnungsgemäße Anbringung des
Ablaufschlauchs mitgeliefert wurden.
Jedes unserer Geräte verfügt über eine 16—
stellige Matrikelnummer, die sich auf dem
Typenschild im Innenbereich des Bullauges
befindet. Bitte notieren Sie sich diese
unbedingt, damit Ihnen der Candy
Kundendienst bei Fragen oder im Servicefall
schneller und gezielter helfen kann.
Dieses Gerät ist entsprechend der
europäischen Richtlinie 2012/19/EU
als elektrisches / elektronisches
Altgerät (WEEE) gekennzeichnet.
Elektrische und elektronische Altgeräte enthalten
vielfach noch wertvolle Materialien. Sie enthalten aber
auch schädliche Stoffe, die für ihre Funktion und
Sicherheit notwendig waren. Im Restmüll oder bei
falscher Behandlung können diese der menschlichen
Gesundheit und der Umwelt schaden. Es ist daher sehr
wichtig, dass elektrische und elektronische Altgeräte
(WEEE) einer speziellen Verwertung zugeführt werden,
damit die schädlichen Stoffe ordnungsgemäß entfernt
und entsorgt werden bzw. wertvolle Rohstoffe der
Wiederverwertung zugeführt werden können.
Sie können mit der Beachtung der folgenden simplen
Hinweise einen wichtigen Beitrag dazu leisten, dass
elektrische und elektronische Altgeräte (WEEE) der
menschlichen Gesundheit und der Umwelt nicht schaden:
! Elektrische— und elektronische Altgeräte
(WEEE) sollten keinesfalls wie Rest— oder
Haushaltsmüll behandelt werden.
! Nutzen Sie stattdessen die an Ihrem Wohnort
eingerichteten kommunalen oder gewerblichen
Sammelstellen zur Rückgabe und Verwertung
elektrischer und elektronischer Altgeräte
(WEEE). Informieren Sie sich, ob ggf. in Ihrem
Land bzw. Ihrer Region für große/sperrige
elektrische und elektronische Altgeräte (WEEE)
eine Abholung angeboten wird. Sorgen Sie in
jedem Falle dafür, dass Ihr Altgerät bis zum
Abtransport kindersicher aufbewahrt wird.
In einigen Ländern sind Händler unterbestimmten
Voraussetzungen beim Geräteneukauf auch zur
Rücknahme des Altgerätes verpflichtet, wenn das
Altgerät dem neuen Fabrikat in der Funktion entspricht.
1. GENERELLE SICHERHEITSHINWEISE
2. INSTALLATION
3. PRAKTISCHE TIPPS
4. WARTUNG UND REINIGUNG
5. KURZANLEITUNG
6. STEUERUNG UND PROGRAMME
7. PROBLEMLÖSUNGEN UND GARANTIE

1. GENERELLE
SICHERHEITSHINWEISE
! Dieses Gerät ist ausschließlich
für den Haushaltsgebrauch konzipiert
bzw. für den haushaltsnahen
Gebrauch, wie z.B:
— Teeküchen für das Personal von
Büros, Geschäften oder ähnlichen
Arbeitsbereichen;
— Ferienhäuser;
— Gäste von Hotels, Motels und
anderen Wohneinrichtungen;
— Gäste von Apartments/
Ferienwohnungen, Bed and
Breakfast Einrichtungen
Eine andere Nutzung als die
normale Haushaltsnutzung, wie z.B.
gewerbliche oder professionelle
Nutzung durch Fachpersonal, ist
auch im Falle der oben erwähnten
Einrichtungen ausgeschlossen.
Sollte das Gerät entgegen diesen
Vorschriften betrieben werden,
kann dies die Lebensdauer des
Gerätes beeinträchtigen und den
Garantieanspruch gegenüber dem
Hersteller verwirken.
Eventuelle Schäden am Gerät oder
andere Schäden oder Verluste, die
durch eine nicht haushaltsnahe
Nutzung hervorgerufen werden
sollten (selbst wenn sie in einem
Haushalt erfolgen), werden, so weit
vom Gesetz ermöglicht, vom
Hersteller nicht anerkannt.
!
Kinder unter 8 Jahren sowie
Personen, die aufgrund ihrer
physischen, sensorischen oder
geistigen Fähigkeiten oder ihrer
Unerfahrenheit oder Unkenntnis
nicht in der Lage sind, die
Waschmaschine sicher zu bedienen,
dürfen die Waschmaschine nicht
ohne Aufsicht oder Anweisung durch
eine verantwortliche Person benutzen,
sich in der Nähe aufhalten oder das
Gerät saubermachen. Kinder sollten
nicht mit dem Gerät
spielen. Reinigung
und Benutzerwartung
sollten nicht
von Kindern ohne Einführung,
ausgeführt werden.
! Kinder sollten über das Gerät
aufgeklärt werden, damit Sie
nicht mit dem gerät spielen.
!
Kinder unter 3 Jahren dürfen
sich nicht unbeaufsichtigt in der
Nähe des Gerätes aufhalten
oder spielen.
! Wenn das Netzkabel beschädigt
ist, muss das Gerät zum Hersteller
gebracht werden und von
zuständigen Personen repariert
werden, um eventuelle Gefahren
zu vermeiden.
!
Verwenden Sie nur die mit dem
Gerät zusammen gelieferten
Schläuche.
!
Für einen ordnungsgemäßen Betrieb
muss der Wasserleitungsdruck
konstant zwischen min. 0,05 MPa
und max. 0,8 MPa liegen.
!
Vergewissern Sie sich, dass
ein Teppich nicht die Maschine

und Ventilatorenöffnungen,
behindert.
! Das Gerät ist abgeschaltet, wenn
sich der Referenzpunkt auf
dem Bedienknauf in der Position
AUS/OFF befindet. In jeder
anderen Stellung ist das Gerät
eingeschaltet und betriebsbereit
(nur für Modelle mit Bedienknebel).
! Nach der Installation, sollte das
Gerät so positioniert sein, dass
der Stecker frei zugänglich ist.
!
Die maximale Beladungskapazität
(trockene Kleidung lt. Normtest)
hängt von dem jeweiligen
Gerätemodell ab (s. Bedienblende).
!
Für die technischen Daten des
Produktes schauen Sie bitte
auf der Internetseite des
Herstellers nach.
!
Bevor Sie die Waschmaschine
reinigen, ziehen Sie das Gerät vor
und drehen Sie die Wasserzufuhr ab.
! Überprüfen Sie, ob der Strom
abgeschaltet ist oder holen Sie
sich professionelle Hilfe dazu.
!
Gebrauchen Sie keine Wandler,
Mehrfachsteckdosen oder erweiterte
Kabel.
!
Stellen Sie sicher, dass sich
kein Wasser mehr in der
Trommel befindet, wenn Sie
das Bullauge öffnen.
! Bringen Sie keine Schnur an,
um die Maschine vorzuziehen.
! Setzen Sie das Gerät keinem
Regen, direktem Sonnenlicht oder
anderen Wetterelementen aus.
! Heben Sie die Maschine nicht
an den Drehknöpfen oder dem
Bullauge an; lassen Sie das
Bullauge nicht im Wagen. Wir
empfehlen, die Maschine, immer
zu zweit anzuheben.
! Im Falle einer Störung schalten
Sie die Maschine aus, schließen
Sie die Wasserzufuhr und ändern
Sie nichts mehr an dem Gerät.
Kontaktieren Sie umgehend den
Kundendienst und verwenden Sie
nur Originale als Ersatzteile.
Mit der Anbringung des —
Zeichens am Gerät zeigen wir
an, dass wir sämtliche für
dieses Produkt geltenden
und notwendigen
europäischen
Sicherheits—, Gesundheits—
und
Umweltstandards einhalten
und hierfür haftbar sind.
WARNUNG:
Wasser kann eine hohe
Temperatur während des
Waschvorgangs annehmen.
!
Schneiden Sie die Transportbefestigungen
der beiden Schläuche und des
Netzkabels vorsichtig durch und
achten darauf, dass diese dabei
nicht versehentlich beschädigt werden.
! Lösen Sie die 2 bzw. 4 Schrauben
(A) auf der Geräterückseite und
entfernen die 2 bzw. 4 Distanzstücke
(B) wie in Abbildung 1 gezeigt.
! Schließen Sie 2 bzw. 4 Öffnungen
anschließend mit den beigefügten
Abdeckungen.
! Wenn es sich bei Ihrem Gerät
um ein Einbaumodell handelt,
bitte nach dem Entfernen der
Schlauchtransportbefestigunge
n die 3 bzw. Schrauben (A) lösen
und die 3 bzw. 4 Distanzstücke
(B) entfernen.
! Je nach Modell fallen eine oder
mehrere der Distanzstücke in das
Gerät. Das Gerät dann vorsichtig
nach vorne neigen und die
Distanzstücke entfernen. Die
Öffnungen anschließend mit den
beigefügten Abdeckungen schließen.
! Bringen Sie die Kunststoffabdeckung
wie in Abb. 2 beschrieben unter dem
Gerät an (je nach Modell wählen Sie
die Variante A, B oder C).
WARNUNG:
Bewahren Sie die Verpackung
abseits von Kindern auf.
! Bitte das Gerät ausschließlich mit dem
mitgelieferten Zulaufschlauch (keinesfalls
alten Schlauch benutzen) mit dem
Wasseranschluß verbinden (s. Abbildung 3).
! Einige Modelle enthalten ein oder
mehrere der folgenden Eigenschaften:
HEIß&KALT (Abbildung 4):
Wasserverbindungseinstellungen mit heiß
und kalt für höhere Energieeinsparungen.
Verbinden Sie den grauen Schlauch mit
dem Wasserhahn und den roten mit dem
Heißwasserhahn. Die Waschmaschine
kann auch nur mit dem Kaltwasserhahn
verbunden werden: In diesem Fall brauche
einige Programme etwas länger, um zu
starten.
WASSERSTOP (Abbildung 5): Im Falle
eines defekten Schlauches stoppt die
Wasserzufuhr. In diesem Fall erscheint auf
dem Fenster „A“ ein rotes Feld und der
Schlauch muss entfernt werden. Um die
Schraubenmutter zu lösen, drücken Sie den
Entsicherungsknopf „B“.
WASSERSCHUTZ (Abbildung 6): Sollte
Wasser aus dem Hauptschlauch „A“
austreten, schützt die Hülle „B“ vor
kompletten Wasseraustritt.
! Am Ende dieses Vorganges kontaktieren
Sie den Kundenservice, damit der
Schlauch ausgewechselt wird.
! Seien Sie mit dem Abstand zwischen
Waschmaschine und Wand vorsichtig, da
der Schlauch eingequetscht werden
könnte. Es sollte ein Mindestabstand von
50 cm eingehalten werden (Abbildung 7).
min 50 cm
max 85 cm
+2,6 mt
max
max 100 cm
! Justieren Sie die Höhe der Standfüße wie
in Abbildung 8 beschrieben:
a. Drehen Sie die Schraubenmuttern im
Uhrzeigersinn, um diese zu lösen.
b. Drehen Sie den Standfuß, um die
Höhe einzustellen.
c. Sichern Sie den Standfuß durch
Drehen der Schraubmuttern gegen den
Uhrzeigersinn bis zum festen Sitz.
Die Waschmittelschublade ist in drei Fächer
aufgeteilt (Abbildung 9):
! Fach «1»: ist für das in der Vorwäsche
benötige Waschmittel vorgesehen;
! Fach « «: ist für spezielle
Wäschezusatzstoffe wie Weichspüler etc.
! Fach «2»: ist für das in der Hauptwäsche
benötige Waschmittel vorgesehen.
Je nach Modell ist im Lieferumfang des Gerätes
ein spezieller Einsatz für Flüssigwaschmittel
enthalten (Abbildung 10), der die Einspülung des
Waschmittels in die Trommel richtig reguliert. Bei
Einsatz von flüssigen Waschmitteln den Einsatz in
Fach «2« einlegen. In Kombination mit dem
Programm «Spülen« kann dieser Einsatz auch für
den Bleichvorgang genutzt werden (s. Beschreibung).
WARNUNG:
Bitte versuchen Sie keinesfalls
den Wasserablaufschlauch selber zu
wechseln, sondern setzen sich hierfür
mit dem Kundendienst in Verbindung.
WARNUNG:
Benutzen Sie im mittleren Fach
ausschließlich Flüssigprodukte!
WARNUNG:
Einige flüssige Waschmittel verteilen
sich nur schwer oder langsam in der
Waschladung . Bitte nutzen Sie ggf. Die
vom Waschmittelhersteller zur Verfügung
gestellten Dosiervorrichtungen (Abbildung 11).

3. PRAKTISCHE TIPPS
WARNUNG: Beim Sortieren der Wäsche,
beachten Sie folgende Punkte:
— Wurden metallische Objekte aus der
Wäsche entfernt;
— Reißverschlüsse geschlossen;
— Kissen auf links gezogen;
— Clips von Vorhängen entfernt;
— Waschanweisungen auf Schildchen in der
Kleidung gelesen.
! Wir empfehlen beim Waschen von
Teppichen/Läufern, Oberbetten und
anderen schweren Textilien den
Schleudervorgang gänzlich abzustellen,
um mögliche Schäden am Gerät zu
vermeiden.
! Beim Waschen von Wolle unbedingt vorher
prüfen, ob diese waschmaschinengeeignet
ist (s. Pflegesymbol in der Wäsche).
Einen umweltfreundlichen und ökonomischen
Gebrauch Ihres Gerätes schaffen.
Maximieren Sie die Füllmenge
! Erzielen Sie den besten Energie—, Wasser—
und Waschmittelverbrauch, in dem sie Ihre
Waschmaschine immer voll füllen. Sichern
Sie 50 % Energie beim Waschen einer
vollen Ladung im Gegensatz zu zwei halben
Ladungen.
Wann ist eine Vorwäsche wirklich notwendig?
! In der Regel nur für stark verschmutzte
Wäsche!
Wenn Sie normal oder wenig
verschmutzte Wäsche waschen, sparen
Sie zwischen 5% und 15% Strom, wenn
Sie keine Vorwäsche wählen.
Ist heißes Waschen erforderlich?
! Das Vorbehandeln von Flecken kann ein
heißes Waschen ersetzen und man kann
bis zu 50% Energie bei einem 60 Grad
Waschgang sparen.
Nachfolgend ein kurzer Ratgeber mit
Tipps
und Empfehlungen für den
Waschmittelgebrauch in den verschiedenen
Programmen/Temperatureinstellungen.
Beachten Sie jedoch unbedingt die Angaben des
Waschmittelherstellers zur Dosierung und
korrekten Anwendung.
Hilfreiche Empfehlungen für den
Nutzer
Beim Waschen von weißen Sachen,
empfehlen wir das 60 Grad
Baumwollprogramm und ein normales
Waschpulver.
Für Waschvorgänge zwischen 40 und
60 Grad muss ein für die Verschmutzung
der Wäsche passendes Waschmittel
ausgewählt werden. Normale
Waschpulver können für weiße oder
leichte Farben verwendet werden,
während flüssige Waschmittel für
Farbschutz geeignet sind.
Für Waschvorgänge unter 40 Grad
empfehlen wir den Gebrauch von
flüssigen Waschmitteln, die für niedrige
Temperaturen geeignet sind.
Zum Waschen von Wolle oder Seide
empfehlen wir nur den Gebrauch von
Spezial— und Feinwaschmitteln.
4. WARTUNG UND
REINIGUNG
Um die Waschmaschine von außen zu
reinigen, nutzen Sie ein feuchtes Tuch mit
leichten Reinigungsmitteln. Das Gerät
erfordert keine besondere Reinigung
von außen: reinigen Sie lediglich die
Schubladen für Waschmittel und den Filter.
! Wir empfehlen die Schubladen zu reinigen,
um Restmengen und Rückstände von
Zusatzstoffen zu vermeiden.
! Der Filter ist dafür ausgelegt, Rückstände
und Ablagerungen von der Wäsche
fernzuhalten. Reinigen Sie diesen wenn
möglich von Hand.
! Die Waschmaschine besitzt eine
spezielle Vorrichtung zum Auffangen
von größeren Gegenständen (z.B.
Knöpfe/Münzen), welche die Pumpe oder
den Ablaufschlauch verstopfen könnten.
! Nur bei einigen Modellen: Schlauch
herausziehen, Stöpsel entfernen und
Restwasser in einem Behälter auffangen.
! Bevor Sie die Klammerfalle öffnen,
empfehlen wir, den Boden mit einer
saugfähigen Unterlage auszulegen.
! Drehen Sie den Verschluss gegen den
Uhrzeigersinn.
! Entnehmen und Reinigen Sie die
Abdeckung mit dem Grobschmutzfilter
und drehen sie anschließend im
Uhrzeigersinn wieder ein.
! Wiederholen Sie die restlichen Schritte in
umgekehrter Reihenfolge, um die Teile
wieder einzubauen.
! Sollte die Maschine in einem überhitzten
Raum gelagert sein, lassen Sie das
gesamte Wasser aus den Schläuchen.
! Ziehen Sie alle Stecker aus der
Maschine.
! Trennen Sie den Schlauch von dem
Riegel und füllen Sie das gesamte
Wasser in eine Schüssel.
! Sichern Sie den Schlauch wieder mit den
Riegeln.
Reinigung der
Waschmittelschublade
Reinigung der Klammerfalle
Vorschläge für anhaltenden
Nichtgebrauch

5. KURZANLEITUNG
Dieses Gerät verfügt über eine moderne
Mengenautomatik, die automatisch die benötigte
Wassermenge, den Energieverbrauch und die
Waschdauer anpasst.
! Schalten Sie Ihr Gerät ein und wählen Sie
das benötigte Programm aus.
! Stellen Sie wenn nötig eine
Waschtemperatur ein.
! Drücken Sie den Button START/PAUSE
um den Waschvorgang zu starten.
Sollte die Maschine während des
Waschvorgangs ausgehen, starten Sie
sie später erneut; das Waschprogramm
wurde gespeichert.
! Am Ende des Programms erscheint die
Nachricht «End» auf der Anzeige bzw. bei
einigen Modellen schalten sich alle
Waschgang—Anzeigelampen an.
! Schalten Sie die Waschmaschine nun
aus..
Für jeden Waschtyp sehen Sie in der
Tabelle die passenden Sequenzen.
Wasserdruck:
min 0,05 Mpa / max 0,8 Mpa
Schleuderdrehzahl:
Siehe Typenschild.
Gesamtanschlußwert/Absicherung/
Spannung:
Siehe Typenschild.
6. STEUERUNG UND
PROGRAMME
Programmwahlschalter mit
Position AUS (OFF)
Taste WASCHTEMPERATURWAHL
Taste SCHLEUDERDREHZAHLWAHL
STARTZEITVERZÖGERUNGSZEIT—/
PROGRAMMABLAUFANZEIGE—
Anzeigen
Anzeigen SCHLEUDERDREHZAHL
Warten Sie bis die Sicherung des
Bullauges aufgeht; dies kann bis zu
zwei Minuten nach Beendigung des
Waschvorgangs passieren.

! Drücken Sie die Taste START/PAUSE, um
das gewählte Waschprogramm zu
beginnen.
! Die Position des Programmwahlschalters
ändert sich während des kompletten
Programmablaufs nicht.
! Um das Gerät auszuschalten, bitte den
Programmwahlschalter auf die Position
AUS stellen.
! Drücken Sie zum Start den ausgewählten
Waschgang (entsprechend dem ausgewählten
Waschgang wird die entsprechende
Anzeigelampe aufleuchten).
WÄSCHE NACHLEGEN ODER ENTNEHMEN,
NACHDEM DAS PROGRAMM BEGONNEN
HAT (PAUSE)
! Drücken Sie die START/PAUSE—Taste
und halten Sie sie für ungefähr 2
Sekunden gedrückt (einige Anzeigelampen
blinken auf, um anzuzeigen, dass die
Maschine angehalten wurde).
! Nach 2 Minuten wird die Türverriegelung
automatisch deaktiviert und das Bullauge
kann geöffnet werden.
! Nachdem Entnehmen oder Nachlegen
von Wäsche das Bullauge wieder
schließen und die Taste START/PAUSE
erneut drücken (Programm wird an der
ursprünglichen Stelle fortgesetzt).
WASCHPROGRAMM ABBRECHEN
! Um ein Programm zu beenden, den
Programmwahlschalter auf die Position
AUS stellen.
! Die Startzeit des Geräts kann mit dieser
Taste eingestellt werden und verzögert den
Start um 3, 6 oder 9 Stunden.
! Gehen Sie wie folgt für einen verzögerten
Start vor:
— Wählen Sie ein Programm aus.
Eine Sicherheitsvorrichtung verhindert,
dass das Bullauge unmittelbar nach
Beendigung des Waschvorganges
geöffnet werden kann. Nach zwei
Minuten erlischt die Anzeige
“Türverriegelung” und das Bullauge
kann geöffnet werden.
Programmwahlschalter mit
Position AUS (OFF)
Wenn Sie ein Programm auswählen,
blinken die Anzeigelampen bezüglich
der
Temperatur und der Schleudergeschwindigkeit
dieses Waschgangs auf.
Um das Gerät auszuschalten, bitte den
Programmwahlschalter auf die Position
AUS stellen.
Der Programmwahlschalter muss am
Ende jedes Waschvorganges oder vor
der Wahl eines neuen Waschprogramms
auf die Position AUS gedreht werden.
ZUERST das Bullauge schliessen und
dann die Taste START/PAUSE drücken.
Wenn die Taste START/PAUSE gedrückt
wurde, kann es einige Sekunden dauern,
bevor der Waschvorgang beginnt.
Bitte überprüfen Sie vor dem Öffnen
der Tür, dass der Wasserstand
unterhalb der Türöffnung liegt, um
das Herausfließen von Wasser zu
verhindern.

— Warten Sie, bis die Anzeigelampen
bezüglich der Temperatur und
der Schleudergeschwindigkeit dieses
ausgewählten Programms aufleuchten.
— Drücken Sie die Taste (jedes Drücken
der Taste verzögert den Start
entsprechend um 3, 6 oder 9 Stunden
und die entsprechende Anzeigelampe
für die Zeit blinkt).
— Drücken Sie die START/PAUSE—Taste,
um den Vorgang der Startverzögerung
zu beginnen (die Anzeigelampe
entsprechend der ausgewählten
Startverzögerungszeit hört auf zu
blinken und bleibt angeschaltet). Am
Ende der erforderlichen Verzögerungszeit
startet das Programm.
!
Die eingestellte Startzeitvorwahl kann
unterbrochen werden, indem der
Programmwähler auf AUS gestellt wird.
Sollte es eine Unterbrechung der
Stromversorgung während eines laufenden
Waschvorgangs geben, werden die
Einstellungen gespeichert, um das Programm
bei Wiederinbetriebnahme automatisch
fortzusetzen.
! Mit dieser Option können Sie am Ende
des Waschgangs noch ein weiteres Mal
spülen. Diese Option wurde für
Menschen mit empfindlicher und
sensibler Haut entwickelt, bei denen
schon kleinste Waschmittelrückstände zu
Hautreizungen oder Allergien führen.
! Der Einsatz dieser Funktion ist auch
ratsam für Gegenstände von Kindern und
für den Fall stark verschmutzter Wäsche,
für die eine größere Menge an
Waschmittel notwendig ist, oder beim
Waschen von Hand— und Badetüchern,
deren Fasern meistens die Tendenz
haben, das Waschmittel zu speichern.
! Mit dieser Taste können Sie die
Temperatur des Waschgangs verändern.
! Um die Stoffe zu schützen, kann die für
jedes Programm erlaubte Höchsttemperatur
nicht überschritten werden.
! Wenn Sie eine Kaltwäsche durchführen
wollen, müssen alle Anzeigelampen
ausgeschaltet sein.
! Durch das Drücken dieser Taste kann die
Höchstgeschwindigkeit gesenkt und,
wenn Sie wollen, der Schleudergang
abgebrochen werden.
! Wenn das Etikett keine spezifischen
Angaben macht, kann die in dem
Programm erwartete maximale
Schleudergeschwindigkeit verwendet
werden.
! Drücken Sie für die Reaktivierung des
Schleudergangs die Taste, bis Sie die
gewünschte Schleudergeschwindigkeit
eingestellt haben.
Die Optionstasten sollten vor dem
Drücken der START/PAUSE—Taste
gewählt werden.
Wenn die Option mit dem
ausgewählten Programm nicht
kompatibel ist, dann blinkt die
entsprechende Anzeigelampe zuerst
und geht dann aus.
Taste WASCHTEMPERATURWAHL
Taste SCHLEUDERDREHZAHLWAHL
Um eine Schädigung des Stoffes zu
vermeiden, kann die für jedes Programm
erlaubte Höchstgeschwindigkeit nicht
überschritten werden.

! Sie können die Schleudergeschwindigkeit
ohne ein Anhalten der Maschine ändern.
! Jedes Mal, wenn die STARTZEITVORWAHL—
Taste gedrückt wird, zeigen die
Anzeigelampen, wie viele Stunden
Verzögerung (3, 6 oder 9 Stunden) Sie
gewählt haben, und den Countdown bis
zu dessen Ende.
! Wenn ein Programm läuft, blinken die
Anzeigelampen nacheinander, um die
laufende Phase anzuzeigen:
! Die Anzeige beginnt zu leuchten, sobald
das Bullauge richtig geschlossen.
! Wenn die Taste START/PAUSE gedrückt
wird blinkt die Anzeige zuerst kurz auf
und leuchtet dann permanent.
! Eine Sicherheitsvorrichtung verhindert,
dass das Bullauge unmittelbar nach
Beendigung des Waschvorganges geöffnet
werden kann. Nach zwei Minuten erlischt
die Anzeige TÜRVERRIEGELUNG und
das Bullauge kann geöffnet werden. Drehen
Sie am Ende des Waschvorganges den
Programmwahlschalter auf die Position
AUS.
Die Anzeigelampe blinkt, wenn die Taste
gedrückt ist.
Wenn die Option mit dem ausgewählten
Programm nicht kompatibel ist, dann blinkt
die entsprechende Anzeigelampe zuerst
und geht dann aus.
Das zeigt die Waschtemperatur des
ausgewählten Programms an, das mit der
entsprechenden Taste (falls erlaubt)
geändert werden kann. Wenn Sie eine
Kaltwäsche durchführen wollen, müssen
alle Anzeigelampen ausgeschaltet sein.
Das zeigt die Schleudergeschwindigkeit des
ausgewählten Programms an, das mit der
entsprechenden Taste geändert oder
weggelassen werden kann.
Eine Überdosierung von Waschmittel
kann zu übermäßiger Schaumbildung
führen. Wenn das Gerät übermäßigen
Schaum entdeckt, kann es die
Schleuderphase aussetzen oder die
Dauer des Programms verlängern und
den Wasserverbrauch erhöhen.
Die Maschine ist mit einem speziellen
elektronischen Gerät ausgestattet,
welches den Schleudergang im Falle
einer Unwucht verhindert. Dadurch
werden Lärm und Schwingungen in
der Maschine verringert und die
Lebensdauer Ihrer Waschmaschine
verlängert.
STARTZEITVERZÖGERUNGSZEIT—/
PROGRAMMABLAUFANZEIGE—
Anzeigen
ZUERST das Bullauge schliessen und
dann die Taste START/PAUSE drücken.
Wird die START/PAUSE Taste nicht
innerhalb von 7 Sekunden nach dem
Schließen des Bullauges gedrückt, muss
das Programm neu gestartet werden.
Anzeigen SCHLEUDERDREHZAHL
Dieses Gerät ist mit Smart Touch
Technologie ausgestattet. Damit können
Sie mit Smartphones, die mit Android
arbeiten und NFC (Near Field
Communication) unterstützen, über die App
darauf direkt zugreifen.
! Laden Sie die Candy simply—Fi App. auf
Ihr Smartphone .
FUNKTIONEN
Dies sind die wichtigsten Funktionen der
App:
! VoiceAssistant — Eine Anleitung, um
den passenden Waschgang mit
lediglich drei Eingaben auszuwählen
(Kleidung/Stoffe, Farbe, Grad der
Verschmutzung).
! Waschgänge — Herunterladen und Anwenden
neuer Waschprogrmme.
! SmartCare – SmartCheckUp und
Selbstreinigungsprogramm sowie eine
Anleitung zur Fehlerbehebung.
! Meine Statistiken — Statistiken zu den
einzelnen Wäschen und Tipps für eine
effizientere Nutzung der Maschine.
ARBEITEN MIT SMART TOUCH
ALS ERSTES — das Gerät registrieren
! Gehen Sie auf «Einstellungen» in Ihrem
Android Smartphone und aktivieren Sie
im Menü «Wireless & Networks» die
NFC Funktion.
!
Stellen Sie den Programmschalter auf
Smart Touch, um den Sensor auf dem
Bedienelement zu aktivieren.
! Starten Sie die App, legen Sie ein
Benutzerprofil an und registrieren Sie das
Gerät. Folgen Sie den Anweisungen auf
dem Display Ihres Smartphones oder der
«Kurzanleitung» des Gerätes.
Die Candy simply—Fi App funktioniert
mit Android und auch mit iOS auf
Tablets und Smartphones. Sie
können mit dem Gerät interagieren,
allerdings können Sie die
Möglichkeiten, die Ihnen Smart Touch
bietet, nur auf Android—Smartphones
mit NFC Technologie nutzen,
wie an folgendem Funktionsschema
dargestellt:
Android
Smartphone
mit NFC
Technologie
Interaktion mit dem
Gerät + Ansicht der
Funktionen
Nur Ansicht der
Funktionen
Nur Ansicht der
Funktionen
Nur Ansicht der
Funktionen
Nur Ansicht der
Funktionen
Schauen Sie sich alle Details der
Smart Touch Funktionen an, holen Sie
sich die App im Demo—Modus oder
gehen Sie zu:
www.candysmarttouch.com
Je nach Smartphone Model und
Android Version, kann die Aktivierung
der NFC verschieden ausfallen.
Schauen Sie für Näheres in das
Handbuch Ihres Smartphones.
Weitere Informationen, häufige Fragen
(F.A.Q.) und das Video für eine
einfache Registrierung finden Sie auf:
www.candysmarttouch
.com/how—to
BEIM NÄCHSTEN MAL — Die normale Anwendung
! Immer, wenn Sie das Gerät über die App
steuern möchten, müsse Sie zunächst den
Smart Touch Modus aktivieren, indem Sie
ihn an die entsprechende Stelle drehen.
! Stellen Sie sicher, dass die Standby—Funktion
nicht aktiviert ist, der Sperrbildschirm nicht
aktiv ist und die NFC—Funktion eingeschaltet
ist; anderfalls den vorher beschriebenen
Anweisungen folgen.
! Zum Starten eines Programms legen Sie
die Wäsche ein, geben das Waschmittel
dazu und schließen die Tür.
! Wählen Sie die gewünschte Funktion in
der App (z.B.: Programm,
SmartCheckUp
,
Aktualisierung der Statistiken, etc. …).
! Folgen Sie den Anweisungen auf dem
Telefondisplay und halten das Gerät
UNMITTELBAR VOR das Smart Touch—
Logo an der Bedienblende wenn Sie dazu
aufgefordert werden.
ANMERKUNGEN:
Halten Sie hr Smartphone so, dass
die NFC Antenne auf der Rückseite
sich am Logo von Smart Touch
befindet (siehe Abbildung hier unten).
Wenn Sie die genaue Position der
NFC—Antenne in Ihrem Smartphone
nicht kennen, bewegen Sie das
Telefon mit kreisenden Bewegungen
vor dem Smart Touch—Logo auf der
Bedienblende, bis die Verbindung in
der App bestätigt wird. Um den
ordnungsgemäßen Datentransfer zu
gewährleisten, ist es wichtig, das
SMARTPHONE FÜR EINIGE SEKUNDEN
VOR DIE BEDIENBLENDE ZU HALTEN;
nach erfolgtem Datenautausch wird
eine entsprechende Nachricht in der
App angezeigt, dass das Smartphone
entfernt werden kann.
Falls Sie eine dicke Schutzhülle
benutzen oder Aufkleber aus Metall
am Smartphone angebracht haben,
könnte dies die Daten—Übertragung
zwischen Gerät und Smartphone
beeinträchtigen oder verhindern.
Falls
erforderlich, entfernen Sie diese.
Der Austausch bestimmter Teile des
Smartphones (z.B. Abdeckungen,
Covers, Akku etc.) gegen Nicht—
Originalteile kann zum Verlust der
NFC—Empfangsfähigkeit führen und
damit zu Fehlfunktionen in der App.
Managen und Kontrollieren des Gerätes
durch die App funktioniert nur » aus der
Nähe»: eine Fernbedienung ist nicht
möglich (z.B. aus einem anderen
Zimmer oder außer Haus).

Anpassbare Einstellung des Knopfes, den Sie auszuwählen haben, um mit
der App für Smartphones interagieren und die Waschgänge herunterladen zu
können (siehe den entsprechenden Abschnitt). Die Werkseinstellung des
Selbstreinigungsprogramm reinigt die Waschmaschine.
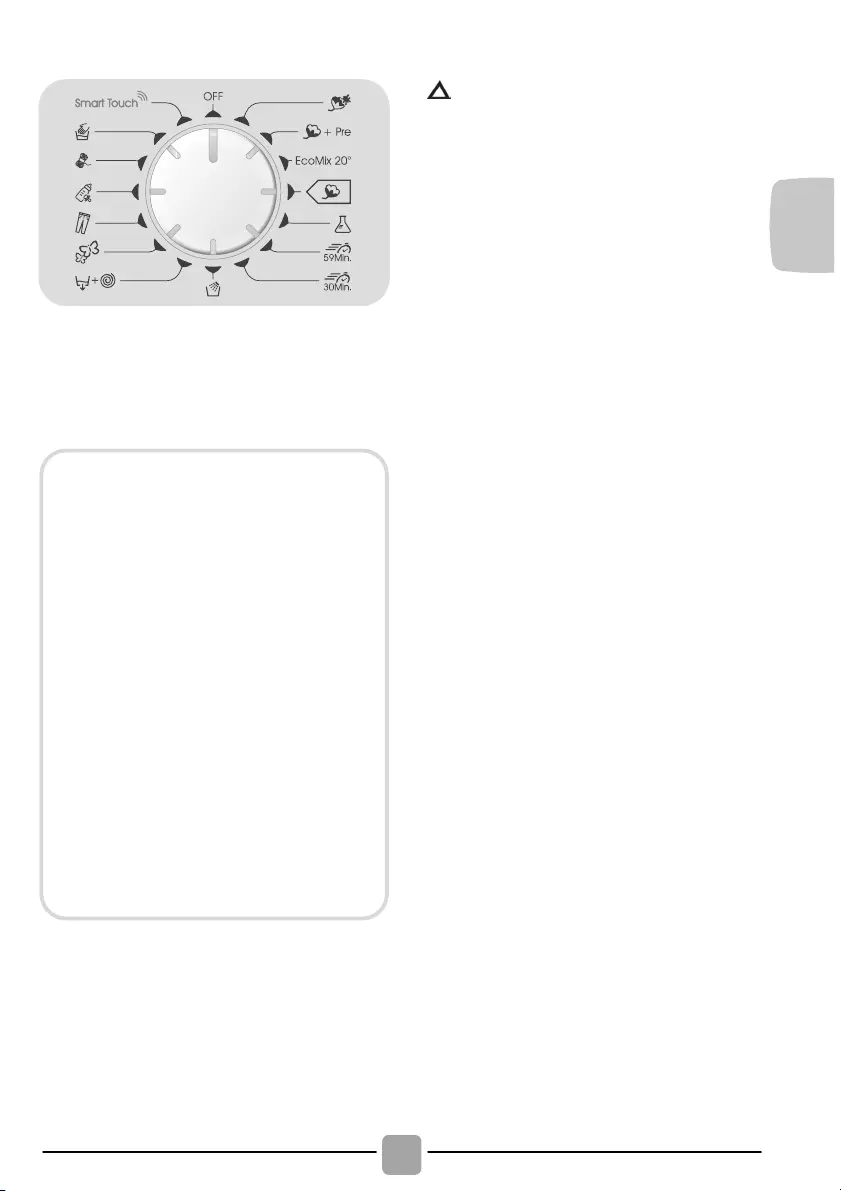
Bitte beachten Sie folgende Hinweise:
*
Die maximale Beladungskapazität (trockene
Kleidung lt. Normtest) hängt von dem
jeweiligen Gerätemodell ab (s. Bedienblende).
(Nur für Modelle mit
entsprechendem Waschmittelfach
für Flüssigwaschmittel)
Wenn nur eine begrenzte Menge
von Textilien mit Flecken behaftet
ist, die mit einem flüssigen
Vorreinigungs— oder Bleichmittel
behandelt werden soll, kann eine
entsprechende
Fleckenbehandlung
mit dem Gerät durchgeführt werden.
Gießen Sie das Vorreinigungs—
/Bleichmittel in die Vorrichtung für
Flüssigwaschmittel und setzen diese in
das mit der Ziffer «2» markierte Fach
der Waschmittelschublade. Wählen
Sie anschließend das Programm
SPÜLEN aus und starten den
Vorgang.
Wenn der Spülvorgang beendet ist,
den Programmwähler auf die Position
AUS stellen, die restliche Wäsche
hinzufügen, das gewünschte
Waschprogramm auswählen und
starten.
Wenn Sie ein Programm auswählen,
leuchtet die Anzeigelampe bezüglich
der empfohlenen Temperatur auf. Sie
können die Temperatur mit der
entsprechenden Taste ändern (falls
erlaubt). Die für jedes Programm
erlaubte Höchsttemperatur kann jedoch
nicht überschritten werden.
**STANDARDBAUMWOLLPROGRAMME
für Prüfung und Energieetikettierung
gemäß Richtlinie (EU) 1015/2010 und
1061/2010.
BAUMWOLLPROGRAMM mit einer
Waschtemperatur von 60°C.
BAUMWOLLPROGRAMM mit einer
Waschtemperatur von 40°C.
Diese Programme eignen sich zur Reinigung
normal verschmutzter Baumwollwäsche und
sind die effizientesten Programme in Bezug
auf den kombinierten Energie— und
Wasserverbrauch zum Waschen von
Baumwollwäsche.
Die Temperaturangaben zu den
Programmen sind auf die Angaben auf
dem Wäscheetikett abgestimmt. Die
tatsächliche Wassertemperatur kann ggf.
leicht abweichen.

Das Gerät bietet eine Vielzahl an
Programmen und Optionen, um
verschiedene Textilarten in allen
Verschmutzungsgraden optimal zu reinigen.
Kochwäsche
Für die gründliche Pflege von
strapazierfähigen Textilien.
Baumwolle + Vorwäsche
Dieses Programm wurde zur Entfernung
von hartnäckigen Flecken aus weißer
Baumwolle konzipiert. Die Vorwäsche
garantiert die Entfernung von hartnäckigen
Flecken. Geben Sie in das Fach «1» die
Menge an Waschmittel, die 20% des
für den Hauptwaschgang genutzten
Waschmittels entspricht.
EcoMix 20°C
Dieses Programm ermöglicht es, bei
einer Waschtemperatur von nur
20°C verschiedene Textilarten und—farben
gemeinsam und besonders sparsam in
einem Waschgang zu waschen. Verwendung
von Waschmittel mit Kaltwaschfunktion
notwendig.
Baumwolle
Effizientestes Waschprogramm (kombinierter
Energie—/Wasserverbrauch) für die Reinigung
normal verschmutzter Baumwollwäsche.
Mischwäsche
Für pflegeleichte Textilien aus Baumwolle,
Leinen, Synthetik oder Mischgewebe
bei reduzierter Waschtemperatur bzw.
Schleuderdrehzahl.
Kurz 59 Min.
Dieses Programm bietet gute Waschergebnisse
in einer relativ kurzen Programmdauer.
Es ist für kleinere Wäscheposten (s.
Programmtabelle) ausgelegt.
Kurz 30 Min.
Ein kompletter Waschzyklus (Waschen,
Spülen, Schleudern) für einen kleinen
Wäscheposten. Dieses Programm eignet
sich insbesondere für leicht verschmutze
Textilien aus Baumwolle oder
Mischgeweben. Um eine Überdosierung zu
vermeiden empfehlen wir nur 20% der vom
Hersteller empfohlenen Waschmittelmenge
zu verwenden.
Spülen
Es werden 3 Spülgänge mit Zwischenschleudern
(Schleuderdrehzahl kann mit der Taste
SCHLEUDERDREHZAHLWAHL reduziert
oder ganz abgestellt werden) durchgeführt.
Abpumpen & Schleudern
Zum nachträglichen Schleudern. Mit
der Taste SCHLEUDERDREHZAHLWAHL
kann die gewünschte Schleuderdrehzahl
eingestellt werden.
Feinwäsche
Lange Einweichphasen in Kombination
mit sanften Trommelbewegungen und
hohem Wasserstand bei verringerter
Waschtemperatur und Schleuderdrehzahl
garantieren optimale Pflege für Feinwäsche.
Jeans
Programm für die richtige Pflege Ihrer
Lieblingsjeans, bei dem Waschrhythmus,
Wasserstand und Schleuderprofil genau auf
die Anforderungen des Textils abgestimmt
sind. Um ein optimales Waschergebnis bei
geringer Knitterbildung und einem Maximum
an Wäschepflege zu erzielen bitte Textilien
vor dem Waschen auf links drehen.
Baby
Dieses Programm mit einer Waschtemperatur
von mindestens 60°C eignet sich ideal zur
porentiefen und hygienischen Reinigung von
Babybekleidung. Zur Erzielung von optimalen
Waschergebnissen empfehlen wir die
Verwendung von Pulverwaschmittel.
Wolle
Für die besonders schonende Reinigung
aller maschinenwaschbaren Wolltextilien (s.
Wäscheetikett) mit langen Programmpausen.
Handwäsche
Handwäscheprogramm für alle
maschinenwaschbaren Textilien mit dem
Handwäschepflegesymbol auf dem
Wäscheetikett.

Smart Touch
Anpassbare Einstellung des Knopfes, den
Sie auszuwählen haben, wenn Sie mit der
App die Maschine steuern möchten und
einen Waschgang herunterladen/starten
wollen (siehe den entsprechenden
Abschnitt und die Bedienungsanleitung
der App für weitere Informationen).
Bei der Option Smart Touch ist
der «Selbstreinigungsprogramm« als
Werkseinstellung zur Reinigung der
Trommel, zur Entfernung schlechter
Gerüche und zur Verlängerung der
Lebensdauer der Waschmaschine
eingestellt. Stellen Sie sicher, dass
der «Selbstreinigungsprogramm« ohne
Kleider in der Maschine und nur mit
Waschpulver gestartet wird. Lassen Sie
die Tür der Maschine am Ende des
Waschgangs offen, damit die Trommel
trocknen kann. Alle 50 Wäschen
empfohlen.
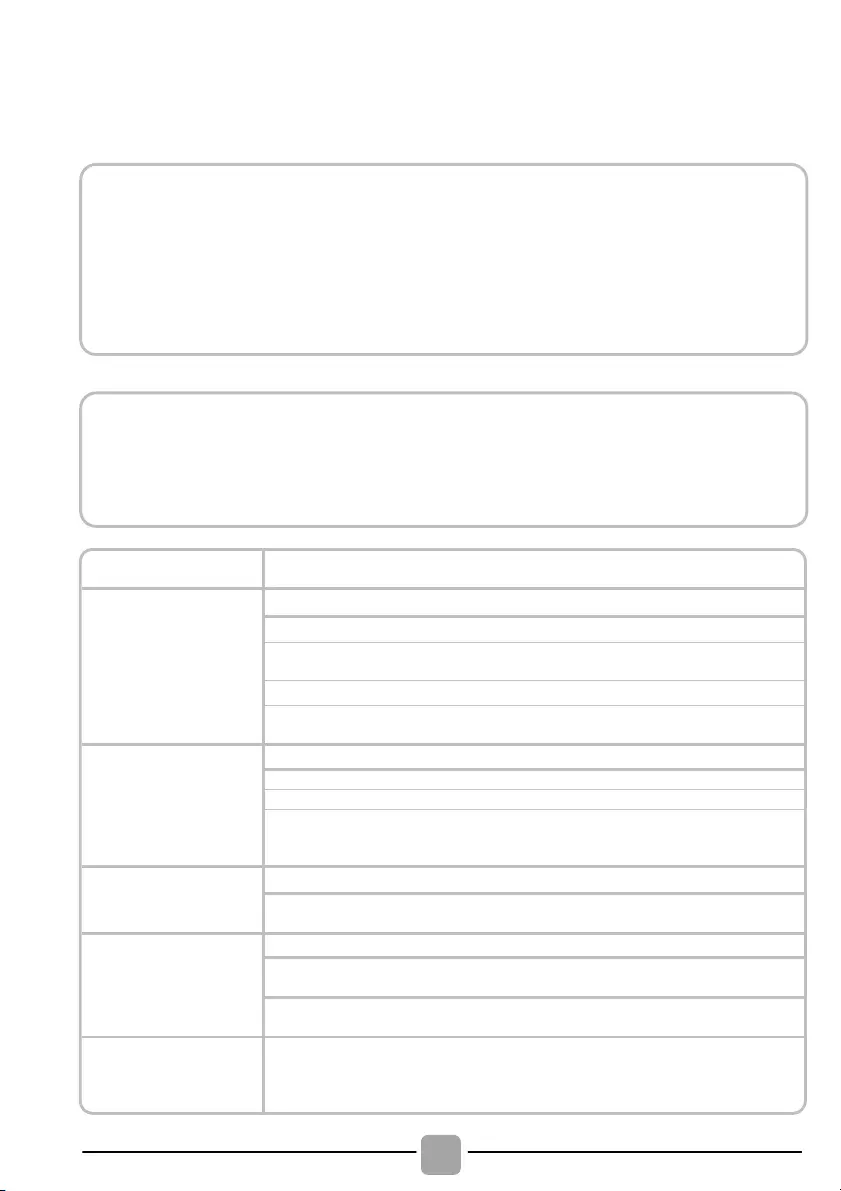
7. PROBLEMLÖSUNGEN UND GARANTIE
Wenn Sie der Meinung sind, das Gerät würde nicht korrekt funktionieren, dann finden Sie
in der beigelegten Kurzanleitung einige praktische Tipps, wie die häufigsten Probleme zu
beheben sind.
FEHLER—BERICHT
Mögliche Ursachen und praktische Lösungen
E2 (mit Display)
2 x Blinken der
LED (ohne Display)
Das Gerät erhält kein Wasser.
Stellen Sie sicher, dass der Wasserhahn geöffnet ist.
Stellen Sie sicher, dass der Schlauch für den Wasserzulauf nicht geknickt
oder eingeklemmt ist.
Wasser—Anschlüsse nicht in der korrekten Höhe (s. unter Installation)
Wasserhahn des Wasserzulaufs schliessen, am Gerät aufschrauben und
prüfen, ob der «Sandfilter» sauber ist und nicht verstopft.
E3 (mit Display)
3 x Blinken der
LED (ohne Display)
Wasser in der Waschmaschine läuft nicht ab.
Stellen Sie sicher, dass der Filter nicht verstopft ist.
Stellen Sie sicher, dass der Schlauch nicht geknickt, oder eingeklemmt ist.
Vergewissern Sie sich, dass die Abflüsse im Haus nicht verstopft sind
und Wasser ohne Probleme ablaufen kann. Prüfen Sie, ob das Wasser
im Waschbecken abläuft.
E4 (mit Display)
4 x Blinken der
LED (ohne Display)
Es gibt zu viel Schaum und/oder Wasser.
Überprüfen Sie, ob Sie eventuell zuviel Waschmittel benutzt haben oder
ein für Waschmaschinen ungeeignetes Waschmittel.
E7 (mit Display)
7 x Blinken der
LED (ohne Display)
Stellen Sie sicher, dass die Tür richtig geschlossen ist. Stellen Sie sicher,
daß keine Wäsche im Gerät das Schließen der Tür behindert.
Falls die Tür sich nicht öffnen lässt, das Gerät ausschalten, den Stecker aus der
Steckdose ziehen, 2—3 Minuten warten und die Tür noch einmal öffnen.
Schalten Sie das Gerät aus und ziehen Sie den Stecker aus der
Steckdose. Schalten Sie das Gerät wieder ein und starten Sie ein
Programm. Wenn der Fehler erneut auftritt, wenden Sie sich bitte an ein
autorisiertes Kunden—Service—Center.
NUR FÜR GERÄTE MIT SMART TOUCH.
Mit der Funktion SmartCheckUp Ihrer Candy simply—Fi—App können Sie jederzeit
prüfen, ob Ihr Gerät ordungsgemäß arbeitet. Sie benötigen nur ein Android
Smartphone mit NFC Technologie. Weitere Infos finden Sie der App.
Wenn das Gerät eine Störung anzeigt (durch einen Code oder aufblinkende LED),
schalten Sie bitte Ihre App ein, und halten Ihr Android Smartphone mit NFC an
das Smart Touch—Logo auf dem Bedienerfeld. Sie können jetzt direkt in der
Anwendung nach dem Problem suchen.
! Geräte mit Display: die Störung wird durch den Buchstaben E zusammen mit einer
Nummer angezeigt (Beispiel: Error 2 = E2)
! Geräte ohne Display: die Störung wird angezeigt, indem die LED so häufig blinken,
wie es dem Fehlercode entspricht, gefolgt von einer Pause von 5 Sekunden
(Beispiel: Error 2 = 2 x Blinken — Pause — 2 x Blinken — usw…)
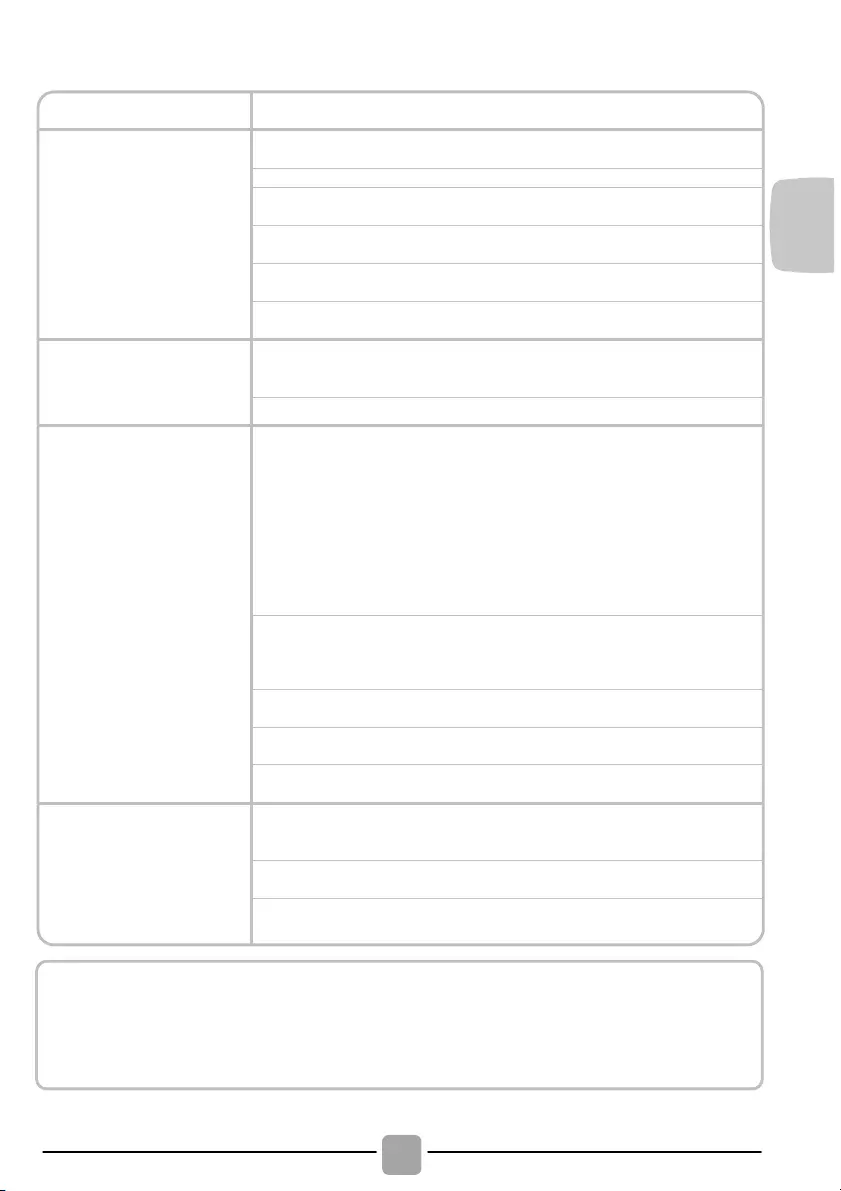
Mögliche Ursachen und praktische Lösungen
Die Waschmaschine
geht nicht/startet nicht
.
Stellen Sie sicher, dass das Gerät an einer funktionierenden
Steckdose angeschlossen ist.
Stellen Sie sicher, dass das Gerät eingeschaltet ist.
Stellen Sie sicher, dass die Steckdose funktioniert, und testen Sie
das mit einem anderen Gerät (eine Lampe)
Es kann sein, dass die Tür nicht korrekt geschlossen ist: öffnen und
schließen Sie es noch einmal.
Überprüfen Sie, ob das gewünschte Programm richtig gewählt und
die Start—Taste gedrückt ist.
Stellen Sie sicher, dass sich das Gerät nicht im Pause—Modus
befindet.
Wasser ist auf den
Boden in der Nähe
Waschmaschine
ausgelaufen.
Dies kann an einem Leck in der Dichtung zwischen Wasserhahn und
Schlauch liegen; in diesem Fall die Dichtung erneuern und alles gut
festziehen.
Stellen Sie sicher, dass der Filter richtig geschlossen ist.
Die Trommel der
Waschmaschine dreht
sich nicht.
Falls die Wäsche nicht optimal in die Maschine geladen wurde, kann
folgendes passieren:
• Es wird versucht, das Gewicht auszubalanzieren, und dadurch
verlangsamt sich die Umdrehungszahl.
• Drehzahl der Trommel wird langsamer, um Vibrationen und Lärm
zu verringern.
• Trommel schaltet sich ab, um die Waschmachine zu schützen.
Stellen Sie sicher, dass die Wäsche gleichmäßig verteilt ist. Falls
dies nicht so ist, entwirren Sie die Wäsche, füllen Sie die Maschine
erneut und starten Sie das Programm noch einmal.
Dies könnte daran liegen, dass das Wasser noch nicht komplett
eingelaufen ist:
warten Sie ein paar Minuten. Falls dies Problem sich nicht beheben
läßt, schauen Sie unter Abschnitt Fehler 3.
Einige Modelle verfügen über eine Funktion «Nicht schleudern»:
stellen Sie sicher, dass diese nicht aktiviert ist.
Stellen Sie sicher, dass nichts aktiviert ist, was das Schleudern
beeinträchtigt.
Zu viel Waschmittel könnte den Beginn des Schleuderorgangs
verzögern.
Während des
Schleuderns hört man
starke Vibrationen /
Geräusche.
Eventuell steht die Waschmaschine nicht vollständig eben: falls
notwendig,
die Füße einstellen, wie in der Anleitung beschrieben.
Stellen Sie sicher, dass Befestigungsschrauben, Gummistopfen
und Schlauchverlängerungen für den Transport entfernt wurden.
Stellen Sie sicher, daß keine Fremdkörper in die Trommel
(Münzen, Scharniere, Knöpfe, usw…) gelangen.
Die Standard—Garantie des Herstellers umfasst Fehler, welche durch elektrische
oder mechanische Fehler des Produktes verursacht wurden, als Handlung oder
Unterlassung des Herstellers. Falls ein Fehler durch Faktoren außerhalb des
gelieferten Produktes verursacht wurde, durch Fehlbedienung oder als Resultat
einer nicht beachteten Gebrauchsanleitung, kann eine Gebühr erhoben werden.

Bei der Nutzung von phosphatfreien
Waschmitteln können folgende Dinge
resultieren:
— Trüberes Abwasser: Dieser Effekt
ist bedingt durch die suspendierten
Zeolithe, was jedoch keine negativen
Auswirkungen auf die Wascheffizienz hat.
— Weißer Schleier auf der Kleidung am
Ende des Waschvorgangs: Dies ist
normal, da das Waschmittel nicht von der
Wäsche aufgenommen wird.
— Schaumbildung im letzten Spülgang:
Dies ist nicht zwingend ein Zeichen für
ein schlechtes Spülergebnis.
— Übermäßige Schaumbildung: Dies tritt
häufig beim Einsatz von anionischen
Tensiden in Waschmitteln auf.
Starten Sie in den vorgenannten Fällen
keinen erneuten Waschvorgang, da dies
nicht helfen wird.
Wenn das Problem fortbesteht oder wenn
Sie einen technischen Defekt vermuten,
kontaktieren Sie umgehend ein autorisiertes
Kundendienstzentrum.
Es empfiehlt sich immer Originalersatzteile
zu benutzen, die in unseren autorisierten
Kundendienstzentren erhältlich sind.
Wir schließen die Haftung für alle evtl.
Druckfehler aus.
Kleinere Änderungen und technische
Weiterentwicklungen im Detail vorbehalten.
Garantie
Die Garantiezeit des Gerätes entspricht
den jeweiligen gesetzlichen Vorschriften.
Nähere Angaben zu Art und Umfang
der Garantiebedingungen finden
Sie im Garantieheft. Bitte das
Original der Kaufrechnung für die
Garantieersatzansprüche aufbewahren,
um diese im Bedarfsfall unserem
Werkskundendienst vorzulegen. Ohne
diese Nachweise können wir und unser
Werkskundendienst den Anspruch nicht
anerkennen


Thank—you for choosing a Candy washing
machine. We are confident it will loyally
assist you in safely washing your clothes,
even delicates, day after day.
You can register your product at
www.registercandy.com to gain faster
access to supplementary services solely
reserved to our most loyal customers.
Carefully read this manual for correct and
safe appliance use and for helpful tips on
efficient maintenance.
Only use the washing machine
after carefully reading these instructions.
We recommend you always keep this
manual on hand and in good condition for
any future owners.
Please check that the appliance is
delivered with this instruction manual,
warranty certificate, service centre address
and energy efficiency label. Also check that
plugs, drain hose support hook and liquid
detergent or bleach tray (only on some
models) are included. We recommend you
keep all these components.
Each product is identified by a unique 16—
character code, also called the “serial
number”, printed on the sticker. This can be
found inside the door opening. This code is
a unique code for your product that you will
need to register the product warranty, or if
you need to contact the Customer Service
Centre.
This appliance is marked according to
the European directive 2012/19/EU
on Waste Electrical and Electronic
Equipment (WEEE).
WEEE contains both polluting substances (which
can cause negative consequences for the
environment) and basic components (which can
be re—used). It is important to have WEEE
subjected to specific treatments, in order to
remove and dispose properly all pollutants, and
recover and recycle all materials. Individuals can
play an important role in ensuring that WEEE
does not become an environmental issue; it is
essential to follow some basic rules:
! WEEE should not be treated as household
waste;
! WEEE should be handed over to the relevant
collection points managed by the municipality or
by registered companies. In many countries, for
large WEEE, home collection could be present.
In many countries, when you buy a new
appliance, the old one may be returned to the
retailer who has to collect it free of charge on a
one—to—one basis, as long as the equipment is of
equivalent type and has the same functions as
the supplied equipment.
1. GENERAL SAFETY RULES
2. INSTALLATION
3. PRACTICAL TIPS
4. MAINTENANCE AND CLEANING
5. QUICK USER GUIDE
6. CONTROLS AND PROGRAMS
7.
THROUBLESHOOTING AND WARRANTY

1. GENERAL SAFETY
RULES
! This appliances is intended to
be used in household and
similar applications such as:
— Staff kitchen areas in shops, offices
and other working environments;
— Farm houses;
— By clients in hotels, motels and
other residential type environments;
— Bed and breakfast type environments.
A different use of this appliance
from household environment
or from typical housekeeping
functions, as commercial use by
expert or trained users, is excluded
even in the above applications. If
the appliance is used in a manner
inconsistent with this it may reduce
the life of the appliance and may
void the manufacturer’s warranty.
Any damage to the appliance or
other damage or loss arising
through use that is not consistent
with domestic or household use
(even if located in a domestic or
household environment) shall not
be accepted by the manufacturer to
the fullest extent permitted by law.
! This appliance can be used by
children aged from 8 years and
above and persons with reduced
physical, sensory or mental
capabilities or lack of experience
and knowledge if they have been
given supervision or instruction
concerning use of the appliance
in a safe way and understand the
hazards involved.
Children shall not play with the
appliance. Cleaning and user
maintenance shall not be made
by children without supervision.
! Children should be supervised
to ensure that they do not play
with the appliance.
! Children of less than 3 years
should be kept away unless
continuously supervised.
! If the supply cord is damaged, it
must be replaced by the
manufacturer, its service agent
or similarly qualified persons in
order to avoid a hazard.
! Only use the hose-sets
supplied with the appliance for
the water supply connection
(do not reuse old hose-sets).
!
Water pressure must be between
0.05 MPa and 0.8 MPa.
! Make sure carpets or rugs do
not obstruct the base or any of
the ventilation openings.
! The OFF condition is reached
by
placing the reference mark on
the programmes control/knob in
the vertical position. Any other
different position of such control
sets the machine in ON condition
(only for models with programmes
knob).

! After installation, the appliance
must be positioned so that the
plug is accessible.
! The maximum load capacity of
dry clothes depends on the
model used (see control panel).
!
To consult the product technical
specification please refer to the
manufacturer website.
!
Before cleaning or maintaining
the washing machine, unplug
the appliance and turn off the
water tap.
!
Make sure the electrical system
is
earthed
. Otherwise, seek
qualified professional assistance.
! Please do not use converters,
multiple sockets or extension
cords.
! Make sure there is no water in
the drum before opening the
door.
! Do not pull on the power cord
or appliance to unplug the
machine.
! Do not expose the washing
machine to rain, direct sunlight
or other weather elements.
Protect from possible freezing.
! When moving, do not lift the
washing machine by the knobs
or detergent drawer; during
transport, never rest the door on
the trolley. We recommend two
people lift the washing machine.
! In the event of fault and/or
malfunction, turn off the
washing machine, close the
water tap and do not tamper
with the appliance.
Immediately contact the
Customer Service Centre and
only use original spare parts.
Failure to observe these
instruction may jeopardise
appliance safety.
By placing the
mark on this
product, we are confirming
compliance to all relevant
European safety, health and
environmental requirements which
are applicable in legislation for
this product.
WARNING:
water may reach very high
temperatures during the
wash cycle.
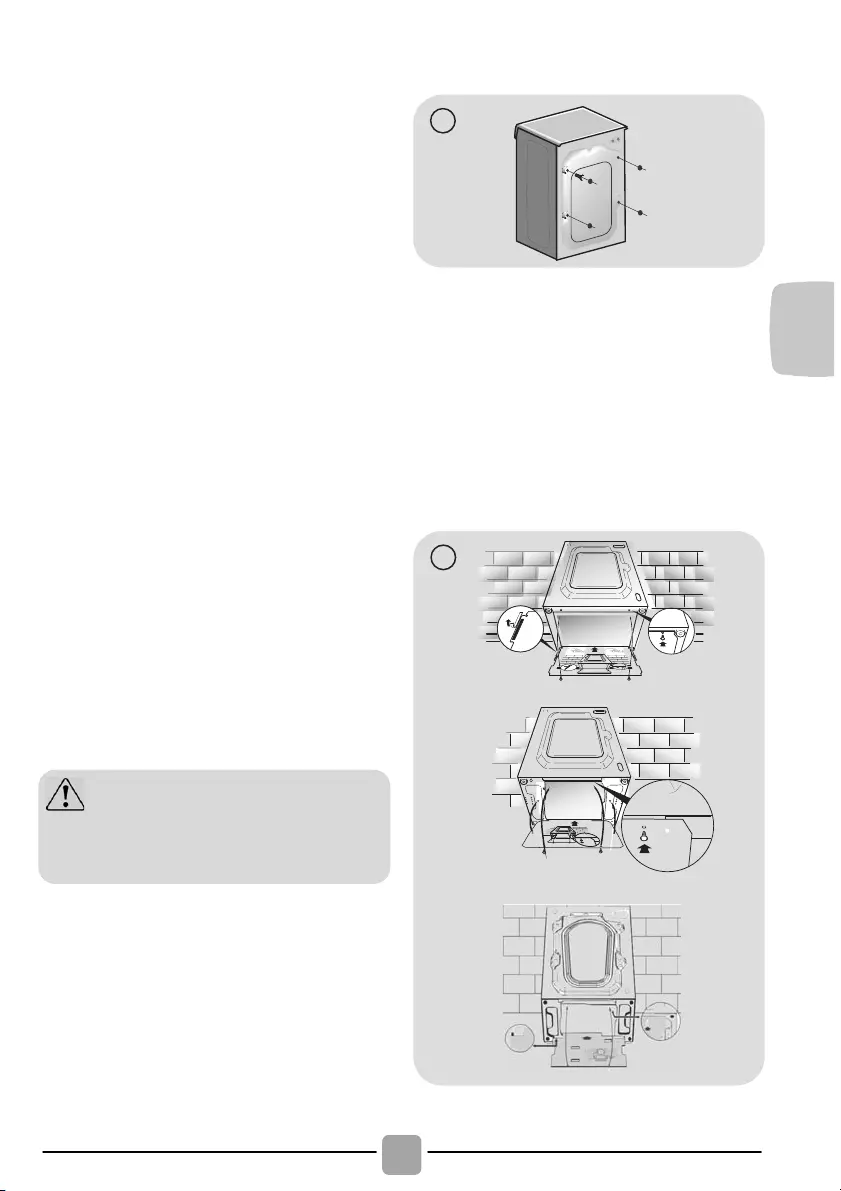
! Release the power chord and
drain hose from the securing
clip at the rear of the machine.
!
Remove the 2 or 4 transportation
screws (A) on the back and
remove the 2 or 4 flat washers,
rubber bungs and plastic spacer
tubes (B) as illustrated in figure 1.
!
If the washing machine is built—in,
unscrew the 3 or 4 transportation
screws (A) and remove the 3 or
4 flat washers, rubber bungs and
plastic spacer tubes (B).
!
During the removal of the screws
occasionally spacer tubes fall
inside the product, these can be
remove by tilting the product forward
and recovering them from the floor
or inside the base of the machine.
! Cover the open transportation
screw holes with the 2 or 4
plastic caps included in the
instruction bag.
! Place the corrugated plastic
sheet, found on top of the
appliance during the unpacking
process, into the base of the
appliance as shown in figure 2
(according to the model,
consider version A, B or C).
WARNING:
keep packaging materials
away from children.
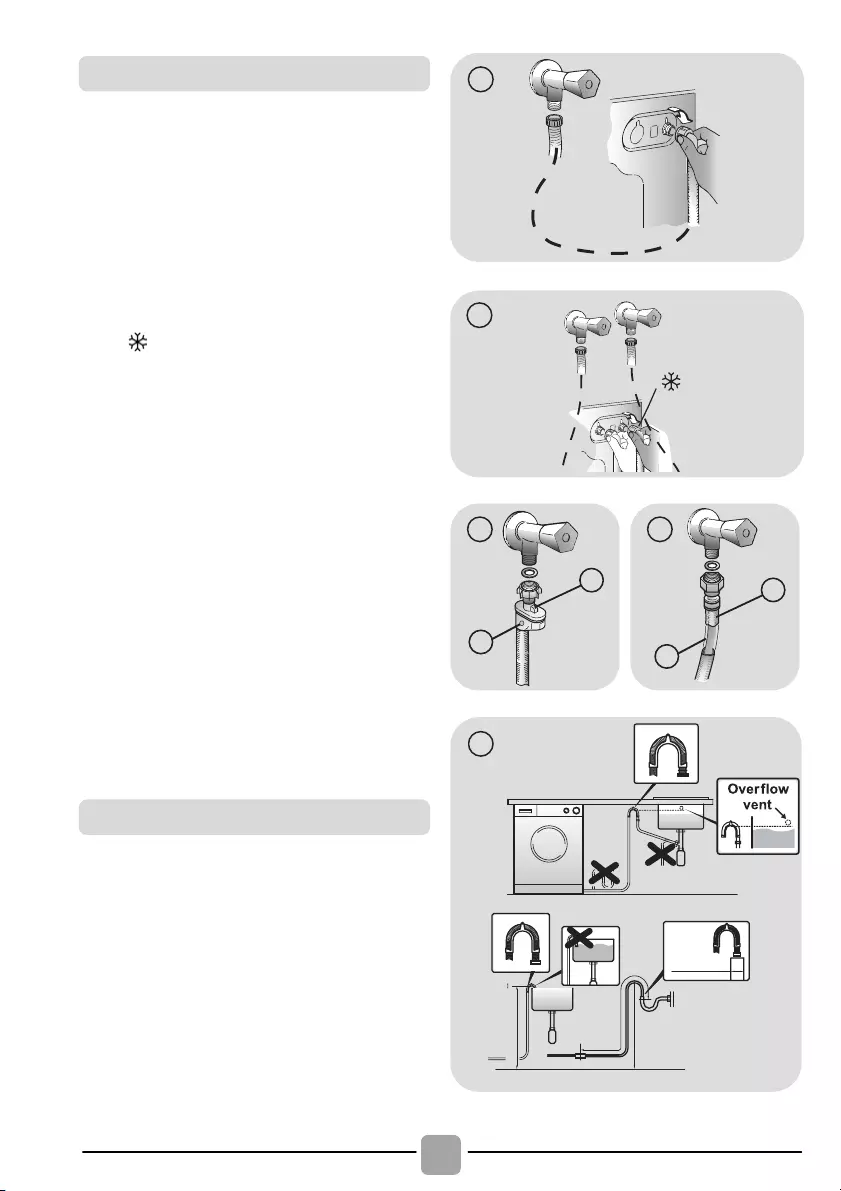
! Connect the water hose to the water
supply tap (fig. 3) only using the hose
supplied with the appliance (do not
reuse old hose—sets).
! Some models may include one or more of
the following features:
! HOT&COLD (fig. 4):
water mains connection settings with hot
and cold water for higher energy savings.
Connect the grey tube to the cold water
tap and the red one to the hot water
tap. The machine can be connected to
the cold water tap only: in this case, some
programs may start a few minutes later.
! AQUASTOP (fig. 5):
a device located on the supply tube that
stops water flow if the tube deteriorates;
in this case, a red mark will appear in the
window “A” and the tube must be
replaced. To unscrew the nut, press the
one—way lock device «B«.
! AQUAPROTECT – SUPPLY TUBE WITH
GUARD (fig. 6):
Should water leak from the primary
internal tube «A«, the transparent
containment sheath «B» will contain water
to permit the washing cycle to complete.
At the end of the cycle, contact the
Customer Service Centre to replace the
supply tube.
! The washing machine should be installed
in its final position such that the water fill
hose is not kinked or trapped. The
corrugated drain hose should be inserted
into suitable drain pipe of between 50 cm
and 85 cm height above the floor using
the curved drain hose support. If an under
sink connection is used the drain hose
must be routed above the sink overfill
opening to prevent back siphoning. Care
must be taken to avoid kinking or trapping
the drain hose (fig. 7).
min 50 cm
max 85 cm
+2,6 mt
max
max 100 cm
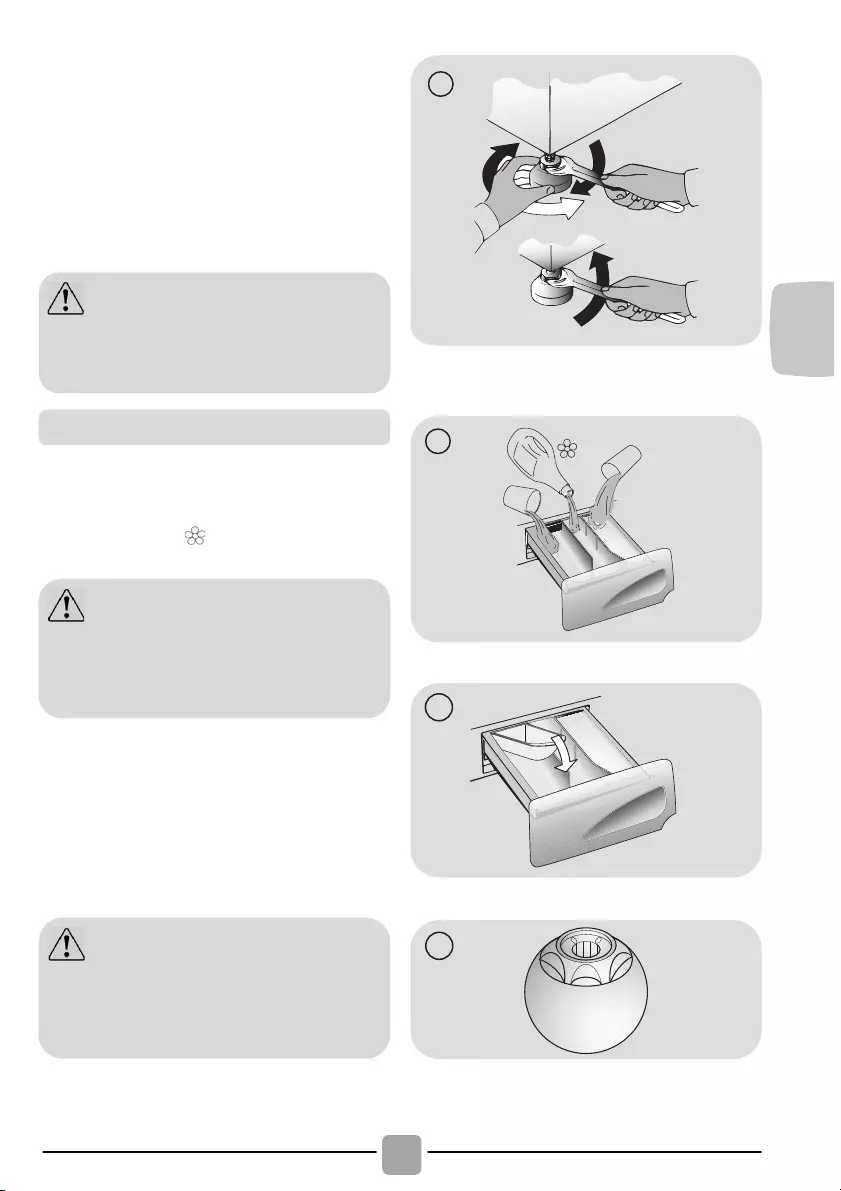
! Level the appliance using the feet as
illustrated in figure 8:
a. turn the nut clockwise to release the
screw;
b. rotate the foot to raise or lower it until it
touches to the floor;
c. lock the foot, screwing in the nut, until it
tightens against to the bottom of the
washing machine.
! Plug in the appliance.
The detergent draw is split into 3
compartments as illustrated in figure 9:
! compartment «1»: for prewash detergent;
! compartment “ ”: for special additives,
softeners, starch fragrances, etc.;
! compartment «2»: for washing detergent.
A liquid detergent cup is also included IN
SOME MODELS (fig. 10). To use it, place it
in compartment «2». This way, liquid
detergent will only enter the drum at the
right time. The cup can also be used for
bleach when the “Rinse” program is
selected.
WARNING:
contact the Customer Service Centre
should the power cord need
replacement.
WARNING:
only use liquid products; the washing
machine is set to automatically dose
additives at each cycle during the last
rinse.
WARNING:
some detergents are hard to remove.
In this case we recommend using the
specific container to be placed in the
drum (example in figure 11).

3. PRACTICAL TIPS
WARNING: when sorting laundry, make
sure:
— have eliminated metallic objects such as
hooks or clips, pins, coins, from laundry;
— to have buttoned pillow cases, closed
zips, tied loose belts and long robe
ribbons;
— to have removed rollers, hooks or clips
from curtains;
— to have carefully read clothing washing
labels;
— to have removed any persistent stains
using specific detergents.
! When washing rugs, bedcovers or other
heavy clothing, we recommend you avoid
the spinning cycle.
! To wash wool, make sure the item can be
machine washed and marked by the
“Pure virgin wool” symbol with the “Does
not mat” or “Machine washable” label.
A guide environmentally friendly and
economic use of your appliance.
Maximise The Load Size
! Achieve the best use of energy, water,
detergent and time by using the
recommended maximum load size.
Save up to 50% energy by washing a full
load instead of 2 half loads.
Do you need to pre—wash?
! For heavily soiled laundry only!
SAVE detergent, time, water and
between 5 to 15% energy consumption
by NOT selecting Prewash for slight to
normally soiled laundry.
Is a hot wash required?
! Pretreat stains with stain remover or soak
dried in stains in water before washing to
reduce the necessity of a hot wash
programme.
Save up to 50% energy by using a 60°C
wash programme.
Following is a quick guide with tips and
recommendations on detergent use at the
various temperatures. In any case, always
read the instructions on the detergent for
correct use and doses.
Helpful suggestions for the user
When washing heavily soiled whites,
we recommend using cotton
programs of 60°C or above and a
normal washing powder (heavy duty)
that contains bleaching agents that at
medium/high temperatures provide
excellent results.
For washes between 40°C and 60°C
the type of detergent used needs to be
appropriate for the type of fabric and
level of soiling.
Normal powders are suitable for “white”
or colour fast fabrics with high soiling,
while liquid detergents or “colour
protecting” powders are suitable for
coloured fabrics with light levels of
soiling.
For washing at temperatures below
40°C we recommend the use of liquid
detergents or detergents specifically
labeled as suitable for low temperature
washing.
For washing wool or silk, only use
detergents specifically formulated for
these fabrics.
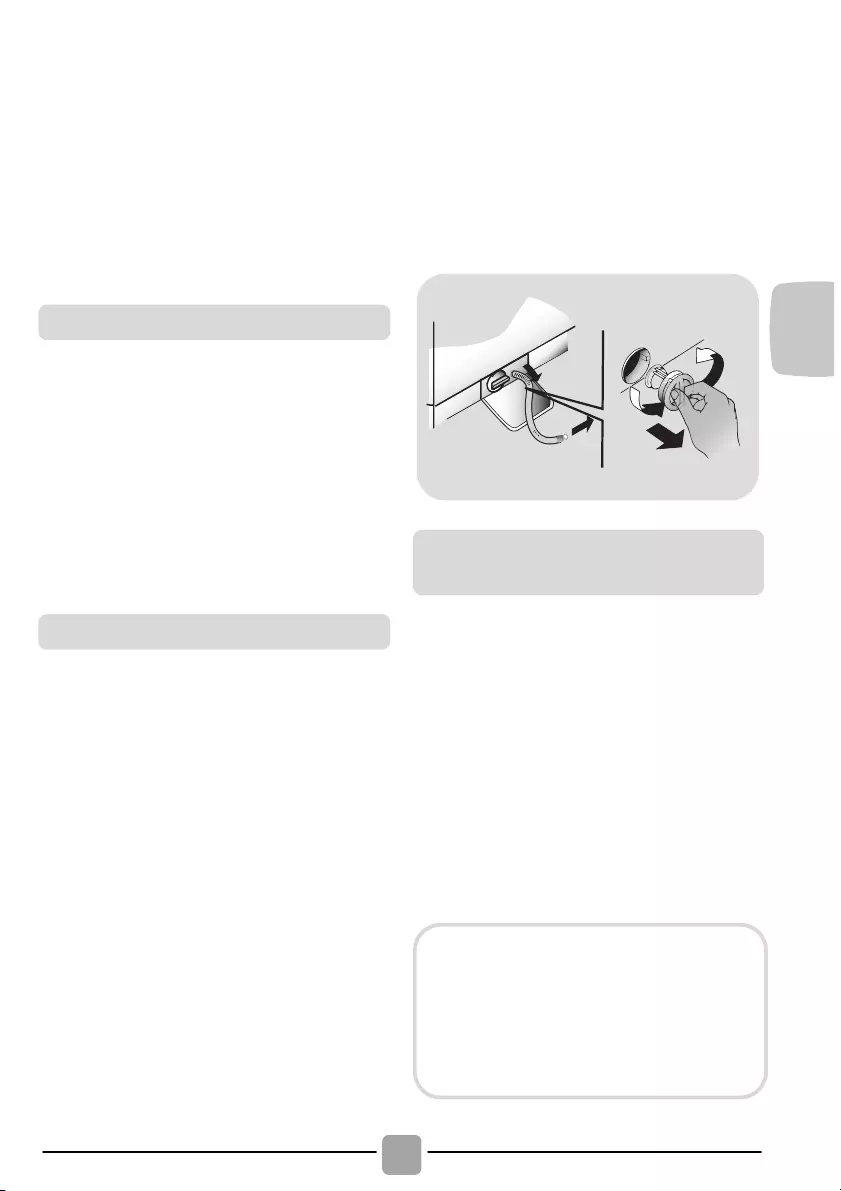
4. MAINTENANCE AND
CLEANING
To clean the washing machine exterior, use
a damp cloth, avoiding abrasives, alcohol
and/or solvents. To maintain a good wash
performance we recommend that the soap
drawer and pump filters are regularly
cleaned. A monthly service wash, using a
proprietary cleaner is also recommended.
! We recommend you clean the drawer to
avoid accumulating detergent and
additive residue.
!
To do this, extract the drawer using slight
force, clean it with running water and
reinsert it in its housing.
!
Ensure the siphon cap is correctly
refitted.
! The washing machine comes with a
special filter able to trap large residue,
such as buttons or coins, which could
clog the drain.
!
Only available on certain models: pull out
the corrugated hose, remove the stopper
and drain the water into a container.
!
Ensure all the water has been emptied
from the drum.
!
Before unscrewing the filter, we
recommend you place an absorbent cloth
under it to keep the floor dry. A small
amount of water will come out of the filter
as you remove it — this is normal.
!
Turn the filter counter—clockwise to the
limit stop.
! Remove and clean the filter; when
finished, replace it turning it clockwise.
The filter handle will be locked when it is
not possible to turn any further and the
handle is horizontal. Smearing a small
amount of liquid soap on the filter seal will
help refitting.
! Repeat the previous steps in reverse
order to reassemble all parts.
! Should the washing machine be stored in
an unheated room for a long period of
time, drain all water from tubes.
! Unplug the washing machine.
! Detach the tube from the drainage
system and clip on the rear of the
machine and lower it, fully draining water
into a bowl.
! Secure the drain tube with the drainage
system and clip on the rear of the
machine when finished.
! Keep the door glass and gasket clean.
Suggestions for moves or
prolonged disuse
The manufacturers warranty only
covers faults within the product of a
mechanical or electrical nature.
Faults caused by handling,
installation or miss use are not
covered and may incur a charge for
any repair visit to resolve.

5. QUICK USER GUIDE
This washing machine automatically adjusts
the level of the water to the type and
quantity of washing. This system gives a
reduction in energy consumption and a
saving in washing times.
! Turn on the washing machine and select
the required program.
! Adjust the washing temperature if
necessary and press the required «option»
buttons.
! Press the START/PAUSE button to start
washing.
Should power go out when the washing
machine is running, a special memory
saves the settings and, when power
returns, the machine resumes the cycle
from where it left off.
! At the end of the programme, the
message «End» will appear on the display
or, on some models, all wash stage
indicator lights will turn on.
! Turn off the washing machine.
For any type of wash, see the program
table and follow the operating sequence
as indicated.
Water pressure:
min 0.05 Mpa / max 0.8 Mpa
(0.05 MPa dispenses approximately 1 litre
of water in 10 seconds)
Spin r.p.m.: See rating plate.
Power input / Power current fuse amp /
Supply voltage: See rating plate.
6. CONTROLS AND
PROGRAMS
Programme selector with OFF
position
TEMPERATURE SELECTION
button
DELAY START TIME / WASH
STAGE indicator lights
DOOR LOCKED indicator light
EXTRA RINSE indicator light
TEMPERATURE SELECTION
indicator lights
SPIN SPEED indicator lights
Wait until the door locked light turns
off: about 2 minutes after the program
ends.

! Press the START/PAUSE button to start
the selected cycle.
! Once a programme is selected the
programme selector remains stationary on
the selected programme till cycle ends.
! Switch off the washing machine by
turning the selector to OFF.
! Press to start the selected cycle
(according to the selected cycle one of
the wash stage indicator lights will
illuminate).
ADD OR REMOVE ITEMS AFTER THE
PROGRAMMES HAS STARTED (PAUSE)
! Press and hold the START/PAUSE
button for about 2 seconds (some
indicator lights will flash, showing that the
machine has been paused).
! Wait 2 minutes until the safety device
unlocks the door.
! After you have added or removed items,
close the door and press the
START/PAUSE button (the programme
will start from where it left off).
CANCELLING THE PROGRAMME
! To cancel the programme, set the
selector to the OFF position.
! Appliance start time can be set with this
button, delaying the start by 3, 6 or 9
hours.
! Proceed as follows to set a delayed start:
— Select a programme.
— Wait until the indicator lights related to
temperature and spin of the programme
selected light up.
— Press the delay start button (each time
the button is pressed the start will be
delayed by 3, 6 or 9 hours respectively
and the corresponding time indicator
light will blink).
A special safety device prevents the
door from being opened immediately
after the end of the cycle.
Wait for 2 minutes after the wash
cycle has finished and the «Door
Security» light has gone out before
opening the door.
PROGRAMME selector with OFF
position
When you select a programme the
indicator lights related to temperature
and spin of that cycle will light up.
N.B.: To switch the machine off, turn the
programme selector to the OFF
position.
The programme selector must be
returned to the OFF position at the end
of each cycle or when starting a
subsequent wash cycle prior to the next
programme being selected and started.
Close the door BEFORE selecting the
button START/PAUSE.
When the START/PAUSE button has
been pressed, the appliance can take
few seconds before it starts working.
Before you open the door, please
check water level is below the door
opening to avoid flooding.

— Press START/PAUSE button to
commence the delay start operation (the
indicator light associated with the
selected delay start time stops blinking
and remains on). At the end of the
required time delay the programme will
start.
! It is possible to cancel the delay start by
turning the programme selector to OFF.
If there is any break in the power supply
while the machine is operating, a special
memory stores the selected programme
and, when the power is restored, it
continues where it left OFF.
! This option allows you to add one rinse at
the end of the washing cycle and is useful
for people with delicate and sensitive
skin, for which a small amount of
detergent residue can cause irritations or
allergies.
! It is advisable to also use this function for
the children clothes and for the washing
of heavily soiled items, which requires a
lot of detergent to be used, or for the
washing of toweling items whose fibres
mostly have the tendency to hold the
detergent.
! This button allows you to change the
temperature of the wash cycles.
! It is not possible to raise the temperature
over the maximum allowed for the
programme, in order to protect the
fabrics.
! If you want carry out a cold wash all the
indicators must be off.
! By pressing this button, it is possible to
reduce the maximum speed, and if you
wish, the spin cycle can be cancelled.
! If the label does not indicate specific
information, it is possible to use the
maximum spin expected in the program.
! To reactivate the spin cycle press the
button until you reach the spin speed you
would like to set.
! It is possible to modify the spin speed
without pausing the machine.
The option buttons should be
selected before pressing the
START/PAUSE button.
If the option is not compatible with the
selected programme, the relevant
indicator light first flashes and then
goes off.
TEMPERATURE SELECTION
button
To prevent damage to the fabrics, it is
not possible to increase the speed
over the maximum allowed for the
programme.
An over dosing of detergent can
cause excessive foaming. If the
appliance detects the presence of
excessive foam, it may exclude the
spinning phase or extend the duration
of the program and increase water
consumption.
The machine is fitted with a special
electronic device, which prevents the
spin cycle should the load be
unbalanced. This reduces the noise
and vibration in the machine and so
prolongs the life of your machine.

! Each time the DELAY START button is
pressed the indicator lights show how
many hours of delay you chosen (3, 6 or
9 hours) and the countdown until the end
of it.
! When a programme is running, the
indicator lights will light in sequence to
indicate the current phase:
! The indicator light is illuminated when the
door is fully closed.
! When START/PAUSE is pressed on
the machine with the door closed, the
indicator will flash momentarily and then
illuminate.
! A special safety device prevents the door
from being opened immediately after the
end of the cycle. Wait for 2 minutes after
the wash cycle has finished and the
DOOR LOCKED light has gone out before
opening the door. At the end of the cycle
turn the programme selector to OFF.
The indicator light will light up when the
button is pressed.
If the option is not compatible with the
selected programme, the relevant indicator
light first flashes and then goes off.
This show the washing temperature of the
selected programme that can be changed
(where allowed) by the relevant button.
If you want carry out a cold wash all the
indicators must be off.
This show the spin speed of the selected
programme, you can reduce or omit by the
relevant button.
DELAY START TIME / WASH
STAGE indicator lights
DOOR LOCKED indicator light
Close the door BEFORE selecting the
START/PAUSE button.
If the door is not properly closed,
the light will continue to flash for
about 7 seconds, after which the
start command will be automatically
cancelled. In this case, close the
door in the proper way and press
the START/PAUSE button.
EXTRA RINSE indicator light
WASH TEMPERATURE indicator
lights
SPIN SPEED indicator lights
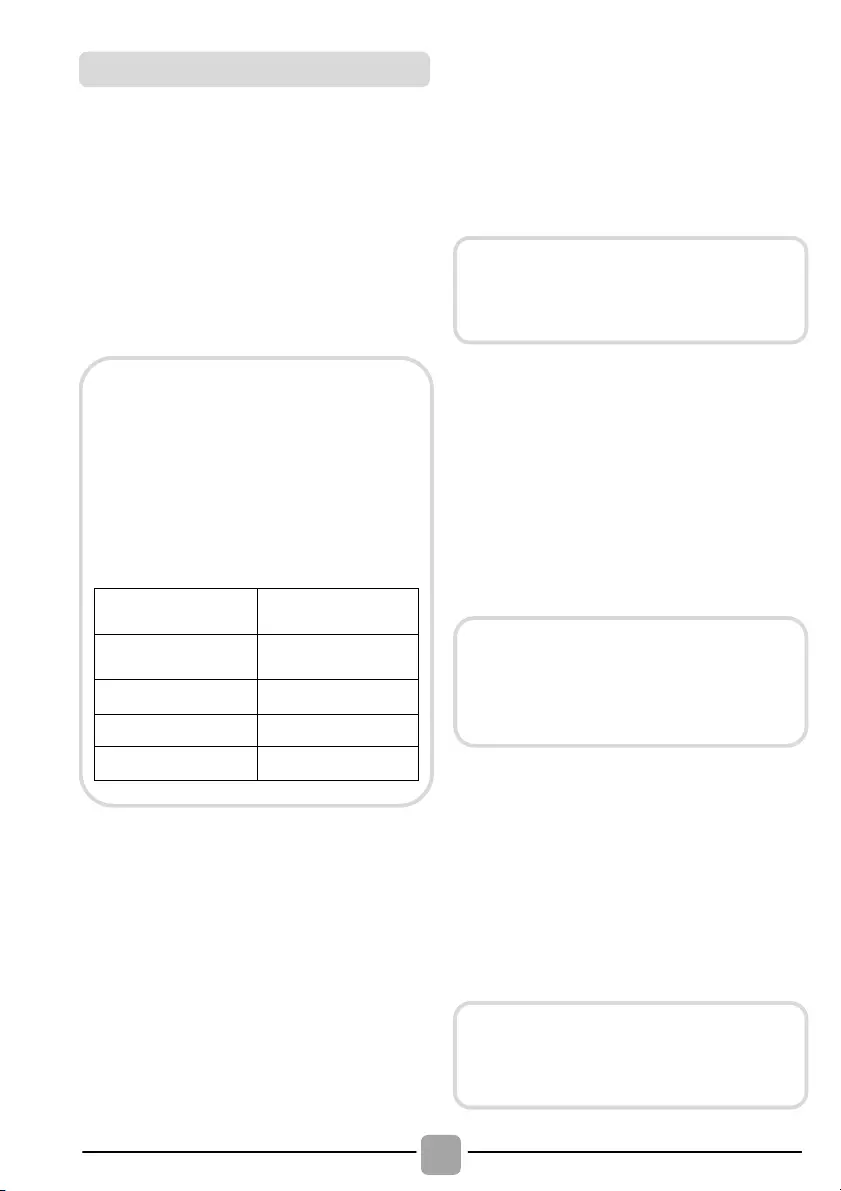
This appliance is equipped with Smart
Touch technology that allows you to
interact, via the App, with smartphones
based on Android operating system and
equipped with NFC (Near Field
Communication) function.
! Download on your smartphone the
Candy simply—Fi App.
FUNCTIONS
The main functions available using the App
are:
! Voice Assistant – A guide to help you
choose the ideal cycle with only three
voice inputs (clothes/fabrics, color, stain
level).
! Cycles – To download and launch new
washing programmes.
! Smart Care – Smart Check—up and Auto—
Clean cycles and a troubleshooting guide.
! My Statistics – Washing statistics and
tips for a more efficient use of your
machine.
HOW TO USE SMART TOUCH
FIRST TIME — Machine registration
! Enter the «Settings» menu of your
Android smartphone and activate the
NFC function inside the «Wireless &
Networks» menu.
! Turn the knob to the Smart Touch
position to enable the sensor on the
dashboard.
! Open the App, create the user profile and
register the appliance following the
instructions on the phone display or the
«Quick Guide» attached on the machine.
The Candy simply—Fi App is available
for devices running both Android and
iOS, both for tablets and for
smartphones. However, you can
interact with the machine and take
advantage of the potential offered
by Smart Touch only with Android
smartphones equipped with NFC
technology, according to following
functional scheme:
Android smartphone
with NFC technology
Interaction with the
machine + contents
Android smartphone
without NFC technology
Get all the details of the Smart Touch
functions, browsing the App in DEMO
mode or go to:
www.candysmarttouch.com
Depending on the smartphone model
and its Android OS version, the
process of the NFC activation may be
different. Refer to the smartphone
manual for more details.
More information, F.A.Q. and the
video for an easy registration are
available on:
www.candysmarttouch.com/how—to
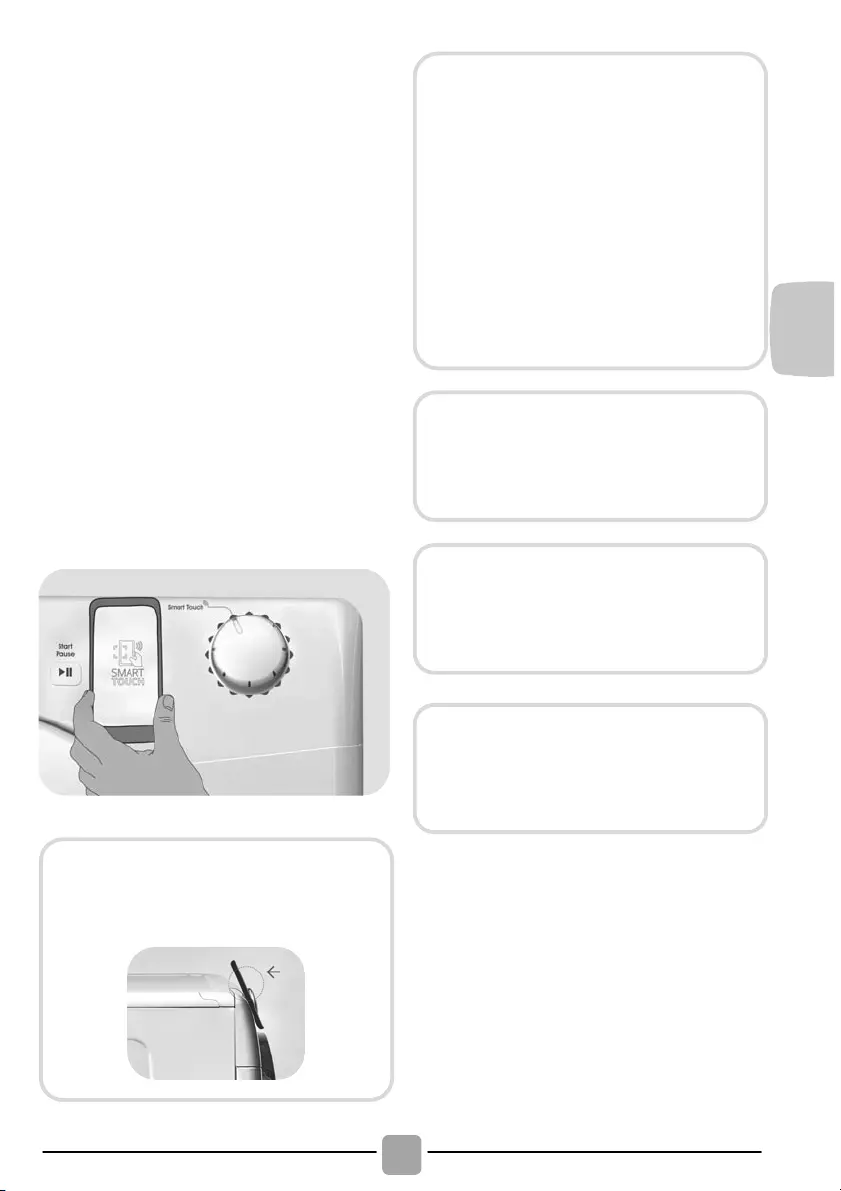
NEXT TIME – Regular usage
! Every time you want to manage the
machine through the App, first you have
to enable the Smart Touch mode by
turning the knob to the Smart Touch
indicator.
! Make sure you have unlocked your phone
(from stand—by mode) and you have
activated the NFC function; then, follow
the steps mentioned earlier.
! If you want to start a washing cycle, load
the laundry, the detergent and close the
door.
! Select the desired function in the App
(e.g.: starting a programme, the Smart
Check—up cycle, update statistics, etc…).
! Follow the instructions on the phone
display, KEEPING IT ON the Smart
Touch logo on the machine dashboard,
when requested to do so by the App.
NOTES:
Place your smartphone so that the
NFC antenna on its back matches
the position of the Smart Touch logo
on the appliance (as illustred below).
If you do not know the position of
your NFC antenna, slightly move the
smartphone in a circular motion over
the Smart Touch logo until the App
confirms the connection. In order for
the data transfer to be successful, it is
essential TO KEEP THE SMARTPHONE
ON THE DASHBOARD DURING THESE
THE FEW SECONDS OF THE
PROCEDURE;
a message on the
device will inform about the correct
outcome of the operation and advise
you when it is possible to move the
smartphone away.
Thick cases or metallic stickers on
your smartphone could affect or
prevent the transmission of data
between machine and telephone. If
necessary, remove them.
The replacement of some components of
the smartphone (e.g. back cover, battery,
etc…) with non—original ones, could result
in the NFC antenna removal, preventing
the full use of the App.
The management and the control of the
machine via App is only possible «by
proximity»: it is therefore not possible to
perform remote operations (e.g.:
from
another room
; outside of the house).

Customizable setting that interacts with the App on your smartphone and to
download the cycles (see the dedicated section). The factory sets the default
programme Auto—Clean, which will sanitize the machine.
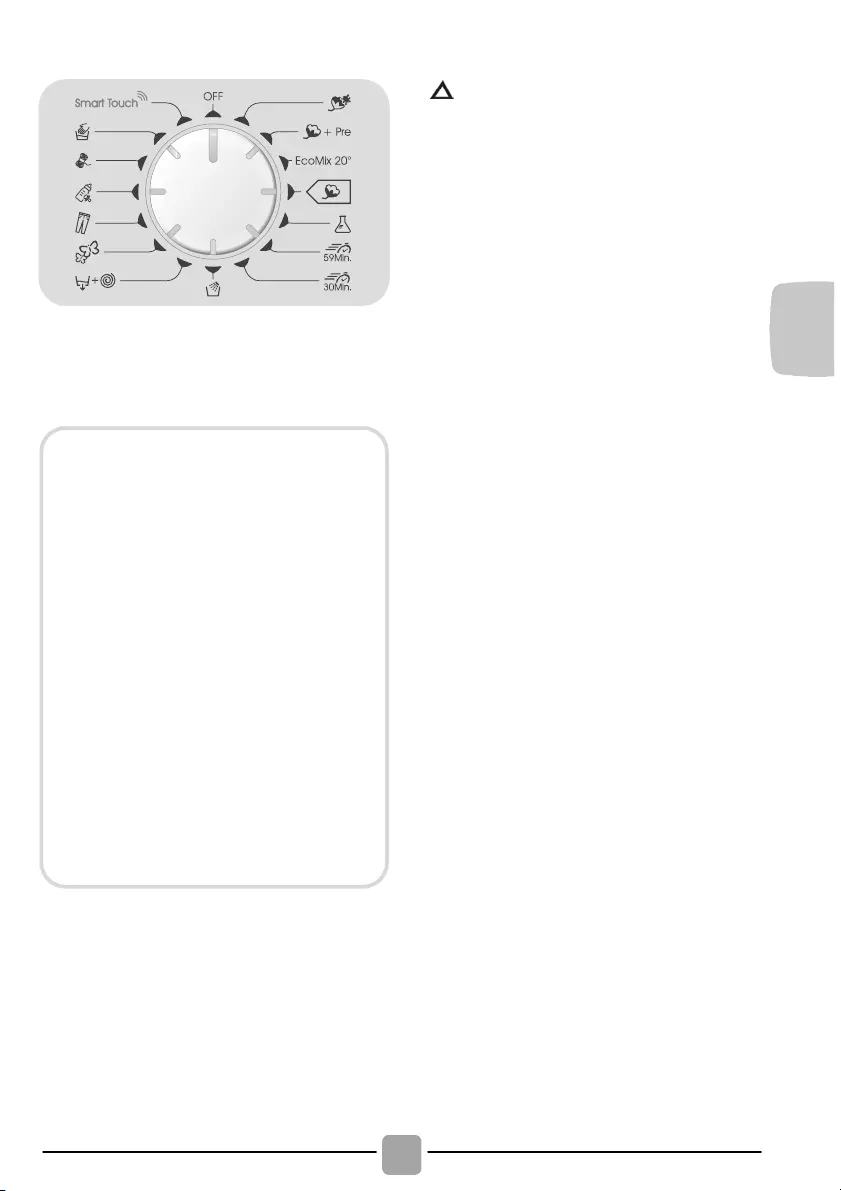
Please read these notes:
* Maximum load capacity of dry clothes,
according to the model used (see control
panel).
(Only for models with liquid
detergent compartment)
When only a limited number of
articles have stains which require
treatment with liquid bleaching
agents, preliminary removal of
stain can be carried out in the
washing machine.
Pour the bleach into the liquid
bleach container, inserted into the
compartment marked «2» in the
detergent drawer, and set the
special programme RINSE.
When this phase has terminated,
turn the programme selector to
the OFF position, add the rest of
the fabrics and proceed with a
normal wash on the most suitable
programme.
When you select a programme,
the indicator light related to
the recommended temperature
lights up. you can reduce the
temperature by pressing the
specific button (if allowed), but it’s
not possible to increase it over the
maximum allowed.
** STANDARD COTTON PROGRAMMES
ACCORDING TO (EU) No 1015/2010 and
No 1061/2010.
COTTON PROGRAMME WITH A
TEMPERATURE OF 60°C.
COTTON PROGRAMME WITH A
TEMPERATURE OF 40°C.
These programmes are suitable to
clean normally soiled cotton laundry and
they are the most efficient programmes
in terms of combined energy and water
consumptions for washing cotton
laundry.
These programmes have been
developed to be compliant with the
temperature on the wash label on the
garments and the actual water
temperature may slightly differ from the
declared temperature of the cycle.

To clean different types of fabrics and
various levels of dirt, the washing machine
has specific programs to meet every need
of washing (see table of programmes).
Whites
An intensive wash. The final spin at
maximum speed gives more efficient
removal.
Cotton + Prewash
This programme has been designed to
remove the stronger stains from cotton
white clothes. The prewash guarantees the
tough dirt removal. Add into compartment
«1» a quantity of detergent equal to 20% of
that used for main wash.
EcoMix 20°
This innovative programme, allows you to wash
different fabrics and colours together, such as
cottons, synthetics and mixed fabrics at only
20°C and provides an excellent cleaning
performance. Consumption on this program is
about 40% of a conventional 40°C. cottons
wash.
Cottons
This program is suitable to clean normally soiled
cotton laundry and it is the most efficient program
in terms of combined energy and water
consumptions for washing cotton laundry.
Synthetics
The washing and rinsing optimise the speed
and rhythm of the drum action and water
levels. The gentle spin, ensures a reduced
formation of creases in the fabric.
Daily 59 Min.
This specially designed programme
maintains the high quality wash performance
whilst greatly reducing the wash time. The
programme is designed for a reduced load
(see table of programmes).
Rapid 30 Min.
A complete washing cycle (wash, rinse and
spin). This programme is particularly suited
to slightly dirty cottons and mixed fabrics.
With this programme it is recommended to
use only 20% of the detergent normally
used to avoid waste.
Rinse
This program performs 3 rinses with an
intermediate spin (which can be reduced or
excluded by using the appropriate button) . It
is used for rinsing any type of fabric, for
example after a wash carried out by hand.
Drain + Spin
The program completes the drain and a
maximum spin. It is possible to delete or
reduce the spin with the SPIN SPEED
button.
Delicates
This program has reduced periods of drum
rotation during the cycle and is particularly
suitable or washing delicate fabrics. The
wash cycle and rinses are carried out with a
high level of water to ensure the best
performance.
Jeans
This program has been designed to have the
highest quality cleaning of fabrics such as
denim: ideal for removing dirt without affecting
the elasticity of the fibers.
Baby Care
This program allows you to wash all baby
clothes getting a perfect clean and
sanitizing effect, setting the temperature at
60°C minimum.
To optimize the result of the sanitizing effect
we recommend the use of powder detergent.
Wool
This program performs a wash cycle
dedicated to the wool fabrics that can be
washed in a washing machine, or the
articles to be washed by hand.
Hand Wash
Program for hand wash only clothes, the
program ends with 3 rinses and a slow spin.

Smart Touch
Customizable setting of the knob that you
have to select when you would like to
transfer a command from the App to the
machine and to download/start a cycle (see
the dedicated section and the user manual
of the App for more info).
In the Smart Touch option the factory sets
as a default the «Auto—Clean» cycle, made
to clean the drum, remove bad smells and
extend the life of the washing machine.
Make sure there is no load in the drum
before starting the «Auto—Clean» cycle, use
a proprietary washing machine cleaning
agent or powder detergent. Leave the door
of the machine open at the end of the cycle
to allow the drum to dry.
Recommended every 50 washes.
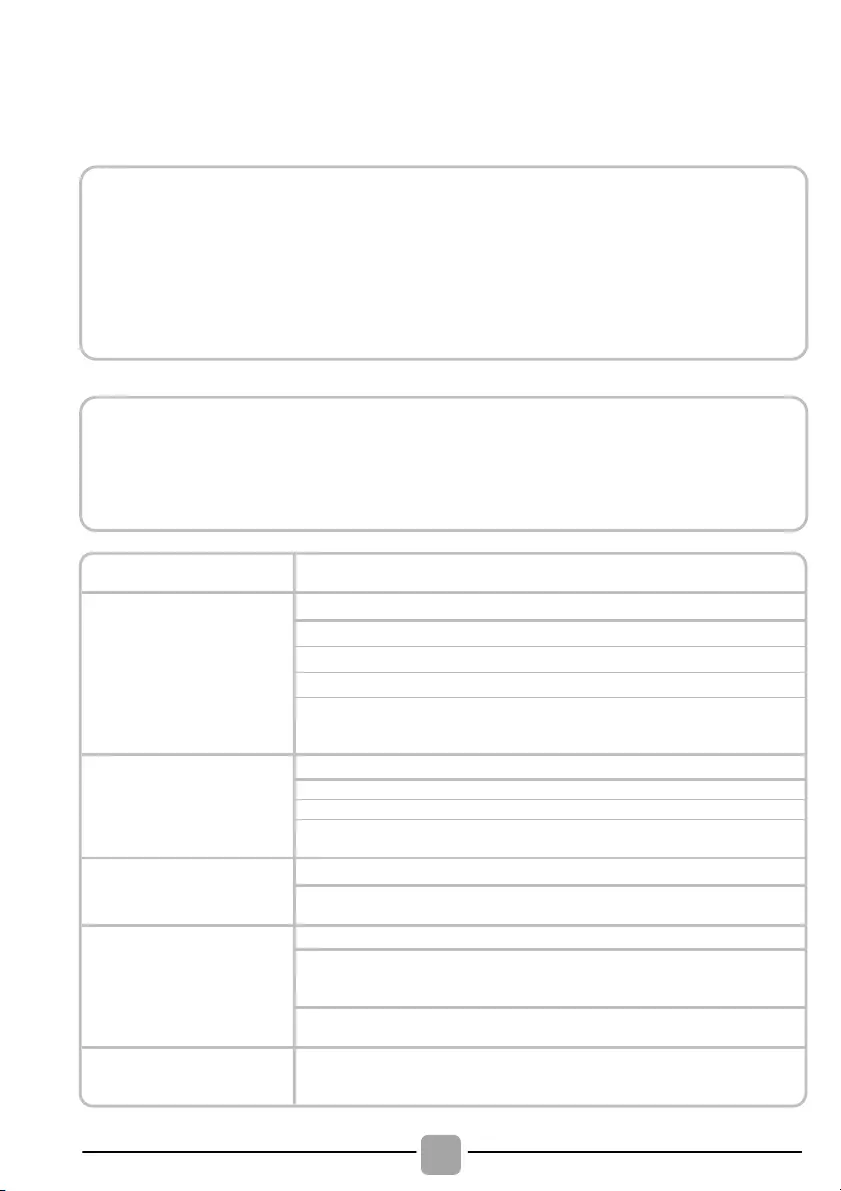
7. THROUBLESHOOTING AND WARRANTY
If you believe the washing machine is not working correctly, consult the quick guide
provided below which includes some practical tips on how to fix the most common
problems.
ERROR CODE FORMAT
Possible causes and practical solutions
E2 (with display)
2 flashes of the LEDs
(without display)
The machine cannot load water.
Make sure the water supply tap is open.
Make sure the water supply hose isn’t bent, kinked or trapped.
Make sure the drain pipe is at the proper height (see installation section).
Close the water supply tap, unscrew the filler hose from the back of
the washing machine and make sure the “anti—sand” filter is clean
and not blocked.
E3 (with display)
3 flashes of the LEDs
(without display)
The washing machine does not drain water.
Make sure the filter is not clogged.
Make sure the drain hose isn’t bent, kinked or trapped.
Make sure the home drainage system is not blocked and is allowing
water to flow through without obstruction. Try to drain the water in the sink.
E4 (with display)
4 flashes of the LEDs
(without display)
There is too much foam and/or water.
Ensure the correct amount of detergent is being used and the
detergent is designed for use in a washing machine.
E7 (with display)
7 flashes of the LEDs
(without display)
Make sure the door is correctly closed.
Make sure the clothes inside the drum are not preventing the door
from closing fully.
If the door is locked, turn off and unplug the washing machine from
the electrical supply socket, wait 2—3 minutes and reopen the door.
Turn off and unplug the washing machine, wait a minute. Turn on the
machine and restart a program. If the error occurs again contact an
Authorised Customer Service Centre directly.
FOR SMART TOUCH MODELS
The Candy simply—Fi app has a Smart Check—up function that allows you to confirm
the functionality and status of the product at any time. To use the Candy simply—Fi app
you will need an Android smartphone with NFC technology.
More info can be found on the App.
If the display of the machine is showing an error (by a code or blinking LEDs), you
should turn on the App on your Android smartphone, with NFC on.
Place your smart phone against the Smart Touch logo on the control panel. You should
now be able to read the fault directory to solve the issue.
! Models with a display: the error is shown by a number preceded by the letter “E”
(example: E2 = Error 2).
! Models without display: an error is shown by a sequence of flashes of every LED.
The error code is shown by the number of flashes followed by a pause of 5 seconds
(example: two flashes – pause 5 seconds – two flashes – repeating = Error 2).
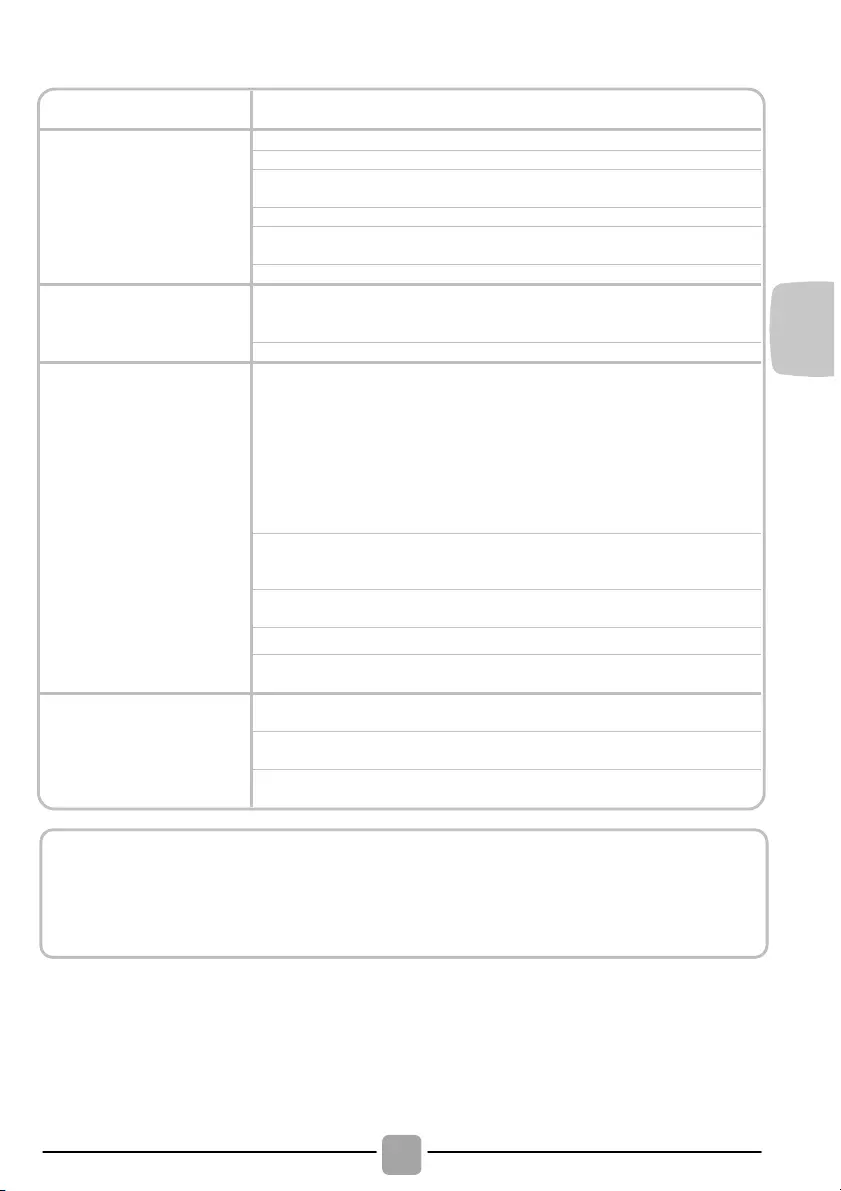
Possible causes and practical solutions
The washing machine
does not work / start
Make sure the product is plugged into a working supply socket.
Make sure the wall socket is working, testing it with another
appliance such as a lamp.
The door may not be correctly closed: open and close it again.
Check whether the required program was correctly selected and the
start button pressed.
Make sure the washing machine is not in pause or time delay mode.
Water leaked on the
floor near the
washing machine
This may be due to a leak from the seal between the tap, supply
hose and fill valve; in this case, replace it and tighten the hose
connections correctly.
Make sure the front filter is correctly closed.
The washing machine
does not spin
The machine is fitted with a detection system that protects the load
and product from damage if the load is not balanced before spinning.
This may result in:—
• The machine attempts to balance the load, increasing the time of
spin.
• Reduction of the speed of spin to decrease vibrations and noise.
• The spin cycle aborting to protect the machine and load.
If this is experienced remove the load de—tangle it, reload it and
restart the spin program.
This could be due to the fact that water has not been completely
drained: wait a few minutes. If the problem persists, see Error 3
section.
Some models include a «no spin» function: make sure it is not
selected.
Check which options are selected and their effect on the spin cycle.
Excessive detergent can impede the spin cycle, ensure the correct
amount of detergent is being used.
Strong vibrations /
noises are heard
during the spin cycle
The washing machine may not be fully levelled: if necessary, adjust
the feet as indicated in the specific section.
Make sure transport screws, rubber bungs and spacer tubes were
removed.
Make sure there are no foreign objects inside the drum (coins,
hinges, buttons, etc…).
The standard manufacturer warranty covers faults caused by electrical or
mechanical faults in the product due to an act or omission of the manufacturer. If
a fault is found to be caused by factors outside the product supplied, miss—use or
as a result of the instructions on use not being followed, a charge may be
applied.

The use of ecological detergents without
phosphates may cause the following effects:
— cloudier rinse drain water: This effect is
tied to the suspended zeolites which do
not have negative effects on rinse
efficiency.
— white powder (zeolites) on laundry at
the end of the wash: this is normal, the
powder is not absorbed by fabric and
does not change its colour.
To remove the zeolites, select a rinse
programme. In the future consider using
slightly less detergent.
— foam in the water at last rinse: this
does not necessary indicate poor rinsing.
Consider using less detergent in future
washes.
— abundant foam: This is often due to the
anionic surfactants found in the
detergents which are hard to eliminate
from laundry.
In this case, do not re—rinse to eliminate
these effects: it will not help at all.
We suggest conducting a maintenance
wash using a proprietary cleaner.
If the problem persists or if you suspect a
malfunction, immediately contact an
Authorised Customer Service Centre.
It is always recommended to use original
spare parts, that are available at our
Authorised Customer Service Centres.
The manufacturer declines all
responsibility for any printing errors in
the booklet included with this product.
Moreover, it also reserves the right to
make any changes deemed useful to its
products without changing their essential
characteristics.
Warranty
The product is guaranteed under the
terms and conditions stated on the
certificate included with the product. The
warranty certificate must be duly filled in
and stored, so as to be shown to the
Authorised Customer Service Centre in
case of need. Proof of purchase must
be made available at the time of any
warranty related repair.


Muchas gracias por elegir una lavadora
Candy. Sin ninguna duda, le ayudará a lavar
toda su ropa de manera segura, incluso la
ropa más delicada, todos los días.
Registre su producto en www.registercandy.com
y acceda fácilmente a los servicios
complementarios exclusivos para nuestros
clientes más fieles.
Lea atentamente este manual de instrucciones
para aprender a usar la lavadora de manera
correcta y segura y para obtener consejos útiles
acerca de su mantenimiento.
Antes de usar su nueva lavadora,
lea atentamente este manual de
instrucciones para optimizar su
funcionamiento. Guarde el manual en buen
estado para otros usuarios que pudieran
necesitarlo más adelante.
Compruebe que además del manual de
instrucciones le hayan entregado el
certificado de garantía, la información sobre
centros de servicio técnico y la etiqueta de
eficiencia energética. Compruebe también
que le hayan entregado la clavija, el codo
para la manguera de desagüe y la cubeta
para detergente (o lejía en algunos
modelos). Conserve todos estos accesorios.
Todos los productos están identificados con
un único código o número de serie de 16
caracteres, que figura en una etiqueta
adherida al aparato (puerta de carga) o en
el sobre que se encuentra dentro de la
lavadora. El código es una especie de
documento de identidad, necesario para
registrar el producto y para solicitar la
asistencia del Servicio de Atención al
Cliente de Candy.
Este dispositivo tiene el distintivo de la
directiva europea 2012/19/UE sobre
Residuos de Aparatos Eléctricos y
Electrónicos (RAEE).
Los RAEE contienen tanto sustancias
contaminantes (que pueden repercutir
negativamente en el medio ambiente) como
componentes básicos (que pueden
reutilizarse). Es importante que los RAEE
se sometan a tratamientos específicos
con el objeto de extraer y eliminar, de
forma adecuada, todos los agentes
contaminantes. Igual de importante es
recuperar y reciclar todo el material posible.
La gente puede desempeñar una función
importante a la hora de asegurarse de que
los RAEE no se convierten en un problema
medioambiental; es crucial seguir algunas
normas básicas:
! Los RAEE no han de tratarse como
residuos domésticos.
! Los RAEE han de depositarse en los
puntos de recogida habilitados para ello
que gestiona el ayuntamiento o empresas
contratadas para ello. En muchos países
se ofrece la posibilidad de recogida a
domicilio de los RAEE de mayor volumen.
En muchos países, cuando la gente compra
un nuevo dispositivo, el antiguo se puede
entregar al vendedor, quien lo recoge de
forma gratuita (un dispositivo antiguo por
cada dispositivo adquirido) siempre que el
equipo entregado sea similar y disponga de
las mismas funciones que el adquirido.
1. NORMAS DE SEGURIDAD
2. INSTALACIÓN
3. CONSEJOS PRÁCTICOS
4. LIMPIEZA Y MANTENIMIENTO
5. GUÍA RÁPIDA
6. CONTROLES Y PROGRAMAS
7. DIAGNÓSTICO DE AVERÍAS Y
GARANTÍA

1. NORMAS DE
SEGURIDAD
!
Este producto es exclusivamente
para uso doméstico o similar:
− zona de cocina para el
personal de tiendas, oficinas y
otros entornos laborales;
− granjas;
− pasajeros de hoteles, moteles
u otros entornos residenciales;
− hostales (B&B).
No se recomienda el uso de este
producto con fines diferentes del
doméstico o similar, por ejemplo,
con fines comerciales o
profesionales. El empleo de
la lavadora con fines no
recomendados puede reducir la
vida útil del artefacto e invalidar
la garantía. Todos los daños,
averías o pérdidas ocasionados
por un uso diferente del
doméstico o similar (aunque ese
uso se realice en un entorno
doméstico) no serán reconocidos
por el fabricante en la medida en
que lo permita la ley.
! Este electrodoméstico puede ser
utilizado por niños mayores de 8
años y por personas con
capacidades físicas, sensoriales
o mentales limitadas o que
carezcan de la experiencia
y el conocimiento necesarios,
siempre y cuando estén
supervisadas por una persona
encargada de velar por su
seguridad o hayan sido
instruidas en su utilización de
manera segura.
Los niños no deben jugar con el
electrodoméstico. Los niños no
deben ocuparse del mantenimiento
ni de la limpieza del electrodoméstico,
salvo que estén supervisados una
persona encargada de velar por su
seguridad.
! Vigile a los niños de manera
que se asegure que no juegan
con el aparato.
!
Los niños menores de 3 años se
deben mantener lejos a menos que
estén supervisados de forma continua.
! Si el cable de alimentación está
dañado, por seguridad debe
reemplazarlo el fabricante, un
técnico del Servicio de Atención
al Cliente o una persona
debidamente cualificada.
!
Sólo deben emplearse las
mangueras de suministro de
agua proporcionadas con el
electrodoméstico. No reutilizar
mangueras de lavadoras antiguas
.
! La presión de agua debe estar
entre 0,05 MPa y 0,8 MPa.
!
Ninguna alfombrilla debe obstruir
las rejillas de ventilación situadas
en la base de la lavadora.
! Para apagar la lavadora, se debe la
marca de referencia del selector de
programas a la posición vertical.
Si la marca no se encuentra en
posición vertical, la lavadora está

encendida (solo para modelos con
mando programador).
!
Una vez instalado el
electrodoméstico, se debe poder
acceder fácilmente al enchufe.
!
La capacidad máxima de colada
seca depende del modelo
usado (ver panel de control).
!
Para consultar la ficha del
producto, visitar la web del
fabricante.
! Desenchufar la lavadora y
cerrar el grifo del agua antes de
proceder a su limpieza o a
cualquier operación de
mantenimiento.
! Asegurarse de que la toma de
corriente tenga conexión a
tierra. Si no se dispone de toma
con conexión a tierra, llamar a
un técnico especializado.
!
No utilizar adaptadores, regletas
ni alargues.
!
Asegurarse de que no quede
agua residual en el tambor antes
de abrir la puerta de carga.
! No desenchufar la lavadora
tirando del cable de alimentación
ni del aparato.
! No instalar la lavadora en el
exterior, ni exponerla a la
lluvia, a los rayos del sol, o a
otros factores ambientales.
!
Para transportar la lavadora, no
levantarla sosteniéndola de los
mandos ni de la cubeta del
detergente y no apoyarla sobre la
puerta de carga. Para levantar la
lavadora, se recomienda la
colaboración de al menos dos
personas.
! En caso de fallo o mal
funcionamiento, apagar la lavadora,
cerrar el grifo del agua y no intentar
repararla. Llamar de inmediato al
Servicio de Atención al Cliente y
utilizar sólo piezas de recambio
originales. El incumplimiento de
estas instrucciones puede afectar
la seguridad del aparato.
Al mostrar el logo marcado
en este producto, declaramos,
bajo nuestra propia responsabilidad,
el cumplimiento de todos los
requisitos europeos en términos
de seguridad, salud y medio
ambiente, establecidos en la
legislación de este producto.
Instrucciones de seguridad
ATENCIÓN:
el agua puede alcanzar
temperaturas muy elevadas
durante el ciclo de lavado.
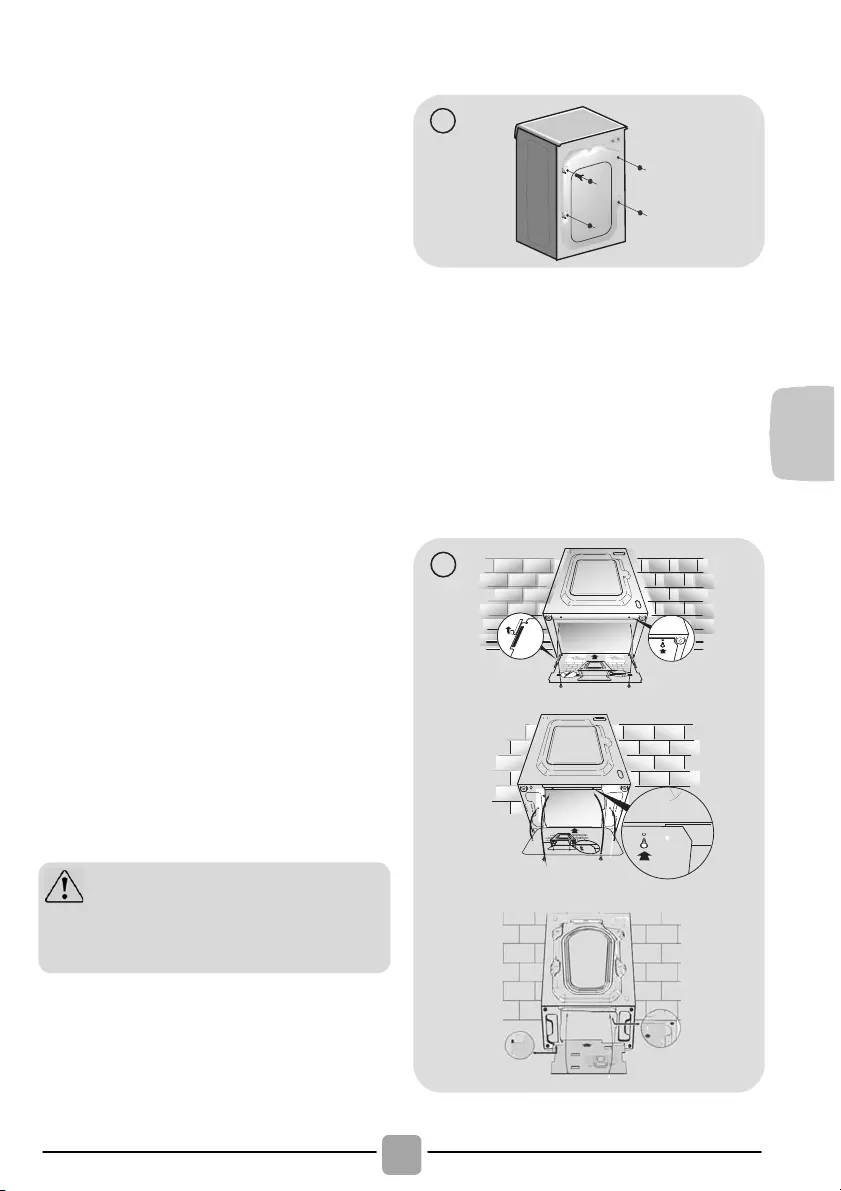
! Retirar las cintas que sostienen
el tubo, cuidando de no dañar ni el
tubo ni el cable de alimentación.
! Extraer los 2 o 4 tornillos (A) que
se encuentran en la parte posterior
de la lavadora y quitar los dos 2 o
4 seguros de transporte (B), tal y
como se muestra en la figura 1.
! Obstruir los 2 o 4 orificios que
quedan tras retirar los tornillos con
los tapones que se encuentran
en el sobre que contiene las
instrucciones.
! Para lavadoras de encastre,
después de cortar las cintas de
la
manguera, extraer los 3 o 4
tornillos (A) y los 3 o 4 seguros de
transporte (B).
! En ciertos modelos, 1 o más
seguros de transporte pueden caer
dentro de la lavadora. Para quitarlos,
inclinar el aparato hacia delante de
modo de poder cogerlos. Obstruir los
orificios que quedan tras retirar los
tornillos con los tapones que se
encuentran en el sobre.
! Colocar la lámina sintética en la
parte inferior, tal y como se muestra
en la figura 2 (A, B o C, según el
modelo).
ATENCIÓN:
los niños no deben jugar con
los materiales de embalaje.
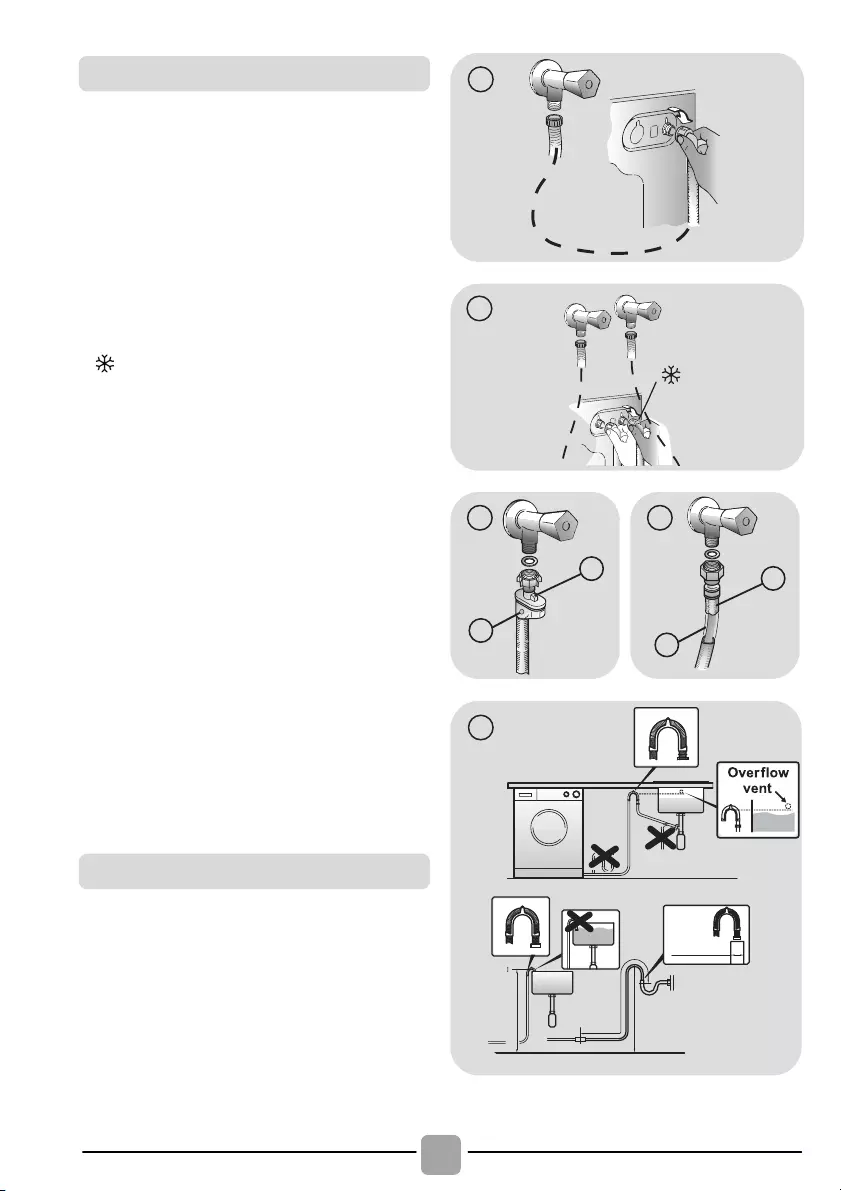
! Conectar la manguera de agua al grifo
(fig. 3), empleando únicamente la manguera
suministrada con el electrodoméstico (no
reutilizar mangueras antiguas).
! Algunos modelos tienen una o más de las
siguientes características:
! Conexiones HOT&COLD para agua fría
y caliente (fig. 4): Favorecen el ahorro
de energía.
Conectar el tubo gris al grifo del agua fría
y el rojo, al del agua caliente. El
electrodoméstico se puede conectar sólo
al grifo del agua fría, en cuyo caso se
retrasará el inicio de algunos programas.
! AQUASTOP (fig.
5):
Un dispositivo
situado en el tubo de alimentación impide
la entrada de agua si el tubo está
deteriorado. En caso de avería, aparece
una marca de color rojo en la ventana
«A», que indica que debe reemplazarse el
tubo. Para extraer la tuerca, presionar el
dispositivo de bloqueo unidireccional «B».
!
AQUAPROTECT – TUBO DE ALIMENTACIÓN
CON PROTECCIÓN (fig. 6): Si el tubo
principal «A» pierde agua, el depósito
transparente «B« contiene agua que
permite que se complete el ciclo de
lavado. Al finalizar el ciclo, solicitar al
Servicio de Atención al Cliente el
reemplazo del tubo de entrada de
agua.
! La lavadora debe quedar cerca de la
pared en su parte posterior, evitando que
el tubo quede doblado o deformado.
Ubicar el tubo de descarga en el
fregadero o, preferentemente, conectarlo
al desagüe de la pared a 50 cm de altura
como mínimo, con un diámetro mayor
que el tubo de la lavadora (fig. 7).
min 50 cm
max 85 cm
+2,6 mt
max
max 100 cm
Conexión a la red de agua
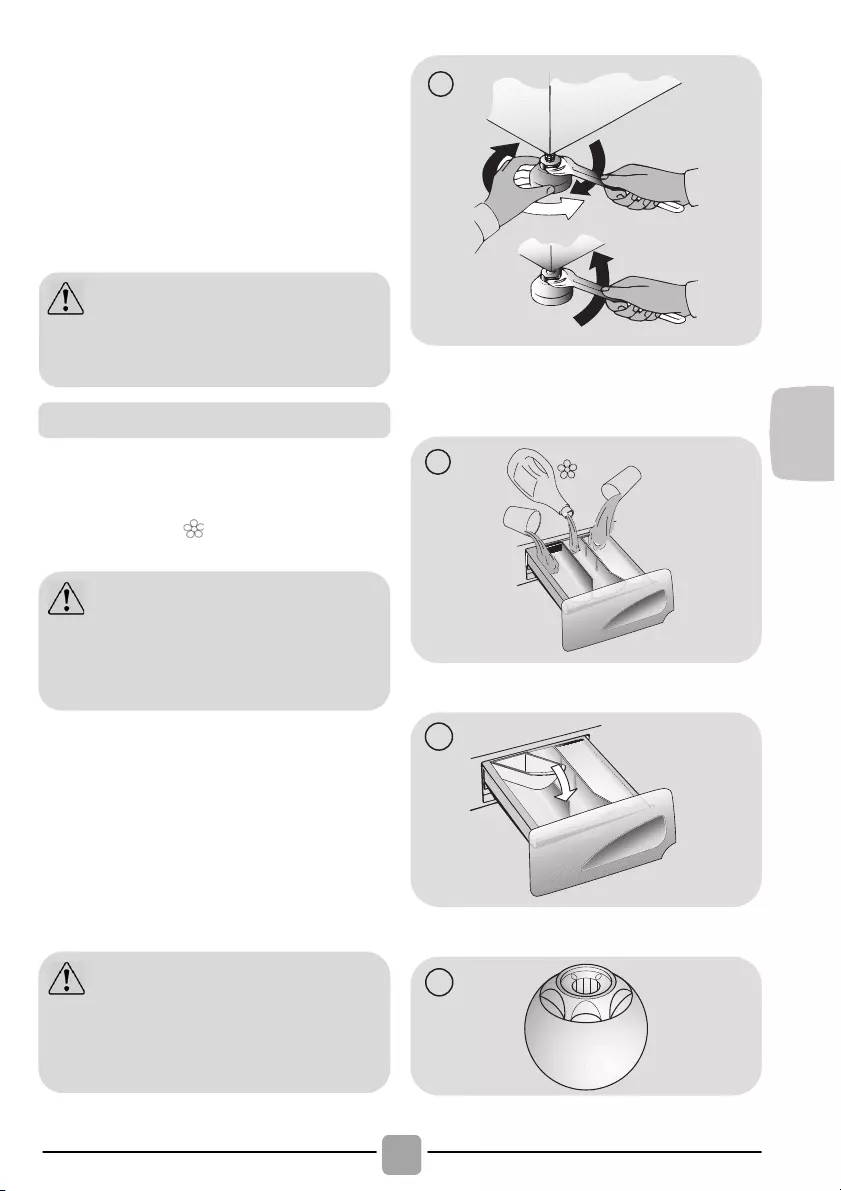
! Nivelar el electrodoméstico ajustando las
patas fig. 8:
a. girar la tuerca en el sentido de las
agujas del reloj para extraer el tornillo;
b. girar la pata regulable hasta que toque
el suelo;
c. bloquear el movimiento de la pata
insertando la tuerca hasta que toque
la parte inferior de la lavadora.
! Enchufar el aparato.
La cubeta se divide en tres compartimentos (fig. 9)::
! compartimento «1»: detergente para el
prelavado;
! compartimento “ ”: otros productos líquidos
como suavizantes, almidón, fragancias, etc;
! compartimento «2»: detergente para el lavado.
Con algunos modelos se suministra una pieza
especial para el detergente líquido (fig. 10).
Si se desea usar detergente líquido, ubicar la
pieza especial en el compartimento «2». De
ese modo, el detergente líquido pasará al
tambor en el momento adecuado del ciclo de
lavado. La pieza especial puede emplearse
para la lejía cuando se selecciona el programa
de aclarado.
ATENCIÓN:
si es necesario reemplazar el cable de
alimentación, solicitar la asistencia del
Servicio de Atención al Cliente.
ATENCIÓN:
sólo deben emplearse productos
líquidos. La lavadora está configurada
para dosificar automáticamente los
productos durante el último aclarado.
ATENCIÓN:
algunos detergentes no son fáciles de
limpiar. Si se utilizan detergentes de
este tipo, emplear el contenedor especial
y ubicarlo dentro del tambor (fig. 11).

3. CONSEJOS PRÁCTICOS
ATENCIÓN: Al clasificar las prendas,
asegurarse de:
— quitar objetos metálicos como broches,
ganchos, monedas, etc.;
— abotonar fundas, cerrar cremalleras,
ajustar cinturones y cintas;
— retirar enganches de las cortinas;
— leer las instrucciones de lavado de cada
prenda;
— tratar previamente las manchas difíciles con
productos especiales.
! Al lavar alfombras, mantas o prendas
pesadas, se recomienda desactivar la
función de centrifugado.
! Al lavar prendas de lana, comprobar que
sean aptas para lavarlas en la lavadora y
que contengan el símbolo de «Pura lana
virgen» con la indicación de «No se
apelmaza » o «Lavable en lavadora».
Cómo usar su lavadora de forma
respetuosa con el medio ambiente y con el
máximo ahorro.
Cargar al máximo la lavadora
! Para ahorrar energía, detergente y tiempo,
se recomienda cargar al máximo la lavadora.
Es posible ahorrar hasta un 50% de energía
con una única colada de carga llena, en
lugar de dos coladas a media carga.
¿Cuándo es necesario el prelavado?
! ¡Sólo cuando las prendas están muy
sucias! Cuando la ropa tiene una
suciedad normal, es posible ahorrar entre
un 5% y un 15% de energía si no se
utiliza la función de prelavado.
¿Qué temperatura de lavado se debe
seleccionar?
! Si se emplea un quitamanchas o se
sumergen las prendas manchadas antes
de lavarlas en la lavadora, se reduce la
necesidad de seleccionar un programa de
lavado de alta temperatura. Seleccionando
el programa de lavado a 60ºC se puede
ahorrar hasta un 50% de energía.
A continuación se proporciona una guía rápida
con consejos y recomendaciones sobre el uso
de detergente a distintas temperaturas. Se
recomienda leer siempre las instrucciones de
cada detergente para utilizarlo correctamente y
en las cantidades adecuadas.
Consejos para colocar la ropa
en la lavadora
Sugerencias útiles para el
usuario
Para lavar ropa blanca muy sucia
y obtener excelentes resultados,
emplear programas para algodón con
temperaturas de 60°C o superiores y
un detergente en polvo normal con
agentes blanqueadores.
Para temperaturas de lavado de 40°C
a 60°C, se debe elegir un detergente
apropiado para el tipo de género y el
nivel de suciedad. Los detergentes
en polvo normales dan excelentes
resultados en el lavado de ropa muy
sucia «blanca» o de colores resistentes,
mientras que los detergentes en
polvo para prendas de color son
recomendables para el lavado de ropa
de color con bajo nivel de suciedad.
Para temperaturas de lavado inferiores
a 40°C, se recomienda emplear
detergentes líquidos o adecuados para
el lavado a bajas temperaturas.
Para el lavado de prendas de lana o seda,
emplear sólo detergentes formulados
especialmente para ese tipo de géneros.

4. LIMPIEZA Y
MANTENIMIENTO
Para limpiar el exterior de la lavadora no usar
productos abrasivos ni alcohol ni solventes;
basta con pasar un paño húmedo. La lavadora
no requiere cuidados especiales para
mantenerla limpia. Mantener limpios los
compartimentos de detergente y suavizante y
el filtro. A continuación ofrecemos algunos
consejos para el traslado o para largos
períodos de inactividad de la lavadora.
! Es conveniente limpiar la cubeta para
que no se acumulen restos de detergente
y otros productos.
! Retirar la cubeta haciendo un poco de
fuerza, dejarla bajo el agua hasta que esté
limpia y volver a colocarla en su sitio.
! La lavadora está provista de un filtro
especial que retiene los objetos de tamaño
relativamente grande, como monedas o
botones, que podrían obstruir el desagüe.
! Sólo algunos modelos: extraiga el tubo,
saque el tapón y recoja el agua en un
contenedor.
! Antes de extraer el filtro, se recomienda
colocar un paño absorbente en el suelo para
evitar que se moje.
! Girar el filtro en sentido contrario al de las
agujas del reloj hasta que se detenga en
la posición vertical.
! Extraer el filtro, limpiarlo y volver a colocarlo
girándolo en el sentido de las agujas del
reloj.
! Para volver a colocar todo en su sitio, repetir
los pasos previos siguiendo las instrucciones
en sentido contrario.
! En el caso de que la lavadora estuviese
inactiva durante un largo período de
tiempo en lugares a bajas temperaturas,
se recomienda vaciar por completo los
restos de agua que hayan quedado en el
interior de los tubos.
! Desenchufar la lavadora.
! Soltar el tubo de la abrazadera y colocar
el extremo en un recipiente en el suelo
para recoger toda el agua.
! Volver a asegurar el tubo de desagüe con
la abrazadera una vez concluida la
operación.
Limpieza de la cubeta para el
detergente
Recomendaciones para el traslado
o para largos períodos de
inactividad de la lavadora

5. GUÍA RÁPIDA
La lavadora regula automáticamente el
nivel de agua según el tipo de ropa y la
carga. Este sistema reduce el consumo
energético y el tiempo de lavado.
! Encender la lavadora y seleccionar el
programa de lavado.
! Regular la temperatura de lavado si es
necesario y configurar las opciones
necesarias.
! Pulsar la tecla INICIO/PAUSA para iniciar el
lavado.
En caso de que se interrumpa el suministro
eléctrico cuando la lavadora está
funcionando, una memoria especial guarda
la configuración elegida y, cuando se
restablece el suministro, la máquina reinicia
el ciclo donde éste se ha interrumpido.
! Al finalizar el programa, el mensaje «End»
aparecerá en el display o, en algunos
modelos, todos los pilotos de los ciclos
de lavado se encenderán.
! Apagar la lavadora.
Para distintos tipos de lavado, consultar
la tabla de programas y seguir los pasos
indicados.
Presión en el circuito hidráulico:
min 0,05 Mpa / max 0,8 Mpa
Revoluciones de centrifugado:
ver tarjeta de datos.
Potencia absorbida/ Amperios del
fusible de la red/ Tension:
ver tarjeta de datos.
6. CONTROLES Y
PROGRAMAS
Selector de programas con
posición OFF
Tecla SELECCIÓN TEMPERATURA
Tecla SELECCIÓN CENTRIFUGADO
Indicadores INICIO DIFERIDO /
FASE DE LAVADO
Indicador SEGURIDAD PUERTA
Indicadores SELECCIÓN
TEMPERATURA
Indicadores SELECCIÓN
CENTRIFUGADO
Esperar unos 2 minutos después de
finalizado el programa hasta que se
apague la luz que indica que se ha
desbloqueado la puerta.

! Accionar la tecla INICIO/PAUSA para
iniciar el ciclo seleccionado.
! Una vez que se selecciona un programa
el selector de programa se mantiene
inmóvil en el programa seleccionado
hasta que termine el ciclo.
! Apague la lavadora girando el selector en
la posición OFF.
! Pulsa para iniciar el ciclo seleccionado
(de acuerdo con el ciclo seleccionado, se
encenderá el piloto de la fase de lavado).
AÑADIR O ELIMINAR ELEMENTOS TRAS
LOS PROGRAMAS HA COMENZADO
(PAUSA)
! Mantén pulsada la tecla INICIO/PAUSA
durante 2 segundos (un piloto
parpadeará, indicando que la lavadora se
ha detenido).
! Espere 2 minutos hasta que el
dispositivo de seguridad permita abrir la
puerta.
! Después de haber agregado o quitado
elementos a la colada, cierre la puerta y
presione la tecla INICIO/PAUSA (el
programa se iniciará a partir de donde se
detuvo).
CANCELACIÓN DE UN PROGRAMA
! Para cancelar un programa, sitúe el
selector en la posición OFF.
! El inicio del electrodoméstico puede
programarse con esta tecla, difiriendo
dicho inicio 3, 6 o 9 horas.
! Para programar un inicio diferido,
procede como se indica a continuación:
— Selecciona un programa.
— Espera hasta que el piloto
correspondiente a la temperatura y al
programa de centrifugado seleccionado
se encienda.
Un dispositivo de seguridad impide
que la puerta se abra inmediatamente
después del final del ciclo.
Espere 2 minutos después de que el
ciclo de lavado haya terminado y la
luz de «Puerta de seguridad» se ha
apagado antes de abrir la puerta.
PROGRAMA selector con
posición OFF
Cuando seleccionas un programa,
los pilotos correspondientes a la
temperatura y centrifugado de ese ciclo
se encenderán.
N.B.: Para apagar la máquina, gire el
selector de programas en la posición
OFF
El selector de programa se debe volver
a la posición OFF al final de cada ciclo
o cuando se inicia un ciclo de lavado
posterior antes del próximo programa
que se está seleccionado y se inicia.
Cierre la escotilla ANTES de
seleccionar INICIO/PAUSA.
Cuando la tecla INICIO/PAUSA ha sido
accionada, la lavadora puede tomar
unos segundos antes de iniciar el cilo.
Antes de abrir la puerta, por favor
comprueba que el nivel de agua está
por debajo de la apertura de la puerta
para evitar que se desborde.

— Pulsa la tecla (cada vez que pulses la
tecla el inicio se diferirá 3, 6 o 9 horas
respectivamente, y el piloto del tiempo
correspondiente parpadeará).
— Pulsa la tecla INICIO/PAUSA para que
se inicie la operación de diferido (el
piloto correspondiente al tiempo diferido
seleccionado dejará de parpadear y se
mantendrá encendido). Al final del
tiempo diferido escogido, se iniciará el
programa.
! Es posible cancelar el inicio diferido
girando el selector de programas a la
posición OFF.
Si hay alguna interrupción en el
suministro de energía mientras la
lavadora está en funcionamiento, una
memoria especial almacena el programa
seleccionado y, cuando se restablezca la
energía, continúa donde lo dejó.
! Esta opción permite añadir un aclarado al
final del ciclo de lavado y está diseñado
especialmente para las personas con
pieles delicadas y sensibles, para las
cuales el mínimo resto de detergente
puede causarles irritación y alergia.
! Esta función también está recomendada
para las prendas de niños en caso de
suciedad extrema, en los que se usa
mucho detergente, o para el lavado de
toallas cuyas fibras en su mayoría
tienden a retener el detergente.
! Esta tecla permite cambiar la temperatura
de los ciclos de lavado.
! No se puede aumentar la temperatura
por encima del máximo permitido para
cada programa, para conservar los
tejidos.
! Si deseas lavar con un programa frío,
todos los indicadores deben estar
desconectados.
! Si pulsas esta tecla, es posible reducir la
velocidad máxima, y si lo deseas, puedes
cancelar el ciclo de centrifugado.
! Si la etiqueta no proporciona información
específica, significa que se puede usar el
centrifugado máximo previsto por el
programa.
! Para reactivar el ciclo de centrifugado,
pulsa la tecla hasta alcanzar la velocidad
de centrifugado deseada.
! Es posible modificar la velocidad de
centrifugado sin detener la lavadora.
Las opciones deberán seleccionarse
antes de pulsar la tecla de
INICIO/PAUSA.
Si la opción no es compatible con el
programa seleccionado, el piloto
correspondiente parpadeará primero y
se apagará después.
Tecla SELECCIÓN TEMPERATURA
Tecla SELECCIÓN CENTRIFUGADO
Para evitar dañar los tejidos, no es
posible aumentar la velocidad por
encima del máximo permitido para
cada programa.

! Cada vez que se pulsa la tecla de INICIO
DIFERIDO, el piloto mostrará cuántas
horas has escogido para el inicio diferido
(3, 6 o 9 horas), y la cuenta atrás hasta
que finalice.
! Cuando un programa está en marcha, el
piloto se encenderá en serie para indicar
la fase en cuestión:
! El icono indica que la puerta está cerrada.
! Cuando INICIO/PAUSA se presiona
con la puerta cerrada, el indicador se
parpadeará y luego de manera fija.
! Un dispositivo de seguridad impide que la
puerta se abra inmediatamente después
del final del ciclo. Espere 2 minutos
después de que el ciclo de lavado haya
terminado y la luz de SEGURIDAD
PUERTA se haya apagado antes de
abrir la puerta. Al final del ciclo, gire el
selector de programas a la posición OFF.
El piloto se encenderá cuando se pulse la
tecla.
Si la opción no es compatible con
el programa seleccionado, el piloto
correspondiente parpadeará primero y se
apagará después.
Los indicadores muestran la temperatura
de lavado del programa seleccionado que
puede cambiarse (si está permitido) con la
tecla correspondiente.
Si deseas lavar con un programa frío, todos
los indicadores deben estar desconectados.
Los indicadores muestran la velocidad de
centrifugado del programa seleccionado
que puede cambiarse o descartarse con la
tecla correspondiente.
Una cantidad excesiva de detergente
puede provocar un exceso de
espuma. Si el electrodoméstico
detecta la presencia de una cantidad
excesiva de espuma, puede descartar
la fase de centrifugado, o extender la
duración del programa y aumentar el
consumo de agua.
La lavadora está equipada con un
dispositivo electrónico que descarta el
ciclo de centrifugado si la carga está
desequilibrada. Esto reduce el ruido y
la vibración en la lavadora, y prolonga
la vida de la lavadora.
Indicadores INICIO DIFERIDO /
FASE DE LAVADO
Indicador SEGURIDAD PUERTA
Cierre la escotilla ANTES de
seleccionar INICIO/PAUSA.
Si la puerta no está bien cerrada, la
luz seguirá parpadeando durante unos
7 segundos, después de lo cual
la orden de marcha se elimina
automáticamente. En este caso, cierre
la puerta de la manera adecuada y
pulse la tecla INICIO/PAUSA.
Indicadores SELECCIÓN
TEMPERATURA
Indicadores SELECCIÓN
CENTRIFUGADO

Este electrodoméstico está equipado con
tecnología Smart Touch que permite
interactuar, a través de la App, con
smartphones con el sistema operativo
Android y equipados con la función NFC
(Near Field Communication).
!
Descarga en tu smartphone la App
Candy simply—Fi.
FUNCIONES
Las principales funciones disponibles de la
App son:
! Asistente de Voz – Una guía para
escoger el ciclo ideal con solo tres
entradas de voz (prendas/tejidos, color,
nivel de suciedad).
! Ciclos – Para descargar y lanzar nuevos
programas de lavado.
! Cuidado Smart – Ciclos de Smart
Check—up y Autolimpieza y la guía de
diagnóstico de averías.
! Mis Estadísticas – Estadísticas y
consejos de lavado para un uso más
eficiente de la lavadora.
CÓMO USAR SMART TOUCH
PRIMERA VEZ — Registro de la lavadora
! Entra en el menú «Ajustes» de tu
smartphone Android y activa la función
NFC en el menú «Redes Móviles».
! Gira el mando hasta la posición Smart
Touch para activar el sensor en el panel.
! Abre la App, crea el perfil de usuario y
registra el electrodoméstico siguiendo las
instrucciones en la pantalla del teléfono,
o en la «Guía Rápida» adjunta a la
lavadora.
La App Candy simply—Fi está
disponible para dispositivos con
sistema Android y iOS, tanto para
tablets como para smartphones. Sin
embargo, puedes interactuar con la
lavadora y aprovecharte del potencial
que ofrece Smart Touch solo con
smartphones Android equipados con
la tecnología NFC, de acuerdo al
siguiente programa funcional:
Smartphone
Android con
tecnología NFC
Interacción con la
lavadora +
contenidos
Smartphone
Android sin
tecnología NFC
Obtén todos los detalles de las
funciones Smart Touch, navegando
por la App en modo DEMO, o vete a:
www.candysmarttouch.com
Según el modelo de smartphone, y su
versión OS Android, el proceso de
activación de la NFC puede ser
diferente. Para obtener más detalles,
consulta el manual del smartphone.
Para más información, las F.A.Q. y el
video para un registro sencillo están
disponibles en:
www.candysmarttouch.com/how—to

SIGUIENTE VEZ – Uso regular
! Cada vez que quieras gestionar la
lavadora a través de la App, primero
deberás conectar el modo Smart Touch,
colocando el mando en el lugar homónimo.
! Asegurarse de que se ha desbloqueado
la pantalla del teléfono (posiblemente del
modo stand—by) y se ha activado la
función NFC; de lo contrario, se deben
seguir los pasos mencionados anteriormente.
! Si deseas iniciar un ciclo de lavado, carga la
colada, pon el detergente y cierra la puerta.
! Selecciona la función deseada en la App
(p.e.: iniciar programa, ciclo Smart
Check—up, actualizar estadísticas, etc…).
! Seguir las instrucciones mostradas en la
pantalla del teléfono, MANTENIÉNDOLO
sobre el logotipo Smart Touch ubicado
en el panel de mandos de la lavadora,
cuando lo solicite la App.
NOTAS:
Coloca tu smartphone de forma que la
antena posterior del NFC coincida con
la posición del logo Smart Touch en el
electrodoméstico (ver foto más abajo).
Si se desconoce la posición de la
antena NFC, se debe mover
ligeramente el teléfono en forma
circular sobre el logotipo de Smart
Touch hasta que la App confirme la
conexión. Para que la transferencia
de datos sea exitosa, es esencial
MANTENER EL SMARTPHONE EN EL
PANEL DE MANDOS DURANTE LOS
SEGUNDOS QUE REQUIERE EL
PROCEDIMIENTO. Un mensaje en el
dispositivo informará del éxito de la
operación e indica el momento en el
que se puede alejar el Smartphone.
Fundas gruesas o pegatinas
metálicas en tu smartphone pueden
afectar o impedir la transmisión de
datos entre la lavadora y el teléfono.
Si fuera necesario, quítalas.
La sustitución de algunos
componentes del smartphone (por
ejemplo, funda trasera, batería, etc …)
por componentes no originales,
puede afectar al sistema NFC,
provocando incluso su eliminación,
por lo que impediría el uso por
completo de la App.
La gestión y el control de la lavadora
a través de la App solo es posible
«por proximidad»: por lo tanto, no es
posible realizar operaciones en
remoto (ej.: desde otra habitación;
fuera de casa).
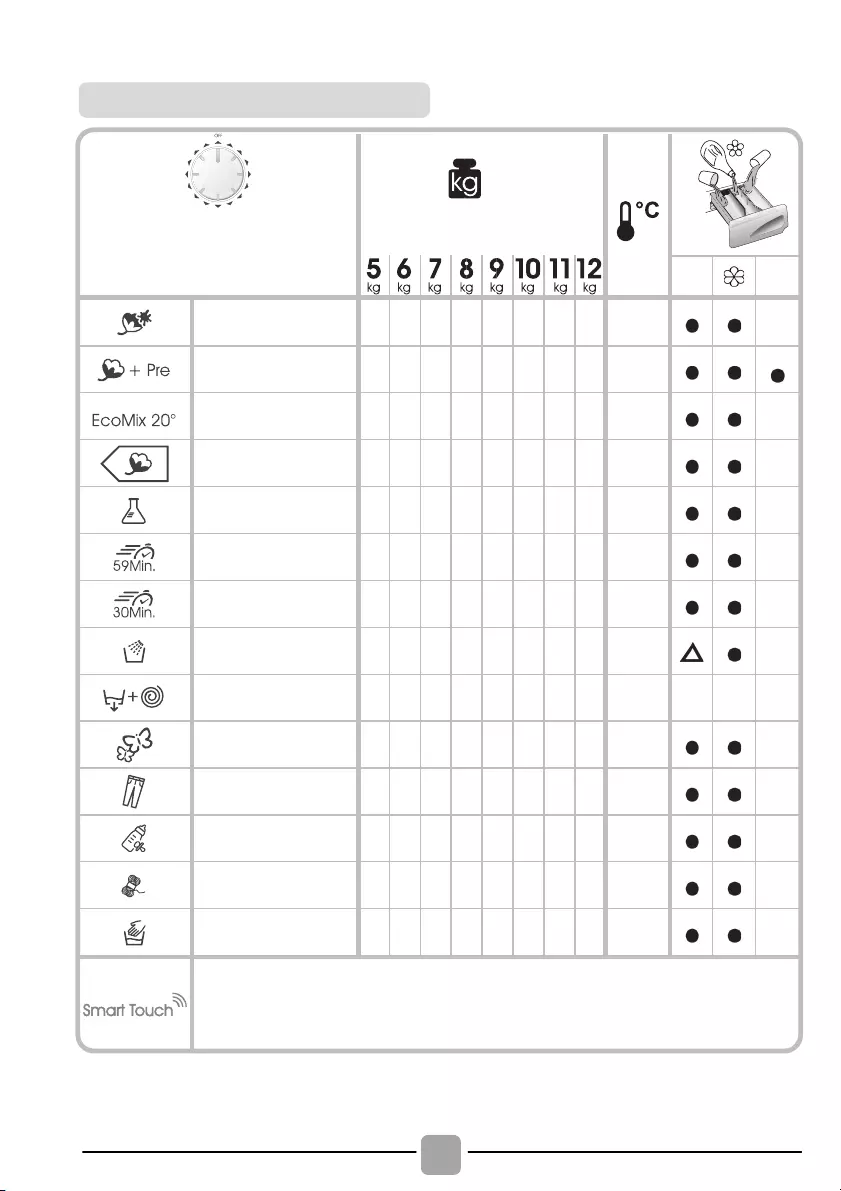
Configuración personalizada del mando que tienes que seleccionar para
interactuar con la App para smartphone y para descargar los ciclos (ir a la sección
especializada). Por defecto viene determinado de fábrica el programa
Autolimpieza, diseñado para higienizar la lavadora.
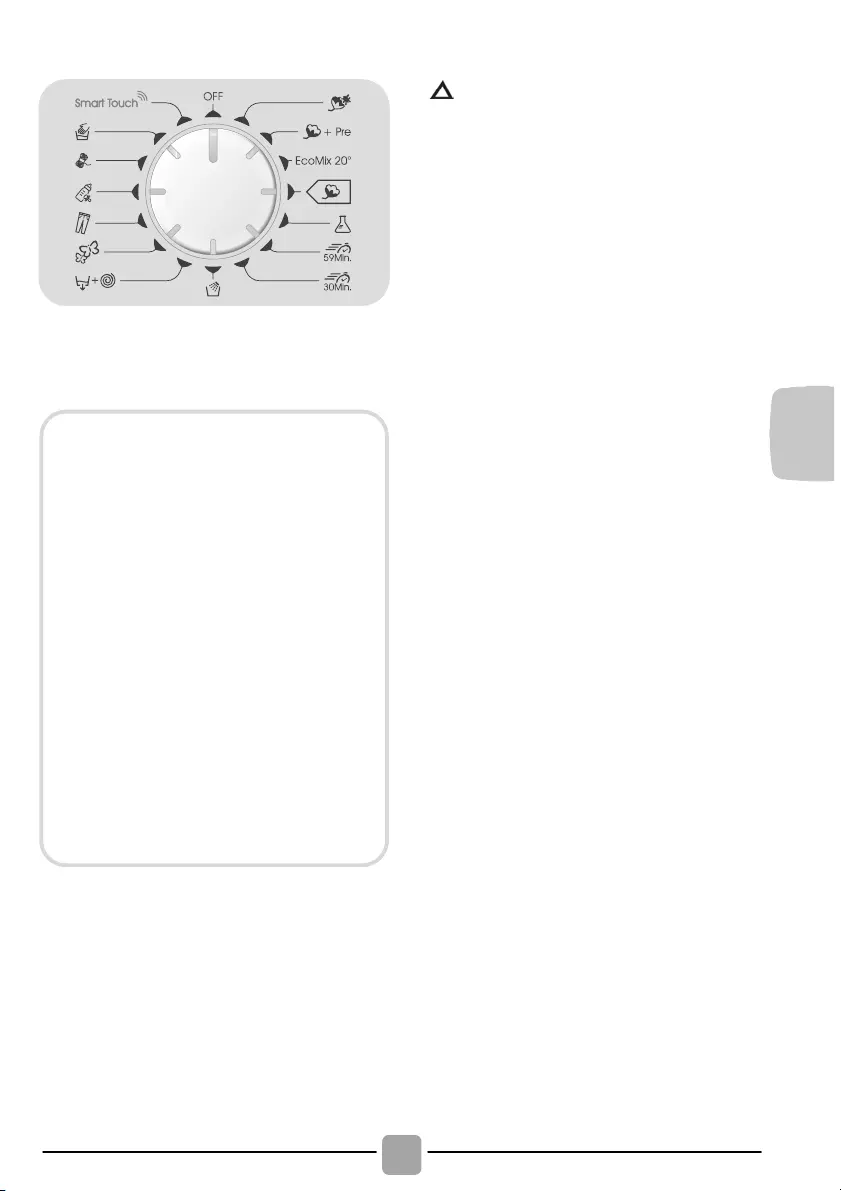
Por favor lea estas notas:
* La capacidad máxima de colada seca
depende del modelo usado (ver panel de
control).
(Solo para modelos con
compartimento detergente líquido)
Cuando un número limitado de
artículos presentan manchas que
requieren tratamiento previo con
agentes de blanqueo líquidos, la
eliminación preliminar de mancha
puede ser llevado a cabo en la
propia lavadora.
Vierta el blanqueador en el
recipiente de detergente líquido,
se inserta en el compartimiento
«2» en el cajetín del detergente, y
establecer el programa especial
de ACLARADOS.
Cuando esta fase ha terminado,
gire el selector de programas en
la posición OFF, agregue el resto
de colada y proceda al lavado
normal en el programa más
adecuado.
Cuando seleccionas un programa,
se encenderá el piloto
correspondiente a la temperatura
recomendada. Siempre podrás
cambiar la temperatura con la
tecla correspondiente (si está
permitido), aunque no podrás
aumentarla por encima de la
máxima permitida.
** PROGRAMAS DE ALGODÓN
ESTÁNDAR SEGÚN (UE) nº 1015/2010
y nº 1061/2010.
PROGRAMA DE ALGODÓN CON
UNA TEMPERATURA DE 60°C.
PROGRAMA DE ALGODÓN CON
UNA TEMPERATURA DE 40°C.
Estos programas son adecuados para
limpiar suciedad normal de lavado de
algodón y son los programas más
eficientes en términos de consumo
combinado de energía y agua para
lavar la ropa de algodón lavado.
Estos programas se han desarrollado
para ser compatibles con la
temperatura en la etiqueta de lavado de
las prendas y la temperatura real del
agua pueden diferir ligeramente de la
temperatura declarada del ciclo.

Para la limpieza de los diferentes tipos de
tejido y los diferentes niveles de suciedad,
la lavadora tiene programas específicos
para satisfacer todas las necesidades de
lavado (véase la tabla).
Ropa Blanca
Realizados para tener un perfecto lavado. El
centrifugado final a la máxima velocidad da
un resultado mucho más eficiente.
Algodón + Prelavado
Este programa está estudiado para eliminar
las manchas más resistentes de las
prendas blancas de algodón. El prelavado
garantiza la eliminación de la suciedad más
resistente. Añadir al compartimento «1» una
cantidad de detergente igual al 20% de lo
que se usaría en un lavado principal.
EcoMix 20°
Este innovador programa, le permite lavar
diferentes tejidos y colores juntos, tales como
algodón, sintéticos y tejidos mixtos a sólo 20°C
y proporciona un excelente rendimiento de
limpieza. El consumo en este programa es de
aproximadamente 40% respecto a un ciclo
convencional 40°C de algodón.
Algodón
Este programa es adecuado para limpiar
suciedad normal de lavado de algodón y es el
programa más eficiente en términos de consumo
combinado de energía y agua para lavar la ropa
de algodón.
Sintéticos
El lavado y de aclarado están optimizados según
los ritmos de rotación del tambor y los niveles de
agua. El centrifugado suave, asegura una menor
presencia de arrugas en las prendas.
Diario 59 Min.
Este programa especialmente diseñado
para mantener el rendimiento de lavado de
alta calidad mientras que reduce en gran
medida el tiempo de lavado. El programa
está diseñado para una carga reducida (ver
tabla de programas).
Rápido 30 Min.
Un ciclo completo de lavado (lavado,
aclarado y centrifugado). Este programa
está especialmente indicado para prendas
de algodón poco sucias y tejidos mixtos.
Con este programa, se recomienda utilizar
sólo el 20% del detergente normalmente se
utiliza para evitar el despilfarro.
Aclarados
Este programa realiza 3 aclarados con un
centrifugado intermedio (que puede ser
reducido o excluido mediante la opción
correspondiente). Se utiliza para el lavado de
cualquier tipo de tejido, por ejemplo después
de un lavado a mano.
Desagüe + Centrifugado
El programa se completa el vaciado y un
centrifugado a máxima velocidad. Es posible
eliminar o reducir el centrifugado con la
opción SELECCIÓN CENTRIFUGADO.
Delicados
Este programa se alterna entre momentos de
lavado con momentos de pausa y es
particularmente adecuado para el lavado de
prendas delicadas. El ciclo de lavado y aclarado
se llevan a cabo con un alto nivel de agua para
asegurar el mejor rendimiento.
Jeans
Este programa ha sido diseñado para obtener
la major calidad de lavado en tejidos como tejanos
resistentes: Ideal para eliminar la suciedad sin
afectar a la elasticidad de las prendas.
Baby
Este programa le permite lavar toda la ropa
del bebé para conseguir un efecto de
limpieza y desinfección perfecta, establezca
la temperatura a 60°C como mínimo.
Para optimizar el resultado del efecto de
desinfección se recomienda el uso de
detergente en polvo.!
Lana
Este programa realiza un ciclo de lavado
pensado para los tejidos de lana que se
pueden lavar en la lavadora, o los artículos
a lavar a mano.
A mano
Programa lavado a mano de prendas, el
programa termina con 3 aclarados y un
centrifugado lento.

Smart Touch
Configuración personalizada del mando
que tienes que seleccionar cuando quieras
transferir una orden de la App a la lavadora
y descargar/iniciar un ciclo (para más
información, ir a la sección especializada y
el manual de usuario para la App).
En la opción Smart Touch, por defecto
viene determinado de fábrica el ciclo
«Autolimpieza», diseñado para higienizar
el tambor, eliminar los malos olores y
mejorar la vida de la lavadora.
Asegúrate de iniciar el ciclo «Autolimpieza»
sin prendas en la lavadora, usando solo
detergente en polvo. Deje la puerta de la
lavadora abierta al final del ciclo para
permitir que se seque el tambor.
Recomendado cada 50 lavados.

7. DIAGNÓSTICO DE AVERÍAS Y GARANTÍA
Si consideras que su lavadora no está funcionando correctamente, consulta la guía rápida
que se suministra más abajo con algunos consejos prácticos sobre cómo solucionar los
problemas más comunes.
INFORME DE ERROR
Posibles causas y soluciones prácticas
E2 (con display)
2 parpadeos de las
LEDs (sin display)
La lavadora no se llena de agua.
Asegúrate de que la llave de suministro de agua esté abierta.
Asegúrate de que la manguera de alimentación de agua no esté
doblada, retorcida o atrapada.
El tubo de desagüe no está a la altura adecuada (ir a la sección instalación).
Cierra la llave de suministro de agua, desenrosca la manguera de
alimentación de la parte de atrás de la lavadora y asegúrate de que
el filtro «anti—arena» esté limpio, no obstruido.
E3 (con display)
3 parpadeos de las
LEDs (sin display)
Asegúrate de que el filtro no esté obstruido.
Asegúrate de que la manguera de desagüe no esté doblada,
retorcida o atrapada.
Asegúrate de que el sistema de desagüe no esté bloqueado y que permita
al agua fluir sin obstrucciones. Intenta drenar el agua en el lavadero.
E4 (con display)
4 parpadeos de las
LEDs (sin display)
Hay mucha espuma y/o agua.
Asegúrate de no haber utilizado una cantidad excesiva de
detergente o de un producto no adecuado para lavadoras.
E7 (con display)
7 parpadeos de las
LEDs (sin display)
Asegúrate de que la puerta está cerrada correctamente. Asegúrate
de que no hay prendas en el interior de la lavadora que puedan
obstruir el cierre de la puerta.
Si la puerta está bloqueada, apagua y desenchufa la lavadora del
suministro eléctrico, espera 2—3 minutos y vuelve a abrir la puerta.
Apaga y desenchufa la lavadora, y espera un minuto. Enciende de
nuevo la lavadora e inicia un programa. Si el error persiste, contacta
directamente con el Servicio de Atención al Cliente autorizado.
SOLO PARA MODELOS SMART TOUCH.
Gracias al ciclo Smart Check—up de tu App Candy simply—Fi puedes comprobar en
cualquier momento el correcto funcionamiento de tu lavadora. Solo necesitas un
smartphone Android con tecnología NFC. Puedes encontrar información adicional en la
App. Si el display de la lavadora muestra un error (a través de un código o de LEDs
parpadeando), deberías conectar la App y acercar el smartphone Android con NFC al logo
Smart Touch situado en el panel para acceder a la guía y resolver el problema.
! Modelos con display: el error se muestra como un número precedido por la letra
“E” (ejemplo: Error 2 = E2)
! Modelos sin display: El error se muestra con el parpadeo de cada LED tantas
veces como represente el código del error, seguido de una pausa de 5 segundos
(ejemplo: Error 2 = dos parpadeos – pausa 5 segundos – dos parpadeos – etc…)
Posibles causas y soluciones prácticas
La lavadora no
funciona
/no se enciende
Asegúrate de que el producto está enchufado a una toma que
funcione.
Asegúrate de que hay electricidad.
Asegúrate de que el enchufe de la pared está funcionando,
enchufando otro aparato, por ejemplo una lámpara.
La puerta puede no estar cerrada correctamente: ábrela y ciérrala
de nuevo.
Comprueba que se ha seleccionado el programa escogido y que se
ha pulsado la tecla de inicio.
Asegúrate de que la lavadora no está en modo pausa.
Agua derramada
sobre
el suelo cerca de la
lavadora
Esto puede ser debido a una fuga en la junta entre la llave y la
manguera de suministro; en este caso, sustitúyela y ajusta la
manguera y la llave.
Asegúrate de que el filtro está correctamente cerrado.
La lavadora no
centrifuga
Debido a una distribución no óptima de las prendas, la lavadora
puede:
Intentar equilibrar la carga, aumentando el tiempo de centrifugado.
Reducir la velocidad de centrifugado para reducir las vibraciones y el
ruido.
Descartar el centrifugado para proteger la lavadora.
Asegúrate de que la carga está equilibrada. De lo contrario,
desenrédala, vuelve a meterla y continúa con el programa.
Esto puede deberse al hecho de que el agua no se haya drenado
completamente: espera unos minutos. Si el problema persiste, ir a la
sección de Error 3.
La mayoría de los modelos incluyen una función de «no
centrifugado»: asegúrate de que no está activada.
Asegúrate de que no tiene activada ninguna opción que cambie el
centrifugado.
Un exceso de detergente puede dificultar el inicio del centrifugado.
Se oyen
vibraciones/ruidos
fuertes durante el
centrifugado
La lavadora puede no estar completamente nivelada: si es
necesario, ajusta las bases tal y como se indica en la sección
correspondiente.
Asegúrate de que se han retirado los tornillos colocados para el
transporte, los tapones de caucho y los tubos separadores.
Asegúrate de que no hay cuerpos extraños en el interior del tambor
(monedas, bisagras, botones, etc...)
La garantía estándar del fabricante cubre los defectos causados por fallos
eléctricos o mecánicos en el producto debidos a un acto u omisión del
fabricante. Si el defecto detectado se debe a factores externos al producto
suministrado, a un uso incorrecto o como resultado de no seguir las
instrucciones de uso, se aplicará un cargo.

El uso de detergentes ecológicos sin
fosfatos puede producir los siguientes
efectos:
— El agua de vaciado del aclarado es
más turbia debido a la presencia de
zeolitos en suspensión, sin que resulte
perjudicada la eficacia del aclarado.
— Presencia de polvo blanco (zeolitos)
en la ropa al finalizar el lavado, que no
se incrusta en el tejido ni altera los
colores.
— Presencia de espuma en el agua del
último aclarado, que no necesariamente
es indicación de un aclarado deficiente.
— Presencia de abundante espuma
debido a los tensoactivos aniónicos
presentes en las formulaciones de los
detergentes para lavadoras y que son
difíciles de separar de la ropa.
Volver a aclarar la ropa en estos casos
no conlleva ningún beneficio.
Si el problema persiste o sospechas de la
existencia de una avería, contacta
inmediatamente con el Servicio de Atención
al Cliente autorizado.
Se recomienda siempre utilizar las piezas de
recambio originales, que están disponibles
en el Servicio de Atención al Cliente
autorizado.
El fabricante no se responsabiliza por
eventuales erratas de imprenta contenidas
en el presente manual de instrucciones.
Asimismo, se reserva el derecho de efectuar
las modificaciones que considere oportunas
para sus productos sin comprometer sus
características fundamentales.
Garantía
El producto tiene unas condiciones de
garantía establecidas en el certificado
que se incluye en el producto. El
certificado de garantía debe completarse
debidamente y archivarse, para poder
mostrarlo al Servicio de Atención al
Cliente autorizado en caso necesario.


Merci d’avoir choisi une machine à laver
Candy. Nous sommes certains qu’elle vous
donnera entière satisfaction et prendra soin
de votre linge, même délicat, jour après
jour.
Vous pouvez enregistrer votre produit sur
www.registercandy.com pour accéder
plus rapidement à des services
supplémentaires réservés à nos clients les
plus fidèles.
Lisez attentivement ce manuel pour une
utilisation de votre produit en toute sécurité
et bénéficier de conseils pratiques pour
l’entretenir efficacement.
Nous vous recommandons de
toujours garder ce manuel à portée de main
et dans de bonnes conditions afin qu’il
puisse également servir aux éventuels
futurs propriétaires.
Cette machine est livrée avec un certificat
de garantie qui permet de contacter
gratuitement l’assistance technique.
Veuillez garder votre ticket d’achat et le
mettre dans un endroit sûr en cas de
besoin.
Chaque produit est identifié par un code à
16 caractères unique également appelé
« numéro de série », imprimé sur l’étiquette
apposée sur l’appareil ou dans l’enveloppe
du document se trouvant à l’intérieur du
produit.
Ce code est nécessaire pour inscrire le
produit ou bien pour prendre contact avec
notre service clientèle Candy.
Cet appareil est commercialisé
en accord avec la directive
européenne 2012/19/EU sur
les déchets des équipements
électriques et électroniques (DEEE).
Les déchets des équipements électriques et
électroniques (DEEE) contiennent des
substances polluantes (ce qui peut
entraîner des conséquences négatives pour
l’environnement) et des composants de
base (qui peuvent être réutilisés). Il est
important de traiter ce type de déchets de
manière appropriée afin de pouvoir éliminer
correctement tous les polluants et de
recycler les matériaux. Les particuliers
peuvent jouer un rôle important en veillant à
ce que les DEEE ne deviennent pas un
problème environnemental. Il est essentiel
de suivre quelques règles simples:
! Les DEEE ne doivent pas être traités
comme les déchets ménagers;
! Les DEEE doivent être remis aux points
de collecte enregistrés. Dans de
nombreux pays, la collecte des produits
gros électroménagers peut être effectuée
à domicile.
Dans de nombreux pays, lorsque vous
achetez un nouvel appareil, l’ancien peut
être retourné au détaillant qui doit collecter
gratuitement sur la base un contre un.
L’équipement repris doit être équivalent
ou bien avoir les mêmes fonctions que le
produit acquis.
1. RÈGLES GÉNÉRALES DE SÉCURITÉ
2. INSTALLATION
3. CONSEILS PRATIQUES
4. ENTRETIEN ET NETTOYAGE
5. GUIDE D’UTILISATION RAPIDE
6. CONTRÔLES ET PROGRAMMES
7. DÉPANNAGE ET GARANTIES

1. RÈGLES GÉNÉRALES
DE SÉCURITÉ
! Le produit est conçu pour être
utilisé dans un foyer domestique,
comme:
— Le coin cuisine dans des
magasins ou des lieux de
travail,
— Employés et clients dans
un hôtel, un motel ou
résidence de ce type,
— Dans des bed and
breakfast,
— Service de stock ou
similaire, mais pas pour de
la vente au détail.
La durée de vie de l’appareil
peut être réduite ou la garantie
du fabricant annulée si
l’appareil n’est pas utilisée
correctement. Tout dommage
ou perte résultant d’un usage qui
n’est pas conforme à un usage
domestique (même s’ils sont
situés dans un environnement
domestique ou un ménage) ne
sera pas acceptée par le
fabricant dans toute la mesure
permise par la loi.
!
Cet appareil peut être utilisé
par des enfants âgés de 8 ans
et plus, ou des personnes
présentant un handicap physique,
moteur ou mental, et manquant
de connaissance sur l’utilisation
de
l’appareil, si elles sont sous la
surveillance d’une personne, donnant
des instructions pour une utilisation
en toute sécurité de l’appareil.
Les enfants ne doivent pas
jouer avec l’appareil.
Le nettoyage et l’entretien de
l’appareil ne doit pas être fait par
des enfants sans surveillance
d’un adulte.
! Les enfants doivent être
surveillés pour être sûr qu’ils
ne jouent pas avec l’appareil.
! Les enfants de moins de 3 ans
doivent être tenus à l’écart ou
bien être sous surveillance de
manière continue.
!
Si le cordon d’alimentation
électrique est endommagé, il
doit être remplacé par le
fabricant, son agent de service
ou un technicien qualifié afin
d’éviter tout danger
.
! N’utilisez que les colliers
fournis avec l’appareil pour la
connexion de l’alimentation en
eau.
!
La pression hydraulique doit être
comprise d’un minimum de 0,05
MPa à un maximum de 0,8 MPa.
! Assurez-vous qu’aucun tapis
n’obstrue la base de la
machine et les ventilations.
!
La mise OFF est obtenue en
positionnant le sélecteur en
position verticale, tout autre
positionnement met la machine

en fonction (uniquement pour
les modèles équipés d’un
sélecteur)
.
! Le positionnement de l’appareil
doit permettre un accès facile à
la prise de courant après
installation.
! Capacité de chargement maximale
de vêtements secs selon le
modèle utilisé (voir le bandeau de
commande).
! Consulter le site web du
fabricant pour plus d’informations.
! Eteignez la machine avant
nettoyage: débranchez l’appareil
et fermer l’arrivée d’eau.
! Assurez-vous que le système
électrique est raccordé à la
terre.
! Merci de ne pas utiliser des
convertisseurs, des prises
multiples ou des rallonges.
! Assurez-vous qu’il n’y a pas
d’eau dans le tambour avant
d’ouvrir le hublot.
! Ne tirez pas sur le cordon
d’alimentation pour débrancher
l’appareil.
! N’exposez pas la machine à la
pluie, au soleil ou aux
intempéries.
! Lors d’un déplacement, ne
soulevez pas la machine à
laver par les boutons ou par le
tiroir à détergent, ne jamais
faire reposer l’appareil sur le
hublot.
Nous recommandons d’être 2
personnes pour soulever la
machine.
! En cas de panne ou de
dysfonctionnement: éteindre la
machine, fermer le robinet
d’eau et ne pas toucher la
machine. Appelez immédiatement
le service client et n’utilisez que
des pièces de rechange d’origine.
Le non—respect de ces consignes
peut compromettre la sécurité de
l’appareil.
En utilisant le symbol sur ce
produit, nous déclarons sur notre
propre responsabilité que ce
produit est conforme à toutes les
normes Européennes relatives
à la sécurité, la santé et à
l’environnement.
ATTENTION:
l’eau peut atteindre des
températures très élevées
pendant le lavage.
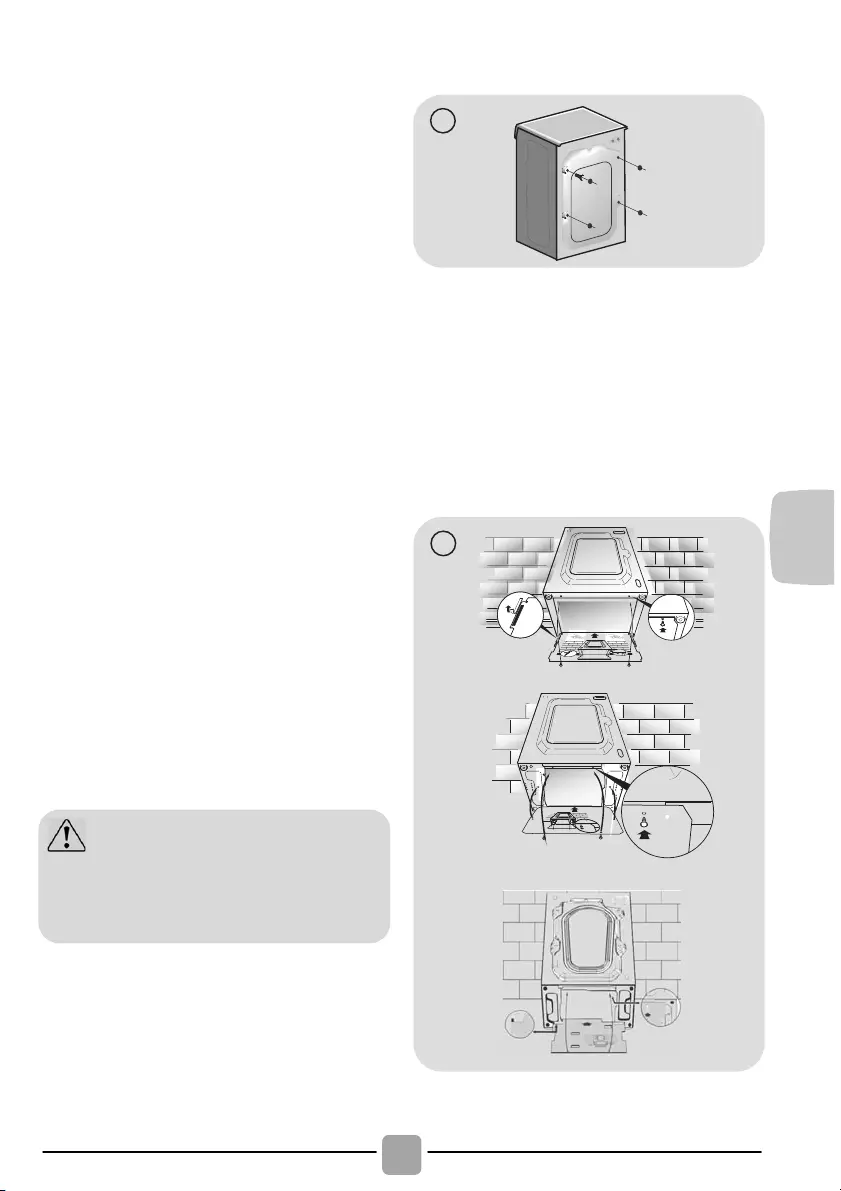
! Coupez avec précaution le
cordon en faisant attention à
ne rien endommager.
! Dévissez les 2 ou 4 vis (A) sur
le dos de l’appareil et retirer les
2 ou 4 cales (B) comme illustré
sur la figure 1.
! Fermez les 2 ou 4 trous en
utilisant les connecteurs inclus
dans l’enveloppe ou se trouve
la notice.
! Si la machine à laver est
intégrée, après avoir coupé les
sangles de serrage, dévisser
les 3 ou 4 vis (A) et retirer 3 ou
4 cales (B).
! Dans certains modèles, une
ou plusieurs cales vont
tomber à l’intérieur de la
machine: inclinez la machine à
laver avant de les enlever.
Bouchez les trous à l’aide des
fiches trouvées dans l’enveloppe.
! Placez la feuille sous la
machine comme présenté sur
le schéma numéro 2 (selon le
modèle, figure A, B ou C).
ATTENTION:
maintenez les matériaux
d’emballage hors de portée
des enfants.
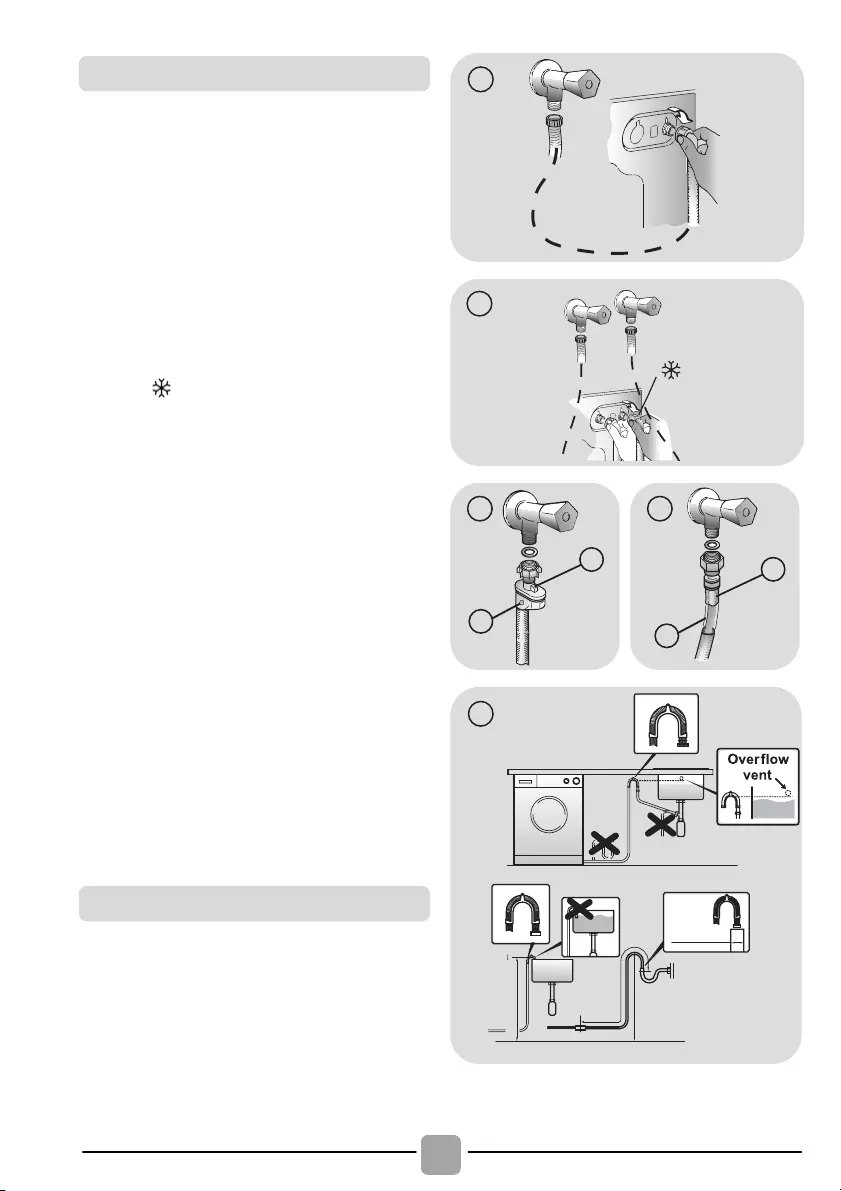
! Brancher le tuyau d’eau au robinet (fig.3).
Utiliser uniquement le tuyau fournit avec
l’appareil (ne pas réutiliser un tuyau
d’une ancienne installation).
! Certains modèles peuvent inclure une ou
plusieurs des caractéristiques suivantes:
! CHAUD ET FROID (fig. 4): conduites
d’eau avec connexion eau chaude et eau
froide pour réaliser des économies
d’énergie.
Connectez le tuyau gris au robinet d’eau
froide et le rouge au robinet d’eau
chaude. L’appareil peut être connecté au
robinet d’eau froide: dans ce cas, certains
programmes peuvent démarrer quelques
minutes plus tard..
!
AQUASTOP
(fig. 5):
un dispositif situé sur
le tube d’alimentation qui arrête le débit
d’eau si le tube se détériore; dans ce cas,
une marque rouge apparaît dans la
fenêtre «A» et le tube doit être remplacé.
Pour dévisser l’écrou, appuyez sur le
sens unique dispositif de verrouillage «B«.
!
AQUAPROTECT–TUBE D’ALIMENTATION
AVEC PROTECTION (fig. 6):
si de l’eau fuit
à partir du tuyau «A», la gaine de
confinement transparent «B» va contenir
de l’eau pour permettre le cycle de lavage
de se terminer. À la fin du cycle,
contactez le service à la clientèle pour
remplacer le tuyau d’alimentation.
! Au niveau du mur, faîtes attention à ce
que le tuyau ne soit pas plié ou écrasé.
Connectez—le de préférence à une
évacuation murale d’au moins 50 cm de
haut avec un diamètre plus grand que le
tuyau de la machine à laver (fig. 7).
min 50 cm
max 85 cm
+2,6 mt
max
max 100 cm
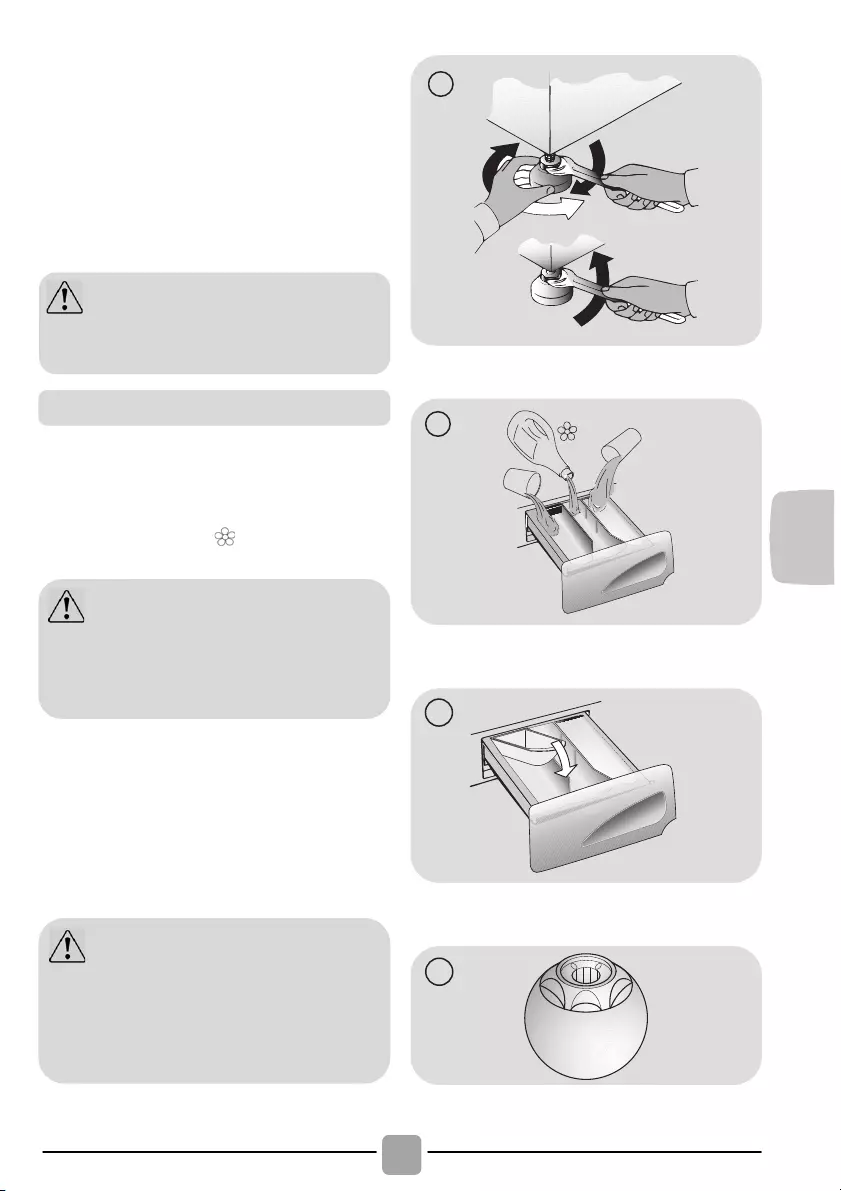
! Utilisez les pieds comme en figure 8
pour régler la hauteur de l’appareil:
a. Tournez dans le sens horaire pour
libérer la vis;
b. Faire pivoter le pied pour élever ou
abaisser jusqu’à ce qu‘elle adhère au sol;
c. Verrouillez le pied en revissant l’écrou dans
le sens inverse des aiguilles d’une montre
et le faire adhérer au fond de la machine.
! Branchez l’appareil.
Le tiroir est divisé en 3 compartiments
comme illustré en figure 9:
! compartiment « 1 »: pour la lessive
destinée au prélavage;
! compartiment « »: des additifs
spéciaux: adoucisseurs, parfums, etc… ;
! compartiment « 2 » sert pour la lessive
destinée au lavage..
Un récipient pour détergent liquide est
également inclus dans certains modèles
(fig. 10). Pour l’utiliser, placez—le dans le
compartiment «2». Grâce à ce système, la
lessive s’écoulera dans le tambour
seulement au bon moment.
ATTENTION:
contactez l’assistance technique si le
cordon d’alimentation doit être changé.
ATTENTION:
utilisez uniquement des produits
liquides; la machine est programmée
pour doser les additifs à chaque cycle
durant le dernier rinçage.
ATTENTION:
Certains détergents sont difficiles à
enlever. Dans ce cas, nous vous
recommandons d’utiliser le doseur
spécifique pour être placé dans le
tambour (par exemple dans la figure 11).

3. CONSEILS PRATIQUES
ATTENTION : Lorsque vous triez le linge,
assurez—vous:
— avoir éliminé objets métalliques tels que
barrettes, épingles, pièces de monnaie;
— avoir boutonné les taies d’oreiller, fermez
les fermetures éclair, accrochez les œillets
et crochets, nouez les ceintures et les
cordes des peignoirs de bain;
— avoir enlevé les crochets de rideaux;
— avoir lu attentivement les étiquettes
d’entretien;
— d’avoir enlevé les tâches tenaces pendant
le tri du linge à l’aide d’un détergent ou
d’un détachant spécial.
! Lors du lavage des tapis, des couvertures
ou des vêtements lourds, nous vous
recommandons d’éviter l’essorage.
! Pour laver la laine, veuillez vous assurer
que l’article peut être lavé en machine
(veuillez vous reporter à l’étiquette de
l’article).
Utilisez votre appareil dans le respect de
l’environnement tout en réalisant des
économies d’énergie.
Maximisez le volume de chargement
! Utilisez la capacité maximale de
chargement de votre appareil.
Economisez jusqu’à 50% d’énergie en
lavant une charge complète au lieu de 2
demi—charges.
Avez—vous besoin d’effectuer un
prélavage?
! Pour le linge très sale seulement!
Economisez du temps, de l’eau et de
l’énergie jusqu’à 15% en ne sélectionnant
pas le prélavage pour un linge
normalement sale.
Un lavage chaud est—il nécessaire?
! Eliminer les taches avec un détachant ou
faire tremper les taches dans l’eau avant
de la laver réduit la nécessité d’un
programme de lavage à chaud.
Economisez jusqu’à 50% d’énergie en
utilisant un programme de lavage à 60°C.
Voici un mini guide avec des conseils et
des recommandations sur l’utilisation des
détergents aux différentes températures.
Dans tous les cas, toujours lire les
instructions sur le détergent à utiliser et les
doses recommandées.
Suggestions d’utilisation
Lorsque vous lavez des blancs très
sales, nous vous recommandons
d’utiliser le programme coton à 60°C
ou au—dessus et d’utiliser une lessive
en poudre contenant des agents
blanchissants.
Pour les lavages entre 40°C et 60°C,
le type de détergent utilisé doit être
adapté au type de tissu et au degré de
salissure. Poudres normales sont
adaptés pour des «blancs» à forte
salissures, alors que les détergents
liquides ou «protection des couleurs»
sont adaptés pour les tissus colorés
avec des niveaux faibles de salissures.
Pour le lavage à des températures
inférieures à 40°C, nous recommandons
l’utilisation de détergents ou de détergents
liquides spécifiquement étiquetés comme
approprié pour lavage de basse
température.
Pour lavage de la laine ou de la soie,
utilisez uniquement des produits de
lavage spécialement formulés pour ces
tissus.

4. ENTRETIEN ET
NETTOYAGE
Pour nettoyer l’extérieur de la machine,
utilisez un chiffon humide en évitant les
produits abrasifs, alcool et/ou solvants. La
machine ne requiert pas de soins particuliers
pour un lavage ordinaire ; pensez à nettoyer
régulièrement le tiroir à produits et le filtre.
Quelques conseils pour déplacer la machine
ou pour la préparer à une longue période
d’inactivité sont donnés ci—dessous.
! Nous recommandons de nettoyer les
bacs pour éviter l’accumulation de
produit.
! Il suffit de tirer légèrement sur le tiroir
pour l’extraire, nettoyer le tiroir sous un
jet d’eau et remettre le tiroir.
! Le nettoyage mensuel du filtre est conseillé.
Ce filtre peut retenir les résidus plus gros
qui pourraient bloquer le tuyau d’évacuation
(pièces de monnaie, boutons…).
! Disponible sur certains modèles
uniquement: sortez le tuyau, ôtez le
bouchon et videz l’eau dans un récipient.
! Avant de dévisser le filtre, nous vous
recommandons de disposer un chiffon
absorbant sur le sol afin de garder le sol
sec.
! Tournez le filtrer dans le sens antihoraire
jusqu’à la limite en position verticale.
! Retirez et nettoyez le filtre; lorsque vous
avez terminé, repositionnez le filtre en
tournant dans le sens horaire.
! Répétez les étapes précédentes dans
l’ordre inverse pour remonter les pièces.
! Si la machine doit être stockée dans une
pièce non chauffée pendant une longue
période, vidangez toute l’eau avant votre
départ.
! Débranchez la machine à laver.
! Enlevez la bague sur le tuyau et le plier
vers le bas afin de vider le reste d’eau.
! Fixez le tuyau de vidange à l’aide de
l’attache lorsque vous avez terminé.
Suggestions lors d’un déménagement
ou une absence prolongée

5. GUIDE D’UTILISATION
RAPIDE
Cette machine adapte automatiquement le
niveau de l’eau en fonction du type et de la
quantité de linge. Ce système permet de
diminuer la consommation d’énergie et
réduit nettement les temps de lavage.
! Mettez le lave—linge en fonction et
sélectionnez le programme souhaité.
! Ajustez la température de lavage si besoin et
sélectionnez les options nécessaires.
! Pressez le bouton DEPART/PAUSE pour
commencer le cycle de lavage.
En cas de coupure courant pendant un
programme de lavage, une mémoire
spéciale restaure le programme sélectionné
et lorsque le courant est rétabli, reprend le
cycle là où il s’est arrêté.
! A la fin du programme, le message «End»
apparaitra sur l’interface, sur certains
modèles tous les voyants lumineux des
étapes de lavage seront allumés.
! Mettez la machine à l’arrêt.
Pour tout type de lavage, voir le tableau
des programmes et suivez la séquence
de fonctionnement comme indiqué.
Pression de l’eau:
min 0,05 Mpa / max 0,8 Mpa
Essorage (Tours par minute):
voir la plaque signalétique.
Puissance / Ampérage / Tension
d’alimentation:
voir la plaque signalétique.
6. CONTRÔLES ET
PROGRAMMES
Sélecteur de programmes
avec position OFF
Touche SELECTION
TEMPERATURE
Touche SELECTION ESSORAGE
Indicateurs DEPART DIFFERE /
ETAPE DE LAVAGE
Indicateur PORTE SECURISEE
Indicateur RINÇAGE INTENSE
Indicateurs
SELECTION
TEMPERATURE
Indicateurs
SELECTION
ESSORAGE
Attendez environ deux minutes que le
verrou de porte se désactive. Le
témoin « Porte sécurisée » s’éteint.
Caractéristiques techniques

! Pressez la touche DEPART/PAUSE pour
démarrer le cycle sélectionné.
! Une fois le programme sélectionné, le
sélecteur de programmes reste positionné
sur le programme sélectionné jusqu’ à la fin
du cycle.
! Positionnez le sélecteur sur OFF pour
éteindre la machine.
! Appuyer pour lancer le cycle de lavage
sélectionné (en fonction du programme
un témoin lumineux s’allume pour
indiquer l’étape du cycle qui est en cours,
exemple: lavage, rinçage, essorage).
AJOUTEZ OU SUPPRIMEZ DES ARTICLES
LORSQUE LE PROGRAMME A DEJA
COMMENCE (PAUSE)
! Appuyer et maintenir enfoncé le bouton
DEPART/PAUSE durant 2 secondes
(des témoins lumineux clignoteront pour
signaler que la machine a été mise en
pause.)
! Attendez 2 minutes pour que la porte se
dévérouille.
! Une fois vos articles ajoutés ou retirés,
fermez la porte et appuyez de nouveau
sur la touche DEPART/PAUSE (le
programme reprend là où il s’est arrêté).
ANNULATION DU PROGRAMME
! Pour annuler le programme, positionnez
le sélecteur sur OFF.
! Le départ différé peut être programmé
avec cette touche, vous pouvez reporter
le départ de 3, 6 ou 9 heures.
! Voici comment retarder le départ du cycle:
— Sélectionner le programme.
— Attendre jusqu’à ce que les témoins
lumineux qui correspondent à la
température et à l’essorage du
programme s’allument.
Un dispositif de sécurité empêche
d’ouvrir la porte immédiatement
après la fin du cycle.
Il faut attendre 2 minutes après que
celui—ci soit terminé et attendre que
l’indicateur lumineux s’éteigne pour
pouvoir ouvrir la porte.
Sélecteur de programmes avec
position OFF
Après avoir sélectionné un programme
les témoins lumineux de la température
et de l’essorage qui correspondent au
programme s’allument.
N.B.:Pour éteindre la machine, il faut
positionner le sélecteur sur la position
OFF.
Le sélecteur de programmes doit être
positionné sur OFF à l’issue de chaque
cycle ou avant le début du cycle
suivant pour sélectionner un nouveau
programme.
Fermez la porte avant d’appuyer sur la
touche DEPART/PAUSE.
Lorsque la touche DEPART/PAUSE a
été enfoncée, le démarrage du cycle
peut prendre quelques secondes.
Avant d’ouvrir la porte, vérifiez que le
niveau d’eau est en dessous de
l’ouverture de la porte afin d’éviter
tout risque d’inondation.

— Appuyer sur la touche (chaque fois que
vous appuyez sur la touche, le départ
est reporté respectivement de 3, 6 ou 9
heures et le témoin lumineux concerné
clignotera).
— Appuyer sur la touche DEPART/PAUSE
pour lancer le départ différé (le témoin
lumineux qui correspond au délai
arrêtera de clignoter et restera allumé).
! Il est possible d’annuler le départ
différé en positionnant le sélecteur de
programme sur OFF.
Si une coupure d’alimentation intervient
lorsque la machine est en marche, la
mémoire restaure automatiquement le
programme sélectionné lorsque l’alimentation
revient et reprend là il s’est arrêté.
! Cette option vous permet d’ajouter un
rinçage supplémentaire à la fin du cycle de
lavage, elle a été conçue spécialement
pour les personnes à peau sensible pour
lesquelles des traces de lessive peuvent
causer des irritations ou des allergies.
! Il est aussi recommandé d’utiliser cette
option pour le linge des enfants, pour le
lavage de linge très sale, en cas de forte
dose de lessive, ou encore en cas de
tissus qui ont tendance à garder la lessive
(Serviette, Peignoir, Sweat Shirt etc.).
! Cette touche vous permet de changer la
température du cycle de lavage.
! Afin de préserver les tissus, il n’est pas
possible d’augmenter la température au—
delà de la température maximum
autorisée pour chaque programme.
! Si vous souhaitez réaliser un lavage à
froid, tous les voyants lumineux doivent
être éteints.
! En appuyant sur cette touche, il est
possible de réduire la vitesse maximum
et si vous le souhaitez, vous pouvez
aussi faire un arrêt cuve pleine.
! Si l’étiquette de vos vêtements n’indique
pas d’information spécifique, vous pouvez
utiliser la vitesse d’essorage maximale
prévue pour le programme.
! Pour modifier le cycle d’essorage
appuyez sur la touche jusqu’à obtenir la
vitesse d’essorage que vous désirez.
! Il est possible de modifier la vitesse
d’essorage et de mettre en pause la
machine.
Les options doivent être choisies
avant d’appuyer sur la touche
DEPART/PAUSE.
Si l’option choisie n’est pas
compatible avec le programme
sélectionné, le témoin lumineux de
l’option clignote puis s’éteint.
Touche SELECTION TEMPERATURE
Touche SELECTION ESSORAGE
Afin d’éviter d’endommager vos
tissus, il n’est pas possible
d’augmenter la vitesse d’essorage
au—delà de la vitesse requise pour
chaque programme.
Un surdosage de lessive peut
entrainer un excès de mousse. Si
l’appareil détecte une importante
quantité de mousse, le cycle
d’essorage sera annulé ou le cycle de
lavage sera plus long et la
consommation d’eau augmentera.

! Chaque fois que vous appuyez sur le
bouton du DEPART DIFFERE, le témoin
lumineux indique combien d’heures vous
avez choisi (3, 6 ou 9 heures) il s’agit du
temps restant avant le départ.
! Quand un programme est en cours un
témoin lumineux indiquera les différentes
phases de lavage:
! L’icône indique que la porte est
verrouillée.
! Lorsque la touche DEPART/PAUSE est
pressé sur la machine avec la porte
fermée, l’icône clignote temporairement
puis s’allume.
Un dispositif de sécurité empêche
l’ouverture immédiatement après la fin du
cycle. Il faut attendre 2 minutes à l’issue du
cycle de lavage avant d’ouvrir la porte. A la
fin du cycle, tournez le sélecteur de
programmes sur OFF.
Le témoin lumineux s’allume si vous
appuyez sur le bouton rinçage intense.
Si l’option choisie n’est pas compatible avec
le programme sélectionné, le témoin
lumineux de l’option clignote puis s’éteint.
Ces témoins lumineux indiquent la
température de lavage du programme
sélectionné. La température peut être
modifiée à l’aide de la touche
correspondant (il n’est pas possible
d’augmenter la température au—delà de la
température maximum autorisée pour
chaque programme).
Si vous souhaitez réaliser un lavage à froid,
tous les voyants lumineux doivent être
éteints.
Ces témoins lumineux indiquent la vitesse
d’essorage du programme sélectionné. Il
est possible de modifier la vitesse
d’essorage ou d’annuler le cycle d’essorage
en appuyant sur la touche correspondant.
La machine est équipée d’un
dispositif électronique spécial qui
maintient le tambour durant le cycle
d’essorage. Cela réduit les bruits et
les vibrations dans la machine ce qui
prolonge la durée de vie de votre
appareil.
Indicateurs DEPART DIFFERE /
ETAPE DE LAVAGE
Indicateur PORTE SECURISEE
Fermez la porte avant d’appuyer sur la
touche DEPART/PAUSE.
Si la porte n’est pas bien fermée, la
lumière continue à clignoter pendant
environ 7 secondes, ce après quoi
la commande de démarrage sera
supprimée automatiquement. Dans ce
cas, fermez la porte de manière
correcte puis appuyez de nouveau
sur la touche DEPART/PAUSE.
Indicateur RINÇAGE INTENSE
Indicateurs SELECTION
TEMPERATURE
Indicateurs SELECTION ESSORAGE

Cet appareil est équipé de la technologie
Smart Touch qui permet de nouvelles
interactions via son application, compatible
avec les Smartphones Android équipé de
la technologie NFC.
! Télécharger sur votre Smartphone
l’application Candy simply—Fi.
FONCTIONS
Les principals fonctions disponibles via
l’application sont:
! Assistant vocal SMART – Un guide qui
vous permet de choisir le programme le plus
adapté en trois échanges vocaux (type de
vêtements, couleur et degré de salissure).
!
Cycles – Permet de télécharger et de
lancer de nouveaux programmes de
lavage.
! Entretient SMART– Permet de lancer un
diagnostic de l’appareil qui vous indiquera
les différentes possibilités d’entretien à
effectuer.
!
Mes statistiques – Retrouvez toutes vos
consommations énergétiques ainsi que
des trucs & astuces pour une utilisation
plus efficace de votre appareil.
COMMENT UTILISER SMART
TOUCH
PREMIERE UTILISATION – Enregistrement
de votre appareil
! Entrez dans le menu «Configuration» de
votre Smartphone Android et activez la
fonction NFC dans sous—menu «Réseaux
Sans fil».
! Tournez le sélecteur bi—directionnel
jusqu’à la position Smart Touch pour
activer le capteur NFC.
! Lancez l’application simply—Fi, et créez
un profile en suivant les instructions
données sur le Smartphone ou sur le
«Guide Rapide» fournit avec l’appareil.
L’application Candy simply—Fi est
disponible pour les tablettes,
smartphones équipés d’Ios et
d’Android. Cependant, pour
bénéficier de tout le potentiel de la
téchnologie Smart Touch, il est
nécessaire de posséder un
Smartphone équipé d’Android et de
la technologie NFC.
Smartphone
Android
équipé de la
technologie NFC
Interaction avec le
lave—linge +
contenus
Smartphone Android
sans la technologie
NFC
Tablette Android
Sans NFC
Retrouvez tous les détails des
fonctions Smart Touch dans le mode
démo de l’application simply—Fi ou sur:
www.candysmarttouch.com
Selon le modèle de votre Smartphone et
de la version Android, le processus
d’activation du NFC peut être différent.
Référez—vous à la notice de votre
Smartphone pour plus de détails.
Plus d’informations ainsi qu’un guide
et des vidéos pour un enregistrement
facile sont disponibles sur:
www.candysmarttouch.com/how—to
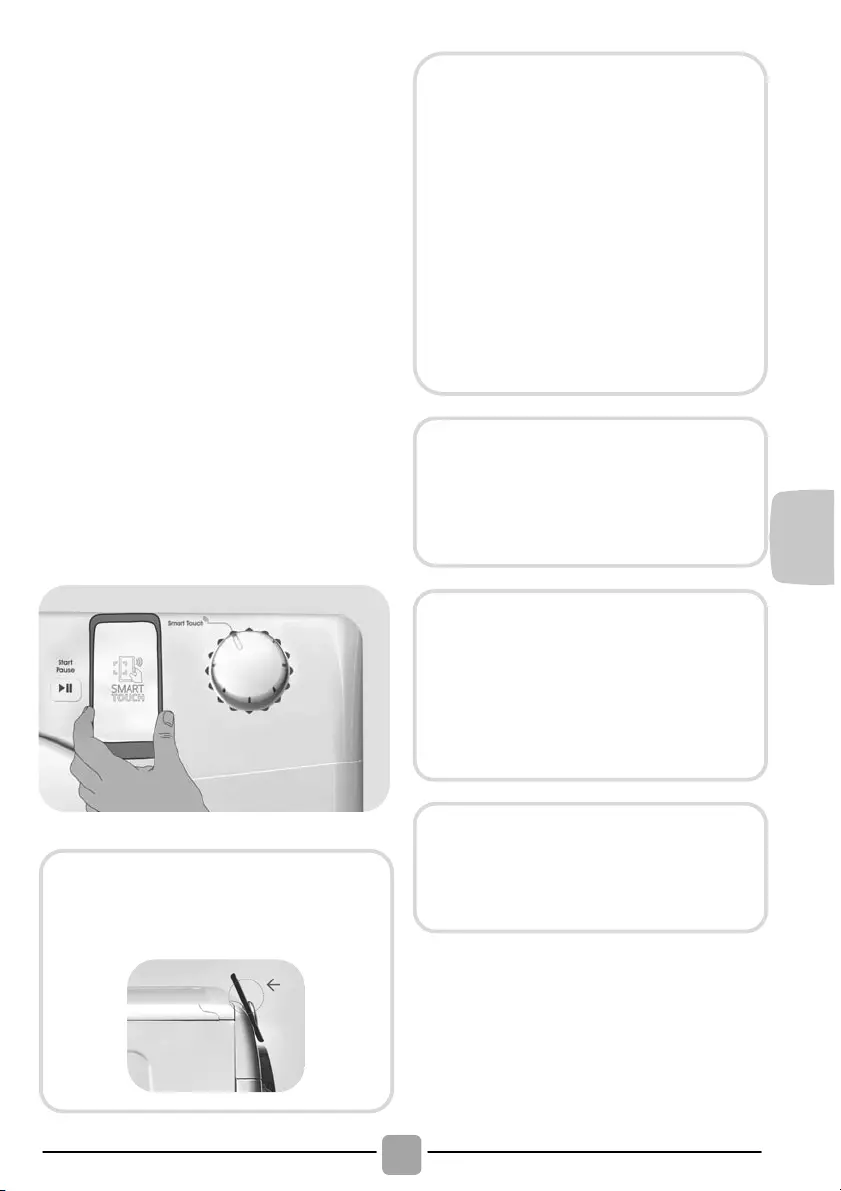
USAGES FRÉQUENTS
! Lorsque vous souhaitez utilisez votre
appareil via votre Smartphone, vous
devez systématiquement activer le mode
Smart Touch en choisissant la position
homonyme à l’aide du sélecteur bi—
diretionnel.
! Assurez—vous d’avoir débloqué l’écran de
votre Smartphone et que vous avez activé
la connectivité NFC. Autrement suiviez les
indications mentionnées précédemment.
! Si vous souhaitez lancer un cycle de
lavage, charger le tambour, ajoutez votre
lessive et fermez la porte.
! Sélectionnez la fonction désirée dans
l’application (exemple: lancer un
programme, lancer un auto—diagnostique,
mettre à jour les statistiques etc.).
! Suivez les instructions indiquées sur votre
Smartphone. APPOSEZ votre Smartphone
sur le logo Smart Touch lorsque
l’application simply—Fi vous le demande.
NOTES:
Placer votre Smartphone de telle manière
à ce que l’antenne, située à l’arrière du
telephone soit proche du logo Smart
Touch (cf image ci—dessous).
Si vous ne savez pas où se situe
l’antenne NFC sur votre Smartphone,
faites de lents mouvements
circulaires autour du logo Smart
Touch jusqu’à ce que l’application
simply—Fi confirme la connexion. Afin
de garantir une connexion stable, il
est important de GARDER LE
SMARTPHONE SUR LOGO Smart
Touch PENDANT LA PROCÉDURE
D’APPAIRAGE ET PENDANT LES
PHASES DE SYNCHRONISATION.
L’application simply—Fi vous avertira
lorsque vous pourrez retirer votre
Smartphone du logo Smart Touch.
Des housses de protection épaisse
ou des autocollants métalliques
peuvent altérer la transmission de
données entre le lave—linge et votre
Smartphone. Si cela est nécessaire,
retirez—les.
Le remplacement de certains
composants de votre Smartphone
(coque arrière, batterie etc) par
d’autres non certifié par la marque de
votre Smartphone peut entraîner un
dysfonctionnement de l’antenne NFC
altérant l’utilisation de l’application
simply—Fi.
Le contrôle et le lancement de cycle de
lavage est possible uniquement en étant
à proximité du lave—linge. Il n’est pas
possible d’effectuer ce type d’opérations
depuis une autre pièce.

(voir tableau de commande)
Il s’agit de programmes supplémentaires que vous pouvez télécharger depuis
votre Smartphone grâce à l’application simply—Fi (pour plus d’information voir la
partie Smart Touch de la notice). Le programme Auto—nettoyage est installé par
défaut pour entretenir votre machine.
Table des programmes
Tabella programmi
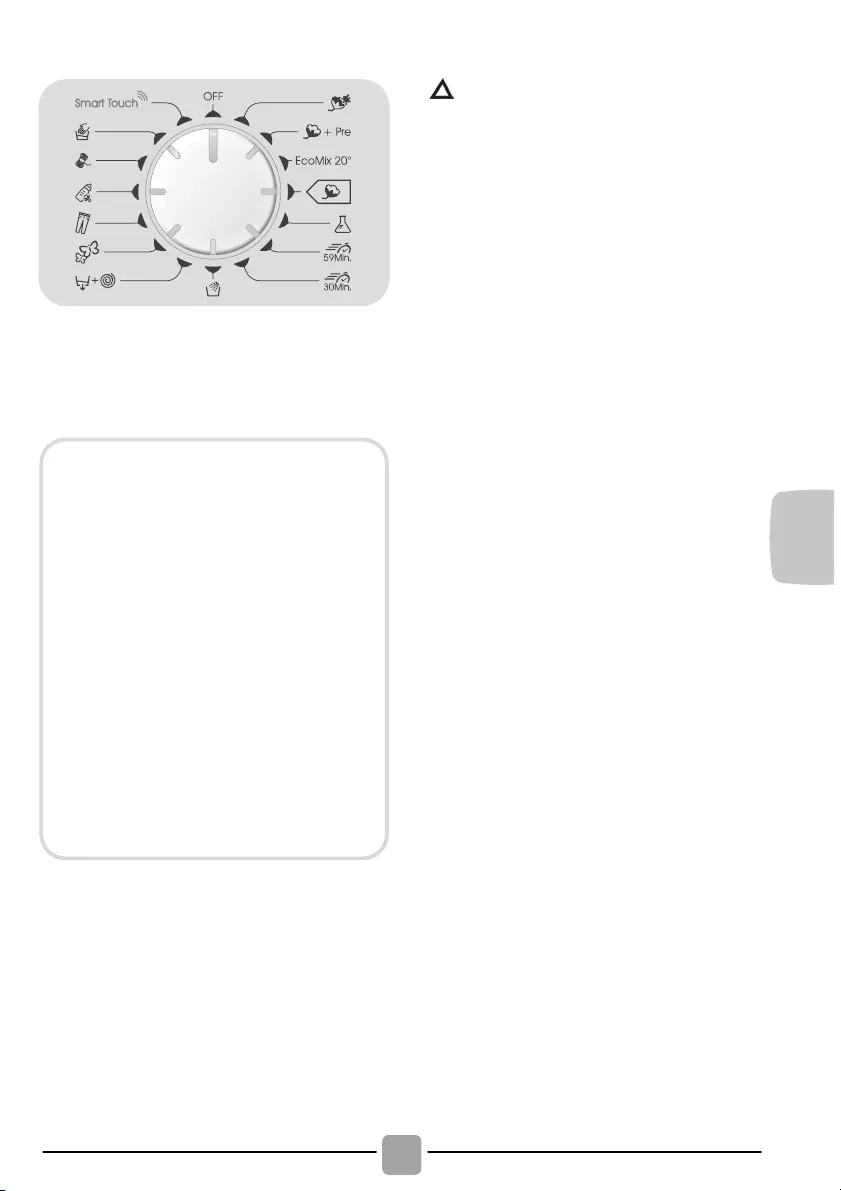
Veuillez lire ces informations
* Capacité de chargement maximale de
vêtements secs selon le modèle utilisé
(voir le bandeau de commande).
(Seulement pour les modèles
équipés d’un compartiment
pour détergent liquide)
Lorsqu’un nombre limité d’articles
sont tâchés et qu’ils nécessitent
un traitement avec des agents de
blanchiment liquides, l’élimination
préalable de la tâche peut être
effectuée dans la machine.
Versez l’eau de javel dans le
récipient prévu à cet effet dans le
compartiment » 2 « et sélectionnez
le programme spécial RINÇAGE.
Lorsque cette phase est terminée,
positionnez le sélecteur sur OFF,
ajoutez le reste de linge et
procédez au lavage avec le
programme le plus approprié.
Quand vous sélectionnez un
programme, le témoin lumineux
de la température qui correspond
au programme s’allume. Vous
pouvez modifier la température à
l’aide du bouton température (si
possible). Par mesure de
protection et de préservation de
vos vêtements vous ne pouvez
pas dépasser la température
maximale autorisée pour le
programme.
** PROGRAMME COTON STANDARD
(EU) No 1015/2010 et No 1061/2010.
PROGRAMME COTON AVEC UNE
TEMPERATURE DE 60°C.
PROGRAMME COTON AVEC UNE
TEMPERATURE DE 40°C.
Ces programmes sont adaptés pour
nettoyer du linge coton normalement
sale et sont les plus efficaces en termes
de consommation d’eau et d’énergie
pour ce type de textile.
Ces programmes ont été développés
pour être conformes à la température
sur l’étiquette de lavage sur les
vêtements. La température réelle de
l’eau peut différer légèrement avec la
température déclarée du cycle.

La machine dispose de différents
programmes et d’options pour répondre à
tous vos besoins et nettoyer différents types
de textiles à des degrés de salissure différents.
Coton Résistant
Pour un lavage parfait. Essorage final à
vitesse maximale pour plus d’efficacité.
Coton + Prélavage
Ce programme a été conçu pour éliminer
les tâches tenaces sur les vêtements
blancs en coton grâce à un prélavage avant
le cycle de lavage. Il convient d’ajouter
dans le compartiment «1» une dose de
lessive équivalente à 20% de la dose
utilisée pour un lavage.
EcoMix 20°
Ce programme innovant permet de laver
ensemble différents types de textiles et
différentes couleurs à seulement 20°C tout
en offrant d’excellentes performances de
lavage. La consommation de ce programme
représente environ 40% d’un programme
coton classique à 40°C.
Coton
Ces programmes sont adaptés pour
nettoyer du linge coton normalement sale et
sont les plus efficaces en termes de
consommation d’eau et d’énergie pour ce
type de textile.
Synthétique
Le lavage et le rinçage sont optimisés dans le
rythme de rotation du tambour ainsi que dans
le niveau d’eau. L’essorage doux réduit la
formation de plis.
Quotidien 59 Min.
Ce programme a été spécialement conçu
pour maintenir une haute performance de
lavage tout en réduisant considérablement
le temps de lavage.
Le programme est conçu pour une charge
réduite (voir tableau de programmes).
Rapide 30 Min.
Un cycle de lavage complet (lavage,
rinçage, essorage). Ce programme est
particulièrement adapté aux cotons peu
sales et aux tissus mixtes. Avec ce
programme, il est recommandé d’utiliser
seulement 20% du détergent normalement
utilisé pour éviter le gaspillage.
Rinçage
Ce programme effectue trois rinçages avec
un essorage intermédiaire. Il peut être utilisé
pour le rinçage de tous types de tissus, après
un lavage à la main par exemple.
Vidange + Essorage
Ce programme complète le rinçage et
essore à vitesse maximale. Il est possible
de réduire la vitesse d’essorage avec la
touche SELECTION ESSORAGE.
Délicats
Ce programme alterne des périodes de
lavage avec des pauses. Il est particulièrement
adpaté pour le lavage des tissus délicats.
Le lavage et le rinçage sont effectués avec
un niveau d’eau élevé.
Jeans
Ce programme a été conçu pour obtenir
des résultats de lavage impeccables sur
des tissus résistants tels que les Jeans.
Ideal pour ôter la saleté sans affecter
l’élasticité des fibres.
Bébé
Ce programme vous permet de laver tous les
vêtements pour bébé et d’obtenir un résultat de
lavage parfait tout en désinfectant les textiles
avec une température de lavage à 60°C au
minimum. Afin d’optimiser la désinfection des
textiles, nous vous recommandons d’utiliser du
détergent en poudre.
Laine
Ce programme est destiné aux textiles en
laine qui peuvent être lavés en machine.
Lavage Main
Programme dédié aux vêtements qui se
lavent à la main, il se termine par 3 rinçages
et un essorage lent.

Smart Touch
Il s’agit de programmes supplémentaires
que vous pouvez télécharger depuis votre
Smartphone grâce à l’application simply—Fi.
Pour plus d’information sur l’application voir
la partie Smart Touch de la notice.
Le programme «Auto—nettoyage» est
installé par défaut pour entretenir votre
machine, il purifie le tambour, élimine les
mauvaises odeurs et améliore ainsi la
longévité de votre appareil. Lors du
lancement du programme, «Auto—nettoyage»,
vérifie qu’il n’y ait pas de vêtement dans
le tambour et utilisez uniquement de la
lessive en poudre. A la fin du cycle de
nettoyage laisser la porte du hublot
ouverte afin de permettre le séchage du
tambour.
Il est recommandé de lancer le cycle de
nettoyage tous les 50 lavages.
7. DÉPANNAGE ET GARANTIES
Si vous constatez que votre lave—linge fonctionne mal, consultez le mini—guide ci—dessous
qui vous indiquera commun les résoudre les problèmes communs.
RAPPORTS D’ERREURS
Causes probables et résolutions
E2 (pour l’affichage
digital)
2 clignotements
(affichage LED)
La machine ne peut pas se charger en eau.
Assurez—vous que le robinet lié au tuyau de raccordement est bien ouvert.
Assurez—vous que le raccordement n’est pas coudé ou obstrué.
Le raccordement d’écoulement n’est pas à la bonne taille (cf
chapitre installation).
Fermez le robinet d’arrivée d’eau. Dévissez le tuyau et assurez—
vous que le filtre n’est pas obstrué.
E3 (pour l’affichage
digital)
3 clignotements
(affichage LED)
Le lave—linge ne draine pas l’eau.
Assurez—vous que le filtre n’est pas bouché.
Assurez—vous que le tuyau d’arrivée d’eau n’est pas plié.
Assurez—vous que le système de drainage n’est pas obstrué et que
l’eau s’écoule normalement. Vérifier que l’eau s’écoule correctement
en plaçant le tuyau dans l’évier.
E4 (pour l’affichage
digital)
4 clignotements
(affichage LED)
Il y a trop de mousse ou d’eau dans la cuve.
Assurez—vous de ne pas avoir trop mis de lessive ou que le produit
est bien conçu pour votre lave—linge.
E7 (pour l’affichage
digital)
7 clignotements
(affichage LED)
Assurez—vous que la porte est bien fermée et que des vêtements
n’obstruent pas la fermeture de la porte.
Si la porte est bloquée, débranchez la prise électrique du lave—linge
puis rebranchez—la. Attendez 2—3 minutes et ouvrez la porte.
Eteignez l’appareil et débranchez la pise électrique du lave—linge.
Attendez une minute. Rebranchez le lave—linge et lancer un
programme. Si le problème persiste, contactez un service client agrée.
UNIQUEMENT POUR LES MODELS SMART TOUCH
Grâce à la fonction Smart Touch de votre application simply—Fi, vous pouvez à
n’importe quel moment vérifier le bon fonctionnement de votre lave—linge. Vous devez
avoir un Smartphone équipé de la technologie NFC. Plus d’informations sont
disponibles sur l’application.
Si l’affichage de votre lave—linge montre une erreur (l’aide d’un code ou en clignotant)
vous pouvez lancer l’application et approcher votre Smartphone du bandeau du lave—
linge. Vous pouvez dès lors lancer un auto—diagnostique pour résoudre le problème.
! Affichage Digital: le code d’erreur s’affiche avec la letter «E» (exemple: Erreur 2 = E2).
! Autres affichages (LED): les erreurs sont affichées par l’appareil sur toutes les LED
en clignotant. Le nombre de clignotement indique le type d’erreur, et sont répétées à
un intervalle de 5 secondes (exemple: erreur 2 = deux clignotements, une pause de
5 secondes, deux clignotements etc).

Causes probables et résolutions
Le lave—linge ne lance
pas de cycle de
lavage.
Assurez—vous que votre lave—linge est bien branché.
Vérifiez que le produit est sous tension.
Assurez—vous que la prise de courant est bien sous tension en
branchant un autre appareil électrique.
La porte peut—être mal fermée. Ouvrez—la puis refermez—la.
Vérifier que vous avez sélectionné le bon programme et que vous
avez bien appuyé sur le bouton «Démarrage».
Assurez—vous que le lave—linge n’est pas en pause.
La fuite peut être causée par le joint d’étanchéité situé entre le tuyau
et le robinet. Dans ce cas, remplacez le joint d’étanchéité et fixez de
nouveau le tuyau d’alimentation.
Vérifiez que le filtre est bien fermé.
Le lave—linge n’essore
pas
A Cause d’un bourrage du tambour, la machine peut:
• Equilibrer le chargement du tambour et accroitre le cycle
d’essorage
• Réduire sa vitesse de rotation pour limiter les vibrations et le bruit.
• Ne pas essorer le chargement du tambour afin de préserver
l’intégrité du lave—linge.
Cela peut être due à une vidange incomplète de l’eau. Dans ce cas,
attendez quelques minutes. Si le problème persiste, reportez—vous à
la section «Erreur 3″.
Certains modèles possèdent une fonction “Sans essorage”. Assurez—
vous que cette dernière n’est pas activée.
Assurez—vous que certaines options de lavages qui pourraient
changer le cycle d’essorage ne sont pas activées.
Un surplus de lessive peut entraver le lancement d’un cycle
d’essorage.
Le lave fait un bruit
étrange / beaucoup de
bruit pendant
l’essorage
Le niveau du lave—linge n’est peut—être pas bon. Si c’est le cas, faites
le niveau à l’aide des pieds ajustables.
Vérifiez que les vis de transports, les tubes d’écartements ont bien
été enlevé.
Vérifiez que des objets oubliés ne sont pas le tambour.
La garantie constructeur couvre les dommages ayant pour origine un
phénomène électrique, électronique ou mécanique interne au produit. Si un
dommage est consécutif à un usage, à une installation et/ou à un branchement
qui ne respectent par la notice, la garantie du fabricant ne saurait s’appliquer.

L’utilisation de détergents écologiques
sans phosphates (voir les informations qui
figurent sur le paquet) peut provoquer les
effets suivants:
— Les eaux sales du rinçage peuvent être
plus opaques à cause de la présence
d’une poudre blanche (zéolithes)
maintenue en suspension, sans toutefois
que la performance de rinçage ne soit
affectée.
— Présence d’une poudre blanche sur le
linge après le lavage, qui n’est pas
absorbée par les tissus et qui ne
changent pas la couleur des tissus.
— Mousse dans l’eau au dernier rinçage.
— Mousse abondante: ceci est le plus
souvent dû à des agents présents dans la
lessive qui sont difficiles à éliminer.
Dans ces cas, il est inutile de
recommencer les cycles de rinçage.
Si le problème persiste ou si vous détectez
une anomalie contactez immédiatement un
service client agréé.
Il est recommandé d’utiliser des pièces
détachées originales disponibles/vendues
dans nos centres de service client agréés.
Le fabricant décline toute responsabilité
pour les erreurs d’impression dans le
livret fourni avec ce produit. En outre,
elle se réserve également le droit
d’apporter toute modification jugée utile
à ses produits sans modifier leurs
caractéristiques essentielles.
Garantie
Le produit est garanti selon les termes et
conditions énoncées dans le certificat
fourni avec le produit.
Le certificat de garantie doit être dûment
rempli et conservé, de façon à être
montré en cas de besoin.

hldsk

16.05 — 41044144 — Canon Italia — Business Services Channel


Благодарим Вас за покупку стиральной
машины Candy. Мы уверены, что она будет
долго и верно служить Вам, и будет
помогать Вам стирать одежду даже из
деликатных тканей.
Вы можете зарегистрировать ваше
изделие на сайте www.registercandy.com
для того, чтобы обеспечить доступ к
дополнительным услугам, которые мы
предоставляем нашим постоянным клиентам.
Внимательно прочти те данное руководство для
того чтобы правильно и безопасно использовать
и обслуживать свою стиральную машину.
Используйте стиральную машин у
только после того, как внимательно
прочтете эти инструкции. Рекомендуется
хранить это руководство под рукой и
сохранить его в хорошем состоянии для
возможных будущих владельцев.
Следует проверить, что электроприбор
поставлен вместе с настоящим руководством
по эксплуатации, гарантийным талоном,
адресами сервисных центров и ярлыком
энергоэффективности. Также следует проверить,
что в комплект стиральной машины входят пробки,
фиксатор для сливного шланга, и лоток для жидкого
моющего средства или отбеливающего средства
(только для некоторых моделей). Мы рекомендуем
Вам сохранить все эти компоненты.
Каждое изделие снабжено уникальным 16разрядным идентификационным кодом
(«серийным номером»), который напечатан на
этикетке, наклеенной на электроприборе (в
области загрузочного люка) или на конверте,
который находится внутри стиральной
машины. Этот код является своего рода
идентификационной картой изделия, и вы
должны будете зарегистрировать его при
обращении в сервисный центр Candy.
Данный электроприбор промаркирован
в соответствии с Европейской
директивой 2012/19/EU относительно
Отходов от электрического и
электронного оборудования (ОЭЭО).
ОЭЭО содержат как загрязняющие вещества
(которые могут оказывать негативное
воздействие на окружающую среду) так и
компоненты, которые могут использоваться
повторно. ОЭЭО обязательно должны
подвергаться специальной обработке для того,
чтобы правильно удалить и утилизировать все
загрязняющие природу вещества и
восстановить и повторно использовать все
материалы пригодные для повторного
использования. Люди могут играть важную роль
в защите окружающей среды от вредного
воздействия на нее ОЭЭО; для этого нужно
соблюдать несколько основных правил:
! ОЭЭО не должны утилизироваться как
бытовые отходы;
!
ОЭЭО должны отправляться на
соответствующие пункты сбора,
управляемые муниципальными властями
или зарегистрированными компаниями. В
некоторых странах для крупногабаритных
ОЭЭО может быть организован их сбор на
дому.
В некоторых странах, если вы покупаете
новый электроприбор, то вы можете вернуть
в магазин старый, который должен быть
принят магазином бесплатно (один на один)
при условии, что приобретается аналогичное
новое оборудование.
1. ОБЩИЕ ПРАВИЛА БЕЗОПАСНОСТИ
2. УСТАНОВКА
3. ПРАКТИЧЕСКИЕ СОВЕТЫ
4. ОБСЛУЖИВАНИЕ И ЧИСТКА
5.
КРАТКОЕ РУКОВОДСТВО ПОЛЬЗОВАТЕЛЯ
6.
ОРГАНЫ УПРАВЛЕНИЯ И ПРОГРАММЫ
7. УСТРАНЕНИЕ НЕИСПРАВНОСТЕЙ И
ГАРАНТИЙНЫЕ ОБЯЗАТЕЛЬСТВА

1. ОБЩИЕ ПРАВИЛА
БЕЗОПАСНОСТИ
! Данный электроприбор предназначен
для бытовых и подобных им
применений, например:
− Кухонные помещения для
персонала в магазинах, офисах,
и другие рабочие помещения;
− Загородные дома;
− Использование клиентами в
отелях, мотелях, других жилых
помещениях;
− В гостиницах типа «постель и
завтрак».
Использование данного электроприбора
для применений, отличных от
бытовых, например, для коммерческих
применений с участием специалистов
или обученных пользователей
,
запрещается. Использование данного
электроприбора для применений,
отличных от домашних, может
привести к снижению срока службы
электроприбора, а также к
отмене гарантии производителя.
Производитель не несет предусмотренной
законом ответственности за любые
повреждения электроприбора или другие
повреждения или потери, связанные с тем,
что электроприбор использовался для
применений отличных от домашних или
бытовых (даже если он установлен в жилом
доме или в бытовом помещении).
!
Данный электроприбор может
использоваться детьми, начиная
с 8 лет, и лицами с нарушенными
физическими или умственными
способностями, а также лицами,
не обладающими достаточным
опытом и знаниями, если за
их действиями наблюдает
ответственное лицо, или если эти
лица были проинструктированы
относительно безопасной эксплуатации
электроприбора и осознают опасности,
связанные с его работой. Не разрешайте
детям играть с электроприбором.
Чистка и обслуживание не должны
выполняться детьми без наблюдения
взрослых.
! Следите за тем, чтобы дети не
играли с электроприбором.
! Дети младше 3 лет не должны
находиться рядом с машиной
или должны находиться под
постоянным наблюдением взрослых.
!
Поврежденный шнур питания
должен заменяться производителем,
его агентом по техобслуживанию, или
квалифицированным специалистом.
Это необходимо для обеспечения
безопасности электроприбора.
! Следует использовать только те
шланги, которые поставляются
вместе с электроприбором. (Не
используйте старые шланги).
! Давление воды должно быть в
пределах от 0,05 MПa до 0,8 MПa.
! Убедитесь в том, что под
основанием машины нет ковра,
и что ковер не загораживает
вентиляционные отверстия машины.
!
Состояние ВЫКЛЮЧЕНО обеспечивается
с помощью установки указательной риски

на ручке управления программами в
вертикальное положение. Если ручка
управления находится в любом другом
положении, то машина находится
в состоянии ВКЛЮЧЕНО.
! Электроприбор должен быть
установлен так, чтобы
обеспечивался свободный доступ
к электрической розетке.
! Максимальная загрузка сухого
белья зависит от используемой
модели (см. панель управления).
! Справочный листок технических
данных изделия можно найти на
веб-сайте производителя.
! Пред выполнением чистки или
обслуживания стиральной машины
отсоедините шнур питания от
электрической розетки, и закройте
водопроводный кран.
! Проверьте, что электроприбор
заземлен. Если электроприбор не
заземлен, обратитесь за помощью
к опытному электрику.
! Не пользуйтесь п реобразователями
напряжения, тройниками, и
удлинительными шнурами.
! Перед тем как открыть
загрузочный люк стиральной
машины, убедитесь в том, что
в барабане машины нет воды.
! При отсоединении шнура питания
от электрической розетки не держитесь
за шнур, а держитесь за вилку.
! Не подвергайте стиральную
машину воздействию дождя,
прямого солнечного света, и
другим погодным воздействиям.
! При перемещении стиральной
машины не поднимайте машину
за ручки управления или
за выдвижную кассету для
моющего
средства. Во время
транспортировки
загрузочный люк
не должен опираться на тележку.
Рекомендуется поднимать машину
при участии двух человек.
! В случае возникновения неисправности
и/или при нарушении нормальной
работы, выключите стиральную машину,
закройте водопроводный кран и не
пытайтесь отремонтировать электроприбор
самостоятельно. Немедленно свяжитесь с
сервисным центром и используйте только
фирменные запчасти. Невыполнение этих
требований может привести к снижению
безопасности электроприбора.
Размещая маркировку на
этой продукции, мы заявляем,
под нашу ответственность, о
соответствии всем Европейским
нормам безопасности, охраны
здоровья и экологическим
требованиям, изложенным в
законодательстве для данного
вида продукции.
Инструкции по безопасности
ПРЕДУПРЕЖДЕНИЕ:
во время цикла стирки вода
может нагреваться до очень
высокой температуры.
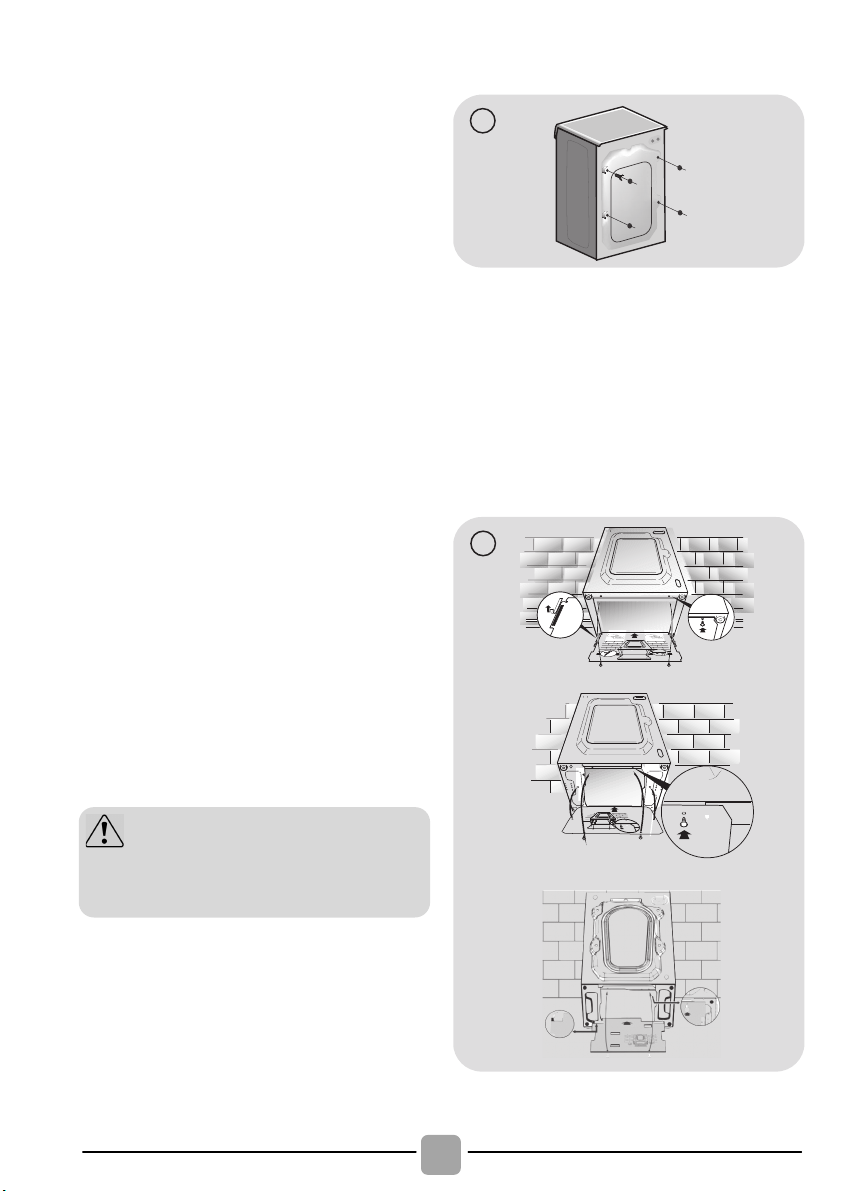
! Разрежьте завязки на шлангах,
соблюдая при этом осторожность,
чтобы не повредить шланги и
шнур питания.
! Выверните 2 или 4 винта (A)
на задней стенке и снимите 2
или 4 прокладки (B), как
показано на рис.1.
! Закройте 2 или 4 отверстия
пробками, которые находятся
в конверте с инструкцией.
! Если стиральная машина
является встраиваемой, то
после разрезания завязок на
шлангах, выверните 3 или 4
винта (A) и снимите 3 или 4
прокладки (B).
! В некоторых моделях 1 или
большее количество прокладок
падает внутрь машины: Наклоните
стиральную машину вперед, чтобы
извлечь их. Закройте отверстия
пробками, которые находятся в
конверте.
! Установите на дно полистироловую
прокладку, как показано на рис. 2
(в соответствии с моделью
стиральной машины могут
быть варианты A, B или C).
ПРЕДУПРЕЖДЕНИЕ:
Храните упаковочные материалы
в недоступном для детей месте.
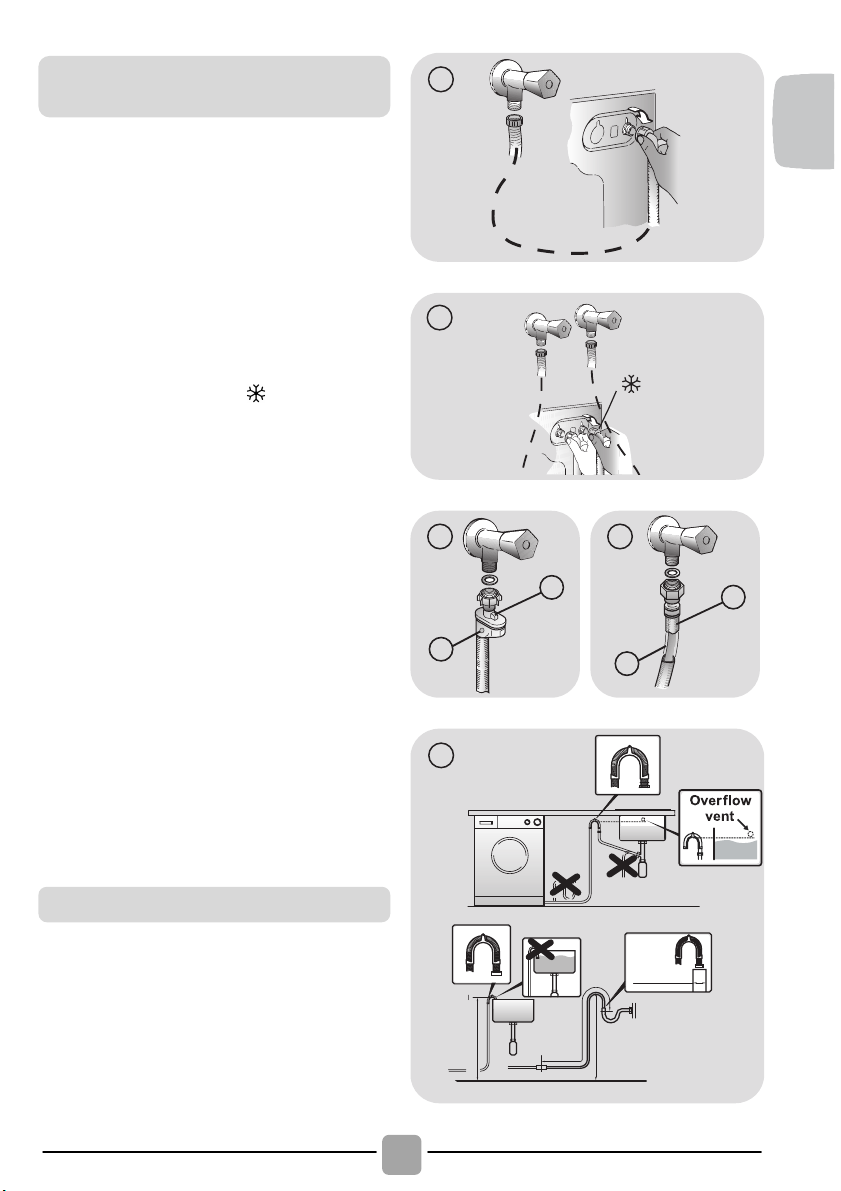
! Подключите заливной шланг к крану
(рис. 3) используя только новый шланг,
поставляемый с бытовым устройством
(не используйте старые шланги).
! Некоторые модели могут иметь одну или
несколько из перечисленных ниже функций:
! HOT&COLD (ГОРЯЧАЯ И ХОЛОДНАЯ)
(рис. 4): Подсоединение к стиральной
машине линий горячей и холодной воды
обеспечивает экономию электроэнергии.
Подсоедините серый шланг к водопроводному
крану линии холодной воды а красный шланг к
водопроводному крану линии горячей воды.
Стиральная машина может быть подсоединена
только к крану холодной воды: в этом случае
некоторые из программ могут начинаться с
запаздыванием в несколько минут.
! AQUASTOP (ПРЕКРАЩЕНИЕ ПОДАЧИ ВОДЫ)
(рис. 5): В шланге подачи воды установлено
устройство, которое при повреждении шланга
подачи воды прекращает подачу воды в
стиральную машину; в этом случае в окне “A”
появляется красная метка, что указывает на то, что
шланг нужно заменить. Чтобы отвернуть гайку,
нужно нажать на фиксатор «B».
! AQUAPROTECT — (ЗАЩИТА ПОДАЧИ ВОДЫ) –
ШЛАНГ ПОДАЧИ ВОДЫ С ОБОЛОЧКОЙ (рис.
6): При наличии утечки воды из основного
внутреннего шланга «A«, в прозрачной оболочке
шланга «B» будет скапливаться вода, позволяющая
завершить цикл стирки. После окончания цикла
стирки свяжитесь с сервисным центром для того,
чтобы заменить шланг подачи воды.
! Проследите за те м, чтобы не было перегибания
или деформации шланга в пространстве между
стиральной машиной и стеной. Поместите конец
сливного шланга в ванну или подсоедините его к
сливному отверстию в стене (предпочтительно),
расположенному на высоте не менее 50 см от
пола. Диаметр сливного шланга должен быть
больше диаметра шланга подачи воды (рис. 7).
min 50 cm
max 85 cm
+2,6 mt
max
max 100 cm
Подключение к водопроводной
линии
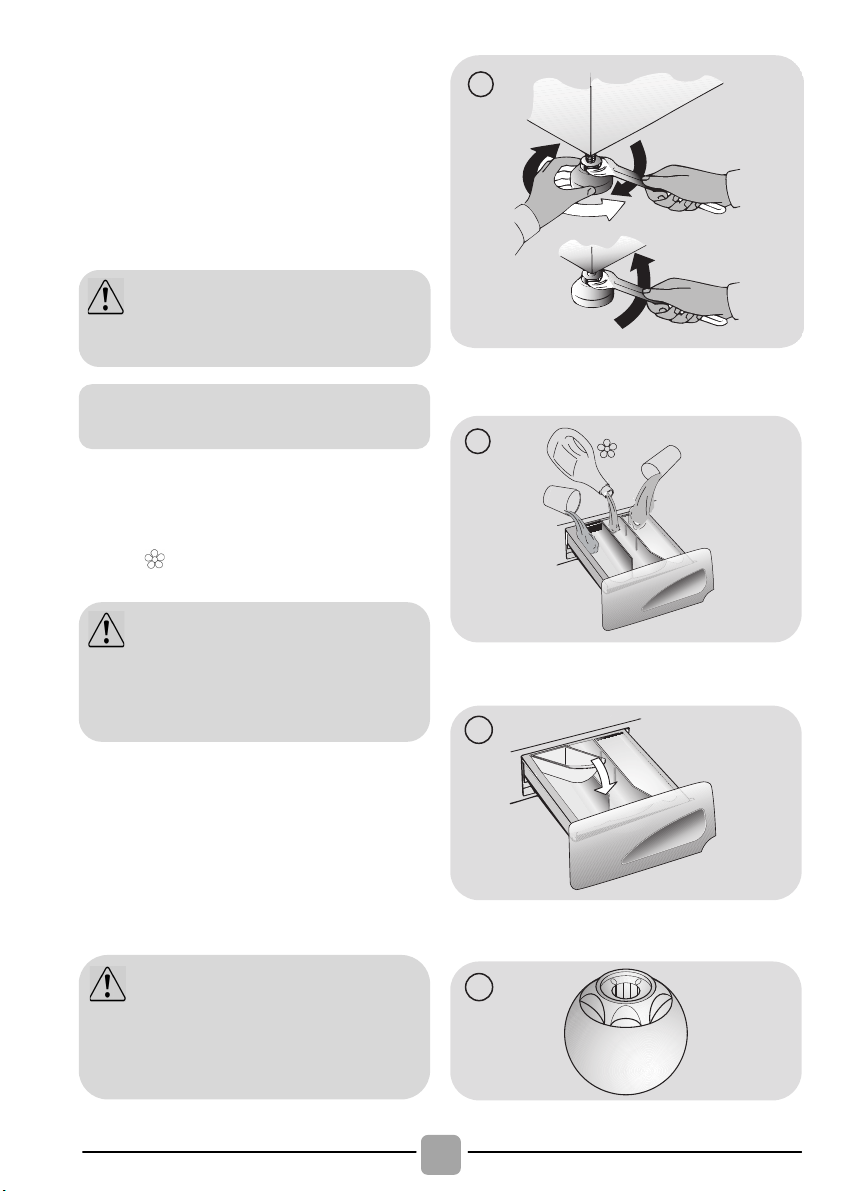
! Отрегулируйте горизонтальный уровень стиральной
машины с помощью ножек, как показано на рис. 8:
a. поверните гайку по часовой стрелке, чтобы
освободить винт;
b. поверните ножку, чтобы она поднялась или
опустилась до соприкосновения с полом;
c. зафиксируйте ножку с помощью гайки так,
чтобы гайка вошла в контакт с дном
стиральной машины.
! Подключите стиральную машину к электросети.
Выдвижная кассета для моющего средства
имеет три отсека, как показано на рис. 9:
! отсек “1”: для моющего средства, используемого
для предварительной стирки;
! отсек “ ”:для специальных добавок, умягчителей
воды, крахмала, ароматизаторов, и т. п;
! отсек “2”: для моющего средства.
В некоторых моделях имеется чашка для жидкого
моющего средства (рис. 10). Чтобы использовать
чашку для жидкого моющего средства, поместите
ее в отсек «2». При этом жидкое моющее средство
попадет в барабан стиральной машины в нужное
время. Эта чашка также может использоваться для
отбеливающего средства при выборе программы
«
Полоскание».
ПРЕДУПРЕЖДЕНИЕ:
Если нужно заменить сетевой шнур,
свяжитесь с сервисным центром.
Выдвижная кассета для моющего
средства
ПРЕДУПРЕЖДЕНИЕ:
Используйте только жидкие продукты,
стиральная машина автоматически
дозирует добавки для каждого цикла во
время последнего полоскания.
ПРЕДУПРЕЖДЕНИЕ:
Некоторые моющие средства являются
трудноудалимыми. В этом случае рекомендуется
установить в барабан стиральной машины
специальный контейнер (пример на рис. 11).

3. ПРАКТИЧЕСКИЕ
СОВЕТЫ
ПРЕДУПРЕЖДЕНИЕ: При сортировке
белья следует проверить, что:
— из белья для стирки удалены
металлические предметы, такие как,
например, шпильки и монеты;
— пуговицы и молнии застегнуты, пояса и
ленты завязаны;
— со штор сняты ролики;
— следует внимательно прочесть информацию
на ярлыках с указаниями относительно стирки;
— следует удалить стойкие пятна с
помощью специальных моющих средств.
! при стирке ковриков, покрывал и других
тяжелых тканей не рекомендуется
использовать отжим.
! Перед стиркой изделий из шерстяных тканей
следует убедиться в том, что данное изделие
может стираться в стиральной машине.
Советы относительно бережного по
отношению к природе и экономичного
использования стиральной машины.
Загружайте в стиральную машину максимальное
рекомендованное количество белья.
! Обеспечьте наилучшее использование
электроэнергии, воды, моющего средства и
времени с помощью максимальной
рекомендованной загрузк и вашей стиральной
машины. При полной загрузке машины
экономится 50% электроэнергии по сравнению
с двумя половинными загрузками.
Вам нужна предварительная стирка?
! Только для очень грязного белья!
СЭКОНОМЬТЕ моющее средство, время,
воду, и от 5 до 15% электроэнергии, не
используя режим предварительной стирки
(Prewash) для стирки не очень сильно
загрязненного белья.
Требуется ли горячая вода?
! Заранее обработайте пятна с помощью
пятновыводителя, или замочите белье в воде
перед стиркой для того, чтобы устранить
необходимость выполнения стирки при
высокой температуре. Сэкономьте до 50%
электроэнергии с помощью использования
программы стирки при температуре 60°C.
Следуйте указаниям и рекомендациям
относительно использования моющего средства
при разных температурах, которые приведены в
кратком руководстве. В любом случае
обязательно прочтите инструкции относительно
правильного использования и дозировки моющего
средства, приведенные на его упаковке.
Советы относительно загрузки
белья
Полезные советы для пользов ателя
При стирке сильно загрязненных
белых тканей мы рекомендуем
вам пользоваться программами
для хлопчатобумажных тканей с
температурой 60°С или выше и
использовать при этом обычный
стиральный порошок (для стирки сильно
загрязненных вещей), содержащий
отбеливающие вещества, который
при умеренных/высоких температурах
обеспечивает превосходные результаты.
Для стирки при температуре от 40°C до
60°C тип используемого моющего средства
должен соответствовать типу ткани и уровню
ее загрязнения. Обычные стиральные
порошки хорошо подходят для “белых” и
цветных тканей с прочной краской, а жидкие
моющие средства или «защищающие цвет»
стиральные порошки хорошо подходят для
стирки цветных тканей с небольшими
уровнями загрязнения.
Для стирки при температуре ниже 40°C мы
рекомендуем использовать жидкие моющие
средства, или моющие средства, на которых
указано, что они могут применяться для
стирки при низкой температуре.
Для стирки изделий из шерсти или шелка
пользуйтесь только специальными моющими
средствами, предназначенными для этих тканей.
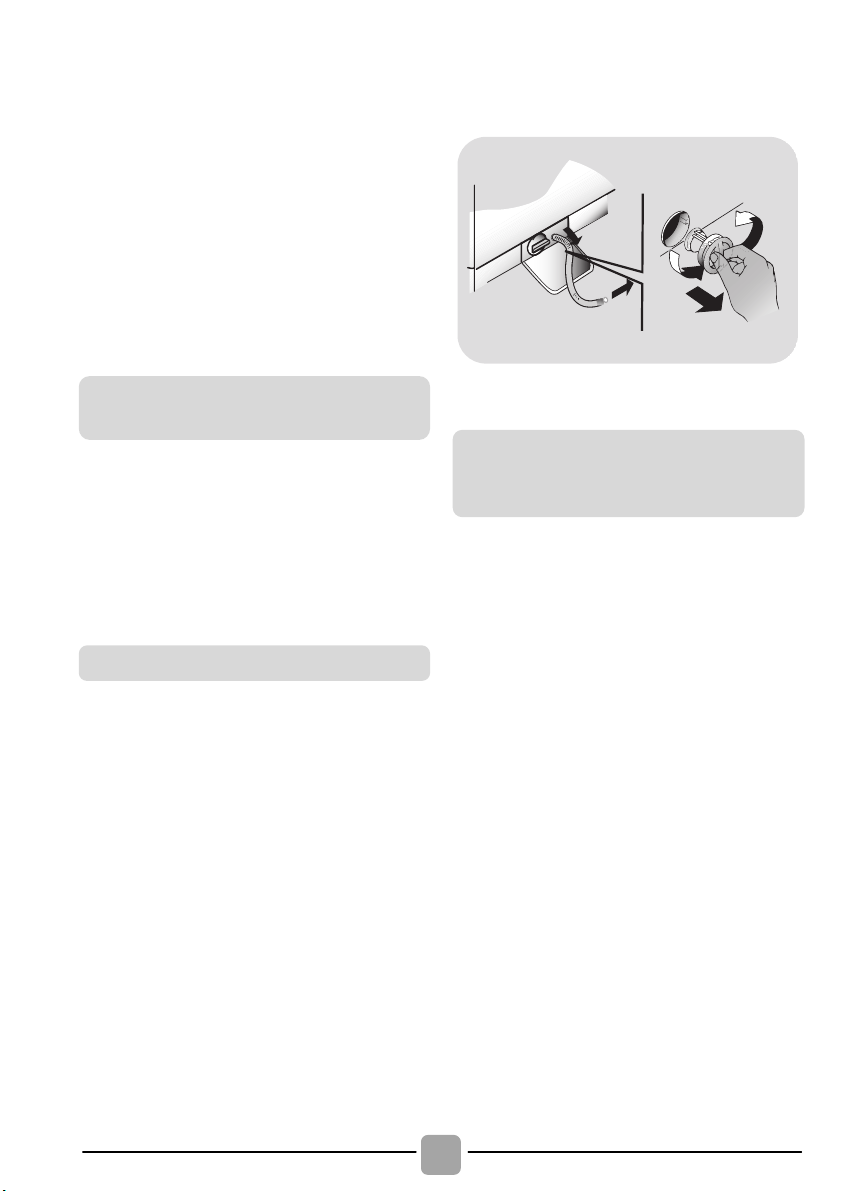
4. ОБСЛУЖИВАНИЕ И
ЧИСТКА
Для чистки наружных поверхностей стиральной
машины используйте влажную ткань. Не
используйте абразивные чистящие средства,
спирт и/или растворители. Для обычной чистки
стиральной машины не требуются специальные
процедуры: очистите отсеки кассеты для
моющих средств и фильтры; ниже
представлены указания относительно
перемещения стиральной машины и
относительно ухода за ней при длительном
хранении.
! Рекомендуется чистить кассету для
моющих средств, чтобы предотвратить
накапливания в ней моющего средства
и добавок.
! Для этого нужно извлечь кассету,
приложив небольшое усилие, промыть ее
под струей воды, и установить на место.
! В стиральной машине имеется
специальный фильтр, задерживающий
достаточно крупные загрязнения
(например, пуговицы и м о не ты )
которые могут забить слив.
! Только для некоторых моделей:
Извлеките гофрированный шланг,
удалите пробку и слейте воду в
контейнер.
! Перед выворачиванием фильтра
рекомендуется положить под него кусок
впитывающей воду ткани, чтобы
сохранить пол сухим.
! Поверните фильтр против часовой
стрелки до ограничителя.
! Снимите и оч истите фильтр; затем
установите его на место, повернув по
часовой стрелке.
! Установите все детали на место,
выполнив описанные выше операции в
обратной последовательности.
! Если стиральная машина должна
храниться в неотапливаемом помещении в
течение длительного времени, слейте из
шлангов всю воду.
! Отсоедините стиральную машину от
электрической сети.
! Снимите со шланга фиксирующую
ленту и опустите шланг, чтобы
полностью слить воду в контейнер.
! Закрепите сливной шланг с помощью
ленты.
Чистка выдвижной кассеты
для моющих средств
Советы относительно п еремещения
стиральной машины и длительного
ее хранения
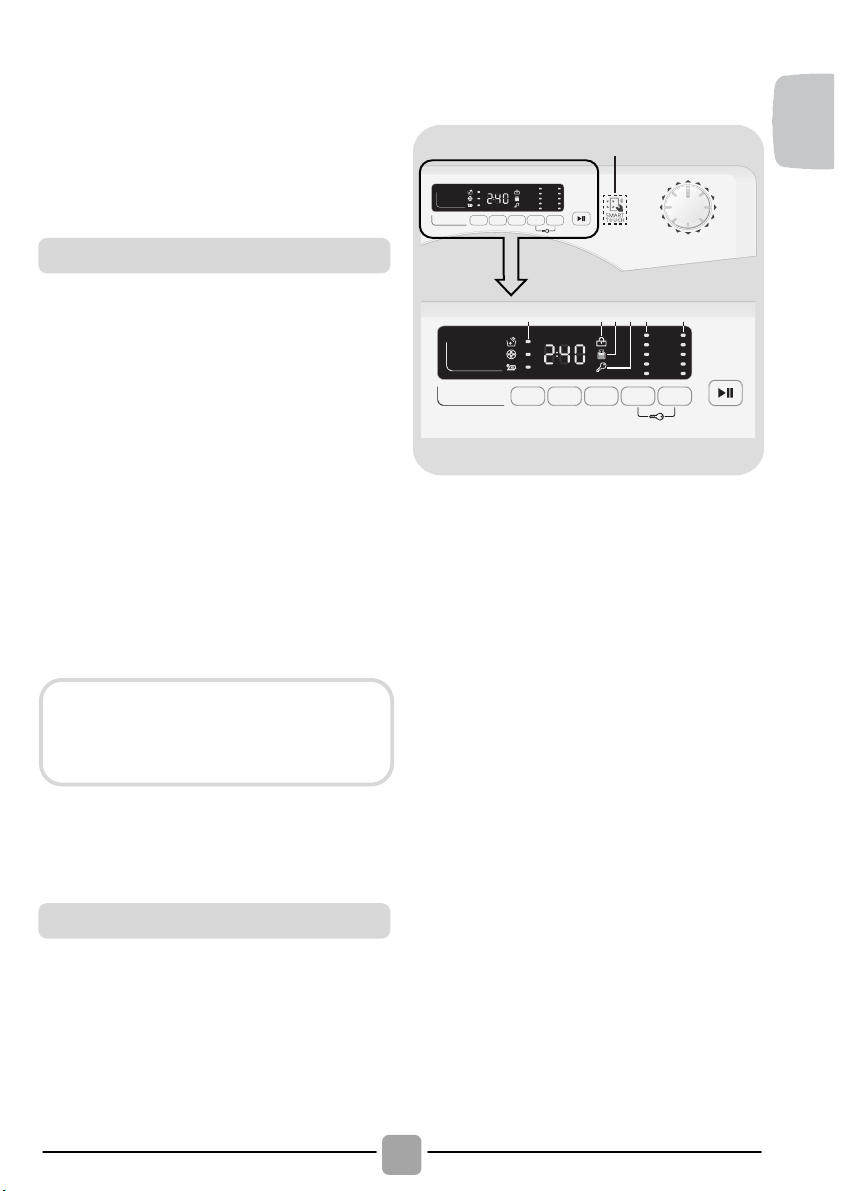
5.
КРАТКОЕ РУКОВОДСТВО
ПОЛЬЗОВАТЕЛЯ
В данной стиральной машине уровень воды
автоматически регулируется в соответствии с
типом и количеством стираемого в ней
белья. Эта система снижает потребление
электроэнергии и время стирки.
! Включите стиральную машину и выберите
нужную программу стирки.
! В случае необходимости выберите температуру
стирки и нажмите нужную кнопку «опции».
! Чтобы начать стирку нажмите кнопку
СТАРТ/ПАУЗА.
Если в процессе стирки происходит
нарушение подачи электроэнергии, то
специальное запоминающее устройство
сохраняет установки, и при восстановлении
подачи электроэнергии машина возобновляет
цикл стирки с того момента, когда произошло
прекращение ее работы.
!
После завершения программы на дисплее
появится сообщение «End» («конец»),
или, у некоторых моделей, включатся
все световые индикаторы цикла стирки.
! Выключите стиральную машину.
Для выполнения любого типа стирки
обратитесь к таблице программ стирки и
выполните указанные операции.
Давление в гидравлической системе:
min 0,05 Mпa / max 0,8 MПa
Скорость вращения центрифуги:
См. Таблицу технических характеристик.
Потребляемая мощность/ эл.
предохранитель/ Напряжение в сети:
См. Таблицу технических характеристик.
6. ОРГАНЫ УПРАВЛЕНИЯ
И ПРОГРАММЫ
A
DC E F G B
H
L
Q
I MNO P
Переключатель выбора программы
с положением OFF (ВЫКЛ.)
Кнопка БЫСТРАЯ / УРОВЕНЬ
ЗАГРЯЗНЕНИЯ
Световой индикатор
БЛОКИРОВКА ДВЕРЦЫ
Индикатор БЛОКИРОВКА
КНОПОК
Индикаторы ВЫБОР
ТЕМПЕРАТУРЫ
Подождите, пока не погаснет световой
индикатор блокировки открывания
загрузочного люка: приблизительно через
2 минуты после окончания программы.
Технические характеристики

! Нажмите кнопку СТАРТ/ПАУЗА, чтобы
запустить выбранный цикл стирки.
! После того, как программа выбрана,
переключатель выбора программы
будет оставаться в неподвижном
положении до окончания цикла.
! Выключите стиральную машину,
повернув переключатель выбора
программы в положение OFF (ВЫКЛ.).
! Нажмите, чтобы запустить выбранный
цикл.
ДОБАВЛЕНИЕ ИЛИ ИЗВЛЕЧЕНИЕ
БЕЛЬЯ ПОСЛЕ ЗАПУСКА ПРОГРАММЫ
(ПАУЗА)
! Нажмите и удерживайте клавишу
СТАРТ/ПАУЗА примерно 2 секунды
(световой индикатор и время до
окончания стирки начнут мигать,
показывая, что машина была
поставлена на паузу).
! Подождите 2 минуты, пока система
безопасности разблокирует дверцу.
! После добавления или извлечения вещей,
закройте дверцу и нажмите клавишу
СТАРТ/ПАУЗА (программа начнется с
того момента, когда она была прервана).
ОТМЕНА ПРОГРАММЫ
! Чтобы отменить программу, установите
переключатель выбора программы в
положение OFF (ВЫКЛ.).
! Эта кнопка позволяет вам задержать
запуск выбранного цикл а стирки на
время до 24 часов.
Специальное защитное устройство
предотвращает открывание дверцы
сразу же после окончания цикла
стирки.
Прежде чем открыть дверцу,
подождите 2 минуты после
окончания цикла стирки (должен
погаснуть световой индикатор
БЛОКИРОВКА ДВЕРЦЫ).
Переключатель выбора
программы с положением
OFF (ВЫКЛ.)
После поворота переключателя
выбора программы загорается
дисплей, на котором отображаются
установки для выбранной программы.
В целях экономии электроэнергии в
конце цикла стирки, и когда машина не
работает, яркость дисплея уменьшается.
ВАЖНО: Чтобы выключить машину,
установите переключатель выбора
программы в положение OFF
(ВЫКЛ.).
Переключатель выбора программы
должен возвращаться в положение
OFF (ВЫКЛ.) в конце каждого цикла
стирки, или при запуске последующего
цикла стирки перед выбором и
запуском следующей программы.
Перед нажатием к нопки СТАРТ/ПАУЗА
закройте дверцу.
После нажатия кнопки СТАРТ/ПАУЗА
может пройти несколько секунд перед
тем, как машина начнет работать.
Во избежание перелива, перед тем
как открыть дверцу, н еобходим о
убедиться в том, что уровень воды
ниже проема дверцы.

! Для задержки запуска цикла стирки
выполните описанные ниже действия:
— Выберите нужную программу.
— Нажмите кнопку один раз, чтобы
активировать ее (на дисплее появляется
h00), а затем нажмите ее еще раз,
чтобы установить задержку 1 час
(на дисплее появляется h01).
Установленная задержка будет
увеличиваться на 1 час после каждого
последующего нажатия кнопки до тех пор,
пока на дисплее не появится h24 (24 часа).
После этого следующее нажатие кнопки
сбрасывает задержку запуска на ноль.
— Подтвердите с помощью нажатия
кнопки СТАРТ/ПАУЗА (дисплей начинает
мигать). Начинается обратный отсчет
времени, и когда он закончится,
программа запустится автоматически.
!
Отложенный старт можно отменить,
повернув переключатель программ в
положение OFF (ВЫКЛ).
В случае нарушения подачи
электроэнергии во время работ ы
машины выбранная программа
сохраняется в специальной памяти,
и после восстановления подачи
электроэнергии эта программа
выполняется с того места, где она
была прервана.
Вы можете выбрать один из трех
вариантов:
— ДОПОЛНИТЕЛЬНОЕ ПОЛОСКАНИЕ
! Эта опция позволяет добавить еще
один цикл полоскания после окончания
цикла стирки и была предусмотрена
для людей с нежной и чувствительной
кожей, у которых даж е незначительные
остатки моющего средства могут
вызвать раздражение или аллергию.
! Эту функцию также рекомендуется
применять при стирке детских вещей и
в случае использования больш ого
количества моющего средства при
стирке очень грязных вещей, волокна
которых обычно удерживают моющее
средство.
— ГИГИЕНА +
Эту опцию можно использовать только в
том случае, если вы задали темпера туру
60°C. Данная опция позволяет проводить
гигиеническую обра б отк у одежды за счет
того, что в течение всего цикла стирки
будет поддерживаться постоянная
температура.
— ЛЕГКАЯ ГЛАЖКА
Эта функция сводит к минимуму
образование складок на ткани путем
отмены промежуточных отжимов или с
помощью уменьшения интенсивности
последнего отжима.
Данная кнопка позволяет выбрать один
из двух вариантов в зависимости от
выбранной программы:
— БЫСТРАЯ
Данная кнопка становится активной
при установке ручки на программу
БЫСТРАЯ (14/30/44 мин.) и позволяет
выбрать одну из указанных
продолжительностей цикла стирки.
— УРОВЕНЬ ЗАГРЯЗНЕНИЯ
! После выбора программы автоматически
отобразится продолжительность цикла
стирки, установленная для этой
программы.
Перед нажатием кнопки СТАРТ/ПАУЗА
следует выбрать кнопки варианта.
Если выбран вариант, который не
совместим с выбранной программой,
индикатор варианта мигнет и
выключится.
Кнопка БЫСТРАЯ / УРОВЕНЬ
ЗАГРЯЗНЕНИЯ
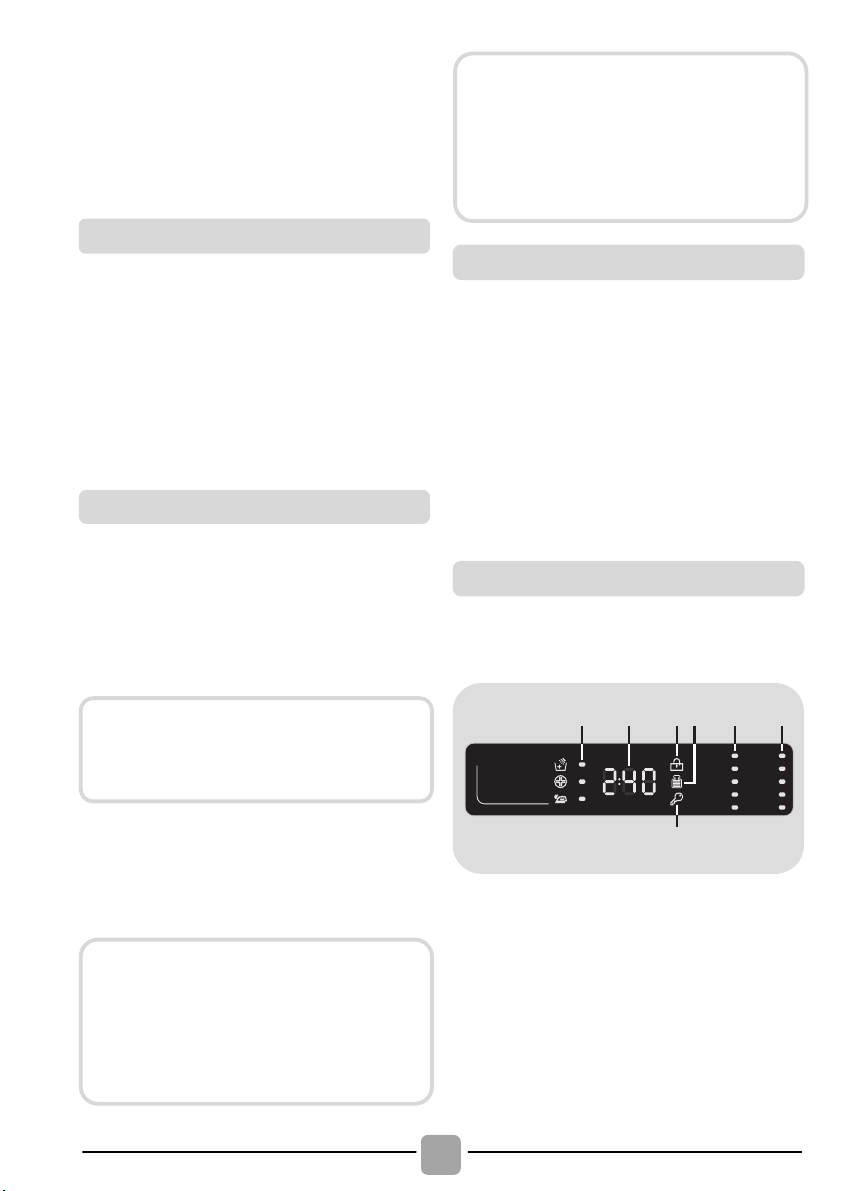
! Эта опция позволяет выбрать один из
трех уровней интенсивности стирки в
зависимости от степени загрязнения тканей,
посредством изменения продолжительности
программы (может использоваться только
для некоторых программ, как показано в
таблице программ).
! Эта кнопка позволяет изменять
температуру циклов стирки.
! Во избежание повреждения тканей
превышение ма ксимального значения
температуры, доп устимо го для каждой
программы, невозможно.
! Если вы хотите, чтобы стирка
проходила в холодной воде, все
индикаторы должны быть выключены.
! Нажатием этой кнопки можно уменьшить
максимальную скорость или, при желании,
отменить цикл отжима.
! При от с у тствии конкретной информации
на этикетке одежды можно использовать
максимальную скорость отжима,
предполагаемую в программе.
! Для повторного включения цикла отжима
нажимайте кнопку до тех пор, пока не
установите желаемую скорость отжима.
! Скорость отжима можно изменять без
приостановки машины.
! Одновременное нажатие кнопок
ВЫБОР ТЕМПЕРАТУРЫ и ВЫБОР
ОТЖИМА в течение трех секунд
позволяет вам заблокировать кнопки.
Тем самым вы исключаете возможность
случайных или непреднамеренных
изменений при случайном нажатии кнопок
на дисплее во время выполнения цикла.
! Отменить блокировку клавиш можно
повторным одновременным нажатием
двух кнопок или выключением и
включением машины.
С помощью дисплея вы имеете возможность
постоянно получать информацию
относительно состояния машины.
1) ИНДИКАТОРЫ ФУНКЦИЙ
Индикаторы показывают функции,
выбранные при нажатии соответствующей
кнопки.
2) ПРОДОЛЖИТЕЛЬНОСТЬ ЦИКЛА
!
После выбора программы на дисплее
автоматически появляется продолжительность
цикла стирки, которая может изменяться в
зависимости от выбранной функции.
Во избежание повреждения ткани
превышение максимальной скорости
отжима, установленного для каждой
программы, невозможно.
Передозировка моющего средства
может привести к избыточному
пенообразованию. Если устройство
обнаруживает наличие избыточной
пены, оно может отменить фазу отжима
или увеличить продолжительность
программы и расход воды.
Машина оборудована специальным
электронным устройством, которое
отменяет цикл отжима, если
загруженное белье не сбалансировано.
Это позволяет уменьшить шум и
вибрацию машины и продлевает
срок ее службы.

! После того как начнется выполнение
программы, вы будете постоянно
получать информацию относительно
времени, оставшегося до конца стирки.
! Машина вычисляет время до конца
выбранной программы на основании
стандартной загрузки. Во время
выполнения цикла стирки машина
корректирует время до конца
выбранной программы в соответствии
с весом и составом загрузки.
3)
СВЕТОВОЙ ИНДИКАТОР БЛОКИРОВКА
ДВЕРЦЫ
! Эта пиктограмма указывает на то, что
дверца машины закрыта.
! После нажатия кнопки СТАРТ/ПАУЗА на
машине с закрытой дверцей, индикатор
будет мигать короткое время, а затем
будет гореть ровным светом.
! Специальное защитное устройство
предотвращает открывание дверцы
сразу же после окончания цикла стирки.
Перед тем как открыть дверцу машины
подождите 2 минуты после окончания
цикла стирки (пока не погаснет световой
индикатор блокировки дверцы). После
окончания цикла стирки установите
переключатель выбора программы в
положение OFF (ВЫКЛ.).
4) ИНДИКАТОР Kg Detector (Проверка
веса) — эта функция действует только
для программ стирки хлопчатобумажных
и синтетических тканей
! Индикатор «Kg Detector» будет гореть в
течение нескольких первых минут цикла
стирки. В это время интеллектуальный
датчик будет взвешивать загруженное в
машину белье и будет регулировать
продолжительность цикла, а также
расход воды и электроэнергии.
! На каждой стадии стирки «Kg Detector»
позволяет контролировать информацию
относительно веса загрузки в барабане
машины, и на первых минутах стирки он:
— регулирует необходимое количество
воды;
— определяет продолжительность цикла
стирки;
—
регулирует полоскание в соответствии
с выбранным типом стираемой ткани;
—
регулирует скорость вращения барабана
в соответствии с типом стираемой ткани;
—
определяет наличие мыльной пены, и,
в случае необходимости, увеличивает
количество расходуем ой воды во
время выполнения полоскания;
— регулирует скорость вращения барабана
в соответствии с загрузкой, предотвращая
тем самым нарушение балансировки
загрузки в барабане.
5) ИНДИКАТОР БЛОКИРОВКИ КНОПОК
Этот индикатор показывает, что кнопки
заблокированы.
6
) ИНДИКАТОРЫ ВЫБОР ТЕМПЕРАТУРЫ
Показывает температуру стирки
выбранной программы, которая может
быть изменена (где это допустимо)
нажатием соответствующей кнопки.
Если вы хотите, чтобы стирка проходила
в холодной воде, все индикаторы
должны быть выключены.
7) ИНДИКАТОРЫ ВЫБОР ОТЖИМА
Показывает скорость отжима для
выбранной программы, которая может
быть изменена или пропущена
посредством нажатия соответствующей
кнопки.
Перед нажатием кнопки СТАРТ/ПАУЗА
закройте дверцу.
Если дверца машина не закрыта полностью,
индикатор будет продолжать мигать в
течение приблизительно 7 секунд. После
этого команда пуска будет автоматически
отменена. В этом случае правильно закройте
дверцу и нажмите кнопку СТАРТ/ПАУЗА.
Loading…
Candy CS4 127TXME/1-S
View the manual for the Candy CS4 127TXME/1-S here, for free. This user manual comes under the category washing machines and has been rated by 12 people with an average of a 8.2. This manual is available in the following languages: English. Do you have a question about the Candy CS4 127TXME/1-S?
Ask your question here
Product Images (11)

Candy CS4 127TXME/1-S specifications
Below you will find the product specifications and the manual specifications of the Candy CS4 127TXME/1-S.
The Candy CS4 127TXME/1-S is a washing machine with a stainless steel drum, weighing 59000 g. It has a rated capacity of 7 kg and an energy efficiency class of A. Its energy consumption per 100 cycles is 45 kWh, and its water consumption per cycle is 41 L. The machine can reach a maximum spin speed of 1200 RPM and has a noise emission class of B, with a noise level of 74 dB for spinning and 51 dB for washing.
This model is designed to be efficient and effective, with a practical stainless steel drum that can handle a 7 kg load. It also features an energy efficiency rating of A and consumes 45 kWh of energy per 100 cycles. With a water consumption of 41 L per cycle, it strikes a balance between effectiveness and efficiency.
The Candy CS4 127TXME/1-S has a maximum spin speed of 1200 RPM, which makes it ideal for families with a lot of laundry, as it can quickly and effectively remove water from clothes. The noise level for spinning is 74 dB, which falls within the B noise emission class. The noise level for washing is 51 dB, making it the perfect machine for those who value a quiet environment.
Overall, the Candy CS4 127TXME/1-S is a reliable and efficient washing machine that is perfect for households with a moderate amount of laundry. Its energy efficiency rating and water consumption per cycle make it a practical choice for those who want to reduce their environmental footprint. Its 7 kg capacity and maximum spin speed of 1200 RPM make it ideal for families or individuals with a lot of laundry to do.
Drum material
Stainless steel
AC input voltage
220 — 240 V
General
| Brand | Candy |
| Model | CS4 127TXME/1-S | 31010471 |
| Product | washing machine |
| EAN | 8059019004969 |
| Language | English |
| Filetype | User manual (PDF), Datasheet (PDF), Energy label (PDF) |
Design
| Drum material | Stainless steel |
| Product colour | White |
| Door colour | White |
| Inverter technology | Yes |
| Appliance placement | Freestanding |
| Loading type | Front-load |
| Drum volume | 48 L |
| Viewing window | Yes |
| Certification | CE |
| Control type | Touch |
| Built-in display | Yes |
| Door hinge | Left |
| Motor type | Brushless |
Packaging data
| Package weight | 61000 g |
| Package height | 890 mm |
| Package width | 650 mm |
| Package depth | 480 mm |
Performance
| Rated capacity | 7 kg |
| Noise emission class | B |
| Noise level (spin) | 74 dB |
| Maximum spin speed | 1200 RPM |
| Noise level (wash) | 51 dB |
| Number of washing programs | 16 |
| Delayed start timer | Yes |
| Delay start (max) | 24 h |
| Spin-drying class | B |
| Cycle time (max) | 208 min |
| Adjustable temperature | Yes |
| Adjustable spin speed | Yes |
| Easy iron function | Yes |
| Washing programs | Hygiene/anti-allergy, Cotton, Eco, Hand/wool, Jeans/denim, Mix, Quick, Sport, Synthetics, Delicate/silk |
| Load balancing system | — |
| AquaStop function | — |
| Foam control system | — |
| Near Field Communication (NFC) | Yes |
Weight & dimensions
| Weight | 59000 g |
| Width | 600 mm |
| Depth | 450 mm |
| Height | 850 mm |
Power
| AC input voltage | 220 — 240 V |
| Energy efficiency class | A |
| Energy efficiency scale | A to G |
| Energy consumption per 100 cycles | 45 kWh |
| Water consumption per cycle | 41 L |
| Power plug type | Type F |
| Energy efficiency class (old) | A |
Ergonomics
| On/off button | Yes |
| Remaining time indication | Yes |
| Self-cleaning | — |
| Child lock | Yes |
Other features
| Annual energy consumption washing | 123 kWh |
Brand-specific features
| Candy technologies (clothes care) | Mix Power System Lite |
show more
Frequently asked questions
Can’t find the answer to your question in the manual? You may find the answer to your question in the FAQs about the Candy CS4 127TXME/1-S below.
What is the weight of the Candy CS4 127TXME/1-S?
The Candy CS4 127TXME/1-S has a weight of 59000 g.
What is the height of the Candy CS4 127TXME/1-S?
The Candy CS4 127TXME/1-S has a height of 850 mm.
What is the width of the Candy CS4 127TXME/1-S?
The Candy CS4 127TXME/1-S has a width of 600 mm.
What is the depth of the Candy CS4 127TXME/1-S?
The Candy CS4 127TXME/1-S has a depth of 450 mm.
What temperature should I use for my laundry?
The washing label of your garment shows the recommended washing temperature.
How do I prevent my washing machine from smelling?
Unpleasant odours can be avoided by occasionally washing at 60 degrees and using the recommended amount of detergent per wash.
Do I need to use an anti-scaling agent for my washing machine?
It is not necessary to use an anti-scaling agent. Scale deposits can be prevented by limiting washing at high temperatures and using the recommended amount of detergent per wash.
What energy label does the Candy CS4 127TXME/1-S have?
The Candy CS4 127TXME/1-S has energy label A.
What certifications does the Candy CS4 127TXME/1-S have?
The Candy CS4 127TXME/1-S has the following certifications: CE.
Is the manual of the Candy CS4 127TXME/1-S available in English?
Yes, the manual of the Candy CS4 127TXME/1-S is available in English .
Is your question not listed? Ask your question here