

Aura Pro
Download Free
Instant Pot® Recipe App
User Manual

Welcome to the World of
Cooking!
Thank you for selecting an Instant Pot® smartcooker! Our vision for Instant Pot® is to
provide you with the right tools to enhance your food preparation experience. Our
smartcookers are designed to save you time, replace a number of appliances, and
prepare healthy and tasty meals in a convenient and dependable way.
We partner with chefs, authors, and bloggers to compile a collection of recipes that we
hope you enjoy! As well, for over 500+ additional recipes, videos and more, download
the Instant Pot® Recipe App.
Happy Instant Pot® Cooking!
Robert J. Wang
Founder, CEO

Page Title
IMPORTANT SAFEGUARDS
When using electrical appliances, basic safety precautions should always be followed:
1. READ ALL INSTRUCTIONS.
2. Do not touch hot surfaces. Only use side handles for carrying or moving.
3. Do not place the appliance on or in close proximity to a hot gas or electric
burner, or in a heated oven; heat from an external source will damage the
appliance.
4. Do not use near water or ame. Please keep out of direct sunlight.
5. Extreme caution must be used when moving the appliance containing hot
liquids.
6. The cooking pot will be hot after cooking. Allow sufcient cooling
down time before handling or serving. Keep hands away from the sides and rim
of the cooking pot. Failure to comply may result in scalding or serious injury.
Always use a pair of Instant Pot® mini mitts or other oven mitts to hold the hot
cooking pot by the handles.
7. Do not use appliance for anything other than intended use.
8. For household use only. Do not use outdoors. Not for commercial use.
9. Do not use this appliance for deep frying or broasting with oil.
10. Do not lean over or place your hands or face over the appliance while it is in
operation. Do not touch the glass lid when the appliance is in operation; this
could result in injury.
11. To protect against electrical shock, do not immerse the power
cord, plugs, or cooker base in water or other liquid.
12. A short power supply cord (0.6 m to 0.9 m) is provided to reduce the hazards
resulting from it being grabbed by children, becoming entangled in, or tripping
over a longer cord.
Read this manual carefully and completely, and retain for future reference.
3
Failure to adhere to safety instructions may result in serious injury.

Page Title
IMPORTANT SAFEGUARDS
13. Unplug from outlet when not in use and before cleaning. To disconnect, press
Cancel, then remove plug from wall outlet. Do not pull from cord. Allow to cool
before putting on or taking off parts, and before cleaning or storage.
14. Proper maintenance is recommended after each use. Refer to “Care & Cleaning”
section for cleaning instruction. Allow the unit to cool before cleaning the
appliance.
15. Do not operate the cooker if you notice any damage to the plug, the cord, the
cooker base, the cooking pot, or the lid, or after the appliance malfunctions,
or has been damaged in any manner. Contact the Customer Care Team for
examination, repair or adjustment.
16. Do not let power cord hang over edge of table or counter, or touch hot surfaces.
17. Intended for countertop use only. Keep the appliance on a stable platform. Do
not place on surfaces that may block the vents on the bottom of the appliance.
18. Spilled food can cause serious burns. Keep appliance and cord
away from children. Never drape cord over edge of counter, never use outlet
below counter, and never use with an extension cord.
19. To avoid spill or splatter, do not ll the cooking pot beyond 3/4 full.
20. When cooking meat with skin (e.g. sausage with casing), the skin can swell when
heated. Do not pierce the skin as long as it is swollen; this could result in scalding
injury.
21. The Delay Start program is not recommended for porridge, oatmeal or other
foamy and thick liquids. Cooking process should be monitored when cooking
these foods.
22. Be aware that certain foods, such as applesauce, cranberries, pearl barley,
oatmeal or other cereals, split peas, noodles, macaroni, rhubarb, or spaghetti
can foam, froth, and spatter. Cooking process should be monitored when
cooking these foods.
Read this manual carefully and completely, and retain for future reference.
4
Failure to adhere to safety instructions may result in serious injury.

Page Title
IMPORTANT SAFEGUARDS
23. Do not cook directly on the heating element. Before inserting the cooking
pot into the appliance, wipe the outer surface of the cooking pot and heating
element to conrm they are dry and free of food debris.
24. Do not attempt to repair, replace, or modify components of the appliance, as this
may cause electric shock, re or injury, and will void the warranty.
25. Do not use appliance in electrical systems other than 120V/60Hz for North
America. Do not use with power converters or adapters.
26. This appliance should not be used by children; by individuals whose
physical, sensory or mental abilities may prevent safe use of the appliance;
or by individuals with limited knowledge of how to use the appliance. Close
supervision is needed when using this appliance near these individuals.
27. To reduce the risk of electric shock, cook only in a cooking pot authorized by the
manufacturer.
28. The use of any accessories or attachments not authorized by Instant Brands™,
Inc. may cause injuries.
SAVE THESE INSTRUCTIONS.
Product Specications
Aura Pro 8QT 150 0 W 120V ~ 60 Hz 8 Quart
7.5 Li tr es
Read this manual carefully and completely, and retain for future reference.
5
Failure to adhere to safety instructions may result in serious injury.
12. 8 lbs
5.8 kg
in: 16.7L x 11.6W x 11.3H
cm: 42.6L x 29.5W x 28.7H

Page TitleWhat’s Included
Before using your new Instant Pot® Aura Pro, please remove all items from the box and read all
instructions carefully.
Tempered Glass Lid Cooking Pot Cooker Base
Steam/Roast &
Sous Vide Rack
Manual Recipe Book
Additional accessories can be purchased at www.store.instantpot.com
6
Measuring Cup

Multicooker Overview
Steam Vent
Tempered Glass Lid
(not for us e in a heated ove n)
Stainless Steel Cooking Pot
(stove -top & oven safe)
Lid Handle
Stainless Steel Rim
Silicone Grip Handle s
Side Handles
Brushed Stainless
Steel Co oker Base
Control Panel
7
Hardwired Power Cord
Connection (Rear)
Heating Element

Getting Started
1. Unbox Your Multicooker & Read Safeguards
Remove all packaging materials from in and aro und the multic ooker
and acce ssories . Do no t remove safety and id entica tion stickers
from the cooker.
Read all war ning cards and st ickers.
2. Wash Before First Use
Clean th e co oking pot, lid, and ac cessori es in the dishwasher, or wi th hot water and
dish so ap. Rinse wit h clear wate r and dry thor oughly prio r to using.
3. Cook with the Cooking Pot
The cooking pot is constructed wi th stainle ss steel bi- ply food grade 304 (18/8)
inter ior and alumin um exterio r for optimal h eat trans fer.
Make sure th e cooker base is empt y and that the heat ing element is clean, free of
debri s, and in good condi tion before us e. Insert you r cl ean, dry cook ing pot into the
cooker base. Always use the cooking pot when cooking in the multicooker.
Cooking pot will be hot duri ng and after cooking. To avoid
injur y, Alw ays use Instant Pot® mini mit ts, heat-resistant pot-holders, or oven mitts
when handling a hot cookin g po t.
While th e co oking pot is stove-top and oven safe, the
tempe red glass lid s hould not be pl aced in a heate d oven.
4. Secure the Power Cord
This mul ticooker has a grounded 3-pro ng plug. Grounding protects the people
who use the mul ticooker from electric shock, as the ca sing is connec ted direct ly to
the ground prong. It also pro tects the mul ticooker from pow er surges.
Secure the 3-pro ng plug into a 120V ou tlet. When p lugged in but n ot in operat ion,
the mult icooker will rema in in Standby mode an d the display will sh ow OFF. To
disco nnect, turn the cooker OFF then remove plug from wall outlet.
Do not re move the groun ding prong fr om the power cord.
8

Control Panel
Temperature Adjustment Keys
Use + and – between Temp
to rais e or lower the te mperatur e
Temperature Display
Shown in units of °F or °C
Sear
Sauté
Slow
Cook
SteamBake
Slow Cook
Slow Cook
Low
LCD Dis play
High
Low
Sous
Vide
RoastStew
Time Adjustment Keys
Use + and – between Time
to adjus t the cooking time
up or dow n
Time Display
Shown in hour-format
5:20 = 5 hour s and 20 minute s
Aura Pro
TimeTemp
Rice
MultigrainYogurt
Smart Programs
Refer to “Smart Progr ams”
section for information on
each Smart Program
Control Keys
Refer to “Advanced Functions”
section for more information
9
Delay
Start
Cancel
www.InstantPot.com
Status Indicators
Refer to “Advanced Functions” sec tion
for more information
Cooking Icon
Cooking in Progress (element
is engaged)
Delay Start Icon
Indic ates when Delay Start
func tion is ON
Keep
Warm
Ke ep Warm Icon
Indic ates when Keep Warm
func tion is ON
Sound OFF Icon
Indicates when sounds are
turned OFF
Sound ON Icon
Indicates when sounds are
turned ON
Loading…

Как правильно пользоваться «умной» скороваркой-мультиваркой
Instant Pot представляет собой скороварку-мультиварку, которая также умеет делать массу других функций и по сути заменяет собой 7 различных кухонных приборов. Она умеет не только делать сочное мясо, но данную скороварку даже можно использовать, к примеру, для консервирования и приготовления йогурта. Поскольку все обилие кнопок, настроек и аксессуаров Instant Pot могут показаться сложным, приведем несколько советов относительно того, как стоит обращаться с данным умным гаджетом. И хотя речь пойдёт о конкретном приборе, советы эти вполне актуальны и для других моделей этой кухонной техники.
1. Инструкция — наше всё

Читайте, пригодится.
Независимо от того, приобрел ли пользователь Instant Pot в первый раз или уже довольно давно пользуется им, в любом случае стоит внимательно перечитать инструкцию. В ней все прекрасно и подробно описано, как все работает, что можно готовить в скороварке, и основные советы (например, как использовать клапан сброса давления). Эту же инструкцию (если она вдруг потеряется) можно найти в Интернете.
2. Использовать все кнопки

Каждая кнопка — новая возможность.
В Instant Pot есть много кнопок — так почему бы не использовать гаджет «по полной». О том, для чего служит каждая из кнопок, можно прочесть в руководстве.
3. Автоматический и ручной сброс давления

Что бы не готовил, не забудь о сбросе давления.
В данном гаджете есть возможность как автоматического, так и ручного сброса избыточного давления. Далеко не всегда нужно полагаться на «автомат».
4. Всегда добавлять достаточное количество жидкости

Без жидкости — никуда.
Чтобы создавать достаточное давление, в Instant Pot должно быть залито достаточное количество жидкости. Всегда стоит добавлять 2 чашки (приблизительно половину литра) воды или других жидкостей (к примеру, бульона) для готовки под давлением. Без жидкости гаджет не обеспечит должного давления. Если пользователь готовит сочные мясные блюда, например, курицу или грудинку, можно сократить количество воды до 1 стакана (237 мл).
5. Знать и соблюдать правила безопасности
При использовании любой скороварки обязательно нужно соблюдать нормы безопасности. Хотя Instant Pot намного безопаснее, чем традиционные плиты, есть пару пунктов, которые нужно запомнить.

Безопасность — превыше всего.
Нужно держать руки и лицо подальше от парового клапана, чтобы избежать ожогов. Фактически, стоит использовать деревянную ложку, чтобы поворачивать клапан вентиляции после окончания готовки, чтобы держать руки подальше от горячего пара.
Необходимо быть осторожным с тем, как заполняется емкость скороварки. Заполнять ее нужно только на две трети объема. Если готовится крупа (например, рис) или бобы, которые будут расширяться, емкость нужно заполнять только наполовину.
Красная / серебряная кнопка от клапана сообщит, когда можно безопасно открывать крышку. Если она находится в поднятом положении, в Instant Pot все еще есть давление. Если кнопка утоплена, можно спокойно открывать крышку. Даже когда давление сбрасывается, Instant Pot внутри все еще очень горячий. Поэтому, чтобы поднимать его, необходимо обязательно использовать прихватки.
6. Чистка Instant Pot

Гораздо проще, чем можно предположить.
При постоянном использовании Instant Pot неизбежно появятся пятна от еды и даже неприятные запахи. Но никогда нельзя погружать основной кулинарный блок в воду, чтобы очистить его. Вместо этого нужно прочесть инструкции по очистке и следовать им.
7. Рецепты и кулинарные идеи

Приготовить можно всё, что угодно!
Порой кажется, что человек может спокойно готовить весь своей рацион только с помощью Instant Pot. В Интернете есть просто огромное количество рецептов для этой скороварки, особенно в сообществах Facebook.
8. Использовать для готовки только Instant Pot

И никаких других кастрюль.
Если попробовать использовать подобную идею в течение некоторого время (день-два, а то и неделя), то так можно прекрасно выучить возможности кухонного гаджета. Да и элемент фана также обеспечен.
9. Использовать рецепты для медленноварки

И мясо получится идеально.
Оказывается, переделать рецепты медленноварки для использования их в Instant Pot очень легко. Есть даже специализированные сайты для этого.
10. Использовать мультиварку для приготовления риса

рецептов приготовления риса в мультиварке великое множество.
Есть несколько отличных рецептов того, как сделать просто великолепный рис в Instant Pot. Более того, получившееся блюдо будет ничем не отличаться от приготовленного в специальной рисоварке.
11. Готовить завтраки

Завтрак в мультиварке — полезно и калорийно.
Варианты блюд для завтрака в Instant Pot просто бесконечны. К числу самых интересных и быстро готовящихся относятся хлопья с фруктами, яйца «в мешочек», запеканка, маффины и йогурт.
12. Выпекать хлеб

Хлеб из мультиварки.
С помощью скороварки Instant Pot можно выпекать свой собственный хлеб. Причем занимает это довольно мало времени.
13. Готовить курицу-гриль

Курица в мультиварке получается просто роскошно.
Если под рукой есть целая тушка курицы и не так много времени, не беда. Можно использовать Instant Pot, чтобы сделать настоящую курицу-гриль.
14. Совместимость с умными домашними устройствами

Умная кастрюля, которая дружит со всем на кухне.
Instant Pot совместим с большинством «интеллектуальных» домашних устройствами, поэтом стоит узнать, какие новые возможности это может предоставить для скороварки.
и в продолжение темы 10 необычных способов применения мультиварки, которые не связаны с приготовлением еды .
Table of Contents
- Instant Pot Duo Plus V3 Multi-Cooker User Manual
- Welcome
- IMPORTANT SAFEGUARDS
- Placement
- General Use
- Pressure Cooking
- Overfill During Pressure Cooking
- Care and Storage
- Power Cord
- Electrical Warning
- WHAT’S IN THE BOX
- Lid
- Stainless Steel Inner Cooking Pot
- Cooker Base
- Parts + Accessories
- USING YOUR DUO PLUS
- Cooking progress bar
- STATUS MESSAGES
- Turning the sound On or Off
- Cancel cooking
- Reset unit to original settings
- INITIAL SETUP
- Clean before use
- Setting up the condensation collector
- Using the Sealing Ring
- Plug in cord (3QT and 6QT models)
- Anti-block shield
- Float valve
- Steam release valve
- Test run
- USING THE LID
- Open the lid
- Close the lid
- HOW TO RELEASE STEAM
- Natural steam release
- Quick steam release
- PRESSURE COOK
- How to pressure cook
- SLOW COOK
- How to slow cook
- SAUTÉ
- YOGURT
- How to make yogurt
- Adding Culture/Starter
- Ferment
- SOUS VIDE
- How to sous vide
- CLEANING
- TROUBLESHOOTING
- ERROR CODES
- LEARN MORE
- Product Specifications
- WARRANTY
- DOWNLOAD
- Read User Manual Online (PDF format)
- Download This Manual (PDF format)
Instant Pot Duo Plus V3 Multi-Cooker User Manual

INSTANT POT® DUO® PLUS V3
USER MANUAL
Welcome
To your new Instant Pot® Duo® Plus!
This Instant Pot Duo Plus Multi-Cooker can help you cook healthy, delicious
meals more easily and in less time. We hope you fall in love with Instant Pot
cooking and enjoy it in your kitchen for years to come!
Get started with your new Duo Plus!
IMPORTANT SAFEGUARDS
WARNING
Read all instructions before using and only use this Instant Pot Duo Plus as
described in this manual.
When using electrical appliances, basic safety precautions should always be
followed to reduce the risk of fire, electric shock, personal injury or
property damage.
Placement
- DO place the appliance on a countertop only. Always operate the appliance on a stable, non-combustible, level surface.
- DO make sure all parts are dry and free of food debris before placing the cooking pot on the cooker base.
- DO NOT place the appliance on or close to a hot gas or electric burner, or a heated oven.
- DO NOT use the appliance near water or flame.
- DO NOT use outdoors. Keep out of direct sunlight.
- DO NOT place on anything that may block the vents on the bottom of the appliance.
General Use
The removable inner cooking pot is extremely hot during use and can be
extremely heavy when full of ingredients.
- DO use oven mitts when handling the inner cooking pot and removing accessories.
- DO place hot accessories on a heat-resistant surface or cooking plate.
- DO use care when lifting the inner cooking pot from the cooker base to avoid burn injury .
- DO use extreme caution when the inner cooking pot contains hot food, hot oil or other hot liquids.
- DO use only the Instant Pot® lid that came with this cooker base. Using any other pressure cooker lids may cause personal injury and/or property damage.
WARNING
- DO NOT use the appliance without the removable inner cooking pot installed.
- DO NOT touch the metal portion of the lid, the appliance’s hot surfaces, or any accessories during or immediately after cooking because they will be hot. Only use the side handles for carrying or moving.
- DO NOT use this appliance for deep frying or pressure frying with oil.
- DO NOT move the appliance while it is in use and use extreme caution when disposing of hot grease.
- DO NOT allow children or persons with reduced physical, sensory or mental capabilities to operate this appliance. Close supervision is necessary when any appliance is used by or near children and persons with reduced physical, sensory or mental capabilities. Children should not play with this appliance.
- DO NOT use the appliance for anything other than household use. It is not intended for commercial use.
- DO NOT leave the appliance unattended while in use.
Pressure Cooking
This appliance cooks under pressure. Allow the appliance to depressurize
naturally or release all excess pressure before opening. Inappropriate use may
result in burns, personal injury and/or property damage.
- DO make sure the appliance is properly closed before operating.
- DO check that the steam release valve is installed.
- DO use the pressure cooking lid when pressure cooking.
- DO turn the appliance off if steam escapes from the steam release valve and/or float valve in a steady stream for longer than 3 minutes. If steam escapes from the sides of the lid, turn the appliance off and make sure the sealing ring is properly installed.
- DO check the steam release valve, steam release pipe, anti-block shield and float valve for clogging before use.
- DO NOT remove the pressure cooking lid with unprotected hands.
- DO NOT attempt to force the lid off the Instant Pot cooker base.
- DO NOT move the appliance when it is under pressure.
- DO NOT cover or obstruct the steam release valve and/or float valve with cloth or other objects.
WARNING
- DO NOT attempt to open the appliance until it has depressurized, and all internal pressure has been released. Attempting to open the appliance while it is still pressurized may lead to sudden release of hot contents and may cause burns or other personal injuries and/or property damage.
- DO NOT place your face, hands or exposed skin over the steam release valve or float valve when the appliance is in operation or has residual pressure, and do not lean over the appliance when removing the lid.
Overfill During Pressure Cooking
Overfilling may cause a risk of clogging the steam release pipe and developing
excess pressure and may cause personal injury and/or property damage.
-
DO NOT fill the inner cooking pot over the line labeled ‘PC MAX — 2/3’.
-
DO NOT fill the inner cooking pot over the line labeled ‘— 1/2’ when cooking foods that expand during cooking such as rice, dried beans or dried vegetables.
-
DO be aware that certain foods, such as applesauce, cranberries, pearl barley, oatmeal or other cereals, split peas, noodles, macaroni, rhubarb, or spaghetti can foam, froth, and sputter, and clog the pressure release device (steam vent). DO NOT fill the inner cooking pot higher than the ‘— 1/2’ line when cooking these foods.
-
DO NOT place oversized foods into the inner cooking pot as they may cause risk of fire, personal injury and/or property damage..
-
DO check that sealing ring is properly installed.
Accessories -
DO use only accessories or attachments authorized by Instant Brands. The use of parts, accessories or attachments not recommended by the manufacturer may cause a risk of personal injury, property damage, fire or electric shock.
-
DO use only an authorized stainless-steel Instant Pot inner cooking pot to reduce the risk of pressure leakage.
-
DO only replace the sealing ring with an authorized Instant Pot sealing ring to prevent personal injury, property damage and/or damage to the appliance.
WARNING
DO NOT use the included accessories in a microwave, toaster oven, convection
or conventional oven, or on a ceramic cooktop, electric coil, gas range or
outdoor grill.
Care and Storage
- DO let the appliance cool to room temperature before cleaning or storage.
- DO NOT store any materials in the cooker base when not in use.
- DO NOT place any combustible materials in the cooker base, such as paper, cardboard, plastic, Styrofoam or wood.
Power Cord
A short power-supply cord is used to reduce the risk resulting from it being
grabbed by children, becoming entangled in, or tripping over a longer cord.
WARNING: Spilled food can cause serious burns. Keep appliance and cord
away from children.
- Never drape cord over edge of counter, never use outlet below counter, and never use with an extension cord.
- DO NOT let the power cord touch hot surfaces or open flame, including the stovetop.
- DO NOT use with power converters or adapters, timer switches or separate remote-control systems.
This appliance has a 3-prong grounding plug. To reduce the risk of electric
shock:
-
ONLY plug the power cord into a grounded electrical outlet.
-
DO NOT remove ground.
If the unit includes a detachable power cord: -
To connect, always attach the power cord to the appliance first, then plug the power cord into the wall outlet.
WARNING
Electrical Warning
The cooker base contains electrical components that are an electrical shock
hazard. Failure to follow these instructions may result in electric shock.
To protect against electrical shock:
- To disconnect, select Cancel, then remove plug from power source. Always unplug when not in use, as well as before adding or removing parts or accessories, and before cleaning. To unplug, grasp the plug and pull from the outlet. NEVER pull from the power cord.
- DO regularly inspect the appliance and power cord.
- DO NOT operate the appliance if the power cord or plug is damaged, or after the appliance malfunctions or is dropped or damaged in any manner. For assistance, contact Customer Care by email at support@instanthome.
- DO NOT attempt to repair, replace or modify components of the appliance, as this may cause electric shock, fire, personal injury and/or or property damage and will void the warranty.
- DO NOT tamper with any of the safety mechanisms, as this may result in personal injury or property damage.
- DO NOT put liquid or food of any kind into cooker base without the inner cooking pot.
- DO NOT immerse power cord, plug or the appliance in water or other liquid.
- DO NOT use the appliance in electrical systems other than 120 V ~ 60 Hz for North America.
- DO NOT clean the appliance by rinsing it under a faucet.
SAVE THESE INSTRUCTIONS
WHAT’S IN THE BOX
Lid

Stand the lid up in the base handles to keep it off your countertop. Insert
the left or right lid fin into corresponding slot in the cooker base handles
to stand it up and save some space.
Illustrations are for reference only and may differ from the actual product.
Stainless Steel Inner Cooking Pot
Cooker Base

Parts + Accessories

Illustrations are for reference only and may differ from the actual product.
USING YOUR DUO PLUS
Control Panel
We’ve designed the control panel to be simple and easy to read.

1. Smart Programs
Pressure cooking
• Pressure Cook
• Soup/Broth
• Cake
• Egg
• Rice
• Bean/Grain
• Porridge/Oatmeal
• Sterilize
2. Time display
• Shows the time in HH:MM format.
• Counts up or down, depending on the Smart Program.
Also displays temperature in ºC (Celsius) or ºF (Fahrenheit) during Sous Vide.
3. Pressure
• When lit, shows the pressure level selected
4. Temperature
• When lit, shows the temperature selected: Low, Med or High
5. Temp / Pressure buttons
6. — / + Time buttons
7. Keep Warm
• Light shows ON
8. Delay Start
• Light shows ON
9. Cancel
10. Start
11. Cooking progress bar
Cooking progress bar
1. Preheating: cooker is heating to the set temperature. Display shows
cooking time.
2. Cooking: cooker has started the smart program. Display counts down cooking
time.
3. Keep Warm: turns on automatically after cooking stops. When done, display
shows End.
STATUS MESSAGES

Turning the sound On or Off
Turn sound off
Press and hold – button for 5 seconds. The display will show SOFF
Audible safety alerts (beeps) cannot be turned off.
Turn sound on
Press and hold the + button for 5 seconds. The display will show S ON.
Cancel cooking
When in Preheating, Cooking or Keep Warm modes, press Cancel. The message
display shows Ready.
Reset unit to original settings
Reset individual programs
With the cooker in Ready mode, press and hold one program button for over 3
seconds. The message display shows Ready.
The Program’s pressure level, cooking time and temperature are restored to the
factory default setting.
Reset all program settings
With the cooker in Ready mode, press and hold Cancel for over 3 seconds. The
message display shows Ready.
The unit’s settings are restored to the factory default.
INITIAL SETUP
Clean before use
1. Wash the inner cooking pot with hot water and soap. Rinse and use a soft
cloth to dry the outside. Or you can wash the inner cooking pot in the
dishwasher.
2. Wipe the heating element inside the cooker base with a soft cloth to
ensure there are no stray packaging particles.
Setting up the condensation collector
The condensation collector sits at the back of the cooker base and accumulates
overflow moisture from the condensation rim. It should be installed before
cooking, then emptied and rinsed out after each use.
Remove the condensation collector
Pull the condensation collector away from the cooker base; do not pull down.
Note: the tabs on the cooker base and the grooves on the condensation
collector.
Install the condensation collector
Align the grooves on the condensation collector with the tabs on the back of
the cooker base and slide the condensation collector into place.
Using the Sealing Ring
When the pressure cooking lid is closed, the sealing ring installed on the
underside of the lid creates an air-tight seal between the lid and the cooker
base.
- The sealing ring must be installed before using the cooker and should be cleaned after each use.
- Install 1 sealing ring at a time; you can use one for sweet dishes and one for savory.
- Sealing rings stretch over time with normal use. To keep your product safe, replace the sealing ring every 12 to 18 months. Replace sooner if you notice stretching, deformation, or damage.
Install the Sealing Ring
1. Place the sealing ring over the sealing ring rack and press it into place.
Press down firmly to ensure there is no puckering.
2. The sealing ring should be snug and should not fall out when the lid is
turned over.

Remove the Sealing Ring
1. Grip the edge of the sealing ring and pull it out from behind the sealing
ring rack.
2. Inspect the rack to ensure it is secured, centered, and an even height all
the way around the lid. If the sealing ring rack is deformed, do not try to
repair it.
Plug in cord (3QT and 6QT models)
When you’re ready to use your Instant Pot Duo Plus, plug the electrical cord
into the power socket on the back of the unit.
Note: the 8QT model has an electrical cord that is always connected to
the unit
Anti-block shield
The anti-block shield prevents food particles from coming up through the steam
release pipe, assisting with pressure regulation.
As an integral part of product safety, the anti-block shield must be installed
before use and cleaned frequently.
Remove the Anti-Block Shield
Grip the lid like a steering wheel and use your thumbs to press firmly against
the side of the anti-block shield (pressing towards the side of the lid and
up) until it pops off the prongs underneath.
Install the Anti-Block Shield
Place anti-block shield over prongs and press down until it snaps into
position. Do not attempt to operate the pressure cooker without the anti-block
shield installed.

Float valve
The float valve is a visual indication of whether there is pressure in the
cooker (pressurized) or not (depressurized). These parts must be installed
before use.

How to remove the Float Valve from the Lid
Place one finger on the flat top of the float valve, then turn the lid over.
Detach the silicone cap from the bottom side of the float valve.
Remove the float valve from the top of the lid. Do not discard the float valve
or silicone cap.
How to install the Float Valve
Drop the narrow end of the float valve into the float valve hole on the top of
the lid. Place one finger on the flat top of the float valve, then turn the
lid over. Firmly attach the silicone cap to the bottom of the float valve.
DO NOT attempt to operate the pressure cooker without the float valve and/or
silicone cap properly installed in the pressure cooking lid. DO NOT touch the
float valve during use.
Steam release valve
Remove the steam release valve
1. Pull the steam release valve up and off the steam release pipe.
2. The steam release valve must be installed before using the cooker.
Install the steam release valve
1. Place the steam release valve on the steam release pipe and press down
firmly.
2. The steam release valve sits loosely on the steam release pipe when
installed properly but should remain in place when the lid is turned over.
Test run
Setting up your new Instant Pot Duo Plus for a test run is a great way to
familiarize yourself with how the unit works before you actually cook a meal.
To perform a test run:
3. Add 3 cups (750 ml) water to the inner cooking pot.
4. Place the inner cooking pot into the cooker base.
5. Place the lid on top of the cooker base and lock the lid.
See ‘How to close and lock the lid’
6. Press Pressure Cook on the control panel.
7. Press the — / + Time buttons to set the cooking time to 5 minutes (00:05).
Adjustments are saved when a Smart Program starts, so the next time you use
Pressure Cook, it will default to 5 minutes
8. Press Keep Warm to turn off the automatic Keep Warm setting.
9. Press Start to begin. The message display shows On.
10. When cooking is done, the display shows End.
11. Release steam by moving the steam release switch to the Vent position.
When steam is completely released, the float valve will drop.
See ‘How to release steam’
12. Unlock and open the lid.
See ‘How to close and unlock the lid’
13. Using proper hand protection, remove the inner cooking pot from the
cooker base. Discard any remaining water, then wash and dry the inner cooking
pot.
Now you’re ready to cook a meal in your Duo Plus!
USING THE LID
You’ll use the pressure cooking lid for most cooking programs, and especially
for pressure cooking. Always use the pressure cooking lid that came with this
Duo Plus cooker base.
Open the lid
Grip the lid handle and turn it counter-clockwise to align the symbol on the
lid with the symbol on the rim of the cooker base .
Lift the lid up and off the cooker base towards your body.
Close the lid
Align the symbol on the lid with the symbol on the cooker base then lower the
lid onto the track.
Turn the lid clockwise until the symbol on the lid aligns with the symbol on
the cooker base .
Illustrations are for reference only and may differ from the actual product.
HOW TO RELEASE STEAM
CAUTION
This appliance uses pressure to cook. Allow the appliance to release all
excess pressure and steam before opening the lid. Opening the lid before
pressure is released may result in burns, personal injury and/or property
damage.
The Duo Plus can release steam naturally or quickly. Use the one that best
fits the type of food you’re cooking.
The steam release switch automatically sets to Seal when you close the lid.
You will need to switch it to Vent when you are not cooking with pressure.
Natural steam release
1. After cooking, leave the steam release switch in the Seal position and
wait for all pressure to release.
2. When pressure is released, the float valve will drop. You can now remove
the lid.
Quick steam release
Quickly releases steam after you move the steam release switch to the Vent
position. Use for: Foods that tend to overcook, like vegetables and seafood.
1. After cooking, set steam release switch to Vent position and wait for all
pressure to release.
2. When pressure is released, the float valve will drop. You can now remove
the lid.
PRESSURE COOK
Pressure cooking uses pressurized steam to cook foods quickly and evenly. Each
specific Smart Program is designed to pressure cook a specific type of food.
You can adjust the settings as your recipe directs.
Choose from these Smart Programs:
Program| Default Cook Time| Min Cook Time| Max Cook Time|
Default Pressure Level
—|—|—|—|—
Pressure Cook| 10 minutes
(00:10)| 1 minute
(00:01)| 8 hours
(8:00)| High
Soup/ Broth| 30 minutes
(00:30)| 1 minute
(00:01)| 4 hours
(04:00)| High
Cake| 30 minutes
(00:30)| 1 minute
(00:01)| 4 hours
(04:00)| High
Egg| 5 minutes
(00:05)| 1 minute
(00:01)| 1 hour
(01:00)| High
Rice| 12 minutes
(00:12)| 1 minute
(00:01)| 1 hour
(01:00)| Low
Bean/Grain| 20 minutes
(00:20)| 1 minute
(00:01)| 1 hour
(01:00)| High
Porridge/ Oatmeal| 5 minutes
(00:05)| 1 minute
(00:01)| 1 hour
(01:00)| High
Sterilize| 15 minutes
(00:15)| 1 minute
(00:01)| 1 hour
(01:00)| High
How to pressure cook
Prep
Cut, chop, season or marinate your ingredients according to your recipe.
Preheat
1. Place the inner cooking pot into the cooker base.
2. Add ingredients to the inner cooking pot.
3. Place the lid on top of the inner cooking pot and be sure it is locked.
See ‘How to close and lock the lid’
4. Choose a Smart Program for cooking and press its button on the control
panel.
See ‘Pressure cooking Smart Programs’
5. If you want to increase or decrease the cooking time exactly, press Time
up/down arrows.
6. Keep Warm setting is On by default. Press Keep Warm again to turn it off.
7. Press Start. After 10 seconds, the display shows On and the Duo Plus is
building pressure.
It can take 10–15 minutes to reach the pressure setting for cooking. Frozen
foods increase the preheating time.
Cook
1. When the pressure is ready, your Duo Plus starts cooking .
2. The cooking timer starts counting down.
3. When the timer reaches 00:00, cooking stops.
You can press Cancel to stop a Smart Program at any time.
Release steam
Choose from the steam release method that works for your recipe.
See ‘How to release steam’
Using liquid to create steam
Pressure cooking requires liquid in the inner cooking pot to produce the steam
needed. Depending on the size of your Duo Plus, here are the minimum amounts
you’ll need:
| Instant pot size | Minimum liquid for pressure cooking |
|---|---|
| 2.8 Litres / 3 Quarts | 1 cup (1 cup (250 mL / ~8 oz )) |
| 5.7 Litres / 6 Quarts | 1 1/2 cup (375 mL / ~12 oz) |
| 7.6 Litres / 8 Quarts | 2 cups (500 mL / ~16 oz) |
Unless otherwise specified in recipe.
Pressure cooking liquids should be water-based, such as broth, stock, soup or
juice. If using canned, condensed, or cream-based soup, add water as directed
above.
Other settings
- Automatic Keep Warm is set to ON by default for all Pressure Cook programs.
- Delay Start is available for all Pressure Cook programs.
SLOW COOK
Slow cooking lets you make your favorite simmering and stewing recipes — just
like grandma used to make. This program does not use pressure to cook food.
Default cook time| Cook Time Range| Default Temperature|
Temperature Range| Notes and tips
—|—|—|—|—
6 hours
(06:00)| 30 minutes
to 24 hours
(00:30 to
24:00)| Med| Low Med High| Less is commonly used for low and slow, all-day
cooking, and should be set for a minimum of 10 hours (10:00) for best results.
Other settings
- Automatic Keep Warm is set to ON by default for all Slow Cook programs.
- Delay Start is available for all Slow Cook programs.
How to slow cook
Prep
Cut, chop, season or marinate your ingredients according to your recipe.
Cook
1. Add ingredients to the inner cooking pot and place the inner cooking pot
into the cooker base.
2. Place the lid on top of the cooker base and lock the lid.
3. Press Slow Cook.
4. The default cooking time flashes. To select it, press Start. Or to change
it press the — / + Time buttons to change it.
5. The default cooking temperature flashes. To select it, press Start. Or to
change it press the arrow Temp/Pressure buttons to change to Low, Med or High.
6. You can delay cooking if you want. Press Delay Start, then press the — / +
Time buttons to select the delay time.
7. Keep Warm setting is ON by default. Press Keep Warm to turn it off.
8. Press Start. Preheating starts. When ready, cooking starts, and the
progress bar shows Cooking.
9. The cooking time starts counting down.
Stop cooking
1. When cooking time reaches 00:00, cooking stops.
2. If Keep Warm is ON, the time starts counting up.
You can press Cancel to stop cooking at any time.
SAUTÉ
Sauté can be used in place of a frying pan, griddle or flat-top grill.
Default Cook Time| Cook Time Range| Default Temperature|
Temperature Range| Notes and tips
—|—|—|—|—
30 minutes
(00:30)| 1 minute
to 1 hour
(00:01 to
01:00)| High| Low| Simmering, thickening, and reducing liquids.
Med| Pan searing or sautéing.
High| Stir-frying or browning meat.
Quite often, you’ll want to sauté foods to brown them before further cooking
them.
1. Sauté ingredients.
2. Press Cancel when done.
You can deglaze the inner cooking pot now before switching to Pressure Cook or
Slow Cook (see Deglazing below)
3. Select the Smart Program you want to use to finish cooking.
Deglazing
Deglazing is the process of adding a liquid to a hot pan, releasing all of the
delicious, caramelized pieces stuck to the bottom.
1. Remove food from inner cooking pot.
2. Add water, broth, or wine.
3. Use wooden spoon or silicone spatula to loosen food stuck to bottom of the
inner cooking pot.
YOGURT
Produce delicious fermented dairy and non-dairy recipes effortlessly.
Default temperature| Temperature range| Default time| Time
range| Notes and tips
—|—|—|—|—
High| Low| 24 hours
(24:00)| 30 minutes to
99 hours and
30 minutes
(00:30 to
99:30)| For lower temperature fermentation (e.g., Jiu niang, a sweet fermented
glutinous rice dessert).
| Med| 8 hours
(08:00)| 30 minutes to
99 hours and
30 minutes| Fermenting milk after culture has been added.
| | | (00:30 to
99:30)|
| High| 3 minutes (boiL)| Not adjustable.| Pasteurizing milk.
Other settings
- Automatic Keep Warm not available.
- Delay Start is not available.
How to make yogurt
Pasteurizing Milk
1. Add milk to the inner cooking pot and place the inner cooking pot into the
cooker base.
2. Place the lid on top of the cooker base and lock the lid.
3. Press Yogurt.
4. The default temperature is set to High. The display shows bOIL.
5. Press Start. Cooking starts, and the progress bar shows On.
6. When pasteurization finishes, display shows End.
Milk must reach a minimum of 161°F / 72°C for pasteurization to occur.
Adding Culture/Starter
1. Allow pasteurized milk to cool to 43°C / 110°F.
2. Add a starter culture to the milk according to package instructions. If
using plain yogurt as a starter, ensure that it contains an active culture.
Mix in 2 tbsp (30 mL) of yogurt per 1 gallon (3.7 L) of milk or follow a
trusted recipe.
3. Place and close lid.
Ferment
1. Press Yogurt.
2. Cycle to Med by pressing Yogurt again; display shows 8 hours
(08:00).
3. The default fermentation time flashes. To select it, press Start. Or to
change it, press —/+ Time buttons to change it, then press Start
4. After 10 seconds the cooker begins heating; display shows timer counting
up from 00:00.
5. When fermentation completes, the unit beeps and the display shows End.
A longer fermentation period will produce tangier yogurt.
6. Allow yogurt to cool.
7. Place in the fridge for 12–24 hours to develop flavors.
How much to make?
| Instant Pot Size | Minimum Milk Volume | Maximum Milk Volume |
|---|---|---|
| 2.8 Litres / 3 Quarts | 4 cups (1 L / ~32 oz) | ~2.5 quarts (2.4 L/ ~ 81 oz) |
| 5.7 Litres / 6 Quarts | 4 cups (1 L / ~32 oz) | ~4 quarts (~3.8 L / ~128 oz) |
| 7.6 Litres / 8 Quarts | 6 cups (1.5 L / ~48 oz) | ~6 quarts (~5.7 L / ~192 oz) |
SOUS VIDE
Sous Vide cooks food underwater in an air-tight, food-safe bag, for a long
period of time. Food cooks in its own juices and comes out delicious and very
tender. This program does not use pressure to cook food. You should use the
pressure cooking lid to maintain an accurate temperature.
Default Temperature| Temperature Range| Default Cook Time|
Time Range| Notes and tips
—|—|—|—|—
56°C
133°F| 25 to 90°C
77 to 194°F| 3 hours
(03:00)| 30 minutes to
99 hours and
30 minutes
(00:30 to
99:30)| Separating servings can help you accommodate unique dietary
restrictions.
Other settings
- Automatic Keep Warm is OFF by default.
- Delay Start is not available.
You’ll need:
- Tongs
- Thermometer
- Food safe, airtight, re-sealable food pouches, or,
- Vacuum sealer and food-safe vacuum bags
For sous vide cooking guidelines, check out the Cooking Time Tables under the
Recipes tab at instantpot.com.
How to sous vide
Prep
1. Cut, chop, season or marinate your ingredients according to your recipe.
2. Add the ingredients to the cooking bag or pouch and seal tightly.
Preheat
1. Place the empty inner cooking pot into the cooker base. Add water to the
2/3 indicator line. Close and lock the lid.
2. Press Sous Vide on the Control Panel.
3. The default cooking time flashes. To select it press Start. Or to change
it, press the —/+ Time buttons to change.
4. The default temperature flashes. To select it, press Start. Or to change
it press the arrow Temp/Pressure buttons to change.
5. Press Start. The message display will say On and the unit starts heating.
Cook
1. When the message display shows Hot, open the steam release vent, unlock
and open the lid.
2. Add the sealed cooking bag or pouch to the inner cooking pot and re-close
and lock the lid.
3. The cooking time starts counting down.
4. When cooking time reaches 00:00, cooking stops.
You can press Cancel to stop cooking at any time.
Remove food
When cooking completes, the display shows End. Open the lid and use
CLEANING
Clean your Duo Plus after each use. Always unplug the unit and let all parts
cool to room temperature before cleaning. Before use or storing, make sure all
surfaces are dry.
| Part | Cleaning instructions |
|---|
Accessories
• Steam Rack
• Condensation Collector
• Sealing Ring| • Wash after each use
• Hand wash with hot water and mild dish soap or wash in dishwasher, top rack
• Never use harsh chemical detergents, powders or scouring pads on
accessories
• Empty and rinse condensation collector after each use
Lid and Parts
• Anti-Block Shield
• Sealing Ring
• Steam Release Vent
• Silicone Cap
• Steam Release Cover| • Hand wash with hot water and mild dish soap or wash
in dishwasher, top rack
• Remove all small parts from lid before washing.
• With steam release valve and anti-block shield removed, clean interior of
steam release pipe to prevent clogging.
• To drain water from the lid after dishwashing, grasp the lid handle and
hold the lid vertically over a sink, then turn it all the way around
• After cleaning, store the lid upside down on the cooker base
• Store sealing rings in a well-ventilated area to disperse odor
• To eliminate odors from sealing ring, add 1 cup (8 oz / 250 mL) water and 1
cup (8 oz / 250 mL) white vinegar to inner cooking pot, and run Pressure Cook
for 5–10 minutes, then use Quick Steam Release
Inner Cooking Pot| • Wash after each use.
• Hand wash with hot water and mild dish soap or wash in dishwasher*
• Hard water stains may need a vinegar-dampened sponge and scrubbing to
remove
• For tough or burned food residue, soak in hot water for a few hours before
cleaning
• Dry all exterior surfaces before placing in cooker base
Power cord| • Use a barely-damp cloth to wipe any particles off cord
Cooker base| • Wipe the inside of the cooker base as well as the condensation
rim with a barely-damp cloth, and allow to air dry
• Clean the outside of the cooker base and the control panel with a soft,
barely-damp cloth or sponge
*Some discoloration may occur after machine washing, but this will not affect the cooker’s safety or performance.
TROUBLESHOOTING
| Problem | Cause | Solution |
|---|---|---|
| Difficulty closing lid | Sealing ring not properly installed | • Reposition |
sealing ring, ensure it is snug behind sealing ring rack.
Contents in cooker are still hot| • Set Steam Release switch to Vent, then
lower lid onto cooker base
Difficulty opening lid| Pressure inside the cooker| • Release pressure
according to recipe; only open lid after float valve has dropped down.
Inner pot is stuck to lid when cooker| Cooling of inner pot may create
suction, causing inner pot to adhere to the lid| • To release the vacuum, set
Steam Release to Vent.
Steam leaks from side of lid| No sealing ring in lid| • Install sealing ring.
Sealing ring damaged or not properly installed| • Replace sealing ring.
Food debris attached to sealing ring| • Remove sealing ring and clean
thoroughly.
Lid not closed properly| • Open, then close lid.
Sealing ring rack is warped or off-center| • Remove sealing ring from lid,
check sealing ring rack for bends or warps. Contact Consumer Care.
Inner cooking pot rim may be misshapen| • Check for deformation and contact
Consumer Care.
Minor steam leaking/ hissing from steam release vent during cooking cycle|
Cooker is regulating excess pressure| • This is normal; no action required.
Problem| Cause| Solution
Steam gushes from steam release vent when Steam Release switch is in Seal
position| Not enough liquid in the inner pot| • Add thin, water-based liquid
to the inner pot according to its size: 6 Quart: 1 1/2 cups
(12 oz / 375 mL)
8 Quart: 2 cups
(16 oz / 500 mL)
Pressure sensor control failure| • Contact Consumer Care.
Internal steam release valve not seated properly| • Check Steam Release
switch to ensure it’s set to Seal.
Display remains blank after connecting the power cord| Bad power connection or
no power| • Inspect power cord for damage. If damage is noticed, contact
Consumer Care.
• Check outlet to ensure it is powered.
Cooker’s electrical fuse has blown| • Contact Consumer Care.
Occasional clicking or light cracking sound| The sound of power switching and
expanding pressure board when changing temperatures| • This is normal; no
action needed.
Bottom of the inner pot is wet| • Wipe exterior surfaces of inner pot. Ensure
heating element is dry before inserting inner pot into cooker base.
Error code appears on display and cooker beeps continuously| There is an issue
with the cooker| • Read “Error Codes” for instructions.
ERROR CODES
If the control panel displays an error code from this list, there is an issue
with the Duo Plus. Here are the actions you should take to fix the problem.
| Problem | Cause | Solution |
|---|---|---|
| C1 C2 C6 C6H C6L | Faulty sensor | • Contact Consumer Care. |
| C5 | Temperature is too high because inner cooking pot is not placed in the | |
| cooker base | • Press Cancel and wait for heating element to cool; ensure |
there are no foreign objects in cooker base; insert or reposition inner
cooking pot in cooker base and re- enter commands.
C5| Temperature is too high because there is no water in inner cooking pot| •
Check for scorching on bottom of inner cooking pot. Add thin, water-based
liquid to the inner pot according to its size:
• 3 Quart: 1 cup (8 oz / 250 mL)
6 Quart: 1 1/2 cups (12 oz /
375 mL) 8 Quart: 2 cups
(16 oz / 500 mL)
C7 or NoPr| Heat element has failed| • Contact Consumer Care.
C7 or NoPr| Not enough liquid| • Add thin, water-based liquid to the inner
cooking pot according to its size:
• 3 Quart: 1 cup (8 oz / 250 mL)
6 Quart: 1 1/2 cups (12 oz /
375 mL) 8 Quart: 2 cups
(16 oz / 500 mL)
C7 or NoPr| Quick release button is in the Vent position| • Check Steam
Release switch to ensure it’s set to Seal.
Lid| Lid is not in the correct position for the selected program| • Open and
close the lid. Do not use a lid when using Sauté.
Problem| Cause| Solution
Food burn| High temperature detected at bottom of inner cooking pot; cooker
automatically reduces temperature to
avoid overheating| • Starch deposits at the bottom of the inner cooking pot
may have blocked heat dissipation.
• Turn the cooker off, release pressure according to the recipe, and inspect
the bottom of the inner cooking pot.
PrSE| Pressure has accumulated during a non-pressure cooking program| • Set
Steam Release switch to Vent.
LEARN MORE
There’s a whole world of Instant Pot Duo Plus information and help just
waiting for you. Here are some of the most helpful resources.
Register your product
Instanthome.com/register
Contact Consumer Care
In the Instant Brands Connect App
Instanthome.com/customer-care-center
support@instanthome.com
Instant Brands® Connect App with 1000+ recipes
Instanthome.com
iOS and Android app stores
Cooking charts and more recipes
Instanthome.com
How-to videos, tips and more
Instanthome.com
Replacement parts and accessories
Instanthome.com
Join the community
Product Specifications
Model| Volume| Wattage| Power| Weight|
Dimensions
—|—|—|—|—|—
Duo Plus 3 v3| 2.8 Litres
3 Quart| 700 W| 120V/
60 Hz| 4.10 kg
9.00 lb| cm: 29 L x 25.5 W x 28.5 H
in: 11.42 L x 10.04 W x 11.22 H
Duo Plus 6 v3| 5.7 Litres
6 Quart| 1000 W| 120V/
60 Hz| 5.50 kg
12.10 lb| cm: 33 L x 31 L x 32 H
in: 12.99 L x 12.20 L x 12.60 H
Duo Plus 8 v3| 7.6 Litres
8 Quart| 1200 W| 120V/
60 Hz| 7.30 kg
16.09 lb| cm: 37.7 L x 33.8 L x 36.1 H
in: 14.84 L x 13.31 L x 14.21 H
WARRANTY
One (1) Year Limited Warranty
This One (1) Year Limited Warranty applies to purchases made from authorized
retailers of Instant Brands LLC (“Instant Brands”) by the original appliance
owner and is not transferable. Proof of original purchase date and, if
requested by Instant Brands, return of your appliance, is required to obtain
service under this Limited Warranty. Provided the appliance was used in
accordance with the use & care instructions, Instant Brands will, in its sole
and exclusive discretion, either: (i) repair defects in materials or
workmanship; or (ii) replace the appliance. In the event that your appliance
is replaced, the Limited Warranty on the replacement appliance will expire
twelve (12) months from the date of receipt. Failure to register your product
will not reduce your warranty rights. The liability of Instant Brands, if any,
for any allegedly defective appliance or part will not exceed the purchase
price of a comparable replacement appliance.
What is not covered by this warranty?
- Products purchased, used, or operated outside of the United States and Canada.
- Products that have been modified or attempted to be modified.
- Damage resulting from accident, alteration, misuse, abuse, neglect, unreasonable use, use contrary to the operating instructions, normal wear and tear, commercial use, improper assembly, disassembly, failure to provide reasonable and necessary maintenance, fire, flood, acts of God, or repair by anyone unless directed by an Instant Brands representative.
- Use of unauthorized parts and accessories.
- Incidental and consequential damages.
- The cost of repair or replacement under these excluded circumstances.
EXCEPT AS EXPRESSLY PROVIDED HEREIN AND TO THE EXTENT PERMITTED BY APPLICABLE
LAW, INSTANT BRANDS MAKES NO WARRANTIES, CONDITIONS OR REPRESENTATIONS,
EXPRESS OR IMPLIED, BY STATUTE, USAGE, CUSTOM OF TRADE OR OTHERWISE WITH
RESPECT TO THE APPLIANCES OR PARTS COVERED BY THIS WARRANTY, INCLUDING BUT NOT
LIMITED TO, WARRANTIES, CONDITIONS, OR REPRESENTATIONS OF WORKMANSHIP,
MERCHANTABILITY, MERCHANTABLE QUALITY, FITNESS FOR A PARTICULAR PURPOSE OR
DURABILITY.
Some states or provinces do not allow for: (1) the exclusion of implied
warranties of merchantability or fitness; (2) limitations on how long an
implied warranty lasts; and/or (3) the exclusion or limitation of incidental
or consequential damages; so these limitations may not apply to you. In these
states and provinces, you have only the implied warranties that are expressly
required to be provided in accordance with applicable law. The limitations of
warranties, liability, and remedies apply to the maximum extent permitted by
law. This limited warranty gives you specific legal rights, and you may also
have other rights which vary from state to state or province to province.
Product Registration
Please visit
www.instanthome.com/register to
register your new Instant Brands appliance. Failure to register your product
will not diminish your warranty rights. You will be asked to provide the store
name, date of purchase, model number (found on the back of your appliance) and
serial number (found on the bottom of your appliance) along with your name and
email address. The registration will enable us to keep you up to date with
product developments and recipes, and contact you in the unlikely event of a
product safety notification. By registering, you acknowledge that you have
read and understand the instructions for use, and warnings set forth in the
accompanying instructions.
Warranty Service
To obtain warranty service, please contact our Consumer Care Department by
email to support@instanthome.com. You can also create a support ticket online
at
www.instanthome.com. If we are unable to resolve
the problem, you may be asked to send your appliance to the Service Department
for quality inspection. Instant Brands is not responsible for shipping costs
related to warranty service. When returning your appliance, please include
your name, mailing address, email address, phone number, and proof of the
original purchase date as well as a description of the problem you are
encountering with the appliance.
Distributed by Instant Brands LLC
3025 Highland Parkway, Suite 700
Downers Grove, IL 60515 U.S.
instanthome.com
© 2022 Instant Brands LLC
110-0039-01
Art release date
11/02/2022
INSTANT, INSTANT POT,
INSTANT BRANDS and DUO
are registered trademarks of Instant Brands Holdings Inc.
DOWNLOAD
Instant Pot Duo Plus V3 Multi-Cooker User Manual – [Download
PDF]
Read User Manual Online (PDF format)
Read User Manual Online (PDF format) >>
Download This Manual (PDF format)
Download this manual >>
If you just got a new Instant Pot and are looking for Instant Pot directions, this beginner’s guide will help you learn how to use your Instant Pot electric pressure cooker. With these Instant Pot pressure cooker instructions, you’ll learn about the parts of the Instant Pot, setup, safety features, pressure release, and the water test. [Video included.]
This post contains affiliate links. As an Amazon Associate, I earn from qualifying purchases. Please read the disclosure.
Instant Pot Parts and Accessories
Make sure all the parts are included. The guide that came with your Instant Pot will tell you what’s included. Here are the common parts of the Instant Pot:
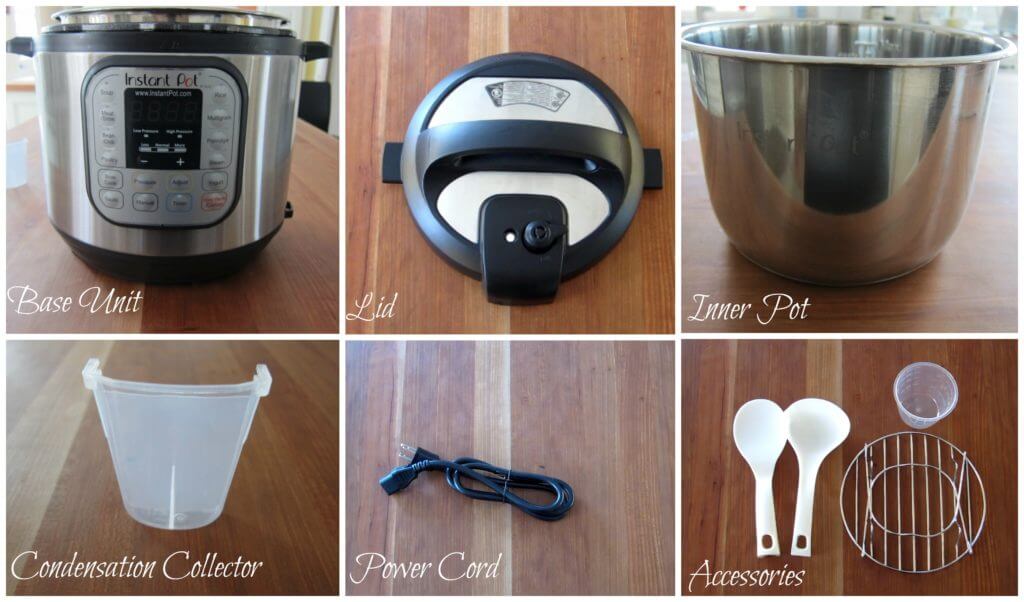
- Base unit/Outer Pot – stainless steel exterior that houses the heating element, control panel, and detachable power cord.
- Lid – closes the Instapot and seals it under pressure.
- Inner pot – removable stainless steel pot, also known as a liner or insert.
- Condensation Collector – catches drips from condensation on the lid.
- Power cord – the 3-prong detachable power cord is plugged into the back of some models. Other models have a permanently attached cord.
- Accessories – may include rice paddle, ladle, measuring cup, and trivet. Some models come with an extra sealing ring.
Instant Pot Lid
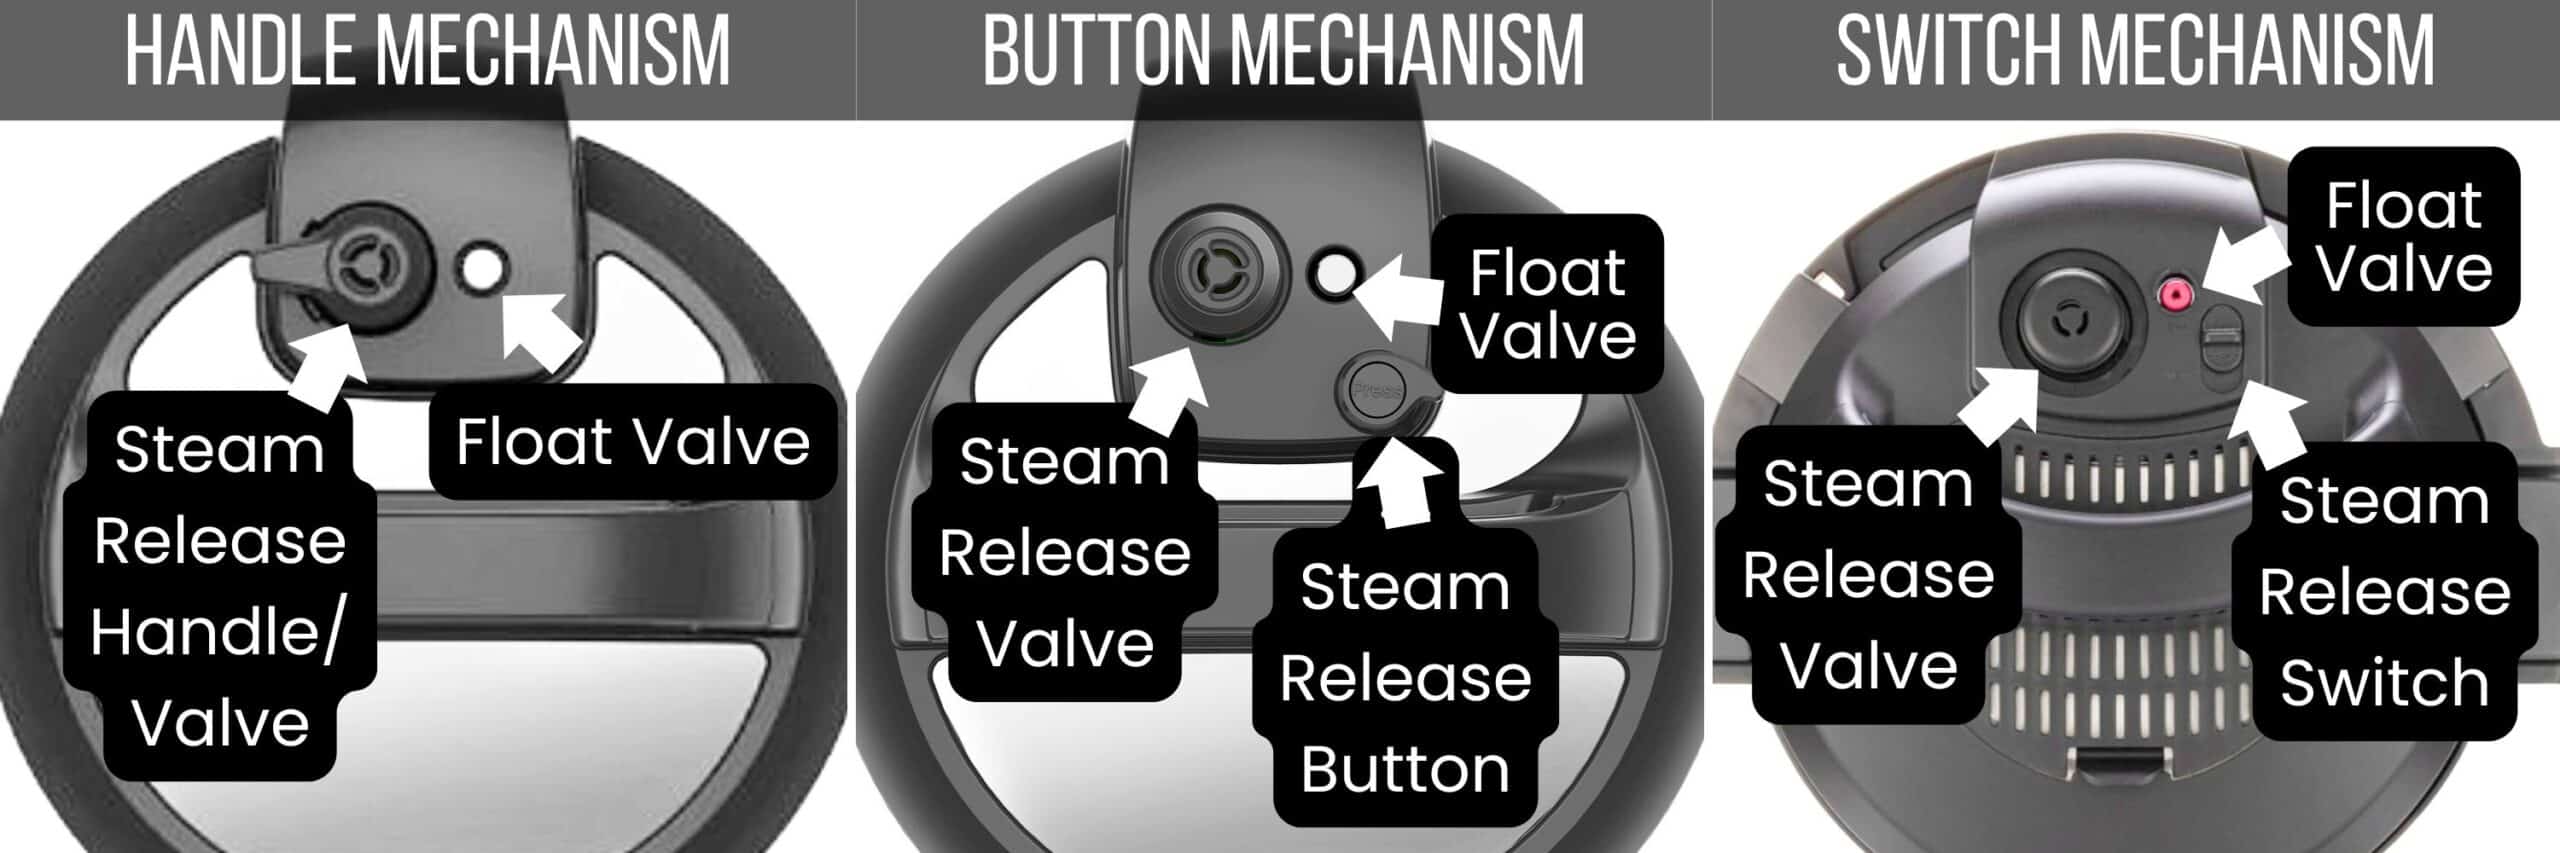
Every Insta Pot model will look slightly different, but the basics are the same. Some lids will have a handle, while others will have a knob or switch to release pressure.
Lid Exterior Parts
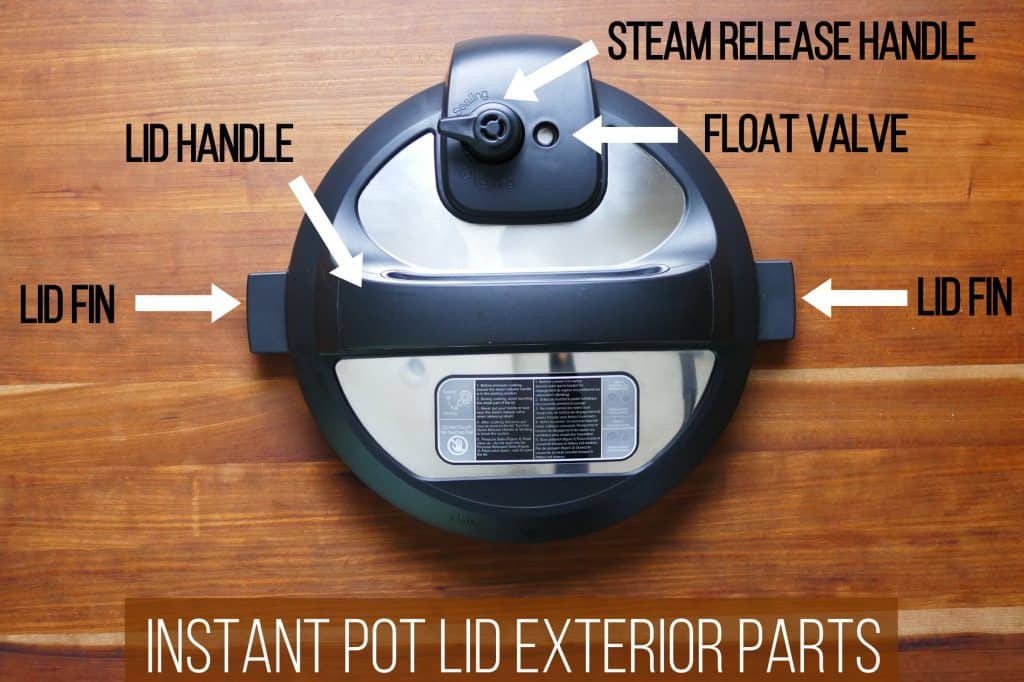
- Lid Handle is used to put on and take off the lid. Some models have a switch, while others have a teardrop-shaped button.
- Lid Fin is placed in the lid fin slot of the base unit to prop the lid open.
- Steam Release Handle is sometimes called the pressure valve, and it fits over the steam release pipe and releases pressure. On some models, the steam release valve has a plastic diffuser that fits over the valve to help the steam release with less force.
- Float Valve seals in the steam, pressurizing the Instant Pot.
Lid Interior Parts
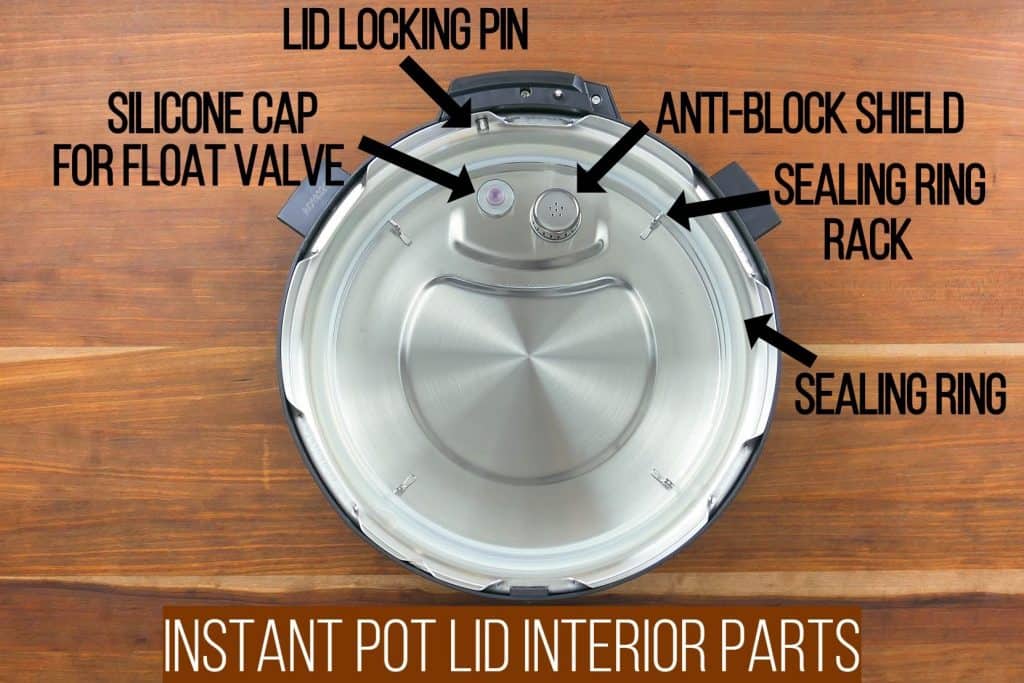
- Silicone Cap for Float Valve covers the instant pot valve and keeps it in place
- Lid Locking Pin is a safety mechanism that prevents the lid from opening under pressure
- Anti-Block Shield prevents food from coming out of the stainless steel inner pot through the steam release pipe
- Sealing Ring Rack – holds the sealing ring in place
- Silicone Sealing Ring allows the Instant Pot to seal
Setting Up
Now that you are familiar with the parts of your Instant Pot, you’re ready to begin setting it up so you can run a water test.
1. Unbox
I regularly hear from people who purchased or got the Instant Pot as a gift and leave it unopened because they’re too intimidated.
If you have a defective unit, you might miss the warranty period if you don’t get it out of the box and try it out!
Place the Instant Pot base unit on a stable surface, away from any open flame. Place it so that the steam won’t blow up onto any cabinets.
2. Place the inner pot in the base unit
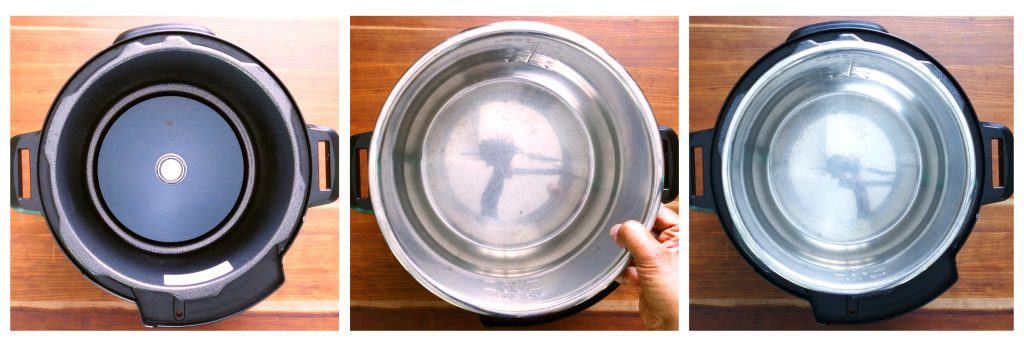
- Make sure the base unit is empty and clean.
- Place the stainless steel inner pot inside the Instant Pot base unit.
3. Attach the condensation collector
The condensation collector catches any moisture that builds up on the rim. This usually comes from moisture dripping from inside the lid into the rim of the Instant Pot base when the lid is opened.

- Line up the condensation collector with the notches on the back of the Instant Pot base unit.
- Slide in the condensation collector until it’s pushed in all the way.
4. Plug in the Instant Pot
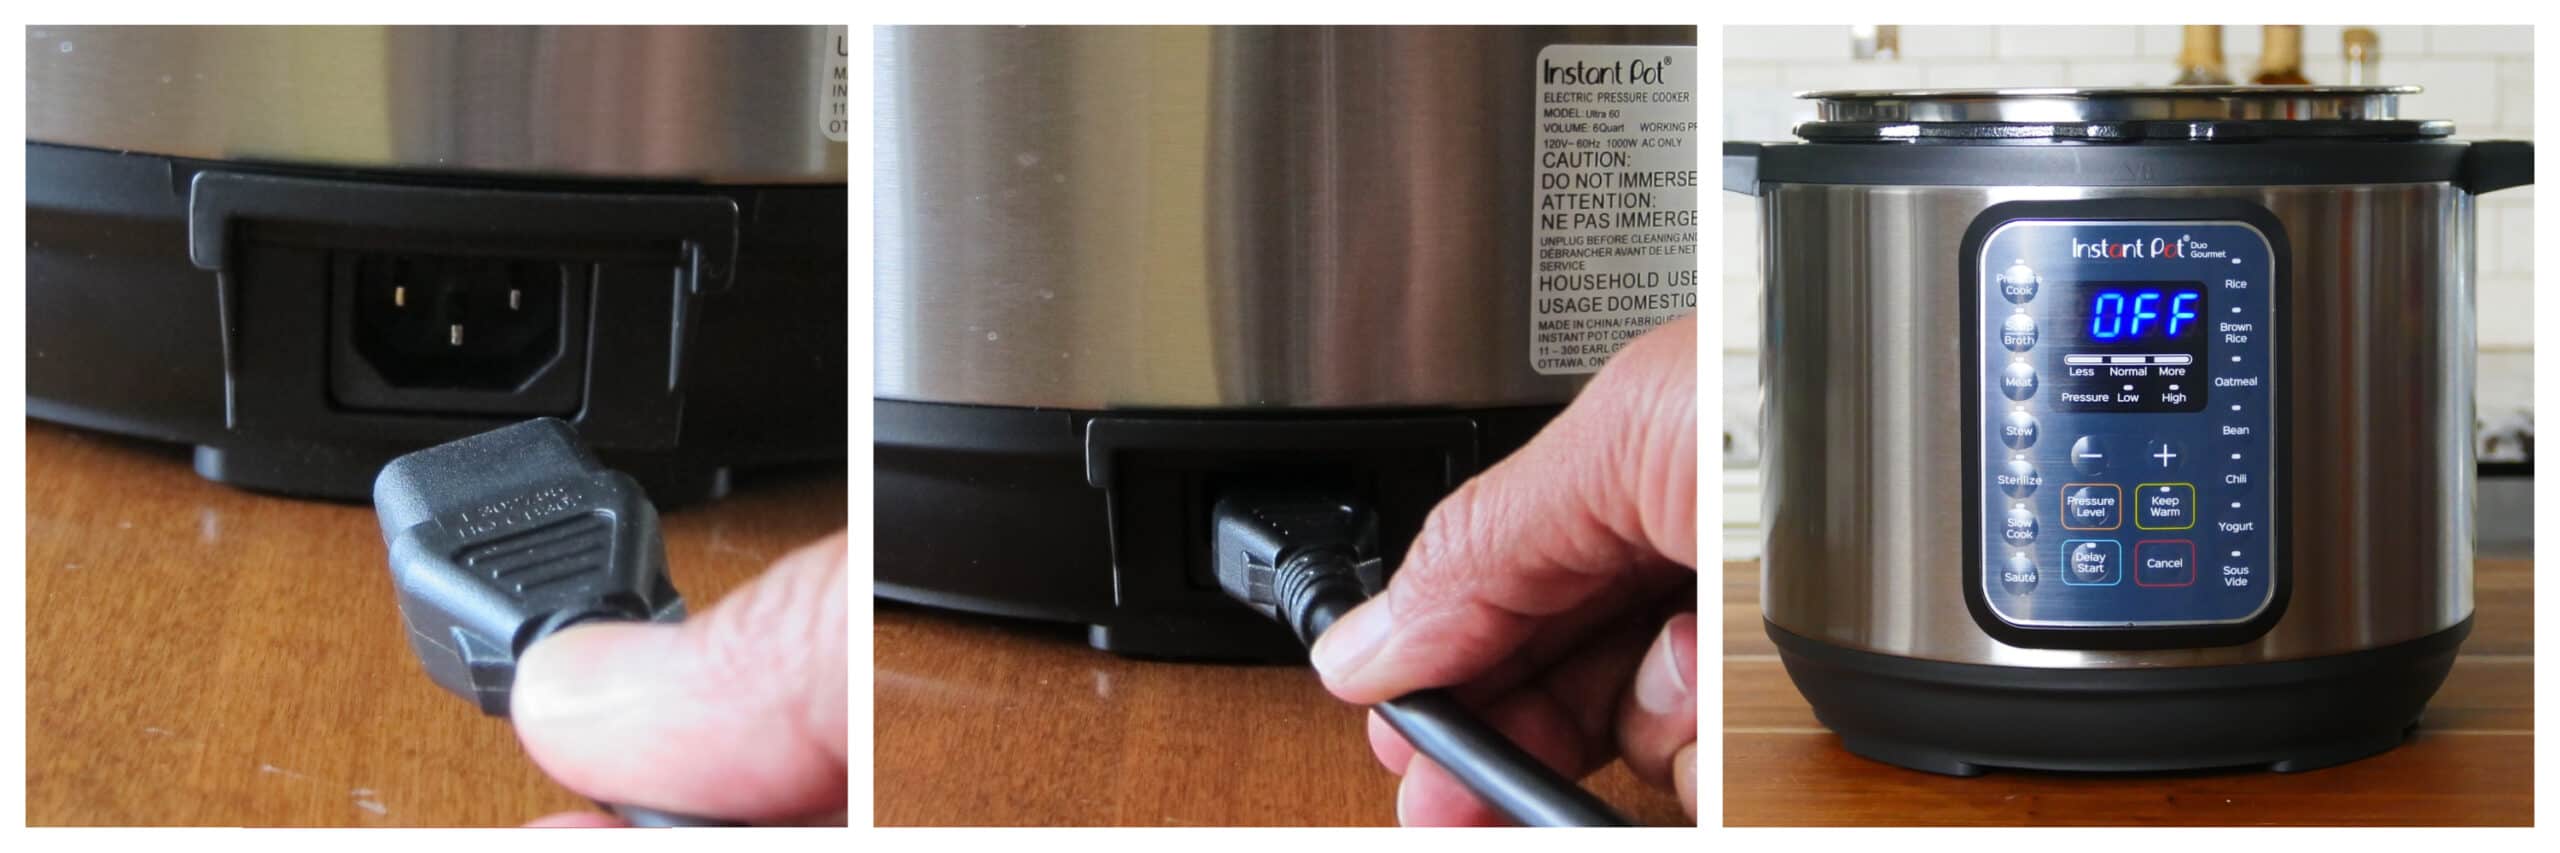
If you have a detachable cord, plug it into the base unit. Plug the cord into an electrical outlet.
Essential Tips Before You Use an Instant Pot Pressure Cooker
Important Information
- There are so many buttons on the Instant Pot, and it can seem overwhelming. You can get by using just a handful of buttons: Pressure Cook, Cancel, Start, and Saute.
- Many buttons or functions on the Instant Pot are presets for pressure cooking various foods, similar to those on a microwave. You can use these shortcuts (e.g., Meat, Soup, Rice) or the Pressure Cook function, which is the same thing.
- Before using the Instant Pot, always have the inner pot (aka liner or insert) in the base unit. Don’t put food or liquid into the Instant Pot base unit! I like to leave a trivet in the base unit when the inner pot is being washed to remind myself and others in the household not to forget the liner.
- The pressure release handle, button, or switch must be in the Sealing position, not Venting.
- The Instant Pot needs a minimum quantity of clear liquid (e.g. water, broth) for pressure cooking. (3 quart – 1 cup, 6 quart 1.5 cups, 8 quart – 2 cups). Some foods, such as vegetables and meats, release liquid during the cooking process, allowing you to use slightly less liquid.
- After using Saute mode, deglaze the inner pot. This involves pouring a small amount of liquid and scraping the bottom of the inner pot to make sure nothing is stuck to the bottom.
- Most Instant Pot recipes require High pressure unless otherwise noted. Low pressure is used in some rice recipes and for quick-cooking vegetables or fish.
- When cooking with dense or starchy ingredients, use the layering technique. Put meat, vegetables, and clear liquid at the bottom of the pot. Add pasta, rice, tomato sauce, and other thick sauces on top, and don’t stir them in. This helps prevent sealing issues and the Food Burn message. Another option is to use a trivet for the pot-in-pot method.
- There are multiple ways to release pressure. The most common methods are the natural release and quick-release methods. In general, use natural pressure release for meats, beans, and foods that need to rest after cooking. Use quick release for foods that will overcook if you let them sit, such as vegetables.
- The total time required to pressure cook is the time the Instant Pot comes to pressure, the time it takes to cook, and the time it takes to release the pressure. If you allow the pressure to release naturally, it can take 10 to 45 minutes, depending on the quantity of food inside the pot. Take this into account when planning how long a recipe will take!
How to open Instant Pot lid
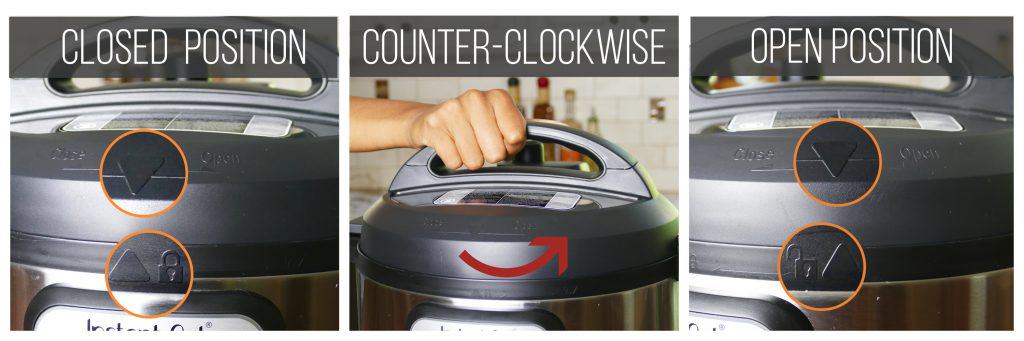
- If the lid is on, turn the lid counterclockwise until you hear a chime.
- The arrow on the lid will be lined up with the open lock icon on the base unit.
- Lift the lid to remove it.
- If you’ve just finished pressure cooking something and feel a slight resistance, wiggle the lid back and forth, and the suction should release.
How to close the lid
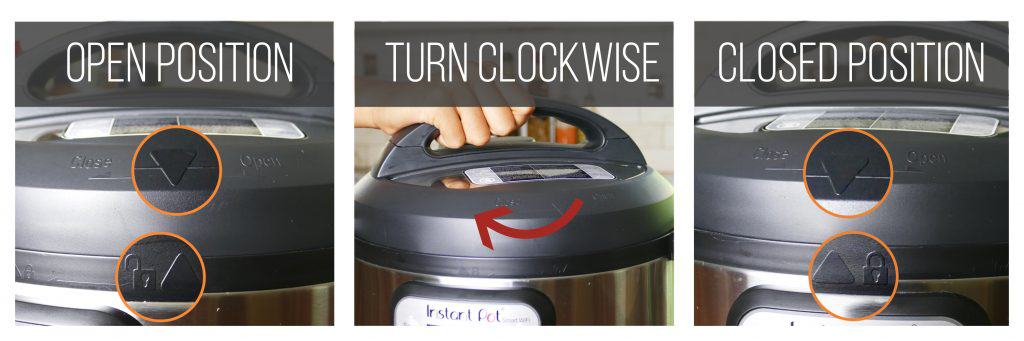
- Here’s how to put the lid on the Instant Pot: place the lid onto the Instant Pot base unit with the arrow mark on the lid lined up with the open lock icon above the right corner of the control panel.
- You will hear a chime (if the volume is turned on).
- Turn the lid clockwise until you hear another chime.
- The lid will be closed.
Float valve positions
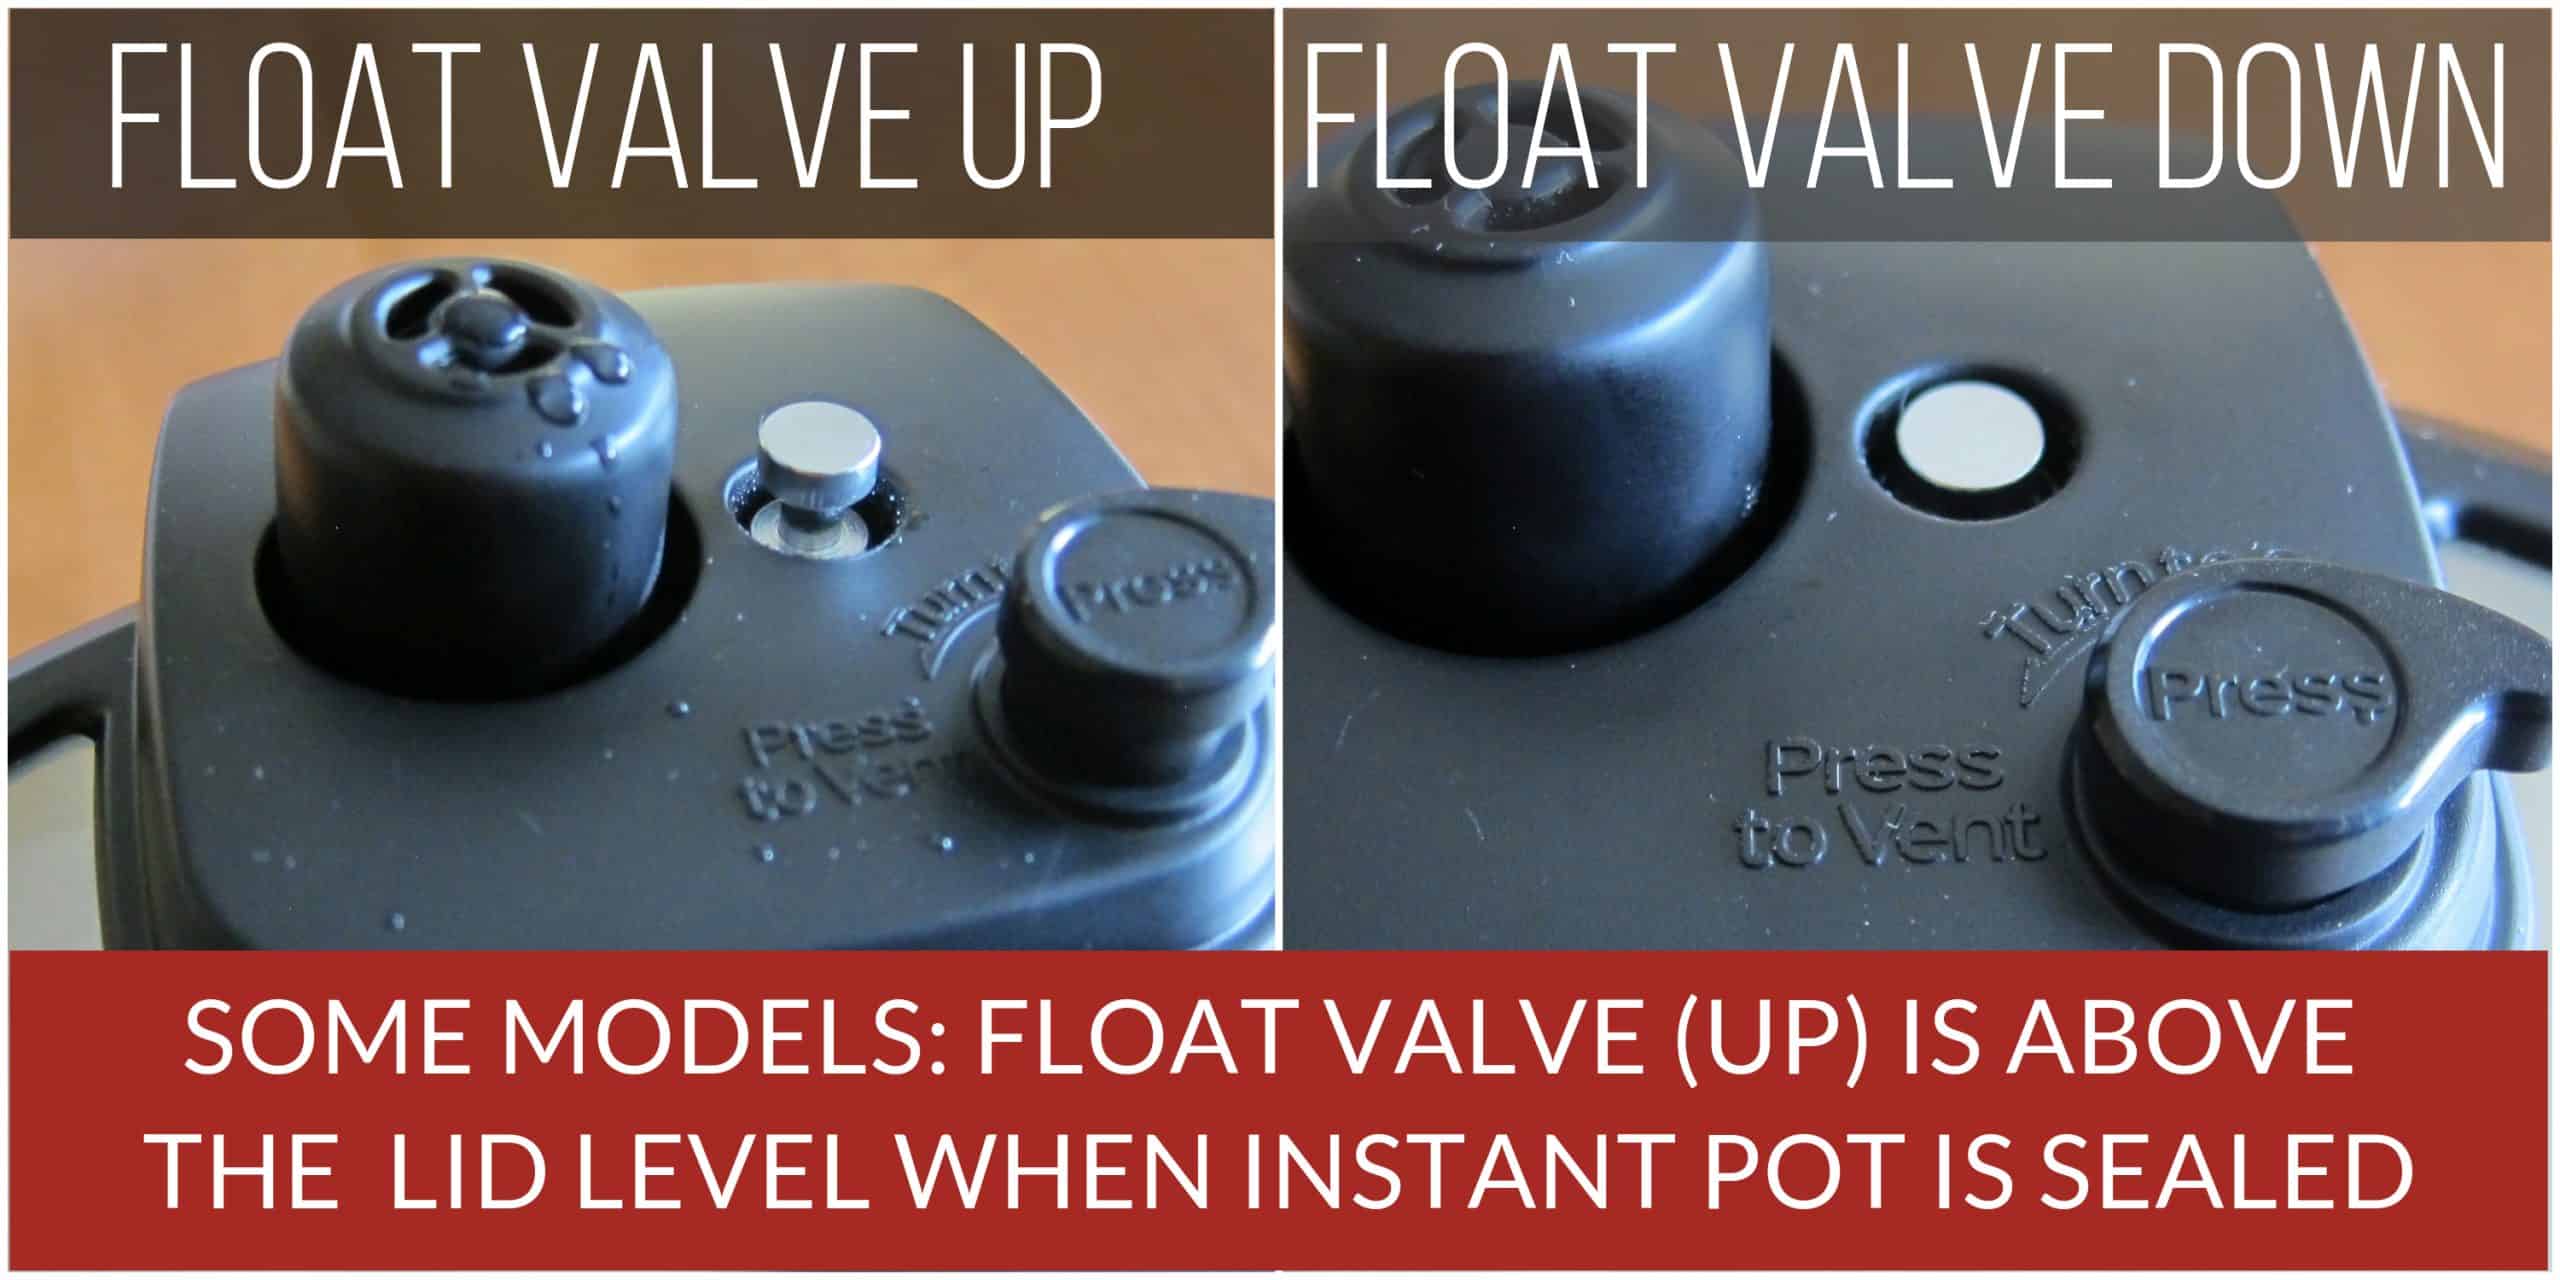
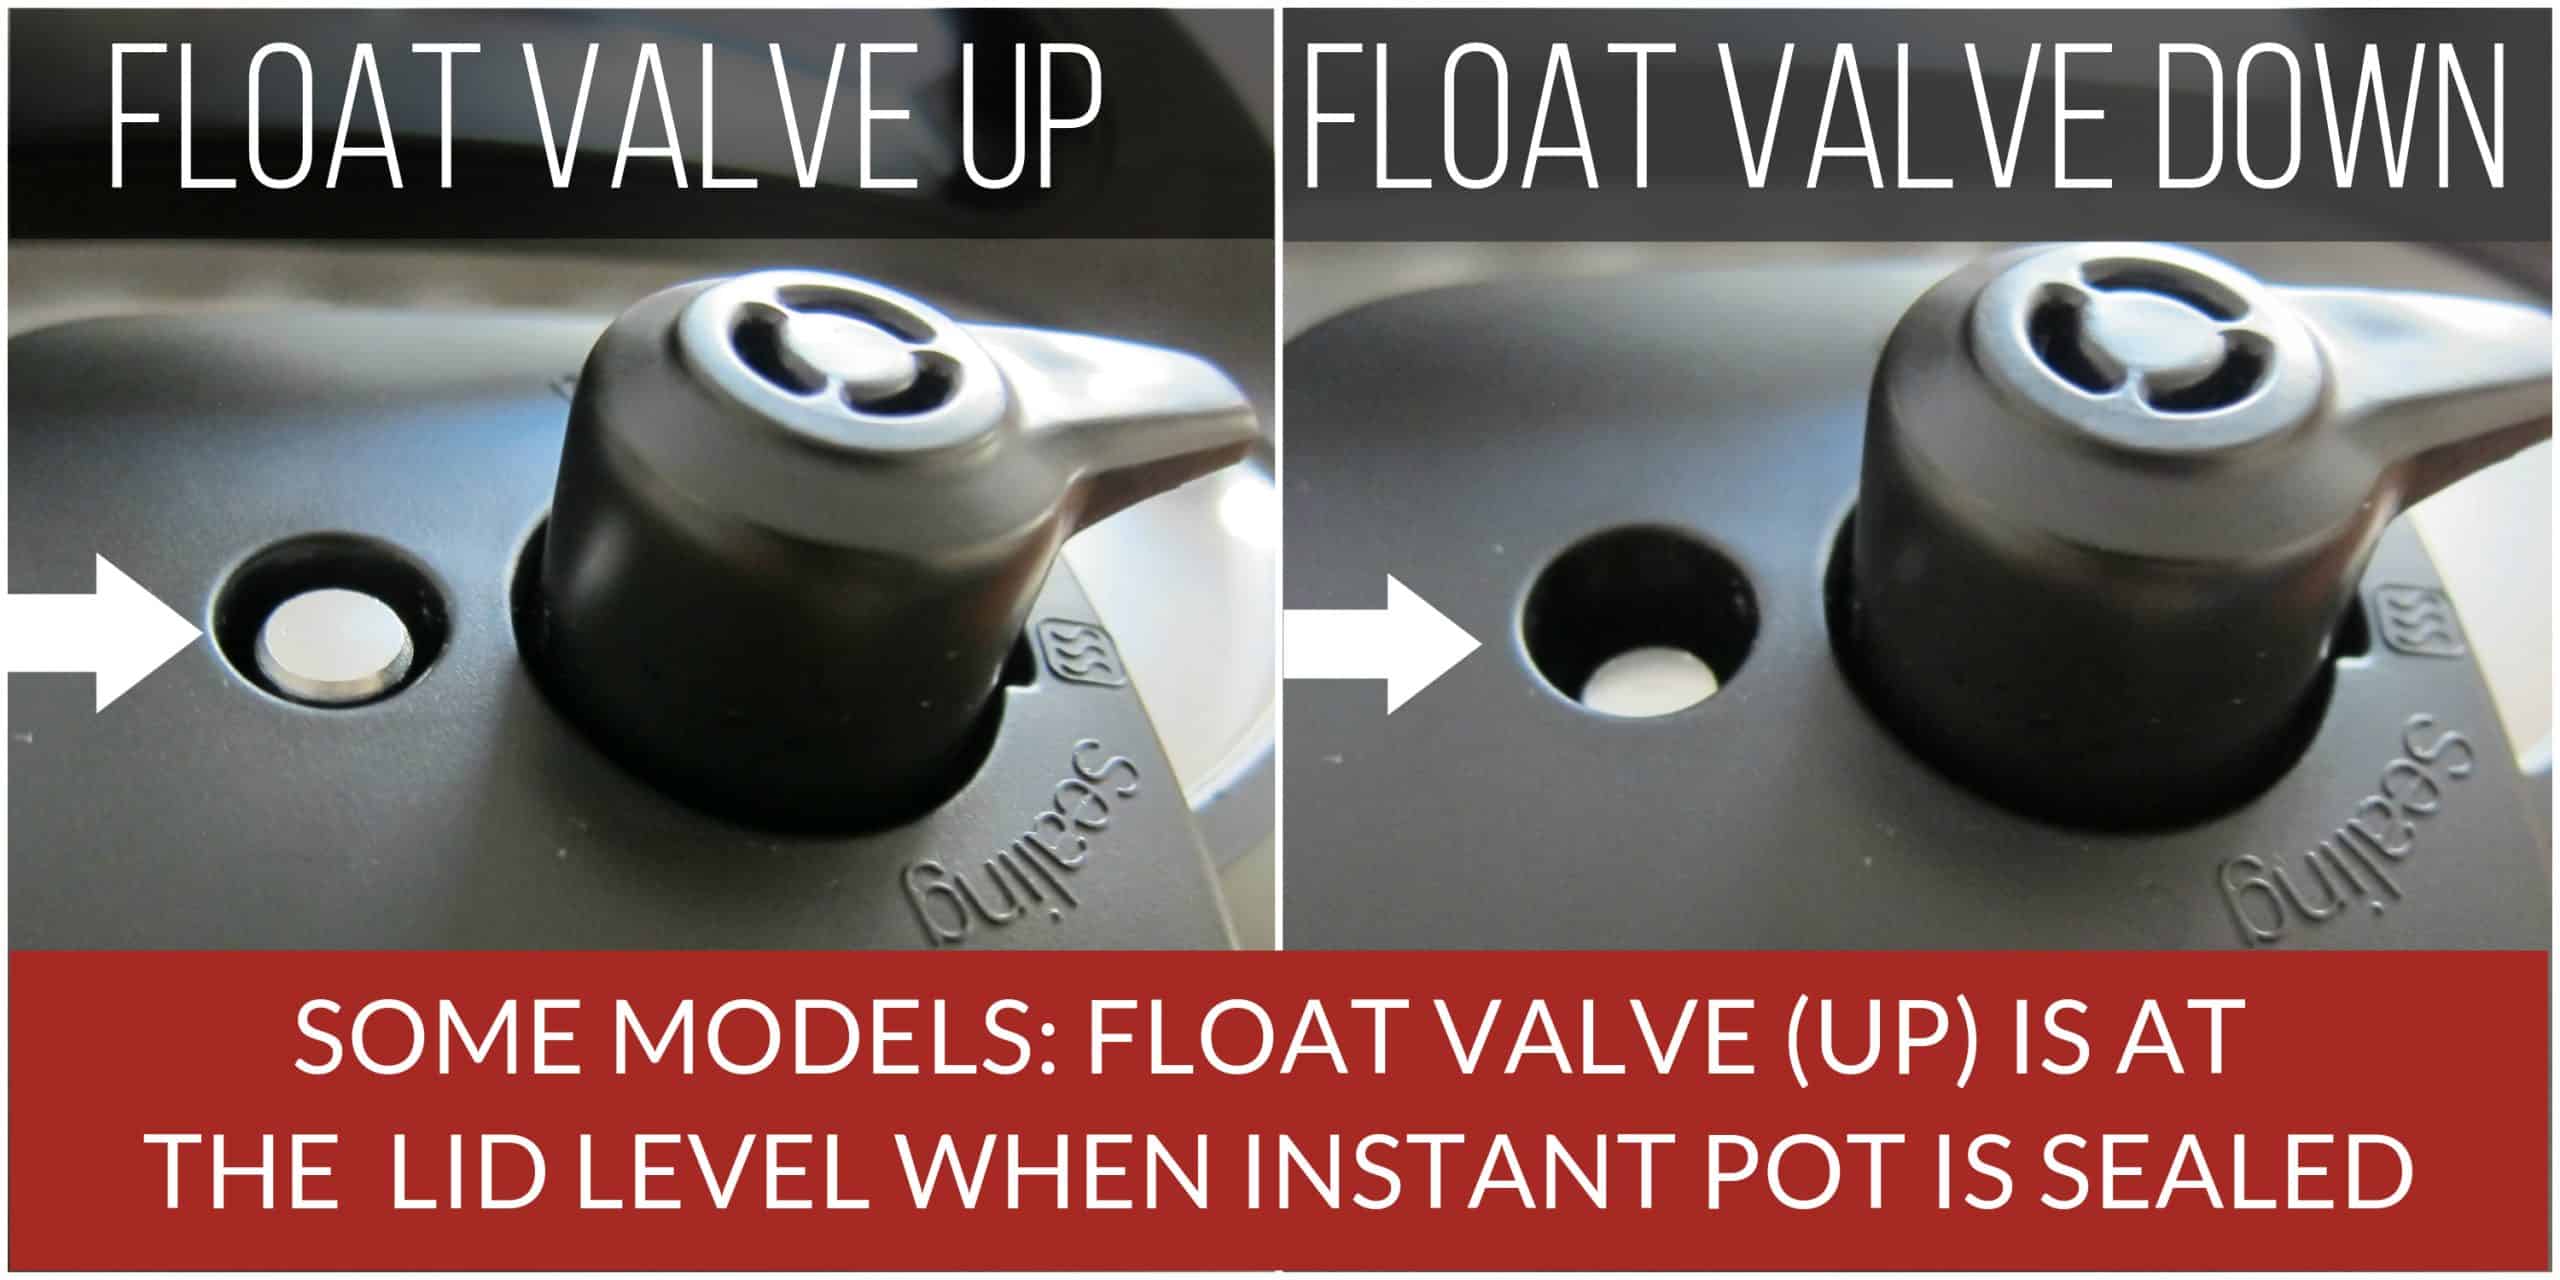
- In some models, the float valve is above the lid level when under pressure and at the lid level when not under pressure.
- In other models, the float valve is at the lid level when under pressure and below the lid level when not under pressure.
Safety Precautions
There are many built-in safety features, including automatic pressure sensors. However, as a user, you need to follow essential safety guidelines, including:
- Don’t touch the hot surfaces, particularly the stainless steel parts. Use the handles to move the Instant Pot and gloves to remove the inner pot.
- Keep hands and face away from the steam and pressure release mechanism.
- Don’t move the Instant Pot when it’s under pressure.
- Don’t fill over ⅔ full. However, when cooking foods that expand, e.g., rice, beans, and pasta, don’t fill over ½ full.
- Don’t open the Instant Pot until the float valve is down, i.e., the Instant Pot is depressurized.
- Don’t obstruct the steam release valve when pressure is released.
Instant Pot Water Test Instructions
What is the Water Test?
A water test is done by pressure cooking water for a few minutes. This allows you to familiarize yourself with the basic operations and ensure your new Instant Pot works.
You should do a water test before the first use, but you can also do it when you have problems with the Instant Pot pressurizing. The water test will pinpoint whether something about a particular recipe is causing your sealing issues.
How to do the Initial Test Run / Water Test
- Pour water into the inner pot. (1 cup for 3 qt, 1.5 cups for 6 qt, 2 cups for 8 qt).
- Close the lid and put the steam release valve, button, or switch into the Sealing position.
- Select the Manual or Pressure Cook button. Some models have buttons, while others have a knob.
- Change the cook time to 5 minutes using the + or – buttons or knob.
- On models with a Start button, press Start. On models without Start, it will automatically start in a couple of seconds.
- The display will change to On.
- Soon, you’ll hear and see small amounts of steam coming from the top of the lid. This is normal and safe! Just keep your hands and face away from the steam. You might also notice a plastic smell. Don’t worry – it will go away and shouldn’t happen again after the first use.
- Once pressure has built up, the float valve will come up.
- After the float valve comes up, the display will change from On to 5 (or 00:05), which can take a few minutes.
- The display will count down from 5 to 0 or (00:05 to 00:00).
- When pressure cooking is complete, you’ll hear a series of beeps, and the display shows L0:00, which means it’s in Keep Warm mode (if the Keep Warm function is turned on.)
- Press the Cancel button. The display will say Off.
- Do a quick release or manual pressure release by moving the steam release knob, button, or switch from sealing position to venting position. Keep hands and face away from the flow of steam. Once all the pressure inside the pot has been released, the float valve goes down, and the Instant Pot is de-pressurized. This can take a few minutes. You can also let the pressure release naturally, which takes 10 to 15 minutes.
- Once the pressure has been released, it’s safe to open and prop the lid.
What to do if the water test fails
If the water test is successful, you can use your new Instant Pot. If it fails and you’re not able to get the Instant Pot to come to pressure, use the following articles to troubleshoot the issue:
- Reasons why your Instant Pot is not Sealing
- Instant Pot Burn Message
- Common Instant Pot Problems
Instant Pot Buttons
- Each Instant Pot model has different buttons. Some buttons are cooking modes or programs (e.g. Rice, Bean) while others are operational (e.g. Cancel, Start).
- On some models, pressing a cooking mode button toggles between Less, Normal, and More, which have customizable default cooking times. You can adjust the time by pressing + or – and set High or Low pressure by pressing Pressure Level.
- On other models, pressing a button lets you customize the pressure level and cooking time using the display panel.
Programs and Default Times
| Button | Less | Normal | More |
|---|---|---|---|
| Bean/Chili | 25 minutes | 30 minutes | 40 minutes |
| Cake | 25 minutes | 40 minutes | 50 minutes |
| Egg | 3 minutes | 4 minutes | 5 minutes |
| Meat/Stew | 20 minutes | 35 minutes | 45 minutes |
| Multigrain (Soaks for 45 minutes first) |
20 minutes | 40 minutes | 60 minutes |
| Poultry | 5 minutes | 15 minutes | 30 minutes |
| Porridge/Oatmeal | 15 minutes | 20 minutes | 30 minutes |
| Pressure Cook | 20 minutes | 35 minutes | 45 minutes |
| Rice | – | 12 minutes (Low Pressure) |
– |
| Soup/Broth | 20 minutes | 30 minutes | 40 minutes |
| Steam | 3 minutes | 10 minutes | 15 minutes |
| Slow Cook | 180–190°F (similar to keep warm on slow cooker) |
190–200°F (similar to low on slow cooker) |
200–210°F (similar to high on slow cooker) |
| Yogurt | 106°F to 113°F (for Chinese fermented rice) |
110°F to 115°F (for incubating yogurt) |
160°F to 180°F (for boiling milk before incubating) |
Other Button Functions
| Button | Function |
|---|---|
| Start | Begin the current program |
| Cancel | Cancels the current program |
| Delay Start | Start the cooking at a later time |
| Fav | Saves custom presets (on some models) |
| Keep Warm | Keeps food warm after pressure cooking; tracks time since cooking completed |
| Pressure Cook | Primary pressure cooking function; adjust pressure level and time |
| Pressure Level | Toggles between High and Low pressure |
| Saute | Allows sautéing before pressure cooking |
| Sous Vide | Cooks food using the sous vide method. You can set the cooking time and temperature |
| Temp | Adjusts temperature (use + or – buttons) |
| Time | Adjusts cooking time (use + or – buttons) |
| Ultra | Customizes temperature, pressure level, and cooking time (Ultra model only) |
Air Fryer Functions (on applicable models)
Some Instant Pot models have an air fryer lid and a pressure cooker lid. These models have pressure cooker and air fryer settings. These are some of the common air fryer modes:
- Air Fry
- Roast
- Broil
- Bake
- Dehydrate
- Proofing
FAQs
How to turn on Instant Pot
The Instant Pot turns on as soon as it’s plugged in. Attach the cord to the Instant Pot (if it’s detachable) and plug the cord into an outlet. The Instant Pot will say Off.
How to start Instant Pot
– The Instant Pot first needs to be plugged in.
– If the display is blank, press any button to turn on the Instant Pot.
– Choose the program and set the cook time.
– To start pressure cooking, some models have a Start button. Press Start.
– Other models automatically start. A few seconds after you program it, the Instant Pot display changes to On, which means it has started cooking.
What is the Instant Pot Manual button?
On older models of the Instant Pot, the Pressure Cook button is called Manual. If you see a recipe that tells you to use the Manual setting, use the Pressure Cook function.
How to set Instant Pot to high pressure
On some models, to set the Instant Pot to high pressure, press the Pressure Level button. It allows you to toggle between High and Low pressure. On other models, select the Pressure Cook function, and you’ll be able to program the pressure level and cooking time on the display panel using the knob.
How long for pressure cooker to reach pressure?
The amount of time it takes to reach pressure and the float valve to go up depends on the amount of liquid inside the cooker and the temperature of the food. The more liquid in the pot and the colder the food, the longer it takes the Instant Pot pressure cooker to reach pressure.
If the Instant Pot has about 2 cups of liquid, it may take 10 minutes for the Instant Pot to reach pressure if the food isn’t frozen. The Instant Pot can take 15 to 30 minutes if it has more liquid.
What Instant Pot accessories do I need?
A trivet and a small dish are useful for Pot in Pot cooking. An extra sealing ring is also a handy accessory. A tempered glass lid is convenient for sauteing, using the Instant Pot as a slow cooker, or for Yogurt mode.
Recipes for the Instant Pot
I hope these Instant Pot directions have helped you get comfortable with your new pressure cooker. Now you’re ready to try your first recipe!
Don’t try to improvise or wing it with your first recipe. Select a recipe from a trusted Instant Pot or Pressure Cooker cookbook or blog and follow it as written.
If you want to make changes or adjustments, you might want to contact the blogger or ask for advice from an experienced Instant Pot user.
Try an easy chicken recipe like Instant Pot Chicken Stew, Instant Pot Chicken Curry Soup, or Instant Pot Thai Red Curry; a dump and start Instant Pot Pork Carnitas or Instant Pot Mac and Cheese; or Indian restaurant vegetarian favorite Instant Pot Chana Masala.
Related Articles
I hope you’ve found these Instant Pot pressure cooker instructions useful. Here are some more articles that are helpful to beginners and intermediate Instant Pot users.
1

Instant Pot Tips and FAQs
Are you new to the Instant Pot and want to learn more about how it works? Here are my Top Instant Pot Tips for any new Instant Pot user. Find out about the Manual mode, leaking steam, doubling recipes, the difference between quick release and natural release, and much more.
INSTANT POT TIPS AND FAQS
2
Instant Pot Common Problems and Solutions
Whether it’s your Instant Pot not sealing, error codes, burn message, or leaking steam, find out how to troubleshoot common Instant Pot problems encountered by beginners and experienced users.
INSTANT POT TROUBLESHOOTING
3
Reasons why Instant Pot is Not Sealing
Here are the top reasons why your Instant Pot is not sealing. This guide helps you troubleshoot the main problem most Instant Pot users encounter: that the Instant Pot is not being pressurized.
INSTANT POT NOT SEALING
If you found this article to be helpful, please share it on social media using the social media share buttons at the top and bottom of this post. Thank you so much!
View the manual for the Instant Pot Duo Multi-Cooker here, for free. This manual comes under the category multi cookers and has been rated by 2 people with an average of a 8.4. This manual is available in the following languages: English. Do you have a question about the Instant Pot Duo Multi-Cooker or do you need help?
Ask your question here
Instant Pot Duo Multi-Cooker specifications
Below you will find the product specifications and the manual specifications of the Instant Pot Duo Multi-Cooker.
The Instant Pot Duo Multi-Cooker is a kitchen appliance that offers multiple cooking functions in one device. It is designed to streamline meal preparation by combining the functionalities of a pressure cooker, slow cooker, rice cooker, steamer, sauté pan, and yoghurt maker in a single unit. The appliance features a user-friendly control panel with various pre-set cooking programs to easily prepare a wide range of dishes.
Constructed with high-quality materials, the Instant Pot Duo Multi-Cooker is built to withstand frequent use and ensure long-lasting performance. It also includes safety features such as overheat protection and automatic pressure control to prevent accidents during operation. The multi-cooker offers a large capacity to accommodate family-sized meals and is equipped with a stainless steel cooking pot for easy cleaning.
With its versatility and convenience, the Instant Pot Duo Multi-Cooker aims to simplify cooking processes and save time in the kitchen. Whether you’re looking to quickly prepare a meal or experiment with new recipes, this appliance provides a practical solution for various cooking needs.
General
Frequently Asked Questions
Can’t find the answer to your question in the manual? You may find the answer to your question in the FAQs about the Instant Pot Duo Multi-Cooker below.
Is the manual of the Instant Pot Duo Multi-Cooker available in English?
Yes, the manual of the Instant Pot Duo Multi-Cooker is available in English .
Is your question not listed? Ask your question here