
Manual
View the manual for the Ikea SMAKLIG 504.678.83 here, for free. This user manual comes under the category stoves and has been rated by 2 people with an average of a 7.4. This manual is available in the following languages: English, Universal. Do you have a question about the Ikea SMAKLIG 504.678.83?
Ask your question here
Ikea SMAKLIG 504.678.83 specifications
Below you will find the product specifications and the manual specifications of the Ikea SMAKLIG 504.678.83.
The Ikea SMAKLIG 504.678.83 stove is a kitchen appliance designed for cooking. It features multiple burners for cooking various dishes simultaneously. The stove is made of durable materials to ensure longevity. It has a sleek design that can complement different kitchen styles. The oven has a capacity large enough to accommodate different sizes of dishes. The stove comes with adjustable heat settings for precise cooking control. It is easy to clean and maintain, making it a practical choice for busy households. The stove is designed for easy installation and operation. It is recommended to follow the manufacturer’s instructions for proper use and care of the appliance. Overall, the Ikea SMAKLIG 504.678.83 stove is a functional and reliable kitchen appliance for everyday cooking needs.
General
| Brand | Ikea |
| Model | SMAKLIG 504.678.83 |
| Product | stove |
| Language | English, Universal |
| Filetype | Visual instructions (PDF) |
Frequently asked questions
Can’t find the answer to your question in the manual? You may find the answer to your question in the FAQs about the Ikea SMAKLIG 504.678.83 below.
How do I reset my induction hob?
Most induction hobs can be reset by disconnecting the hob from power by unplugging it from the power outlet. You will then have to wait at least 60 minutes.
What is a Perilex connection?
A Perilex connection is a special connection that can handle more power than a normal connection. This connection has five holes instead of two and is often used for induction hobs.
Can I use my pans on induction?
Nowadays almost all pans are suitable for induction. You can easily test whether your old pans can also be used on induction by holding a magnet against the bottom of the pan. If the magnet stays on the pan, your old pan is suitable for induction.
Is cooking on induction dangerous?
No, cooking on induction is not dangerous.
Is the manual of the Ikea SMAKLIG 504.678.83 available in English?
Yes, the manual of the Ikea SMAKLIG 504.678.83 is available in English .
Is your question not listed? Ask your question here
- June 5, 2024
- Ikea
Table of Contents
- Safety Information
- Installation
- Product description
- Control panel
- Indicators
- Cookware guidance
- First Use
- Daily use
- Functions
- Cooking tables
- Cleaning and maintenance
- Troubleshooting
- Technical data
- Electrical connection
- CLEANING AND MAINTENANCE
- References
- Read User Manual Online (PDF format)
- Download This Manual (PDF format)
SMALLING


Safety Information
Before using the appliance, read these safety instructions. Keep them nearby
for future reference.
These instructions and the appliance itself provide important safety warnings,
to be observed at all times. The manufacturer declines any liability for
failure to observe these safety instructions, for inappropriate use of the
appliance, or for the incorrect setting of controls.
WARNING!: The appliance and its accessible parts become hot during use.
Care should be taken to avoid touching heating elements. Children, less than 8
years of age must be kept away unless continuously supervised.
WARNING!: If the hob surface is cracked, do not use the appliance – the
risk of electric shock.
WARNING!: Danger of fire: do not store items on the cooking surfaces.
CAUTION: The cooking process has to be supervised. A short cooking
process has to be supervised continuously.
WARNING!: Unattended cooking on a hob with fat or oil can be dangerous –
the risk of fire. NEVER try to extinguish a fire with water: instead, switch
off the appliance and then cover the flame e.g. with a lid or a fire blanket.
Do not use the hob as a work surface or support.
Keep clothes or other flammable materials away from the appliance, until all
the components have cooled down completely – the risk of fire.
Metallic objects such as knives, forks, spoons, and lids should not be placed
on the hob surface since they can get hot.
Very young children (0-3 years) should be kept away from the appliance.
Young children (3-8 years) should be kept away from the appliance unless
continuously supervised. Children from 8 years old and above and persons with
reduced physical, sensory or mental capabilities or lack of experience and
knowledge can use this appliance only if they are supervised or have been
given instructions on safe use and understand the hazards involved. Children
must not play with the appliance. Cleaning and user maintenance must not be
carried out by children without supervision.
After use, switch off the hob element by its control and do not rely on the
pan detector.
PERMITTED USE
CAUTION: The appliance is not intended to be operated by means of an
external switching device, such as a timer, or a separate remote-controlled
system. This appliance is intended to be used in household and similar
applications such as staff kitchen areas in shops, offices, and other working
environments; farm houses; by clients in hotels, motels, bed & breakfast,s,
and other residential environments.
No other use is permitted (e.g. heating rooms).
This appliance is not for professional use. Do not use the appliance outdoors.
INSTALLATION
The appliance must be handled and installed by two or more persons – the
risk of injury. Use protective gloves to unpack and install – the risk of
cuts.
Installation, including water supply (if any), electrical connections,
and repairs must be carried out by a qualified technician. Do not repair or
replace any part of the appliance unless specifically stated in the user
manual. Keep children away from the installation site. After unpacking the
appliance, make sure that it has not been damaged during transport. In the
event of problems, contact the dealer or your nearest Aftersales Service. Once
installed, packaging waste (plastic, styrofoam parts, etc.) must be stored out
of reach of children – the risk of suffocation. The appliance must be
disconnected from the power supply before any installation operation – the
risk of electric shock. During installation, make sure the appliance does not
damage the power cable – the risk of fire or electric shock. Only activate the
appliance when the installation has been completed.
Carry out all cabinet cutting works before fitting the appliance in the
place and remove all wood chips and sawdust.
If the appliance is not installed above an oven, a separator panel (not
included) must be installed in the compartment under the appliance.
ELECTRICAL WARNINGS
It must be possible to disconnect the appliance from the power supply by
unplugging it if the plug is accessible, or by a multi-pole switch installed
upstream of the socket in accordance with the wiring rules and the appliance
must be earthed in conformity with national electrical safety standards.
Do not use extension leads, multiple sockets, or adapters. The
electrical components must not be accessible to the user after installation.
Do not use the appliance when you are wet or barefoot. Do not operate this
appliance if it has a damaged power cable or plug, if it is not working
properly, or if it has been damaged or dropped.
** If the supply cord is damaged, it must be replaced with an identical one
by the manufacturer, its service agent, or similarly qualified persons in
order to avoid a hazard – the risk of electric shock.
NOTE:** People with a pacemaker or similar medical device should use care
when standing near this induction hob while it is on. The electromagnetic
field may affect the pacemaker or similar device. Consult your doctor or the
manufacturer of the pacemaker or similar medical device for additional
information about its effects on the electromagnetic fields of the induction
hob.
Installation
The installation process must follow the laws, ordinances, directives, and
standards (electrical safety rules and regulations, proper recycling in
accordance with the regulations, etc.) in force in the country of use!
- For further information on the installation refer to the Assembly Instruction.
- Do not use silicon sealant between the appliance and the worktop.
- Make sure that the space underneath the hob is sufficient for air circulation. Please refer to the Assembly Instruction.
- The bottom of the appliance can get hot. If the appliance is installed above the drawers, make sure to install a noncombustible separation panel under the appliance to prevent access to the bottom. Please refer to the assembly Instruction.
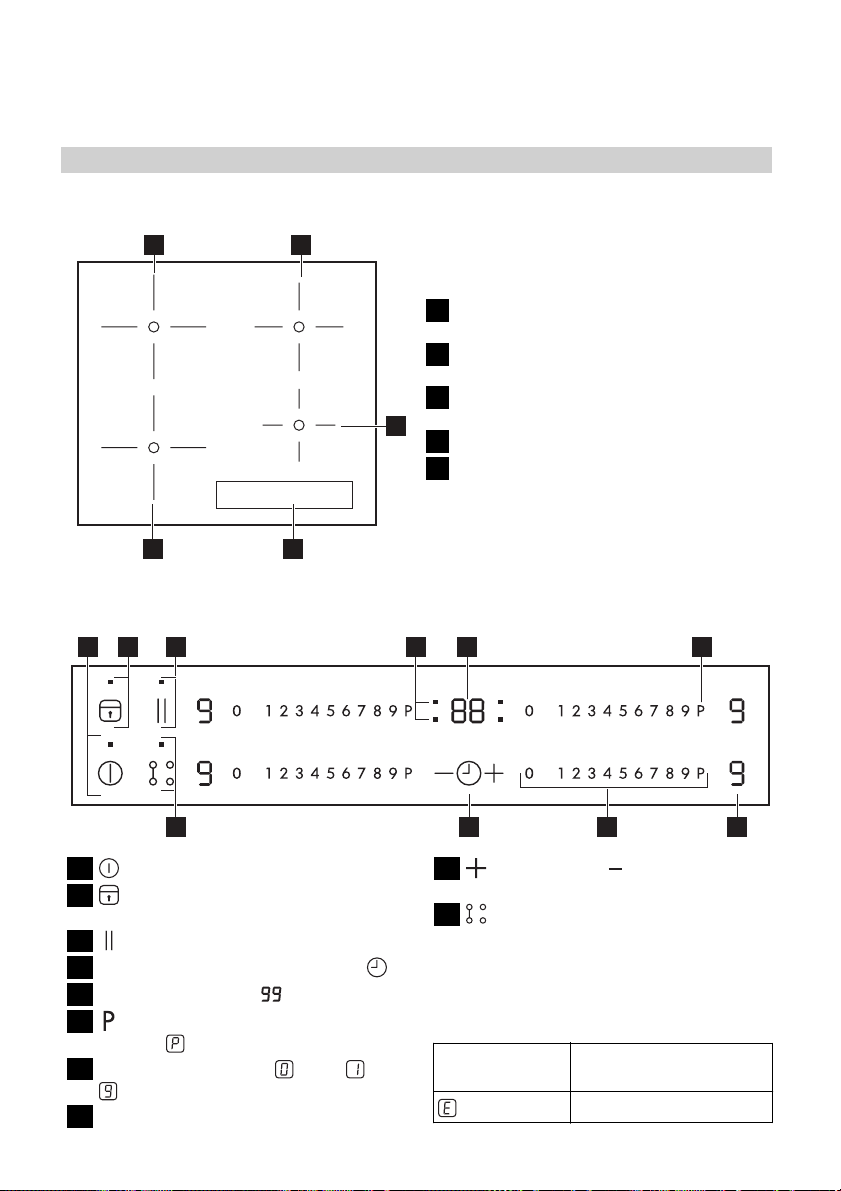
Product description

A Control panel
B Cooking zones: 1, 2, 3, 4
Control panel

1 Symbol of Automatic functions
2 Cooking levels selected
3 Cooking zone off
4 Scroll keypad
5 Booster| 6 On/Off
7 Bridge + Mode
8 Timer control
9 Cooking time indicator
10 Activation of Automatic Functions| 11 OK/Keylock button
12 Pause
13 Zone active Led
14 Timer Led
15 Timer symbol
—|—|—
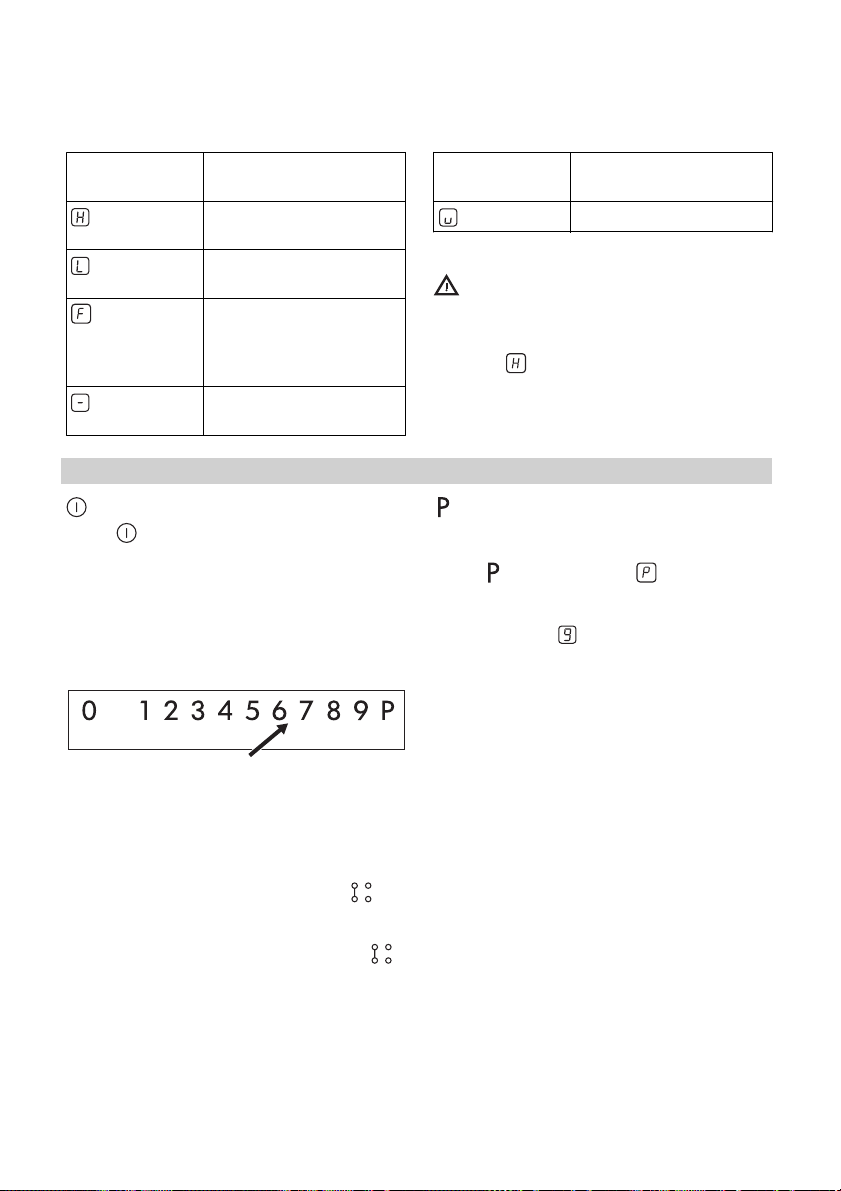
Indicators
Pot incorrectly positioned or missing
This symbol appears if the pot is not suitable for induction cooking, is not
positioned correctly, or is not of an appropriate size for the cooking zone
selected. If no pot is detected within 30 seconds of making the selection, the
cooking zone switches off.
H Residual heat
If the display shows “H“, the cooking zone is still hot. When the cooking zone
cools down, the display goes off.
Cookware guidance
What pots to use
Only use pots and pans with bottoms made from ferromagnetic material which is
suitable for use with inductions hobs:
- cast iron
- enameled steel
- carbon steel
- stainless steel (although not all)
- aluminum with ferromagnetic coating or ferromagnetic plate
To determine if a pot or pan is suitable, check for the symbol (usually
stamped on the bottom). You can also hold a magnet to the bottom. If it clings
to the underside, the cookware will work on an induction hob.
To ensure optimum efficiency, always use pots and pans with a flat bottom that
distributes the heat evenly. If the bottom is uneven, this will affect power
and heat conduction.
How to use
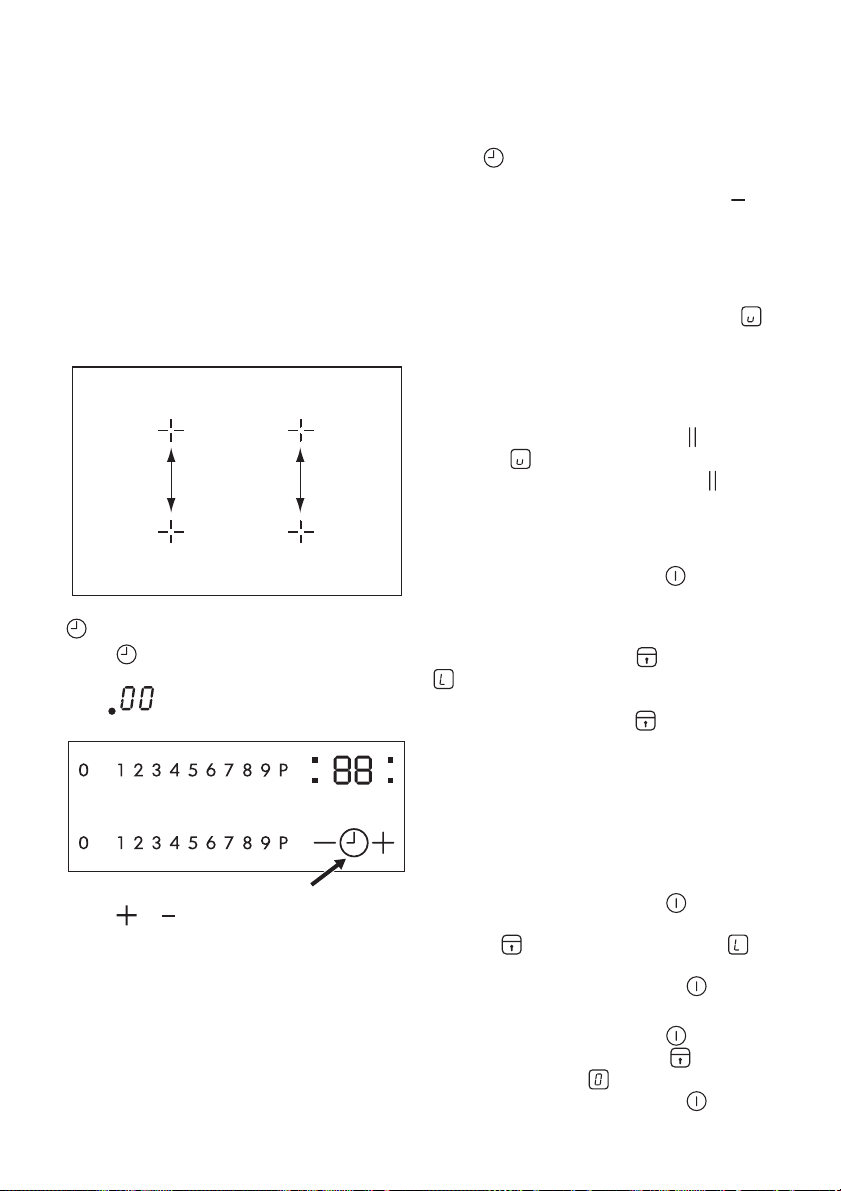
Minimum diameter of pot/pan base for the different cooking areas
To ensure that the hob functions properly, the pot must cover one or more of
the reference points indicated on the surface of the hob, and must be of
suitable minimum diameter.
Always use the cooking zone that best corresponds to the diameter of the
bottom of the pan.
Using a pot or pan with a smaller diameter than the adapter disc may cause
heat to build up that is not transmitted to the pot or pan and this could
blacken both the hob and the disc.
| Cooking Zone | Cookware diameter (cm) |
|---|---|
| Right rear cooking zone | 15,0 – 21,0 |
| Right front cooking zone | 10,0 – 15,0 |
| Left rear cooking zone | 12,0 – 20,0 |
| Left front cooking zone | 12,0 – 20,0 |
| Bridge+ cooking zone | 20,0 – 37,5 |
Empty or thin-based pots/pans
Do not use empty or thin-based pots/pans on the hob as it will not be able to
monitor the temperature or turn off automatically if the temperature is too
high, damaging the pan or the hob surface. If this occurs, do not touch
anything and wait for all components to cool down. If an error message
appears, refer to “Troubleshooting”.
Hint/tips
Noise during cooking
When a cooking zone is active, it may hum briefly. This is a characteristic of
all ceramic glass cooking zones and does not impair the function or life of
the appliance. The noise depends on the cookware used. If it causes a
considerable disturbance, it may help to change the cookware.
First Use
POWER LIMITATION
At the time of purchase, the hob is set to the maximum possible power. Adjust
the setting in relation to the limits of the electrical system in your home as
described in the following paragraph.
NOTE: in case of activation of the max power level of 2.5 kW, some
features with more power demand will be not available.
To set the power of the hob:
Once you have connected the device to the mains power supply, you can set the
power level within 60 seconds.
Press the timer “+“ button for at least 5 seconds. The display shows PL
Press the button until the last power level selected appears.
| PL | 2.5kW | 4.0 kW | 6.0 kW | 7.2 kW |
|---|---|---|---|---|
| P L | 2. 5 | 4. 0 | . 0 | 7. 2 |
Use the “+“ and “-“ buttons to select the desired maximum power consumption of
the hob. The levels available are 2.5 kW – 4.0 kW – 6.0 kW – 7.2 kW. Confirm
by pressing .
The power level selected will stay in the memory even if the power supply is
interrupted.
To change the power level, disconnect the appliance from the mains for at
least 60 seconds, then plug it back in and repeat the steps above.
If an error occurs during the setting sequence, the EE symbol will appear, and
you will hear a beep. If this happens, repeat the operation. If the error
persists, contact the After-Sales Service.
ACOUSTIC SIGNAL ON / OFF
To switch the acoustic signal on/off:
- Connect the hob to the power supply;
- Wait for the switch-on sequence;
- Press the “Boost“ button on the first keypad at the top left for 5 seconds.
Any alarms set will remain active.
Daily use
SWITCHING THE HOB ON/OFF
To turn the hob on, press the power button for around 1 second.
To turn the hob off, press the same button again, and all cooking zones will
be deactivated.
POSITIONING
CAUTION: Never cover the control panel with cookware or any other objects
otherwise the product could enter protection mode. To restore the working
condition of the product, remove the cookware and wait at least 10 seconds
before using the product. In the cooking zones close to the control panel,
pots and pans must be kept inside the markings and centered within the cooking
zones. When grilling or frying, is it recommended to use the rear cooking
zones.

ACTIVATING/DEACTIVATING COOKING ZONES AND ADJUSTING POWER LEVELS
0—————BOOST
To activate the cooking zones:
Move your finger horizontally across the scroll keypad (SLIDER) of the
required cooking, zone to activate it, and adjust the power. The level will be
shown in line with the area, along with the indicator light identifying the
active cooking zone. The “BOOST“ button can be used to select the quick
heating function.
To deactivate the cooking zones:
Press the “0” button to the left of the power adjustment
CONTROL PANEL LOCK
To lock the settings and prevent it from being switched on accidentally, press
and hold the OK/Keylock button for 3 seconds. A beep and a warning light above
the symbol indicate that this function has been activated. The control panel
is locked, with the exception of the On/Off button. To unlock the controls,
repeat the activation procedure.
– + TIMER
There is one timer witch controls each cooking zones button.
To activate the timer:
Select the cooking zone, and press the “+“ or “-“ button to set the desired
time. An indicator light will be activated in line with the specific symbol .
Once the set time has elapsed, a beep will sound, and the cooking zone will
switch off automatically. The time can be changed at any point, and several
timers can be activated simultaneously.
In case the timer is activated “Zone selection indicator“ flashes and the
relative cooking time selected is displayed on the central display.
To deactivate the timer:
Press the “+“ and “-“ buttons together until the timer is deactivated.
The timer is not available with auto functions.
TIMER INDICATOR
The LED of the “timer active indicator” indicates that the timer has been set
for the cooking zone.
II PAUSE FUNCTION
This function allows to temporarily hold and then resume cooking processes
while maintaining previous settings. The function also freezes all active
timers.
To activate this function press the II key.
The symbol II flashes on the display in place of the power levels.
To resume cooking, press the II key and touch the slider of an active zone
again.
Functions
BRIDGE + MODE
By selecting the “Bridge + Mode“ button, you can combine two cooking zones and
use them at the same power by covering the entire surface with a large pot or
partially with a round/oval pot. The function always remains on and, when
using only one pot, can be moved over the entire area. In this case, both
left-hand scroll keypads can be used indifferently. Ideal for cooking with
oval or rectangular pots or with pan supports. To activate/deactivate the
bridge + zone press the bridge+ button
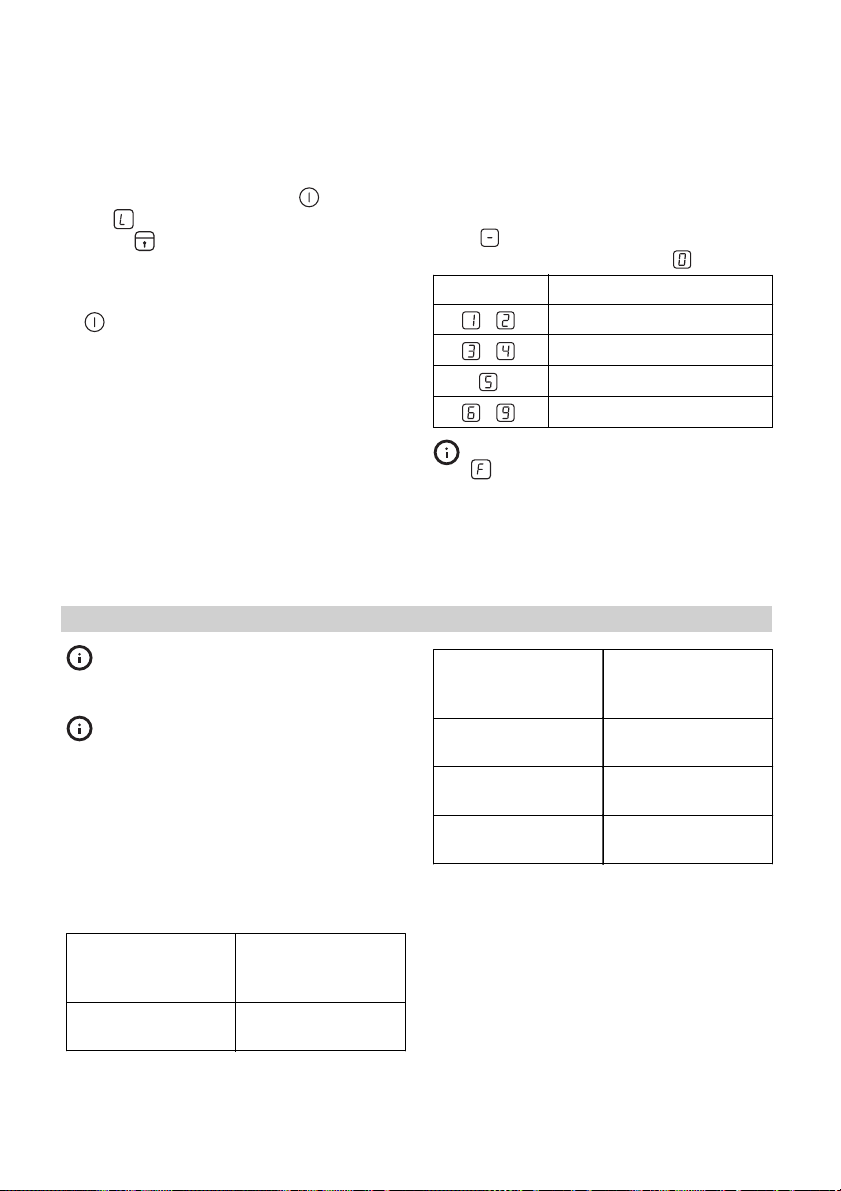
AUTOMATIC FUNCTIONS
Place the pot in position and select the cooking zone.
Press the automatic functions button. “R “ will appear on the display.
The indicator for the special feature available for the cooking zone will
light up.
Press the “ok“ button to confirm, otherwise, the special function indicator
will start blinking, waiting for the ok. The power level during the special
function is preset and cannot be modified. To deactivate the automatic
functions, press the “0“ button.
-
Melting
This function allows you to bring food to the ideal temperature for melting
and to maintain the condition of the food without the risk of burning. This
method is ideal, as it does not damage delicate foods such as chocolate, and
prevents them from sticking to the pot. -
• Keep Warm
This feature allows you to keep your food at an ideal temperature, usually
after cooking is complete, or when reducing liquids very slowly. Ideal for
serving foods at the perfect temperature. -
Simmering
This function is ideal for maintaining a simmering temperature, allowing you
to cook food for long periods with no risk of burning. Ideal for long-cooking
recipes (rice, sauces, roasts) with liquid sauces. -
Boiling
This function allows you to bring water to a boil and keep it boiling, with
lower energy consumption.
About 2 liters of water (preferably at room temperature) should be placed in
the pan and left uncovered. In all cases, users are advised to monitor the
boiling water closely and check the amount of water remaining regularly.
NOTE: in case of activation of the power management at 2.5kW, the boiling
function will not be available.
Cooking tables
POWER LEVEL| TYPE OF COOKING| LEVEL USE (indicating cooking
experience and habits)
—|—|—
Maximum power| Boost| Fast heating| Ideal for rapidly increasing
the temperature of food to a fast boil (for water) or for rapidly heating
cooking liquids.
**| 8-9| Frying – boiling| Ideal for browning, starting to cook, frying
deep-frozen products, and bringing liquids to the boil quickly
Browning – sautéing – boiling – grilling| Ideal for sautéing, maintaining a
lively boil, cooking, and grilling.
5-7| Browning – cooking – stewing – sautéing – grilling| Ideal for sautéing,
maintaining a gentle boil, cooking and grilling, and preheating accessories.
Cooking – stewing – sautéing – grilling – cooking until creamy| Ideal for
stewing, maintaining a gentle boil, cooking, and grilling (for longer
periods).
3-4| Cooking – simmering – thickening – creaming| Ideal for slower-cook
recipes (rice, sauces, roast, fish) with liquids (e.g. water, wine, broth,
milk), and for creaming pasta.
Ideal for slow-cook recipes (quantities under 1 liter: rice, sauces, roasts,
fish) with liquids (e.g. water, wine, broth, milk).
1-2| Melting – defrosting| Ideal for softening butter, gently melting
chocolate, and thawing small items.
Keeping food warm – creaming risotto| Ideal for keeping small portions of
just-cooked food or serving dishes warm and for creaming risotto.
Zero power**| 0| –| Hob in standby or off mode (possible end-of-cooking
residual heat, indicated by an “H“).
Cleaning and maintenance
WARNING!:
- Do not use steam cleaning equipment.
- Before cleaning, make sure the cooking zones are switched off and that the residual heat indicator (“H“) is not displayed.
Important:
- Do not use abrasive sponges or scouring pads as they may damage the glass.
- After each use, clean the hob (when it is cool) to remove any deposits and stains from food residue.
- A surface that is not kept suitably clean may reduce the sensitivity of control panel buttons.
- Use a scraper only if residues are stuck to the hob. Follow the scraper manufacturer’s instructions to avoid scratching the glass.
- Sugar or foods with a high sugar content can damage the hob and must be immediately removed.
- Salt, sugar, and sand could scratch the glass surface.
- Use a soft cloth, absorbent kitchen paper, or a special hob cleaner (follow the Manufacturer’s instructions).
- Spills of liquid in the cooking zones can cause the pots to move or vibrate.
- After cleaning the hob, dry thoroughly.
Troubleshooting
- Check that the electricity supply has not been shut off.
- If you are unable to turn the hob off after using it, disconnect it from the power supply.
- If alphanumeric codes appear on the display when the hob is switched on, consult the following table for instructions.
Please note: The presence of water, liquid spilled from pots, or any
objects resting on any of the hob buttons can accidentally activate or
deactivate the control panel lock function.
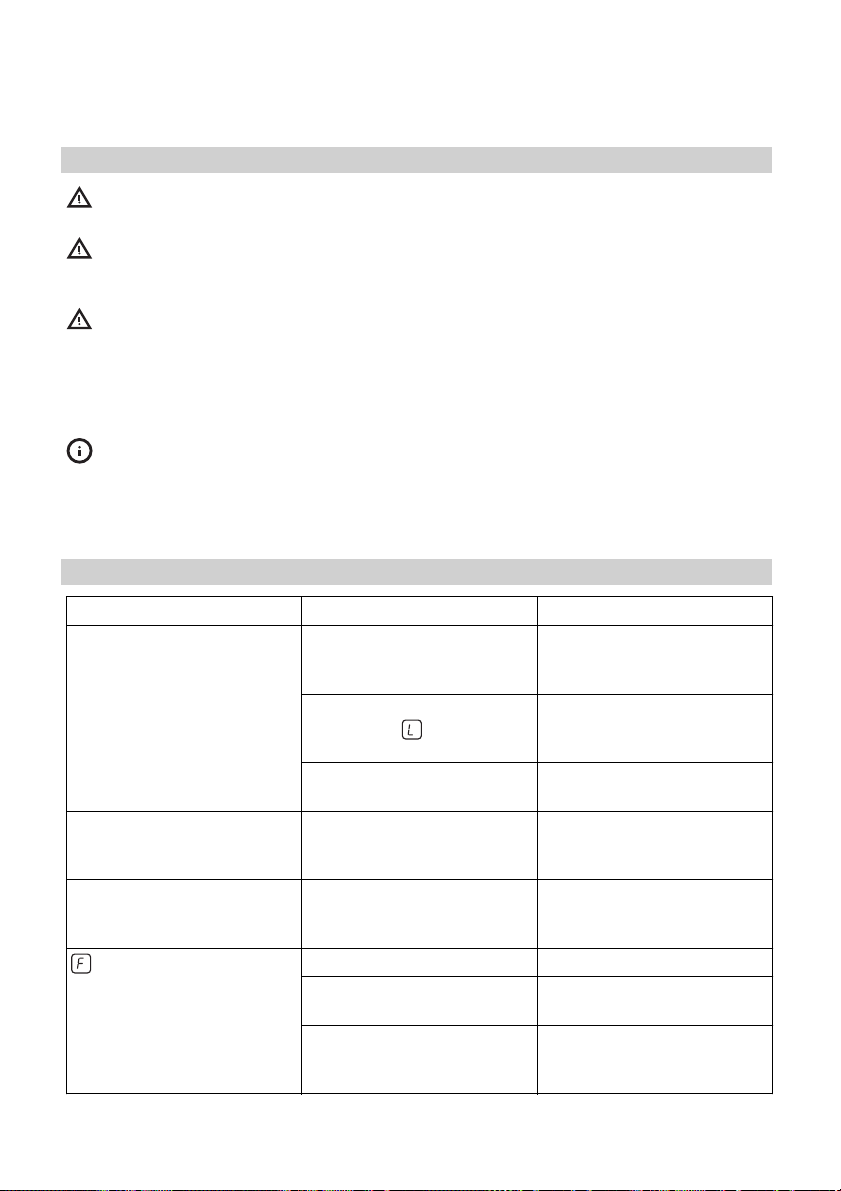
| Display code | Description | Possible causes | Solution |
|---|---|---|---|
| No Code | You cannot activate or operate the hob. | There is residual water or | |
| stains on the control panel. | Clean and dry the control panel. | ||
| No Code | The display does not react to the touch. | Part of the display is | |
| covered or the pots are placed too near to the display. | Remove the objects. |
Move the pots away from the display. If the problem persists wait 10 seconds.
F0E1| Cookware is detected but it is not compatible with the requested
operation.| The cookware is not well-positioned in the cooking zone, or it is
not compatible with one or more cooking zones.| Press the On/Off button twice
to remove the F0E1 code and restore the functionality of the cooking zone.
Then, try to use the cookware with a different cooking zone, or use different
cookware.
F0E7| Wrong power cord connection| The power supply connection is not exactly
as indicated in the “ELECTRICAL CONNECTION“ paragraph.| Adjust the power
supply connection according to the “ELECTRICAL CONNECTION“ paragraph.
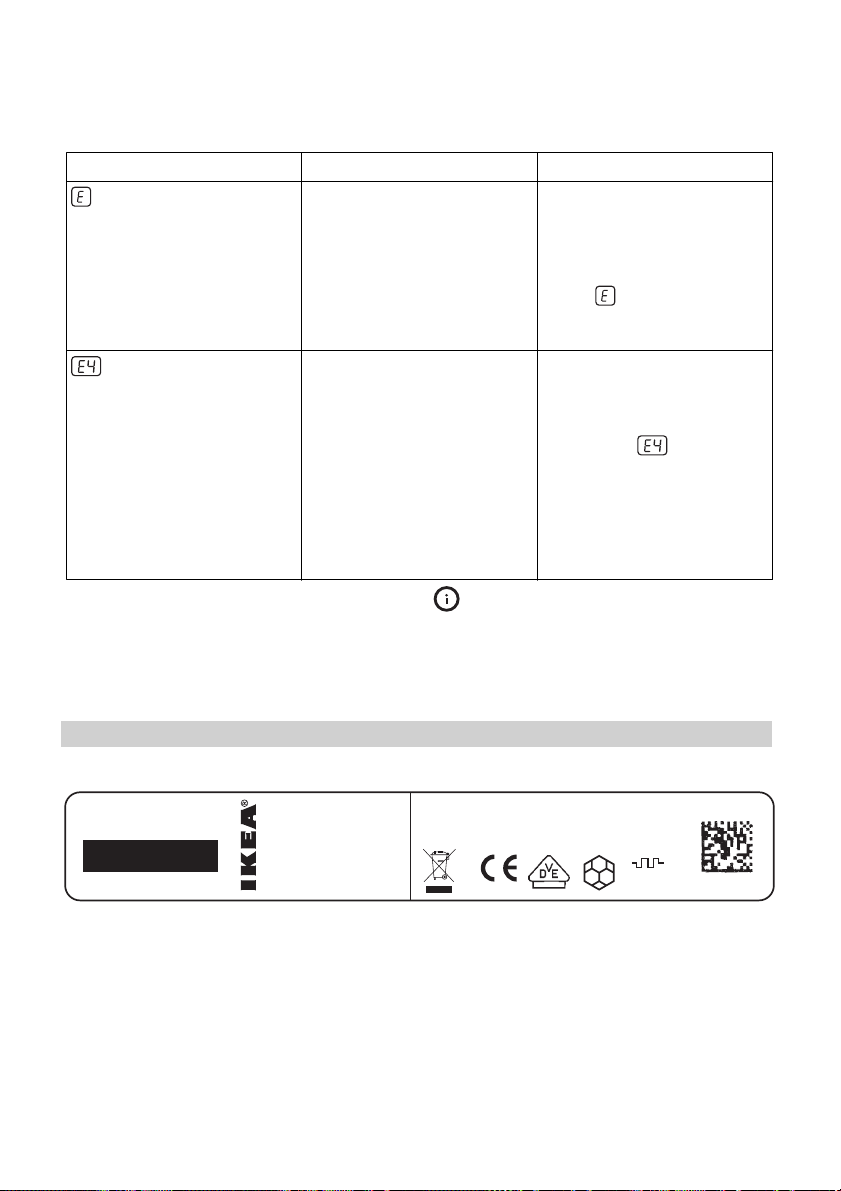
F0EA| The control panel switches off because of excessively high
temperatures.| The internal temperature of electronic parts is too high.| Wait
for the hob to cool down before using it again.
F0E2, F0E4, F0E6, F0E8, F0EC, F1E1, F6E1, F7E5, F7E6, F2E1| Disconnect the hob
from the power supply.
Wait a few seconds then reconnect the hob to the power supply.
If the problem persists, call the service center and specify the error code
that appears on the display.
e.g.| The hob does not allow a special function to be activated.| The power
regulator limits the power levels in accordance with the maximum value set for
the hob.| See paragraph “Power management”.
e.g. [Power level lower than level requested]| The hob automatically sets a
minimum power level to ensure that the cooking zone can be used.| The power
regulator limits the power levels in accordance with the maximum value set for
the hob.| See paragraph “Power management”.
Sounds produced during operation
Induction hobs may whistle or creak during normal operation.
These noises actually come from the cookware and are linked to the
characteristics of the pan bottoms (for example, when the bottoms are made
from different layers of material or are irregular).
These noises may vary according to the type of cookware used and the amount of
food, it contains and is not the symptom of something wrong.
Before calling the after-sales service:
- If there is a fault try to resolve the problem by following troubleshooting guidelines.
- Switch the appliance off and back on again to see if the fault persists.
If after the above checks the fault still occurs, get in touch with the
nearest after-sales service.
You can find a full list of IKEA-appointed contacts at the end of this user
manual.
When contacting our Client After-sales service, always specify:
• a brief description of the fault;
• the type and exact model of the appliance;
• the service number (number after the word Service on the rating plate). The
service number is also indicated on the guarantee booklet;
- your full address;
- your telephone number.
If any repairs are required, please contact an authorized aftersales service
(to guarantee that original spare parts will be used and repairs carried out
correctly).
Technical data
Model: SMAKLIG 804.678.86
Type of hob| Electric
Number of cooking zones| 4
Heating technology| Induction
Dimension of Heater (Ø or LxW)| Left front 18,5 x 20,0 cm
Left rear 18,5 x 20,0 cm
Right rear 21,0 cm
Right front 15,0 cm
Bridge+ Zone (Ø or LxW)| Left 37,5 x 20,0 cm
Energy consumption per cooking zone – (EC electric cooking)| Left front 196,2
Wh/kg
Left rear 188,3 Wh/kg
Right rear 180,2 Wh/kg
Right front 176,8 Wh/kg
Energy consumption per Bridge+ Zone – (EC electric cooking)| Left 191,7 Wh/kg
Energy consumption of the hob – (EC electric hob)| 186,7 Wh/kg
This appliance meets the Ecodesign requirements of European Regulation
n.66/2014, in conformity to the European Standard EN 60350-2 HB I84F 00
The technical information is situated on the rating plate on the bottom side
of the appliance.

The date of manufacture of the product is the serial number (serial number),
where the third and fourth digits correspond to the last two digits of the
manufacturing year, and the fifth and sixth digits as the annual number of the
week. For example, the serial number 002109012345 means that the product was
produced in the ninth week of 2021
Electrical connection
Electrical connection must be made before connecting the appliance to the
electricity supply.
Installation must be carried out by qualified personnel who know the current
safety and installation regulations. Specifically, installation must be
carried out in compliance with the regulations of the local electricity supply
company.

Make sure the voltage specified on the data plate located on the bottom of the
appliance is the same as that of the home. Regulations require that the
appliance be earthed: use conductors (including the earth conductor) of the
appropriate size only. The product is supplied with the mains cable H05V2V2-F
which conforms to Standard IEC/EN

CLEANING AND MAINTENANCE
WARNING! Ensure that the appliance is switched off and disconnected from
the power supply before performing any maintenance operation; never use steam
cleaning equipment – the risk of electric shock.
Do not use abrasive or corrosive products, chlorine-based cleaners, or pan
scourers.
DISPOSAL OF PACKAGING MATERIALS
The packaging material is 100% recyclable and is marked with the recycle
symbol . The various parts of the packaging must therefore be disposed of
responsibly and in full compliance with local authority regulations governing
waste disposal.
DISPOSAL OF HOUSEHOLD APPLIANCES
This appliance is manufactured with recyclable or reusable materials. Dispose
of it in accordance with local waste disposal regulations. For further
information on the treatment, recovery, and recycling of household electrical
appliances, contact your local authority, the collection service for household
waste, or the store where you purchased the appliance. This appliance is
marked in compliance with European Directive 2012/19/EU,
Waste Electrical and Electronic Equipment (WEEE). By ensuring this product is
disposed of correctly, you will help prevent negative consequences for the
environment and human health.
The symbol on the product or on the accompanying documentation indicates that
it should not be treated as domestic waste but must be taken to an appropriate
collection center for the recycling of electrical and electronic equipment.
ENERGY SAVING TIPSs
Make the most of your hot plate’s residual heat by switching it off a few
minutes before you finish cooking. The base of your pot or pan should cover
the hot plate completely; a container that is smaller than the hot plate will
cause energy to be wasted. Cover your pots and pans with tight-fitting lids
while cooking and use as little water as possible. Cooking with the lid off
will greatly increase energy consumption. Use only flat-bottomed pots and
pans.
DECLARATION OF CONFORMITY
This appliance meets the Eco Design requirements of European Regulations n.
66/2014 in conformity to the European standard EN 60350-2.
Transport and storage
Products must be transported in the original packaging in a horizontal
position. During transport and storage, protect the product from weathering
and mechanical damage. Products should be stored in a packed form in heated
rooms at a temperature from plus 5 °C to plus 40 °C.”
Manufacturer:
IKEA of Sweden AB
Box 702, 343 81 Älmhult, Sweden
Factory
Whirlpool EMEA S.p.A.
Melano Factory – Strada Provinciale Arceviese, km 64.100 – 60044 Fabriano
(Ancona) – Italy
The importer and the entity authorized by the manufacturer:
LLC “IKEA TORG”, bad. 1, micro rayon IKEA, Khimki, Moscow region, 141400
Russia,
tel.: +7(495) 737-5301, fax: +7(495) 737-5324
This device was designed, manufactured, and sold in accordance with the
standards of the Customs Union technical regulations, and with local normative
legal documents.
The entity authorized by the manufacturer to take actions in the Russian
Federation for assessment of the conformity of products: LLC
“Whirlpool RUS”, Russian Federation, 127018, Moscow, Dvintsev street 12,
building 1 letter V, floor 5; tel.: +7 (495) 961-29-00
Made in Italy
For IKEA product quality issues, contact the seller: LLC IKEA DOM, bld. 1,
micro rayon IKEA, Khimki, Moscow region, 141400 Russia;
tel.: +7 495-666-2929,
www.ikea.ru
Life cycle: 10 years
After the life cycle is finished, your product can become dangerous. So, after
the life cycle has been finished, or in case you decided to stop using the
product earlier, please address to appropriate officials to legally destroy
the appliance”
IKEA GUARANTEE
How long is the IKEA guarantee valid?
This guarantee is valid for five (5) years from the original date of purchase
of your appliance at IKEA. The original sales receipt is required as proof of
purchase. If service work is carried out under a guarantee, this will not
extend the guarantee period for the appliance.
Who will execute the service?
IKEA service provider will provide the service through its own service
operations or authorized service partner network.
What does this guarantee cover?
The guarantee covers faults of the appliance, which have been caused by faulty
construction or material faults from the date of purchase from IKEA. This
guarantee applies to domestic use only. The exceptions are specified under the
headline “What is not covered under this guarantee?” Within the guarantee
period, the costs to remedy the fault e.g. repairs, parts, labor, and travel
will be covered, provided that the appliance is accessible for repair without
special expenditure. On these conditions, the respective local regulations are
applicable. Replaced parts become the property of IKEA.
What will IKEA do to correct the problem?
IKEA appointed Service Provider will examine the product and decide, at its
sole discretion, if it is covered under this guarantee. If considered covered,
IKEA Service Provider or its authorized service partner through its own
service operations, will then, at its sole discretion, either repair the
defective product or replace it with the same or a comparable roduct.
What is not covered under this guarantee?
- Normal wear and tear.
- Deliberate or negligent damage, damage caused by failure to observe operating instructions, incorrect installation or by connection to the wrong voltage, damage caused by a chemical or electrochemical reaction, rust, corrosion, or water damage including but not limited to damage caused by excessive lime in the water supply, damage caused by abnormal environmental conditions.
- Consumable parts including batteries and lamps.
- Non-functional and decorative parts which do not affect the normal use of the appliance, including any scratches and possible color differences.
- Accidental damage caused by foreign objects or substances and cleaning or unblocking of filters, drainage systems, or soap drawers.
- Damage to the following parts: ceramic glass, accessories, crockery and cutlery baskets, feed and drainage pipes, seals, lamps and lamp covers, screens, knobs, casings, and parts of casings. Unless such damages can be proved to have been caused by production faults.
- Cases where no fault could be found during a technician’s visit.
- Repairs not carried out by our appointed service providers and/or an authorized service contractual partner or where non-original parts have been used.
- Repairs caused by installation which is faulty or not according to specification.
- The use of the appliance in a non-domestic environment i.e. professional use.
- Transportation damages. If a customer transports the product to his home or another address, IKEA is not liable for any damage that may occur during transport. however, if IKEA delivers the product to the customer’s delivery address, then damage to the product that occurs during this delivery will be covered by IKEA.
- Cost for carrying out the initial installation of the IKEA appliance.
However, if an IKEA appointed Service Provider or its authorized service
partner repairs or replaces the appliance under the terms of this guarantee,
the appointed Service Provider or its authorized service partner will
reinstall the repaired appliance or install the replacement, if necessary.
How country law applies
The IKEA guarantee gives you specific legal rights, which cover or exceed all
the local legal demands. However, these conditions do not limit in any way
consumer rights described in the local legislation.
The dedicated AFTER-SALES for IKEA appliances
Please don’t hesitate to contact IKEA appointed Authorized Service Centre to:
- make a service request under this guarantee;
- ask for clarifications on the installation of the IKEA appliance in the dedicated IKEA kitchen furniture;
- ask for clarification on the functions of IKEA appliances.
To ensure that we provide you with the best assistance, please read carefully
the Assembly Instructions and/or the User Manual before contacting us.
How to reach us if you need our service
Please refer to the last page of this manual for the full list of IKEA-
appointed After Sales Service Providers and relative national phone numbers.
In order to provide you with a quicker service, we recommend using the
specific phone numbers listed in this manual. Always refer to the numbers
listed in the booklet of the specific appliance, you need assistance for.
Please also always refer to the IKEA article number (8 digit code) and 12
digit service number placed on the rating plate of your appliance.
SAVE THE SALES RECEIPT!
It is your proof of purchase and required for the guarantee to apply. The
sales receipt also reports the IKEA name and article number (8 digit code) for
each of the appliances you have purchased.
Do you need extra help?
For any additional questions not related to After Sales of your appliances
please contact your nearest IKEA store call center. We recommend you read the
appliance documentation carefully before contacting us.
Coverage for equipment purchased in Russia
This warranty is applicable only to equipment purchased in Russia. The
warranty service obligations remain in force only if the item was installed in
accordance with the following requirements:
- the technical requirements accepted in the country where the customer applied for warranty service;
- the safety rules are given in the installation instructions and user manual.
UNITED KINGDOM – IRELAND
Phone number:
Rate:
Opening hours:| 02076601517
Local rate
Monday – Friday
Saturday
Sunday| 8.00am – 6.00pm
8.30am – 4.30pm
9.30am – 3.30pm
—|—|—
© Inter IKEA Systems B.V. 2021
References
- Møbler, boligtilbehør og inspiration til hjemmet — IKEA
- Hej! Welcome to IKEA Global
- ИКЕА — IKEA
Read User Manual Online (PDF format)
Read User Manual Online (PDF format) >>
Download This Manual (PDF format)
Download this manual >>

GB
DE
SMAKLIG
FR
IT


ENGLISH 4
DEUTSCH 16
FRANÇAIS 29
ITALIANO 46
ENGLISH 4
Contents
Safety information 4
Product description 6
Daily use 7
Helpful hints and tips 9
Care and cleaning 10
Subject to change without notice.
What to do if… 10
Technical information 11
Installation 12
Environment concerns 13
IKEA GUARANTEE 13
Safety information
For your safety and correct operation
of the appliance, read this manual
carefully before installation and use. Always
keep these instructions with the appliance
even if you move or sell it. Users must fully
know the operation and safety features of
the appliance.
Correct use
• Do not leave the appliance unattended
during operation.
• The appliance is designed exclusively for
domestic use.
• The appliance must not be used as a
work surface or as a storage surface.
• Do not place or store flammable liquids,
highly inflammable materials or fusible
objects (e.g. plastic film, plastic, aluminium) in or near the appliance.
• Watch out when connecting electric ap-
pliances to sockets nearby. Do not allow
connecting leads to come into contact
with or to catch underneath the appliance or hot cookware.
• Do not do repairs yourself to prevent in-
jury and damage to the appliance. Always contact your local After Sales Service (refer to the Service chapter).
Child safety
• Only adults can use this appliance. Chil-
dren must get supervision to make sure
that they do not play with the appliance.
• Keep all packaging away from children.
There is a risk of suffocation.
• Keep children away from the appliance
when it is on.
Warning! Activate the child safety
device to avoid small children and pets
unintentionally switching the appliance on.
General safety
• This appliance is not intended for use by
persons (including children) with reduced
physical, sensory or mental capabilities,
or lack of experience and knowledge, unless they have been given supervision or
instruction concerning use of the appliance by a person responsible for their
safety.
Installation
• Make sure that the appliance is not damaged because of transport. Do not connect a damaged appliance. If necessary,
contact the After Sales Service (refer to
the Service chapter).
• Only an authorized service engineer can
install, connect or repair this appliance.
Use only original spare parts.
• Built-in appliances can only be used after
they are built into suitable built-in units
and work surfaces that meet standards.
• Do not change the specifications or modify this product. Risk of injury and damage
to the appliance.
Warning! Carefully obey the
instructions for electrical and gas
connections.
• Do not install the appliance if it is damaged during the transportation.
Safety during use
• Remove all packaging, stickers and film
from the appliance before the first use.
ENGLISH 5
Warning! Fire hazard! Overheated
fats and oils can ignite very quickly.
• Switch the cooking zones off after each
use by its controls and do not rely on pan
detector.
• Risk of burns! Do not place objects made
of metal, such as knives, forks, spoons
and saucepan lids on the cooking surface, as they can get hot.
Warning! The ventilation gap of 5 mm
between the worktop and front of the
unit underneath it must not be covered. For
all safety distances between hob and
cabinets refer to the Assembly Instruction.
Warning! Users with implanted
pacemakers should keep their upper
body at least 30 cm from induction cooking
zones that are switched on.
Warning! Do not operate the
appliance with wet hands and keep
control panel surface dry. Lot of water on
control panel keys will make them no longer
operable.
Warning! If the surface is cracked,
switch off the appliance to avoid
possibility of an electric shock and call the
After Sales Service (refer to the Service
chapter).
How to avoid damage to the appliance
• The glass ceramic can be damaged by
objects falling onto it, or knocked by the
cookware.
• Cookware made of cast iron, cast aluminum or with damaged bottoms can
scratch the glass ceramic if slid on the
surface.
• To avoid damaging cookware and glass
ceramics, do not allow saucepans or frying pans to boil dry.
• Do not use the cooking zones with empty
cookware or without cookware.
• Never line any part of the appliance with
aluminium foil. Never place plastic or any
other material which may melt in or on
the appliance.
Information on acrylamides
Important! According to the latest scientific
knowledge, intensive browning of food,
especially in products containing starch, can
constitute a health risk due to acrylamides.
Therefore, we recommend cooking at the
lowest possible temperatures and not
browning foods too much.
ENGLISH 6
Product description
Cooking surface layout
1 2
Single cooking zone (210 mm) 2300 W,
1
with Booster 3200 W
Single cooking zone (180 mm) 1800 W,
2
with Booster 2500 W
Single cooking zone (145 mm) 1400 W,
3
3
45
Control panel layout
with Booster 1800 W
Control panel
4
Single cooking zone (210 mm) 2300 W,
5
with Booster 3200 W
1 2 3 4 5 6
to switch the hob on or off
1
to activate and deactivate the Lock
2
or the Child safety device
To activate Stop+Go function
3
Cooking zones’ indicators of Timer
4
Timer display:
5
to activate the Booster (Display
6
shows a
A heat setting display:
7
Control bar to select heat settings
8
00
)
to minutes
, from to
to increase , or to decrease the
9
Timer
to activate and deactivate the
10
Bridge function.
Touch Control sensor fields and displays
You operate the hob by touching sensor
fields. Displays and acoustic signals (short
beep) confirm the selection of a function.
Heat setting
display
Description
A malfunction occurred
78910
ENGLISH 7
Heat setting
display
Description
A cooking zone is still
hot
The Child Safety Device
is on
Cookware is unsuitable,
too small, or no cookware is on the cooking
zone
The Automatic Switch
off is on
Daily use
Switching on and off
Touch
ance on or off.
Adjusting the heat setting
Touch the control bar where there is a desired heat setting. Correct to the left or the
right, if necessary. Do not release before
you reach a desired heat setting.
for 2 seconds to switch the appli-
Heat setting
display
Residual heat indicator
Warning! Risk of burns from residual
heat! After you switch the appliance
off, the cooking zones need some time to
cool down. Look at the residual heat
indicator
Use residual heat for melting and keeping
food warm.
Using the Booster function
The Booster function makes additional power available to the induction cooking zones.
Touch
display. After maximum 10 minutes, the induction cooking zones automatically return
to cooking level
.
to switch it on, a lights up on a
Description
The Stop+Go is on
.
Bridge function
The Bridge function connects two cooking
zones and they operate as one.
First set the heat setting for one of the cooking zone.
To activate the Bridge function touch
set or change the heat setting touch one of
the control sensors.
To deactivate the Bridge function touch
The cooking zones operate independently.
. To
.
ENGLISH 8
Power management
The power management shares the maximum available power between two cooking
zones generating a pair (see picture). Booster function can cause, that the maximum
available power for a pair is exceeded.
Then the second cooking zone will be automatically reduced to a lower power level.
The display for the reduced zone alternates
between selected and maximum available.
Using the Timer
Touch
desired cooking zone displays. For exam-
ple,
Touch or of the Timer to set the time
between
lot light flashes more slowly, the time counts
down. Set the heat settings.
If the heat setting is set and the time set has
elapsed, acoustic signal appears,
es, and cooking zone switches off. If cooking
zone is not in use and the time set has
elapsed acoustic signal appears and
flashes.
repeatedly until the pilot light of a
for the front left zone.
and 99 minutes. When the pi-
00
flash-
00
Select
the function, and the pilot light of the cook-
ing zone selected flashes faster. Touch
and the remaining time counts backwards
to
STOP+GO
The Stop+Go function sets all cooking zones
that operate to the lowest heat setting (
).
When Stop+Go operates, you cannot
change the heat setting.
The Stop+Go function does not stop the timer function.
•
•
Lock
When the cooking zones operate, you can
lock the control panel, but not
vents an accidental change of the heat setting.
First set the heat setting.
To start this function touch
The Timer stays on.
To stop this function touch
ting that you set before comes on.
When you stop the appliance, you also stop
this function.
The child safety device
This function prevents an accidental operation of the appliance.
To activate the child safety device
•
•
•
To deactivate the child safety device
•
•
for a cooking zone to switch off
. The pilot light goes out.
00
To activate this function touch
symbol
To deactivate this function touch
heat setting that you set before comes on.
comes on for 4 seconds.
Activate the appliance with
set the heat settings.
Touch
comes on.
Deactivate the appliance with
Activate the appliance with
set the heat settings. Touch
onds. The symbol
Deactivate the appliance with
comes on.
for 4 seconds. The symbol
comes on.
. The
. The
. It pre-
. The symbol
. The heat set-
. Do not
.
. Do not
for 4 sec-
.
ENGLISH 9
To override the child safety device for
only one cooking time
•
Activate the appliance with
bol
•
• When you deactivate the appliance with
Automatic Switch off
The function switches the hob off
automatically if:
• all cooking zones are switched off.
• you do not set the heat setting after
• you cover any sensor field with objects (a
comes on.
Touch
ting in 10 seconds. You can operate the
appliance.
again.
switching on the hob.
pan, a cloth, etc.) for longer than approx.
10 seconds. The cooking zone is switched
off automatically and acoustic signal
sounds until you uncover the sensor fields.
for 4 seconds. Set the heat set-
, the child safety device operates
. The sym-
Helpful hints and tips
Cookware is suitable for induction
cooking zones if marked by the manu-
facturer.
When a cooking zone is switched on, it
may hum briefly. This is a characteristic
of all ceramic glass cooking zones and does
not impair either the function or the life of
the appliance.
Cookware sizes
Induction cooking zones adapt automatically to the size of the bottom of the cookware.
But, it must have a minimum diameter depending on the size of the cooking zone.
Cooking zone Minimum diameter
Right rear cooking
zone
of cookware base
[mm]
145
• you do not switch a cooking zone off after a certain time, or you do not modify
the heat setting, or if the overheating occurs (e.g. when a pan boils dry). The sym-
lights up. Before using again, you
bol
must set the cooking zone to
Heat setting Automatic switch off after
—
—
—
If cookware that is not suitable is used,
lights up in the display and after 2
minutes the indicator for the cooking zone
switches itself off.
Cooking zone Minimum diameter
Right front cooking
zone
Left rear cooking
zone
Left front cooking
zone
Energy saving
• If possible, always place lids on the pans.
• Place cookware on the cooking zone be-
fore you switch it on.
• The bottom of the cookware should be as
thick and flat as possible.
6 hours
5 hours
4 hours
1.5 hours
of cookware base
.
[mm]
125
125
125
ENGLISH 10
Care and cleaning
Warning! Switch the appliance off and
let it cool down before you clean it.
Warning! For safety reasons, do not
clean the appliance with steam
blasters or high-pressure cleaners.
Warning! Sharp objects and abrasive
cleaning agents will damage the
appliance. Clean the appliance and
remove the residues with water and
washing up liquid after each use. Remove
also the remnants of the cleaning agents!
Scratches or dark stains on the glass
ceramic that cannot be removed do
not affect the functioning of the appliance.
Removing the residues and stubborn
residues:
1. Food containing sugar, plastics, tin foil
residues should be removed at once,
best tool for cleaning glass surface is a
scraper (not included with the appliance). Place a scraper on the glass ceramic surface at an angle and remove
residues by sliding the blade over the
surface. Wipe the appliance with a
damp cloth and a little washing up liquid. Finally, rub the appliance dry using
a clean cloth.
2. Limescale rings, water rings, fat
splashes, shiny metallic discolorations
should be removed after the appliance
has cooled down using cleaner for
glass ceramic or stainless steel.
What to do if…
Problem Possible cause Remedy
The appliance cannot be
switched on or is not operating.
Acoustic signal sounds, appliance switches off.
Display is switching between
two heat settings.
lights up on the heat set-
ting display.
More than 10 seconds have
passed since the appliance
was switched on.
The child safety device is
switched on
Several sensor fields were
touched at the same time.
One or more sensor fields
have been covered for longer than 10 seconds.
Power management is reducing the power of this
cooking zone.
Unsuitable cookware. Use suitable cookware.
No cookware on the cook-
ing zone.
The diameter of the bottom
of the cookware is too small
for the cooking zone.
.
Switch the appliance on
again.
Deactivate child safety device (See the section “Child
safety device” ).
Only touch one sensor field.
Uncover sensor field.
See the section «Switching
the power function on and
off».
Place cookware on the
cooking zone.
Move onto a smaller cooking zone.
ENGLISH 11
Problem Possible cause Remedy
symbol plus a number
appears on the heat setting
display.
lights up on the heat
setting display.
If there is a fault, first try to find a solution to
the problem yourself. If you cannot find a
solution to the problem yourself, contact
your dealer or the After Sales Service.
Electronics fault. Disconnect the appliance
from the electrical supply for
a few minutes (Take the fuse
out of the house’s electric
system) If after switching on
again,
is displayed
again, call the after sales
service.
Overheating protection for
the cooking zone operates.
Switch off the appliance. Remove the hot cookware. After approximately 30 seconds switch on the cooking
zone again.
should disappear, residual heat indicator can stay. Cool down
the cookware and check it
with the section Cookware
for the induction cooking
zone.
If you operated the appliance wrongly,
or the installation was not carried out
by a registered engineer, the visit from the
customer service technician or dealer may
not take place free of charge, even during
the warranty period.
Technical information
Rating Plate
Made in Germany
© Inter IKEA Systems B.V. 1999
202.228.30
PQM
The graphic above represents the rating
plate of the appliance (without serial number which is generated dynamically during
the production process), which is located at
its underneath surface of the casing.
21552
Model SMAKLIG Typ 58 GAD DC AU 7,4kW
PNC 949 594 315 00 S NO …………… 220V-240V AC 50-60 Hz
7,4kW Induction
230 V
DGT
Dear Customer, please apply here aside
the sticker you can find in the dedicate
plastic bag inserted inside the hob packaging. This will allow us to assist you better, by
identifying precisely your hob, in case you
will need in future our assistance. Thank you
for your help!
ENGLISH 12
Installation
Manufacturer is not responsible for any injury to persons and pets or damage to
property caused by failure to comply following requirements.
Caution! To proceed with the
installation refer to the assembly
instructions.
Warning! Installation process must
follow the laws, ordinances, directives
and standards (electrical safety rules and
regulations, proper recycling in accordance
with the regulations, etc.) in force in the
country of use!
Warning! The appliance must be
earthed!
Warning! Risk of injury from electrical
current.
• The electrical mains terminal is live.
• Make electrical mains terminal free of
voltage.
• Loose and inappropriate plug and socket
connections can make the terminal overheat.
• Have the clamping connections correctly
installed.
• Use strain relief clamp on cable.
• Follow the connection diagram (it is loca-
ted on the underneath surface of the
casting of the hob).
Important! You must observe the minimum
distances to other appliances and furniture
cabinets or other units according to
Assembly Instruction.
If there is no oven beneath the hob insert a
dividing panel at a minimum distance of 20
mm from the bottom of the hob.
Do not use silicon sealant between the appliance and the worktop. Avoid installing
the appliance next to doors and under windows as hot cookware may be knocked off
the rings when doors and windows are
opened.
Only an authorized service engineer can install, connect or repair this appliance. Use
only original spare parts.
Electrical connection
Before connecting, check that the nominal
voltage of the appliance stated on the rating plate, corresponds to the available supply voltage. Also, check the power rating of
the appliance and ensure that the wire is
suitably sized to suit the appliance power
rating (refer to the Technical data chapter).
The rating plate is located on the lower casing of the hob.
The appliance is not provided with mains
cable. Buy the right one from specialized
dealer. Single-phase or two-phase connection requires the mains cable of type H05
BB-F/H05V2V2-F Tmax 90°C (equal or
higher).
The appliance works perfectly on AC 230 V,
AC220V~ or AC240V~ 50Hz electrical network.
You must have the means for disconnection
incorporated in the fixed wiring. Have the
appliance connected to the mains using a
device that allows the appliance to be disconnected from the mains at all poles with a
contact opening width of at least 3 mm, eg.
automatic line protecting cut-out, earth
leakage trips or fuse.
You must have the connection and the connecting links carried out as shown in the
connection diagram (it is located on the underneath surface of the casting of the hob).
ENGLISH 13
The earth lead is connected to terminal
marked with the symbol
longer than leads carrying electric current.
Tighten the terminal screws securely! Finally,
secure the connecting cable with the mains
cable cleat and the covering closed by
pressing firmly (lock into place).
and must be
Environment concerns
The symbol on the product or on its
packaging indicates that this product may
not be treated as household waste. Instead
it should be taken to the appropriate
collection point for the recycling of electrical
and electronic equipment. By ensuring this
product is disposed of correctly, you will
help prevent potential negative
consequences for the environment and
human health, which could otherwise be
caused by inappropriate waste handling of
this product. For more detailed information
about recycling of this product, please
contact your local council, your household
IKEA GUARANTEE
How long is the IKEA guarantee valid?
This guarantee is valid for five (5) years
from the original date of purchase of Your
appliance at IKEA, unless the appliance is
named LAGAN in which case two (2) years
of guarantee apply. The original sales receipt is required as proof of purchase. If
service work is carried out under guarantee,
this will not extend the guarantee period for
the appliance,
Which appliances are not covered by the
IKEA five (5) years guarantee?
The range of appliances named LAGAN
and all appliances purchased in IKEA before 1st of August 2007
Who will execute the service?
IKEA service provider will provide the service through its own service operations or
authorized service partner network.
Warning! Once connected to the
mains supply check that all cooking
zones are ready for use by briefly setting
each to maximum power.
waste disposal service or the shop where
you purchased the product.
Packaging materials
The materials with the symbol
clable. Dispose the packaging in a suitable
collection containers to recycle it.
Before disposal of appliance
Warning! Do these steps to dispose
the appliance:
• Pull the mains plug out of the mains sock-
et.
• Cut off the mains cable and discard it.
What does this guarantee cover?
The guarantee covers faults of the appliance, which have been caused by faulty
construction or material faults from the date
of purchase from IKEA. This guarantee applies to domestic use only. The exceptions
are specified under the headline “What is
not covered under this guarantee?” Within
the guarantee period, the costs to remedy
the fault e.g. repairs, parts, labour and travel will be covered, provided that the appliance is accessible for repair without special
expenditure. On these conditions the EU
guidelines (Nr. 99/44/EG) and the respective local regulations are applicable. Replaced parts become the property of IKEA.
are recy-

ENGLISH 14
What will IKEA do to correct the problem?
IKEA appointed service provider will examine the product and decide, at its sole discretion, if it is covered under this guarantee.
If considered covered, IKEA service provider
or its authorized service partner through its
own service operations, will then, at its sole
discretion, either repair the defective product or replace it with the same or a comparable product.
What is not covered under this
guarantee?
• Normal wear and tear.
• Deliberate or negligent damage, damage caused by failure to observe operating instructions, incorrect installation or by
connection to the wrong voltage, damage caused by chemical or electro-chemical reaction, rust, corrosion or water
damage including but not limited to damage caused by excessive lime in the water supply, damage caused by abnormal
environmental conditions.
• Consumable parts including batteries
and lamps.
• Non-functional and decorative parts
which do not affect normal use of the appliance, including any scratches and possible color differences.
• Accidental damage caused by foreign
objects or substances and cleaning or unblocking of filters, drainage systems or
soap drawers.
• Damage to the following parts: ceramic
glass, accessories, crockery and cutlery
baskets, feed and drainage pipes, seals,
lamps and lamp covers, screens, knobs,
casings and parts of casings. Unless such
damages can be proved to have been
caused by production faults.
• Cases where no fault could be found during a technician’s visit.
• Repairs not carried out by our appointed
service providers and/or an authorized
service contractual partner or where nonoriginal parts have been used.
• Repairs caused by installation which is
faulty or not according to specification.
• The use of the appliance in a non-domestic environment i.e. professional use.
• Transportation damages. If a customer
transports the product to their home or
other address, IKEA is not liable for any
damage that may occur during transport.
However, if IKEA delivers the product to
the customer’s delivery address, then
damage to the product that occurs during
this delivery will be covered by this guarantee.
• Cost for carrying out the initial installation
of the IKEA appliance. However, if an
IKEA service provider or its authorized
service partner repairs or replaces the
appliance under the terms of this guarantee, the service provider or its authorized
service partner will re-install the repaired
appliance or install the replacement, if
necessary.
This restriction do not apply to fault-free
work carried out by a qualified specialist
using our original parts in order to adapt
the appliance to the technical safety specifications of another EU country.
How country law applies
The IKEA guarantee gives You specific legal
rights, which covers or exceed local demands. However these conditions do not
limit in any way consumer rights described
in the local legislation
Area of validity
For appliances which are purchased in one
EU country and taken to another EU country, the services will be provided in the
framework of the guarantee conditions normal in the new country. An obligation to
carry out services in the framework of the
guarantee exists only if the appliance complies and is installed in accordance with:
• the technical specifications of the country
in which the guarantee claim is made;
• the Assembly Instructions and User Manual Safety Information;
The dedicated After Sales Service for
IKEA appliances:
Please do not hesitate to contact IKEA After
Sales Service to:
ENGLISH 15
1. make a service request under this guarantee;
2. ask for clarification on installation of the
IKEA appliance in the dedicated IKEA
kitchen furniture. The service won’t provide clarifications related to:
– the overall IKEA kitchen installation;
– connections to electricity (if machine
comes without plug and cable), to
water and to gas since they have to
be executed by an authorized service engineer.
3. ask for clarification on user manual contents and specifications of the IKEA appliance.
To ensure that we provide you with the best
assistance, please read carefully the Assembly Instructions and/or the User Manual
section of this booklet before contacting us.
How to reach us if You need our service
Please refer to the last page of this manual
for the full list of IKEA appointed contacts
and relative national phone numbers.
Important! In order to provide You with a
quicker service, we recommend that You
use the specific phone numbers listed at the
end of this manual. Always refer to the
numbers listed in the booklet of the specific
appliance You need an assistance for.
Before calling us, assure that You have to
hand the IKEA article number (8 digit code)
for the appliance of which you need our
assistance.
Important! SAVE THE SALES RECEIPT! It is
Your proof of purchase and required for the
guarantee to apply. Note that the receipt
reports also the IKEA article name and
number (8 digit code) for each of the
appliances you have purchased.
Do You need extra help?
For any additional questions not related to
After Sales of your appliances, please contact our nearest IKEA store call centre. We
recommend you read the appliance documentation carefully before contacting us.
DEUTSCH 16
Inhalt
Sicherheitshinweise 16
Gerätebeschreibung 18
Täglicher Gebrauch 19
Praktische Tipps und Hinweise 21
Reinigung und Pflege 22
Änderungen vorbehalten.
Was tun, wenn … 22
Technische Daten 24
Montage 24
Umwelttipps 25
IKEA GARANTIE 26
Sicherheitshinweise
Zur Gewährleistung der Sicherheit und
der richtigen Bedienung des Geräts lesen Sie diese Anleitung vor der Installation
und Verwendung sorgfältig durch. Bewahren Sie diese Bedienungsanleitung in der
Nähe des Geräts auf, auch wenn Sie dieses
anderswo aufstellen oder verkaufen. Alle
Benutzer müssen mit der Bedienung und
den Sicherheitseigenschaften des Geräts
vertraut sein.
Bestimmungsgemäße Verwendung
• Lassen Sie das Gerät bei Betrieb nicht
unbeaufsichtigt.
• Das Gerät ist ausschließlich zur Verwen-
dung im Haushalt bestimmt.
• Das Gerät darf nicht als Arbeits- oder
Abstellfläche verwendet werden.
• Brennbare Flüssigkeiten, leicht entzündli-
che Materialien oder schmelzbare Materialien (z.B. Folien, Kunststoff, Aluminium)
dürfen nicht auf dem Gerät oder in dessen Nähe abgestellt oder gelagert werden.
• Vorsicht bei Anschluss von Elektrogeräten
an Steckdosen in Gerätenähe. Die Anschlussleitungen dürfen nicht unter dem
Gerät oder heißem Kochgeschirr eingeklemmt werden oder damit in Berührung
kommen.
• Versuchen Sie nicht, selbst Reparaturen
auszuführen. Andernfalls besteht Unfallgefahr und das Gerät könnte beschädigt
werden. Wenden Sie sich stets an Ihren
lokalen Kundendienst (siehe hierzu den
Abschnitt «Wartung»).
Sicherheit von Kindern
• Nur Erwachsene dürfen dieses Gerät bedienen. Kinder müssen beaufsichtigt werden, so dass sie nicht mit dem Gerät spielen können.
• Halten Sie das Verpackungsmaterial von
Kindern fern. Andernfalls besteht Erstickungsgefahr.
• Halten Sie Kinder von dem Gerät fern,
wenn es in Betrieb ist.
Warnung! Aktivieren Sie die
Kindersicherung, um ein
versehentliches Einschalten durch
Kleinkinder und Haustiere zu verhindern.
Allgemeine Sicherheit
• Personen (einschließlich Kinder), die auf-
grund ihrer physischen, sensorischen oder
geistigen Fähigkeiten oder ihrer Unerfahrenheit oder Unkenntnis nicht in der Lage
sind, das Gerät sicher zu bedienen, sollten dieses Gerät nicht ohne Aufsicht oder
Anweisung durch eine verantwortliche
Person benutzen.
Aufstellung
• Vergewissern Sie sich, dass das Gerät
beim Transport nicht beschädigt wurde.
Schließen Sie ein beschädigtes Gerät
nicht an. Wenden Sie sich bei Bedarf an
den Kundendienst (siehe hierzu den Abschnitt «Wartung»).
•Dieses Gerät darf nur von einem autori-
sierten Servicetechniker installiert, angeschlossen oder repariert werden. Verwenden Sie nur Originalersatzteile.
DEUTSCH 17
• Einbaugeräte dürfen nur nach dem Einbau in normgerechte, passende Einbauschränke und Arbeitsplatten betrieben
werden.
• Nehmen Sie weder technische noch anderweitige Modifikationen am Gerät vor.
Andernfalls besteht Unfallgefahr und das
Gerät könnte beschädigt werden.
Warnung! Beachten Sie genau die
Anweisungen zu den elektrischen und
Gasanschlüssen.
• Das Gerät niemals installieren, wenn es
während des Transports beschädigt wurde.
Sicherheit während der Benutzung
• Entfernen Sie vor der ersten Benutzung
des Geräts sämtliches Verpackungsmaterial sowie alle Aufkleber und Folien.
Warnung! Brandgefahr! Überhitzte
Fette und Öle entzünden sich sehr
schnell.
• Schalten Sie nach jedem Gebrauch die
Kochzonen mit den Bedienelementen aus
und verlassen Sie sich nicht auf die Topferkennung.
• Verbrennungsgefahr! Legen Sie keine
Metallgegenstände wie Messer, Gabeln,
Löffel oder Deckel auf die Oberfläche
des Kochfelds, da diese heiß werden
können.
Warnung! Vergewissern Sie sich, dass
zwischen der Arbeitsfäche und der
Gerätevorderseite der Lüftungsspalt von 5
mm nicht verdeckt ist. Siehe die
Montageanleitung zu den
Sicherheitsabständen zwischen Kochfeld
und Schränken.
Warnung! Träger von implantierten
Herzschrittmachern müssen sich jedoch
mindestens 30 cm von eingeschalteten
Kochfeldern fernhalten.
Warnung! Benutzen Sie das Gerät
nicht mit nassen Händen und achten
Sie darauf, dass die Oberfläche des
Bedienfelds stets trocken ist. Die
Bedienelemente am Bedienfeld verlieren
ihre Funktionstüchtigkeit, wenn sie mit viel
Wasser in Berührung kommen.
Warnung! Schalten Sie das Gerät
sofort ab, wenn Sie Risse auf der
Glaskeramikfläche feststellen, um die
Gefahr eines Stromschlags zu vermeiden,
und wenden Sie sich an den Kundendienst
(siehe hierzu den Abschnitt «Wartung»).
Vermeidung von Schäden am Gerät
• Die Glaskeramik kann durch herabfallen-
de Gegenstände oder durch das Kochgeschirr beschädigt werden.
• Kochgeschirr aus Gusseisen, Aluguss oder
mit beschädigten Böden können beim
Verschieben die Glaskeramik verkratzen.
• Das Leerkochen von Töpfen und Pfannen
vermeiden. Es kann Beschädigungen am
Kochgeschirr oder der Glaskeramik verursachen.
• Benutzen Sie die Kochzonen nicht mit lee-
rem oder ohne Kochgeschirr.
• Legen Sie nie einen Teil des Gerätes mit
Alu-Folie aus. Legen Sie keine Gegenstände aus Kunststoff oder aus anderem
Material, das schmelzen kann, in oder
auf auf das Gerät.
Hinweis zu Acrylamid
Wichtig! Nach neuesten wissenschaftlichen
Erkenntnissen kann eine intensive Bräunung
von Lebensmitteln, speziell bei
stärkehaltigen Produkten, eine
gesundheitliche Gefährdung durch
Acrylamid verursachen. Daher empfehlen
wir, möglichst bei niedrigen Temperaturen
zu garen und die Speisen nicht zu stark zu
bräunen.

DEUTSCH 18
Gerätebeschreibung
Kochfeldanordnung
1 2
Einkreis-Kochzone (210 mm) 2300 W,
1
mit Power-Funktion 3200 W
Einkreis-Kochzone (180 mm) 1800 W,
2
mit Power-Funktion 2500 W
Einkreis-Kochzone (145 mm) 1400 W,
3
3
45
Bedienfeldanordnung
mit Power-Funktion 1800 W
Bedienfeld
4
Einkreis-Kochzone (210 mm) 2300 W,
5
mit Power-Funktion 3200 W
1 2 3 4 5 6
Zum Ein- und Ausschalten des Koch-
1
felds
Zum Ein- und Ausschalten der Tas-
2
tenverriegelung oder Kindersicherung
Zum Einschalten der Funktion Stop
3
+Go
Kochzonen-Anzeigen des Timers
4
Timer-Anzeige:
5
Zum Einschalten der Power-Funktion
6
(auf dem Display erscheint
Kochstufenanzeige:
7
bis Minuten
00
, von bis
)
Bedienleiste zur Auswahl der Kochstu-
8
fen
zum Höherstellen oder zum Nied-
9
rigerstellen des Timers
Zum Ein- und Ausschalten der Brü-
10
ckenfunktion.
Touch Control-Sensorfelder und Anzeigen
Das Kochfeld wird durch Berühren der Sensorfelder bedient. Die Anzeigen und akustischen Signale (kurzer Signalton) bestätigen
die Auswahl einer Funktion.
78910
Loading…
Просмотр
Доступно к просмотру 68 страниц. Рекомендуем вам скачать файл инструкции, поскольку онлайн просмотр документа может сильно отличаться от оригинала.
-
SMAKLIG                                                            PL
TR
RU
SK
LT
-
POLSKI                   4
TURKCE                  17
РУССКИЙ                 29
SLOVENSKY               44
LIETUVIU                56
-
POLSKI                                                               4
Spis tresci
Informacje dotyczace bezpieczenstwa  4  Co zrobic, gdy…              10
Opis urzadzenia                  6  Dane techniczne                  12
Codzienna eksploatacja           7  Instalacja                      12
Przydatne rady i wskazowki       9  Ochrona srodowiska              13
Konserwacja i czyszczenie       10  GWARANCJA IKEA                   14
Producent zastrzega sobie mozliwosc wprowadzenia zmian bez wczesniejszego
powiadomienia.
Informacje dotyczace bezpieczenstwa
Aby zapewnic bezpieczenstwo uzytko-  Bezpieczenstwo dzieci
wania i prawidlowe dzialanie urza-  •Urzadzenie moze byc obslugiwane wy-
dzenia, przed przystapieniem do instalacji  lacznie przez osoby dorosle. Dzieciom
i obslugi nalezy dokladnie przeczytac ni-  nalezy zapewnic odpowiednia opieke,
niejsza instrukcje. Instrukcja powinna byc  aby miec pewnosc, ze nie bawia sie
przechowywana razem z urzadzeniem, na-  urzadzeniem.
wet w przypadku jego sprzedazy lub prze-  • Wszystkie materialy opakowaniowe na-
prowadzki. Uzytkownicy powinni w pelni  lezy przechowywac poza zasiegiem
zapoznac sie z obsluga oraz funkcjami bez-  dzieci. Istnieje ryzyko uduszenia.
pieczenstwa tego urzadzenia.        •Gdy urzadzenie dziala, dzieci nie moga
Prawidlowe uzytkowanie                sie do niego zblizac.
•Wlaczonego urzadzenia nie wolno po-    Ostrzezenie! Aby uniknac
zostawiac bez nadzoru.                 przypadkowego wlaczenia urzadzenia
•Urzadzenie jest przeznaczone wylacznie  przez dziecko lub zwierze domowe, nalezy
do uzytku w gospodarstwie domowym.  wlaczyc blokade uruchomienia.
•Urzadzenia nie wolno uzywac jako po-  Ogolne zasady bezpieczenstwa
wierzchni roboczej ani skladowac na nim
przedmiotow.                       • Niniejsze urzadzenie nie jest przeznaczo-
•W urzadzeniu, na nim lub w jego poblizu  ne do uzytku przez osoby (w tym dzieci)
nie wolno umieszczac ani przechowywac  o ograniczonych zdolnosciach fizycznych,
zadnych palnych cieczy ani latwopalnych  sensorycznych czy umyslowych, a takze
badz topliwych materialow (jak np. folia  nieposiadajace wiedzy lub doswiadcze-
plastikowa, przedmioty z aluminium lub  nia w uzytkowaniu tego typu urzadzen,
tworzywa sztucznego).                chyba, ze beda one nadzorowane lub
•Nalezy zachowac ostroznosc przy podla-  zostana poinstruowane na temat korzys-
czaniu urzadzen elektrycznych do gniaz-  tania z tego urzadzenia przez osobe od-
dek umieszczonych w poblizu urzadze-  powiedzialna za ich bezpieczenstwo.
nia. Nie wolno dopuscic do tego, aby  Instalacja
przewody zasilajace mialy kontakt lub  •Nalezy upewnic sie, ze urzadzenie nie
ocieraly sie o urzadzenie lub gorace na-  zostalo uszkodzone w czasie transportu.
czynia.
•Aby uniknac odniesienia obrazen, nie  Nie nalezy podlaczac uszkodzonego
urzadzenia do zrodla zasilania. Jesli to
wolno samodzielnie naprawiac urzadze-  konieczne, nalezy skontaktowac sie z ser-
nia. W razie potrzeby nalezy kontakto-  wisem (patrz rozdzial poswiecony serwi-
wac sie z miejscowym autoryzowanym   sowi).
serwisem (patrz rozdzial "Serwis").
- 1
- 2
- 3
- 4
- 68

Inhoud
Veiligheidsinformatie 44
Beschrijving van het product 46
Dagelijks gebruik 47
Nuttige aanwijzingen en tips 49
Onderhoud en reiniging 50
Problemen oplossen 50
Technische informatie 51
Montage 52
Milieubescherming 53
IKEA GARANTIE 53
Wijzigingen voorbehouden.
Veiligheidsinformatie
Lees voor uw eigen veiligheid en cor-
recte werking van het apparaat eerst
deze handleiding aandachtig door, alvo-
rens het apparaat te installeren en te ge-
bruiken. Bewaar deze instructies altijd bij
het apparaat, zelfs wanneer u het ver-
plaatst of verkoopt. Gebruikers moeten vol-
ledig op de hoogte zijn van de bediening
en veiligheidsfuncties van het apparaat.
Gebruik conform de voorschriften
• Laat het apparaat tijdens het gebruik
niet onbeheerd achter.
• Het apparaat is uitsluitend ontworpen
voor huishoudelijk gebruik.
• Het apparaat mag niet worden gebruikt
als werkoppervlak of een vlak om iets op
te bergen.
• Plaats geen brandbare vloeistoffen, licht
ontvlambare materialen of voorwerpen
die kunnen smelten (bijv. plastic folie,
plastic, aluminium) in of in de buurt van
het apparaat.
• Wees voorzichtig bij het aansluiten van
elektrische apparaten op stopcontacten
in de buurt van het apparaat. Laat de
contacten niet in aanraking komen met of
onder de hete ovendeur komen.
• Voer niet eigenhandig reparaties uit om
letsel en schade aan het apparaat te
voorkomen. Neem altijd contact op met
uw plaatselijke Klantenservice (zie hoofd-
stuk Service).
Veiligheid van kinderen
• Dit apparaat mag alleen worden ge-
bruikt door volwassenen. Kinderen moe-
ten onder toezicht staan om ervoor te
zorgen dat ze niet met het apparaat spe-
len.
• Houd alle verpakkingsmaterialen uit de
buurt van kinderen. Er bestaat een ge-
vaar voor verstikking.
• Houd kinderen uit de buurt van het ap-
paraat als het aan staat.
Waarschuwing! Activeer de
kinderbeveiliging om te voorkomen dat
kleine kinderen en huisdieren per ongeluk
het apparaat inschakelen.
Algemene veiligheid
• Dit apparaat is niet bedoeld voor ge-
bruik door personen (met inbegrip van
kinderen) met beperkte lichamelijke, zin-
tuiglijke of verstandelijke vermogens of
een gebrek aan ervaring en kennis, tenzij
dit onder toezicht gebeurt van een voor
hun veiligheid verantwoordelijke persoon
of tenzij zij van een dergelijke persoon
instructie hebben ontvangen over het ge-
bruik van het apparaat.
Installatie
•Verzeker u ervan dat het apparaat tij-
dens het transport niet beschadigd is ge-
raakt. Sluit een beschadigd apparaat
niet aan. Neem indien nodig contact op
met de Klantenservice (zie hoofdstuk Ser-
vice).
NEDERLANDS 44
• Dit apparaat mag alleen geïnstalleerd,
aangesloten en gerepareerd worden
door een erkende servicemonteur. Ge-
bruik alleen originele onderdelen.
• Inbouwapparaten mogen alleen worden
gebruikt nadat zij ingebouwd zijn in ge-
schikte inbouwunits of werkbladen die
aan de normen voldoen.
• Verander de specificaties van dit product
niet en wijzig het niet. Gevaar voor letsel
en schade aan het apparaat.
Waarschuwing! Volg nauwkeurig de
instructies op voor elektrische en
gasaansluitingen.
• Installeer het apparaat niet als het tijdens
het transport beschadigd is geraakt.
Veiligheid tijdens het gebruik
• Verwijder al het verpakkingsmateriaal,
stickers en folie van het apparaat, voor-
dat u het in gebruik neemt.
Waarschuwing! Brandgevaar!
Oververhitte vetten en oliën kunnen
snel in brand vliegen.
• Schakel de kookzones na elk gebruik met
de bedieningsknoppen uit. Vertrouw niet
op de pandetector.
• Gevaar voor brandwonden! Plaats geen
voorwerpen die gemaakt zijn van me-
taal, zoals messen, vorken, lepels en dek-
sels op de kookplaat, daar zij zeer heet
kunnen worden.
Waarschuwing! De ventilatiespleet
van 5 mm tussen het werkblad en de
voorkant van de eenheid eronder mag niet
worden afgedekt. Zie de Montage-
instructies voor alle veilige afstanden tussen
het kooktoestel en de keukenkastjes.
Waarschuwing! Gebruikers met
geïmplanteerde pacemakers moeten
hun bovenlichaam op een afstand van ten
minste 30 cm van ingeschakelde
inductiekookzones houden.
Waarschuwing! Bedien het apparaat
niet met natte handen. Houd het
oppervlak van het bedieningspaneel droog.
Veel water op de toetsen van het
bedieningspaneel maakt deze defect.
Waarschuwing! Als het oppervlak is
gebarsten, schakelt u het apparaat uit
om het risico op een elektrische schok te
voorkomen en belt u de Klantenservice (zie
hoofdstuk Service).
Voorkoming van beschadiging van het
apparaat
• Het glaskeramische oppervlak kan be-
schadigd raken als er voorwerpen op
vallen of als er kookgerei tegenaan stoot.
• Kookgerei dat gemaakt is van gietijzer,
aluminium of met beschadigde bodems,
kunnen krassen veroorzaken op de glas-
keramische plaat als deze over het op-
pervlak worden geschoven.
• Om te voorkomen dat kookgerei en glas-
keramische platen beschadigd raken,
steelpannen of braadpannen niet droog
laten koken.
• Gebruik de kookzones niet met lege pan-
nen of zonder pannen erop.
• Leg nooit aluminiumfolie over welk deel
van het apparaat ook. Leg nooit kunststof
materialen op het apparaat, deze kun-
nen smelten.
Informatie over acrylamide
Belangrijk! Volgens recente
wetenschappelijke informatie kan het
intensief bruinen van levensmiddelen, met
name in producten die zetmeel bevatten,
een gezondheidsrisico vormen tengevolge
van acrylamides. Om die reden adviseren
wij levensmiddelen zoveel mogelijk bij lage
temperaturen gaar te laten worden en de
gerechten niet te veel te bruinen.
NEDERLANDS 45