
КРАТКОЕ СПРАВОЧНОЕ
РУКОВОДСТВО
RU
БЛАГОДАРИМ ВАС ЗА ПРИОБРЕТЕНИЕ ИЗДЕЛИЯ
МАРКИ INDESIT. Для получения более полной
технической поддержки зарегистрируйте ваш прибор на:
www.indesit.eu/register
Вы также можете загрузить инструкцию по
безопасности и руководство “Использование
и уход” с нашего сайта docs.indesit.eu следуя
инструкциям, приведенным на обратной стороне
этого буклета.
Перед началом использования прибора внимательно прочтите руководство “Здоровье и
безопасность”.
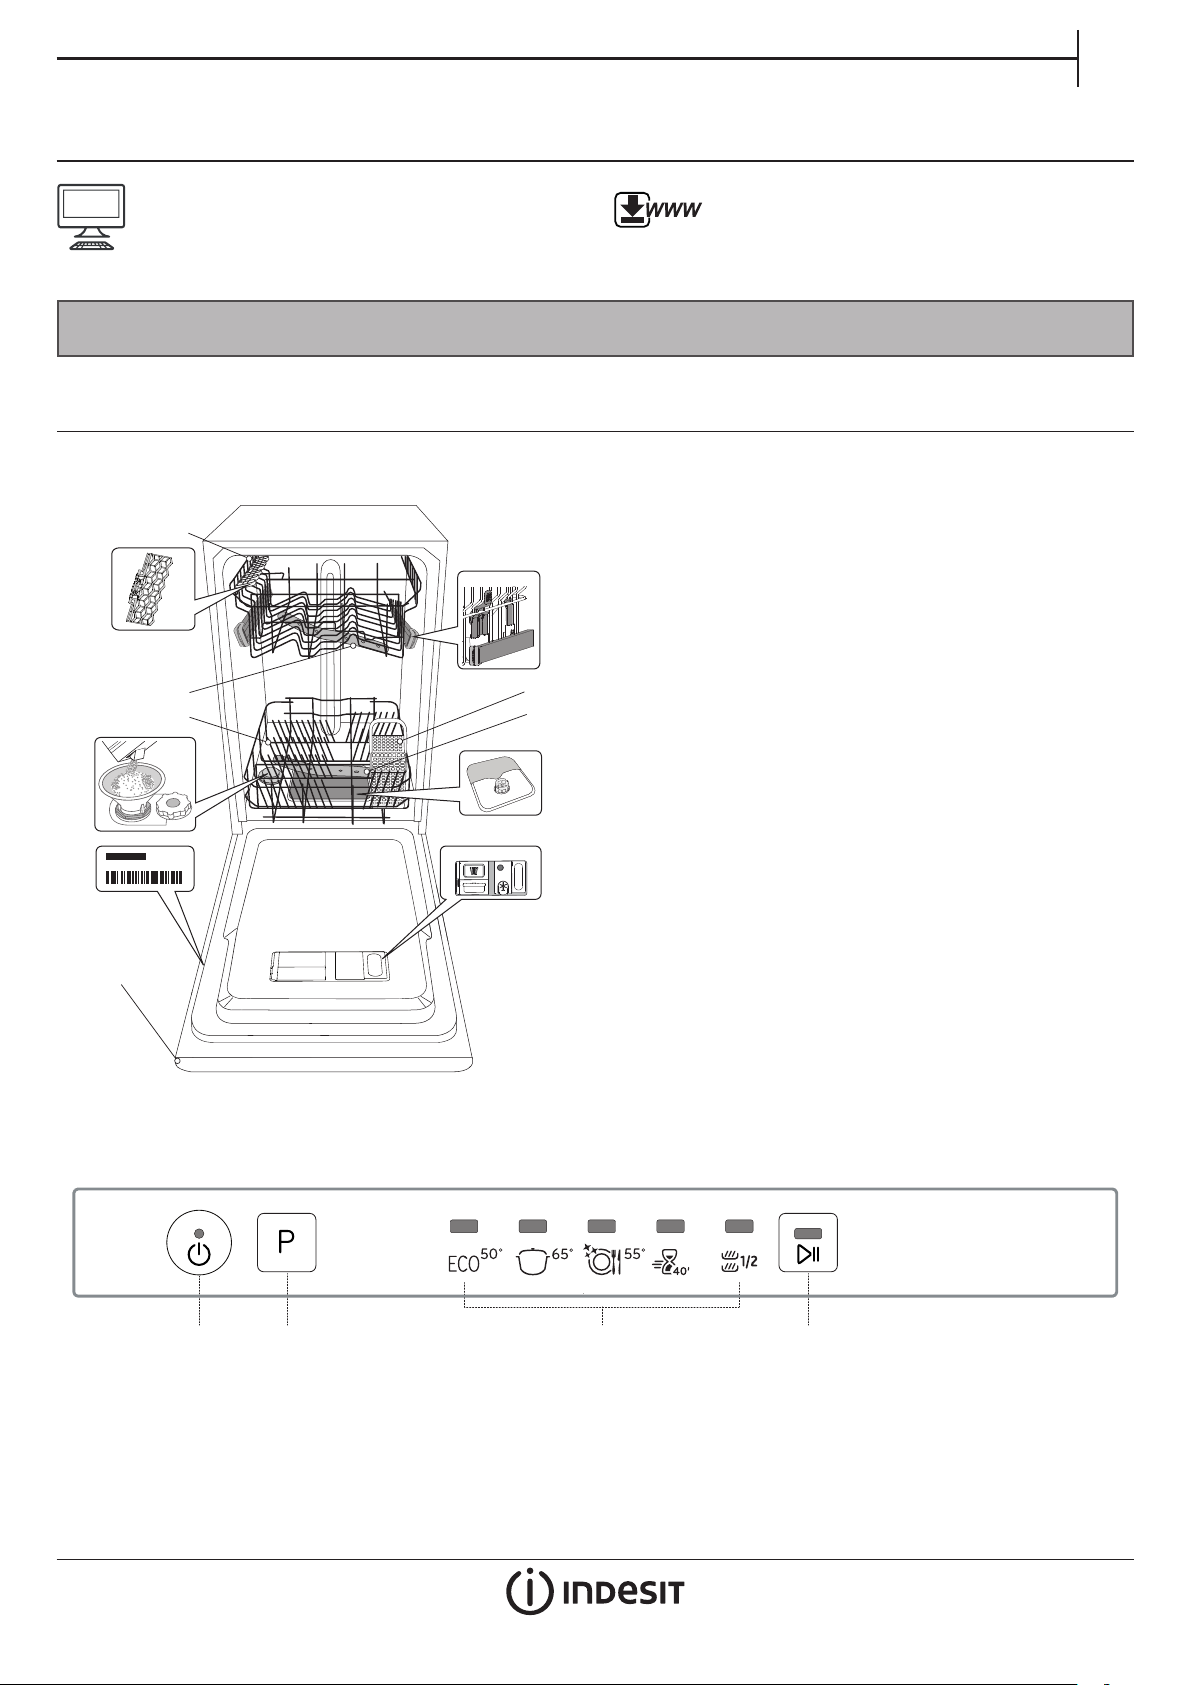
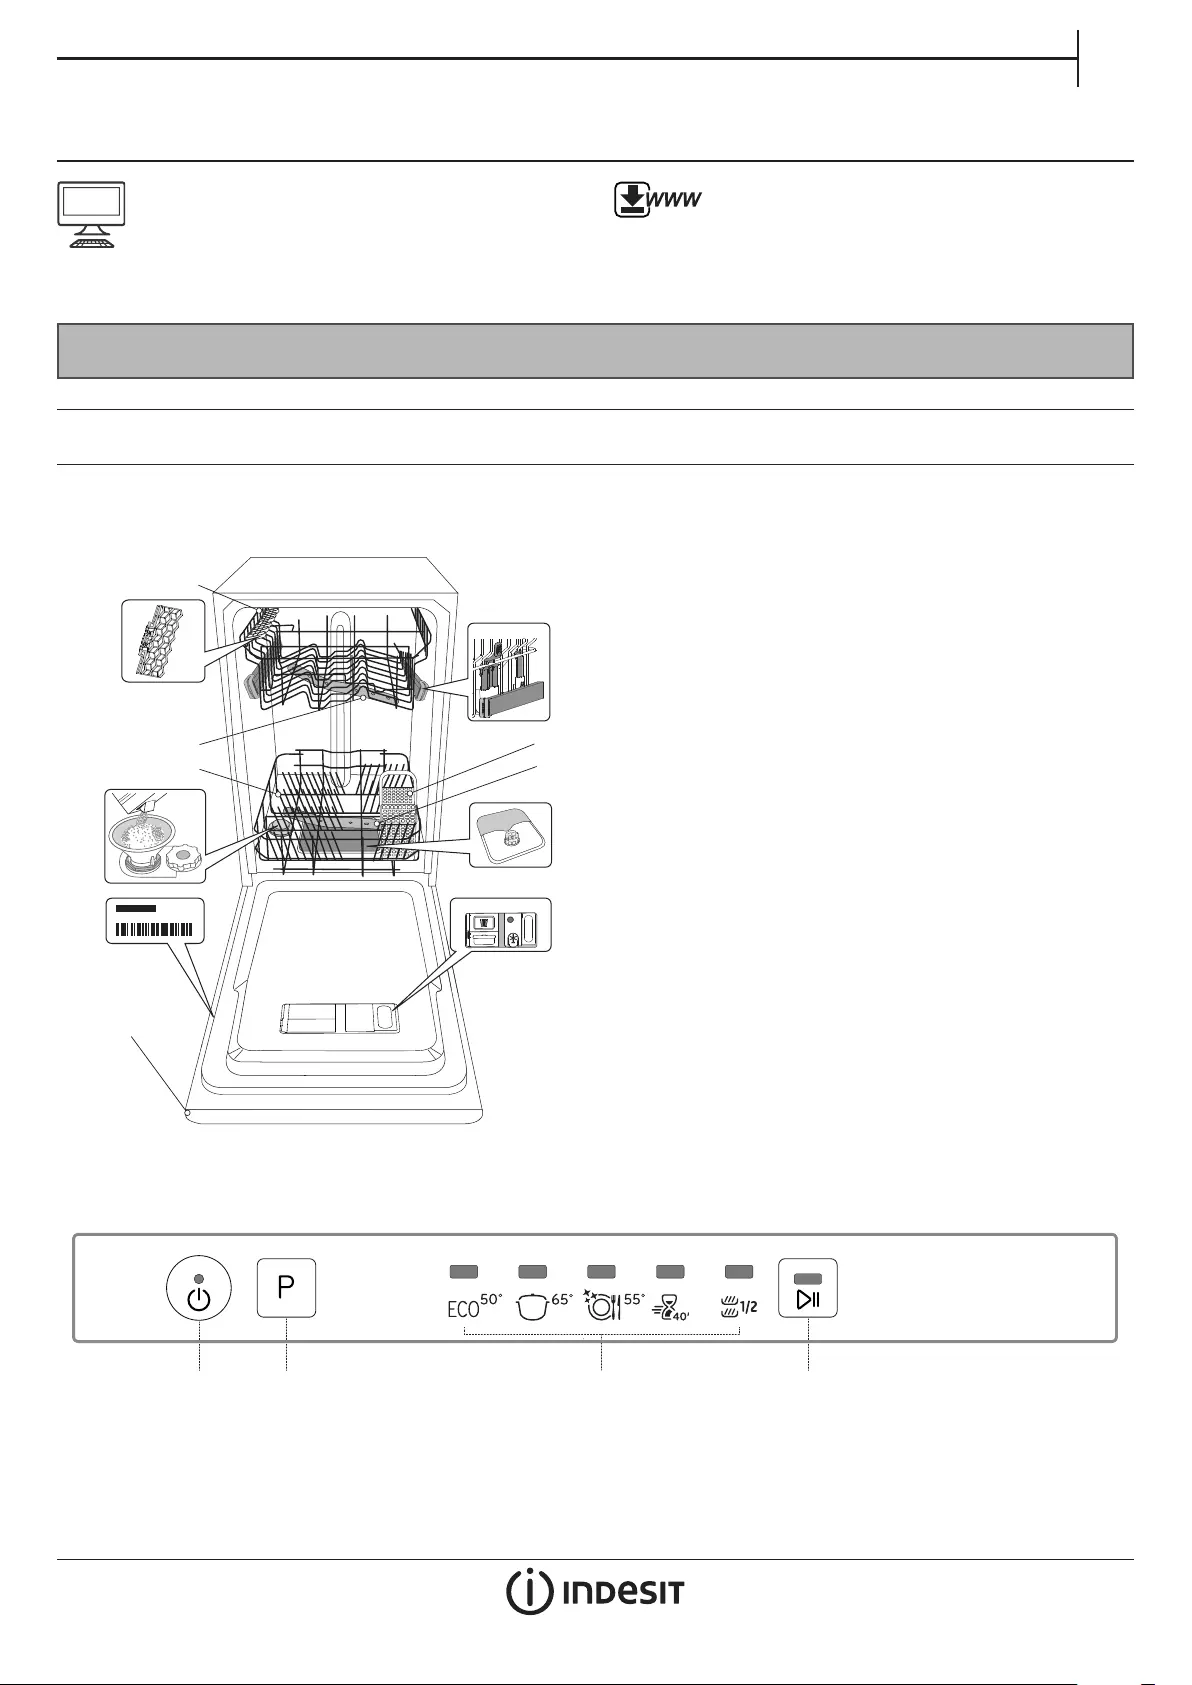
ОПИСАНИЕ ИЗДЕЛИЯ
ПРИБОР
1. Верхняя корзина
2. Откидные полочки
3. Регулятор высоты верхней корзины
4. Верхний разбрызгиватель
5. Нижняя корзина
6. Корзина для столовых приборов
7. Нижний разбрызгиватель
8. Фильтрующий узел
9. Бачок для соли
10. Дозаторы моющего средства и ополаскивателя
11. Паспортная табличка
12. Панель управления
Service:
0000 000 00000
1
2
3
4
5
9
6
7
8
1011
12
ПАНЕЛЬ УПРАВЛЕНИЯ
1 2 3 4
1. Кнопка “Вкл.-Выкл./Сброс” с индикатором
2. Кнопка выбора программы
3. Индикаторы программы
4. Кнопка “Старт/Пауза” с индикатором
1
ПЕРВОЕ ИСПОЛЬЗОВАНИЕ
СОЛЬ, ОПОЛАСКИВАТЕЛЬ И МОЮЩЕЕ СРЕДСТВО
ПЕРЕД ПЕРВЫМ ИСПОЛЬЗОВАНИЕМ
После установки удалите фиксаторы с корзин и удерживающие
эластичные элементы с верхней корзины.
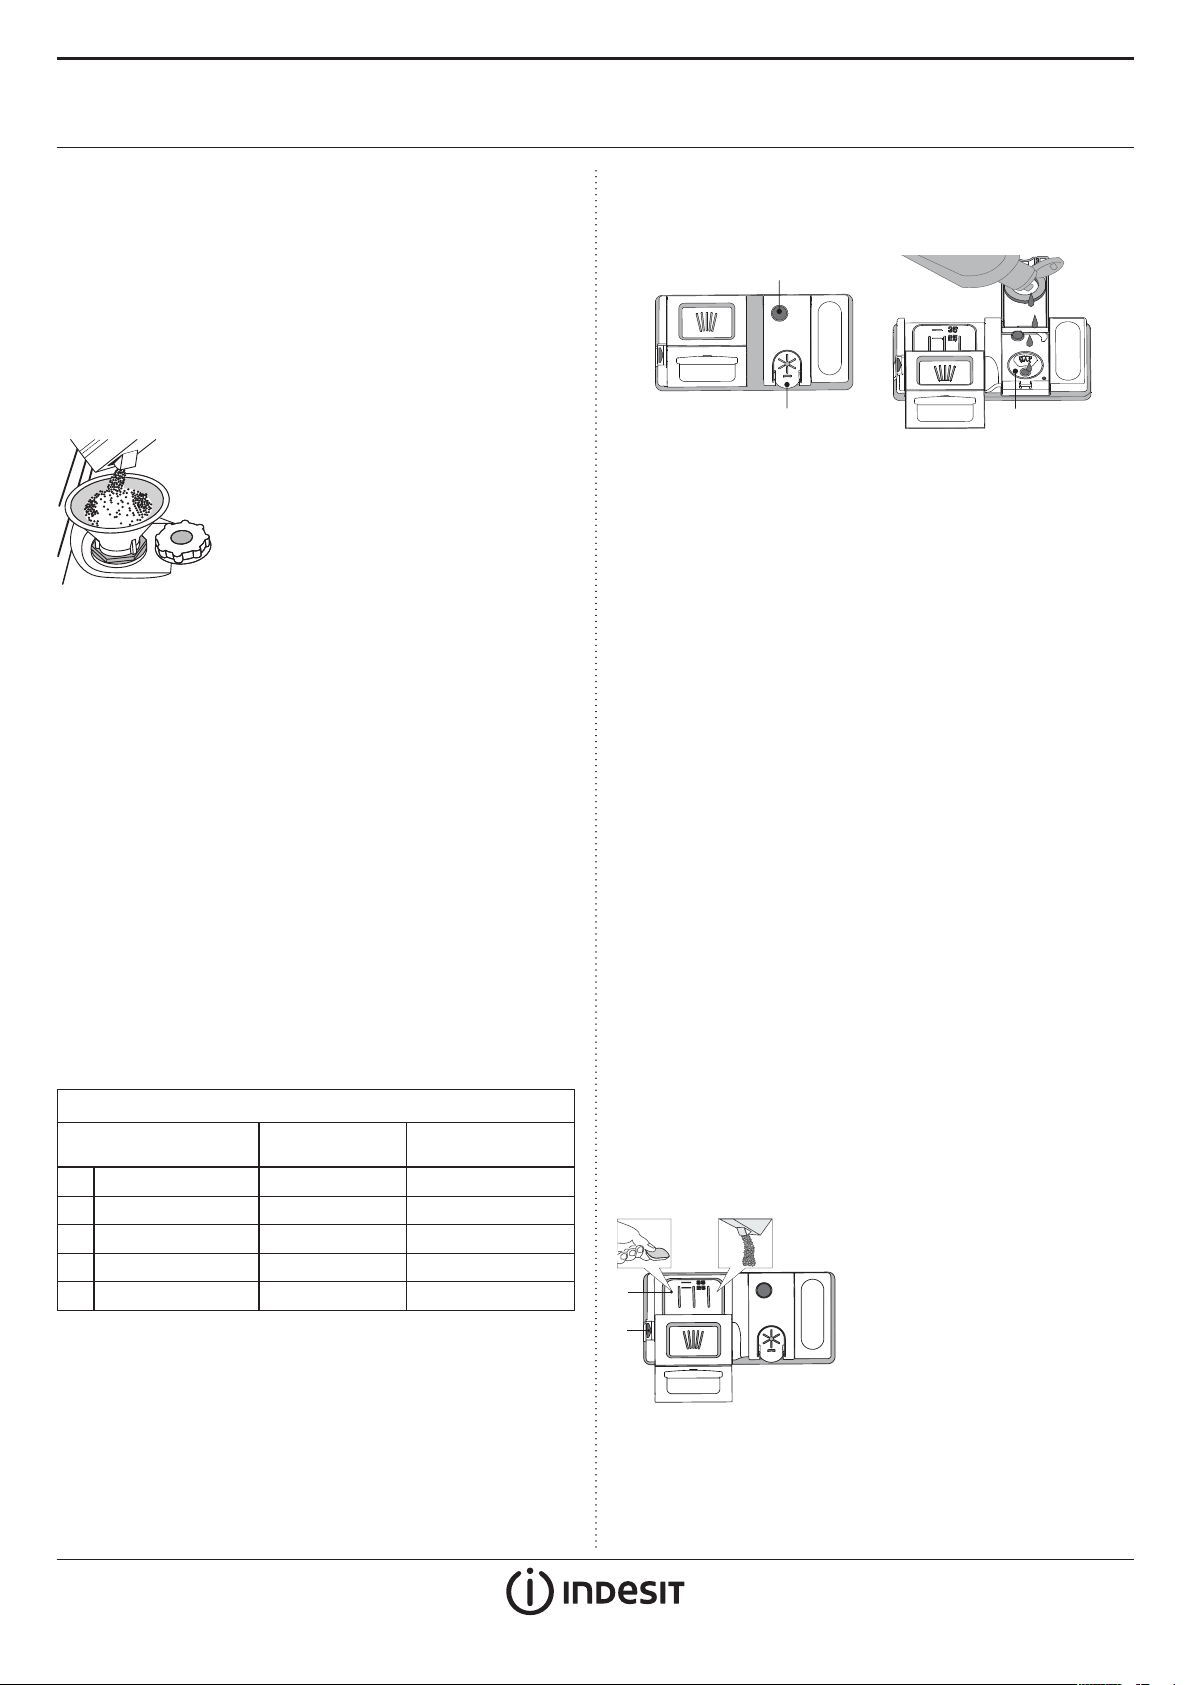
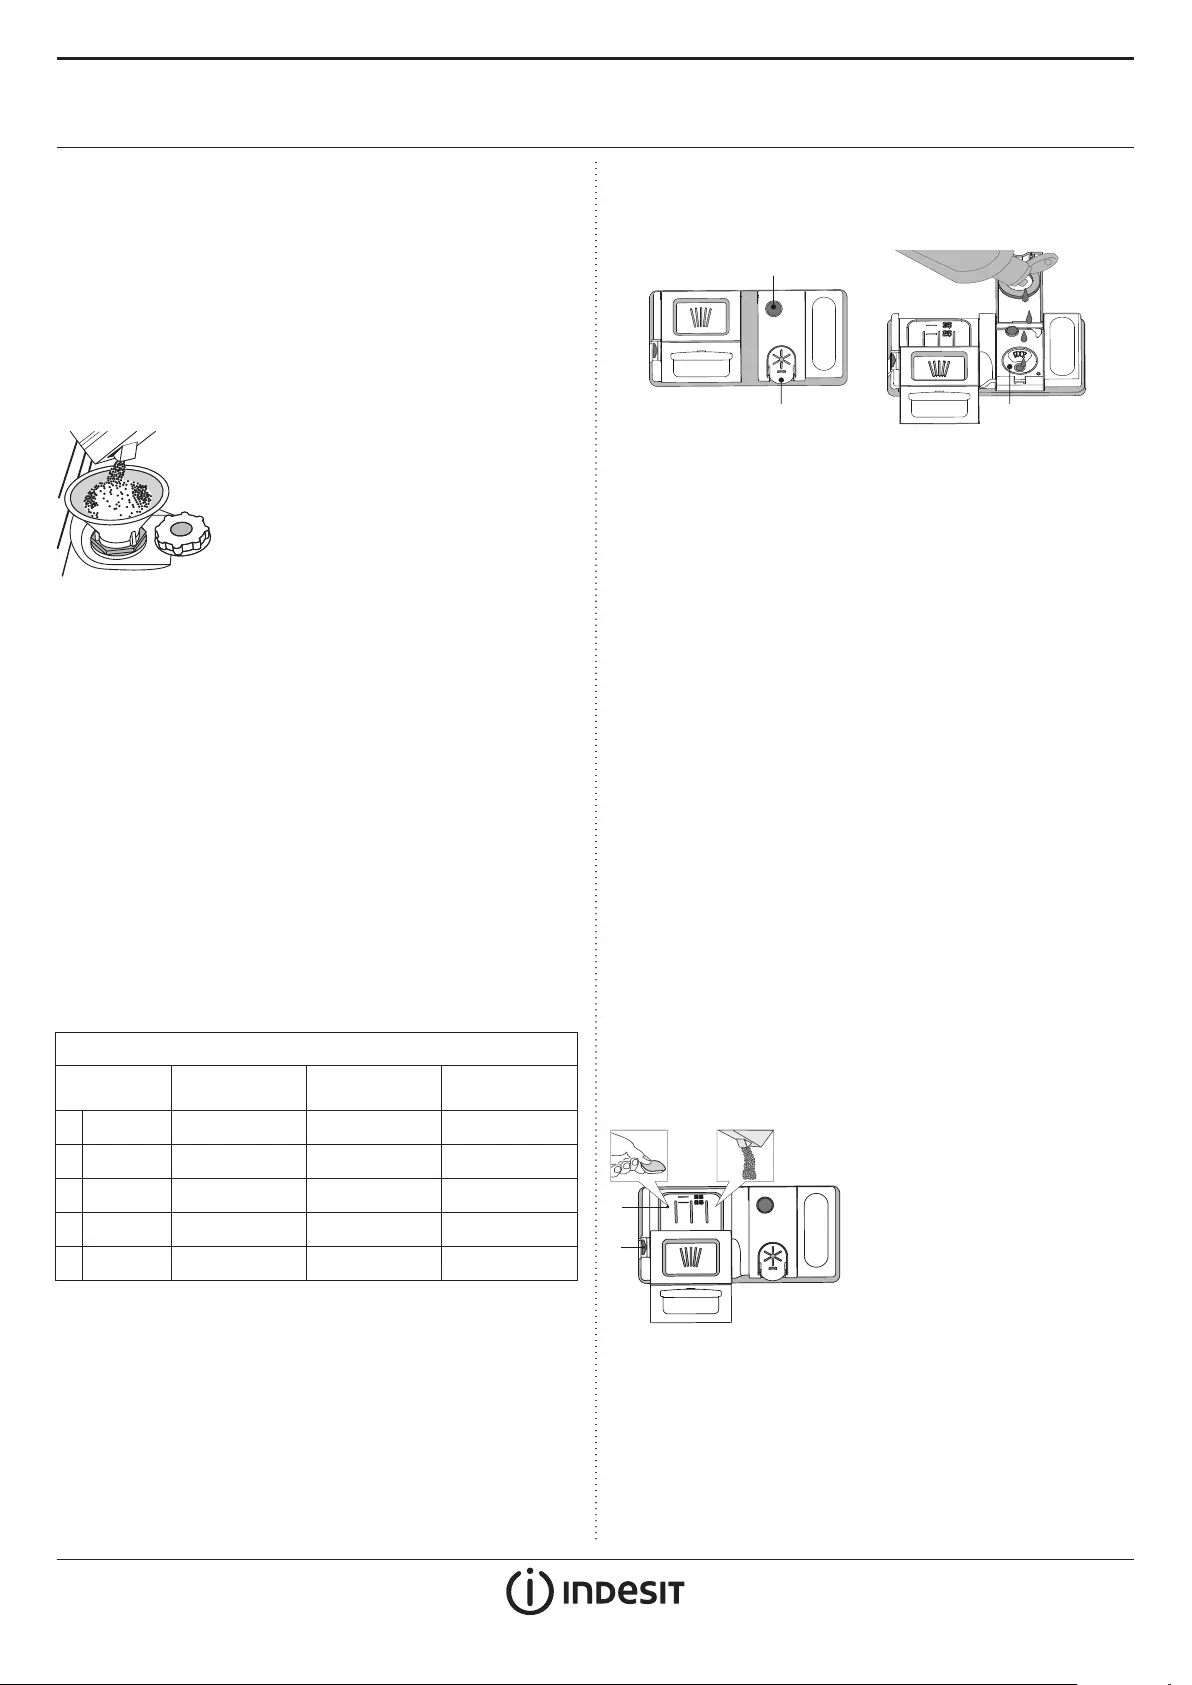
ЗАГРУЗКА РЕГЕНЕРИРУЮЩЕЙ СОЛИ
Использование соли предотвращает образование ИЗВЕСТКОВОГО
НАЛЕТА на посуде и функциональных компонентах посудомоечной
машины.
• Бачок для соли не должен оставаться пустым.
• Обязательно установите уровень жесткости.
Резервуар с солью расположен в нижней части посудомоечной ма-
шины (см. ОПИСАНИЕ ИЗДЕЛИЯ), его необходимо наполнить, если зеленый поплавок на крышке резервуара с солью больше не виден.
1. Выньте нижнюю корзину и отвинтите
крышку бачка (против часовой стрелки).
2. Выполняется только при первом
использовании: залейте воду в бачок для соли.
3. Вставьте воронку (см. рисунок) и заполните
бачок солью до краев (примерно 1 кг). При
этом из бачка может вытечь небольшое
количество воды.
4. Выньте воронку и протрите участок вокруг
отверстия от остатков соли.
Плотно завинтите крышку, чтобы во время мойки в емкость не попадало
моющее средство (иначе умягчитель воды может выйти из строя).
Если нужно добавить соль, необходимо завершить процедуру
до начала цикла мойки.
УСТАНОВКА ЖЕСТКОСТИ ВОДЫ
Для обеспечения правильной работы умягчителя параметр
жесткости воды должен соответствовать фактической жесткости
воды в вашем доме. Соответствующую информацию можно
получить в местной водоснабжающей организации.
Заводская настройка соответствует средней степени жесткости (3).
• Включите прибор нажатием кнопки ВКЛ./ВЫКЛ.
• Выключите прибор нажатием кнопки ВКЛ./ВЫКЛ.
• Удерживайте нажатой кнопку P в течение 5 секунд, пока не
раздастся звуковой сигнал.
• Включите прибор нажатием кнопки ВКЛ./ВЫКЛ.
• Индикатор программы, соответствующий выбранному уровню,
мигает.
• Нажмите кнопку P, чтобы выбрать нужный уровень жесткости
(см. ТАБЛИЦУ ЖЕСТКОСТИ ВОДЫ).
Таблица жесткости воды
Уровень
1 Мягкая 0 — 6 0 — 10
2 Средняя 7 — 11 11 — 20
3 Средняя 12 — 17 21 — 30
4 Жесткая 17 — 34 31 — 60
5 Очень жесткая 35 — 50 61 — 90
• Выключите прибор нажатием кнопки ВКЛ./ВЫКЛ.
Настройка завершена!
После завершения данного действия запустите программу, не
загружая посуду.
Используйте только специальную соль для посудомоечных машин.
После загрузки соли индикатор ОТСУТСТВИЕ СОЛИ гаснет.
Отсутствие соли в бачке может привести к повреждению
умягчителя воды и нагревательного элемента.
°dH
Немецкие градусы
Французские градусы
°fH
ЗАЛИВКА ОПОЛАСКИВАТЕЛЯ
Ополаскиватель способствует СУШКЕ посуды. Дозатор ополаскивателя A необходимо наполнить, если темный оптический указатель на дверце C дозатора стал прозрачным.
C
B
1. Откройте дозатор B, нажав и потянув вверх язычок крышки.
2. Осторожно залейте ополаскиватель до максимальной
отметки (110 мл). Если вы случайно пролили ополаскиватель,
немедленно вытрите его сухой тряпкой
3. Закройте крышку, нажав на нее до щелчка.
НИКОГДА не заливайте ополаскиватель непосредственно в
моечную камеру.
A
РЕГУЛИРОВКА ДОЗЫ ОПОЛАСКИВАТЕЛЯ
Если вас не удовлетворяет качество сушки, можно отрегулировать
дозировку ополаскивателя
• Включите посудомоечную машину нажатием кнопки ВКЛ./ВЫКЛ.
• Выключите прибор нажатием кнопки ВКЛ./ВЫКЛ.
• Нажмите три раза кнопку P: раздастся звуковой сигнал.
• Включите прибор нажатием кнопки ВКЛ./ВЫКЛ.
• Индикатор программы, соответствующий выбранному уровню,
мигает.
• Нажимая кнопку P, выберите уровень подачи ополаскивателя.
• Выключите прибор нажатием кнопки ВКЛ./ВЫКЛ.
Настройка завершена!
Уровень ополаскивателя можно установить на НОЛЬ (ЭКО), В
этом случае ополаскиватель не используется, причем индикатор
ОТСУТСТВИЕ ОПОЛАСКИВАТЕЛЯ не загорается, даже если дозатор пуст.
В зависимости от модели посудомоечной машины доступно до
4 уровней настройки. Заводские настройки указаны для модели,
чтобы узнать настройки для своей машины, следуйте приведенной выше инструкции.
• Если на посуде остаются синеватые разводы, установите
меньшее значение (1-2).
• Если на посуде остаются капли воды или пятна накипи,
установите более высокое значение (3-4).
ЗАГРУЗКА МОЮЩЕГО СРЕДСТВА
Для открытия дозатора моющего средства используйте
фиксатор A. Загрузите моющее средство только в сухой
дозатор B. Моющее средство для предварительной мойки
поместите непосредственно в моечную камеру.
1. Для определения требуемого
количества моющего средства
см. указания выше. С внутренней
стороны лотка B нанесены мерные
отметки, позволяющие правильно
дозировать моющее средство.
2. Удалите остатки моющего
средства с краев дозатора и
закройте крышку со щелчком.
3. Закройте крышку дозатора
моющего средства, потянув ее вверх
до возврата на место фиксатора.
Дозатор моющего средства открывается автоматически в нужный
момент времени согласно выбранной программе.
2
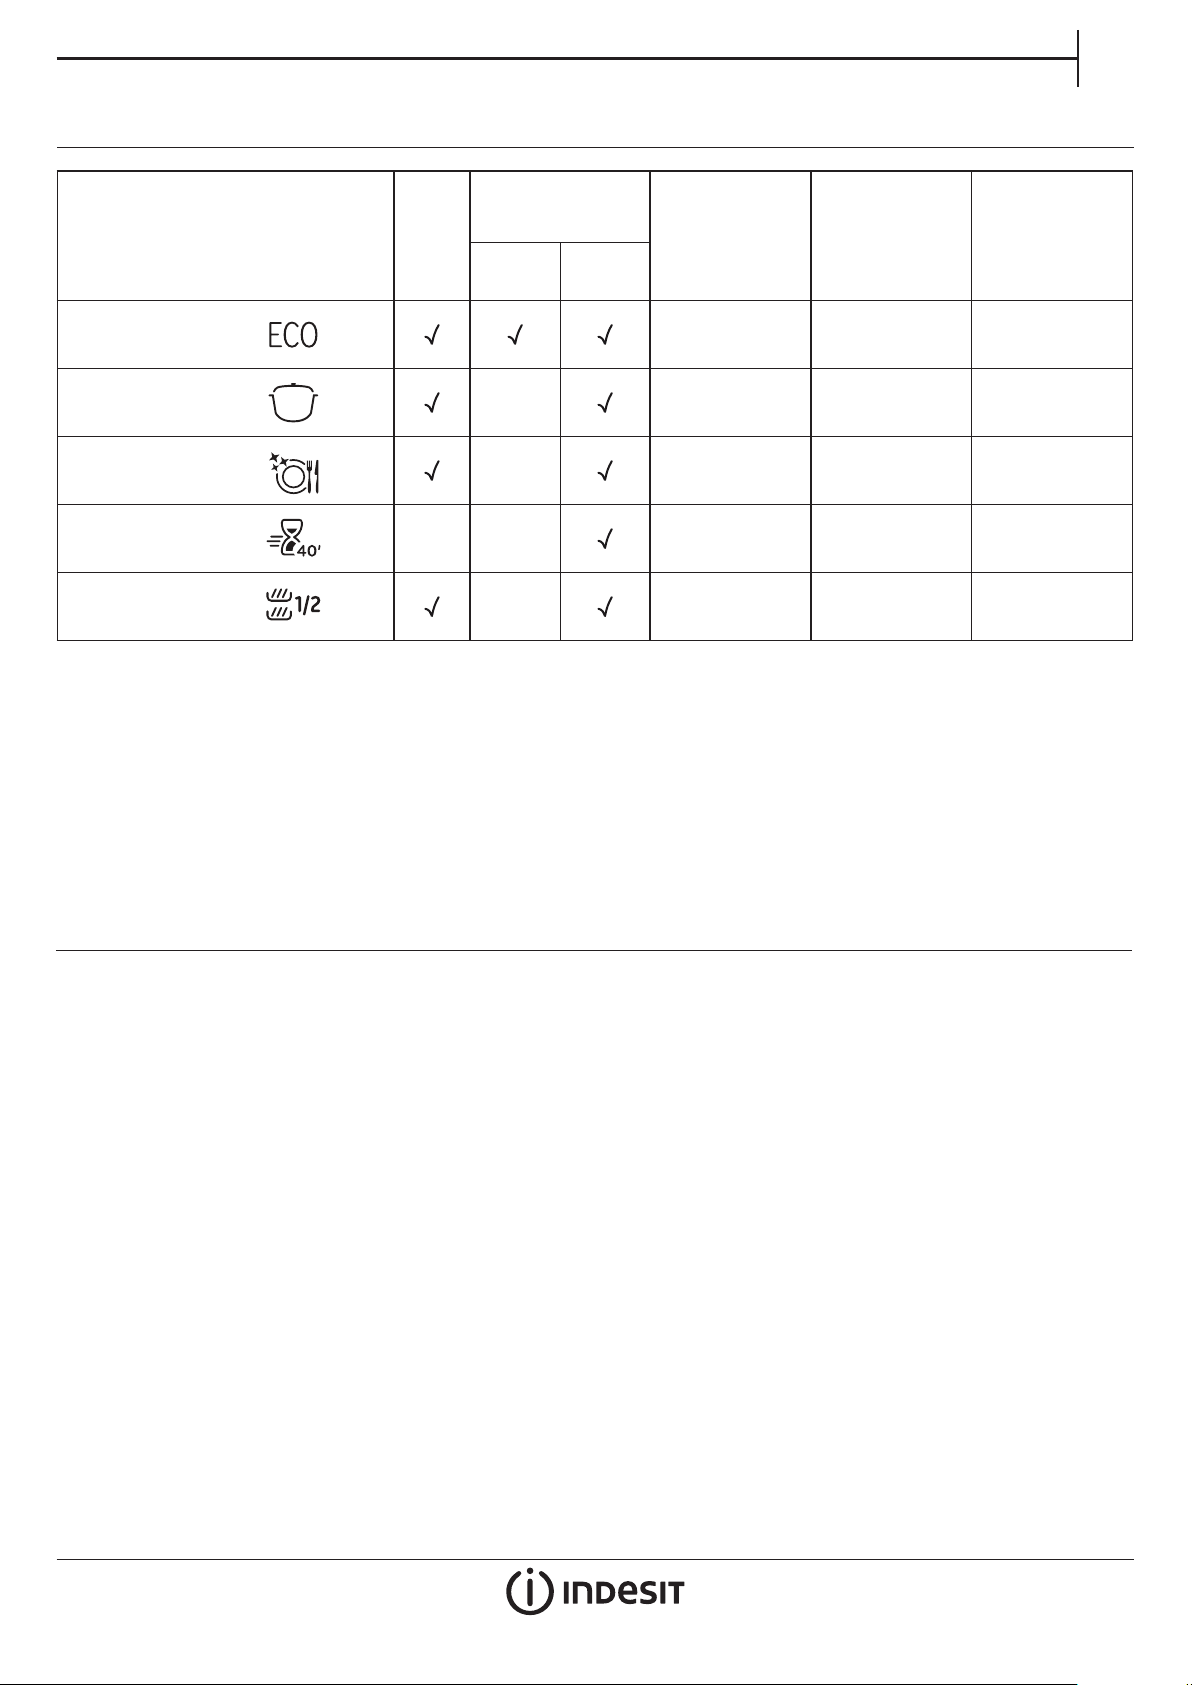
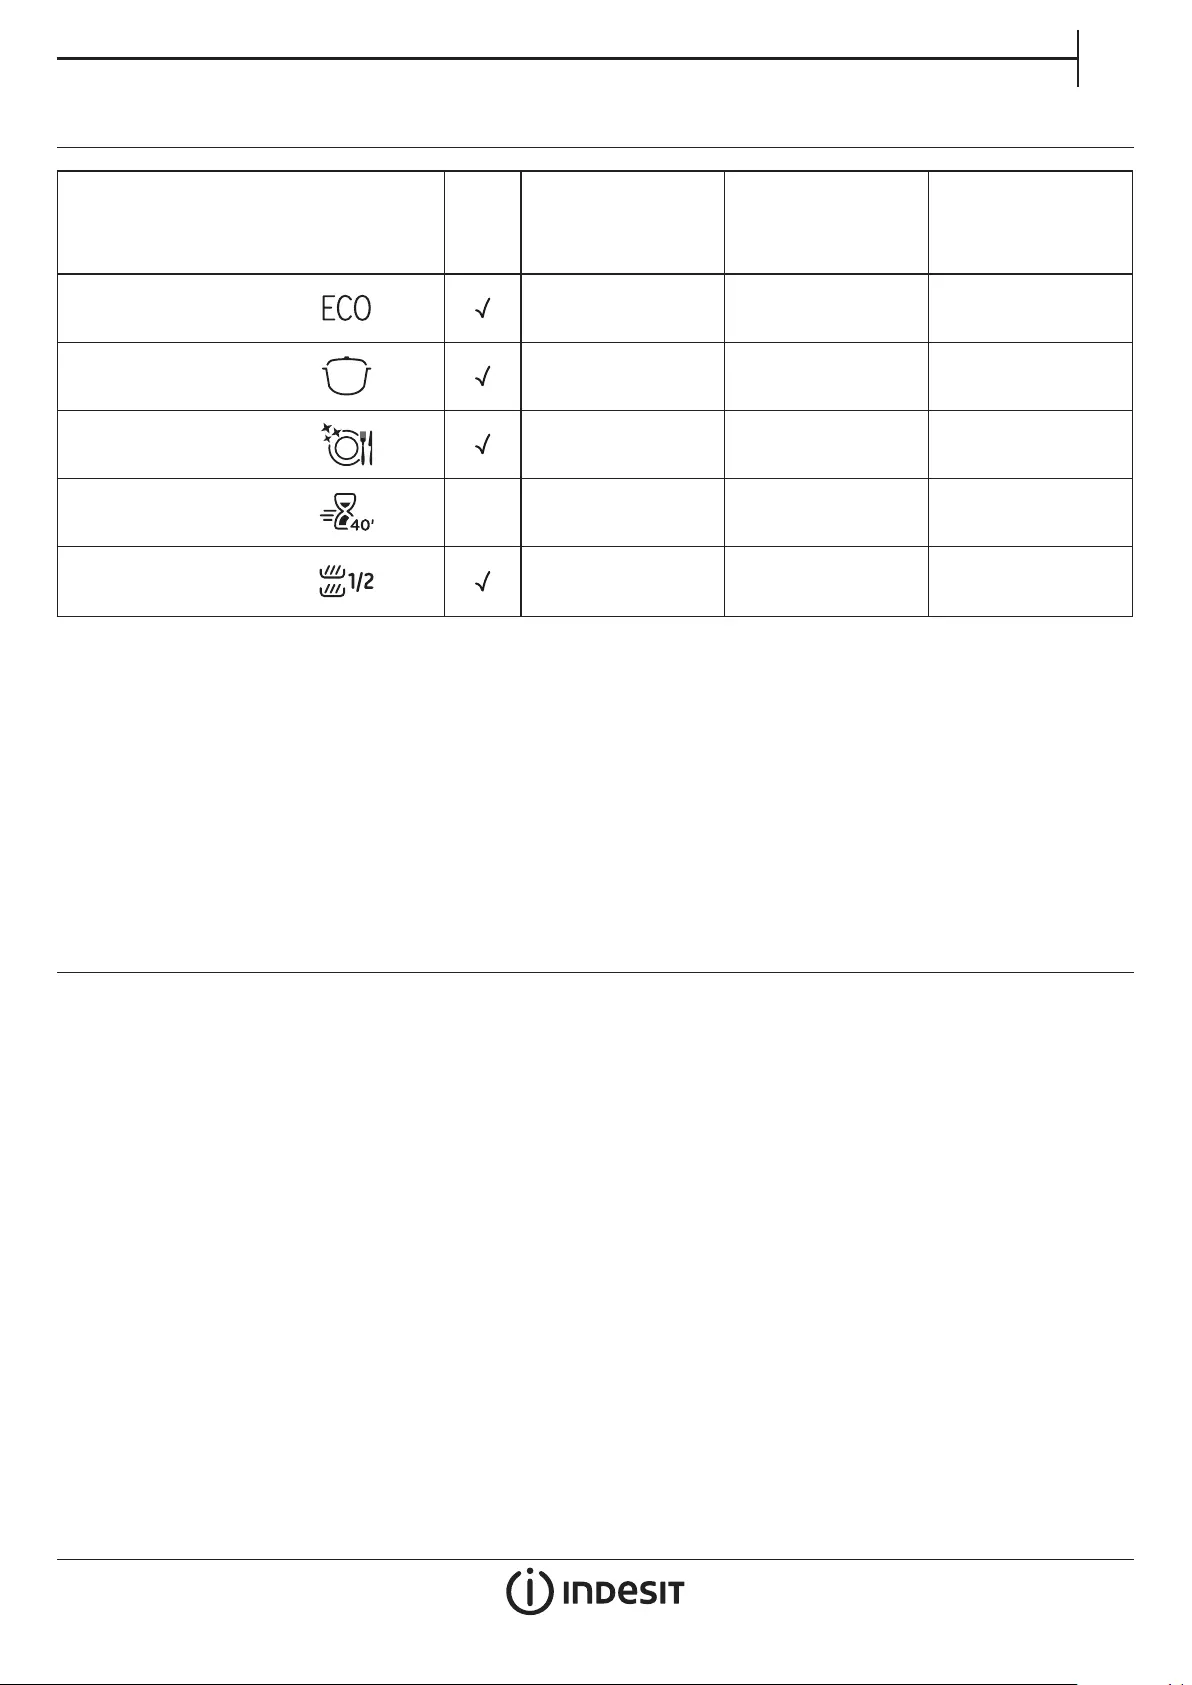
ТАБЛИЦА ПРОГРАММ
Контейнер для
моющего
Программа
сушки
Стадия
1
Эko 50°
2
Интенсивная 65° — 2:30 15,0 1,50
3
Обычная 55° — 2:25 15,0 1,35
Ускоренная
4
40 мин.
Половинная
5
загрузка
50°
50° —
—
средства
Камера
— 0:40 8,0 0,90
B
Длительность
программы
(ч:мин)
**)
4:00 11,5 0,83
1:15 11,0 0,90
Расход
воды
(л/цикл)
RU
Расход
энергии
(кВтч/цикл)
Показатели программы ЭКО были измерены в лабораторных условиях в соответствии с европейским стандартом EN 50242.
Примечание для Испытательных Лабораторий: для получения более подробной информации об условиях сравнительного испытания EN
пошлите запрос на адрес: assistenza_en_lvs@indesitcompany.com
Ни одна программа не предусматривает предварительную обработку посуды.
*) Длительность программы, отображаемая на дисплее или указанная в инструкции, представляет собой оценочное значение, рассчитанное
для стандартных условий. Фактическое время может варьироваться в зависимости от многих факторов, таких как температура и давление
подаваемой воды, температура в помещении, количество моющего средства, объем и тип загрузки, баланс загрузки, выбор дополнительных
опций и калибровка датчиков. Калибровка датчиков может увеличивать длительность программы на время до 20 мин.
Потребление в режиме “ожидание”: Потребление в режиме “остановлено”: 5 Вт — Потребление в режиме “выключено”: 0.5 Вт
ОПИСАНИЕ ПРОГРАММ
Указания по выбору программ мойки.
1 ЭКО
Нормально загрязненная посуда. Стандартная программа мойки,
наиболее эффективная по совокупному потреблению воды и электроэнергии.
2 ИНТЕНСИВНАЯ
Программа для очень грязной посуды, наиболее подходящая для
сковородок и кастрюль (не использовать для легко повреждаемой
посуды).
3 ОБЫЧНАЯ
Для мытья посуды с разной степенью загрязнения.Программа для
нормально загрязненной посуды с засохшими остатками пищи.
4 УСКОРЕННАЯ 40 МИН.
Программа для легко загрязненной посуды без засохших
остатков пищи.
5 ПОЛОВИННАЯ ЗАГРУЗКА
Программа для нормально или сильно загрязненной посуды с половинной загрузкой посудомоечной машины.
Примечания:
Обратите внимание, что быстрые циклы лучше всего подходят для не
очень грязной посуды.
Для сокращения потребления старайтесь использовать посудомоечную машину только с полной загрузкой.
3
7/0 с 9:00 до 21:00
вт-сб с 14:00 до 18:00
Бесплатная горячая линия
Ежедневно с 9:00 до 21:00
Бонус при заказе по телефону
Вы получите подарок, а менеджер сразу оформит и подтвердит Ваш заказ

Прямо сейчас 0 человек смотрят этот товар
Артикул:
140023
Габариты (ШxГxВ)
44.8×55.5×82 см
Тип установки
Встраиваемые
Все характеристики
Прямо сейчас 0 человек смотрят этот товар
В наличии
Находится на российских складах, даты доставки в Ваш город уточняйте при заказе
Выгода на услуги 11 427 ₽
Мы проанализировали цены на услуги в других интернет-магазинах и мы предлагаем наибольшую выгоду
Доставка по Москве: курьером
Для регионов: по тарифам ТК
Артикул:
140023
В наличии
Находится на российских складах, даты доставки в Ваш город уточняйте при заказе
Теги:
- Описание
-
Отзывы
(11)
-
Доставка и оплата
- Гарантия
Описание
Подробные характеристики
Общие характеристики
- Тип
- узкая
- Установка
- встраиваемая полностью
- Вместимость
- 10 комплектов
- Класс энергопотребления
- A+
- Класс мойки
- A
- Класс сушки
- A
- Тип управления
- электронное
Технические характеристики
- Расход воды
- 11.5 л
- Максимальная потребляемая мощность
- 1900 Вт
- Энергопотребление за цикл
- 0.83 кВтч
- Время мойки при обычной программе
- 240 мин
- Уровень шума при работе
- 51 дБ
Программы и режимы мойки
- Количество программ
- 5
- Количество температурных режимов
- 3
- Сушка посуды
- конденсационная
- Стандартные программы мойки
- обычная программа для повседневного мытья, интенсивная программа для сильнозагрязненной посуды, экспресс-программа (быстрый цикл)
- Специальные программы
- экономичная программа для слабозагрязненной посуды
- Режим половинной загрузки
- есть
Другие функции и особенности
- Защита от протечек
- есть
- Макс. температура воды на входе
- 60 °C
- Индикатор наличия соли / ополаскивателя
- нет / нет
- Особенности рабочей камеры
- внутренняя поверхность из нерж. стали, регулируемая по высоте корзина для посуды
- Дополнительные принадлежности
- держатель для бокалов
- Размеры (ШхГхВ)
- 44.8×55.5×82 см
- Вес
- 30 кг
Дополнительно
- Срок службы
- 10 лет
- Гарантийный срок
- 1 г.
Производитель на свое усмотрение и без дополнительных уведомлений может менять комплектацию, внешний вид, страну производства и технические характеристики модели. Если вы заметили ошибку в описании, пожалуйста, сообщите нам по адресу info@vsestiralnie.com
Страна производства: Китай, Польша
Инструкция по эксплуатации Indesit DSIE 2B10
Доставка и оплата

- Стандартная доставка
-
в пределах МКАД
600 ₽
-
за МКАД (до 50 км)
40 ₽ за 1 км.
- VIP доставка
-
по Москве
1200 ₽
-
за МКАД (до 50 км)
60 ₽ за 1 км.
Доставим как можно быстрее
Заказ, оформленный до 15:00 может быть доставлен
на следующий день.
Всегда на связи
Точная информация о дате и времени доставки доступна только после подтверждения заказа ВсеСтиральные.com
График доставки
по Москве и Московской области
10:00–18:00
18:00-23:00
ежедневно
Выбирайте время доставки!
При оформлении заказа вы всегда
сможете выбрать удобный для вас
интервал доставки.

Для вашего удобства в нашем интернет-магазине предусмотрено несколько вариантов оплаты:
Наличными
Курьер доставит вам товар по указанному адресу. Вы внимательно осматриваете комплектацию и внешний вид продукции, после чего оплачиваете ее стоимость, а также стоимость выбранных вами услуг. На привезенные изделия мы предоставим товарный чек и документацию.
Банковские карты при получении
Курьер доставит вам товар по указанному адресу. Вы внимательно осматриваете комплектацию и внешний вид продукции, после чего оплачиваете ее стоимость с помощью карт Visa / Mastercard / Maestro и МИР, а также стоимость выбранных вами услуг. На привезенные изделия мы предоставим товарный чек и документацию.
Банковские карты через сайт
Для удобной оплаты банковской картой используется система электронных платежей Яндекс.Денег. При оформлении заказа выберите способ оплаты с помощью карт Visa / Mastercard / Maestro и МИР, после чего вы перейдете на страницу безопасного платежа.
Банковский перевод
Для осуществления платежа банковским переводом менеджер выставит счет с выбранными товарами и вышлет на вашу электронную почту. Данный способ оплаты по банковским реквизитам компании предусмотрен как для физических, так и для юридических лиц.
Гарантия


- Если Вы не получили товар. Вы получите полное возмещение, если Ваш заказ не будет доставлен в течение срока, обещанного ВсеСтиральные.com после совершенной оплаты..
- При несоответствии описанию. Вы можете получить полный возврат, если товар значительно отличается от описания, указанного на сайте.
Гарантия юридической компетенции
Гарантия соответствия цены
- Все цены на сайте являются действительными.
- Цена для клиента остается без изменений после заказа.
- Цена на товар не может измениться после его оплаты.
Выезд мастера в день обращения
- При обращении до 12.00 дня (Доступно только для жителей Москвы и МО)
Гарантия профессиональной установки
- На все виды установок наша компания дает гарантию 1 год!
- Отзывы о нашей работе вы можете посмотреть «здесь«
- Похожие товары
|
Код: 106719 Извините, товара сейчас нет в наличии
Бесплатная доставка Извините, товара сейчас нет в наличии Сравнить Услуги:Установка и подключение посудомоечной машины Новости интернет-магазина «Лаукар»:23.04.2025 26.02.2025 17.02.2025 Дополнительная информация в категории Встраиваемая посудомоечная машина:Встраиваемые посудомоечные машины — разбираемся в терминах Таблица Авторизованных сервисных центров по брендам. Описание Инструкция Отзывы (0) В интернет-магазине бытовой техники «Лаукар» Вы можете скачать инструкцию к товару Встраиваемая посудомоечная машина Indesit DSIE 2B10 совершенно бесплатно. Все инструкции, представленные на сайте интернет-магазина бытовой техники «Лаукар», предоставляются производителем товара. Для того чтобы скачать инструкцию, Вам необходимо нажать на ссылку «скачать инструкцию», расположенную ниже, а в случае, если ссылки нет, Скачать инструкцию Смотреть инструкцию 
Фирма-производитель оставляет за собой право на внесение изменений в конструкцию, дизайн и комплектацию товара: Встраиваемая посудомоечная машина Indesit DSIE 2B10. Пожалуйста, сверяйте информацию о товаре с информацией на |
Table of Contents
- Indesit DSIE 2B10 Integrated Dishwasher
- PRODUCT DESCRIPTION
- FIRST TIME USE
- SALT, RINSE AID, AND DETERGENT
- SETTING THE WATER HARDNESS
- PROGRAMS TABLE
- PROGRAMS DESCRIPTION
- Instructions on wash cycle selection
- LOADING THE RACKS
- DAILY USE
- ADVICE AND TIPS
- CARE AND MAINTENANCE
- TROUBLESHOOTING
- Frequently Asked Questions
- Read User Manual Online (PDF format)
- Download This Manual (PDF format)
Indesit DSIE 2B10 Integrated Dishwasher

THANK YOU FOR BUYING A INDESIT PRODUCT.
- To receive more complete assistance, please register your appliance at: www.indesit.com/register
- You can download the Safety Instructions and the User Manual, by visiting our website docs.indesit.eu and following the Instructions on the back of this booklet.
Before using the appliance carefully read the Safety Instructions guide.
PRODUCT DESCRIPTION
APPLIANCE
- 1. Upper rack
- 2. Foldable flaps
- 3. Upper rack height adjuster
- 4. Upper spray arm
- 5. Lower rack
- 6. Cutlery basket
- 7. Lower spray arm
- 8. Filter Assembly
- 9. Salt reservoir
- 10. Detergent and Rinse Aid dispensers
- 11. Rating plate
- 12. Control panel
CONTROL PANEL
- 1. ON-OFF / Reset button with indicator light
- 2. Program selection button
- 3. Program indicator lights
- 4. START/Pause button with indicator light

FIRST TIME USE
SALT, RINSE AID, AND DETERGENT
-
ADVICE REGARDING THE FIRST-TIME USE
After installation, remove the stoppers from the racks and the retaining
elastic elements from the upper rack. -
FILLING THE SALT RESERVOIR
The use of salt prevents the formation of LIMESCALE on the dishes and the
machine’s functional components.- THE SALT RESERVOIR must NEVER BE EMPTY.
- It is important to set the water hardness.
-
The salt reservoir is located in the lower part of the dishwasher (see Product Description) and must be filled when the green float on the cap of the salt reservoir is no longer visible..
- Remove the lower rack and unscrew the reservoir cap (anticlockwise).
- Only the first time you do this: fill the salt reservoir with water.
- Position the funnel (see figure) and fill the salt reservoir right up to its edge (approximately 1 kg); it is not unusual for a little water to leak out.
- Remove the funnel and wipe any salt residue away from the opening.
Make sure the cap is screwed on tightly so that no detergent can get into the
container during the wash program (this could damage the water softener beyond
repair).
Whenever you need to add salt, it is mandatory to complete the procedure
before the beginning of the washing cycle to avoid corrosion.
SETTING THE WATER HARDNESS
To allow the water softener to work perfectly, it is essential that the water
hardness setting is based on the actual water hardness in your house. This
information can be obtained from your local water supplier. The factory sets
the default value for the water hardness
- Switch on the appliance by pressing the ON/OFF button.
- Switch off the appliance by pressing the ON/OFF button.
- Hold down button P for 5 seconds, until you hear a beep.
- Switch on the appliance by pressing the ON/OFF button.
- The program indicator light of the current set level flashes.
- Press button P to select the desired hardness level (see WATER HARDNESS TABLE).
- Switch off the appliance by pressing the ON/OFF button.
Water Hardness Table
Level| °dH
German degrees
| °fH
French degrees
| °Clark
English degrees
1| Soft| 0 – 6| 0 – 10| 0 – 7
2| Medium| 7 – 11| 11 – 20| 8 – 14
3| Average| 12 – 16| 21 – 29| 15 – 20
4| Hard| 17 – 34| 30 – 60| 21 – 42
5| Very hard| 35 – 50| 61 – 90| 43 – 62
The setting is complete!
As soon as this procedure is complete, run a program without loading. Only use
salt that has been specifically designed for dishwashers. After the salt has
been poured into the machine, the SALT REFILL indicator light switches off.
If the salt container is not filled, the water softener and the heating
element may be damaged as a result of limescale accumulation. Using Salt is
recommended with any type of dishwasher detergent.
FILLING THE RINSE AID DISPENSER
Rinse aid makes dish DRYING easier. The rinse aid dispenser A should be filled
when the dark optical indicator on the dispenser door C becomes transparent.

- Open the dispenser B by pressing and pulling up the tab on the lid.
- Pour in the rinse aid (max.110 ml), making sure it does not overflow from the dispenser. If this happens, clean the spill immediately with a dry cloth.
- Press the lid down until you hear a click to close it.
NEVER pour the rinse aid directly into the appliance tub.
ADJUSTING THE DOSAGE OF RINSE AID
If you are not completely satisfied with the drying results, you can adjust
the quantity of rinse aid used.
- Switch the dishwasher on using the ON/OFF button.
- Switch it off using the ON/OFF button.
- Press button P three times – a beep will be heard.
- Switch it on using the ON/OFF button.
- The program indicator light of the current set level flashes.
- Press button P to select the level of rinse aid quantity to be supplied.
- Switch it off using the ON/OFF button Setting is complete!
If the rinse aid level is set to 1 (ECO), no rinse aid will be supplied.
A maximum of 5 levels can be set according to the dishwasher model. The
factory setting is specific to the model, please follow the instructions above
to check this for your machine.
- If you see bluish streaks on the dishes, set a low number (2-3).
- If there are drops of water or limescale marks on the dishes, set a mid-range number (4-5 ).
FILLING THE DETERGENT DISPENSER
To open the detergent dispenser use the opening device D. Introduce the
detergent into the dry dispenser E only. Place the amount of detergent for
pre-washing directly inside the tub.
- When measuring out the detergent refer to the mentioned earlier information to add the proper quantity. Inside the dispenser E, there are indications to help the detergent dosing.
- Remove detergent residues from the edges of the dispenser and close the cover until it clicks.
- Close the lid of the detergent dispenser by pulling it up until the closing device is secured in place.
The detergent dispenser automatically opens up at the right time according to
the program.
Usage of detergent not designed for dishwashers may cause mal-function or
damage to the appliance.
PROGRAMS TABLE

ECO program data is measured under laboratory conditions according to European
Standard EN 60436:2020.
Note for Test Laboratories:
For information on comparative EN testing conditions, please send an email to
the following address:
assistenza_en_lvs@indesitcompany.com
Pre-treatment of the dishes is not needed before any of the programs.*) Values
given for programs other than the eco-program are indicative only. The actual
time may vary depending on many factors such as temperature and pressure of
the incoming water, room temperature, amount of detergent, quantity and type
of load, load balancing, additional selected options, and sensor calibration.
The sensor calibration can increase program duration by up to 20 min.
PROGRAMS DESCRIPTION
Instructions on wash cycle selection
-
1 ECO
Eco program is suitable for cleaning normally soiled tableware, for this use,
it is the most efficient program in terms of its combined energy and water
consumption, and it is used to assess compliance with the EU Ecodesign
legislation. -
2 INTENSIVE
Program recommended for heavily soiled crockery, especially suitable for pans
and saucepans (not to be used for delicate items). -
3 MIXED
Mixed soil. For normally soiled dishes with dried food residues. -
4 RAPID 40’
Program to be used for a half load of lightly soiled dishes with no dried food
residues. Does not have a drying phase. -
5 HALF LOAD
Ideal for washing a half load of lightly or normally soiled crockery.- Notes: Please note that cycle Rapid 40’ is dedicated to lightly soiled dishes.
LOADING THE RACKS
UPPER RACK
Load delicate and light dishes: glasses, cups, saucers, and low salad bowls.
(loading example for the upper rack)
ADJUSTING THE HEIGHT OF THE UPPER RACK
- The height of the upper basket can be adjusted: a high position to place bulky crockery in the lower basket and a low position to make the most of the tip-up compartments by creating more space upwards.
- The upper rack is equipped with an Upper Rack height adjuster (see figure), without pressing the levers, lift it up by simply holding the rack sides, as soon as the rack is stable in its upper position. To restore to the lower position, press the levers (A) at the sides of the rack and move the basket downwards.
- We strongly recommend that you do not adjust the height of the rack when it is loaded.
- NEVER raise or lower the basket on one side only.
FOLDABLE FLAPS WITH ADJUSTABLE POSITION
-
The side foldable flaps can be folded or folded to optimize the arrangement of crockery inside the rack.
-
Wine glasses can be placed safely in the foldable flaps by inserting the stem of each glass into the corresponding slots.
-
Depending on the model:
-
- to unfold the flaps there is a need to slide it up and rotate or release it from the snaps and pull it down.
- to fold the flaps there is a need to rotate it and slide flaps down or pull it up and attach flaps to the snaps.
- to unfold the flaps there is a need to slide it up and rotate or release it from the snaps and pull it down.
LOWER RACK
For pots, lids, plates, salad bowls, cutlery, etc… Large plates and lids
should ideally be placed at the sides to avoid interferences with the spray
arm.
(loading example for the lower rack)
CUTLERY BASKET
It is fitted with top grids for improved cutlery arrangement. It must only be
positioned at the front of the lower rack.

Knives and other utensils with sharp edges must be placed in the cutlery
basket with the points facing downwards or they must be positioned
horizontally in the tip-up compartments on the upper rack.
DAILY USE
-
CHECK WATER CONNECTION
Check that the dishwasher is connected to the water supply and that the tap is
open. -
SWITCH ON THE DISHWASHER
Open the door and press the ON/OFF button. -
LOAD THE RACKS (see LOADING THE RACKS)
-
FILLING THE DETERGENT DISPENSER
-
CHOOSE THE PROGRAM AND CUSTOMISE THE CYCLE
Select the most appropriate program per the type of crockery and its soiling
level (see PROGRAMS DESCRIPTION) by pressing the P button. -
START
Start the wash cycle by pressing the START/Pause button (LED is lit) and
closing the door within 4 sec. When the program starts you hear a single beep.
If the door is not closed within 4 seconds, the alarm sound will be played. In
this case, open the door, press the START/Pause button, and close the door
again within 4 sec. -
END OF WASH CYCLE
The end of the wash cycle is indicated by beeps and by the flashing of the
indicator light of the selected program. Open the door and switch off the
appliance by pressing the ON/OFF button. Wait for a few minutes before
removing the crockery – to avoid burns. Unload the racks, beginning with the
lower one.
The machine will switch off automatically during certain extended periods of
inactivity, to minimize electricity consumption. If the crockery is only
lightly soiled or if it has been rinsed with water before being placed in the
dishwasher, reduce the amount of detergent used accordingly.
-
MODIFYING A RUNNING PROGRAM
- If a wrong program was selected, it is possible to change it, provided that it has only just begun: open the door, press and hold the ON/OFF button, and the machine will switch off.
- Switch the machine back on using the ON/OFF button and select the new wash cycle and any desired options; Start the wash cycle by pressing the START/Pause button and closing the door within 4 sec.
-
ADDING EXTRA CROCKERY
Without switching off the machine, open the door (START/Pause LED starts
blinking) (beware of HOT steam!) and place the crockery inside the dishwasher.
Press the START/Pause button and close the door within 4 sec., the cycle will
resume from the point at which it was interrupted. -
ACCIDENTAL INTERRUPTIONS
If the door is opened during the wash cycle, or if there is a power cut,
the cycle stops. Press the START/Pause button and close the door within 4
sec., the cycle will resume from the point at which it was interrupted.
ADVICE AND TIPS
TIPS
- Before loading the baskets, remove all food residues from the crockery and empty the glasses. You do not need to rinse beforehand under running water.
- Arrange the crockery so that it is held in place firmly and does not tip over; and arrange the containers with the openings facing downwards and the concave/convex parts placed obliquely, thus allowing the water to reach every surface and flow freely.
- Warning: lids, handles, trays, and frying pans do not prevent the sprayer arms from rotating.
- Place any small items in the cutlery basket.
- Very soiled dishes and pans should be placed in the lower basket because in this sector the water sprays are stronger and allow a higher washing performance.
- After loading the appliance, make sure that the sprayer arms can rotate freely.
UNSUITABLE CROCKERY
- Wooden crockery and cutlery.
- Delicate decorated glasses, artistic handicrafts, and antique crockery. Their decorations are not resistant.
- Parts in synthetic material that do not withstand high temperatures.
- Copper and tin crockery.
- Crockery soiled with ash, wax, lubricating grease, or ink.
The colors of glass decorations and aluminum/silver pieces can change and fade
during the washing process. Some types of glass (e.g. crystal objects) can
become opaque after several wash cycles too.
DAMAGE TO GLASS AND CROCKERY
- Only use glasses and porcelain guaranteed by the manufacturer as dishwasher safe.
- Use a delicate detergent suitable for crockery
- Collect glasses and cutlery from the dishwasher as soon as the wash cycle is over.
TIPS ON ENERGY SAVING
- When the household dishwasher is used according to the manufacturer’s instructions, washing tableware in a dishwasher usually consumes less energy and water than hand dishwashing.
- To maximize dishwasher efficiency it is recommended to initiate the wash cycle once the dishwasher is fully loaded. Loading the household dishwasher up to the capacity indicated by the manufacturer will contribute to energy and water savings. Information on the correct loading of tableware can be found in the Loading chapter. In case of partial loading, it is recommended to use dedicated wash options if available (Half load/ Zone Wash, Multizone), filling up only selected racks. Incorrect loading or overloading the dishwasher may increase resource usage (such as water, energy, and time, as well as increase noise level), reducing cleaning and drying performance.
- Manual pre-rinsing of tableware items leads to increased water and energy consumption and is not recommended.
HYGIENE
To avoid odor and sediment which can be accumulated in the dishwasher please
run a high-temperature program at least once a month. Use a tea spoon of
detergent and run it without loading to clean your appliance.
CARE AND MAINTENANCE
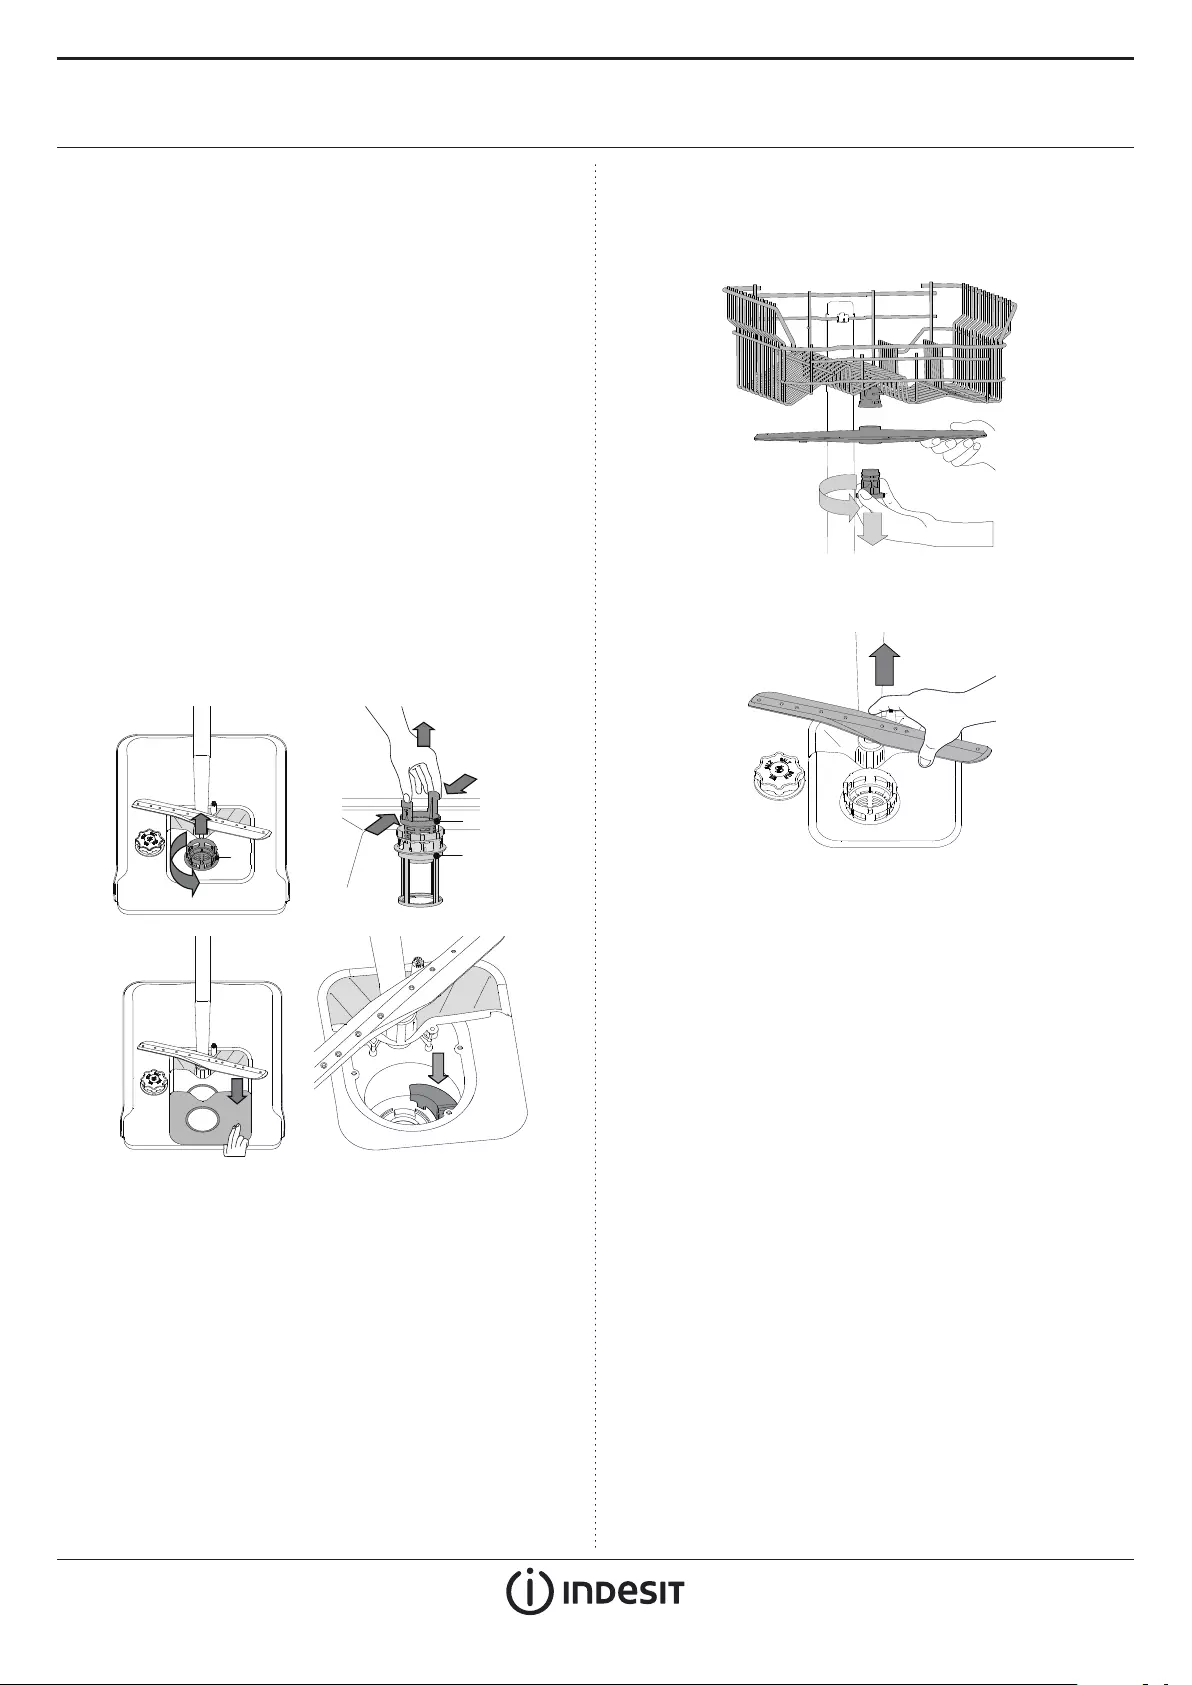
CLEANING THE FILTER ASSEMBLY
- Regularly clean the filter assembly so that the filters do not clog and that the waste water flows away correctly.
- Using a dishwasher with clogged filters or foreign objects inside the filtration system or spray arms may cause unit malfunction resulting in loss of performance, noisy work, or higher resource usage.
- The filter assembly consists of three filters which remove food residues from the washing water and then recirculate the water.
- The dishwasher must not be used without filters or if the filter is loose.
- At least once per month or after every 30 cycles, check the filter assembly and if necessary clean it thoroughly under running water, using a non–metallic brush and following the instructions below:
- Turn the cylindrical filter A in an anti-clockwise direction and pull it out (Fig 1).
- Remove the cup filter B by exerting a slight pressure on the side flaps (Fig 2).
- Slide out the stainless-steel plate filter C (Fig 3).
- In case you find foreign objects (such as broken glass, porcelain, bones, fruit seeds, etc.) please remove them carefully.
- Inspect the trap and remove any food residues. NEVER REMOVE the wash-cycle pump protection (black detail) (Fig 4).
After cleaning the filters, re-place the filter assembly and fix it in
position correctly; this is essential for maintaining the efficient operation
of the dishwasher.
CLEANING THE WATER INLET HOSE
If the water hoses are new or have not been used for an extended period, let
the water run to make sure it is clear and free of impurities before
performing the necessary connections. If this precaution is not taken, the
water inlet could become blocked and da-mage the dishwasher.
CLEANING THE SPRAY ARMS
On occasions, food residue may become encrusted onto the spray arms and block
the holes used to spray the water. It is therefore recommended that you check
the arms from time to time and clean them with a small non-metallic brush.
To remove the upper spray arm, turn the plastic locking ring in an anti-
clockwise direction. The upper spray arm should be replaced so that the side
with the greater number of holes is facing upwards.
The lower spray arm may be removed by pulling it upwards.
WATER SOFTENING SYSTEM
- Water softener automatically reduces water hardness, consequently preventing scale buildup on the heater, contributing also to better cleaning efficiency.
- This system regenerates itself with salt, therefore it is required to refill the salt containers when empty.
- The frequency of regeneration depends on the water hardness level setting – regeneration takes place once per 5 Eco cycles with the water hardness level set to 3.
- The regeneration process starts in the final rinse and finishes in the drying phase before the cycle ends.
- Single regeneration consumes: ~3.5L of water;
- Takes up to 5 additional minutes for the cycle;
- Consumes below 0.005kWh of energy.
TROUBLESHOOTING
In case your dishwasher doesn’t work properly, check if the problem can be
solved by going through the following list.
For other errors or issues please contact authorized After-sales Service whose
contact details can be found in the warranty booklet. The manufacturer ensures
the availability of spare parts for at least 10 years after the production
date of this appliance.
| PROBLEMS | POSSIBLE CAUSES | SOLUTIONS |
|---|
The dishwasher won’t start
or does not respond to commands.
| The appliance has not been plugged in properly.| Insert the plug into the
socket.
Power outage.| For safety reasons, the dishwasher will not restart
automatically when power returns. Open the dishwasher door, press the
START/Pause button and close the door within
____4 seconds.
The dishwasher door is not closed.| Vigorously push the door until you hear
the “click”.
The cycle is interrupted by the door opening for more than 4 seconds.| Press
START/Pause and close the door within 4 seconds.
It does not respond to commands.
| Switch off the appliance by pressing the ON/OFF button, switch it back
on after approximately one minute, and restart the program. If the problem
persists, unplug the appliance for 1 minute, then plug it back in.
The dishwasher won’t drain.| The wash cycle has not finished yet.| _Wait
until the wash cycle finishes._
The drain hose is bent.| ___Check that the drain hose is not bent (see
INSTALATION INSTRUCTION)._
The sink drain pipe is blocked.| Clean the sink drain pipe.
The filter is clogged up with food residues.| Clean the filter (see CLEANING
THE FILTER ASSEMBLY).
The dishwasher makes excessive noise.| The dishes are rattling against each
other.| Position the crockery correctly (see LOADING THE RACKS).
An excessive amount of foam has been produced.
| The detergent has not been measured out correctly or it is not suitable for
use in dishwashers (see FILLING THE DETERGENT DISPENSER). Restart
the current cycle by switching OFF the dishwasher, then switch it on again,
select a new program, press START/Pause, and close the door within 4
seconds. Please do not add any detergent.
The dishes are not clean.| The crockery has not been arranged properly.|
Arrange the crockery correctly (see LOADING THE RACKS).
The spray arms cannot rotate freely, being hindered by the dishes.| Arrange
the crockery correctly (see LOADING THE RACKS).
The wash cycle is too gentle.| Select an appropriate wash cycle (see PROGRAMS
TABLE).
An excessive amount of foam has been produced.| The detergent has not been
measured out correctly or it is not suitable for use
__in dishwashers (see FILLING THE DETERGENT DISPENSER).
The cap on the rinse aid compartment has not been shut correctly.| Make sure
the cap of the rinse aid dispenser is closed.
The filter is soiled or clogged.| Clean the filter assembly (see CARE AND
MAINTENANCE).
There is no salt.| Fill the salt reservoir (see FILLING THE SALT RESERVOIR).
The dishwasher does not fill
the water.
All LEDs are blinking rapidly
| No water in the water supply or the tap is closed.| Make sure there is water
in the water supply or the tap running.
The inlet hose is bent.| Make sure the inlet hose is not bent (see
INSTALLATION) reprogram
__the dishwasher and reboot.
The sieve in the water inlet hose is clogged; it is necessary to clean it|
After having carried out the verification and cleaning, turn off and turn on
the dishwasher and restart a new program.
The dishwasher finishes the cycle prematurely.| Drain hose positioned too low
or siphoning into the home sewage system.| Check if the end of the drain hose
is placed at the correct height (see INSTALLATION). Check for siphoning into
the home sewage system, and install an air admittance valve if necessary.
Air in water supply.| Check the water supply for leaks or other issues letting
air inside.
Policy and standard documentation and additional product information can be
found by:
- Visiting our website docs.indesit.eu
- Using QR Code
- Alternatively, contact our After-sales Service (See phone number in the warranty booklet). When contacting our After-sales Service, please state the codes provided on your product‘s identification plate.
The model information can be retrieved using the QR code reported in the
energy label.
The label also includes the model identifier that can be used to consult the
portal of the registry at https://eprel.ec.europa.eu (available only on
certain models).
400011498068
09/2020 ks – Xerox Fabriano
Frequently Asked Questions
What is the purpose of the upper rack in the dishwasher, and how should I use
it?
The upper rack is designed for loading delicate and light dishes such as
glasses, cups, saucers, and low salad bowls. It’s important to load it
correctly to avoid tipping over.
How do I adjust the height of the upper rack?
The upper rack comes with a height adjuster. You can raise it to accommodate
bulky crockery in the lower basket or lower it to create more space in the
upper rack. Make sure not to adjust the height when it’s loaded.
What is the purpose of foldable flaps in the upper rack, and how do I use
them?
The foldable flaps in the upper rack can be folded or unfolded to optimize the
arrangement of crockery inside the rack. You can use them to secure wine
glasses by inserting their stems into the slots provided.
What should I load in the lower rack, and are there any loading tips?
The lower rack is suitable for pots, lids, plates, salad bowls, cutlery, etc.
Make sure to place large plates and lids at the sides to avoid interfering
with the spray arm’s rotation.
How do I use the cutlery basket, and where should I position it?
The cutlery basket is designed for cutlery placement. It should be positioned
at the front of the lower rack. Knives and sharp utensils should be placed
with the points facing downwards or horizontally in the tip-up compartments on
the upper rack.
How do I fill the salt reservoir, and why is it important?
Filling the salt reservoir is crucial to prevent limescale formation on dishes
and machine components. The salt reservoir is located in the lower part of the
dishwasher. You need to fill it when the green float on the cap is no longer
visible. Follow the provided instructions to fill it properly.
How do I set the water hardness level for the dishwasher?
Setting the water hardness level is essential for the water softener to work
correctly. You should set it based on the actual water hardness in your area.
Follow the instructions in the user manual to configure this setting.
How do I fill the rinse aid dispenser, and what is its purpose?
The rinse aid dispenser helps with dish drying. Fill it when the dark optical
indicator on the dispenser door becomes transparent. Instructions for filling
the rinse aid dispenser are provided in the user manual.
How can I adjust the dosage of rinse aid if needed?
You can adjust the quantity of rinse aid used if you are not satisfied with
the drying results. Follow the instructions in the user manual to adjust the
rinse aid dosage.
How do I fill the detergent dispenser, and where should I place the detergent?
To fill the detergent dispenser, use the opening device and introduce the
detergent into the dry dispenser. Follow the markings for proper dosing.
Detailed instructions are available in the user manual.
What are the available programs for this dishwasher, and how do I select them?
The dishwasher offers different programs such as ECO, INTENSIVE, MIXED, RAPID
40′, and HALF LOAD. You can select the program based on your needs by pressing
the program selection button. Refer to the user manual for program
descriptions.
Can I modify a running program, and how can I do it?
Yes, you can modify a running program if it has just begun. Open the door,
press and hold the ON/OFF button, and then select a new wash cycle and
options. Close the door within 4 seconds to continue.
Reference:Indesit DSIE 2B10 Integrated Dishwasher User Guide-
device.report
Read User Manual Online (PDF format)
Read User Manual Online (PDF format) >>
Download This Manual (PDF format)
Download this manual >>
Displayed below is the user manual for DSIE 2B10 UK N by Indesit which is a product in the Dishwashers category.
This manual has pages.
EN
1
Before using the appliance carefully read Safety Instructions guide.
APPLIANCE
THANK YOU FOR BUYING A INDESIT PRODUCT.
In order to receive a more complete assistance, please
register your appliance on: www.indesit.com/register
You can download the Safety Instructions
and the
User Manual, by visiting our website
docs.indesit.eu
and following the Instructions
on the back of this booklet.
1. Upper rack
2. Foldable aps
3. Upper rack height adjuster
4. Upper spray arm
5. Lower rack
6. Cutlery basket
7. Lower spray arm
8. Filter Assembly
9. Salt reservoir
10. Detergent and Rinse Aid dispensers
11. Rating plate
12. Control panel
1. ON-OFF / Reset button with indicator light
2. Program selection button
3. Program indicator lights
4. START/Pause button with indicator light
DAILY REFERENCE
GUIDE
CONTROL PANEL
PRODUCT DESCRIPTION
1 2 3 4
0000 000 00000
Service:
1
2
3
4
5
6
7
98
1011
12
2
FIRST TIME USE
SALT, RINSE AID AND DETERGENT
ADVICE REGARDING THE FIRST TIME USE
After installation, remove the stoppers from the racks and the retaining
elastic elements from the upper rack.
FILLING THE SALT RESERVOIR
The use of salt prevents the formation of LIMESCALE on the dishes
and on the machine’s functional components.
• It is mandatory that THE SALT RESERVOIR NEVER BE EMPTY.
• It is important to set the water hardness.
The salt reservoir is located in the lower part of the dishwasher
(see Product Description) and must be lled when the green oat on the
cap of the salt reservoir is no longer visible..
1. Remove the lower rack and unscrew the
reservoir cap (anticlockwise).
2. Only the rst time you do this: ll the salt
reservoir with water.
3. Position the funnel (see gure) and ll the salt
reservoir right up to its edge (approximately
1 kg); it is not unusual for a little water to leak
out.
4. Remove the funnel and wipe any salt residue
away from the opening.
Make sure the cap is screwed on tightly, so that no detergent can get
into the container during the wash program (this could damage the wa-
ter softener beyond repair).
Whenever you need to add salt, it is mandatory to complete the
procedure before the beginning of the washing cycle to avoid corrosion.
SETTING THE WATER HARDNESS
To allow the water softener to work in a perfect way, it is essential that
the water hardness setting is based on the actual water hardness in your
house. This information can be obtained from your local water supplier.
The factory sets the default value for the water hardness
• Switch on the appliance by pressing the ON/OFF button.
• Switch o the appliance by pressing the ON/OFF button.
• Hold down button P for 5 seconds, until you hear a beep.
• Switch on the appliance by pressing the ON/OFF button.
• The program indicator light of the current set level ashes.
• Press button P to select the desired hardness level (see WATER
HARDNESS TABLE).
• Switch o the appliance by pressing the ON/OFF button.
Setting is complete!
As soon as this procedure is complete, run a program without loading.
Only use salt that has been specically designed for dishwashers.
After the salt has been poured into the machine, the SALT REFILL indi-
cator light switches o.
If the salt container is not lled, the water softener and the heating
element may be damaged as a result of limescale accumulation.
Using of Salt is recommended with any type of dishwasher deter-
gent.
Water Hardness Table
Level
°dH
German
degrees
°fH
French
degrees
Liters
Softening capacity
(depending of the set
hardness Level)
1 Soft 0 — 6 0 — 10 150
2 Medium 7 — 11 11 — 20 100
3 Average 12 — 16 21 — 30 50
4 Hard 17 — 34 31 — 60 30
5 Very hard 35 — 50 61 — 90 16
Example: Level 3 is set as default, what means regeneration of the softener should take
place once per 50 ltr.
More on SOFTENER REGENERATION (how often it occures, the uses of water,
energy, etc.) you can nd on the page CARE AND MAINTENANCE.
FILLING THE RINSE AID DISPENSER
Rinse aid makes dish DRYING easier. The rinse aid dispenser A should
be lled when when the dark optical indicator on the dispenser door C
becomes transparent.
1. Open the dispenser B by pressing and pulling up the tab on the lid.
2. Pour in the rinse aid (max.110 ml), making sure it does not overow
from the dispenser. If this happens, clean the spill immediately with
a dry cloth.
3. Press the lid down until you hear a click to close it.
NEVER pour the rinse aid directly into the appliance tub.
ADJUSTING THE DOSAGE OF RINSE AID
I
f you are not completely satised with the drying results, you can adjus
t
the quantity of rinse aid used.
• Switch the dishwasher on using the ON/OFF button.
• Switch it o using the ON/OFF button.
• Press button P three times — a beep will be heard.
• Switch it on using the ON/OFF button.
• The program indicator light of the current set level ashes.
• Press button P to select the level of rinse aid quantity to be supplied.
• Switch it o using the ON/OFF button
Setting is complete!
If the rinse aid level is set to 1 (ECO), no rinse aid will be supplied.
A maximum of 5 levels can be set according to the dishwasher model.
The factory setting is specic to the model, please follow instruction
above to check this for your machine.
• If you see bluish streaks on the dishes, set a low number (2-3).
• If there are drops of water or limescale marks on the dishes, set a mid-
-range number (4-5 ).
FILLING THE DETERGENT DISPENSER
To open the detergent dispenser use the opening device D.
Introduce the detergent into the dry dispenser E only. Place
the amount of detergent for pre-washing directly inside the tub.
1. When measuring out the detergent
refer to the mentioned earlier infor—
mation to add the proper quantity.
Inside the dispenser E there are
indications to help the detergent
dosing.
2. Remove detergent residues from
the edges of the dispenser and clo-
se the cover until it clicks.
3. Close the lid of the detergent
dispenser by pulling it up until
the closing device is secured in pla-
ce.
The detergent dispenser automatically opens up at the right time
according to the program.
Usage of detergent not designed for dishwashers may cause mal-
function or damage to the appliance.
A
B
C
Water Hardness Table
Level °dH
German degrees
°fH
French degrees
°Clark
English degrees
1 Soft 0 — 6 0 — 10 0 — 7
2 Medium 7 — 11 11 — 20 8 — 14
3 Average 12 — 16 21 — 29 15 — 20
4 Hard 17 — 34 30 — 60 21 — 42
5 Very hard 35 — 50 61 — 90 43 — 62
EN
3
ECO program data is measured under laboratory conditions according to European Standard EN 60436:2020.
Note for Test Laboratories:
For information on comparative EN testing conditions, please send an email to the following address: assistenza_en_lvs@indesitcompany.com
Pre-treatment of the dishes is not needed before any of the programs.
*) Values given for programmes other than the eco programme are indicative only. The actual time may vary depending on many factors such as tem-
perature and pressure of the incoming water, room temperature, amount of detergent, quantity and type of load, load balancing, additional selected
options and sensor calibration. The sensor calibration can increase program duration up to 20 min.
Program
Drying
phase
Duration
of wash
program
(h:min)*)
Water
consumption
(litres/cycle)
Energy
consumption
(kWh/cycle)
1. Eco 50° 4:00 11.5 0.84
2. Intensive 65° 2:30 15.0 1.5
3. Mixed 55° 2:25 15.0 1.35
4. Rapid 40’
50°
—0:40 8.0 0.9
5. Half Load 50° 1:15 11.0 0.9
PROGRAMS TABLE
PROGRAMS DESCRIPTION
Instructions on wash cycle selection.
1 ECO
Eco program is suitable to clean normally soiled tableware, that for this
use, it is the most ecient program in terms of its combined energy
and water consumption, and that it is used to assess compliance with
the EU Ecodesign legislation.
2 INTENSIVE
Program recommended for heavily soiled crockery, especially suitable
for pans and saucepans (not to be used for delicate items).
3 MIXED
Mixed soil. For normally soiled dishes with dried food residues.
4 RAPID 40’
Program to be used for half load of lightly-soiled dishes with no dried
food residues. Does not have drying phase.
5 HALF LOAD
Ideal for washing a half load of lightly or normally soiled crockery.
Notes:
Please note that cycle Rapid 40’ is dedicated for lightly soiled dishes.
4
LOADING THE RACKS
LOWER RACK
For pots, lids, plates, salad bowls, cutlery
etc… Large plates and lids should ideally be
placed at the sides to avoid interferences
with the spray arm.
(loading example for the lower rack)
CUTLERY BASKET
It is tted with top grids for improved cutlery arrangement.
It must only be positioned at the front of the lower rack.
Knives and other utensils with sharp edges must be placed
in the cutlery basket with the points facing downwards or they
must be positioned horizontally in the tip-up compartments on
the upper rack.
UPPER RACK
Load delicate and light dishes: glasses, cups,
saucers, low salad bowls.
(loading example for the upper rack)
ADJUSTING THE HEIGHT OF THE UPPER RACK
The height of the upper basket can be
adjusted: high position to place bulky crockery
in the lower basket and low position to make
the most of the tip-up compartments by
creating more space upwards.
The upper rack is equipped with a Upper Rack
height adjuster (see gure), without pressing
the levers, lift it up by simply holding the rack
sides, as soon as the rack is stable in its upper
position. To restore to the lower position, press
the levers (A) at the sides of the rack and move the basket downwards.
We strongly recommend that you do not adjust the height
of the rack when it is loaded.
NEVER raise or lower the basket on one side only.
FOLDABLE FLAPS WITH ADJUSTABLE POSITION
The side foldable aps can be fold or unfold
to optimize the arrangement of crockery
inside the rack.
Wine glasses can be placed safely
in the foldable aps by inserting the stem
of each glass into the corresponding slots.
Depending on the model:
– to unfold the aps there is needed to slide
it up and rotate or release it from the snaps
and pull it down.
– to fold the aps there is needed to rotate
it and slide aps down or pull it up
and attach aps to the snaps.

EN
5
DAILY USE
1. CHECK WATER CONNECTION
Check that the dishwasher is connected to the water supply
and that the tap is open.
2. SWITCH ON THE DISHWASHER
Open the door and press the ON/OFF button.
3. LOAD THE RACKS (see LOADING THE RACKS)
4. FILLING THE DETERGENT DISPENSER
5. CHOOSE THE PROGRAM AND CUSTOMISE THE CYCLE
Select the most appropriate program in accordance with the type
of crockery and its soiling level (see PROGRAMS DESCRIPTION) by
pressing the P button.
6. START
Start the wash cycle by pressing START/Pause button (led is
lit) and closing the door within 4 sec. When the program starts
you hear a single beep. If the door was not closed within 4sec.,
the alarm sound will be played. In this case, open the door, press
START/Pause button and close the door again within 4 sec.
7. END OF WASH CYCLE
The end of the wash cycle is indicated by beeps and by the ash-
ing
of the indicator light of the selected program. Open the door
and switch o the appliance by pressing the ON/OFF button.
Wait for a few minutes before removing the crockery — to avoid
burns. Unload the racks, beginning with the lower one.
The machine will switch o automatically during certain extended
periods of inactivity, in order to minimise electricity consumption.
If the crockery is only lightly soiled or if it has been rinsed with
water before being placed in the dishwasher, reduce the amount
of detergent used accordingly.
MODIFYING A RUNNING PROGRAM
If a wrong program was selected, it is possible to change it, provided
that it has only just begun: open the door, press and hold the ON/OFF
button, the machine will switch o.
Switch the machine back on using the ON/OFF button and select
the new wash cycle and any desired options; Start the wash cycle by
pressing START/Pause button and closing the door within 4 sec.
ADDING EXTRA CROCKERY
Without switching o the machine, open the door (START/Pause led
starts blinking) (be ware of HOT steam!) and place the crockery inside
the dishwasher. Press the START/Pause button and close the door
within
4 sec., the cycle will resume from the point at which it was
interrupted.
ACCIDENTAL INTERRUPTIONS
If the door is opened during the wash cycle, or if there is a power cut,
the cycle stops. Press the START/Pause button and close the door
within
4 sec., the cycle will resume from the point at which it was
interrupted.
ADVICE AND TIPS
TIPS
Before loading the baskets, remove all food residues from the crockery
and empty the glasses. You do not need to rinse beforehand under
running water.
Arrange the crockery so that it is held in place rmly and does not tip
over; and arrange the containers with the openings facing downwards
and the concave/convex parts placed obliquely, thus allowing the wa-
ter to reach every surface and ow freely.
Warning: lids, handles, trays and frying pans do not prevent the spray-
er arms from rotating.
Place any small items in the cutlery basket.
Very soiled dishes and pans should be placed in the lower basket
because in this sector the water sprays are stronger and allow a higher
washing performance.
After loading the appliance, make sure that the sprayer arms can
rotate freely.
UNSUITABLE CROCKERY
• Wooden crockery and cutlery.
• Delicate decorated glasses, artistic handicraft and antique crockery.
Their decorations are not resistant.
• Parts in synthetic material which do not withstand high temperatures.
• Copper and tin crockery.
• Crockery soiled with ash, wax, lubricating grease or ink.
The colours of glass decorations and aluminium/silver pieces can
change and fade during the washing process. Some types of glass (e.g.
crystal objects) can become opaque after a number of wash cycles
too.
DAMAGE TO GLASS AND CROCKERY
• Only use glasses and porcelain guaranteed by the manufacturer
as dishwasher safe.
• Use a delicate detergent suitable for crockery
• Collect glasses and cutlery from the dishwasher as soon as the wash
cycle is over.
TIPS ON ENERGY SAVING
• When the household dishwasher is used according to the manufac-
turer’s instructions, washing tableware in a dishwasher usually
consumes less energy and water than hand dishwashing.
• In order to maximize dishwasher eciency it is recommended to in-
itiate the wash cycle once dishwasher is fully loaded. Loading
the household dishwasher up to the capacity indicated by the man-
ufacturer will contribute to energy and water savings. Information
on correct loading of tableware can be found in Loading chapter.
In case of partial loading it is recommended to use dedicated wash
options if available (Half load/ Zone Wash, Multizone), illing up only
selected racks. Incorrect loading or overloading the dishwasher may
increase resources usage (such as water, energy and time, as well
as increase noise level), reducing cleaning and drying performance.
• Manual pre-rinsing of tableware items leads to increased water
and energy consumption and is not recommended.
HYGIENE
To avoid odour and sediment which can be accumulated in the dish-
washer please run a high temperature program at least one
a month. Use a tea spoon of detergent and run it without the loading
to clean your appliance.
6
CARE AND MAINTENANCE
CLEANING THE FILTER ASSEMBLY
Regularly clean the lter assembly so that the lters do not clog and that
the waste water ows away correctly.
Using dishwasher with clogged lters or foreign objects inside ltra-
tion system or sprayarms may cause unit malfunction resulting in lose
of performance, noisy work or higher resources usage.
The lter assembly consists of three lters which remove food residues
from the washing water and then recirculate the water.
The dishwasher must not be used without lters or if the lter is
loose.
At least once per month or after each 30 cycles, check the lter assembly
and if necessary clean it thoroughly under running water, using a non—
-metallic brush and following the instructions below:
1. Turn the cylindrical lter A in an anti-clockwise direction and pull
it out (Fig 1).
2. Remove the cup lter B by exerting a slight pressure on the side
aps (Fig 2).
3. Slide out the stainless-steel plate lter C (Fig 3).
4. In case you nd foreign objects (such as broken glass, porcelain,
bones, fruit seeds etc.) please remove them carefully.
5. Inspect the trap and remove any food residues. NEVER REMOVE
the wash-cycle pump protection (black detail) (Fig 4).
After cleaning the lters, re-place the lter assembly and x it in
position correctly; this is essential for maintaining the ecient
operation of the dishwasher.
CLEANING THE WATER INLET HOSE
If the water hoses are new or have not been used for an extended
period of time, let the water run to make sure it is clear and free
of impurities before performing the necessary connections. If this
precaution is not taken, the water inlet could become blocked and da-
mage the dishwasher.
CLEANING THE SPRAY ARMS
On occasions, food residue may become encrusted onto the spray arms
and block the holes used to spray the water. It is therefore recommen—
ded that you check the arms from time to time and clean them with
a small non-metallic brush.
To remove the upper spray arm, turn the plastic locking ring in an
anti-clockwise direction. The upper spray arm should be replaced so
that the side with the greater number of holes is facing upwards.
The lower spray arm may be removed by pulling it upwards.
WATER SOFTENING SYSTEM
Water softener automatically reduces water hardness, consequently
preventing scale buildup on heater, contributing also to better cleaning
eciency.
This system regenerates itself with salt, therefore it is required
to rell salt container when empty.
Frequency of regeneration depends on water hardness level setting
— regeneration takes place once per 5 Eco cycles with water hardness
level set to 3.
Regeneration process starts in nal rinse and nishes in drying phase,
before cycle ends.
• Single regeneration consumes: ~3.5L of water;
• Takes up to 5 additional minutes for the cycle;
• Consumes below 0.005kWh of energy.
AA
B
C
1
3
2
4
EN
7
In case your dishwasher doesn’t work properly, check if the problem can be solved by going through the following list.
For other errors or issues please contact authorized After-sales Service which contact details can be found in the warranty booklet.
The manufacturer ensures the availability of spare parts for at least 10 years after production date of this appliance.
TROUBLESHOOTING
PROBLEMS POSSIBLE CAUSES SOLUTIONS
The dishwasher
won’t start
or does not
respond to com-
mands.
The appliance has not been plugged
in properly. Insert the plug into the socket.
Power outage.
For safety reasons, dishwasher will not re-start automatically when power returns.
Open dishwasher door, press START/Pause button and close the door within
4 seconds.
The dishwasher door is not closed. Vigorously push the door until you hear the “click”.
Cycle is interupted by door opening
for more than 4 seconds. Press START/Pause and close the door within 4 seconds.
It does not respond to commands.
Switch o the appliance by pressing the ON/OFF button, switch it back on
after approximately one minute and restart the program. If problem persists,
unplug the appliance for 1 minute, then plug it back in.
The dishwasher
won’t drain.
The wash cycle has not nished yet. Wait until the wash cycle nishes.
The drain hose is bent. Check that the drain hose is not bent (see INSTALATION INSTRUCTION).
The sink drain pipe is blocked. Clean the sink drain pipe.
The lter is clogged up with food residues. Clean the lter (see CLEANING THE FILTER ASSEMBLY).
The dishwasher
makes
excessive noise.
The dishes are rattling against each other. Position the crockery correctly (see LOADING THE RACKS).
An excessive amount of foam has been
produced.
The detergent has not been measured out correctly or it is not suitable
for use in dishwashers (see FILLING THE DETERGENT DISPENSER). Restart
the current cycle by switching OFF the dishwasher, then switch it on again,
select a new program, press START/Pause and close the door within 4
seconds. Please do not add any detergent.
The dishes are
not clean.
The crockery has not been arranged
properly. Arrange the crockery correctly (see LOADING THE RACKS).
The spray arms cannot rotate freely, being
hindered by the dishes. Arrange the crockery correctly (see LOADING THE RACKS).
The wash cycle is too gentle. Select an appropriate wash cycle (see PROGRAMS TABLE).
An excessive amount of foam has been
produced.
The detergent has not been measured out correctly or it is not suitable for use
in dishwashers (see FILLING THE DETERGENT DISPENSER).
The cap on the rinse aid compartment has
not been shut correctly. Make sure the cap of the rinse aid dispenser is closed.
The lter is soiled or clogged. Clean the lter assembly (see CARE AND MAINTENANCE).
There is no salt. Fill the salt reservoir (see FILLING THE SALT RESERVOIR).
The dishwasher
does not ll
the water.
All LEDs are
blinking rapidly
No water in the water supply or the tap is
closed. Make sure there is water in the water supply or the tap running.
The inlet hose is bent. Make sure the inlet hose is not bent (see INSTALLATION) reprogram
the dishwasher and reboot.
The sieve in the water inlet hose is clogged;
it is necessary to clean it
After having carried out the verication and cleaning, turn o and turn on
the dishwasher and restart a new program.
Dishwasher
nishes the cycle
prematurely.
Drain hose positioned too low or siphoning
into home sewage system.
Check if end of drain hose is placed at correct height (see INSTALLATION).
Check for siphoning into home sewage system, install air admittance valve
if necessary.
Air in water supply. Check water supply for leaks or other issues letting air inside.
Policy and standard documentation and additional product information can be found by:
• Visiting our website docs.indesit.eu
• Using QR Code
• Alternatively, contact our After-sales Service (See phone number in the warranty booklet).
When contacting our After-sales Service, please state the codes provided on your product‘s
identication plate.
The model information can be retrieved using the QR-Code reported in the energy label.
The label also includes the model identier that can be used to consult the portal of the registry
at https://eprel.ec.europa.eu (available only on certain models).
IEC 436
:

8
09/2020 ks — Xerox Fabr