
Инструкция по эксплуатации для стиральной машины IKEA RENLIGFWM
Комплектующие для стиральной машины
Тэны
| Модель | Фото |
|---|---|
|
Тэн для стиральной машины 1950 W 230 мм с отверстием (46142) Thermowatt |
Подставки
| Модель | Фото |
|---|---|
|
Антивибрационные подставки для стиральной машины SKL |
|
|
Антивибрационные подставки для стиральной машины |
Право на изменения сохраняется.
Сведения по технике безопасности
Перед установкой и эксплуатацией прибора внимательно ознакомьтесь с приложенным руководством. Производитель не несет ответственность за травмы и повреждения, полученные/вызванные неправильной установкой и эксплуатацией. Позаботьтесь о том, чтобы данное руководство было у Вас под рукой на протяжении всего срока службы прибора.
Безопасность детей и лиц с ограниченными возможностями
ВНИМАНИЕ!
Существует риск удушья, получения травм или стойких нарушений нетрудоспособности.
• Данный прибор может эксплуатироваться детьми старше 8 лет и лицами с ограниченными физическими, сенсорными или умственными способностями и с недостаточным опытом или знаниями только при условии нахождения под присмотром лица, отвечающего за их безопасность, или после получения соответствующих инструкций, позволяющих им безопасно эксплуатировать электроприбор и дающих им представление об опасности, сопряженной с его эксплуатацией.
• Не позволяйте детям играть с прибором.
• Детям младше 3 лет запрещается находиться рядом с прибором, если взрослые не обеспечивают за ними постоянный надзор.
• Храните все упаковочные материалы вне досягаемости детей.
• Храните все средства для стирки вне досягаемости детей.
• Не подпускайте детей и домашних животных к прибору, когда его дверца открыта.
• Если прибор оснащен устройством защиты от детей, рекомендуем Вам включить это устройство.
• Очистка и доступное пользователю техническое обслуживание не должно производиться детьми без присмотра.
Общие правила техники безопасности
• Не изменяйте параметры данного прибора.
• Прибор может быть установлен как отдельно, так и под столешницу, если под ней достаточно места.
• Не устанавливайте прибор за дверью, запираемой на замок, за раздвижной дверью или за дверью с петлями, расположенными на противоположной стороне по отношению к петлям на дверце прибора.
• Вставляйте вилку сетевого кабеля в розетку только во конце установки прибора. Убедитесь, что после установки имеется доступ к вилке.
• Вентиляционные отверстия в днище (если они предусмотрены конструкцией) не должны перекрываться ковровым покрытием.
• Обеспечьте надлежащую вентиляцию для того, чтобы избежать обратного притока газов в помещение, создаваемого устройствами, в которых происходит сгорание других видов топлива (включая камины).
• Запрещается отводить выпускаемый прибором воздух в вытяжную систему, используемую для приборов, в которых происходит сжигание газа или иных видов топлива (если это применимо).
• Рабочее давление воды (минимальное и максимальное) должно находиться в пределах 0,5 бар (0,05 МПа) и 8 бар (0,8 МПа).
• Соблюдайте максимально допустимую загрузку в 7 кг (см. Главу «Таблица программ»).
• При подключении прибора к водопроводу должны использоваться новые поставляемые с ним комплекты шлангов. Использовать старые комплекты шлангов нельзя.
• В случае повреждения шнура питания во избежание несчастного случая он должен быть заменен изготовителем, авторизованным сервисным центром или специалистом с равнозначной квалификацией.
• Убирайте ворс, скопившийся вокруг прибора.
• Перед тем, как сушить в стирально-сушильной машине вещи, загрязненные такими веществами, как кулинарный жир, ацетон, спирт, бензин, керосин, пятновыводители, скипидар, воск и средства для удаления воска, их следует выстирать в горячей воде с увеличенным количеством стирального порошка.
• Не используйте прибор для вещей, подвергшиеся чистке с помощью промышленных химикатов.
• Не сушите в стирально-сушильной машине нестиранные вещи.
• Нельзя сушить в стирально-сушильной машине изделия из вспененной резины (латексная губка), шапочки для душа, водостойкие текстильные изделия, изделия на резиновой основе, а также одежду и подушки со вставками из вспененной резины.
• Смягчители для ткани и другие подобные средства следует использовать в соответствии с указаниями их изготовителей.
• Выньте из карманов все предметы, например, зажигалки и спички.
• Никогда не останавливайте стирально-сушильную машину до завершения цикла сушки за исключением случая, когда белье быстро вынимается и расстилается для обеспечения рассеивания тепла.
• Заключительный этап цикла сушки в стирально-сушильной машине выполняется без нагрева (этап охлаждения) для того, чтобы конечная температура белья позволила обеспечить его сохранность.
• Не используйте для очистки прибора подаваемую под давлением воду или пар.
• Протирайте прибор мягкой влажной тряпкой. Используйте только нейтральные моющие средства. Не используйте абразивные средства, царапающие губки, растворители или металлические предметы.
• Перед выполнением операций по чистке и уходу выключите прибор и извлеките вилку сетевого шнура из розетки.
Указания по безопасности
Установка
• Удалите всю упаковку и вывинтите транспортировочные болты.
• Сохраните транспортировочные болты. Перед следующим перемещением прибора Вам будет необходимо заблокировать барабан.
• Прибор имеет большой вес: не забывайте о мерах предосторожности при его перемещении. Обязательно используйте защитные перчатки.
• Не устанавливайте и не подключайте прибор, если он имеет повреждения.
• Следуйте приложенным к прибору инструкциям по его установке.
• Убедитесь, что пол на месте установки прибора ровный, прочный, чистый и не боится нагрева.
• Не устанавливайте прибор там, где его дверцу будет невозможно полностью открыть.
• Перемещайте прибор только в вертикальном положении.
• Задняя сторона прибора должна располагаться у стены.
• Убедитесь, что между днищем прибора и полом имеется достаточная вентиляция.
• Для обеспечения необходимого пространства между прибором и ковровым покрытием отрегулируйте высоту ножек прибора.
• После установки прибора в рабочее положение при помощи спиртового уровня убедитесь в том, что прибор стоит абсолютно ровно. При необходимости выровняйте его, изменяя высоту ножек.
Подключение к электросети
ВНИМАНИЕ! Существует риск пожара и поражения электрическим током.
• Прибор должен быть заземлен.
• Включайте прибор только в установленную надлежащим образом электророзетку с защитным контактом.
• Не пользуйтесь тройниками и удлинителями.
• Для отключения прибора от электросети не тяните за кабель электропитания. Всегда беритесь за саму вилку.
• Не беритесь за кабель электропитания или за его вилку мокрыми руками.
• Только для Великобритании и Ирландии: Прибор оснащен вилкой, расчитанной на ток 13 А. При замене предохранителя в вилке электропитания следует использовать предохранитель 13 А ASTA (BS 1362).
• Данный прибор соответствует директивам E.E.C.
Подключение к водопроводу
• Следите за тем, чтобы не повредить шланги для воды.
• Перед подключением прибора к новым или давно не использовавшимся трубам дайте воде стечь, пока она не станет чистой.
• Перед первым использованием прибора убедитесь в отсутствии протечек.
Эксплуатация
ВНИМАНИЕ! Существует риск травмы, поражения электрическим током, пожара, получения ожогов или повреждения прибора.
• Используйте прибор только в жилых помещениях.
• Не изменяйте параметры данного прибора.
• Не кладите на прибор, рядом с ним или внутрь него легковоспламеняющиеся материалы или изделия, пропитанные легковоспламеняющимися веществами.
• Не прикасайтесь к стеклянной части дверцы во время работы программы. Дверца может быть горячей.
• Не сушите поврежденные изделия с набивкой или наполнителями.
• Если при стирке белья использовался пятновыводитель, то перед тем, как запустить цикл сушки, следует выполнить дополнительный цикл полоскания.
• Удостоверьтесь, что из белья извлечены все металлические предметы.
• Сушите только ткани, для которых допускается сушка в стирально-сушильной машине. Следуйте указаниям на ярлыке.
• Пластмассовые предметы не являются жаростойкими.
– В случае использования мерного шарика для моющего средства извлеките его перед запуском программы сушки.
– Не используйте мерный шарик для моющего средства при выборе программы «нон-стоп».
ВНИМАНИЕ! Это может привести к повреждению прибора или травмам.
• Не садитесь и не вставайте на открытую дверцу.
• Не сушите в приборе неотжатые вещи.
Утилизация
• Отключите прибор от электросети.
• Отрежьте и утилизируйте кабель электропитания.
• Удалите защелку дверцы, чтобы предотвратить риск ее запирания при попадании внутрь прибора детей и домашних животных.
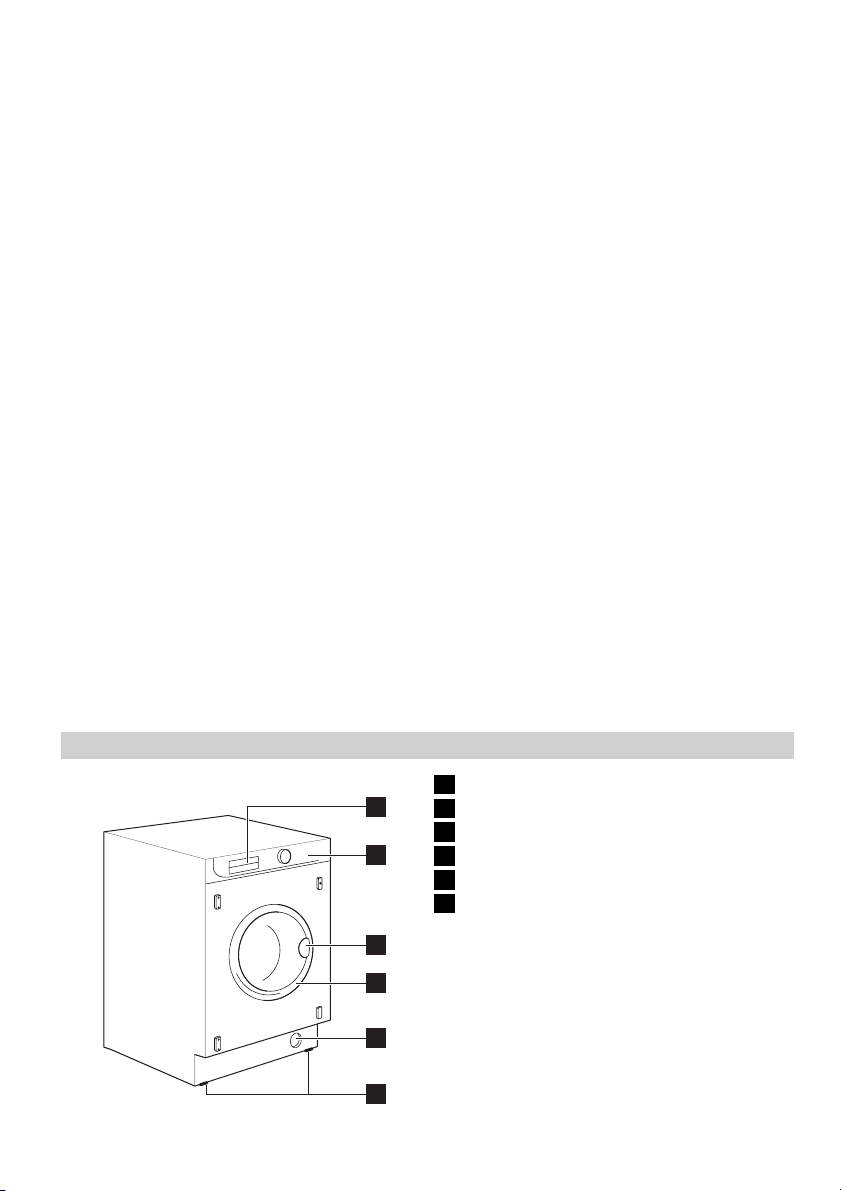
Описание изделия
Обзор прибора
1 Дозатор моющих средств
2 Панель управления
3 Ручка для открывания дверцы
4 Табличка с техническими данными
5 Сливной фильтр
6 Регулируемые ножки
Дозатор моющих средств
Отделение для моющего средства, используемого при предварительной стирке и замачивании, или для пятновыводителя, используемого на этапе выведения пятен (если имеется). Моющее средство для предварительной стирки и замачивания добавляется в начале выполнения программы стирки. Пятновыводитель добавляется на этапе выведения пятен.
Отделение для порошкового или жидкого моющего средства, используемого при основной стирке. При использовании жидкого моющего средства наливайте его непосредственно перед запуском программы.
Отделение для жидких добавок (смягчителя для ткани, крахмала).
При дозировке моющих средств и добавок руководствуйтесь указаниями изготовителя и не превышайте отметку «МАКС» на стенке дозатора моющих средств. Смягчитель для ткани или крахмальные добавки следует заливать в отделение дозатора до начала выполнения программы стирки.
Система защиты от детей
Чтобы предупредить возможность запирания внутри барабана детей или домашних животных, в приборе предусмотрено специальное устройство. Следите за тем, чтобы дети и домашние животные не забирались в барабан. Проверяйте барабан перед началом использования прибора.
Для включения этого устройства поверните по часовой стрелке кнопку с внутренней стороны дверцы (не нажимая ее) так, чтобы паз пришел в горизонтальное положение. При необходимости используйте для этого монету.
Чтобы отключить это устройство и закрыть дверцу, поверните кнопку против часовой стрелки так, чтобы паз оказался в вертикальном положении.
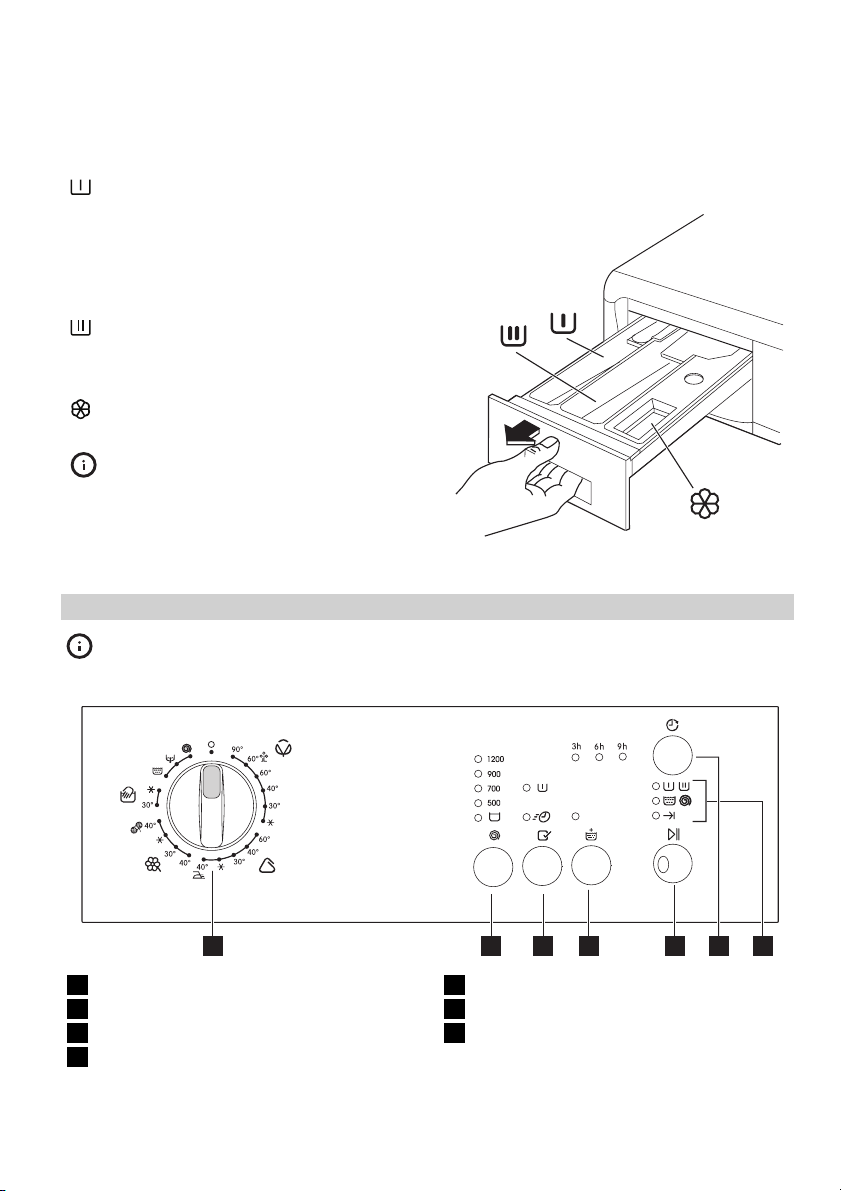
Панель управления
Описание панели управления
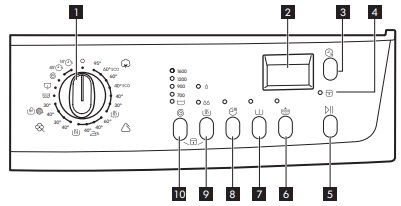
1 Селектор программ
2 Дисплей
3 Кнопка «Отсрочка пуска»
4 Индикатор блокировки дверцы
5 Кнопка «Пуск/Пауза»
6 Кнопка «Дополнительное полоскание»
7 Кнопка «Предварительная стирка»
8 Кнопка времени сушки
9 Кнопка автоматической сушки
• В шкаф
• Под утюг
10 Кнопка снижения скорости отжима :
• Остановка с водой в баке
| Селектор программ | С его помощью можно включить/выключить прибор и выбрать программу. |
|
Дисплей |
На дисплей выводится следующая информация: A) Защита от детей. Данная функция позволяет оставлять работающий прибор без присмотра. B) В этой области отображается следующая информация: • Продолжительность выбранной программы. После выбора программы ее продолжительность в часах и минутах отображается на дисплее (например, 2,05). Продолжительность выбранной программы стирки рассчитывается автоматически на основании максимальной загрузки, предусмотренной для каждого типа ткани. После запуска программы на дисплее ежеминутно обновляется время, оставшееся до ее окончания. • Выбранное время сушки. После выбора программы сушки на дисплее будет выведено время сушки в минутах или в часах и минутах. После запуска программы на дисплее ежеминутно обновляется время, оставшееся до ее окончания. • Отсрочка пуска. Выбранное значение задержки пуска, заданное с помощью соответствующей кнопки, будет высвечиваться на дисплее в течение нескольких секунд, а затем дисплей вернется в режим индикации продолжительности выбранной программы. Индикация оставшегося времени отсрочки будет изменяться с интервалом в 1 час до тех пор, пока эта величина не дойдет до одного часа. После этого она будет изменяться ежеминутно. • Коды неисправностей. В случае какой-либо неисправности на дисплее может появиться соответствующий код, например, E20 (см. Главу «Поиск и устранение неисправностей»). • Неправильный выбор режима. В случае выбора режима, несовместимого с выбранной программой стирки, на дисплее в течение нескольких секунд будет высвечиваться сообщение Ошибка, а также начнет мигать красный индикатор кнопки . • Окончание программы. По окончании программы на дисплее высвечивается мигающий ноль (0), а индикатор и индикатор кнопки гаснет: теперь дверцу можно открыть. |
| Кнопка «Отсрочка пуска» | Эта кнопка позволяет отсрочить пуск программы на 30, 60, 90 минут, 2 часа и дольше (максимум 20 часов), с шагом в 1 час. |
| Кнопка «Пуск/ Пауза» | Эта кнопка позволяет запустить или прекратить выбранную программу стирки. |
| Индикатор блокировки дверцы | Индикатор загорается, когда запускается программа, и указывает, можно ли открыть дверцу: • индикатор включен: дверцу открывать нельзя. Прибор работает или остановился с водой в баке; • индикатор выключен: дверцу можно открывать. Выполнение программы завершено или вода из бака слита; • индикатор мигает: дверцу можно будет открыть через несколько минут. |
| Кнопка «Дополнительное полоскание» | Данный прибор специально разработан для обеспечения экономии воды. Если необходимо прополоскать белье дополнительным количеством воды (дополнительное полоскание), выберите этот режим. Будет выполнено несколько дополнительных полосканий. Этот режим рекомендуется для людей, страдающих аллергией на моющие средства, а также в регионах с очень мягкой водой. |
| Кнопка «Предварительная стирка» | При выборе этого режима перед тем, как приступать к основной стирке, прибор производит предварительную стирку. Продолжительность стирки при этом увеличивается. Этот режим рекомендуется для стирки сильно загрязненного белья. |
| Кнопка времени сушки | Если требуется использовать программу сушки с заданным временем, нажимайте эту кнопку до тех пор, пока на дисплее не высветится нужное время сушки, соответствующее типу белья (хлопок или синтетика). Для хлопка можно выбрать время сушки от 10 до 250 минут (4.10). Для синтетики можно выбрать время сушки от 10 до 130 минут (2.10). При каждом нажатии на эту кнопку время сушки увеличивается на 5 минут. |
| Кнопка автоматической сушки | С помощью этой кнопки можно выбрать нужную степень сушки для изделий из хлопка и синтетики: • В шкаф (хлопок и синтетика). • Под утюг (хлопок) При этом загорается индикатор выбранной степени сушки. |
| Снижение скорости отжима | Нажав на эту кнопку, можно изменить скорость отжима для выбранной программы. • Остановка с водой в баке При выборе этого режима вода после последнего полоскания не сливается для предотвращения образования складок на белье. Перед открыванием дверцы необходимо слить воду из барабана. Для осуществления слива воды выполните указания, приведенные в Разделе «По окончании программы». |
Перед первым использованием
1. Убедитесь, что подключение прибора к электросети, водопроводу и канализации выполнено в соответствии с инструкциями по установке.
2. Выньте из барабана все материалы.
Параметры
Звуковая сигнализация
Прибор оборудован устройством звуковой сигнализации, срабатывающим в следующих случаях:
• по окончании цикла;
• в случае неисправности.
При одновременном нажатии на кнопки и примерно на 6 секунд звуковая сигнализация отключается (звуковой сигнал будет подаваться только в случае неисправности). Если нажать эти две кнопки повторно, звуковая сигнализация снова включается.
Защита от детей
Это устройство позволяет оставлять прибор без присмотра, не беспокоясь о том, что дети могут его повредить или сами получить травму. Эта функция остается включенной также и в том случае, если прибор не работает.
Существует два различных способа выбора этого режима:
• До нажатия кнопки : при этом запуск прибора будет невозможен.
• После нажатия кнопки : при этом будет невозможно изменить какую-либо программу или режим. Для включения или отключения этого режима одновременно нажмите и удерживайте в течение примерно 6 секунд кнопки и до тех пор, пока на дисплее не загорится или не исчезнет значок.
Ежедневное использование – Только стирка
Откройте дверцу.
Откройте дверцу, осторожно потянув ее за ручку.
Загрузите белье
Положите белье в барабан по одной вещи, стараясь при этом максимально расправить каждую вещь. Нажав на раму лючка, плотно закройте дверцу.
Загрузите моющее средство и смягчитель ткани
Насыпьте моющее средство в отделение для основной стирки или в соответствующее отделение, если это требуется для выбранной программы или дополнительной функции (более подробно см. в Разделе «Дозатор моющих средств»). Подробнее выборе необходимого количества моющих средств см. в разделе «Степени жесткости воды».
Налейте смягчитель для ткани и другие добавки в отделение, помеченное значком (запрещается превышать отметку «Макс» на стенке дозатора).
Осторожно закройте дозатор моющих средств
Выберите нужную программу с помощью селектора программ.
Теперь прибор включен. Индикатор кнопки начнет мигать.
По окончании программы селектор программ следует повернуть в положение , чтобы выключить прибор.
Описание каждого цикла стирки, сведения о совместимости программ стирки с программами стирки и режимами см. в Главе «Программы».
ВНИМАНИЕ! Если во время работы прибора установить селектор программ в положение, соответствующее другой программе, красный индикатор кнопки мигнет три раза, а на дисплее появится сообщение , указывающее на неправильный выбор. При этом прибор не будет выполнять вновь выбранную программу.
Снизьте скорость отжима, нажав на кнопку
При выборе программы автоматически предлагается максимальная скорость отжима, предусмотренная для этой программы.
Если Вы хотите установить другую скорость отжима, несколько раз нажмите на кнопку . Загорается соответствующий индикатор.
Выберите необходимые режимы нажатием на кнопки и
В зависимости от программы возможно сочетание различных функций. Их следует выбирать после выбора нужной программы и до начала ее выполнения.
При нажатии этих кнопок загораются соответствующие индикаторы. При их повторном нажатии индикаторы гаснут.
В случае выбора несовместимого режима красный индикатор , встроенный в кнопку , мигнет 3 раза, а на дисплее высветится сообщение Ошибка.
Сведения о совместимости программ стирки с различными режимами находятся в Главе «Программы».
Выберите функцию «Отсрочка пуска» с помощью кнопки
Перед тем, как запустить программу, если вы хотите задать отсрочку пуска, нажимайте на кнопку до тех пор, пока на дисплее не высветится нужное время отсрочки. Значение выбранной отсрочки будет высвечиваться на дисплее в течение нескольких секунд, после чего на нем снова появится продолжительность программы.
Этот режим следует выбрать после выбора программы, но до ее запуска.
Вы можете изменить время отсрочки пуска или вообще отменить ее в любой момент до нажатия кнопки .
Выбор отсрочки пуска:
1. Выберите программу и требуемые режимы.
2. Выберите режим отсрочки пуска с помощью кнопки .
3. Нажмите на кнопку :
• прибор начнет обратный отсчет с шагом индикации в один час.
• программа будет запущена по истечении выбранного времени отсрочки.
Отмена отсрочки после запуска программы:
1. Установите прибор на ПАУЗУ, нажав на кнопку .
2. Нажмите на кнопку один раз; на дисплее высветится .
3. Снова нажмите на кнопку , чтобы запустить программу.
Выбрать функцию «Отсрочка пуска» нельзя, если задана программа «СЛИВ».
Заданное значение отсрочки пуска можно изменить только после повторного выбора программы. Во время действия отсрочки пуска дверца будет заблокирована. Если необходимо открыть дверцу, вначале установите прибор на ПАУЗУ, а затем подождите несколько минут перед тем, как открывать дверцу. После закрытия дверцы еще раз нажмите на кнопку .
Запустите программу, нажав на кнопку .
Чтобы начать выполнение выбранной программы, нажмите на кнопку ; соответствующий зеленый индикатор перестанет мигать. Загорится индикатор , указывая на то, что дверца заблокирована, потому что прибор начал работу.
Для прерывания выполняемой программы нажмите на кнопку : замигает соответствующий индикатор.
Если была выбрана отсрочка пуска, прибор начнет обратный отсчет времени, остающегося до начала запуска программы.
В случае выбора несовместимого режима на дисплее в течение нескольких секунд будет высвечиваться сообщение , а красный индикатор, встроенный в кнопку , мигнет 3 раза.
Изменение дополнительной функции или выполняемой программы
Некоторые режимы можно изменить до того, как программа начала их выполнять. Перед внесением в программу любых изменений необходимо перевести прибор в режим «ПАУЗА», нажав на кнопку .
Изменить текущую программу можно только путем ее отмены. Для этого поверните селектор программ на , а затем — на новую программу. Запустите новую программу, снова нажав на кнопку . При этом вода из бака сливаться не будет.
Прерывание программы
Для прерывания выполняемой программы нажмите на кнопку ; при этом начнет мигать соответствующий индикатор зеленого цвета.
Снова нажмите на кнопку , чтобы возобновить выполнение программы.
Отмена программы
Поверните селектор программ в положение для отмены выполняемой программы.
Теперь Вы можете выбрать новую программу.
Открывание дверцы
После запуска программы дверца блокируется. Если по какой-либо причине нужно открыть дверцу, сначала переведите прибор в режим паузы, нажав на кнопку . Через несколько минут дверцу можно будет открыть. Если дверца остается заблокированной, это значит, что прибор уже начал подогрев воды или что уровень воды в приборе слишком высок. В любом случае не пытайтесь открывать дверцу силой!
Если дверца не открывается, а вам необходимо ее открыть, следует выключить прибор, повернув селектор программ в положение . Через несколько минут дверцу можно будет открыть (при этом обратите внимание на уровень воды и температуру!). После закрытия дверцы необходимо снова выбрать программу стирки и режимы и нажать на кнопку .
По окончании программы
Прибор автоматически завершит работу. Звучит ряд звуковых сигналов, а на дисплее начинает мигать . Индикатор кнопки (а через несколько минут также и индикатор ) погаснет. Теперь дверцу можно открыть.
При выборе программы или режима, по окончании которых в баке остается вода, продолжит гореть индикатор . Дверца остается заблокированной, напоминая о том, что перед тем, как открыть дверцу, следует слить воду из машины.
При этом до момента слива воды барабан продолжает вращаться с периодическими паузами.
1. Поверните селектор программ, установив его в положение .
2. Выберите программу слива или отжима.
3. При необходимости уменьшите скорость отжима с помощью кнопки .
4. Нажмите на кнопку .
По окончании этой программы дверца будет разблокирована и ее можно будет открыть. Поверните селектор программ в положение для выключения прибора. Достаньте белье из барабана и убедитесь, что он пуст. Если новой стирки не планируется, закройте водопроводный кран. Оставьте дверцу открытой для предотвращения образования плесени и неприятных запахов.
Режим ожидания
По окончании программы включается система энергосбережения и загорается соответствующий индикатор. При нажатии любой кнопки прибор выйдет из режима экономии энергии.
Ежедневное использование – Только сушка
ВНИМАНИЕ! См. Главы, содержащие Сведения по технике безопасности.
ВНИМАНИЕ! Рекомендуемая загрузка: 3,5 кг для хлопка и льна и 2 кг для синтетики.
Также возможно высушить до 5 кг изделий из хлопка (см. Таблицу «Программа для сушки с заданным временем»), нажав на кнопку .
ВНИМАНИЕ! Водопроводный кран должен быть открыт, а сливной шланг выведен в раковину или подключен к канализации
1. Загрузите белье.
2. Чтобы получить оптимальные результаты сушки, выберите максимально допустимую для данного типа ткани скорость отжима.
3. Выберите при помощи селектора программ программу сушки для изделий из хлопка или синтетики.
4. Если требуется выбрать программу «Автоматическая сушка» (только для изделий из хлопка и синтетики), нажмите на кнопку и дождитесь, пока загорится сигнальный индикатор требуемой степени сушки.
5. Если Вы хотите выполнить программу сушки с заданным временем, нажимайте на кнопку до тех пор, пока на дисплее не высветится требуемое время сушки (см. Таблицу «Программы сушки с заданным временем»). При каждом нажатии на эту кнопку время сушки увеличивается на 5 минут.
При этом полное время программы автоматически увеличивается на несколько минут
6. Нажмите на кнопку для запуска программы. Время, оставшееся до окончания программы, обновляется ежеминутно.
7. По окончании программы выдается звуковой сигнал. На дисплее появляется мигающий символ . При этом светится индикатор .
Последние минуты цикла сушки соответствуют фазе «антисминание».
В течение этого времени дверца остается заблокированной. На дисплее появляется мигающий символ . По окончании фазы «антисминание» индикатор дверцы гаснет.
Если необходимо открыть дверцу до начала фазы «антисминание» или во время ее выполнения, или же прервать его, нажмите любую кнопку или поверните селектор программ на любую программу (кроме ).
8. Чтобы выключить прибор, установите селектор программ на .
9. Выньте белье из барабана.
Некоторые изделия из хлопка (полотенца, простыни, рубашки и т.д.) или любые изделия, сворачивающиеся при отжиме, могут высохнуть не полностью. В том редком случае, когда по окончании цикла белье окажется слегка влажным, рекомендуется расправить свернувшиеся вещи, равномерно разложить их в барабане и выбрать дополнительный цикл сушки продолжительностью 20-30 минут.
Если продолжительность этапа сушки задана равной 10 минутам при помощи кнопки сушки , будет произведена только фаза охлаждения.
Ежедневное использование – стирка и сушка
ВНИМАНИЕ! См. Главы, содержащие Сведения по технике безопасности.
Программа «НОН-СТОП» — стирка и сушка с заданным временем
Рекомендуемая загрузка: 3,5 кг для хлопка и 2 кг для синтетики.
Также возможно высушить до 5 кг изделий из хлопка (см. Таблицу «Программа для сушки с заданным временем»).
ВНИМАНИЕ! При выполнении безостановочной программы стирки и сушки не используйте дозировочное устройство/шарик.
1. Загрузите белье и добавьте моющее средство и смягчитель для ткани.
2. Включите прибор, повернув селектор программ на нужную программу стирки/тип ткани.
3. Выберите нужные режимы с помощью соответствующих кнопок.
По возможности не выбирайте скорость отжима ниже той, которая предлагается прибором. Это позволит избежать слишком долгой сушки и сэкономить электроэнергию.
В любом случае сокращение скорости отжима возможно только после выбора сушки. Минимальное значение, которое может быть выбрано для хлопка и синтетики – 900 об/мин, а для тканей, требующих деликатного обращения – 700 об/мин.
4. Задайте время сушки, нажав на кнопку . На дисплее отобразится общая продолжительность стирки и выбранного цикла сушки.
Если при выборе программы стирки продолжительность сушки была задана равной лишь 10 минутам, на дисплее отображается общая продолжительность программы, которая также включает этапы остановки и охлаждения.
5. Запустите программу, нажав на кнопку . Время, оставшееся до окончания программы, обновляется ежеминутно.
6. По окончании программы поверните селектор в положение для выключения прибора и выньте белье.
Программа «НОН-СТОП» – стирка и автоматическая сушка
Максимальная загрузка: 3,5 кг для хлопка и льна и 2 кг для синтетики.
ОСТОРОЖНО! При выполнении безостановочной программы стирки и сушки не используйте дозировочное устройство/шарик.
1. Загрузите белье.
2. Добавьте моющее средство и смягчитель для ткани.
3. Включите прибор, повернув селектор программ на нужную программу стирки.
4. Выберите нужные режимы с помощью соответствующих кнопок.
По возможности не выбирайте скорость отжима ниже той, которая предлагается прибором. Это позволит избежать слишком долгой сушки и сэкономить электроэнергию.
В любом случае сокращение скорости отжима возможно только после выбора сушки.
Минимальное значение, которое может быть выбрано для хлопка и синтетики – 900 об/мин.
5. Выберите степень сушки, нажав на кнопку . На дисплее отобразится общая продолжительность стирки и выбранного цикла сушки.
6. Запустите программу, нажав на кнопку . Время, оставшееся до окончания программы, обновляется ежеминутно.
7. По окончании программы поверните селектор в положение для выключения прибора. Выньте белье.
Ворс на белье
В ходе этапа СТИРКИ И/ИЛИ СУШКИ сушка определенных видов тканей, например, пористой ткани и свитеров может привести к образованию ворса.
Образовавшийся ворс может пристать к ткани в ходе следующего цикла.
Этот недостаток еще более проявляется в ходе обработки т.н. технических тканей.
Для предотвращения образования ворса на одежде рекомендуется:
1. Не стирать темные вещи после стирки и сушки светлых вещей (новые вещи из пористой ткани, особенно толстовки из трикотажа).
2. После первой стирки сушить вещи из подобных видов ткани на воздухе.
3. Производить очистку фильтра.
4. Между стиркой и сушкой тканей различных цветов произвести один или более цикл полоскания для очистки барабана от ворса.
5. После этапа сушки тщательно очистите пустой барабан, прокладку и дверцу мокрой тряпкой.
Полезные советы
Сортировка белья
Руководствуйтесь символами на этикетке каждой вещи и инструкциями производителя по стирке. Сортируйте белье следующим образом: белое белье, цветное белье, синтетика, деликатное белье, изделия из шерсти.
Выведение пятен
Некоторые пятна могут не отстираться только водой и моющим средством.
Поэтому перед стиркой их рекомендуется обработать.
Кровь: промойте свежие пятна холодной водой. Засохшие пятна следует замочить на ночь со средством для удаления пятен, затем потереть их в мыльном растворе.
Масляные краски: смочите пятновыводителем на бензиновой основе, положите вещь на мягкую подстилку и промокните пятно; повторите обработку несколько раз.
Засохшие жирные пятна: смочите скипидаром, положите вещь на мягкую подстилку и кончиками пальцев промокните пятно, используя хлопчатобумажную ткань.
Ржавчина: используйте раствор щавелевой кислоты в горячей воде или специальное средство для выведения пятен ржавчины в холодном виде. Будьте осторожны со старыми пятнами ржавчины, так как структура целлюлозы под ними повреждена и ткань может порваться.
Пятна плесени: обработайте отбеливателем и тщательно сполосните (только для белого и цветного нелиняющего белья).
Трава: слегка потрите мылом, а затем обработайте отбеливателем (только для белого и цветного нелиняющего белья).
Шариковая ручка и клей: смочите ацетоном 1), положите вещь на мягкую подстилку и промокните пятно.
Губная помада: смочите ацетоном, как указано выше, затем обработайте пятно денатуратом. Обработайте оставшиеся следы отбеливателем.
Красное вино: замочите с моющим средством, прополощите и обработайте уксусной или лимонной кислотой, затем еще раз прополощите. Обработайте оставшиеся следы отбеливателем.
Чернила: в зависимости от состава чернил сначала смочите пятно ацетоном 1) , затем уксусной кислотой; обработайте оставшиеся на белой ткани следы отбеливателем и тщательно прополощите ее.
Пятна смолы: сначала обработайте пятновыводителем, денатуратом или бензином, затем потрите, используя чистящую пасту.
Градусы жесткости воды
Жесткость воды измеряется в так называемых градусах жесткости. Информацию о жесткости воды в месте проживания можно получить в службе водоснабжения или от местных органов власти.
| Тип | Градусы жесткости воды | |
| градусы по немецкому стандарту (dH°) | градусы по французскому стандарту (°T.H.) | |
| Мягкая | 0-7 | 0-15 |
| Средний | 8-14 | 16-25 |
| Жесткая | 15-21 | 26-37 |
| Очень жесткая | > 21 | > 37 |
Смягчитель воды следует добавлять при стирке в воде со средней и высокой жесткостью. Следуйте указаниям изготовителя. После этого количество моющего средства можно скорректировать (уменьшить) в соответствии со смягчением воды.
1) не используйте ацетон для чистки изделий из искусственного шелка
Рекомендации по сушке
Подготовка к циклу сушки
Во время сушки прибор работает по принципу конденсации влаги.
Поэтому водопроводный кран должен быть открыт, а сливной шланг выведен в раковину или подключен к канализации даже во время выполнения сушки.
Перед началом выполнения программы сушки выньте из машины часть выстиранного белья для получения лучших результатов.
Белье, непригодное для сушки
• Особо деликатные вещи, такие как синтетические занавески, шерсть и шелк, белье с металлическими деталями, нейлоновые чулки, объемные предметы, такие как теплые куртки, покрывала, накидки, спальные мешки, пуховые одеяла, не следует сушить в машине.
• Не следует сушить темную одежду вместе со светлыми ворсистыми изделиями, например полотенцами, т.к. к одежде могут прилипнуть ворсинки.
• Когда прибор закончит сушку, выньте из нее белье.
• Чтобы исключить во время сушки появление электростатического заряда, применяйте при стирке белья смягчитель ткани, либо используйте кондиционер ткани, специально предназначенный для применения в сушильных машинах.
• Не следует сушить в машине изделия с подкладкой из поролона или материалов, сходных с поролоном; они представляют опасность возгорания.
• Кроме того, во избежание образования опасных испарений не следует сушить в машине вещи с остатками лосьонов для укладки волос, лака для волос, растворителя лака для ногтей или аналогичных веществ.
Моющие средства и добавки следует помещать в соответствующие отделения дозатора моющих средств перед началом выполнения программы стирки.
При использовании жидких моющих средств необходимо выбирать программу без предварительной стирки. Ваш прибор оборудован системой рециркуляции, обеспечивающей оптимальное использование концентрированных моющих средств.
Соблюдайте рекомендации изготовителей, касающиеся дозировки соответствующих средств и не превышайте отметки «МАКС» на стенке дозатора.
Этикетки с информацией по уходу
При сушке руководствуйтесь указаниями изготовителя, приведенными на этикетках
• = Допускается сушка в сушильном барабане.
• = Сушка при высокой температуре.
• = Сушка при пониженной температуре.
• = Не сушить в сушильных машинах.
Продолжительность цикла сушки
Время сушки может зависеть от
• скорости заключительного отжима;
• нужной степени сушки (под утюг, в шкаф);
• типа белья;
• величины загрузки.
Средние значения времени для сушки с заданной продолжительностью указано в Главе «Программы сушки с заданным временем». Приобретенный опыт поможет лучше подбирать программы сушки для различных типов белья Принимайте во внимание продолжительность уже выполненных циклов сушки.
Дополнительная сушка
Если по окончании программы сушки белье все еще остается влажным, снова задайте короткий цикл сушки
Не пересушивайте белье во избежание образования складок и усадки одежды
Программы
Программа
Всегда выбирайте программу стирки в соответствии с символом по уходу на этикетке каждой вещи.
| Программа Температура |
Тип белья | Описание цикла | Макс. загрузка | Доступные режимы | Отделение для моющего средства |
|
ХЛОПОК 90°-60° |
Белый хлопок (изделия из хлопка с сильной или обычной степенью загрязнения). | Основная стирка Полоскания Макс. конечная скорость отжима 1600 об/мин |
7 | ||
|
ХЛОПОК ЭКОНОМ 2) 60°-40° |
Экономный режим для белого и цветного белья из хлопка, вещей небольшой и сильной степени загрязнения, рубашек, блузок, нижнего белья. | Основная стирка Полоскания Макс. конечная скорость отжима 1600 об/мин |
7 | ||
|
ХЛОПОК 40°С– 30°С (холодная стирка) |
Цветной хлопок (с обычной или слабой степенью загрязнения). | Основная стирка Полоскания Макс. конечная скорость отжима 1600 об/мин |
7 | ||
| СУШКА ХЛОПКА | Программа сушки изделий из хлопка. | Сушка | 3,5 5 3) . |
||
|
СИНТЕТИКА 60°-40° |
Изделия из синтетических или смесовых тканей: нижнее белье, цветное белье, рубашки без усадки, блузки. | Основная стирка Полоскания Макс. конечная скорость отжима 900 об/мин |
3,5 | ||
|
ЛЕГКАЯ ГЛАЖКА 40° |
Изделия из синтетических тканей: при выборе этой программы белье стирается и отжимается очень бережно, чтобы избежать образования складок. Это облегчает глажку. Кроме того, прибор выполняет при этом дополнительные полоскания. | Основная стирка Полоскания Макс. конечная скорость отжима 900 об/мин |
1,5 | ||
| СУШКА СИНТЕТИКИ | Программа сушки изделий из синтетики. | Сушка | 2 | ||
|
ДЕЛИКАТНЫЕ ТКАНИ 40°-30° |
Изделия из деликатных тканей: например, шторы. | Основная стирка Полоскания Макс. конечна я скорость отжима 700 об/мин |
3,5 | ||
|
ШЕРСТЬ – РУЧНАЯ СТИРКА 40°- 30° |
Специальная программа для изделий из шерсти и деликатных тканей с этикеткой «чистая новая шерсть, пригодна для машинной стирки, не дает усадки». | Основная стирка Полоскания Макс. конечная скорость отжима 900 об/мин |
2 | ||
| ПОЛОСКАНИЯ | Эта программа позволяет полоскать и отжимать изделия из хлопка, выстиранные вручную. Прибор выполняет несколько полосканий, за которыми следует заключительный длительный отжим. Скорость отжима можно уменьшить. | Полоскания Макс. конечная скорость отжима 1600 об/мин |
7 | ||
| СЛИВ | Используется для слива воды после последнего полоскания в программах с выбранным режимом «Остановка с водой в баке». | Слив воды | 7 | ||
| ОТЖИМ | Отдельный отжим, выполняемый для изделий, выстиранных вручную, и по окончании программ с режимом «Остановка с водой в баке». Соответствующей кнопкой можно выбрать скорость отжима в зависимости от типа белья. | Макс. конечная скорость отжима 1600 об/мин | 7 | ||
| 60° | Эта программа позволяет выстирать изделия из хлопка всего за 45 минут. | Основная стирка Полоскания Макс. конечная скорость отжима 1200 об/мин |
3 | ||
| 30° | Короткий цикл стирки — идеален для белья, которое нужно только освежить. | Основная стирка Полоскания Макс. конечная скорость отжима 900 об/мин |
2 | ||
| ВЫКЛ | Поверните для выключения прибора и/или сброса программы. |
1) При использовании жидких средств для стирки необходимо выбирать программу без функции «ПРЕДВАРИТЕЛЬНАЯ СТИРКА».
2) Энергосберегающая программа для хлопка Программа с температурой 60°C и загрузкой 7 кг является эталонной программой для расчета данных, указанных на табличке энергопотребления в соответствии со стандартом EEC 92/75. Выбор этой программы обеспечивает хорошие результаты стирки и уменьшает потребление электроэнергии. Продолжительность программы стирки при этом увеличивается.
3) Данный вид загрузки доступен только для режима
Программы сушки
Программы для автоматической сушки
| Уровень сухости | Тип ткани | Загрузка |
| В шкаф Для вещей, которые предстоит убрать на хранение |
Хлопок и лен (купальные халаты, полотенца и т.д.). |
до 3,5 кг |
| Синтетические или смесовые ткани (джемперы, блузки, нижнее белье, кухонное белье) |
до 2 кг | |
| Под утюг Для белья, подлежащего глажке |
Хлопок и лен (простыни, скатерти, рубашки и т.д.) |
до 3,5 кг |
Программы для сушки с заданным временем
| Уровень сухости | Тип ткани | Загрузка (кг) | Скорость отжима (об/мин) | Рекомендованная продолжительность (мин) |
| В шкаф Для вещей, которые предстоит убрать на хранение |
Хлопок и лен (купальные халаты, полотенца и т.д.). | 5 | 1600 | 165 — 185 |
| 3,5 | 85 — 95 | |||
| 2 | 35 — 45 | |||
| В шкаф Для вещей, которые предстоит убрать на хранение |
Синтетические или смесовые ткани (джемперы, блузки, нижнее белье, кухонное белье) | 2 | 900 | 70 — 80 |
| 1 | 35 — 45 | |||
| Под утюг Для белья, подлежащего глажке |
Хлопок и лен (простыни, скатерти, рубашки и т.д.) | 5 | 1600 | 135 — 155 |
| 3,5 | 65 — 75 | |||
| 2 | 30 — 40 |
Советы для тестирующей организации
Тестирование в соответствии с EN 50229 должно производиться с первой загрузкой весом 4 кг (состав загрузки: наволочка и полотенца) с выбором программы СУШКИ С ЗАДАННЫМ ВРЕМЕНЕМ для изделий из хлопка и установкой таймера на 100 минут. Вторая загрузка для сушки должна иметь вес 3 кг (состав загрузки: 3 простыни и полотенца); тестирование должно проводиться с выбором программы СУШКИ С ЗАДАННЫМ ВРЕМЕНЕМ для изделий из хлопка и установкой таймера на 85 минут.
Показатели потребления
Приведенные в таблице данные являются ориентировочными. Они могут меняться в зависимости от количества и типа белья, температуры воды и окружающей температуры.
| Программы | Загрузка (кг) | Потребление электроэнергии (кВт·ч) | Потребление воды (в литрах) | Приблизительная продолжительность программы (в минутах) |
| Хлопок 90°C | 7 | 2,2 | 67 | Продолжительность программ высвечивается на дисплее на панели управления. |
| Хлопок 60°С | 7 | 1,35 | 63 | |
| «Энергосберегающая программа для хлопка» при 60°C 1) | 7 | 1,05 | 45 | |
| Хлопок 40°C | 7 | 0,8 | 63 | |
| Синтетика 40°С | 3,5 | 0,55 | 51 | |
| Деликатные ткани, 40°C | 3,5 | 0,55 | 63 | |
| Шерсть / Ручная стирка 30°C | 2 | 0,25 | 58 |
1) «Энергосберегающая программа для хлопка» при 60°C и загрузке 7 кг является эталонной программой для расчета данных, указанных на табличке энергопотребления в соответствии со стандартом EEC 92/75.
| В отключенном состоянии (Вт) | При оставлении во включенном состоянии (Вт) |
| 0,1 | 0,98 |
Информация, приведенная в таблице выше, соответствует постановлению еврокомиссии ЕС 1015/2010 введении в действие директивы 2009/125/EC.
Уход и очистка
ВНИМАНИЕ! См. Главы, содержащие Сведения по технике безопасности.
ВНИМАНИЕ! Прежде чем приступать к каким-либо операциям по чистке или уходу, отключите прибор от электросети.
Профилактическая стирка
Выполнение стирки с низкой температурой может привести к скоплению остатков внутри барабана.
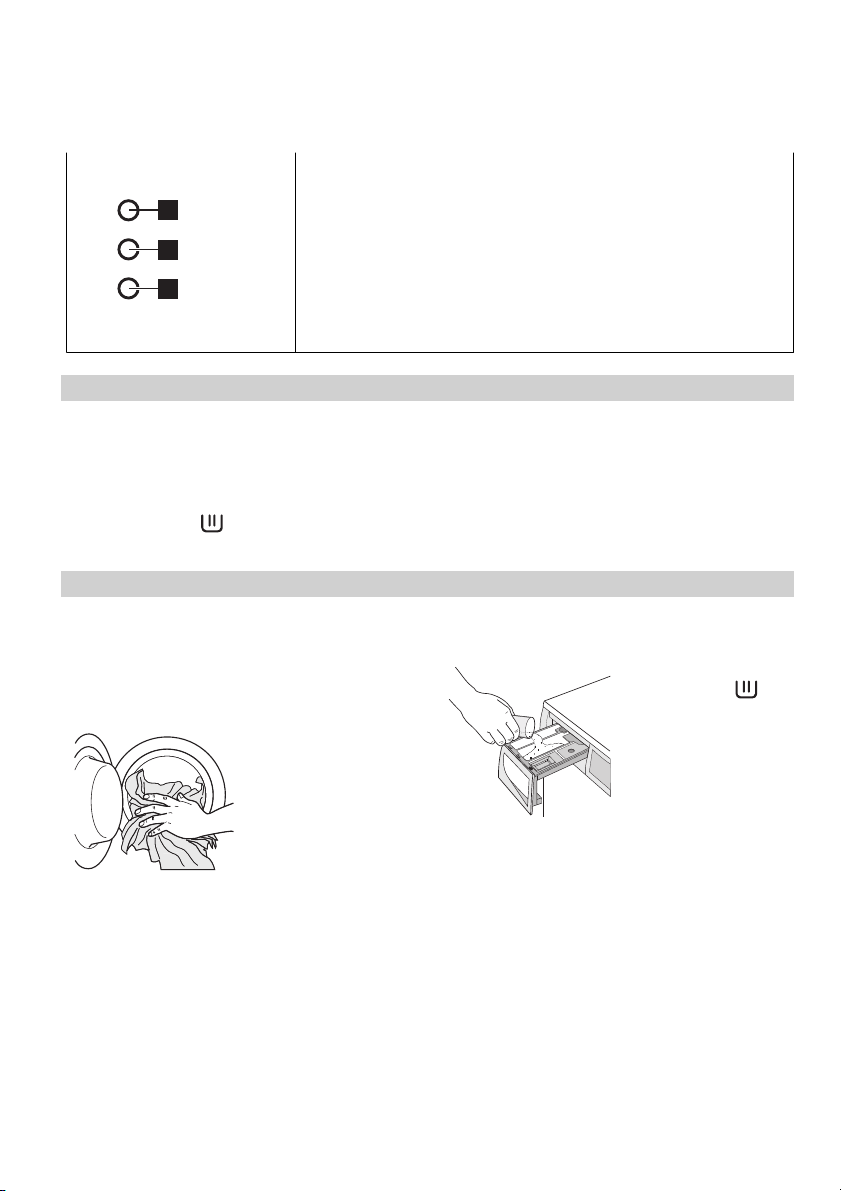
Мы рекомендуем регулярно выполнять так называемую профилактическую стирку. При выполнении профилактической стирки • В барабане не должно быть белья. • Выберите программу стирки хлопка с наиболее высокой температурой. • Используйте обычное количество моющего средства; им должен быть стиральный порошок с биодобавками. Чистка дозатора моющих средств и отсека, в который он устанавливается Дозатор моющих средств и добавок следует регулярно очищать.
Чтобы извлечь дозатор, нажмите вниз защелку и потяните его на себя.
Для облегчения чистки можно также снять верхнюю часть отделения для добавок.
Используйте маленькую щеточку для очистки отсека и удаления остатков моющих средств.
Промойте все съемные части дозатора проточной водой, чтобы удалить все остатки скопившегося порошка.
Используйте ту же щеточку, чтобы прочистить отсек, тщательно удалив все остатки моющих средств из его верхней и нижней части.
После очистки дозатора моющих средств и отсека, в который он устанавливается, установите дозатор на место и запустите программу полоскания без белья, чтобы смыть все остатки.
Чистка фильтра сливного насоса
Действуйте следующим образом:
Откройте крышку фильтра.
Подставьте под нишу под фильтром контейнер, чтобы собрать вытекающую воду.
Нажмите на два рычажка, расположенные на сливной трубке, и потяните ее вперед, чтобы дать воде вытечь.
Когда контейнер наполнится водой, установите сливную трубку на место и вылейте воду из контейнера.
Повторяйте данное действие, пока из фильтра не перестанет вытекать вода.
Установите сливную трубку на место.
Открутите и извлеките фильтр.
Удалите из насоса ворс и посторонние предметы.
Убедитесь, что крыльчатка насоса свободно вращается. В противном случае обратитесь в авторизованный сервисный центр.
Очистите фильтр, находящийся под водопроводным вентилем, и вставьте его обратно в фильтр по специальным направляющим. Затяните как следует, чтобы предотвратить протечку.
Закройте дверцу насоса.
Очистка впускного фильтра и фильтра клапана
Если прибор наполняется водой слишком долго или не наполняется, кнопка пуска мигает красным цветом. Проверьте, не засорен ли впускной фильтр и фильтр клапана (подробнее см. Главу «Поиск и устранение неисправностей»). Действуйте следующим образом:
• Закройте водопроводный вентиль.
• Отвинтите шланг от крана.
• Прочистите фильтр в шланге жесткой щеткой.
• Снова плотно привинтите наливной шланг к крану.
• Отвинтите шланг от прибора. Держите рядом тряпку, т.к. может вытечь вода.
• Прочистите фильтр клапана жесткой щеткой или тряпкой.
• Привинтите наливной шланг обратно к прибору, повернув его влево или вправо в зависимости от места установки прибора. Правильно затяните контргайку, чтобы не допустить утечки воды.
• Откройте водопроводный вентиль.
Аварийный слив
Если вода не сливается, для слива выполните следующие действия:
• извлеките вилку сетевого шнура из розетки;
• закройте водопроводный вентиль;
• при необходимости дождитесь, чтобы вода остыла;
• откройте дверцу фильтра;
• положите на пол контейнер, подставив его под нишу фильтра;
• нажмите на два рычажка, расположенные на сливной трубке, и потяните ее вперед, чтобы дать воде вытечь;
• когда контейнер наполнится водой, установите сливную трубку на место и вылейте воду из контейнера. Повторяйте эту процедуру до окончания слива воды;
• при необходимости произведите очистку фильтра (см. Раздел «Очистка сливного фильтра»);
• закройте дверцу сливного насоса. После выполнения операций экстренного слива воды необходимо повторно включить систему слива:
• залейте 2 литра воды в отсек дозатора моющего средства для основной стирки;
• запустите программу, чтобы слить воду.
Опасность замерзания
Если прибор установлен в помещении, температура в котором может опускаться ниже 0°C, для удаления воды, оставшейся в приборе, действуйте следующим образом:
• извлеките вилку сетевого шнура из розетки;
• закройте водопроводный вентиль;
• отвинтите наливной шланг от крана;
• слейте воду из сливного насоса, как описано в Разделе «Аварийный слив»;
• после слива воды из фильтра снова подключите наливной шланг.
ВНИМАНИЕ! Перед возобновлением использования прибора убедитесь, что температура превышает 0°C. Производитель не несет ответственности за ущерб, вызванный воздействием низких температур.
Поиск и устранение неисправностей
ВНИМАНИЕ! См. Главы, содержащие Сведения по технике безопасности.
Введение
Прибор не запускается или останавливается во время работы.
Сначала попытайтесь найти решение проблемы (см. Таблицу). Если решение не найдено, обратитесь в авторизованный сервисный центр.
В случае ряда проблем прибором могут выдаваться звуковые сигналы, а на дисплее — высвечиваться коды ошибок:
• — В прибор не поступает вода.
• — Прибор не сливает воду.
• — Дверца прибора открыта или не закрыта как следует.
ВНИМАНИЕ! Перед выполнением проверок выключите прибор.
Возможные неисправности
| Неисправность | Возможная причина | Способ устранения |
| Прибор не запускается. | Дверца не закрыта. | Плотно закройте дверцу. |
| Вилка не вставлена в розетку надлежащим образом. | Вилка не вставлена в розетку надлежащим образом. | |
| В розетке отсутствует напряжение. | Проверьте домашнюю электропроводку. | |
| Перегорел предохранитель на распределительном щитке. | Замените предохранитель. | |
| Селектор программ установлен неверно, и не нажата кнопка . | Поверните селектор программ и снова нажмите на кнопку . | |
| Выбрана отсрочка пуска. | Чтобы сразу же начать стирку белья, отмените функцию «Отсрочка пуска». | |
| Включена функция «Защита от детей». | Отключите функцию «Защита от детей». | |
| Прибор не заливает воду: | Закрыт водопроводный вентиль. | Откройте вентиль подачи воды. |
| Водопроводный кран закрыт или причина в накипи. | Прочистите водопроводный кран. | |
| Неправильно подключен наливной шланг. | Проверьте подсоединение наливного шланга. | |
| Давление воды слишком низкое. | Обратитесь в местную службу водоснабжения. | |
| Наливной шланг передавлен или перекручен. | Проверьте подсоединение наливного шланга. | |
| В наливном шланге или впускном клапане засорился фильтр. | Прочистите фильтры наливного шланга. (Подробнее см. «Очистка наливного шланга и фильтра клапана»). | |
| Дверца не закрыта как следует. | Плотно закройте дверцу. | |
| Прибор не сливает воду. | Сливной шланг передавлен или перекручен. | Проверьте подключение сливного шланга. |
| Засорен сливной фильтр. | Прочистите фильтр сливного насоса. | |
| Выбрана программа или дополнительная функция, по окончании которой в баке остается вода, или в которой исключена фаза отжима. | Выберите программу слива или отжима. | |
| Неправильно подключен сливной шланг. | Проверьте подключение сливного шланга. | |
| Прибор выключается в ходе этапа стирки. | Отключена подача электропитания. | Дождитесь возобновления подачи электроэнергии. Прибор продолжит работу с этапа, на котором была прервана работа. |
| Отжим начинается с опозданием или не выполняется. | Из-за неравномерного распределения белья в барабане сработало электронное устройство контроля дисбаланса. Белье перераспределяется более равномерно путем вращения барабана в обратном направлении. Это может происходить несколько раз до тех пор, пока дисбаланс не исчезнет и не установится нормальный отжим. Если по истечении 10 минут белье в барабане не распределилось равномерно, отжим выполняться не будет. | Перераспределите белье вручную или добавьте белья и задайте программу «Отжим». |
| Вода на полу. | Использовано слишком много средства для стирки или применено неподходящее средство, вызывающее избыточное пенообразование. | Уменьшите количество средства для стирки или используйте другое моющее средство. |
| Проверьте, нет ли утечек в соединениях наливного шланга. Утечка воды из шланга не всегда заметна: проверьте, не намок ли он. | Проверьте подсоединение наливного шланга. | |
| Поврежден сливной или наливной шланг. | Замените его на новый (уточните в авторизованном сервисном центре номер запасной части по каталогу). | |
| Сливной фильтр был неправильно завинчен после очистки. | Завинтите фильтр до упора. | |
| Дверца не открывается: | Выполнение программы не закончено. | Дождитесь окончания стирки. |
| Не сработала система снятия блокировки дверцы. | Подождите несколько минут, прежде чем открывать дверцу. | |
| В барабане есть вода. | Чтобы слить воду, выберите программу слива или отжима. | |
| Прибор издает необычный шум. | Не удалены транспортировочные болты и элементы упаковки. | Проверьте правильность установки прибора. |
| Не отрегулирована высота ножек. | Проверьте правильность установки прибора в горизонтальной плоскости. | |
| Возможно, забит фильтр сливного насоса. | Проверьте фильтр сливного насоса. (Более подробные сведения см. в Разделе «Очистка сливного фильтра»). | |
| Неудовлетворительные результаты стирки. | Слишком мало моющего средства, либо используется неподходящее моющее средство. | Увеличьте количество моющего средства или используйте другое моющее средство. |
| Стойкие пятна не были обработаны перед стиркой. | Используйте имеющиеся в продаже средства для выведения стойких пятен. | |
| Задана неподходящая температура. | Проверьте правильность выбора температуры. | |
| Слишком большая загрузка. | Уменьшите загрузку в соответствии с таблицей «Программы стирки». | |
| Прибор совсем не выполня ет сушку или не высушив ает белье должны м образом : | Не выбраны время или степень сушки. | Выберите время или степень сушки. |
| Закрыт водопроводный вентиль. | Откройте вентиль подачи воды. | |
| Засорен сливной фильтр. | Прочистите фильтр сливного насоса. | |
| Прибор перегружен. | Следует уменьшить количество белья, загружаемого в барабан. | |
| Выбранная программа сушки, время или степень сушки не соответствует данному типу белья. | Выберите подходящую для данного типа белья программу сушки и время или степень сушки. | |
| На белье много ворса другого цвета. | От предыдущей загрузки белья остался ворс другого цвета (см. «Ворс на одежде», Глава «Ежедневное использование — стирка и сушка»). | Этап сушки помогает избавиться от части ворса. Очистите одежду приспособлением для удаления ворса. |
| В случае повторного обнаружения необычно большого количества ворса дважды проделайте следующее: | 1. Тщательно очистите пустой барабан, уплотнитель и дверцу мокрой тряпкой. 2. Запустите цикл полоскания. 3. Положите в барабан кусок шерстяной или ворсовой ткани. 4. Запустите 10-минутный цикл сушки. 5. Извлеките кусок шерстяной или ворсовой ткани. |
Сервис
Мы рекомендуем использовать оригинальные запчасти. После проверки включите прибор и нажмите на кнопку для возобновления выполнения программы.
Если неисправность устранить не удалось, обратитесь в авторизованный сервисный центр.
Данные для сервисных центров находятся на табличке с техническими данными.
Рекомендуем записать их здесь:
Технические данные
| Тип изделия | Free standing — Washer Dryer | |
| Габаритные размеры | Ширина (см) | 59,6 |
| Высота (см) | 84,5 | |
| Глубина (см) | 63,6 max | |
| Давление в водопроводной сети 1) | Минимум | 0,5 бар (0,05 МПа) |
| Максимум | 8 бар (0,8 МПа) | |
| Хлопок, макс. загрузка (кг) | 7 | |
| Макс. скорость отжима (об/мин) | 1600 | |
| Класс энергопотребления | А | |
| Класс стирки | А | |
| Класс отжима | А | |
| Уровень шума при стирке (дБ(A)) | 55 | |
| Уровень шума при стирке (дБ(A)) | 79 | |
| Среднее годовое потребление электроэнергии (кВт/ч) 2) | 952 | |
| Среднее годовое потребление воды (литры) 2) | 19400 |
1) Если там, где Вы проживаете, давление в водопроводной системе выше или ниже указанных значений, просим обратиться в авторизованный сервисный центр.
2) Данное значение рассчитано для стандартной программы стирки изделий из хлопка, предназначенных для испытательных лабораторий. Число циклов стирки в год принят равным 200.
Информация по подключению к электросети, напряжению и общей мощности указана на табличке с техническими данными, расположенной на внутренней стороне дверцы прибора.
ОХРАНА ОКРУЖАЮЩЕЙ СРЕДЫ
Материалы с символом следует сдавать на переработку. Положите упаковку в соответствующие контейнеры для сбора вторичного сырья. Принимая участие в переработке старого электробытового оборудования, Вы помогаете защитить окружающую среду и здоровье человека. Не выбрасывайте вместе с бытовыми отходами бытовую технику, помеченную символом . Доставьте изделие на местное предприятие по переработке вторичного сырья или обратитесь в свое муниципальное управление.
ГАРАНТИЯ IKEA
Срок действия гарантии ИКЕА
Гарантийный срок на бытовую технику IKEA составляет пять (5) лет. Гарантия начинает действовать в день покупки. Исключение составляют товары серии LAGAN/ЛАГАН, на них гарантия составляет два (2) года. Пожалуйста, сохраняйте чек как подтверждение факта и даты покупки.
На какую бытовую технику не распространяется данная гарантия?
Данная гарантия не распространяется на бытовую технику LAGAN/ЛАГАН, а также технику, приобретенную в магазине ИКЕА до 1 августа 2007 года – на них распространяется двухлетняя гарантия (2 года).
Кем выполняется техобслуживание?
Техобслуживание выполняется сервисным центром, авторизованным компанией IKEA.
Что покрывает данная гарантия?
Данная гарантия покрывает неисправности изделия, обусловленные дефектами конструкции или материалов, проявившимися после его покупки в магазине ИКЕА. Данная гарантия относится только к случаям бытового использования изделия. Все исключения указаны в пункте «Что не покрывает данная гарантия?». В рамках гарантии предусматривается возмещение затрат, связанных с устранением неисправностей, например затраты на ремонт, запасные части, выполнение работ и дорожные расходы – при условии, что доступ к технике в целях ремонта не затруднен и не вызывает существенных расходов и что неисправность вызвана дефектами конструкции или материалов, покрываемыми гарантией. При данных условиях применимы нормы ЕС (№ 99/44/EG) и соответствующие местные правила и предписания. Замененные запчасти переходят в собственность компании ИКЕА.
Что ИКЕА делает, чтобы устранить неисправность?
Сервисная служба, уполномоченная компанией ИКЕА, изучит изделие и решит, покрывается ли случай данной гарантией. Если будет решено, что изделие попадает под действие гарантии, то сервисная служба ИКЕА или ее авторизованный партнер произведет либо ремонт неисправного изделия, либо его замену таким же или аналогичным.
Что не покрывает данная гарантия?
• Естественный износ;
• Умышленные повреждения или повреждения вследствие небрежного обращения, обусловленные невнимательностью, несоблюдением инструкций по эксплуатации, неправильной установкой или подключением к электрической сети с напряжением, не соответствующим техническим требованиям прибора; повреждения, вызванные химическими или электрохимическими реакциями; повреждения, обусловленные ржавчиной, коррозией или воздействием воды, в том числе, но не ограничиваясь этим, повреждения, вызванные повышенной жесткостью воды, подаваемой в сети водоснабжения; повреждения, вызванные аномальными условиями окружающей среды;
• Расходные материалы и запчасти, в том числе батареи и лампочки;
• Повреждения нефункциональных и декоративных деталей, не влияющих на нормальную работу устройства, в том числе любые царапины или возможное различие в цвете.
• Случайные повреждения, вызванные присутствием инородных предметов и/или веществ, а также чисткой или устранением засоров в фильтрах, системах слива или дозаторах моющих средств.
• Повреждения следующих деталей: стеклокерамики, аксессуаров, корзин для посуды и столовых приборов, подающих и сливных труб, уплотнителей, ламп и плафонов для ламп, экранов, ручек, корпуса и частей корпуса (эти детали попадают под действие гарантии, только если сервисный центр представит заключение, что причиной повреждений был производственный брак).
• Случаев, если дефекты не были обнаружены специалистом во время визита.
• На ремонт, выполненный неуполномоченными обслуживающими организациями либо неавторизованными сервис-партнерами, а так же с использованием неоригинальных запасных частей.
• На ремонт вследствие неправильной установки.
• На повреждения, возникшие при небытовом использовании товара, например использующиеся в профессиональных целях или иных целях, связанных с предпринимательской деятельностью.
• Повреждения, возникшие при перевозке товара. Если покупатель самостоятельно осуществляет транспортировку товара домой или по другому адресу, ИКЕА не несет ответственности за повреждения, возникшие при перевозке. Тем не менее, если услуга доставки была заказана покупателем в ИКЕА, все повреждения, возникшие при перевозке товара, покрывается данной гарантией.
• Условия выполнения установки бытовой техники ИКЕА, за исключением случаев, когда необходимость установки вызвана ремонтом или заменой неисправных частей. При покупке бытовой техники в ИКЕА услуга первоначальной установки не включена в стоимость товара. Если уполномоченные ИКЕА обслуживающие организации или авторизированные сервис-партнеры осуществляют ремонт или замену бытового прибора в соответствии с условиями данной гарантии, уполномоченные обслуживающие организации или авторизированные сервис-партнеры обязуются при необходимости выполнить повторную установку отремонтированного бытового прибора или бытового прибора, заменяющего неисправный. Данные ограничения не распространяются, если установка была произведена квалифицированным специалистом, с использованием оригинальных запасных частей для адаптации бытовой техники к требованиям технической безопасности другой страны ЕС.
Применимость законодательства конкретной страны
Гарантия, предоставляемая ИКЕА, полностью покрывает или даже превышает все требования местного законодательства, которые могут отличаться в разных странах.
Зона действия
Если изделие было куплено в одной стране ЕС и перевезено в другую страну ЕС, гарантийное обслуживание будет производиться на условиях, действующих во второй стране. Обязательства по гарантийному обслуживанию остаются в силе только, если:
• сам прибор и его установка соответствуют техническим требованиям страны, в которой подана заявка на гарантийное обслуживание;
• сам прибор и его установка соответствуют инструкциям по сборке и положениям руководства пользователя
Сервисный центр, авторизованный ИКЕА
Вы можете обращаться к поставщикам гарантийных услуг ИКЕА по следующим вопросам:
1. Гарантийный ремонт;
2. Рекомендации и техническая консультация по установке техники, купленной в магазине ИКЕА, в кухонную мебель ИКЕА; Сервисный центр не сможет давать рекомендации по следующим вопросам:
• вопросы по установке кухонной мебели ИКЕА
• подсоеденение к электрической сети, если бытовая техника не имеет вилки и кабеля; подключение к водопроводным и газовым коммуникациям. Эти виды работ должны выполняться авторизованным специалистом
3. За разъяснением функций и правил эксплуатации техники, купленной в магазине ИКЕА
Для получения оптимального результата просим вас тщательно изучить сопроводительные документы и инструкцию по эксплуатации перед обращением в сервисный центр.
Как связаться с нами, если вам нужна наша помощь
Пожалуйста, ознакомьтесь со списком сервисных центров, авторизированных ИКЕА, который представлен на последней странице этой инструкции
Для ускорения обслуживания просим вас называть артикул изделия (12-значный сервисный код и 8-значный код изделия), указанный в данном буклете при обращении в сервисные центры.
ОБЯЗАТЕЛЬНО СОХРАНЯЙТЕ ЧЕК!
Чек является подтверждением покупки, его необходимо предъявлять при обращении за гарантийным обслуживанием.
Нужна дополнительная помощь?
По всем дополнительным вопросам, не касающимся гарантийного обслуживания, обращайтесь в отдел обслуживания покупателей ближайшего магазина ИКЕА. Пожалуйста, тщательно изучите сопроводительные документы перед обращением.
Инструкции
Manual
View the manual for the Ikea RENLIG IWM60 here, for free. This user manual comes under the category washing machines and has been rated by 16 people with an average of a 8.5. This manual is available in the following languages: English. Do you have a question about the Ikea RENLIG IWM60?
Ask your question here
Ikea RENLIG IWM60 specifications
Below you will find the product specifications and the manual specifications of the Ikea RENLIG IWM60.
The Ikea RENLIG IWM60 is a washing machine that is designed to accommodate a variety of laundry needs while providing efficient and reliable performance. It has a 6kg capacity and is rated with an energy efficiency class A+. This means that it consumes less energy than other washing machines and is considered environmentally friendly.
The RENLIG IWM60 is equipped with several features that make it easy to use. It has a delay start option that allows users to choose when they want the washing cycle to begin. Additionally, it has a quick wash function that can complete a cycle in just 30 minutes, perfect for those who are short on time.
The washing machine has 16 different programs and a sensor-based system that automatically adjusts the amount of water and energy used based on the load size. It is also equipped with a spin speed of up to 1200 rpm, which helps to remove moisture from clothes quickly and efficiently.
The Ikea RENLIG IWM60 has a simple and modern design with a white finish. It also comes with a standard manufacturer’s warranty, ensuring that any issues that arise can be dealt with effectively. Overall, the Ikea RENLIG IWM60 is an excellent choice for those in search of an energy-efficient and reliable washing machine.
General
Frequently asked questions
Can’t find the answer to your question in the manual? You may find the answer to your question in the FAQs about the Ikea RENLIG IWM60 below.
What temperature should I use for my laundry?
The washing label of your garment shows the recommended washing temperature.
How do I prevent my washing machine from smelling?
Unpleasant odours can be avoided by occasionally washing at 60 degrees and using the recommended amount of detergent per wash.
Do I need to use an anti-scaling agent for my washing machine?
It is not necessary to use an anti-scaling agent. Scale deposits can be prevented by limiting washing at high temperatures and using the recommended amount of detergent per wash.
Is the manual of the Ikea RENLIG IWM60 available in English?
Yes, the manual of the Ikea RENLIG IWM60 is available in English .
Is your question not listed? Ask your question here

GB
FR
RENLIG
IWM60
DE
IT


ENGLISH 4
FRANÇAIS 25
DEUTSCH 54
ITALIANO 80
ENGLISH 4
Contents
Safety information 4
Product description 6
Control panel 7
First use 9
Daily use 9
Helpful hints and tips 12
Washing programmes 12
Consumption values 15
Subject to change without notice
Care and cleaning 15
What to do if… 18
Technical data 20
Installation 21
Electrical connection 22
Environment concerns 22
IKEA GUARANTEE 23
Safety information
For your safety and correct operation of
the appliance, read this manual carefully
before installation and use. Always keep these
instructions with the appliance even if you
move or sell it. Users must fully know the operation and safety features of the appliance.
The manufacturer is not responsible for damages caused by incorrect installation and use.
Children and vulnerable people safety
• Do not let persons, children included, with
reduced physical sensory, reduced mental
functions or lack of experience and knowledge to use the appliance. They must have
supervision or instruction for the operation
of the appliance by a person who is responsible for their safety.
• Keep all packaging well away from chil-
dren. There is risk of suffocation.
• Keep all detergents in a safe area. Do not
let children touch the detergents.
• Make sure that children or pets do not climb
into the drum. Please check into the drum
before using it.
This appliance incorporates a special feature to prevent children and pets becoming
trapped inside the drum.
To activate this device, rotate the button clockwise (without pressing it) inside the door until
the groove is horizontal. If necessary
use a coin.
General safety
• Do not change the specifications or modify
this product. There is risk of injury and damage to the appliance.
• If the appliance is delivered in the winter
months when there are minus temperatures,
store it at room temperature for 24 hours
before using for the first time. Please read
the “dangers of freezing” chapter.
• This appliance is designed for use in normal
inside temperature. Manufacturer is not responsible for freezing damages.
• Always unplug the appliance and turn off
the water supply after use, cleaning and
maintenance.
To disable this device and restore the
possibility of closing
the door, rotate the
button anticlockwise until the
groove is vertical.

ENGLISH 5
Installation
• A qualified and competent person must do
the electrical and the plumbing installation.
• This appliance is heavy. Take care when you
move it.
• Make sure that the appliance is not damaged because of transport. Do not connect
a damaged appliance. If necessary, contact
dedicated After Sales Service.
• Remove all packaging and transit bolts before first use. Serious damage can occur to
the appliance or to neighbouring cabinets
or furniture.
• Keep all transit devices so that they can be
refitted if the appliance ever has to be transported again. Please refer to the relevant
steps in the Assembly Instruction.
• Never place cardboard, wood or similar
materials under the appliance to compensate for any unevenness in the floor.
Level accurately the appliance and tight the
lock nuts to prevents vibration, noise and
displacement of the appliance during operation.
• If your appliance is installed on a carpeted
floor, adjust the feet in order to ensure that
the air must circulate freely under the appliance.
• Check that your appliance is not standing on
the inlet and drain hose and the worktop or
the back of the appliance is not pressing the
electrical supply cable against the wall.
• Always be sure, that there is no water leakage from hoses and their connections after
the installation.
• If the appliance is installed in a location subject to frost, please read the “dangers of
freezing” chapter.
Use
• The appliance is only for domestic use. Do
not use the appliance for commercial and
industrial use or for other uses.
• Only an authorised service engineer can repair this appliance. Use only original spare
parts.
• Refer to the instructions on the label of each
item (garment) before washing.
• Do not overload the appliance. See the
Washing Programme Table.
• Before washing, ensure that all pockets are
empty and buttons and zips are fastened.
• Any objects such as coins, safety pins, nails,
screws, stones or any other hard, sharp material can cause extensive damage and must
not be placed into the appliance.
• Treat stains such as paint, ink, rust, and grass
before washing.
• Only use the advised quantities of fabric
softener and detergent. Damage to the fabric can ensue if you overfill. Refer to the manufacturer’s recommendations of quantities.
• Wash small items such as socks, laces, washable belts etc. in a washing bag or pillow
case as it is possible for such items to slip
down between the tub and the inner drum.
• Do not use your appliance to wash articles
with whalebones, items without hems,
frayed and torn. Underwired bras must NOT
be washed.
• Garments which have been in contact with
volatile petroleum products should not be
appliance washed. If volatile cleaning fluids
are used, care should be taken to ensure
that the fluid is removed from the garment
before placing in the appliance.
• The water we use normally contains lime. It
is a good idea to periodically use a water
softening powder in the appliance. Do this
without any laundry into the drum and according to the softening powder manufacturer’s instructions. This will help to prevent
the formation of lime deposits making your
appliance more efficiency.
• Never pull the power supply cable to remove the plug from the socket; always take
hold of the plug itself.
• Never use the appliance if the power supply
cable, the control panel, the working surface
or the base is damaged so that the inside of
the appliance is accessible.
Water inlet
• This appliance must be connected to a cold
water supply.
• Do not use connection hoses from an old
appliance to connect it to the water supply.
ENGLISH 6
• The water pressure must be in the limits (refer to the chapter «Technical data» table).
Make sure that the local water authority
gives you the average mains pressure in
your area.
• Make sure that there are no kinks in the water inlet hose and that the water inlet hose
is not squashed or entangled.
• Before connecting up the appliance to new
pipework or to pipework that has not been
used for some time, run off a reasonable
amount of water to flush out any debris that
may have collected in the pipes.
• Turn the inlet hose on the back of the appliance to the left or the right to suit the installation.
• The inlet hose must not be lengthened. If it is
too short and you do not wish to move the
tap, you will have to purchase a new, longer
hose specially designed for this type of use.
• Before opening the water tap, be sure to
tighten the ring nut well to prevent any leaks.
Water drainage
• Make sure the end of the drain hose cannot
come unhooked when the appliance is emptying. This could be done by tying it to the
tap with a piece of string or attaching it to
the wall.
• The drain hose must be placed at a height
of not less than 44 cm and not more than 90
cm. Please refer to the Assembly Instruction
booklet.
Care and cleaning
• Before maintenance, switch off the appliance and disconnect the mains plug from the
mains socket.
• Clean the exterior cabinet of the appliance
with soap and water only, and then dry
thoroughly.
• The washing powder and additive dispenser drawer should be cleaned regularly.
• Inspected the pump regularly and particularly if:
– the appliance does not empty and/or
spin
– the appliance makes an unusual noise
during draining due to objects such as
safety pins, coins etc. blocking the pump.
• Never remove the pump cover during a
wash cycle. Always wait until the appliance
has drained out the water. If you have selected an high temperature washing programme please wait until the water has
cooled down.
• Ensure that the pump cover is securely retightened to prevent any leaks.
Product description
1 Detergent dispenser drawer
1
2
3
4
5
6
2 Control panel
3 Door opening handle
4 Rating Plate
5 Drain pump
6 Adjustable feet
ENGLISH 7
Detergent dispenser drawer
Compartment for detergent used for prewash and soak phase or for stain remover
used during the stain action phase (if available). The prewash and soak detergent is
added at the beginning of the wash programme. The stain remover is added during
the stain action phase.
Compartment for powder or liquid detergent used for main wash. If using liquid detergent pour it just before starting the programme.
Compartment for liquid additives (fabric
softener, starch).
Follow the product manufacturer’s rec-
ommendations on quantities to use and
do not ever exceed the «MAX» mark in the
detergent dispenser drawer. Any fabric softener or starching additives must be poured
into the compartment before starting the
wash programme.
Control panel
Below is a picture of the control panel. It shows the programme selector dial as well as the
buttons and the indicator lights. These are presented by relevant numbers on the following
pages.
1 2 3 4 5 6 7
1 Programme selector dial
2 Spin reduction button
3 Multi-Functions button
4 Extra Rinse button
5 Start/Pause button
6 Delay Start button
7 Programme Indicator lights
ENGLISH 8
Table of Symbol
= Cottons
= Economy
= Cold wash = Options
= Synthetics = Prewash
= Easy Iron = Quick Wash
= Delicates = Extra Rinse
= Wool = Delay Start
= Handwash = Main Wash
= Rinses = End Cycle
= Drain = Start/Pause
= Spin
= On/Off — Reset
= Rinse Hold
Programme selector dial It allows you to switch the appliance On/Off and/or to select a
Spin reduction button By pressing this button you can change the spin speed of the
Multi-Functions button: By pressing this button, you can select only one of the options.
Extra Rinse button This appliance is designed for saving energy. If it necessary to
Start/Pause button This button allows you to start or to interrupt the selected wash-
Delay Start button This button allows you to delay the start of the programme by 3,
Programme Indicator lights
programme.
selected programme.
• Rinse Hold option: by selecting this option the water of the last
rinse is not emptied out to prevent the fabrics from creasing.
Before opening the door it will be necessary to empty out the
water. To empty out the water, please read the paragraph
«At the end of the programme».
The relevant light will light up.
• Prewash: by selecting this option the appliance performs a
prewash cycle before the main wash phase. The washing time
will be prolonged. This option is recommended for heavily
soiled laundry.
• Super Quick: a very short cycle for slightly soiled items that
have been worn for a short time.
rinse the laundry using an extra quantity of water (extra rinse),
select this option. Some additional rinses will be performed. This
option is recommended for people who are allergic to detergents, and in areas where the water is very soft.
ing programme.
6 or 9 hours.
ENGLISH 9
When selecting a washing programme both lights 7.1 and 7.2
illuminate.
7.1
7. 2
7. 3
When you have pressed the button 5 the only light corresponding to the running phase stays on.
The appliance starts working and the door is locked.
The light 7.3 illuminates at the end of the washing cycle. After a
few minutes the door can be opened.
Important! If the draining programme is selected any light will
illuminate.
First use
1. Ensure that the electrical and water connections comply with the installation instructions.
2. Remove any material from the drum.
3. Pour 2 liters of water into the main wash
compartment
in order to activate the ECO valve.
of the detergent drawer
Select a cotton cycle at the highest temperature without any laundry in the appliance, to remove any manufacturing residue from the drum and tub.
Pour 1/2 a measure of detergent into the
main wash compartment and start the appliance.
Daily use
Open the door
Open the door by carefully pulling the door
handle outwards.
Load the laundry
Place the laundry in
the drum, one item at
a time, shaking them
out as much as possible.
By pushing the porthole frame, close
firmly the door.
Measure out detergent and fabric softener
1
Pour the detergent
into the main wash
compartment
in the appropriate
compartment if the
selected programme/option it requires (see more details in «Detergent
dispenser drawer»).
To pour the right
quantity of the detergent, see more details in «Degrees of
water hardness».
or
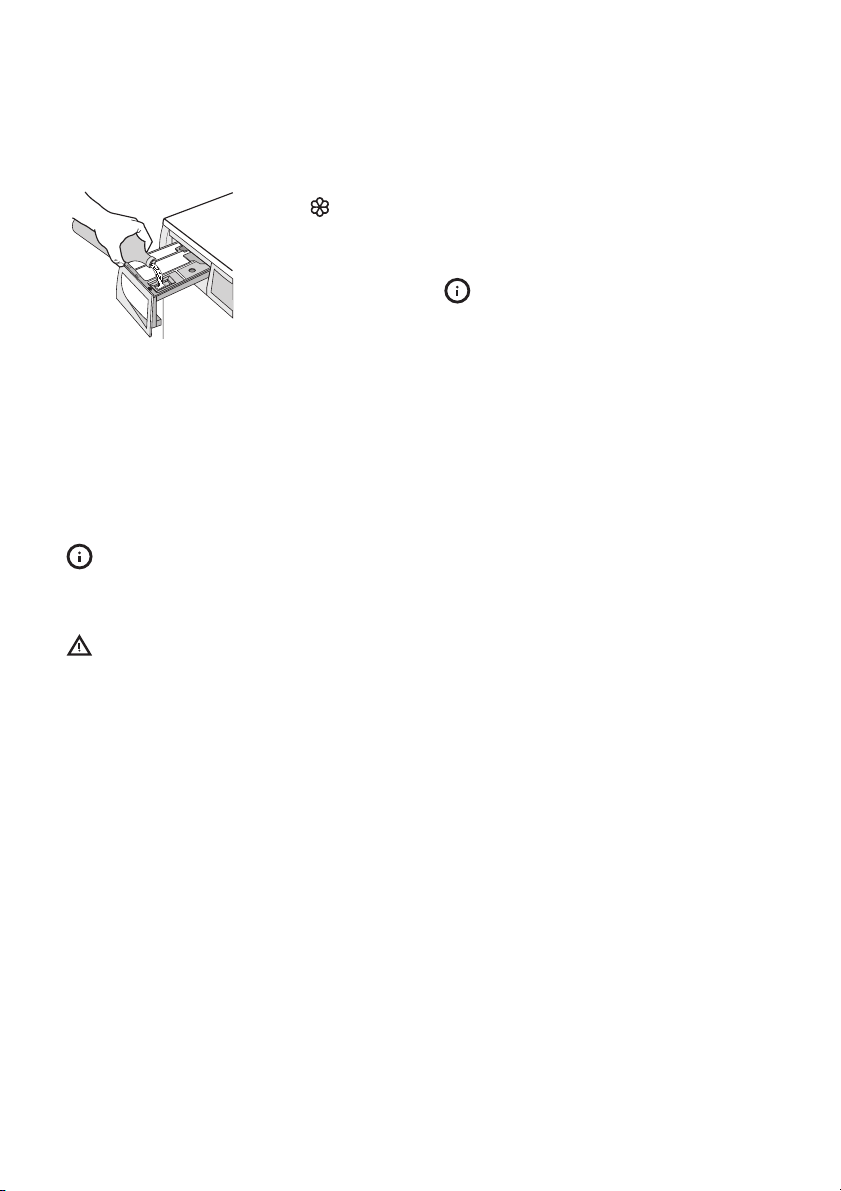
ENGLISH 10
2 Pour fabric softener
Close the drawer gently
Select the required programme by turning
the programme selector dial (1)
The appliance is now switched on. The indicator light of button 5 starts to blink.
At the end of the programme the selector dial
must be turned to position O , to switch the appliance off.
For the description of each wash cycle,
the compatibility among the washing
programmes and the options, consult the
chapter «Washing Programmes».
Caution! If you turn the programme
selector dial to another programme when
the appliance is working, the red indicator light
of button 5 will blink 3 times to indicate a
wrong selection. The appliance will not
perform the new selected programme.
Reduce the spin speed by pressing button 2
By selecting a programme, the appliance proposes automatically the maximum spin speed
provided for that programme.
Press button 2 repeatedly to change the spin
speed, if you want your laundry to be spun at
a different speed. The relevant light illuminates.
Select the available options by pressing
buttons 2, 3 and 4
Depending on the programme, different functions can be combined. These must be selected
after choosing the desired programme and
before starting the programme.
into the compartment
marked
exceed the «MAX»
mark in the drawer).
(must not
When these buttons are pressed, the corresponding indicator lights illuminate. When
they are pressed again, the indicator lights go
out. If an incorrect option is selected, the integrated red indicator light of the button 5 flashes for 3 times.
For the compatibility among the washing
programmes and the options see chapter
«Washing Programmes».
Select the Delay Start by pressing button 6
Before you start the programme, if you wish to
delay the start, press the button 6 repeatedly,
to select the desired delay. The relevant light
illuminates.
You must select this option after you have set
the programme and before you start the programme.
You can cancel or modify the delay time at any
moment, before you press button 5.
Selecting the delayed start:
1. Select the programme and the required
options.
2. Select the delay start by pressing the button 6.
3. Press button 5:
– the appliance starts its countdown.
– The programme will start after the se-
lected delay has expired.
Cancelling the delayed start after having started the programme:
1. Set the washing appliance to PAUSE by
pressing button 5.
2. Press button 6 once, the light relevant to the
selected delay goes off
3. Press button 5 again to start the pro-
gramme.
The Delay Start can not be selected with
DRAIN programme.
Important! The selected delay can be
changed only after selecting the washing
programme again.
The door will be locked throughout the delay
time. If you need to open the door, you must
set the appliance to PAUSE (by pressing the
button 5) and then wait a few minutes. After
you have closed the door, press the button 5
again.

ENGLISH 11
Start the programme by pressing button 5
To start the selected programme, press the
button 5, the corresponding green indicator
light stops blinking. The indicator light corresponding to the running phase illuminates. The
appliance starts operating and the door is
locked.
To interrupt a programme which is running,
press the button 5: the corresponding green
indicator light starts blinking.
To restart the programme from the point at
which it was interrupted, press the button 5
again. If you have chosen a delayed start, the
appliance will begin the countdown.
If an incorrect option is selected, the red indicator light of the button 5 blinks 3 times.
Altering an option or a running programme
It is possible to change some options before
the programme carries them out.
Before you make any change, you must PAUSE
the appliance by pressing the button 5.
Changing a running programme is possible
only by resetting it. Turn the programme selector dial to O and then to the new programme position. Start the new programme by
pressing the button 5 again. The washing water in the tub will be not emptied out.
Interrupting a programme
Press the button 5 to interrupt a programme
which is running, the corresponding green indicator light starts blinking.
Press the button again to restart the programme.
Cancelling a programme
Turn the selector dial to O to cancel a programme which is running.
You can select now a new programme.
Opening the door
After the programme has started the door is
locked. If, for any reason, you need to open it,
set firstly the appliance to PAUSE by pressing
the button 5. After a few minutes it will be possible to open the door.
If the door remains locked, this means that the
appliance is already heating or that the water
level is too high. In any case, do not try to force
the door!
If you cannot open the door but you need to
open it you have to switch the appliance off by
turning the selector dial to O . After a few minutes the door can be opened (pay attention
to the water level and temperature!).
After closing the door, it is necessary to select
the programme and options again and to
press button 5.
At the end of the programme
The appliance stops automatically. The indicator light of button 5 and the indicator light
corresponding to the just finished washing
phase goes off. The light 7.3 illuminates. After
a few minutes the door can be opened.
If a programme or an option that ends with
water left in the tub has been selected, the light
7.3 illuminates but the door remains locked to
indicate that the water must be emptied out
before opening the door.
Follow the below instructions to empty out the
water:
1. Turn the programme selector dial to O .
2. Select the draining or spinning pro-
gramme.
3. Reduce the spin speed if needed, by press-
ing the button 2.
4. Press button 5.
At the end of the programme, the door can be
now opened. Turn the programme selector dial to O to switch the appliance off.
Remove the laundry from the drum and carefully check that the drum is empty. If you do not
intend to carry out another wash, close the
water tap. Leave the door open to prevent any
mildew and unpleasant smells.
Stand by : once the programme has fin-
ished the energy saving system is enabled with the pilot lights switched on. By pressing any button the appliance will come out of
the energy saving status.
ENGLISH 12
Helpful hints and tips
Sorting out the laundry
Follow the wash code symbols on each garment label and the manufacturer’s washing instructions. Sort the laundry as follows: whites,
coloureds, synthetics, delicates, woollens.
Removing stains
Stubborn stains may not be removed by just
water and detergent. It is therefore advisable
to treat them prior to washing.
Blood: treat fresh stains with cold water. For
dried stains, soak overnight in water with a
stain remover product then rub in the soap and
water.
Oil based paint: moisten with benzine stain
remover, lay the garment on a soft cloth and
dab the stain; treat several times.
Dried grease stains: moisten with turpentine,
lay the garment on a soft surface and dab the
stain with the fingertips and a cotton cloth.
Rust: oxalic acid dissolved in hot water or a rust
removing product used cold. Be careful with
rust stains which are not recent since the cellulose structure will already have been damaged and the fabric tends to hole.
Mould stains: treat with bleach, rinse well
(white cottons and fast coloureds only).
Characteristic
Soft 0-7 0-15
Medium 8-14 16-25
Hard 15-21 26-37
Very hard > 21 > 37
German °dH French °T.H.
Grass: soap lightly and treat with bleach
(white cottons and fast coloureds only).
Ball point pen and glue: moisten with ace-
1)
tone
, lay the garment on a soft cloth and dab
the stain.
Lipstick: moisten with acetone as above, then
treat stains with methylated spirits. Treat any
residual marks with bleach.
Red wine: soak in water and detergent, rinse
and treat with acetic or citric acid, then rinse.
Treat any residual marks with bleach.
Ink: depending on the type of ink, moisten the
fabric first with acetone
acid; treat any residual marks on white fabrics
with bleach and then rinse thoroughly.
Tar stains: first treat with stain remover, methylated spirits or benzine, then rub with detergent paste.
Degrees of water hardness
Water hardness is classified in so-called “degrees” of hardness. Information on hardness of
the water in your area can be obtained from
the relevant water supply company, or from
your local authority.
Degrees of water hardness
1)
, then with acetic
A water softener must be added when water has a medium-high degree of hardness. Follow
the manufacturer’s instructions. The quantity of detergent can then always be adjusted (re-
duced) to degree of hardness soft.
Washing programmes
Please always refer to the care label symbol of your garment and select the washing programme based on what it says.
1) do not use acetone on artificial silk
ENGLISH 13
1)
Type of
Programme/
Temperature
COTTONS
90°-60°
COTTONS
ECO
60°
COTTONS
40°-30°-Cold
SYNTHETICS
60°-40°-30°Cold
EASY IRON
40°
DELICATES
40°-30°-Cold
laundry
White cotton (heavynormally soiled items).
White and fast coloured cotton economy, lightly-heavy
soiled items, shirts, underwear.
Coloured cotton (normally-lightly soiled
items).
Synthetic or mixed
fabrics: underwear,
coloured garments,
non-shrink shirts, blouses.
Synthetic fabrics: selecting this programme the laundry is
gently washed and
spun to avoid any
creasing. In this way
ironing is easier. Furthermore the appliance will perform additional rinses.
Delicate fabrics: for
example curtains.
Cycle
Description
Main wash
Rinses
Max. final
spin at 1200
rpm
Main wash
Rinses
Max. f inal
spin at 1200
rpm
Main wash
Rinses
Max. final
spin at 1200
rpm
Main wash
Rinses
Max. final
spin at 900
rpm
Main wash
Rinses
Max. final
spin at 900
rpm
Main wash
Rinses
Max. final
spin at 700
rpm
6 kg
3 kg
6 kg
6 kg
3 kg
3 kg
1.5 kg
1.5 kg
3 kg
1.5 kg
Max. Load
1)
1)
1)
1)
Red. Load
Available
Options
Spin
Rinse Hold
Prewash
Super Quick
Extra Rinse
Spin
Rinse Hold
Prewash
Extra Rinse
Spin
Rinse Hold
Prewash
Super Quick
Extra Rinse
Spin
Rinse Hold
Prewash
Super Quick
Extra Rinse
Spin
Rinse Hold
Prewash
Extra Rinse
Spin
Rinse Hold
Prewash
Super Quick
Extra Rinse
Detergent
Compartment
2)
2)
2)
2)
2)
2)
ENGLISH 14
1)
Type of
WOOL
40°
Programme/
Temperature
laundry
Special programme
for wool garments
bearing the «Pure new
wool, non-shrink, appliance washable» la-
Cycle
Description
Main wash
Rinses
Max. final
spin at 900
rpm
2 kg
Max. Load
Red. Load
bel.
HANDWASH
30°-Cold
Special programme
for delicate fabrics
with «hand washing»
care symbol.
Main wash
Rinses
Max. final
spin at 900
2 kg
rpm
RINSES With this programme
it is possible to rinse
and spin cotton garments which have
Rinses
Max. final
spin at 1200
rpm
been washed by
hand. The appliance
6 kg
performs some rinses,
followed by a final
long spin. The spin
speed can be reduced.
DRAIN For emptying out the
water of the last rinse
in programmes with
Draining of
water
6 kg
the Rinse Hold option
selected.
SPIN Separate spin for
hand washed garments and after pro-
Max. final
spin at 1200
rpm
grammes with the
Rinse Hold option selected. You can
6 kg
choose the spin speed
by pressing the relevant button to adapt it
to the fabrics to be
spun.
1) If you select the SUPER QUICK option, we recommend you, to reduce the maximum load as indicated.
(Red. load = reduced load). Full loading is possible however with somewhat reduced cleaning results.
2) If using liquid detergents, a programme without PREWASH must be selected.
Available
Options
Detergent
Compartment
Spin
Rinse Hold
Spin
Rinse Hold
Spin
Rinse Hold
Extra Rinse
Spin

ENGLISH 15
Consumption values
Programme Energy consumption
White Cottons 90° 2 61 140
Cottons 60° 1.3 58 125
Cottons ECONOMY
2)
60°
Cottons 40° 0.75 58 120
Synthetics 40° 0.5 47 80
Delicates 40° 0.55 58 70
Wool 40° 0.45 55 60
Handwash 30° 0.3 58 55
1) Without prewash option selected.
2) «Cottons Economy» at 60°C with a load of 6 kg is the reference programme for the data entered in the
energy label, in compliance with CEI 456 standards.
The consumption data shown on this chart is to be considered purely indicative, as it may
vary depending on the quantity and type of laundry, on the inlet water temperature and
on the ambient temperature.
(KWh)
1.02 45 155
Water consumption
(litres)
Programme duration
(Minutes)
1)
Care and cleaning
Warning! Switch the appliance off before
you carry out any cleaning or
maintenance work.
Maintenance Wash
With the use of low temperature washes it is
possible to get a build up of residues inside the
drum.
We recommend that a maintenance wash be
performed on a regular basis.
To run a maintenance wash:
• The drum should be empty of laundry.
• Select the hottest cotton wash programme.
• Use a normal measure of detergent, must be
a powder with biological properties.
Cleaning the dispenser drawer and the
drawer recess
1
To remove the drawer, press the catch
downwards and pull
it out.
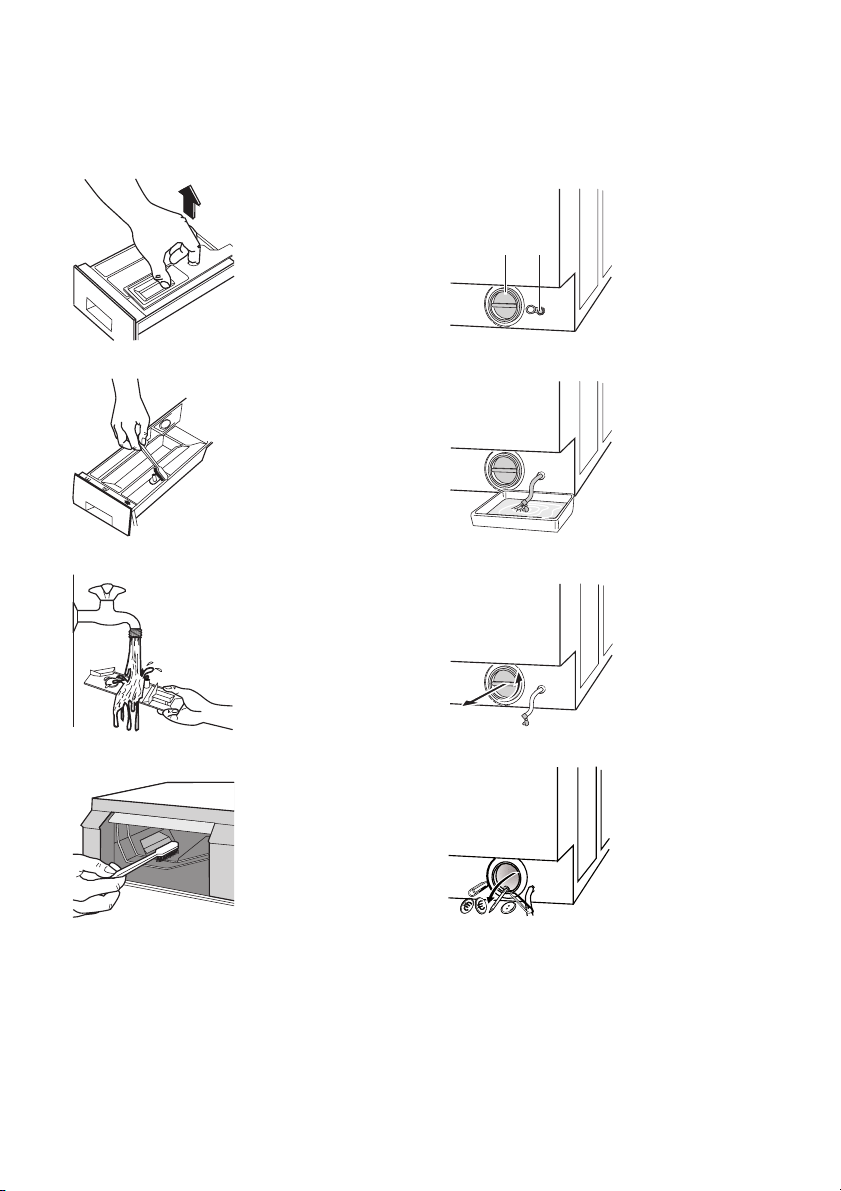
ENGLISH 16
2 To aid cleaning, re-
3
4
move also the top
part of the additive
compartment.
Use a stiff brush to
clean and remove all
washing powder residue.
Flush out all the removed parts of the
dispenser drawer
under a tap to remove any traces of
accumulated powder.
1
B
A
2
3
Place a container
close to the pump (A),
to collect any spillage.
Pull out the emergency emptying hose (B),
place it in the container and remove its
cover cap.
When no more water
comes out, unscrew
the pump cover (A)
and remove it. Always keep a rag
nearby to dry up
spillage of water
when removing the
pump.
5
Cleaning the pump
Proceed as follows:
Use the previous
brush to clean the recess, ensuring that
upper and lower part
of it is well cleaned.
After having cleaned
the dispenser and
the drawer recess,
replace it and run a
rinse programme
without any laundry
in the drum to flush
away any residue.
4
Remove any objects
from the pump impeller by rotating it.
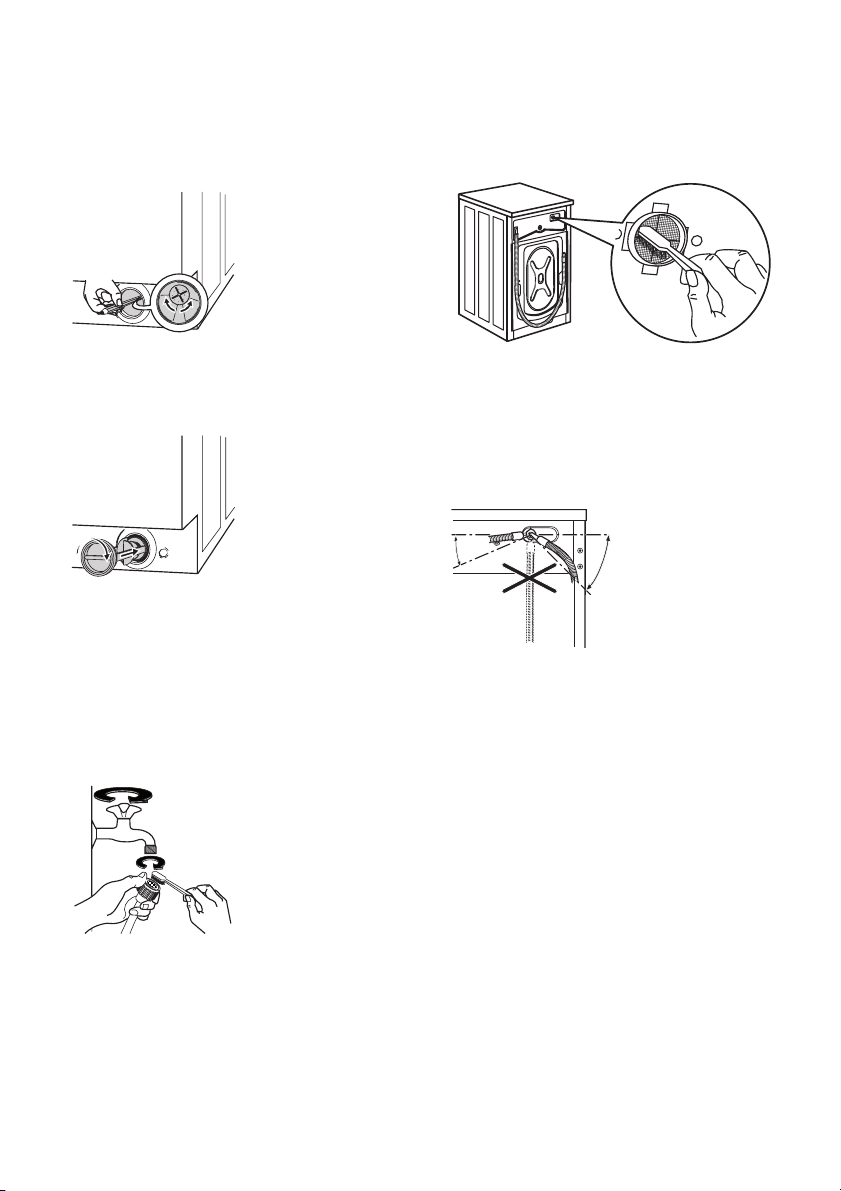
ENGLISH 17
5 Use a pencil to check
whether the pump
wheel right at the
back of the pump
housing can turn. (It is
normal for the pumping wheel to turn
jerkily.) If the pumping wheel cannot be
turned, please contact the After Sales
Service.
6
Put the cap back on
the emergency emptying hose and place
the latter back in its
seat. Screw the pump
fully in.
Cleaning the water inlet filters
If the appliance takes long to fill with water or
doesn’t fill, the starting button indicator light
blinks in red. Check if the water inlet filters are
blocked (see chapter «What to do if…» for
more details).
Proceed as follows:
1
• Turn off the water
tap.
• Unscrew the hose
from the tap.
• Clean the filter in
the hose with a stiff
brush.
• Screw firmly the inlet hose back onto
the tap.
2
• Unscrew the hose from the appliance.
Keep a rag nearby because some water
may flow.
• Clean the filter in the valve with a stiff
brush or with the piece of cloth.
3
•Screw the hose
back to the appliance turning it to
35°
the left or the right
45°
to suit the installation. Tight the locknut correctly to
prevent water
leaks.
• Turn on the water
tap.
The dangers of freezing
If the appliance is exposed to temperatures
below 0°C, certain precautions should be taken.
• Turn off the water tap.
• Unscrew the inlet hose.
• Place the end of the emergency emptying
hose and that of the inlet hose in a bowl
placed on the floor and let water drain out.
• Screw the water inlet hose back on and reposition the emergency emptying hose after
having put the cap on again.
• When you intend to start the appliance up
again, make sure that the room temperature
is above 0°C.
ENGLISH 18
Important! Every time you drain the water
through the emergency emptying hose you
must pour 2 litres of water into the main wash
compartment of the detergent drawer and
then run the drain programme. This will
activate the ECO VALVE device avoiding that
part of the detergent remains unused at next
washing.
Emergency emptying out
If the water is not discharged, proceed as follows to empty out the appliance:
• pull out the plug from the power socket;
• close the water tap;
• if necessary, wait until the water has cooled
down;
• open the pump door;
• place a bowl on the floor and place the end
of the emergency emptying hose into the
bowl. Remove its cap. The water should
drain by gravity into the bowl. When the
bowl is full, put the cap back on the hose.
Empty the bowl. Repeat the procedure until
water stops flowing out;
• clean the pump if necessary as previously
described;
• replace the emergency emptying hose in its
seat after having plugged it;
• screw the pump cover again and close the
door.
What to do if…
The appliance does not start or stops during
operation. It is possible that the red indicator
light of button 5 blinks to indicate that the appliance is not working.
Problem Possible cause Solution
The door has not been closed (The
red indicator light of button 5 blinks).
The plug is not properly inserted in
the power socket.
There is no power at the socket. Please check your domestic electrical
The appliance
does not start:
The appliance
does not fill:
The main fuse or the fuse in a plug
has blown.
The programme selector dial is not
correctly positioned and the button 5
has not been pressed.
The delay start has been selected. If the laundry are to be washed im-
The water tap is closed The red indicator light of button 5 blinks).
The inlet hose is squashed or kinked
(The red indicator light of button 5
blinks).
The filter in the inlet hose or the inlet
valve filter are blocked (The red indicator light of button 5 blinks).
Before contacting your local Service Centre,
please carry out the checks listed below.
Close the door firmly.
Insert the plug into the power socket.
installation.
Replace the fuse.
Please turn the selector dial and
press the button 5 again.
mediately, cancel the delay start.
Open the water tap.
Check the inlet hose connection.
Clean the water inlet filters. (See
«Cleaning the water inlet filters» for
more details).
ENGLISH 19
Problem Possible cause Solution
The appliance
does not empty:
The appliance
spinning phase
starts late or
does not start:
There is water
on the floor:
The door will not
open:
The door is not properly closed (The
red indicator light of button 5 blinks).
The drain hose is squashed or kinked
(The red indicator light of button 5
blinks).
The drain filter is clogged (The red
indicator light of button 5 blinks).
An option or a programme that ends
with the water still in the tub or a that
eliminates all the spinning phases
has been selected.
The electronic unbalance detection
device has cut in because the laundry
is not evenly distributed in the drum.
The laundry is redistributed by reverse rotation of the drum. This may
happen several times before the unbalance disappears and normal
spinning can resume. If, after 10 minutes, the laundry is still not evenly
distributed in the drum, the appliance will not spin.
Too much detergent or unsuitable
detergent (creates too much foam)
has been used.
Check whether there are any leaks
from one of the inlet hose fittings. It is
not always easy to see this as the
water runs down the hose; check to
see if it is damp.
The drain or inlet hose is damaged. Replace it with a new one (check with
The cap on the emergency emptying
hose has not been replaced or the
filter has not been properly screwed
in after cleaning action.
The programme is still running. Wait the end of washing cycle.
The door lock has not been released. Wait a few minutes before opening
Close the door firmly.
Check the drain hose connection.
Clean the drain filter.
Select the draining or spinning programme.
Redistribute the load manually or
load more laundry and select the
spin programme.
Reduce the detergent quantity or use
another one.
Check the water inlet hose connection.
the After Sales Service the right spare
part number).
Refit the cap on the emergency emptying hose or screw the filter fully in.
the door.
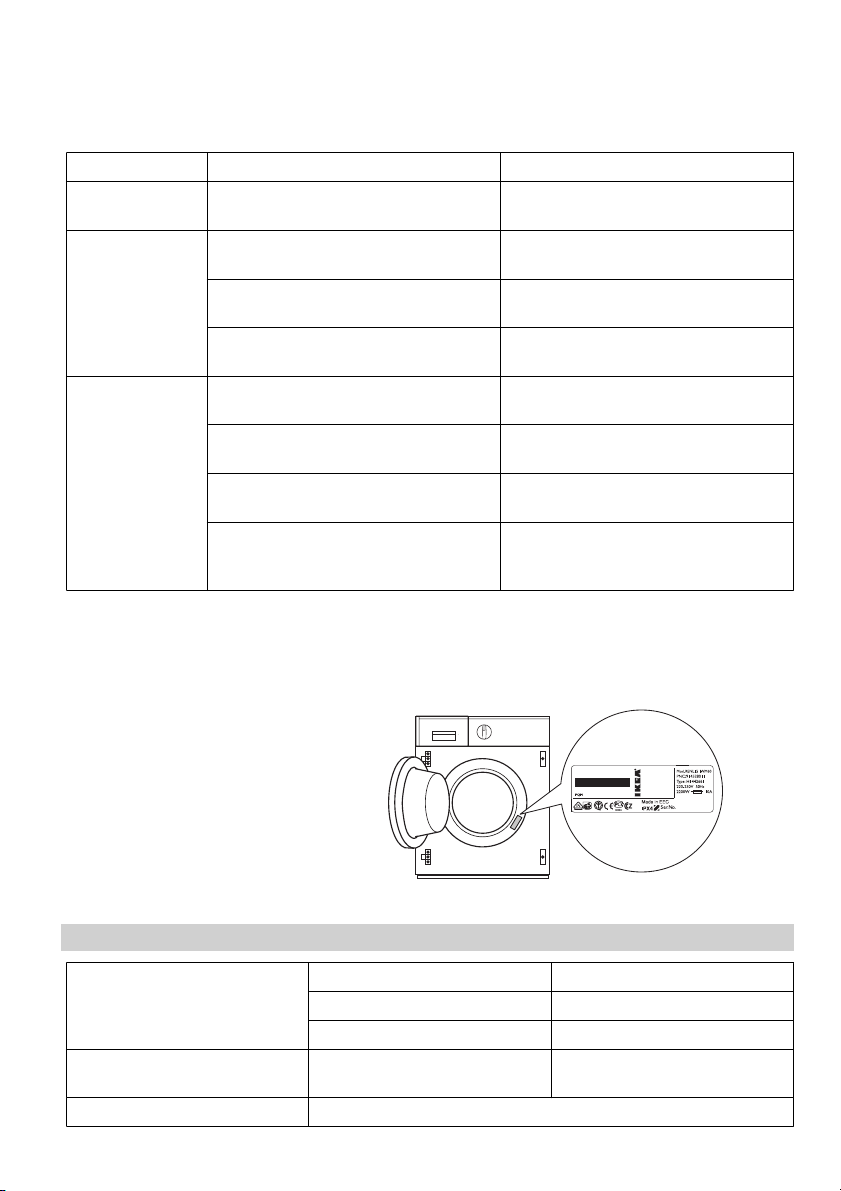
ENGLISH 20
Problem Possible cause Solution
There is water in the drum. Select drain or spin programme to
The transit bolts and packing have
not been removed.
The appliance
produces an unusual noise
The support feet have not been ad-
justed
The drain pump could be blocked. Check the drain pump. (See «Clean-
Too little detergent or unsuitable de-
tergent has been used.
Stubborn stains have not been trea-
Unsatisfactory
washing results:
ted prior to washing.
The correct temperature was not se-
lected.
Excessive laundry load. Reduce the laundry load in accord-
After the check, switch on the appliance and
press the button 5 to restart the programme.
If the malfunction shows again, contact your
After Sales Service.
Model description (MOD): …………………
Product number (PNC): ………………………
Serial number (S.N.): ………………………….
The necessary data for the service centre is on
the rating plate. We recommend that you write
the data here:
empty out the water.
Check the correct installation of the
appliance.
Check the correct levelling of the ap-
pliance.
ing the pump» for more details).
Increase the detergent quantity or
use another one.
Use commercial products to treat the
stubborn stains.
Check if you have selected the cor-
rect temperature.
ing to the Washing Programmes table.
Made In Italy
© Inter IKEA Systems B.V. 1999
21552
Technical data
Dimensions Width (cm) 59,6
Water supply pressure
Cotton max. load (kg) 6
Height (cm) 82
Depth (cm) 54
1)
Minimum
Maximum
0,5 bar (0,05 MPa)
8 bar (0,8 MPa)
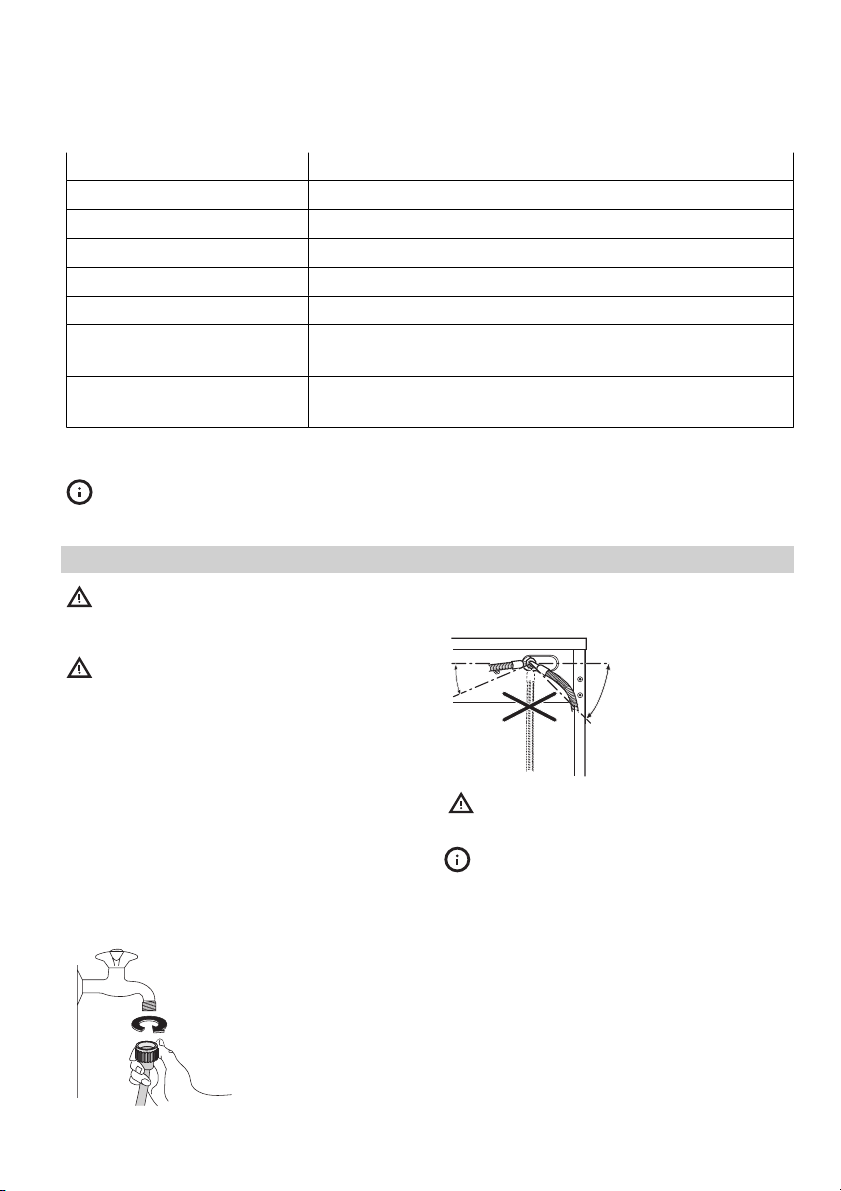
ENGLISH 21
Max. spin speed (rpm) 1200
Energy class A+
Washing class A
Spinning class B
Washing noise (dB(A)) 54
Spinning noise (db(A)) 76
Average annual energy con-
sumption (kWh)
2)
Average annual water consumption (litres)
1) If the pressure in your area is lower or higher, please contact your After Sales Service.
2) The data is based on the washing programme for test institutes assuming 220 cycles per a year.
2)
204
9000
Information on the electrical connection, voltage and overall power is given on the rating
plate, on the inner edge of the appliance door.
Installation
Caution! Refer to the assembly
instructions, in order to proceed with the
installation.
Warning! Make sure that mains plug is
disconnected from the mains socket
during installation.
Place the appliance on the floor and install it
under a counter (kitchen worktop or sink).
If a repair is necessary, the appliance must be
easily accessible for the engineer. Put the appliance adjacent to a water tap and a drain.
For the venting of the appliance only water fill,
water drain and power supply cable openings
are necessary.
Water inlet
1
Connect the hose to a
tap with 3/4″ thread.
2
Turn the inlet hose to
the left or the right to
suit the installation.
35°
Tight the locknut cor-
45°
rectly to prevent water leaks.
Caution! Do not place the inlet hose
downwards.
The inlet hose must not be lengthened. If
it is too short and you do not wish to move
the tap, you will have to purchase a new, longer hose specially designed for this type of use.
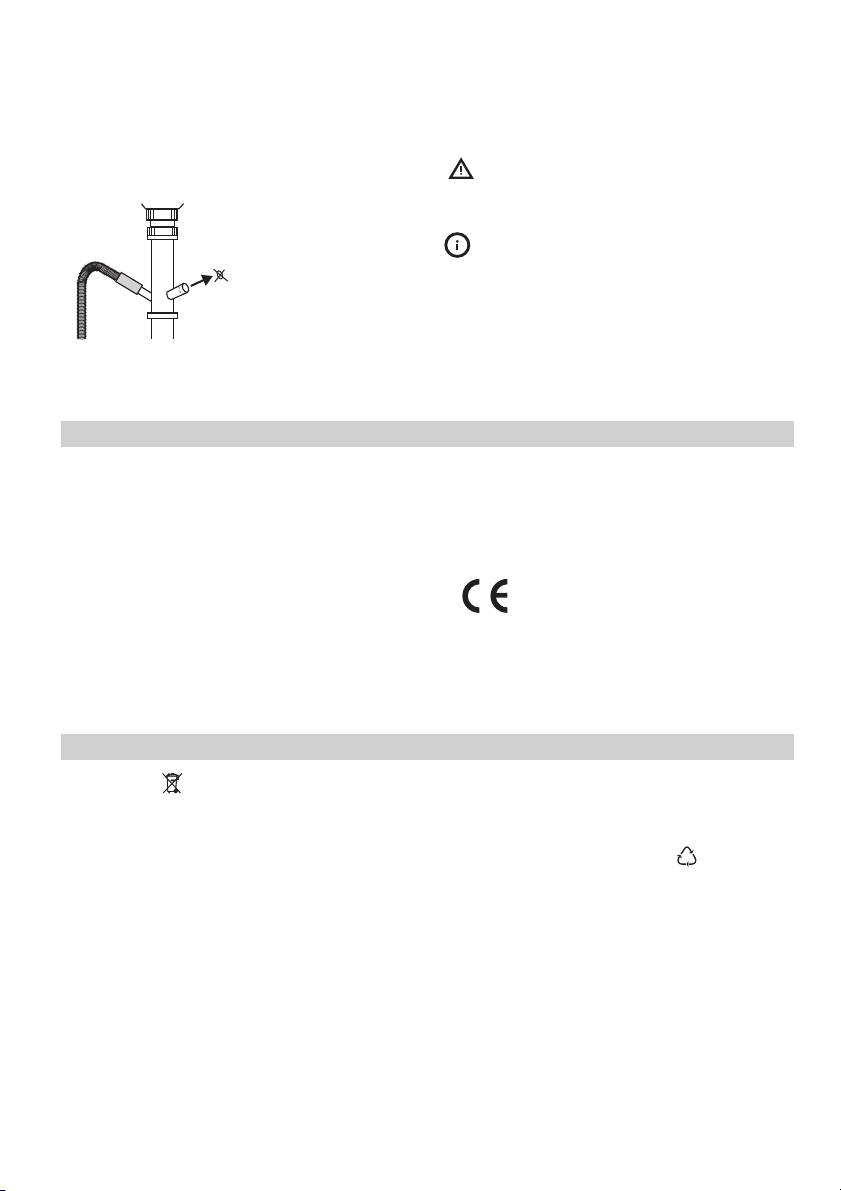
ENGLISH 22
Water drainage
If you connect the
water drain hose to a
water trap under the
A
sink, remove the
plastic membrane
(A). If you do not remove the membrane,
detergent residue
and clothes fluff can
cause a blockage in
the drain hose spigot.
Electrical connection
• The appliance must be earthed.
• Make sure that the electrical information on
the rating plate agree with your domestic
power supply.
• Always use a correctly installed shockproof
socket.
• Do not use multi-way plugs, connectors and
extension cables. There is a risk of fire.
• Do not replace or modify the mains cable
yourself. Contact the After Sales Service.
• Make sure that the mains plug and cable is
not squashed or damaged by the back of
the appliance.
Caution! Make sure that the water couplings are tight to prevent water leak-
age.
The drain hose may be extended to a
maximum of 4 metres. An additional
drain hose and joining piece is available from
your local Service Centre.
• Make sure that the mains plug is accessible
after installation.
• Do not pull the mains cable to disconnect the
appliance. Always pull the mains plug.
• This appliance complies with the E.E.C. Di-
rectives.
Environment concerns
The symbol on the product or on its
packaging indicates that this product may not
be treated as household waste. Instead it
should be taken to the appropriate collection
point for the recycling of electrical and
electronic equipment. By ensuring this product
is disposed of correctly, you will help prevent
potential negative consequences for the
environment and human health, which could
otherwise be caused by inappropriate waste
handling of this product. For more detailed
information about recycling of this product,
please contact your local council, your
household waste disposal service or the shop
where you purchased the product.
Packaging materials
The materials with the symbol
ble. Dispose the packaging in a suitable collection containers to recycle it.
Disposal of the appliance
• To prevent the risk of physical injury or dam-
age:
– Disconnect the mains plug from the mains
socket.
– Cut off the mains cable and discard it.
– Discard the door catch. This prevents chil-
dren or small animals from being closed
inside of the appliance. There is a risk of
suffocation.
are recycla-

ENGLISH 23
IKEA GUARANTEE
How long is the IKEA guarantee valid?
This guarantee is valid for five (5) years from
the original date of purchase of Your appliance at IKEA, unless the appliance is named
LAGAN in which case two (2) years of guarantee apply. The original sales receipt is required as proof of purchase. If service work is
carried out under guarantee, this will not extend the guarantee period for the appliance,
Which appliances are not covered by the
IKEA five (5) years guarantee?
The range of appliances named LAGAN and
all appliances purchased in IKEA before 1st of
August 2007
Who will execute the service?
IKEA service provider will provide the service
through its own service operations or authorized service partner network.
What does this guarantee cover?
The guarantee covers faults of the appliance,
which have been caused by faulty construction
or material faults from the date of purchase
from IKEA. This guarantee applies to domestic
use only. The exceptions are specified under
the headline “What is not covered under this
guarantee?” Within the guarantee period, the
costs to remedy the fault e.g. repairs, parts, labour and travel will be covered, provided that
the appliance is accessible for repair without
special expenditure. On these conditions the
EU guidelines (Nr. 99/44/EG) and the respective local regulations are applicable. Replaced
parts become the property of IKEA.
What will IKEA do to correct the problem?
IKEA appointed service provider will examine
the product and decide, at its sole discretion,
if it is covered under this guarantee. If considered covered, IKEA service provider or its authorized service partner through its own service operations, will then, at its sole discretion,
either repair the defective product or replace
it with the same or a comparable product.
What is not covered under this guarantee?
• Normal wear and tear.
• Deliberate or negligent damage, damage
caused by failure to observe operating instructions, incorrect installation or by connection to the wrong voltage, damage
caused by chemical or electro-chemical reaction, rust, corrosion or water damage including but not limited to damage caused by
excessive lime in the water supply, damage
caused by abnormal environmental conditions.
• Consumable parts including batteries and
lamps.
• Non-functional and decorative parts which
do not affect normal use of the appliance,
including any scratches and possible color
differences.
• Accidental damage caused by foreign ob-
jects or substances and cleaning or unblocking of filters, drainage systems or soap
drawers.
• Damage to the following parts: ceramic
glass, accessories, crockery and cutlery baskets, feed and drainage pipes, seals, lamps
and lamp covers, screens, knobs, casings
and parts of casings. Unless such damages
can be proved to have been caused by production faults.
• Cases where no fault could be found during
a technician’s visit.
• Repairs not carried out by our appointed
service providers and/or an authorized
service contractual partner or where nonoriginal parts have been used.
• Re pa ir s c aus ed by in st all at io n w hi ch is f au lt y
or not according to specification.
• The use of the appliance in a non-domestic
environment i.e. professional use.
• Transportation damages. If a customer
transports the product to their home or other
address, IKEA is not liable for any damage
that may occur during transport. However,
if IKEA delivers the product to the customer’s
delivery address, then damage to the product that occurs during this delivery will be
covered by this guarantee.
ENGLISH 24
• Cost for carrying out the initial installation of
the IKEA appliance. However, if an IKEA
service provider or its authorized service
partner repairs or replaces the appliance
under the terms of this guarantee, the service provider or its authorized service partner
will re-install the repaired appliance or install the replacement, if necessary.
This restriction do not apply to fault-free work
carried out by a qualified specialist using our
original parts in order to adapt the appliance
to the technical safety specifications of another
EU country.
How country law applies
The IKEA guarantee gives You specific legal
rights, which covers or exceed local demands.
However these conditions do not limit in any
way consumer rights described in the local
legislation
Area of validity
For appliances which are purchased in one EU
country and taken to another EU country, the
services will be provided in the framework of
the guarantee conditions normal in the new
country. An obligation to carry out services in
the framework of the guarantee exists only if
the appliance complies and is installed in accordance with:
• the technical specifications of the country in
which the guarantee claim is made;
• the Assembly Instructions and User Manual
Safety Information;
The dedicated After Sales Service for IKEA
appliances:
Please do not hesitate to contact IKEA After
Sales Service to:
1. make a service request under this guaran-
tee;
2. ask for clarification on installation of the
IKEA appliance in the dedicated IKEA
kitchen furniture. The service won’t provide
clarifications related to:
– the overall IKEA kitchen installation;
– connections to electricity (if machine
comes without plug and cable), to water
and to gas since they have to be executed by an authorized service engineer.
3. ask for clarification on user manual contents and specifications of the IKEA appliance.
To ensure that we provide you with the best
assistance, please read carefully the Assembly
Instructions and/or the User Manual section of
this booklet before contacting us.
How to reach us if You need our service
Please refer to the last page of this manual for
the full list of IKEA appointed contacts and relative national phone numbers.
Important! In order to provide You with a
quicker service, we recommend that You use
the specific phone numbers listed at the end of
this manual. Always refer to the numbers listed
in the booklet of the specific appliance You
need an assistance for. Before calling us,
assure that You have to hand the IKEA article
number (8 digit code) for the appliance of
which you need our assistance.
Important! SAVE THE SALES RECEIPT! It is
Your proof of purchase and required for the
guarantee to apply. Note that the receipt
reports also the IKEA article name and number
(8 digit code) for each of the appliances you
have purchased.
Do You need extra help?
For any additional questions not related to After Sales of your appliances, please contact
our nearest IKEA store call centre. We recommend you read the appliance documentation
carefully before contacting us.
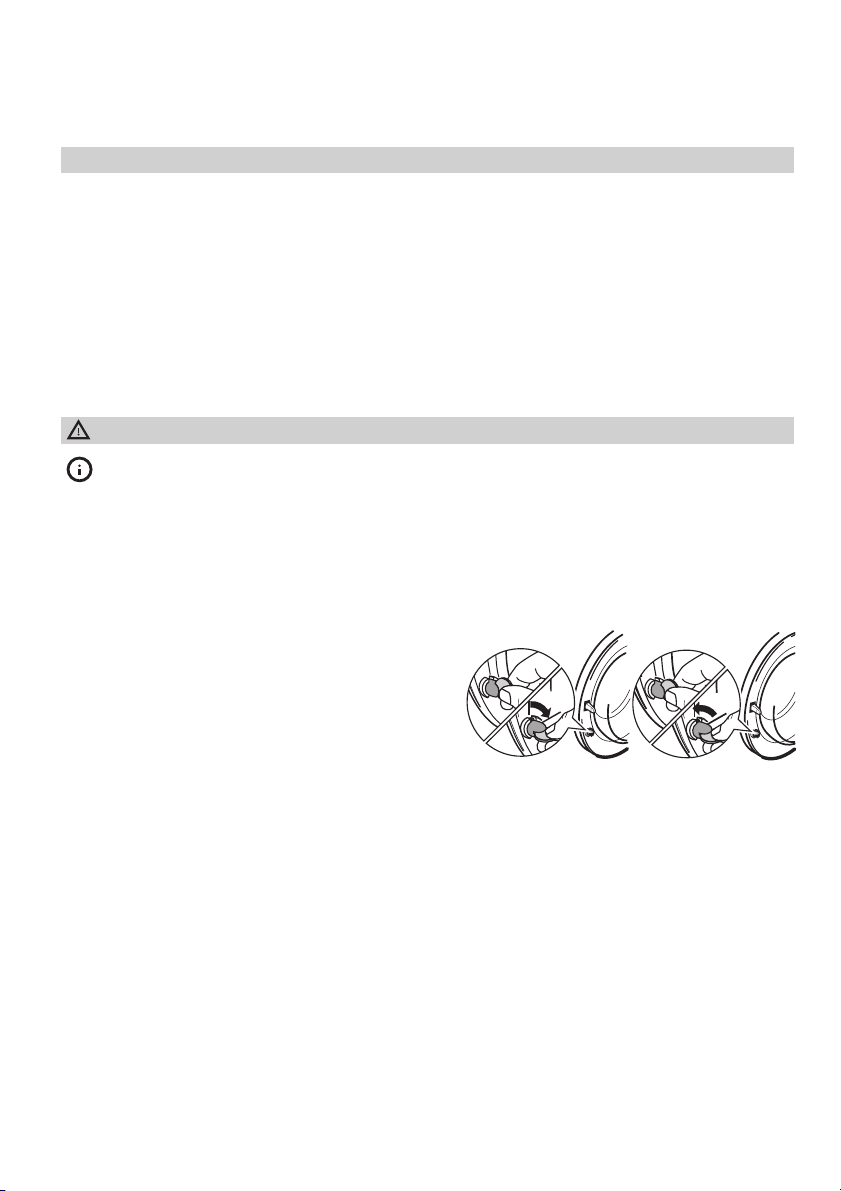
FRANÇAIS 25
Sommaire
Consignes de sécurité 25
Description de l’appareil 28
Bandeau de commande 29
Première utilisation 30
Utilisation quotidienne 31
Conseils utiles 33
Programmes de lavage 34
Valeurs de consommation 37
Entretien et nettoyage 38
Sous réserve de modifications
En cas d’anomalie de fonctionnement 40
Caractéristiques techniques 43
Installation 44
Branchement électrique 45
En matière de protection de l’environnement
45
GARANTIE IKEA 46
GARANTIE IKEA — FRANCE 48
Consignes de sécurité
Pour votre sécurité et pour garantir une
utilisation correcte de l’appareil, lisez attentivement cette notice d’utilisation, ainsi que
ses conseils et avertissements, avant d’installer
et d’utiliser l’appareil pour la première fois.
Conservez cette notice d’utilisation avec l’appareil. Si l’appareil devait être vendu ou cédé
à une autre personne, assurez-vous que la notice d’utilisation l’accompagne. Pour éviter
toute erreur ou accident, veillez à ce que toute
personne qui utilise l’appareil connaisse bien
son fonctionnement et ses options de sécurité.
Le fabricant décline toute responsabilité en
cas de dommages dus à une mauvaise installation ou utilisation.
Sécurité des enfants et des personnes
vulnérables
• Cet appareil n’est pas destiné à être utilisé
par des enfants ou des personnes dont les
capacités physiques, sensorielles ou mentales, ou le manque d’expérience et de connaissance les empêchent d’utiliser l’appareil
sans risque lorsqu’ils sont sans surveillance
ou en l’absence d’instruction d’une personne responsable qui puisse leur assurer une
utilisation de l’appareil sans danger.
• Ne laissez pas les emballages à la portée
des enfants. Risque d’asphyxie.
•Conservez tous les produits de lavage dans
un endroit sûr. Ne laissez pas les enfants
toucher les produits de lavage.
• Assurez-vous que les enfants ou vos animaux domestiques ne pénètrent pas dans le
tambour. Vérifiez l’intérieur du tambour
avant chaque utilisation.
Cet appareil comporte un dispositif spécial
qui empêche les enfants et les animaux familiers d’être emprisonnés dans le tambour.
Pour activer ce dispositif, tournez le
bouton (sans appuyer dessus) dans
le sens des aiguilles
d’une montre jusqu’à ce que la rainure soit horizontale. Si nécessaire, utilisez une pièce de
monnaie
Pour désactiver ce
dispositif et permettre à nouveau la fermeture du hublot,
tournez le bouton
dans le sens contraire des aiguilles
d’une montre jusqu’à ce que la rainure soit verticale.

FRANÇAIS 26
Consignes générales de sécurité
• Ne modifiez pas ou n’essayez pas de modifier les caractéristiques de cet appareil.
Vous risqueriez de vous blesser et d’endommager l’appareil.
• Si votre appareil est livré en hiver, lorsque
la température est inférieure à 0 °C, stockez-le à température ambiante pendant 24
heures avant sa première utilisation. Veuillez lire le chapitre « Précautions contre le
gel ».
• Cet appareil est conçu pour une utilisation à
une température intérieure normale. Le fabricant décline toute responsabilité en cas
de dommages dus au gel.
• Débranchez toujours la prise de courant et
fermez le robinet d’eau après chaque utilisation et avant le nettoyage et l’entretien de
l’appareil.
Installation
• Les raccordements électriques et hydrauliques doivent être réalisés par des professionnels qualifiés.
• Cet appareil est lourd. Faites attention lorsque vous le déplacez.
• Vérifiez que l’appareil n’a pas été endommagé pendant le transport. Ne branchez
jamais un appareil endommagé. Au besoin,
contactez votre service après-vente.
• Retirez tous les emballages et dispositifs de
protection avant la première utilisation.
Faute de quoi l’appareil ou les meubles
avoisinants pourraient être endommagés.
• Conservez ces dispositifs de sécurité ; ils devront être remontés pour tout autre transport de l’appareil. Veuillez consulter la partie correspondante des instructions de montage.
• Ne placez jamais de cales en carton, en bois
ou autre sous l’appareil pour compenser l’irrégularité du sol.
Mettez l’appareil d’aplomb avec précision
puis serrez les contre-écrous afin d’empêcher les vibrations, le bruit et le déplacement
de l’appareil pendant son fonctionnement.
• Si l’appareil est installé sur une moquette,
réglez les pieds de sorte que l’air puisse circuler librement sous l’appareil.
• Vérifiez que votre appareil ne repose pas
sur le tuyau d’alimentation ou le tuyau de
vidange et que le plan de travail ou l’arrière
de l’appareil n’exerce aucune pression sur
le câble d’alimentation.
• Assurez-vous, après avoir installé l’appareil, qu’aucun tuyau ou raccord ne fuit.
• Si l’appareil est installé dans un lieu exposé
au gel, veuillez lire le chapitre « Précautions
contre le gel ».
Utilisation
• Cet appareil est destiné à un usage domestique normal. N’utilisez pas cet appareil à
des fins commerciales ou industrielles ou
pour d’autres usages.
• Les réparations ne doivent être effectuées
que par un service après vente qualifié. Une
réparation non conforme peut être la cause
de graves dommages. Utilisez exclusivement des pièces d’origine.
• Avant le lavage, consultez les instructions
d’entretien de chaque article (vêtement).
• Ne surchargez pas l’appareil. Voir le chapitre correspondant dans cette notice d’utilisation «Programmes de lavage»
• Avant le lavage, videz les poches et fermez
les boutonnières et les fermetures à glissière.
• Les objets tels que les pièces de monnaie,
les épingles de sûreté, les clous, les vis, les
cailloux ou tout autre objet dur, tranchant,
peuvent provoquer d’importants dégâts et
ne doivent pas être placés dans l’appareil.
• Les tâches de peinture, d’encre, de rouille et
d’herbe doivent être traitées avant le lavage.
• N’utilisez que les quantités de lessive et
d’assouplissant indiquées par le fabricant.
Une quantité excessive pourrait endommager le linge. Conformez-vous aux doses préconisées par les fabricants.
• Groupez les petits articles, tels que les
chaussettes, lacets, ceintures lavables etc.,
dans un sac de lavage ou une taie d’oreiller,
afin d’éviter que ces articles ne glissent entre
le tambour et la cuve.

FRANÇAIS 27
• Ne lavez pas dans votre machine les articles
avec baleines, les articles sans ourlet, effilochés ou déchirés. Les soutiens-gorge à armature NE doivent PAS être lavés en machine.
• Les articles qui ont été en contact avec des
produits pétroliers volatiles ne doivent pas
être lavés dans l’appareil. Si vous utilisez un
liquide détachant volatile, veillez à ce que
le produit se soit évaporé avant d’introduire
l’article dans l’appareil.
• L’eau du robinet contient du calcaire. Il est
conseillé d’utiliser régulièrement une poudre anticalcaire. Utilisez ce produit conformément aux instructions du fabricant, sans
linge dans le tambour. Cela empêche la formation de dépôts de calcaire et améliore
l’efficacité de votre appareil.
•Ne tirez jamais sur le câble d’alimentation
pour le débrancher ; mais toujours au niveau
de la prise.
•N’utilisez jamais votre appareil si le câble
d’alimentation, le bandeau de commande,
le plan de travail ou le socle sont endommagés de sorte que l’intérieur de l’appareil
soit accessible.
Arrivée d’eau
• Cet appareil est conçu pour être raccordé à
l’eau froide.
• Ne raccordez pas votre appareil à l’arrivée
d’eau au moyen d’un tuyau provenant d’un
ancien appareil.
• La pression de l’eau doit se situer dans les
limites indiquées (reportez-vous au chapitre
« Caractéristiques techniques »). Demandez
à votre compagnie de distribution d’eau de
vous indiquer la pression moyenne de l’eau
dans votre région.
• Contrôlez que le tuyau d’arrivé d’eau n’est
pas plié, ni écrasé ou emmêlé.
• Si le branchement est réalisé sur une tuyauterie neuve ou qui n’a pas servi depuis longtemps, laissez couler une certaine quantité
d’eau afin d’évacuer tous les débris accumulés dans les tuyauteries.
• Le tuyau d’alimentation peut être orienté
vers la gauche ou la droite pour s’adapter
à l’installation.
• Le tuyau d’alimentation ne doit pas être rallongé. S’il est trop court et que vous ne souhaitez pas déplacer le robinet, vous devrez
acheter un nouveau tuyau conçu pour ce type d’utilisation.
• Avant d’ouvrir le robinet d’arrivée d’eau,
serrez bien la bague de serrage pour éviter
toute fuite.
Vidange de l’eau
• Assurez-vous que l’extrémité du tuyau de
vidange ne peut pas se décrocher pendant
que l’appareil se vide. A cet effet, vous pouvez fixer le tuyau au robinet à l’aide d’une
ficelle ou le fixer au mur.
• Le tuyau de vidange doit être placé à une
hauteur comprise entre 44 et 90 cm. Veuillez
consulter les instructions de montage.
Entretien et nettoyage
• Avant toute opération d’entretien, mettez
l’appareil à l’arrêt et débranchez la prise
secteur.
• Nettoyez la partie externe de l’appareil à
l’eau savonneuse. Rincez et séchez soigneusement.
• Les compartiments à lessive et à produits
additifs doivent faire l’objet d’un nettoyage
régulier.
• Vérifiez la pompe régulièrement, en particulier si :
– l’appareil ne vidange pas ou n’essore
pas.
– l’appareil fait un bruit inhabituel pendant
la vidange en raison d’un blocage de la
pompe par des objets tels que des épingles de sûreté, pièces de monnaie, etc.
• Ne retirez jamais le couvercle de la pompe
pendant un cycle de lavage. Attendez que
l’appareil ait vidangé l’eau. Si vous avez sélectionné un programme de lavage à température élevée, attendez que l’eau ait refroidi.
• Assurez-vous que le couvercle de la pompe
est bien resserré afin d’éviter toute fuite.
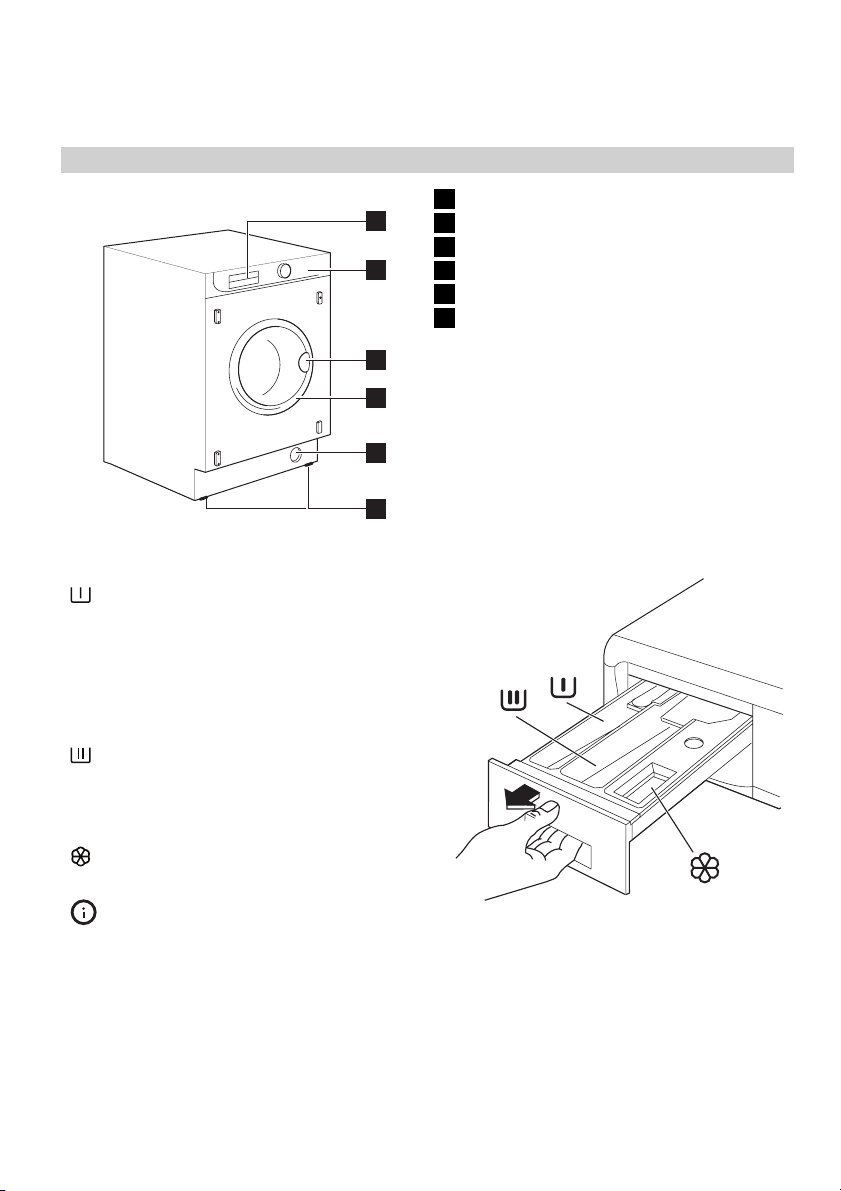
FRANÇAIS 28
Description de l’appareil
1 Boîte à produits
1
2
3
4
5
6
Boîte à produits
Compartiment destiné au produit de lavage utilisé pour le prélavage et le trempage
ou pour le détachant employé au cours de la
phase anti-taches (le cas échéant). La lessive
de prélavage et de trempage est ajoutée au
début du programme de lavage. Le détachant est ajouté pendant la phase d’action
contre les taches.
Compartiment destiné à la lessive en
poudre ou liquide utilisé au cours du lavage
principal. Si vous employez une lessive liquide, versez-la juste avant de démarrer le programme.
Compartiment destiné aux additifs liquides (assouplissant, amidon).
Respectez les doses préconisées par le
fabricant du produit sans jamais dépasser le niveau « MAX » de la boîte à produits. L’assouplissant ou les additifs d’amidon doivent être versés dans le compartiment avant le départ du programme de lavage.
2 Bandeau de commande
3 Poignée d’ouverture du hublot
4 Plaque signalétique
5 Pompe de vidange
6 Pieds réglables
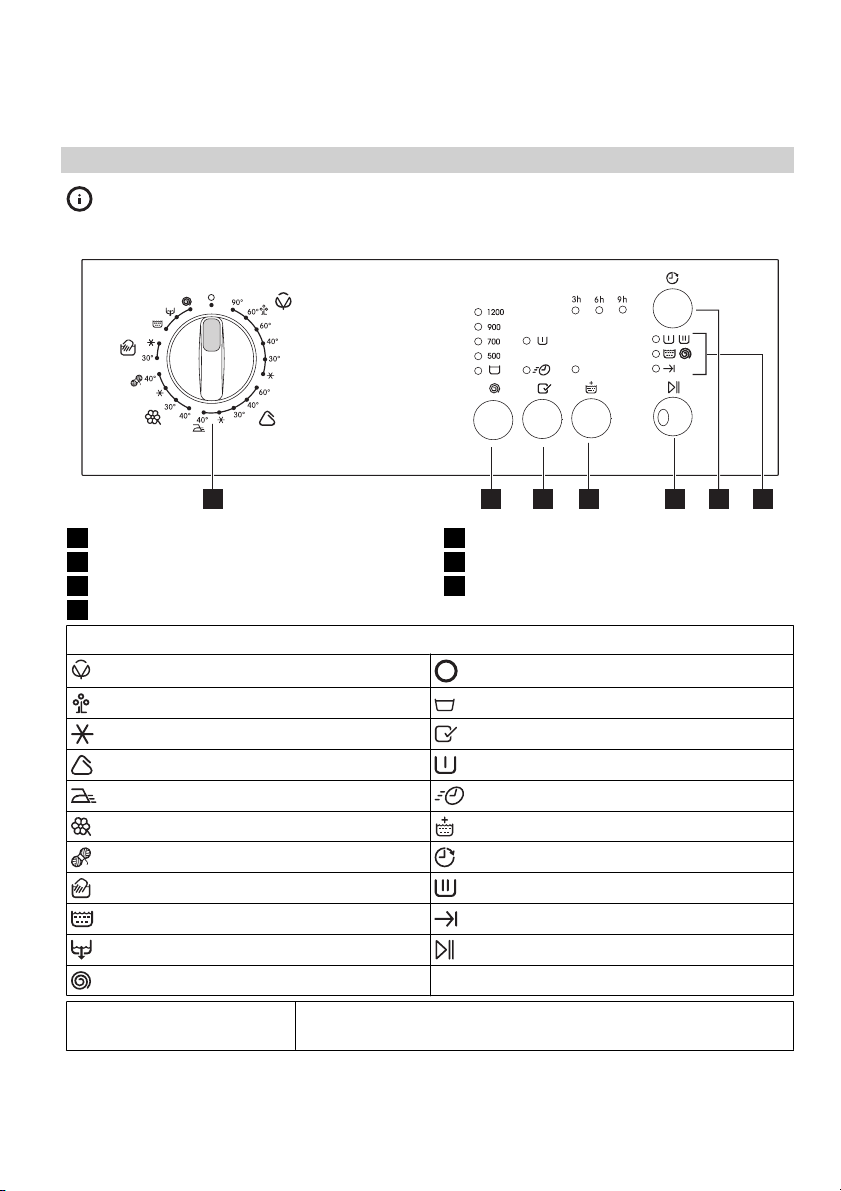
FRANÇAIS 29
Bandeau de commande
Le bandeau de commandes est illustré ci-dessous. Il comprend : le sélecteur de programmes,
les touches et les voyants. Ceux-ci sont signalés tout au long de la notice par les numéros
auxquels ils se réfèrent.
1 2 3 4 5 6 7
1 Sélecteur de programmes
2 Touche réduction d’essorage
3 Touche de la fonction « Tout en 1 »
4 Touche Rinçage plus
Tableau des symboles
= Coton
= Éco
= Lavage à l’eau froide = Options
= Synthétiques = Prélavage
= Repassage facile = Lavage rapide
= Textiles fragiles = Rinçage plus
= Laine = Départ différé
= Lavage à la main = Lavage
= Rinçages = Fin de cycle
= Vidange = Marche/Arrêt
= Essorage
Sélecteur de programmes Il vous permet de mettre l’appareil en fonctionnement et à l’arrêt,
mais aussi de sélectionner un programme.
5 Touche Marche/Arrêt
6 Touche Départ différé
7 Voyants des programmes
= Marche/Arrêt — Réinitialisation
= Arrêt cuve pleine
FRANÇAIS 30
Touche Réduction d’essora-geEn appuyant sur cette touche, vous pouvez modifier la vitesse
Touche de la fonction « Tout
en 1 » :
Touche Rinçage plus Cet appareil est conçu pour consommer peu d’eau. S’il est né-
Touche Marche/Arrêt Cette touche permet de démarrer ou d’interrompre le program-
Touche Départ différé Cette touche permet de retarder le démarrage du programme
Voyants des programmes
7.1
7. 2
7. 3
d’essorage du programme sélectionné.
• Option Arrêt cuve pleine : en choisissant cette option, l’eau du
dernier rinçage n’est pas évacuée pour éviter que le linge ne
se froisse. Avant d’ouvrir le hublot, vous devez vidanger l’eau.
Pour vidanger l’eau, veuillez lire le paragraphe « Fin du programme ».
Cette touche vous permet de sélectionner uniquement une des
options. Le voyant correspondant s’allume.
• Prélavage : si vous sélectionnez cette option, la machine effectue un cycle de prélavage avant la phase de lavage principal. La durée de lavage sera prolongée Cette option est
recommandée pour le linge particulièrement sale.
• Rapide : cycle très court pour les articles peu sales, portés peu
de temps.
cessaire de rincer le linge avec une quantité d’eau supérieure
(Rinçage plus), sélectionnez cette option. Le lave-linge effectuera quelques rinçages supplémentaires. Cette option est recommandée pour les personnes allergiques aux produits de lessive,
et dans les zones où l’eau est très douce.
me sélectionné.
de 3, 6 ou 9 heures.
Lorsque vous sélectionnez un programme de lavage, les deux
voyants 7.1 et 7.2 s’allument.
Une fois que vous avez appuyé sur la touche 5, seul le voyant
de la phase en cours reste allumé.
L’appareil se met en marche et le hublot est verrouillé.
Le voyant 7.3 s’allume à la fin du cycle de lavage. Le hublot
pourra être ouvert au bout de quelques minutes.
Important Si le programme de vidange est sélectionné un voyant au hasard s’allume.
Première utilisation
1. Assurez-vous que les raccordements électriques et hydrauliques sont conformes aux
instructions d’installation.
2. Retirez tout ce qui se trouve dans le tambour.
3. Versez 2 litres d’eau dans le compartiment
de lavage principal
duits afin d’activer l’éco clapet.
Sélectionnez un cycle coton à la température maximale, sans placer de linge dans
l’appareil, afin d’éliminer du tambour et de
la cuve les résidus de fabrication.
de la boîte à pro-
Loading…
-
Page 1
RENLIG IWM60 GB FR DE IT[…]
-
Page 2
[…]
-
Page 3
ENGLISH 4 FRANÇAIS 25 DEUTSCH 54 ITALIANO 80[…]
-
Page 4
Contents Safety information 4 Product description 6 Control panel 7 First use 9 Daily use 9 Helpful hints and tips 12 Washing programmes 12 Consumption values 15 Care and cleaning 15 What to do if… 18 Technical data 20 Installation 21 Electrical connection 22 Environment concerns 22 IKEA GUARANTEE 23 Subject to change without notice Safety inform[…]
-
Page 5
Installation • A qualified and competent person must do the electrical and the plumbing in stallation. • This appliance is heavy. Take care when you move it. • Make sure that the appliance is not dam- aged because of tran sport. Do not connect a damaged appliance. If necessary, contact dedicated After Sales Service. • Remove all packaging a[…]
-
Page 6
• The water pressure must be in the limits (re- fer to the chapter «T echnical data» table). Make sure that the local water authority gives you the avera ge mains pressure in your area. • Make sure that there are no kinks in the wa- ter inlet hose and that the water inlet hose is not squashed or entangled. • Before connecting up the applian[…]
-
Page 7
Detergent dispenser drawer Compartment for detergent used for pre- wash and soak phase or for stain remover used during the stain action phase (if avail- able). The prewash and soak detergent is added at the beginning of the w ash pro- gramme. The stain remover is added during the stain action phase. Compartment for powder or liquid deter- gent use[…]
-
Page 8
Table of Symbol = Cottons = On/Off — Reset = Economy = Rinse Hold = Cold wash = Options = Synthetics = Prewash = Easy Iron = Quick Wash = Delicates = Extra Rinse = Wool = Delay Start = Handwash = Main Wash = Rinses = End Cycle = Drain = Start/Pause = Spin Programme selector dial It allows you to swit ch the appliance On/Off and/or to select a progr[…]
-
Page 9
7.1 7. 2 7. 3 When selecting a washing programme both lights 7.1 and 7.2 illuminate. When you have pressed the butto n 5 the only light correspond- ing to the running phase stays on. The appliance starts working and the door is locked. The light 7.3 illuminates at the en d of the washing cycle. After a few minutes the door can be opened. Important![…]
-
Page 10
2 Pour fabric softener into the compartment marked (must not exceed the «MAX» mark in the drawer). Close the drawer gently Select the required programme by turning the programme selector dial (1) The appliance is now switched on. The indi ca- tor light of button 5 starts to blink. At the end of the programme the selector dial must be turned to po[…]
-
Page 11
Start the programme by pressing b utton 5 To start the selected programme, press the button 5, the corresponding green indicator light stops blinking. Th e indicator light corre- sponding to the running phase ill uminates. The appliance starts operating and the door is locked. To interrupt a programme which is running, press the button 5: th e corr[…]
-
Page 12
Helpful hints and tips Sorting out the laundry Follow the wash code symbols on each gar- ment label and the manufacturer’s washing in- structions. Sort the laundry as follows: whites, coloureds, synthetics, delicates, wooll ens. Remov ing stain s Stubborn stains may not be removed by just water and detergent. It is therefore advisable to treat th[…]
-
Page 13
Programme/ Temperature Type of laundry Cycle Descript ion Max. Load Red. Load 1) Available Options Detergent Compartment COTTONS 90°-60° White cotton (heavy- normal ly soiled item s). Main was h Rinses Max. fina l spin at 1200 rpm 6 kg 3 kg 1) Spin Rinse Hold Prewash Super Quick Extra Rinse 2) COTTONS ECO 60° White and fast col- oured cotton eco[…]
-
Page 14
Programme/ Temperature Type of laundry Cycle Descript ion Max. Load Red. Load 1) Available Options Detergent Compartment WOOL 40° Special programme for wool garments bearing the «Pure new wool, non-shrink, ap- pliance washable» la- bel. Main was h Rinses Max. fina l spin at 900 rpm 2 kg Spin Rinse Hold HANDWASH 30°-Cold Special programme for de[…]
-
Page 15
Consumption values Programme Energy consumpt ion (KWh) Water consumption (litres) Programme duration (Minutes) 1) White Cottons 90° 2 61 140 Cottons 60° 1.3 58 125 Cottons ECONOMY 60° 2) 1.02 45 155 Cottons 40° 0.75 58 120 Synthetics 40° 0.5 47 80 Delicates 40° 0.5 5 58 70 Wool 40° 0.45 55 60 Handwash 30° 0.3 58 55 1) Without prewash option[…]
-
Page 16
2 To aid cleaning, re- move also the top part of the additive compartment. 3 Use a stiff brush to clean and remove all washing powder res- idue. 4 Flush out all the re- moved parts of the dispenser drawer under a tap to re- move any traces of accumulated pow- der. 5 Use the previous brush to clean the re- cess, ensuring that upper and lower part of[…]
-
Page 17
5 Use a pencil to check whether the pump wheel right at the back of the pump housing can turn. (It is normal for the pump- ing wheel to turn jerkily.) If the pump- ing wheel cannot be turned, please con- tact the After Sales Service. 6 Put the cap back on the emergency em p- tying hose and place the latter back in its seat. Screw the pump fully in.[…]
-
Page 18
Important! Every time you drain the water through the emergency emptying hose you must pour 2 litres of water into the main wash compartment of the detergent drawer and then run the drain programme. This will activate the ECO VALVE device avoiding that part of the detergent remains unused at next washing. Emergency emptying out If the water is not […]
-
Page 19
Problem Possible cause Solution The door is not properly closed (The red indicator light of button 5 blinks). Close the door firmly. The appliance does not empty: The drain hose is squashed or kinked (The red indicator light of button 5 blinks). Check the drain hose connection. The drain filter i s clogged (The red indicator light of button 5 blink[…]
-
Page 20
Problem Possible cause Solution There is water in the drum. Select drain or spin p rogramme to empty out the water. The appliance produces an un- usual noise The transit bolts and packing have not been removed. Check the correct installation of the appliance. The support feet have not been ad- justed Check the correct levelling of the ap- pliance. […]
-
Page 21
Max. spin speed (r pm) 1200 Energy class A+ Washing class A Spinning class B Washing noise (dB(A)) 54 Spinning noise (db(A)) 76 Average annual energy con- sumption (kWh) 2) 204 Average annual water con- sumption (litres) 2) 9000 1) If the pressure in your area is l ower or higher, please contact your After Sales Service. 2) The data is based on the[…]
-
Page 22
Water drai nage A If you connect the water drain hose to a water trap under the sink, remove the plastic membrane (A). If you do not re- move the me mbrane, detergent residue and clothes fluff can cause a blockage in the drain hose spigot. Caution! Make sure that the water cou- plings are tight to prevent water leak- age. The drain hose may be exte[…]
-
Page 23
IKEA GUARANTEE How long is the IKEA guarantee valid? This guarantee is valid for five (5) years from the original date of purchase of Your appli- ance at IKEA, unless the appliance is nam ed LAGAN in which case two (2) years of guar- antee app ly. The origi nal sales r eceipt is re — quired as proof of purchase. If service work is carried out under[…]
-
Page 24
• Cost for carrying out th e initial insta llation of t h e I K E A a p p l i a n c e . H o w e v e r , i f a n I K E A service provider or its authorized service partner repairs or replaces the appliance under the terms of this guarantee, the serv- ice provide r or its a uth orized service partner will re-install the repai red appliance or in- s[…]
-
Page 25
Sommaire Consignes de sécurité 25 Description de l’appareil 28 Bandeau de commande 29 Première utilisation 30 Utilisation quotidienne 31 Conseils utiles 33 Programmes de lavage 34 Valeurs de consommation 37 Entretien et nettoyage 38 En cas d’anomalie de fonctionnement 40 Caractéristiques techniques 43 Installation 44 Branchement élec[…]
-
Page 26
Consignes générales de sécuri té • Ne modifiez pas ou n’essayez pas de mo- difier les caractéristiques de cet appareil. Vous risqueriez de vous blesser et d’endom- mager l’appareil. • Si votre appareil est li vré en hiver, lorsque la température est infé rieure à 0 °C, stoc- kez-le à température ambiante pendant 24 he[…]
-
Page 27
• Ne lavez pas dans votre machine les articles avec baleines, l es articles sans ourle t, effilo- chés ou déchirés. Les soutiens-gorge à ar- mature NE doivent PAS être lavés en ma- chine. • Les articles qui ont été en contact avec des produits pétroliers vo latiles ne doivent pas être lavés dans l’appare il. Si vous utilisez un […]
-
Page 28
Description de l’appareil 1 2 3 4 5 6 1 Boîte à produi ts 2 Bandeau de commande 3 Poignée d’ouverture du hublot 4 Plaque signalétique 5 Pompe de vidange 6 Pieds réglables Boîte à produits Compartiment destiné au produit de la- vage utilisé pour le prélavage et le trempage ou pour le détachant employé au cours de la phase anti-[…]
-
Page 29
Bandeau de commande Le bandeau de commandes est illus tré ci-dessous. Il comprend : le sélecteur de programmes, les touches et les vo yants. Ceux-ci sont si gnalés tout au long de la notice par les numéros auxquels ils se réfèr ent. 1 2 3 4 5 6 7 1 Sélecteu r de progr ammes 2 Touche réduction d’essorage 3 Touche de la fonction « Tout […]
-
Page 30
Touche Réduction d’essora- ge En appuyant sur cette touche, vo us pouvez modifi er la vitesse d’essorage du programme sélectionné. • Option Arrêt cuve pleine : en choisissant cette option, l’eau du dernier rinçage n’est pas évacuée pour éviter que le linge ne se froisse. Avant d’ouvrir le hu blot, vous devez vidanger l’e[…]
-
Page 31
Versez 1/2 mesure de les sive dans le com- partiment de lavage principal, puis mettez l’appareil en fonctionnement. Utilisation quotidienne Ouvrez la porte. Ouvrez le hublot en tirant avec précaution vers l’extérieur à l’aide de la poi gnée. Chargement du linge Placez les articles un à u n d a n s l e t a m — bour, en les dépli[…]
-
Page 32
Sélectionnez les options disponibles en appuyant sur les touches 2, 3 et 4. Selon le programme, différentes fonctions peuvent être combinée s. Ces der nières doi- vent être sélectionnées aprè s le choix du pro- gramme et avant le démarrage du program- me. Si vous appuyez sur ce s touches, les voyants correspondants s’allument. Si vou[…]
-
Page 33
Appuyez de nouveau sur la même touche pour redémarrer le progr amme. Annulation d’un programme Mettez le sélecteur sur O pour annuler un pro- gramme en cours. Vous pouvez à présent sélectionner un nou- veau programme. Ouverture du hublot Une fois le programme de lavage lancé, le hu- blot est verrouillé. Si, pour une raison quel- conque[…]
-
Page 34
Peinture à l’huile : humidi fiez à l’aide d’un dé- tachant à l’essence, étalez l e vêtement sur un chiffon doux puis tampo nnez la tache. Traitez plusieurs fois. Taches de graisse séchée s : humidifiez à l’es — sence de térébenthine, étal ez le vêtement sur un chiffon doux puis tamponnez la tache du bout des do[…]
-
Page 35
Programme/ Température Type de linge Cycle Descript ion Charge max Charge réd. 1) Options Disponibles Bac à lessive COTON 90°-60° Coton blanc (linge normalement sale à très sale). Lavage Rinçages Essorage fi- nal à 1 200 tpm maxi 6 kg 3 kg 1) Essorage Arrêt cuve pleine Prélavage Court Rinçage plus 2) COTON ÉCO 60° Coton blanc et coule[…]
-
Page 36
Programme/ Température Type de linge Cycle Description Charge m ax Charge réd. 1) Options Disponibles Bac à lessi ve DÉLIC AT 40°-30°- Froid Tissus délicats : p.ex. des rideaux. Lavage Rinçages Essorage fi- nal à 700 tpm maxi 3 kg 1,5 kg 1) Essorage Arrêt cuve pleine Prélavage Court Rinçage plus 2) LAINE 40° Programme spécial pour les[…]
-
Page 37
Programme/ Température Type de linge Cycle Description Charge m ax Charge réd. 1) Options Disponibles Bac à lessi ve ESSORAGE Essorage séparé pour les vêtements lavés à l a m a i n e t a p r è s l e s programmes utilisés avec l’option Arrêt cu- ve pleine. Vous pou- vez choisir la vites se d’essorage à l’aide de la touche […]
-
Page 38
Entretien et nettoyage Avertissement Mettez l’appareil à l’arrêt avant toute opération d’entretien ou de nettoyage. Lavage d’entretien Les lavages à basse te mp érature peuvent pro- voquer l’accumulation de résidus à l’intérieur du tambour. Nous vous conseillons d’effectuer un lavage d’entretie n régulièremen t. P[…]
-
Page 39
1 A B Placez un récipient à proximité de la pom- pe (A) pour recueillir l’eau qui pourrait s’en écouler. 2 Sortez le petit tuyau d’évacuation (B), placez-le dans le ré- cipient et enlevez l e bouchon. 3 Quand l’eau ne s’écoule plus, dévis- sez le couvercle de la pompe (A) puis reti- rez-le. Conservez toujours à por[…]
-
Page 40
2 • Dévissez le tuyau de l’ap pareil. Conservez un chiffon à portée de main car de l’eau peut s’écouler. • Nettoyez le filtre du robinet à l’aide d’une petite brosse dure ou d’un chiffon. 3 35° 45° • Revissez le tuyau sur l’appareil en l’orientant vers l a gauche ou la droi- te pour s’adapte[…]
-
Page 41
Symptôme Cause possible Solution L’appareil n’est pas corr ectement branché. Branchez l’appareil. La prise n’est pas alimentée. Vérifiez votre installation électrique domestique. Le fusible de l’installation él ectrique est endommagé. Remplacez le fusible. Le sélecteur de programme n’ est pas correctement positionné et[…]
-
Page 42
Symptôme Cause possible Solution La phase d’es- sorage démarre tardivement ou ne démarre pas : Le dispositif de sécurité anti-balourd électronique s’est activé par ce que le linge n’est pas bien réparti dans le tambour. Pour mieux répartir le linge, le tambour effectue des rotations d a n s l e s d e u x s e n s e t c e j u […]
-
Page 43
Symptôme Cause possible Solution Les résultats de lavage ne sont pas satisfai- sants : Vous avez utilisé tr op peu de lessive ou une lessive qui ne convient pas au lavage en machine. Augmentez la quantité de lessive ou utilisez une au tre lessive pl us adap- tée. Les taches tenaces n’ont pas été pré- alablement traitées. Utilisez des pro[…]
-
Page 44
Bruit de lavage (dB( A)) 54 Bruit d’essorage (dB(A)) 76 Consommation d’énergie an- nuelle moyenne (kWh) 2) 204 Consommation d’eau annuel- le moyenne (litres) 2) 9000 1) Si la pression de votre région est plus basse ou plus élevée, contactez le se rvice après-vente. 2) Les données sont basées sur le programme de lavage des organismes[…]
-
Page 45
Attention Assurez-vous que tous les raccords de tuyaux d’eau sont bien ser- rés afin d’évite r les fuites. Le tuyau de vidange peut être allongé jusqu’à 4 mètres maximum. Un tuya u de vidange supplémentaire et un raccor d sont disponibles auprès de votre service après- vente. L’inobservation de ces règles pourrai t entraîne[…]
-
Page 46
GARANTIE IKEA Pendant combien de temps la garantie IKEA est-elle valable ? Cette garantie est valable cinq (5) ans à comp- ter de la date d’achat de votre appareil chez IKEA, à moins qu’il ne s’agisse d’un appareil LAGAN, auquel cas la garantie ne dure q ue deux (2) ans. Le ticket de cai sse original est nécessaire et constit[…]
-
Page 47
• Les réparations qui n’ont pas été effectuées par des techniciens de service après-vent e désignés et/ou un partenaire contractuel autorisé ni celles où l’on n’a pas utili sé des pièces d’origine. • Les dommages résultant d’une i nstallation incorrecte ou non respectueuse des spécifi- cations d’installat[…]
-
Page 48
Important Pour que nous puissions vous fournir un service rapide et compétent, nous vous conseillons d’utiliser les numéros de téléphone sp écifiques ind iqués à la fin de cette notice. Vous trouvere z tous les numéros de téléphone utiles dans la notice d’utilisation correspondant à votre appareil. Avant de nous appeler, cherch[…]
-
Page 49
Litiges éventuels En cas de difficulté vous avez la possibilité, avant toute action en justice , de rechercher une solution amiable, notamment avec l’aide : • d’une association de consommateurs ; • ou d’une organisation professionnelle de la branche ; • ou de tout autre co nseil de votre choix. Il est rappelé que la recherche d’un[…]
-
Page 50
Qui est couvert par la garantie ? La présente garantie concerne l’acheteur agissant en qualité de consommateur à comp- ter de la date d’achat du produit. Qui exécutera les presta tions dans le cadre de la garantie ? Le prestataire de serv ices désigné par IKEA fournira l’assistance de son réseau de répara- teurs agréés pour vo[…]
-
Page 51
• Les dommages tels que, entre autres, le vol, la chut e o u l e cho c d’ un o bjet , l’ ince ndi e, la décoloration à la lumière, l es brûlures, l’hu- midité ou la chaleur sèche excessive ou tou- te autre condition environnementale anor- male, les coupures, les éraflures, toute im- prégnation par un liquide, les réactions chi- miq[…]
-
Page 52
• Art. L. 211-12. « L’action résultant du défaut de conformité se prescrit par deux ans à compter de la délivrance du bien. » • Art. L. 211-5. « Pour être conforme au con- trat, le bien d oit : 1° Etre propre à l’usage habituellement atten- du d’un bien semblable et, le cas échéant : – correspondre à la descriptio n donné[…]
-
Page 53
Important CONSERVEZ IMPERATIVEMENT L’ORIGINAL DE VOTRE TICKET DE CAISSE, FACTURE OU BON DE LIVRAISON AVEC LE LIVRET DE GARANTIE ! Ils vous seront néce ssaires comme preuve de l’achat pour vous perm ettre de bénéficier de la présente garantie, et pour retrouver facile- ment la désignation et l a référence IKEA (cod e à 8 chiffres) de cha[…]
-
Page 54
Inhalt Sicherhe itshinweis e 54 Gerätebeschreibung 57 Bedien blende 58 Erste Inbetriebnahme 60 Täglicher Gebrauch 60 Praktische Tipps und Hinwei se 63 Spülprogramme 64 Verbrauchswerte 67 Reinigung und Pflege 68 Was tun, wenn … 71 Technis che Daten 74 Gerät aufstellen 75 Elektrischer Anschluss 75 Umwelttipps 76 IKEA GARANTIE 77 Änderungen vor[…]
-
Page 55
• Wenn das Gerät in den Wintermonaten bei Minustemperaturen geliefert wird, lagern Sie es für 24 Stunden bei Raumtemperatur, bevor Sie es das er ste Mal verwenden. Le- sen Sie bitte das Kapitel „Gefahren durch Frost“. • Dieses Gerät ist für d en Betrieb bei normaler Innentemperatur ausgel egt. Der Herstelle r ist für Frostschäden nich[…]
-
Page 56
• Benutzen Sie Ihre Maschine nicht zum Wa- schen von Gegenständen mit Fischbein, Ma- terialien ohne Saum, ausgefransten oder zerrissenen Stoffen. Bügel-BHs dürfen NICHT in der Maschine gewaschen werden. • Textilien, die mit fl üchtigen Erdölerzeugnis- sen in Kontakt gekommen sind, dürfen nicht in der Maschine gewaschen werden. Wenn flüch[…]
-
Page 57
• Entfernen Sie die Pumpenabd eckung nie- mals während eine s Waschzyklus. Warten Sie stets darauf, bis die Maschine das Was- ser abgepumpt hat. Wenn Sie ein Wasch- programm mit hoher Te mperat ur wählten, warten Sie bitte, bis sich das Wasser abge- kühlt hat. • Stellen Sie sicher, dass die Pumpenabde- ckung wieder fest angezogen wurde, um L[…]
-
Page 58
Waschmittelschublade Fach für Waschmittel für d ie Vorwäsche und Einweichphase oder für Fl eckentferner während der Flecken-Behandlungsphase (falls verfügbar). Vorwasch- und Einweich- mittel werden zu Beginn des Waschpro- gramms eingespült. Der Fleckentferner wird während der Flecken-Behandlungsphase zugegeben. Fach für Pulver- oder flüs […]
-
Page 59
Symboltabelle = Energiesparen = Spülstopp = Kaltwäsche = Optionen = Pflegele icht = Vorwäsche = Leichtbügeln = Kurzwäsche = Schonwäsche = Extraspülen = Wolle = Zeitvorwahl = Handwäsche = Hauptwäsche = Spülgänge = Endzyklus = Abpumpen = Start/Pause = Schleudern Programm-Wahlschalter Er ermöglicht die Wahl ei nes Programms und/ oder das E[…]
-
Page 60
Zeitvorwahl-Taste Mit dieser Taste kann de r Programmstart um 3, 6 oder 9 Stunden verzögert werden. Programmkont rolllampen 7.1 7. 2 7. 3 Bei der Auswahl eines Waschprogra mms leuchten beide Lam- pen, 7.1 und 7.2, auf. Wenn Sie die Taste 5 drückten, blei bt nur die zum Waschgang zugehörige Lampe erleuchtet. Das Gerät beginnt mit dem Betrie b, u[…]
-
Page 61
unter „Wasserhärte- grade“. 2 Schütten Sie Weich- spüler in das mi t markierte Fach (die eingefüllte Menge darf die Markierung „MAX“ in der Waschmittelschubla- de nicht überschrei- ten). Schließen Sie vorsichtig die Schublade. Wählen Sie das gewüns chte Programm mit dem Programm-Wahlschalter (1). Das Gerät ist nun einges chaltet. D[…]
-
Page 62
Wichtig! Die eingestel lte Startzeitvorwahl kann nur nach erneutem Einstellen des betreffenden Waschprogramms geändert werden. Während der gesamten Ze it der Startzeitvor- wahl bleibt die Tür verriegelt. Falls Sie die Tür öffnen müssen, versetzen Sie das Ger ät in den Zustand PAUSE (durch Drücken der Taste 5) und warten dann einige Minuten.[…]
-
Page 63
4. Drücken Sie die Taste 5. Am Ende des Programms kann die Tür geöffnet werden. Drehen Sie den Programm-Wahl- schalter auf O , um das Gerät abzu schalten. Nehmen Sie die Wäsche heraus und prüfen Sie sorgfältig, ob die Trommel leer i st. Wenn Sie keinen weiteren Waschgang starten möchten, schließen Sie den Wasserhahn. Lassen Sie di e Tür o[…]
-
Page 64
Wasserhärte Die Wasserhärte ist in sogenannte Wasser- härtegrade eingeteilt. Informati onen zur Was- serhärte an Ihrem Wohnort erha lten Sie beim Wasserwerk od er bei Ihrer Gemeindeverwal- tung. Eigenschaft Wasserhärtegrade Deutsch °dH Französisch °T.H. Weich 0-7 0-15 Mittel 8-14 16-25 Hart 15-21 26-37 Sehr hart > 21 > 37 Ein Wasseren[…]
-
Page 65
Programm/ Temperatur Art der Wäsche Zyklus Beschreibung Max. Beladung Ver. Füllmenge 1) Verfügbare Optionen Waschmittel- Fach KOCH-/ BUNTWÄ- SCHE 40° — 30° — Kalt Buntwäsche (normal verschmutzt) Haupt- waschg ang Spülgänge Max. Ab- schluss- Schleuder- drehzah l 1200 U/min 6 kg 3 kg 1) Schleudern Spülstopp Vorwaschen Extrakurz Extraspülen[…]
-
Page 66
Programm/ Temperatur Art der Wäsche Zyklus Beschreibung Max. Beladung Ver. Füllmenge 1) Verfügbare Optionen Waschmittel- Fach WOLLE 40° Sonderprogramm für Wolltextilien mit Pfle- gekennzeichen „Reine Schurwolle, nicht ein- laufend, waschma- schinenfest“. Haupt- waschg ang Spülgänge Max. Ab- schluss- Schleuder- drehzah l 900 U/min 2 kg Sc[…]
-
Page 67
Programm/ Temperatur Art der Wäsche Zyklus Beschreibung Max. Beladung Ver. Füllmenge 1) Verfügbare Optionen Waschmittel- Fach SCHLEUDERN Separater Schleuder- gang für handgewa- schene Kleidungsstü- cke und nach Pro- grammen mit ausge- wählter Option Spül- stopp. Sie können die Drehzahl mit der ent- sprechenden Taste passend zu der zu schleu[…]
-
Page 68
Programm Energieverbrauch (kWh) Wasserverbrauch (in Litern) Programmdauer (in Minuten) 1) Handwäsche 30° 0.3 58 55 1) Ohne Vorwäsche-Option ausgewählt. 2) „Koch-/Buntwäsche + Energiesparen“ bei 60 °C mit einer Beladung von 6 kg ist in Übereinstimmung mit der Norm CEI 456 das Referenzpr ogramm für die im Energielabel eingetrage nen Werte[…]
-
Page 69
5 Verwenden Sie die gleiche Bürste zur Reinigung der Schubladenaufnah- me und stellen Sie si- cher, dass die Unter- und Oberseite gut gereinigt sind. Nach der Reinigung der Waschmittel- schublade und der Schubladenaufnah- me setzen Sie die Schublade wieder ein und lassen Sie oh- ne eingelegte Wä- sche ein Spülpro- gramm laufen, um al- le Reste w[…]
-
Page 70
Reinigung des Wasserzulauffilters Wenn das Wasser zu lange in das Gerät ein- läuft oder nicht füllt, blinkt die Anzeigelampe der Starttaste rot. Prüfen Sie dann, ob die Ein- lassfilter blockiert sind (weitere Details finden Sie im Kapitel „Was tun, wenn…“). Gehen Sie hierzu folgendermaßen vor: 1 • Schließen Sie den Wasserhahn. • Sch[…]
-
Page 71
• Ziehen Sie den Netzstecker aus der Netz- steckdose. • Schließen Sie d en Wasserhahn. • Falls nötig, warten Sie, b is das Wasser ab- gekühlt ist. • Öffnen Sie die Pumpenklappe. • Stellen Sie einen Behälter auf den Fu ßboden und halten Sie das Ende des Notentlee- rungsschlauchs in den Behälter. Entfernen Sie die Verschluss kappe vo[…]
-
Page 72
Problem Mögliche Ursache Abhilfe Der Wasserzulaufschlauch ist ge- knickt oder gequetscht (die rote Kon- trolllampe der Taste 5 blinkt). Überprüfen Sie den Anschluss des Zulaufschlauchs. Der Filter im Einlassschlauch oder im Einlassventil ist ve rstopft (die rote Kontrolllampe der Taste 5 blin kt). Reinigen Sie die Wasse rzulauffilter. (Unter „[…]
-
Page 73
Problem Mögliche Ursache Abhilfe Der Ablauf- oder Zulaufschlauch ist beschädigt. Ersetzen Sie diesen durch einen neu- en (wenden Sie sich an unseren Kun- dendienst zwecks Abklärung der Er- satzteilnummer). Der Verschlussstopfen des Noten- tleerungsschlauchs wurde nach der Pumpenreinigung nicht wieder auf- gesteckt oder der Filter nicht kor rekt […]
-
Page 74
Modellbeschreibung (MOD): …… ………. ….. 21552 © Inter IKEA Systems B.V. 1999 Made In Italy 501.514.59 Produkt-Nummer (PNC): .. ………… ………. … Seriennumme r (S.N.): …. ………… ……….. …. Technische Daten Abmessungen Breite (cm) 59,6 Höhe (cm) 82 Tiefe (cm) 54 Wasserdruck 1) Mindestens Maximal 0,5 bar (0,05 MPa) […]
-
Page 75
Gerät aufstel len Vorsicht! Beachten Sie die Montageanleitung, um mit der Installation fortzufahren. Warnung! Verge wissern Sie sich, dass der Netzstecker währ end der Installation des Geräts gezogen ist. Setzen Sie das Gerät auf dem Fußboden ab und installieren Sie es unter einer Spüle oder Arbeitsplatte. Falls eine Reparatur erfor derlich w[…]
-
Page 76
• Schließen Sie das Gerät nur an eine sach- gemäß installierte Sc hutzkontaktsteckdose an. • Verwenden Sie keine Me hrfachsteckdosen, Steckerleisten oder Verlän gerungskabel. Es besteht Brandgefahr. • Tauschen Sie das Netzkabel nicht selbst aus und ändern Sie es nicht. Kontaktieren Sie den Kundendienst. • Vergewisse rn Sie sich, dass […]
-
Page 77
IKEA GARANTIE Wie lang ist die IKEA Garantie gültig? Diese Garantie ist für (5) fünf Jahre gültig ab dem Originalkaufdatum Ihres Gerätes bei IKEA; sollte das Gerät die Bezeichnung «LA- GAN» tragen, gilt die Garantie in die sem Fall nur (2) zwei Jahre. Als Kaufnachwei s ist der Originalkassenbon oder die Origi nalrechnung erforderlic[…]
-
Page 78
• Fälle, in denen bei einem Besuch des Kun- dendienstes kein Fehler gefunden werden konnte. • Reparaturen, die nicht dur ch unser autori- siertes Kundendienst personal und/oder das autorisierte Kundendiens tpersonal un- serer Vertra gspartner ausgef ührt wurden, oder Fäl le, in dene n keine Ori ginalteil e ver- wendet wurden. • Reparaturen[…]
-
Page 79
Auf der letzten Seite dieser Broschüre finde n Sie eine vollständige Li ste mit offiziellen IKEA Kundendienststellen und den jeweiligen nati — onalen Telefonnummern. Wichtig! Damit Sie bei F ragen rasch die zuständige Stelle err eichen, empfehlen wir Ihnen, die am Ende dieser Broschüre aufgelisteten speziellen Telefonnummern zu benutzen. Bezieh[…]
-
Page 80
Indice Informazioni per la sicurez za 80 Descrizione del prodotto 83 Pannello dei comandi 84 Primo utiliz zo 85 Utilizzo quotidiano 86 Consigli e suggerimenti utili 88 Programmi di lavaggio 89 Valori di consumo 92 Pulizia e cura 93 Cosa fare se… 96 Dati tecnici 99 Installazione 99 Collegamento elettrico 100 Considerazioni ambientali 101 GARANZIA […]
-
Page 81
• Questa apparecchiatura è stata studiata per essere utilizzata a temperatura ambien- te normale. Il produttore non si assume al- cuna responsabilità per eventuali danni le- gati a congelamento. • Dopo l’uso e prima delle operazioni di pu- lizia e manutenzione, staccare sempre la spina dalla presa di corr ente e chiudere il rubinetto del[…]
-
Page 82
• L’acqua che si usa normalmente contiene calcare. È buona norma usare periodica- mente un sale addolcente. Es eguire il trat- tamento anticalcare separatamente dal ci- clo di lavaggio e rispetta ndo le istruzioni del produttore. In questo modo si ridurrà la for- mazione di depositi di calcare e si renderà al tempo stesso l’apparecchiat[…]
-
Page 83
Descrizione del prodotto 1 2 3 4 5 6 1 Cassetto del detersivo 2 Pannello dei comandi 3 Maniglia di apertura del l’oblò 4 Targhetta del modello 5 Pompa di scarico 6 Piedini regolabili Cassetto del detersivo Scomparto per deters ivo utilizzato nella fase di prelavaggio o di ammollo, o per lo smacchiatore nella fas e antimacchia (se pre- vista).[…]
-
Page 84
Pannello dei comandi Qui sotto è ra ffigurato il pa nnello dei coma ndi. L’immagine mostra il selettore dei program- mi, i tasti e le spi e di indicazione. Questi el ementi sono presentati con i relativi numeri nell e pagine seguenti. 1 2 3 4 5 6 7 1 Selettore dei programmi 2 Tasto Riduzione centrifuga 3 Tasto multifunzione 4 Tasto Extra risc[…]
-
Page 85
Tasto Riduzione centrifuga Premendo questo tasto è possibile cambiare la velocità di cen- trifuga del programma selezionato. • Opzione Antipiega: selezionando questa opzi one, si esclude lo scarico dell’acqua dell’ultimo risciacquo in modo da non sgualcire i tessuti. Prima di aprire l’oblò sar à necessario sca- ricare l’ac[…]
-
Page 86
Selezionare un ciclo a vuoto usando il pro- gramma cotone alla massima temperatu- ra, per elim inare i resi dui di fabbrica zione dal cesto e dalla vasca. Versare mezza dose di detersivo nello scomparto del lavaggi o principale e av- viare l’apparecchiatura. Utilizzo quotidiano Aprire l’oblò. Aprire l’oblò tirando la maniglia verso l&[…]
-
Page 87
Selezionare le opzioni dis ponibili premendo i tasti 2, 3 e 4 A seconda del programma, è possibile com- binare diverse funzioni. La scelta delle opzioni deve avvenire dopo aver impostato il pro- gramma desiderato e prima di iniziare il pro- gramma. Quando si premono questi tasti si accendono le spie corrispondenti. Premend o nuovamente i tasti, le[…]
-
Page 88
Annullamento di un programma Ruotare il selettore su O per annullare un pro- gramma in corso. A questo punto è possibile scegliere un nuovo programma. Apertura dell’oblò Dopo l’avvio del programma l’oblò è bloccato. Se per qualsiasi motivo è necessario aprir e l’oblò, impostare come prima cosa l’apparec- chiatura su PAUS[…]
-
Page 89
Erba: insaponare leggerm ente e trattare con candeggina (solo cotoni bianchi e colori resi- stenti). Inchiostro e colla: inumidire con ace tone 4) , stendere il capo su un panno morbido e tam- ponare la macchia. Rossetto: inumidire con acetone, quindi tratta- re le macchie con alcol. Trattare gli eventuali residui con candeggina. Vino rosso: l asci[…]
-
Page 90
Programma/ Temperatura Tipo di tessuto Ciclo Descrizione Carico massimo Carico rid. 1) Disponibile Opzioni Detersivo Scomparto COTONI 90°-60° Cotone bianco (capi molto sporchi o nor- malmente sporchi). Lavaggio princip ale Risciacqui Velocità massima centrifuga fi- nale 1200 rpm 6 kg 3 kg 1) Centrifuga Antipiega Prelavaggio Molto brev e Extra ri[…]
-
Page 91
Programma/ Temperatura Tipo di tessuto Ciclo Descrizione Carico massimo Carico rid. 1) Disponibile Opzioni Detersivo Scomparto PRONTO STI- RO 40° Tessuti sintetici: que- sta opzione prevede un ciclo di lavaggio e centrifuga delicato per evitare sgualciture e facilitare la sti ratura. L’apparecchiatura eseguirà alc uni ri- sciacqui a ggiuntiv[…]
-
Page 92
Programma/ Temperatura Tipo di tessuto Ciclo Descrizione Carico massimo Carico rid. 1) Disponibile Opzioni Detersivo Scomparto RISCIACQ UI Questo pro gramma permette di risciac- quare e centrifugare i capi in cotone lavati a mano. L’apparecchia- tura esegue alcuni ri- sciacqui seguiti da una lunga centrifuga fina- le. La velocità di cen- trif[…]
-
Page 93
Programma Consumo di energia (kWh) Consumo d’acqua (li- tri) Durata del program- ma (minuti) 1) Cotone RISPARMIO ENERGIA 60° 2) 1.02 45 155 Cotone 40° 0.75 58 120 Sintetici 40° 0.5 47 80 Delicati 40° 0.55 58 70 Lana 40° 0.45 55 60 Lavaggio a mano 30° 0.3 58 55 1) Senza opzione di prelavaggio selezionata. 2) «Cotone + Risparmio energia»[…]
-
Page 94
3 Utilizzare uno spaz- zolino duro per pulire e rimuovere tutti i re- sidui di detersivo. 4 Eliminare tutte le parti rimosse dalla vaschetta sotto un ru- binetto per rimuove- re eventuali tracce di detersivo accumula- to. 5 Utilizzare lo spazzo- lino di prima per pu- lire la rientranza, as- sicurandosi ch e la parte superiore e quella inferiore si […]
-
Page 95
5 Utilizzare una matita per verificare se l a ruota della pompa, posta dietro l’allog- giamento della pom- pa stessa, è libera di girare. (È normale che la ruota della pompa giri a scatti). Nel caso in cui la ruo- ta della pompa non giri, si prega di con- tattare il centro di as- sistenza. 6 Riapplicare il tappo sul tubicino di scarico e rip[…]
-
Page 96
Importante Ogni qualvolta si effettua lo scarico manuale o di emergenza dell’acqua, occorre versare 2 litri di acqua nello scomparto del detersivo per il lavaggio principale prima di eseguire il programma di scarico. Ciò determina l’attivazione della VALVOLA ECO che consente il totale utilizzo del detersivo. Scarico di emergenza Se l’a[…]
-
Page 97
Problema Possibile causa Soluzione Il filtro nel tubo di carico oppure il fil- tro della valvola di ingresso sono bloccati (la spia rossa del tasto 5 lampeggia). Pulire i filtri di ingresso dell’acqua. (Per maggiori dettagli, vedere «Puli- zia dei filtri di in gresso dell’acqua»). L’oblò non è chiuso correttamente (la spi[…]
-
Page 98
Problema Possibile causa Soluzione Non è stato riapplicato il tappo sul filtro o il filtro non è stato corretta- mente avvitato dopo la pulizia. Riapplicare il tappo sul filtro o ri av- vitare bene il filtro. L’oblò non si apre: Il pro gramma è ancora in corso. Attendere la fine del ciclo di lava g- gio. L’oblò non si è sbloccato. A[…]
-
Page 99
Descrizione del modello (MOD): …… ………. ….. 21552 © Inter IKEA Systems B.V. 1999 Made In Italy 501.514.59 Numero prodotto (PNC): ………… ……….. …. Numero di seri e (S.N.): .. ………. ……….. …….. Dati tecnici Dimensioni Larghezza (cm) 59,6 Altezza (cm) 82 Profondità (cm) 54 Pressione di carico dell’acqua 1) Min[…]
-
Page 100
Collocare l’apparecchi atura sul pavimento e installarla sotto un ripiano (piano di l avoro della cuc ina o lave llo). Se sono necessarie ripa razioni, l’appare cchia- tura deve essere faci lm ente accessibile al tec- nico. Collocare l’apparecch iatura vicino ad un rubinetto dell’acq ua e ad uno scarico. Non sono richies te ulteriori […]
-
Page 101
Considerazioni ambientali Il simbolo sul prodotto o sulla confezione indica che il prodotto non deve essere considerato come un normale rifiuto domestico, ma deve es sere portato nel punto di raccolta appropriat o per il riciclaggio di apparecchiature elettric he ed elettroniche. Provvedendo a smaltire questo prodotto in modo appropriato, si contri[…]
-
Page 102
Come interverrà IKEA per risolvere il problema? Il fornitore del servizio nominato da IKEA esa- minerà il prodotto e deciderà a propria escl u- siva discrez ione se lo stesso rientra nella co- pertura della garanzia. In caso affermativo, il fornitore del servizio nominato da IKEA o un suo partner di assisten za autorizzato provve- derà a propri[…]
-
Page 103
Servizio Assistenza dedicato agli elettrodomestici IKEA: Non esitate a contattare il Serv izio Assistenza IKEA per: 1. usufruire della garanzia; 2. chiedere chiarime nti sull’installazione de- gli elettrodomestici IKEA nei mobili da in — casso specific i di IKEA. Il servi zio non for- nirà assistenza o chiarimenti in merito a: – installazio[…]
-
Page 104
Country Phone number Call Fee Opening time België 070 24 6 01 6 Binnenlandse gespreksk osten 8 to t 20 W eekdagen Belgique T arif des appels nationaux 8 à 20. En semaine България 0 7 00 1 0 2 1 8 Такса за повикване от страната От 9 до 1 8 ч в работни дни Česká r epublika 2 46 0 1 97 2 1 Cena za […]
-
Page 105
105[…]
-
Page 106
106[…]
-
Page 107
107[…]
-
Page 108
© Inter IKEA Systems B. V. 2008 AA-47534 3-1 132950640-0 0-492009[…]

Inhoud
Veiligheidsinformatie 4
Beschrijving van het product 7
Bedieningspaneel 8
Het eerste gebruik 9
Dagelijks gebruik 10
Nuttige aanwijzingen en tips 12
Wasprogramma’s 13
Verbruikswaarden 16
Onderhoud en reiniging 17
Problemen oplossen 20
Technische gegevens 22
Montage 23
Aansluiting aan het elektriciteitsnet 24
Milieubescherming 24
IKEA GARANTIE 25
Wijzigingen voorbehouden
Veiligheidsinformatie
Lees voor uw eigen veiligheid en correcte
werking van het apparaat eerst deze
handleiding aandachtig door, alvorens het
apparaat te installeren en te gebruiken. Be-
waar deze instructies altijd bij het apparaat,
zelfs wanneer u het verplaatst of verkoopt.
Gebruikers moeten volledig op de hoogte zijn
van de bediening en veiligheidsfuncties van
het apparaat.
De fabrikant is niet verantwoordelijk voor
schade die door onjuiste installatie en onjuist
gebruik veroorzaakt is.
Veiligheid van kinderen en kwetsbare
mensen
• Mensen, met inbegrip van kinderen, met be-
perkte lichamelijke, zintuiglijke of verstan-
delijke vermogens of gebrek aan ervaring
en kennis, mogen dit apparaat niet gebrui-
ken. Zij moeten onder toezicht staan of in-
structies krijgen over het gebruik van dit ap-
paraat van iemand die verantwoordelijk is
voor hun veiligheid.
• Houd alle verpakkingsmateriaal buiten het
bereik van kinderen. Er bestaat een gevaar
voor verstikking.
• Bewaar alle afwasmiddelen op een veilge
plaats. Laat kinderen de afwasmiddelen
niet aanraken.
• Zorg ervoor dat kinderen of huisdieren niet
in de trommel kunnen klimmen Controleer
de trommel vóór gebruik.
Dit apparaat heeft hij een speciale functie
om te voorkomen dat kinderen of huisdieren
binnen in deze machine vast komen te zit-
ten.
Om deze functie te
activeren draait u
de knop (zonder
deze in te drukken)
aan de binnenkant
van de deur naar
rechts tot de groef
horizontaal staat.
Gebruik zo nodig
een muntstuk
Om deze functie uit
te schakelen en de
mogelijkheid te her-
stellen om de deur
te sluiten, draait u
de knop naar links
tot de groef verti-
caal staat.
Algemene veiligheid
• Verander de specificaties van dit product
niet en wijzig het niet Risico op letsel en be-
schadiging van het apparaat.
• Als de machine in de winter wordt afgele-
verd, als de temperatuur onder nul is, zet de
wasmachine dan 24 uur in een ruimte met
kamertemperatuur voordat u hem in ge-
bruik neemt. Lees het hoofdstuk ‘Bevrie-
zingsgevaren’.
• Dit apparaat is bedoeld voor gebruik bij
normale kamertemperatuur. Fabrikant is
niet verantwoordelijk voor bevriezingsscha-
de.
NEDERLANDS 4
• Trek na gebruik, reiniging en onderhoud
van de machine altijd de stekker uit het
stopcontact en draai de kraan dicht
Montage
• Een gekwalificeerd en bekwaam persoon
moet de elektrische installatie en het lood-
gieterswerk uitvoeren.
• Dit apparaat is zwaar. Let op bij het ver-
plaatsen.
• Controleer of het apparaat niet beschadigd
is tijdens het transport Sluit een beschadigd
apparaat niet aan. Neem indien nodig con-
tact op met de Klantenservice.
• Verwijder de verpakking en de transport-
bouten vóór het eerste gebruik. Het appa-
raat en de naastgelegen keukenkastjes of
meubels kunnen anders beschadigen.
• Wij raden u aan alle transportbeveiligingen
te bewaren, zodat zij kunnen worden ge-
monteerd als de machine ooit nog eens
moet worden vervoerd. Raadpleeg de re-
levante stappen van de installatie-instruc-
ties.
• Leg nooit karton, hout of iets dergelijks on-
der het apparaat om oneffenheden van de
vloer te compenseren.
Plaats het apparaat waterpas en draai de
sluitmoeren vast om trillingen, lawaai of ver-
schuiving van het apparaat tijdens de werk-
ing te voorkomen.
• Als het apparaat op een vloer met vloerbe-
dekking wordt geïnstalleerd, stel de voetjes
dan zo af dat de lucht vrij onder het appa-
raat kan circuleren.
• Controleer of het apparaat niet op de toe-
voer- en afvoerslang staat en of het werk—
blad of de achterkant van het apparaat het
aansluitsnoer niet platdrukt tegen de muur.
• Let er altijd op of er na de installatie geen
water lekt uit de slangen en de aansluitin-
gen
• Als het apparaat geïnstalleerd is op een
plaats waar het kan vriezen, lees dan het
hoofdstuk ‘Bevriezingsgevaren’.
Gebruik
• Dit apparaat is uitsluitend bestemd voor
huishoudelijk gebruik. Gebruik het appa-
raat niet voor commerciële of industriële
doeleinden, of voor enig ander doel.
• Dit apparaat mag alleen gerepareerd wor-
den door een erkende servicemonteur Ge-
bruik alleen originele reserveonderdelen.
• Kijk naar de wasvoorschriften op de etiket-
ten op elk item (uw kleding) voordat u de
stukken wast.
• Doe niet te veel wasgoed in de machine Zie
de «Wasprogramma»-tabel
• Voordat u gaat wassen, dient u ervoor te
zorgen dat alle zakken leeg zijn en dat alle
knopen en ritsen dicht zijn
• Voorwerpen als munten, veiligheidsspel-
den, spijkers, schroeven, stenen of andere
harde, scherpe materialen kunnen grote
schade aan het apparaat toebrengen en
mogen niet in het apparaat terechtkomen.
• Behandel vlekken van verf, inkt, roest en
gras voor het wassen.
• Gebruik alleen de aanbevolen hoeveelheid
wasverzachter en wasmiddel Als u te veel
doseert, kunnen kledingstukken beschadigd
raken. Raadpleeg de aanbevelingen van
de fabrikant met betrekking tot de hoeveel-
heden.
• Was kleine artikelen zoals sokken, veters,
wasbare ceintuurs enz. in een waszak of
kussensloop, omdat deze tussen de kuip en
de trommel terecht kunnen komen.
• Gebruik uw apparaat niet om artikelen met
baleinen, materialen zonder zoom of ge-
scheurde materialen te wassen. Beugelbe-
ha’s mogen NIET machinaal worden gewas-
sen.
• Kledingstukken die in aanraking zijn ge-
weest met vluchtige petroleumproducten
mogen niet in het apparaat gewassen wor-
den. Als vluchtige reinigingsvloeistoffen zijn
gebruikt, dient u ervoor te zorgen dat de
vloeistof uit het kledingstuk is verwijderd
voordat u het in de machine doet.
NEDERLANDS 5