
- Описание
- Характеристики
- Документация
- Отзывы (0)
- Расходные материалы
- Принадлежности
Описание
Электрический резчик Husqvarna K 4000 Cut-n-Break совершенно новый инструмент с уникальной технологией Cut-n-Break, позволяющей осуществлять резку глубиной до 400 мм при очень малых затратах на инструмент. Резчик обеспечивает новые возможности глубокой резки, особенно в помещениях, но также и на открытом воздухе. Модель прекрасно осуществляет резку заподлицо, что делает ее идеальной для резки вблизи стен и пола. Она также хорошо подходит для более мелких работ, таких, как оконные проемы, где нужно избегать перереза по углам. Электрорез превосходно работает при резке труб в траншеях, штроб для кабелей и температурных швов, при ремонте трещин в поверхностях.
Особенности:
- Эргономичная передняя рукоятка резчика облегчает как вертикальную, так и горизонтальную резку. Значительное расстояние между рукоятками обеспечивает безопасное управление и снижение нагрузки
- Электронная система ограничения тока Softstart™ и система Elgard™ – защищают резчик Husqvarna K 4000 Cut-n-Break от перегрузки
- Коническая шестерня большого размера обеспечивает высокую долговечность, минимальные потери энергии и низкий уровень шума
- «Убегающее» вращение — диски вращаются вперед, что позволяет эффективно зарезаться в материал, сводя к минимуму возможности отскока.
- Машина Husqvarna K 4000 Cut-n-Break поставляется в сборе с двойными режущими дисками и „фомкой“ для выламывания перемычки. Комплект для влажной резки входит в комплектацию.
|
Два специально разработанных металлических диска диаметром 230 мм обеспечивают высокую скорость работы машины входят в комплектацию |
|
|
Удобная запатентованная конструкция задней рукоятки облегчает работу
|
|
|
Высокопроизводительный электрический резчик с простой в применении технологией глубокой резки до 400 мм |
|
|
Модель K 4000 Cut-n-Break идеальна для резки заподлицо, так как регулируемый защитный кожух позволяет осуществлять резку вблизи стен и пола. |
|
|
Современная электронная система защиты Elgard от перегрузки изменяет скорость вращения при наступлении перегрузки. |
|
|
Система Electronic Softstart обеспечивает пуск с плавным возрастанием нагрузки на предохранители |
Особенности резчика:
Cut-n-break это фирменный специальный метод алмазной резки разработанный компанией Husqvarna. Технология резки Cut-n-break реализована на данный момент в ручном электрическом и бензиновом резчиках шведской компании.
Термин Cut-n-break дословно означает «Режь и ломай». Суть метода заключается в том, что два высокоскоростных алмазных или абразивных диска делают не один разрез, а два. При резке диски образуют в пропиле керн, который довольно легко отламывается, с помощью специальной фомки, которая идет в комплекте с режущим инструментом.
После того как керн отломан, можно делать следующий пропил (глубина одного реза за раз не более 65мм). И так, пока не достигните желаемой глубины. Максимальная глубина разреза составляет 400мм.
|
Электрический резчик Husqvarna K 4000 Cut-n-Break совершенно новый инструмент с уникальной технологией Cut-n-Break, позволяющей осуществлять резку глубиной до 400 мм при очень малых затратах на инструмент. Резчик обеспечивает новые возможности глубокой резки, особенно в помещениях, но также и на открытом воздухе. Модель прекрасно осуществляет резку заподлицо, что делает ее идеальной для резки вблизи стен и пола. Она также хорошо подходит для более мелких работ, таких, как оконные проемы, где нужно избегать перереза по углам. Электрорез превосходно работает при резке труб в траншеях, штроб для кабелей и температурных швов, при ремонте трещин в поверхностях.
Особенности:
Эргономичная передняя рукоятка резчика облегчает как вертикальную, так и горизонтальную резку. Значительное расстояние между рукоятками обеспечивает безопасное управление и снижение нагрузки
Электронная система ограничения тока Softstart™ и система Elgard™ – защищают резчи
Характеристики
| Характеристики | |
| Гарантированная звуковая мощность, Lw дБ (А) | 109 |
| Звуковое давление возле уха оператора, дБ(А) | 95 |
| Идеальная резка внутри помещений | + |
| Комплект для влажной резки | + |
| Максимальная глубина резания, мм | 400 |
| Максимальный диаметр режущего диска (диаметр алмазного кольца), | 230 |
| Масса (без режущего оборудования), кг | 8,9 |
| Мощность двигателя, кВт | 2,7 |
| Напряжение, В | 230 |
| Номинальный ток, А | 12 |
| Посадка, мм | Cut-n-Break |
| Режущий инструмент входящий в комплект поставки (диски, кольца, | Набор дисков EL10 |
| Резка вплотную к стене или полу (для K3000 Cut-n-Break заподлицо | + |
| Система нейтрализация пыли DEX | + |
| Тип двигателя | Электрический |
| Убегающее вращение | + |
| Эквивалентный уровень вибраций, передняя / задняя рукоятка, м/с2 | 3,2 / 3,4 |
| Электронная система защиты от перегрузки Elgard ™ | + |
| Фильтры | |
| Максимальная глубина резания, мм | 400 |
| Мощность двигателя, кВт | 2.7 |
| Тип двигателя | Электрический |
| Габариты и вес | |
| Вес брутто, кг | 15 |
| Высота в упаковке, мм | 500 |
| Длина в упаковке, мм | 500 |
| Ширина в упаковке, мм | 900 |
| Применение | |
| Блоки, бордюры и тротуары | Резка строительных блоков, бордюров и тротуаров. |
| Глубокая резка | Резка с переменной глубиной реза. |
| Коррекция проемов | Резка и небольшая коррекция оконных и дверных проемов. |
| Литой бетон | Резка литого бетона. |
| Пазы | Нарезание канавок для температурных швов и ремонт трещин. |
| Полы и стены | Стандартная резка полов и стен. |
| Траншеи для трубопроводов | Глубокая резка в траншеях для труб. |
| Трубы | Резка труб. |
| Комплект поставки | |
| Ручной резчик K 4000 Cut-n-Break — 1 шт. | |
| Набор алмазных дисков Husqvarna CUT-N-BREAK EL10CNB — 1 шт. | |
| Фомка для выламывания и удаления распиленного бетона — 1 шт. | |
| Инструкция — 1 шт. |
Документация
Отзывы (0)
Нет отзывов о данном товаре.
Обнаружив ошибку или неточность в тексте или описании товара, выделите ее и нажмите Shift+Enter.
1

Oper ator’s manual Manuel d’utilisation
Bedienungsanweisung Gebruiksaanwijzing
Istruzioni per l’uso
K 4000 Cut-n-Br eak
Please r ead the operator’s manual carefully and make sure you understand the instructions before using the machine.
Lesen Sie die Bedienungsanweisung sorgfältig durch und machen Sie sich mit dem Inhalt vertraut, bevor Sie das Gerät
Neem de gebruiksaanwijzing grondig door en gebruik de machine niet voor u alles duidelijk heeft begrepen.
Prima di usare la macchina, leggere per intero le istruzioni per l’uso e accertarsi di averne compreso il contenuto.
Lire attentivement et bien assimiler le manuel d’utilisation avant d’utiliser la machine.
benutzen.
GGGGBBBB FFFFRRRR DDDDEEEE NNNNLLLL IIIITT
TT
2
W
En
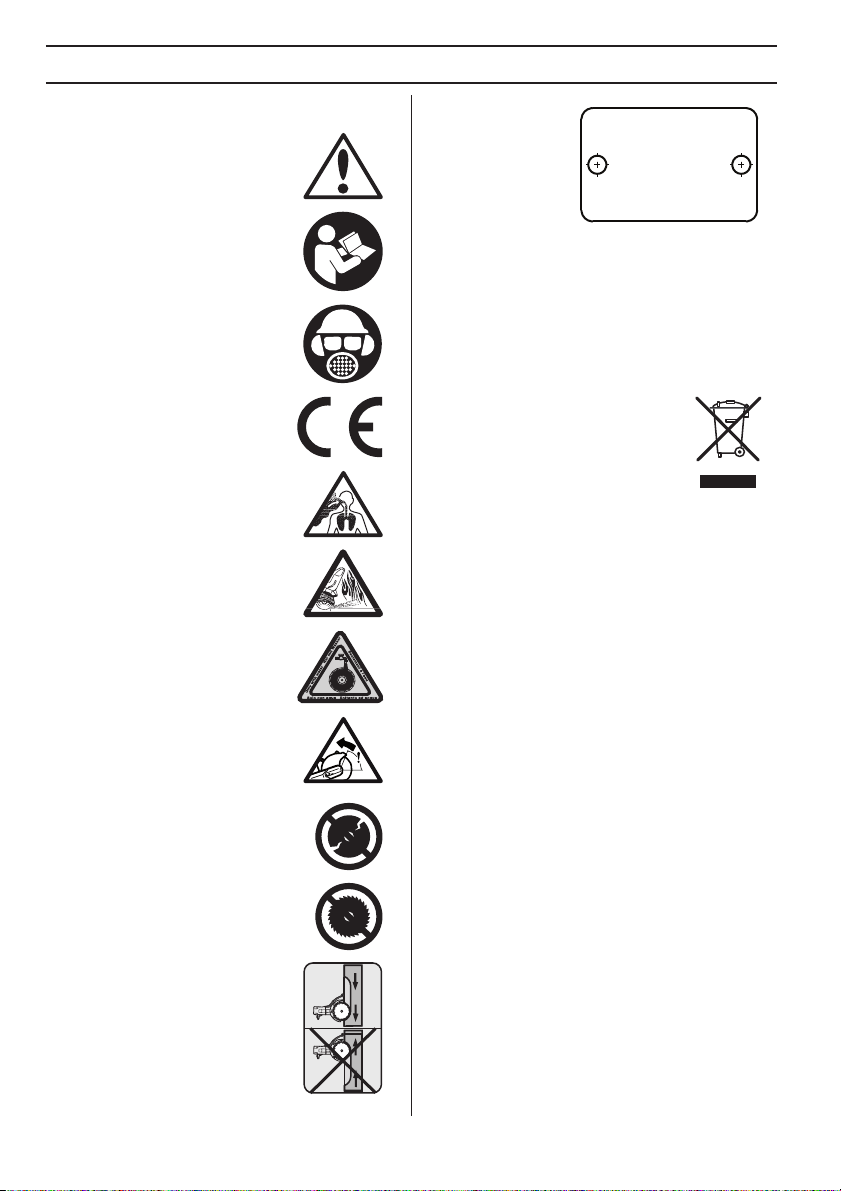
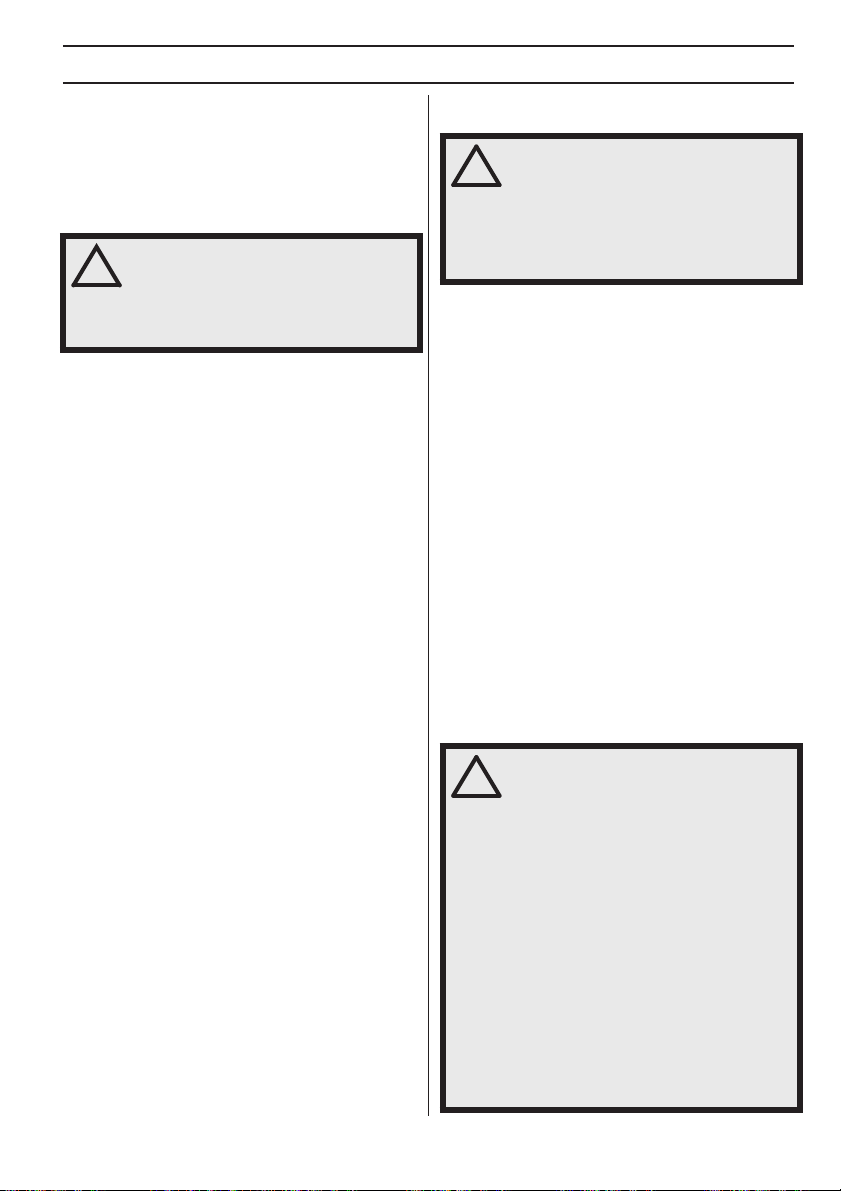
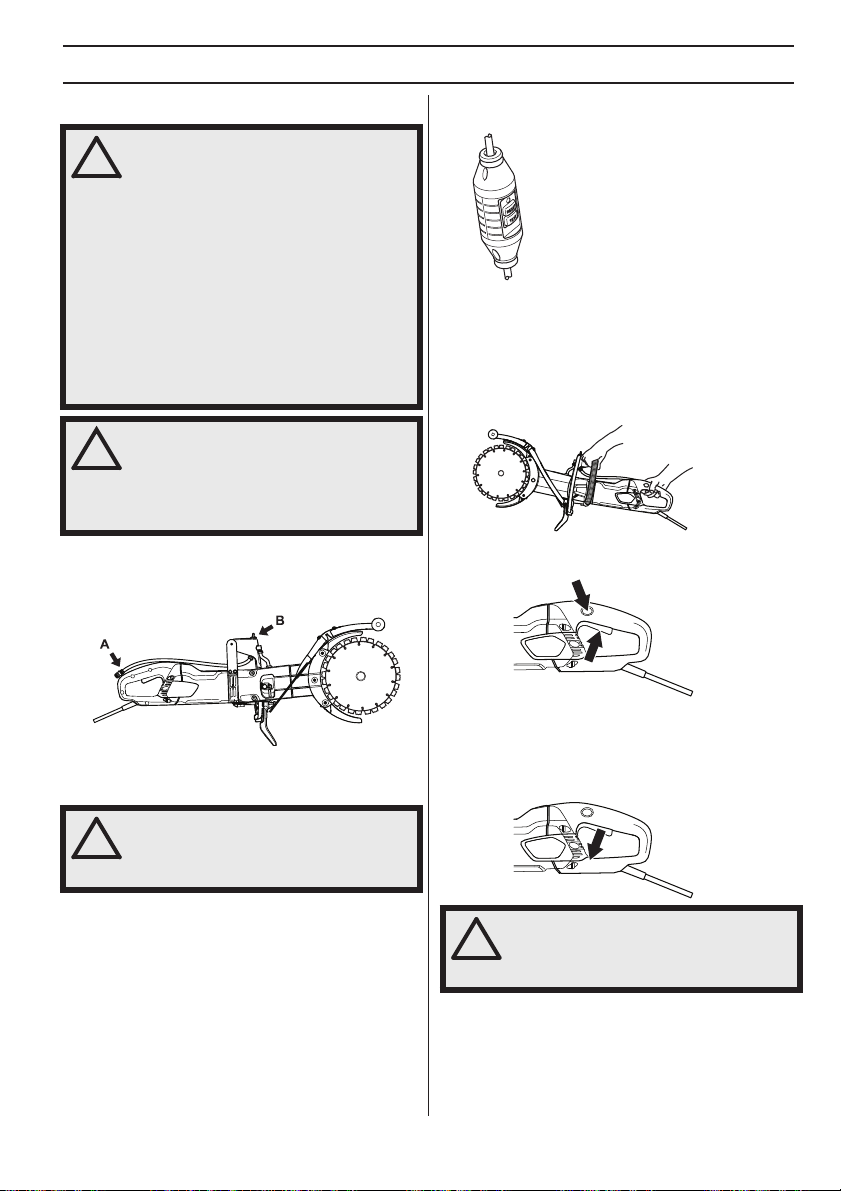
Symbols on the mac hine:
ARNING! The machine can be a
dangerous tool if used incorrectly or
carelessly, which can cause serious or
fatal injury to the operator or others.
Please read the operator’s manual
carefully and make sure you
understand the instructions before
using the machine.
Wear personal protective equipment.
See instructions under the ”Personal
protective equipment” heading.
This product is in accordance with
applicable EC directives.
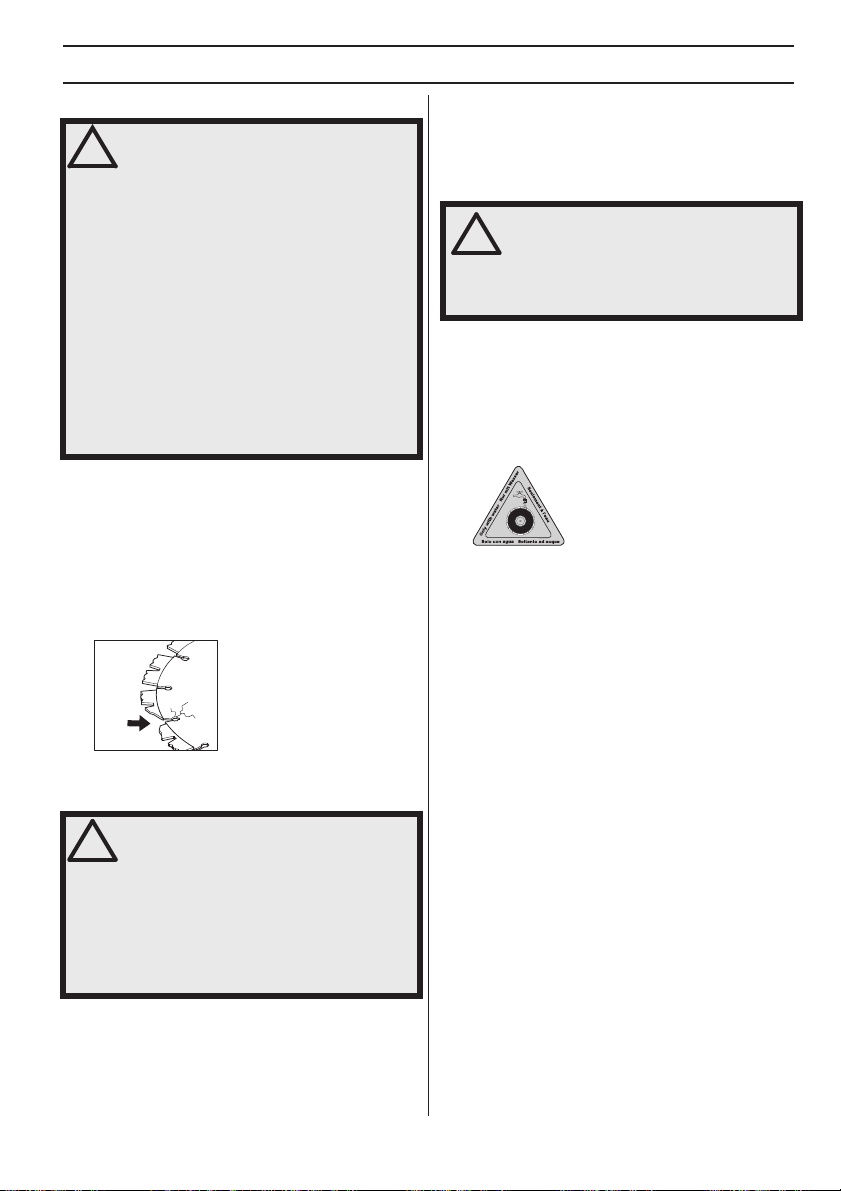
WARNING! Dust forms when cutting,
which can cause injuries if inhaled. Use
an approved breathing mask. Always
provide for good ventilation.
WARNING! Sparks from the cutting
blade can cause fire in combustible
materials such as: petrol (gas), wood,
dry grass etc.
Water cooling must always be used.
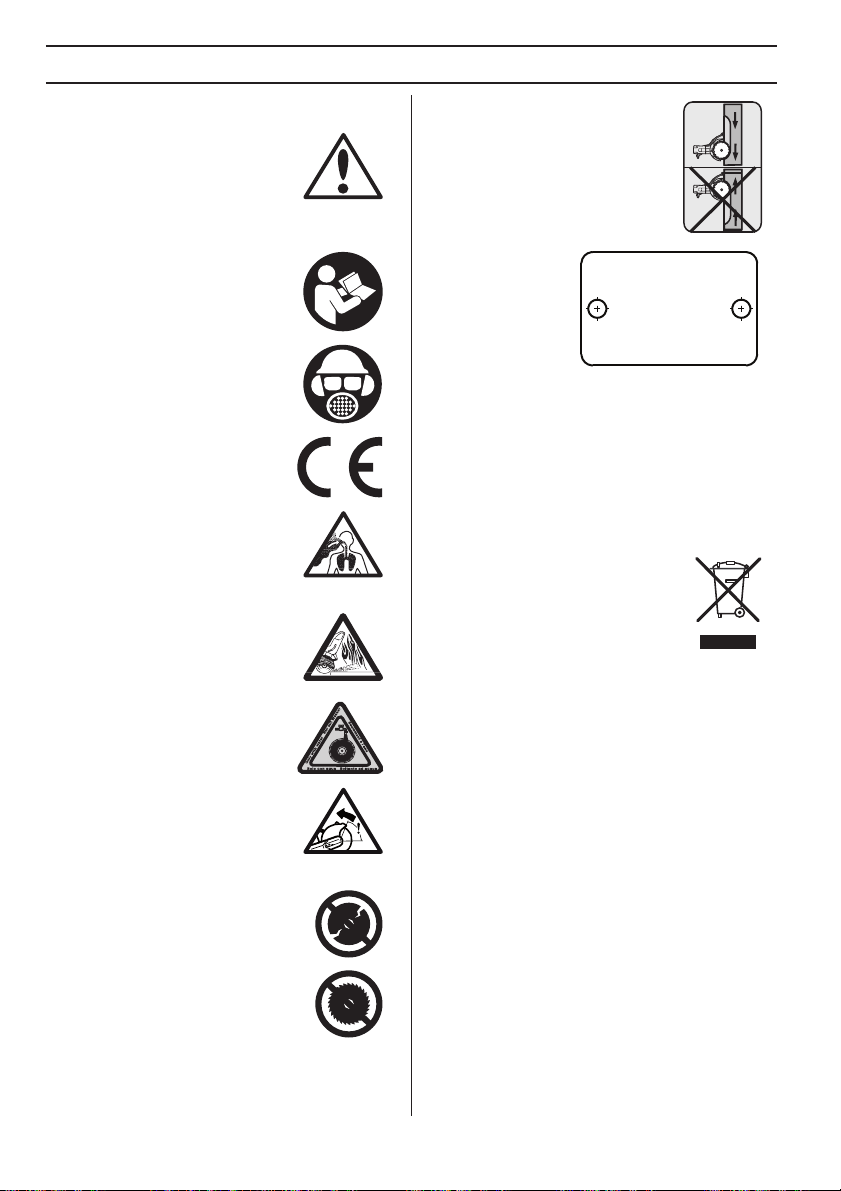
KEY T O SYMBOLS
Rating plate
Row 1: Brand, Model
(X,Y)
Row 2: Serial No.
with manufacturing
date (Y, W, X): Year,
Week, Sequence No.
Row 3: Product No.
(X)
Row 4: Manufacturer
Row 5: A: Max speed of output shaft, B: Cutting blade
diameter, C: Blade bolt diameter
Row 6: D: Input voltage, E: Input current, F: Input
frequency
Row 7: Country of origin
vironmental marking. Symbols on
the product or its packaging indicate that
this product cannot be handled as
domestic waste. It must instead be
submitted to an appropriate recycling
station for the recovery of electrical and
electronic equipment.
By ensuring that this product is taken care of correctly,
you can help to counteract the potential negative impact
on the environment and people that can otherwise result
through the incorrect waste management of this product.
For more detailed information about recycling this
product, contact your municipality, your domestic waste
service or the shop from where you purchased the
product.
Other symbols/decals on the mac hine refer to special
certification requirements for certain markets.
XXXXXXXXX YYYY
s / n YYYY WWXXXXX
XXX XX XX-XX
Husqvarna AB
AAAAAA BBBBB CC
DDDD EEEE FFFF
XXXXXXXXXXXXXXX
WARNING! Kickbacks can be sudden,
rapid and violent and can cause life
threatening injuries. Read and
understand the instructions in the
manual before using the machine.
WARNING! Ensure the blades are not
cracked or damaged in any other way.
WARNING! Do not use circular saw
blades
Always cut in the correct direction. See
safety instructions!
– English

W
W
CA
NO
KEY T O SYMBOLS
Explanation of warning le vels
The w arnings are graded in three levels.
ARNING!
ARNING! Indicates a hazardous
situation which, if not avoided, will result
!
in death or serious injury.
CAUTION!
UTION! Indicates a hazardous
situation which, if not avoided, could
!
result in minor or moderate injury.
NOTICE!
TICE! Is used to address practices not related to
personal injury.
English
–
3

4
MA
CONTENTS
Contents
KEY TO SYMBOLS
Symbols on the machine: ……………………………….. 2
Explanation of warning levels …………………………. 3
CONTENTS
Contents ……………………………………………………… 4
PRESENT ATION
Dear Customer , …………………………………………….. 5
WHA T IS WHAT?
What is what on the po wer cutter? ………………….. 6
CHINE´S SAFETY EQUIPMENT
Gener al ……………………………………………………….. 7
CUTTING BLADES
Gener al ……………………………………………………….. 9
Diamond blades for different materials …………….. 9
Water cooling ……………………………………………….. 9
Sharpening diamond blades …………………………… 9
Transport and storage ……………………………………. 9
ASSEMBL Y
Assemb ly …………………………………………………….. 10
OPERA TING
Protectiv e equipment …………………………………….. 11
General safety warnings ………………………………… 11
Basic working techniques ………………………………. 14
ARTING AND STOPPING
Bef ore starting ……………………………………………… 17
Starting ……………………………………………………….. 17
Stopping ………………………………………………………. 17
MAINTENANCE
Gener al ……………………………………………………….. 18
Maintenance schedule …………………………………… 18
Cleaning ………………………………………………………. 19
Functional inspection …………………………………….. 19
Replacing the carbon brushes ………………………… 20
Water tap …………………………………………………….. 21
Disposal, scrapping ………………………………………. 21
TECHNICAL D ATA
echnical data ………………………………………………. 22
Cutting equipment …………………………………………. 22
Recommended cable dimensions ……………………. 22
EC Declaration of Conformity …………………………. 23
ST
T
– English

PRESENT A TION
Dear Customer ,
Thank y ou for choosing a Husqvarna product!
It is our wish that you will be satisfied with your product
and that it will be your companion for a long time. A
purchase of one of our products gives you access to
professional help with repairs and services. If the retailer
who sells your machine is not one of our authorized
dealers, ask him for the address of your nearest service
workshop.
This operator’s manual is a valuable document. Make
sure it is always at hand at the work place. By following its
content (operating, service, maintenance etc.) the life
span and the second-hand value of the machine can be
extended. If you will sell this machine, make sure that the
buyer will get the operator´s manual.
More than 300 y ears of innovation
Husqv arna AB is a Swedish company based on a tradition
that dates back to 1689, when the Swedish King Karl XI
ordered the construction of a factory for production of
muskets. At that time, the foundation was already laid for
the engineering skills behind the development of some of
the world’s leading products in areas such as hunting
weapons, bicycles, motorcycles, domestic appliances,
sewing machines and outdoor products.
Husqvarna is the global leader in outdoor power products
for forestry, park maintenance and lawn and garden care,
as well as cutting equipment and diamond tools for the
construction and stone industries.
User responsibility
It is the o wner’s/employer’s responsibility that the operator
has sufficient knowledge about how to use the machine
safely. Supervisors and operators must have read and
understood the Operator’s Manual. They must be aware
of:
• The machine’s safety instructions.
• The machine’s range of applications and limitations.
• How the machine is to be used and maintained.
National legislation could regulate the use of this
machine. Find out what legislation is applicable in the
place where you work before you start using the machine.
The man ufacturer’s reservation
All inf ormation and all data in the Operator’s Manual were
applicable at the time the Operator’s Manual was sent to
print.
Husqvarna AB has a policy of continuous product
development and therefore reserves the right to modify
the design and appearance of products without prior
notice.
English
–
5
WHA T IS WHA T?
6
1
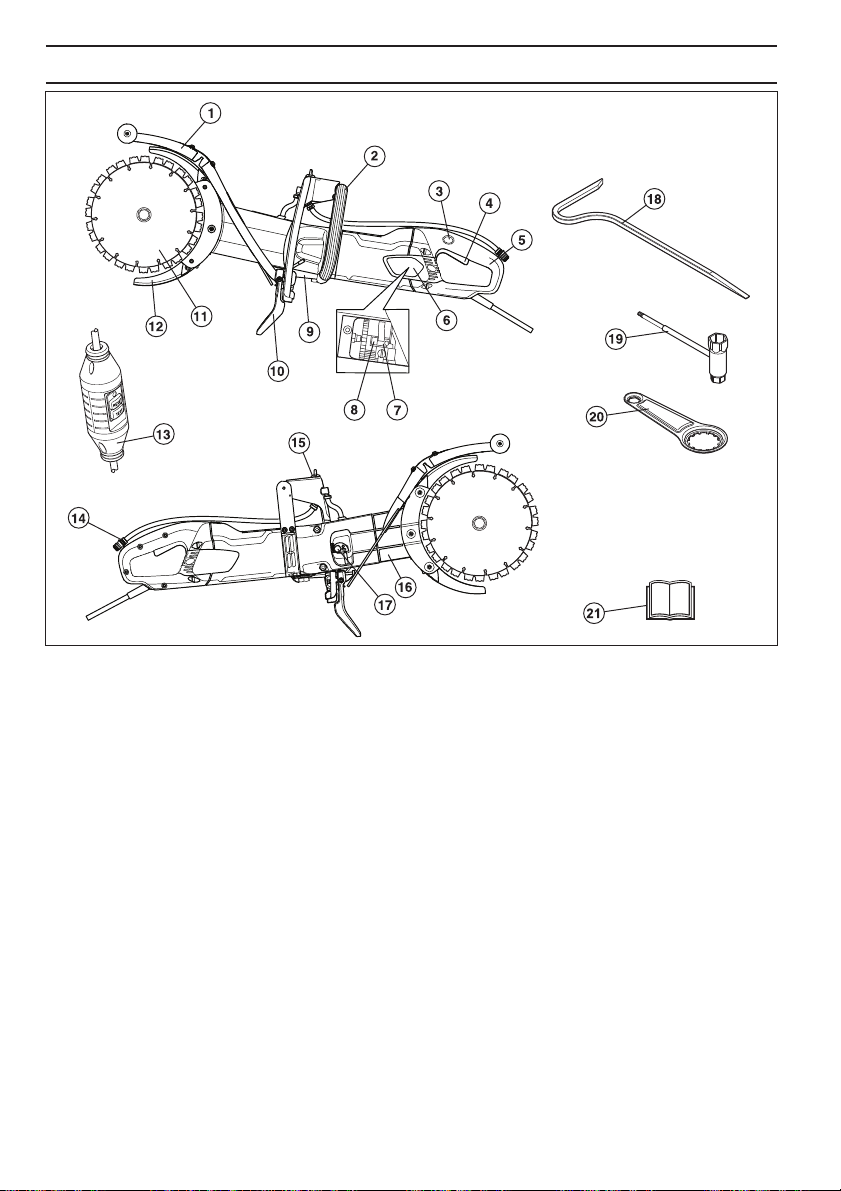
What is what on the po wer cutter?
Splash guard
2 Front handle
3 Power switch lock
4 Power switch
5 Rear handle
6 Inspection cover
7 Carbon brushes
8 Brush retainer
9 Rating plate
10 Spray guard
11 Blades
– English
12 Blade guards
13 Residual-current device (not for UK and Ireland 110V)
14 Water connector
15 Water tap
16 Cutting arm
17 Belt tensioner
18 Breaking tool
19 Combination spanner
20 Bearing tool
21 Operator ′ s manual
CHINE´S SAFETY EQ UIPMENT
General
This section descr ibes the machine ′ s safety equipment,
its purpose, and how checks and maintenance should be
carried out to ensure that it operates correctly. See the
”What is what?” section to locate where this equipment is
positioned on your machine.
ARNING! Never use a machine that has
faulty safety equipment! Carry out the
!
inspection, maintenance and service
routines listed in this section.
All servicing and repair work on the
machine requires special training. This is
especially true of the machine
equipment. If your machine fails any of
the checks described below you must
contact your service agent. When you
buy any of our products we guarantee
the availability of professional repairs
and service. If the retailer who sells your
machine is not a servicing dealer, ask
him for the address of your nearest
service agent.
s safety
MA
P
•
P
•
W
′
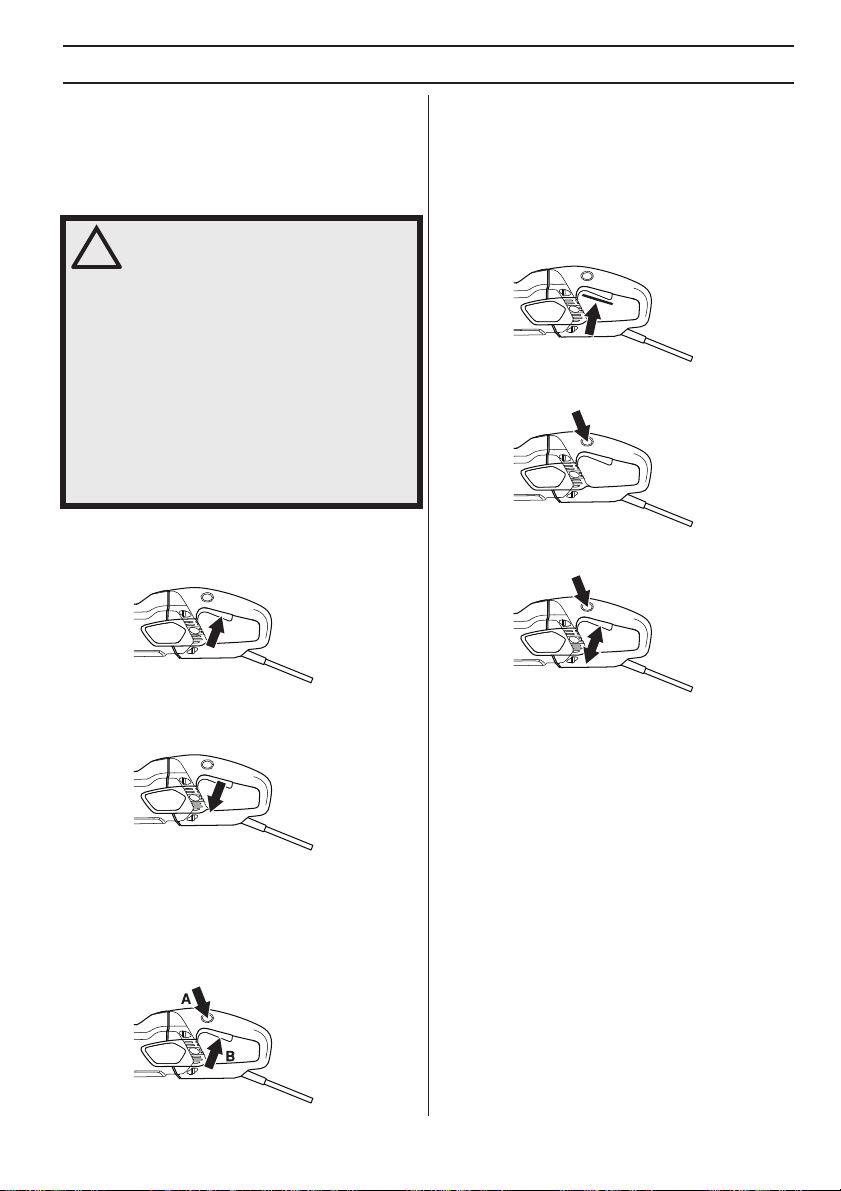
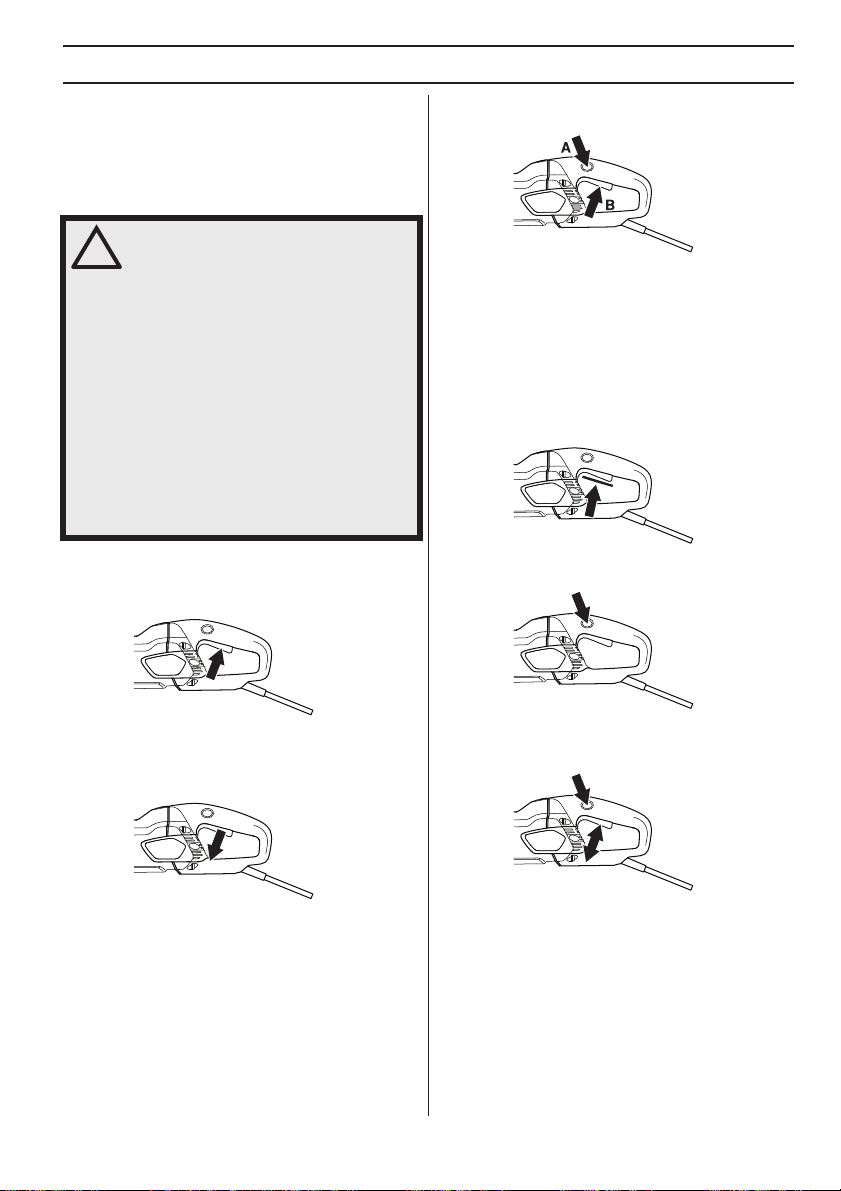
The power switch lock remains depressed as long as the
power switch is depressed. When the grip on the handle
is released both the power switch and power switch lock
are reset. This movement is controlled by two
independent return springs. This position results in the
machine stopping and the power switch being locked.
Chec king the power switch lock
Make sure the power switch is locked when the power
switch lock is in its original position.
• Press in the power switch lock and make sure it
returns to its original position when you release it.
ower switch
The po wer switch should be used to start and stop the
machine.
Chec king the power switch
Start the machine, release the power switch and
check that the engine and the cutting blade stop.
• A defective power switch should be replaced by an
authorized service workshop.
ower switch lock
The po wer switch lock is designed to prevent accidental
operation of the switch. When the lock (A) is pressed in
the power switch (B) is released.
• Check that the power switch and power switch lock
move freely and that the return springs work properly.
• Switch on the machine, release the switch, and check
that the engine and blades stop.
Gradual star t and overload protection
The machine is equipped with electronically controlled
gradual start and overload protection.
The engine starts to pulsate if the machine is loaded
above a specific level. If the load is reduced the engine
reverts to its normal state and cutting can resume.
The electronics will cut the current after a set time if the
machine continues to be run with a pulsating engine. The
higher load the faster the shutoff.
The electronics cut the current immediately if the blade
jams.
English
–
7
CHINE´S SAFETY EQ UIPMENT
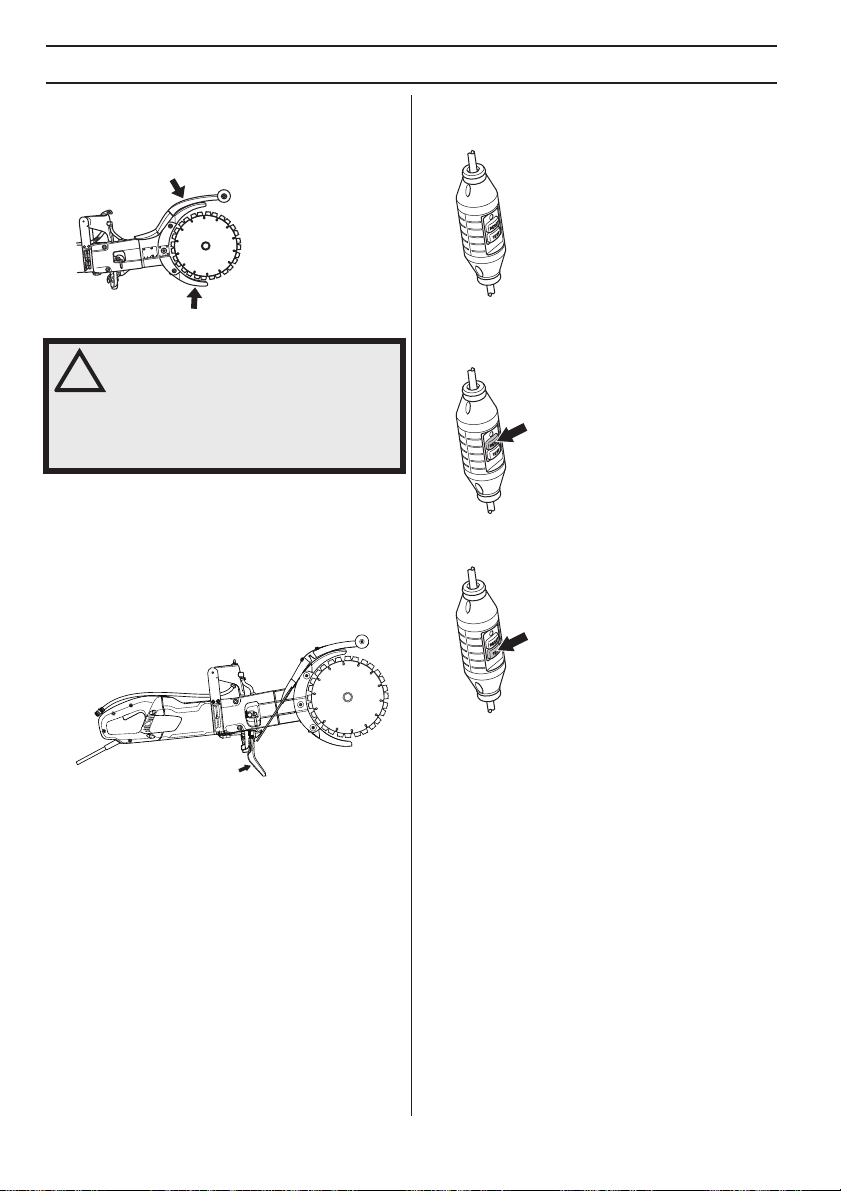
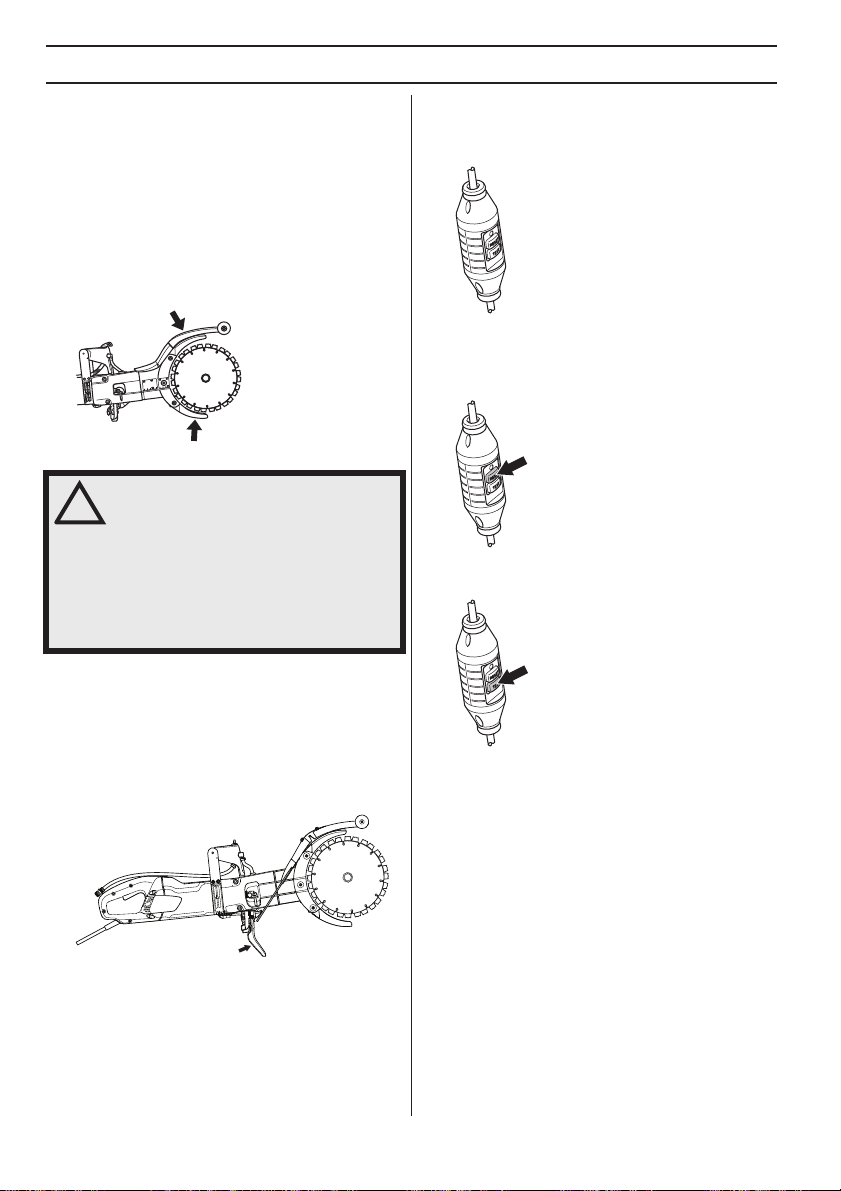
Blade guar ds
This guard is fi tted above and below the cutting blade and
is designed to prevent parts of the blade or cutting
fragments from being thrown towards the user.
MA
The LED indicates that the ground fault circuit interrupter
is on and that the machine can be switched on. If the LED
is not on, push the RESET button (green).
8
•
Chec king the blade guards
WARNING! Always check that all guards
are correctly fitted before starting the
!
machine. Check that the cutting blade is
fitted correctly and does not show signs
of damage. A damaged cutting blade can
cause personal injury. See instructions
under the heading Assembly.
Check that the guard is complete and without any
cracks or deformations.
• Never use a defective guard or a guard that has not
been fitted correctly.
Spra y guard
The spr ay guard provides protection against ejected
debris, thrown water and concrete slurry.
Chec king the spray guard
Ensure there are no cracks or holes from slurry blasting in
the spray guard. Replace guard if damaged.
Residual-current device
(not for UK and Ireland 110V)
Ground fault circuit interrupters are for protection in case
an electrical fault should occur.
Check the residual-current device
• Connect the machine to the socket. Push the RESET
button (green) and the red LED lights up.
• Start the machine.
• Push the TEST button (blue).
• The ground fault circuit interrupter should trip and the
machine switch off instantly. If not, contact your
dealer.
• Reset with the RESET button (green).
– English
CUTTING BLADES
General
WARNING! A cutting blade may burst and
cause injury to the operator.
!
A cutting blade should be checked before
it is assembled on the saw and frequently
during use. Look for cracks, lost
segments (diamond blades) or pieces
broken off. Do not use a damaged cutting
blade.
Test the integrity of each new cutting
blade by running it at full throttle for about
1 minute.
Only use original cutting blades designed
by Husqvarna for use on this machine.
Husqvarna issues warnings and
recommendations for the use and proper
care of the cutting blades. Those warnings
come with the cutting blades. Read and
follow all instructions from Husqvarna.
• This machine is only to be used with Husqvarna´s
specially developed diamond blades intended for Cutn-Break. The blades have an integrated belt pulley
and are approved for freehand cutting.
• Diamond blades consist of a steel core provided with
segments that contain industrial diamonds.
• Always use a sharp diamond blade.
• Ensure the blades are not cracked or damaged in any
other way. Replace blades if necessary.
Diamond blades for different
materials
WARNING! Never use a cutting blade for
any other materials than what it was
!
intended to cut.
Never use a diamond blade to cut plastic
material. The heat produced during cutting
may melt the plastic and it can stick to the
cutting blade and cause a kickback.
Cutting metal generates sparks that may
cause fire. Do not use the machine near
ignitable substances or gases.
• Diamond blades are ideal for masonry and reinforced
concrete. Ask your dealer for help in choosing the
right product.
• Diamond blades are available in several hardness
classes. A «soft» diamond blade has a relatively short
service life and large cutting capacity. It is used for
hard materials such as granite and hard concrete. A
«hard» diamond blade has a longer service life and
reduced cutting capacity, and should be used for soft
materials such as brick and asphalt.
Water cooling
WARNING! Cool diamond blades
designed for wet cutting continuously
with water to prevent heating, which can
deform the diamond blade resulting in
damage to the machine and personal
injury.
• Water cooling must always be used.
• Using wet cutting blades without water can cause
excessive heat build-up, resulting in poor
performance, severe blade damage and is a safety
hazard.
• Water cools the blade and increases its service life
while also reducing the formation of dust.
Sharpening diamond blades
Diamond blades can become dull when the wrong feeding
pressure is used or when cutting certain materials such
as heavily reinforced concrete. Working with a dull
diamond blade causes overheating, which can result in
the diamond segments coming loose.
Sharpen the blades by cutting a soft material such as
sandstone or brick.
Transport and storage
• Make sure the machine is secured and that the cutting
blades are properly protected during the transport and
storage of the machine.
• Before use inspect all blades for transport or storage
damage.
English – 9
ASSEMBLY
Assembly
WARNING! Always pull out the plug from
the outlet socket before cleaning,
!
maintenance or assembly.
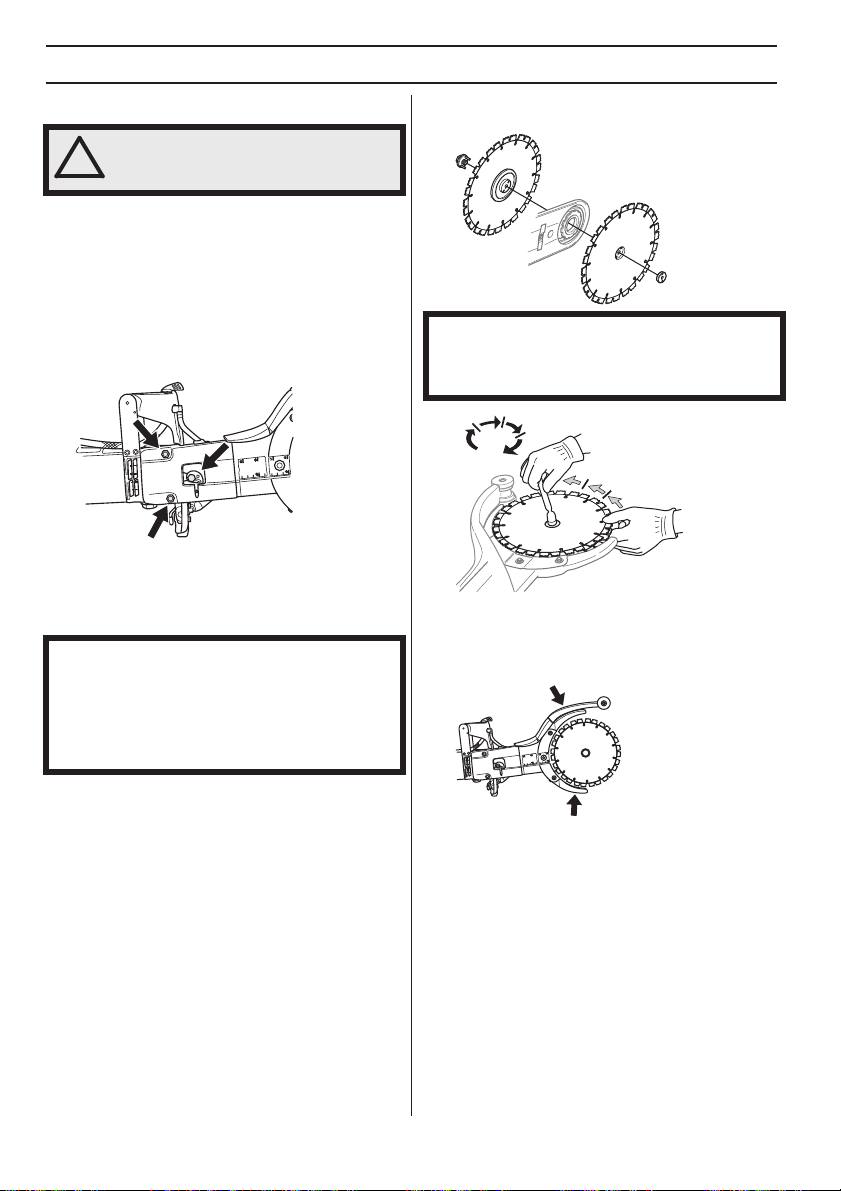
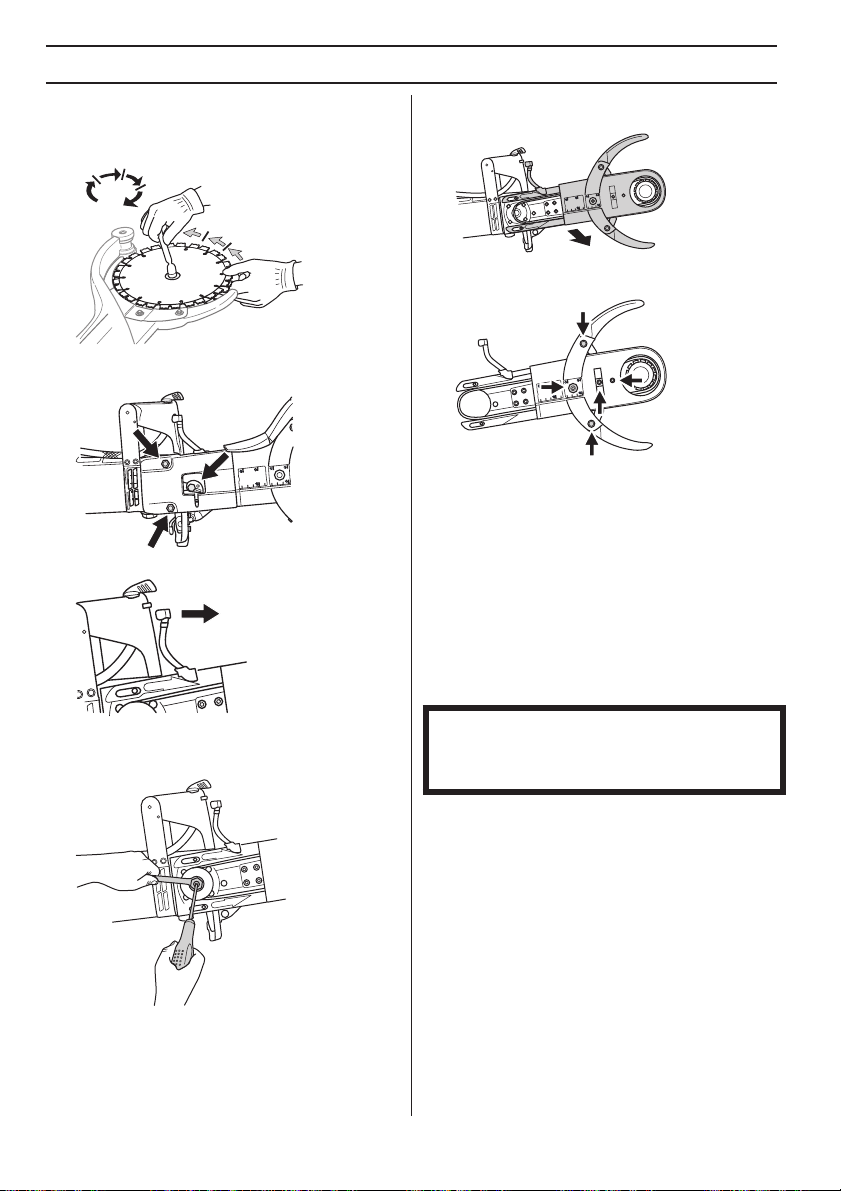
Assembling the blades
• Husqvarna blades are especially manufactured and
approved for freehand cutting with the K 3000 Cut-nBreak. The blades have integrated belt pulley halves
and are to be changed in pairs.
• Loosen the nuts and clamping bolt which release the
bar. This will position the drive belt in a more
favourable position with regard to assembling the new
blades.
The drive belt is not clamped so easily.
• Dismantle the old blades by loosening the centre nut.
Check the drive belt for wear when the blades are
dismantled. When changing the drive belt see the
instructions under the heading ”Replacing the drive
belt”.
NOTICE! It is very important that the blades rotate when
the nut is tightened. This is to ensure that the belt is not
clamped between the integrated drive belt halves on the
blades when the blades/drive belt are pulled together
with the nut. Ideally this is done alternately, i.e. tighten a
little, rotate a little and repeat until the blades are
secured.
torque for the bolt holding the blade is: 15 Nm (130
in.lb).
NOTICE! Do not forget to tighten the belt and check the
belt adjustment before cutting. See the instructions
under the heading ”Inspecting and adjusting the drive
belt”.
Protection for the blades
• The guards should always be fitted on the machine.
Check that the guards are properly secured and work
before starting to cut.
• Position the blades on each side of the cutting arm.
Make sure that the holes for both guide pins in the
drive belt halves are aligned so that they correspond
with the holes in the washer, and the nut too. Now fit
the bolt and washer unit with guide pins. Tightening
10 – English
OPERATING
Protective equipment
General
Do not use the machine unless you are able to call for
help in the event of an accident.
Personal protective equipment
You must use approved personal protective equipment
whenever you use the machine. Personal protective
equipment cannot eliminate the risk of injury but it will
reduce the degree of injury if an accident does happen.
Ask your dealer for help in choosing the right equipment.
WARNING! The use of products such as
cutters, grinders, drills, saws that sand
!
or form material can generate dust and
vapours which may contain hazardous
chemicals. Check the nature of the
material you intend to process and use
an appropriate breathing mask.
Long-term exposure to noise can result
in permanent hearing impairment.
Always use approved hearing protection.
Listen out for warning signals or shouts
when you are wearing hearing
protection. Always remove your hearing
protection as soon as the motor stops.
Always wear:
• Approved protecting helmet.
• Hearing protection.
• Approved eye protection. If you use a face shield then
you must also wear approved protective goggles.
Approved protective goggles must comply with
standard ANSI Z87.1 in the USA or EN 166 in EU
countries. Visors must comply with standard EN 1731.
• Approved respiratory protection.
• Protective gloves.
• Heavy-duty, firm grip gloves.
• Tight-fitting, heavy-duty and comfortable clothing that
permits full freedom of movement. Cutting generates
sparks that can ignite clothing. Husqvarna
recommends that you wear flame-retardant cotton or
heavy denim. Do not wear clothing made of material
such as nylon, polyester or rayon. If ignited such
material can melt and cling to the skin. Do not wear
shorts
• Boots with steel toe-caps and non-slip sole.
Other protective equipment
CAUTION! Sparks may appear and start a
fire when you work with the machine.
Always keep fire fighting equipment
handy.
• Fire Extinguisher
• First aid kit
General safety warnings
This section describes basic safety directions for using
the machine. This information is never a substitute for
professional skills and experience. If you get into a
situation where you feel unsafe, stop and seek expert
advice. Contact your dealer, service agent or an
experienced user. Do not attempt any task that you feel
unsure of!
• Please read the operator’s manual carefully and make
sure you understand the instructions before using the
machine. It is recommended that first time operators
also obtain practical instruction before using the
machine.
• Keep in mind that it is you, the operator that is
responsible for not exposing people or their property
to accidents or hazards.
• The machine must be kept clean. Signs and stickers
must be fully legible.
WARNING! Read all safety warnings and
all instructions. Failure to follow the
warnings and instructions may result in
electric shock, fire and/or serious injury.
Save all warnings and instructions for future reference.
The term ”power tool” in the warnings refers to your
mains-operated (corded) power tool or battery-operated
(cordless) power tool.
Work area safety
• Keep work area clean and well lit. Cluttered or dark
areas invite accidents.
• Do not operate power tools in explosive
atmospheres, such as in the presence of
flammable liquids, gases or dust.
create sparks which may ignite the dust or fumes.
• Keep children and bystanders away while
operating a power tool.
to lose control.
• Do not use the machine in bad weather, such as
dense fog, rain, strong wind, intense cold, etc.
Working in bad weather is tiring and can lead to
dangerous conditions, e.g. slippery surfaces.
• Never start to work with the machine before the
working area is clear and you have a firm foothold.
Look out for any obstacles with unexpected
Distractions can cause you
Power tools
English – 11
OPERATING
movement. Ensure when cutting that no material can
become loose and fall, causing injury to the
operator.Take great care when working on sloping
ground.
WARNING! The safety distance for the
power cutter is 15 metres (50 foot). You
!
are responsible to ensure that animals
and onlookers are not within the working
area. Do not start cutting until the
working area is clear and you are
standing firmly.
Electrical safety
• Power tool plugs must match the outlet. Never
modify the plug in any way. Do not use any
adapter plugs with earthed (grounded) power
tools.
Unmodified plugs and matching outlets will
reduce the risk of electric shock.
• Avoid body contact with earthed or grounded
surfaces, such as pipes, radiators, ranges and
refrigerators.
shock if your body is earthed or grounded.
• Do not expose power tools to rain or wet
conditions.
the risk of electric shock.
• Do not abuse the cord. Never use the cord for
carrying, pulling or unplugging the power tool.
Keep cord away from heat, oil, sharp edges or
moving parts.
the risk of electric shock.
• When operating a power tool outdoors, use an
extension cord suitable for outdoor use.
cord suitable for outdoor use reduces the risk of
electric shock.
• If operating a power tool in a damp location is
unavoidable, use a residual current device (RCD)
protected device. Use of an RCD reduces the risk of
electric shock.
• Check that the cord and extension cord are intact and
in good condition. Never use the machine if the cord
is damaged, hand it in to an authorized service
workshop for repair. An undersized cable means a risk
of reduced machine capacity and overheating.
• The machine should be connected to an earthed
outlet socket. Check that the mains voltage
corresponds with that stated on the rating plate on the
machine.
• Ensure the cord is behind you when you start to use
the machine so that the cord will not be damaged.
!
There is an increased risk of electric
Water entering a power tool will increase
Damaged or entangled cords increase
Use of a
WARNING! Do not pressure wash the
machine, as water can enter the
electrical system or the engine and
cause damage to the machine or short
circuit.
WARNING! The machine (United
Kingdom 110V) is not equipped with a
ground fault circuit interrupter. The
machine must always be used with an
isolating transformer for protection in
case an electrical fault should occur.
Personal safety
• Stay alert, watch what you are doing and use
common sense when operating a power tool. Do
not use a power tool while you are tired or under
the influence of drugs, alcohol or medication.
moment of inattention while operating power tools
may result in serious personal injury.
• Use personal protective equipment. Always wear
eye protection.
mask, non-skid safety shoes, hard hat, or hearing
protection used for appropriate conditions will reduce
personal injuries.
• Prevent unintentional starting. Ensure the switch
is in the OFF-position before connecting to power
source and/or battery pack, picking up or carrying
the tool.
switch or energising power tools that have the switch
on invites accidents.
• Remove any adjusting key or wrench before
turning the power tool on.
attached to a rotating part of the power tool may result
in personal injury.
• Do not overreach. Keep proper footing and
balance at all times.
the power tool in unexpected situations.
• Dress properly. Do not wear loose clothing or
jewellery. Keep your hair, clothing and gloves
away from moving parts.
long hair can be caught in moving parts.
• If devices are provided for the connection of dust
extraction and collection facilities, ensure these
are connected and properly used.
collection can reduce dust-related hazards.
• Remain at a distance from the blades when the
engine is running.
Protective equipment such as dust
Carrying power tools with your finger on the
A wrench or a key left
This enables better control of
Loose clothes, jewellery or
Use of dust
WARNING! Overexposure to vibration
can lead to circulatory damage or nerve
damage in people who have impaired
circulation. Contact your doctor if you
experience symptoms of overexposure
to vibration. These symptoms include
numbness, loss of feeling, tingling,
pricking, pain, loss of strength, changes
in skin colour or condition. These
symptoms normally appear in the
fingers, hands or wrists.
A
12 – English
OPERATING
Power tool use and care
• Please read the operator’s manual carefully and make
sure you understand the instructions before using the
machine.
• The machine is only designed for cutting hard
materials, such as concrete, brick, masonry as well as
cast iron and cement pipes.
WARNING! A power cutter is a
dangerous tool if used carelessly or
!
incorrectly and can cause serious, even
fatal injuries. It is extremely important
that you read and understand the
contents of this Operator’s Manual.
• Do not force the power tool. Use the correct power
tool for your application.
do the job better and safer at the rate for which it was
designed.
• Do not use the power tool if the switch does not
turn it on and off.
controlled with the switch is dangerous and must be
repaired.
• Disconnect the plug from the power source and/or
the battery pack from the power tool before
making any adjustments, changing accessories,
or storing power tools.
measures reduce the risk of starting the power tool
accidentally.
• Store idle power tools out of the reach of children
and do not allow persons unfamiliar with the
power tool or these instructions to operate the
power tool.
of untrained users.
• Maintain power tools. Check for misalignment or
binding of moving parts, breakage of parts and
any other condition that may affect the power
tool´s operation. If damaged, have the power tool
repaired before use.
poorly maintained power tools.
• Keep cutting tools sharp and clean. Properly
maintained cutting tools with sharp cutting edges are
less likely to bind and are easier to control.
• Use the power tool, accessories and tool bits etc.
in accordance with these instructions, taking into
account the working conditions and the work to
be performed.
Power tools are dangerous in the hands
Use of the power tool for operations
The correct power tool will
Any power tool that cannot be
Such preventive safety
Many accidents are caused by
different from those intended could result in a
hazardous situation.
WARNING! Under no circumstances may
the design of the machine be modified
without the permission of the
manufacturer. Always use original
accessories. Non-authorized
modifications and/or accessories can
result in serious personal injury or the
death of the operator or others.
• Make sure that no pipes or electrical cables are routed
in the working area or in the material to be cut.
• Always check and mark out where gas pipes are
routed. Cutting close to gas pipes always entails
danger. Make sure that sparks are not caused when
cutting in view of the risk of explosion. Remain
concentrated and focused on the task. Carelessness
can result in serious personal injury or death.
• Inspect new blades for transport or storage damage.
• The guard for the cutting equipment must always be
on when the machine is running.
Service
• Have your power tool serviced by a qualified
repair person using only identical replacement
parts.
This will ensure that the safety of the power tool
is maintained.
Always use common sense
It is not possible to cover every conceivable situation you
can face. Always exercise care and use your common
sense. If you get into a situation where you feel unsafe,
stop and seek expert advice. Contact your dealer, service
agent or an experienced user. Do not attempt any task
that you feel unsure of!
WARNING! The machine can be a
dangerous tool if used incorrectly or
carelessly, which can cause serious or
fatal injury to the operator or others.
Never allow children or other persons
not trained in the use of the machine to
use or service it.
Never allow anyone else to use the
machine without first ensuring that they
have read and understood the contents
of the operator’s manual.
Never use a machine that is faulty. Carry
out the safety checks, maintenance and
service instructions described in this
manual. Some maintenance and service
measures must be carried out by trained
and qualified specialists. See
instructions under the Maintenance
heading.
English – 13
OPERATING
Basic working techniques
WARNING! This section describes basic
safety directions for using a power
!
cutter. This information is never a
substitute for professional skills and
experience. If you get into a situation
where you feel unsafe, stop and seek
expert advice. Contact your dealer,
service agent or an experienced power
cutter user. Do not attempt any task that
you feel unsure of!
Do not pull the power cutter to one side,
this can cause the blade to jam or break
resulting in injury to people.
Under all circumstances avoid grinding
using the side of the blade; it will almost
certainly be damaged, break and can
cause immense damage. Only use the
cutting section.
Cutting plastics with a diamond blade
can cause kickback when the material
melts due to the heat produced when
cutting and sticks to the blade. Never cut
plastic materials with a diamond blade!
Cutting metal generates sparks that may
cause fire. Do not use the machine near
ignitable substances or gases.
Water cooling
Water cooling must always be used. Dry cutting causes
immediate overheating and machine and cutting blade
failure with a risk of personal injury.
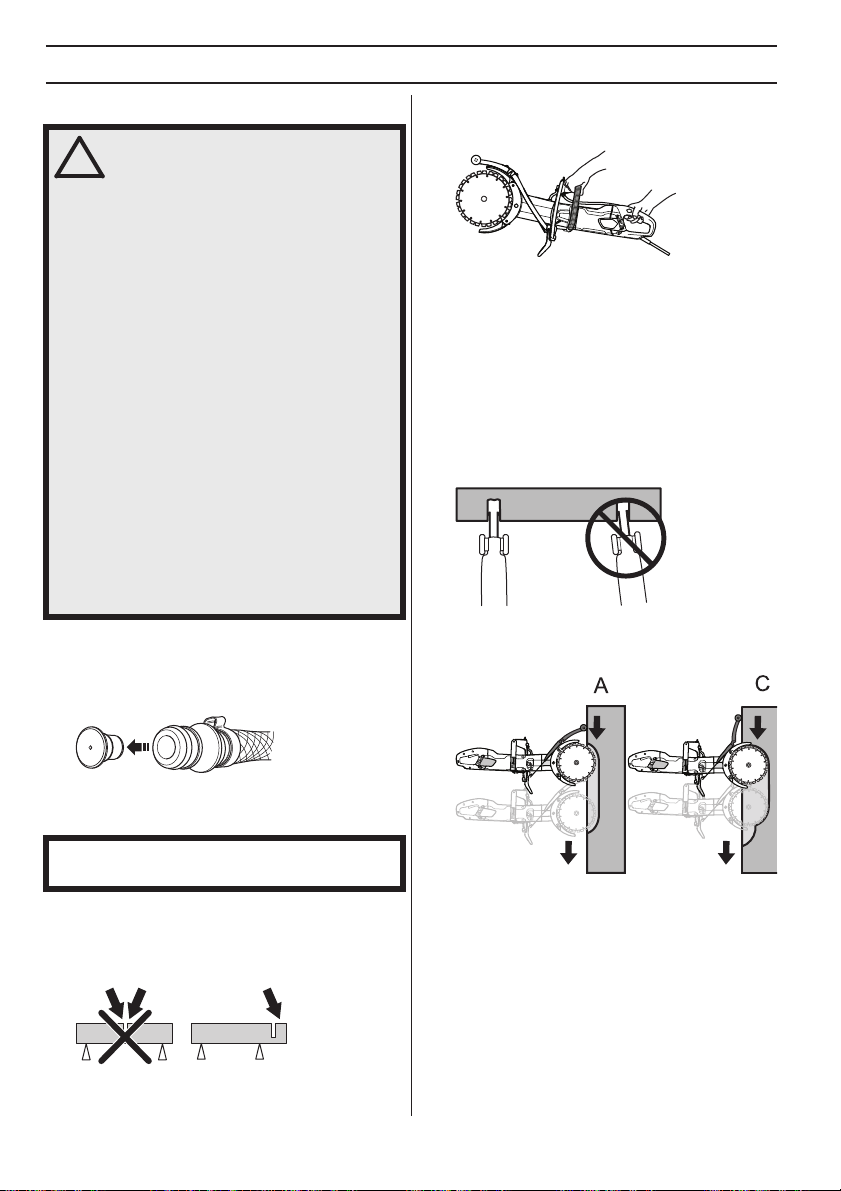
• Always hold the machine in a firm grip with both
hands. Hold it so that the thumbs and fingers grip
round the handles.
• Check that the blade is not in contact with anything
when the machine is started
• Start cutting with the machine running at maximum
speed.
• Start cutting smoothly, allowing the machine to work
without forcing or pressing in the blade. Always cut at
maximum speed.
• Cut in the same direction when cutting into an existing
cut. Avoid cutting at an angle to the previous cut,
otherwise there is a risk of the blade jamming or that
the machine can ”climb in the cut” and cause a
kickback.
• Always cut from top to bottom (A).
• Remove the cutter and use a crowbar to remove the
material that remains between the cut (B).
At a low water pressure, for example when the water tank
is used, the restrictor can be dismantled to give the
correct water flow.
NOTICE! It is important not to use a too high water flow
without throttling as the belt can then slip.
Cutting technique
• Support the work piece in such a way that it is possible
to predict what will happen, and so that the cut
remains open while cutting.
14 – English
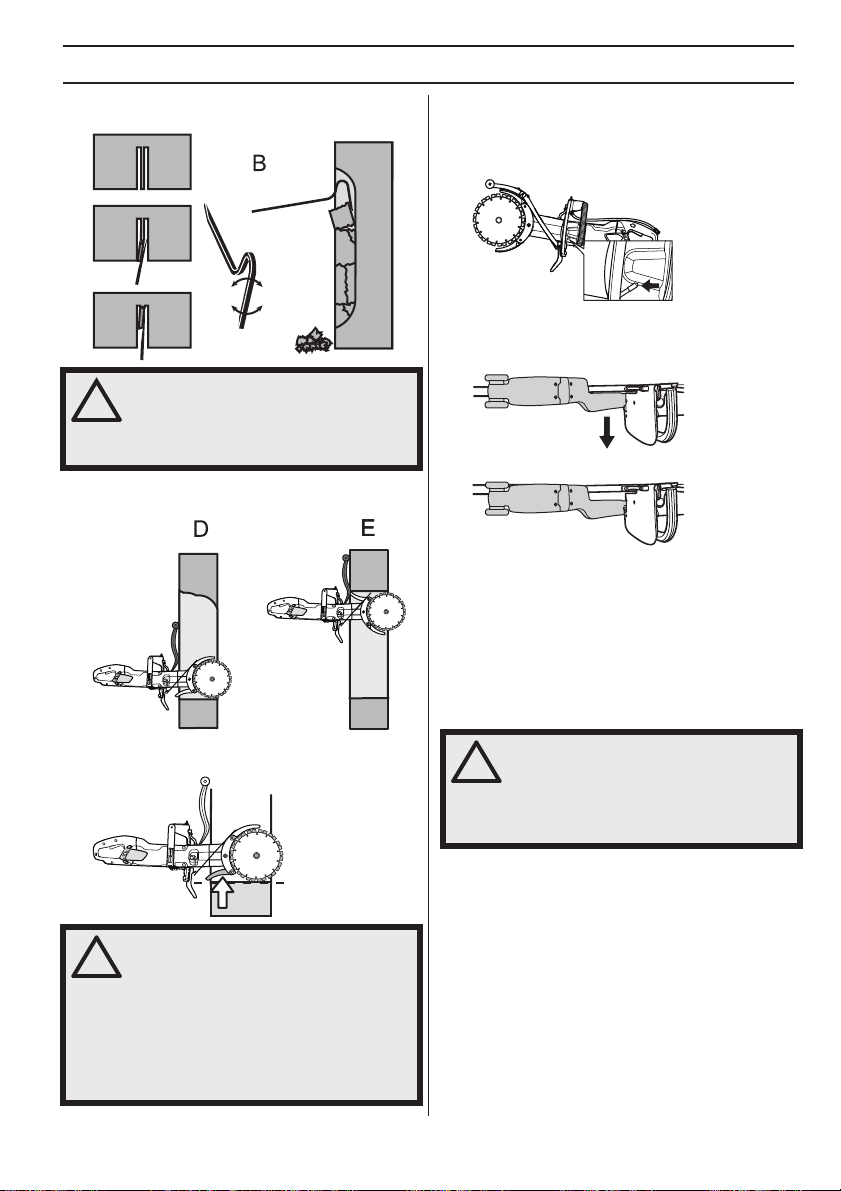
OPERATING
• Follow the same saw cut, but further in the work piece
(C), and repeat the work with the crowbar.
WARNING! When cutting vertically,
always cut from the top of the cut and
!
down. Never cut from the bottom of the
cut and up. This can cause a kickback
and result in personal injury.
• Repeat this working method until the required cutting
depth is achieved (D, E).
• The blade guards are designed to easily adapt to how
deep in the work piece the power cutter is moved.
Smooth cutting
To enable smooth cutting, the splash guard must be
adjusted.
• Release the latch.
• Slide the splash guard sideways.
• Lock the latch.
Kickback
Kickback is a sudden, rearward motion of the saw that can
occur if the blades are stalled (pinched, jammed, twisted)
in the so called kickback zone. Most kickbacks are small
and felt as small ”jerks” in the front handle. However,
kickback can be very powerful. If you are not paying
attention or have a poor grip the saw can be thrown all the
way back at you.
WARNING! Kickback can be very sudden
and viloent, throwing the saw back at
you. It can cause serious or even fatal
injuries. It is vital you understand what
causes kickback and how to aviod it
using proper cutting techique.
WARNING! Under all circumstances
avoid grinding using the side of the
!
blade; it will almost certainly be
damaged or break and can cause
immense damage. Only use the cutting
section.
Do not pull the power cutter to one side,
this can cause the blade to jam or break
resulting in injury to people.
English – 15
OPERATING
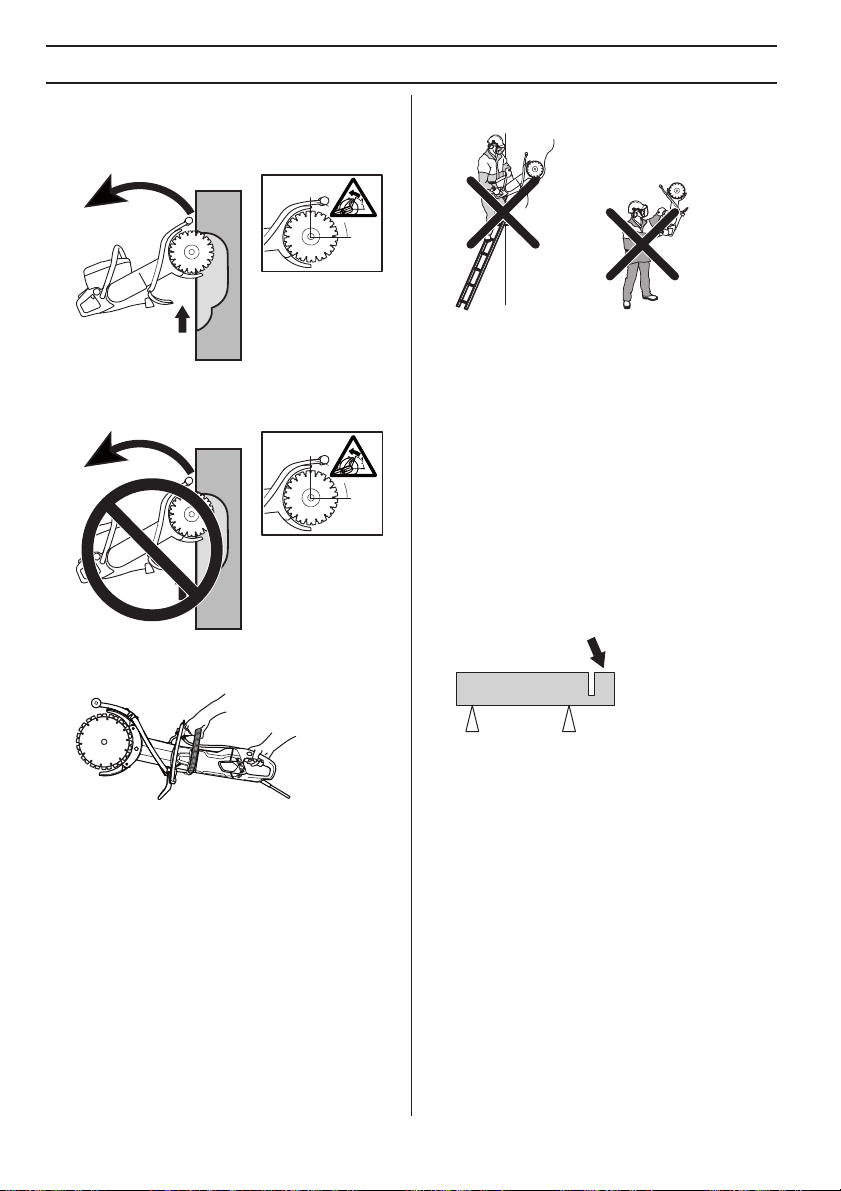
Cause of kickback
Kickback is caused if you are cutting with the kickback
zone of the blade for example when cutting ”upwards” or
towards you.
General rules
• Never cut upwards or towards you so that the kickback
zone becomes actively cutting.
• Always hold the machine in a firm grip with both
hands. Hold it so that the thumbs and fingers grip
round the handles.
• Never cut from a ladder. Use a platform or scaffold if
the cut is above shoulder height.
• Be alert to movement of the work piece or anything
else that can occur, which could cause the cut to close
and pinch the blade.
Pull in
Pull in occurs when the blades’ lower sections suddenly
stop or when the cut closes. (To avoid, see the
instructions under the heading ”General rules” and
”Pinching/rotation”, here below.).
Pinching/rotation
If the cut is pressed together this can lead to jamming.
The machine can be pulled down suddenly with a very
powerful jerk.
How to avoid pinching
Support the work piece in such a way that the cut remains
open during the cutting operation and when the cut is
finished.
• Keep a good balance and a firm foothold.
• When cutting vertically, always cut from the top of the
cut and down.
• Always cut at maximum speed.
• Do not cut with the upper quadrant (kickback zone) of
the blade. Avoid twisting or pushing the blades
sideways in the cut. This can cause kickback.
• Take care when inserting the blade in an existing cut.
Make certain that the cut is wide enough and that the
blades are not angled in the cut. This can cause
kickback.
• Stand at a comfortable distance from the work piece.
• Never cut above shoulder height.
16 – English
Check the engine speed
Use a revolution counter regularly to check the engine
speed at the working temperature, at full throttle and
without a load.
STARTING AND STOPPING
Before starting
WARNING! Note the following before
starting:
!
The machine should be connected to an
earthed outlet socket.
Check that the mains voltage
corresponds with that stated on the
rating plate on the machine.
Make sure you have a secure footing and
that the cutting blade cannot touch
anything.
Keep people and animals well away from
the working area.
WARNING! The machine (UK and Ireland
110V) is not equipped with a ground fault
!
circuit interrupter. The machine must
always be used with an isolating
transformer for protection in case an
electrical fault should occur.
Water connector
• Connect the water hose to the water supply (A). The
water flow is regulated using the water tap (B).
switched on. If the LED is not on, push the RESET
button (green).
• Check the ground fault circuit interrupter. See
instructions under the heading Checking, maintaining
and servicing the machine’s safety equipment.
Starting
• Grip the front handle with the left hand.
• Grip the rear handle with your right hand.
• Press in the power switch lock with your right-hand
thumb and press in the power switch.
Residual-current device
(not for UK and Ireland 110V)
WARNING! Never use the tool without the
ground fault circuit interrupter delivered
!
with the tool. Carelessness can result in
serious personal injury or even death.
• Make sure the ground fault circuit interrupter is
switched on. The LED indicates that the ground fault
circuit interrupter is on and that the machine can be
• Run the machine unloaded and in a safe manner for
at least 30 seconds.
Stopping
• Stop the motor by releasing the power switch.
WARNING! Make sure that the cutting
blade can rotate freely until it completely
stops. Carelessness can cause serious
personal injury.
English – 17

MAINTENANCE
General
WARNING! The user must only carry out the maintenance and service work described in this
Operator’s Manual. More extensive work must be carried out by an authorized service workshop.
!
Inspection and/or maintenance should be carried out with the motor switched off and the plug
disconnected.
Wear personal protective equipment. See instructions under the ”Personal protective equipment”
heading.
The life span or the runtime of the machine can be reduced and the risk of accidents can increase
if machine maintenance is not carried out correctly and if service and/or repairs are not carried
out professionally. If you need further information please contact your nearest service workshop.
Maintenance schedule
In the maintenance schedule you can see which parts of your machine that require maintenance, and with which
intervals it should take place. The intervals are calculated based on daily use of the machine, and may differ depending
on the rate of usage.
Daily maintenance Weekly maintenance/40 hours Monthly maintenance
Cleaning
Functional inspection
Clean the machine.
Cooling air intake
General inspection Carbon brushes Drive wheel
Water system Drive belt
Power switch*
Power switch lock*
Blade guard*
Cutting blade**
18 – English

MAINTENANCE
Cleaning
WARNING! Do not use a high pressure
washer when rinsing the inside of the
!
machine.
The machine can withstand taking in damp air and
splashes during the cutting process. Clean water does
not affect the machine’s function.
When cutting materials such as concrete or brick, which
can contain salt, you must rinse the machine after the
work is finished. The cleaning reduces the risk for
accretions building up inside the engine, which can cause
leakage current between electric components, which in
turn can cause the ground fault circuit interrupter to turn
off without intention.
• Clean the machine daily by rinsing it with clean water
after the work is finished.
• Place the machine with the rear handle facing
upwards. Rinse the air intakes at the rear handle with
clean water. The water will run out through the front air
outlets.
• Connect the plug and run the engine dry for approx.
30 sec in order to speed up the drying of the engine.
Cooling system
• The machine is equipped with an efficient fan to cool
the motor. Cooling air which is drawn in through the
grille by the machines rear handle passes over the
stator and rotor and out through the front of the motor
housing.
6 Check the condition of the cutting blade.
7 Check and clean the cooling air openings.
8
Check that the cord and extension cord are intact and
in good condition. Never use the machine if the cord is
damaged, hand it in to an authorized service workshop
for repair.
Drive belt
NOTICE! The drive belt is fully enclosed and well-protected
from dust, dirt and mechanical damage when cutting.
Tensioning the drive belt
• Check the tension of the drive belt. Stick a screwdriver
in the notch.
• A correctly adjusted drive belt should have about 5
mm of movement.
• Tighten the drive belt.
• Loosen the two nuts.
• Loosen the clamping bolt.
• In order for the machine to always be cooled
sufficiently the cooling air openings must be kept clear
and clean. Blow down the machine regularly with
compressed air.
Functional inspection
General inspection
WARNING! Never use damaged cables.
They can cause serious, even fatal,
!
personal injuries.
1 Check that nuts and screws are tightened.
2 Check that the power switch unit works smoothly.
3 Check the residual-current device
4 Clean the outside of the machine.
5 Checking the blade guard
• Turn the eccentric plate anti-clockwise with a
screwdriver or a torx driver. This tightens the drive belt
by pushing the bar forwards.
• Tighten the nuts.
•
Screw the bolt tight. Hold still the eccentric plate so that
it doesn’t move along when you tighten the screws.
NOTICE! A new drive belt shall be tightened once after
30-60 minutes operation.
English – 19
MAINTENANCE
Replacing the drive belt
• Release the belt tension.
• Remove the blades.
• Remove the belt cover by loosening the nuts, the
clamping bolt and the eccentric cam.
• Loosen water hose.
• Remove the cutting arm by pulling it straight out from
the machine.
• Loosen the five screws holding the guards on the
cutting arm.
• Remove the old drive belt and put in a new one.
• Refit the guards on the cutting arm.
• Fit the cutting arm on the machine while fastening the
drive wheel.
• Replace the water hose.
• Refit the belt cover, the nuts, the clamping bolt and the
eccentric cam.
• Refit the blades and tighten the nut. See instructions
under Heading ”Assembling the blades”.
• Tighten the drive belt and the nuts and bolt. See the
instructions under the heading ”Inspecting and
adjusting the drive belt”.
• Loosen the drive gear. Use a spanner as a
counterhold. (The combination spanner or bearing
tool can be used as a counterhold.)
20 – English
IMPORTANT! Do not forget to tighten the belt and check
the belt adjustment before cutting. See the instructions
under the heading ”Inspecting and adjusting the drive
belt”.
Replacing the carbon brushes
• Check the carbon brushes at least once a month. The
carbon brushes should be replaced with new brushes
if they are worn, cracked or in any other way
deformed.
• All carbon brushes must be replaced when the
brushes are replaced.
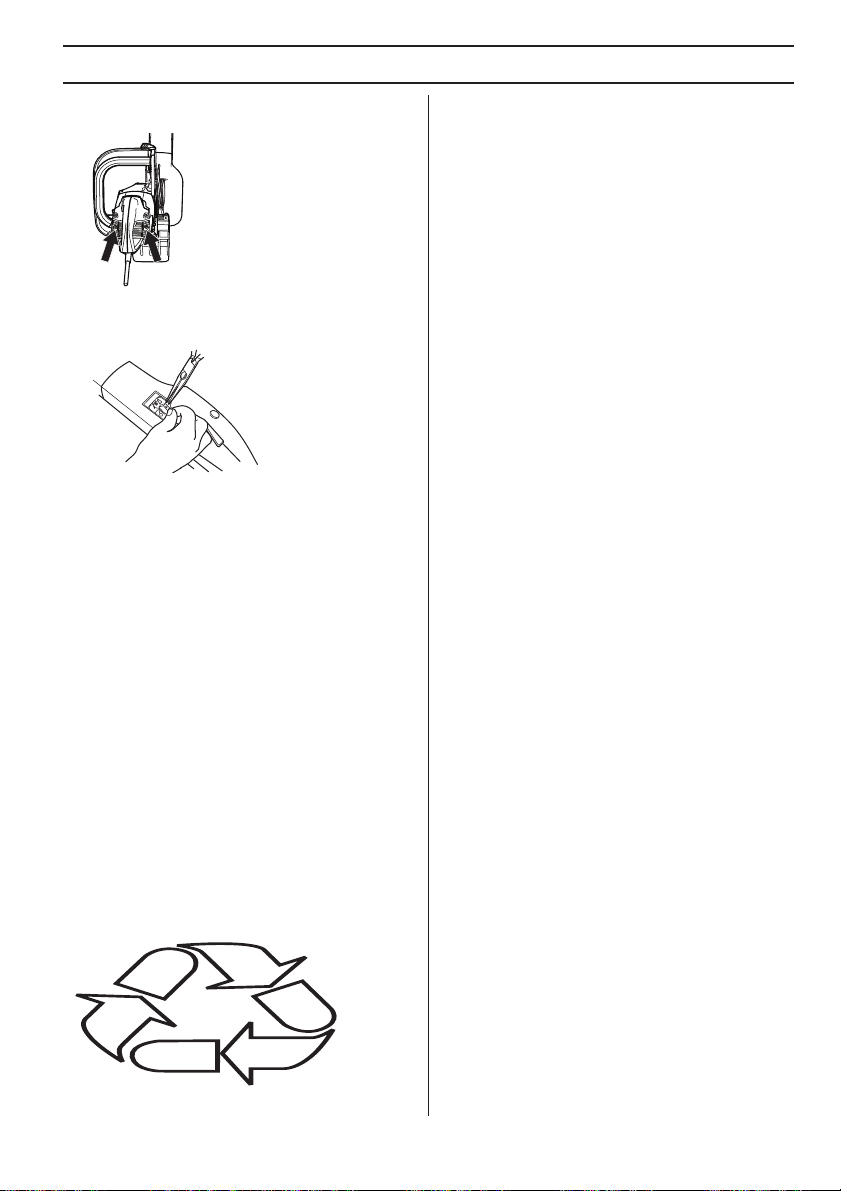
MAINTENANCE
• Remove the inspection cover by loosening both
screws.
• Unscrew the cable holding the carbon brush. Now lift
up the spr
the brush retainer.
• Clean the brush retainers with a dry brush.
• Carefully blow away the dust.
• Fit the new carbon brushes and, at the same time,
chec
• Fold down the springs and tighten the cable.
• New carbon brushes must be run in for approximately
40 min
ing and then lift out the carbon brush from
k that they slide easily in the brush retainers.
utes while idling.
Water tap
• Check and clean the restrictor if necessary. Do not
use hoses that are distorted, worn or damaged.
Disposal, scrapping
This product should be submitted to an appropriate
recycling station in accordance with local requirements.
By ensuring that this product is taken care of correctly,
you can help to counteract the potential negative impact
on the environment and people that can otherwise result
through the incorrect waste management of this product.
For more detailed information about recycling this
product, contact y
service or the shop from where you purchased the
product.
our municipality, your domestic waste
English – 21

TECHNICAL DATA
Technical data
Technical data K 4000 Cut-n-Break
Protection class I
Max. blade speed, rpm
Rated voltage, V
Europe 230
United Kingdom 110
Rated output, W
Europe 230V, 50Hz 2700/12 A
United Kingdom 110V, 50Hz 2200/20 A
Weight
Power cutter without cable package (excluding cutting blades), kg / Lbs 8.4 / 18.5
Power cutter without cable package (including cutting blades), kg / Lbs 8.9 / 19.6
Water cooling
Water cooling Ye s
Water connector Type ”Gardena”
Recommended water pressure, bar / PSI 0.5-8 / 7.3-116
Noise emissions (see note 1)
Sound power level, measured dB(A) 115
Sound levels (see note 2)
Sound pressure level at the operators ear, dB(A) 104
Equivalent vibration levels, a
Front handle, m/s
Rear handle, m/s
Note 1: Noise emissions in the environment measured as sound power (LWA) conforming to EN 60745-1. Reported data
for noise power level has an uncertainty of 3 dB(A).
Note 2: Noise pressure level according to EN 60745-1. Reported data for noise pressure level has an uncertainty of 3
dB(A).
Note 3: Equivalent vibration level, according to EN 60745-2-22, is calculated as the time-weighted energy total for
vibration levels under various working conditions. Reported data for vibration level has a typical statistical dispersion
(standard deviation) of 1,5 m/s
2
2
hveq
2
.
(see note 3)
Cutting equipment
230V, 50Hz 4200
120V, 60Hz 3900
3.6
3.8
Cutting blade, mm/inches Gear ratio Max. peripheral speed, m/s Cutting depth, mm/inches
230 / 9 45 / 79 60 400 / 16
Recommended cable dimensions
Cable area 1,5 mm
Input voltage 100-120 V 20 m 40 m
Input voltage 220-240 V 30 m 50 m
22 – English
2
2,5 mm
2

TECHNICAL DATA
EC Declaration of Conformity
(Applies to Europe only)
Husqvarna AB, SE-561 82 Huskvarna, Sweden, tel: +46-36-146500, declares under sole responsibility that the portable
cut-off machine
stated on the rating plate, followed by the serial number), complies with the requirements of the COUNCIL’S DIRECTIVE:
• of May 17, 2006 ”relating to machinery” 2006/42/EC.
• of February 26, 2014 ”relating to electromagnetic compatibility” 2014/30/EU.
• of June 8, 2011 on the ”restriction of use of certain hazardous substances” 2011/65/EU.
The following standards have been applied: EN ISO 12100:2010, EN 55014-1:2006+A1:2009+A2:2011, EN 550142:1997+A1:2001+A2:2008, EN 61000-3-2:2014, EN 61000-3-3:2013, EN 60745-1:2009, EN 60745-222:2011+A11:2013.
Partille, 1 January 2018
Joakim Ed
Global R & D Director
Construction Equipment Husqvarna AB
(Authorized representative for Husqvarna AB and responsible for technical documentation.)
Husqvarna K 4000 Cut-n-Break dating from 2018 serial numbers and onwards (the year is clearly
English – 23
EXPLICATION DES SYMBOLES
Symboles sur la machine:
AVERTISSEMENT! La machine
utilisée de manière imprudente ou
inadéquate peut devenir un outil
dangereux, pouvant causer des
blessures graves voire mortelles à
l’utilisateur et aux autres personnes
présentes.
Lire attentivement et bien assimiler le
manuel d’utilisation avant d’utiliser la
machine.
Utiliser les équipements de protection
personnelle. Voir au chapitre
Ӄquipement de protection
personnelle”.
Ce produit est conforme aux
directives CE en vigueur.
AVERTISSEMENT! Au cours de la
découpe, la poussière générée peut
occasionner des blessures si elle est
aspirée. Utiliser une protection
respiratoire approuvée. Veiller à
disposer d’une bonne ventilation.
AVERTISSEMENT! Les étincelles du
disque de coupe peuvent provoquer un
incendie en cas de contact avec des
matières inflammables tels que
l’essence, le bois, l’herbe sèche.
Toujours utiliser le refroidissement par
eau.
AVERTISSEMENT! Les rebonds
peuvent être soudains, rapides et
violents et peuvent générer des
blessures pouvant être mortelles. Lire
et assimiler les instructions du manuel
avant d’utiliser la machine.
AVERTISSEMENT! Vérifier que les
lames ne comportent ni fissures ni autre
dommage.
Toujours couper dans la direction
adéquate. Voir les consignes de
sécurité !
Plaque signalétique
Rangée 1 : Marque,
modèle (X, Y)
Rangée 2 : N° de
série avec date de
fabrication (Y, W, X)
Année, semaine, n
de séquence
Rangée 3 : N° de produit (X)
Rangée 4 : Fabricant
Rangée 5 : A : Vitesse max. de l’arbre de sortie, B :
Diamètre de la lame de coupe, C
lame
Rangée 6 : D : Tension d’entrée, E : Courant d’entrée, F :
Fréquence d’entrée
Rangée 7 : Pays d’origine
Marquage environnemental. Ce
symbole figurant sur le produit ou sur son
emballage indique que ce produit ne peut
pas être traité comme déchet ménager. Il
doit être collecté et amené à une
installation de récupération appropriée
de déchets d’équipements électriques et
électroniques.
En veillant à ce que ce produit soit correctement éliminé,
vous pouvez contribuer à prévenir les conséquences
négatives potentielles sur l’environnement et les
hommes, qui pourraient sinon être le résultat d’un
traitement incorrect des déchets de ce produit.
Pour des informations plus détaillées sur le recyclage de
ce produit, contactez votre commune ou le magasin où
vous avez acheté le produit.
Les autres symboles/autocollants présents sur la
machine concernent des exigences de certification
spécifiques à certains marchés.
:
°
XXXXXXXXX YYYY
s / n YYYY WWXXXXX
XXX XX XX-XX
Husqvarna AB
AAAAAA BBBBB CC
DDDD EEEE FFFF
XXXXXXXXXXXXXXX
: Diamètre du boulon de
AVERTISSEMENT! N’utilisez pas de
lames de scie circulaire.
24 – French
EXPLICATION DES SYMBOLES
Explication des niveaux
d’avertissement
Il existe trois niveaux d’avertissement.
AVERTISSEMENT!
AVERTISSEMENT! Désigne une situation
dangereuse qui, si elle n’est pas évitée,
!
peut entraîner des blessures graves,
voire mortelles.
REMARQUE !
REMARQUE ! Désigne une situation
dangereuse qui, si elle n’est pas évitée,
!
peut entraîner des blessures mineures
ou modérées.
REMARQUE !
REMARQUE ! Sert à désigner des pratiques sans
risque de blessures corporelles.
French – 25

SOMMAIRE
Sommaire
EXPLICATION DES SYMBOLES
Symboles sur la machine: ………………………………. 24
Explication des niveaux d’avertissement ………….. 25
SOMMAIRE
Sommaire ……………………………………………………. 26
PRÉSENTATION
Cher client, …………………………………………………… 27
QUELS SONT LES COMPOSANTS?
Quels sont les composants de la découpeuse? … 28
ÉQUIPEMENT DE SÉCURITÉ DE LA MACHINE
Généralités ………………………………………………….. 29
DISQUES DÉCOUPEURS
Généralités ………………………………………………….. 31
Lames diamant pour matériaux divers ……………… 31
Refroidissement par eau ………………………………… 31
Affûtage des lames diamant …………………………… 31
Transport et rangement ………………………………….. 31
MONTAGE
Montage ………………………………………………………. 32
COMMANDE
Équipement de protection ………………………………. 33
Consignes générales de sécurité ……………………. 33
Techniques de travail de base ………………………… 36
DÉMARRAGE ET ARRÊT
Avant de démarrer la machine ………………………… 40
Démarrage …………………………………………………… 40
Arrêt ……………………………………………………………. 40
ENTRETIEN
Généralités ………………………………………………….. 41
Schéma d’entretien ……………………………………….. 41
Nettoyage …………………………………………………….. 42
Contrôle fonctionnel ………………………………………. 42
Remplacement des balais de charbon …………….. 44
Robinet d’eau ……………………………………………….. 44
Mise au rebut ……………………………………………….. 44
CARACTÉRISTIQUES TECHNIQUES
Caractéristiques techniques …………………………… 45
Équipement de découpe ………………………………… 45
Dimensions de câble recommandées ………………. 45
Déclaration CE de conformité …………………………. 46
26 – French

PRÉSENTATION
Cher client,
Nous vous remercions d’avoir choisi un produit
Husqvarna
Nous espérons que cette machine vous donnera toute
satisfaction et qu’elle vous accompagnera pendant de
longues années. L’achat de l’un des nos produits garantit
une assistance professionnelle pour l’entretien et les
réparations. Si la machine n’a pas été achetée chez l’un
de nos revendeurs autorisés, demandez l’adresse de
l’atelier d’entretien le plus proche.
Ce mode d’emploi est précieux. Veillez à ce qu’il soit
toujours à portée de main sur le lieu de travail. En suivant
les instructions qu’il contient (utilisation, révision,
entretien etc.), il est possible d’allonger considérablement
la durée de vie de la machine et d’augmenter sa valeur
sur le marché de l’occasion. En cas de vente de la
machine, ne pas oublier de remettre le manuel
d’utilisation au nouveau propriétaire.
Plus de 300 ans d’innovation
Husqvarna AB est une entreprise suédoise qui a vu le
jour en 1689 lorsque le roi Karl XI décida de construire un
arsenal pour la fabrication des mousquets. À l’époque, les
compétences en ingénierie à la base du développement
de certains des produits leaders du marché mondial dans
des domaines tels que les armes de chasse, les vélos, les
motocycles, l’électroménager, les machines à coudre et
les produits d’extérieur, étaient déjà solides.
Husqvarna est le premier fournisseur mondial de produits
motorisés pour utilisation en extérieur dans la foresterie,
l’entretien de parcs, de pelouses et de jardins, ainsi que
d’équipements de coupe et d’outils diamant destinés aux
industries de la construction et de la pierre.
Responsabilité de l’utilisateur
Il est de la responsabilité du propriétaire/de l’employeur
de s’assurer que l’utilisateur possède les connaissances
nécessaires pour manipuler la machine en toute sécurité.
Les responsables et les utilisateurs doivent avoir lu et
compris le Manuel d’utilisation. Ils doivent avoir
conscience :
• Des instructions de sécurité de la machine.
• Des diverses applications de la machine et de ses
• De la façon dont la machine doit être utilisée et
La législation nationale peut réglementer l’utilisation de
cette machine. Recherchez la législation applicable dans
le lieu où vous travaillez avant d’utiliser la machine.
Droit de réserve du fabricant
Toutes les informations et toutes les données indiquées
dans ce manuel d’utilisation étaient valables à la date à
laquelle ce manuel a été porté à l’impression.
Husqvarna AB travaille continuellement au
développement de ses produits et se réserve le droit d’en
!
limites.
entretenue.
modifier, entre autres, la conception et l’aspect sans
préavis.
French – 27

QUELS SONT LES COMPOSANTS?
Quels sont les composants de la découpeuse?
1 Protection anti-éclaboussures
2 Poignée avant
3 Blocage de l’interrupteur
4 Interrupteur
5 Poignée arrière
6 Capot de contrôle
7 Balais de charbon
8 Support de balais
9 Plaque signalétique
10 Protection anti-éclaboussures
11 Lames
28 – French
12 Protège-lame
13 Disjoncteur de fuite à la terre
14 Raccord de l’eau
15 Robinet d’eau
16 Bras de coupe
17 Tendeur de courroie
18 Outil d’arrachage
19 Clé universelle
20 Dispositif de roulement
21 Manuel d’utilisation
ÉQUIPEMENT DE SÉCURITÉ DE LA MACHINE
Généralités
Ce chapitre présente les équipements de sécurité de la
machine, leur fonction, comment les utiliser et les
maintenir en bon état. Voir au chapitre Quels sont les
composants? pour trouver leur emplacement sur la
machine.
AVERTISSEMENT! Ne jamais utiliser une
machine dont les équipements de
!
sécurité sont défectueux. Suivre les
directives de maintenance, d’entretien et
les instructions de réparation indiquées
dans ce chapitre.
L’entretien et la réparation de la machine
exigent une formation spéciale. Ceci
concerne particulièrement l’équipement
de sécurité de la machine. Si les
contrôles suivants ne donnent pas un
résultat positif, s’adresser à un atelier
spécialisé. L’achat de l’un de nos
produits offre à l’acheteur la garantie
d’un service et de réparations qualifiés.
Si le point de vente n’assure pas ce
service, s’adresser à l’atelier spécialisé
le plus proche.
bouton de blocage ((A)) est enfoncé, l’interrupteur (B) est
libéré.
Le blocage de l’interrupteur reste enfoncé tant que
l’interrupteur est enfoncé. Quand la poignée est
relachée, l’interrupteur et le blocage de l’interrupteur
reviennent en position initiale. Ce retour s’effectue grâce
à deux systèmes de ressorts de rappel indépendants l’un
de l’autre. Dans cette position, la machine s’arrête et
l’interrupteur se bloque.
Contrôle du blocage de l’interrupteur
• Contrôler que l’interrupteur est bloqué quand le
blocage de l’interrupteur est en position de repos.
Interrupteur
L’interrupteur est utilisé pour démarrer et arrêter la
machine.
Contrôle de l’interrupteur
• Démarrer la machine, relâcher l’interrupteur et
contrôler que le moteur et le disque découpeur
s’arrête.
• Un interrupteur défectueux doit être remplacé par une
atelier d’entretien agréé.
Blocage de l’interrupteur
Le blocage de l’interrupteur a pour fonction d’empêcher
toute activation involontaire de l’interrupteur. Quand le
• Appuyer sur le blocage de líinterrupteur et vérifier quíil
revient en position initiale quand il est relâché.
• Vérifier que l’interrupteur, le blocage de l’interrupteur
et le système de ressorts de rappel fonctionne
correctement.
• Allumez la machine, relâchez l’interrupteur et vérifiez
que le moteur et les disques s’arrêtent.
Démarrage en douceur et protection
contre les surcharges
La machine est équipée d’un dispositif électronique de
démarrage en douceur et d’une protection contre la
surcharge.
Si la charge sur la machine dépasse un certain niveau, le
moteur se met à pulser. Si la charge est allégée, le moteur
retourne à la normale et la découpe peut continuer.
French – 29
ÉQUIPEMENT DE SÉCURITÉ DE LA MACHINE
Si l’on continue à utiliser la machine avec le moteur qui
pulse, le système électronique coupe le courant après un
certain temps. Plus la charge est élevée, plus la coupure
est rapide.
Si le disque de coupe se coince, le système électronique
coupe immédiatement le courant.
Protège-lame
Cette protection est placée au-dessus et en dessous du
disque de découpe et a pour fonction d’empêcher que
des éclats de disque ou de matériau ne soient projetés en
direction de l’utilisateur.
Contrôle de la protection des lames
AVERTISSEMENT! Vérifiez toujours que
toutes les protections sont montées
!
correctement avant de démarrer la
machine. Contrôler également si le
disque découpeur est correctement
monté et qu’il ne présente aucun
dommage. Un disque découpeur
endommagé peut causer des blessures.
Voir les instructions au chapitre
Montage.
Le voyant lumineux indique que le disjoncteur de fuite à la
terre est activé et que la machine peut être allumée. Si le
voyant lumineux est éteint, appuyez sur le bouton RESET
(vert).
Vérifiez le disjoncteur de fuite à la terre
• Branchez la machine à la prise électrique. Appuyez
sur le bouton RESET (vert) et le voyant lumineux
rouge s’allume.
• Démarrer la machine.
• Appuyez sur le bouton TEST (bleu).
• Contrôler que la protection est entière et qu’elle n’est
ni fissurée, ni déformée.
• Ne jamais utiliser un protège-lame défectueux ou
monté de manière incorrecte.
Protection anti-éclaboussures
La protection anti-projections fournit une protection
contre les projections de débris, d’eau et de béton.
Vérification de la protection anti-projections
Assurez-vous qu’il n’y a aucune fissure ni aucun trou
dans la protection causé(e) par les projections de béton.
Remplacez la protection si elle est endommagée.
Disjoncteur de fuite à la terre
Les disjoncteurs de fuite à la terre constituent une
protection si un défaut d’origine électrique survient.
30 – French
• Le disjoncteur de fuite à la terre devrait s’enclencher
et la machine s’éteint instantanément. Dans le cas
contraire, veuillez contacter votre revendeur.
• Initialisez l’appareil à l’aide du bouton RESET (vert).
Loading…
Описание
Электрический резчик Husqvarna K4000 Cut-n-Break — уникальный резчик с запатентованной технологией Cut-n-Break, единственный в своем классе, способный выполнять резку на глубину до 400 мм. Оснащен мощным электрическим двигателем 220В и системой водяного охлаждения алмазного диска. Подходит для применения внутри помещений или на открытом воздухе.
Резка осуществляется специальным сдвоенным алмазным диском 230 мм, каждый проход выполняется на глубину до 65 мм, при этом между дисками образуется тонкий простенок, который легко выламывается при помощи специального инструмента, входящего в комплект. После выламывания простенка резка продолжается до достижения необходимой глубины. Идеально подходит для резки вдоль стен и потолков, т.к. оснащен плоской шиной легко ложащейся вровень с поверхностью.
Резчик Husqvarna K4000 Cut-n-Break очень эффективен в эксплуатации, легок в обслуживании и представляет собой альтернативу дорогостоящей стенорезной машине.
Поставляется с с алмазным диском Husqvarna Cut-n-Break EL 10.
Технические характеристики
|
Двигатель |
Электрический 230В |
|
Напряжение, В |
230 |
|
Номинальный ток, А |
12 |
|
Мощность, кВт |
2,7 |
|
Диаметр режущего диска, мм |
230 |
| Диаметр посадочного отверстия, мм | Cut-n-Break |
|
Макс. глубина резки, мм |
400 |
| Толщина диска, мм | 2,5 |
| Макс. переферическая скорость вращения диска, м/с | 60 |
|
Вибрации на передней рукоятке, м/с² |
3,2 |
|
Вибрации на задней рукоятке, м/с² |
3,4 |
|
Звуковое давление возле уха оператора, дБ(А) |
95 |
|
Мощность звука, дБ(А) |
109 |
| Габариты (ДхШхВ), мм | 867х226х325 |
|
Вес (без режущего оборудования), кг |
8,4 |
|
Вес, кг |
10,4 |
| Алмазный диск в комплекте | Cut-n-Break EL 10 |
| Комплект для влажной резки | + |
| Электронная система плавного пуска Electronic SoftStart™ | + |
| Современная электронная система защиты от перегрузки Elgard™ — изменяет скорость вращения при наступлении перегрузки | + |
| Система нейтрализации пыли DEX (распыление воды через форсунки для охлаждения диска и удаления пыли) | + |
| Резка вплотную к стене или полу | + |
| Убегающее вращение (вращение дисков вперед для эффективного зарезания в материал и минимум возможности отскока) | + |
| Идеальная резка внутри помещений | + |
Тех. описание
Применение
Коррекция проемов
Блоки, бордюры, тротуары
Литой бетон
Трубы
Глубокая резка
Пазы
Траншеи для трубопроводов
Полы и стены
Особенности
Высокопроизводительные, прочные сдвоенные диски включены в комплект поставки машины
Мощный электрический резчик для работ внутри и вне помещений
Диски на всех наших электрических резаках вращаются вперед, что позволяет эффективно зарезаться в материал, сводя к минимуму возможности отскока
Вода позволяет отводить пыль и более эффективно выполнять резку
Документация
Отзывы
17.12.2020
Потребовалось в бетонных стенах толщиной 340 мм увеличивать ширину проемов, помещение закрытое, вентиляция достаточная. Глубина пропила была нужна большая, возможности резать с двух сторон нет. По рекомендации магазина купили электрический Husqvarna K 4000 Cut-n-Break с дисками EL 35 по железобетону. Максимальная глубина пропила в 40 см устраивала. От магазина в подарок получили бак для подачи воды и шлем. Работали с подачей воды. Недостаток в отсутствии подключения пылесоса, конструкцией не предусмотрено. Вещь очень полезная, работает быстро, рекомендую.
Прайс-лист
| Артикул | Наименование | Мощность, кВт | Диаметр диска, мм | Макс. глубина резки, мм | Вес, кг | Цена | |
|---|---|---|---|---|---|---|---|
| 9670797-01 | Электрический резчик Husqvarna K4000 Cut-n-Break | 2,7 | 230 | 400 | 10,4 |
295 000 p |
Manual
View the manual for the Husqvarna K 4000 here, for free. This user manual comes under the category saws and has been rated by 1 people with an average of a 7.6. This manual is available in the following languages: English. Do you have a question about the Husqvarna K 4000?
Ask your question here
Frequently asked questions
Can’t find the answer to your question in the manual? You may find the answer to your question in the FAQs about the Husqvarna K 4000 below.
How do I remove rust from my Husqvarna saw?
1. Soak the rusty part in vinegar until completely soaked through. 2. Let the vinegar work on the rust for 24 hours. 3. Remove the rust with a wire brush or aluminium foil.
My saw blade is blunt. What now?
If there is resin or other debris on the blade, it may look like the blade is blunt. If the saw blade has been thoroughly cleaned and is still blunt, it is recommended to have the saw blade sharpened.
What does ’16V’ or ’20V’ mean?
The maximum achievable charge level is expressed with 16V or 20V. The V in this case stands for Volt.
Do I have to wear hearing protection when using a saw?
The amount of sound varies a lot per brand and type of saw, it is therefore wise to wear hearing protection to be sure.
What is the best way to clean my saw blade?
1. Wipe sawdust from the saw blade with a brush. 2. Spray the saw blade with oven cleaner and leave for 30 minutes. 3. Remove the oven cleaner and dirt with a dry cloth. 4. Grease saw blade with Vaseline.
Is the manual of the Husqvarna K 4000 available in English?
Yes, the manual of the Husqvarna K 4000 is available in English .
Is your question not listed? Ask your question here
- June 10, 2024
- Husqvarna
Table of Contents
- Husqvarna K4000 Cut n Break
- Product Information
- Product Usage Instructions
- KEY TO SYMBOLS
- Explanation of warning levels
- PRESENTATION
- WHAT IS WHAT
- MACHINE´S SAFETY EQUIPMENT
- CUTTING BLADES
- Diamond blades for different materials
- ASSEMBLY
- OPERATING
- Protective equipment
- STARTING AND STOPPING
- MAINTENANCE
- Functional inspection
- Replacing the drive belt
- TECHNICAL DATA
- US WARRANTY STATEMENT
- References
- Read User Manual Online (PDF format)
- Download This Manual (PDF format)
Husqvarna K4000 Cut n Break

The K 4000 Cut-n-Break is a powerful cutting tool designed for cutting through
hard materials such as concrete and rock. It is important to read the
operator’s manual carefully and understand the instructions before using the
machine. Personal protective equipment must be worn while operating the
machine. Always ensure good ventilation as dust forms when cutting, which can
cause injuries if inhaled.
Product Information
- Brand: Husqvarna AB
- Model: K 4000 Cut-n-Break
- Max speed of output shaft: A
- Cutting blade diameter: B
- Blade bolt diameter: C
- Input voltage: D
- Input current: E
- Input frequency: F
- Country of origin: XXXXXXXXXXXXXXX
The product is certified to conform to UL Std 60745-1, 60745-25 and CSA C22.2
No. 60745-1, 60745-2-5.
Product Usage Instructions
- Before starting to use the machine, ensure that you have read and understood the operator’s manual. Wear personal protective equipment at all times while operating the machine. Ensure good ventilation around the work area.
- The cutting blade generates dust that can cause respiratory disease if inhaled. Use an approved breathing mask and avoid inhalation of dust, mist and fumes. Ensure that all bystanders wear appropriate respiratory protection such as dust masks designed to filter out microscopic particles.
- Always use water cooling while using the machine to prevent sparks from the cutting blade causing fire in combustible materials such as petrol (gas), wood, dry grass etc.
- Do not use circular saw blades with the machine.
- Cut in the correct direction and ensure that the blades are not cracked or damaged in any other way. Kickbacks can be sudden, rapid and violent and can cause life-threatening injuries. Read and understand the instructions in the manual before using the machine.
- Please read the operator’s manual carefully and make sure you understand the instructions before using the machine. Lire attentivement et bien assimiler le manuel d’utilisation avant d’utiliser la machine.
KEY TO SYMBOLS
Symbols on the machine:
-
WARNING! The machine can be a dangerous tool if used incorrectly or carelessly, which can cause serious or fatal injury to the operator or others.
Please read the operator’s manual carefully and make sure you understand the
instructions before using the machine. -
Wear personal protective equipment. See instructions under the heading ”Personal protective equipment”.
-
WARNING! Dust forms when cutting, which can cause injuries if inhaled. Use an approved breathing mask. Always provide for good ventilation.
-
WARNING! Sparks from the cutting blade can cause fire in combustible materials such as: petrol (gas), wood, dry grass etc.
-
Water cooling must always be used.
-
WARNING! Kickbacks can be sudden, rapid and violent and can cause life threatening injuries. Read and understand the instructions in the
manual before using the machine. -
WARNING! Ensure the blades are not cracked or damaged in any other way.
-
WARNING! Do not use circular saw blades
-
Always cut in the correct direction. See safety instructions!
-
Conforms to UL Std 60745-1, 60745-2-
-
5 Certified to CSA C22.2 No. 60745-1, 60745-2-5.
-
Type plate
-
Row 1: Brand, Model (X, Y)
-
Row 2: Serial No. with manufacturing date (Y, W, X): Year, Week, Sequence No.
-
Row 3: Product No. (X)
Row 4 : Manufacturer -
Row 5: A: Max speed of output shaft, B: Cutting blade diameter, C: Blade bolt diameter
-
Row 6: D: Input voltage, E: Input current, F: Input frequency
-
Row 7: Country of origin
-
Other symbols/decals on the machine refer to special certification requirements for certain markets.
Explanation of warning levels
- The warnings are graded in three levels.
- WARNING! Indicates a hazardous situation which, if not avoided, will result in death or serious injury.
- CAUTION! Indicates a hazardous situation which, if not avoided, could result in minor or moderate injury.
- NOTICE! Is used to address practices not related to personal injury.
Note the following before starting:
- WARNING! Cutting, especially when DRY cutting, generates dust that comes from the material being cut, which frequently contains silica. Silica is a basic component of sand, quartz, brick clay, granite and numerous other minerals and rocks. Exposure to excessive amount of such dust can cause:
- Respiratory disease (affecting your ability to breath), including chronic bronchitis, silicosis and pulmonary fibrosis from exposure to silica. These diseases may be fatal;
- Skin irritation and rash.
- Cancer according to NTP and IARC */ National Toxicology Program, International Agency for Research on Cancer
- Take precautionary steps:
- Avoid inhalation of and skin contact with dust, mist and fumes.
- Wear and ensure that all bystanders wear appropriate respiratory protection such as dust masks designed to filter out microscopic particles. (See OSHA 29 CFR Part 1926.1153)
- Wet cut when feasible, to minimize dust.
- The engine exhaust from this product contains chemicals known to the State of California to cause cancer, birth defects or other reproductive harm.
- NOTICE! CALIFORNIA AIR RESOURCES BOARD (CARB): This machine is considered a preempt Off-Road Applicatoin as relating to CARB standards. The U.S. EPA has sole authority to establish emission standards for preempt construction equipment. For more information see www.arb.ca.gov/msprog/offroad/preempt.htm
PRESENTATION
Dear customer!
- Thank you for choosing a Husqvarna product!
- It is our wish that you will be satisfied with your product and that it will be your companion for a long time. A purchase of one of our products gives you access to professional help with repairs and services. If the retailer who sells your machine is not one of our authorised dealers, ask him for the address of your nearest service workshop.
- This operator’s manual is a valuable document. Make sure it is always at hand at the work place. By following its content (operating, service, maintenance etc.) the life span and the second-hand value of the machine can be extended. If you ever lend or sell this machine, make sure that the borrower or buyer gets the operator′s manual, so they will also know how to properly maintain and use it.
More than 300 years of innovation
- Husqvarna AB is a Swedish company based on a tradition that dates back to 1689, when the Swedish King Karl XI ordered the construction of a factory for production of muskets. At that time, the foundation was already laid for the engineering skills behind the development of some of the world’s leading products in areas such as hunting weapons, bicycles, motorcycles, domestic appliances, sewing machines and outdoor products.
- Husqvarna is the global leader in outdoor power products for forestry, park maintenance and lawn and garden care, as well as cutting equipment and diamond tools for the construction and stone industries.
User Responsibility
- It is the owner’s/employer’s responsibility that the operator has sufficient knowledge about how to use the machine safely. Supervisors and operators must have read and understood the Operator’s Manual. They must be aware of:
- The machine’s safety instructions.
- The machine’s range of applications and limitations.
- How the machine is to be used and maintained.
- National legislation could regulate the use of this machine. Find out what legislation is applicable in the place where you work before you start using the machine.
The manufacturer’s reservation
- All information and all data in the Operator’s Manual were applicable at the time the Operator’s Manual was sent to print.
- Husqvarna AB has a policy of continuous product development and therefore reserves the right to modify the design and appearance of products without prior notice.
WHAT IS WHAT

What is what on the power cutter?
- Splash guard
- Front handle
- Power switch lock
- Power switch
- Rear handle
- Inspection cover
- Carbon brushes
- Brush retainer
- Type plate
- Spray guard
- Blades
- Blade guards
- Ground fault circuit interrupter 14 Wash-out port
- Water tap
- Cutting arm
- Belt tensioner
- Breaking tool
- Combination spanner
- Bearing tool
- Operator’s manual
MACHINE´S SAFETY EQUIPMENT
General
This section describes the machine′s safety equipment, its purpose, and how
checks and maintenance should be carried out to ensure that it operates
correctly. See the ”What is what?” section to locate where this equipment is
positioned on your machine.
- WARNING! Never use a machine that has faulty safety equipment! Carry out the inspection, maintenance, and service routines listed in this section.
- All servicing and repair work on the machine requires special training. This is especially true of the machine′s safety equipment. If your machine fails any of the checks described below you must contact your service agent. When you buy any of our products we guarantee the availability of professional repairs and service. If the retailer who sells your machine is not a servicing dealer, ask him for the address of your nearest service agent.
Power switch
- The power switch should be used to start and stop the machine.
Checking the power switch
- Start the machine, release the power switch and check that the engine and the cutting blade stop.
- A defective power switch should be replaced by an authorized service workshop.
Power switch lock
- The power switch lock is designed to prevent accidental operation of the switch. When the lock (A) is pressed the power switch (B) is released.
- The power switch lock remains depressed as long as the power switch is depressed. When the grip on the handle is released both the power switch and power switch lock are reset. This movement is controlled by two independent return springs. This position results in the machine stopping and the power switch is locked.
Checking the power switch lock
- Make sure the power switch is locked when the power switch lock is in its original position.
- Press in the power switch lock and make sure it returns to its original position when you release it.
- Check that the power switch and power switch lock move freely and that the return springs work properly.
- Switch on the machine, release the switch, and check that the engine and blades stop.
Gradual start and overload protection
- The machine is equipped with electronically controlled gradual start and overload protection.
- The engine starts to pulsate if the machine is loaded above a specific level. If the load is reduced the engine reverts to its normal state and cutting can resume.
- The electronics will cut the current after a set time if the machine continues to be run with a pulsating engine. The higher load the faster the shutoff.
- The electronics cut the current immediately if the blade jams.
Blade guards
- This guard is fitted above and below the cutting blade and is designed to prevent parts of the blade or cutting fragments from being thrown towards the user.
Checking the blade guards
- WARNING! Always check that all guards are correctly fitted before starting the machine. Check that the cutting blade is fitted correctly and does not show signs of damage. A damaged cutting blade can cause personal injury. See instructions under the heading Assembly.
- Check that the guard is complete and without any cracks or deformations.
- Never use a defective guard or a guard that has not been fitted correctly.
Spray guard
- The spray guard provides protection against ejected debris, thrown water and concrete slurry.
Checking the spray guard
- Ensure there are no cracks or holes from slurry blasting in the spray guard. Replace guard if damaged.
Ground fault circuit interrupter
- Ground fault circuit interrupters are for protection in case an electrical fault should occur.
- The LED indicates that the ground fault circuit interrupter is on and that the machine can be switched on. If the LED is not on, push the RESET button (green).
Check the ground fault circuit interrupter
- Connect the machine to the socket. Push the RESET button (green) and the red LED lights up.
- Start the machine.
- Push the TEST button (blue).
- The ground fault circuit interrupter should trip and the machine switch off instantly. If not, contact your dealer.
- Reset with the RESET button (green).
CUTTING BLADES
General
- WARNING! A cutting blade may burst and cause injury to the operator.
- A cutting blade should be checked before it is assembled on the saw and frequently during use. Look for cracks, lost segments (diamond blades) or pieces broken off. Do not use a damaged cutting blade.
- Test the integrity of each new cutting blade by running it at full throttle for about 1 minute.
- Only use original cutting blades designed by Husqvarna for use on this machine.
- Husqvarna issues warnings and recommendations for the use and proper care of the cutting blades. Those warnings come with the cutting blades. Read and follow all instructions from Husqvarna.
- This machine is only to be used with Husqvarna´s specially developed diamond blades intended for Cut-n-Break. The blades have an integrated belt pulley and are approved for freehand cutting.
- Diamond blades consist of a steel core provided with segments that contain industrial diamonds.
- Always use a sharp diamond blade.
- Ensure the blades are not cracked or damaged in any other way. Replace blades if necessary.
Diamond blades for different materials
- WARNING! Never use a cutting blade for any other materials than what it was intended to cut.
- Never use a diamond blade to cut plastic material. The heat produced during cutting may melt the plastic and it can stick to the cutting blade and cause a kickback.
- Cutting metal generates sparks that may cause fire. Do not use the machine near ignitable substances or gases.
- Diamond blades are ideal for masonry and reinforced concrete. Ask your dealer for help in choosing the right product.
- Diamond blades are available in several hardness classes. A “soft” diamond blade has a relatively short service life and large cutting capacity. It is used for hard materials such as granite and hard concrete. A “hard” diamond blade has a longer service life and reduced cutting capacity, and should be used for soft materials such as brick and asphalt.
Water cooling
- WARNING! Cool diamond blades designed for wet cutting continuously with water to prevent heating, which can deform the diamond blade resulting in damage to the machine and personal injury.
- Water cooling must always be used.
- Using wet cutting blades without water can cause excessive heat build-up, resulting in poor performance, severe blade damage and is a safety hazard.
- Water cools the blade and increases its service life while also reducing the formation of dust.
Sharpening diamond blades
- Diamond blades can become dull when the wrong feeding pressure is used or when cutting certain materials such as heavily reinforced concrete. Working with a dull diamond blade causes overheating, which can result in the diamond segments coming loose.
Sharpen the blades by cutting a soft material such as sandstone or brick.
Transport and storage
- Make sure the machine is secured and that the cutting blades are properly protected during the transport and storage of the machine.
- Before use inspect all blades for transport or storage damage.
ASSEMBLY
WARNING! Always pull out the plug from the outlet socket before cleaning,
maintenance or assembly.
Assembling the blades
WARNING! You must replace the screw kit when you replace the blade.
- Husqvarna blades are especially manufactured and approved for freehand cutting with the K 4000 Cut-n-Break. The blades have integrated belt pulley halves and are to be changed in pairs.
- Loosen the nuts and clamping bolt which release the bar. This will position the drive belt in a more favourable position with regard to assembling the new blades. The drive belt is not clamped so easily.
- Dismantle the old blades by loosening the centre nut. Check the drive belt for wear when the blades are dismantled. When changing the drive belt see the instructions under the heading ”Replacing the drive belt”.
- NOTICE! It is very important that the blades rotate when the nut is tightened. This is to ensure that the belt is not clamped between the integrated drive belt halves on the blades when the blades/drive belt are pulled together with the nut. Ideally this is done alternately, i.e. tighten a little, rotate a little and repeat until the blades are secured.
- Place the blades on each side of the bar. Insert the steering pins of the nut through the blades and the bolt washer.
- Rotate the blades by hand while tightening the blade bolt. This is especially important because it assures the belt is not squeezed between the pulley halves, which are incorporated into the blades. Alternate between tightening the blade bolt and rotating the blades until the blades are fully tightened. Tighteningtorque for the bolt holding the blade is: 130 in.lb (15 Nm).
- NOTICE! Do not forget to tighten the belt and check the belt adjustment before cutting. See the instructions under the heading ”Inspecting and adjusting the drive belt”.
Protection for the blades
- The guards should always be fitted on the machine. Check that the guards are properly secured and work before starting to cut.
OPERATING
Protective equipment
General
- Do not use the machine unless you are able to call for help in the event of an accident.
- Personal protective equipment
- You must use approved personal protective equipment whenever you use the machine. Personal protective equipment cannot eliminate the risk of injury but it will reduce the degree of injury if an accident does happen. Ask your dealer for help in choosing the right equipment.
- WARNING! The use of products such as cutters, grinders, drills, saws that sand or form material can generate dust and vapors which may contain hazardous chemicals. Check the nature of the material you intend to process and use an appropriate breathing mask.
- Long-term exposure to noise can result in permanent hearing impairment. Always use approved hearing protection. Listen out for warning signals or shouts when you are wearing hearing protection. Always remove your hearing protection as soon as the motor stops.
Always wear:
- Approved protecting helmet.
- Hearing protection.
- Approved eye protection. If you use a face shield then you must also wear approved protective goggles. Approved protective goggles must comply with standard ANSI Z87.1 in the USA or EN 166 in EU countries. Visors must comply with standard EN 1731.
- Approved respiratory protection.
- Protective gloves.
- Heavy-duty, firm grip gloves.
- Tight-fitting, heavy-duty and comfortable clothing that permits full freedom of movement. Cutting generates sparks that can ignite clothing. Husqvarna recommends that you wear flame-retardant cotton or heavy denim. Do not wear clothing made of material such as nylon, polyester or rayon. If ignited such material can melt and cling to the skin. Do not wear shorts
- Boots with steel toe-caps and non-slip sole
Other protective equipment
CAUTION! Sparks may appear and start a fire when you work with the
machine. Always keep fire fighting equipment handy.
- Fire Extinguisher
- First aid kit
General safety warnings
- This section describes basic safety directions for using the machine. This information is never a substitute for professional skills and experience. If you get into a situation where you feel unsafe, stop and seek expert advice. Contact your dealer, service agent or an experienced user. Do not attempt any task that you feel unsure of!
- Please read the operator’s manual carefully and make sure you understand the instructions before using the machine. It is recommended that first time operators also obtain practical instruction before using the machine.
- Keep in mind that it is you, the operator that is responsible for not exposing people or their property to accidents or hazards.
- The machine must be kept clean. Signs and stickers must be fully legible.
- WARNING! Read all safety warnings and all instructions. Failure to follow the warnings and instructions may result in electric shock, fire and/or serious injury.
- Save all warnings and instructions for future reference.
- The term ”power tool” in the warnings refers to your mains-operated (corded) power tool or battery-operated (cordless) power tool.
Work area safety
- Keep work area clean and well lit. Cluttered or dark areas invite accidents.
- Do not operate power tools in explosive atmospheres, such as in the presence of flammable liquids, gases or dust. Power tools create sparks which may ignite the dust or fumes.
- Keep children and bystanders away while operating a power tool. Distractions can cause you to lose control.
- Do not use the machine in bad weather, such as dense fog, rain, strong wind, intense cold, etc. Working in bad weather is tiring and can lead to dangerous conditions, e.g. slippery surfaces.
- Never start to work with the machine before the working area is clear and you have a firm foothold. Look out for any obstacles with unexpected movement. Ensure when cutting that no material can become loose and fall, causing injury to the operator.Take great care when working on sloping ground.
- WARNING! The safety distance for the power cutter is 50 feet (15 metres). You are responsible to ensure that animals and onlookers are not within the working area. Do not start cutting until the working area is clear and you are standing firmly.
Electrical safety
- Power tool plugs must match the outlet. Never modify the plug in any way. Do not use any adapter plugs with earthed (grounded) power tools. Unmodified plugs and matching outlets will reduce the risk of electric shock.
- Avoid body contact with earthed or grounded surfaces, such as pipes, radiators, ranges and refrigerators. There is an increased risk of electric shock if your body is earthed or grounded.
- Do not expose power tools to rain or wet conditions. Water entering a power tool will increase the risk of electric shock.
- Do not abuse the cord. Never use the cord for carrying, pulling or unplugging the power tool. Keep cord away from heat, oil, charp edges or moving parts. Damaged or entangled cords increase the risk of electric shock.
- When operating a power tool outdoors, use an extension cord suitable for outdoor use. Use of a cord suitable for outdoor use reduces the risk of electric shock.
- If operating a power tool in a damp location is unavoidable, use a residual current device (RCD) protected device. Use of an RCD reduces the risk of electric shock.
- Check that the cord and extension cord are intact and in good condition. Never use the machine if the cord is damaged, hand it in to an authorized service workshop for repair. An undersized cable means a risk of reduced machine capacity and overheating.
- The machine should be connected to an earthed outlet socket. Check that the mains voltage corresponds with that stated on the rating plate on the machine.
- Ensure the cord is behind you when you start to use the machine so that the cord will not be damaged.
- WARNING! Do not pressure wash the machine, as water can enter the electrical system or the engine and cause damage to the machine or short circuit.
Personal safety
- Stay alert, watch what you are doing and use common sense when operating a power tool. Do not use a power tool while you are tired or under the influence of drugs, alcohol or medication. A moment of inattention while operating power tools may result in serious personal injury.
- Use personal protective equipment. Always wear eye protection. Protetctive equipment such as dust mask, non-skid safety shoes, hard hat, or hearing protection used for appropriate conditions will reduce personal injuries.
- Prevent unintentional starting. Ensure the switch is in the OFF-position before connecting to power source and/or battery pack, picking up or carrying the tool. Carrying power tools with your finger on the switch or energising power tools that have the switch on invites accidents.
- Remove any adjusting key or wrench before turning the power tool on. A wrench or a key left attached to a rotating part of the power tool may result in personal injury.
- Do not overreach. Keep proper footing and balance at all times. This enables better control of the power tool in unexpected situations.
- Dress properly. Do not wear loose clothing or jewellery. Keep your hair, clothing and gloves away from moving parts. Loose clothes, jewellery or long hair can be caught in moving parts.
- If devices are provided for the connection of dust extraction and collection facilities, ensure that these are connected and properly used. Use of dust collection can reduce dust-related hazards.
- Remain at a distance from the blades when the engine is running.
- WARNING! Overexposure to vibration can lead to circulatory damage or nerve damage in people who have impaired circulation. Contact your doctor if you experience symptoms of overexposure to vibration. These symptoms include numbness, loss of feeling, tingling, pricking, pain, loss of strength, changes in skin colour or condition.
- These symptoms normally appear in the fingers, hands or wrists.
Power tool use and care
- Please read the operator’s manual carefully and make sure you understand the instructions before using the machine.
- The machine is only designed for cutting hard materials, such as concrete, brick, masonry as well as cast iron and cement pipes.
- WARNING! A power cutter is a dangerous tool if used carelessly or incorrectly and can cause serious, even fatal injuries. It is extremely important that you read and understand the contents of this Operator’s Manual.
- Do not force the power tool. Use the correct power tool for your application. The correct power tool will do the job better and safer at the rate for which it was designed.
- Do not use the power tool if the switch does not turn it on and off. Any power tool that cannot be controlled with the switch is dangerous and must be repaired.
- Disconnect the plug from the power source and/or the battery pack from the power tool before making any adjustments, changing accessories, or storing power tools. Such preventive safety measures reduce the risk of starting the power tool accidentally.
- Store idle power tools out of the reach of children and do not allow persons unfamiliar with the power tool or these instructions to operate the power tool. Power tools are dangerous in the hands of untrained users.
- Maintain power tools. Check for misalignment or binding of moving parts, breakage of parts and any other condition that may affect the power tool´s operation. If damaged, have the power tool repaired before use. Many accidents are caused by poorly maintained power tools.
- Keep cutting tools sharp and clean. Properly maintained cutting tools with sharp cutting edges are less likely to bind and are easier to control.
- Use the power tool, accessories and tool bits etc. in accordance with these instructions, taking into account the working conditions and the work to be performed. Use of the power tool for operations different from those intended could result in hazardous situations.
- WARNING! Under no circumstances may the design of the machine be modified without the permission of the manufacturer. Always use genuine accessories. Non-authorized modifications and/or accessories can result in serious personal injury or the death of the operator or others.
- Make sure that no pipes or electrical cables are routed in the working area or in the material to be cut.
- Always check and mark out where gas pipes are routed. Cutting close to gas pipes always entails danger. Make sure that sparks are not caused when cutting in view of the risk of explosion. Remain concentrated and focused on the task. Carelessness can result in serious personal injury or death.
- Inspect new blades for transport or storage damage.
- The guard for the cutting equipment must always be on when the machine is running.
Service
- Have your power tool serviced by a qualified repair person unsing only identical replacement parts. This will ensure that the safety of the power tool is maintained.
Always use common sense
- It is not possible to cover every conceivable situation you can face. Always exercise care and use your common sense. If you get into a situation where you feel unsafe, stop and seek expert advice. Contact your dealer, service agent or an experienced user. Do not attempt any task that you feel unsure of!
- WARNING! The machine can be a dangerous tool if used incorrectly or carelessly, which can cause serious or fatal injury to the operator or others.
- Never allow children or other persons not trained in the use of the machine to use or service it.
- Never allow anyone else to use the machine without first ensuring that they have read and understood the contents of the operator’s manual.
- Never use a machine that is faulty. Carry out the safety checks, maintenance and service instructions described in this manual. Some maintenance and service measures must be carried out by trained and qualified specialists. See instructions under the heading Maintenance.
Basic working techniques
- WARNING! This section describes basic safety directions for using a power cutter. This information is never a substitute for professional skills and experience. If you get into a situation where you feel unsafe, stop and seek expert advice. Contact your dealer, service agent or an experienced power cutter user. Do not attempt any task that you feel unsure of!
- Do not pull the power cutter to one side, this can cause the blade to jam or break resulting in injury to people.
- Under all circumstances avoid grinding using the side of the blade; it will almost certainly be damaged, break and can cause immense damage. Only use the cutting section.
- Cutting plastics with a diamond blade can cause kickback when the material melts due to the heat produced when cutting and sticks to the blade. Never cut plastic materials with a diamond blade!
- Cutting metal generates sparks that may cause fire. Do not use the machine near ignitable substances or gases.
Water cooling
- Water cooling must always be used. Dry cutting causes immediate overheating and machine and cutting blade failure with a risk of personal injury.
- At a low water pressure, for example when the water tank is used, the restrictor can be dismantled to give the correct water flow.
- NOTICE! It is important not to use a too high water flow without throttling as the belt can then slip.
Cutting technique
- Support the work piece in such a way that it is possible to predict what will happen, and so that the cut remains open while cutting.
- Always hold the machine in a firm grip with both hands. Hold it so that the thumbs and fingers grip round the handles.
- Check that the blade is not in contact with anything when the machine is started
- Start cutting with the machine running at maximum speed.
- Start cutting smoothly, allowing the machine to work without forcing or pressing in the blade. Always cut at maximum speed.
- Cut in the same direction when cutting into an existing cut. Avoid cutting at an angle to the previous cut, otherwise there is a risk of the blade jamming or that the machine can ”climb in the cut” and cause a kickback.
- Always cut from top to bottom (A).
- Remove the cutter and use a crowbar to remove the material that remains between the cut (B).
- Follow the same saw cut, but further in the work piece (C), and repeat the work with the crowbar.
- WARNING! When cutting vertically, always cut from the top of the cut and down. Never cut from the bottom of the cut and up. This can cause a kickback and result in personal injury.
- Repeat this working method until the required cutting depth is achieved (D, E).
- The blade guards are designed to easily adapt to how deep in the work piece the power cutter is moved.
- WARNING! Under all circumstances avoid grinding using the side of the blade; it will almost certainly be damaged or break and can cause immense damage. Only use the cutting section.
- Do not pull the power cutter to one side, this can cause the blade to jam or break resulting in injury to people.
Smooth cutting
- To enable smooth cutting, the splash guard must be adjusted.
- Release the latch.
- Slide the splash guard sideways.
- Lock the latch.
Kickback
- Kickback is a sudden, rearward motion of the saw that can occur if the blades are stalled (pinched, jammed, twisted) in the so called kickback zone. Most kickbacks are small and felt as small ”jerks” in the front handle. However, kickback can be very powerful. If you are not paying attention or have a poor grip the saw can be thrown all the way back at you.
- WARNING! Kickback can be very sudden and viloent, throwing the saw back at you. It can cause serious or even fatal injuries. It is vital you understand what causes kickback and how to aviod it using proper cutting techique.
Cause of kickback
- Kickback is caused if you are cutting with the kickback zone of the blade for example when cutting ”upwards” or towards you.
General rules
- Never cut upwards or towards you so that the kickback zone becomes actively cutting.
- Always hold the machine in a firm grip with both hands. Hold it so that the thumbs and fingers grip round the handles.
- Keep a good balance and a firm foothold.
- When cutting vertically, always cut from the top of the cut and down.
- Always cut at maximum speed.
- Do not cut with the upper quadrant (kickback zone) of the blade. Avoid twisting or pushing the blades sideways in the cut. This can cause kickback.
- Take care when inserting the blade in an existing cut. Make certain that the cut is wide enough and that the blades are not angled in the cut. This can cause kickback.
- Stand at a comfortable distance from the work piece.
- Never cut above shoulder height.
- Never cut from a ladder. Use a platform or scaffold if the cut is above shoulder height.
- Be alert to movement of the work piece or anything else that can occur, which could cause the cut to close and pinch the blade.
Pull in
- Pull in occurs when the blades’ lower sections suddenly stop or when the cut closes. (To avoid, see the instructions under the heading ”General rules” and
Pinching/rotation”, here below.).
Pinching/rotation
- If the cut is pressed together this can lead to jamming. The machine can be pulled down suddenly with a very powerful jerk.
How to avoid pinching
- Support the work piece in such a way that the cut remains open during the cutting operation and when the cut is finished.
Check the engine speed
- Use a revolution counter regularly to check the engine speed at the working temperature, at full throttle and without a load.
STARTING AND STOPPING
Before starting
- WARNING! Note the following before starting:
- The machine should be connected to an earthed outlet socket.
- Check that the mains voltage corresponds with that stated on the rating plate on the machine.
- Make sure you have a secure footing and that the cutting blade cannot touch anything.
- Keep people and animals well away from the working area.
Wash-out port
- Connect the water hose to the water supply (A). The water flow is regulated using the water tap (B).
Ground fault circuit interrupter
- WARNING! Never use the tool without the ground fault circuit interrupter delivered with the tool. Carelessness can result in serious personal injury or even death.
- Make sure the ground fault circuit interrupter is switched on. The LED indicates that the ground fault circuit interrupter is on and that the machine can be switched on. If the LED is not on, push the RESET button (green).
- Check the ground fault circuit interrupter. See instructions under the heading Checking, maintaining and servicing the machine’s safety equipment.
Starting
- Grip the front handle with the left hand.
- Grip the rear handle with your right hand.
- Press in the power switch lock with your right-hand thumb and press in the power switch.
- Run the machine unloaded and in a safe manner for at least 30 seconds.
Stopping
- Stop the motor by releasing the power switch.
- WARNING! Make sure that the cutting blade can rotate freely until it completely stops. Carelessness can cause serious personal injury.
MAINTENANCE
General
- WARNING! The user must only carry out the maintenance and service work described in this manual. More extensive work must be carried out by an authorized service workshop.
- Inspection and/or maintenance should be carried out with the motor switched off and the plug disconnected.
- Wear personal protective equipment. See instructions under the heading ”Personal protective equipment”.
- The life span or the runtime of the machine can be reduced and the risk of accidents can increase if machine maintenance is not carried out correctly and if service and/or repairs are not carried out professionally. If you need further information please contact your nearest service workshop.
Maintenance schedule
- In the maintenance schedule you can see which parts of your machine that require maintenance, and with which intervals it should take place. The intervals are calculated based on daily use of the machine, and may differ depending on the rate of usage.
| Daily Maintenance| Weekly maintenance/40 hours| Monthly
maintenance
—|—|—|—
Cleaning| Clean the machine.| |
Cooling air intake| |
Functional inspection
| General inspection| Carbon brushes| Drive wheel
Water system| Drive belt|
Power switch| |
Power switch lock| |
Blade guard*| |
Cutting blade**| |
Cleaning
-
WARNING! Do not use a high pressure washer when rinsing the inside of the machine.
-
The machine can withstand taking in damp air and splashes during the cutting process. Clean water does not affect the machine’s function.
When cutting materials such as concrete or brick, which can contain salt, you
must rinse the machine after the work is finished. The cleaning reduces the
risk for accretions building up inside the engine, which can cause leakage
current between electric components, which in turn can cause the ground fault
circuit interrupter to turn off without intention. -
Clean the machine daily by rinsing it with clean water after the work is finished.
-
Place the machine with the rear handle facing upwards. Rinse the air intakes at the rear handle with clean water. The water will run out through the front air outlets.
-
Connect the plug and run the engine dry for approx. 30 sec in order to speed up the drying of the engine.
Cooling system
- The machine is equipped with an efficient fan to cool the motor. Cooling air which is drawn in through the grille by the machines rear handle passes over the stator and rotor and out through the front of the motor housing.
- In order for the machine to always be cooled sufficiently the cooling air openings must be kept clear and clean. Blow down the machine regularly with compressed air.
Functional inspection
General inspection
- WARNING! Never use damaged cables. They can cause serious, even fatal, personal injuries.
- Check that nuts and screws are tightened.
- Check that the power switch unit works smoothly.
- Check the ground fault circuit interrupter
- Clean the outside of the machine.
- Checking the blade guard
- Check the condition of the cutting blade.
- Check and clean the cooling air openings.
- Check that the cord and extension cord are intact and in good condition. Never use the machine if the cord is damaged, hand it in to an authorized service workshop for repair.
Drive belt
NOTICE! The drive belt is fully enclosed and well-protected from dust,
dirt and mechanical damage when cutting.
Tensioning the drive belt
- Check the tension of the drive belt. Stick a screwdriver in the notch.
- A correctly adjusted drive belt should have about 5 mm of movement.
- Tighten the drive belt.
- Loosen the two nuts.
- Loosen the clamping bolt.
- Turn the eccentric plate anti-clockwise with a screwdriver or a torx driver. This tightens the drive belt by pushing the bar forwards.
- Tighten the nuts.
- Screw the bolt tight. Hold still the eccentric plate so that it doesn’t move along when you tighten the screws.
- NOTICE! A new drive belt shall be tightened once after 30-60 minutes operation.
Replacing the drive belt
- Release the belt tension.
- Remove the blades.
- Remove the belt cover by loosening the nuts, the clamping bolt and the eccentric cam.
- Loosen water hose.
- Loosen the drive gear. Use a spanner as a counterhold. (The combination spanner or bearing tool can be used as a counterhold.)
- Remove the cutting arm by pulling it straight out from the machine.
- Loosen the five screws holding the guards on the cutting arm.
- Remove the old drive belt and put in a new one.
- Refit the guards on the cutting arm.
- Fit the cutting arm on the machine while fastening the drive wheel.
- Replace the water hose.
- Refit the belt cover, the nuts, the clamping bolt and the eccentric cam.
- Refit the blades and tighten the nut. See instructions under Heading ”Assembling the blades”.
- Tighten the drive belt and the nuts and bolt. See the instructions under the heading ”Inspecting and adjusting the drive belt”.
- IMPORTANT! Do not forget to tighten the belt and check the belt adjustment before cutting. See the instructions under the heading ”Inspecting and adjusting the drive belt”.
Replacing the carbon brushes
- Check the carbon brushes at least once a month. The carbon brushes should be replaced with new brushes if they are worn, cracked or in any other way deformed.
- All carbon brushes must be replaced when the brushes are replaced.
- Remove the inspection cover by loosening both screws.
- Unscrew the cable holding the carbon brush. Now lift up the spring and then lift out the carbon brush from the brush retainer.
- Clean the brush retainers with a dry brush.
- Carefully blow away the dust.
- Fit the new carbon brushes and, at the same time, check that they slide easily in the brush retainers.
- Fold down the springs and tighten the cable.
- New carbon brushes must be run in for approximately 40 minutes while idling.
Water tap
- Check and clean the restrictor if necessary. Do not use hoses that are distorted, worn or damaged.
Disposal, scrapping
- This product should be submitted to an appropriate recycling station in accordance with local requirements.
- By ensuring that this product is taken care of correctly, you can help to counteract the potential negative impact on the environment and people that can otherwise result through the incorrect waste management of this product.
- For more detailed information about recycling this product, contact your municipality, your domestic waste service or the shop from where you purchased the product.
TECHNICAL DATA
| Technical data | K 4000 Cut-n-Break |
|---|---|
| Protection class | I |
| Max. blade speed, rpm | 120V, 60Hz |
Rated voltage, V
USA / Canada / Japan| 100-120
Rated output, W
USA / Canada / Japan| 100-120V, 50-60Hz| 15 A
Weight
Power cutter without cable package (excluding cutting blades), Lbs / kg| 18.5
/ 8.4
Power cutter without cable package (including cutting blades), Lbs / kg| 19.6
/ 8.9
Water cooling
Water cooling| Yes
Wash-out port| Type ”Gardena”
Recommended water pressure, PSI / bar| 7.3-116 / 0.5-8
Cutting equipment
Cutting blades, inches/mm| Gear ratio| Max. peripheral speed,
ft/min / m/s| Cutting depth, inches/mm
—|—|—|—
9 / 230| 45 / 79| 12000 / 60| 16 / 400
Recommended cable dimensions
| Cable area | 1,5 mm 2 | 2,5 mm 2 |
|---|---|---|
| Input voltage 100-120 V | 20 m | 40 m |
US WARRANTY STATEMENT
WARRANTY POLICY
- All warranty claims will be determined after inspection at a designated facility. A Returned Goods Authorization is required for all warranty claims. Contact Husqvarna Customer Service Department at 800-845-1312 for an RGA. The customer must prepay the freight and absorb any labor expense required to return or replace a product submitted for warranty consideration. Husqvarna will pay return shipping expenses for repaired or approved replacement products.
EQUIPMENT
- Equipment manufactured by Husqvarna is warranted to be free from manufacturing defects in normal service for a period of two (2) years from date of purchase by the original consumer purchaser. Component manufacturers offer separate warranty periods. Call Technical Services at 800-288-5040 for complete information.
- Our obilgation under this warranty is expressly limited to the replacement or repair at Husqvarna Construction Products North America, Olathe, Kansas 66061, or at a service facility designated by us, of such part or parts as inspection shall disclose to have been defective.
- This warranty does not apply to defects caused by damage, unreasonable use, faulty repairs made by others than an approved Husqvarna servicing dealer, or defects cacused by failure to provide reasonable maintenence, while in the possession of the consumer. Further, the warranty is void if the product, or any of its components, are altered or modified by the consumer purchaser, or if the product is used in an inappropriate manner or with tools not recommended by the manufacturer.
- Exceptions: Drill motors – 3 months, Wall saws – 1 year, Power cutters – 3 months, DM230 – 1 year, DM225 – 3 months, Gyro systems – 1 year, CD40 system – 1 year, DS160 C – 1 year, Smart box – 1 year, CS2515 – 1 year, PP455 E – 1 year, PP345 E – 1 year, HP40 – 1 year.
- Wear items: Filters, spark plugs, bearings*, belts, wheels** and wear pads.
- Except IntelliSeal™ system. **Except delalmination.
References
- Request Rejected
- New Vehicle and Engine Certification: Executive Orders | California Air Resources Board
- New Vehicle and Engine Certification: Executive Orders | California Air Resources Board
Read User Manual Online (PDF format)
Read User Manual Online (PDF format) >>
Download This Manual (PDF format)
Download this manual >>