
Оформить вызов мастера можно двумя способами: по телефонам
+7 (495) 215 – 14 – 41
+7 (903) 722 – 17 – 03
или через специальную заявку на сайте. В обоих случаях сообщите, пожалуйста:
- Какая марка и модель у вашей стиральной машины.
- Признаки поломки. Например, машинка не сливает воду или не отжимает белье.
- Удобное для вас время приезда мастера.
- Ваши контактные данные: имя, адрес, телефон для связи.
Мастер в день ремонта позвонит по указанному вами номеру для подтверждения вызова.
Если вы обнаружили неисправность в работе своей Hotpoint-Ariston ARTXL 109, не пытайтесь устранить её своими силами. Самостоятельный ремонт может привести к более серьёзным поломкам и дорогостоящему ремонту. Лучше сразу позвоните в «РемБытТех»! Наш специалист приедет к вам уже в течение 24 часов после обращения и с гарантией до 2 лет отремонтирует вашу машинку так, что она прослужит вам ещё долгие годы.

Instructions for use
WASHING MACHINE
GB
English,1
I
Italiano,37
ARTXL 109
ES
Español,13
GR
ЕллзнйкЬ,49
CIS
РУССКИЙ, 25
CZ
Èesky,61
Contents
GB
Installation, 2-3
Unpacking and levelling
Connecting the electricity and water supplies
The first wash cycle
Technical data
Description of the washing machine
and starting a wash cycle, 4-5
Control panel
Indicator lights
How to open and shut the drum
Starting a wash cycle
Wash cycles, 6
Table of wash cycles
Personalisation, 7
Setting the temperature
Setting the spin speed
Functions
Detergents and laundry, 8
Detergent dispenser drawer
Bleach cycle
Preparing the laundry
Garments requiring special care
Load balancing system
Precautions and tips, 9
General safety
Disposal
Saving energy and respecting the environment
Care and maintenance, 10
Cutting off the water or electricity supply
Cleaning the washing machine
Caring for your appliance door and drum
Cleaning the pump
Checking the water inlet hose
How to clean the detergent dispenser
Troubleshooting, 11
Service, 12
1

Installation
GB
Keep this instruction manual in a safe place for
future reference. Should the appliance be sold,
transferred or moved, make sure the instruction
manual accompanies the washing machine to inform
the new owner as to its operation and features.
Read these instructions carefully: they contain vital
information on installation, use and safety.
Unpacking and levelling
Unpacking
1. Unpack the
washing machine.
2. Check whether the
washing machine has
been damaged during
transport. If this is the
case, do not install it
and contact your
retailer.
3. Remove the four
protective screws and
the rubber washer
with the respective
spacer, situated on
the rear of the
appliance (see figure).
4. Seal the gaps using the plastic plugs provided.
5. Keep all the parts: you will need them again if
the washing machine needs to be moved to
another location.
Warning: should the screws be re-used, make sure
you fasten the shorter ones at the top.
Packaging materials are not children’s toys.
Levelling
Your machine may make a considerable amount of
noise if the two front feet have not been adjusted
correctly.
1. Install the washing
machine on a flat
sturdy floor, without
resting it up against
walls, furniture cabinets
or other.
2. If the floor is not
perfectly level, compensate for any
unevenness by
tightening or loosening
the adjustable front feet (see figure); the angle of
inclination, measured according to the worktop,
must not exceed 2°.
Levelling your appliance correctly will provide it with
stability and avoid any vibrations, noise and shifting
during operation. If it is placed on a fitted or loose
carpet, adjust the feet in such a way as to allow
enough room for ventilation beneath the washing
machine.
Putting your appliance in place and moving it.
If your washing
machine is equipped
with a special set of
retractable wheels you
can easy move it. To
lower the wheels and
thus move the
appliance effortlessly,
just pull the lever,
situated on the lefthand side beneath the
base. Once the
appliance is in the required position, put the lever
back in place. The washing machine is now firmly in
place (see figure).
Electric and water connections
Connecting the water inlet hose
1. Connect the supply
pipe by screwing it to a
cold water tab using a ¾
gas threaded connection
(see figure).
Before performing the
connection, allow the
water to run freely until it
is perfectly clear.
2. Connect the other end
of the water inlet hose to
the washing machine,
screwing it onto the
appliance’s cold water
inlet, situated on the top
right-hand side on the
rear of the appliance (see
figure).
3. Make sure there are no kinks or bends in the hose.
The water pressure at the tap must be within the
values indicated in the Technical details table
(on the next page).
If the water inlet hose is not long enough, contact
a specialist store or an authorised serviceman.
2

Connecting the drain hose
65 — 100 cm
Connect the drain hose,
without bending it, to a
drainage duct or a wall
drain located at a height
between 65 and 100 cm
from the floor;
Do not use extension cords or multiple sockets.
GB
The cable should not be bent or compressed.
The power supply cable must only be replaced by
authorised technicians.
Warning! The company shall not be held responsible
in the event that these regulations are not respected.
The first wash cycle
alternatively, rest it on
the side of a washbasin
or bathtub, fastening the
duct supplied to the tap
(see figure). The free end
of the hose should not
be underwater.
We advise against the use of hose extensions; if it is
absolutely necessary, the extension must have the
same diameter as the original hose and must not
exceed 150 cm in length.
Electrical connections
Before plugging the appliance into the electricity
socket, make sure that:
the socket is earthed and complies with all
applicable laws;
the socket is able to withstand the maximum power
load of the appliance as indicated in the Technical
data table (see opposite);
the power supply voltage falls within the values
indicated in the Technical data table (see opposite);
Once the appliance has been installed, and before
you use it for the first time, run a wash cycle with
detergent and no laundry, using the wash cycle 2.
Technical data
Model
Dimensions
Capacity
Electrical
connections
Water connections
Spin speed
ARTXL 109
width 40 cm
height 85 cm
depth 60 cm
from 1 to 6 kg
please refer to the technical data
plate fixed to the machine
maximum pressure 1 MPa (10 bar)
minimum pressure 0.05 MPa (0.5 bar)
drum capacity 42 litres
up to 1000 rotations per minute
the socket is compatible with the plug of the
washing machine. If this is not the case, replace
the socket or the plug.
The washing machine must not be installed
outdoors, even in covered areas. It is extremely
dangerous to leave the appliance exposed to rain,
storms and other weather conditions.
When the washing machine has been installed, the
electricity socket must be within easy reach.
Energy rated
programmes
according to
regulation
EN 60456
programme 7; temperature 60°C;
using a load of 6 kg.
This appliance conforms to the
following EC Directives:
— 89/336/EEC dated 03/05/89
(Electromagnetic Compatibility) and
subsequent modifications
— 2002/96/EC
— 2006/95/EC (Low Voltage)
3

Description of the washing machine
and starting a wash cycle
GB
Control panel
SPIN SPEED
ON/OFF
ON/OFF button: switches the washing machine on
and off.
WASH CYCLE knob: programmes the wash cycles.
During the wash cycle, the knob does not move.
FUNCTION buttons with indicator light: used to
select the available functions. The indicator light
corresponding to the selected function will remain lit.
TEMPERATURE knob: sets the temperature or the
cold wash cycle (see Personalisation).
SPIN SPEED knob: sets the spin speed or exclude
the spin cycle completely (see Personalisation).
WASH CYCLE PROGRESS/DELAY TIMER
indicator light
wash cycle. The illuminated indicator light shows
which phase is in progress. If the Delay Timer function
has been set, the time remaining until the wash cycle
starts will be indicated (see next page).
LID LOCKED indicator light: indicates whether the
door may be opened or not (see next page).
s:used to monitor the progress of the
button
WASH CYCLE
TEMPERATURE
knob
knob
WASH CYCLE PROGRESS/
DELAY TIMER
knob
FUNCTION
buttons with
indicator lights
Standby mode
This washing machine, in compliance with new energy
saving regulations, is fitted with an automatic standby
system which is enabled after about 30 minutes if no
activity is detected. Press the ON-OFF button briefly
and wait for the machine to start up again.
indicator lights
LID LOCKED
indicator light
START/PAUSE
button with indicator
light
Indicator lights
The indicator lights provide important information.
This is what they can tell you:
Delayed start
If the DELAY TIMER function has been activated (see
Personalisation), after the wash cycle has been
started the indicator light corresponding to the
selected delay period will begin to flash:
As time passes, the remaining delay will be displayed
and the corresponding indicator light will flash:
START/PAUSE button with indicator light: starts or
temporarily interrupts the wash cycles.
N.B. To pause the wash cycle in progress, press this
button; the corresponding indicator light will flash
orange, while the indicator light for the current wash
cycle phase will remain lit in a fixed manner. If the LID
LOCKED
may be opened. To start the wash cycle from the
point at which it was interrupted, press this button
again.
4
indicator light is switched off, the door
Once the set delay has elapsed, the flashing indicator
light will switch off and the selected wash cycle will begin.
Wash cycle phase indicator lights
Once the desired wash cycle has been selected and has
begun, the indicator lights switch on one by one to
indicate which phase of the cycle is currently in progress.

Wash
Rinse
Spin
Drain
End of wash cycle
Function buttons and corresponding indicator lights
When a function is selected, the corresponding
indicator light will illuminate.
If the selected function is not compatible with the
programmed wash cycle, the corresponding indicator
light will flash and the function will not be activated.
If a function which is incompatible with another
function selected previously, only the most recent
selection will remain active.
Lid locked indicator light
If this indicator light is on, the appliance door is locked to
prevent it from being opened accidentally; to avoid any
damage, wait for the indicator light to switch off (it will take
about three minutes) before you open the appliance door.
N.B. If the DELAY TIMER function is activated, the door
cannot be opened; pause the machine by pressing the
START/PAUSE button if you wish to open it.
If the START/PAUSE indicator light (orange) flashes
rapidly at the same time as the function indicator
light, this indicates a problem has occurred (see
Troubleshooting).
How to open and to close the drum
Fig. 1
Fig. 2
A) Opening (Fig. 1):
Lift the external lid and open it completely.
B) Opening the drum (Soft opening):
With one finger, push the button indicated in fig. 2
and the drum will open delicately.
C) Loading the washing machine (Fig. 3).
D) Shutting (Fig. 4):
— close the drum fully by first shutting the front
door followed by the rear one;
— then ensure the hooks on the front door are
perfectly housed within the seat of the rear door;
— after the hooks have clicked into position, press
both doors lightly downwards to make sure they
do not come loose;
— finally shut the external lid.
Starting a wash cycle
1. Turn the washing machine on by pressing the
ON/OFF button. All the indicator lights will turn on for
a few seconds, then only the indicator lights relative
to the selected programme settings will remain lit and
the START/PAUSE indicator light will flash.
2. Load the laundry, close the door and the lid.
3. Set the WASH CYCLE knob to the desired
programme.
4. Set the washing temperature (see
Personalisation).
5. Set the spin speed (see Personalisation).
6. Measure out the detergent and washing additives
(see Detergents and laundry).
7. Select the desired functions.
8. Start the wash cycle by pressing the START/
PAUSE button and the corresponding indicator light
will remain lit in a fixed manner, in green.
To cancel the set wash cycle, pause the machine by
pressing the START/PAUSE button and select a new
cycle.
9. At the end of the wash cycle the
will switch on. The LID LOCKED indicator light will
switch off, indicating that the door may be opened.
Take out your laundry and leave the appliance door
ajar to make sure the drum dries completely.
Switch the washing machine off by pressing the ON/
OFF button.
indicator light
GB
Fig. 3
Fig. 4
5

Wash cycles
GB
Table of wash cycles
.
Max
Description of the wash cycle
Wash cycles
Special cycles
Sanitizing cycle 90°:
7
Sanitizing cycle 90° (1):
7
Goodnigt cycle:
8
Baby cycle:
9
Shirts
10
Silk /C urtains:
11
Wool:
12
Everyday wash cycles (Daily)
Cotton + Prewash 90°:
1
Cotton:
2
Cotton (2):
2
Coloured Cottons (3):
3
Synthetics resistents:
4
Synthetics delicates:
4
Mix 30′:
5
silk and clothes which require washing by hand).
Mix 15′:
6
silk and clothes which require washing by hand).
Partials wash cycles
Heavily soiled delicate colours.
For wool, cashmere, etc.
Heavily soiled whites and resistant colours.
Heavily soiled whites and delicate colours.
To refresh lightly soiled garments quickly (not suitable for wool,
To refresh lightly soiled garments quickly (not suitable for wool,
Extremely soiled whites.
Heavily soiled whites and resistant colours.
Lightly soiled delicate colours.
For garments in silk and viscose, lingerie.
Extremely soiled whites.
Lightly soiled whites and delicate colours.
Heavily soiled resistant colours.
Lightly soiled resistant colours.
temp.
Max.
speed
(°C)
(rpm)
90° 1000
60° 1000 40° 800 40° 800 40° 600 30° 0 40° 600 —
90° 1000 60° 1000
40° 1000
40° 1000
60° 800 40° 800 —
30° 800 —
30° 800 —
Rinse — 1000
Spin — 1000 — — — 616
Light spin — 800 — — — 2,5 12
Drain no spin — 0 — — — 62
Detergents
Bleach Wash
Fabric
softener
ll l
ll
ll
ll
ll
ll
ll
ll
ll l
ll l
ll l
ll
ll
ll
ll
l
l
—
Max.
load
duration
(kg)
6165
6 141
4288
2 116
269
155
155
6164
6 138
6 123
689
2,5 85
2,5 73
330
1,5 15
636
Cycle
The information contained in the table is intended as a guide only.
For all Test Institutes:
1) Test wash cycle in compliance with regulation EN 60456: set wash cycle 7 with a temperature of 60°C.
2) Long wash cycle for cottons: set wash cycle 2 with a temperature of 40°C.
3) Short wash cycle for cottons: set wash cycle 3 with a temperature of 40°C.
Specials wash cycles
Sanitizing cycle (wash cycle 7). A high-temperature hygienic wash cycle (over 60°C) which requires the use of bleach.
Pour the bleach, the detergent and the additives into the relevant compartments (see paragraph entitled
Detergent dispenser drawer).
Goodnigt cycle (wash cycle 8). This is a silent cycle which can be run at night, when the electricity prices are lower. The
wash cycle is designed for cottons and synthetics. At the end of the cycle the machine stops while there is still water in
the drum; to spin and drain the laundry press the START/PAUSE button; alternatively the machine will perform the spin
cycle and drain the water automatically after 8 hours.
Baby cycle (wash cycle 9). This wash cycle can be used to remove the soiling typically caused by babies, while ensuring
that all detergent is removed from nappies in order to prevent the delicate skin of babies from suffering allergies. The
cycle has been designed to reduce the amount of bacteria by using a greater quantity of water and optimising the effect
of special disinfecting additives added to the detergent.
Mix 30 (wash cycle 5) this wash cycle was designed to wash lightly soiled garments quickly: it lasts just 30 minutes and
therefore saves both energy and time. By selecting this wash cycle (5 at 30°C), it is possible to wash different fabrics
together (except for wool and silk items), with a maximum load of 3 kg.
Mix 15(wash cycle 6) this wash cycle was designed to wash lightly soiled garments quickly: it lasts just 15 minutes and
therefore saves both energy and time. By selecting this wash cycle (6 at 30°C), it is possible to wash different fabrics
together (except for wool and silk items), with a maximum load of 1.5 kg.
6

Personalisation
Setting the temperature
Turn the TEMPERATURE knob to set the wash temperature (see Table of wash cycles).
The temperature may be lowered, or even set to a cold wash (
The washing machine will automatically prevent you from selecting a temperature which is higher than the
maximum value set for each wash cycle.
).
Setting the spin speed
Turn the SPIN SPEED knob to set the spin speed for the selected wash cycle.
The maximum spin speeds available for each wash cycle are as follows:
Wash cycles Maximum spin speed
Cottons 1000 rpm
Synthetics 800 rpm
Wool 600 rpm
Silk drain only
The spin speed may be lowered, or the spin cycle can be excluded altogether by selecting the symbol
The washing machine will automatically prevent you from selecting a spin speed which is higher than the
maximum speed set for each wash cycle.
.
Functions
The various wash functions available with this washing machine will help to achieve the desired results, every time.
To activate the functions:
1. Press the button corresponding to the desired function;
2. the function is enabled when the corresponding indicator light is illuminated.
Note: If the indicator light flashes rapidly, this signals that this particular function may not be selected in
conjunction with the selected wash cycle.
GB
Delay timer
This timer delays the start time of the wash cycle by up to 12 hours.
Press the button repeatedly until the indicator light corresponding to the desired delay time switches on. The fifth time
the button is pressed, the function will be disabled.
N.B. Once you have pressed the START/PAUSE button, the delay time may only be decreased if you wish to modify it.
This option is enabled with all programmes.
Easy iron
By selecting this function, the wash and spin cycles will be modified in order to reduce the formation of creases. At
the end of the cycle the washing machine will perform slow rotations of the drum.
For the 11 wash cycle, the machine will end the cycle while the laundry is soaking, the EASY IRON and START/
PAUSE indicator lights will flash (orange) and the RINSE phase will remain lit in a fixed manner. To drain the water
so that the laundry may be removed, press the START/PAUSE button or the EASY IRON button.
This function may not be used in conjunction with wash cycles 5, 6, 7, 8, 9, 12, , , .
Extra rinse
By selecting this function, the efficiency of the rinse is increased and optimal detergent removal is guaranteed. It is
particularly useful for sensitive skin.
This function may not be used in conjunction with wash cycles 5, 6,
Super Wash
Because a greater quantity of water is used in the initial phase of the cycle, and because of the increased cycle
duration, this function offers a high-performance wash.
This function may not be used in conjunction with wash cycles 5, 6, 7, 11, 12,
, , .
, , , .
7

Detergents and laundry
GB
Detergent dispenser drawer
Good washing results also depend on the correct
dose of detergent: adding too much detergent won’t
necessarily make for a more efficient wash, and may
in fact cause build up on the interior of your appliance
and even pollute the environment.
Open up the detergent
dispenser and pour in
the detergent and fabric
softener, as follows.
compartment 1: Detergent for pre-wash
compartment 2: Detergent for the wash cycle
(powder or liquid)
It is recommended that you place liquid detergent
directly into the compartment using the appropriate
dosing cup.
compartment 3: Additives (softener, etc.)
When pouring the softener in compartment 3, avoid
exceeding the «max» level indicated.
The softener is added automatically into the machine
during the last wash. At the end of the wash
programme, some water will be left in compartment
3. This is used for the inlet of denser fabric softeners
into the machine, i.e. to dilute the more concentrated
softeners. Should more than a normal amount of
water remain in compartment 3, this means the
emptying device is blocked. For cleaning instructions,
see Care and maintenance.
compartment 4: Bleach
Bleach cycle
Bleaching may only be performed in conjunction with
wash cycles 2, 3, 7,
Pour the bleach into compartment 4; pour the
detergent and softener into the corresponding
compartments, then select one of the
abovementioned wash cycles.
This option is recommended only for very soiled
cotton garments.
.
Preparing the laundry
Divide the laundry according to:
— the type of fabric/the symbol on the label
— the colours: separate coloured garments from
whites.
Empty all garment pockets and check the buttons.
Do not exceed the listed values, which refer to the
weight of the laundry when dry:
Durable fabrics: max. 6 kg
Synthetic fabrics: max. 2,5 kg
Delicate fabrics: max. 2 kg
Wool: max. 1 kg
How much does your laundry weigh?
1 sheet 400-500 g
1 pillow case 150-200 g
1 tablecloth 400-500 g
1 bathrobe 900-1200 g
1 towel 150-250 g
Garments requiring special care
Shirts: use special wash cycle 10 to wash shirts in
various fabrics and colours.
It guarantees maximum care is taken of the garments
and minimises the formation of creases.
Silk: use special wash cycle 11 to wash all silk
garments. We recommend the use of special
detergent which has been designed to wash delicate
clothes.
Curtains: fold curtains and place them in a pillow
case or mesh bag. Use wash cycle 11.
Wool: is the only washing machine manufacturer to
have been awarded the prestigious Woolmark
Platinum Care endorsement (M.0508) by the
Woolmark Company, which means that all woollen
garments may be washed in the washing machine,
even those which state hand wash only
label. Wash cycle 12 therefore offers complete peace
of mind when washing woollen garments in the
washing machine (max. load 1 kg) and guarantees
optimal performance.
on the
Load balancing system
Before every spin cycle, to avoid excessive vibrations
and to distribute the load in a uniform manner, the
drum rotates continuously at a speed which is slightly
greater than the washing rotation speed. If, after
several attempts, the load is not balanced correctly,
the machine spins at a reduced spin speed. If the
load is excessively unbalanced, the washing machine
performs the distribution process instead of spinning.
To encourage improved load distribution and balance,
we recommend small and large garments are mixed
in the load.
8

Precautions and tips
This washing machine was designed and
constructed in accordance with international safety
regulations. The following information is provided for
safety reasons and must therefore be read carefully.
General safety
This appliance is not intended for use by persons
(including children) with reduced physical, sensory
or mental capabilities, or lack of experience and
knowledge, unless they have been given
supervision or instruction concerning use of the
appliance by a person responsible for their safety.
Children should be supervised to ensure that they
do not play with the appliance.
The washing machine must only be used by adults,
in accordance with the instructions provided in this
manual.
This appliance was designed for domestic use only.
Do not touch the machine when barefoot or with
wet or damp hands or feet.
Do not pull on the power supply cable when
unplugging the appliance from the electricity
socket. Hold the plug and pull.
Do not touch the drained water as it may reach
extremely high temperatures.
Never force the porthole door. This could damage
the safety lock mechanism designed to prevent
accidental opening.
If the appliance breaks down, do not under any
circumstances access the internal mechanisms in
an attempt to repair it yourself.
Always keep children well away from the appliance
while it is operating.
If the appliance has to be moved, work in a group
of two or three people and handle it with the utmost
care. Never try to do this alone, because the
appliance is very heavy.
Before loading laundry into the washing machine,
make sure the drum is empty.
Disposal
Disposing of the packaging materials: observe local
regulations so that the packaging may be re-used.
The crossed out «wheeled bin» symbol on the
product reminds you of your obligation, that when
you dispose of the appliance it must be separately
collected.
Consumers should contact their local authority or
retailer for information concerning the correct
disposal of their old appliance.
Saving energy and respecting the
environment
Saving on detergent, water, energy and time
To avoid wasting resources, the washing machine
should be used with a full load. A full load instead
of two half loads allows you to save up to 50% on
energy.
The pre-wash cycle is only necessary on
extremely soiled garments. Avoiding it will save on
detergent, time, water and between 5 and 15%
energy.
Treating stains with a stain remover or leaving
them to soak before washing will cut down the
need to wash them at high temperatures. A
programme at 60°C instead of 90°C or one at
40°C instead of 60°C will save up to 50% on
energy.
Use the correct quantity of detergent depending
on the water hardness, how soiled the garments
are and the amount of laundry you have, to avoid
wastage and to protect the environment: despite
being biodegradable, detergents do contain
ingredients that alter the natural balance of the
environment. In addition, avoid using fabric
softener as much as possible.
If you use your washing machine from late in the
afternoon until the early hours of the morning, you
will help reduce the electricity board’s peak load.
The Delay Timer option helps to organise your
wash cycles accordingly.
If your laundry has to be dried in a tumble dryer,
select a high spin speed. Having the least water
possible in your laundry will save you time and
energy in the drying process.
GB
The European Directive 2002/96/EC on Waste
Electrical and Electronic Equipment, requires that
old household electrical appliances must not be
disposed of in the normal unsorted municipal waste
stream. Old appliances must be collected
separately in order to optimise the recovery and
recycling of the materials they contain and reduce
the impact on human health and the environment.
9

Care and maintenance
GB
Cutting off the water or electricity
supply
Turn off the water tap after every wash. This will
limit the wear of your appliance’s water system
and also prevent leaks.
Unplug your appliance when cleaning it and during
all maintenance operations.
Cleaning your appliance
The exterior and rubber parts of your appliance can
be cleaned with a soft cloth soaked in lukewarm
soapy water. Do not use solvents or abrasives.
Caring for your appliance door and
drum
Always leave the appliance door ajar to prevent
unpleasant odours from forming.
Cleaning the pump
The washing machine is fitted with a self-cleaning
pump that does not require any maintenance.
Sometimes, small items (such as coins or buttons)
may fall into the pre-chamber that protects the
pump, situated in the lower part of the same.
Make sure the wash cycle has ended and unplug
the appliance.
To recover any objects that have fallen into the prechamber:
1. remove the plinth at
the bottom on the front
side of the washing
machine by pulling from
the side with your
hands (see figure);
2. unscrew the lid
rotating it anticlockwise (see figure): a little
water may trickle out.
This is perfectly normal;
3. clean the interior
thoroughly;
4. screw the lid back on;
5. reposition the panel,
making sure the hooks
are securely in place
before you push it onto
the appliance.
Checking the water inlet hose
Check the water inlet hose at least once a year. If
you see any cracks, replace it immediately: during the
wash cycles, water pressure is very strong and a
cracked hose could easily split open.
How to clean the detergent dispenser
Disassembly:
Press lightly on the large
button on the front of the
detergent dispenser and
pull it upwards (fig. 1, 2).
Fig. 1 Fig. 2
Cleaning:
Then clean the dispenser under a tap (fig. 3) using an
old toothbrush and, once the pair of siphons inserted in
the top of compartments 1 and 2 (fig. 4) have been pulled
out, check whether the same are not clogged and then
rinse them.
Never use hoses that have already been used.
Reassembly:
Do not forget to reinsert the
pair of siphons into the special housings and then to
replace the dispenser into
its seat, clicking it into place
(fig. 4, 2 and 1).
Fig. 3
Fig. 4
10

Troubleshooting
Your washing machine could fail to work. Before contacting the Technical Assistance Centre (see Assistance),
make sure that the problem cannot be not solved easily using the following list.
Problem:
The washing machine does not
switch on.
The wash cycle does not start.
The washing machine does not
take in water (the indicator light
for the first wash cycle stage
flashes rapidly).
The washing machine
continuously takes in and drains
water.
Possible causes / Solutions:
The appliance is not plugged into the socket fully, or is not making contact.
There is no power in the house.
The appliance Lid is not shut properly.
The ON/OFF button has not been pressed.
The START/PAUSE button has not been pressed.
The water tap has not been opened.
A delayed start has been set (see Personalisation).
The water inlet hose is not connected to the tap.
The hose is bent.
The water tap has not been opened.
There is no water supply in the house.
The pressure is too low.
The START/PAUSE button has not been pressed.
The drain hose is not fitted at a height between 65 and 100 cm from
the floor (see Installation).
The free end of the hose is under water (see Installation).
The wall drainage system is not fitted with a breather pipe.
If the problem persists even after these checks, turn off the water tap,
switch the appliance off and contact the Assistance Service. If the
dwelling is on one of the upper floors of a building, there may be problems
relating to water drainage, causing the washing machine to fill with water
and drain continuously. Special anti-draining valves are available in shops
and help to avoid this inconvenience.
GB
The washing machine does not
drain or spin.
The washing machine vibrates a
lot during the spin cycle.
The washing machine leaks.
The START/PAUSE indicator light
(orange) and the function
indicator lights flash rapidly.
There is too much foam.
The wash cycle does not include draining: some wash cycles require
the drain phase to be started manually.
The EASY IRON function has been activated: To complete the wash
cycle, press the START/PAUSE button (Personalisation).
The drain hose is bent (see Installation).
The drainage duct is clogged.
The drum was not unlocked correctly during installation (see Installation).
The washing machine is not level (see Installation).
The washing machine is trapped between cabinets and walls (see Installation).
The water inlet hose is not screwed on properly (see Installation).
The detergent dispenser drawer is blocked (for cleaning instructions, see
Care and maintenance).
The drain hose is not fixed properly (see Installation).
Switch off the machine and unplug it, wait for approximately 1 minute
and then switch it back on again.
If the problem persists, contact the Technical Assistance Service.
The detergent is not suitable for machine washing (it should display the
text for washing machines or hand and machine wash, or the like).
Too much detergent was used.
11

Service
GB
Before calling for Assistance:
Check whether you can solve the problem alone (see Troubleshooting);
Restart the programme to check whether the problem has been solved;
If this is not the case, contact an authorised Technical Assistance Centre using the telephone number
provided on the guarantee certificate.
Always request the assistance of authorised technicians.
Have the following information to hand:
the type of problem;
the appliance model (Mod.);
the serial number (S/N).
This information can be found on the data plate situated on the rear of the washing machine.
12

Manual de instrucciones
LAVADORA
ES
Español
ARTXL 109
Sumario
ES
Instalación, 14-15
Desembalaje y nivelación
Conexiones hidráulicas y eléctricas
Primer ciclo de lavado
Datos técnicos
Descripción de la lavadora y comienzo
de un programa, 16-17
Panel de control
Pilotos
Cómo abrir y cerrar el cesto
Poner en marcha un programa
Programas, 18
Tabla de programas
Personalizaciones, 19
Seleccionar la temperatura
Seleccionar el centrifugado
Funciones
Detergentes y ropa, 20
Contenedor de detergentes
Ciclo de blanqueo
Preparar la ropa
Prendas especiales
Sistema de equilibrado de la carga
Precauciones y consejos, 21
Seguridad general
Eliminaciones
Ahorrar y respetar el ambiente
Mantenimiento y cuidados, 22
Interrumpir el agua y la corriente eléctrica
Limpiar la lavadora
Cuidar la puerta y el cesto
Limpiar la bomba
Controlar el tubo de alimentación de agua
Cómo limpiar la cubeta de detergente
Anomalías y soluciones, 23
Asistencia, 24
13

Instalación
ES
Es importante conservar este manual para poder
consultarlo en cualquier momento. En caso de venta,
de cesión o de traslado, verifique que permanezca
junto con la lavadora para informar al nuevo propietario sobre el funcionamiento y brindar las correspondientes advertencias.
Lea atentamente las instrucciones: ellas contienen
importante información sobre la instalación, el uso y la
seguridad.
Desembalaje y nivelación
Desembalaje
1. Desembale la
lavadora.
2. Controle que la
lavadora no haya sufrido
daños durante el
transporte. Si estuviera
dañada no la conecte y
llame al revendedor.
3. Quite los cuatro
tornillos de protección
para el transporte y la
arandela de goma con
el correspondiente
distanciador, ubicados
en la parte posterior
(ver la figura).
4. Cierre los orificios con los tapones de plástico
suministrados con el aparato.
5. Conserve todas las piezas: cuando la lavadora deba ser
transportada nuevamente, deberán volver a colocarse.
Atención: si vuelve a utilizar los tornillos más cortos,
se deben colocar arriba.
Los embalajes no son juguetes para los niños.
Nivelación
1. Instale la lavadora sobre un piso plano y rígido, sin
apoyarla en las paredes, muebles ni en ningún otro aparato.
2. Si el piso no está
perfectamente horizontal,
compense las irregularidades desenroscando o
enroscando los pies
delanteros (véase la
figura); el ángulo de
inclinación medido sobre la
superficie de trabajo, no
debe superar los 2º.
Una cuidadosa nivelación brinda estabilidad a la
máquina y evita vibraciones, ruidos y desplazamientos
durante el funcionamiento.
Cuando se instala sobre moquetas o alfombras,
regule los pies para conservar debajo de la lavadora
un espacio suficiente para la ventilación.
Instalación, desplazamientos
Si su lavadora està
dotada de un carro
especial con ruedas
retráctiles, se facilitarà
su desplazamiento.
Para hacer descender
este carro y poder
moverla sin esfuerzo, es
necesario tirar la
palanca, situada abajo a
la izquierda, debajo del
zócalo. Finalizado el
desplazamiento es necesario devolverla a su posición
inicial. A partir de ese momento, la máquina está
sólidamente colocada.
Conexiones hidráulicas y eléctricas
Conexión del tubo de alimentación de agua
1. Introduzca la junta A
en el extremo del tubo de
alimentación y enrósquelo
a un grifo de agua fría
con boca roscada de 3/4
gas (ver la figura).
Antes de conectarlo,
haga correr el agua hasta
que esté límpida.
2. Conecte el tubo de
alimentación a la lavadora enroscándolo en la
toma de agua correspondiente ubicada en la
parte posterior arriba y a
la derecha (véase la
figura).
3. Verifique que el tubo
no tenga pliegues ni
estrangulaciones.
La presión de agua del grifo debe estar comprendida
dentro de los valores contenidos en la tabla de Datos
técnicos (ver la página del costado).
Si la longitud del tubo de alimentación no fuera
suficiente, diríjase a una tienda especializada o a un
técnico autorizado.
No utilice nunca tubos ya usados.
14

Conexión del tubo de descarga
Conecte el tubo de
descarga, sin plegarlo, a
una tubería de descarga
o a una descarga de
pared colocadas a una
65 — 100 cm
altura del piso entre 65 y
100 cm;
No utilice prolongaciones ni conexiones múltiples.
ES
El cable no debe estar plegado ni sufrir
compresiones.
El cable de alimentación debe ser sustituido sólo
por técnicos autorizados.
¡Atención! La empresa fabricante declina toda
responsabilidad en caso de que estas normas no
sean respetadas.
o apóyelo en el borde de
un lavamanos o de una
bañera, uniendo la guía
suministrada con el
aparato, al grifo (ver la
figura). El extremo libre
del tubo de descarga no
debe permanecer
sumergido en el agua.
No se aconseja utilizar tubos de prolongación, si
fuera indispensable hacerlo, la prolongación debe
tener el mismo diámetro del tubo original y no superar
los 150 cm.
Conexión eléctrica
Antes de enchufar el aparato, verifique que:
la toma tenga la conexión a tierra y haya sido
hecha según las normas legales;
la toma sea capaz de soportar la carga máxima de
potencia de la máquina indicada en la tabla de
Datos técnicos (ver al costado);
la tensión de alimentación esté comprendida dentro
de los valores indicados en la tabla de Datos
técnicos (ver al costado);
la toma sea compatible con el enchufe de la
lavadora. Si no es así, sustituya la toma o el
enchufe.
La lavadora no debe ser instalada al aire libre, ni
siquiera si el lugar está reparado, ya que es muy
peligroso dejarla expuesta a la lluvia o a las
tormentas.
Una vez instalada la lavadora, la toma de corriente
debe ser fácilmente accesible.
Primer ciclo de lavado
Después de la instalación y antes del uso, realice un
ciclo de lavado con detergente y sin ropa,
seleccionando el programa 2.
Datos técnicos
Modelo
Dimensiones
Capacidad
Conexiones
eléctricas
Conexiones
hídricas
Velocidad de
centrifugado
Programas de
control según la
norma EN 60456
ARTXL 109
ancho 40 cm.
altura 85 cm.
profundidad 60 cm.
de 1 a 6 kg.
ver la placa de características
técnicas aplicada en la máquina
presión máxima 1 MPa (10 bar)
presión mínima 0,05 MPa (0,5 bar)
capacidad del cesto 42 litros
máxima 1000 r.p.m.
programa 7; temperatura 60ºC;
efectuado con 6 kg. de carga.
Esta máquina cumple con lo
establecido por las siguientes
Directivas de la Comunidad:
— 89/336/CEE del 03/05/89
(Compatibilidad Electromagnética) y
sucesivas modificaciones
— 2002/96/CE
— 2006/95/CE (Baja Tensión)
15

Descripción de la lavadora y
comienzo de un programa
ES
Panel de control
ENCENDIDO/
Botón de ENCENDIDO/APAGADO: para encender
y apagar la lavadora.
Mando de PROGRAMAS: para elegir los programas. Durante
el funcionamiento del programa el mando no se mueve.
Botones con pilotos de FUNCIÓN: para seleccionar
las funciones disponibles. El piloto correspondiente a
la función seleccionada permanecerá encendido.
Mando de CENTRIFUGADO: para seleccionar el
centrifugado o excluirlo (ver Personalizaciones).
Mando de TEMPERATURA: para seleccionar la
temperatura o el lavado en frío (ver Personalizaciones).
Pilotos DE AVANCE DEL CICLO/COMIENZO
RETRASADO: para seguir el estado de avance del
programa de lavado. El piloto encendido indica la fase en
curso. Si se seleccionó la función Comienzo retrasado,
indicarán el tiempo que falta para la puesta en marcha
del programa (ver la página correspondiente).
Piloto PUERTA BLOQUEADA: para saber si la
puerta se puede abrir (ver la página correspondiente).
Botón de
APAGADO
PROGRAMAS
TEMPERATURA
Mando de
CENTRIFUGADO
Mando de
Mando de
Pilotos
DE AVANCE DEL
CICLO/COMIENZO
RETRASADO
Piloto
PUERTA
BLOQUEADA
Botón con piloto
PUESTA EN
Botones con pilotos
FUNCIÓN
Modalidad de stand by
Esta lavasecadora está en conformidad con las nuevas
normativas vinculadas al ahorro energético. Está dotada de
un sistema de auto-apagado (stand by) que, en caso de no
funcionamiento, se activa pasados aproximadamente 30
minutos. Presionar brevemente el botón ENCENDIDO/
APAGADO y esperar que la máquina se active.
MARCHA/PAUSA
Pilotos
Los pilotos suministran información importante.
He aquí lo que nos dicen:
Comienzo retrasado
Si se ha activado la función Comienzo retrasado (ver
Personalizaciones), después de haber puesto en
marcha el programa, comenzará a centellear el piloto
correspondiente al retraso seleccionado:
Con el transcurrir del tiempo se visualizará el retraso
residual con el centelleo de la luz testigo
correspondiente:
Botón con piloto PUESTA EN MARCHA/PAUSA: se
utiliza para poner en marcha los programas o
interrumpirlos momentáneamente.
Nota: Presione este botón para poner en pausa el
lavado en curso, el piloto correspondiente centelleará
con color anaranjado mientras que el de la fase en
curso permanecerá encendido en forma fija. Si el
piloto PUERTA BLOQUEADA
podrá abrir la puerta. Para que el lavado se reanude a
partir del momento en el cual fue interrumpido,
presione nuevamente este botón.
16
está apagado, se
Una vez transcurrido el tiempo fijado, la luz testigo
centelleante se apagará y comenzará el programa
seleccionado.
Pilotos fase en curso
Una vez seleccionado y puesto en marcha el ciclo de
lavado deseado, las luces testigo se encenderán
progresivamente para indicar su estado de avance:

Lavado
Aclarado
Centrifugado
Descarga
Fin del Lavado
Botones de función y pilotos correspondientes
Seleccionando una función, el piloto correspondiente
se iluminará. Si la función seleccionada no es
compatible con el programa elegido, el piloto
correspondiente centelleará y la función no se activará.
Cuando se seleccione una función incompatible con
otra seleccionada precedentemente, permanecerá
activa sólo la última elección realizada.
Piloto puerta bloqueada
El piloto encendido indica que la puerta está
bloqueada para impedir aperturas accidentales; antes
de abrir la puerta es necesario esperar que dicho
piloto se apague, de este modo se evitarán daños
(la espera es de aproximadamente 3 minutos).
Nota: si la función Comienzo retrasado está
activada, la puerta no se puede abrir, para abrirla se
debe poner en pausa la máquina presionando el
botón PUESTA EN MARCHA/PAUSA.
El centelleo rápido del piloto PUESTA EN MARCHA/
PAUSA (anaranjado) simultáneamente con el de las
funciones indica una anomalía (ver Anomalías y
soluciones).
Cómo abrir y cerrar el cesto
Fig. 1
Fig. 2
A) Abertura (Fig. 1):
Levante la tapa externa y ábrala completamente.
B) Abertura del cesto (Soft opening):
Pulse el botón indicado en la fig. 2 con un dedo
y el cesto se abrirá delicadamente.
C) IntroduccIón de la ropa (Fig. 3).
D) Cierre (Fig. 4):
— cierre bien el cesto bajando primero la puerta
delantera y apoyando luego la posterior;
— luego verifique que los ganchos de la puerta
delantera estén perfectamente alojados en la sede
de la puerta posterior;
— después de haber escuchado el «clac»
correspondiente al enganche, ejerza una leve
presión hacia abajo sobre ambas puertas que no
se deben desenganchar;
— por último cierre la tapa externa.
Poner en marcha un programa
1. Encienda la lavadora pulsando el botón ENCENDIDO/
APAGADO. Todos los pilotos se encenderán durante
algunos segundos, luego permanecerán encendidos
sólo los pilotos correspondientes a las configuraciones
para el programa seleccionado y centelleará el piloto
PUESTA EN MARCHA/PAUSA.
2. Cargue la ropa y cierre las puertas y la tapa.
3. Seleccione el programa deseado con el mando de
PROGRAMAS.
4. Fije la temperatura de lavado (ver Personalizaciones).
5. Fije la velocidad de centrifugado (ver
Personalizaciones).
6. Vierta detergente y aditivos (ver Detergentes y ropa).
7. Seleccione las funciones deseadas.
8. Ponga en marcha el programa presionando el
botón PUESTA EN MARCHA/PAUSA y el piloto
correspondiente permanecerá encendido, fijo y de
color verde.
Para anular el ciclo seleccionado ponga en pausa la
máquina presionando el botón PUESTA EN MARCHA/
PAUSA y elija un nuevo ciclo.
9. Al final del programa se iluminará el piloto
piloto PUERTA BLOQUEADA se apagará indicando
que la puerta se puede abrir. Extraiga la ropa y deje la
puerta semicerrada para permitir que el cesto se
seque.Apague la lavadora presionando el botón
ENCENDIDO/APAGADO.
. El
ES
Fig. 3
Fig. 4
17

Programas
ES
Tabla de programas
Te m p .
Descripción del Programa
Programas
Programas Especiales
Ciclo Desinfectante:
7
Ciclo Desinfectante (1):
7
Ciclo Buenas Noches:
8
Baby cycle:
9
Camisas
10
Seda/Cortinas:
11
Lana:
12
Diario (programas para todos los días)
Prelavado Algodón 90°C:
1
Algodón:
2
Algodón (2):
2
Algodón de col or (3):
3
Sintético:
4
Sintético:
4
Mix 30′:
5
aconseja utilizarlo para lana, seda y prendas para lavar a mano).
Mix 15′:
6
aconseja utilizarlo para lana, seda y prendas para lavar a mano).
Programas Parciales
colores delicados muy sucios.
para lana, cachemira, etc.
blancos y colores resistentes muy sucios.
colores resistentes muy sucios.
colores resistentes poco sucios.
para refrescar rápidamente prendas poco sucias (no se
para refrescar rápidamente prendas poco sucias (no se
ropa blanca muy sucia.
blancos y colores resistentes muy sucios.
colores delicados poco sucios.
para prendas de seda, viscosa, lencería
blancos sumamente sucios.
blancos y colores delicados muy sucios.
blancos poco sucios y colores delicados.
.
Velocidad
max.
(°C)
máx.
(r.p.m.)
90° 1000
60° 1000 40° 800 40° 800 40° 600 30° 0 40° 600 —
90° 1000 60° 1000
40° 1000
40° 1000
60° 800 40° 800 —
30° 800 —
30° 800 —
Aclarado Algodón — 1000 — Centrifugado Rápido — 1000 — — — 616
Centrifugado Delicado — 800 — — — 2,5 12
Descarga — 0 — — — 62
Los datos contenidos en la tabla tienen un valor indicativo.
Para todos los Test Institutes:
1) Programa de control según la norma EN 60456: seleccione el programa 7 con una temperatura de 60ºC.
2) Programa algodón largo: seleccione el programa 2 con una temperatura de 40ºC.
3) Programa algodón corto: seleccione el programa 3 con una temperatura de 40ºC.
Detergentes
Blanqu-
eador
Lavado
Suavi-
zante
lll
ll
ll
ll
ll
ll
ll
ll
lll
lll
lll
ll
ll
ll
ll
l
Carga
Duración
máx.
del ciclo
(Kg.)
6 165
6 141
4288
2 116
269
155
155
6 164
6 138
6 123
689
2,5 85
2,5 73
330
1,5 15
636
Programas particulares
Ciclo Desinfectante (programa 7). Un programa higienizante con elevadas temperaturas, prevé el uso del
blanqueador con temperaturas mayores que 60ºC.
Para blanquear vierta el blanqueador, los detergentes y los
aditivos en los compartimentos correspondientes (ver el párrafo Contenedor de detergentes).
Ciclo Buenas noches (programa 8). Es un ciclo silencioso que puede trabajar de noche cuando la tarifa
energética es menor. El programa ha sido estudiado para prendas sintéticas y de algodón. Al final del ciclo, la
máquina se detiene con el agua en la cuba; para realizar el centrifugado y la descarga presione el botón PUESTA
EN MARCHA/PAUSA, de lo contrario, después de 8 horas, la máquina los realizará automáticamente.
Baby Cycle (programa 9). Programa capaz de eliminar la suciedad característica de los niños pero garantizando la
eliminación del detergente de las prendas para evitar problemas de alergia en la piel delicada de los niños. El ciclo
ha sido estudiado para disminuir la carga bacteriana utilizando una mayor cantidad de agua y optimizando el
efecto de aditivos específicos higienizantes agregados al detergente.
Mix 30′ (programa 5) fue estudiado para lavar prendas ligeramente sucias y en poco tiempo: dura sólo 30 minutos
y de esa manera permite ahorrar energía y tiempo. Seleccionando el programa (5 a 30ºC) es posible lavar
conjuntamente tejidos de distinto tipo (excluidas lana y seda), con una carga máxima de 3 kg.
Mix 15′ (programa 6) fue estudiado para lavar prendas ligeramente sucias y en poco tiempo: dura sólo 15 minutos
y de esa manera permite ahorrar energía y tiempo. Seleccionando el programa (6 a 30ºC) es posible lavar
conjuntamente tejidos de distinto tipo (excluidas lana y seda), con una carga máxima de 1,5 kg.
18

Personalizaciones
Seleccionar la temperatura
Girando el mando de la TEMPERATURA se selecciona la temperatura de lavado (ver la Tabla de programas).
La temperatura se puede disminuir hasta el lavado en frío (
La máquina impedirá automáticamente seleccionar una temperatura mayor que la máxima prevista para cada
programa.
).
Seleccionar el centrifugado
Girando el mando de CENTRIFUGADO se selecciona la velocidad de centrifugado del programa seleccionado.
Las velocidades máximas previstas para los programas son:
Programas Velocidad máxima
Algodón 1000 r.p.m.
Sintéticos 800 r.p.m.
Lana 600 r.p.m.
Seda sólo descarga
Se puede disminuir la velocidad de centrifugado o excluirlo seleccionando el símbolo
La máquina impedirá automáticamente efectuar un centrifugado a una velocidad mayor que la máxima prevista
para cada programa.
.
Funciones
Las distintas funciones de lavado previstas por la lavadora permiten obtener la limpieza y el blanco deseados.
Para activar las funciones:
1. presione el botón correspondiente a la función deseada;
2. el encendido del piloto correspondiente indica que la función está activa.
Nota: El centelleo rápido del piloto indica que la función correspondiente no se puede seleccionar para el
programa elegido.
ES
Comienzo retrasado
Retrasa la puesta en marcha de la máquina hasta 12 horas.
Presione varias veces el botón hasta hacer encender la luz testigo correspondiente al retraso deseado. La quinta vez
que se presione el botón, la función se desactivará.
Nota: Una vez presionado el botón PUESTA EN MARCHA/PAUSA, se puede modificar el valor del retraso sólo
disminuyéndolo.
Se puede utilizar en todos los programas.
Plancha fácil
Cuando se selecciona esta función, el lavado y el centrifugado se modificarán oportunamente para disminuir la
formación de arrugas.
En el programa 11 la máquina terminará el ciclo dejando la ropa en remojo y el piloto de la función PLANCHA
FÁCIL y el de PUESTA EN MARCHA/PAUSA centellearán (anaranjado) y el de la fase ACLARADO permanecerá
encendido en forma fija. Para descargar el agua y poder sacar la ropa, es necesario presionar el botón PUESTA
EN MARCHA/PAUSA o el botón PLANCHA FÁCIL.
No se puede activar con los programas 5, 6, 7, 8, 9, 12, , , .
Aclarado extra
Al elegir esta función aumentará la eficacia del aclarado y se asegurará la máxima eliminación del detergente. Es
útil para pieles particularmente sensibles.
No se puede activar con los programas 5, 6, , , .
Super wash
Gracias al uso de una mayor cantidad de agua en la fase inicial del ciclo y al empleo de mayor tiempo, dicha
función garantiza un lavado con óptimos resultados.
No se puede activar con los programas 5, 6, 7, 11, 12, , , , .
19

Detergentes y ropa
ES
Cajón de detergentes
El buen resultado del lavado depende también de la
correcta dosificación del detergente: si se excede la
cantidad, no se lava de manera más eficaz, sino que
se contribuye a encostrar las partes internas de la
lavadora y a contaminar el ambiente.
Extraiga el cajón de
detergentes e introduzca el detergente o el
aditivo de la siguiente
manera:
cubeta 1: Detergente para prelavado (en polvo)
cubeta 2: Detergente para lavado
(en polvo o líquido)
El detergente líquido es conveniente colocarlo directamente en la cuba utilizando la correspondiente bola
de dosificación.
cubeta 3: Aditivos (suavizante, etc.)
Cuando vierta el suavizante en el compartimiento 3,
tenga cuidado de no superar el nivel «max» indicado.
El suavizante se introduce automáticamente
en la máquina durante el último aclarado. Al finalizar
el programa de lavado, en el compartimiento 3
permanece una cantidad residual de agua. La función
de la misma es la introducción de suavizantes muy
densos o diluir a aquellos concentrados. Si en el
compartimiento 3 permaneciera más agua de la
normal, esto significa que el dispositivo de vaciado
está obstruido. Para la limpieza, véase
Mantenimiento y cuidados.
cubeta 4: Blanqueador
Preparar la ropa
Subdivida la ropa según:
— el tipo de tejido / el símbolo en la etiqueta.
— los colores: separe las prendas de color y las
blancas.
Vacíe los bolsillos y controle los botones.
No supere los valores indicados, referidos al peso
de la ropa seca:
Tejidos resistentes: max 6 kg.
Tejidos sintéticos: max 2,5 kg.
Tejidos delicados: max 2 kg.
Lana: max 1 kg.
¿Cuánto pesa la ropa?
1 sábana 400/500 g
1 funda 150/200 g
1 mantel 400/500 g
1 albornoz 900/1200 g
1 toalla 150/250 g
Prendas especiales
Camisas: para lavar camisas de distintos tipos de
telas y color, utilice el programa 10. Garantiza su
máximo cuidado minimizando la formación de
arrugas.
Seda: utilice el programa correspondiente 11 para
lavar todas las prendas de seda. Se aconseja el uso
de un detergente específico para prendas delicadas.
Cortinas: pliéguelas y colóquelas dentro de una
funda o de una bolsa de red. Utilice el programa 11.
Lana: es la única lavadora que ha obtenido el
prestigioso reconocimiento Woolmark Platinum Care
(M.0508) otorgado por The Woolmark Company que
certifica el lavado en lavadora de todas las prendas
de lana, incluidas aquellas que contienen la etiqueta
sólo lavado a mano
programa 12 se puede utilizar la lavadora con total
tranquilidad para lavar todas sus prendas de lana
(máx. 1 kg) garantizando la obtención de los mejores
resultados.
. En consecuencia, con el
Ciclo de blanqueo
El blanqueo se puede realizar sólo con los programas
2, 3, 7,
Vierta el blanqueador en la cubeta 4, el detergente y
el suavizante en las correspondientes cubetas y luego
seleccione uno de los programas indicados.
Es adecuado sólo para prendas de algodón muy
sucias.
20
.
Sistema de equilibrado de la carga
Antes de cada centrifugado, para evitar vibraciones
excesivas y para distribuir la carga de modo uniforme,
el cesto realiza rotaciones a una velocidad
ligeramente superior a la del lavado. Si después de
varios intentos, la carga todavía no está
correctamente equilibrada, la máquina realiza el
centrifugado a una velocidad inferior a la prevista.
Cuando existe un excesivo desequilibrio, la lavadora
realiza la distribución antes que el centrifugado. Para
obtener una mejor distribución de la carga y su
correcto equilibrado, se aconseja mezclar prendas
grandes y pequeñas.

Precauciones y consejos
La lavadora fue proyectada y fabricada en
conformidad con las normas internacionales de
seguridad. Estas advertencias se suministran por
razones de seguridad y deben ser leídas
atentamente.
Seguridad general
El aparato no debe ser empleado por personas
(niños incluidos) con capacidades físicas,
sensoriales o mentales reducidas y con
experiencias y conocimientos insuficientes, a menos
que dicho uso no se realice bajo la supervisión o las
instrucciones de una persona responsable de su
seguridad. Los niños deben ser vigilados para
asegurarse que no jueguen con el aparato.
La lavadora debe ser utilizada sólo por personas
adultas y siguiendo las instrucciones contenidas en
este manual.
Este aparato ha sido fabricado para un uso de tipo
doméstico exclusivamente.
No toque la máquina con los pies desnudos ni con
las manos o los pies mojados o húmedos.
No desenchufe la máquina tirando el cable, sino
tomando el enchufe.
No toque el agua de descarga porque puede
alcanzar temperaturas elevadas.
En ningún caso fuerce la puerta: podría dañarse el
mecanismo de seguridad que la protege de
aperturas accidentales.
En caso de avería, no acceda nunca a los
mecanismos internos para intentar una reparación.
Controle siempre que los niños no se acerquen a la
máquina cuando está en funcionamiento.
Si debe ser trasladada, deberán intervenir dos o
más personas, procediendo con el máximo
cuidado. La máquina no debe ser desplazada
nunca por una sola persona ya que es muy pesada.
Antes de introducir la ropa controle que el cesto
esté vacío.
El símbolo del cubo de basura tachado se marca
sobre todos los productos para recordar al
consumidor la obligación de separarlos para la
recogida selectiva.
El consumidor debe contactar con la autoridad
local o con el vendedor para informarse en relación
a la correcta eleminación de su electrodoméstico
viejo.
Ahorrar y respetar el medio ambiente
Tecnología a servicio del medio ambiente:
ahorrar detergente, agua, energía y tiempo
Para no derrochar recursos es necesario utilizar la
lavadora con la máxima carga. Una carga completa en lugar de dos medias cargas permite ahorrar
hasta el 50% de energía.
El prelavado es necesario sólo para ropa muy
sucia. Evitarlo permite ahorrar detergente, tiempo,
agua y entre el 5 y el 15% de energía.
Tratar las manchas con un quitamanchas o dejarlas
en remojo antes del lavado, disminuye la necesidad
de lavar a altas temperaturas. Un programa a 60ºC
en vez de 90ºC o uno a 40ºC en vez de 60ºC,
permite ahorrar hasta un 50% de energía.
Dosificar bien el detergente en base a la dureza del
agua, al grado de suciedad y a la cantidad de ropa
evita derroches y protege el ambiente: aún siendo
biodegradables, los detergentes contienen elementos que alteran el equilibrio de la naturaleza.
Además, si es posible, evite utilizar el suavizante.
Realizando los lavados desde el atardecer hasta las
primeras horas de la mañana se colabora para
reducir la carga de absorción de las empresas
eléctricas.
La opción Comienzo retrasado ayuda mucho a
organizar los lavados en ese sentido.
ES
Eliminaciones
Eliminación del material de embalaje: respete las
normas locales, de ese modo, los embalajes podrán
volver a ser utilizados.
En base a la Norma europea 2002/96/CE de
Residuos de aparatos Eléctricos y Electrónicos, los
electrodomésticos viejos no pueden ser arrojados
en los contenedores municipales habituales; tienen
que ser recogidos selectivamente para optimizar la
recuperación y reciclado de los componentes y
materiales que los constituyen, y reducir el impacto
en la salud humana y el medioambiente.
Si el lavado debe ser secado en una secadora,
seleccione una velocidad de centrifugado alta.
Poca agua en el lavado, permite ahorrar tiempo y
energía en el programa de secado.
21

Mantenimiento y cuidados
ES
Excluir agua y corriente eléctrica
Cierre el grifo de agua después de cada lavado. De
este modo se limita el desgaste de la instalación
hidráulica de la lavadora y se elimina el peligro de
pérdidas.
Desenchufe la máquina cuando la deba limpiar y
durante los trabajos de mantenimiento.
Limpiar la lavadora
La parte externa y las partes de goma se pueden
limpiar con un paño embebido en agua tibia y jabón.
No use solventes ni productos abrasivos.
Cuidar la puerta y el cesto
Deje siempre semicerrada la puerta para evitar
que se formen malos olores.
Limpiar la bomba
La lavadora posee una bomba autolimpiante que no
necesita mantenimiento. Pero puede suceder que
objetos pequeños (monedas, botones) caigan en la
precámara que protege la bomba, situada en la parte
inferior de la misma.
Verifique que el ciclo de lavado haya terminado y
desenchufe la máquina.
Para recuperar los
objetos caídos en la
precámara:
1. quite el zócalo
ubicado en la parte
inferior delantera de la
lavadora tirando de los
costados con las
manos (ver la figura);
2. desenrosque la tapa
girándola en sentido
antihorario (ver la figura);
es normal que se vuelque
un poco de agua;
3. limpie con cuidado el
interior;
4. vuelva a enroscar la
tapa;
5. vuelva a montar el
panel verificando, antes
de empujarlo hacia la
máquina, que los
ganchos se hayan
introducido en las correspondientes ranuras.
Controle el tubo de alimentación
de agua
Controle el tubo de alimentación al menos una vez al
año. Si presenta grietas o rozaduras se debe sustituir:
durante los lavados, las fuertes presiones podrían
provocar roturas imprevistas.
No utilice nunca tubos ya usados.
Cómo limpiar la cubeta de detergente
Desmontaje:
Ejerza una ligera presión
sobre el botón grande en
la parte delantera de la
cubeta de detergente y
tírelo hacia arriba (fig. 1, 2).
Fig. 1 Fig. 2
22
Limpieza:
Limpie luego la cubeta bajo el grifo (fig. 3) utilizando un
viejo cepillo de dientes y, una vez extraído el par de sifones
ubicados en la parte superior de los compartimientos 1 y
2 (fig. 4), controle que los mismos no estén obstruidos y
enjuáguelos.
Fig. 3
Reinstalación:
No olvide volver a introducir
el par de sifones en sus
correspondientes alojamientos y por último volver a colocar la cubeta en su lugar,
enganchándola (fig. 4, 2, 1).
Fig. 4
Loading…
Hotpoint Ariston ARTXL 109 (EU)
GB
1
Contents
Installation, 2-3
Unpacking and levelling
Connecting the electricity and water supplies
The first wash cycle
Technical data
Description of the washing machine
and starting a wash cycle, 4-5
Control panel
Indicator lights
How to open and shut the drum
Starting a wash cycle
Wash cycles, 6
Table of wash cycles
Personalisation, 7
Setting the temperature
Setting the spin speed
Functions
Detergents and laundry, 8
Detergent dispenser drawer
Bleach cycle
Preparing the laundry
Garments requiring special care
Load balancing system
Precautions and tips, 9
General safety
Disposal
Saving energy and respecting the environment
Care and maintenance, 10
Cutting off the water or electricity supply
Cleaning the washing machine
Caring for your appliance door and drum
Cleaning the pump
Checking the water inlet hose
How to clean the detergent dispenser
Troubleshooting, 11
Service, 12
ARTXL 109
Instructions for use
WASHING MACHINE
English,1
GB
ES
Español,13
Italiano,37
I
ÐÓÑÑÊÈÉ, 25
CIS
ÅëëçíéêÜ,49
GR
View the manual for the Hotpoint Ariston ARTXL 109 (EU) here, for free. This manual comes under the category washing machines and has been rated by 9 people with an average of a 9.4.
This manual is available in the following languages: English. Do you have a question about the Hotpoint Ariston ARTXL 109 (EU) or do you need help?
Ask your question here
Product Images (3)

Hotpoint Ariston ARTXL 109 (EU) specifications
Below you will find the product specifications and the manual specifications of the Hotpoint Ariston ARTXL 109 (EU).
The Hotpoint Ariston ARTXL 109 (EU) is a freestanding washing machine that offers efficient washing capabilities. With its energy efficiency class of A, it ensures that your laundry is cleaned without consuming excessive energy.
This washing machine does not feature a built-in display, providing a simple and straightforward user experience. It is designed to be conveniently placed anywhere in your home without the need for installation or integration into your existing cabinetry.
The ARTXL 109 (EU) offers four washing programs, enabling you to choose the most suitable one for your needs. Whether you have delicate fabrics or heavily soiled clothes, this washing machine provides the versatility to accommodate different types of laundry.
With a large rated capacity of 12 kg, you can wash a significant amount of laundry in one cycle, reducing the number of loads and saving time. The maximum spin speed of 1000 RPM helps to remove excess water efficiently, shortening the drying time for your clothes.
The spin-drying class of C indicates that this washing machine does not offer the highest level of spin drying efficiency, but it still effectively removes water from your laundry.
Measuring 400 millimeters in width, 600 millimeters in depth, and 850 millimeters in height, the ARTXL 109 (EU) has compact dimensions that allow for easy placement in your laundry area.
This washing machine is controlled using buttons and a rotary dial, providing a tactile and intuitive interface for setting your wash preferences. Its reliable construction ensures long-lasting performance and durability.
Number of washing programs
4
General
Power
| A | |
| Energy consumption washing per cycle | — kWh |
| Water consumption per cycle | — L |
Design
| Built-in display | No |
| Loading type | Top-load |
| Appliance placement | Freestanding |
| Control type | Buttons, Rotary |
| Product color | White |
| Door color | White |
Other features
Performance
| Number of washing programs | 4 |
| Drum capacity | 12 kg |
| Maximum spin speed | 1000 RPM |
| Spin-drying class | C |
| Hygiene/anti-allergy, Black, Hand/wool, Quick |
Weight & dimensions
| Width | 400 mm |
| Depth | 600 mm |
| Height | 850 mm |
show more
Frequently Asked Questions
Can’t find the answer to your question in the manual? You may find the answer to your question in the FAQs about the Hotpoint Ariston ARTXL 109 (EU) below.
How do I select the correct wash cycle on the Hotpoint Ariston ARTXL 109 (EU)?
To select the wash cycle on your Hotpoint Ariston ARTXL 109 (EU), turn the program selector knob to the desired cycle. Each cycle is indicated by a label or symbol on the control panel.
How much detergent should I use for a standard wash load?
For a standard wash load in the Hotpoint Ariston ARTXL 109 (EU), it is recommended to use approximately 100-150 ml of detergent. However, the precise amount may vary depending on the specific type and concentration of the detergent you are using.
What should I do if the washing machine is not draining water after a wash cycle?
If the washing machine is not draining water, first ensure that the drain hose is not obstructed or kinked. Additionally, check if the drain pump filter is clean and free from debris. If the issue persists, there may be a problem with the drain pump, and it is advised to contact a professional technician for assistance.
Why is the washing machine vibrating excessively during the spin cycle?
Excessive vibration during the spin cycle of your Hotpoint Ariston ARTXL 109 (EU) can be caused by an unbalanced load. Make sure to distribute the clothes evenly inside the drum and avoid overloading. Also, ensure that the washing machine is properly leveled by adjusting its feet if needed.
How can I clean the detergent dispenser drawer?
To clean the detergent dispenser drawer of your Hotpoint Ariston ARTXL 109 (EU), remove it from the machine by firmly pulling it out. Then, wash it under running water to remove any residue or buildup. Ensure that all compartments are thoroughly cleaned and dry before reinserting the drawer back into the washing machine.
Is the Hotpoint Ariston ARTXL 109 (EU) energy efficient?
Yes, it has an energy efficiency class of A. This means it is a high-performing and energy-saving washing machine.
Does the Hotpoint Ariston ARTXL 109 (EU) have a built-in display?
No, it does not have a built-in display. This means it might not offer advanced features that require a display, but it still provides basic washing functions.
Can the Hotpoint Ariston ARTXL 109 (EU) be placed anywhere?
Yes, it is a freestanding washing machine. This means you can place it anywhere in your home without the need for additional installation.
Is the Hotpoint Ariston ARTXL 109 (EU) good at washing clothes?
Yes, it has a washing class of A. This means it provides excellent cleaning performance and ensures your clothes come out fresh and clean.
How many washing programs does the Hotpoint Ariston ARTXL 109 (EU) have?
It has 4 washing programs. This means it offers a decent range of options to meet different laundry needs, but it may be limited compared to other models with more programs.
What is the height of the Hotpoint Ariston ARTXL 109 (EU)?
The Hotpoint Ariston ARTXL 109 (EU) has a height of 850 mm.
What is the width of the Hotpoint Ariston ARTXL 109 (EU)?
The Hotpoint Ariston ARTXL 109 (EU) has a width of 400 mm.
What is the depth of the Hotpoint Ariston ARTXL 109 (EU)?
The Hotpoint Ariston ARTXL 109 (EU) has a depth of 600 mm.
What temperature should I use for my laundry?
The washing label of your garment shows the recommended washing temperature.
How do I prevent my washing machine from smelling?
Unpleasant odours can be avoided by occasionally washing at 60 degrees and using the recommended amount of detergent per wash.
Do I need to use an anti-scaling agent for my washing machine?
It is not necessary to use an anti-scaling agent. Scale deposits can be prevented by limiting washing at high temperatures and using the recommended amount of detergent per wash.
Is the manual of the Hotpoint Ariston ARTXL 109 (EU) available in English?
Yes, the manual of the Hotpoint Ariston ARTXL 109 (EU) is available in English .
Is your question not listed? Ask your question here
Раздел: Бытовая, кухонная техника, электроника и оборудование
Тип: Посудомоечная Машина
Характеристики, спецификации
Установка:
отдельно стоящая
Тип загрузки:
вертикальная
Максимальная загрузка белья:
6 кг
Управление:
электронное (интеллектуальное)
Размеры (ШxГxВ):
40x60x85 см
Класс электропотребления:
A
Класс эффективности стирки:
A
Класс эффективности отжима:
C
Скорость вращения при отжиме:
до 1000 об/мин
Выбор скорости отжима:
есть
Защита от протечек:
частичная (корпус)
Контроль за уровнем пены:
есть
Программа стирки шерсти:
есть
Специальные программы:
стирка деликатных тканей, предотвращение сминания, стирка детской одежды, супер-полоскание, экспресс-стирка, программа удаления пятен
Таймер отсрочки начала стирки:
есть
Материал изготовления бака:
пластик
Инструкция к Посудомоечной Машиной Hotpoint-Ariston ARTXL 109

Руководство по
эксплуатации
СТИРАЛЬНАЯ МАШИНА
Содержание
CIS
Установка, 2-3
CIS
Распаковка и нивелировка
Подключение к водопроводу и электричеству
Русский
Первый цикл стирки
Технические характеристики
Описание стиральной машины и
порядка запуска программы, 4-5
Панель управления
Индикаторы
Как открыть и закрыть барабан
Порядок запуска программы
Программы, 6
Таблица программ
Персонализированные настройки, 7
ARTXL 1097
Регулировка температуры
Выбор скорости отжима
Дополнительные функции
Моющие средства и типы белья, 8
Распределитель моющих средств
Отбеливание
Подготовка белья
Изделия, требующие деликатной стирки
Система балансировки белья
Предосторожности и рекомендации, 9
Общие требования к безопасности
Утилизация
Экономия энергии и охрана окружающей среды
Техническое обслуживание и уход, 10
Отключение воды и электричества
Уход за стиральной машиной
ход за дверцей машины и барабаном
Чистка насоса
Проверка заливного шланга
Как чистить распределитель моющих средств
Поиск неисправностей и методы их
устранения, 11
Сервисное обслуживание, 12
1
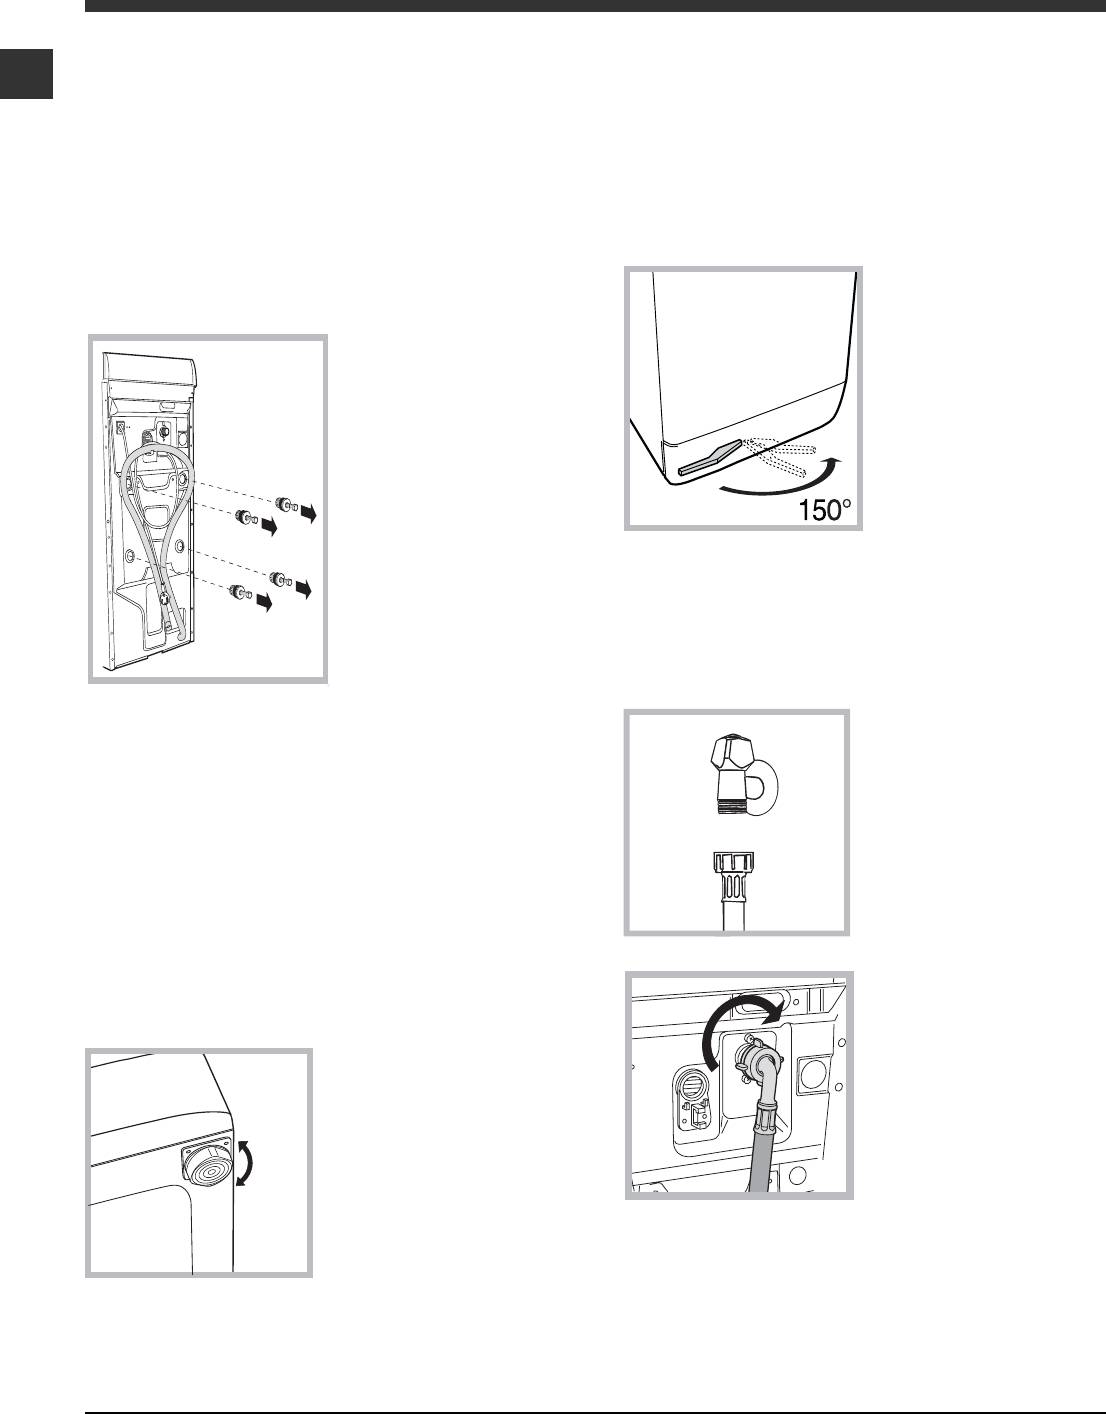
Установка
! Сохраните данное руководство. Оно должно быть
Правильное выравнивание оборудования поможет
CIS
в комплекте со стиральной машиной в случае
избежать шума, вибраций и смещений во время
продажи, передачи оборудования или при
работы машины.
переезде на новую квартиру, чтобы новый
Если стиральная машина стоит на полу, покрытом
владелец оборудования мог ознакомиться с
ковром, убедитесь, что ее основание возвышает-
правилами его функционирования и обслуживания.
ся над ковром. В противном случае вентиляция
будет затруднена или вовсе невозможна.
!
Внимательно прочитайте руководство: в нем
содержатся важные сведения по установке и
Установка машины на место и перемещение
безопасной эксплуатации стиральной машины.
Ваша стиральная
машина может быть
Распаковка и выравнивание
оснащена специальны-
Распаковка
ми убирающимися ко-
1. Распакуйте
лесами для облегчения
стиральную машину.
ее перемещения.
2.Убедитесь, что
Чтобы опустить колеса
оборудование не было
и передвинуть обору-
повреждено во время
дование, просто потя-
транспортировки. При
ните за рычаг,
обнаружении поврежде-
расположенный слева
ний – не подключайте
под основанием маши-
машину – свяжитесь
ны. После установки
с поставщиком
оборудования в требуемое положение верните
немедленно.
рычаг в исходное поло.
3. Удалите четыре
Подключение к водопроводной и
транспортировочных
электрической сети
винта и резиновые
пробки с
Подсоединение заливного шланга
прокладками,
1. Прикрутите шланг
расположенные в задней части стиральной
подачи к крану холодной
машины (см. рис.).
воды с резьбовым
4. Закройте отверстия прилагающимися
отверстием 3/4 gas (см.
пластиковыми заглушками.
схему).
5. Сохраняйте все детали: они Вам понадобятся
Перед подсоединением
при последующей транспортировке стиральной
откройте водопроводный
машины.
кран до тех пор, пока из
болты, резиновые шайбы и большую металличес-
него не потечет чистая
кую поперечную планку. Закройте образовавшиеся
вода.
отверстия пластмассовыми заглушками.
! Не разрешайте детям играть с упаковочными
2. Подсоедините залив-
материалами.
ной шланг к стиральной
машине, навинтив его
Выравнивание
на водоприемник,
1. Установите стиральную
расположенный в
машину на ровном и
задней верхней части
прочном полу, так чтобы
справа (см. рис.).
она не касалась стен,
мебели и прочих
предметов.
2. После установки
3.Убедитесь, что шланг не перекручен и не
машины на место отрегу-
пережат.
лируйте ее устойчивое
! Давление воды должно быть в пределах значе-
положение путем враще-
ний, указанных в таблице Технических характе-
ния передних ножек (см. рис.). Для этого сначала
ристик (см. с. 27).
ослабьте контргайку, после завершения регулировки
! Если длина водопроводного шланга окажется
контргайку затяните. После установки машины на место
недостаточной, обратитесь в Авторизованный
проверьте по уровню горизонтальность верхней крышки
Сервисный центр.
корпуса, отклонение горизонтали должно быть не более 2°.
2

Подсоединение сливного шланга
z розетка заземлена в соответствии с нормами безо-
Повесьте загнутый конец
пасности, описанными в данном разделе инструкции
CIS
сливного шланга на край
(допускается организация заземления рабочим ну-
раковины, ванны, или
лем, при условии, что защитная линия не имеет раз-
поместите в
рыва и подключена напрямую в обвод каких-либо
приборов (например, электрического счетчика).
специальный вывод
канализации. Шланг не
Если вилка не подходит к розетке, ее следует заменить
FP
должен перегибаться.
на новую, соответствующую розетке, или заменить пита-
Верхняя точка сливного
ющий кабель. Замена кабеля должна производиться
шланга должна нахо-
только квалифицированным персоналом.
диться на высоте 65-100
Запрещается использование переходников, двойных и
см от пола. Расположе-
более розеток и удлинителей (они создают опасность
ние сливного шланга
возгорания). Если Вы считаете их использование необ-
должно обеспечивать
ходимым, применяйте один единственный удлинитель,
разрыв струи при сливе
удовлетворяющий требованиям безопасности.
(конец шланга не
Оборудование, подключенное с нарушением требова-
должен быть опущен в
ний безопасности бытовых приборов большой
воду).
мощности, изложенных в данной инструкции, являет-
В случае крепления на
ся потенциально опасным.
край ванной или ракови-
Производитель не несет ответственности за ущерб
ны, шланг вешается с
здоровью и собственности, если он вызван
помощью направляющей
несоблюдением указанных норм установки.
(входит в комплект
поставки), которая
Первый цикл стирки
крепится к крану (рис.).
По завершении установки, перед началом эксплуатации
! Не рекомендуется применение удлинителей для
необходимо произвести один цикл стирки со
сливного шланга, при необходимости допускается
стиральным порошком, но без белья, по программе 2.
его наращивание шлангом такого же диаметра и
длиной не более 150 см.
Техничесêие хараêтеристиêи
Подсоединение к электросети
Внимание! Оборудование обязательно должно быть
заземлено!
Модель ARTXL 1097
1. Машина подключается к электрической сети при по-
ши р и н а 40 см
мощи двухполюсной розетки с заземляющим контактом
Размеры
высота 85 см
(розетка не поставляется с машиной). Фазный провод
ãлóбина 60 см
должен быть подключен через автомат защиты сети, рас-
считанный на максимальный ток (ток срабатывания) 16
Заãрóзêа 1 — 6 êã
А, и имеющий время срабатывания не более 0,1 с.
cмотрите паспортнóю табличêó с
2. При наличии вблизи от предполагаемого места уста-
Элеêтричесêие
техничесêими хараêтеристиêами на
новки машины розетки с заземляющим контактом,
параметры
машине
имеющей трехпроводную подводку кабеля с медными
жилами сечением не менее 1,5 кв. мм (или алюминие-
max давление 1 Мпа (10 бар)
Гидравличесêие
выми жилами сечением не менее 2,5 кв. мм), доработка
min давление 0,05 Мпа (0,5 бар)
параметры
электросети не производится. При отсутствии указанной
объем барабана 42 л
розетки и проводки следует провести их монтаж.
Сêорость отжима до 1000 об/мин
3. Прокладка заземления отдельным проводом не
допускается.
Kонтрольные
4. Для доработки электрической сети рекомендуется
проãраммы
проãрамма ; температ
óра 60°С;
применять провод типа ППВ 3х1,5 380 ГОСТ 6223-79.
соãласно нормативó
при заãрóзêе до 6 êã.
Допускается применение других марок кабеля, обеспе-
EN 60456
чивающих пожаро- и электробезопасность при эксплуа-
тации машины.
Машина соответствóет следóющим
Диреêтивам Европейсêоãо
Перед включением машины в сеть убедитесь, что:
Эêономичесêоãо сообщества:
z розетка и проводка соответствуют требованиям, изло-
— 89/336 /ЕЕС от 03.05.89 (элеêтро—
женным в данном разделе инструкции;
маãнитной совместимости) и
z напряжение и частота тока сети соответствуют данным
последóющие модифиêации
машины;
— 2002/96/CE
z розетка и вилка одного типа;
— 2006/95/CE (низêоãо напряжения)
3
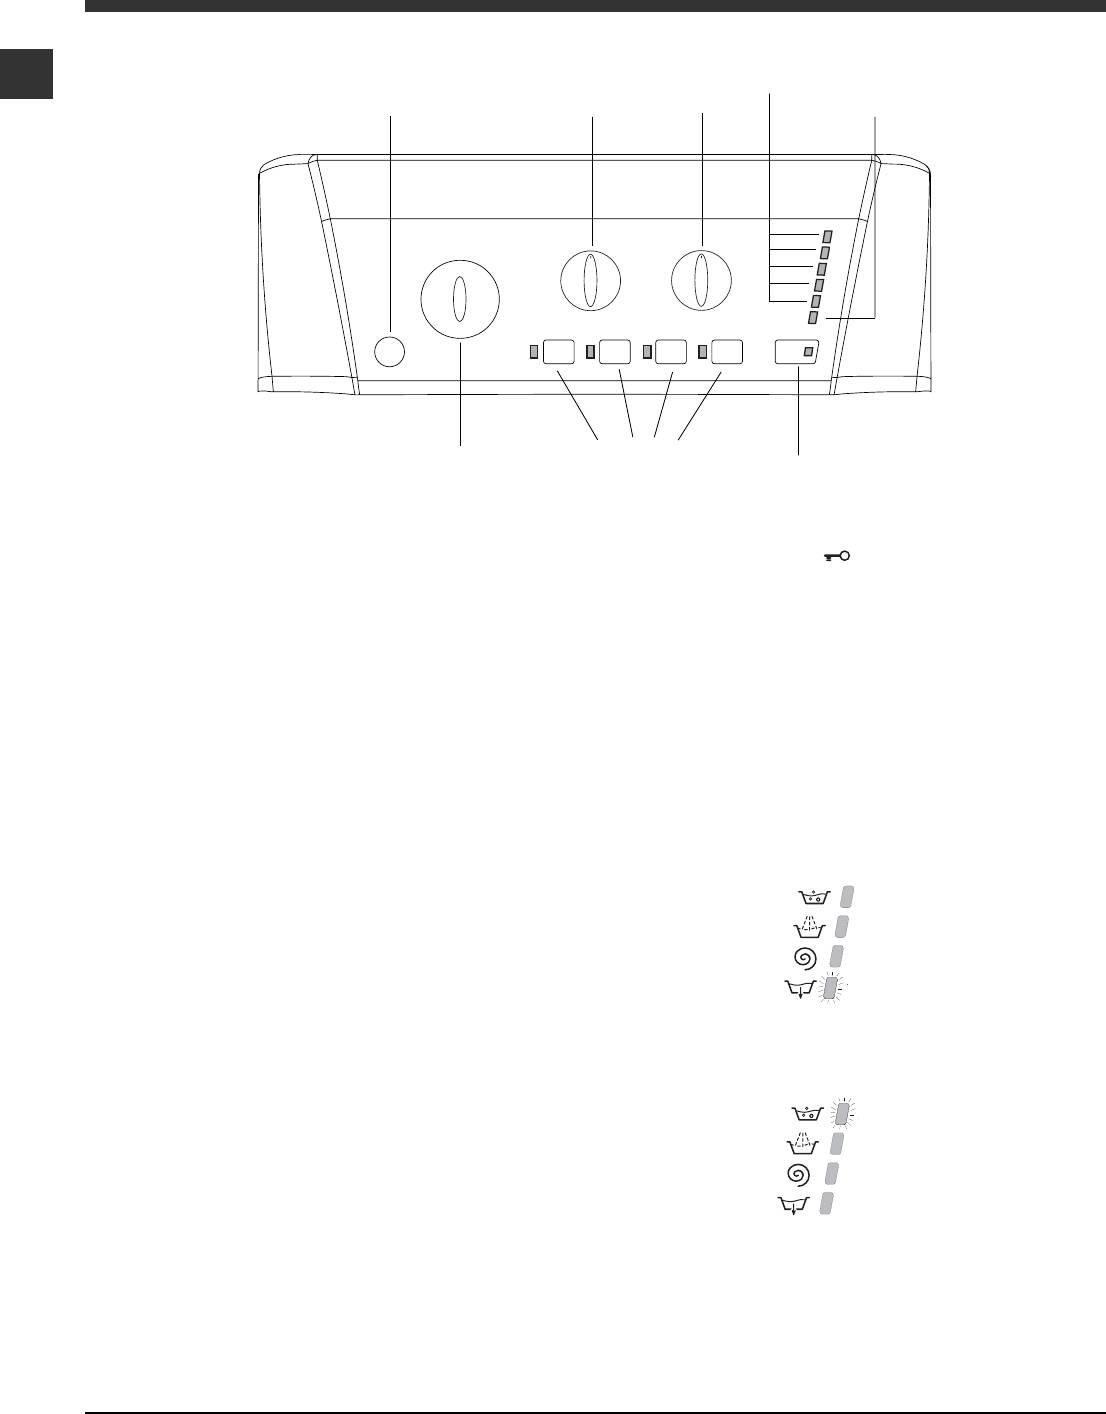
Описание стиральной машины и
порядка запуска программы
Панель управления
Индикаторы ВЫПОЛНЕНИЯ ФАЗ
CIS
ЦИКЛА/ЗАПУСКА С ЗАДЕРЖКОЙ
Кнопка
Регулятор
Скорости
Индикатор БЛОКИРОВКИ
ВКЛ/ВЫКЛ
ТЕМПЕРАТУРЫ
ОТЖИМА
ЛЮКA
Рукоятка выбора
Кнопка с
индикатором
ПРОГРАММА
ПУСК/ПАУЗА
Кнопки с индикаторами
дополнительных
ФУНКЦИЙ
Кнопка ВКЛ/ВЫКЛ: служит для включения и
стирки будет гореть, не мигая. Если индикатор
выключения стиральной машины.
БЛОКИРОВКИ ЛЮКA
погас, можно открыть люк.
Для возобновления цикла стирки с момента, когда
Рукоятка выбора ПРОГРАММА: служит для
он был прерван, вновь нажмите ПУСК/ПАУЗА.
выбора программ. В процессе выполнения
программы рукоятка не вращается.
Индикаторы
Кнопки с индикаторами дополнительных
ФУНКЦИЙ: служат для выбора имеющихся
Индикаторы сообщают пользователю важные
дополнительных функций. Индикатор,
сведения. Значение индикаторов:
соответствующий выбранной функции, останется
включенным.
Таймер отсрочки
Если была включена функция “Таймер отсрочки”
Скорости ОТЖИМА: служит для выбора скорости
(см. «Персонализированные настройки»), после
отжима или для его исключения
запуска программы начнет мигать индикатор,
(см «Персонализированные настройки»).
соответствующий заданному времени задержки:
Регулятор ТЕМПЕРАТУРЫ: служит для настройки
3Ч
температуры или для стирки в холодной воде
6Ч
(см. «Персонализированные настройки»).
9Ч
индикаторы ВЫПОЛНЕНИЯ ФАЗ ЦИКЛА/
12Ч
ЗАПУСКА С ЗАДЕРЖКОЙ: показывают
последовательность выполнением программы
По мере отсчета времени будет показываться
стирки. Включенный индикатор соответствует
остающееся время вместе с миганием
текущей фазе.Если была включена функция
соответствующего индикатора.
“Таймер отсрочки”, индикаторы будут показывать
время, остающееся до запуска программы (см.
3Ч
страницу сбоку).
6Ч
Индикатор БЛОКИРОВКИ ЛЮКA: показывает,
9Ч
можно ли открыть люк (см. страницу сбоку).
12Ч
Кнопка с индикатором ПУСК/ПАУЗА: служит для
По прошествии заданного времени задержки мигающий
запуска или для временного прерывания
индикатор погаснет, и запустится заданная программа.
программы.
ПРИМЕЧАНИЕ: для временного прерывания
Индикаторы текущей фазы цикла:
текущего цикла стирки нажмите эту кнопку.
После выбора и запуска цикла стирки индикаторы
Соответствующий индикатор замигает
будут загораться один за другим, показывая
оранжевымцветом, а индикатор текущей фазы
последовательность выполнения программы:
4
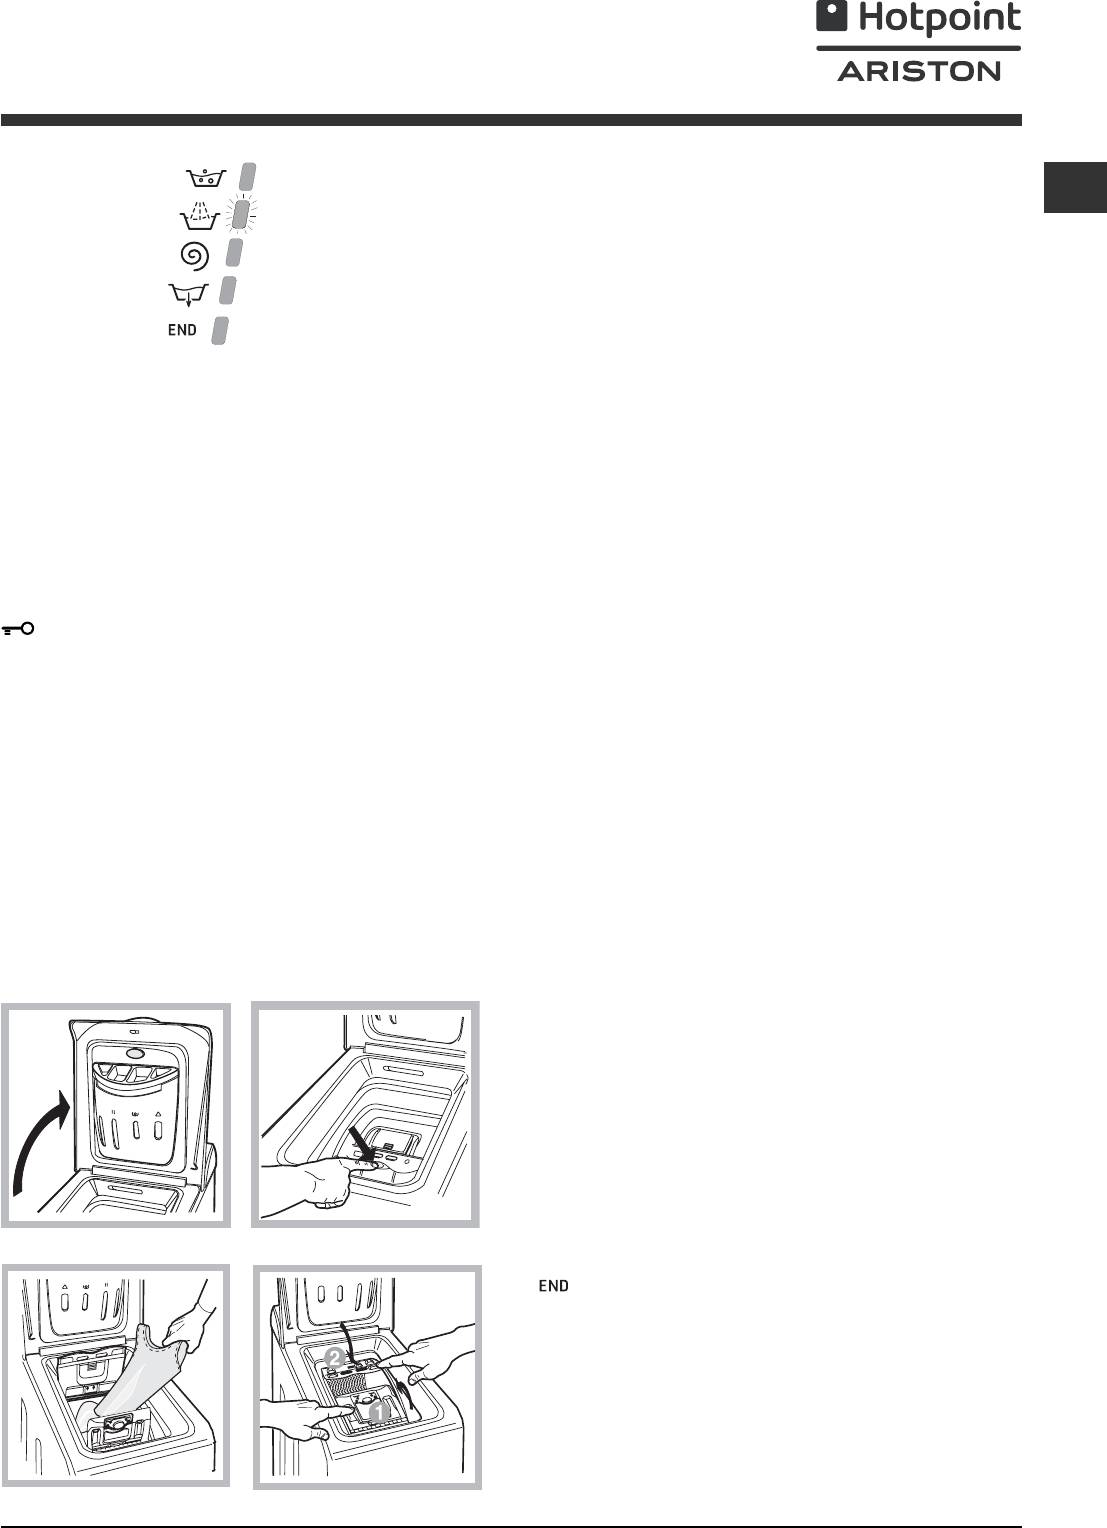
Cтирка
A) ОТКРЫВАНИЕ (рис. 1).
CIS
Поднимите внешнюю крышку и полностью ее
Полоскание
откройте.
Отжим
B) Открывание барабана (Soft opening – Плавное
открывание):
Слив
Нажмите кнопку, показанную на рис. 2, крышка
Конец цикла
барабана плавно откроется.
Кнопки дополнительный функций и
C) ЗАГРУЗКА СТИРАЛЬНОЙ МАШИНЫ (рис. 3).
соответствующие индикаторы
При выборе функции загорается соответствующая кнопка.
D) ЗАКРЫВАНИЕ (рис. 4).
Если выбранная функция является несовместимой с
— закройте полностью барабан, опуская сначала
заданной программой, соответствующий индикатор будет
переднюю дверцу, а затем заднюю;
мигать, и такая функция не будет включена.
— затем удостоверьтесь, что крюки передней
Если будет выбрана функция, несовместимая с другой,
дверцы точно вошли в предназначенные места на
ранее выбранной функцией, останется включенной только
задней дверце;
последняя выбранная функция.
— после того, как крюки защелкнулись, нажмите обе
дверцы слегка вниз, чтобы убедиться они закрыты
Индикатор блокировки люка:
плотно;
Включенный индикатор означает, что люк заблокирован во
— и, наконец, закройте внешнюю крышку.
избежание его случайного открывания. Во избежание его
повреждения необходимо дождаться, когда индикатор
погаснет, перед тем как открыть люк (Обычно индикатор
Порядок запуска программы
гаснет через 3 минуты после окончания стирки).
1. Включите стиральную машину, нажав кнопку ВКЛ/
ПРИМЕЧАНИЕ: если включена функция “Таймер
ВЫКЛ. Все индикаторы загорятся на несколько
отсрочки”, люк открыть нельзя. Для этого необходимо
секунд, затем погаснут, останется мигать индикатор
переключить машину в режим паузы при помощи
ПУСК/ПАУЗА.
кнопки ПУСК/ПАУЗА.
2. Загрузите белье, закройте дверцы и крышку.
! Быстрое мигание индикатора ПУСК/ПАУЗА
(оранжевый) одновременно с индикатором функций
3. Задайте рукояткой ПРОГРАММА нужную
означает неисправность (см. «Неисправности и
программу.
методы их устранения»).
4. Задайте температуру стирки (см.
«Персонализированные настройки»).
Как открыть и закрыть барабан
5. Задайте скорость отжима (см.
«Персонализированные настройки»).
6. Поместите моющие средства и добавки (см.
«Стиральные вещества и типы белья»).
7. Включите нужные дополнительные функции.
8. Запустите программу при помощи кнопки ПУСК/ПАУЗА,
соответствующий индикатор загорится зеленым цветом.
Для отмены заданного цикла переключите машину в
режим паузы при помощи кнопки ПУСК/ПАУЗА и выберите
новый цикл.
рис. 1
рис. 2
9. По завершении программы загорится индикатор
. Индикатор БЛОКИРОВКИ ЛЮКA погаснет,
показывая, что теперь можно открыть люк. Выньте
белье и оставить люк полуоткрытым для сушки
барабана.
Выключите стиральную машину, нажав кнопку ВКЛ/
ВЫКЛ.
рис. 3
рис. 4
5
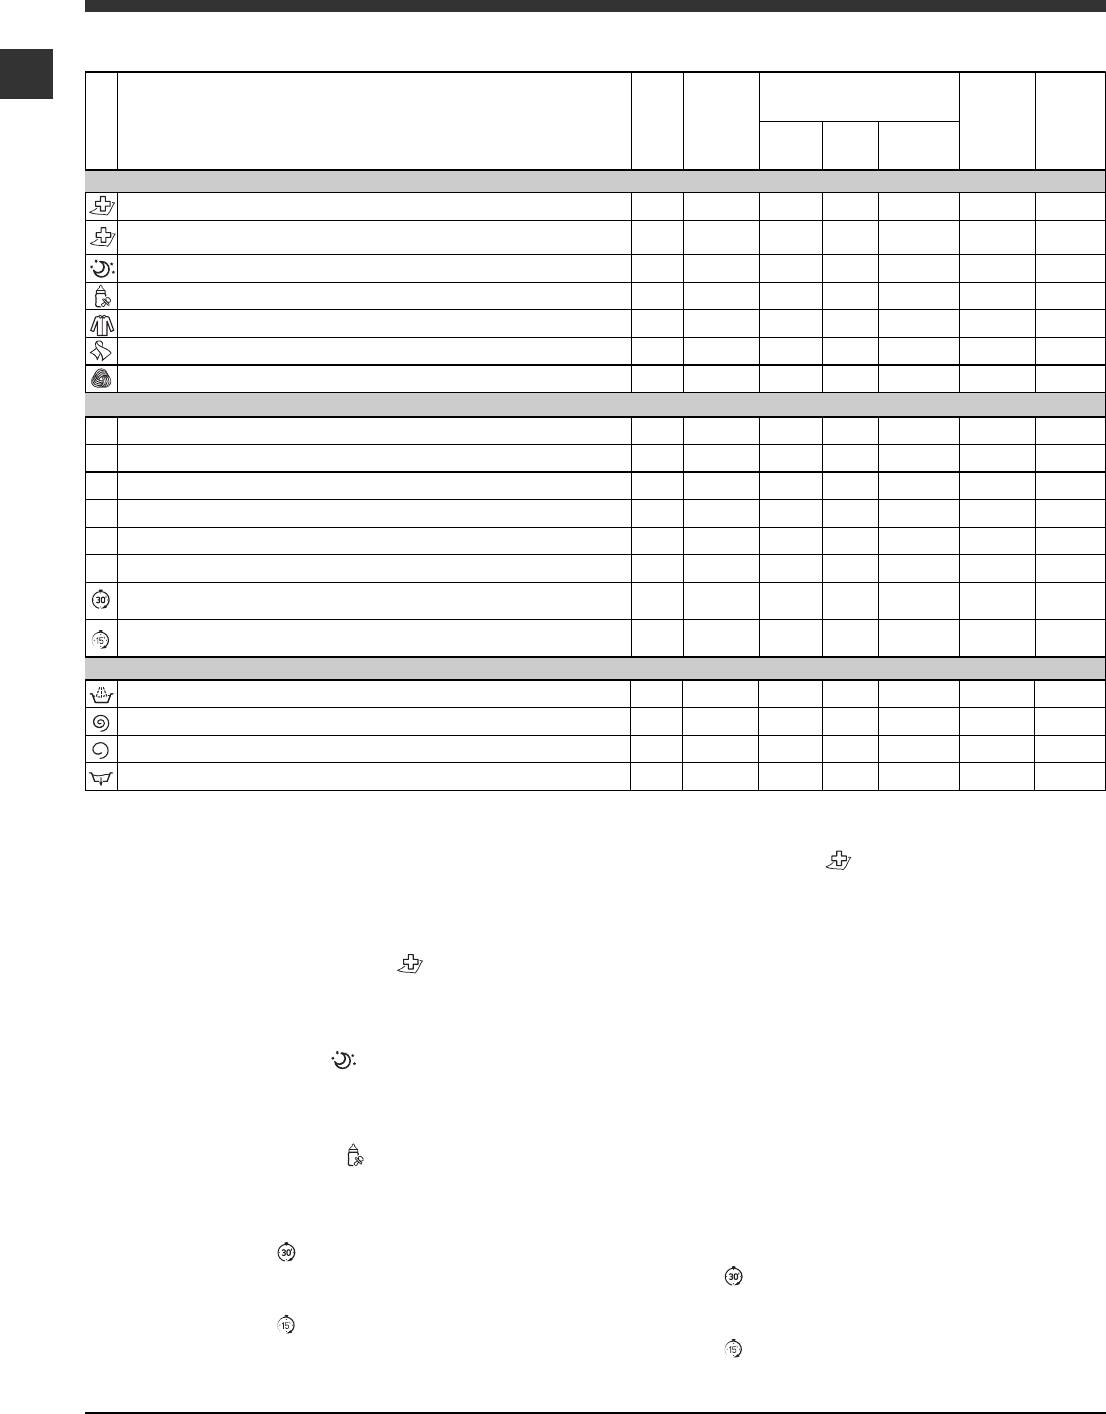
Программы
Таблица программ
CIS
Стиральные средства
Маêс
Маêс.
Маêс.
Продол—
Описание проãраммы
темп.
сêорость
заãрóзêа
житть
(°C)
(об./мин.)
Отбел—
Стирêа Ополасêи—
(êã)
циêла
Программы
иватель
ватель
Специальные проãраммы
ЦИKЛ АНТИБАKТЕРИЯ: сильнозаãрязненное белое белье.
90° 1000
zz z
6165
ЦИKЛ АНТИБАKТЕРИЯ (1): сильнозаãрязненное белое и прочное цветное
60° 1000 —
zz
6141
белье.
НОЧНОЙ ЦИKЛ: слабозаãрязненное делиêатное цветное белье.
40° 800 —
zz
4288
ДЕТСKОЕ БЕЛЬЕ: сильнозаãрязненное делиêатное цветное белье.
40° 800 —
zz
2116
РУБАШKИ
40° 600 —
zz
269
ШЕ Л K/ЗАНАВЕСKИ: для изделий из ше л êа, висêозы и нижнеãо белья.
30° 0 —
zz
155
ШЕ Р С Т Ь : для шерс т и, êашемира и т.д.
40° 600 —
zz
155
Ежедневные проãраммы
1
ПРЕДВАРИТЕЛЬНАЯ + ХЛОПОK 90°: очень сильно заãрязненное белое белье.
90° 1000 —
zz
6164
2
ХЛОПОK: сильнозаãрязненное белое и прочное цветное белье.
60° 1000
zz z
6138
2
ХЛОПОK (2): сильнозаãрязненное белое и делиêатное цветное белье.
40° 1000
zz z
6123
3
ХЛОПОK (3): сильнозаãрязненное белое и цветное делиêатное белье.
40° 1000
zz z
689
4
СИНТЕТИKА: сильнозаяãрязненное белье прочное цветное белье.
60° 800 —
zz
2,5 85
4
СИНТЕТИKА: слабозаãрязненное прочное цветное белье.
40° 800 —
zz
2,5 73
MИKС 30′: для быстроãо освежения малоãрязноãо белья (не для ше р с ти,
30° 800 —
zz
330
ше л êа и изделия рóчной стирêи).
MИKС 15′: для быстроãо освежения малоãрязноãо белья (не для ше р с т и ,
30° 800 —
zz
1,5 15
ше л êа и изделия рóчной стирêи).
Дoполнительные проãраммы
Полос êание
— 1000 —
z
636
Отжим
— 1000 — — 616
Делиêатный отжим
— 800 — — 2,5 12
Слив
— 0 — — 62
Приведенные в таблице значения являются примерными.
Для всех институтов тестирования:
1) Программы управления в соответствии с Директивой EN 60456: задайте программу
с температурой 60°C.
2) Длинная программа для х/б белья: задайте программу 2 с температурой 40°C.
3) Короткая программа для х/б белья: задайте программу 3 с температурой 40°C.
Специальные программы
ЦИKЛ АНТИБАKТЕРИЯ
(программа ). Дезинфецирующая программа с высокой температурой,
предусматривающая использование отбеливателя при температуре выше 60°C.
Для отбеливания залейте
отбеливатель, моющее средство и добавки в соответствующие ячейки (см параграф «Распределитель моющих
средств»).
НОЧНОЙ ЦИKЛ
(программа ). Это бесшумный цикл, который можно включить ночью, экономя электроэнергию.
Данная программа расчитана на стирку синтетических и х/б вещей. По завершении цикла машина
останавливается с водой в барабане; для слива и отжима нажмите кнопку ПУСК/ПАУЗА, в противном случае по
прошествии 8 часов машина автоматически произведет слив воды и отжим.
ДЕТСKОЕ БЕЛЬЕ
(программа ). Программа удаляет типичные загрязнения детской одежды, гарантируя удаление
моющего средства из ткани во избежание аллергии чувствительной детской кожи. Данный цикл расчитан на
сокращение количества бактерий благодаря использованию большего объема воды и оптимизируя воздействие
специальных дезинфицирующих добавок старильного вещества.
MИKС 30′
(программа ) предназначена для быстрой стирки слабозагрязненного белья цикл длится всего 30 минут,
что позволяет сэкономить время и электроэнергию. По этой программе (
, 30°C) можно стирать вместе белье из
разных тканей (за исключением шерсти и шелка) с максимальной загрузкой 3 кг.
MИKС 15′
(программа ) предназначена для быстрой стирки слабозагрязненного белья цикл длится всего 15 минут,
что позволяет сэкономить время и электроэнергию. По этой программе (
, 30°C) можно стирать вместе белье из
разных тканей (за исключением шерсти и шелка) с максимальной загрузкой 1,5 кг.
6

Персонализированные
настройки
Регулировка температуры
Настройка температуры стирки производится при помощи регулятора ТЕМПЕРАТУРЫ (см.Таблицу программ).
CIS
Значение температуры может быть уменьшено вплоть до стирки в холодной воде (
).
Машина автоматически не допускает выбор температуры, превышающийs максимальное значение,
предусмотренное для каждой прораммы.
Выбор скорости отжима
Выбор скорости отжима выбранной программы производится при помощи регулятора скорости ОТЖИМ.
Для разных программ предусматривается разная максимальная скорость отжима:
Программы Максимальная скорость отжима
Хлопок 1000 оборотов в минуту
Синтетические ткани 800 оборотов в минуту
Шерсть 600 оборотов в минуту
Шелк без отжима
Скорость отжима может быть уменьшена, или же отжим может быть совсем исключен, повернув регулятор в
положение
.
Машина автоматически не допускает выбор скорости отжима, превышающий максимальную скорость,
предусмотренную для каждой прораммы.
Дополнительные функции
Различные функции стирки машины позволяют достичь желаемой чистоты и белизны вашего белья.
Порядок выбора функций:
1. нажмите кнопку нужной вам функции;
2. включение соответствующего индикатора означает, что функция включена.
Примечание: Частое мигание индикатора означает, что данная функция не может быть выбрана для заданной
программы.
Таймер отсрочки
Задерживает запуск цикла вплоть до 12 часов.
Нажмите кнопку несколько раз вплоть до включения индикатора, соответствующего нужному значению задержки.
При пятом нажатии кнопки функция отключается.
ПРИМЕЧАНИЕ: После нажатия кнопки ПУСК/ПАУЗА, можно изменить значение задержки только в сторону
уменьшения.
! Эта функция совместима с любой программой.
Легкая глажка
При выборе этой функции циклы стирки и отжима изменяются таким образом, чтобы сократить складки на
белье. По завершении цикла машина производит медленное вращение барабана.
При выборе программы 4,
, машина завершает цикл без слива воды, и Индикатор функции ЛЕГКАЯ
ГЛАЖКА и индикатор ПУСК/ПАУЗА мигают (оранжевым цветом), индикатор фазы “Полоскание” горит, не
мигая. Для слива воды и выгрузки белья необходимо нажать кнопку ПУСК/ПАУЗА или кнопку ЛЕГКАЯ
ГЛАЖКА.
! Эта функция несовместима с программами , , , , , , , , .
Дополнительное Полоскание
При выборе этой функции повышается эффективность ополаскивания, обеспечивая максимальное удаление
моющего вещества. Эта функция особенно удобна для людей с кожей, чувствительной к стиральным веществам.
! Эта функция несовместима с программами , , , , .
Суперстирка
Обеспечивает оптимальную стирку благодаря использованию большего объема воды в начале цикла и большей
продолжительности цикла.
! Эта функция несовместима с программами , , , , , , , , .
7
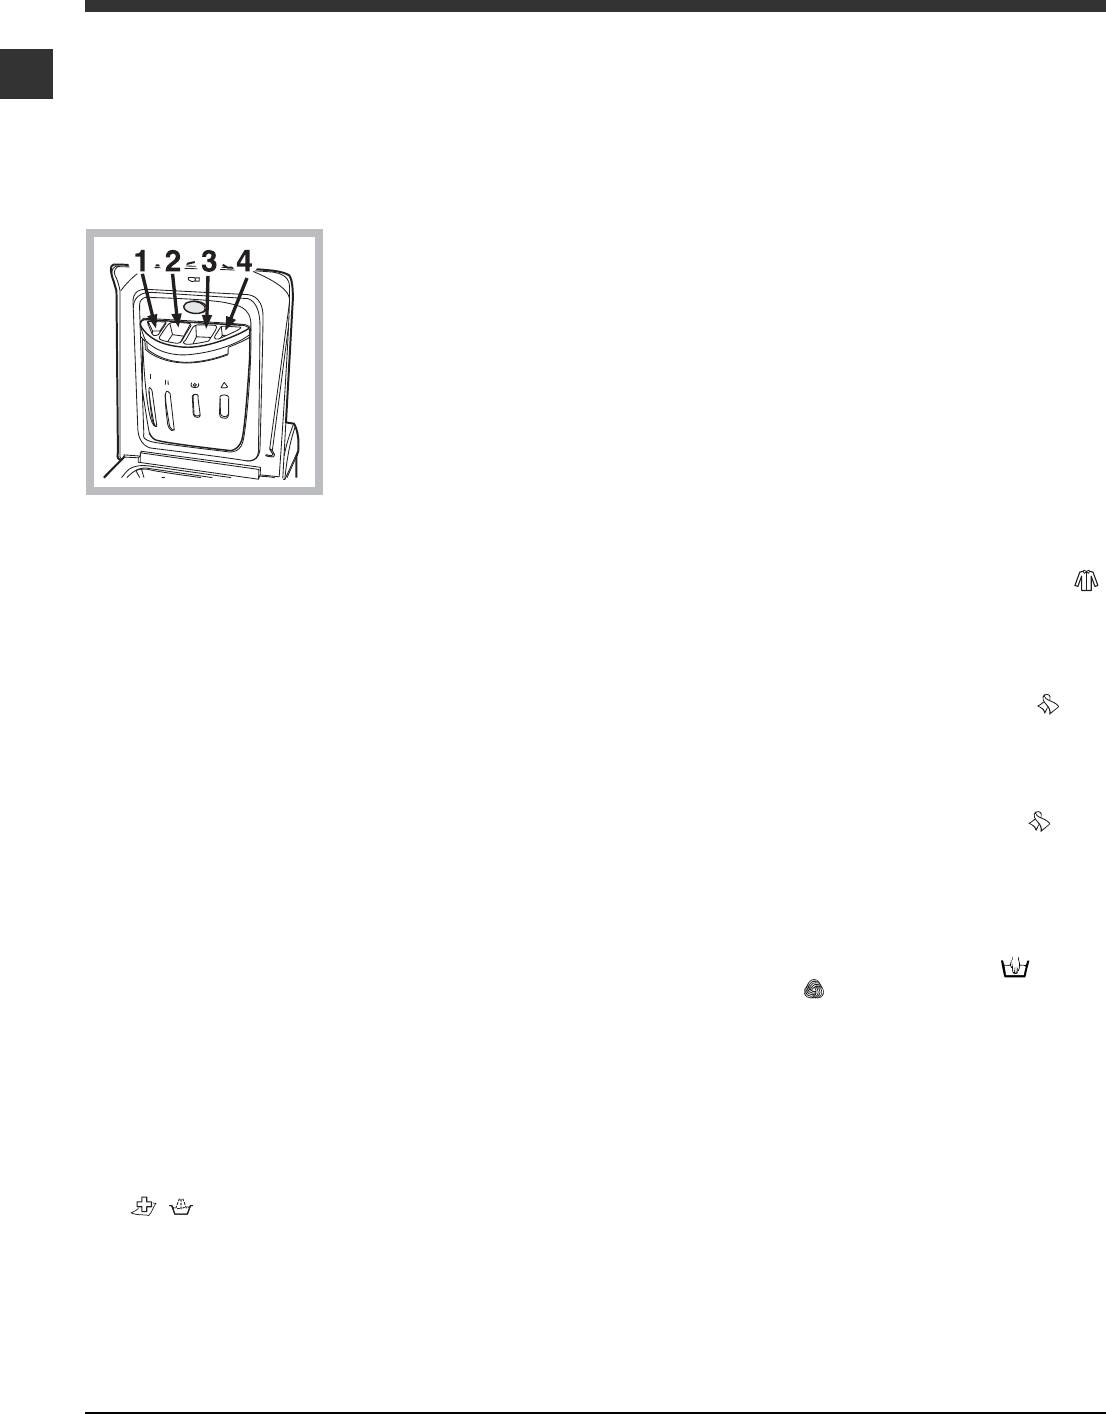
Моющие средства и
типы белья
Распределитель моющих средств
Подготовка белья
CIS
Хороший результат стирки зависит также от правиль-
• Разделите белье по следующим признакам:
ной дозировки моющего средства: его избыток не
— тип ткани / обозначения на этикетке.
гарантирует более эффективную стирку, напротив
— цвет: отделите цветное белье от белого.
может привести к образованию налетов внутри
• Выньте из карманов все предметы и проверьте пуговицы.
машины и загрязнению окружающей среды.
• Не превышайте максимальную загрузку барабана,
указанную для сухого белья:
Выдвиньте распредели-
Прочные ткани: макс. 6 кг
тель и заполните его
Синтетические ткани: макс. 2,5 кг
отделения моющим
Деликатные ткани: макс. 2 кг
средством и смягчите-
Шерсть: макс. 1 кг
лем:
Сколько весит белье?
1 простыня 400-500 гр.
1 наволочка 150-200 гр.
1 скатерть 400-500 гр.
1 халат 900-1200 гр.
1 полотенце 150-250 гр.
Отделение 1: моющее средство для предва-
Изделия, требующие деликатной
рительной стирки (порошок)
стирки
ячейка 2: Стиральное вещество
Рубашки: используйте специальную программу
(порошок или жидкость)
для стирки рубашек из разных тканей и разных
цветов.
Жидкое стиральное вещество следует помещать
Это обеспечит максимальную сохранность вещей и
непосредственно в барабан в специальном
сделает их менее мятыми.
круглом пластмассовом дозаторе.
Шелк: используйте специальную программу
для
ячейка 3: Добавки (ополаскиватель и т.д.)
стирки всех шелковых вещей. Рекомендуется
Когда вы наливаете ополаскиватель в ячейку 3,
использовать специальное стиральное вещество
обращайте внимание, чтобы не превысить
для деликатных тканей.
максимальный уровень, указанный отметкой «max».
Занавески: сверните и положите в наволочку или в
Ополаскиватель автоматически подается в
сетчатый мешочек. Используйте программу
.
барабан в процессе последнего ополаскивания.
Шерсть: Стиральная машина марки Hotpoint/Ariston
По завершении программы стирки в ячейке 3
единственная получила престижный знак Woolmark
остается вода. Она необходима для подачи в
Platinum Care (M.0508) от Компании The Woolmark
барабан очень густых ополаскивателей, т.е. для
Company, который сертифицирует машинную стирку
разбавления концентрированных
всех шерстяных изделий, даже тех, на этикетках
ополаскивателей. Если в ячейке 3 останется воды
которых указано «только ручная стирка»
. При
больше нормального, это значит, что канал слива
выборе программы
вы можете надежно и
ополаскивателя в барабан засорился. Смотрите
эффективно стирать любые шерстяные изделия
описание чистки ячеек на стр. “Техническое
(макс. 1 кг) с гарантированным лучшими
обслуживание и уход”.
результатами.
ячейка 4:
Цикл отбеливания
Система балансировки белья
Перед каждым отжимом во избежание чрезмерных
Отбеливание
вибраций и для равномерного распределения белья
в барабане машина производит вращения со
Отбеливание производится только с программами
скоростью, слегка превышающей скорость стирки.
2, 3,
, .
Если после нескольких попыток белье не будет
Добавьте отбеливатель в чашу 4, моющее средство и
правильно сбалансировано, машина произведет
ополаскиватель в соответствующие отделения, затем
отжим на меньшей скорости по сравнению с
выберите одну из вышеуказанных программ.
предусмотренной.
Рекомендуется только для очень грязного х/б белья.
8

Предосторожности и
рекомендации
! Стиральная машина спроектирована и изготовлена в
Экономия энергии и охрана
соответствии с международными нормативами по
CIS
окружающей среды
безопасности. Необходимо внимательно прочитать
настоящие предупреждения, составленные в целях
Экономия моющих средств, воды, электро-
вашей безопасности.
энергии и времени
Общие требования к безопасности
• Для экономии ресурсов следует максимально
• Данное изделие предназначено исключительно для
загружать стиральную машину. Один цикл стирки
домашнего использования.
при полной загрузке вместо двух циклов с
• Стиральной машиной должны пользоваться только
наполовину загруженным барабаном позволяет
взрослые лица, соблюдающие инструкции,
сэкономить до 50% электроэнергии.
приведенные в данном техническом руководстве.
• Не прикасайтесь к изделию влажными руками,
• Цикл предварительной стирки необходим только
босиком или во влажной одежде.
для очень грязного белья. При цикле
• Не тяните за сетевой кабель для отсоединения
предварительной стирки расходуется больше
изделия из электро розетки, возьмитесь за вилку
стирального порошка, времени, воды и на 5 –
рукой.
15% больше электроэнергии.
• Избегайте контактов со сливаемой водой, так как
она может быть очень горячей.
• Если вы обработаете пятна пятновыводителем
• Категорически запрещается открывать люк силой:
или замочите белье перед стиркой, это поможет
это может привести к повреждению защитного
избежать стирки при высоких температурах.
механизма, предохраняющего от случайного
открытия машины.
Использование программы стирки при 60°C
вместо 90°C, или 40°C вместо 60°C позволяет
• В случае неисправности категорически
сэкономить до 50% электроэнергии.
запрещается открывать внутренние механизмы
изделия с целью их самостоятельного ремонта.
• Правильная дозировка стирального порошка в
• Избегайте контактов детей с работающей
стиральной машиной.
зависимости от жесткости воды, степени
загрязнения и объема загружаемого белья
• При необходимости переместить стиральную
машину следует выполнять эту операцию вдвоем
помогает избежать нерационального расхода
или втроем с предельной осторожностью. Никогда
моющего средства и загрязнения окружающей
не перемещайте машину в одиночку, так как
среды: хотя стиральные порошки и являются
машина очень тяжелая.
биоразлагаемыми, они содержат вещества,
• Перед загрузкой в стиральную машину белья
отрицательно влияющие на экологию. Кроме
проверьте, чтобы барабан был пуст.
того, по возможности избегайте использовать
ополаскиватели.
Утилизация
• Уничтожение упаковочных материалов: соблюдайте
• Использование стиральной машины утром или
местные нормативы с целью повторного
вечером уменьшит пиковую нагрузку на
использования упаковочных материалов.
электросеть. С помощью функции «Таймер
• Согласно Европейской Директиве 2002/96/СЕ
отсрочки» можно запрограммировать начало
касательно утилизации электронных и электрических
стирки с вышеуказанной целью.
электроприборов электроприборы не должны
выбрасываться вместе с обычным городским
• Если белье должно сушиться в автоматической
мусором. Выведенные из строя приборы должны
сушке, необходимо выбрать большую скорость
собираться отдельно для оптимизации их утилизации и
рекуперации составляющих их материалов, а также
отжима. Интенсивный отжим сэкономит время и
для безопасности окружающей среды и здоровья.
электроэнергию при автоматической сушке.
Символ зачеркнутая мусорная корзинка, имеющийся
на всех приборах, служит напоминанием об их
отдельной утилизации.
За более подробной информацией о правильной
утилизации бытовых электроприборов пользователи
могут обратиться в специальную государственную
организацию или в магазин.
9
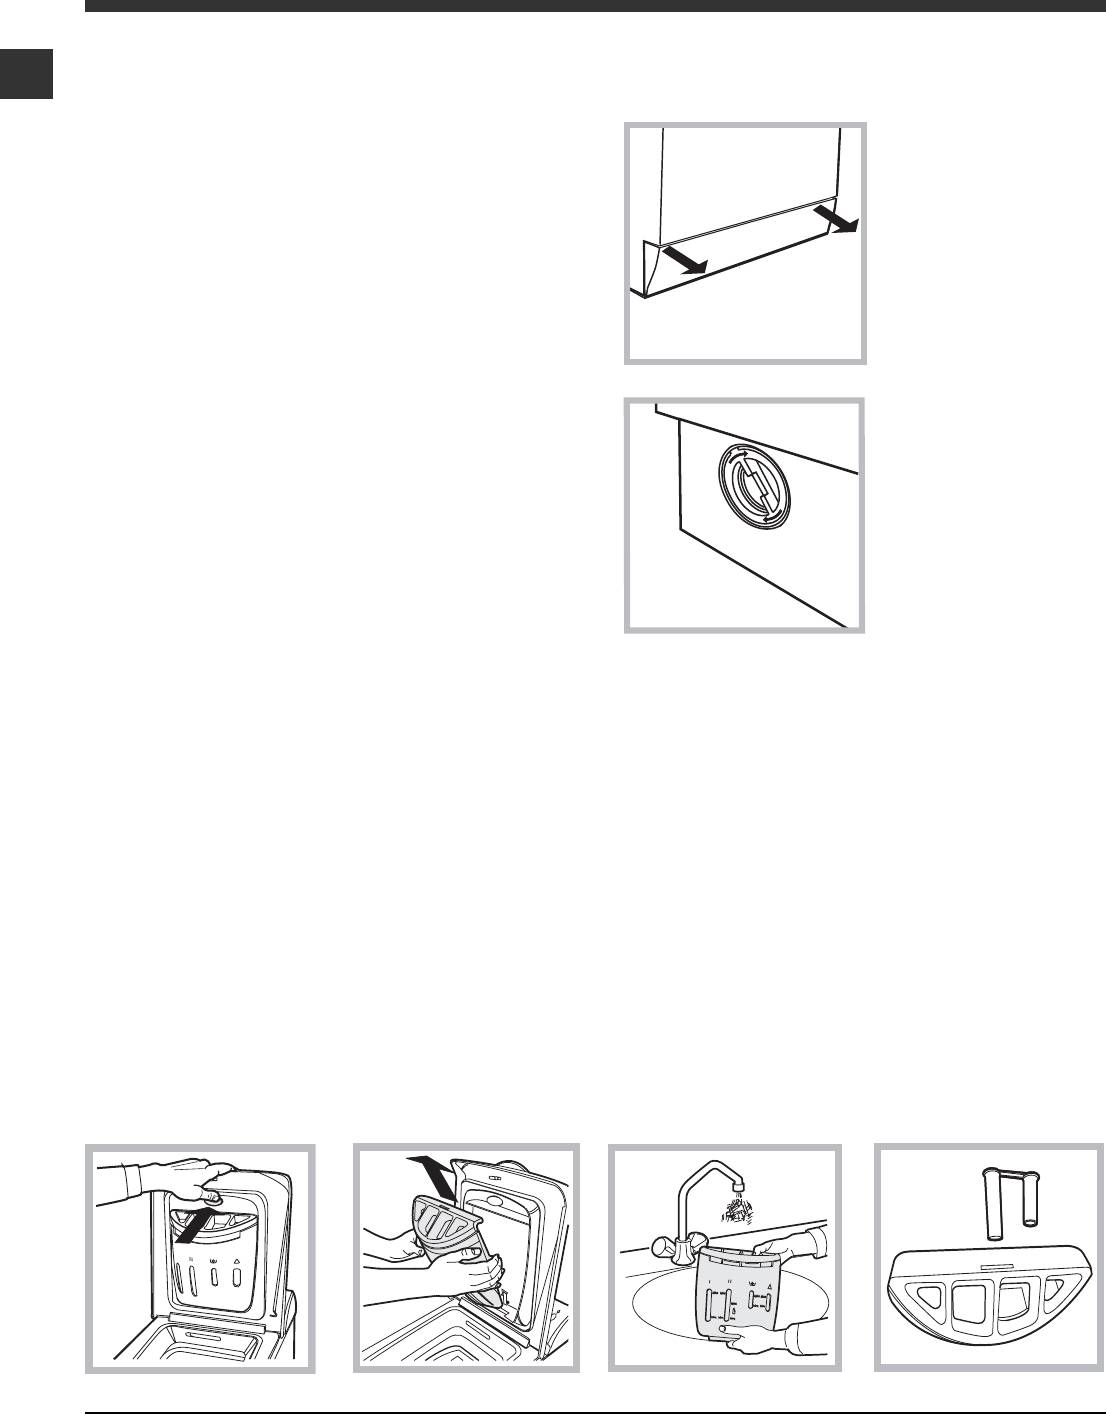
Техническое обслуживание
и уход
Отключение воды и электричества
Как достать предметы, упавшие в пространство
CIS
между барабаном и кожухом машины:
• Перекрывайте водопроводный кран после каж-
дой стирки. Таким образом сокращается износ
1. снимите нижний
водопроводной системы стиральной машины и
плинтус в передней
устраняется вероятность протечек.
части стиральной
машины, потянув
• Всегда вынимайте вилку из розетки перед мой-
обеими руками за его
кой и обслуживанием машины.
края (смотрите
рисунок);
Уход за стиральной машиной
2. выверните крышку
фильтра, вращая ее
Внешние и резиновые части машины очищайте
против часовой стрел-
мягкой тканью с теплой мыльной водой. Не ис-
ки (см. рис.): из
пользуйте растворители или абразивные чистящие
насоса может вылить-
средства.
ся немного воды – это
нормальное явление.
3.тщательно прочистите
Уход за дверцей машины
фильтр изнутри;
и барабаном
4. заверните крышку
обратно;
• После каждой стирки оставляйте дверцу маши-
ны полуоткрытой во избежание образования в
5. установите на
барабане неприятных запахов и плесени.
место переднюю
панель, предваритель-
Чистка насоса
но убедившись, что крюки вошли в
соответствующие петли.
Стиральная машина имеет сливной насос самоочи-
Проверка заливного шланга
щающегося типа, который не требует очистки или
особого обслуживания. Однако мелкие предметы
Проверяйте шланг не реже одного раза в год. При
(монеты, пуговицы и др.) могут случайно попасть в
любых признаках течи или повреждения немед-
насос. Для их извлечения насос оборудован
ленно замените шланг. Во время работы машины
«уловителем» — фильтром, доступ к которому
неисправный шланг, находящийся под давлением
закрыт нижней передней панелью.
воды, может внезапно лопнуть.
!
Никогда не используйте шланги, бывшие в
! Убедитесь, что цикл стирки закончился, и отклю-
употреблении.
чите оборудование от сети.
Как чистить распределитель моющих средств
Разборка:
Чистка:
Сборка:
Слегка нажмите на большую
Затем промойте распределитель под струей воды (рис. 3),
Установите пару сифонов в
кнопку на передней стороне
используя старую зубную щетку. Выньте пару сифонов,
специальные отверстия и за-
распределителя и вытяните
вставленных в вершину отделений 1 и 2 (рис. 4), проверьте
тем поместите распредели-
его вверх (рис. 1, 2)
.
не забиты ли они и промойте их.
тель на место, вставляя его
до щелчка (рис. 4, 2, 1).
рис. 1
рис. 2
рис. 3
рис. 4
10

Поиск неисправностей и
методы их устранения
Если ваша стиральная машина не работает. Прежде чем обратиться в Центр Сервисного обслуживания
CIS
(см. Сервисное обслуживание), проверьте, можно ли устранить неисправность, следуя рекомендациям,
приведенным в следующем перечне.
Неисправности:
Возможные причины / Методы устранения:
Стиральная машина не
• Штепсельная вилка не соединена с электро розеткой или отходит и не
включается.
обеспечивает контакта.
• В доме отключено электричество.
Цикл стирки не запускается.
• Люк плохо закрыт.
• Не была нажата кнопка ВКЛ/ВЫКЛ.
• Не была нажата кнопка ПУСК/ПАУЗА.
• Перекрыт водопроводный кран.
• Была запрограммирована задержка запуска цикла (Таймер отсрочки,
(см. «Персонализированные настройки»).
Стиральная машина не заливает
• Водопроводный шланг не подсоединен к крану.
воду (часто мигает индикатор
• Шланг согнут.
первой фазы стирки).
• Перекрыт водопроводный кран.
• В доме нет воды.
• Недостаточное водопроводное давление.
• Не была нажата кнопка ПУСК/ПАУЗА.
Машина непрерывно заливает и
• Сливной шланг не находится на высоте 65 – 100 см. от пола (см. «Установка»).
сливает воду.
• Конец сливного шланга погружен в воду (см. «Установка»).
• Настенное сливное отверстие не оснащено вантузом для выпуска
воздуха.
Если после вышеперечисленных проверок неисправность не будет
устранена, следует перекрыть водопроводный кран, выключить
стиральную машину и обратиться в Центр Сервисного Обслуживания.
Если ваша квартира находится на последних этажах здания, могут
наблюдаться явления сифона, поэтому стиральная машина производит
непрерывный залив и слив воды. Для устранения этой аномалии в
продаже имеются специальные клапаны против явления сифона.
Стиральная машина не сливает
• Выбранная программа не предусматривает слив воды: для некоторых
воду и не отжимает белье.
программ необходимо включить слив вручную.
• Включена функция ЛЕГКАЯ ГЛАЖКА: для завершения программы
нажмите кнопку ПУСК/ПАУЗА (см. «Персонализированные
настройки»).
• Сливной шланг согнут (см. «Установка»).
• Засорен сливной трубопровод.
Стиральная машина сильно
• В момент установки стиральной машины барабан был разблокирован
вибрирует в процессе отжима.
неправильно (см. «Установка»).
• Стиральная машина установлена неровно (см. «Установка»).
• Машина зажата между стены и мебелью (см. «Установка»).
Утечки воды из стиральной
• Плохо прикручен водопроводный шланг (см. «Установка»).
машины.
• Засорен распределитель моющего средства (порядок его чистки см. в
параграфе «Техническое обслуживание и уход»).
• Сливной шланг плохо закреплен (см. «Установка»).
Индикатор ПУСК/ПАУЗА
• Выключите машину и выньте штепсельную вилку из сетевой розетки,
(оранжевый) и индикаторы
подождите 1 минуту и вновь включите машину.
функций часто мигают.
Если неисправность не устраняется, обратитесь в Сервисную Службу.
В процессе стирки образуется
• Моющее средство непригодно для стирки в стиральной машине (на
слишком обильная пена.
упаковке должно быть указано «для стирки в стиральной машине»,
«для ручной и машинной стирки» или подобное).
• В распределитель было помещено чрезмерное количество моющего
средства.
11

Сервисное
195079610.00
06/2009 — Xerox Fabriano
обслуживание
Мы заботимся о своих покупателях и стараемся сделать сервисное обслуживание наиболее
CIS
качественным. Мы постоянно совершенствуем наши продукты, чтобы сделать Ваше общение с
техникой простым и приятным.
Уход за техникой
Продлите срок эксплуатации и снизьте вероятность поломки техники.
Воспользуйтесь профессиональными средствами для ухода за техникой от Indesit Professional для наиболее
простого, эффективного и легкого ухода за Вашей бытовой техникой.
Продукты Indesit Professional производятся в Италии с соблюдением высоких европейских стандартов в
области качества, экологии и безопасности использования и созданы с учетом многолетнего опыта
производителя техники. Узнайте подробнее на сайте www.hotpoint-ariston.ru в разделе «Сервис» и
спрашивайте в магазинах Вашего города.
Авторизованные сервисные центры
Чтобы быть ближе к нашим потребителям, мы создали широкую сервисную сеть, особенностью которой
является высокая подготовка, профессионализм и честность сервисных мастеров. На сегодняшний день она
насчитывает около 350 сервисных центров на территории России и СНГ.
Их контакты Вы можете найти в сервисном сертификате и на сайте www. hotpoint-ariston.ru в разделе
«Сервис».
Если вам надо обратиться в сервисный центр:
Внимание! При ремонте требуйте использования оригинальных запасных частей.
Перед тем как обратиться в Службу Сервиса:
• Проверьте, нельзя ли устранить неисправность самостоятельно (см. «Неисправности и методы их
устранения»);
• Вновь запустите программу для проверки исправности машины;
• В протвном случае обратиться в Авторизованный Сервисный Центр по телефонам, указанным в
гарантийном таллоне.
! Никогда не обращайтесь к неавторизованным сервисным центрам.
При обращении в Сервисную Службу необходимо сообщить:
• тип неисправности;
• номер гарантийного документа (сервисной книжки, сервисного сертификата и т.п.);
• модель машины (Мод.) и серийный номер (S/N), указанные в информационной табличке, расположен-
ной на задней панели стиральной машины.
Другую полезную информацию и новости Вы можете найти на сайте www. hotpoint-ariston.ru в
разделе «Сервис».
12
Аннотации для Посудомоечной Машиной Hotpoint-Ariston ARTXL 109 в формате PDF
Топ 10 инструкций
Другие инструкции