
Для того, чтобы скачать инструкции по эксплуатации для стиральными машинами Hoover, необходимые Вам, выберете модель,
соответствующую Вашему устройству.
Список моделей для стиральными машинами Hoover Вы можете увидеть ниже. Когда Вы найдете необходимый Вам файл, кликните напротив
него кнопку «Скачать», чтобы перейти на конечную страницу для загрузки руководства пользователя для стиральными машинами Hoover. Обратите
внимание, представленные в нашем каталоге инструкции пользователя для стиральными машинами Hoover находятся в PDF формате и всегда
доступны для бесплатной загрузки.
Если Вы не можете найти необходимый Вам мануал, свяжитесь с нами. Просто оставьте свой запрос на отсутствующий файл через нашу
контактную форму, и мы постараемся Вам помочь.
Обзор
- Посудомоечные машины Инструкция (2)
- Пылесосы Инструкция (12)
- Стиральные машины Инструкция (11)
View the manual for the Hoover HVP 16 ALU-03 S here, for free. This user manual comes under the category washing machines and has been rated by 1 people with an average of a 7.5. This manual is available in the following languages: English. Do you have a question about the Hoover HVP 16 ALU-03 S?
Ask your question here
Frequently asked questions
Can’t find the answer to your question in the manual? You may find the answer to your question in the FAQs about the Hoover HVP 16 ALU-03 S below.
What temperature should I use for my laundry?
The washing label of your garment shows the recommended washing temperature.
How do I prevent my washing machine from smelling?
Unpleasant odours can be avoided by occasionally washing at 60 degrees and using the recommended amount of detergent per wash.
Do I need to use an anti-scaling agent for my washing machine?
It is not necessary to use an anti-scaling agent. Scale deposits can be prevented by limiting washing at high temperatures and using the recommended amount of detergent per wash.
Is the manual of the Hoover HVP 16 ALU-03 S available in English?
Yes, the manual of the Hoover HVP 16 ALU-03 S is available in English .
Is your question not listed? Ask your question here
Washing machine Instructions for use
®

Introduction
Please read these instructions for use carefully and all other information enclosed with the
washing machine.
Keep all documentation in a safe place for future reference or for any future owners.
Note: this machine is solely for domestic use.
Notes on disposal
All packaging material used is environmentally-friendly and recyclable. Please help dispose of
the packaging via environmentally-friendly means.
Your supplier or local council will be able to give you
details of current means of disposal.
Valuable materials can be salvaged from an old appliance via scrap reprocessing.
Note: pull out the mains plug from any old appliance.
Cut the power cable and dispose of it, together with the
plug.
When disposing of an old washing machine, please ensure that the door lock is rendered
inoperable to prevent children shutting themselves in the appliance.
2

Contents Page
Introduction 2
General delivery notes 4
Safety notes 4
Quick start 5
Description of controls 6
Programme Table 14
Programme selector 16
Detergent drawer 18
Detergents, washing aids and amounts to use 19
Useful advice for the user 21
The main wash 22
Cleaning and routine maintenance 24
Investigating malfunctions 26
Technical data 27
Setting up + installation 28
BEFORE SWITCHING ON THE APPLIANCE MAKE SURE
IT IS CORRECTLY INSTALLED AND THAT THE FIXING
SCREWS ARE REMOVED AS SHOWN IN PAGE 28.
3

General delivery notes
Please check that the following items are delivered with the appliance:
— Instruction manual
— Certificate of guarantee
— Inlet hose
— Liquid detergent or liquid bleach compartment
Check that no damage has occurred during transit, and if so, do not install the appliance and
call the Customer Service Centre immediately.
Safety notes.
Note:
for cleaning or maintenance of the washing machine.
A) Pull out the plug
B) Turn off the tap
C) Hoover equips all its appliances with earthing. Ensure that the mains supply is earthed,
and if it is not, seek assistance from a qualified person.
D) Do not touch the appliance when hands or feet are wet or damp. Do not use the appliance
with bare feet.
E) Do not use this appliance with a cord extension set, multiple connector or electrical
portable outlet device due to risk of overload, splashing or ingress of moisture.
Note:
water temperature can reach 90°C during the wash cycle.
F) Check there is no water left in the drum before opening the door.
G) This appliance is not intended for use by persons (including children) with reduced
physical, sensory or mental capabilities, or lack of experience and knowledge, unless they
have been given supervision or instruction concerning use of the appliance by a person
responsible for their safety.
Children should be supervised to ensure that they do not play with the appliance.
H) Do not pull the power cable or the appliance itself to remove the plug from the socket.
I) The appliance must not be exposed to weather conditions (rain, direct sun, etc…)
L) When moving the appliance never lift it by the controls or by the detergent drawer.
When in transit never rest the door against the trolley or transport the appliance without
the polystyrene base.
4

M) N.B!
If the appliance is installed on a carpeted floor ensure that the ventilation holes on the
base of the appliance are not obstructed.
N) If the appliance is not running properly or breaks down, switch it off, turn off the tap and do
not tamper with the appliance.
Consult only the Authorised Customer Service Centre for possible repair and ask them to
use original spare parts.
Failure to comply with the above can compromise the safety of the appliance.
O) If the appliance’s power cable should ever need replacing, consult the Authorised
Customer Service Centre.
Quick start
Washing
— Open the door by using the handle “A” (Fig. 1, page 6)
— Select laundry and put it in the machine
— Close the door
— Put detergent in the compartments as indicated in the programme guide in this instruction
manual
— Select programme
— The display will show the settings for the programme selected.
— Adjust the wash temperature if necessary.
Press additional function buttons (if required)
— Press the “Start/Pause” button (page 7)
— The programme starts.
After washing
— The word “End” will appear on the display.
— Wait for the door lock to be released
(about 2 minutes after the programme has finished).
The “Door Security” indicator light will go out.
— Switch off the washing machine by turning the
selector to “OFF” position.
— Open the door and remove the laundry.
Ensure that the machine is correctly installed in line with the instructions found on page 28.
5
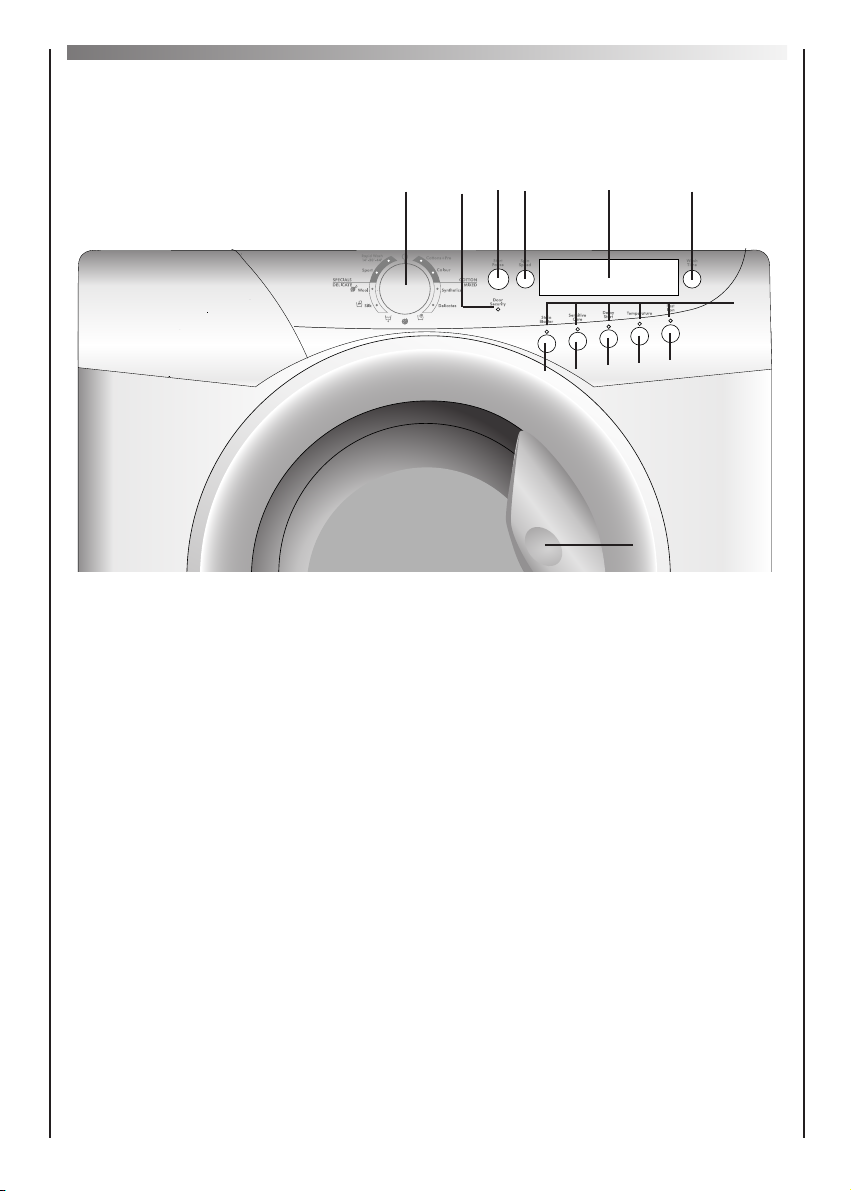
Description of controls
C I MN
P
H
Door handle A
«Door Security» indicator light B
«Start/Pause» button C
«Fast Iron» button D
G
LB
F
E
A
O
D
«Temperature» Selection button E
«Delay Start» button F
«Sensitive Care» button G
«Stain Blaster» button H
«Spin Speed» Selection button I
Digital Display L
«Wash Time» button M
Programme selector with «OFF» position N
Buttons indicator light O
Detergent drawer P
6

“Kg MODE”
(Function active only on Cotton and Synthetics programmes)
Through every wash phase “Kg MODE” allows to monitor information on the wash load in the
drum.
So, as soon as the “Kg MODE” is set in motion, in the first 4 minutes of the wash, it:
— adjusts the amount of water required
— determines the length of the wash cycle
— controls rinsing
according to the type of fabric selected to be washed it:
— adjusts the rhythm of drum rotation for the type of fabric being washed
— recognises the presence of lather, increasing, if necessary, the amount of water during rinsing
— adjusts the spin speed according to the load, thus avoiding any imbalance.
In this way “Kg MODE” is able to decide, by itself, the most suitable programme for each
individual wash from the hundreds of possible wash combinations.
“Kg MODE” meets the need for easy use by permitting a simplified programme selection.
Infact, the user need only tell the machine the type of fabric in the drum and the degree of
soiling, to obtain a perfect wash with the highest level of drying possible with a spin which really
cares for your clothes.
7
Door handle
Press the finger-bar inside the door handle to open the door.
A
DOOR SECURITY indicator light
The “Door Security” indicator light is illuminated when the door is fully closed and the machine is ON.
When «Start/Pause» is pressed on the machine with the door closed the indicator will flash
momentarily and then illuminate.
If the door is not closed the indicator will continue to flash.
A special safety device prevents the door from being opened immediately after the end of the cycle.
Wait for 2 minutes after the wash cycle has finished and the “Door Security” light has gone out
before opening the door. At the end of the cycle turn the programme selector to «OFF» .
“START/PAUSE” button
Press to start the selected cycle .
NOTE:
Few seconds after the start the wash cycle will begin. During the
first 4 minutes of the wash cycle, the “kg mode” (active only on
cotton and synthetics programmes) will weigh the clothes and
update the maximum wash time remaining on the display every
five seconds until the weight has been determined.
While this function is operating the “kg mode” indicator is on.
B
C
Changing the settings after the programmes has started (PAUSE)
Press and hold the “START/PAUSE” button for about 2 seconds, the flashing lights on the
options buttons and time remaining indicator will show that the machine has been paused,
adjust as required and press the “START/PAUSE” button again to cancel the flashing lights.
If you wish to add or remove items during washing, wait 2 minutes until the safety device
unlocks the door.
When you have carried out the manoeuvre, close the door, press «Start/Pause» button and
the appliance will continue working where it left off.
CANCELLING THE PROGRAMME
To cancel the programme, set the selector to the OFF position.
Select a different programme.
Re-set the programme selector to the OFF position.
8

The option buttons should be selected before pressing
the «Start/Pause» button.
“FAST IRON” button
The Fast Iron function (Not available on COTTON programmes) minimizes creases as much
as possible with a uniquely designed anti-crease system that is tailored to specific fabrics.
MIXED FABRICS — the water is gradually cooled throughout the final two rinses with no
spinning and then a delicate spin assures the maximum relaxation of the fabrics.
DELICATE FABRICS – after the final two rinses with no spinning the machine stops in the
final rinse stage and the option indicators blink. The load is held in the water in the drum,
thus reducing creasing and enabling easier ironing.
WOLLENS/SILK – after the final rinse the load is held in the water in the drum, thus
reducing creasing and enabling easier ironing and the option indicators blink.
To complete the cycle press the Fast Iron button and the machine will pump out the water
and complete the cycle.
If you do not want to spin the clothes and activate drain only:
— Turn the programme selector to the «OFF» position;
— Select programme drain only ;
— Switch on the appliance again by pressing the «Start/Pause» button.
“TEMPERATURE” selection button
D
E
When a programme is selected the relevant indicator will light up to show the recommended
wash temperature. The Temperature button can be used to decrease or increase the
temperature of your chosen wash cycle. Each time the button is pressed, the new
temperature level is shown on the Wash Temperature Indicator.
9

“DELAY START” button
This button allows you to pre-programme the wash cycle to delay the start of the cycle for up
to 24 hours.
To delay the start use the following procedure:
Set the required programme.
Press the button once to activate it (h00 appears on the display) and then press it again to set
a 1 hour delay (h01 appears on the display); the pre-set delay increases by 1 hour each time
the button is pressed, until h24 appears on the display, at which point pressing the button
again will reset the delay start to zero.
Confirm by pressing the “START/PAUSE” button (the light on the display starts to flash). The
countdown will begin and when it has finished the programme will start automatically.
It is possible to cancel the delay start by taking the following action:
Press and hold the button for 5 seconds until the display will show the settings for the
programme selected.
At this stage it is possible to start the programme previously selected by pressing the
“START/PAUSE” button or to cancel the process by setting the selector to the OFF position
and then selecting another programme.
F
Warning: If there is any break in the power supply while
the machine is operating, a special memory stores the
selected programme and, when the power is restored, it
continues where it left off.
“SENSITIVE CARE” button
By pressing this button you can activate a special new wash cycle in the Cotton and Mixed
Fabrics programs, thanks to the new Sensor System. This option treats with care the fibres of
garments and the delicate skin of those who wear them.
The load is washed in a much larger quantity of water and this, together with the new combined
action of the drum rotation cycles, where water is filled and emptied, will give you garments which
have been cleaned and rinsed to perfection. The amount of water in the wash is increased so that
the detergent dissolves perfectly, ensuring an efficient cleaning action. The amount of water is also
increased during the rinse procedure so as to remove all traces of detergent from the fibres. This
function has been specifically designed for people with delicate and sensitive skin, for whom even
a very small amount of detergent can cause irritation or allergy.
You are advised to also use this function for children’s clothing and for delicate fabrics in general,
or when washing garments made of towelling, where the fibres tend to absorb a greater quantity of
detergent. To ensure the best performance for your wash, this function is always activated on the
Delicates and Woollens/Silk programs.
10
G
Loading…
-
Страница 1
W ashing machine Instructions for use ®[…]
-
Страница 2
Intr oduction Please read these instructions for use carefully and all other information enclosed with the washing machine. Keep all documentation in a safe place for future reference or for any future owners. Note: this machine is solely for domestic use. Notes on disposal All packaging material used is environmentally-friendly and recyclable. Ple[…]
-
Страница 3
Contents Page Introduction 2 General delivery notes 4 Safety notes 4 Quick start 5 Description of controls 6 Programme T able 14 Programme selector 16 Detergent drawer 18 Detergents, washing aids and amounts to use 19 Useful advice for the user 21 The main wash 22 Cleaning and routine maintenance 24 Investigating malfunctions 26 T echnical data 27 […]
-
Страница 4
General delivery notes Please check that the following items are delivered with the appliance: — Instruction manual — Certificate of guarantee — Inlet hose — Liquid detergent or liquid bleach compartment Check that no damage has occurred during transit, and if so, do not install the appliance and call the Customer Service Centre immediately . Safet[…]
-
Страница 5
M) N.B! If the appliance is installed on a carpeted floor ensure that the ventilation holes on the base of the appliance are not obstructed. N) If the appliance is not running properly or breaks down, switch it of f, turn off the tap and do not tamper with the appliance. Consult only the Authorised Customer Service Centre for possible repair and as[…]
-
Страница 6
6 Description of contr ols Door handle A «Door Security» indicator light B «Start/Pause» button C «Fast Iron» button D «T emperature» Selection button E «Delay Start» button F «Sensitive Care» button G «Stain Blaster» button H «Spin Speed» Selection button I Digital Dis[…]
-
Страница 7
“Kg MODE” (Function active only on Cotton and Synthetics programmes) Through every wash phase “Kg MODE” allows to monitor information on the wash load in the drum. So, as soon as the “Kg MODE” is set in motion, in the first 4 minutes of the wash, it: — adjusts the amount of water required — determines the length of the wash cycle — cont[…]
-
Страница 8
“ST ART/P AUSE” button Press to start the selected cycle . Changing the settings after the programmes has started (P AUSE) Press and hold the “ST ART/P AUSE” button for about 2 seconds, the flashing lights on the options buttons and time remaining indicator will show that the machine has been paused, adjust as required and press the “ST A[…]
-
Страница 9
9 D The option buttons should be selected before pr essing the «Start/Pause» button. “TEMPERA TURE” selection button When a programme is selected the relevant indicator will light up to show the recommended wash temperature. The T emperature button can be used to decrease or increase the temperature of your chosen wash cycle. Each tim[…]
-
Страница 10
10 “DELA Y ST ART” button This button allows you to pre-programme the wash cycle to delay the start of the cycle for up to 24 hours. T o delay the start use the following procedure: Set the required programme. Press the button once to activate it (h00 appears on the display) and then press it again to set a 1 hour delay (h01 appears on the disp[…]
-
Страница 11
11 “ST AIN BLASTER” button By pressing this button, which can only be activated in the Cotton cycles, the sensors in the new system come into operation. They af fect both the selected temperature, keeping it at a constant level throughout the wash cycle, and the mechanical function of the drum. The drum is made to turn at two different speeds a[…]
-
Страница 12
12 2) SPIN SPEED Once the programme has been selected, the maximum spin speed allowed for that programme appears on the display . Pressing the spin button will reduce the speed by 100 rpm each time the button is pressed. The minimum speed allowed is 400 rpm, or it is possible to omit the spin by pressing the spin button repeatedly . 3) DELA Y ST AR[…]
-
Страница 13
PROGRAMME selector with «OFF» position When the programme selector is tur ned the display lights up to show the settings for the programme selected. N.B. T o switch the machine of f, tur n the pr ogramme selector to the “OFF” position. T oday , most detergents have been impr oved to wash efficiently at lower temperatures, ther efore w[…]
-
Страница 14
14 21 ●● ● ●● ●● ●● ● ●● ●● ●● ●● ●● ●● 7 7 4 2 — — — 1,5 2 3 1,5 2,5 3,5 1) 1) 1) RECOMMENDED TEMP . °C 60° 40° 40° 40° — — — 30° 40° 30° 30° 30° 30° Resistant fabrics Cotton, linen with Prewash Cotton, mixed resistant, Coloureds Mixed fabrics and synthetics Cotton, mixed fabrics, synthetics V[…]
-
Страница 15
15 Please read these notes The spin speed may also be reduced, to match any guidelines suggested on the f abr ic label, or for v er y delicate f a br ics cancel the spin completely this option is av ailable with a spin speed button. * Progr amme recommended for normally soiled loads with max w ash time and a temperature of 40°C at 1400rpm spin spe[…]
-
Страница 16
16 Pr ogramme selector For the various types of fabrics and various degrees of dirt the washing machine has different programme bands according to: wash cycle, temperature and lenght of cycle (see table of washing cycle programmes). RESIST ANTS F ABRICS The programmes have been designed for a maximum wash and the rinses, with spin intervals, ensure[…]
-
Страница 17
SPECIAL SILK PROGRAMME This washing machine also has a gentle Silk and Hand W ash programme cycle. This programme allows a complete washing cycle for garments specified as ‘Hand W ash only’ and laundry items made from Silk on the fabric label. The programme has a maximum temperature of 30° and concludes with 3 rinses and no final spin. WOOLMAR[…]
-
Страница 18
Detergent drawer The detergent drawer is split into 3 compartments: — the compartment labelled «1» is for prewash detergent; — the compartment labelled » » is for special additives, fabric softeners, fragrances, starch, brighteners etc; — the compartment labelled «2» is for main wash detergent. If liquid detergents are[…]
-
Страница 19
Detergents, washing aids and amounts to use Choice of detergent General purpose detergents — Powder detergents , for a thorough wash, with bleaching agent, particularly suitable for use in hot wash programmes (60°C and over), for heavily soiled and stained laundry . — Liquid detergents , particularly suitable for grease stains, such as greasy skin[…]
-
Страница 20
Dosages Only use detergents which are suitable for use in a washing machine. Y ou will obtain the best results from your wash with the minimum use of chemical products and the best care for your laundry if you take into consideration the degree of soiling as well as the type of detergent to choose. The amount of detergent to use depends on: — water[…]
-
Страница 21
Useful advice for users T ips on using your domestic appliance in the most environmentally-friendly and economical way Do a full load in your washing machine T o prevent any possible waste of energy , water or detergent we recommend that you put a full load in your washing machine, not exceed the recommended maximum load size. Up to 50% energy savi[…]
-
Страница 22
Main wash Sorting the laundry — It is recommended you wash only items which are machine washable with water and detergent and not dry-clean items. — If you need to wash rugs, bedspreads or other heavy items, it is best not to spin them. — Sort the laundry according to fabric type, degree of soiling and wash temperature: Always follow the wash care […]
-
Страница 23
The correct way to wash Preparing the laundry A) Select the laundry . Loading the laundry B) Open the porthole. C) Put the laundry in the washing machine. Close the porthole again, ensuring that no items of laundry are obstructing the lock. Putting detergent in machine D) Open the drawer , choose the detergent and put in the correct amount, accordi[…]
-
Страница 24
Cleaning and r outine maintenance Do not use alcohol-based scourers and / or thinners on the outside of your washing machine, just a wipe with a damp cloth will suffice. The washing machine needs very little maintenance: — Cleaning the drawer compartments. — Cleaning the filter . — Cleaning the door glass. Cleaning the drawer compartments Even if i[…]
-
Страница 25
Cleaning the door glass Regularly clean the door glass with a damp cloth. A build up of soiling and residues from the water may result in water leaking from the door . Do not use abrasive cleaners as they can scratch the surface. T ransporting the appliance or long periods when appliance is not in use If the appliance is being transported or is out[…]
-
Страница 26
Plug not in socket. Not switched on. Power failure. Fuse blown. Door open. See cause 1. T ap turned of f. Programme selector not correctly positioned. Fill hoses are kinked Kink in discharge hose. Foreign bodies in filter House drain is blocked Leaking gasket between tap and water inlet hose. House drain is blocked Soap drawer blocked with soap res[…]
-
Страница 27
Note: The use of environmentally-friendly , phosphate-free detergents can have the following effects: — waste water from rinsing may be cloudier because of the presence of zeolites held in suspension, without the rinse performance being adversely affected; — presence of white powder (zeolites) on laundry after washing, which is not absorbed by the […]
-
Страница 28
SETTING UP + INST ALLA TION Remove the polystyrene base and place the machine near its permanent position (diagram 1). Carefully cut through the hose retaining clip at the rear of the appliance (diagram 2). Remove the 4 fixing screws marked ( A ) and remove the 4 spacers marked ( B ) (diagram 3). Cover the 4 holes using the caps provided in the ins[…]
-
Страница 29
Note: we recommend you keep the scr ews to immobilise the machine for futur e transit. The Manufacturers will not be r esponsible for any possible damage to the machine caused by not following the rules relating to r eleasing the mechanism. The user is responsible for all costs of installation. W ater connection The appliance must be connected to t[…]
-
Страница 30
30 Note: it is advisable to tur n of f the tap after each wash to isolate the washing machine fr om the water supply . For the washing machine to function properly the terminal end of the discharge hose (mouth) must be at a minimum of 50 cm and a maximum of 85 cm from the ground. Electricity supply and safety advice This W ashing machine is supplie[…]
-
Страница 31
……………………………………………………………………………………………………………………………………………………………………………………………. ………………………………………………………………………………………………………………………[…]
-
Страница 32
EN This appliance is marked according to the European directive 2002/96/EC on W aste Electrical and Electronic Equipment (WEEE). By ensuring this product is disposed of correctly , you will help prevent potential negative consequences for the environment and human health, which could otherwise be caused by inappropriate waste handling of this produ[…]
Популярность:
23463 просмотры
Подсчет страниц:
32 страницы
Тип файла:
Размер файла:
1.13 Mb
-
Hoover Nextra Мануал
Популярность:
18781 просмотры
Подсчет страниц:
32 страницы
Тип файла:
PDF
Размер файла:
4.19 Mb