

AVR 158
Pengantar, Penempatan dan Koneksi
Speaker (Pengeras Suara)
Pengantar
Terima kasih Anda sudah memilih produk harman kardon®!
Pedoman start singkat ini terdapat semua informasi yang Anda perlukan untuk
menyambung dan memasang amplifier (alat penerima) audio/video harman kardon®
yang baru milik Anda.
Untuk menghemat sumber daya alam kami, maka AVR Anda tidak mencakup buku
pegangan pemilik tercetak. Buku pegangan pemilik terdapat informasi lengkap tentang
cara pengoperasian semua fitur AVR baru yang terdapat di situs Web. Lihatlah pada www.
harmankardon.com lalu unduh
Buku Pegangan Pemilik AVR 158
.
Meletakkan AVR
Letakkan AVR pada permukaan yang mantap dan rata. Pastikan permukaan dan
s
perlengkapan pemasangan bisa menopang berat AVR.
Tentukan ruang yang tepat di atas dan di bawah AVR untuk saluran udara ventilasi. Jika
s
Anda pasang AVR pada kabinet atau di suatu area tertutup, maka berikan aliran udara
pendingin di sekitar kabinet. Untuk keadaan tertentu kipas angin bisa juga digunakan.
Jangan sampai menghalangi lubang ventilasi di atas AVR atau meletakkan benda apa s
saja tepat di atasnya.
Jangan meletakkan AVR di atas karpet.s
Jangan meletakkan AVR pada tempat yang basah atau lembab, sangat panas atau s
dingin, di lokasi dekat alat pemanas atau lubang pengatur panas atau langsung
tersengat sinar matahari.
Koneksi
Meletakkan Speaker
Tentukan letak speaker sistem Anda sesuai dengan petunjuk dari pabrik dan tata letak
ruang untuk mendengarkan. Gunakan gambar dibawah sebagai panduan.
Untuk keterangan penempatan speaker lebih rinci, termasuk menggunakan tinggi depan
speaker, unduh selengkapnya
com.
Buku Pegangan Pemilik AVR 158
dari www.harmankardon.
PERHATIAN: Sebelum membuat koneksi dengan reseiver audio/video, lepaskan dahulu
kabel listrik AVR dari stop kontak listrik dengan AVR. Bila koneksi kabel AVR dalam
keadaan dicolokkan lalu dinyalakan bisa menyebabkan rusaknya spiker (pengeras
suara).
Konektor Antena Radio Konektor HDMI
®
Konektor Audio Digital Konektor Video Analog
Konektor Audio Analog Konektor
Konektor Subwoofer Konektor
2
Speaker
Koneksi Panel-Belakang AVR 158
Sakelar Daya
Utama
Input Listrik
AVR 158
Koneksi
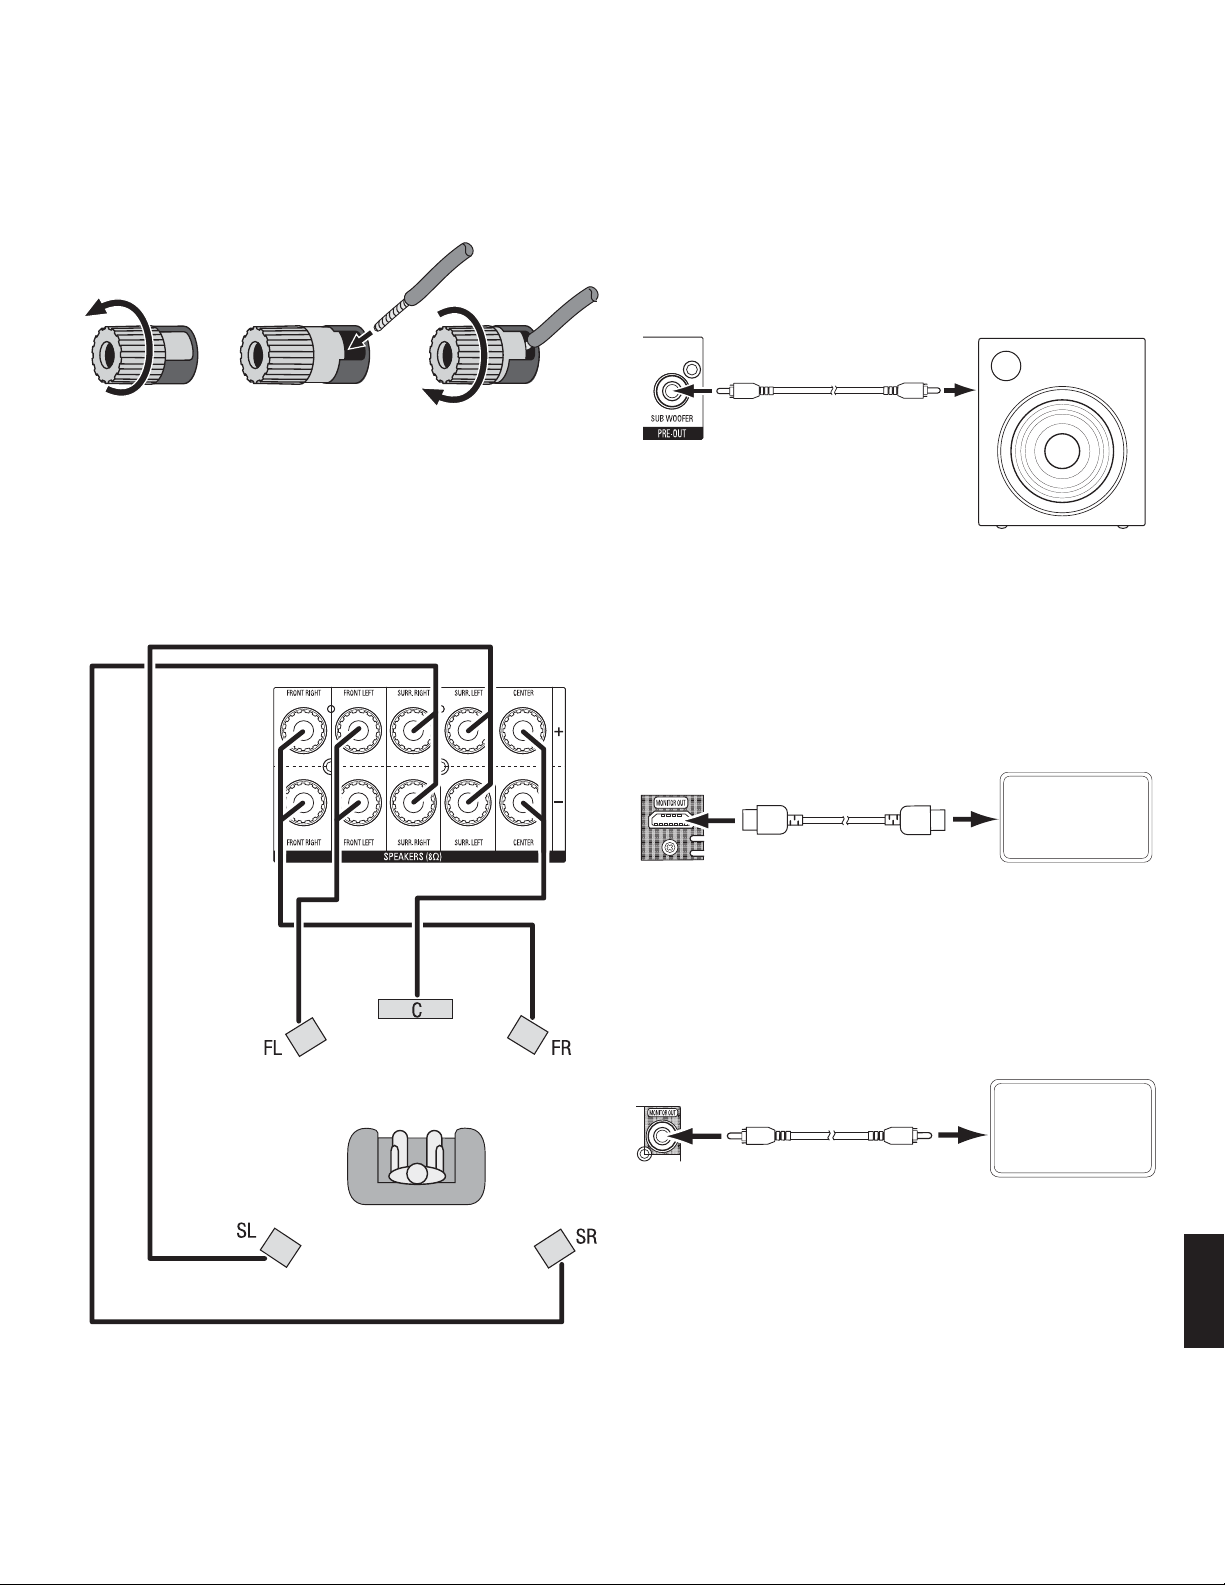
Menyambung Speaker
Cara menggunakan terminal speaker AVR:
1. Lepaskan Tutupnya 2. Masukkan Kawat 3. Kencangkan Tutupnya
Selalu sambungkan terminal (+) warna pada AVR dengan terminal (+) pada speaker
(biasanya merah) lalu terminal (–) hitam pada AVR dengan terminal (–) pada speaker
(biasanya hitam).
PENTING: Pastikan kawat ( + ) dan (–) tidak saling menyenggol atau dengan terminal
lainnya. Bila kedua kawat saling menyenggol maka bisa menyebabkan korsleting
sehingga terjadi kerusakan pada AVR.
Sambungan speaker seperti terlihat pada gambar.
Menyambung Subwoofer
Gunakan satu kabel audio RCA untuk menyambung konektor Pre-Out Subwoofer AVR
dengan subwoofer. Lihatlah buku pegangan pengguna subwoofer untuk memperoleh
keterangan spesifik tentang cara membuat koneksi.
Konektor Pre-Out
Sub Woofer AVR
Satu Kabel Audio RCA
(tidak diberikan)
Subwoofer
Bertenaga
Menyambung TV atau Layar Video
Konektor Monitor Out HDMI
Jika TV memiliki konektor HDMI dan punya perangkat HDMI atau perangkat sumber video
komponen, gunakan kabel HDMI (tidak diberikan) untuk menyambungkan TV dengan
konektor Monitor Out HDMI AVR. Dengan demikian dapat memberikan mutu gambar
dengan kemungkinan yang terbaik.
Konektor Monitor
Out HDMI AVR
TV
Kabel HDMI
(tidak diberikan)
Konektor Monitor Out Video Campuran
Jika TV tidak memiliki ataupun memiliki konektor HDMI
beberapa perangkat sumber dengan konektor video campuran saja
video campuran (tidak diberikan) untuk menyambungkan konektor Monitor Out Campuran
AVR dengan konektor video campuran TV.
Konektor
Monitor Out
Campuran AVR
Kabel Video
Campuran
(tidak diberikan)
namun Anda sedang menyambung
, gunakanlah kabel
TV
INDONESIA
3
-
Page 1: Harman Kardon AVR 158
A VR 1 58 Aud io /video r ece iv er Owner’s Manual ENGLISH 0296CSK — HK (x65Series) AVR158-230 OM [HKP1992], WORK05.indd 1 30/06/11 13:59:59[…]
-
Page 2: Harman Kardon AVR 158
2 A VR 1 58 T able of Contents INTRODUCTION 3 SUPPLIED ACCESSORIES 3 IMPORT ANT SAFETY INFORMA TION 3 PLACE THE A VR 3 FRONT -PANEL CONTROLS 4 REAR-P ANEL CONNECTORS 6 SYSTEM REMOTE CONTROL FUNCTIONS 8 INTRODUCTION TO HOME THEA TRE 10 TYPICAL HOME THEA TRE SYSTEM 10 MUL TICHANNEL AUDIO 10 SURROUND MODES 10 PLACE YOUR SPEAKERS 10 PLACING THE LEFT , […]
-
Page 3: Harman Kardon AVR 158
3 A VR 1 58 ENGLISH Introduction, Supplied Accessories, Important Safety Information and Place the A VR Introduction Thank you for choosing this Harman Kardon product! For more than fifty years, the Harman Kardon mission has been to share a passion for music and entertainment, using leading-edge technology to achieve premium performance. Sidney Ha[…]
-
Page 4: Harman Kardon AVR 158
4 A VR 1 58 Front-Panel Controls Front-P anel Controls Power Indicator Message Display Volume Knob Surround Mode Select Buttons Set Button IR Sensor Power Button Left/Right Buttons Headphone Jack Source Select Buttons T uning Mode Button Digital Input Button Surround-Mode Category Button Up/Down Buttons/ T uning Buttons USB Port Aux Analogue Audio […]
-
Page 5: Harman Kardon AVR 158
5 A VR 1 58 ENGLISH Front-Panel Controls, continued Front-P anel Controls, continued Power indicator: This LED has three possible modes: LED is off: Indica tes tha t the A VR is unplugged or the rear-panel Main Power switch • is off. LED glows amber: Indicates that the A VR is in the Standby mode. • LED glows white: Indicates that the A VR is t[…]
-
Page 6: Harman Kardon AVR 158
6 A VR 1 58 Rear -Panel Connectors Rear -P anel Connectors HDMI Input Connectors HDMI ® Monitor Out Connector Composite Video Monitor Output Connector DVD Component Video Input Connector Radio Aerial Connectors Subwoofer Connector Analogue Audio Input/Output Connectors Speaker Connectors 12V T rigger Connector Main Power Switch AC Input Connector […]
-
Page 7: Harman Kardon AVR 158
7 A VR 1 58 ENGLISH Rear -Panel Connectors, continued Rear -P anel Connectors, continued Radio Aerial connectors: Connect the included AM and FM aerials to their respective terminals for radio reception. HDMI Monitor Out connector: If your TV has an HDMI connector and you have HDMI or component video source devices, use an HDMI cable (not included)[…]
-
Page 8: Harman Kardon AVR 158
8 A VR 1 58 System Remote Control Functions System Remote Control Functions IR T ransmitter Lens Mute Button Source Selector Buttons Volume Up/Down Buttons Speaker Setup Buttons OK Button Delay Button Number Buttons Memory Button Macro Buttons T ransport Control Buttons Display Dimmer Button RDS Button Preset Station Up/Down Buttons Clear Button Le[…]
-
Page 9: Harman Kardon AVR 158
9 A VR 1 58 ENGLISH System Remote Control Functions, continued System Remote Control Functions, continued In addition to controlling the AVR, the AVR remote is capable of controlling eight other devices. During the installa tion process, you may program the codes for each of your source components into the remote. (See Program the Remote to Control[…]
-
Page 10: Harman Kardon AVR 158
10 A VR 1 58 I nt r od uc t io n t o H o me Th ea t re and Place Y our Speakers Introduction to Home Theatre This introductor y section will help you to familiarise yourself with some basic concepts unique to multichannel surround-sound AVRs, which will make it easier for you to set up and operate your A VR. T ypical Home Theatre System A home thea[…]
-
Page 11: Harman Kardon AVR 158
11 A VR 1 58 ENGLISH T ypes of Home Theatre System Connections T ypes of Home Theatre System Connections There are different types of audio and video connections used to connect the AVR to your speakers, your TV or video display , and your source devices. The Consumer Electronics Association has established the CEA ® colour -coding standard. Conne[…]
-
Page 12: Harman Kardon AVR 158
12 A VR 1 58 T ypes of Home Theatre System Connections, continued Digital Audio Connections – Optical Optical digital audio connectors are normally covered by a shutter to protect them from dust. The shutter opens as the cable is inserted. Analogue Audio Connections T wo-channel analogue connections require a stereo audio cable, with one connecto[…]
-
Page 13: Harman Kardon AVR 158
13 A VR 1 58 ENGLISH Making Connections Making Connections CAUTION: Before making an y connections to the AVR, ensure that the A VR’ s AC cord is unplugged from the AVR and the AC outlet. Making connections with the AVR plugged in and turned on could damage the speakers. Connect Y our Speakers After you have placed your loudspeakers in the room a[…]
-
Page 14: Harman Kardon AVR 158
14 A VR 1 58 Making Connections, continued HDMI devices If any of your source devices have HDMI connectors, using those connectors will provide the best possible video and audio performance quality. Since the HDMI cable carries both digital video and digital audio signals, you do not have to make any additional audio connections for devices you con[…]
-
Page 15: Harman Kardon AVR 158
15 A VR 1 58 ENGLISH Making Connections, continued, and Set Up the Remote Control Audio recorders Connect an analogue audio recorder’ s inputs to the AVR’ s analogue audio T ape Out connectors. Y ou can record any analogue audio input signal. Stereo Audio Cable (not supplied) T o Stereo Analogue Record Inputs Analogue Recording Device AVR Analo[…]
-
Page 16: Harman Kardon AVR 158
16 A VR 1 58 Set Up the AVR T urn On the AVR Set the rear-panel Main Power s witch to “On.” (The front-panel Power indicator will 1. glow amber .) Press the front-panel Power button. 2. Power Button Main Power Switch Unless you will not be using the AVR for an extended period of time, leave the Main Power switch set to “On.” When the Main P[…]
-
Page 17: Harman Kardon AVR 158
17 A VR 1 58 ENGLISH Set Up the AVR, continued Configure the AVR for Y our Speakers Y our A VR is flexible and may be configured to work with most speakers and to compensate for the acoustic characteristics of your room. Before beginning, place your loudspeakers as explained in the Place Y our Speakers section, on page 10, and connect them to the[…]
-
Page 18: Harman Kardon AVR 158
18 A VR 1 58 Set Up the AVR, continued After you return to the Speaker Setup menu, navigate to the Distance line and press the OK button to display the Distance menu. * DISTANCE * FL : 10FT CEN : 10FT FR : 10FT SR : 10FT SL : 10FT SUB : 10FT DELAY RESET : OFF UNIT : FEET A/V SYNC DELAY : 0mS BACK TO SPEAKER SETUP Enter the distance from each speake[…]
-
Page 19: Harman Kardon AVR 158
19 A VR 1 58 ENGLISH Set Up the AVR, continued, and Operating Y our A VR Operating Y our AVR Now that you have installed your components and completed a basic configuration, you are ready to begin enjoying your home theatre system. Controlling the Volume Adjust the volume either by turning the front-panel Volume knob (clockwise to increase volume […]
-
Page 20: Harman Kardon AVR 158
20 A VR 1 58 Operating Y our A VR, continued, and Advanced Functions Listening to FM and AM Radio Select the AM/FM source. Use the T uning Up/Down buttons to tune a station, which will be shown on the front-panel display and the TV screen. The AVR defaults to automatic tuning, meaning each press of the T uning Up/Down buttons scans until a station […]
-
Page 21: Harman Kardon AVR 158
21 A VR 1 58 ENGLISH Advanced Functions, continued Surround Modes Surround-mode selection depends upon the format of the incoming audio signal as well as your personal taste. Although there is never a time when all of the AVR’ s surround modes are available, there is usually a wide variety of modes available for a given input. T able A9 in the Ap[…]
-
Page 22: Harman Kardon AVR 158
22 A VR 1 58 Advanced Functions, continued System Setup The AVR’ s System Setup menu lets you customise in wha t way many of the AVR’ s features operate. Press the OSD button and navigate to the System Setup line. Press the OK button to display the System Setup menu. VFD Fade Time Out: Some people find the brightness of the AVR’ s front-pane[…]
-
Page 23: Harman Kardon AVR 158
23 A VR 1 58 ENGLISH Advanced Functions, continued Sleep Timer The sleep timer sets the AVR to play for up to 90 minutes and then turn off automatically . Press the Sleep button on the remote, and the time until turn-off will be displayed on the front-panel Message display and on a connected TV . Each additional press of the Sleep button decreases […]
-
Page 24: Harman Kardon AVR 158
24 A VR 1 58 T roubleshooting Symptom Cause Solution Unit does not function when Main Power switch is turned on No AC power • Ensure that the power cord is plugged into a live AC • power outlet Check if the AC outlet is switch-controlled • Front-panel Message display lights, but there’s no sound or picture Intermittent input connection ?[…]
-
Page 25: Harman Kardon AVR 158
25 A VR 1 58 ENGLISH Specifications Specifications Audio Section Stereo power: 70W per channel, two channels driven @ 8 ohms, 1kHz, <0.9% THD Multichannel power: 70W per channel, two channels driven @ 8 ohms, 1kHz, <0.9% THD Input sensitivity/impedance: 200mV/47k ohms Signal-to-noise ratio (IHF-A): 100dB Surround system adjacent-channel separ[…]
-
Page 26: Harman Kardon AVR 158
26 A VR 1 58 Source DVD HDMI 1 HDMI 2 HDMI 3 V ideo 1 Video 2 Aux 1 Aux 2 CD T ape T uner TV Title TUNER Audio Input COAX 1 HDMI HDMI HDMI ANALOGUE OPTICAL 1 ANALOGUE ANALOGUE ANALOGUE ANALOGUE INT . TUNER OPTICAL 1 Auto Poll ON OFF OFF OFF OFF ON OFF OFF OFF ON – – OFF Surround Mode LOGIC 7 MOVIE LOGIC 7 MOVIE LOGIC 7 MOVIE LOGIC 7 MOVIE LOGIC[…]
-
Page 27: Harman Kardon AVR 158
27 A VR 1 58 ENGLISH Source All Sources Left/Right Speaker ON Centre Speaker ON Surround Speaker ON Surround Back Speaker ON Subwoofer ON Left/Right Speaker Crossover 100Hz Centre Speaker Crossover 100Hz Surround Speaker Crossover 100Hz Surround Back Speaker Crossover 100Hz LFE PRESENT Sub Mode SUB Speaker Positions Y our Distances From Speaker to […]
-
Page 28: Harman Kardon AVR 158
28 A VR 1 58 Source DVD HDMI 1 HDMI 2 HDMI 3 V ideo 1 V ideo 2 Aux 1 Aux 2 CD T ape T uner Title INT . TUNER Video Input Component Video Input N/A N/A N/A N/A N/A N/A N/A N/A N/A N/A Digital Audio Input N/A N/A N/A Analogue Audio Input DVD VIDEO 1 VIDEO 2 AUX (FRONT — P ANEL) AUX (REAR- P ANEL) CD T APE TUNER Auto Poll N/A N/A N/A Front Left Front […]
-
Page 29: Harman Kardon AVR 158
29 A VR 1 58 ENGLISH Source Input Product T ype (circle one) Remote Control Code Video 1 VCR, PVR, DMC Video 2 Cable, Satellite HDMI 1 DVD, Blu-ray Disc player , VCR/PVR/DMC, Cable/Satellite HDMI 2 DVD, Blu-ray Disc player , VCR/PVR/DMC, Cable/Satellite HDMI 3 DVD, Blu-ray Disc player , VCR/PVR/DMC, Cable/Satellite DVD DVD, Blu-ray Disc player , VC[…]
-
Page 30: Harman Kardon AVR 158
30 A VR 1 58 Surround Mode Description Incoming Bitstream or Signal Dolby Digital Provides up to five separate main audio channels and a dedicated low-frequency effects (LFE) channel. Dolby Digital 1/0/.0 or .1, 2/0/.0 or .1, 3/0/.0 or .1, • 2/1/.0 or .1, 2/2/.0 or .1, 3/2/.0 or .1 Dolby Digital EX (played as 5.1) • Dolby Digital Plus decoded […]
-
Page 31: Harman Kardon AVR 158
31 A VR 1 58 ENGLISH Appendix Surround Mode Description Incoming Bitstream or Signal DTS Digital Using a different encoding/decoding method from Dolby Digital, DTS Digital also provides up to five discrete main channels, plus an LFE channel. DTS 1/0/.0 or .1, 2/0/.0 or .1, 3/0/.0 or .1, 3/1/.0 or • .1, 2/2/.0 or .1, 3/2/.0 or .1 DTS-ES Matrix (p[…]
-
Page 32: Harman Kardon AVR 158
32 A VR 1 58 Appendix Refer to the numbered buttons when using the Remote Control Function List 0296CSK — HK (x65Series) AVR158-230 OM [HKP1992], WORK05.indd 32 30/06/11 14:00:06[…]
-
Page 33: Harman Kardon AVR 158
33 A VR 1 58 ENGLISH T able A10 – Remote Control Function List No. Button Name AVR Function DVD CD/CD-R T ape VCR (VID1) TiVo ® (VID1) DMC (VID 1/ HDMI 1/2/3) CBL (VID2) SA T (VID2) HDMI 1/2/3 01 Power On Power On P ower On P ower On Power On Power On/Off Power On Power On P ower On Power On 02 P ower Off P ower Off Power Off Power Off Power Off[…]
-
Page 34: Harman Kardon AVR 158
34 A VR 1 58 No. Button Name AVR Function DVD CD/CD-R T ape VCR (VID1) Ti Vo ® (VID1) DMC (VID 1/ HDMI 1/2/3) CBL (VID2) SA T (VID2) HDMI 1/2/3 38 6 6 6 6 6 6 6 6 6 6 39 7 7 7 7 7 7 7 7 7 7 40 8 8 8 8 8 8 8 8 8 8 41 T un-M T uner Mode Chapter+ or Zoom Repeat Zoom 42 9 9 9 9 9 9 9 9 9 9 43 0 0 0 0 0 0 0 0 0 0 44 Memory Memory Audio or Playlist Time[…]
-
Page 35: Harman Kardon AVR 158
35 A VR 1 58 ENGLISH TV Manufacturer/Brand Setup Code Number ADMIRAL 192 ANAM 045 106 109 112 122 AOC 037 122 123 128 AUDIOVOX 012 BLAUPUNKT 084 BROKSONIC 205 206 CITIZEN 045 123 128 132 CONTEC 045 CRAIG 045 157 158 159 CROWN 045 132 CURTIS MA THES 123 128 132 DAEWOO 045 087 102 105 106 108 111 114 116 119 127 128 132 DA YTRON 128 132 DYNA TECH 063[…]
-
Page 36: Harman Kardon AVR 158
36 A VR 1 58 VCR Manufacturer/Brand Setup Code Number AIWA 040 AKAI 048 108 109 126 APPLE TV 016 AUDIO DYNAMICS 018 048 BROKSONIC 110 147 CANON 135 140 CAPEHART 094 CITIZEN 134 CRAIG 045 116 DAEWOO 017 094 104 DA YTRON 094 DBX 018 048 DYNA TECH 040 EMERSON 013 040 042 110 112 FISHER 017 FUNAI 040 GE 076 095 124 HARMAN KARDON 002 003 018 049 HIT ACH[…]
-
Page 37: Harman Kardon AVR 158
37 A VR 1 58 ENGLISH VCR Manufacturer/Brand Setup Code Number SYL VANIA 040 SYMPHONIC 040 T AND Y 017 040 TEAC 040 048 TEKNIKA 040 THOMAS 040 TiV o 004 005 006 007 008 009 011 012 TMK 013 TOSHIBA 112 155 TOTEVISION 045 UNITECH 045 VECTOR RESEARCH 018 VIDEO CONCEPTS 018 040 VIDEOSONIC 045 WARDS 040 045 112 Y AMAHA 018 040 048 ZENITH 040 050 076 083 […]
-
Page 38: Harman Kardon AVR 158
38 A VR 1 58 CD Manufacturer/Brand Setup Code Number PROTON 210 RADIO SHACK 126 166 213 RCA 024 081 093 150 REALISTIC 058 093 095 104 105 108 164 166 SANSUI 047 081 134 157 172 SANYO 033 082 095 SCOTT 108 SHARP 058 105 114 151 159 167 180 181 SHERWOOD 003 041 058 105 133 SONY 103 115 116 118 132 139 163 205 206 207 208 212 217 SOUNDSTREAM 124 SYMPH[…]
-
Page 39: Harman Kardon AVR 158
39 A VR 1 58 ENGLISH Cassette Deck Manufacturer/Brand Setup Code Number HARMAN KARDON 001 T able A16 – Remote Control Product Codes: T ape T able A17 – Remote Control Product Codes: Cable Cable Manufacturer/Brand Setup Code Number ABC 001 011 ALLEGRO 111 AMERICAST 212 ARCHER 112 BELCOR 113 CABLE ST AR 033 113 CITIZEN 111 COMCAST 007 DIGI-LINK 1[…]
-
Page 40: Harman Kardon AVR 158
40 A VR 1 58 T able A17 – Remote Control Product Codes: Cable (cont.) Cable Manufacturer/Brand Setup Code Number PHILIPS 013 019 020 085 090 PIONEER 001 041 119 171 209 215 216 RADIO SHACK 111 112 213 RCA 053 214 RECOTON 116 REGAL 056 099 100 101 208 REMBRANDT 032 SAMSUNG 003 072 186 SCIENTIFIC A TLANT A 183 203 221 222 SEAM 121 SIGNA TURE 001 18[…]
-
Page 41: Harman Kardon AVR 158
www.harmankardon.com HARMAN Consumer, Inc. 8500 Balboa Boulevard, Northridge, CA 91329 USA © 2011 HARMAN International Industries, Incorporated. All rights reserved. Harman Kardon and Logic 7 are trademarks of HARMAN International Industries, Incorporated, registered in the United States and/or other countries. Apple, iPhone, iPod, iPod touch, iPo[…]
-
Page 42: Harman Kardon AVR 158
0296CSK — HK (x65Series) AVR158-230 OM [HKP1992], WORK05.indd 42 30/06/11 14:00:08[…]
-
Страница 1
A VR 1 58 Aud io /video r ece iv er Owner’s Manual ENGLISH 0296CSK — HK (x65Series) AVR158-230 OM [HKP1992], WORK05.indd 1 30/06/11 13:59:59[…]
-
Страница 2
2 A VR 1 58 T able of Contents INTRODUCTION 3 SUPPLIED ACCESSORIES 3 IMPORT ANT SAFETY INFORMA TION 3 PLACE THE A VR 3 FRONT -PANEL CONTROLS 4 REAR-P ANEL CONNECTORS 6 SYSTEM REMOTE CONTROL FUNCTIONS 8 INTRODUCTION TO HOME THEA TRE 10 TYPICAL HOME THEA TRE SYSTEM 10 MUL TICHANNEL AUDIO 10 SURROUND MODES 10 PLACE YOUR SPEAKERS 10 PLACING THE LEFT , […]
-
Страница 3
3 A VR 1 58 ENGLISH Introduction, Supplied Accessories, Important Safety Information and Place the A VR Introduction Thank you for choosing this Harman Kardon product! For more than fifty years, the Harman Kardon mission has been to share a passion for music and entertainment, using leading-edge technology to achieve premium performance. Sidney Ha[…]
-
Страница 4
4 A VR 1 58 Front-Panel Controls Front-P anel Controls Power Indicator Message Display Volume Knob Surround Mode Select Buttons Set Button IR Sensor Power Button Left/Right Buttons Headphone Jack Source Select Buttons T uning Mode Button Digital Input Button Surround-Mode Category Button Up/Down Buttons/ T uning Buttons USB Port Aux Analogue Audio […]
-
Страница 5
5 A VR 1 58 ENGLISH Front-Panel Controls, continued Front-P anel Controls, continued Power indicator: This LED has three possible modes: LED is off: Indica tes tha t the A VR is unplugged or the rear-panel Main Power switch • is off. LED glows amber: Indicates that the A VR is in the Standby mode. • LED glows white: Indicates that the A VR is t[…]
-
Страница 6
6 A VR 1 58 Rear -Panel Connectors Rear -P anel Connectors HDMI Input Connectors HDMI ® Monitor Out Connector Composite Video Monitor Output Connector DVD Component Video Input Connector Radio Aerial Connectors Subwoofer Connector Analogue Audio Input/Output Connectors Speaker Connectors 12V T rigger Connector Main Power Switch AC Input Connector […]
-
Страница 7
7 A VR 1 58 ENGLISH Rear -Panel Connectors, continued Rear -P anel Connectors, continued Radio Aerial connectors: Connect the included AM and FM aerials to their respective terminals for radio reception. HDMI Monitor Out connector: If your TV has an HDMI connector and you have HDMI or component video source devices, use an HDMI cable (not included)[…]
-
Страница 8
8 A VR 1 58 System Remote Control Functions System Remote Control Functions IR T ransmitter Lens Mute Button Source Selector Buttons Volume Up/Down Buttons Speaker Setup Buttons OK Button Delay Button Number Buttons Memory Button Macro Buttons T ransport Control Buttons Display Dimmer Button RDS Button Preset Station Up/Down Buttons Clear Button Le[…]
-
Страница 9
9 A VR 1 58 ENGLISH System Remote Control Functions, continued System Remote Control Functions, continued In addition to controlling the AVR, the AVR remote is capable of controlling eight other devices. During the installa tion process, you may program the codes for each of your source components into the remote. (See Program the Remote to Control[…]
-
Страница 10
10 A VR 1 58 I nt r od uc t io n t o H o me Th ea t re and Place Y our Speakers Introduction to Home Theatre This introductor y section will help you to familiarise yourself with some basic concepts unique to multichannel surround-sound AVRs, which will make it easier for you to set up and operate your A VR. T ypical Home Theatre System A home thea[…]
-
Страница 11
11 A VR 1 58 ENGLISH T ypes of Home Theatre System Connections T ypes of Home Theatre System Connections There are different types of audio and video connections used to connect the AVR to your speakers, your TV or video display , and your source devices. The Consumer Electronics Association has established the CEA ® colour -coding standard. Conne[…]
-
Страница 12
12 A VR 1 58 T ypes of Home Theatre System Connections, continued Digital Audio Connections – Optical Optical digital audio connectors are normally covered by a shutter to protect them from dust. The shutter opens as the cable is inserted. Analogue Audio Connections T wo-channel analogue connections require a stereo audio cable, with one connecto[…]
-
Страница 13
13 A VR 1 58 ENGLISH Making Connections Making Connections CAUTION: Before making an y connections to the AVR, ensure that the A VR’ s AC cord is unplugged from the AVR and the AC outlet. Making connections with the AVR plugged in and turned on could damage the speakers. Connect Y our Speakers After you have placed your loudspeakers in the room a[…]
-
Страница 14
14 A VR 1 58 Making Connections, continued HDMI devices If any of your source devices have HDMI connectors, using those connectors will provide the best possible video and audio performance quality. Since the HDMI cable carries both digital video and digital audio signals, you do not have to make any additional audio connections for devices you con[…]
-
Страница 15
15 A VR 1 58 ENGLISH Making Connections, continued, and Set Up the Remote Control Audio recorders Connect an analogue audio recorder’ s inputs to the AVR’ s analogue audio T ape Out connectors. Y ou can record any analogue audio input signal. Stereo Audio Cable (not supplied) T o Stereo Analogue Record Inputs Analogue Recording Device AVR Analo[…]
-
Страница 16
16 A VR 1 58 Set Up the AVR T urn On the AVR Set the rear-panel Main Power s witch to “On.” (The front-panel Power indicator will 1. glow amber .) Press the front-panel Power button. 2. Power Button Main Power Switch Unless you will not be using the AVR for an extended period of time, leave the Main Power switch set to “On.” When the Main P[…]
-
Страница 17
17 A VR 1 58 ENGLISH Set Up the AVR, continued Configure the AVR for Y our Speakers Y our A VR is flexible and may be configured to work with most speakers and to compensate for the acoustic characteristics of your room. Before beginning, place your loudspeakers as explained in the Place Y our Speakers section, on page 10, and connect them to the[…]
-
Страница 18
18 A VR 1 58 Set Up the AVR, continued After you return to the Speaker Setup menu, navigate to the Distance line and press the OK button to display the Distance menu. * DISTANCE * FL : 10FT CEN : 10FT FR : 10FT SR : 10FT SL : 10FT SUB : 10FT DELAY RESET : OFF UNIT : FEET A/V SYNC DELAY : 0mS BACK TO SPEAKER SETUP Enter the distance from each speake[…]
-
Страница 19
19 A VR 1 58 ENGLISH Set Up the AVR, continued, and Operating Y our A VR Operating Y our AVR Now that you have installed your components and completed a basic configuration, you are ready to begin enjoying your home theatre system. Controlling the Volume Adjust the volume either by turning the front-panel Volume knob (clockwise to increase volume […]
-
Страница 20
20 A VR 1 58 Operating Y our A VR, continued, and Advanced Functions Listening to FM and AM Radio Select the AM/FM source. Use the T uning Up/Down buttons to tune a station, which will be shown on the front-panel display and the TV screen. The AVR defaults to automatic tuning, meaning each press of the T uning Up/Down buttons scans until a station […]
-
Страница 21
21 A VR 1 58 ENGLISH Advanced Functions, continued Surround Modes Surround-mode selection depends upon the format of the incoming audio signal as well as your personal taste. Although there is never a time when all of the AVR’ s surround modes are available, there is usually a wide variety of modes available for a given input. T able A9 in the Ap[…]
-
Страница 22
22 A VR 1 58 Advanced Functions, continued System Setup The AVR’ s System Setup menu lets you customise in wha t way many of the AVR’ s features operate. Press the OSD button and navigate to the System Setup line. Press the OK button to display the System Setup menu. VFD Fade Time Out: Some people find the brightness of the AVR’ s front-pane[…]
-
Страница 23
23 A VR 1 58 ENGLISH Advanced Functions, continued Sleep Timer The sleep timer sets the AVR to play for up to 90 minutes and then turn off automatically . Press the Sleep button on the remote, and the time until turn-off will be displayed on the front-panel Message display and on a connected TV . Each additional press of the Sleep button decreases […]
-
Страница 24
24 A VR 1 58 T roubleshooting Symptom Cause Solution Unit does not function when Main Power switch is turned on No AC power • Ensure that the power cord is plugged into a live AC • power outlet Check if the AC outlet is switch-controlled • Front-panel Message display lights, but there’s no sound or picture Intermittent input connection ?[…]
-
Страница 25
25 A VR 1 58 ENGLISH Specifications Specifications Audio Section Stereo power: 70W per channel, two channels driven @ 8 ohms, 1kHz, <0.9% THD Multichannel power: 70W per channel, two channels driven @ 8 ohms, 1kHz, <0.9% THD Input sensitivity/impedance: 200mV/47k ohms Signal-to-noise ratio (IHF-A): 100dB Surround system adjacent-channel separ[…]
-
Страница 26
26 A VR 1 58 Source DVD HDMI 1 HDMI 2 HDMI 3 V ideo 1 Video 2 Aux 1 Aux 2 CD T ape T uner TV Title TUNER Audio Input COAX 1 HDMI HDMI HDMI ANALOGUE OPTICAL 1 ANALOGUE ANALOGUE ANALOGUE ANALOGUE INT . TUNER OPTICAL 1 Auto Poll ON OFF OFF OFF OFF ON OFF OFF OFF ON – – OFF Surround Mode LOGIC 7 MOVIE LOGIC 7 MOVIE LOGIC 7 MOVIE LOGIC 7 MOVIE LOGIC[…]
-
Страница 27
27 A VR 1 58 ENGLISH Source All Sources Left/Right Speaker ON Centre Speaker ON Surround Speaker ON Surround Back Speaker ON Subwoofer ON Left/Right Speaker Crossover 100Hz Centre Speaker Crossover 100Hz Surround Speaker Crossover 100Hz Surround Back Speaker Crossover 100Hz LFE PRESENT Sub Mode SUB Speaker Positions Y our Distances From Speaker to […]
-
Страница 28
28 A VR 1 58 Source DVD HDMI 1 HDMI 2 HDMI 3 V ideo 1 V ideo 2 Aux 1 Aux 2 CD T ape T uner Title INT . TUNER Video Input Component Video Input N/A N/A N/A N/A N/A N/A N/A N/A N/A N/A Digital Audio Input N/A N/A N/A Analogue Audio Input DVD VIDEO 1 VIDEO 2 AUX (FRONT — P ANEL) AUX (REAR- P ANEL) CD T APE TUNER Auto Poll N/A N/A N/A Front Left Front […]
-
Страница 29
29 A VR 1 58 ENGLISH Source Input Product T ype (circle one) Remote Control Code Video 1 VCR, PVR, DMC Video 2 Cable, Satellite HDMI 1 DVD, Blu-ray Disc player , VCR/PVR/DMC, Cable/Satellite HDMI 2 DVD, Blu-ray Disc player , VCR/PVR/DMC, Cable/Satellite HDMI 3 DVD, Blu-ray Disc player , VCR/PVR/DMC, Cable/Satellite DVD DVD, Blu-ray Disc player , VC[…]
-
Страница 30
30 A VR 1 58 Surround Mode Description Incoming Bitstream or Signal Dolby Digital Provides up to five separate main audio channels and a dedicated low-frequency effects (LFE) channel. Dolby Digital 1/0/.0 or .1, 2/0/.0 or .1, 3/0/.0 or .1, • 2/1/.0 or .1, 2/2/.0 or .1, 3/2/.0 or .1 Dolby Digital EX (played as 5.1) • Dolby Digital Plus decoded […]
-
Страница 31
31 A VR 1 58 ENGLISH Appendix Surround Mode Description Incoming Bitstream or Signal DTS Digital Using a different encoding/decoding method from Dolby Digital, DTS Digital also provides up to five discrete main channels, plus an LFE channel. DTS 1/0/.0 or .1, 2/0/.0 or .1, 3/0/.0 or .1, 3/1/.0 or • .1, 2/2/.0 or .1, 3/2/.0 or .1 DTS-ES Matrix (p[…]
-
Страница 32
32 A VR 1 58 Appendix Refer to the numbered buttons when using the Remote Control Function List 0296CSK — HK (x65Series) AVR158-230 OM [HKP1992], WORK05.indd 32 30/06/11 14:00:06[…]
-
Страница 33
33 A VR 1 58 ENGLISH T able A10 – Remote Control Function List No. Button Name AVR Function DVD CD/CD-R T ape VCR (VID1) TiVo ® (VID1) DMC (VID 1/ HDMI 1/2/3) CBL (VID2) SA T (VID2) HDMI 1/2/3 01 Power On Power On P ower On P ower On Power On Power On/Off Power On Power On P ower On Power On 02 P ower Off P ower Off Power Off Power Off Power Off[…]
-
Страница 34
34 A VR 1 58 No. Button Name AVR Function DVD CD/CD-R T ape VCR (VID1) Ti Vo ® (VID1) DMC (VID 1/ HDMI 1/2/3) CBL (VID2) SA T (VID2) HDMI 1/2/3 38 6 6 6 6 6 6 6 6 6 6 39 7 7 7 7 7 7 7 7 7 7 40 8 8 8 8 8 8 8 8 8 8 41 T un-M T uner Mode Chapter+ or Zoom Repeat Zoom 42 9 9 9 9 9 9 9 9 9 9 43 0 0 0 0 0 0 0 0 0 0 44 Memory Memory Audio or Playlist Time[…]
-
Страница 35
35 A VR 1 58 ENGLISH TV Manufacturer/Brand Setup Code Number ADMIRAL 192 ANAM 045 106 109 112 122 AOC 037 122 123 128 AUDIOVOX 012 BLAUPUNKT 084 BROKSONIC 205 206 CITIZEN 045 123 128 132 CONTEC 045 CRAIG 045 157 158 159 CROWN 045 132 CURTIS MA THES 123 128 132 DAEWOO 045 087 102 105 106 108 111 114 116 119 127 128 132 DA YTRON 128 132 DYNA TECH 063[…]
-
Страница 36
36 A VR 1 58 VCR Manufacturer/Brand Setup Code Number AIWA 040 AKAI 048 108 109 126 APPLE TV 016 AUDIO DYNAMICS 018 048 BROKSONIC 110 147 CANON 135 140 CAPEHART 094 CITIZEN 134 CRAIG 045 116 DAEWOO 017 094 104 DA YTRON 094 DBX 018 048 DYNA TECH 040 EMERSON 013 040 042 110 112 FISHER 017 FUNAI 040 GE 076 095 124 HARMAN KARDON 002 003 018 049 HIT ACH[…]
-
Страница 37
37 A VR 1 58 ENGLISH VCR Manufacturer/Brand Setup Code Number SYL VANIA 040 SYMPHONIC 040 T AND Y 017 040 TEAC 040 048 TEKNIKA 040 THOMAS 040 TiV o 004 005 006 007 008 009 011 012 TMK 013 TOSHIBA 112 155 TOTEVISION 045 UNITECH 045 VECTOR RESEARCH 018 VIDEO CONCEPTS 018 040 VIDEOSONIC 045 WARDS 040 045 112 Y AMAHA 018 040 048 ZENITH 040 050 076 083 […]
-
Страница 38
38 A VR 1 58 CD Manufacturer/Brand Setup Code Number PROTON 210 RADIO SHACK 126 166 213 RCA 024 081 093 150 REALISTIC 058 093 095 104 105 108 164 166 SANSUI 047 081 134 157 172 SANYO 033 082 095 SCOTT 108 SHARP 058 105 114 151 159 167 180 181 SHERWOOD 003 041 058 105 133 SONY 103 115 116 118 132 139 163 205 206 207 208 212 217 SOUNDSTREAM 124 SYMPH[…]
-
Страница 39
39 A VR 1 58 ENGLISH Cassette Deck Manufacturer/Brand Setup Code Number HARMAN KARDON 001 T able A16 – Remote Control Product Codes: T ape T able A17 – Remote Control Product Codes: Cable Cable Manufacturer/Brand Setup Code Number ABC 001 011 ALLEGRO 111 AMERICAST 212 ARCHER 112 BELCOR 113 CABLE ST AR 033 113 CITIZEN 111 COMCAST 007 DIGI-LINK 1[…]
-
Страница 40
40 A VR 1 58 T able A17 – Remote Control Product Codes: Cable (cont.) Cable Manufacturer/Brand Setup Code Number PHILIPS 013 019 020 085 090 PIONEER 001 041 119 171 209 215 216 RADIO SHACK 111 112 213 RCA 053 214 RECOTON 116 REGAL 056 099 100 101 208 REMBRANDT 032 SAMSUNG 003 072 186 SCIENTIFIC A TLANT A 183 203 221 222 SEAM 121 SIGNA TURE 001 18[…]
-
Страница 41
www.harmankardon.com HARMAN Consumer, Inc. 8500 Balboa Boulevard, Northridge, CA 91329 USA © 2011 HARMAN International Industries, Incorporated. All rights reserved. Harman Kardon and Logic 7 are trademarks of HARMAN International Industries, Incorporated, registered in the United States and/or other countries. Apple, iPhone, iPod, iPod touch, iPo[…]
-
Страница 42
0296CSK — HK (x65Series) AVR158-230 OM [HKP1992], WORK05.indd 42 30/06/11 14:00:08[…]
FAQ: Types of Manuals and Their Contents
Harman Kardon AVR 158 Manuals come in various types, each serving a specific purpose to help users effectively operate and maintain their devices. Here are the common types of Harman Kardon AVR 158 User Guides and the information they typically include:
- User Manuals: Provide comprehensive instructions on how to use the device, including setup, features, and operation. They often include troubleshooting tips, safety information, and maintenance guidelines.
- Service Instructions: Designed for technicians and repair professionals, these manuals offer detailed information on diagnosing and repairing issues with the device. They include schematics, parts lists, and step-by-step repair procedures.
- Installation Guides: Focus on the installation process of the device, providing detailed instructions and diagrams for proper setup. They are essential for ensuring the device is installed correctly and safely.
- Maintenance Manuals: Provide guidance on routine maintenance tasks to keep the device in optimal condition. They cover cleaning procedures, part replacements, and regular servicing tips.
- Quick Start Guides: Offer a concise overview of the essential steps needed to get the device up and running quickly. They are ideal for users who need immediate assistance with basic setup and operation.
Each type of Harman Kardon AVR 158 instruction is designed to address specific needs, ensuring users have the necessary information to use, maintain, and repair their devices effectively.
Related Instructions for Harman Kardon AVR 158:
2
FL 8380
Technical manual Manual: Harman Kardon FL 8380 (BW6O84, Upd.28.01.2025)
70
237
41
3
DVD22
Owner’s manual Manual: Harman Kardon DVD22 (G53166, Upd.Mon 11.2024)
32
1442
347
6
AVR 254
Owner’s manual Harman Kardon Stereo Receiver Owner’s manual (File: harman-kardon-avr-254-owner-s-manual-76, 31st Dec 2024)
76
597
132
7
HK GOPLAY II
Specifications PDF Guide (@IF34VP), Harman Kardon HK GOPLAY II Other (Sat 02.2025)
2
71
15
8
CD401
Owner’s manual PDF User Guide (@37H4X2), Harman Kardon CD401 CD Player (08.04.2025)
13
56
14
10
CITATION 7.2
Owner’s manual CITATION 7.2 (Speakers ePDF User Manual, #3K8S94)
10
1423
328
Receiver Devices by Other Brands:
|
Pioneer VSX-43 Operating Instructions Manual Receiver #9O5GJJ Register your product on 06 Feb 2025 | 68 |
|
|
Ortovox 3+ Manual Transceiver #836TN4 Lawinen-Verschütteten-Suchgerät 03 Mar 2025 | 27 |
|
|
Pioneer MVH-S310BT Operation Manual Pioneer MVH-S310BT User Guide (Operation manual), @515366 English 24 Jan 2025 | 50 |
|
|
Yamaha RX-530 Owner’s Manual #9F37ZL: RX-530 Stereo Receiver Owner’s manual www.SteamPoweredRadio.Com 19 Apr 2025 | 16 |
Categories:
Blu-ray Player
Universal Remote
GPS
Amplifier
Av receiver
DVD Player
5.1-channel, 60-watt audio/video receiver with HDMI
®
v.1.4a for 3-D
AVR 158
Specifications
Harman Kardon
®
AVR 158
As a multitalented A/V receiver for budget-conscious
film and music lovers, the Harman Kardon
®
AVR 158
is a more than capable way to take your home
entertainment to the next level. With all the latest
Dolby
®
and DTS
®
audio modes and HDMI
®
v.1.4 with
3-D and Deep Colour, the AVR 158 lets you experience
the next dimension in TV viewing – while Harman Kardon
Logic 7
®
processing supplies you with an exhilarating
5.1-channel, 360-degree soundstage for movies, TV
shows and games. And with three HDMI inputs and
extensive video and audio connectivity, the AVR 158
also grants you the flexibility to add a Blu-ray Disc
™
player and surround-sound speaker system to the mix.
Overall, the AVR 158 is a great starting off point if you
want a gratifying home theatre system.
Highlights
HDMI v.1.4 with 3-D and Deep Colour
Powers an entire 5.1-channel surround-sound system
60 watts of power per channel
Dolby TrueHD and DTS-HD Master Audio
™
decoding
Logic 7 processing
Surround-sound decoding
Extensive video connectivity
Colour-coded binding-post speaker connectors
Multidevice, programmable IR remote control
FM/AM tuner with RDS