
Manual

The information in this document is subject to change without notice and does not represent a
commitment on the part of Native Instruments GmbH. The software described by this document is subject to a License Agreement and may not be copied to other media. No part of this
publication may be copied, reproduced or otherwise transmitted or recorded, for any purpose,
without prior written permission by Native Instruments GmbH, hereinafter referred to as Native
Instruments.
“Native Instruments”, “NI” and associated logos are (registered) trademarks of Native Instruments GmbH.
Mac, Mac OS, GarageBand, Logic, iTunes and iPod are registered trademarks of Apple Inc.,
registered in the U.S. and other countries.
Windows, Windows Vista and DirectSound are registered trademarks of Microsoft Corporation
in the United States and/or other countries.
All other trade marks are the property of their respective owners and use of them does not imply any affiliation with or endorsement by them.
Document authored by: Native Instruments GmbH
GUITAR RIG software version: 5.0 (07/2011)
Controller version: 3
Disclaimer
Special thanks to the Beta Test Team, who were invaluable not just in tracking down bugs, but
in making this a better product.

Germany
Native Instruments GmbH
Schlesische Str. 29-30
D-10997 Berlin
Germany
www.native-instruments.de
USA
Native Instruments North America, Inc.
6725 Sunset Boulevard
5th Floor
Los Angeles, CA 90028
USA
www.native-instruments.com
Contact
© Native Instruments GmbH, 2011. All rights reserved.

Table of Contents
Table of Contents
1 Welcome to the World of GUITAR RIG! ………………………………………………………………
2 Before You Start – Important Notes …………………………………………………………………..
2.1 Serial Numbers and Nameplate …………………………………………………………………………………….. 8
2.2 Using the Unit Safely …………………………………………………………………………………………………… 8
2.3 Disclaimer …………………………………………………………………………………………………………………. 9
2.2.1 Warning ……………………………………………………………………………………………………… 8
2.2.2 Caution ………………………………………………………………………………………………………. 8
2.2.3 Disposal Notice ……………………………………………………………………………………………. 9
3 The RIG KONTROL Hardware ……………………………………………………………………………
3.1 Top Panel ……………………………………………………………………………………………………………………10
3.2 Rear Panel …………………………………………………………………………………………………………………. 11
4 Installation Under Windows ……………………………………………………………………………
4.1 Software Installation …………………………………………………………………………………………………… 13
4.2 Hardware Installation ………………………………………………………………………………………………….. 17
4.3 Configuration …………………………………………………………………………………………………………….. 18
4.4 Audio Connections and Levels ………………………………………………………………………………………. 20
4.3.1 Configuring GUITAR RIG ……………………………………………………………………………….. 18
4.3.2 Using the RIG KONTROL as Your Default Audio Interface ……………………………………. 19
4.4.1 Connecting Your Instrument and Adjusting the Input Level ………………………………… 20
4.4.2 Connecting a Second Instrument ……………………………………………………………………. 22
4.4.3 The Input Level of GUITAR RIG ……………………………………………………………………….. 22
4.4.4 Connecting the Output …………………………………………………………………………………. 23
5 Installation under Mac OS X ……………………………………………………………………………
5.1 Software Installation …………………………………………………………………………………………………… 25
5.2 Hardware Installation ………………………………………………………………………………………………….. 26
5.3 Configuration …………………………………………………………………………………………………………….. 27
7
8
10
13
25
GUITAR RIG KONTROL — Manual — 4

Table of Contents
5.4 Audio Connections and Levels ………………………………………………………………………………………. 30
5.3.1 5.3.1 Configuring GUITAR RIG ……………………………………………………………………….. 27
5.3.2 Using RIG KONTROL as Your Default Audio Interface …………………………………………. 29
5.4.1 Connecting your Instrument and Adjusting the Input Level ………………………………… 31
5.4.2 Connecting a Second Instrument ……………………………………………………………………. 32
5.4.3 The Input Level of GUITAR RIG ……………………………………………………………………….. 32
5.4.4 Connecting the Output …………………………………………………………………………………. 33
6 Advanced Configuration …………………………………………………………………………………
6.1 Advanced Configuration on Windows ……………………………………………………………………………… 35
6.2 Advanced Configuration on Mac OS X …………………………………………………………………………….. 39
6.1.1 The Audio Settings Page ……………………………………………………………………………….. 35
6.1.2 Diagnostics Page …………………………………………………………………………………………. 37
7 Using the RIG KONTROL as a Controller Interface ………………………………………………..
7.1 Activating the RIG KONTROL in GUITAR RIG …………………………………………………………………….. 40
7.2 Using MIDI Controllers with the RIG KONTROL MIDI Interface …………………………………………….. 41
7.3 Using Additional Footswitches and Pedals ……………………………………………………………………… 41
8 Troubleshooting …………………………………………………………………………………………..
8.1 Audio Issues ………………………………………………………………………………………………………………. 43
8.2 Hardware-Related Problems …………………………………………………………………………………………. 45
8.1.1 No Sound or Low Volume ……………………………………………………………………………….. 44
8.1.2 Distorted Signal …………………………………………………………………………………………… 44
8.1.3 Noise …………………………………………………………………………………………………………. 44
8.1.4 Ground Loops ………………………………………………………………………………………………. 45
8.2.1 Driver Issues ……………………………………………………………………………………………….. 45
8.2.2 USB Issues …………………………………………………………………………………………………. 46
8.2.3 Using the RIG KONTROL with a Laptop ……………………………………………………………. 46
9 Technical Specifications ……………………………………………………………………………….
9.1 Jacks and Sockets ………………………………………………………………………………………………………. 48
35
40
43
48
GUITAR RIG KONTROL — Manual — 5

9.2 Audio Specifications ……………………………………………………………………………………………………. 48
9.3 Power Supply ……………………………………………………………………………………………………………… 50
9.4 Dimensions and Weight ……………………………………………………………………………………………….. 50
9.5 Environmental Specifications: ………………………………………………………………………………………. 50
9.6 System Requirements ………………………………………………………………………………………………….. 51
Table of Contents
GUITAR RIG KONTROL — Manual — 6

Welcome to the World of GUITAR RIG!
1 Welcome to the World of GUITAR RIG!
GUITAR RIG KONTROL is the complete solution for guitar and bass players. The stage-ready
RIG KONTROL foot pedal integrates seamlessly with the GUITAR RIG software and provides
studio-quality sound with its built-in audio interface. It is designed and optimized for GUITAR
RIG, but as it complies with industry standards and features full MIDI support, it works perfectly with most professional audio software.
The RIG KONTROL connects to your computer via high-speed USB 2.0, which also provides its
power supply. It features two inputs, suited either for instrument or line level signals. A twochannel line-out connects to your monitoring system, and a stereo jack allows for headphone
monitoring at an independent volume.
As a controller, the RIG KONTROL offers nine switches and a pedal, giving you control over
almost all of GUITAR RIG’s functions. Moreover, it features MIDI connections as well as two
analogue inputs to connect external controllers.
In the following chapters, you will learn more about the RIG KONTROL and how to make the
best use of it. Please read this manual carefully in order to get acquainted with the product.
GUITAR RIG KONTROL — Manual — 7

Before You Start – Important Notes
Serial Numbers and Nameplate
2 Before You Start – Important Notes
First things first; before using GUITAR RIG, it is advised that you read this chapter carefully.
2.1 Serial Numbers and Nameplate
GUITAR RIG Kontrol comes with two serial numbers. The RIG KONTROL’s serial number can
be found on the bottom of the hardware, along with the nameplate listing the product model
name and other technical information. The serial number for activating GUITAR RIG is located
on the sleeve of the product DVD.
2.2 Using the Unit Safely
Please read the following instructions thoroughly to prevent from health risks and damaging
the product.
2.2.1 Warning
To prevent hearing damage, please observe the following warnings:
▪ This Product, in combination with an amplifier, headphones, or speakers can produce
sounds in decibel ranges that may cause hearing damage.
▪ For protection, set all volume levels to a minimum before using the RIG KONTROL. Grad-
ually raise the volume controls while music is playing to set the desired listening level.
▪ Do not operate it at high volume levels for long periods. If you experience any hearing
problems or ringing in the ears, consult an audiologist immediately.
2.2.2 Caution
To make sure that the RIG KONTROL or any device connected is not damaged during usage or
maintenance, it is important that you observe the following rules:
GUITAR RIG KONTROL — Manual — 8

Before You Start – Important Notes
Using the Unit Safely
▪ Do not open the device or attempt to disassemble or modify the internal parts. The device
contains no user-serviceable parts. If it appears to be malfunctioning, discontinue use immediately and have it inspected by qualified service personnel.
▪ Do not expose the unit to rain, use it near water or in damp or wet conditions.
▪ Do not allow any objects or liquids of any kind to penetrate the unit.
▪ Never use or store the unit in areas that are subject to temperature extremes (e.g., direct
sunlight in an enclosed vehicle or near heat-generating equipment) or high levels of vibration.
▪ Do not place the RIG KONTROL in an unstable position where it is possible the unit could
accidentally fall. Remove all connected cables before moving the unit.
▪ Before turning the power on or off for any component, set all volume levels to their mini-
mum.
▪ Do not use excessive force on the knobs or connectors.
▪ When cleaning the RIG KONTROL, use a soft, dry cloth. Never use paint thinners, sol-
vents, cleaning fluids or chemical-impregnated wiping cloths.
2.2.3 Disposal Notice
Should this product become damaged beyond repair, or if you wish to dispose it, please observe the regulations of your area and country that relate to the disposal of electronic products.
2.3 Disclaimer
Native Instruments GmbH cannot be held responsible for damage or lost or destroyed data
caused by improper use or modification to the RIG KONTROL.
The information contained in this manual is believed to be correct at the time of printing or
digital release. However, Native Instruments reserves the right to make changes to the specifications at any time without notice or obligation to update existing units.
GUITAR RIG KONTROL — Manual — 9
3 The RIG KONTROL Hardware
This section will give you an overview of the RIG KONTROL hardware.
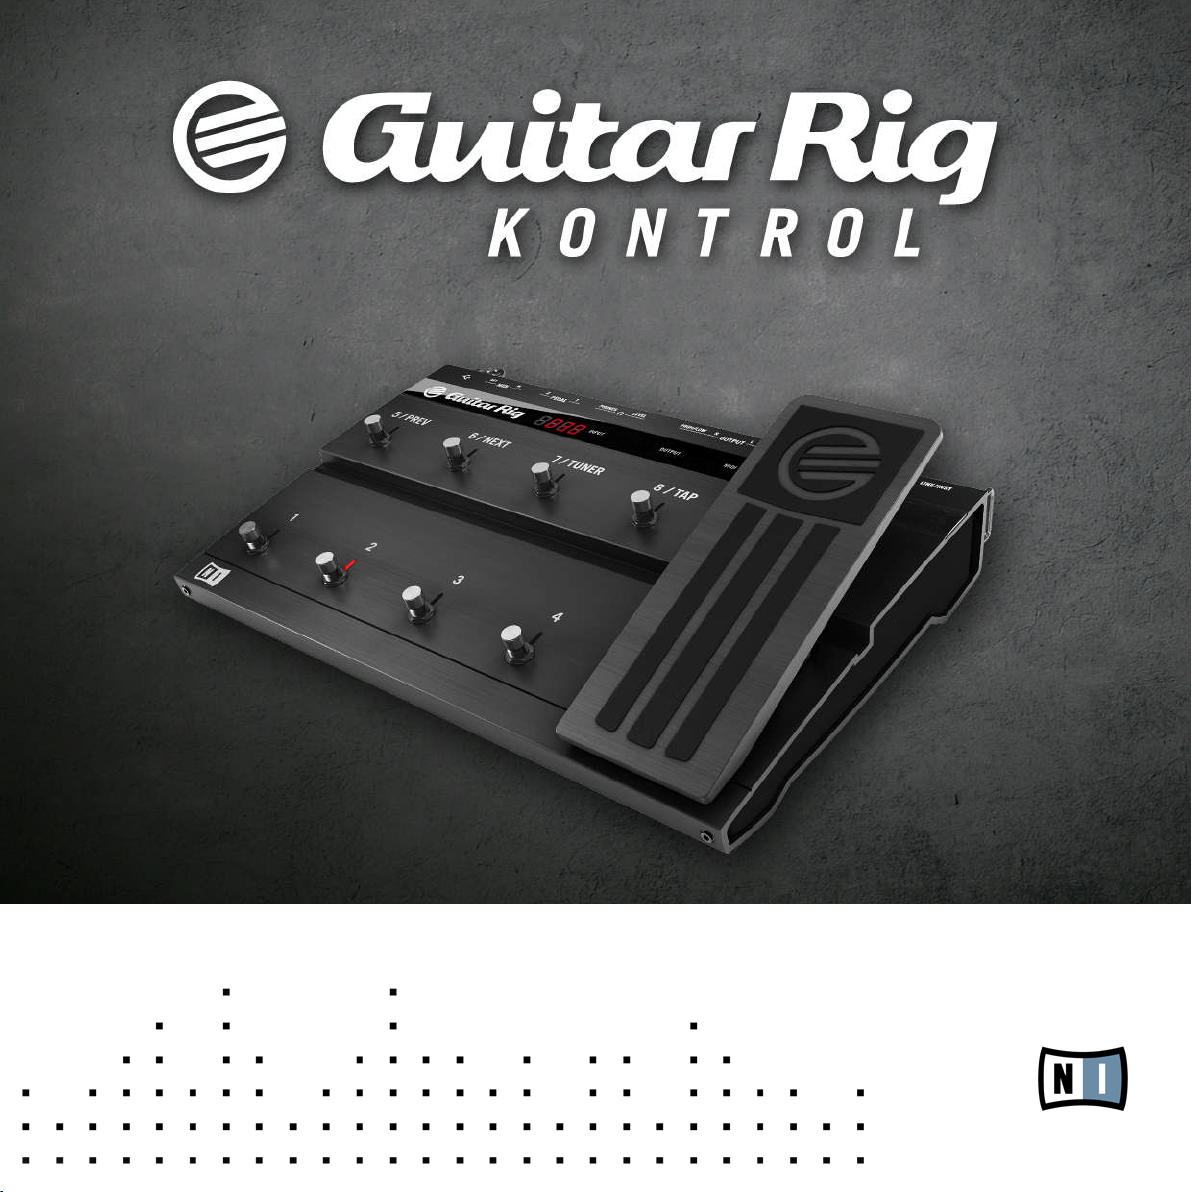
3.1 Top Panel
The RIG KONTROL Hardware
Top Panel
The RIG KONTROL’s top panel.
(1) The footswitches can be assigned in the software to perform tasks such as stepping through
presets, or turning individual components on and off. Each switch has an LED to indicate
whether it is activated. The top row is labeled with the most frequently used functions of GUITAR RIG, matching their pre-configured assignments.
GUITAR RIG KONTROL — Manual — 10
The RIG KONTROL Hardware
(2) The expression pedal can be used to control any continuous parameter of the software,
such as volume or wah-wah. There is an additional freely assignable switch underneath the tip
of the pedal.
(3) Shows the number of the currently activated preset.
(4) This LED-Meter shows the level of the audio signal at the input. The red LEDs indicate
clipping and should never light up. Turn the according input gain down if it does.
(5) This LED-Meter shows the level of the audio signal at the output. The red LEDs indicate
clipping and should never light up. Turn the output level down if it does.
(6) This LED indicates that the RIG KONTROL is receiving MIDI signals from a sequencer or
from another controller.
(7) This LED shows whether the switch underneath the pedal is activated.
3.2 Rear Panel
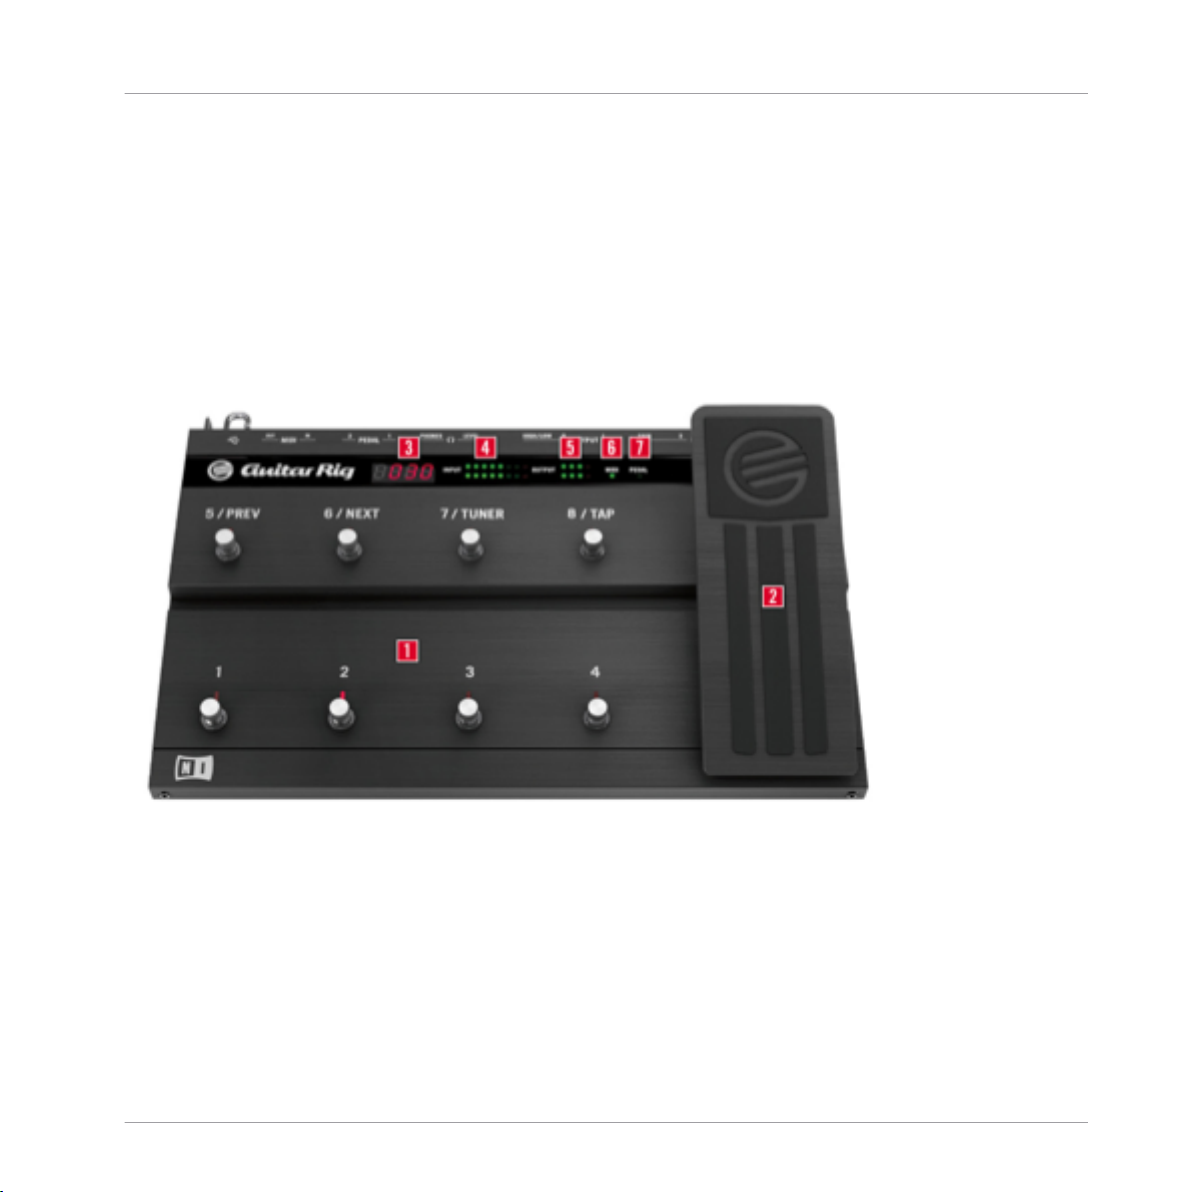
Rear Panel
The RIG KONTROL’s rear panel.
(1) The Inst/Line switch sets the input sensitivity for Input 1 and 2. When depressed, the inputs will handle instrument signals such as a guitar or bass, when pressed, line level signals
are accepted. The selected input type is also indicated on the unit’s top.
(2) This knob controls the gain of input 1.
GUITAR RIG KONTROL — Manual — 11

The RIG KONTROL Hardware
(3) The socket for Input 1 (¼» jack, TRS balanced) will accept line level or instrument level
signals, depending on the position of the Line/Inst switch. Connect a guitar, bass guitar, keyboard or the left channel of a stereo device.
(4) The socket for Input 2 (¼» jack, TRS balanced) will accept line level or instrument level
signals, depending on the position of the Line/Inst switch. Connect a second guitar, bass guitar, keyboard or the right channel of a stereo device.
(5) This knob controls the gain of input 2.
(6) These jacks transmit the processed output from the audio interface. Connect both for stereo sound.
(7) The output amplification can be set to full or –14 dB.
(8) Separately controls the volume of the headphones output.
(9) For connecting stereo headphones.
(10) For connecting external expression pedals, footswitches, volume pedals or switchboxes.
(11) The RIG KONTROL features a MIDI interface with one input and one output. The RIG
KONTROL does not require MIDI to send controller messages to GUITAR RIG, but it is able to
send MIDI signals to other applications.
Rear Panel
(12) The USB port connects the unit to your computer. Your computer must support USB 2.0
in order to work with the hardware. The unit also relies on the USB bus power to function. Connect this unit directly to your computer’s USB 2.0 port and avoid using un-powered USB hubs.
You should always secure the USB cable by wrapping it around the USB Hook.
GUITAR RIG KONTROL — Manual — 12

Installation Under Windows
Software Installation
4 Installation Under Windows
This chapter describes the installation of the RIG KONTROL hardware under Windows 7, focusing on the setup of the audio interface. To activate the foot pedal as a controller in GUITAR
RIG and to use its MIDI capabilities, please refer to ↑7, Using the RIG KONTROL as a Control-
ler Interface of this manual.
For detailed information about the GUITAR RIG software, please consult the Application Reference. You can find this on the product DVD or in the GUITAR RIG menu under Help > Open
Manual > Your Language.
4.1 Software Installation
Make sure you are logged in with administrator privileges. Don’t connect the RIG KONTROL
yet.
1. Browse the content of the product DVD and locate the setup file. If you are using a download version of GUITAR RIG, you need to extract the setup files first.
GUITAR RIG KONTROL — Manual — 13

Installation Under Windows
Software Installation
2. Double-click the GUITAR RIG setup file («Guitar Rig 5 [version number] Setup PC.exe») to
start the installation procedure.
3. Follow the on-screen instructions, which will guide you through the installation procedure.
It is advised to install the software to the default installation folders.
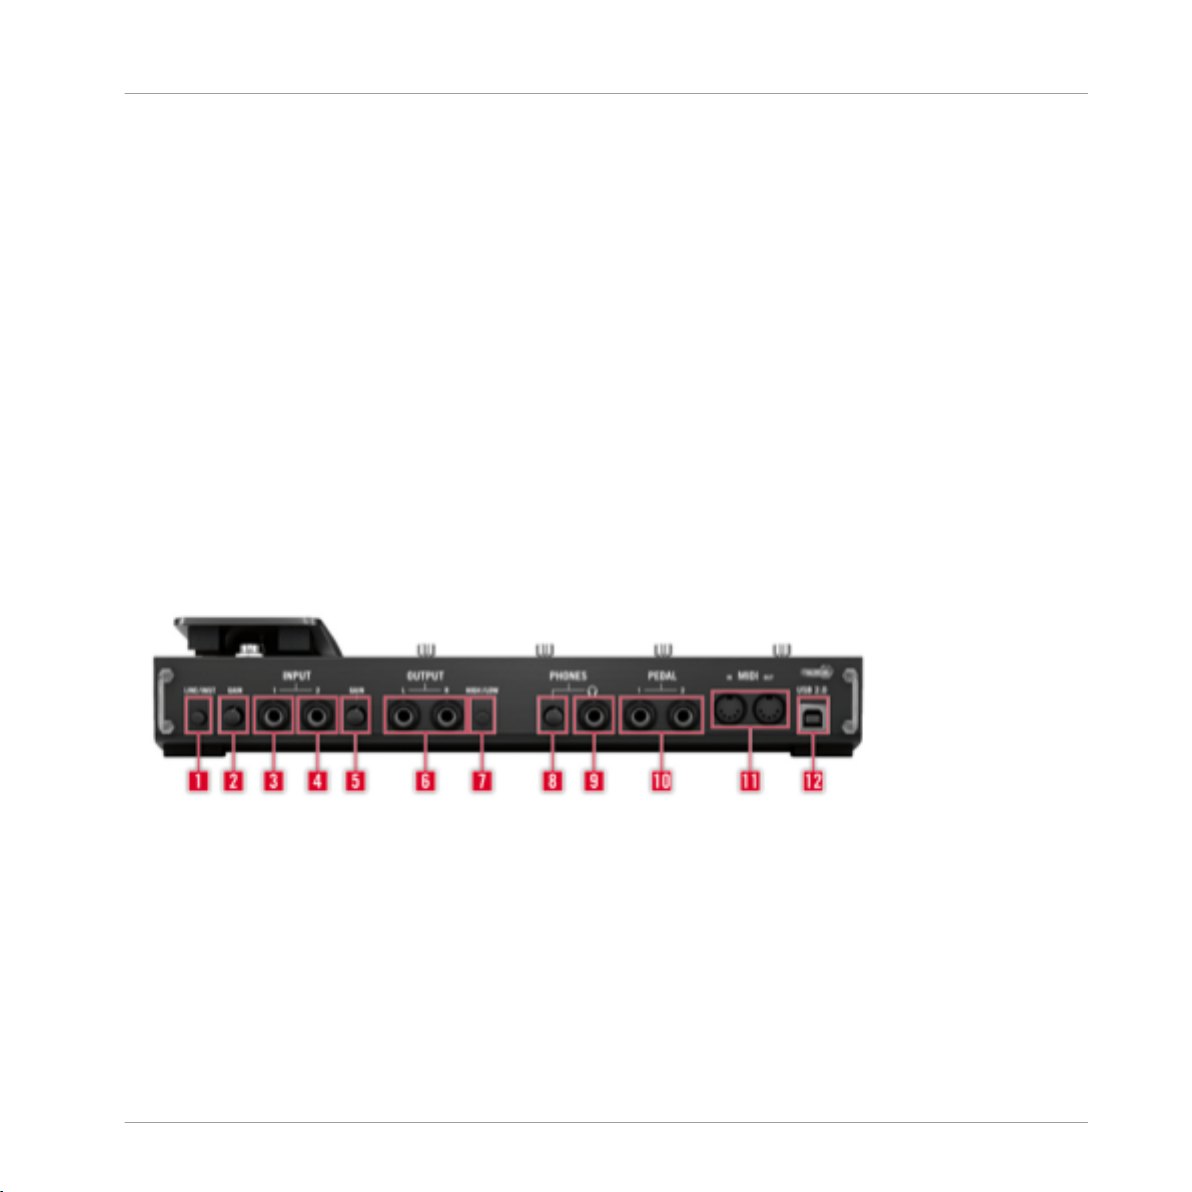
4. You will be asked to specify the path to the VST plug-in folder on your system. If you
don’t know what a VST plug-in is, or if you are sure you will be using GUITAR RIG in
stand-alone mode only, just use the standard setting. If you want to use GUITAR RIG as a
GUITAR RIG KONTROL — Manual — 14
Installation Under Windows
Software Installation
plug-in in a host software, you need to change the folder to your host software’s plug-in
folder.
GUITAR RIG KONTROL — Manual — 15

Installation Under Windows
Software Installation
5. You will be asked if you want to install drivers for the GUITAR RIG audio interfaces. Put a
checkmark next to Install the Rig Kontrol 3 Driver and click Next.
6. If prompted, you may need to restart your computer upon completion.
The following applications have been placed onto your hard drive:
▪ The GUITAR RIG fully featured stand-alone software.
▪ The GUITAR RIG plug-ins: Use GUITAR RIG as a plug-in in your Digital Audio Workstation
(DAW) of choice. On Windows computers, GUITAR RIG supports the VST and the RTAS
plug-in formats.
▪ The Service Center: this application handles product activation as well as update manage-
ment. Please refer to the Setup Guide for details.
▪ The hardware drivers for the RIG KONTROL.
In case you want to install the hardware drivers only, a separate driver installer file is available on the installation DVD. You can also download its latest version from the Support section of the Native Instruments website.
GUITAR RIG KONTROL — Manual — 16
Loading…
Большинство компьютерных музыкантов, использующих виртуальные студии звукозаписи и секвенсоры, не говоря уже профессиональных гитаристах, очень часто сталкивается с тем, что им нужно обработать чистый гитарный звук, добавив всевозможные эффекты. Современные гитарные процессоры наивысшего качества и самых известных брендов стоят весьма недешево, и позволить себе такую покупку может далеко не каждый. Поэтому музыканты предпочитают пользоваться виртуальными «примочками», в которых наборы эффектов представлены гораздо шире.
К одним из самых популярных приложений относится небезызвестный эффект-процессор Guitar Rig, на данный момент доступный в виде пятой модификации. Несмотря на множество встроенных пресетов, настройка гитары в Guitar Rig 5 у многих пользователей вызывает массу вопросов, поскольку в этом процессе необходимо учесть некоторые важные нюансы.
Что такое Guitar Rig: краткие сведения
Сама же программа представляет собой мощнейший комбайн, состоящий из огромного количества эффектов, которые можно комбинировать между собой в любых сочетаниях. Предустановленных шаблонов тут тоже хватает.
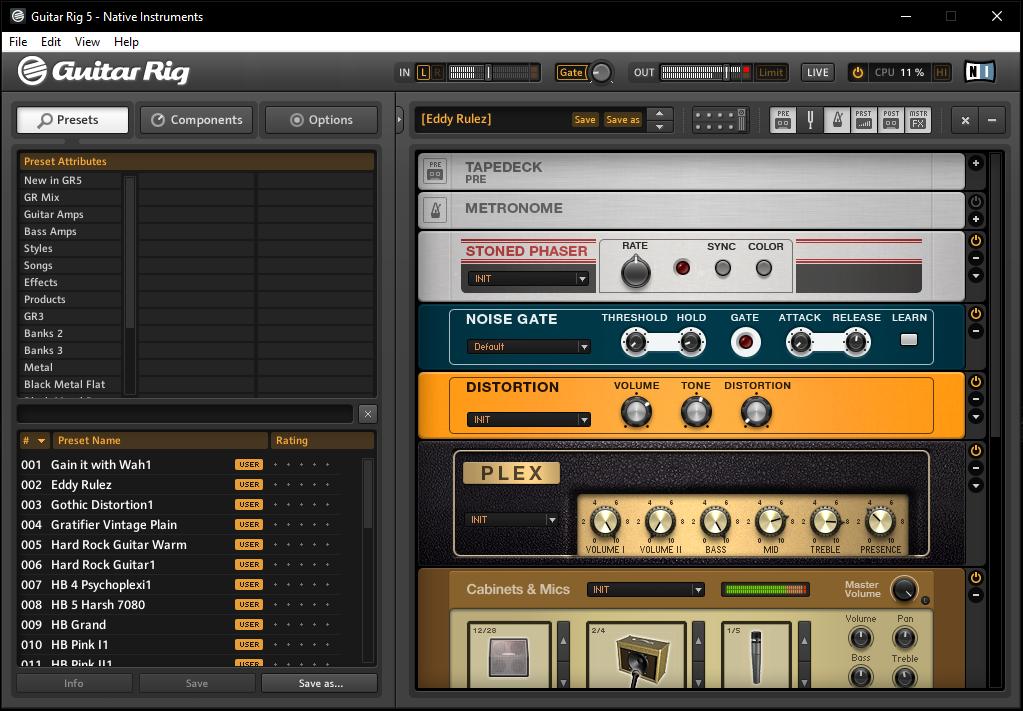
Грубо говоря, можно просто выбрать понравившийся набор, который может соответствовать именно тем настройкам звука, которые используются либо определенными гитаристами с мировыми именами, либо применяются в определенных стилях музыки, отдельных композициях и т.д. Каждый подключенный модуль в виде кабинетов и цепочек эффектов можно перестраивать по своему усмотрению, сохранять собственные настройки, импортировать дополнительные шаблоны и т. д.
Само приложение разработано всемирно известной в области создания и совершенствования звуковых компьютерных технологий компанией Native Instruments и является платным. Однако на просторах Рунета можно найти версии с ключами, лицензиями или кей-генераторами. Конечно, использование такого ПО является противозаконным, но наших пользователей это не останавливает. Суть не в том. Оставим в стороне морально-этические соображения и займемся исключительно настройкой Guitar Rig 5.
Нюансы установки
После загрузки инсталлятора на компьютер и его запуска необходимо четко определиться, какую именно версию предполагается использовать. Данное программное обеспечение может устанавливаться и в виде самостоятельной программы (Standalone), и в виде виртуального плагина форматов VST или AAX, подключаемого к хосту основной студийной программы (DAW).
Процесс установки достаточно прост и заострять на нем внимание особого смысла нет. Но вот в качестве дополнительного компонента настоятельно рекомендуется установить специальный звуковой драйвер ASIO4ALL, без использования которого настройка Guitar Rig 5 на оптимальное качество звучания станет абсолютно бессмысленной. Установщик драйвера можно загрузить из интернета. Но при использовании его в качестве основного устройства воспроизведения необходимо выполнить ряд важных настроек.
Предварительная настройка звукового драйвера
Когда вы запустите гитарный процессор в первый раз в виде самостоятельного приложения, сразу появится окно настройки аудиоинтерфейса, в котором из списка доступных устройств и нужно выбрать ASIO4ALL. Если же плагин активируется в студийной программе-секвенсоре, для него автоматически будет применен тот драйвер, который используется в основном приложении. Основные параметры, предлагаемые по умолчанию, можно не менять.

А вот значение буфера, устанавливаемое в стандартных настройках Guitar Rig 5 и ASIO на 512 сэмплов, лучше сразу выставить на максимум (2048 сэмплов). Это позволит избежать торможения в работе гитарного процессора и непредвиденных скачков или помех при воспроизведении звука. Обратите внимание, что при использовании стационарной программы настоятельно рекомендуется отключить микрофон (если таковой подключен к обычному ПК или по умолчанию включен на ноутбуке), поскольку сразу же появится наводка на колонки в виде сильнейшего свиста.
Настройка звука в Guitar Rig 5
Наконец, кратко остановимся на использовании гитарных модулей и эффектов. Если вы новичок в вопросах настройки Guitar Rig 5, можете просто просмотреть доступные шаблоны, выбрав нужный раздел, и двойным кликом активировать загрузку набора предустановленных модулей и настроек.

Также можно использовать выбора стиля, название какой-то известной композиции или задать поиск по ключевым словам. Наконец, если имеющиеся шаблоны вам не нравятся, можете загрузить из интернета дополнительные наборы, созданные энтузиастами своего дела, хотя и собственные эксперименты с кабинетами и всевозможными гитарными эффектами многим тоже могут прийтись по вкусу.
Хорошее руководство по эксплуатации
Законодательство обязывает продавца передать покупателю, вместе с товаром, руководство по эксплуатации Native GUITAR RIG 5 PRO. Отсутствие инструкции либо неправильная информация, переданная потребителю, составляют основание для рекламации в связи с несоответствием устройства с договором. В законодательстве допускается предоставлении руководства в другой, чем бумажная форме, что, в последнее время, часто используется, предоставляя графическую или электронную форму инструкции Native GUITAR RIG 5 PRO или обучающее видео для пользователей. Условием остается четкая и понятная форма.
Что такое руководство?
Слово происходит от латинского «instructio», тоесть привести в порядок. Следовательно в инструкции Native GUITAR RIG 5 PRO можно найти описание этапов поведения. Цель инструкции заключается в облегчении запуска, использования оборудования либо выполнения определенной деятельности. Инструкция является набором информации о предмете/услуге, подсказкой.
К сожалению немного пользователей находит время для чтения инструкций Native GUITAR RIG 5 PRO, и хорошая инструкция позволяет не только узнать ряд дополнительных функций приобретенного устройства, но и позволяет избежать возникновения большинства поломок.
Из чего должно состоять идеальное руководство по эксплуатации?
Прежде всего в инструкции Native GUITAR RIG 5 PRO должна находится:
— информация относительно технических данных устройства Native GUITAR RIG 5 PRO
— название производителя и год производства оборудования Native GUITAR RIG 5 PRO
— правила обслуживания, настройки и ухода за оборудованием Native GUITAR RIG 5 PRO
— знаки безопасности и сертификаты, подтверждающие соответствие стандартам
Почему мы не читаем инструкций?
Как правило из-за нехватки времени и уверенности в отдельных функциональностях приобретенных устройств. К сожалению само подсоединение и запуск Native GUITAR RIG 5 PRO это слишком мало. Инструкция заключает ряд отдельных указаний, касающихся функциональности, принципов безопасности, способов ухода (даже то, какие средства стоит использовать), возможных поломок Native GUITAR RIG 5 PRO и способов решения проблем, возникающих во время использования. И наконец то, в инструкции можно найти адресные данные сайта Native, в случае отсутствия эффективности предлагаемых решений. Сейчас очень большой популярностью пользуются инструкции в форме интересных анимаций или видео материалов, которое лучше, чем брошюра воспринимаются пользователем. Такой вид инструкции позволяет пользователю просмотреть весь фильм, не пропуская спецификацию и сложные технические описания Native GUITAR RIG 5 PRO, как это часто бывает в случае бумажной версии.
Почему стоит читать инструкции?
Прежде всего здесь мы найдем ответы касательно конструкции, возможностей устройства Native GUITAR RIG 5 PRO, использования отдельных аксессуаров и ряд информации, позволяющей вполне использовать все функции и упрощения.
После удачной покупки оборудования/устройства стоит посвятить несколько минут для ознакомления с каждой частью инструкции Native GUITAR RIG 5 PRO. Сейчас их старательно готовят или переводят, чтобы они были не только понятными для пользователя, но и чтобы выполняли свою основную информационно-поддерживающую функцию.
Guitar Rig 5 не нуждается в особом представлении, о её возможностях знает практически каждый гитарист, использующий цифровую обработку звука. Большое количество разнообразных эффектов, программные аналоги известных усилителей, настройка тона, встроенный проигрыватель для игры под «минусову» и много других полезных функций и возможностей, позволяющие в полной мере раскрыть реалии своего творчества.
К сожалению, очень часто, пользователи при первом знакомстве с Guitar Rig 5 сталкиваются с проблемой – «запустил программу, подключил гитару, но она не звучит». Данная, пошагово описанная инструкция, поможет преодолеть эту проблему и наслаждаться новым звучанием своей гитары. Рассматривается вариант настройки в ПК, необорудованном отдельной звуковой картой.
Скриншот 1

Скриншот 2

Скриншот 3

Скриншот 4
1. ASIO. Это программа создаёт оптимизацию звукового потока — на вход и на выход. Улучшает качество звучания и снижает задержку передачи аудиопотока. То есть гитара будет звучать без запаздывания. Программа не является платной и доступна для скачивания на официальном сайте. ASIO – необходимо скачать и установить на ПК, перед тем, как запускать и настраивать Guitar Rig.
2. Настройка аудио. Теперь, когда ASIO установлен, можно перейти непосредственно к настройкам программы. Для этого нужно зайти в пункт <Audio and MIDI Settings> меню <File> (скриншот 1). В открывшейся опции (скриншот 2) в графе <DRIVER> из ниспадающего меню нужно выбрать <ASIO>. Эта настройка указывает, какой звуковой драйвер программа должна использовать (скриншот 3). В противном случае был бы задействован стандартный звуковой драйвер Windows, который уступает по качеству звучания.
3. Если сделано всё правильно, в трее появляется значок подключенного в Guitar rig драйвера. В этой же опции, нужно кликнуть по кнопке <ASIO config>, и также сделать необходимые настройки (скриншот 4). Предварительно нужно подключить гитару в линейный вход ПК. В списке подключенных устройств не должно быть крестиков, указывающих на то, что устройство отключено. Их появление может быть вызвано тем, что параллельно на компьютере запущено другое ПО, которое также использует данные устройства. Его необходимо закрыть и перезапустить Guitar Rig.
4. Затем, <Размер буфера> — выставляется опытным путём. Чем меньше его значение, тем меньше запаздывание, но ухудшается стабильность звучания и может появиться характерное потрескивание. Если больше – качество звука лучше, но увеличивается время задержки. Нужно найти оптимальный вариант. Эта настройка зависит от мощности ПК.
5. <Смещение буфера> — рекомендуется выставить в 0 мс.
6. Если все действия выполнены верно, гитара уже должна звучать в Guitar Rig. Можно пользоваться установленными пресетами <Presets>, перейти к стилям <Styles> и выбрать интересующий, например, <Metal>. Далее перейти в нижнюю панель и выбрать конфигурацию усилителя и эффектов.
7. Если одновременно с обработанным звуком слышится чистый звук (без эффектов), необходимо в системной настройке звука в Windows отключить линейный вход (иконка динамика в трее -> значок динамики -> вкладка <Уровни>).

Ну, вот и всё, теперь можно приступать к гитарному искусству с новым звучанием.