
11
. Режим видеозаписи
. Просмотр фотоснимков
. Воспроизведение видео
1
Режим записи (стр. 48)
2
Настройка баланса белого (стр. 65)
3
Оставшийся объём памяти для
видеозаписи (стр. 48)
4
Время записи видео (стр. 48)
5
Вспышка (стр. 39)
6
Компенсация экспозиции (стр. 64)
7
Индикатор заряда батареи (стр. 21)
8
Выполняется запись видео (стр. 48)
1
Тип файла
2
Индикатор защиты (стр. 75)
3
Имя папки/имя файла (стр. 103)
4
Качество фотоснимка (стр. 64)
5
Разрешение фотоснимка (стр. 35)
6
Чувствительность ISO (стр. 66)
7
Значение диафрагмы
8
Выдержка
9
Дата/время (стр. 109)
bk
Индикатор заряда батареи (стр. 21)
1
Тип файла
2
Индикатор защиты (стр. 75)
3
Имя папки/имя файла (стр. 103)
4
Время записи видео (стр. 48)
5
Качество видео (стр. 38)
6
Дата/время (стр. 109)
7
Индикатор заряда батареи (стр. 21)
1 2
7
6
8
3
4
5
3
1
bk
4
7
5
8
9
6
2
1
4
5
7
2 3
6
B

12
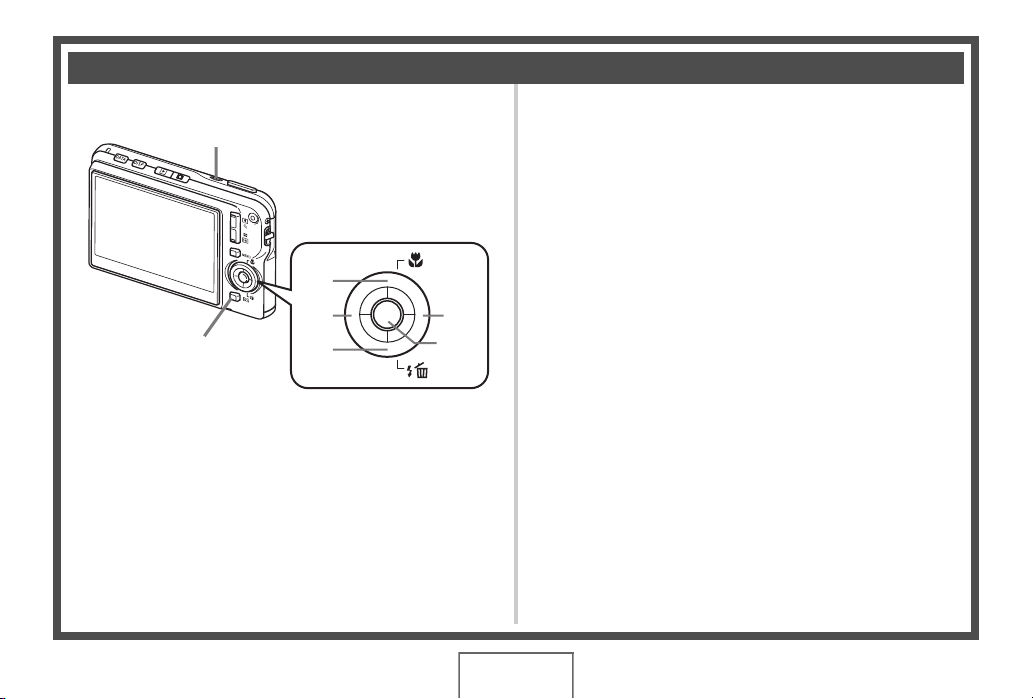
Вы можете включить или выключить экранную информацию, нажав [
8] (DISP).
Отдельные настройки можно регулировать в режиме записи и режиме
просмотра.
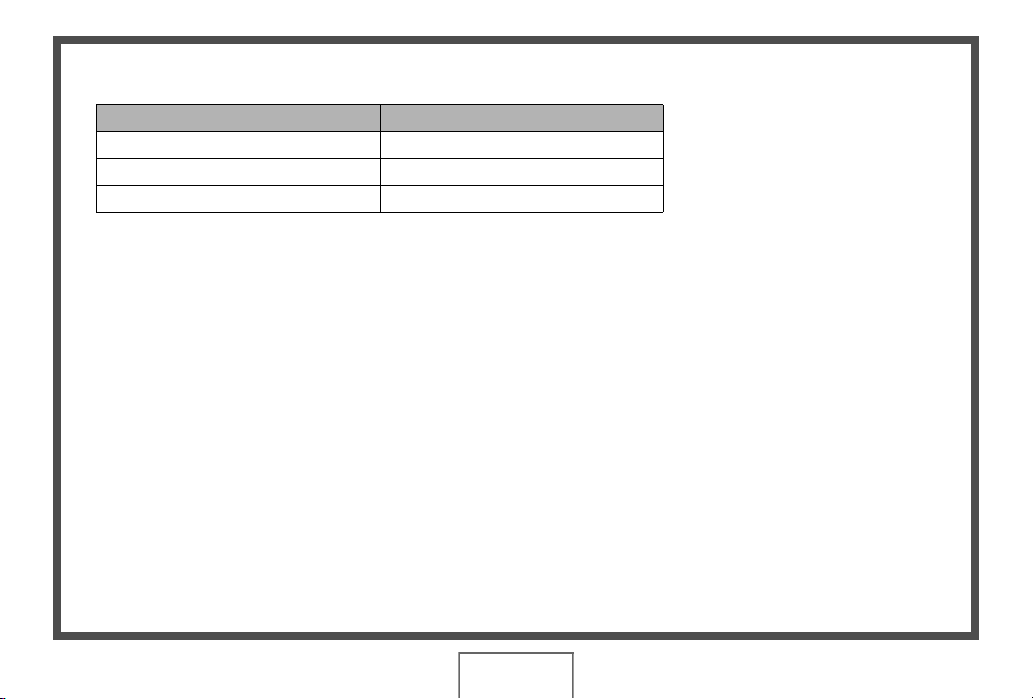
Регулировка настроек дисплея
Отображение
информации вкл.
Отображение информации о настройках
изображения и т.д. (только режим Записи)
Отображение
информации +
Дата/время вкл.
Вдобавок к информации о настройках фото,
отображается информация о настройках видео и
экран даты/времени.
• Вы можете выбрать желательный формат даты
(стр. 110).
Отображение
информации выкл.
Никакая информация не отображается

13
Краткое руководство
Краткое руководство
Что представляет собой цифровая камера?
Удаление
Цифровая камера сохраняет изображения на карте памяти, позволяя
вам неограниченно записывать и удалять их.
Воспроиз-
ведение
Запись
Вы можете использовать записанные изображения различными
способами.
Сохранять их на
компьютере.
Распечатывать их.
Прикреплять изображения
к электронным
сообщениям.

14
Краткое руководство
В камере CASIO предусмотрен мощный набор свойств функций, позволяющих
упростить запись цифровых изображений. К таким функциям относятся и три
нижеупомянутые.
Особенности камеры CASIO
BEST SHOT
Просто выберите соответствующий
шаблонный сюжет, и настройка камеры
выполнится автоматически. Теперь Вам всего
лишь нужно нажать кнопку спуска затвора и
получить идеальное изображение.
Стабилизатор
Камера автоматически выполняет
корректировку для уменьшения размытия
изображения, которое может быть обусловлено
перемещением камеры или высокой скоростью
движения объекта.
Дополнительная информация указана на
стр.
60
.
Дополнительная информация указана на
стр.
52
.
Дополнительная информация указана на
стр.
42
.
Распознавание лица
Направьте камеру на объект съёмки и она
автоматически распознает лицо объекта. Этот
режим позволяет всякий раз получать
прекрасные портретные снимки.

15
Краткое руководство
Обратите внимание на то, что батарея новой камеры не заряжена. Для
установки батареи в камере и начала зарядки выполните нижеописанную
процедуру.
• Питание данной камеры осуществляется от перезаряжаемой литий-ионной
батареи CASIO (NP-80). Не пытайтесь воспользоваться другим типом
батареи.
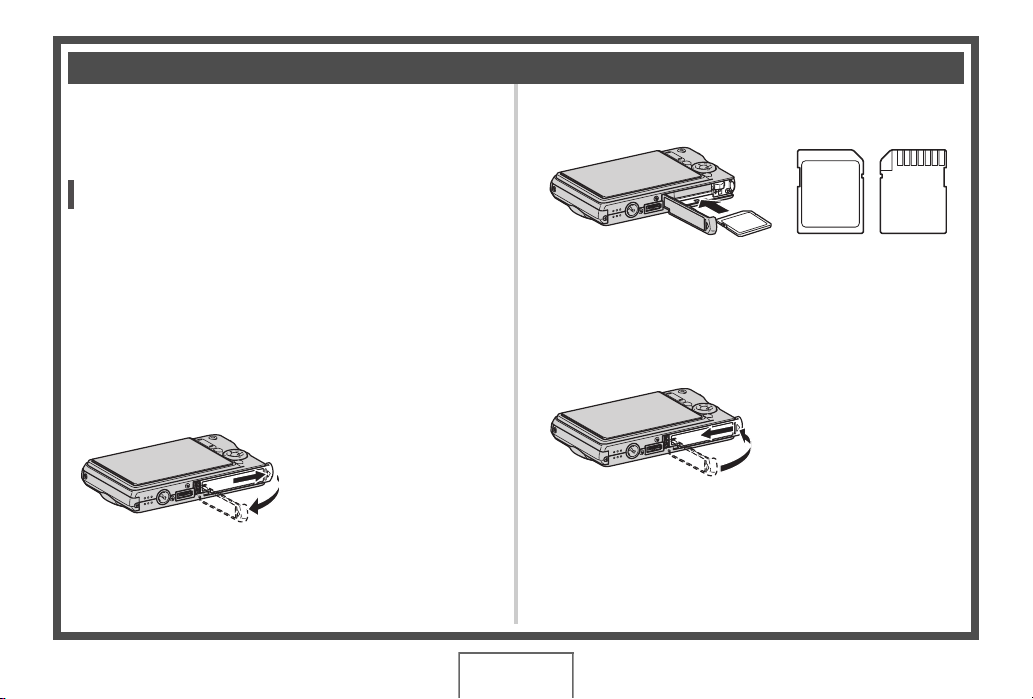
1.
Откройте крышку батарейного
отсека.
Нажмите на крышку батарейного
отсека и подвиньте её по
направлению стрелки.
2.
Установите батарею.
Повернув логотип EXILIM на
батарее вверх (по
направлению к дисплею
монитора), удерживайте
стопор рядом с батареей в
направлении, указанном
стрелкой, вставляя батарею
в камеру. Нажимайте на
батарею, пока стопор не
будет надёжно удерживать
её на месте.
3.
Закройте крышку батарейного
отсека.
Нажмите на крышку батарейного
отсека, двигайте её к камере до
закрывания.
• Информация о замене батареи
приведена на стр. 122.
Перед началом работы с камерой зарядите батарею.
Установка батареи
2
1
Логотип EXILIM
Стопор
Вид сзади
Контакты батареи
Вид
спереди
1
2

16
Краткое руководство
Зарядку батареи можно выполнить одним из двух нижеописанных методов.
• Адаптер USB-AC
• USB-подключение к компьютеру
. Зарядка с помощью адаптера USB-AC
1.
Выключите камеру.
Убедитесь в том, что на экране монитора камеры
отображается пустота. Если это не так, нажмите
[ON/OFF] (Питание), чтобы выключить камеру.
2.
После
подключения
комплектного USB-
кабеля к адаптеру
USB-AC
подключите
адаптер к сетевой
розетке.
Зарядите батарею
[ON/OFF] (Питание)
USB
Адаптер
USB-AC
Шнур питания
USB-кабель
(поставляется с камерой)
Порт USB

17
Краткое руководство
3.
Подключите USB-
кабель к камере.
Задний индикатор
должен постоянно
гореть красным,
указывая на начало
зарядки.
Задний индикатор
погаснет, как только
процесс зарядки
завершится.
Для полной зарядки
обычно требуется
120 минут. В
зависимости от
условий зарядки
процесс может занять
больше времени.
Работа заднего индикатора
4.
После завершения зарядки отключите USB-кабель от камеры, а
затем выньте шнур блока питания из розетки.
Состояние
индикатора
Описание
Горит красным
Зарядка
Мигает красным
Ненормальные температурные
условия окружающей среды,
неисправность или проблемы с
адаптером USB-AC или
батареей (стр. 122)
Выкл.
Зарядка завершена
USB-кабель
(поставляется с камерой)
Убедитесь в том, что пометка на соединителе
кабеля USB повёрнута к экрану монитора, подключите
кабель к камере.
Порт
[USB/AV]
Малый
соединитель
Адаптер USB-AC
Задний
индикатор

18
Краткое руководство
. Зарядка через USB-подключение к компьютеру
Установленная в камере батарея заряжается при непосредственном
подключении камеры к компьютеру через кабель USB.
• В зависимости от настроек вашего компьютера, возможно, вы не сможете
зарядить батарею камеры через USB-соединение. В этом случае
рекомендуется использовать комплектный адаптер USB-AC.
1.
Выключите камеру.
Убедитесь в том, что на экране монитора
камеры отображается пустота. Если это не
так, нажмите [ON/OFF] (Питание), чтобы
выключить камеру.
• При первом подключении камеры к компьютеру после её покупки компьютер
переходит в режим опознания камеры. В таком случае необходимо
выполнить процедуру, описанную на стр. 87 или 97. После опознания
компьютером камеры выключите камеру.
Дисплей монитора
[ON/OFF] (Питание)

19
Краткое руководство
2.
Подключите к
включённому
компьютеру камеру.
Задний индикатор должен
постоянно гореть
красным, указывая на
начало зарядки.
Задний индикатор
погаснет, как только
процесс зарядки
завершится.
Для полной зарядки
обычно требуется
140 минут. В зависимости
от условий зарядки
процесс может занять
больше времени.
Работа заднего индикатора
3.
После завершения зарядки отключите USB-кабель от камеры, а
затем и от компьютера.
Состояние
индикатора
Описание
Горит красным
Зарядка
Мигает красным
Необычная температура
окружающей среды, необычно
долгое время зарядки или
проблемы с батареей (стр. 122)
Выкл.
Зарядка завершена
Порт USB
USB-кабель
(поставляется с
камерой)
Порт
[USB/AV]
Большой соединитель
Малый
соединитель
Убедитесь в том, что пометка на
соединителе кабеля USB повёрнута к экрану
монитора, подключите кабель к камере.
Задний
индикатор

20
Краткое руководство
• Даже после включения камеры батарея будет продолжать заряжаться, если
установлено USB-соединение с компьютером. Однако в этом случае задний
индикатор будет выглядеть следующим образом:
Работа заднего индикатора
• Зарядка не начинается, если подключённый компьютер находится в спящем
режиме.
• Ошибка зарядки может возникнуть сразу после начала процесса зарядки или
через некоторое время после этого. В случае ошибки зарядки задний
индикатор мигает красным цветом.
Прочие меры предосторожности в процессе зарядки
• Благодаря двум описанным выше методам зарядки батарею камеры (NP-80)
можно заряжать, не вынимая её из камеры. Батарею также можно заряжать с
помощью дополнительного зарядного устройства (BC-80L). Никогда не
используйте другие типы зарядных устройств. Использование другого
зарядного устройства может привести к непредвиденной ситуации.
• Тёплая после недавнего использования батарея может не зарядиться
полностью. Перед зарядкой дайте батарее остыть.
• Батарея слегка разряжается, даже если она не используется в камере.
Поэтому рекомендуется заряжать батарею непосредственно перед
использованием.
• Зарядка аккумулятора камеры может создавать помехи приёму теле- и
радиосигналов. В этом случае вставьте шнур питания зарядного устройства в
розетку подальше от телевизора или радио.
• Реальное время зарядки зависит от степени заряда батареи и условий
зарядки.
• Не используйте адаптер USB-AC с любым другим устройством.
Состояние
индикатора
Описание
Горит/Мигает
жёлтым
Зарядка
Мигает красным
Необычная температура окружающей среды,
необычно долгое время зарядки или проблемы с
батареей (стр. 122)
Горит зелёным
Зарядка завершена

Данное руководство также подходит к другим моделям:
- Casio EX-ZS5
06:00
9-10-2013 Casio Exilim EX-ZS5 14.1MP Camera Video & Photo Tests in 480p UHQ
02:23
カシオ EXILIM EX-ZS5(カメラのキタムラ動画_CASIO)
02:56
ФОТОАППАРАТ CASIO EX-ZS5 в Баку / Bakida
04:41
Unboxing Review Kamera Casio Exilim Zs5
01:01
Tes Rekaman Video Kamera Digital Casio Exilim EX ZS5
01:23
Casio Ex-Zs5 sound bass guitar
Нажмите на кнопку для помощи
Digital Camera
EX-S770D
User’s Guide
Thank you for purchasing this CASIO product.
• Before using it, be sure to read the precautions
contained in this User’s Guide.
• Keep the User’s Guide in a safe place for future
reference.
• For the most up-to-date information about this
product, visit the official EXILIM
Website at http://www.exilim.com/.
E
K837PCM2DMX
1
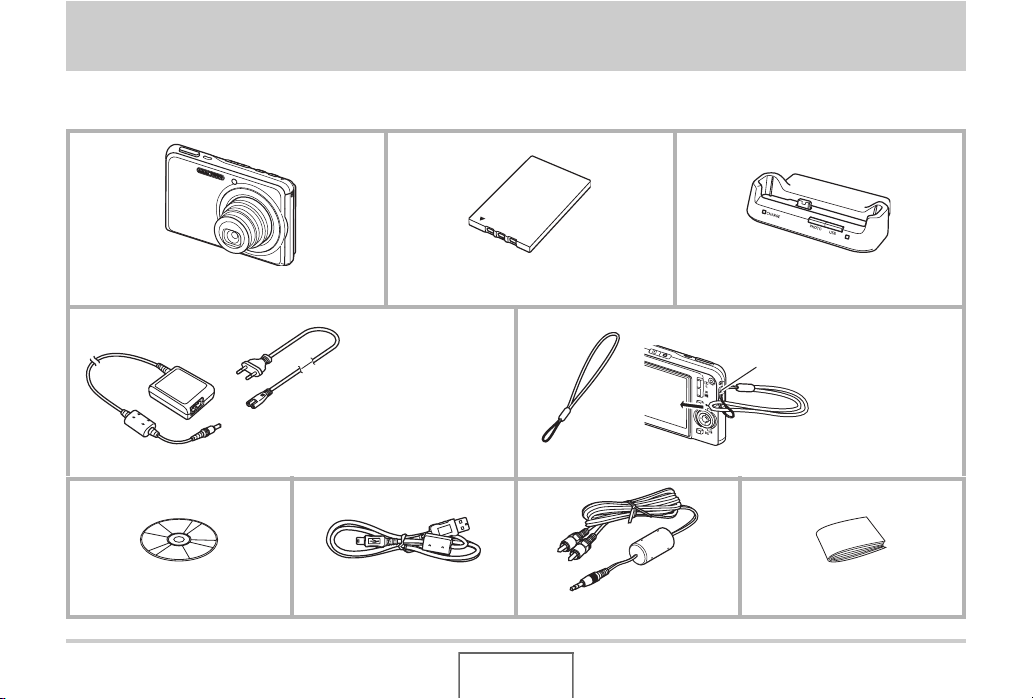
UNPACKING
As you unpack your camera, check to make sure that all items shown below are included. If anything is missing, contact your original
retailer.
Digital Camera
* The shape of the AC
power cord plug varies
according to country or
geographic area.
Special AC Adaptor (AD-C52S or AD-C52G)/AC Power Cord* Strap
CD-ROM USB Cable AV Cable Basic Reference
B
Rechargeable Lithium Ion Battery
(NP-20)
2
USB Cradle (CA-34)
To attach the strap to the camera.
Attach strap here.
UNPACKING

CONTENTS
UNPACKING 2
QUICK START BASICS 10
First, charge the battery . . . . . . . . . . . . . . . . . . . . . 10
Configuring Display Language, Date, and
Time Settings . . . . . . . . . . . . . . . . . . . . . . . . . . . . . . 12
Using a Memory Card . . . . . . . . . . . . . . . . . . . . . . . 14
Shooting a Snapshot . . . . . . . . . . . . . . . . . . . . . . . . 16
Viewing Snapshots . . . . . . . . . . . . . . . . . . . . . . . . . 18
Shooting a Movie . . . . . . . . . . . . . . . . . . . . . . . . . . . 19
Viewing a Movie . . . . . . . . . . . . . . . . . . . . . . . . . . . . 20
Deleting a File . . . . . . . . . . . . . . . . . . . . . . . . . . . . . 21
INTRODUCTION 22
Features . . . . . . . . . . . . . . . . . . . . . . . . . . . . . . . . . . 22
Read this first! . . . . . . . . . . . . . . . . . . . . . . . . . . . . . 24
Precautions during Use . . . . . . . . . . . . . . . . . . . . . 27
GETTING READY 37
Charging the Battery . . . . . . . . . . . . . . . . . . . . . . . . 37
■ To load the battery 37
■ To charge the battery 38
■ Replacing the Battery 42
■ Battery Precautions 42
Turning Power On and Off . . . . . . . . . . . . . . . . . . .43
Using a Memory Card . . . . . . . . . . . . . . . . . . . . . . . 46
■ Loading a Memory Card into the Camera 48
■ Replacing the Memory Card 49
■ Formatting a Memory Card 50
Using On-screen Menus . . . . . . . . . . . . . . . . . . . . . 52
■ Configuring Monitor Screen Settings 53
■ Selecting a Screen Layout (Layout) 54
■ Turning Display Information On and Off (Info.) 57
■ Adjusting Monitor Screen Brightness (Brightness) 59
■ Adjusting Monitor Screen Image Quality (Type) 60
If you lose your way… . . . . . . . . . . . . . . . . . . . . . . . 61
Using the Camera on a Trip . . . . . . . . . . . . . . . . . .62
■ Extra Batteries 62
■ Using the Camera in another Country 62
CONTENTS
3

SHOOTING A SNAPSHOT 63
SHOOTING A MOVIE 89
Holding the Camera Correctly . . . . . . . . . . . . . . . . 63
Shooting a Snapshot . . . . . . . . . . . . . . . . . . . . . . . . 64
■ Specifying Image Size 67
■ Specifying Image Quality 69
■ Turning Off the AF Assist Lamp 70
■ Snapshot Shooting Precautions 71
■ Auto Focus Restrictions 72
Shooting with Zoom . . . . . . . . . . . . . . . . . . . . . . . . 72
Using Flash . . . . . . . . . . . . . . . . . . . . . . . . . . . . . . . 76
Using the Self-Timer . . . . . . . . . . . . . . . . . . . . . . . . 81
Using Continuous Shutter . . . . . . . . . . . . . . . . . . . 83
■ Selecting the Continuous Shutter Mode 83
■ Recording with Normal-speed Continuous
Shutter, High-speed Continuous Shutter,
and Flash Continuous Shutter 84
■ Recording with Zoom Continuous Shutter 84
■ Continuous Shutter Precautions 85
Adding Audio to a Snapshot . . . . . . . . . . . . . . . . . 86
B
Movie Image Quality . . . . . . . . . . . . . . . . . . . . . . . .89
Shooting a Movie . . . . . . . . . . . . . . . . . . . . . . . . . . .90
■ Movie Recording Precautions 91
Using Short Movie . . . . . . . . . . . . . . . . . . . . . . . . . . 92
Using Past Movie . . . . . . . . . . . . . . . . . . . . . . . . . . .95
Shooting a Snapshot while Shooting a Movie
(Snapshot-In-Movie) . . . . . . . . . . . . . . . . . . . . . . . . 97
USING BEST SHOT 98
Reducing the Effects of Hand and Subject
Movement . . . . . . . . . . . . . . . . . . . . . . . . . . . . . . . .104
Taking Bright Images without Flash . . . . . . . . . .105
Shooting Images of Business Cards and
Documents (Business Shot) . . . . . . . . . . . . . . . . . 106
Restoring an Old Photograph. . . . . . . . . . . . . . . . 109
CONTENTS
4

ADVANCED SETTINGS 112
Changing the Focus Mode . . . . . . . . . . . . . . . . . . 112
■ Using Auto Focus 113
■ Using Macro Focus 114
■ Using Fixed Focus (Pan Focus) 118
■ Using Infinity Focus 119
■ Using Manual Focus 119
Correcting Image Brightness (EV Shift) . . . . . . . 121
Controlling White Balance . . . . . . . . . . . . . . . . . . 123
Specifying ISO Sensitivity . . . . . . . . . . . . . . . . . . 126
Specifying the Metering Mode . . . . . . . . . . . . . . . 127
Using the Camera’s Filter Effects . . . . . . . . . . . . 129
Controlling Image Sharpness . . . . . . . . . . . . . . . . 129
Controlling Color Saturation . . . . . . . . . . . . . . . . 130
Adjusting Image Contrast . . . . . . . . . . . . . . . . . . . 130
Date Stamping Snapshots . . . . . . . . . . . . . . . . . . 131
Using the On-screen Histogram to
Check Exposure. . . . . . . . . . . . . . . . . . . . . . . . . . . 132
Other Useful Recording Functions . . . . . . . . . . . 135
■ Using Key Customize to Assign Functions
[W] and [X]135
■ Displaying an On-screen Grid 136
■ Displaying the Image You Just Recorded
(Image Review) 137
■ Using Icon Help 137
■ Using Mode Memory to Configure
Power On Default Settings 138
■ Resetting the Camera to
Its Initial Factory Defaults 140
VIEWING SNAPSHOTS
AND MOVIES 142
Viewing a Snapshot . . . . . . . . . . . . . . . . . . . . . . . . 142
■ Listening to the Audio of an Audio Snapshot 143
Viewing a Movie . . . . . . . . . . . . . . . . . . . . . . . . . . .144
■ Playing Back a Movie with Anti Shake 146
Playing a Slideshow on the Camera . . . . . . . . . . 147
Viewing Camera Images on a TV . . . . . . . . . . . . . 151
Zooming the Displayed Image . . . . . . . . . . . . . . . 154
Using the 12-image Screen . . . . . . . . . . . . . . . . . . 155
Using the Calendar Screen . . . . . . . . . . . . . . . . . .155
Using Image Roulette . . . . . . . . . . . . . . . . . . . . . .156
5
CONTENTS

EDITING IMAGES 158
DELETING FILES 186
Resizing a Snapshot . . . . . . . . . . . . . . . . . . . . . . . 158
Cropping a Snapshot . . . . . . . . . . . . . . . . . . . . . . 159
Keystone Correction . . . . . . . . . . . . . . . . . . . . . . . 160
Using Color Restoration to Correct
the Color of an Old Photograph . . . . . . . . . . . . . . 162
Editing the Date and Time of an Image . . . . . . . . 164
Rotating an Image . . . . . . . . . . . . . . . . . . . . . . . . . 165
Editing a Movie on the Camera . . . . . . . . . . . . . . 166
Creating a Snapshot of a Movie Frame
(MOTION PRINT) . . . . . . . . . . . . . . . . . . . . . . . . . . 171
USING AUDIO 173
Adding Audio to a Snapshot . . . . . . . . . . . . . . . . 173
Recording Audio Only (Voice Recording) . . . . . .176
MANAGING YOUR FILES 179
Files and Folders . . . . . . . . . . . . . . . . . . . . . . . . . . 179
Protecting a File Against Deletion . . . . . . . . . . . . 180
Using the FAVORITE Folder . . . . . . . . . . . . . . . . . 181
Copying Files . . . . . . . . . . . . . . . . . . . . . . . . . . . . . 184
Deleting a Specific File . . . . . . . . . . . . . . . . . . . . . 186
Deleting All Files . . . . . . . . . . . . . . . . . . . . . . . . . . 187
Deleting FAVORITE Folder Snapshots . . . . . . . .187
OTHER SETTINGS 189
Configuring Camera Sound Settings . . . . . . . . . .189
Turning the Startup Screen On or Off . . . . . . . . . 191
Specifying the File Name Serial Number
Generation Rule . . . . . . . . . . . . . . . . . . . . . . . . . . .192
Changing the Camera Date and Time Setting . . .192
Using World Time . . . . . . . . . . . . . . . . . . . . . . . . . 194
■ Configuring World Time Settings 194
Changing the Display Language . . . . . . . . . . . . .196
Changing the USB Port Protocol . . . . . . . . . . . . . 196
[ ] (REC) and [ ] (PLAY) Button Settings . .197
Formatting Built-in Memory . . . . . . . . . . . . . . . . . 199
CONTENTS
6

PRINTING 200
Types of Printing . . . . . . . . . . . . . . . . . . . . . . . . . . 200
Using Professional Print Service . . . . . . . . . . . . . 201
Using Your Printer to Print Images . . . . . . . . . . . 202
Using DPOF to Specify Images to be Printed
and the Number of Copies . . . . . . . . . . . . . . . . . . 205
■ Date Stamping 208
Supported Protocols . . . . . . . . . . . . . . . . . . . . . . . 209
USING THE CAMERA WITH A
COMPUTER 211
What you can do . . . . . . . . . . . . . . . . . . . . . . . . . . 211
Using the Camera with a Windows Computer . . 212
■ Viewing and Storing Images on a Computer 215
■ Transfer of Images from the Camera and
Management of Images on the Computer 224
■ Retouching, Reorienting, or Printing Snapshots 227
■ Playing Movies 228
■ Transferring Images to the Camera 229
■ Viewing User Documentation (PDF) Files 233
■ User Registration 234
■ Exiting the CD-ROM Menu 234
Using the Camera with a Macintosh . . . . . . . . . . 235
■ Viewing and Storing Images on a Macintosh 236
■ Transfer of Images from the Camera and
Management of Images on Your Macintosh 242
■ Viewing User Documentation (PDF Files) 243
■ Registering as a User 244
Reading Files Directly from a Memory Card . . . . 244
Memory Card Data . . . . . . . . . . . . . . . . . . . . . . . . .245
TRANSFERRING DOCUMENTS TO
YOUR CAMERA (DATA STORAGE) 249
Transferring Documents to the Camera . . . . . . .249
■ Transferring documents from a
computer running Windows 249
■ Transferring documents from a Macintosh 251
Viewing a Transferred Document on
the Camera . . . . . . . . . . . . . . . . . . . . . . . . . . . . . . . 253
Deleting Documents from Camera Memory . . . .255
■ Deleting a Document Page 255
■ Deleting Documents 256
7
CONTENTS

APPENDIX 258
General Guide . . . . . . . . . . . . . . . . . . . . . . . . . . . . 258
Monitor Screen Contents . . . . . . . . . . . . . . . . . . . 260
Menu Reference . . . . . . . . . . . . . . . . . . . . . . . . . . . 262
Display Menu Reference . . . . . . . . . . . . . . . . . . . . 266
Indicator Lamps . . . . . . . . . . . . . . . . . . . . . . . . . . . 267
Troubleshooting Guide . . . . . . . . . . . . . . . . . . . . . 271
■ Find the Problem and Fixing It 271
■ If you have problems installing the USB driver… 275
■ Display Messages 276
Specifications . . . . . . . . . . . . . . . . . . . . . . . . . . . . 278
8
CONTENTS

.
Getting the Most Out of Your Camera
Snapshots
Shooting with Optimum Setups
➞ USING BEST SHOT . . . . . . . . . . . . . . . . . . . . . . . . . . .98
Portrait, Scenery, Night Scene, Night Scene Portrait, Children, etc.
Adding Special Effects
➞ USING BEST SHOT . . . . . . . . . . . . . . . . . . . . . . . . . . .98
Monochrome, retro, etc.
Compensating for Hand or Subject Movement
➞
Reducing the Effects of Hand and Subject Movement . 104
Increasing Sensitivity when Lighting is Dim
➞ Taking Bright Images without Flash . . . . . . . . . . . . . .105
Making Images of Business Cards, Documents, and
Meeting Information (White Board) Easier to Read
➞ Shooting Images of Business Cards and Documents
(Business Shot) . . . . . . . . . . . . . . . . . . . . . . . . . . . . . .106
Selecting the Best Focus Mode for Shooting Conditions
➞ Changing the Focus Mode . . . . . . . . . . . . . . . . . . . . .112
Eliminating Light Source Color Cast
➞ Controlling White Balance . . . . . . . . . . . . . . . . . . . . . .123
Sharpening or Softening Subject Outlines
➞ Controlling Image Sharpness . . . . . . . . . . . . . . . . . . .129
Snapshots
Enhancing or Reducting Color Satuation
➞ Controlling Color Saturation . . . . . . . . . . . . . . . . . . . . 130
Increasing or Decreasing Contrast
➞ Adjusting Image Contrast . . . . . . . . . . . . . . . . . . . . . . 130
Movies
Normal Movie Recording
➞ Shooting a Movie . . . . . . . . . . . . . . . . . . . . . . . . . . . . . 90
Limiting Movie Length
➞ Using Short Movie . . . . . . . . . . . . . . . . . . . . . . . . . . . . 92
Capturing Action Occurring before
the Shutter Button is Pressed
➞ Using Past Movie . . . . . . . . . . . . . . . . . . . . . . . . . . . . . 95
9
CONTENTS
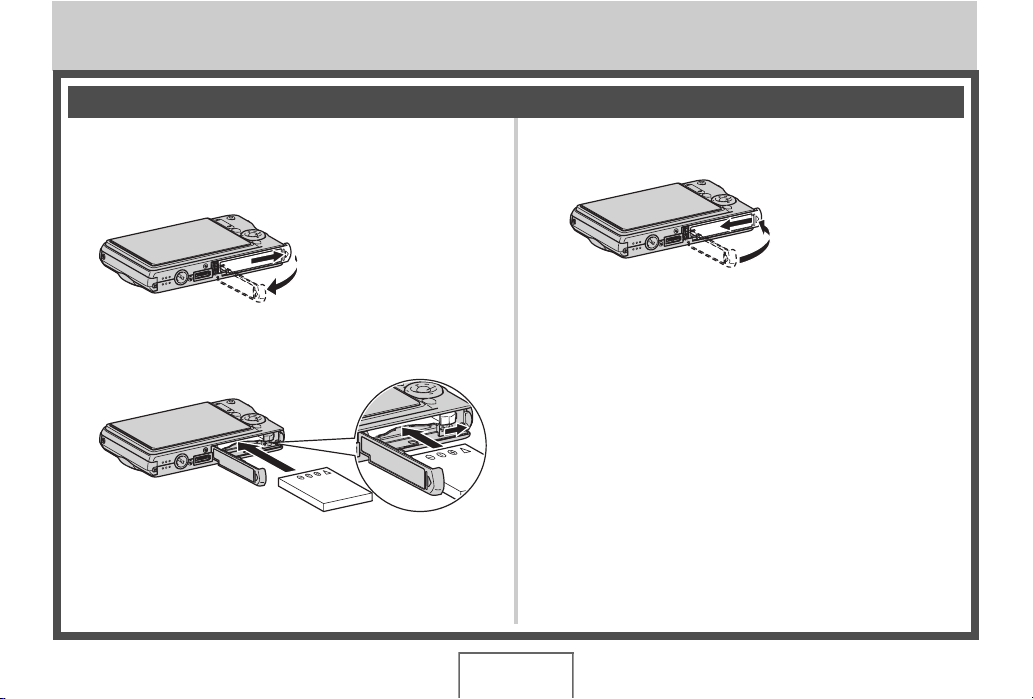
QUICK START BASICS
First, charge the battery
■ Loading the Battery into the Camera
1. Open the battery cover.
While pressing lightly on
the cover, slide it in the
direction indicated by the
arrow to open.
2. Load the battery into the camera.
(page 37)
3. Close the battery cover.
10
QUICK START BASICS
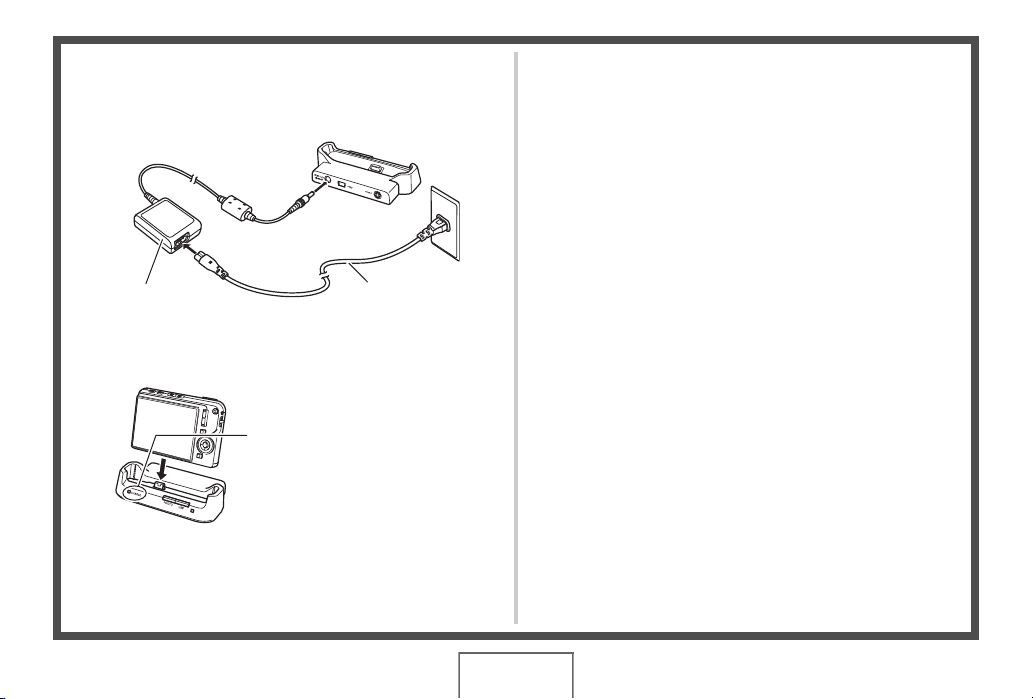
■ Using the USB Cradle to Charge
1. Plug the USB cradle into a household power
outlet.
AC adaptor
AC power cord
2. Place the camera onto the USB cradle.
[CHARGE] lamp
Red: Charging
Green: Charged (Full)
• It takes about two hours to
achieve a full charge.
11
QUICK START BASICS
Configuring Display Language, Date, and Time Settings
[ON/OFF] (Power)
1. Press [ON/OFF] to turn on the camera.
2. Use [S], [T], [W], and [X] to select the
language you want and then press [SET].
3. Use [S], [T], [W], and [X] to select the area
where you will use the camera and then press
[SET].
[]
[]
[BS]
The settings on this page are required the first time you turn on
the camera after purchasing it.
[]
[]
[SET]
4. Use [S] and [T] to select the city where you
will use the camera and then press [SET].
5. Use [S] and [T] to select the summer time
(DST) setting you want and then press [SET].
(pages 192, 196)
12
QUICK START BASICS
6. Use [S] and [T] to select the date format and then press [SET].
Example: December 19, 2006
To display the date like this: Select this option:
06/12/19 YY/MM/DD
19/12/06 DD/MM/YY
12/19/06 MM/DD/YY
7. Set the date and the time.
Use [W] and [X] to select the setting you want (year, month, day, hour, minute) and then use [S] and [T] to change the setting.
To switch between 12-hour and 24-hour format, press [BS].
8. When all the settings are the way you want, press [SET].
9. Press [ON/OFF] to turn off the camera.
• After finishing this procedure, advance to the procedure on the next page.
13
QUICK START BASICS
Using a Memory Card
■ Loading a Memory Card into the Camera
When a memory card is loaded, the camera stores images you
shoot on the card.
NOT
• Though the camera has built-in memory, using a memory
card provides additional capacity you can use to store more
images, high-quality and large-size images, and longer
movies.
• The camera will store images in its built-in memory if there
is no memory card loaded. If you prefer to use built-in
memory, skip this procedure and go to “Shooting a
Snapshot” on page 16.
1. Open the battery cover.
While pressing lightly on the
cover, slide it in the
direction indicated by the
arrow to open.
2. Load a memory card into the camera.
MEMORY
EMORY
M
CARD
With the front of the memory card facing upwards (towards
the monitor screen side of the camera), slide it into the card
slot and press until it clicks securely into place.
CARD
Front Back
3. Close the battery cover.
(page 46)
14
QUICK START BASICS
■ Formatting a Memory Card
Before you can use a memory card with your camera, you must
format it.
IMPORTANT!
• Formatting a memory card that already has snapshots or
other files on it, will delete its contents. Normally you do not
need to format a memory card again. However, if storing to
a card has slowed down or if you notice any other
abnormality, re-format the card.
• Be sure to perform the following procedure on the camera
to format the memory card.
5. Press [S] to select “Format” and then press
[SET].
• To cancel formatting, select “Cancel” and then press
[SET].
Wait until the “Busy… Please wait…” message disappears
from the monitor screen before doing anything else.
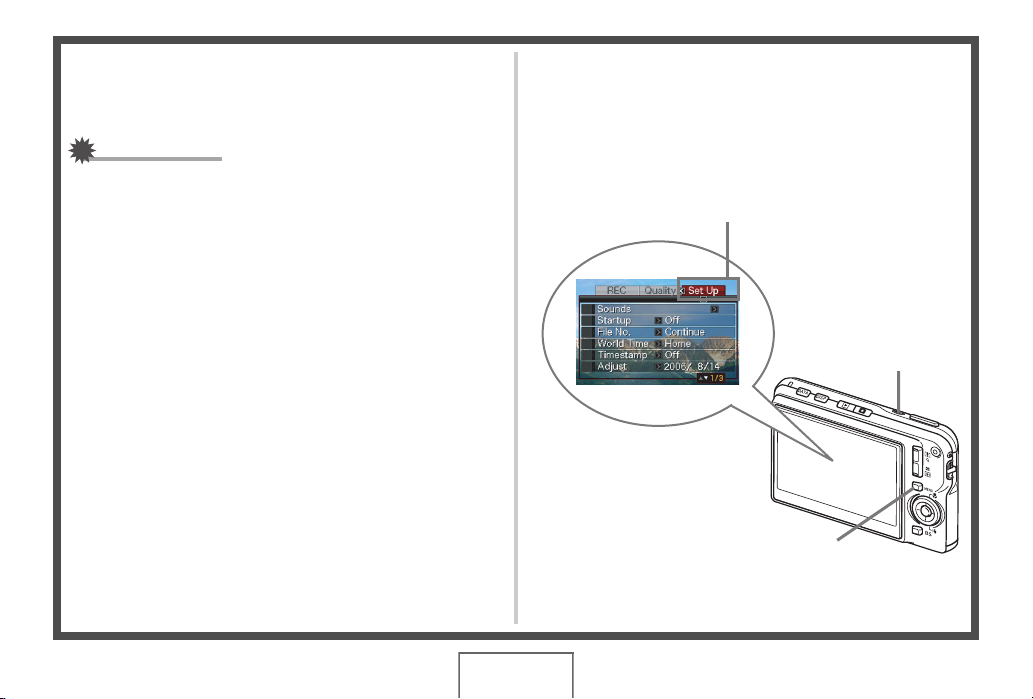
“Set Up” Tab
1. Press [ON/OFF] to turn on the camera.
2. Press [MENU].
3. Use [W] and [X] to select the “Set Up” tab.
4. Use [T] to select “Format” and then press [X].
[ON/OFF] (Power)
[MENU]
QUICK START BASICS
15
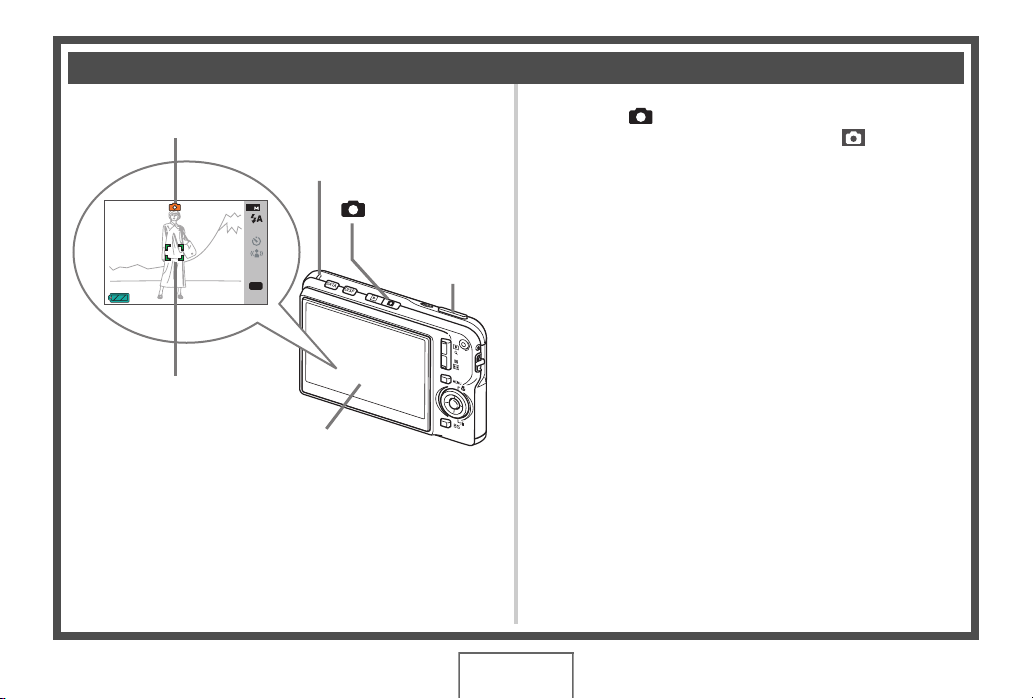
Shooting a Snapshot
Auto icon
2
62
N
AF
ISO
AWB
EV
15:37
Focus Frame
Monitor Screen
Operation Lamp
[] (REC)
Shutter Button
(page 63)
1. Press [ ] to turn on the camera.
This enters the REC mode and displays “ ” (Auto icon)
on the monitor screen.
2. Point the camera at the subject.
3. While taking care to keep the camera still, half-
press the shutter button.
When the image is in focus, the camera will beep, the operation
lamp will light green, and the focus frame will turn green.
4. Continuing to keep the camera still, press the
shutter button all the way down.
The recorded image will remain on the display for about one
second, and then it will be stored in memory. After that, the
camera will be ready to shoot the next image.
16
QUICK START BASICS
Snapshot Image Size and Image Quality
Your camera lets you select from among various image size
and quality settings. Note that image size and quality
settings affect how many images can be stored in memory.
• You can change the image size and quality settings as
required to shoot a smaller or lower-resolution image for
attachment to an e-mail message, for publishing on a
website, etc. You can also select an image size that suits
the size of paper you plan to use for printing your images.
For details, see pages 67, 69, and 278.
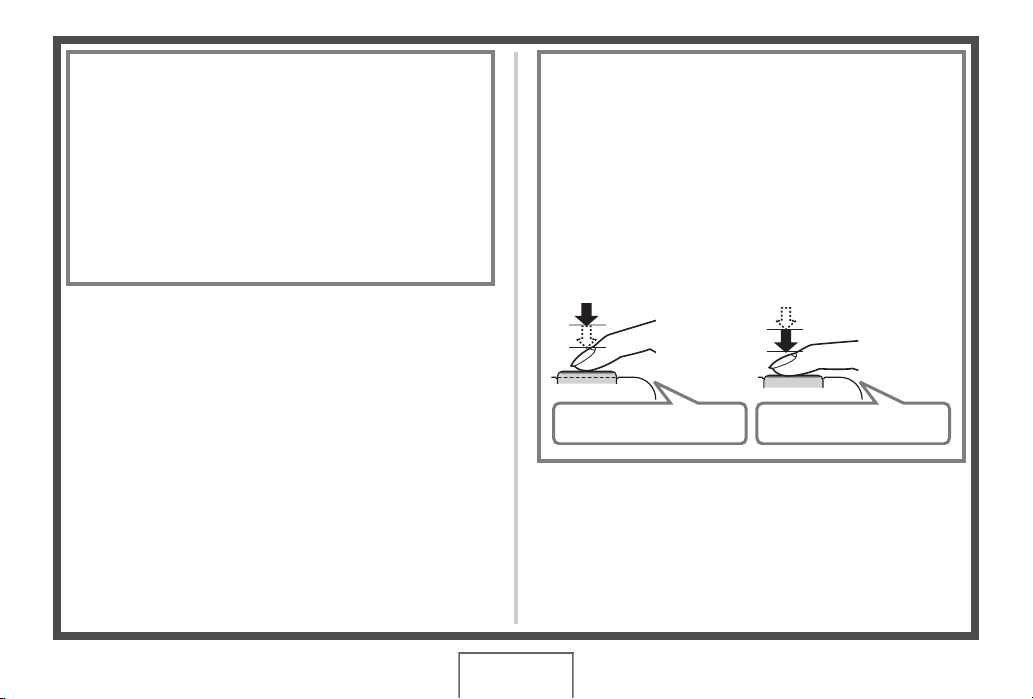
How do I half-press the shutter button?
The shutter button is designed to stop about half way down
when you press it lightly. Stopping at this point is called a
“half-press”. When you half-press the shutter button, the
camera automatically adjusts exposure and focuses on the
subject it is currently pointed at.
Mastering how much pressure is required for a half-press
and a full-press of the shutter button is an important
technique for good-looking images.
Half-press
Press lightly
until the
button stops.
Beep-beep! Click!
Full-press
All the way
17
QUICK START BASICS
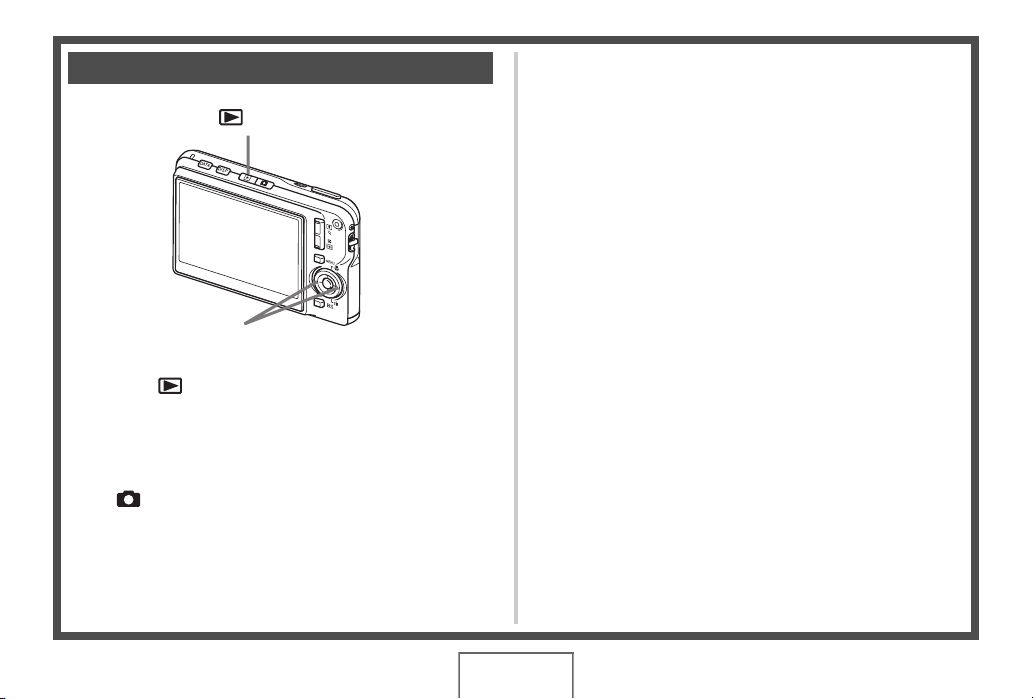
Viewing Snapshots
[ ] (PLAY)
[W][X]
1. Press [ ] to enter the PLAY mode.
If there are multiple images in memory, use [W] and [X] to
scroll through them.
■ To return to the REC mode
Press [ ].
(page 142)
18
QUICK START BASICS
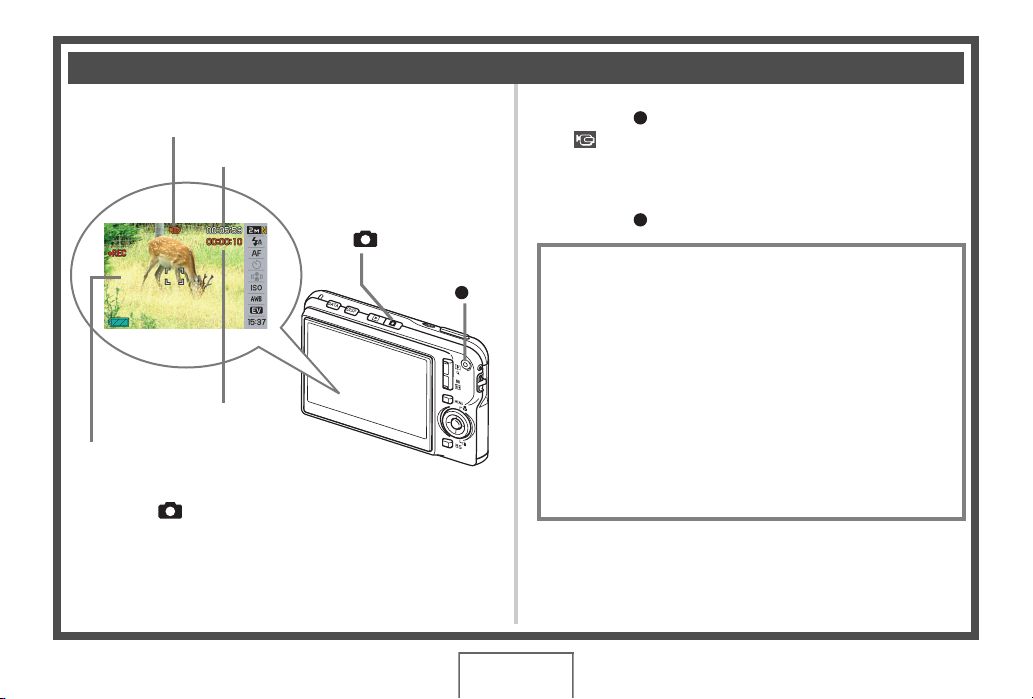
Shooting a Movie
Movie Icon
Remaining Recording Time
(page 89)
2. Press [ ] to start shooting the movie.
“ ” (movie icon) remains on the monitor screen while
movie recording is in progress.
• Audio is also recorded during movie recording.
[] (REC)
Recording Time
Movie Recording Screen
1. Press [ ] to enter the REC mode.
[]
3. Press [ ] again to stop recording.
Movie Image Quality
Your camera lets you select from among five image quality
settings (HQ, HQ Wide, Normal, Normal Wide, LP) for
movies. For best camera performance, use the “HQ” (High
Quality) or “HQ Wide” setting for movie recording.
Movie quality is a standard that determines the detail,
smoothness, and clarity of the image during playback.
Reducing image quality let’s you shoot longer, so you can
switch to “Normal”, “Normal Wide”, or “LP” conserve
remaining memory capacity if you start to run low.
For details, see pages 89 and 279.
QUICK START BASICS
19
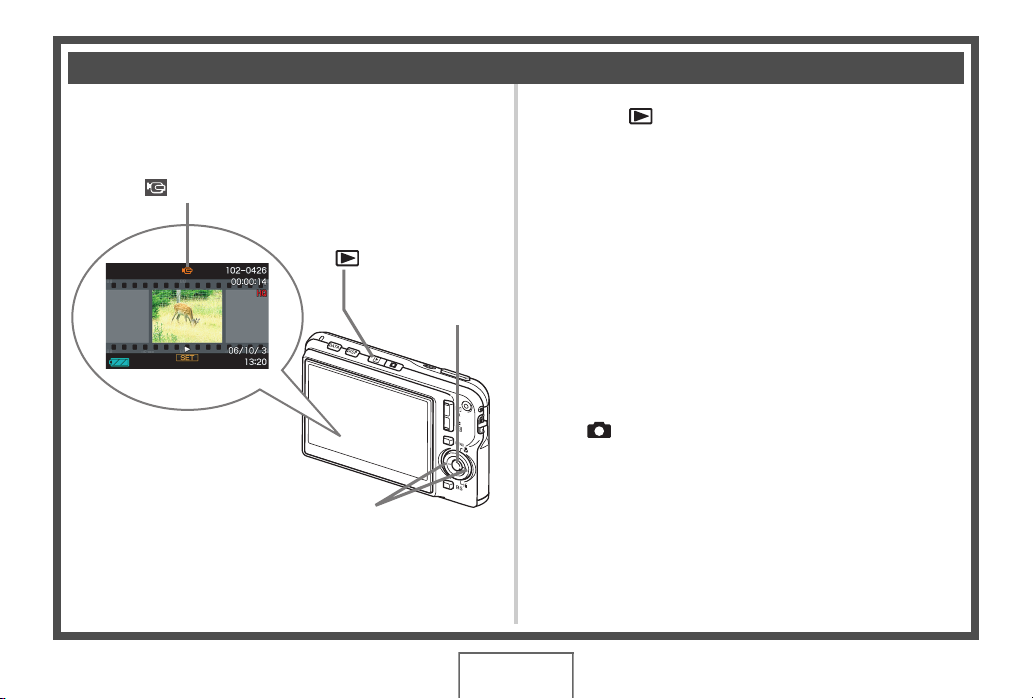
Viewing a Movie
The film-like frame that appears on the monitor screen indicates
that this is an image from a movie.
“ ” Movie icon
(page 144)
1. Press [ ] to enter the PLAY mode.
2. Use [W] and [X] to select the movie you want
to play.
When scrolling through images, a movie is displayed on the
monitor screen by showing its first frame.
[ ] (PLAY)
[W] [X]
[SET]
3. Press [SET] to start playback.
The monitor screen will return to the image selection screen
in step 2 after the end of the movie is reached.
• During movie playback, you can adjust volume, skip
forward and back, and perform other operations (page
145).
■ To return to the REC mode
Press [ ].
QUICK START BASICS
20

Deleting a File
You can use the following procedure to delete files you have
transferred to your computer’s hard disk, images you have
printed, or files you simply no longer need. This frees up
memory for recording more images.
[] (PLAY)
[S]
[SET]
[W] [X]
[T] ( )
(page 186)
1. Press [ ].
2. Press [T] ( ).
3. Use [W] and [X] to select the snapshot or
movie you want to delete.
4. Press [S] to select “Delete”.
• To cancel the delete operation, select “Cancel”.
5. Press [SET].
This deletes the selected snapshot or movie.
• If you want to delete more, repeat the above procedure
from step 3.
• To quit the delete operation, press [MENU].
21
QUICK START BASICS
INTRODUCTION
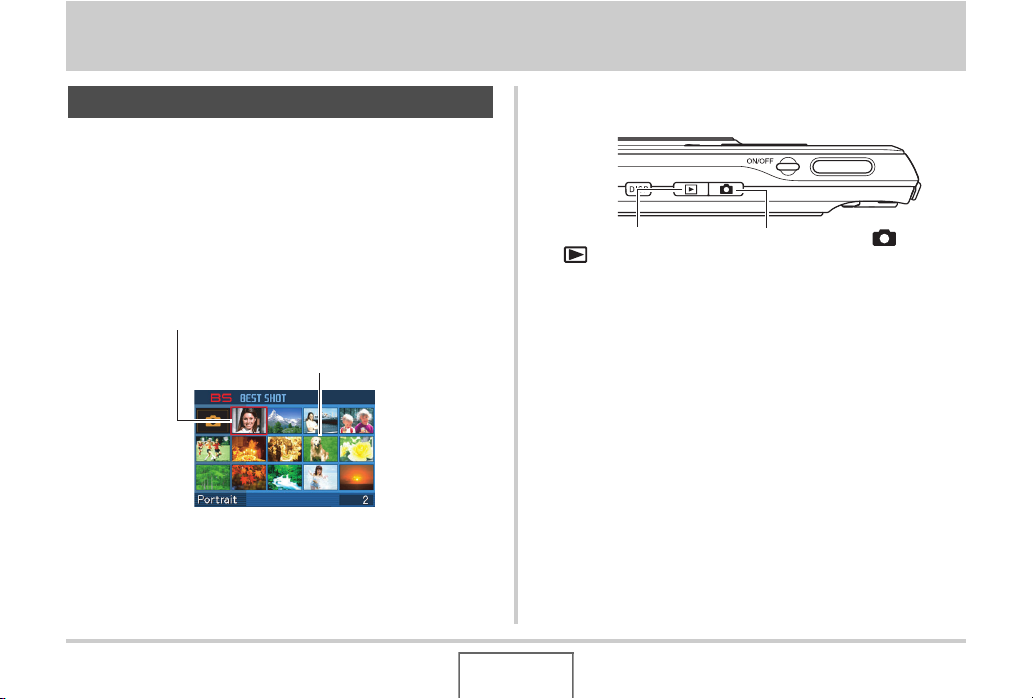
Features
■ BEST SHOT for beautiful shots simply by
selecting a sample image built into the
camera
Simply select the scene that is similar to what you want to shoot
(Night Scene Portrait, Flower, etc.), for instant camera setups. A
dedicated [BS] button gives you direct access to the BEST
SHOT library of sample scenes.
Example: Select for skillful shots of a fast-moving pet.
Example: Select for beautiful portraits.
BEST SHOT Screen
■ Direct Mode Power On
To view images, press
[ ] to power up in the
PLAY mode.
To record, press [ ] to
power up in the REC mode.
■ A powerful collection of useful recording
features
• Hand movement and subject movement reduction using high
shutter speed (page 104)
• High-sensitivity recording avoids dark images, even when the
flash is not being used (page 105)
• Quick Shutter for very high-speed focus (page 118)
INTRODUCTION
22

■ High-quality (MPEG-4, DivX) movie
recording
• Short Movie for shooting a short movie starting a few seconds
before [ ] is pressed and a few seconds after it is pressed
(page 92)
• Past Movie for shooting a movie that includes scenes a few
seconds before [ ] is pressed (page 95)
• Normal movie recording (page 90)
• Snapshot recording, even while a movie is being recorded
(page 97)
• MOTION PRINT for printing of a
movie scene as a single image
(page 171)
• DivX Play Bundle (page 213)
Official DivX
product.
Encodes DivX
R
Certified Encorder
R
video content.
■ Powerful Print Features
• DPOF feature for easy specification of date stamping and the
number of copies (page 205)
• Timestamp feature that stamps the date into the image data
(page 131)
• Support for PictBridge for easy at-home printing on a printer
that supports one of these standards, without a computer
(page 202)
■ Multi-function USB Cradle
You can place the camera on the USB cradle to perform the
following operations.
– Battery charging (page 37)
– Photo Stand slideshow of images (page 149)
– Connection to a TV for viewing on the TV screen (page
151)
– Connection to a printer for image printing (page 202)
– Connection to a computer for transfer of images to the
computer (pages 217, 237)
23
INTRODUCTION

■ Document transfer to the camera
• Bundled Photo Transport software (page 229) lets you
transfer images saved on your computer or displayed on your
computer screen (website data, maps, etc.) to your camera.
• Bundled CASIO DATA TRANSPORT software lets you
transfer documents from your computer to the camera and
take it along with you (page 249).
Read this first!
■ LCD Panel
The liquid crystal panel of the monitor screen uses highprecision technology that provides a pixel yield in excess of
99.99%.
This means that some pixels may not light or may remain lit at all
times. This is due to the characteristics of the liquid crystal
panel, and does not indicate malfunction.
24
INTRODUCTION

■ Copyrights
Except for your own personal enjoyment, unauthorized use of
image, movie, audio, or music files without permission of the
copyright holder is strictly prohibited by copyright laws and
international treaties. Also, regardless of whether such files are
purchased or obtained for free, posting them on the Internet or
distributing them to third parties without permission of the
copyright holder is strictly prohibited by copyright laws and
international treaties. Note that CASIO COMPUTER CO., LTD.
shall not be held liable for any misuse of this product that
infringes on the copyrights of others or that violates copyright
laws.
The following terms, which are used in this manual, are
registered trademarks or trademarks of their respective owners.
• SDHC Logo is a trademark.
• Windows, Internet Explorer, Windows Media, and DirectX are
trademarks of Microsoft Corporation of the United States.
• Macintosh is a trademark of Apple Computer, Inc.
• MultiMediaCard™ is a trademark of Infineon Technologies
AG of Germany, and licensed to the MultiMediaCard
Association (MMCA).
• MMCplus™ is a trademark of the MultiMediaCard
Association.
• Adobe and Reader are trademarks or registered trademarks
in the United States and other countries of Adobe Systems
Incorporated.
• DivX and associated logos are trademarks of DivX, Inc. and
are used under license.
• All other company or product names mentioned herein are
registered trademarks or trademarks of their respective
companies.
• Photo Loader, Photohands, Photo Transport, and CASIO
DATA TRANSPORT rights are owned by CASIO
COMPUTER CO., LTD. Except for the rights of other
companies as defined above, all rights related to these
programs and other rights shall revert to CASIO COMPUTER
CO., LTD.
25
INTRODUCTION

• The contents of this manual are subject to change without
notice.
• The content of this manual has been checked at each step
of the production process. Please contact us if you notice
anything that is questionable, erroneous, etc.
• Any copying of the contents of this manual, either in part or
its entirety, is forbidden. Except for your own personal use,
and other use of the contents of this manual without the
permission of CASIO COMPUTER CO., LTD. is forbidden
under copyright laws.
• CASIO COMPUTER CO., LTD. shall not be held liable for
any damages or loss suffered by you or any third party due
to the use or malfunction of this product.
• CASIO COMPUTER CO., LTD. shall not be held liable for
any damages or loss suffered by you or any third party due
to the use of Photo Loader, Photohands, Photo Transport,
and/or CASIO DATA TRANSPORT.
• CASIO COMPUTER CO., LTD. shall not be held liable for
any damages or loss caused by deletion of memory contents
due to malfunction, repair, or any other reason.
• Note that the example screens and product illustrations
shown in this manual may differ somewhat by the screens
and configuration of the actual camera.
26
INTRODUCTION

Precautions during Use
■ Take test shots before shooting the final
shot.
• Before shooting your final image, shoot a test shot to ensure
that the camera is recording correctly.
■ Avoid Use While In Motion
• Never use the camera to record or play back images while
operating an automobile or other vehicle, or while walking.
Looking at the monitor while in motion creates the risk of
serious accident.
■ Directly Viewing the Sun or Bright Light
• Never look at the sun or any other bright light through the
cameras viewfinder. Doing so can damage your eyesight.
■ Flash
• Never use the flash unit in areas where flammable or
explosive gas may be present. Such conditions create the risk
of fire and explosion.
• Never fire the flash in the direction of a person operating a
motor vehicle. Doing so can interfere with the drivers vision
and creates the risk of accident.
• Never fire the flash too close to the eyes of the subject. Doing
so creates the risk of loss of eyesight.
27
INTRODUCTION

■ Display Panel
• Do not apply strong pressure to the LCD panel surface or
subject it to strong impact. Doing so can cause the display
panel glass to crack.
• Should the display panel ever become cracked, never touch
any of the liquid inside the panel. Doing so creates the risk of
skin inflammation.
• Should display panel liquid ever get into your mouth,
immediately rinse your mouth out and contact your physician.
• Should display panel liquid ever get into your eyes or onto
your skin, immediately rinse with clean water for at least 15
minutes and contact your physician.
■ Connections
• Never plug any devices that are not specified for use with this
camera into connectors. Connecting a non-specified device
creates the risk of fire and electric shock.
■ Transport
• Never operate the camera inside of an aircraft or anywhere
else where operation of such devices is restricted. Improper
use creates the risk of serious accident.
■ Smoke, abnormal odor, overheating, and
other abnormalities
• Continued use of the camera while it is emitting smoke or
strange odor, or while it is overheating creates the risk of fire
and electric shock. Immediately perform the following steps
whenever any of the above symptoms are present.
1. Turn off the camera.
2. If you are using the AC adaptor to power the camera,
unplug it from the wall outlet. If you are using battery
power, remove the battery from the camera, taking care to
protect yourself against burn injury.
3. Contact your dealer or nearest CASIO authorized service
center.
28
INTRODUCTION

■ Water and Foreign Matter
• Water, other liquids, or foreign matter (especially metal)
getting inside the camera creates the risk of fire and electric
shock. Immediately perform the following steps whenever any
of the above symptoms are present. Particular care is
required when using the camera where it is raining or
snowing, near the ocean or other body of water, or in a
bathroom.
1. Turn off the camera.
2. If you are using the AC adaptor to power the camera,
unplug it from the wall outlet. If you are using battery
power, remove the battery from the camera.
3. Contact your dealer or nearest CASIO authorized service
center.
■ Dropping and Rough Treatment
• Continued use of the camera after it is damaged by dropping
or other rough treatment creates the risk of fire and electric
shock. Immediately perform the following steps whenever any
of the above symptoms are present.
1. Turn off the camera.
2. If you are using the AC adaptor to power the camera,
unplug it from the wall outlet. If you are using battery
power, remove the battery from the camera.
3. Contact your dealer or nearest CASIO authorized service
center.
■ Keep Away From Fire
• Never expose the camera to fire, which can cause it to
explode and creates the risk of fire and electric shock.
29
INTRODUCTION

■ Disassembly and Modification
• Never try to take the camera apart or modify it in any way.
Doing so creates the risk of electric shock, burn injury, and
other personal injury. Be sure to leave all internal inspection,
maintenance, and repair up to your dealer or nearest CASIO
authorized service center.
■ Locations To Be Avoided
• Never leave the camera in any of the following types of
locations. Doing so creates the risk of fire and electric shock.
– Areas subject to large amounts of humidity or dust
– Food preparation areas or other locations where oil smoke
is present
– Near heaters, on a heated carpet, in areas exposed to
direct sunlight, in a closed vehicle parked in the sun, or
other areas subject to very high temperatures
• Never place the camera on an unstable surface, on a high
shelf, etc. Doing so can cause the camera to fall, creating the
risk of personal injury.
■ Backing Up Important Data
• Always keep backup copies of important data in camera
memory by transferring it to a computer or other storage
device. Note that data can be deleted in the case of camera
malfunction, repair, etc.
■ Memory Protection
• Whenever replacing the battery, be sure to follow the correct
procedure as described in the documentation that comes with
the camera. Incorrectly replacing the battery can result in
corruption or loss of data in camera memory.
■ Rechargeable Battery
• Use only the specified charger unit or the specified device to
charge the battery. Attempting to charge the battery by an
unauthorized means creates the risk of battery overheating,
fire, and explosion.
• Do not expose or immerse the battery in fresh water or salt
water. Doing so can damage the battery, and cause
deterioration of its performance and loss of service life.
30
INTRODUCTION
Loading…
Casio Exilim HS EX-ZR1000
Digital Camera
E
User’s Guide
Thank you for purchasing this CASIO product.
• Before using it, be sure to read the precautions contained in this User’s Guide.
• Keep the User’s Guide in a safe place for future reference.
• For the most up-to-date information about this product, visit the official EXILIM
Website at http://www.exilim.com/
View the manual for the Casio Exilim HS EX-ZR1000 here, for free. This manual comes under the category photo cameras and has been rated by 3 people with an average of a 7.8.
This manual is available in the following languages: English. Do you have a question about the Casio Exilim HS EX-ZR1000 or do you need help?
Ask your question here
Index
- Accessories
- Read this first!
- Contents
- General Guide
- Monitor Screen Contents and How to Change Them
- Quick Start Basics
- Snapshot Tutorial
- Recording Movies
- Using BEST SHOT
- Advanced Settings (REC MENU)
- Viewing Snapshots and Movies
- Other Playback Functions (PLAY MENU)
- Printing
- Using the Camera with a Computer
- Other Settings (SETTING)
- Appendix
Product Images (5)

Casio Exilim HS EX-ZR1000 specifications
Below you will find the product specifications and the manual specifications of the Casio Exilim HS EX-ZR1000.
The Casio Exilim HS EX-ZR1000 is a compact camera with an approximate megapixel count of 16.1 MP. It features a 1/2.3″ CMOS sensor, providing high-quality image capture. The maximum image resolution is 4608 x 3456 pixels, allowing for detailed and sharp photographs.
This camera does not have an image stabilizer, so it may be beneficial to use a tripod or steady hand when capturing photos to avoid blurriness. The supported aspect ratios include 3:2 and 16:9, providing flexibility in composition.
With a total megapixel count of 16.79 MP, the Casio Exilim HS EX-ZR1000 offers ample resolution for capturing various scenes. It features a 12.5x optical zoom, allowing for closer shots of subjects at a distance. Additionally, a 4x digital zoom can further enhance the zooming capabilities.
The minimum focal length, measured in 35mm film equivalent, is 24 mm, providing a wide-angle perspective. On the other hand, the maximum focal length is 300 mm, allowing for telephoto shots. The minimum aperture number is 3, which enables decent depth of field control for creative photography.
The Casio Exilim HS EX-ZR1000 supports various still image resolutions, including 640 x 480, 2048 x 1536, 2560 x 1920, 3648 x 2736, 4608 x 2592, 4608 x 3072, and 4608 x 3456 pixels. This range of options allows users to select the desired image quality based on their needs.
In conclusion, the Casio Exilim HS EX-ZR1000 is a compact camera with a 16.1 MP CMOS sensor, providing high-resolution images. With a versatile zoom range, wide focal length, and various still image resolutions, it offers flexibility for capturing a wide range of subjects and scenes.
Focus adjustment
Auto/Manual
ISO sensitivity
80,100,200,400,800,1600,3200,25600
Fastest camera shutter speed
1/4000 s
Flash modes
Auto, Flash off, Flash on, Red-eye reduction
General
| Brand | Casio |
| Model | Exilim HS EX-ZR1000 | EX-ZR1000WEECB |
| Product | photo camera |
| EAN | 4971850496038, 4971850496045 |
| Language | English |
| Filetype | User manual (PDF) |
Picture quality
| Megapixel | 16.1 MP |
| Camera type | Compact camera |
| Image sensor size | 1/2.3 « |
| Sensor type | CMOS |
| Maximum image resolution | 4608 x 3456 pixels |
| Still image resolution(s) | 640 x 480,2048 x 1536,2560 x 1920,3648 x 2736,4608 x 2592,4608 x 3072,4608 x 3456 |
| Image stabilizer | No |
| Supported aspect ratios | 3:2, 16:9 |
| Total megapixels | 16.79 MP |
Lens system
| Optical zoom | 12.5 x |
| Digital zoom | 4 x |
| Focal length range | 4.24 — 53 mm |
| Minimum focal length (35mm film equiv) | 24 mm |
| Maximum focal length (35mm film equiv) | 300 mm |
| Minimum aperture number | 3 |
| Maximum aperture number | 7.9 |
| Lens structure (elements/groups) | 9/8 |
Focusing
| Focus adjustment | Auto/Manual |
| Auto focusing (AF) modes | Multi Point Auto Focus, Tracking Auto Focus |
| Normal focusing range | 5 m |
| Macro focusing range (tele) | 0.01 — 0.50 m |
| Super Macro focusing range | 0.01 — 0.50 m |
| Auto Mode focusing range (tele) | 0.05 — ∞ m |
| Manual focusing range (tele) | 0.05 — ∞ m |
| Auto Focus (AF) assist beam | Yes |
| Face tracking | Yes |
Exposure
| ISO sensitivity | 80,100,200,400,800,1600,3200,25600 |
| Light exposure modes | Aperture priority AE, Manual, Shutter priority AE |
| Light exposure control | Program AE |
| Light exposure correction | ± 2EV (1/3EV step) |
| Light metering | Centre-weighted, Evaluative (Multi-pattern), Spot |
| ISO sensitivity (min) | 80 |
| ISO sensitivity (max) | 25600 |
Shutter
| Fastest camera shutter speed | 1/4000 s |
| Slowest camera shutter speed | 15 s |
| Camera shutter type | Electronic, Mechanical |
Flash
| Flash modes | Auto, Flash off, Flash on, Red-eye reduction |
| Flash range (wide) | 0.4 — 4.7 m |
| Flash range (tele) | 0.9 — 2.4 m |
| Flash recharging time | 5 s |
Video
| Maximum video resolution | 1920 x 1080 pixels |
| Video resolutions | 640 x 480,1280 x 720,1920 x 1080 pixels |
| Motion JPEG frame rate | 30 fps |
| Analog signal format system | NTSC, PAL |
| HD type | Full HD |
| Video formats supported | H.264, MOV |
| Video recording | Yes |
Audio
Memory
| Internal memory | 52.2 MB |
| Compatible memory cards | SD, SDHC, SDXC |
| Maximum memory card size | 16 GB |
Display
| Display | TFT |
| Display diagonal | 3 « |
| Display resolution | 960 x 480 pixels |
| Display resolution (numeric) | 460800 pixels |
Ports & interfaces
| PictBridge | Yes |
| USB version | 2.0 |
Other features
| HDMI ports quantity | 1 |
| Power source type | Battery |
| Built-in flash | Yes |
Design
Camera
| White balance | Auto, Daylight, Fluorescent, Fluorescent H, Manual, Shade, Tungsten |
| Scene modes | — |
| Photo effects | — |
| Self-timer delay | 2, 10 s |
| Camera playback | Movie, Slide show |
Weight & dimensions
| Width | 107.5 mm |
| Depth | 36.7 mm |
| Height | 61.5 mm |
| Weight (including battery) | 255 g |
Battery
| Battery technology | Lithium-Ion (Li-Ion) |
| Battery type | NP-130 |
| Battery life (CIPA standard) | 470 shots |
| Battery life (max) | 520 h |
Packaging content
| AC adapter included | Yes |
| Battery charger included | Yes |
show more
Frequently Asked Questions
Can’t find the answer to your question in the manual? You may find the answer to your question in the FAQs about the Casio Exilim HS EX-ZR1000 below.
How do I adjust the shutter speed on my Casio Exilim HS EX-ZR1000?
Simply access the shooting menu, select the manual shooting mode, and then adjust the desired shutter speed using the control dial.
How can I change the ISO setting on my Casio Exilim HS EX-ZR1000?
Navigate to the shooting menu, select the ISO option, and then use the control dial to select the ISO sensitivity that suits your shooting conditions.
How do I enable the continuous shooting mode on my Casio Exilim HS EX-ZR1000?
Press the mode dial button until you reach the continuous shooting mode. Once selected, you can capture a series of consecutive shots by holding down the shutter button.
What should I do if my photos appear blurry on the Casio Exilim HS EX-ZR1000?
Firstly, ensure that the camera is steady and not shaking while taking the photo. Consider using a tripod or resting the camera on a stable surface. Additionally, you can adjust the focus settings to ensure the subject is sharp and clear.
How can I change the white balance settings on my Casio Exilim HS EX-ZR1000?
Access the shooting menu and select the white balance option. From there, you can choose the appropriate white balance preset or manually adjust it to match the lighting conditions of your shooting environment.
Does the Casio Exilim HS EX-ZR1000 have image stabilization?
No. This means that the camera does not have a built-in mechanism to reduce the effects of camera shake, so users may need to use a tripod or steady their hands to prevent blurry photos.
What is the maximum resolution of images that the Casio Exilim HS EX-ZR1000 can capture?
The maximum image resolution is 4608 x 3456 pixels. This high resolution allows users to capture detailed and sharp images.
How much optical zoom does the Casio Exilim HS EX-ZR1000 have?
It has a 12.5x optical zoom. This means that users can zoom in on subjects without losing image quality, making it suitable for capturing distant or small objects.
Can the Casio Exilim HS EX-ZR1000 automatically adjust focus?
Yes, it has auto focusing modes including Multi Point Auto Focus and Tracking Auto Focus. This enables the camera to automatically focus on the subject and keep it in focus as it moves, ensuring sharp and clear photos.
What is the sensor type of the Casio Exilim HS EX-ZR1000?
The sensor type is CMOS. CMOS sensors are known for their high image quality, low noise levels, and good performance in low light conditions. This makes the camera well-suited for various photography situations.
What is the height of the Casio Exilim HS EX-ZR1000?
The Casio Exilim HS EX-ZR1000 has a height of 61.5 mm.
What is the width of the Casio Exilim HS EX-ZR1000?
The Casio Exilim HS EX-ZR1000 has a width of 107.5 mm.
What is the depth of the Casio Exilim HS EX-ZR1000?
The Casio Exilim HS EX-ZR1000 has a depth of 36.7 mm.
What is the screen size of the Casio Exilim HS EX-ZR1000?
The screen size of the Casio Exilim HS EX-ZR1000 is 3 «.
What is the screen resolution of the display of the Casio Exilim HS EX-ZR1000?
The screen resolution of the Casio Exilim HS EX-ZR1000 is 960 x 480 pixels.
Is the manual of the Casio Exilim HS EX-ZR1000 available in English?
Yes, the manual of the Casio Exilim HS EX-ZR1000 is available in English .
Is your question not listed? Ask your question here
To download your free user guide, please click on the model of your choice in the list below
Casio Exilim EX: 10 100 100F User Manual pdf
- EX-10 — U.M.
- EX-100 — U.M.
- EX-100F — U.M.
- EX-F1 — U.M.
Casio Exilim EX: FC100 FC150 FC200S FC300S FC400S FC500S User Manual pdf
- EX-FC100 — U.M.
- EX-FC150 — U.M.
- EX-FC200S — U.M.
- EX-FC300S — U.M.
- EX-FC400S — U.M.
- EX-FC500S — U.M.
Casio Exilim EX: FH20 FH25 FH100 User Manual pdf
- EX-FH20 — U.M.
- EX-FH25 — U.M.
- EX-FH100 — U.M.
Casio Exilim EX: FR10 FR100 FR200 Series User Manual pdf
- EX-FR10 — U.M.
- EX-FR100 — U.M.
- EX-FR200 — U.M.
Casio Exilim EX-FS10 User Manual pdf
- EX-FS10 — U.M.
Casio Exilim EX-G1 User Manual pdf
- EX-G1 — U.M.
Casio Exilim EX: H5 H10 H15 H20G H30 H50 H60 User Manual pdf
- EX-H5 — U.M.
- EX-H10 — U.M.
- EX-H15 — U.M.
- EX-H20G — U.M.
- EX-H30 — U.M.
- EX-H35 — U.M.
- EX-H50 — U.M.
- EX-H60 — U.M.
Casio Exilim EX-JE10 User Manual pdf
- EX-JE10 — U.M.
Casio Exilim EX: M1 M2 M20 M20U User Manual pdf
- EX-M1 Part 1 — U.M.
- EX-M1 Part 2 — U.M.
- EX-M2 Part 1 — U.M.
- EX-M2 Part 2 — U.M.
- EX-M20 Part 1 — U.M.
- EX-M20 Part 2 — U.M.
- EX-M20 Part 3 — U.M.
- EX-M20 Part 4 — U.M.
- EX-M20 Part 5 — U.M.
- EX-M20U Part 1 — U.M.
- EX-M20U Part 2 — U.M.
- EX-M20U Part 3 — U.M.
- EX-M20U Part 4 — U.M.
- EX-M20U Part 5 — U.M.
Casio Exilim EX-MR1 User Manual pdf
- EX-MR1 — U.M.
Casio Exilim EX: N1 N2 N5 N10 N20 N50 User Manual pdf
- EX-N1 — U.M.
- EX-N2 — U.M.
- EX-N5 — U.M.
- EX-N10 — U.M.
- EX-N20 — U.M.
- EX-N50 — U.M.
Casio Exilim EX: P505 P600 P700 User Manual pdf
- EX-P505 — U.M.
- EX-P600 — U.M.
- EX-P700 — U.M.
Casio Exilim EX-S Series User Manual pdf
- EX-S1 Part 1 — U.M.
- EX-S1 Part 2 — U.M.
- EX-S2 Part 1 — U.M.
- EX-S2 Part 2 — U.M.
- EX-S3 Part 1 — U.M.
- EX-S3 Part 2 — U.M.
- EX-S3 Part 3 — U.M.
- EX-S3 Part 4 — U.M.
- EX-S3 Part 5 — U.M.
- EX-S5 — U.M.
- EX-S6 — U.M.
- EX-S7 — U.M.
- EX-S8 — U.M.
- EX-S9 — U.M.
- EX-S10 — U.M.
- EX-S12 — U.M.
- EX-S20 Part 1 — U.M.
- EX-S20 Part 2 — U.M.
- EX-S20 Part 3 — U.M.
- EX-S20 Part 4 — U.M.
- EX-S20 Part 5 — U.M.
- EX-S20U Part 1 — U.M.
- EX-S20U Part 2 — U.M.
- EX-S20U Part 3 — U.M.
- EX-S20U Part 4 — U.M.
- EX-S20U Part 5 — U.M.
- EX-S100 — U.M.
- EX-S200 — U.M.
- EX-S300 — U.M.
- EX-S500 — U.M.
- EX-S600 — U.M.
- EX-S770 — U.M.
- EX-S770D — U.M.
- EX-S880 — U.M.
Casio Exilim EX-TR Series User Manual pdf
- EX-TR10 — U.M.
- EX-TR15 — U.M.
- EX-TR35 — U.M.
- EX-TR50 — U.M.
- EX-TR60 — U.M.
- EX-TR80 — U.M.
- EX-TR100 — U.M.
- EX-TR150 — U.M.
- EX-TR200 — U.M.
- EX-TR300 — U.M.
- EX-TR350 — U.M.
- EX-TR350S — U.M.
- EX-TR500 — U.M.
- EX-TR550 — U.M.
- EX-TR600 — U.M.
- EX-TR700 — U.M.
- EX-TR750 — U.M.
- EX-TRYX — U.M.
Casio Exilim EX: V7 V8 User Manual pdf
- EX-V7 — U.M.
- EX-V8 — U.M.
Casio Exilim EX-Z Series User Manual pdf
- EX-Z1 — U.M.
- EX-Z2 — U.M.
- EX-Z3 Part 1 — U.M.
- EX-Z3 Part 2 — U.M.
- EX-Z3 Part 3 — U.M.
- EX-Z3 Part 4 — U.M.
- EX-Z3 Part 5 — U.M.
- EX-Z4 Part 1 — U.M.
- EX-Z4 Part 2 — U.M.
- EX-Z4 Part 3 — U.M.
- EX-Z4 Part 4 — U.M.
- EX-Z4 Part 5 — U.M.
- EX-Z4U Part 1 — U.M.
- EX-Z4U Part 2 — U.M.
- EX-Z4U Part 3 — U.M.
- EX-Z4U Part 4 — U.M.
- EX-Z4U Part 5 — U.M.
- EX-Z5 — U.M.
- EX-Z6 — U.M.
- EX-Z7 — U.M.
- EX-Z8 — U.M.
- EX-Z9 — U.M.
- EX-Z10 — U.M.
- EX-Z11 — U.M.
- EX-Z12 — U.M.
- EX-Z15 — U.M.
- EX-Z16 — U.M.
- EX-Z18 — U.M.
- EX-Z19 — U.M.
- EX-Z20 — U.M.
- EX-Z21 — U.M.
- EX-Z22 — U.M.
- EX-Z25 — U.M.
- EX-Z27 — U.M.
- EX-Z28 — U.M.
- EX-Z29 — U.M.
- EX-Z30 — U.M.
- EX-Z32 — U.M.
- EX-Z33 — U.M.
- EX-Z35 — U.M.
- EX-Z37 — U.M.
- EX-Z40 — U.M.
- EX-Z42 — U.M.
- EX-Z50 — U.M.
- EX-Z55 — U.M.
- EX-Z57 — U.M.
- EX-Z60 — U.M.
- EX-Z60DX — U.M.
- EX-Z65 — U.M.
- EX-Z70 — U.M.
- EX-Z75 — U.M.
- EX-Z77 — U.M.
- EX-Z80 — U.M.
- EX-Z85 — U.M.
- EX-Z88 — U.M.
- EX-Z90 — U.M.
- EX-Z100 — U.M.
- EX-Z110 — U.M.
- EX-Z115 — U.M.
- EX-Z120 — U.M.
- EX-Z150 — U.M.
- EX-Z155 — U.M.
- EX-Z200 — U.M.
- EX-Z250 — U.M.
- EX-Z270 — U.M.
- EX-Z280 — U.M.
- EX-Z300 — U.M.
- EX-Z330 — U.M.
- EX-Z335 — U.M.
- EX-Z350 — U.M.
- EX-Z370 — U.M.
- EX-Z400 — U.M.
- EX-Z450 — U.M.
- EX-Z500 — U.M.
- EX-Z550 — U.M.
- EX-Z600 — U.M.
- EX-Z650 — U.M.
- EX-Z670 — U.M.
- EX-Z680 — U.M.
- EX-Z690 — U.M.
- EX-Z700 — U.M.
- EX-Z750 — U.M.
- EX-Z790 — U.M.
- EX-Z800 — U.M.
- EX-Z850 — U.M.
- EX-Z890 — U.M.
- EX-Z1000 — U.M.
- EX-Z1050 — U.M.
- EX-Z1080 — U.M.
- EX-Z1200 — U.M.
- EX-Z2000 — U.M.
- EX-Z2200 — U.M.
- EX-Z2300 — U.M.
- EX-Z3000 — U.M.
Casio Exilim EX-ZR Series User Manual pdf
- EX-ZR10 — U.M.
- EX-ZR15 — U.M.
- EX-ZR20 — U.M.
- EX-ZR50 — U.M.
- EX-ZR55 — U.M.
- EX-ZR62 — U.M.
- EX-ZR65 — U.M.
- EX-ZR100 — U.M.
- EX-ZR200 — U.M.
- EX-ZR300 — U.M.
- EX-ZR310 — U.M.
- EX-ZR320 — U.M.
- EX-ZR400 — U.M.
- EX-ZR410 — U.M.
- EX-ZR500 — U.M.
- EX-ZR510 — U.M.
- EX-ZR700 — U.M.
- EX-ZR710 — U.M.
- EX-ZR750 — U.M.
- EX-ZR800 — U.M.
- EX-ZR850 — U.M.
- EX-ZR1000 — U.M.
- EX-ZR1500 — U.M.
- EX-ZR1750 — U.M.
- EX-ZR2000 — U.M.
- EX-ZR2100 — U.M.
- EX-ZR3500 — U.M.
- EX-ZR3600 — U.M.
- EX-ZR3700 — U.M.
- EX-ZR5000 — U.M.
- EX-ZR5100 — U.M.
- EX-ZR5500 — U.M.
Casio Exilim EX-ZS Series User Manual pdf
- EX-ZS5 — U.M.
- EX-ZS6 — U.M.
- EX-ZS10 — U.M.
- EX-ZS12 — U.M.
- EX-ZS15 — U.M.
- EX-ZS20 — U.M.
- EX-ZS27 — U.M.
- EX-ZS30 — U.M.
- EX-ZS35 — U.M.
- EX-ZS50 — U.M.
- EX-ZS100 — U.M.
- EX-ZS150 — U.M.
- EX-ZS160 — U.M.
- EX-ZS180 — U.M.
- EX-ZS200 — U.M.
- EX-ZS220 — U.M.
Casio Exilim Link User Manual pdf
- Exilim Link — U.M.
Casio Exilim Remote User Manual pdf
- Exilim Remote — 3.0 — U.M.
- Exilim Remote for Golf — U.M.
Casio GV10 GV20 User Manual pdf
- GV-10 Part 1 — U.M.
- GV-10 Part 2 — U.M.
- GV-20 Part 1 — U.M.
- GV-20 Part 2 — U.M.
Casio QV Series User Manual pdf
- QV-3EX — U.M.
- QV-10 — U.M.
- QV-10A — U.M.
- QV-10B — U.M.
- QV-11 — U.M.
- QV-30 — U.M.
- QV-70 — U.M.
- QV-100 — U.M.
- QV-120 — U.M.
- QV-200 — U.M.
- QV-300 — U.M.
- QV-700 — U.M.
- QV-700 — Repair Guide, Parts List, Diagrams and Assembling Charts
- QV-770 — U.M.
- QV-2000LR — U.M.
- QV-2000UX — U.M.
- QV-2300UX — U.M.
- QV-2400UX Part 1 — U.M.
- QV-2400UX Part 2 — U.M.
- QV-2400UX Part 3 — U.M.
- QV-2800UX — U.M.
- QV-2900UX Part 1 — U.M.
- QV-2900UX Part 2 — U.M.
- QV-2900UX Part 3 — U.M.
- QV-3000EX — U.M.
- QV-3000LR — U.M.
- QV-3500EX Part 1 — U.M.
- QV-3500EX Part 2 — U.M.
- QV-3500EX Part 3 — U.M.
- QV-4000 Part 1 — U.M.
- QV-4000 Part 2 — U.M.
- QV-4000 Part 3 — U.M.
- QV-5000SX — U.M.
- QV-5500SX — U.M.
- QV-5700 Part 1 — U.M.
- QV-5700 Part 2 — U.M.
- QV-5700 Part 3 — U.M.
- QV-7000SX — U.M.
- QV-8000SX — U.M.
Casio QV-R Series User Manual pdf
- QV-R3 Part 1 — U.M.
- QV-R3 Part 2 — U.M.
- QV-R3 Part 3 — U.M.
- QV-R4 Part 1 — U.M.
- QV-R4 Part 2 — U.M.
- QV-R4 Part 3 — U.M.
- QV-R40 Part 1 — U.M.
- QV-R40 Part 2 — U.M.
- QV-R40 Part 3 — U.M.
- QV-R40 Part 4 — U.M.
- QV-R40 Part 5 — U.M.
- QV-R40 Part 6 — U.M.
- QV-R40 Part 7 — U.M.
- QV-R41 — U.M.
- QV-R51 — U.M.
- QV-R61 — U.M.
- QV-R70 — U.M.
- QV-R80 — U.M.
- QV-R100 — U.M.
- QV-R200 — U.M.
- QV-R300 — U.M.
Casio TRYX EX-TR100 User Manual pdf
- TRYX EX-TR100 — U.M.

1
E
Thank you for purchasing this CASIO product.
• Before using it, be sure to read the precautions contained in this User’s Guide.
• Keep the User’s Guide in a safe place for future reference.
• For the most up-to-date information about this product, visit the official EXILIM
Website at http://www.exilim.com/
Digital Camera
User’s Guide