
SERVICE MANUAL
Color Inkjet Printer
Epson Stylus Photo PX650/TX650/TX659
Epson Stylus Photo PX660
Epson Stylus Photo PX660 Premium
Artisan 635
Confidential
SEMF09010

Notice:
All rights reserved. No part of this manual may be reproduced, stored in a retrieval system, or transmitted in any form or by any means, electronic, mechanical,
photocopying, recording, or otherwise, without the prior written permission of SEIKO EPSON CORPORATION.
The contents of this manual are subject to change without notice.
All effort have been made to ensure the accuracy of the contents of this manual. However, should any errors be detected, SEIKO EPSON would greatly appreciate being
informed of them.
The above not withstanding SEIKO EPSON CORPORATION can assume no responsibility for any errors in this manual or the consequences thereof.
EPSON is a registered trademark of SEIKO EPSON CORPORATION.
General Notice: Other product names used herein are for identification purpose only and may be trademarks or registered trademarks of their
respective owners. EPSON disclaims any and all rights in those marks.
Copyright © 2011 SEIKO EPSON CORPORATION.
I & I CS QUALITY ASSURANCE DEPARTMENT
Confidential

PRECAUTIONS
Precautionary notations throughout the text are categorized relative to 1) Personal injury and 2) damage to equipment.
DANGER Signals a precaution which, if ignored, could result in serious or fatal personal injury. Great caution should be exercised in performing procedures preceded by
DANGER Headings.
WARNING Signals a precaution which, if ignored, could result in damage to equipment.
The precautionary measures itemized below should always be observed when performing repair/maintenance procedures.
DANGER
1. ALWAYS DISCONNECT THE PRODUCT FROM THE POWER SOURCE AND PERIPHERAL DEVICES PERFORMING ANY MAINTENANCE OR REPAIR
PROCEDURES.
2. NO WORK SHOULD BE PERFORMED ON THE UNIT BY PERSONS UNFAMILIAR WITH BASIC SAFETY MEASURES AS DICTATED FOR ALL ELECTRONICS
TECHNICIANS IN THEIR LINE OF WORK.
3. WHEN PERFORMING TESTING AS DICTATED WITHIN THIS MANUAL, DO NOT CONNECT THE UNIT TO A POWER SOURCE UNTIL INSTRUCTED TO DO
SO. WHEN THE POWER SUPPLY CABLE MUST BE CONNECTED, USE EXTREME CAUTION IN WORKING ON POWER SUPPLY AND OTHER ELECTRONIC
COMPONENTS.
4. WHEN DISASSEMBLING OR ASSEMBLING A PRODUCT, MAKE SURE TO WEAR GLOVES TO AVOID INJURIER FROM METAL PARTS WITH SHARP EDGES.
WARNING
1. REPAIRS ON EPSON PRODUCT SHOULD BE PERFORMED ONLY BY AN EPSON CERTIFIED REPAIR TECHNICIAN.
2. MAKE CERTAIN THAT THE SOURCE VOLTAGES IS THE SAME AS THE RATED VOLTAGE, LISTED ON THE SERIAL NUMBER/RATING PLATE. IF THE
EPSON PRODUCT HAS A PRIMARY AC RATING DIFFERENT FROM AVAILABLE POWER SOURCE, DO NOT CONNECT IT TO THE POWER SOURCE.
3. ALWAYS VERIFY THAT THE EPSON PRODUCT HAS BEEN DISCONNECTED FROM THE POWER SOURCE BEFORE REMOVING OR REPLACING PRINTED
CIRCUIT BOARDS AND/OR INDIVIDUAL CHIPS.
4. IN ORDER TO PROTECT SENSITIVE MICROPROCESSORS AND CIRCUITRY, USE STATIC DISCHARGE EQUIPMENT, SUCH AS ANTI-STATIC WRIST
STRAPS, WHEN ACCESSING INTERNAL COMPONENTS.
5. REPLACE MALFUNCTIONING COMPONENTS ONLY WITH THOSE COMPONENTS BY THE MANUFACTURE; INTRODUCTION OF SECOND-SOURCE ICs OR
OTHER NON-APPROVED COMPONENTS MAY DAMAGE THE PRODUCT AND VOID ANY APPLICABLE EPSON WARRANTY.
6. WHEN USING COMPRESSED AIR PRODUCTS; SUCH AS AIR DUSTER, FOR CLEANING DURING REPAIR AND MAINTENANCE, THE USE OF SUCH
PRODUCTS CONTAINING FLAMMABLE GAS IS PROHIBITED.
Confidential

About This Manual
A D J U S T M E N T
R E Q U I R E D
This manual describes basic functions, theory of electrical and mechanical operations, maintenance and repair procedures of the printer. The instructions and procedures included
herein are intended for the experienced repair technicians, and attention should be given to the precautions on the preceding page.
Manual Configuration
This manual consists of six chapters and Appendix.
CHAPTER 1.PRODUCT DESCRIPTIONS
Provides a general overview and specifications of the product.
CHAPTER 2.OPERATING PRINCIPLES
Describes the theory of electrical and mechanical operations of the
product.
CHAPTER 3.TROUBLESHOOTING
Describes the step-by-step procedures for the troubleshooting.
CHAPTER 4.DISASSEMBLY / ASSEMBLY
Describes the step-by-step procedures for disassembling and assembling
the product.
CHAPTER 5.ADJUSTMENT
Provides Epson-approved methods for adjustment.
CHAPTER 6.MAINTENANCE
Provides preventive maintenance procedures and the lists of Epsonapproved lubricants and adhesives required for servicing the product.
CHAPTER 7 APPENDIX
Provides the additional information for repair and maintenance.
CHAPTER 8.Epson Stylus Photo PX660/PX660 Premium/Artisan 635
Provides particular information for Epson Stylus Photo PX660
Symbols Used in this Manual
Various symbols are used throughout this manual either to provide additional
information on a specific topic or to warn of possible danger present during a
procedure or an action. Be aware of all symbols when they are used, and always read
NOTE, CAUTION, or WARNING messages.
Indicates an operating or maintenance procedure, practice or condition
that is necessary to keep the product’s quality.
Indicates an operating or maintenance procedure, practice, or condition
that, if not strictly observed, could result in damage to, or destruction of,
equipment.
May indicate an operating or maintenance procedure, practice or
condition that is necessary to accomplish a task efficiently. It may also
provide additional information that is related to a specific subject, or
comment on the results achieved through a previous action.
Indicates an operating or maintenance procedure, practice or condition
that, if not strictly observed, could result in injury or loss of life.
Indicates that a particular task must be carried out according to a certain
standard after disassembly and before re-assembly, otherwise the quality of the components in question may be adversely affected.
Confidential

Revision Status
Revision Date of Issue Description
A August 5, 2009 First Release
B July 20, 2010 Revised Contents
All chapters
De script ion about Epson Stylus Photo PX660 has been added.
Chapter 1
Checkpoint has been added in «1.1 Features (p10)».
Chapter 2
Checkpoint has been added in «2.1 Overview (p35)».
Made correction in «2.2 Power-On Sequence (p38)».
Chapter 3
Checkpoint has been added in «3.1 Overview (p42)».
Information for Epson Stylus Photo PX660 has been added in
Chapter 4
Checkpoint has been added in «4.1 Overview (p61)».
Checkpoint has been added in «4.1.6 Disassembly and Reassembly Procedure (p63)».
Checkpoint has been added, made correction in «4.2.5 Scanner Unit (p69)».
Checkpoint has been added in «4.2.6 Panel Unit (p72)».
Made change in «4.2.7 M/B Cover (p74)».
Made correction in «4.2.8 Waste Ink Tray Assy (p74)».
Made change for checkpoint in «4.3.1 Main Board Unit (p78)».
Checkpoint has been added in «4.3.2 Panel Board (p81)».
Made correction in «4.4.1 Printhead (p85)».
Checkpoint has been added in «4.4.3 Printer Mechanism (p88)».
Checkpoint has been added in «4.4.10 CR Unit (p98)».
Chapter 5
Checkpoint has been added in «5.1 Adjustment Items and Overview (p111)».
Made change for «Specified Scanner for BR S/PFP Adjustment» in «5.4 Banding Reduction System (BRS)
Adjustment/Paper Feed Amount Profile (PFP) Correction (p122)».
Chapter 6
Checkpoint has been added in «6.1 Overview (p131)».
Chapter 7
Made change in «7.1 Exploded Diagram / Parts List (p139)».
Chapter 8
Information for Epson Stylus Photo PX660 has been added.
«3.3.6 Troubleshooting for Motors and Sensors (p59)».
Confidential

Revision Status
Revision Date of Issue Description
C August 25, 2011 Revised Contents
All chapters
De script ion about Epson Stylus Photo PX660 Premium/Artisan 635 has been added.
Chapter 1
Checkpoint has been added in «1.1 Features (p10)».
Made change in «1.5.2 Memory Card Slots (p19)»
Chapter 2
Checkpoint has been added in «2.1 Overview (p35)».
Chapter 3
Checkpoint has been added in «3.1 Overview (p42)».
Chapter 4
Checkpoint has been added in «4.1 Overview (p61)».
Checkpoint has been added in«4.1.6 Disassembly and Reassembly Procedure (p63)»
Checkpoint has been added in«4.2.5 Scanner Unit (p69)»
Checkpoint has been added in«4.2.6 Panel Unit (p72)»
Checkpoint has been added in«4.4.3 Printer Mechanism (p88)»
Checkpoint has been added in«4.4.10 CR Unit (p98)»
Chapter 5
Checkpoint has been added in «5.1.1 Servicing Adjustment Item List (p111)».
Checkpoint has been added in «5.3 PG Adjustment (p120)».
Made change for «Specified Scanner for BR S/PFP Adjustment» in «5.4 Banding Reduction System (BRS)
Adjustment/Paper Feed Amount Profile (PFP) Correction (p122)».
Checkpoint has been added in «5.4.2.2 PFP Adjustment (p125)».
Chapter 6
Checkpoint has been added in «6.1 Overview (p131)».
Chapter 8
Information for Epson Stylus Photo PX660 Premium and Artisan 635 has been added.
Checkpoint has been added in «8.2.2 Disassembly Procedures (p144)».
Checkpoint has been added in «8.2.2.5 CR Unit
Checkpoint has been added in «8.3.1 Overview (p157)».
«8.3.5 Overview Artisan 635 (p163)»has been added.
«8.3.6 USB Interface Epson Stylus Photo PX660/PX660 Premium/Artisan 635 (p163)»has been added.
«8.3.7 Memory Card Slots Epson Stylus PX660/PX660 Premium (p164)»has been added.
«8.3.8 Memory Card Slots Artisan 635 (p165)»has been added.
«8.3.9 Electrical Specifications (p166)»has been added.
(p155)».
Confidential

Epson Stylus Photo PX650/TX650/TX659/PX660/PX660 Premium/Artisan 635 Revision C
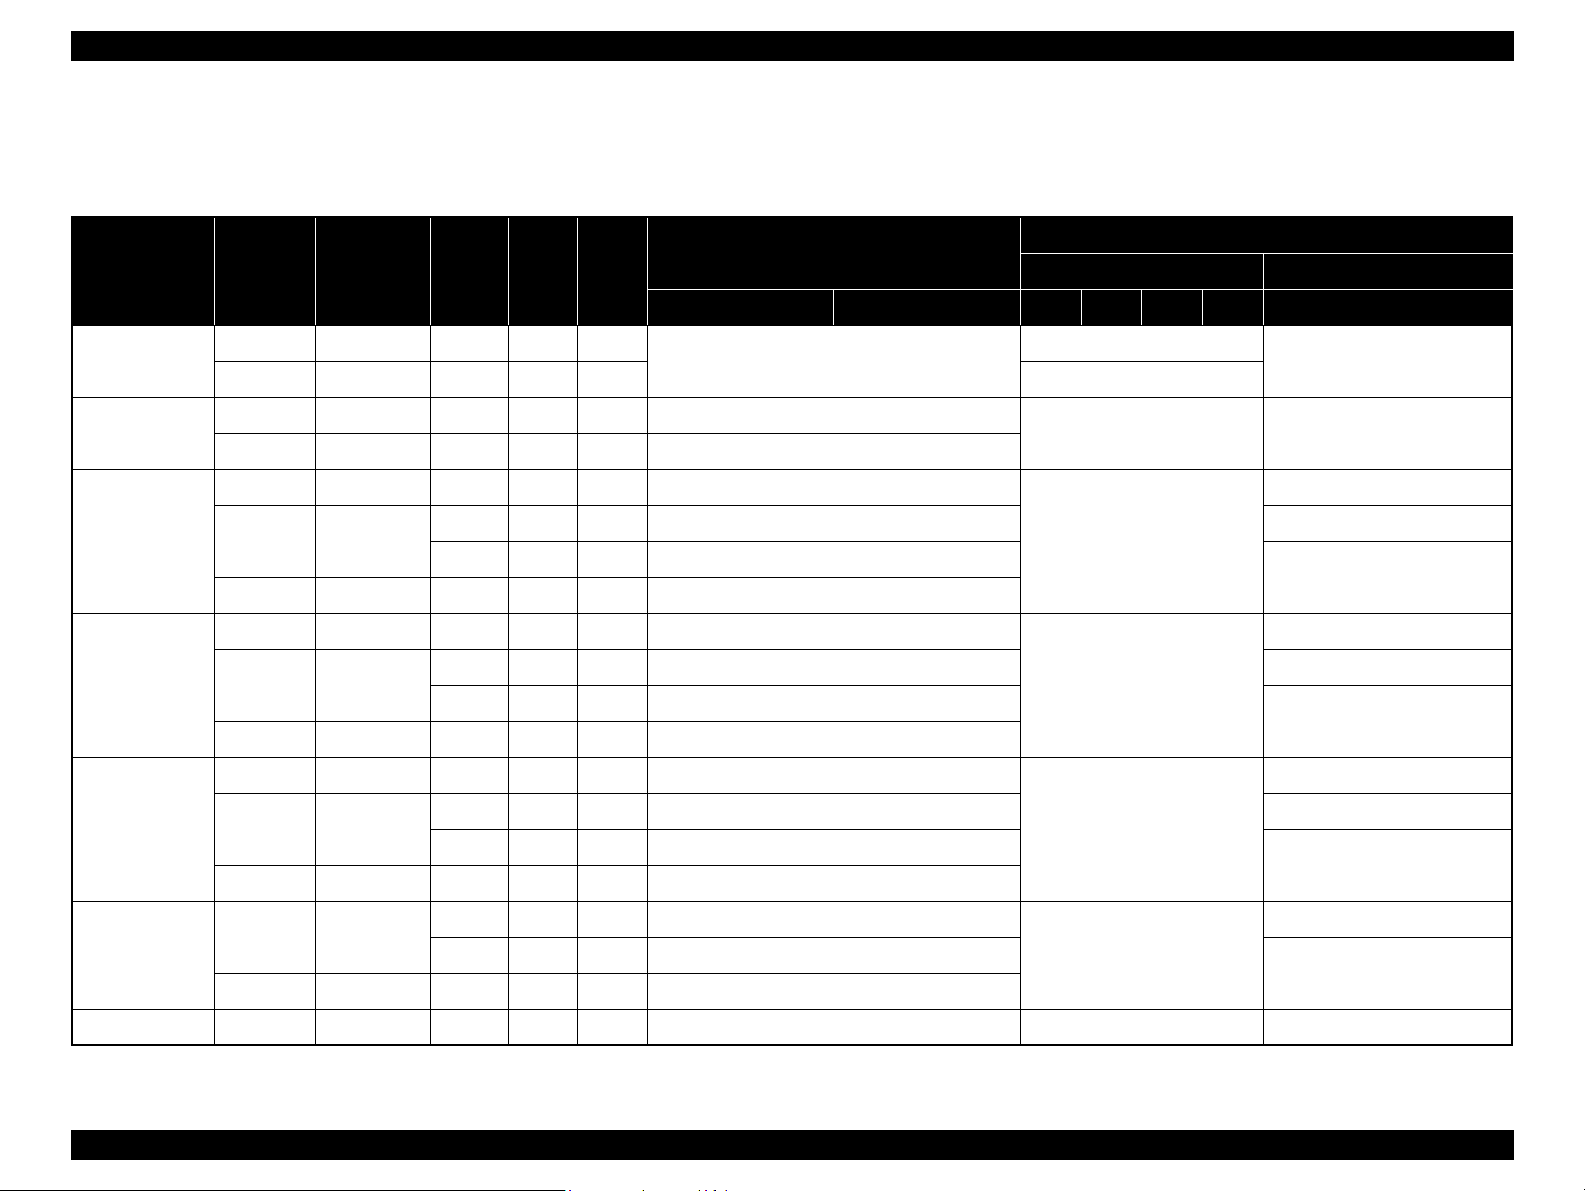
CONTENTS
Chapter 1 PRODUCT DESCRIPTION
1.1 Features……………………………. ………………………………………… ……………………….. 10
1.2 Printing Specifications……………………………………………………………………………. 11
1.2.1 Basic Specifications……………………………………………………………………… 11
1.2.2 Ink Cartridge……………………………………………………………………………….. 11
1.2.3 Print Mode………………………………………………………………………………….. 12
1.2.4 Supported Paper…………………………………………………………………………… 14
1.2.5 Printing Area …………………………………… …………………………………………. 16
1.3 Scanner Specifications…………………………… ………………………………………… ……. 16
1.4 General Specifications……………………………………………………………………………. 17
1.4.1 Electrical Specifications…………………………………………….. ………………… 17
1.4.2 Environmental Conditions…………………………………………………………….. 17
1.4.3 Durability……………………………………………………………………………………. 18
1.4.4 Acoustic Noise…………………………………………………………………………….. 18
1.4.5 Safety Approvals (Safety standards/EMI)…………………………………. ……. 18
1.5 Interfaces ……………………………………………………………………………………………… 18
1.5.1 USB Interfaces…………………………………………………………………………….. 18
1.5.2 Memory Card Slots………………………………………………………………………. 19
1.6 Control Panel………………………………………………………………………………………… 20
1.6.1 Operation Buttons & LED…………………………………………………………….. 20
1.7 Specifications of Each Function………………………………………………………………. 21
1.7.1 Stand-alone Copy Function…………………………………………… … …………… 21
1.7.2 Memory Card Direct Print Function……………………………………………….. 23
1.7.3 Backup Function………………………………………………………………………….. 26
1.7.4 Camera Direct Print Function (PictBridge)……………………………………… 28
1.7.5 Specialty Print Functions………………………………………………………………. 30
1.7.6 Setup Mode…………………………………………………………………………………. 32
Chapter 2 OPERATING PRINCIPLES
2.1 Overview ……………………………………………………………………………………………… 35
2.1.1 Printer Mechanism……………………………………………………………………….. 35
2.1.2 Motors and Sensors ……………………………………………………………………… 36
2.1.3 Printhead…………………………………………………………………………………….. 37
2.2 Power-On Sequence ………………………………………………………………………………. 38
2.3 Printer Initialization……………………………………………………………………………….. 40
Chapter 3 TROUBLESHOOTING
3.1 Overview……………………………………………………………………………………………… 42
3.1.1 Specified Tools ……………………………………………………………………………. 42
3.1.2 Preliminary Checks ……………………………………………………………………… 42
3.1.3 Procedure for Troubleshooting………………………………………………………. 42
3.2 Troubleshooting When There is Error Display………………………………………….. 43
3.2.1 Error List ………………………….. ………………………………………… …………….. 43
3.2.2 Warning List……………………………………………………………………………….. 44
3.2.3 FATAL Error………………………………………………………………………………. 47
3.3 Troubleshooting When There is No Error Display…………………………………….. 51
3.3.1 Troubleshooting for Printer…………………………………………………………… 51
3.3.2 Power Supply Related Troubleshooting………………………………………….. 55
3.3.3 Ink Supply Related Troubleshooting………………………………………………. 55
3.3.4 I/F Related Troubleshooting………………………………………………………….. 57
3.3.5 Troubleshooting for Scanner…………………………………………………………. 58
3.3.6 Troubleshooting for Motors and Sensors………………………………………… 59
Chapter 4 DISASSEMBLY AND ASSEMBLY
4.1 Overview……………………………………………………………………………………………… 61
4.1.1 Precautions …………………………………………………………………………………. 61
4.1.2 Tools………………………………………………………………………………………….. 61
4.1.3 Preparation before Disassembly…………………………………………………….. 61
4.1.4 Making a Special Tool for CSIC Board………………………………………….. 62
4.1.5 How to Unlock the Carriage………………………………………………………….. 62
4.1.6 Disassembly and Reassembly Procedure……….. ………………………………. 63
4.2 Removal of Exterior Parts………………………………………………………………………. 64
4.2.1 Paper Support Assy……………………………………………………. ……………….. 64
4.2.2 Stacker Cover …………………………………………………………. ………………….. 64
4.2.3 Document Cover/ASF Cover ………………………………………………………… 65
4.2.4 Upper Housing/Scanner Cable Cover ……………………………… …………….. 66
4.2.5 Scanner Unit……………………………………………………………………………….. 69
4.2.6 Panel Unit…………………………………………………………………………………… 72
Confidential
7

Epson Stylus Photo PX650/TX650/TX659/PX660/PX660 Premium/Artisan 635 Revision C
4.2.7 M/B Cover………………………………………………………………………………….. 74
4.2.8 Waste Ink Tray Assy……………………………………………………………………. 74
4.2.9 Middle Housing…………………………………………………………………………… 75
4.3 Removing the Circuit Boards………………………………………………………………….. 78
4.3.1 Main Board Unit…………………………………………………….. …………………… 78
4.3.2 Panel Board ………………………………………………………………………………… 81
4.3.3 Power Supply Board…………………………………………………………………….. 83
4.4 Disassembling the Printer Mechanism………………………………………… …………… 85
4.4.1 Printhead…………………………………………………………………………………….. 85
4.4.2 Linear Scale………………………………………….. ……………………………………. 87
4.4.3 Printer Mechanism……………………………………………………………………….. 88
4.4.4 PF Encoder/PF Scale……………………………………………………………………. 90
4.4.5 PF Motor…………………………………………………………………………………….. 91
4.4.6 Ink System Unit…………………………………………………………………………… 92
4.4.7 ASF Unit…………………………………………………………………………………….. 93
4.4.8 APG Unit……………………………………………………………………………………. 95
4.4.9 CR Motor……………………………………………………………………………………. 96
4.4.10 CR Unit…………………………………………………………………………………….. 98
4.4.11 Paper Eject Frame Assy……………………… …………………………………….. 100
4.4.12 Upper Paper Guides………………………………………………………………….. 102
4.4.13 Front Paper Guide Assy…………………………………………………………….. 104
4.4.14 Waste Ink Pads………………………………………………………………………… 105
4.5 Disassembly of Scanner Unit ………………………………………………………………… 106
4.5.1 Scanner Housing………………………………………. ……………………………….. 106
4.5.2 CIS Unit……………………………………………………………………………………. 107
4.5.3 CR Motor Unit…………………………………………………………………………… 108
Chapter 5 ADJUSTMENT
5.1 Adjustment Items and Overview……………………………………………………………. 111
5.1.1 Servicing Adjustment Item List……………………………………………………. 111
5.1.2 Required Adjustments………………………………………………………………… 114
5.2 Adjustment by Using Adjustment Program …………………………………………….. 116
5.2.1 Top Margin Adjustment……………………………………………………………… 116
5.2.2 Head angular adjustment…………………………………………………………….. 116
5.2.3 Bi-D Adjustment ……………………………………………………………………….. 117
5.2.4 PW Adjustment/First Dot Position Adjustment……………………………… 118
5.2.5 PF Adjustment…………………………………………………………………………… 119
5.3 PG Adjustment ……………………………………………………………………………………. 120
5.4 Banding Reduction System (BRS) Adjustment/Paper Feed Amount Profile (PFP)
Correction…………………………………………………………………………………………………. 122
5.4.1 Overview…………… ………………………………………… ………………………….. 122
5.4.2 Adjustment Procedure…………………………………………… …………………… 124
5.5 Scanner Original Adjustment………………………………………………………………… 127
Chapter 6 MAINTENANCE
6.1 Overview………… ………………………………………… ………………………………………. 131
6.1.1 Maintenance Error……………………………………. ……………………………….. 131
6.1.2 Cleaning………………………………… ………………………………………… ………. 131
6.1.3 Lubrication ……………………………. ………………………………………… ………. 132
Chapter 7 APPENDIX
7.1 Exploded Diagram / Parts List …………………………………………………………… …. 139
Chapter 8 Epson Stylus Photo PX660/PX660 Premium/Artisan 635
8.1 Overview………… ………………………………………… ………………………………………. 141
8.2 Disassembly/assembly………………………………………………………………. …………. 142
8.2.1 Procedural Differences between the Models………………………………….. 142
8.2.2 Disassembly Procedures…………………………………………………….. ………. 144
8.3 Adjustment ………………….. ………………………………………… ………………………….. 157
8.3.1 Overview…………… ………………………………………… ………………………….. 157
8.3.2 Required Adjustments………………………………………………………………… 158
8.3.3 Touch Panel Calibration……………………………………………………………… 160
8.3.4 Touch Panel Operation Check…………………………………………………….. . 160
8.3.5 Overview Artisan 635 ………………………………………………………………… 163
8.3.6 USB Interface Epson Stylus Photo PX660/PX660 Premium/Artisan 635…
163
8.3.7 Memory Card Slots Epson Stylus PX660/PX660 Premium …………….. 164
8.3.8 Memory Card Slots Artisan 635………………………………………………….. 165
8.3.9 Electrical Specifications …………………………….. 166
Confidential
8

PRODUCT DESCRIPTION
CHAPTERA
1
Confidential
Epson Stylus Photo PX650/TX650/TX659/PX660/PX660 Premium/Artisan 635 Revision C
1.1 Features
Description in this chapter is applied to Epson Stylus Photo PX650/
TX650/TX659. For information on Epson Stylus Photo PX660/
PX660 Premium/Artisan 635, see below.
Chapter 8 «Epson Stylus Pho to PX660/PX660 Premium/
Artisan 635″ (p140)
Epson Stylus Photo PX650/TX650/TX659 are color inkjet printers equipped with
scanner function. The main features are described below.
Available Functions
Printer
• Printing from a PC
• Direct print on CD or DVD (label print)
Scanner
• Scanning from a PC
• Scan to Memory function
(directly stores a scan data to a memory card inserted)
Stand-alone copy
• Stand-alone copy using the printer and scanner functions.
Memory card slot
• Direct print from a memory card
• Accessible from a PC as a USB memory card slot
Dimensions
Dimensions: 450 mm (W) x 386 mm (D) x 195 mm (H)
(when the ASF and the stacker are closed. includes the rubber feet)
Weight: 8.4 kg
(excludes the ink cartridges, power supply cable and the CD-R tray)
USB host interface
• Direct print from an external USB storage device
• Direct backup of memory card data to an external USB storage device
• Direct print from a digital camera (PictBridge)
2.5-inch TFD color LCD
High speed & high quality
Maximum resolution: 5760 (H) x 1440 (V) dpi
High quality with 6 colors dye ink (6 independent cartridges)
High speed print with F3 Mach Turbo2 head
(Black: 90 nozzles x 1 column, Color: 90 nozzles x 5 columns)
Borderless print on EPSON designated paper
PRODUCT DESCRIPTION Features 10
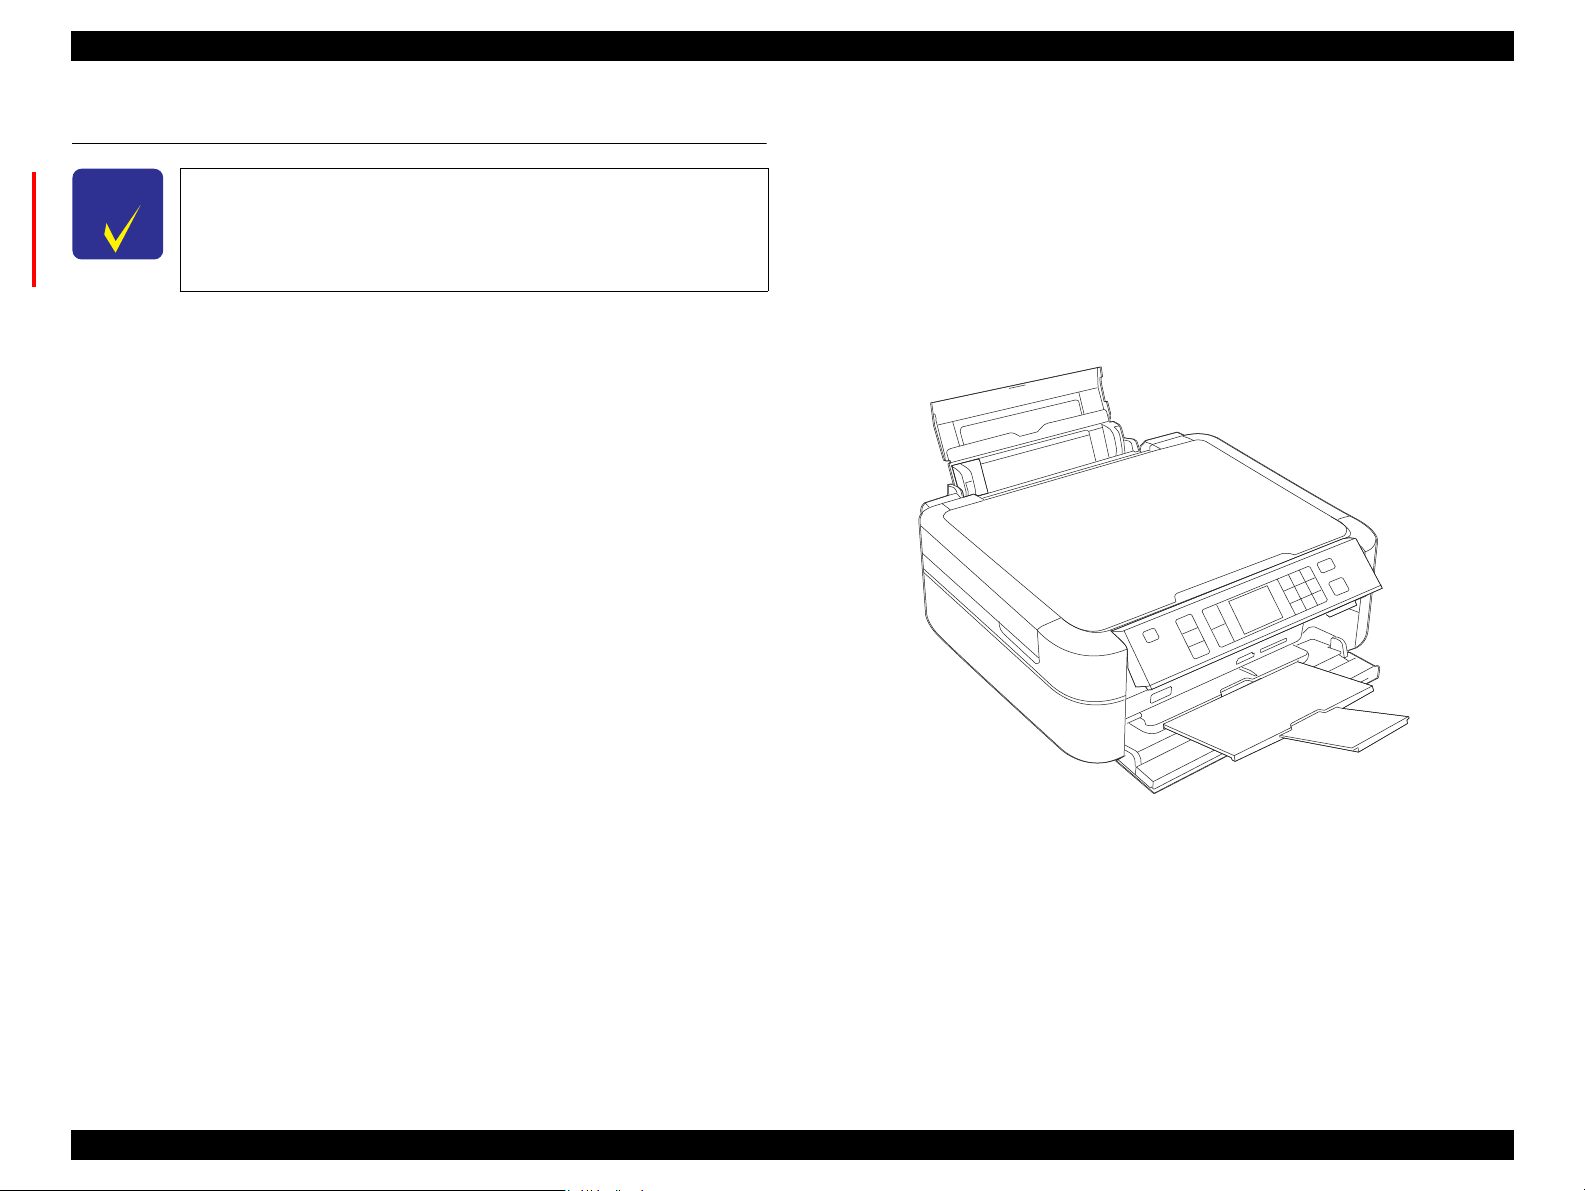
Figure 1-1. External View
Confidential
Epson Stylus Photo PX650/TX650/TX659/PX660/PX660 Premium/Artisan 635 Revision C
1.2 Printing Specifications
1.2.1 Basic Specifications
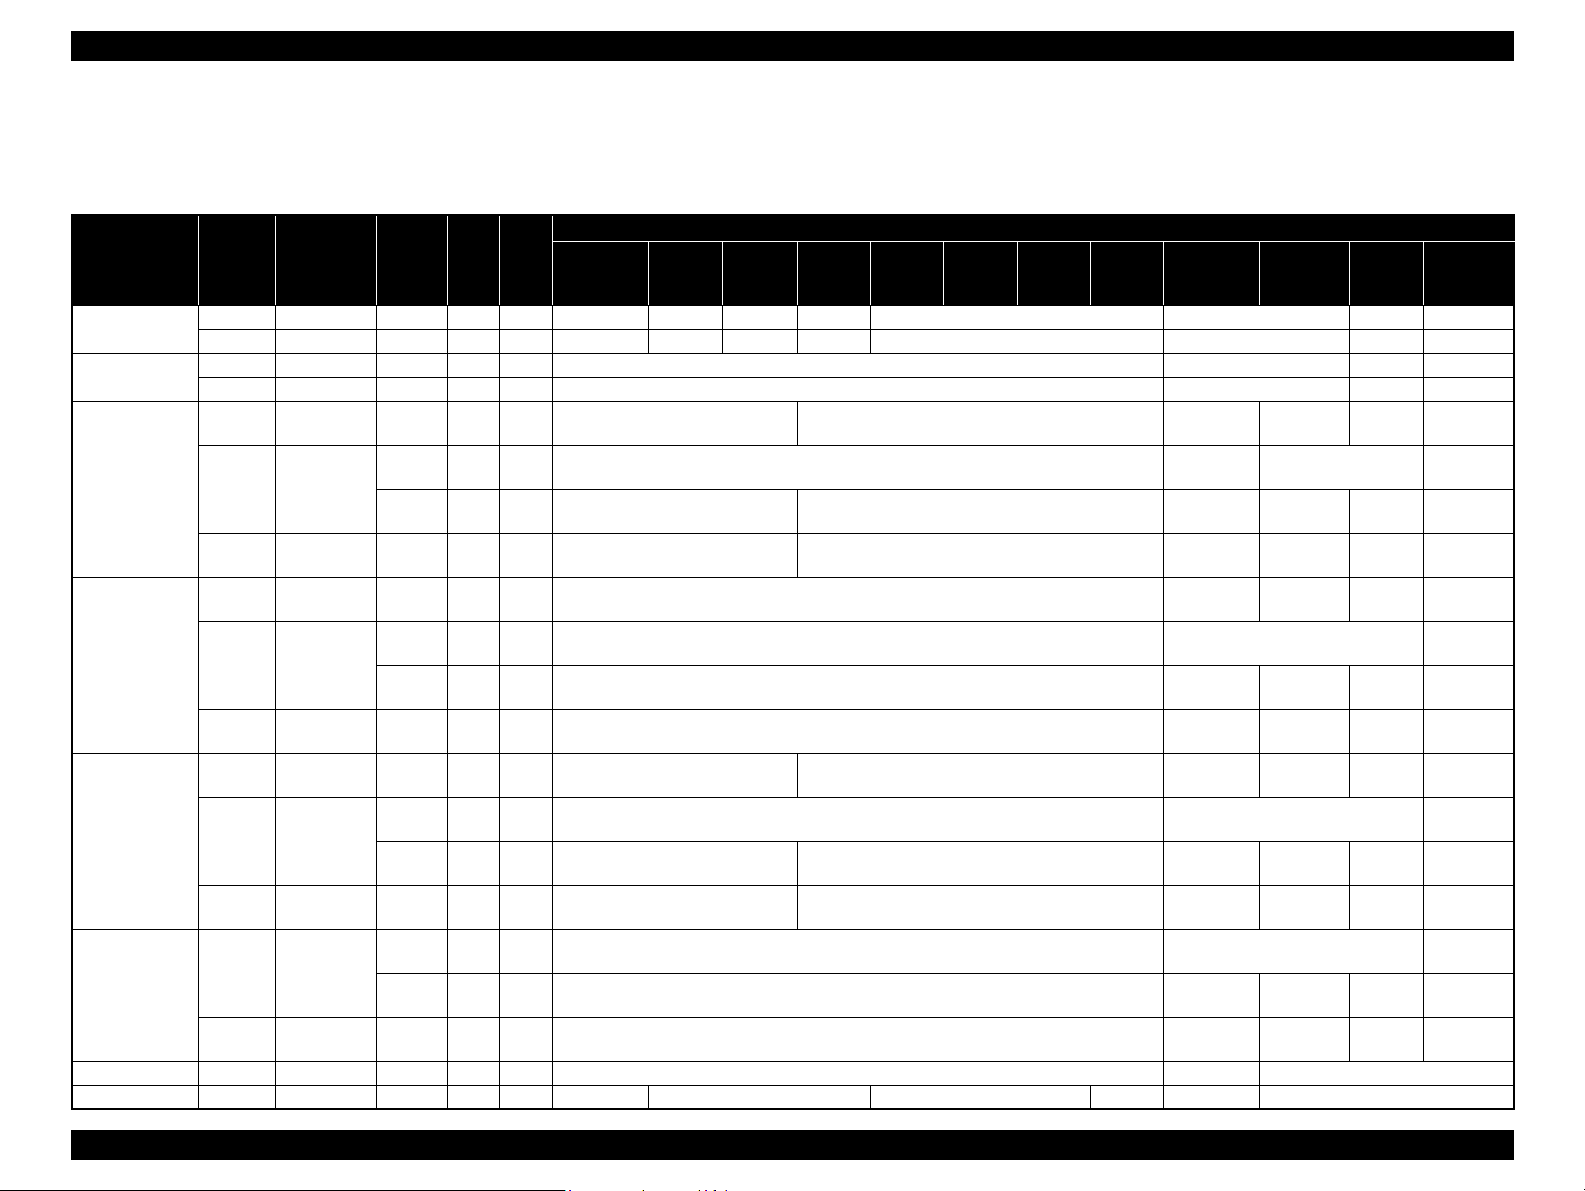
Table 1-1. Printer Specifications
Item Specifications
Print method On-demand inkjet
Nozzle
configuration
Print direction Bi-directional minimum distance printing, unidirectional printing
Print resolution
Control code
Input buffer size 64 Kbytes
Paper feed method Friction feed using an ASF (Auto Sheet Feeder)
Paper path Top feed, front out
Paper feed rate 110 msec. (at 25.4 mm feed)
PF interval Programmable in 0.01764 mm (1/1440 inch) steps
Black: 90 nozzles x 1
Color: 90 nozzles x 5 (cyan, magenta, yellow, light cyan, light magenta)
Horizontal x Vertical (dpi)
• 360 x 180
• 360 x 360
• 720 x 360
• ESC/P Raster command
• ESC/P-R (RGB) command
• EPSON Remote comm and
• 720 x 540
• 720 x 720
• 5760 x 1440
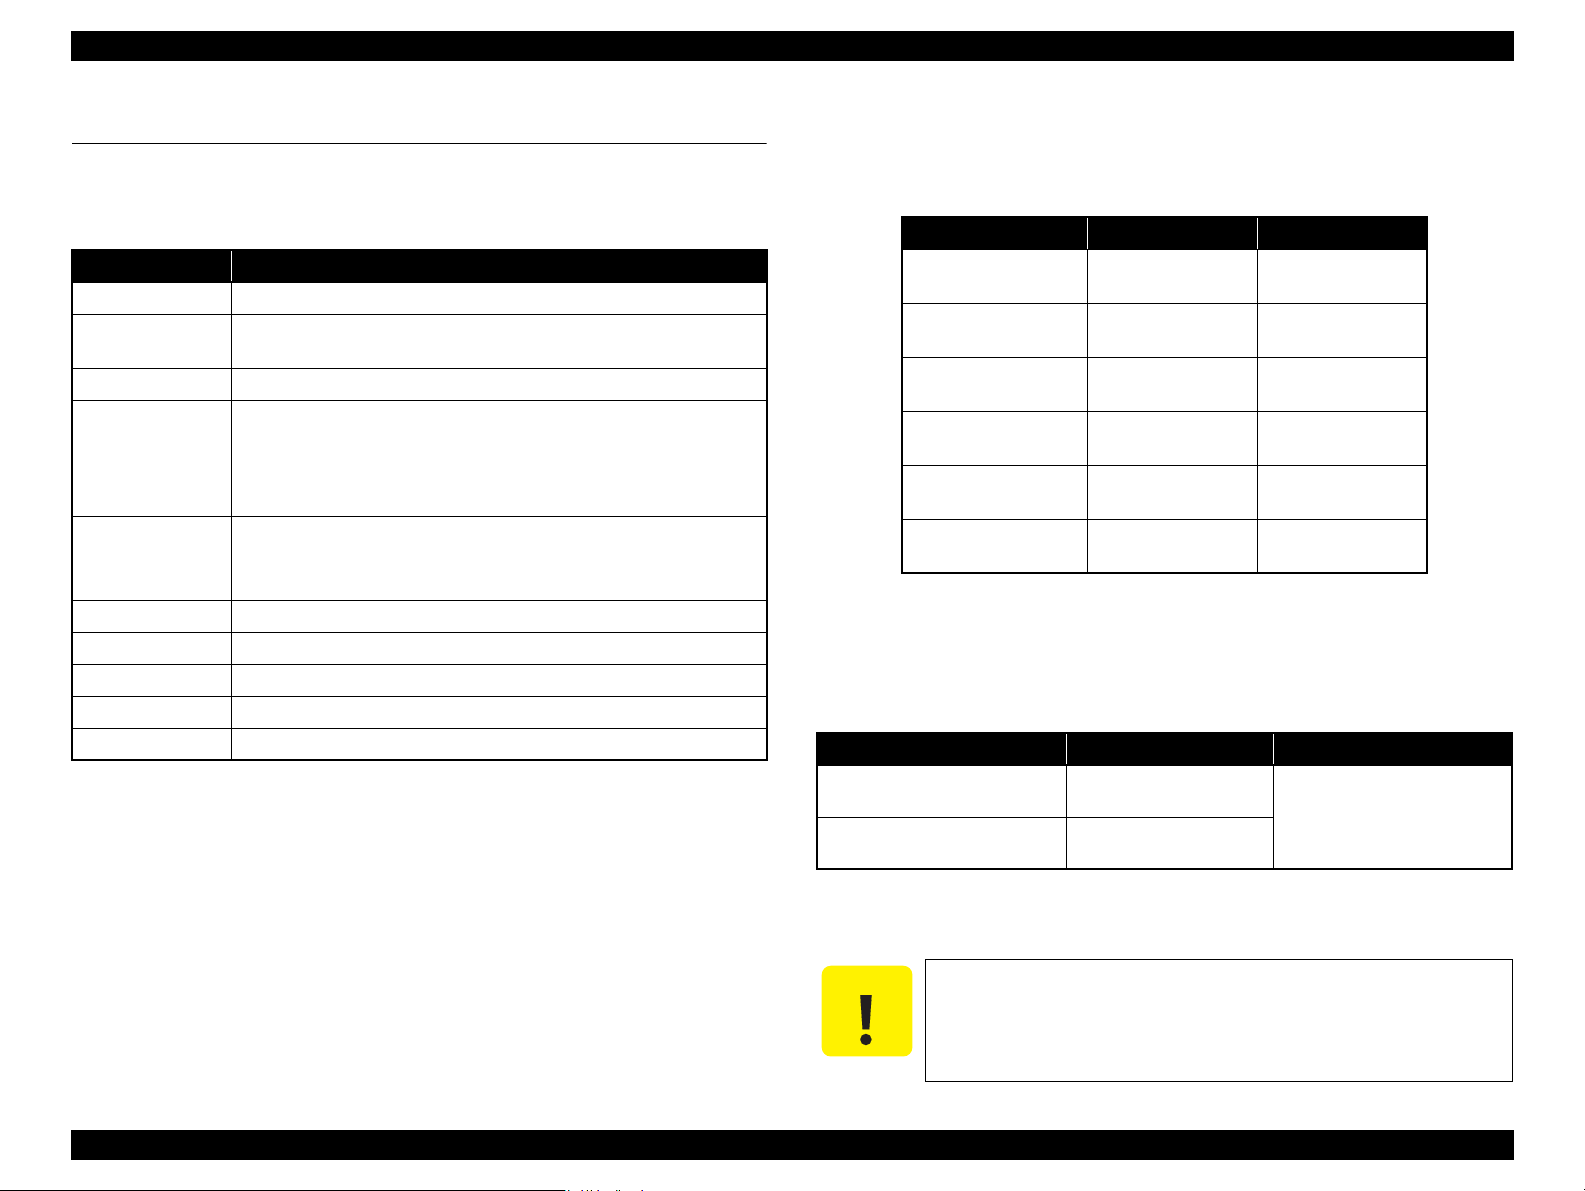
1.2.2 Ink Cartridge
The product numbers of the Epson ink cartridges for this printer are shown below.
Table 1-2. Product No. of Ink Cartridges
Color Europe CISMEA, Asia
Black
Cyan
Magenta
Yellow
Light Cyan
Light Magenta
T0791 (S)
T0801 (2S)
T0792 (S)
T0802 (2S)
T0793 (S)
T0803 (2S)
T0794 (S)
T0804 (2S)
T0795 (S)
T0805 (2S)
T0796 (S)
T0806 (2S)
Shelf life
Two years from production date (if unopened), six months after opening the
package.
Storage Temperature
Table 1-3. Storage Temperature
Status Storage Temperature Limit
o
-20
When stored in individual boxes
When installed in main unit
C to 40oC
(-4oF to 104oF)
-20oC to 40oC
o
F to 104oF)
(-4
T0811N (S)
T0821N (2S)
T0812N (S)
T0822N (2S)
T0813N (S)
T0823N (2S)
T0814N (S)
T0824N (2S)
T0815N (S)
T0825N (2S)
T0816N (S)
T0826N (2S)
1 month max. at 40
o
C (104oF)
Dimension
12.7 mm (W) x 68 mm (D) x 47 mm (H)
Do not use expired ink cartridges.
The ink in the cartridges freezes at -16 °C (3.2°F). It takes about
three hours under 25°C (77°F) until the ink thaws and becomes
usable.
PRODUCT DESCRIPTION Printing Specifications 11
Confidential
Epson Stylus Photo PX650/TX650/TX659/PX660/PX660 Premium/Artisan 635 Revision C
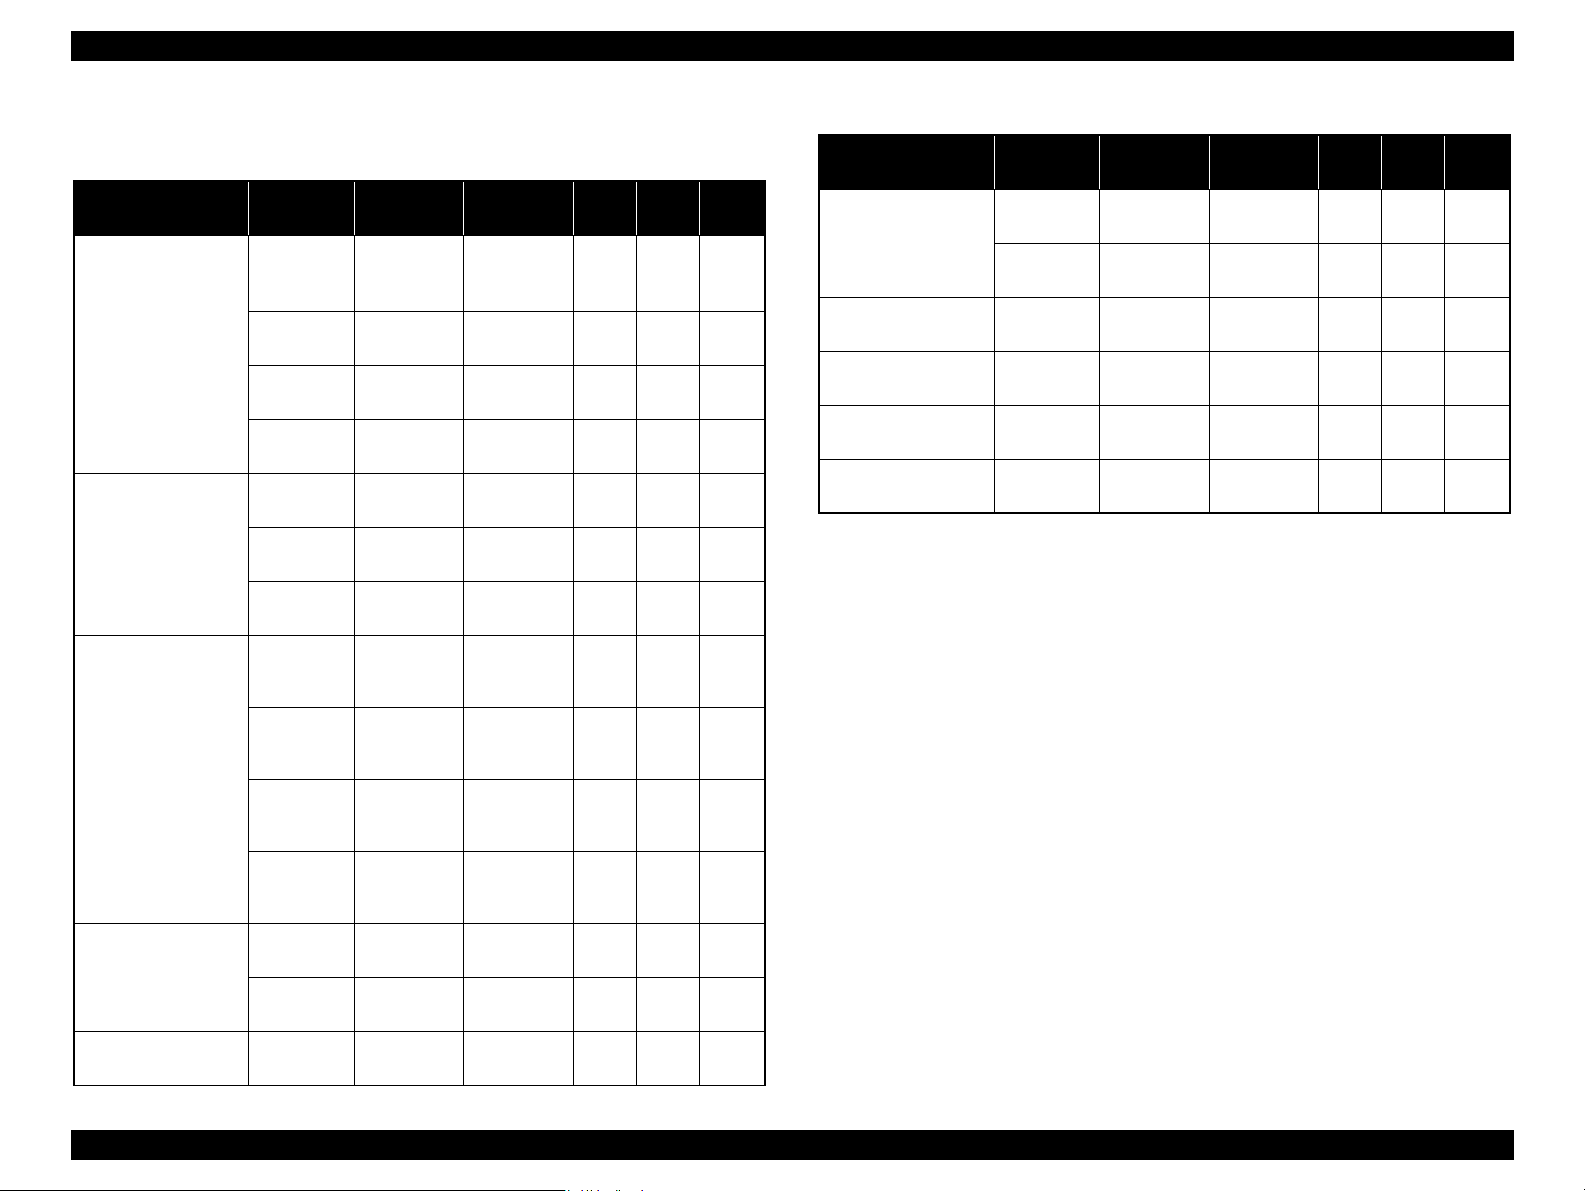
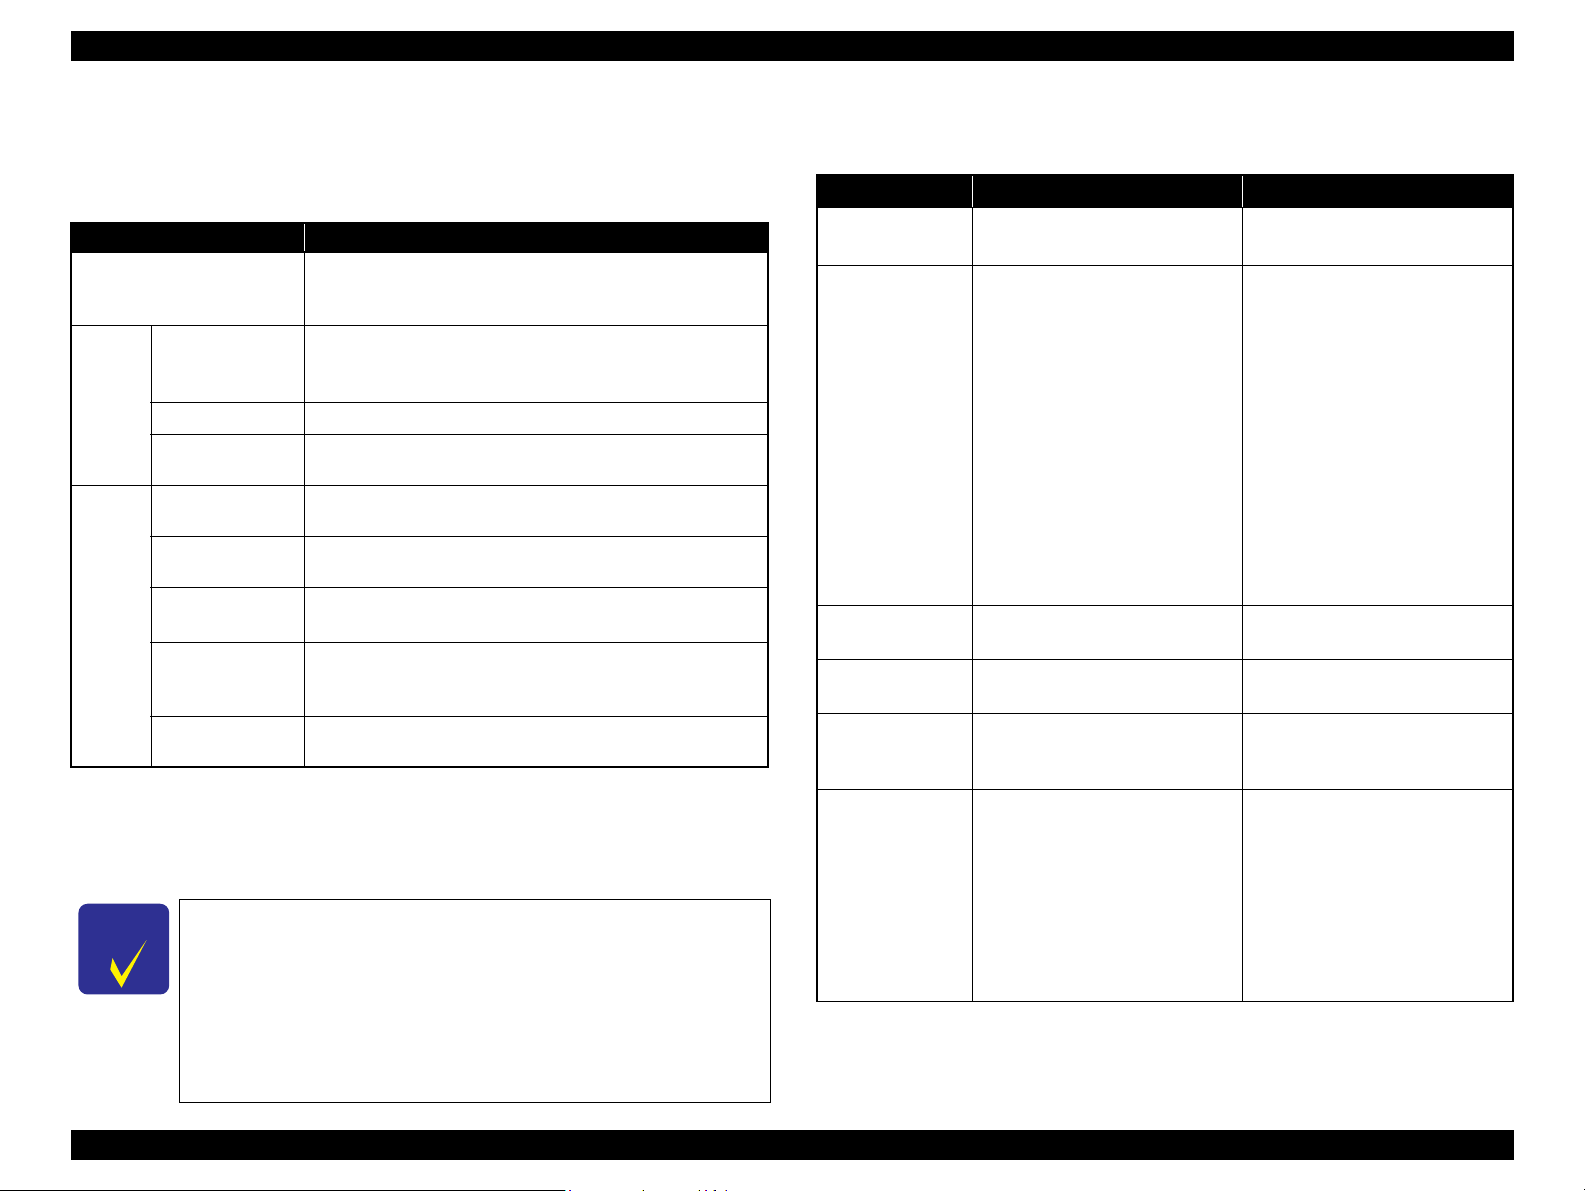
1.2.3 Print Mode
Media Print Mode
• Plain paper
• Premium Ink jet
Plain Paper
• Bright White Ink
jet Paper
Ultra Glossy Photo
Paper
• Photo Paper
• Glossy Photo Paper
• Premium Glossy
Photo Paper
• Premium
Semigloss Photo
Paper
(Economy)
Photo Fine 720 x 720
Super Photo 5760 x 1440
Table 1-4. Print Mode (Color)
Resolution
(H x V) dpi
Draft 1
(Fast
360 x 180
economy)
Draft 2
360 x 180
Normal 360 x 360
Photo*
Photo*
2
(1.5 pass)
720 x 720
(2.0 pass)
720 x 720
2
Fine 720 x 360
720 x 720
2
Photo*
Photo*
2
(1.5 pass)
720 x 720
(2.0 pass)
Dot Size
(400 cps)
(400 cps)
(360 cps)
(240 cps)
(240 cps)
(280 cps)
(200 cps)
(240 cps)
(240 cps)
(280 cps)
(cps*1)
Eco
Eco
MC2-1
MC1-1
MC1-2
MC2-2
MC1-5
MC1-1
MC1-2
MC2-2
Micro
Bi-d
Weave
ON OFF
ON OFF
ON OFF
ON ON
ON ON
ON ON
ON ON
ON ON
ON ON
ON ON
Border
-less
NA
NA
NA
NA
OK
OK
OK
OK
OK
OK
Table 1-4. Print Mode (Color)
Media Print Mode
Envelope
Normal 360 x 360
Resolution
(H x V) dpi
Photo Fine 720 x 720
Iron-On Cool Peal
Transfer Paper
Photo stickers
CD/DVD label
High-quality CD/
DVD label
Photo Fine 720 x 720
Photo
(2.0 pass)
720 x 720
*2
Super Photo 5760 x 1440
Super Photo 5760 x 1440
Note *1: cps = character per second
*2: Photo mode uses 1.5 pass or 2.0 pass depending on the paper size.
1.5 pass supported size: 4” x 6”
2.0 pass supported size: 16:9 wide, 5” x 7”, 8” x 10”, Letter, A4
Dot Size
*1
(cps
MC2-1
(360 cps)
MC1-1
(240 cps)
MC1-1
(240 cps)
MC2-2
(280 cps)
MC1-5
(200 cps)
MC1-5
(200 cps)
)
Micro
Bi-d
Weave
OFF OFF
OFF ON
OFF ON
ON ON
ON ON
ON ON
Border
-less
NA
NA
NA
NA
NA
NA
Matte Paper Heavyweight
Photo Quality Ink jet
Paper
Super Photo 5760 x 1440
Photo*
(2.0 pass)
720 x 720
2
Super Photo 5760 x 1440
720 x 720
2
Photo*
(2.0 pass)
MC1-5
(200 cps)
MC2-2
(280 cps)
MC1-5
(200 cps)
MC2-2
(280 cps)
ON ON
ON ON
ON ON
ON ON
OK
OK
OK
NA
PRODUCT DESCRIPTION Printing Specifications 12
Confidential
Epson Stylus Photo PX650/TX650/TX659/PX660/PX660 Premium/Artisan 635 Revision C
Media Print Mode
• Plain paper
• Premium Ink jet
Plain Paper
• Bright White Ink
jet Paper
Ultra Glossy Photo
Paper
• Photo Paper
• Glossy Photo Paper
• Premium Glossy
Photo Paper
• Premium
Semigloss Photo
Paper
Table 1-5. Print Mode (Monochrome)
Resolution
(H x V) dpi
Draft 1
(Fast
360 x 180
economy)
Draft 2
(Economy)
360 x 180
Normal 360 x 360
Photo Fine 720 x 720
Photo*
Photo*
2
(1.5 pass)
720 x 720
(2.0 pass)
720 x 720
2
Super Photo 5760 x 1440
Fine 720 x 360
720 x 720
2
Photo*
Photo*
2
(1.5 pass)
720 x 720
(2.0 pass)
Dot Size
(cps*1)
Eco
(400 cps)
Eco
(400 cps)
MC2-1
(360 cps)
MC1-1
(240 cps)
MC1-2
(240 cps)
MC2-2
(280 cps)
MC1-5
(200 cps)
MC1-1
(240 cps)
MC1-2
(240 cps)
MC2-2
(280 cps)
Micro
Bi-d
Weave
ON OFF
ON OFF
ON OFF
ON ON
ON ON
ON ON
ON ON
ON ON
ON ON
ON ON
Border
-less
NA
NA
NA
NA
OK
OK
OK
OK
OK
OK
Table 1-5. Print Mode (Monochrome)
Media Print Mode
Envelope
Normal 360 x 360
Resolution
(H x V) dpi
Photo Fine 720 x 720
Iron-On Cool Peal
Transfer Paper
Photo stickers
CD/DVD label
High-quality CD/
DVD label
Photo Fine 720 x 720
Photo*
(2.0 pass)
720 x 720
2
Super Photo 5760 x 1440
Super Photo 5760 x 1440
Note *1: cps = character per second
*2: Photo mode uses 1.5 pass or 2.0 pass depending on the paper size.
1.5 pass supported size: 4” x 6”
2.0 pass supported size: 16:9 wide, 5” x 7”, Letter, A4
Dot Size
(cps*1)
MC2-1
(360 cps)
MC1-1
(240 cps)
MC1-1
(240 cps)
MC2-2
(280 cps)
MC1-5
(200 cps)
MC1-5
(200 cps)
Micro
Bi-d
Weave
OFF OFF
OFF ON
OFF ON
ON ON
ON ON
ON ON
Border
-less
NA
NA
NA
NA
NA
NA
Matte Paper Heavyweight
Photo Quality Ink jet
Paper
Super Photo 5760 x 1440
Photo*
(2.0 pass)
720 x 720
2
Super Photo 5760 x 1440
720 x 720
2
Photo*
(2.0 pass)
MC1-5
(200 cps)
MC2-2
(280 cps)
MC1-5
(200 cps)
MC2-2
(280 cps)
ON ON
ON ON
ON ON
ON ON
OK
OK
OK
NA
PRODUCT DESCRIPTION Printing Specifications 13
Confidential
Epson Stylus Photo PX650/TX650/TX659/PX660/PX660 Premium/Artisan 635 Revision C
1.2.4 Supported Paper
The table below lists the paper type and sizes supported by the printer. The Supported paper type and sizes vary depending on destinations (between EUR and Asia).
.
Table 1-6. Supported Paper
Paper Name Paper Size
Legal 215.9 x 355.6 mm (8.5” x 14”)
Letter 215.9 x 279.4 mm (8.5” x 11”) Y — Y —A4 210 x 297 mm (8.3” x 11.7”) Y — Y —
Plain paper
Premium Ink jet Plain Paper A4 210 x 297 mm (8.3” x 11.7”) 0.11 80 21 Y — Y —Bright White Ink jet Paper A4 210 x 297 mm (8.3” x 11.7”) 0.13 92.5 25 Y — Y —
Ultra Glossy Photo Paper
B5 182 x 257 mm (7.2” x 10.1”) Y — Y —A5 148 x 210 mm (5.8” x 8.3”) Y — Y —A6 105 x 148 mm (4.1” x 5.8”) Y — Y —
User Defined
A4 210 x 297 mm (8.3” x 11.7”)
5” x 7” 127 x 178 mm Y Y — —4” x 6” 101.6 x 152.4 mm Y Y Y Y
89 x 127- 329 x 1117.6 mm
(3.56” x 5.08” — 13.16” x 44.7”)
Thickness Weight EUR Asia
mm g/m
0.08-0.11 64-90 17-24
0.30 290 77
2
lb. P*1B*1P*1B*
Y — Y —
Y — Y —
Y Y Y Y
1
Premium Glossy Photo Paper
Glossy Photo Paper
Premium Semigloss Photo Paper
A4 210 x 297 mm (8.3” x 11.7”)
5” x 7” 127 x 178 mm Y Y Y Y
4″ x 6
»
16:9 wide 102 x 181 mm (4” x 7.11”) Y — — —A4 210 x 297 mm (8.3” x 11.7”)
5” x 7” 127 x 178 mm Y Y — —4” x 6” 101.6 x 152.4 mm Y Y Y Y
A4 210 x 297 mm (8.3” x 11.7”)
4” x 6” 101.6 x 152.4 mm Y Y Y Y
101.6 x 152.4 mm Y Y Y Y
0.27 255 68
0.25 258 68
0.27 250 66
YYYY
YYYY
Y Y Y Y
PRODUCT DESCRIPTION Printing Specifications 14
Confidential
Epson Stylus Photo PX650/TX650/TX659/PX660/PX660 Premium/Artisan 635 Revision C
Table 1-6. Supported Paper
Thickness Weight EUR Asia
Photo Paper
Paper Name Paper Size
A4 210 x 297 mm (8.3” x 11.7”)
5” x 7” 127 x 178 mm Y Y — —4″ x 6
«
101.6 x 152.4 mm Y Y Y Y
mm g/m
0.24 190 51
2
lb. P*1B*1P*1B*
Y Y Y Y
Matte Paper Heavy-weight A4 210 x 297 mm (8.3” x 11.7”) 0.23 167 44 Y Y Y Y
Double-sided Matte Paper A4 210 x 297 mm (8.3” x 11.7”) 0.22 185 49 Y — Y —Photo Quality Ink jet Paper A4 210 x 297 mm (8.3” x 11.7”) 0.12 102 27 Y — Y —
Envelopes
#10 104.8 x 241.3 mm (4.125” x 9.5”)
#DL 110 x 220 mm Y — Y —
— 75-90 20-24
Y — Y —
#C6 114 x 162 mm Y — Y —
Iron-On Cool Peal Transfer Paper A4 210 x 297 mm (8.3” x 11.7”) 0.14 130 35 Y — Y —Photo Stickers 16 A6 105 x 148 mm (4.1” x 5.8”) 0.19 — — — — Y
Photo Stickers 4 A6 105 x 148 mm (4.1” x 5.8”) 0.19 — — — — Y
CD/DVD
CD/DVD Premium Surface
ø12 cm ø12 cm — — — Y — Y —ø8 cm ø8 cm — — — Y — Y —
*2
—
*2
—
1
Note *1: “Y” in the “P” column stands for “the paper type/size is Supported”. “Y” in the “B”
column stands for “Borderless printing is available”.
*2: Select settings of “Epson Matte” instead of “Photo Quality Ink jet Paper”.
PRODUCT DESCRIPTION Printing Specifications 15
Make sure the paper is not wrinkled, fluffed, torn, or folded.
Make sure to correct the warpage of the paper before use.
When printing on an envelope, be sure the flap is folded neatly.
Do not use the adhesive envelopes.
Do not use double envelopes and cellophane window envelopes.
Confidential
Epson Stylus Photo PX650/TX650/TX659/PX660/PX660 Premium/Artisan 635 Revision C
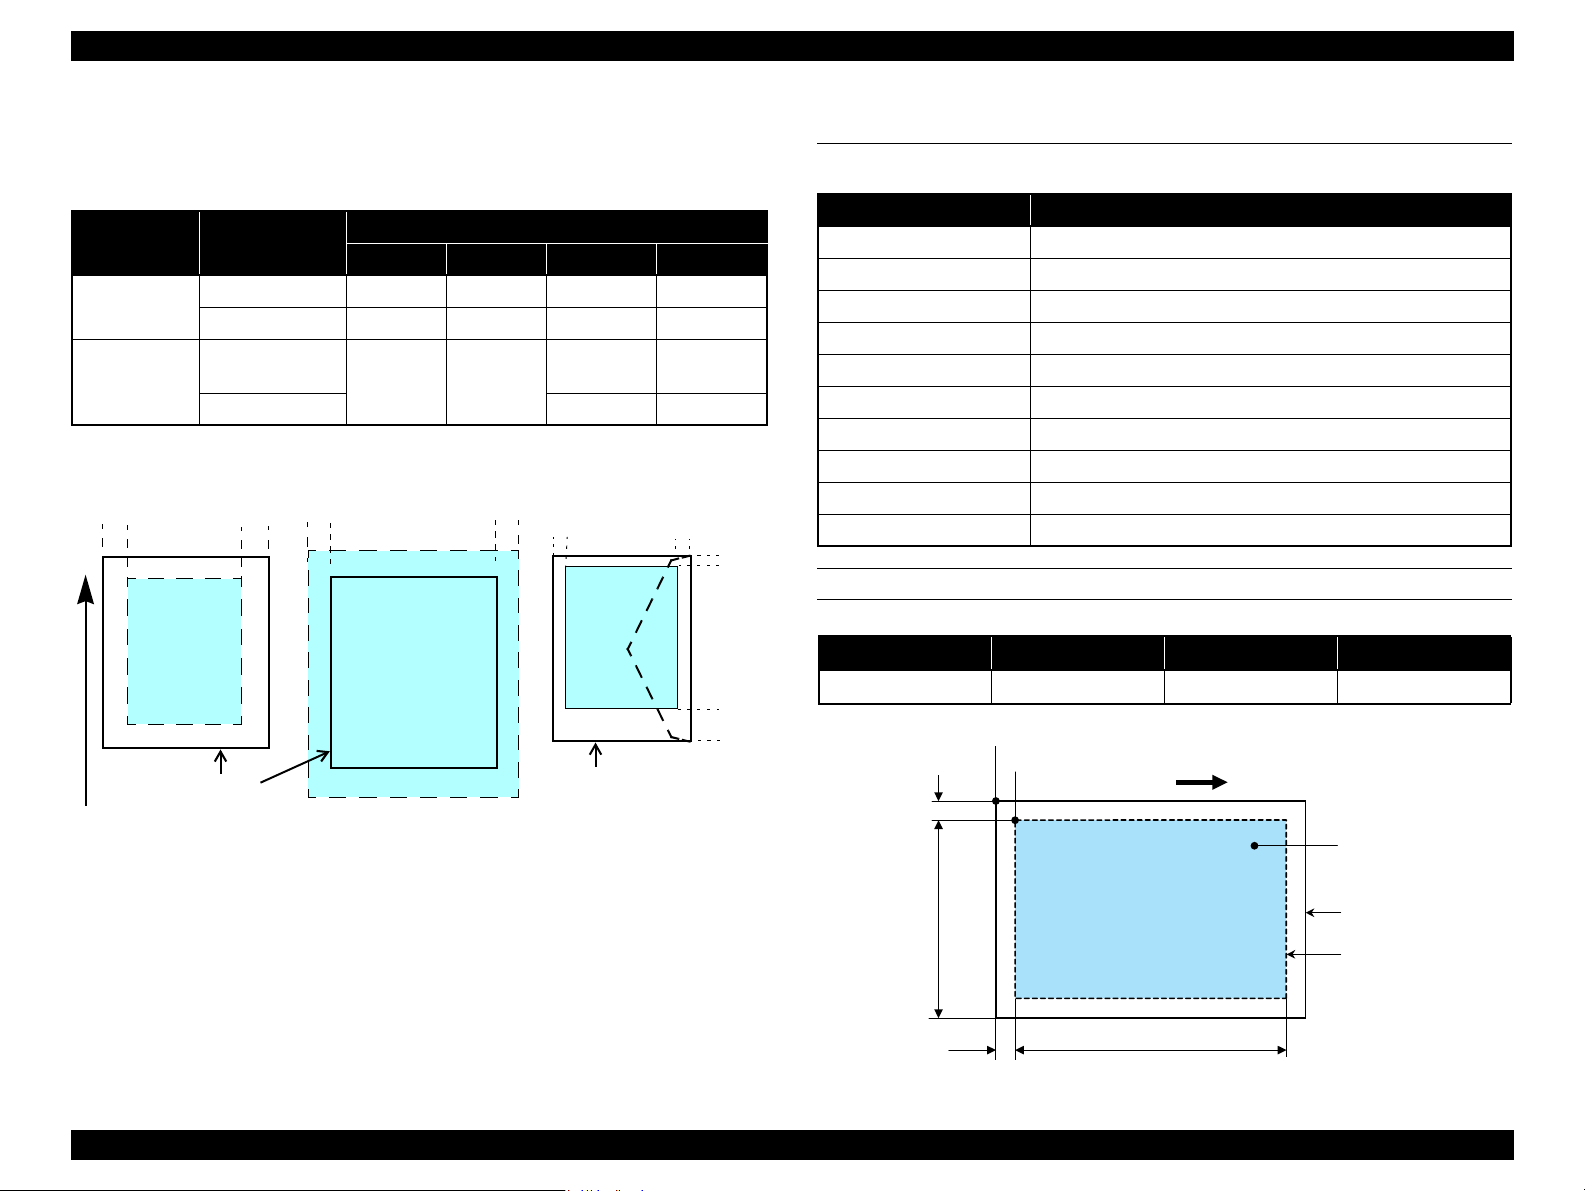
Print Area
LM RM
TM
BM
BM
Cut Sheet (Standard)
Cut Sheet (Borderless)
Paper Size
LM
RM
TM
BM
Print Area
LM RM
Print Area
Envelope
Paper Size
TM
Paper Feed Direction
RW
RL
OTM
OLM
Scanning start position
Home position
Scanning range
Scan bed
Original (face down)
Scanning direction
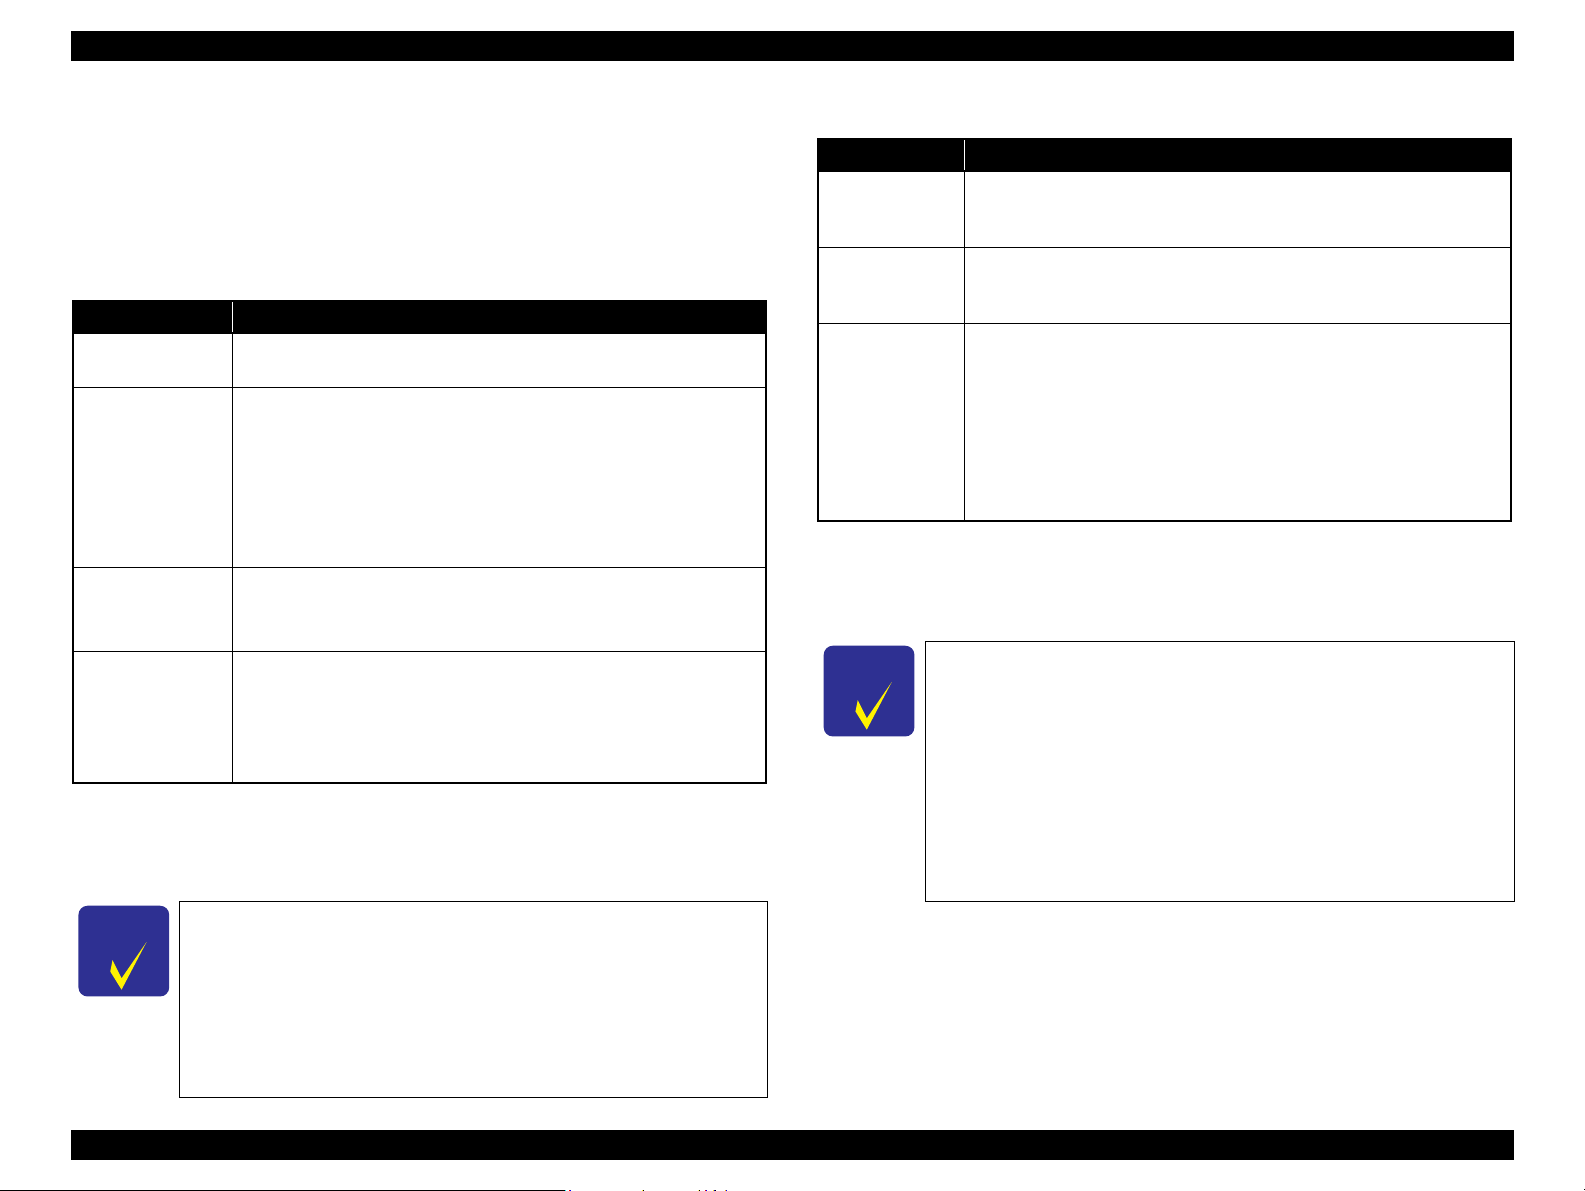
1.2.5 Printing Area
The printing area for this printer is shown below.
Table 1-7. Printing Area (Margins)
Print Mode Paper Size
Standard print
Borderless
print
Note *: The margins for Borderless print are margins that bleed off the edges of paper.
Any size 3 mm 3 mm 3 mm 3 mm
Envelope 5 mm 5 mm 3 mm 20 mm
A4/Letter to
5” x 7”
4” x 6” 1.34 mm 2.54 mm
Left Right Top Bottom
2.54 mm 2.54 mm
Margin*
2.96 mm 4.02 mm
1.3 Scanner Specifications
Table 1-8. Basic Specifications
Item Specification
Scanner type Flatbed, color
Scanning method Moving carriage, stationary document
Home position Far left corner
Photoelectric device CIS
Light source LED
Maximum document size US letter, or A4 size
Scanning range 216 x 297 mm (8.5” x 11.7”)
Maximum resolution Main scan: 1200 dpi / Sub scan: 2400 dpi
Maximum effective pixels 10,200 x 14,040 pixels (with 1200 dpi scanning)
Pixel depth 16 bit per pixel (input), 1 or 8 bit per pixel (output)
SCANNING RANGE
Table 1-9. Scanning Range
RL (read length) RW (read width) OLM (left margin) OTM (top margin)
216 mm 297 mm 1.5 mm 1.5 mm
PRODUCT DESCRIPTION Scanner Specifications 16
Figure 1-2. Printing Area
Figure 1-3. Scanning Range
Confidential
Epson Stylus Photo PX650/TX650/TX659/PX660/PX660 Premium/Artisan 635 Revision C
10/50
27/80
30/86 35/95 40/10420/68
Temperature (°C/°F)
20
30
40
50
90
80
70
60
Humidity (%)
1.4 General Specifications
1.4.1 Electrical Specifications
Primary power input
Table 1-10. Primary Power Specifications
Item 100-120V model 220-240V model
Rated power supply voltage 100 to 120 VAC 220 to 240 VAC
Input voltage range 90 to 132 VAC 198 to 264 VAC
Rated current 0.6 A (max. 1.2 A) 0.3 A (max. 0.6 A)
Rated frequency 50 to 60 Hz
Input frequency range 49.5 to 60.5 Hz
Insulation resistance TBD V (for one minute)
Energy conservation International Energy Star Program compliant
Power
consumption
Stand alone copy
(ISO/IEC24712 pattern)
Ready Approx. 7.0 W
Sleep mode Approx. 1.3 W Approx. 1.5 W
Power off Approx. 0.2 W Approx. 0.3 W
Approx. 18 W
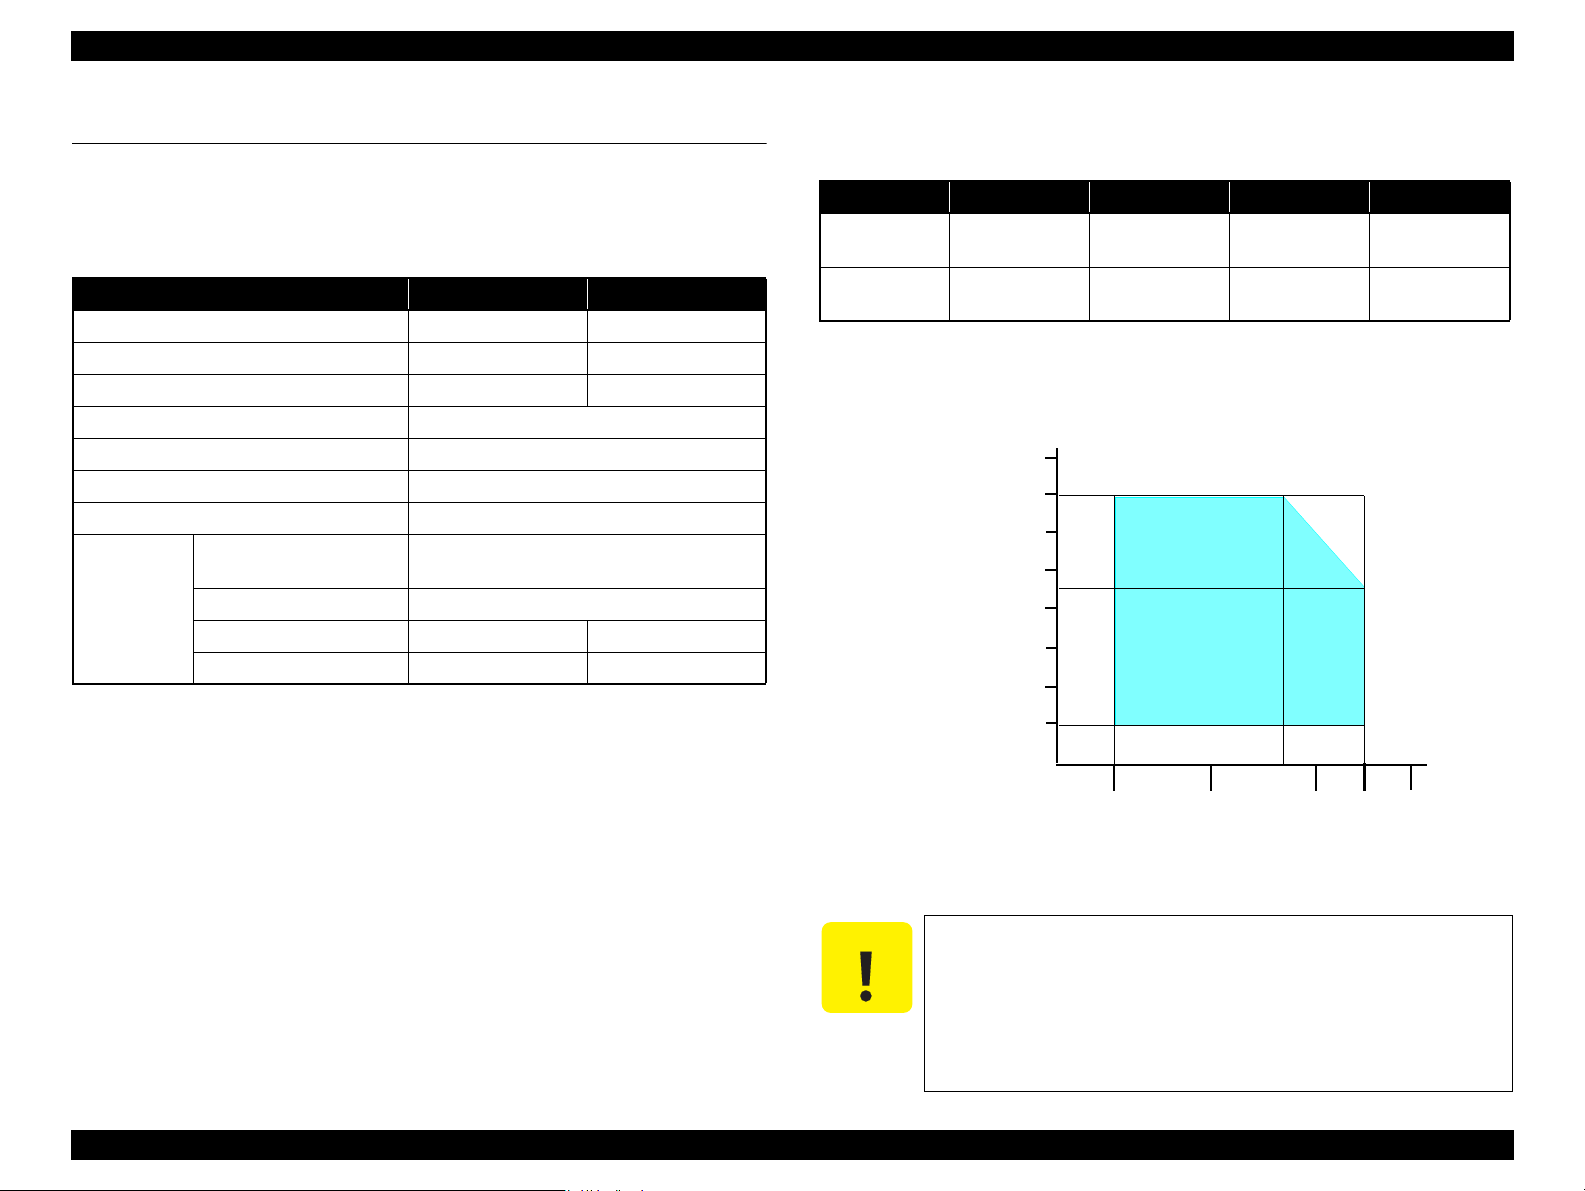
1.4.2 Environmental Conditions
Table 1-11. Environmental Conditions
*3
*1
Humidity
20
Condition Temperature
Operating
Storage
(unpacked)
Note *1: The combined Temperature and Humidity conditions must be within the blue-shaded
range in
*2: No condensation
*3: Must be less than 1 month under 40°C.
10 to 35°C
(50 to 95°F)
-20 to 40°C
(-4°F to 104°F)
Fig.1-4.
to 80%
to 85%
5
*1,2
Shock Vibration
1 G
(1 msec. or less)
2 G
(2 msec. or less)
10 to 55 Hz
10 to 55 Hz
0.15 G,
0.50 G,
Note : When no operation is made for more than 13 minutes, it goes to the low power mode
within two minutes.
PRODUCT DESCRIPTION General Specifications 17
Figure 1-4. Temperature/Humidity Range
When returning the repaired printer to the customer, make sure
the Printhead is covered with the cap and the ink cartridge is
installed.
If the Printhead is not covered with the cap when the printer is
off, turn on the printer with the ink cartridge installed, make
sure the Printhead is covered with the cap, and then turn the
printer off.
Confidential
Epson Stylus Photo PX650/TX650/TX659/PX660/PX660 Premium/Artisan 635 Revision C
1.4.3 Durability
Table 1-12. Durability
Item Specification
*1
Total print life
Printhead Six billions shots (per nozzle) or five years which ever comes first
Scanner carriage 36,000 cycles of carriage movement
Note *1: Condition: A4, 3.5% duty, ECMA pattern, Plain paper, default mode
*2: Condition: A4, ISO24712 pattern, Plain paper, default mode
Black
Color
16,000 pages or five years which ever comes first
*2
10,000 pages or five years which ever comes first
1.4.4 Acoustic Noise
36 dB
(when printing from PC, on Premium Glossy Photo Paper, in the highest quality)
1.4.5 Safety Approvals (Safety standards/EMI)
EU EN60950-1
EN55022 Class B
EN61000-3-2, EN61000-3-3
EN55024
Germany EN60950-1
Russia GOST-R (IEC60950-1, CISPR 22)
Korea K60950-1
KN22 Class B
KN61000-4-2/-3/-4/-5/-6/-11
Australia AS/NZS CISPR22 Class B
1.5 Interfaces
The printer has USB interfaces and memory card slots of the following specifications.
1.5.1 USB Interfaces
The printer has two USB ports; USB Device port for connecting with a host device
such as a computer, and USB Host port for connecting with an external device such as
DSC (Digital Still Camera).
Table 1-13. USB Interface Specification
Item USB Device Port USB Host Port*
• Universal Serial Bus
Specifications Revision 2.0
• Universal Serial Bus Device
Standard
Transfer rate
Data format
Compatible connector
Maximum cable length
Note* : The following devices can be connected to the USB Host port.
• DSC compliant with CIPA DC-001-2003 Rev.2.0 (PictBridge) Specification.
• Devices compliant with Universal Serial Bus Mass Storage Class Bulk-Only Transport
Revision 1.0, and the Subclass code is one of the followings.
0x06 (SCSI transparent command set)
0x05 (SFF-8070i command set)
0x02 (SFF-8020i command set)
Class Definition for Printing
Devices Version 1.1
• Universal Serial Bus Mass
Storage Class Bulk-Only
Transport Revision 1.0
480 Mbps (High Speed)
USB Series B USB Series A
Table 1-14. Device ID
When IEEE 1284.4 is Enabled When IEEE 1284.4 is Disabled
MFG:EPSON;
CMD:ESCPL2,BDC,D4,D4PX,ESCPR1;
MDL:Model Name;
CLS:PRINTER;
DES:EPSON<SP>Model Name;
CID:EpsonRGB;
Note : The “Model Name” is replaced as shown below.
Europe: Stylus Photo PX650
Asia/Pacific/CISMEA:Stylus Photo TX650
MFG:EPSON;
CMD:ESCPL2,BDC,ESCPR1;
MDL:Model Name;
CLS:PRINTER;
DES:EPSON<SP>Model Name;
CID:EpsonRGB;
• Universal Serial Bus
Specifications Revision 2.0
NRZI
2 m or less
PRODUCT DESCRIPTION Interfaces 18
Confidential
Epson Stylus Photo PX650/TX650/TX659/PX660/PX660 Premium/Artisan 635 Revision C
1.5.2 Memory Card Slots
If you insert a Memory Stick DUO to the Memory Card Slot
without using the adapter, make sure to turn off the printer first,
then remove the card using tweezers.
Table 1-15. List of Supported Memory Card
Priority
1
2 Compact Flash
Slot Compatible memory card Standard
Memory Stick/
Memory Stick
PRO
SD/MMC
xD-Picture card xD-Picture card*2 xD-Picture Card Specification Ver.1.20 compatible 2GB Type M/H supported
Memory Stick “MemoryStick Standard” Format Specification Ver. 1. 43 — 00 compatible 128MB
MagicGate Memory Stick — — Copy protection function is not supported
MagicGate Memory Stick Duo
Memory Stick PRO
Memory Stick Duo MemoryStick Duo Format Specification Ver.1.10-00 compatible —Memory Stick Pro Duo
Memory Stick Pro HG Duo
Memory Stick micro Memory Stick Micro Format Specification Ver.1.02-00 compatible —
SD (Security Digital)
miniSD/microSD The SD adapter should be used
SDHC
miniSDHC/microSDHC
MultiMediaCard
MultiMediaCard Plus
Memory Stick PRO Format Specifications-without security Ver.1.02-00
compatible
MemoryStick PRO Duo Format Specification Ver.1.02-00 compatible —
SD Memory Card Specifications / PART1. Physical Layer Specification Ver. 2.0
compatible
MultiMediaCard Standard Ver. 4.2 compatible 4GB/32GB Only MultiMediaCard Plus supports 4GB
— — An adapter should be used
MMC Mobile/MMC micro
Compact Flash CompactFlash Specification Revision 2.1 compatible 32GB Type-I/Type-II<Storage Card only>
Microdrive — — CF+Type2 <HDD>
Max.
capacity*1
Includes versions with memory select function
32GB Copy protection function is not supported
The Memory Stick Duo adapter should be used
The Memory Stick Duo adapter should be used
The Memory Stick adapter for standard size should
be used.
2GB
Speed Class is not supported
32GB
The SD adapter should be used
Speed Class is not supported
Remarks
—
Note *1 : It is necessary to format media for capacity to exceed 2GB with FAT32.
*2 : On the xD-Picture Card specif i cation, FAT32 Format is not provided. A printer doesn’t recognized it when the xD-Picture Card is formatted with FAT32.
Note: • Memory Stick/PRO, SD/MMC and xD-Picture Card shares the same slot.
• When cards are inserted in the two slots at once, the slot which will be accessed first is determined according to the priority shown in the table.
• To select a card that has been inserted in a non-active slot, first remove the card in the active slot.
• In memory card direct printing mode, the image files in the active slot are valid and have assigned frame numbers. The number of images wi ll not change if a card is inserted in another nonselected slot.
• When the card inserted in the slot is accessed from the PC, only one drive is displayed at a time as a removable disk* and only the card that is in the active slot can be accessed via the removable disk. A card that has
been inserted into a non-selected slot cannot be accessed. (This is for Windows. For Macintosh, the card in the active slot will be mounted on the desktop.)
• Does not support 5V type of memory cards.
• When a memory card is being accessed, do not touch the memory card.
• For detailed information on the supported file system and formatting the memory card, refer to «1.7.2 Memory Card Direct Print Function (p.23)».
PRODUCT DESCRIPTION Interfaces 19
Confidential
Epson Stylus Photo PX650/TX650/TX659/PX660/PX660 Premium/Artisan 635 Revision C
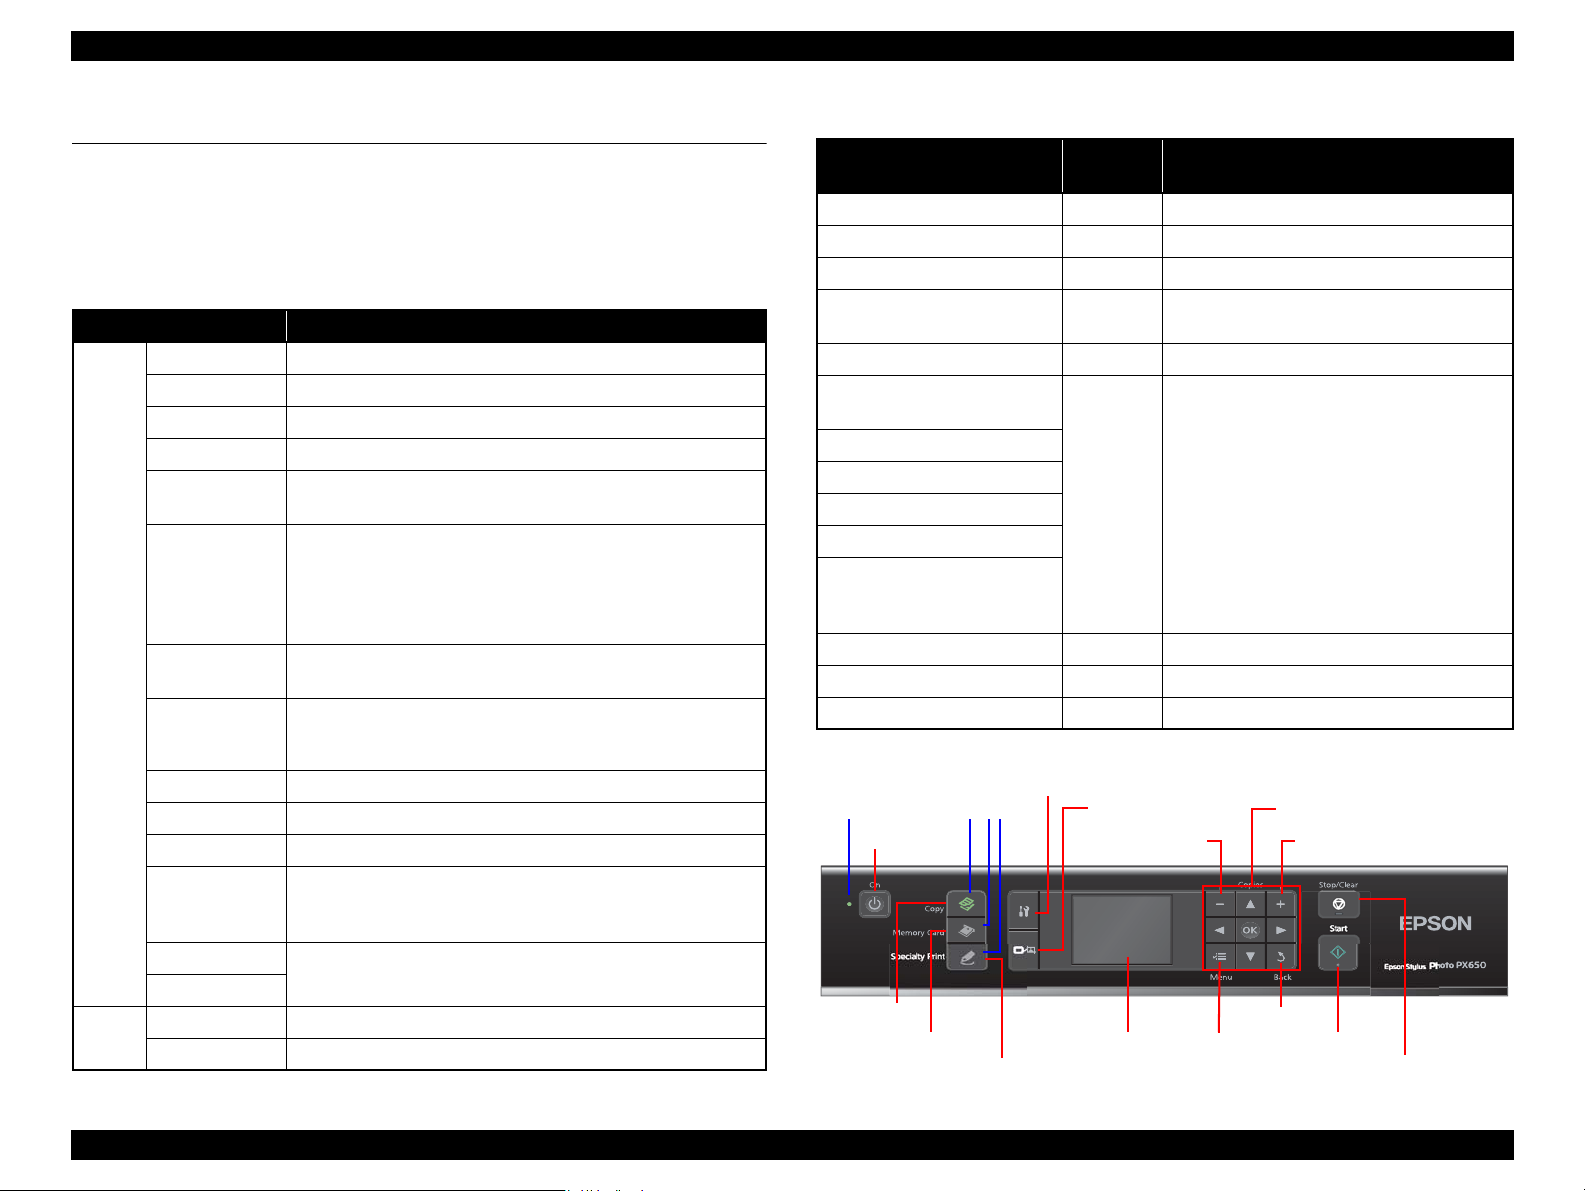
Power Button
Memory Card button
Speciality Print button
Copy button
Setup button
Display/Crop button
— button + button
Menu button
Back button
Start button
Stop/Clear button
OK button and Cross keyPower LED
LCD
Mode LEDs
1.6 Control Panel
1.6.1 Operation Buttons & LED
The following tables explain the functions of the buttons and LEDs on the control
panel.
Table 1-16. Operation Buttons & LEDs
Button/LED Function
Power Turns the power ON/OFF.
Start Starts printing.
Copy Goes to the stand alone copy mode.
Memory Card Goes to the memory card direct print mode.
Goes to the special mode that provides Reprint/Restore Photos
and Print on CD/DVD functions.
• Stops operation and displays the menu screen.
• Stops printing and ejects paper.
• Returns the print settings of the current mode to their default
and displays the Top screen. (Returns to the previous screen
during printing maintaining the current settings)
Goes to the Setup mode that provides maintenance menu (head
cleaning, head alignment, etc.) and various option setting menu.
• Goes to the zoom setting screen for the selected ima ge.
• Changes the image preview layout (1-up, 9-up, etc.) on the
LCD.
Selects a menu item of setting value.
Sets the number of copies.
Button
LED*
Specialty Print
Stop/Clear
Setup
Display/Crop
Menu Goes to the print setting menu screen.
OK Accepts the changed settings.
Back Cancels the previous operation.
Cross Key
(up/down/left/
right)
+
Power Indicates the power On/Off status.
Mode Lights during the corresponding mode is selected.
Table 1-17. LED Functions
Printer Status
Power-on sequence Flashing OFF
Power-off sequence Flashing The current mode LED lights
Fatal error Flashing All the mode LEDs flash
Standby/The panel being
operated
Printing/Scanning Flashing The current mode LED lights
Printing from an external
device (PC/camera)
Running a head cleaning
Running a nozzle check
Printing head alignment pattern
Canceling a print job
Backup of memory card, or
Scan to Memory function is in
process
Running a slide show ON The memory card mode LED lights
Displaying the screen-saver ON The current mode LED lights
Power save mode ON Flashing each mode LED one by one.
Note* : In the Setup mode, the mode LED corresponds to the previous mode lights.
Power
LED
Mode LED
ON The current mode LED lights
Flashing The current mode LED lights
*
*
*
*
*
Note *: See Table 1-17 on page 20 for more information on the LEDs.
PRODUCT DESCRIPTION Control Panel 20
Figure 1-5. Control Panel (Europe Version as a Sample)
Confidential

Epson Stylus Photo PX650/TX650/TX659/PX660/PX660 Premium/Artisan 635 Revision C
1.7 Specifications of Each Function
1.7.1 Stand-alone Copy Function
1.7.1.1 Copy print mode and available paper type/size and print layout
Table 1-18. Copy Print Mode & Available Paper Size by Layout
Paper Type Quality
Plain Paper
Matte
Photo Paper
Glossy
Prem. Glossy
Ultra Glossy
Standard 360 x 360 MC2-1 ON OFF A4, A5 — A4 CD/DVD
Standard 5760 x 1440 MC2-2 ON ON A4 —
Standard 720 x 720
Standard 720 x 720
Standard 720 x 720
Standard 720 x 720
Resolution
(H x V) dpi
Draft 360 x 180 Eco ON OFF A4, A5 — —
Best 720 x 720 MC1-1 ON ON A4, A5 — A4 CD/DVD
Best 5760 x 1440 MC1-5 ON ON A4 —
Best 5760 x 1440 MC1-5 ON ON A4, 13 x 18 cm (5” x 7”), 10 x 15 cm (4” x 6”) A4 —
Best 5760 x 1440 MC1-5 ON ON A4, 13 x 18 cm (5” x 7”), 10 x 15c m (4” x 6”) A4 —
Best 5760 x 1440 MC1-5 ON ON A4, 13 x 18 cm (5” x 7”), 10 x 15 cm (4” x 6”) A4 —
Dot
Size
MC1-2 ON ON 10 x 15 cm (4” x 6”) — —MC2-2 ON ON A4, 13 x 18 cm (5” x 7”) A4 —
MC1-2 ON ON 10 x 15 cm (4”x6”) — —MC2-2 ON ON A4, 13 x 18 cm (5”x7”) A4 —
MC1-2 ON ON 10 x 15 cm (4” x 6”) — —MC2-2 ON ON A4, 13 x 18 cm (5” x 7”) A4 —
MC1-2 ON ON 10 x 15 cm (4” x 6”) — —MC2-2 ON ON A4, 13 x 18 cm (5” x 7”) A4 —
Bi-D
Micro
Weave
With Border Borderless Repeat Auto Repeat 4 2-up CD
Available Paper Size by Print Layout
Best 5760 x 1440 MC1-5 ON ON A4, 13 x 18 cm (5” x 7”), 10 x 15 cm (4” x 6”) A4 —
CD/DVD Best 5760 x 1440 MC1-5 ON ON — CD/DVD
PRODUCT DESCRIPTION Specifications of Each Function 21
Confidential

Epson Stylus Photo PX650/TX650/TX659/PX660/PX660 Premium/Artisan 635 Revision C
1.7.1.2 Stand-alone Copy Menu
Table 1-19. Copy Menu
Menu Item Function
Number of copies Sets number of copies within the range of 1 to 99.
Copy type Selects either color or monochrome.
Document Selects the document type from “Text”, “Graphics”, and “Photo”.
Layout Selects print layout from the options listed in Table 1-20.
Paper type Selects paper type from the options li sted in Table 1-18.
Paper size Selects paper size from the options listed in Table 1-18.
Quality Selects print quality from the options listed in Table 1-18.
Selects scaling factor from the preset factors listed in Table 1-21,
Print
Settings
Zoom
Density Selects from the nine density levels of -4 to +/-0 to +4.
Expansion
CD InnerOuter
Auto Fit Page, or specifies a desired scaling factor within the range
of 25 to 400%.
Selects the margins level (margins bleed off the edges of paper)
from the Standard (100%), Mid. (50%) or Min. (25%).
Specifies the printing range on a CD/DVD by entering outer and
inner diameter of a CD/DVD.
Outer: specifies within the range of 114 to 120 mm
Inner: specifies within the range of 18 to 46 mm
Table 1-21. Preset Scaling Factors
Zoom Menu Items
10 x 15 cm A4 195% 215%
A4 10 x 15 cm 47% 55%
13 x 18 cm
10 x 15 cm 13 x 18 cm 115% 132%
A4 A5 69% 74%
A5
Note* : A scaling factor corresponds to the selected copy layout and zoom setting is displayed
10 x 15 cm 77% 91%
A4 141% 147%
on the LCD.
With Border Borderless
Scaling Factor
*
1.7.1.4 Copy Speed
Table 1-22. Copy Speed
Copy Conditions (e-memo3, Letter, Plain Paper) Copy Speed
Draft 360 x 180
Default 720 x 360
Monochrome copy 35 cpm
Color copy 35 cpm
Monochrome copy 10 cpm
Color copy 10 cpm
1.7.1.3 Copy Layout & Preset Scaling Factors
Available print layout and scaling factors in the stand-alone copy mode are as follows.
Table 1-20. Copy Layout
Layout Description
With Border Makes a copy with 3 mm of left/right/top/bottom white margins.
Borderless Makes a copy with no white margins.
CD/DVD Copy Makes a copy of a CD/DVD label directly on a CD/DVD.
Repeat Copy
Repeat Copy-4 Makes four copies of one document on a sheet of selected sized paper.
2-up Copy
PRODUCT DESCRIPTION Specifications of Each Function 22
Makes a specified number of copies of one document on a sheet of
selected sized paper.
Makes a copy of two A4 or letter sized documents on a sheet of A4 or
letter sized paper.
Confidential
Epson Stylus Photo PX650/TX650/TX659/PX660/PX660 Premium/Artisan 635 Revision C
1.7.2 Memory Card Direct Print Function
1.7.2.1 Memory card direct print mode and available paper type/size and print layout
Paper Type Quality
Plain Paper
Matte
Photo Paper
Glossy
Prem. Glossy
Ultra Glossy
Photo Sticker 16 Stan dard 720 x 720 MC2-2 ON ON — A 6 —Photo Stickers Standard 720 x 720 MC2-2 ON ON
Standard 360 x 360 MC2-1 ON OFF A4 — A4 — A4 — A4 —
Best 720 x 720 MC1-1 ON ON A4 — A4 — A4 — A4 —
Standard 5760 x 1440 MC2-2 ON ON A4 — A4 —
Best 5760 x 1440 MC1-5 ON ON A4 — A4 —
Draft 720 x 360 MC1-1 ON ON
Standard 720 x 720
Best 5760 x 1440 MC1-5 ON ON
Draft 720 x 360 MC1-1 ON ON A4, 13 x 18 cm (5” x 7”), 10 x 15 cm (4” x 6”) —
Standard 720 x 720
Best 5760 x 1440 MC1-5 ON ON A4, 13 x 18 cm (5”x7”), 10 x 15 cm (4” x 6”) —
Draft 720 x 360 MC1-1 ON ON
Standard 720 x 720
Best 5760 x 1440 MC1-5 ON ON
Standard 720 x 720
Best 5760 x 1440 MC1-5 ON ON A4, 13 x 18 cm (5” x 7”), 10 x 15 cm (4” x 6”) —
Resolution
(H x V) dpi
Dot size Bi-D
MC1-2 ON ON 10 x 15cm (4” x 6”) — —
MC2-2 ON ON A4, 13 x 18 cm (5” x 7”), 16:9wide A4, 13 x 18 cm (5” x 7”) —
MC1-2 ON ON 10 x 15 cm (4” x 6”) —
MC2-2 ON ON A4, 13 x 18 cm (5”x7”) —
MC1-2 ON ON 10×15 cm (4” x 6”) —
MC2-2 ON ON A4, 13 x 18 cm (5” x 7”), 16:9wide A4, 13 x 18 cm (5”x7”) —
MC1-2 ON ON 10 x 15 cm (4” x 6”) —
MC2-2 ON ON A4, 13 x 18 cm (5” x 7”) —
Table 1-23. Memory Card Direct Print Mode & Available Paper Size by Layout
Micro
Weave
With
Border
A4, 13 x 18 cm (5” x 7”),
10 x 15 cm (4” x 6”), 16:9wide
A4, 13 x 18 cm (5” x 7”),
10 x 15 cm (4” x 6”), 16:9wide
A4, 13 x 18 cm (5” x 7”),
10 x 15 cm (4” x 6”), 16:9wide
A4, 13 x 18 cm (5” x 7”),
10 x 15 cm (4” x 6”), 16:9wide
100 x 148 mm
Border-
less
P.I.F.
(Single/
Multi)
— 100 x 148 mm —
Upper
1/2
Available Paper Size by Print Layout
2-up 4-up 8-up 20-up 16-up 30-up 80-up Photo ID
A4, 13 x 18 cm (5” x 7”), 10 x 15 cm (4” x 6”) —
A4, 13 x 18 cm (5” x 7”), 10 x 15 cm (4” x 6”) —
A4, 13 x 18 cm (5”x7”), 10 x 15 cm (4” x 6”) —
A4, 13 x 18 cm (5” x 7”), 10 x 15 cm (4” x 6”) —
100 x 148 mm
13 x 18 cm
(5” x 7”)
13 x 18 cm
(5” x 7”)
13 x 18 cm
(5” x 7”)
13 x 18 cm
(5” x 7”)
13 x 18 cm
(5” x 7”)
13 x 18 cm
(5” x 7”)
13 x 18 cm
(5” x 7”)
13 x 18 cm
(5” x 7”)
13 x 18 cm
(5” x 7”)
13 x 18 cm
(5” x 7”)
13 x 18 cm
(5” x 7”)
10 x 15 cm
A4
A4 —
A4
A4
A4 —
A4
A4
A4 —
A4
A4 —
A4
—
(4” x 6”)
10 x 15 cm
(4” x 6”)
10 x 15 cm
(4” x 6”)
10 x 15 cm
(4” x 6”)
10 x 15 cm
(4” x 6”)
10 x 15 cm
(4” x 6”)
10 x 15 cm
(4” x 6”)
10 x 15 cm
(4” x 6”)
10 x 15 cm
(4” x 6”)
10 x 15 cm
(4” x 6”)
10 x 15 cm
(4” x 6”)
PRODUCT DESCRIPTION Specifications of Each Function 23
Confidential
Epson Stylus Photo PX650/TX650/TX659/PX660/PX660 Premium/Artisan 635 Revision C
1.7.2.2 Supported File Type and Media Type
The following describes the file system, media format, and file type supported by the
memory card direct function.
Table 1-24. Supported File System, Types and Media Format
Item Specification
DCF Version 1.0 or 2.0 *1 compliant. Other than those does
File System
Memory card
Media
format
File type
Note *1: For more information on the DCF specifications, see “Camera File System Standard
CD-R
DVD
JPEG (*.JPG)
TIFF (*.TIFF)
Camera definition
file (*.MRK)
P.I.F definition file
(*.USD)
P.I.F definition file
(*.FD2)
DCF Version 2.0, JEIDA-CP-3461”.
*2: Available only when the memory card supports FAT32.
*3: UDF-formatted DVDs are not supported.
*4: The memory card direct print functions supports level 1 of the P.I.F.Rev.3.1.
The printer does not detect any files stored under the following
directories or their sub-directories.
• Directories containing system properties or hidden properties.
• “RECYCLED” (Windows directory for deleted files)
• “PREVIEW” (directories of CASIO DSC for thumbnail images)
• “SCENE” (directories of CASIO DSC for its Best Shot function)
• “MSSONY” (directories of SONY DSC for e-mail images, voice memos, movies,
or non-compressed images)
• “DCIM\ALBUM\IMAGE” (directories of CASIO DSC for its album function)
PRODUCT DESCRIPTION Specifications of Each Function 24
not ensure proper operation. File systems available with the
card reader are restricted by the host’s specification.
• DCF Version 1.0 or 2.0 compliant
*2
• DOS FAT format (FAT12/FAT16/FAT32
partition (basic partitioned)
ISO9660 Level1 (Joliet) format
ISO9660 Level1 (Joliet), or ISO9660 Level1 (Joliet) & UDF
Bridge format
Image files conform to Exif Version 2.21. (Exif version 1.0/
2.0/2.1/2.2/2.21 are supported)
Image files conform to Exif Version 2.21. (Exif version 1.0/
2.0/2.1/2.2/2.21 are supported)
Camera definition files used for DPOF mode.
“\MISC\AUTOPRINT.MRK” file is valid.
Print layout definition files compliant with PRINT Image
Framer Rev.2.1 specifications. Files in”/EPUDL/” directory
are valid.
Print layout definition files compliant with PRINT Image Framer
Rev.3.1
*3
*4
specifications. Files in a memory card are valid.
) with single
1.7.2.3 Specifications for Handling Image Data
Table 1-25. Specifications for Handling Image Data
Item Specification Remarks
Image size (pixel)
Maximum number
of images
Maximum number
of copies
Valid date and time
Thumbnail image
data
File sorting
• Horizontal: 80
• Vertical: 80
Up to 999 images When a memory card stores 1,000
99 copies for each image.
Up to 999 sheets in total.
01/01/1980 00:00:00 to
12/31/2099 23:59:59
Supports DCF Ver.1.0 or 2.0compatible data (Exif format,
160×120 pixels)
The printer sorts image files in
ascending ASCII order based on
their full-pathnames such as
“\DCIM\100EPSON\EPSN0000.J
PG”, and assigns a number to each
of them.
X 9200
Y 9200
or more images, the first 999
images are detected and become
valid in the printer. The detecting
order varies depending on the
folder configuration in the card, so
which images are included in the
first 999 cannot be defined.
However, images specified by
camera definition files can be
selected to be printed even when
the total number of images has
exceeded 999. Up to 999 camera
defined image files can be
specified.
Thumbnail images are used for the
Print Index Sheet function.
• The image number assigned by
the printer may be different from
that assigned by the camera.
• If two or more files have the
same full pathname, the sorting
function may not operate
properly. (existence of the same
full-pathname is not allowed
under DOS)
—
—
—
Confidential
Epson Stylus Photo PX650/TX650/TX659/PX660/PX660 Premium/Artisan 635 Revision C
Table 1-25. Specifications for Handling Image Data
Item Specification Remarks
Acquisition of date
and time
information
Camera shooting
information
The printer acquires date and time
information included in image files
in the order of precedence shown
below.
1. Date and time information in
digital camera standard format
(Exif)
2. Date and time information
applied on DOS-compliant file
system.
3. Fixed date and time information
(01/01/1980, 00:00:00)
The following shooting
information conforms to Exif
standard can be printed with the
images.
• Exposure time/Shutter speed
(example: 1/30s)
• F-measure (example: F2.8)
• ISO film speed (example: ISO100)
Date and time information
included in an image file is not
always the shooting date and time.
It changes each time the image is
edited and restored. The printer
acquires the latest date and time
information.
When both an exposure time and
shutter speed information exist, the
exposure time is printed. No
information is printed if the Exifcompliant photo data has no
information.
Embedded rotation tag of an image associated with a P.I.F. script
The image’s rotational direction specified by a tag embedded in the
image file associated with a P.IF. script is always applied when the
image is printed using the stand-alone function. Therefore, if a P.I.F.
file (layout file) that has not been associated with any images is
specified to print an image, the printout result (the image rotational
direction) may differ whether the image has been associated with
another P.I.F.3 script or not.
1.7.2.4 Memory Card Direct Print Menu
Table 1-26. Memory Card Mode Menu
Menu Item Function
View and Print
*1,2
Photos
Print All
*1,2
Photos
Print by Date
Print Index
Sheet
Slide Show
Scan to
Memory Card
Note *1: 0 to 99 copies can be specified for each of the images. Up to 999 copies in total.
*2: The images are listed in ASCII descending order.
*3: While performing the slide show, displaying number of copies, printing from an
*4: “Latest 60” and “Latest 90” are displayed on the LCD depending on the number of
Prints the selected images.
Prints all images in a memory card. Specified num ber of copies is applied to
the all images (the default is 1 copy). Specifying it for each of the images
independently also can be made in the preview screen.
The date of the images are listed in the descending order with the number of
images by date. Selecting date from the list selects the images that has the
*1
selected date information. Specified number of copies is applied to the
selected images (the default is 1 copy). Specifying it for each of the image s
independently also can be made in the preview screen.
Print Index Sheet
Prints an index sheet that prints images in a memory card in thumbnailed
form. The number of images to be included in the sheet can be selected from
the following four options.
“All image” (default), “Latest 30”, “Latest 60”, “L atest 90”
Make Prints from Index Sheet
Scans the index sheet, and prints images according to markings written on
the sheet.
Starts a slide show on the LCD. Images in a memory card is displayed one by
*3
one in the order sorted by the printer. Printing one of the images can be made
from the paused screen.
Stores an image scanned by the scanner directly into a memory card. The
format in which to save the file can be selected from JPEG and PDF.
external device or from a computer cannot be made.
images in the memory card.
*4
Automatic Detection of Images in Media
• When a memory card is inserted;
The printer automatically searches for all images stored in the me mory card
and displays them on the LCD.
• When an external storage device is connected;
If the media in the connected device includes a backup folder, a folder
selection screen appears. The printer automatically se arches for all images in
the selected folder and displays them on the LCD. When the backup file does
PRODUCT DESCRIPTION Specifications of Each Function 25
not exist, all images in the media are searched for and displayed.
Confidential
Epson Stylus Photo PX650/TX650/TX659/PX660/PX660 Premium/Artisan 635 Revision C
1.7.3 Backup Function
The Backup Memory Card function provided in the Setup mode allows the user to
make a backup copy of a memory card on a media in an external device. Printing the
backed up images directly from the external device also can be made.
1.7.3.1 Backup Function Specifications
Table 1-27. Basic Specifications
Item Specification
Source media
Destination media
Target files
Operations disabled
during the backup
Note *1: A backup on 700MB or larger size CD-R is not ensured.
*2: The CD-R/DVD-R must be formatted as described in Table 1-24.
*3: The printer cannot recognize USB flash memory that incorporates a hub.
PRODUCT DESCRIPTION Specifications of Each Function 26
A memory card conforms to the specifications described in Table 1-24,
and that is inserted into the active slot.
Supports the following media in an external device connected via the
USB Host port. (See Table 1-13 ?USB Interface Specification? on
page 18 for information on the available external devices)
• MO: 128MB/230MB/640MB/1.3GB
• CD-R: 650MB/700MB
• DVD-R: 4.7GB
• USB flash memory
All image files in the source media except the following files.
• Files that have hidden attribute or system attribute.
• Files of which the size is 0 (zero) byte.
In order to prevent the possible corruption of data, the following
operations are disabled during the backup.
• Access from a computer or via a network
• Automatic ejection of the destination media
• ON/OFF of the printer power
*2
*1,2
*3
Due to the file system restriction, a backup of a memory card
that has eight or more levels deep in folder hierarchy cannot be
made on an ISO9660 Level 1-formatted CD-R.
Due to the logical format of the CD/DVD, the pathname length
is restricted as described below;
• Destination media: ISO9660: up to 255 byte
Joliet: up to 240 byte
• Source media: Memory card (FAT12/16/32): up to 260 byte
Item Specification
Folder hierarchy
Format
File name
Note *1: As a backup to CD/DVD media requires time, a folder hierarchy definition file
*2: xxx stands for a 3-digit number. The number is automatically assigned from 001 in
Other restrictions on the backup function
The printer does not have the function to write a backup data on an external
Since the printer does not have calendar function, created date and time of
Table 1-28. Specifications on Writing Backup Data
A backup folder is automatically created on the destination media to save
the backup data keeping the original folder hierarchy*1 under the folder. A
number (001 to 999) is assigned as the folder name.
The printer automatically formats the destination media in a supported
format if the media is rewritable and detected as unformatted or formatted
in unsupported format.
Because ISO9660 Level1 format is used to write backup data to a CD/
DVD, double-byte characters are not allowed to be used for the folder or
directory names. Any file or directory names that include double-byte
characters are automatically changed in accordance with the rule
described below.
• A file name is changed to “EPSONxxx”
• A directory name is changed to “EPDIRxxx”
• Replaces an unsupported character in the extension with “_” (underbar)
(EPBKINF.DAT) is first created under the backup folder.
each folder of directory.
*2
*2
The maximum number of writing times
• FAT12/16-formatted media: up to 512 times (001 to 512)
If any files other than backup folders exist in the route directly, the max.
number of writings becomes less than 512 due to the MS-DOS restriction.
When more than 512 times of writing history of an inserted MO is detected,
the printer handles it as a backup error (file name, to folder hierarchy error).
• CD-R: 640MB: up to 47 times
700MB: up to 50 times
This is because each session information must be saved.
• DVD-R: 4.7GB: up to 274 times
This is because each session information must be saved.
media back to a memory card in order to prevent the possible corruption of
data.
backup files is the date and time initially assigned or updated by a device
other than the printer.
Confidential
Epson Stylus Photo PX650/TX650/TX659/PX660/PX660 Premium/Artisan 635 Revision C
1.7.3.2 Backup Errors
If a backup operation is cancelled voluntarily or due to an error, a “Backup canceled”
message appears with a hexadecimal 8-digit error code on the LCD. The following
table lists the leftmost two-digit error codes that are controlled by the printer firmware.
For explanations on other backup errors, see «3.2.1 Error List (p.43)».
Table 1-29. Backup Error FW Control Code List
Code
0x00 No error 0xC0 No files to be backed up
0x10 Album function error 0xE7 Parameter error
0x20 Backup function error 0xE8 File open error
0xA0 Other ATAPI/SCSI command error 0xE9 Internal buffer overflow
0xA1 ModeSense command error 0xEA CD/DVD format error
0xA2 ModeSelect comman d erro r 0xEB Not used
0xA3 Get Disc Information command error 0xEC Insufficient memory
0xA4
0xA5 Synchronize Cache command error 0xEE Not used
0xA6 CloseSession command error 0xEF Write-protect error
0xA7 Read command error 0xF0 Read/write error
0xA8 Write command error 0xF1 Invalid file open mode
0xA9 Set Speed command error 0xF2 Seek error
0xAA Eject command error 0xF3 Overflow of root directory
0xAB Drive lock command error 0xF4 Overflow of file descriptor
0xAC GetConfigration command error 0xF5 Invalid path name
0xAD Verify command error 0xF6 No file exist
0xAE Device error 0xF7 Medium was exchanged
0xB8 Short file name convert error 0xF8 Unformatted medium
0xB9 Unsupported device 0xF9 Device is not ready
0xBA No medium 0xFA Invalid device handle
0xBB Not writable medium 0xFB Invalid file descriptor
0xBC Unsupported medium 0xFC Not used
0xBD Hierarchical directory error 0xFD Backup initialization failed
0xBE Path length is too long 0xFE Acquiring memory pool failed
0xBF File name is too long 0xFF System error
Get Track Information
command error
Meaning
Code
0xED
Meaning
Some data exist in the destination
directory
PRODUCT DESCRIPTION Specifications of Each Function 27
Confidential

Epson Stylus Photo PX650/TX650/TX659/PX660/PX660 Premium/Artisan 635 Revision C
1.7.4 Camera Direct Print Function (PictBridge)
Printing operations (selecting images to be printed, making print settings, starting/
canceling printing, and monitoring print process) can be carried out from a directly
connected DSC (Digital Still Camera) that conforms to the standard described below.
1.7.4.1 Available DSC
Those DSCs which are compliant with one of the following standards.
“CIPA DC-001-2003 Digital Photo Solutions for Imaging Devices”
(DPS Version 1.0)
“CIPA DC-001-2003 Rev.2.0 Digital Photo Solutions for Imaging Devices”
(DPS Version 1.1).
1.7.4.2 Print Settings Available from DSC
The following print settings can be made from the DSC. However, depending on the
DSC, some of the settings may not be available.
Table 1-30. Print Settings Available from DSC
Item Specification
How to specify images Single Sheet/Multiple Sheet/DPOF specified/XHTML-Print
Paper type Plain Paper/Prem. Glossy
Paper size 10 x 15 cm (4” x 6”), 13 x 18 cm (5” x 7”), A4, 16:9 wide, CD/DVD
Layout Borderless, With Border, 2-up, 4-up, 8-up, 20-up, Index
Date On/Off
Quality Draft/Standard/Best
Auto Correct On/Off
Fit to Frame On/Off
Print Image Framer Not available
The following operations are available; Getting the printer status,
Control of printer
starting a print job or canceling it immediately or after printing the
current page is finished.
1.7.4.3 General Operation Procedure
Before connecting the DSC, check that the printer is in the
following status.
• No print job from a computer is processed or performed.
• Direct print from a memory card is not processed or performed.
• Stand alone copy using the scanner function is not operating.
• Backup of a memory card is not proceeded.
• No error is occurring such as paper out error or ink out error.
The DSC direct print procedure differs depending on the DSC specifications.The
following explains common procedure.
1. Setting on the printer
Before connecting a DSC with a USB cable, make the print settings such as paper
type/size, layout setting on the printer. This may not be required for some DSCs.
2. Setting on the DSC
Make the following settings on the DSC before connecting it to the printer. Some
DSCs may require to first connect to the printer for making the settings.
• When printing multiple images, specify images and number of copies using
the DPOF and Multiple Sheet menus. The menus may not be available on
some DSCs.
• When printing a single image, specify an image and the number of copies.
Specifying the number of copies may not be available on some DSCs.
• Select the paper type/size, layout, and make the Fit to Frame setting if
necessary. These settings may not be available on some DSCs.
3. Starting to print
When the print settings on both the printer and the DSC is completed, follow the
procedure below to start printing.
1. Connect the printer and the DSC with a USB cable. Using a USB cable
included in the DSC package is recommended.
2. Operate the DSC to start printing.
3. Printing is carried out according to the settings made on the DSC. When some
print settings have not been made on the DSC, the corresponding settings
made on the printer are applied.
PRODUCT DESCRIPTION Specifications of Each Function 28
Confidential
Epson Stylus Photo PX650/TX650/TX659/PX660/PX660 Premium/Artisan 635 Revision C
1.7.4.4 Operating Specifications during Connecting DSC
Table 1-31. Operations during Connecting DSC
Operation Specifications
Connecting DSC
(print start)
When a DSC is connected as described in «1.7.4.3 General Operation
Procedure (p.28)» Step 3-(1), PictBridge logo is displayed on the LCD.
Canceling
printing
After printing is
completed
Exclusion
control
A print job can be canceled from the DSC.
The [Stop/Clear] button on the control panel also cancels the print job.
When performing memory card direct print after printing from a DSC, the USB
cable connecting the DSC must be disconnected from the printer in advance.
Print settings made on both the DSC and the printer can become
impossible settings for the printer due to unsupported combination of paper
type, paper size and layout. In such case, the settings made on the DSC are
maintained and any print setting items that are not specified by the DSC
are changed in accordance with the DSC settings. When the paper type is
changed, changed to Prem. Glossy, when the paper size is changed,
changed to 4” x 6” size, and when the layout is changed, changed to
Borderless layout.
PRODUCT DESCRIPTION Specifications of Each Function 29
Confidential
Epson Stylus Photo PX650/TX650/TX659/PX660/PX660 Premium/Artisan 635 Revision C
1.7.5 Specialty Print Functions
1.7.5.1 Specialty print functions and available paper type/size and print layout
Paper Type Quality
Plain Paper
Matte
Photo Paper
Glossy
Prem. Glossy
Standard 360 x 360 MC2-1 ON OFF
Standard 5760 x 1440 MC2-2 ON ON A4
Standard 720 x 720
Standard 720 x 720
Standard 720 x 720
Resolution
(H x V) dpi
Best 720 x 720 MC1-1 ON ON CD/DVD
Best 5760 x 1440 MC1-5 ON ON —
Draft 720 x 360 MC1-1 ON ON —
Best 5760 x 1440 MC1-5 ON ON —
Draft 720 x 360 MC1-1 ON ON —
Best 5760 x 1440 MC1-5 ON ON —
Draft 720 x 360 MC1-1 ON ON —
Best 5760 x 1440 MC1-5 ON ON —
Dot size
MC1-2 ON ON 10 x 15 cm (4” x 6”) —MC2-2 ON ON A4, 13 x 18 cm (5” x 7”)
MC1-2 ON ON 10 x 15 cm (4” x 6”) —MC2-2 ON ON A4, 13 x 18 cm (5” x 7”)
MC1-2 ON ON 10 x 15 cm (4” x 6”) —MC2-2 ON ON A4, 13 x 18 cm (5” x 7”)
Bi-D
Micro
Weave
Reprint/Restore Photos
CD Print CD Jacket
Borderless With Border 1-up 4-up 8-up 12-up Jewel Upper Jewel Index
—
—
— A4
—
—
—
CD/DVD Print
A4
A4
A4
A4
A4
A4
A4
Ultra Glossy
Standard 720 x 720
Best 5760 x 1440 MC1-5 ON ON —
CD/DVD Best 5760 x 1440 MC1-5 ON ON — CD/DVD —
MC1-2 ON ON 10 x 15 cm (4” x 6”)
MC2-2 ON ON A4, 13 x 18 cm (5” x 7”)
—
—
A4
PRODUCT DESCRIPTION Specifications of Each Function 30
Confidential
Loading…
- About
- Blog
- Projects
- Help
-
Donate
Donate icon
An illustration of a heart shape - Contact
- Jobs
- Volunteer
- People
Bookreader Item Preview
texts
Epson Stylus Photo PX660 Service manual
- Addeddate
- 2021-01-11 19:06:59
- Identifier
- manualzz-id-1033897
- Identifier-ark
- ark:/13960/t6b37v101
- Ocr
- tesseract 4.1.1
- Ocr_autonomous
- true
- Ocr_detected_lang
- en
- Ocr_detected_lang_conf
- 1.0000
- Ocr_detected_script
- Latin
- Ocr_detected_script_conf
- 0.9996
- Ocr_module_version
- 0.0.10
- Ocr_parameters
- -l eng+Latin
- Page_number_confidence
- 78.18
comment
Reviews
There are no reviews yet. Be the first one to
write a review.
1,208
Views
DOWNLOAD OPTIONS
Temporarily Unavailable
DAISY
For users with print-disabilities
Uploaded by
chris85
on
SIMILAR ITEMS (based on metadata)
Раздел: Офисная Техника
Тип: Мфу
Характеристики, спецификации
Тип принтера:
струйный цветной
Тип цветной печати:
6-ти цветная
Макс. разреш. фотопечати:
5760х1440 т/д
Скорость печати текста до:
37 стр/мин
Полностраничная цв. печать до:
38 стр/мин
Скорость печати фото 10×15 до:
12 сек
Копирование без компьютера:
Да
Область сканирования:
216*297 мм
Оптическое разреш. сканера:
1200×2400 т/д
Печать с цифр. носителей:
Да
Печать на CD/DVD дисках:
Да
Тип карты памяти:
CF, MS Duo, MS PRO Duo, SD, SDHC, xD
Лоток для подачи бумаги:
до 120 листов
Работа под Windows:
XP, Vista, Windows 7
Работа под Mac OS:
X 10.4 и выше
Интерфейс связи с ПК:
USB 2.0
Фронт. порт USB 2.0 Тип A:
1
Программное обеспечение:
в комплекте
Потребляемая мощность:
18 Вт
Габаритные размеры (В*Ш*Г):
20*45*39 см
Краткое описание:
струйный цветной;5760х1440 т/д;USB 2.0;8.5кг
Вид гарантии:
гарантийный талон
*Инструкция на цифровом носителе:
Да
Инструкция к Мфу Epson Stylus Photo PX660
EN
Basic Operation Guide
— for use without a computer —
RU
Руководство по основным операциям
— для использования без компьютера —
UK
Посібник з основних операцій
— для використання без комп’ютера —
AR
— —
FA
— —

EN
Contents
RU
Оглавление
About This Guide ………………………………………………………………………………………………………………………………….. 5
Обозначения в данном руководстве………………………………………………………………………………………………5
Copyright Notice …………………………………………………………………………………………………………………………………..6
Уведомление об авторских правах ………………………………………………………………………………………………… 6
Important Safety Instructions …………………………………………………………………………………………………………….. 7
Важные правила техники безопасности ……………………………………………………………………………………….. 7
Precautions on the Touchpad ……………………………………………………………………………………………………………..9
Меры предосторожности при использовании сенсорной панели ………………………………………..9
Guide to Control Panel ……………………………………………………………………………………………………………………….10
Описание панели управления………………………………………………………………………………………………………..10
Using the LCD Screen………………………………………………………………………………………………………………………….13
Использование ЖК-дисплея ……………………………………………………………………………………………………………13
Adjusting Angle of Control Panel ……………………………………………………………………………………………………..15
Настройка угла наклона панели управления……………………………………………………………………………..15
Handling Media and Originals
Обращение с носителями и оригиналами
Selecting Paper ………………………………………………………………………………………………………………………………..18
Выбор бумаги………………………………………………………………………………………………………………………………….18
Loading Paper ………………………………………………………………………………………………………………………………….20
Загрузка бумаги ……………………………………………………………………………………………………………………………..20
Loading a CD/DVD ………………………………………………………………………………………………………………………….22
Загрузка CD/DVD ……………………………………………………………………………………………………………………………22
Inserting a Memory Card ……………………………………………………………………………………………………………….24
Вставка карты памяти …………………………………………………………………………………………………………………..24
Placing Originals ……………………………………………………………………………………………………………………………..26
Расположение оригиналов …………………………………………………………………………………………………………26
Copy Mode
Режим копирования
Copying Documents ……………………………………………………………………………………………………………………….28
Копирование документов ……………………………………………………………………………………………………………28
Copy/Restore Photos ………………………………………………………………………………………………………………………30
Копирование/восстановление фото …………………………………………………………………………………………30
Copying a CD/DVD ………………………………………………………………………………………………………………………….32
Копирование CD/DVD-диска ………………………………………………………………………………………………………32
Copy Mode Menu List …………………………………………………………………………………………………………………….34
Список меню режима Копирование …………………………………………………………………………………………34
Print Photos Mode
Режим Печать фото
Printing Photos ………………………………………………………………………………………………………………………………..40
Печать фотографий ……………………………………………………………………………………………………………………….40
Printing in Various Layouts …………………………………………………………………………………………………………….42
Печать различных макетов …………………………………………………………………………………………………………42
Printing on a CD/DVD …………………………………………………………………………………………………………………….44
Печать на CD/DVD………………………………………………………………………………………………………………………….44
Printing Photo Greeting Cards ………………………………………………………………………………………………………47
Печать фотооткрыток …………………………………………………………………………………………………………………..47
Printing from an External USB Device ………………………………………………………………………………………….50
Печать с внешнего USB-устройства…………………………………………………………………………………………..50
Print Photos Mode Menu List ………………………………………………………………………………………………………..51
Список меню режима Печать фото ……………………………………………………………………………………………51
Other Mode
Другой режим
Scanning to a Memory Card ………………………………………………………………………………………………………….56
Сканирование на карту памяти …………………………………………………………………………………………………56
Scanning to a Computer ………………………………………………………………………………………………………………..57
Сканирование на компьютер ……………………………………………………………………………………………………..57
Backup to an External USB Device ………………………………………………………………………………………………..58
Резервное копирование на внешнее USB-устройство …………………………………………………………58
Other Mode Menu List ……………………………………………………………………………………………………………………59
Список параметров в меню других режимов …………………………………………………………………………59
Setup Mode (Maintenance)
Режим Установка (Сервис)
Checking the Ink Cartridge Status ………………………………………………………………………………………………..62
Проверка уровня чернил …………………………………………………………………………………………………………….62
Checking/Cleaning the Print Head ……………………………………………………………………………………………….64
Проверка/прочистка печатающей головки ……………………………………………………………………………64
Aligning the Print Head ………………………………………………………………………………………………………………….66
Калибровка печатающей головки ……………………………………………………………………………………………..66
Printing from a Digital Camera ……………………………………………………………………………………………………..68
Печать с цифрового фотоаппарата …………………………………………………………………………………………..68
Setup Mode Menu List ……………………………………………………………………………………………………………………70
Список меню режима Установка………………………………………………………………………………………………..70
Solving Problems
Решение проблем
Error Messages …………………………………………………………………………………………………………………………………74
Сообщения об ошибках ……………………………………………………………………………………………………………….74
Replacing Ink Cartridges ………………………………………………………………………………………………………………..79
Замена картриджей ………………………………………………………………………………………………………………………79
Paper Jam …………………………………………………………………………………………………………………………………………84
Замятие бумаги ………………………………………………………………………………………………………………………………84
Print Quality/Layout Problems ………………………………………………………………………………………………………85
Проблемы с качеством/макетом печати ………………………………………………………………………………….85
Contacting Epson Support …………………………………………………………………………………………………………….90
Служба поддержки Epson ……………………………………………………………………………………………………………90
Index ……………………………………………………………………………………………………………………………………………………..91
Указатель ……………………………………………………………………………………………………………………………………………..92
2

UK
Зміст
AR
Посібник ……………………………………………………………………………………………………………………………………………….. 5
Попередження про авторське право ……………………………………………………………………………………………..6
Важливі вказівки з техніки безпеки ……………………………………………………………………………………………….. 7
Застереження щодо сенсорної панелі ……………………………………………………………………………………………9
Довідник для панелі керування ……………………………………………………………………………………………………..10
Використання РК-екрану …………………………………………………………………………………………………………………13
Регулювання кута нахилу панелі керування ……………………………………………………………………………….15
Обробка носіїв та оригіналів
Вибір паперу …………………………………………………………………………………………………………………………………..18
Завантаження паперу …………………………………………………………………………………………………………………..20
Завантаження CD/DVD………………………………………………………………………………………………………………….22
Встановлення картки пам’яті ………………………………………………………………………………………………………24
Розміщення оригіналів …………………………………………………………………………………………………………………26
Режим копіювання
Копіювання документів ………………………………………………………………………………………………………………..28
Копіювання/відновлення фото …………………………………………………………………………………………………..30
Копіювання CD/DVD ……………………………………………………………………………………………………………………..32
Список меню режиму Копіювати ……………………………………………………………………………………………….34
Режим Друк фото
Друк фотографій …………………………………………………………………………………………………………………………….40
Друк з різними макетами …………………………………………………………………………………………………………….42
Друк на CD/DVD ……………………………………………………………………………………………………………………………..44
Друк фотолистівок…………………………………………………………………………………………………………………………47
Друк із зовнішнього пристрою USB …………………………………………………………………………………………..50
Список меню режиму Друк фото ……………………………………………………………………………………………….51
Режим Інше
Сканування на картку пам’яті ……………………………………………………………………………………………………..56
Сканування на комп’ютер ……………………………………………………………………………………………………………57
Резервне копіювання на зовнішній пристрій USB …………………………………………………………………58
Список меню режиму Інше ………………………………………………………………………………………………………….59
Режим Налашт. (Обслуговув.)
Перевірка стану картриджа ………………………………………………………………………………………………………..62
Перевірка/очищення друкувальної голівки……………………………………………………………………………64
Вирівнювання друкувальної голівки ………………………………………………………………………………………..66
Друк із цифрового фотоапарата ………………………………………………………………………………………………..68
Список меню режиму Налашт. ……………………………………………………………………………………………………70
Вирішення проблем
Повідомлення про помилки ……………………………………………………………………………………………………….74
Заміна чорнильних картриджів …………………………………………………………………………………………………79
Застрягання паперу ………………………………………………………………………………………………………………………84
Проблеми якості/макета друку ………………………………………………………………………………………………….85
Звернення у відділ підтримки компанії Epson ………………………………………………………………………..90
Покажчик……………………………………………………………………………………………………………………………………………..93
3

FA
4

About This Guide
Обозначения в данном руководстве
Посібник
Follow these guidelines as you read your instructions:
Следуйте этим указаниям во время чтения инструкций:
Під час читання інструкцій дотримуйтеся цих вказівок:
w c
Q R &
Warning:
Caution:
Must be observed to avoid
Note:
Indicates a page number where
bodily injury and damage to
additional information can be
Warnings must be followed
Cautions must be observed to
Notes contain important information
your equipment.
found.
carefully to avoid bodily injury.
avoid damage to your equipment.
and hints for using the printer.
Предупреждение:
Предостережение:
Эти указания необходимо
Примечание:
Так обозначается указание
соблюдать во избежание травм
номера страницы с
Предупреждения необходимо
Предостережения необходимо
В примечаниях содержатся
и повреждения оборудования.
дополнительной информацией.
соблюдать во избежание
соблюдать во избежание
важная информация и советы
травм.
повреждения оборудования.
по использованию принтера.
Попередження:
Застереження:
Слід дотримуватися, щоб
Примітка:
Вказує номер сторінки, що
уникнути травмування або
містить додаткову інформацію.
попереджень слід уважно
застереження слід виконувати,
примітки містять важливу
пошкодження обладнання.
дотримуватися, щоб запобігти
щоб уникнути пошкодження
інформацію і поради щодо
травмуванню.
обладнання.
експлуатації принтера.
5

Copyright Notice
Уведомление об авторских правах
Попередження про авторське право
No part of this publication may be reproduced, stored in a retrieval system, or transmitted in any form or by any means, electronic, mechanical, photocopying, recording, or otherwise, without the prior
written permission of Seiko Epson Corporation. The information contained herein is designed only for use with this product. Epson is not responsible for any use of this information as applied to other
printers.
Neither Seiko Epson Corporation nor its aliates shall be liable to the purchaser of this product or third parties for damages, losses, costs, or expenses incurred by the purchaser or third parties as a result of
accident, misuse, or abuse of this product or unauthorized modications, repairs, or alterations to this product, or (excluding the U.S.) failure to strictly comply with Seiko Epson Corporation’s operating and
maintenance instructions.
Seiko Epson Corporation shall not be liable for any damages or problems arising from the use of any options or any consumable products other than those designated as Original Epson Products or Epson
Approved Products by Seiko Epson Corporation.
Seiko Epson Corporation shall not be held liable for any damage resulting from electromagnetic interference that occurs from the use of any interface cables other than those designated as Epson Approved
Products by Seiko Epson Corporation.
EPSON
®
and EPSON STYLUS
®
are registered trademarks, and EPSON EXCEED YOUR VISION or EXCEED YOUR VISION is a trademark of Seiko Epson Corporation.
PRINT Image Matching
™
and the PRINT Image Matching logo are trademarks of Seiko Epson Corporation. Copyright © 2001 Seiko Epson Corporation. All rights reserved.
SDHC
™
is a trademark.
Memory Stick, Memory Stick Duo, Memory Stick PRO, Memory Stick PRO Duo, Memory Stick PRO-HG Duo, Memory Stick Micro, MagicGate Memory Stick, and MagicGate Memory Stick Duo are trademarks
of Sony Corporation.
xD-Picture Card
™
is a trademark of Fuji Photo Film Co., Ltd.
The Bluetooth
®
word mark is owned by the Bluetooth SIG, Inc. and licensed to Seiko Epson Corporation.
General Notice: Other product names used herein are for identication purposes only and may be trademarks of their respective owners. Epson disclaims any and all rights in those marks.
6
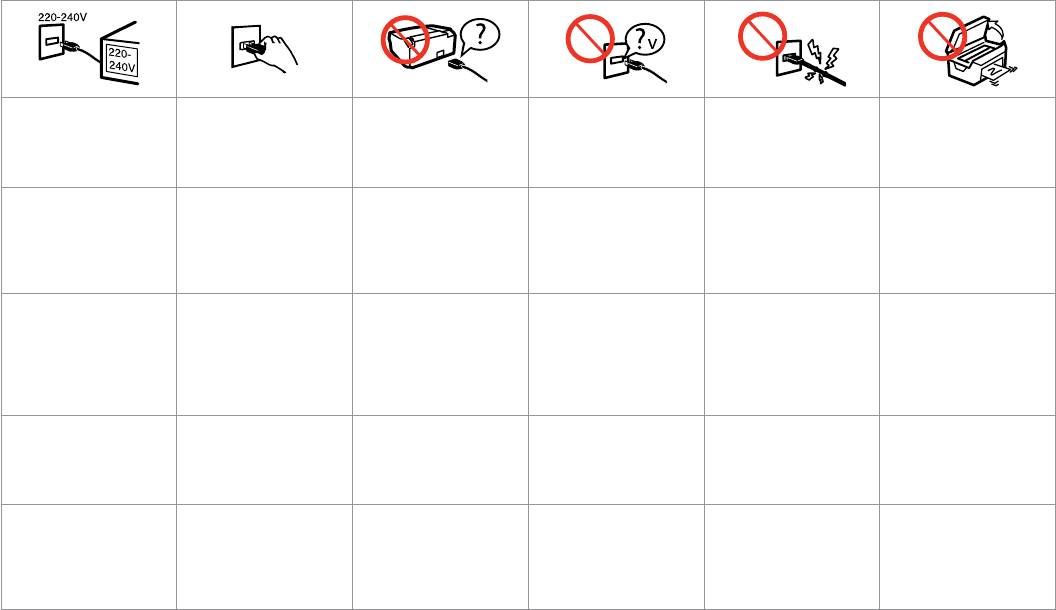
Important Safety Instructions
Важные правила техники безопасности
Важливі вказівки з техніки безпеки
Make sure the power cord
Place the printer near a wall
Use only the power cord that
Use only the type of power
Do not let the power cord
Do not open the scanner unit
meets all relevant local safety
outlet where the power cord
comes with the printer. Use of
source indicated on the label.
become damaged or frayed.
while copying, printing, or
standards.
can be easily unplugged.
another cord may cause re or
scanning.
shock. Do not use the cord with
any other equipment.
Убедитесь, что кабель
Расположите принтер возле
Используйте только кабель питания
Используйте источник
Следите за тем, чтобы шнур
Не открывайте сканер во
питания соответствует всем
розетки, от которой можно
из комплекта поставки принтера.
питания того типа, который
не был поврежден и не
время копирования, печати
действующим местным
легко отсоединить кабель
Использование другого кабеля питания
указан на наклейке принтера.
износился.
или сканирования.
стандартам безопасности.
питания.
может привести к возгоранию или
поражению током. Не используйте этот
кабель питания с другим оборудованием.
Переконайтеся, що шнур
Розміщуйте принтер
Використовуйте тільки шнур живлення,
Використовуйте джерело
Не використовуйте шнур
Не відкривайте блок сканера
живлення відповідає всім
біля настінної розетки
що входить у комплект постачання
живлення лише того типу, що
живлення, якщо він
під час копіювання, друку чи
місцевим стандартам техніки
електромережі, щоб мати
принтера. Використання іншого шнура
вказано на етикетці.
пошкоджений або зношений.
сканування.
безпеки.
змогу швидко витягти шнур
живлення може призвести до пожежі
живлення у разі потреби.
або ураження електричним струмом.
Не використовуйте шнур живлення з
іншим обладнанням.
7
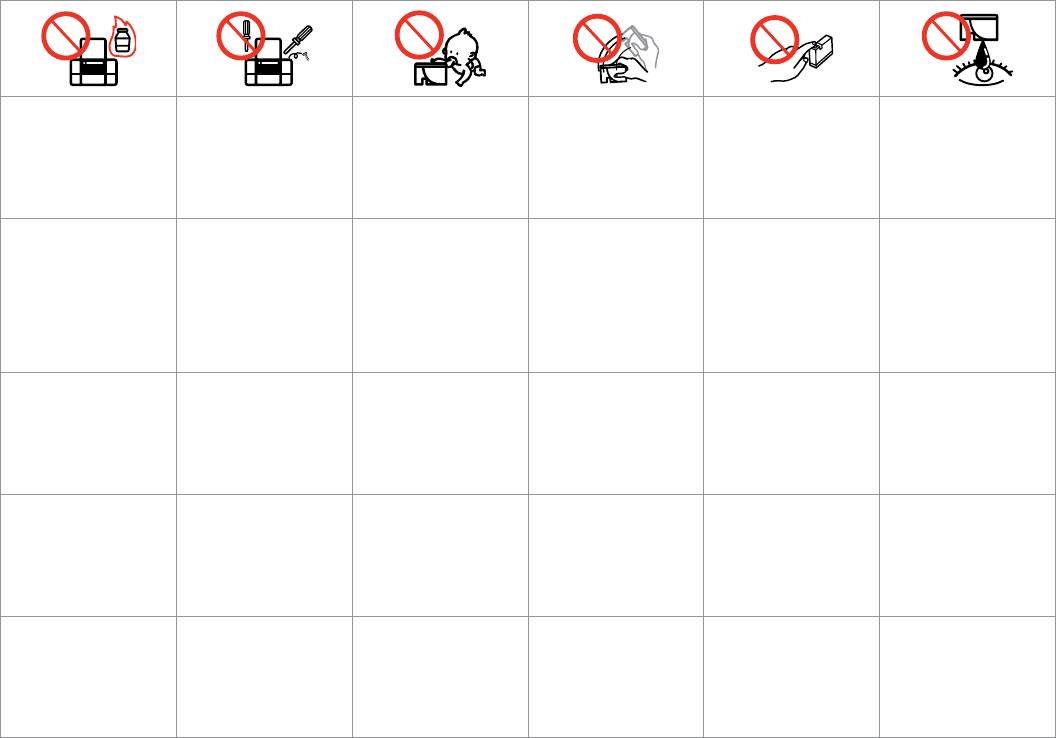
8
Do not use aerosol products
Except as specically explained
Keep ink cartridges out of the
Do not shake ink cartridges
If you remove an ink cartridge
If ink gets on your skin, wash
that contain ammable gases
in your documentation, do not
reach of children and do not
after opening their packages;
for later use, protect the ink
it o with soap and water. If it
inside or around the printer.
attempt to service the printer
drink the ink.
this can cause leakage.
supply area from dirt and
gets in your eyes, ush them
Doing so may cause re.
yourself.
dust and store it in the same
immediately with water. If
environment as the printer. Do
you still have discomfort or
not touch the ink supply port
vision problems, see a doctor
or surrounding area.
immediately.
Не используйте аэрозоль с
Не пытайтесь самостоятельно
Храните картриджи в месте,
Не трясите чернильный
Если требуется извлечь картридж
При попадании чернил на
горючим газом внутри или
отремонтировать принтер,
недоступном для детей. Не
картридж после вскрытия
для дальнейшего использования,
кожу смойте их водой с мылом.
вблизи принтера. Это может
если это явно не указано в
пейте чернила.
упаковки — чернила могут
защитите область подачи
При попадании чернил в
привести к возгоранию.
документации.
вылиться из картриджа.
чернил от грязи и пыли. Храните
глаза немедленно промойте
картридж в тех же условиях,
глаза водой. Если после этого
в которых следует хранить
возникнет чувство дискомфорта
принтер. Не дотрагивайтесь до
или проблемы со зрением,
входного отверстия для чернил и
немедленно обратитесь к врачу.
прилегающей к нему области.
Не використовуйте
За винятком випадків, окремо
Тримайте картриджі у місцях,
Не струшуйте картриджі
Тимчасово виймаючи
Якщо чорнило потрапить на
аерозольні продукти,
описаних у документації,
недоступних для дітей, і не
після відкривання упаковки;
чорнильний картридж, захистіть
шкіру, змийте його водою з
що містять займисті гази,
не намагайтеся самостійно
пийте чорнила.
чорнило може вилитися.
область виходу чорнила від бруду
милом. Якщо воно потрапить в
всередині чи біля принтера.
виконувати технічне
й пилу; зберігайте картридж у
очі, відразу ж промийте їх водою.
Це може спричинити пожежу.
обслуговування принтера.
тих же умовах, що й принтер. Не
Якщо залишаться неприємні
торкайтеся сопла подачі чорнила
відчуття або погіршиться зір,
й навколишньої області.
негайно зверніться до лікаря.
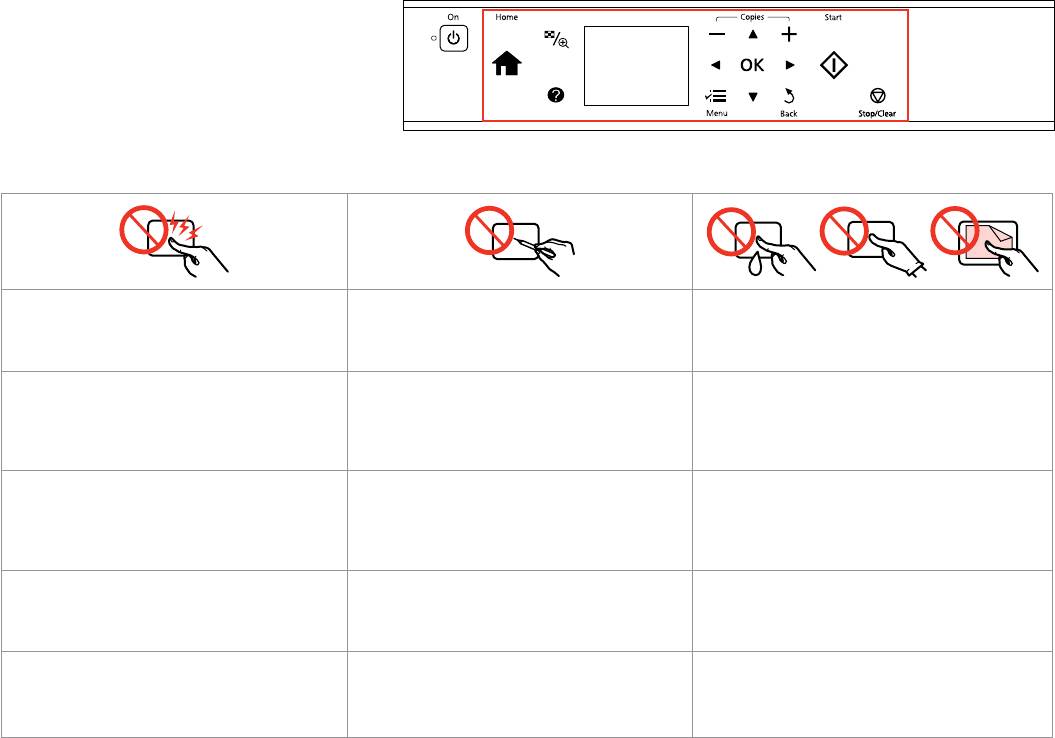
Precautions on the Touchpad
Меры предосторожности при
использовании сенсорной панели
Застереження щодо сенсорної панелі
Press the touchpad gently with the tip of your nger. Do
Do not operate using sharp or pointed objects such as
The touchpad is a capacitive touch panel that only
not press too hard or tap it with your nails.
ball point pen, sharp pencil, stylus pen, and so on.
responds to direct nger touch. The touchpad may not
respond to touch from wet hands, gloved hands, or over
the protective sheet or stickers.
Несильно нажмите на сенсорную панель кончиком
Не используйте заостренные предметы: шариковые
Сенсорная панель является емкостной сенсорной
пальца. Не нажимайте слишком сильно и не
ручки, заточенные карандаши, стилусы и т. п.
панелью и реагирует только на прикосновение пальцев.
используйте ногти.
Сенсорная панель может не отреагировать, если у
пользователя мокрые или защищенные перчатками руки,
а также если не удалены защитные пленки или стикеры.
На клавіші сенсорної панелі слід натискати кінчиком
Не застосовуйте гострі предмети та предмети з
Сенсорна панель є ємнісною, а тому реагує лише на
пальця, не прикладаючи надмірного зусилля.
гострими краями: кулькові ручки, гострі олівці,
безпосереднє натиснення пальця. Сенсорна панель
Не натискайте на неї нігтями чи з прикладанням
стилуси тощо.
може не реагувати на дотик, якщо палець вологий
надмірного зусилля.
або дотик здійснюється рукою в рукавичці або через
захисну плівку чи наклейку.
9
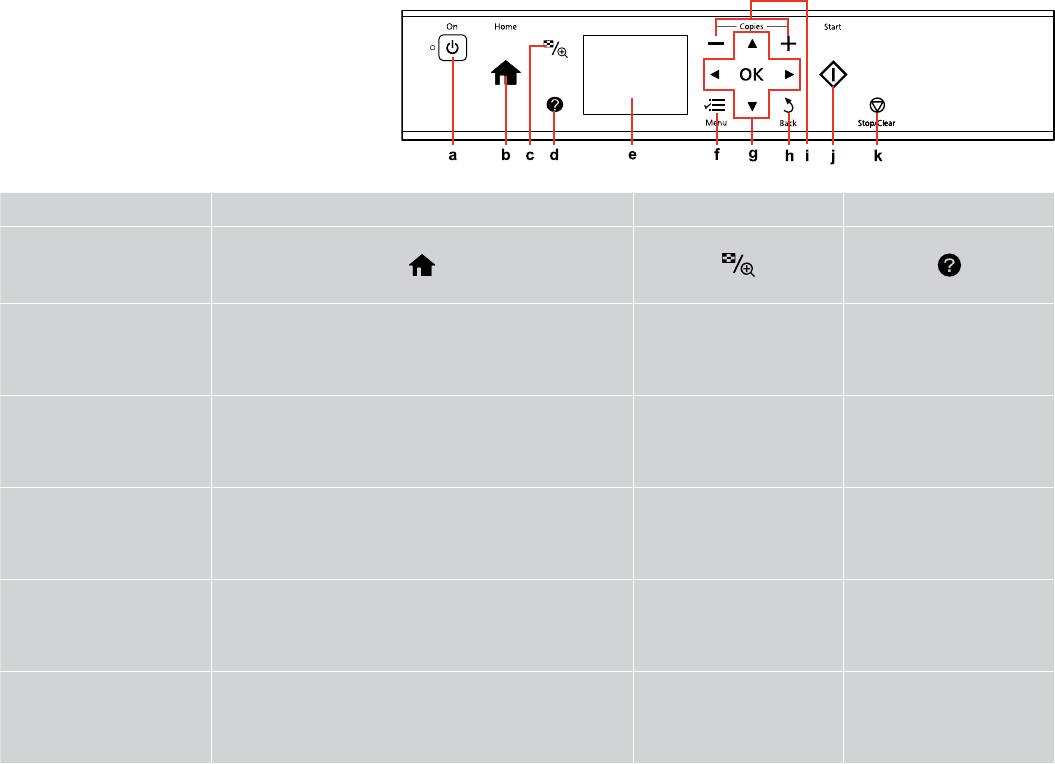
Guide to Control Panel
Описание панели управления
Довідник для панелі керування
a b c d
P
Turns on/o printer. Returns to the top menu. When on the top menu, switches between
Changes the view of photos or
Displays Help to solve problems.
Copy, Print Photos, Scan, Setup, and Back Up Data mode.
crops the photos.
Включение/выключение
Возврат к меню верхнего уровня. При нахождении в меню
Изменение способа
Отображение справки для
принтера.
верхнего уровня: переключение между режимами Копирование,
отображения фотографий или
решения проблем.
Печать фото, Сканир-ние, Установка и Резервное копирование.
обрезка фотографий.
Вмикання/вимикання
Повернення до головного меню. У головному меню перемикання
Зміна відображення
Відображення довідки для
принтера.
між режимами Копіювати, Друк фото, Скан., Налашт. і Рез. коп.
фотографій або обрізання
рішення проблем.
дані.
фото.
10

Control panel design varies by area.
Дизайн панели управления может различаться в зависимости от региона.
Дизайн панелі керування залежить від країни.
e f g h
—
x
l, u, r, d, OK
y
The LCD screen displays a preview of the
Displays detailed settings for each mode. Selects photos and menus. Cancels/returns to the previous menu.
selected images, or displays settings.
ЖК-дисплей для предварительного
Отображение подробных параметров
Выбор фотографий и меню. Отмена/переход к предыдущему меню.
просмотра выбранных изображений
для каждого режима.
или отображения настроек.
На РК-екрані відображається
Відображення детальних настройок для
Вибір фотографій та меню. Скасування/повернення до
попередній перегляд вибраних
кожного режиму.
попереднього меню.
зображень або налаштування.
11
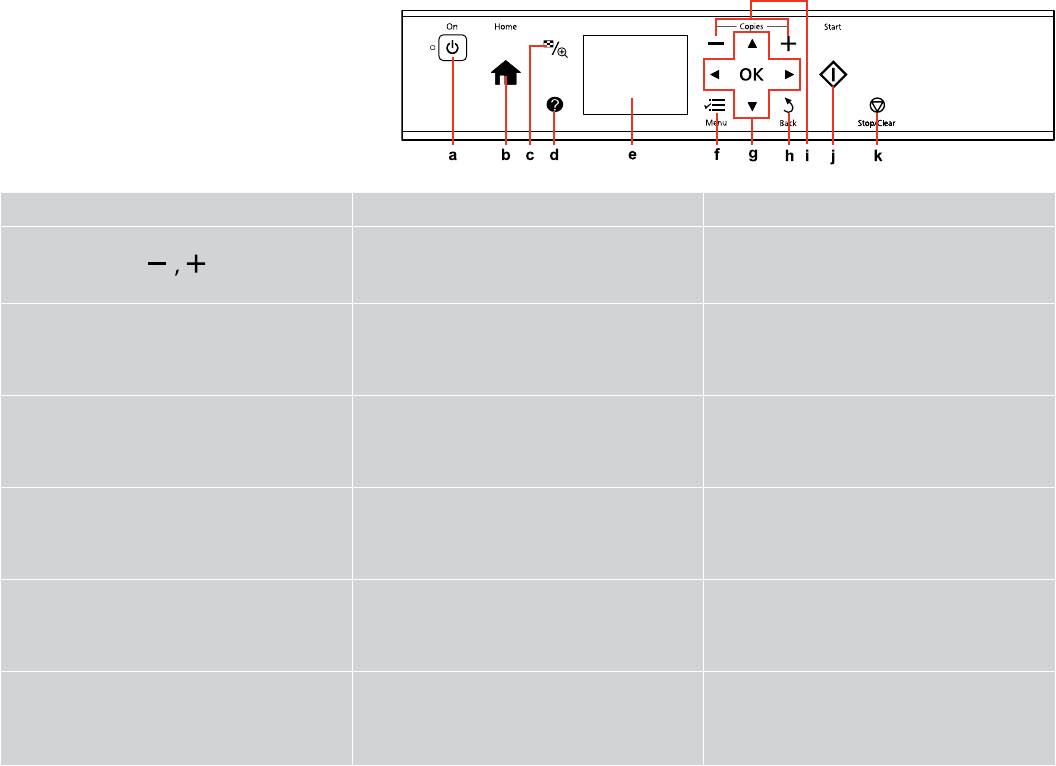
i j k
x y
Sets the number of copies. Starts copying/printing. Stops copying/printing or reset settings.
Определение количества копий. Запуск копирования/печати. Остановка копирования/печати или сброс настроек.
Визначення кількості копій. Запуск копіювання/друку. Зупинка копіювання/друку або скидання настройок.
12
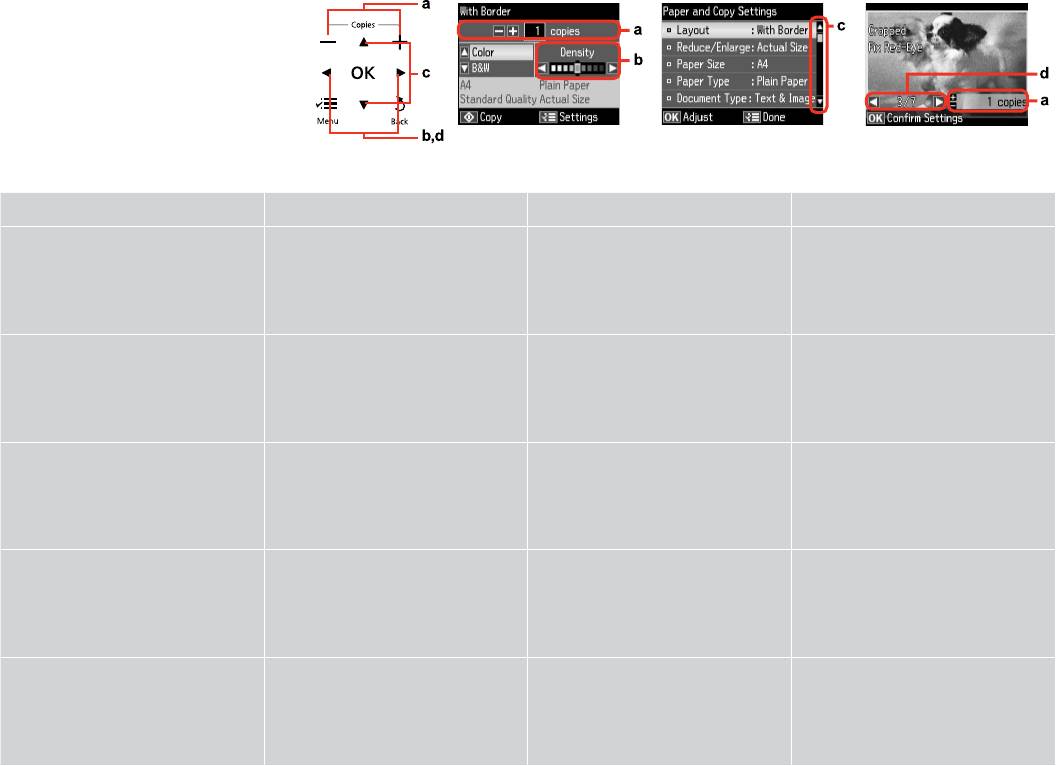
Using the LCD Screen
Использование ЖК-дисплея
Використання РК-екрану
a b c d
Use Copies + or — to set the number of
Press l or r to set the density. Press u or d to select the menu item. The
Press l or r to change the photo displayed
copies for the selected photo.
highlight moves up or down.
on the LCD screen.
С помощью кнопок + и — на панели
С помощью кнопок l и r настраивается
С помощью кнопок u и d выбирается
При нажатии кнопки l или r меняется
Copies указывается число копий
плотность.
пункт меню. При этом выделение
фотография, отображаемая на ЖК-
выбранной фотографии.
перемещается выше или ниже.
дисплее.
Використовуйте кнопки Copies + або –,
Натисніть l чи r для налаштування
Натисніть u або d для вибору елемента
Натисніть l або r, щоб змінити
щоб вказати кількість копій для вибраної
щільності.
меню. Виділення рухається вгору чи
фотографію, що відображається на
фотографії.
вниз.
РК-екрані.
rl du
rl
rl du
rl
13
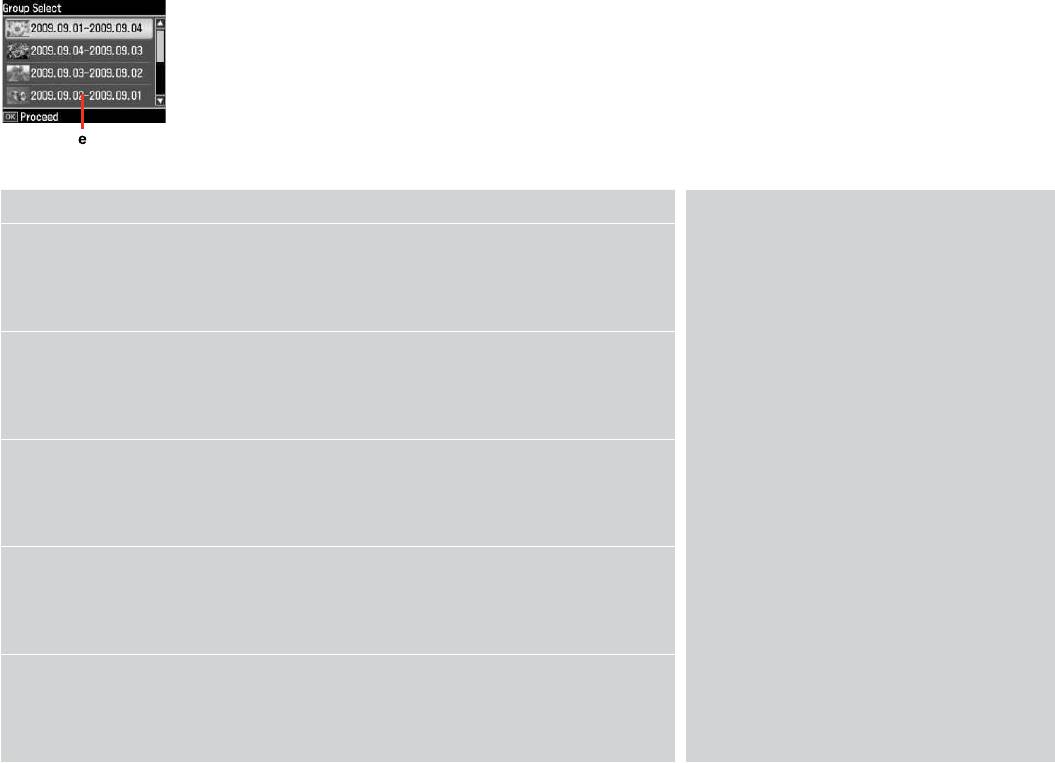
The actual screen display may dier slightly from those shown in this guide.
Реальное изображение на экране может отличаться от приведенного в данном руководстве.
Дійсне зображення дисплея може дещо відрізнятися від наведеного у даному посібнику.
e
Q
When you have more than 999 photos on your memory card, the LCD screen displays a message to let you select
After 13 minutes of inactivity, the screen turns black
a group. Images are sorted by the date they were taken. To select and show images in a group, press u or d to
to save energy. Press any button except P to return
select a group and then press OK. To re-select a group or folder, select Print Photos, Select Location, and then
the screen to its previous state.
select Select Group or Select Folder.
Через 13 минут неактивности экран выключится
для экономии электроэнергии. Чтобы вернуть
экран к предыдущему состоянию, нажмите
Когда на карте памяти сохранено более 999 снимков, на ЖК-дисплее отображается запрос на создание
любую кнопку, кроме P.
группы. Снимки сортируются по дате съемки. Чтобы выбрать и просмотреть снимки в группе, нажмите
u или d для выбора группы и затем нажмите кнопку OK. Чтобы заново выбрать группу или папку выберите
У разі відсутності будь-яких дій через
Печать фото, Выбор места и затем выберите Выбор группы или Выбор папки.
13 хвилин екран вимикається з метою економії
електроенергії. Натисніть будь-яку кнопку, за
винятком кнопки P, щоб повернути екран до
Якщо на картці пам’яті більше 999 фотографій, на РК-екрані відобразиться повідомлення із проханням
попереднього режиму роботи.
вибрати групу. Зображення сортуються за датою зйомки. Щоб вибрати та показати зображення у групі,
натисніть u або d для вибору групи, а потім натисніть OK. Щоб повторно вибрати групу чи папку, виберіть
P
Друк фото, Вибрати розташ., а потім виберіть Вибрати групу або Вибрати папку.
du
P
du
14
Adjusting Angle of Control Panel
Настройка угла наклона панели управления
Регулювання кута нахилу панелі керування
To lower or close the panel, unlock by pushing the button at the rear, and
then lower. Simply lift the panel to raise it.
Чтобы опустить или закрыть панель, снимите блокировку, нажав кнопку
сзади, а затем опустите. Просто поднимите панель, чтобы сделать ее
выше.
Щоб опустити або закрити панель, виконайте розблокування,
натиснувши кнопку ззаду, й опустіть. Щоб підняти панель, просто
потягніть її вгору.
15

Handling Media and Originals
Обращение с носителями и оригиналами
Обробка носіїв та оригіналів
17

Selecting Paper
If you want to print
Choose this Paper
Loading
При печати на
Выберите этот
Допустимое
on this paper…
Type on the LCD
capacity
этой бумаге…
Тип бумаги на ЖК-
количество
Выбор бумаги
screen
(sheets)
дисплее
листов
a Plain paper Plain Paper [12 mm] * *
a Простая бумага Простая бумага [12 мм] * *
Вибір паперу
b Epson Bright White
Plain Paper 80 *
b Epson Bright White
Простая бумага 80 *
Ink Jet Paper
Ink Jet Paper
c Epson Premium Ink
Plain Paper 100
c Epson Premium Ink
Простая бумага 100
Jet Plain Paper
Jet Plain Paper
d Epson Photo
Matte 100
d Epson Photo
Матовая бумага 100
Quality Ink Jet
Quality Ink Jet
Paper
Paper
e Epson Matte Paper
Matte 20
e Epson Matte Paper
Матовая бумага 20
— Heavyweight
— Heavyweight
f Epson Premium
Prem. Glossy 20
f Epson Premium
Prem. Glossy 20
Glossy Photo Paper
Glossy Photo Paper
g Epson Premium
Prem. Glossy 20
g Epson Premium
Prem. Glossy 20
Semigloss Photo
Semigloss Photo
Paper
Paper
The availability of special paper
h Epson Ultra Glossy
Ultra Glossy 20
h Epson Ultra Glossy
Ultra Glossy 20
varies by area.
Photo Paper
Photo Paper
Доступность специальной бумаги
i Epson Glossy
Glossy 20
i Epson Глянцевая
Glossy 20
различается в зависимости от
Photo Paper
фотобумага
региона.
Наявність спеціальних типів
j Epson Photo Paper Photo Paper 20
j Epson Photo Paper Фотобумага 20
паперу залежить від країни.
*1 Paper with a weight of 64 to 90 g/m.
*1 Бумага плотностью от 64 до 90 г/м.
*2 30 sheets for paper that already has printing on one side.
*2 30 листов, на которых уже осуществлена печать с одной стороны.
18

Щоб друкувати на
Виберіть цей
Ресурс
цьому папері…
Тип паперу
завантаження
на РК-дисплеї
(аркушів)
a Звичайний папір Звичайний
[12 мм] * *
* * [ 12]
Plain Paper
a
папір
[
12]
Plain Paper
a
Plain Paper* 80
b
* *
b Яскраво-білий
Звичайний
80 *
папір для
папір
Plain Paper* 80
b
струменевого
Plain Paper100
c
друку Epson
Plain Paper100
c
c Стандартний папір
Звичайний
100
найвищої якості
папір
Matte100
d
для струменевого
Matte100
d
друку Epson
d Фотопапір для
Матов. 100
Matte20
e
Matte20
e
струменевого
друку Epson
20
Prem.
f
20
Prem.
f
e Матовий папір
Матов. 20
Glossy
Glossy
підвищеної
щільності Epson
20
Prem.
g
20
Prem.
g
Glossy
Glossy
f
Глянцевий
Глянц. найв.
20
фотопапір найвищої
як.
Ultra Glossy20
h
Ultra Glossy20
h
якості Epson
g
Напівглянцевий
Глянц. найв.
20
Glossy20
i
Glossy20
i
фотопапір найвищої
як.
якості Epson
Photo Paper20
j
Photo Paper20
j
h Ультраглянцевий
Ультраглянц.
20
фотопапір Epson
*
*
*
*
i Глянцевий
Глянц. 20
фотопапір Epson
j Фотопапір Epson Фотопапір 20
*1 Папір вагою від 64 до 90 г/м.
*2 30 аркушів для паперу, який вже має роздруківки з
одного боку.
19
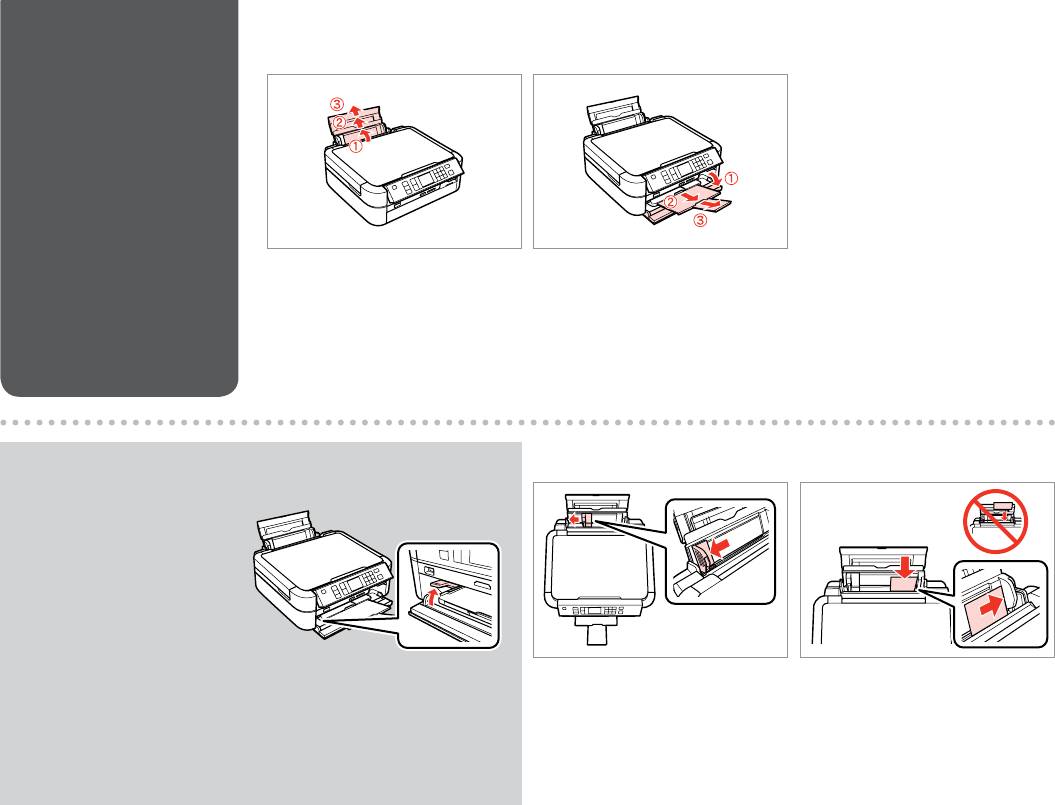
Loading Paper
A B
Загрузка бумаги
Завантаження
паперу
Open and slide out.
Open and slide out.
Откройте и выдвиньте.
Откройте и выдвиньте.
Відкрийте і витягніть.
Відкрийте і витягніть.
Q
C
D
Make sure that the lever is in up
position.
Убедитесь, что рычаг
находится в верхней позиции.
Переконайтеся, що важіль у
верхній позиції.
Slide edge guide.
Load printable side up.
Сдвиньте боковую направляющую.
Загрузите печатной стороной вверх.
Зсуньте бічну напрямну.
Завантажте стороною для друку вгору.
20
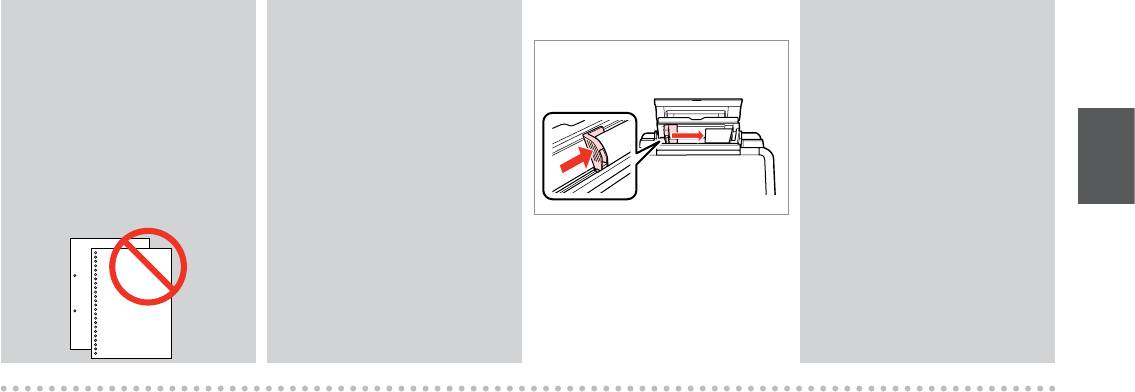
Q
Q
E
Q
Do not use paper with binder holes.
Align the edges of the paper
Do not load paper above the
before loading.
H arrow mark inside the edge
Не используйте бумагу с
guide.
отверстиями брошюровщика.
Перед загрузкой выровняйте
края бумаги.
Не загружайте бумагу выше
Не використовуйте папір з
значка в виде стрелки
отворами для скріплення.
Перед завантаженням
H с внутренней стороны
вирівняйте краї паперу.
направляющей.
Не завантажуйте папір вище
мітки зі стрілкою H на внутрішній
Fit.
поверхні рамки.
Поправьте.
H
Поправте.
H
21
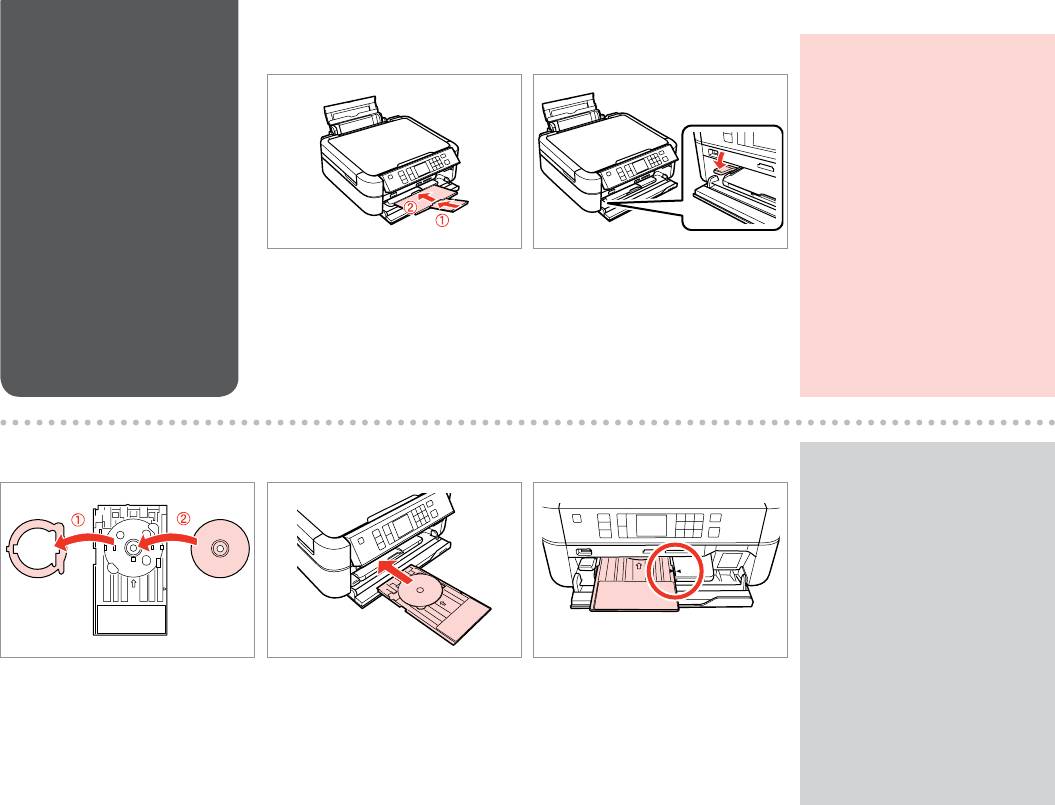
Loading a CD/DVD
A
B
c
Загрузка CD/DVD
Do not move the tray lever while
the printer is operating.
Завантаження
Не двигайте рычажок лотка во
CD/DVD
время работы принтера.
Не зсовуйте важіль лотка під час
роботи принтера.
Close.
Move the lever down.
Закройте.
Опустите рычажок вниз.
Закрийте.
Зсуньте важіль униз.
C
D
E
Q
To print on 8 cm CDs, see the
online User’s Guide.
Инструкции по печати на
компакт-дисках диаметром
8 см см. в интерактивном
Руководство пользователя.
Для друку на CD діаметром
8 см див. онлайновий Посібник
користувача.
Place.
Insert.
Align the arrow marks.
Поместите.
Вставьте.
Совместите стрелки.
Покладіть.
Вставте.
Вирівняйте стрілки.
22
A
B
Removing a CD/DVD
Извлечение CD/DVD
Виймання CD/DVD
Pull out.
Move the lever up.
Вытяните.
Поднимите рычажок вверх.
Вийміть.
Зсуньте важіль угору.
23
Inserting a Memory
A B
c
Card
Do not try to force the card all the
way into the slot. It should not be
Вставка карты
fully inserted.
памяти
Не пытайтесь надавливать на
карту, вводя ее в гнездо. Она
Встановлення
не должна быть полностью
картки пам’яті
вставлена.
Не намагайтеся повністю
вставити картку в рознім. Вона
Insert one card at a time.
Check the light stays on.
має бути вставлена частково.
Вставляйте по одной карте за один
Проверьте индикатор.
раз.
Перевірте, чи світиться індикатор.
Встановлюйте одну картку
одночасно.
Removing a Memory
A B
Q
Card
Извлечение карты
On Flashing
памяти
Вкл. Мигает
Виймання картки
Горить Блимає
пам’яті
Check the light stays on.
Remove.
Проверьте индикатор.
Извлеките.
Перевірте, чи світиться індикатор.
Витягніть.
24
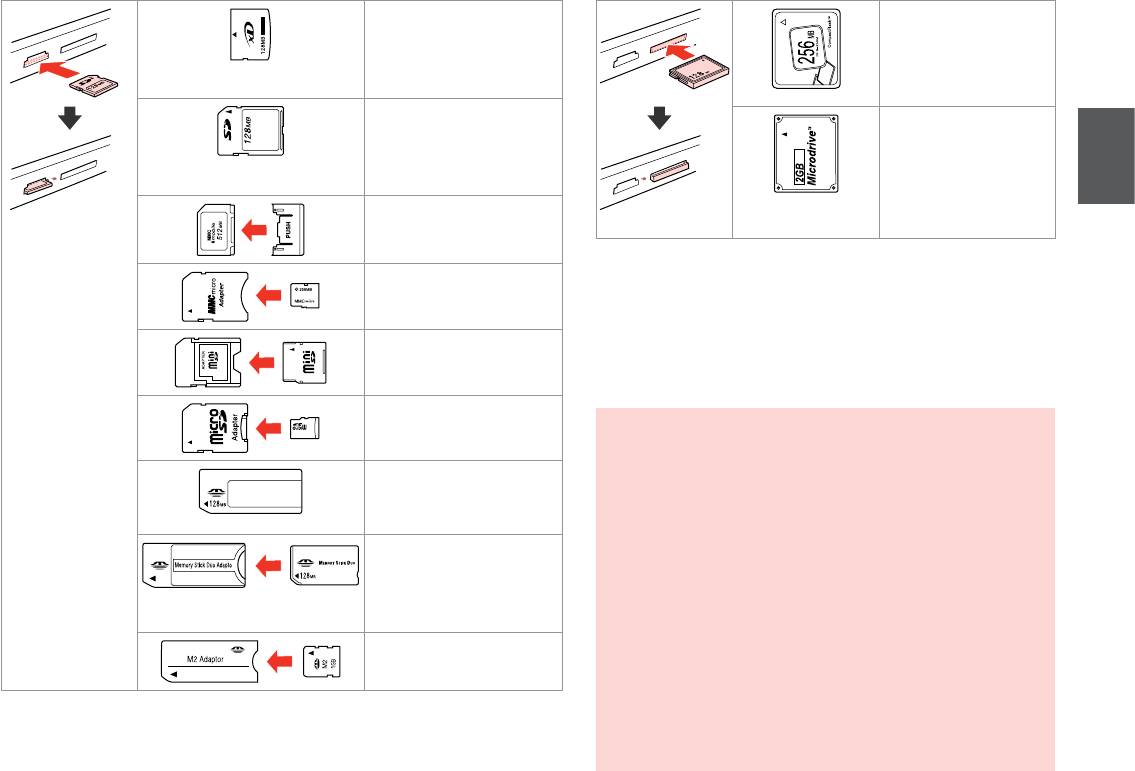
xD-Picture Card
CompactFlash
xD-Picture Card Type M
xD-Picture Card Type M+
xD-Picture Card Type H
SD
Microdrive
SDHC
MultiMediaCard
MMCplus
MMCmobile *
*Adapter required
MMCmicro *
*Требуется адаптер
*Потрібен адаптер
miniSD *
*
miniSDHC *
*
microSD *
microSDHC *
c
If the memory card needs an adapter then attach it before
Memory Stick
inserting the card into the slot, otherwise the card may get stuck.
Memory Stick PRO
Если для карты памяти требуется адаптер, установите его
MagicGate Memory Stick
перед вставкой карты в гнездо, иначе карта может застрять.
Memory Stick Duo *
Якщо для картки пам’яті потрібен адаптер, вкладіть у нього
картку, перш ніж вставити її в рознім. У разі недотримання цієї
Memory Stick PRO Duo *
умови картка може застрягнути.
Memory Stick PRO-HG Duo *
MagicGate Memory Stick Duo *
Memory Stick Micro *
25
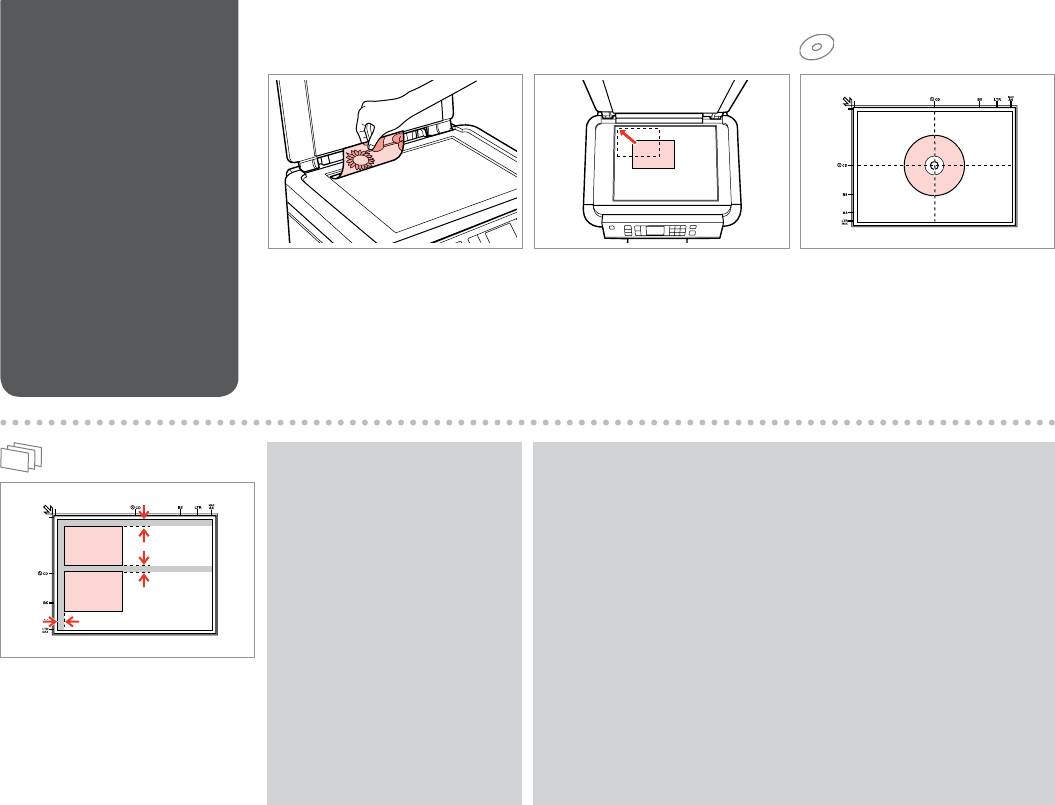
Placing Originals
A B
Расположение
оригиналов
Розміщення
оригіналів
Place face-down horizontally.
Slide to the corner.
Place in the center.
Положите горизонтально лицевой
Расположите в углу.
Поместите в центре.
стороной вниз.
Посуньте в куток.
Розмістіть у центрі.
Розмістіть лицьовим боком вниз,
горизонтально.
Q
Q
You can reprint photos from
You can copy photos of dierent sizes at the same time as long as they are
30 × 40 mm to 127 × 178 mm.
larger than 30 × 40 mm.
Можно перепечатывать
Можно одновременно копировать фотографии разных размеров, если
фотографии от 30 × 40 мм до
они больше 30 × 40 мм.
127 × 178 мм.
Можна копіювати фотографії різного розміру одночасно, якщо вони
Можна передруковувати фото
більші за 30 × 40 мм.
розміром від 30 × 40 мм до
127 × 178 мм.
Place photos 5 mm apart.
Располагайте фото в 5 мм друг от друга.
Розміщуйте фото на відстані 5 мм.
26
Оглавление
Аннотации для Мфу Epson Stylus Photo PX660 в формате PDF
Топ 10 инструкций
Другие инструкции
График работы поддержки:
Пн-Пт: с 9:00 до 18:00
Сб-Вс: Выходной
График отправки ключей
Adjustment program и Canon Service Tool:
Рабочие дни:
с 09:00 до 18:00 в течении 5 — 15 мин.
с 18:00 до 23:00 в течении 1 часа
с 23:00 до 09:00 отправка не производится
Выходные дни:
с 09:00 до 23:00 По свободному графику
Мы работаем по московскому времени!
Прошивки для принтеров Samsung, Xerox, HP, Pantum вы можете получить в автоматическом режиме, круглосуточно, моментально после оплаты, сделав заказ через магазин
Делайте покупки через свой аккаунт на нашем сайте и накапливайте постоянную скидку до 17%