

Photo Printer
®
English
No part of this publication may be reproduced, stored in a retrieval
system, or transmitted in any form or by any means, electronic,
mechanical, photocopying, recording, or otherwise, without the prior
written permission of Seiko Epson Corporation. The information
contained herein is designed only for use with this Epson printer. Epson
is not responsible for any use of this information as applied to other
printers.
Neither Seiko Epson Corporation nor its affiliates shall be liable to the
purchaser of this product or third parties for damages, losses, costs, or
expenses incurred by the purchaser or third parties as a result of
accident, misuse, or abuse of this product or unauthorized
modifications, repairs, or alterations to this product, or (excluding the
U.S.) failure to strictly comply with Seiko Epson Corporation’s
operating and maintenance instructions.
Seiko Epson Corporation shall not be liable for any damages or
problems arising from the use of any options or any consumable
products other than those designated as Original Epson Products or
Epson Approved Products by Seiko Epson Corporation.
Seiko Epson Corporation shall not be held liable for any damage
resulting from electromagnetic interference that occurs from the use of
any interface cables other than those designated as Epson Approved
Products by Seiko Epson Corporation.
®
EPSON
of Seiko Epson Corporation.
PRINT Image Matching™ and the PRINT Image Matching logo are
trademarks of Seiko Epson Corporation.
is a registered trademark and PictureMate™ is a trademark
Copyright © 2001 Seiko Epson Corporation. All rights reserved.
USB DIRECT-PRINT™ and the USB DIRECT-PRINT logo are
trademarks of Seiko Epson Corporation.
Copyright © 2002 Seiko Epson Corporation. All rights reserved.
Microsoft
Corporation.
Apple
Inc.
Part of the photo data stored on the Printer Software CD- ROM is
licensed from Design Exchange Co., Ltd. Copyright © 2000 Design
Exchange Co., Ltd. All rights reserved.
DPOF™ is a trademark of CANON INC., Eastman Kodak Company,
Fuji Photo Film Co., Ltd. and Matsushita Electric Industrial Co., Ltd.
The Bluetooth word mark and logos are owned by the Bluetooth SIG,
Inc. and any use of such marks by Seiko Epson Corporation is under
license.
Zip
SD™ is a trademark.
Memory stick, Memory Stick Duo, Memory Stick PRO, and Memory
Stick PRO Duo are trademarks of Sony Corporation.
xD-Picture Card™ is a trademarks of Fuji Photo Film Co.,Ltd.
General Notice: Other product names used herein are for identification
purposes only and may be trademarks of their respective owners. Epson
disclaims any and all rights in those marks.
Copyright © 2005 Seiko Epson Corporation. All rights reserved.
®
and Windows® are registered trademarks of Microsoft
®
and Macintosh® are registered trademarks of Apple Computer,
®
is a registered trademark of Iomega Corporation.
1

Get to Know Your PictureMate
Power light
On button
LCD panel
Zoom button
Cancel button
Memory card light
USB port for
computer
Battery cover
Power cable
Cartridge
compartment
cover
Paper
support
Handle
Menu button
Back button
4-way scroll buttons
Output tray
OK button
Memory card
slot cover
Print button
EXT/IF (USB)
port
2

Contents
English
Safety Instructions
Important Safety Instructions. . . . . . . . . . . . . . . . . . . . . . . .6
Warnings, Cautions, and Notes . . . . . . . . . . . . . . . . . . . . .12
Welcome!
A Quick Introduction to the Digital Photography Process
14
Supported Photo Formats. . . . . . . . . . . . . . . . . . . . . . . . . .16
Where to Find Information. . . . . . . . . . . . . . . . . . . . . . . . .16
Preparing to Print
Loading Paper. . . . . . . . . . . . . . . . . . . . . . . . . . . . . . . . . . . .17
Paper Handling Instructions . . . . . . . . . . . . . . . . . . . . . . .18
Inserting Your Memory Card. . . . . . . . . . . . . . . . . . . . . . .19
Basic Photo Printing
Printing All Photos. . . . . . . . . . . . . . . . . . . . . . . . . . . . . . . .22
Printing Several Photos . . . . . . . . . . . . . . . . . . . . . . . . . . . .22
Printing Range of Photos. . . . . . . . . . . . . . . . . . . . . . . . . . .23
Printing Photos Searching by Date. . . . . . . . . . . . . . . . . . 24
Printing an Index. . . . . . . . . . . . . . . . . . . . . . . . . . . . . . . . . 25
Printing a Photo With a Frame . . . . . . . . . . . . . . . . . . . . . 25
Printing Camera-Selected DPOF Photos . . . . . . . . . . . . . 27
Doing More With Your Photos
Choosing a Layout . . . . . . . . . . . . . . . . . . . . . . . . . . . . . . . 28
Adding the Date or Time . . . . . . . . . . . . . . . . . . . . . . . . . . 29
Printing Photos in Black and White or Sepia . . . . . . . . . 31
Cropping Your Photo . . . . . . . . . . . . . . . . . . . . . . . . . . . . . 31
Fixing Your Photos . . . . . . . . . . . . . . . . . . . . . . . . . . . . . . . 32
Printing a Photo With a Frame Specified by Camera . . 35
Viewing a Slide Show. . . . . . . . . . . . . . . . . . . . . . . . . . . . . 35
Saving Your Photos to an External Device
Saving Photos to an External Device . . . . . . . . . . . . . . . . 37
Printing From an External Device
Printing From an External Drive. . . . . . . . . . . . . . . . . . . . 40
Printing From a PictBridge-Enabled Camera . . . . . . . . . 42
3

Printing From a Bluetooth Device. . . . . . . . . . . . . . . . . . .44
Replacing the Photo Cartridge
Checking the Photo Cartridge Status (Ink Level) . . . . . . 50
Replacing the Photo Cartridge. . . . . . . . . . . . . . . . . . . . . . 50
Taking PictureMate With You
Setting PictureMate Preferences
Changing the View of Photos on the LCD Screen . . . . . 58
Setting the After Print Confirmation. . . . . . . . . . . . . . . . .59
Adjusting the LCD Screen Contrast . . . . . . . . . . . . . . . . . 60
Selecting the Language on the LCD Screen . . . . . . . . . . .60
Changing the Default Settings. . . . . . . . . . . . . . . . . . . . . .60
Resetting All Print Settings. . . . . . . . . . . . . . . . . . . . . . . . . 61
Using PictureMate With a Computer
Installing the Printer Software . . . . . . . . . . . . . . . . . . . . . .62
Maintaining PictureMate
Checking the Print Head Nozzles . . . . . . . . . . . . . . . . . . .65
Cleaning the Print Head . . . . . . . . . . . . . . . . . . . . . . . . . . .66
Aligning the Print Head. . . . . . . . . . . . . . . . . . . . . . . . . . . 67
Cleaning the Printer . . . . . . . . . . . . . . . . . . . . . . . . . . . . . . 70
Troubleshooting
Error/Warning Messages . . . . . . . . . . . . . . . . . . . . . . . . . 71
Print and Noise Problems . . . . . . . . . . . . . . . . . . . . . . . . . 73
Photo Quality Problems. . . . . . . . . . . . . . . . . . . . . . . . . . . 74
Problems With Paper Feeding . . . . . . . . . . . . . . . . . . . . . 75
Miscellaneous Printout Problems. . . . . . . . . . . . . . . . . . . 76
Customer Support
Contacting Customer Support . . . . . . . . . . . . . . . . . . . . . 78
Technical Support Web Site . . . . . . . . . . . . . . . . . . . . . . . 78
Options and Consumable Products
Options . . . . . . . . . . . . . . . . . . . . . . . . . . . . . . . . . . . . . . . . . 79
Consumable Products . . . . . . . . . . . . . . . . . . . . . . . . . . . . 79
Using the Optional Battery . . . . . . . . . . . . . . . . . . . . . . . . 80
Printer Specifications
Printer Specifications . . . . . . . . . . . . . . . . . . . . . . . . . . . . . 83
4

Index
English
5

Safety Instructions
Important Safety Instructions
Read all of the instructions in this section before using
your printer. Also, be sure to follow all warnings and
instructions marked on the printer.
When choosing a place for the printer
Observe the following when choosing a place for the
printer:
❏ Place the printer on a flat, stable surface that
extends beyond the base of the printer in all
directions. If you place the printer by the wall,
leave more than 10 cm between the back of the
printer and the wall. The printer will not operate
properly if it is tilted at an angle.
❏ When storing or transporting the printer, do not
tilt it, stand it on its side, or turn it upside down.
Otherwise, ink may leak from the cartridge.
❏ Leave enough space in front of the printer for the
paper to be fully ejected.
❏ Avoid places subject to rapid changes in
temperature and humidity. Also, keep the printer
and the AC adapter away from direct sunlight,
strong light, water, or heat sources.
❏ Do not leave the printer in a place subject to high
temperature, such as in a car. Also, keep the
printer away from direct sunlight, strong light,
and heat sources. Otherwise, the printer may be
damaged or ink may leak.
❏ Avoid places subject to dust, shock, or vibration.
❏ Leave enough room around the printer to allow
for sufficient ventilation.
❏ Place the AC adapter near a wall outlet where the
plug can be easily unplugged.
❏ Do not place or store the printer, the AC adapter,
or the optional battery outdoors.
6 Safety Instructions

When setting up your printer
Observe the following when setting up the printer:
❏ Do not block or cover the vents and openings in
the printer.
❏ Power supply cords should be placed to avoid
abrasions, cuts, fraying, crimping, and kinking.
Do not place objects on top of power-supply cords
and do not allow the AC adapter or power-supply
cords to be stepped on or run over. Be particularly
careful to keep all power-supply cords straight at
the ends and the points where they enter and
leave the AC adapter.
❏ Use only the power-supply cords that comes with
this product. Use of another cord may resu lt in fire
or electrical shock, or injury.
❏ The AC adapter model A361H is designed for use
with the printer with which it was included. Do
not attempt to use it with other electronic devices
unless specified.
❏ Use only the type of power source indicated on
the AC adapter’s label, and always supply power
directly from a standard domestic electrical outlet
with the AC power cord that meets the relevant
local safety standards.
❏ Avoid using outlets on the same circuit as
photocopiers or air control systems that regularly
switch on and off.
❏ Avoid using electrical outlets controlled by wall
switches or automatic timers.
❏ Keep the entire computer system away from
potential sources of electromagnetic interference,
such as loudspeakers or the base units of cordless
telephones.
❏ Do not use a damaged or frayed power cord, AC
adapter, and the optional battery.
❏ If you use an extension cord with the printer,
make sure that the total ampere rating of the
devices plugged into the extension cord does not
exceed the cord’s ampere rating. Also, make sure
that the total ampere rating of all devices plugged
into the wall outlet does not exceed the wall
outlet’s ampere rating.
English
Safety Instructions 7

❏ Never disassemble, modify, or attempt to repair
the AC adapter, power cord, printer, and options
by yourself except as specifically explained in the
printer’s guides.
❏ Unplug the printer and the AC adapter, remove
the optional battery from the printer, and refer
servicing to qualified service personnel under the
following conditions:
The power cord or plug is damaged; liquid has
entered the printer, the AC adapter, or the
optional battery; the printer, the AC adapter or
the optional battery has been dropped or the
casing damaged; the printer, the AC adapter or
the optional battery does not operate normally or
exhibits a distinct change in performance. (Do not
adjust controls that are not covered by the
operating instructions.)
❏ Do not use with wet hands.
When using the printer
Observe the following when using the printer:
❏ If you use the printer in places where the use of
electronic devices is limited, such as in airplanes
or hospitals, follow all instructions in those
places.
❏ Do not insert objects through the slots in the
printer.
❏ Take care not to spill liquid on the printer and the
AC adapter.
❏ Do not put your hand inside the printer or touch
the photo cartridge during printing.
❏ Always turn the printer off using the On button.
Do not unplug the printer or turn off the power to
the outlet until the power light goes out.
❏ If you plan to use the AC adapter or the optional
battery in Germany, the building installation
must be protected by a10 or 16 amp circuit breaker
to provide adequate short-circuit protection and
over-current protection for this printer.
8 Safety Instructions
❏ Before transporting the printer, make sure that the
photo cartridge is in place.
❏ Leave the photo cartridge installed. Removing the
cartridge can dehydrate the print head and may
prevent the printer from printing.

When using a memory card
❏ Use only memory cards compatible with the
printer. Refer to Loading Memory Cards.
When using LCD
❏ The LCD panel contains a few small bright or dark
spots. These are normal and do not mean that the
LCD monitor is damaged in any way.
❏ Only use a dry, soft cloth to clean the LCD panel.
Do not use liquid or chemical cleansers.
When using the optional Bluetooth Photo
Print Adapter
Refer to the Bluetooth Photo Print Adapter’s
documentation for the safety instructions.
When using the optional battery
❏ If battery aci d gets in to your eyes or on you r skin,
immediately rinse the affected area thoroughly
with water and seek medical treatment. If a
battery is swallowed, seek medical treatment
immediately.
English
❏ If the LCD panel on your printer’s control panel
is damaged, contact your dealer. If the liquid
crystal solution gets on your hands, wash them
thoroughly with soap and water. If the liquid
crystal solution gets into your eyes, flush them
immediately with water. If discomfort or vision
problems remain after a thorough flushing, see a
doctor immediately.
❏ Use only an Epson Li-ion battery model EU-112
for this printer according to the directions in the
user documentation. Replacing the battery with
an incorrect model may cause an explosion.
❏ Use only AC adapter model A361H to charge the
battery and operate the printer.
❏ Do not charge or use the battery with devices
other than the specified product. Using the
battery with other devices may damage the
battery or other devices, or may cause an
explosion.
Safety Instructions 9

❏ To protect against short circuits, do not remove
the outside case of the battery.
❏ Do not handle the battery with wet hands or use
them near water.
❏ Do not expose the battery to water or high
humidity.
❏ Do not drop, puncture, disassemble, mutilate, or
short-circuit the battery.
❏ Do not place the battery near or into fire or water.
❏ Do not use the battery that is leaking or damaged
in any way.
❏ Do not charge the battery on devices except this
product.
❏ Do not insert objects into any openings as they
may touch dangerous voltage points or
short-circuit components.
❏ Prevent the battery from coming into contact with
metal objects that could short-circuit it, such as
coins or keys.
❏ Do not solder wires or terminals directly to the
battery.
❏ Do not touch battery terminals.
❏ Keep the battery away from open flame if they
leak or smell strange.
❏ If overheating, discoloration, or deformation
occur, remove the battery from this product and
do not use it.
❏ Do not charge the battery near open flame or in
very hot locations.
❏ Keep the battery away from heat sources.
❏ Do not leave the battery in a vehicle to prevent the
battery from overheating.
10 Safety Instructions
❏ Charge the battery before using it if it has not been
used for a long period.
When storing the optional battery
❏ When not using the printer for a long period of
time, remove the battery from the printer and
store them separately to avoid over-discharging
the battery.
❏ Do not store the battery where the temperature or
humidity is very high.
❏ Store the battery out of children’s reach.
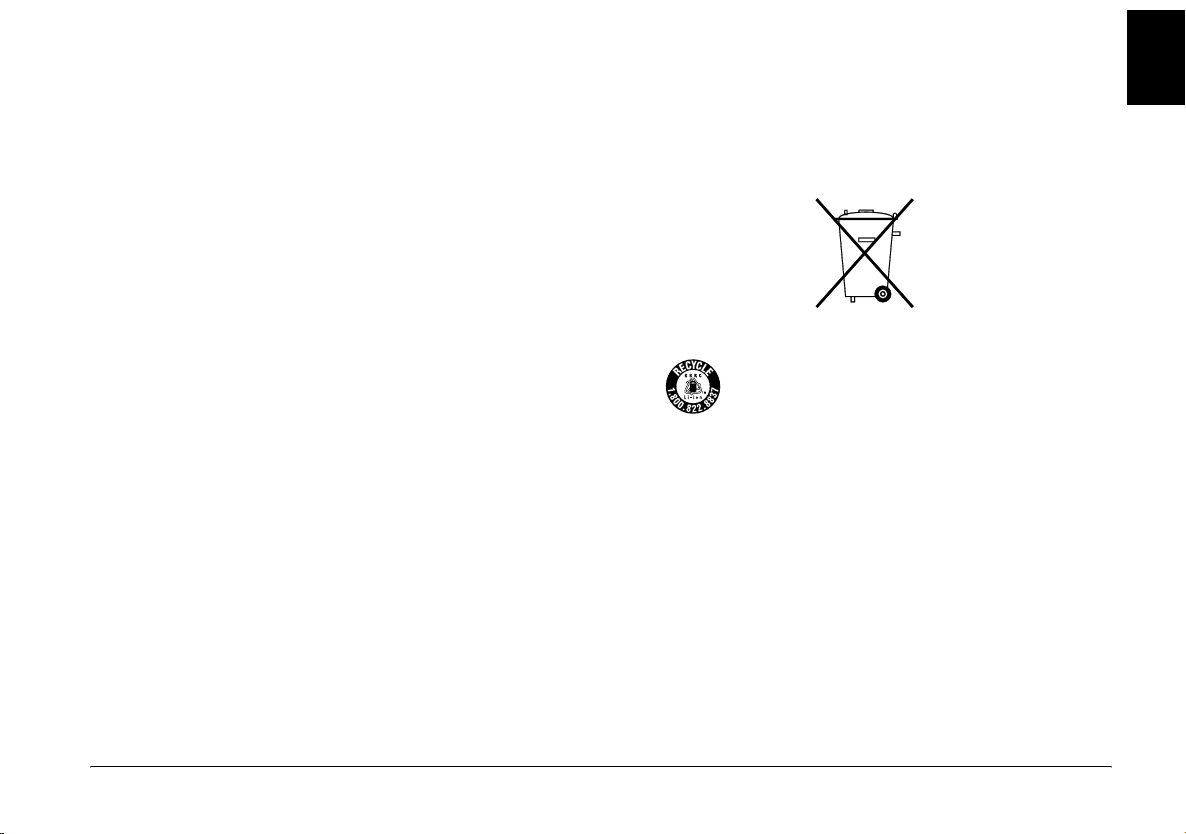
When disposing of the optional battery
Before disposing of the battery, make sure you
discharge them completely.
For European users:
English
Do not dispose of batteries as ordinary refuse. Instead,
dispose of them in a recycle box in accordance with
local laws.
For users in the United States and Canada:
This mark indicates that the battery will be
recycled by RBRC. When you dispose of the
battery, contact RBRC.
Warning:
w
❏ Do not dispose of batteries as ordinary
refuse. Instead, dispose of them in a
collection or recy cle box in accordance with
local laws.
❏ Do not incinerate or dispose of the battery
in fire.
When handling photo cartridges
Observe the following when handling photo
cartridges:
❏ Do not shake photo cartridge after removing it
from the bag; this can cause leakage.
❏ Do not remove or tear the label on the cartridge;
this can cause leakage.
Safety Instructions 11

❏ Do not use a photo cartridge beyond the date
printed on the cartridge carton: otherwise, it may
result in reduced print quality. For best results,
use up the photo cartridge within six months of
installing it.
❏ Do not dismantle photo cartridges or try to refill
them. This could damage the print head.
❏ After bringing a photo cartridge inside from a
cold storage site, allow it to warm up at room
temperature for at least three hours before using
it.
❏ Store photo cartridges in a cool, dark place.
❏ The IC chip on the photo cartridge retains a
variety of cartridge-related information, such as
the amount of ink remaining, so that the cartridge
may be removed and reinstalled freely. However,
each time the cartridge is inserted, some ink is
consumed because the printer automatically
performs a reliability check.
ENERGY STAR
The International
Program is a voluntary partnership with the computer
and office equipment industry to promote the
introduction of energy-efficient personal computers,
monitors, printers, fax machines, copiers, scanners,
and multifunction devices in an effort to reduce air
pollution caused by power generation. Their
standards and logos are uniform among participating
nations.
®
Compliance
As an ENERGY STAR® Partner,
Epson has determined that this
product meets the
guidelines for energy efficiency.
ENERGY STAR
®
Office Equipment
ENERGY STAR
Warnings, Cautions, and Notes
Warnings
w
must be followed carefully to avoid bodily
injury.
®
❏ Store each photo cartridge so that the bottom of
its packaging faces down.
12 Safety Instructions
Cautions
c
must be observed to avoid damage to your
equipment.

Notes
contain important information and useful tips on the
operation of your printer.
English
Safety Instructions 13
Welcome!
PictureMate™ is your easy-to-use, personal photo lab.
Just insert a digital camera memory card and you’re
ready to print brilliant, long-lasting photos. Because
PictureMate is light and portable, you can print
whenever and wherever you take pictures. Plus, your
PictureMate photos are archival; generations from
now your PictureMate prints will be as vibrant as they
are today.
A Quick Introduction to the Digital
Photography Process
With film cameras, the process
was simple; buy film, take
pictures, leave the film at the
photo lab, and come back later
for your photos and negatives.
Since you had negatives, you
could take them back later if
you wanted reprints.
The digital process is simple too, and it gives you
complete control. Just follow these basic steps:
1. Review and Delete
After you finish taking your
photos, review them on your
digital camera’s screen. Delete
the photos you don’t want to
print or keep.
2. Print
Insert your camera’s memory
card in PictureMate, choose
your photos, and print.
3. Save
To preserve your digital photo
files (just like film negatives),
save them to a CD or your
computer. Then you can reprint
them any time.
4. Clear the Memory Card
After you save your photo files, delete them from your
memory card so you have room for more photos.
14 Welcome!
Special Features
Printing with your PictureMate becomes even easier
with these special features:
From the PictureMate Main Menu,
you can print all your photos or you
can select just the ones you want.
See “Basic Photo Printing” on page
Main Menu
Crop
DPOF
21.
You can crop photos right from
PictureMate—no computer
required. See “Cropping Your
Photo” on page 31.
If your camera supports DPOF
(Digital Print Order Format), you
can pre-select which photos to print
while the memory card is still in
your camera. Then, when you
insert the card into PictureMate, it
knows which photos you chose. See
“Printing Camera-Selected DPOF
Photos” on page 27.
®
If you have a PictBridge
— or USB
DP (USB Direct Print)-enabled
camera, you can connect the
camera to PictureMate and control
printing right from your camera.
See “Printing From a
PictBridge-Enabled Camera” on page 42.
®
If you have a Bluetooth
-enabled
PDA, cell phone, or computer, you
can send photos wirelessly to
PictureMate for printing. You just
need the optional Epson
®
Bluetooth Photo Print Adapter. See
“Printing From a Bluetooth
Device” on page 44.
Note:
PictureMate also supports P.I.M. (PRINT Image
Matching™) and Exif Print image enhancement standards
that are built into many cameras. To see if your camera is
P.I.M.-enabled, see your camera’s documentation.
English
Welcome! 15
Supported Photo Formats
JPEG TIFF
Make sure your photos meet these requirements for
printing with your PictureMate:
Printing, changing settings, and installing the printer
software
Basic
Operation
Guide
Basics Operation Guide (this book)
explains how to print photos
directly from your camera’s
memory card. It also covers how to
print from other devices, replace
the PictureMate Photo Cartridge,
take care of PictureMate, install the
printer software, and troubleshoot problems.
❏ JPEG files or uncompressed TIFF files only
❏ Resolutions ranging from 120 × 120 to 4600 × 4600
pixels
PictureMate recognizes and prints the first 999 photos
on your memory card.
Where to Find Information
Unpacking and setting up
Start
Here
16 Welcome!
See your Start Here to unpack, set
up, and use your PictureMate.
Using your PictureMate with a computer
The on-screen User’s Guide on the
CD provides comprehensive
information and instructions for
using PictureMate with a
computer.
Preparing to Print
English
Before you can print, you need to load paper and insert
your memory card in PictureMate.
Loading Paper
Follow these steps to load PictureMate Photo Paper:
Caution:
c
Do not load plain paper; this may damage
PictureMate.
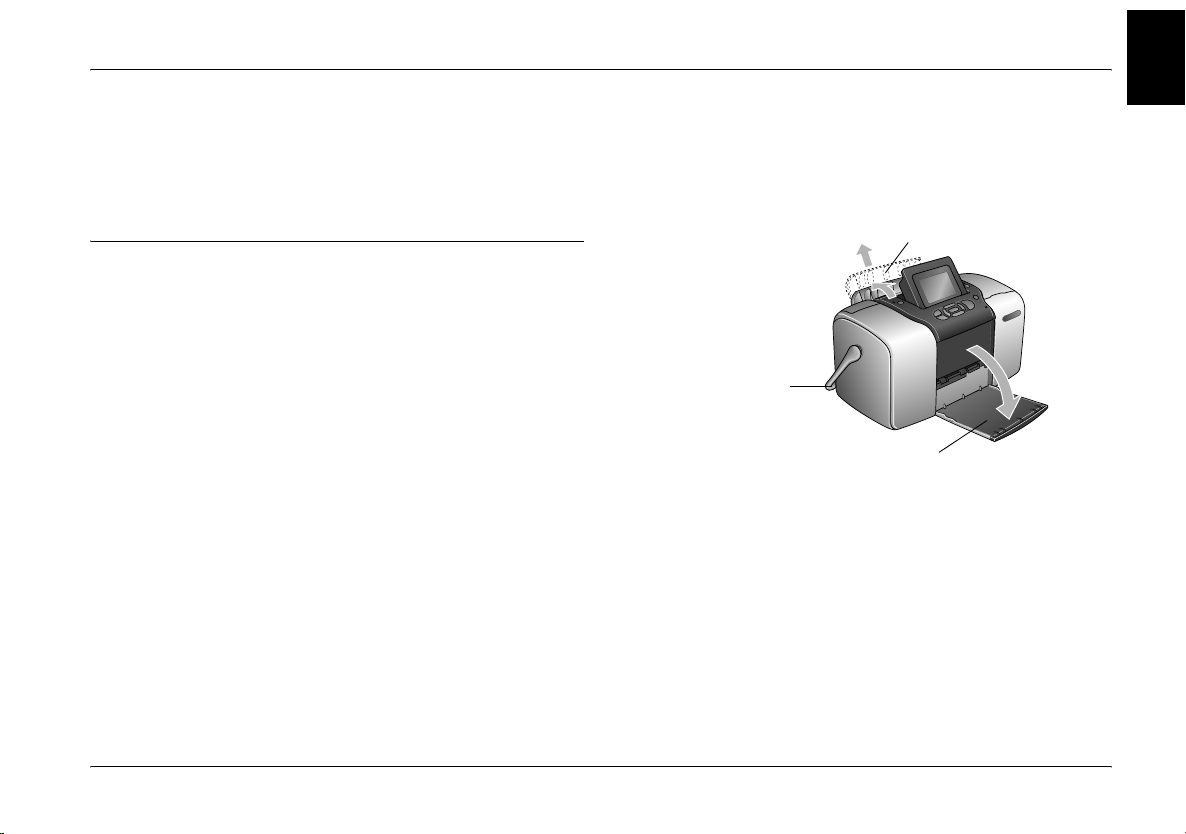
1. Move the handle to the back and down. Then
open the paper support and output tray.
Open paper support
Move handle to the
back and down
Open output tray
Note:
Keep the handle all the way down when printing, to
allow paper to feed through.
Preparing to Print 17
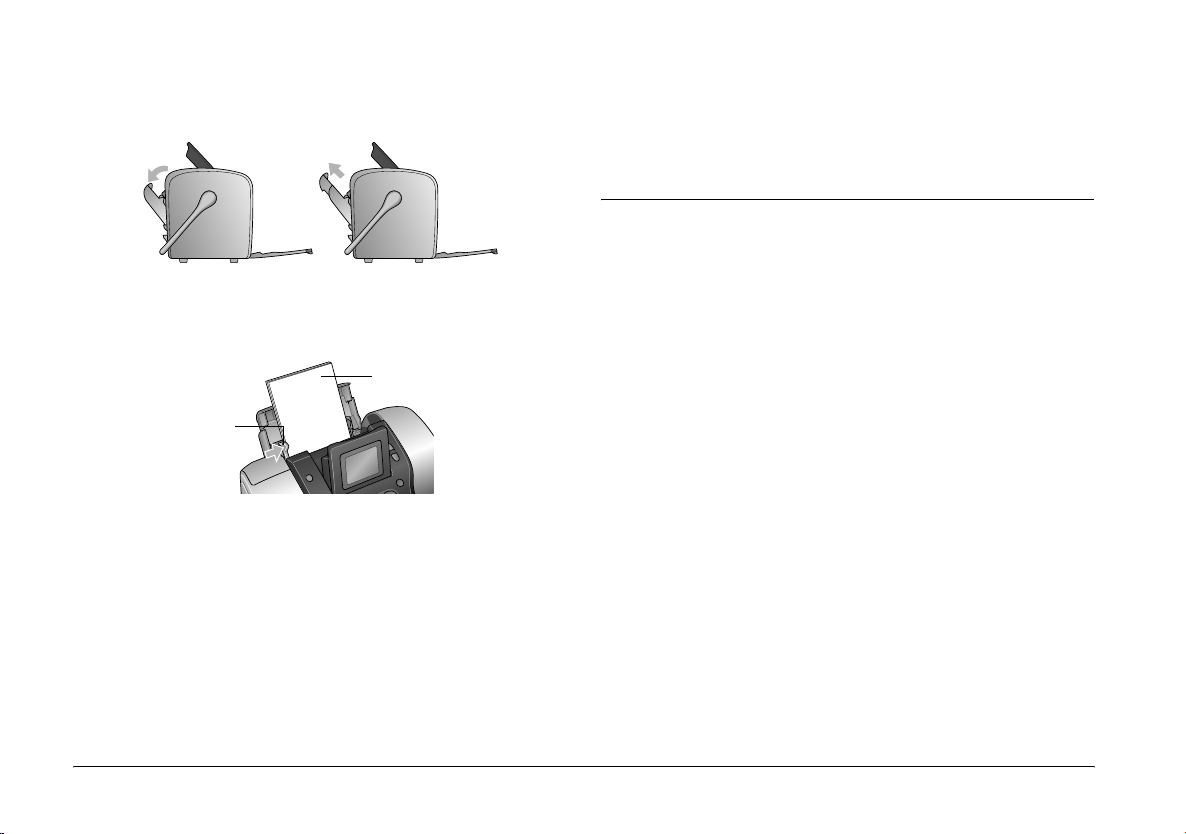
2. Slide the top part of the paper support up gently
until it clicks into place.
Note:
When you need more paper, order a PictureMate
PicturePack. See “Consumable Products” on page 79 for
more information.
Paper Handling Instructions
3. Place your paper against the right edge, with the
glossy side up.
Load glossy side up
Edge guide
Note:
Make sure paper is glossy side up to prevent smearing.
4. Slide the left edge guide against the paper. Make
sure it is snug, but not so tight that paper can’t
move.
18 Preparing to Print
When storing printouts
❏ Do not touch the printed side or stack your
printouts until the ink is dry.
❏ To avoid scratching the image, be sure not to rub
the printed side of the paper. If the printed side is
rubbed too strongly, ink may come off the paper.
❏ Do not stack printouts with the image sides
touching.
❏ Do not stack printouts and conventional film
photographs with the image sides touching.
❏ If you stack printouts, place a sheet of plain paper
or other absorbent paper between the individual
prints.
When storing unused paper
Return any unused paper to the original package, and
store it away from extreme temperatures, high
humidity, and bright lights.
English
Top:
When displaying printouts
❏ When displaying your printouts indoors, Epson
recommends placing your printouts in glass
frames to preserve the colors in your image.
❏ Avoid displaying your printouts outdoors or in a
place exposed to direct sunlight to prevent fading.
Note:
For best results, allow your prints to dry thoroughly for 24
hours before framing.
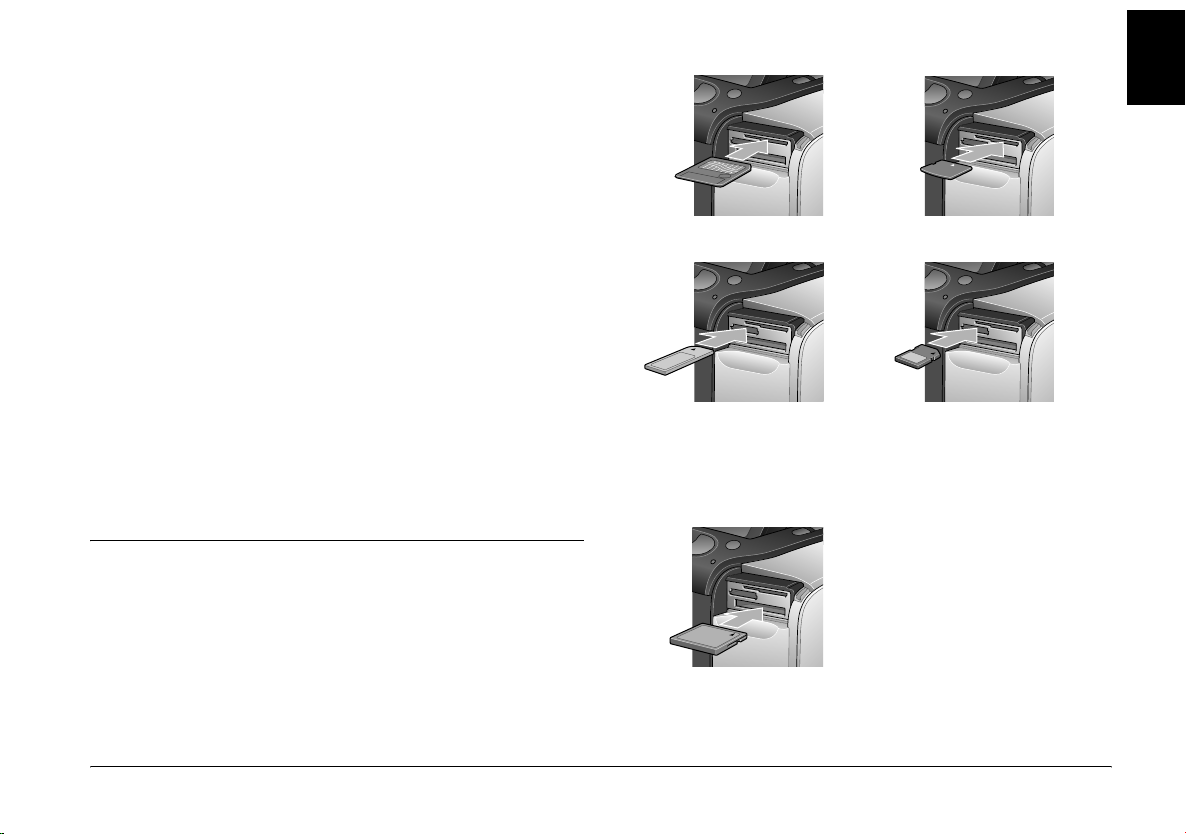
Inserting Your Memory Card
1. Press On to turn on PictureMate.
2. Open the memory card cover.
3. Insert the memory card into the correct slot, as
shown in the illustration.
SmartMedia™
Middle:
®
(Type I + II)
®
Sony Memory Stick
Memory Stick Duo™ *
Memory Stick PRO™
Memory Stick PRO Duo™
MagicGate™ Memory Stick
MagicGate Memory Stick Duo™ *
Bottom:
Microdrive™
CompactFlash
xD Picture Card™
SD (Secure Digital)
miniSD™ card **
*
MMC™ (MultiMediaCard™)
*Requires Memory Stick Duo
adapter
**Requires miniSD adapter
Preparing to Print 19
Push the card in carefully until it stops (it won’t
go in all the way).
Insert just one card at a time.
When it is in, the card light comes on.
Card light
4. Close the memory card cover.
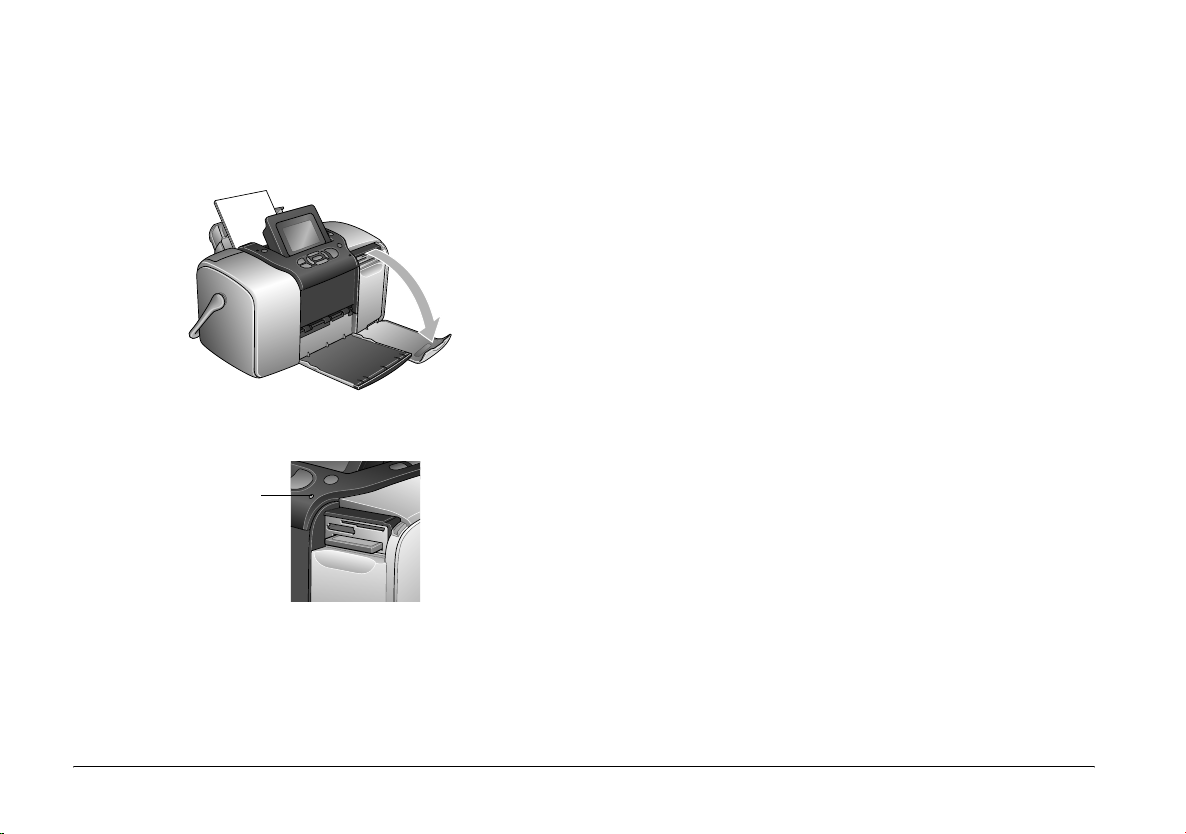
Removing Your Memory Card
When you are ready to remove a memory card, make
sure the card light is not flashing, then pull the card
straight out of the slot.
Caution:
c
Do not remove a card while the card light is
flashing; you may lose photos on your card.
Now you can choose photos and layouts for printing
from the Main Menu. See “Basic Photo Printing” on
page 21.
20 Preparing to Print
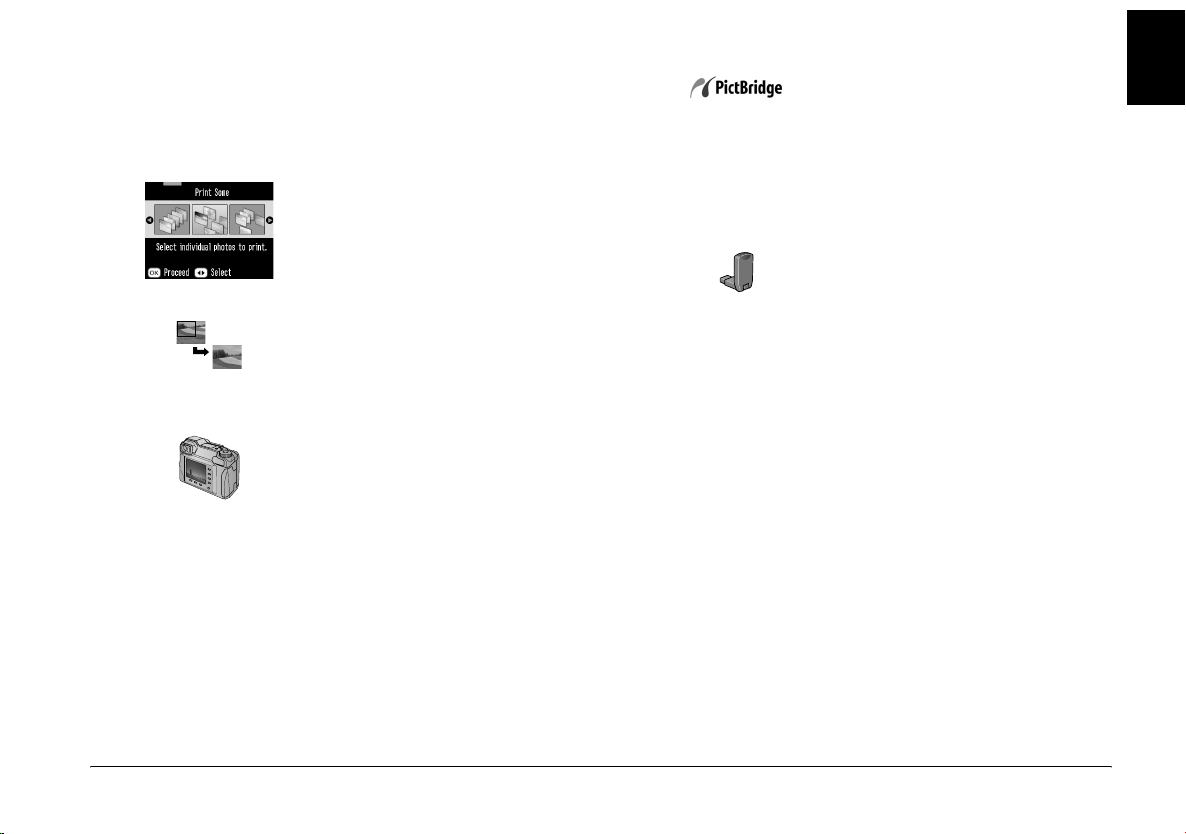
Basic Photo Printing
English
You can choose the photos you want to print from the
main menu.
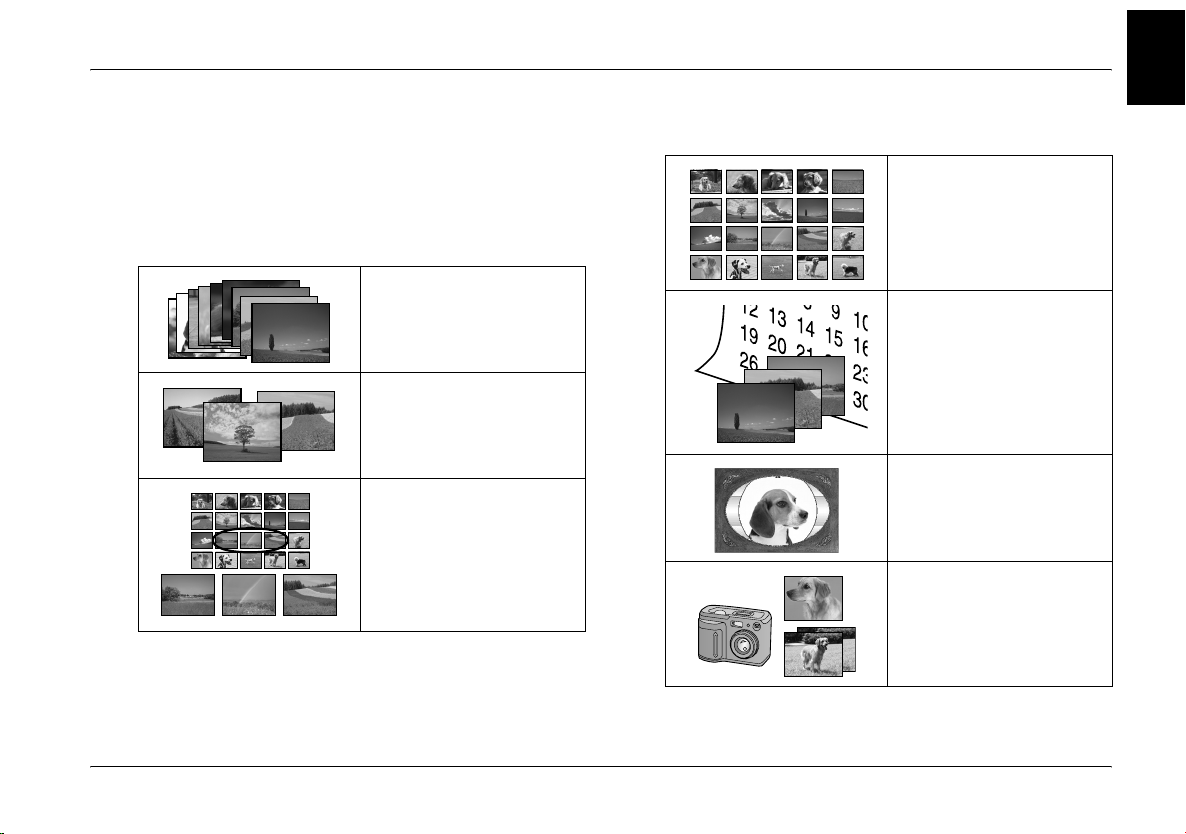
Print All: print all the photos on
your card.
Print Some: select several
photos, and choose one or
more copies for each.
Print Range: print a sequence
of photos on your card.
Print Index: print a thumbnail
view of all the photos stored in
your memory card.
Print by Date: search photos by
the date they were taken, and
select the photos you want.
Add Frame: print a photo with
a frame from your printer or
memory card.
Camera-selected DPOF
photos: print a set of photos
that you pre-selected in your
digital camera using DPOF.
Basic Photo Printing 21
Make sure your memory card is inserted in
PictureMate and the Main Menu is on the screen, then
follow the steps below for the option you want.
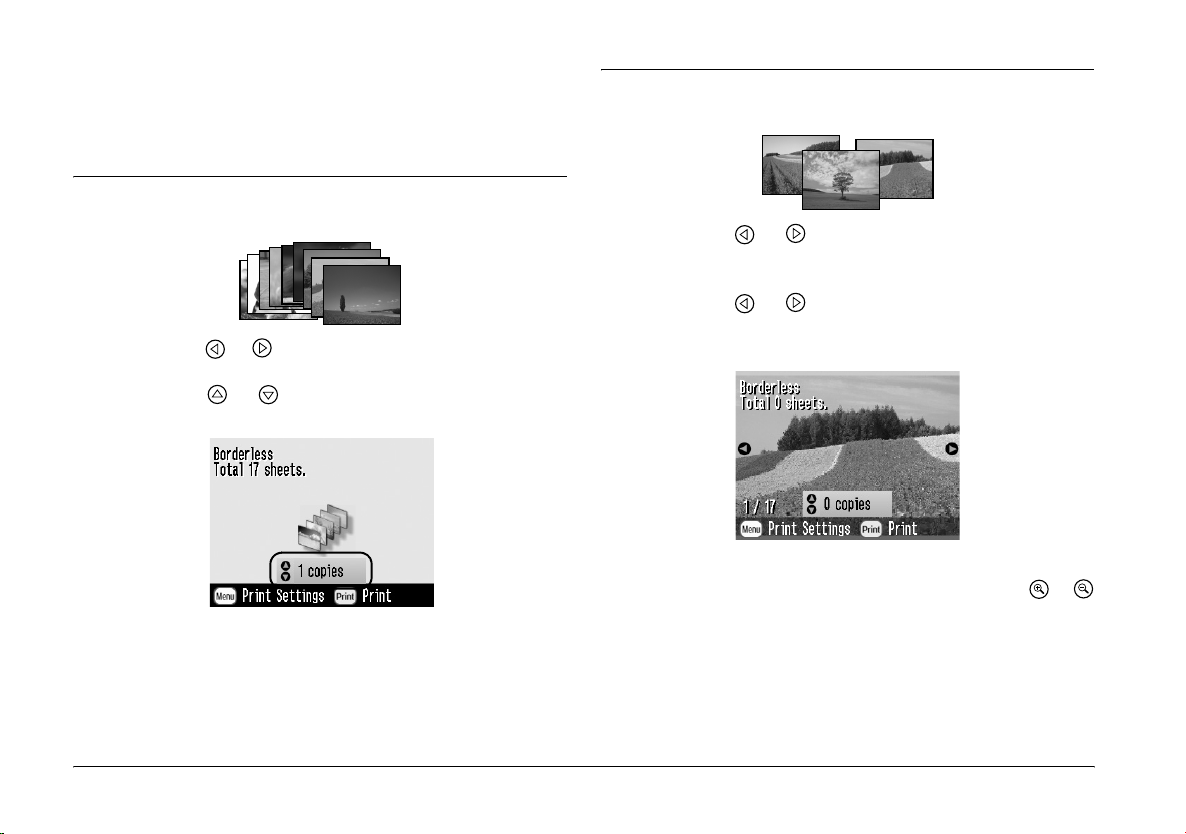
Printing All Photos
1. Press or to highlight Print All, then press OK.
2. Press or to select the number of copies.
3. Press OK to confirm your print selections.
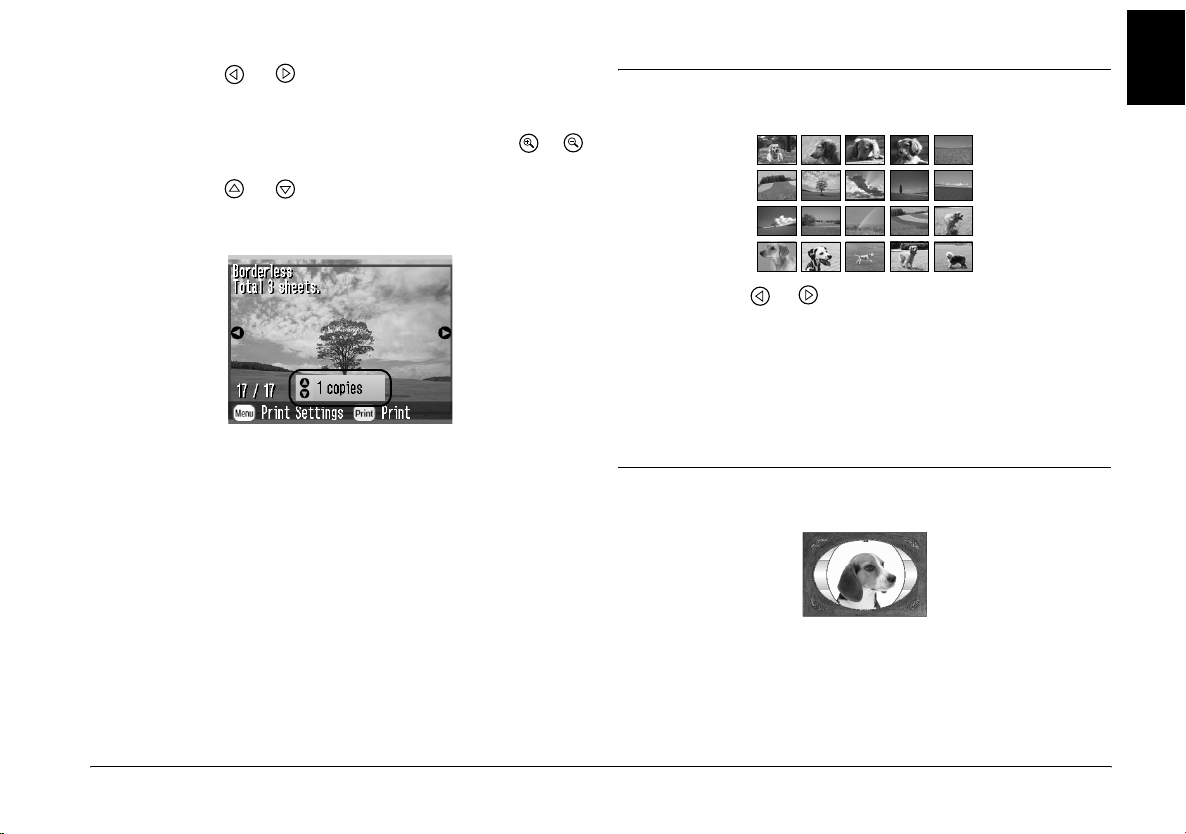
Printing Several Photos
1. Press or to choose Print Some, then press
OK.
2. Press or to view the photo you want to
print.
Note:
You can switch the view of photos by pressing or
4. Press Print to start printing.
22 Basic Photo Printing
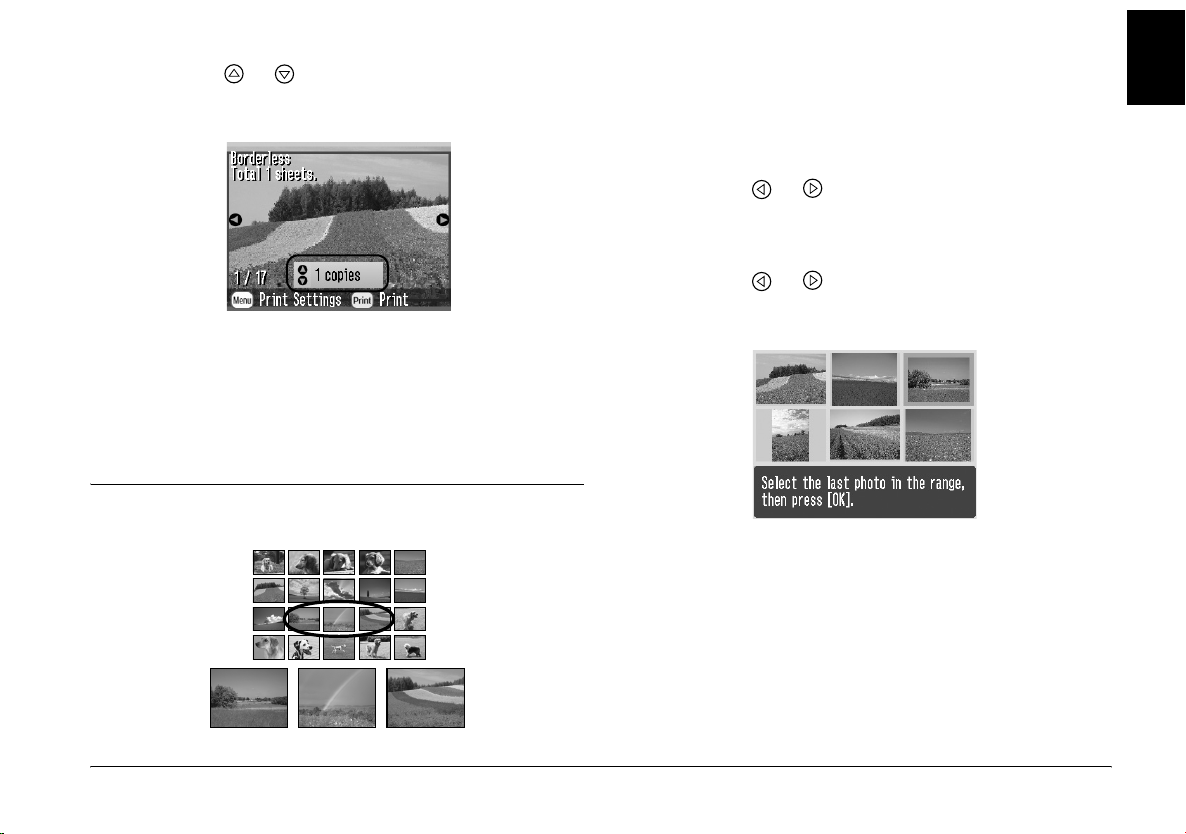
3. Press or to choose the number of copies to
print for that photo (up to 100).
4. Repeat steps 2 and 3 for additional photos.
5. Press OK to confirm your print selections.
6. Press Print to start printing.
Printing Range of Photos
Follow the steps below to print a range (or sequence)
of consecutive photos from your camera’s memory
card. Selecting a range is convenient because you
don’t have to choose each individual photo.
1. Press or to highlight Print Range, then
press OK. Thumbnail images of the photos
appear.
2. Press or to choose the first photo. Then
press OK.
English
Basic Photo Printing 23
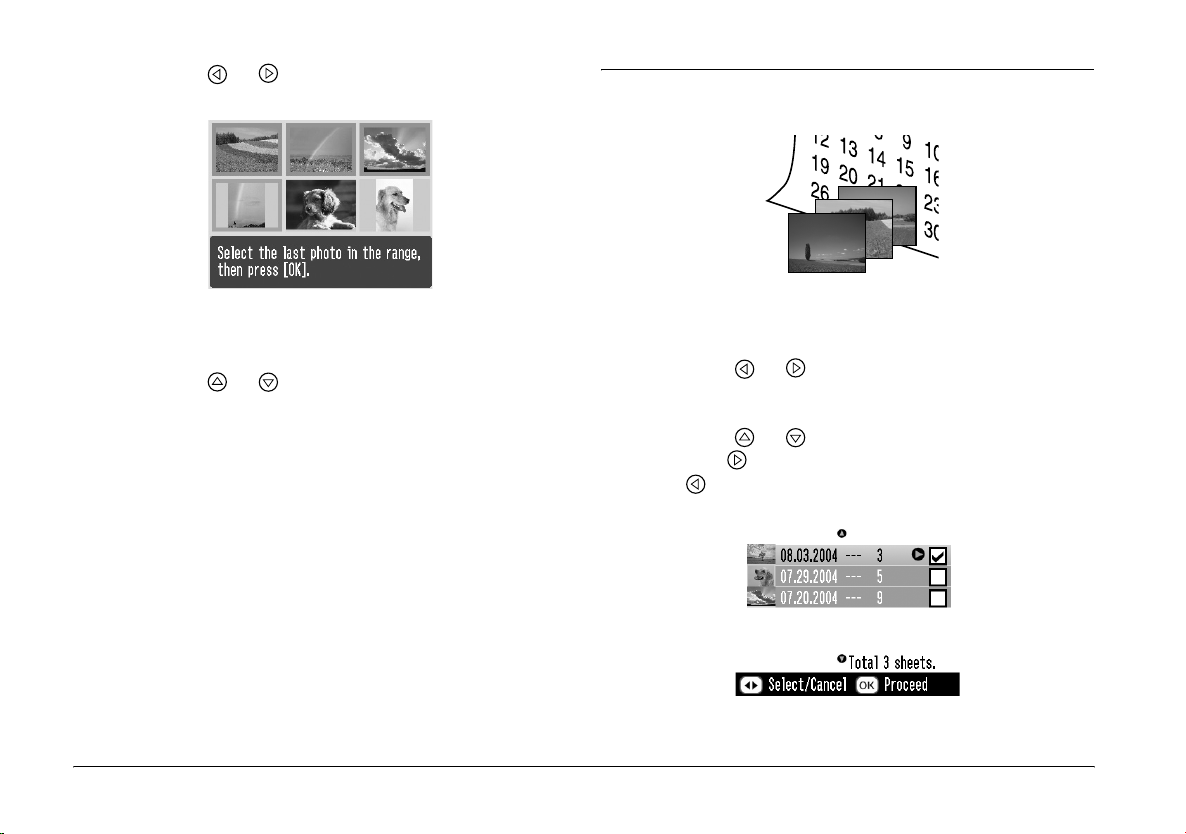
3. Press or to choose the last photo.
Printing Photos Searching by Date
4. Make sure that the photos you want to print are
highlighted in blue, then press OK.
5. Press or to select the number of copies.
6. Press OK to confirm your print selections.
7. Press Print to start printing.
24 Basic Photo Printing
If you know the date the photos were taken, you can
find and print them easily using this menu.
1. Press or to highlight Print by Date, then
press OK.
2. Press or to highlight the date you want,
then to check the date. To clear the check, press
.
3. Press OK.
4. Press or to select the photo you want.
Note:
You can switch the view of photos by pressing or
5. Press or to select the number of copies for
that photo.
6. Repeat steps 4 and 5 for additional photos.
Printing an Index
1. Press or to highlight Print Index, then press
OK.
2. Press OK to confirm your print selections.
3. Press Print to start printing.
English
7. Press OK to confirm your print selections.
8. Press Print to start printing.
Printing a Photo With a Frame
Basic Photo Printing 25
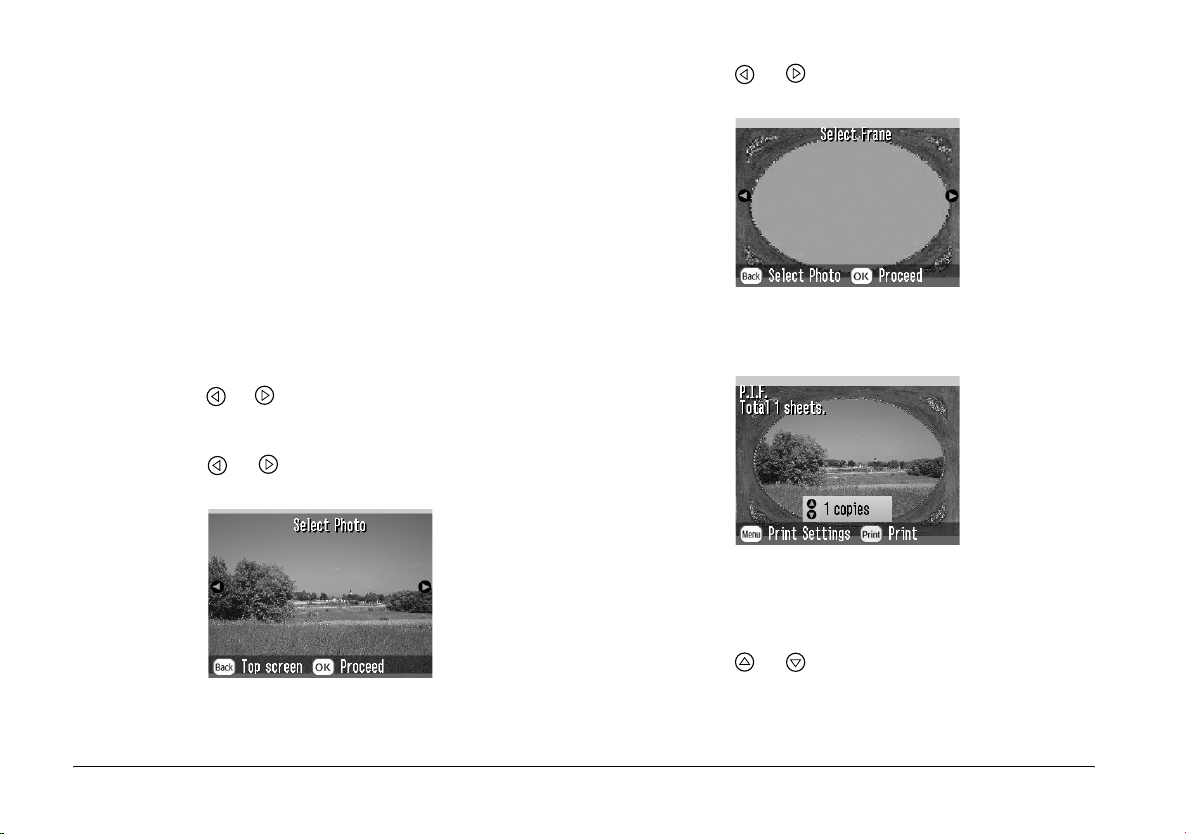
You can make your photo more fun by printing it with
a frame! As well as the preset frames, you can add
frames from the memory card by using PIF
DESIGNER and EPSON PRINT Image Framer Tool
software. For details on installing the software, see
“Installing the Printer Software” on page 62. For
details on using the software see the online User’s
Guide.
Note:
If you want to print a photo with a frame you previously
specified by EPSON camera, see “Printing a Photo With a
Frame Specified by Camera” on page 35.
1. Press or to select the Add Frame and press
OK.
2. Press or to select the photo and press OK.
3. Press or to select the frame and press OK.
A preview of the photo and the frame you selected
appears.
Note:
If you select a frame from the memory card, you cannot
see the preview of the photo and frame.
26 Basic Photo Printing
4. Press or to select the number of copies.
5. Press OK to confirm your print selections.
6. Press Print to start printing.
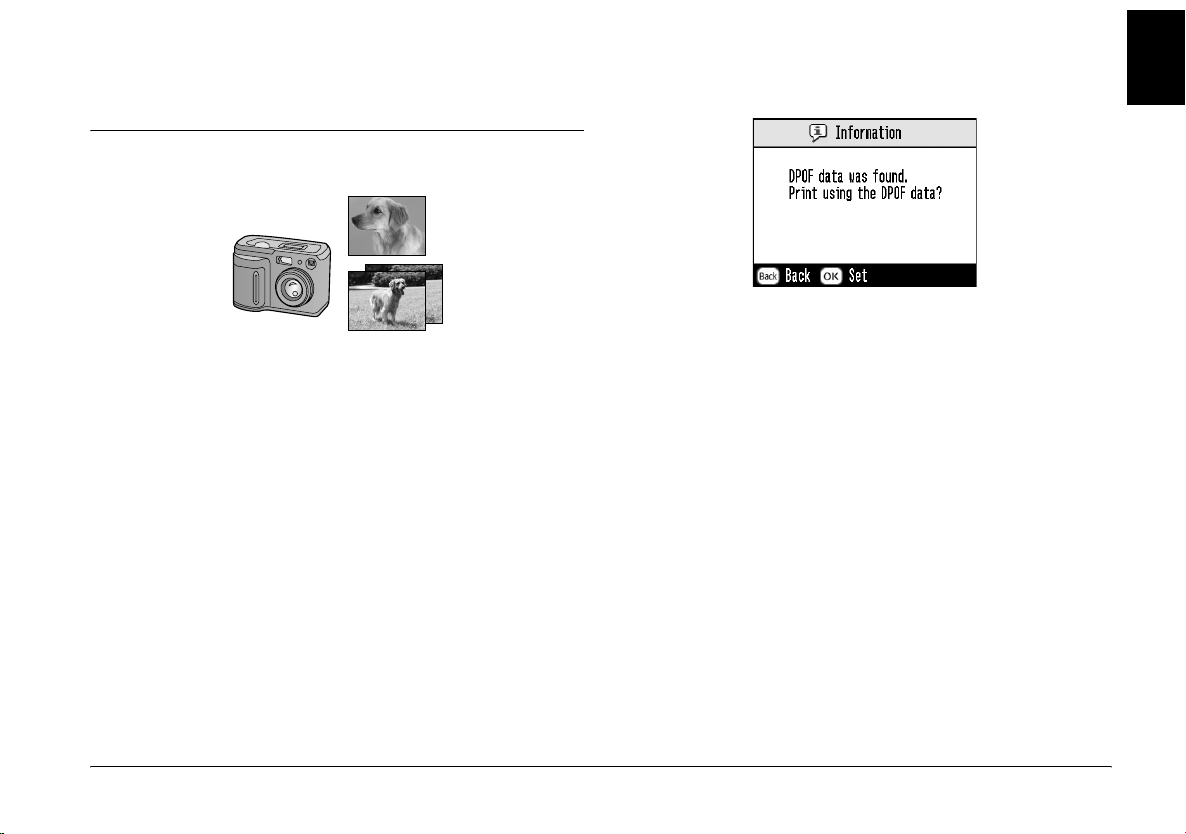
Printing Camera-Selected DPOF Photos
If your camera supports DPOF (Digital Print Order
Format), you can use it to pre-select which photos and
how many copies you want to print. See your camera’s
manual to choose photos for printing with DPOF, then
insert your memory card in PictureMate. PictureMate
automatically reads your pre-selected photos.
1. Load paper and a memory card that contains
DPOF data.
2. When this message appears, press OK.
English
3. Press Print to start printing.
Basic Photo Printing 27
Loading…
Additional Information:
Print, scan, and share directly from your iPhone®, iPad®, or iPod® Touch. Print photos, emails, webpages and files including Microsoft® Word, Excel®, PowerPoint® and PDF documents. Also supports Box, Dropbox, Evernote®*1, Google Drive™ and Microsoft OneDrive™. Epson iPrint makes printing easy and convenient whether your printer is in the next room or across the world. Key Features • Print, scan, and share directly from your iPhone, iPod Touch or iPad • Print from anywhere in the world to email-enabled Epson printers using remote print functionality • Print photos, PDFs and Microsoft Office documents such as Word, Excel and PowerPoint • Print stored files, email attachments, and online files from Box, Dropbox, Evernote, Google Drive and Microsoft OneDrive • Capture a document with your device camera, format, enhance, then save, ready to print • Scan from your Epson all-in-one and share your file (save to your device, send via email or save online) • Copy documents and photos using your mobile device and a nearby Epson printer • Transfer files between your device and an SD card or USB drive via an Epson printer • Check your printer’s status and ink levels • Print within a complex network environment using manual IP printer setup • Get help with a built-in FAQ section Advanced Features • Print high quality photos with automatic backlight and color cast correction • Choose and print multiple photos • Print your email attachments and stored files • Configure your print options including paper size and type, number of copies, page range and one- or two-sided printing • Print with and without borders • Switch between color or monochrome printing • Choose from different scanning resolutions and image types • Optimize print quality • Buy ink and supplies for your printer • Setup & register to Epson Connect • Manage remote printers

1
R4CF95P
SHORT.bk
Rev. D
FRONT.FM
A5 size
2/22/05
R
Proof Sign-off:
H. Yamasaki CRE Nakano
M. Otsuka
editor name
En
glish
Photo Printer
No part of this publication may be reproduced, stored in a retrieval
system, or transmitted in any form or by any means, electronic,
mechanical, photocopying, recording, or otherwise, without the prior
written permission of Seiko Epson Corporation. The information
contained herein is designed only for use with this Epson printer. Epson
is not responsible for any use of this information as applied to other
printers.
Neither Seiko Epson Corporation nor its affiliates shall be liable to the
purchaser of this product or third parties for damages, losses, costs, or
expenses incurred by the purchaser or third parties as a result of
accident, misuse, or abuse of this product or unauthorized
modifications, repairs, or alterations to this product, or (excluding the
U.S.) failure to strictly comply with Seiko Epson Corporation’s
operating and maintenance instructions.
Seiko Epson Corporation shall not be liable for any damages or
problems arising from the use of any options or any consumable
products other than those designated as Original Epson Products or
Epson Approved Products by Seiko Epson Corporation.
Seiko Epson Corporation shall not be held liable for any damage
resulting from electromagnetic interference that occurs from the use of
any interface cables other than those designated as Epson Approved
Products by Seiko Epson Corporation.
EPSON
®
is a registered trademark and PictureMate™ is a trademark
of Seiko Epson Corporation.
PRINT Image Matching™ and the PRINT Image Matching logo are
trademarks of Seiko Epson Corporation.
Copyright © 2001 Seiko Epson Corporation. All rights reserved.
USB DIRECT-PRINT™ and the USB DIRECT-PRINT logo are
trademarks of Seiko Epson Corporation.
Copyright © 2002 Seiko Epson Corporation. All rights reserved.
Microsoft
®
and Windows
®
are registered trademarks of Microsoft
Corporation.
Apple
®
and Macintosh
®
are registered trademarks of Apple Computer,
Inc.
Part of the photo data stored on the Printer Software CD- ROM is
licensed from Design Exchange Co., Ltd. Copyright © 2000 Design
Exchange Co., Ltd. All rights reserved.
DPOF™ is a trademark of CANON INC., Eastman Kodak Company,
Fuji Photo Film Co., Ltd. and Matsushita Electric Industrial Co., Ltd.
The Bluetooth word mark and logos are owned by the Bluetooth SIG,
Inc. and any use of such marks by Seiko Epson Corporation is under
license.
Zip
®
is a registered trademark of Iomega Corporation.
SD™ is a trademark.
Memory stick, Memory Stick Duo, Memory Stick PRO, and Memory
Stick PRO Duo are trademarks of Sony Corporation.
xD-Picture Card™ is a trademarks of Fuji Photo Film Co.,Ltd.
General Notice: Other product names used herein are for identification
purposes only and may be trademarks of their respective owners. Epson
disclaims any and all rights in those marks.
Copyright © 2005 Seiko Epson Corporation. All rights reserved.
®
- Topics
- manualsbase, manuals,
- Collection
- printer-manuals-epson; printer-manuals; manuals; additional_collections
- Language
- English
- Item Size
- 24.3M
- Addeddate
- 2020-08-14 11:50:07
- Identifier
- manualsbase-id-250877
- Identifier-ark
- ark:/13960/t70w7pv95
- Ocr
- ABBYY FineReader 11.0 (Extended OCR)
- Page_number_confidence
- 100.00
- Ppi
- 300
- Scanner
- Internet Archive Python library 1.9.4
plus-circle Add Review
plus-circle Add Review
comment
Reviews
There are no reviews yet. Be the first one to
write a review.
88
Views
DOWNLOAD OPTIONS
download 1 file
ABBYY GZ download
Temporarily Unavailable
DAISY
For users with print-disabilities
Temporarily Unavailable
EPUB
download 1 file
FULL TEXT download
download 1 file
ITEM TILE download
download 1 file
PAGE NUMBERS JSON download
download 1 file
PDF download
download 1 file
SINGLE PAGE PROCESSED JP2 ZIP download
download 1 file
TORRENT download
download 12 Files
download 6 Original
SHOW ALL
IN COLLECTIONS
Manuals: Epson
Printer Manuals
The Manual Library
Additional Collections
Uploaded by
chris85
on