
View the manual for the Epson Perfection 1250 Photo here, for free. This user manual comes under the category scanners and has been rated by 1 people with an average of a 7.5. This manual is available in the following languages: English. Do you have a question about the Epson Perfection 1250 Photo?
Ask your question here
Frequently asked questions
Can’t find the answer to your question in the manual? You may find the answer to your question in the FAQs about the Epson Perfection 1250 Photo below.
Is the manual of the Epson Perfection 1250 Photo available in English?
Yes, the manual of the Epson Perfection 1250 Photo is available in English .
Is your question not listed? Ask your question here
Warnings, Cautions, and Notes
Unpacking
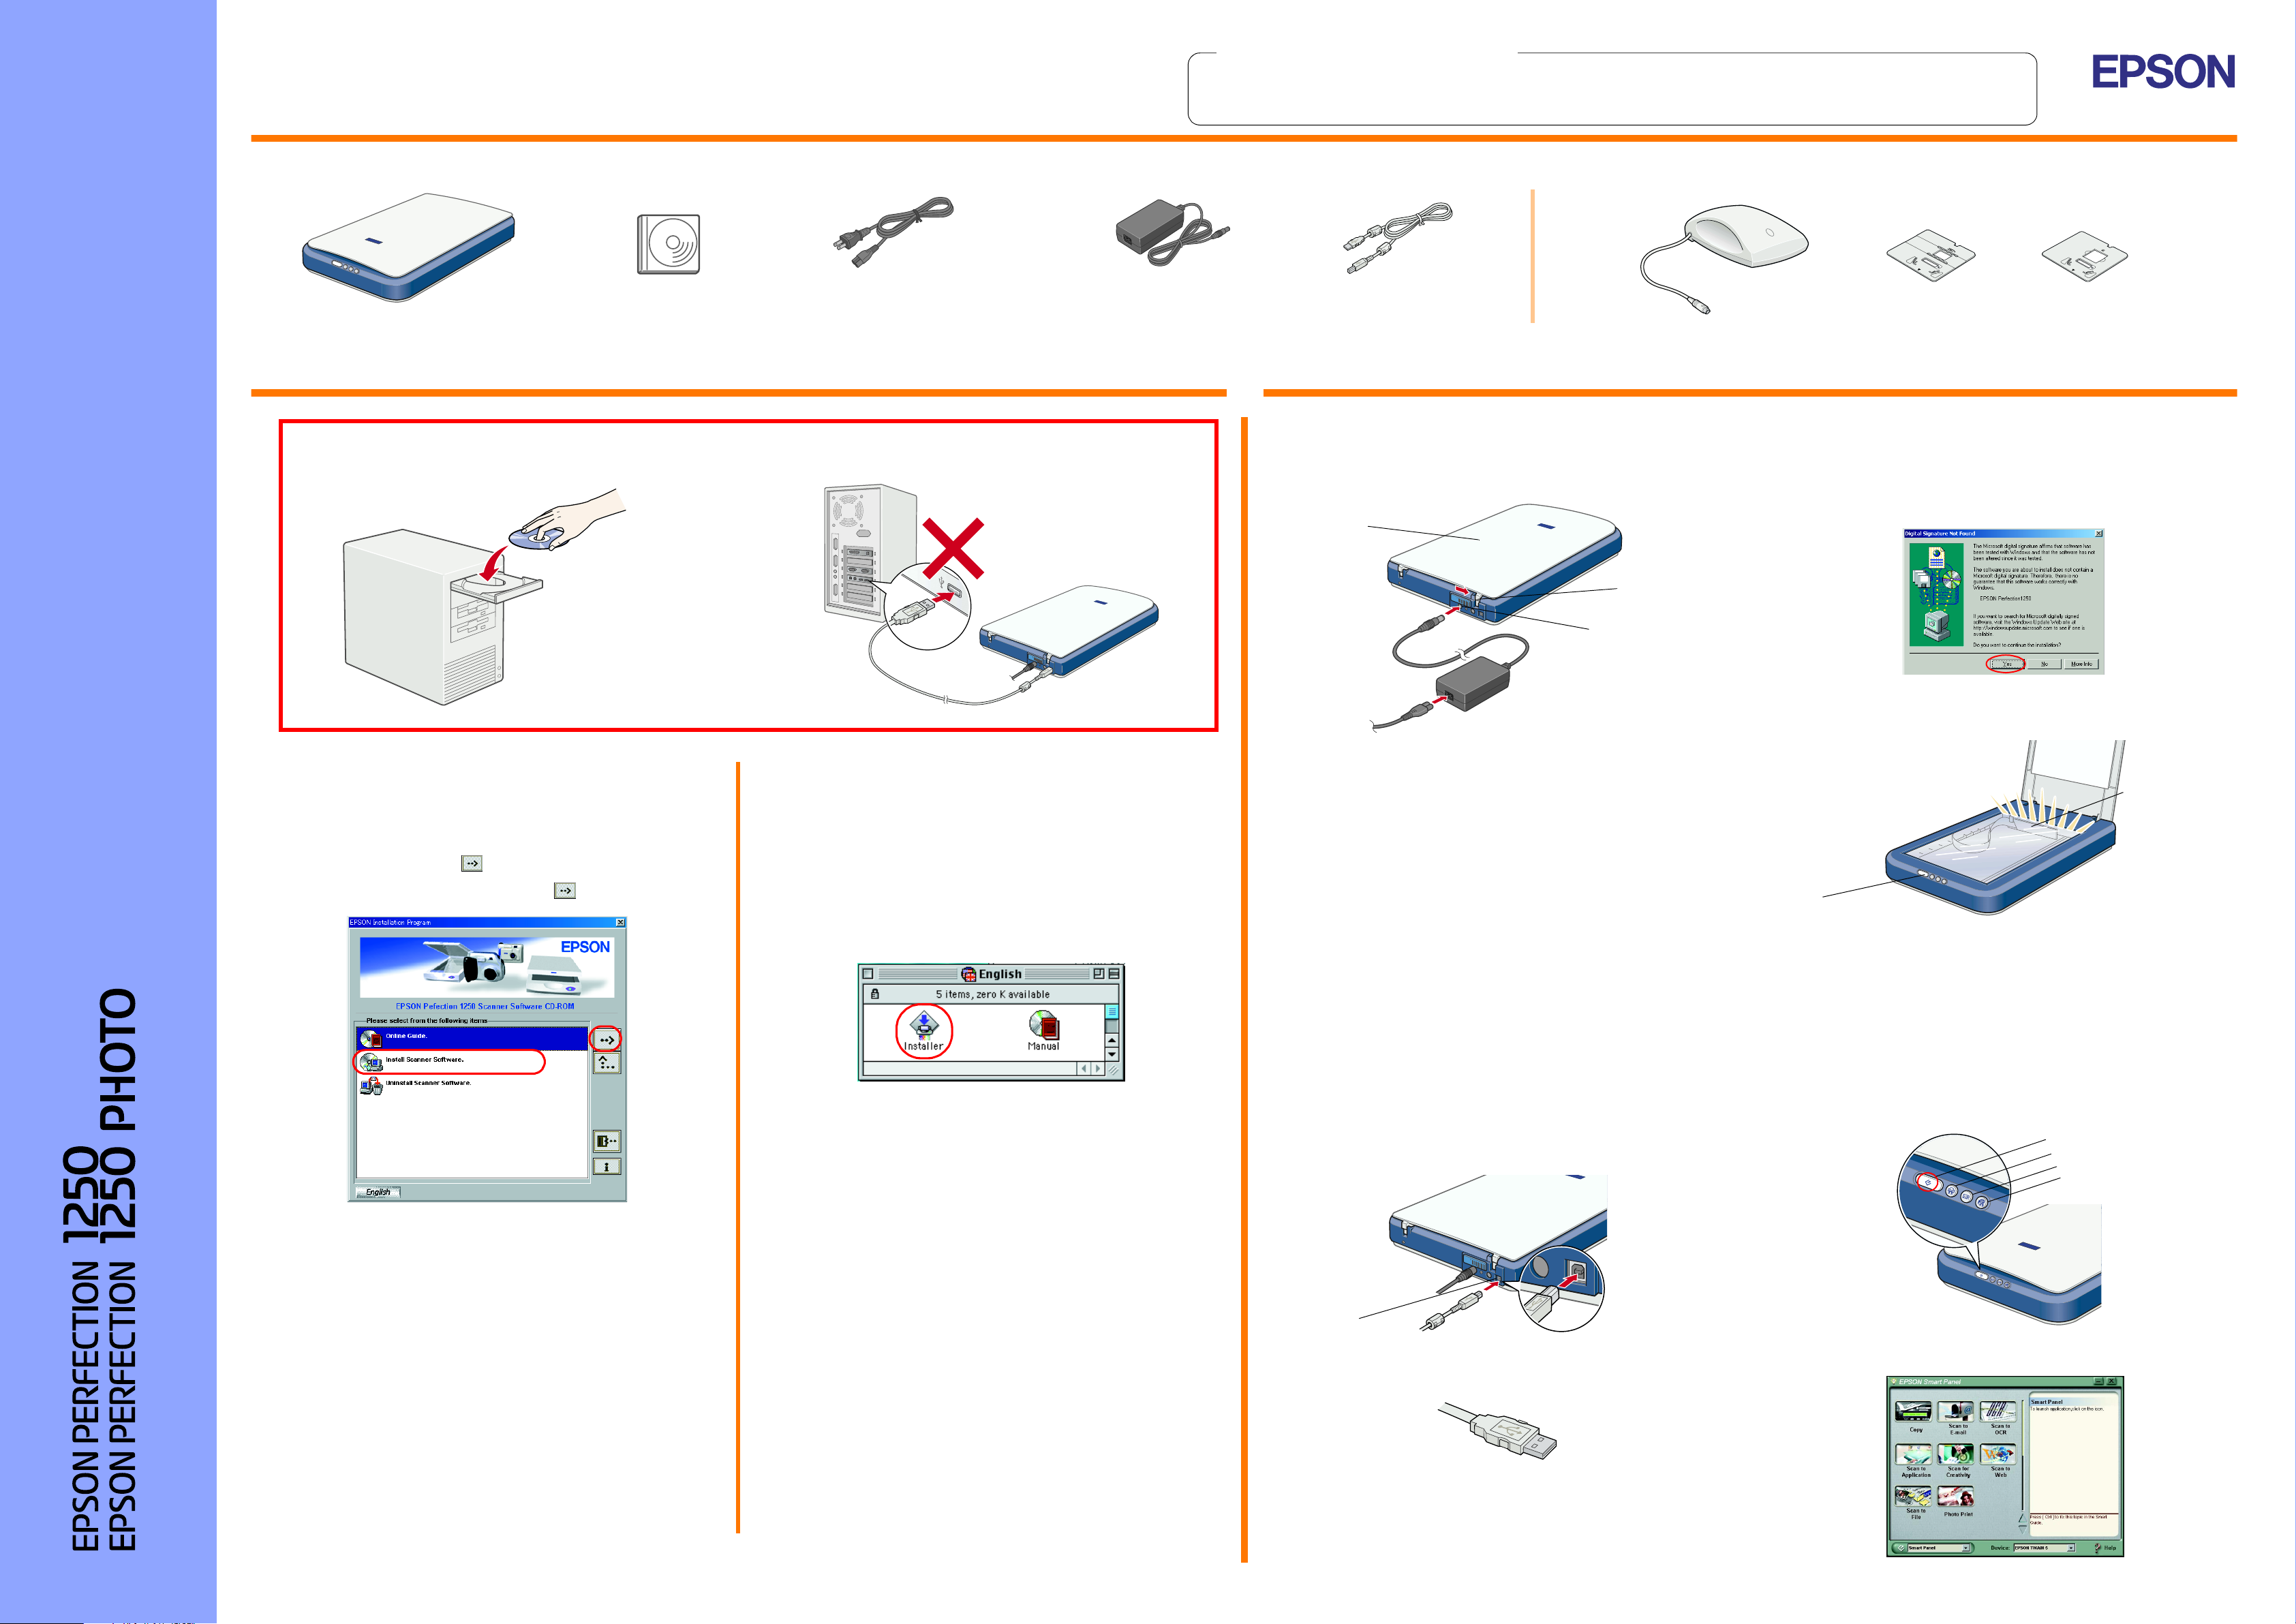
Make sure the following parts are included and not damaged. If you find any missing or damaged items, contact your EPSON dealer immediately.
English
1. Installing the Software 2. Setting up the Scanner
Setup
Insert the scanner software CD in the CD-ROM drive and install the software BEFORE
connecting the scanner to your computer.
scanner
scanner software CD
power cord
The power cord is designed to match
the voltage of the country of purchase.
w
AC adapter
The AC adapter is designed to match
the voltage of the country of purchase.
Warnings must be followed
carefully to avoid bodily injury.
c
USB cable
Cautions must be observed to
avoid damage to your
equipment.
For the Perfection 1250 Photo
The Perfection 1250 Photo comes with the Film Adapter which is also available as an option for the Perfection 1250.
1. Unlock and plug in the scanner
1. Slide the transportation lock to the right and connect the AC adapter as
shown below.
Notes contain important information
and useful tips on the operation of your
scanner.
Film Adapter
3. The scanner is recognized automatically. For Windows users, the dialog
box appears during the recognition process.
Note for Windows 2000 users:
When you connect the scanner, the following dialog box appears. Click
Yes to continue.
film holders
For Windows
1. Insert the scanner software CD in the CD-ROM drive.
2. The EPSON Installation Program dialog box appears. Select your
preferred language and click .
3. Select Install Scanner Software, and click .
For Macintosh
1. Insert the scanner software CD in the CD-ROM drive.
2. Double-click your preferred language icon in the EPSON folder.
Note:
If the EPSON folder does not appear on your desktop, double-click the
EPSON icon on your desktop.
document cover
transportation lock
DC inlet
Note:
If you plan to use the Film Adapter, install it first.
2. Plug the other end of the power cord into an electrical outlet and make
sure the indicator light turns on in green.
c
Caution:
❏ It is not possible to change the AC adapter’s input and output
voltage. If the label on the AC adapter does not show the correct
voltage, contact your dealer. Do not plug in the power cord.
4. Open the document cover and make sure the fluorescent lamp on the
carriage turns on.
carriage
(in the home position)
light
Note:
If the EPSON Installation Program dialog box does not appear,
double-click the My Computer icon. Click the CD-ROM icon, then select
Open from the File menu. Then double-click Setup.exe.
4. Make sure all the software in the list is selected and click OK.
3. Double-click the Installer icon.
4. The Installer dialog box appears. Be sure to install all the software in
the list.
5. Click Start and follow the on-screen instructions.
This completes the scanner software installation. Next,
set up the scanner as described in “2. Setting up the
Scanner.”
❏ Whenever you unplug the scanner, wait at least 10 seconds
before plugging it back in. Rapidly plugging and unplugging the
scanner can damage it.
Note:
❏ This scanner does not have a power button. It turns on when you
connect the AC adapter and then plug in the power cord.
❏ Be sure to unplug the scanner once you have finished using it. The
scanner turns off when unplugged.
2. Connect the USB cable
1. Connect one end of the USB cable to the scanner’s USB port.
USB port
Note:
The fluorescent lamp turns off if you unplug the USB cable, and turns
on again if you connect the USB cable.
Now you are ready to use your scanner.
3. Check the installation and setup
Follow these steps to make sure the installation and setup are completed
properly, and the scanner operates correctly.
1. Press the
]
Start button on the scanner.
Start button
Photo Print button
Scan to E-mail button
Scan to Web button
5. Then, follow the on-screen instructions until all the software is installed.
When a message appears informing you that installation is complete,
click OK.
2. Connect the other end of the USB cable to the USB port on your
computer.
2. If the EPSON Smart Panel window appears, your scanner is now set
up and ready to use.
This completes the scanner software installation. Next,
set up the scanner as described in “2. Setting up the
Scanner.”
Read the Safety Instructions on the back of this sheet when setting up and
Color Image Scanner
using this scanner.
Read this side first!
4014161-00
x00
Safety Instructions
Read all these instructions and save them for later reference. Follow all
warnings and instructions marked on the scanner.
When using the scanner
❏ Do not place the scanner or the AC adapter on an unstable surface,
near a radiator or heat source.
❏ Do not use the scanner or the AC adapter near water, in excess
humidity, outdoors, or handle either device and the power plug with wet
hands.
❏ Never disassemble, modify, or attempt to repair the AC adapter, power
cord, scanner, and option by yourself except as specifically explained
in the scanner’s guides.
❏ Do not insert objects into any openings as they may touch dangerous
voltage points or short out parts. Beware of electrical shock hazards.
❏ Unplug the scanner and the AC adapter, and refer servicing to qualified
service personnel under the following conditions:
❏ If the power cord or plug is damaged;
❏ If liquid has entered the scanner or the AC adapter;
❏ If the scanner or the AC adapter has been dropped or the case
damaged;
❏ If the scanner or the AC adapter does not operate normally or
exhibits a distinct change in performance. (Do not adjust controls
that are not covered by the operating instructions.)
❏ Unplug the scanner and the AC adapter before cleaning. Clean with a
damp cloth only. Do not use liquid or aerosol cleaners.
❏ If you are not going to use the scanner for a long period, be sure to
unplug the AC adapter from the electrical outlet.
For United Kingdom users
The following safety information applies to the AC adapter.
Safety information
w
Warning:
Refer to the rating plate for the voltage and check that the appliance
voltage corresponds to the supply voltage.
Important: The wires in the mains lead fitted to this appliance are
coloured in accordance with the following code:
When choosing a place for the scanner
❏ Place the scanner close enough to the computer for the interface cable
to reach it easily.
❏ Place the scanner and the AC adapter near an electrical outlet where
the power cord can be easily unplugged.
Note for French-speaking users:
Installez le scanner et l’adapteur près d’une prise électrique permettant
de débrancher facilement le cordon d’alimentation.
❏ Allow space behind the scanner for the cables, and space above the
scanner so that you can raise the document cover fully.
❏ Keep the scanner and the AC adapter away from high temperatures,
humidity and excessive dirt or dust. Also avoid using or storing the
scanner in places subject to rapid changes of temperature and humidity.
❏ Keep the scanner and the AC adapter away from direct sunlight and
strong light sources.
❏ Avoid places subject to shocks and vibrations.
When choosing a power source
❏ Use only the AC adapter model A130B/E that comes with your scanner.
Using any other adapter could cause fire, electrical shock, or injury.
❏ The AC adapter is designed for use with the scanner with which it was
included. Do not attempt to use it with other electronic devices unless
specified.
❏ Use only the type of power source indicated on the AC adapter’s label,
and always supply power directly from a standard domestic electrical
outlet with the AC power cord that meets the relevant local safety
standards.
❏ Avoid using outlets on the same circuit as photocopiers or air control
systems that regularly switch on and off.
❏ If you use an extension cord with the scanner, make sure the total
ampere rating of the devices plugged into the extension cord does not
exceed the cord’s ampere rating. Also, make sure the total ampere
rating of all devices plugged into the electrical outlet does not exceed
the electrical outlet’s ampere rating. Do not place multiple loads on the
electrical outlet.
❏ Do not let the power cord become damaged or frayed.
❏ Power-supply cords should be protected from abrasion, cuts, crimping
and kinking. Be sure to place your cords to avoid any damage. Do not
place objects on top of the power cord and the AC adapter or allow the
power cord to be stepped on or run over. You should take special care
to try to keep the power cord straight at the ends and the points where
it enters and leaves the transformer.
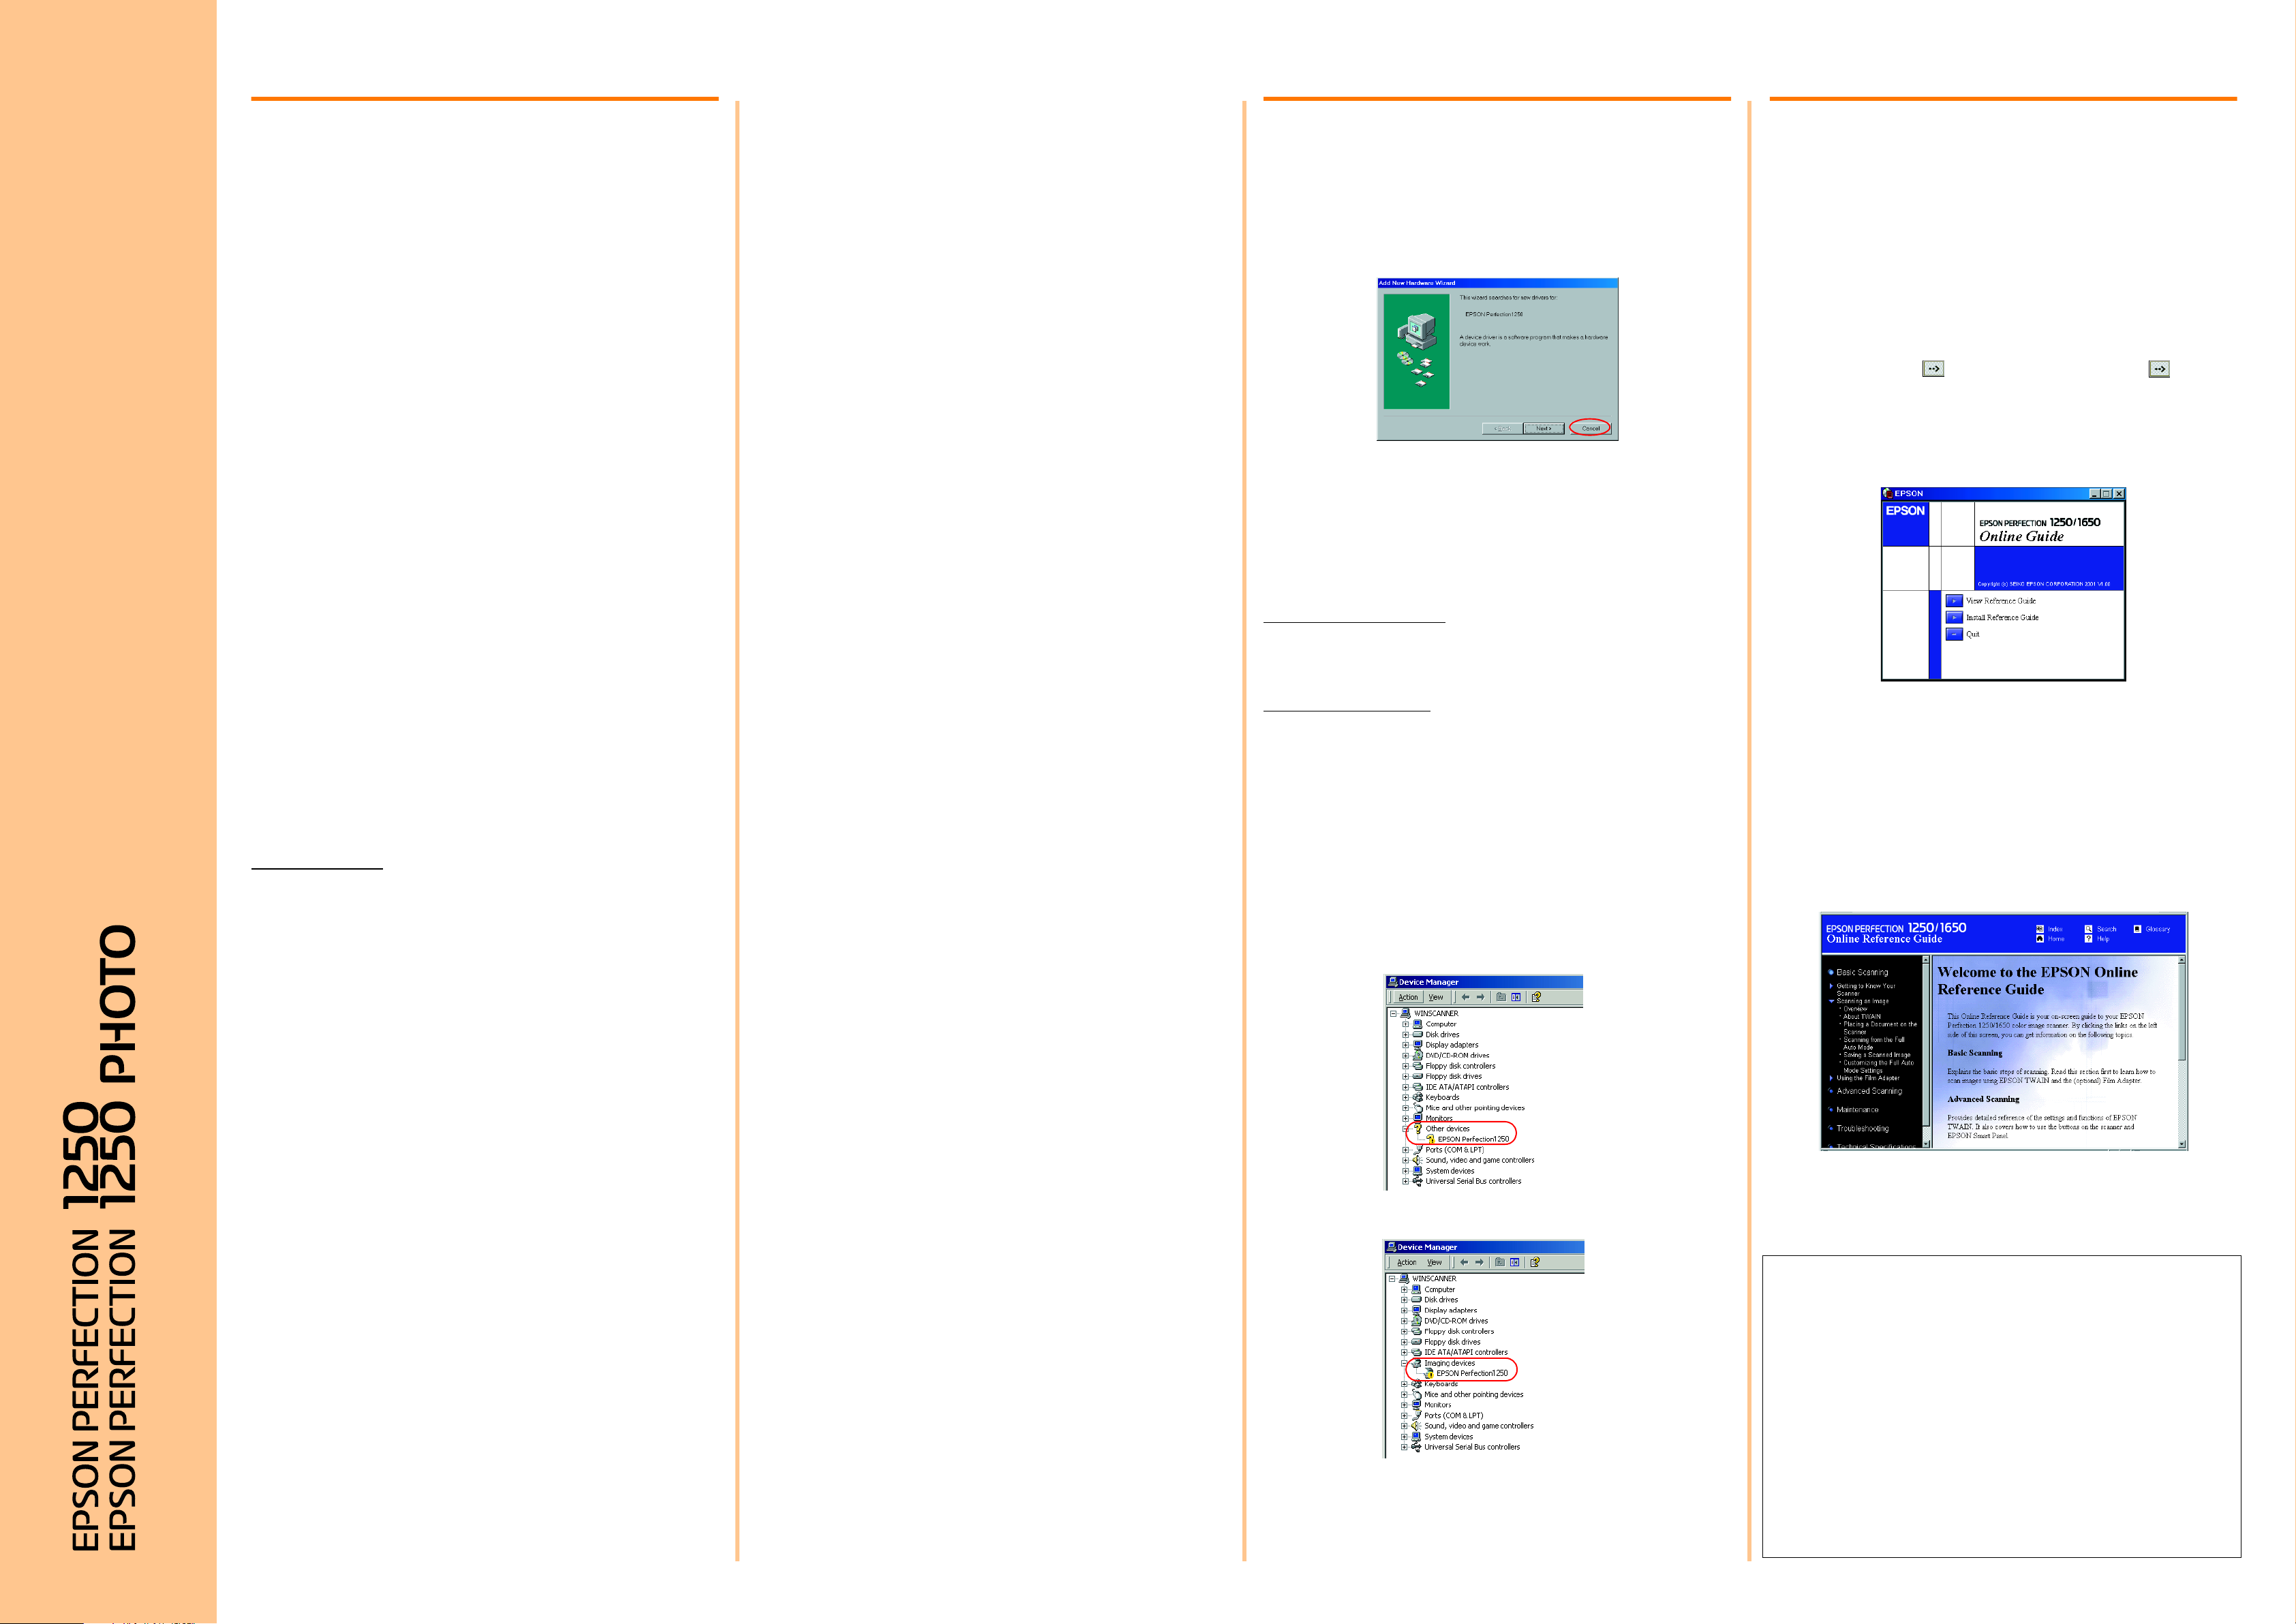
Troubleshooting
For Windows
If the Add New Hardware Wizard or the Found New Hardware Wizard dialog
box appears, click Cancel and follow the steps described on the reverse
side. Do not click Next.
Recovering from Scanner Software Installation
Problems
If you canceled the scanner software installation before the procedure was
completed, or you connected the scanner before installing the software,
EPSON TWAIN may be incorrectly installed.
Follow these steps to install the software correctly.
For Windows Me, 98 users
1. Disconnect the AC adapter and the USB cable from the scanner.
2. Follow the steps described on the reverse side.
For Windows 2000 users
1. Make sure your scanner is plugged in and connected to your computer.
2. Right-click the My Computer icon on your desktop, and then click
Properties.
3. In the System Properties dialog box, select the Hardware tab and then
click Device Manager….
4. Click the plus (+) sign next to Other devices or Imaging devices. If your
scanner appears under Other devices with a question (?) mark or under
Imaging devices with an exclamation (!) mark, right-click
? EPSON Perfection 1250 or ! EPSON
select Uninstall….
Your scanner appearing under Other devices with a question (?) mark:
Perfection 1250
, and then
Getting Information from the
Online Reference Guide
To learn more about your scanner, see the Online Reference Guide which
includes detailed information on scanning and troubleshooting.
Note:
A Web browser must be installed on your computer to view the Online
Reference Guide.
1. Insert the scanner software CD in your CD-ROM drive.
2. For Windows users:
Select your preferred language in the EPSON Installation Program
dialog box and click . Select Online Guide and click .
For Macintosh users:
Double-click your preferred language icon, and then double-click the
Manual icon. Finally, double-click the Online Guide icon.
3. The online guide menu appears.
4. For viewing the Online Reference Guide, click View Reference Guide.
For installing the guide, click Install Reference Guide and follow the
on-screen instructions.
Note:
If your hard disk does not have enough space for installing the Online
Reference Guide, view it directly from the CD.
5. When the Online Reference Guide opens, use the table of contents in
the guide to access all topics in the guide. Click a main entry (and a sub
entry) to view topics under the entry, and click a topic to go to that page.
Click Help to get information on how to use the guide.
Blue — Neutral
Brown — Live
If you have to fit a plug:
As the colours of the mains lead of this appliance may not match the
coloured markings used to identify the terminals in a plug, please observe
the following:
❏ The blue wire must be connected to the terminal in the plug marked with
the letter N.
❏ The brown wire must be connected to the terminal in the plug marked
with the letter L.
❏ If damage occurs to the plug, replace the cord set or consult a qualified
electrician.
❏ Replace fuses only with fuses of the correct size and rating.
❏ If you plan to use the scanner in Germany, observe the following:
To provide adequate short-circuit protection and over-current protection
for this scanner, the building installation must be protected by a 10 or
16 amp circuit breaker.
Note for German-speaking users:
Bei Anschluss des Scanner an die Stromversorgung muss
sichergestellt werden, dass die Gebäudeinstallation mit einer
10 A- oder 16 A-Sicherung abgesichert ist.
❏ For US and Canadian users
❏ To reduce the risk of fire, use only the included power cord or a 6
to 10 feet long UL-approved type SPT-2 or heavier, 2 x 18 AWG
cord with a 125 V 10 A plug and 125 V 7 A connector.
❏ If your AC Adapter is equipped with a polarized alternating-current
line plug (a plug having one blade wider than the other) and a
polarized power inlet, you must insert the plug into a power outlet
in a specific way. This is a safety feature. If you are unable to insert
the plug properly, try reversing the plug. If this fails again, contact
an electrician to replace your outlet. Be sure to use only the
polarized AC cord which comes with the scanner.
Your scanner appearing under Imaging devices with an exclamation (!) mark:
All rights reserved. No part of this publication may be reproduced, stored in a retrieval system, or
transmitted in any form or by any means, electronic, mechanical, photocopying, recording, or
otherwise, without the prior written permission of SEIKO EPSON CORPORATION. No patent
liability is assumed with respect to the use of the information contained herein. Neither is any liability
assumed for damages resulting from the use of the information contained herein.
Neither SEIKO EPSON CORPORATION nor its affiliates shall be liable to the purchaser of this
product or third parties for damages, losses, costs, or expenses incurred by purchaser or third
parties as a result of: accident, misuse, or abuse of this product or unauthorized modifications,
repairs, or alterations to this product.
SEIKO EPSON CORPORATION and its affiliates shall not be liable against any damages or
problems arising from the use of any options or any consumable products other than those
designated as Original EPSON Products or EPSON Approved Products by SEIKO EPSON
CORPORATION.
5. The Confirm Device Removal dialog box appears. Click OK.
6. Shut down your computer and unplug your scanner. Then disconnect
your scanner from your computer.
Keep this sheet handy for quick reference.
Customer Support: The United Kingdom and the Republic of Ireland (www.epson.co.uk); Australia (www.epson.com.au);
Singapore (www.epson.com.sg); Hong Kong (www.epson.com.hk); Malaysia (www.epson.com.my); India (www.epson.co.in);
Color Image Scanner
Philippines (Phone: (632) 813-6552)
Copyright© 2001 by SEIKO EPSON CORPORATION, Nagano, Japan. Printed in XXXX
7. Follow the steps described on the reverse side.
EPSON is a registered trademark of SEIKO EPSON CORPORATION.
Macintosh is a registered trademark of Apple Computer, Inc. Microsoft and Windows are registered
trademarks of Microsoft Corporation in the United States of America and other countries.
General Notice: Other product names used herein are for identification purposes only and may be
trademarks of their respective owners. EPSON disclaims any and all rights in those marks.
Can You Chip In?
Dear Patron: Please don’t scroll past this. The Internet Archive is a nonprofit fighting for universal access to quality information. We build and maintain all our own systems, but we don’t charge for access, sell user information, or run ads. We’d be deeply grateful if you’d join the one in a thousand users that support us financially.
We understand that not everyone can donate right now, but if you can afford to contribute this Friday, we promise it will be put to good use. Our resources are crucial for knowledge lovers everywhere—so if you find all these bits and bytes useful, please pitch in.
Can You Chip In? Dear Patron: Please don’t scroll past this. The Internet Archive is working to keep the record straight by recording government websites, news publications, historical documents, and more. If you find our work useful, please pitch in.
Epson Perfection 1250
EPSON Perfection
®
1250/1650 Series
Scanner Basics
basics.book Page i Monday, July 16, 2001 4:11 PM
View the manual for the Epson Perfection 1250 here, for free. This manual comes under the category scanners and has been rated by 1 people with an average of a 7.5.
This manual is available in the following languages: English. Do you have a question about the Epson Perfection 1250 or do you need help?
Ask your question here
Index
- Front Matter
- Contents
- Scanning from Start to Finish
- Problem Solving
- Requirements and Notices
- Index
Product Images (3)

Epson Perfection 1250 specifications
Below you will find the product specifications and the manual specifications of the Epson Perfection 1250.
The Epson Perfection 1250 scanner is a versatile scanning device equipped with features that make it easy to use. It is capable of scanning slides and negatives with the 35 mm slide adapter that comes included, allowing for a wide range of scanning options. The scanner is designed for easy installation and quick access to various features, making it convenient for users to achieve fast and accurate scans.
With the Epson Perfection 1250 scanner, users can create high-quality reprints and enlargements, as well as utilize the included software to design calendars, cards, and other projects. The scanner is designed to be user-friendly, making it suitable for both beginners and more experienced users.
Overall, the Epson Perfection 1250 scanner offers a reliable scanning solution with a variety of features that cater to different needs. Its versatility and ease of use make it a practical choice for those looking for a dependable scanner for their scanning needs.
General
| Brand | Epson |
| Model | Perfection 1250 | B11B145113GE |
| Product | scanner |
| EAN | 8715946124513 |
| Language | English |
| Filetype | User manual (PDF), Product Brochure (PDF), Datasheet (PDF) |
Frequently Asked Questions
Can’t find the answer to your question in the manual? You may find the answer to your question in the FAQs about the Epson Perfection 1250 below.
How do I troubleshoot if the scanner buttons on the Epson Perfection 1250 scanner are not responding?
If the scanner buttons on the Epson Perfection 1250 scanner are not responding, you can troubleshoot the issue by following these steps:
1. Check if the scanner has entered power-saving mode. Press the Start button to «wake» the scanner from sleep mode. Alternatively, unplug the USB cable or power cable and then plug it back in.
2. Ensure that the power cord is securely connected to the scanner and plugged into a power outlet.
3. Wait until the fluorescent lamp stays on, indicating that the scanner is ready for scanning. You may need to preview your scan to activate the lamp.
4. If you are using a USB hub, try connecting the scanner directly to the computer’s USB port using the USB cable that came with the scanner.
5. If you can see the scanner in the Windows Control Panel but still can’t scan, uninstall and reinstall the scanner software.
6. If you are using a Macintosh and the scanner buttons don’t work after plugging in the USB cable or AC adapter, wait until the scanner has initialized before using the buttons. If pressing a button doesn’t trigger any action, initialize the scanner by scanning an image from Smart Panel. After that, you should be able to use the buttons.
Please note that these troubleshooting steps are specific to the Epson Perfection 1250 scanner.
What should I do if the EPSON Smart Panel software is not detecting the Epson Perfection 1250 scanner?
If the EPSON Smart Panel software is not detecting the Epson Perfection 1250 scanner, you can try the following steps:
1. Check the physical connection: Ensure that the scanner is properly connected to your computer via the USB cable. Make sure the cable is securely plugged into both the scanner and the computer.
2. Restart the scanner and computer: Sometimes, a simple restart can resolve software detection issues. Turn off the scanner, disconnect the USB cable, and then restart both the scanner and your computer. After they have fully restarted, reconnect the USB cable.
3. Update the software: Visit the official Epson website and download the latest version of the EPSON Smart Panel software for the Epson Perfection 1250 scanner. Install the software according to the provided instructions.
4. Check compatibility: Ensure that the EPSON Smart Panel software is compatible with your operating system. Verify that your computer meets the minimum system requirements for the software.
5. Reinstall the software: If the issue persists, uninstall the EPSON Smart Panel software from your computer and then reinstall it. Follow the instructions provided by the software installer.
By following these steps, you should be able to resolve the issue of the EPSON Smart Panel software not detecting the Epson Perfection 1250 scanner.
How do I troubleshoot if the scanned documents or pictures appear distorted or have poor quality on the Epson Perfection 1250 scanner?
To troubleshoot if the scanned documents or pictures appear distorted or have poor quality on the Epson Perfection 1250 scanner, follow these steps:
1. Check the position and condition of your document. Make sure the document is placed flat against the scanner’s document table glass. If only part of the image is blurred, part of your document may be wrinkled or warped.
2. Try scanning at a higher resolution. Refer to page 18 of the manual for recommended settings.
3. Ensure that the document table glass is clean. You can find detailed instructions in the electronic Reference Guide.
4. Make sure the scanner is not tilted or placed on an unstable or uneven surface.
5. If the issue persists, check your software settings. Incorrect settings for your document type can affect the scanned image. Try different combinations of image settings using your scanner software.
6. Keep in mind that the colors on your printed image may not exactly match what you see on your screen due to differences in color representation between your monitor and printer.
7. If the file size is too big, adjust your scan settings by selecting a lower resolution, saving the file in a different format, or scanning only part of the image.
8. If the printed image is larger or smaller than the original size, check if you have changed the resolution or scaled the image. The image size settings in your software determine the size of the printed image.
9. If you notice a dotted line in the image, clean the document table glass as described in the electronic Reference Guide. If the line appears only on the printout, you may need to clean your printer.
By following these troubleshooting steps, you should be able to resolve any issues with distorted or poor-quality scanned documents or pictures on the Epson Perfection 1250 scanner.
Is the manual of the Epson Perfection 1250 available in English?
Yes, the manual of the Epson Perfection 1250 is available in English .
Is your question not listed? Ask your question here