
1. Подготовка принтера
Подготовьте принтер для начальной настройки.
Просмотреть »
2. Загрузка и подключение
Загрузив бесплатное программное обеспечение для своего устройства, можно приступить к установке подключения к принтеру.
Загрузить »
3. Несколько устройств?
Можно добавить несколько компьютеров и интеллектуальных устройств. Перейдите на веб-сайт http://epson.sn с нового устройства!

User’s Guide
NPD5532-01 EN

User’s Guide
Copyright
Copyright
No part of this publication may be reproduced, stored in a retrieval system, or transmitted in any form or by any
means, electronic, mechanical, photocopying, recording, or otherwise, without the prior written permission of
Seiko Epson Corporation. No patent liability is assumed with respect to the use of the information contained
herein. Neither is any liability assumed for damages resulting from the use of the information herein.
information contained herein is designed only for use with this Epson product. Epson is not responsible for any
use of this information as applied to other products.
Neither Seiko Epson Corporation nor its aliates shall be liable to the purchaser of this product or third parties for
damages, losses, costs, or expenses incurred by the purchaser or third parties as a result of accident, misuse, or
abuse of this product or unauthorized modications, repairs, or alterations to this product, or (excluding the U.S.)
failure to strictly comply with Seiko Epson Corporation’s operating and maintenance instructions.
Seiko Epson Corporation and its aliates shall not be liable for any damages or problems arising from the use of
any options or any consumable products other than those designated as Original Epson Products or Epson
Approved Products by Seiko Epson Corporation.
e
Seiko Epson Corporation shall not be held liable for any damage resulting from electromagnetic interference that
occurs from the use of any interface cables other than those designated as Epson Approved Products by Seiko
Epson Corporation.
© 2016 Seiko Epson Corporation. All rights reserved.
contents of this manual and the
e
specications
of this product are subject to change without notice.
2

User’s Guide
Trademarks
Trademarks
❏ EPSON® is a registered trademark, and EPSON EXCEED YOUR VISION or EXCEED YOUR VISION is a
trademark of Seiko Epson Corporation.
❏ PRINT Image Matching™ and the PRINT Image Matching logo are trademarks of Seiko Epson Corporation.
Copyright © 2001 Seiko Epson Corporation. All rights reserved.
❏ Epson Scan 2 soware is based in part on the work of the Independent JPEG Group.
❏
libti
Copyright © 1988-1997 Sam
Copyright © 1991-1997 Silicon Graphics, Inc.
Permission to use, copy, modify, distribute, and sell this soware and its documentation for any purpose is
hereby granted without fee, provided that (i) the above copyright notices and this permission notice appear in
all copies of the soware and related documentation, and (ii) the names of Sam Leer and Silicon Graphics
may not be used in any advertising or publicity relating to the soware without the specic, prior written
permission of Sam Leer and Silicon Graphics.
THE SOFTWARE IS PROVIDED «AS-IS» AND WITHOUT WARRANTY OF ANY KIND, EXPRESS,
IMPLIED OR OTHERWISE, INCLUDING WITHOUT LIMITATION, ANY WARRANTY OF
MERCHANTABILITY OR FITNESS FOR A PARTICULAR PURPOSE.
IN NO EVENT SHALL SAM LEFFLER OR SILICON GRAPHICS BE LIABLE FOR ANY SPECIAL,
INCIDENTAL, INDIRECT OR CONSEQUENTIAL DAMAGES OF ANY KIND, OR ANY DAMAGES
WHATSOEVER RESULTING FROM LOSS OF USE, DATA OR PROFITS, WHETHER OR NOT ADVISED
OF THE POSSIBILITY OF DAMAGE, AND ON ANY THEORY OF LIABILITY, ARISING OUT OF OR IN
CONNECTION WITH THE USE OR PERFORMANCE OF THIS SOFTWARE.
Leer
❏ Microso
❏ Apple, Macintosh, Mac OS, OS X, Bonjour, Safari, iPad, iPhone, iPod touch, and iTunes are trademarks of Apple
Inc., registered in the U.S. and other countries.
❏ Chrome™, Chrome OS™, and Android™ are trademarks of Google Inc.
❏ Adobe and Adobe Reader are either registered trademarks or trademarks of Adobe Systems Incorporated in the
United States and/or other countries.
❏ Intel
❏ General Notice: Other product names used herein are for
of their respective owners. Epson disclaims any and all rights in those marks.
, Windows®, and Windows Vista® are registered trademarks of Microso Corporation.
®
is a registered trademark of Intel Corporation.
®
identication
purposes only and may be trademarks
3

User’s Guide
Contents
Contents
Copyright
Trademarks
About This Manual
Introduction to the Manuals……………….7
Marks and Symbols…………………….7
Descriptions Used in this Manual……………8
Operating System References………………8
Important Instructions
Safety Instructions……………………..9
Printer Advisories and Warnings…………… 9
Advisories and Warnings for Setting Up/
Using the Printer……………………10
Advisories and Warnings for Using the
Printer with a Wireless Connection………..11
Protecting Your Personal Information………..11
Printer Basics
Part Names and Functions……………….12
Control Panel………………………. 14
Buttons and Lights…………………..14
Network Settings
Wi-Fi Connection……………………. 17
Connecting to a Computer……………….17
Connecting to a Smart Device……………. 19
Making Wi-Fi Settings from the Control Panel. . . . .19
Making Wi-Fi Settings by Push Button Setup. . . . 19
Making Wi-Fi Settings by PIN Code Setup
(WPS)…………………………..20
Checking the Network Connection Status……..21
Checking the Network Status Using Network
Light……………………………21
Printing a Network Connection Report……..22
Printing a Network Status Sheet………….25
Replacing or Adding New Access Points………26
Changing the Connection Method to a Computer. . 26
Restoring the Network Settings from the
Control Panel………………………. 28
Loading Paper
Paper Handling Precautions………………29
Available Paper and Capacities…………….30
List of Paper Types…………………..30
Loading Paper in the Rear Paper Feed………..31
Placing Originals on the Scanner
Glass
Placing Multiple Photos for Scanning at the
Same Time………………………….35
Printing
Printing from a Computer……………….36
Printing Basics — Windows……………..36
Printing Basics — Mac OS X……………..37
Printing on 2-Sides (for Windows only). . . . . . . . 39
Printing Several Pages on One Sheet……….40
Printing to Fit the Paper Size…………….41
Printing Multiple Files Together (for
Windows Only)…………………….43
Printing One Image on Multiple Sheets to
Create a Poster (for Windows Only)………. 44
Printing Using Advanced Features……….. 50
Printing Photos Using Epson Easy Photo Print. . 52
Printing from Smart Devices…………….. 53
Using Epson iPrint…………………..53
Canceling Printing…………………….54
Canceling Printing — Printer Button………..55
Canceling Printing — Windows………….. 55
Canceling Printing — Mac OS X…………..55
Copying
Copying Basics……………………… 56
Making Multiple Copies…………………56
Scanning
Scanning from the Control Panel………….. 57
Scanning from a Computer……………….57
Scanning Using Epson Scan 2……………57
Scanning from Smart Devices……………..63
Installing Epson iPrint………………..63
Scanning Using Epson iPrint…………… 63
4

User’s Guide
Contents
Relling
Checking the Ink Levels…………………65
Ink Bottle Codes……………………..65
Ink Bottle Handling Precautions……………65
Relling the Ink Tanks………………….66
Ink
Maintaining the Printer
Checking and Cleaning the Print Head……….70
Checking and Cleaning the Print Head —
Printer Buttons……………………. 70
Checking and Cleaning the Print Head —
Windows…………………………71
Checking and Cleaning the Print Head —
Mac OS X………………………..71
Replacing Ink inside the Ink Tubes………….71
Replacing Ink inside the Ink Tubes — Windows. . .72
Replacing Ink inside the Ink Tubes — Mac OS X. . 72
Aligning the Print Head…………………72
Aligning the Print Head — Windows………..72
Aligning the Print Head — Mac OS X……….73
Cleaning the Paper Path…………………73
Cleaning the Scanner Glass……………….74
Checking the Total Number of Pages Fed
rough the Printer……………………74
Checking the Total Number of Pages Fed
rough
Checking the Total Number of Pages Fed
rough the Printer — Windows…………. 75
Checking the Total Number of Pages Fed
rough the Printer — Mac OS X………….75
Saving Power………………………..75
Saving Power — Windows………………75
Saving Power — Mac OS X………………76
the Printer — Printer Buttons………74
Network Service and Software
Information
Epson Connect Service………………….77
Web Cong…………………………77
Running Web Cong on a Web Browser. . . . . . . 78
Running Web Cong on Windows……….. 78
Running Web
Windows Printer Driver…………………79
Guide to Windows Printer Driver…………80
Making Operation Settings for the Windows
Printer Driver……………………..82
Mac OS X Printer Driver………………..82
Guide to Mac OS X Printer Driver……….. 83
on Mac OS X………..79
Cong
Making Operation Settings for the Mac OS X
Printer Driver……………………..84
Epson Scan 2 (Scanner Driver)…………….85
Epson Event Manager…………………..85
Epson Easy Photo Print…………………86
E-Web Print (for Windows Only)………….. 86
EPSON Soware Updater. . . . . . . . . . . . . . . . . . . . 87
Uninstalling Applications………………..87
Uninstalling Applications — Windows……… 87
Uninstalling Applications — Mac OS X………88
Installing Applications………………….89
Updating Applications and Firmware………..89
Solving Problems
Checking the Printer Status……………… 91
Checking the Error Indicators on the Printer. . . . 91
Checking the Printer Status — Windows……..92
Checking Printer Status — Mac OS X……….92
Removing Jammed Paper………………..93
Removing Jammed Paper from the Rear
Paper Feed………………………..93
Removing Jammed Paper from Inside the
Printer…………………………..93
Paper Does Not Feed Correctly…………….95
Paper Jams………………………..95
Paper Feeds at a Slant…………………95
Several Sheets of Paper are Fed at a Time. . . . . . . 96
No Paper Feeds…………………….96
Power and Control Panel Problems………….96
Power Does Not Turn On………………96
Power Does Not Turn O………………96
Cannot Print from a Computer…………….96
When You Cannot Make Network Settings…….97
Cannot Connect from Devices Even ough
Network Settings are No Problem…………97
Checking the SSID Connected to the Printer. . . . 99
Checking the SSID for the Computer……… 99
Suddenly the Printer Cannot Print over a
Network Connection………………….100
Suddenly the Printer Cannot Print Using a USB
Connection………………………..101
Printout Problems……………………101
Printout is Scued or Color is Missing……..101
Banding or Unexpected Colors Appear…….101
Colored Banding Appears at Intervals of
Approximately 2.5 cm………………..102
Blurry Prints, Vertical Banding, or
Misalignment……………………..102
5

User’s Guide
Contents
Print Quality is Poor…………………103
Paper Is Smeared or Scued……………104
Printed Photos are Sticky……………..104
Images or Photos are Printed in Unexpected
Colors………………………….104
Colors
Display…………………………105
Cannot Print Without Margins………….105
Edges of the Image are Cropped During
Borderless Printing………………….105
e Position, Size, or Margins of the Printout
Are Incorrect……………………..105
Printed Characters Are Incorrect or Garbled. . . 106
e Printed Image Is Inverted…………..106
Mosaic-Like Patterns in the Prints………..106
Uneven Colors, Smears, Dots, or Straight
Lines Appear in the Copied Image………..106
Moiré (Cross-Hatch) Patterns Appear in the
Copied Image……………………. 107
An Image of the Reverse Side of the Original
Appears in the Copied Image………….. 107
e Printout Problem Could Not be Cleared. . . 107
Other Printing Problems………………. 107
Printing Is Too Slow…………………107
Printing Slows Down Dramatically During
Continuous Printing…………………108
Cannot Start Scanning…………………108
Cannot Start Scanning when Using the
Control Panel……………………..108
Scanned Image Problems……………….109
Uneven Colors, Dirt, Spots, and so on Appear
when Scanning from the Scanner Glass…….109
Image Quality Is Rough……………109
e
Oset
Text is Blurred…………………….110
Moiré Patterns (Web-Like Shadows) Appear. . . 110
Cannot Scan the Correct Area on the
Scanner Glass……………………..110
Cannot Preview in umbnail…………. 111
Text is Not Recognized Correctly when
Saving as a Searchable PDF…………….111
Cannot Solve Problems in the Scanned Image. . 111
Other Scanning Problems……………….112
Scanning Speed Is Slow……………….112
Scanning Stops when Scanning to PDF/
Multi-TIFF……………………… 112
Other Problems……………………..113
Slight Electric Shock when Touching the
Printer………………………….113
Operation Sounds Are Loud……………113
from What You See on the
Dier
Appears in the Background of Images. . . 109
Application Is Blocked by a Firewall (for
Windows Only)……………………113
Appendix
Technical Specications………………..114
Printer Specications………………..114
Scanner
Interface
Network Function List……………….115
Wi-Fi Specications…………………117
Security Protocol…………………..117
Dimensions………………………117
Electrical Specications……………… 117
Environmental Specications…………..118
System Requirements………………..118
Regulatory Information………………..119
Standards and Approvals…………….. 119
Restrictions on Copying………………119
Transporting the Printer………………..120
Where to Get Help……………………122
Technical Support Web Site…………….122
Contacting Epson Support…………….123
Specications
Specications
………………. 115
……………….115
6

User’s Guide
About This Manual
About This Manual
Introduction to the Manuals
e following manuals are supplied with your Epson printer. As well as the manuals, see the help included in the
various Epson soware applications.
❏ Start Here (paper manual)
Provides you with information on setting up the printer, installing the soware, using the printer, solving
problems, and so on.
❏ User’s Guide (digital manual)
is manual. Provides overall information and instructions on using the printer, on network settings when
using the printer on a network, and on solving problems.
You can obtain the latest versions of the above manuals with the following methods.
❏ Paper manual
Visit the Epson Europe support website at http://www.epson.eu/Support, or the Epson worldwide support
website at http://support.epson.net/.
❏ Digital manual
Start EPSON Soware Updater on your computer. EPSON Soware Updater checks for available updates of
Epson soware applications and the digital manuals, and allows you to download the latest ones.
Related Information
& “EPSON Soware Updater” on page 87
Marks and Symbols
Caution:
!
Instructions that must be followed carefully to avoid bodily injury.
Important:
c
Instructions that must be observed to avoid damage to your equipment.
Note:
Provides complementary and reference information.
&
Related Information
Links to related sections.
7

User’s Guide
About This Manual
Descriptions Used in this Manual
❏ Screenshots of the printer driver and the Epson Scan 2 (scanner driver) screens are from Windows 10 or Mac
OS X v10.11.x. e content displayed on the screens varies depending on the model and situation.
❏ Illustrations of the printer used in this manual are examples only. Although there may be slight dierences
depending on the model, the method of operation is the same.
Operating System References
Windows
In this manual, terms such as «Windows 10», «Windows 8.1», «Windows 8», «Windows 7», «Windows Vista», and
«Windows XP» refer to the following operating systems. Additionally, «Windows» is used to refer to all versions.
❏ Microso
❏ Microso
❏
Microso
❏ Microso
❏ Microso
❏
Microso
❏ Microso
Mac OS X
In this manual, «Mac OS X v10.11.x» refers to OS X El Capitan, «Mac OS X v10.10.x» refers to OS X Yosemite, «Mac
OS X v10.9.x» refers to OS X Mavericks, and «Mac OS X v10.8.x» refers to OS X Mountain Lion. Additionally, «Mac
OS X» is used to refer to «Mac OS X v10.11.x», «Mac OS X v10.10.x», «Mac OS X v10.9.x», «Mac OS X v10.8.x», «Mac
OS X v10.7.x», and «Mac OS X v10.6.8».
Wi n d o w s® 10 operating system
®
Wi n d o w s® 8.1 operating system
®
Wi n d o w s® 8 operating system
®
Wi n d o w s® 7 operating system
®
Wi n d o w s Vis ta® operating system
®
Wi n d o w s® XP operating system
®
Wi n d o w s® XP Professional x64 Edition operating system
®
8

User’s Guide
Important Instructions
Important Instructions
Safety Instructions
Read and follow these instructions to ensure safe use of this printer. Make sure you keep this manual for future
reference. Also, be sure to follow all warnings and instructions marked on the printer.
❏ Some of the symbols used on your printer are to ensure safety and proper use of the printer. Visit the following
Web site to learn the meaning of the symbols.
http://support.epson.net/symbols
❏ Use only the power cord supplied with the printer and do not use the cord with any other equipment. Use of
other cords with this printer or the use of the supplied power cord with other equipment may result in re or
electric shock.
❏ Be sure your AC power cord meets the relevant local safety standard.
❏ Never disassemble, modify, or attempt to repair the power cord, plug, printer unit, scanner unit, or options by
yourself, except as specically explained in the printer’s manuals.
❏ Unplug the printer and refer servicing to qualied service personnel under the following conditions:
e power cord or plug is damaged; liquid has entered the printer; the printer has been dropped or the casing
damaged; the printer does not operate normally or exhibits a distinct change in performance. Do not adjust
controls that are not covered by the operating instructions.
❏ Place the printer near a wall outlet where the plug can be easily unplugged.
❏ Do not place or store the printer outdoors, near excessive dirt or dust, water, heat sources, or in locations
subject to shocks, vibrations, high temperature or humidity.
❏ Take care not to spill liquid on the printer and not to handle the printer with wet hands.
❏ Keep the printer at least 22 cm away from cardiac pacemakers. Radio waves from this printer may adversely
aect the operation of cardiac pacemakers.
❏ Be careful not to touch any ink when you handle the ink tanks, ink tank caps, and opened ink bottles or ink
bottle caps.
❏ If ink gets on your skin, wash the area thoroughly with soap and water.
❏ If ink gets into your eyes,
a thorough ushing, see a doctor immediately.
❏ If ink gets into your mouth, see a doctor right away.
❏ Do not tilt or shake an ink bottle
them immediately with water. If discomfort or vision problems continue
ush
removing its seal; this can cause leakage.
aer
aer
❏ Keep ink bottles and the ink tank unit out of the reach of children. Do not allow children to drink from or
handle the ink bottles and ink bottle cap.
Printer Advisories and Warnings
Read and follow these instructions to avoid damaging the printer or your property. Make sure you keep this
manual for future reference.
9

User’s Guide
Important Instructions
Advisories and Warnings for Setting Up/Using the Printer
❏ Do not block or cover the vents and openings in the printer.
❏ Use only the type of power source indicated on the printer’s label.
❏ Avoid using outlets on the same circuit as photocopiers or air control systems that regularly switch on and o.
❏ Avoid electrical outlets controlled by wall switches or automatic timers.
❏ Keep the entire computer system away from potential sources of electromagnetic interference, such as
loudspeakers or the base units of cordless telephones.
❏ e power-supply cords should be placed to avoid abrasions, cuts, fraying, crimping, and kinking. Do not place
objects on top of the power-supply cords and do not allow the power-supply cords to be stepped on or run over.
Be particularly careful to keep all the power-supply cords straight at the ends and the points where they enter
and leave the transformer.
❏ If you use an extension cord with the printer, make sure that the total ampere rating of the devices plugged into
the extension cord does not exceed the cord’s ampere rating. Also, make sure that the total ampere rating of all
devices plugged into the wall outlet does not exceed the wall outlet’s ampere rating.
❏ If you plan to use the printer in Germany, the building installation must be protected by a 10 or 16 amp circuit
breaker to provide adequate short-circuit protection and over-current protection for the printer.
❏ When connecting the printer to a computer or other device with a cable, ensure the correct orientation of the
connectors. Each connector has only one correct orientation. Inserting a connector in the wrong orientation
may damage both devices connected by the cable.
❏ Place the printer on a
will not operate properly if it is tilted at an angle.
❏ When storing or transporting the printer, avoid tilting it, placing it vertically, or turning it upside down;
otherwise ink may leak.
❏ Allow space above the printer so that you can fully raise the document cover.
❏ Leave enough space in front of the printer for the paper to be fully ejected.
❏ Avoid places subject to rapid changes in temperature and humidity. Also, keep the printer away from direct
sunlight, strong light, or heat sources.
❏ Do not insert objects through the slots in the printer.
❏ Do not put your hand inside the printer during printing.
❏ Do not touch the white at cable and ink tubes inside the printer.
❏ Do not use aerosol products that contain
❏ Do not move the print head by hand; otherwise, you may damage the printer.
stable surface that extends beyond the base of the printer in all directions. e printer
at,
ammable
gases inside or around the printer. Doing so may cause
re.
❏ Be careful not to trap your ngers when closing the scanner unit.
❏ Do not press too hard on the scanner glass when placing the originals.
❏ If any of the ink tanks are not lled up to the lower line, rell the ink soon. Continued use of the printer when
the ink level is below the lower line on the tanks could damage the printer.
❏ Always turn the printer o using the
P
until the
❏ Before transporting the printer, make sure that the print head is in the home (far right) position.
❏ If you are not going to use the printer for a long period, be sure to unplug the power cord from the electrical
outlet.
light stops ashing.
P
button. Do not unplug the printer or turn o the power at the outlet
10

User’s Guide
Important Instructions
Advisories and Warnings for Using the Printer with a Wireless
Connection
❏ Radio waves from this printer may negatively aect the operation of medical electronic equipment, causing
them to malfunction. When using this printer inside medical facilities or near medical equipment, follow
directions from the authorized personnel representing the medical facilities, and follow all posted warnings and
directions on the medical equipment.
❏ Radio waves from this printer may negatively
automatic doors or re alarms, and could lead to accidents due to malfunction. When using this printer near
automatically controlled devices, follow all posted warnings and directions on these devices.
the operation of automatically controlled devices such as
aect
Protecting Your Personal Information
When you give the printer to someone else or dispose of it, erase the network settings stored in the printer’s
memory by turning on the printer while holding down the
button on the control panel.
11
User’s Guide
Printer Basics
Printer Basics
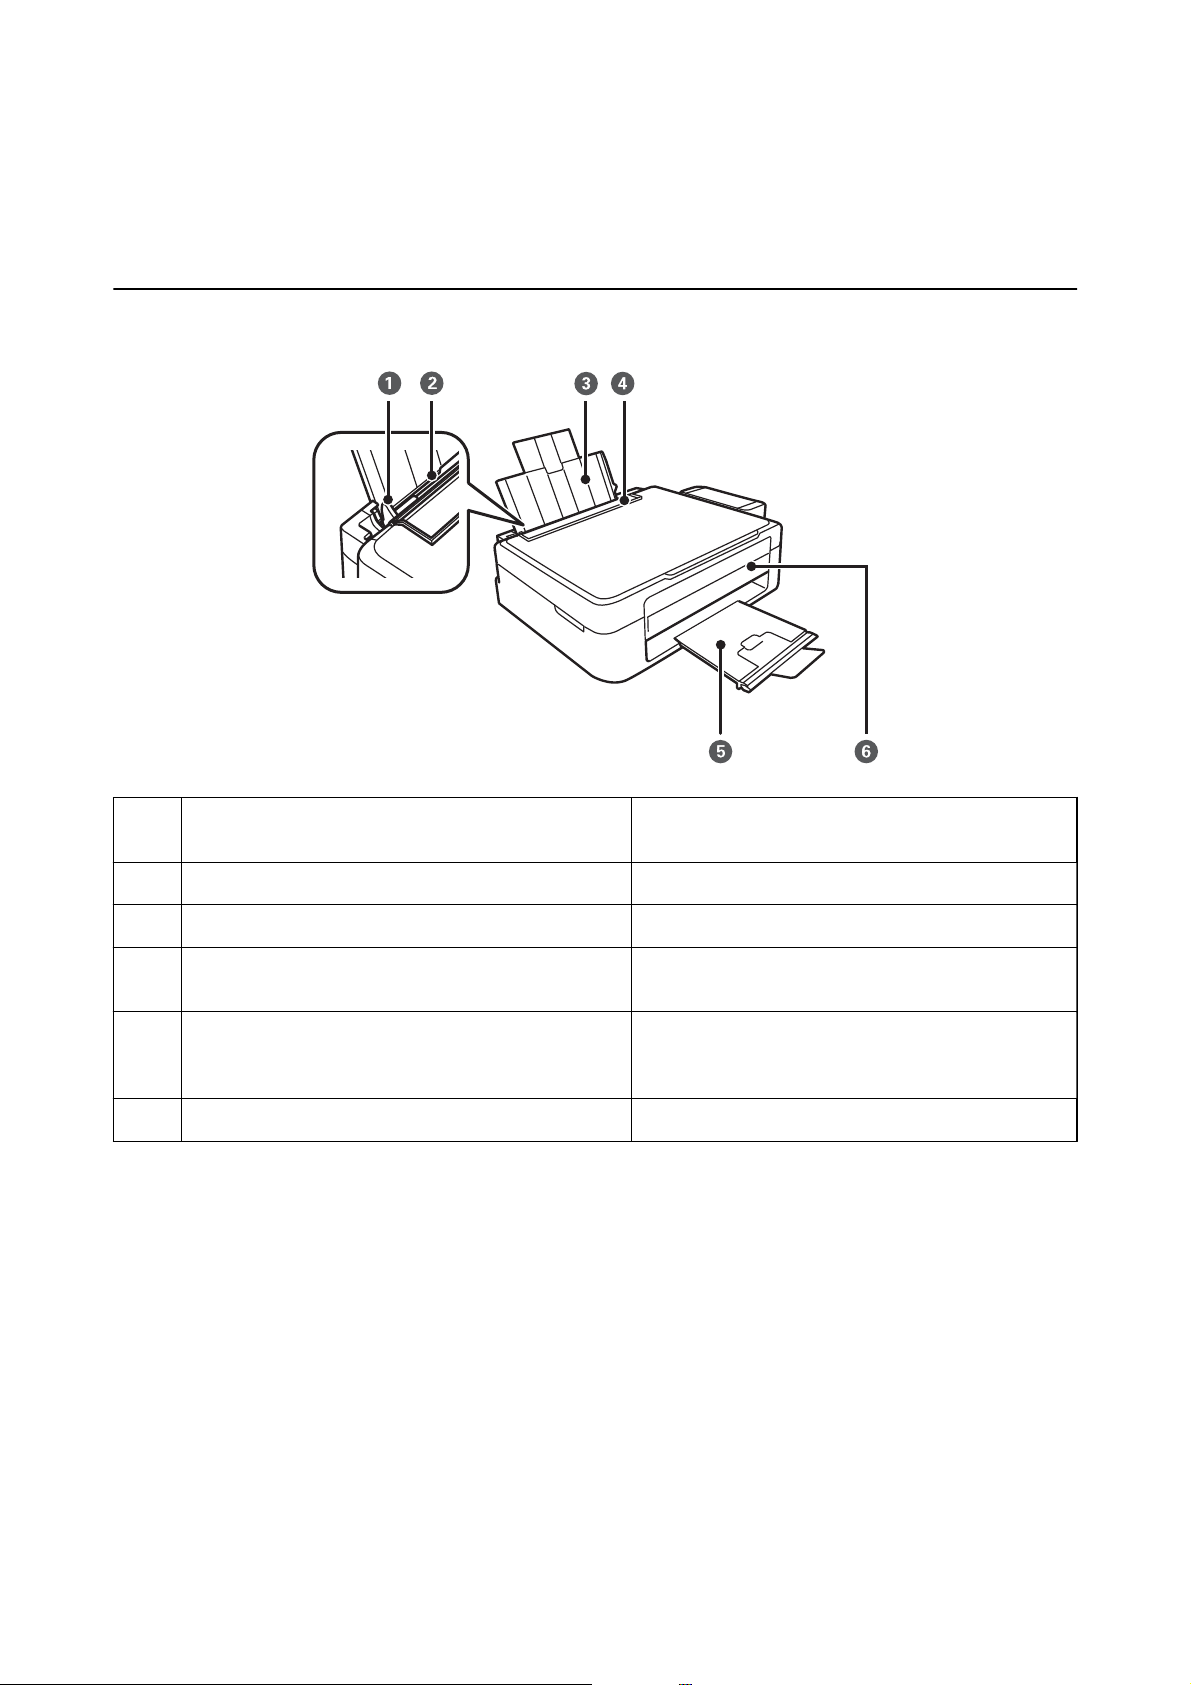
Part Names and Functions
Edge guide Feeds the paper straight into the printer. Slide to the
A
edges of the paper.
Rear paper feed Loads paper.
B
Paper support Supports loaded paper.
C
Feeder guard Prevents foreign substance from entering the printer.
D
Usually keep this guard closed.
Output tray Holds the ejected paper. Before printing, raise the
E
stopper to prevent the ejected paper from falling o
the tray.
Control panel Operates the printer.
F
12
User’s Guide
Printer Basics
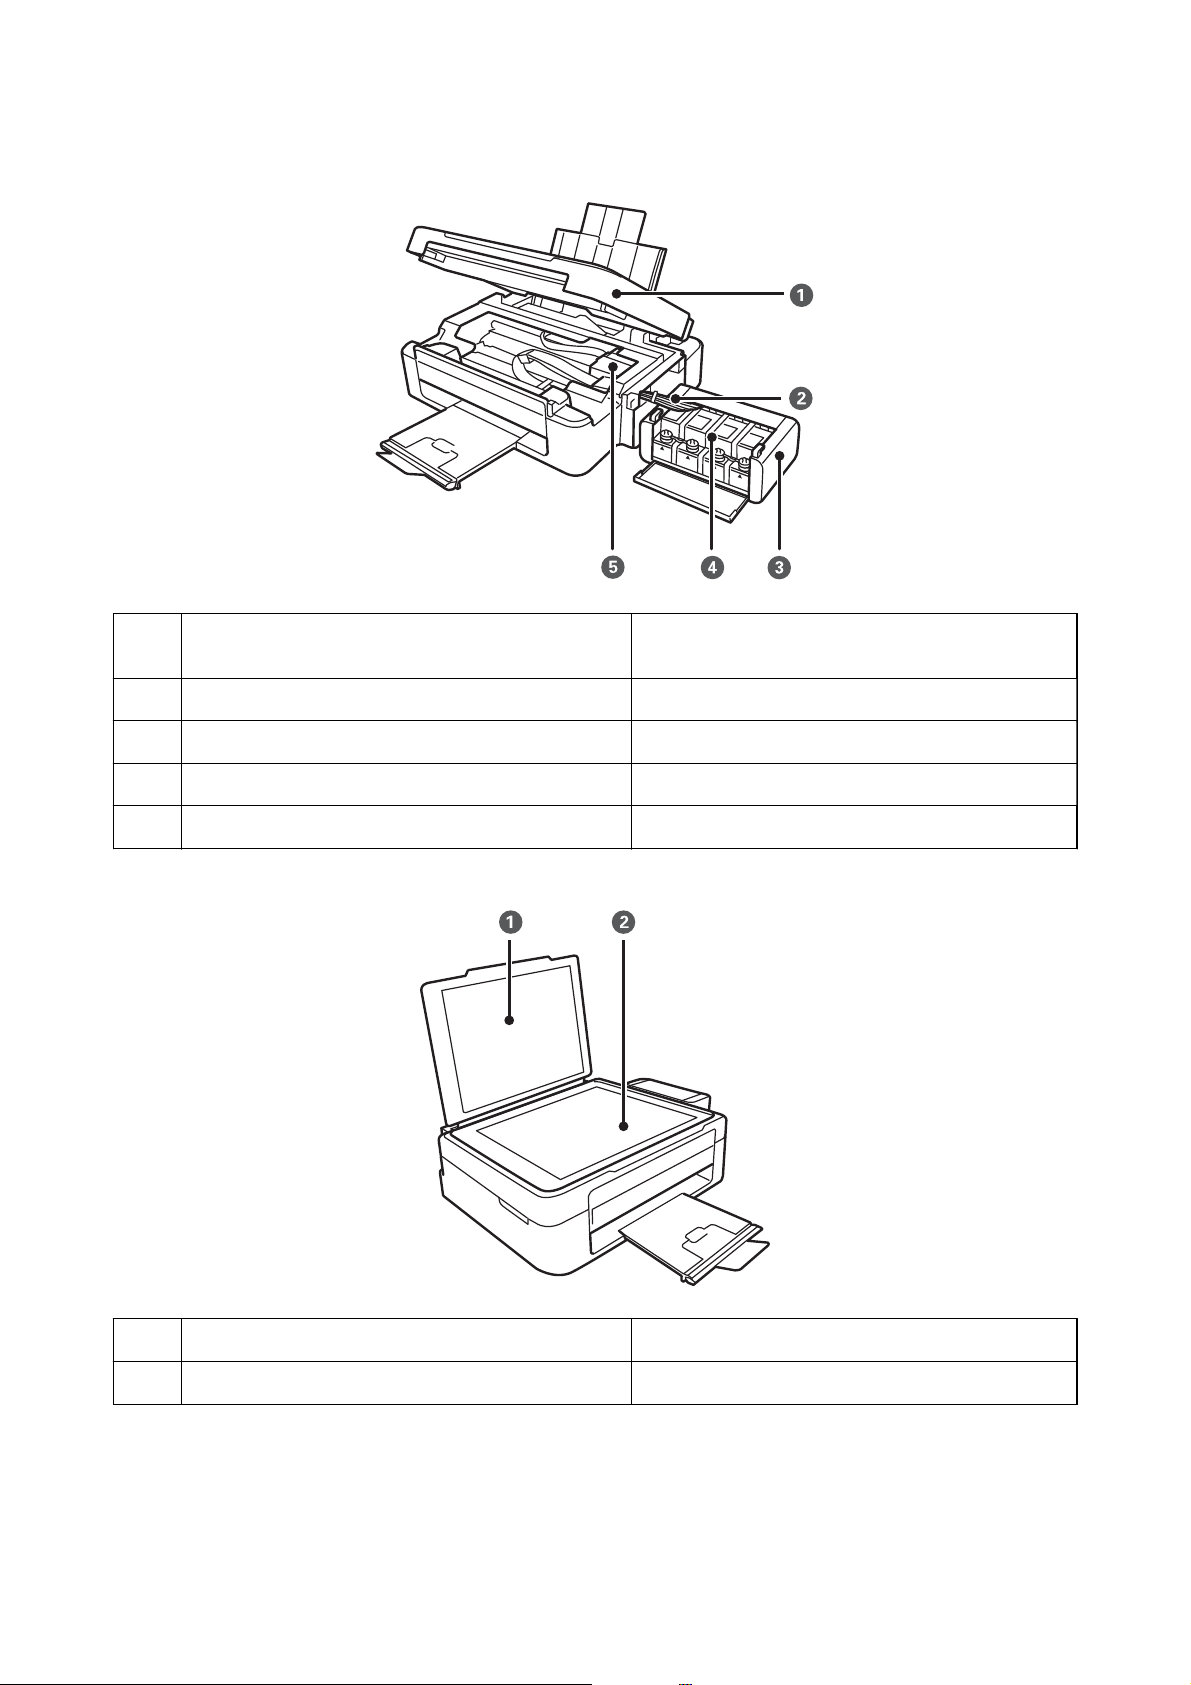
Scanner unit Scans placed originals. Open when removing jammed
A
paper inside the printer.
Ink tube Supplies ink to the print head.
B
Ink tank unit Contains the ink tanks.
C
Ink reservoir tanks (Ink tanks) Supplies ink to the ink tubes.
D
Print head Fires ink.
E
Document cover Blocks external light while scanning.
A
Scanner glass Place the originals.
B
13
User’s Guide
Printer Basics
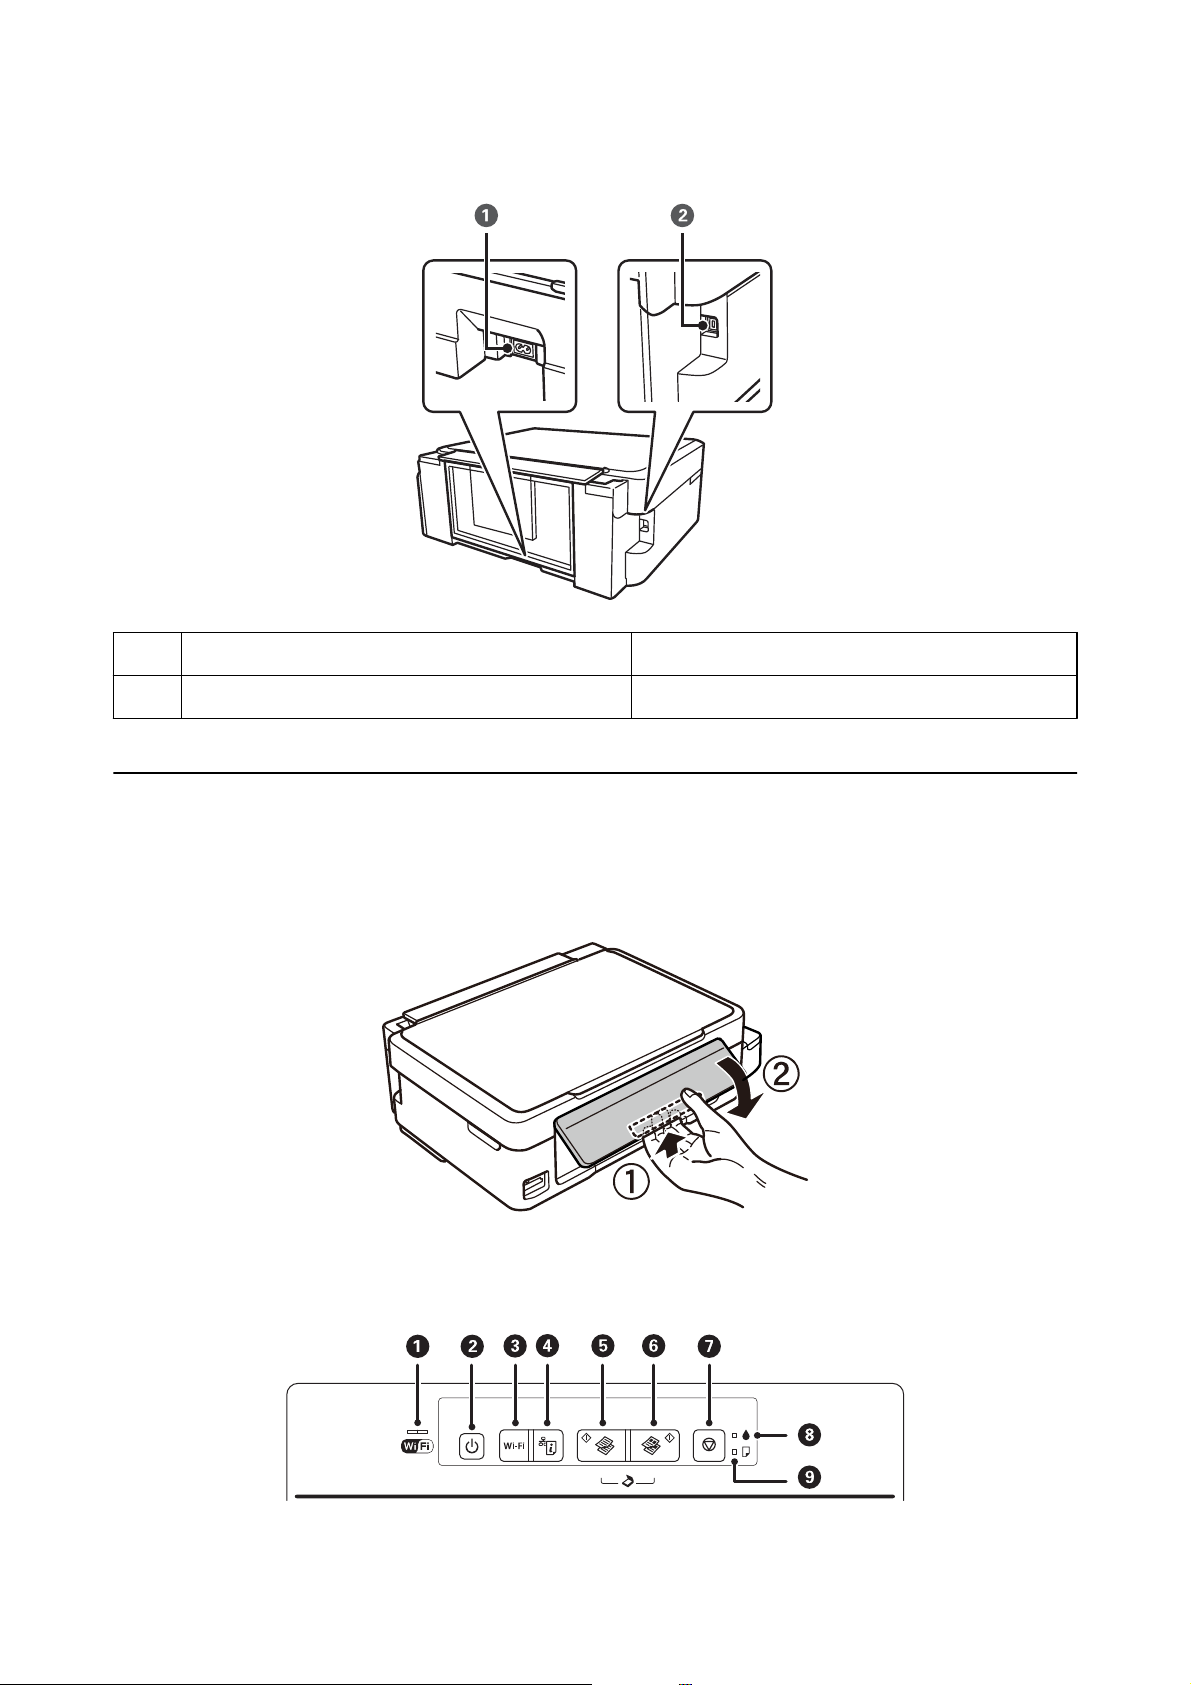
AC inlet Connects the power cord.
A
USB port Connects a USB cable.
B
Control Panel
You can change the angle of the control panel.
To lower the control panel, squeeze the lever on the back of the panel as shown below.
Buttons and Lights
14
User’s Guide
Printer Basics
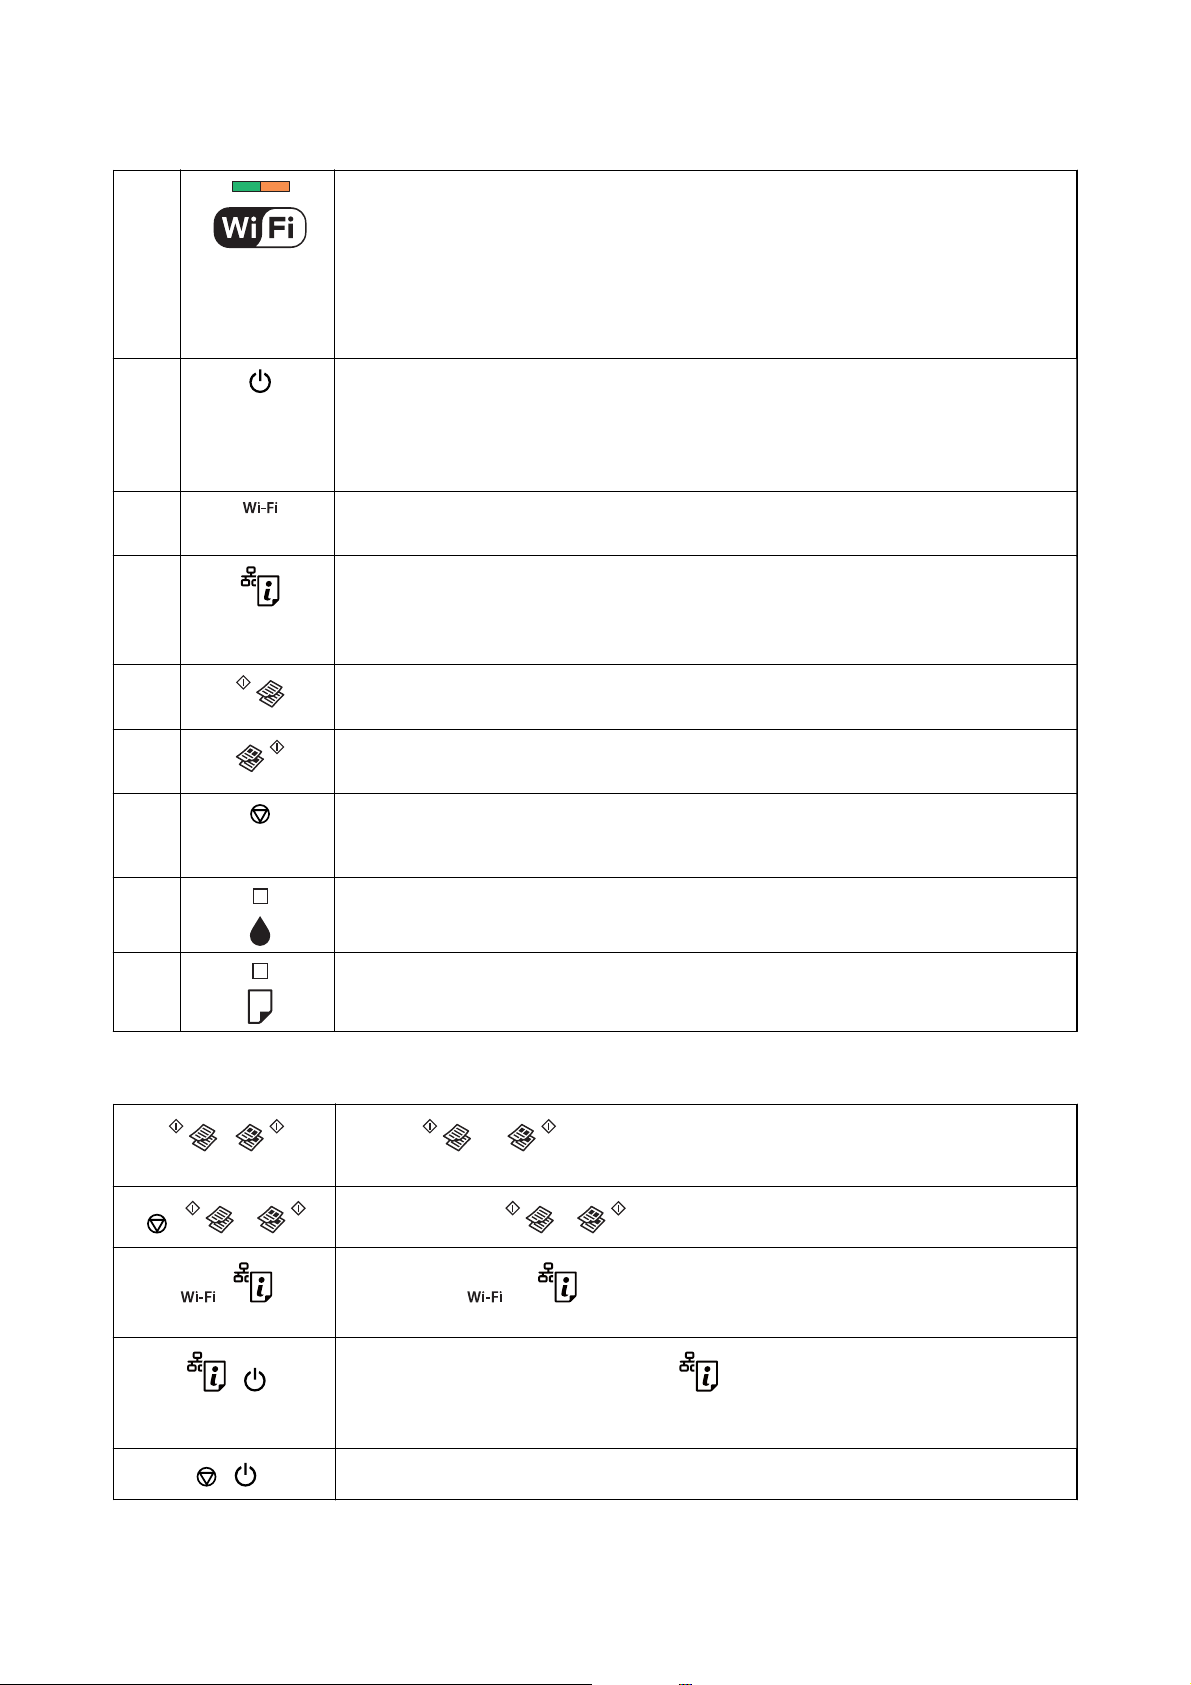
A
B
C
D
E
F
The left and right lights indicate the network status.
❏ Green light — left: Turns on while the printer is connected to a wireless (Wi-Fi) network, or
ashes while communicating.
❏ Orange light — right: Flashes when a problem with the printer’s wireless (Wi-Fi) network
connection occurs.
The lights ash alternately or simultaneously while initializing or making network settings.
Turns the printer on or o.
Do not turn o while the power light is ashing (while the printer is operating or processing
data).
Unplug the power cord when the power light is o.
When a network error occurs, pressing this button cancels the error. Hold this button down for
more than three seconds to perform Wi-Fi auto setup using the WPS push button.
Prints a network connection report allowing you to determine the causes of any problems you
may have using the printer on a network. If you need more detailed network settings and
connection status, hold this button down for at least 10 seconds to print a network status
sheet.
Starts monochrome copying on A4 size plain paper. To increase the number of copies (by up to
20 copies), press this button within one second intervals.
Starts color copying on A4 size plain paper. To increase the number of copies (by up to 20
copies), press this button within one second intervals.
G
H
I
Stops the current operation.
Hold this button down for three seconds until the
Indicates the status of the initial ink charging.
Turns on or ashes when paper is out or a paper jam occurs.
P
button ashes to run print head cleaning.
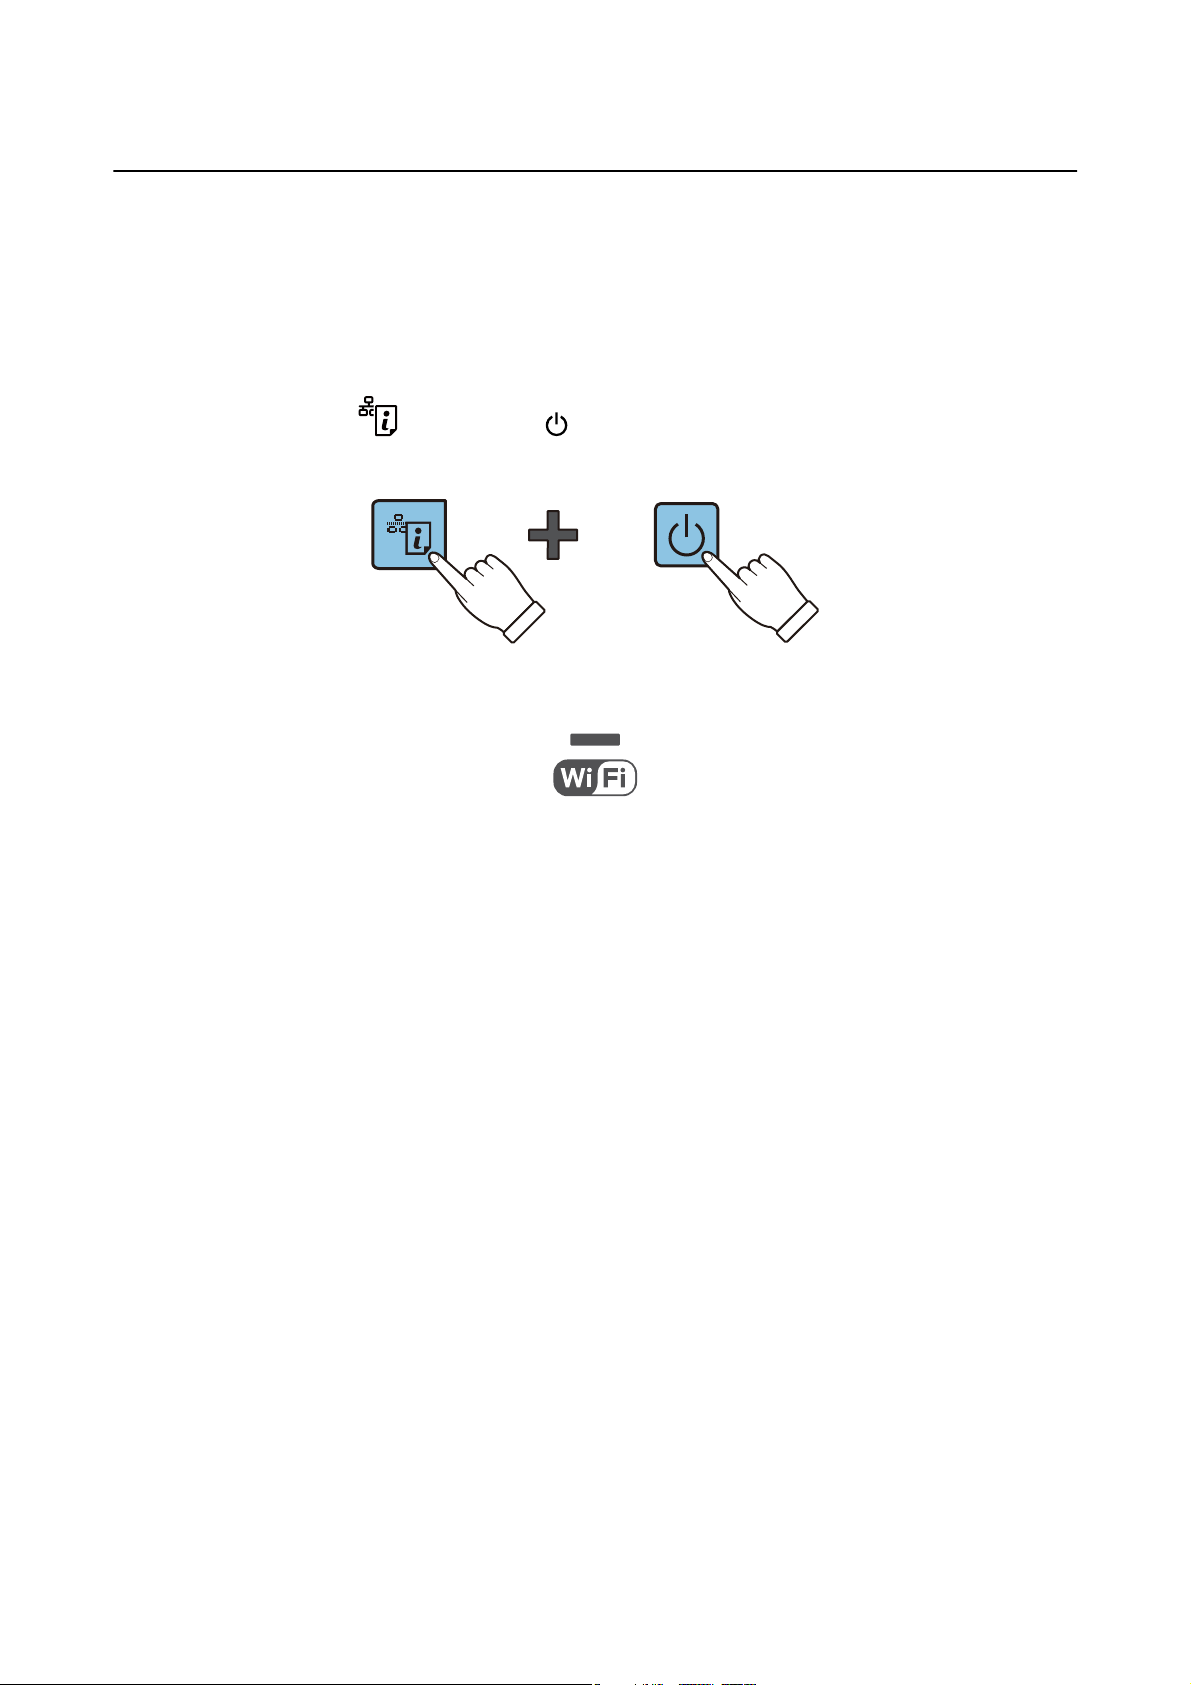
Additional functions are available with dierent combinations of buttons.
+ Press the and buttons simultaneously to run software on a USB-connected
computer and scan as a PDF
+ or Press the y and the or buttons simultaneously to copy in draft mode.
+ Hold down the and buttons simultaneously for more than three seconds to start PIN
Code Setup (WPS).
+ Turn the printer on while holding down the button to restore the default network
settings. When the network settings are restored, the printer turns on and the network status
lights
orange and green.
ash
le.
+
Turn the printer on while holding down the y button to print the nozzle check pattern.
15

User’s Guide
Printer Basics
Related Information
& “Checking the Error Indicators on the Printer” on page 91
& “Making Wi-Fi Settings by PIN Code Setup (WPS)” on page 20
& “Restoring the Network Settings from the Control Panel” on page 28
16
User’s Guide
Network Settings
Network Settings
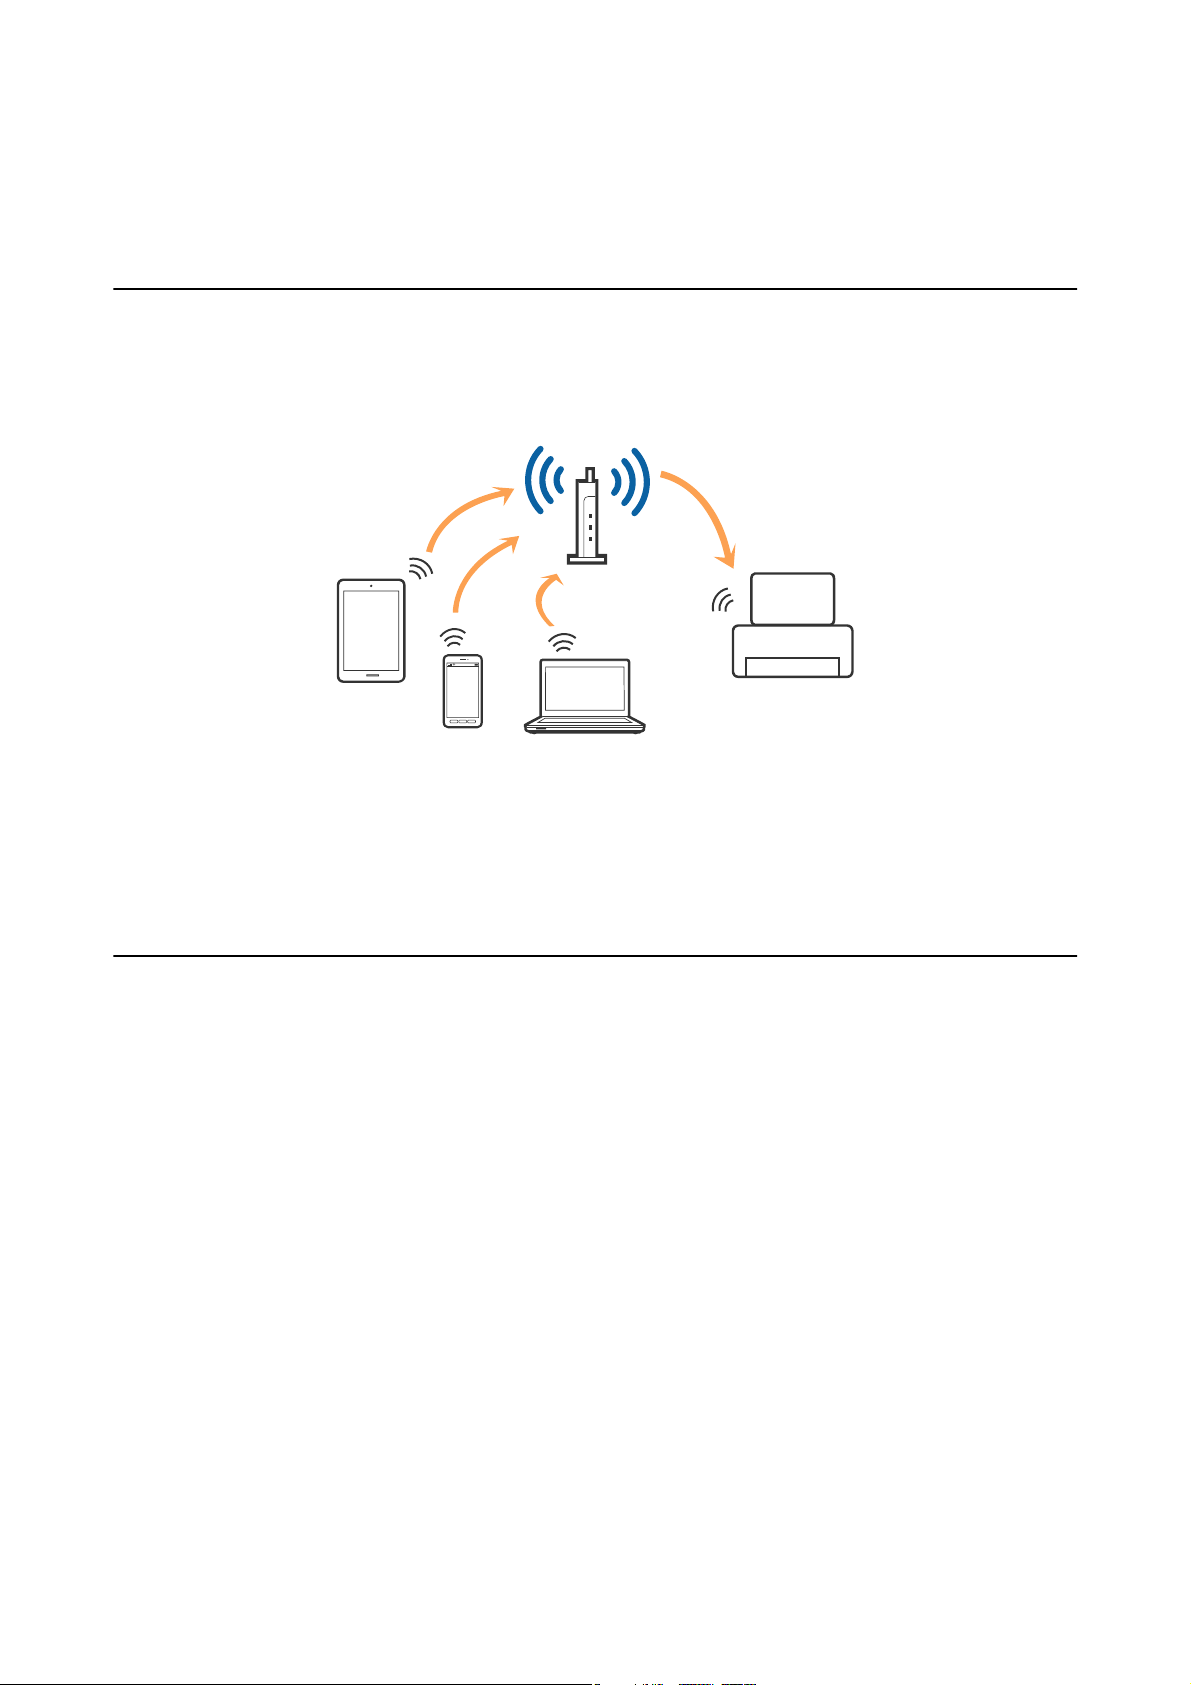
Wi-Fi Connection
Connect the printer and the computer or smart device to the access point. is is the typical connection method
for home or oce networks where computers are connected by Wi-Fi through the access point.
Related Information
& “Connecting to a Computer” on page 17
& “Connecting to a Smart Device” on page 19
& “Making Wi-Fi Settings from the Control Panel” on page 19
Connecting to a Computer
We recommend using the installer to connect the printer to a computer. You can run the installer using one of the
following methods.
❏ Setting up from the website
Access the following website, and then enter the product name.
http://epson.sn
Go to Setup, and then click Download in the download and connect part. Click or double-click the
downloaded le to run the installer. Follow the on-screen instructions.
❏ Setting up using the
with disc drives.)
Insert the soware disc into the computer, and then follow the on-screen instructions.
soware
disc (only for the models that come with a
soware
disc and users with computers
Selecting the Connection Methods
Follow the on-screen instructions until the following screen is displayed, and then select the connection method of
the printer to the computer.
17
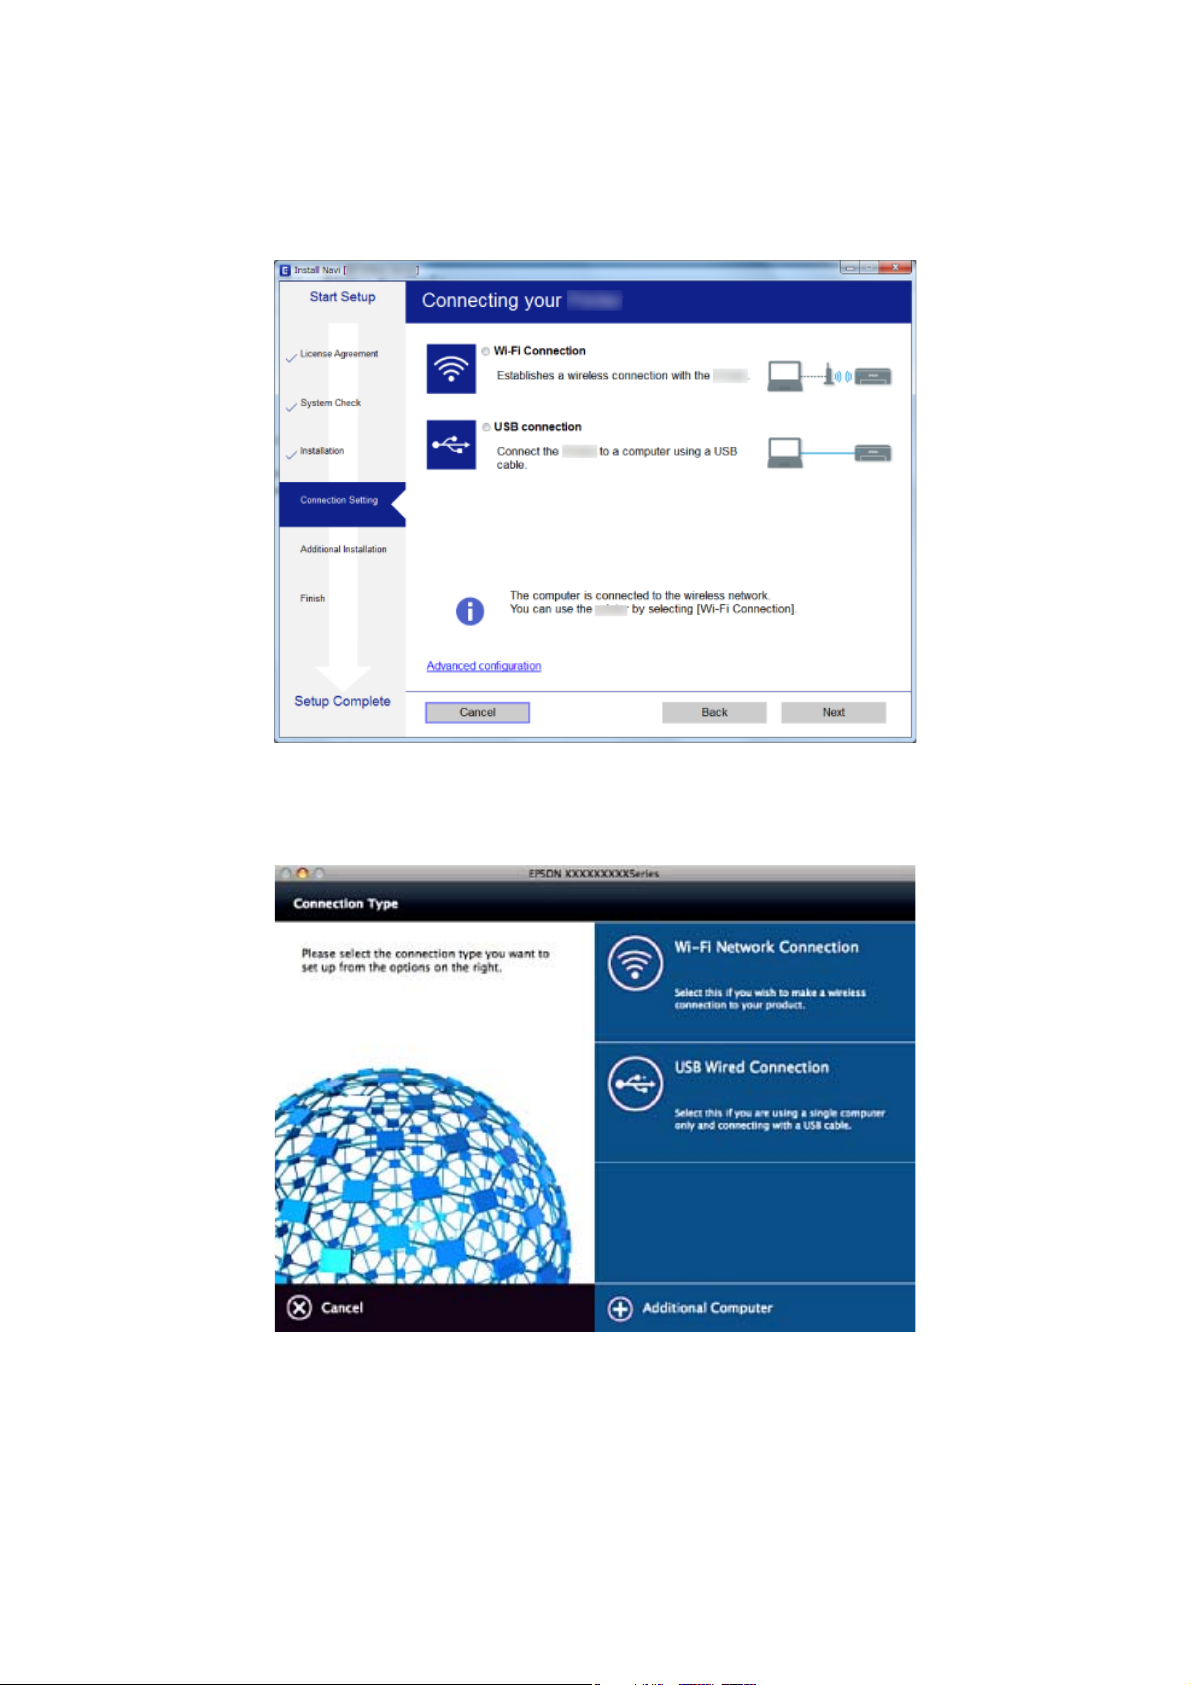
User’s Guide
❏ Wi n d o w s
Select the connection type and then click Next.
Network Settings
❏ Mac OS X
Select the connection type.
Follow the on-screen instructions. e necessary soware is installed.
18

User’s Guide
Network Settings
Connecting to a Smart Device
You can use the printer from a smart device when you connect the printer to the same Wi-Fi network (SSID) as the
smart device. To use the printer from a smart device, set up from the following website. Access to the website from
the smart device that you want to connect to the printer.
http://epson.sn > Setup
Note:
If you want to connect a computer and a smart device to the printer at the same time, we recommend connecting the
computer rst.
Making Wi-Fi Settings from the Control Panel
You can make network settings from the printer’s control panel. Aer connecting the printer to the network,
connect to the printer from the device that you want to use (computer, smart phone, tablet, and so on.)
Related Information
& “Making Wi-Fi Settings by Push Button Setup” on page 19
& “Making Wi-Fi Settings by PIN Code Setup (WPS)” on page 20
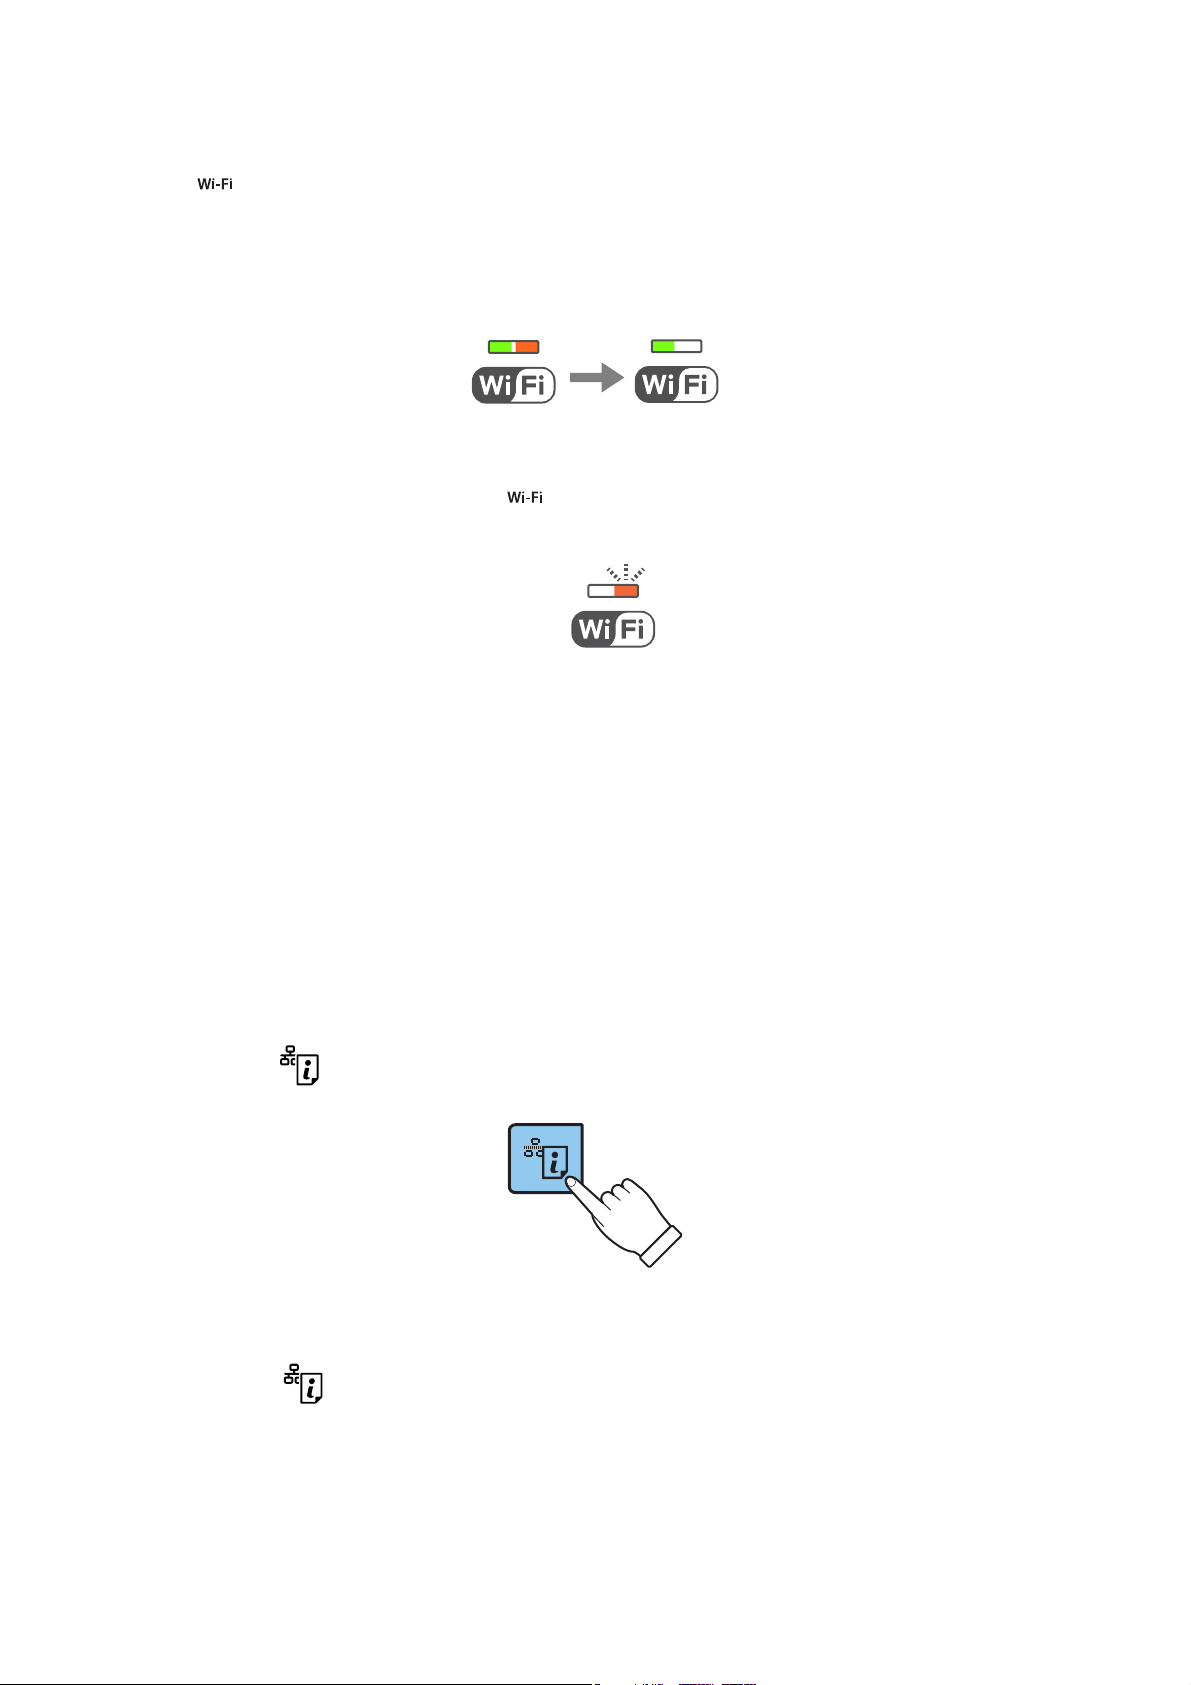
Making Wi-Fi Settings by Push Button Setup
You can automatically set up a Wi-Fi network by pressing a button on the access point. If the following conditions
are met, you can set up by using this method.
❏ e access point is compatible with WPS (Wi-Fi Protected Setup).
❏ e current Wi-Fi connection was established by pressing a button on the access point.
Note:
If you cannot nd the button or you are setting up using the soware, see the documentation provided with the access point.
1. Hold down the [WPS] button on the access point until the security light ashes.
If you do not know where the [WPS] button is, or there are no buttons on the access point, see the
documentation provided with your access point for details.
19
User’s Guide
Network Settings
2. Press button on the printer’s control panel until the green light on the le and the orange light on the right
alternately blink (approximately 3 seconds).
e connection setting will start. Green light on the le and orange light on the right will simultaneously turn
on when the connection is established. Orange light on the right will be automatically turned o within 5
minutes.
Note:
e printer is in a connection error status when green light on the le is o and orange light on the right is blinking.
Aer clearing the printer error by pressing the
the printer and try again. If it still does not work, print a network connection report and check the solution.
button on the control panel, reboot the access point, place it close to
Related Information
& “Checking the Network Connection Status” on page 21
& “When You Cannot Make Network Settings” on page 97
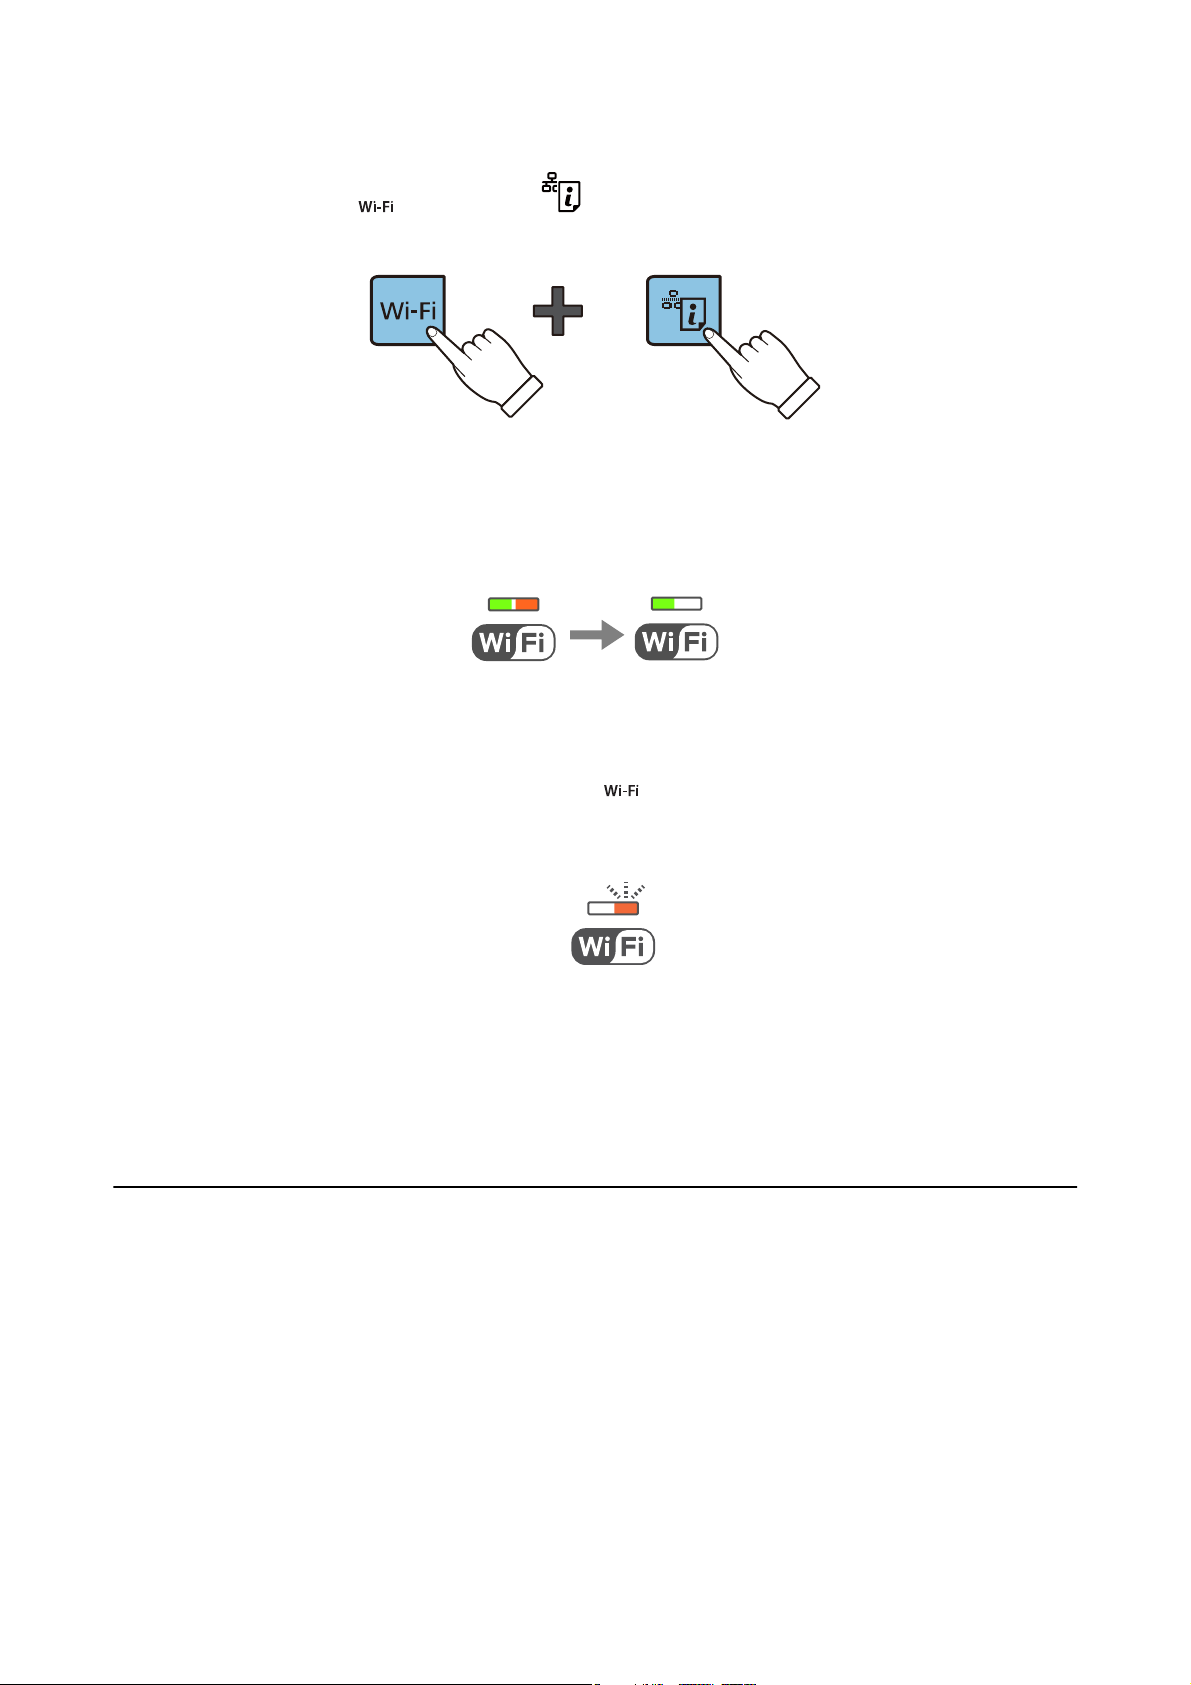
Making Wi-Fi Settings by PIN Code Setup (WPS)
You can connect to an access point by using a PIN code that is printed on the network status sheet. You can use
this method to set up if an access point is capable of WPS (Wi-Fi Protected Setup). Use a computer to enter a PIN
code into the access point.
1. Load papers.
2. Hold down the
button on the printer’s control panel for at least 10 seconds.
network status sheet is printed.
e
Note:
If you release the
information is not printed on this report.
button within 10 seconds, a network connection report is printed. Note that PIN code
20
User’s Guide
Network Settings
3. While holding down the button, press the button until green light on the
right ash simultaneously (approximately 3 seconds).
4. Use your computer to enter the PIN code (an eight digit number) printed on [WPS-PIN Code] column of the
network status sheet into the access point within two minutes.
Green light on the le and orange light on the right will simultaneously turn on when the connection is
established. Orange light on the right will be automatically turned o within 5 minutes.
Note:
❏ See the documentation provided with your access point for details on entering a PIN code.
❏ e printer is in a connection error status when the green light on the le is o and the orange light on the right is
blinking.
place it close to the printer and try again. If it still does not work, print a network connection report and check the
solution.
clearing the printer error by pressing the
Aer
button on the control panel, reboot the access point,
and orange light on the
le
Related Information
& “Printing a Network Status Sheet” on page 25
& “Checking the Network Connection Status” on page 21
& “When You Cannot Make Network Settings” on page 97
Checking the Network Connection Status
Checking the Network Status Using Network Light
You can check the network connection status using the network light on the printer’s control panel.
Related Information
“Buttons and Lights” on page 14
&
21
User’s Guide
Network Settings
Printing a Network Connection Report
You can print a network connection report to check the status between the printer and the access point.
1. Load papers.
2. Press the
network connection report is printed.
e
Related Information
& “Messages and Solutions on the Network Connection Report” on page 22
button.
Messages and Solutions on the Network Connection Report
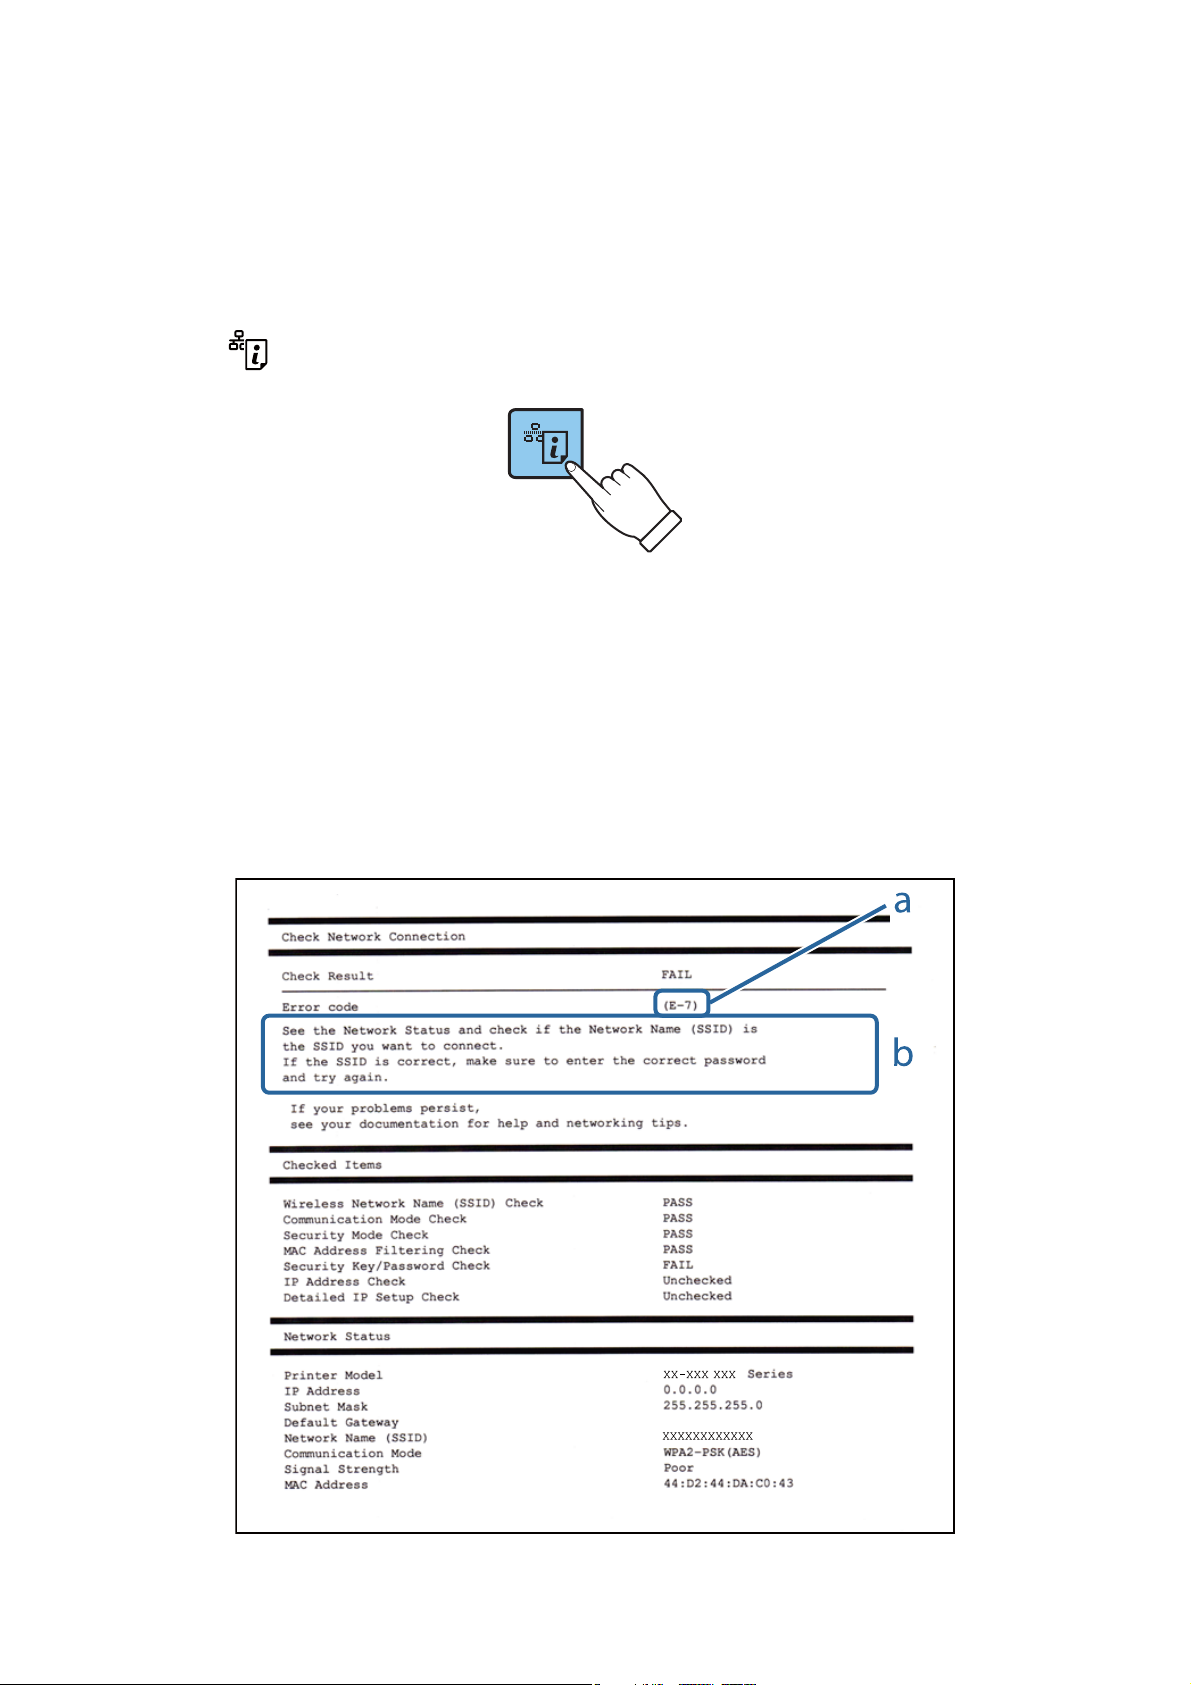
Check the messages and error codes on the network connection report, and then follow the solutions.
22

User’s Guide
Network Settings
a. Error code
b. Messages on the Network Environment
a. Error code
Code Solution
E-1 ❏ Make sure that the Ethernet cable is connected to the printer, a hub, or other network devices.
❏ Make sure that the hub or other network devices are turned on.
E-2
E-3
E-7
E-5 Make sure the access point’s security type is set to one of the following. If it is not, change the security type on
❏ Make sure that the access point is turned on.
❏ Check that the computer or other devices are connected correctly to the access point.
❏ Place the printer close to the access point. Remove any obstacles between them.
❏ If you have entered the SSID manually, check if it is correct. Check the SSID from the Network Status part on
the network connection report.
❏ To establish a network using push button setup, check that the access point supports WPS. If it does not
support WPS, you cannot establish a network using push button setup.
❏ Check that only ASCII characters (alphanumeric characters and symbols) are used for the SSID. The printer
cannot display an SSID which contains any characters other than ASCII characters.
❏ Check the SSID and password before connecting to the access point. If you are using an access point with its
default settings, the SSID and password are on the label. If you do not know the SSID and password, contact
the person who set up the access point, or see the documentation provided with the access point.
❏ When you want to connect to an SSID generated using the tethering function on a smart device, check the
SSID and password in the documentation provided with the smart device.
❏ If the Wi-Fi connection is suddenly disconnected, check the following. If any of these are applicable, reset the
network settings using the installer. You can run it from the following website.
http://epson.sn > Setup
❏ Another smart device was added to the network using push button setup.
❏ The Wi-Fi network was set up using any method other than push button setup.
the access point, and then reset the printer’s network settings.
❏ WEP-64 bit (40 bit)
❏ WEP-128 bit (104 bit)
❏ WPA PSK (TKIP/AES)
❏ WPA2 PSK (TKIP/AES)
❏ WPA (TKIP/AES)
❏ WPA2 (TKIP/AES)
* : WPA PSK is also known as WPA Personal. WPA2 PSK is also known as WPA2 Personal.
E-6 ❏ Check if the MAC address ltering is disabled. If it is enabled, register the printer’s MAC address so that it is
not ltered. See the documentation provided with the access point for details. You can check the printer’s
MAC address from the Network Status part on the network connection report.
❏ If the access point’s shared authentication is enabled on the WEP security method, make sure the
authentication key and index are correct.
E-8 ❏ Enable DHCP on the access point when the printer’s Obtain IP Address is set to Auto.
❏ If the printer’s Obtain IP Address is set to Manual, the IP address you manually set is out of range (for
example: 0.0.0.0) and it is disabled. Set a valid IP address from printer’s control panel or Web Cong.
*
*
23

User’s Guide
Code Solution
E-9 Check the following.
❏ Devices are turned on.
❏ You can access the Internet and other computers or network devices on the same network from the devices
you want to connect to the printer.
If it still does not work after checking the above, reset the network settings using the installer. You can run it
from the following website.
http://epson.sn > Setup
E-10 Check the following.
❏ Other devices on the network are turned on.
❏ Network addresses (IP address, subnet mask, and default gateway) are correct if you have set the printer’s
Obtain IP Address to Manual.
Reset the network address if these are incorrect. You can check the IP address, subnet mask, and default
gateway from the Network Status part on the network connection report.
When DHCP is enabled, change the printer’s Obtain IP Address to Auto. If you want to set the IP address
manually, check the printer’s IP address from the Network Status part on the network connection report, and
then select Manual on the network settings screen. Set the subnet mask to [255.255.255.0].
Network Settings
E-11 Check the following.
❏ The default gateway address is correct when you set the printer’s TCP/IP Setup to Manual.
❏ The device that is set as the default gateway is turned on.
Set the correct default gateway address. You can check the default gateway address from the Network Status
part on the network connection report.
E-12 Check the following.
❏ Other devices on the network are turned on.
❏ The network addresses (IP address, subnet mask, and default gateway) are correct if you are entering them
manually.
❏ The network addresses for other devices (subnet mask and default gateway) are the same.
❏ The IP address does not conict with other devices.
If it still does not work after checking the above, try the following.
❏ Make network settings on the computer that is on the same network as the printer using the installer. You
can run it from the following website.
http://epson.sn > Setup
❏ You can register several passwords on an access point that uses the WEP security type. If several passwords
are registered, check if the
registered password is set on the printer.
rst
24
User’s Guide
Code Solution
E-13 Check the following.
❏ Network devices such as an access point, hub, and router are turned on.
❏ The TCP/IP Setup for network devices has not been set up manually. (If the printer’s TCP/IP Setup is set
automatically while the TCP/IP Setup for other network devices is performed manually, the printer’s network
may dier from the network for other devices.)
If it still does not work after checking the above, try the following.
❏ Make network settings on the computer that is on the same network as the printer using the installer. You
can run it from the following website.
http://epson.sn > Setup
❏ You can register several passwords on an access point that uses the WEP security type. If several passwords
are registered, check if the rst registered password is set on the printer.
b. Messages on the Network Environment
Network Settings
Message Solution
*Multiple network names (SSID) that
match your entered network name (SSID)
have been detected. Conrm network
name (SSID).
The Wi-Fi environment needs to be
improved. Turn the wireless router o and
then turn it on. If the connection does not
improve, see the documentation for the
wireless router.
*No more devices can be connected.
Disconnect one of the connected devices if
you want to add another one.
The same SSID may be set on several access points. Check the settings on the
access points, and change the SSID.
After moving the printer closer to the access point and removing any
obstacles between them, turn the access point on. If it still does not connect,
see the documentation supplied with the access point.
You can simultaneously connect up to four computers and smart devices in
Wi-Fi Direct (Simple AP) connection. To add another computer or smart
device, disconnect one of the connected devices rst.
Related Information
& “Connecting to a Computer” on page 17
& “Web Cong” on page 77
& “When You Cannot Make Network Settings” on page 97
Printing a Network Status Sheet
You can check the detailed network information by printing it.
1. Load papers.
25
User’s Guide
Network Settings
2. Hold down the button on the printer’s control panel for at least 10 seconds.
e network status sheet is printed.
Note:
If you release the
button within 10 seconds, a network connection report is printed.
Replacing or Adding New Access Points
If the SSID changes due to the replacement of an access point, or an access point is added and a new network
environment is established, re-set the Wi-Fi settings.
Related Information
& “Changing the Connection Method to a Computer” on page 26
Changing the Connection Method to a Computer
Using the installer and re-set up in a dierent connection method.
❏ Setting up from the website
Access the following website, and then enter the product name.
http://epson.sn
Go to Setup, and then click Download in the download and connect part. Click or double-click the
downloaded
to run the installer. Follow the on-screen instructions.
le
❏ Setting up using the soware disc (only for the models that come with a soware disc and users with computers
with disc drives.)
Insert the soware disc into the computer, and then follow the on-screen instructions.
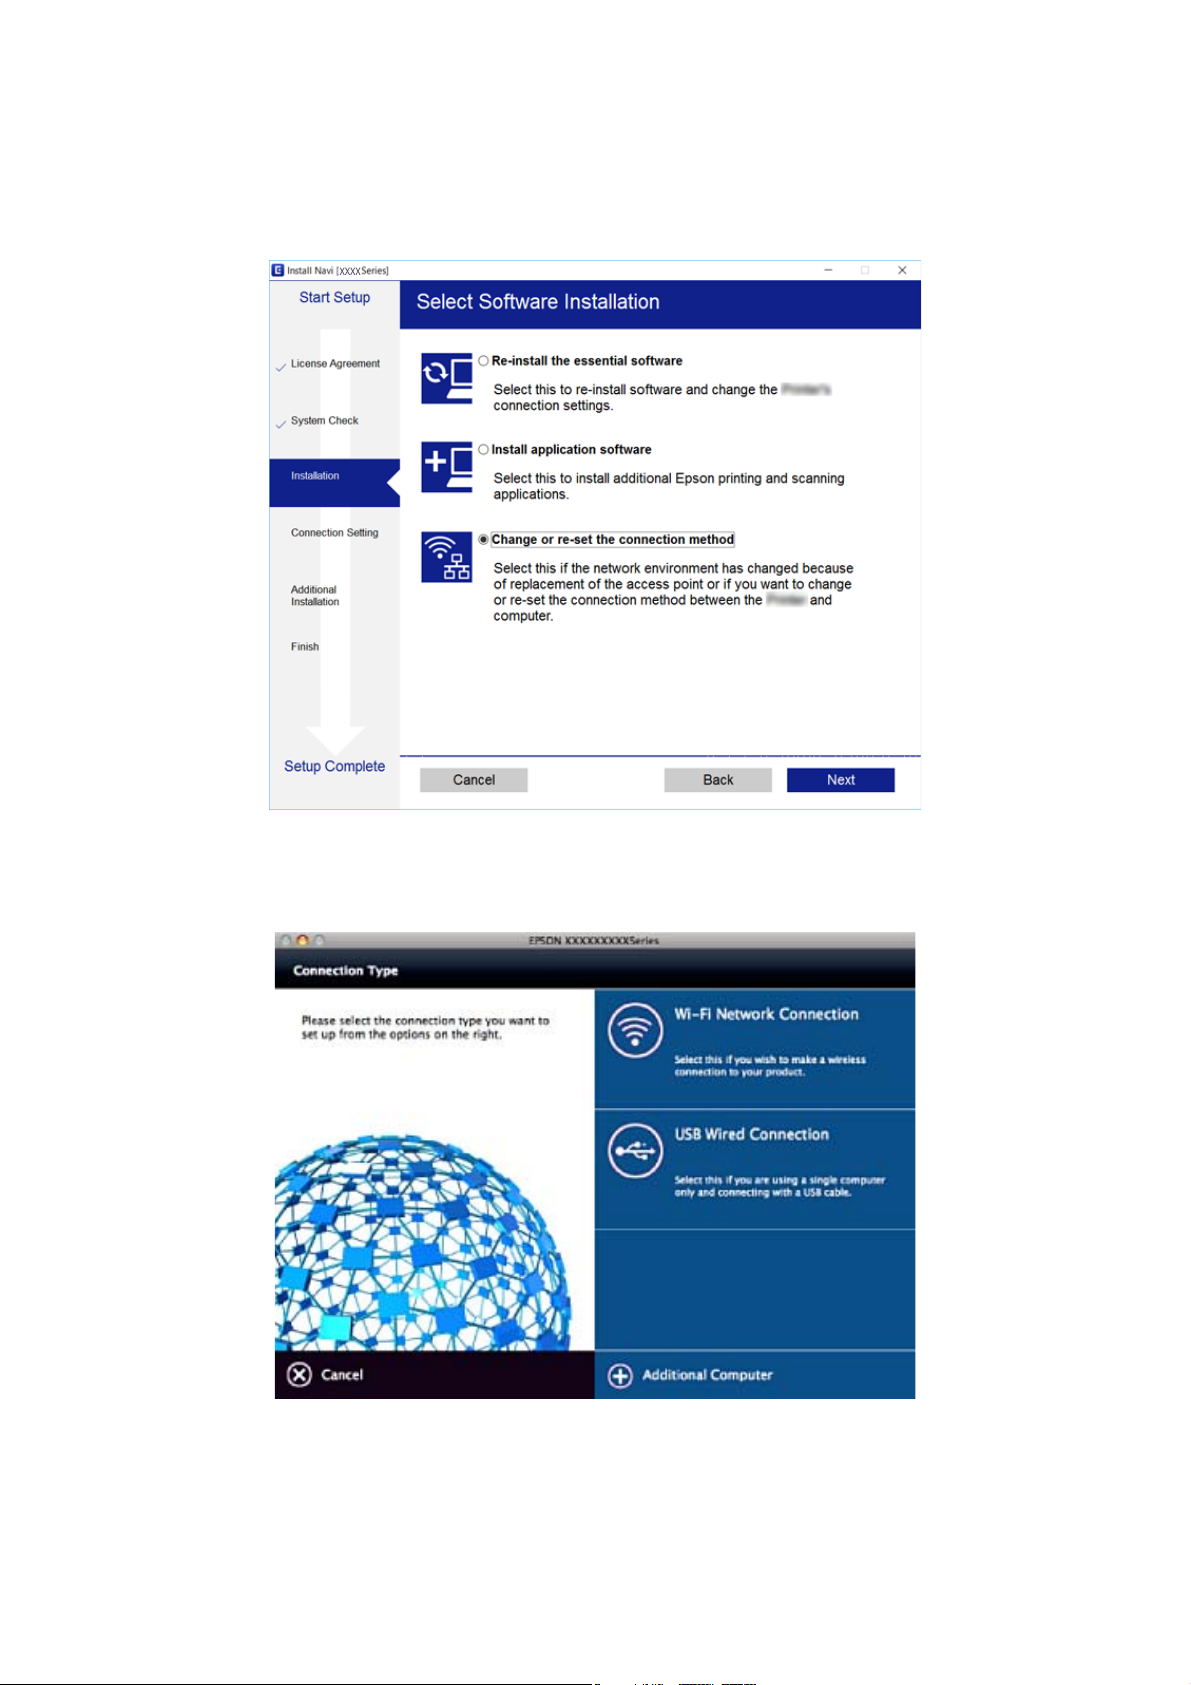
Selecting Change the Connection Methods
Follow the on-screen instructions until the following screen is displayed.
26
User’s Guide
Network Settings
❏ Wi n d o w s
Select Change or re-set the connection method on the Select
Soware
Installation screen, and then click Next.
❏ Mac OS X
Select how you want to connect the printer to your computer.
27
User’s Guide
Network Settings
Restoring the Network Settings from the Control
Panel
You can restore all network settings to their defaults.
1. Turn the printer o.
2. While holding down the
on the right
Restoration is complete when green light on the le and the orange light on the right are o.
ash
alternately.
button, press the button until the green light on the le and the orange light
28
User’s Guide
Loading Paper
Loading Paper
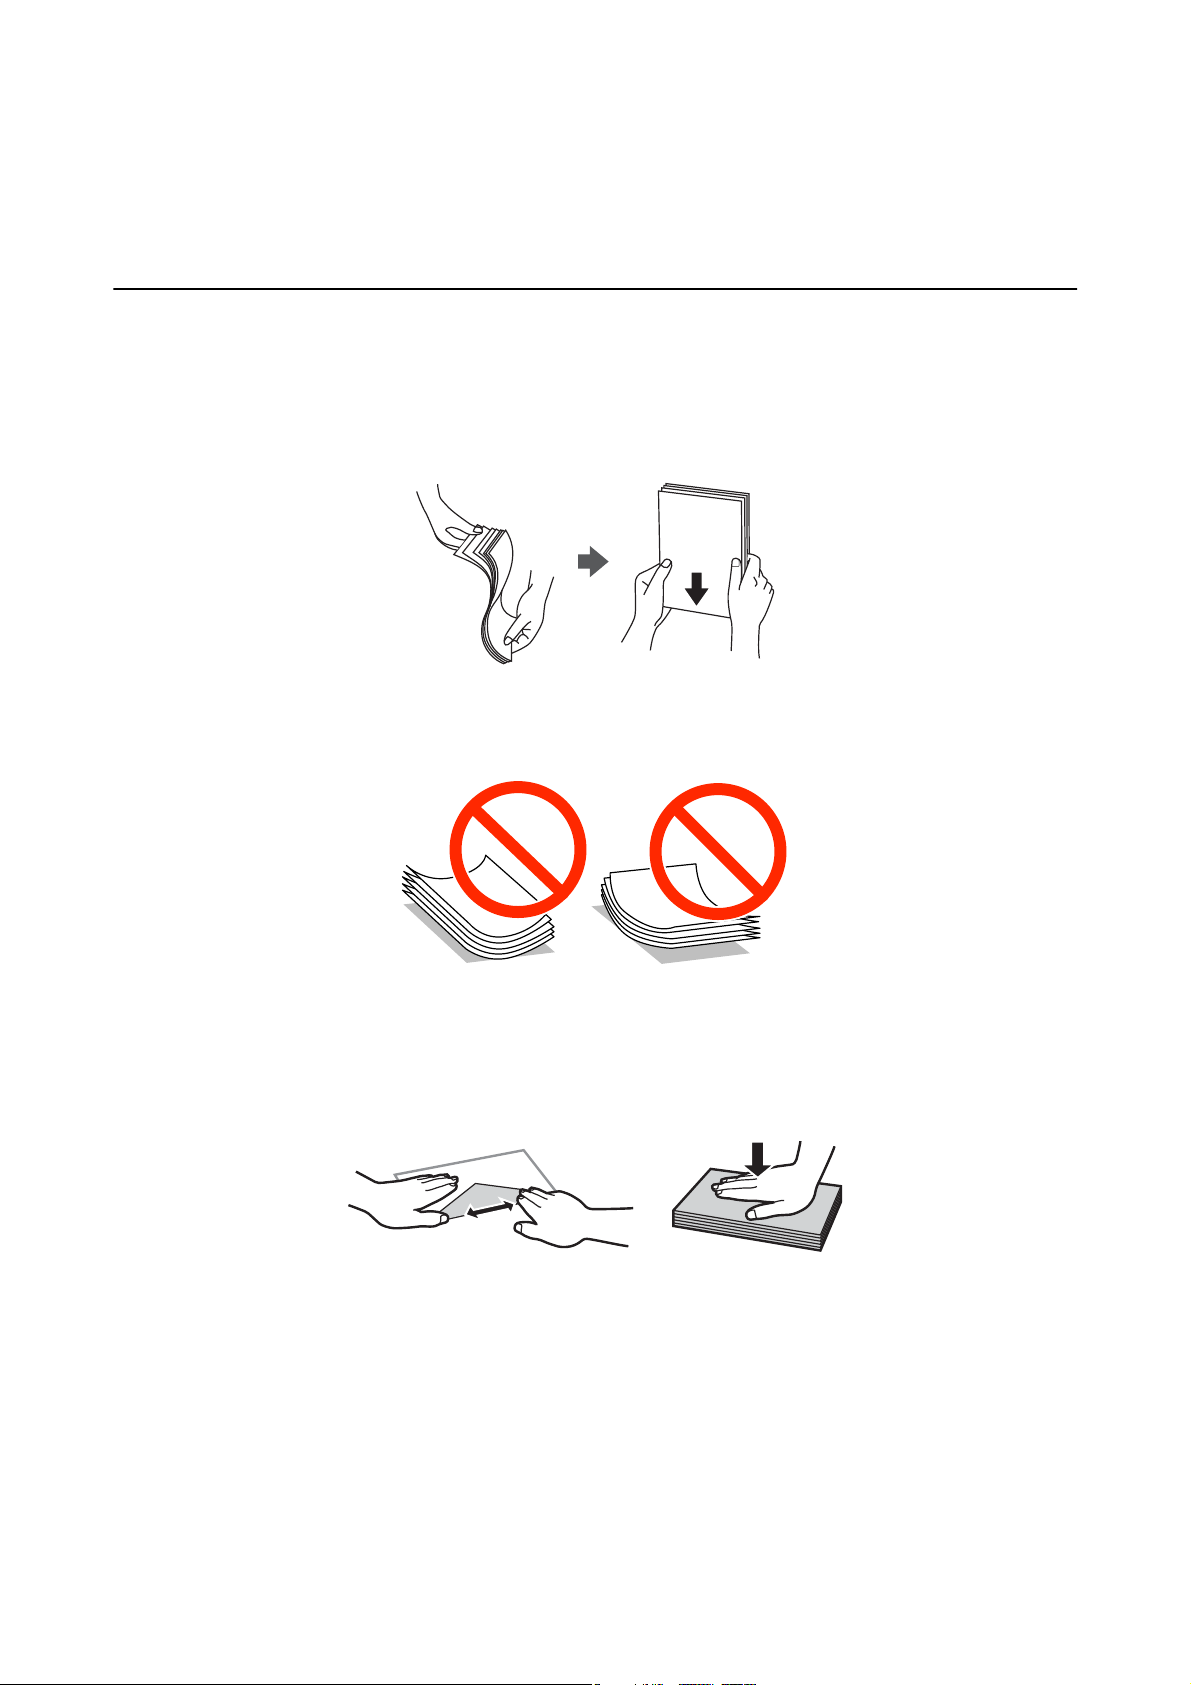
Paper Handling Precautions
❏ Read the instruction sheets supplied with the paper.
❏ Fan and align the edges of the paper before loading. Do not fan or curl photo paper. Doing so may damage the
printable side.
❏ If the paper is curled, atten it or curl it slightly in the opposite direction before loading. Printing on curled
paper may cause paper jams and smears on the printout.
❏ Do not use paper that is wavy, torn, cut, folded, damp, too thick, too thin, or paper that has stickers stuck to it.
Using these types of paper causes paper jams and smears on the printout.
❏ Fan and align the edges of the envelopes before loading. When the stacked envelopes are pued up with air,
press them down to atten them before loading.
❏ Do not use envelopes that are curled or folded. Using these envelopes causes paper jams and smears on the
printout.
❏ Do not use envelopes with adhesive surfaces on the aps or window envelopes.
❏ Avoid using envelopes that are too thin, as they may curl during printing.
Related Information
& “Printer Specications” on page 114
29
User’s Guide
Loading Paper
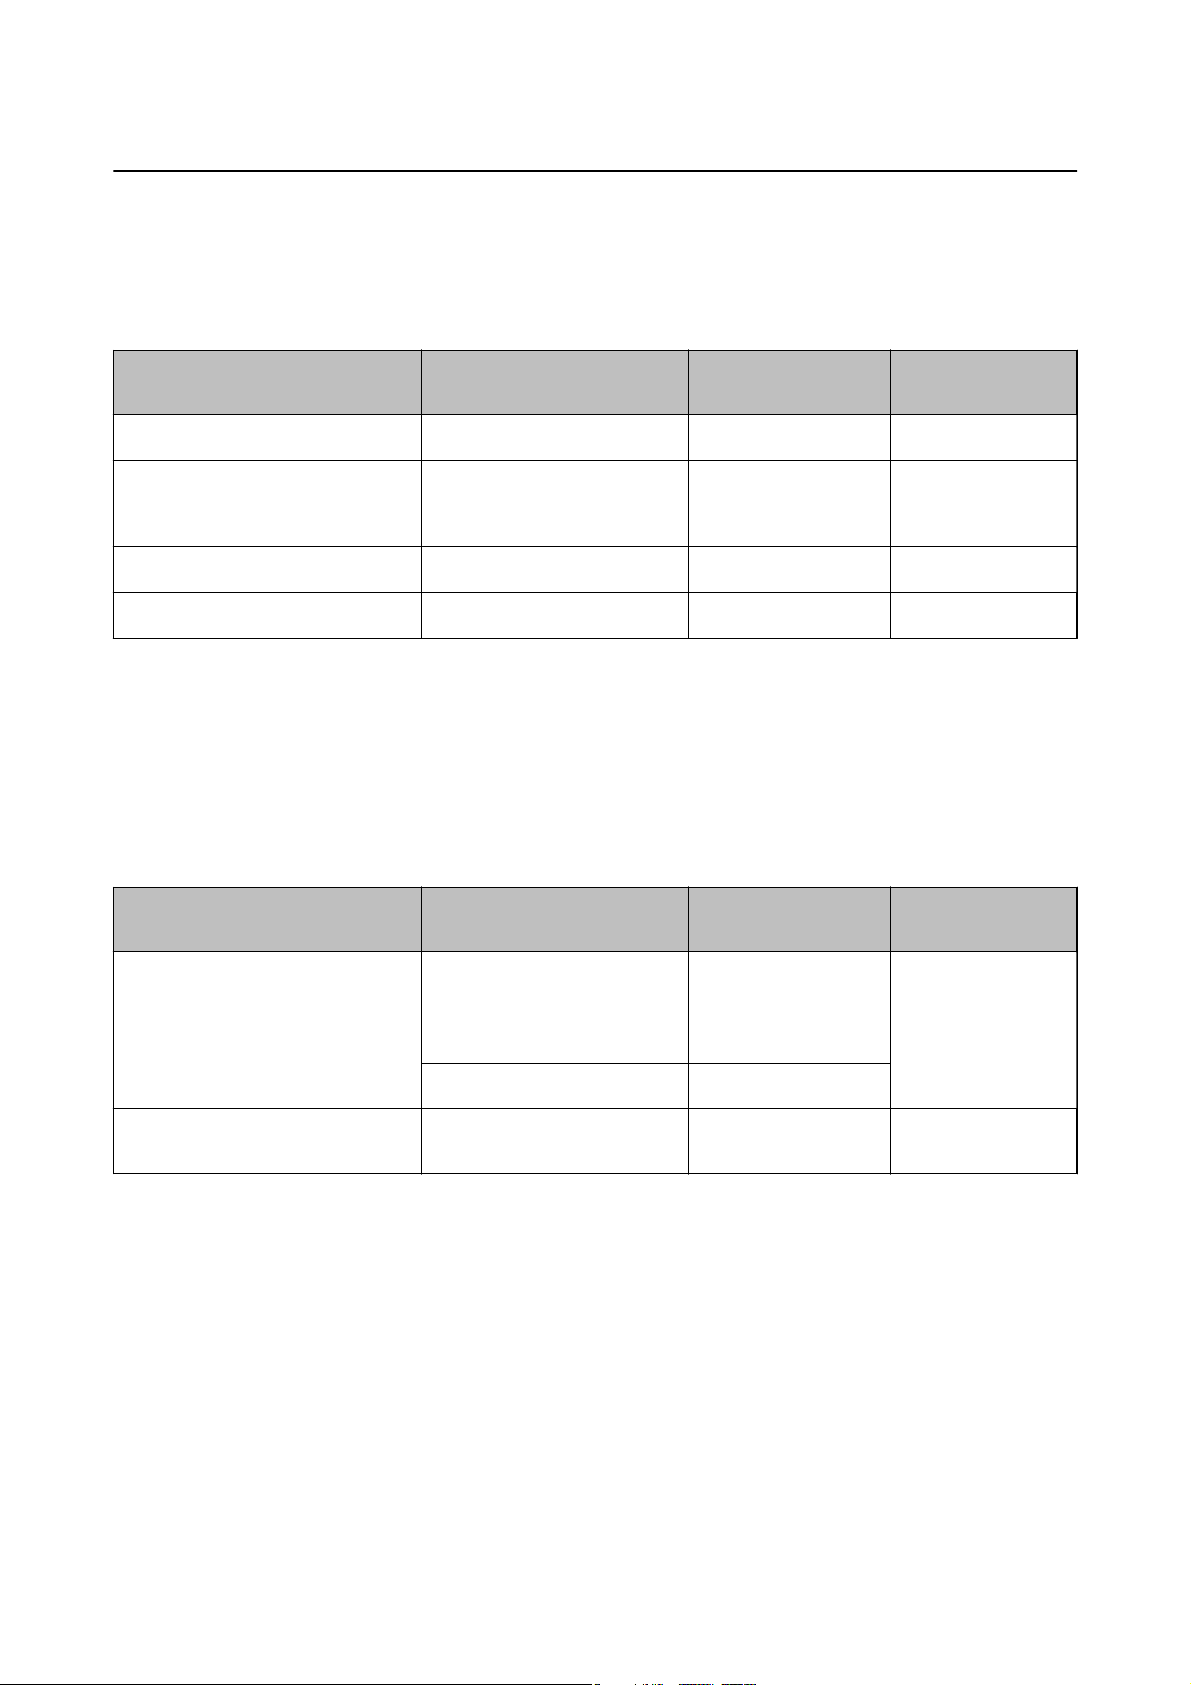
Available Paper and Capacities
Epson recommends using genuine Epson paper to ensure high-quality printouts.
Genuine Epson Paper
Media Name Size Loading Capacity
(Sheets)
Epson Bright White Ink Jet Paper A4
*2
Epson Premium Glossy Photo Paper
Epson Matte Paper-Heavyweight
Epson Photo Quality Ink Jet Paper
*1 For manual 2-sided printing, you can load up to 30 sheets for paper with one side already printed.
*2 Only printing from computer or smart device is available.
*2
A4, 13×18 cm (5×7 in.), 16:9
wide size (102×181 mm), 10×15
cm (4×6 in.)
A4 20 —
*2
A4 80 —
*1
80
20 —
Manual 2-Sided
Printing
✓
Note:
e availability of paper varies by location. For the latest information on paper available in your area, contact Epson
support.
Commercially Available Paper
Media Name Size Loading Capacity
(Sheets)
Manual 2-Sided
Printing
Plain paper
Envelope
*1 Only printing from computer or smart device is available.
*2 For manual 2-sided printing, you can load up to 30 sheets for paper with one side already printed.
*1
*1
Letter
, A4, B5*1, A5*1, A6
Legal, User Dened
Envelope #10, Envelope DL,
Envelope C6
*1
*1
Up to the line
indicated by the
triangle symbol on the
edge guide.
1
10 —
*2
Related Information
& “Technical Support Web Site” on page 122
List of Paper Types
To obtain optimum printing results, select the paper type that suits the paper.
✓
30
Loading…

Добро пожаловать! Если вы только что приобрели принтер Epson L386, то вам, безусловно, понадобится инструкция по его настройке и использованию. В этой статье я постараюсь вам помочь и предоставить полное руководство для эффективного использования данного устройства.
1. Установка принтера
Перед началом работы с принтером Epson L386, вам нужно правильно его установить. Все необходимые шаги описаны ниже:
- Распакуйте принтер и проверьте наличие всех компонентов в комплекте.
- Подключите принтер к розетке и включите его кнопкой питания.
- Наполните чернильные емкости. Убедитесь, что уровень чернил достаточен для печати.
- Установите драйверы принтера на ваш компьютер. Вы можете найти их на официальном веб-сайте Epson.
- Соедините принтер с компьютером с помощью кабеля USB.
- Дождитесь, пока операционная система определит принтер и установит все необходимые драйверы.
- Протестируйте принтер, напечатав тестовую страницу.
2. Использование принтера
Теперь, когда ваш принтер Epson L386 успешно установлен, можно перейти к использованию. Вот несколько важных моментов, которые вам следует знать:
- При печати выберите соответствующие настройки, такие как ориентация бумаги, качество печати и тип бумаги.
- Если вам нужно сканировать документы или фотографии, используйте функцию сканирования на принтере. При необходимости вы можете настроить параметры сканирования.
- Для экономии чернил рекомендуется использовать режим экономии чернил, который обычно доступен в настройках принтера. Также следует регулярно проверять уровень чернил и заполнять их, когда это необходимо.
- Если вам понадобится печать большого объема документов, рекомендуется использовать оригинальные чернила Epson, чтобы получить наилучшее качество печати.
- Не забывайте очищать печатающие головки регулярно, чтобы избежать засорения и ухудшения качества печати.
3. Решение проблем
В процессе эксплуатации принтера Epson L386 возможно столкнуться с некоторыми проблемами. Вот несколько распространенных проблем и их решений:
Проблема: Принтер не печатает.
Решение: Убедитесь, что принтер правильно подключен к компьютеру и включен. Проверьте, достаточно ли уровня чернил для печати. Проверьте настройки принтера и убедитесь, что он выбран в качестве устройства по умолчанию.
Проблема: Печать выходит с пятнами или искажениями.
Решение: Очистите печатающие головки принтера, следуя инструкциям пользователя. Если проблема не исчезает, возможно, требуется замена картриджей чернил.
Итог

Принтер Epson L386 — это надежное и удобное устройство для печати документов и фотографий. Следуя инструкциям по установке и использованию, описанным в этой статье, вы сможете достичь высокого качества печати и избежать возможных проблем. Не забывайте следить за уровнем чернил и регулярно очищать печатающие головки принтера для поддержания оптимальной производительности. Наслаждайтесь печатью с принтером Epson L386!
Инструкция для принтера Epson L386

Добро пожаловать в нашу подробную инструкцию по использованию принтера Epson L386! Если вы только что приобрели эту модель или уже давно пользуетесь ею, но хотите узнать больше о ее функциях и возможностях, то вы попали по адресу. Мы расскажем вам обо всех необходимых настройках и способах эксплуатации этого принтера.
Вступление
Epson L386 — это многофункциональное устройство, которое объединяет в себе функции принтера, сканера и копира. Он оснащен системой непрерывной подачи чернил (CISS), что позволяет существенно сэкономить на печати и обеспечивает высокое качество изображений.
Шаг 1: Установка принтера
Перед началом использования принтера Epson L386 вам необходимо правильно установить его.
- Распакуйте принтер из коробки и проверьте наличие всех комплектующих.
- Подключите принтер к источнику питания и компьютеру, используя кабели.
- Включите принтер и дождитесь, пока он завершит инициализацию.
- Установите необходимое ПО, следуя инструкциям на экране.
Шаг 2: Настройка сетевого подключения

Epson L386 позволяет подключиться к сети Wi-Fi, что обеспечивает беспроводную печать.
- Настройте сетевое подключение на принтере, следуя инструкциям в руководстве пользователя.
- Настройте подключение к сети Wi-Fi на вашем компьютере или мобильном устройстве.
- Проверьте сетевое подключение, запустив печать тестовой страницы.
Шаг 3: Заправка чернилами
Принтер Epson L386 использует систему непрерывной подачи чернил (CISS), что позволяет значительно сэкономить на печати. Однако, периодически потребуется заправить чернила.
Следуйте этим шагам для заправки чернилами:
- Подготовьте нужные чернила для заправки. Убедитесь, что они соответствуют спецификациям принтера.
- Откройте крышку чернильных емкостей и аккуратно заправьте каждую емкость нужным цветом чернил.
- Закройте крышку чернильных емкостей и проверьте их герметичность.
Шаг 4: Использование сканера и копира
Принтер Epson L386 также является сканером и копиром. Чтобы воспользоваться этими функциями, выполните следующие действия:
- Разместите документ или фотографию на стекле сканера.
- Выберите режим сканирования или копирования на панели управления принтера.
- Настройте параметры сканирования или копирования на экране компьютера или принтера.
- Нажмите кнопку «Сканировать» или «Копировать» для начала процесса.
Итог
Принтер Epson L386 — это надежное и функциональное устройство, которое обеспечивает высокое качество печати, сканирования и копирования. Благодаря системе непрерывной подачи чернил (CISS), он позволяет существенно сэкономить на печати, а также обеспечивает удобство использования. Установка и настройка этого принтера просты и понятны даже для начинающих пользователей. Не сомневайтесь, Epson L386 — отличный выбор для домашнего использования или небольшого офиса.
Инструкция для принтера Epson L386
Принтер Epson L386 представляет собой надежное устройство с высоким качеством печати. Он идеально подходит для домашнего использования и небольших офисов. В этой статье мы расскажем о всех особенностях и возможностях этого принтера и предоставим полезные рекомендации по его использованию.
Установка принтера

Перед началом использования принтера Epson L386 необходима его правильная установка. Следуйте этим шагам, чтобы убедиться, что все настроено правильно:
- Распакуйте принтер и проверьте комплектность.
- Подключите принтер к источнику питания и включите его.
- Подключите принтер к компьютеру или ноутбуку с помощью USB-кабеля.
- Выберите язык, дату и время на экране принтера.
- Установите чернильницы и проверьте их уровень чернил.
- Запустите установочный диск и следуйте указаниям по установке драйверов.
- После установки драйверов принтер готов к использованию.
Основные функции принтера
Принтер Epson L386 имеет множество функций, которые обеспечивают удобство использования и высокое качество печати. Вот некоторые из них:
- Высокая скорость печати, позволяющая сэкономить время.
- Беспроводная печать через Wi-Fi, что позволяет печатать непосредственно с компьютера или мобильного устройства без необходимости подключения кабелей.
- Функция двусторонней печати, с помощью которой можно экономить бумагу.
- Многофункциональность, позволяющая сканировать, копировать и печатать документы.
- Высокое качество печати с яркими цветами и четкими текстами.
- Экономия чернил с помощью системы непрерывной подачи чернил Epson.
Рекомендации по использованию принтера

Чтобы достичь оптимальной работы принтера Epson L386, рекомендуется следовать этим советам:
- Выберите правильное качество печати в зависимости от типа документа: черновик, нормальное или наилучшее качество.
- Внимательно отслеживайте уровень чернил и перезаправляйте его при необходимости.
- Регулярно проводите процедуру очистки головки печати, чтобы избегать засорений и неправильной печати.
- Используйте оригинальные картриджи или заправляемые картриджи Epson для достижения наилучшего качества печати.
- Обновляйте драйверы и программное обеспечение для принтера для поддержания его работоспособности и совместимости с новыми операционными системами.
Итоги
Принтер Epson L386 является отличным выбором для тех, кто ищет надежное и высококачественное устройство для печати. Благодаря своим различным функциям и возможностям, он обеспечивает удобство использования и превосходное качество печати. Следуйте нашей инструкции и рекомендациям, чтобы максимально эффективно использовать этот принтер и наслаждаться его преимуществами на полную катушку.
Additional Information:
Print, scan, and share directly from your iPhone®, iPad®, or iPod® Touch. Print photos, emails, webpages and files including Microsoft® Word, Excel®, PowerPoint® and PDF documents. Also supports Box, Dropbox, Evernote®*1, Google Drive™ and Microsoft OneDrive™. Epson iPrint makes printing easy and convenient whether your printer is in the next room or across the world. Key Features • Print, scan, and share directly from your iPhone, iPod Touch or iPad • Print from anywhere in the world to email-enabled Epson printers using remote print functionality • Print photos, PDFs and Microsoft Office documents such as Word, Excel and PowerPoint • Print stored files, email attachments, and online files from Box, Dropbox, Evernote, Google Drive and Microsoft OneDrive • Capture a document with your device camera, format, enhance, then save, ready to print • Scan from your Epson all-in-one and share your file (save to your device, send via email or save online) • Copy documents and photos using your mobile device and a nearby Epson printer • Transfer files between your device and an SD card or USB drive via an Epson printer • Check your printer’s status and ink levels • Print within a complex network environment using manual IP printer setup • Get help with a built-in FAQ section Advanced Features • Print high quality photos with automatic backlight and color cast correction • Choose and print multiple photos • Print your email attachments and stored files • Configure your print options including paper size and type, number of copies, page range and one- or two-sided printing • Print with and without borders • Switch between color or monochrome printing • Choose from different scanning resolutions and image types • Optimize print quality • Buy ink and supplies for your printer • Setup & register to Epson Connect • Manage remote printers
Содержание
- инструкции на русском
- Струйное МФУ Epson L386
- Epson L386 инструкция на русском скачать бесплатно
- Epson L386 характеристика
- Струйное МФУ Epson L386 видео
- Инструкция, как подключить принтер Epson к WiFi и настроить печать
- Первое включение принтера
- Способы подключения через Вай-Фай
- Wi-Fi Protected Setup (WPS)
- Ввод Pin кода
- Драйвер для Epson L386
- Установка драйвера в Windows 10
- Драйвер для Epson L386
- Как установить драйвер в Windows 10
инструкции на русском
Инструкцию для Epson L386 на русском языке, в формате pdf можно скачать с нашего сайта. Наш каталог предоставляем Вам инструкцию производителя фирмы Epson, которая была взята из открытых источников. Ознакомившись с руководством по эксплуатации от Epson, Вы на все 100% и правильно сможете воспользоваться всеми функциями устройства.
Струйное МФУ Epson L386
- Скачать инструкцию Epson L386
- Видео инструкция Epson L386
- Характеристика Epson L386
- Оставить отзыв
Epson L386 инструкция на русском скачать бесплатно
Описание к инструкции:
- Тип устройства: Струйное МФУ
- Фирма производитель: Epson
- Модель: Epson L386
- Инструкция на русском языке
- Формат файла: pdf
- Размер файла: 349 Kb
Epson L386 характеристика
Струйное МФУ Epson L386 видео
Видео скоро будет добавлено на сайт
Для сохранения инструкции «Струйное МФУ Epson L386» на русском языке на вашем компьютере либо телефоне, нажмите кнопку «Скачать инструкцию». Если активна кнопка «Инструкция онлайн», то Вы можете просмотреть документ (manual), в своём браузере онлайн.
Если у Вас нет возможности скачать инструкцию по эксплуатации либо просмотреть её, Вы можете поделиться ссылкой на эту страницу в социальных сетях и при удобном моменте скачать инструкцию. Либо добавьте эту страницу в закладки Вашего браузера, нажав кнопку «Добавить страницу в закладки браузера».
Источник
Инструкция, как подключить принтер Epson к WiFi и настроить печать
Этот материал поможет произвести подключение и настройку WiFi на принтере Epson популярных моделей l366, l805, l355, l3060, l386, Pixma mg 3640 и многих других в том числе. Здесь рассмотрены все способы «связать» устройство с беспроводной сетью через WPS, ввод пин-кода и функцию SES. Отдельно даны рекомендации по настройке печати по «вайфай» с компьютера, ноутбука, телефона или планшета. А также показано, как правильно устанавливать драйвера (программное обеспечение) для Вашего Эпсона.
Первое включение принтера
Практически любая модель принтера Epson серии «Л» оборудована специальным радиомодулем беспроводной связи. Именно тот позволяет соединить аппарат с локальной сетью в одну связку. А это уже дает возможность производить печать документов или фотографий с других устройств в той же сети. Это могут быть компьютеры, ноутбуки, смартфоны и даже планшет.
Если принтер только куплен и это будет его первое включение, то стоит правильно подготовиться. Первым делом нужно наполнить банки системы непрерывной подачи чернил красками нужного оттенка. СНПЧ находится слева, а красители часто идут в комплекте с техникой. Но приобрести их можно отдельно в любой компьютерном магазине.
После каждой заправки рекомендовано проводить программную очистку сопел и дюз печатающей головки. Для автоматического запуска процедуры зажмите на несколько секунд кнопку треугольник в круге красного цвета. Она самая крайняя справа на панели.
Способы подключения через Вай-Фай
Wi-Fi Protected Setup (WPS)
Технология позволяет «связать» два устройства с использованием Wi-Fi в одной сети. Для этого действуйте по такой инструкции:
- На передней панели управления, которая находится непосредственно на корпусе принтер, найдите и нажмите кнопку с надписью «WiFi».

- Держите ее нажатой не менее чем три секунды.
- Когда лампочки на панели начнут мигать по очереди, нажмите кнопку WPS на роутере.

- Работа индикаторов должна измениться на одновременное мигание вместе.
- Соединение между устройствами установлено успешно.
Ввод Pin кода
К сожалению, не все роутеры имеют кнопку WPS, а потому придется воспользоваться способом ввода специального пин-кода. Он находится внизу на корпусе принтера на наклейке с информацией о серийном номере и MAC адресом. Состоит из восьми цифр, которые разделены на пары по 4 штуки дефисом. Код нужно записать или запомнить.
Теперь нужно зайти в настройки роутера. В большинстве случаев это выполняется через веб-интерфейс. Откройте браузер и введите в строку «192.168.1.1» или «192.168.1.0». Точный IP указан на этикетке роутера. Там же данные для входа: логин и пароль. По умолчанию это могут быть «Admin» и «1111», если настройка сетевого оборудования не проводилась ранее. А также можно попробовать авторизоваться с данными входа в Wi-Fi.
В админ-части после входа найдите раздел меню с названием WPS (также могут быть указаны как «QSS» или полное название WiFi Protected Setup). Теперь нажмите кнопку или ссылку, которая добавляет новое устройство. Введите PIN код принтера. Сохраните изменения, если это требуется.
Источник
Драйвер для Epson L386
Windows XP/Vista/7/8/10 — для печати
Размер: 37 MB (x32) и 39.7 MB (x64)
Разрядность: 32/64
Ссылка:
- для x32 — Epson L386-windows 32bit
- для x64 — Epson L386-windows 64bit
Windows XP/Vista/7/8/10 — для сканирования
Размер: 51.8 MB (x64)
Разрядность: 32/64
Ссылка: Epson L386-windows scan
Установка драйвера в Windows 10
Обычно у пользователей принтера Epson L386 нет проблем с установкой драйверов, однако если вы впервые столкнулись с такой необходимостью, то рекомендуем ознакомиться с информацией ниже. Тем более что на данной странице нашего сайта вы не только найдете инфо по установке драйверов, но и сможете скачать драйвер Epson L386 под любую операционную систему.
Обратите внимание, что файл-установщик драйвера будет запакован в архив. Как только архив будет скачен, сразу же запускайте установочный файл и в первом, появившемся перед вами окне, выберите «Setup».

В следующем окне просто нажмите кнопку «ОК».
Теперь выберите русский язык и также нажмите «ОК».
Далее нужно прочитать и принять лицензионное соглашение – просто поставьте «галочку» у пункта «Согласен» и перейдите к следующему окну, нажав «ОК».
Здесь просто немного подождите.
А теперь убедитесь в том, что ваш принтер подсоединен к компьютеру при помощи кабеля USB, после чего включите его и дождитесь, пока операционная система автоматически определит его.
Все, теперь вы можете заняться распечаткой документов!
Источник
Драйвер для Epson L386
Windows XP / Vista / 7 / 8 / 8.1 / 10 — для печати
Варианты разрядности: x32/x64
Размер драйвера: 37 MB (x32) и 40 MB (x64)
Нажмите для скачивания (x32): Epson L386
Нажмите для скачивания (x64): Epson L386
Windows XP / Vista / 7 / 8 / 8.1 / 10 — для сканирования
Варианты разрядности: x32/x64
Размер драйвера: 52 MB
Нажмите для скачивания: Epson L386
Как установить драйвер в Windows 10
Среди принтеров Epson модель Epson L386 держится немного особняком. Связано это с процедурой установки драйвера. Если всем остальным требуется распаковка архива «своими силами» (с помощью системы или отдельного архиватора), то у Epson L386 драйвер запакован в самораспаковывающийся архив. То есть не требует использования или установки отдельных программ. Запускаем выполнение и видим следующее окно.
В нём можем либо отменить действие нажатием «Cancel». Либо перейти к установке, нажав «Setup». Распаковка выполняется быстро и запускается установка драйвера.

В списке присутствует лишь 1 устройство. Нажимаем на него левой кнопкой мыши после чего жмём «Ок».

Теперь выбираем язык. Выбор делается из выпадающего списка. Подтверждается действие нажатием «Ок».

В окне лицензионного соглашения кнопка «Ок» заблокирована. Она станет доступной после того, как пользователь отметит ячейку «Согласен». Поэтому ставим отметку и жмём «Ок».

Подключаем принтер к компьютеру, как показано на рисунке. Возможно, потребуется выключить и включить его. Как только устройство будет определено мастером установки запустится автоматический процесс.
Больше от пользователя ничего не потребуется.
Источник