
Replacing Ink Cartridges
17
English
c
Caution:
❏ Be careful not to break the hooks on the
side of the ink cartridge when you remove
it from the package.
❏ Do not touch the green chip on the side of
the cartridge. This can damage the ink
cartridge.
7. Remove the yellow tape.
c
Caution:
❏ You must remove the yellow tape from the
cartridge before installing it; otherwise,
print quality may decline or you may not be
able to print.
❏ Do not remove the seal.
❏ Be sure to always install an ink cartridge
into the printer immediately following the
removal of the current ink cartridge. If the
ink cartridge is not installed promptly, the
print head may dry out, rendering it unable
to print.
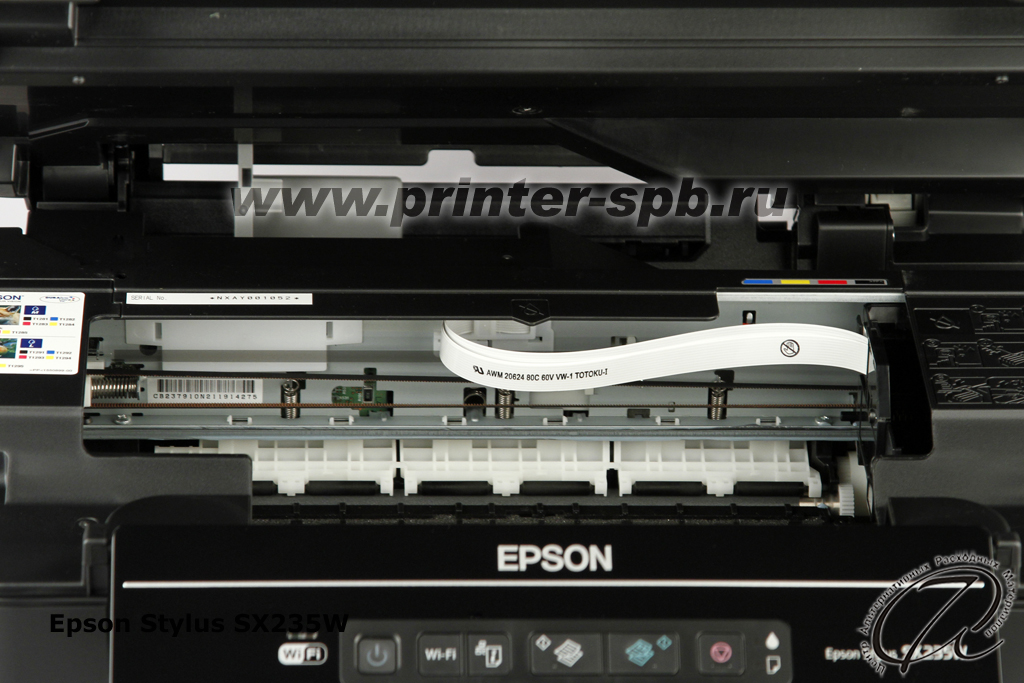
8. Place the new ink cartridge in the
cartridge holder and press it down until
it clicks into place.
9. Close the ink cartridge cover and press it
until it clicks into place.
c
Caution:
If you find it difficult to close the cover, make
sure all the cartridges are firmly seated.
Press down on each cartridge until you hear
it click into place. Do not attempt to force the
cover closed.
10. Close the scanner unit.
11. Press y Stop.
The printer starts charging the ink
delivery system.
c
Caution:
Do not turn off the printer during ink charging
as this will waste ink.
Note:
If you had to replace an ink cartridge during
copying, to ensure copy quality after ink
charging is finished, cancel the job that is
copying and start again from placing the
originals.
Руководство По Замене Картриджей Epson Stylus 7300
Ниже приводится руководство по настройке МФУ Epson Stylus CX7300 в Kubuntu 7.10. Действия для настройки других моделей этой серии аналогичны. Важный upd Настройка устройства в Kubuntu 8.04+ происходит автоматически при подключении. Итак, настройка печтающей части Включаем девайс, заходим в настройщик CUPS, например так — http://127.0.0.1:631/ Add Printer — вводим любые name/loc/desc, выбираем наш определившийся МФУ И выбираем драйвер для CX7800. Все.

Обнуление картриджа. о замене картриджа. а не раньше. читайте инструкцию, которая шла в Обратитесь в сервисный центр Epson. подскажите я собираюсь перейти СНПЧ, но из 4-х картриджей у 2х ещё.
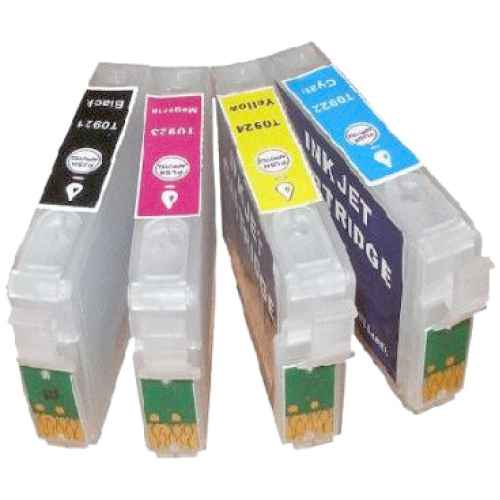
Перезаправляемые картриджи (ПЗК) для Epson Stylus CX3900, CX7300, CX4900, CX8300, CX5900, CX9300F, CX6900F (ПЗК), 4 шт, с чипами. Описание Отзывы (0) Инструкция по установке и использованию ПЗК для Epson.
Собрание инструкций по заправке картриджей для струйных принтеров. CX7300, скачать | просмотреть Инструкция по замене оригинальных чипов, суперчипами SCSI для Epson Pro3800, Инструкция по подключению оригинального датчика к планке с чипами Epson Stylus C91, скачать | просмотреть.
Epson не видит картриджи — решение проблемы в картинках Диагностика Для начала нужно определить симптомы принтера. Неисправность может быть — в чипах ( поставьте новый, желательно заведомо исправный), в CSIC, или в плате Если при включении загорается индикатор “капелька”, который символизирует, что нет картриджа или закончились чернила. При нажатии на кнопку над индикатором, принтер покажет, что всех картриджей нет, хотя у вас установлены все картриджи.
EPSON STYLUS CX7300 перестал видеть картриджи Видет картриджи, только в Замена предохранителя не привела к результату.
Картридж Epson T0731 — C13T07314A черный Ресурс: 245 с. 4ml за 15 секунд. МФЦ струйный Epson Stylus CX7300. МФЦ струйный.
- Ниже приводится руководство по настройке МФУ Epson Stylus CX7300. Периодически принтер предупреждает о замене картриджей.
- Service manual Hp · Service manual Canon · Service manual Xerox Выньте один, любой картридж и нажмите на кнопку над горящим На примере принтера Epson Stylus Photo T50 мы показали замену предохранителя, на Epson Stylus CX7300 : транзисторы A2098 и C6082 рисунок 24.
- На примере принтера Epson Stylus Photo T50 мы показали замену предохранителя, Epson Stylus CX7300 : транзисторы A2098 и C6082 рисунок 24.
Рекомендую прочитать вот эту статью: ‘Что такое чип в картридже Epson?’ чернил сливается в памперс при замене картриджа — так как принтер производит 1) Работает напрямую с CSIC в картриджах принтеров Epson Stylus.
Комментарии (0)Просмотров (650)
CX7300 specifications
Epson has long been synonymous with quality printing solutions and has built a reputation around its versatile and innovative models. Among its offerings, the Epson CX7300, DX8400, CX8300, and DX7400 printers stand out, catering to diverse printing needs from home offices to professional environments.
The Epson CX7300 is a multifunction printer that excels in delivering high-quality prints, scans, and copies. With its all-in-one design, users can benefit from a compact solution that doesn’t compromise on functionality. Equipped with PrecisionCore technology, the CX7300 offers sharp, vibrant images and crisp text. Furthermore, its intuitive interface simplifies the user experience, while wireless connectivity options allow for seamless printing from smartphones and tablets.
The DX8400 stands out with its advanced photo printing capabilities, making it an ideal choice for photography enthusiasts. This model uses six-color ink technology, which includes photo black and light cyan, enhancing the depth and detail in printed photographs. The DX8400 also features an integrated card slot and a large color LCD for easy navigation and direct printing from various media types. In addition to its printing prowess, the DX8400 supports high-resolution scanning and copying, providing a comprehensive solution for creative professionals.
Next in line, the Epson CX8300 builds on similar features to the CX7300 but adds extra versatility through its enhanced support for various paper types and sizes. The CX8300 is designed with an emphasis on photo printing, producing borderless prints up to 8.5” x 14” — perfect for scrapbooking and professional presentations. Its fast printing speed does not sacrifice quality, delivering reliable outputs with every task.
Finally, the DX7400 is designed for users seeking a balance between affordability and performance. This all-in-one model is equipped with a flatbed scanner that allows for the easy copying and scanning of various documents, including bulky items. The DX7400 features user-friendly software that simplifies editing and organizing scanned files, offering convenience for both personal and professional use. With its eco-conscious design, the DX7400 utilizes low-energy consumption technology, promoting a sustainable printing solution.
Overall, Epson’s CX7300, DX8400, CX8300, and DX7400 printers are a testament to the company’s commitment to innovation, functionality, and quality. With a range of features tailored to meet different user needs, these models provide reliable solutions for printing, scanning, and copying, ensuring that users can execute their tasks with ease and precision.
Printed in XXXXXX XX.XX-XX XXX
5.
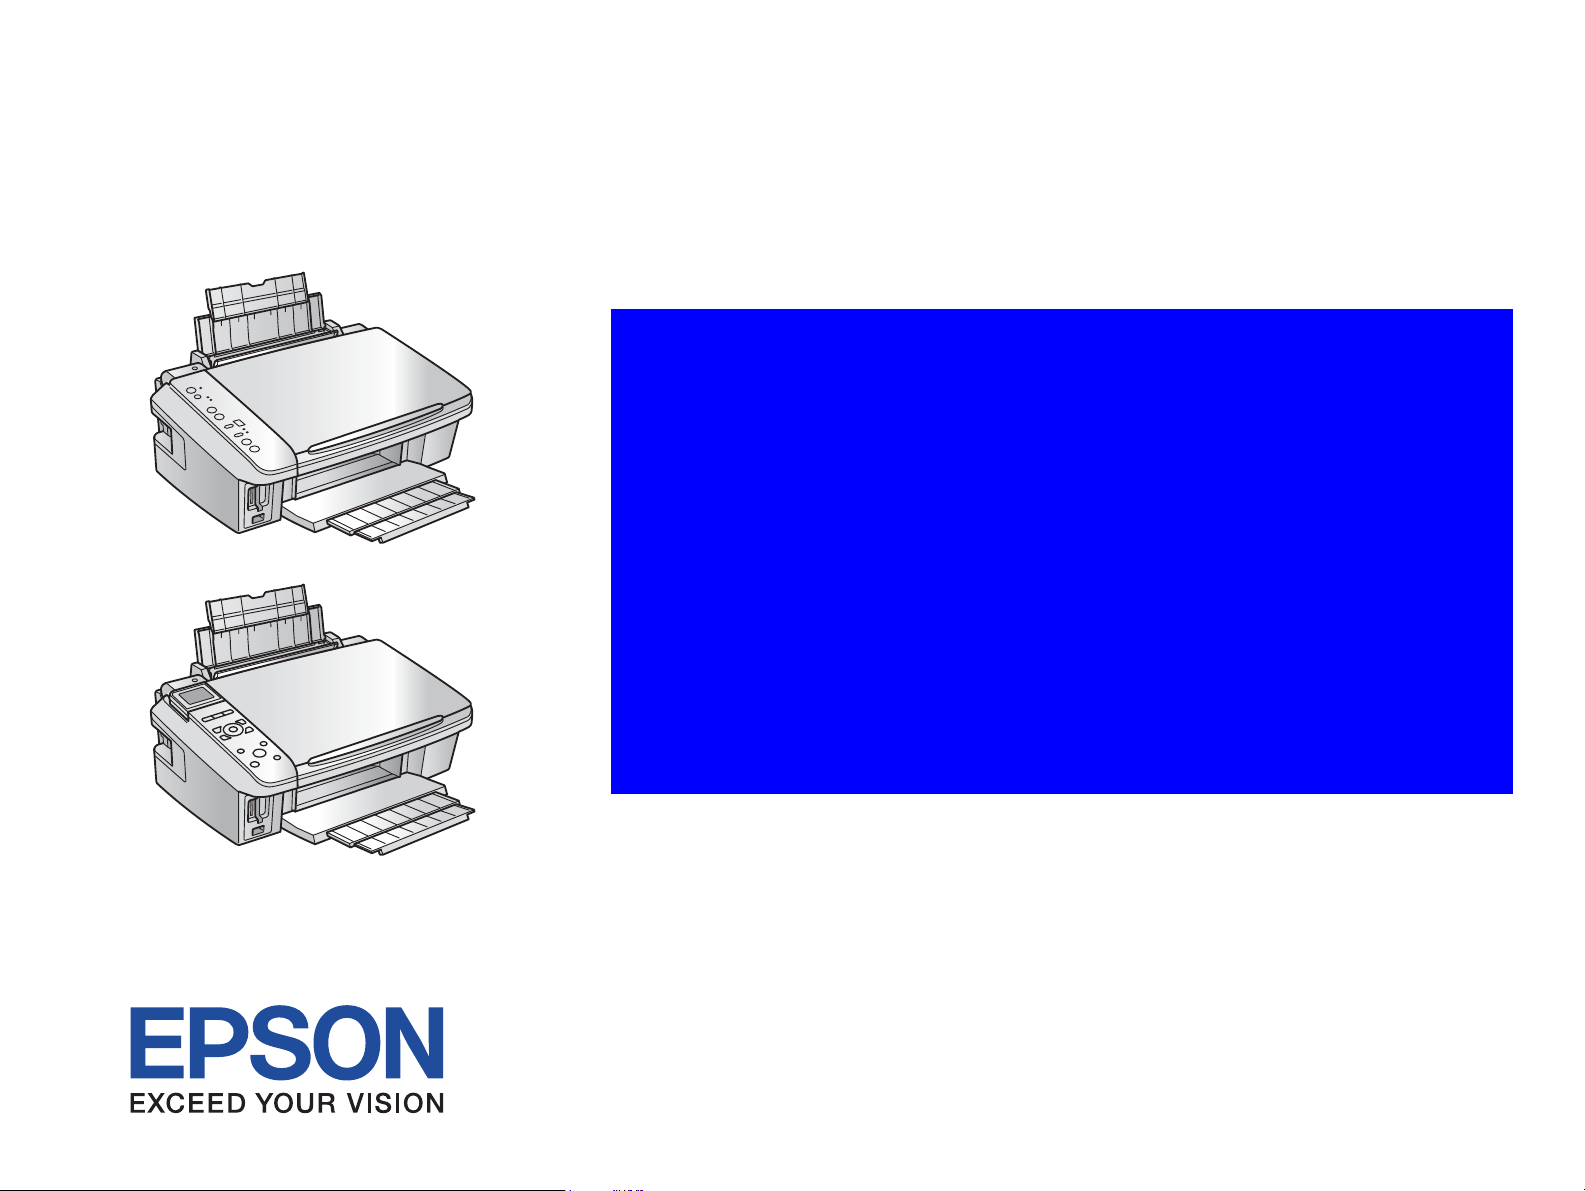
Stylus CX7300/DX7400
Start Here • Установка • Встановлення
1.
4.
2.
6.
Do not connect the USB cable until you are instructed to do so.
Не подключайте USB кабель, пока не встретите указание сделать это.
Не підключайте USB кабель, поки не з’явиться вказівка зробити це.
Windows
No installation screen?
&
Окно установки не появилось?
&
Вікно встановлення не з’явилося?
&
If this screen appears, click
Cancel.
Если появится такое окно, нажмите Cancel (Отмена).
Якщо з’явиться таке вікно, натисніть Cancel (Скасувати).
Windows
Mac OS X
3.
Stylus CX8300/DX8400
Note:
The ink cartridges first installed in your printer will be partly used to charge the print head. These cartridges print fewer pages compared to subsequent ink cartridges.
Примечание:
Чернильные картриджи, впервые установленные в принтер, частично расходуются на прокачку системы подачи чернил. Этот картридж напечатает меньше страниц по сравнению со следующими
обычными чернильными картриджами.
Примітка:
Чорнильні картриджі, установлені в принтер, частково витрачаються на прокачування системи подачі чорнила. Цей картридж надрукує менше сторінок порівняно з наступними чорнильними картриджами.
Wait about 2.5 min •
Примерно 2,5 минуты • Приблизно 2,5 хвилини
Wait about 2.5 min •
Примерно 2,5 минуты • Приблизно 2,5 хвилини
Flashing •
Мигает • Блимає
On •
Вкл. • Вкл.
Note:
Do not open the ink cartridge package until you are ready to install it in the printer. The cartridges are vacuum packed to maintain its reliability.
Примечание:
Не открывайте упаковку чернильного картриджа, пока не будете готовы установить его в принтер. Вакуумная упаковка обеспечивает сохранность картриджа.
Примітка:
Не відкривайте упаковку чорнильного картриджа, поки не будете готові вставити його в принтер. Картридж перебуває у вакуумній упаковці для підтримки його надійності.
Stylus CX7300/DX7400
Stylus CX8300/DX8400
Getting More Information •
Дополнительные сведения • Додаткова інформація
Stylus CX8300/DX8400
Нажмите на кнопку для помощи
SERVICE MANUAL
Color Inkjet Printer
EPSON Stylus CX7300/CX7400/DX7400
NX200/TX200/TX203/TX209
SX200/SX205
EPSON Stylus CX8300/CX8400/DX8400
NX400/TX400/TX405/TX409
SX400/SX405

Notice:
All rights reserved. No part of this manual may be reproduced, stored in a retrieval system, or transmitted in any form or by any means, electronic, mechanical,
photocopying, recording, or otherwise, without the prior written permission of SEIKO EPSON CORPORATION.
The contents of this manual are subject to change without notice.
All effort have been made to ensure the accuracy of the contents of this manual. However, should any errors be detected, SEIKO EPSON would greatly appreciate being
informed of them.
The above not withstanding SEIKO EPSON CORPORATION can assume no responsibility for any errors in this manual or the consequences thereof.
EPSON is a registered trademark of SEIKO EPSON CORPORATION.
General Notice: Other product names used herein are for identification purpose only and may be trademarks or registered trademarks of their
respective owners. EPSON disclaims any and all rights in those marks.
Copyright © 2008 SEIKO EPSON CORPORATION.
Imaging Products CS, PL & Environmental Management
Confidential

PRECAUTIONS
Precautionary notations throughout the text are categorized relative to 1) Personal injury and 2) damage to equipment.
DANGER Signals a precaution which, if ignored, could result in serious or fatal personal injury. Great caution should be exercised in performing procedures preceded by
DANGER Headings.
WARNING Signals a precaution which, if ignored, could result in damage to equipment.
The precautionary measures itemized below should always be observed when performing repair/maintenance procedures.
DANGER
1. ALWAYS DISCONNECT THE PRODUCT FROM THE POWER SOURCE AND PERIPHERAL DEVICES PERFORMING ANY MAINTENANCE OR REPAIR
PROCEDURES.
2. NO WORK SHOULD BE PERFORMED ON THE UNIT BY PERSONS UNFAMILIAR WITH BASIC SAFETY MEASURES AS DICTATED FOR ALL ELECTRONICS
TECHNICIANS IN THEIR LINE OF WORK.
3. WHEN PERFORMING TESTING AS DICTATED WITHIN THIS MANUAL, DO NOT CONNECT THE UNIT TO A POWER SOURCE UNTIL INSTRUCTED TO DO
SO. WHEN THE POWER SUPPLY CABLE MUST BE CONNECTED, USE EXTREME CAUTION IN WORKING ON POWER SUPPLY AND OTHER ELECTRONIC
COMPONENTS.
4. WHEN DISASSEMBLING OR ASSEMBLING A PRODUCT, MAKE SURE TO WEAR GLOVES TO AVOID INJURIER FROM METAL PARTS WITH SHARP EDGES.
WARNING
1. REPAIRS ON EPSON PRODUCT SHOULD BE PERFORMED ONLY BY AN EPSON CERTIFIED REPAIR TECHNICIAN.
2. MAKE CERTAIN THAT THE SOURCE VOLTAGES IS THE SAME AS THE RATED VOLTAGE, LISTED ON THE SERIAL NUMBER/RATING PLATE. IF THE
EPSON PRODUCT HAS A PRIMARY AC RATING DIFFERENT FROM AVAILABLE POWER SOURCE, DO NOT CONNECT IT TO THE POWER SOURCE.
3. ALWAYS VERIFY THAT THE EPSON PRODUCT HAS BEEN DISCONNECTED FROM THE POWER SOURCE BEFORE REMOVING OR REPLACING PRINTED
CIRCUIT BOARDS AND/OR INDIVIDUAL CHIPS.
4. IN ORDER TO PROTECT SENSITIVE MICROPROCESSORS AND CIRCUITRY, USE STATIC DISCHARGE EQUIPMENT, SUCH AS ANTI-STATIC WRIST
STRAPS, WHEN ACCESSING INTERNAL COMPONENTS.
5. REPLACE MALFUNCTIONING COMPONENTS ONLY WITH THOSE COMPONENTS BY THE MANUFACTURE; INTRODUCTION OF SECOND-SOURCE ICs OR
OTHER NON-APPROVED COMPONENTS MAY DAMAGE THE PRODUCT AND VOID ANY APPLICABLE EPSON WARRANTY.
6. WHEN USING COMPRESSED AIR PRODUCTS; SUCH AS AIR DUSTER, FOR CLEANING DURING REPAIR AND MAINTENANCE, THE USE OF SUCH
PRODUCTS CONTAINING FLAMMABLE GAS IS PROHIBITED.
Confidential
About This Manual
A D J U S T M E N T
R E Q U I R E D
This manual describes basic functions, theory of electrical and mechanical operations, maintenance and repair procedures of the printer. The instructions and procedures included
herein are intended for the experienced repair technicians, and attention should be given to the precautions on the preceding page.
Manual Configuration
This manual consists of six chapters and Appendix.
CHAPTER 1.PRODUCT DESCRIPTIONS
Provides a general overview and specifications of the product.
CHAPTER 2.OPERATING PRINCIPLES
Describes the theory of electrical and mechanical operations of the
product.
CHAPTER 3.TROUBLESHOOTING
Describes the step-by-step procedures for the troubleshooting.
CHAPTER 4.DISASSEMBLY / ASSEMBLY
Describes the step-by-step procedures for disassembling and assembling
the product.
CHAPTER 5.ADJUSTMENT
Provides Epson-approved methods for adjustment.
CHAPTER 6.MAINTENANCE
Provides preventive maintenance procedures and the lists of Epsonapproved lubricants and adhesives required for servicing the product.
APPENDIX Provides the following additional information for reference:
• Exploded Diagram
• Parts List
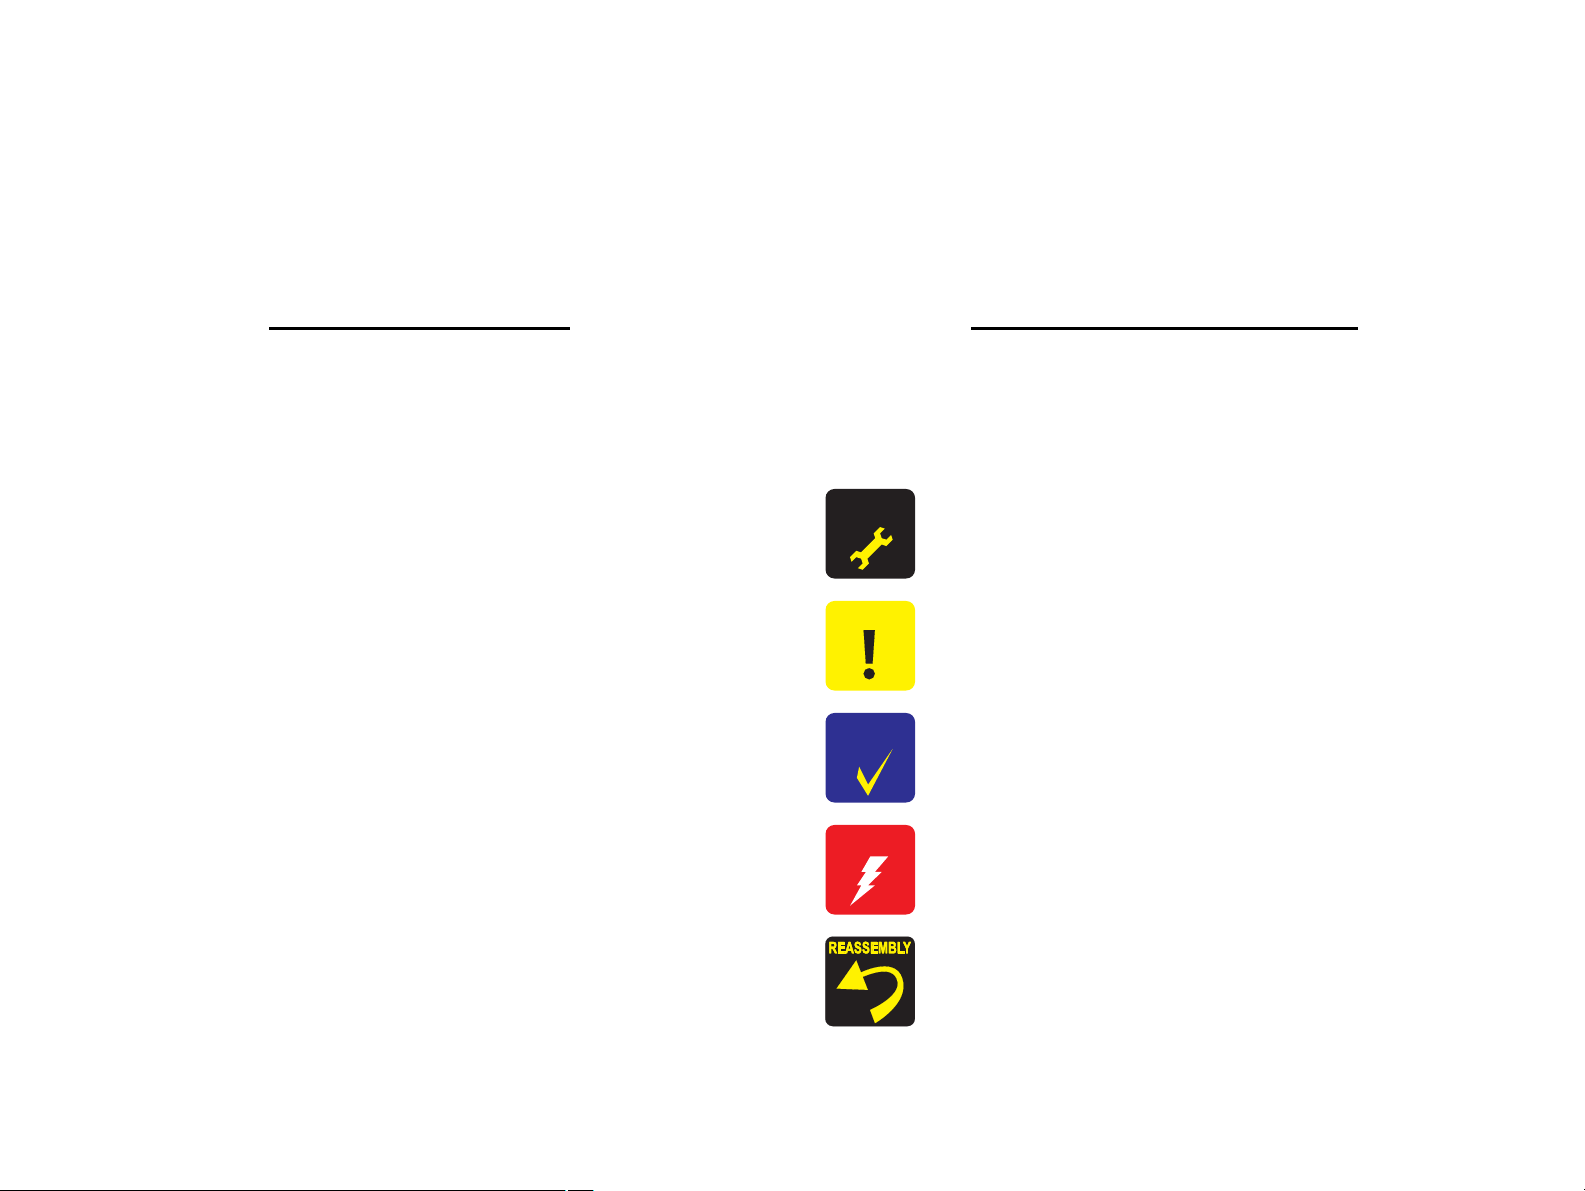
Symbols Used in this Manual
Various symbols are used throughout this manual either to provide additional
information on a specific topic or to warn of possible danger present during a
procedure or an action. Be aware of all symbols when they are used, and always read
NOTE, CAUTION, or WARNING messages.
Indicates an operating or maintenance procedure, practice or condition
that is necessary to keep the product’s quality.
Indicates an operating or maintenance procedure, practice, or condition
that, if not strictly observed, could result in damage to, or destruction of,
equipment.
May indicate an operating or maintenance procedure, practice or
condition that is necessary to accomplish a task efficiently. It may also
provide additional information that is related to a specific subject, or
comment on the results achieved through a previous action.
Indicates an operating or maintenance procedure, practice or condition
that, if not strictly observed, could result in injury or loss of life.
Indicates that a particular task must be carried out according to a certain
standard after disassembly and before re-assembly, otherwise the
quality of the components in question may be adversely affected.
Confidential

Revision Status
Revision Date of Issue Description
A August 9, 2007 First Release
B May 20, 2008 Revised Contents
Descriptions about Epson Stylus TX200/TX203/SX200/SX205/TX400/TX405/SX400/SX405 are added.
Chapter 1
“CHECK POINT” has been added in 1.1 Features (p9).
Descriptions have been added in 1.1 Features (p9).
Made changes in Table 1-2 “Product No. of Ink Cartridges” (p10).
Made changes in Table 1-6 “Supported Paper” (p13).
Made changes in Table 1-10 “Primary Power Specifications” (p16).
Made changes in 1.4.3 Durability (p17).
Made changes in 1.4.5 Safety Approvals (Safety standards/EMI) (p17).
Made changes in Table 1-13 “Device ID” (p17).
“CAUTION” has been added in 1.5.2 Memory Card Slots (p18).
Made changes in Table 1-15 “List of Supported Memory Card” (p18).
Made changes in Figure 1-11 “Nozzle Check Pattern” (p39).
Chapter 2
2.3 Electrical Circuit Operating Principles has been deleted.
Chapter 3
Made changes in 3.1 Overview (p59).
Made changes in Table 3-12 “Check point for Memory Card error according to each phenomenon” (p77).
Chapter 4
“CHECK POINT” has been added in 4.1 Overview (p91).
Chapter 7
7.2 Electrical Circuits has been deleted.
C July 15, 2008 Revised Contents
All Chapter
The model name; Epson Stylus NX200/TX209/NX400/TX409 are added.
Confidential

EPSON Stylus CX7300/CX7400/DX7400/NX200/TX200 series/SX200 series/Stylus CX8300/CX8400/DX8400/NX400/TX400 series/SX400 series Revision C
Contents
Chapter 1 PRODUCT DESCRIPTION
1.1 Features…………………………………………………………………………………………………… 9
1.2 Printing Specifications…………………………………………………………………………….. 10
1.2.1 Basic Specifications………………………………………………………………………… 10
1.2.2 Ink Cartridge………………………………………………………………………………….. 10
1.2.3 Print Mode …………………………………………………………………………………….. 11
1.2.4 Supported Paper……………………………………………………………………………… 13
1.2.5 Printing Area………………………………………………………………………………….. 15
1.3 Scanner Specifications…………………………………………………………………………….. 15
1.3.1 Scanning Range ……………………………………………………………………………… 15
1.4 General Specifications…………………………………………………………………………….. 16
1.4.1 Electrical Specifications ………………………………………………………………….. 16
1.4.2 Environmental Conditions ……………………………………………………………….. 16
1.4.3 Durability………………………………………………………………………………………. 17
1.4.4 Acoustic Noise……………………………………………………………………………….. 17
1.4.5 Safety Approvals (Safety standards/EMI) ………………………………………….. 17
1.5 Interface………………………………………………………………………………………………… 17
1.5.1 USB Interface ………………………………………………………………………………… 17
1.5.2 Memory Card Slots…………………………………………………………………………. 18
1.6 Control Panel …………………………………………………………………………………………. 19
1.6.1 Operation Buttons & LEDs ……………………………………………………………… 19
1.6.2 Control Panel Functions in Each Mode ……………………………………………… 21
1.7 Specification for Each Function ……………………………………………………………….. 29
1.7.1 Stand-alone Copy Function ……………………………………………………………… 29
1.7.2 Memory Card Direct Print Function………………………………………………….. 31
1.7.3 Camera Direct Print Function (USB Direct Print/PictBridge) ………………. 36
1.7.4 Reprint/Restore Photos Function (CX8300/TX400 series only) ……………. 38
1.7.5 Setup Mode……………………………………………………………………………………. 39
Chapter 2 OPERATING PRINCIPLES
2.1 Overview ………………………………………………………………………………………………. 42
2.1.1 Printer Mechanism………………………………………………………………………….. 42
2.1.2 Motors & Sensors …………………………………………………………………………… 43
2.1.3 Printhead……………………………………………………………………………………….. 44
2.1.4 Carriage Mechanism……………………………………………………………………….. 46
2.1.5 Paper Loading/Paper Feed Mechanism ……………………………………………… 47
2.1.6 Ink System Mechanism …………………………………………………………………… 52
2.1.7 Ink Sequence………………………………………………………………………………….. 55
2.2 Scanner Mechanism ……………………………………………………………………………….. 56
2.2.1 Scanner Carriage Mechanism…………………………………………………………… 56
Chapter 3 TROUBLESHOOTING
3.1 Overview ………………………………………………………………………………………………. 59
3.1.1 Specified Tools ………………………………………………………………………………. 59
3.1.2 Preliminary Checks…………………………………………………………………………. 59
3.2 Troubleshooting……………………………………………………………………………………… 60
3.2.1 Motor and Sensor Troubleshooting …………………………………………………… 60
3.3 Error Indications and Fault Occurrence Causes ………………………………………….. 61
3.3.1 Error Indication Method ………………………………………………………………….. 61
3.3.2 Troubleshooting by Error Message …………………………………………………… 65
3.3.3 Superficial Phenomenon-Based Troubleshooting ……………………………….. 83
6
Confidential

EPSON Stylus CX7300/CX7400/DX7400/NX200/TX200 series/SX200 series/Stylus CX8300/CX8400/DX8400/NX400/TX400 series/SX400 series Revision C
Chapter 4 DISASSEMBLY/ASSEMBLY
4.1 Overview ………………………………………………………………………………………………. 91
4.1.1 Precautions…………………………………………………………………………………….. 91
4.1.2 Tools …………………………………………………………………………………………….. 92
4.1.3 Work Completion Check …………………………………………………………………. 92
4.1.4 Procedural Differences between the Models ………………………………………. 94
4.2 Disassembly Procedures………………………………………………………………………….. 95
4.3 Removing the Housing……………………………………………………………………………. 96
4.3.1 Paper Support Assy…………………………………………………………………………. 96
4.3.2 Stacker Assy ………………………………………………………………………………….. 96
4.3.3 Document Cover/ASF Cover……………………………………………………………. 97
4.3.4 Scanner Unit/Hinge ………………………………………………………………………… 98
4.3.5 Upper Housing/Card Slot Cover……………………………………………………… 100
4.4 Removing the Circuit Boards …………………………………………………………………. 101
4.4.1 Main Board Unit …………………………………………………………………………… 101
4.4.2 Panel Unit/LCD Unit …………………………………………………………………….. 103
4.4.3 Power Supply Unit………………………………………………………………………… 105
4.5 Disassembling the Printer Mechanism …………………………………………………….. 107
4.5.1 Printhead ……………………………………………………………………………………… 107
4.5.2 CR Scale ……………………………………………………………………………………… 109
4.5.3 Hopper ………………………………………………………………………………………… 110
4.5.4 Removing the Printer Mechanism (Lower Housing)………………………….. 111
4.5.5 Left Frame …………………………………………………………………………………… 113
4.5.6 Front Frame/Right Frame ………………………………………………………………. 114
4.5.7 Star Wheel Holder Assy ………………………………………………………………… 116
4.5.8 EJ Roller ……………………………………………………………………………………… 116
4.5.9 PF Encoder Sensor………………………………………………………………………… 117
4.5.10 PF Scale …………………………………………………………………………………….. 118
4.5.11 PF Motor……………………………………………………………………………………. 119
4.5.12 CR Motor …………………………………………………………………………………… 120
4.5.13 Main Frame Assy………………………………………………………………………… 122
4.5.14 CR Unit……………………………………………………………………………………… 124
4.5.15 Upper Paper Guide ……………………………………………………………………… 126
4.5.16 ASF Unit……………………………………………………………………………………. 126
4.5.17 Ink System Unit ………………………………………………………………………….. 128
4.5.18 Front Paper Guide……………………………………………………………………….. 131
4.5.19 PF Roller……………………………………………………………………………………. 132
4.5.20 Waste Ink Pads …………………………………………………………………………… 133
4.6 Disassembling the Scanner Unit……………………………………………………………… 134
4.6.1 Upper/Front Scanner Housing ………………………………………………………… 134
4.6.2 Scanner Carriage Unit …………………………………………………………………… 135
4.6.3 Scanner Motor Unit ………………………………………………………………………. 138
4.7 Differences in Disassembling/Reassembling Stylus CX7300/TX200 series …. 139
4.7.1 Panel Unit (CX7300/TX200 series) ………………………………………………… 139
Chapter 5 ADJUSTMENT
5.1 Adjustment Items and Overview…………………………………………………………….. 142
5.1.1 Servicing Adjustment Item List………………………………………………………. 142
5.1.2 Required Adjustments …………………………………………………………………… 144
5.2 Using the Adjustment Program ………………………………………………………………. 146
5.2.1 TOP Margin Adjustment ……………………………………………………………….. 146
5.2.2 First Dot Position Adjustment ………………………………………………………… 146
5.2.3 Head Angular Adjustment……………………………………………………………… 147
5.2.4 Bi-D Adjustment…………………………………………………………………………… 148
5.2.5 PF Adjustment ……………………………………………………………………………… 148
5.2.6 PF Band Adjustment……………………………………………………………………… 150
5.2.7 Bottom Margin Adjustment……………………………………………………………. 150
Chapter 6 MAINTENANCE
6.1 Overview …………………………………………………………………………………………….. 152
6.1.1 Cleaning………………………………………………………………………………………. 152
6.1.2 Service Maintenance……………………………………………………………………… 152
6.1.3 Lubrication…………………………………………………………………………………… 153
Chapter 7 APPENDIX
7.1 Exploded Diagram / Parts List ……………………………………………………………….. 159
7
Confidential

PRODUCT DESCRIPTION
CHAPTER
1
Confidential
EPSON Stylus CX7300/CX7400/DX7400/NX200/TX200 series/SX200 series/Stylus CX8300/CX8400/DX8400/NX400/TX400 series/SX400 series Revision C
Notation Product name
CX7300 series Stylus CX7300/CX7400/DX7400
TX200 series Stylus NX200/TX200/TX203/TX209/SX200/SX205
CX8300 series Stylus CX8300/CX8400/DX8400
TX400 series Stylus NX400/TX400/TX405/TX409/SX400/SX405
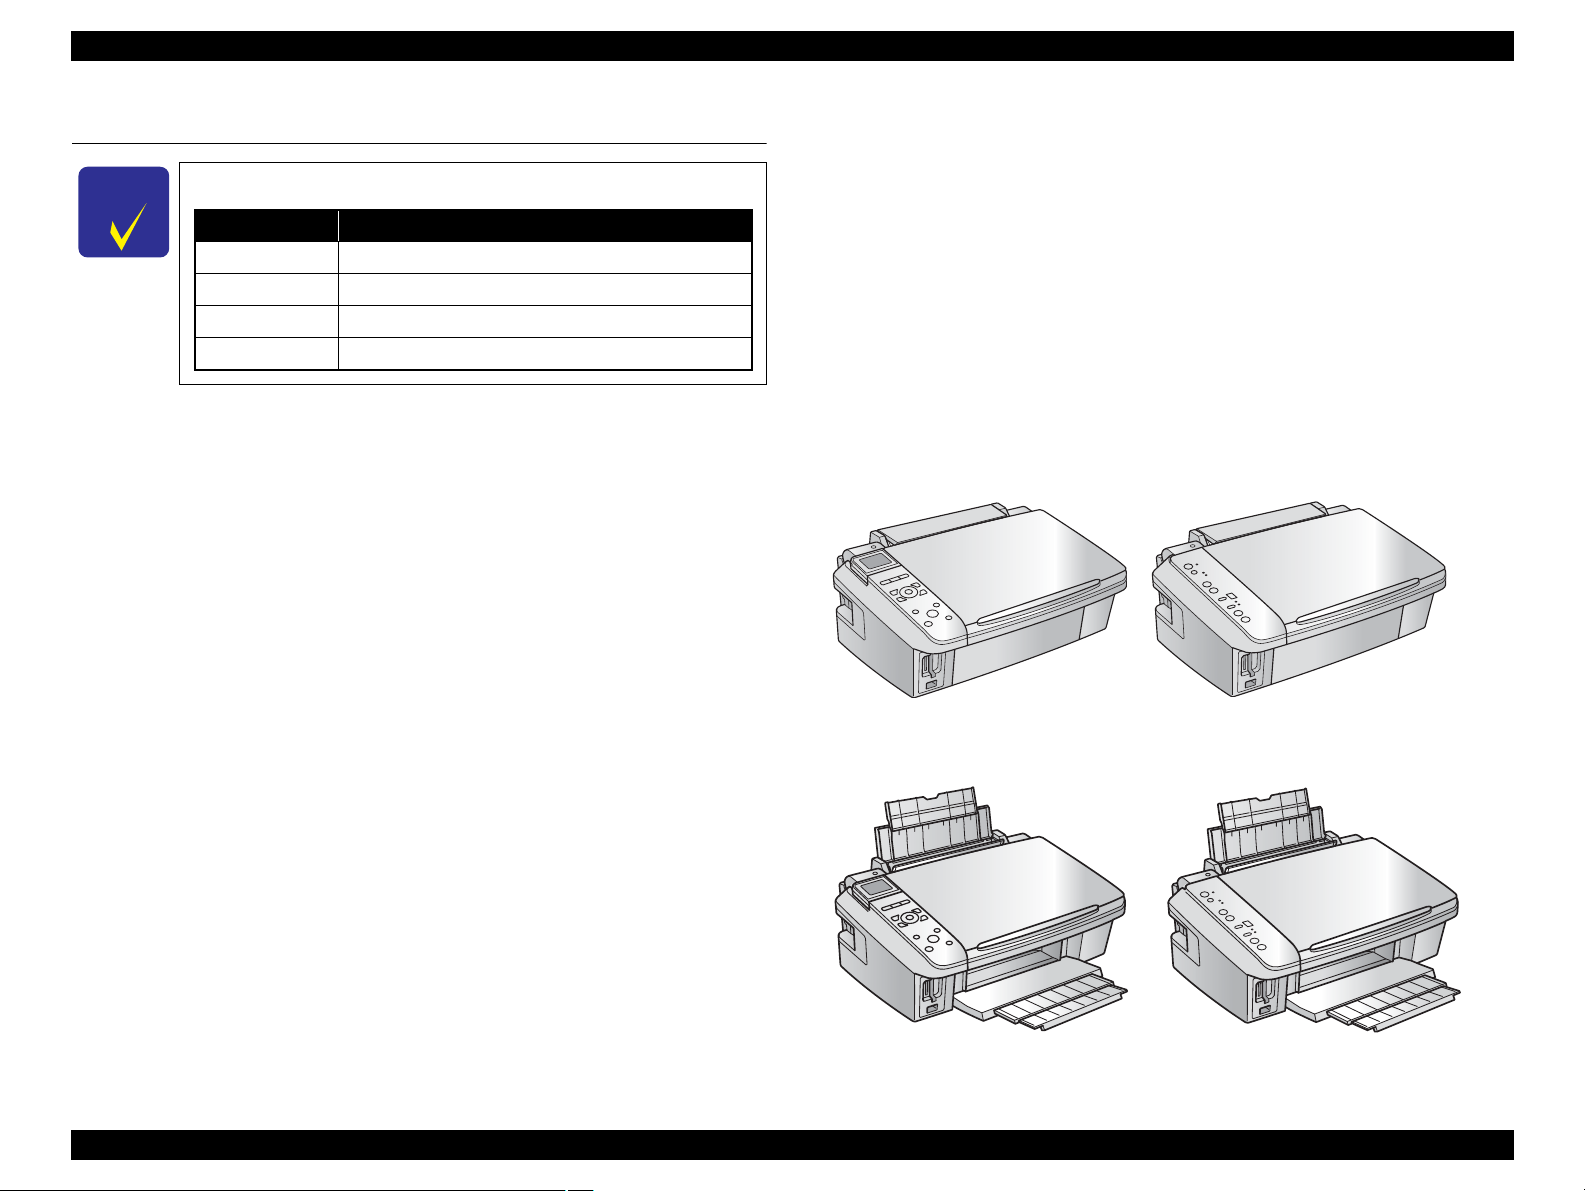
Paper Support & Stacker are Closed
CX8300/TX400 series
CX7300/TX200 series
CX8300/TX400 series
CX7300/TX200 series
1.1 Features
Dimensions
Stylus CX7300/CX8300 series
In this chapter, the product names are called as follows:
• Dimensions*1: 450 mm (W) x 340 mm (D) x 179 mm (H)
• Weight*2: CX8300 series: 5.9 kg
CX7300 series: 5.8 kg
Stylus TX200/TX400 series
• Dimensions*1: 450 mm (W) x 342 mm (D) x 182 mm (H)
• Weight*2: TX400 series: 5.9 kg
TX200 series: 5.8 kg
EPSON Stylus CX7300/TX200/CX8300/TX400 series are color ink-jet printers with
scanner function and have the following features.
*1 :Paper support and stacker are closed. Rubber feet are excluded.
*2 :Excluding the weight of ink cartridges and power cable.
The difference in appearance between the two models is LCD; CX8300/TX400 series
is equipped with LCD, and CX7300/TX200 series is not equipped with it.
Available Functions
Printer
Printing from a computer or directly printing from a memory card.
Scanner
Scanning from a computer
Copy
Stand alone copy using the scanning and printing functions
Memory card slot
Available as USB memory card slot for PC
Color LCD (CX8300/TX400 series only)
• 2.5-inch color TFD LCD (CX8300 series)
• 2.5-inch color α-TFT LCD (TX400 series)
High speed & High quality
Maximum print resolution: SMGA 5760 (H) x 1440 (V) dpi
D4-chips Turbo II Printhead achieves higher print speed than ever.
(Black: 90 nozzles x 1, Color: 90 nozzles x 1 per color)
Four independent ink cartridges is installed.
Newly developed pigment ink is employed.
Borderless printing on specified EPSON brand paper is available.
PRODUCT DESCRIPTION Features 9
Figure 1-1. External View
Confidential
EPSON Stylus CX7300/CX7400/DX7400/NX200/TX200 series/SX200 series/Stylus CX8300/CX8400/DX8400/NX400/TX400 series/SX400 series Revision C
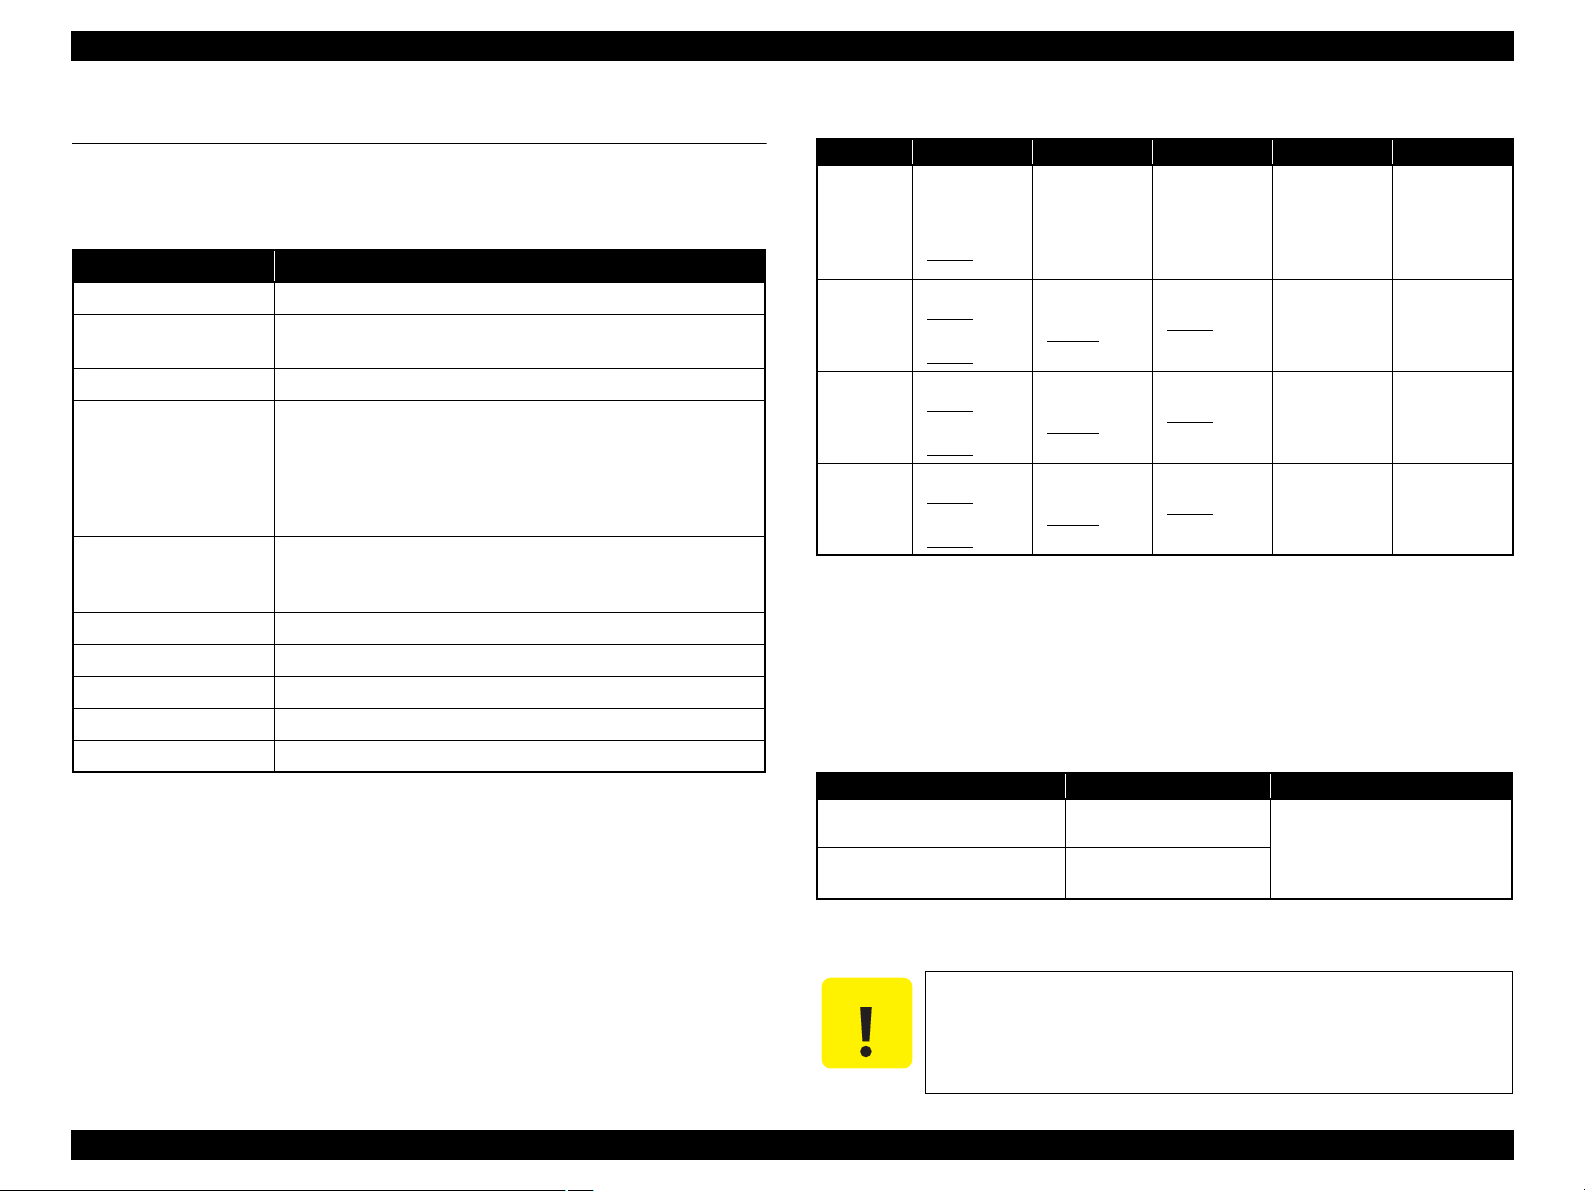
1.2 Printing Specifications
1.2.1 Basic Specifications
Table 1-1. Printer Specifications
Item Specification
Print method On-demand ink jet
Nozzle configuration
Print direction Bi-directional minimum distance printing, Unidirectional printing
Print resolution
Control code
Input buffer size 64 Kbytes
Paper feed method Friction feed, using the ASF (Auto Sheet Feeder)
Paper path Top feed, front out
Paper feed rates T.B.D. mm/sec (at 25.4 mm feed)
PF interval Programmable in 0.01764 mm (1/1440 inch) steps
1.2.2 Ink Cartridge
Black: 90 nozzles x 1
Color: 90 nozzles x 3 (Cyan, Magenta, Yellow)
Horizontal x Vertical (dpi)
• 360 x 120 • 1440 x 720
• 360 x 360 • 1440 x 1440
• 360 x 720 • SMGA 5760 x 1440 (2880 x 1440)
• 720 x 720
• ESC/P Raster command
• ESC/P-R (RGB) command
• EPSON Remote command
Table 1-2. Product No. of Ink Cartridges
Color EAI Latin Euro CISMEA Asia
T0731H (S)
1
T0731HN (S)*
T0731 (2S)
2
T0731N (2S)*
4
T0901 (3S)*
4
T0732 (3S)
2
*
T0732N (3S)*
4
*
4
T0733 (3S)
2
*
T0733N (3S)*
4
*
4
T0734 (3S)
2
*
T0734N (3S)*
4
*
4
T0711H (S)
T0711 (2S)
4
T0891 (3S)*
3
T0712 (3S)
T0712 (3S)*
4
T0892 (4S)*
T0713 (3S)
T0713 (3S)*
4
T0893 (4S)*
T0714 (3S)
T0714 (3S)*
4
T0894 (4S)*
T0731H (S)
T0731HN (S)*
T0731 (2S)
4
T0731N (2S)*
T0732 (3S)
4
T0732N (3S)*
4
T0733 (3S)
4
T0733N (3S)*
4
T0734 (3S)
4
T0734N (3S)*
4
T0731HN (S)*
4
T0731 (2S)
T0731N (2S)*
4
T0732 (3S)
4
T0732N (3S)*
T0733 (3S)
4
T0733N (3S)*
T0734 (3S)
4
T0734N (3S)*
Black
Cyan
Magenta
Yellow
T0681 (S)*
T0691 (2S)
T0881 (3S)*
T0881 (3S)*
T0692 (3S)
T0692 (3S)*
T0882 (4S)
T0882 (4S)
T0693 (3S)
T0693 (3S)*
T0883 (4S)
T0883 (4S)
T0694 (3S)
T0694 (3S)*
T0884 (4S)
T0884 (4S)
Note *1 : Available only with CX8300/TX400 series.
*2 : Available only with CX7300/TX200/TX400 series.
*3 : Available only with CX7300/CX8300 series.
*4 : Available only with TX200/TX400 series.
Shelf life
Two years from production date (if unopened), six months after opening package.
Storage Temperature
Table 1-3. Storage Temperature
Situation Storage Temperature Limit
When stored in individual boxes
When installed in main unit
-20 oC to 40 oC
o
F to 104oF)
(-4
-20 oC to 40 oC
(-4oF to 104oF)
1 month max. at 40 oC (104oF)
4
4
4
4
4
The product numbers of the EPSON ink cartridges for this printer are shown below.
PRODUCT DESCRIPTION Printing Specifications 10
Dimension
12.7 mm (W) x 68 mm (D) x 47 mm (H)
Do not use expired ink cartridges.
The ink in the ink cartridge freezes at -16 °C (3.2 oF). It takes
about three hours under 25 °C (77
becomes usable.
o
F) until the ink thaws and
Confidential
EPSON Stylus CX7300/CX7400/DX7400/NX200/TX200 series/SX200 series/Stylus CX8300/CX8400/DX8400/NX400/TX400 series/SX400 series Revision C
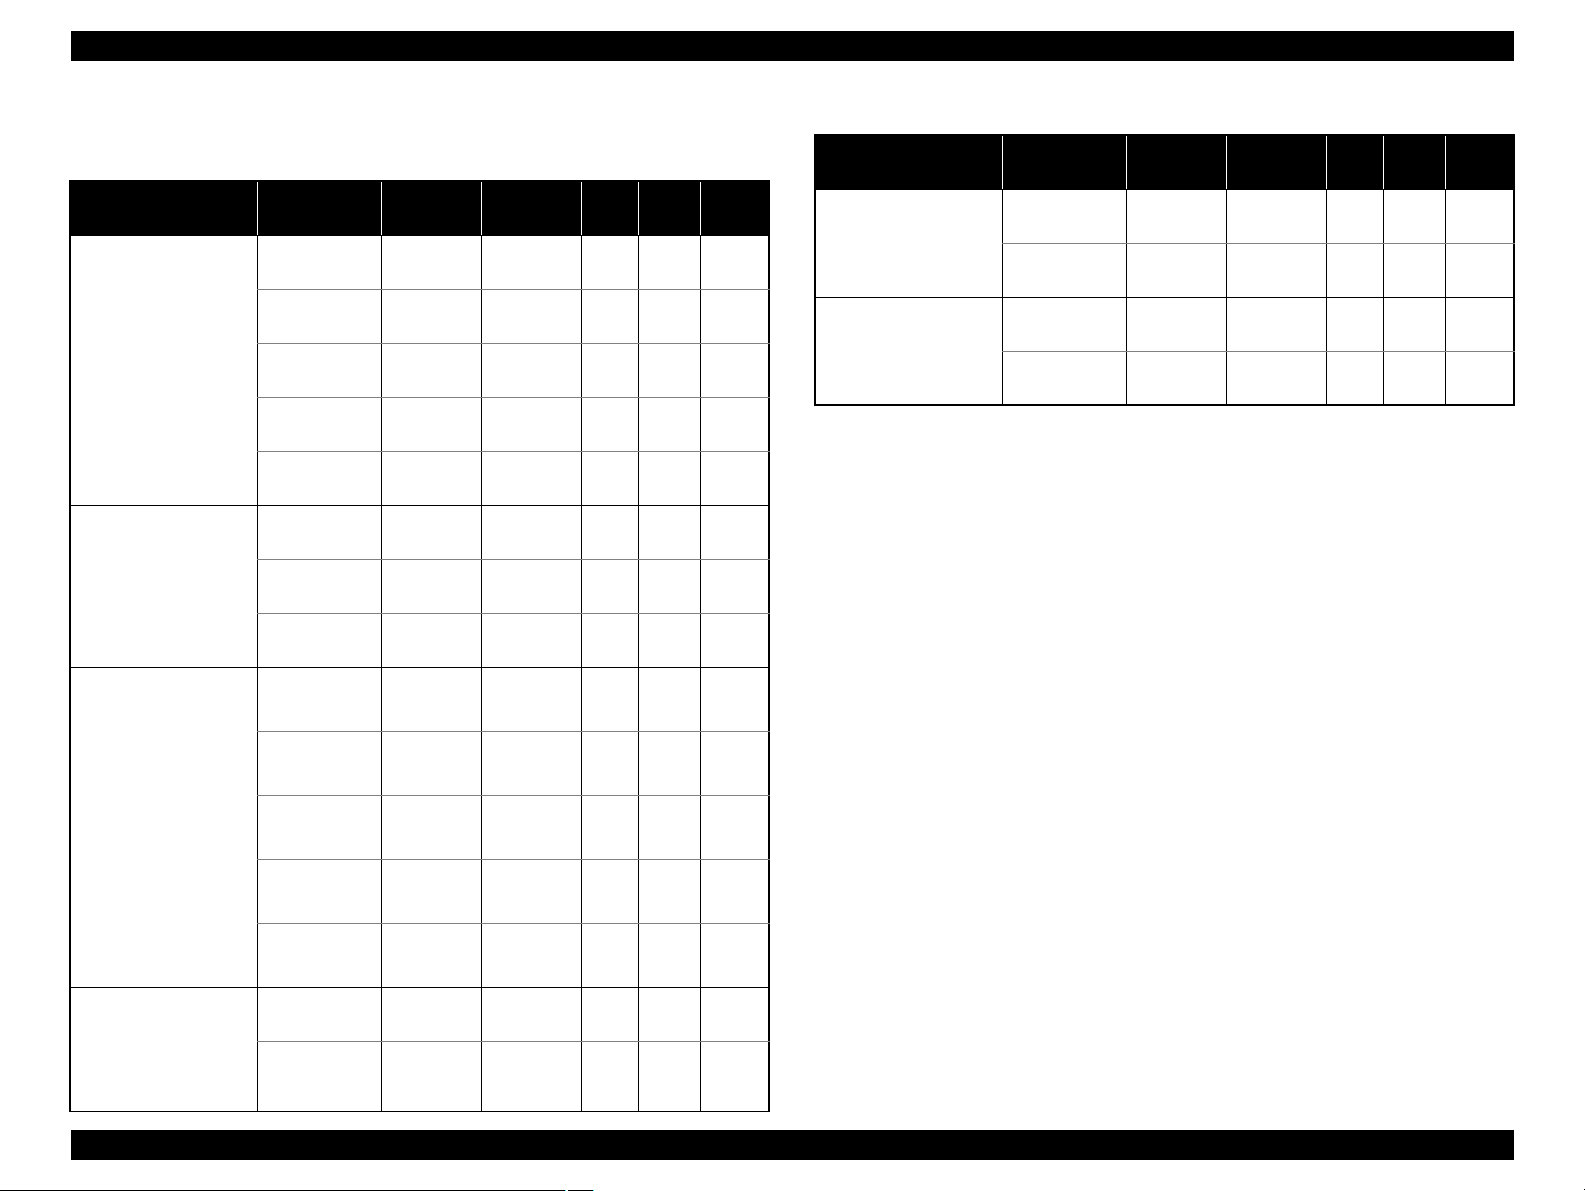
1.2.3 Print Mode
Media Print Mode
• Plain paper
• Premium Bright
White Paper (EAI)
• Premium Bright
White Inkjet Paper
(others)
• Ultra Premium
Glossy Photo Paper
(EAI)
• Ultra Glossy Photo
Paper (others)
• Photo Paper Glossy
(EAI)
• Glossy Photo Paper
(others)
• Premium Photo
Paper Glossy (EAI)
• Premium Glossy
Photo Paper (others)
• Premium Photo
Paper Semi-Gloss
(EAI)
• Premium Semigloss
Photo Paper (other)
Table 1-4. Print Mode (Color)
Resolution
(H x V dpi)
Fast Economy
Economy
Draft 360×120
Normal 360×360
Fine (360) 360×720
Fine (720) 720×720
Photo (1440) 1440×720
Photo2 (1440) 1440×1440
Photo (5760) 2880×1440
Photo Draft 360×720
Photo (720) 720×720
Photo (1440) 1440×720
Photo2 (1440) 1440×1440
Photo (5760) 2880×1440
/
360×120
Dot Size
(cps)
Eco
(400cps)
Eco
(400cps)
VSD1
(245cps)
VSD2
(285cps)
VSD3
(285cps)
VSD3
(285cps)
VSD3
(285cps)
VSD3
(285cps)
VSD1
(245cps)
VSD2
(285cps)
VSD3
(285cps)
VSD3
(285cps)
VSD3
(285cps)
Micro
Bi-d
Weave
ON OFF
ON OFF
ON OFF
ON ON
ON ON
ON ON
ON ON
ON ON
ON ON
ON ON
ON ON
ON ON
ON ON
Border-
less
N/A
N/A
N/A
OK
OK
OK
OK
OK
N/A
OK
OK
OK
OK
Media Print Mode
• Photo Quality Inkjet
Paper* (others)
Photo (1440) 1440×720
Envelope
Note* : Not supported in EAI.
Table 1-4. Print Mode (Color)
Resolution
(H x V dpi)
Photo (720) 720×720
Normal 360×360
Fine (720) 720×720
Dot Size
VSD2
(285cps)
VSD3
(285cps)
VSD1
(245cps)
VSD3
(285cps)
(cps)
Micro
Bi-d
Weave
ON ON
ON ON
OFF OFF
OFF ON
Border-
less
N/A
N/A
N/A
N/A
• Premium
Presentation Paper
Matte (EAI)
• Matte Paper Heavyweight (others)
Photo (720) 720×720
Photo (1440) 1440×720
VSD2
(285cps)
VSD3
(285cps)
ON ON
ON ON
OK
OK
PRODUCT DESCRIPTION Printing Specifications 11
Confidential

EPSON Stylus CX7300/CX7400/DX7400/NX200/TX200 series/SX200 series/Stylus CX8300/CX8400/DX8400/NX400/TX400 series/SX400 series Revision C
Media Print Mode
• Plain paper
• Premium Bright
White Paper (EAI)
• Premium Ink Jet
Plain papers (others)
• Ultra Premium
Glossy Photo Paper
(EAI)
• Ultra Glossy Photo
Paper (others)
• Photo Paper Glossy
(EAI)
• Glossy Photo Paper
(others)
• Premium Photo
Paper Glossy (EAI)
• Premium Glossy
Photo Paper (others)
• Premium Photo
Paper Semi-Gloss
(EAI)
• Premium Semigloss
Photo Paper (other)
Table 1-5. Print Mode (Monochrome)
Resolution
(H x V dpi)
Fast Economy
Economy
Draft 360×120
Normal 360×360
Fine (360) 360×720
Fine (720) 720×720
Photo (1440) 1440×720
Photo2 (1440) 1440×1440
Photo (5760) 2880×1440
Photo Draft 360×720
Photo (720) 720×720
Photo (1440) 1440×720
Photo2 (1440) 1440×1440
Photo (5760) 2880×1440
/
360×120
Dot Size
(cps)
Eco
(400cps)
Eco
(400cps)
VSD1
(245cps)
VSD2
(285cps)
VSD3
(285cps)
VSD3
(285cps)
VSD3
(285cps)
VSD3
(285cps)
VSD1
(245cps)
VSD2
(285cps)
VSD3
(285cps)
VSD3
(285cps)
VSD3
(285cps)
Micro
Bi-d
Weave
ON OFF
ON OFF
ON OFF
ON ON
ON ON
ON ON
ON ON
ON ON
ON ON
ON ON
ON ON
ON ON
ON ON
Border-
less
N/A
N/A
N/A
N/A
N/A
OK
OK
OK
OK
OK
OK
OK
OK
Table 1-5. Print Mode (Monochrome)
Media Print Mode
• Photo Quality Inkjet
Paper* (others)
Photo (1440) 1440×720
Envelope
Note* : Not supported in EAI.
Resolution
(H x V dpi)
Photo (720) 720×720
Normal 360×360
Fine (720) 360×720
Dot Size
(cps)
VSD2
(285cps)
VSD3
(285cps)
VSD1
(320cps)
VSD3
(285cps)
Micro
Bi-d
Weave
ON ON
ON ON
OFF OFF
OFF ON
Border-
less
N/A
N/A
N/A
N/A
• Premium
Presentation Paper
Matte (EAI)
• Matte Paper Heavyweight (others)
Photo (720) 720×720
Photo (1440) 1440×720
VSD2
(285cps)
VSD3
(285cps)
ON ON
ON ON
OK
OK
PRODUCT DESCRIPTION Printing Specifications 12
Confidential
EPSON Stylus CX7300/CX7400/DX7400/NX200/TX200 series/SX200 series/Stylus CX8300/CX8400/DX8400/NX400/TX400 series/SX400 series Revision C
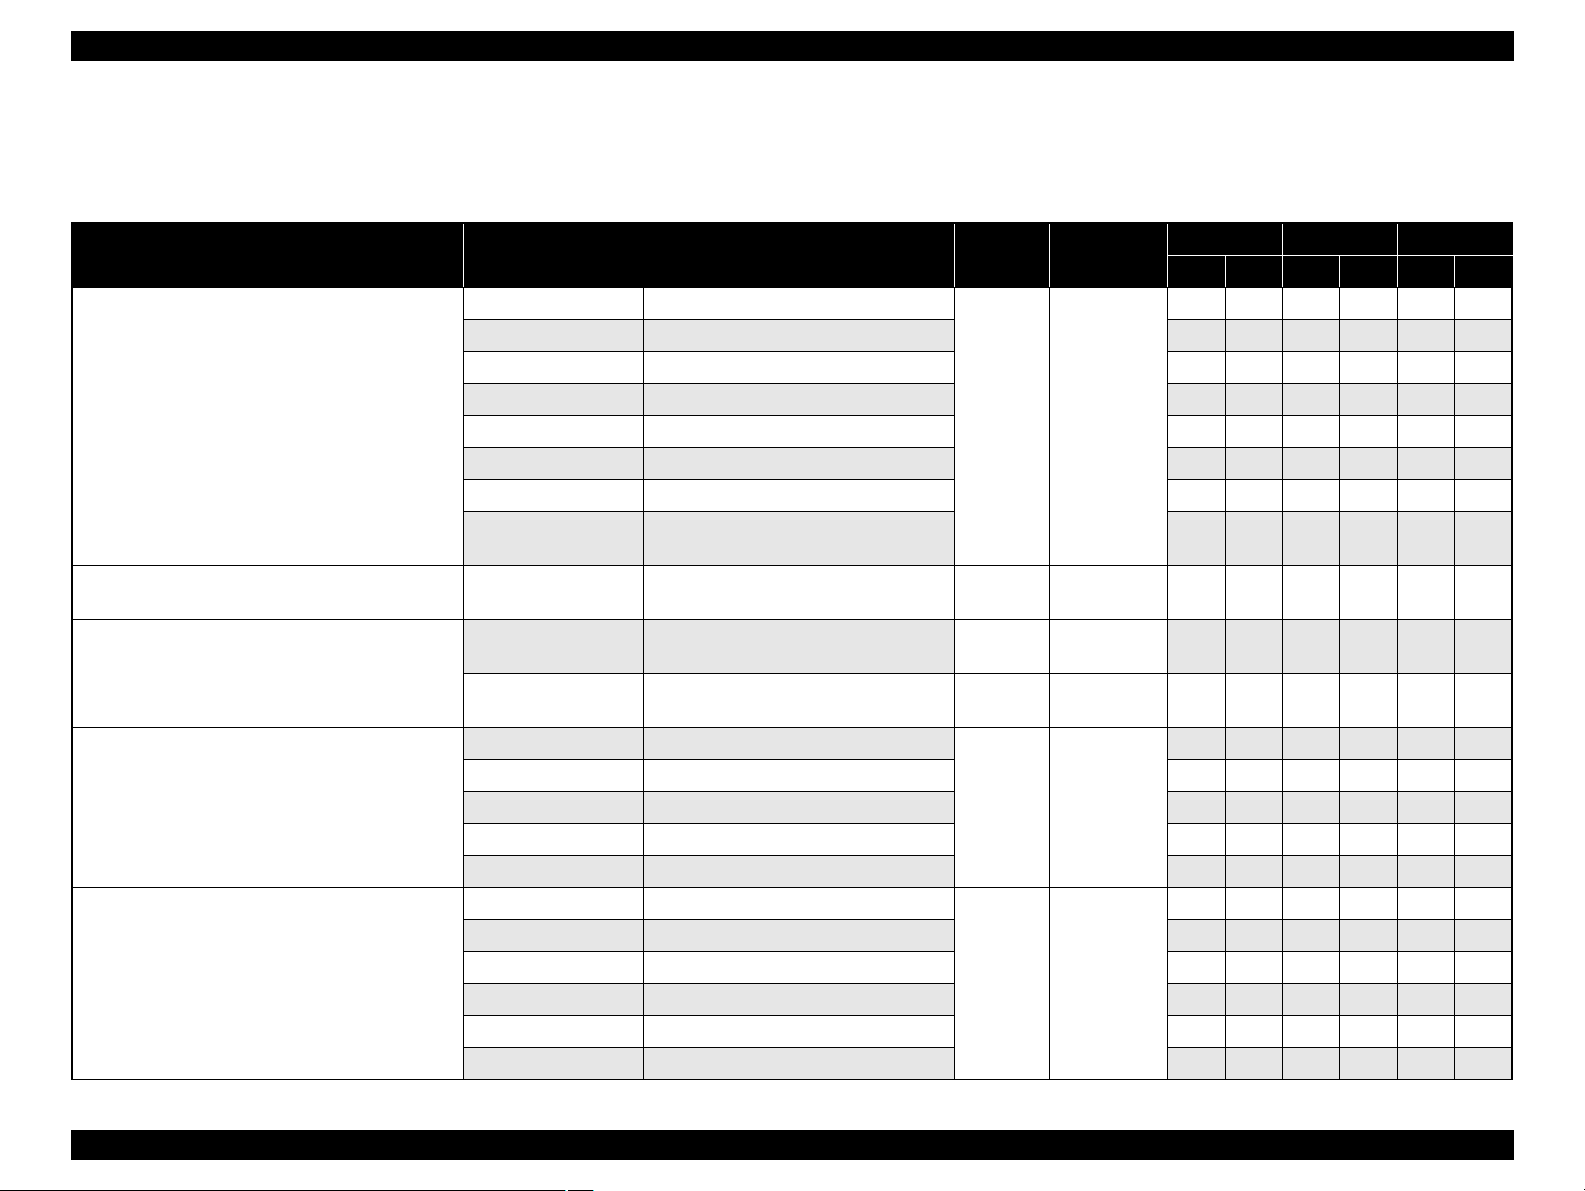
1.2.4 Supported Paper
The table below lists the paper type and sizes supported by the printer. The supported paper type and sizes vary depending on destinations (between EAI, EUR, and Asia).
Table 1-6. Supported Paper
Paper Name Paper Size
Thickness
(mm)
Legal 215.9 x 355.6 mm (8.5”x14”)
Letter 215.9 x 279.4 mm (8.5”x11”) Y — Y — Y —
A4 210 x 297 mm (8.3”x11.7”) Y — Y — Y —
B5 182 x 257 mm (7.2”x10.1”) — — Y — Y —
Plain paper
A5 148 x 210 mm (5.8”x8.3”) — — Y — Y —
0.08-0.11
Half Letter 139.7 x 215.9 mm (5.5″x8.5”) Y — — — — —
A6 105 x 148 mm (4.2”x5.8”) Y — Y — Y —
User Defined
89 x 127- 329 x 1117.6 mm
(3.56”x 5.08” — 13.16”x44.7”)
Premium Inkjet Plain Paper A4 210 x 297 mm (8.3”x11.7”) 0.11
Premium Bright White Paper (EAI)
Bright White Inkjet Paper (Euro, Asia)
Letter 215.9 x 279.4 mm (8.5”x11”) 0.11
A4 210 x 297 mm (8.3”x11.7”) 0.13
Letter 215.9 x 279.4 mm (8.5”x11”)
A4 210 x 297 mm (8.3”x11.7”) — — Y Y Y Y
Ultra Premium Glossy Photo Paper (EAI)
Ultra Glossy Photo Paper (Euro, Asia)
8” x 10” 203.2 x 254 mm Y Y — — — —
0.30
5” x 7” 127 x 178 mm Y Y Y Y — —
4” x 6” 101.6 x 152.4 mm Y Y Y Y Y Y
Letter 215.9 x 279.4 mm (8.5”x11”)
A4 210 x 297 mm (8.3”x11.7”) Y Y Y Y Y Y
Premium Photo Paper Glossy (EAI)
Premium Glossy Photo Paper (Euro, Asia)
8” x 10” 203.2 x 254 mm Y Y — — — —
0.27
5” x 7” 127 x 178 mm Y Y Y Y Y Y
4″ x 6
«
101.6 x 152.4 mm Y Y Y Y Y Y
16:9 wide 101.6 x 180.6 mm Y Y Y Y Y Y
Weight
64-90 g/m
(17-24 lb.)
80 g/m
(21 lb.)
90 g/m
(24 lb.)
92.5 g/m
(25 lb.)
290 g/m
(77 lb.)
255 g/m
(68 lb.)
2
2
2
2
2
2
EAI EUR Asia
*1
*2
*1
*2
P
B
P
B
*1
P
Y — Y — Y —
Y — Y — Y —
— — Y — Y —
Y — — — — —
— — Y — Y —
Y Y — — — —
Y Y — — — —
*2
B
PRODUCT DESCRIPTION Printing Specifications 13
Confidential
EPSON Stylus CX7300/CX7400/DX7400/NX200/TX200 series/SX200 series/Stylus CX8300/CX8400/DX8400/NX400/TX400 series/SX400 series Revision C
Note *1 : “Y” in the “P” column stands for “the paper type/size is Supported”.
*2 : “Y” in the “B” column stands for “Borderless printing is available”.
*3 : CX7300/CX8300 series is not supported.
Make sure the paper is not wrinkled, fluffed, torn, or folded.
The curve of paper must be 5 mm or below.
When printing on an envelope, be sure the flap is folded neatly.
Do not use the adhesive envelopes.
Do not use double envelopes and cellophane window envelopes.
Table 1-6. Supported Paper
Paper Name Paper Size
Thickness
(mm)
Letter 215.9 x 279.4 mm (8.5”x11”)
Photo Paper Glossy (EAI)
Glossy Photo Paper (Euro, Asia)
A4 210 x 297 mm (8.3”x11.7”) Y Y Y Y Y Y
0.25
5” x 7” 127 x 178 mm — — Y Y — —
4” x 6” 101.6 x 152.4 mm Y Y Y Y Y Y
Letter 215.9 x 279.4 mm (8.5”x11”)
Premium Photo Paper Semi-Gloss (EAI)
Premium Semigloss Photo Paper (Euro, Asia)
A4 210 x 297 mm (8.3”x11.7”) — — Y Y Y Y
0.27
4” x 6” 101.6 x 152.4 mm Y Y Y Y Y Y
Letter 215.9 x 279.4 mm (8.5”x11”)
Premium Presentation Paper Matte (EAI)
Matte Paper-Heavyweight (Euro, Asia)
A4 210 x 297 mm (8.3”x11.7”) — — Y Y Y Y
0.23
8” x 10” 203.2 x 254 mm Y Y — — — —
Photo Quality Inkjet Paper A4 210 x 297 mm (8.3”x11.7”) 0.13
#10 104.8 x 241.3 mm (4.125”x9.5”)
Envelopes
#DL 110 x 220 mm — — Y — Y —
—
#C6 114 x 162 mm — — Y — Y —
A4 210 x 297 mm (8.3”x11.7”)
Photo Paper*
3
5” x 7” 127 x 178 mm — — Y Y — —
0.24
4” x 6” 101.6 x 152.4 mm — — Y Y Y Y
Weight
258 g/m
(68 lb.)
250 g/m
(66 lb.)
167 g/m
(44 lb.)
102 g/m
(27 lb.)
75-100 g/m
(20-27 lb.)
190 g/m
(51 lb.)
2
2
2
2
2
2
EAI EUR Asia
*1
*2
*1
*2
P
B
P
B
*1
P
Y Y — — — —
Y Y — — — —
Y Y — — — —
— — Y — Y —
Y — Y — Y —
— — Y Y Y —
B
*2
PRODUCT DESCRIPTION Printing Specifications 14
Confidential
EPSON Stylus CX7300/CX7400/DX7400/NX200/TX200 series/SX200 series/Stylus CX8300/CX8400/DX8400/NX400/TX400 series/SX400 series Revision C
Print Area
LM RM
TM
BM
BM
Cut Sheet (Standard)
Cut Sheet (Borderless)
Paper SIze
LM
RM
TM
BM
Print Area
LM RM
Print Area
Envelope
Paper Size
TM
Paper Feed Direction
RW
RL
OTM
OLM
Scanning starting position
Scan area
Scan bed
Original
(facedown)
Home position
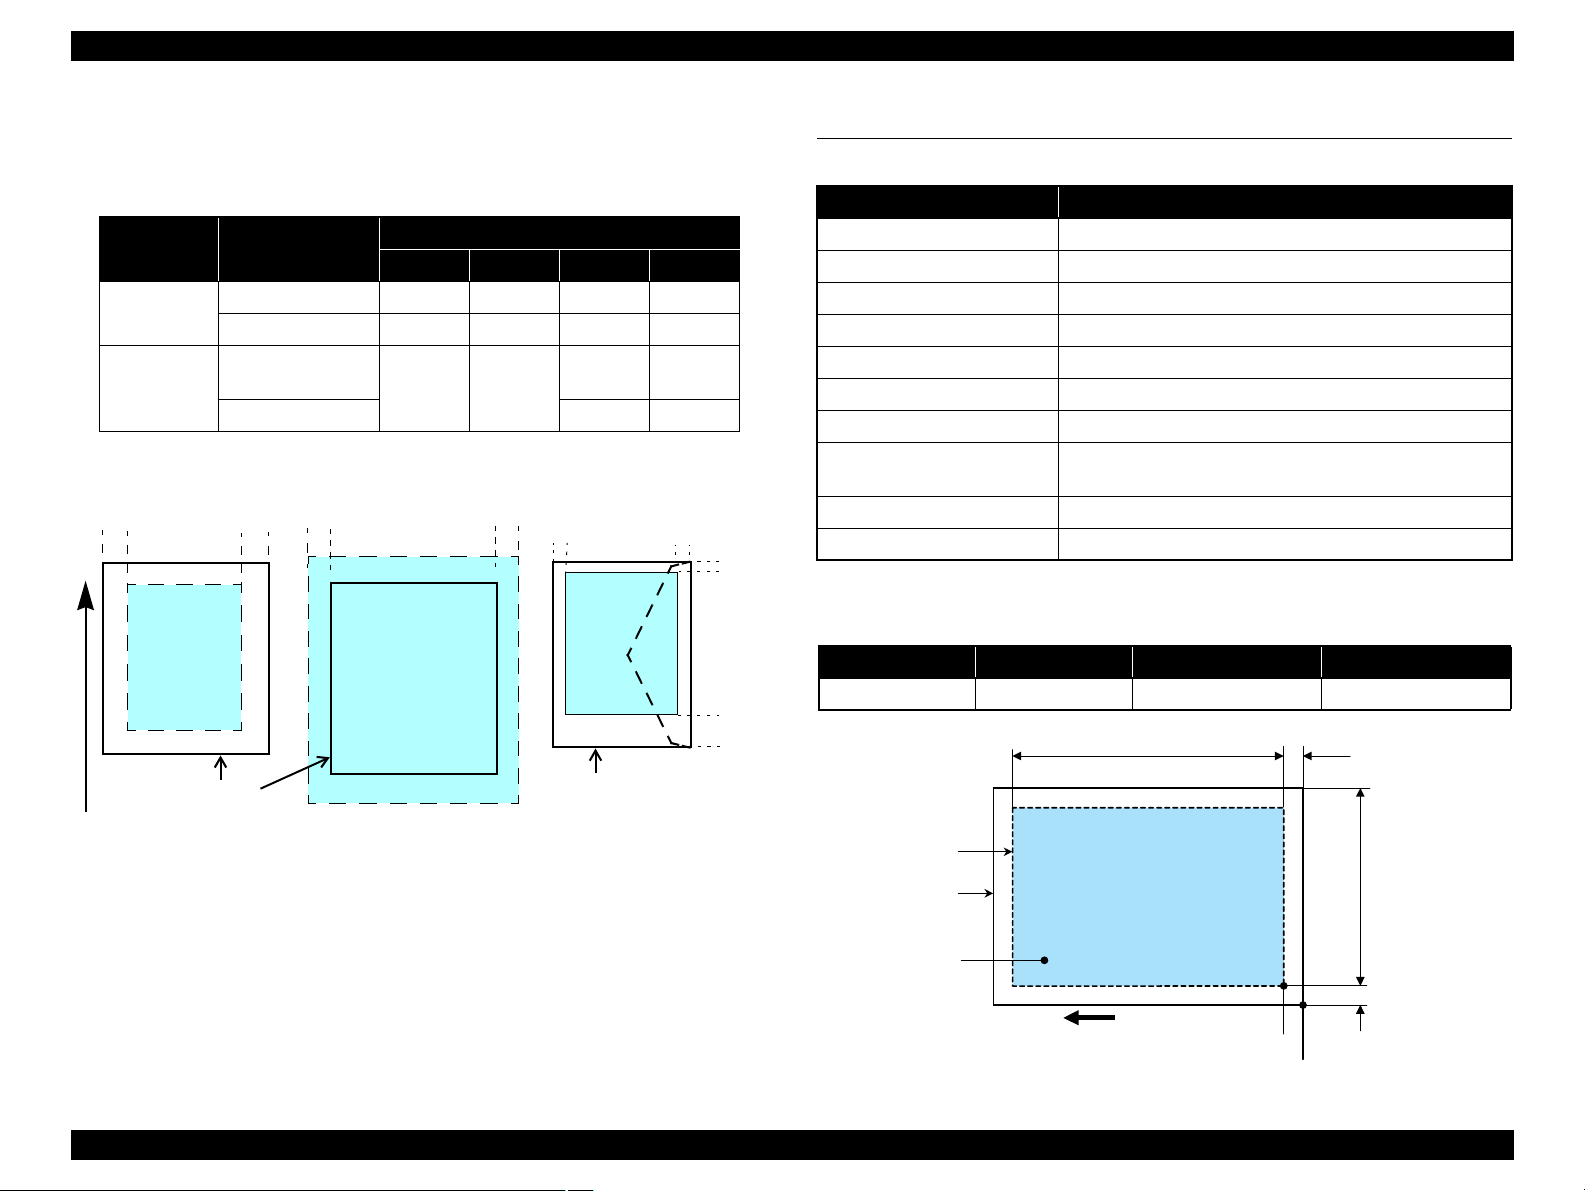
1.2.5 Printing Area
The printing area for this printer is shown below.
Table 1-7. Printing Area (Margins)
Print Mode Paper Size
Standard print
Borderless
print
Note * : The margins for Borderless print are margins that bleed off the edges of paper.
Any size
Envelope
A4/Letter to
5” x 7” / Hi-Vision
4” x 6”
Left Right Top Bottom
3 mm 3 mm 3 mm 3 mm
5 mm 5 mm 3 mm 20 mm
2.54 mm* 2.54 mm*
Margin
2.96 mm* 3.39 mm*
2.82 mm* 3.39 mm*
1.3 Scanner Specifications
Table 1-8. Basic Specifications
Item Specification
Scanner type Flatbed, color
Scanning method Moving carriage, stationary document
Home position The front right corner
Photoelectric device CIS
Light source LED
Maximum document sizes A4 or US letter
Scanning range 8.5″ x 11.7″ (216 mm x 297 mm)
Maximum resolution
Maximum effective pixels 10,200 x 14,040 pixels (CIS optical resolution x Microstep drive)
Pixel depth 16 bit per pixel (input) and 8 bit per pixel (output).
Main scan: 1200 dpi
Sub scan: 2400 dpi
1.3.1 Scanning Range
Table 1-9. Scanning Range
RL (read length) RW (read width) OLM (left margin) OTM (top margin)
216 mm 297 mm 1.5 mm 1.5 mm
PRODUCT DESCRIPTION Scanner Specifications 15
Figure 1-2. Printing Area
Figure 1-3. Scanning Range
Confidential
EPSON Stylus CX7300/CX7400/DX7400/NX200/TX200 series/SX200 series/Stylus CX8300/CX8400/DX8400/NX400/TX400 series/SX400 series Revision C
10/50
27/80
35/9520/68
Temperature (°C/°F)
20
30
40
50
90
80
70
60
Humidity (%)
30/86 40/104
1.4 General Specifications
1.4.1 Electrical Specifications
Table 1-10. Primary Power Specifications
Item 100-120 V model 220-240 V model
Rated power supply voltage 100 to 120 VAC 220 to 240 VAC
Input voltage range 90 to 132 VAC 198 to 264 VAC
Rated current (Max. rated current) 0.6 A (1.0 A) 0.3 A (0.5 A)
Rated frequency 50 to 60 Hz
Input frequency range 49.5 to 60.5 Hz
Insulation resistance 3000 V (for one minute)
Energy conservation International Energy Star Program compliant
Copy
(Printing pattern: ISO/IEC24712)
Power
consumption
Ready Approx. 5.0 W Approx. 5.0 W
Sleep Approx. 2.5 W Approx. 3 W
Off Approx. 0.2W Approx. 0.3W
Note 1: If the printer or scanner is not operated for more than three minutes, the printer goes
into the power save mode within two minutes.
2: When no operation is made with the control panel for more than 13 minutes, the panel
goes to the power save mode within two minutes.
Approx. 12 W Approx. 12 W
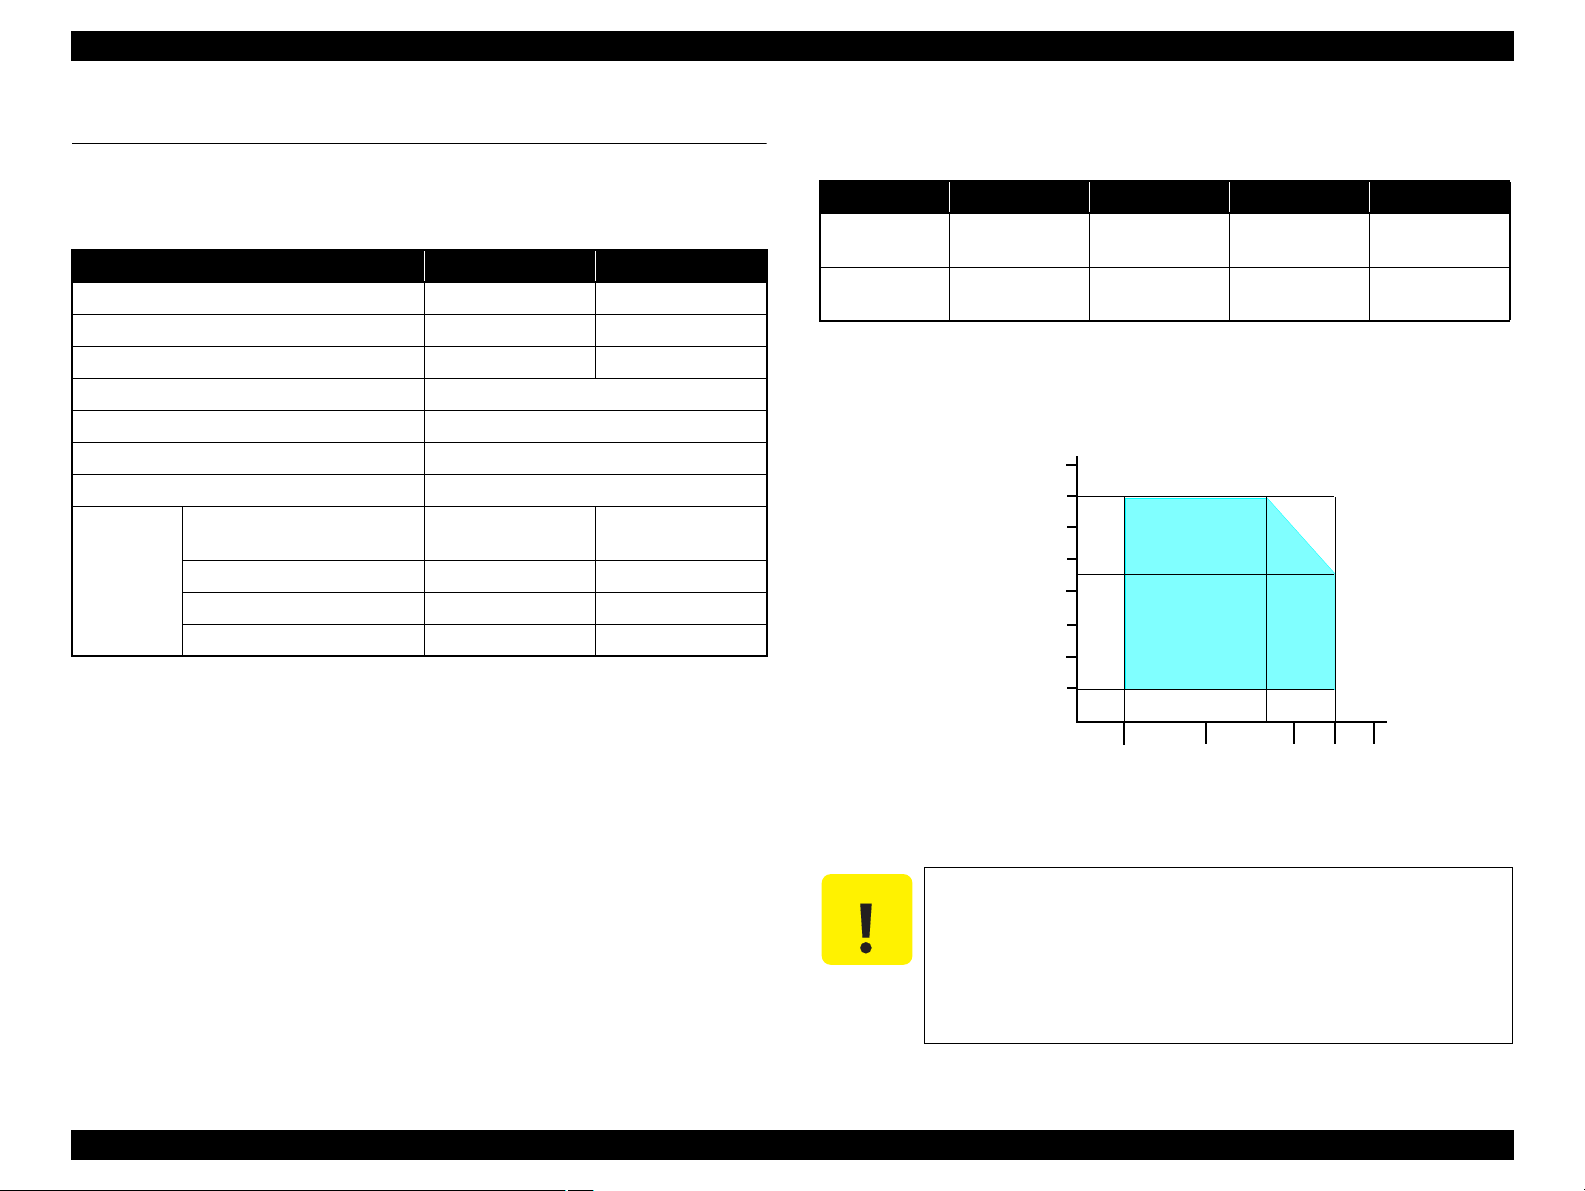
1.4.2 Environmental Conditions
Table 1-11. Environmental Conditions
°F)
*1
3
Humidity
20 to 80%
Condition Temperature
Operating
Storage
(unpacked)
10 to 35°C
(50 to 95
-20 to 40°C*
(-4°F to 104°F)
Note *1 : The combined Temperature and Humidity conditions must be within the blue-shaded
range in
Fig.1-4.
*2 : No condensation
*3 : Must be less than 1 month at 40°C.
5 to 85%
*1,2
Shock Vibration
1G
(1 msec or less)
10
2G
(2 msec or less)
10
0.15G,
to 55Hz
0.50G,
to 55Hz
Figure 1-4. Temperature/Humidity Range
PRODUCT DESCRIPTION General Specifications 16
When returning the repaired printer to the customer, make sure
the Printhead is covered with the cap and the ink cartridge is
installed.
If the Printhead is not covered with the cap when the printer is
off, turn on the printer with the ink cartridge installed, make
sure the Printhead is covered with the cap, and then turn the
printer off.
Confidential
EPSON Stylus CX7300/CX7400/DX7400/NX200/TX200 series/SX200 series/Stylus CX8300/CX8400/DX8400/NX400/TX400 series/SX400 series Revision C
1.4.3 Durability
Total print life: Black 10,000 pages (A4, 3.5% duty),
Color 10,000 pages (A4, ISO FDC24712),
or five years which ever comes first
Printhead: Five billions shots (per nozzle) or five years which ever comes
first
Scanner carriage: 30,000 cycles of carriage movement
1.4.4 Acoustic Noise
T.B.D. dB
(when printing from PC, on Premium Glossy Photo Paper, in highest quality)
T.B.D. dB (when scanning, default setting)
1.4.5 Safety Approvals (Safety standards/EMI)
USA UL60950-1
FCC Part15 Subpart B Class B
Canada CSA No.60950-1
CAN/CSA-CEI/IEC CISPR 22 Class B
Mexico NOM-019-SCFI-1998
Taiwan CNS13438 Class B
CNS14336
EU EN60950-1
EN55022 Class B
EN61000-3-2, EN61000-3-3
EN55024
Germany EN60950-1
Russia GOST-R (IEC60950-1, CISPR 22)
Singapore IEC60950-1
Korea K60950-1
KN22 Class B
1
China*
Hong Kong*
2
Argentina IEC60950-1
Australia AS/NZS CISPR22 Class B
Note *1 : CX7300/TX400 series is not supported.
*2 : CX7300 series is not supported.
KN61000-4-2/-3/-4/-5/-6/-11
GB4943
GB9254 Class B, GB17625.1
IEC60950-1
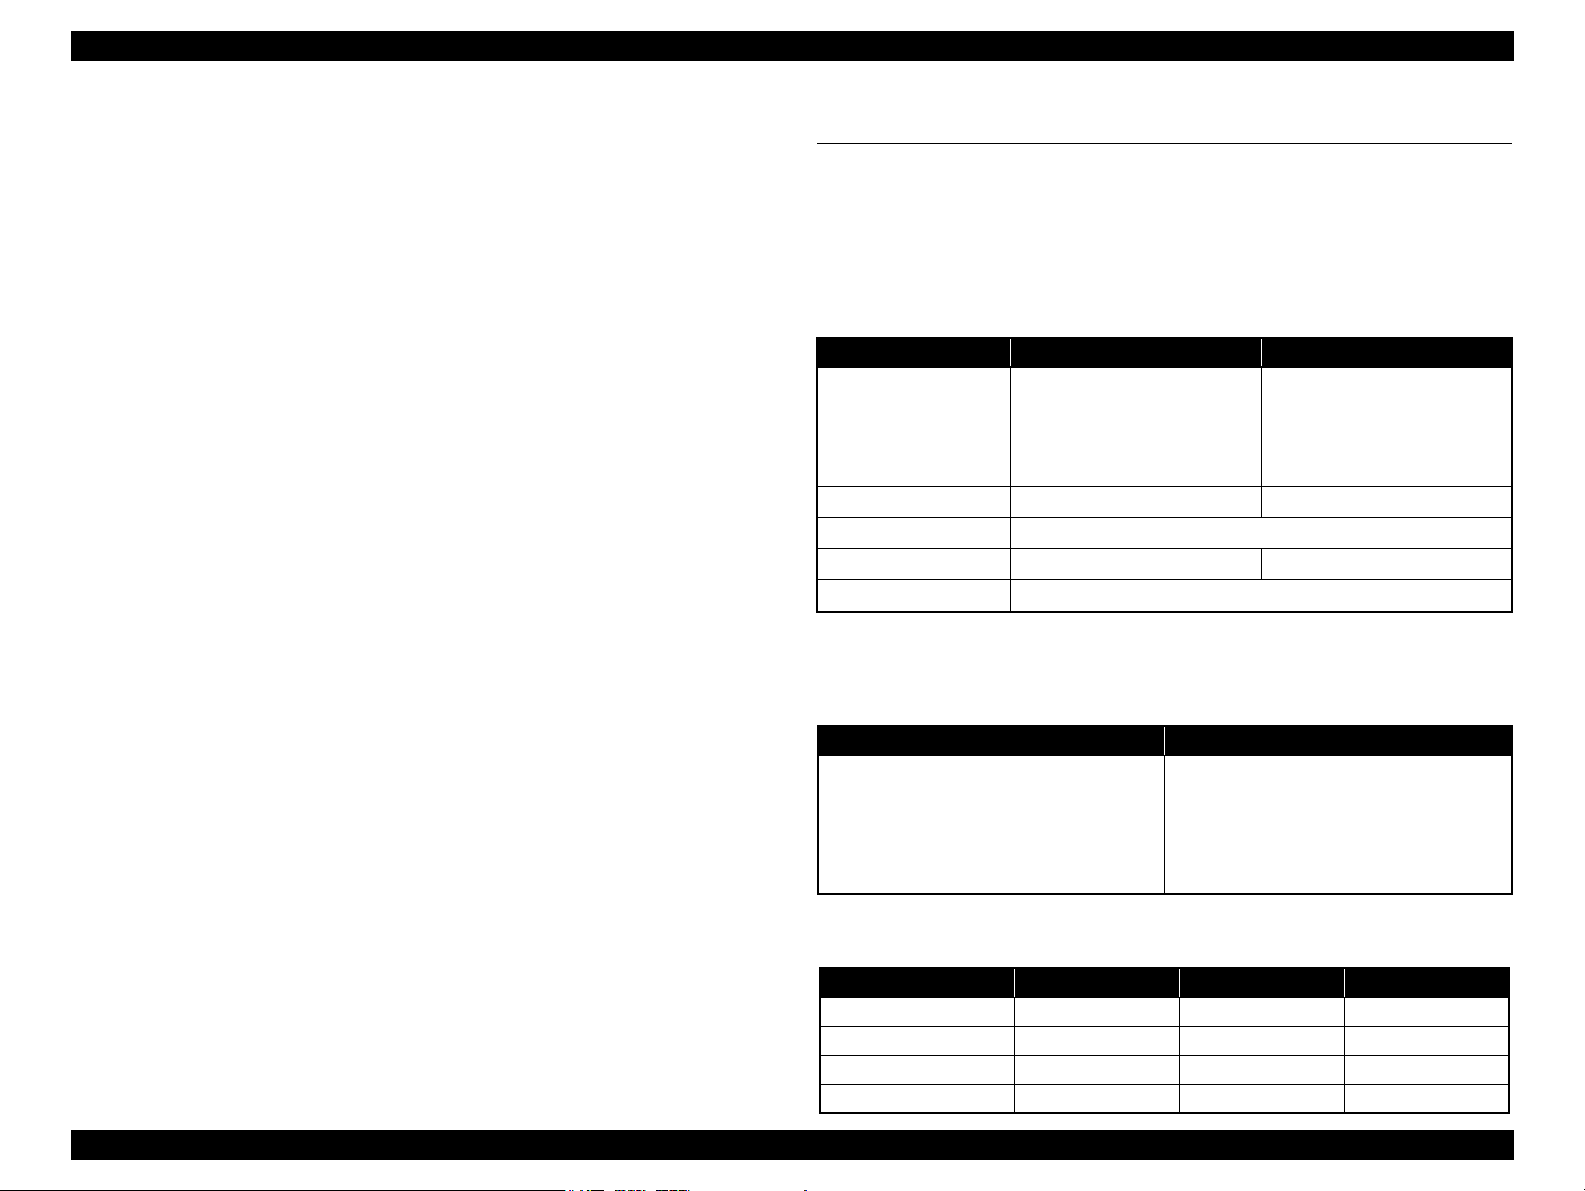
1.5 Interface
This printer has USB interface and memory card slots of the following specifications.
1.5.1 USB Interface
The table below describes the specifications of the two USB ports; USB device port for
connecting with a host such as a computer, and the USB host port for connecting with
an external devices such as a DSC (digital still camera).
Table 1-12. USB Interface Specifications
Item USB Device port USB Host port*
• Universal Serial Bus
Specifications Revision 2.0
Compatible standards
Transfer rate
• Universal Serial Bus Device
Class Definition for Printing
Devices Version 1.1
480 Mbps (High Speed) 12 Mbps (Full Speed)
Data format
Compatible connector
Max. cable length
Note* : External devices that can be connected to the USB device port are:
DSC compliant with the USB Direct Print Protocol specification Rev 1.0
DSC compliant with the CIPA DC-001-2003 (PictBridge) specifications
USB Series B USB Series A
Table 1-13. Device ID
When IEEE 1284.4 is Enabled When IEEE 1284.4 is Disabled
@EJL<SP>ID<CR><LF>
MFG:EPSON;
CMD:ESCPL2,BDC,D4,D4PX,ESCPR1;
MDL:Model Name;
CLS:PRINTER;
DES:EPSON<SP>Model Name;
The “Model Name” is replaced as shown in the following table.
Table 1-14. Model Names Indicated in the Device ID
Destination North America Euro Asia/Pacific
CX7300 series Stylus CX7400 Stylus DX7400 Stylus CX7300
CX8300 series Stylus CX8400 Stylus DX8400 Stylus CX8300
TX200 series TBD TBD TBD
TX400 series TBD TBD TBD
@EJL<SP>ID<CR><LF>
MFG:EPSON;
CMD:ESCPL2,BDC;ESCPR1;
MDL:Model Name;
CLS:PRINTER;
DES:EPSON<SP>Model Name;
• Universal Serial Bus
Specifications Revision 2.0
• Universal Serial Bus Mass
Storage Class Bulk-Only
Transport Revision 1.0
NRZI
2 [m] or less
PRODUCT DESCRIPTION Interface 17
Confidential

EPSON Stylus CX7300/CX7400/DX7400/NX200/TX200 series/SX200 series/Stylus CX8300/CX8400/DX8400/NX400/TX400 series/SX400 series Revision C
1.5.2 Memory Card Slots
In the case of TX200/TX400 series; if you insert a Memory Stick
DUO to the Memory Card Slot without using the adapter, make
sure to turn off the printer first, then remove the card using
tweezers.
Priority
1
2
Note: • Memory Stick/PRO, SD/MMC and xD-Picture Card shares the same slot.
PRODUCT DESCRIPTION Interface 18
Slot Compatible memory card Standard Max. capacity Remarks
Memory Stick/
Memory Stick
PRO
SD/MMC SD (Security Digital) SD Memory Card Specifications / PART1. Physical Layer Specification Ver. 2.0 compatible
xD-Picture card xD-Picture card xD-Picture Card Specification Ver.1.20 compatible 2GB Type M/H supported
CF Type II Compact Flash CF+ and CompactFlash Specification Revision 3.0 compatible (CX7300/CX8300 series) 4GB True-IDE compatible memory card only
Memory Stick “MemoryStick Standard” Format Specification Ver.1.42-00 compatible 128MB Includes versions with memory select function
MagicGate Memory Stick 128MB Copy protection function is not supported
MagicGate Memory Stick Duo An adapter should be used
Memory Stick PRO Memory Stick PRO Format Specifications-without security specifications Ver.1.02-00
compatible
Memory Stick Duo MemoryStick Duo Format Specification Ver.1.11-00 compatible The Memory Stick Duo adapter should be
Memory Stick Pro Duo MemoryStick PRO Duo Format Specification Ver.1.02-00 compatible The Memory Stick Duo adapter should be
Memory Stick micro Memory Stick Micro Format Specification Ver.1.02-00 compatible The Memory Stick adapter for standard size
miniSD/microSD The SD adapter should be used
SDHC
miniSDHC/microSDHC The SD adapter should be used
MultiMediaCard
MultiMediaCard Plus
Microdrive
MultiMediaCard Standard Ver. 4.1 compatible
CF+ and CompactFlash Specification Revision 4.1 compatible (TX200/TX400 series) 32GB
• When cards are inserted in the two slots at once, the slot which will be accessed first is determined according to the priority shown in the table.
• To select a card that has been inserted in a non-active slot, first remove the card in the active slot.
• In memory card direct printing mode, the image files in the active slot are valid and have assigned frame numbers. The number of images will not change if a card is inserted in another
nonselected slot.
• When the card inserted in the slot is accessed from the PC, only one drive is displayed at a time as a removable disk* and only the card that is in the active slot can be accessed via the
removable disk. A card that has been inserted into a non-selected slot cannot be accessed.
(This is for Windows. For Macintosh, the card in the active slot will be mounted on the desktop.)
• Does not support 5V type of memory cards.
• When a memory card is being accessed, do not touch the memory card.
• For detailed information on the supported file system and formatting the memory card, refer to “ 1.7.2 Memory Card Direct Print Function ( p. 31 ) ”.
Table 1-15. List of Supported Memory Card
4GB
2GB
8GB
64MB/4GB
Copy protection function is not supported
used
used.
should be used.
Speed Class is not supported
Speed Class is not supported
Only MultiMediaCard Plus supports 4GB
Confidential
EPSON Stylus CX7300/CX7400/DX7400/NX200/TX200 series/SX200 series/Stylus CX8300/CX8400/DX8400/NX400/TX400 series/SX400 series Revision C
Power button
Start button
Stop/Clear button
Copy button
Memory Card button
Photo button
Display/Crop button
Setup button
— button
Menu button
Back button
+ button
LCD
Power LED
Cross key and OK button
Note : The Card Access LED is provided near the memory card slot.
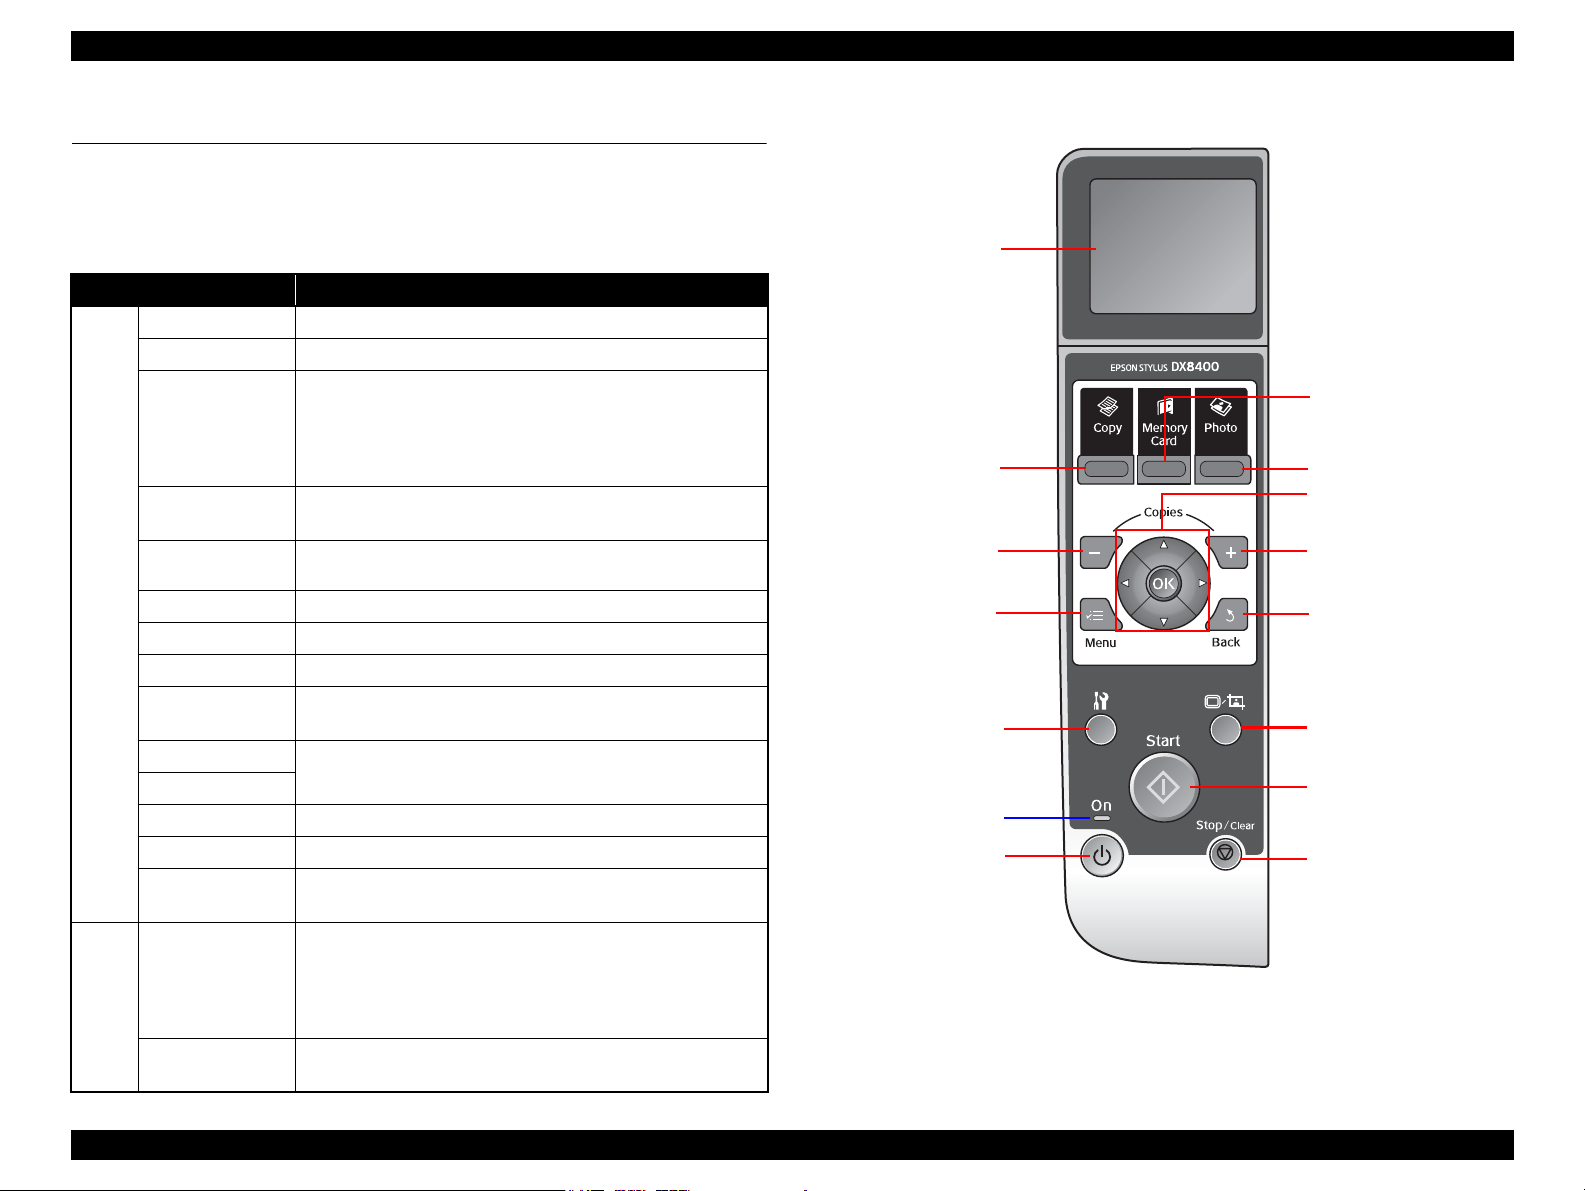
1.6 Control Panel
1.6.1 Operation Buttons & LEDs
CX8300/TX400 series (LCD-equipped model)
Table 1-16. CX8300/TX400 series Buttons & LEDs
Button/LED Function
Power Turns the power ON/OFF.
Start Starts printing.
• Stops operation and displays the menu screen.
• Stops printing and ejects paper.
• Returns the print settings in the current mode to their default
and displays the Top screen. (Returns to the previous screen
during printing maintaining the current settings)
Goes to the Setup mode that provides maintenance menu (head
cleaning, head alignment, etc.) and various setting menu.
• Goes to the zoom setting screen for the selected image.
• Changes the image preview layout on the LCD.
Selects a menu item or a setting value.
Sets the number of copies.
Goes to the special mode that provides Reprint/Restore Photos
function.
• Flashes at power ON/OFF.
• Flashes during some sequence is in progress.
• Flashes when an fatal error occurs.
• Lights when the status is other than above. (i.e. when in
stand-by / in setting operation using the control panel)
• Lights when a memory card is inserted.
• Flashes when a memory card is being identified or accessed.
Figure 1-5. CX8300/TX400 series Control Panel
Stop/Clear
Setup
Display/Crop
Button
LED
Menu Goes to the print setting menu screen.
OK Accepts the changed settings
Back Cancels the previous operation.
Cross Key
(Up/Down/Left/Right)
+
—
Copy Goes to the stand alone Copy mode.
Memory Card Goes to the memory card direct print mode.
Photo
Power (Green)
Card Access
(Green)
PRODUCT DESCRIPTION Control Panel 19
Confidential
EPSON Stylus CX7300/CX7400/DX7400/NX200/TX200 series/SX200 series/Stylus CX8300/CX8400/DX8400/NX400/TX400 series/SX400 series Revision C
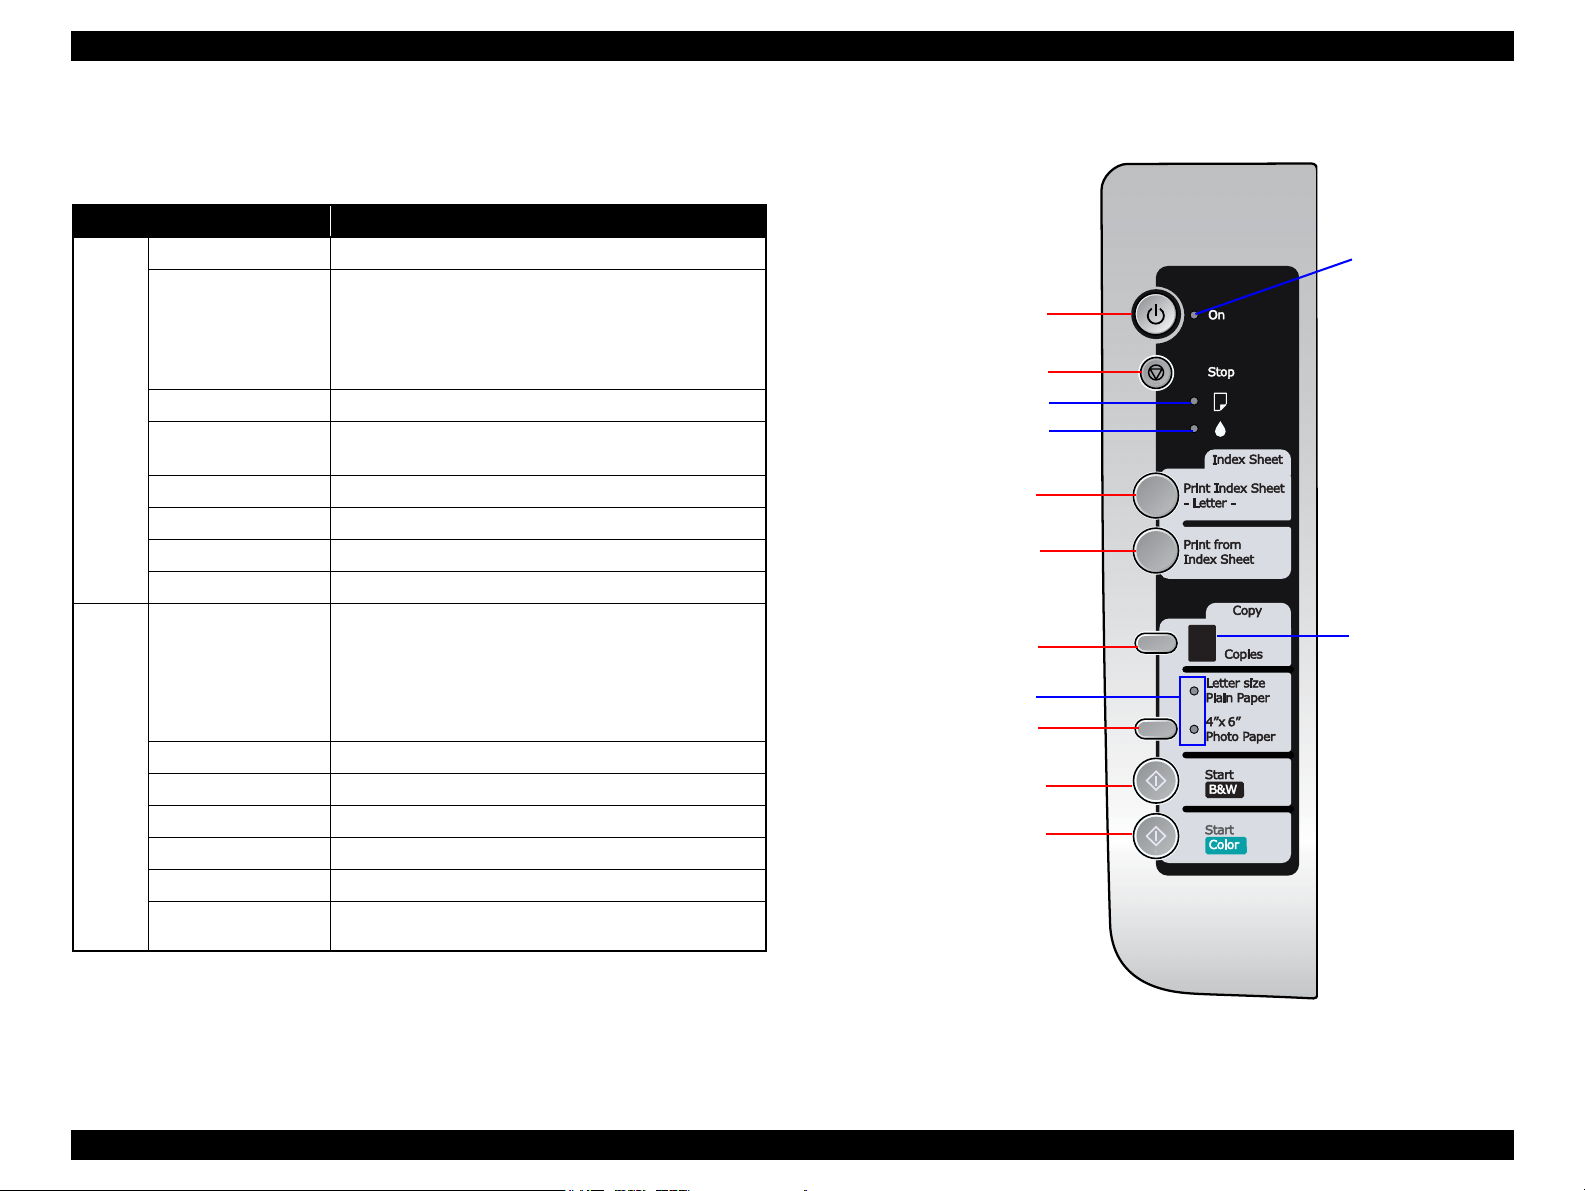
Power button
Print Index Sheet button
Start B&W button
Copies button
Note : The Card Access LED is provided near the memory card slot.
Error LED
Ink LED
Print from Index Sheet
Start Color button
Paper type button
Paper LED1/2
7 Segment LED
Power LED
Stop / Maintenance button
CX7300/TX200 series (LCD-non-equipped model)
The printer has the following buttons and LEDs on the control panel.
Table 1-17. CX7300/TX200 series Operation Buttons & LEDs
Button/LED Function
Power Turns the power ON/OFF.
[When printing]
Stops printing, cancels the job, or cancels the error.
Stop / Maintenance
Button
Print Index Sheet Prints an index sheet.
Print from Index Sheet
Copies Sets a number of copies.
Paper Type Selects paper type and size.
Start B&W Starts B&W copying.
Start Color Starts color copying.
Power (Green)
Error (Orange) Flashes when a paper- related error occurs.
LED*
Ink (Orange) Flashes when an ink-related error occurs.
7 Segments Displays the number of copies, status, or error code.
Paper LED 1 (Green) Lights while plain paper is selected.
Paper LED 2 (Green) Lights while photo paper is selected.
Note * :See Table 1-19 on page 22 and Table 1-20 on page 25 for details on the button
Card Access (Green)
functions, and Table 1-21 on page 26 for details on the LED functions.
[When not printing]
Performs maintenance such as head cleaning and Ink
replacement. Clears the settings.
Starts reading an index sheet and prints photos stored in
memory card.
• Flashes at power ON/OFF.
• Flashes during some sequence is in progress.
• Flashes when maintenance is performed or a fatal error
occurs.
• Lights when the printer status is other than above.
(standby / while the control panel is used for setting)
• Lights while a memory card is inserted in the slot.
• Flashes while a memory card is accessed.
Figure 1-6. CX7300/TX200 series Control Panel
PRODUCT DESCRIPTION Control Panel 20
Confidential
EPSON Stylus CX7300/CX7400/DX7400/NX200/TX200 series/SX200 series/Stylus CX8300/CX8400/DX8400/NX400/TX400 series/SX400 series Revision C
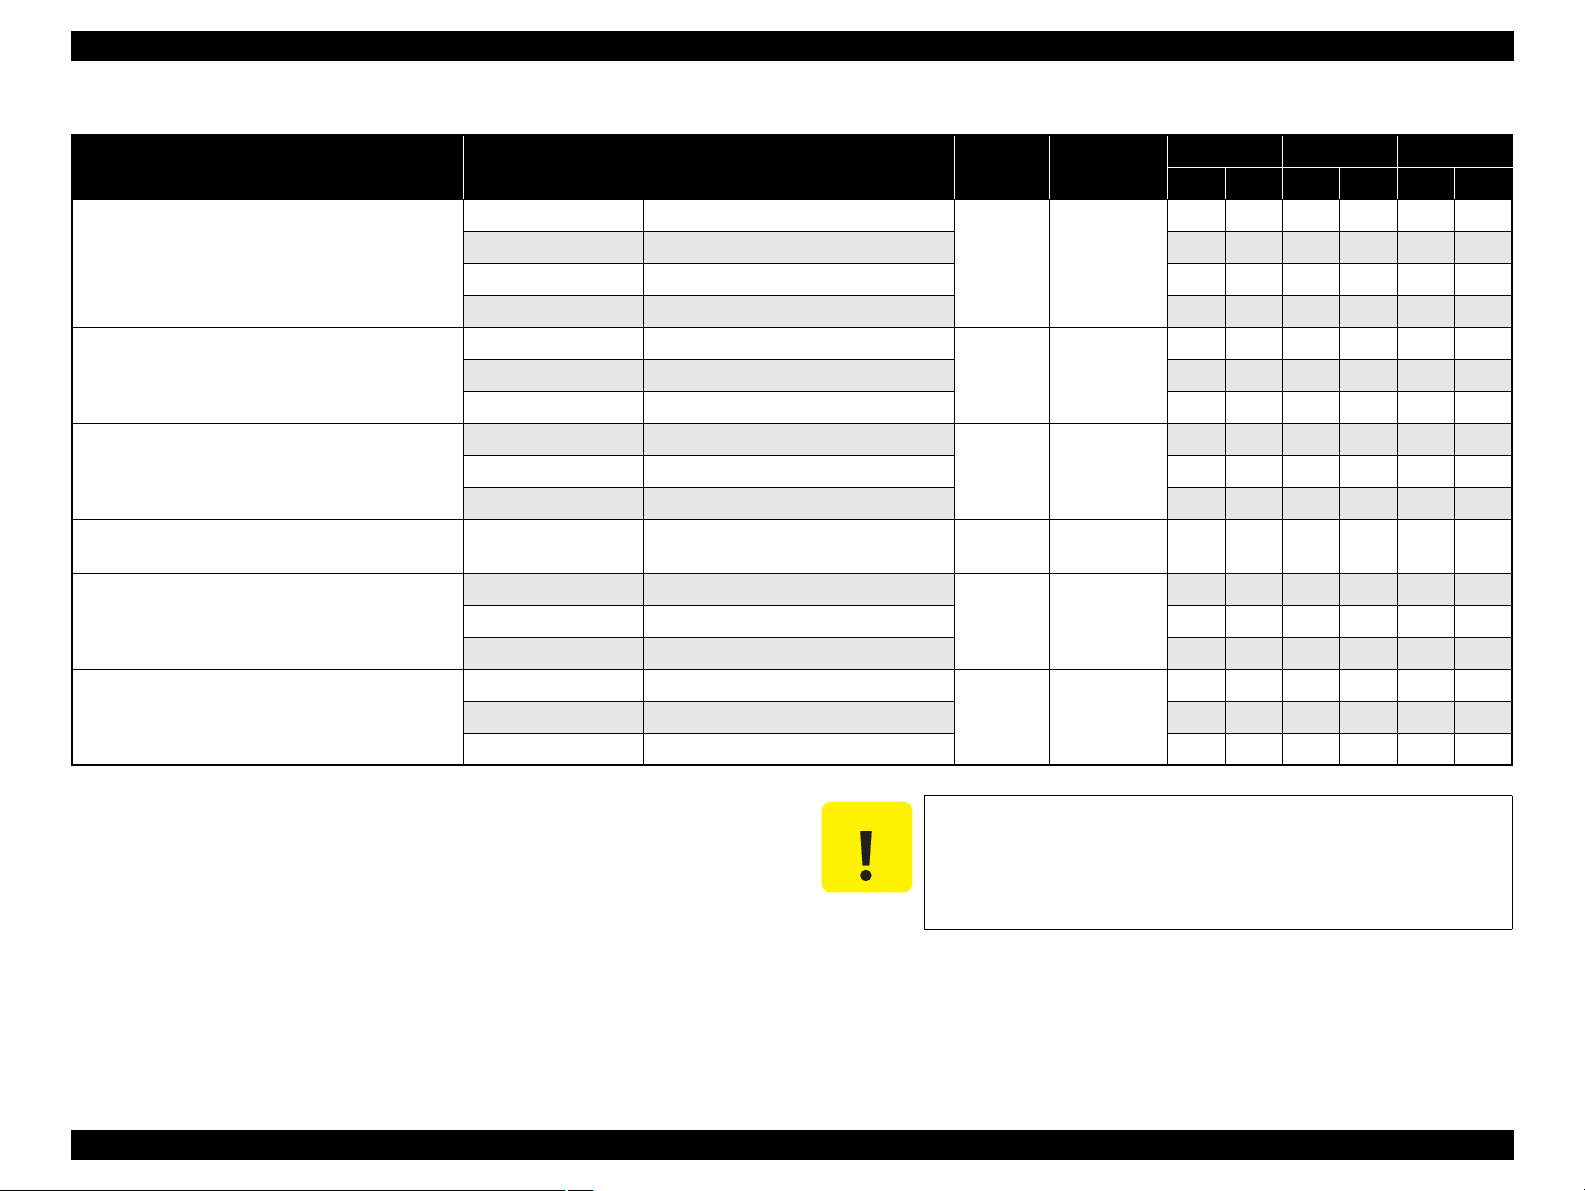
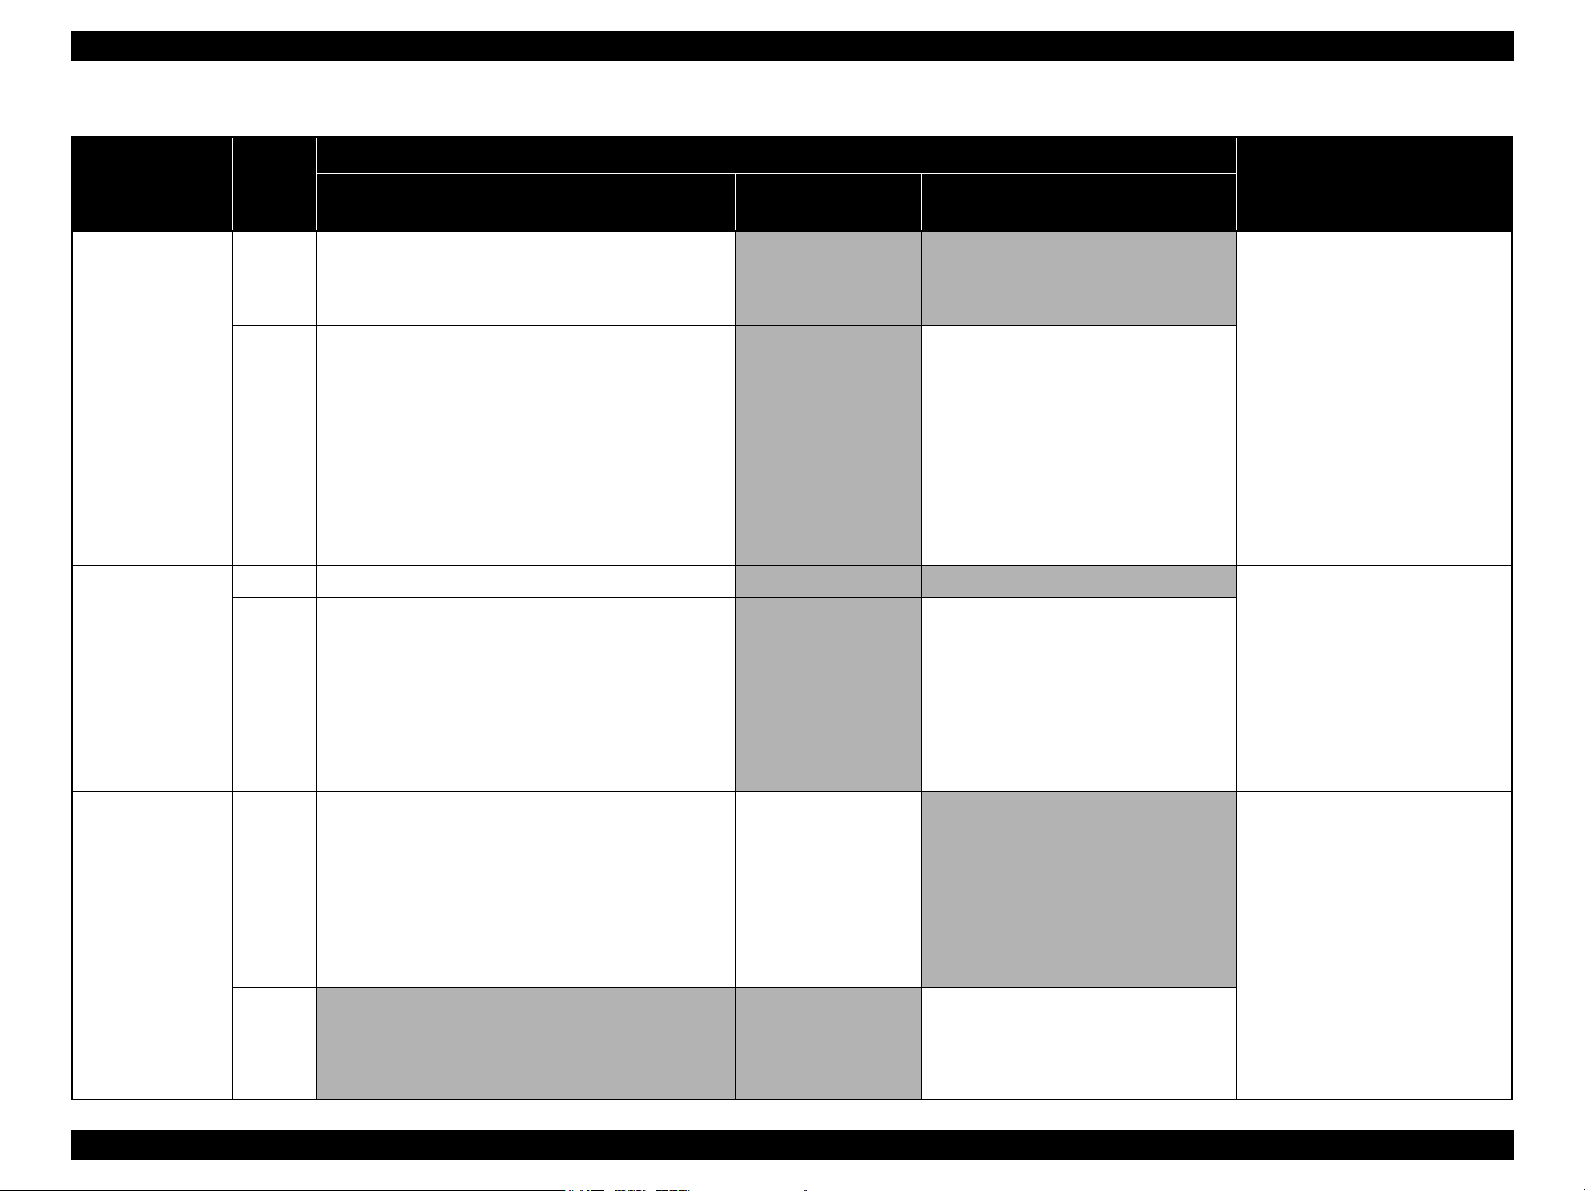
1.6.2 Control Panel Functions in Each Mode
1.6.2.1 Control Panel Functions for CX8300/TX400 series
The table below shows the print setting menu items for each mode and their default, and when the settings are saved or returned to their default. Explanations on detailed control
panel functions of the CX8300/TX400 series are omitted here, because the LCD displays the detailed instruction.
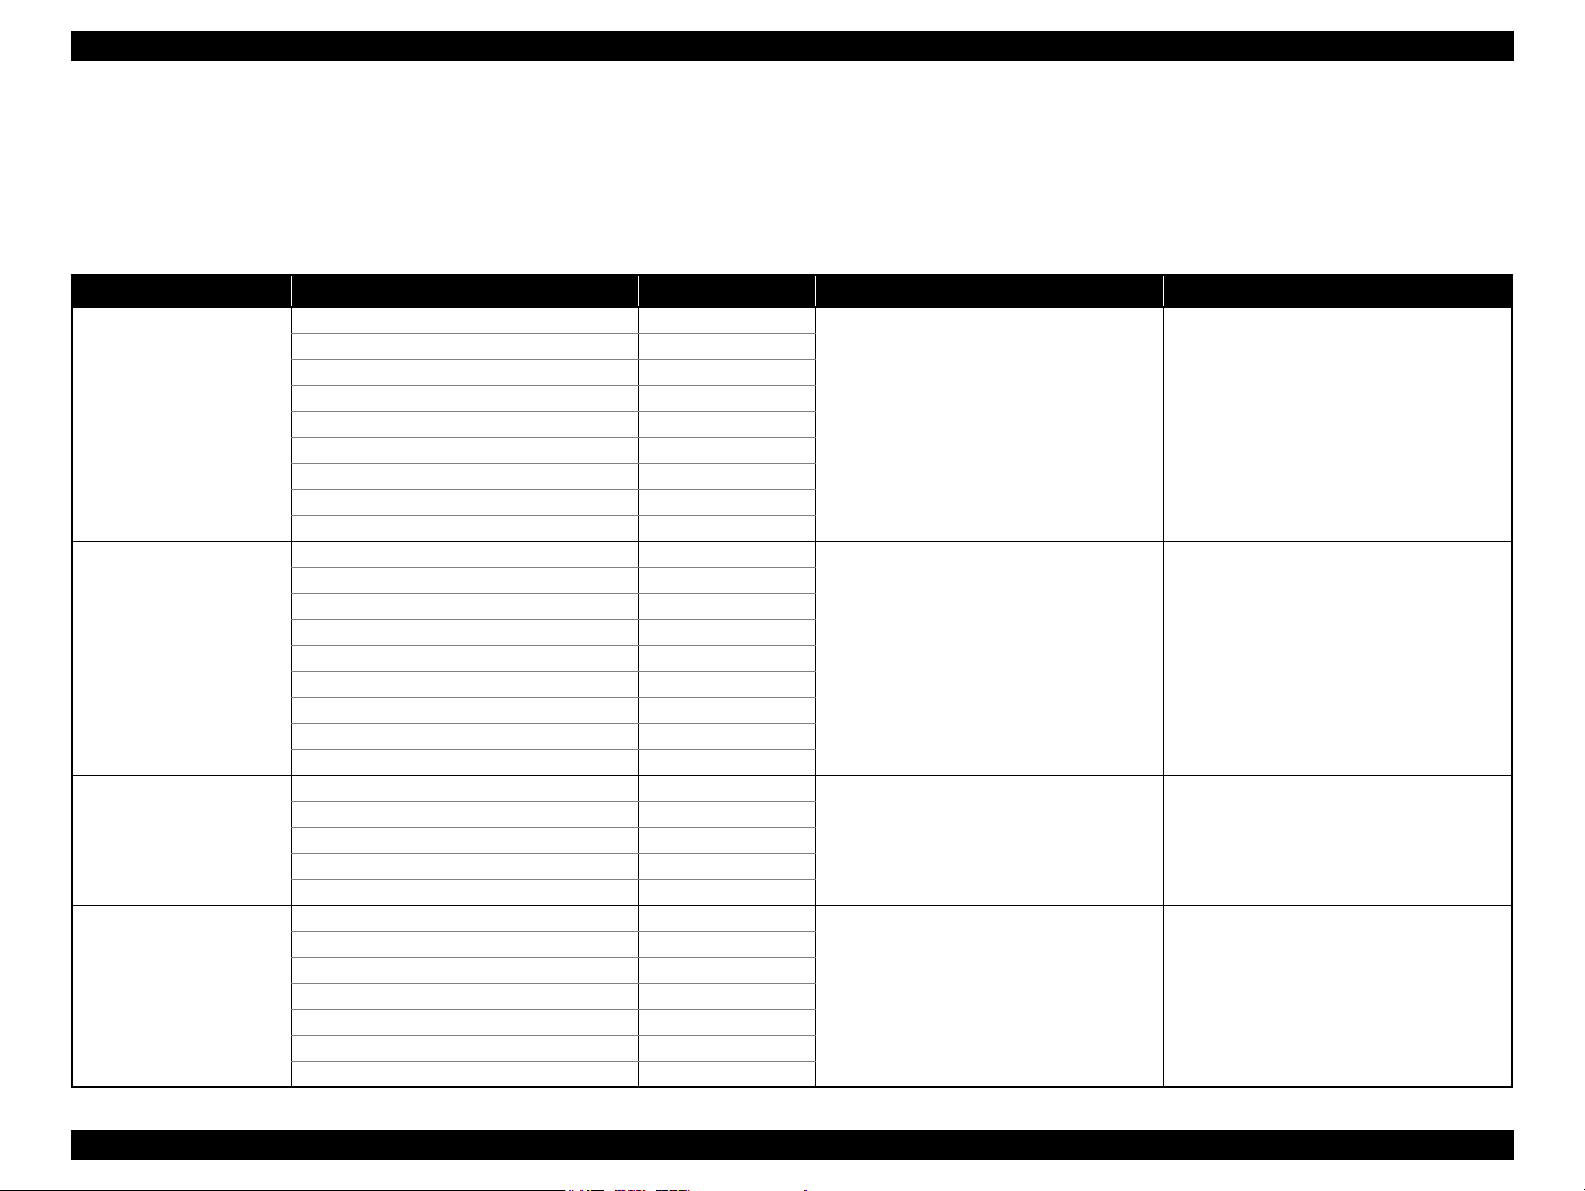
Table 1-18. Timing of Saving or Initializing Control Panel Settings
Mode Print Setting Default Value Saving Timing Initializing Timing*
Copy
Memory Card
Photo
Camera Direct
Note * : All the settings except “LCD Brightness” of Setup menu returns to their default when the “Restore Default Settings” of the Setup menu is executed by the OK button.
Copy Type Color
Layout With Border
Number of copies 1
Zoom Actual
Paper Type Plain Paper
Paper Size A4, Letter (for EAI)
Quality Standard
Density ±0
Expansion Standard
Paper Type Prem. Glossy
Paper Size 4×6 inch
Layout Borderless
Quality Standard
Expansion Standard
Date None
Bidirectional On
Select (Print Index Sheet setting) All Photos
Information (Print Index Sheet setting) (EAI only) File Name
Paper Type Prem. Glossy
Paper Size 4×6 inch
Layout Borderless
Expansion Standard
Color Restoration Off
Paper type Prem. Glossy
Paper size 4×6 inch
Layout Borderless
Quality Standard
Expansion Standard
Date None
Bidirectional On
When the Start button is pressed When the Stop/Clear button is pressed
When the Start button is pressed When the Stop/Clear button is pressed
When the Start button is pressed When the Stop/Clear button is pressed
When the settings are made in the PictBridge Setup
of the Setup menu.
When the Stop/Clear button is pressed while
making the settings.
PRODUCT DESCRIPTION Control Panel 21
Confidential
EPSON Stylus CX7300/CX7400/DX7400/NX200/TX200 series/SX200 series/Stylus CX8300/CX8400/DX8400/NX400/TX400 series/SX400 series Revision C
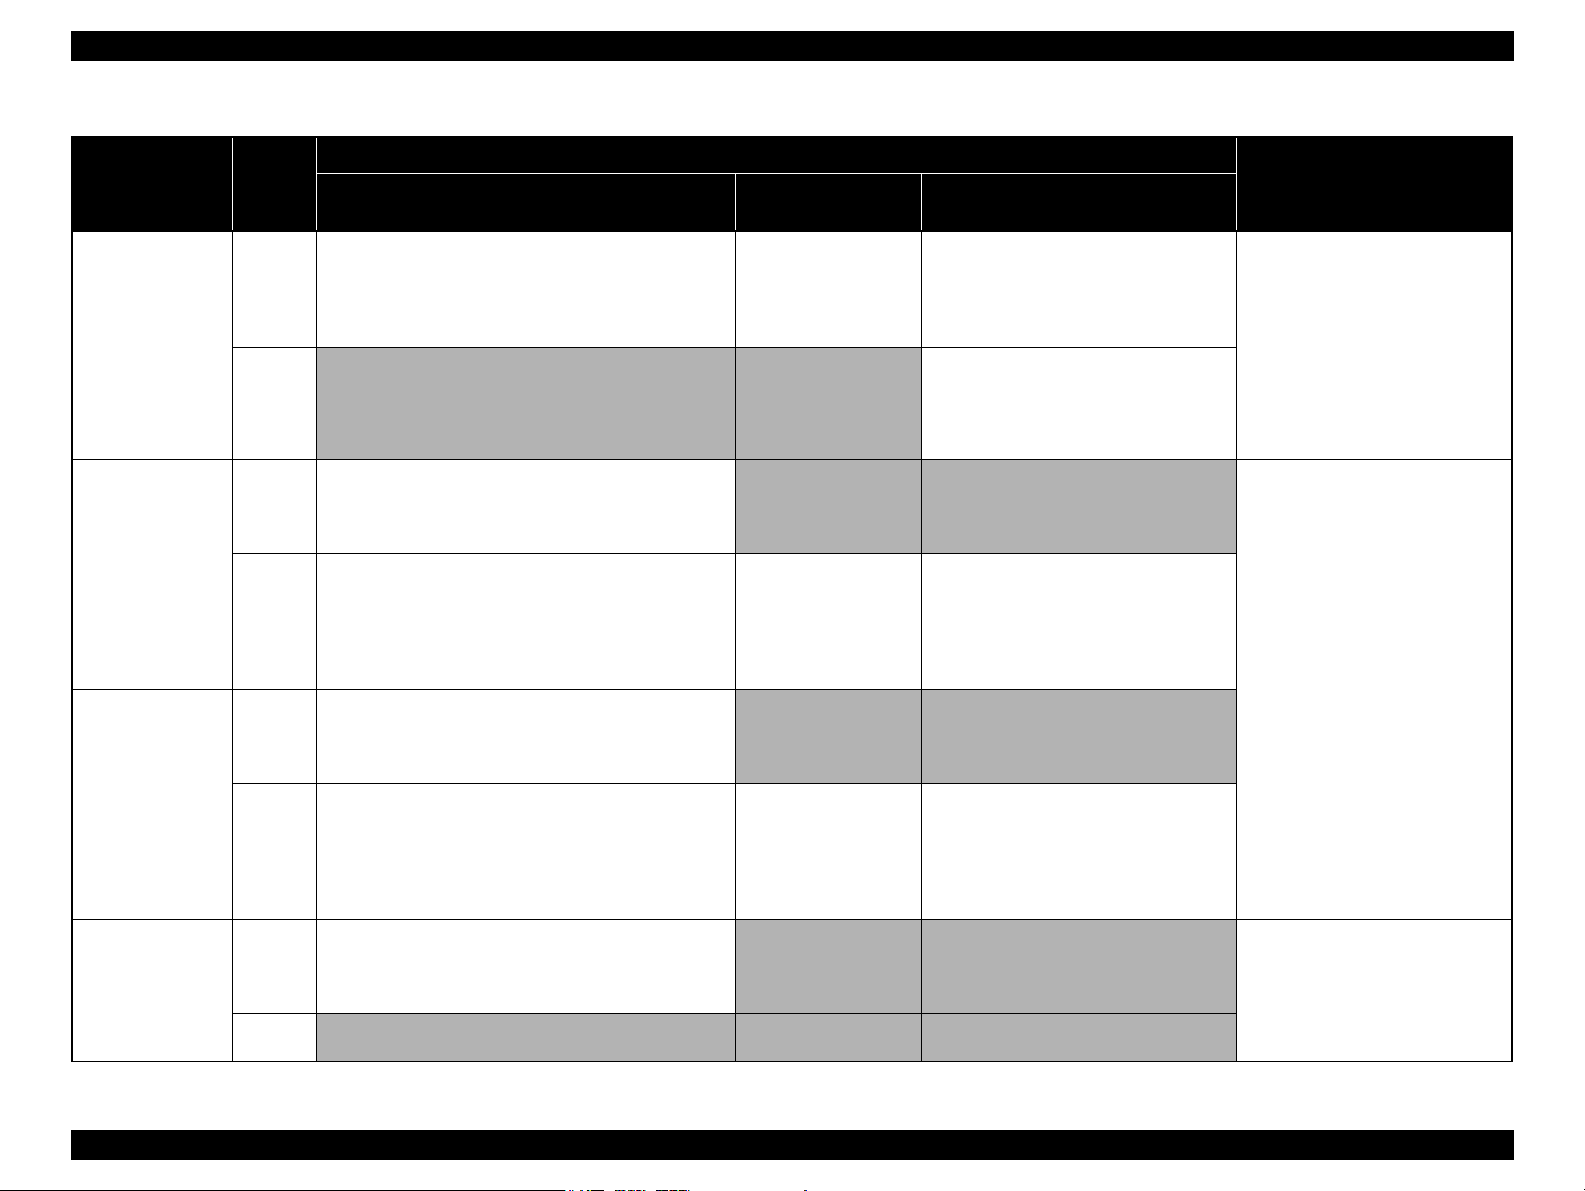
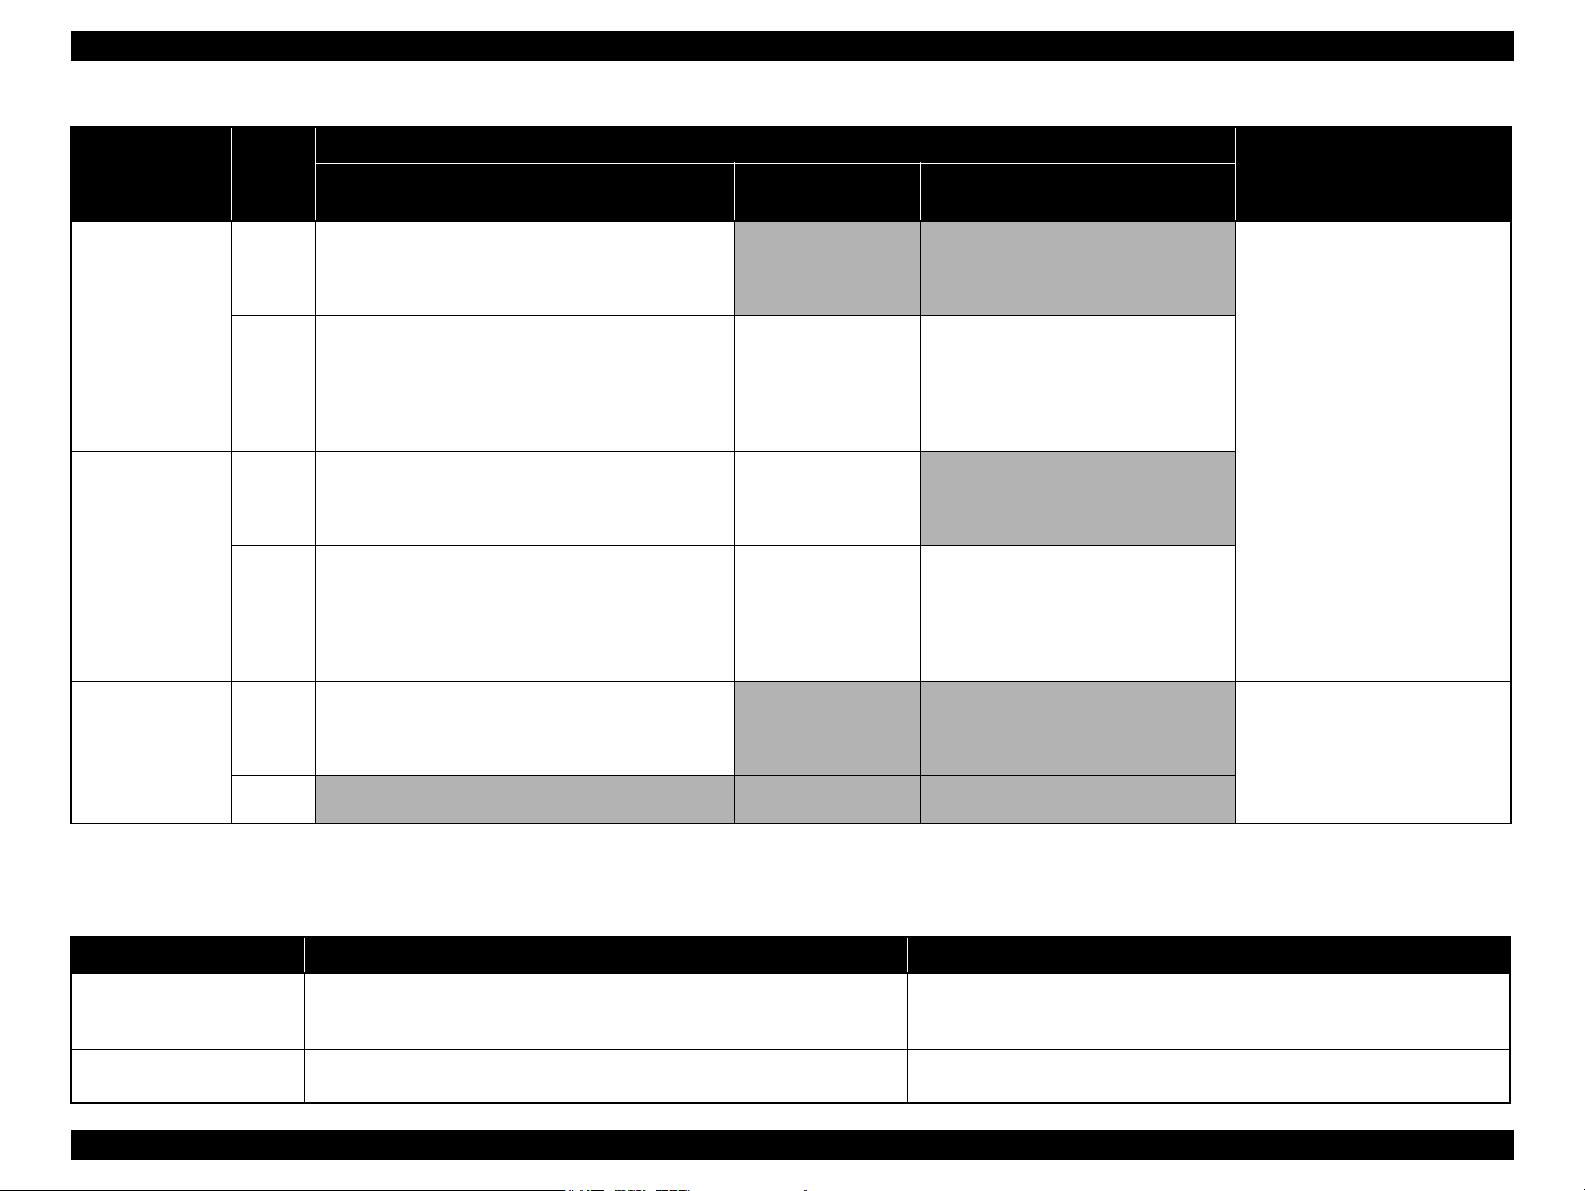
1.6.2.2 Control Panel and LED Functions for CX7300/TX200 series
This section explains the detailed functions of the operation buttons and LEDs of the CX7300/TX200 series that are not equipped with an LCD.
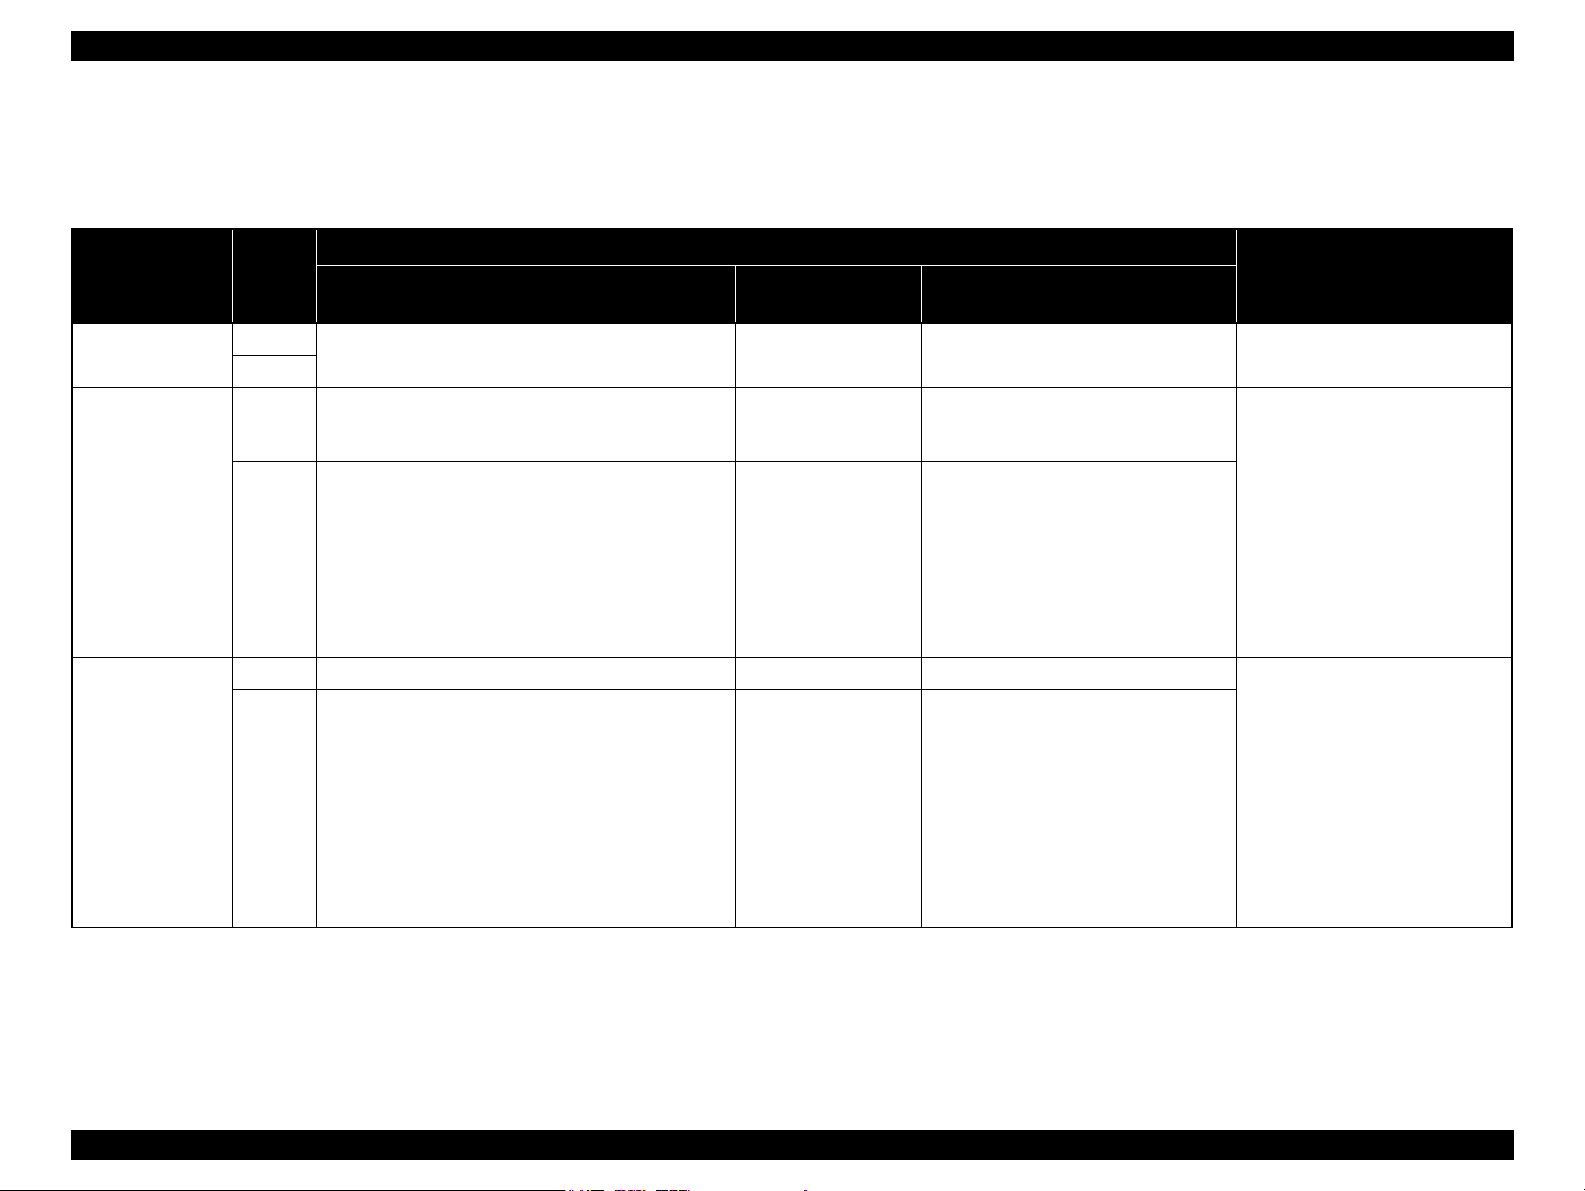
Table 1-19. CX7300/TX200 series Buttons & LEDs Functions
Button
Power Normal Turns the power OFF.
Stop /Maintenance Normal Stops printing and cancels the print/copy job.
Stop /Maintenance
(when pressed for 3
seconds or more)
Printer
Status
Error
Error • Cancels the error, stops printing, cancels the job, or ejects
Normal Runs a head cleaning. Same as the left column. Same as the left column. • When an ink-out error is occurring
Error [When a no paper error, memory card error, or index sheet
(Turns the power ON when the power is OFF.)
At this time, the panel settings are not initialized but returned
to the previous settings.
paper.
[When an ink-related error occurs]*
• Executes an ink cartridge replacement sequence when an
ink end error, no ink cartridge error, or ink cartridge error
occurs.
• Moves the carriage to the ink check position when ink end
error or no ink cartridge error occurs.
error occurred]
Cancels the error and retained print job, and starts head
cleaning.
During Normal Printing
Functions
During DPOF
Printing
Same as the left column. Same as the left column. None
Same as the left column. Same as the left column. • During power ON / OFF operation
Same as the left column. Same as on the left except the cases below.
Same as the left column. • Same as the left column in the case of
During Camera Direct Printing
• When a camera direct error (camera
recognition is failed) occurs, cancels the
error and returns to the status before the
error occurs.
• When the camera direct error caused by
the camera connected before the printer is
powered on, returns to stand-by status
(initial status at power-on)
paper-out error.
• When a camera direct error (camera
recognition is failed) occurs, cancels the
error and returns to the status before the
error occurs, and then runs a head cleaning.
• When the camera direct error caused by the
camera connected before the printer is
powered on, returns to stand-by status
(initial status at power-on), and then runs a
head cleaning.
Button Operation Disabled Cases
• During scanner operation from PC
• During head cleaning
• During ink cartridge replacement
• When a no ink cartridge error or ink
cartridge error is occurring
• When an error other than above or
the camera direct error is occurring
• During printing
• During scanner operation
• During head cleaning
• During ink cartridge replacement
• When printing is being stopped or a
print job is being canceled
Note * : If the carriage is at an ink check position, the carriage moves to ink check positions for another color in the order of cyan, magenta, yellow, and black (the colors not requiring ink check will be skipped). After ink
check is completed, the carriage moves to the ink replacement position. If the carriage is at the ink cartridge replacement position, it moves to the home position.
Continued on next page
PRODUCT DESCRIPTION Control Panel 22
Confidential
EPSON Stylus CX7300/CX7400/DX7400/NX200/TX200 series/SX200 series/Stylus CX8300/CX8400/DX8400/NX400/TX400 series/SX400 series Revision C
Table 1-19. CX7300/TX200 series Buttons & LEDs Functions
Button
Print Index Sheet Normal Starts printing an index sheet.*
Print from Index
Sheet
Printer
Status
The paper size / paper type are changed to A4 / plain paper
automatically. Initializes the panel settings and turns off the 7segment LED.
Error • Displays a memory card error when no memory card or a
non-supported formatted memory card is detected, or when
no image data is found in the memory card.
• When an index sheet error is occurring, cancels the error
and retrys to print the index sheet.
• When a paper-out error is occurring, performs paper feed
operation. If the paper is fed successfully, cancels the error
and prints the index sheet.
• When a paper jam error is occurring, performs paper
ejection operation. If the paper is ejected successfully,
cancels the error and prints the index sheet.
Normal Reads an index sheet and starts printing images. Disabled Disabled • During printing
Error Same as the [Print Index Sheet] button other than the cases
below.
• When the index sheet cannot be read normally, cancels the
print job and displays an index sheet error.
• When the button is pressed after an index sheet error is
displayed, cancels the error display and resumes the print
job.
During Normal Printing
Functions
During DPOF
Printing
Disabled Disabled • During printing
Disabled When a camera direct error is occurring,
Disabled When a camera direct error is occurring,
During Camera Direct Printing
cancels the error and returns to the index sheet
print process.
cancels the error and starts reading the index
sheet.
Button Operation Disabled Cases
• During scanner operation
• During head cleaning
• During ink cartridge replacement
• When an error except memory card
error, index sheet error is occurring
• When print data is spooled
• When printing is being stopped or a
print job is being canceled
• When the button is pressed two or
more times after a memory card error
occurred.
• During scanner operation
• During head cleaning
• During ink cartridge replacement
• When print data is spooled
• When printing is being stopped or a
print job is being canceled
• When the button is pressed two or
more times after a memory card error
occurred
Copies Normal Sets the number of copies.
Default value is 1 copy.
1 to 9 sheets and “≡” (20 sheets continuously) can be set.
Saves the set value when starting copying. Does not save
when the power is Off. Returns the setting to the default when
the power is turned Off or the mode is changed. The 7segment LED displays the set number of copies and decreases
the number each time a copy is made. When the copy job is
finished, the number returns to the set value.
Error Disabled Disabled When a camera direct error is occurring,
Note * : After printing an index sheet, the paper type and size settings are returned to the previous ones.
Cancels the DPOF mode
and returns to standby
mode.
The set number of copies
is returned to the default,
and the paper type and
size settings are returned
to the previous ones.
Disabled • During printing
• During scanner operation
• During head cleaning
• During ink cartridge replacement
• When an error is occurring
• When print data is spooled
• When printing is being stopped or a
print job is being canceled
cancels the error, and goes to the standby
mode. The set number of copies is returned to
the default, and the paper type and size
settings are returned to the previous ones.
Continued on next page
PRODUCT DESCRIPTION Control Panel 23
Confidential
EPSON Stylus CX7300/CX7400/DX7400/NX200/TX200 series/SX200 series/Stylus CX8300/CX8400/DX8400/NX400/TX400 series/SX400 series Revision C
Table 1-19. CX7300/TX200 series Buttons & LEDs Functions
Button
Paper Type Normal Sets the paper size / paper type.
Start B&W Normal Starts copying in B&W mode.
Start B&W
(when pressed for 3
seconds or more)
Stop /Maintenance
+ Start B&W
Printer
Status
Default is A4 (Letter for EAI), Plain Paper
Saves the settings when the power is turned Off by the Power
button, the modes is changed, or copying is started. Does not
save when the power plug is disconnected.
Error Disabled Disabled When a camera direct error is occurring,
Saves the number of copies and paper type and size settings
when starting copying and displays the saved settings after the
copying is complete.
Error • When a paper-out error is occurring, performs paper feed
operation. If the paper is fed successfully, cancels the error
and starts the copy job.
• When a paper jam error is occurring, performs paper
ejection operation. If the paper is ejected successfully,
cancels the error starts the copy job.
Normal Starts autofit copying in B&W mode.
Saves the number of copies and paper type and size settings
when starting copying and displays the saved settings after the
copying is complete.
Error • When a paper-out error is occurring, performs paper feed
operation. If the paper is fed successfully, cancels the error
and starts the copy job.
• When a paper jam error is occurring, performs paper
ejection operation. If the paper is ejected successfully,
cancels the error starts the copy job.
Normal Starts monochrome draft copy. (A4 plain paper only)
Saves the number of copies and paper type and size settings
when starting copying and displays the saved settings after the
copying is complete.
Error Disabled Disabled Disabled
During Normal Printing
Functions
During DPOF
Printing
Same as the left column. Same as the left column. • During printing
Disabled Disabled* • During printing
Same as the left column. Same as the left column.
Disabled Disabled*
Same as the left column. Same as the left column.
Disabled Disabled* • During scanner operation
During Camera Direct Printing
cancels the error, and goes to the standby
mode. The set number of copies is returned to
the default, and the paper type and size
settings are returned to the previous ones.
Button Operation Disabled Cases
• During scanner operation
• During head cleaning
• During ink cartridge replacement
• When an error is occurring
• When print data is spooled
• When printing is being stopped or a
print job is being canceled
• During scanner operation
• During head cleaning
• During ink cartridge replacement
• When an ink error is occurring
• When print data is spooled
• When printing is being stopped or a
print job is being canceled
• During head cleaning
• During ink cartridge replacement
• When printing is being stopped or a
print job is being canceled
• When an error is occurring
Note * : When in camera direct mode, starts printing according to requirements from the camera.
Continued on next page
PRODUCT DESCRIPTION Control Panel 24
Confidential
EPSON Stylus CX7300/CX7400/DX7400/NX200/TX200 series/SX200 series/Stylus CX8300/CX8400/DX8400/NX400/TX400 series/SX400 series Revision C
Table 1-19. CX7300/TX200 series Buttons & LEDs Functions
Button
Start Color Normal Starts copying in color mode.
Start Color
(when pressed for 3
seconds or more)
Stop /Maintenance
+ Start Color
Note * : When in camera direct mode, starts printing according to requirements from the camera.
Printer
Status
Saves the number of copies and paper type and size settings
when starting copying and displays the saved settings after the
copying is complete.
Error • When a paper-out error is occurring, performs paper feed
operation. If the paper is fed successfully, cancels the error
and starts the copy job.
• When a paper jam error is occurring, performs paper
ejection operation. If the paper is ejected successfully,
cancels the error starts the copy job.
Normal Starts autofit copying in color mode.
Saves the number of copies and paper type and size settings
when starting copying and displays the saved settings after the
copying is complete.
Error • When a paper-out error is occurring, performs paper feed
operation. If the paper is fed successfully, cancels the error
and starts the copy job.
• When a paper jam error is occurring, performs paper
ejection operation. If the paper is ejected successfully,
cancels the error starts the copy job.
Normal Starts color draft copy. (A4 plain paper only)
Saves the number of copies and paper type and size settings
when starting copying and displays the saved settings after the
copying is complete.
Error Disabled Disabled Disabled
During Normal Printing
Functions
During DPOF
Printing
Disabled Disabled* • During printing
Same as the left column. Same as the left column.
Starts printing
according to the
DPOF setting.
Same as the left column. Same as the left column.
Disabled Disabled* • During scanner operation
During Camera Direct Printing
Disabled*
Button Operation Disabled Cases
• During scanner operation
• During head cleaning
• During ink cartridge replacement
• When an ink error is occurring
• When print data is spooled
• When printing is being stopped or a
print job is being canceled.
• During head cleaning
• During ink cartridge replacement
• When printing is being stopped or a
print job is being canceled
• When an error is occurring
Table 1-20. CX7300/TX200 series Special Button Operations for Maintenance Functions
Button Function Remarks
Stop / Maintenance & Power
(Power On)
Copies & Power
(Power On)
Prints a nozzle check pattern.
After printing the pattern, returns to the standby state of normal print mode.
Enters mechanism adjustment mode and prints a Head Alignment pattern.
After printing the pattern, goes to the adjustment value input mode.
• The nozzle check pattern printed by the printer is shown in Figure 1-11.
• If the Stop / Maintenance button is pressed while printing a nozzle check pattern, stops
printing, eject paper, and turns the power OFF.
• See “ 1.7.5.8 Head Alignment ( p. 40 ) ” for details on Bi-D adjustment.
PRODUCT DESCRIPTION Control Panel 25
Confidential

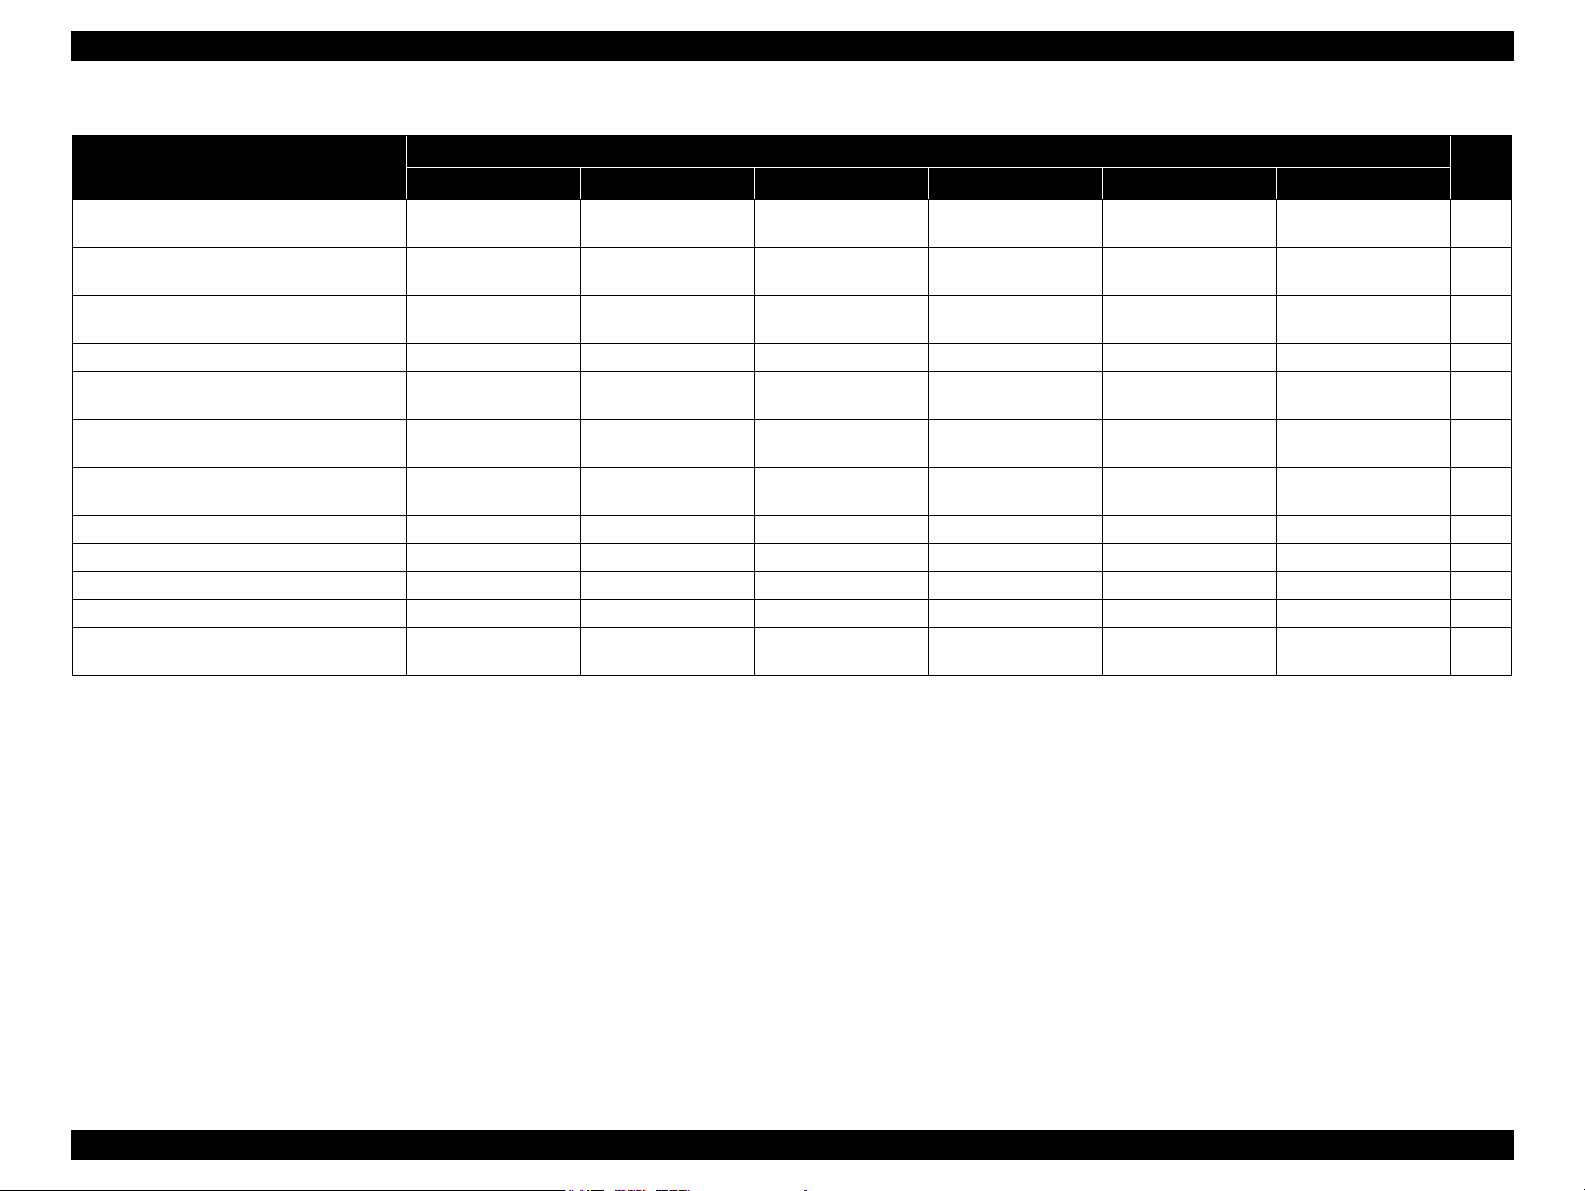
EPSON Stylus CX7300/CX7400/DX7400/NX200/TX200 series/SX200 series/Stylus CX8300/CX8400/DX8400/NX400/TX400 series/SX400 series Revision C
Table 1-21. CX7300/TX200 series LED Functions
Printer Status
Power OFF (processing) High-speed flashing OFF OFF OFF OFF — 1
Fatal error (system error)
Fatal error (mechanical error)
Maintenance request
Power ON (initializing) Flashing — — — — — 5
Reset request / Stop request / Job cancel request
Paper jam error — Flashing OFF — — — 7
Ink out error / No ink cartridge error
read error / write error
Ink cartridge replacement is in progress Flashing 2 OFF Flashing 2 — — — 9
Ink sequence is in progress Flashing — — — — — 10
No paper error — ON OFF — — — 11
Multi-feed error — ON OFF — — — 11
Index sheet being printed
Index sheet is being scanned & printed
DPOF printing
Copying
Camera direct printing
Printing from PC Flashing — — OFF OFF — 13
Scanner operation from PC Flashing — — OFF OFF — 13
Printing & job being canceled Flashing — — — — — 14
Memory card being recognized Flashing — — — — Flashing 3 15
Power ON (Print data processing) Flashing — — — — — 16
Hub connection error — Flashing 2 OFF Flashing 2 of “H” — — 17
Camera direct error — Flashing 2 OFF Flashing 2 of “P” — — 18
Memory card error — Flashing 2 OFF Flashing 2 of “1” OFF — 19
Power Error Ink 7
High-speed flashing High-speed flashing High-speed flashing
Flashing Flashing Flashing Flashing of “E”
Flashing ON ON Flashing of “E”
ON for 1 second ON for 1 second ON for 1 second ON for 1 second
— OFF ON — — — 8
*1
Flashing
*1
Flashing
Flashing — — ON of “d”
Flashing — —
Flashing — — ON of “P”
— — OFF
— — OFF
LED
Segments
High-speed flashing of
“E”
Displays remaining
number of copies
*3
Paper 1/2 Card Access
High-speed flashing
(selected side)
Flashing
(selected side)
Flashing
(selected side)
ON for 1 second
(selected side)
ON
(Paper 1 only)
*2
ON
(selected side)
ON
(selected side)
ON
(selected side)
ON
(selected side)
— 2
— 3
— 4
— 6
— 12
— 12
— 12
— 12
— 12
Continued on next page
Pri-
ority
PRODUCT DESCRIPTION Control Panel 26
Confidential
EPSON Stylus CX7300/CX7400/DX7400/NX200/TX200 series/SX200 series/Stylus CX8300/CX8400/DX8400/NX400/TX400 series/SX400 series Revision C
Table 1-21. CX7300/TX200 series LED Functions
Printer Status
Index sheet error
(incorrect placement of the sheet)
Index sheet error
(unmatch between the sheet and memory card)
Index sheet error
(incorrect markings on the sheet)
Ink level low error — — Flashing — — — 23
In copy mode
In DPOF mode
In camera direct mode
Power ON (normal idle state) ON — — — — — 25
No memory card — — — — — OFF —
Memory card recognized — — — — — ON —
Memory card being accessed — — — — — Flashing 3 —
Power ON
(panel low power mode)
Power Error Ink 7
— Flashing 2 OFF Flashing 2 of “2” — — 20
— Flashing 2 OFF Flashing 2 of “4” — — 21
— Flashing 2 OFF Flashing 2 of “3” — — 22
— — —
— — — ON of “d”
— — — ON of “P”
ON OFF OFF
Segments
Displays remaining
number of copies
“_”
Low-speed flashing
Paper 1/2 Card Access
*3
ON
(selected side)
ON
(selected side)
ON
(selected side)
OFF — —
— 24
— 24
— 24
LED
Pri-
ority
Note *1: Nothing changes in the normal stand-by status.
*2 : Both LEDs turn OFF in the normal stand-by status.
*3 : “≡” is displayed when continuous 20 sheets is selected.
Note : —: No change
Flashing: Repeats ON and OFF every 1.25 seconds.
Flashing 2: Repeats ON for 0.5 second, OFF for 0.5 second, ON for 0.5 second, and OFF for 1.0 second.
Flashing 3: ON and OFF according to the memory card access status.
High-speed flashing: Repeats ON and OFF every 0.5 second.
Low-speed flashing: Repeats ON and OFF every 2 seconds.
Note : See “ 3.3 Error Indications and Fault Occurrence Causes ” (p.61) for remedies for errors.
PRODUCT DESCRIPTION Control Panel 27
Confidential

EPSON Stylus CX7300/CX7400/DX7400/NX200/TX200 series/SX200 series/Stylus CX8300/CX8400/DX8400/NX400/TX400 series/SX400 series Revision C
1.6.2.3 Control Panel Power Saver Mode
If no operation is made on the control panel for approximately 13 minutes, both the
CX8300/TX400 series and CX7300/TX200 series automatically enter control panel
power saver mode. The details of control panel power save mode are shown below.
Conditions for not entering the control panel power save mode
• The printer or scanner is in operation
• During printing or scanning from PC
• Camera direct is in operation
• Slide show is being displayed
• An error is being displayed
• Mechanical adjustment is being made in setup mode
• Firmware is being updated
Conditions recovering from the control panel power save mode
• Any button other than the power button is pressed (when the power button is
pressed, the power is turned OFF)
• A memory card or a camera direct device is connected
• Operation from PC (printing / scanning / maintenance)
NOTE: See “ 1.7.3.4 Operating Specifications during Connecting DSC ( p. 37 ) ”
for information on the panel operation during connecting a camera to the
EXT.IF.
PRODUCT DESCRIPTION Control Panel 28
Confidential
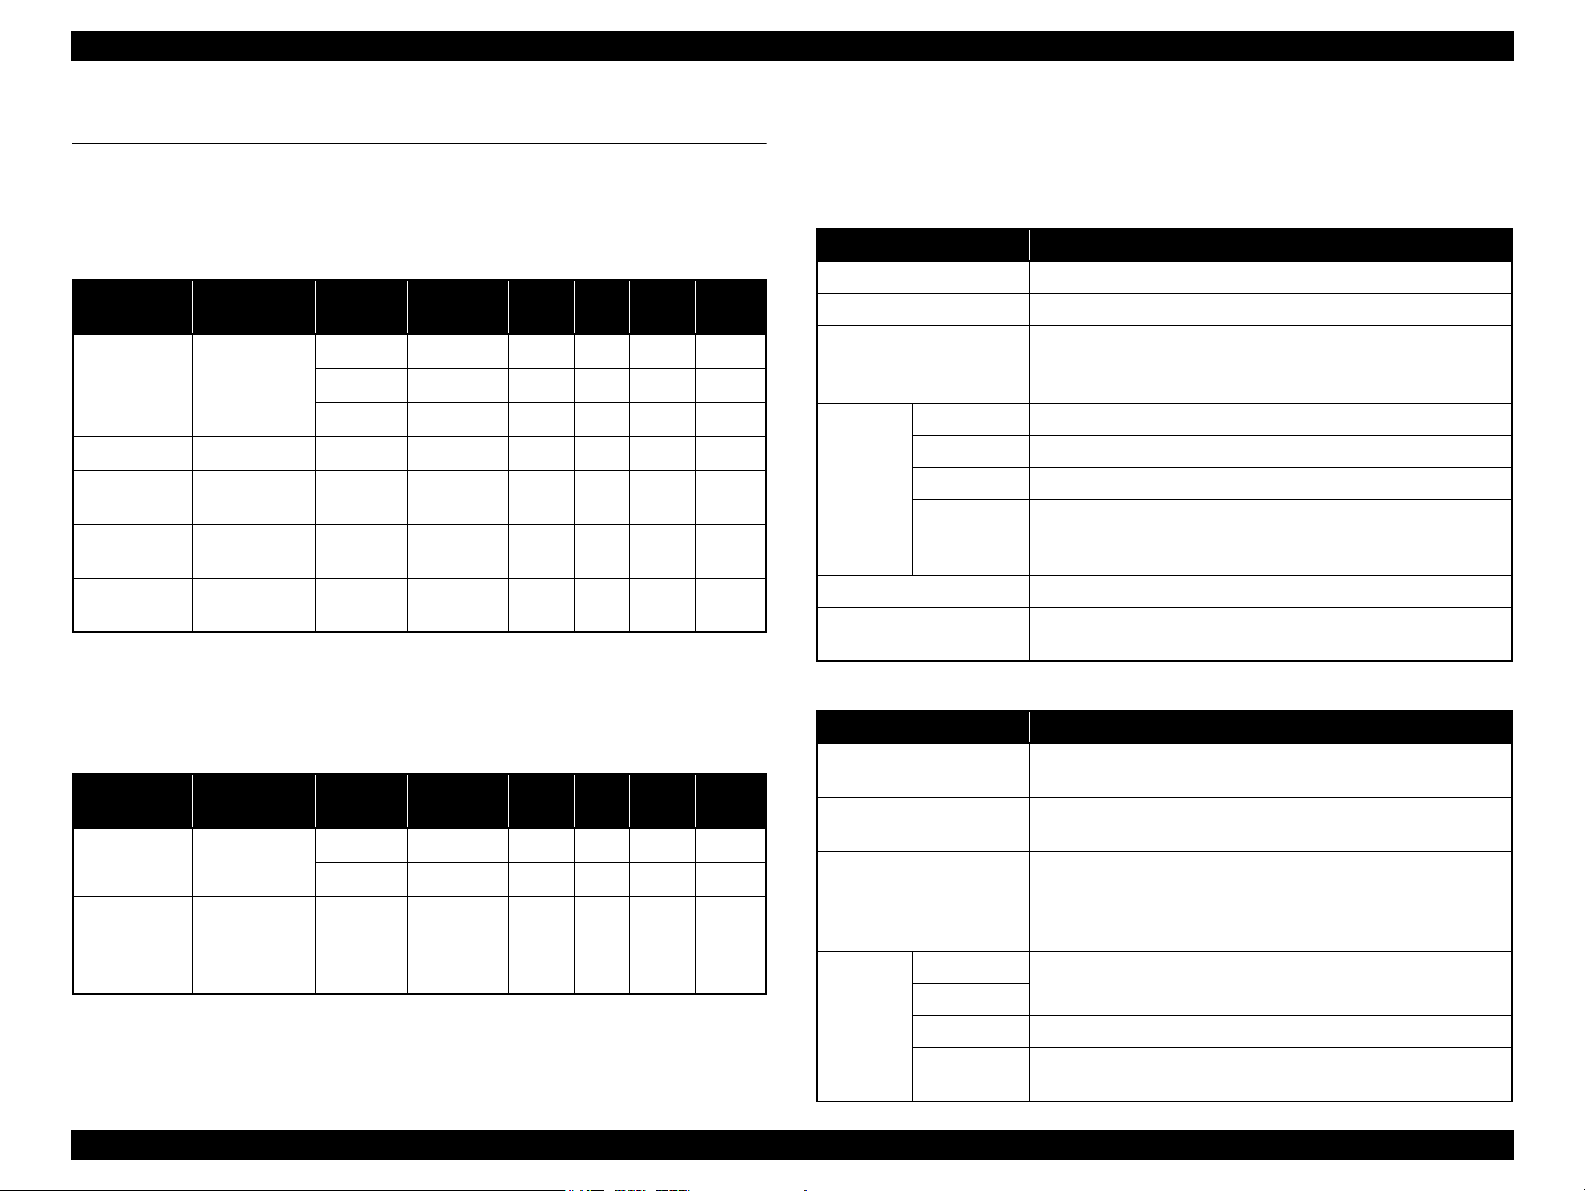
EPSON Stylus CX7300/CX7400/DX7400/NX200/TX200 series/SX200 series/Stylus CX8300/CX8400/DX8400/NX400/TX400 series/SX400 series Revision C
1.7 Specification for Each Function
1.7.1 Stand-alone Copy Function
1.7.1.1 Supported Paper and Copy Mode
Table 1-22. Supported Paper and Copy Mode for CX8300/TX400 series
*1
*1
*1
*1
Quality
Draft
Standard
Best
Standard
Standard
Standard
Resolution
360×120 Eco ON OFF
360×360 VSD1 ON OFF
720×720 VSD3 ON ON
1440×720 VSD3 ON ON
1440×720 VSD3 ON ON
1440×720 VSD3 ON ON
1440×720 VSD3 ON ON
Paper Type
Plain paper A4*1, Letter
Matte paper A4*1, Letter*1Standard
Photo Paper
Prem. Glossy
Ultra Glossy
Note *1 : The model for Latin supports both the letter and A4 sizes. The model for North
*2 : Borderless printing of 5×7 size is not supported for EAI.
A4*1, Letter
A4*1, Letter
A4
America supports letter size only, and the other destination models support A4 size
only.
1
Size*
4×6, 5×7,
4×6, 5×7,
4×6, 5×7,
*1
, Letter
Table 1-23. Supported Paper and Copy Mode for CX7300/TX200 series
*1
Quality
Draft
Standard
Resolution
360×120 Eco ON OFF
360×360 VSD1 ON OFF
1440×720 VSD3 ON ON
Paper Type
Plain paper
Photo Paper
(Photo Paper,
Prem. Glossy,
Ultra Glossy)
Note *1 : The model for Latin supports both the letter and A4 sizes. The model for North
America supports letter size only, and the other destination models support A4 size
only.
Size
A4*1, Letter
4×6 Standard
Dot
Size
Dot
Size
Bi-D
Bi-D
Micro
Weave
Micro
Weave
Border-
OK*
Border-
less
NA
NA
NA
OK
OK
OK
less
NA
NA
OK
1.7.1.2 Stand-alone Copy Menu
The stand-alone copy mode menu for the CX8300/TX400 series and CX7300/TX200
series (settable items) are shown in the following tables.
Table 1-24. Copy Menus for CX8300/TX400 series
Menu Function
Number of copies Sets the number of copies within the range of 1 to 99.
Copy type Selects either color or monochrome.
Selects from the following two layouts:
Layout
Paper type Selects paper type from the options shown in Table 1-22.
Paper size Selects paper size from the options shown in Table 1-22.
2
Print
setting
Density Selects from the nine density levels of -4 to +/-0 to +4.
Expansion
(for borderless print)
Quality Selects print quality from the options shown in Table 1-22.
Zoom
Table 1-25. Copy Settings for CX7300/TX200 series
Setting Item Operation and Function
Number of copies
Copy type
Layout
Paper type
Print
setting
Paper size
Quality Selects print quality from the options shown in Table 1-23.
Zoom
• With Border (normal layout with 3mm margins)
• Borderless (no margins)
Selects Actual or Auto Fit Page.
Or reduction/enlargement ratio can be specified within the range
of 25% to 400%.
Selects the margins level (margins bleed off the edges of paper)
from the Standard (100%), Mid. (50%) or Min. (0%).*
Sets the number of copies within the range of 1 to 99 using the
Copies button.
Selects either color or monochrome with the Color button or
B&W button.
Selects print layout from the following three options:
• Standard (normal layout with 3mm margins)
• Small margin (layout with 1.5mm margins)
• Borderless (no margins)
Selects paper type and size from the options shown in Table 1-23
using the Paper Type button.
Actual size is selected by default. Autofit can be set by holding
down the B&W / Color button for 3 seconds or longer.
PRODUCT DESCRIPTION Specification for Each Function 29
Confidential
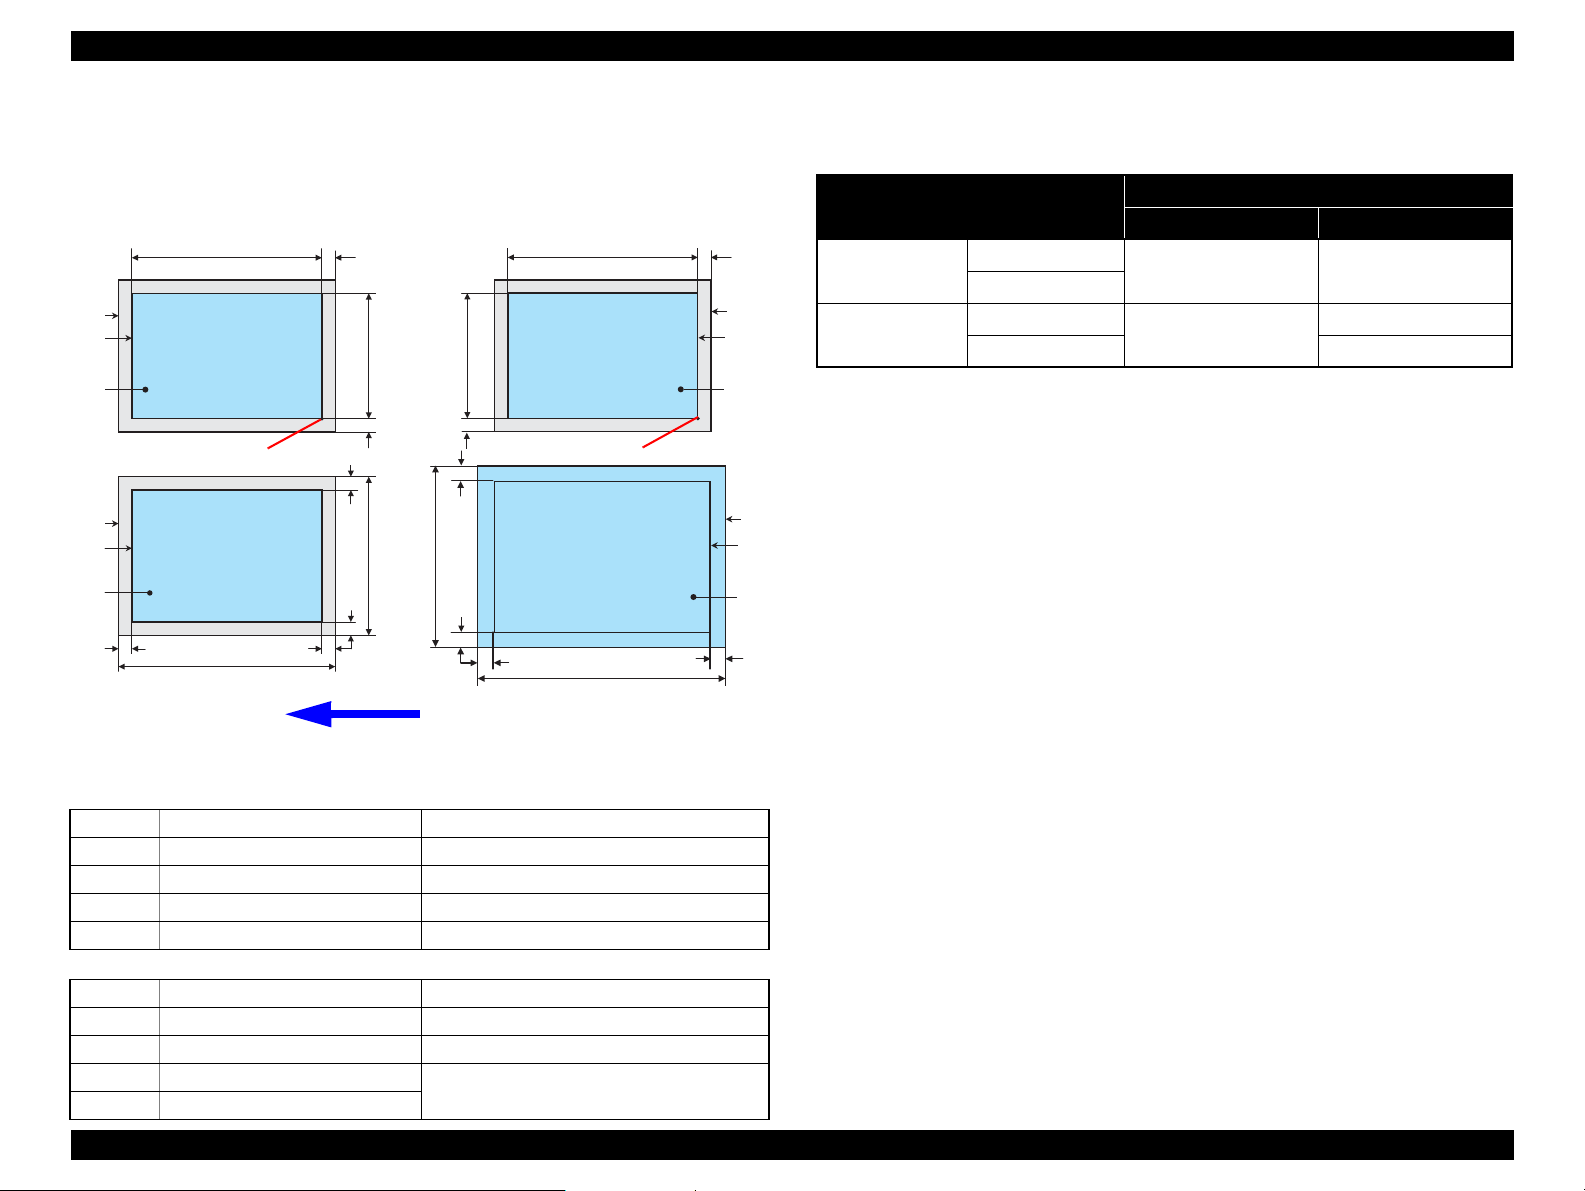
EPSON Stylus CX7300/CX7400/DX7400/NX200/TX200 series/SX200 series/Stylus CX8300/CX8400/DX8400/NX400/TX400 series/SX400 series Revision C
Scan / Print direction
A
A
B
B
C
C
D
D
E
E
F
F
Readable Length
Paper Length
Paper
Width
Paper Length
Readable
Width
Readable Length
OTM
OTM
OLM
LM
LM
RM
RM
TM
BM
BM
TM
OLM
Home position
Home position
Standard copy
Borderless copy
1.7.1.3 Relation Between Original and Copy
The scanning start position is located on the front right of the scan bed. The relations
between the original placed face down and its copy are as follows.
1.7.1.4 Copy Speed
Copy Conditions
(eMemo2, A4 size)
Draft 360 x 120
Default 360 x 360
Monochrome copy
Color copy
Monochrome copy
Color copy T.B.D. cpm
Table 1-26. Copy Speed
Model
CX8300/TX400 series CX7300/TX200 series
T.B.D. cpm T.B.D. cpm
T.B.D. cpm
T.B.D. cpm
Figure 1-7. Relation Between Original and Copy (Borderless/With Borders)
Original Document
A Scan bed —
B Scan area “ 1-9 Scanning Range ” (p.15)
C Original (face down) —
OTM Top margin (out of scan range) “ 1-9 Scanning Range ” (p.15)
OLM Left margin (out of scan range) “ 1-9 Scanning Range ” (p.15)
Copied Document
D Copied paper —
E Print area “ 1-7 Printing Area (Margins) ” (p.15)
F Copy —
LM, RM Left margin, Right margin* “ 1-7 Printing Area (Margins) ” (p.15)
TM, BM Top margin, Bottom margin*
PRODUCT DESCRIPTION Specification for Each Function 30
Confidential
Loading…