
ИНСТРУКЦИИ
- Инструкция к эхолотам Lowrance X-4, X-4 Pro | Скачать (3,4МБ)
- Инструкция к эхолотам X52, X59DF | Скачать (4,5МБ)
- Инструкция к эхолотам HDS-5x | Скачать (1.8 МБ)
- Инструкция к картплоттерам/эхолотам HDS-5, HDS-7, HDS-8, HDS-10 | Скачать (7.5 МБ)
- Инструкция к эхолотам Mark-5x, Mark-5x PRO, Elite-5x | Скачать (8 МБ)
- Инструкция к картплоттерам/эхолотам Elite-5 | Скачать (10 МБ)
- Инструкция по бесплатному обновлению карт C-MAP 4D | Скачать (формат doc, 800Kb)
ЭМУЛЯТОРЫ
Эмуляторы Lowrance — загружаемые программные приложения, которые моделируют на Вашем компьютере работу фактического прибора. Вы можете установить эмулятор на свой компьютер и программа создаcт виртуальный эхолот или GPS, который в точности повторяет внешний вид и работу прибора! Демонстрационные карты Navionics® включены в эмуляторы продуктов, у которых есть возможность чтения карты памяти.
Эти эмуляторы позволяют Вам:
- попробовать эхолот, эхолот-навигатор Lowrance в работе, не покупая его
- спокойно, в домашней обстановке, разобраться во всех функциях сонара и не тратить драгоценное время на обучение на воде
- экспериментировать с дополнительными функциями и установками для максимально точной настройки под собственные нужды
- детально осматривать сохраненные маршруты ваших путешествий, исследуя пути и рельеф дна в излюбленных местах рыбалки не расходуя топливо для лодки
Эмуляторы серий Mark, Elite выделены жирным.
- Elite-5 Emulator|Загрузить (17 MB)
- Elite-5x Emulator | Загрузить (15 MB)
- Mark-5x Emulator | Загрузить (15 MB)
- Lowrance AirMap® 2000C | Загрузить (12.6 MB)
- Lowrance LCX-25C | Загрузить (14.6 MB)
- Lowrance LCX-112C | Загрузить (17.3 МБ)
- Lowrance LMS-520C | Загрузить (17.3 МБ)
- Lowrance LMS-522C iGPS | Загрузить (17.3 МБ)
- Lowrance LMS-525C DF | Загрузить (17.3 МБ)
- Lowrance LMS-527C DF iGPS | Загрузить (17.3 МБ)
- Lowrance X125 | Загрузить (5.3 МБ)
- Lowrance X126DF | Загрузить (5.3 МБ)
- Lowrance X510C | Загрузить (5 МБ)
- Lowrance X515C DF | Загрузить (4.9 МБ)
- Lowrance X87 | Загрузить (3.3 МБ)
- Lowrance X88DF | Загрузить (3.3 МБ)
- Lowrance iFINDER® H2O | Загрузить (12.5 МБ)
- Lowrance iFINDER® Pro | Загрузить (12.8 МБ)
Установка эмулятора предельно проста. Кликните на кнопку «загрузить», напротив интересующего вас прибора. В появившемся меню выберите кнопку «сохранить», затем укажите папку на вашем компьютере в которую загрузится эмулятор. После завершения загрузки запустите установочную программу и следуйте инструкциям (достаточно просто нажимать кнопку «Next»). По завершении установки в меню «Пуск/Программы» (Start/Programs) появиться новый раздел, в котором и будет эмулятор.
Выключение программы происходит как и в настоящем приборе, а именно — необходимо нажать и удерживать кнопку «PWR».
Для удаления программы достаточно зайти в «Панель управления» в раздел «Установка и удаление программ», найти там программу, которую вы хотите удалить и нажать на кнопку «Заменить/Удалить».
SONAR LOG VIEWER (SLV)
Sonar Log Viewer (SLV) — программа для просмотра эхограмм для любых эхолотов имеющих слот для SD/MMC карточки.
- Поддерживает эхограммы StructureScan
- Поддерживает SL2 файлы
- Позволяет выводить информацию в формате Exel
- Увеличение масштаба изображения (zoom), чувствительность,
- Цветная интерпретация сигналов эхолота может быть определенна пользователем
- Динамически изменяемое окно
- Работает как Windows Multimedia Player (кнопки вперед, назад, быстрая перемотка, пауза и т.д.)
- Курсор мыши показывает GPS координаты, глубину, температуру и прочее
- Поддержка просмотра нескольких каналов с синхронизацией
Скачать Sonar Log Viewer — Версия 2.1.2 (20МБ, exe)Установка программы предельно проста. Скачайте программу. После завершения скачивания запустите установочную программу и следуйте инструкциям (достаточно просто нажимать кнопку «Дальше»). По завершении установки в меню «Пуск/Программы» появиться новый раздел Lowrance Electronics, в котором и будет Sonar Log Viewer.
ПРИМЕР ЭХОГРАММЫ ЛОВЛИ СОМА НА КВОК
Вы можете скачать эхограмму ловли сома (38 Mб) и просмотреть ее с помощью Sonar Log Viewer. Запись любезно предоставлена Олегом Омельянчуком и сделана картплоттером/эхолотом Lowrance HDS 5.
Ниже представлены — скриншоты этой эхограммы с расшифровкой.


Для увеличения картинки кликните на ней
Скачать Sonar Log Viewer — Версия 2.1.2 (20МБ, exe)
Удачной рыбалки!

X-4 Pro
Fish-Finding Sonar
Installation and Operation
Instructions

Copyright © 2010 Navico
All rights reserved.
No part of this manual may be copied, reproduced, republished,
transmitted or distributed for any purpose, without prior written
consent of Navico. Any unauthorized commercial distribution of
this manual is strictly prohibited.
Lowrance
®
is a registered trademark of Navico.
Navico may find it necessary to change or end our policies, regulations,
and special offers at any time. We reserve the right to do so without
notice. All features and specifications subject to change without notice.
All screens in this manual are simulated.
For free owner’s manuals and other information,
visit our web site:
www.lowrance.com

Table of Contents
Capabilities and Specifications: X-4 Pro ……………………………… 1
Preparations …………………………………………………………………………….. 2
Installation ………………………………………………………………………………. 2
Recommended Tools and supplies …………………………………………… 3
Selecting a Transducer Location …………………………………………….. 3
How low should you go? …………………………………………………………. 5
Shoot-Thru-Hull vs. Transom Mounting …………………………………. 5
Transom Transducer Assembly and Mounting ………………………… 6
Trolling Motor Bracket Installation ………………………………………. 10
Transducer Orientation and Fish Arches ………………………………. 11
Shoot-Thru-Hull Preparation ……………………………………………….. 11
Testing Determines Best Location ………………………………………… 13
Shoot-Thru-Hull Installation ……………………………………………….. 14
Power Connections (permanent mount only) …………………………. 15
Mounting the Sonar Unit: In-Dash, Bracket or Portable ………… 16
Bracket Installation …………………………………………………………….. 17
Portable Sonar Installation ……………………………………………………… 19
Installing the Batteries ………………………………………………………… 20
Mounting the Unit ………………………………………………………………….. 20
Portable Transducer Assembly …………………………………………….. 21
Portable Transducer Storage ………………………………………………… 23
Operation ……………………………………………………………………………… 24
Keyboard Basics ……………………………………………………………………… 24
Memory ………………………………………………………………………………….. 24
Menus …………………………………………………………………………………….. 24
Display …………………………………………………………………………………… 25
Full Chart ………………………………………………………………………………. 26
Depth Range …………………………………………………………………………… 26
Zoom ………………………………………………………………………………………. 27
Sensitivity ………………………………………………………………………………. 28
Grayline
Chart Speed ……………………………………………………………………………. 31
Frequency ………………………………………………………………………………. 32
Fish I.D.™ ………………………………………………………………………………. 33
FishTrack™ ……………………………………………………………………………. 34
Alarms ……………………………………………………………………………………. 34
Fish Alarm ……………………………………………………………………………… 34
Depth Alarms …………………………………………………………………………. 35
Shallow Alarm ………………………………………………………………………… 35
Deep Alarm …………………………………………………………………………….. 36
Battery Alarm …………………………………………………………………………. 37
®
………………………………………………………………………………… 30
i

Noise Rejection and ASP™ ………………………………………………………. 37
Depth Display …………………………………………………………………………. 39
Temperature Display ………………………………………………………………. 39
Voltage …………………………………………………………………………………… 40
Backlight ………………………………………………………………………………… 40
Contrast …………………………………………………………………………………. 40
Simulator ……………………………………………………………………………….. 40
Set Language ………………………………………………………………………….. 41
Software Information ………………………………………………………………. 41
Reset Options………………………………………………………………………….. 41
Troubleshooting …………………………………………………………………… 42
ii

Capabilities and Specifications: X-4 Pro
General
Case size: ……………………. 5.8″ H x 4.3″ W x 2.5″ D (14.7 cm H x 10.8 cm
W x 6.6 cm D) sealed, waterproof; suitable for
saltwater use.
Display: ………………………. High-contrast Film SuperTwist LCD. Di-
agonal viewing area: 4″ (10.16 cm).
Resolution: …………………. 240 pixels (vert.) x 160 pixels (horiz.) resolu-
tion; 38,400 total pixels
Backlighting: ……………… incandescent backlit screen
Input power: ………………. 10 to 17 volts DC.
Current drain: ……………. 170 ma lights off; 240 ma lights on.
Back-up memory: ……….. Built-in memory stores sonar settings when
unit is turned off.
Sonar
Frequency: …………………. 83/200 kHz.
Transducers: ………………. A dual search Skimmer
built-in temperature sensor is packed with
your unit. It has a wide fish detection area of
up to 60º/120º with high sensitivity settings.
Operates at boat speeds up to 70 mph (61
kts).
Transmitter: ……………….. 1,500 watts peak-to-peak power (typical);
188 watts RMS power (typical).
Sonar sounding
depth capability: ………… 1,000 feet (305 meters). Actual capability de-
pends on transducer configuration and installation, bottom composition and water conditions. All sonar units typically read deeper in
fresh water than in salt water.
Depth display: ……………. Continuous digital readout.
Audible alarms: ………….. Deep/shallow/fish.
Automatic ranging: ……. Yes, with instant screen updates.
Auto bottom track: …….. Yes.
Zoom bottom track: ……. Yes.
Split-screen zoom: ……… No.
Surface water temp: ….. Yes, built into transducer.
®
transducer with
1

NOTICE!
The storage temperature for your unit is from -4 degrees to +167
degrees Fahrenheit (-20 degrees to +75 degrees Celsius). Extended
storage in temperatures higher or lower than specified will damage
the liquid crystal display in your unit. This type of damage is not
covered by the warranty. For more information, contact the factory’s Customer Service Department; phone numbers are inside the
manual’s back cover.
Preparations
The following shows the recommended sequence for installing the
transducer:
CAUTION:
You should read over this entire installation section before drilling any holes in your vehicle or vessel!
1. Determine the approximate location for the sonar unit, so you can
plan how and where to route the cables for the transducer and power.
This will help you make sure you have enough cable length for the desired configuration.
2. Determine the location for the transducer and its cable route.
3. Determine the location of your battery or other power connection,
along with the power cable route.
4. Install the transducer and route the transducer cable to the sonar
unit.
5. Route the power cable from the unit’s location to an appropriate
power source and connect it there.
6. Connect the transducer/power cable to the unit and mount the sonar
unit on the bracket.
Installation
®
These instructions will help you install your Skimmer
transom, on a trolling motor or inside a hull. Please read all instructions
before proceeding with any installation. Your Skimmer transducer typically comes packaged with a one-piece stainless steel bracket for mounting it to the transom of your boat. The trolling motor mount uses a onepiece plastic bracket with an adjustable strap.
These are all «kick-up» mounting brackets. They help prevent damage if
the transducer strikes an object while the boat is moving. If the transducer does «kick-up,» the bracket can easily be pushed back into place without
tools.
2
transducer on a

Depending on your sonar unit’s connectors, your transducer cable may
also have the sonar unit’s power cable attached to it. If that is the case,
be sure to install the transducer first, before connecting the power cable
to a power source. See the instructions later in this manual for connecting the power cable to a battery or other power supply.
Read these instructions carefully before attempting the installation.
Determine which of the mounting positions is right for your boat. Use
extreme care if mounting the transducer inside the hull, because once
it is epoxied into position, the transducer usually cannot be removed.
Remember, the transducer installation is the most critical part
of a sonar installation.
Recommended Tools and supplies
If you prefer the option of routing the cable through the transom, you
will need a 5/8″ drill bit. Each transom mount requires use of a high
quality, marine grade above- or below-waterline caulking compound.
NOTE:
The following installation types also call for these recommended
tools and required supplies (supplies are not included):
Single-frequency transom installations
Tools include: two adjustable wrenches, drill, #29 (0.136″) drill bit, flathead screwdriver (for mounting screws and their pilot holes). Supplies:
none.
Single-frequency trolling motor installations
Tools: two adjustable wrenches, flat-head screwdriver. Supplies: plastic
cable ties.
Shoot-through hull installations
Tools: these will vary depending on your hull’s composition. Consult your
boat dealer or manufacturer. Supplies: 100 grit sandpaper, specially formulated epoxy adhesive available from LEI (see ordering information
on the inside back cover). A sandwich hull also requires polyester resin.
Selecting a Transducer Location
1. The location must be in the water at all times, at all operating speeds.
2. The transducer must be placed in a location that has a smooth flow
of water at all times. If the transducer is not placed in a smooth flow of
water, interference caused by bubbles and turbulence will show on the
sonar’s display in the form of random lines or dots whenever the boat is
moving.
3
NOTE:
Some aluminum boats with strakes or ribs on the outside of the
hull create large amounts of turbulence at high speed. These boats
typically have large outboard motors capable of propelling the boat
at speeds faster than 35 mph. Typically, a good transom location on
aluminum boats is between the ribs closest to the engine.
3. The transducer should be installed with its face pointing straight
down, if possible. For shoot-thru applications: Many popular fishing boat
hulls have a flat keel pad that offers a good mounting surface. On vee
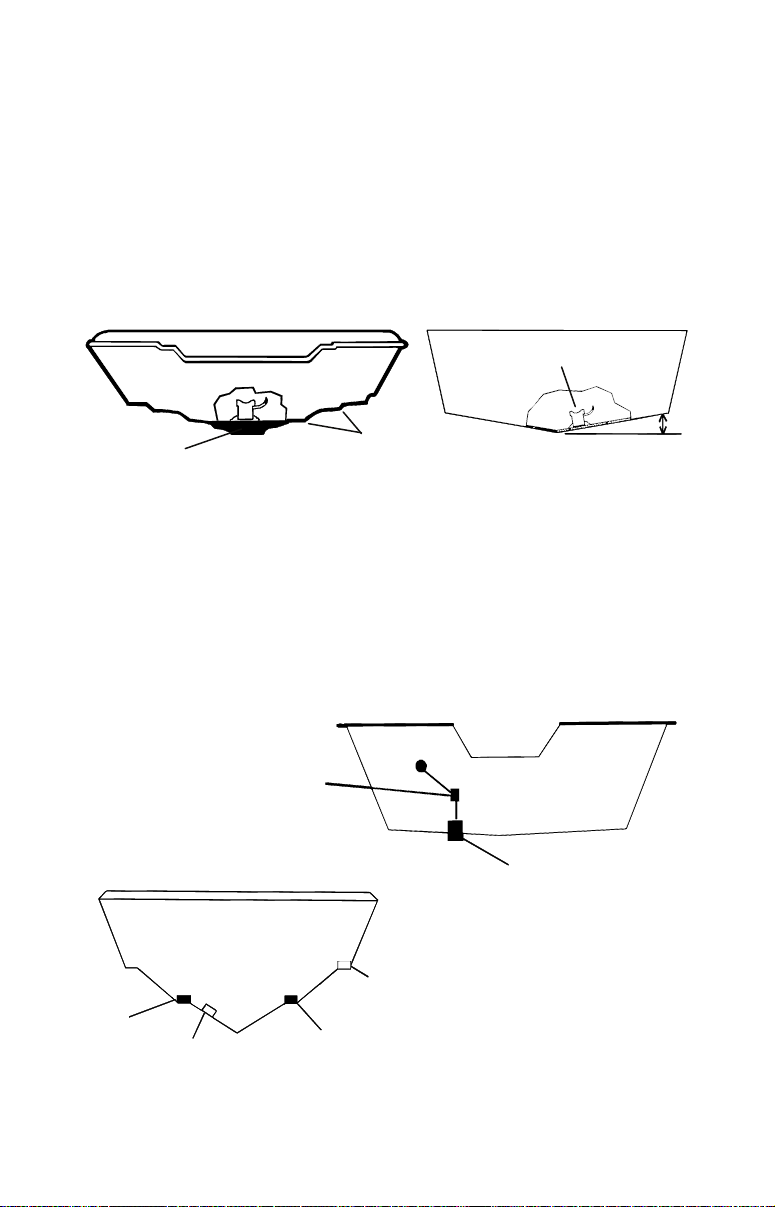
hulls, try to place the transducer where the deadrise is 10° or less.
Deadrise less than 10°
Pad
Vee pad hull (left); Vee hull (right). A pod style transducer is shown
here, but the principle is the same for Skimmers inside a hull.
Strakes
4. If the transducer is mounted on the transom, make sure it doesn’t
interfere with the trailer or hauling of the boat. Also, don’t mount it
closer than approximately one foot from the engine’s lower unit. This
will prevent cavitation (bubble) interference with propeller operation.
5. If possible, route the transducer cable away from other wiring on the
boat. Electrical noise from engine wiring, bilge pumps and aerators can
be displayed on the sonar’s screen. Use caution when routing the
transducer cable around these wires.
CAUTION: Clamp the transducer cable to transom near
the transducer. This will help
revent the transducer from
entering the boat if it is
knocked off at high speed.
Good
location
Poor angle
Good and poor transducer locations.
Poor location
Good location
4
Good location

How low should you go?
For most situations, you should install your Skimmer transducer so
that its centerline is level with the bottom of the boat hull. This will
usually give you the best combination of smooth water flow and protection from bangs and bumps.
Transducer
centerline
Align transducer centerline with hull bottom.
Transom
Hull bottom
There, however, are times when you may need to adjust the transducer
slightly higher or lower. (The slots in the mounting brackets allow you
to loosen the screws and slide the transducer up or down.) If you frequently lose bottom signal lock while running at high speed, the transducer may be coming out of the water as you cross waves or wakes.
Move the transducer a little lower to help prevent this.
If you cruise or fish around lots of structure and cover, your transducer
may be frequently kicking up from object strikes. If you wish, you may
move the transducer a little higher for more protection.
There are two extremes you should avoid. Never let the edge of the
mounting bracket extend below the bottom of the hull. Never let the
bottom – the face – of the transducer rise above the bottom of the hull.
Shoot-Thru-Hull vs. Transom Mounting
In a shoot-thru-hull installation, the transducer is bonded to the inside
of the hull with epoxy. The sonar «ping» signal actually passes through
the hull and into the water. This differs from a bolt-thru-hull installation (often called «thru-hull»). In that case, a hole is cut in the hull and a
specially designed transducer is mounted through the hull with a
threaded shaft and nut. This puts the transducer in direct contact with
the water.
Typically, shoot-thru-hull installations give excellent high speed operation and good to excellent depth capability.
There is no possibility of damage from floating objects. It can’t be
knocked off when docking or loading on the trailer.
However, the shoot-thru-hull installation does have its drawbacks.
First, some loss of sensitivity does occur, even on the best hulls. This
5

varies from hull to hull, even from different installations on the same
hull. This is caused by differences in hull lay-up and construction.
Second, the transducer angle cannot be adjusted for the best fish
arches. This can be a problem on hulls that sit with the bow high when
at rest or at slow trolling speeds.
Third, a transducer CAN NOT shoot through wood and metal hulls.
Those hulls require either a transom mount or a thru-hull installation.
Fourth, a Skimmer transducer with a built-in temp sensor will show
only the temperature of the bilge, not the water surface temp.
Follow the procedure listed in the shoot-thru-hull installation section
at the end of this lesson to determine if you can satisfactorily shoot
through the hull.
Transom Transducer Assembly and Mounting
The best way to install these transducers is to loosely assemble all of the
parts first, place the transducer’s bracket against the transom and see if
you can move the transducer so that it’s parallel with the ground.
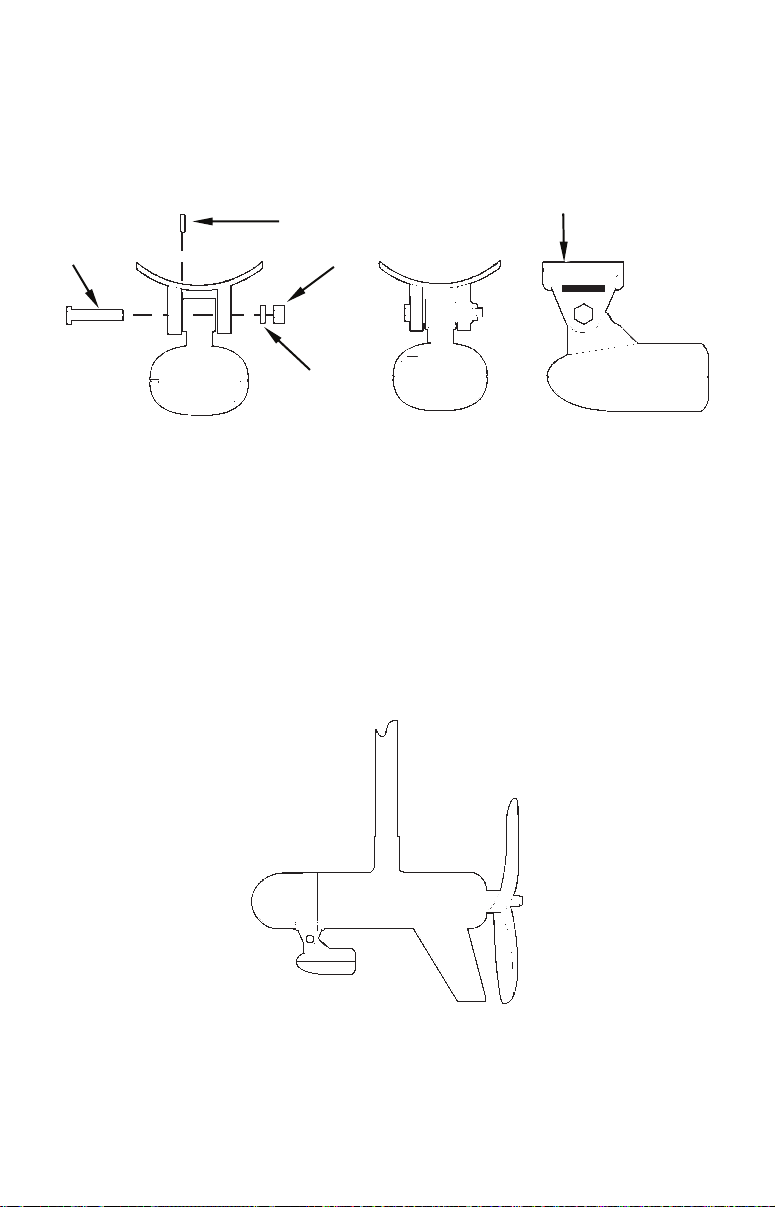
1. Assembling the bracket. Press the two small plastic ratchets into
the sides of the metal bracket as shown in the following illustration.
Notice there are letters molded into each ratchet.
Place each ratchet into the bracket with the letter «A» aligned with the
dot stamped into the metal bracket.
This position sets the transducer’s coarse angle adjustment for a 14°
transom. Most outboard and stern-drive transoms have a 14° angle.
Dot
Align plastic ratchets in bracket.
2. Aligning the transducer on the transom. Slide the transducer
between the two ratchets. Slide the bolt though the transducer assembly and hold it against the transom. Looking at the transducer from the
side, see if it will adjust so its face is parallel to the ground. If it does,
then the «A» position is correct for your hull.
If the transducer’s face isn’t parallel with the ground, adjust the ratchets so the letter «B» aligned with the dot stamped in the bracket.
6
Reassemble the transducer and bracket and place them against the
transom. Again, check to see if you can move the transducer so it’s parallel with the ground. If you can, then go to step 3. If it doesn’t, repeat
step 2, but use a different alignment letter.
Ratchets
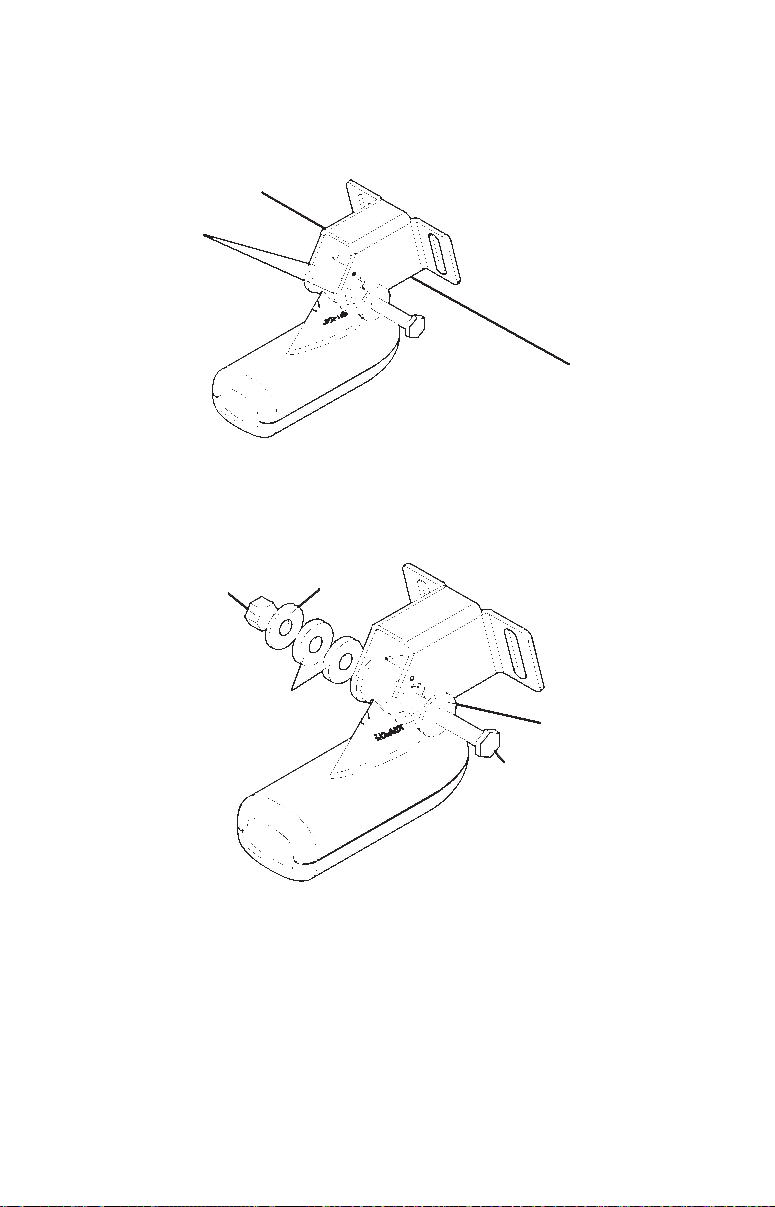
Insert bolt and check transducer position on transom.
3. Assembling the transducer. Once you determine the correct posi-
tion for the ratchets, assemble the transducer as shown in the following
figure. Don’t tighten the lock nut at this time.
Nut
Rubber
washers
Metal
washer
Metal washer
Bolt
Assemble transducer and bracket.
4. Drilling mounting holes. Hold the transducer and bracket assem-
bly against the transom. The transducer should be roughly parallel to
the ground. The transducer’s centerline should be in line with the bottom of the hull. Don’t let the bracket extend below the hull!
Mark the center of each slot for the mounting screw pilot holes. You
will drill one hole in the center of each slot.
Drill the holes. Use the #29 bit (for the #10 screws).
7
Transom
Transom
Position transducer mount on transom and mark mounting holes.
Side view shown at left and seen from above at right.
5. Attaching transducer to transom. Remove the transducer from
the bracket and re-assemble it with the cable passing through the
bracket over the bolt as shown in the following figures.
Route cable over bolt and through bracket.
Side view shown (left) and seen from above (right).
Attach the transducer to the transom. Slide the transducer up or down
until it’s aligned properly with the bottom of the hull as shown in the
preceding and following figures. Tighten the bracket’s mounting
screws, sealing them with the caulking compound.
Adjust the transducer so that it’s parallel to the ground and tighten the
nut until it touches the outer washer, then add 1/4 turn. Don’t over
tighten the lock nut! If you do, the transducer won’t «kick-up» if it
strikes an object in the water.
8
Bottom
of
hull
Dee
Flat-bottom hull
Align transducer centerline with hull bottom
and attach to transom.
-«vee» hull
6. Route the transducer cable through or over the transom to
the sonar unit. Make sure you leave some slack in the cable at the
transducer. If possible, route the transducer cable away from other wiring. Electrical noise from the engine’s wiring, bilge pumps, VHF radio
wires, cables and aerators can be picked up by the sonar. Use caution
when routing the transducer cable around these wires.
WARNING:
Clamp the transducer cable to the transom close to the
transducer. This can prevent the transducer from entering the boat if it is knocked off at high speed.
If you need to drill a hole in the transom to pass the connector through,
the required hole size is 5/8″. (If you intend to route an additional speed
or temp sensor cable through the same hole, you will need a 1″ (25.4
mm) drill bit instead.)
Caution:
If you drill a hole in the transom for the cable, make sure it is
located above the waterline. After installation, be sure to seal the
hole with the same marine grade above- or below-waterline sealant used for the mounting screws.
7. Make a test run to determine the results. If the bottom is lost at
high speed, or if noise appears on the display, try sliding the trans-
ducer bracket down. This puts the transducer deeper into the water,
hopefully below the turbulence causing the noise. Don’t allow the
transducer bracket to go below the bottom of the hull!
9
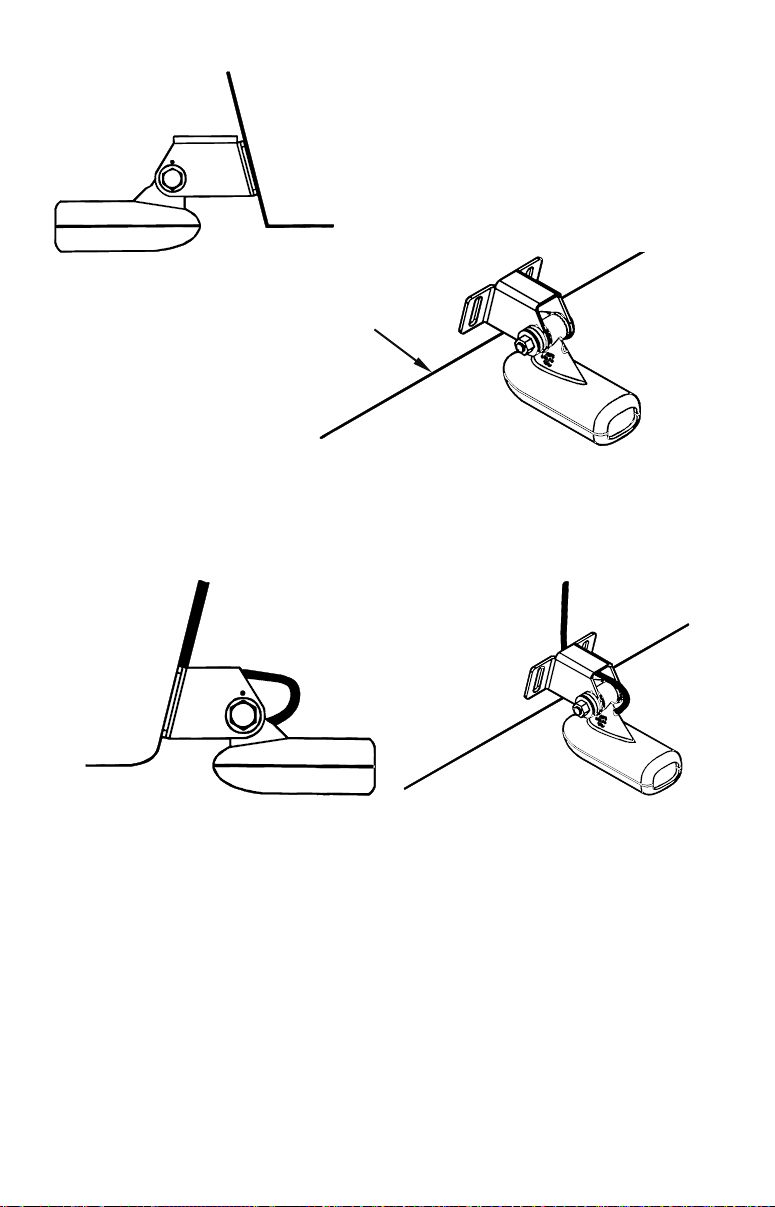
Trolling Motor Bracket Installation
1. Attach the optional TMB-S bracket to the transducer as shown in the
following figure, using the hardware supplied with the transducer.
(Note: The internal tooth washer is supplied with the TMB-S.)
TMB-S bracket
Bolt
Internal tooth washer
Nut
Flat washe
Attach motor mounting bracket to transducer.
2. Slide the adjustable strap supplied with the TMB-S through the slot
in the transducer bracket and wrap it around the trolling motor.
Position the transducer to aim straight down when the motor is in the
water. Tighten the strap securely.
3. Route the transducer cable alongside the trolling motor shaft. Use
plastic ties (not included) to attach the transducer cable to the trolling
motor shaft. Make sure there is enough slack in the cable for the motor
to turn freely. Route the cable to the sonar unit and the transducer is
ready for use.
Transducer mounted on trolling motor, side view.
10
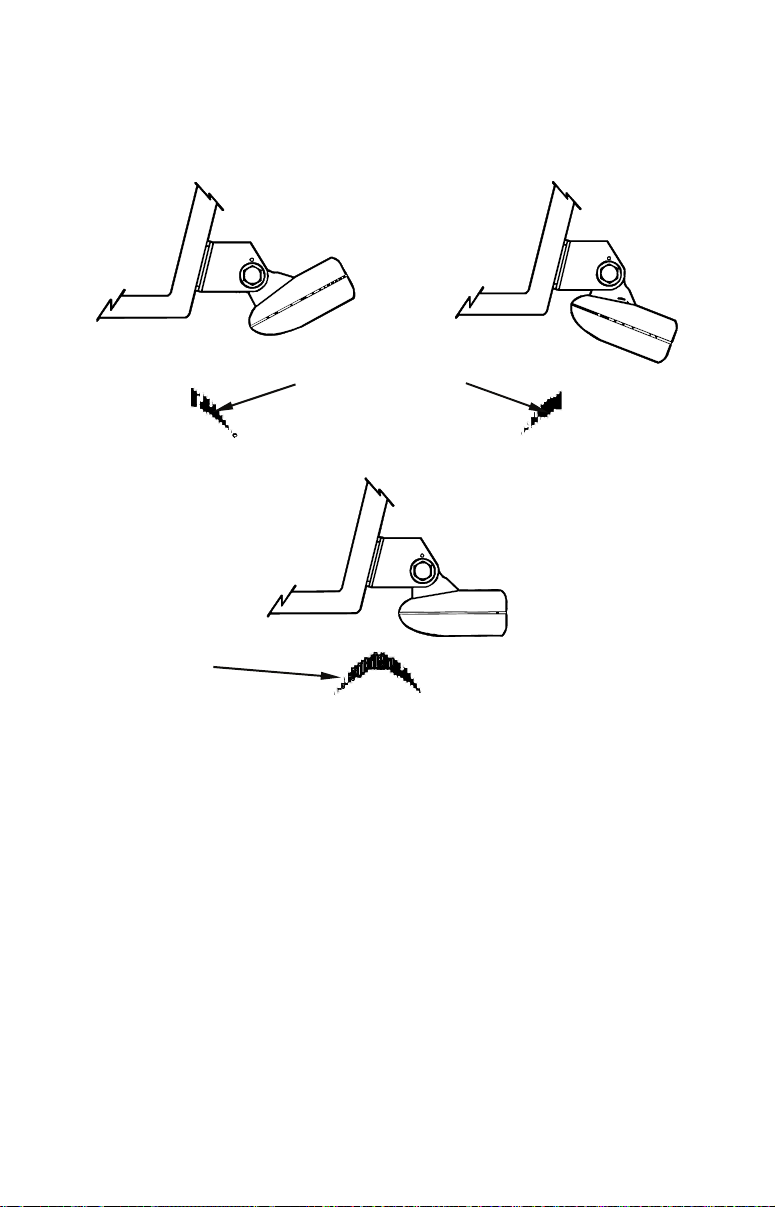
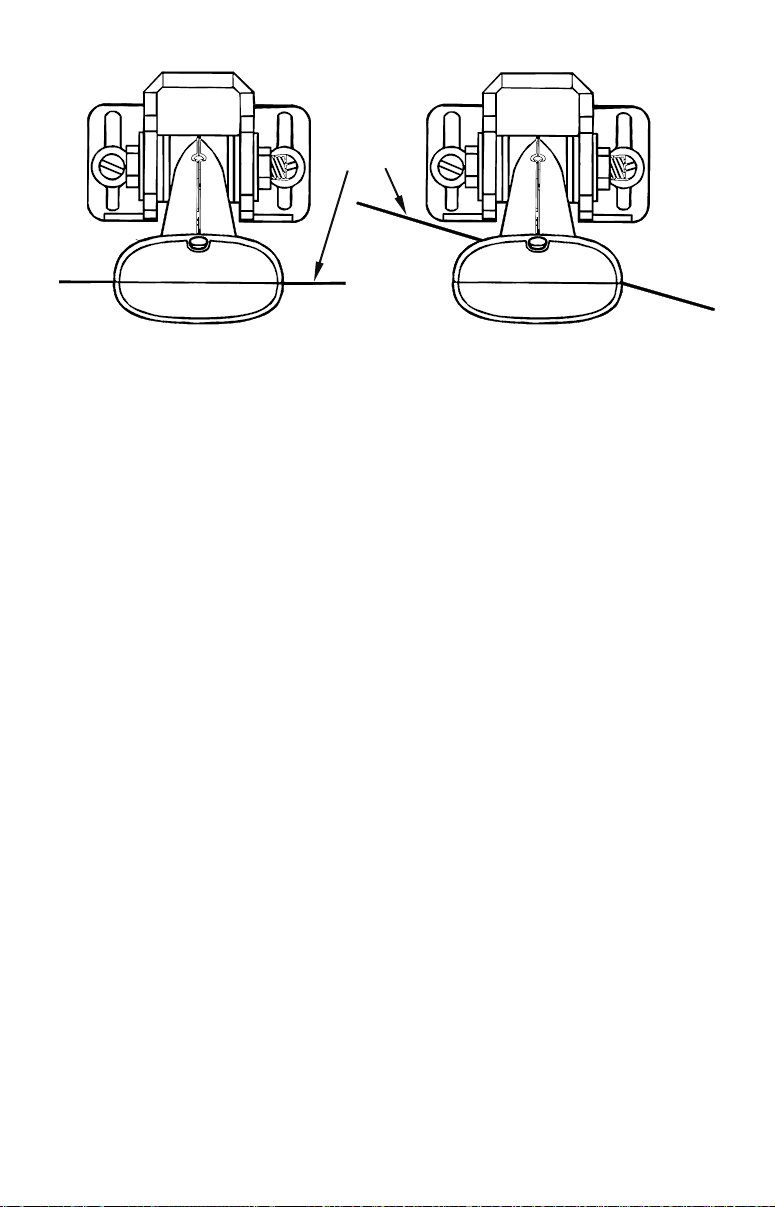
Transducer Orientation and Fish Arches
If you do not get good fish arches on your display, it could be because
the transducer is not parallel with the ground when the boat is at rest
in the water or at slow trolling speeds.
Partial fish arches
Transducer aimed
too far back
Full fish arch
Transducer aimed
too far forward
Proper transducer angle
Transducer angles and their effects on fish arches.
If the arch slopes up – but not back down – then the front of the transducer is too high and needs to be lowered. If only the back half of the
arch is printed, then the nose of the transducer is angled too far down
and needs to be raised.
NOTE:
Periodically wash the transducer’s face with soap and water to remove any oil film. Oil and dirt on the face will reduce the sensitivity or may even prevent operation.
Shoot-Thru-Hull Preparation
Hulls with Flotation Materials
The transducer installation inside a fiberglass hull must be in an area
that does not have air bubbles in the resin or separated fiberglass lay-
11
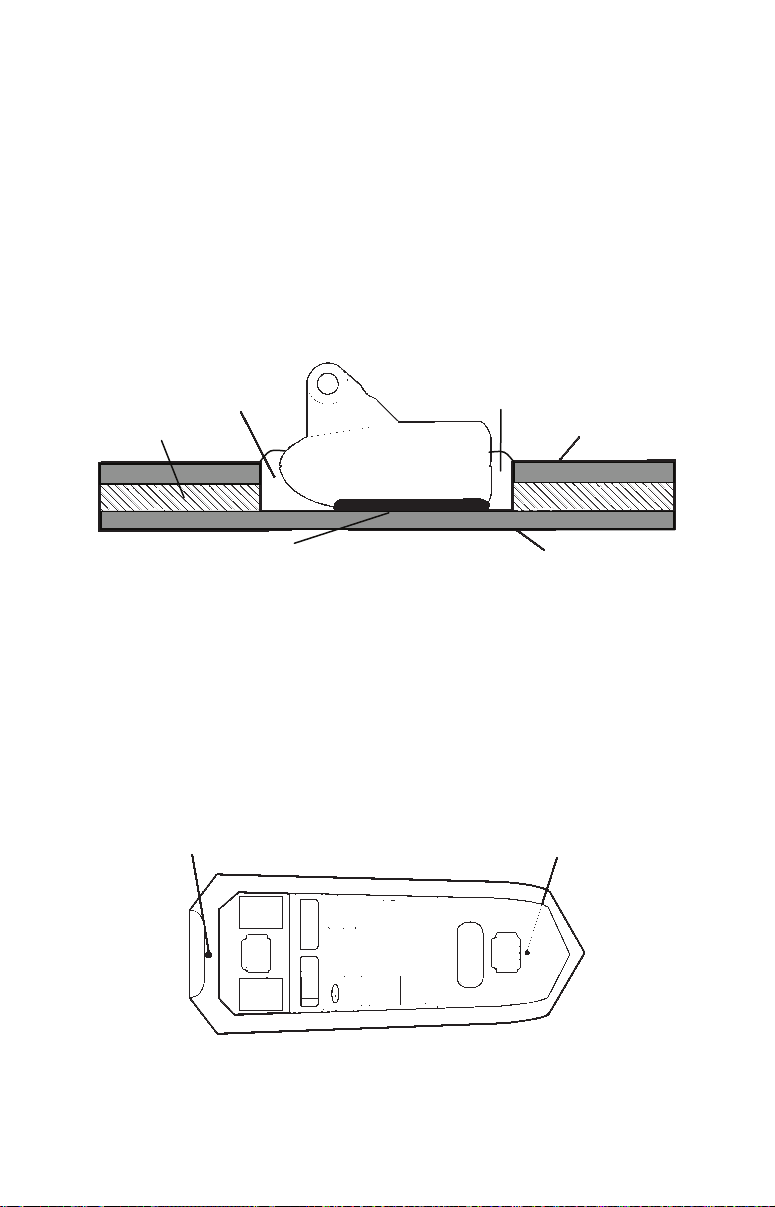
ers. The sonar signal must pass through solid fiberglass. A successful
transducer installation can be made on hulls with flotation materials
(such as plywood, balsa wood or foam) between layers of fiberglass if
the material is removed from the chosen area. See the figure below.
WARNING:
Do not remove any material from your inner hull unless
you know the hull’s composition. Careless grinding or
cutting on your hull can result in damage that could
sink your boat. Contact your boat dealer or manufacturer to confirm your hull specifications.
Fill with resin
Flotation material
Epoxy to hull first
Epoxy the transducer to a solid portion of the hull.
Fill with resin
Inner hull
Outer hull
For example, some (but not all) manufacturers use a layer of fiberglass,
then a core of balsa wood, finishing with an outer layer of fiberglass.
Removing the inner layer of fiberglass and the balsa wood core exposes
the outer layer of fiberglass. The transducer can then be epoxied directly to the outer layer of fiberglass. After the epoxy cures for 24 hours, fill
the remaining space with polyester resin. When the job is finished, the
hull is watertight and structurally sound. Remember, the sonar signal
must pass through solid fiberglass. Any air bubbles in the fiberglass or
the epoxy will reduce or eliminate the sonar signals.
Transducer location (high speed)
Transducer location (trolling speed)
Shoot-thru-hull transducer locations for
high speed or trolling speed operation.
12
Loading…
Lowrance X-4 Pro
Fish-Finding Sonar
Installation and Operation
Instructions
Manual
View the manual for the Lowrance X-4 Pro here, for free. This manual comes under the category fish finders and has been rated by 7 people with an average of a 8.6.
This manual is available in the following languages: English. Do you have a question about the Lowrance X-4 Pro or do you need help?
Ask your question here
Product Images (1)
Lowrance X-4 Pro specifications
Below you will find the product specifications and the manual specifications of the Lowrance X-4 Pro.
The Lowrance X-4 Pro is a fish finder that is designed to assist anglers in locating and tracking fish. This fish finder uses advanced sonar technology to provide accurate and detailed information about the underwater environment.
The Lowrance X-4 Pro features a high-resolution 4-inch grayscale display that allows for easy viewing in any lighting conditions. This display provides clear and detailed images of the fish and structure below the surface. With its 240×160 pixel resolution, it offers a sharp and crisp picture.
Equipped with a dual-frequency transducer, the Lowrance X-4 Pro offers both 83/200 kHz sonar frequencies, allowing users to choose the best frequency for their specific fishing conditions. This feature enables anglers to have a broader view of the underwater landscape and increases their chances of locating fish.
The Lowrance X-4 Pro also includes a depth capability of up to 600 feet, providing anglers with information about the depth of the water they are fishing in. Additionally, it has a wide sonar coverage area, enabling users to track fish over a larger area.
Designed with user-friendliness in mind, the Lowrance X-4 Pro features a simple and intuitive interface. It comes with easy-to-use menus and settings that allow anglers to customize their fishing experience. The compact and durable design of the fish finder ensures it can withstand the rigors of fishing trips.
Overall, the Lowrance X-4 Pro is a reliable and efficient fish finder that provides anglers with essential information to enhance their fishing experience.
General
Frequently Asked Questions
Can’t find the answer to your question in the manual? You may find the answer to your question in the FAQs about the Lowrance X-4 Pro below.
How do I adjust the sensitivity settings on the fish finder?
Press the «Menu» button, navigate to the «Sonar» settings, then locate the «Sensitivity» option. Use the arrow keys to increase or decrease the sensitivity level until you achieve the desired results.
Why is my Lowrance X-4 Pro fish finder not turning on?
Ensure that the power cable is securely connected to both the fish finder and the power source. Check if the power source is functional and verify that the unit has not reached its maximum battery life.
How do I interpret the sonar display on my Lowrance X-4 Pro?
The fish arches and bottom contour lines are displayed as sonar returns. A higher-intensity signal indicates a stronger return, which typically corresponds to larger fish or objects. Use the manual to familiarize yourself with the various indicators and their meanings.
How can I optimize the fish finder to locate fish more effectively?
Experiment with adjusting the sensitivity, depth range, and frequency settings to find what works best for your fishing conditions. Utilize the manual to understand how each setting affects the sonar readings and make informed adjustments accordingly.
How can I troubleshoot if the fish finder is not providing accurate depth readings?
Ensure that the transducer is properly mounted and securely attached to the boat. Check for any obstructions, such as weeds or air bubbles, which may interfere with the sonar signal. If the issue persists, refer to the manual for advanced troubleshooting steps.
Is the manual of the Lowrance X-4 Pro available in English?
Yes, the manual of the Lowrance X-4 Pro is available in English .
Is your question not listed? Ask your question here
Обзор эхолота Lowrance X-4 Pro
Эхолот Lowrance X-4 Pro считается универсальным рыбопоисковым прибором, который работает на мелководье и на большой глубине. Усовершенствованная конструкция позволяет обнаружить рыбу в пресной и в морской воде. Вся полученная информация отображается на четырехдюймовом экране. Качество изображения гарантировано даже при ярком солнечном свете. Двухлучевой трансдьюсер обеспечивает угол обзора 120 градусов. За счет дополнительных функций появляется не только возможность обнаружить рыбу, но и определить расстояние до нее, детально изучить структуру дна, разделить цели и улучшить качество просмотра.
В базовую комплектацию входит эхолот с двухлучевым трансдьюсером, комплект креплений, шнур питания, инструкция по эксплуатации и гарантийный талон. Аккумулятор и зарядное устройство необходимо приобретать дополнительно.
Обзор модели
Эхолот Lowrance X-4 Pro представляет собой мощный рыбопоисковый прибор. Пиковая мощность достигает 1500 ВТ. Габариты прибора – 108 на 147 на 64 мм. Film SuperTwist LCD экран с диагональю 4 дюйма и поддержкой 4 оттенков серого. Есть подсветка для работы в условиях низкой освещенности.
Двухлучевой трансдьюсер работает на частотах 83 и 200 килогерц. Максимальный угол обзора составляет 120 градусов. Рабочая глубина достигает 305 метров. Эхолот оснащен улучшенной функцией поиска рыбы. После идентификации цели на экран выводятся символы в виде рыбы. В процессе эхолокации определяется структура дна и его рельеф, определяется расстояние до рыбы. В автоматическом режиме прослеживается диапазон глубины. Сигнал стабильный даже при высоких скоростях. Корпус прочный с защитой от попадания воды. Работает в пресной и соленой воде.
Как работает эхолот
Двухчастотный датчик Skimmer® крепится на транец. Необходимо продумать расположение провода, чтобы его длины было достаточно для подключения. Иногда трансдьюсер крепят на троллинговый мотор, но для этого необходимо специальное пластиковое крепление с ремнем регулировки. Перед началом установки прибора необходимо ознакомиться с инструкцией, потому что правильная установка датчика – основа всей работы механизма. Лицевая часть трансдьюсера должна быть направлена вертикально вниз. Работает эхолот от сети 10 — 17 В. При обнаружении цели срабатывает звуковое оповещение, изображение мгновенно появляется на экране.
Технические характеристики
Эхолот Lowrance X-4 Pro имеет следующие характеристики:
• монохромный экран с разрешением 240 на 160 пикселей;
• двухлучевой датчик Skimmer®;
• работает на частотах 83 и 200 килогерц;
• углы обзора составляют 60 и 120 градусов;
• встроенный температурный датчик;
• нет возможности подключения скоростного датчика и модуля GPS;
• пиковая мощность -1500 Вт;
• максимальная рабочая глубина 305 м.
Основные возможности эхолота
Эхолот Lowrance X-4 Pro имеет следующие особенности:
• функция Lowrance ASP обеспечивает расширенную обработку сигнала и автоматическую настройку;
• функция Lowrance Advanced Fish I.D распознает рыбу и отображает в виде символов;
• функция FISH TRACK точно определяет расстояние до цели;
• функция GRAYLINE определяет состав и твердость дна;
• работает при низких температурах;
• подсветка обеспечивает использование прибора в темное время суток;
• возможность выбора режима мелководье и глубоководье;
• быстрое обновление сведений на экране;
• автоматическое увеличение придонной области;
• настройки пользователя сохраняются даже при аварийном отключении.
Как пользоваться эхолотом
Lowrance X-4 Pro оснащен простым и понятным меню. Кнопки навигации расположены снизу под экраном. При первом включении необходимо выставить базовые настройки. Эхолот поддерживает несколько языков, поэтому в первую очередь необходимо зайти в пункт Language и выбрать русский язык. По умолчанию установлен автоматический режим, при котором включена функция Fish I.D, отображается диапазон глубин, температура и т.д. Дно отображается в нижней части экрана. В полноэкранном режиме функция Fish I.D отключается. С помощью кнопки PWR/Clear убирается окно меню с экрана. Все настройки можно установить для удобства в ручном режиме, они сохраняются в памяти эхолота.
Преимущества и недостатки
Преимущества эхолота Lowrance X-4 Pro:
• компактные размеры;
• ударопрочный и водонепроницаемый корпус;
• понятное меню с дополнительными функциями;
• большой экран с подсветкой для ночной рыбалки;
• возможность использования во время зимней рыбалки;
• сканирует дно водоема на скорости до 112 км в час;
• сохраняет настройки пользователя при аварийном отключении;
• оптимальное соотношение цены-качества.
В качестве недостатков чаще всего отмечают отсутствие возможности подключения GPS, а также слабая подсветка экрана. Существенных недостатков не выявлено. В целом Lowrance X-4 Pro характеризуется как надежный, качественный эхолот, достоверно передающий сведения о наличии рыбы и особенностях водоема.
Обзор эхолотов для рыбалки: для каяка, лодки ПВХ, байдарки. Эхолоты – устройства, определяющие рельеф дна, и позволяющие быстро найти места для хорошего улова.
Lowrance X-4 Pro Installation Manual
Lowrance X-4 Pro Fish Finder Specification
The Lowrance X-4 Pro Fish Finder is a compact and efficient device designed for anglers who require precision and clarity in fish detection. It features a 4-inch Film SuperTwist LCD display, offering a resolution of 240 x 160 pixels for clear and crisp images, even under direct sunlight. This fish finder operates on a dual-frequency sonar system, providing 83 kHz and 200 kHz frequencies for versatile depth penetration and target separation. The 83 kHz frequency covers a wider area, ideal for scanning large bodies of water, while the 200 kHz frequency offers enhanced detail and accuracy for pinpointing fish and underwater structures.
With a depth capability of up to 1,000 feet, the X-4 Pro is suitable for both freshwater and saltwater fishing environments. It delivers 800 watts of peak-to-peak power, ensuring strong signal transmission and reliable performance. The device is equipped with ASP (Advanced Signal Processing) technology, which automatically adjusts settings to provide clearer images with minimal manual tuning. This feature is particularly beneficial for novice users who prefer a straightforward, plug-and-play experience.
The fish finder is housed in a rugged, waterproof casing, rated to withstand the harsh conditions often encountered in marine environments. Installation is user-friendly, with a quick-release tilt and swivel bracket, allowing for easy mounting and adjustments. The Lowrance X-4 Pro is powered by a 12V battery system, ensuring long-lasting operation during extended fishing trips. Its intuitive interface and reliable performance make it an excellent choice for anglers seeking a balance of functionality and affordability in fish finding technology.
Lowrance X-4 Pro Fish Finder F.A.Q.
To install the Lowrance X-4 Pro Fish Finder, begin by selecting a suitable location for the transducer, usually at the stern of the boat. Mount the transducer using the provided bracket and screws, ensuring it is level with the waterline. Next, install the display unit on the console using the included bracket, then connect the transducer cable to the display unit. Finally, connect the power cable to a 12V DC power source.
The X-4 Pro uses sonar to detect objects underwater, displaying them as arches or icons on the screen. Fish typically appear as arches due to their movement through the sonar beam. The depth scale on the right indicates the depth of detected objects, while the bottom contour is shown as a continuous line. Adjust sensitivity settings to improve detection based on water conditions.
If the X-4 Pro does not power on, check the power cable connections to ensure they are secure and free of corrosion. Verify that the battery is charged and providing adequate voltage. Inspect the fuse in the power line and replace it if necessary. If the unit still does not power on, consult the user manual for further troubleshooting steps or contact Lowrance support.
To maintain the X-4 Pro, regularly check the transducer for any debris or damage and clean it with mild soap and water. Inspect the power and transducer cables for wear or corrosion and ensure all connections are tight. Store the unit in a dry place when not in use, and update the software if updates are provided by Lowrance.
To adjust sensitivity on the X-4 Pro, press the menu button until the sensitivity option appears. Use the arrow keys to increase or decrease sensitivity. A higher sensitivity setting will detect smaller objects but may also increase noise, while a lower setting reduces noise but may miss smaller targets. Adjust based on your current water conditions and fishing needs.
If the sonar display is not showing fish, ensure the transducer is properly mounted and submerged. Check that the sensitivity is set correctly and not too low. Also, verify that the Fish ID feature is enabled. If in deep or murky waters, you may need to increase the sensitivity or adjust the depth range settings.
Yes, the Lowrance X-4 Pro can be used in saltwater environments. However, after use, it is important to rinse the transducer and other components with fresh water to prevent salt buildup and corrosion. Regular maintenance and inspection of the unit are recommended to ensure longevity and optimal performance.
The Lowrance X-4 Pro is a basic model that typically does not support software updates. However, if updates are made available, they would usually be provided on the Lowrance website along with instructions for installation. Consult the user manual or contact Lowrance support for confirmation regarding updates.
If the X-4 Pro displays inaccurate depth readings, first check the transducer position to ensure it is not tilted or obstructed. Inspect the cable connections to ensure they are secure. You may need to reset the unit to factory settings or recalibrate it following the instructions in the user manual.
To improve fish detection accuracy, adjust the sensitivity to balance between picking up targets and reducing noise. Use the Fish ID feature to identify fish targets more easily. Additionally, ensure the transducer is correctly mounted and consider adjusting the depth range to focus on specific water columns.