
Хорошее руководство по эксплуатации
Законодательство обязывает продавца передать покупателю, вместе с товаром, руководство по эксплуатации Humminbird PiranhaMax 160. Отсутствие инструкции либо неправильная информация, переданная потребителю, составляют основание для рекламации в связи с несоответствием устройства с договором. В законодательстве допускается предоставлении руководства в другой, чем бумажная форме, что, в последнее время, часто используется, предоставляя графическую или электронную форму инструкции Humminbird PiranhaMax 160 или обучающее видео для пользователей. Условием остается четкая и понятная форма.
Что такое руководство?
Слово происходит от латинского «instructio», тоесть привести в порядок. Следовательно в инструкции Humminbird PiranhaMax 160 можно найти описание этапов поведения. Цель инструкции заключается в облегчении запуска, использования оборудования либо выполнения определенной деятельности. Инструкция является набором информации о предмете/услуге, подсказкой.
К сожалению немного пользователей находит время для чтения инструкций Humminbird PiranhaMax 160, и хорошая инструкция позволяет не только узнать ряд дополнительных функций приобретенного устройства, но и позволяет избежать возникновения большинства поломок.
Из чего должно состоять идеальное руководство по эксплуатации?
Прежде всего в инструкции Humminbird PiranhaMax 160 должна находится:
— информация относительно технических данных устройства Humminbird PiranhaMax 160
— название производителя и год производства оборудования Humminbird PiranhaMax 160
— правила обслуживания, настройки и ухода за оборудованием Humminbird PiranhaMax 160
— знаки безопасности и сертификаты, подтверждающие соответствие стандартам
Почему мы не читаем инструкций?
Как правило из-за нехватки времени и уверенности в отдельных функциональностях приобретенных устройств. К сожалению само подсоединение и запуск Humminbird PiranhaMax 160 это слишком мало. Инструкция заключает ряд отдельных указаний, касающихся функциональности, принципов безопасности, способов ухода (даже то, какие средства стоит использовать), возможных поломок Humminbird PiranhaMax 160 и способов решения проблем, возникающих во время использования. И наконец то, в инструкции можно найти адресные данные сайта Humminbird, в случае отсутствия эффективности предлагаемых решений. Сейчас очень большой популярностью пользуются инструкции в форме интересных анимаций или видео материалов, которое лучше, чем брошюра воспринимаются пользователем. Такой вид инструкции позволяет пользователю просмотреть весь фильм, не пропуская спецификацию и сложные технические описания Humminbird PiranhaMax 160, как это часто бывает в случае бумажной версии.
Почему стоит читать инструкции?
Прежде всего здесь мы найдем ответы касательно конструкции, возможностей устройства Humminbird PiranhaMax 160, использования отдельных аксессуаров и ряд информации, позволяющей вполне использовать все функции и упрощения.
После удачной покупки оборудования/устройства стоит посвятить несколько минут для ознакомления с каждой частью инструкции Humminbird PiranhaMax 160. Сейчас их старательно готовят или переводят, чтобы они были не только понятными для пользователя, но и чтобы выполняли свою основную информационно-поддерживающую функцию.

TFX1 60
Operations Manual

THANK YOU
Thank you for choosing Teleflex Sonar, manufactured by Techsonic
Industries, for your sonar fishfinder and depthsounder. Techsonic has built
its reputation by designing and manufacturing top-quality, thoroughly
reliable marine equipment. Techsonic has designed your Teleflex Sonar
unit to be trouble free even in the harshest marine environments.
In the unlikely event that your Teleflex Sonar product does require repairs,
Techsonic offers an exclusive Service Guarantee — free of charge during
the first year after purchase, and available at a reasonable rate after the
one-year period. Complete details are included at the end of this manual.
We encourage you to read this operations manual carefully in order to
get full benefit from all the features and uses of your Teleflex Sonar
product. Also, to register your purchase and help us learn more about
you, please fill out the included warranty registration card
WARNING! This device should not be used as a navigational aid to
prevent collision, grounding, boat damage, or personal injury.
When the boat is moving, water depth may change too quickly to
allow time for you to react. Always operate the boat at very slow
speeds if you suspect shallow water or submerged objects.
WARNING:
service personnel. Any modification of the serial number or attempt to repair the original equipment or
accessories by unauthorized individuals will void the warranty.Handling and/or opening this unit may result
in exposure to lead,in the form of solder.
WARNING: This product contains lead, a chemical known to the State of California to
cause cancer and birth defects and other reproductive harm.
Dis-assembly and repair of this electronic unit should only be performed by authorized

TABLE OF CONTENTS
Section 1: INSTALLATION PREPARATION . . . . . . . . . . . . . . . 2
Parts Supplied . . . . . . . . . . . . . . . . . . . . . . . . . . . . . . 2
Accessories . . . . . . . . . . . . . . . . . . . . . . . . . . . . . . . . 2
Installation Overview . . . . . . . . . . . . . . . . . . . . . . . . . 2
Alternative Transducers and Mounting Methods. . . . . . 4
Section 2: USING THE
160
Performance . . . . . . . . . . . . . . . . . . . . . . . . . . . . 5
Simulator and Feature Memory. . . . . . . . . . . . . . . . . . 6
Control Functions . . . . . . . . . . . . . . . . . . . . . . . . . . . . 7
Knobs. . . . . . . . . . . . . . . . . . . . . . . . . . . . . . . . . 7
Real Time Sonar Window . . . . . . . . . . . . . . . . . . . 9
Chart Window. . . . . . . . . . . . . . . . . . . . . . . . . . 10
Modes of Operation. . . . . . . . . . . . . . . . . . . . . . . . . 12
Automatic Mode . . . . . . . . . . . . . . . . . . . . . . . . 12
Bottom Lock Zoom Mode. . . . . . . . . . . . . . . . . . 14
Manual Mode . . . . . . . . . . . . . . . . . . . . . . . . . . 15
Control Panels . . . . . . . . . . . . . . . . . . . . . . . . . . . . . 16
Section 5: MAINTENANCE AND WARRANTY. . . . . . . . . . . 21
Maintenance . . . . . . . . . . . . . . . . . . . . . . . . . . . . . . 21
Troubleshooting . . . . . . . . . . . . . . . . . . . . . . . . . . . . 21
Warranty . . . . . . . . . . . . . . . . . . . . . . . . . . . . . . . . . 25
Service Policy . . . . . . . . . . . . . . . . . . . . . . . . . . . . . . 25
Customer Support . . . . . . . . . . . . . . . . . . . . . . . . . . 26
Specifications. . . . . . . . . . . . . . . . . . . . . . . . . . . . . . 27
160
. . . . . . . . . . . . . . . . . . . . . . . . . 5

INSTALLATION PREPARATION
PARTS SUPPLIED
PARTS SUPPLIED
Before installing your 160, please ensure the following parts are included
in the box:
• 160 fishfinder
• Transducer with 20′ (6m) of cable and mounting hardware kit
• Mounting system and mounting hardware kit
• 6′ (2m) power cable
• Speed/Temperature Sensor and mounting hardware
• Collector Plug
• Publications kit
If any of these items are missing, call our Customer Support Hotline listed
in the end of this manual.
ACCESSORIES
Techsonic offers a wide assortment of accessories that complement and
expand the capability of your new 160. These accessories are designed
with the same high standards and are backed by the same one-year
warranty. All sonar accessories are available through your full-service
dealer or factory direct through our number listed in the Customer Support
section.
INSTALLATION OVERVIEW
All 160 Series consists of three primary components to install: the control
head, the transducer and the speed/temp sensor.
The control head contains the sonar transmit and receive circuitry, as well
as the user controls and display. It should be installed in a location that
provides access to the controls and visibility while in use. The control head
mounts on a gimbal mounting system that tilts and swivels providing
flexibility for viewing from different locations on the boat. In addition, the
160 can be mounted in the boat console.
2
INSTALLATION PREPARATION
INSTALLATION OVERVIEW
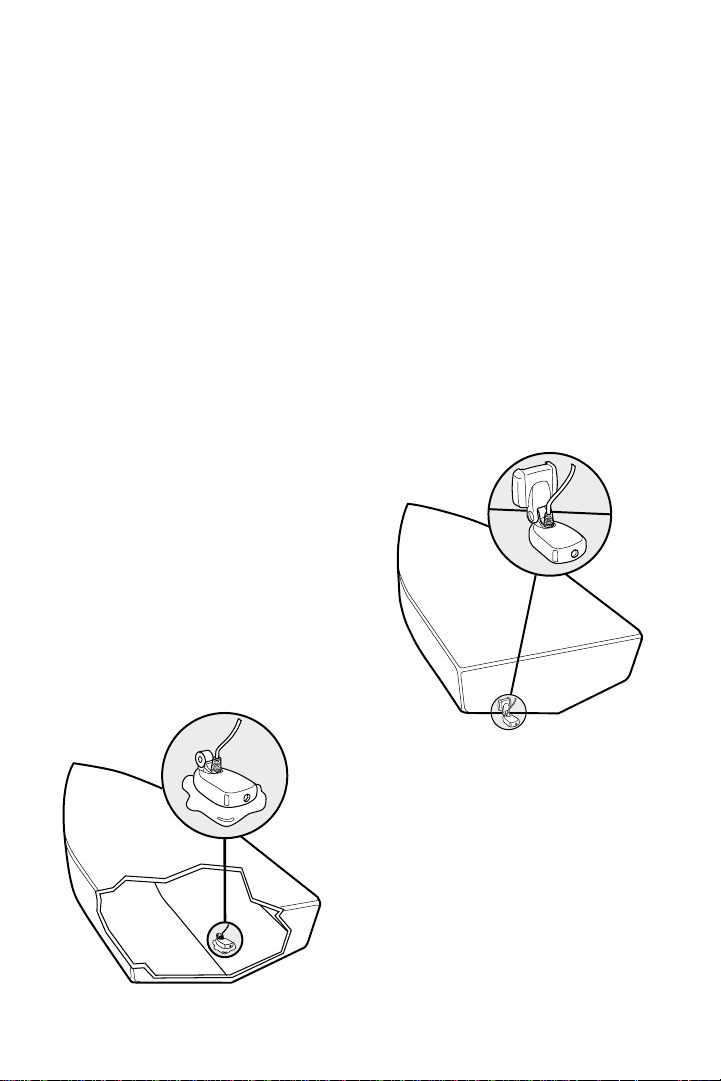
The speed/temperature sensor takes readings from the water at the
surface. It should be installed in contact with the surface of the water in an
area that has smooth water flow — usually on the transom of the boat.
Refer to the speed/temperature installation sheet included.
The transducer converts electrical energy from the transmitter into
mechanical pulses or sound waves. The transducer also receives the
reflected sound waves and converts them back into electrical signals for
display on the control head. It should be installed in contact with the
surface of the water in an area that has smooth water flow — usually on the
transom of the boat. There are several mounting options for the
transducer. Review the following section to determine the method that
works for you and your boat.
Determining How to Mount the
Transducer
The 160 includes a model TZ160H
transducer. This transducer can be
mounted on the transom of the boat,
or bonded to the inside of a fiberglass
hull boat.
Inside the Hull Mounted Transducer
Transom Mounted Transducer
The transom installation, which is the
most widely used, places the transducer
on the outside of the boat hull. This
technique produces the least signal loss,
and provides a way to adjust the
transducer after installation. The
mounting hardware included is
designed to protect both the boat and
the transducer should the boat strike
debris in the water or when trailering.
3

INSTALLATION PREPARATION
ALTERNATE TRANSDUCERS AND MOUNTING METHODS
As an alternative to transom mounting, it is possible on many fiberglass-hulled
boats to glue the transducer on the inside of the boat hull. Since fiberglass has
similar sonar characteristics as water , the sonar signal can pass thr ough the boat
hull with minimal loss. The hull of the boat must be single layer construction (not
double-hulled). Also, any air trapped in the lamination of the fiberglass would
prevent the sonar signal from passing through.
Inside the hull installations require no holes to be drilled into the boat and through
experimentation, high-speed operation comparable to transom mounting can be
achieved. Two part, slow cure epoxy is required to glue the transducer in place.
ALTERNATE TRANSDUCERS AND MOUNTING METHODS
The 160 comes with everything necessary for installation and operation on
most boats. However , ther e are several situations which may r equire a dif ferent
type of transducer. Inboard boats, wood or metal hulls, and sail boats create
unique transducer mounting needs. Alternate transducers and mounting
methods are detailed below.
Trolling Motor Mounting
The standard high-speed transducer can also be adapted to mount on most
trolling motors using part number AD-STM-7. This accessory includes a bracket
and hose clamp that allows mounting the transducer to the body of most
trolling motors.
BEGINNING INSTALLATION
Now that you have determined the transducer mounting method, you can
begin installation of the 160. The fold out installation guide included provides
detailed step by step instructions for installation of the control head, transducer
and speed/temp sensor. For transom mount transducer installations, you will
need the mounting template at the front of this manual.
4

USING THE 160
160 PERFORMANCE
In addition to the parts included you need the following for installation and operation:
• A powered hand drill and various drill bits
• Phillips and flat-head screw drivers
• A ruler or measuring tape
• Pen or pencil
• 12 volt power source (your boat’s battery)
• Silicone sealant (for sealing drilled holes)
• 2-part, slow-cure epoxy (for inside the hull transducer installations)
USING THE 160
160 Performance
The 160 Series represents a new way of thinking about fishing electronics.
Combining state of the art electronics and paper chart recorder sonar
performance, it offers the best of the present and the past. Minimal, easy
to understand knob controls provide access to the most important features.
The 160 eliminates confusion created by too many buttons and menus.
High technology, high performance, with «back to basics» operation
makes the 160 the ideal choice of the serious angler.
The 160 uses sonar to locate and define underwater objects. Sonar
technology is based on sound waves sent into the water in a controlled
«beam» from the transducer. Objects within this beam reflect the sonar
signal back. The 160 very accurately measures the distance to these objects
based on the time it takes for the sonar to return. Each object (bottom, fish
or structure) reflects the sonar uniquely, providing information about its
makeup. The 160 draws this returned information on the display.
The 160 operates in a wide variety of water conditions, from 2’ to 600’.
Actual depth capability depends on many factors such as bottom hardness,
water conditions, and transducer installation. All sonar units typically read
to deeper depths in fresh water than saltwater.
5

USING THE 160
SIMULATOR AND FEATURE MEMORY
POWERING UP THE 160
After installation, turn the 160 on by momentarily pressing the Gain knob.
An audible chirp sounds as the unit turns on. If the unit detects that the
transducer is connected and is in water, the 160 begins to show sonar
information on the display. If the transducer is not detected, the unit starts
up in simulator mode.
To power the unit off at any time, press and hold the Gain knob for several
seconds until the 160 turns off.
Simulator and Feature Memory
The 160contains a simulator that allows you to use the unit as though you are on the
water . The Simulator is an invaluable aid to learning the features and functions of the
160. All controls are operational and settings can be changed to experiment with
various features. When operating in Simulator an indicator appears at the bottom left
of the display .
There are two ways to start the simulator. The method to use depends on whether a
transducer is connected:
If the 160is powered on with no transducer connected, it starts up in simulator mode.
No other steps are needed. In this mode the 160 does not remember any setting
changes that are made.
If the 160 is powered on with the transducer connected, the Simulator must be
manually turned on.
To manually turn the simulator on:
1. Press the Control Panel knob to display the
list of options.
2. Rotate the Control Panel knob to scroll
through the list until Simulator is visible and is
highlighted on the display.
3. Turn the Range knob to turn Simulator from
OFF to ON.
4. Press the Control Panel knob to clear the screen.
6
USING THE 160
CONTROL FUNCTIONS
When operating with the Simulator on and the transducer connected
changes made to Chart Speed, RTS Window, Surface Clutter, Contrast,
White Line, (language in international models,) and the Units Control
Panels are permanently remembered. When a transducer is not connected,
changes are not remembered.
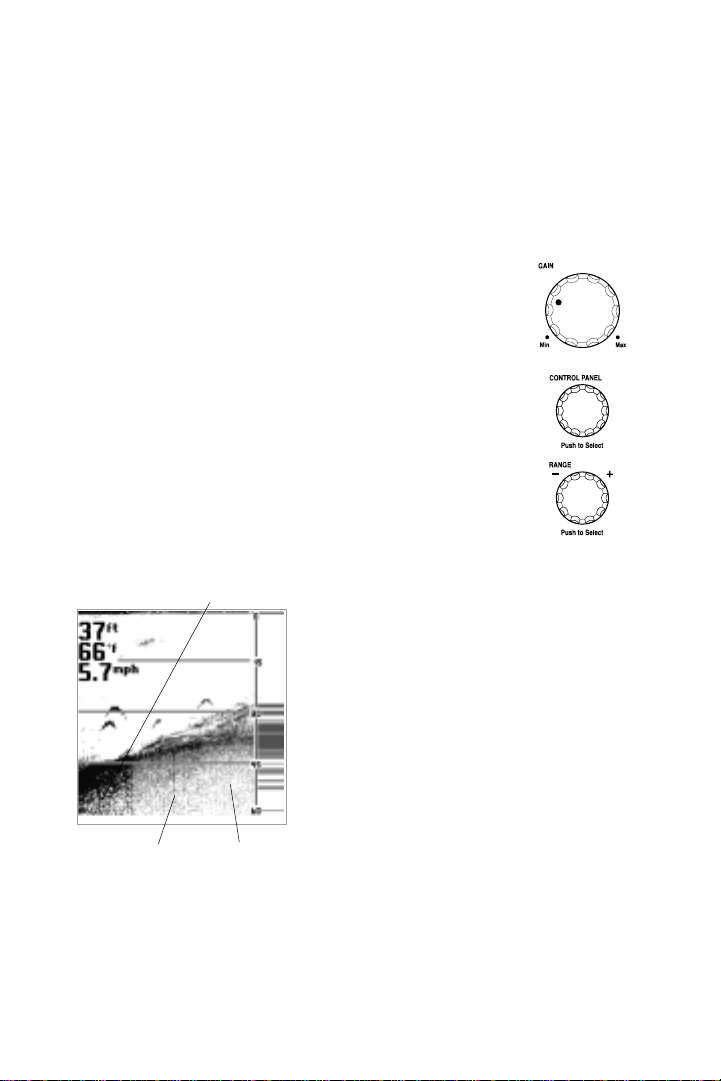
CONTROL FUNCTIONS
Three knobs on the 160 control all user settings: Gain,
Control Panel and Range.
G
AIN KNOB
The GAIN knob controls the gain (sometimes called
sensitivity) of the sonar receiver . G
on or off. When the 160 is off, press G
on. Press and hold G
AIN to turn the unit off.
AIN also powers the unit
AIN to turn the unit
Increasing the gain shows faint sonar returns from small bait fish and
suspended debris in the water, however the
Maximum Gain
display may become too cluttered in some
water conditions. Increased gain is also
beneficial at deeper depths to maintain a
good bottom image and adequately show
sonar returns from deep objects. Decreasing
the gain eliminates the clutter from the
display, however if adjusted too low may not
show many faint sonar returns that could be
fish.
Turn the G
AIN knob clockwise to increase the
gain; turn counterclockwise to decrease the
Medium Gain Low Gain
gain. As you turn the knob, only new sonar
information being graphed shows the affect
of the gain change.
Push ON / OFF
7
Loading…
Обзор эхолота Humminbird PiranhaMAX 160
Эхолот Humminbird PiranhaMAX 160 — усовершенствованная версия базовой модификации эхолотов для любительского использования Хамминберд. Разработчик и производитель Humminbird Piranhamax 160 – Humminberd Corporation Ltd. Конструкторское бюро и заводы компании расположены в Соединенных Штатах Америки. Для команды компании важна каждая деталь в производстве оборудования для активного туризма, рыбалки или охоты. Это гарантирует удобное и эффективное использование приборов.
Обзор модели
Гидроэхолокационная система Humminbird 160 позволяет получить информацию о состоянии водной толщи на большом исследуемом участке. Система Humminbird Piranhamax 160 (датчик плюс цифроаналитический блок) хорошо подходит для любительского использования.
Эхолот Humminbird Piranhamax 160 цену имеет низкую, а уровень информативности — высокий. Точность данных о состоянии дна, о его рельефе, о структуре водного участка, о предметах, корягах, водорослях и главное — о наличии рыбы — подтверждена и результатами многочисленных независим экспертиз, и отзывами о Humminbird Piranhamax 160.
Как работает эхолот
Эхолот Humminbird PiranhaMAX 160 функционирует по принципу, который является базовым для всех эхолотов всех марок и модификаций. Принципиальный алгоритм получения информации следующий:
• Сбор информации о состоянии заданного участка водной акватории инициируется командой “Старт» с цифрового блока системы. Команда поступает на датчик Humminbird PiranhaMAX 160. И уже далее датчик формирует зондирующий луч, отправляет его в водную толщу.
• Луч отправляется с определённой системой скоростью. Он отправляется с датчика, доходит до поверхности объекта и возвращается обратно к датчику. По времени пути туда-обратно и скорости вычисляется путь, который прошёл луч.
• Такие зондирующие лучи отправляются один за другим. Информация, полученная от каждого луча, аккумулируется системой.
• Программный код, прописанный в этой гидроэхолокационной системе, обрабатывает все данные согласно заданным алгоритмам. Так на выходе получается сводная, общая информация по исследуемому водному участку.
• На дисплей монитора информация выводится в графическом виде в выбранном пользователем масштабе и в выбранном режиме.
В эхолоте Humminbird PiranhaMAX 160 заложен простой алгоритм получения информации. В этом случае простота алгоритма — это залог долгой исправной работы.
Технические характеристики
Согласно техническому паспорту и инструкции к эхолоту Humminbird 160 прибор обладает следующими характеристиками:
• Тип информационного дисплея — ЖК, чёрно-белая цветовая схема с четырьмя уровнями градиента.
• Размер информационного дисплея — 4 дюйма.
• Разрешение информационного дисплея — 160 на 128 пикселей.
• Длина кабеля — 6 метров.
• Глубина зондирования — до 182 метров.
• Тип экрана — ЖК с подсветкой.
• Тип трансдьюсера — двухлучевой (200 и 83 кГц, 20 и 60 градусов для каждого луча соответственно).
• Тип крепления трансдьюсера — универсальный.
• Межобъектный интервал — 6 см.
• Выходная мощность — 800 Вт (пиковая), 100 Вт (RMS).
• Класс влагопылезащиты — IPX7.
• Питание системы — 12 В.
Заявленные характеристики эхолотов Хамминберд 160 совпадают с теми показателями, которые выявлены у этого прибора на практике.
Основные возможности эхолота
Эхолот Humminbird PiranhaMAX 160 создан для того, чтобы не только упростить процесс рыбалки, но и сделать рыбалку более эффективной. Ведь зная, где обитает рыба, а где — нет, охотиться на неё гораздо продуктивнее. Система этой модели обладает следующими возможностями:
• Получение информации о наличии или отсутствии рыбы.
• Разделение опознанной рыбы по размерным группам по шкале от 1 до 3.
• Выяснение глубины, на которой замечена рыба.
• Измерение глубины обследуемого участка водной акватории.
• Измерение температуры водной толщи.
• Измерение температуры окружающей среды.
• Выявление в составе водной толщи растений и остатков древесных пород, воздушных пузырей, камней, прочих объектов.
• Определение состава донной толщи.
• Формирование данных о рельефе дна.
• Предустановленный режим отображения информации или режим индивидуальных настроек.
Купить эхолот Humminbird Piranhamax 160 — это купить верного помощника в рыболовецком деле на долгое время.
Как пользоваться эхолотом
Эхолот Humminbird PiranhaMAX 160 приводится в активное состояние нажатием кнопки POWER. Система загружается весьма быстро. Когда прибор полностью включен, можно погружать датчик в воду.
С этого момента можно начинать исследовать водную акваторию. Нужно выбрать режим работы гидроэхолокационной системы. Это можно делать либо в автоматическом режиме, либо в режиме индивидуальной настройки. Для работы в режиме индивидуальной настройки без опыта в рыболовецком деле не обойтись. Меню также позволяет выбирать масштаб отображения информации, громкость звукового оповещения, отображение или скрытие дополнительных данных.
После завершения работы с гидроэхолокационной системой нужно обесточивать прибор. Это полезно и для безопасности использования, и для экономии расхода энергии.
Преимущества и недостатки
Поклонники рыболовецкого ремесла, в большинстве своём, дают эхолотам Humminbird PiranhaMAX 160 отзывы положительные. О каких-то недостатках пользователи говорят редко. Да и если такие недостатки замечаются, то они, как правило, практически не мешают эффективному использованию этой модели гидроэхолокационных систем в процессе рыбалки.
Преимущества
• Прибор лёгкий. Это важно при длительном использовании. Его легко переносить без особой нагрузки на организм.
• Маленький размер. Не зря эта модификация относится к портативным.
• Кабель большой длины — 6 метров. Вкупе с техническими характеристиками датчика этого достаточно для исследования большого участка водной толщи.
• Система не только достоверно определяет факт наличия рыбы, но и в большинстве случаев точен и в определении размеров этой рыбы.
• Предоставляет данные о глубине нахождения рыбы. Это важно при подборе и настройке удилища.
• Хорошее звуковое сопровождение основных функций системы.
• Высокая степень палевлагозащиты.
• Цены на эхолоты Humminbird PiranhaMAX 160 относятся к низким.
• Простой пользовательский интерфейс.
• Стильный дизайн цифроаналитического блока.
• Увеличенный срок гарантии — 24 месяца.
• В официальных сервисных центрах все мастера проходят регулярное повышение квалификации, работают качественно.
Недостатки
• Запасные части для гидроэхолокаторов Humminbird PiranhaMAX 160 купить можно в основном только под заказ. И часто такие заказы доставляются весьма долго.
• На поверхности цифрового блока легко остаются следы от пальцев. Нужно часто протирать эту поверхность. Но об этом недостатке в основном можно узнать только от эстетов рыбалки.
Эхолот Humminbird 160 доступен в любой стране. Humminbird PiranhaMAX 160 купить можно либо у официальных распространителей, либо в крупных супермаркетах оборудования для активного туризма, охоты и рыбалки. Команда компании Humminbird предоставляет двухгодичную гарантию на все эхолоты Хамминберд 160.
Обзор эхолотов для рыбалки: для каяка, лодки ПВХ, байдарки. Эхолоты – устройства, определяющие рельеф дна, и позволяющие быстро найти места для хорошего улова.
-
Page 1: Humminbird 160
Installation and Operations Manual 531678-1_B Installation and Operations Manual P i r a n h a M A X ™ 1 5 0 , 1 6 0 , 17 0 , 1 8 0 , 1 9 0 c P i r a n h a M A X ™ 1 5 0 , 1 6 0 , 17 0 , 1 8 0 , 19 0 c[…]
-
Page 2: Humminbird 160
T hank Y ou! Thank y ou for choosing Humminbird®, America’s #1 name in fishfinders. Humminbird® has built its reputation by designing and manuf acturing top-quality , thor oughly reliable marine equipment. Y our Humminbird® is designed for trouble-free use in e ven the harshest marine envir onment. In the unlikely event that y our Humminbir[…]
-
Page 3: Humminbird 160
WEE E DIRE CT IVE : EU D ire cti ve 2 00 2/9 6/E C “W aste o f Ele ctr ic al an d Ele ct ron ic Equ ip men t Dir ec tiv e (W EEE )” im pa cts m ost d is tri but or s, se lle rs, a nd m anu fac tu rer s of con su mer e lec tr oni cs in t he E uro pea n Un ion . T he WE EE Di rec ti ve r equ ire s th e pro du cer o f con su mer e le ctr oni cs t […]
-
Page 4: Humminbird 160
T ab le o f Co nt en ts Installation Overview 1 Control Head Installation 2 Determine Where to Mount …………………………………………………………………… 2 Connect the Po wer Cable to the Boat …………………………………… ……………….. 2 Assembling the Control Head Base …………………………..[…]
-
Page 5: Humminbird 160
iv T ab le o f Co nt en ts The Menu System 30 Light (Setting Not Saved in Memory) ……………………………………………….. 30 Sensitivity (Setting Saved in Memory) ……………………………………………… 30 Depth Range (Setting Not Saved in Memory) …………………………………… 31 Zoom (Setting Not Saved […]
-
Page 6: Humminbird 160
[…]
-
Page 7: Humminbird 160
Installation Overvie w Before you start installation , we encourage you to read these instructions carefully in order to get the full benefit from y our PiranhaMAX™. Ther e are three basic installation tasks that you must perf orm for the PiranhaMAX™: • Installing the control head • Installing the transducer • T esting the complete instal[…]
-
Page 8: Humminbird 160
Control Head Installation Determine Wher e to Mount Begin the installation by determining where to mount the control head. Consider the following to determine the best location: • T o chec k the l ocat ion p lann ed fo r the c ontr ol hea d, tes t run t he cab les f or th e pow er a nd transducer . See the installation section for your transducer[…]
-
Page 9: Humminbird 160
NO TE: Humminbird® is not responsible for over-voltage or over -current failures. The control head must have adequate protection through the proper selection and installation of a 1 amp fuse. 1a. If a fu se term inal is ava ilabl e, use cri mp-on t ype ele ctric al conn ector s (not included) that match the terminal on th e fuse pa nel. At tach th[…]
-
Page 10: Humminbird 160
Assembling the Control Head Base Y our control head base will either have a tilt mount or a tilt and s wivel mount. Refer to procedures A or B belo w to assemble and mount the control head base. A. If you hav e a tilt mount, follow these steps: 1. Set the tilt mount control head base in place on the mounting surface. Mark the four mounting screw lo[…]
-
Page 11: Humminbird 160
Routing the Control Head Cables Under the Deck Use the following steps to r oute the control head cables under the deck. NO TE: Under the deck cable routing is not always possible. If this is not an option, the cables should be routed and secured above deck. T il t Mo unt o r T il t an d Sw iv el M oun t: 1a. Mark and drill a 3/4″ hole as show[…]
-
Page 12: Humminbird 160
Attaching the Control Head to the Base Follow these steps to attach the contr ol head to the already-assembled base: NO TE: The transducer cable and po wer cable should be routed prior to securing the mounting bracket to the deck. 1. Apply marine-grade silicone sealant to the drilled holes for the mounting bracket. 2. Pl ace t he m oun ti ng b ra c[…]
-
Page 13: Humminbird 160
Attaching the Cables to the Control Head F ol lo w th es e st ep s to a tt ac h th e po wer a nd t r an sd uc er c ab le s to t he c on tr o l he ad : 1. Ma tch in g the c ab le p lug s to t he s hap e an d ori en ta tio n of t he so ck et s, i ns ert t he tr an sdu ce r and p ow er cab les i nt o the correct so ckets on the control h ead (F ig ur […]
-
Page 14: Humminbird 160
T ransducer Installation Ov erview The tr ansducer can be installed on the transom of the boat, inside the hull, or onto a trolling motor , depending on your transducer type. The type of transducer you ha ve will also determine how the cable will be routed. Go to the section that describes your transducer , and follow the steps to position and moun[…]
-
Page 15: Humminbird 160
T ransom T ransducer Installation Locating the T ransducer Mounting P osition T urbulence: Y ou m ust firs t deter mine th e best lo cati on on the t ransom t o install the transducer . It is very important to locate the transducer in an area that is r elative ly free of tu rbulent w ater . Consider the f ollowi ng to find the be st location with t[…]
-
Page 16: Humminbird 160
• If the transom is behind the propeller(s), it may be impossible to find an area clear from turbulence, and a diff erent mounting technique or tran sduce r type sh ould be c onsid ered, s uch as an I nside t he Hull T ransducer . • If you plan to trailer your boat, do not mount the transducer too close to trailer bunks or roller s to avoid mov[…]
-
Page 17: Humminbird 160
Preparing the Mounting Location After d eterm ining t he mount ing loc ation f or the tr ans duc er , fol low t he st eps b elo w to p osit ion a nd mo un t th e tr an sd uc er br ack et . 1. Mak e sur e th at t he b oat i s le vel o n th e tr ai le r , bo th f ro m po rt t o st ar bo ar d an d fr om b ow t o st er n, b y pl ac in g yo ur l ev el o[…]
-
Page 18: Humminbird 160
4. Ma ke s ur e tha t th e dr il l bi t is p er pe ndi cu la r to t he a ct ua l sur f ac e of t he tr an so m, N O T pa ra ll el t o th e gr ou nd , be f or e yo u dr il l. U si ng a 5 /3 2” bi t, d ri ll th e tw o ho le s on ly t o a de pth o f ap pr oxim at el y 1” . NO TE: O n fib er gl ass h ul ls, i t is b es t to us e pr ogr es si ve ly […]
-
Page 19: Humminbird 160
2. Pla ce the t wo r atc hets , one o n eith er si de of th e tr ansd uce r knuc kle , so tha t the be ads on e ach r atc het l ine up w ith th e des ire d posi tio n numb er on th e knuc kle ( Fig ur e 18a) . If y ou ar e set ting t he ra tch ets at p osi tion 1 , the b eads o n eac h rat che t will l ine up w ith t he rib o n the t ran sdu cer kn[…]
-
Page 20: Humminbird 160
3. Pu t th e piv ot bol t th ro ugh t he a ss emb ly t o ho ld it i n po sit io n an d loo se ly i nst al l the n ut , bu t do NO T tig hte n th e nu t at th is t im e (F ig ur e 19 ). 4. Align t he mounting bracket tran sducer assembly with the drill ed holes in the tr an so m. W it h a 5/1 6″ s oc ke t dr iv er , mo unt th e ass em bl y to t[…]
-
Page 21: Humminbird 160
6. Adj ust t he t ra ns duc er a ss emb ly v er ti cal ly , un til t he s ea m on th e le adi ng e dg e of th e tr an sd uce r (t he e dge c lo ses t to t he t ra ns om of t he bo at ) is l ev el a nd j ust s li gh tly b el ow th e hul l (F ig ur e 23 ). NO TE: T he tr an sd uc er h as a n at ur al do wn wa rd s la nt of 4 -5 d eg re es f ro m le a[…]
-
Page 22: Humminbird 160
Routing the Cable The tr ansducer cable has a low pr ofile connector , which must be routed to the point where the control head is mounted. T here are se veral wa ys to route the transducer cable to the area wher e the control head is installed. T he most common procedure r outes the cable through the transom into the boat. NO TE: Y our boat may ha[…]
-
Page 23: Humminbird 160
3. Pl ace th e es cut cheo n pl ate ove r th e cable ho le and use it as a gui de to mark the two escutcheon plate mounti ng holes. Remove th e plate, drill two 9/64″ di ameter x 5/8″ de ep holes, an d th e n fi ll b ot h ho le s wi th marine -grade silicon e sealant. Pla ce the escutc heon plate over the ca ble hole and attach w ith two […]
-
Page 24: Humminbird 160
T est and Finish the Installation On ce y ou h av e in st all ed b ot h the c on tr ol h ead and t he t ra ns om t ra ns duc er , an d hav e route d all the cab les, yo u must perf orm a fin al test bef ore lo cking the tr an sd uce r in p lac e. T est ing s ho ul d be pe rf or me d wit h th e bo at in t he w at er . 1. Press POWER once to turn the[…]
-
Page 25: Humminbird 160
NO TE: It is often necessary to make several incremental transducer adjustments before op timum high sp eed perform ance is achi eved. Du e to the wide v ariety of bo at hulls, howev er, it is not always possible to obtain high speed depth readings. 6. On ce y ou ha ve r ea ch ed a c o ns is te n tl y go od s on ar si gn al a t th e d es ir ed sp e[…]
-
Page 26: Humminbird 160
I n s id e th e Hu l l T r an sd uc e r I n s t al la t i o n In -hu ll m ou nti ng g ene r all y pr od uc es go od r es ul ts in s in gl e thi ck nes s fi be rg la ss- hulled b oats. Hum minbir d® canno t guaran tee depth p erfor mance whe n tr an smi tti ng a nd r ece iv ing t hr oug h th e hul l of th e bo at, s in ce so me si gn al lo ss oc cu[…]
-
Page 27: Humminbird 160
Determine the T ransducer Mounting Location Decide where to install the transducer on the inside of the hull. Consider the following to find the best location: • Observe the outside of the boat hull to find the areas that are mostly fr ee from turbulent water . Avoid ribs, strakes and other protrusions, as these create turbulence (Figure 28). •[…]
-
Page 28: Humminbird 160
T rial Installation Y ou will not be able to adjust the mounting after an inside the hull transducer is insta lled. It is best, the ref ore, to p erfor m a trial ins tallat ion fir st that in cludes running the boat at various speeds, in order to determine the best mounting area befor e permanently mounting the transducer . 1. Plug the transducer i[…]
-
Page 29: Humminbird 160
Route the Cable 1. Once the mounting location is determined and you have mark ed the position of the transducer , route the cable from the transducer to the control head. P ermanently Mount the T ransducer 1. Make sure the position of the transducer is mark ed. 2. Y ou may have to disconnect the cable to the contr ol head and reconnect it at the en[…]
-
Page 30: Humminbird 160
T r ol lin g Mo to r T r ans du cer I ns ta lla ti on Severa l style s of the tra nsdu cer are com patib le with t rollin g motor m ount ing. (Figu re 32). I f you have a trol ling m otor bracket, ref er to the separate installation ins truct ions th at are inc luded w ith th e bracket. Y ou m ay purcha se a T ro lling M otor A dapte r kit tha t wi[…]
-
Page 31: Humminbird 160
P ow ering ON and OFF Press an d hold the P OWER-ME NU key until th e PiranhaM AX™ powers on, then release the k ey . T o pow er off, pr ess and hold the POWER-MENU ke y until the unit shuts down. When the PiranhaMAX™ powers on, the Start-Up menu temporarily appears. F rom this menu, select either Start-Up, Simulator , or SetUp. • Use Start-U[…]
-
Page 32: Humminbird 160
What Y ou See On the Displa y The Pir anhaMAX™ displays underw ater information in an easy -to-understand format. T he top of the display corresponds to the water surf ace at the transducer , and the bottom of the display corresponds to the Depth Range automatically se lected for the cur rent water d epth. T he Bottom Contour v aries as the depth[…]
-
Page 33: Humminbird 160
PMAX150/190c (Single Beam) and PMAX160/170 (Dual Beam) Display PMAX180 (T ri Beam) Display * Uni ts w ith 8 3 kHz D ua l Bea m son ar s how t arg et s in th e wid e be am as h oll ow f ish i con s. * Uni ts w ith 4 55 kH z T ri Bea m son ar sh ow t arg ets i n th e lef t bea m as l eft -loo kin g fi sh sym bo ls, a nd ta rg ets i n the r ig ht be a[…]
-
Page 34: Humminbird 160
PiranhaMAX™ Sonar T echnology The Pir anhaMAX™ is the easiest to use fishfinder ever . For most anglers, all you’ll ever need to do is power on and fish! The Pir anhaMAX™ automatically determines depth and makes adjustments to keep the bottom and fish visible on the display . The Pir anhaMAX™ uses sonar technology to send sound waves fr o[…]
-
Page 35: Humminbird 160
Single Beam Sonar The PiranhaMAX™1 50 and PiranhaMAX™190c use a 200 kHz single beam sonar system with a 20° area of cov erage. Boat speed, wav e action, bottom hardness, water conditions and transdu cer installation can all affect depth capability . Dual Beam Sonar T he Pir an haMA X™16 0 and Pi ran haMA X™17 0 use a 20 0/83 k Hz dua l bea[…]
-
Page 36: Humminbird 160
T he Menu System A simple menu system allows you to access your PiranhaMAX™ adj ustable settings. T o activate the menu system, press the POWER- MENU key . Press the POWER-MENU key repeatedly to displa y the PiranhaMAX™ menu settings, one at a time. When a menu setting is on the display , use the RIGHT and LEFT Arro w key s to adjust th e menu […]
-
Page 37: Humminbird 160
Depth Range (Setting Not Saved in Memory) Pres s the POWER- MENU ke y until DE PTH RANGE a ppear s. Auto matic is th e de fa ul t set ti ng. Whe n in au to ma tic , th e lo w er r ang e wi ll b e adj us te d by t he un it to f ollo w the b ott om. (A ut o, 15 to 6 00 ft [P ir anha MAX ™150 /160 ], 15 t o 800 ft [P ir an haM AX ™17 0/ 18 0/ 190 […]
-
Page 38: Humminbird 160
Chart Speed (Setting Saved in Memory) Press the POWER-MENU key until CHAR T SPEED appears. Select a setting from 1-5 to increase or decr ease the chart speed, where 1 is the slowest and 5 is the fastest chart speed. Chart speed determines the speed at which the sonar information moves acr oss the display , and consequently the amount of detail show[…]
-
Page 39: Humminbird 160
Filter (Setting Saved in Memory) Press the POWER-MENU key until FIL TER appears. Select either Off or On. Filter adjusts the sonar filter to limit interfer ence on the display from sources such as your boat engine, turbulence, or other sonar de vices. (On, Off, Def ault = Off) SetUp Menu (Setting Not Saved in Memory) Press the POWER-MENU ke y until[…]
-
Page 40: Humminbird 160
Fish ID+ TM (SetUp Menu) (Setting Saved in Memory) Make s ure that t he SetUp me nu is selec ted, then p ress the P OWER-ME NU key until FI SH ID+ T M ap pears . Select ei ther Off to v iew “r aw” son ar retu rns or On to view Fish sy mbols. Fish ID+ TM uses adv anced signal processing to inte rpret sonar r eturns , and will di splay a F ish Sy[…]
-
Page 41: Humminbird 160
Structure ID® represents weak r eturns as light pixels and s trong ret urns as d ark pix els. T his h as the benefit of ensuring that strong returns will be clearly visible on the display . Bla ck (Bottom Black) displays all pixels belo w the bott om conto ur as bla ck, r egar dless o f signa l stre ngth. This has the benefit of pr oviding a high […]
-
Page 42: Humminbird 160
Battery Alarm (SetUp Menu) (Setting Saved in Memory) Make sure that the SetUp menu is selected, then press the POWER-MENU key unti l BATTERY ALAR M a ppears . S elect Of f o r 8 .5 to 13.5 V olt s. Batte ry Alarm soun ds when the inp ut battery v oltage is eq ual to or less th an the menu setting. (Off, 8.5 to 13.5 V olts, Default = Off) Scroll thr[…]
-
Page 43: Humminbird 160
Maintenance Y our Pi ra nha MA X™ is d es ign ed t o pr ov id e ye ar s of tr oubl e-f r ee op er at ion w it h virtua lly no main tenance . Follo w these s imple pr ocedur es to ensu re you r Pi ra nh aMA X™ c ont in ue s to de li ve r to p per f orm an ce . If t he un it c om es in to c on tac t wi th sa lt s pr a y , wip e th e aff ecte d su[…]
-
Page 44: Humminbird 160
T roubleshooting Do not attempt to repair the PiranhaMAX™ your self . Ther e are no user -serviceable parts inside, and special tools and techniques are requir ed for assembly t o ensure the w aterproof integr ity of the housing. Repair s should be performed only by authorized Humminbir d technicians. Many r eques ts for r epair r eceiv ed by Hum[…]
-
Page 45: Humminbird 160
3. Th er e is no bo tt om r ea di ng v is ibl e on t he d isp la y . If the l oss of bo ttom in for mati on occu rs onl y at hig h boat sp eeds, t he tr ans duc er ne eds a dju sti ng – se e yo ur Pi ra nha MAX ™ Ins tal lat ion G uid e fo r deta ils. Al so, in v ery de ep wa ter , it may be n eces sary to i ncr ease th e se ns iti vi ty s et t[…]
-
Page 46: Humminbird 160
7. My un it lo se s po w er at h ig h sp ee ds. Y our Pi ra nh aMA X™ h as o ve r -vo lt age p r ote ct io n tha t tu rns t he u ni t off w he n input v oltage e xceeds 20 V DC. Some out board m otors d o not eff ective ly re gu la te th e po w er ou tp ut o f the e ng in e’s a lt er nat or a nd c an pr od uc e vo lt ag e in e xce ss o f 20 V o[…]
-
Page 47: Humminbird 160
International Purchases A sep ara te w arr ant y is pr ov ide d by in ter nat iona l dis tri buto rs f or un its p urc has ed out side t he Un ited S tat es. T his war ran ty is i nclu ded b y yo ur loc al di stri but or and thi s dist rib utor m ain tain s loca l ser vice f or y our u nit. W arr ant ies ar e on ly va lid in th e ar ea o f in te nd[…]
-
Page 48: Humminbird 160
Hu mm in bi r d® 1 — Y ea r Li mi te d W ar r an ty W e w arr ant th e ori gina l ret ail p urc has er tha t pro duc ts mad e by Hu mmi nbir d® ha ve be en man uf actu re d fre e fro m def ect s in mat eria ls an d wor kma nshi p. T his warranty is effectiv e for one year from the date of original r etail purchase. Hum minb ir d® pr odu cts f ou[…]
-
Page 49: Humminbird 160
Hu mm in bi r d® S er vi ce P ol ic y Even though you’ll probably never need to take adv antage of our incredible service policy , it’s good to know that we back our products this confidently . W e do it because you deserve the best. W e will make every effort to r epair your unit within three business da ys from the receipt of your unit[…]
-
Page 50: Humminbird 160
Re tu rn in g Y ou r Un it f or Se rv ic e Bef or e se ndi ng y our u nit i n for r epair , pl eas e con tac t the f act ory , eith er b y pho ne or b y emai l, to o btai n a Rep air A uth oriz ati on Num ber f or y our un it. NO TE: Please do not return your Humminbird® to the store for service. Pl eas e ha v e yo ur pr oduc t mo del n am e and s[…]
-
Page 51: Humminbird 160
Sp ec if ic at io ns De pt h Cap ab il it y … .. … .. .. .. … .. .. .. .. … .. .. .. … .. .. .. .. .. … .. .. .. … . 60 0 ft ( 185 m ) – (P MA X15 0/ 16 0) 80 0 ft (2 50 m ) – (P MAX 17 0/ 180 /1 90 c) P ow er Out pu t …. .. … .. .. … .. .. … .. … .. .. … .. .. … .. .. … .. … .. .. … .. .. 80 0 W atts ( PT P) ?[…]
-
Page 52: Humminbird 160
46 Contact Humminbird® Co nt ac t th e Hu mm in bi r d® C us to me r R es ou rc e Ce n te r in a n y of t he f ol lo win g w ay s: By T el ep ho ne (M on da y — Fri da y 8:0 0 a. m. t o 4: 30 p .m . Ce nt r al S ta nd ar d T ime ): 1- 80 0- 63 3- 14 6 8 By e -m ai l (t yp ic al ly w e res p on d to y ou r e- ma il wit hi n th r ee b us in es s da[…]
Marine Equipment > Fish Finder
When we buy new device such as Humminbird 160pt we often through away most of the documentation but the warranty.
Very often issues with Humminbird 160pt begin only after the warranty period ends and you may want to find how to repair it or just do some service work.
Even oftener it is hard to remember what does each function in Fish Finder Humminbird 160pt is responsible for and what options to choose for expected result.
Fortunately you can find all manuals for Fish Finder on our side using links below.
Humminbird 160pt Manual
44 pages928.8 Kb
Also you can find more Humminbird manuals or manuals for other Marine Equipment.