
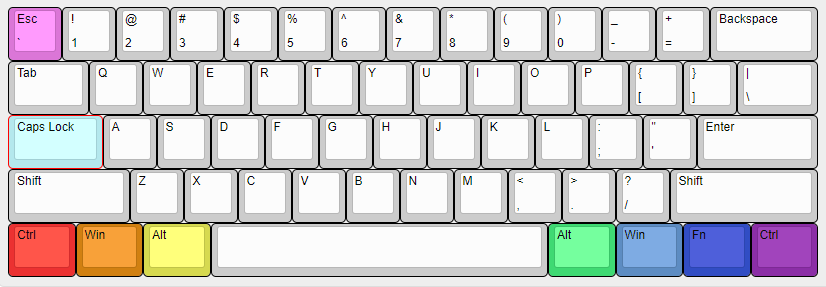
МОДЕЛЬ КЛАВИАТУРЫ DKON2061ST / DKME2061ST
В конце страницы представлена инструкция для более старых моделей. Модель клавиатуры указана на нижней части корпуса.
Смена функций клавиш
1. Применяемые клавиши: Fn/Alt/Ctrl/Windows/Caps Lock
2. Как поменять назначение клавиши:
- Последовательно зажмите Fn+Left Alt+K на 5 секунд (держите пока функциональные клавиши не окрасятся разными цветами согласно картинке ниже).
- За исключением Caps Lock, все остальные 6 клавиш могут смело меняться местами (Одновременно можно менять функционал не более 2х кнопок). Для этого зажмите две клавиши, затем отпустите — они поменяются цветами и функциями.
- Нажмите Caps Lock, что бы он поменял свою функцию, по цвету подсветки можно будет определить, какую функцию получила эта клавиша. Соотвественно красный — Left Ctrl, оранжевый — Left Windows, желтый — Left Alt, зеленый — Right Alt, голубой — Right Windows, синий — Fn, фиолетовый Right Ctrl.
- Нажмите Esc, что бы выйти из режима смены функциональных клавиш.
- Примечание: Вы можете нажать клавишу Esc, чтобы выйти из режима смены функциональных клавиш, не начиная вносить изменения.
DIP-переключатели
Инструкция: сначала отключаете клавиатуру, затем меняете положение DIP-переключателя, включаете клавиатуру и вы великолепны!
| Номер переключателя | Положение OFF | Положение ON |
| DIP1 | Windows клавиша включена | Winndows клавиша выключена |
| DIP2 |
Режим, в котором работают все клавиши одновременно N-key Rollover Mode |
Режим в котором максимальное кол-во нажатий — 6 клавиш 6-key Rollover Mode |
| DIP3 | Определение клавиатуры с Ducky Vender ID (VID) | Vender ID не определяется |
| DIP4 | Стандартный режим работы | Демонстранционный режим работы |
Слои
Стандартный

Fn слой
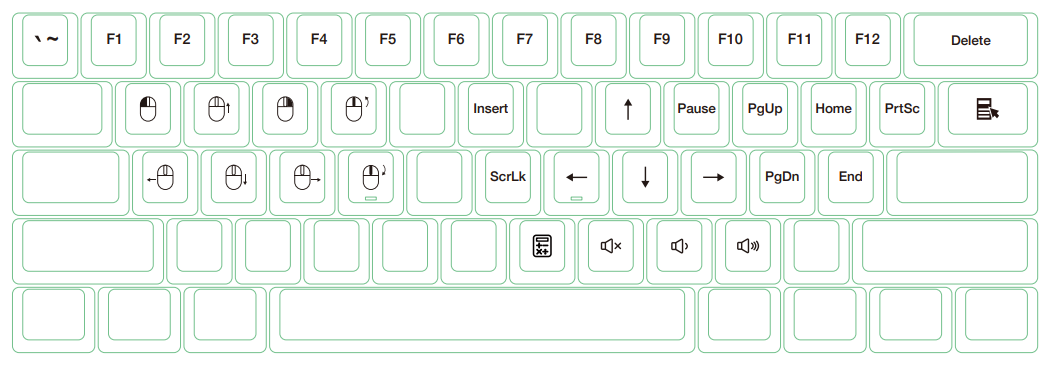
Fn+Alt слой
Режимы подсветки RGB
Fn + Alt + T:
Первый режим: Волна (по умолчанию)
Второй режим: Цветовой цикл
Третий режим: Капли дождя
Четвертый режим: Пульсация
Пятый режим: Случайная реакция
Шестой режим: Реакция (цвет регулируется)
Седьмой режим: Ореол (цвет регулируется)
Восьмой режим: Дыхание (цвет регулируется)
Девятый режим: 100% полная подсветка (цвет регулируется)
Десятый режим: Радар (цвет регулируется)
Одиннадцатый режим: подсветка выключена
Все вышеперечисленные режимы можно регулировать с помощью следующих комбинаций клавиш:
Fn + Alt + J: уменьшение скорости
Fn + Alt + L: увеличение скорости
* Удерживайте Fn + Alt+T в течение 3 секунд, чтобы выключить всю подсветку (включая CM1 и СМ2).
* Только режимы подсветки 6-10 можно регулировать с помощью следующих комбинаций:
Fn + Alt + Z: регулировка яркости красного цвета (R). 10 уровней.
Fn + Alt + X: регулировка яркости зеленого цвета (G). 10 уровней.
Fn + Alt + C: регулировка яркости синего цвета (B). 10 уровней.
Fn + Alt + V: стереть настройки красного, зеленого и синего цветов.
Fn + Alt + пробел (цветовая палитра): активируйте цветовую палитру для отображения доступного спектра цветов, нажмите на нужный цвет, все клавиши автоматически приобретут выбранный цвет.
Режимы настраиваемых зон подсветки (CM1 и CM2)
Fn + Alt + G — режим настраиваемой зоны подсветки 1 (СM1):
Первый шаг — включить настраиваемую зону
Второй шаг — включить настраиваемую зону в режиме «Дыхание»
Третий шаг — выключить настраиваемую зону
Fn + Alt + B — режим настраиваемой зоны подсветки 2 (СM2):
Первый шаг — включить настраиваемую зону
Второй шаг — включить настраиваемую зону в режиме «Дыхание»
Третий шаг — выключить настраиваемую зону
Fn + Alt + Caps Lock (REC): зажмите в течение 3 секунд до тех пор, пока клавиши G (CM1) и В (СМ2) не загорятся, выберите слой для настройки, нажмите его и начните настройку
Caps Lock + Z: настроить красный цвет (R), 10 уровней
Caps Lock + X: настроить зелёный цвет (G), 10 уровней
Caps Lock + C: настроить синий цвет: (В), 10 уровней
Caps Lock + V: стереть весь настроенный цвет
Caps Lock + пробел: цветовая палитра
Caps Lock + Left Shift: завершение настройки
Шаги записи:
• Сначала отрегулируйте цвет, а затем нажмите отдельные клавиши, которые хотите настроить на этот цвет.
1. Зажмите Fn + Alt + Caps Lock в течение 3-х секунд, кнопки G (CM1) и В (СМ2) загорятся, затем нажмите G, чтобы установить CM1, или нажмите В, чтобы установить CM2.
2. При запуске режима записи Caps Lock будет отображать текущий настроенный цвет. Цвет можно настроить, нажав Caps Lock + Z / X / C / V. После установки нужного цвета нажатие любой клавиши на клавиатуре применит установленный цвет к этой клавише.
3. Повторение описанных выше шагов позволяет пользователю устанавливать разные цвета для разных клавиш. Если цвет клавиши был настроен, нажмите еще раз, чтобы отменить настройку.
4. Чтобы завершить запись, нажмите Caps Lock + Left Shift (REC over). Цвет клавиши Caps Lock — это настроенный вами цвет.
Примечание:
• При запуске режима записи Caps Lock будет отображать текущий настроенный цвет.
• CM1 и CM2 могут работать с другими режимами подсветки одновременно. Кроме того, CM1 имеет приоритет над СМ2 в местах, где настроенные зоны перекрывают друг друга.
Зажмите Fn + Alt + T в течение 3 секунд, чтобы выключить все режимы подсветки.
• Если в течение 30 секунд в режиме записи не происходит никаких действий, сеанс записи завершается без сохранения.
• Цвет светодиода Caps Lock соответствует режиму «одиночной подсветки».
Игровые режимы
1) Включение умопомрачительно веселой игры с выбором победителя клавиатурой. Суть простая: запускаем мод, игроки выбирают сегмент клавиатуры, который будет отвечать за их победу (как сторону монетки). Клавиатура рандомно раскручивает рулетку цветов и по нажатию рандомно выбирает, какой сегмент подсветить. Игрок, чей сегмент был выбран — побеждает.
- Fn + Alt + N: запустить игру на двух игроков
- Fn + Alt + M: запустить игру на четырех игроков
- Fn + Alt + J: снижение скорости раскрутки цветов
- Fn + Alt + L: увеличение скорости
- Fn + Alt + T: выйти из игры
- Если в течение 10 минут нет активности, режим игрового взаимодействия прекратится.
2) Сапер. Клавиатура превращается в минное поле. Рискуя жизнью, игроки по очереди нажимают на клавиши. Если клавиша загорелась зеленым цветом — повезло, поле без мины. Если загорелась красным — GAME OVER. .
- Fn + Alt + , : запустить игру.
- После того, как игра завершилась, нажмите пробел для перезапуска
- Fn + Alt + T — выйти из игры.
- Если в течение 10 минут нет активности, режим игрового взаимодействия прекратится.
Мультимедия
- Fn + W: Курсор вверх
- Fn + A: Курсор влево
- Fn + S: Курсор вниз
- Fn + D: Курсор вправо
- Fn + Q: Левая кнопка мыши
- Fn + E: Правая кнопка мыши
- Fn + R: Скролл вверх
- Fn + F: Скролл вниз
Настройка времени задержки/фильтрация лишних нажатий
Удерживайте клавиши в течение 3 секунд, клавиатура промигает 3 раза, сигнализируя об успешном изменении времени задержки
- Fn + Alt + Y: 5 мс.
- Fn + Alt + U: 10 мс. (Базовое значение)
- Fn + Alt + I: 15 мс.
- Fn + Alt + O: 25 мс.
Примечание: метод состоит в том, чтобы отрегулировать время реакции контактной пластины на нажатие клавиши. Чем меньше время, тем раньше обработается сигнал, но если оно слишком короткое, это может привести к некорректной работе.
Простыми словами, если выставлено значение в 25 мс., то после первого нажатия, в течение 25 мс., все лишние обрабатываться не будут.
Если нет необходимости изменять время, рекомендуется использовать значение по умолчанию.
Демо режим
Зажмите Левый Ctrl + Левый Shift + Caps Lock, затем подключите клавиатуру к источнику питания.
Примечание: подходит для подключения к мобильному источнику питания или зарядной USB-подставке для обеспечения отображения световых эффектов. Клавиатура не будет посылать никаких сигналов. Обратите внимание, что выходное напряжение источника питания устройства должно соответствовать 5В. Если напряжение не соответствует, клавиатура может быть повреждена.
Дисплей режим
Зажмите Fn + Alt + Ctrl на 3 секунды
Используется для отображения различных режимов подсветки. Только для демонстрации.
Сброс до заводских настроек:
- US ANSI and EU ISO раскладка — зажмите Left Windows key + Right Windows key до получения желаемого эффекта
- JP JIS раскладка — зажмите Fn+ Left Windows key
Примечание: Зажмите клавиши на 3 секунды. Подсветка клавиатуры будет мигать 3 раза, показывая, что она была сброшена.
Включение/выключение кнопки Windows
Fn + любая клавиша Alt + любая клавиша Windows в течение 3 секунд, подсветка клавиатуры промигает 3 раза указывая на то, что клавиша была включена/отключена.
Выбора профиля и запись макросов
Шаг 1: Выберите профиль
| Fn + Alt + | Профиль: |
| 1 | Переключиться на профиль 1 (стандартный заводской) |
| 2 | Переключиться на профиль 2 |
| 3 | Переключиться на профиль 3 |
| 4 | Переключиться на профиль 4 |
| 5 | Переключиться на профиль 5 |
| 6 | Переключиться на профиль 6 |
Примечание:
- Когда клавиатура подключена, Caps Lock и цифровые клавиши будут мигать аналогичное номеру профиля кол-во раз.
- Выберите профиль от 2 до 6, чтобы писать макросы.
- После переключения профиля, Caps Lock или световой индикатор будут мигать аналогичное номеру текущего профиля кол-во раз.
- Запись макросов происходит с той скоростью, с которой вы печатаете.
Шаг 2: Чтобы начать запись макроса, зажмите Fn + Alt + Tab на 3 секунды. В режиме записи Caps Lock будет медленно мигать.
Шаг 3: Нажмите на клавишу, которую хотите использовать для активации макроса. Нажатая клавиша начнет мигать (но не в версии клавиатуры без подсветки), а Caps Lock и световые индикаторы будут мигать быстро.
Шаг 4: Нажмите любую клавишу и выберите вариант реализации макроса и записи времени.
Шаг 5: Для записи другой клавиши (выйти из текущей записи) нажмите Fn + Alt, чтобы выбрать другую клавишу и продолжить запись.
Шаг 6: Зажмите Fn + Alt + Tab на 1 секунду, чтобы закончить запись и вернуться к профилю.
Горячие клавиши:
| Fn + Alt + | Функция: |
| Tab |
Начать запись: зажать на 3 секунды |
| ESC | Caps Lock будет мигать аналогичное номеру профиля кол-во раз |
| Backspace | Удалить установки текущего профиля |
Fn + Alt: Зажмите в течение 1 секунды, чтобы закончить запись текущей клавиши и выбрать другую клавишу для записи
Слои, поддерживающие запись макросов:
- Стандартный слой
- Слой Fn
- Слой Fn + Ctrl
Клавиши, не поддерживающие запись макросов:
- Fn
- Caps Lock
Пример записи макросов
Примечание: выберите профиль 2-6 перед записью макроса.
Пример A Переназначение клавиши Z на клавишу Q
Порядок действий:
Зажмите Fn + Alt + Tab на 3 секунды —► Нажмите Z —► Нажмите Q —► Нажмите Fn + Alt —► Зажмите Fn + Alt + Tab на одну секунду
Пример B Назначение команды «показать рабочий стол» (на ОС Windows) на клавишу Z
Порядок действий:
Зажмите Fn + Alt + Tab на 3 секунды —► Нажмите Z —► Нажмите Windows + D —► Нажмите Fn + Alt —► Зажмите Fn + Alt + Tab на одну секунду
Пример C Назначение команды «выключить звук» на сочетание клавиш Fn + Ctrl + M
Порядок действий:
Зажмите Fn + Alt + Tab на 3 секунды —► Нажмите Fn + Ctrl + M —► Нажмите Fn + Windows + A —► Нажмите Fn + Alt —► Зажмите Fn + Alt + Tab на одну секунду
Пример D Назначение включения режима подсветки «Реакция» на сочетание клавиш Fn + Ctrl + Q
Порядок действий:
Зажмите Fn + Alt + Tab на 3 секунды —► Нажмите Fn + Ctrl + Q —► Нажмите Fn + Shift + S —► Нажмите Fn + Alt —► Зажмите Fn + Alt + Tab на одну секунду
Мудьтимедиа функции
Примечание: должны быть записаны, прежде чем использоваться
Fn + Windows + клавиши ниже:
| A | Отключение звука | G | Предыдущий плейлист | M | Поиск | S | Курсор мыши вверх |
| B | Увеличение громкости | H | Калькулятор | N | Предыдущая страница | T | Курсор мыши вниз |
| C | Уменьшение громкости | I | Мой компьютер | O | Следующая страница | U | Курсор мыши влево |
| D | Воспроизведение / пауза | J | Браузер | P | Левая кнопка мыши | V | Курсор мыши вправо |
| E | Стоп | K | Почта | Q | Правая кнопка мыши | W | Прокрутка вверх |
| F | Следующий плейлист | L | Мультимедиа | R | Средняя кнопка мыши (колесо) | X | Прокрутка вниз |
Функциональные клавиши
Примечание: должны быть записаны, прежде чем использоваться
Fn + Shift + клавиши ниже:
| A | Отобразить номер выбранного профиля | N | Режим подсветки: Волна |
| B | Профиль 1 | O | Режим подсветки: Цветовой цикл |
| C | Профиль 2 | P | Режим подсветки: Капли дождя |
| D | Профиль 3 | Q | Режим подсветки: Пульсация |
| E | Профиль 4 | R | Режим подсветки: Случайная реакция |
| F | Профиль 5 | S | Режим подсветки: Реакция |
| G | Профиль 6 | T | Режим подсветки: 100% полная подсветка |
| H | Переключение режимов подсветки | U | Режим подсветки: Дыхание |
| I | Настроить красный цвет | V | Режим подсветки: Радар |
| J | Настроить зелёный цвет | W | Режим подсветки: подсветка выключена |
| K | Настроить синий цвет | X | Клавиша “.» на цифровом блоке (Num_.) |
| L | Стереть весь настроенный цвет | Y | Блокировка цифр |
| M | Цветовая палитра |
Функциональные клавиши Windows
| Ctrl + C |
Копировать | Win + D |
Рабочий стол |
| Ctrl + X | Вырезать | Win + M | Свернуть все окна |
| Ctrl + V | Вставить | Win + L | Заблокировать компьютер или сменить пользователя |
| Ctrl + Z | Отменить | Win + R | Открыть окно «Выполнить» |
| Ctrl + Y | Вернуть | Win + ↑ | Развернуть окно на весь экран |
| Ctrl + N | Открыть новое окно | Win + ↓ | Уменьшить окно |
| Ctrl + O | Открыть новый файл | Win + ← | Развернуть до левого края экрана |
| Ctrl + S | Сохранить изменения | Win + → | Развернуть до правого края экрана |
| Ctrl + P | Печать | Win + Home | Свернуть все окна, кроме используемого |
| Alt + F4 |
Закрыть программу/приложение |
МОДЕЛЬ КЛАВИАТУРЫ DKON1861ST / DKME1861ST
Режимы подсветки RGB
Fn + Alt + T:
Первый режим: Волна (по умолчанию)
Второй режим: Цветовой цикл
Третий режим: Капли дождя
Четвертый режим: Пульсация
Пятый режим: Случайная реакция
Шестой режим: Реакция (цвет регулируется)
Седьмой режим: Дыхание (цвет регулируется)
Восьмой режим: 100% полная подсветка (цвет регулируется)
Девятый режим: Радар (цвет регулируется)
Десятый режим: подсветка выключена
Всё остальное управление подсветкой аналогично модели DKON2061ST / DKME2061ST (см. в начале страницы)
DIP-переключатели
Инструкция: сначала отключаете клавиатуру, затем меняете положение DIP-переключателя, включаете клавиатуру — вы великолепны!
| DIP-переключатель 1 | DIP-переключатель 2 | ФУНКЦИЯ |
| OFF | OFF | |
| ON | OFF | |
| OFF | ON | |
| ON | ON |
DIP-переключатель 3
| OFF | ON |
| CAPS LOCK = CAPS LOCK | CAPS LOCK → FN (FN=FN) |
DIP-переключатель 4
| OFF | ON |
| N-key Rollover Mode | 6-key Rollover Mode |
Выбора профиля и запись макросов
Аналогично модели DKON2061ST / DKME2061ST (см. в начале страницы)
View the manual for the Ducky One 2 Mini here, for free. This user manual comes under the category keyboards and has been rated by 1 people with an average of a 6.5. This manual is available in the following languages: English. Do you have a question about the Ducky One 2 Mini?
Ask your question here
Ducky One 2 Mini specifications
Below you will find the product specifications and the manual specifications of the Ducky One 2 Mini.
The Ducky One 2 Mini is a compact keyboard that operates through a USB connection. Designed for versatile use, it can be utilized across various devices. Its keyboard key switch is mechanical, meaning it provides a tactile response and is known for its durability. This modern keyboard utilizes a wired connectivity technology, ensuring a stable connection during use. With its mini form factor, the Ducky One 2 Mini boasts a small size, making it portable and space-saving. Its straight keyboard style offers a sleek and streamlined appearance. The keyboard does not come with a pointing device, meaning a separate mouse is required for navigation. Additionally, it does not include a USB hub or a fingerprint reader, catering to its minimalist design. The Ducky One 2 Mini does not come with a mouse or a wrist rest for added convenience. Furthermore, it lacks a numeric keypad. Overall, the Ducky One 2 Mini is a compact and versatile mechanical keyboard with a wired connectivity option. Its small size and minimalist design make it ideal for those who prefer a minimalistic setup. With a reliable and durable construction, this keyboard ensures long-term usage. However, it is important to note that the Ducky One 2 Mini does not come with certain features, such as a pointing device, USB hub, fingerprint reader, mouse, wrist rest, or a numeric keypad.
Keyboard dimensions (WxDxH)
302 x 108 x 40 mm
General
| Brand | Ducky |
| Model | One 2 Mini | DKON1861ST-CFIPDAZT1 |
| Product | keyboard |
| EAN | 4713319664363, 4713319664370 |
| Language | English |
| Filetype | User manual (PDF) |
Keyboard
| Device interface | USB |
| Recommended usage | Universal |
| Keyboard key switch | Mechanical |
| Keyboard layout | — |
| Keyboard language | — |
| Connectivity technology | Wired |
| Purpose | Universal |
| Keyboard form factor | Mini |
| Pointing device | No |
| USB hub | No |
| Fingerprint reader | No |
| Numeric keypad | No |
| Keyboard key switch technology | Cherry MX Blue |
| Number of height positions | 3 |
| Country of origin | Taiwan |
Design
| Keyboard style | Straight |
| Wrist rest | No |
| Product colour | Black, White |
| Adjustable keyboard height | Yes |
| Light effects | Yes |
| Backlight | Yes |
| Backlight type | LED |
| Backlight colour | Red/Green/Blue |
Mouse
Weight & dimensions
| Keyboard dimensions (WxDxH) | 302 x 108 x 40 mm |
| Keyboard weight | 590 g |
Power
show more
Frequently asked questions
Can’t find the answer to your question in the manual? You may find the answer to your question in the FAQs about the Ducky One 2 Mini below.
How can I best clean my keyboard?
A slightly damp cleaning cloth or soft, dust-free cloth works best to remove fingerprints. Dust in hard-to-reach places is best removed with compressed air.
How do I clean my keyboard?
Hold the keyboard upside down and use a can of compressed air to blow away the dirt. The keys can even be cleaned with a damp cloth.
Is the manual of the Ducky One 2 Mini available in English?
Yes, the manual of the Ducky One 2 Mini is available in English .
Is your question not listed? Ask your question here
Ducky One 2 Mini RGB
View the manual for the Ducky One 2 Mini RGB here, for free. This manual comes under the category keyboards and has been rated by 4 people with an average of a 8.1. This manual is available in the following languages: English. Do you have a question about the Ducky One 2 Mini RGB or do you need help?
Ask your question here
Product Images (8)

Ducky One 2 Mini RGB specifications
Below you will find the product specifications and the manual specifications of the Ducky One 2 Mini RGB.
The Ducky One 2 Mini RGB is a mechanical keyboard that features Cherry MX Red key switches, offering a responsive and tactile typing experience. The keyboard is powered by a USB connection, which also serves as the device interface. Measuring 302 x 108 x 40 millimeters and weighing 590 grams, this compact keyboard is designed to fit comfortably on any desk or surface.
In terms of features, the Ducky One 2 Mini RGB offers anti-ghosting technology, which allows for accurate and simultaneous key presses. The keyboard also has adjustable height settings, allowing users to customize their typing experience for optimal comfort. However, it does not come with a wrist rest.
With a straight keyboard style and monochromatic surface coloration, the Ducky One 2 Mini RGB sports a sleek and minimalist design. It has a polling rate of 1000 Hz, ensuring fast and accurate data transmission between the keyboard and the connected device.
Recommended for universal usage, the Ducky One 2 Mini RGB provides a versatile solution for various tasks and applications. Whether you are typing documents, playing games, or simply browsing the internet, this keyboard aims to deliver a reliable performance.
To sum up, the Ducky One 2 Mini RGB is a compact and responsive mechanical keyboard with Cherry MX Red key switches. It offers anti-ghosting, adjustable height settings, and a minimalist design. With its versatile usage and reliable performance, it aims to be a suitable option for various tasks.
Keyboard key switch
Mechanical
Keyboard dimensions (WxDxH)
302 x 108 x 40 mm
Adjustable keyboard height
Yes
General
| Brand | Ducky |
| Model | One 2 Mini RGB | DKON1861ST-RUSPDAZT1 |
| Product | keyboard |
| EAN | 4713319664394, 4713319664066 |
| Language | English |
| Filetype | User manual (PDF) |
Keyboard
| Keyboard key switch | Mechanical |
| Keyboard key switch technology | Cherry MX Red |
| Device interface | USB |
| Rollover | N-key rollover |
| Polling rate | 1000 Hz |
| Recommended usage | Universal |
| Keyboard layout | — |
| Keyboard language | — |
| Pointing device | No |
| Keyboard form factor | Full-size (100%) |
| Numeric keypad | No |
Power
Weight & dimensions
| Keyboard dimensions (WxDxH) | 302 x 108 x 40 mm |
| Keyboard weight | 590 g |
Features
Design
| Adjustable keyboard height | Yes |
| Wrist rest | No |
| Keyboard style | Straight |
| Surface coloration | Monochromatic |
| Backlight | Yes |
| Backlight type | RGB LED |
| Product colour | Black |
Mouse
Packaging content
| Number of products included | 1 pc(s) |
show more
Questions & answers
Can’t find the answer to your question in the manual? You may find the answer to your question in the FAQs about the Ducky One 2 Mini RGB below.
How to Customize RGB Lighting on Ducky One 2 Mini Keyboard
How do I enable or disable the Windows key on my Ducky One 2 Mini keyboard?
To enable or disable the Windows key on your keyboard, press and hold the Fn key, then press the Windows key (located at the bottom-left) and the right Alt key simultaneously. This combination will toggle the Windows key functionality on or off, depending on your preference.
How do I set up the RGB lighting on my Ducky One 2 Mini keyboard?
To set up the RGB lighting on your keyboard, press and hold the Fn key located at the bottom-right corner of the keyboard, and then press one of the number keys (from 1 to 6) to select a lighting preset. You can also use the arrow keys while holding the Fn key to adjust the brightness or speed of the lighting effects.
How can I remap the keys on my Ducky One 2 Mini keyboard?
The Ducky One 2 Mini keyboard has a built-in function to remap keys. To do this, press and hold the Fn key, then press the right Alt key (or the Menu key on older models) to enter the programming mode. From there, you can follow the instructions on the keyboard to remap keys according to your preference. Remember to save the changes before exiting the programming mode.
What is the best way to clean my {keyboard} Ducky One 2 Mini?
To clean your Ducky One 2 Mini keyboard, it is recommended to use compressed air to remove any dust or debris from between the keys. Additionally, you can gently wipe the keycaps and the keyboard frame with a soft, lint-free cloth dampened with mild soapy water. Avoid using excessive moisture or harsh cleaning agents, as they may damage the keyboard.
Can I change the polling rate of my Ducky One 2 Mini keyboard?
Yes, you can change the polling rate of your keyboard. To do this, press and hold the Fn key, then press the left Ctrl key (or Caps Lock key on older models) and the right Ctrl key simultaneously. The keyboard will cycle through different polling rate options, and you can release the keys when your desired polling rate is selected. Note that the available polling rates may vary depending on the specific model.
Does the Ducky One 2 Mini RGB have a mechanical key switch?
Yes, the Ducky One 2 Mini RGB has a mechanical key switch. This means that the keys are more durable, provide a better tactile feel, and are generally preferred by gamers and typists.
What type of key switch technology does the Ducky One 2 Mini RGB use?
The Ducky One 2 Mini RGB uses Cherry MX Red key switch technology. Cherry MX Red switches are linear and have a light actuation force, making them ideal for fast and responsive typing and gaming.
Can the Ducky One 2 Mini RGB be powered by USB?
Yes, the Ducky One 2 Mini RGB can be powered by USB. This means that it can be easily connected to a computer or other compatible device without the need for an external power source.
Is the Ducky One 2 Mini RGB compatible with USB devices?
Yes, the Ducky One 2 Mini RGB has a USB device interface. This means that it can be easily connected to other USB devices, such as computers and gaming consoles, for seamless compatibility and use.
Does the Ducky One 2 Mini RGB have adjustable keyboard height?
Yes, the Ducky One 2 Mini RGB has adjustable keyboard height. This allows users to customize the angle and height of the keyboard for a more ergonomic and comfortable typing or gaming experience.
How can I best clean my keyboard?
A slightly damp cleaning cloth or soft, dust-free cloth works best to remove fingerprints. Dust in hard-to-reach places is best removed with compressed air.
How do I clean my keyboard?
Hold the keyboard upside down and use a can of compressed air to blow away the dirt. The keys can even be cleaned with a damp cloth.
Is the manual of the Ducky One 2 Mini RGB available in English?
Yes, the manual of the Ducky One 2 Mini RGB is available in English .
Is your question not listed? Ask your question here
Ducky
Loading…
D
- DKSH1408SD
M
- Mecha Mini
O
- One 2 mini
- One 2 SF
R
- Rooster
S
- Secret DMSE15O
- Shine 4
- Shine 5
- Shine 6
- Shine 7
Y
- Year of the Rat Limited Edition
Loading…
Loading…
Nothing found
One 2 mini
operation manual
56 pgs3.94 Mb0
Table of contents
Loading…
…
Ducky operation manual
Download
Specifications and Main Features
Frequently Asked Questions
User Manual


Loading…
+ 39 hidden pages
You need points to download manuals.
1 point = 1 manual.
You can buy points or you can get point for every manual you upload.
Buy points
Upload your manuals
The Ducky One 2 Mini RGB keyboard is a compact and highly popular mechanical keyboard known for its customizable RGB lighting.
This keyboard has a solid following among gamers and tippers because of its stylish design and high-quality construction.
RGB lighting adds a touch of personalization and flair to your keyboard, allowing you to create a visually appealing setup that matches your style and preferences.
In this article, we will explore the various Ducky One 2 Mini RGB settings and how you can easily customize the lighting effects to make your keyboard genuinely unique.
Whether you’re a gamer or want to add visual charm to your workspace, read on to discover the exciting possibilities of Ducky One 2 Mini RGB settings.
Understanding the Ducky One 2 Mini RGB Keyboard
Before we dive into the exciting world of Ducky One 2 Mini RGB settings, let’s take a moment to understand the keyboard itself.
The Ducky One 2 Mini RGB is a compact keyboard that packs a punch. Its small form makes it perfect for gamers and typists who value space-saving designs without compromising functionality.
What sets the Ducky One 2 Mini RGB apart is its unique RGB lighting system. Each keycap is individually backlit, allowing you to customize the lighting of every single key.
This means you can create unique lighting effects, colour combinations, and patterns to suit your mood or gaming setup.
With the Ducky One 2 Mini RGB settings, you can unleash your creativity and personalize your keyboard like never before.
Let’s explore how you can make the most out of these settings in the upcoming sections.
Getting Started with Ducky One 2 Mini RGB Settings
Now that you have your Ducky One 2 Mini RGB keyboard in front of you, it’s time to dive into the exciting world of customization.
Let’s begin with the steps to get started with your Ducky One 2 Mini RGB settings.
Unboxing and Setting Up
When unboxing your keyboard, ensure that all the components are present. Plug in the other end of the keyboard and connect your PC using the USB cable.
Once connected, your keyboard should light up, indicating it’s ready.
Visit the Ducky Website
Open your web browser and go to the official Ducky website. Look for the “Support” or “Downloads” section.
Download the Ducky Software
Locate the software download section and find the software compatible with your operating system (Windows or macOS). To begin the download procedure, click the download link.
Install the Software
Once the download is complete, locate the downloaded file on your computer and run the installer. To install the software, adhere to the on-screen directions. After the installation, you should see the Ducky software icon on your desktop or in your applications folder.
Connect the Keyboard
Use the included USB connector to connect your Ducky One 2 Mini RGB keyboard to your PC. Make sure the keyboard is turned on and connected correctly.
Launch the Ducky Software
Double-click on the Ducky software icon to launch the program. The software should automatically detect your connected Ducky One 2 Mini RGB keyboard.
Check for Firmware Updates
In the Ducky software, look for a section or option related to firmware updates. Click on it to check for any available updates for your keyboard’s firmware.
If updates are available, follow the instructions provided by the software to install them. Firmware updates can enhance performance, fix bugs, and introduce new features.
Explore the Software Interface
Take some time to familiarize yourself with the Ducky software interface. Various tabs and settings allow you to customize your keyboard’s RGB lighting, create profiles, and more. Spend some time exploring the options and features available to you.
By following these steps, you can ensure that your Ducky One 2 Mini RGB keyboard is equipped with the latest firmware updates and ready to unleash its full potential.
Now that you have the software installed and your firmware updated, you’re all set to dive into the exciting world of Ducky One 2 Mini RGB settings and make your keyboard unique.
Creating Custom Lighting Profiles
One of the exciting features of the Ducky One 2 Mini RGB keyboard is the ability to create custom lighting profiles.
This means you can design unique lighting effects and colour combinations that reflect your style. Let’s walk through the process of creating your lighting profile step by step.
Choosing a Profile Name
Start by giving your profile a descriptive and memorable name. This will help you quickly identify and select it later.
Selecting Desired Lighting Effects
Dive into the world of lighting effects and choose the ones that captivate you the most. You can opt for a single effect, such as a static colour or breathing mode, or combine multiple effects to create a dynamic lighting experience.
Configuring Color Options
Experiment with colour combinations to find the perfect palette for your custom lighting profile. Whether you prefer vibrant and bold colours or subtle and soothing tones, the choice is yours.
Saving and Applying the New Profile
Once you’re satisfied with your custom lighting profile, don’t forget to save it. The Ducky software typically provides a “Save” or “Apply” button to store your settings.
Once saved, you can easily switch between different profiles whenever you want a change of ambiance.
By creating custom lighting profiles, you can personalize your Ducky One 2 Mini RGB keyboard to match your mood, gaming setup, or even the game you’re playing. Don’t be afraid to experiment, and let your creativity shine.
Advanced Customization Options
If you’re ready to take your Ducky One 2 Mini RGB settings to the next level, this section is for you.
Let’s explore some advanced customization options that will allow you to create even more impressive lighting effects and integrate them with macros and key binds.
Exploring More Intricate Lighting Effects
The Ducky One 2 Mini RGB keyboard offers a variety of intricate lighting effects that can elevate your keyboard’s aesthetics. Here are a few examples:
- Reactive Typing: With reactive typing, each key you press will light up momentarily, creating a stunning visual effect as you type.
- Ripple Effect: The ripple effect produces a ripple of light that expands from the key you press, adding a dynamic and immersive element to your keyboard’s lighting.
- Breathing Mode: Breathing mode mimics a breath’s gentle rise and fall, creating a soothing and subtle lighting effect.
Explore these effects in the Ducky software to find the ones that resonate with you.
Integrating Lighting with Macros and Keybinds
The Ducky One 2 Mini RGB keyboard allows you to synchronize lighting effects with your macros and key binds, enhancing your gaming or productivity experience. For example:
- Syncing Lighting Effects with Keypresses: You can set your keyboard to display specific lighting effects when certain keys are pressed, helping you keep track of essential actions during gaming or programming.
- Creating Macros with Customized Lighting: Customize your macros with unique lighting effects to distinguish them from regular keypresses visually. This can be particularly useful for complex commands or shortcuts.
You can create a cohesive and immersive experience beyond visual aesthetics by integrating lighting with macros and key binds.
Remember to have fun and experiment with different combinations and settings. The Ducky One 2 Mini RGB keyboard offers endless possibilities to let your creativity shine.
Troubleshooting and Tips
While the Ducky One 2 Mini RGB keyboard is a fantastic device, you may encounter some issues or have questions. Here are a few troubleshooting tips and general advice to help you out:
Common Issues: If you experience any problems with your keyboard, such as unresponsive keys or software glitches, try disconnecting and reconnecting the keyboard, restarting your computer, or reinstalling the Ducky software.
Resetting to Default Settings: Most Ducky keyboards have a reset option if you want to revert your keyboard to its original settings. Refer to the user manual or the Ducky website for instructions specific to your model.
Longevity of RGB Lighting: To maximize the lifespan of your keyboard’s RGB lighting, avoid using high brightness settings for prolonged periods and keep the keyboard clean from dust and debris.
How to change your ducky one 2 mini RGB
FAQ
Q: What should I do if I encounter issues with my Ducky One 2 Mini RGB settings?
A: If you experience problems with your keyboard or software, try disconnecting and reconnecting the keyboard, restarting your computer, or reinstalling the Ducky software. These troubleshooting steps often resolve common issues.
Q: Is the Ducky software compatible with different operating systems?
A5: Yes, the Ducky software is typically compatible with various operating systems. Visit the Ducky website to ensure you download the correct software version for your specific operating system.
Q: How can I share my custom lighting profiles with the Ducky community?
A: To share your custom lighting profiles with the Ducky community, upload them to online platforms or forums where Ducky enthusiasts gather. This way, others can download and enjoy your creative lighting designs.
Conclusion
Congratulations! You’ve reached the end of our guide to Ducky One 2 Mini RGB settings. This article has helped you unlock the full potential of your keyboard and create a personalized lighting experience that suits your style.
With the Ducky One 2 Mini RGB settings, you can transform your keyboard into a captivating centrepiece for your gaming or typing sessions.
So explore the endless possibilities, and let your creativity shine with the Ducky One 2 Mini RGB settings. Happy customizing!
I am a regular user of computer keyboards. For using keyboard face different kinds of problems and also solve it very easily. I love sharing knowledge about keyboards.