

User Manual
Nord Stage EX
OS Version 6.x
Part No. 50250 Copyright Clavia DMI AB 2010
Print Edition 6.0
CAUTION — ATTENTION
RISK OF ELECTRIC SHOCK
DO NOT OPEN
RISQUE DE SHOCK ELECTRIQUE
NE PAS OUVRIR
CAUTION: TO REDUCE THE RISK OF ELECTRIC SHOCK
DO NOT REMOVE COVER (OR BACK).
NO USER SERVICEABLE PARTS INSIDE.
REFER SERVICING TO QUALIFIED PERSONNEL.
ATTENTION:POUR EVITER LES RISQUES DE CHOC ELECTRIQUE, NE
PAS ENLEVER LE COUVERCLE.
AUCUN ENTRETIEN DE PIECES INTERIEURES PAR L´USAGER.
CONFIER L´ENTRETIEN AU PERSONNEL QUALIFE.
AVIS: POUR EVITER LES RISQUES D´INCIDENTE OU D´ELECTROCUTION,
N´EXPOSEZ PAS CET ARTICLE A LA PLUIE OU L´HUMIDITET.
Instructions pertaining to a risk of re, electric shock or injury to persons.
IMPORTANT SAFETY INSTRUCTIONS
SAVE THESE INSTRUCTIONS
Warning — When using electric products, basic precautions should always be followed, including the following:
1) Read these instructions.
2) Keep these instructions.
3) Heed all warnings.
4) Follow all instructions.
5) Do not use this apparatus near water.
6) Clean only with dry cloth.
7) Do not block any ventilation openings. Install in accordance
with the manufacturer’s instructions.
 Do not install near any heat sources such as radiators, heat
registers, stoves, or other apparatus (including ampliers) that
produce heat.
9) Do not defeat the safety purpose of the polarized or
grounding-type plug. A polarized plug has two blades with one
wider than the other. A grounding type plug has two blades
and a third grounding prong. The wide blade or the third prong
are provided for your safety. If the provided plug does not t
into your outlet, consult an electrician for replacement of the
obsolete outlet.
Additional Safety Information
No naked ame sources, such as lighted candles, should be placed on
the apparatus;
Do not use the apparatus in tropical climates.
WARNING: To reduce the risk of re or electric shock, do not expose
this apparatus to rain or moisture.
The apparatus shall not be exposed to dripping or splashing and that
no objects lled with liquids, such as vases, shall be placed on the
apparatus.
The maims plug is used as the disconnect device and shall remain
readily operable.
The lightning ash with the arrowhead symbol within
an equilateral triangle is intended to alert the user to the
presence of uninsulated voltage within the products en-
closure that may be of sufcient magnitude to constitute
a risk of electric shock to persons.
Le symbole éclair avec le point de èche à l´intérieur d´un triangle
équilatéral est utilisé pour alerter l´utilisateur de la presence à
l´intérieur du coffret de ”voltage dangereux” non isolé d´ampleur
sufsante pour constituer un risque d`éléctrocution.
The exclamation mark within an equilateral triangle is
intended to alert the user to the presence of important
operating and maintenance (servicing) instructions in the
literature accompanying the product.
Le point d´exclamation à l´intérieur d´un triangle équilatéral est
employé pour alerter l´utilisateur de la présence d´instructions
importantes pour le fonctionnement et l´entretien (service) dans le
livret d´instructions accompagnant l´appareil.
10) Protect the power cord from being walked on or pinched
particularly at plugs, convenience receptacles, and the point
where they exit from the apparatus.
11) Only use attachments/accessories specied by the manufacturer.
12) Use only with the cart, stand,
tripod, bracket, or table specied by the
manufacturer, or sold with the apparatus.
When a cart is used, use caution when
moving the cart/apparatus combination to
avoid injury from tip-over.
13) Unplug this apparatus during lightning
storms or when unused for long periods of time.
14) Refer all servicing to qualied service personnel. Servicing
is required when the apparatus has been damaged in any way,
such as power-supply cord or plug is damaged, liquid has been
spilled or objects have fallen into the apparatus, the apparatus
has been exposed to rain or moisture, does not operate normally, or has been dropped.
Il convient de ne pas placer sur l´appareil de sources de ammes nues,
telles que des bougies allumées;
L´appareil n’est pas destiné á étre utilisé sous un climat tropical.
L´appareil ne doit pas étre exposé á des égouttements d´eau ou des
éclaboussures et de plus qu´aucun objet rempli de liquide tel que des
vases ne doit étre placé sur l´appareil.
Lorsque la prise du résau d’alimentation est utilisée comme dispositif
de déconnexion, ce dispositif doit demeuré aisément accessible.
Trademarks: The Nord logo is trademark of Clavia DMI AB. All other trademarks mentioned
in this publication are the properties of their respective holders.
Specications and appearances are subject to change without notice.
Copyright © Clavia DMI AB

Nord Stage EX v6.x Table of contents
Table of contents
1. Introduction ………………………………………………… 5
Welcome …………………………………………………………………………… 5
About the Owner’s Manual……………………………………………….. 6
Clavia on the Internet ……………………………………………………… 6
2. Overview ………………………………………………………. 7
The Nord Stage front panel …………………………………………….. 7
The Keyboard……………………………………………………………………. 8
About Knobs & Buttons……………………………………………………. 8
3. Connections ………………………………………………..10
Nord Stage rear panel …………………………………………………… 10
Audio connections ………………………………………………………….. 10
MIDI connections ……………………………………………………………. 10
Connecting pedals………………………………………………………….. 11
4. Getting Started ………………………………………….12
About Instruments …………………………………………………………. 12
About Programs……………………………………………………………… 12
Activating instrument sections ………………………………………. 13
About Panel A & B ………………………………………………………….. 14
Setting output Level for instruments ……………………………. 15
Adding a Global effect …………………………………………………… 15
5. The Program section ……………………………………16
Overview…………………………………………………………………………. 16
What is a Program? ………………………………………………………… 19
Storing Programs…………………………………………………………… 20
6. The Instruments ………………………………………….22
Introduction…………………………………………………………………… 22
Common Features……………………………………………………………. 22
The Organ Section………………………………………………………….. 24
The Piano section……………………………………………………………. 30
The Synth section…………………………………………………………… 34
1

Table of contents Nord Stage EX v6.x
7. The Effects ………………………………………………… 49
About the effects ……………………………………………………………49
The Panel effects…………………………………………………………….50
The Rotor section …………………………………………………………..55
8. Keyboard Zones and Dual Panel setups ……… 56
Keyboard Zones ……………………………………………………………….56
Octave Shift ……………………………………………………………………58
Dual Panel setups …………………………………………………………..58
9. The Morph Assign feature ………………………….. 60
About Morph Assign ………………………………………………………..60
Using Morph — an example…………………………………………………60
Morph Assignable parameters………………………………………….61
About setting Morph parameter ranges …………………………..62
Clearing Morph Assignments……………………………………………62
About Aftertouch ……………………………………………………………62
10. The Extern section …………………………………… 63
About the Extern section ………………………………………………..63
Setting up ……………………………………………………………………….63
Using the Extern section…………………………………………………63
The Parameter section……………………………………………………..64
11. System functions………………………………………66
System menu…………………………………………………………………….66
Sound Menu……………………………………………………………………..68
MIDI menu ………………………………………………………………………..68
Extern menu …………………………………………………………………….70
2

Nord Stage EX v6.x Table of contents
12. Factory Presets and OS ……………………………71
Internal memory……………………………………………………………… 71
Factory presets……………………………………………………………… 71
OS upgrades…………………………………………………………………… 71
13. Nord Stage Manager …………………………………72
Overview…………………………………………………………………………. 72
The Quick Tour ……………………………………………………………….. 75
Nord Stage Manager reference………………………………………. 79
Tabs ……………………………………………………………………………….. 84
14. MIDI functions…………………………………………..86
About the MIDI implementation ……………………………………….. 86
Using Nord Stage with a sequencer ……………………………….. 87
Program, Controller and Synth Sound dumps………………… 88
Panic………………………………………………………………………………. 89
15. MIDI implementation…………………………………..90
MIDI Controller list………………………………………………………. 90
MIDI Implementation Chart……………………………………………… 93
Index………………………………………………………………95
3

Table of contents Nord Stage EX v6.x
4

Nord Stage EX v6.x 1. Introduction: Welcome
1. INTRODUCTION
WELCOME
We’d first like to thank you for purchasing the Nord Stage EX Eighty Eight/Seventy Six/Compact!
Clavia’s goal when developing the Nord Stage was to create a flagship stage instrument encompassing the whole range of Clavia’s expertise. Building on the success of the Nord Electro, the Nord Stage
incorporates the best emulations of traditional electromechanical/acoustic keyboard instruments on
the market as well as a synthesizer section designed for maximum ease of use, yet offering wide sonic
possibilities.
The Nord Stage EX features outstanding classic keyboard sounds with true feel, from natural keyboard response to authentic sound. A medium weighted hammer action 88/76 note keyboard, or a 73
note semi-weighted waterfall keyboard makes this instrument the largest in Clavia’s range, yet it
weighs only 18,5/16,5/9,7 kilos which is an achievement in itself.
To make a great tool you have to put all the focus on a few things, and that’s what we did with the
Nord Stage. Think about it, the best tool isn’t a Swiss army knife.
FEATURES
The Nord Stage EX has the following main features:
• Organ section with faithful reproductions of three classic models; B3 (Hammond), V-Type (Vox
Continental) and F-Type (Farfisa).
• Piano section with concert grand/upright acoustic pianos, Electric Pianos and Wurlitzer electric
pianos, Clavinet, and Electric Grand. The total memory capacity in the Stage EX units is 256 MB.
The available space for the pianos is a bit smaller, part of the memory is used for the wavetables.
• Synth section with subtractive, FM and wavetable synthesis.
• Comprehensive effects section.
• A medium weighted hammer action 88/76 note keyboard with Aftertouch, or a 73 note semiweighted waterfall keyboard with Aftertouch.
• An Extern section for controlling external MIDI instruments.
• A Morph feature for applying multiple parameter changes to a sound with controllers.
• Splits and layers are easily set up by assigning instruments to Keyboard Zones.
But that’s not all. There are two independent Panels “A” and “B”, each containing a full setup of the
Stage instruments. This means that you have access to six instrument sections and two independent
effect sections! Amongst other things, this allows for “dual manual” B3 organ emulation, and easy
setup of all kinds of instrument layering and splits.
Page 5

1. Introduction: About the Owner’s Manual Nord Stage EX v6.x
ABOUT THE OWNER’S MANUAL
The manual is arranged mainly as a reference manual. In many cases you’ll get tips on how to practically use the functions, alone and also together with other functions. Every time the manual wants
your attention to an object on the Stage, the name of that object will be printed
TORE button’. The LCD display on the Nord Stage EX is always referred to as the DISPLAY.
the S
Whenever there is a reference to the ‘keyboard’, that reference also applies to any incoming MIDI
note messages.
READING THE MANUAL IN ADOBE ACROBAT READER
This manual is also available in the digital PDF-file format. It can be downloaded, free of charge,
from Clavia’s web site at http://www.nordkeyboards.com. When reading the manual as PDF-file, you
will need Adobe Acrobat Reader 4.0 or later.
This program can be downloaded, free of charge, at http://www.adobe.com.
With Adobe Acrobat Reader it is possible to use special navigation features like hyperlinks. This
means that you can click with the mouse on a word or sentence and automatically get to the location
indicated by the word/sentence. To better show what words or sentences are hyperlinked in this manual, these words are written in magenta.
LIKE THIS, e.g. ‘press
NORD ON THE INTERNET
If you have access to the Internet, you’re very welcome to visit http://www.nordkeyboards.com.
There you will find the latest information about Nord Stage EX and other Nord products. You can
also download new Nord Stage EX sounds and software upgrades, free of charge.
Page 6

Nord Stage EX v6.x 2. Overview: The Nord Stage EX front panel
2. OVERVIEW
THE NORD STAGE EX FRONT PANEL
Organ section
Master
Level/Rotor
effect section
Piano
section
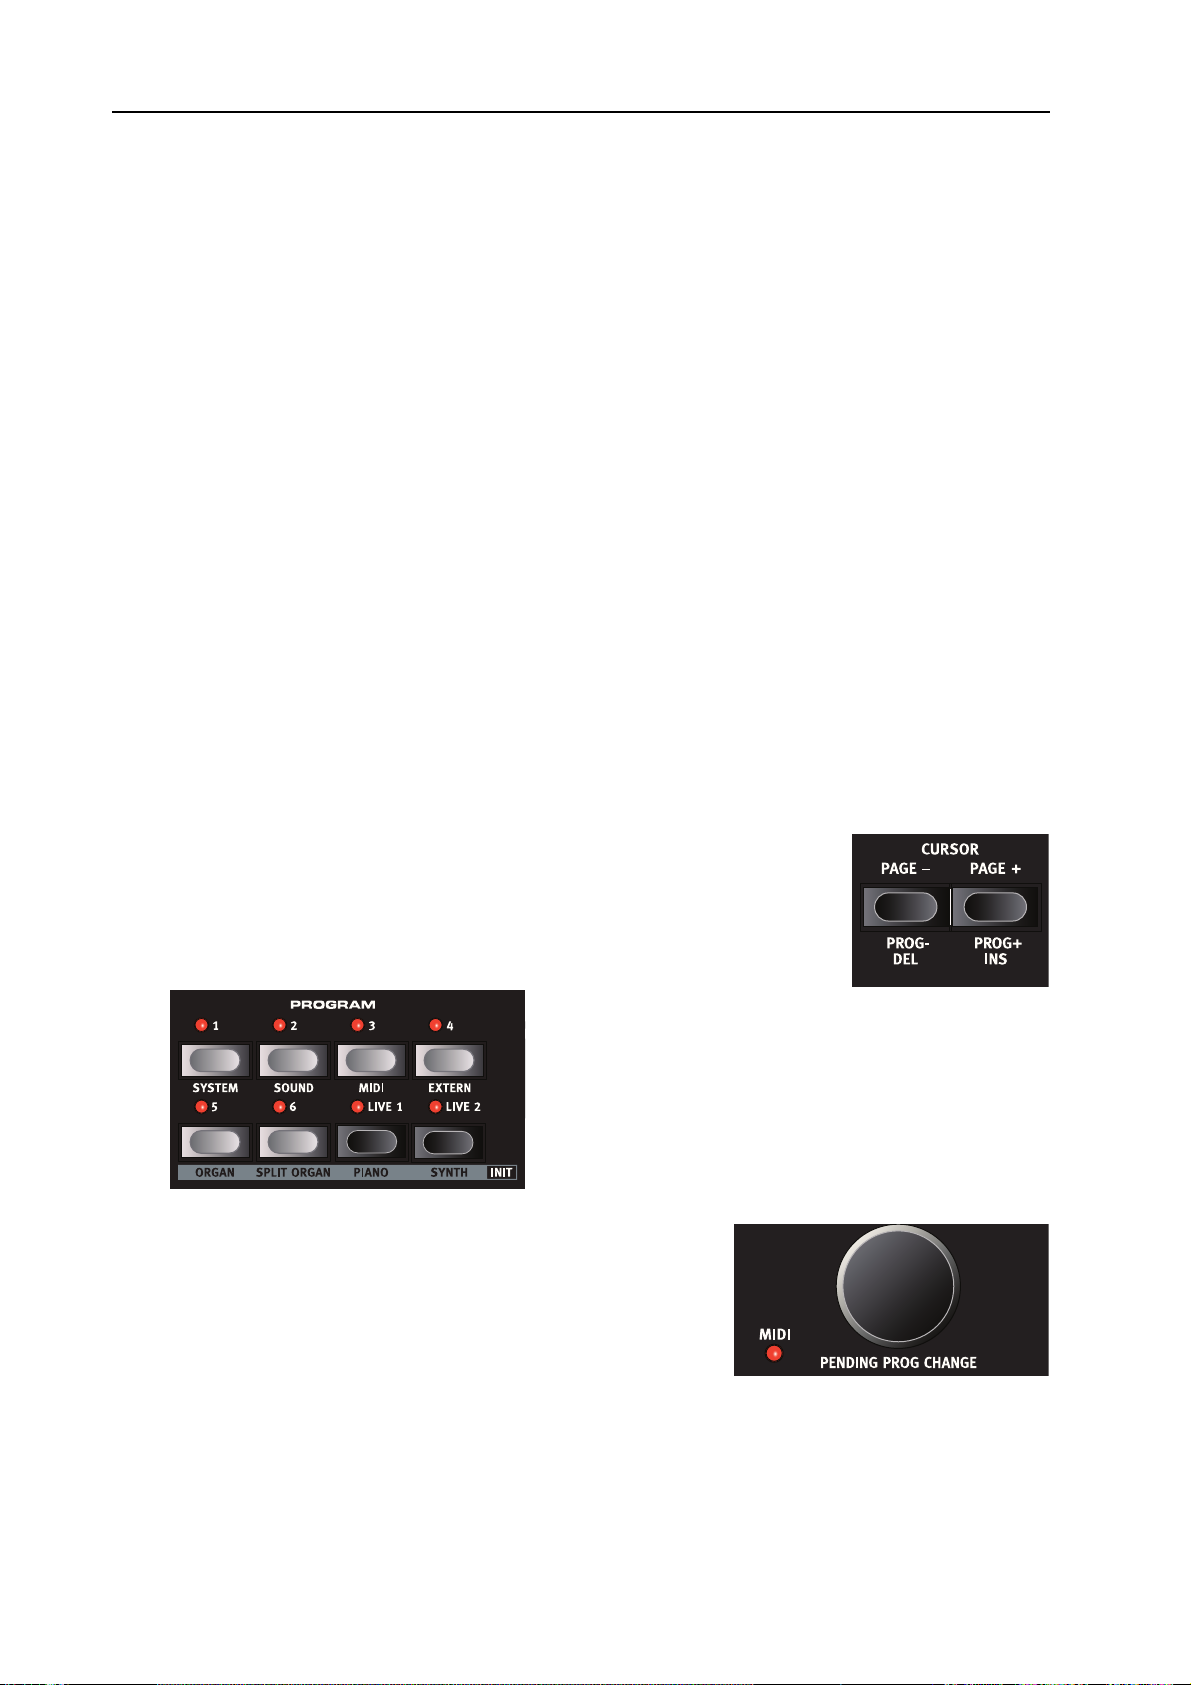
Program
section
Synth section
Effects section
Extern
section
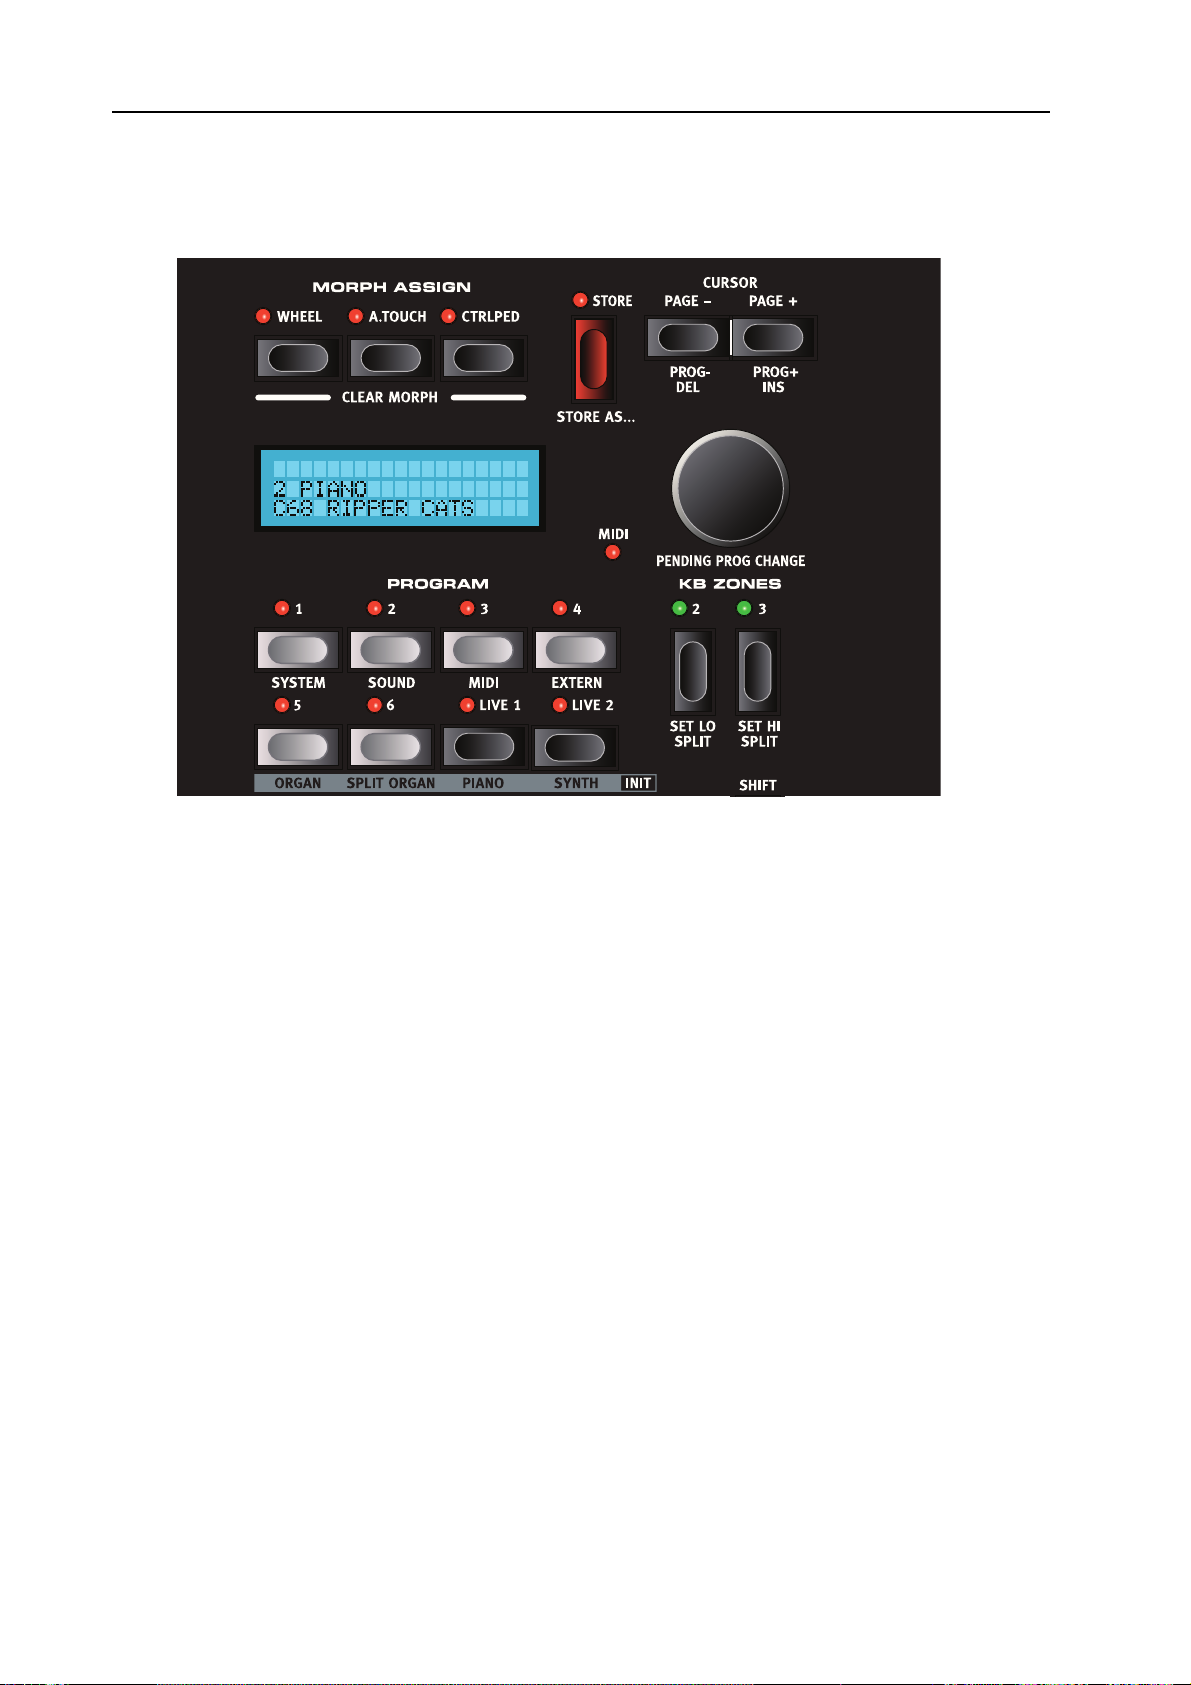
THE PROGRAM SECTION
The central Program section is where you select and store Programs, access System parameters, activate keyboard zones for splits and layers, and assign Morphing functions. See “The Program sec-
tion” on page 16 for details.
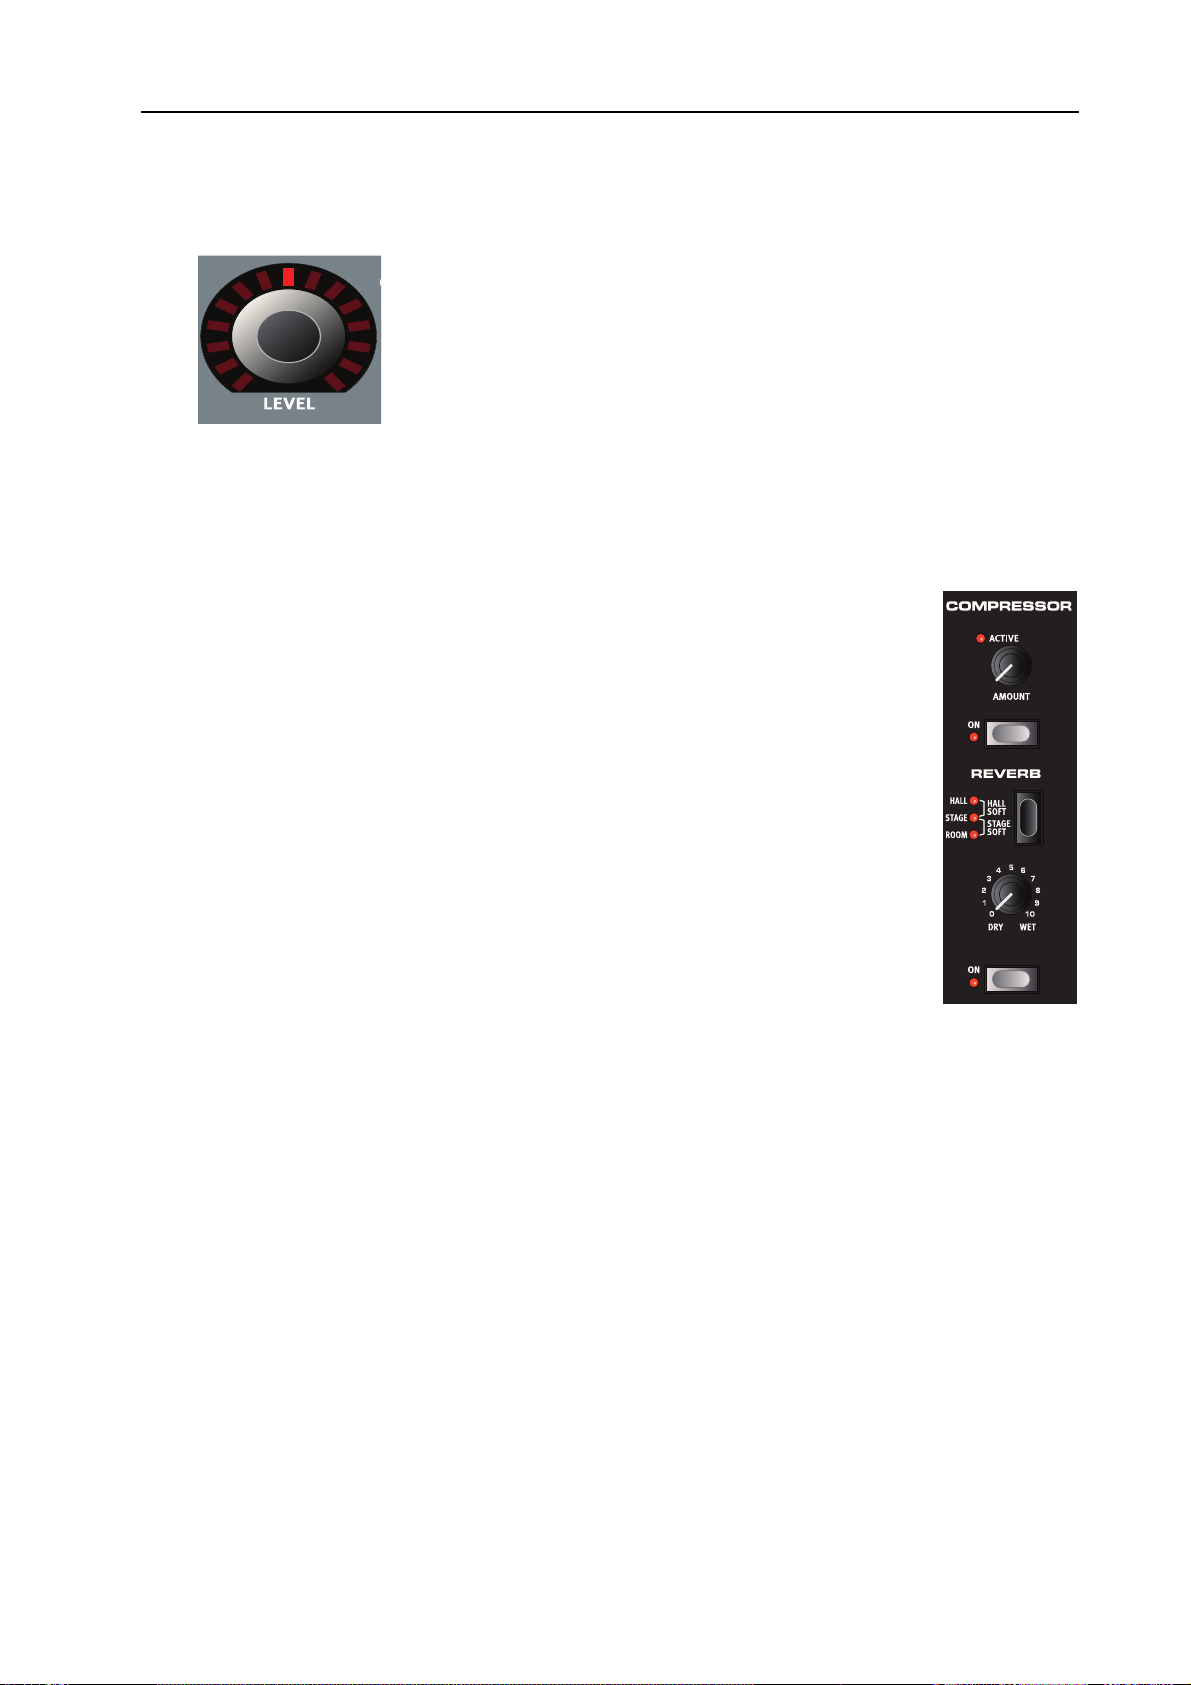
MASTER LEVEL/ROTOR SECTION
The leftmost front panel section contains a Master Level control and a rotary speaker simulator effect.
The M
PHONES output.
The Rotor effect section is logically placed close to the organ section (as rotary speaker effects are
most commonly used with organ sounds), but can be applied to any instrument section just like the
other effects. See “The Rotor section” on page 55
ASTER LEVEL knob controls the overall output level for all four CH OUT jacks and the HEAD—
THE ORGAN SECTION
The Organ section in the Stage features emulations of three classic organ models; a Hammond B3, a
Vox Continental II (V-Type) and a Farfisa Compact DeLuxe (F-Type). See “The Organ Section” on
page 24.
THE PIANO SECTION
The piano section in Nord Stage EX comprises various multi-sampled piano instruments. The Nord
Stage EX utilizes advanced multi-level sample playback, catching every nuance from soft to hard key
strokes. Nord Stage comes right out of the box with several classic piano instruments stored in a Flash
memory with a total capacity of 256 MB. The big advantage with Flash memory is that you can replace instruments with new ones and that no backup battery is required. The Stage also sports a USB
interface for quick and easy download of new piano sounds. See “The Piano section” on page 30.
Page 7
2. Overview: The Keyboard Nord Stage EX v6.x
THE SYNTH SECTION
The Synth section has been designed for maximum ease of use in live situations, while keeping flexibility and sound control. It is based on standard subtractive synthesis, with a very flexible oscillator
section that can produce all common analog-style waveforms, up to three-oscillator FM synthesis,
and a bank of carefully designed wavetables for those unusual timbres. The synth also sports a highquality resonant low-pass filter with selectable slope, two envelopes, a simple EQ, and a very powerful Unison mode.
See “The Synth section” on page 34.
THE EXTERN SECTION
The Extern section controls an external MIDI instrument. You can use the PARAMETER knob to control various parameters on the external device. You can also assign the external instrument to any
Keyboard Zone, just like the built-in instruments! See “The Extern section” on page 63.
THE EFFECTS SECTION
Here you’ll find the numerous effects and modulations you can use to add that extra flavour to your
sounds. See “The Effects” on page 49.
THE KEYBOARD
The keyboard of the Nord Stage EX features 88/76 medium weighted keys or 73 semi-weighted waterfall keys for optimal feel and response with piano instruments. For organ sounds there is also a fast
trigger response option which closely mimics the feel of a real organ.
The keyboard can be split into three Keyboard Zones to which any instrument section can be freely
assigned. Assigned Keyboard Zones are saved with a Program. See “Keyboard Zones and Dual Panel
setups” on page 56.
ABOUT KNOBS & BUTTONS
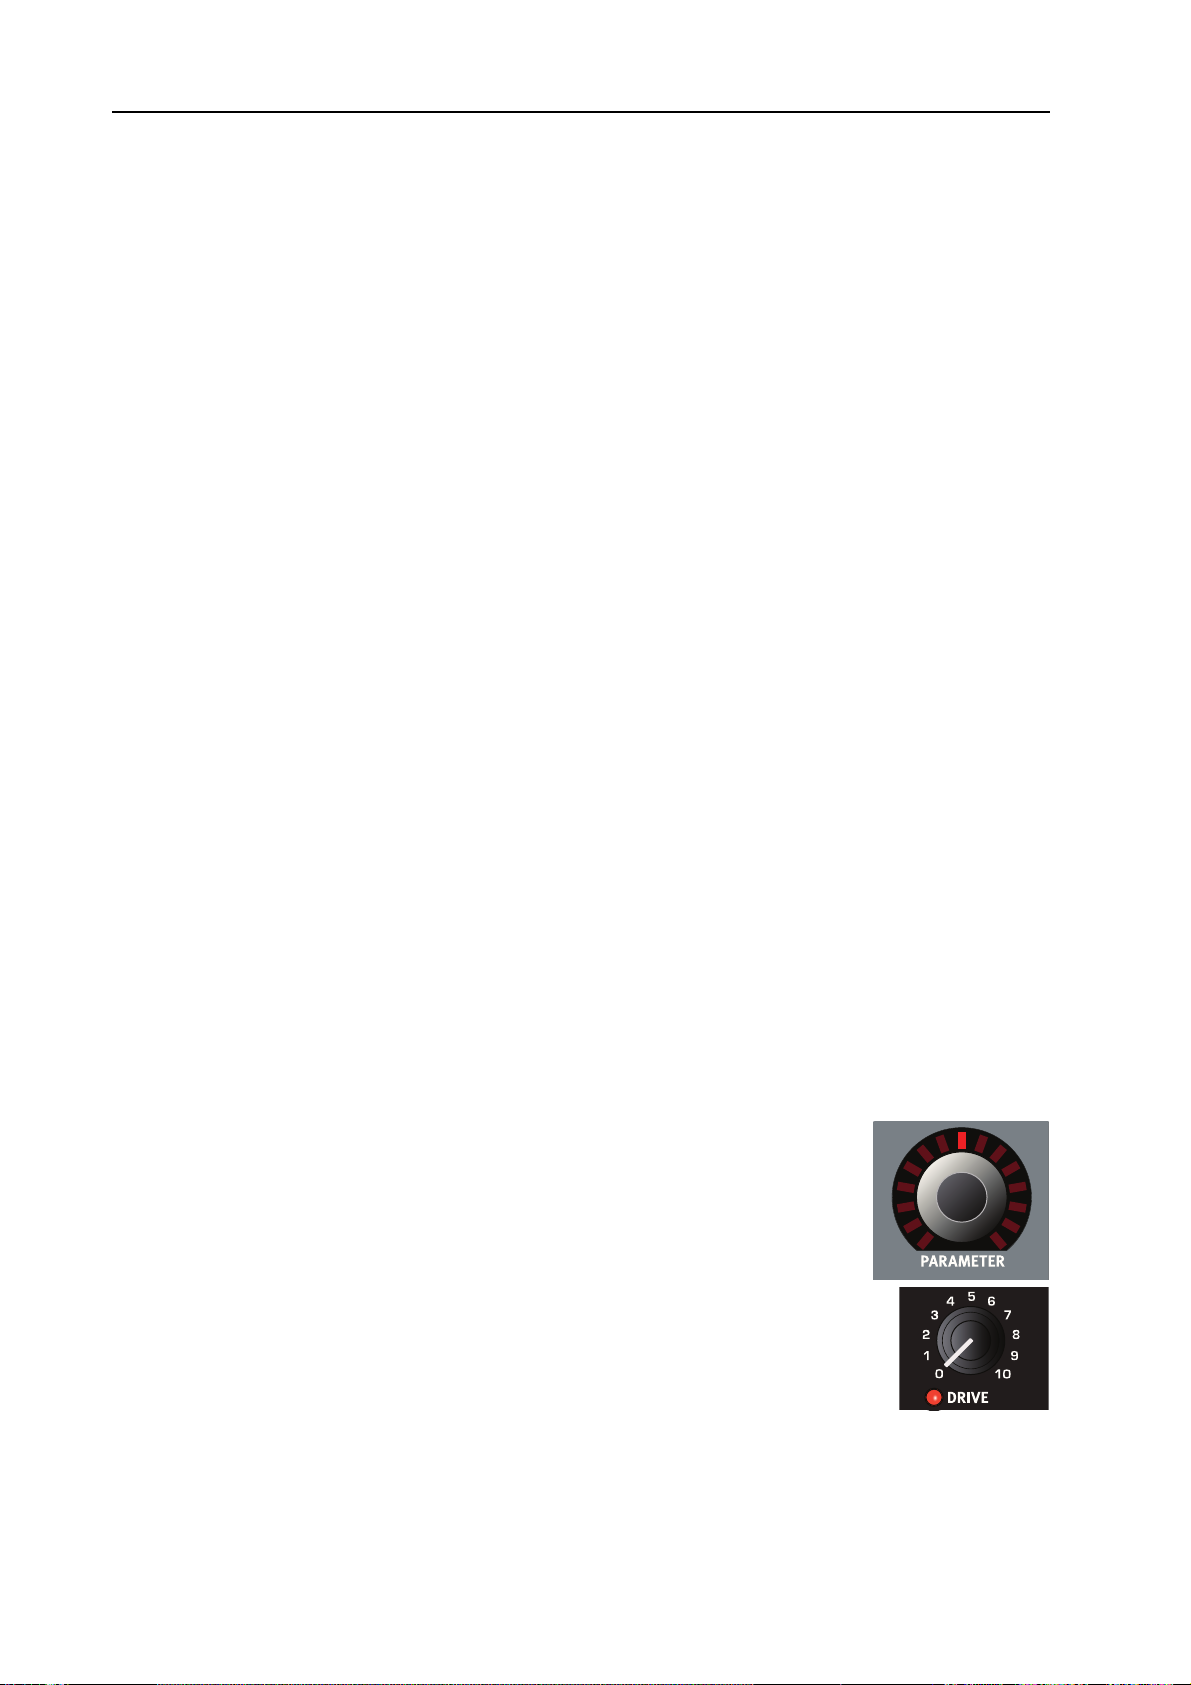
THE KNOBS
There are two types of knobs on the Nord Stage EX:
• Rotary Encoders that show the position with red LED indicators.
These always reflect the “true” value, and can also be controlled using the
Morph function (see “About Morph Assign” on page 60).
• Other knobs are of the potentiometer type. After you load a program, the corresponding parameter may not correspond to the actual position of the physical
knob. As soon as you begin turning a knob, the parameter value will ‘snap’ to
the knob’s physical position. The display will indicate the parameter value if the
corresponding section is active, with an exception for the Effect parameters.
These will be shown regardless of the Effect sections active status.
Page 8
Nord Stage EX v6.x 2. Overview: About Knobs & Buttons
THE BUTTONS
There are three types of buttons for editing sounds on the Nord Stage EX:
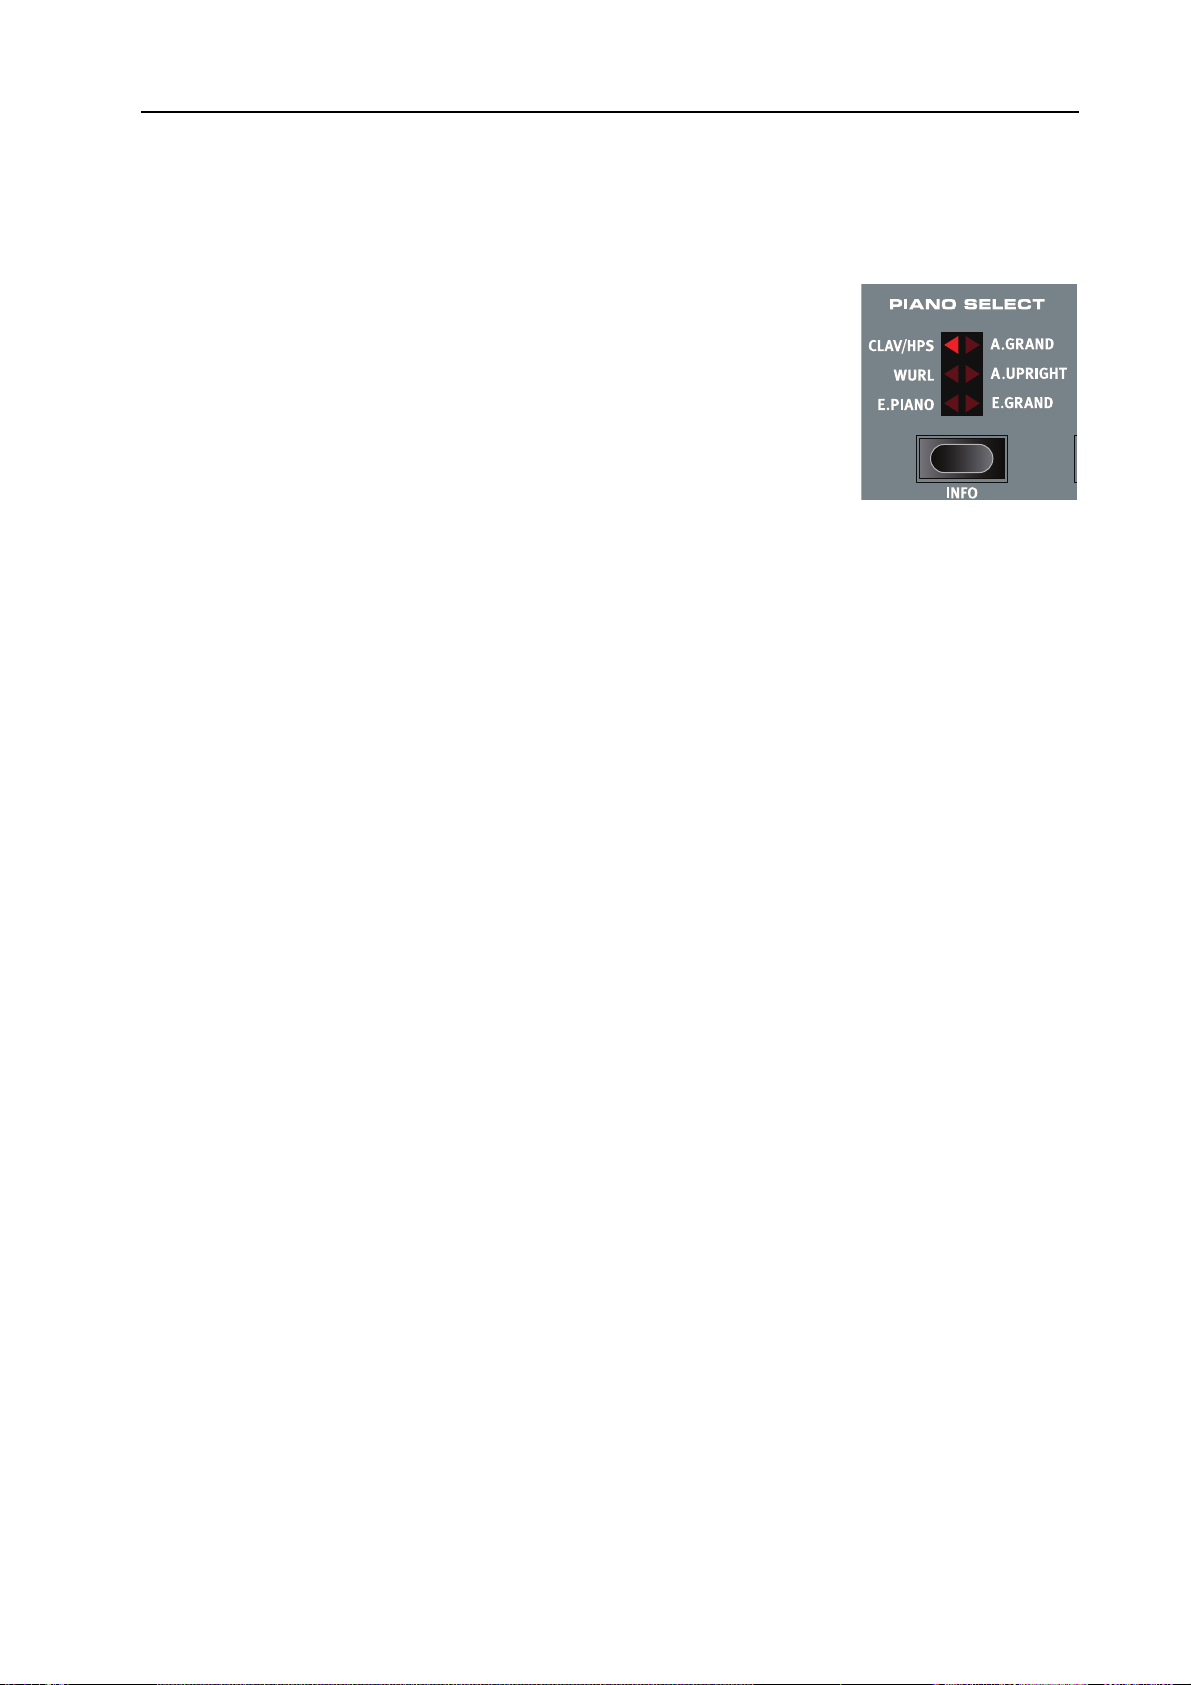
ELECTOR BUTTONS
S
Press the SELECTOR button repeatedly to select between options printed
next to the corresponding triangular LED (see figure).
O
N/OFF BUTTONS
The ON/OFF buttons have a LED next to them to indicate the status.
RAWBAR BUTTONS
D
The DRAWBAR buttons are special in the way that they auto-increment/decrement the corresponding
parameter when held. I.e. if you hold a D
continue to increment or decrement (within its range) until you release the button.
RAWBAR button the corresponding drawbar parameter will
THE SHIFT BUTTON
Many buttons and knobs have a second function, printed in darker text just below the button or knob.
You access these additional functions and parameters by holding S
turning a knob.
The S
HIFT button is also an EXIT button, used for example to exit menus and store operations.
HIFT while pressing a button or
Page 9
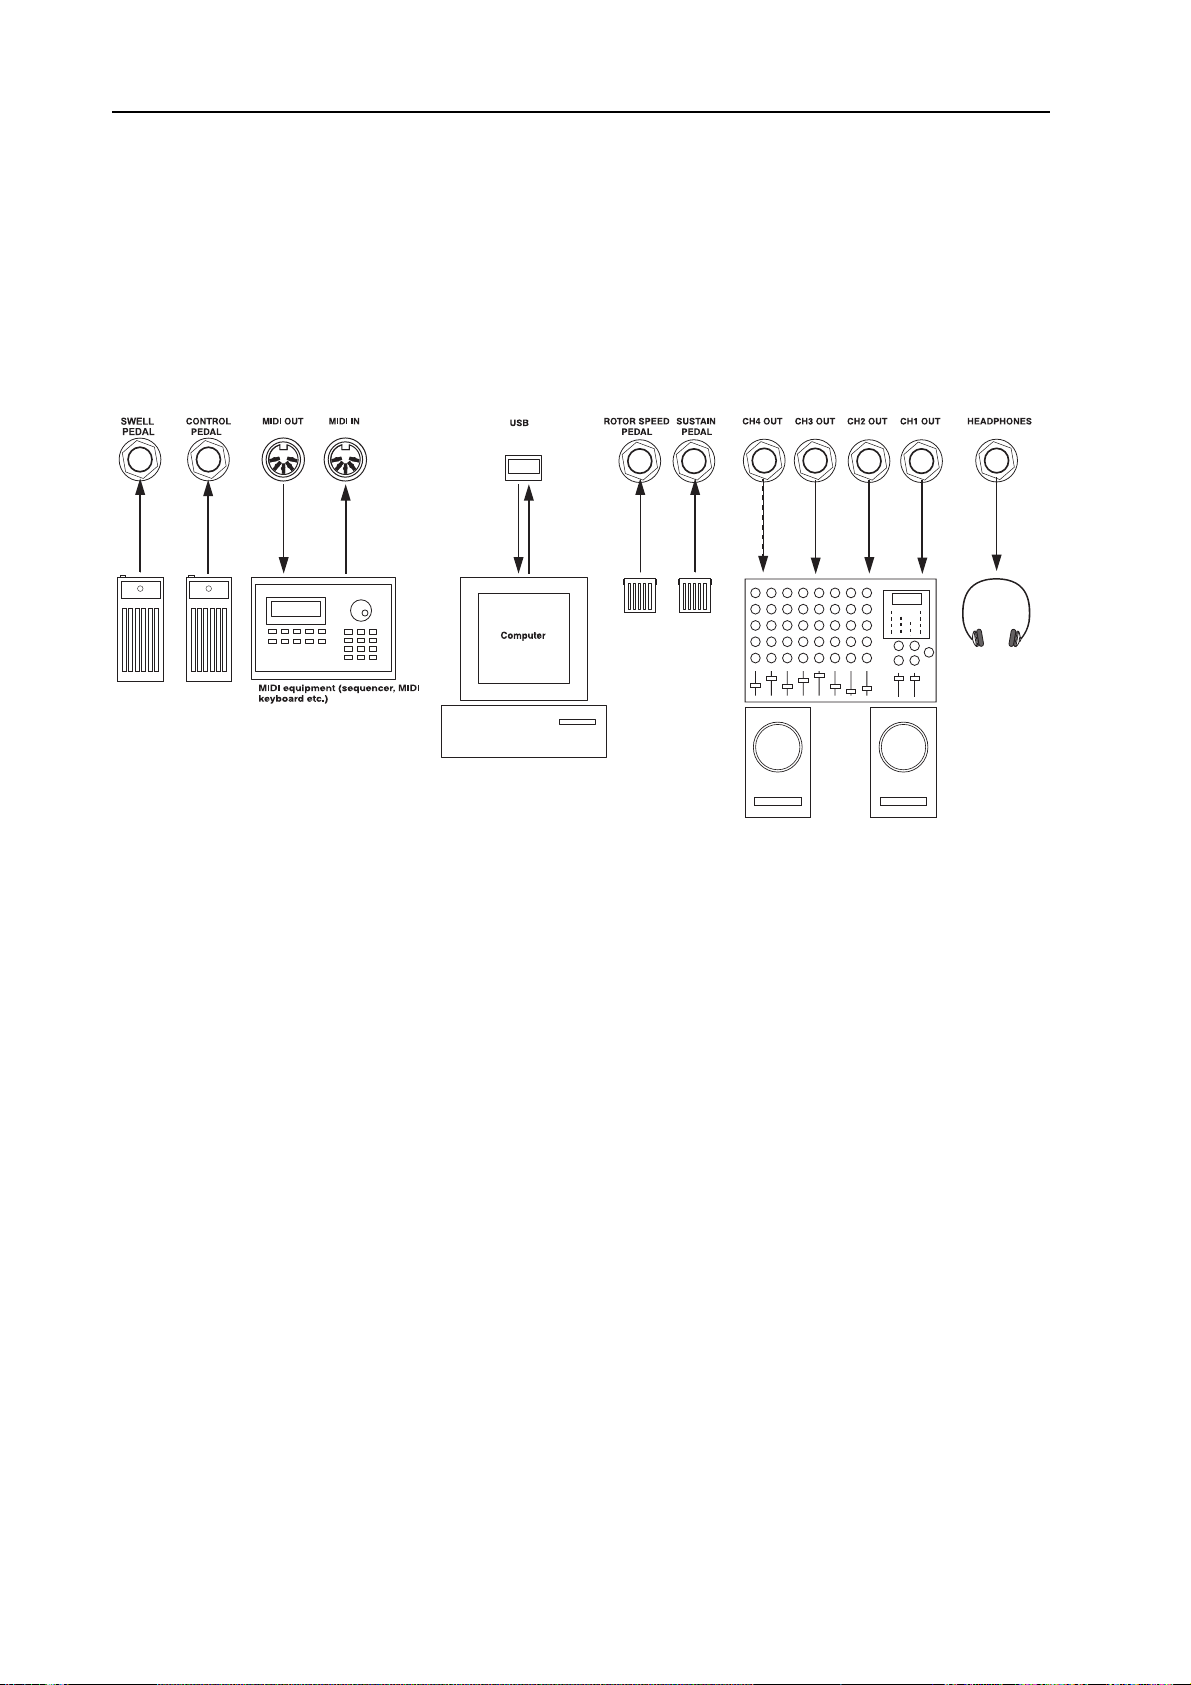
3. Connections: Nord Stage EX rear panel Nord Stage EX v6.x
3. CONNECTIONS
NORD STAGE EX REAR PANEL
AUDIO CONNECTIONS
• Make all audio connections before turning on your power amplifier!
• All signal cables used with the Nord Stage EX must be shielded.
• The four audio outputs (CH O
• If you wish to connect the Nord Stage EX in stereo to your audio equipment, you should use CH1
UT in pair with CH2 OUT.
O
• You can also route individual instruments to CH O
channels. This is done on the System page — see page 66.
UT 1-4)) are line level and unbalanced.
UTPUTS 3 & 4 either in stereo or as two mono
MIDI CONNECTIONS
• If you are using a Nord Stage EX together with a MIDI keyboard, connect a MIDI cable from
MIDI Out on the keyboard to MIDI I
• If you are using Nord Stage EX to control an external MIDI instrument, connect a MIDI cable
from MIDI O
UT on the Nord Stage EX to the MIDI In connector on the other instrument.
N on the Nord Stage EX.
Page 10
Nord Stage EX v6.x 3. Connections: Connecting pedals
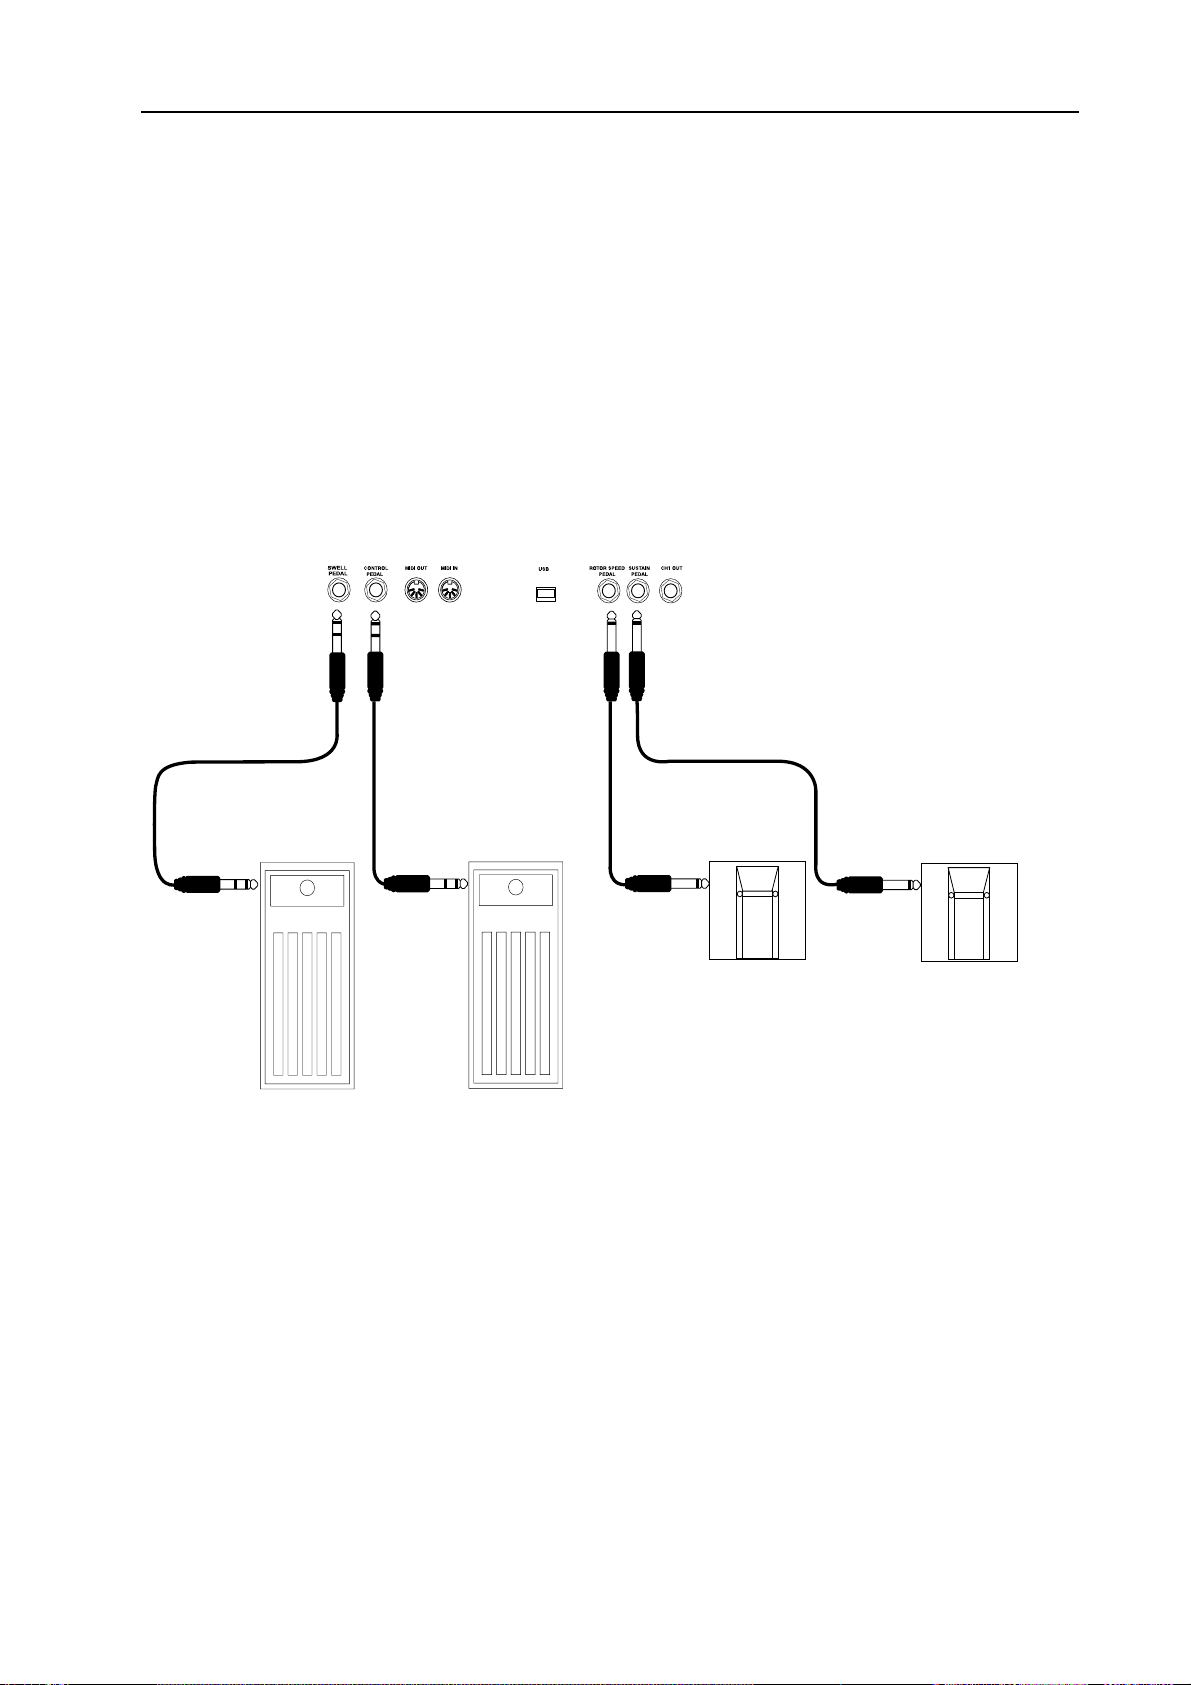
CONNECTING PEDALS
The Nord Stage EX has four pedal inputs: one CONTROL PEDAL input (configurable to control various Nord Stage EX parameters), one O
TOR SPEED input (for rotary speaker fast/slow selection). You can select for each instrument whether
it should react to sustain or not (see “Activating the Sustain Pedal/Pitch Stick for Instruments” on
page 22). Connect the pedals as shown in the figure below:
RGAN SWELL input, one SUSTAIN PEDAL input and one RO—
When connecting an expression-type pedal to the C
should use a stereo cable (Tip-Ring-Sleeve). Please note that the pedal must have a stereo output jack.
Pedals from various manufacturers have different characteristics. To simplify setup, the most common pedal models (Roland, Yamaha, Ernie Ball and Fatar) are preconfigured in the Nord Stage EX,
and you simply select the type of pedal in the System menu. See “Ctrl Pedal Type” on page 67 for
more information about this setting.
ONTROL PEDAL or ORGAN SWELL input, you
THE ORGAN SWELL INPUT
You can connect an expression pedal to the ORGAN SWELL input to control organ swell. For the B3
organ, the characteristic swell volume/frequency response is faithfully reproduced. If you want to
control the entire Stage’s volume with a pedal, this can be set in the System Settings to apply to a
pedal connected to the Organ Swell input. See “Swell Pedal Dest” on page 68 for more information
about this setting.
USING A ROTOR SPEED PEDAL
You can use a pedal connected to the ROTOR SPEED input to switch between Slow and Fast rotor
speed for the Rotary Speaker effect. This pedal can work in hold or toggle mode, which is set in the
System Menu (see page 66).
Page 11
4. Getting Started: About Instruments Nord Stage EX v6.x
4. GETTING STARTED
ABOUT INSTRUMENTS
When “Instrument sections” or “Instruments” are referred to in the manual, this is a collective reference to the Organ, Piano and Synth instruments which can be all be active within a Program.
ABOUT PROGRAMS
A Program in Nord Stage EX basically contains all settings (instruments and effects etc.) when the
Program was saved. A Program can consist of a single instrument or a combination of up to six instruments and two Extern sections, which can be assigned to one ore more Keyboard Zones for split
and layered sounds.
Programs also contains settings for both Panel A and B (see “About Panel A & B” on page 14.
For more details about the Program memory architecture see “What is a Program?” on page 19.
SELECTING PROGRAMS
The Program memory in Nord Stage EX consists of 21 Program Pages, with each Page holding 6 Programs for a total of 126 Programs. All Programs can be edited and replaced at any time. To select a
Program for playing/editing, proceed as follows:
1. Select a Page (1-21) by pressing the P
section. Hold a P
2. Select a Program on the current Page by pressing one of the six P
GRAM buttons 1 to 6.
• You can also use the V
PLAY to select Programs. By turning the knob you can con-
tinuously scroll between all Programs (on all Pages).
AGE -/+ to scroll quickly through the Program Pages.
ALUE DIAL to the right of the DIS—
AGE -/+ buttons in the Program
RO—
Page 12
Nord Stage EX v6.x 4. Getting Started: Activating instrument sections
EDITING A PROGRAM
Actually, how to change a programmed sound can be described in one sentence: “tweak the knobs
and press the buttons”. It is as simple as that! Don’t be afraid to edit and overwrite the factory Programs. If you want to restore any of the original factory programs later, you can download them at
http://www.nordkeyboards.com and transfer them to your Nord Stage EX as MIDI SysEx files or use
the Nord Sound Manager to reload them. To indicate that a Program has been edited (changed from
the stored version), an asterisk (*) is shown to the right of the Program number in the D
ISPLAY.
REVERTING TO THE ORIGINAL PROGRAM
If you have edited a Program and want to revert to the stored original, just press the corresponding
ROGRAM button again.
P
STORING AND NAMING PROGRAMS
How to store and name Programs is described in a separate chapter — see “The Program section” on
page 16.
ACTIVATING INSTRUMENT SECTIONS
There are three main instrument sections in Nord Stage EX: the Organ section,
the Piano section and the Synth section. You can activate/deactivate instrument
sections in the following ways:
• Pressing the KB Z
that one or more of the LEDs lights up will activate the corresponding instrument. If all LEDs are
lit, the instrument will play across the whole range of the keyboard. Any other active instrument(s)
will in this case be layered with the instrument you just activated.
• Pressing the KB Z
will turn off the corresponding section.
• For information on how to use splits see the chapter “Keyboard Zones and Dual Panel setups” on
page 56.
INSTRUMENT INITS
Alternatively, you can use the following method to select one of four basic INSTRUMENT INIT setups
(Init-Organ/Init-Split Organ/Init-Piano/Init-Synth). This will activate the corresponding instrument,
and deactivate all other instruments.
ONE SELECT ON/OFF button for an Instrument section so
ONE SELECT button for an active Instrument section (so that the LEDs go dark)
1. Hold down the S
2. Press one of the O
activate the corresponding instrument section. The “Split Organ” setup uses a split for a Lower/
Upper manual organ where the lower half of the keyboard plays an organ belonging to Panel A
and the upper half plays Panel B (see “About Split Organ Setups” on page 29).
HIFT button.
RGAN, SPLIT ORGAN, PIANO OR SYNTH buttons in the Program section to
Page 13
4. Getting Started: About Panel A & B Nord Stage EX v6.x
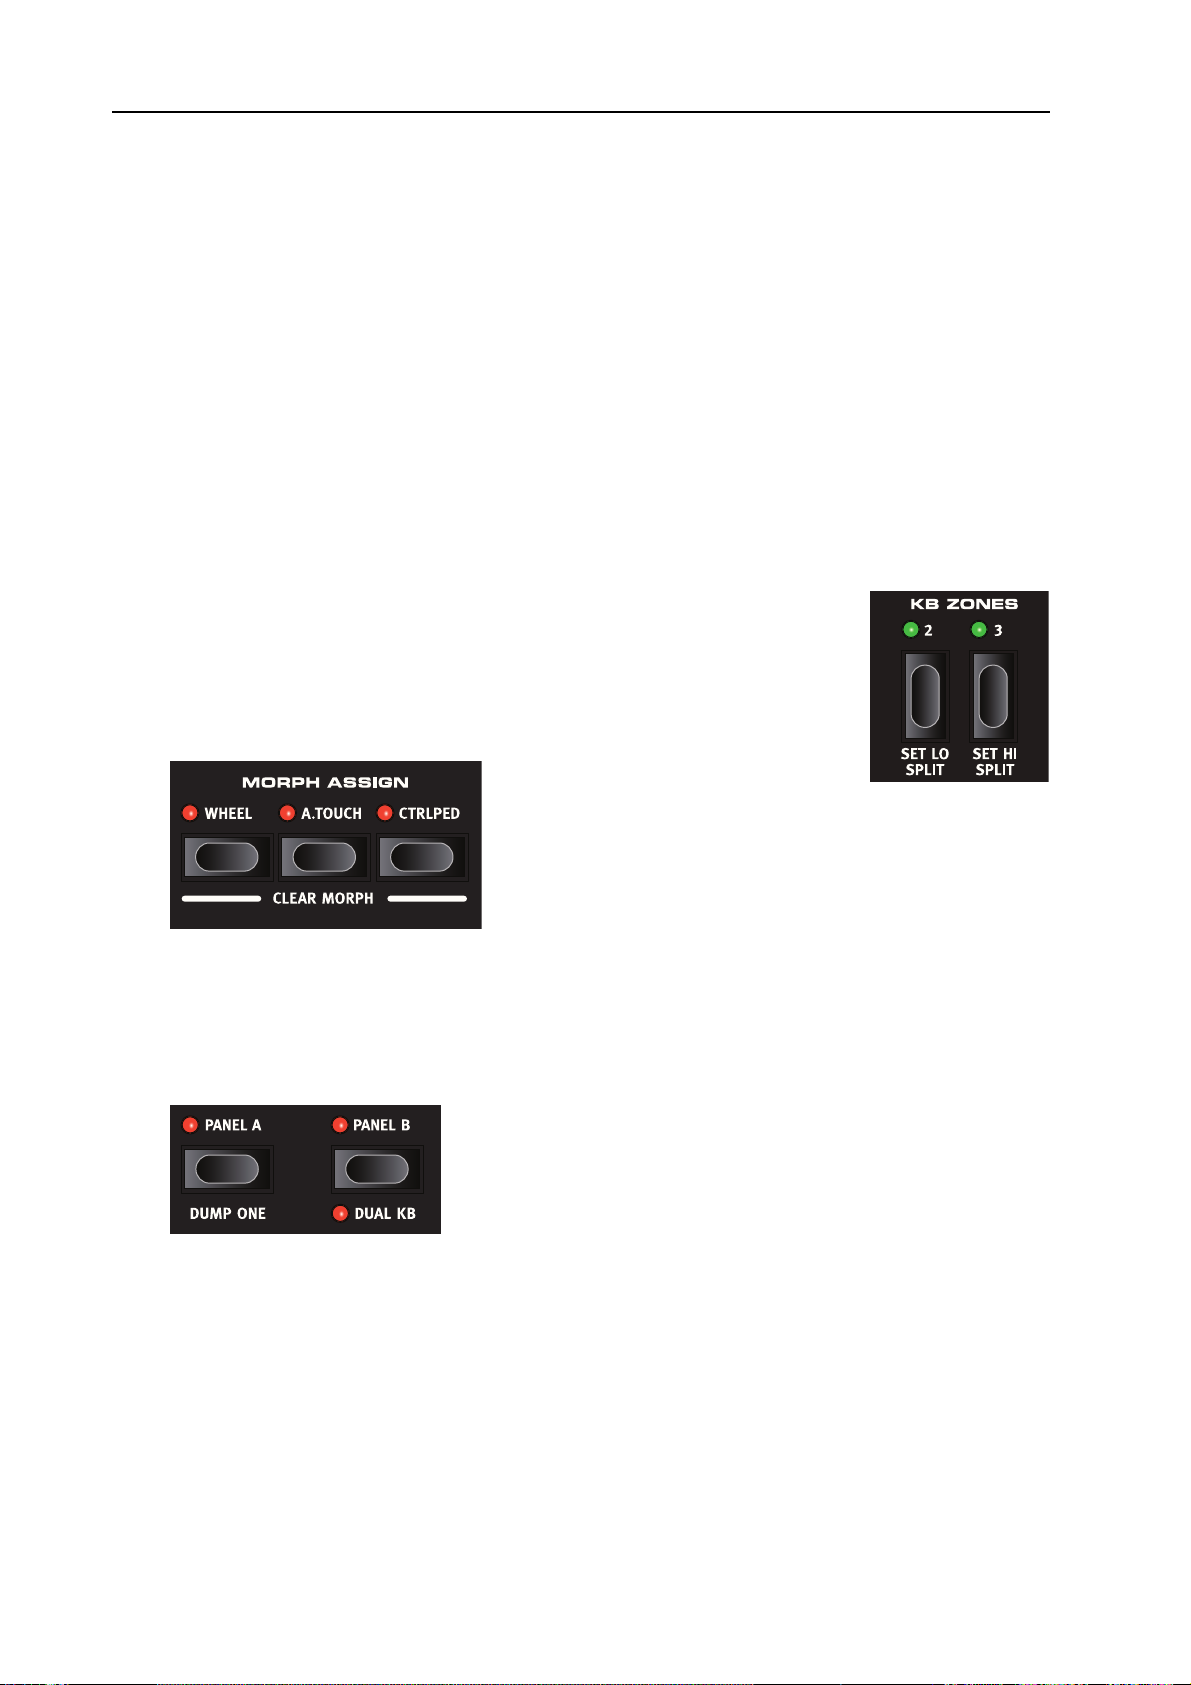
ABOUT PANEL A & B
All instruments in Nord Stage EX are two part multitimbral. This means that each instrument section
can produce two sounds simultaneously, with completely independent settings. The key to this feature are the two Panels; A and B.
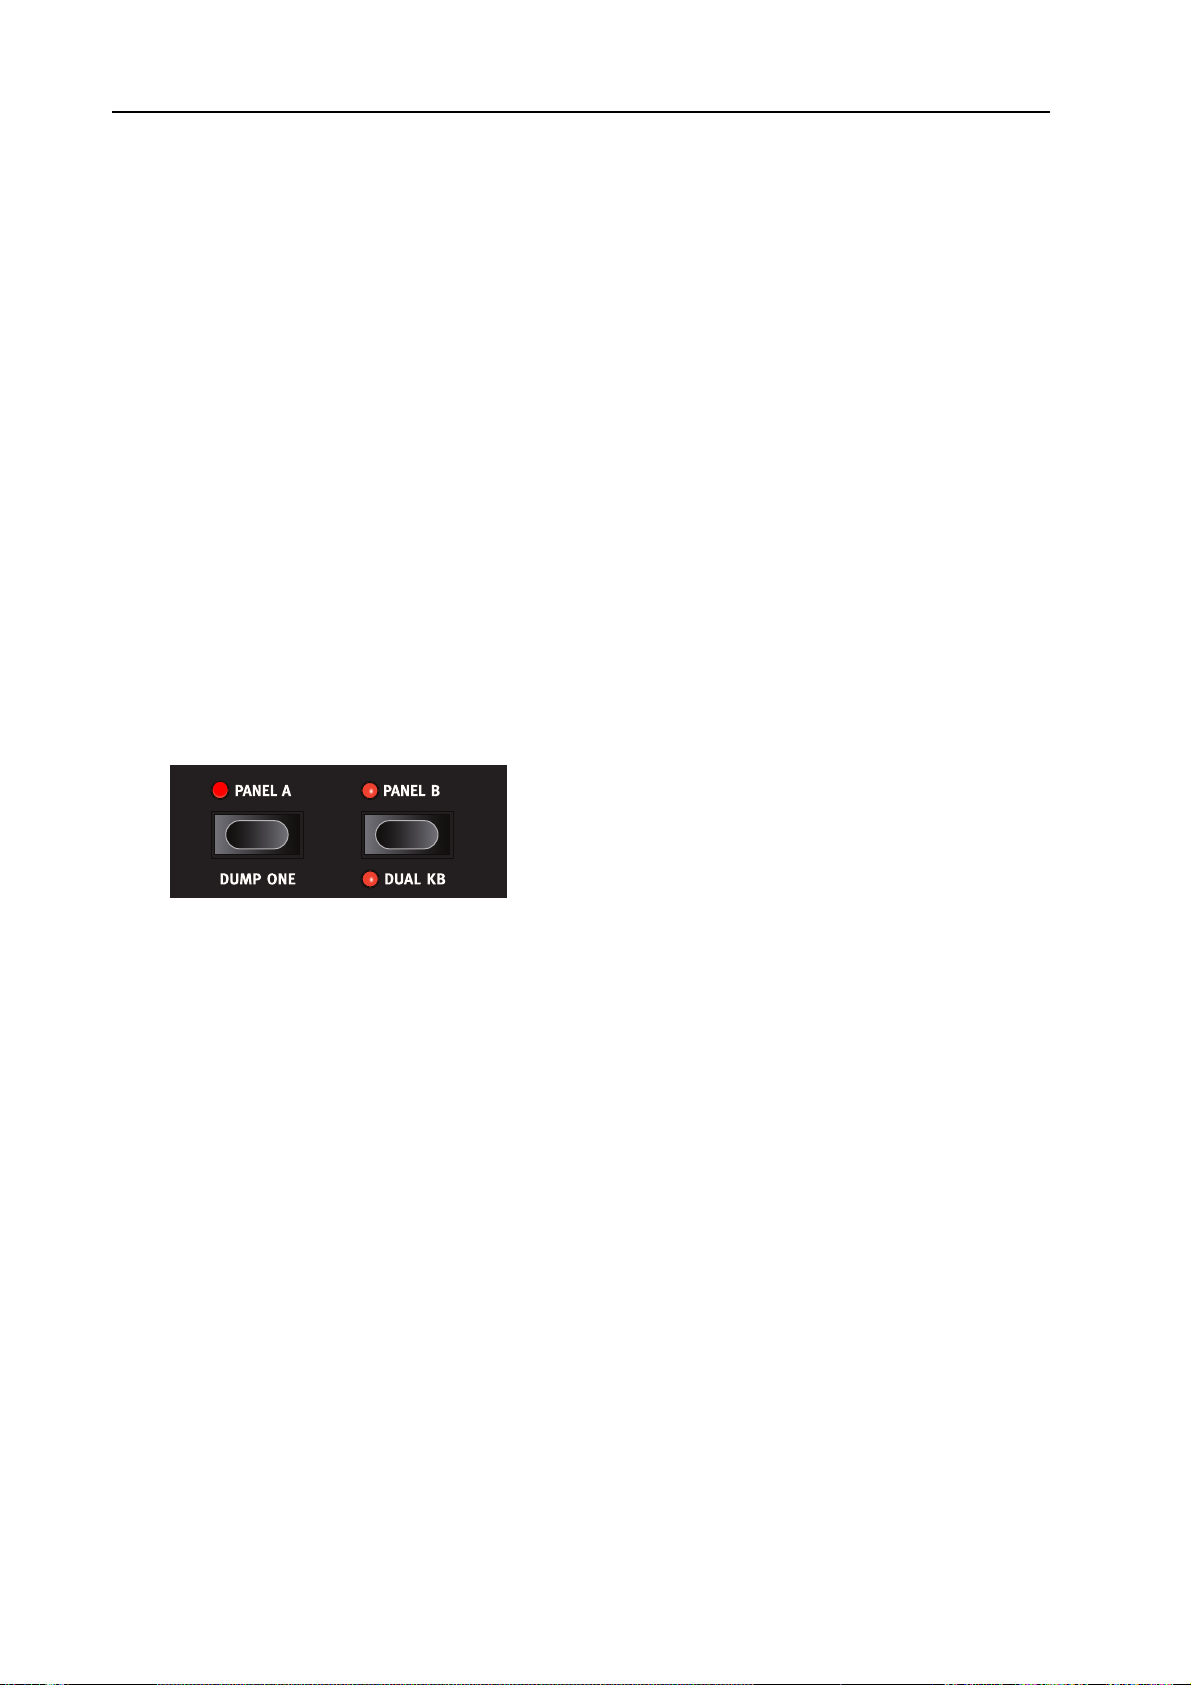
The two P
ANEL buttons A and B selects which Panel is currently active (or edit active — see below).
Each Panel controls three instrument sections and four Panel effects. Having two Panels with their
own settings not only allows you to alternate between two sound setups within a selected Program. It
also lets you have both Panels activated, giving you access to two simultaneous instruments in each
section, e.g. a Electric Piano and a Clavinet, two Synths etc. In dual panel mode you are basically
layering two full sets of the Nord Stage EX panel.
• You activate both panels by holding down one of the P
ANEL A/B buttons and then pressing the
other.
• To exit “Dual Panel” mode, hold down one of the P
ANEL A/B buttons and then press the other.
• To copy the settings from another Panel to the active Program/Panel, press and hold one of the
Panel buttons and turn the Value dial. The display will indicate which of the Panels in the entire
Program memory of the Stage that will be copied to the current Program/Panel. Don’t forget to
save any new Panel combination that you have created using this method if you want to keep it.
ABOUT PANEL EDIT FOCUS
Both Panels activated. One of the PANEL button
LEDs will blink to indicate which Panel is currently
has the edit focus.
If both Panels are activated, the settings on the front panel always reflects settings for one of the Panels (A or B) at a time.
• Any tweaking of parameters will only affect the Panel that has “edit focus”, which is indicated by
a blinking P
ANEL button.
• If you select pianos to both Panels, they can be detuned by using the Unison Detune feature.
• Pressing the other P
ANEL button will then instantly switch edit focus to the other Panel and allow
you to edit the settings.
• Each Panel contains independent settings for the Organ, separate instances of two instruments
(Piano and Synth), one Extern section, as well as four Panel effects (Effect 1/2, Delay and AmpSim/EQ).
• Thus, within a single Program you can use up to six instruments, two external instruments and
eight independent effects.
Page 14
Nord Stage EX v6.x 4. Getting Started: Setting output Level for instruments
SETTING OUTPUT LEVEL FOR INSTRUMENTS
Each instrument has a LEVEL rotary encoder at the top of the panel. This adjusts the output level for
the corresponding instrument section. The L
EVEL encoders can be controlled in a Morph scenario.
ADDING A GLOBAL EFFECT
Nord Stage EX features four effect groups; the Rotor section (rotary speaker effect),
the Effects section (three separate effects units; Effect 1, 2 and Delay), the Ampsim/
EQ section (overdrive and amplifier/speaker modelling with EQ), and a Compressor
and Reverb section. The Compressor and Reverb effects are global, and affect all instruments routed to the main CH OUT 1/2 jacks. The Rotor can process the same
instrument from both panels (Organ A&B, Piano A&B or Synth A&B). The other
effects can process one freely selectable instrument per Panel.
• To add a global reverb effect to a sound, simply press the O
section.
Now you can adjust the amount of reverb effect using the D
the basic reverb character (Hall/Hall soft/Stage/Stage soft/Room) using the Selector
button!
How to use the other effects is described in the Effects chapter, see “The Effects” on
page 49.
N button in the Reverb
RY/WET knob, and set
Page 15
5. The Program section: Overview Nord Stage EX v6.x
5. THE PROGRAM SECTION
OVERVIEW
The Program section comprises central functions such as Program handling, system pages etc. System pages are covered in a separate chapter — see “System functions” on page 66.
LOAD A PROGRAM
You can load a program in several different ways.
• Press any of the P
gram Page.
• Press or hold P
• Turn the V
shifted as needed.
• Hold S
is shifted as needed.
• Press either of the L
Live 1&2 Buffers” on page 19).
ALUE DIAL in either direction to scroll through all Programs. Program Page focus is
HIFT and press or hold the PAGE buttons to step through the Programs. Program Page focus
ROGRAM 1-6 buttons to load the corresponding program from the current Pro-
AGE + or — to step through the 21 Program Pages in the Nord Stage.
IVE 1-2 buttons to activate one of the special Live Buffers (see “About the
Page 16
Nord Stage EX v6.x 5. The Program section: Overview
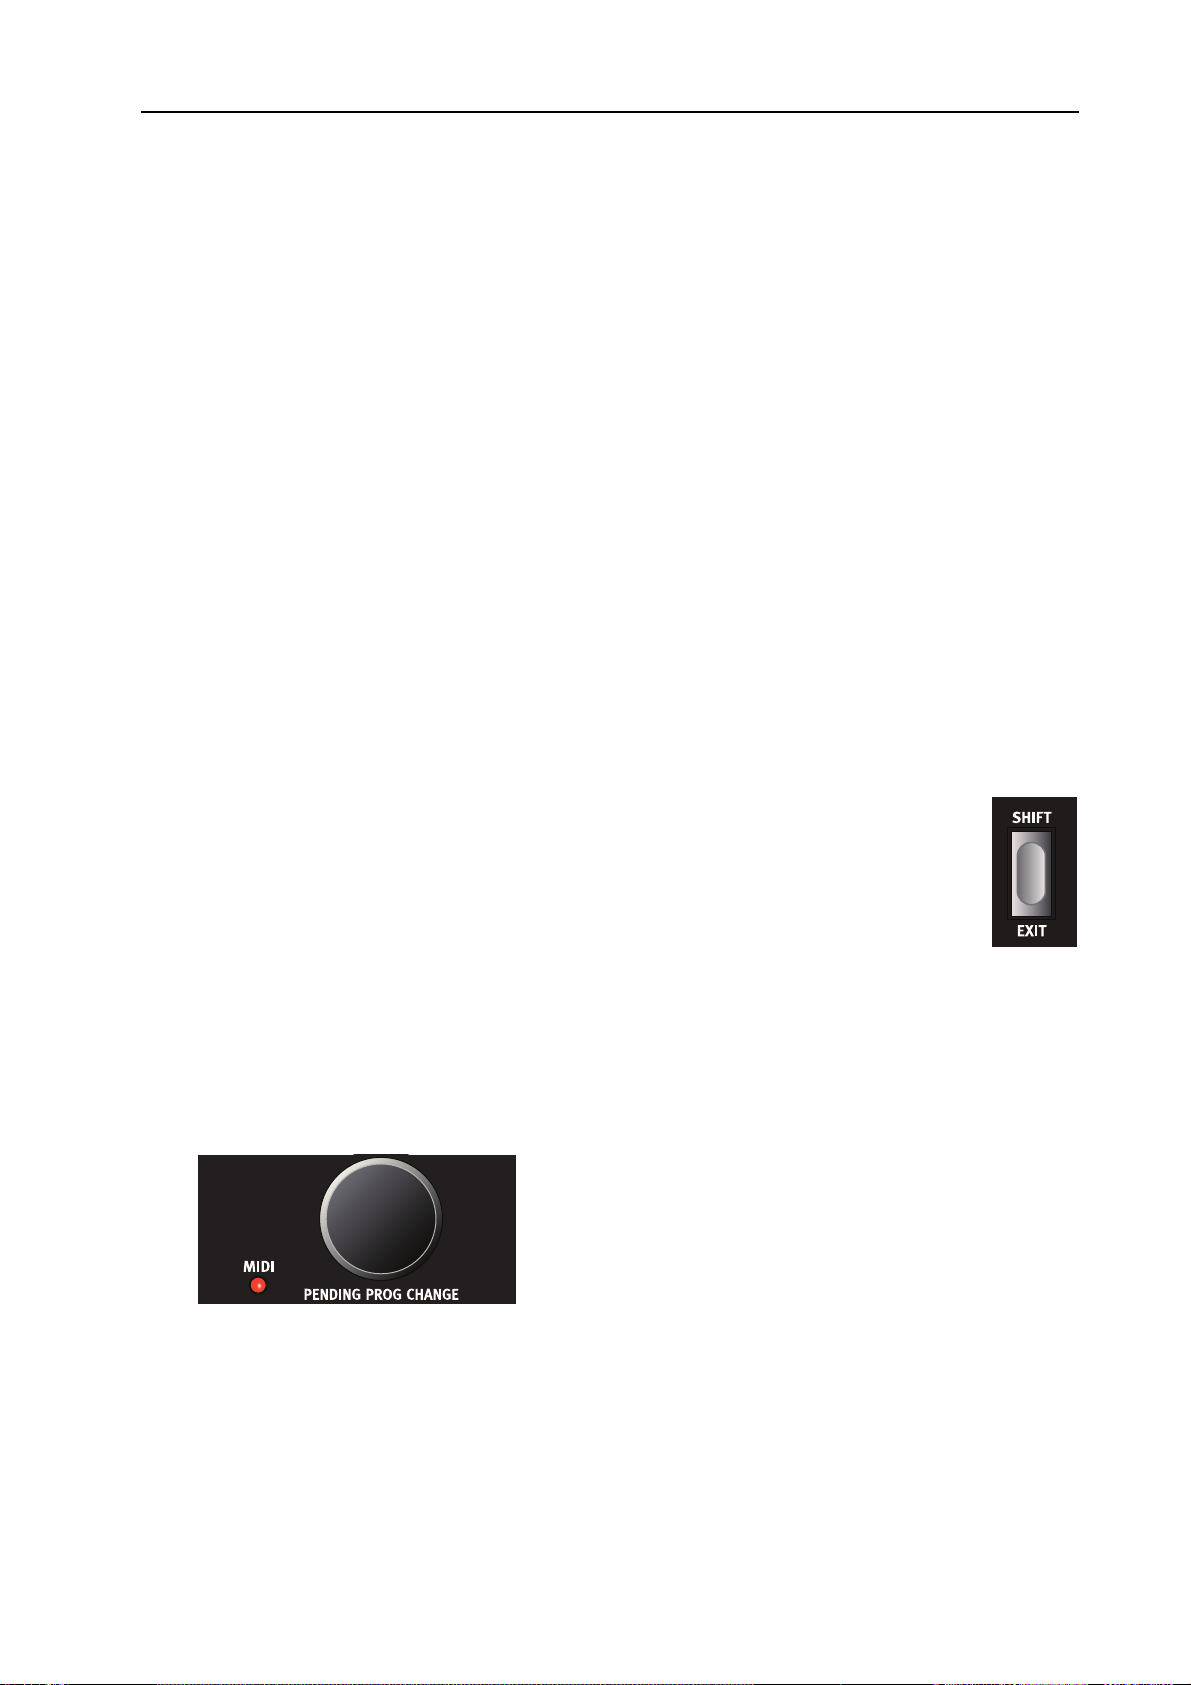
PENDING PROGRAM CHANGE
Normally a program is loaded the same moment you press a PROGRAM button, or as soon as you turn
ALUE DIAL. Sometimes you may want to browse through the programs without leaving the cur-
the V
rent program, for example while still playing with the other hand. Then you can use the “pending program change” feature:
• While pressing S
ISPLAY. Release the SHIFT button. The corresponding PROGRAM BUTTON will flash to show
D
HIFT, turn the VALUE DIAL until you see the program you want to load in the
you that it is ready to load. Press the flashing button to load the program.
• If you change your mind, press E
XIT (SHIFT) to cancel the operation.
PAGE -/+ BUTTONS
The PAGE -/+ buttons are used to select Program Pages and to navigate between System menu pages.
Hold either button to browse quickly through the pages.
When combined with the S
HIFT button, the PAGE buttons step through all the 121 available Pro-
grams.
DISPLAY
The MAIN DISPLAY normally shows the name of the currently selected Program, but is also used for
displaying various system parameters and messages.
THE SHIFT / EXIT BUTTON
Many buttons and knobs have secondary functions that you can access by holding down
S
HIFT and pressing the button or turning the knob. The Shift induced functions are always
printed below the corresponding button or knob. For example, pressing S
GRAM 3 button will allow you to access the MIDI system parameters.
HIFT + PRO—
In a few cases, the “shift” functionality can be achieved by double-clicking a button. This works primarily with Keyboard Zone assignments and Effect source selects.
HIFT button is also an EXIT button, for example when you want to exit a menu, or cancel a Store
The S
operation.
VALUE DIAL
The VALUE DIAL to the right of the DISPLAY is used to select Program locations, to set system parameter values and to “type” in Program names.
When used with the S
press the corresponding, blinking P
HIFT button, the VALUE DIAL selects a Program, but does not load it until you
ROGRAM button. See “Pending program change” above.
Page 17
5. The Program section: Overview Nord Stage EX v6.x
THE STORE BUTTON
The red STORE button is used when storing Programs (see “Storing Programs” on page 20).
PROGRAM BUTTONS
Below the DISPLAY are the six PROGRAM buttons (1- 6). They are used to load Programs, to access
menus and to load either of the two Organ Inits.
THE LIVE 1/2 BUTTONS
Pressing either of the LIVE 1/2 buttons will activate a Live buffer — see “About the Live 1&2 Buffers”
on page 19 for a description of this special memory feature. They are also used to load the Piano and
Synth Inits.
KB ZONES 2/3 BUTTONS
These buttons are used to activate keyboard zones. Each Program can have up
to three keyboard zones (Lower/Upper/High), and each instrument section can
be set to play across all, two or one of these zones — see “Keyboard Zones and
Dual Panel setups” on page 56.
MORPH ASSIGN BUTTONS
This section allows you to assign panel parameter(s) to be controlled using the Mod wheel, a control
pedal or keyboard aftertouch. Multiple parameters can be Morph-assigned so that when you for example move the Mod wheel it will change the drawbars settings for the organ and the volume of the
piano section simultaneously. See “The Morph Assign feature” on page 60.
PANEL A/B BUTTONS
For each Program you have two independent Panels; A and B, where each Panel contains independent
instances and settings of the three instrument sections and effects. If you activate both Panels you can
use two instruments of the same type at the same time, e.g. two Piano instruments or a Split Organ
setup (see “About Split Organ Setups” on page 29. This is done by simultaneously pressing both
ANEL A and B buttons. When both panels are active you have access to six instrument sections and
P
eight effects sections (Effect 1 & 2, Delay and AmpSim/EQ x2).
One of the P
settings that are currently shown and can be tweaked. To switch edit focus to the other Panel, press
the corresponding P
ANEL A & B buttons will then blink to indicate edit focus, i.e. which of the two Panel’s
ANEL button.
Page 18

Nord Stage EX v6.x 5. The Program section: What is a Program?
To copy the settings from another Panel to the selected Program/Panel, press and hold one of the Panel buttons and turn the Value dial. The display will indicate which of the Panels in the entire Program
memory of the Stage that will be copied to the current Program/Panel.
WHAT IS A PROGRAM?
A Program basically stores everything (except System functions which are mostly global). To understand the internal architecture in Nord Stage EX, keep the following in mind:
• For each Panel
independent (except the choice of organ model, which is always shared between the panels).
• A Program
six instruments, eight Panel Effects, and two Extern sections.
• A Program also stores all settings from the Extern menu, except the Extern A & B MIDI channels
and the Send on Load setting (see “Extern menu” on page 70), and the output routings for each
instrument (see “System menu” on page 66).
• The Global effects (Compressor/Reverb) and the Rotor effect affect both Panels, and are stored
with the Program as well.
• Splits, layers (Keyboard Zones) and Morph assignments are of course also part of a Program.
, settings for all three Instruments, the four Panel Effects, and the Extern section are
stores settings for both Panel A and B, so a Program contains independent settings for
ABOUT THE LIVE 1&2 BUFFERS
The special Live memory feature can be described as a “live program memory”. If you activate the
IVE 1 OR 2 buttons, all changes to panel settings you make will be continuously saved. If you switch
L
the power off, or select another Program, the settings are still stored in the Live memory, so when you
power up next time (or return to the Live memory) all settings will be exactly as you left them.
Having two Live memory locations means that two independent setups can be “saved” in this way.
If Live memory is selected and you decide you wish to store the settings permanently as a Program
you can do so using the standard methods (see below).
You can also store Programs into the Live 1 or 2 memory locations, in which case the Program settings will replace the current Live memory settings. Note that when you store a Program into either
of the Live memory locations, the stored settings will be “transferred” to Live memory, i.e. any
changes you make will be stored continuously, and you will not be able to revert back to the exact
settings as they were when “stored”.
The Live buffers are useful, e.g., for improvisatory performances, and as scratch pads for new sound
setups.
Page 19

5. The Program section: Storing Programs Nord Stage EX v6.x
STORING PROGRAMS
Storing a Program will overwrite the existing Program in the selected memory location.
Note! When Nord Stage EX is shipped from factory, Memory Protect is set to ‘On’. To be able
to store Programs, you need to change this to “Off”. See “Memory Protect” on page 68.
STORING A PROGRAM
You can store a Program in two ways, with the old name or with a new name. To store a Program
without changing its name, proceed as follows:
1. Press the S
rently selected P
the D
TORE button once. The STORE button and the cur-
ROGRAM button indicator starts blinking, and
ISPLAY will read “Store to X : X” (the current Page and
Store to 1:5
Wizard
Program number), plus the Program name,
2. Next step is to select a Page/Program location to store the edited Program in. You can use the
P
AGE -/+ buttons to select a Program Page (1-21), and the PROGRAM 1-6 buttons to select a Pro-
gram number on the selected Page (or the Live 1 or 2 memories). Alternatively, you can use the
ALUE DIAL to scroll through all Programs (on all Program Pages). To cancel the operation,
V
press E
XIT (SHIFT).
• From here you can opt to name the program before finally storing it — see “Naming a Program”
below.
3. Press S
TORE again to store your Program. The Display now reads “Program Stored!” for a short
duration.
Page 20

Nord Stage EX v6.x 5. The Program section: Storing Programs
NAMING A PROGRAM
To name a program, proceed as follows:
1. Hold down S
blinking, and the D
HIFT and press the STORE AS… button once. The STORE button indicator starts
ISPLAY will read “Set Name”.
2. Now use one of the following methods to name your Program:
• You can move the cursor position left or right in the D
ISPLAY by using the PAGE -/+ buttons.
• When the cursor is at the position where you want to enter/change a character, you can use the
V
ALUE DIAL to scroll through all available characters (a-z.A-Z, 0-9, Space and “-”).
• By holding down S
HIFT and pressing the INS (PAGE +) button, you enter a blank step at the cursor
position.
• By holding down S
HIFT and pressing the DEL (PAGE -) button, you erase the character at the cur-
sor position.
• Alternatively, you can press and hold down the KB Z
characters in the D
ALUE DIAL to select a character at the current cursor position. When you release the KB
the V
ONES button the cursor automatically moves to the next position.
Z
3. Press S
TORE again. Now you can use the same methods as outlined in “Storing a Program”
ISPLAY with the focus on the character the cursor was last on. You can now use
ONES 2 OR 3 button. This will bring up the
above to store your name with the Program.
Page 21
6. The Instruments: Introduction Nord Stage EX v6.x
6. THE INSTRUMENTS
INTRODUCTION
The Nord Stage EX features 3 different Instruments; Organ, Piano and Synth. Each Instrument is two
part multitimbral meaning that there are actually two independent sound engines for each Instrument.
These “engines” are internally connected to the Panels, one for Panel A and another for Panel B. The
Organ behaves a little differently in that there is actually only one “engine” but it supports two manuals with separate drawbar settings — see “About Split Organ Setups” on page 29.
COMMON FEATURES
ACTIVATING THE SUSTAIN PEDAL/PITCH STICK FOR INSTRUMENTS
You can freely set which instruments should respond to a connected Sustain Pedal and to Pitch Bend.
• To activate the Sustain pedal for an instrument, press S
ing instrument section so that the S
eral method to deactivate reception of Sustain for an instrument section, which in that case turns
off the S
• To activate Pitch Bend for an instrument section, press S
STICK button in the corresponding instrument section so that the
P
STICK LED lights up.
P
The bend range is fixed to -/+ 2 semitones.
USTPED LED indicator.
USTPED LED lights up below the button. You use the same gen-
HIFT + SUSTPED button in the correspond-
HIFT +
Page 22
Nord Stage EX v6.x 6. The Instruments: Common Features
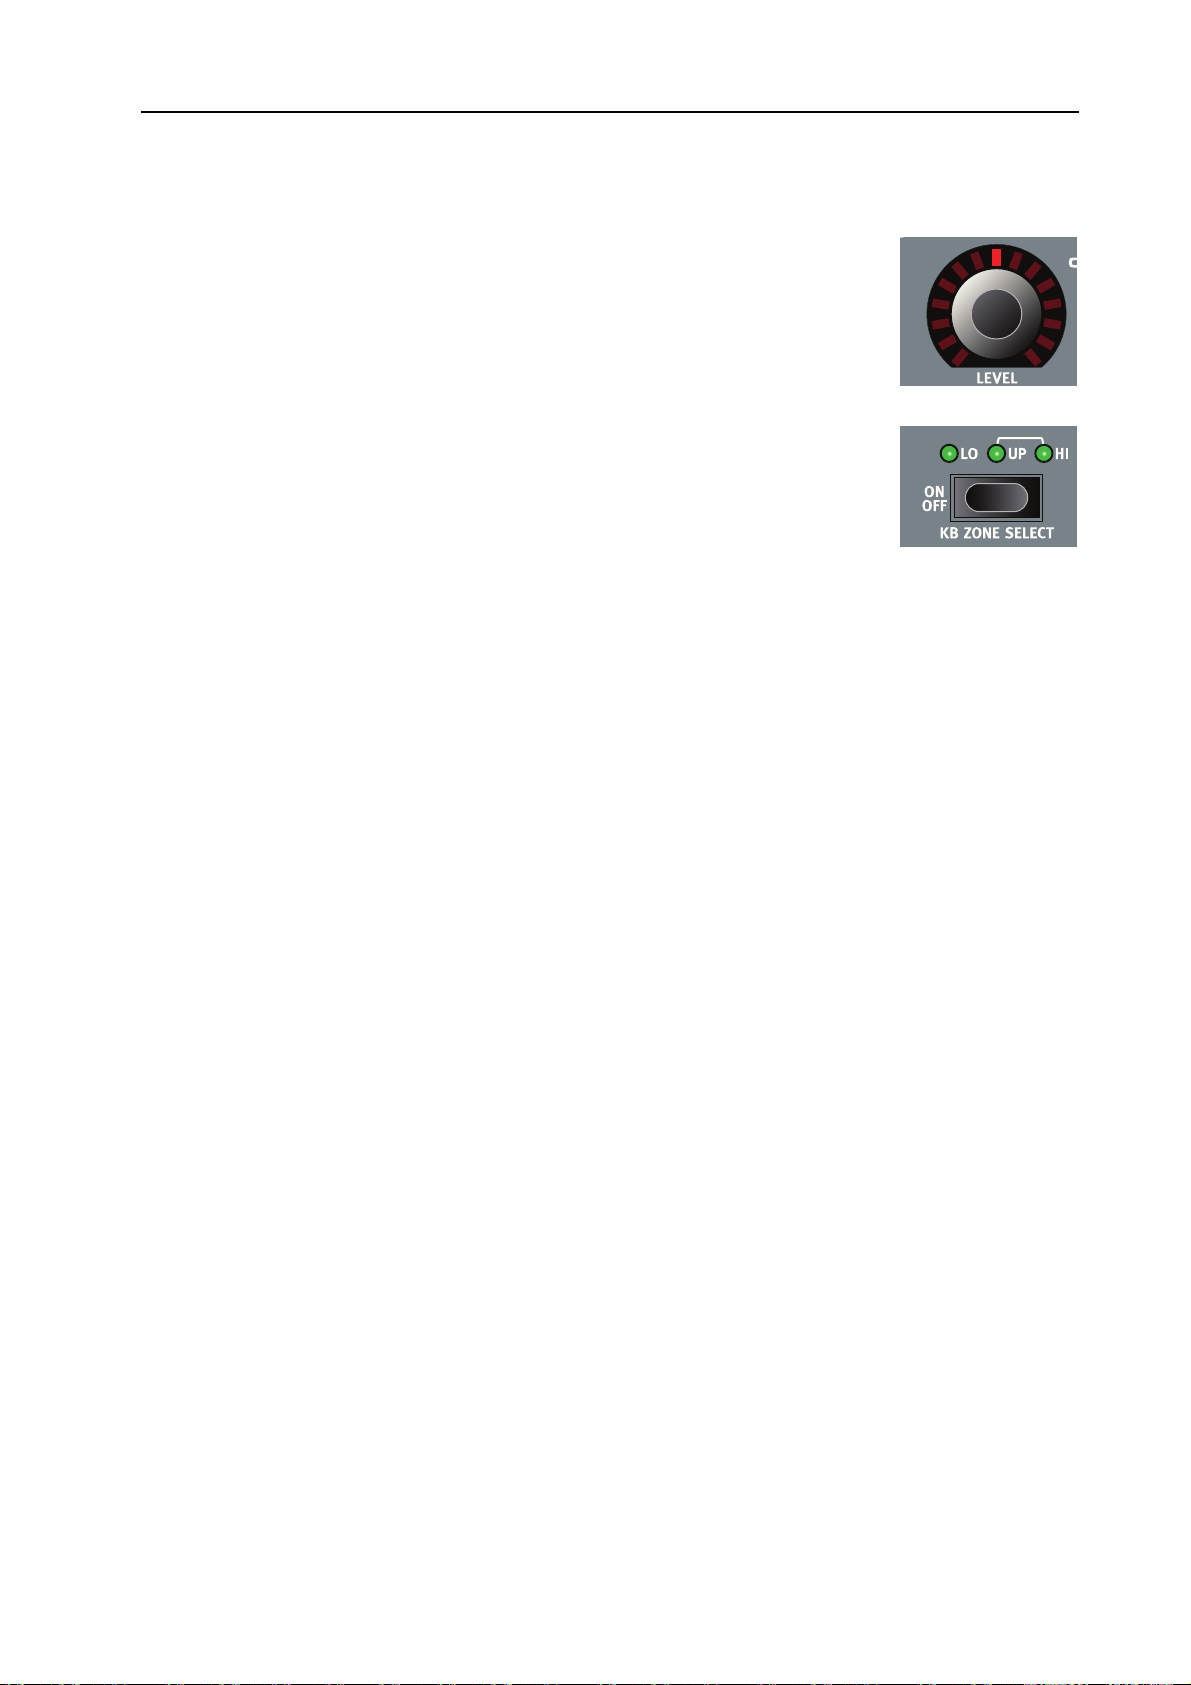
LEVEL ENCODER
The LEVEL rotary encoder allows you to adjust the volume for the instrument.
Instrument level can be Morph controlled.
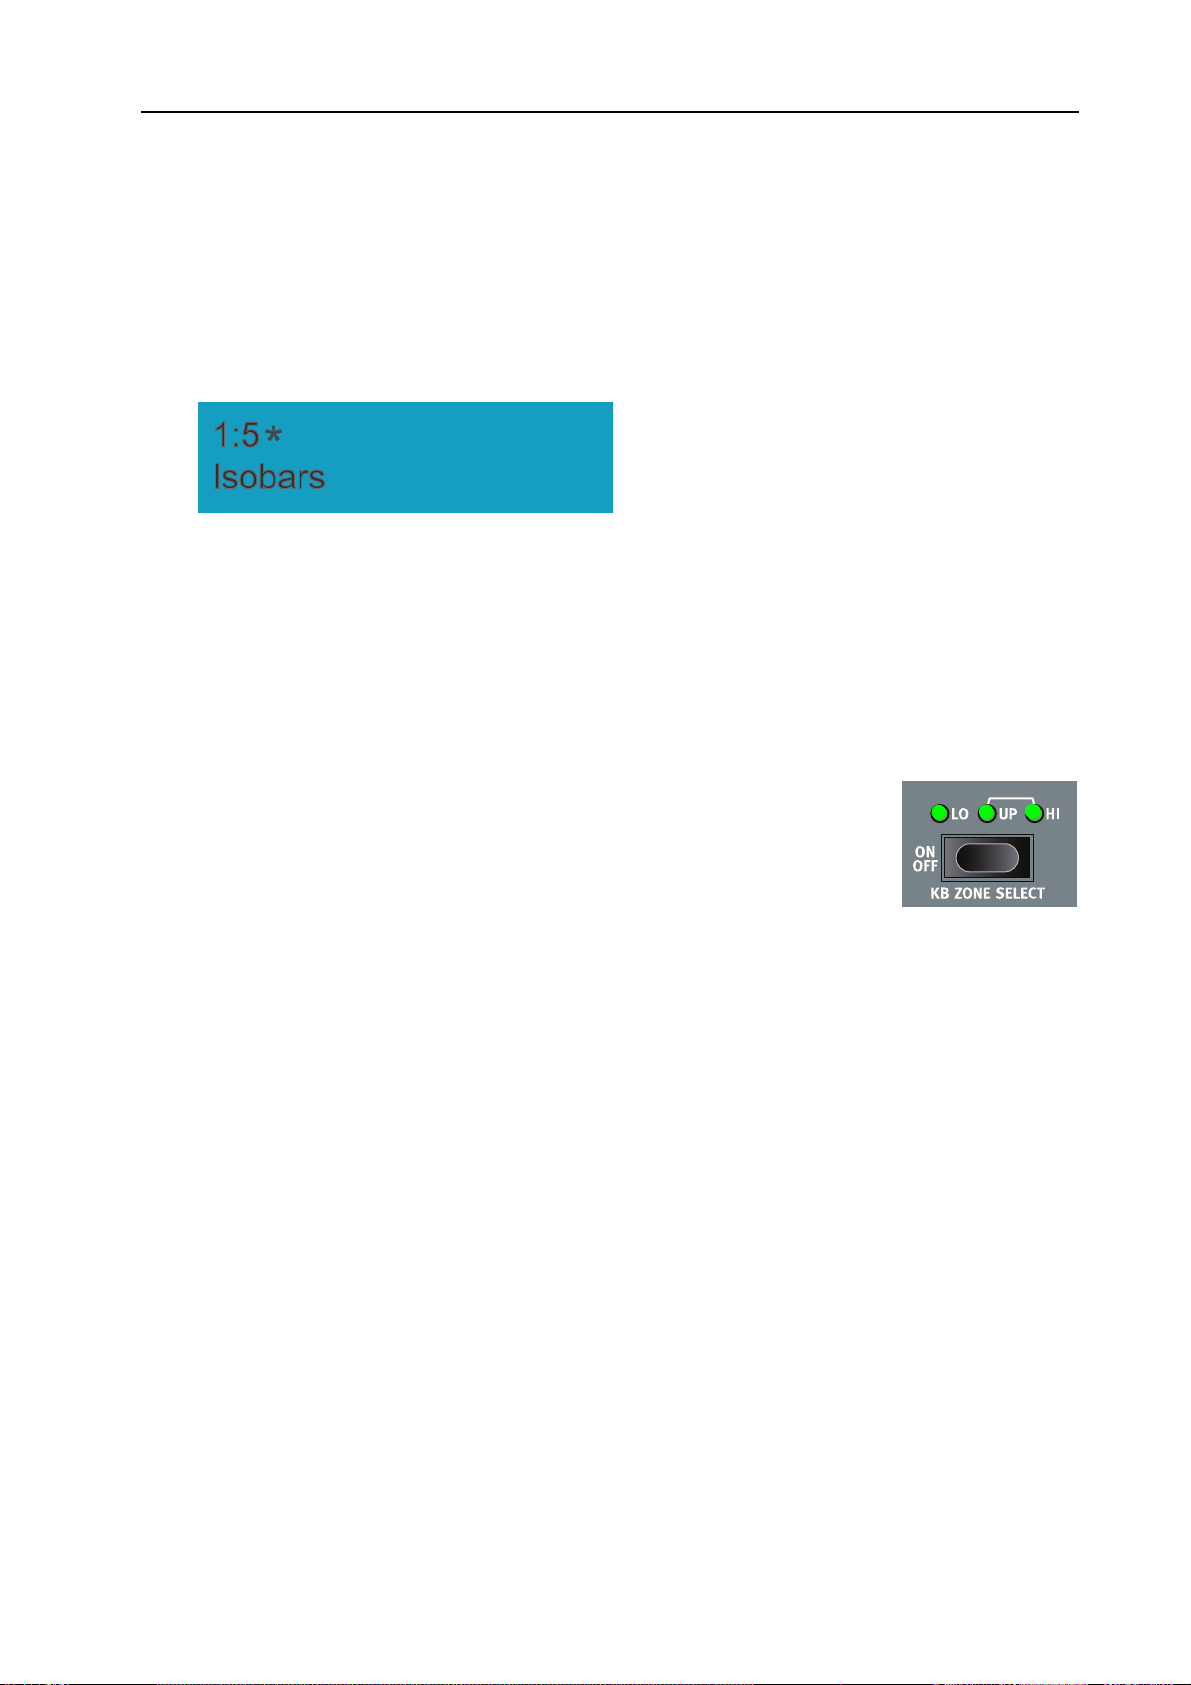
KB ZONE SELECT BUTTONS
The KB ZONE SELECT buttons allow you to assign the instrument to Keyboard
Zones to create splits and layers. This is described in “Keyboard Zones and
Dual Panel setups” on page 56.
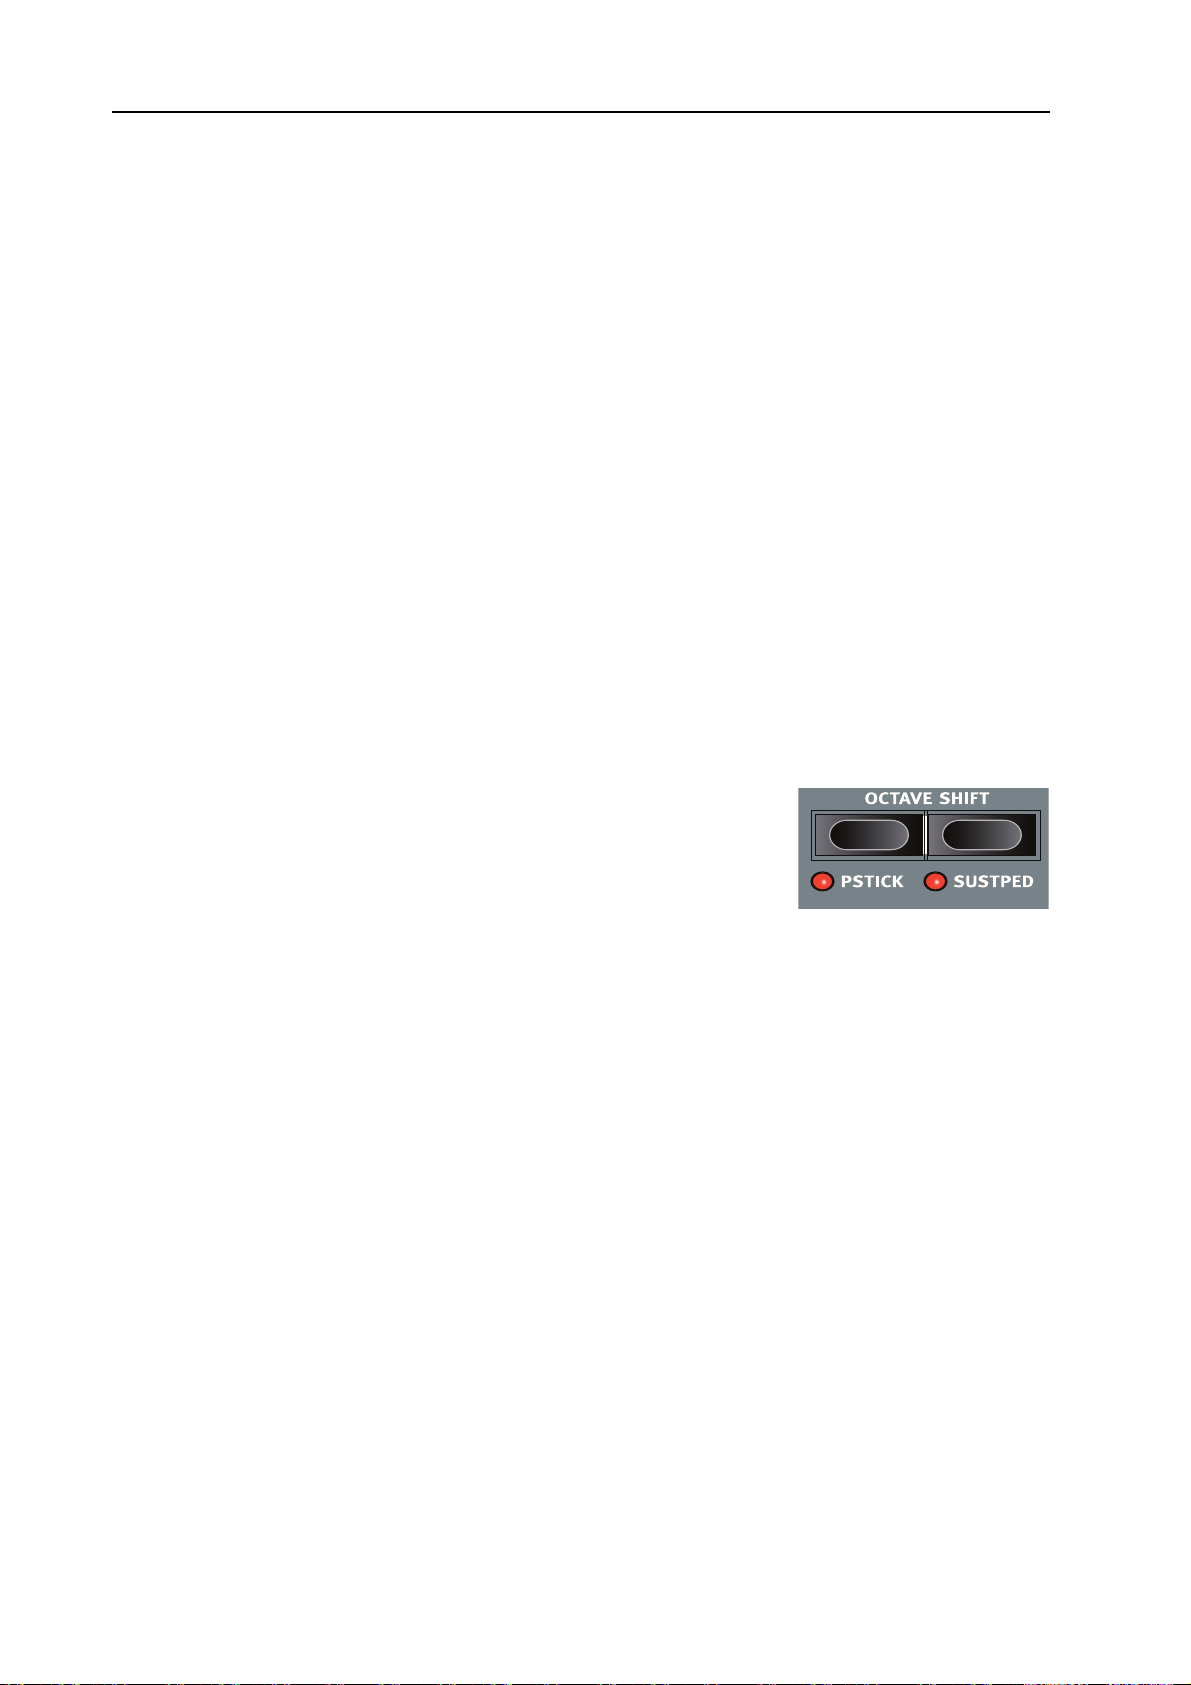
OCTAVE SHIFT
Each instrument has a finite note range. You can use Octave Shift to shift the pitch up or down within
the instruments note range. See “Octave Shift” on page 58 for more information.
OUTPUT ROUTING
The Nord Stage EX has four audio outputs. Each instrument can be freely assigned to output 1&2
(default) or 3&4 in stereo, or to output 3 or 4 in mono. The output routings can be set for each program, or globally for all programs, which is the default setting. In global mode, the routing settings
stored with the program are overridden by the global settings. See “System menu” on page 66 for
more information about the output routings.
Page 23
6. The Instruments: The Organ Section Nord Stage EX v6.x
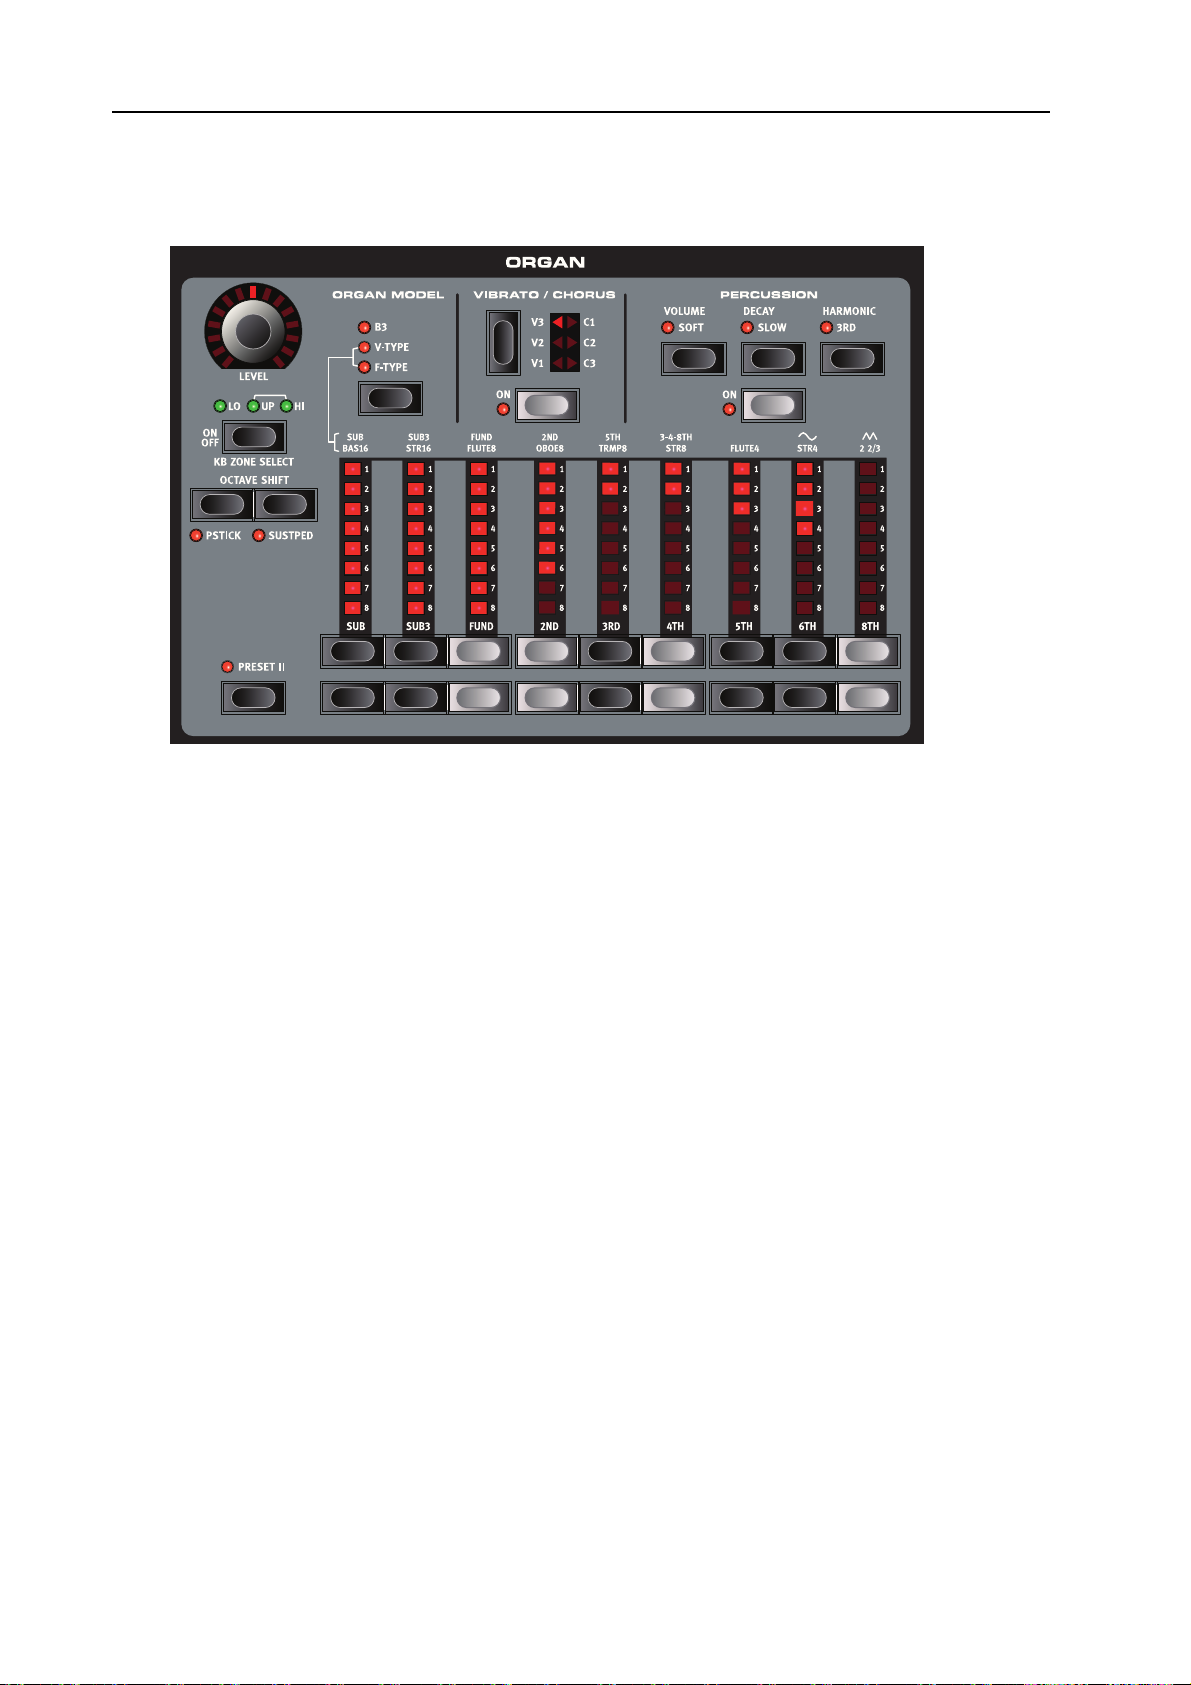
THE ORGAN SECTION
The Organ section in the Stage features emulations of three classic organ models; a Hammond B3, a
Vox Continental II (V-Type) and a Farfisa Compact DeLuxe (F-Type).
You select which model to play using the O
RGAN MODEL button.
THE B3 MODEL (HAMMOND)
The B3 Organ in the Nord Stage EX is based on a digital simulation of the mechanical tone wheels
of the classic Hammond B3 organ. This simulation utilizes innovative and advanced methods to capture every nuance of the original B3 sound, for example:
• An extremely accurate digital model of the original chorus and vibrato scanner.
• Modeling of the individual random contact bounces for each harmonic.
• Modeling of the unique frequency characteristics of the built-in pre-amplifier which forms the
”body” of the B3 sound.
• Simulation of the energy robbing on the tone wheels that results in the typical ”compressed”
sound.
• Authentic tuning of the tone wheels according to the original B3 design.
• Extremely fast keyboard response.
• Full polyphony.
T
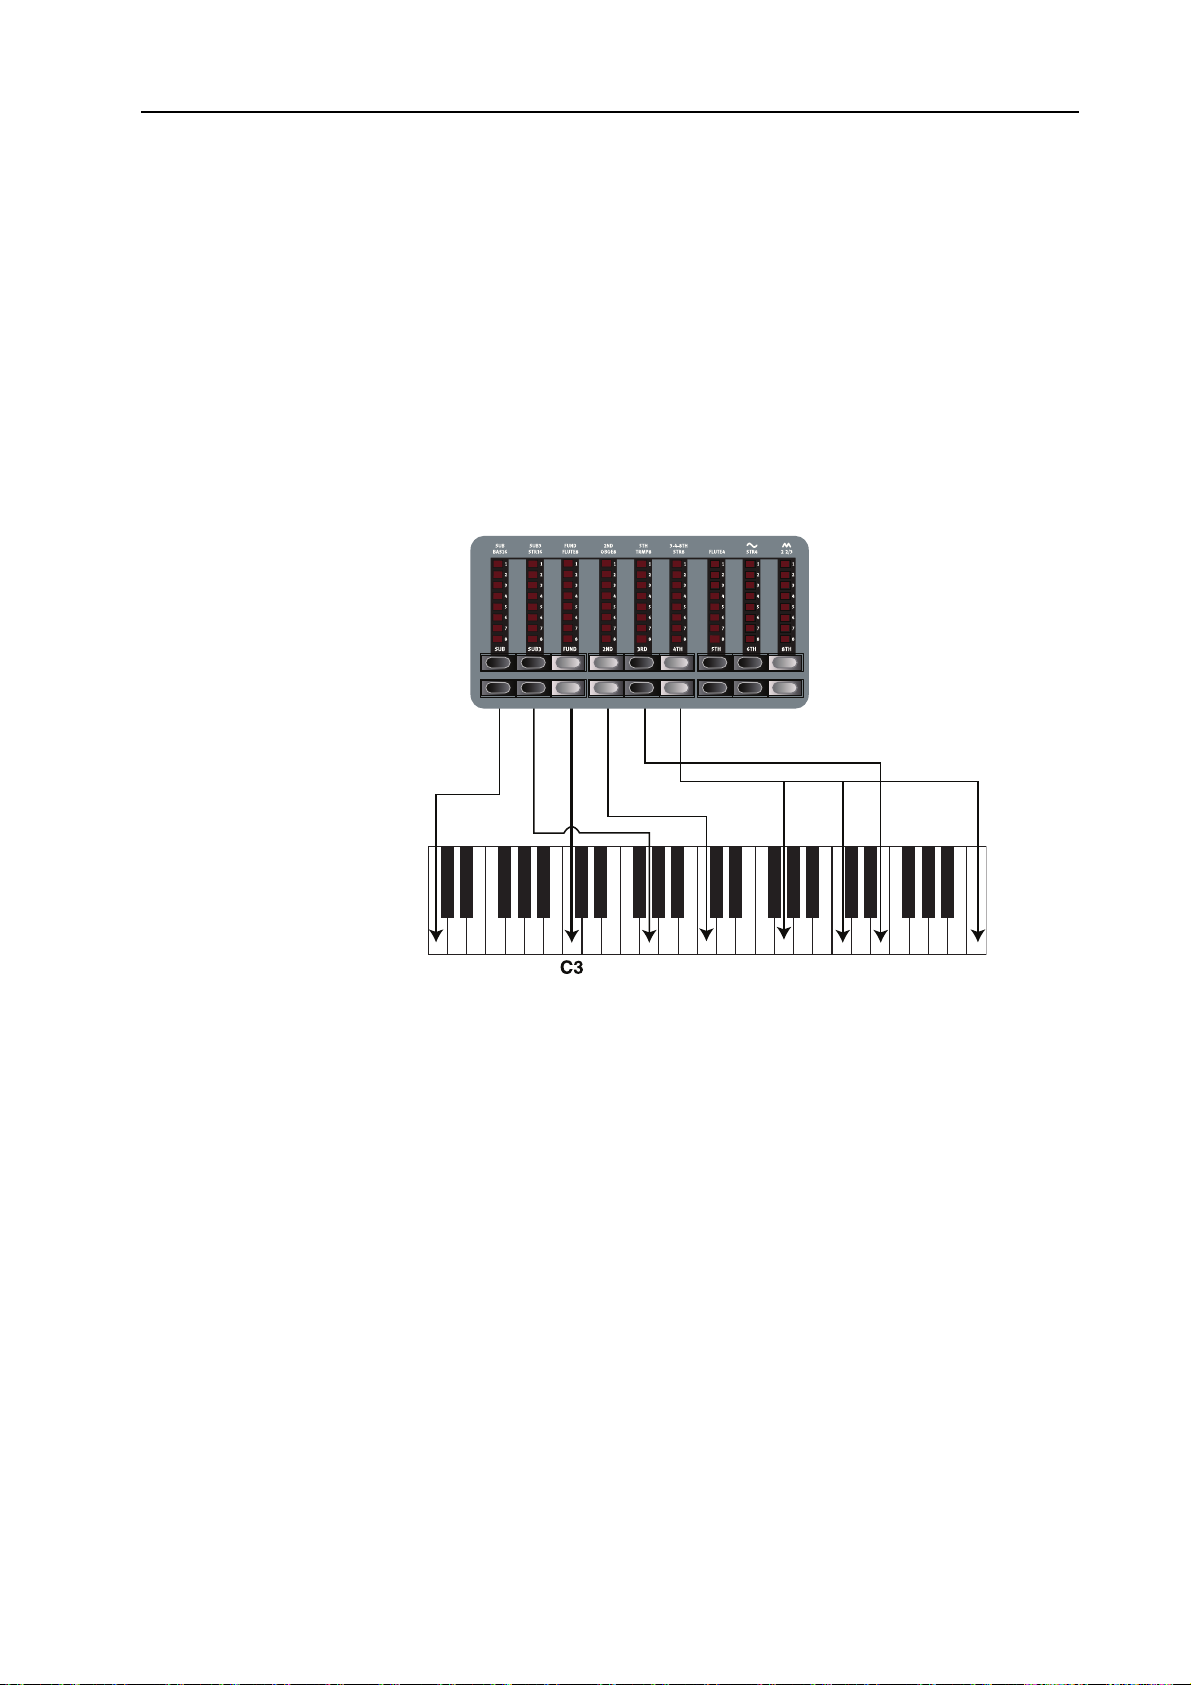
HE DRAWBARS
The drawbars of Nord Stage EX are represented by buttons and LED chain graphs instead of ordinary
mechanical drawbars. This gives you a big advantage: when you change preset or Programs, the correct drawbar settings are recalled immediately and shown by the LEDs. In other words, no need for
the regular ’trial and error’ method. It’s very easy to get the hang of changing the drawbar settings in
a natural way with the buttons.
Page 24
Nord Stage EX v6.x 6. The Instruments: The Organ Section
The drawbars of Nord Stage EX
SUB SUB3 FUND 2ND 3RD 4TH 5TH 6TH 8TH
behave similar to their mechanical counterparts, i.e. you “pull
out” the drawbars by pressing
OWER DRAWBAR buttons
the L
and “push them back in” by
pressing the U
buttons. The D
PPER DRAWBAR
RAWBAR buttons
are special in the way that they
auto-increment/decrement the
drawbar value when held. I.e. if
you hold a D
RAWBAR button the
corresponding drawbar value
will continue to increment or
decrement (within its range) until you release the button. Each
drawbar represents a harmonic
(sometimes called a partial). In
the figure you can see the pitch
interval among the nine drawbars. Note that the SUB3 drawbar actually lies a 5th above the
In the illustration above we have chosen C3 as our reference note. The
FUND drawbar is considered the basic (fundamental) harmonic in the
organ sound. The arrows point at the respective note that each drawbar
represents when C3 is our reference note.
fundamental harmonic. However, in most situations it is perceived as sounding below the basic harmonic. When you play different
notes on the keyboard, the harmonics are being transposed up or down with the fixed harmonic intervals.
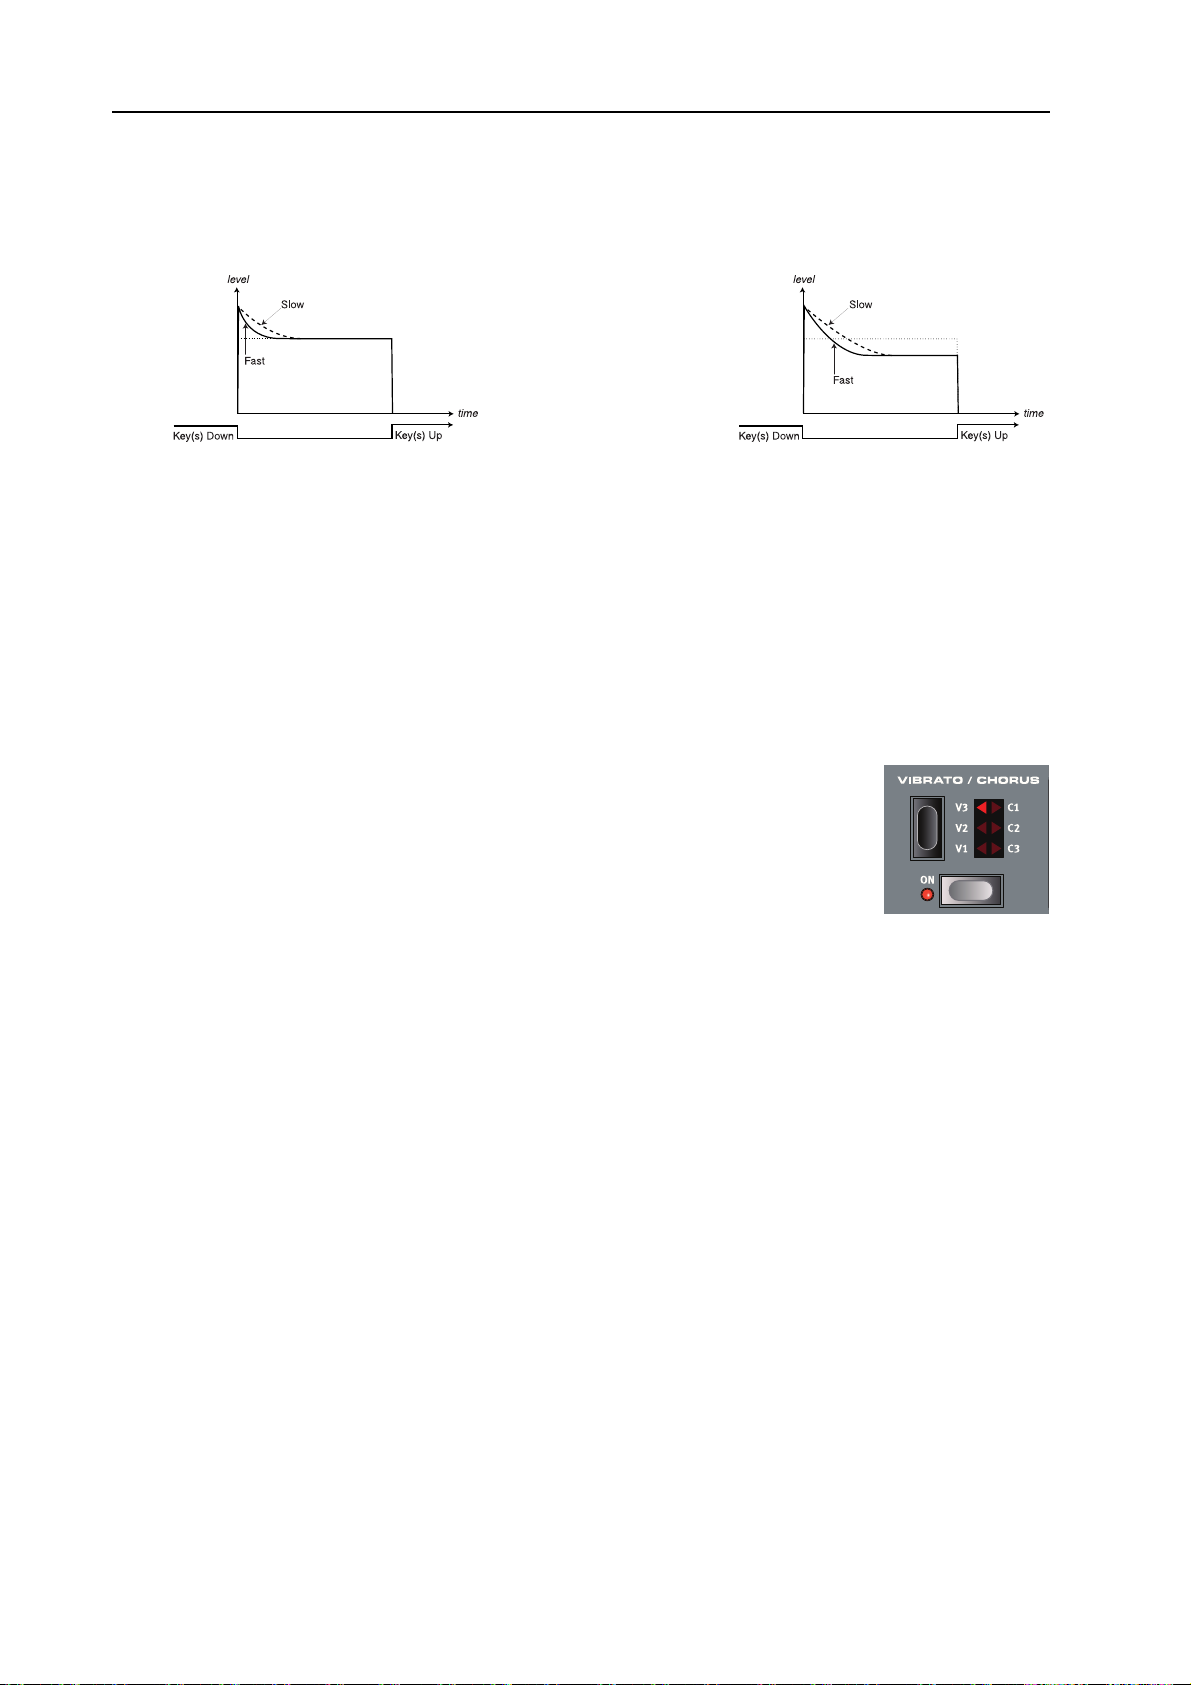
ERCUSSION
P
In the original B3 the Percussion effect is generated by a single envelope generator that controls either the 2nd or 3rd harmonic. The
envelope “opens up” for a short moment in the beginning of the
sound when you press the key(s).
• You activate and deactivate the Percussion effect by pressing the
O
N button.
• The Percussion effect can be set to control either the 2nd (H
ARMONIC 3RD button LED Off) or 3rd
harmonic.
Page 25
6. The Instruments: The Organ Section Nord Stage EX v6.x
• The envelope Decay time can be set to Fast (DECAY button LED Off) or Slow and the Volume
characteristics to Normal (V
OLUME button LED Off) or Soft.
(The horizontal dotted
lines represent the current drawbar level without Percussion).
The figure above shows the Percussion envelope in SOFT mode.
The figure above shows the Percussion envelope in NORMAL mode.
Like on the original B3, the Percussion is a single-triggered non-legato effect. By “single-triggered”
we mean that the percussion is only present when you hit the keys when no other note is sounding.
In other words, if you play a note or a chord and then add on more notes without releasing the previously pressed keys, there will be no percussion effect in the new notes. You have to release all keys
to be able to play new notes with the percussion effect. Also, like on the original B3, in Normal Percussion mode the sustain level is significantly lower than in Soft Percussion mode (or with the Percussion effect disabled).
IBRATO
V
The original B3 chorus and vibrato scanner consists of a modulated delay line in
combination with a rotating scanner. For the Vibrato effect, phase shift is applied
to the signal. For the Chorus effect, the phase modulated signal is added to the
original signal. A lot of time and effort have been spent in accurately recreating
the chorus and vibrato scanner effect. Like on the original B3, Nord Stage EX
offers three different types of choruses (C1-C3) and three different types of vibratos (V1-V3). Select one of these types by pressing the S
tivate the Vibrato section by pressing the O
EY CLICK CONTROL
K
N button.
ELECTOR button. You activate and deac-
On an original B3 organ, the key click produced by the random contact bounces was originally an
unintended audio artifact. This particular artifact later became a desirable effect amongst musicians.
In the Nord Stage EX you can select the amount of key click that should be present in the B3 organ
sounds.
1. Press the S
HIFT + SOUND buttons to access the Sound menu page.
2. You use the P
3. Now you can use the V
When you are done, press the E
Page 26
AGE -/+ buttons to navigate to the Organ Key Click Level menu item.
ALUE DIAL to change the Click Level 0-100%. Default setting is 50%.
XIT (SHIFT) button.
Nord Stage EX v6.x 6. The Instruments: The Organ Section
THE V-TYPE MODEL (VOX CONTINENTAL II)
The Vox Continental is probably the most famous of all the transistor-based combo organs that
emerged in the early 60’s. Transistor technology made it possible to manufacture much more compact
and portable organ instruments. Compared to the mighty sound of tone-wheel based organs, transistor
organs generally sounded reedier and weaker, but the Vox Continental had a distinctive sound character which together with the portability and cool design (inverse keyboard and chrome “Z-frame”
stand) made the instrument massively popular at the time. The sound is timeless and recreated faithfully in Nord Stage EX.
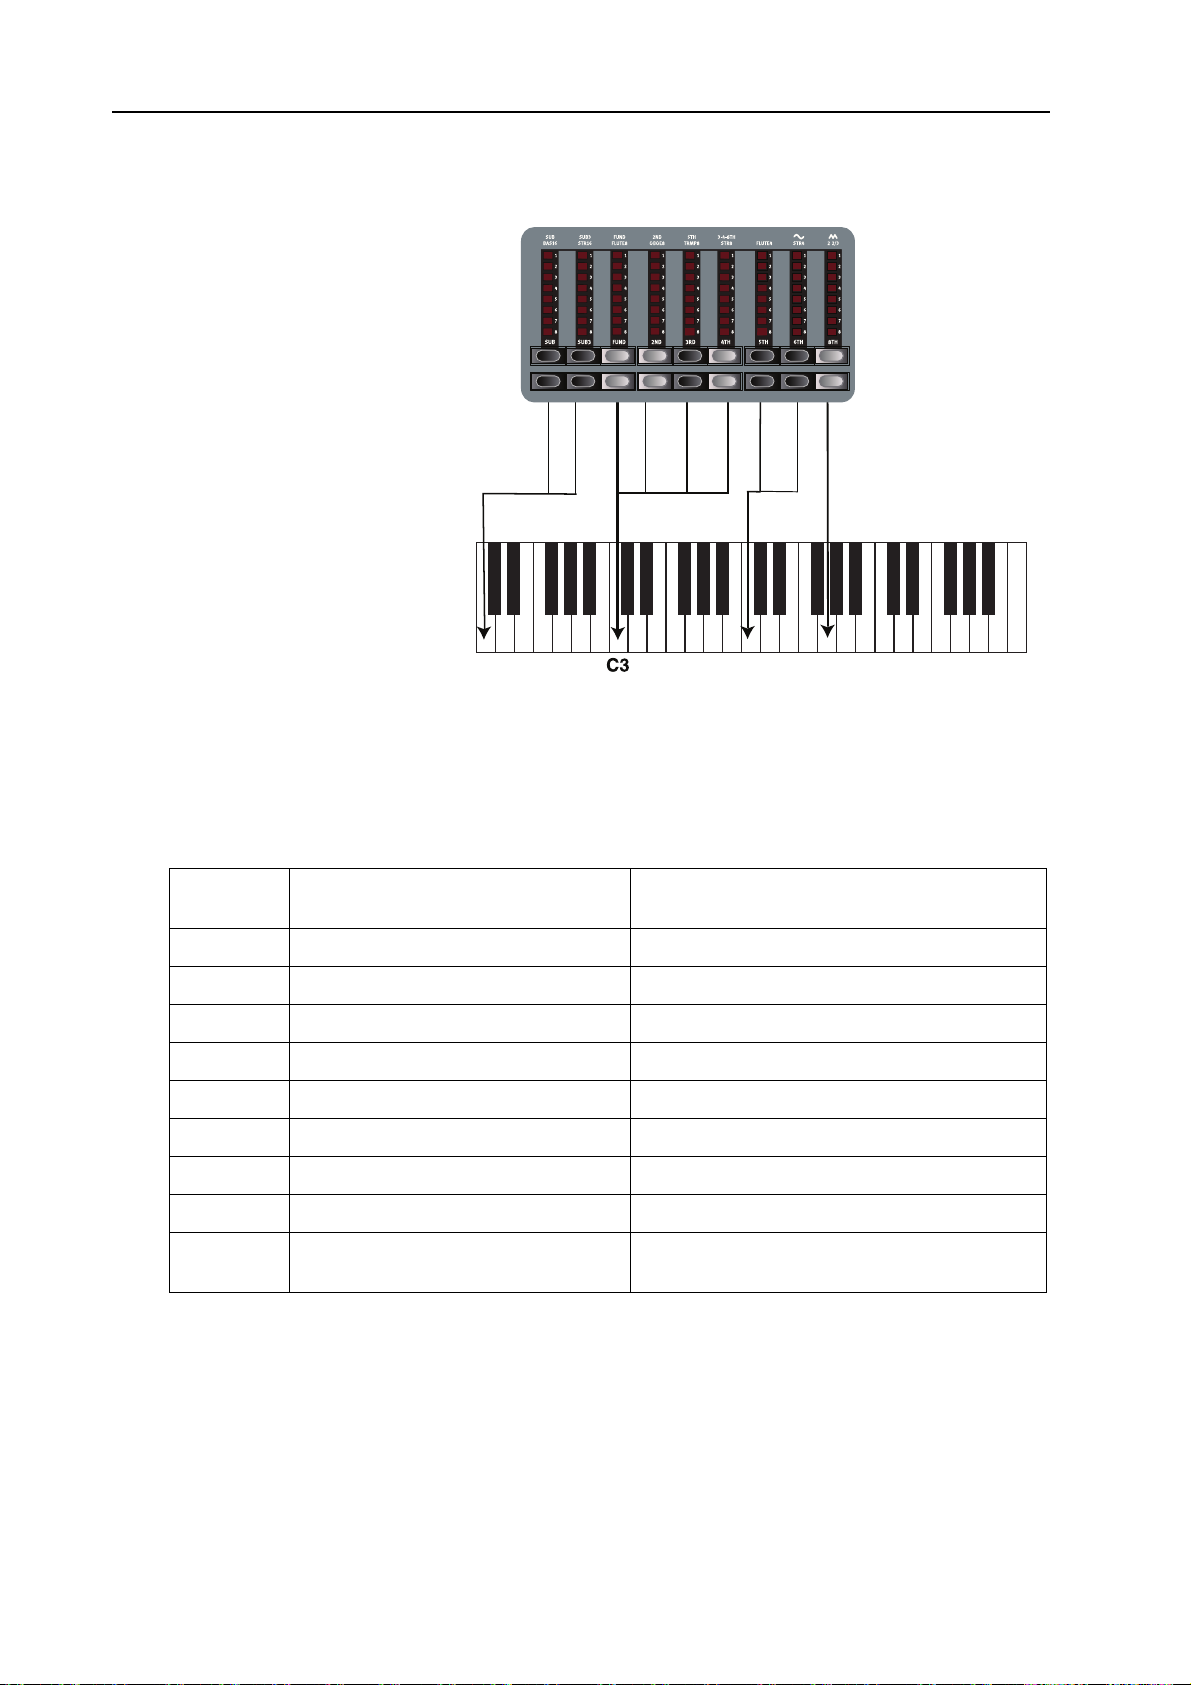
HE DRAWBARS
T
The original Vox Continental used drawbars to change the timbre of the sound. The harmonic intervals for the V-Type organ are printed on the upper row above the drawbars (see page 24 for a general
description of how the drawbars work in Nord Stage EX).
In the figure you can see the
pitch interval among the six
drawbars used by the V-Type
organ. Note that the 6th drawbar from the left controls three
harmonics simultaneously (3rd4th-8th). The two rightmost
drawbars determine the mix of
the two basic waveforms that
make up the sound generating
source of the organ sound, just
like on the original. You have
access to sine (soft) and triangle
(bright) waveforms which can
be freely mixed together. If
these drawbars are both fully
“pushed in”, the organ will not
produce any sound.
In the illustration above we have chosen C3 as our reference note. The FUND
drawbar is considered the basic (fundamental) harmonic in the organ sound.
The arrows point at the respective note that each drawbar represents when C3
is our reference note.
V
IBRATO
There is only one type of vibrato available for the V-Type, which is activated using the ON button in
the Vibrato section.Note that the V-Type vibrato is common for both Panels if a dual manual organ
is used.
F-TYPE MODEL (FARFISA)
The typical “buzzy” sound of the Farfisa organ is one of the most distinct and easily recognizable
keyboard sounds ever created, yet it is actually possible to get quite a wide range of sounds out of the
instrument. For the Nord Stage EX a Farfisa Compact DeLuxe was used as the source model.
Page 27
6. The Instruments: The Organ Section Nord Stage EX v6.x
THE REGISTER SELECTORS
The drawbars act as on/off
switches, or “Register selectors”
when the F-Type model is selected. Instead of drawbars, the
original Farfisa organs featured
“rocker”-type switches to select
instrument “voices” (actually
different filter settings) in various footage (octave) ranges. In
Nord Stage EX, this functionality is reproduced. When the FType organ model is selected,
OWER DRAWBAR buttons
the L
are used to turn voices on, and
the H
IGHER DRAWBAR buttons
turns them off. The drawbar
LEDs 5-8 are lit up for an activated voice, and drawbar LEDs
1-4 are lit up for a deactivated
voice. The available voices for
the F-type (also printed on the
panel directly over the draw-
In the illustration above we have chosen C3 as our reference note. The
four ‘Register selectors correspond to the fundamental harmonic (but
with different tonal characteristics). The arrows point at the respective
note that each drawbar represents when C3 is our reference note.
bars) are as follows (from left to
right):
Register
selector #
1 Bass 16 BAS16
2 Strings 16 STR16
3 Flute 8 FLUTE8
4 Oboe 8 OBOE8
5Trumpet 8 TRMP8
6 Strings 8 STR8
7 Flute 4 FLUTE4
8 Strings 4 STR4
9 A bright voice, pitched an octave and a
Voice Panel Name
2 2/3
fifth above the fundamental.
Note that the voices aren’t supposed to replicate the instruments they are named after, but rather to
describe the basic tonal characteristic of the voice (i.e. flute=soft/oboe=reedy/strings=bright/trumpet=brassy).
Page 28
Loading…
User Manual Nord Stage 2 EX 88
Nord Stage 2 EX HP76 Nord Stage 2 EX Compact
OS Version 2.x
Part No. 50444 Copyright Clavia DMI AB Print Edition: B
CAUTION — ATTENTION RISK OF ELECTRIC SHOCK
DO NOT OPEN RISQUE DE SHOCK ELECTRIQUE
NE PAS OUVRIR
CAUTION: TO REDUCE THE RISK OF ELECTRIC SHOCK DO NOT REMOVE COVER (OR BACK).
NO USER SERVICEABLE PARTS INSIDE. REFER SERVICING TO QUALIFIED PERSONNEL.
ATTENTION:POUR EVITER LES RISQUES DE CHOC ELECTRIQUE, NE PAS ENLEVER LE COUVERCLE.
AUCUN ENTRETIEN DE PIECES INTERIEURES PAR LUSAGER. CONFIER LENTRETIEN AU PERSONNEL QUALIFE.
AVIS: POUR EVITER LES RISQUES DINCIDENTE OU DELECTROCUTION, NEXPOSEZ PAS CET ARTICLE A LA PLUIE OU LHUMIDITET.
1) Read these instructions.
2) Keep these instructions.
3) Heed all warnings.
4) Follow all instructions.
5) Do not use this apparatus near water.
6) Clean only with dry cloth.
7) Do not block any ventilation openings. Install in accordance with the manufacturers instructions.
Do not install near any heat sources such as radiators, heat registers, stoves, or other apparatus (including amplifiers) that produce heat.
9) Do not defeat the safety purpose of the polarized or grounding-type plug. A polarized plug has two blades with one wider than the other. A grounding type plug has two blades and a third grounding prong. The wide blade or the third prong are provided for your safety. If the provided plug does not fit into your outlet, consult an electrician for replacement of the obsolete outlet.
10) Protect the power cord from being walked on or pinched particularly at plugs, convenience receptacles, and the point where they exit from the apparatus.
11) Only use attachments/accessories specified by the manu- facturer.
12) Use only with the cart, stand, tripod, bracket, or table specified by the manufacturer, or sold with the apparatus. When a cart is used, use caution when moving the cart/apparatus combination to avoid injury from tip-over.
13) Unplug this apparatus during lightning storms or when unused for long periods of time.
14) Refer all servicing to qualified service personnel. Servicing is required when the apparatus has been damaged in any way, such as power-supply cord or plug is damaged, liquid has been spilled or objects have fallen into the apparatus, the apparatus has been exposed to rain or moisture, does not operate nor- mally, or has been dropped.
The lightning flash with the arrowhead symbol within an equilateral triangle is intended to alert the user to the presence of uninsulated voltage within the products en- closure that may be of sufficient magnitude to constitute a risk of electric shock to persons.
Le symbole clair avec le point de flche lintrieur dun triangle quilatral est utilis pour alerter lutilisateur de la presence lintrieur du coffret de voltage dangereux non isol dampleur suffisante pour constituer un risque d`lctrocution.
The exclamation mark within an equilateral triangle is intended to alert the user to the presence of important operating and maintenance (servicing) instructions in the literature accompanying the product.
Le point dexclamation lintrieur dun triangle quilatral est employ pour alerter lutilisateur de la prsence dinstructions importantes pour le fonctionnement et lentretien (service) dans le livret dinstructions accompagnant lappareil.
Instructions pertaining to a risk of fire, electric shock or injury to persons.
IMPORTANT SAFETY INSTRUCTIONS SAVE THESE INSTRUCTIONS
Trademarks: The Nord logo is a trademark of Clavia DMI AB. All other trademarks mentioned in this publication are the properties of their respective holders.
Specifications and appearances are subject to change without notice. Copyright Clavia DMI AB
No naked flame sources, such as lighted candles, should be placed on the apparatus;
Do not use the apparatus in tropical climates.
WARNING: To reduce the risk of fire or electric shock, do not expose this apparatus to rain or moisture.
The apparatus shall not be exposed to dripping or splashing and that no objects filled with liquids, such as vases, shall be placed on the apparatus.
The maims plug is used as the disconnect device and shall remain readily operable.
Il convient de ne pas placer sur lappareil de sources de flammes nues, telles que des bougies allumes;
Lappareil nest pas destin tre utilis sous un climat tropical.
Lappareil ne doit pas tre expos des gouttements deau ou des claboussures et de plus quaucun objet rempli de liquide tel que des vases ne doit tre plac sur lappareil.
Lorsque la prise du rsau dalimentation est utilise comme dispositif de dconnexion, ce dispositif doit demeur aisment accessible.
Warning — When using electric products, basic precautions should always be followed, including the following:
Additional Safety Information
| 3
1Introduction
Thank you! . . . . . . . . . . . . . . . . . . . . . . . . . . . . . . . . . . . . . 5
Features . . . . . . . . . . . . . . . . . . . . . . . . . . . . . . . . . . . . . . . . 5
About the User Manual . . . . . . . . . . . . . . . . . . . . . . . . . 5 Reading the manual in Adobe Acrobat Reader . . . . . . . . . . . . 5
Nord on the Internet . . . . . . . . . . . . . . . . . . . . . . . . . . . 5 Restoring the factory presets . . . . . . . . . . . . . . . . . . . . . . . . . 5 OS upgrades . . . . . . . . . . . . . . . . . . . . . . . . . . . . . . . . . . . . . . 5 Free sounds . . . . . . . . . . . . . . . . . . . . . . . . . . . . . . . . . . . . . . 5 Disclaimer . . . . . . . . . . . . . . . . . . . . . . . . . . . . . . . . . . . . . . . . 5
2About the Nord Stage 2 EX
The Organ section . . . . . . . . . . . . . . . . . . . . . . . . . . . . . . 6
Piano Library v5 . . . . . . . . . . . . . . . . . . . . . . . . . . . . . . . . 6 Small, Medium & Large . . . . . . . . . . . . . . . . . . . . . . . . . . . . . . 6
String Resonance . . . . . . . . . . . . . . . . . . . . . . . . . . . . . . . 6
Nord Triple Pedal . . . . . . . . . . . . . . . . . . . . . . . . . . . . . . . 7
Pedal Noise . . . . . . . . . . . . . . . . . . . . . . . . . . . . . . . . . . . . . 7
The Synth Section . . . . . . . . . . . . . . . . . . . . . . . . . . . . . . 7
3Getting Started
Hook it up . . . . . . . . . . . . . . . . . . . . . . . . . . . . . . . . . . . . . . 8
Programs . . . . . . . . . . . . . . . . . . . . . . . . . . . . . . . . . . . . . . . 8 Select a program . . . . . . . . . . . . . . . . . . . . . . . . . . . . . . . . . . . 8 The Shift Button . . . . . . . . . . . . . . . . . . . . . . . . . . . . . . . . . . . 8 Sort Mode . . . . . . . . . . . . . . . . . . . . . . . . . . . . . . . . . . . . . . . . 9 The Knobs . . . . . . . . . . . . . . . . . . . . . . . . . . . . . . . . . . . . . . . 9 The Buttons . . . . . . . . . . . . . . . . . . . . . . . . . . . . . . . . . . . . . . . 9
Edit a program . . . . . . . . . . . . . . . . . . . . . . . . . . . . . . . . . 9 Select a new piano sound . . . . . . . . . . . . . . . . . . . . . . . . . . . . 9
Turning the Memory Protection Off . . . . . . . . . . 10
Storing a Program . . . . . . . . . . . . . . . . . . . . . . . . . . . . . 10
Live Mode . . . . . . . . . . . . . . . . . . . . . . . . . . . . . . . . . . . . . 10
Activate an effect . . . . . . . . . . . . . . . . . . . . . . . . . . . . . 10 Activate another instrument . . . . . . . . . . . . . . . . . . . . . . . . . 11
The Slots . . . . . . . . . . . . . . . . . . . . . . . . . . . . . . . . . . . . . . 11 Create a Split . . . . . . . . . . . . . . . . . . . . . . . . . . . . . . . . . . . . 11 Set the Piano to the Upper zone . . . . . . . . . . . . . . . . . . . . . 11 Set the Synth to the Lower zone . . . . . . . . . . . . . . . . . . . . . . 11
Load a Synth sound . . . . . . . . . . . . . . . . . . . . . . . . . . . 12 Create a Layer . . . . . . . . . . . . . . . . . . . . . . . . . . . . . . . . . . . . 12
The Morph . . . . . . . . . . . . . . . . . . . . . . . . . . . . . . . . . . . . . 12
The Synthesizer . . . . . . . . . . . . . . . . . . . . . . . . . . . . . . . 13
Arpeggio clinic . . . . . . . . . . . . . . . . . . . . . . . . . . . . . . . . 13
Master Clock . . . . . . . . . . . . . . . . . . . . . . . . . . . . . . . . . . 14
4Program Section
Transpose On/Set . . . . . . . . . . . . . . . . . . . . . . . . . . . . . 15
Slot Buttons A & B . . . . . . . . . . . . . . . . . . . . . . . . . . . . 15 Mono Output . . . . . . . . . . . . . . . . . . . . . . . . . . . . . . . . . . . . . 15 Dual KB . . . . . . . . . . . . . . . . . . . . . . . . . . . . . . . . . . . . . . . . . 15
Shift / Exit button . . . . . . . . . . . . . . . . . . . . . . . . . . . . . 16
Live Mode . . . . . . . . . . . . . . . . . . . . . . . . . . . . . . . . . . . . . 16
Program Buttons . . . . . . . . . . . . . . . . . . . . . . . . . . . . . . 16 What is a program? . . . . . . . . . . . . . . . . . . . . . . . . . . . . . . . . 16 System, Sound, MIDI, Extern . . . . . . . . . . . . . . . . . . . . . . . . 16 Panic . . . . . . . . . . . . . . . . . . . . . . . . . . . . . . . . . . . . . . . . . . . 16
Store, Store As. . . . . . . . . . . . . . . . . . . . . . . . . . . . . . . 16 Storing a Program . . . . . . . . . . . . . . . . . . . . . . . . . . . . . . . . . 17 Naming a program . . . . . . . . . . . . . . . . . . . . . . . . . . . . . . . . 17
Categories . . . . . . . . . . . . . . . . . . . . . . . . . . . . . . . . . . . . . . . 17
Value Dial . . . . . . . . . . . . . . . . . . . . . . . . . . . . . . . . . . . . . 17
MIDI Indicator . . . . . . . . . . . . . . . . . . . . . . . . . . . . . . . . . 17
Program Bank buttons . . . . . . . . . . . . . . . . . . . . . . . . 18 Organ Piano Synth Init . . . . . . . . . . . . . . . . . . . . . . . . . . . . . 18 Organ Split . . . . . . . . . . . . . . . . . . . . . . . . . . . . . . . . . . . . . . 18
Program Page buttons . . . . . . . . . . . . . . . . . . . . . . . . 18 Pending Load . . . . . . . . . . . . . . . . . . . . . . . . . . . . . . . . . . . . 18 Sort Mode . . . . . . . . . . . . . . . . . . . . . . . . . . . . . . . . . . . . . . . 18 Cursor, Del, Ins . . . . . . . . . . . . . . . . . . . . . . . . . . . . . . . . . . . 18
Mst Clk . . . . . . . . . . . . . . . . . . . . . . . . . . . . . . . . . . . . . . . 18 External Sync . . . . . . . . . . . . . . . . . . . . . . . . . . . . . . . . . . . . 18
Morph Assign . . . . . . . . . . . . . . . . . . . . . . . . . . . . . . . . . 19 Morph Destinations . . . . . . . . . . . . . . . . . . . . . . . . . . . . . . . . 19 Clearing a Morph . . . . . . . . . . . . . . . . . . . . . . . . . . . . . . . . . . 19
KB Zones . . . . . . . . . . . . . . . . . . . . . . . . . . . . . . . . . . . . . . 19
5Common features
Instrument & Extern Controls . . . . . . . . . . . . . . . . . 20 On/Off buttons . . . . . . . . . . . . . . . . . . . . . . . . . . . . . . . . . . . 20 KB Zone Select buttons . . . . . . . . . . . . . . . . . . . . . . . . . . . . 20 Creating a split . . . . . . . . . . . . . . . . . . . . . . . . . . . . . . . . . . . 20 Setting split points to change Zone ranges . . . . . . . . . . . . . 21 Layering instruments . . . . . . . . . . . . . . . . . . . . . . . . . . . . . . . 21 Octave Shift . . . . . . . . . . . . . . . . . . . . . . . . . . . . . . . . . . . . . . 21 Note Range . . . . . . . . . . . . . . . . . . . . . . . . . . . . . . . . . . . . . . 21 Latch Ped & KB Gate . . . . . . . . . . . . . . . . . . . . . . . . . . . . . . 21 Output Routing . . . . . . . . . . . . . . . . . . . . . . . . . . . . . . . . . . . 21 Using an external keyboard (Dual KB) . . . . . . . . . . . . . . . . . . 22 Using multiple keyboards . . . . . . . . . . . . . . . . . . . . . . . . . . . 22
Master level . . . . . . . . . . . . . . . . . . . . . . . . . . . . . . . . . . . 22
6Organ
Drawbars and buttons . . . . . . . . . . . . . . . . . . . . . . . . . 23 Selecting The Organ Model . . . . . . . . . . . . . . . . . . . . . . . . . 23
The B3 Model . . . . . . . . . . . . . . . . . . . . . . . . . . . . . . . . . 23
B3 Drawbars . . . . . . . . . . . . . . . . . . . . . . . . . . . . . . . . . . 24
Vibrato & Chorus . . . . . . . . . . . . . . . . . . . . . . . . . . . . . . 24
Percussion . . . . . . . . . . . . . . . . . . . . . . . . . . . . . . . . . . . . . 24 Key click control . . . . . . . . . . . . . . . . . . . . . . . . . . . . . . . . . . 24
Organ Preset I & II . . . . . . . . . . . . . . . . . . . . . . . . . . . . 24
The Vox Model . . . . . . . . . . . . . . . . . . . . . . . . . . . . . . . . 25
Vox Drawbars . . . . . . . . . . . . . . . . . . . . . . . . . . . . . . . . . . 25
Vibrato . . . . . . . . . . . . . . . . . . . . . . . . . . . . . . . . . . . . . . . . . 25
The Farf Model . . . . . . . . . . . . . . . . . . . . . . . . . . . . . . . . 25
Farf Registers . . . . . . . . . . . . . . . . . . . . . . . . . . . . . . . . . . 25
Vibrato . . . . . . . . . . . . . . . . . . . . . . . . . . . . . . . . . . . . . . . . . 26 Swell Control . . . . . . . . . . . . . . . . . . . . . . . . . . . . . . . . . . . . . 26
Rotary Speaker . . . . . . . . . . . . . . . . . . . . . . . . . . . . . . . . 26
7Piano
The Piano sounds . . . . . . . . . . . . . . . . . . . . . . . . . . . . . 27
Piano Select . . . . . . . . . . . . . . . . . . . . . . . . . . . . . . . . . . . 27 Type . . . . . . . . . . . . . . . . . . . . . . . . . . . . . . . . . . . . . . . . . . . . 27 Info . . . . . . . . . . . . . . . . . . . . . . . . . . . . . . . . . . . . . . . . . . . . 27 Model . . . . . . . . . . . . . . . . . . . . . . . . . . . . . . . . . . . . . . . . . . 27 Clavinet . . . . . . . . . . . . . . . . . . . . . . . . . . . . . . . . . . . . . . . . . 27 Dynamics . . . . . . . . . . . . . . . . . . . . . . . . . . . . . . . . . . . . . . . 28
Acoustics . . . . . . . . . . . . . . . . . . . . . . . . . . . . . . . . . . . . . 28 String Resonance . . . . . . . . . . . . . . . . . . . . . . . . . . . . . . . . . 28 Long Release . . . . . . . . . . . . . . . . . . . . . . . . . . . . . . . . . . . . 28 Pedal Noise . . . . . . . . . . . . . . . . . . . . . . . . . . . . . . . . . . . . . . 28
Nord Triple Pedal . . . . . . . . . . . . . . . . . . . . . . . . . . . . . . 28 Half pedaling . . . . . . . . . . . . . . . . . . . . . . . . . . . . . . . . . . . . . 28
Sostenuto . . . . . . . . . . . . . . . . . . . . . . . . . . . . . . . . . . . . . . . 28 Soft Pedal . . . . . . . . . . . . . . . . . . . . . . . . . . . . . . . . . . . . . . . 28
Slot Detune/Clav EQ . . . . . . . . . . . . . . . . . . . . . . . . . . . 28 Clav EQ . . . . . . . . . . . . . . . . . . . . . . . . . . . . . . . . . . . . . . . . 28 Slot Detune . . . . . . . . . . . . . . . . . . . . . . . . . . . . . . . . . . . . . . 28
8Synth
Basics . . . . . . . . . . . . . . . . . . . . . . . . . . . . . . . . . . . . . . . . . 29
Oscillator . . . . . . . . . . . . . . . . . . . . . . . . . . . . . . . . . . . . . 29 Shape . . . . . . . . . . . . . . . . . . . . . . . . . . . . . . . . . . . . . . . . . . 29 Shape Mod . . . . . . . . . . . . . . . . . . . . . . . . . . . . . . . . . . . . . . 30 Waveform selector button . . . . . . . . . . . . . . . . . . . . . . . . . . . 30 Analog style waveforms . . . . . . . . . . . . . . . . . . . . . . . . . . . . 30 Triangle . . . . . . . . . . . . . . . . . . . . . . . . . . . . . . . . . . . . . . . . . 30 Sawtooth . . . . . . . . . . . . . . . . . . . . . . . . . . . . . . . . . . . . . . . . 30 Pulse . . . . . . . . . . . . . . . . . . . . . . . . . . . . . . . . . . . . . . . . . . . 30 Oscillator Sync waveforms . . . . . . . . . . . . . . . . . . . . . . . . . . 30 Frequency Modulation . . . . . . . . . . . . . . . . . . . . . . . . . . . . . 31 FM Algorithms . . . . . . . . . . . . . . . . . . . . . . . . . . . . . . . . . . . . 31 Wavetables . . . . . . . . . . . . . . . . . . . . . . . . . . . . . . . . . . . . . . 32 Samples . . . . . . . . . . . . . . . . . . . . . . . . . . . . . . . . . . . . . . . . 32 Skip Sample Attack . . . . . . . . . . . . . . . . . . . . . . . . . . . . . . . . 32 Load Sound . . . . . . . . . . . . . . . . . . . . . . . . . . . . . . . . . . . . . . 32
Filter Section . . . . . . . . . . . . . . . . . . . . . . . . . . . . . . . . . 32 Filter button . . . . . . . . . . . . . . . . . . . . . . . . . . . . . . . . . . . . . . 32 Low Pass — LP 24 & LP 12 . . . . . . . . . . . . . . . . . . . . . . . . . . 32 High Pass — HP . . . . . . . . . . . . . . . . . . . . . . . . . . . . . . . . . . . 33 Band Pass — BP . . . . . . . . . . . . . . . . . . . . . . . . . . . . . . . . . . 33 Notch . . . . . . . . . . . . . . . . . . . . . . . . . . . . . . . . . . . . . . . . . . 33 Filter Frequency . . . . . . . . . . . . . . . . . . . . . . . . . . . . . . . . . . 33 KB Track . . . . . . . . . . . . . . . . . . . . . . . . . . . . . . . . . . . . . . . . 33 Resonance . . . . . . . . . . . . . . . . . . . . . . . . . . . . . . . . . . . . . . 33 Freq Mod 1 — LFO . . . . . . . . . . . . . . . . . . . . . . . . . . . . . . . . . 33 Freq Mod 2 . . . . . . . . . . . . . . . . . . . . . . . . . . . . . . . . . . . . . . 33
The Envelopes . . . . . . . . . . . . . . . . . . . . . . . . . . . . . . . . . 33 Mod Envelope . . . . . . . . . . . . . . . . . . . . . . . . . . . . . . . . . . . 33 Amp Envelope . . . . . . . . . . . . . . . . . . . . . . . . . . . . . . . . . . . 34
The LFO . . . . . . . . . . . . . . . . . . . . . . . . . . . . . . . . . . . . . . . 34
Velocity . . . . . . . . . . . . . . . . . . . . . . . . . . . . . . . . . . . . . . . 34
Voices section . . . . . . . . . . . . . . . . . . . . . . . . . . . . . . . . 34 Voice Mode Mono . . . . . . . . . . . . . . . . . . . . . . . . . . . . . . . . . 34 Voice Mode Legato . . . . . . . . . . . . . . . . . . . . . . . . . . . . . . . . 35 Glide . . . . . . . . . . . . . . . . . . . . . . . . . . . . . . . . . . . . . . . . . . . 35 Unison . . . . . . . . . . . . . . . . . . . . . . . . . . . . . . . . . . . . . . . . . 35 Vibrato . . . . . . . . . . . . . . . . . . . . . . . . . . . . . . . . . . . . . . . . . 35 Storing Synth Sounds . . . . . . . . . . . . . . . . . . . . . . . . . . . . . . 35
Arpeggiator . . . . . . . . . . . . . . . . . . . . . . . . . . . . . . . . . . . 35
9Effects
Overview . . . . . . . . . . . . . . . . . . . . . . . . . . . . . . . . . . . . . . 36 About mono/stereo and effect routing . . . . . . . . . . . . . . . . . 36
The Slot effects . . . . . . . . . . . . . . . . . . . . . . . . . . . . . . . 36 Activating Slot effects . . . . . . . . . . . . . . . . . . . . . . . . . . . . . . 36 Making settings for Slot effects . . . . . . . . . . . . . . . . . . . . . . . 36 The Focus button . . . . . . . . . . . . . . . . . . . . . . . . . . . . . . . . . 37 Mst Clk . . . . . . . . . . . . . . . . . . . . . . . . . . . . . . . . . . . . . . . . . 37
Effect 1 . . . . . . . . . . . . . . . . . . . . . . . . . . . . . . . . . . . . . . . . 37 A-Pan (Auto Pan) . . . . . . . . . . . . . . . . . . . . . . . . . . . . . . . . . . 37 Trem (Tremolo) . . . . . . . . . . . . . . . . . . . . . . . . . . . . . . . . . . . 37 RM (Ring modulation) . . . . . . . . . . . . . . . . . . . . . . . . . . . . . . 37 Wa-Wa . . . . . . . . . . . . . . . . . . . . . . . . . . . . . . . . . . . . . . . . . . 37 A-Wa 1 & 2 (Auto-Wah) . . . . . . . . . . . . . . . . . . . . . . . . . . . . 37
Effect 2 . . . . . . . . . . . . . . . . . . . . . . . . . . . . . . . . . . . . . . . 38 Phaser 1 & 2 . . . . . . . . . . . . . . . . . . . . . . . . . . . . . . . . . . . . . 38 Flanger . . . . . . . . . . . . . . . . . . . . . . . . . . . . . . . . . . . . . . . . . 38 Vibe . . . . . . . . . . . . . . . . . . . . . . . . . . . . . . . . . . . . . . . . . . . . 38 Chorus 1 & 2 . . . . . . . . . . . . . . . . . . . . . . . . . . . . . . . . . . . . . 38
Delay . . . . . . . . . . . . . . . . . . . . . . . . . . . . . . . . . . . . . . . . . 38
Amp Sim/Equalizer . . . . . . . . . . . . . . . . . . . . . . . . . . . 38 Amp model . . . . . . . . . . . . . . . . . . . . . . . . . . . . . . . . . . . . . . 38 Drive . . . . . . . . . . . . . . . . . . . . . . . . . . . . . . . . . . . . . . . . . . . 38 EQ section . . . . . . . . . . . . . . . . . . . . . . . . . . . . . . . . . . . . . . . 39
Global Effects . . . . . . . . . . . . . . . . . . . . . . . . . . . . . . . . . 39
Nord Stage 2 User Manual
4 | NordStage2eXUSerMaNUaloSv1.7X
Compressor . . . . . . . . . . . . . . . . . . . . . . . . . . . . . . . . . . . . . 39 Reverb . . . . . . . . . . . . . . . . . . . . . . . . . . . . . . . . . . . . . . . . . . 39
Rotary Speaker . . . . . . . . . . . . . . . . . . . . . . . . . . . . . . . 39 About the Rotary effects signal routing . . . . . . . . . . . . . . . . 39 Rotary parameter . . . . . . . . . . . . . . . . . . . . . . . . . . . . . . . . . 39
10Extern Section
Extern section . . . . . . . . . . . . . . . . . . . . . . . . . . . . . . . . 40 Setting up . . . . . . . . . . . . . . . . . . . . . . . . . . . . . . . . . . . . . . . 40
Using the Extern section . . . . . . . . . . . . . . . . . . . . . . 40 Activating . . . . . . . . . . . . . . . . . . . . . . . . . . . . . . . . . . . . . . . . 40 Keyboard Zones . . . . . . . . . . . . . . . . . . . . . . . . . . . . . . . . . . 40 Octave Shift . . . . . . . . . . . . . . . . . . . . . . . . . . . . . . . . . . . . . . 40 Activating Pitch Stick/Sustain Pedal messages . . . . . . . . . . 40
Extern Parameters . . . . . . . . . . . . . . . . . . . . . . . . . . . . . 41 Volume . . . . . . . . . . . . . . . . . . . . . . . . . . . . . . . . . . . . . . . . . 41 Prog Change . . . . . . . . . . . . . . . . . . . . . . . . . . . . . . . . . . . . 41 MIDI CC . . . . . . . . . . . . . . . . . . . . . . . . . . . . . . . . . . . . . . . . 41 Send On Load . . . . . . . . . . . . . . . . . . . . . . . . . . . . . . . . . . . . 41 Extern Section and MIDI re-routing . . . . . . . . . . . . . . . . . . . . 41
11Menus
System Menu . . . . . . . . . . . . . . . . . . . . . . . . . . . . . . . . . . 42 Global Transpose . . . . . . . . . . . . . . . . . . . . . . . . . . . . . . . . . 42 Fine Tune . . . . . . . . . . . . . . . . . . . . . . . . . . . . . . . . . . . . . . . . 42 Output Routing . . . . . . . . . . . . . . . . . . . . . . . . . . . . . . . . . . . 42 Organ Audio A/B Output . . . . . . . . . . . . . . . . . . . . . . . . . . . . 42 Piano Audio A/B Output . . . . . . . . . . . . . . . . . . . . . . . . . . . . 42 Synth Audio A/B Output . . . . . . . . . . . . . . . . . . . . . . . . . . . . 42 Organ Keyboard Trig Point . . . . . . . . . . . . . . . . . . . . . . . . . . 42 Sustain Pedal Type . . . . . . . . . . . . . . . . . . . . . . . . . . . . . . . . 42 Sustain Pedal Func . . . . . . . . . . . . . . . . . . . . . . . . . . . . . . . . 42 Rotor/Latch Pedal Type . . . . . . . . . . . . . . . . . . . . . . . . . . . . . 42 Rotor/Latch Pedal Func . . . . . . . . . . . . . . . . . . . . . . . . . . . . 42 Ctrl Pedal Type . . . . . . . . . . . . . . . . . . . . . . . . . . . . . . . . . . . 43 Control Pedal Gain . . . . . . . . . . . . . . . . . . . . . . . . . . . . . . . . 43 Control Pedal Func . . . . . . . . . . . . . . . . . . . . . . . . . . . . . . . . 43 Swell Pedal Type . . . . . . . . . . . . . . . . . . . . . . . . . . . . . . . . . . 43 Swell Pedal Gain . . . . . . . . . . . . . . . . . . . . . . . . . . . . . . . . . . 43 Swell Pedal Func . . . . . . . . . . . . . . . . . . . . . . . . . . . . . . . . . . 43 Memory Protection . . . . . . . . . . . . . . . . . . . . . . . . . . . . . . . . 43
Sound Menu . . . . . . . . . . . . . . . . . . . . . . . . . . . . . . . . . . . 43 Organ Key Click Level B3 . . . . . . . . . . . . . . . . . . . . . . . . . . . 43 Organ Tonewheel Mode . . . . . . . . . . . . . . . . . . . . . . . . . . . . 43 Piano Pedal Noise Level . . . . . . . . . . . . . . . . . . . . . . . . . . . . 43 Piano String Res Level . . . . . . . . . . . . . . . . . . . . . . . . . . . . . 43 Synth Vibrato Rate . . . . . . . . . . . . . . . . . . . . . . . . . . . . . . . . 43 Synth Dly Vibrato Amount . . . . . . . . . . . . . . . . . . . . . . . . . . . 43 FX Rotary Speaker Horn Speed . . . . . . . . . . . . . . . . . . . . . . 43 FX Rotary Speaker Horn Acc . . . . . . . . . . . . . . . . . . . . . . . . 43 FX Rotary Speaker Rotor Speed . . . . . . . . . . . . . . . . . . . . . . 43 FX Rotary Speaker Rotor Acc . . . . . . . . . . . . . . . . . . . . . . . . 43 FX Delay Mode . . . . . . . . . . . . . . . . . . . . . . . . . . . . . . . . . . . 44
MIDI Menu . . . . . . . . . . . . . . . . . . . . . . . . . . . . . . . . . . . . . 44 MIDI Control Local . . . . . . . . . . . . . . . . . . . . . . . . . . . . . . . . 44 MIDI Global Channel . . . . . . . . . . . . . . . . . . . . . . . . . . . . . . . 44 MIDI Slot A/B Channel . . . . . . . . . . . . . . . . . . . . . . . . . . . . . 44 MIDI Organ A/B Channel . . . . . . . . . . . . . . . . . . . . . . . . . . . 44 MIDI Piano A/B Channel . . . . . . . . . . . . . . . . . . . . . . . . . . . . 44 MIDI Synth A/B Channel . . . . . . . . . . . . . . . . . . . . . . . . . . . . 44 MIDI Dual KB Channel . . . . . . . . . . . . . . . . . . . . . . . . . . . . . . 44 MIDI Ctrl Change Mode . . . . . . . . . . . . . . . . . . . . . . . . . . . . 44 MIDI Prog Change Mode . . . . . . . . . . . . . . . . . . . . . . . . . . . . 44 Send MIDI Ctrl . . . . . . . . . . . . . . . . . . . . . . . . . . . . . . . . . . . . 44 Dump Program . . . . . . . . . . . . . . . . . . . . . . . . . . . . . . . . . . . 44 Dump Synth . . . . . . . . . . . . . . . . . . . . . . . . . . . . . . . . . . . . . 44
Extern Menu . . . . . . . . . . . . . . . . . . . . . . . . . . . . . . . . . . . 45 Extern MIDI Mode . . . . . . . . . . . . . . . . . . . . . . . . . . . . . . . . . 45 Extern MIDI A/B Channel . . . . . . . . . . . . . . . . . . . . . . . . . . . 45 Extern MIDI A/B Volume . . . . . . . . . . . . . . . . . . . . . . . . . . . . 45 Extern MIDI A/B Prog Change . . . . . . . . . . . . . . . . . . . . . . . 45 Extern MIDI A/B Bank Sel cc 00 . . . . . . . . . . . . . . . . . . . . . . 45 Extern MIDI A/B Bank Sel cc 32 . . . . . . . . . . . . . . . . . . . . . . 45 Extern MIDI A/B CC Number . . . . . . . . . . . . . . . . . . . . . . . . 45 Extern MIDI A/B CC Value . . . . . . . . . . . . . . . . . . . . . . . . . . 45 Extern MIDI A/B Send Wheel . . . . . . . . . . . . . . . . . . . . . . . . 45 Extern MIDI A/B Send A .Touch . . . . . . . . . . . . . . . . . . . . . . . 45 Extern MIDI A/B Send CtrlPed . . . . . . . . . . . . . . . . . . . . . . . 45 Extern MIDI A/B Send Swell . . . . . . . . . . . . . . . . . . . . . . . . . 45 Extern MIDI A/B Vel Curve . . . . . . . . . . . . . . . . . . . . . . . . . . 45 Extern MIDI Send on Load . . . . . . . . . . . . . . . . . . . . . . . . . . 45 Extern MIDI Soft Thru . . . . . . . . . . . . . . . . . . . . . . . . . . . . . . 45
12Nord Sound Manager
Nord Sound Manager . . . . . . . . . . . . . . . . . . . . . . . . . . . . . . 46 System requirements . . . . . . . . . . . . . . . . . . . . . . . . . . . . . . 46
13MIDI
Using MIDI . . . . . . . . . . . . . . . . . . . . . . . . . . . . . . . . . . . . 47 Global . . . . . . . . . . . . . . . . . . . . . . . . . . . . . . . . . . . . . . . . . . 47 Slot A/B . . . . . . . . . . . . . . . . . . . . . . . . . . . . . . . . . . . . . . . . . 47 Extern . . . . . . . . . . . . . . . . . . . . . . . . . . . . . . . . . . . . . . . . . . 47 Instrument MIDI . . . . . . . . . . . . . . . . . . . . . . . . . . . . . . . . . . . 47
Playing/Controlling outboard gear with the Extern section . . . . . . . . . . . . . . . . . . . . . . . . . . . . . . . . . 48
Controlling the Stage 2 EX with an external keyboard or MIDI device . . . . . . . . . . . . . . . . . . . . . . 48 Dual Kb . . . . . . . . . . . . . . . . . . . . . . . . . . . . . . . . . . . . . . . . . 48 Slot MIDI control . . . . . . . . . . . . . . . . . . . . . . . . . . . . . . . . . . 49 Global MIDI . . . . . . . . . . . . . . . . . . . . . . . . . . . . . . . . . . . . . . 49 External Sync . . . . . . . . . . . . . . . . . . . . . . . . . . . . . . . . . . . . 49 Extern Section and MIDI re-routing . . . . . . . . . . . . . . . . . . . . 49
Recording a Stage 2 EX performance to a MIDI sequencer . . . . . . . . . . . . . . . . . . . . . . . . . . . . . . . . . . . . . 49 Program Change . . . . . . . . . . . . . . . . . . . . . . . . . . . . . . . . . . 49
Using the Stage 2 EX as a sound source with a sequencer . . . . . . . . . . . . . . . . . . . . . . . . . . . . . . . . . . . . . 50 MIDI Input Only . . . . . . . . . . . . . . . . . . . . . . . . . . . . . . . . . . . 50
Messages . . . . . . . . . . . . . . . . . . . . . . . . . . . . . . . . . . . . . . 50 Panic . . . . . . . . . . . . . . . . . . . . . . . . . . . . . . . . . . . . . . . . . . . 51 USB MIDI . . . . . . . . . . . . . . . . . . . . . . . . . . . . . . . . . . . . . . . . 51
MIDI Controller list . . . . . . . . . . . . . . . . . . . . . . . . . . . . 52
MIDI Implementation Chart . . . . . . . . . . . . . . . . . . . 53
IAppendix: Connections
Audio connections . . . . . . . . . . . . . . . . . . . . . . . . . . . . . 54 Headphones . . . . . . . . . . . . . . . . . . . . . . . . . . . . . . . . . . . . . 54 Audio Outputs 1-4 . . . . . . . . . . . . . . . . . . . . . . . . . . . . . . . . . 54 Monitor In . . . . . . . . . . . . . . . . . . . . . . . . . . . . . . . . . . . . . . . 54
USB Connection . . . . . . . . . . . . . . . . . . . . . . . . . . . . . . . 54
MIDI Connections . . . . . . . . . . . . . . . . . . . . . . . . . . . . . . 54 MIDI In . . . . . . . . . . . . . . . . . . . . . . . . . . . . . . . . . . . . . . . . . . 54 MIDI Out . . . . . . . . . . . . . . . . . . . . . . . . . . . . . . . . . . . . . . . . 54
Nord Music Stand . . . . . . . . . . . . . . . . . . . . . . . . . . . . . 55
Connecting Pedals . . . . . . . . . . . . . . . . . . . . . . . . . . . . . 55 The Organ Swell input . . . . . . . . . . . . . . . . . . . . . . . . . . . . . . 55 Using a Rotor Speed pedal . . . . . . . . . . . . . . . . . . . . . . . . . . 55 Using a Latch pedal . . . . . . . . . . . . . . . . . . . . . . . . . . . . . . . 55 Sustain pedal . . . . . . . . . . . . . . . . . . . . . . . . . . . . . . . . . . . . 55 Nord Triple Pedal . . . . . . . . . . . . . . . . . . . . . . . . . . . . . . . . . 55
IIAppendix: Factory Presets
Factory Presets and OS . . . . . . . . . . . . . . . . . . . . . . . 56 Internal memory . . . . . . . . . . . . . . . . . . . . . . . . . . . . . . . . . . 56 Factory presets . . . . . . . . . . . . . . . . . . . . . . . . . . . . . . . . . . . 56 Restoring the factory content . . . . . . . . . . . . . . . . . . . . . . . . 56 OS upgrades . . . . . . . . . . . . . . . . . . . . . . . . . . . . . . . . . . . . . 56
IIIIndex
Index . . . . . . . . . . . . . . . . . . . . . . . . . . . . . . . . . . . . . . . . . . . 57
Thank you! Wed first like to thank you for purchasing the Nord Stage 2 EX! Our goal when developing the Nord Stage 2 was to create a flagship stage instrument encompassing the whole range of our companys accumu- lated expertise. Building on the success of the original Nord Stage, the Nord Stage 2 incorporates the best emulations of electromechanical and acoustic keyboard instruments on the market as well as a syn- thesizer section designed for maximum ease of use, yet offering wide sonic possibilities. With Nord Stage 2 EX the instrument also benefits from an expanded Piano memory.
The Nord Stage 2 EX features outstanding classic keyboard sounds with true feel, from natural keyboard response to authentic sound. A medium weighted hammer action 88 note keyboard, 76 key por- table hammer action keyboard or a 73 note semi-weighted waterfall keyboard makes this instrument the biggest in the Nord range, yet it weighs only 18,5/12,4/9,7 kilos which is an achievement in itself.
Features The Nord Stage 2 EX has the following main features:
Organ section with faithful reproductions of three classic organ mod- els; B3, Vox and Farf (Farfisa).
Piano section with acoustic grand and upright pianos, tine-based electric pianos, Wurlitzer electric pianos, Digital FM pianos, Clavinet, and Electric Grand. The memory capacity for the Piano section in the Stage 2 EX is approximately 1 Gigabyte.
Synth section with sample playback, FM, analog-style and digital waveforms in a subtractive synthesis architecture.
Comprehensive effects section.
A medium weighted hammer action 88 note keyboard with after- touch, a portable hammer action 76 note keyboard with aftertouch, or a 73 note semi-weighted waterfall keyboard with aftertouch.
An Extern section for controlling external MIDI instruments.
A powerful Morph feature for applying multiple parameter changes to a sound with controllers.
Splits and layers are easily set up by assigning instruments to Key- board Zones.
But thats not all. There are two independent Slots A and B, each containing a full setup of the Stage 2 instruments. This means that you have access to six instrument sections and two independent effect sections! Amongst other things, this allows for dual manual B3 organ emulation, and easy setup of all kinds of instrument layering and splits.
About the User Manual The manual is arranged mainly as a reference manual. In many cases youll get tips on how to practically use the functions, alone and also together with other functions.
Reading the manual in Adobe Acrobat Reader This manual is also available in the digital PDF-file format. It can be downloaded, free of charge, from the Nord web site at www.nordkeyboards.com. With Adobe Acrobat Reader it is possible to use special navigation features like hyper links. This means that you can click with the mouse on a word or sentence and automatically get to the location indicated by the word/sentence.
Nord on the Internet If you have access to the Internet, youre very welcome to visit www.nordkeyboards.com. There you will find the latest information about the Nord Stage 2 EX and other Nord products. You can also download new Nord Stage 2 EX sounds and software upgrades, free of charge.
Restoring the factory presets The factory programs, samples and pianos are available as Nord Sound Manager backup files for download at the Nord web site at www.nordkeyboards.com or on the included Nord DVD.
OS upgrades The latest OS version for Nord Stage 2 EX is available for download at the www.nordkeyboards.com website. Please visit our website from time to time, to make sure you have the latest version in your unit.
Free sounds Since the Nord Stage 2 EX is designed as an open system, each and every piano and sample in the Nord Stage 2 EX can be replaced by you. This is done using the Nord Sound Manager application.
The Nord Stage 2 EX is compatible with the continuously expanding Nord Piano Library and the Nord Sample Library. These sounds are included on the DVD that accompanies the Stage 2 EX. When new sounds become available, you can download these for free from the www.nordkeyboards.com website.
Disclaimer Any trademarks and brand names mentioned in this manual are the property of their respective owners and are not affiliated or associated with Clavia. These trademarks and brand names are only mentioned to describe the types of sounds reproduced by Nord Stage 2 EX.
1 Introduction
Chapter 1 IntroduCtIon | 5
Great sounds and maximum expressiveness are two essential features in the Nord Stage 2 EX. To make a great tool we believe that you have to put all the focus on a few important things and that is exactly what we have tried to achieve. Lets have a look at some of the key features:
The Organ section Almost fifteen years have passed since we made our first digital model of a tonewheel organ. The Stage 2 EXs dedicated organ section uses our third generation B3 Organ model as found in the acclaimed Nord C2 Combo Organ.
Considered by many the most accurate emulation of the B3 ever, the Stage 2 EXs organ model is based on the analysis of the signals from each of the 91 spinning discs inside several original instruments and painstaking work on understanding exactly how all the components interact with each other. The virtual circuitry reacts not only to the settings on the panel but also during the real time performance. The Stage 2 EX will faithfully reproduce the important foldback and energy robbing characteristics; the latter will produce the gentle compression effect that makes those lovely smears absolutely wonderful. There are 3 tonewheel modes that allow you to switch from a clean, factory specd instrument to a worn and battered workhorse with some 40 years worth of touring.
We also created carefully modelled emulations of two of the most famous transistor organs from the 1960s, the Vox Continental and the Farfisa Compact. Alongside the organs themselves, the Stage 2 EX features a rotary speaker simulation derived from the Nord C2. Incorpo- rating the acoustic variations that occur as a physical rotating spreads the sound around in a room, they bring the Stage 2 EXs organs to life with remarkable realism In terms of control, Draw buttons and LED bar graphs have replaced the original mechanical drawbars. This gives you the advantage of always having the correct drawbar settings after changing preset.
Piano Library v5 The Nord Stage 2 EX is compatible with version 5 of the Nord Piano Library. We have spent a lot of time and effort in creating our best piano sounds ever, to match the features available in the Nord Stage 2 EX.
The piano sounds are included on the DVD and are organized in cat- egories and in some cases available in various sizes (for the acoustic grand pianos and uprights). New sounds will be available free of charge on the www.nordkeyboards.com website.
Small, Medium & Large The acoustic grand pianos and uprights are available in several sizes; X-Large, large, medium and small. The large, medium and small sizes share the same amount of velocity layers, and the same number of zones that are mapped across the keyboard. This means that you can rely on a consistent quality in regards to the playability and expres- siveness in the basic sound of every piano, no matter what size you choose to install into your Nord Stage 2 EX (or any other Nord Piano Library compatible unit).
Small (Sml) is the version that uses the least amount of space in the piano memory, but still carry a big and powerful punch. This version does not contain any String Resonance samples at all. If a Sml piano is selected in the Nord Stage 2 EX, the String Resonance feature will be disabled.
The Medium versions have pedal-down String Resonance samples in the important middle region of the range, but omit these in the lowest and the highest areas. This gives you a good ratio of functionality and size.
The Large versions have the pedal-down String Resonance samples all across the keyboard, providing you with the fullest of sounds, but also the largest size.
Some pianos are available in XL versions which means that they are fully mapped across the keyboard which increases the size a bit.
String Resonance String resonance is the acoustic phenomenon which occurs inside every acoustic piano when strings, or parts of strings, resonate at their fundamental or harmonic frequencies when other strings are played. When playing any of the medium or large v5 pianos in your Stage 2 EX with this functionality is turned on, all notes you play will affect each other to reproduce the wonderful acoustics that occur inside an acous- tic grand or upright piano.
String resonance is also very noticeable when you use the sustain pedal with the String Resonance feature enabled (again, on medium and large acoustic pianos only). With the sustain pedal held down, any notes you play will have a beautiful and familiar sound quality to them, enhanced by the un-dampened strings resonating in sympathy with the notes you are playing.
Another thing that the String Resonance produces is a crescendo effect. If you play the same key repeatedly with the same force, the sound will change. This is originally caused by the hammers hitting the vibrating string in various phases, and creates a nice, gentle fluctuation in volume and timbre in the Nord Stage 2 EX.
2 About the Nord Stage 2 EX
6 | Nord Stage 2 eX USer MaNUal oS v1.7X
Nord Triple Pedal The Nord Stage 2 EX is compatible with the accessory Nord Triple Pedal (not included, sold separately) which offers an unprecedented functionality. The Piano Pedal adds dynamic control of the mechanical noise during operation, and the ability for you as a player to use half pedaling and release and catch again techniques.
E If you have purchased a Nord Triple Pedal, you need to select this pedal type in the System Menu.
1Hold Shift and press the System/Program 1 button beneath the LCD to enter the System Menu settings.
2Press the Program Page 4 button above the Value Dial until you reach the Sustain Pedal Type setting.
3Turn the Value Dial to select Triple. Press Shift to exit the menu and attach the Tripe Pedal to the Nord Stage 2 EX.
The right pedal is the sustain pedal. If you operate this, all the notes that you play will sustain until the pedal is released again.
The left pedal is the soft pedal, also known as the Una Corda. When you press this pedal, all the notes you play will be slightly lower in vol- ume and also have a slightly more subdued tone quality.
The middle pedal is the Latch/Sostenuto. In order for this functionality to be used, it has to be activated in the instruments. Read more about this in the section Latch Ped & KB Gate on page 21.
Pedal Noise When the sustain pedal is operated on an acoustic grand or upright piano, many different sounds are produced by the mechanical com- ponents of that instruments pedal mechanism. Your Nord Stage 2 EX reproduces many of these natural sounds. When the sustain pedal is pressed down, lifting the dampers from the strings, a beautiful sizzle can be heard.
When the pedal is released, the dampers are returned to the strings, which creates a different, muted type of sound. The Nords sustain pedal is dynamic, allowing you to experiment with varying forces both for pressing the pedal down and also releasing it. If you allow your foot to slip off the edge of the pedal, it will spring back with full force, creating an obvious sound.
The floor sound is heard when the pedal reaches the bottom of its travel. You can experience this in isolation if you press down the pedal completely, then lift it less than halfway back up and then press down again.
If you lift the pedal and immediately press it down again, a very rich sound will be heard. Another big sound is The Stomp, which requires you to start with your foot above the actual pedal, in order to be able to reach the high velocity that is required to get this sound.
The Synth Section The Stage 2 EXs powerful synthesizer engine was built from the DNA of the Nord Wave. Capable of classic analogue synthesis, three opera- tor FM synthesis, Wavetable synthesis and, crucially, compatibility with the Nord Sample Library.
The Nord Sample Library not only gives Stage 2 EX owners access to the huge free library of world-class sounds, including the famous vin- tage Mellotron and Chamberlin samples. Thanks to the included Nord Sample Editor for Mac and PC, user-created samples can be loaded into the instrument, opening up a whole new creative world of sound.
The Synth engine itself features classic analogue synthesis with dual saw, hard sync and pulse wave modulation, three-operator FM synthe- sis with 32 different modulation frequencies, Wavetable synthesis with 62 waveforms and Sample based synthesis. A new great sounding multimode filter features 12 and 24 dB low pass, high pass, band pass and notch filters. And with an Amp envelope, Modulation envelope, an LFO, and Unison control, the Stage 2 EXs synth capabilities are hugely powerful, delivering amazing on-stage sound.
The Synth section also features a new Arpeggiator which can be synchronized to either external clock or the Stage 2 EXs Master Clock for perfect timing with several elements of the Stage 2 EX, including its effects and the synth LFO.
Chapter 2 aboUt the Nord Stage 2 eX | 7
Hook it up 1Connect the Nord Stage 2 EX power cord to the unit and a mains
power supply, connect the sustain pedal and a set of headphones or a sound system.
2Make sure to turn on the Stage 2 EX first, before the sound sys- tem. Please be careful with the output volume.
For more information on all the connections on the Stage 2 EX, look in the Connections chapter on page 54.
Programs The Program area is the part of the panel that is located in the center of the panel with the display in the middle. Complete settings of every parameter on the panel are stored in the program memory of the Nord Stage 2 EX, with enough room for 400 programs.
This is organized into 4 banks; each bank contains 20 pages of 5 pro- grams each, all of which can be edited and replaced as you wish.
E The 100 programs in the D bank when the unit is shipped from the factory are duplicates of the programs in the A bank. This means that you can immediately start to save any edits you do in either the A or D bank without risking to overwrite any of the factory programs until you have decided which ones you want to keep.
A complete set of the factory programs are available on our website, www.nordkeyboards.com. This means that you can always return to the state of the program memory when the unit was new.
Select a program 1Programs are selected by pressing the five Program buttons,
located below the display. An alternate method is to turn the Value Dial located to the right of the display.
2The P
CAUTION - ATTENTION                                The lightning flash with the arrowhead symbol within
an equilateral triangle is intended to alert the user to the
RISK OF ELECTRIC SHOCK                         presence of uninsulated voltage within the products en-
DO NOT OPEN                               closure that may be of sufficient magnitude to constitute
RISQUE DE SHOCK ELECTRIQUE                       a risk of electric shock to persons.
NE PAS OUVRIR
Le symbole eclair avec le point de fleche a l?interieur d?un triangle
equilateral est utilise pour alerter l?utilisateur de la presence a
CAUTION: TO REDUCE THE RISK OF ELECTRIC SHOCK          l?interieur du coffret de ”voltage dangereux” non isole d?ampleur
DO NOT REMOVE COVER (OR BACK).                   suffisante pour constituer un risque d`electrocution.
NO USER SERVICEABLE PARTS INSIDE.
REFER SERVICING TO QUALIFIED PERSONNEL.             The exclamation mark within an equilateral triangle is
intended to alert the user to the presence of important
ATTENTION:POUR EVITER LES RISQUES DE CHOC ELECTRIQUE, NE   operating and maintenance (servicing) instructions in the
PAS ENLEVER LE COUVERCLE.                      literature accompanying the product.
AUCUN ENTRETIEN DE PIECES INTERIEURES PAR L?USAGER.
CONFIER L?ENTRETIEN AU PERSONNEL QUALIFE.            Le point d?exclamation a l?interieur d?un triangle equilateral est
employe pour alerter l?utilisateur de la presence d?instructions
AVIS: POUR EVITER LES RISQUES D?INCIDENTE OU D?ELECTROCUTION,   importantes pour le fonctionnement et l?entretien (service) dans le
N?EXPOSEZ PAS CET ARTICLE A LA PLUIE OU L?HUMIDITET.    livret d?instructions accompagnant l?appareil.
Instructions pertaining to a risk of fire, electric shock or injury to persons.
IMPORTANT SAFETY INSTRUCTIONS
SAVE THESE INSTRUCTIONS
Warning - When using electric products, basic precautions should always be followed, including the following:
1) Read these instructions.                     10) Protect the power cord from being walked on or pinched
particularly at plugs, convenience receptacles, and the point
2) Keep these instructions.
where they exit from the apparatus.
3) Heed all warnings.
11) Only use attachments/accessories specified by the manu-
4) Follow all instructions.                     facturer.
5) Do not use this apparatus near water.        12) Use only with the cart, stand,
tripod, bracket, or table specified by the
6) Clean only with dry cloth.
manufacturer, or sold with the apparatus.
7) Do not block any ventilation openings. Install in accordance   When a cart is used, use caution when
with the manufacturer’s instructions.           moving the cart/apparatus combination to
avoid injury from tip-over.
8) Do not install near any heat sources such as radiators, heat
registers, stoves, or other apparatus (including amplifiers) that   13) Unplug this apparatus during lightning
produce heat.                                   storms or when unused for long periods of time.
9) Do not defeat the safety purpose of the polarized or   14) Refer all servicing to qualified service personnel. Servicing
grounding-type plug. A polarized plug has two blades with one   is required when the apparatus has been damaged in any way,
wider than the other. A grounding type plug has two blades   such as power-supply cord or plug is damaged, liquid has been
and a third grounding prong. The wide blade or the third prong   spilled or objects have fallen into the apparatus, the apparatus
are provided for your safety. If the provided plug does not fit   has been exposed to rain or moisture, does not operate nor-
into your outlet, consult an electrician for replacement of the   mally, or has been dropped.
obsolete outlet.
Additional Safety Information
No naked flame sources, such as lighted candles, should be placed on   Il convient de ne pas placer sur l?appareil de sources de flammes nues,
the apparatus;                                  telles que des bougies allumees;
Do not use the apparatus in tropical climates.  L?appareil n’est pas destine a etre utilise sous un climat tropical.
WARNING: To reduce the risk of fire or electric shock, do not expose
this apparatus to rain or moisture.
The apparatus shall not be exposed to dripping or splashing and that   L?appareil ne doit pas etre expose a des egouttements d?eau ou des
no objects filled with liquids, such as vases, shall be placed on the   eclaboussures et de plus qu?aucun objet rempli de liquide tel que des
apparatus.                                      vases ne doit etre place sur l?appareil.
The maims plug is used as the disconnect device and shall remain   Lorsque la prise du resau d’alimentation est utilisee comme dispositif
readily operable.                               de deconnexion, ce dispositif doit demeure aisement accessible.
Trademarks: The Nord logo is trademark of Clavia DMI AB. All other trademarks mentioned
in this publication are the properties of their respective holders.
Specifications and appearances are subject to change without notice.
Copyright © Clavia DMI AB
Skip to content
Music, composing, mixing, and mastering
NORD Stage 2 (HA88) User Manual (pdf)
-
Version
-
Download
227 -
File Size
13.90 MB -
File Count
1 -
Create Date
30 December, 2019 -
Last Updated
3 April, 2023
Page load link
Go to Top