
Owner’s
Manual
1

DECLARATION OF CONFORMITY
Manufacturer’s Name: Harman Music Group
Manufacturer’s Address: 8760 S. Sandy Parkway
Sandy, Utah 84070, U.S.A.
declares that the product:
Product name: JamMan Solo
Product option: all (requires Class II power adapter that conforms
to the requirements of EN60065, EN60742, or
equivalent.)
conforms to the following Product Specifications:
Safety IEC 60065 -01+Amd 1
EMC EN 55022:2006
EN 55024:1998
FCC Part 15
Supplementary Information:
The product herewith complies with the requirements of the:
Low Voltage Directive 2006/95/EC
EMC Directive 2004/108/EC.
RoHS Directive 2002/95/EC
WEEE Directive 2002/96/EC
With regard to Directive 2005/32/EC and EC Regulation 1275/2008 of 17 December
2008, this product is designed, produced, and classified as Professional Audio Equipment and thus is exempt from this Directive.
With regard to Directive 2005/32/EC and EC Regulation 278/2009 of 6 April 2009,
this regulation applies to Class A (single output) external power supplies. The
external power supply used with this product is a multi-output power supply and
thus is exempt from this Directive.
The product herewith complies with the requirements of the Low Voltage Directive
2006/95/EC and the EMC Directive 2004/108/EC.
Vice-President of Engineering
8760 S. Sandy Parkway
Sandy, Utah 84070, U.S.A.
Date: March 30, 2010
European Contact: Your local DigiTech Sales and Service Office or
Harman Music Group
8760 South Sandy Parkway
Sandy, Utah, 84070 U.S.A.
Ph: (801) 566-8800
Fax: (801) 568-7583
This device complies with part 15 of the FCC Rules. This device may not cause
harmful interference, this device must accept any interference received.
Warning
For your protection, please read the following:
Important Safety Instructions
1. Read these instructions.
2. Keep these instructions.
3. Heed all warnings.
4. Do not use this apparatus near water.
5. Clean only with dry cloth.
6. Do not block any ventilation openings. Install in accordance with the manufacturer’s instructions.
7. Do not install near any heat sources such as radiators,
heat registers, stoves, or other apparatus (including amplifiers) that produce heat.
8. Protect the power cord from being walked on or pinched
particularly at plugs, convenience receptacles, and the
point where they exit from the apparatus.
9. Unplug this apparatus during lightning storms or when
unused for long periods of time.
10. No user serviceable parts inside. Refer all servicing to
qualified service personnel. Servicing is required when
the apparatus has been damaged in any way, such as
power-supply cord or plug is damaged, liquid has been
spilled or objects have fallen into the apparatus, the
apparatus has been exposed to rain or moisture, does not
operate normally, or has been dropped.
11. WARNING: To reduce the risk of fire or electric shock,
do not expose this apparatus to rain or moisture.
12. Refer to labels on the unit, including bottom cover, or
other markings and pertinent information.

Description of Controls ……………..2
Setup 1- Amp Input ……………………8
Setup 2 — Amp Loop …………………..9
Setup 3 — MP3/Aux Input ……………10
Using the JamMan
Select a Memory Location ……………………12
Create a Loop (PDL TEMPO LED
is off) ……………………………………………………..13
Create a Loop, with Tempo Count-in
(PDL TEMPO LED is on) ………………………14
Add Overdubs to a Loop …………………….. 16
Undo/Redo Overdubs …………………………..17
Recording From an MP3 or CD Player ..18
Storing Phrases ……………………………………..20
Copy a Loop to a Different Memory
Location …………………………………………………21
Time Signature ………………………………………22
Setting a Loop Tempo for Recording ……24
®
Solo Looper ..11
Using Auto-Quantize Looping ……………… 25
Pedal Tempo Mode ………………………………..26
Time Stretching a Loop ………………………..28
Loop / Single Phrases…………………………….29
Rhythm Type ………………………………………….30
Deleting Individual Loop Phrases …………32
Erase All Loop Phrases (Internal
Memory)………………………………………………..34
Erase All Loop Phrases (SD/SDHC
Memory Card) ………………………………………35
Using Optional SD/SDHC Memory
Cards ……………………………………………………..36
Formatting SD Cards…………………………….38
Unformatted Cards……………………………….39
Optional FS3X Footswitch ……………………40
JamManager
Factory Restore …………………………………….43
TM
Librarian Software ………..42
Specifications …………………………….44

Warranty
We at DigiTech® are very proud of our products and back up each one we sell with the following warranty:
1. The warranty registration card must be mailed within ten days after purchase date to validate this
warranty.
2. DigiTech warrants this product, when used solely within the U.S., to be free from defects in materials and workmanship under normal use and service.
3. DigiTech liability under this warranty is limited to repairing or replacing defective materials that show evidence
of defect, provided the product is returned to DigiTech WITH RETURN AUTHORIZATION, where all parts and
labor will be covered up to a period of one year (this warranty is extended to a period of six years when the
product has been properly registered by mail or through our website). A Return Authorization number may be
obtained from DigiTech by telephone. The company shall not be liable for any consequential damage as a result of
the product’s use in any circuit or assembly.
4. Proof-of-purchase is considered to be the burden of the consumer.
5. DigiTech reserves the right to make changes in design, or make additions to, or improvements upon this product
without incurring any obligation to install the same on products previously manufactured.
6. The consumer forfeits the benefits of this warranty if the product’s main assembly is opened and tampered with by
anyone other than a certified DigiTech technician or, if the product is used with AC voltages outside of the range
suggested by the manufacturer.
7. The foregoing is in lieu of all other warranties, expressed or implied, and DigiTech neither assumes nor authorizes
any person to assume any obligation or liability in connection with the sale of this product. In no event shall
DigiTech or its dealers be liable for special or consequential damages or from any delay in the performance of this
warranty due to causes beyond their control.
NOTE: The information contained in this manual is subject to change at any time without notification. Some information contained in this manual may also be inaccurate due to undocumented changes in the product or operating
system since this version of the manual was completed. The information contained in this version of the owner’s
manual supersedes all previous versions.

Congratulations and thank you for purchasing the JamMan® Solo!
Designed for guitarists and bassists who want a full-featured looper in a compact form
factor, The JamMan Solo features 99 internal memory locations that can hold up to 35
minutes of loops, plus an SD memory card expansion slot for another 99 locations that
can store over 16 hours of loops!
The JamMan Solo also has USB connectivity and can sync to DigiTech’s free
JamManagerTM software download that organizes and saves your loops to PC or Mac,
and lets you quickly create JamLists to take to your gig.
The JamMan Solo is the perfect looper/phrase sampler for practicing, composing, and
performing:
Record rhythm loops and solo over them on the fly, completely •
Hands-Free™.
Load up the JamMan with bass lines, drums, harmonies, and more; create an entire •
backup band, take it with you, and perform anywhere!
Slow down or speed up any song without changing pitch.•
10 built-in rhythm (and applause) loops that you can play, edit, delete and restore (via •
the Factory Restore feature).
The JamMan opens up new horizons to your musical explorations. The possibilities are
literally endless, endless, endless…!
1
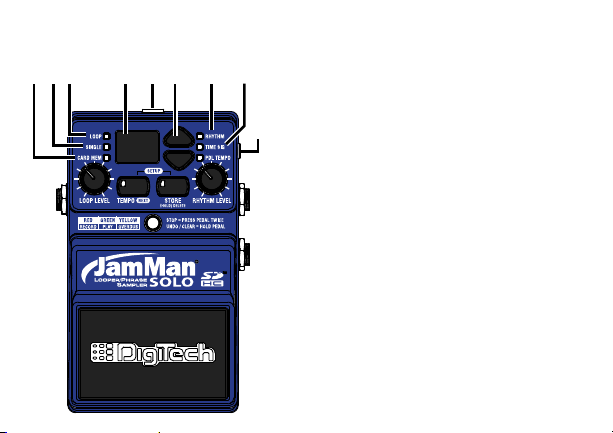
Description of Controls
2
1. Card Memory LED
This red LED lights when you are selecting
loop memories on the optional SD/SDHC
memory card. When this LED is off, loops
are being selected from the JamMan
Solo’s internal memory.
2. Single LED
This yellow LED indicates the current
phrase memory is set to playback only
once when play is initiated. Single phrases
can be converted to Loop phrases and
vice versa.
3. Loop LED
This green LED indicates the current
phrase memory is set to play back
continuously as a loop when play is
initiated. Loop phrases can be converted
to Single phrases and vice versa. When
this LED is flashing, the internal or SD
memory is busy and the SD memory card
should not be removed.
®

4. Display
The main purpose for the Display is to
show the currently selected loop memory
location. It also shows information during
store/copy procedures, setup options, file
deletion, and card formatting procedures.
5. Power Jack
Connect the included PS200R DC power
supply here. The JamMan
®
Solo can only
be powered by using the external adapter.
6. Loop Select buttons
The Loop Select buttons are used for
selecting different loop memories and
making selections when in the Setup
menu. You can use these buttons to cue
up and seamlessly change to a different
loop while a loop is playing.
7. Rhythm LED
This red LED will light when selecting the
Rhythm guide track to record and play with.
8. Time Signature LED
This red LED lights when selecting the
Time Signature for a new loop memory
location. You can select from 2 to 15
beats per measure. This means if you
want to record in 5/4 time, select 5 in the
Display. To record in 7/8 time, select 7,
and so forth. Note that Time Signature can
only be changed for a memory location
that has no phrase recorded in it.
9. Auxiliary Input
This 1/8” input accepts a mono or stereo
line level source from a portable CD or
MP3 player. All audio recording at the
Auxiliary input is recorded in mono.
3
10. Pedal Tempo LED
11
12
13
14
15
16
18
17
10
This red LED lights when Pedal Tempo
Mode is enabled. In Pedal Tempo Mode, any
new loop location can have the tempo set
by tapping the Pedal Switch. Setting Pedal
Tempo Mode is explained on page 26.
4
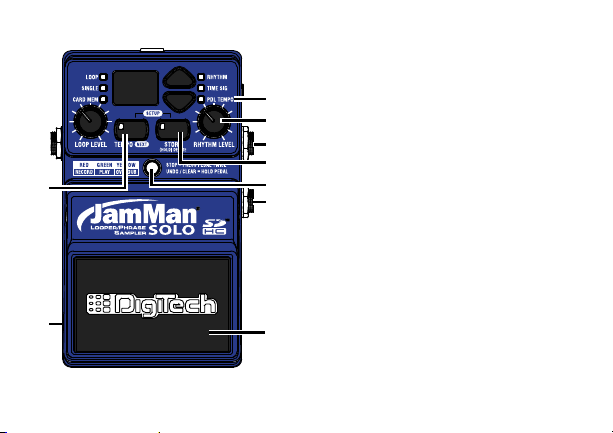
11. Rhythm Level
This knob controls the level of the
Rhythm guide track.
12. Input Jack
Connect your guitar to this jack.
13. Store Button
This button is used to store and copy
recorded loops and changes to loop
attributes to the memory card. Pressing
and holding this button will initiate the
deletion of the current loop memory.
Pressing both the Tempo and Store
buttons simultaneously will enter Setup.

14. Status LED
This LED indicates the status during
record, playback, and overdub:
Solid red: Record
Solid green: Play
Solid yellow: Overdub
Flashing red/green: Pedal Tempo
Record Count In
Flashing yellow: Undo/Redo
Flashing red: Clear
15. Footswitch Jack
This jack accommodates the FS3X
footswitch for remotely selecting loop
memories, tapping in the loop tempo, and
undo and clear functions.
16. Pedal Switch
The Pedal Switch is used to start
recording and toggle between playback
and overdubbing. The Pedal Switch can
also be used for tapping in tempo for a
new phrase as well as undo and redo the
last overdub. Pressing the Pedal Switch
two times quickly stops loop playback.
17. USB Jack
The 5-pin mini-B USB jack provides a
connection to a PC or Mac computer for
transferring loop files to and from the
®
JamMan
Solo using the JamManagerTM
Loop Librarian software, downloadable at
www.digitech.com.
18. Tempo Button
This button can be pressed multiple
times to set the tempo for a new loop
5
or change the tempo of an existing loop.
The first downbeat of the measure flashes
red and the other beats flash green. If the
tempo for an existing loop is changed, the
loop plays back at the new tempo without
any change of pitch. Pressing and holding
this button will reset any tempo change
applied to an existing loop. Pressing
both the Tempo and Store buttons
simultaneously will enter the Setup menu
to set Rhythm Type, Time Signature, Pedal
Tempo, or Loop/Single phrase status.
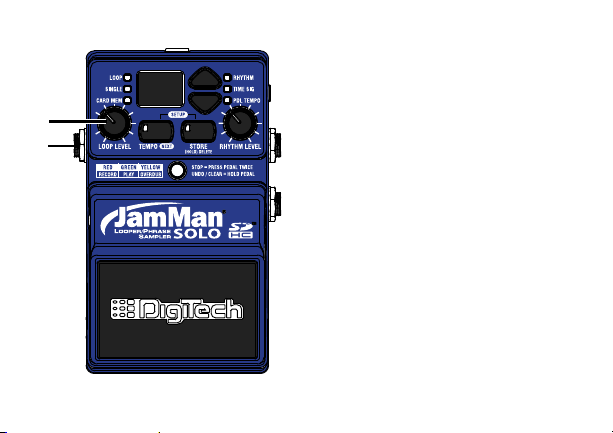
19. Output Jack
Connect this output to the input of a
guitar amplifier, channel of a mixer, or pair
of headphones.
20. Loop Level
This knob controls the output level of the
loop phrase.
6
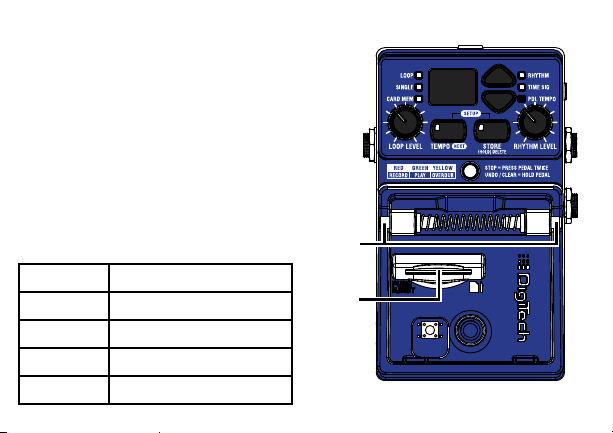
21. Pedal Switch Release Pins
Depress these pins to remove the Pedal
Switch and access the SD memory card slot.
When the Pedal Switch (16) is removed, it
exposes the SD card slot.
22. SD Memory Card Slot
The JamMan
optional SD/SDHC memory cards up
to 32GB in size. New cards should be
formatted in the JamMan Solo before use.
The JamMan Solo includes internal memory
providing 35 minutes of total loop storage.
Card Size Total Loop Memory
1GB 3 hours
2GB 6 hours
4GB 12 hours
8GB-32GB 16 hours
®
Solo is compatible with
7
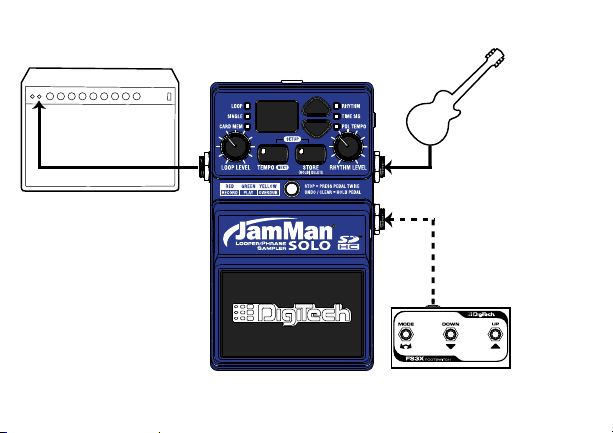
Setup 1- Amp Input
Connect the JamMan™
Solo’s output to the
amp’s input.
Connect your guitar
to the JamMan Solo’s
Instrument input.
Connect optional
FS3X to the JamMan
Solo’s Footswitch input.
8
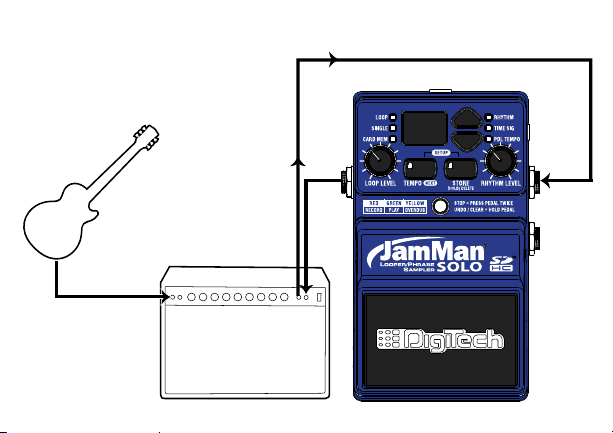
Setup 2 — Amp Loop
Connect your guitar
to the amp’s input.
Connect the JamMan
Solo’s Output to the
amp Loop Return.
Connect the amp Loop
Send to the JamMan™
Solo’s Instrument Input.
9
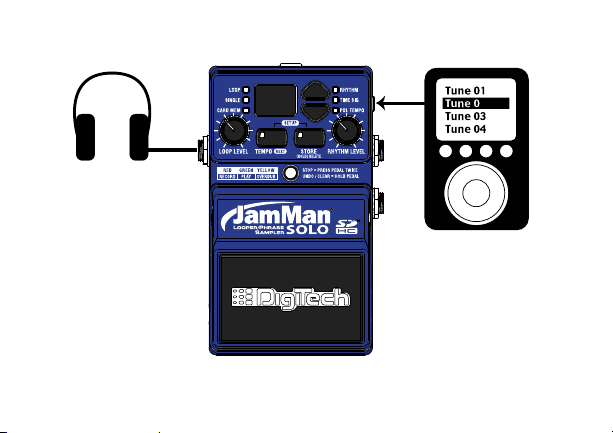
Setup 3 — MP3/Aux Input
Connect your portable
CD/MP3 player to the
JamMan Solo’s Aux Input.
Connect your
headphones to the
JamMan
®
Solo’s Output.
2
10
NOTE: All audio signals connected to
the Aux input are summed to mono.

Using the JamMan® Solo Looper
The JamMan® Solo is designed to be very simple to use right out of the box. The
following section explains how to use the JamMan Solo.
The JamMan Solo has 35 minutes of total built-in loop memory storage and can
be expanded using an optional SD/SDHC memory card. You should have a guitar/
instrument or audio device connected before proceeding.
NOTE: The maximum loop time the JamMan Solo can record or play is10 minutes.
11

Select a Memory Location
The JamMan® Solo has two banks of loop
memory, internal and optional external
card memory. There are 99 memory
locations available in each of these banks
for a total of 198 memories when an
optional SD/SDHC memory card is
installed. The external memory bank is
only available when a memory card is
installed.
NOTE: Changing loops discards any
changes that have not been stored to
memory. Storing the changes will remove
the ability to undo or clear overdubs.
To select loops, press either of the LOOP
SELECT buttons. Pressing the up arrow
button will select the next loop above the
current loop. Pressing the down arrow
button will select the previous loop below.
12
The DISPLAY will show the memory
location number as these buttons are
pressed.
When Loop 99 is reached, pressing
the up arrow button will return to
the first memory location (1 will be
shown in the DISPLAY). Likewise, if
Loop 1 is reached, pressing the down
arrow button will return to the last
memory location (99 will be shown in
the DISPLAY). If an optional memory
card is installed, pressing the LOOP
SELECT buttons will alternate through
one bank of memories and then the next
(1-99 internal and then 1-99 external).
The CARD MEM LED will light when
memories are selected on the optional
external card.
Loading…
Товар снят с производства!
DigiTech JamMan Solo XT — педаль эффекта стерео лупер для электрогитары, способная записать до 35 минут стерео звучания CD качества в 200 ячейках памяти. Опциональная micro SDHC карта может увеличить время записанного звучания до 16 часов и добавить еще 200 ячеек памяти. Незаметный переход между записанными фразами делает педаль безценным помощником при сочинении и исполнении музыки. Функции авто-записи, авто-квантайза, регулируемого темпа и трех режимов Stop позволяют довести исполнение до совершенства.
Педаль имеет USB порт для соединения с компьютером, дающий возможность с помощью бесплатной программы JamManager XT Loop Librarian создавать библиотеки и листы лупов, синхронизировать их и переносить с педали на компьютер и обратно. Вход Aux позволяет осуществлять импорт музыки с CD или MP3 плеера. Треки со звучанием полной группы с басовыми париями, гармонией и барабанами могут быть загружены в педаль и использованы для выступлений. Имеется метроном с разными размерами и звуками. Возможна синхронизация нескольких педалей JamMan Solo XT.
Основные особенности JamMan Solo XT:
- сохраняет 35 минут стерео петель CD качества в 200 ячейках памяти;
- опциональная micro SDHC карта увеличивает время записи до 16 часов и добавляет 200 ячеек памяти;
- возможна запись “на лету” без помощи рук;
- синхронизация с другими JamMan Solo XT;
- USB порт для работы с программой JamManager™ Loop Librarian;
- Aux вход для импорта с CD или MP3 плеера;
- загрузка треков со звучанием полной группы;
- изменяет темп без изменения тональности;
- встроенный метроном;
- прочный металлический корпус.
Программа JamManager XT Loop Librarian:
- Скачать JamManager XT v2.3.5 (Windows)
- Скачать JamManager XT v2.3.5 (Mac OS X)
- DigiTech
- Гитары DigiTech
- Педали эффектов DigiTech
Файлы для скачивания
- Инструкция для DigiTech JamMan Solo XT (English) (PDF 3 Мб 682 Кб)
DigiTech JamMan Solo Other PDF User Guides and Manuals for Free Download: Found (1) Manuals for DigiTech JamMan Solo Device Model (Owner’s Manual)
DigiTech JamMan Solo Owner’s Manual
Details:
- Manufacturer: DigiTech
- Product Name/ID: DigiTech JamMan Solo / #165944
- Category: Other
- File Path: digitech/jamman-solo_165944.pdf
- Last Updated: 15 May 2025
- Description: This manual for DigiTech JamMan Solo offers essential guidance for installation, operation, and maintenance, ensuring that you can maximize the performance and reliability of your device.
- Document Type: User Manual
- Pages: 52
Download PDF
Read Online
The DigiTech JamMan Solo is a looper pedal that has created quite a buzz among musicians looking for a portable and user-friendly solution for live performances and practice. Packed with features that cater to both guitarists and vocalists alike, the JamMan Solo offers musicians an array of options to enhance their sound. Whether you are a beginner or an experienced artist, this pedal has something to offer. In this review, we’ll delve into its features, build quality, and overall performance.
One of the standout features of the DigiTech JamMan Solo is its straightforward user interface. Musicians can start looping in no time, thanks to its simple controls. Here are some key aspects:
- Easy to Use: The layout is intuitive, making it easy for users to record, overdub, and layer sounds in real-time.
- Storage Capacity: You can store up to 10 minutes of loop time, and it also supports an optional SD card for extended storage options.
- Backup Capability: Users can create backups of their loops to ensure that they don’t lose any of their creative work.
The build quality of the DigiTech JamMan Solo deserves special mention. Constructed with a sturdy metal chassis, the pedal can withstand the rigors of regular use, making it a reliable option for touring musicians. Additionally, the design is compact, allowing musicians to easily integrate it into their pedalboard setup without taking up too much space.
Another noteworthy feature of the JamMan Solo is its sound quality. The pedal utilizes high-quality A/D and D/A converters, which ensure that the audio signal remains pristine and clear. Musicians can create rich and complex loops without the worry of degradation in sound fidelity. The pedal also supports various input devices, including guitars, keyboards, and microphones, providing versatile performance options.
However, there are some points worth considering. While the DigiTech JamMan Solo is primarily designed for simplicity, some advanced users may find its features somewhat limited compared to more complex loopers on the market. Here are a few potential drawbacks:
- Lack of Advanced Features: Some users might miss features like MIDI sync or Bluetooth connectivity, which are available on higher-end models.
- Learning Curve for Advanced Functions: Although basic looping is easy, exploring some advanced features may take time for complete beginners.
In terms of versatility, the DigiTech JamMan Solo shines. It is suitable for various music genres, including rock, jazz, and acoustic, making it a valuable addition to any musician’s toolkit. The flexibility to layer multiple loops also opens up creative possibilities for songwriting and live performance.
Overall, the DigiTech JamMan Solo is an impressive looper pedal that provides excellent value for its price. From its user-friendly interface to its quality sound, it meets the needs of both novice and experienced musicians. While there may be limitations for those seeking advanced features, its ease of use and reliable performance make it a fantastic choice for anyone looking to experiment with looping. Whether you’re jamming at home or performing on stage, the JamMan Solo stands out as a solid companion in your musical journey.
ВАЖНАЯ ИНФОРМАЦИЯ О БЕЗОПАСНОСТИ
МЕРЫ
ПРЕДУПРЕЖДЕНИЕ
ПРЕДОСТОРОЖНОСТИ
РИСК ПОРАЖЕНИЯ ЭЛЕКТРИЧЕСКИМ ТОКОМ
НЕ ОТКРЫВАТЬ
ПРОЧТИТЕ СЛЕДУЮЩЕЕ:
ПРЕДУПРЕЖДЕНИЕ: ДЛЯ УМЕНЬШЕНИЯ РИСКА УДАРА
ЭЛЕКТРИЧЕСКИМ ТОКОМ НЕ ОСТАВЛЯЙТЕ УСТРОЙСТВО ПОД
ВОЗДЕЙСТВИЕМ ДОЖДЯ ИЛИ ВЛАГИ.  РУКОВОДСТВУЙТЕСЬ УКАЗАННЫМИ ИНСТРУКЦИЯМИ.
Представленные символы являются международными символами,
предупреждающими о существующей угрозе при использовании   УЧТИТЕ ВСЕ ПРЕДУПРЕЖДЕНИЯ.
электроустройств. Символ молнии со стрелкой в равностороннем
треугольнике призван предупредить пользователя о наличии   СЛЕДУЙТЕ ВСЕМ ИНСТРУКЦИЯМ.
опасного напряжения внутри устройства. Восклицательный знак в
равностороннем треугольнике означает необходимость вниматель-  УСТРОЙСТВО НЕ ДОЛЖНО НАХОДИТЬСЯ В МЕСТАХ ДОСТУ-
ного прочтения руководства пользователя.   ПА КАПЕЛЬ ИЛИ БРЫЗГ, А ТАКЖЕ НЕЛЬЗЯ УСТАНАВЛИВАТЬ
Данный символ предупреждает об отсутствии деталей, доступных   НА УСТРОЙСТВО СОСУДЫ С ЖИДКОСТЬЮ, НАПРИМЕР,
для обслуживания пользователем. Не открывайте корпус аппарата.   ВАЗЫ.
Не пытайтесь ремонтировать устройство самостоятельно. Сервис-
ное обслуживание устройства выполняется квалифицированным   ПРОТИРАЙТЕ КОРПУС ТОЛЬКО СУХОЙ ТКАНЬЮ.
персоналом. Открытие корпуса устройства по любой причине
приведет к отказу в гарантийном обслуживании. Не допускайте
попадания воды в устройство. Если жидкость все же попала внутрь,   НЕ БЛОКИРУЙТЕ ВЕНТИЛЯЦИОННЫЕ ОТВЕРСТИЯ. УСТА-
немедленно отключите питание устройства и предоставьте его для   НОВИТЕ УСТРОЙСТВО В СООТВЕТСТВИИ С ИНСТРУКЦИЯ-
выполнения сервисного ремонта. Во время грозы также необходимо   МИ ПРОИЗВОДИТЕЛЯ.
отключить питание устройства.
НЕ РАЗМЕЩАЙТЕ УСТРОЙСТВО РЯДОМ С ТАКИМИ ИС-
МЕРЫ ПРЕДОСТОРОЖНОСТИ   ТОЧНИКАМИ ТЕПЛА, КАК РАДИАТОРЫ, ПЕЧИ ИЛИ ДРУГИЕ
(ВКЛЮЧАЯ УСИЛИТЕЛИ), КОТОРЫЕ НАГРЕВАЮТСЯ ПРИ
ПРИМЕЧАНИЯ ДЛЯ ПОЛЬЗОВАТЕЛЕЙ, УСТРОЙСТВО КОТО-
РЫХ ОСНАЩЕНО КАБЕЛЕМ ПИТАНИЯ.   РАБОТЕ.
ПРЕДУПРЕЖДЕНИЕ: ДАННОЕ УСТРОЙСТВО ДОЛЖНО БЫТЬ   ИСПОЛЬЗУЙТЕ ТОЛЬКО РЕКОМЕНДУЕМЫЕ ПРОИЗВОДИТЕ-
ПОДКЛЮЧЕНО К РОЗЕТКЕ, ОСНАЩЕННОЙ ЗАЩИТНЫМ   ЛЕМ АКСЕССУАРЫ.
КОНТАКТОМ ЗАЗЕМЛЕНИЯ.
Контакты розетки окрашены в соответствии со следующим кодом:  ОТКЛЮЧАЙТЕ УСТРОЙСТВО ОТ СЕТИ ВО ВРЕМЯ ГРОЗЫ
Зеленый и желтый - земля        ИЛИ КОГДА ОНО НЕ ИСПОЛЬЗУЕТСЯ ДОЛГОЕ ВРЕМЯ.
Синий – нейтраль (без напряжения)
Не недооценивайте важности использования поляризованной или
Коричневый – под напряжением    заземленной вилки. Поляризованная вилка имеет два плоских кон-
Так как цвета проводов устройства могут не соответствовать цветам   такта, один из которых шире другого. Вилка с заземлением имеет
разъемов вашего кабеля, выполните следующее:   третий контакт для заземления. Широкий штырь или заземляю-
щий используются для обеспечения дополнительной безопасности.
•  Провод, окрашенный зеленым и желтым, должен быть подклю-
чен к разъему, отмеченному буквой Е или символом заземления,   Если прилагаемая вилка не подходит к вашей розетке, обратитесь к
или окрашенному зеленым цветом или зеленым с желтым.  электрику для замены на соответствующую.
•  Провод, окрашенный синим цветом, должен быть подключен к
разъему, отмеченному символом N или окрашенному в черный цвет.   Берегите кабель питания. Не наступайте на кабель и следите за
•  Провод, окрашенный коричневым цветом, должен быть подключен к   его целостностью, особенно у вилки и в месте, где он выходит из
разъему, отмеченному символом L или окрашенному в красный цвет.   устройства.
Для подключения данного устройства вам может потребоваться
отдельный двухжильный провод или штепсельная розетка, в   Сервисное обслуживание устройства выполняется квалифици-
зависимости от доступного источника питания в установке. Если   рованным персоналом. Сервисное обслуживание требуется, если
потребуется заменить штепсельную розетку, обратитесь к квалифи-  устройство повреждено, например, поврежден кабель или вилка
цированному электрику, необходимые данные для которого пред-  питания, пролита жидкость или внутрь пропали посторонние
ставлены в следующей таблице. Зеленый/желтый провод должен   предметы, устройство побывало под дождем или в условиях повы-
быть непосредственно подключен к корпусу устройства.
шенной влажности, устройство уронили, и оно не функционирует
Цвет провода
Проводник               нормально.
Обычный  Альтернативный
L  Под напряжением   Коричневый   Черный
N  Без напряжения  Синий  Белый  Отключение от сети: Сетевая розетка должна быть легко до-
E  Заземление/земля  Зеленый/ желтый  ЗЕЛЕНЫЙ
ступна. Для выполнения монтажа в рэк или при использовании в
ПРЕДУПРЕЖДЕНИЕ: Пренебрежительное отношение к заземле-  установке с недоступной розеткой необходимо встроить в электро-
нию может привести к сбою в работе данного устройства или всей   установку рэка многополюсный выключатель с делением не менее
системы, в которой устройство используется. При одновременном   3 мм на каждый полюс.
прикосновении к корпусу и точке заземления устройства вы можете
получить серьезные травмы, вплоть до летального исхода.