
Содержание
СоветыУстановкиВоспроизведениеПодсоединения
Приложение
AVR-X1000
СЕТЕВОЙ AV РЕСИВЕР
Руководство пользователя
Передняя
панель
Дисплей Задняя панель
На одном листе бумаги можно распечатать несколько страниц PDF-руководства.
Пульт ДУ
Предметный
указатель
Содержание
Содержание
СоветыУстановкиВоспроизведениеПодсоединения
Приложение
Комплект поставки ······································································· 6
Установка батареек ········································································ 7
Диапазон действия пульта ДУ ······················································· 7
Отличительные особенности ···················································· 8
Высокое качество звука ································································· 8
Высокое качество видео ································································ 8
Простота и удобство использования ············································ 9
Наименования и назначение составных
частей
Передняя панель ·········································································· 10
Дисплей ··························································································· 13
Задняя панель ··············································································· 14
Пульт дистанционного управления ······································ 16
Подсоединения
Подсоединение колонок ··························································· 19
Установка акустической системы ················································ 19
Подключение колонок ·································································· 21
Подсоединение телевизора ····················································· 25
Соединение 1 : Телевизор оборудован разъемом HDMI и
поддерживает ARC (Audio Return Channel) ································· 26
Соединение 2 : Телевизор имеет разъем HDMI ························ 27
Соединение 3 : Телевизор без разъема HDMI ··························· 28
Подключение проигрывателя ················································· 29
Подсоединение декодера телеканалов
(спутникового тюнера/кабельного телевидения) ······················· 30
Подключение DVD-проигрывателя ·············································· 31
Подключение видеокамеры или другого устройства ················ 32
Подключение iPod или запоминающего устройства
USB в порт USB
············································································ 33
Подключение антенны FM ······················································· 35
Подключение к домашней сети (LAN) ································· 36
Подключение кабеля питания ················································ 37
Воспроизведение
Базовая эксплуатация ································································ 39
Включение питания ······································································ 39
Выбор источника входного сигнала ············································ 39
Регулировка общего уровня громкости ······································ 40
Временное отключение звука ····················································· 40
Воспроизведение с помощью проигрывателя
дисков DVD/Blu-ray ······································································· 40
Воспроизведение с iPod ···························································· 41
Прослушивание музыки с iPod ···················································· 42
Настройки режима обзора iPod ··················································· 43
Повторное воспроизведение ······················································· 44
Воспроизведение треков в случайном порядке ························· 44
Воспроизведение запоминающего устройства USB ······ 45
Воспроизведение файлов с запоминающих устройств USB ····· 46
Передняя
панель
Дисплей Задняя панель
2
Пульт ДУ
Предметный
указатель
Содержание
СоветыУстановкиВоспроизведениеПодсоединения
Приложение
Прослушивание FM-радиостанций ······································· 48
Прослушивание FM-радиостанций ·············································· 49
Ввод частоты при настройке на радиостанцию
(Прямая настройка) ······································································· 50
Поиск RDS ····················································································· 51
Поиск PTY ······················································································ 51
Поиск TP ························································································ 52
Радиотекст ···················································································· 53
Изменение режима поиска радиостанций
(Режим настройки) ········································································ 53
Прослушивание предустановленной радиостанции ·················· 53
Добавление текущей радиостанции (Предус-ка памяти) ··········· 54
Настройка радиостанций и их автоматическое добавление
(Авто установок) ··········································································· 55
Укажите название добавляемой радиостанции
(Имя установки) ············································································ 55
Пропуск добавленных радиостанций
(Пропуск уст-ки) ············································································ 56
Отмена пропуска радиостанций ·················································· 56
Прослушивание интернет-радио ··········································· 57
Прослушивание интернет-радио ················································· 58
Воспроизведение последней принятой
интернет-радиостанции ······························································· 59
Использование vTuner для добавления
интернет-радиостанций в предпочтения ···································· 60
Воспроизведение файлов с компьютера и NAS ·············· 61
Настройка общего доступа к медиафайлам ······························· 62
Воспроизведение файлов с компьютера и NAS ························· 63
Прослушивание Last.fm····························································· 65
Прослушивание Last.fm ······························································· 66
Log Out ·························································································· 69
Просмотр фотоснимков, размещенных на
сайте Flickr
Просмотр фотоснимков других пользователей ························· 71
Просмотр всех фотоснимков на сайте Flickr ······························ 72
······················································································ 70
Прослушивание Spotify ····························································· 74
Прослушивание Spotify ································································ 74
Кнопка добавить к FAVORITE STATION ······························ 78
Воспроизведение контента, привязанного к кнопке
FAVORITE STATION ······································································ 79
Функция AirPlay ············································································ 80
Воспроизведение композиций с iPhone, iPod touch или iPad ···· 80
Воспроизведение музыки с iTunes на этом устройстве ············ 81
Выбор нескольких громкоговорителей (устройств)··················· 81
Выполнение операций воспроизведения iTunes с пульта ДУ
данного устройства ······································································ 82
Повторное воспроизведение ······················································· 84
Воспроизведение треков в случайном порядке ························· 84
Регистрация в избранном ···························································· 85
Воспроизведение содержимого из “Запомнить избр-е” ·········· 85
Удаление контента, добавленного в избранное ························ 86
Поиск с помощью ключевых слов (Поиск текста) ······················ 86
Прослушивание музыки на фоне понравившегося
изображения (Слайдшоу) ····························································· 87
Установка интервала показа ························································ 88
Проигрывание определенного видео во время
воспроизведения аудио (Видео отбор) ······································· 88
Выбор режима звука ·································································· 89
Выбор режима звука ···································································· 90
Прямое воспроизведение ···························································· 91
Передняя
панель
Дисплей Задняя панель
3
Пульт ДУ
Предметный
указатель
Содержание
СоветыУстановкиВоспроизведениеПодсоединения
Приложение
Режим управления HDMI ·························································· 98
Порядок настройки ······································································· 98
Режим автоматического отключения ·································· 99
Использование таймера сна ························································ 99
Режим быстрого выбора ························································· 100
Вызов режима быстрого выбора ··············································· 100
Изменение настроек ·································································· 100
Установки
Карта меню ·················································································· 101
Управление меню ······································································· 107
Ввод символов ············································································ 108
Меню клавиатуры ······································································· 108
Аудио ······························································································ 109
Уровень диалога ········································································· 109
Уров.сабвуфера ·········································································· 109
Пар-ры окр.звуч. ········································································· 110
Тон ······························································································· 113
Restorer ······················································································· 113
Аудио задержка ·········································································· 114
Громкость ···················································································· 114
Audyssey ······················································································ 115
Ручн уст-ка экв. ··········································································· 117
Видео ······························································································ 118
Установка HDMI ·········································································· 118
На экр.дисплея············································································ 119
ТВ формат ··················································································· 120
Входы ····························································································· 121
Назначение входа ······································································· 121
Переимен.ист. ············································································· 123
Скрытые источ-ки ······································································· 123
Уров.источника ··········································································· 123
Выбор входа ················································································ 124
Громкоговорители ···································································· 125
Установка Audyssey
Настройка акустической системы (Установка Audyssey®) ······· 127
Сообщения об ошибках ······························································ 132
Восстановление настроек Установка Audyssey® ······················ 133
®
······························································ 125
Ручная установка ······································································· 134
Конфиг.АС ··················································································· 134
Дистанции ··················································································· 135
Уровни ························································································· 135
Кроссоверы ················································································· 136
Басы ····························································································· 137
Сеть ································································································· 138
Информация ················································································ 138
IP Контроль ················································································· 138
Приемлемое имя ········································································ 138
Установки ···················································································· 139
Диагностики ················································································ 140
Передняя
панель
Дисплей Задняя панель
4
Пульт ДУ
Предметный
указатель
Содержание
СоветыУстановкиВоспроизведениеПодсоединения
Приложение
Главный ························································································· 141
Язык ····························································································· 141
Быст выбор имени ······································································ 141
Автоотключение ········································································· 141
Фронт дисплей ············································································ 142
Информация ················································································ 142
Данные об использовании ························································· 144
Программн обес-е ······································································ 144
Настр-ка закрыта ········································································ 146
Советы
Содержание ················································································· 147
Советы ························································································· 148
Устранение неполадок ······························································· 150
Возврат к заводским настройкам ········································ 162
Приложение
HDMI ······························································································· 163
Воспроизведение устройств памяти USB ····························· 166
Воспроизведение файлов с компьютера
или из сетевого хранилища
Воспроизведение Интернет-радио ········································· 168
Режим персональной памяти ···················································· 168
Режим запоминания настроек при выключении ·················· 168
Режимы звука и выходной канал ············································· 169
Режимы звука и параметры объемного звука ····················· 170
Типы входных сигналов и соответствующие режимы
воспроизведения звука
Словарь терминов ······································································· 175
Сведения о торговых марках ···················································· 180
Технические характеристики ···················································· 182
Предметный
указатель ······························································· 184
Лицензия ························································································ 186
······················································ 167
······························································ 173
Передняя
панель
Дисплей Задняя панель
5
Пульт ДУ
Предметный
указатель
Содержание
Благодарим за приобретение устройства Denon. Чтобы гарантировать его бесперебойную работу, пожалуйста, внимательно прочтите настоящее
руководство пользователя, прежде чем приступить к эксплуатации изделия.
Ознакомившись с руководством, используйте его в дальнейшей работе с устройством.
СоветыУстановкиВоспроизведениеПодсоединения
Приложение
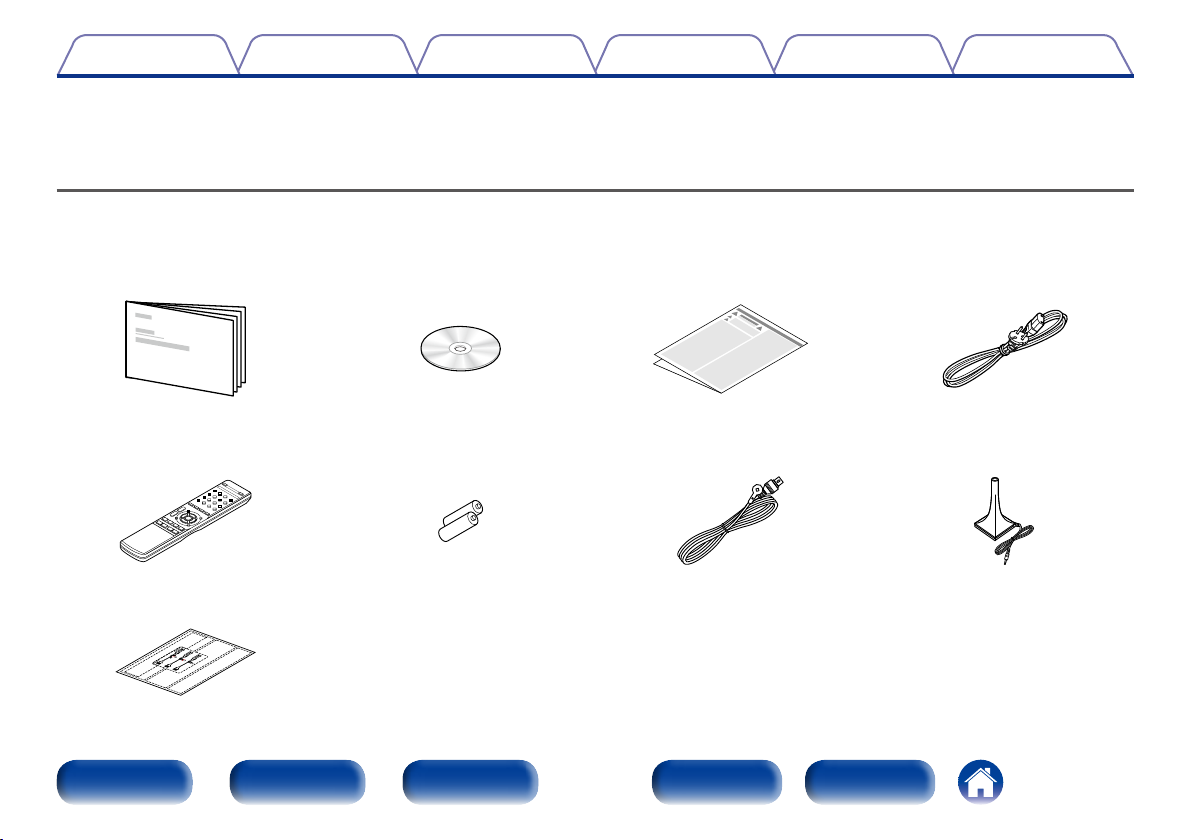
Комплект поставки
Убедитесь в наличии следующих компонентов в комплекте поставки изделия:
q Начало работы w CD-ROM
(руководство пользователя)
t Пульт дистанционного
управления (RC-1181)
y Элементы питания R03/AAA u Комнатная FM антенна i Настроечный и измерительный
o Ярлык кабеля
Передняя
панель
Дисплей Задняя панель
e Правила техники
безопасности
6
Пульт ДУ
r Сетевой шнур
микрофон (ACM1HB)
Предметный
указатель
Содержание
СоветыУстановкиВоспроизведениеПодсоединения
Приложение
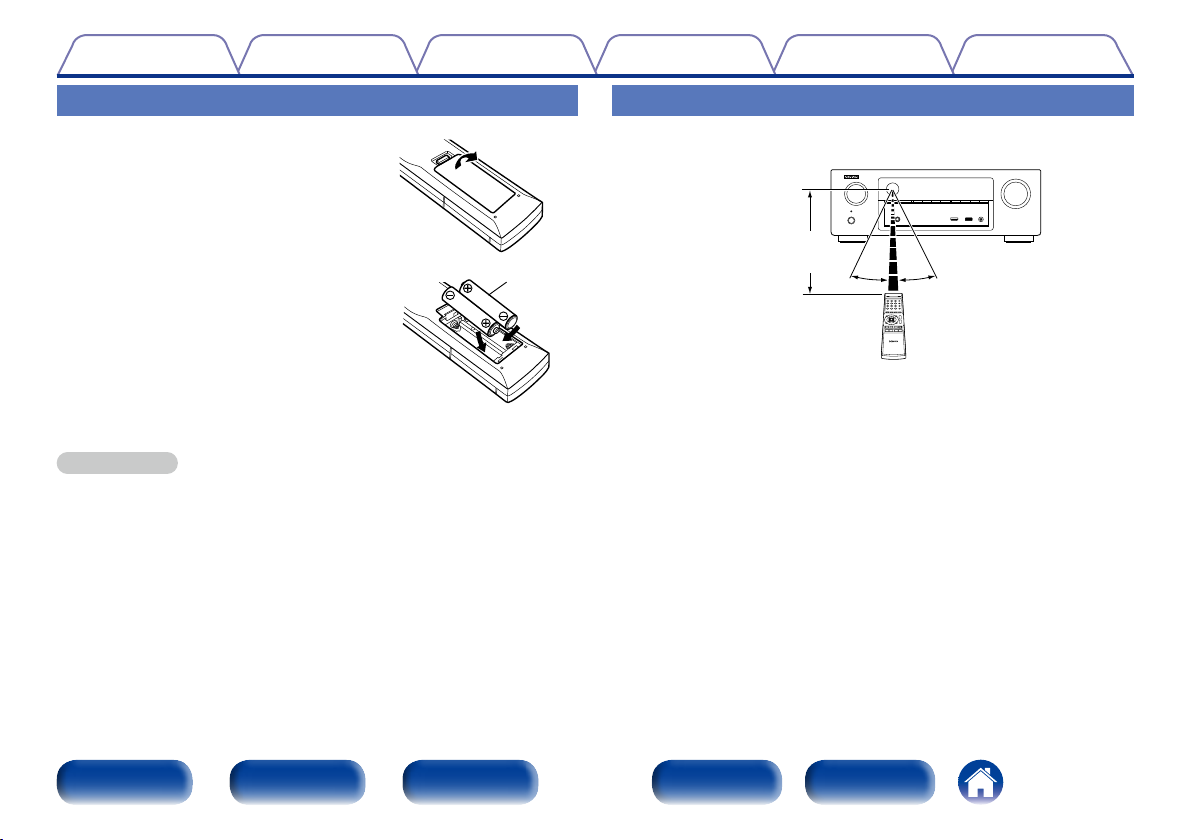
Установка батареек
q Снимите заднюю крышку в
направлении, указанном стрелкой, и
снимите ее.
w Вставьте две батарейки, соблюдая
полярность, указанную маркировкой q
и w в отсеке для батареек.
e Вставьте заднюю крышку на место.
ПРИМЕЧАНИЕ
•При установке батареек соблюдайте направление, указанное маркировкой q
и w в отсеке для батареек.
•Чтобы предотвратить ущерб или утечку жидкости из батареек:
•Запрещается пользоваться новой батарейкой вместе со старой.
•Запрещается пользоваться батарейками разных типов.
•Извлекайте батарейки из пульта ДУ при продолжительном перерыве в его
использовании.
•В случае утечки жидкости из батареек тщательно вытрите жидкость в отсеке
для батареек и вставьте новые батарейки.
R03/AAA
Диапазон действия пульта ДУ
При управлении направляйте пульт ДУ на датчик ДУ.
Приблизительно
7 м
30°30°
Передняя
панель
Дисплей Задняя панель
7
Пульт ДУ
Предметный
указатель
Содержание
Отличительные особенности
СоветыУстановкиВоспроизведениеПодсоединения
Приложение
Высокое качество звука
•Благодаря технологии с дискретной схемой усилитель обеспечивает
одинаковое качество для всех 5-каналов (120 Вт х 5-каналов)
Секция усилителя оснащена отдельными блоками питания
(неинтегральная схема), что позволяет добиться максимальной
реалистичности и потрясающего динамического диапазона.
Благодаря мощным отдельным блокам питания усилитель дает
возможность легко управлять высококачественными колонками.
Высокое качество видео
•Поддержка потоковой передачи интернет-радио, музыки и
фотоснимков
Поддержка технологии AirPlay® (vстр.80)
Широкий выбор контента, включая прослушивание интернет-радио,
воспроизведение аудиофайлов с ПК и просмотр фотографий с
компьютера на телевизоре.
Данное устройство также поддерживает технологию Apple AirPlay,
которая позволяет организовать потоковую передачу музыкальной
библиотеки с устройств iPhone®, iPad®, iPod touch® и приложения iTunes®.
•Совместимость с приложением для дистанционного управления
“Denon Remote App” для выполнения основных операций управления
устройством с iPad, iPhone или со смартфона на базе Androidz
“Denon Remote App” — это программное приложение, которое
позволяет выполнять основные операции с помощью iPad, iPhone,
смартфона на базе Android или планшета Android tablet — например,
ON/OFF (включение/выключение устройства), регулировку уровня
громкости и переключение источников сигнала.
z Загрузите соответствующее приложение “Denon Remote App” для
устройств iOS и Android. Это устройство должно быть подключено
к вашей локальной сети, а iPhone/iPod touch или другие устройства
должны быть подключены к этой же сети посредством Wi-Fi
(беспроводного подключения к локальной сети).
•Разъемы HDMI позволяют быстро подключать различные
цифровые аудио- и видеоустройства (5 входов, 1 выход)
Устройство оснащено 5 входными разъемами HDMI для подключения
устройств с аналогичными разъемами, например, проигрывателей
дисков Blu-Ray, игровых приставок, цифровых видеокамер HD,
телевизоров высокого разрешения и т. д.
•Поддерживает HDMI (3D-видео, возврат звукового сигнала
ARC, увеличение глубины цвета Deep Color, цветовой стандарт
“x.v.Color”, автоматическую синхронизацию звука и изображения
Auto Lip Sync) и функцию управления HDMI (vстр.163)
Ресивер имеет дополнительные функции HDMI, а именно: сквозной канал
видео в формате 3D, возврат звукового сигнала ARC, автоматическая
синхронизация звука и изображения Auto Lip Sync, увеличение глубины
цвета Deep Color и цветовой стандарт “x.v.Color”. Кроме того, ресивер
оснащен функциями управления HDMI CEC. Если цифровой видеосигнал
с разрешением 4K подается на вход, он передается через устройство без
изменений, а функция наложения графического интерфейса пользователя
(GUI) настраивает разрешение соответствующим способом.
Передняя
панель
Дисплей Задняя панель
8
Пульт ДУ
Предметный
указатель
Содержание
•Прямое воспроизведение с устройств iPod и iPhone через USB
(vстр.33)
При подсоединении кабеля USB из комплекта поставки iPod к порту
USB данного устройства можно воспроизводить музыкальные данные
с iPod или iPhone. Кроме того, пульт ДУ, который поставляется
вместе с данным устройством, подходит для управления iPod и
iPhone.
Простота и удобство использования
•В “Setup Assistant” содержатся удобные указания по настройке
Сначала по запросу выбирается язык. Затем просто следуйте
указаниям, которые отображаются на телеэкране, чтобы настроить
акустическую систему и т. д.
•Новая удобная настройка
Новые, удобные для подключения разъемы динамиков с
горизонтальным расположением.
•Удобный графический интерфейс пользователя
Данное устройство оснащено удобным графическим интерфейсом
пользователя, который включает в себя экраны с меню, красочные
значки и интуитивно понятные элементы управления, гарантирующие
максимальную простоту использования.
СоветыУстановкиВоспроизведениеПодсоединения
Приложение
Передняя
панель
Дисплей Задняя панель
9
Пульт ДУ
Предметный
указатель
Содержание
СоветыУстановкиВоспроизведениеПодсоединения
Наименования и назначение составных частей
Передняя панель
ioQ0 u
Q1 Q5Q3Q2 Q4
Приложение
Передняя
панель
Дисплей Задняя панель
10
Пульт ДУ
yr teq w
Предметный
указатель
Содержание
СоветыУстановкиВоспроизведениеПодсоединения
Приложение
ioQ0 u
yr teq w
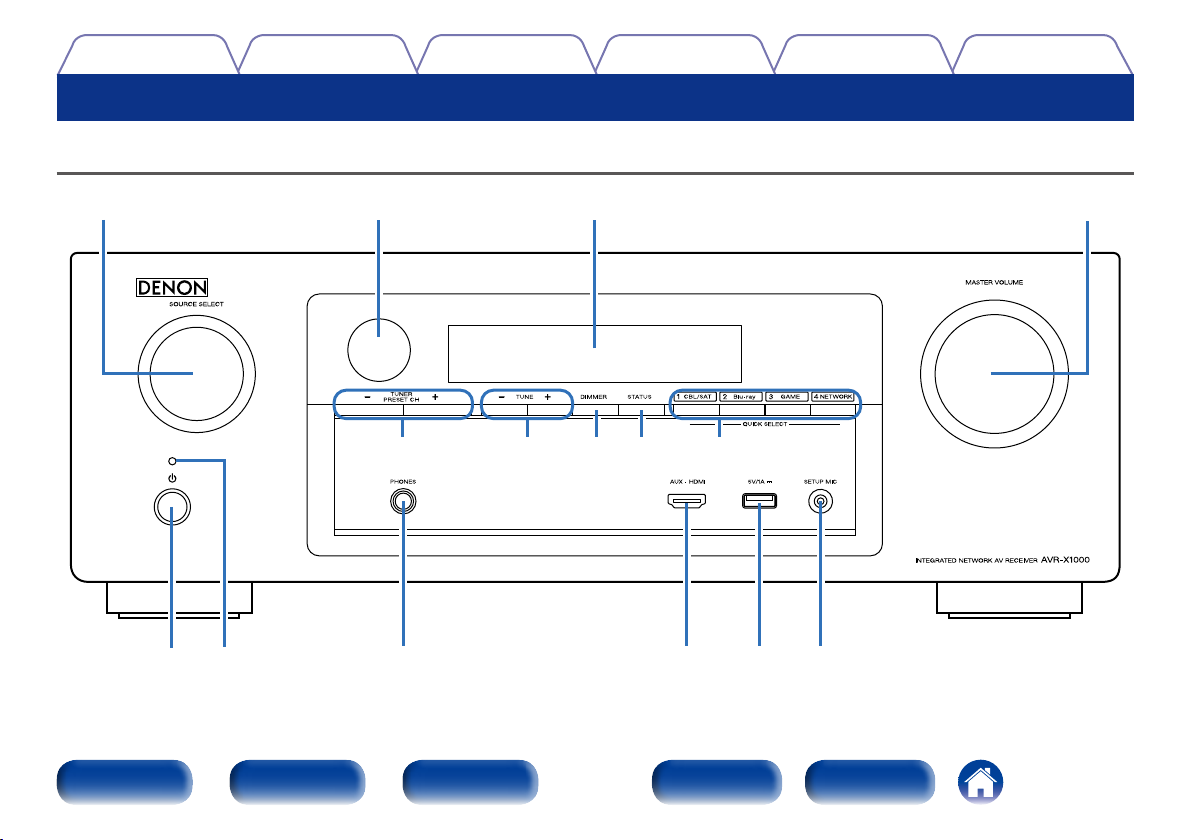
q Кнопка включения питания (X)
Позволяет включать/выключать питание (переводить в режим
ожидания) (vстр.39).
w Индикатор питания
Цвет индикатора питания отражает текущий режим:
•Питание включено: Зеленый
•Стандартный режим ожидания : Выкл.
•Когда “По HDMI” (vстр.118) или “Управление HDMI”
(vстр.118) установлены в положение “Вкл.”: Красный
•Когда “IP Контроль” (vстр.138) установлен в положение
“Всегда включен”: Красный
e Разъем для головных телефонов (PHONES)
Используются для подключения наушников.
При подключении наушников к этому разъему звук перестанет
выводиться через акустическую систему.
ПРИМЕЧАНИЕ
•Чтобы предотвратить ухудшение слуха, не следует слишком высоко
поднимать уровень громкости при использовании головных телефонов.
r Разъем AUX-HDMI
Используется для подключения таких устройств, как видеокамера
или игровая приставка (vстр.32).
t USB-порт
Используется для подключения USB-накопителей (запоминающих
устройств USB) и USB-кабеля для iPod (vстр.33).
y Разъем микрофона SETUP MIC
Используется для подключения настроечного и измерительного
микрофона, входящего в комплект поставки данного устройства
(vстр.128).
u Регулятор MASTER VOLUME
Регулирует уровень громкости (vстр.40).
i Дисплей
Служит для отображения информации (vстр.13).
o Датчик пульта ДУ
Принимает сигналы от пульта дистанционного управления
(vстр.7).
Q0 Регулятор SOURCE SELECT
Служит для выбора источника входного сигнала (vстр.39).
Передняя
панель
Дисплей Задняя панель
11
Пульт ДУ
Предметный
указатель
Содержание
Q5Q1 Q3Q2 Q4
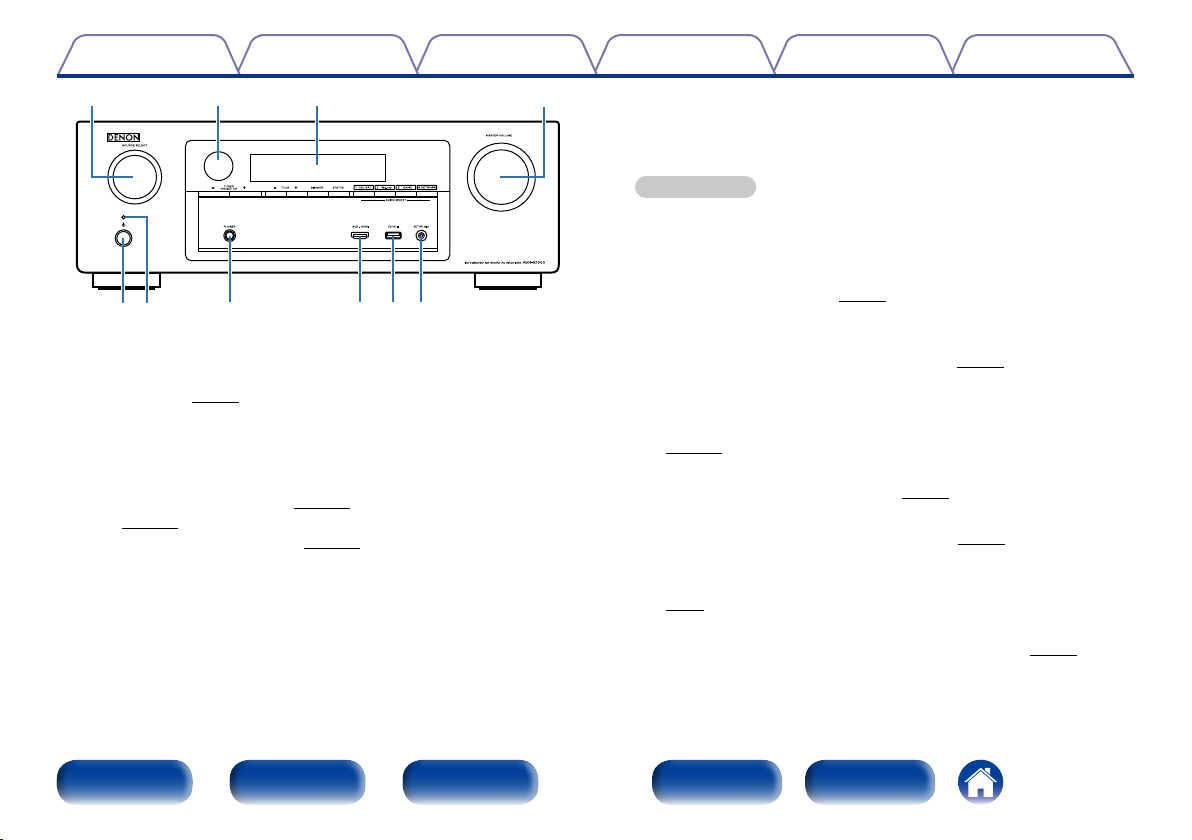
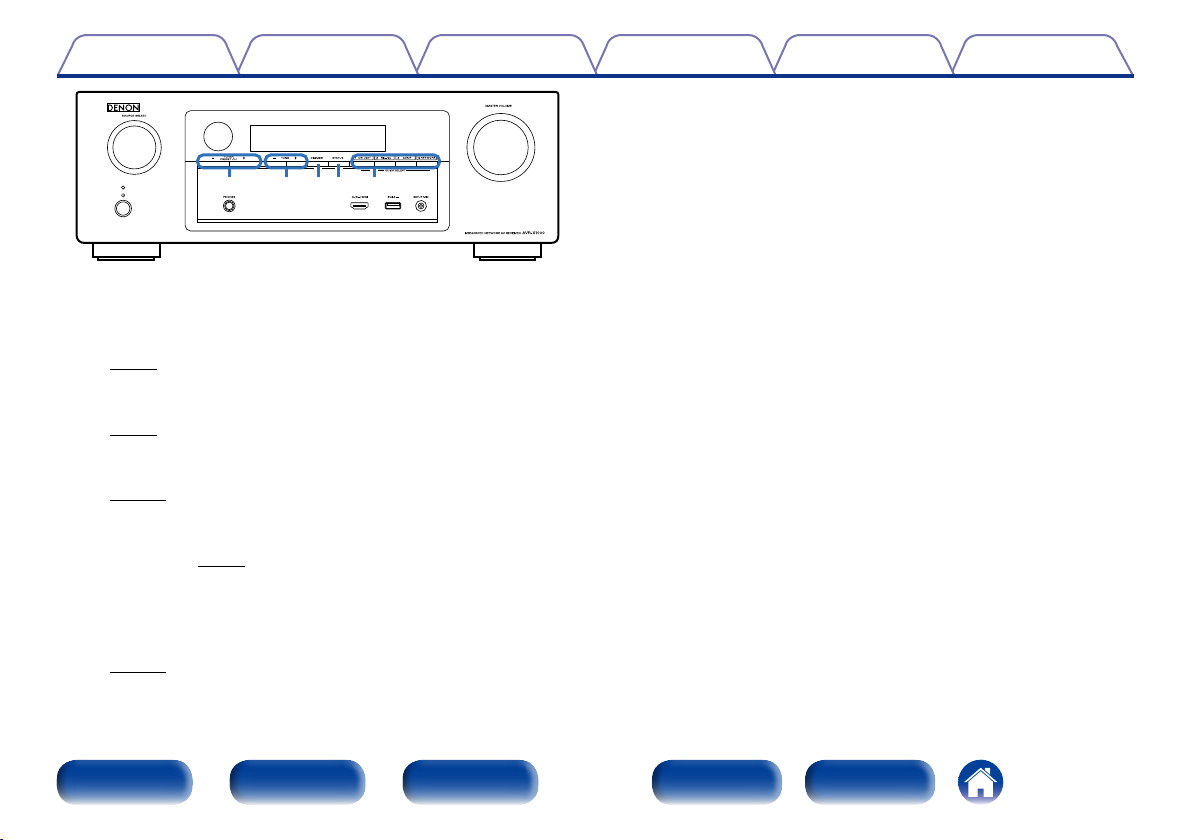
Q1 Кнопки предустановленных каналов тюнера
(TUNER PRESET CH +, –)
Используются для выбора запрограммированных FM-радиостанций
(vстр.53).
Q2 Кнопки настройки на радиостанции
Позволяют выбирать частоту приема для FM-радиостанций
(vстр.49).
Q3 Кнопка DIMMER
Каждое нажатие этой кнопки изменяет уровень яркости дисплея
(vстр.142).
Q4 Кнопка STATUS
Каждое нажатие этой кнопки переключает индикацию состояния
на дисплее (vстр.43).
Q5 Кнопки QUICK SELECT
С помощью нажатия одной из кнопок можно открыть различные
настройки, установленные для каждой кнопки, например источник
входного сигнала, уровень громкости и настройки режима звучания
(vстр.100).
СоветыУстановкиВоспроизведениеПодсоединения
Приложение
Передняя
панель
Дисплей Задняя панель
12
Пульт ДУ
Предметный
указатель
Содержание
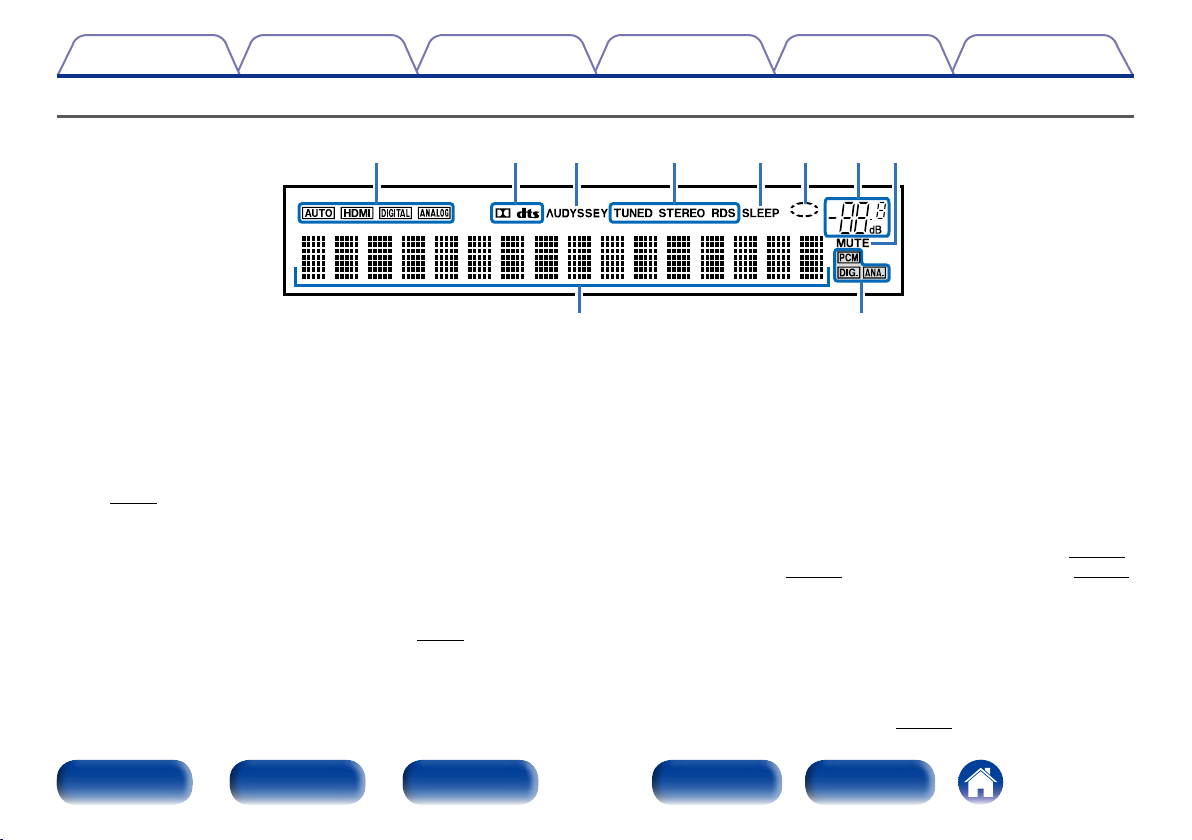
Дисплей
СоветыУстановкиВоспроизведениеПодсоединения
r etyuioQ0
q w
Приложение
q Информационный экран
Здесь выводятся имя источника входного сигнала, режим звука,
значения настроек и другие сведения.
w Индикаторы входящих сигналов
e Индикатор MUTE
Данный индикатор мигает при выборе режима отключения звука
(vстр.40).
r Индикатор общего уровня громкости
t Индикатор сети
Индикатор сети отображается, если при воспроизведении музыки
источник входного сигнала “NETWORK” или “iPod/USB”.
y Индикатор таймера отключения
Подсвечивается при выборе режима сна (vстр.99).
Передняя
панель
Дисплей Задняя панель
u Индикаторы режима приема тюнера
Подсвечивается в зависимости от условий приема при выборе в
качестве источника сигнала “TUNER”.
STEREO : Подсвечивается при приеме передач стереофонического
радиовещания в FM-диапазоне.
TUNED : Подсвечивается при правильной настройке на
радиостанцию.
RDS : Подсвечивается при приеме радиовещания RDS.
i Индикатор Audyssey®
Подсвечивается, если для режимов “MultEQ® XT” (vстр.115),
“Dynamic EQ” (vстр.115) или “Dynamic Volume” (vстр.116)
выбрано любое значение, кроме “Выкл”.
o Индикатор декодирования
Загорается, когда на выходе есть сигнал Dolby или DTS, или во
время работы Dolby или DTS.
Q0 Индикаторы режима входа
Установка режима входного звукового сигнала для разных
источников звукового сигнала (vстр.124).
13
Пульт ДУ
Предметный
указатель
Содержание
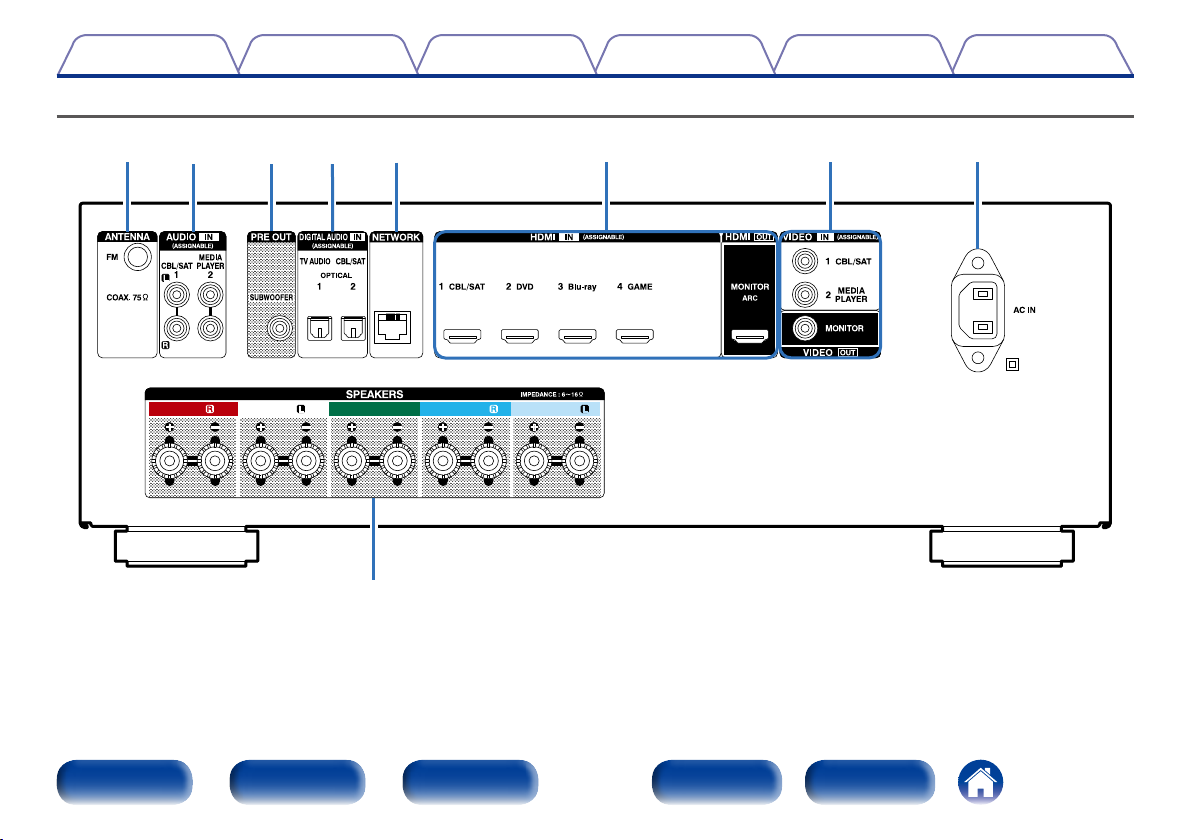
Задняя панель
FRONT FRONT CENTER SURROUNDSURROUND
q
СоветыУстановкиВоспроизведениеПодсоединения
Приложение
r wo ti eyu
Передняя
панель
Дисплей Задняя панель
14
Пульт ДУ
Предметный
указатель
Содержание
СоветыУстановкиВоспроизведениеПодсоединения
Приложение
r wo ti eyu
FRONT FRONT CENTER SURROUNDSURROUND
q
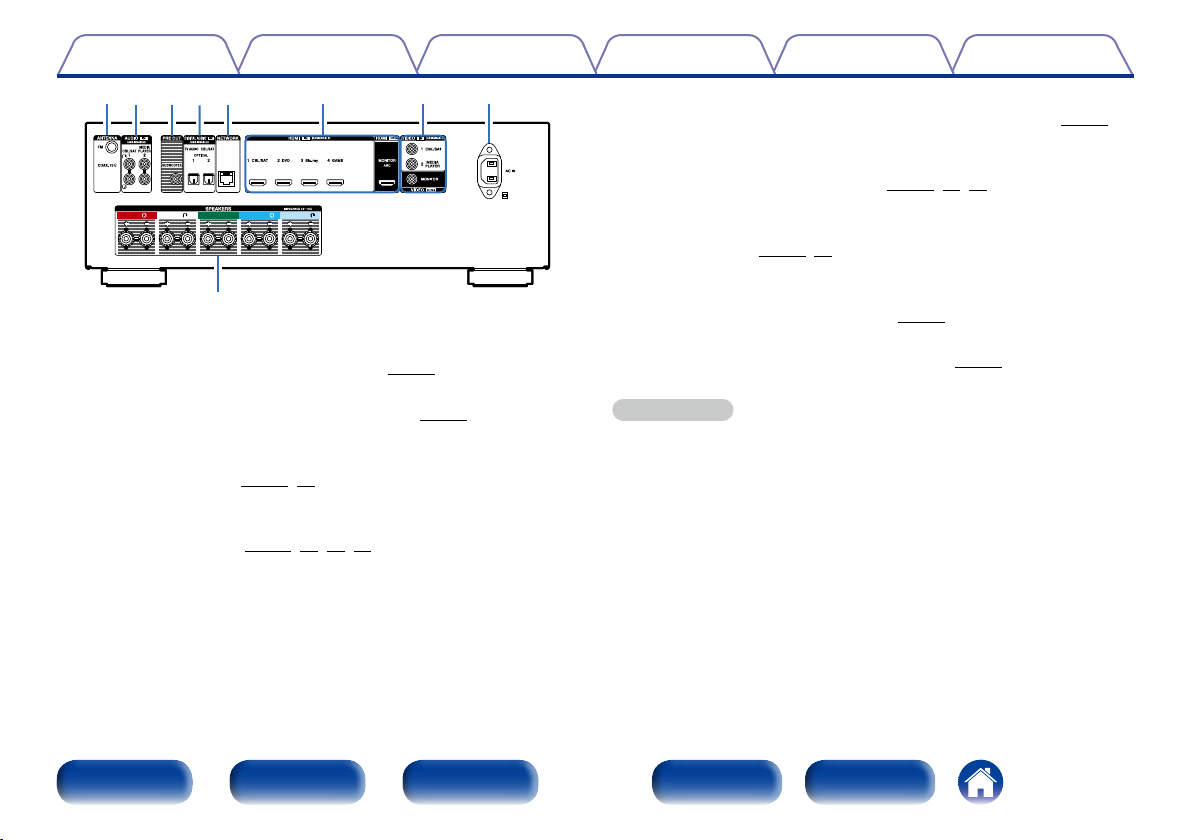
q Клеммы динамиков (SPEAKERS)
Служат для подключения динамиков (vстр.21).
w Вход AC (AC IN)
Служит для подключения шнура питания (vстр.37).
e Разъемы видео (VIDEO)
Используются для подключения устройств, совместимых с
видеоразъемами (vстр.28, 30).
r Разъемы HDMI
Используются для подключения устройств, совместимых с
разъемами HDMI (vстр.26, 27, 30, 31).
t Сетевые разъемы (NETWORK)
Служат для подключения данного устройства к сети (vстр.36).
y Разъемы для цифрового звука (DIGITAL AUDIO)
Используются для подключения устройств, совместимых с
цифровыми аудиоразъемами (vстр.27, 28, 30).
u Разъемы PRE OUT
Используются для подключения сабвуфера со встроенным
усилителем (vстр.22, 24).
i Разъемы аналогового звука (AUDIO)
Используются для подключения устройств, совместимых с
аналоговыми аудиоразъемами (vстр.30).
o Гнездо FM (ANTENNA)
Служит для подключения FM-антенны (vстр.35).
ПРИМЕЧАНИЕ
•Запрещается прикасаться к внутренним контактам разъемов на задней панели.
Электростатический разряд может привести к неустранимому повреждению
устройства.
Передняя
панель
Дисплей Задняя панель
15
Пульт ДУ
Предметный
указатель
Содержание
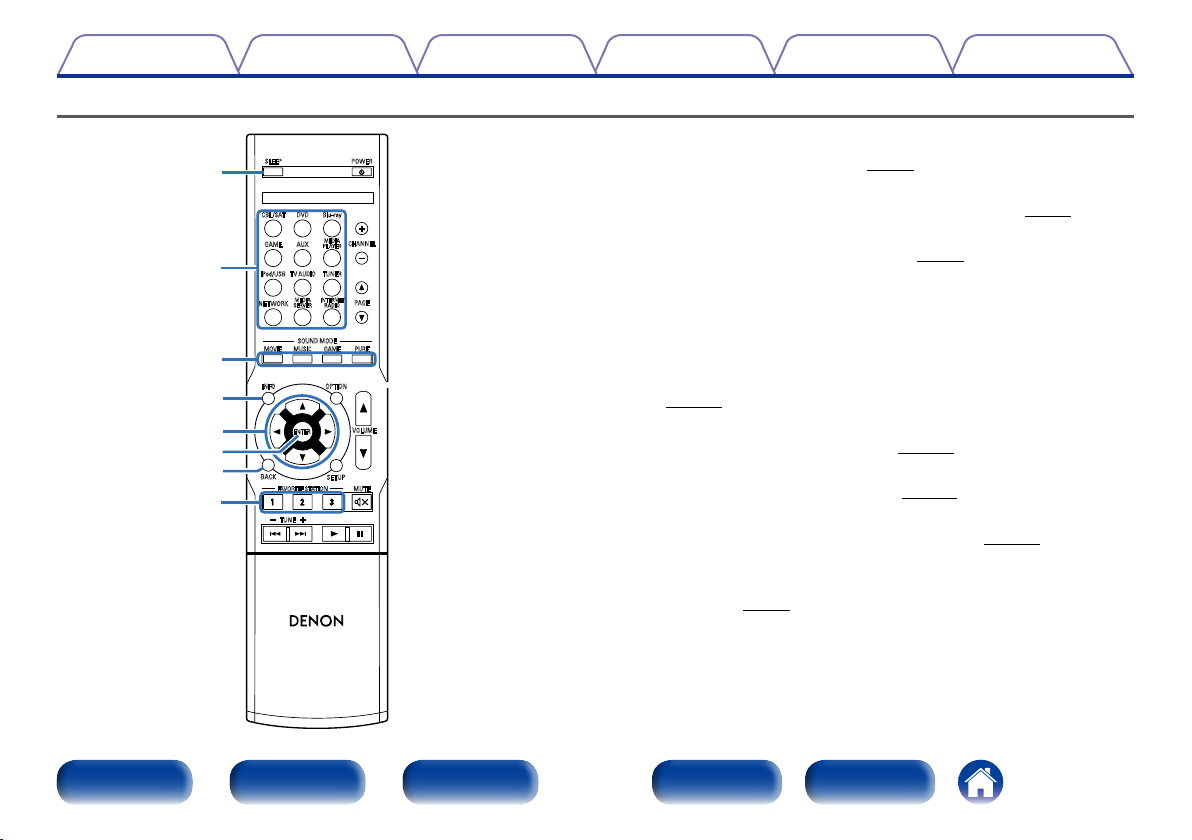
Пульт дистанционного управления
СоветыУстановкиВоспроизведениеПодсоединения
Приложение
q
w
e
r
t
y
u
i
SLEEP
DVD
CBL/SAT
AUX
GAME
TV AUDIO
iPod/USB
MEDIA
NETWORK
SERVER
SOUND MODE
INFO
ENTER
BACK
FAVORITE STATION MUTE
1 2 3
TUNE
RC-1181
Blu-ray
MEDIA
PLAYER
TUNER
INTERNET
RADIO
OPTION
SETUP
POWER
CHANNEL
PAGE
PUREMOVIE GAMEMUSIC
VOLUME
q Кнопка SLEEP
Устанавливает таймер сна (vстр.99).
w Кнопки выбора источника входного сигнала
Позволяют выбрать источник входного сигнала (vстр.39).
e Кнопки SOUND MODE
Позволяют выбрать режим звука (vстр.89).
•Кнопка MOVIE
•Кнопка MUSIC
•Кнопка GAME
•Кнопка PURE
r Кнопка информации (INFO)
Отображает на экране телевизора информацию о состоянии
(vстр.143).
t Кнопки курсора (uio p)
Служат для выбора элементов (vстр.107).
y Кнопка ENTER
Подтверждает выбор значения (vстр.107).
u Кнопка BACK
Служит для возврата в предыдущее меню (vстр.107).
i Кнопки FAVORITE STATION (1 – 3)
Служат для вызова запрограммированных радиостанций и типов
программ (vстр.78).
Передняя
панель
Дисплей Задняя панель
16
Пульт ДУ
Предметный
указатель

Содержание
SLEEP
DVD
CBL/SAT
AUX
GAME
TV AUDIO
iPod/USB
MEDIA
NETWORK
SERVER
SOUND MODE
INFO
ENTER
BACK
FAVORITE STATION MUTE
1 2 3
TUNE
RC-1181
Blu-ray
MEDIA
PLAYER
TUNER
INTERNET
RADIO
OPTION
SETUP
POWER
CHANNEL
PAGE
PUREMOVIE GAMEMUSIC
VOLUME
o
Q0
Q1
Q2
Q3
Q4
Q5
Q6
Q7
СоветыУстановкиВоспроизведениеПодсоединения
Приложение
o Передатчик сигнала дистанционного управления
Передает сигналы от пульта дистанционного управления
(vстр.7).
Q0 Кнопка POWER (X)
Включает и выключает питание (vстр.39).
Q1 Кнопки каналов (CHANNEL +, –)
Позволяют выбирать предварительно настроенные радиостанции
(vстр.53).
Q2 Кнопки поиска страницы (PAGE df)
Позволяют переключать страницы (vстр.43).
Q3 Кнопка OPTION
Отображает на экране телевизора меню действий (vстр.83).
Q4 Кнопки VOLUME (df)
Регулируют уровень громкости (vстр.40).
Q5 Кнопка SETUP
Отображает меню на экране телевизора (vстр.107).
Q6 Кнопка MUTE (:)
Отключает звук (vстр.40).
Q7 Системные кнопки
Служат для управления воспроизведением (vстр.41).
•Кнопки пропуска (8, 9)
•Кнопка воспроизведения (1)
•Кнопка паузы (3)
Кнопки настройки на радиостанции (TUNE +, –)
Используются для управления тюнером (vстр.49).
Передняя
панель
Дисплей Задняя панель
17
Пульт ДУ
Предметный
указатель

Содержание
Подсоединения
Подсоединения
СоветыУстановкиВоспроизведение
Приложение
Подсоединение колонок (vстр.19)
Подсоединение телевизора (vстр.25)
Подключение проигрывателя (vстр.29)
Подключение iPod или запоминающего устройства
USB в порт USB (vстр.33)
Подключение антенны FM (vстр.35)
Подключение к домашней сети (LAN) (vстр.36)
Подключение кабеля питания (vстр.37)
ПРИМЕЧАНИЕ
•Не включайте устройство в розетку, пока не будут подсоединены все
компоненты. Запустите “Setup Assistant” и следуйте инструкциям по
подключению на экране “Setup Assistant” (C стр. 7). (Во время работы
“Setup Assistant” на разъемы ввода-вывода напряжение не подается.)
•Не прокладывайте сетевые шнуры вместе с соединительными кабелями. Это
может привести к образованию помех.
2 Кабели, используемые для подключения
Используйте кабели, подходящие для подключаемых устройств.
Кабель для колонок
Кабель для сабвуфера
Кабель HDMI
Видеокабель
Оптический кабель
Звуковой кабель
Кабель LAN
L
R
L
R
Передняя
панель
Дисплей Задняя панель
18
Пульт ДУ
Предметный
указатель

Содержание
Подсоединения
СоветыУстановкиВоспроизведение
Приложение
Подсоединение колонок
Установите колонки и подключите их к данному устройству (vстр.19, 21).
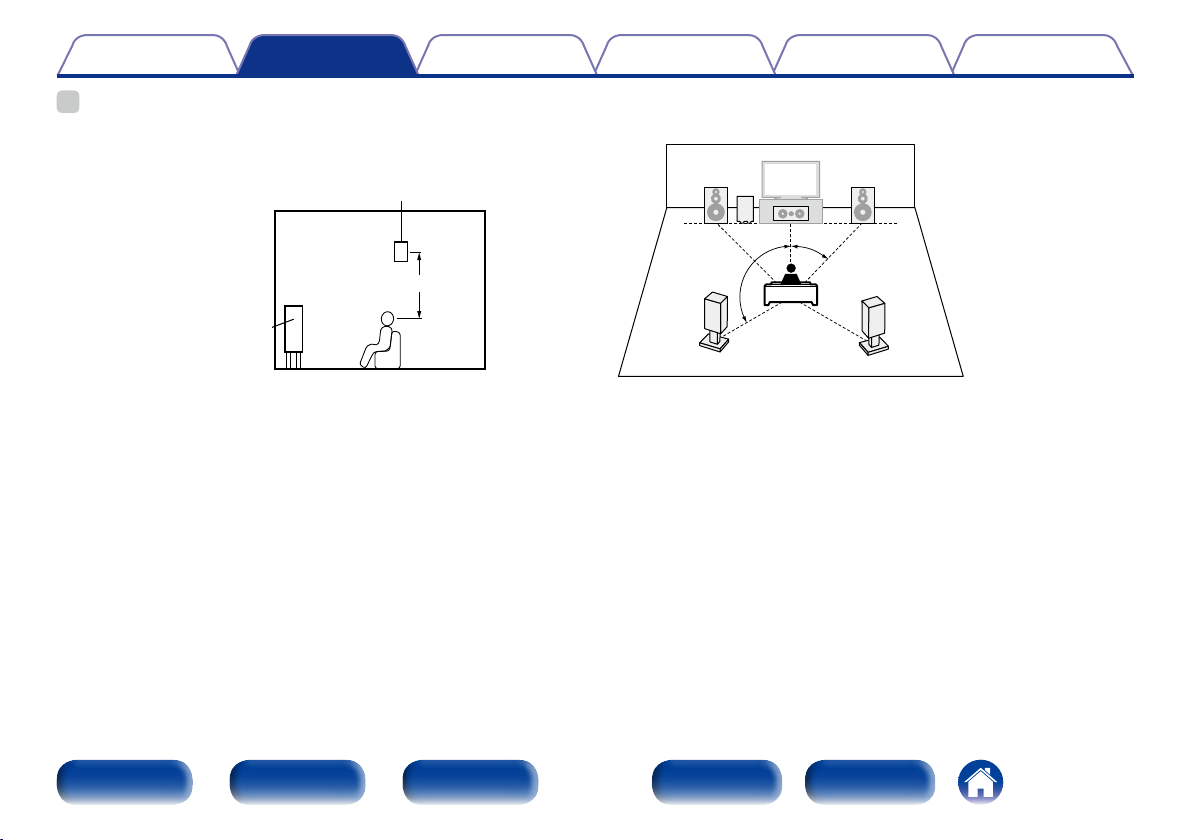
Установка акустической системы
Определите тип акустической системы исходя из количества колонок и установите колонки и сабвуфер в комнате. Здесь на примере объясняется,
как установить колонки.
FL/FR : Установите левый и правый FRONT динамики на равном
FL FR
SW
C
SL SR
удалении от основной позиции прослушивания. Расстояние
между телевизором и обоими динамиками также должно быть
одинаковым.
C : Установите CENTER динамик между фронтальными динамиками
выше или ниже телевизора.
SL/SR : Поместите правый и левый динамики объемного звучания
на одинаковом расстоянии справа и слева, чуть позади
от слушателя, направив их в сторону основной позиции
прослушивания.
SW : Установите SUBWOOFER в удобном месте рядом с фронтальными
динамиками.
Передняя
панель
Дисплей Задняя панель
19
Пульт ДУ
Предметный
указатель
Содержание
Подсоединения
СоветыУстановкиВоспроизведение
Приложение
%
•Ниже на рисунке показано, на какой высоте устанавливать каждую колонку.
Высота указана приблизительно.
Панорамный
громкоговоритель
60 – 90 см
Фронтальный
громкогово-ритель
GВид сбокуH
2 Установка 5,1-канальной акустической
системы
z1 22˚ – 30˚
FL FR
SW
z2
SL
GИспользуемые сокращенияH
FL Фронтальный
громкоговоритель (Л)
FR Фронтальный
громкоговоритель (П)
C Центральный
громкоговоритель
C
z1
SR
SW Сабвуфер
SL Тыловой
SR Тыловой
z2 120˚
громкоговоритель (Л)
громкоговоритель (П)
Передняя
панель
Дисплей Задняя панель
20
Пульт ДУ
Предметный
указатель
Содержание
Подсоединения
СоветыУстановкиВоспроизведение
Приложение
Подключение колонок
В данном разделе описывается подключение данного устройства к
колонкам в помещении.
Подключение объясняется на примерах.
ПРИМЕЧАНИЕ
•Перед подключением акустической системы, отключите шнур питания
устройства из розетки. Выключите сабвуфер.
•Выполняйте подсоединение таким образом, чтобы центральные проводники
кабеля акустической системы не выступали из клеммы громкоговорителя.
Возможно срабатывание схемы защиты при соприкосновении центральных
проводников с задней панелью или при соприкосновении проводов + и – друг
с другом (vстр.179 “Схема защиты”).
•Запрещается прикасаться к клеммам акустической системы при включенном
сетевом шнуре. Это может привести к поражению электрическим током. Если
выполняется “Setup Assistant”, следуйте его инструкциям по подключению.
(Во время работы “Setup Assistant” электропитание на акустическую систему
не подается.)
•Используйте динамики с импедансом в диапазоне от 6 до 16 Ом.
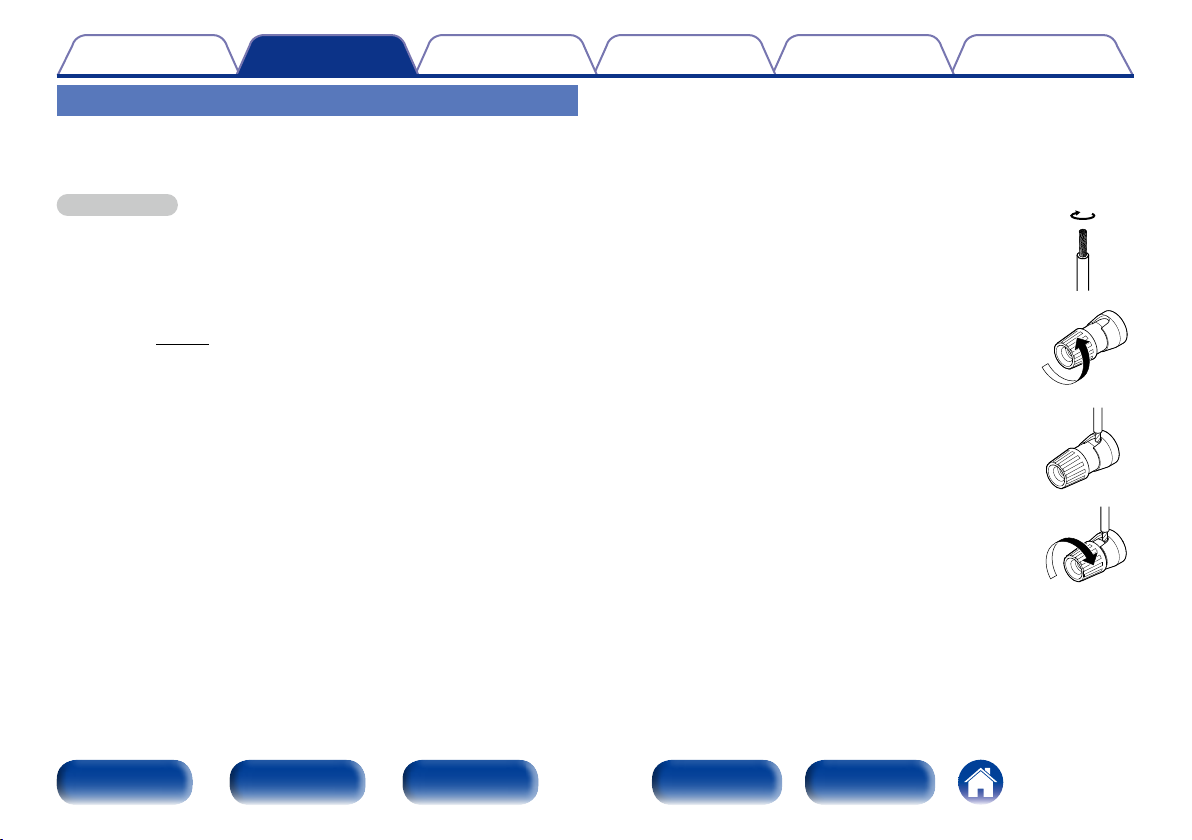
2 Подключение кабелей к акустической
системе
Внимательно проверьте левый (L) и правый (R) каналы и полярность
(+ красный, – черный) на колонках, присоединенных к устройству,
чтобы подключить каналы и полярность правильно.
Срежьте около 10 мм изоляции с провода
1
колонок, затем или крепко скрутите
сердечник провода, или воспользуйтесь
клеммами для подключения.
На колонках поверните разъемы для
2
подключения против часовой стрелки и
немного ослабьте их.
Вставьте кабель от колонок в разъемы.
3
На колонках поверните разъемы для
4
подключения по часовой стрелке и
затяните их.
Передняя
панель
Дисплей Задняя панель
21
Пульт ДУ
Предметный
указатель
Содержание
Подсоединения
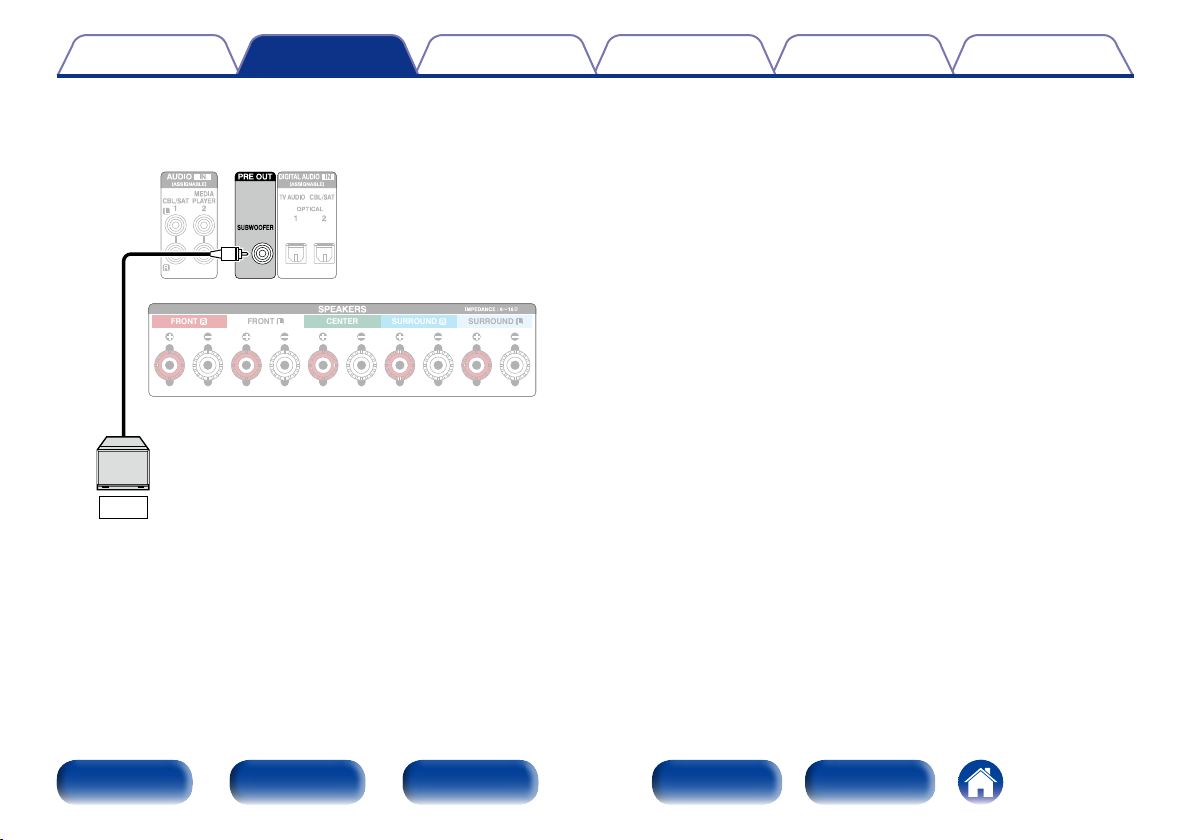
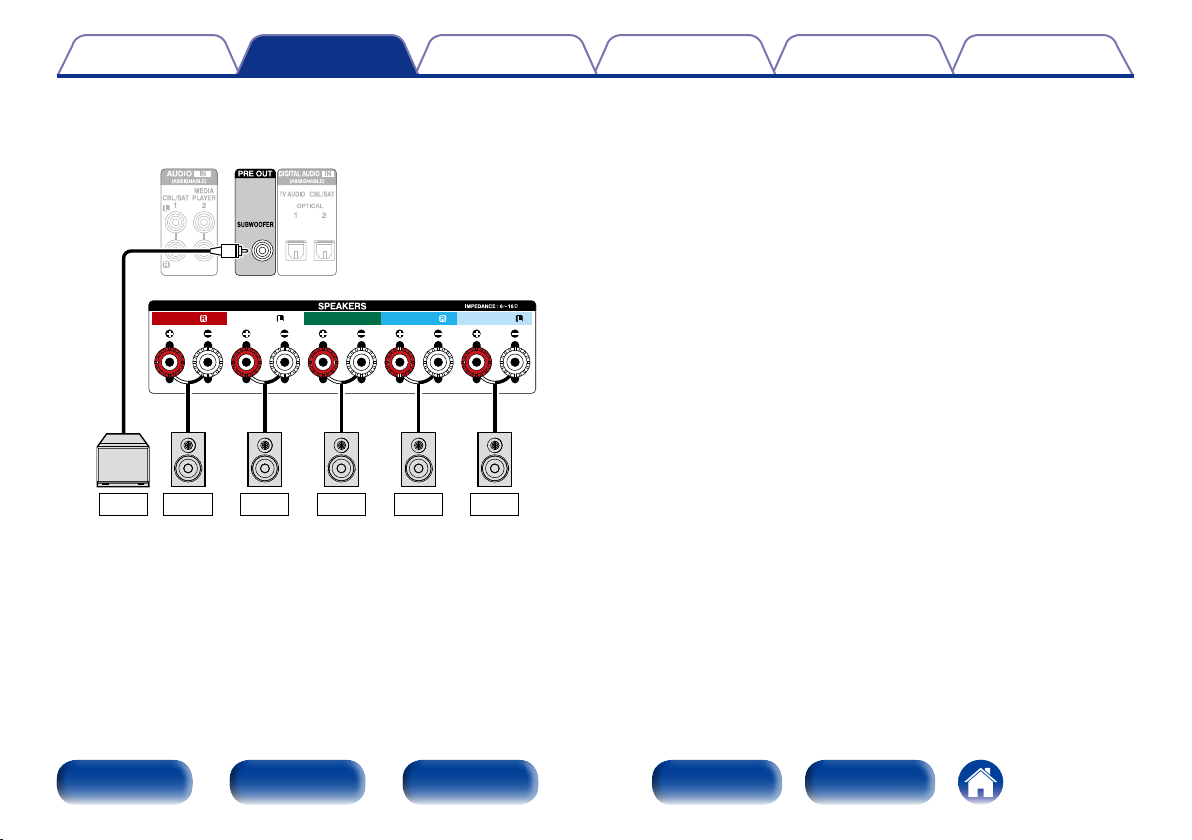
2 Подключение сабвуфера
Чтобы подключить сабвуфер, воспользуйтесь кабелем для
сабвуфера.
FRONT FRONT CENTER SURROUNDSURROUND
SW
СоветыУстановкиВоспроизведение
Приложение
Передняя
панель
Дисплей Задняя панель
22
Пульт ДУ
Предметный
указатель
Содержание
Подсоединения
СоветыУстановкиВоспроизведение
Приложение
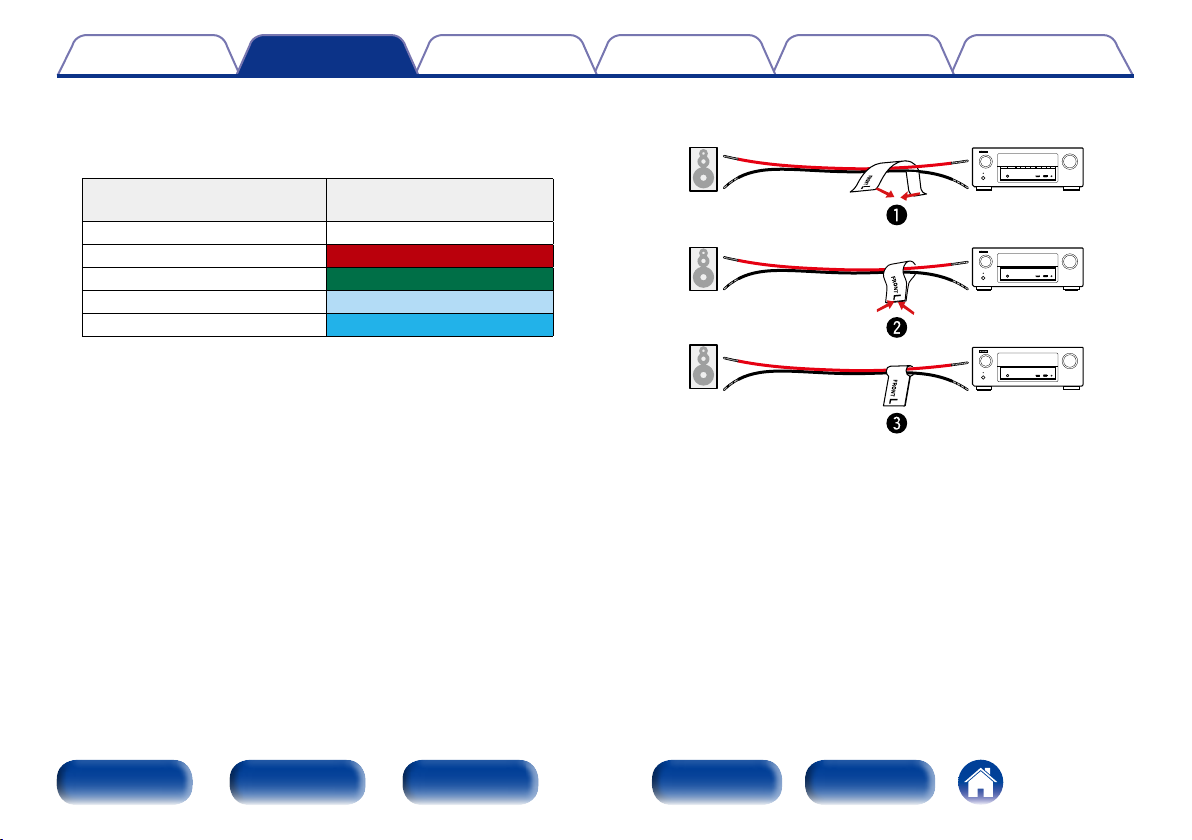
2 Информация о ярлыке кабеля динамиков
(входят в комплект) для определения канала
Раздел экрана канала для клемм динамика на задней панели имеет
цветовую маркировку для определения каждого канала.
Клеммы акустической
системы
FRONT L Белый
FRONT R Красный
CENTER Зеленый
SURROUND L Голубой
SURROUND R Синий
Прикрепите ярлык кабеля динамика для каждого канала к кабелю
динамика, как показано на картинке.
Далее подключите так, чтобы цвет клеммы динамика совпадал с
цветом ярлыка кабеля динамика.
Цвет
GКак прикрепить ярлык кабеля динамикаH
Колонки Это устройство
Передняя
панель
Дисплей Задняя панель
23
Пульт ДУ
Предметный
указатель
Содержание
Подсоединения
2 Стандартное подключение динамиков
На рисунке ниже показан пример стандартного подключения
динамиков.
FRONT FRONT CENTER SURROUNDSURROUND
СоветыУстановкиВоспроизведение
Приложение
SW
Передняя
панель
FLFR C SR SL
Дисплей Задняя панель
24
Пульт ДУ
Предметный
указатель
Содержание
Подсоединения
СоветыУстановкиВоспроизведение
Приложение
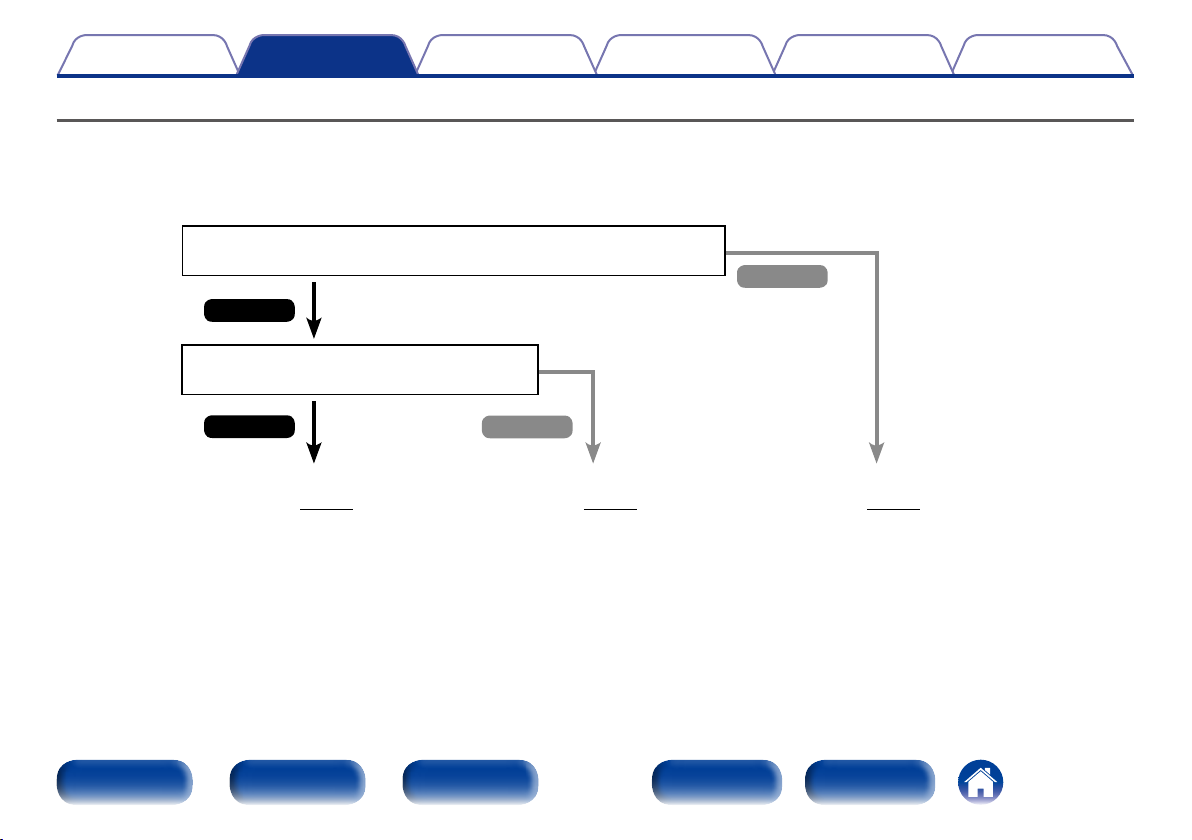
Подсоединение телевизора
Подключите телевизор к данному устройству, чтобы вывести входящий видеосигнал на телевизор. Данное устройство может использоваться
также для прослушивания звука с телевизора.
Функция ARC позволяет выводить телевизионный аудиосигнал на данном устройстве через кабель HDMI.
Оснащен ли телевизор разъемом HDMI?
Нет
Да
Поддерживает ли телевизор ARC
(Audio Return Channel)?
Передняя
панель
Да
Соединение 1
(vстр.26)
Дисплей Задняя панель
Нет
Соединение 2
(vстр.27)
25
Пульт ДУ
Соединение 3
(vстр.28)
Предметный
указатель
Содержание
Подсоединения
СоветыУстановкиВоспроизведение
Приложение
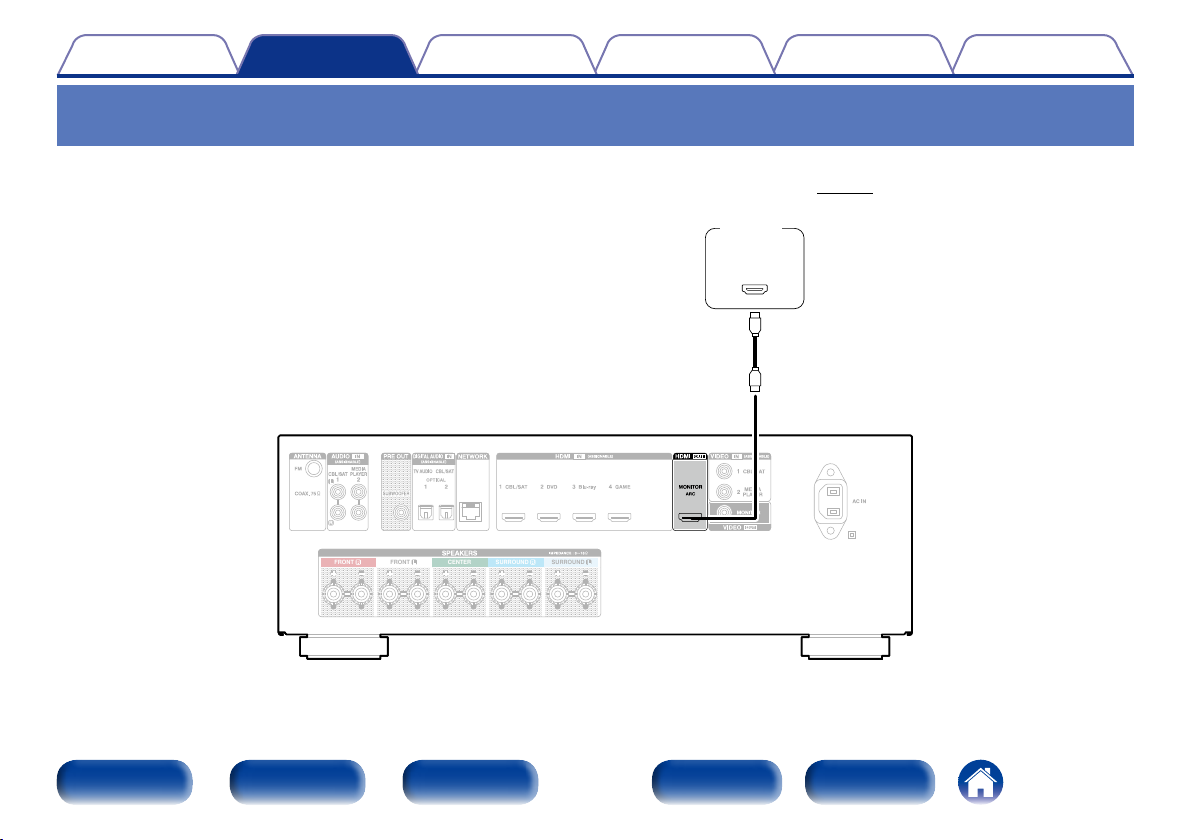
Соединение 1 : Телевизор оборудован разъемом HDMI и поддерживает ARC
(Audio Return Channel)
Для подключения к данному устройству телевизора, совместимого с режимом ARC, используйте кабель HDMI.
При использовании телевизора с поддержкой режима ARC установите параметр “HDMI Control” (vстр.118) на значение “Вкл”.
ТВ
HDMI
IN
(ARC)
FRONT FRONT CENTER SURROUNDSURROUND
Передняя
панель
Дисплей Задняя панель
26
Пульт ДУ
Предметный
указатель
Содержание
Подсоединения
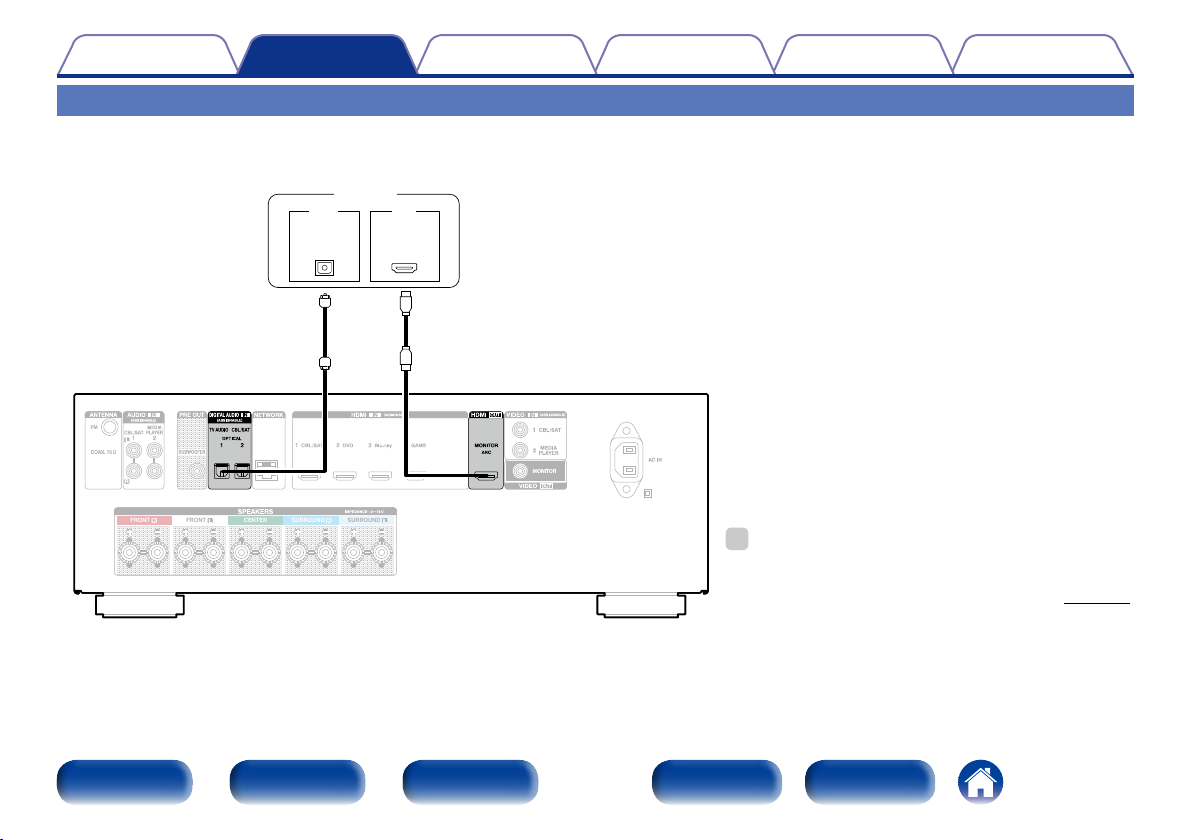
Соединение 2 : Телевизор имеет разъем HDMI
Используйте для подключения телевизора к данному устройству кабель HDMI.
Для прослушивания звука с телевизора соедините оба устройства оптическим кабелем.
ТВ
OUT IN
OPTICAL
FRONT FRONT CENTER SURROUNDSURROUND
OUT
HDMI
IN
СоветыУстановкиВоспроизведение
Приложение
%
•Чтобы вывести аудиосигналы, поступающие из входного
разъема HDMI на телевизор, подключенный через HDMI,
установите для “HDMI Аудио-Выход” (vстр. 118)
параметр “TV”.
Передняя
панель
Дисплей Задняя панель
27
Пульт ДУ
Предметный
указатель

Содержание
Подсоединения
Соединение 3 : Телевизор без разъема HDMI
Используйте видеокабель для подключения телевизора к данному устройству.
Для прослушивания звука с телевизора соедините оба устройства оптическим кабелем.
ТВ
OUT IN
FRONT FRONT CENTER SURROUNDSURROUND
OPTICAL
OUT
VIDEO
IN
СоветыУстановкиВоспроизведение
Приложение
Передняя
панель
Дисплей Задняя панель
28
Пульт ДУ
Предметный
указатель

Содержание
Подсоединения
СоветыУстановкиВоспроизведение
Приложение
Подключение проигрывателя
Данное устройство оснащено двумя типами разъемов видеовхода (HDMI и композитное видео) и двумя типами разъемов видеовыхода (HDMI и
композитное видео).
Используйте входные разъемы, соответствующие параметрам подключаемого устройства.
Если прибор, подключенный к этому устройству оборудован разъемом HDMI, рекомендуется использовать подключение HDMI.
Для передачи аудио- и видеосигналов через разъем HDMI требуется только кабель HDMI.
•Подсоединение декодера телеканалов (спутникового тюнера/кабельного телевидения) (vстр.30)
•Подключение DVD-проигрывателя (vстр.31)
•Подключение видеокамеры или другого устройства (vстр.32)
%
•Подключите к входным разъемам данного устройства другие устройства, как предписано маркировкой на входных разъемах источников аудио-/видеосигнала.
•Это устройство может изменить источник сигнала, назначенный для разъемов HDMI IN, DIGITAL AUDIO IN, VIDEO IN и AUDIO IN.
Как изменить источник сигнала, назначенный для разъемов (vстр.121 “Назначение входа”).
Передняя
панель
Дисплей Задняя панель
29
Пульт ДУ
Предметный
указатель
Содержание
Подсоединения
СоветыУстановкиВоспроизведение
Приложение
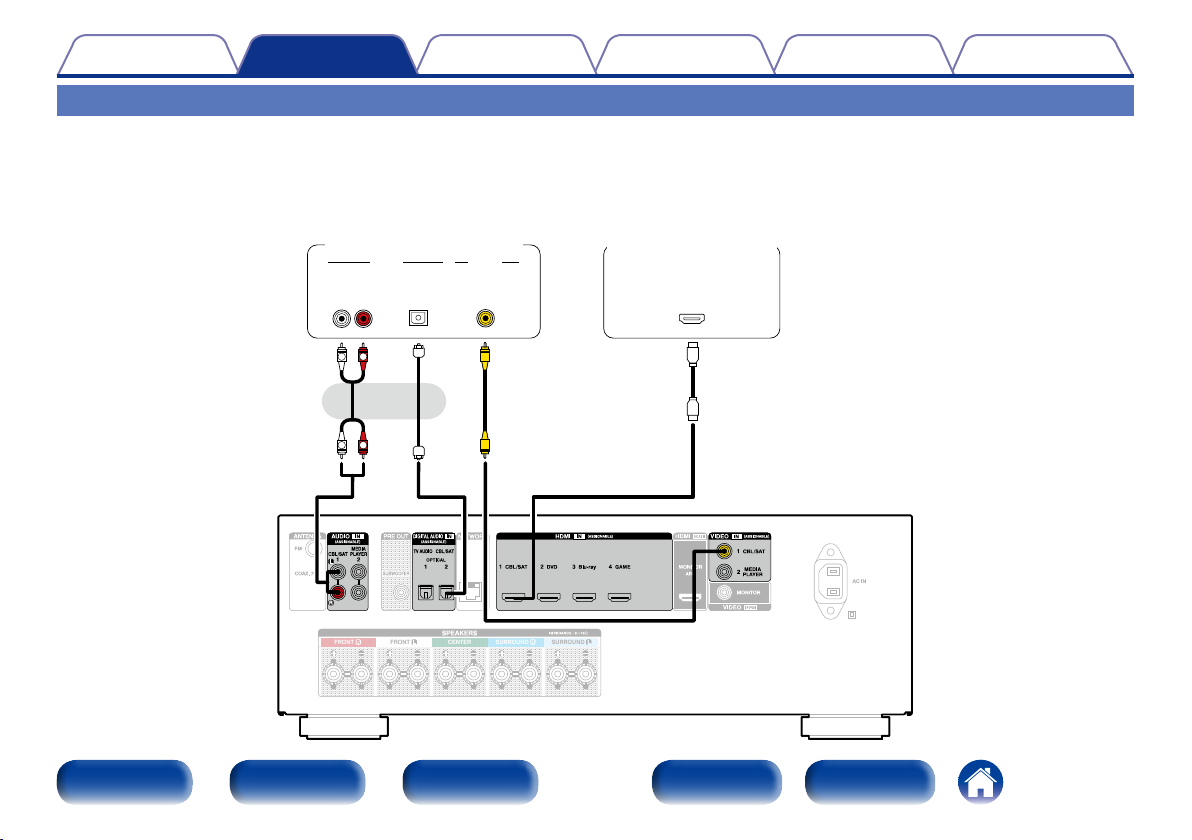
Подсоединение декодера телеканалов (спутникового тюнера/кабельного телевидения)
В инструкции ниже описано подключение спутникового тюнера/декодера кабельного ТВ.
Используйте входные разъемы, соответствующие параметрам подключаемого устройства.
(HDMI-несовместимое
устройство)
Спутниковый приемник/
кабельное телевидение
AUDIO
OUT
L
AUDIO
OPTICAL
OUT
RL
R
VIDEO
VIDEO
OUT
или
R
L
Спутниковый тюнер/
Кабельное ТВ
HDMI
OUT
Передняя
панель
FRONT FRONT CENTER SURROUNDSURROUND
Дисплей Задняя панель
30
Пульт ДУ
Предметный
указатель
Loading…
View the manual for the Denon AVR-X1000 here, for free. This manual comes under the category receivers and has been rated by 17 people with an average of a 8.2.
This manual is available in the following languages: English. Do you have a question about the Denon AVR-X1000 or do you need help?
Ask your question here
Denon AVR-X1000 specifications
Below you will find the product specifications and the manual specifications of the Denon AVR-X1000.
The Denon AVR-X1000 is a receiver with a power output per channel of 80 W at 20-20KHz with 8 Ohm impedance, and 145 W at 1KHz with 6 Ohm impedance. Its Total Harmonic Distortion is at a low 0.08%. The receiver has 5.1 audio output channels, input sensitivity of 200 mV, and input impedance of 47,000 Ω. The Signal-to-Noise Ratio of this receiver is 98 dB, ensuring clear and uninterrupted audio.
The Denon AVR-X1000 features pre-out connectivity with 1 SW channel and a pre-out channel. It has 5 HDMI inputs, 2 composite video inputs, 2 Audio(L/R) inputs, and 2 digital audio optical inputs. This makes the receiver very versatile and able to accommodate multiple devices at once.
Designed with quality materials, this product has been built for longevity and reliability. Overall, the Denon AVR-X1000 is a high-quality receiver with excellent audio capabilities and connectivity options, making it a great choice for home theater systems and music setups.
Power output per channel (20-20KHz@8 Ohm)
80 W
Speakers connectivity type
Binding post
Audio formats supported
AAC, FLAC, MP3, WAV, WMA
General
| Brand | Denon |
| Model | AVR-X1000 | AVRX1000BKE2 |
| Product | receiver |
| EAN | 4250494910132, 4250494910149, 4582116369197, 883795002806, 0883795002806 |
| Language | English |
| Filetype | User manual (PDF), Datasheet (PDF) |
Audio
| Power output per channel (20-20KHz@8 Ohm) | 80 W |
| Audio output channels | 5.1 channels |
| Power output per channel (1KHz@8 Ohm) | 80 W |
| Power output per channel (1KHz@6 Ohm) | 145 W |
| Total Harmonic Distortion (THD) | 0.08 % |
| Input sensitivity | 200 mV |
| Input impedance | 47000 Ω |
| Signal-to-Noise Ratio (SNR) | 98 dB |
| Frequency range | 10 — 100000 Hz |
| Pre-out connectivity | Yes |
| Pre-out channels | 1 SW |
| Receiver type | — |
Inputs
| HDMI in | 5 |
| Composite video in | 2 |
| Audio (L/R) in | 2 |
| Digital audio optical in | 2 |
| AC (power) in | Yes |
| Ethernet LAN (RJ-45) ports | 1 |
| USB ports quantity | 1 |
Outputs
| Number of HDMI outputs | 1 |
| Composite video out | 1 |
| Headphone outputs | 1 |
| Multichannel audio output type | RCA |
Ports & interfaces
| Speakers connectivity type | Binding post |
| Connectivity technology | Wired |
| AM antenna ports quantity | 0 |
| FM antenna ports quantity | 1 |
File formats
| Audio formats supported | AAC, FLAC, MP3, WAV, WMA |
| Image formats supported | JPS |
Network
Radio
| Supported radio bands | FM |
| Internet radio | Yes |
| Internet radio services supported | vTuner |
| Radio Data System (RDS) | Yes |
| Auto digital tuning | Yes |
Optical drive
| Optical drive included | No |
Storage
| Card reader integrated | No |
Technical details
| Display | — |
| Audio decoders | Dolby Digital EX, Dolby Pro Logic IIx, Dolby TrueHD, DTS 96/24, DTS-ES, DTS-HD Master Audio |
| Equalizer | Yes |
| Multi-Zone capability | No |
| Graphical user interface (GUI) | Yes |
| Handheld remote control | Yes |
| Product color | Black |
| Audio amplifier | Yes |
| Volume control | Rotary |
| Apple docking compatibility | iPhone |
| AirPlay | Yes |
| Detachable power cord | Yes |
| Number of products included | 1 pc(s) |
| Audio Return Channel (ARC) | Yes |
| Sleep timer | Yes |
| Yes |
Power
| AC input voltage | 230 V |
| AC input frequency | 50 Hz |
| Power consumption (typical) | 390 W |
| Power consumption (standby) | 0.1 W |
Weight & dimensions
| Width | 434 mm |
| Depth | 330 mm |
| Height | 151 mm |
| Weight | 8200 g |
Packaging content
Video
show more
Frequently Asked Questions
Can’t find the answer to your question in the manual? You may find the answer to your question in the FAQs about the Denon AVR-X1000 below.
How do I connect my Denon AVR-X1000 receiver to my TV?
To connect your Denon AVR-X1000 receiver to your TV, use an HDMI cable to connect the HDMI output on the receiver to the HDMI input on your TV. Make sure to select the correct HDMI input on your TV for audio and video playback.
How can I optimize the audio settings on my Denon AVR-X1000?
To optimize the audio settings, go to the «Audio Setup» menu on the receiver. From there, you can adjust the speaker settings, set up the correct speaker distances, and calibrate the audio levels using the Audyssey MultEQ feature to ensure a balanced and immersive sound experience.
How do I set up and use the network features on my Denon AVR-X1000?
To set up and use the network features, connect the receiver to your home network using an Ethernet cable or via Wi-Fi. Access the «Network Setup» menu on the receiver to configure the network connection and enable features such as AirPlay, streaming services, and firmware updates.
How can I control my Denon AVR-X1000 using a smartphone or tablet?
To control your receiver using a smartphone or tablet, download the Denon Remote App from your device’s app store. Ensure that both your receiver and your smartphone/tablet are connected to the same network. Open the app and follow the setup instructions to control various functions of the AVR-X1000 conveniently from your mobile device.
I’m experiencing video issues when using my Denon AVR-X1000, How can I troubleshoot this?
If you’re experiencing video issues, check the HDMI connections and ensure that you’re using high-speed HDMI cables. Verify that the video input and output settings on the receiver and TV match correctly. If the problem persists, power cycle the devices by turning them off, disconnecting the power cords, waiting for a few minutes, and then reconnecting and powering them on again.
What is the power output per channel (20-20KHz@8 Ohm) of the Denon AVR-X1000?
The power output per channel (20-20KHz@8 Ohm) of the Denon AVR-X1000 is 80 W. This means that the receiver can deliver 80 watts of power to each channel at 8 Ohms, providing a decent sound output for a home theater setup.
How many audio output channels does the Denon AVR-X1000 have?
The Denon AVR-X1000 has 5.1 audio output channels. This means it supports a surround sound setup with five main speakers and one subwoofer, delivering an immersive audio experience for movies and music.
What is the total harmonic distortion (THD) of the Denon AVR-X1000?
The total harmonic distortion (THD) of the Denon AVR-X1000 is 0.08%. This indicates that the receiver produces a clean and accurate sound output, with minimal distortion, providing a high-quality listening experience.
Does the Denon AVR-X1000 have pre-out connectivity?
Yes, the Denon AVR-X1000 does have pre-out connectivity. This allows users to connect additional power amplifiers or subwoofers to enhance the overall audio performance of their setup, giving them more flexibility in customizing their sound system.
How many HDMI inputs does the Denon AVR-X1000 have?
The Denon AVR-X1000 has 5 HDMI inputs. This allows users to connect multiple HDMI-enabled devices, such as Blu-ray players, gaming consoles, and media streaming devices, simultaneously, making it convenient and versatile for multimedia connectivity.
What is the weight of the Denon AVR-X1000?
The Denon AVR-X1000 has a weight of 8200 g.
Can bluetooth devices of different brands be connected to each other?
Yes, bluetooth is a universal method that allows different devices equipped with bluetooth to connect to each other.
What is the height of the Denon AVR-X1000?
The Denon AVR-X1000 has a height of 151 mm.
What is the width of the Denon AVR-X1000?
The Denon AVR-X1000 has a width of 434 mm.
What is bluetooth?
Bluetooth is a way of exchanging data wirelessly between electronic devices via radio waves. The distance between the two devices that exchange data can in most cases be no more than ten metres.
What is the depth of the Denon AVR-X1000?
The Denon AVR-X1000 has a depth of 330 mm.
What is HDMI?
HDMI stands for High-Definition Multimedia Interface. An HDMI cable is used to transport audio and video signals between devices.
When is my volume too loud?
A volume above 80 decibels can be harmful to hearing. When the volume exceeds 120 decibels, direct damage can even occur. The chance of hearing damage depends on the listening frequency and duration.
How can I best clean my receiver?
A slightly damp cleaning cloth or soft, dust-free cloth works best to remove fingerprints. Dust in hard-to-reach places is best removed with compressed air.
Wat is Dolby Atmos?
Dolby Atmos is a technology that ensures that the sound is reflected from the ceiling to where you are listening. This makes it possible to create a 5.1 effect with only 1 speaker.
Is the manual of the Denon AVR-X1000 available in English?
Yes, the manual of the Denon AVR-X1000 is available in English .
Is your question not listed? Ask your question here
Report abuse
Libble takes abuse of its services very seriously. We’re committed to dealing with such abuse according to the laws in your country of residence. When you submit a report, we’ll investigate it and take the appropriate action. We’ll get back to you only if we require additional details or have more information to share.
Product:
Get your user manual by e-mail
Enter your email address to receive the manual of Denon AVR-X1000 in the language / languages: English as an attachment in your email.
The manual is 6,43 mb in size.
You will receive the manual in your email within minutes. If you have not received an email, then probably have entered the wrong email address or your mailbox is too full. In addition, it may be that your ISP may have a maximum size for emails to receive.
The manual is sent by email. Check your email
If you have not received an email with the manual within fifteen minutes, it may be that you have a entered a wrong email address or that your ISP has set a maximum size to receive email that is smaller than the size of the manual.
Denon AVR-X1000 Receiver PDF User Guides and Manuals for Free Download: Found (5) Manuals for Denon AVR-X1000 Device Model (Getting Started, Service Manual, Owner’s Manual)
The Denon AVR-X1000 is a versatile and powerful audio/video receiver that stands out in a competitive market. With its sleek design and robust features, it appeals to both audiophiles and casual listeners alike. Built to deliver exceptional sound quality and support a wide range of formats, the AVR-X1000 is an investment that enhances any home theater experience.
One of the main strengths of the Denon AVR-X1000 lies in its sound performance. It features a 5.1 channel setup that delivers a rich and immersive audio experience, making it perfect for both movies and music. The advanced audio processing technology used in the AVR-X1000 ensures that sound clarity remains high, translating every note and dialogue beautifully. When paired with high-quality speakers, the receiver truly shines, providing a surround sound experience that can transport you into the heart of the action.
Key Features of the Denon AVR-X1000:
- High-current amplification delivering 80 watts per channel.
- Support for various audio formats, including Dolby TrueHD and DTS-HD Master Audio.
- Built-in wireless streaming capabilities for music from various sources.
- Seven HDMI inputs with 4K pass-through feature.
- User-friendly setup assistant for easy installation.
Another compelling aspect of the AVR-X1000 is its connectivity options. With multiple HDMI inputs, you can easily connect various devices such as gaming consoles, Blu-ray players, and streaming boxes. The AVR-X1000 also supports 4K video passthrough, making it a future-proof choice for anyone looking to upgrade their home theater in the coming years. Additionally, its built-in Wi-Fi allows for easy wireless streaming from services like Spotify, Pandora, and more.
The user interface of the Denon AVR-X1000 is designed with convenience in mind. The on-screen menu is intuitive, allowing users to navigate through settings and options effortlessly. The inclusion of a remote app further enhances the user experience, enabling control of your home theater system right from your smartphone or tablet. Furthermore, the setup assistant simplifies installation, helping you get the most out of your AV receiver without needing extensive technical knowledge.
However, no product is without its downsides, and the AVR-X1000 is no exception. Some users may find that while the features are robust, they may not be entirely beginner-friendly. Certain advanced settings can be overwhelming for those who are not familiar with audio/video receivers. Furthermore, while the built-in amplification is powerful, it may not be sufficient for larger rooms without additional external amplification.
In conclusion, the Denon AVR-X1000 is a well-rounded audio/video receiver that meets the needs of most home theater enthusiasts. With its impressive sound performance, extensive connectivity options, and user-friendly interface, the AVR-X1000 stands as a strong contender in its class. Though it may have a learning curve for some users, the results it delivers make it a worthy investment for anyone looking to elevate their home entertainment system.
-
Page 1
Appendix Tips Settings Playback Connections Contents Front panel Display Rear panel Index Remote AVR-X1000 INTEGRATED NETWORK AV RECEIVER Owner’s Manual You can print more than one page of a PDF onto a single sheet of paper.[…]
-
Page 2
2 Appendix Tips Settings Playback Connections Front panel Display Rear panel Index Remote Contents Accessories ························································································ 6 Inserting the batteries ··················[…]
-
Page 3
3 Appendix Tips Settings Playback Connections Front panel Display Rear panel Index Remote Contents Listening to FM broadcasts ························································ 48 Listening to FM broadcasts ········································?[…]
-
Page 4
4 Appendix Tips Settings Playback Connections Front panel Display Rear panel Index Remote Contents Selecting a sound mode ······························································ 89 Selecting a sound mode ······································?[…]
-
Page 5
5 Appendix Tips Settings Playback Connections Front panel Display Rear panel Index Remote Contents Network ························································································· 138 Information ························[…]
-
Page 6
6 Appendix Tips Settings Playback Connections Contents Front panel Display Rear panel Index Remote Accessories Check that the following parts are supplied with the product. q Getting Started w CD-ROM (Owner’s Manual) e Safety Instructions r Power cord t Remote control unit (RC-1181) y R03/AAA batteries u FM indoor antenna i Setup and measurement […]
-
Page 7
7 Appendix Tips Settings Playback Connections Contents Front panel Display Rear panel Index Remote Operating range of the remote control unit Point the remote control unit at the remote sensor when operating it. 30° 30° Approx. 7 m Inserting the batteries q Remove the rear lid in the direction of the arrow and remove it. w Load the two batteries […]
-
Page 8
8 Appendix Tips Settings Playback Connections Contents Front panel Display Rear panel Index Remote High quality sound • With discrete circuit technology, the power amplifier provides identical quality for all 5-channels (120 Watts x 5-channels) For optimum realism and stunning dynamic range, the power amplifier section features discrete powe[…]
-
Page 9
9 Appendix Tips Settings Playback Connections Contents Front panel Display Rear panel Index Remote • Direct play for iPod and iPhone via USB ( v page33) Music data from an iPod or iPhone can be played back if you connect the USB cable supplied with the iPod via the USB port of this unit, and also an iPod can be controlled with the remote co[…]
-
Page 10
10 Appendix Tips Settings Playback Connections Contents Front panel Display Rear panel Index Remote Front panel Q1 Q5 Q3 Q2 Q4 y r t e q w i o Q0 u Part names and functions[…]
-
Page 11
11 Appendix Tips Settings Playback Connections Contents Front panel Display Rear panel Index Remote q Power operation button ( X ) This turns the power on/o (standby) ( v page39). w Power indicator This is lit as follows according to the power status: • Power on : Green • Normal standby : O • When “HDMI Pass Through” ( v[…]
-
Page 12
12 Appendix Tips Settings Playback Connections Contents Front panel Display Rear panel Index Remote Q5 Q1 Q3 Q2 Q4 Q1 Tuner preset channel buttons (TUNER PRESET CH +, –) These select preset FM radio stations ( v page53). Q2 Tuning up / Tuning down buttons These select the receiving frequency for FM radio stations ( v page49). Q3 DIMMER butt[…]
-
Page 13
13 Appendix Tips Settings Playback Connections Contents Front panel Display Rear panel Index Remote Display r e t y u i o Q0 q w q Information display The input source name, sound mode, setting values and other information are displayed here. w Input signal indicators e MUTE indicator This lights when the audio mute mode is selected ( v page40).[…]
-
Page 14
14 Appendix Tips Settings Playback Connections Contents Front panel Display Rear panel Index Remote Rear panel FRONT FRONT CENTER SURROUND SURROUND q r w o t i e y u[…]
-
Page 15
15 Appendix Tips Settings Playback Connections Contents Front panel Display Rear panel Index Remote q Speaker terminals (SPEAKERS) Used to connect speakers ( v page21). w AC inlet (AC IN) Used to connect the power cord ( v page37). e Video connectors (VIDEO) Used to connect devices equipped with video connectors ( v page30, 31). r HDMI con[…]
-
Page 16
16 Appendix Tips Settings Playback Connections Contents Front panel Display Rear panel Index Remote Remote control unit q SLEEP button This sets the sleep timer ( v page99). w Input source select buttons These select the input source ( v page39). e SOUND MODE buttons These select the sound mode ( v page89). • MOVIE button • MUSIC[…]
-
Page 17
17 Appendix Tips Settings Playback Connections Contents Front panel Display Rear panel Index Remote o Remote control signal transmitter This transmits signals from the remote control unit ( v page7). Q0 POWER button ( X ) This turns the power on/o ( v page39). Q1 Channel buttons (CHANNEL +, –) These select preset radio stations ( v page?[…]
-
Page 18
18 Appendix Tips Settings Playback Contents Front panel Display Rear panel Index Remote Connections Connections Speaker connection ( v page19) Connecting a TV ( v page25) Connecting a playback device ( v page29) Connecting an iPod or USB memory device to the USB port ( v page33) Connecting an FM antenna ( v page35) Connecting to a ho[…]
-
Page 19
19 Appendix Tips Settings Playback Contents Front panel Display Rear panel Index Remote Connections Speaker connection Install speakers and connect them to this unit ( v page19, 21). Speaker installation Determine the speaker system depending on the number of speakers you are using and install each speaker and subwoofer in the room. Here, we exp[…]
-
Page 20
20 Appendix Tips Settings Playback Contents Front panel Display Rear panel Index Remote Connections % • Use the illustration below as a guide for how high each speaker should be installed. The height does not need to be exactly the same. Surround speaker 60 – 90 cm G Viewed from the side H Front speaker 2 When 5.1-channel speakers are instal[…]
-
Page 21
21 Appendix Tips Settings Playback Contents Front panel Display Rear panel Index Remote Connections Speaker connection Here we connect the speakers in the room to this unit. This section explains how to connect them using typical examples. NOTE • Disconnect this unit’s power plug from the power outlet before connecting the speakers. Also, tu[…]
-
Page 22
22 Appendix Tips Settings Playback Contents Front panel Display Rear panel Index Remote Connections 2 Connecting the subwoofer Use a subwoofer cable to connect the subwoofer. FRONT FRONT CENTER SURROUND SURROUND SW[…]
-
Page 23
23 Appendix Tips Settings Playback Contents Front panel Display Rear panel Index Remote Connections 2 About the speaker cable label (supplied) for channel identification The channel display section for speaker terminals on the rear panel is color-coded for each channel to be identifiable. Speaker terminals Color FRONT L White FRONT R Red CENTER G[…]
-
Page 24
24 Appendix Tips Settings Playback Contents Front panel Display Rear panel Index Remote Connections 2 Connecting 5.1-channel speakers The illustrations shows a connection example for performing 5.1-channel playback. FRONT FRONT CENTER SURROUND SURROUND FL FR C SR SL SW[…]
-
Page 25
25 Appendix Tips Settings Playback Contents Front panel Display Rear panel Index Remote Connections Connecting a TV Connect a TV to this unit so that the input video is output to the TV. You can also enjoy audio from the TV on this unit. How to connect a TV depends on the connectors and functions equipped on the TV. ARC function plays TV audio on t[…]
-
Page 26
26 Appendix Tips Settings Playback Contents Front panel Display Rear panel Index Remote Connections Connection 1 : TV equipped with an HDMI connector and compatible with the ARC (Audio Return Channel) Use an HDMI cable to connect a TV that is compatible with the ARC function to this unit. Set “HDMI Control” ( v page118) to “On” when usin[…]
-
Page 27
27 Appendix Tips Settings Playback Contents Front panel Display Rear panel Index Remote Connections Connection 2 : TV equipped with an HDMI connector Use an HDMI cable to connect the TV to this unit. To listen to audio from TV on this unit, use an optical cable to connect the TV to this unit. FRONT FRONT CENTER SURROUND SURROUND OUT OPTICAL OUT IN […]
-
Page 28
28 Appendix Tips Settings Playback Contents Front panel Display Rear panel Index Remote Connections Connection 3 : TV without an HDMI connector Use a video cable to connect the TV to this unit. To listen to audio from TV on this unit, use an optical cable to connect the TV to this unit. FRONT FRONT CENTER SURROUND SURROUND OUT OPTICAL OUT IN IN VID[…]
-
Page 29
29 Appendix Tips Settings Playback Contents Front panel Display Rear panel Index Remote Connections Connecting a playback device This unit is equipped with two types of video input connectors (HDMI and composite video) and two types of video output connectors (HDMI and composite video). Select input connectors on this unit according to the connecto[…]
-
Page 30
30 Appendix Tips Settings Playback Contents Front panel Display Rear panel Index Remote Connections Connecting a set-top box (Satellite tuner/cable TV) This explanation uses the connection with a satellite tuner/cable TV STB as an example. Select input connectors on this unit according to the connectors equipped on the device you want to connect. F[…]
-
Page 31
31 Appendix Tips Settings Playback Contents Front panel Display Rear panel Index Remote Connections Connecting a DVD player This explanation uses the connection with a DVD players as an example. FRONT FRONT CENTER SURROUND SURROUND OUT HDMI DVD player[…]
-
Page 32
32 Appendix Tips Settings Playback Contents Front panel Display Rear panel Index Remote Connections Connecting a video camcorder or other device This explanation uses the connection with a video camcorders as an example. OUT HDMI Video camcorder[…]
-
Page 33
33 Appendix Tips Settings Playback Contents Front panel Display Rear panel Index Remote Connections Connecting an iPod or USB memory device to the USB port To connect an iPod to this unit, use the USB adapter cable that was supplied with the iPod. For operating instructions see “Playing an iPod” ( v page41) or “Playing a USB memory device?[…]
-
Page 34
34 Appendix Tips Settings Playback Contents Front panel Display Rear panel Index Remote Connections 2 Supported iPod models • iPod classic • iPod nano • iPod touch • iPhone[…]
-
Page 35
35 Appendix Tips Settings Playback Contents Front panel Display Rear panel Index Remote Connections Connecting an FM antenna After connecting the antenna and receiving a broadcast signal ( v page 49 “Listening to FM broadcasts”), fix the antenna with tape in a position where the noise level becomes minimal. FRONT FRONT CENTER SURROUND FM ou[…]
-
Page 36
36 Appendix Tips Settings Playback Contents Front panel Display Rear panel Index Remote Connections Connecting to a home network (LAN) You can connect this unit to your home network (LAN) to perform various types of playbacks and operations as follows. • Playback of network audio such as Internet Radio and from your media server(s) • Play[…]
-
Page 37
37 Appendix Tips Settings Playback Contents Front panel Display Rear panel Index Remote Connections % • When using this unit, we recommend you use a router equipped with the following functions: • Built-in DHCP server This function automatically assigns IP addresses on the LAN. • Built-in 100BASE-TX switch When connecting multiple de[…]
-
Page 38
38 Appendix Tips Settings Connections Contents Front panel Display Rear panel Index Remote Playback Playback Turning the power on ( v page39) Selecting the input source ( v page39) Adjusting the master volume ( v page40) Turning o the sound temporarily ( v page40) Playing a DVD player/Blu-ray Disc player ( v page40) Playing an iPo[…]
-
Page 39
39 Appendix Tips Settings Connections Contents Front panel Display Rear panel Index Remote Playback Basic operation ENTER 1 1 2 2 3 3 RC-1181 POWER SLEEP CHANNEL PAGE Blu-ray INTER NET R ADIO MEDIA SERVER TUNER DVD AUX T V AUDIO NET WORK CB L /SA T GAME iPo d/ USB SOUND MODE PURE MOVIE GAME MUSIC SET UP VOLUME OPTION INFO BACK TUNE FA VORITE STA TI[…]
-
Page 40
40 Appendix Tips Settings Connections Contents Front panel Display Rear panel Index Remote Playback Adjusting the master volume 1 Use VOLUME df to adjust the volume. • The variable range diers according to the input signal and channel level setting. % • You can also adjust the master volume by turning MASTER VOLUME on the main unit. Tu[…]
-
Page 41
41 Appendix Tips Settings Connections Contents Front panel Display Rear panel Index Remote Playback Playing an iPod 1 1 2 2 3 3 RC-1181 ENTER POWER SLEEP CHANNEL PAGE Blu-ray INTER NET R ADIO MEDIA SERVER TUNER DVD AUX T V AUDIO CB L /SA T GAME iPo d/ USB SOUND MODE PURE MOVIE GAME MUSIC SET UP VOLUME OPTION INFO BACK TUNE FA VORITE STA TION MUTE M[…]
-
Page 42
42 Appendix Tips Settings Connections Contents Front panel Display Rear panel Index Remote Playback Listening to music on an iPod 1 Connect the iPod to the USB port ( v page33). 2 Press iPod/USB to switch the input source to “iPod/ USB”. “Browse From iPod” is displayed on the display of this unit. • Nothing is displayed on the TV sc[…]
-
Page 43
43 Appendix Tips Settings Connections Contents Front panel Display Rear panel Index Remote Playback Setting operation mode (iPod Browse Mode) In this mode, various lists and screens during playback on the iPod are displayed on the TV screen. This section describes the steps up to playing back tracks on the iPod in “On-Screen”. 1 Press OPTION. T[…]
-
Page 44
44 Appendix Tips Settings Connections Contents Front panel Display Rear panel Index Remote Playback Performing repeat playback (Repeat) 1 Press OPTION with “iPod Browse Mode” set to “On-Screen”. The option menu screen is displayed. 2 Use ui to select “Repeat”, then press ENTER. 3 Use o p to select repeat playback mode. O (Default) : […]
-
Page 45
45 Appendix Tips Settings Connections Contents Front panel Display Rear panel Index Remote Playback Playing a USB memory device RC-1181 ENTER 1 1 2 2 3 3 POWER SLEEP CHANNEL PAGE Blu-ray INTER NET R ADIO MEDIA SERVER TUNER DVD AUX T V AUDIO CB L /SA T GAME iPo d/ USB SOUND MODE PURE MOVIE GAME MUSIC SET UP VOLUME OPTION INFO BACK ME D IA PLAY ER NE[…]
-
Page 46
46 Appendix Tips Settings Connections Contents Front panel Display Rear panel Index Remote Playback Playing files stored on USB memory devices 1 Connect the USB memory device to the USB port ( v page33). 2 Press iPod/USB to switch the input source to “iPod/ USB”. Folder1 Folder2 Folder3 Music1 Music2 Music3 Music4 OPTION USB [1/9] Option 3 […]
-
Page 47
47 Appendix Tips Settings Connections Contents Front panel Display Rear panel Index Remote Playback 2 Operations available through the OPTION button • Searching content with keywords (Text Search) ( v page86) • Performing repeat playback (Repeat) ( v page84) • Performing random playback (Random) ( v page84) • Playing ba[…]
-
Page 48
48 Appendix Tips Settings Connections Contents Front panel Display Rear panel Index Remote Playback Listening to FM broadcasts 1 1 2 2 3 3 RC-1181 ENTER POWER SLEEP CHANNEL PAGE Blu-ray INTER NET R ADIO MEDIA SERVER TUNER DVD AUX T V AUDIO CB L /SA T GAME iPo d/ USB SOUND MODE PURE MOVIE GAME MUSIC SET UP VOLUME OPTION INFO BACK TUNE FA VORITE STA […]
-
Page 49
49 Appendix Tips Settings Connections Contents Front panel Display Rear panel Index Remote Playback Listening to FM broadcasts 1 Press TUNER to switch the input source to “TUNER”. G TV Screen H TUNE+/- OPTION AUTO CH +/- TUNER CH 1 FM 87.50MHz Tune Preset Option G Display of this unit H 01 FM 87.50MHz 2 Press TUNE + or TUNE – to select the st[…]
-
Page 50
50 Appendix Tips Settings Connections Contents Front panel Display Rear panel Index Remote Playback 2 Adding to the FAVORITE STATION button ( v page78) 2 Operations available through the OPTION button • Tuning in by entering the radio frequency (Direct Tune) ( v page50) • RDS search ( v page51) • PTY search ( v page51) ?[…]
-
Page 51
51 Appendix Tips Settings Connections Contents Front panel Display Rear panel Index Remote Playback RDS search RDS is a broadcasting service which allows a station to send additional information along with the regular radio program signal. Use this function to automatically tune to FM stations that provide the RDS service. Note that the RDS functio[…]
-
Page 52
52 Appendix Tips Settings Connections Contents Front panel Display Rear panel Index Remote Playback 1 Press OPTION. The option menu screen is displayed. 2 Use ui to select “PTY Search”, then press ENTER. 3 Use ui to call out the desired program type. 4 Press ENTER. PTY search begins automatically. % • If you use o p within 5 seconds after […]
-
Page 53
53 Appendix Tips Settings Connections Contents Front panel Display Rear panel Index Remote Playback Radio Text RT allows RDS stations to send text messages that appear on the display. “Radio Text” appears on the display when radio text data is received. 1 Press OPTION. The option menu screen is displayed. 2 Use ui to select “Radio Text”, th[…]
-
Page 54
54 Appendix Tips Settings Connections Contents Front panel Display Rear panel Index Remote Playback Presetting the current broadcast station (Preset Memory) Your favorite broadcast stations can be preset so that you can tune them in easily. Up to 56 stations can be preset. 1 Tune in the broadcast station you want to preset ( v page49 “Listenin[…]
-
Page 55
55 Appendix Tips Settings Connections Contents Front panel Display Rear panel Index Remote Playback Tuning in to radio stations and presetting them automatically (Auto Preset) Up to 56 stations can be preset. If “Auto Preset” is performed after performing “Preset Memory”, the “Preset Memory” settings will be overwritten. 1 Press OPTION.[…]
-
Page 56
56 Appendix Tips Settings Connections Contents Front panel Display Rear panel Index Remote Playback Skipping preset broadcast stations (Preset Skip) You can set in advance, the stations you do not want to be displayed when tuning in, by groups or by stations. The preset skip setting is useful when tuning in, because only your favorite stations are […]
-
Page 57
57 Appendix Tips Settings Connections Contents Front panel Display Rear panel Index Remote Playback Listening to Internet Radio 1 1 2 2 3 3 RC-1181 ENTER POWER SLEEP CHANNEL PAGE Blu-ray INTER NET R ADIO MEDIA SERVER TUNER DVD AUX T V AUDIO CB L /SA T GAME iPo d/ USB SOUND MODE PURE MOVIE GAME MUSIC SET UP VOLUME OPTION INFO BACK TUNE FA VORITE STA[…]
-
Page 58
58 Appendix Tips Settings Connections Contents Front panel Display Rear panel Index Remote Playback Listening to Internet Radio 1 Prepare for playback. • Check the network environment, then turn on this unit’s power ( v page36 “Connecting to a home network (LAN)”). 2 Press NETWORK. • You can also press INTERNET RADIO to select th[…]
-
Page 59
59 Appendix Tips Settings Connections Contents Front panel Display Rear panel Index Remote Playback radiodenon.com : • Displays Internet Radio stations added to favorites in vTuner. For instructions on how to add to favorites in vTuner, see “Using vTuner to add Internet Radio stations to favorites” ( v page60). Recently Played : • […]
-
Page 60
60 Appendix Tips Settings Connections Contents Front panel Display Rear panel Index Remote Playback Using vTuner to add Internet Radio stations to favorites There are many Internet Radio stations in the world, and this unit can tune into these stations. But finding the radio station you want to hear may be dicult, because there are too many sta[…]
-
Page 61
61 Appendix Tips Settings Connections Contents Front panel Display Rear panel Index Remote Playback Playing back files stored on a PC and NAS 1 1 2 2 3 3 RC-1181 ENTER POWER SLEEP CHANNEL PAGE Blu-ray INTER NET R ADIO MEDIA SERVER TUNER DVD AUX T V AUDIO CB L /SA T GAME iPo d/ USB SOUND MODE PURE MOVIE GAME MUSIC SET UP VOLUME OPTION INFO BACK TUN[…]
-
Page 62
62 Appendix Tips Settings Connections Contents Front panel Display Rear panel Index Remote Playback Applying media sharing settings Here, we apply the settings to share music files stored on a PC and NAS on the network. If you are using a Media Server, be sure to apply this setting first. 2 When using Windows Media Player 12 (Windows 7 / Windows […]
-
Page 63
63 Appendix Tips Settings Connections Contents Front panel Display Rear panel Index Remote Playback Playing back files stored on a PC and NAS Use this procedure to play music files, image files or playlists. 1 Prepare for playback. q Check the network environment, then turn on this unit’s power ( v page36 “Connecting to a home network (LA[…]
-
Page 64
64 Appendix Tips Settings Connections Contents Front panel Display Rear panel Index Remote Playback % • The display switches between track title, artist name, and album title each time the STATUS button is pressed. • When a WMA (Windows Media Audio), MP3 or MPEG-4 AAC file includes album art data, the album art can be displayed while the[…]
-
Page 65
65 Appendix Tips Settings Connections Contents Front panel Display Rear panel Index Remote Playback Listening to Last.fm 1 1 2 2 3 3 RC-1181 ENTER POWER SLEEP CHANNEL PAGE Blu-ray INTER NET R ADIO MEDIA SERVER TUNER DVD AUX T V AUDIO CB L /SA T GAME iPo d/ USB SOUND MODE PURE MOVIE GAME MUSIC SET UP VOLUME OPTION INFO BACK TUNE FA VORITE STA TION M[…]
-
Page 66
66 Appendix Tips Settings Connections Contents Front panel Display Rear panel Index Remote Playback Listening to Last.fm 1 Prepare for playback. • Check the network environment, then turn on this unit’s power ( v page36 “Connecting to a home network (LAN)”). 2 Press NETWORK. 3 Use uio p to select “Last.fm”, then press ENTER. Favor[…]
-
Page 67
67 Appendix Tips Settings Connections Contents Front panel Display Rear panel Index Remote Playback 5 Use ui p to enter your username and password. BACK This service is currently available in limited countries. Last.fm Account Username Password OK Enter Username Exit • For character input, see page108. • The password should be no longe[…]
-
Page 68
68 Appendix Tips Settings Connections Contents Front panel Display Rear panel Index Remote Playback 9 Press p while a track is playing. The Last.fm menu screen is displayed. Menu [1/3] Love this track Ban this track Scrobbling (On) Love this track : • Loving tracks improves your Last.fm recommendations, and you can optionally share them on pop[…]
-
Page 69
69 Appendix Tips Settings Connections Contents Front panel Display Rear panel Index Remote Playback Log Out Disassociate this unit from your Last.fm account. 1 Use ui to select “Log Out”, then press ENTER. BACK Last.fm [10/10] Option Popular tag Popular Artists Your Recent Stations Your Friends’ Radio Your Recommended Radio Your Library Are y[…]
-
Page 70
70 Appendix Tips Settings Connections Contents Front panel Display Rear panel Index Remote Playback Viewing photographs on the Flickr site 1 1 2 2 3 3 RC-1181 ENTER POWER SLEEP CHANNEL PAGE Blu-ray INTER NET R ADIO MEDIA SERVER TUNER DVD AUX T V AUDIO NET WORK CB L /SA T GAME iPo d/ USB SOUND MODE PURE MOVIE GAME MUSIC SET UP VOLUME OPTION INFO BAC[…]
-
Page 71
71 Appendix Tips Settings Connections Contents Front panel Display Rear panel Index Remote Playback Viewing photographs shared by particular users 1 Prepare for playback. • Check the network environment, then turn on this unit’s power ( v page36 “Connecting to a home network (LAN)”). 2 Press NETWORK. 3 Use uio p to select “Flickr”[…]
-
Page 72
72 Appendix Tips Settings Connections Contents Front panel Display Rear panel Index Remote Playback 7 Use ui to select the folder, and then press ENTER. Favorites : • Displays the favorite photographs of the specified user. Photostream : • Displays a list of shared photographs. PhotoSets : • Displays the folder (photograph album) li[…]
-
Page 73
73 Appendix Tips Settings Connections Contents Front panel Display Rear panel Index Remote Playback NOTE • Depending on the file format, some photographs may not be viewable. 2 Operations available through the OPTION button • Playing back still images in sequential order (Slideshow Time) ( v page88) • Displaying your desired vide[…]
-
Page 74
74 Appendix Tips Settings Connections Contents Front panel Display Rear panel Index Remote Playback Listening to Spotify 1 1 2 2 3 3 RC-1181 ENTER POWER SLEEP Blu-ray INTER NET R ADIO MEDIA SERVER TUNER DVD AUX T V AUDIO CB L /SA T GAME iPo d/ USB SOUND MODE PURE MOVIE GAME MUSIC SET UP VOLUME OPTION INFO BACK TUNE FA VORITE STA TION MUTE ME D IA P[…]
-
Page 75
75 Appendix Tips Settings Connections Contents Front panel Display Rear panel Index Remote Playback 4 If you have a Spotify account, then press ENTER. BACK Spotify Get Started Introduce your Denon to a whole new world of music. With Spotify, you can enjoy instant access to millions of songs. A Spotify Premium subscription is required. Just subscrib[…]
-
Page 76
76 Appendix Tips Settings Connections Contents Front panel Display Rear panel Index Remote Playback 7 Use ui to select menu and then press ENTER. OPTION [1/5] Search What’s New Starred Playlists Accounts Spotify Option Search : • Searches for tracks, artists and albums by entering keywords. What’s New : • Displays the list of the late[…]
-
Page 77
77 Appendix Tips Settings Connections Contents Front panel Display Rear panel Index Remote Playback 9 Press p while a track is playing. The Spotify menu screen is displayed. [1/3] Star this track Browse “Artist name” Browse “Album name” Track-Artist Back Star this track : • Adds a star to the selected track. Browse “Artist name” : […]
-
Page 78
78 Appendix Tips Settings Connections Contents Front panel Display Rear panel Index Remote Playback Adding to the FAVORITE STATION button With a single press of these, you can call up registered radio stations and contents You can add up to three types of content. 1 Press and hold one of the FAVORITE STATION 1 – 3 buttons for 3 seconds or longer […]
-
Page 79
79 Appendix Tips Settings Connections Contents Front panel Display Rear panel Index Remote Playback Playing back content added to the FAVORITE STATION button You can easily call up content by pressing the FAVORITE STATION button. 1 Press one of the FAVORITE STATION 1 – 3 buttons that you added content to. Playback starts. % • Internet Radio […]
-
Page 80
80 Appendix Tips Settings Connections Contents Front panel Display Rear panel Index Remote Playback AirPlay function Enjoy music from your iTunes library with high quality sound anywhere in your home. PC Router This unit Streaming music stored in iPhone, iPod touch, or iPad directly to the unit If you update your “iPhone/iPod touch/iPad” to iOS[…]
-
Page 81
81 Appendix Tips Settings Connections Contents Front panel Display Rear panel Index Remote Playback Playing iTunes music with this unit 1 Install iTunes 10, or later, on a Mac or Windows PC that is connected to the same network as this unit. 2 Turn this unit ON. Set “IP Control” ( v page138) to “Always On” for this unit. NOTE • When[…]
-
Page 82
82 Appendix Tips Settings Connections Contents Front panel Display Rear panel Index Remote Playback Perform iTunes playback operations with the remote control unit of this unit With this unit’s remote control unit, you can perform iTunes song play, pause, and auto search (cue) operations. 1 Select “Edit” – “Preferences…” on the menu. […]
-
Page 83
83 Appendix Tips Settings Connections Contents Front panel Display Rear panel Index Remote Playback Convenience functions 1 1 2 2 3 3 RC-1181 ENTER POWER SLEEP CHANNEL PAGE Blu-ray INTER NET R ADIO MEDIA SERVER TUNER DVD AUX T V AUDIO NET WORK CB L /SA T GAME iPo d/ USB SOUND MODE PURE MOVIE GAME MUSIC SET UP VOLUME OPTION INFO BACK TUNE FA VORITE […]
-
Page 84
84 Appendix Tips Settings Connections Contents Front panel Display Rear panel Index Remote Playback Performing repeat playback (Repeat) n Supported input sources : USB / Media Server / Spotify 1 While content is playing, press OPTION. The option menu screen is displayed. 2 Use ui to select “Repeat”, then press ENTER. 3 Use o p to select repeat […]
-
Page 85
85 Appendix Tips Settings Connections Contents Front panel Display Rear panel Index Remote Playback Add to favorites from the Option menu (Save to Favorites) You can add up to 100 items as favorites for Internet Radio and Media Server. n Supported input sources : Internet Radio / Media Server 1 While content is playing, press OPTION. The option men[…]
-
Page 86
86 Appendix Tips Settings Connections Contents Front panel Display Rear panel Index Remote Playback Deleting content added to favorites (Remove from Favorites) 1 Press NETWORK. 2 Use uio p to select “Favorites”, then press ENTER. 3 Use ui to select the content you want to delete from favorites, then press OPTION. The option menu screen is displ[…]
-
Page 87
87 Appendix Tips Settings Connections Contents Front panel Display Rear panel Index Remote Playback Playing back music and a favorite picture at the same time (Slideshow) n Supported input sources : USB 1 Play back a still picture. • Playing back still pictures stored on USB memory devices ( v page46). 2 Play back a music file ( v page4[…]
-
Page 88
88 Appendix Tips Settings Connections Contents Front panel Display Rear panel Index Remote Playback Playing back still pictures in sequential order (Slideshow Time) You can play back still picture (JPEG) files stored on a USB memory device or Media Server and pictures on Flickr website as a slide show. The display time can also be set. n Supported[…]
-
Page 89
89 Appendix Tips Settings Connections Contents Front panel Display Rear panel Index Remote Playback Selecting a sound mode ENTER 1 1 2 2 3 3 RC-1181 POWER SLEEP CHANNEL PAGE Blu-ray INTER NET R ADIO MEDIA SERVER TUNER DVD AUX T V AUDIO NET WORK CB L /SA T GAME iPo d/ USB SOUND MODE PURE MOVIE GAME MUSIC SET UP VOLUME OPTION INFO BACK TUNE FA VORITE[…]
-
Page 90
90 Appendix Tips Settings Connections Contents Front panel Display Rear panel Index Remote Playback Selecting a sound mode 1 Press MOVIE, MUSIC or GAME to select a sound mode. MOVIE : Switches to the sound mode suitable for enjoying movies and TV programs. MUSIC : Switches to the sound mode suitable for enjoying music. GAME : Switches to the sound […]
-
Page 91
91 Appendix Tips Settings Connections Contents Front panel Display Rear panel Index Remote Playback Direct playback Sound recorded in source is played as is. 1 Press PURE to select “DIRECT”. Direct playback begins. % • In DIRECT sound modes, the following items cannot be adjusted. • Tone ( v page113) • Restorer ( v page113)[…]
-
Page 92
92 Appendix Tips Settings Connections Contents Front panel Display Rear panel Index Remote Playback 2 Description of sound mode types Dolby sound mode Sound mode type Description DOLBY PL g This mode can be selected when the Dolby Pro Logic g decoder is used to play back 2-channel sources in 5.1-channel surround sound with an enveloping surround so[…]
-
Page 93
93 Appendix Tips Settings Connections Contents Front panel Display Rear panel Index Remote Playback PCM multi-channel sound mode Sound mode type Description MULTI CH IN This mode can be selected when playing multi-channel PCM sources from a disc player or external decoder that features analog multi-channel outputs. Original sound mode Sound mode ty[…]
-
Page 94
94 Appendix Tips Settings Connections Contents Front panel Display Rear panel Index Remote Playback Stereo sound mode Sound mode type Description STEREO This mode plays 2-channel stereo audio with no additional surround sound processing. • Sound is output from the front left and right speakers, and subwoofer if connected. • When multi-ich[…]
-
Page 95
95 Appendix Tips Settings Connections Contents Front panel Display Rear panel Index Remote Playback 2 Sound mode • The following sound modes can be selected using the MOVIE, MUSIC, GAME, and PURE buttons. • Adjust the sound field eect with the menu “Surr.Parameter” ( v page110) to enjoy surround sound the way you like it. Input[…]
-
Page 96
96 Appendix Tips Settings Connections Contents Front panel Display Rear panel Index Remote Playback Input signal Sound mode NOTE Sound mode MOVIE MUSIC GAME Multi-channel z 3 STEREO S S S Dolby Digital DOLBY DIGITAL S S S Dolby TrueHD DOLBY TrueHD S S S Dolby Digital Plus DOLBY DIGITAL Plus S S S DTS DTS SURROUND S S S DTS 96/24 S S S DTS-HD / DTS […]
-
Page 97
97 Appendix Tips Settings Connections Contents Front panel Display Rear panel Index Remote Playback 2 Views on the display + DVD q w q Shows a decoder to be used. • A DOLBY DIGITAL Plus decoder is displayed as “ ”. w Shows the name of the input source being played back.[…]
-
Page 98
98 Appendix Tips Settings Connections Contents Front panel Display Rear panel Index Remote Playback HDMI control function A recent addition to the HDMI standard is CEC (Consumer Electronics Control), which allows control signals from one device to communicate with another device via the HDMI cable connection. Not all HDMI-equipped devices have this[…]
-
Page 99
99 Appendix Tips Settings Connections Contents Front panel Display Rear panel Index Remote Playback ENTER 1 1 2 2 3 3 RC-1181 POWER SLEEP CHANNEL PAGE Blu-ray INTER NET R ADIO MEDIA SERVER TUNER DVD AUX T V AUDIO NET WORK CB L /SA T GAME iPo d/ USB SOUND MODE PURE MOVIE GAME MUSIC SET UP VOLUME OPTION INFO BACK TUNE FA VORITE STA TION MUTE ME D IA […]
-
Page 100
100 Appendix Tips Settings Connections Contents Front panel Display Rear panel Index Remote Playback Quick select function You can save settings such as the input source selection, volume level, and sound mode at the QUICK SELECT 1 – 4 buttons. You can simply press one of the set QUICK SELECT buttons for subsequent playback to switch to various s[…]
-
Page 101
101 Appendix Tips Playback Connections Contents Front panel Display Rear panel Index Remote Settings Settings Menu map For menu operation, connect a TV to this unit and display the menu on the TV screen. For menu operations, see the following page. By default, this unit has recommended settings defined. You can customize this unit based on your ex[…]
-
Page 102
102 Appendix Tips Playback Connections Contents Front panel Display Rear panel Index Remote Settings Setting items Description Page Tone Adjusts the tonal quality of the sound. 113 Tone Control Set the tone control function to “On” and “O”. 113 Bass Adjust bass. 113 Treble Adjust treble. 113 Restorer Expands the low and high frequency co[…]
-
Page 103
103 Appendix Tips Playback Connections Contents Front panel Display Rear panel Index Remote Settings 2 Video Setting items Description Page HDMI Setup Makes settings for HDMI video/audio output. 118 Auto Lip Sync Make automatic compensation for timing shift in audio and video output. 118 HDMI Audio Out Select HDMI audio output device. 118 HDMI Pass[…]
-
Page 104
104 Appendix Tips Playback Connections Contents Front panel Display Rear panel Index Remote Settings 2 Speakers Setting items Description Page Audyssey ® Setup The acoustic characteristics of the connected speakers and listening room are measured and the optimum settings are made automatically. 125 Manual Setup Perform when setting the speakers ma[…]
-
Page 105
105 Appendix Tips Playback Connections Contents Front panel Display Rear panel Index Remote Settings 2 General Setting items Description Page Language Sets the language for display the menu on the TV screen. 141 Quick Sel.Names Change the “Quick Select” display title to one you prefer. 141 Auto Standby When you do not perform any operation on t[…]
-
Page 106
106 Appendix Tips Playback Connections Contents Front panel Display Rear panel Index Remote Settings 2 Setup Assistant Setting items Description Page Begin Setup Perform basic installation/connections/settings from the beginning according to the guidance indicated on the TV screen. C 7 Language Select Perform settings item by item according to the […]
-
Page 107
107 Appendix Tips Playback Connections Contents Front panel Display Rear panel Index Remote Settings Menu operation 1 Press SETUP. The menu is displayed on the TV screen. 2 Use uio p to select the menu to be set or operated, then press ENTER. 3 Use o p to change to desired setting. 4 Press ENTER to enter the setting. • To return to the previou[…]
-
Page 108
108 Appendix Tips Playback Connections Contents Front panel Display Rear panel Index Remote Settings Inputting characters On this unit, you can change the name displayed on the following screens to the names that you prefer. • Text Search ( v page86) • Preset Name ( v page55) • Source Rename ( v page123) • Friendly Name[…]
-
Page 109
109 Appendix Tips Playback Connections Contents Front panel Display Rear panel Index Remote Settings Audio Make audio-related settings. Dialog Level Sets the output level to clarify the dialogue output from the center channel. 2 Level –12.0dB – +12.0dB (Default : 0.0dB) Subwoofer Level This setting adjusts the volume level for the subwoofer. 2 […]
-
Page 110
110 Appendix Tips Playback Connections Contents Front panel Display Rear panel Index Remote Settings Surr.Parameter You can adjust the surround audio sound field eects to match your preferences. The items (parameters) that can be adjusted depend on the signal being input and the currently set sound mode. For details on the adjustable parameters[…]
-
Page 111
111 Appendix Tips Playback Connections Contents Front panel Display Rear panel Index Remote Settings 2 Low Frequency Adjust the low-frequency eects level (LFE). –10dB – 0dB (Default) % • For proper playback of the dierent sources, we recommend setting to the values below. • Dolby Digital sources : 0dB • DTS movie sources : […]
-
Page 112
112 Appendix Tips Playback Connections Contents Front panel Display Rear panel Index Remote Settings 2 Center Width Distributes the dialogue output from the center channel to left and right channels and widens the sound image in the front. 0 – 7 (Default : 3) % • You can set this when the sound mode is Dolby PL g in the “Music” mode. •[…]
-
Page 113
113 Appendix Tips Playback Connections Contents Front panel Display Rear panel Index Remote Settings Tone Adjust the tonal quality of the sound. 2 Tone Control Set the tone control function to “On” and “O”. On : Allow tone adjustment (bass, treble). O : Playback without tone adjustment. 2 Bass Adjust bass. –6dB – +6dB 2 Treble Adj[…]
-
Page 114
114 Appendix Tips Playback Connections Contents Front panel Display Rear panel Index Remote Settings Audio Delay While viewing video, manually adjust the time to delay audio output so that the video and audio are synchronized. 0ms (Default) – 200ms % • This item can be set within the range of 0 to 100 ms when “Auto Lip Sync” ( v page […]
-
Page 115
115 Appendix Tips Playback Connections Contents Front panel Display Rear panel Index Remote Settings Audyssey Set Audyssey MultEQ® XT, Audyssey Dynamic EQ® and Audyssey Dynamic Volume®. These can be selected after Audyssey® Setup has been performed. For additional information on Audyssey technology, please see page175. % • “MultEQ® X[…]
-
Page 116
116 Appendix Tips Playback Connections Contents Front panel Display Rear panel Index Remote Settings 2 Ref.Lev.Oset Audyssey Dynamic EQ® is referenced to the standard film mix level. It makes adjustments to maintain the reference response and surround envelopment when the volume is turned down from 0 dB. However, film reference level is not a[…]
-
Page 117
117 Appendix Tips Playback Connections Contents Front panel Display Rear panel Index Remote Settings Manual EQ Use the 9 band graphic equalizer to adjust the tone of each speaker. % • “Manual EQ” can be set when “MultEQ® XT” ( v page 115 ) setting is “Manual EQ”. • Speakers for which “Manual EQ” can be set dier acco[…]
-
Page 118
118 Appendix Tips Playback Connections Contents Front panel Display Rear panel Index Remote Settings Video Make video-related settings. HDMI Setup Make settings for HDMI video/audio output. NOTE • When “HDMI Pass Through” and “HDMI Control” is set to “On”, it consumes more standby power. If you are not using this unit for an extend[…]
-
Page 119
119 Appendix Tips Playback Connections Contents Front panel Display Rear panel Index Remote Settings 2 Pass Source The AV receiver will “pass through” the sources HDMI signal when in standby. Last (Default) : Choose this option to “pass through” the last used HDMI input video source. CBL/SAT / DVD / Blu-ray / GAME / AUX / MEDIA PLAYER z : C[…]
-
Page 120
120 Appendix Tips Playback Connections Contents Front panel Display Rear panel Index Remote Settings TV Format Set the video signal format to be output for the TV you are using. 2 Format PAL (Default) : Select PAL output. NTSC : Select NTSC output. % • “Format” can also be set by the following procedure. However, the menu screen is not dis[…]
-
Page 121
121 Appendix Tips Playback Connections Contents Front panel Display Rear panel Index Remote Settings Inputs Perform settings related to input source playback. You do not have to change the settings to use the unit. Make settings when needed. Input Assign By making connections as indicated by the input sources printed on the audio/video input connec[…]
-
Page 122
122 Appendix Tips Playback Connections Contents Front panel Display Rear panel Index Remote Settings 2 HDMI Set this to change the HDMI input connectors assigned to the input sources. 1 / 2 / 3 / 4 / Front : Assign an HDMI input connector to the selected input source. – : Do not assign an HDMI input connector to the selected input source. % •?[…]
-
Page 123
123 Appendix Tips Playback Connections Contents Front panel Display Rear panel Index Remote Settings Source Rename Change the display name of the selected input source. This is convenient when the input source name of your device and the input source name of this unit are dierent. You can change the name to suit your needs. When the renaming is […]
-
Page 124
124 Appendix Tips Playback Connections Contents Front panel Display Rear panel Index Remote Settings Input Select Set the audio input mode and decode mode of each input source. The input modes available for selection may vary depending on the input source. 2 Input Mode Set the audio input modes for the dierent input sources. It is normally recom[…]
-
Page 125
125 Appendix Tips Playback Connections Contents Front panel Display Rear panel Index Remote Settings Speakers The acoustic characteristics of the connected speakers and listening room are measured and the optimum settings are made automatically. This is called “Audyssey® Setup”. You do not have to perform Audyssey® Setup when you have already[…]
-
Page 126
126 Appendix Tips Playback Connections Contents Front panel Display Rear panel Index Remote Settings 2 About Setup and measurement microphone placement • Measurements are performed by placing the Setup and measurement microphone successively at multiple positions throughout the entire listening area, as shown in G Example q H . • Even if […]
-
Page 127
127 Appendix Tips Playback Connections Contents Front panel Display Rear panel Index Remote Settings Procedure for speaker settings (Audyssey ® Setup) Preparation Measurement Calculation Check Store Finish 1 Mount the Setup and measurement microphone on a tripod or stand and place it in the main listening position. When you set the setup microphon[…]
-
Page 128
128 Appendix Tips Playback Connections Contents Front panel Display Rear panel Index Remote Settings 3 Connect the Setup and measurement microphone to the SETUP MIC jack of this unit. When the Setup and measurement microphone is connected, the following screen is displayed. Audyssey Setup Your AVR can automatically measure the acoustics of your roo[…]
-
Page 129
129 Appendix Tips Playback Connections Contents Front panel Display Rear panel Index Remote Settings 7 The detected speakers are displayed. Audyssey Setup Repeat Last Test Next Front Speaker Detection Center Subwoofer Surround Yes Yes Yes Yes 8 Select “Next” and then press ENTER. 9 Move the Setup and measurement microphone to position 2, select[…]
-
Page 130
130 Appendix Tips Playback Connections Contents Front panel Display Rear panel Index Remote Settings 10 Repeat step 9, measuring positions 3 to 8. 11 Select “Calculation” and then press ENTER. Audyssey Setup Calibration complete! Now Calculating… Please wait… 75% • Analysis takes several minutes to complete. The more speakers and measu[…]
-
Page 131
131 Appendix Tips Playback Connections Contents Front panel Display Rear panel Index Remote Settings 13 Select “Store” and then press ENTER. Save the measurement results. Audyssey Setup Check processing result. To proceed, select “Store”. Speaker Config. Distances Levels Crossovers Store • Saving the results requires about 20 seconds. […]
-
Page 132
132 Appendix Tips Playback Connections Contents Front panel Display Rear panel Index Remote Settings Error messages An error message is displayed if Audyssey® Setup could not be completed due to speaker placement, the measurement environment, etc. If an error message is displayed, check the relevant items and perform the necessary measures. Be sur[…]
-
Page 133
133 Appendix Tips Playback Connections Contents Front panel Display Rear panel Index Remote Settings Retrieving Audyssey ® Setup settings If you set “Restore…” to “Restore”, you can return to Audyssey® Setup measurement result (value calculated at the start by MultEQ® XT) even when you have changed each setting manually. Audyssey Setup[…]
-
Page 134
134 Appendix Tips Playback Connections Contents Front panel Display Rear panel Index Remote Settings Manual Setup Perform when setting the speakers manually or when changing settings made in Audyssey® Setup. • If you change the speaker settings after performing Audyssey® Setup, it will not be possible to select Audyssey MultEQ® XT, Audyssey[…]
-
Page 135
135 Appendix Tips Playback Connections Contents Front panel Display Rear panel Index Remote Settings Distances Set distance from listening position to speakers. Measure beforehand the distance from the listening position to each speaker. 2 Unit Set the unit of distance. Meters (Default) Feet 2 Step Set the minimum variable width of the distance. 0.[…]
-
Page 136
136 Appendix Tips Playback Connections Contents Front panel Display Rear panel Index Remote Settings 2 Set the crossover frequency 40Hz / 60Hz / 80Hz (Default) / 90Hz / 100Hz / 110Hz / 120Hz / 150Hz / 200Hz / 250Hz % • “Crossovers” can be set when the “Subwoofer Mode” ( v page137) setting is “LFE+Main”, or when you have a speake[…]
-
Page 137
137 Appendix Tips Playback Connections Contents Front panel Display Rear panel Index Remote Settings Bass Set subwoofer and LFE signal range playback. 2 Subwoofer Mode Select low range signals to be reproduced by subwoofer. LFE (Default) : The low range signal of the channel set to “Small” speaker size is added to the LFE signal output from the[…]
-
Page 138
138 Appendix Tips Playback Connections Contents Front panel Display Rear panel Index Remote Settings Network To use this unit by connecting it to a home network (LAN), you must configure network settings. If you set up your home network (LAN) via DHCP, set “DHCP” to “On” (use the default setting). This allows this unit to use your home net[…]
-
Page 139
139 Appendix Tips Playback Connections Contents Front panel Display Rear panel Index Remote Settings Settings Make settings for wired LAN. • If you are using a broadband router (DHCP function), there is no need to make the settings at “IP Address” and “Proxy”, since the DHCP function is set to “On” in this unit’s default settings[…]
-
Page 140
140 Appendix Tips Playback Connections Contents Front panel Display Rear panel Index Remote Settings 2 Proxy Make this setting when connecting to the Internet via a proxy server. Make the proxy settings only when you connect to the Internet via a proxy server that is on your internal network or provided by your provider, etc. On(Address) : Select w[…]
-
Page 141
141 Appendix Tips Playback Connections Contents Front panel Display Rear panel Index Remote Settings Language Set the language for display on the menu screen. English (Default) / Deutsch / Français / Italiano / Español / Nederlands / Svenska / / Polski % • “Language” can also be set by the following procedure. However, the menu screen is[…]
-
Page 142
142 Appendix Tips Playback Connections Contents Front panel Display Rear panel Index Remote Settings Front Display Makes settings related to the display on this unit. 2 Dimmer Adjust the display brightness of this unit. Bright (Default) : Normal display brightness. Dim : Reduced display brightness. Dark : Very low display brightness. O : Turns t[…]
-
Page 143
143 Appendix Tips Playback Connections Contents Front panel Display Rear panel Index Remote Settings 2 Video Show the HDMI input/output signals and HDMI monitor information. HDMI Signal Resolution / Color Space / Pixel Depth HDMI Monitor Interface / Resolutions 2 Status Show information about current settings. The information displayed diers acc[…]
-
Page 144
144 Appendix Tips Playback Connections Contents Front panel Display Rear panel Index Remote Settings Usage Data To help us improve our products and customer service, Denon collects anonymous information about how you use your AV receiver (such as frequently used input sources and sound modes and speaker settings). Denon will never provide any infor[…]
-
Page 145
145 Appendix Tips Playback Connections Contents Front panel Display Rear panel Index Remote Settings 2 Notifications When the latest firmware is available, a notification message is displayed on the TV screen at power on. Update On (Default) : Display update message. O : Do not display update message. Upgrade The notification message is disp[…]
-
Page 146
146 Appendix Tips Playback Connections Contents Front panel Display Rear panel Index Remote Settings Notes concerning use of “Update” and “Add New Feature” • In order to use these functions, you must have the correct system requirements and settings for a broadband Internet connection ( v page36). • Do not turn o the power u[…]
-
Page 147
147 Appendix Settings Playback Connections Contents Front panel Display Rear panel Index Remote Tips Tips Contents 2 Tips ………………………………………………………… (148) I want the volume not to become too loud by mistake ……………… (148) I want to keep the volume at the same level when I turn the power on ………[…]
-
Page 148
148 Appendix Settings Playback Connections Contents Front panel Display Rear panel Index Remote Tips Tips I want the volume not to become too loud by mistake. • Set the volume upper limit for “Volume Limit” in the menu beforehand. This prevents children or others from increasing the volume too much by mistake ( v page114). I want to kee[…]
-
Page 149
149 Appendix Settings Playback Connections Contents Front panel Display Rear panel Index Remote Tips I want to combine a desired video with the current music. • Set “Video Select” in the option menu to “On”. You can combine the current music with your desired video source from Set-top Box or DVD, etc. while listening to music from Tune[…]
-
Page 150
150 Appendix Settings Playback Connections Contents Front panel Display Rear panel Index Remote Tips Troubleshooting If a problem should arise, first check the following: 1. Are the connections correct? 2. Is the set being operated as described in the owner’s manual? 3. Are the other devices operating properly? If this unit does not operate prop[…]
-
Page 151
151 Appendix Settings Playback Connections Contents Front panel Display Rear panel Index Remote Tips 2 Operations cannot be performed through the remote control unit Symptom Cause/Solution Page Operations cannot be performed through the remote control unit. • Batteries are worn out. Replace with new batteries. • Operate the remote control[…]
-
Page 152
152 Appendix Settings Playback Connections Contents Front panel Display Rear panel Index Remote Tips 2 No sound comes out Symptom Cause/Solution Page No sound comes out of speakers. • Check the connections for all devices. • Insert connection cables all the way in. • Check that input connectors and output connectors are not reversely[…]
-
Page 153
153 Appendix Settings Playback Connections Contents Front panel Display Rear panel Index Remote Tips 2 Desired sound does not come out Symptom Cause/Solution Page The volume does not increase. • The maximum volume is set too low. Set the maximum volume using “Limit”on the menu. • Appropriate volume correction processing is performed a[…]
-
Page 154
154 Appendix Settings Playback Connections Contents Front panel Display Rear panel Index Remote Tips Symptom Cause/Solution Page DTS sound is not output. • Check that the digital audio output setting on the connected device is set to “DTS”. • Set “Decode Mode” on the menu to “Auto” or “DTS”. – 124 Dolby TrueHD, DTS-HD, D[…]
-
Page 155
155 Appendix Settings Playback Connections Contents Front panel Display Rear panel Index Remote Tips 2 Sound is interrupted or noise occurs Symptom Cause/Solution Page During playback from the Internet radio or USB memory device, sound is occasionally interrupted. • When the transfer speed of the USB memory device is slow, sound may occasional[…]
-
Page 156
156 Appendix Settings Playback Connections Contents Front panel Display Rear panel Index Remote Tips Symptom Cause/Solution Page No video is shown on the TV with the DVI-D connection. • With the DVI-D connection, on some device combinations, devices may not function properly due to the copy guard copyright protection (HDCP). 165 No video from […]
-
Page 157
157 Appendix Settings Playback Connections Contents Front panel Display Rear panel Index Remote Tips 2 iPod cannot be played back Symptom Cause/Solution Page iPod cannot be connected. • When using iPod by connecting it to the USB port, some iPod variations are not supported. • When iPod is connected by using a USB cable other than the gen[…]
-
Page 158
158 Appendix Settings Playback Connections Contents Front panel Display Rear panel Index Remote Tips 2 USB memory devices cannot be played back Symptom Cause/Solution Page “No Connection” is displayed. • The set cannot recognize a USB memory device. Disconnect and reconnect the USB memory device. • USB memory devices of a mass storage[…]
-
Page 159
159 Appendix Settings Playback Connections Contents Front panel Display Rear panel Index Remote Tips 2 File names on the iPod/USB memory device are not displayed properly Symptom Cause/Solution Page The file names are not displayed properly (“…”, etc.). • Characters that cannot be displayed are used. This is not a malfunction. On this u[…]
-
Page 160
160 Appendix Settings Playback Connections Contents Front panel Display Rear panel Index Remote Tips 2 Music files on PC or NAS cannot be played back Symptom Cause/Solution Page Files stored on a computer cannot be played. • Files are stored in a non-compatible format. Record in a compatible format. • You are attempting to play a file t[…]
-
Page 161
161 Appendix Settings Playback Connections Contents Front panel Display Rear panel Index Remote Tips 2 The HDMI control function does not work Symptom Cause/Solution Page The HDMI control function does not work. • Check that “HDMI Control” in the menu is set to “On”. • You cannot operate devices that are not compatible with the HD[…]
-
Page 162
162 Appendix Settings Playback Connections Contents Front panel Display Rear panel Index Remote Tips Resetting factory settings Perform this procedure if the display is abnormal or if operations cannot be performed. Note that when the microprocessor is reset, all the settings are reset to their default values and setup will need to be performed aga[…]
-
Page 163
163 Tips Settings Playback Connections Contents Front panel Display Rear panel Index Remote Appendix Appendix About HDMI HDMI is an abbreviation of High-Definition Multimedia Interface, which is an AV digital interface that can be connected to a TV or amplifier. With the HDMI connection, high definition video and high quality audio formats adopt[…]
-
Page 164
164 Tips Settings Playback Connections Contents Front panel Display Rear panel Index Remote Appendix • HDMI control If you connect the unit and an HDMI control function compatible TV or player with an HDMI cable and then enable the HDMI control function setting on each device, the devices will be able to control each other. • Power o l[…]
-
Page 165
165 Tips Settings Playback Connections Contents Front panel Display Rear panel Index Remote Appendix 2 Supported audio formats 2-channel Linear PCM 2-channel, 32 kHz – 192 kHz, 16/20/24 bit Multi-channel Linear PCM 7.1-channel, 32 kHz – 192kHz, 16/20/24 bit Bitstream Dolby Digital / DTS / Dolby TrueHD / Dolby Digital Plus / DTS-HD Master Audio […]
-
Page 166
166 Tips Settings Playback Connections Contents Front panel Display Rear panel Index Remote Appendix Playing back USB memory devices • This unit is compatible with MP3 ID3-Tag (Ver.2) standard. • This unit can show the artwork that was embedded by using MP3 ID3- Tag Ver.2.3 or 2.4. • This unit is compatible with WMA META tags. […]
-
Page 167
167 Tips Settings Playback Connections Contents Front panel Display Rear panel Index Remote Appendix Playing back files stored on PC or NAS • This unit is compatible with MP3 ID3-Tag (Ver.2) standard. • This unit can show the artwork that was embedded by using MP3 ID3- Tag Ver.2.3 or 2.4. • This unit is compatible with WMA MET[…]
-
Page 168
168 Tips Settings Playback Connections Contents Front panel Display Rear panel Index Remote Appendix Playing back Internet Radio 2 Playable broadcast station specifications Sampling frequency Bit rate Extension WMA (Windows Media Audio) 32/44.1/48 kHz 48 – 192 kbps .wma MP3 (MPEG-1 Audio Layer-3) 32/44.1/48 kHz 32 – 320 kbps .mp3 MPEG-4 AAC 32[…]
-
Page 169
169 Tips Settings Playback Connections Contents Front panel Display Rear panel Index Remote Appendix Sound modes and channel output S This indicates the audio output channels or surround parameters that can be set. D This indicates the audio output channels. The output channels depend on the settings of “Speaker Config.” ( v page134). Sound[…]
-
Page 170
170 Tips Settings Playback Connections Contents Front panel Display Rear panel Index Remote Appendix Sound modes and surround parameters Sound mode ( v page89) Surr.Parameter ( v page110) Dialog Level ( v page109) Subwoofer Level ( v page109) Cinema EQ ( v page110) Loudness Mngmt z 4 ( v page110) Dynamic Comp. z 5 ( v page110) […]
-
Page 171
171 Tips Settings Playback Connections Contents Front panel Display Rear panel Index Remote Appendix Sound mode ( v page89) Surr.Parameter ( v page110) Tone z 7 ( v page113) Audyssey ( v page115) Restorer z 10 ( v page113) PRO LOGIC g Music mode only NEO:6 Music mode only Panorama ( v page111) Dimension ( v page111) Center Widt[…]
-
Page 172
172 Tips Settings Playback Connections Contents Front panel Display Rear panel Index Remote Appendix z 1 Audio is output when “Subwoofer Mode” ( v page137) in the menu is set to “LFE+Main”. z 2 This setting is unavailable when the set sound mode name contains “+PL g Music”. z 3 This setting is possible when the sound mode is “Cinem[…]
-
Page 173
173 Tips Settings Playback Connections Contents Front panel Display Rear panel Index Remote Appendix Types of input signals, and corresponding sound modes F This indicates the default sound mode. S This indicates the selectable sound mode. Sound mode ( v page89) NOTE 2-channel signal Multi-channel signal Analog / PCM Dolby Digital (+/ HD) / DTS […]
-
Page 174
174 Tips Settings Playback Connections Contents Front panel Display Rear panel Index Remote Appendix Sound mode ( v page89) NOTE 2-channel signal Multi-channel signal Analog / PCM Dolby Digital (+/ HD) / DTS (-HD) PCM Multi DTS-HD DTS Express DTS ES DSCRT 6.1 DTS ES MTRIX 6.1 DTS DOLBY TrueHD DOLBY DIGITAL Plus DOLBY DIGITAL EX DOLBY DIGITAL DSP[…]
-
Page 175
175 Tips Settings Playback Connections Contents Front panel Display Rear panel Index Remote Appendix Explanation of terms A AirPlay AirPlay sends (plays) contents recorded in iTunes or on an iPhone/iPod touch/iPad to a compatible device via the network. ALAC (Apple Lossless Audio Codec) This is a codec for lossless audio compression method develope[…]
-
Page 176
176 Tips Settings Playback Connections Contents Front panel Display Rear panel Index Remote Appendix Dolby Digital Plus Dolby Digital Plus is an improved Dolby Digital signal format that is compatible with up to 7.1-channels of discrete digital sound and also improves sound quality thanks to extra data bit rate performance. It is upwardly compatibl[…]
-
Page 177
177 Tips Settings Playback Connections Contents Front panel Display Rear panel Index Remote Appendix DTS-HD Master Audio DTS-HD Master Audio is a lossless audio format created by Digital Theater System (DTS). This format provides the facility to support up to 8 audio channels with a sampling frequency of 96 kHz/ 24 bit resolution and up to 6 audio […]
-
Page 178
178 Tips Settings Playback Connections Contents Front panel Display Rear panel Index Remote Appendix I iTunes iTunes is the name of the multimedia player provided by Apple Inc. It enables management and playback of multimedia contents including music and movies. iTunes supports many main file formats including AAC, WAV, and MP3. L LFE This is an a[…]
-
Page 179
179 Tips Settings Playback Connections Contents Front panel Display Rear panel Index Remote Appendix V vTuner This is a free online content server for Internet Radio. Note that usage fees are included in upgrade costs. For inquiries about this service, visit the vTuner site below. vTuner website: http://www.radiodenon.com This product is protected […]
-
Page 180
180 Tips Settings Playback Connections Contents Front panel Display Rear panel Index Remote Appendix Trademark information Manufactured under license from Audyssey Laboratories™. U.S. and foreign patents pending. Audyssey MultEQ® XT, Audyssey Dynamic EQ® and Audyssey Dynamic Volume® are registered trademarks of Audyssey Laboratories. Manufactu[…]
-
Page 181
181 Tips Settings Playback Connections Contents Front panel Display Rear panel Index Remote Appendix Windows Media and the Windows logo are trademarks or registered trademarks of Microsoft Corporation in the United States and/or other countries. Adobe, the Adobe logo and Reader are either registered trademarks or trademarks of Adobe Systems Incorpo[…]
-
Page 182
182 Tips Settings Playback Connections Contents Front panel Display Rear panel Index Remote Appendix 2 Audio section • Power amplifier Rated output: Front: 80 W + 80 W (8 Ω/ohms, 20 Hz – 20 kHz with 0.08 % T.H.D.) 120 W + 120 W (6 Ω/ohms, 1 kHz with 0.7 % T.H.D.) Center: 80 W (8 Ω/ohms, 20 Hz – 20 kHz with 0.08 % T.H.D.) 120 W (6 Ω/oh[…]
-
Page 183
183 Tips Settings Playback Connections Contents Front panel Display Rear panel Index Remote Appendix 2 Tuner section [FM] (Note: μV at 75 Ω/ohms, 0 dBf = 1 x 10 –15 W) Receiving Range: 87.5 MHz – 108.0 MHz Usable Sensitivity: 1.2 μV (12.8 dBf) 50 dB Quieting Sensitivity: MONO 2.8 μV (20.2 dBf) S/N : MONO 70 dB (IHF–A weighted, DIRECT mode[…]
-
Page 184
184 Tips Settings Playback Connections Contents Front panel Display Rear panel Index Remote Appendix v Numerics 3D ········································································ 163 5.1-channel ·····································[…]
-
Page 185
185 Tips Settings Playback Connections Contents Front panel Display Rear panel Index Remote Appendix v M Menu map ···························································· 101 Audio ····················································?[…]
-
Page 186
186 Tips Settings Playback Connections Contents Front panel Display Rear panel Index Remote Appendix License This section describes software license used for this unit. To maintain the correct content, the original (English) is used. n Boost http://www.boost.org/ Boost Software License — Version 1.0 — August 17th, 2003 Permission is hereby granted,[…]
-
Page 187
187 Tips Settings Playback Connections Contents Front panel Display Rear panel Index Remote Appendix g. “Standard V ersion ” refers to such a W ork if it has not been modified, or has been modified in accordance with the consent of the Author , such consent being in the full discretion of the Author . h. “W ork” refers to the collection o[…]
-
Page 188
188 Tips Settings Playback Connections Contents Front panel Display Rear panel Index Remote Appendix 6. Representations, Warranties and Disclaimer. THIS WORK IS PROVIDED “AS IS”, “WHERE IS” AND “AS AVAILABLE”, WITHOUT ANY EXPRESS OR IMPLIED WARRANTIES OR CONDITIONS OR GUARANTEES. YOU, THE USER, ASSUME ALL RISK IN ITS USE, INCLUDING COPY[…]
-
Page 189
189 Tips Settings Playback Connections Contents Front panel Display Rear panel Index Remote Appendix • Redistributions in binary form must reproduce the above copyright notice, this list of conditions and the following disclaimer in the documentation and/or other materials provided with the distribution. • Neither the name of the Xiph.org[…]
-
Page 190
190 Tips Settings Playback Connections Contents Front panel Display Rear panel Index Remote Appendix n Tremor http://wiki.xiph.org/index.php/Tremor Copyright (c) 2002, Xiph.org Foundation Redistribution and use in source and binary forms, with or without modification, are permitted provided that the following conditions are met: • Redistribut[…]
-
Page 191
191 Tips Settings Playback Connections Contents Front panel Display Rear panel Index Remote Appendix n zlib http://www.zlib.net/ zlib.h — interface of the ‘zlib’ general purpose compression library version 1.2.3, July 18th, 2005 Copyright (C) 1995-2004 Jean-loup Gailly and Mark Adler This software is provided ‘as-is’, without any express o[…]
-
Page 192
192 Tips Settings Playback Connections Contents Front panel Display Rear panel Index Remote Appendix 2 License Information for the Software Used in the Unit About GPL (GNU-General Public License), LGPL (GNU Lesser General Public License) License This product uses GPL/LGPL software and software made by other companies. After you purchase this produc[…]
-
Page 193
193 Tips Settings Playback Connections Contents Front panel Display Rear panel Index Remote Appendix 2 Dimensions Unit : mm 288.5 330.0 198.0 43.5 47.0 15.0 136.0 151.0 434.0 344.0 60.0 45.0 45.0 18.5 23.0 2 Weight : 8.2 kg[…]
-
Page 194
D&M Holdings Inc. 3520 10210 00AD www.denon.com[…]