
Table of Contents
- COOKe LEWIS CLCER60a Electric Hob User Manual
- Checking instructions
- Safety
- Installation
- Technical data
- Trouble shooting
- Commercial Guarantee
- Recycling and Disposal
- Installation
- General
- Use
- Function & Settings
- Heating zone operation
- Care and Maintenance
- References
- Read User Manual Online (PDF format)
- Download This Manual (PDF format)
COOKe LEWIS CLCER60a Electric Hob User Manual
Checking instructions
Things to check before you start. Warning: All installation work must be
carried out by a suitably
these instructions.
-
WARNING: Read the instructions before using the appliance.
-
To avoid the risks that are always present when you use an electrical appliance it is important that this electric hob is installed correctly and that you read the safety instructions carefully to avoid misuse and hazards. After unpacking the electric hob please
but contact Customer Services on 0800 324 7818 (UK) and 1-800 932 230 (Eire). -
Check the package and make sure you have all of the parts listed and decide upon the appropriate location for your product.
-
If this product contains glass please take care with fitting or heading to prevent personal injury or damage to the product.
-
The specification plate shown on this appliance displays all the necessary identification information for ordering replacement parts.
-
If you sell the appliance, give it away, or leave it behind when you move house, please ensure that you pass on this manual so that the new owner can become familiar with the appliance and its safety warnings.
Safety
These instructions are for your safety. Please read the following instructions
carefully before proceeding with the installation and use of this appliance.
-
WARNING: Before connecting the hob, check that the supplied voltage and frequency match with that indicated on the appliance rating plate.
-
Failure to install the appliance in accordance with these instructions may result in a safety hazard.
-
If in doubt, ask for advice in store or from a qualified installer.
-
WARNING: Consult local regulations regarding extraction outlets and ensure these are complied with.
-
WARNING: This appliance can be used by children aged from 8 years and above and persons with reduced physical, sensory or mental capabilities or lack of experience and knowledge if they have been given supervision or instruction concerning use of the appliance in a safe way and understand the hazards involved. Children shall not play with the appliance. Cleaning and user maintenance shall not be made by children without supervision.
Keep the appliance and its supply cord out of the reach of children less than
8 years old. -
Do not use inappropriate child safety shields or hob guards. These can cause accidents.
-
Do not use covers. These can cause accidents or overheating and damage to the electric hob.
-
We recommend that great care be taken during use and cleaning. Read the cleaning and maintenance sections of this appliance carefully.
-
Risk of electric shock! Do not use any high pressure cleaners or steam cleaners, which can result in an electric shock.
-
Danger of burns! The hotplates and surrounding area become very hot. Never touch the hot surfaces. When a cooking zone has been in use, the surface remains hot for some time afterwards. Be careful not to touch the hot surface and not to place any objects on it.
-
After use, switch off the hob element by its control.
-
Metallic objects such as knives, forks, spoons and lids should not be placed on the hob surface since they can get hot.
-
Never use water to put out burning oil or fat. Switch off the hotplate. Extinguish flames carefully using a fire blanket.
-
Risk of fire! The hotplates become very hot. Never place combustible items on the hob.
-
Never store objects on the hob.
-
Risk of fire! Do not use flammable sprays in close vicinity to the appliance.
-
Risk of fire! Do not store detergents or flammable materials beneath the hob.
-
This appliance is intended for domestic use only. The appliance must only be used for the preparation of food and drink.
-
The appliance must be supervised during operation. Only use this appliance indoors.
-
The manufacturer declines all liability for personal or material damage as a result of misuse or incorrect installation of this appliance. Please dispose of the packing material carefully.
-
Risk of injury! Saucepans may suddenly move due to liquid between the pan base and the hotplate. Always keep the hotplate and saucepan bases dry.
-
WARNING: There is a risk of electric shock and fire if cleaning is not carried out in accordance with these instructions.
-
WARNING: Use only the same size of fittings and mounting screws as recommended in this instruction manual. Failure to follow these instructions may result in electrical hazards.
-
WARNING: Switch off the appliance at the mains supply before carrying out any maintenance work.
-
WARNING: Accessible parts may become hot when used with cooking appliances. Young children should be kept away. Care should be taken to avoid touching the appliance.
-
WARNING: Means for full disconnection must be incorporated in the fixed wiring in accordance with the local wiring installation rules for your country. An all-pole disconnection switch having a contact separation of at least 3mm in all poles should be connected during installation.
-
WARNING: Only clean the hob when it has cooled down sufficiently. When the power to the cooktop is switched off, there will be no residual heat indication but the cooking zone may still be hot. Take extreme care!
-
WARNING: Unattended cooking on a hob with fat or oil can be dangerous and may result in fire. NEVER try to extinguish a fire with water, but switch off the appliance and then cover flame e.g. with a lid or a fire blanket.
-
CAUTION: The cooking process has to be supervised. A short term cooking process has to be supervised continuously.
-
WARNING: Danger of fire: do not store items on the cooking surfaces.
-
WARNING: Use only hob guards designed by the manufacturer of the cooking appliance or indicated by the manufacturer of the appliance in the instructions for use as suitable or hob guards incorporated in the appliance. The use of inappropriate guards can cause accidents.
-
WARNING: If the surface is cracked, switch off the appliance to avoid the possibility of electric shock.
-
The appliance is not intended to be operated by means of an external timer or separate remote-control system. El If the supply cord is damaged, it must be replaced by the manufacturer, its service agent or similarly qualified persons in order to avoid a safety hazard.
IMPORTANT:
- Heavy duty scourers, some nylon scourers and harsh/abrasive cleaning agents may scratch the glass. Always read the label to check if your cleaner or scourer is suitable.
- Never leave cleaning residue on the cooktop: the glass may become stained.
- The appliance is for domestic use as a cooking device; do not use as a source of heat.
Installation
All installation must be carried out by a competent person or qualified
electrician. Before connecting the mains supply ensure that the mains voltage
corresponds to the voltage on the rating plate.
Direct Connection
The appliance must be connected directly to the mains using an omnipolar
circuit breaker with a
minimum opening of 3 mm between the contacts.
The installer must ensure that the correct electrical connection has been made
and that it complies with the wiring diagram.
The cable must not be bent or compressed.
Regularly check the power plug and power cord for damage.
WARNING: This is a Class I appliance and MUST be earthed.
This appliance is supplied with a 3 core mains cable coloured as follows:
L or Live = Brown (or Red)
N or Neutral = Blue (or Black)
E or Earth = Green and Yellow

This appliance requires a 32 Amp Miniature Circuit Breaker.
To avoid the risks that are always present when you use an electrical
appliance it is important that this appliance is installed correctly and that
you read the safety instructions carefully to avoid misuse and hazards. Please
keep this instruction booklet for future reference and pass it on to any
future owners. After unpacking the appliance please check that it is not
damaged. If in doubt, do not use the appliance but contact Customer Services.
The manufacturer declines all liability for damage caused to persons and
objects due to incorrect
or improper installation of the appliance. Any permanent electrical
installation must comply with the latest wiring regulations applicable to
your country and for your own safety a qualified electrician or contractor
should undertake the electrical installation.
Technical data
| Supply voltage | 220-240 V~ 50Hz |
|---|---|
| Dimensions (W x D x H) | 590 x 520 x 52 mm |
| Built-in dimensions | 560 x 490 mm |
| Max. power consumption | 6000W (230V~ 50Hz) |
| Net weight | 7.6 kg |
| Symbol | Value |
| — | — |
| Model identification | |
| Type of hob | |
| Number of cooking zone sand/or areas | |
| Symbol | Value |
| — | — |
Heating technology (induction cooking zones and cooking areas, radiant cooking
zones, solid plates)| Radiant cooking zones
For circular cooking zones or area:diameter of useful surface areaper electric
heated cooking zone,rounded to the nearest 5mm| 0| Left front: 15.5Left rear:
18.5Right rear: 15.5Right front: 18.5| cm
For non-circular cooking zones orareas: length and width of usefulsurface area
per electric heatedcooking zone or area, rounded tothe nearest 5mm| L, W| —|
cm
Energy consumption per cookingzone or area calculated per kg| ECelectric
cooking| Front left zone: 187.7Rear left zone: 183.4Rear right zone:
194.1Front right zone: 191.3| Wh/ kg
Energy consumption for the hob| ECelectric cooking| 189.1| Wh/ kg
The measurement and calculation method of the above table was done in
accordance with commission regulation (EN) No 66/2014.
Trouble shooting
| Problem | Possible cause | Solution |
|---|---|---|
| The cooktop cannot be turned on. | No power. | Make sure the cooktop is |
connected to the power supply and that it is switched on. Check the household
fuse for the appliance. Check whether there is a power cut by trying other
electric appliances.
The touch controls
are unresponsive.| The controls are locked.| Unlock the controls (—> Safety
mode (child lock)).
The touch controls are difficult to operate.| There may be a slight film of
water over the controls or you may be using the tipof your finger when
touching the controls.| Make sure the touch control area is dry. Use the ball
of your finger when touching the controls.
Some pans make crackling or clicking noises.| This may be caused by the
construction of your cookware (layers of different metals vibrating
differently).| This is normal for cookware and does not indicate a fault.
Error message ER03| Press any key more than 10 seconds| Release the key and
then the
appliance reset automatically.
Error message ER21| The temperature inside the appliance is too high.| Stop
and cool the appliance.
This appliance respects laws of the suppression of radio interference. As the
Manufacturer has a policy of continuous product improvement, it reserves the
right to adapt and carry out any modification considered necessary without
prior warning. Kingfisher International Products Limited, 3 Sheldon Square,
London, W2 6PX, United Kingdom.
Commercial Guarantee
At Cooke and Lewis we take special care to select high quality materials and
use manufacturing techniques that allow us to create ranges of products
incorporating design and durability. That’s why we offer a 24 months’
guarantee against manufacturing defects on our ceramic hob – 4 zones.
This ceramic hob – 4 zones is guaranteed for 24 months from the date of
purchase, if bought in store, or delivery, if bought online, for normal (non-
professional or commercial) household use. You may only make a claim under
this guarantee upon presentation of your sales receipt or purchase invoice.
Please keep your proof of purchase in a safe place.
The guarantee covers all parts and labour costs associated with the repair of
the ceramic hob – 4 zones if it is found to be defective due to faulty
materials or workmanship within 24 months from the date of purchase or
delivery subject to the exclusions set out below and provided it was used for
the purpose for which it is intended and subject to installation, cleaning,
care and maintenance in accordance with the information contained in the user
manual. This guarantee does not cover defects and damage caused by normal wear
and tear of ceramic hob – 4 zones and damage that could be the result of
improper use, faulty installation, storage or assembly, neglect, accident,
modification of the product, consumable items such as carbon filters and
bulbs.
If the ceramic hob – 4 zones is defective, we will repair it. However, if,
during the guarantee period, the ceramic hob – 4 zones becomes irreparable as
agreed by an engineer approved by our authorised agent then we reserve the
right, at our discretion, to exchange the defective ceramic hob – 4 zones with
a replacement ceramic hob – 4 zones. If the same ceramic hob – 4 zones is no
longer available an alternative ceramic hob – 4 zones will be offered with the
equivalent functions and specifications.
During the service work carried out it may be necessary to remove the built in
ceramic hob – 4 zones from its fitted position. If the ceramic hob – 4 zones
is glued, grouted or tiled in such a manner that it cannot be removed, it is
the responsibility of the customer/installer to remove and reinstall the
ceramic hob – 4 zones to facilitate the repair or replacement.
After the ceramic hob – 4 zones has been repaired or replaced any remaining
balance of the guarantee period will apply to the repaired or replaced ceramic
hob – 4 zones.
Should any person other than an engineer approved by our authorised agent
modify or attempt to repair the ceramic hob – 4 zones then the guarantee will
be invalid. This guarantee only applies to the country of purchase or delivery
and is not transferrable to any other countries. This guarantee is non-
transferrable to any other person or product. Relevant local law will apply to
this guarantee. This guarantee is in addition to and does not affect your
statutory rights relating to faulty goods as a consumer.
Guarantee related queries should be addressed to a store affiliated with the
distributor you purchased the ceramic hob – 4 zones from.
To arrange a service call, please contact our customer services on one of the
following Toll Free numbers, you must contact the number in the country in
which you purchased the ceramic hob -4 zones:
UK 0800 324 7818
uk@kingfisherservice.com
Eire 1-800 932 230
eire@kingfisherservice.com
Recycling and Disposal
Waste electrical products (WEEE) should not be disposed of with household
waste.
Please recycle where facilities exist. Check with your local governmental
authority, domestic waste disposal services or the retailer where the product
was bought for recycling advice.
The wheelie bin symbol on the product or its packaging indicates that this
product cannot be treated as normal household waste. This product must be
handed over to an electric and electronic equipment collection point for
recycling. On ensuring that this product is disposed of correctly, you will
help to avoid possible negative consequences for the environment and public
health, which could occur if this product is not handled correctly.
Manufacturer • Fabricant • Producent • Producator • Fabricante:
UK Manufacturer:
Kingfisher International Products Limited, 3 Sheldon Square, London, W2 6PX,
United Kingdom EU Manufacturer:
Kingfisher International Products B.V. Rapenburgerstraat 175E 1011 VM
Amsterdam The Netherlands
www.kingfisher.com/products
www.diy.com www.screwfix.com
www.screwlix.ie
Installation
IMPORTANT – Please read carefully the separate safety guide before use


Installation
Caution
- The ceramic hob must be installed by qualified personnel or technicians. Please never conduct the operation by yourself.
- The hob must not be installed directly above a dishwasher, fridge, freezer, washing machine or clothes dryer, as the humidity may damage the hob electronics.
- Do not attempt to dismantle the appliance, there are no user servicable parts inside.
- At the end of its life, the appliance should not be disposed of in household waste; contactyour Local Authority for guidance.
- This hob must be connected to the mains power supply only by a suitably qualified person.
- Before connecting the hob to the mains power supply, check that:
- the domestic wiring system is suitable for the power drawn by the hob.
- the voltage corresponds to the value given in the rating plate.
- the power supply cable sections can withstand the load specified on the rating plate.
- To connect the hob to the mains power supply, do not use adapters, reducers, or branching devices, as they can cause overheating and fire.
- The power supply cable must not touch any hot parts and must be positioned so that its temperature will not exceed 75ºC at any point.
- The work surface is square and level, and no structural members interfere with space requirements.
- The work surface is made of a heat-resistant material.
- If the hob is installed above an oven, the oven has a built-in cooling fan.
- The installation will comply with all clearance requirements and applicable standards and regulations.
- A suitable isolating switch providing full disconnection from the mains power supply is incorporated in the permanent wiring, mounted and positioned to comply with the local wiring rules and regulations. The isolating switch must be of an approved type and provide a3 mm air gap contact separation in all poles (or in all active [phase] conductors if the local wiring rules allow for this variation of the requirements).
- The isolating switch will be easily accessible to the customer with the hob installed.
- You consult local building authorities and bylaws if in doubt regarding installation.
- You use heat-resistant and easy-to-clean finishes (such as ceramic tiles) for the wall surfaces surrounding the hob.
- When you have installed the hob, make sure that
- The power supply cable is not accessible through cupboard doors or drawers.
- There is adequate flow of fresh air from outside the cabinetry to the base of the hob.
- If the hob is installed above a drawer or cupboard space, a thermal protection barrier is installed below the base of the hob.
- The isolating switch is easily accessible by the customer.
- The hob should be fixed into the worktop using the fixing brackets and sealing tape supplied with the appliance. Do not use silicone sealant or PVA to secure the hob. Doing so will prevent an engineer removing the appliance to facilitate a repair.

CAUTION! Before drilling it is extremely important to check the wall for
hidden pipes, electrical cables etc using an appropriate detection device.
WARNING: Good ventilation is required around the appliance for easier
dissipation of heat and low power consumption. Sufficient clearance is
required around the appliance. The safety distance between the ceramic hob and
any cupboard above the hotplate should be at least 760 mm.
The ceramic hob must be well ventilated and the air inlet and outlet must not
be blocked. Ensure you select a heat-resistant work surface to mount the
ceramic hob.

Cut an aperture in the worktop using a jigsaw as shown. The worktop should be
at least 30mm thick and made of a heat resistant material.

Seal the cut edge of the worktop using silicone sealant or PVA adhesive.
IMPORTANT: Ensure that either product is fully cured as per the
manufacturer’s instructions before you commence installation of the hob. This
hob MUST NOT be sealed into the worktop.

Stretch out and stick the supplied tape along the underside edge of the hob,
ensuring the ends overlap. Trim off any excess tape and dispose of it.

Once the worktop edge has cured, and the tape is fitted, position the hob into
the cutout in the worktop. Apply gentle downwards pressure onto the hob to
push it into the worktop ensuring a good seal around the outer edge.
General
All installation must be carried out by a competent person or qualified
electrician. Before connecting the mains supply ensure that the mains voltage
corresponds to the voltage on the rating plate.
Direct Connection
The appliance must be connected directly to the mains using an omnipolar
circuit-breaker with a minimum
opening of 3 mm between the contacts
The installer must ensure that the correct electrical connection has been made
and that it complies with
the wiring diagram.
The cable must not be bent or compressed.
Regularly check the power plug and power cord for damage. If the supply cord
is damaged, it must be replaced by the manufacturer, its service agent or
similarly qualified persons in order to avoid a safety hazard.
WARNING: This is a Class I appliance and MUST be earthed.
This appliance is supplied with a 3 core mains cable coloured as follows:
Brown = L or Live
Blue = N or Neutral
Green and Yellow = E or Earth

This appliance must be connected directly to the mains consumer unit and
protected by a 32 Amp Residual Current Device (RCD).
To avoid the risks that are always present when you use an electrical
appliance it is important that this appliance is installed correctly and that
you read the safety instructions carefully to avoid misuse and hazards. Please
keep this instruction booklet for future reference and pass it on to any
future owners. After unpacking the appliance please check that it is not
damaged. If in doubt, do not use the appliance but contact Customer Services –
see end of Care & Maintenance section for details.
Use
Before you start
When the power is switched on at the switched fused spur, the buzzer will
sound once, ƁLJzeroes will be
displayed briefly on the control panel and go off. The appliance is ready for
use.
CAUTION: When the ON/OFF key (D) is pressed for three seconds, the
ceramic hob returns to off mode if no other operation is carried out within 20
seconds.
Function & Settings
Protection from over-heating
When the built-in sensor detects an excessive temperature, the hob will be
switched off automatically
Residual heat indicator
WARNING: The display will show the letter “H” to indicate that the
appliance is too hot to touch.
Auto shutdown
If you forget to switch off a cooking zone, the appliance will automatically
shutdown after a certain time. The default shutdown times are shown in the
table below:
| Power level | The heating zone shuts down automatically after |
|---|---|
| 1-2 | 6 hours |
| 3-4 | 5 hours |
| 5 | 4 hours |
| 6-9 | 90 minutes |
Protection against unintended operation.
If a button is held down for ten seconds the appliance will sound a beep and
display the error code ER03.
This will continue until the button is released.

A Zone position
B Reduce power output
C Increase power output
D ON / OFF
Heating zone operation
When the ON/OFF key “ ” is pressed, all the indicators show “0.”
-
Select the cooking zone you wish to use by pressing the “ ” key. The “0” symbol selected will stay
fully lit. All other zone indicators will dim. -
Select the power level by pressing the “+” key “ ” or “ ” key “ ”
-
The power level will start at “0”. Pressing the “+” will count up the power levels from 0 to 9 (max
power) in numerical order. Pressing the “–” key will take the power straight
from 0 to 9. Pressing the
“–” key again will decrease the power level. -
The zone button “A” and “Žƨ”” will flash alternately for 20 seconds when the power is reduced to zeroƢ
-
The display will have a residual heat warning of “H” until the cooking zone has cooled to a safe level.
-
To reuse the same cooking zone again, please follow the above steps.
| Heating Zone | Max. Power (230V~) |
|---|---|
| 1800 W | |
| 1200 W | |
| 1800 W | |
| 1200 W |
Safety mode (Child lock)
To ensure the safety of children, the ceramic hob is fitted with an interlock
device.
- If one or more cooking zones are in use the child lock cannot be activated.
- Please ensure that all of the cooking zones are in standby mode. Simultaneously press the “–” key and the furthest left zone selection key. The hob emits a beep and all keys should be released. At this point pressing the furthest left zone selection key once more will activate the child lock and L. will be shown in all 4 display windows.
- In child lock mode, all keys are locked except the on/off key. No cooking zones can be activated. The appliance can only be switched on and off.
- The child lock can be deactivated temporarily. Press the on/off key to enter the off mode. Then press on/off key again to enter standby mode. Simultaneously press the “–” key and the furthest left zone activation key. The child lock will be switched off temporarily. It will not be shown during this operation but it will reactivate the next time the hob is switched on.
- The child lock can be permanently deactivated. Press on/off key to enter the off mode. Then press on/ off key again to enter standby mode. Simultaneously press the “–” key and furthest left zone selection key. The hob will emit a beep and all keys should be released. At this point pressing the “–” key again will deactivate the child lock function.
Care and Maintenance
General
WARNING: Always switch off the electricity supply before performing
maintenance work. In the event of a fault, contact customer services.
| Damaged power cables should be replaced by a competent person or qualified
electrician
—|—
| For domestic use only
| Never place an empty pan on the hob as this will cause the overheat sensor
to switch off the appliance automatically.
| When a cooking zone has been on for a long time, the surface remains hot and
shows “H” in the display
| If the surface of the hob becomes cracked, do not use, switch off the
appliance at the fused spur and contact customer services
| Do not place rough or uneven vessels on the hob, as they could damage the
glass surface.
| Avoid banging pots and pans down on the hob. The ceramic surface is tough
but not unbreakable.
| Do not put detergents or flammable materials beneath the hob.
- The appliance should be cleaned after use, allow to cool first!
- The surface of the ceramic hob should be cleaned as follows:
| Type of dirt | Cleaning method | Cleaning materials |
|---|---|---|
| Limescale | Apply white vinegar to the surface, then wipe it dry with soft | |
| cloth | Special ceramic cleaner | |
| Burnt-on stains | Clean with damp cloth and dry it with a soft cloth | Special |
ceramic cleaner
Light stains| Clean with damp cloth and dry it with a soft cloth| Cleaning
sponge
Melted plastics| Use a scraper suitable for ceramic glass to remove residue|
Special ceramic cleaner
CAUTION: Avoid rubbing with any abrasive or with the base of the pans,
etc, as this will wear the markings on the top of the ceramic hob over time.
Clean the ceramic hob on a regular basis to prevent the build up of food
residue.

Never use:
- Undiluted washing-up liquid
- Detergent intended for dishwashers
- Scouring agents
- Harsh cleaning agents such as oven spray or stain remover
- Abrasive sponges
- High-pressure cleaners or steam jet cleaners
Addresses
Manufacturer • Fabricant • Producent •
Producător • Fabricante:
UK Manufacturer:
Kingfisher International Products Limited,
3 Sheldon Square, London, W2 6PX,
United Kingdom
EU Manufacturer:
Kingfisher International Products B.V.
Rapenburgerstraat 175E
1011 VM Amsterdam
The Netherlands
www.kingfisher.com/product
References
- Brico Dépôt : Magasin de bricolage
- Brico Depôt | Bricolaje, jardín, construcción y climatización
- Brico Dépôt : Magasin de bricolage
- Brico Depôt | Bricolage, construção, jardim e climatização
- Bricolage, jardinage et aménagement de la maison | Castorama
- B&Q | DIY Products at Everyday Low Prices | DIY at B&Q
- Koçtaş | Evimi Çok Seviyorum
Read User Manual Online (PDF format)
Read User Manual Online (PDF format) >>
Download This Manual (PDF format)
Download this manual >>
Manuals.eu
- Manuals.eu
- Cooke & Lewis
- Home & Kitchen
- Ovens
- 9BROV6002A
Free Manuals for Cooke & Lewis 9BROV6002A
Manufacturer:Cooke & Lewis
Category:Home & Kitchen
Device:Cooke & Lewis 9BROV6002A
Name:Installation
Language:EU
Pages:2
Size:2.03 MB
DescriptionCooke & Lewis 9BROV6002A InstallationView Cooke & Lewis 9BROV6002A Installation (EU)
×
Copyright © Manuals.eu
Agreement
Privacy Policy
Contact us
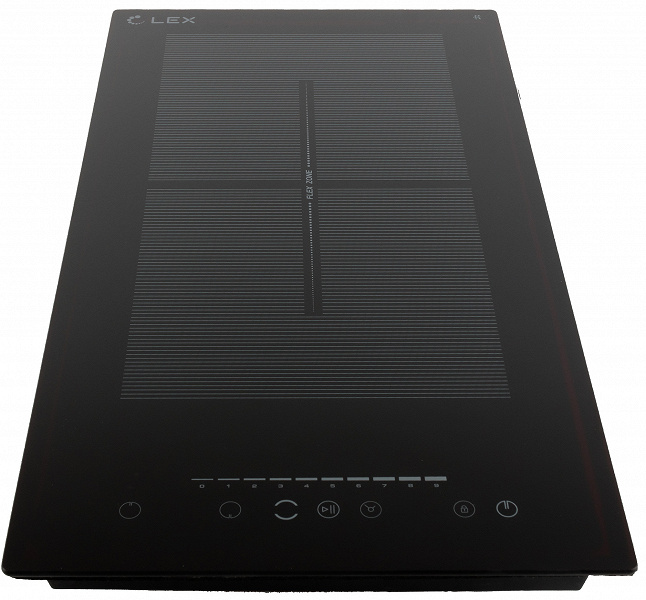
У нас на тестах компактная, но мощная индукционная варочная поверхность Lex, модель EVI 320 F из коллекции Urban/Compact. Это двухконфорочная стеклокерамическая панель глубокого черного цвета, отвечающая всем современным трендам как по дизайну, так и по техническим характеристикам. Будем исследовать, насколько удобно на ней готовить и какой целевой аудитории она больше всего может подойти в качестве надежного помощника.
Характеристики
| Производитель | Lex |
|---|---|
| Модель | EVI 320 F |
| Тип | индукционная встраиваемая варочная поверхность |
| Страна производства | Китай |
| Гарантия | 36,6 мес |
| Мощность | 3500 Вт |
| Количество конфорок | 2 (1500 и 2000 Вт) + FlexZone (одновременное использование двух конфорок) |
| Материал | стеклокерамика |
| Управление | сенсорное |
| Таймер | да |
| Безопасность | датчик распознавания посуды, защита от перегрева, индикатор остаточного тепла, кнопка блокировки панели, отключение при выкипании, зона FlexZone, функция stop&go |
| Вес | 4,5 кг |
| Габариты (Ш×В×Г) | 61×290×520 мм |
| Габариты встраивания | 270×490 мм |
| Длина сетевого кабеля | 1 м |
| Розничные предложения |
узнать цену |
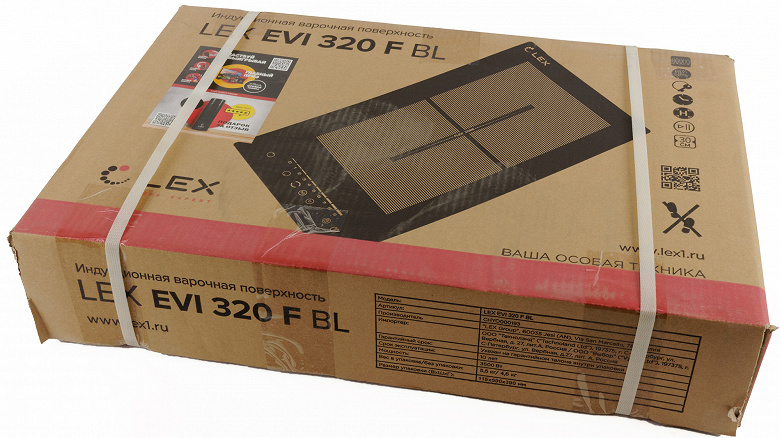
Комплектация
Lex EVI 320 F приехала на тесты в коробке из толстого технического картона. На коробке монохромная печать — фотография прибора, его технические характеристики и служебные пиктограммы. Упаковка, конечно, не парадный подарочный вариант, но функции защиты и идентификации прибора выполняет отлично. Сама поверхность упакована и зафиксирована внутри пенопластовыми вставками.
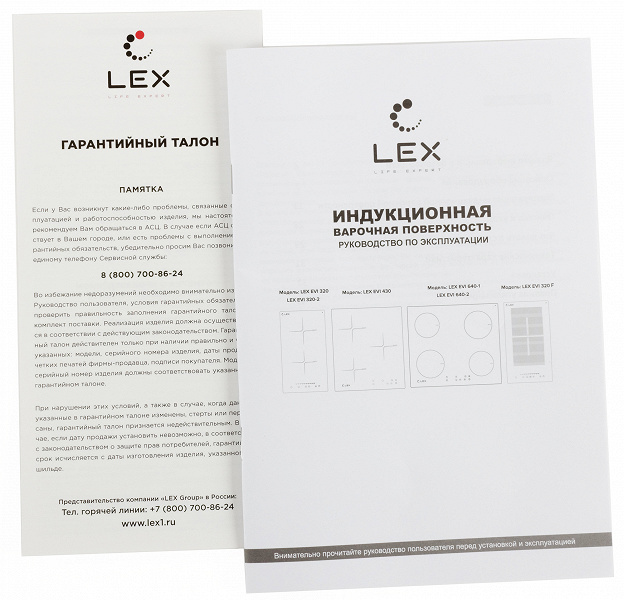
Вскрыв коробку, внутри мы обнаружили прибор, инструкцию и гарантийный талон.
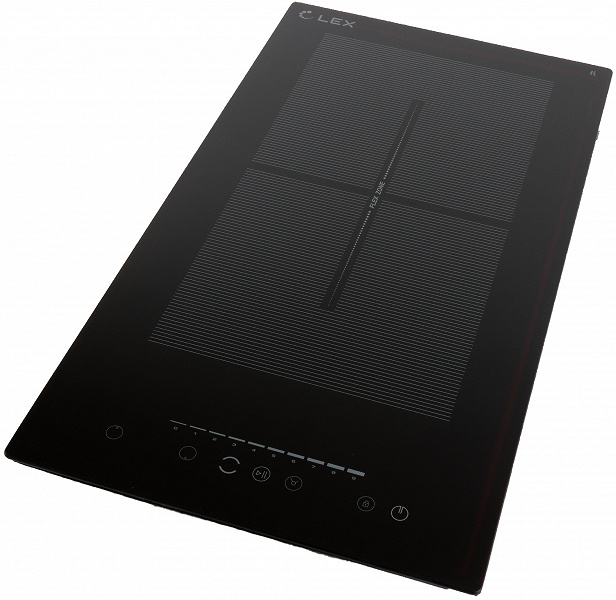
На первый взгляд
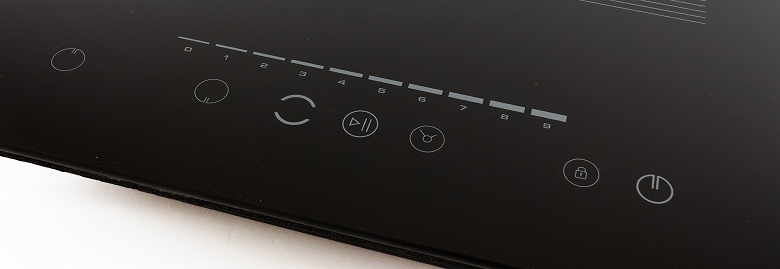
Над внешним видом Lex EVI 320 F явно работал отличный дизайнер — плитка, с одной стороны, строгая и лаконичная, не сразу понятно даже, что это за прибор, с другой стороны, притягивает взгляд. Нет стандартных кругов центровки, все строго параллельно и перпендикулярно.
Два квадрата с нанесенной штриховкой — две конфорки, внизу 2 линии символов — панель управления. Никаких границ, весь прибор — единый стеклокерамический монолит.
Под стеклокерамической поверхностью находится пластиковый корпус высотой 6 см. Благодаря этому прибор не требует заземления.

На обратной стороне корпуса находятся наклейка с техническими характеристиками и серийным номером, вентилятор и выход шнура электропитания.

Инструкция
Руководство по эксплуатации написано сразу для 4 моделей плит и представляет собой книжку А5 из 38 страниц. В руководстве присутствуют все стандартные разделы: техника безопасности, эксплуатация, уход, технические характеристики, описание оборудования. Дано подробное описание установки, эксплуатации прибора и таблица неисправностей. Текст написан понятно и сопровождается пояснительными чертежами и рисунками.
Если внимательно прочитать инструкцию, то вопросов по пользованию прибором возникнуть не должно.
Управление
Приборная панель располагается спереди плиты и состоит из нижнего ряда сенсорных кнопок управления, обозначенных пиктограммами и верхнего ряда в виде черточек, которые служат для установки мощности или таймера.
Нижний ряд справа налево:
- кнопка вкл./выкл.
- блокировка
- индикатор времени
- таймер
- кнопка функции stop&go
- кнопка включения зоны FlexZone
- кнопки выбора зон нагрева с индикаторами между ними
Сверху находятся 9 кнопок регулировки мощности от 0 (крайняя слева) до 9 (крайняя справа).
Для запуска конфорки нужно нажать кнопку включения, кнопку выбора зоны нагрева (верх, низ, верх+низ) и выставить мощность от 1 до 9. Если на поверхности стоит подходящая посуда с подходящим диаметром дна — рядом с выбранной кнопкой зоны нагрева индикатор перестанет мигать, отобразится установленная мощность и конфорка начнет работать. При выборе режима FlexZone соответствующую мощность отобразят оба индикатора. Если индикаторы продолжают мигать или загорается служебный символ — значит на поверхность поставлена не соответствующая требованиям посуда.
Кнопка функции stop&go, находящаяся посередине, позволяет запустить паузу на выбранной конфорке, то есть конфорка переходит в режим ожидания, таймер приостанавливается. При повторном нажатии плита возвращается к прерванным установкам.
Таймер может быть установлен различными способами: как минутный таймер со звуковым сигналом, но без отключения конфорок, как таймер для определенной конфорки с выключением ее после истечения установленного времени. Максимальное время таймера 99 минут.
Сенсорные кнопки Lex EVI 320 F достаточно чувствительны, хорошо реагируют на слабое прикосновение даже мокрыми пальцами.
Управление варочной поверхностью реализовано просто и понятно.
Подключение и установка
Правила установки Lex EVI 320 F подробно описаны в инструкции.
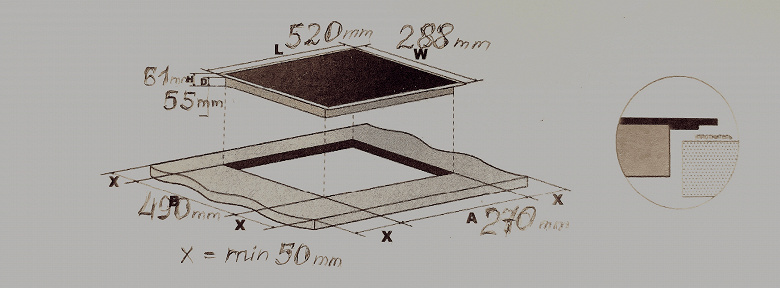
Столешница для врезки должна быть из термостойкого материала не менее 20 мм толщиной.
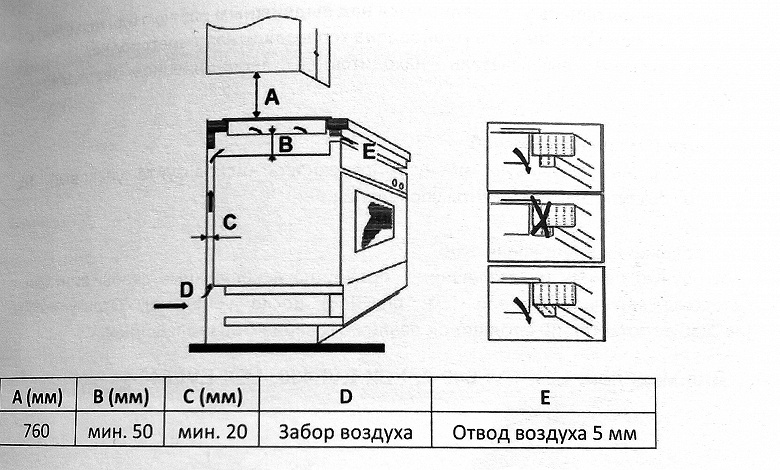
Шнур питания Lex EVI 320 F не оборудован вилкой и рассчитан на прямое подключение к выделенной линии сети, исключающей возможность подключения других электроприборов, с обязательным соблюдением полярности.
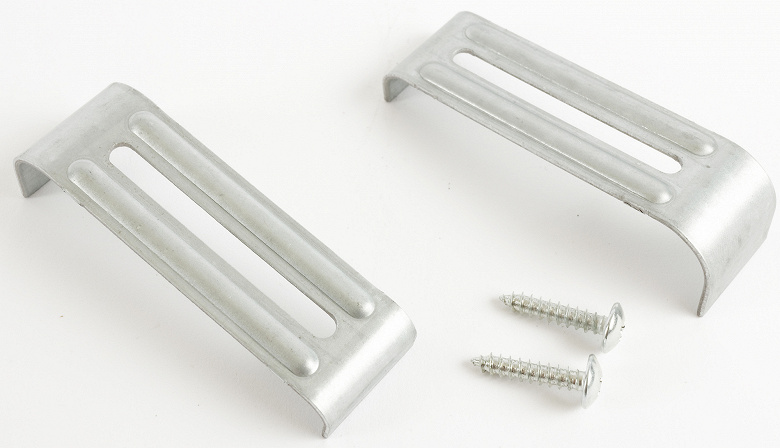
Монтаж производится с помощью скоб, поставляемых в комплекте.
Эксплуатация
Хочется отметить, что при своих небольших габаритах Lex EVI 320 F вполне может заменить четырехконфорочную плиту. Во-первых, из-за своей мощности и режима совмещения конфорок FlexZone, на плите можно в считанные минуты приготовить большой объем или блюдо, требующее максимального нагрева — стейк, вок, фритюр. Во-вторых, конфорки достаточно большие, чтобы совмещать приготовление сразу в двух емкостях объемом 4-6 литров, а обычно больше одновременно и не требуется.
Таймер позволяет использовать плиту автономно, а режим stop&go не даст блюду подгореть при необходимости отойти во время приготовления чего-то, требующего постоянного внимания.
Регулировки мощности для слабого нагрева в совмещении с таймером могут использоваться для приготовления в режиме су-вид.
Средняя мощность отлично подходит для бульонов.
Стеклокерамическое покрытие отлично очищается, тем более на варочной поверхности нет ни одного шва или места, где могла бы застрять пища.
Поверхность достаточно требовательна к посуде. Если посуда не совсем подходит для индукционных плит — немного неровное дно, небольшой диаметр, застаревшие большие загрязнения, данная плита такие емкости просто не видит, хотя некоторые модели в предыдущих тестах с такой посудой работали.
При работе, особенно на высокой мощности, поверхность издает разные негромкие звуки: свист, жужжание, но через некоторое время это проходит. Шум вентилятора тоже не очень сильный, так что можно назвать Lex EVI 320 F нешумной плитой.
Равномерность приготовления блинов, сырников и прочего скорее зависит от толщины дна и качества выбранной посуды, а не от самой плиты — на разных сковородках блюда получались разной равномерности прожарки.
Уход
Производитель рекомендует незамедлительно убирать разлив горячих сладких блюд, растаявшую или выкипевшую пищу с поверхности с помощью лопатки, шпателя или специального скребка. Для чистки нельзя использовать абразивные средства, струи пара. Сенсорные кнопки должны быть всегда чистыми, приборы на них ставить запрещено.
Полная информация по уходу за поверхностью содержится в инструкции.
Наши измерения
Кипячение 1 литра воды температурой 20 °C
На конфорке 2000 Вт (верхняя) в стальной кастрюле с диаметром дна 29 см 1 литр воды температурой 20 °C дошел до фазы активных пузырьков за 2 минуты 10 секунд, вскипел за 4 минуты 20 секунд. Плитка работала в режиме регулировки мощности на максимум (9, 2000 Вт), реальное энергопотребление было выше — 2160 Вт. На кипячение было потрачено 0,156 кВт·ч электроэнергии (с учетом нагревания большой кастрюли).
В зоне FlexZone (середина плиты, две конфорки одновременно) в той же стальной кастрюле 1 литр воды температурой 20 °C дошел до фазы активных пузырьков за 1 минуту 20 секунд, вскипел за 2 минуты 30 секунд. Плитка работала в режиме регулировки мощности на максимум (9, 3200-3500 Вт), максимальное энергопотребление составило 3450 Вт. На кипячение было потрачено 0,137 кВт·ч электроэнергии (с учетом нагревания большой кастрюли).
Энергопотребление в различных режимах
В режимах от 1 до 6 плитка работает в импульсном режиме, то включая, то выключая излучатель на разной мощности. Характер пауз более сложный, чем просто комбинация из одной паузы и одного включения, поэтому в соответствующей графе таблицы мы указали цикл в виде последовательности «выключено—включено—выключено—включено», в секундах. Усредненная мощность рассчитывалась по формуле: потребляемая мощность × общая длительность включения / (общая длительность включений + общая длительность пауз).
| Режим мощности | Потребляемая мощность, Вт | Цикл (выкл.—вкл.—выкл.—вкл.—…), с | Среднее энергопотребление, Вт |
|---|---|---|---|
| Нижняя конфорка | |||
| 1 | 800 | 10—1 | 80 |
| 2 | 800 | 8—1,5—8—2 | 105 |
| 3 | 800/1200 | 8—2,5 | 238 |
| 4 | 800/1200 | 5—5 | 500 |
| 5 | 1000/1300 | 2—6 | 900 |
| 6 | 1260 | 1—9 | 1134 |
| 7 | 1260 | — | 1260 |
| 8 | 1350 | — | 1350 |
| 9 | 1350 | — | 1350 |
| Верхняя конфорка | |||
| 1 | 900/1000/1200 | 10—1,5 | 136 |
| 2 | 1200 | 10—3 | 277 |
| 3 | 1200/1300 | 7—4 | 454 |
| 4 | 1300 | 4—6 | 780 |
| 5 | 1300 | 1,5—9 | 1110 |
| 6 | 1300/1450 | 1—11 | 1260 |
| 7 | 1450 | 1450 | |
| 8 | 1600 | 1600 | |
| 9 | 2150 | 2150 |
(значения в таблице усредненные)
Размер нагревательного элемента
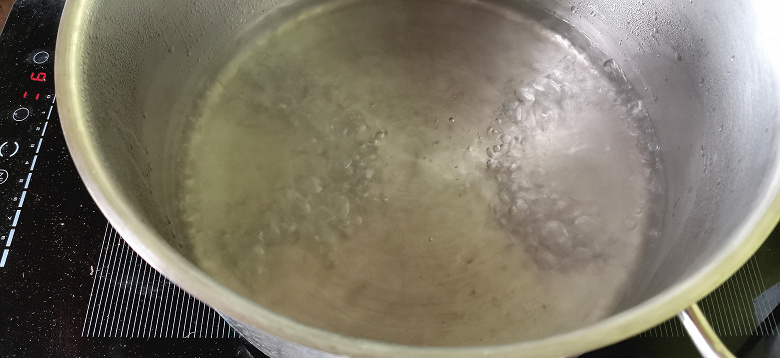
Для определения размера нагревательного элемента мы поставили на плитку нержавеющую кастрюлю большего размера, чем сама плитка, налив в нее немного воды. Через несколько секунд придонные пузырьки обозначили конфигурацию нагревательного элемента. Это круг диаметром 16 см без пустот внутри.
В зоне FlexZone оба нагревательных элемента работают одновременно. В кастрюле 29 см диаметром это выглядит как два почти соприкасающихся круга.
Прочие измерения
За 12 часов 6 минут работы прибор потребил 5,42 кВт·ч электроэнергии. Максимальная мощность, зарегистрированная ваттметром, составила 3541 Вт, что практически соответствует заявленной. В состоянии ожидания плитка потребляет 0,9 Вт.
Практические тесты
В практических тестах мы оценивали удобство приготовления на двух конфорках, режим максимальной мощности, удобство таймера, режим средней и малой мощности, равномерность нагрева.
Обжаренная говядина
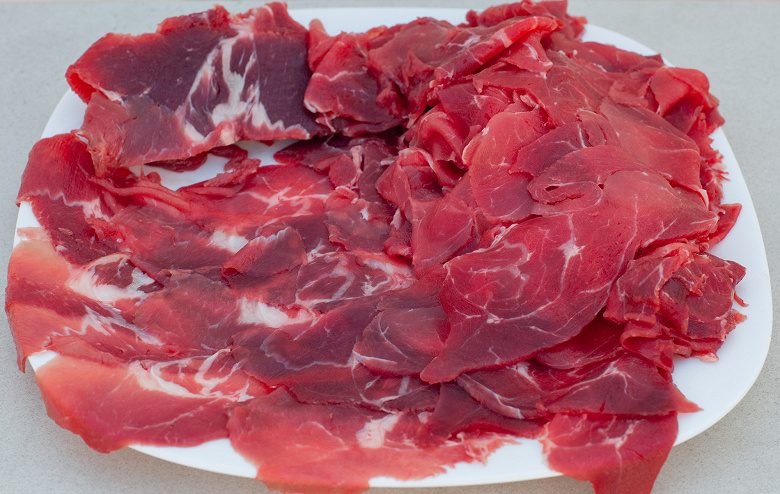
Мы взяли говядину и свинину, нарезали тонкими кусочками и обжарили на максимальной мощности в режиме совмещения конфорок FlexZone на сковороде 30 см диаметром.
Мясо обжарилось практически моментально, даже не успев дать сок. В результате достаточно жилистая говядина оказалась мягкой, но при этом сочной. Подали с салатом из капусты, огурца и оливок.
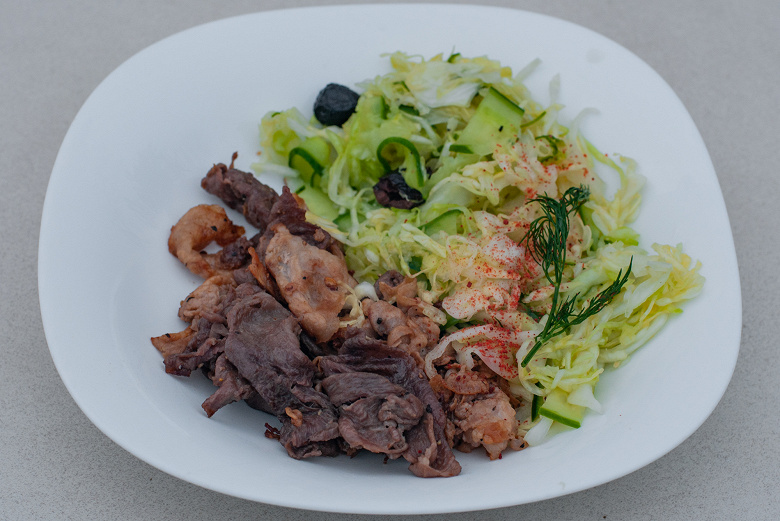
Результат: отлично.
Блины
Мы сделали стандартное блинное тесто, взяли чугунную сковородку диаметром 32 см. После некоторых проб оказалось, что оптимальная мощность для тонких блинов в нашем случае — 7.
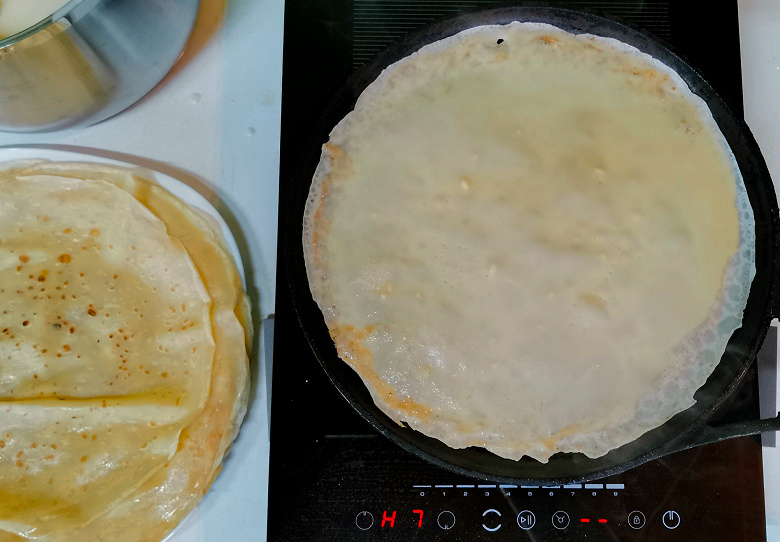
Блины прожаривались равномерно, быстро, работать на поверхности удобно. При поднятии сковородки для распределения теста плита через секунду отключается, так как не видит посуду, но при постановке сковородки обратно сразу включается снова. Брызги от масла легко стираются в процессе бумажным полотенцем.
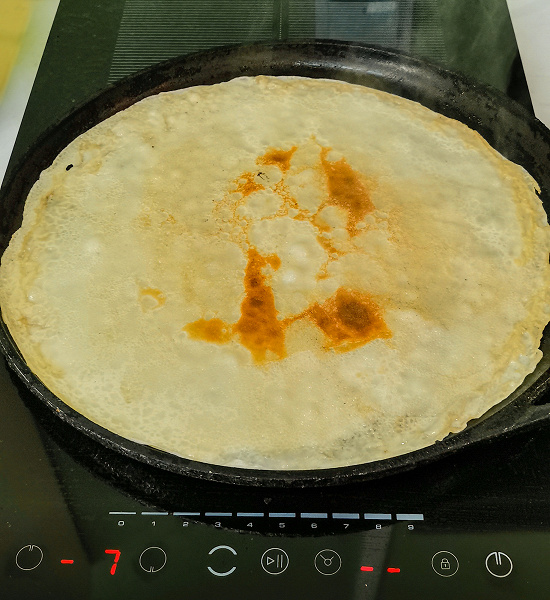
Результатом остались довольны.

Результат: отлично.
Тыквенная каша
Для каши мы взяли 2 пачки замороженной тыквы и круглозерный рис.
Готовили в 5-литровой кастрюле на режиме 3. В кастрюлю засыпали тыкву, долили воды, посолили, всыпали сверху рис. Закрыли крышкой, выставили мощность и таймер и забыли про кашу на 1,5 часа.
Через 1,5 часа каша была готова, осталось только разложить по тарелкам и добавить масла.
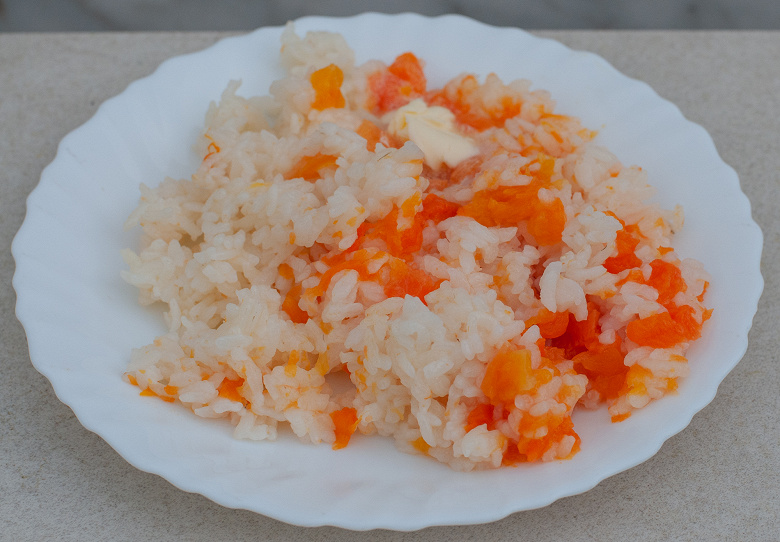
Результат: отлично.
Тушеная капуста с беконом
Мы взяли бекон.
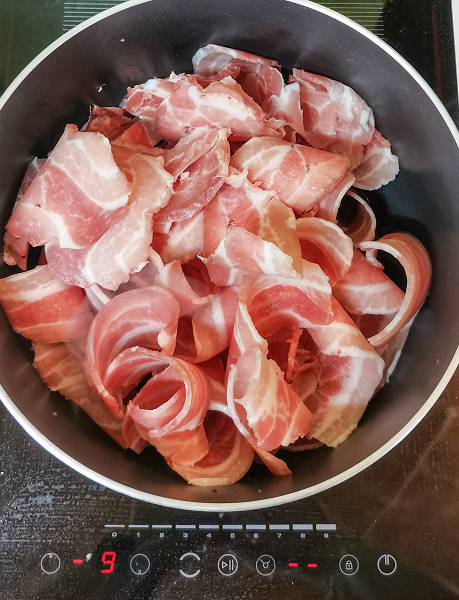
Обжарили его в кастрюле с антипригарным покрытием на режиме 9.
Уложили сверху квашеную капусту со специями, долили воды, выставили мощность и таймер. Тушили на режиме 4 в течение 2 часов.
Получился отличный вкусный бигус, хотя бекон и развалился на мелкие кусочки.

Результат: отлично.
Куриный бульон из корнишонов
В кастрюлю на 6,5 л положили несколько куриц-корнишонов, залили водой и поставили на плиту в режиме слабого нагрева. Выставили таймер на 1,5 часа. Через 1,5 часа добавили в бульон морковь, корни петрушки и зелень.
Довели до готовности, немного увеличив мощность. Бульон получился отлично.

Результат: отлично.
Выводы
Индукционная стеклокерамическая поверхность Lex EVI 320 F имеет все необходимые современные функции для комфортного приготовления пищи и, несмотря на небольшой размер, может заменить громоздкую четырехконфорочную плиту. Регулировка мощности в широком диапазоне позволяет готовить весь спектр блюд от су-вида до стейка и вок на большой сковороде. Встроенный таймер с возможностью отключения конфорки делает возможным автономное приготовление, а функция stop&go позволяет в одно касание сделать паузу при готовке, не отключая настройки плиты.

Дизайн Lex EVI 320 F не только вписывает прибор практически в любой интерьер, но и облегчает уход за ним, так как поверхность представляет собой единую монолитную плиту без дополнительных выступающих деталей.

Плюсы:
- дизайн
- таймер
- широкий диапазон мощности
- функция stop&go
Минусы:
- не обнаружены
Индукционная варочная панель EVI 320 F BL предоставлена на тестирование компанией Lex
устранение неисправностей
неисправность
Не удается включить
варочную панель.
Сенсорная панель
управления не реагирует
на прикосновения.
Сенсорная панель
управления
плохо реагирует
на прикосновения.
При использовании
некоторых сковородок
слышно потрескивание
или щелчки.
При установке
высокой температуры
нагрева индукционная
панель издает низкий
гудящий звук.
Во время работы
индукционной варочной
панели слышен
шум вентилятора.
GLOA10335_SM — 200000017_R-All-languages.indd 33
Возможная причина
Отсутствует
электропитание.
Панель управления
заблокирована.
Возможно, на панели
управления осталось немного
воды или вы прикасаетесь к
элементам управления только
кончиком пальца.
Возникновение таких
звуков может быть
связано с конструкцией
используемой посуды (слои
из различных металлов
вибрируют по-разному).
Шум обусловлен
принципом работы
индукционного нагрева.
Индукционная варочная
панель оснащена встроенным
охлаждающим вентилятором,
который включается
для предотвращения
перегрева электронных
компонентов прибора.
Он может продолжать
работать даже после
выключения индукционной
варочной панели.
решение
Убедитесь, что варочная
панель подключена к сети
электропитания и включена.
Проверьте предохранитель
надомашнем распределительном
щите, к которому подключен
прибор. Проверьте, не произошло
ли отключения электроэнергии,
включив другие электроприборы.
Отключите блокировку
элементов управления
(→ Безопасный режим
(защита от детей)).
Убедитесь, что область
сенсорной панели управления
сухая. Нажимайте кнопки
на панели управления всей
подушечкой пальца.
Это нормальное явление
при использовании посуды,
не указывающее на
наличие неисправности.
Это нормальное явление, но шум
должен стать тише или полностью
прекратиться при понижении
температуры нагрева.
Это не является неисправностью,
и выполнение каких-либо
действий не требуется. Не следует
отключать варочную панель от
настенной сетевой розетки, пока
работает вентилятор.
11/05/2017 16:14