
|
02.02.2018, 13:50 |
||||
|
||||
|
Инструкция Citizen Eco-Drive Radio Controlled Cal. 9447 Добрый день! Ну никак не могу победить настройку данных часов. С уважением.Алексей Миниатюры
__________________ |
||||
|
|
|
15.03.2018, 12:22 |
||||
|
||||
|
Так ничего и не нарыл…может быть, кто посоветует что?
__________________ |
||||
|
|
|
19.03.2018, 15:41 |
||||
|
||||
|
Приветствую! Процедура следующая: Верхняя кнопка — увеличение, нижняя — уменьшение. Ну вот как-то так. Миниатюры
|
||||
|
|
|
Эти 2 пользователей сказали Спасибо! Toad за это сообщение: |
|
19.03.2018, 15:50 |
||||
|
||||
|
2Toad Большое Вам спасибо! Сегодня вечером постараюсь настроить их….
__________________ |
||||
|
|
|
19.03.2018, 16:51 |
||||
|
||||
|
Надеюсь у Вас се получится. Не правильно обозвал кнопки : |
||||
|
|
|
Этот пользователь сказал Спасибо! Toad за это сообщение: |
|
23.03.2018, 15:39 |
||||
|
||||
|
Пока не получилось обнулиться.
__________________ |
||||
|
|
|
24.03.2018, 23:38 |
||||
|
||||
|
Обнулился,потом выставил дату и точное время,все получилось Toad,ещё раз огромное спасибо Вам за оказанную помощь и подробную инструкцию к действию! Миниатюры
__________________ |
||||
|
|
|
25.03.2018, 20:28 |
||||
|
||||
|
Рад, что все получилось. Кривая дата в окошке у меня в других часах выправилась сама, через несколько дней. |
||||
|
|
|
Этот пользователь сказал Спасибо! Toad за это сообщение: |
|
30.03.2018, 11:40 |
||||
|
||||
|
Еще немного «танцев с бубном» и удалось отрегулировать дату относительно окошка.
__________________ |
||||
|
|
|
04.04.2018, 12:22 |
||||
|
||||
|
Тема, между тем, получила интересное продолжение. Мне на вторичке попался более ранний, кварцевый экземпляр с боковым серым модулем и функцией Радиоконтроля Вот такой: Но часы не обнуляются ни в какую, стрелки в 0 положении на 12 не выставляются автоматом и дата не движется совсем… Двигаются стрелки, но не могу обнулиться…. Может быть, элемент питания приказывает долго жить? Миниатюры
__________________ |
||||
|
|
|
Этот пользователь сказал Спасибо! Alex01061979 за это сообщение: |
1
Table of Contents
1. Your Watch ……………………………………………………………………………………. 9
2. Before Use …………………………………………………………………………………… 12
• Checking the Reference Position ………………………………………………… 14
3. Basic Watch Operations ……………………………………………………………….. 16
Radio Signal Reception
4. Radio Signal Reception ………………………………………………………………… 18
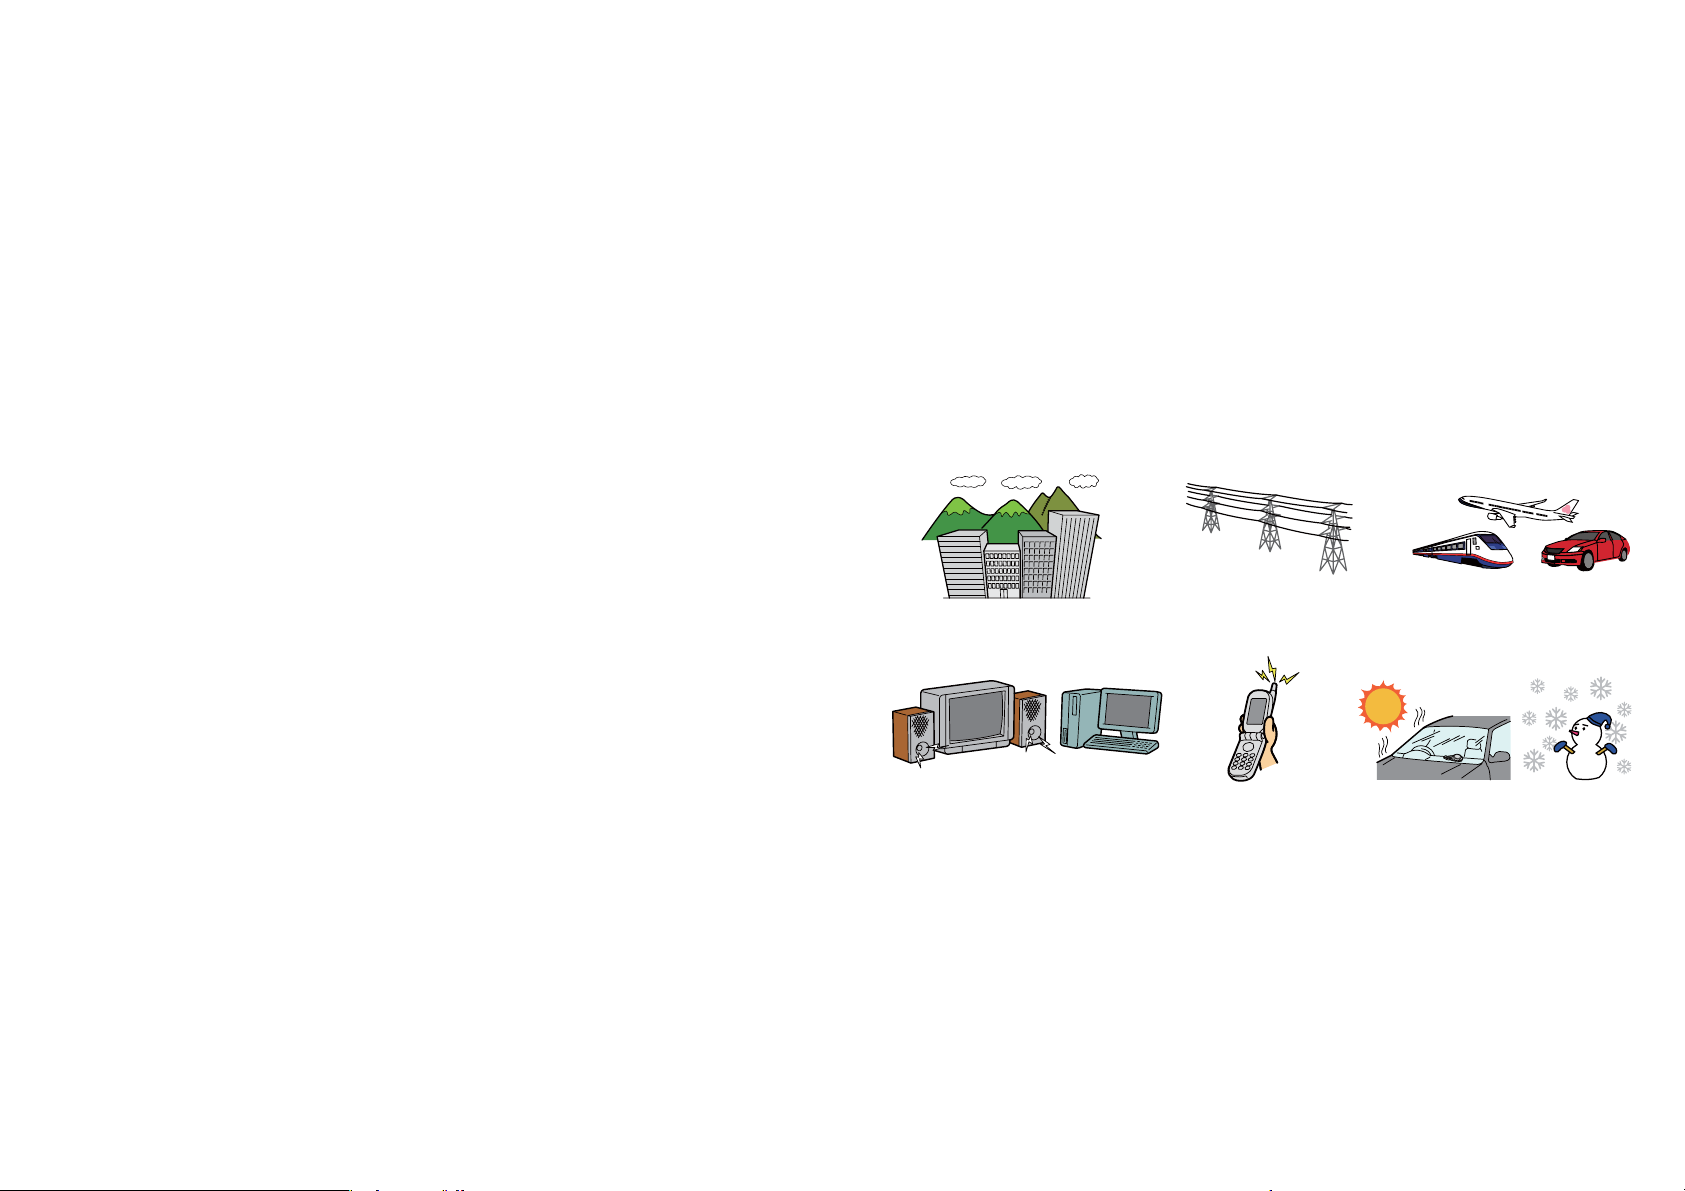
5. Poor Reception Areas…………………………………………………………………… 23
6. Display during Reception ……………………………………………………………… 24
7. Confirming Reception Status………………………………………………………… 26
8. Reception Area Guidelines……………………………………………………………. 28
9. World City Display………………………………………………………………………… 33
10. Charge Level Display……………………………………………………………………. 38
English

2 3
Operations in Each Mode
11. Changing Mode ……………………………………………………………………………. 40
12. Using Home Time and World Time………………………………………………… 42
13. Using Daylight Saving Time………………………………………………………….. 44
14. Setting the Time (TME) …………………………………………………………………. 46
15. Setting the Calendar (CAL)……………………………………………………………. 50
16. Using the Timer (TMR)………………………………………………………………….. 54
17. Using the Chronograph (CHR)………………………………………………………. 58
18. Using the World Time Setting (WT-S)…………………………………………….. 60
19. Using the World Time Alarm (AL-1 and 2) ……………………………………… 64
20. Using the Receive Setting (RX-S) ………………………………………………….. 66
21. LED Lights …………………………………………………………………………………… 70
22. Resetting Your Watch…………………………………………………………………… 70
23. Adjusting the Reference Position………………………………………………….. 72
Using the Slide Rule Bezel …………………………………………………………………. 76
Solar Power
24. Solar Power Function …………………………………………………………………… 88
25. Characteristics of the Solar Powered Watch………………………………….. 90
A. Power Saving Function …………………………………………………………….. 92
B. Insufficient Charge Warning Function……………………………………….. 94
C. Overcharging Prevention Function……………………………………………. 95
D. Guide to Charging Time ……………………………………………………………. 96
E. Handling Your Solar Powered Watch…………………………………………. 98
Troubleshooting
Radio Signal Reception Function ………………………………………………… 100
Eco-Drive……………………………………………………………………………………. 104
Precautions……………………………………………………………………………………… 106
26. Specifications…………………………………………………………………………….. 112

4 5
Congratulations and Thank You for your selection of a CITIZEN Eco-Drive watch.
To get the most out of your purchase, please be sure to read this manual and keep it
on hand for reference.
Once fully charged by exposure to light, your watch will give you years of
enjoyment and reliability.
Notice
All repairs performed on this watch are to be performed at the CITIZEN.
When desiring to have your watch repaired or inspected, please contact the Citizen
Service Center either directly or through the store where you purchased your watch.
Please use this watch after it has been sufficiently
charged by exposure to light.
If the second hand of the watch is moving at two-second intervals, this indicates the
watch is insufficiently charged. To ensure proper operation, the watch should be fully
charged by placing the watch under direct sunlight for about eight (8) hours. We
recommend the watch keep a high charge level to ensure optimum operation.
Charge your watch as indicated in “Guide to Charging Time” (p. 96).
6 7
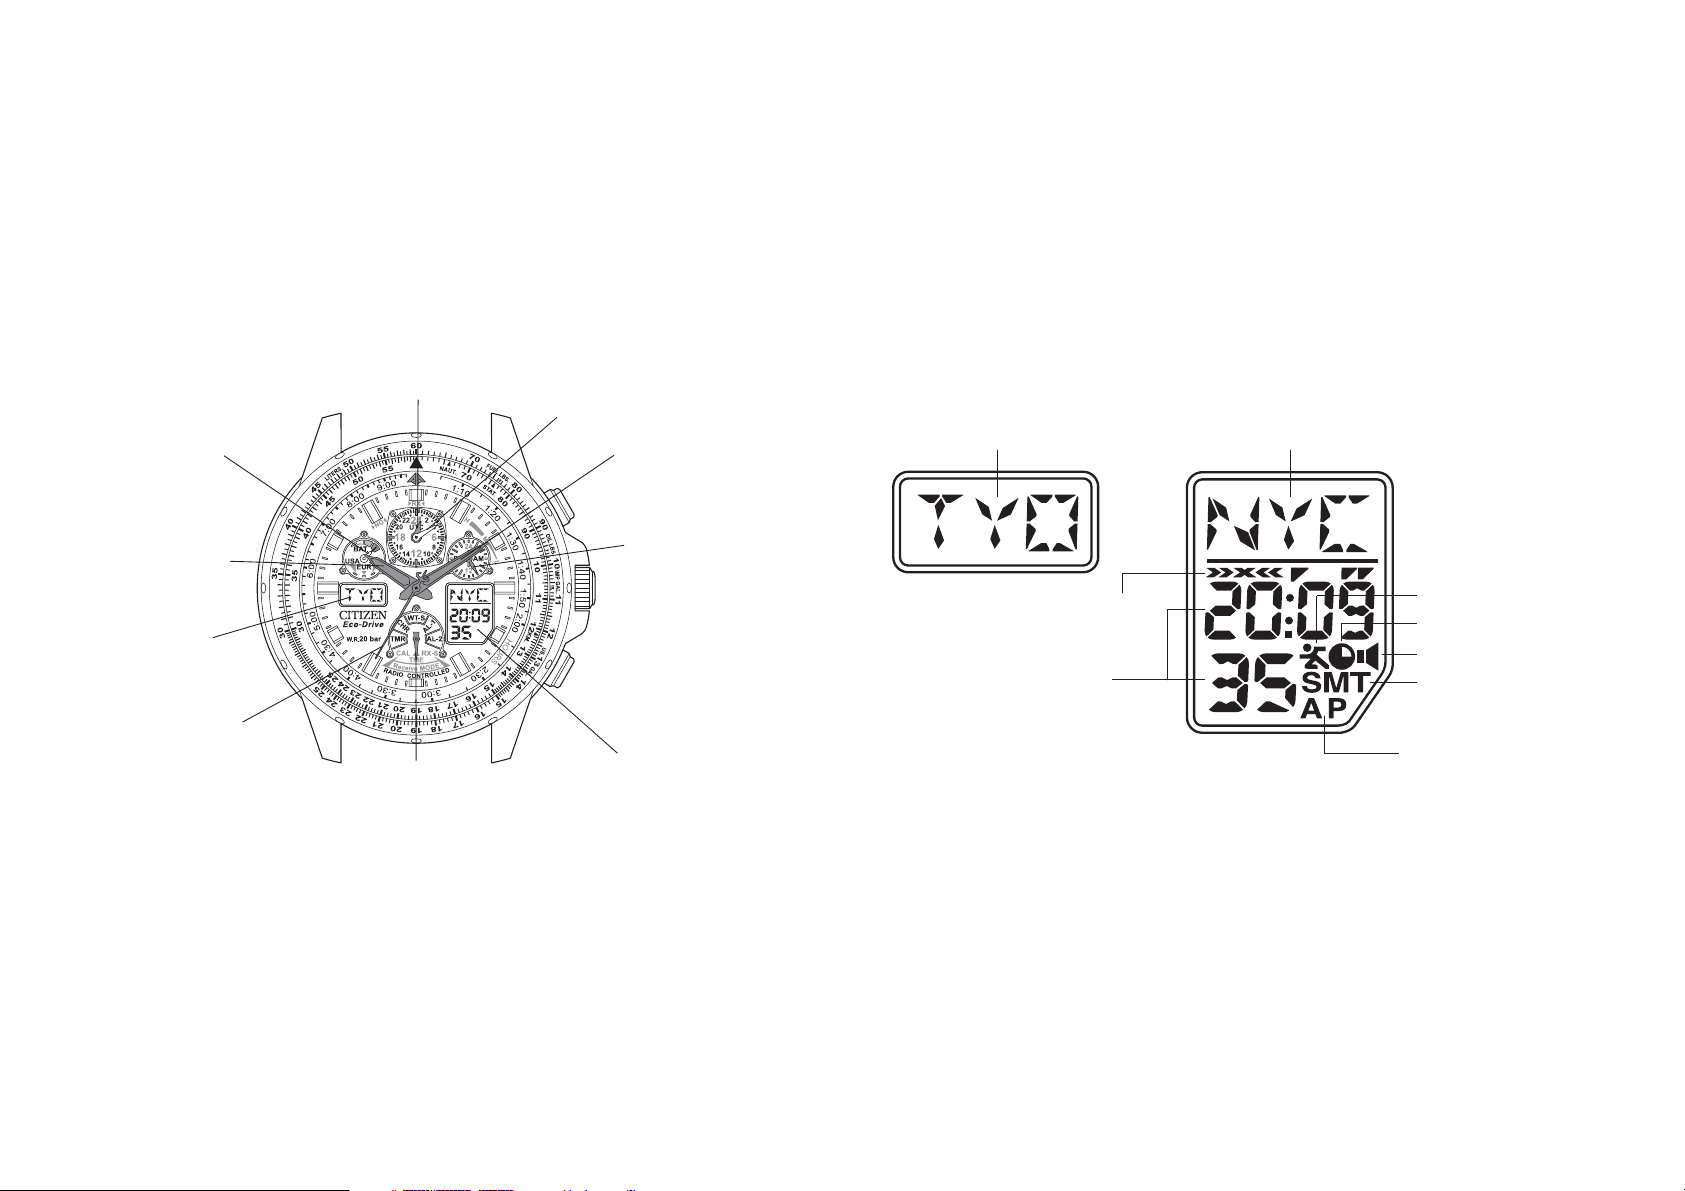
Note: To assist in the explanation, all parts of the digital display are shown in the illustration.
Part Names (2): Digital Displays
[Digital display 2] [Digital display 1]
World city name
Morning: A
Afternoon: P
Chronograph
measurement mark
Timer measurement mark
Alarm setting mark
Daylight saving time setting
mark
Home city name
Insufficient charge
warning mark
World city time
Hour/minute/second
• The illustrations shown in this manual may differ from the actual watch you have purchased.
Part Names (1)
Charge level indicator/
radio wave reception
indicator
Home time hour hand
Digital display 2
(Displays the home city)
Home time second
hand
Mode hand
UTC hour hand
UTC minute hand
Home time minute hand
Button (B)
24-hour hand
Crown
Button (A)
Digital display 1
(Displays world city/
world time)
WW
1. Your Watch
World Time Eco-Drive Radio Controlled Watch
<Radio Signal Reception Function>
This watch is a radio controlled watch, which receives the standard time radio waves that are
broadcast from radio wave transmitters in three regions, Japan, the USA and Europe
(Germany), and uses these waves to automatically correct the time and date. (p. 18)
i Automatic reception: The watch will automatically receive the radio wave up to three
times a day, at 2 a.m., 3 a.m. and 4 a.m., and adjust the time and date accordingly. However,
note that if the watch successfully receives the radio wave at 2 a.m., it will not perform
automatic reception again at the later times.
The 4 a.m. automatic reception can be changed to any time of the day.
i On demand reception: The radio wave can be received at any time of the day to adjust
the time and date.
In the event that a radio signal cannot be received, the watch can be manually set and will
operate keeping time within +/- 15 seconds per month.
8 9
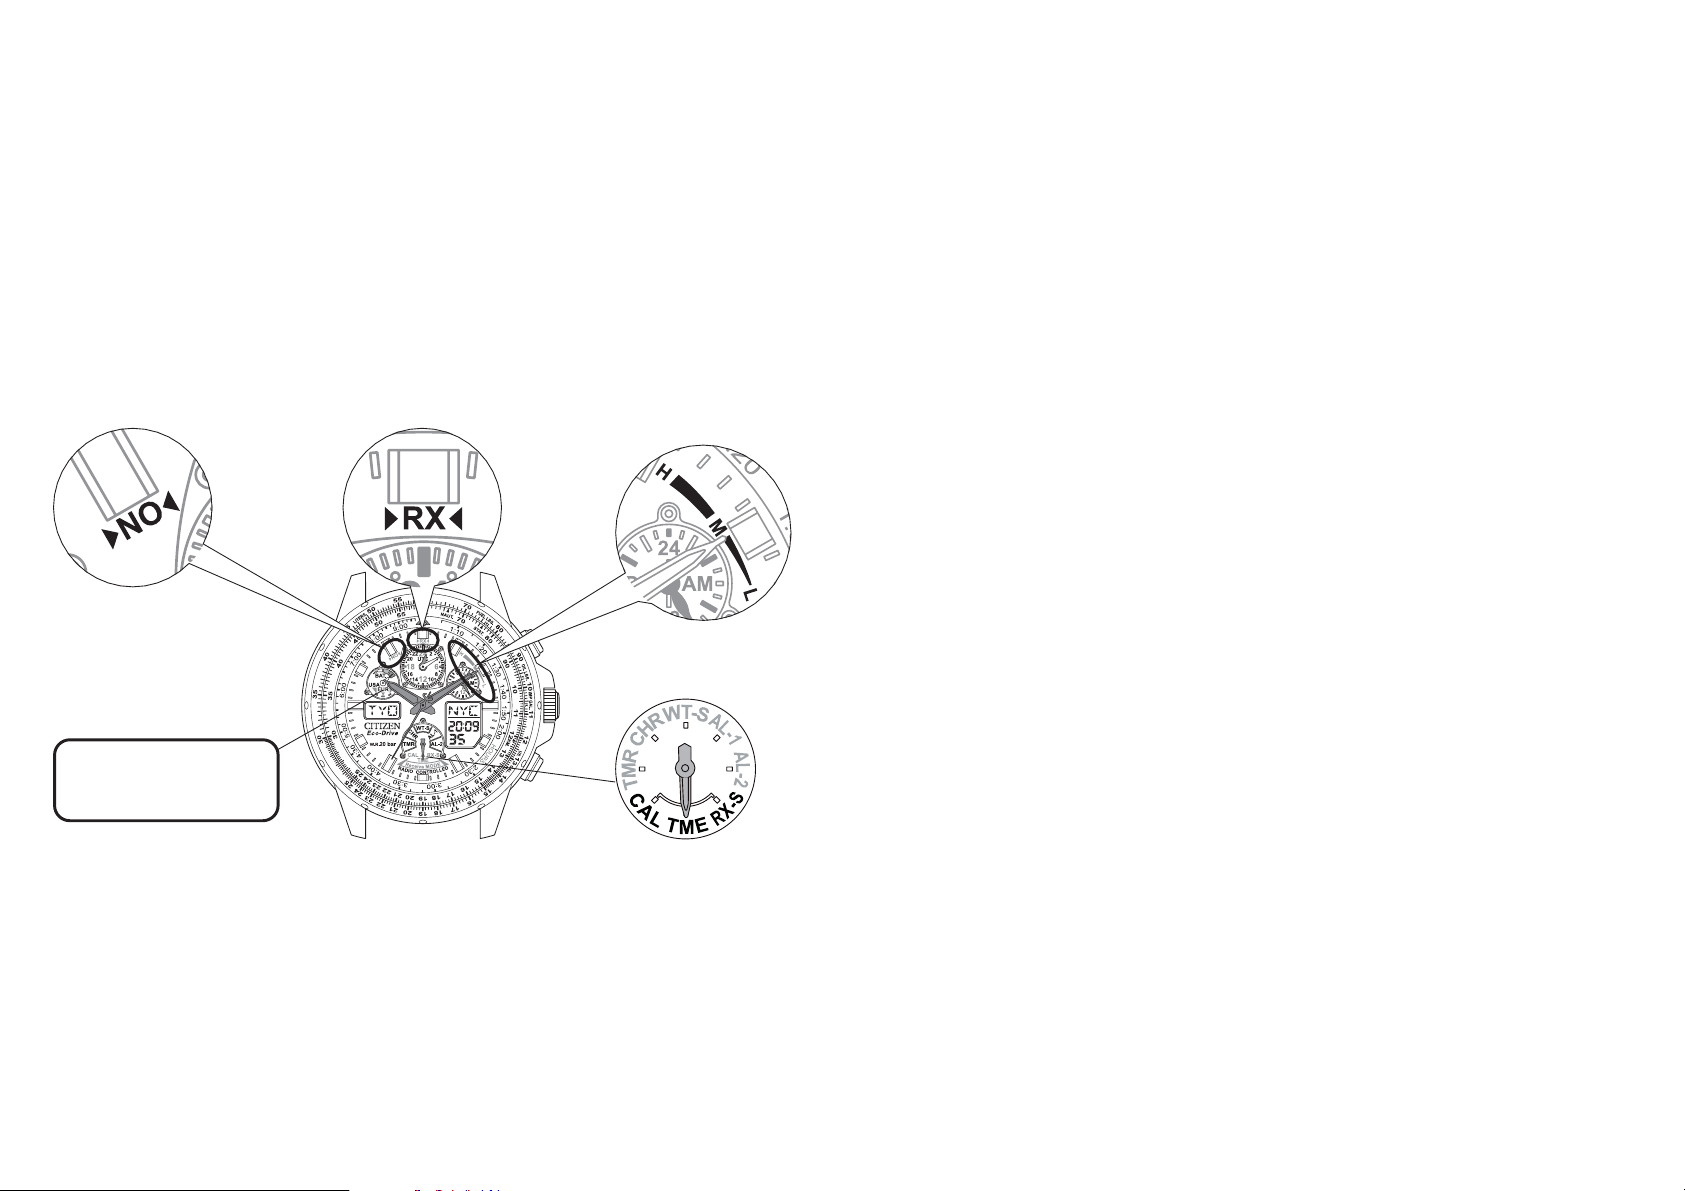
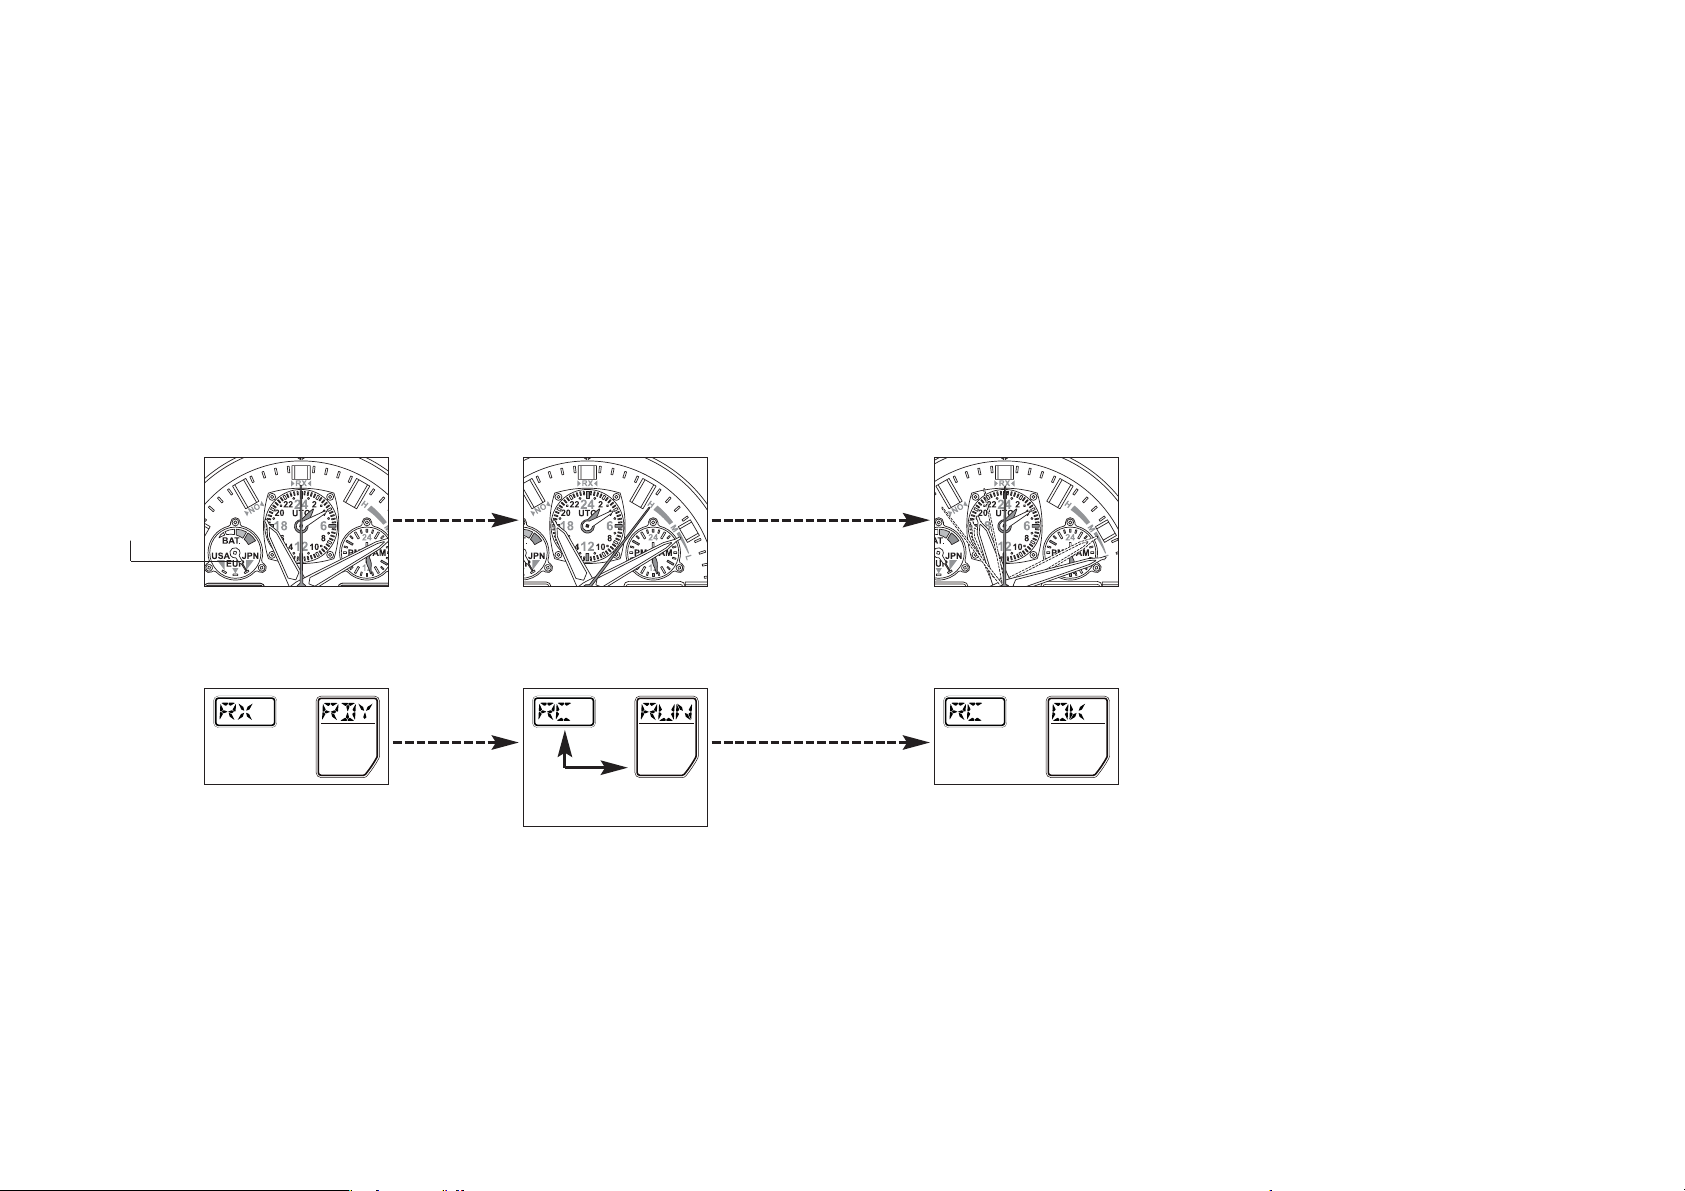
Part Names (3): Radio Wave Reception Display
NO: Signal reception failed RX: Reception standby H, M, L: Reception level/
reception status
Modes where reception is
possible: CAL, TME and
RX-S
JPN : JJY (Japan)
USA : WWVB (USA)
EUR : DCF77 (Germany)

10 11
Important Points Regarding Radio Wave Reception
There are two methods to receive radio signals during normal operation, Automatic and
On Demand.
The internal unidirectional antenna may be weakened by geography or building
structures, which may require the user to place the watch near a window.
When receiving radio waves:
* Remove the watch from your wrist
* Face the 9:00 position of the watch towards a window
* Place the watch on a stable surface
* Do not move the watch during this process. Movement of the watch may cause
incomplete reception. During radio reception, the second hand of the watch moves in
reception level.
* When reception is complete, the watch will return to movement at one-second
intervals.
Reception can take from about 2 minutes to a maximum of 15 minutes.
<World Time Function>
i UTC (Coordinated Universal Time), the time and date of 43 cities (or regions) from around
the world and one city (any can be set) can be displayed and easily called up. It is
convenient when traveling overseas on business or vacation.
Daylight saving time can also be set. (p. 44)
<Solar Power Function>
This is a multi-functional Eco-Drive watch, which is equipped with a solar power function for
powering the watch by converting light energy into electric energy.
i Charge level display function: This function displays the charge level in four grades, to
give an approximate indication of how much the secondary battery is charged. (p. 38)
i Power saving function: The watch is equipped with two power saving functions.
If the watch face is not exposed to light for 30 minutes or longer, all the LCD display
sections turn off (Power saving 1). If the watch face is then not exposed to light for one
week or longer, the hands are stopped in order to minimize the watch’s power consumption
(Power saving 2). (p. 92)
12 13
Check the
reception status.
• Pull out the crown to
position 1.
• Turn the crown to
align the mode hand
with TME.
• Return the crown to
the normal position.
• Press the lower right
button (A) at the
4:00 position.
(p. 26)
The second
hand indicates
a reception
status of H, M
or L
The second
hand indicates
a reception
status of NO
Refer to “On Demand
Reception” (p. 20) to
perform the radio wave
reception.
Your watch is
correctly receiving
the standard time
radio wave.
It is ready to use.
If you are unable to
receive radio waves,
please inquire to the
Citizen Service Center.
WW
2. Before Use
[Insufficient charging]
Charge level
indicator
[Fully charged]
Check the movement of
the second hand.
The second hand is
moving at 2-second
intervals or is stopped.
The second hand is
moving at 1-second
intervals.
Charge the watch
sufficiently by placing it in
direct sunlight as indicated
in “Guide to Charging
Time” (p. 96).
NO: Signal
reception failed
RX: Reception
standby
Reception level/
reception status
H: High
M: Middle
L: Low
Crown in its
normal position
Button (A)
Mode hand
14 15
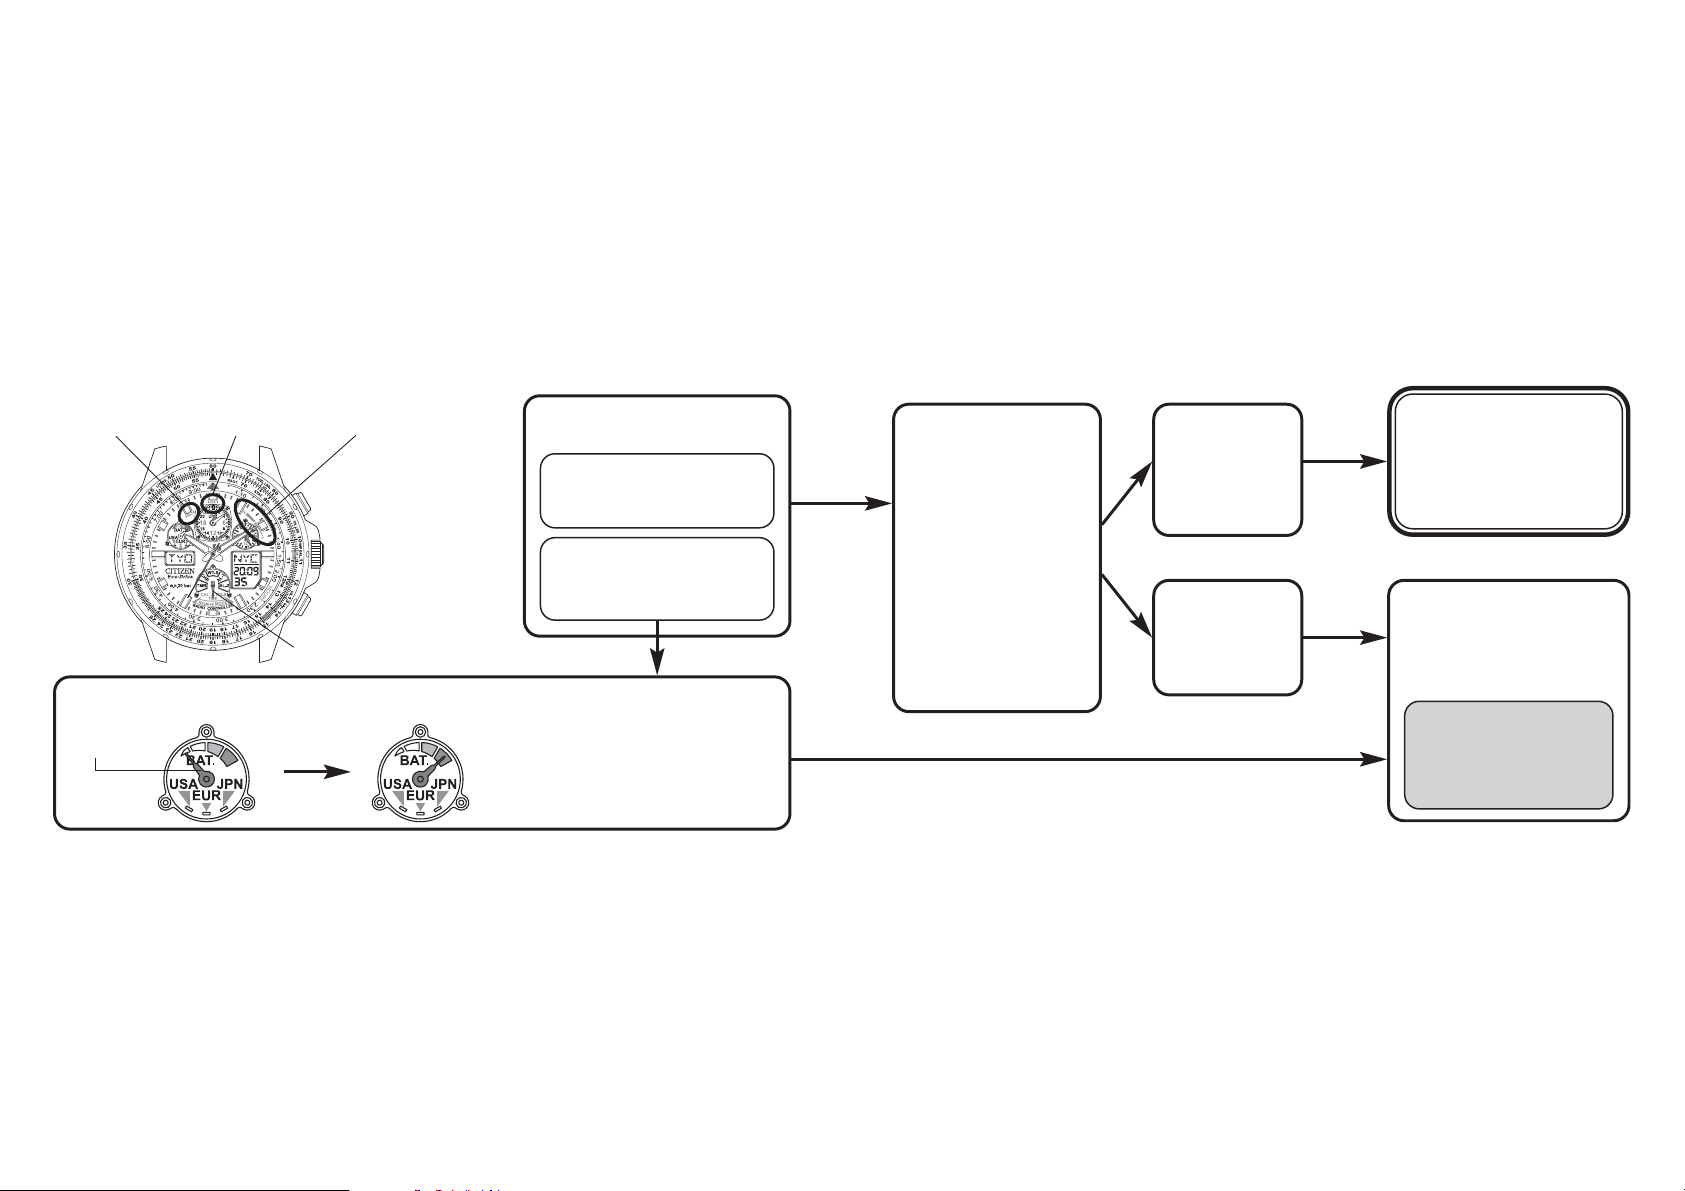
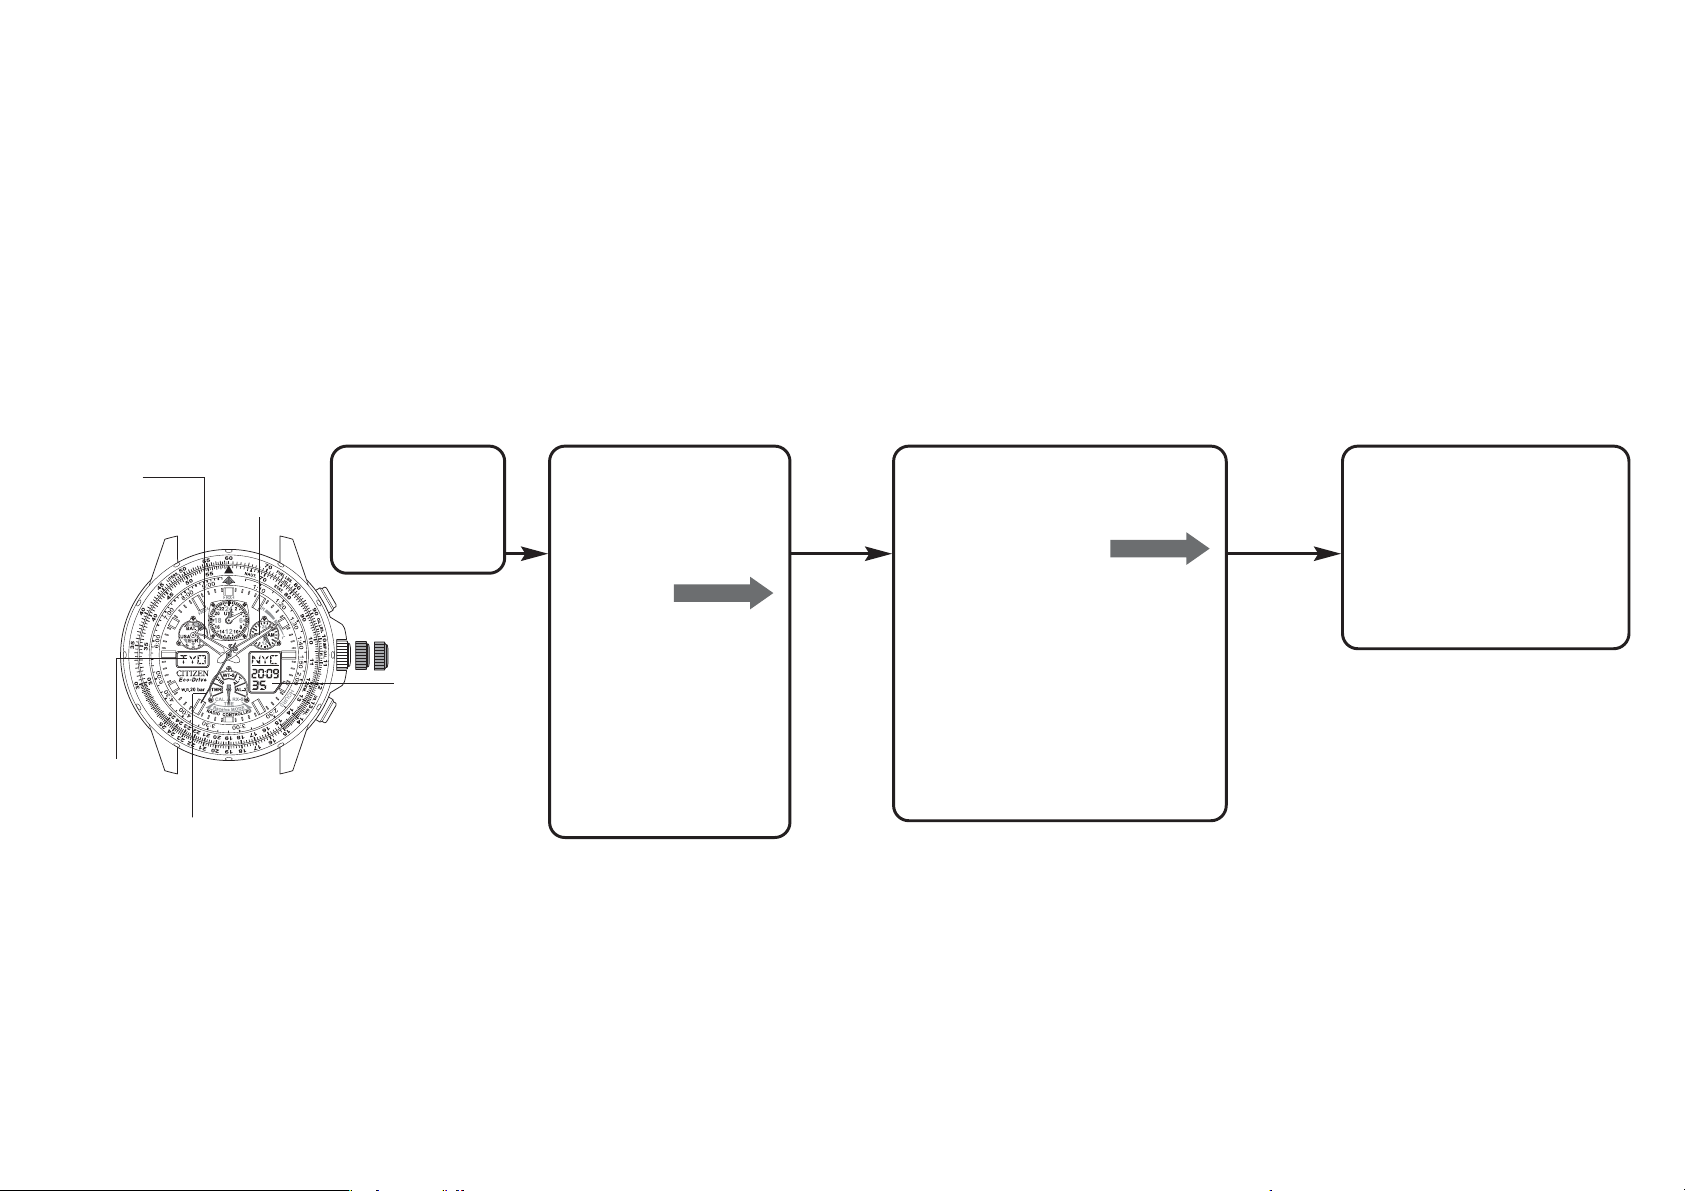
1. Pull the crown out to position 1 and turn to align
the mode hand with CHR (chronograph mode).
2. Pull out the crown to position 2.
• The hands will move rapidly, stopping at the
reference position recorded in the watch
memory.
Correct reference positions
Charge level indicator: EUR
UTC hour and minute hands: 12:00
Hour, minute and second hands: 12:00:00
24-hour hand: 12:00
3. If the reference position is correct, the check is
complete. Press the crown back into its normal
position.
• If a position is incorrect, refer to “Adjusting the
Reference Position” and adjust it to the correct
position. (p. 72)
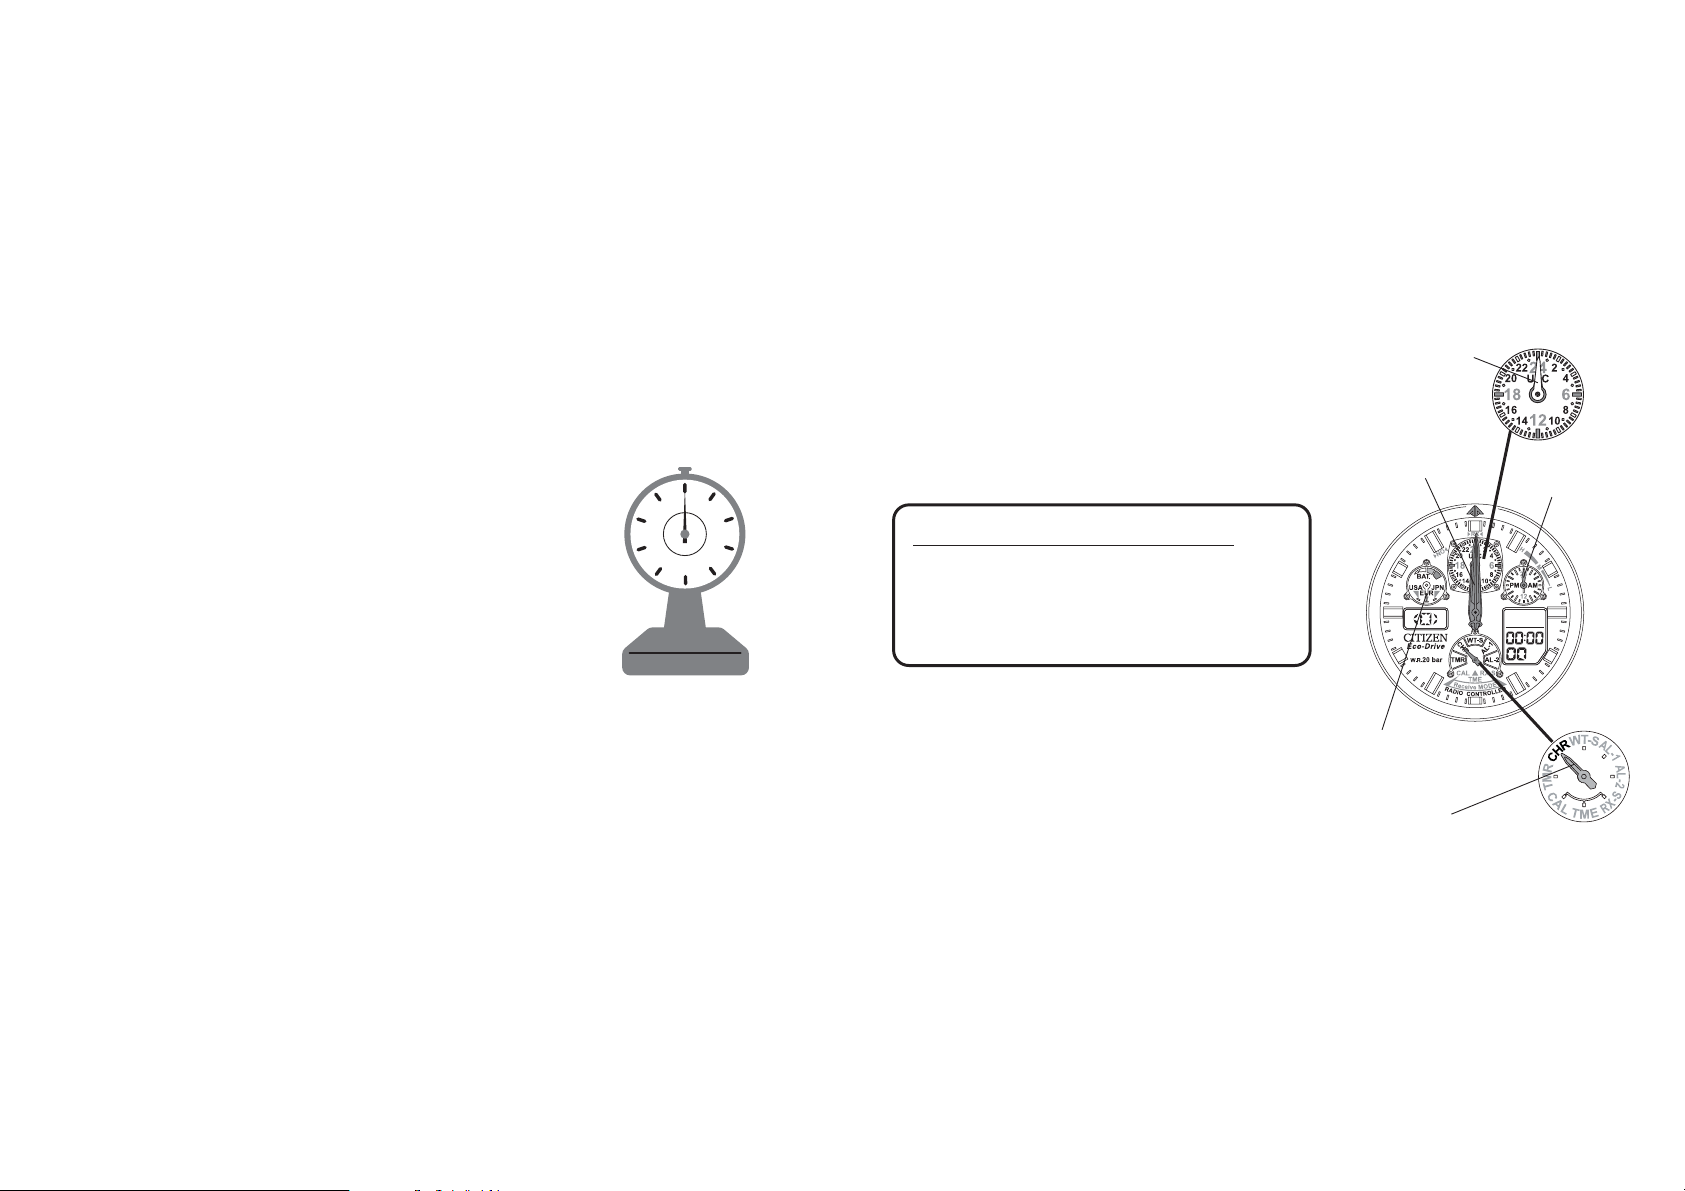
[Checking the Reference Position]
Before using the watch, confirm that the hands are aligned with
“0”, similar to when setting weighing scales
i The reference position may become misaligned when the
watch is exposed to strong magnetism, static electricity
or impacts. Even if radio waves are received, the correct
time will not be indicated unless the watch hands are
aligned to the correct reference position. Check that the
hands are properly aligned with “0”.
Examples of magnetic products that can affect the
watch.
• Health products (for example, medical necklaces and waist bands
that have magnetic fields)
• Refrigerators (magnetic part of the door)
• Electromagnetic cookers
• Bags (with magnet fasteners)
• Mobile phones (speaker part)
Keep the watch away from items similar to those above.
Hour, minute
and second
hands
UTC hour and
minute hands
24-hour
hand
Charge level
indicator
Mode hand
16 17
3.
Set the home time.
If the home time is correct,
(1) Set the time manually (p. 46)
(2) Set the time by receiving the radio
wave (p. 20)
Caution:
If the home city is set to a city that
is outside the reception area, the
radio wave cannot be received.
Turn off the automatic reception
and set the time manually.
(p. 66oo69)
4.
Set digital display 1.
The world time or date can be
displayed on digital display 1.
Also, the mode can be switched
in order to use the alarm, timer
or chronograph. (p. 40)
WW
3. Basic Watch Operations
* The watch receives the radio wave from the radio wave transmitter located in the
home city’s region.
1.
Check the
charge level.
(p. 38)
2.
Set the home city.
If the city in which you
are situated is displayed
in digital display 2,
(1) Pull out the crown to
position 1 and turn to
align the mode hand
with TME.
(2) Press button (A) or (B)
to call up the home city
in digital display 1.
(3) Press button (A) and
button (B) at the same
time to display the home
city in digital display 2.
Home time
hour hand
Home time
minute hand
Digital display 1
Home time second hand
Home city
(Digital display 2)
Button (A)
Button (B)
18 19
Automatic reception
• It is not necessary to operate buttons during automatic reception.
• The watch will automatically receive the radio wave every day at 2
a.m., 3 a.m. and 4 a.m.
• The 4 a.m. reception can be changed to any time of the day. (p. 66oo69)
• Reception can be set to OFF. (p. 66oo69)
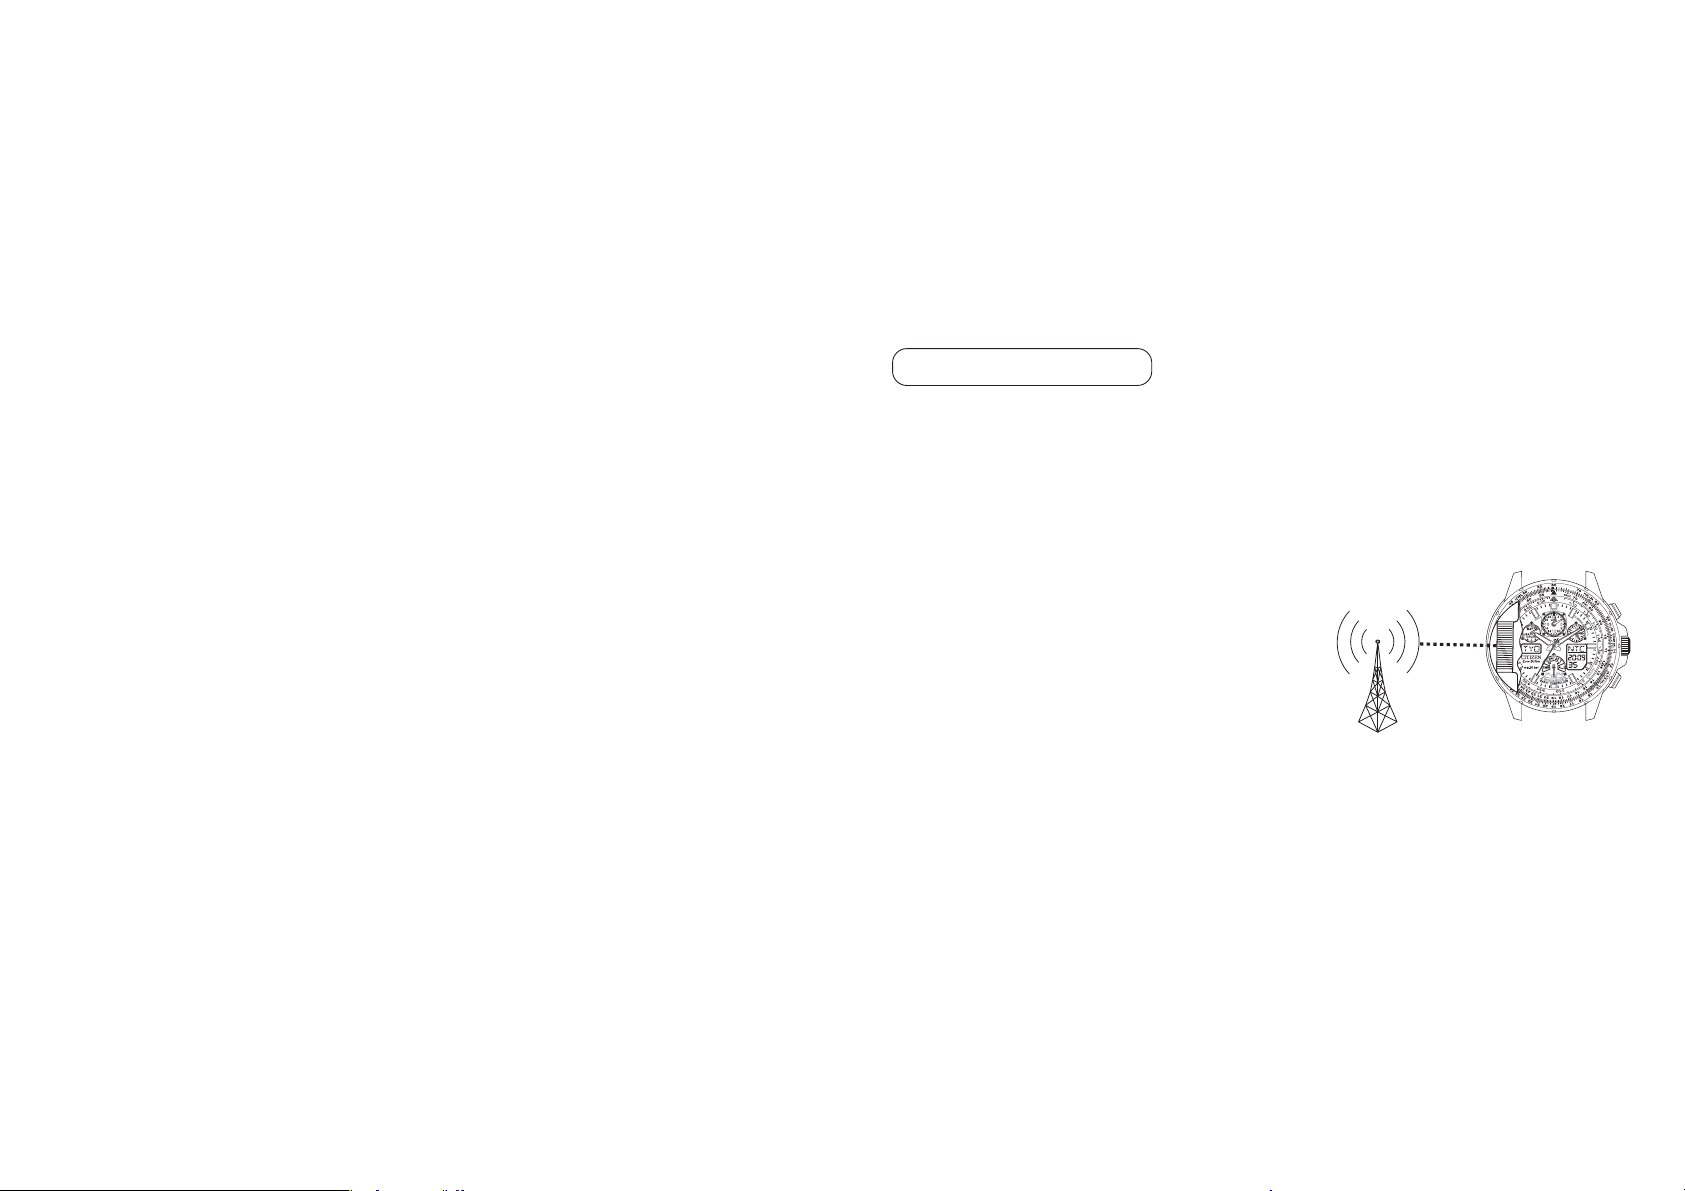
<Receiving the radio signals>
1. Remove the watch from your wrist and place on
a stable surface in a location, such as near a
window, from which radio waves can be easily
received, pointing the 9:00 side (reception
antenna position) in the direction of the radio
wave transmitter.
2. The watch will automatically receive the radio
wave every day at 2 a.m.
If it successfully receives the wave, reception is
not performed at 3 a.m. and 4 a.m.
WW
4. Radio Signal Reception
Three types of radio signal reception are possible: automatic reception, on demand
reception and recovery automatic reception.
There are three modes where reception is possible: time (TME), calendar (CAL) and
receive set (RX-S). The watch cannot receive signals in any other mode.
Display the home city in digital display 2 when receiving the radio wave.
• Reception is not possible unless the crown is in the normal position.
• If the home city is “UTC”, reception is not possible.
• Reception is not possible during chronograph or timer measurement.
• The reception level may change depending on the surrounding environment. While
referring to reception level (H, M or L), change the watch location, direction and angle
to try to receive the radio wave.
• When the watch is receiving the radio wave signal, all of the hands will stop.
To check the time, hold the lower right button (A) for 2 seconds to cancel the radio
wave reception. The hands will then return to the current time.
An antenna for receiving the radio
signals is located inside the watch
(on the 9:00 position).
20 21
Recovery Automatic Reception (Automatic Reception)
• If the watch stops due to insufficient charging, expose the watch to
sunlight to recharge it. When the watch is recharged sufficiently, it will
automatically receive the radio wave once.
* Regularly charge your radio controlled watch so it does not become insufficiently
charged.
The radio wave reception can be checked with “Confirming
Reception Status”. (p. 26)
On Demand Reception (Manual Reception)
• Signals can be received at any time.
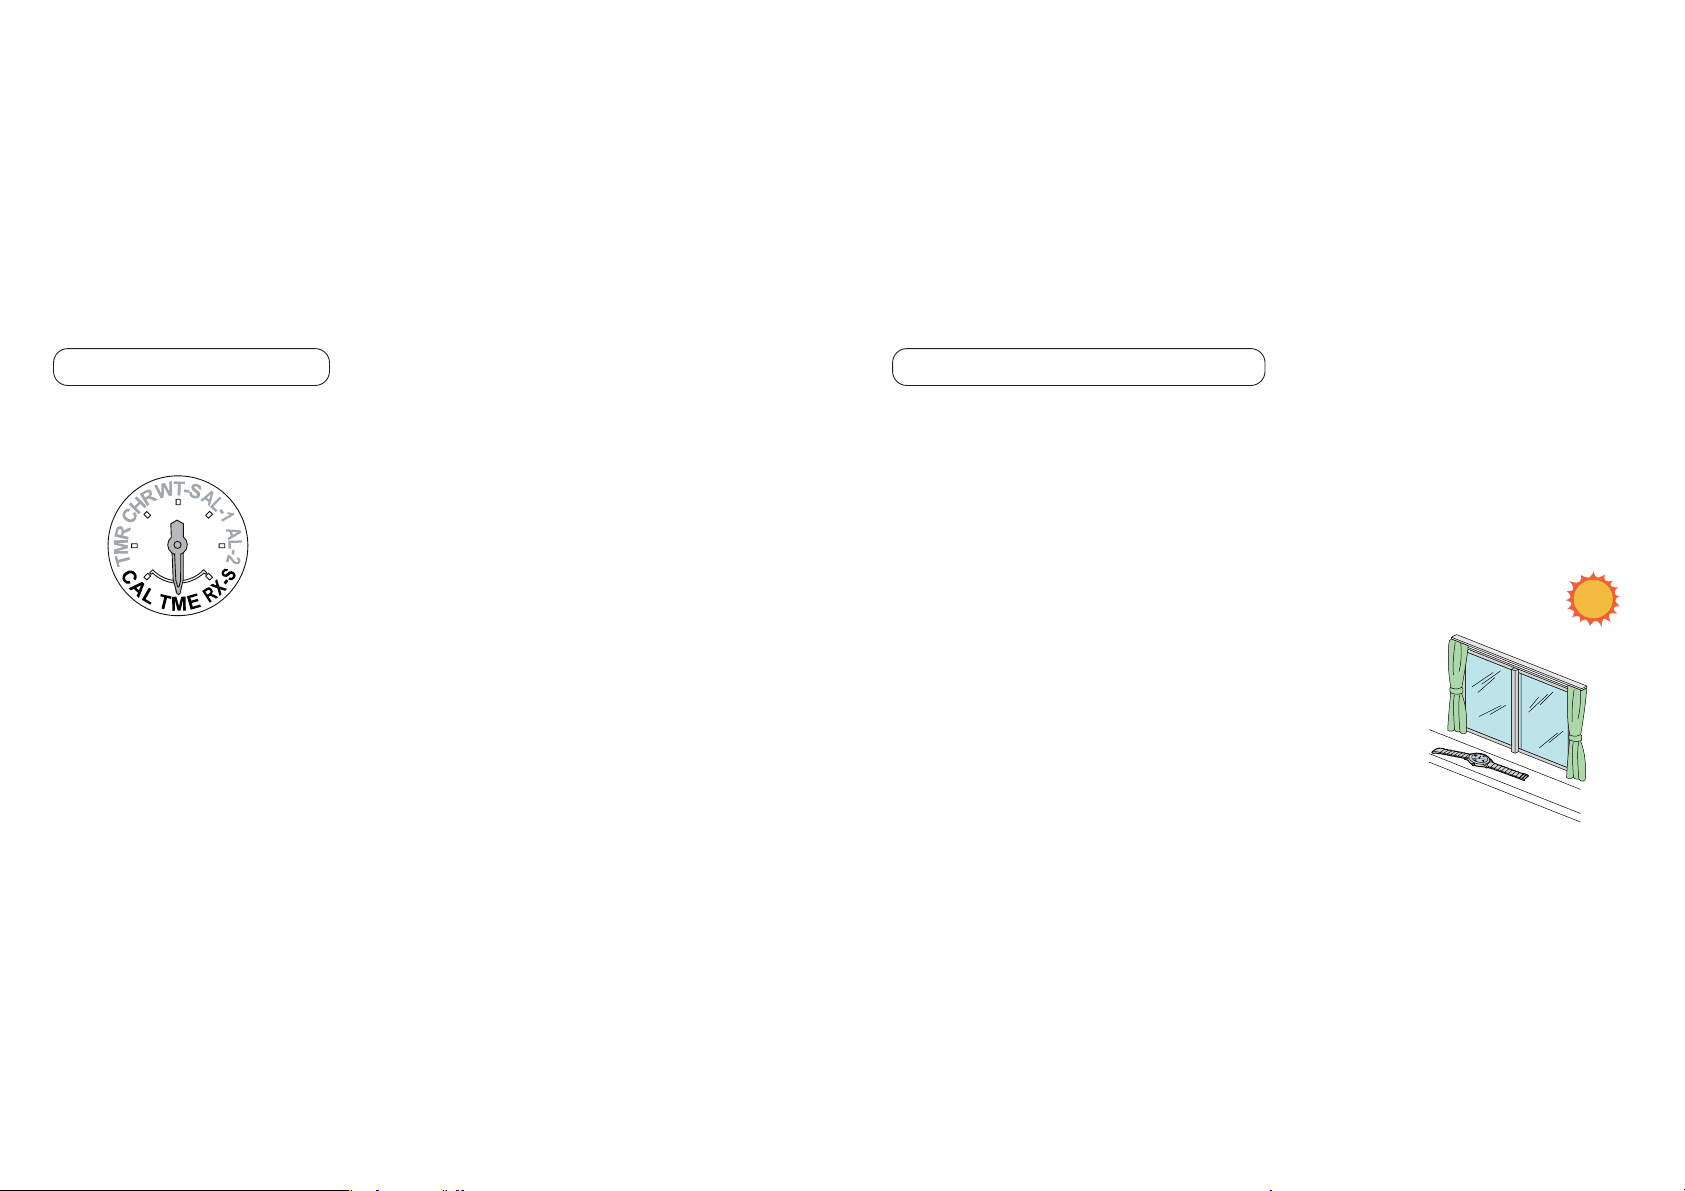
<Receiving the radio signals>
1. Pull the crown out to position 1 and turn to align the
mode hand with the CAL, TME or RX-S position.
2. Return the crown to the normal position.
3. Remove the watch from your wrist and place on a
stable surface near a window where the radio signal
can be easily received.
4. Point the 9:00 side of the watch in the direction of the radio wave transmitter, and hold
down the lower right button (A) for more than 2 seconds. Release when the
confirmation tone sounds and the second hand stops at RX. The second hand will then
move to H, M or L.
* Do not move the watch during reception.
5. When the radio wave has been properly received, the second hand will automatically
move from H, M or L to the time that was received, all the hands will be corrected,
and the second hand will return to 1-second interval movement.
[Mode hand position
when receiving]
22 23
WW
5. Poor Reception Areas
It may not be possible to receive radio waves under environmental conditions where reception
is difficult or in areas susceptible to radio noise, such as those shown in the illustrations below.
While referring to the reception level display, try to find a location with better reception.
j Extremely hot or cold locationsj Near cellular
phones that are
in use
j Inside vehicles, including
cars, trains and aero planes
j Near TVs, refrigerators,
computers, fax machines and other
home electronics or appliances
j Inside reinforced concrete
buildings or underground
j Near high-tension electrical
lines, railway overhead wires
or communication facilities
<Storing Your Radio Controlled Watch>
If the watch has received insufficient light for charging or has been kept in a dark
location for an extended period of time (one week or more), the Power Save Feature of
the watch is activated and the hands of the watch stop. Even though the watch will not
show movement, the correct time is kept in memory. When the watch is in the Power
Save mode, it will continue to keep the correct time internally. In some instances,
“Automatic Reception” may not be successful due to a weak signal reception. When
resuming use of the watch after the power save mode has been activated for an extended
period of time, you can cancel the Power Save function by placing the watch in light
sufficient for charging and performing the “On Demand” reception process to correctly
set the time and date. (Refer to page 92 for information on the Power Save Function.)
24 25
<Time required for reception>
Reception can take from about 2 minutes to a
maximum of 15 minutes, depending on factors such
as the weather or noise. If the radio wave reception
fails, the watch may return immediately to the
normal display.
[Caution] During reception, the second hand may
rotate once and show the reception level
again.
Do not move the watch until the second
hand has returned to 1-second interval
movement.
WW
6. Display during Reception
[During reception standby]
j Second hand moves to RX and
stops.
The radio wave reception
indicator points to the received
transmitter.
[Digital display]
[Second hand display]
Off Off
j If the reception fails, RC and
NO are displayed.
Repeatedly switches
between on and off
j The second hand moves from
RX to reception level H, M or L
and reception starts.
j When the reception is
successful, the second hand
will return to 1-second interval
movement and the other hands
will be automatically corrected.
[Receiving signal]
[Reception completed]
Radio wave
reception
indicator
26 27
Reception status
Signal reception failed
Radio wave reception environment was very
good
Radio wave reception environment was good
Radio wave reception environment was not very
good
Reception
level
NO
H
M
L
* The time display may shift slightly depending on the reception environment and
internal watch processing even if radio waves are properly received.
* H, M and L indicate the reception status and are not connected to the performance of
the watch.
• If NO is indicated, find a location or direction where the reception is better and
perform on demand reception again. (p. 20)
WW
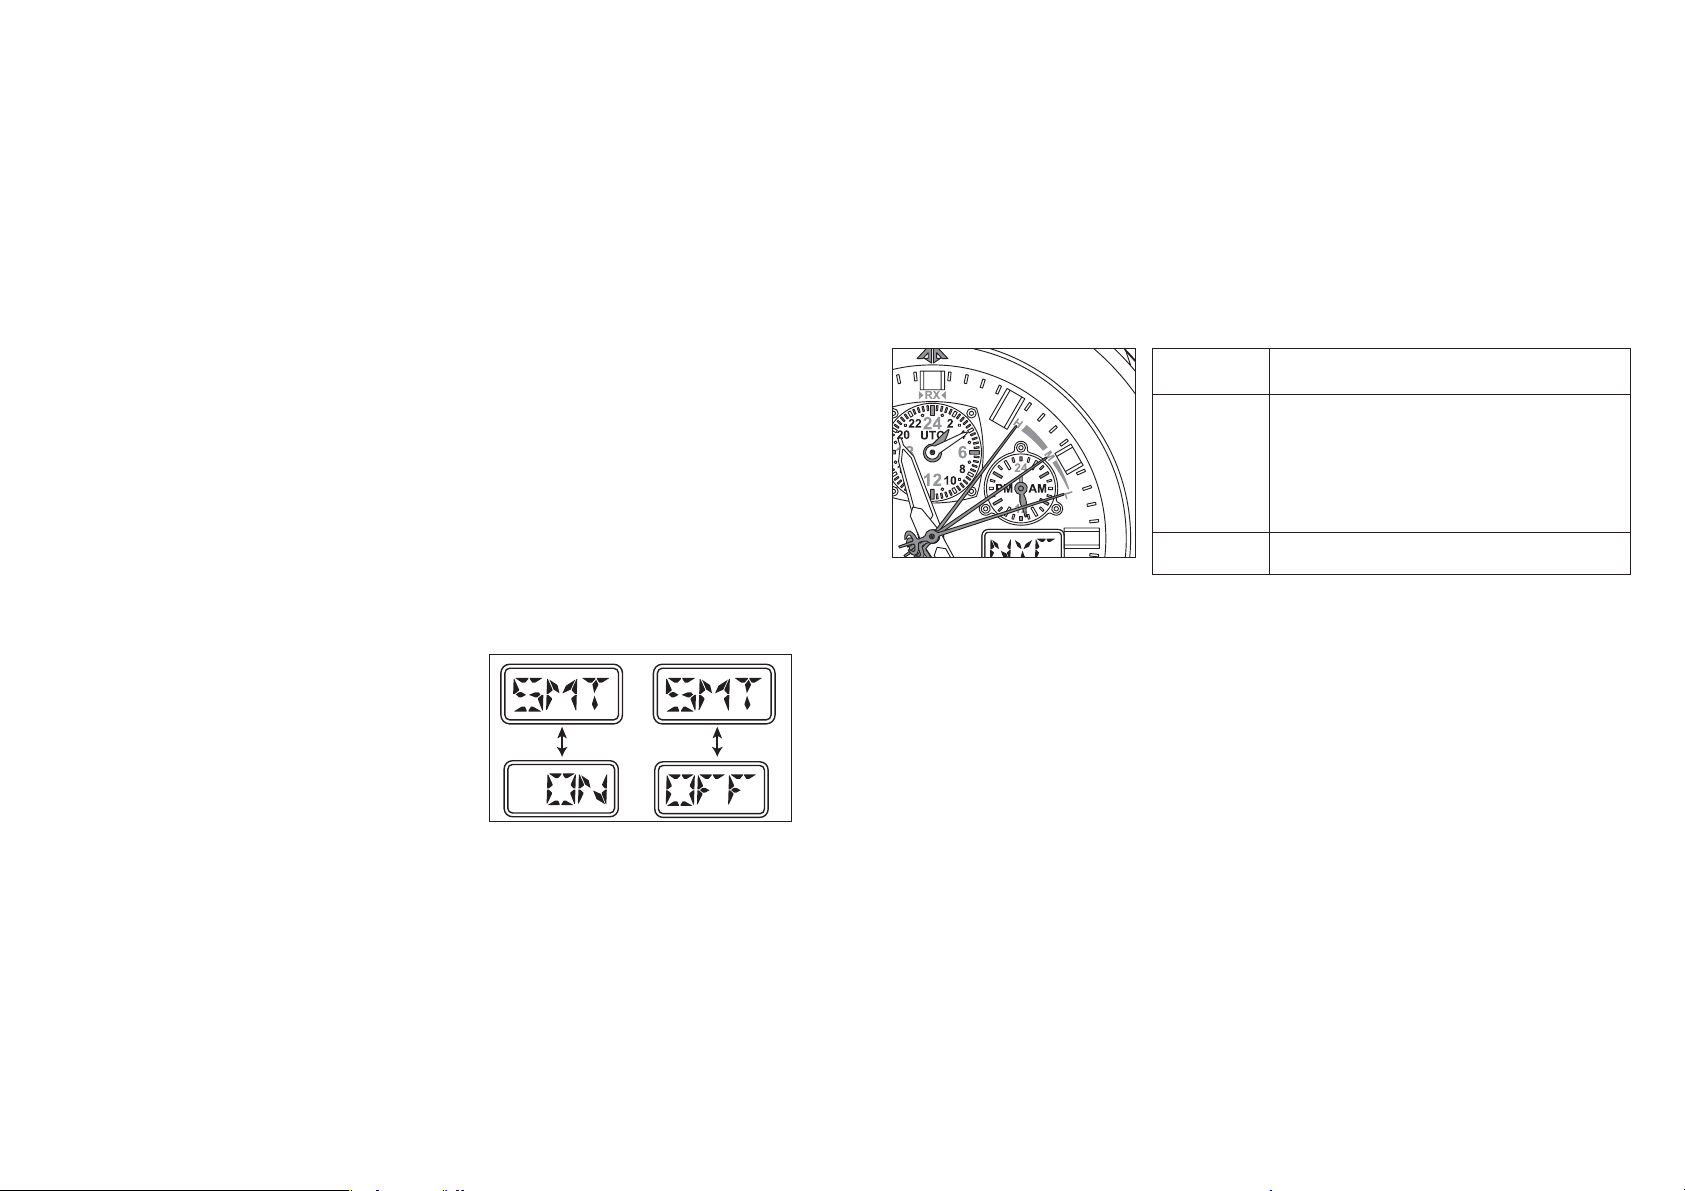
7. Confirming Reception Status
• The result of the radio wave reception can be confirmed.
• The daylight saving time setting status of the home city can be confirmed.
1. Set the mode to TME, CAL or RX-S.
2. Press the lower right button (A) once to display the reception status. The second hand
will move to H, M, L or NO.
• The daylight saving time setting status for the home time is displayed on digital
display 2 (flashes alternately between SMT and ON or OFF).
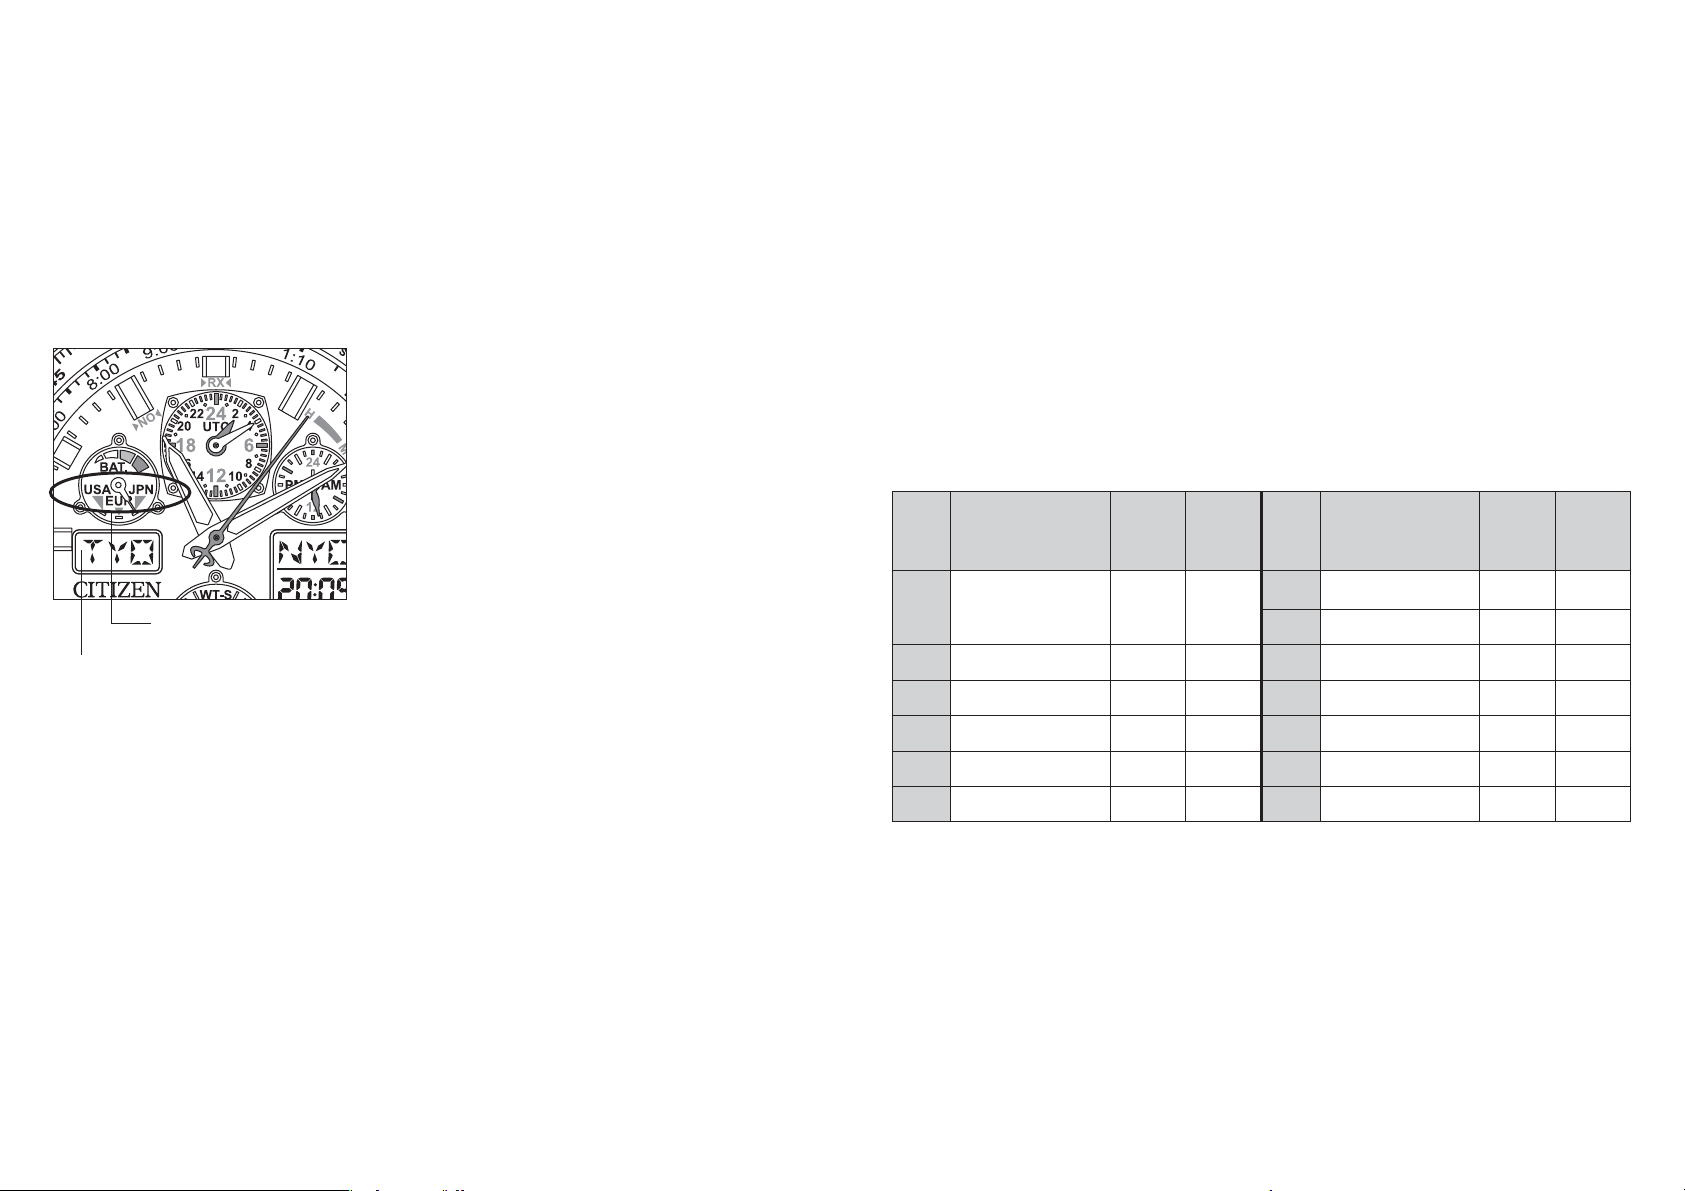
• The radio wave reception indicator points to
JPN, EUR or USA.
3. Press the lower right button (A) once.
• The watch returns to the normal time display
(1-second interval movement).
• It also returns automatically to normal
display if there are no operations for 10
seconds.
[Digital display 2]
USA
EUR
JPN
28 29
WW
8. Reception Area Guidelines
This watch can receive standard time radio waves broadcast from Japan (two
transmitters), the USA and Europe (Germany).
The standard time radio wave to be received can be changed by selecting the city in
another region.
The maps show the approximate reception areas. However, note that the radio wave
condition could change due to factors including the weather (such as lightning) and
changes in the season or sunrise/sunset time.
The reception area on the map is only guideline, and it may be difficult to receive the
radio signal even within the areas indicated on the map.
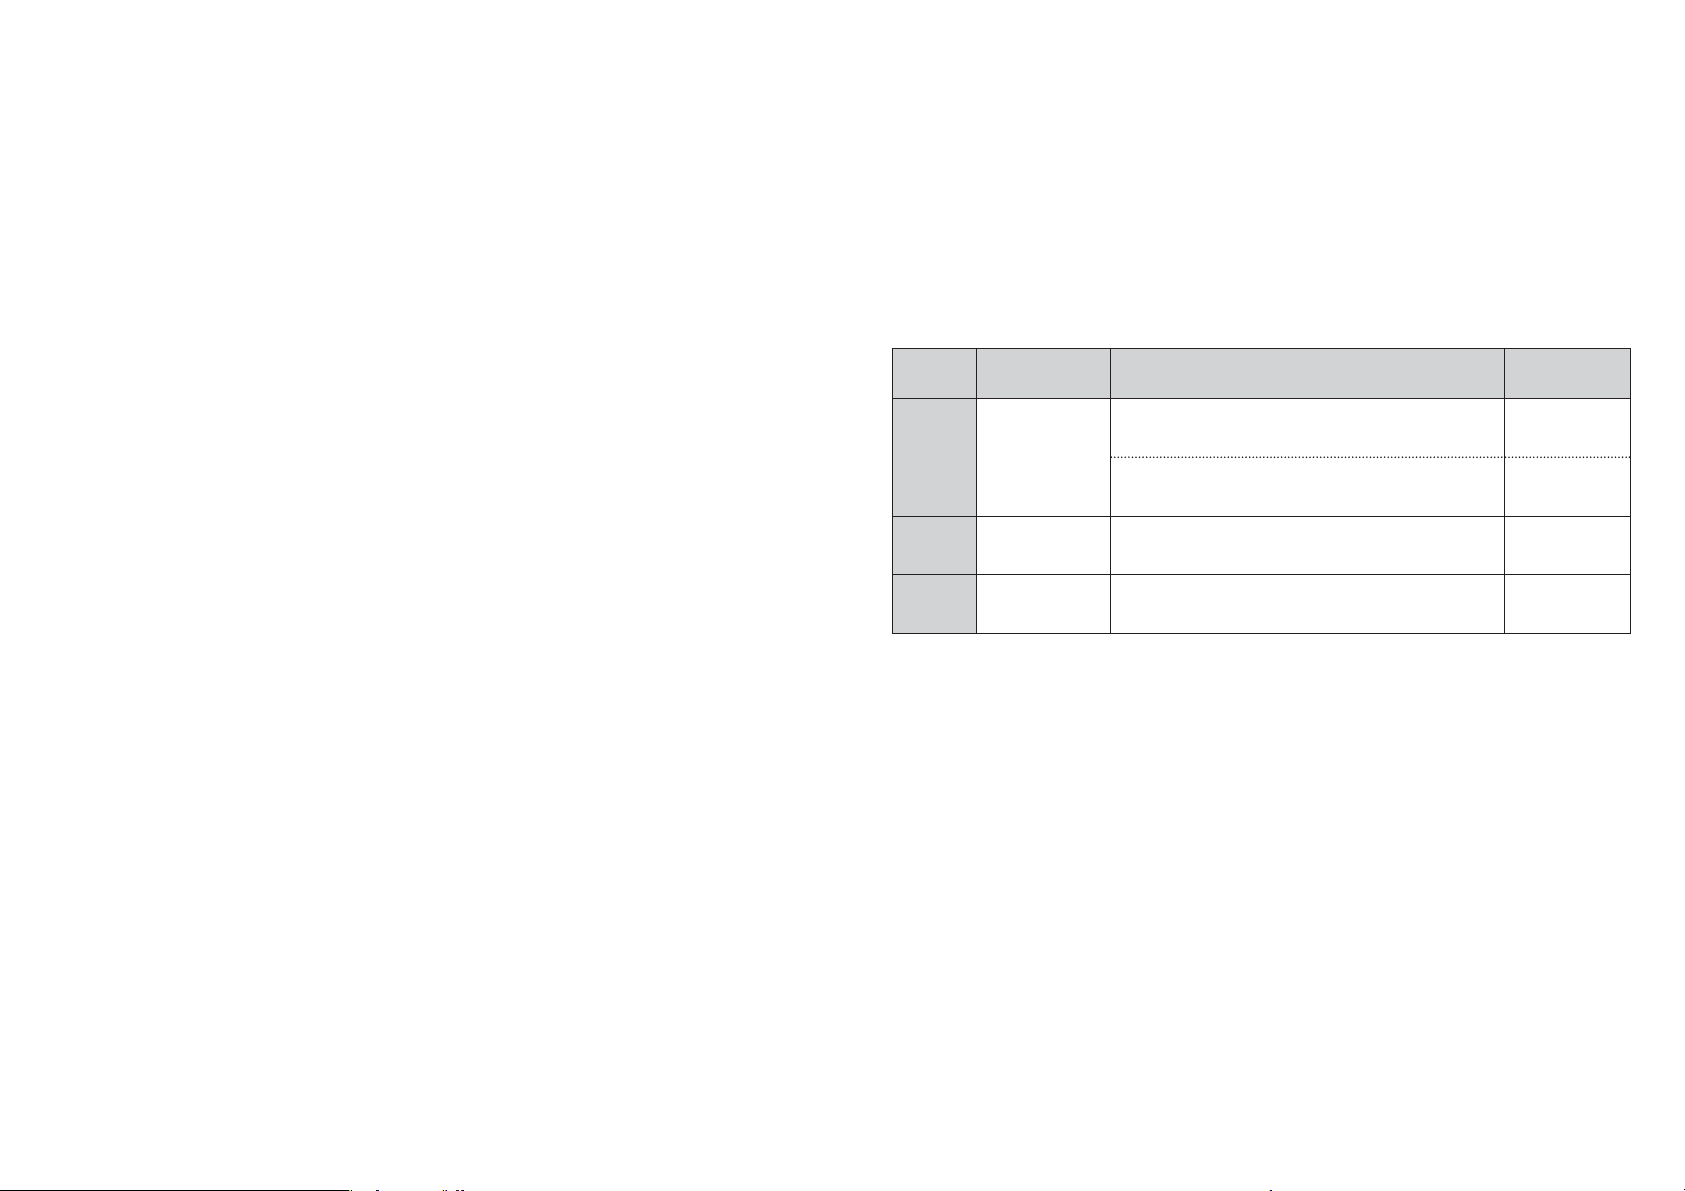
Standard time
radio signal
Transmitter Frequency
JJY
Japan
WWVB
USA
DCF77
Germany
Ohtakadoya-yama Standard Time Transmitter
(Fukushima Transmitter)
Hagane-yama Standard Time Transmitter
(Kyushu Transmitter)
Fort Collins Transmitter, Denver, Colorado
Mainflingen Transmitter, Southeast Frankfurt
The standard time radio wave this watch uses is broadcast almost continuously 24-hours
a day, but may occasionally be interrupted for maintenance.
Even if reception of the standard time radio signal has failed, the watch will continue to
be accurate to within ±15 seconds per month.
40 kHz
60 kHz
60 kHz
77.5 kHz
30 31
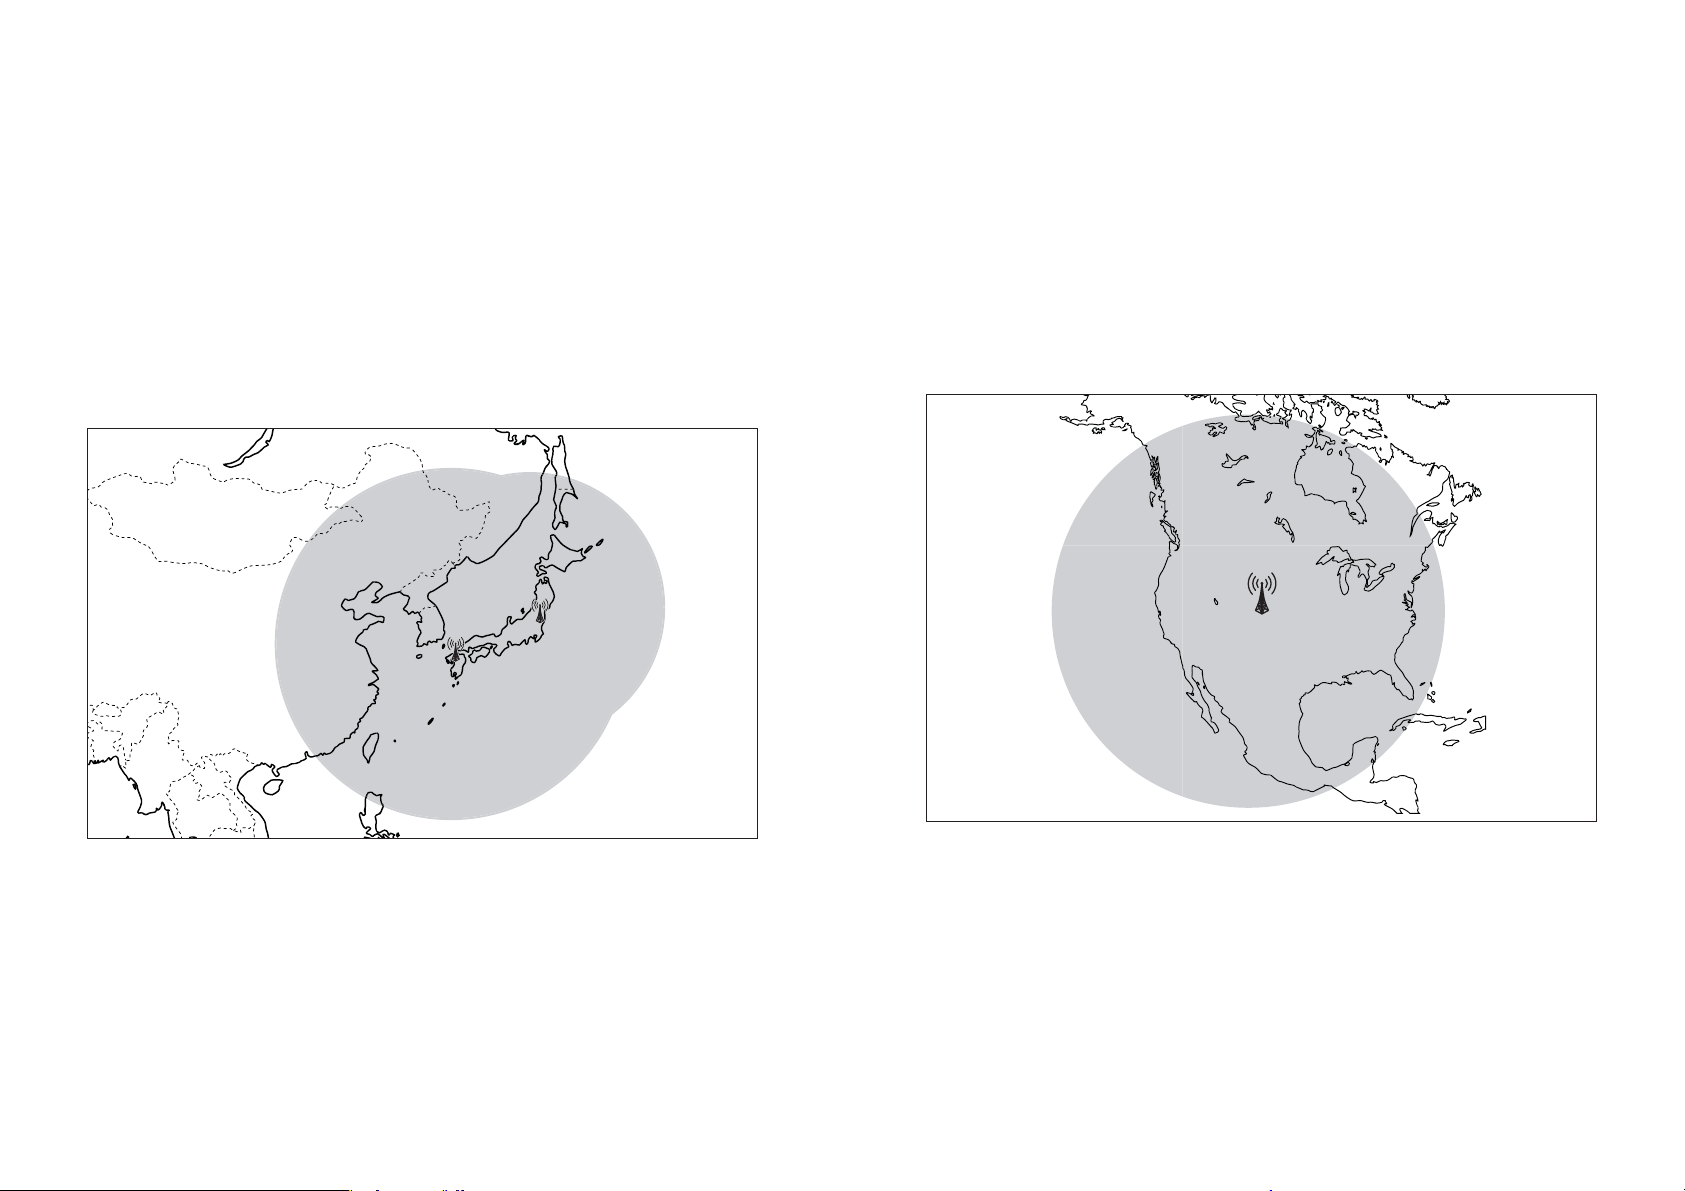
USA: WWVB (USA) Fort Collins: 3,000 km radius from the transmitter
JPN: JJY (Japan) Automatically selects one of the two transmitters
Fukushima Transmitter: 1,500 km radius from the transmitter
Kyushu Transmitter: 2,000 km radius from the transmitter
32 33
WW
9. World City Display
UTC (Coordinated Universal Time) and 43 cities (or regions) are registered in this watch
in advance, and it is also possible to register one additional city. The time of each city
can be called up and displayed.
• Press the upper right button (B) while the crown is in position 1 during TME mode or
CAL mode to display in sequence from the top left to bottom right the city names
shown in “Table of UTC Time Differences” (p. 35), and press the lower right button
(A) to display the city names in sequence from the bottom right to top left.
UTC: Coordinated Universal Time
This is the time of an atomic clock that is used as the global standard (= international atomic time).
It uses leap seconds to correct deviations in time systems that are based on the rotation of the Earth
(universal time).
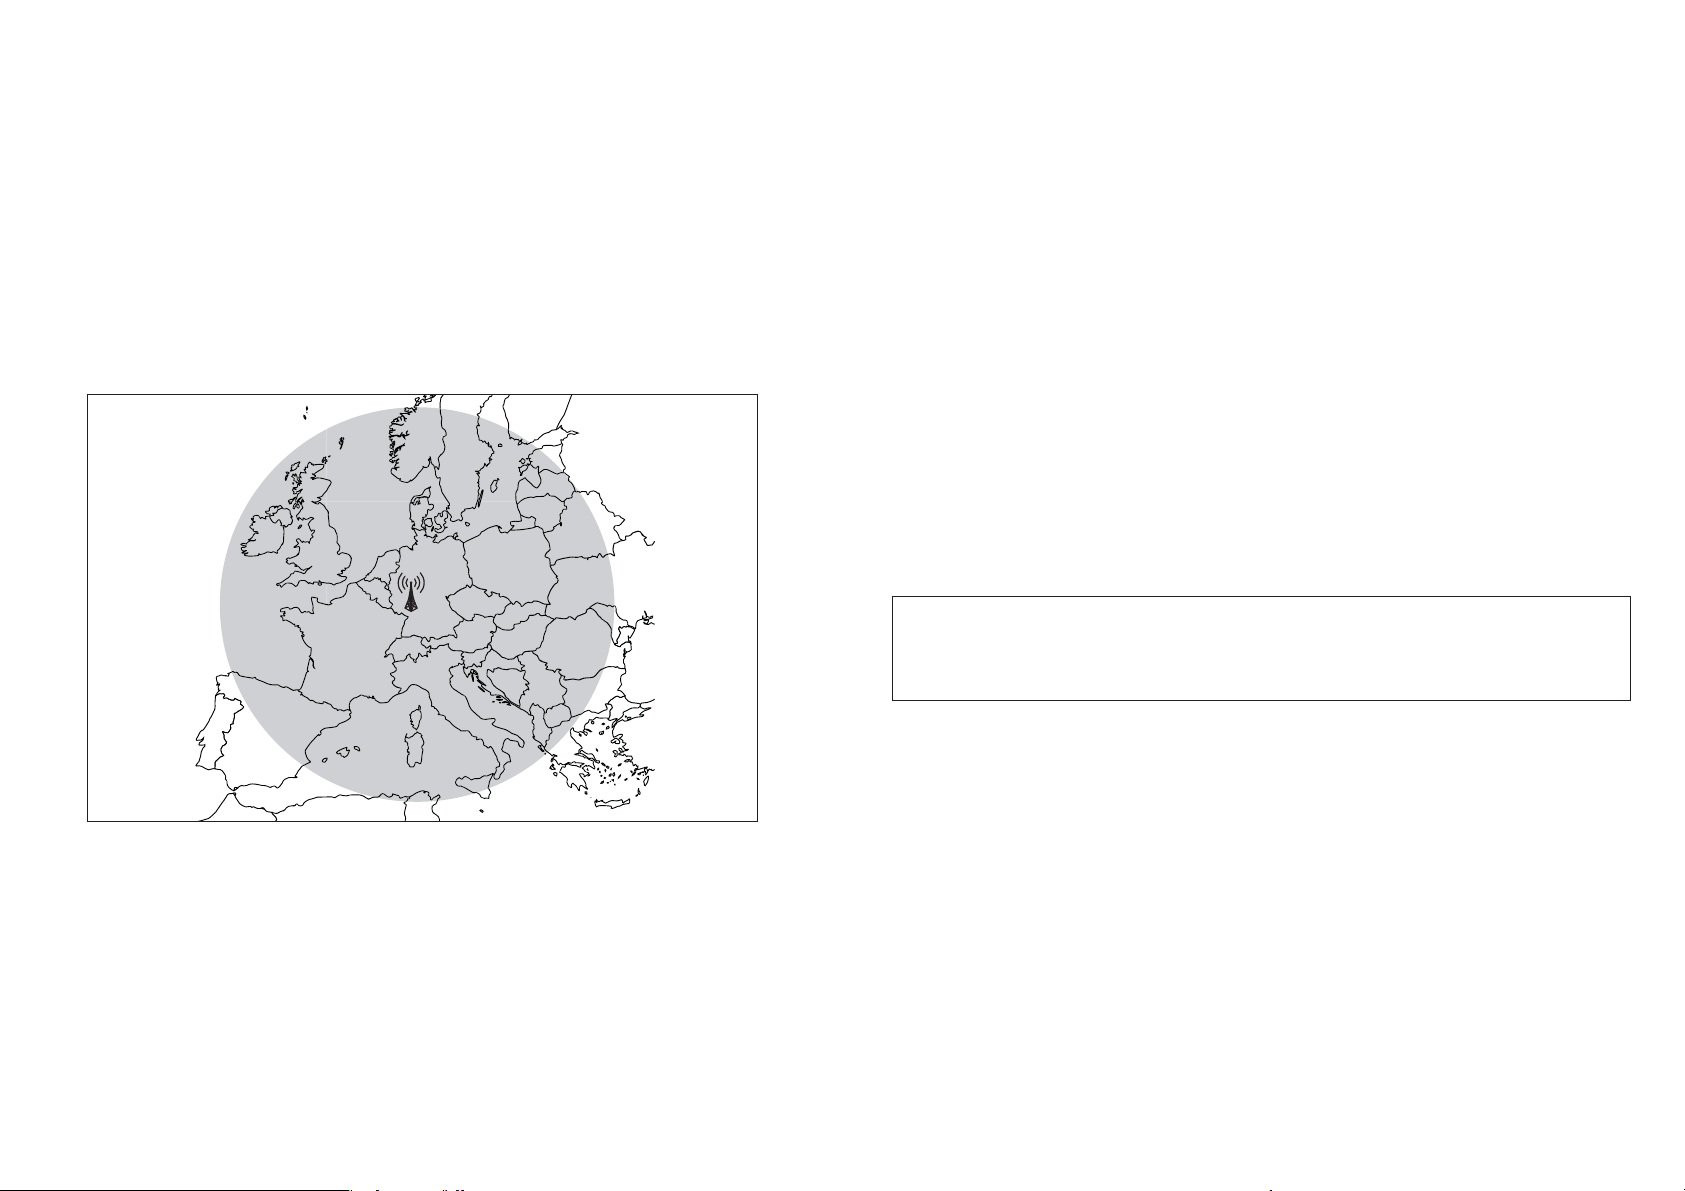
EUR: DCF77 (Germany) Mainflingen: 1,500 km radius from the transmitter
CAI
JNB
ATH
MOW
RUH
THR
DXB
UTC
LON
PAR
ROM
BER
MAD
34 35
[Cities and the standard time radio
wave assignment]
• The received standard time radio waves shown
in “Table of UTC Time Differences” are
assigned one of the following three radio wave
transmitters, in accordance with the home city
in digital display 2.
[Standard time radio wave
assignment]
JPN : JJY (Japan)
USA : WWVB (USA)
EUR : DCF77 (Germany)
• Radio wave transmitters are assigned even for countries and regions outside the
reception area.
• For regions that are assigned Japan’s standard time radio wave (JJY), either the
Fukushima transmitter or Kyushu transmitter is selected automatically for reception,
whichever is easier to receive.
Radio signal transmitter
Digital display 2
[Table of UTC Time Differences]
Set to TME mode and press the upper right button (B) repeatedly while the crown is in
position 1 to display in sequence in digital display 1 the table’s city names from top to
bottom, and press the lower right button (A) to display in sequence the city names from
bottom to top.
Watch
display
City name
Coordinated
universal time
London
Paris
Rome
Berlin
Madrid
Time
difference
0
0
+ 1
+ 1
+ 1
+ 1
—
EUR
EUR
EUR
EUR
EUR
Received
standard
time radio
wave
Watch
display
City name
Cairo
Johannesburg
Athens
Moscow
Riyadh
Tehran
Dubai
Time
difference
+ 2
+ 2
+ 2
+ 3
+ 3
+ 3.5
+ 4
EUR
EUR
EUR
EUR
EUR
EUR
EUR
Received
standard
time radio
wave
Loading…
Содержание
1. Ваши часы
2. Перед использованием
3. Основные операции
Получение радио сигнала
4. Получение радио сигнала
5. Зоны слабого приема
6. Индикация во время приема
7. Подтверждение статуса приема
8. Информация по зонам приема
9. Индикация городов мира
10. Индикация заряда
11. Изменение режима
12. Использование домашнего времени и мирового времени
13. Использование функции летнего времени
14. Установка времени
15. Установка календаря
16. Использование таймера
17. Использование хронографа
18. Настройки мирового времени
19. Использование будильника мирового времени
20. Использование настроек получения
21. Подсветка
22. Сброс всех настроек
Использование логарифмической линейки
Солнечный заряд
23. Функция солнечного заряда
24. Характеристики часов с солнечной батареей
А. Функция сохранения энергии
В. Фун-я предупреждения о недостаточном заряде
С. Фун-я предотвращения перезарядки
D. Уход за часами на солнечной батарее
Исправление ошибок
А. Фун-я приема радио сигнала
В. Eco-Drive
Предупреждения
25. Спецификация
1. Ваши часы
Функция приема радио сигнала
Это часы с функцией корректировки времени, способные принимать радио волны с
точным временем, транслируемые через радио передатчики, расположенные в трех
регионах: Японии, США и Европе( Германии). Часы используют радио волны, чтобы
корректировать время и дату.
Автоматический прием: Часы трижды в сутки способны принимать радио волны в 2, 3 и 4
утра. Если часы успешно приняли сигнал в 2 часа, то больше не будут делать попыток в
эти сутки.
Прием радио волны назначенный на 4 часа может быть изменен на любое другое время
суток.
Прием по необходимости: Радио волна может быть принята в любое время суток. В
случае невозможности приема радио волны, время и дату можно установить вручную,и
часы будут работать с погрешностью +/- 15 секунд в месяц.
Функция мирового времени
UTC (Всеобщее скоординированное время), время и дата 43 городов (или регионов) мира,
или же время одного города ( региона) могут быть установлены и использованы в любое
время. Это удобно при частых путешествиях.
Функция солнечного заряда.
Это мультифункциональные часы Eco-Drive, оснащенные солнечной батареей и
превращающие солнечную энергию в электричество.
Фун-я индикации заряда: Эта функция отображает уровень заряда, используя четыре
деления, и показывая примерно на сколько заряжена батарея.
Фун-я сохранения энергии: Часы оснащены двумя функциями сохранения энергии. Если
часы не повернуты циферблатом к солнечному светы 30 минут или более, все
жидкокристаллические дисплеи выключаются ( 1я фун-я). Если часы не повернуты
циферблатом к солнечному свету неделю или более, секундные стрелки останавливаются,
чтобы минимизировать энергозатраты (2я фун-я).
Важные моменты, касающиеся приема радио сигнала
Есть 2 метода приема радио волн: автоматический и по необходимости.
Прием сигнала внутренней однонаправленной антенной может быть ослаблен
географически м положением или зданиями.
Чтобы принять радио волны:
— Снимите часы с руки
— Направьте часы отметкой 9.00 к окну
— Положите часы на стабильную поверхность
-Не двигайте часы во время приема. Движение часов может привести к прерыванию и
незавершенному приему. Во время приема сигнала, секундная стрелка двигается в режиме
приема. После окончания, возвращается к движению в односекундном интервале.
— Прием занимает от 2 до 15 минут максимум.
2. Перед использованием
Проверьте как движется секундная стрелка.
С интервалом в 1 секунду → Проверьте статус приема.
Часовую головку в Секундная стрелка Ваши часы правильно
С интервалом в 2 секудв 1е положение. указывает на статус → получают радио
или остановились Вращайте головку → приема Н, М или L сигнал.
↓ чтобы установить режим
Срочно зарядите часы, ТМЕ
поместив их под лучи Часовую головку в
солнца. нормальное положение → Секундная стрелка Обратитесь к разделу
Нажмите на правую указывает на статус → «Прием по необходимости»
нижнюю кнопку (А) приема NO чтобы настроить прием
сигнала
Если прием сигнала невозможен, обратитесь в сервисный центр Citizen.
Перед использованием часов, убедитесь в том что стрелки точно откалиброваны и
показывают точно на «0» точку. Стрелки могут сбиться с исходного положения при
сильном магнитном воздействии. В этом случае, даже при получении радио волн, стрелки
не будут показывать время точно.
Примеры вещей, способных повлиять на часы таким образом:
— Медицинские продукты, например браслеты, ожерелья, повязки.
— Холодильные установки
— Электромагнитные печи
— Сумки с магнитными замками
— Мобильные телефоны
1. Вытащите часовую головку в 1е положение и установите режим на CHR (хонограф)
2. Установите часовую головку во 2е положение.
Стрелки начнут двигаться быстро, останавливаясь на исходном положении занесенном в
память телефона.
3. Если исходное положение установлено правильно, проверка закончена. Установите
часовую головку в исходное положение.
Если исходное положение неверно, обратитесь к разделу «Установка исходного
положение».
Правильные исходные положения.
Индикатор заряда: EUR
Часовая и минутная стрелки UTC: 12.00
24 часовая стрелка: 12.00
3. Основные операции
1. Проверьте уровень заряда
→
Установите родной город (а. установите часовую
головку в 1е положение и установите режим ТМЕ. в. Нажмите кнопку А или В
чтобы установить необходимый город. с. Нажмите кнопки А и В одновременно
чтобы зафиксировать выбранный город.)
→
Установите время (вручную или
путем приема радио сигнала)
→
Настройте цифровой дисплей 1 (мировое время
или дата могут быть показаны на дисплее 1)
4. Получение радио сигнала
Возможно 3 вида получения радио сигнала: автоматическое получение, по необходимости
и восстанавливающий радио сигнал.
Есть 3 режима в которых возможно получение сигнала: время (ТМЕ), календарь (CAL),
получение (RX-S). Часы не могут принимать сигнал ни в каких других режимах.
— Получение сигнала невозможно пока часовая головка находится в нормальном
положении
— Если родной город «UTC», то получение невозможно
— Получение невозможно во время работы хронографа или таймера
— Уровень приема может меняться в зависимости от окружающей среды.
— Когда часы принимают радио сигнал, все стрелки остановятся.
Автоматический прием
Не обязательно устанавливать режимы во время автоматического приема. Часы сами
получат радио волны каждые сутки в 2, 3 и часа утра. Прием в 4 часа может быть изменен
на любое время суток. Прием сигнала может быть отключен.
Получение радио сигналов
Снимите часы с руки и положите на стабильную поверхность максимально близко кокну,
где радио волны будут более доступны, повернув боком с отметкой 9.00 к передатчику.
Прием по необходимости
— Установите часовую головку в 1е положение и установите режим CAL, TME или RX-S.
— Установите часовую головку в нормальное положение.
— Снимите часы с руки и положите на стабильную поверхность максимально близко
кокну, где радио волны будут более доступны.
— Направьте часы стороной с отметкой 9.00 к передатчику и зажмите правую нижнюю
кнопку (А) примерно на 2 секунды. Отпустите когда услышите звук а секундная стрелка
остановится на RX. Затем секундная стрелка переместится на Н, М или L.
Не двигайте часы во время приема.
— После успешного получения сигнала секундная стрелка автоматически передвинется с
Н, М или L на полученное время и к 1 секундным интервалам.
Восстанавливающий радио сигнал.
Если часы останавливаются из-за недостаточного заряда, положите их под солнечный
свет. После зарядки, часы автоматически получат радио сигнал, чтобы восстановить
время.
Хранение ваших часов с радио приемником.
Если часы получают недостаточно света или же хранятся в темноте продолжительное
время (неделя или больше) , включается функция сохранения энергии и стрелки часов
останавливаются. Хотя время и не отображается, часы сохраняют его правильным. В
некоторых ситуациях автоматический прием невозможен, из-за слабого сигнала.
5. Зоны слабого приема.
Из-за внешних условий прием сигнала может быть невозможен, или сильно затруднен по
причине помех. Например, при большой концентрации зданий, радом с высоковольтными
вышками, в поезде, самолете, машине, рядом с телевизором, компьютером, работающим
телефоном, в очень жарких, или холодных местах.
6. Индикация во время приема
Подготовка к получению
Получение сигнала
Получение завершено
Секундная стрелка перемещается
Секундная стрелка
При успешном приеме секундная
На отметку RX и останавливается
перемещается с отметки
стрелка возвращается к движению
RX на уровень радио сигнала
с 1 секундными интервалами и
Н, М или L и начинается
корректируются все остальные
прием
стрелки
Время, необходимое для приема
Прием занимает примерно от 2х до 15 минут, в зависимости от погодных условий. Если
прием сигнала срывается, часы возвращаются к нормальной работе.
Во время приема сигнала, секундная стрелка может сделать 1 полный оборот и вернутся к
индикации уровня сигнала. Не двигайте часы до полного завершения процесса, пока
секундная стрелка не вернется к движению с 1 секундными интервалами.
7. Подтверждение статуса приема.
1. Установите режим ТМЕ, CAL или RX-S.
2. Нажмите нижнюю правую кнопку (А) 1 раз чтобы отобразить статус приема.
Секундная стрелка передвинется на Н, М, L или NO.
3. Нажмите нижнюю кнопку (А) еще раз и часы вернуться к нормальному режиму
работы. ТО же самое произойдет если в течение 10 секунд не делать никаких
операций.
8. Информация по зонам приема
Эти часы могут принимать стандартные радио волны, транслируемые из Японии (два
передатчика), США и Европы (Германии). Можно выбрать другой город в своем регионе.
Качество приема сигнала зависит от условий погоды (гроза например) и изменяется в
зависимости от времени года.
9. Индикация городов мира
UTC (объединенное мировое время) и 43 города (региона) внесены в память этих часов
заранее, а также возможно внести еще 1 город по своему усмотрению. Время любого
города можно посмотреть.
Нажимайте правую верхнюю кнопку (В) в то время как часовая головка установлена в
первое положение и часы находятся в режиме ТМЕ или CAL чтобы выбрать города.
10. Индикация уровня заряда батареи.

— Уровень заряда (примерный) показывается шкалой из 4х делений.
— Следите за уровнем заряда своих часов. Мы рекомендуем вам поддерживать заряд на
уровне 2 примерно.
11. Изменение режима
У часов есть 8 режимов: время (ТМЕ), календарь (CAL), таймер (ТМR), хронограф (СНR),
установка мирового времени (WT-S), будильник 1 (AL – 1), будильник 2 (AL – 2) и
установка приема (RX – S).
1.
Установите часовую головку в положение 1
2. Вращайте часовую головку вправо или влево чтобы выбрать
необходимый вам режим.
3. Верните часовую головку в нормальное положение.
12. Использование домашнего времени и мирового времени
Когда вы путешествуете в другую страну или город с отличным часовым поясом, можно
легко посмотреть время в родном городе и в городе пребывания. (переключение может
быть только в режимах времени и календаря).
Переключение между домашним временем и мировым временем.
— Установите часовую головку в первое положение
— Установите режим времени (ТМЕ) или календаря (CAL)
— Зажмите кнопки (А) и (В) одновременно ( вы услышите звуковое подтверждение)
— Поверните часовую головку, чтобы вернуться в нормальное положение.
13. Использование функции летнего времени
При обновлении времени, используя функцию приема радио волны, летнее время
устанавливается автоматически при необходимости.
14. Установка времени
— Время может быть установлено вручную в зонах, где невозможно принять радио волну.
— Чтобы установить время, выберите город, время которого вы хотите изменить.
Изменение времени.
— Установите часовую головку в первое положение и включите режим времени (ТМЕ).
-Нажимайте кнопки (А) или (В), чтобы выбрать город, время которого вы хотите
изменить.
— Установите часовую головку в положение 2 чтобы войти в режим корректировки
времени
·
Секундная стрелка установится на положение 12 часов
·
Дисплей, показывающий домашнее время выключится
·
Нажмите нижнюю правую кнопку (А) чтобы включить или выключить функцию
летнего времени
·
После включения режима летнего времени часовая стрелка сдвинется на час
вперед
·
Нажав верхнюю правую кнопку (В) вы сможете поменять режим корректировки.
— Нажмите верхнюю правую кнопку (В) чтобы откорректировать секунды
·
Нажмите нижнюю правую кнопку (А) чтобы установить 0 секунд
— Нажмите правую верхнюю кнопку (В) чтобы откорректировать минуты
·
Вращайте часовую головку чтобы установить время.
— Нажмите верхнюю правую кнопку (В) чтобы откорректировать часы
·
Вращайте часовую головку чтобы установить время.
— Нажмите правую верхнюю кнопку (В) чтобы войти в режим 24/12 времени
·
Нажмите нижнюю правую кнопку (А) чтобы выбрать режим времени.
— Установите часовую головку в нормальное положение чтобы завершить операцию.
15. Установка календаря
— Установите часовую головку в положение 1 и выберите режим календаря (CAL).
— Нажимайте кнопку (А) или (В) чтобы выбрать город, дату которого вы хотите изменить.
— Установите часовую головку в положение 2 чтобы войти в режим корректировки даты.
·
Дисплей с датой замигает
— При нажатии верхней правой кнопки (В) меняется режим настройки. (месяц-дата-год)
— Выберите необходимый режим и вращайте часовую головку чтобы настроить.
— Установите часовую головку в нормальное положение.
16. Использование таймера
Таймер может быть установлен от 1 до 99 минут. После окончания времени часы
пропищат в течение 5 секунд.
Установка таймера.
— Установите часовую головку в положение 1 и выберите режим таймера (TMR)
— Установите часовую головку в положение 2 чтобы войти в настройки таймера
·
на дисплее 2 появится SET и заморгают минуты на дисплее 1
— Вращайте часовую головку чтобы установить время таймера
— После установки верните часовую головку в нормальное положение.
17. Использование хронографа
Хронограф можно засечь на 23 часа 59 минут и 59.99 секунд
По истечении 24 часов хронограф возвращается к нулю
— Установите часовую головку в положение 1 и выберите режим хронографа (CHR)
— Верните часовую головку в нормальное положение
— Звуковой сигнал будет звучать при каждом нажатии на кнопку (В), включающую и
выключающую хронограф.
— Нажмите кнопку (А) чтобы посмотреть текущее засеченное время в течение 10 секунд.
— Нажмите кнопку (А) после остановки хронографа чтобы обнулить его.
18. Настройки мирового времени (WT-S)
— Функция летнего времени может быть установлена для каждого из городов (44 города)
мирового времени
— Любая разница во времени может быть установлена между родным городом и мировым
временем в 15 минутных отрезках.
·
Установите часовую головку в положение 1 и выберите режим WT-S
·
Установите часовую головку в положение 2 чтобы войти в режим корректировки
мирового времени
·
Вращайте часовую головку чтобы выбрать родной город
·
Нажмите верхнюю правую кнопку (В) дважды чтобы войти в режим установки
разницы во времени
·
Каждый раз нажимая кнопку (В) меняются функции между режимами «Летнего
времени», «Отображения города на дисплее», «Разницы во времени»
·
Выберите режим установки разницы во времени (time difference setting)
·
Вращайте часовую головку чтобы установит разницу во времени (изменения 15
минутными интервалами)
·
Установите часовую головку в нормальное положение
19. Использование будильника мирового времени
— Установите часовую головку в положение 1 и выберите режим будильника 1 или 2 AL-1
или AL-2.
— Установите часовую головку в положение 2 чтобы войти в режим настройки будильника
— Нажмите кнопку (А) чтобы включить или выключить будильник
— При каждом нажатии кнопки (В) меняются этапы настройки (будильник вкл/выкл –
город – будильник: часы – минуты)
— Город: вращайте часовую головку чтобы выбрать город
— Будильник: вращайте часовую головку чтобы установит время
20. Использование настроек получения (RX-S)
Время приема волны 2, 3 и 4 часа утра.
4 часовой прием можно изменить на любое другое время дня кроме 2х и 3х часов утра.
Установка
— Установите часовую головку в положение 1 и выберите режим RX-S
— Установите часовую головку в положение 2 и войдите в режим настроек SMT
— Нажмите кнопку (А) чтобы выбрать режимы AU или mA
— Нажмите кнопку (В) чтобы войт в настройки автоматического приема сигнала
— Нажмите кнопку (А) чтобы выбрать ручной режим настройки времени приема сигнала
— Чтобы поменять время приема вращайте часовую головку
— После установки верните часовую головку в нормальное положение
21. Подсветка
Чтобы включить подсветку, нажмите кнопку (В). Подсветка включится на 1-2 секунды.
В следующих случаях подсветка не включается:
· Во время таймера или хронографа
· Во время приема радио сигнала
· При движении секундной стрелки с 2х секундным интервалом, что означает
недостаточный заряд.
22. Сброс всех настроек
Если часы работают ненормально из-за сильного воздействия волн или статического
электричества, необходимо обнулить все настройки.
После сброса всех настроек, все установки возвращаются в исходное положение.
— Установите часовую головку в положение 1 установите режим хронографа CHR
— Установите часовую головку в положение 2
— Стрелки сделают 1 оборот и после того как остановятся, нажмите кнопки (А) и (В)
одновременно
— Звуковой сигнал подтвердит сброс. По завершению верните часовую головку в
нормальное положение.
Использование логарифмической линейки
Используя линейку, можно просчитать дальность полета. С ее помощью невозможно
вычислить точные данные и использовать ее нужно как альтернатива более точным
приборам.
А. Вычисление времени
Задача: за сколько пролетит самолет расстояние в 450 км. со скоростью в 180 узлов
Решение: Установите отметку 18 на внешней стороне на SPEED INDEX. В этот момент
отметка показывающая 45 на внешней стороне, покажет 2.30 на внутренней.
Вычисление скорости
Задача: какова скорость самолета если за 1.20 он преодолевает 240 морских миль
Решение: Сопоставьте отметки 24 на внешней стороне с 1.20 (80) на внутренней. В этом
случае стрелка скорости укажет на скорость 18. Следовательно ответ 180 узлов.
Вычисление расстояния
Задача: Какое расстояние преодолеет самолет за 40 минут при скорости 210 узлов
Решение: Сопоставьте отметки 21 на внешней стороне со стрелкой скорости. В этот
момент отметка 40 на внутренней стороне укажет на 14, следовательно ответ 140 морских
миль.
Потребление топлива
Задача: Если 120 галлонов топливо потрачено на 30 минут полета, то каково среднее
потребление
Решение: Сопоставьте отметки 12 на внешней стороне с 30 на внутренней. Стрелка
скорости укажет на 24, следовательно ответ 240 галлонов в час.
23. Функция солнечного заряда
Эти часы используют аккумулятор для накопления энергии. При полной зарядки часы
будут работать около 6 месяцев.
Обеспечение наилучшей работоспособности часов.
Для лучшей работы заряжайте ваши часы под прямыми солнечными лучами.
24. Характеристики часов с солнечной батареей
При недостаточном заряде секундная стрелка начнет идти с 2х секундным интервалом.
При полной остановке часов по причине недостаточного зарядя, необходимо как минимум
30 минут зарядки, чтобы они начали ходить.
Функция сохранения энергии
Если часы долго не находятся под лучами света, то включается фун-я сохранения энергии
— Отключаются электронные дисплеи
— При долгом не попадании на свет стрелки останавливаются, будильник не срабатывает,
но время не сбивается и остается в памяти часов.
Функция сохранения энергии автоматически отключится когда часы попадут по дсвет.
Функция предупреждения о недостаточном заряде.
При недостаточном заряде секундная стрелка начинает двигаться с 2х секундным
интервалом и на дисплее 1 появляется следующий знак >>>X<<<
Когда часы находятся в таком состоянии ряд функций перестают работать и необходимо
срочно подзарядить часы.
Функция предотвращения перезарядки.
При полной зарядке аккумулятора, включается функция предотвращения перезарядки.
Независимо от того как долго заряжаются часы, это не навредит аккумулятору.
Уход за часами с солнечной батареей.
— Не пытайтесь вытащить аккумулятор самостоятельно, и при необходимости обращайтесь
в авторизированный центр.
— Используйте только оригинальные запчасти и аккумулятор во избежание полной
поломки часов.
— Не заряжайте часы на высокой температуре инее допускайте их перегревания.
25. Спецификация.
1. Модель номер: U60*
2. Тип: Часы с солнечной батареей
3. Точность хода: Без приема радио сигнала средняя допустимая норма ± 15 секунд в
месяц при использовании в комнатной температуре
4. Допустимые температуры: от 0 градуса по Цельсию до +50 градусов по Цельсию
5. Функции дисплеев:
Аналоговые дисплеи
— Время родного города: Часы, минуты, секунды, 24х часовое время
— UTC время: часы, минуты
— Уровень заряда
— Индикация приема радио сигнала
Цифровые дисплеи
— Имя родного города
— Мировое время
— Вкл/выкл режим летнего времени
— Дата: месяц, дата, день ( полностью автоматический календарь,
запрограммированный до 31 декабря 2099 года)
6. Дополнительные функции
—
Прием радио сигнала
—
Режим ожидания приема
—
Уровень сигнала
—
Функция подтверждения приема сигнала
—
Автоматическая настройка времени по радио сигналу
—
Функция включения-выключения летнего времени
—
2
будильника
—
Хронограф
—
Таймер
— —
Индикация мирового времени
—
Возможность корректировки разницы во времени
03:04
Мъжки часовник Citizen — JY0020 64E
03:21
CITIZEN SUPER SKYHAWK JY0020-64E Обновленная версия
02:41
CITIZEN Eco Drive Skyhawk A-T watch JY0020-64E
01:08
Citizen Promaster JY0020-64E Skyhawk — Zegarek.net
02:02
Citizen Promaster Skyhawk JY0020-64E
02:05
Citizen Eco-Drive Radio Controlled
07:32
Citizen PMV 65-2271 Калибровка стрелок.
Нажмите на кнопку для помощи
Checking the Watch Functions
Before you start using your Citizen Eco-Drive Watch WR200, it’s important to familiarize yourself with its various functions. This will ensure that you can make the most of its features and enjoy a seamless user experience. Here are the key functions you should check:
- Time Display: Check if the watch is displaying the correct time. Ensure that the hour, minute, and second hands are functioning correctly and moving smoothly.
- Date Display: Verify whether the watch accurately displays the date. Check if the date changes at midnight and advances correctly.
- Chronograph: Test the stopwatch function, also known as the chronograph. Start, stop, and reset the stopwatch to ensure that it is functioning accurately.
- Alarm: Set and test the alarm function to ensure it sounds at the desired time. Adjust the alarm volume if necessary.
- Perpetual Calendar: If your watch has a perpetual calendar feature, check if it is displaying the correct day, month, and year. Make sure it automatically adjusts for leap years.
- Radio-Controlled Time Setting: If your Citizen Eco-Drive Watch WR200 has a radio-controlled time setting, ensure that it is receiving the time signal properly. Check if the watch is synchronizing with the atomic clock accurately.
- Water Resistance: Ensure that the watch is water-resistant as specified in its user manual. Perform a quick water resistance test by exposing the watch to water to confirm its durability.
By thoroughly checking these functions, you can ensure that your Citizen Eco-Drive Watch WR200 is in proper working order and ready to be used. If any issues or discrepancies arise during the testing process, consult the user manual provided by Citizen or contact their customer support for further assistance.
Charging the Watch
The Citizen Eco-Drive Watch WR200 is powered by sunlight or any artificial light source. Before using the watch for the first time or if it has been in storage, it may need to be charged to ensure optimum performance. Here’s how you can charge your Citizen Eco-Drive Watch WR200:
- Place the watch under a direct light source, such as sunlight or a lamp. Make sure the watch receives ample light exposure to effectively charge the watch’s power reserve.
- Avoid placing the watch face down, as it may obstruct the light from reaching the solar panel on the dial.
- Charge the watch for at least 8 hours to ensure a full charge. This duration may vary depending on the model, so it’s essential to check the user manual for specific charging instructions.
- Once fully charged, the power reserve of your Citizen Eco-Drive Watch WR200 can last anywhere from several months to years, depending on the model and usage.
Remember that regular exposure to light will help maintain the power reserve of your watch. If you notice the power reserve decreasing or the watch is not functioning properly, it may be a sign that the watch needs to be charged. Additionally, if you plan to store your watch for an extended period, make sure to charge it fully before doing so.
The Eco-Drive technology in the Citizen Eco-Drive Watch WR200 eliminates the need for battery replacements. By harnessing the power of light, this environmentally-friendly timepiece provides a hassle-free and sustainable solution for accurate timekeeping.
Setting the Time
Setting the time on your Citizen Eco-Drive Watch WR200 is a straightforward process. Follow the steps below to ensure accurate timekeeping:
- Start by unscrewing or pulling out the crown located on the side of the watch. The crown is typically marked with the letter “C” or a small symbol.
- Pull the crown out to the fully extended position. This will allow you to adjust the time.
- Rotate the crown clockwise or counterclockwise to set the correct hour and minute. Take into consideration whether it is AM or PM, if applicable.
- For models with a 24-hour format, ensure that you set the time accordingly, distinguishing between morning and evening hours.
- Once the correct time is set, push the crown back in gently to its original position.
- If your watch offers a seconds hand, it will automatically start moving once the time is set.
Keep in mind that some Citizen Eco-Drive Watch WR200 models may feature additional functions, such as a date or day complication. To set these functions, refer to the user manual for specific instructions.
It’s good practice to periodically check the accuracy of your watch’s timekeeping against a reliable time source, such as an atomic clock or your smartphone. This will ensure that your Citizen Eco-Drive Watch WR200 is keeping time accurately.
If you experience any difficulties or have questions regarding the time-setting process, consult the user manual provided by Citizen or reach out to their customer support for assistance.
Setting the Calendar
The calendar function on your Citizen Eco-Drive Watch WR200 allows you to keep track of the date with ease. Follow these simple steps to set the calendar on your watch:
- If your watch has a crown, unscrew or pull it out to the fully extended position. For watches with push buttons, locate the button responsible for adjusting the calendar function.
- Once the crown is in the proper position or the button is activated, rotate or press it until the correct date is displayed.
- Some watches offer the option to set the calendar in different formats, such as month-day or day-month. Adjust the setting according to your preference and location.
- After setting the calendar, push the crown back in or release the button to secure the changes.
- Verify that the date advances correctly at midnight to ensure the accuracy of the calendar function.
It’s important to note that not all watches in the Citizen Eco-Drive Watch WR200 series have a calendar feature. Refer to the user manual for your specific model to confirm if this function is available.
If you encounter any difficulties or have questions while setting the calendar, consult the user manual provided by Citizen or contact their customer support for guidance.
By keeping the calendar on your Citizen Eco-Drive Watch WR200 up-to-date, you can stay organized and on schedule with ease.
Setting the Alarm
The alarm function on your Citizen Eco-Drive Watch WR200 allows you to set reminders or wake-up calls. Follow these steps to set the alarm on your watch:
- If your watch has a crown, unscrew or pull it out to the position where the alarm can be adjusted. For watches with dedicated buttons, locate the button responsible for the alarm function.
- Once in the appropriate position, rotate the crown or press the button to set the desired alarm time. Make sure to consider whether it should be set for AM or PM, depending on the time of day.
- Some Citizen Eco-Drive Watch WR200 models offer the option to set the alarm for specific days of the week or as a daily recurring alarm. Refer to the user manual for your specific watch to understand the available options.
- After setting the alarm, push the crown back in or release the button to lock in the changes.
When the set alarm time is reached, the watch will emit an audible sound or vibration to alert you. If your watch offers adjustable volume, ensure that it is set at the desired level.
Note that the alarm function on your Citizen Eco-Drive Watch WR200 may have a limited duration, typically lasting for a few seconds before automatically turning off.
If you experience any difficulties or have questions regarding the alarm function, consult the user manual provided by Citizen or contact their customer support for assistance.
By utilizing the alarm function on your watch, you can rely on it to keep you on schedule and remind you of important events or tasks.
Setting the Stopwatch
The stopwatch function on your Citizen Eco-Drive Watch WR200 allows you to accurately time events or activities. Follow these steps to set and use the stopwatch feature:
- Ensure that the watch is in the regular timekeeping mode, not in any other function mode such as the calendar or alarm.
- Press the dedicated stopwatch button or navigate to the stopwatch function using the watch’s crown or other buttons, depending on the model.
- Start the stopwatch by pressing the start button. The display should show the elapsed time.
- To stop the stopwatch, press the stop button. The display will freeze, showing the final elapsed time.
- Reset the stopwatch to zero by pressing the reset button. This will prepare the stopwatch for the next timing session.
- Some Citizen Eco-Drive Watch WR200 models may offer additional features such as lap times or split times. Refer to your watch’s user manual to understand how to utilize these functions.
When using the stopwatch function, keep in mind that the time measured may differ slightly from precise timekeeping due to human reaction time and other factors. However, for most everyday applications, the accuracy of the stopwatch function will suffice.
If you encounter any difficulties or have questions regarding the stopwatch function, consult the user manual provided by Citizen or contact their customer support for assistance.
With the stopwatch feature on your Citizen Eco-Drive Watch WR200, you can measure time accurately for a variety of activities, including workouts, sports, or simply tracking the duration of events.
Using the Perpetual Calendar
The perpetual calendar feature on your Citizen Eco-Drive Watch WR200 ensures accurate and automatic date adjustment, including leap years. Here’s how you can use the perpetual calendar on your watch:
- Access the perpetual calendar function by navigating through the watch’s modes using the crown or dedicated buttons, depending on the model.
- Once in the perpetual calendar mode, the watch will display the current day, month, and year.
- Verify that the date displayed is accurate. The perpetual calendar feature takes into account varying month lengths and even leap years, making manual adjustments unnecessary.
- In the event that the watch battery is depleted or the watch has been in storage for an extended period, you may need to manually adjust the date to ensure accuracy.
- Refer to the user manual for your specific watch model to understand how to make manual adjustments to the perpetual calendar if needed.
The perpetual calendar in your Citizen Eco-Drive Watch WR200 is designed to provide seamless and hassle-free datekeeping for many years to come. By eliminating the need for manual date adjustments, you can enjoy the convenience of a perpetually accurate watch.
If you experience any difficulties or have questions regarding the perpetual calendar function, consult the user manual provided by Citizen or contact their customer support for assistance.
With the perpetual calendar feature, your Citizen Eco-Drive Watch WR200 will always display the correct date, ensuring you stay organized and on track with your schedule.
Using the Radio-Controlled Time Setting
If your Citizen Eco-Drive Watch WR200 has a radio-controlled time setting feature, it can synchronize with an atomic clock signal for precise timekeeping. Here’s how you can use the radio-controlled time setting on your watch:
- Ensure that your watch is in the normal timekeeping mode, not in any other function mode such as the alarm or stopwatch.
- Find a location with open space and minimal interference, preferably near a window or outdoors.
- Activate the radio-controlled time setting function on your watch. Consult the user manual for your specific model to understand how to do this.
- The watch will automatically search for the atomic clock signal and attempt to synchronize with it. This process may take a few minutes, so be patient.
- Once the time signal is received and the synchronization is successful, the watch will adjust the time to the precise atomic clock time.
- In order to maintain accurate timekeeping, it is recommended to keep the watch within range of a radio signal and perform occasional time synchronization.
The radio-controlled time setting feature ensures that your Citizen Eco-Drive Watch WR200 maintains accurate timekeeping, regardless of time zone changes or daylight saving adjustments. It’s a convenient and reliable way to keep your watch synchronized with the most precise time source available.
If you experience any difficulties or have questions regarding the radio-controlled time setting function, consult the user manual provided by Citizen or contact their customer support for assistance.
With the radio-controlled time setting feature, your Citizen Eco-Drive Watch WR200 will always display accurate and reliable time, giving you peace of mind throughout your day.
Troubleshooting Common Problems
While the Citizen Eco-Drive Watch WR200 is designed for reliable performance, you may encounter some common issues from time to time. Here are some troubleshooting tips for addressing common problems:
- Inaccurate Timekeeping: If your watch is consistently running fast or slow, it may need to be adjusted. Consult the user manual for instructions on manually adjusting the time or consider recharging the watch in full sunlight to reset it.
- Unresponsive Buttons: If the buttons on your watch are not functioning, check if they are covered with dirt, dust, or debris. Gently clean the buttons using a soft, dry cloth or a toothpick, if necessary.
- Foggy or Condensation Underneath the Crystal: If you notice fog or condensation inside your watch, it could indicate a problem with the water resistance or a damaged seal. Immediately take your watch to an authorized service center for repair.
- Weak or No Display: If the display on your watch appears dim or is not visible at all, it may be due to low battery power. Place the watch under a direct light source to charge the battery or, if needed, consult an authorized service center for battery replacement.
- Stuck or Jammed Crown: If the crown on your watch is difficult to pull out or rotate, avoid applying excessive force. This may indicate a mechanical issue that should be addressed by a professional watchmaker or authorized service center.
- Loose or Broken Strap: If the watch strap feels loose or breaks, it may need to be replaced. Consult an authorized service center or a reputable watch repair shop for assistance in finding a suitable replacement strap.
If the issues persist or you encounter other problems not listed here, it is recommended to consult the user manual provided by Citizen or contact their customer support for additional assistance. They can provide further guidance and direct you to authorized service centers or qualified watchmakers for necessary repairs.
By following these troubleshooting tips, you can address common problems with your Citizen Eco-Drive Watch WR200 and ensure continued performance and enjoyment of your timepiece.
Cleaning and Maintenance
To keep your Citizen Eco-Drive Watch WR200 in optimal condition and maintain its appearance, regular cleaning and maintenance are essential. Here are some tips to help you keep your watch looking its best:
- Cleaning: Use a soft, lint-free cloth to gently wipe the watch’s case, crystal, and bracelet. Avoid using abrasive materials or harsh chemicals that may damage the watch’s finish. For stubborn dirt or smudges, dampen the cloth with mild soap and water, taking care to avoid water contact with the watch’s internal components.
- Water Resistance: If your watch is water-resistant, it is important to ensure that its water-resistance is maintained. Refer to the user manual to understand the specific water resistance rating of your watch. Avoid exposing the watch to extreme temperatures, such as hot showers or saunas, and be cautious when wearing it during water activities.
- Strap and Bracelet Care: For watches with straps or bracelets made of materials like leather, rubber, or metal, follow the manufacturer’s instructions for cleaning and maintenance. Avoid exposing leather straps to water, as it can cause damage or discoloration.
- Storage: When not in use, store your watch in a cool, dry place away from direct sunlight and extreme temperature changes. Consider using a watch box or pouch to protect it from dust, scratches, and other potential damage.
- Battery Replacement: If your watch’s battery is nearing the end of its life and needs replacement, consult an authorized service center or reputable watch repair shop to ensure proper battery installation.
- Regular Servicing: To maintain the long-term reliability and accuracy of your watch, consider periodic servicing by an authorized service center or qualified watchmaker. They can assess the watch’s performance, conduct necessary repairs, and perform any required lubrication or adjustments.
Proper care and maintenance will help extend the lifespan of your Citizen Eco-Drive Watch WR200 and preserve its overall quality and appearance.
By following these cleaning and maintenance tips, you can enjoy your watch’s performance and stylish appeal for years to come.