
Notes de version pour commutateurs de série 200, 300, 500 et ESW2 Version du micrologiciel 1.3.0.62
1
Notes de version
Notes de la version 1.3.0.62 du logiciel pour
commutateurs de série 200, 300, 500 et ESW2
Mai 2013
Les présentes notes de version décrivent les pratiques recommandées et les
problèmes connus relatifs à la version 1.3.0.62 du logiciel destiné aux produits suivants.
Modèle
Description
Ports
SF200-24
Commutateur Smart 10/100 à 24 ports
e1 à e24, g1 à g2
SF200-24P
Commutateur Smart PoE 10/100 à 24 ports
e1 à e24, g1 à g2
SF200-48
Commutateur Smart 10/100 à 48 ports
e1 à e48, g1 à g2
SF200-48P
Commutateur Smart PoE 10/100 à 48 ports
e1 à e48, g1 à g2
SG200-18
Commutateur Smart Gigabit à 18 ports
g1 à g18
SG200-26
Commutateur Smart Gigabit à 26 ports
g1 à g26
SG200-26P
Commutateur Smart Gigabit à 26 ports avec PoE
g1 à g26
SG200-50
Commutateur Smart Gigabit à 50 ports
g1 à g50
SG200-50P
Commutateur Smart Gigabit à 50 ports avec PoE
g1 à g50
SG300-10
Commutateur géré Gigabit à 10 ports
g1 à g10
SG300-10MP
Commutateur géré Gigabit à 10 ports avec PoE
g1 à g10
SG300-10SFP
Commutateur géré Gigabit à 10 ports avec PoE
8 emplacements SFP + 2
emplacements combinés
SG300-10P
Commutateur géré Gigabit à 10 ports avec PoE
g1 à g10
Quick Start Guide
Cisco 300 Series Managed Switches

Welcome
Thank you for choosing the Cisco 300 Series Managed Switch, a Cisco
network communications device. This device is designed to be
operational right out of the box as a standard bridge. In the default
configuration, it will forward packets between connecting devices after
power up.
Before you begin installing the switch, make sure you have all of the
package contents available, access to the Cisco 300 Series Managed
Switch Administration Guide, and a PC with a web browser for using
web-based system management tools.
Package Contents
• Cisco 300 Series Managed Switch
• Rackmount Kit
• Wallmount Kit (only for the 8-port devices)
• Power Cord (power adapter included with 8-port devices)
• This Quick Start Guide
• Product CD
• Serial Cable
• Rubber Feet
This guide will familiarize you with the layout of the managed switch and
describe how to deploy the device in your network. For additional
information, see www.cisco.com/go/300switches.
1
Mounting the Cisco Switch
There are three ways to physically install the switch:
• Set the switch on a flat surface.
• Mount the switch on a wall (8-port devices only).
• Mount the switch in a standard rack (1 rack unit high).
2 Cisco 300 Series Managed Switches

Do not deploy the device in a location where any of the following
conditions exist:
• High Ambient Temperature—Refer to the following table for the high
ambient temperature rating of each switch:
Ambient Temperature Ratings
Switch Model High Temperature
SF300-24P 104 degrees Fahrenheit (40 Centigrade)
SF300-24PP 113 degrees Fahrenheit (45 Centigrade)
SF300-24MP 122 degrees Fahrenheit (50 Centigrade)
SF300-48P 104 degrees Fahrenheit (40 Centigrade)
SF300-48PP 122 degrees Fahrenheit (50 Centigrade)
SF302-08P 104 degrees Fahrenheit (40 Centigrade)
SF302-08PP 113 degrees Fahrenheit (45 Centigrade)
SF302-08MP 104 degrees Fahrenheit (40 Centigrade)
SF302-08MPP 113 degrees Fahrenheit (45 Centigrade)
SG300-10P 104 degrees Fahrenheit (40 Centigrade)
SG300-10PP 113 degrees Fahrenheit (45 Centigrade)
SG300-10MP 104 degrees Fahrenheit (40 Centigrade)
SG300-10MPP 113 degrees Fahrenheit (45 Centigrade)
SG300-10SFP 113 degrees Fahrenheit (45 Centigrade)
SG300-28P 122 degrees Fahrenheit (50 Centigrade)
SG300-28PP 113 degrees Fahrenheit (45 Centigrade)
SG300-28MP 122 degrees Fahrenheit (50 Centigrade)
SG300-28SFP 122 degrees Fahrenheit (50 Centigrade)
SG300-52P 113 degrees Fahrenheit (45 Centigrade)
SG300-52MP 113 degrees Fahrenheit (45 Centigrade)
• Reduced Air Flow—Both side panels must be unobstructed to prevent
overheating.
• Mechanical Overloading—The device should be level, stable, and
secure to prevent it from sliding or shifting out of position.
• Circuit Overloading—Adding the device to the power outlet must not
overload that circuit.
Cisco 300 Series Managed Switches 3
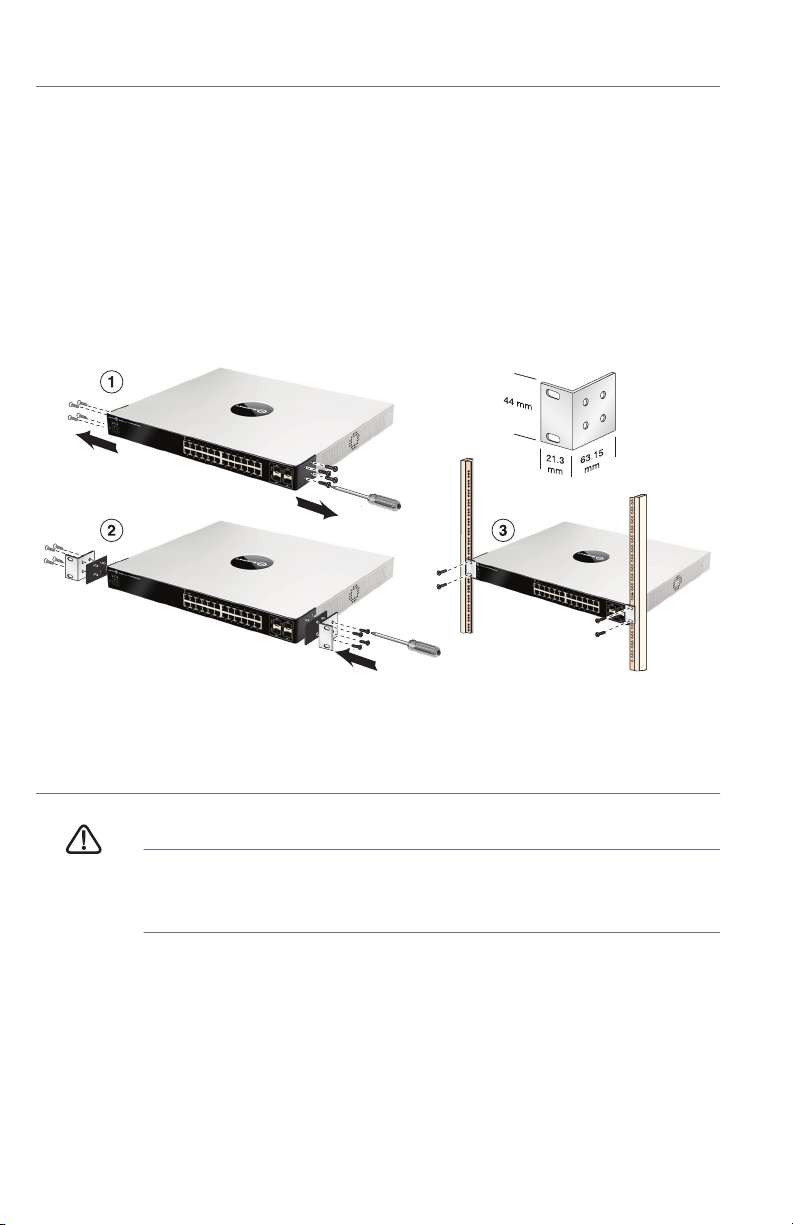
Rack-Mount Placement
STEP 1 Remove the four screws from each side near the front of the switch.
Retain the screws for re-installation. (Do not remove the four screws
from each side near the back of the switch.)
STEP 2 Place one of the supplied spacers on the side of the switch so the
four holes of the spacers align to the screw holes. Place a rack
mount bracket next to the spacer and reinstall the four screws
removed in Step 1.
NOTE If your screws are not long enough to reattach the bracket
with the spacer in place, attach the bracket directly to the case
without the spacer.
181185
STEP 3 Repeat Step 2 for the other side of the switch.
STEP 4 After the mounting hardware has been securely attached, the
switch is now ready to be installed into a standard 19-inch rack.
CAUTION For stability, load the rack from the bottom to the top, with the
heaviest devices on the bottom. A top-heavy rack is likely to
be unstable and may tip over.
Wall Mounting
Only the 8-port models of the switch can be wall-mounted.
NOTE The switch should be mounted so that the ports face up or down.
Do not mount the switch with the ports to the side.
4 Cisco 300 Series Managed Switches
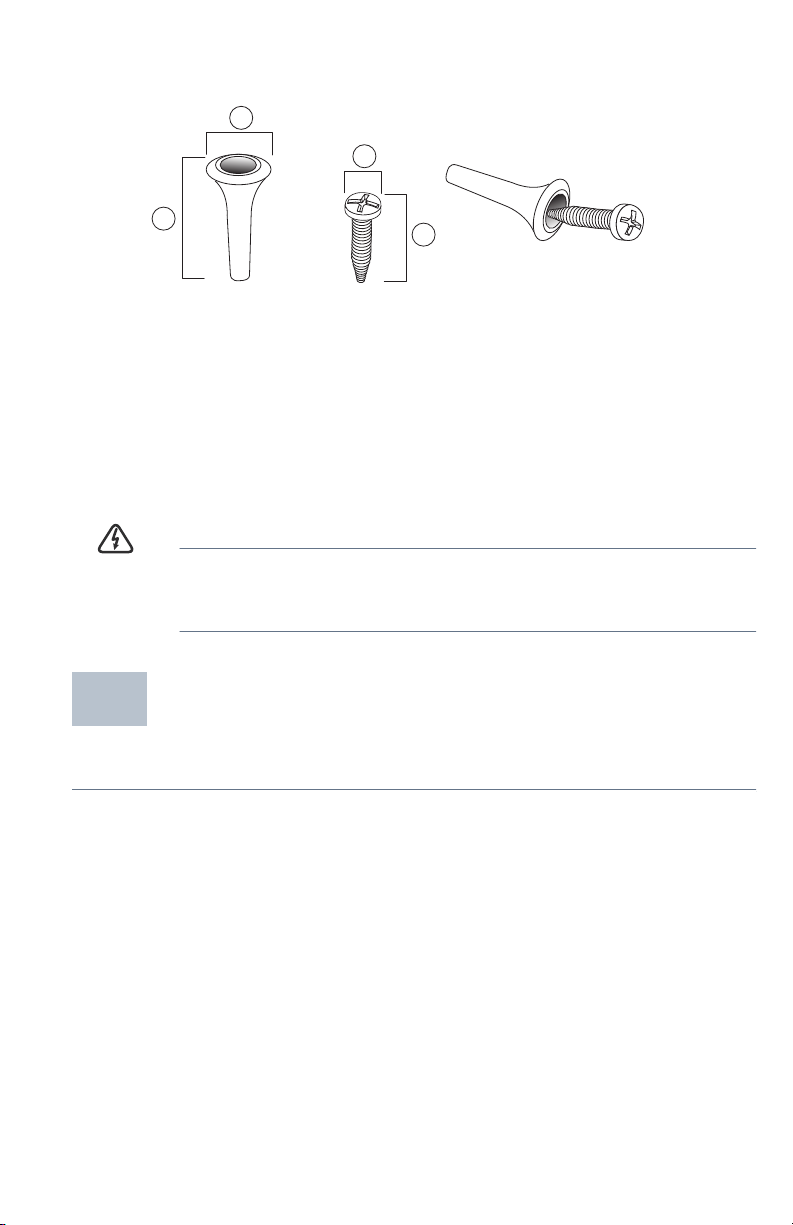
There is a wall-mount kit packed with your switch. The dimensions for the
mount kit are as follows:
1
3
2
1 8 mm/0.4 in 2 22.2 mm/0.9 in 3 6.8 mm/0.3 in 4 17.6 mm/0.7 in
Mount the managed switch to the wall by drilling two pilot holes
3.7 inches (95 mm) apart, attaching the provided anchors and screws to
the wall, then sliding the switch into position on the screws.
The switch should have a minimum of 5 inches (130 mm) of clearance on all
sides.
WARNING Insecure mounting may damage the device or cause injury.
Cisco is not responsible for damages incurred by insecure wallmounting.
4
196243
Connecting Network Devices
2
To connect the switch to the network:
STEP 1 Connect the Ethernet cable to the Ethernet port of a computer,
printer, network storage, or other network device.
STEP 2 Connect the other end of the network Ethernet cable to one of the
numbered managed switch Ethernet ports.
The Ethernet port light turns green when the connection is active.
Refer to Features of the Cisco 300 Series Managed Switch for
details about the different ports and LEDs on each switch.
Cisco 300 Series Managed Switches 5
Loading…
FAQ: Types of Manuals and Their Contents
Cisco SG300-10 Manuals come in various types, each serving a specific purpose to help users effectively operate and maintain their devices. Here are the common types of Cisco SG300-10 User Guides and the information they typically include:
- User Manuals: Provide comprehensive instructions on how to use the device, including setup, features, and operation. They often include troubleshooting tips, safety information, and maintenance guidelines.
- Service Instructions: Designed for technicians and repair professionals, these manuals offer detailed information on diagnosing and repairing issues with the device. They include schematics, parts lists, and step-by-step repair procedures.
- Installation Guides: Focus on the installation process of the device, providing detailed instructions and diagrams for proper setup. They are essential for ensuring the device is installed correctly and safely.
- Maintenance Manuals: Provide guidance on routine maintenance tasks to keep the device in optimal condition. They cover cleaning procedures, part replacements, and regular servicing tips.
- Quick Start Guides: Offer a concise overview of the essential steps needed to get the device up and running quickly. They are ideal for users who need immediate assistance with basic setup and operation.
Each type of Cisco SG300-10 instruction is designed to address specific needs, ensuring users have the necessary information to use, maintain, and repair their devices effectively.
Related Instructions for Cisco SG300-10:
2
Vodafone One Net 7841
4
155
33
5
Nexus 9236C
Manual #S5MSJF: Nexus 9236C Switch Manual
4
313
63
6
AIR-LAP1242AG-A-K9
Datasheet Guide: Cisco AIR-LAP1242AG-A-K9 (6VM1LM, Upd.Saturday 07-12-2024)
10
472
81
7
ASR 900 Series
152
916
184
8
Broadband Access Center
Installation manual Guide: Cisco Broadband Access Center (5O9O2Z, Upd.Wed 10.2024)
76
670
114
9
ASR 9001-S
Overview and reference manual Cisco Network Router Overview and reference manual (File: cisco-asr-9001-overview-and-reference-manual-170, Wed 12.2024)
170
712
143
10
TelePresence MXP Series
172
1238
285
Switch Devices by Other Brands:
|
Key Digital KD-2X2CS Champion Setup Manual KD-2X2CS Champion Setup manual — HW5RKL 2 Inputs to 2 Outputs HDMI Matrix Switcher 22 Feb 2025 | 6 |
|
|
Bticino Living Now K4001C Manual Switch #X26ST9 K4001C 06 Mar 2025 | 4 |
|
|
Hawking HGS8T Specification Hawking Switch Specification (File: hawking-hgs8t-manual-2, 18/10/2024) Hawking Technologies’ H-GS8T 8-port 10/100/1000Mbps Gigabit Auto-sensing Switch is the 18 Oct 2024 | 2 |
|
|
Dell PowerEdge M620 Tech Note PowerEdge M620 Tech note — MM1727 SAN TECH NOTE 19 Jan 2025 | 2 |
Categories:
Network security
Water Filtration Systems
Power distribution unit
Corded phone
Adapter
Access point router
A good user manual
The rules should oblige the seller to give the purchaser an operating instrucion of Cisco Systems SG300-10PP, along with an item. The lack of an instruction or false information given to customer shall constitute grounds to apply for a complaint because of nonconformity of goods with the contract. In accordance with the law, a customer can receive an instruction in non-paper form; lately graphic and electronic forms of the manuals, as well as instructional videos have been majorly used. A necessary precondition for this is the unmistakable, legible character of an instruction.
What is an instruction?
The term originates from the Latin word „instructio”, which means organizing. Therefore, in an instruction of Cisco Systems SG300-10PP one could find a process description. An instruction’s purpose is to teach, to ease the start-up and an item’s use or performance of certain activities. An instruction is a compilation of information about an item/a service, it is a clue.
Unfortunately, only a few customers devote their time to read an instruction of Cisco Systems SG300-10PP. A good user manual introduces us to a number of additional functionalities of the purchased item, and also helps us to avoid the formation of most of the defects.
What should a perfect user manual contain?
First and foremost, an user manual of Cisco Systems SG300-10PP should contain:
— informations concerning technical data of Cisco Systems SG300-10PP
— name of the manufacturer and a year of construction of the Cisco Systems SG300-10PP item
— rules of operation, control and maintenance of the Cisco Systems SG300-10PP item
— safety signs and mark certificates which confirm compatibility with appropriate standards
Why don’t we read the manuals?
Usually it results from the lack of time and certainty about functionalities of purchased items. Unfortunately, networking and start-up of Cisco Systems SG300-10PP alone are not enough. An instruction contains a number of clues concerning respective functionalities, safety rules, maintenance methods (what means should be used), eventual defects of Cisco Systems SG300-10PP, and methods of problem resolution. Eventually, when one still can’t find the answer to his problems, he will be directed to the Cisco Systems service. Lately animated manuals and instructional videos are quite popular among customers. These kinds of user manuals are effective; they assure that a customer will familiarize himself with the whole material, and won’t skip complicated, technical information of Cisco Systems SG300-10PP.
Why one should read the manuals?
It is mostly in the manuals where we will find the details concerning construction and possibility of the Cisco Systems SG300-10PP item, and its use of respective accessory, as well as information concerning all the functions and facilities.
After a successful purchase of an item one should find a moment and get to know with every part of an instruction. Currently the manuals are carefully prearranged and translated, so they could be fully understood by its users. The manuals will serve as an informational aid.