
30
OL-8273-01
Посылка вызовов конференц-связи
С помощью IP-телефона Cisco можно соединить трех и более абонентов путем создания конференции.
Типы поддерживаемых конференций
Предусмотрено два типа конференций: обычные и открытые.
Обычные конференции
Организатор обычной (или «закрытой») конференции должен выполнить посылку вызова каждому
участнику, которого требуется добавить к конференции. На IP-телефоне Cisco можно создавать
обычные конференции различными способами в зависимости от выполняемых задач и настройки
телефона.
• Конф – эта экранная клавиша служит для организации обычной конференции путем вызова
каждого участника по отдельности. Организация обычных конференций является функцией
по умолчанию, доступной на большинстве телефонов.
• ->Конф – эта экранная клавиша служит для организации обычной конференции на основе
нескольких вызовов, которые уже поступили на линию.
• кВмеш – эта экранная клавиша служит для присоединения к существующему вызову
с преобразованием этого вызова в обычную конференцию. Эта дополнительная функция,
используемая только на линиях общего доступа, настраивается системным администратором.
Подробнее см. раздел «Использование линии общего доступа» на стр. 36.
Открытые конференции
Для присоединения к открытой конференции можно набрать номер, заданный для конференции,
не дожидаясь вызова от инициатора конференции.
Для создания открытой конференции нажмите экранную клавишу ‘Конф№’ на телефоне,
затем наберите телефонный номер открытой конференции, предоставленный системным
администратором. Для участия в открытой конференции наберите в указанное время телефонный
номер открытой конференции. Участники конференции, набравшие ее номер раньше инициатора
конференции, слышат сигнал «занято». Открытая конференция начинается с момента набора
номера конференции ее инициатором и может продолжаться даже после отключения инициатора.
Организация открытых конференций является специальной функцией, настраиваемой системным
администратором. Дополнительные инструкции см. в разделе «Организация открытой конференции
и присоединение к ней» на стр. 33.
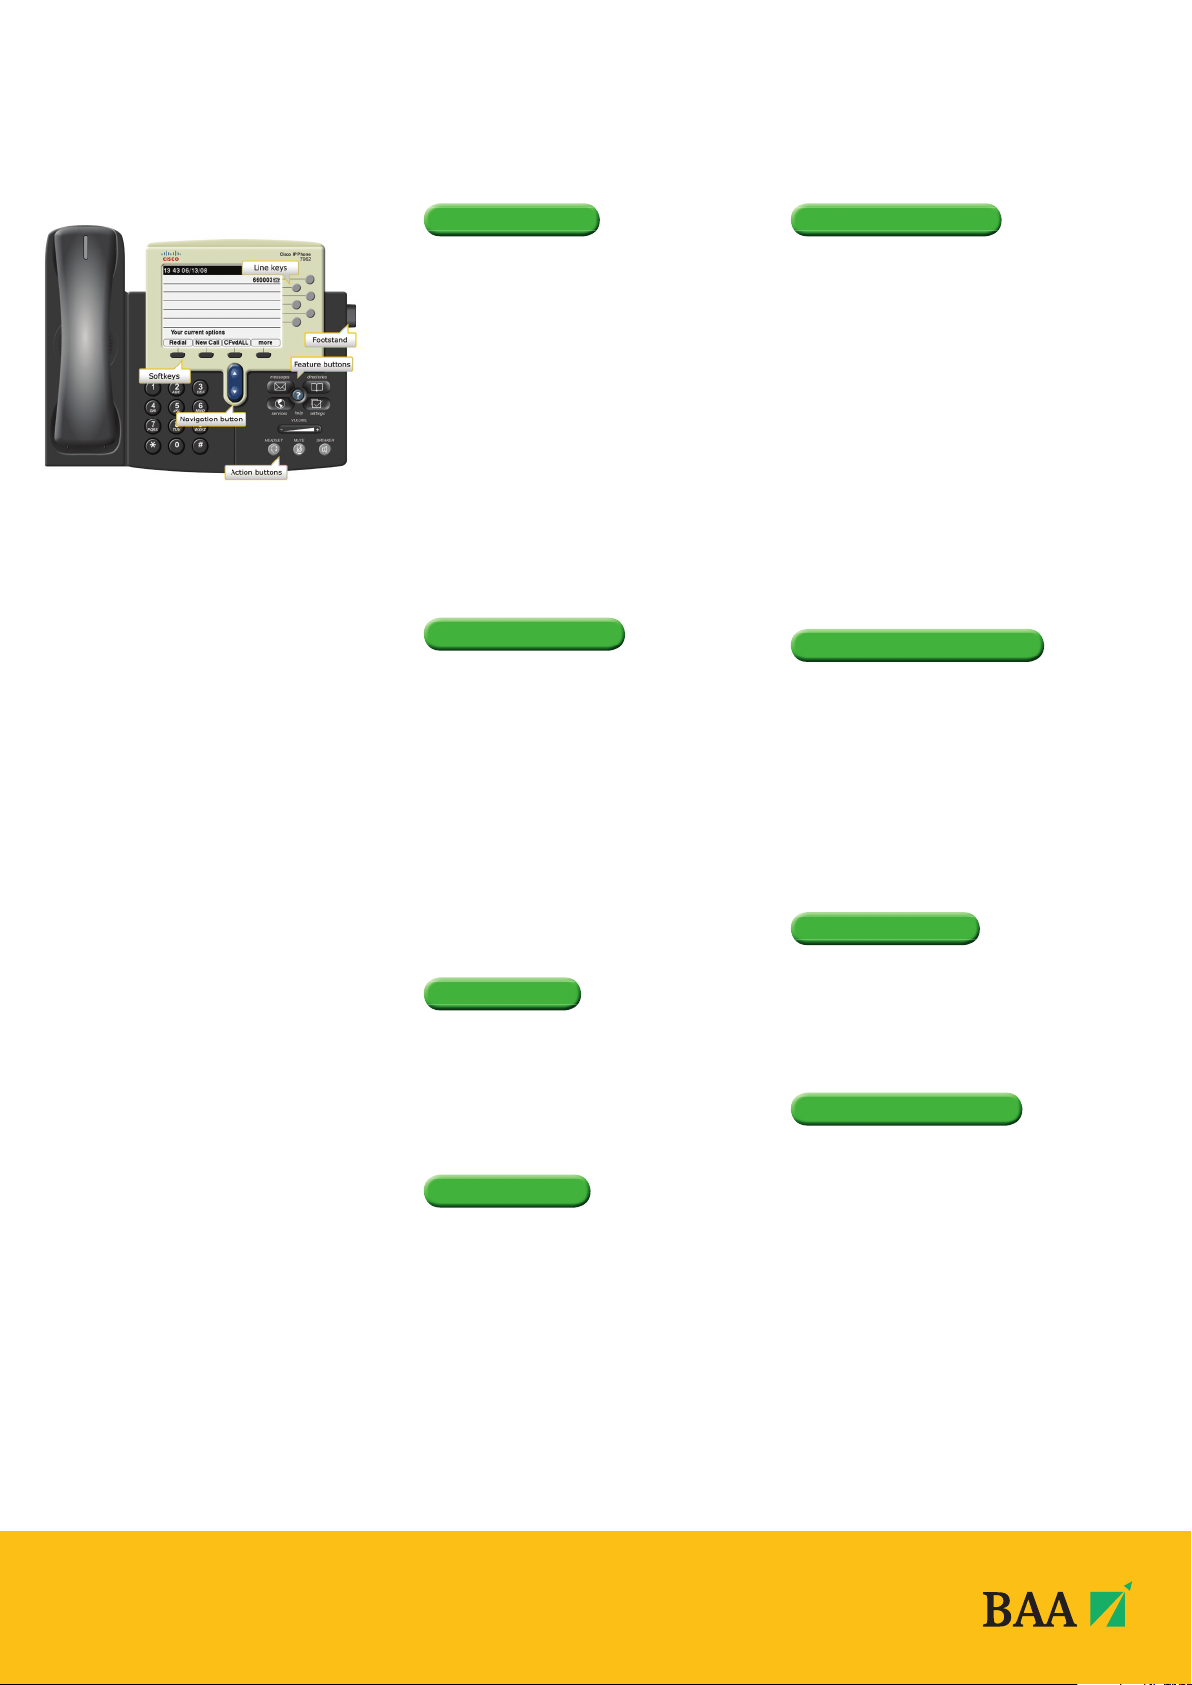
MAKE A CALL
There are a number of ways to make a call. Please
choose one of the following:
• Lift handset and dial number required (9 for
outside line).
• Press the line key displaying your extension number, and
then dial number.
• Press Speaker key then dial number.
• Press NewCall softkey and dial number.
• With handset down enter the phone number, then
press the Dial softkey.
Note: As you begin dialling the number, the screen will
display any previously dialled matching numbers. If shown,
select the number required using the Navigation button
and press the Dial softkey or lift handset.
• If using a headset, press the NewCall softkey and
dial number.
Note: If you make a mistake while entering a phone
number, press << to erase one or more digits.
• Press the EndCall softkey to exit the dialling attempt.
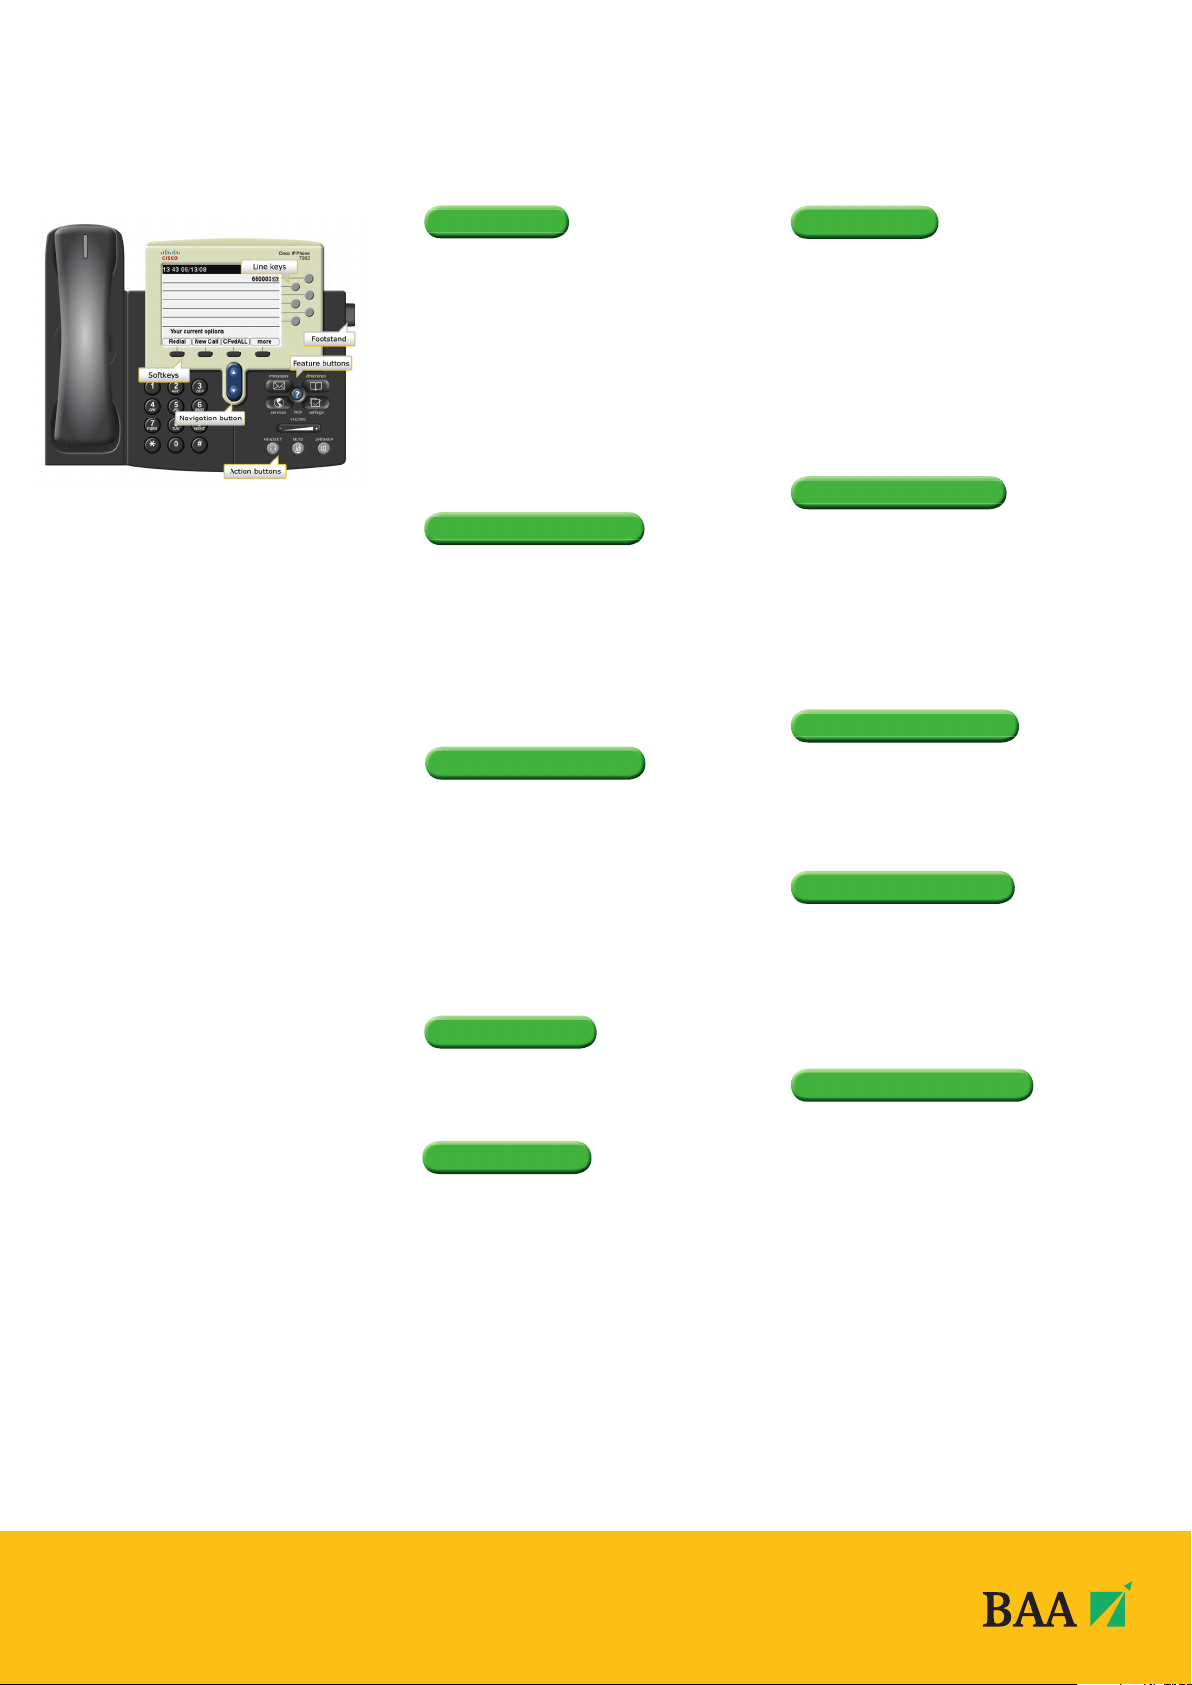
ANSWER A CALL
The light strip at the top of the handset blinks red
when the phone rings:
• Lift handset.
• For handsfree mode, press Speaker button or press the
orange fl ashing line key.
• If using a headset, press Headset button or
Answer softkey.
To answer a second call when displayed on
your handset:
• Press Answer softkey and the fi rst call will be placed
on hold.
You can now switch between the two calls if required:
• Press Hold softkey on the second call.
• Use the Navigation button to highlight the fi rst call,
press Resume softkey.
END A CALL
Choose one of the following options to end your call:
• Replace the handset.
• Press the EndCall softkey and replace the handset.
• If on handsfree, press the Speaker button or the
EndCall softkey.
• If using a headset, press the Headset button or the
EndCall softkey.
HOLD A CALL
When connected to a caller:
• Press the Hold softkey.
• To retrieve the call, press the Resume softkey.
• If multiple calls are on hold, use the Navigation button
to select the caller you wish to retrieve and press the
Resume softkey.
Note: Caller will hear repeated beep whilst on hold.
TRANSFER A CALL
Once connected to a call:
• Press Transfer softkey. This places the call on hold.
You may wish to announce the call prior to transferring to
check the person you are transferring the call to wishes to
accept the call.
Announced call transfer
• Dial the required number.
• When the person answers, announce the call.
• Press the Transfer softkey to connect the callers and
hang up.
Note: If the person does not wish to accept the call, press
EndCall softkey and Resume to retrieve the original caller.
Unannounced call transfer
• Dial the required number.
• When dialled number rings, press the Transfer softkey
and hang up.
Note: If you make a mistake while entering a number,
press << softkey to delete digits.
REDIAL LAST NUMBER
To redial the most recently dialled number:
• Press the Redial softkey and lift handset to speak to
caller when answered.
To redial a number from Placed call Log:
• Press Directories button.
• Use the Navigation button to highlight the placed calls
menu and the Select softkey.
• Use the Navigation button to view numbers
previously dialled.
• Highlight the number required then press Dial softkey or
lift the handset.
PICK UP A CALL
When you hear an extension ringing within your pick
up group your handset will display the extension
number. To pick up the call:
• With handset down, press more then the Pickup
softkey, call will ring on your handset, press Answer
softkey or lift handset to connect to caller.
CALL FORWARDING
To forward all calls to another number with the
handset down:
• Press the CFwdALL softkey. You will hear two beeps.
• Enter the number you wish to forward your calls to or
press speed dial key if programmed.
Note: If you wish to forward your calls to an external
number, remember to place 9 in front of required number
for line access. You will know that your call forward is
successful as an animated arrow appears above the phone
icon in the upper right corner of the LCD screen, and the
screen displays forwarding number.
• To cancel the call forwarding, press the CFwdALL softkey.
Forward all calls to Voicemail with the handset down:
• Press the CFwdALL softkey. You will hear two beeps.
• Press Messages button.
You will know that your call forward is successful as an
animated arrow appears above the phone icon in the upper
right corner of the LCD screen, and the screen displays the
message ‘Forwarded to voicemail’
• To cancel the call forwarding, press the CFwdALL softkey.
CISCO 7962 HANDSET USER GUIDE
ALL BAA TELEPHONE
EXTENSION NUMBERS
ARE NOW 6 DIGITS.
The old BAA 5 digit extension numbers will
no longer work.
Add the following prefi x to the existing
extension number:
Aberdeen 68
BSC 64
Edinburgh 68
Gatwick 69
Glasgow 62
Heathrow 6
Southampton 60
Stansted 61
CALLBACK
You can choose to set up an automatic redial when a
busy extension becomes available:
• On hearing a busy tone, press the Callback softkey.
• Press Exit softkey to set callback or Cancel if
not required.
The system will make you aware when the required extension
becomes available by initiating a ‘Callback’ ringtone on
your handset.
• To initiate the call to the required extension, press Dial
softkey and lift the handset to speak.
DIRECT TRANSFER
With 2 calls on your handset on hold:
• Highlight one and press Resume softkey (Advise
the caller they are going to be transferred).
• Use the Navigation button to highlight the second
call still on hold, press DirTrfr softkey to connect them
together and drop you from the call.
If you want to stay on the line with the callers, use Join
softkey to create a conference call.
IMMEDIATE DIVERT
Only available to handsets with Voicemail
If a call is ringing on your line but you are unable to
answer the call you can choose to divert the call directly to
your voicemail:
• Press the iDivert softkey.
VOLUME CONTROL
To adjust the handset, speakerphone or headset volume:
• During a call, press the Volume button + —
• Press Save softkey to apply the new volume level to
future calls.
To adjust the ring volume:
• Press the Volume button + — while the handset is in
its cradle.
HANDSET CONTRAST
• Press the Settings button.
• Highlight User Preferences and press the
Select softkey.
• Highlight Contrast and press the Select softkey.
• Press the Up and Down softkeys to adjust contrast and
press the Save softkey.
• Press the Exit softkey to return to the normal screen.
CALL LOGS
To View Missed, Received or Placed Calls:
• Press the Directories button
• Use the Navigation button to highlight either the
Missed, Received or Placed calls menu option followed
by the Select softkey.
• Use the Navigation button to scroll through call log
entries – the date and time of call will be displayed.
• Should you wish to return a call, use the navigation
button to Highlight the number required and press the
Dial softkey or lift handset to connect.
Note: If the number you wish to dial is external press the
EditDial softkey, place a 9 in front of the number and press
the Dial softkey or Lift handset to connect.
CONFERENCE CALL
When connected to a call:
• Press the more softkey and then the Confrn softkey to
open a new line, this will place the fi rst person on hold.
• Place a call to another number.
• When the call connects, press the Confrn softkey again
to join the new person to the call.
• This can be repeated for up to 7 callers.
Note: Only the person who started the conference call can
add or remove callers.
CONFERENCE LIST
To view a list of conference participants, during the
conference call:
• Press the more softkey.
• Press ConfList softkey to view list of conference participants.
• The initiator of the conference may select a participant
and remove them from the call by pressing Remove
softkey. The attendee list is automatically updated
on the initiator handset.
• Press Exit softkey to return to normal screen.
Note: Conference call attendees viewing the conference list
can press the Update softkey to view remaining participants.
MUTE A CALL
A caller on mute hears silence:
• Press the Mute button.
• To turn off mute, press the Mute button again.
PARK A CALL
You can choose to ‘park’ a call and pick it up from
another extension:
• With a call in progress, press more softkey.
• Press Park softkey.
• Make a note of the Call Park number displayed and
replace the handset.
• Go to the handset you wish to pick the call up on.
• Lift handset and dial the Call Park number and you will
be connected immediately to the parked call.
To support your usage of the
new telephony system, BAA have
developed an online eHelp system, to
walk you through performing specifi c
tasks on your new handset.
To access eHelp go to
www.baa.com/telecoms
or BAA Intranet — IT pages
CISCO 7962 HANDSET USER GUIDE
Loading…
Cisco 7962 manual user guide for cisco 7962 IP phone users, cisco 7942G / 7962G manuals. This PDF User Guide demonstrates the basic calling features of the Cisco Unified IP Phone. Cisco 7962 phone is used to connect directly to the corporate IP telephony network. The setup will most likely be done by your corporate system administrator. Cisco highly recommends that you only use high quality external devices with your telephone unit.

Overview of Cisco 7962 IP Phone
Cisco 7962 Unified IP Phone is a telephone with many features providing communication over your computer network. This phone is used by businesses all throughout the United States. There are many easy to use features that allow users to transfer incoming calls, place hold on calls, forward telephone calls, access voicemail and conference calls.
How to Transfer Calls
1. Press ”Transfer”, the key that is located below the screen.
2. Enter the extension number you are transferring the call to.
3. Wait for the recipient to answer the call.
4. Press the “Transfer” button to finalize the transfer.
How to Put Calls on Hold
1. Press “Hold”, the key that is located below the screen.
2. Make sure the line you are transferring is highlighted on the phone’s screen.
3. When you are ready to take the call off Hold, press “Resume”. That is the same key you used to place the call on Hold.
How to Use Call Forwarding
1. Press the “CFwdAll” button. The telephone will beep twice.
2. Enter the extension or telephone number you would like your calls to be forwarded to. The telephone will beep once. Call forwarding is now complete.
3. To cancel the call forwarding feature, press the “CFwdAll” button again.
How to Access Voicemail
1. Press the button with the envelope icon. This is the voicemail button.
2. You will hear a set of voicemail instructions that will guide you through the steps of setting up your voicemail greeting.
3. When you have a voicemail, a red light will flash on the handset and an indicator will be on the right corner of the phone’s screen.
4. You can listen to your voicemails by pressing the “Envelop” icon on the right side of your phone.
5. Follow the voicemail instructions.
How to Use Conference Calling
1. Make your first call.
2. After that call answers, press the “Confrn” button. This button is located under the telephone’s screen.
3. Make your second call.
4. Press the “Confrn” button again.
5. Repeat the above to add more calls.
Free download Cisco 7962 Manual User Guide (7942G/7962G)
cisco IP phone 7962 ,cisco ip phone 7962 manual ,cisco 7962 ,cisco 7962 user guide ,cisco ip phone 7962 user guide ,cisco 7962 user manual ,Cisco7962ManualUserGuideforCisco7962IPPhoneUsers7942G/7962G ,cisco ip phone 7962 user manual ,cisco ip 7962 user guide ,Cisco 7962 Phone User Guide
Время на прочтение13 мин
Количество просмотров222K
В статье будут описаны нюансы настройки IP-телефона Cisco на примере цискофона 7942G.
Итак, если вы присматриваетесь к VoIP-устройствам Cisco серии 79XX, то добро пожаловать под кат.
Используется:
Cisco VoIP Phone 7942G
Asterisk 1.4.39
TFTP-server-0.49
Внимание! Инструкция подходит не для всех телефонов Cisco 79XX. См. здесь
Настройка
Комбинации клавиш в Cisco
**#** — перезагрузка телефона (через меню)
**# — разблокировка настроек (также через меню). Разблокировка нужна, например, для того чтобы поставить настройки DHCP-клиента
TFTP
Первое что нам понадобиться сделать — это настроить tftpserver. Я использовал стандартный линуксовый. Рекомендую сразу настроить, чтобы tftp-запросы записывались в лог-файл (по умолчанию /var/log/messages).
cat /etc/xinetd.d/tftp:
...

server_args = -s /tftpboot -v

...
Смена прошивки
Итак, сначала нужно разыскать нужную прошивку для работы по SIP, т.к. по умолчанию используется версия с SCCP. Для этого есть гугл или торренты.
Далее заходим на известный всем сайт voip-info.org. По ссылке выложена информация о прошивке. Т.к. у меня версия астериска 1.4 (которая не умеет работать по tcp), то советуют брать версию 8.5.4. По этой ссылке есть много и другой полезной информации.
Таким образом, нам нужен файл cmterm-7942_7962-sip.8-5-4.zip. Все файлы которые там есть нужно вывалить в корень тфтп-сервера.
Русская локаль
Еще бы нам не помешала русская локаль. Ну т.е. чтобы все надписи на экране были на русском языке.
Я её брал из файла po-locale-ru_RU-8.4.3.1000-1.exe (тоже можно найти в интернете). Тут есть одна хитрость — при запуске программы она вываливает ошибку и потом закрывается. Но нам ведь всего лишь нужны файлы локали, установить мы их можем и сами.
Поэтому после запуска идем в папку %TEMP% (советую предварительно её очистить) и смотрим что там программа вывалит.
Там в числе прочего будет папка Russian_Russian_Federation. Вот её нам и нужно будет поместить в корень tftp-сервера.
Версия локали будет как раз 8.4.3.1000-1.
Файл кофигурации цискофона
Теперь перейдем непосредственно к файлу конфигурации. Цискофон загружает его исключительно с tftp-сервера. Сначала кажется неудобно, с другой стороны, нужно настроить всего один раз, а затем можно эти телефоны хоть штабелями закупать — настройка их будет аналогичной и займет минимум времени. Кроме того, этим Cisco обезопасил телефон от «шаловливых ручек» пользователей. Через меню сделать практически ничего нельзя.
Файл должен называться SEP<MAC-адрес Cisco-телефона>.cnf.xml.
Мак-адрес записан на тыльной стороне устройства.
Определим некоторые значения:
$ASTERISK — ай-пи нашего астериска
$SERVICESURL — полный путь до скрипта, который генерирует адресную книгу (например, 192.168.0.22/asterisk/directory.php)
$ACCOUNT — пользователь/номер нашего аккаунта на астериске. Если у вас нет соответствия номер<=>пользователь, то конфиг нужно будет соответствующим образом поменять.
$ACCOUNT_PASS — пароль от SIP-аккаунта
<device>
    <fullConfig>true</fullConfig>
    <deviceProtocol>SIP</deviceProtocol>
    <devicePool>
        <dateTimeSetting>
            <dateTemplate>D.M.Y</dateTemplate>
            <timeZone>Ekaterinburg Standard Time</timeZone>
            <ntps>
                <ntp>
                    <name>$ASTERISK</name>
                    <ntpMode>Unicast</ntpMode>
                </ntp>
            </ntps>
        </dateTimeSetting>
        <callManagerGroup>
            <tftpDefault>true</tftpDefault>
                <members>
                <member priority="0">
                <callManager>
                <name>$ASTERISK</name>
                <description>CallManager 5.0</description>
                <ports>
                  <ethernetPhonePort>2000</ethernetPhonePort>
                  <sipPort>5060</sipPort>
                  <securedSipPort>5061</securedSipPort>
                </ports>
                <processNodeName>$ASTERISK</processNodeName>
                </callManager>
                </member>
                </members>
             </callManagerGroup>
    </devicePool>
    <commonProfile>
        <phonePassword></phonePassword>
        <backgroundImageAccess>true</backgroundImageAccess>
        <callLogBlfEnabled>0</callLogBlfEnabled>
    </commonProfile>
    <loadInformation>SIP42.8-5-4S</loadInformation>
    <loadInformation434  model="Cisco 7942">SIP42.8-5-4S</loadInformation434>
    <vendorConfig>
        <disableSpeaker>false</disableSpeaker>
        <disableSpeakerAndHeadset>false</disableSpeakerAndHeadset>
        <pcPort>0</pcPort>
        <settingsAccess>1</settingsAccess>
        <garp>0</garp>
        <voiceVlanAccess>0</voiceVlanAccess>
        <videoCapability>0</videoCapability>
        <autoSelectLineEnable>0</autoSelectLineEnable>
        <daysDisplayNotActive>1,7</daysDisplayNotActive>
        <displayOnTime>10:30</displayOnTime>
        <displayOnDuration>06:05</displayOnDuration>
        <displayIdleTimeout>00:05</displayIdleTimeout>
        <webAccess>1</webAccess>
        <spanToPCPort>1</spanToPCPort>
        <loggingDisplay>1</loggingDisplay>
        <loadServer></loadServer>
    </vendorConfig>

<userLocale>
  <name>Russian_Russian_Federation</name>
  <uid></uid>
  <langCode>ru_RU</langCode>
  <version>8.4.3.1000-1</version>
  <winCharSet>utf-8</winCharSet>
</userLocale>


<networkLocale>Russian_Federation</networkLocale>
<networkLocaleInfo>
  <name>Russian_Federation</name>
  <uid></uid>
  <version>8.4.3.1000-1</version>
</networkLocaleInfo>

    <deviceSecurityMode>1</deviceSecurityMode>
    <idleTimeout>0</idleTimeout>
    <directoryURL></directoryURL>
    <servicesURL>$SERVICESURL</servicesURL>
    <idleURL></idleURL>
    <messagesURL></messagesURL>
    <proxyServerURL></proxyServerURL>
    <dscpForSCCPPhoneConfig>96</dscpForSCCPPhoneConfig>
    <dscpForSCCPPhoneServices>0</dscpForSCCPPhoneServices>
    <dscpForCm2Dvce>96</dscpForCm2Dvce>
    <transportLayerProtocol>2</transportLayerProtocol>
    <capfAuthMode>0</capfAuthMode>
    <capfList>
        <capf>
            <phonePort>3804</phonePort>
        </capf>
    </capfList>
    <certHash></certHash>
    <encrConfig>false</encrConfig>
    <sipProfile>
        <sipProxies>
            <backupProxy>$ASTERISK</backupProxy>
            <backupProxyPort>5060</backupProxyPort>
            <emergencyProxy>$ASTERISK</emergencyProxy>
            <emergencyProxyPort>5060</emergencyProxyPort>
            <outboundProxy>$ASTERISK</outboundProxy>
            <outboundProxyPort>5060</outboundProxyPort>
            <registerWithProxy>true</registerWithProxy>
        </sipProxies>
     <sipCallFeatures>
        <cnfJoinEnabled>true</cnfJoinEnabled>
        <callForwardURI>x--serviceuri-cfwdall</callForwardURI>
        <callPickupURI>x-cisco-serviceuri-pickup</callPickupURI>
        <callPickupListURI>x-cisco-serviceuri-opickup</callPickupListURI>
        <callPickupGroupURI>x-cisco-serviceuri-gpickup</callPickupGroupURI>
        <meetMeServiceURI>x-cisco-serviceuri-meetme</meetMeServiceURI>
        <abbreviatedDialURI>x-cisco-serviceuri-abbrdial</abbreviatedDialURI>
        <rfc2543Hold>false</rfc2543Hold>
        <callHoldRingback>2</callHoldRingback>
        <localCfwdEnable>true</localCfwdEnable>
        <semiAttendedTransfer>true</semiAttendedTransfer>
        <anonymousCallBlock>2</anonymousCallBlock>
        <callerIdBlocking>2</callerIdBlocking>
        <dndControl>0</dndControl>
        <remoteCcEnable>true</remoteCcEnable>
     </sipCallFeatures>
     <sipStack>
        <sipInviteRetx>6</sipInviteRetx>
        <sipRetx>10</sipRetx>
        <timerInviteExpires>180</timerInviteExpires>
        <timerRegisterExpires>3600</timerRegisterExpires>
        <timerRegisterDelta>5</timerRegisterDelta>
        <timerKeepAliveExpires>120</timerKeepAliveExpires>
        <timerSubscribeExpires>120</timerSubscribeExpires>
        <timerSubscribeDelta>5</timerSubscribeDelta>
        <timerT1>500</timerT1>
        <timerT2>4000</timerT2>
        <maxRedirects>70</maxRedirects>
        <remotePartyID>false</remotePartyID>
        <userInfo>None</userInfo>
     </sipStack>
     <autoAnswerTimer>1</autoAnswerTimer>
     <autoAnswerAltBehavior>false</autoAnswerAltBehavior>
     <autoAnswerOverride>true</autoAnswerOverride>
     <transferOnhookEnabled>false</transferOnhookEnabled>
     <enableVad>false</enableVad>
        <preferredCodec>g711alaw</preferredCodec>
       <dtmfAvtPayload>101</dtmfAvtPayload>
       <dtmfDbLevel>3</dtmfDbLevel>
       <dtmfOutofBand>avt</dtmfOutofBand>
        <alwaysUsePrimeLine>false</alwaysUsePrimeLine>
        <alwaysUsePrimeLineVoiceMail>false</alwaysUsePrimeLineVoiceMail>
        <kpml>3</kpml>
        <stutterMsgWaiting>1</stutterMsgWaiting>
        <callStats>true</callStats>
        <silentPeriodBetweenCallWaitingBursts>10</silentPeriodBetweenCallWaitingBursts>
        <disableLocalSpeedDialConfig>true</disableLocalSpeedDialConfig>
        <startMediaPort>10100</startMediaPort>
        <stopMediaPort>10300</stopMediaPort>
        <voipControlPort>5060</voipControlPort>
        <dscpForAudio>184</dscpForAudio>
        <ringSettingBusyStationPolicy>0</ringSettingBusyStationPolicy>
        <dialTemplate>dialplan.xml</dialTemplate>
        <phoneLabel>Cisco</phoneLabel>
          <natReceivedProcessing>false</natReceivedProcessing>
          <natEnabled>false</natEnabled>
          <natAddress></natAddress>
        <sipLines>
          <line button="1">
            <featureID>9</featureID>
            <featureLabel>$ACCOUNT</featureLabel>
            <proxy>$ASTERISK</proxy>
            <port>5060</port>
            <name>$ACCOUNT</name>
            <displayName>$ACCOUNT</displayName>
            <autoAnswer>
              <autoAnswerEnabled>2</autoAnswerEnabled>
            </autoAnswer>
            <callWaiting>3</callWaiting>
            <authName>$ACCOUNT</authName>
            <authPassword>$ACCOUNT_PASS</authPassword>
            <sharedLine>false</sharedLine>
            <messageWaitingLampPolicy>3</messageWaitingLampPolicy>
            <messagesNumber></messagesNumber>
            <ringSettingIdle>4</ringSettingIdle>
            <ringSettingActive>5</ringSettingActive>
            <contact>$ACCOUNT</contact>
            <forwardCallInfoDisplay>
              <callerName>true</callerName>
              <callerNumber>false</callerNumber>
              <redirectedNumber>false</redirectedNumber>
              <dialedNumber>true</dialedNumber>
            </forwardCallInfoDisplay>
          </line>
          <line button="2">
          <featureID></featureID>
          <featureLabel></featureLabel>
          <speedDialNumber></speedDialNumber>
          </line>
        </sipLines>
    </sipProfile>
</device>
Теперь будем комментировать.
<timeZone>Ekaterinburg Standard Time</timeZone> - настройки часового пояса, которые будут использовать при получении информации от NTP-сервере (в конфиге это наш астериск).
Все часовые пояса можно найти, например, здесь.
<loadInformation>SIP42.8-5-4S</loadInformation> - имя прошивки, которая будет загружена
Следующие настройки нужны для настройки локали:
<userLocale>
  <name>Russian_Russian_Federation</name>
  <uid></uid>
  <langCode>ru_RU</langCode>
  <version>8.4.3.1000-1</version>
  <winCharSet>utf-8</winCharSet>
</userLocale>
<networkLocale>Russian_Federation</networkLocale>
<networkLocaleInfo>
  <name>Russian_Federation</name>
  <uid></uid>
  <version>8.4.3.1000-1</version>
</networkLocaleInfo>
<servicesURL>$SERVICESURL</servicesURL> - указываем откуда загружать XML для сервисов (в нашем случае там будет передаваться список абонентов).
<dialTemplate>dialplan.xml</dialTemplate> - это очень важная строчка, о ней будет ниже.
<line button="2"> - у нас пустой, т.к. используем один SIP-аккаунт.
<preferredCodec>g711alaw</preferredCodec> - кодек G711 alaw у нас будет предпочтительным.
Конфигурация sip.conf астериска
...
[$ACCOUNT]
deny=0.0.0.0/0.0.0.0
permit=192.168.0.0/255.255.255.0
type=friend
host=dynamic
context=НАШ_КОНТЕКСТ
dtmfmode=rfc2833
disallow=all
allow=alaw
allow=ulaw
allow=gsm
username=$ACCOUNT
secret=$ACCOUNT_PASS
call-limit=2
...
Самое интересное здесь — call-limit=2. Суть в том, что можно будет получать 1 или 2 звонка (3 звонок уже на циску не пойдет — зачем её напрягать?), их можно обрабатывать на телефоне, переключаясь между ними. Больше чем 2 звонка в этом аппарате не поддерживается (возможно будет поддерживаться в новых прошивках), хотя обрабатывать 3 звонка уже достаточно накладно.
Настройка диалплана цискофона
Циско настолько умная, что может использовать свой собственный диалплан. Но тут есть обратная сторона медали. Если этот диалплан не указать, то исходящие звонки вообще ходить не будут. Точней будут, но только на номера от 0 до 9 =).
<DIALTEMPLATE>
  <TEMPLATE MATCH="*" Timeout="3"/> <!-- Anything else -->
</DIALTEMPLATE>
В этом конфиге мы по сути передаем всю ответственность на астериск — т.е. просто после 3-х секунд передаем номер. Более изящные номерные планы можно найти на voip-info.org.
Адресная книга абонентов
У нас есть LDAP (в связке с samba), в нем есть информация о телефонах пользователей. Так почему бы этим не воспользоваться?
Сервер LDAP, filter поиска нужно будет поменять на свои настройки.
directory.php:
<?
   header("Content-type: text/xml");
   header("Connection: close");
   header("Expires: -1");

  $page=1;
  if(isset($_GET['page']))
  {
    $page = $_GET['page'];
    if(settype($page,"integer") == false)
      die("<b>BAD REQUEST (invalid type)</b>");
  }

  echo '<?xml version="1.0" encoding="UTF-8"?>'."\n";

  $ldapconfig['host'] = '192.168.0.8';
  $ldapconfig['port'] = NULL;
  $ldapconfig['basedn'] = 'ou=users,dc=MyCompany,dc=ru';
  $ldapconfig['filter'] = "(&(uid=*)(objectClass=sambaSamAccount)(objectClass=inetOrgPerson))";

   print("<CiscoIPPhoneDirectory>\n");
   print("\t<Title> </Title>\n");
   print("\t<Prompt> </Prompt>\n");

  $DS = @ldap_connect($ldapconfig['host'], $ldapconfig['port']);

  if ( $DS === false )
    exit("ldap_connect problem: ".ldap_error($DS));

  $SRes = @ldap_search($DS, $ldapconfig['basedn'], $ldapconfig['filter']);

  if ( $SRes === false )
    exit("ldap_search problem: ".ldap_error($DS));

  $res = @ldap_get_entries($DS, $SRes);
  if ( $res === false )
    exit("ldap_get_entries problem: ".ldap_error($DS));


  $results = array();

  for ($i = 0; $i < $res["count"]; $i++)
  {

    if (!isset($res[$i]["telephonenumber"]))
      continue;
    if (!isset($res[$i]["displayname"]))
      continue;

    $r_ar = array();

    $r_ar['displayname']=$res[$i]["displayname"][0];
    $r_ar['telephonenumber']=$res[$i]["telephonenumber"][0];
    array_push($results, $r_ar);

  }

  for ($i = 0; $i < (count($results)-1); $i++)
    for ($k = $i+1; $k < count($results); $k++)
    {
      if (strcmp($results[$i]['displayname'],$results[$k]['displayname']) > 0)
      {
        $r_tmp = array();
        $r_tmp = $results[$i];
        $results[$i] = $results[$k];
        $results[$k] = $r_tmp;
      }

    }


  for ($i = (32*($page-1)); $i < (32*$page); $i++)
  {

    if ($i == count($results))
      break;

    print("\t<DirectoryEntry>\n");

    print("\t\t<Name>");
    print($results[$i]['displayname']);
    print("</Name>\n");


    print("\t\t<Telephone>");
    print($results[$i]['telephonenumber']);
    print("</Telephone>\n");

    print("\t</DirectoryEntry>\n");
  }

  print("<SoftKeyItem>");
  print("<Name>Dial</Name>");
  print("<URL>SoftKey:Dial</URL>");
  print("<Position>1</Position>");
  print("</SoftKeyItem>");

  if ($page > 1)
  {
    print("<SoftKeyItem>");
    print("<Name>Prev</Name>");
    print("<URL>http://".$_SERVER['SERVER_NAME']."/asterisk/directory.php?page=".($page-1)."</URL>");
    print("<Position>2</Position>");
    print("</SoftKeyItem>");
  }

  $count_pages = (int) (count($results) / 32);

  if ((count($results) % 32) !=0)
    $count_pages++;

  if ($page < $count_pages)
  {
    print("<SoftKeyItem>");
    print("<Name>Next</Name>");
    print("<URL>http://".$_SERVER['SERVER_NAME']."/asterisk/directory.php?page=".($page+1)."</URL>");
    print("<Position>3</Position>");
    print("</SoftKeyItem>");
  }

  print("<SoftKeyItem>");
  print("<Name>Exit</Name>");
  print("<URL>SoftKey:Exit</URL>");
  print("<Position>4</Position>");
  print("</SoftKeyItem>");

  print("</CiscoIPPhoneDirectory>\n");

?>
Обновление. Заметьте, что на странице только 32 контакта. Почему так? Не знаю, чем это объяснить, но так реализовано в прошивке — больше чем 32 контакта не поддерживается. Впрочем, это не беда, т.к. можно реализовать при помощи софткеев механизм отображения пред. и след. страниц.
Делаем настройки для логотипа
Для начала по логам tftp смотрим куда cisco обращается за картинкой. Происходит это в момент выбора фонового изображения
через меню телефона (как разблокировать меню написано выше).
изображения из меню
/tftpboot/Desktops/320x196x4/List.xml:
<CiscoIPPhoneImageList>
  <ImageItem Image="TFTP:Desktops/320x196x4/Logo-TN.png" URL="TFTP:Desktops/320x196x4/Logo.png"/>
</CiscoIPPhoneImageList>
Нам нужно создать одну картинку 320×196 и одну картинку в 4 раза меньше (80×49).
Logo-TN.png — эскиз.
Logo.png — полноценная картинка.
Изменять логотип нужно через меню телефона.
Что не вошло в статью
— Настройка сигналов вызовов. Да, это тоже можно делать. Другое дело — зачем? Если для вас оно имеет смысл — то дерзайте.
— Настройка directories. Есть возможность, например, читать RSS с телефона и вообще добавлять различные контент-каталоги.
Проблемы, возникшие в процессе настройки
1. Нужна была прошивка для SIP (по умолч. SCCP)
2. Не регистрировался телефон (поставил прошивку 9.0.3, которая работает только по TCP)
3. Не шли исходящие звонки (см. dialplan.xml)
4. Отображаются только 32 контакта в адресной книге (ограничение прошивки)
Ссылки
www.voip-info.org/wiki/view/Asterisk+phone+cisco+79×1+xml+configuration+files+for+SIP
www.voip-info.org/wiki/view/Asterisk+phone+cisco+7970+SIP
www.asteriskguru.com/tutorials/cisco_7960_ip_phone_configuration.html
Опыт настройки:
3090607.ru/note/27-cisco-ip-phone-locale
forum.sysadmins.su/index.php?showtopic=20489
www.voipstore.com/configuring-cisco-7975-ip-phones-for-sip
asteriskpbx.ru/display/Asterisk/CISCO+7911
www.gho.no/2009/05/cisco-ip-phone-configuration-with-asterisk
Офиц. руководство:
www.cisco.com/en/US/docs/voice_ip_comm/cuipph/7960g_7940g/sip/2_0/english/administration/guide/admin2.pdf
www.cisco.com/en/US/docs/voice_ip_comm/cuipph/7962g_7942g/6_0/english/administration/guide/7962G-Admin-Book-Wrapper.html
XML objects:
www.cisco.com/univercd/cc/td/doc/product/voice/vpdd/cdd/5_0/5_0_1/ipphsv/ip503ch2.htm#wp1033491
www.ibm.com/developerworks/wireless/library/wi-voip
webmaxtor.blogspot.com/2009/04/cisco-ipphonedirectory-exit-softkey.html
www.cisco.com/univercd/cc/td/doc/product/voice/vpdd/cdd/5_0/5_0_1/ipphsv/ip503ch2.htm
docstore.mik.ua/univercd/cc/td/doc/product/voice/vpdd/cdd/5_0/ipphsv/ip502apa.htm#wp1007090
my.safaribooksonline.com/book/telephony/1587050609/using-cisco-ip-phone-xml-objects-and-tags/ch04#X2ludGVybmFsX0ZsYXNoUmVhZGVyP3htbGlkPTEtNTg3MDUtMDYwLTkvNjE=