
Cерия консолей ChamSys QuickQ — идеальное и мощное решение для управления небольшими шоу.
В линейке ChamSys QuickQ представлены 3 модели пультов с интуитивно понятным интерфейсом и большим сенсорным экраном (9,7 дюймов).
Пульты очень просты в работе — производители позаботились о доступности основных инструментов, легком выборе цвета, интенсивности, масштаба и прокрутки. Полезные подсказки и видео мануалы позволяет освоить пульт еще быстрее.Встроенный Wi-Fi роутер позволит управлять пультом через планшет или телефон, или использовать гаджеты как дополнительный монитор. Помимо прочего доступна полная поддержка переноса шоу с PC на пульт посредством флешки.
Все модели QuickQ используют ту же библиотеку приборов, что и другие пульты Chamsys. Поддержка RDM позволяет автоматически подхватить и запатчить приборы, поддерживающие систему RDM. Шоу-файлы от пультов QuickQ можно легко воспроизвести и на старших консолях от Chamsys.
ChamSys QuickQ 20
Дизайн
Простой пользовательский интерфейс
Легкая навигация
Большой тачскрин с интуитивно понятным графическим интерфейсом
Подсказки по установке, настройке и управлению
Совместимость
Неограниченное количество приборов, 2 потока на 1024 канала.
Пользовательский интерфейс
Смоделирован по принципу иконок и жестового управления
Интуитивный интерфейс позволяет легко контролировать все параметры приборов
Поддерживает жест удержания для увеличения и прокручивания интерфейса
Удаленное управление консолью через приложение
Фейдеры
20 фейдеров для управления диммерами приборов, LED приборами и движущимися головами (Moving head).,
10 назначаемых мастер фейдеров, 1 Master фейдер, 6 энкодеров, flash-кнопки под каждый фейдер.
Входы и выходы
2 выхода DMX на 5pin XLR 2 USB порта 1 Art-net, MIDI Встроенный Wi-Fi для соединения со смартфоном или планшетом HDMI
выход с поддержкой 1920 x 1080Аудио вход/ выход
Работа offline
Offline редактор доступен для ОС Windows и Mac
Простые обновления
Включает визуализатор MagicVis Полностью копирует консоль Quick Q, за исключением output.
Габариты: 560x350x106 мм
Вес: 5,2 кг
ChamSys QuickQ 30
Installation, Operation Manual and Warranty
Certificate
ChamSys Support mailto:support@chamsys.co.uk
Software Version v10, 2024-03-11
Manual
View the manual for the ChamSys QuickQ 30 here, for free. This user manual comes under the category not categorized and has been rated by 1 people with an average of a 8.4. This manual is available in the following languages: English. Do you have a question about the ChamSys QuickQ 30?
Ask your question here
Index
- QuickQ Manual: Installation, Operation Manual and Warranty Certificate
- Contents
- Edition Notes
- Chapter 1. QuickQ Range
- Chapter 2. QuickQ Screen User Interface
- Chapter 3. Setting Up and Connecting
- Chapter 4. Setting Up Your Show
- Chapter 5. Controlling Fixtures
- Chapter 6. Recording Items with QuickQ
- Chapter 7. Editing Cues
- Chapter 8. Effects
- Chapter 9. Execute Window
- Chapter 10. Settings Window
- Chapter 11. File Management
- Chapter 12. MIDI Notes and Timecode
- Chapter 13. Audio
- Chapter 14. 10Scene Window and 10Scene Wall Plates
- Chapter 15. Events Window
- Chapter 16. Outputs Window
- Chapter 17. Unused Cue Stacks Window
- Chapter 18. Network Devices Window
- Chapter 19. Hot Takeover and Emergency Triggers
- Chapter 20. Open Sound Control (OSC)
- Chapter 21. Ethernet Remote Control
- Chapter 22. Upgrading Console Software
- Chapter 23. Factory Reset
- Glossary
- Appendix A: DMX, Ethernet and Art-Net
- Appendix B: FCC Part 15 Notice
- Appendix C: Technical Specifications
- Appendix D: Disposal and Recycling of Unwanted Consoles
- Appendix E: QuickQ Warranty Certificate
Product Images (2)

ChamSys QuickQ 30 specifications
Below you will find the product specifications and the manual specifications of the ChamSys QuickQ 30.
The ChamSys QuickQ 30 is a lighting console designed for live entertainment and event production. Featuring a user-friendly interface, it allows for easy operation and quick programming of lighting cues. The console is compact in size, making it suitable for small to medium-sized venues. It offers a range of control options, including faders and touch screens, to accommodate different user preferences.
With its intuitive layout, the QuickQ 30 enables efficient control of various lighting fixtures, such as moving heads, LED pars, and strobes. It also supports a wide range of protocols, ensuring compatibility with a variety of lighting equipment. The console offers a reliable performance with stable outputs and responsive controls.
Overall, the ChamSys QuickQ 30 is a versatile lighting console that is ideal for users looking for a compact and easy-to-use solution for their lighting needs.
General
Frequently asked questions
Can’t find the answer to your question in the manual? You may find the answer to your question in the FAQs about the ChamSys QuickQ 30 below.
Is the manual of the ChamSys QuickQ 30 available in English?
Yes, the manual of the ChamSys QuickQ 30 is available in English .
Is your question not listed? Ask your question here

ChamSys
QuickQ 10, QuickQ 20, QuickQ 30
Console and QuickQ Rack
Installation, Software manual and
Warranty Certificate

www.chamsys.co.uk QuickQ User Manual
Edition Notes
The QuickQ User Manual includes a description, safety precautions, installation, programming, operation and
maintenance instructions for the QuickQ series consoles and Rack Mount products as of the release date of this
edition.
ChamSys constantly strives to provide the most powerful and stable software for all of our lighting consoles. As
such, we are making continual improvements to the software available to all of our users. To unlock the full
potential of your console, and to make sure that you have the most current fixture library, we suggest
downloading and installing the latest Console software from the ChamSys website.
Detailed installation instructions can be found in section 3.9 of this manual.
Trademarks
ChamSys, the ChamSys logo and QuickQ are registered trademarks or trademarks of ChamSys Ltd in the United
Kingdom and other countries. Other company and product names and logos referred to herein may be
trademarks of their respective companies.
Copyright Notice
The works of authorship contained in this manual, including, but not limited to, all design, text and images are
owned by ChamSys Ltd. All rights reserved.
Manual Use
ChamSys authorises its customers to download and print this manual for professional information purposes only.
Chauvet expressly prohibits the usage, copy, storage, distribution, modification, or printing of this manual or its
content for any other purpose without written consent from ChamSys
Intended Audience
Any person installing, operating, and/or maintaining this product should completely read through the guide that
shipped with the product, as well as this manual, before installing, operating, or maintaining this product.
Disclaimer
ChamSys believes that the information contained in this manual is accurate in all respects. However, ChamSys
assumes no responsibility and specifically disclaims any and all liability to any party for any loss, damage or
disruption caused by any errors or omissions in this document, whether such errors or omissions result from
negligence, accident or any other cause. ChamSys reserves the right to revise the content of this document
without any obligation to notify any person or company of such revision, however, ChamSys has no obligation to
make, and does not commit to make, any such revisions. Download the latest version from www.chamsys.co.uk
Page 2 of 52

www.chamsys.co.uk QuickQ User Manual
Table of Contents
ChamSys …………………………………………………………………………………………………………………………………………………… 1
Care of Your Console …………………………………………………………………………………………………………………………………. 4
Safety Notes ……………………………………………………………………………………………………………………………………………… 4
Glossary …………………………………………………………………………………………………………………………………………………… 5
QuickQ Software User Manual ……………………………………………………………………………………………………………………. 7
1. Introduction ………………………………………………………………………………………………………………………………………. 7
2. New Shows and Patching ………………………………………………………………………………………………………………….. 20
3.0 Home Screen and Controlling Fixtures …………………………………………………………………………………………………. 24
3.1 Home – Layout Screen ………………………………………………………………………………………………………………………. 24
3.2 Controlling Fixtures with QuickQ ………………………………………………………………………………………………………… 25
3.3 Recording Items with QuickQ ……………………………………………………………………………………………………………… 33
3.4 Editing Cues ……………………………………………………………………………………………………………………………………… 39
3.5 Effects ……………………………………………………………………………………………………………………………………………… 40
3.6 Execute Window ………………………………………………………………………………………………………………………………… 42
3.7 MIDI Notes and Timecode ………………………………………………………………………………………………………………….. 44
3.8 Audio Input ……………………………………………………………………………………………………………………………………….. 45
3.9 Upgrading Console Software ……………………………………………………………………………………………………………….. 46
4.0 Setting up a QuickQ Console to output Artnet. ………………………………………………………………………………………. 46
4.1 Factory Reset …………………………………………………………………………………………………………………………………….. 47
4.2 Appendix ………………………………………………………………………………………………………………………………………….. 48
4.2 FCC Part 15 Notice …………………………………………………………………………………………………………………………….. 49
4.3 Technical Specifications ……………………………………………………………………………………………………………………… 50
Disposal and Recycling of unwanted consoles …………………………………………………………………………………………….. 51
QuickQ Warranty Certificate …………………………………………………………………………………………………………………….. 52
Page 3 of 52

www.chamsys.co.uk QuickQ User Manual
Care of Your Console
To keep your console in best condition please observe the following recommendations:
Keep liquids away from the console. Drinks spilt over a console may cause irreparable damage.
Keep the console out of direct sunlight – place the console in the shade. Excess heat from the sun may cause
damage to the touch screens and to overlays.
Do not use sharp objects on the touch-screen. If you wish to use an object other than your finger, then use a
blunt object that will not damage the surface.
Do not block the ventilation grills on the rear panel, side and underneath the console.
Do not use the console outside its operating temperature range.
Handle the console with care when moving or transporting it. The console contains components that may be
damaged by shock such as a hard drive. Always use a padded flight case wherever possible.
Do not use solvents or cleansers to clean the console. Do not rub firmly on the metal or plastic surfaces – this
may cause the paint or lettering to be removed. Gently use a damp cloth to clean the panels. Do not put
water on the touch screen as this may get inside it and make it unusable.
Safety Notes
Do not open the console unless you are a skilled person authorised and trained by ChamSys in console
maintenance and repair. The console contains components with voltages that may shock.
CAUTION: QuickQ consoles incorporate a replaceable CR2032 processor battery. These batteries can cause a
serious burn hazard if ingested. Do not place battery into the mouth. Keep out of reach of small children. If
accidentally ingested the battery it is imperative to seek immediate medical help.
Do not use the console if the power cables are damaged in any way.
Repairs should only be undertaken by authorised service representatives. There are no user serviceable parts
inside the console.
If liquids are spilt over the console then remove power immediately, and seek advice from your authorised
service representative.
When transporting the console ensure that there are sufficient people to carry the console.
Ensure safe installation of the QuickQ Rack and Consoles, so that the unit cannot slip off or fall from it
operated position.
Page 4 of 52

www.chamsys.co.uk QuickQ User Manual
Glossary
Below are a few commonly used terms to help with getting started with QuickQ programing.
DMX or DMX512: an acronym for Digital Multiplex and is a standard for digital communication networks that are
commonly used to control stage lighting and effects. Today, we can transmit DMX data over both direct DMX
cables and via Network. QuickQ has connections for both.
Fixture: A fixture is the name used by the console to control a device. Each Fixture has its own number. A Fixture
can be a lamp operated by a dimmer, an LED, a Moving Light or any device that can be controlled via DMX. Other
consoles may refer to this as a Lighting Instrument, Instrument, or Head, and may be referred to by a channel
number or head number.
Fixture Mode: Most fixtures have different modes that can be selected on the physical fixture itself. It is
important that the mode set on the fixture matches the mode selected during Patching. The Fixture mode
defines the number of DMX Channels a fixture uses.
DMX Channels: DMX512 has 512 individual DMX channels per each Universe of DMX.
DMX Universe: A collection of 512 DMX Channels is referred to as a Universe of DMX.
Patching: Telling the console what fixtures are connected to the console and connected via DMX.
Start DMX Address: Often shortened to DMX address as in “what is the DMX address of that fixture?” Each
fixture has its own starting DMX address, which is different for every fixture.
Fixture Number: Each fixture is given a number during patching. Fixtures 1 to 20 or 1 to 40 on the QQ30 can also
be controlled from the fixture faders with the corresponding number. These may also be referred to as the
Channel Number if it is a simple dimmer in a theatre.
Group: A collection of more than one fixture of the same Type and Fixture Mode, but could also be a collection of
all the Fixtures of one gel colour.
Cue: A recorded collection of values of levels and Attributes for one or more fixtures.
Attributes: QuickQ has 4 attributes categories used to describe and control Fixtures. Intensity, Colour, Position
and Beam. Beam includes many functions that are simply not the other 3, for example – shutter, prism and gobo
wheels!
FX: Shortened from Effects. The automated application of changes to one of the 4 attributes. There are Intensity
Effects, Colour Effects, Beam Effects and Position Effects built into QuickQ.
MIDI: MIDI is an acronym that stands for Musical Instrument Digital Interface. It is a way to connect devices that
make and control sound. It can be used to trigger lighting from an audio device such as a digital keyboard.
Multifunction Faders: Are found on the left side of the console. The QQ10 and the QQ20 have 20 faders and the
QQ30 has 40 faders.
Multifunction Fader Mode: The faders on the left side of the console can operate in one of 3 modes using the
mode buttons on the console above the COL MIX encoders or on the bottom left of the touch screen:
Fixture: each fader controls one fixture as assigned during patching.
Group: each fader controls a group or collection of fixtures recorded to it
Cue: each fader can have one cue recorded to it for playback in this mode.
Page 5 of 52

www.chamsys.co.uk QuickQ User Manual
Cue Stack: One or more cues, either taken one after the other by pressing the go button or taken automatically
one after the other in a Chase.
Theatre Style Cue Stack: a numbered sequence of cues in a cue stack, typically run one after the other in the
same order and fader in and out with a Fade Time.
Chase: an automated sequence of cues taken one after the other.
Fade Time: the time taken for a cue to change. Fade in and fade out can be the same or different.
Playbacks: are the faders on the bottom right of the console:
QQ10 has one theatre style cue stack and two chase cue stacks
QQ20 and QQ30 each have 10 playbacks
Palettes: a collection of fixture attributes of one type — i.e. colour, that can be used as building blocks when
recording cues. They are then referenced by cues and many cues can contain the same palette. The advantage is
if for example, you had 500 cues all referencing the colour palette named “yellow” and you wanted to change the
particular shade of yellow you had used in all 500 cues — re-recording the colour palette “yellow” would achieve
this in one action. Palettes are found towards the top of their respective parameter windows.
Page 6 of 52
www.chamsys.co.uk QuickQ User Manual
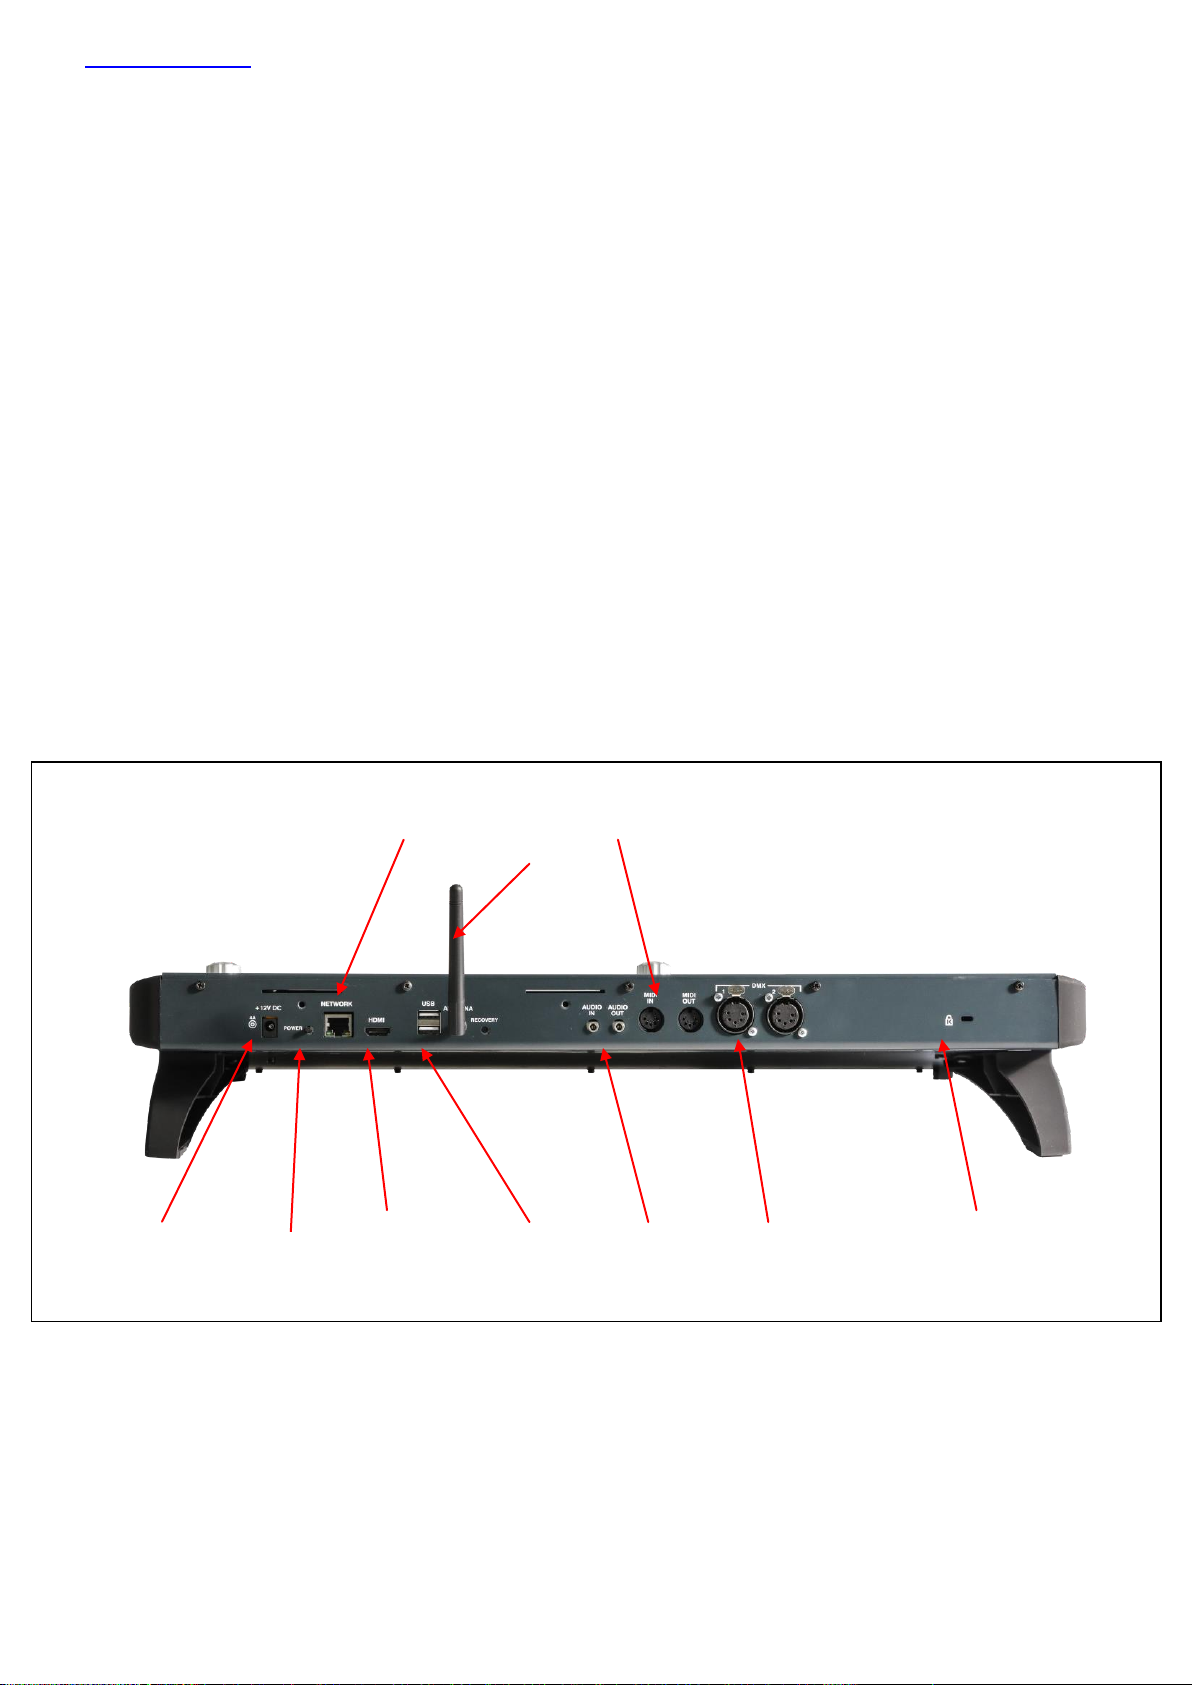
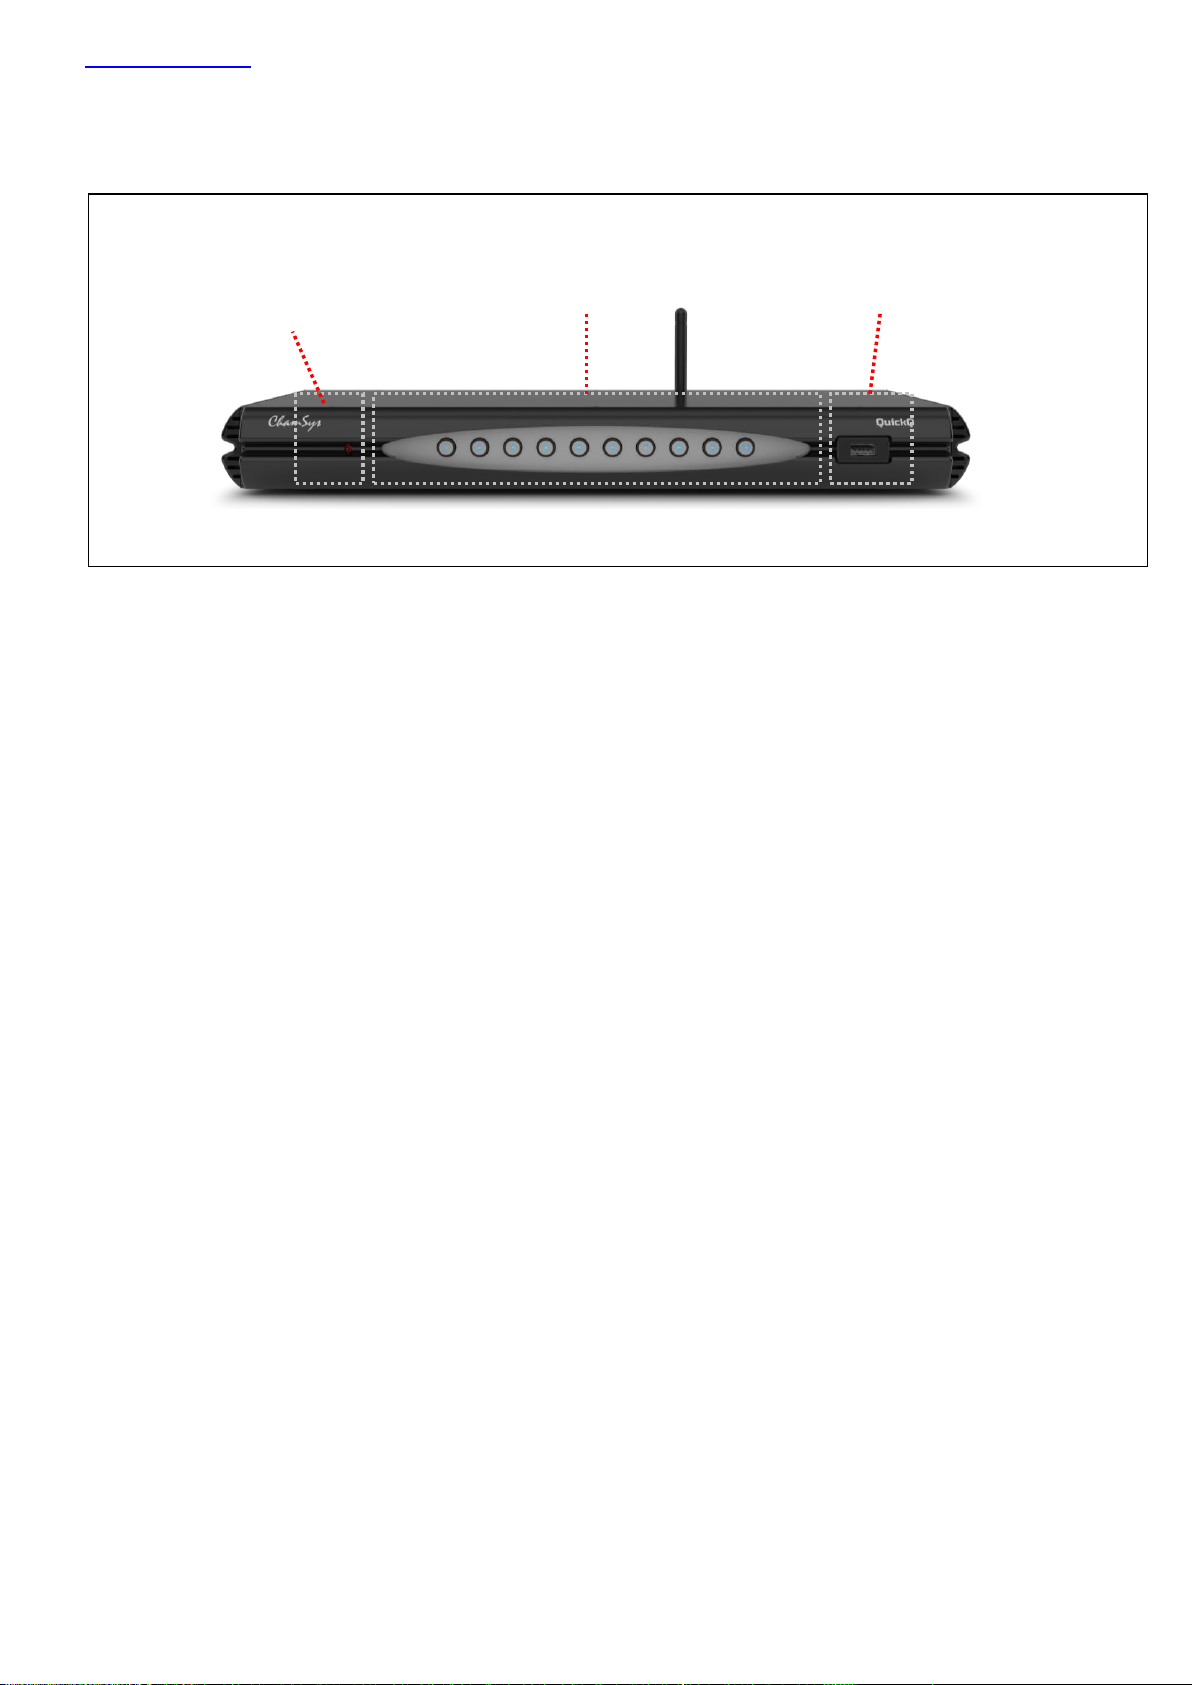
Network Port WIFI MIDI ports
Antenna
Power Socket Power HDMI USB Ports Audio DMX Kensington
Switch Output ports ports lock
QuickQ Software User Manual
1. Introduction
This document is intended to enable you to get up and running with QuickQ console or Rack mount product. It is
designed to introduce the layout of the console along with programming instructions and the key functions.
This manual covers QuickQ software version 2.0 and onwards.
QuickQ Consoles
The QuickQ range of consoles includes the QuickQ10, Quick 20 and QuickQ 30 consoles. All consoles run the same
QuickQ software – they just vary in number of faders, encoders and buttons and number of universes output
from the console.
QuickQ consoles use the same operating system utilising the same installer .cdq extension files.
Connections
The picture below shows the connections on the QuickQ 20 console. The QuickQ 10 and 30 consoles have similar
layouts, with the QuickQ 10 having only 1 DMX port and no Midi connectors. The QuickQ 30 has 3 DMX ports.
Plugging Up
DMX Connections
The QuickQ 10, 20 and 30 consoles have either 1, 2 or 3 direct DMX outputs respectively on the rear of the panel
so you can connect your DMX cables direct to the console.
Alternatively, you can use Ethernet and an external Ethernet to DMX converter box such as our range of SnakeSys
Ethernet to DMX Interfaces or Chauvet Net-X range. Connect the Interface to the console Network port via a
network cable.
Page 7 of 52
www.chamsys.co.uk QuickQ User Manual
Powering Up
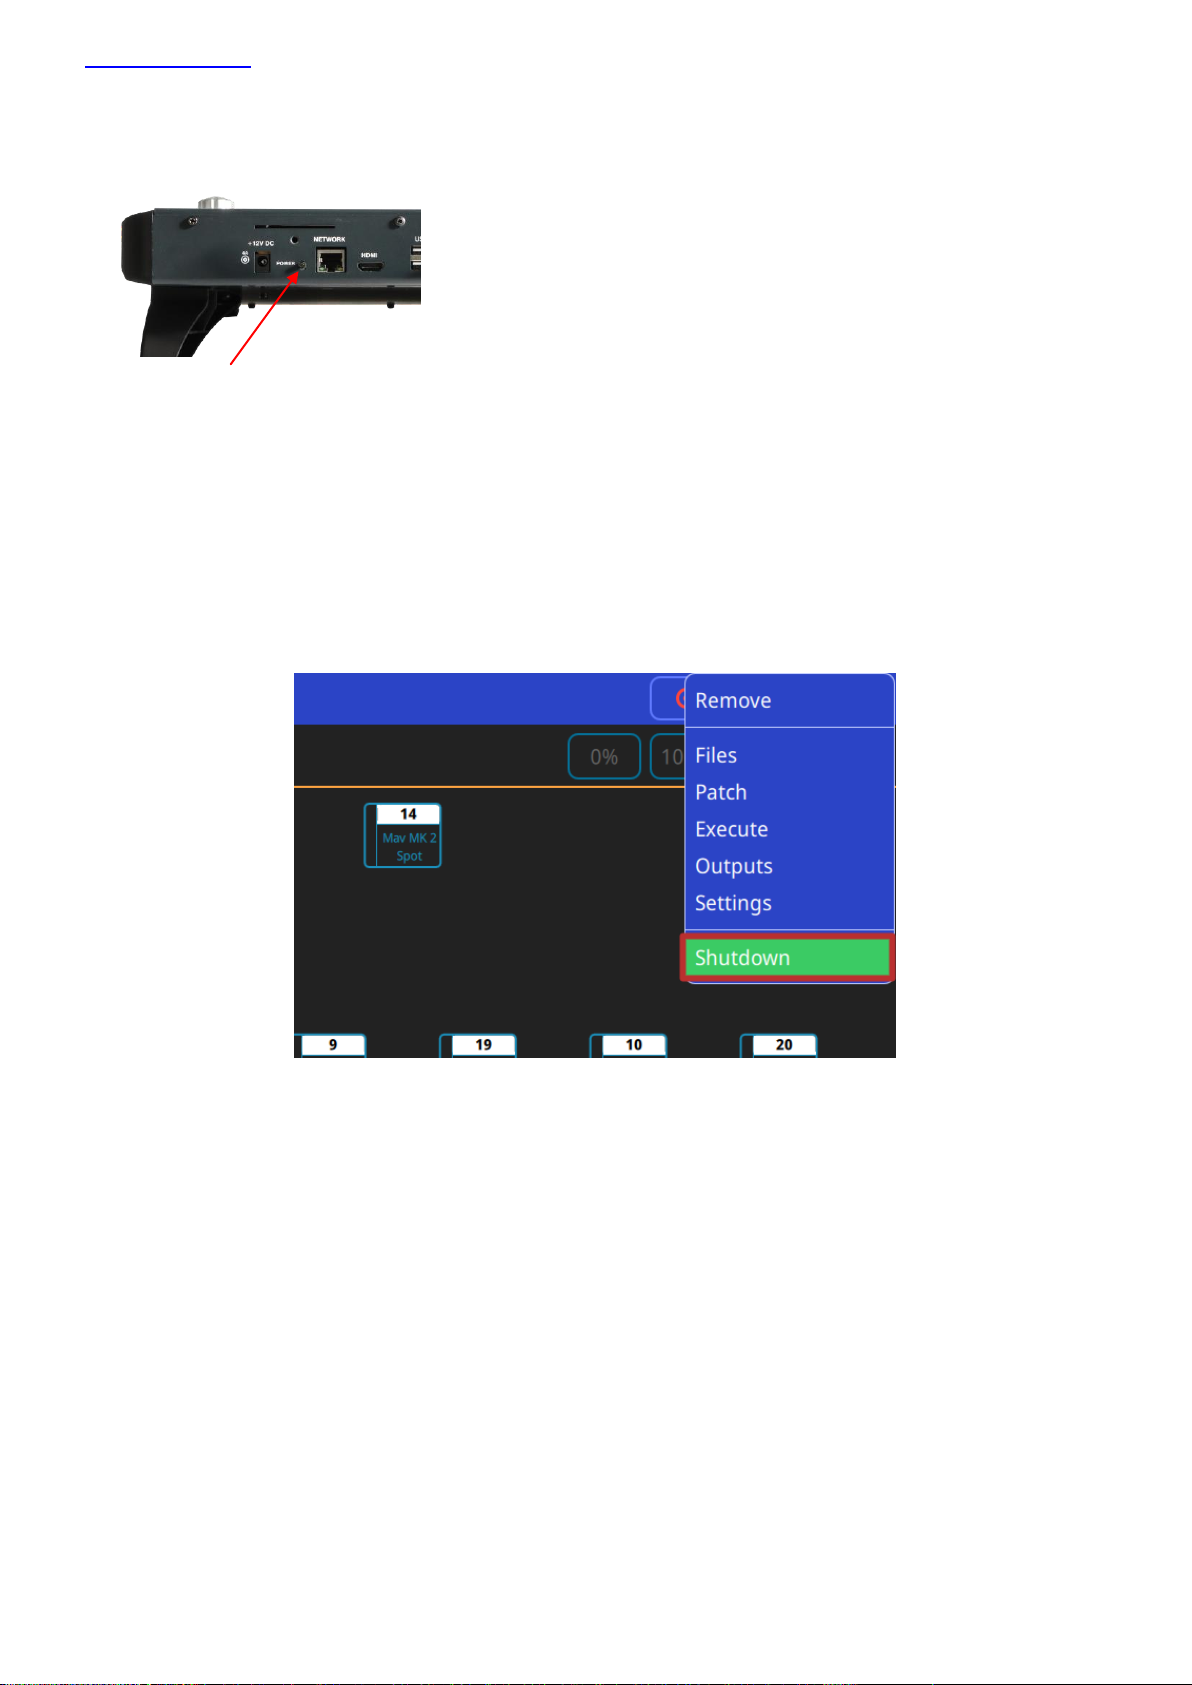
To power up the console, simply plug in the supplied 12v DC power supply. If the console has been shut down via
the software, press the power switch on the back panel. After a few seconds the screen will come to life, you will
see the operating system loading.
Powering Down
To power down the console it is necessary to shut down the QuickQ application. The console operating system
performs an automatic shutdown and turns itself off when complete. To quit the QuickQ application, press the
Menu button on the top right of the display and then select the QUIT soft button. When asked for confirmation, press
the YES.
If for any reason you are unable to power off the console then you may need to force the console to power off as
below.
Forcing the Console to power off
Switch off the console at the mains supply.
Page 8 of 52
www.chamsys.co.uk QuickQ User Manual
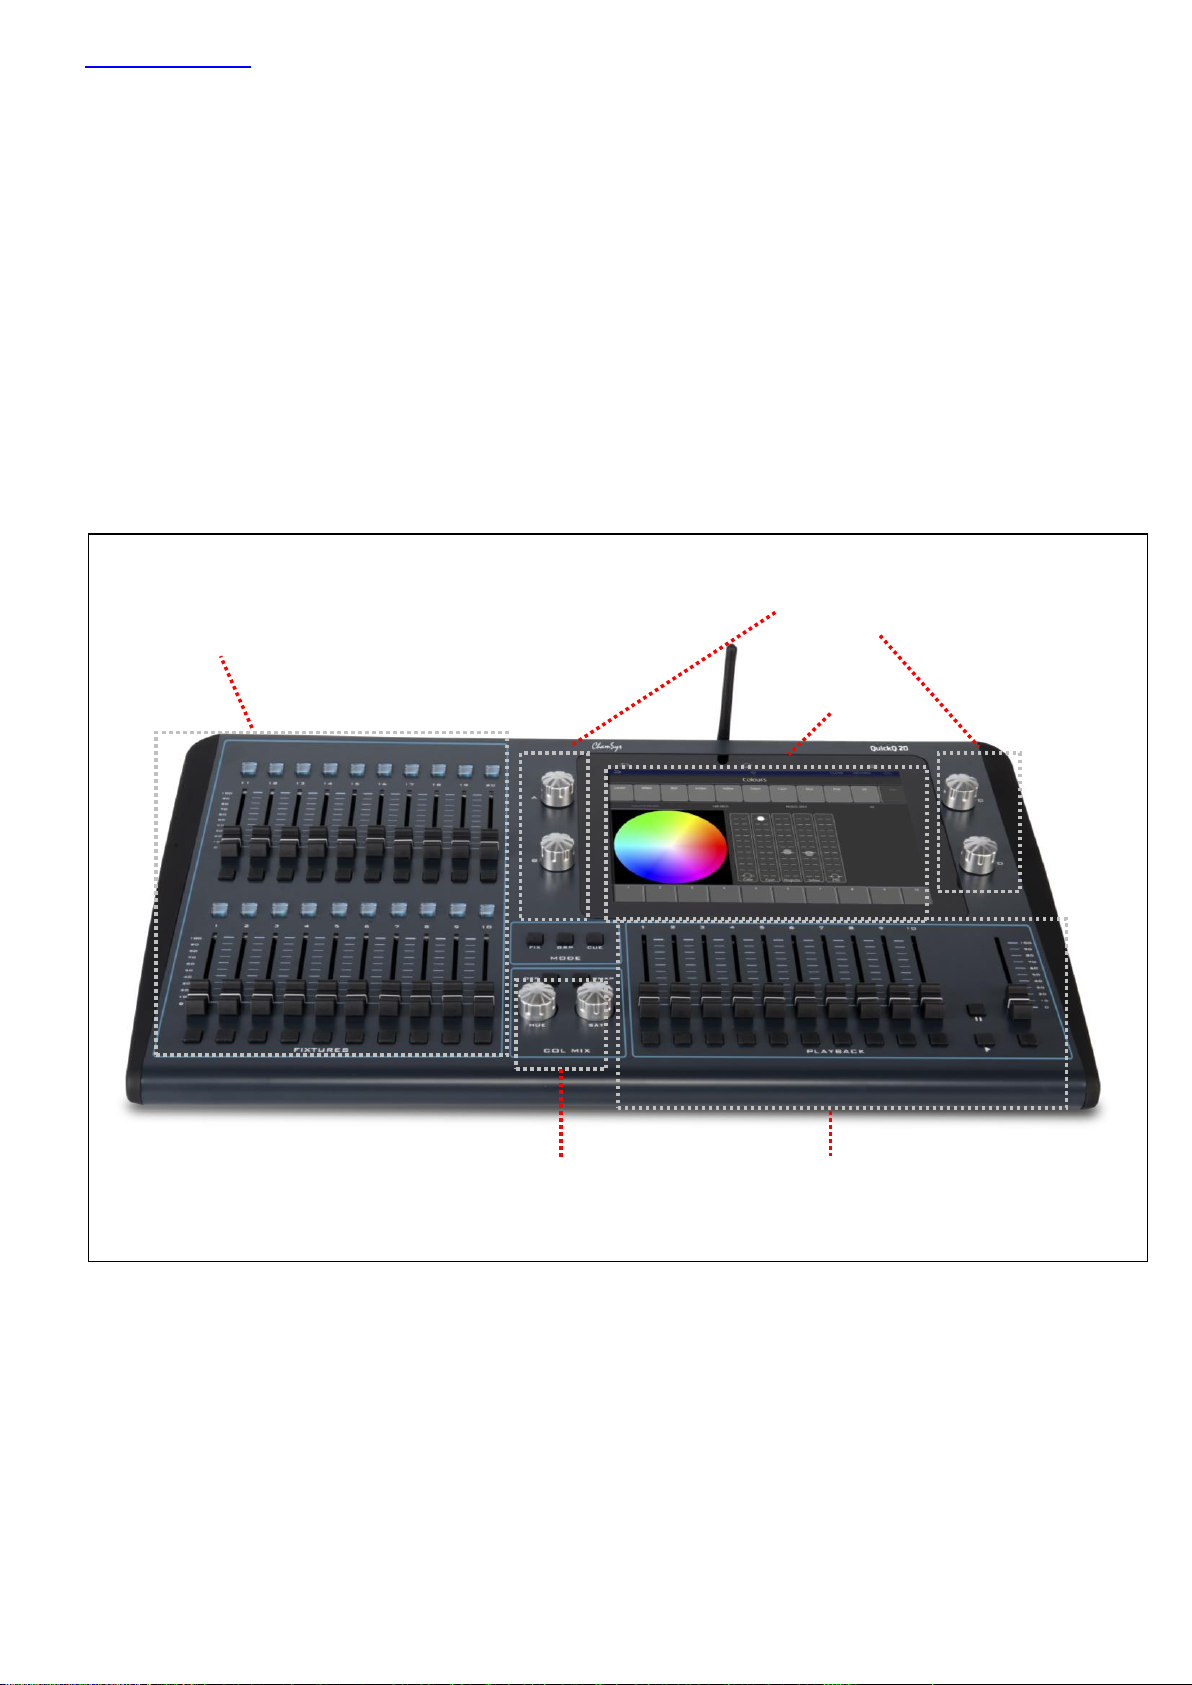
Multi-function
fixture/group/cue
faders
Dedicated
Colour control
section
Console Layout
All QuickQ consoles layout are very similar — the programming interface is consistent across the entire range of
consoles.
One of the main areas of QuickQ consoles is the large 9.7” multi-touch display. QuickQ consoles feature an
intuitive smart phone based, app-based user interface making them extremely user friends.
Other key areas of the QuickQ physical hardware, is the Multi-function fixture/Group/Cue faders to the left of the
display and the Playback section below the multi-touch display.
QuickQ consoles have a grand master fader located on the lower right side of the console – this fader must be at
full to enable connected fixtures to output from the console.
Page 9 of 52
www.chamsys.co.uk QuickQ User Manual
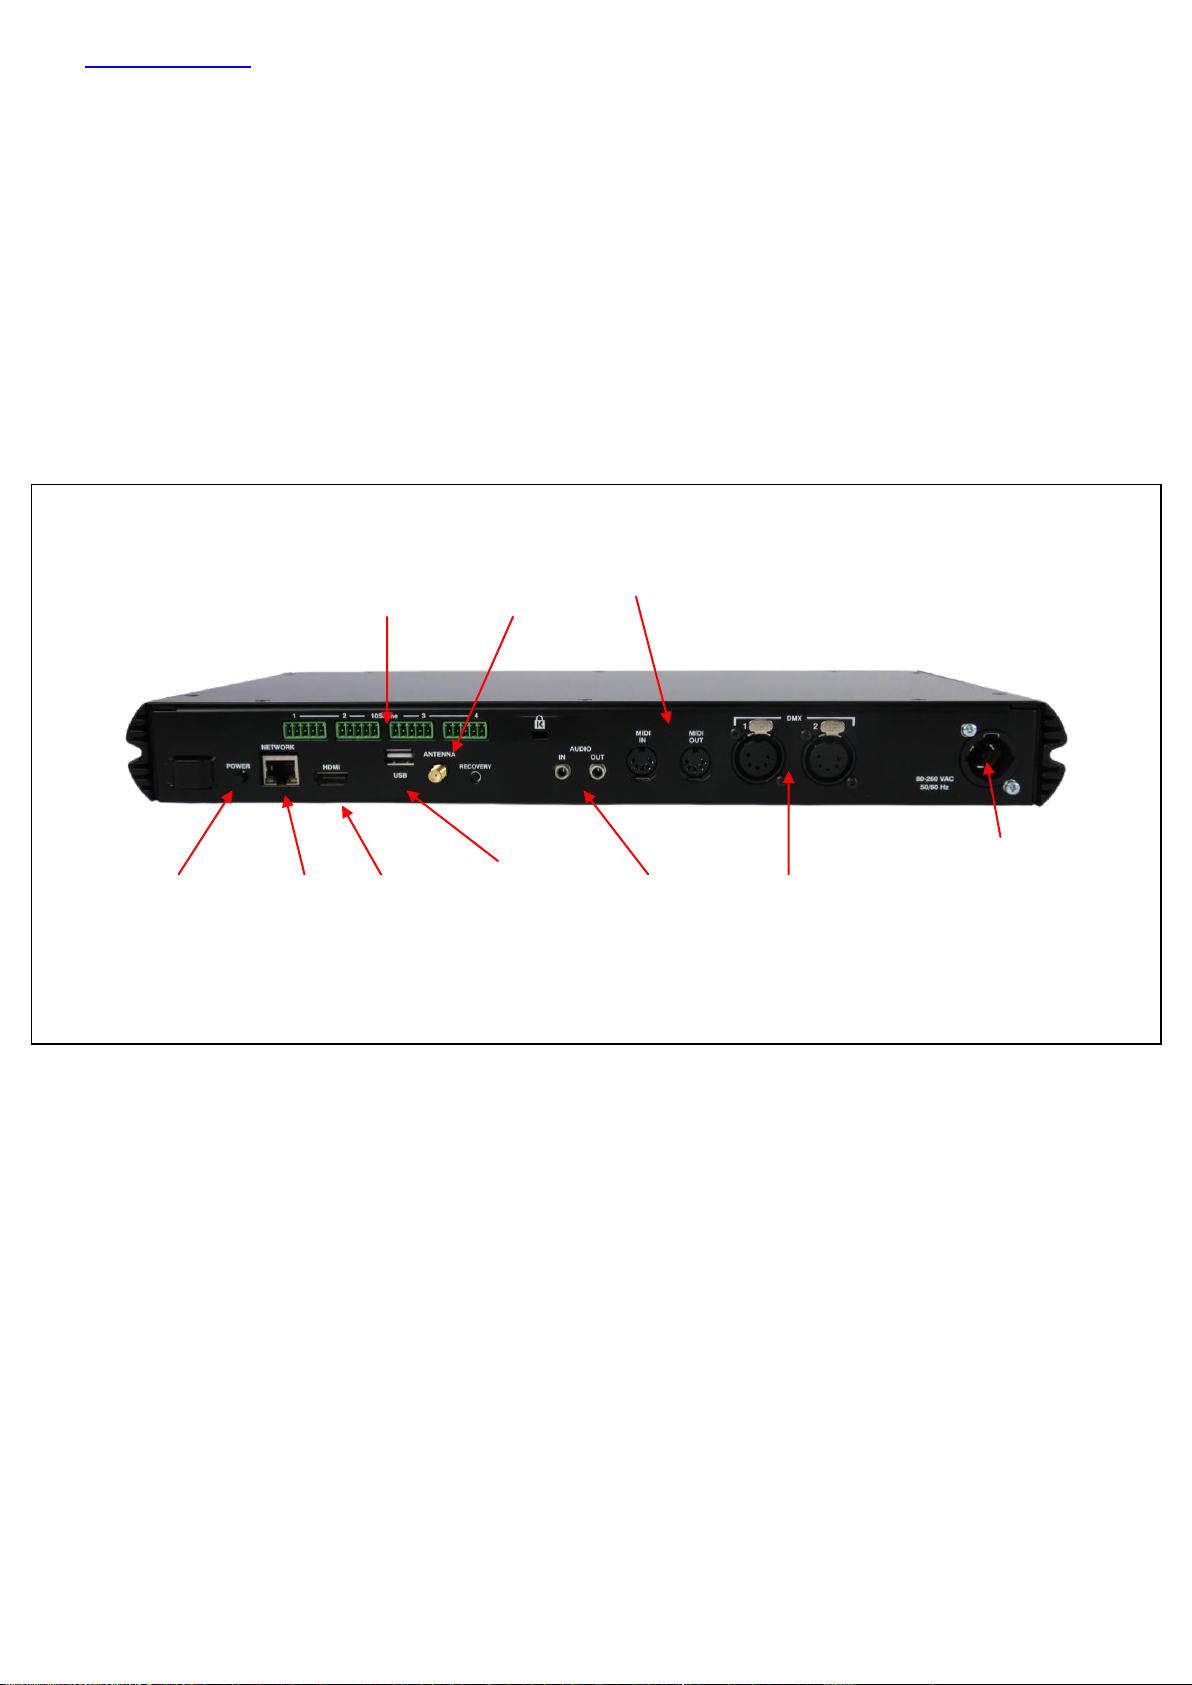
Pheonix Connectors WIFI MIDI ports
For 10Scene Wall Plates Antenna
Power Switch Network HDMI USB Port Audio DMX TrueCon Mains
Port Output Ports Ports Input (100-240VAC)
QuickQ Rack
The Rack runs the same QuickQ software as QuickQ Consoles – The rack is aimed as an installation product –
instead of the having the faders/encoders of QuickQ consoles, it fits into a standard 1U 19” Rack size and has 10
Scene trigger buttons on the front of the unit.
QuickQ rack use the same operating system as QuickQ Consoles utilising the same installer .cdq extension files.
Connections
The picture below shows the connections on the QuickQ Rack
Plugging Up
DMX Connections
The QuickQ Rack has 2 direct DMX outputs on the rear of the unit so you can connect your DMX cables direct to
the console.
Alternatively, you can use Ethernet and an external Ethernet to DMX converter box such as our range of SnakeSys
Ethernet to DMX Interfaces or Chauvet Net-X range. Connect the Interface to the console Network port via a
network cable.
Page 10 of 52
www.chamsys.co.uk QuickQ User Manual
Powering Up
To power up the QuickQ Rack, simply plug in the supplied Mains TrueCon Cable. If the console has been shut
down via the software, press the power switch on the rear of the Rack.
Powering Down
The QuickQ Rack can be used as a fully standalone unit without the need for a monitor or WiFI remote connected.
To power down the unit when none of the above are connected press and hold the power button on the rear of the
unit for 2s. If a screen has been connected the unit will display a power off dialog.
Otherwise the unit will shutdown after 5s.
To power down the QuickQ Rack via the QuickQ application software with a remote or display/mouse connected,
press the Menu button on the top right of the display and then select the QUIT soft button. When asked for
confirmation, press the YES.
If for any reason you are unable to power off the console then you may need to force the console to power off as
detailed in the section above for the QuickQ Consoles.
Page 11 of 52
www.chamsys.co.uk QuickQ User Manual
QuickQ Rack Layout
Page 12 of 52
www.chamsys.co.uk QuickQ User Manual
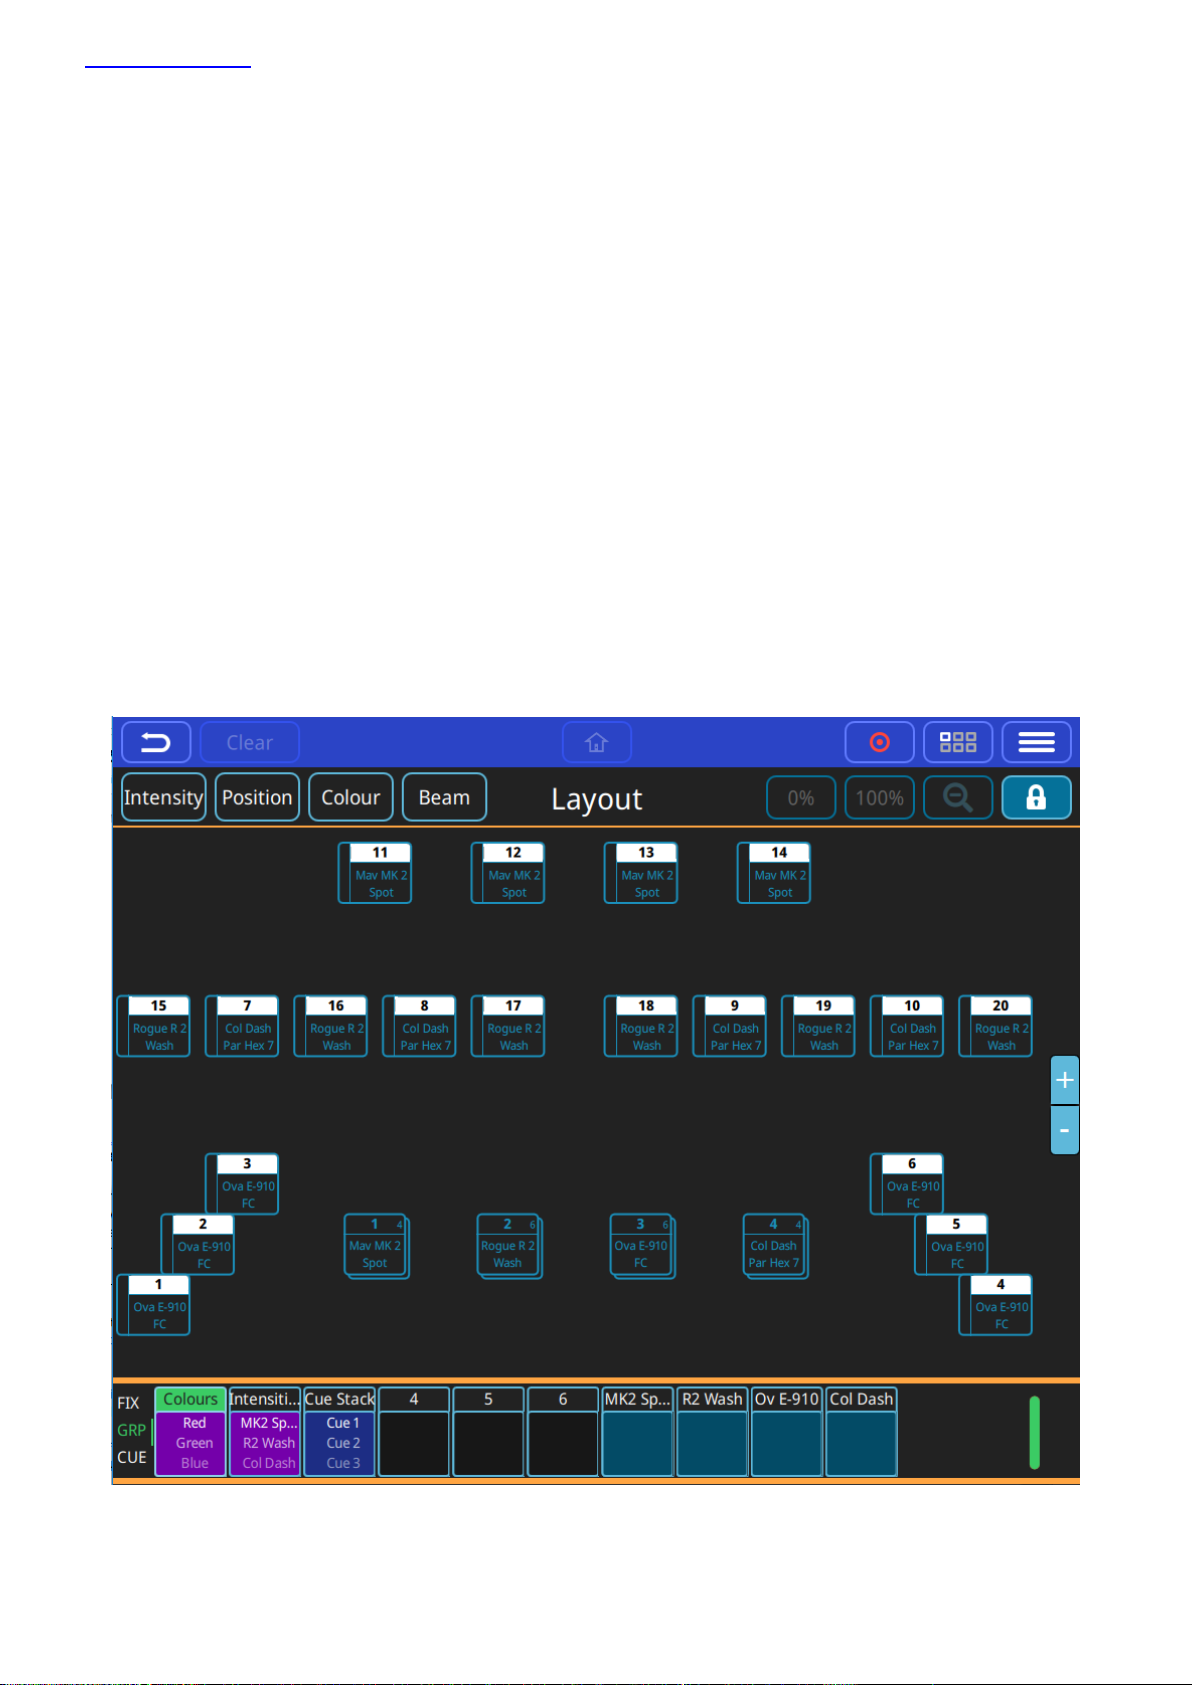
QuickQ User Interface layout
The QuickQ user interface is based around a smart phone style interface, with familiar buttons similar to those
used on phones/tablets such as the home and menu keys.
The top menu bar of the interface remains consistent with its buttons in all windows on the console.
From Left to Right the functions here are:
Back, Clear, Home, Record, Action and Menu as pictured below.
Below this a ‘soft’ toolbar of options specific to each window can be found.
For example in the ‘Home’ window buttons on screen to open controls for Intensity, Position Colour and Beam
can be found.
The Central section of the screen area shows the current open window – for example the fixture layout view on
the ‘home’ window and the Colour picker in the ‘colour’ window.
At the bottom of the display legends can be found for each playback on the console. The legends for each
playback also show handy feedback such as the current cue of the playback if a multi-cue stacks such as a chase.
Page 13 of 52
www.chamsys.co.uk QuickQ User Manual
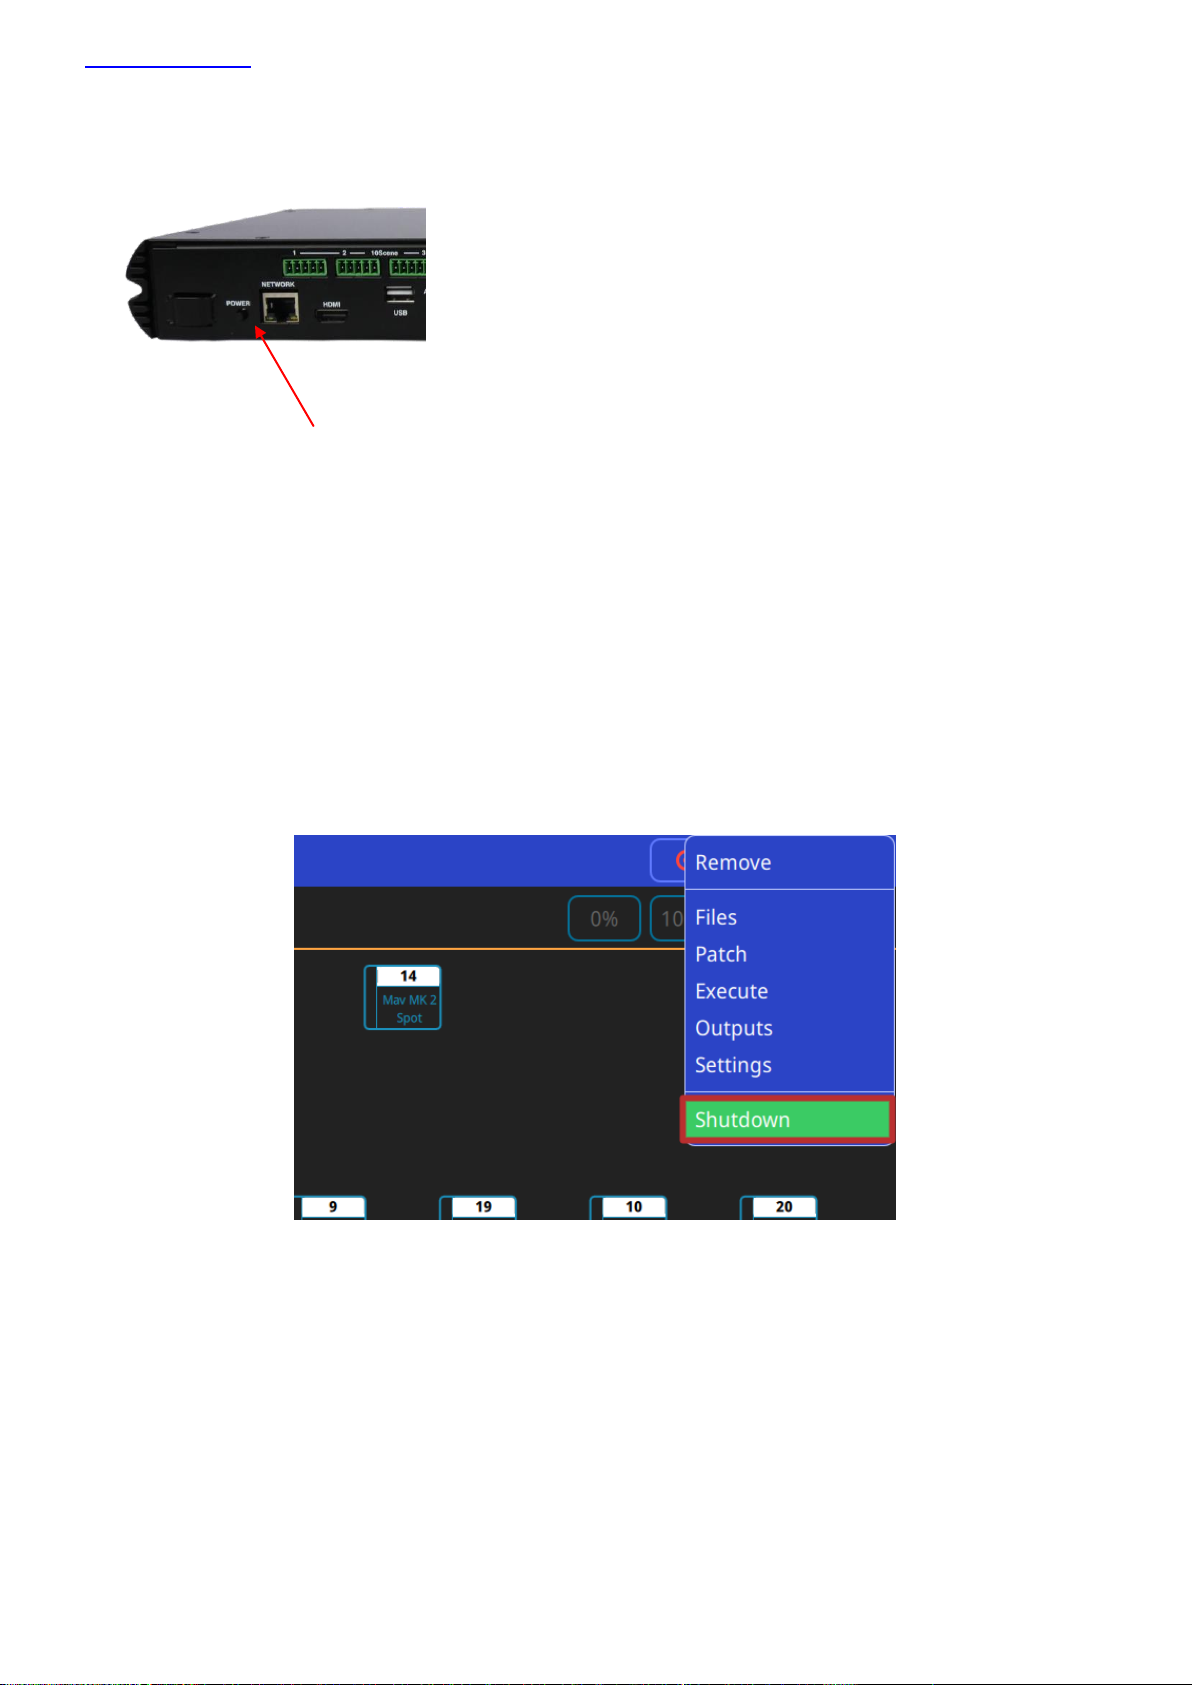
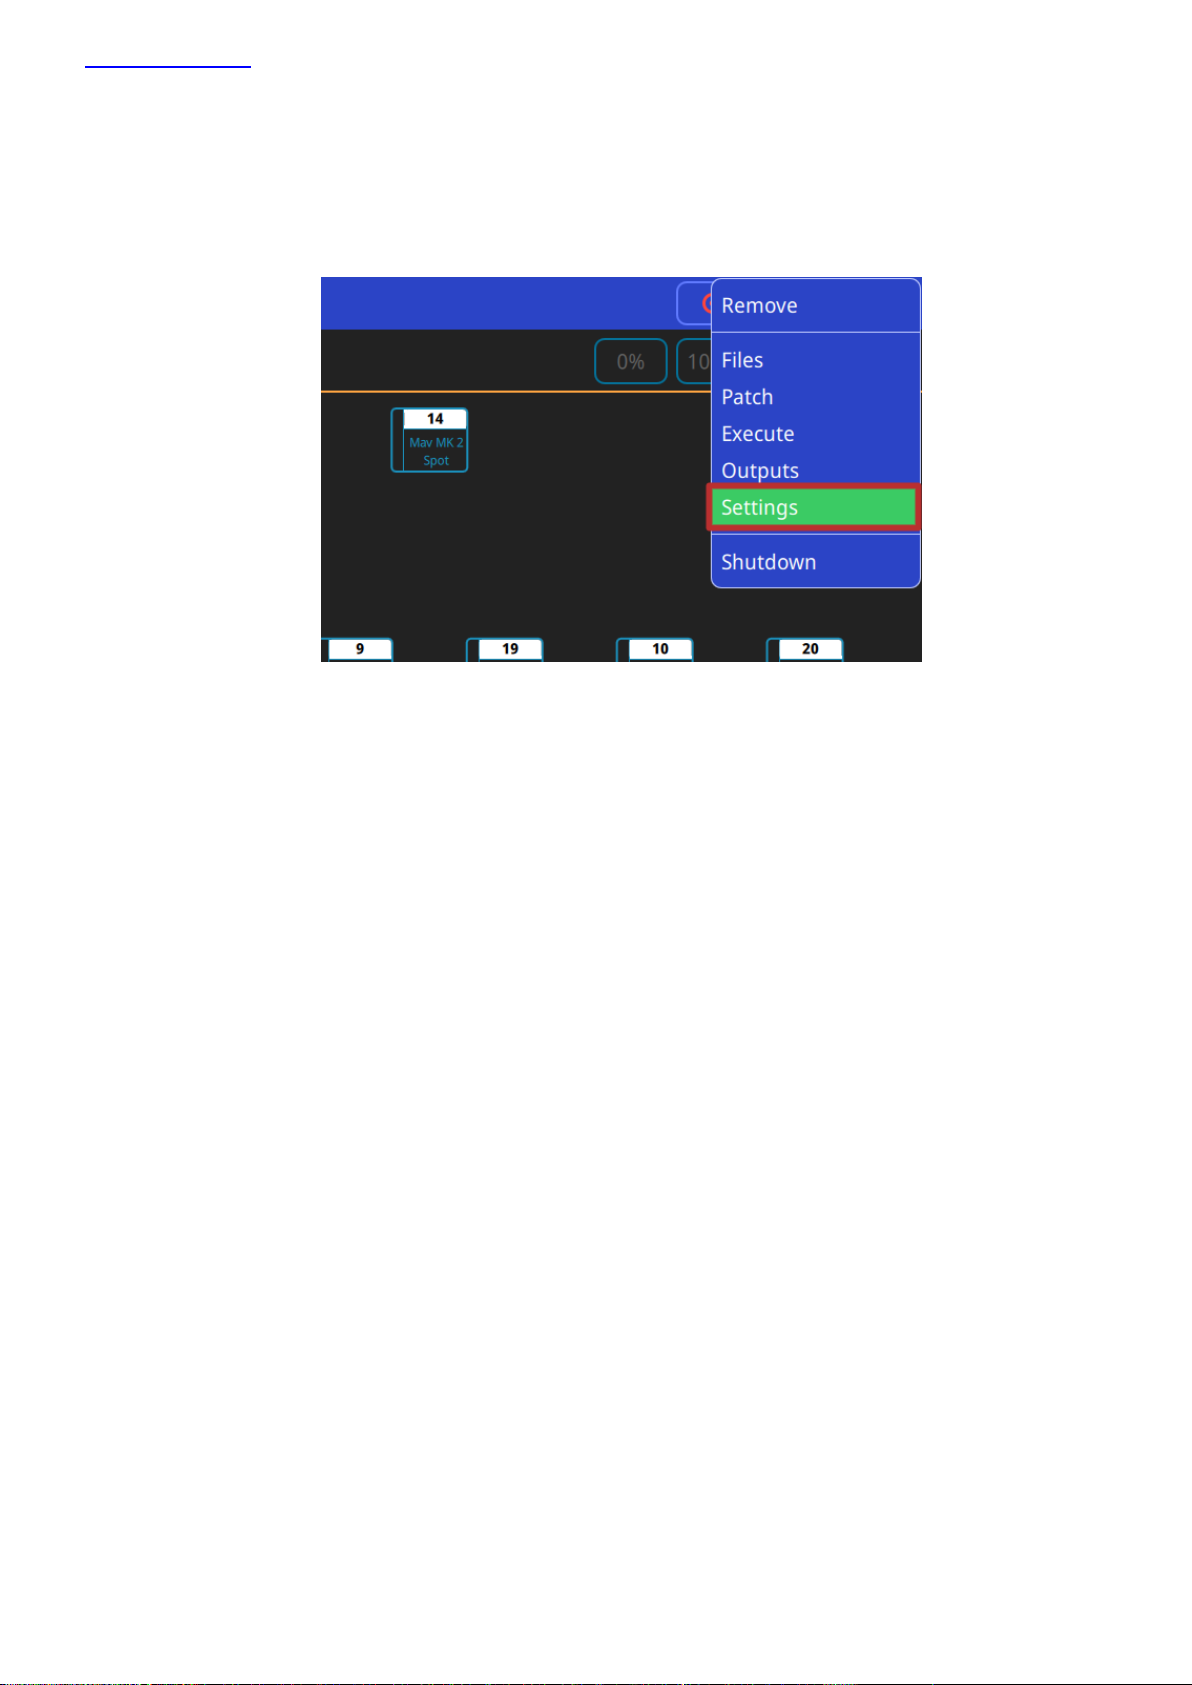
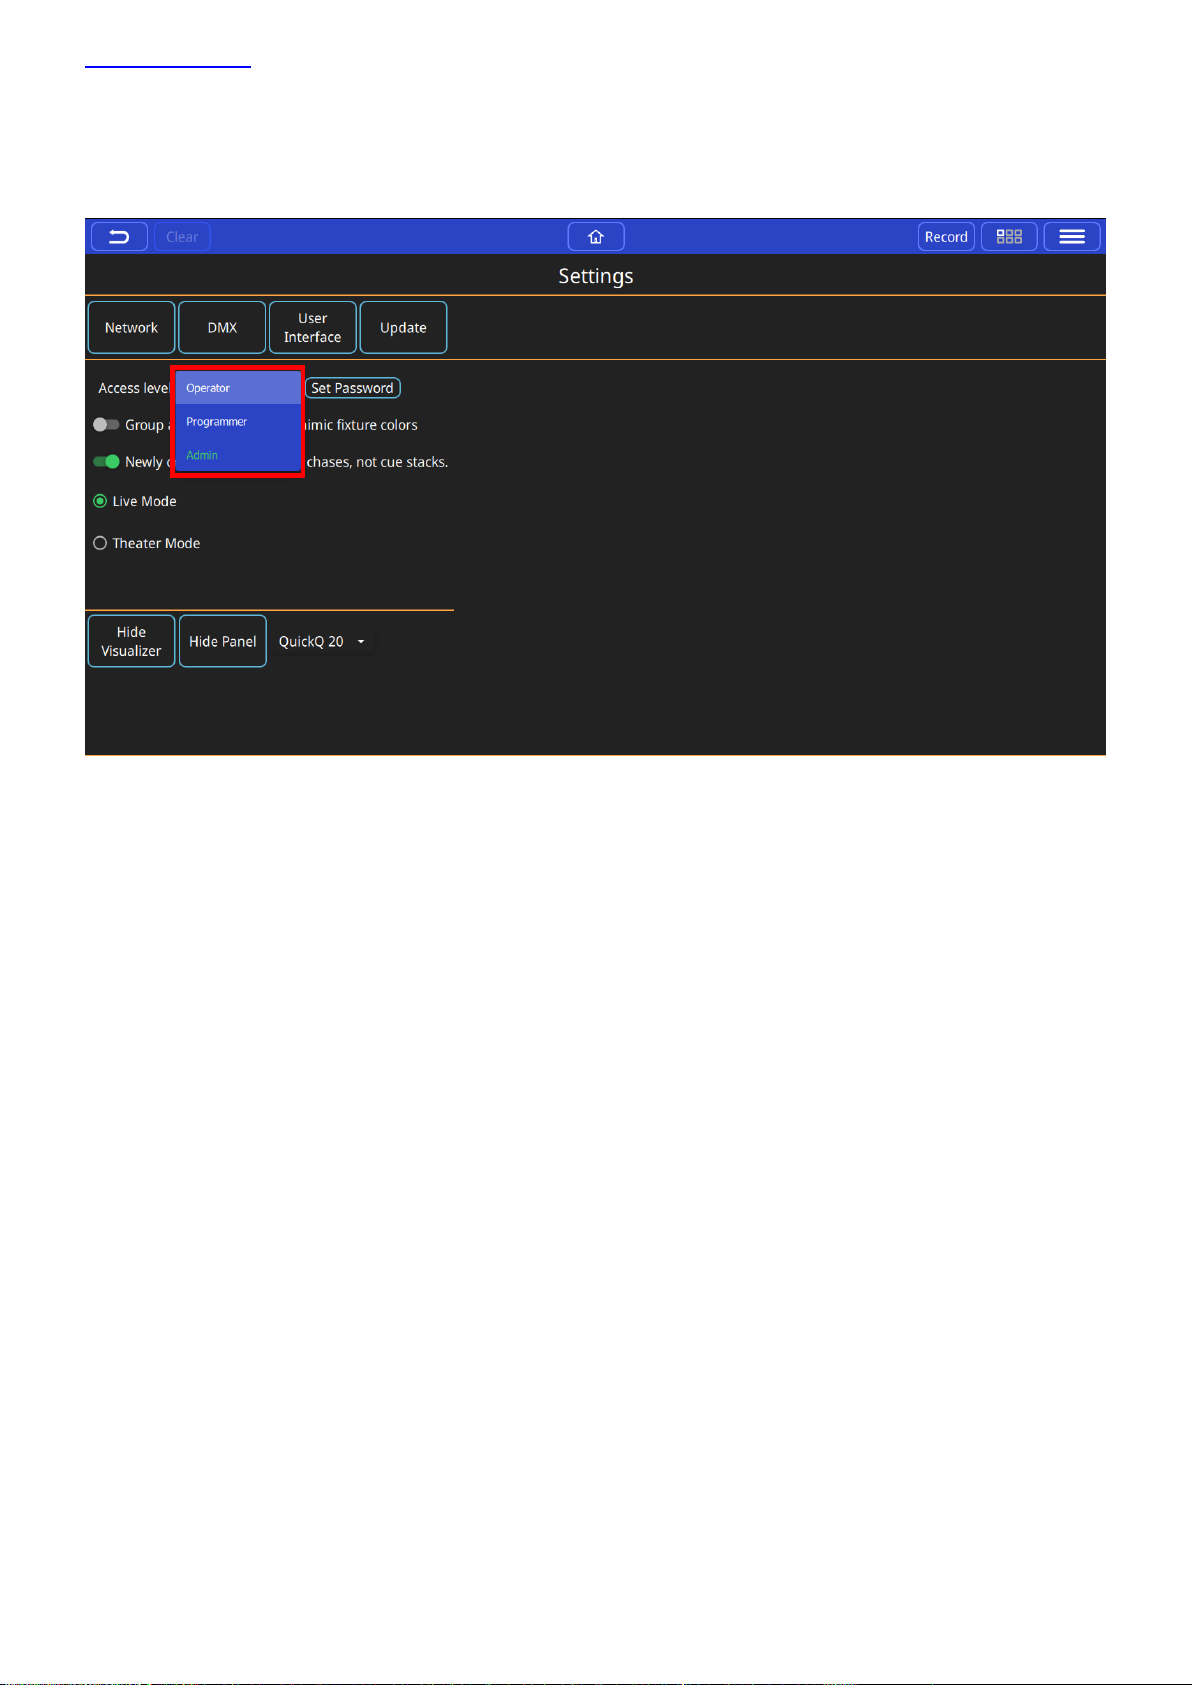
Settings Menu
To access the QuickQ settings menu, click the main menu button on the top right of the display and press the
“Settings” option. Within the Settings window, you are able to adjust network, DMX and user interface options.
Also found within the QuickQ Settings window are a selection of global options that can be applied to the console,
these can be found below the “Network”, “DMX”, “User Interface” and “Update” buttons. Changing the way the
console playbacks, cue stacks and chases behave, QuickQ consoles can be run in 2 different modes, live mode and
theatre mode.
Theatre mode, unlike Live mode, defaults all future cue recordings to cue stacks, enabling the user to step
through the cues one at a time. In addition to this, Theatre mode also enables the use of move when dark and
playback crossfades, converting playback 2 to a dedicated crossfade fader.
Page 14 of 52
www.chamsys.co.uk QuickQ User Manual
Access Levels
Access Levels can be used to prevent users from making unwanted changes to the show files and console settings.
There are 3 access levels, Admin is the default and allows unlimited control of the console, patch and settings.
Programmer allows users to program shows but not to change the patch or settings. Operator prevents any
changes to the show file, but the show can still be operated as normal. When in the Operator level the home
screen changes to the Execute window.
The access level can be changed in the Settings window. The Admin and Programmer access levels can be
password protected, and passwords can be changed in the Settings window. The current access level and the
passwords are stored in the show file. The user must enter the current Admin password before they can change a
password.
Page 15 of 52
www.chamsys.co.uk QuickQ User Manual
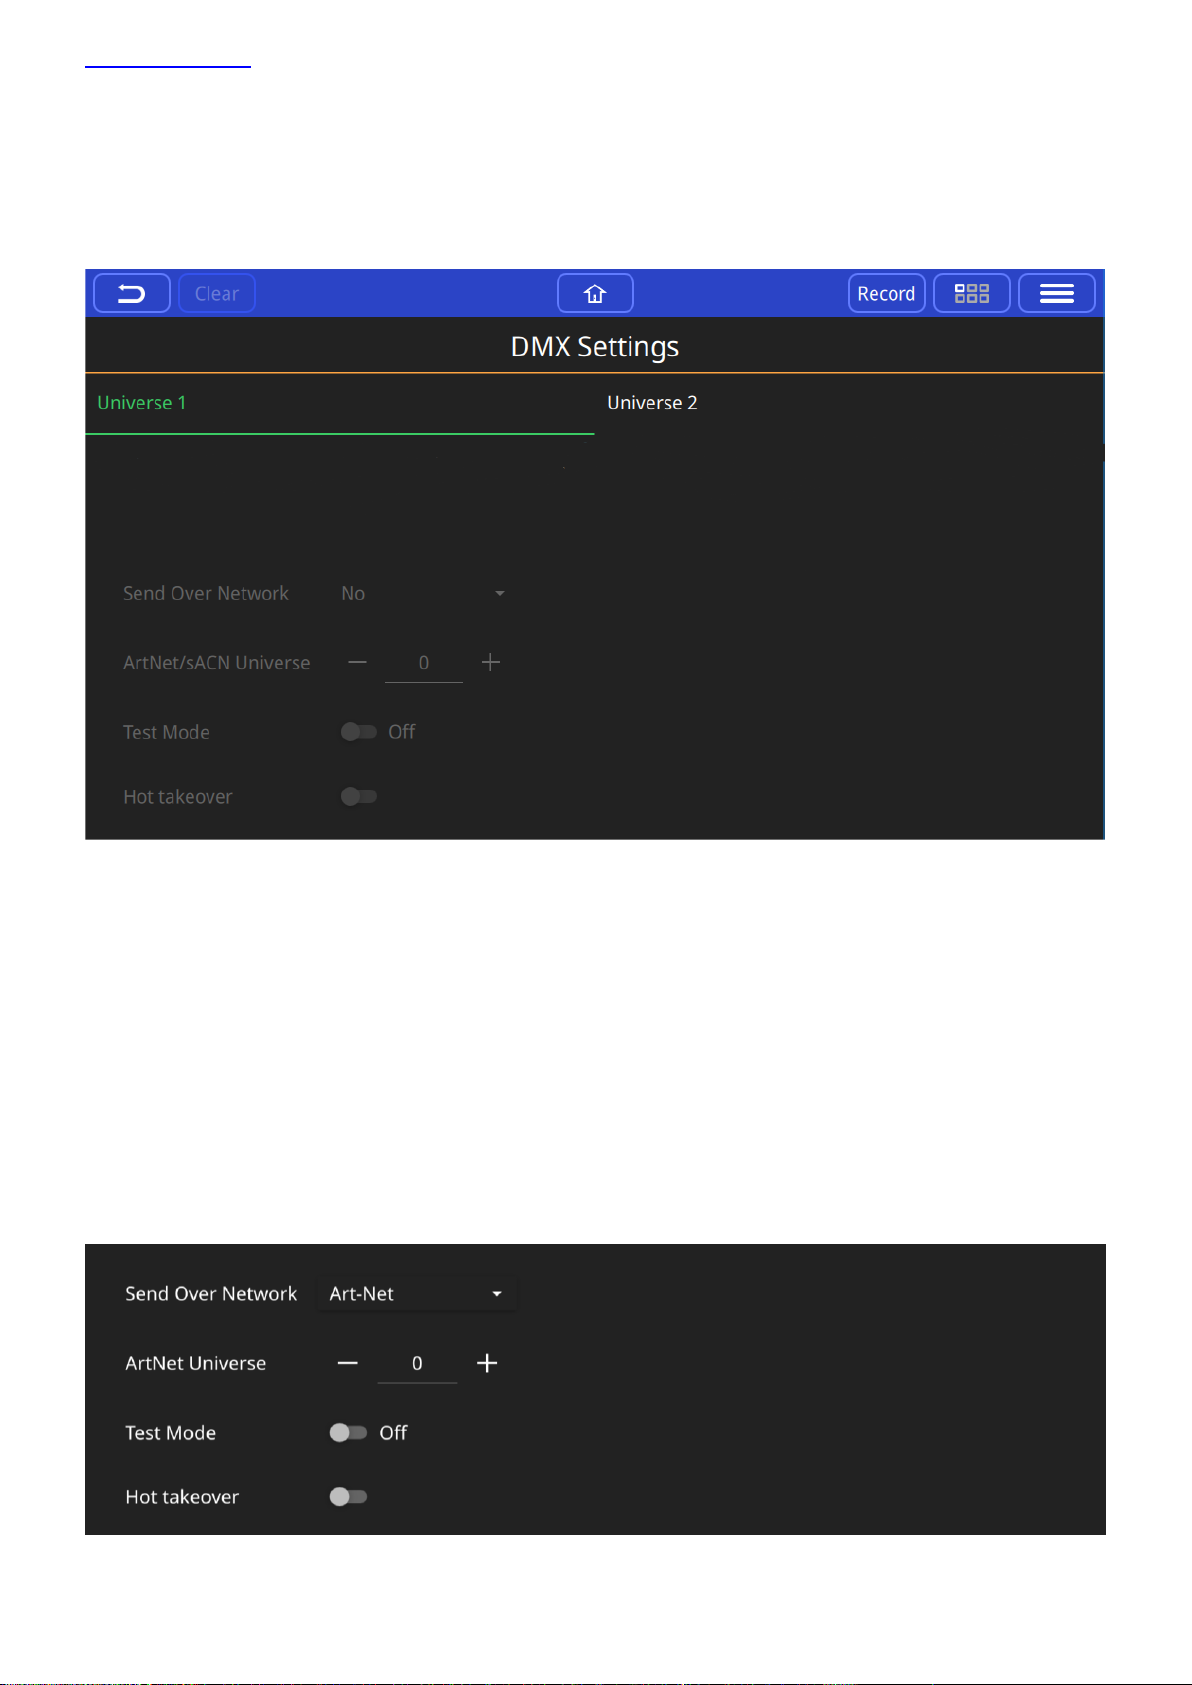
DMX Settings
The DMX Settings window can be used to define the way the console outputs DMX. QuickQ automatically assigns
each console universe to a corresponding DMX port located on the rear of the console.
If you wish to output via the console’s network port, the output protocol and universe can be defined within this
window. With each available universe defined at the top of the window, within a universe tab simply select the
protocol required from the “Send Over Network” drop down and set the ArtNet universe below it.
The DMX Settings window also features a Test Mode for testing the console output and a Hot takeover mode for
responding to additional ArtNet data.
Once enabled, Test mode sends a 0-255 DMX ramp on the currently selected universes, outputting to all
connected fixtures irrespective of patch or address.
Hot takeover mode allows the console’s output to automatically be enabled and disabled based on the current
DMX traffic on the connected network. If for instance QuickQ detects another console outputting on the network,
QuickQ will disable its own output to ensure the other signal is received.
Page 16 of 52
Loading…
ChamSys QuickQ 30 — Пульт управления светом.
Chamsys QuickQ 30 пульт с интуитивно понятным интерфейсом и большим сенсорным экраном (9,7 дюймов). Пульты очень просты в работе — производители позаботились о доступности основных инструментов, легком выборе цвета, интенсивности, масштаба и прокрутки. Полезные подсказки и видео мануалы позволяет освоить пульт еще быстрее.
Встроенный Wi-Fi роутер позволит управлять пультом через планшет или телефон, или использовать гаджеты как дополнительный монитор. Помимо прочего доступна полная поддержка переноса шоу с PC на пульт посредством флешки.
Все модели QuickQ используют ту же библиотеку приборов, что и другие пульты Chamsys.(Детальнее можно узнать только по телефону на сайте w w w. m u z a k k o r d. r u). Поддержка RDM позволяет автоматически подхватить и запатчить приборы, поддерживающие систему RDM. Шоу-файлы от пультов QuickQ можно легко воспроизвести и на старших консолях от Chamsys.
Технические характеристики:
- Дизайн
- Простой пользовательский интерфейс
- Легкая навигация
- Большой тачскрин с интуитивно понятным графическим интерфейсом
- Подсказки по установке, настройке и управлению
- Совместимость
- Неограниченное количество приборов, 4 потока на 2048 каналов.
- Пользовательский интерфейс
- Смоделирован по принципу иконок и жестового управления Интуитивный интерфейс позволяет легко контролировать все параметры приборов
- Поддерживает жест удержания для увеличения и прокручивания интерфейса
- Удаленное управление консолью через приложение
- Фейдеры
- 40 фейдеров для управления приборами, 10 назначаемых мастер фейдеров, 1 Master фейдер, 6 энкодеров, flash-кнопки под каждый фейдер.
- Входы и выходы
- 3 выхода DMX на 5pin XLR 2 USB порта 1 Art-net, MIDI Встроенный Wi-Fi для соединения со смартфоном или планшетом HDMI выход с поддержкой 1920 x 1080
- Аудио вход/ выход Работа offline
- Offline редактор доступен для ОС Windows и Mac
- Простые обновления
- Включает визуализатор MagicVis
- Полностью копирует консоль Quick Q, за исключением output.
Характеристики
Тип товара
Пульты управления светом
Need help? Check out our support and training resources below.
Support Tools
Support Documents
Fixture Files
The Fixture library is updated online daily, the link below will always be up to date to the last 24 hours. If you can’t find a Fixture on list of fixtures below, use the request a Fixture file button below.
Software Updates
The QuickQ software is updated regularly with new features and fixes.
Latest Stable Releases:
Loading Releases…