
Casio Privia PX-400R
PX400R-ES-1
ES
USER’S GUIDE
GUÍA DEL USUARIO
Please keep all information for future reference.
Guarde toda información para tener como referencia futura.
Safety Precautions
Before trying to use the digital piano, be
sure to read the separate “Safety
Precautions”.
Precauciones de seguridad
Antes de intentar usar el piano digital,
asegúrese de leer las “Precauciones de
seguridad” separadas.
PX400R_es_cover.p65 04.8.24, 4:33 PM1
View the manual for the Casio Privia PX-400R here, for free. This manual comes under the category keyboards and has been rated by 1 people with an average of a 10.
This manual is available in the following languages: English. Do you have a question about the Casio Privia PX-400R or do you need help?
Ask your question here
Product Images (1)
Casio Privia PX-400R specifications
Below you will find the product specifications and the manual specifications of the Casio Privia PX-400R.
The Casio Privia PX-400R is a keyboard that offers a range of features for musicians. With its sleek design and compact size, it is suitable for both professional musicians and beginners.
One notable feature of the PX-400R is its 88 weighted keys, which provide an authentic piano playing experience. The keyboard also offers 128-note polyphony, allowing for complex and layered compositions.
The PX-400R includes a variety of sounds and tones, including 670 built-in tones and 200 rhythm patterns. It also features a SD card slot, which enables users to save and transfer their compositions easily.
Additionally, the keyboard offers a range of connectivity options, including USB and MIDI ports. This allows for seamless integration with other devices and software, making it suitable for both studio and live performances.
The PX-400R also includes a built-in recorder, which allows users to capture and playback their performances. This feature is particularly useful for musicians who want to review and improve their playing.
Furthermore, the keyboard features a built-in lesson function, making it a great tool for beginners. The lesson function provides step-by-step instructions and exercises to help users improve their technique and musical skills.
Overall, the Casio Privia PX-400R is a versatile and practical keyboard that offers a wide range of features for musicians. Its compact size, authentic piano feel, and various connectivity options make it a valuable tool for both professional musicians and beginners looking to develop their musical talents.
General
| Brand | Casio |
| Model | Privia PX-400R |
| Product | keyboard |
| Language | English |
| Filetype | User manual (PDF) |
Frequently Asked Questions
Can’t find the answer to your question in the manual? You may find the answer to your question in the FAQs about the Casio Privia PX-400R below.
How do I adjust the volume of the keyboard?
To adjust the volume on your Casio Privia PX-400R, locate the «Volume» knob on the control panel. By turning this knob clockwise, you can increase the volume, and by turning it counterclockwise, you can decrease the volume to your desired level.
How can I connect my keyboard to external speakers?
To connect your Casio Privia PX-400R to external speakers, locate the «OUTPUT» jacks on the rear panel of the keyboard. Use appropriate audio cables (e.g., RCA or TRS) to connect these jacks to the input jacks on your external speakers. This will allow the sound to be output through the external speakers instead of the keyboard’s built-in speakers.
How do I record and save my performances?
To record and save your performances on the Casio Privia PX-400R, press the «REC» button on the control panel and then select the desired track using the numbered buttons. Press the «START/STOP» button to initiate the recording, and press it again to stop. To save the recorded performance, press the «SAVE» button and follow the on-screen prompts to choose a location and file name for your recording.
Can I split the keyboard into different sections?
Yes, you can split the keyboard on your Casio Privia PX-400R to play different sounds or instruments simultaneously. Press the «SPLIT» button on the control panel, and use the designated keys to select the split point on the keyboard. You can then assign different sounds or functions to each side of the split.
How do I use the built-in metronome?
To use the built-in metronome on the Casio Privia PX-400R, press the «METRONOME» button on the control panel. Use the «+» and «-» buttons to adjust the tempo, and the numbered buttons to select different time signatures. The metronome will then provide an audible click or beat at the chosen tempo and time signature to help you maintain a consistent rhythm while playing.
How can I best clean my keyboard?
A slightly damp cleaning cloth or soft, dust-free cloth works best to remove fingerprints. Dust in hard-to-reach places is best removed with compressed air.
Is the manual of the Casio Privia PX-400R available in English?
Yes, the manual of the Casio Privia PX-400R is available in English .
Is your question not listed? Ask your question here
USER’S GUIDE
GUÍA DEL USUARIO
Please keep all information for future reference.
Guarde toda información para tener como referencia futura.
ES
PX400R-ES-1
PX400R_es_cover.p65 04.8.24, 4:33 PM1
Safety Precautions
Before trying to use the digital piano, be
sure to read the separate “Safety
Precautions”.
Precauciones de seguridad
Antes de intentar usar el piano digital,
asegúrese de leer las “Precauciones de
seguridad” separadas.
TO REDUCE THE RISK OF FIRE OR ELECTRIC SHOCK, REFER SERVICING TO QUALIFIED SERVICE PERSONNEL.
IMPORTANT SAFETY INSTRUCTIONS
1. Read these instructions.
2. Keep these instructions.
3. Heed all warnings.
4. Follow all instructions.
5. Do not use this apparatus near water.
6. Clean only with dry cloth.
7. Do not block any ventilation openings. Install in accordance with the manufacturer’s instructions.
8. Do not install near any heat sources such as radiators, heat registers, stoves, or other apparatus (including
amplifiers) that produce heat.
9. Do not defeat the safety purpose of the polarized or grounding-type plug. A polarized plug has two blades with
one wider than the other. A grounding type plug has two blades and a third grounding prong. The wide blade or
the third prong are provided for your safety. If the provided plug does not fit into your outlet, consult an electrician
for replacement of the obsolete outlet.
10. Protect the power cord from being walked on or pinched particularly at plugs, convenience receptacles, and the
point where they exit from the apparatus.
11. Only use attachments/accessories specified by the manufacturer.
12. Use only with the cart, stand, tripod, bracket, or table specified by the manufacturer, or
sold with the apparatus. When a cart is used, use caution when moving the cart/apparatus
combination to avoid injury from tip-over.
13. Unplug this apparatus during lightning storms or when unused for long periods of time.
14. Refer all servicing to qualified service personnel. Servicing is required when the apparatus has been damaged in
any way, such as power-supply cord or plug is damaged, liquid has been spilled or objects have fallen into the
apparatus, the apparatus has been exposed to rain or moisture, does not operate normally, or has been dropped.
The apparatus shall not be exposed to dripping or splashing and that no objects filled with liquids, such as vases,
shall be placed on the apparatus.
NOTICE
This equipment has been tested and found to comply with the limits for a Class B digital device, pursuant to Part 15 of
the FCC Rules. These limits are designed to provide reasonable protection against harmful interference in a residential
installation. This equipment generates, uses and can radiate radio frequency energy and, if not installed and used in
accordance with the instructions, may cause harmful interference to radio communications. However, there is no guarantee
that interference will not occur in a particular installation. If this equipment does cause harmful interference to radio or
television reception, which can be determined by turning the equipment off and on, the user is encouraged to try to
correct the interference by one or more of the following measures:
• Reorient or relocate the receiving antenna.
• Increase the separation between the equipment and receiver.
• Connect the equipment into an outlet on a circuit different from that to which the receiver is connected.
• Consult the dealer or an experienced radio/TV technician for help.
FCC WARNING
Changes or modifications not expressly approved by the party responsible for compliance could void the user’s authority to operate the equipment.
Important!
Please note the following important information before using this product.
• Before using the AD-12 Adaptor to power the unit, be sure to check the AC Adaptor for any damage first. Carefully
check the power cord for breakage, cuts, exposed wire and other serious damage. Never let children use an AC adaptor
that is seriously damaged.
• The product is not intended for children under 3 years.
• Use only CASIO AD-12 adaptor.
• The AC adaptor is not a toy.
• Be sure to disconnect the AC adaptor before cleaning the product.
PX400R_e_00.p65 04.8.24, 4:33 PM2
CASIO Europe GmbH
Bornbarch 10, 22848 Norderstedt, Germany
419A-E-002A
Contents
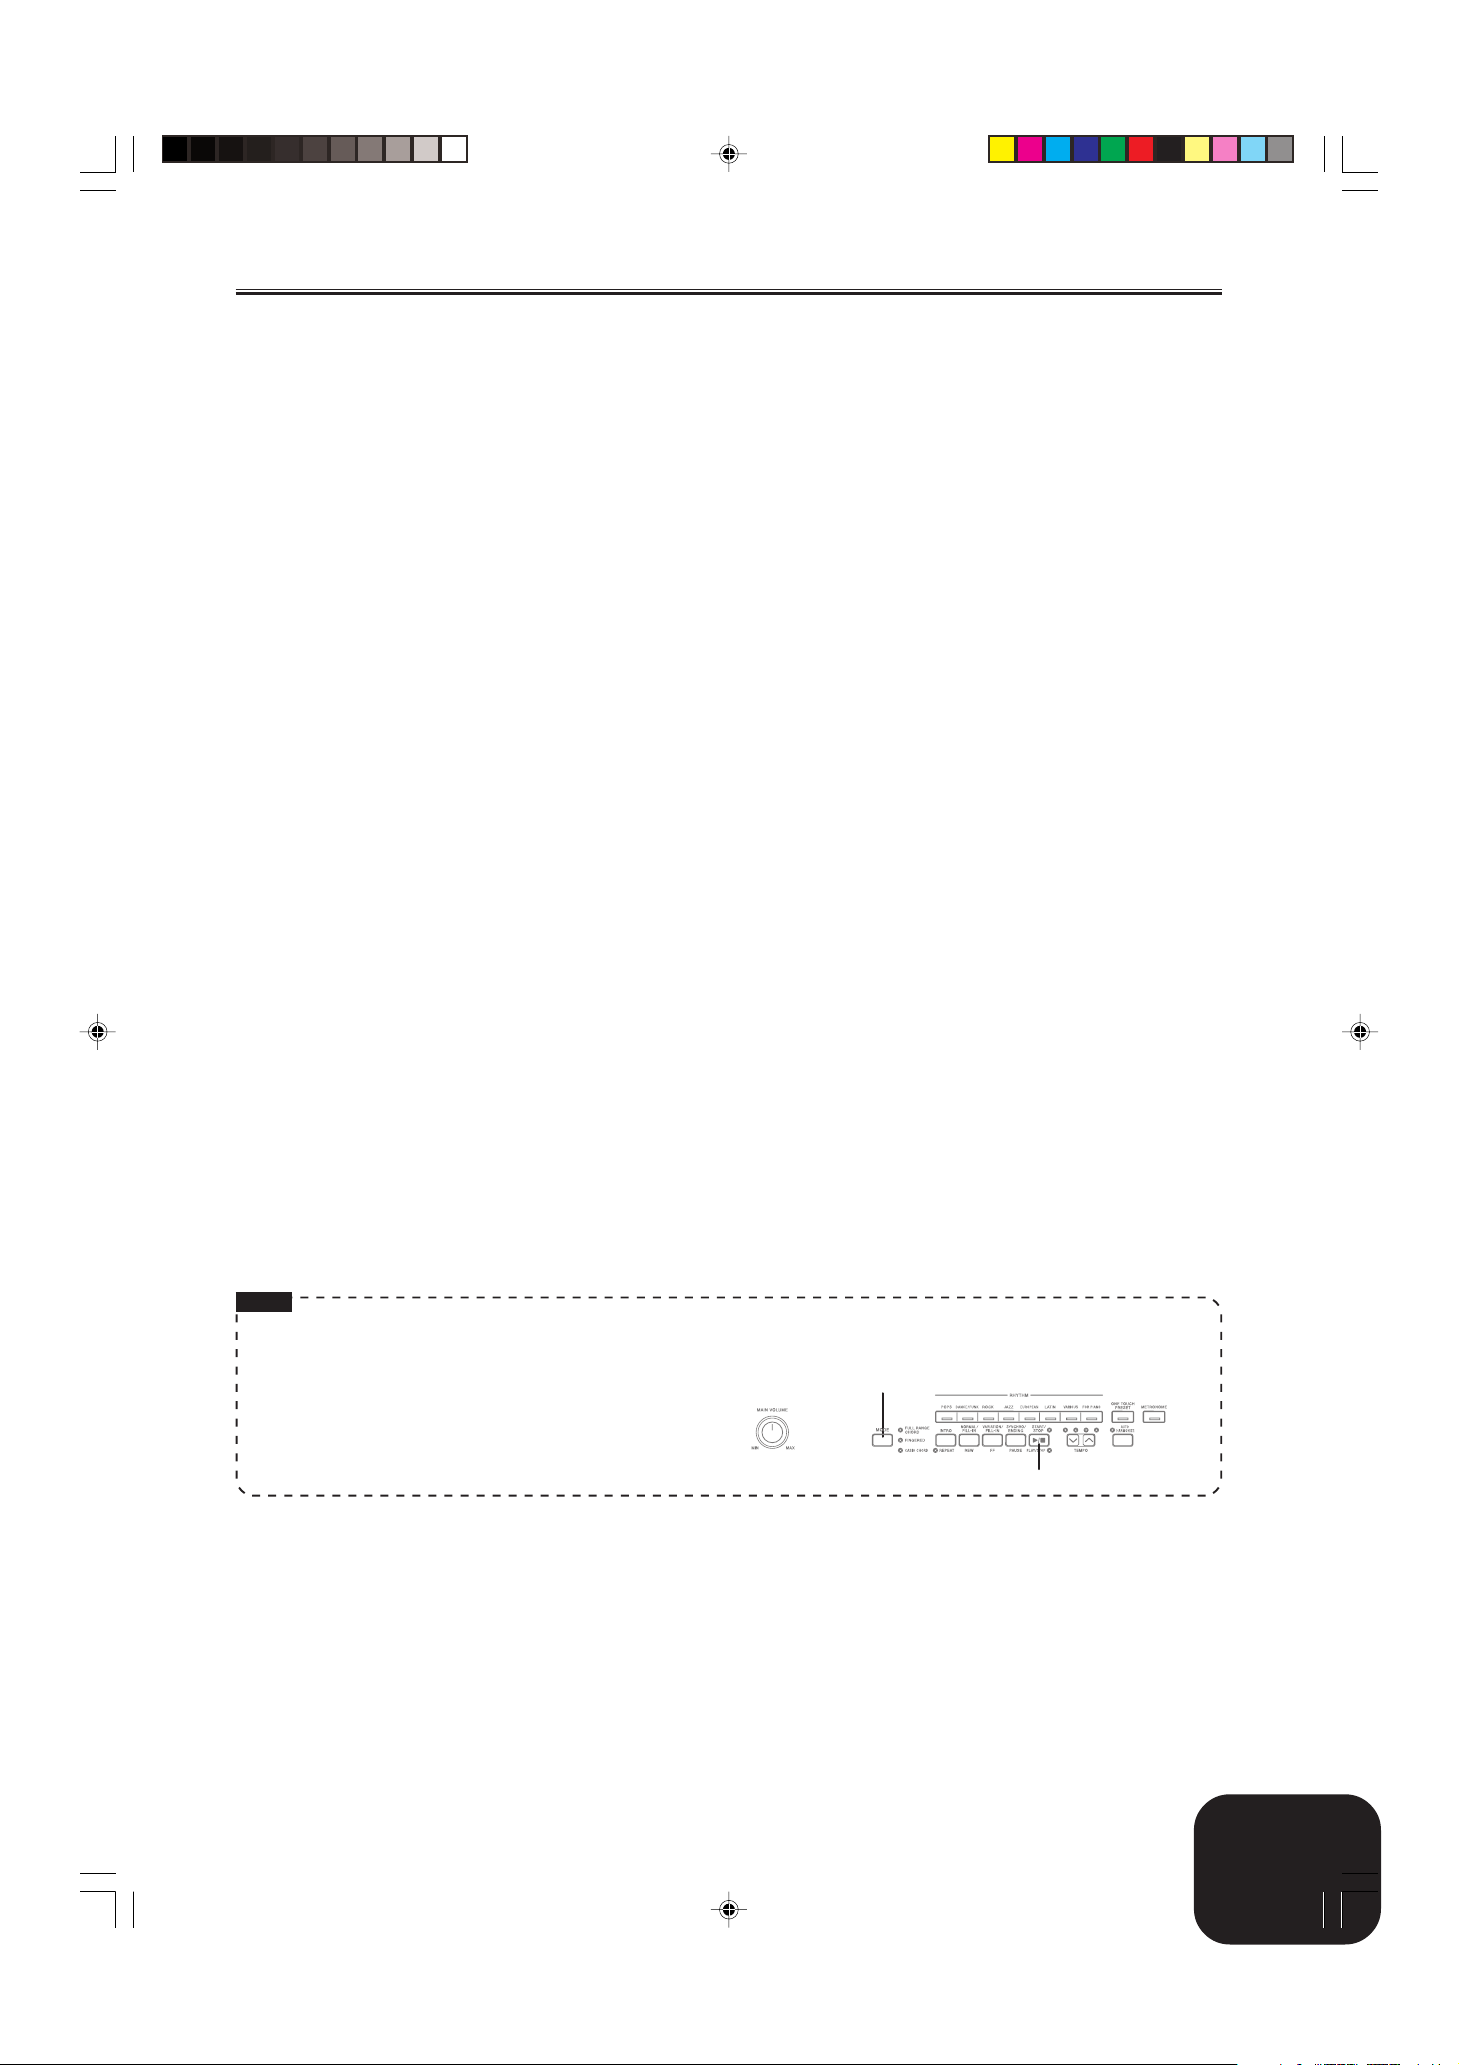
General Guide……………………………………E-2
Attachment of the Score Stand ………………………………. E-2
Power Supply …………………………………… E-4
Using the AC Adaptor ……………………………………………. E-4
Connections …………………………………….. E-5
Connecting Headphones ……………………………………….. E-5
Connecting to a PEDAL Jack …………………………………. E-5
Connecting an audio or musical instrument amplifier …E-5
Selecting and Using Built-in Tones…….E-6
Tone Type ……………………………………………………………. E-6
Selecting a Tone …………………………………………………… E-6
Using Tone Effects ………………………………………………… E-7
Layering Two Tones……………………………………………….E-7
Splitting the Keyboard between Two Tones ………………E-8
Using Layer and Split Together ……………………………….E-8
Using the Piano’s Pedals ………………………………………. E-9
Using the PITCH BEND Wheel ………………………………. E-9
Using the Metronome ……………………………………………. E-9
Playing a Rhythm ……………………………. E-10
Playing a Rhythm ……………………………………………….. E-10
Using Auto Accompaniment …………………………………. E-11
Adjusting the Volume of Accompaniment, Tune,
and Memory Card Playback ………………………………….E-13
Using Auto Harmonize …………………………………………. E-13
Using One-Touch Preset ……………………………………… E-14
Recording Your Keyboard Play ………..E-22
Recordable Data, Parts, and Tracks ……………………… E-22
Recording Your Practice (Song Recording) …………….E-23
Recording a Performance (Free Recording)……………E-23
Playing Back a Free Recording ……………………………..E-24
Overdubbing a Free Recording …………………………….. E-25
Deleting a Specific Part/Track ………………………………. E-25
Other Settings ………………………………… E-26
Keyboard Touch ………………………………………………….. E-26
Keyboard Tuning ………………………………………………… E-26
Layer Tone Volume ……………………………………………… E-26
Pitch Bend Range ………………………………………………..E-26
Soft/Sostenuto Pedal Setting ……………………………….. E-26
Display Contrast …………………………………………………. E-26
Using MIDI ………………………………………………………….E-27
Connecting to a Computer …………………………………… E-27
USB Mode and MIDI mode ………………………………….. E-28
Expanding the Number of Built-in Tunes ………………..E-28
Using a Memory Card ………………………E-29
Using a Memory Card ………………………………………….E-29
Saving Files to a Memory Card …………………………….. E-30
Loading a File from a Memory ……………………………… E-31
Renaming a Memory Card File …………………………….. E-32
Deleting a Memory Card File ……………………………….. E-32
Formatting a Memory Card ………………………………….. E-33
Supported Input Characters ………………………………….E-33
Memory Card Error Messages ………………………………E-34
Using Registration Memory ……………..E-15
What is registration memory? ………………………………. E-15
Playing Back Built-in Tunes……………..E-17
Playing Back a Piano Group Tune …………………………E-17
Playing Back a Song Group Tune …………………………. E-17
Adjusting Playback Tempo …………………………………… E-17
Pausing Playback ………………………………………………..E-18
Skipping Back through a Tune ………………………………E-18
Skipping Forward through a Tune …………………………. E-18
Looping a Musical Phrase …………………………………….E-18
Changing the Melody Tone of a Tune …………………….E-18
Playing All of the Built-in Tunes ……………………………..E-19
Playing Tunes You Download from the Internet………. E-19
Playing Music Data from a Memory Card ……………….E-19
Practicing a Built-in Tune …………………………………….. E-19
Using a Microphone for Sing Along …. E-20
Using Transpose ………………………………………………….E-21
Troubleshooting ……………………………… E-35
Specifications …………………………………. E-37
Appendix …………………………………………. A-1
Tone List ……………………………………………………………… A-1
Rhythm List …………………………………………………………..A-3
Song List ……………………………………………………………… A-4
Drum Assignment List …………………………………………… A-5
Fingered Chord Chart ……………………………………………. A-6
Operational Precautions ………………….. A-7
MIDI Implementation Chart
Company and product names used in this manual may be
registered trademarks of others.
419A-E-003A
PX400R_e_01-16.p65 04.8.24, 4:34 PM1
E-1
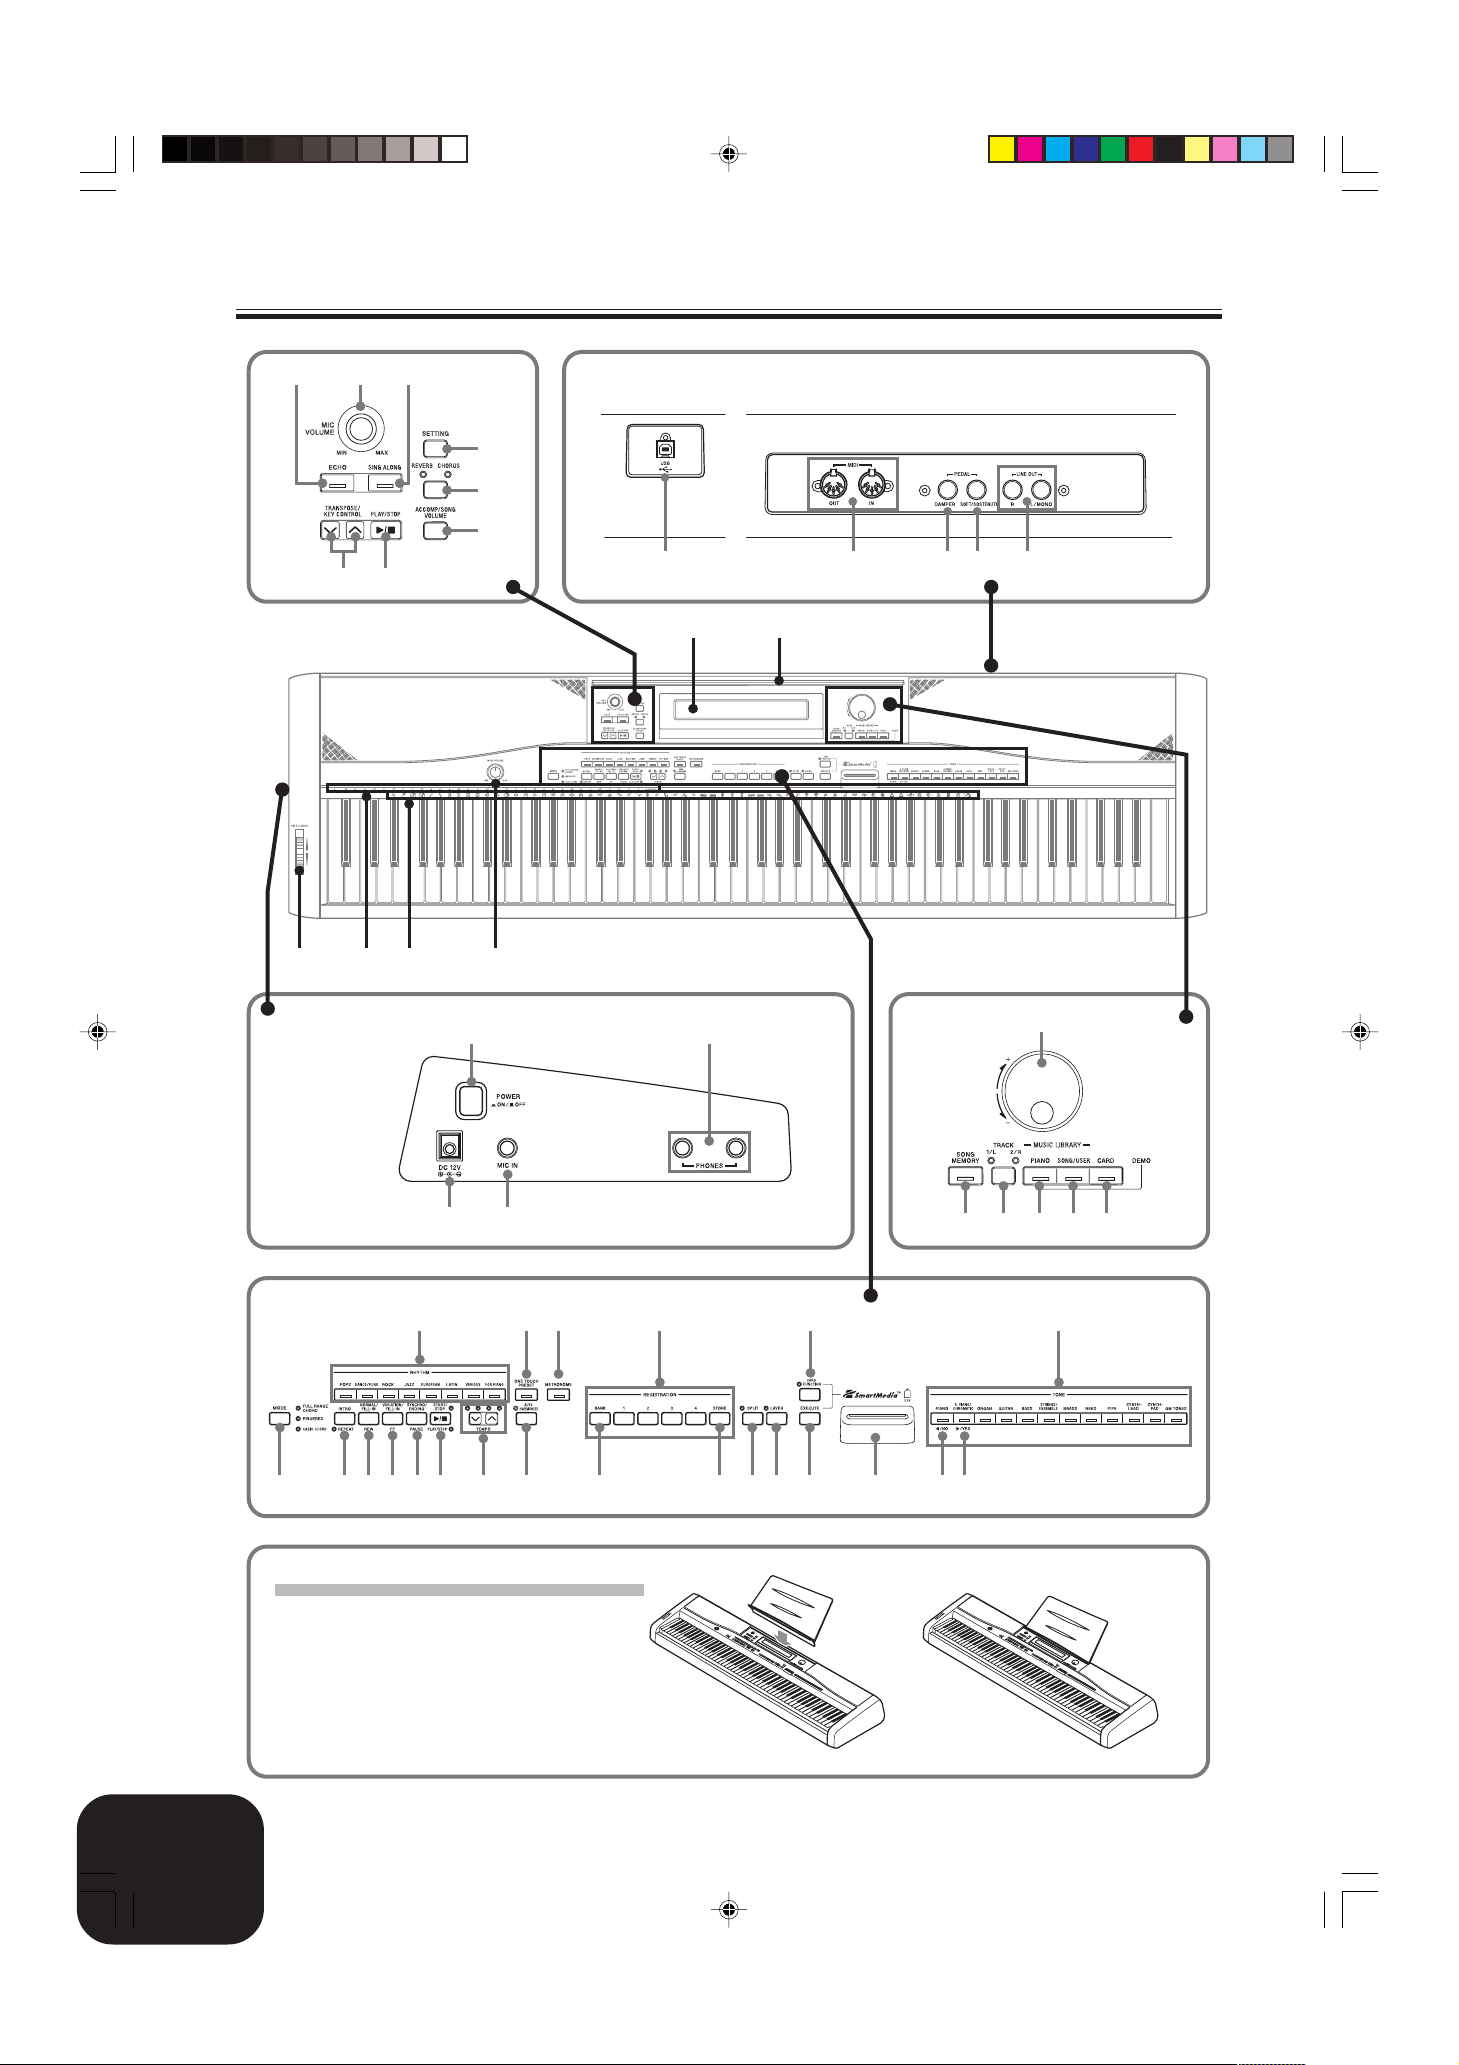
General Guide
213
5
4
6
7
8
Back Panel
b
9
fedc
*
0 CAB
Left Side Panel
J
N O P Q
K
h
g
i
R S U Z
T V W X Y [ _ a\L M
j
D
E F G H I
]
*Attachment of the Score Stand
Insert the score stand into the slot at the top of
the digital piano as shown in the illustration.
E-2
PX400R_e_01-16.p65 04.8.24, 4:34 PM2
419A-E-004A
General Guide
1
ECHO button
2
MIC VOLUME knob
3
SING ALONG button
4
TRANSPOSE/KEY CONTROL buttons
5
<PLAY/STOP> button
6
SETTING button
7
REVERB CHORUS button
8
ACCOMP/SONG VOLUME button
9
Display screen
0
PITCH BEND wheel
A
CHORD root name
B
Percussion instrument list
C
MAIN VOLUME knob
D
Dial
E
SONG MEMORY button
F
TRACK 1/L 2/R button
● MUSIC LIBRARY
G
PIANO button
H
SONG/USER button
I
CARD button
J
MODE button
K
RHYTHM buttons
L
INTRO, REPEAT button
M
NORMAL/FILL-IN, REW button
N
VARIATION/FILL-IN, FF button
O
SYNCHRO/ENDING, PAUSE button
P
START/STOP, PLAY/STOP button
Q
TEMPO buttons
R
ONE TOUCH PRESET button
S
METRONOME button
T
AUTO HARMONIZE button
U
REGISTRATION buttons
V
BANK button
W
STORE button
X
SPLIT button
Y
LAYER button
Z
CARD FUNCTION button
[
EXECUTE button
\
Card slot
]
TONE buttons
_
[왗] cursor/NO button
a
[왘] cursor/YES button
[Back panel]
b
USB port
c
MIDI OUT/IN terminals
d
PEDAL DAMPER jack
e
PEDAL SOFT/SOSTENUTO jack
f
LINE OUT R, L/MONO jacks
[Left side panel]
g
POWER button
h
DC 12V jack
i
MIC IN jack
j
PHONES jacks
NOTE
• Key, button, and other names are indicated in the text of this manual using bold type.
• This digital piano has two PLAY/STOP buttons. In this manual, the PLAY/STOP button that is located under the SING ALONG
button is indicated as <PLAY/STOP>.
• Each chapter of this manual starts with an illustration of the
digital piano’s console, which shows the buttons and other
controllers you need to operate.
419A-E-005B
MODE
START/STOP
E-3
PX400R_e_01-16.p65 04.8.24, 4:34 PM3
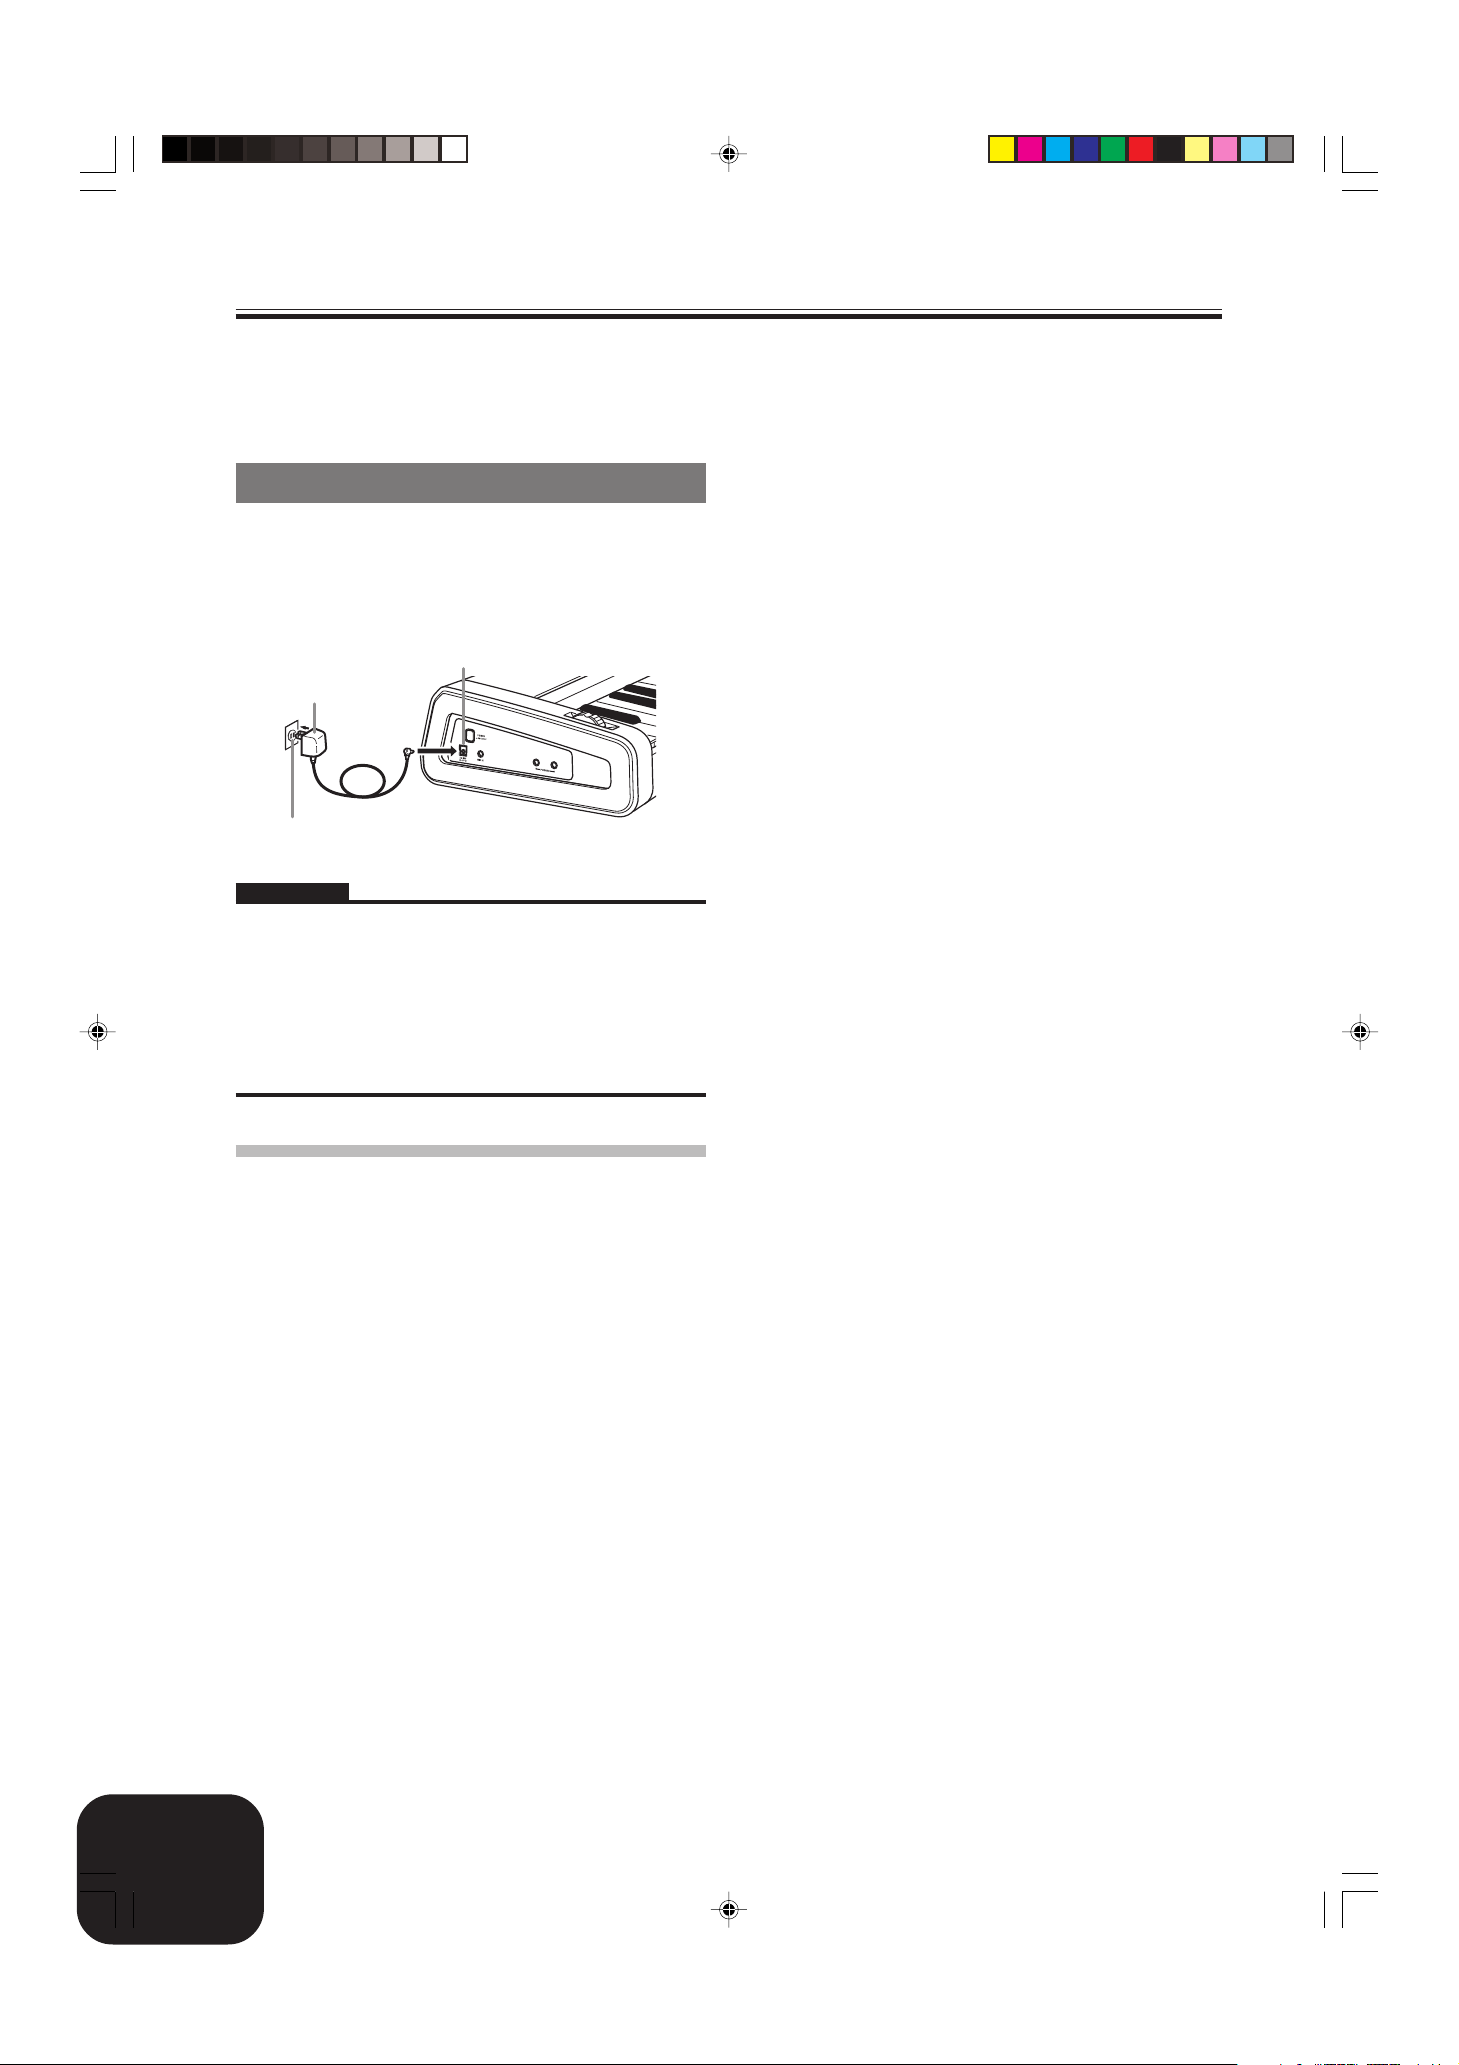
Power Supply
You can power this digital piano by plugging it into a standard
household power outlet.
Be sure you turn off power and unplug the power cord from the
electrical outlet whenever the digital piano is not in use.
Using the AC Adaptor
Make sure that you use only the AC adaptor specified for this digital
piano.
Specified AC Adaptor: AD-12
[Left Side Panel]
DC 12V jack
AC adaptor AD-12
AC outlet
IMPORTANT!
• Make sure that the product is turned off before connecting or
disconnecting the AC adaptor.
• Using the AC adaptor for a long time can cause it to become
warm to touch. This is normal and does not indicate malfunction.
• Do not pull on the AC adaptor cord with excessive force while it
is connected to the digital piano. Doing so can damage the AC
adaptor terminal.
• When storing the AC adaptor, do not wrap the cord around the
adaptor. Doing so can damage cord connections.
Memory Protection
Certain settings and memory contents are retained even when the
digital piano is turned off. This means that the data and settings
will still be available when you turn the digital piano back on again.
This following is a list of the major settings and memory contents
that are retained.
• Song Memory Data
• Registration Memory Contents
• User Songs
• Display Contrast Setting
• Music Library Song Numbers
E-4
PX400R_e_01-16.p65 04.8.24, 4:34 PM4
419A-E-006A
Connections
IMPORTANT!
• Whenever connecting external equipment, first set the MAIN
VOLUME knob of the digital piano and the volume controller
of the external equipment to relatively low volume settings. You
can later adjust volume to the level you want after connections
are complete.
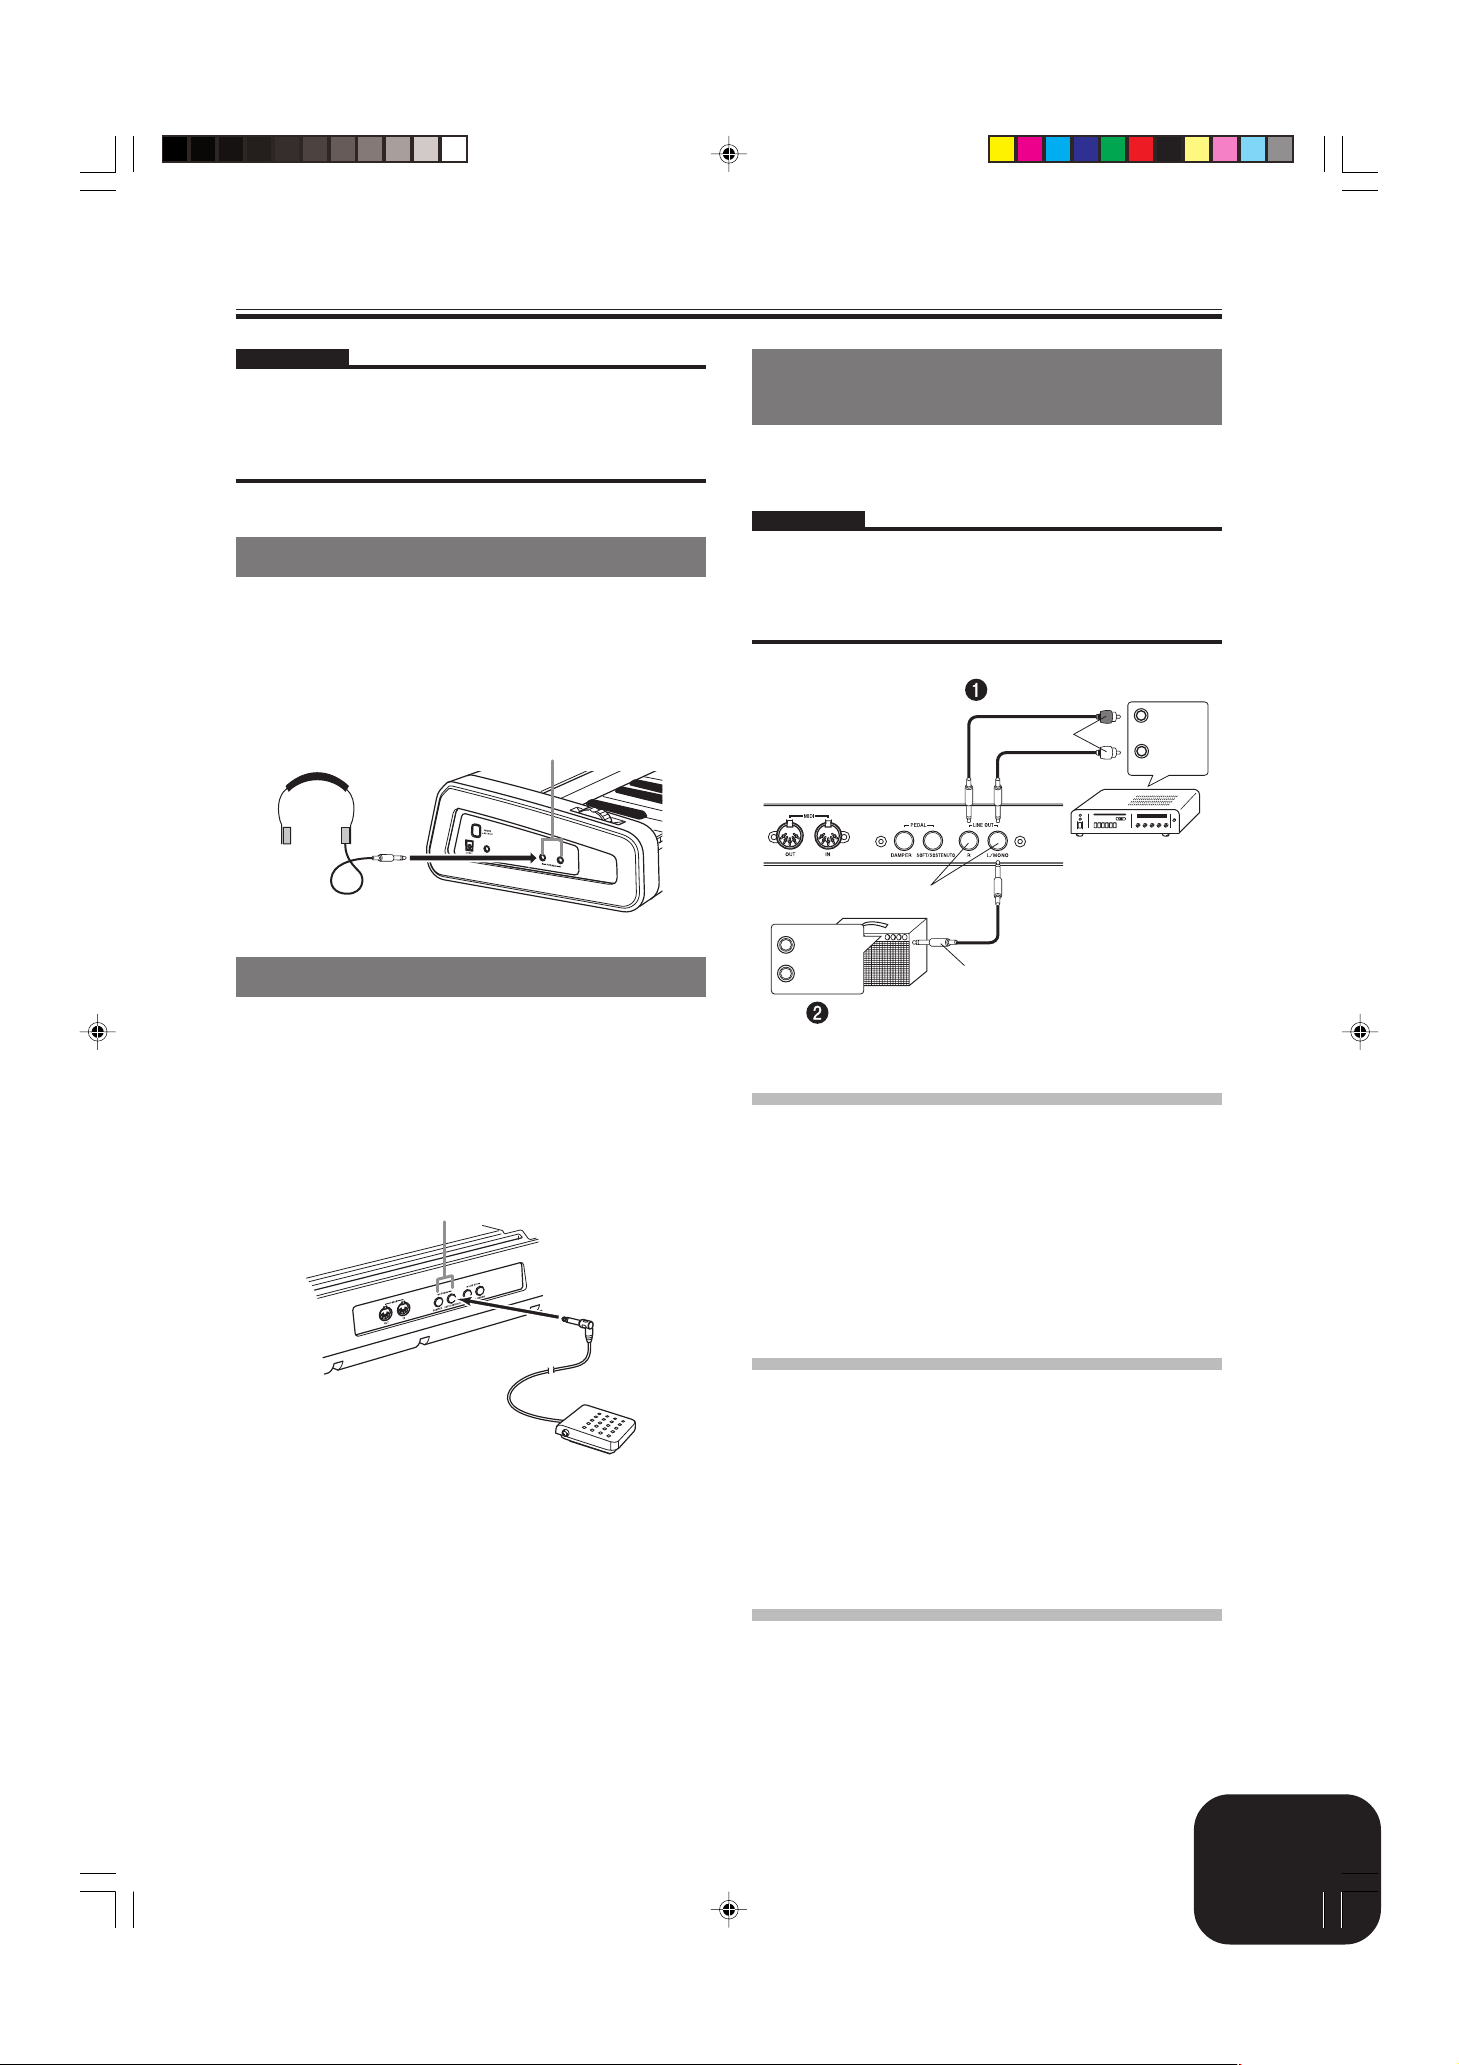
Connecting Headphones
Connect commercially available headphones to the digital piano’s
PHONES jacks. This cuts off the built-in speakers, which means
you can practice even late at night without disturbing others. To
protect your hearing, make sure that you do not set the volume
level too high when using headphones.
[Left Side Panel]
PHONES jacks
Headphones
Connecting an audio or musical
instrument amplifier
Connecting to an audio or musical instrument amplifier provides
even clearer, more powerful sound through external speakers.
IMPORTANT!
• The digital piano automatically adjusts sound output to optimize
for headphone output (when headphones are connected) or builtin speaker output (when headphones are not connected). Note
that this feature also affects the sound output from the LINE
OUT R and L/MONO jacks.
Audio amplifier AUX IN, etc.
RIGHT
PIN plugs
Standard jacks
(Red)
LEFT
(White)
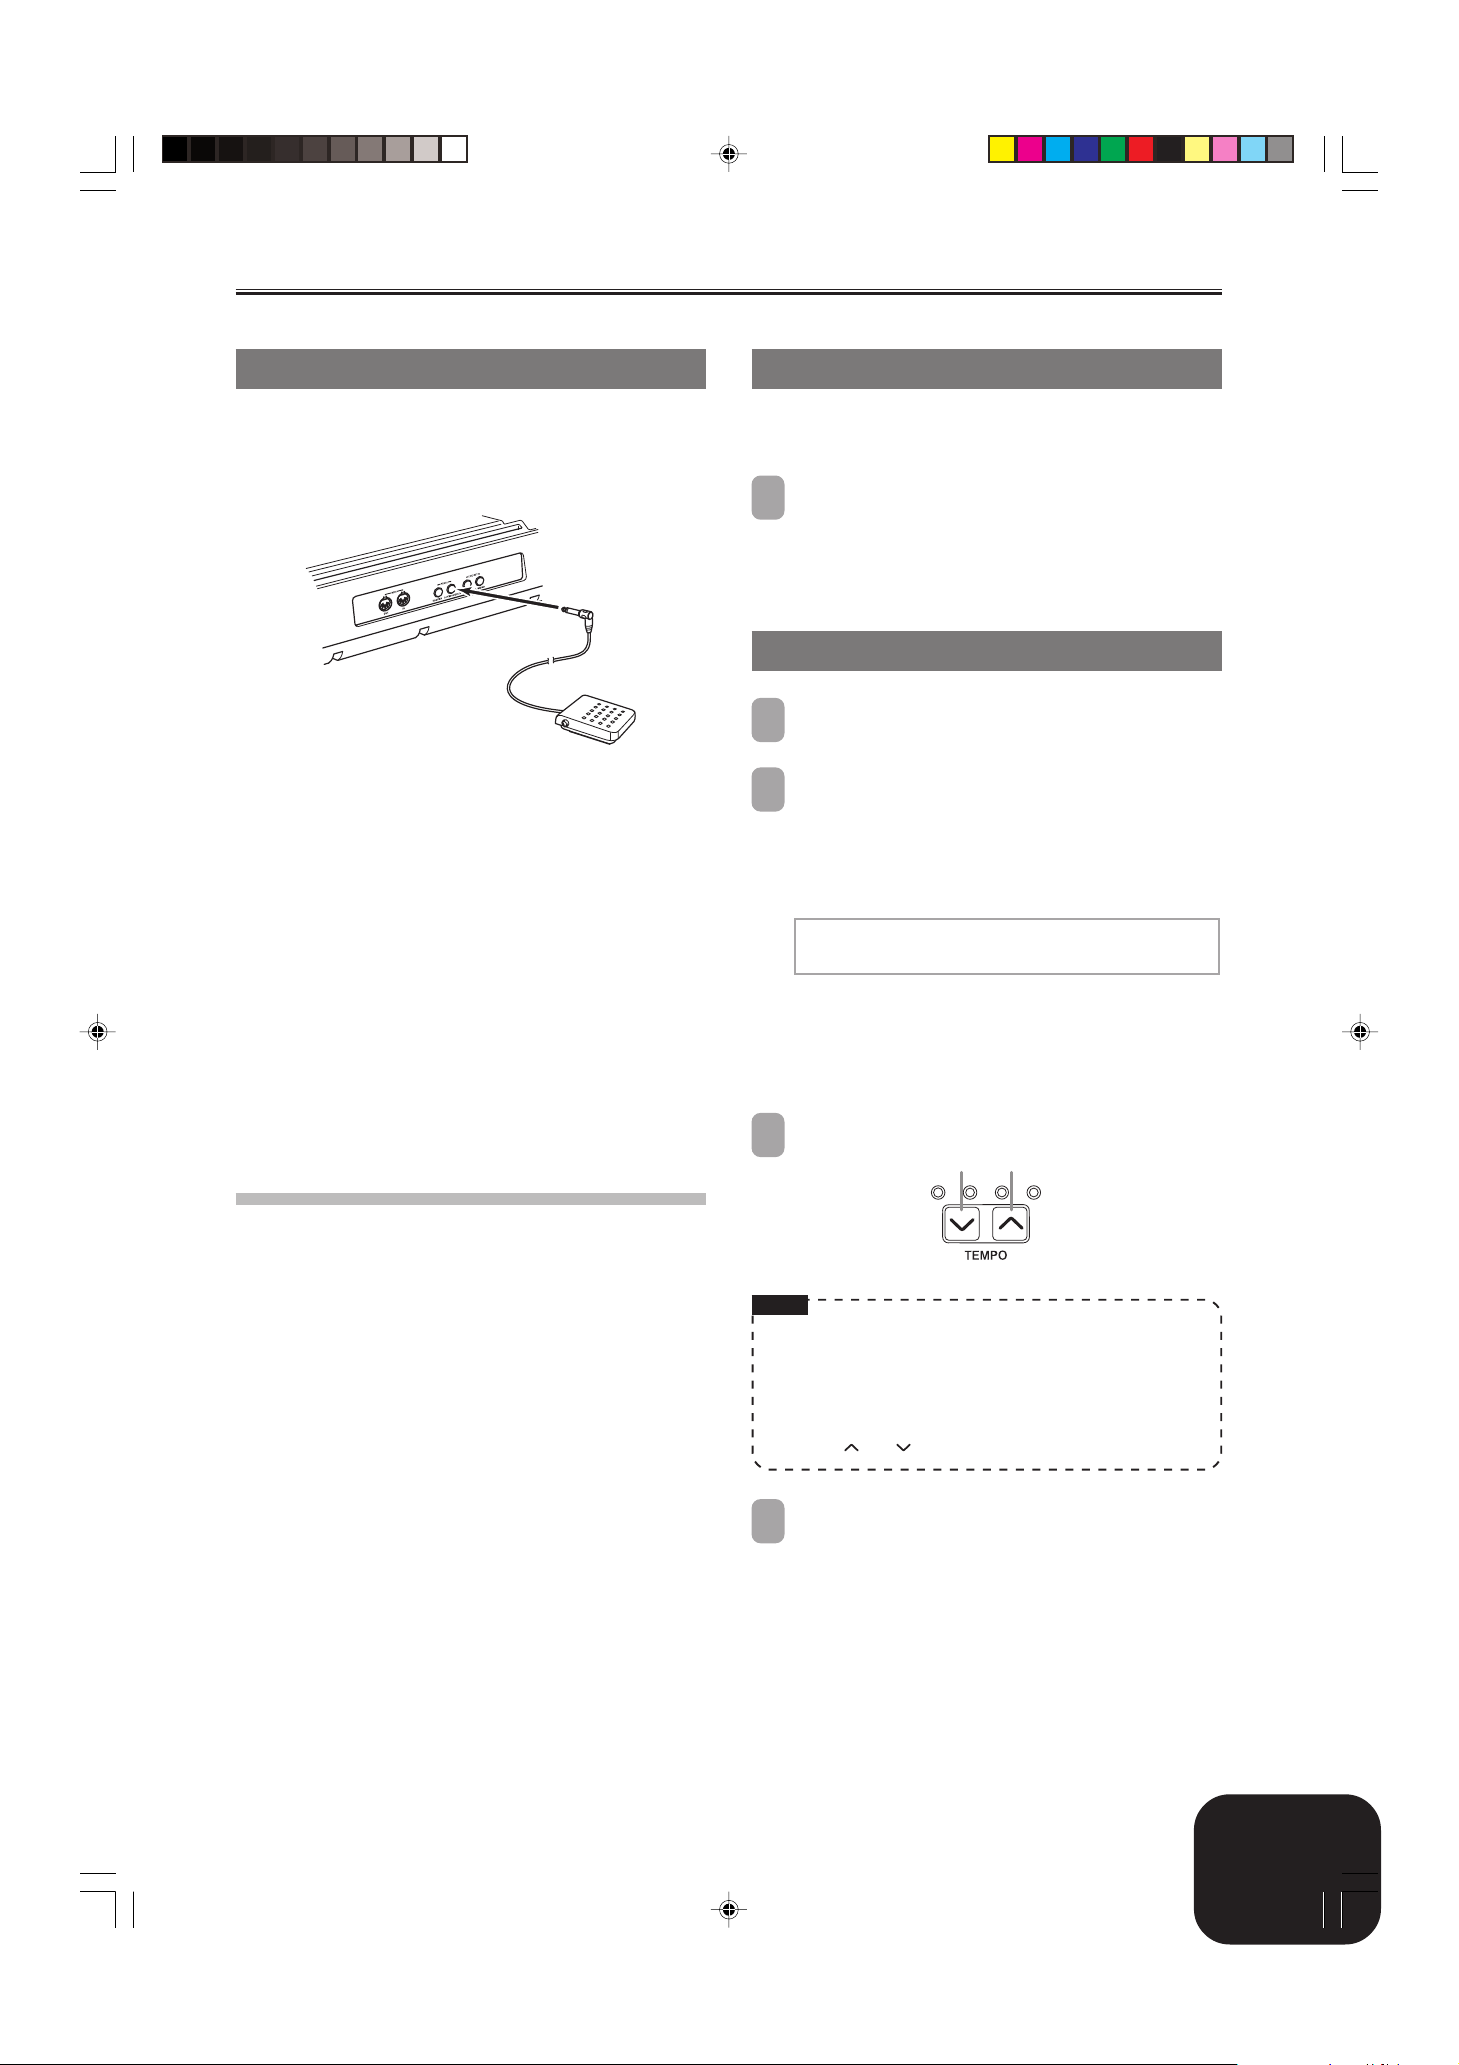
Connecting to a PEDAL Jack
Depending on the type of operation you want the pedal (SP-3) to
perform, connect the pedal’s cable to the digital piano’s PEDAL
DAMPER jack or PEDAL SOFT/SOSTENUTO jack. If you want
to use both jacks at the same time, you need to purchase another
optionally available pedal.
See “Using the Digital Piano’s Pedals” on page E-9 for information
about using a pedal.
[Back Panel]
PEDAL jacks
SP-3
INPUT 1
INPUT 2
Guitar amplifier,
keyboard amplifier, etc.
Standard plug
Connecting to Audio Equipment 1
Use commercially available cables to connect the external audio
equipment to the digital piano’s LINE OUT jacks as shown in
Figure 1. R jack output is right channel sound, while L/MONO
jack output is left channel sound. It is up to you to purchase
connecting cables like the ones shown in the illustration for
connection of audio equipment. Normally in this configuration you
must set the audio equipment’s input selector to the setting that
specifies the terminal (such as AUX IN) to which the digital piano
is connected. Use the digital piano’s MAIN VOLUME knob to
adjust the volume level.
Connecting to a Musical Instrument
Amplifier 2
Use commercially available cables to connect the amplifier to the
digital piano’s LINE OUT jacks as shown in Figure 2. R jack output
is right channel sound, while L/MONO jack output is left channel
sound. Connecting to the L/MONO jack only outputs a mixture of
both channels. It is up to you to purchase connecting cables like
the ones shown in the illustration for connection of the amplifier.
Use the digital piano’s MAIN VOLUME knob to adjust the volume
level.
419A-E-007B
PX400R_e_01-16.p65 04.8.24, 4:34 PM5
Accessories and Options
Use only the accessories and options specified for this digital piano.
Use of non-authorized items creates the danger of fire, electric
shock, and personal injury.
E-5
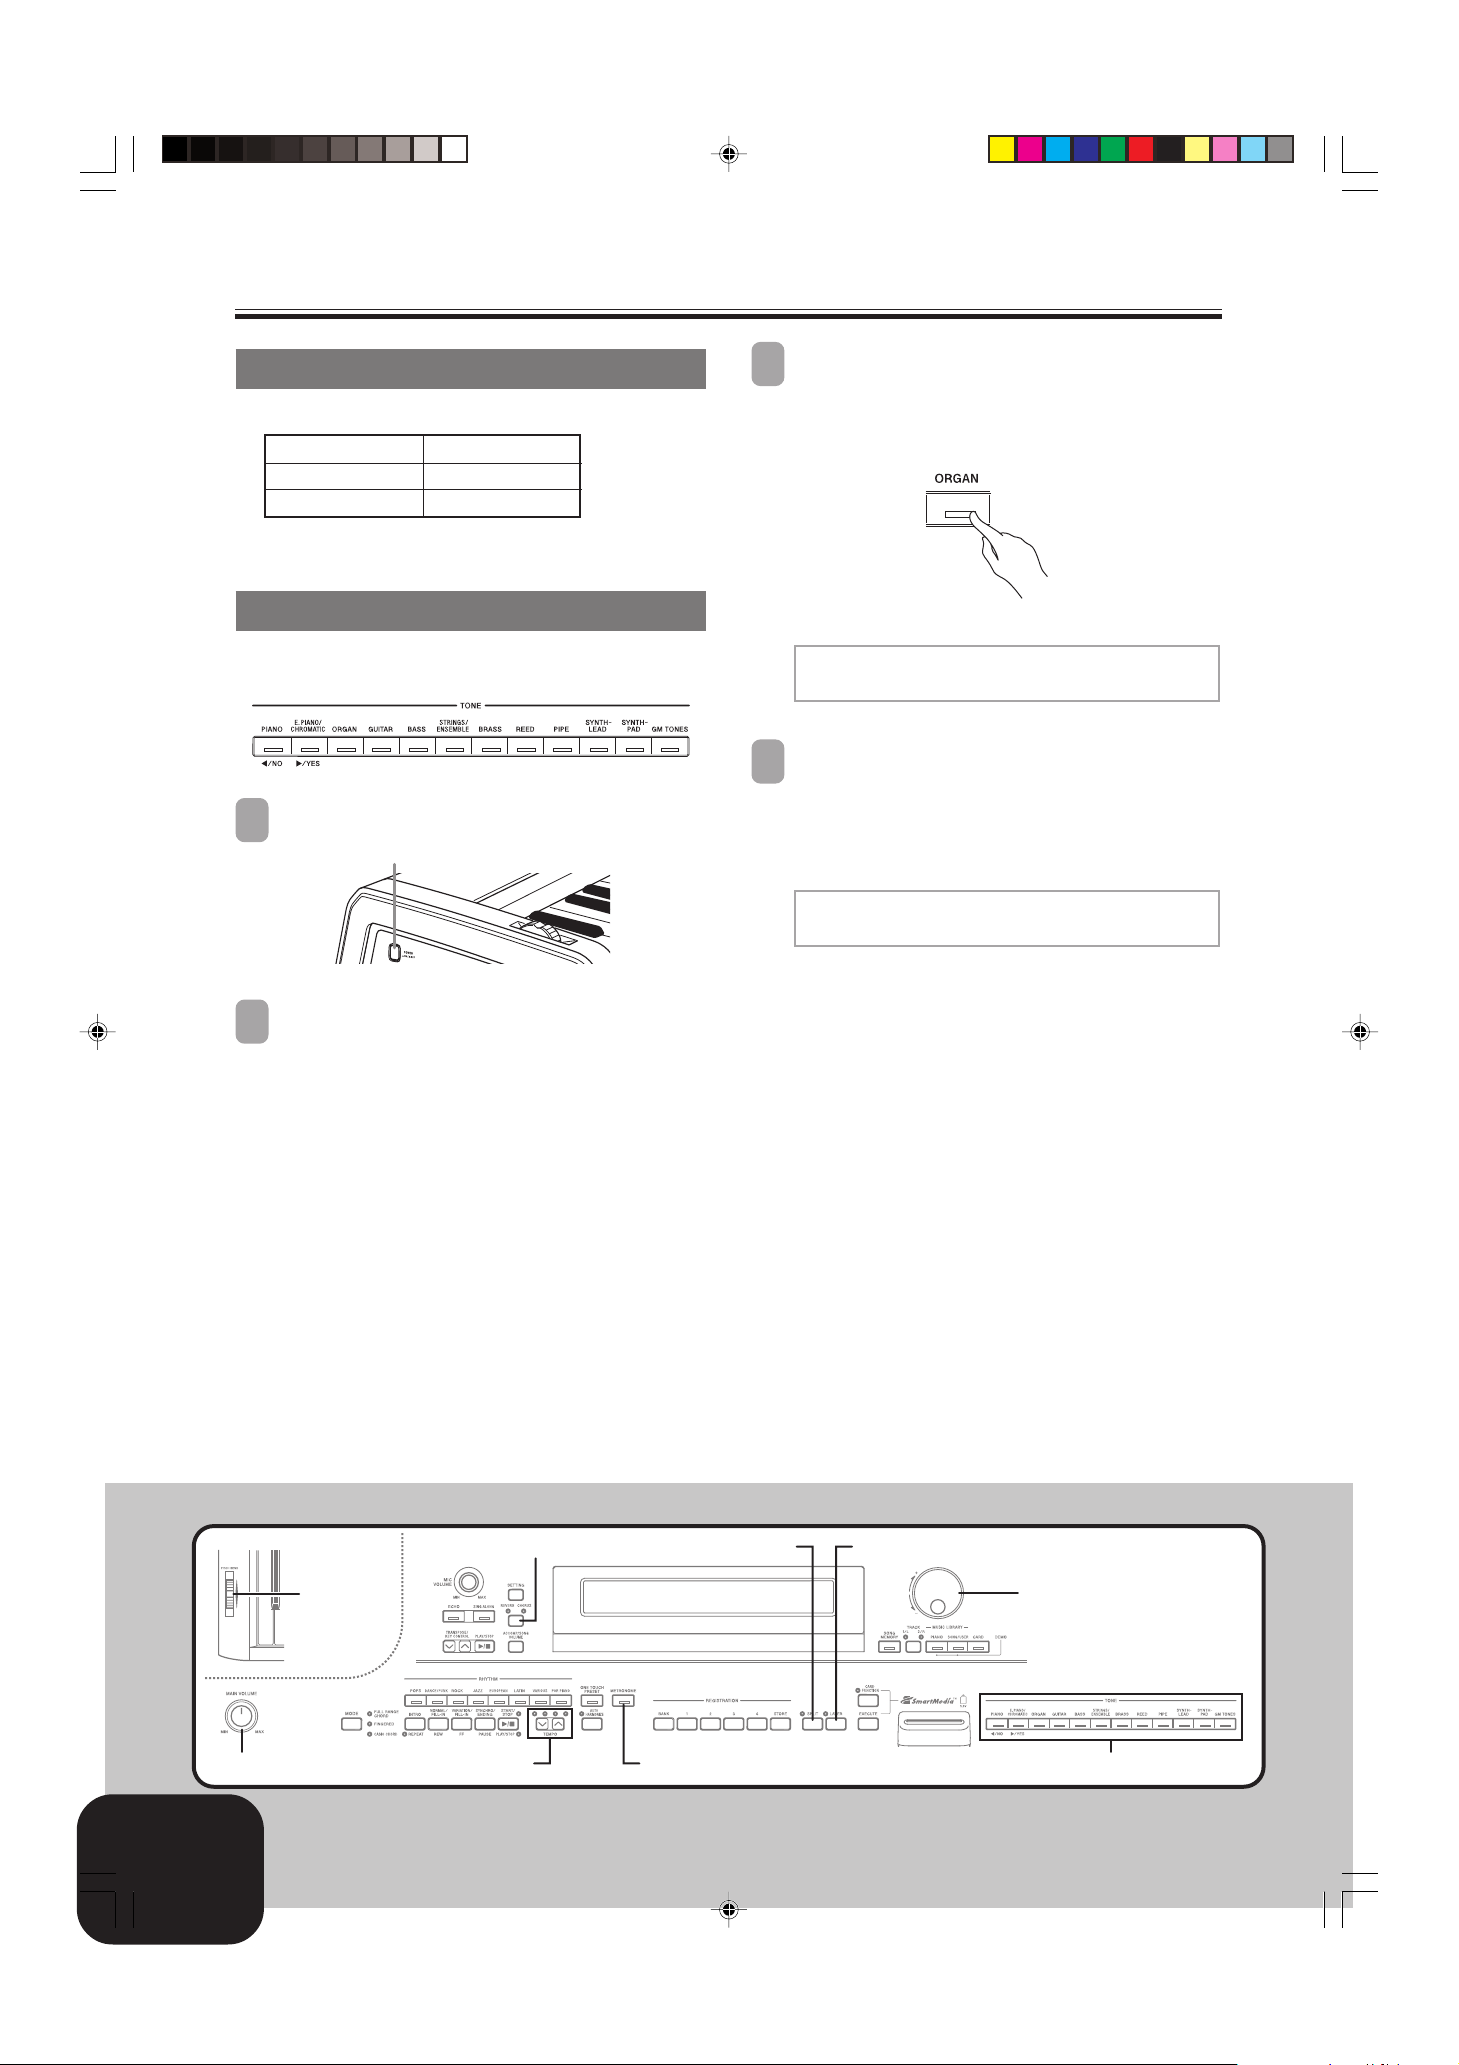
Selecting and Using Built-in Tones
Press one of the 12 TONE buttons to select the tone
Tone Type
Your digital piano has the following types of tones built in.
Panel Tones 120
GM Tones 128
Drum Sets 10
• See the Tone List on page A-1 for more information.
3
group you want.
• For information about each tone group, see the tone list
on page A-1.
Example: ORGAN
Selecting a Tone
Panel tones are divided into 12 groups. You can select a group by
pressing its TONE button on the digital piano control panel.
Press the POWER button.
1
POWER button
Use the MAIN VOLUME knob to adjust the volume
2
level.
• Before playing, it is a good idea to set the volume to a
relatively low level.
• Pressing a TONE button causes its indicator lamp to light.
[
000 : Dr awbar Org1
]
Pop0 1
Rotate the dial to select a tone in the current selected
4
tone group.
• Rotating the dial scrolls through the names of the available
tones on the display. Display the name of the tone you
want to use.
Example: Jazz Organ
[
0 0 6 : 0 Jazz0 Organ] 0
0 Pop0 1
PITCH BEND
MAIN VOLUME
E-6
PX400R_e_01-16.p65 04.8.24, 4:34 PM6
REVERB CHORUS
TEMPO TONE
METRONOME
SPLIT
LAYER
Dial
419A-E-008B
Selecting and Using Built-in Tones
Using Tone Effects
Reverb: Makes your notes resonate
Chorus: Adds more breadth to your notes
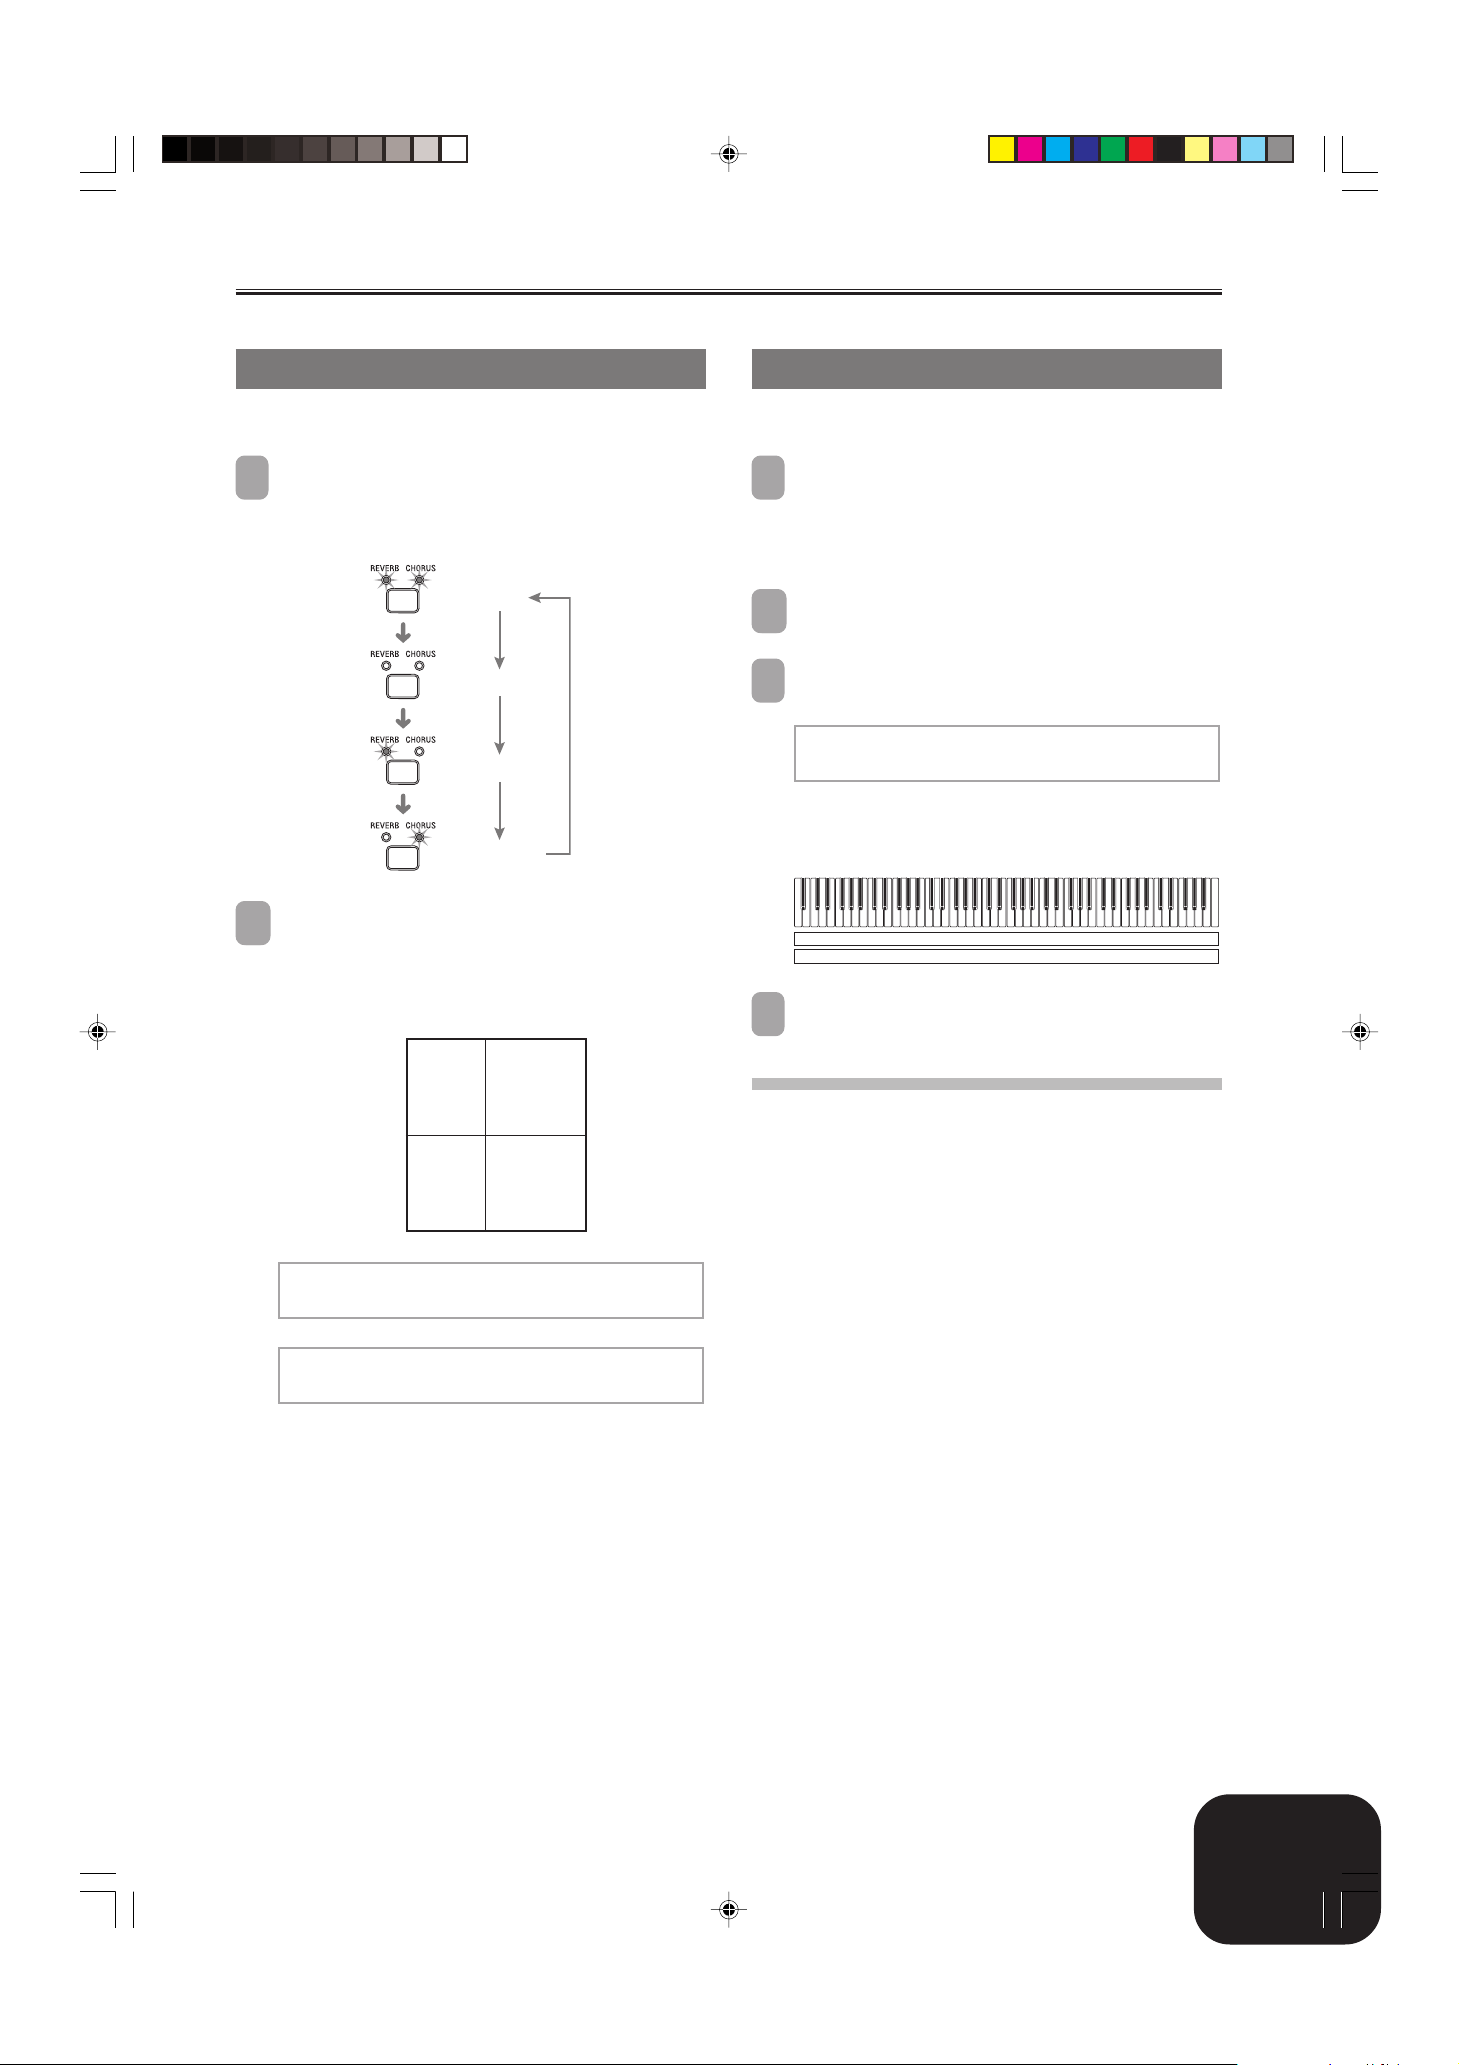
Press the REVERB CHORUS button to cycle through
1
the effect settings as shown below.
• You can find out the current effect setting by looking at
the REVERB and CHORUS indicator lamps.
On
Both on
Off
Both off
On
Reverb on
On
Chorus on
After turning on the effect you want, use the dial to
2
select the effect type you want.
• Note that you need to select an effect type with the dial
within a few seconds after turning on an effect. If you don’t,
the display will exit the setting screen.
Effect List
Reverb Room 1
Room 2
Hall 1
Hall 2
Chorus Chorus 1
Chorus 2
Chorus 3
Chorus 4
Layering Two Tones
Use the following procedure to layer two tones, so they sound at
the same time.
Use the procedure under “Selecting a Tone” on page
1
E-6 to select the main tone.
Example: To select Grand Piano, press the PIANO button,
Press the LAYER button.
2
• This causes the LAYER indicator lamp to light.
Select the layered tone.
3
Example: To select Strings
• This will cause the indicator lamp of the layered tone (the
• Now you can play using your layered tones.
After you are finished using the layered tones, press the
4
LAYER button again to unlayer them.
Adjusting the Volume of the Layered Tone
You can independently adjust the volume of the layered tone (the
second one you select). See page E-26 for more information.
and then rotate the dial until “Grand Piano” is
displayed as the tone name.
[
0 0 0 : 0 S t r i ngs
0 Pops 0 1
second one you selected) to light.
Grand Piano
Strings
]
Reverb Type:
[
Room0 1]00000000000000
Chorus Type:
[
Chorus0 1]000000000000
419A-E-009B
E-7
PX400R_e_01-16.p65 04.8.24, 4:34 PM7
Selecting and Using Built-in Tones
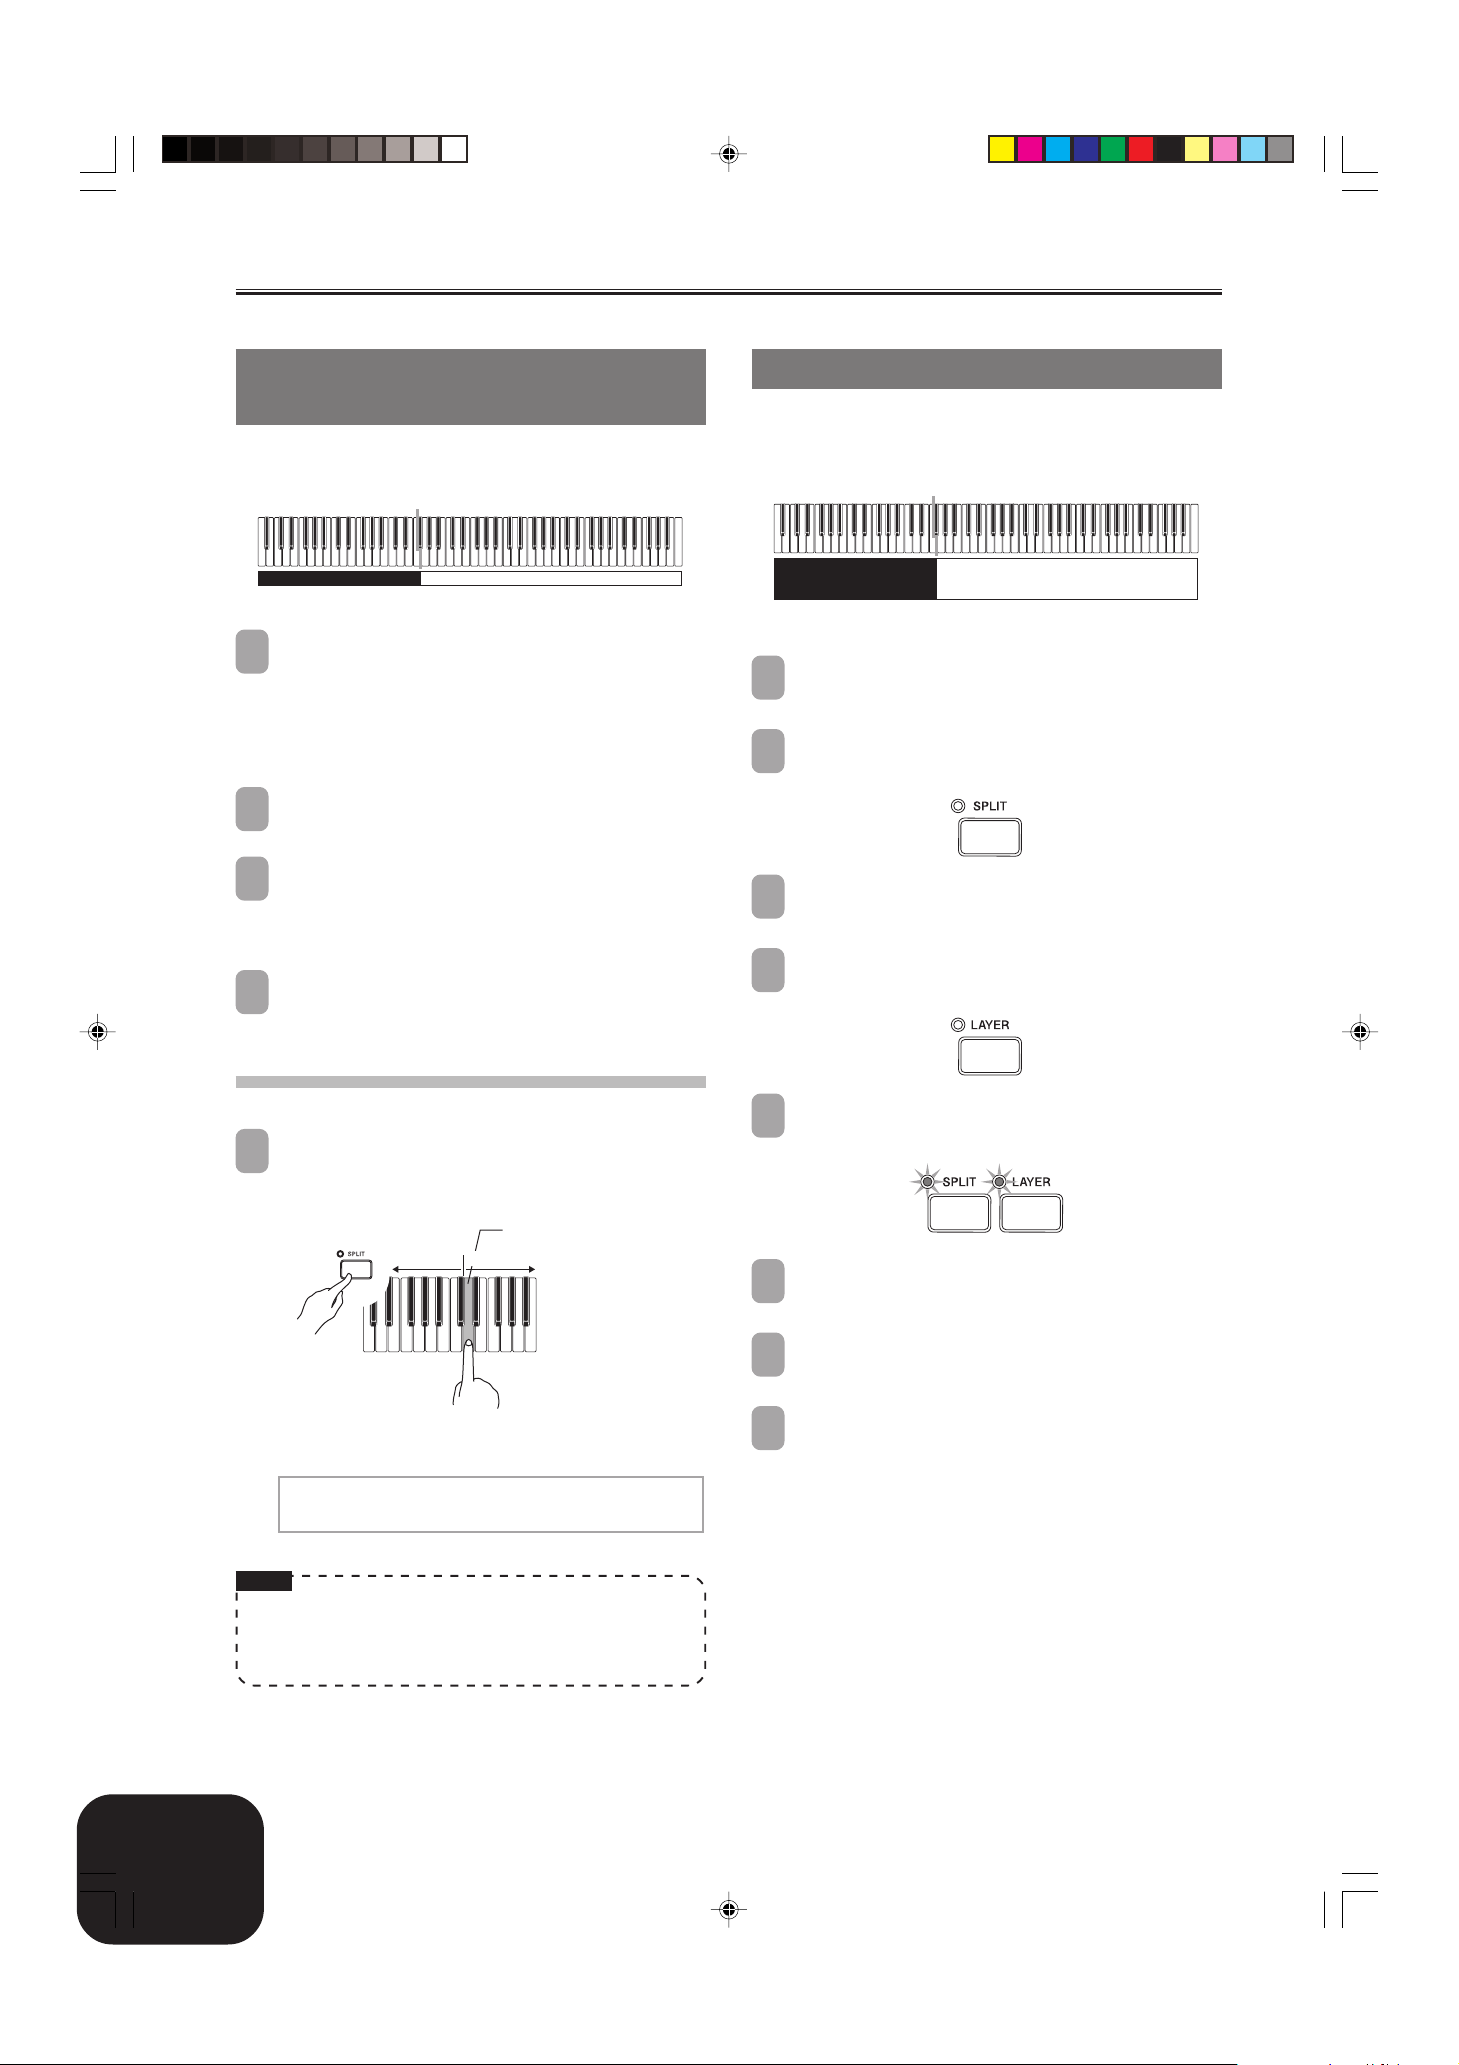
Splitting the Keyboard between
Two Tones
You can assign different tones to keys on the left side and the right
side of the keyboard.
Split Point
Strings Grand Piano
Use the procedure under “Selecting a Tone” to select
1
the tone you want to assign to the right side of the
keyboard.
Example: To select Grand Piano, press the PIANO button,
Press the SPLIT button.
2
• This causes the SPLIT indicator lamp to light.
Select the tone you want to assign to the left side of the
3
keyboard.
Example: Strings
• Now you can play using the two tones.
After you are finished using the split keyboard, press
4
the SPLIT button again to unsplit it.
• This causes the SPLIT indicator lamp to go out.
and then rotate the dial until “Grand Piano” is
displayed as the tone name.
Using Layer and Split Together
You can use the following procedure to layer two tones on the left
side of the keyboard (left main tone + left layered tone), and two
other tones on the right side (right main tone + right layered tone).
Split point
Split Tone
+
Layered Split Tone
Use the procedure under “Selecting a Tone” to select
1
the right main tone.
Use the procedure under “Splitting the Keyboard
2
between Two Tones” to select the left main tone.
Press the SPLIT button to temporarily turn off split (SPLIT
3
indicator lamp unlit).
Use the procedure under “Layering Two Tones” to select
4
the left layered tone.
Main Tone
+
Layered Tone
To specify the keyboard split point
While holding down the SPLIT button, press the
1
keyboard key where you want the left limit of the high
range (right) tone to be.
Left limit of the high range
Low range
• A note does not sound when you press a keyboard key at
this time.
High range
Sp l i t 0 P o i n t : 00000
F#30000000000000000000
NOTE
• The split point is the boundary between the Auto
Accompaniment area (pages E-11, E-12) and the melody area
of the keyboard. You can change the location of the split point,
which also changes the sizes of the keyboard areas.
Press the LAYER and SPLIT buttons as required so the
5
indicators of both buttons are lit.
Use the procedure under “Layering Two Tones” to select
6
the right layered tone.
Use the procedure under “To specify the keyboard split
7
point” to specify the split point.
Now you can play using your layered tones and split
8
keyboard.
• After you are finished using layer and split, press the
LAYER button to unlayer it and the SPLIT button to
unsplit it.
E-8
PX400R_e_01-16.p65 04.8.24, 4:34 PM8
419A-E-010B
Selecting and Using Built-in Tones
Using the Digital Piano’s Pedals
The digital piano is equipped with two pedal jacks, one for a
damper pedal and one for a soft/sostenuto pedal. You can use the
procedure below to specify the type of operation that should be
performed by the pedal connected to the PEDAL SOFT/
SOSTENUTO jack.
SP-3
Pedal Types
● Damper Pedal
Pressing the pedal connected to the DAMPER jack while playing
notes causes the notes to sustain until you release the pedal.
● Soft Pedal
While the SOFT pedal is depressed, the volume of notes played
on the keyboard is reduced slightly, producing a softer sound.
Only notes that are played after the pedal is depressed are
affected, while previously played notes are not.
● Sostenuto Pedal
Like the DAMPER pedal, pressing the SOSTENUTO pedal causes
notes to continue to sustain until you release the pedal. The
difference is the timing when the effect is applied. With the
sostenuto pedal you play the notes and then depress the pedal
before releasing the keyboard keys. Only the notes whose
keyboard keys are depressed when the sostenuto pedal is pressed
are affected.
Using the PITCH BEND Wheel
Rotating the PITCH BEND wheel causes the pitch of notes to bend.
This lets you add realistic effects to saxophone, electric guitar, and
other tones.
While playing a note on the keyboard, rotate the PITCH
1
BEND wheel on the left of the keyboard upwards or
downwards.
• Releasing the PITCH BEND wheel will cause the pitch to
return to its normal setting automatically.
Using the Metronome
Press the METRONOME button.
1
• This starts the metronome.
Rotate the dial to select the number of beats per
2
measure.
• Note that you need to select the number of beats per
measure with the dial within a few seconds after turning
on the metronome. If you don’t, the display will exit the
setting screen.
Me t r o n ome 0 B e a t : 00000
[
0]00000000000000
• You can select a value in the range of 2 through 6. With
each setting, a chime sounds as the first beat of each
measure, and the remaining beats sound as clicks.
Specifying 0 as the setting plays a straight click, without
any chime. This setting lets you practice with a steady beat.
Use the TEMPO buttons to adjust the tempo.
3
Slower Faster
Selecting the PEDAL SOFT/SOSTENUTO
jack Pedal Function
The initial power on setting of the PEDAL SOFT/SOSTENUTO
jack is for soft pedal operation. See “Other Settings” on page E-26
for information about changing to sostenuto pedal operation.
NOTE
• You can also use the dial to change the tempo setting while
the current setting is indicated by a value in brackets ([ ]) on
the display.
Example: [T:120]
• The value indicates the number of beats per minutes.
• To return the tempo to its initial default setting, press the
TEMPO and buttons at the same time.
To stop the metronome, press the METRONOME button
4
again.
419A-E-011B
PX400R_e_01-16.p65 04.8.24, 4:34 PM9
E-9
Playing a Rhythm
Playing a Rhythm
You can select from among 120 built-in rhythms. See the Rhythm
List on page A-3 for more information.
NOTE
• FOR PIANO group rhythms 10 through 19 consist of chord
accompaniments only, without any drums or other percussion
instruments. These rhythms do not sound unless CASIO
CHORD, FINGERED, or FULL RANGE CHORD is selected
as the accompaniment mode. With such rhythms, make sure
that CASIO CHORD, FINGERED, or FULL RANGE CHORD
is selected before you try playing chords.
• Note that there are two different patterns for each rhythm,
named “normal” and “variation”. Buttons are available for
selecting either the normal pattern or variation pattern.
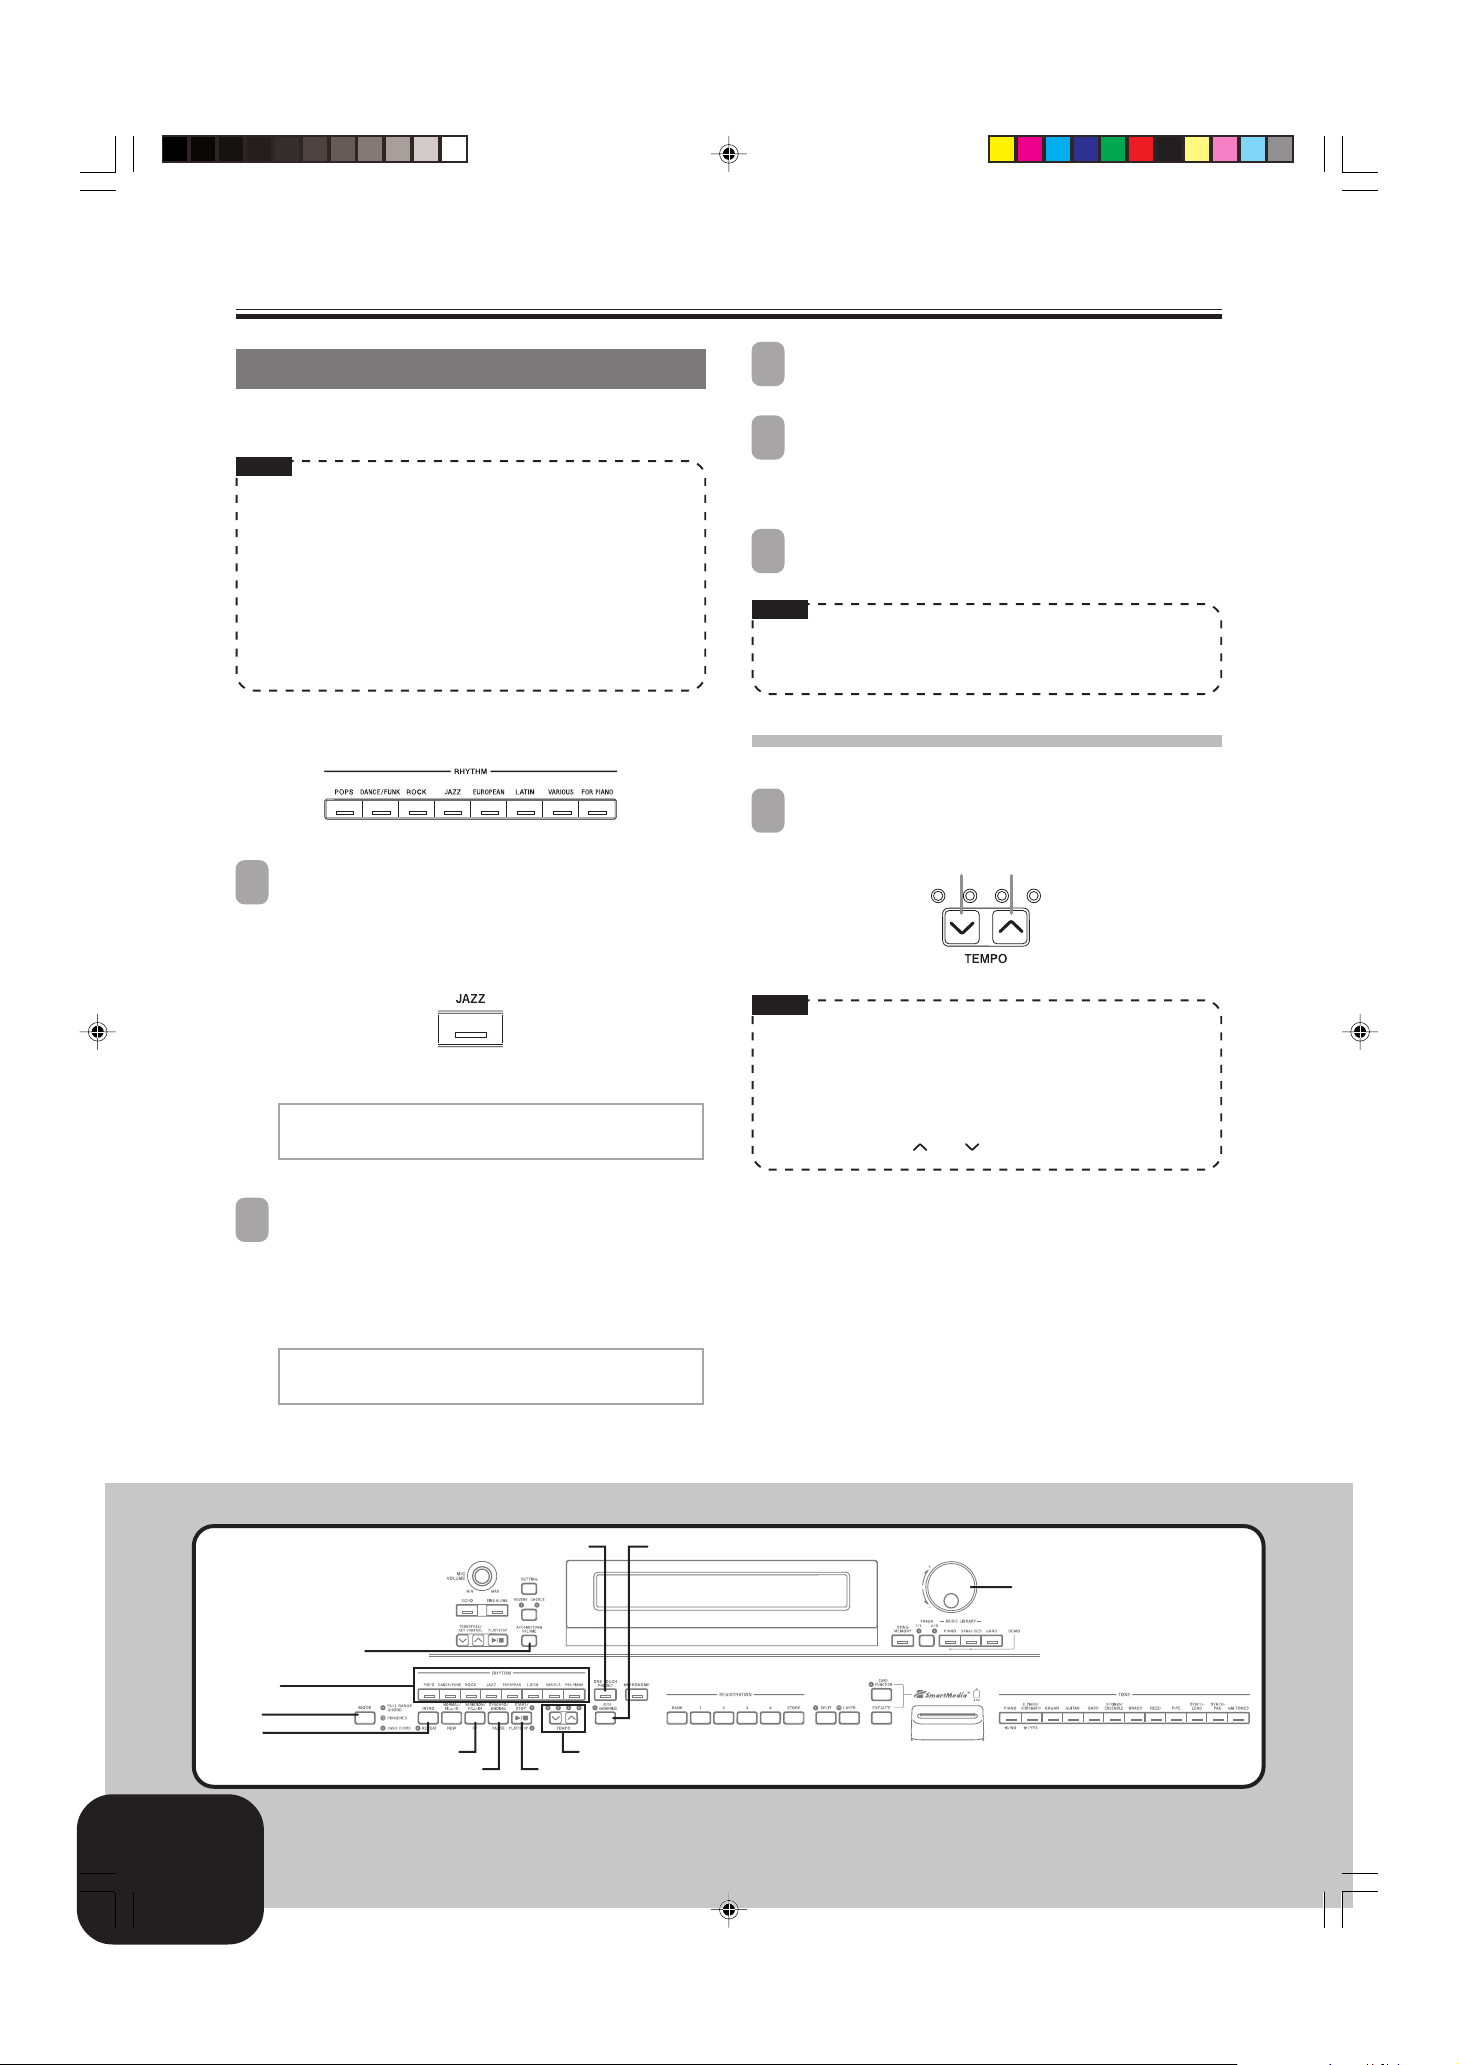
Rhythms are divided into 8 groups. You can select a group by
pressing its RHYTHM button on the digital piano control panel.
Press one of the eight RHYTHM buttons to select the
1
rhythm group you want.
• For a complete list of the rhythms available in each group,
see the Rhythm List on page A-3.
Example: JAZZ
Press the START/STOP button to start play of the selected
3
rhythm’s normal pattern.
If you want to change to the variation rhythm pattern,
4
press the VARIATION/FILL-IN button.
• To return to the normal rhythm pattern, press the
NORMAL/FILL-IN button.
To stop the rhythm, press the START/STOP button again.
5
NOTE
• You can also start rhythm play by pressing the NORMAL/
FILL-IN button (plays the normal pattern) or VARIATION/
FILL-IN button (plays the variation pattern).
To adjust the tempo of rhythm play
Use the TEMPO buttons to adjust the tempo of rhythm
1
play.
Slower Faster
• This causes the indicator lamp of the button to light.
Grand0 P i a n o 00000
[
00 : B i g0 Band0 1
Rotate the dial to select a rhythm in the current selected
2
rhythm group.
• Rotating the dial scrolls through the names of the available
rhythms on the display. Display the name of the rhythm
you want to use.
Example: Swing
]
Grand0 P i a n o 00000
[
03 : 0 S w i n
g
ONE TOUCH PRESET
]
NOTE
• You can also use the dial to change the tempo setting while
the current setting is indicated by a value in brackets ([ ]) on
the display.
Example: [T:120]
• The value indicates the number of beats per minutes.
• To return the selected rhythm to its standard tempo setting,
press the TEMPO and buttons at the same time.
AUTO HARMONIZE
Dial
ACCOMP/
SONG VOLUME
RHYTHM
MODE
INTRO
VARIATION/FILL-IN
SYNCHRO/ENDING
E-10
PX400R_e_01-16.p65 04.8.24, 4:34 PM10
TEMPO
START/STOP
419A-E-012B
Using Auto Accompaniment
With Auto Accompaniment, the digital piano automatically plays
rhythm, bass, and chord parts in accordance with chords you select
using simplified keyboard fingerings, or chords you play. Auto
Accompaniment makes it feel like you have your own private
backup group with you all the time.
Using the MODE Button
You can use the MODE button to select the accompaniment mode
you want to use. You can also use it to turn off Auto
Accompaniment. Each press of the MODE button cycles through
accompaniment modes in the sequence shown below.
Playing a Rhythm
Use a CASIO CHORD fingering to play the first chord
4
within the accompaniment keyboard range.
• See “How to Play Chords” on this page for information
about how to finger chords with the different chord modes.
• Playing a chord will cause the intro pattern for the selected
rhythm to play, followed by the Auto Accompaniment
rhythm and chord pattern.
Use CASIO CHORD fingerings to play other chords.
5
• You can insert a fill-in pattern while an Auto
Accompaniment is playing by pressing the NORMAL/
FILL-IN button. A fill-in helps to change the mood of the
Auto Accompaniment pattern.
• If you want to change to the variation rhythm pattern, press
the VARIATION/FILL-IN button. To return to the normal
rhythm pattern, press the NORMAL/FILL-IN button.
To stop Auto Accompaniment play, press the
6
SYNCHRO/ENDING button.
• This will play an ending pattern for the selected rhythm
before stopping Auto Accompaniment play.
NOTE
• You can start or stop auto accompaniment play without an
intro or ending pattern by pressing the START/STOP button
in steps 3 and 6.
NORMAL (Auto Accompaniment off)
FULL RANGE CHORD
FINGERED
CASIO CHORD
• In the NORMAL mode (no indicator lamp lit), only rhythm
accompaniment plays.
• The FULL RANGE CHORD, FINGERED, and CASIO CHORD
modes all play Auto Accompaniment patterns. See page E-11
for details about each of these different modes.
To play with Auto Accompaniment
Getting Ready
• Use the procedures under “Playing a Rhythm” to select the
rhythm you want to use and adjust the tempo.
Use the MODE button to select CASIO CHORD,
1
FINGERED, or FULL RANGE CHORD as the
accompaniment mode.
• Here we will select the CASIO CHORD mode.
• See page E-11 for information about selecting the
accompaniment mode.
How to Play Chords
The way you finger chords depends on the current chord mode.
■ NORMAL
In this mode, Auto Accompaniment is turned off, so you can play
chords as you would normally do on a piano keyboard.
■ CASIO CHORD
Even if you do not know how to play chords normally, this mode
lets you play four different types of chords using simplified
fingerings in the accompaniment area of the keyboard. The
following shows where the accompaniment area is located, and
explains how to finger chords in the CASIO CHORD mode.
CASIO CHORD Mode Keyboard
Accompaniment Area Melody Area
IMPORTANT!
• In the CASIO CHORD mode, the keys in the accompaniment
area of the keyboard operate as “chord switches” only. You
cannot use the keys in this area to play notes.
Press the SYNCHRO/ENDING button.
2
• This configures the digital piano so rhythm and chord
accompaniment will start automatically when you press
any keys within the accompaniment keyboard range.
Press the INTRO button.
3
419A-E-013B
PX400R_e_01-16.p65 04.8.24, 4:34 PM11
E-11
Playing a Rhythm
Chord Type
Major Chords
Pressing a single accompaniment
area key in the CASIO CHORD
mode will play the major chord
whose name is marked above the
key. All of the accompaniment
area keys that are marked with the
same chord name play exactly the
same chord.
Minor Chords
To play a minor chord, press the
accompaniment area key that
corresponds to the major chord,
while also pressing one other
accompaniment area key to the
right.
Seventh Chords
To play a seventh chord, press the
accompaniment area key that
corresponds to the major chord,
while also pressing two other
accompaniment area keys to the
right.
Minor Seventh Chords
To play a minor seventh chord,
press the accompaniment area key
that corresponds to the major
chord, while also pressing three
other accompaniment area keys to
the right.
Example
C (C major)
##
CCDE F
EFGAABBCCDE FE
#
Cm (C minor)
##
CCDE F
EFGAABBCCDE FE
#
C7 (C 7th)
##
CCDE F
EFGAABBCCDE FE
#
Cm7 (C minor 7th)
##
CCDE F
EFGAABBCCDE FE
#
■ FINGERED
In the FINGERED mode, you play standard chord fingerings in
the accompaniment area to play chords. To finger a C chord, for
example, you would press the C-E-G keys.
FINGERED Mode Keyboard
Accompaniment Area Melody Area
IMPORTANT!
• In the FINGERED mode, the keys in the accompaniment area of
the keyboard operate as “chord switches” only. You cannot use
the keys in this area to play notes.
CCm
1
Caug *
2
Cm7 *
Csus4
Cmaj7 *
2
Cdim
C7 *
Cm7
2
5
NOTE
• When playing a minor, seventh, or minor seventh chord, it
makes no different whether the additional keys you press
are black or white.
5 *1
C7
Cmadd9 CmM7 *
C7sus4
Cadd9
2
Cdim7 *
1
NOTE
• See the “Fingered Chord Chart” on page A-6 for information
about fingering chords with other roots in the accompaniment
area.
*1: Inverted fingerings are not supported for these chords. The
lowest note fingered is used as the root. See the
NOTE
below
for more information about inverted chords.
*2: For these chords, the same chord is specified even if the G fifth
is not fingered.
NOTE
• Except for the chords whose names have *1 after them in the
above examples, you can also use inverted fingerings for
chords. This means, for example, that you could use the
fingering E-G-C or G-C-E instead of C-E-G for C major.
• Except for the chords whose names have *2 after them in the
above examples, you need to press all of the indicated keys
in order to finger a chord. Failure to include even a single
note may produce a chord that is different from the one you
want.
E-12
PX400R_e_01-16.p65 04.8.24, 4:34 PM12
419A-E-014A
Playing a Rhythm
■ FULL RANGE CHORD
The FULL RANGE CHORD mode lets you play a total of 38
different types of chords (the same chords available in the
FINGERED mode plus 23 more). FULL RANGE CHORD
recognizes the pressing of three or more keyboard keys anywhere
on the keyboard as a chord fingering. Anything else (pressing one
or two keys, or playing any group of notes that does not form a
chord fingering that is recognized by the keyboard) is treated as
melody notes.
FULL RANGE CHORD Mode Keyboard
Accompaniment and Melody
Recognized Chords
Pattern Type
FINGERED
Standard Fingerings
Example: To play the chord C major and .
E
NOTE
• When there are at least six semitones between the lowest note
and the next note to the right, the lowest note is assumed to
be the bass note.
• Note that the digital piano’ s built-in tunes (Piano Group
tunes and Song Group Tunes) use rhythms, accompaniments,
and effects that are not available with Auto Accompaniment.
Because of this, you may not be able to perform a piece exactly
like a built-in tune when using Auto Accompaniment.
Number of Chord Variations
The 15 chord patterns shown under
“FINGERED” on page E-12.
23 standard chord fingerings. The
following are examples of the 23 chords
available with C as the bass note.
C6 • Cm6 • C69
DCECFCGC A
D
••••• •
C
BCDmCDmCFmCGmCAmCBm
••••••
DdimCA
1
EG C
G C
2
7
•••• •
Fm7CGm7C A
CF7C
C
E
B
C
C
add9
C
1 ….. Chord C
2 ….. Chord C
C
C
E
Adjusting the Volume of Accompaniment,
Tune, and Memory Card Playback
Use the procedures below to adjust the volume of the
accompaniment, built-in tune playback, and memory card tune
playback. These settings are independent of the volume setting
for the notes you play on the keyboard. You can specify volume
levels in the range of 000 (minimum) to 127 (maximum).
Press the ACCOMP/SONG VOLUME button.
1
If the RHYTHM button indicator lamp is lit
Accomp 0 Vo l ume :
[
127]00000000000000000
If the PIANO, SONG/USER, or CARD button indicator lamp
is lit
Song 0 Vo l ume :
[
127]00000000000000000
Use the dial to adjust the volume level.
2
Using Auto Harmonize
When you turn on Auto Harmonize in the FINGERED or CASIO
CHORD accompaniment mode, the keyboard automatically adds
one of the notes that make up the current chord to each melody
note you play. This adds more depth to your melody line.
To play with Auto Harmonize
Use the MODE button to select the CASIO CHORD or
1
FINGERED mode. This turns on Auto Accompaniment.
Press the AUTO HARMONIZE button.
2
• This causes the AUTO HARMONIZE indicator lamp to
light, indicating that Auto Harmonize is turned on.
Use the dial to select the Auto Harmonize type you
3
want to use.
• Note that you need to select the Auto Harmonize type with
the dial within a few seconds after turning on the Auto
Harmonize. If you don’t, the display will exit the setting
screen.
• See “Auto Harmonize Types” on page E-14 for more
information about Auto Harmonize types.
419A-E-015B
PX400R_e_01-16.p65 04.8.24, 4:34 PM13
A u t o 0 Ha rmon i ze 0 Typ e:
[
D u e t 1]000000000000000
Start Auto Accompaniment play, and play something
4
in the melody area of the keyboard.
• Harmonize notes are added automatically to the melody
notes you play.
To turn off Auto Harmonize, press the AUTO
5
HARMONIZE button again.
• This causes the AUTO HARMONIZE indicator lamp to
go out.
E-13
Loading…
Casio Privia PX400R Keyboard Specification
The Casio Privia PX400R is a digital keyboard designed to cater to both novice and intermediate musicians, offering a blend of advanced features and user-friendly functionality. It features an 88-key, scaled hammer-action keyboard that mimics the touch and feel of an acoustic piano, providing a realistic playing experience. The keyboard includes a wide array of 128-note polyphony, allowing for complex musical compositions without note dropouts. The PX400R is equipped with over 600 built-in tones, offering a diverse range of sounds from grand pianos to strings and synthesizers. Additionally, it includes 120 built-in rhythms, providing varied accompaniment styles to enhance practice and performance.
The keyboard also features an integrated recording function, enabling users to capture and playback their performances with ease. Its MIDI compatibility allows it to be used seamlessly with other MIDI devices and music software, making it a versatile tool for both learning and composition. The PX400R includes a backlit LCD display for easy navigation through its numerous settings and functions, ensuring an intuitive user interface. The dual and split keyboard modes offer flexibility, enabling different sounds to be played simultaneously or separately, enhancing creativity and versatility in performance.
Built-in speakers deliver high-quality sound, while headphone and line outputs facilitate private practice and external amplification. The Casio Privia PX400R is lightweight and portable, making it suitable for both home and stage use. Its robust feature set, combined with Casio’s renowned quality, makes the PX400R a valuable instrument for musicians seeking a comprehensive digital piano experience.
Casio Privia PX400R Keyboard F.A.Q.
To perform a factory reset, turn off the keyboard, then hold down the ‘Function’ button while turning it back on. This will reset the keyboard to its original factory settings.
Use a USB-MIDI interface to connect the MIDI OUT port of the PX400R to the USB port of your computer. Ensure your recording software recognizes the keyboard as a MIDI device.
First, check if the volume is turned up and the keyboard is not in ‘Mute’ mode. If the issue persists, try restarting the keyboard. If certain keys still do not work, it may require professional servicing.
Press the ‘Function’ button, then use the keys labeled ‘Touch Sensitivity’ to cycle through the available sensitivity settings until you find the one that suits your playing style.
Yes, you can layer sounds by pressing the ‘Layer’ button. Select the first tone, then press ‘Layer’ again and choose the second tone. Both tones will play simultaneously.
To transpose the keyboard, press the ‘Function’ button and use the ‘Transpose’ keys to raise or lower the pitch in semitone steps.
Regularly dust the keyboard with a soft, dry cloth. Avoid using harsh chemicals or water. Keep the keyboard in a climate-controlled environment to prevent damage from humidity and temperature extremes.
Use the ‘Memory’ button to save your current settings. Hold it down until the display confirms the settings are saved. You can recall these settings by pressing the corresponding memory button later.
Check to ensure the power adapter is correctly plugged in and the outlet is working. If using batteries, make sure they are inserted correctly and have sufficient charge. If the problem continues, consult a technician.
Press the ‘Metronome’ button to start it. Adjust the tempo by using the ‘Tempo’ buttons and set the desired time signature using the ‘Beat’ buttons.
-
Страница 1
PX400R-ES-1 ES USER’S GUIDE GUÍA DEL USUARIO Please keep all information for future reference. Guarde toda información para tener como referencia futura. S afety Precautions Before trying to use the digital piano, be sure to read the separate “ Safety Precautions ” . Precauciones de seguridad Antes de intentar usar el piano digital, aseg ú[…]
-
Страница 2
CASIO Europe GmbH Bornbarch 10, 22848 Norderstedt, Germany Important! Please note the following important information before using this pr oduct. • Before using the AD-12 Adaptor to power the unit, be sure to check the AC Adaptor for any damage first. Car efully check the power cord for br eakage, cuts, exposed wire and other serious damage. Neve[…]
-
Страница 3
E-1 Contents Company and product names used in this manual may be register ed trademarks of others. 419A-E-003A General Guide …………………………………… E-2 Attachment of the Score Stand ………………………………. E-2 Power Supply …………………………………… E-4 Using the AC Adaptor ……………………[…]
-
Страница 4
E-2 General Guide Back Panel * Attachment of the Score Stand Insert the score stand into the slot at the top of the digital piano as shown in the illustration. Left Side Panel 419A-E-004A b g D 9 j J T V W X Y [ _ a L M K R S U Z N O P Q h 0 C AB i E F G H I f e d c ] * 2 13 5 6 7 8 4 PX400R_e_01-16.p65 04.8.24, 4:34 PM 2[…]
-
Страница 5
E-3 General Guide 419A-E-005B 1 ECHO button 2 MIC VOLUME knob 3 SING ALONG button 4 TRANSPOSE/KEY CONTROL buttons 5 <PLA Y/STOP> button 6 SETTING button 7 REVERB CHORUS button 8 ACCOMP/SONG VOLUME button 9 Display screen 0 PITCH BEND wheel A CHORD root name B Percussion instrument list C MAIN VOLUME knob D Dial E SONG MEMORY button F TRACK 1/[…]
-
Страница 6
E-4 Power Supply Y ou can power this digital piano by plugging it into a standard household power outlet. Be sure you turn off power and unplug the power cor d from the electrical outlet whenever the digital piano is not in use. Using the AC Adaptor Make sure that you use only the AC adaptor specified for this digital piano. Specified AC Adaptor: A[…]
-
Страница 7
E-5 Connections 419A-E-007B IMPORT ANT! • Whenever connecting external equipment, first set the MAIN VOLUME knob of the digital piano and the volume controller of the external equipment to relatively low volume settings. Y ou can later adjust volume to the level you want after connections are complete. Connecting Headphones Connect commercially a[…]
-
Страница 8
E-6 Selecting and Using Built-in T ones T one T ype Y our digital piano has the following types of tones built in. Panel T ones 120 GM T ones 128 Drum Sets 10 • See the T one List on page A-1 for more information. Selecting a T one Panel tones are divided into 12 gr oups. Y ou can select a group by pressing its TONE button on the digital piano co[…]
-
Страница 9
E-7 Using T one Effects Reverb: Makes your notes resonate Chorus: Adds more breadth to your notes 1 Press the REVERB CHORUS button to cycle through the effect settings as shown below . • Y ou can find out the current effect setting by looking at the REVERB and CHORUS indicator lamps. 2 After turning on the effect you want, use the dial to select […]
-
Страница 10
E-8 Selecting and Using Built-in T ones 419A-E-010B Using Layer and Split T ogether Y ou can use the following procedure to layer two tones on the left side of the keyboard (left main tone + left layer ed tone), and two other tones on the right side (right main tone + right layered tone). 1 Use the procedure under “Selecting a T one” to select […]
-
Страница 11
E-9 Selecting and Using Built-in T ones 419A-E-01 1B Using the PITCH BEND Wheel Rotating the PITCH BEND wheel causes the pitch of notes to bend. This lets you add realistic ef fects to saxophone, electric guitar, and other tones. 1 While playing a note on the keyboard, rotate the PITCH BEND wheel on the left of the keyboard upwards or downwards. ?[…]
-
Страница 12
E-10 Playing a Rhythm 419A-E-012B A UT O HARMONIZE Dial ONE T OUCH PRESET TEMPO ST ART/ST OP SYNCHRO/ENDING V ARIA TION/FILL-IN MODE INTRO RHYTHM ACCOMP/ SONG V OLUME Playing a Rhythm Y ou can select from among 120 built-in rhythms. See the Rhythm List on page A-3 for more information. NOTE • FOR PIANO group r hythms 10 through 19 consist of chor[…]
-
Страница 13
E-11 Playing a Rhythm 419A-E-013B Using Auto Accompaniment W ith Auto Accompaniment, the digital piano automatically plays rhythm, bass, and chor d parts in accordance with chor ds you select using simplified keyboard fingerings, or chor ds you play . Auto Accompaniment makes it feel like you have your own private backup group with you all the time[…]
-
Страница 14
E-12 Playing a Rhythm 419A-E-014A Chord T ype Major Chords Pressing a single accompaniment area key in the CASIO CHORD mode will play the major chord whose name is marked above the key . All of the accompaniment area keys that ar e marked with the same chor d name play exactly the same chord. Minor Chords T o play a minor chord, press the accompani[…]
-
Страница 15
E-13 Playing a Rhythm 419A-E-015B ■ FULL RANGE CHORD The FULL RANGE CHORD mode lets you play a total of 38 differ ent types of chords (the same chords available in the FINGERED mode plus 23 more). FULL RANGE CHORD recognizes the pr essing of three or more keyboar d keys anywhere on the keyboard as a chor d fingering. Anything else (pressing one o[…]
-
Страница 16
E-14 Playing a Rhythm 419A-E-016A NOTE • Auto Harmonize is available in the FINGERED and CASIO CHORD accompaniment modes only . • Auto Harmonize is disabled and cannot be used while playing back a tune from the Music Library or a memory car d. Auto Harmonize T ypes Auto Harmonize lets you select from among the following 12 Auto Harmonize types.[…]
-
Страница 17
E-15 Using Registration Memory What is registration memory? Registration memory lets you save up to 16 (4 areas × 4 banks) digital piano setups (tone, rhythm, tempo, etc.) for instant r ecall whenever you need them. Registration Memory Setup Data The following are the settings that can be saved for each r egistration memory setup. • T one • Rh[…]
-
Страница 18
E-16 T o store a setup in registration memory 1 On the digital piano, configure the tone, rhythm, and other settings you want to save as your setup. • See “ Registration Memory Setup Data ” (page E-15) for more information. 2 Use the BANK button to select the registration memory bank where you want to save the setup. • This causes the numbe[…]
-
Страница 19
E-17 Playing Back Built-in T unes Dial CARD TEMPO TRACK 1/L TRACK 2/R P AUSE FF REW PLA Y/STOP REPEA T SONG/USER PIANO TO N E 419A-E-019B Y our digital piano comes with a total of 80 tunes built in. Y ou can play back built-in tunes for your own listening pleasure, or you can use them for practice and even sing-along. Built-in tunes are divided bet[…]
-
Страница 20
E-18 419A-E-020B NOTE • Y ou can also use the dial to change the tempo setting while the current setting is indicated by a value in brackets ([ ]) on the display . Example : [T :120] • The value indicates the number of beats per minutes. • T o return the tempo to its initial default setting, press the TEMPO and buttons at the same time. • A[…]
-
Страница 21
E-19 Playing Back Built-in T unes 419A-E-021B Playing All of the Built-in T unes Y ou can use the following procedure to play thr ough all of the digital piano ’ s 80 built-in tunes in tune number sequence. 1 Press the PIANO button and SONG/USER button at the same time. • This starts playback of the built-in tunes in tune number sequence, start[…]
-
Страница 22
E-20 Using a Microphone for Sing Along 419A-E-022B Y ou can connect a microphone to the digital piano to sing along with built-in tunes, or with playback of SMF data from a memory card. Using the Microphone Jack Y ou can connect a commercially available microphone to the digital piano ’ s microphone jack. Befor e connecting a microphone, set the […]
-
Страница 23
E-21 419A-E-023A Using a Microphone for Sing Along 5 Press the <PLA Y/STOP> button to start playback. • If the song you selected includes lyric data, the lyrics appear on the digital piano ’ s display . • Use the microphone to sing along with the playback. • When you pressing the SING ALONG button and enter the Sing Along mode, the di[…]
-
Страница 24
E-22 Recording Y our Keyboard Play 419A-E-024A Y ou can record your practice sessions while playing along with a Song Memory tune (Song Recording), or you can r ecord your keyboard play along with the Auto Accompaniment you ar e using (Free Recor ding). Recordable Data, Parts, and T racks The type of data that is recor ded into Song Memory depends […]
-
Страница 25
E-23 Recording Y our Keyboard Play 419A-E-025B Recording Y our Practice (Song Recording) Y ou can use the procedure below to r ecord your play during practice with one of the digital piano ’ s built-in tunes. Y ou can specify which parts you want to practice, and the keyboard plays the remaining parts as accompaniment. Getting Ready • Press the[…]
-
Страница 26
E-24 Recording Y our Keyboard Play Free Recording T rack 1 Data In addition to notes played on the keyboard and chor d accompaniments, the following data is also stored in T rack 1 during performance recor ding. • T one number • Rhythm number • Rhythm controller operations • Pedal operations • Layer and split settings • Split point • […]
-
Страница 27
E-25 Deleting a Specific Part/T rack Y ou can use the following procedure to delete a specific part/track from a song r ecording or free r ecording. Getting Ready <When deleting a song recor ding part> • Press the SONG/USER button or PIANO button. <When deleting a free r ecording part> • Press the RHYTHM button. 1 Press the SONG MEM[…]
-
Страница 28
E-26 Other Settings Use the procedur e provided below to change the following settings. Keyboard T ouch This setting changes the relative touch of the keyboar d keys. off : Off Light : W eak (Strong sound is produced even when relatively light pr essure is applied.) Normal : Normal Heavy : Strong (Normal sound is produced even when relatively str o[…]
-
Страница 29
E-27 Other Settings Using MIDI What is MIDI? MIDI is a standard for digital signals and connectors that allows musical instruments, computers, and other devices, r egardless of manufacturer , to exchange data with each other . MIDI Connections Connecting your computer or other external MIDI device to the digital piano ’ s MIDI IN/OUT terminals ma[…]
-
Страница 30
E-28 Other Settings Expanding the Number of Built-in T unes Y ou can transfer song data for up to 10 tunes (approximately 132 kilobytes) to digital piano memory and store it as Song Gr oup tunes number 30 through 39. Y ou can obtain a copy of the special CASIO conversion software by downloading it at the W eb page shown below . After downloading, i[…]
-
Страница 31
E-29 Using a Memory Card The digital piano has a card slot that accepts SmartMedia TM memory cards. This pr ovides you with the means to store virtually unlimited amounts of user song and other data from digital piano memory . SmartMedia memory cards ar e available in capacities ranging from 8MB up to 128MB. The cost of a card varies according to i[…]
-
Страница 32
E-30 Using a Memory Card 419A-E-032A Loading a Memory Card into the Card Slot W ith the label side of the memory card facing downwards, car efully insert it into the card slot. Car efully slide the memory card straight into the slot, as far as it will go. NOTE • When inserting a SmartMedia card into the car d slot, make sur e you carefully orient[…]
-
Страница 33
E-31 Using a Memory Card 419A-E-033A Loading a File from a Memory Use the procedur e below to load data from a memory card into the digital piano memory . IMPORT ANT! • Before you can use a SmartMedia car d with this digital piano, you need to perform the procedure below to format it. After formatting the card, transfer SMF data from your compute[…]
-
Страница 34
E-32 Using a Memory Card 419A-E-034A Renaming a Memory Card File Y ou can use the procedure below to change the name of a file that you previously saved to a memory car d. Getting Ready • Insert the memory card that contains the file you want to rename into the card slot. Make sur e that the sticker is removed from the card ’ s write pr otect a[…]
-
Страница 35
E-33 419A-E-035B Formatting a Memory Card Use the procedure below to format a memory car d. IMPORT ANT! • Note that formatting a memory card that already contains data causes all of that data to be deleted. Data deleted by the format operation cannot be recover ed. Before performing the procedur e below , check to make sure that the memory card d[…]
-
Страница 36
E-34 419A-E-036A Using a Memory Card Display Message Err Card R/W Err CardFull Err No Card Err FileName Err ReadOnly Err Format Err Mem Full Err Not SMF0 Err No File Err Protect Err WrongDat Err SizeOver Cause There is something wr ong with the memory card. The memory card is full. 1. The memory card is not set correctly in the card slot. 2. There […]
-
Страница 37
E-35 419A-E-037B T roubleshooting Problem No sound is produced when I pr ess a digital piano key . The pitch of the digital piano is off. Demo play seems to start, but I can ’ t hear anything. Digital piano memory contents seem to disappear . When I play something on the digital piano, my connected external MIDI sound source does not sound. Auto […]
-
Страница 38
E-36 Troubleshooting 419A-E-038A I can ’ t store data on a memory car d. I can ’ t load data from a memory car d. 1. The card is write-protected. 2. The card is not inserted corr ectly into the card slot. 3. There is not enough room available on the card. 4. The card has voltage specifications or a capacity that is not supported by this digital[…]
-
Страница 39
E-37 419A-E-039B Specifications Model: PX-400R Keyboard: 88 piano keys (with t ouch response) Polyphony: 32 notes, maximum T ones: 120 panel tones + 128 GM tones + 10 dr um sets; with layer and split Digital Effects: Reverb (4 types), Chorus (4 types) Metronome: • T ime Signatures: 0, 2, 3, 4, 5, 6 • T empo Range: 20 to 255 Auto Accompaniment: […]
-
Страница 40
A-1 419A-E-079A Appendix/Ap é ndice T one List/Lista de sonidos 1 1 1 1 1 T one Group Name/Nombre de grupo de sonido 2 2 2 2 2 No./N º 3 3 3 3 3 T one Name/Nombre de sonidos 4 4 4 4 4 Program Change/Cambio de programa PIANO 000 STEREO PIANO 0 2 16 001 GRAND PIANO 0 1 32 002 MELLOW PIANO 0 3 16 003 ROCK PIANO 1 2 16 004 DANCE PIANO 1 1 16 005 HONK[…]
-
Страница 41
A-2 Appendix/Ap é ndice 419A-E-080A GM TONES 006 GM HARPSICHORD 6 0 32 007 GM CLA VI 7 0 32 008 GM CELEST A 8 0 32 009 GM GLOCKENSPIEL 9 0 32 010 GM MUSIC BOX 10 0 1 6 01 1 GM VIBRAPHONE 1 1 0 32 012 GM MARIMBA 12 0 32 013 GM XYLOPHONE 13 0 3 2 014 GM TUBULAR BELL 14 0 3 2 015 GM DULCIMER 15 0 16 016 GM ORGAN 1 16 0 16 017 GM ORGAN 2 17 0 16 018 G[…]
-
Страница 42
A-3 Appendix/Ap é ndice Rhythm List/Lista de ritmos 1 1 1 1 1 Rhythm Group Name/Nombre de grupo de ritmo 2 2 2 2 2 No./N º 3 3 3 3 3 Rhythm Name/Nombre de ritmo NOTE • FOR PIANO group r hythms 10 through 19 consist of chord accompaniments only , without any drums or other percussion instruments. These rhythms do not sound unless CASIO CHORD, FI[…]
-
Страница 43
A-4 Appendix/Ap é ndice Song List/Lista de canciones No./N º 00 01 02 03 04 05 06 07 08 09 10 11 12 13 14 15 16 17 18 19 20 21 22 23 24 25 26 27 28 29 30 31 32 33 34 35 36 37 38 39 40 41 42 43 44 45 46 47 48 49 Song name/Nombre de canciones Winter Games Someday My Prince Will Come Hills Frosted Glass Hot Feel Let It Be Over The Rainbow The Entert[…]
-
Страница 44
A-5 Appendix/Ap é ndice Drum Assignment List/Lista de sonidos de bater í a ST ANDARD SET 1 Ke y/Note Number ST ANDARD SET 2 ROOM SET POWER SET ELECTRONIC SET SYNTH SET 1 SYNTH SET 2 JAZZ SET BR USH SET ORCHESTRA SET E1 F1 G1 A1 B1 C2 D2 E2 F2 G2 A2 B2 C3 D3 E3 F3 G3 A3 B3 C4 D4 E4 F4 G4 A4 B4 C5 D5 E5 F5 G5 A5 B5 C6 D6 E6 28 29 31 33 35 36 38 40 […]
-
Страница 45
A-6 Appendix/Ap é ndice Fingered Chord Chart/Cuadro de acordes digitados (Fingered) dim m7 5 M7 M m 7 m7 dim7 Chord Type Root C D E F G A B C /(D ) (D )/E F /(G ) (G )/A (A )/B aug sus4 C D E F G A B C /(D ) (D )/E F /(G ) (G )/A (A )/B m add9 7sus4 mM7 7 5 add[…]
-
Страница 46
A-7 419A-E-085B Operational Precautions Locating the Unit A void the following locations. • Areas exposed to dir ect sunlight and high humidity • Areas subjected to very low temperatur es • Near a radio, TV , video deck, or tuner (unit can cause interference with audio or video signals) Care of the Unit • Never use benzene, alcohol, thinner[…]
-
Страница 47
[…]
-
Страница 48
Model PX-400R MIDI Implementation Chart Version: 1.0 419A-E-087A Mode 1 : OMNI ON, POLY Mode 2 : OMNI ON, MONO O : Yes Mode 3 : OMNI OFF, POLY Mode 4 : OMNI OFF, MONO X : No Function … Transmitted Recognized Remarks Basic Default Channel Changed Default Mode Messages Altered Note Number True voice Velocity Note ON Note OFF After Key ’ s Touch C[…]
-
Страница 49
This recycle mark indicates that the packaging conforms to the environmental protection legislation in Germany. Esta marca de reciclaje indica que el empaquetado se ajusta a la legislaci ó n de protecci ó n ambiental en Alemania. MA0408-B Printed in China PX400R-ES-1 P CASIO COMPUTER CO.,LTD. 6-2, Hon-machi 1-chome Shibuya-ku, Tokyo 151-8543, Jap[…]
Document Download |
‹
›
Casio PX-400R Manual Online:
4.5,
1661
votes
Casio PX-400R User Manual
Casio PX-400R User Guide
Casio PX-400R Online Manual
Text of Casio PX-400R User Guide:
More Instructions:
|
Casio PX-400R Safety precautions
|
DOWNLOAD |
Related Products and Documents (Musical Instrument):
-
Casio LK-220 Musical Instrument Operation & user’s manual
LK-220
casio/lk-220.pdf, 45 -
Casio CTK-691 Musical Instrument Midi implementation manual
CTK-691
casio/ctk-691.pdf, 78 -
Casio LK-50 Musical Instrument Song bank manual
LK-50
casio/lk-50.pdf, 2 -
Casio WK-500 Musical Instrument Operation & user’s manual
WK-500
casio/wk-500.pdf, 80 -
Casio CTK-480 Musical Instrument Operation manual
CTK-480
casio/ctk-480.pdf, 18 -
Casio SK-1 Musical Instrument Operation manual
SK-1
casio/sk-1.pdf, 29 -
Casio LK230ES1A Musical Instrument Operation & user’s manual
LK230ES1A
casio/lk230es1a.pdf, 47 -
Casio CT636 Musical Instrument Operation manual
CT636
casio/ct636.pdf, 10
Comparable Devices:
| # | Manufacturer | Model | Document Type | File | Updated | Pages | Size |
|---|---|---|---|---|---|---|---|
| 1 | Milwaukee | 6514 Series | Operator’s manual | milwaukee/6514-series-UJ4.pdf | 19 Aug 2023 | 28 | |
| 2 | Miller Electric | DB1712RDI25 | Owner’s manual | miller-electric/db1712rdi25-937.pdf | 12 Apr 2025 | 24 | |
| 3 | McCulloch | MT202A13 | Service spare parts list | mcculloch/mt202a13-TM3.pdf | 12 Aug 2024 | 1 | |
| 4 | BMW | E36 | Electrical troubleshooting manual | bmw/e36-3Y5.pdf | 14 May 2025 | 386 | |
| 5 | Denon | S81 | Operating instructions manual | denon/s81-HBE.pdf | 12 May 2024 | 36 | 1.28 Mb |
| 6 | AEG | LAVATHERM 37700 | Operating instructions manual | aeg/lavatherm-37700-758.pdf | 17 Aug 2024 | 36 | 0.37 Mb |
Similar Resources:
Musical Instrument Instructions:
-
InFocus Projector in32 in34
InFocus Projector in32 in34 Brochure & specs
in32 in34, 4
-
Wouxun Two-Way Radio kg-689e
Two-Way Radio PDF Operation & user’s manual
kg-689e, 35
-
Invacare Wheelchair Storm Series
Invacare Storm Series User Manual (Doc Type: Wheelchair Parts catalog)
Storm Series, 197
-
Kenwood CD Player CD-2280M
Kenwood Product User Guide: CD-2280M PDF Instruction manual — 2M56V2
CD-2280M, 32
-
Renault Automobile Laguna
Renault Laguna Automobile Wiring diagrams
Laguna, 17
-
First Alert Carbon Monoxide Alarm FCD4
Carbon Monoxide Alarm #33I96Q
FCD4, 24
-
LG Cell Phone C1300 C1300 C1300
Cell Phone Specifications (LG C1300 C1300 C1300)
C1300 C1300 C1300, 2
-
Zephyr Sleep Technologies Medical Equipment MATRx plus
Healthcare provider manual for Zephyr Sleep Technologies MATRx plus Medical Equipment
MATRx plus, 84
-
Hand Held Products Barcode Reader QUICK CHECK 890
Hand Held Products Barcode Reader Operation & user’s manual (File: hand-held-products-quick-check-890-operation-user-s-manual-40, 17th Oct 2024)
QUICK CHECK 890, 40
-
Flycolor Drone & Quadcopter Accessories X-Cross BL-32 4in1 40A
Flycolor X-Cross BL-32 4in1 40A User Manual (Operation & user’s manual), @XYAJ3S
X-Cross BL-32 4in1 40A, 2
-
ION DJ Equipment Holiday Party Smart
ION Holiday Party Smart User Manual (Doc Type: DJ Equipment Quick start manual)
Holiday Party Smart, 20
-
Philips MP3 Player SA2VBE04RC
#59IVJ7 SA2VBE04RC: Philips MP3 Player Owner Documentation
SA2VBE04RC, 3