
USER’S GUIDE
Please keep all information for future reference.
Safety Precautions
Before trying to use the keyboard, be sure to read the
separate “Safety Precautions”.
GUÍA DEL USUARIO
Guarde toda información para tener como referencia futura.
Precauciones de seguridad
Antes de intentar usar el teclado, asegúrese de leer
las “Precauciones de seguridad” separadas.
ES
EnglishEspañol
CTK2000/3000ES1B
NOTICE
This equipment has been tested and found to comply with the limits for a Class B digital device, pursuant to Part 15 of the
FCC Rules. These limits are designed to provide reasonable protection against harmful interference in a residential
installation. This equipment generates, uses and can radiate radio frequency energy and, if not installed and used in
accordance with the instructions, may cause harmful interference to radio communications. However, there is no guarantee
that interference will not occur in a particular installation. If this equipment does cause harmful interference to radio or
television reception, which can be determined by turning the equipment off and on, the user is encouraged to try to correct
the interference by one or more of the following measures:
• Reorient or relocate the receiving antenna.
• Increase the separation between the equipment and receiver.
• Connect the equipment into an outlet on a circuit different from that to which the receiver is connected.
• Consult the dealer or an experienced radio/TV technician for help.
FCC WARNING
Changes or modifications not expressly approved by the party responsible for compliance could void the userís authority to
operate the equipment.
Declaration of Conformity
Model Number: CTK-2000/CTK-3000
Trade Name: CASIO COMPUTER CO., LTD.
Responsible party: CASIO AMERICA, INC.
Address: 570 MT. PLEASANT AVENUE, DOVER, NEW JERSEY 07801
Telephone number: 973-361-5400
This device complies with Part 15 of the FCC Rules, Operation is subject to the following two conditions:
(1) This device may not cause harmful interference, and (2) this device must accept any interference received, including
interference that may cause undesired operation.
Important!
Please note the following important information before using this product.
• Before using the optional AD-5 Adaptor to power the unit, be sure to check the AC Adaptor for any damage first. Carefully check
the power cord for breakage, cuts, exposed wire and other serious damage. Never let children use an AC adaptor that is
seriously damaged.
• Never attempt to recharge batteries.
• Do not use rechargeable batteries.
• Never mix old batteries with new ones.
• Use recommended batteries or equivalent types.
• Always make sure that positive (+) and negative (–) poles are facing correctly as indicated near the battery compartment.
• Replace batteries as soon as possible after any sign they are getting weak.
• Do not short-circuit the battery terminals.
• The product is not intended for children under 3 years.
• Use only CASIO AD-5 adaptor.
• The AC adaptor is not a toy.
• Be sure to disconnect the AC adaptor before cleaning the product.
Manufacturer:
This mark applies in EU countries only.
CASIO COMPUTER CO.,LTD.
6-2, Hon-machi 1-chome, Shibuya-ku, Tokyo 151-8543, Japan
Responsible within the European Union:
CASIO EUROPE GmbH
Bornbarch 10, 22848 Norderstedt, Germany
● Company and product names used in this manual may be registered trademarks of others.
● Any reproduction of the contents of this manual, either in part or its entirety, is prohibited. Except for your own,
personal use, any other use of the contents of this manual without the consent of CASIO is prohibited under
copyright laws.
● IN NO EVENT SHALL CASIO BE LIABLE FOR ANY DAMAGES WHATSOEVER (INCLUDING, WITHOUT
LIMITATION, DAMAGES FOR LOSS OF PROFITS, BUSINESS INTERRUPTION, LOSS OF
INFORMATION) ARISING OUT OF THE USE OF OR INABILITY TO USE THIS MANUAL OR PRODUCT,
EVEN IF CASIO HAS BEEN ADVISED OF THE POSSIBILITY OF SUCH DAMAGES.
● The contents of this manual are subject to change without notice.
Contents
General Guide ……………………….. E-2
Using the 10-key Pad (bn) ………………………………. E-4
Using the Setting Button (
)…………………………… E-4
3
Getting Ready to Play ……………. E-5
Preparing the Music Stand ………………………………. E-5
Power Supply ………………………………………………… E-5
Playing the Digital Keyboard….. E-6
Turning on Power and Playing …………………………. E-6
Using Headphones…………………………………………. E-6
Changing Keyboard Response to
Touch Pressure (Touch Response)
(CTK-3000 only) …………………………………………….. E-7
Using the Metronome ……………………………………… E-8
Controlling the
Keyboard Sounds………………….. E-9
Select from a variety of musical
instrument sounds ………………………………………….. E-9
Using Reverb……………………………………………….. E-10
Using a Pedal ………………………………………………. E-10
Changing the Pitch
(Transpose, Tuning) ……………………………………… E-11
Using the Pitch Bend Wheel to
Shift the Pitch of Notes (CTK-3000 Only)…………. E-11
Sampling a Sound and Playing It
on the Keyboard (Sampling)…………………………… E-12
Using a Sampled Sound in a Rhythm
(Drum Assign)………………………………………………. E-14
Playing Built-in Songs …………. E-15
Playing the Demo Songs……………………………….. E-15
Playing Back a Particular Song ………………………. E-15
Using Built-in Songs to
Master Keyboard Play …………..E-19
Phrases ………………………………………………………. E-19
Step Up Lesson Flow ……………………………………. E-19
Selecting the Song, Phrase, and
Part You Want to Practice ……………………………… E-20
Lessons 1, 2, and 3 ………………………………………. E-21
Lesson Settings ……………………………………………. E-22
Using Auto Step Up Lesson …………………………… E-23
Music Challenge
Keyboard Game …………………… E-25
Using Auto Accompaniment…. E-27
Playing the Rhythm Part Only ………………………… E-27
Playing All Parts …………………………………………… E-28
Using Auto Accompaniment Effectively……………. E-30
Using One-Touch Preset ……………………………….. E-31
Connecting External Devices
Connecting a Computer…………………………………. E-32
MIDI Settings ……………………………………………….. E-33
Connecting to Audio Equipment……………………… E-35
….. E-32
Reference…………………………….. E-36
Troubleshooting……………………………………………. E-36
Specifications ………………………………………………. E-38
Operating Precautions …………………………………… E-39
Song List……………………………………………………… E-40
Chord Chart …………………………………………………. E-41
MIDI Implementation Chart
English
Included Accessories
● Music Stand
● Song Book
● Leaflets
• Safety Precautions
• Appendix
• Other (Warranty, etc.)
Items included as accessories are subject to change without notice.
Separately Available Accessories
• You can get information about accessories that
are separately for this product from the CASIO
keyboard catalog available from your retailer, and
from the CASIO website at the following URL.
http://world.casio.com/
E-1
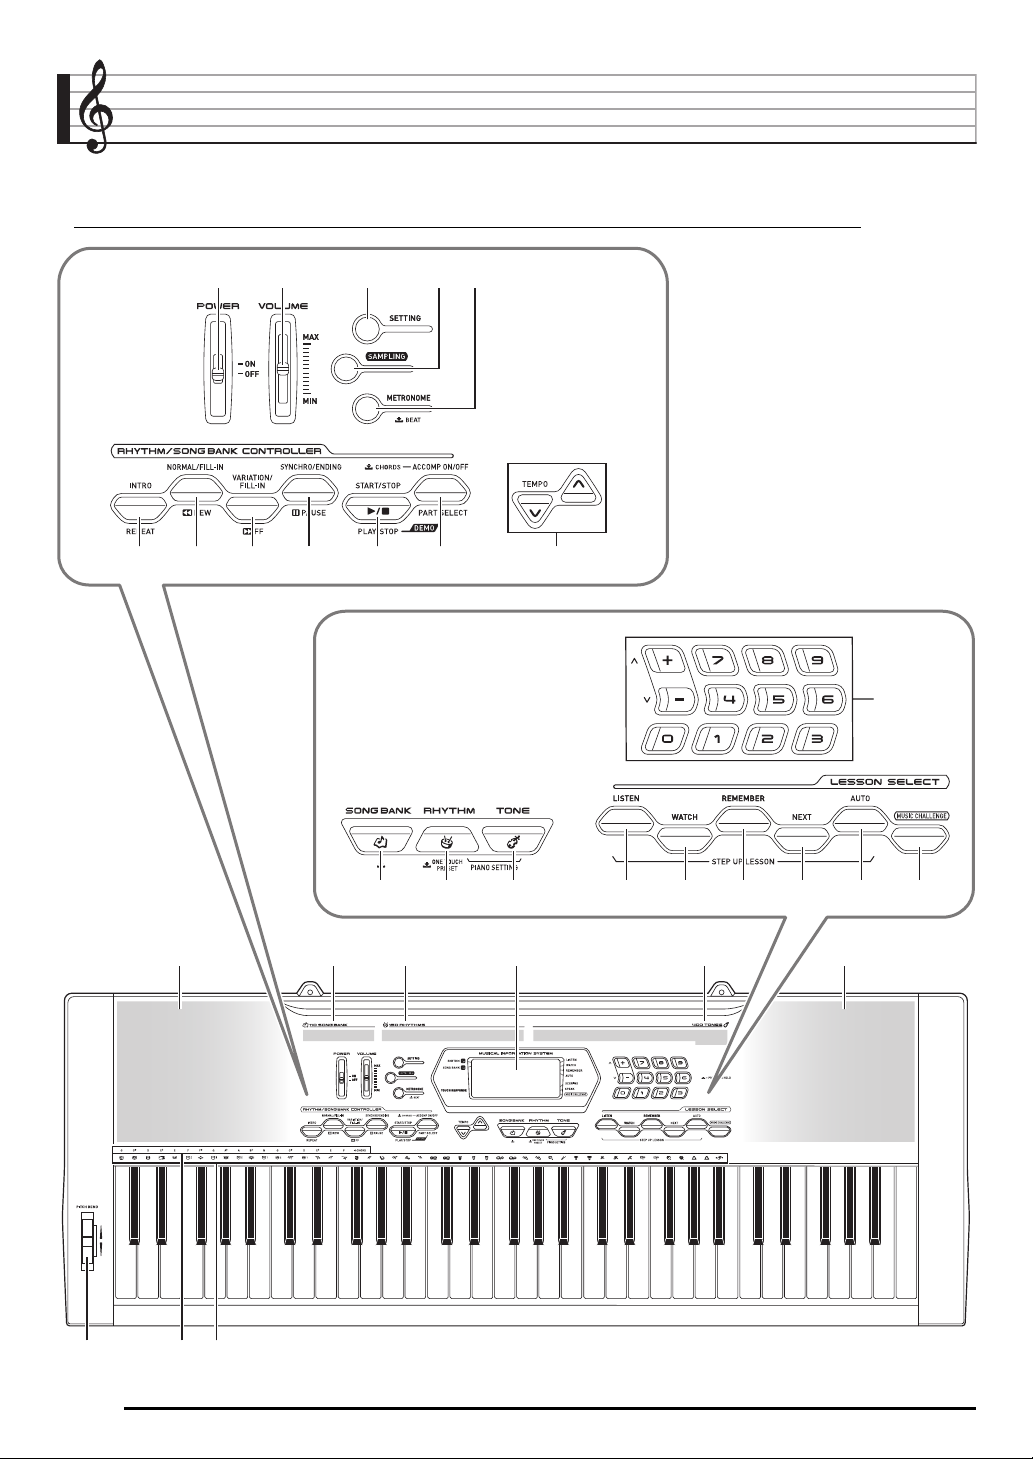
General Guide
• In this manual, the term “Digital Keyboard” refers to the CTK-2000/CTK-3000.
• Illustrations in this User’s Guide show the CTK-3000.
• In this manual, buttons and other controllers are identified using the numbers shown below.
1
2345
789 bmbk bl6
bn
E-2
bo bp bq br bs bt ck cl cm
cn co cp cq cr cn
ct dkcs
General Guide
POWER switch ☞E-6
1
VOLUME slider ☞E-6
2
SETTING button ☞E-4
3
SAMPLING button ☞E-12
4
METRONOME button ☞E-8
5
INTRO, REPEAT button ☞E-16, 17, 22, 30
6
NORMAL/FILL-IN, REW button ☞E-16, 20, 27, 30
7
VARIATION/FILL-IN, FF button ☞E-16, 20, 30
8
SYNCHRO/ENDING, PAUSE button
9
☞E-16, 30, 31
START/STOP, PLAY/STOP button
bk
☞E-15, 16, 18, 21, 22, 27
ACCOMP ON/OFF, PART SELECT button
bl
☞E-15, 18, 20, 22, 28, 34
TEMPO buttons ☞E-8, 17, 31
bm
Number buttons, [–]/[+] buttons ☞E-4
bn
SONG BANK button ☞E-15, 17, 20
bo
RHYTHM, ONE TOUCH PRESET button
bp
☞E-9, 27, 31
TONE button ☞E-6, 9
bq
LISTEN button ☞E-21
br
WATCH button ☞E-21
bs
REMEMBER button ☞E-22
bt
NEXT button ☞E-20
ck
AUTO button ☞E-23
cl
MUSIC CHALLENGE button ☞E-25
cm
Speakers
cn
Song Bank list
co
Rhythm list
cp
Display
cq
Tone list
cr
PITCH BEND wheel (CTK-3000 only) ☞E-11
cs
CHORD root names ☞E-28
ct
Percussion instrument list ☞E-9
dk
English
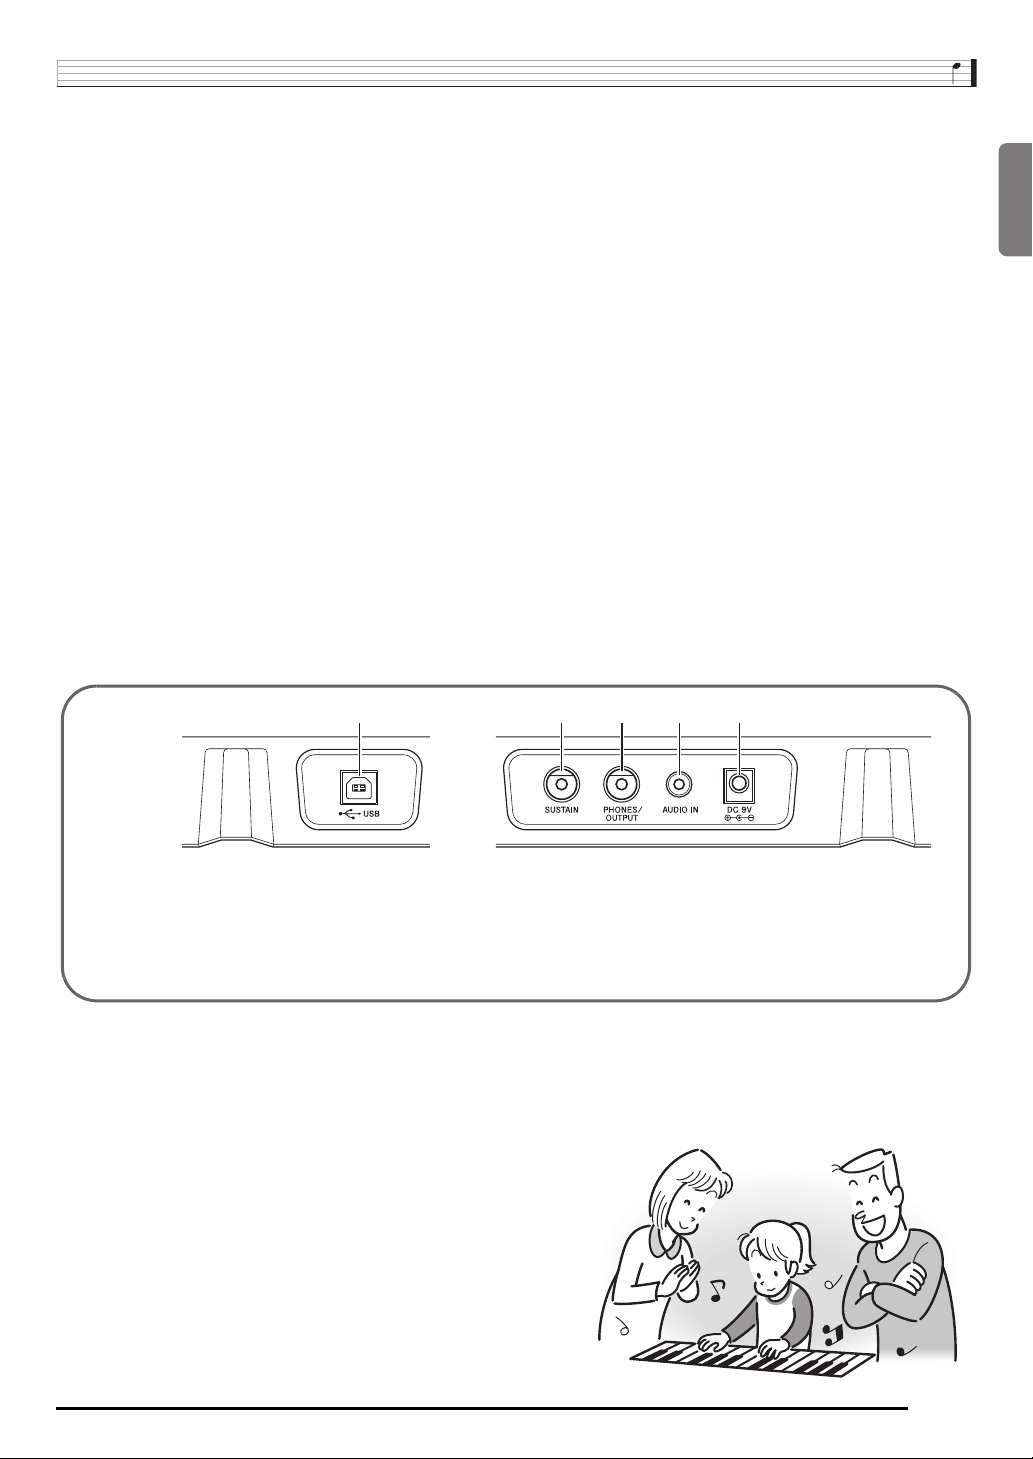
USB port ☞E-32
dl
dl
dm dn do dp
SUSTAIN jack ☞E-10
dm
PHONES/OUTPUT jack ☞E-6, 35
dn
AUDIO IN jack ☞E-12, 35
do
DC 9V terminal ☞E-5
dp
E-3
General Guide
Using the 10-key Pad (bn)
Use the number buttons and the [–] and [+] buttons to change
the settings of the parameters that appear in the upper left
area of the display.
Setting
Mde r nPno
Number Buttons
Use the number buttons to enter numbers and values.
• Enter the same number of digits as the currently displayed
value.
Example: To enter tone number 005, input 0 3 0 3 5.
• Negative values cannot be input using the number buttons.
Use [+] (increase) and [–] (decrease) instead.
[–] and [+] Buttons
You can use the [+] (increase) and [–] (decrease) buttons to
change the displayed number or value.
• Holding down either button scrolls the displayed setting.
• Pressing both buttons at the same time will revert to the
initial default setting or the recommended setting.
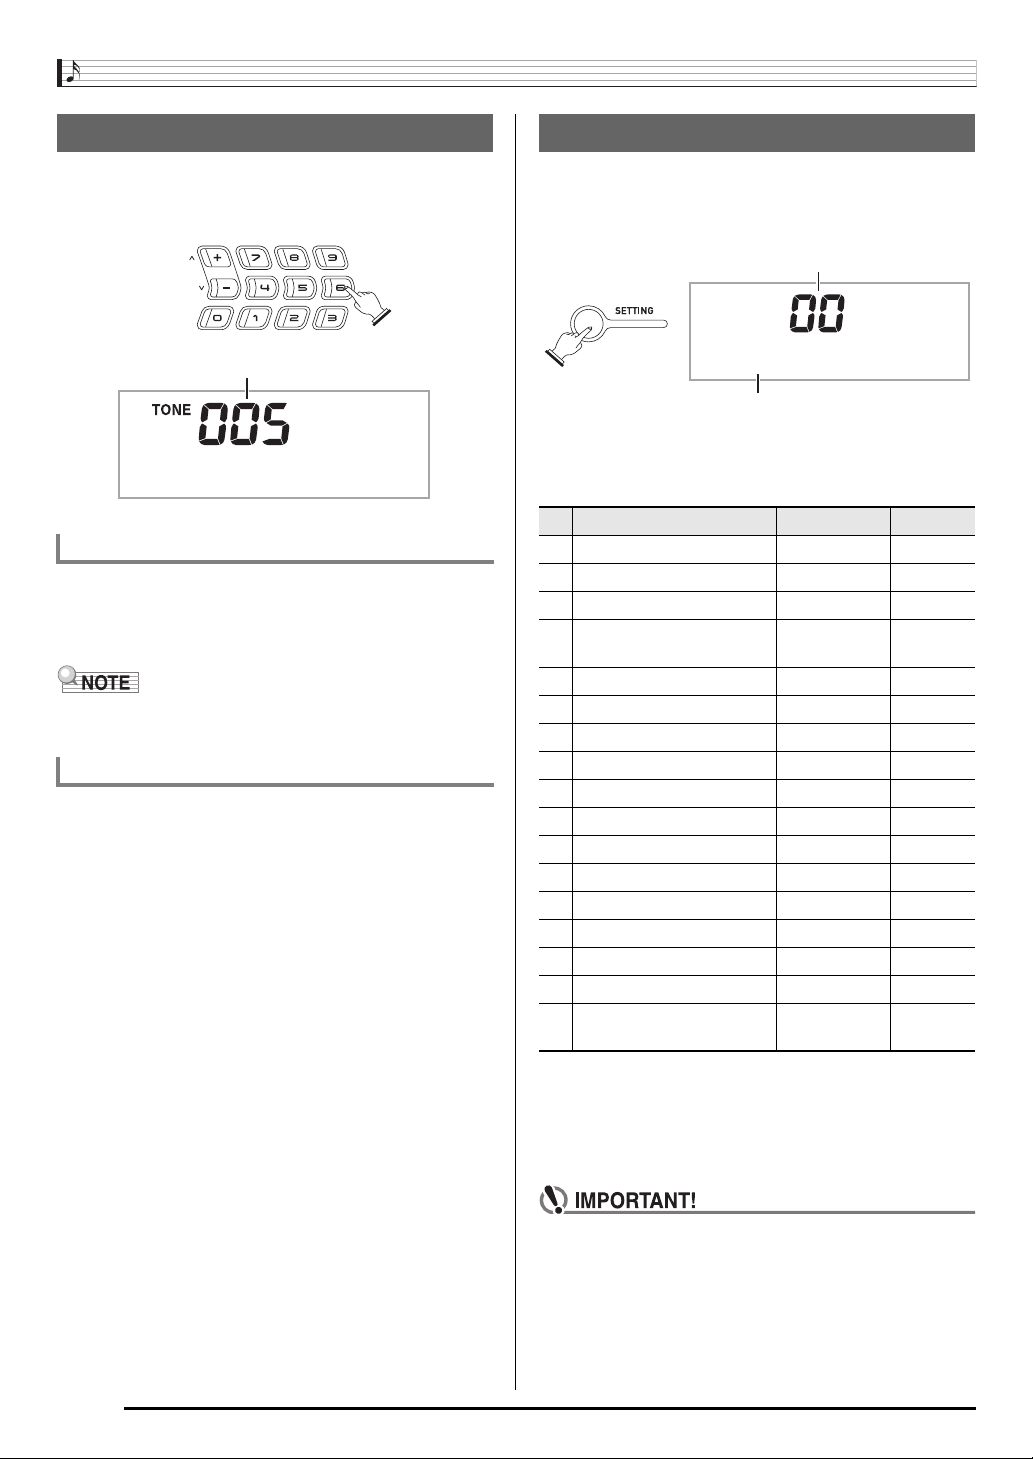
Using the Setting Button (3)
Use the Setting button (
select the reverb type, pedal effect, etc.
1.
Press 3.
) to access settings that let you
3
Setting
T r a n s .
Parameter
2.
Next press 3 until the parameter whose setting
you want to change is displayed.
Each press of 3 cycles through the available parameters.
Parameter Display See Page
1 Transpose Trans. E-11
2 Accompaniment Volume AcompVol E-31
3 Song Volume Song Vol E-17
Touch Response
4
(CTK-3000 only)
5 Tuning Tune E-11
6 Reverb Reverb E-10
7 Voice Fingering Guide Speak E-22
8 Note Guide NoteGuid E-23
9 Performance Evaluation Scoring E-23
10 Phrase PhraseLn E-23
11 Sampling Start SmplAuto E-13
12 Keyboard Channel Keybd Ch E-33
13 Navigate Channels Navi. Ch E-33
14 Local Control Local E-34
15 Accomp Out AcompOut E-34
16 Pedal Effect Jack E-10
Pitch Bend Range
17
(CTK-3000 only)
Touch E-7
Bend Rng E-11
E-4
3.
When the parameter you want is displayed, use
(10-key) to change its setting.
bn
• The parameter setting will disappear from the upper left
area of the screen if you do not perform any operation
for some time.
• The tone and other parameters revert to their initial
defaults whenever you turn on power (page E-6).
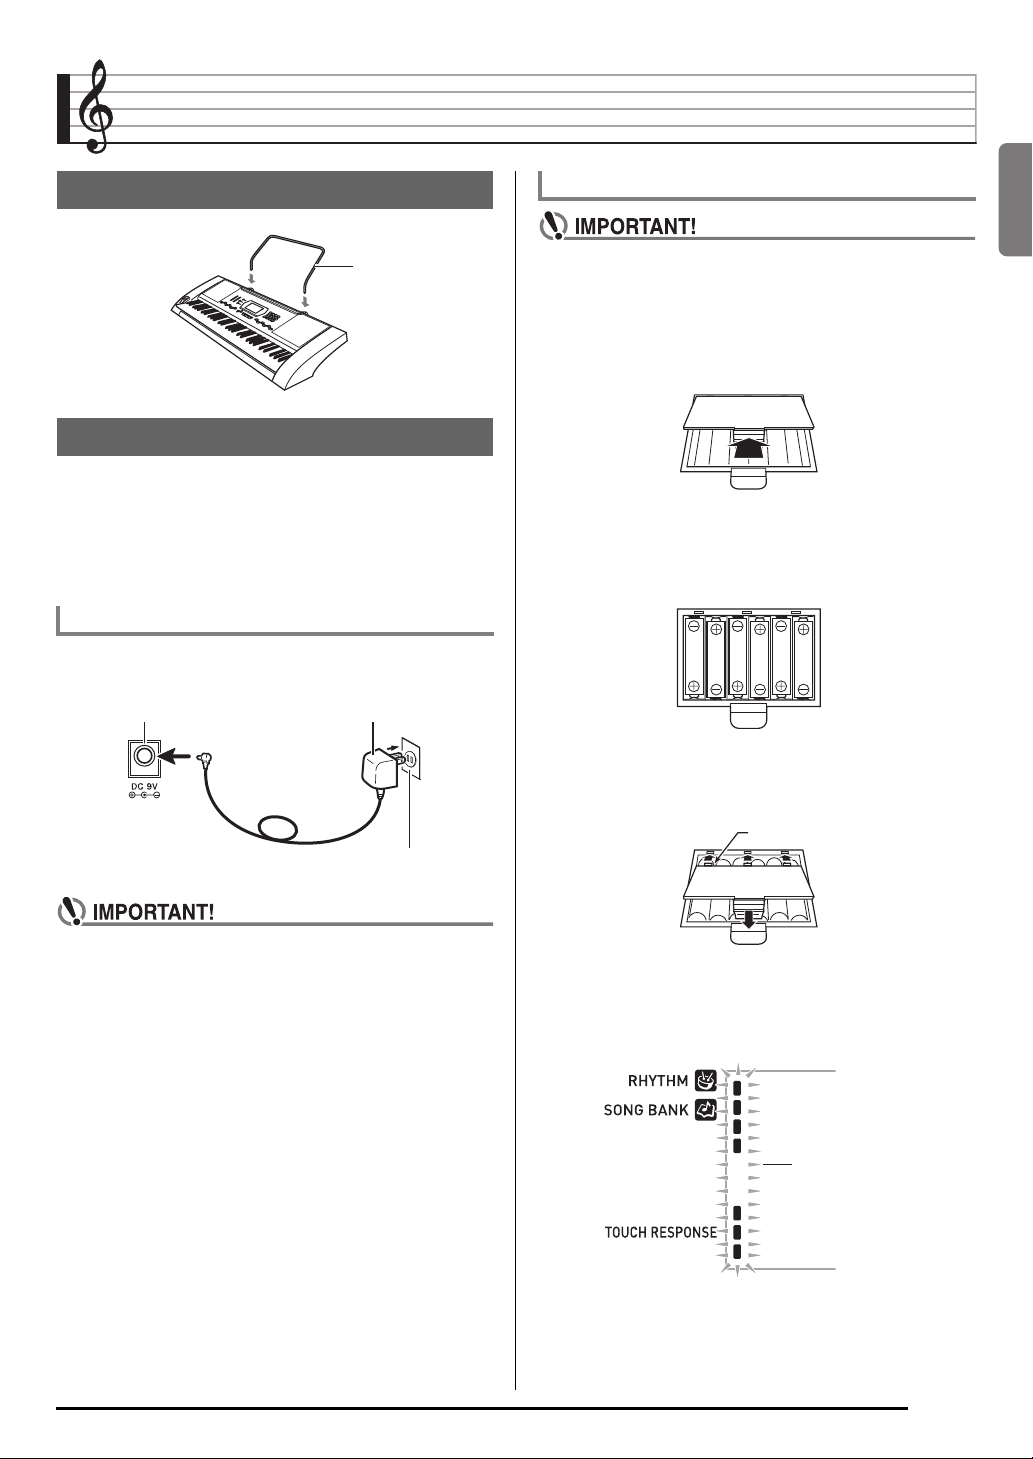
Getting Ready to Play
Preparing the Music Stand
Music stand
Power Supply
Either an AC adaptor or batteries can be used to power this
Digital Keyboard. Normally, use of AC adaptor power is
recommended.
• The AD-5 AC adaptor does not come with this Digital
Keyboard. Purchase it separately from your retailer. See
page E-1 for information about options.
Using the AC Adaptor
Use the AD-5 AC adaptor when you want to power the Digital
Keyboard from a household electrical outlet.
AD-5DC 9V terminal
Household power outlet
Using Batteries
• Be sure to turn off power before loading batteries.
• It is up to you to prepare six commercially available
AA-size batteries. Do not use oxyride batteries or any
other nickel based batteries.
1.
Open the battery cover on the bottom of the
Digital Keyboard.
2.
Load six AA-size batteries into the battery
compartment.
Make sure the positive + and negative — ends of the
batteries are facing as shown in the illustration.
3.
Insert the tabs of the battery cover into the
holes on the side of the battery compartment,
and close the cover.
Tabs
English
• Be sure to turn off Digital Keyboard power before
connecting or disconnecting the AC adaptor.
■ Low Battery Indication
The indicator shown below starts to flash to let you know
when battery power is low. Replace the batteries with new
ones.
Low battery indicator
(flashes)
E-5
Playing the Digital Keyboard
11 22 33 55
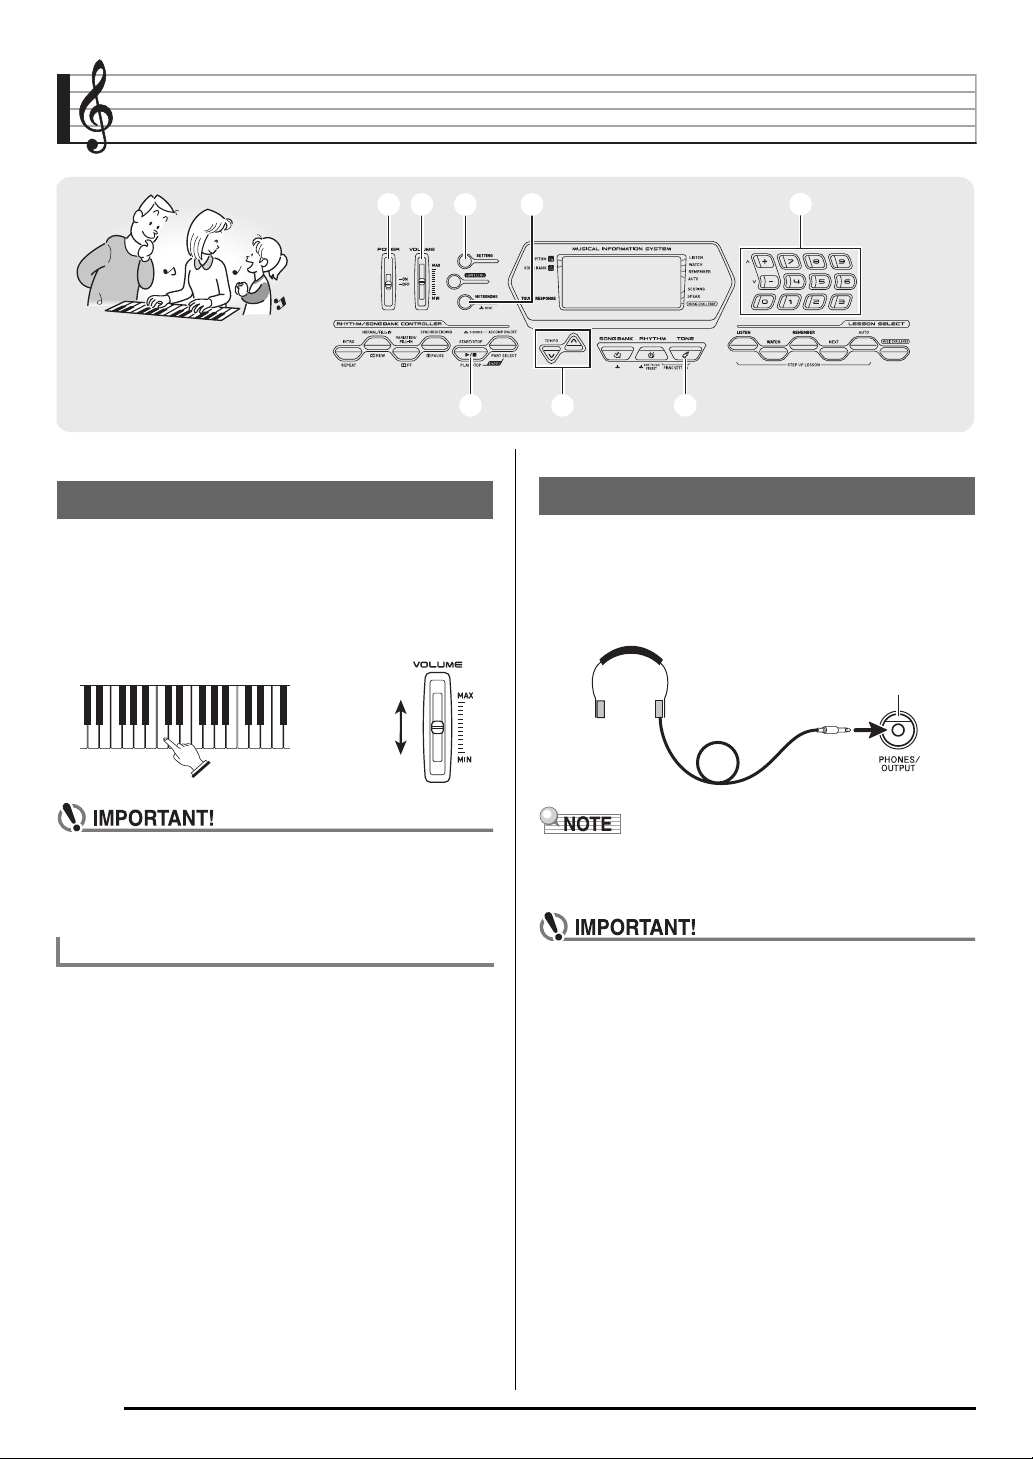
Turning on Power and Playing
1.
Turn on 1.
This turns on power.
2.
Try playing something on the keyboard. Use 2
to adjust volume.
Increase
Decrease
bnbn
bmbm
Using Headphones
Using headphones cuts off output from the built-in speakers,
which means you can practice playing even late at night
without disturbing others.
• Be sure to turn down the volume level before connecting
headphones.
bqbqbkbk
PHONES/OUTPUT jack
• Turning off the keyboard power causes all current
settings and sampled sounds (page E-12) to be cleared.
The keyboard will revert to initial default settings the
next time you turn it on.
Auto Power Off (Using Batteries)
While you are using batteries for power, power will turn off
automatically if you do not perform any operation for about six
minutes. Auto Power Off is disabled while the AC adaptor is
being used for power.
■ Disabling Auto Power Off
You can disable Auto Power Off to ensure that power is not
turned off automatically during a concert, etc.
1.
While holding down bq, turn on power.
Auto Power Off will be disabled.
E-6
• Headphones do not come with the Digital Keyboard.
• Use commercially available headphones. See page E-1 for
information about options.
• Do not listen to very high volume output over
headphones for long period. Doing so creates the risk
of hearing damage.
• If you are using headphones that require an adaptor
plug, make sure you do not leave the adaptor plugged
in when removing the headphones.
Playing the Digital Keyboard
Changing Keyboard Response to
Touch Pressure
(Touch Response)
(CTK-3000 only
Touch Response alters tone volume in accordance with
keyboard pressure (speed). This provides you some of the
same expressivity you get on an acoustic piano.
Keyboard Instrument Sound Intensity
■ Sound intensity depends on the speed that keys
are pressed.
People normally believe that the stronger the pressure applied
to a piano keyboard, the louder the sound. Actually, however,
the intensity of the notes played depends on the speed at
which keys are pressed. Notes are louder when keys are
pressed quickly, and quieter when keys are pressed slowly.
Keeping this in mind as you play a keyboard musical
instrument lets you control note volume without striving to
apply too much pressure with your fingertips.
■ The playability of an acoustic piano
Your Digital Keyboard provides you with key touch that is the
next best thing to an acoustic piano. Note volume changes
automatically in accordance with key press speed.
)
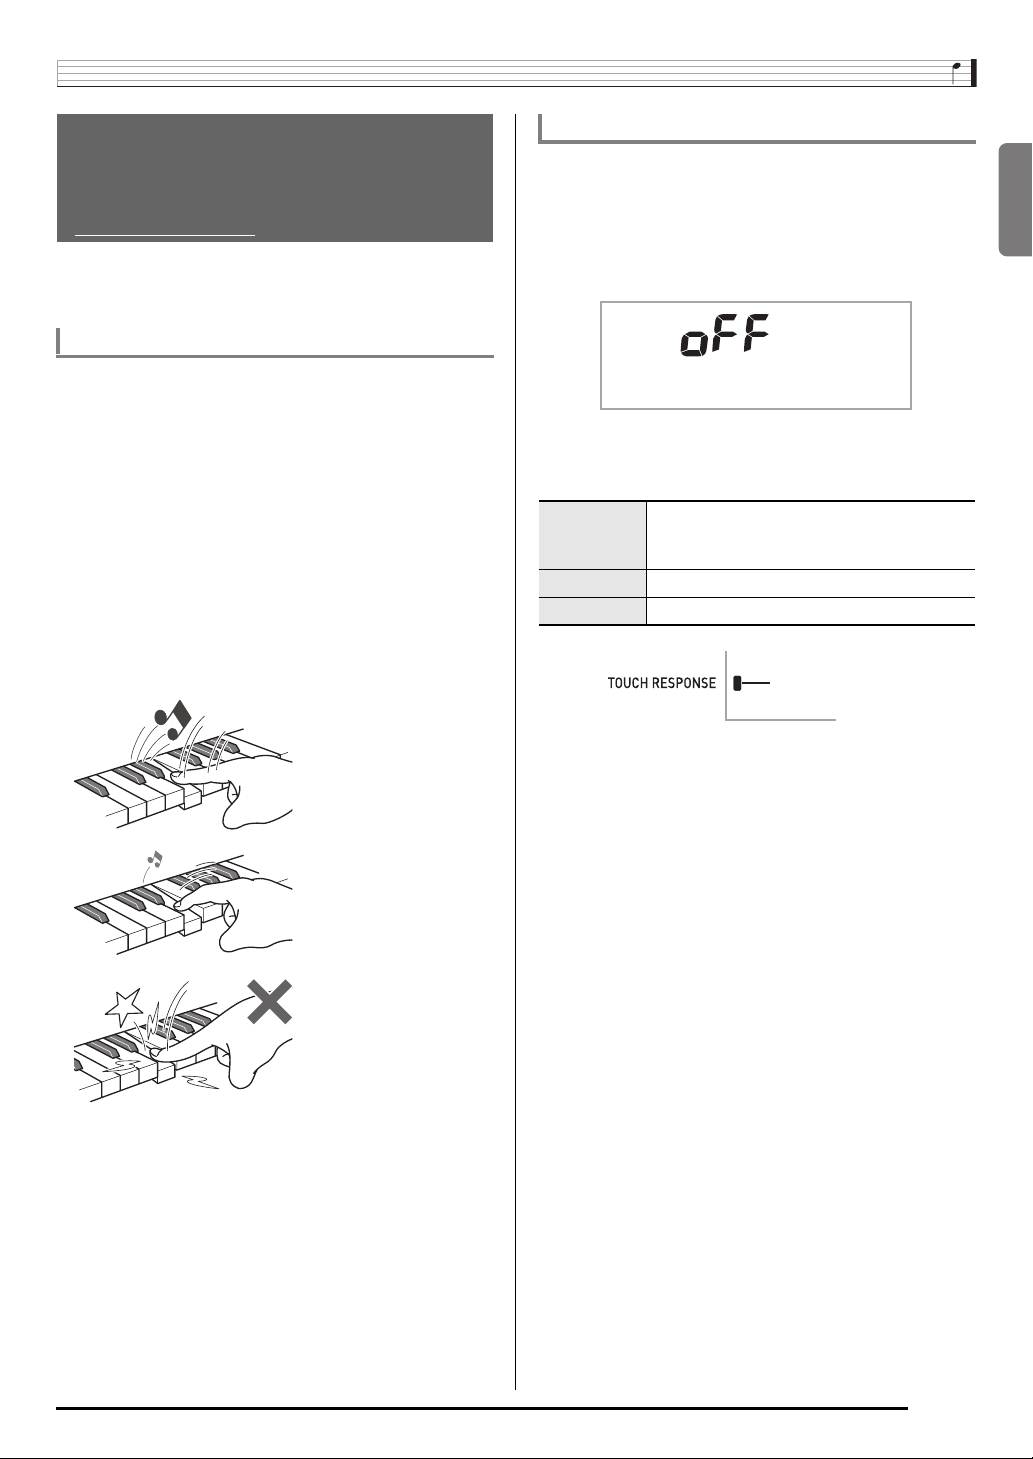
Changing Touch Response Sensitivity
Use the procedure below to control how much the volume of
played notes change in accordance with playing speed.
Select the setting that best matches your playing style.
1.
Press 3 a number of times until “Touch”
appears on the display (page E-4).
T o u c h
2.
Use bn (10-key) [–] and [+] keys to select one of
the three Touch Response sensitivity settings.
Off (oFF) Touch Response is turned off. Sound
volume is fixed, regardless of key press
speed.
Type 1 (1) Normal Touch Response
Type 2 (2) More sensitive Touch Response than Type 1
Indicator disappears when
Touch Response is turned off.
English
Pressing fast produces
louder notes.
Pressing slowly produces
softer notes.
Do not try to use too much
pressure.
E-7
Playing the Digital Keyboard
Using the Metronome
The metronome lets you play and practice along with a steady
beat to help keep you on tempo.
Start/Stop
1.
Press 5.
This starts the metronome.
This pattern changes with each beat.
2.
Press 5 again to stop the metronome.
Changing the Beats Per Measure
You can configure the metronome to use a bell sound for the
first beat of each measure of the song you are playing.
• You can specify 0, or a value from 2 to 6 as the number of
beat per measure.
• When playing a built-in song, the beats per measure setting
(which determines when the bell sounds) is configured
automatically for the currently selected song.
1.
Hold down 5 until the beats per measure
setting screen appears on the display.
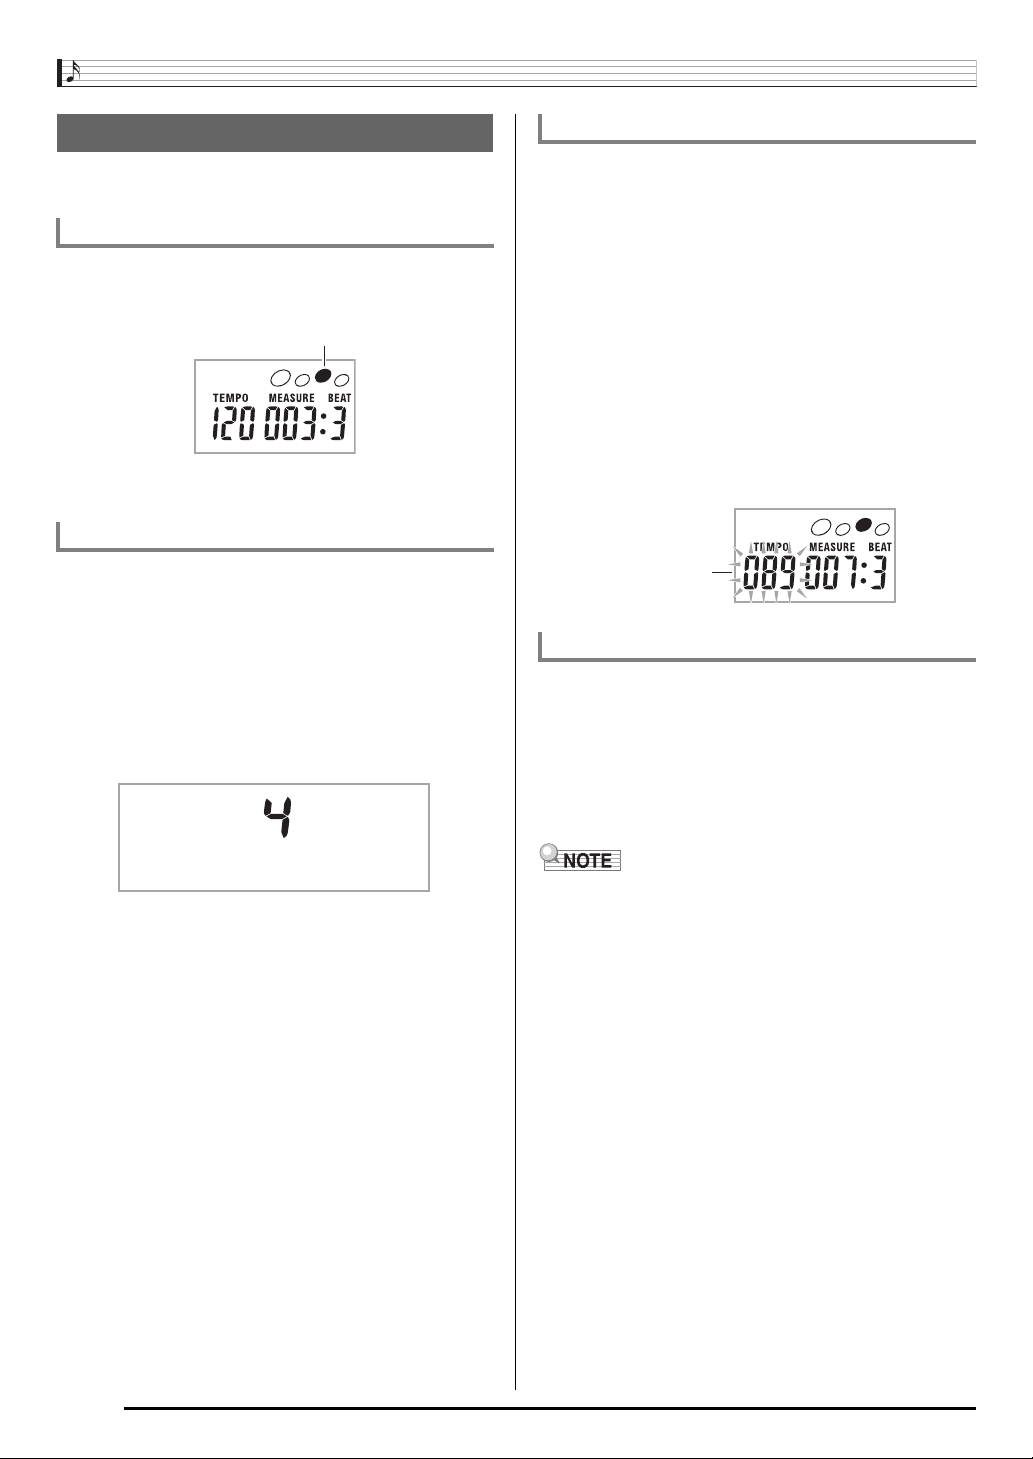
Changing the Metronome Tempo
Use the following procedure to change the tempo of the
metronome.
1.
Press bm.
Use y (slower) and t (faster) to change the tempo
setting. Holding down either button changes the setting at
high speed.
• Pressing y and t at the same time will initialize the
tempo setting in accordance with the currently selected
song or rhythm.
• Pressing
display. While the tempo value is flashing, you can use
(10-key) to change it.
bn
Note that you must input leading zeros, so 89 is input
as 089.
• The tempo value will stop flashing if you do not perform
any operation for a short while.
Tempo value (flashes)
causes the tempo value to flash on the
bm
Changing the Metronome Sound Volume
The metronome volume setting is changed automatically with
the volume level of the currently selected Auto
Accompaniment or song. The metronome volume cannot be
adjusted independently.
• For information about changing the Auto Accompaniment
volume, see page E-31.
• For information about changing the song volume, see page
E-17.
Bea t
• If you do not perform any operation for after the beats
per measure setting screen appears, the display will
return to the screen displayed before you pressed
2.
Use bn (10-key) to enter the number of beats
per measure.
• The bell will not sound if you specify 0 for this setting. In
this case, all beats are indicated by a click sound. This
setting lets you practice with a steady beat, without
worrying how many beats there are in each measure.
E-8
5
• You cannot adjust the balance between the metronome
and note volume during Auto Accompaniment and built-in
tune play.
.
Controlling the Keyboard Sounds
11 33
cscs
Select from a variety of musical
instrument sounds
Your Digital Keyboard lets you select tones for a wide variety
of musical instrument sounds, including violin, flute, orchestra,
and more. Even the same song sound takes on a different feel
by changing the instrument type.
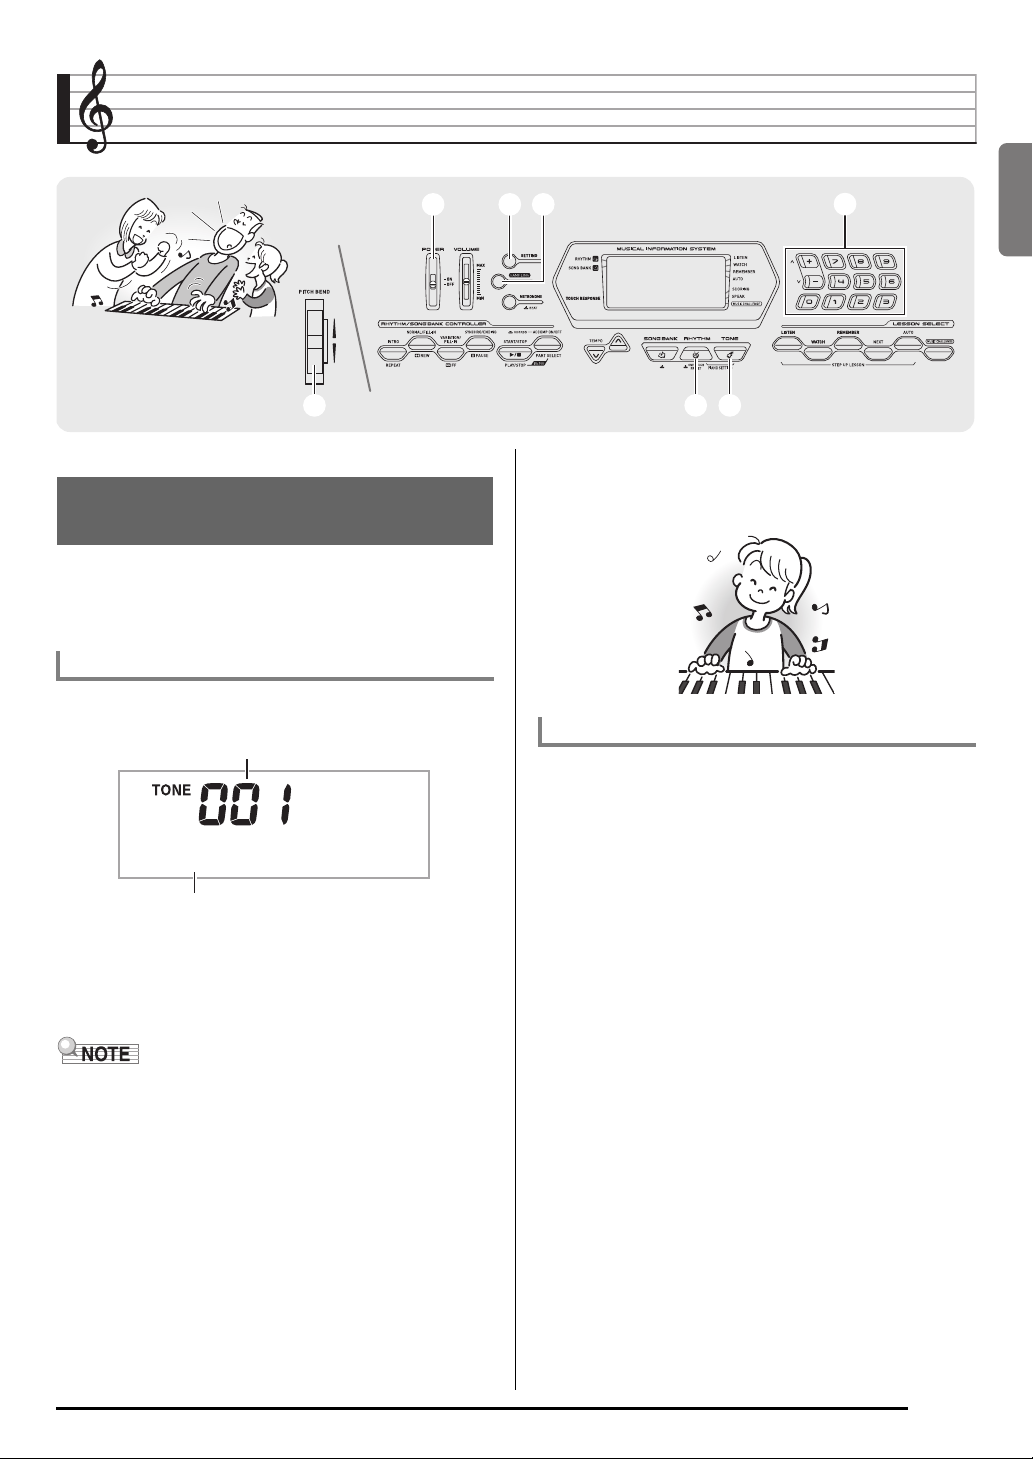
To select an instrument for playing
1.
Press bq.
Tone number
44
bqbq
bpbp
3.
Try playing something on the keyboard.
The tone of the instrument you selected will sound.
Playing with a Piano Tone (Piano Setup)
1.
Press bp and bq at the same time.
This selects the grand piano tone.
bnbn
English
S t . G r P n o
Tone name
2.
Use bn (10-key) to select the tone number you
want.
The corresponding tone number and tone name will
appear on the screen.
• See the separate “Appendix” for a complete list of available
tones.
• You also can find out instrument numbers using the tone
groups printed on the Digital Keyboard’s console.
• Use the number buttons to enter the tone number. Specify
three digits for the tone number.
Example: To select 001, enter 0 3 0 3 1.
• When one of the drum sets is selected (tone numbers 395
through 400), each keyboard key is assigned a different
percussion sound.
Settings
Tone Number: “001”
Reverb: “06”
Transpose: 00
Touch Response: Off:Returns to initial default
On: No change
Pedal Effect: SUS
Rhythm Number: “131”
Accompaniment: Rhythm part only
Local Control: On
Drum Assign: Off
E-9
Controlling the Keyboard Sounds
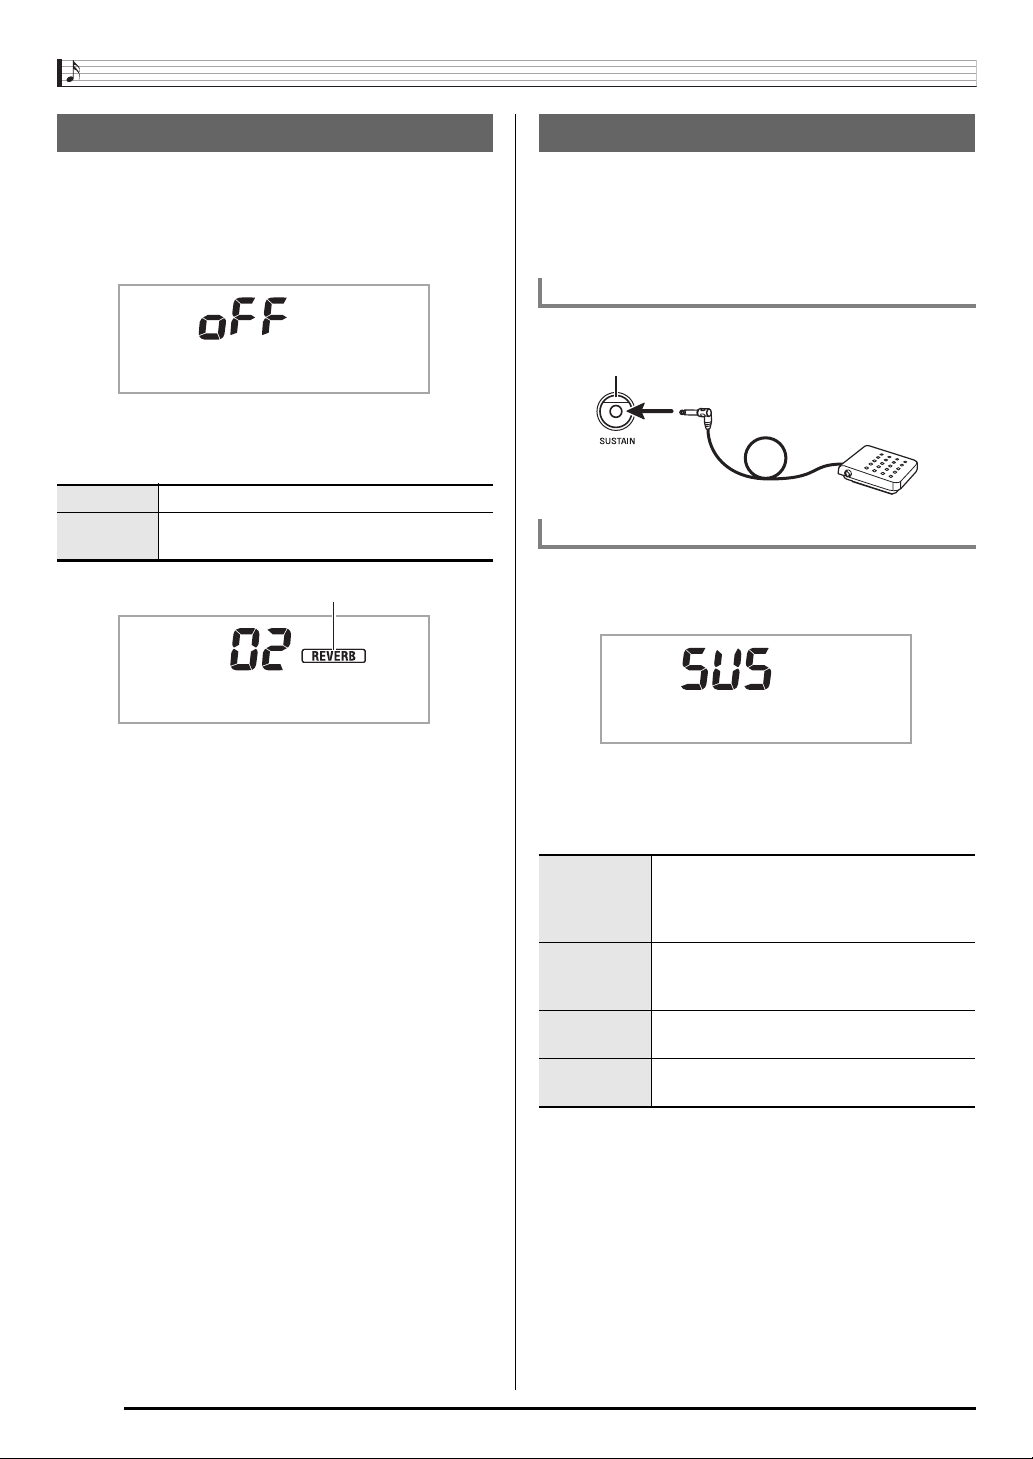
Using Reverb
Reverb adds reverberation to notes. You can change the
duration of the reverb.
1.
Press 3 a number of times until “Reverb”
appears on the display (page E-4).
Reverb
2.
Use the bn (10-key) [–] and [+] keys to select the
reverb setting you want.
Off (oFF) Turns off reverb.
1 to 10 The larger the number selected, the longer
the reverb duration.
Indicator disappears when reverb is turned off.
R e v e r b
Using a Pedal
A pedal can be used to change notes in various ways while
playing.
• A pedal unit does not come with the Digital Keyboard.
Purchase one separately from your retailer. See page E-1
for information about options.
Connecting a Pedal Unit
Connect an optional pedal unit.
SUSTAIN jack
Selecting the Pedal Effect
1.
Press 3 a number of times until “Jack”
appears on the display (page E-4).
J a c k
2.
Use the bn (10-key) [–] and [+] keys to select the
pedal effect you want.
• The following shows the available pedal effects.
Sustain
(SUS)
Sostenuto
(SoS)
Soft
(SFt)
Rhythm
(rHy)
Sustains notes played while the pedal is
depressed. Organ and other similar tone
notes are sustained even if the pedal is not
pressed.
Sustains notes that are playing when the
pedal is depressed before the keyboard
keys are released.
Slightly softens notes played while the pedal
is depressed.
Pressing the pedal starts and stops Auto
Accompaniment or song playback.
E-10

Controlling the Keyboard Sounds
Changing the Pitch
(Transpose, Tuning)
Changing the Pitch in Semitone Steps
(Transpose)
The transpose feature lets you change the pitch, in semitone
steps. A simple operation lets you instantly change the pitch
to match that of a singer.
• The transpose setting range is –12 to +12 semitones.
1.
Press 3.
Trans.
2.
Use the bn (10-key) [–] and [+] keys to select the
transpose setting you want.
Fine Tuning (Tuning)
Use the tuning feature when you need to adjust the pitch
slightly to play along with another musical instrument. Also,
some artists perform their music with slightly altered tuning.
You can use the tuning feature to adjust tuning so it exactly
matches a performance on a CD.
• The tuning setting range is –99 to +99 cents.
1.
Press 3 a number of times until “Tune”
appears on the display (page E-4).
Using the Pitch Bend Wheel to
Shift the Pitch of Notes
(CTK-3000 Only
You can use the pitch bend wheel to slide the pitch of notes
smoothly upwards and downwards. This technique makes it
possible to produce effects that are similar to sounds
produced when bending notes on a saxophone or electric
guitar.
To play with the pitch bend wheel
1.
While playing a note on the keyboard, rotate the
pitch bend wheel on the left of the keyboard
upwards or downwards.
The amount the note bends depends on how much you
rotate the pitch bend wheel.
• Do not have the pitch bend wheel rotated as you turn
on the keyboard.
Specifying the Pitch Bend Range
Use the following procedure to specify how much the pitch of
the note changes whenever the pitch bend wheel is rotated
upwards or downwards. You can specify a range from 0 to 12
semitones (one octave).
)
English
Tune
2.
Use the bn (10-key) [–] and [+] keys to adjust the
tuning.
1.
Press 3 a number of times until “Bend Rng”
appears on the display (page E-4).
B e n d R n
2.
Use the bn (10-key) [–] and [+] keys to change
the range.
g
E-11
Controlling the Keyboard Sounds
Sampling a Sound and Playing It
on the Keyboard (Sampling)
You can use the Digital Keyboard to sample a sound from a
portable audio player, or other device, and then play the
sound with keyboard keys. For example, you could sample
the bark of your dog and then use the sound in a melody. You
also can sample and use passages from a CD. The sampling
feature is a great way to create new sounds that are highly
creative.
Connection
Connect a external device.
Keyboard AUDIO IN jack
CD player, Cassette player,
etc.
Stereo mini plug
• Connection requires commercially available connecting
cords, supplied by you. The connecting cords should have
a stereo mini plug on one end and a plug that matches the
configuration of the external device on the other end.
Sampling a Sound and Playing It
1.
Turn the volume levels of the external device
and Digital Keyboard down.
2.
Turn on the external device and then the Digital
Keyboard.
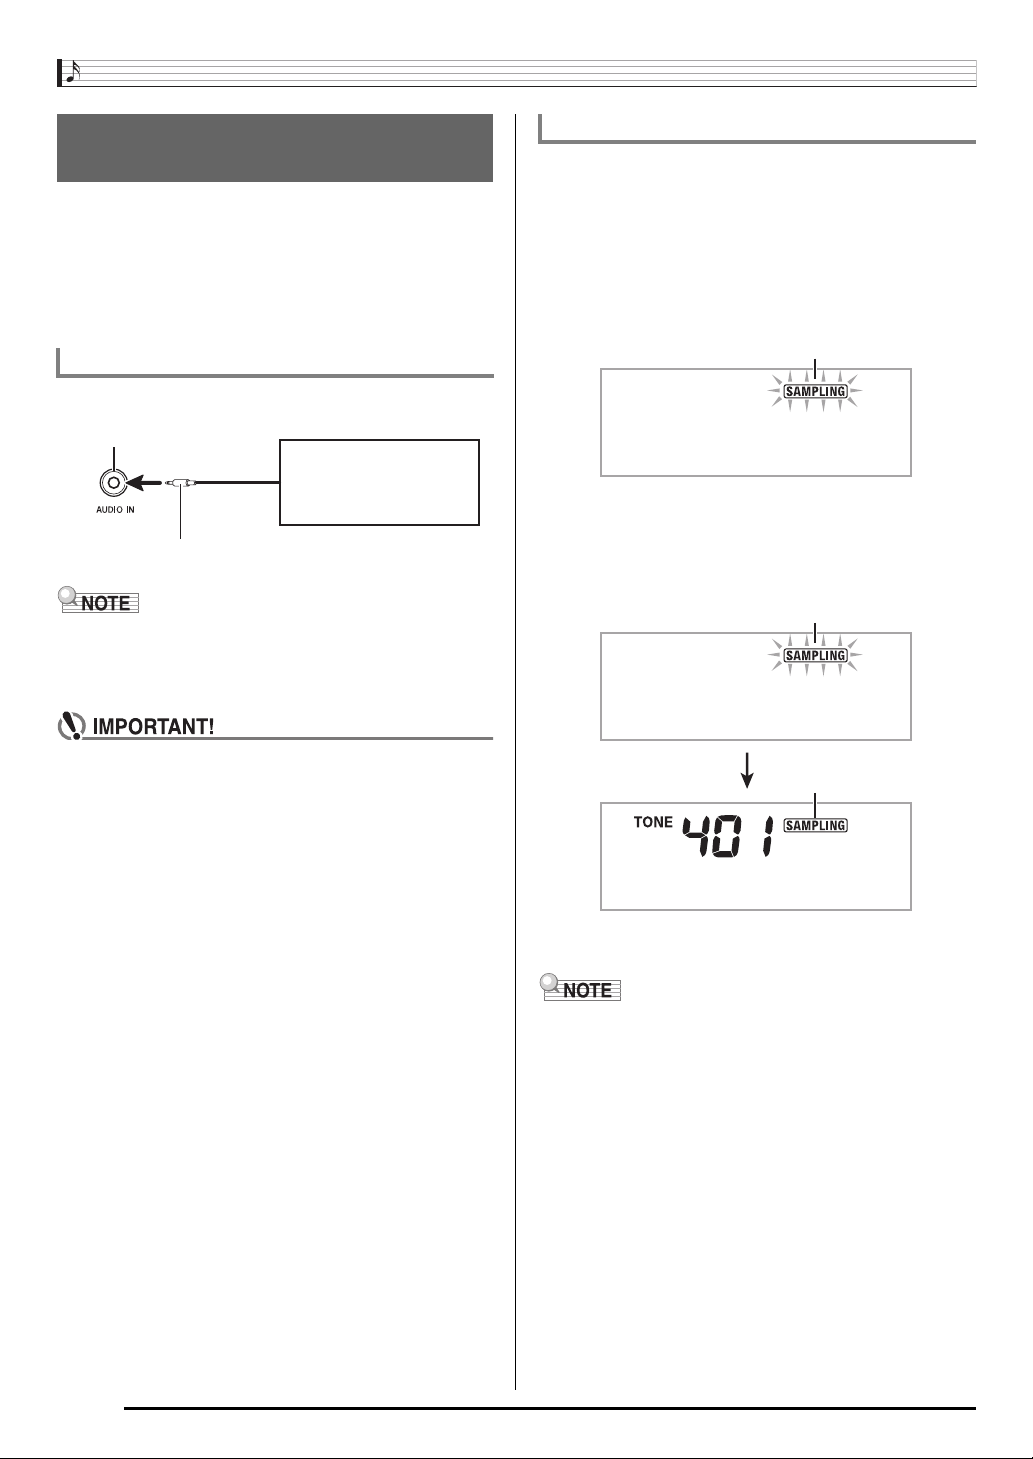
3.
Press 4.
This enters record standby.
Flashes
Flashes
g
W
a i t i n
4.
Output the sound from the external device.
The Digital Keyboard will start sampling automatically,
and stop after one second.
What you sample is stored as tone number 401.
• Turn off the external device and the Digital Keyboard
before connecting them.
• Sampled sounds are recorded in monaural.
S a m p l i n g
Lights
O r i g i n a l
5.
Try playing something on the keyboard.
• Sampling will not start if the volume level of the external
device is too low.
• A new sample replaces sample data currently stored as
tone number 401. The old data is deleted.
E-12
Loading…
РУКОВОДСТВО ПОЛЬЗОВАТЕЛЯ
Пожалуйста, сохраните данное руководство для обращения к нему в дальнейшем.
Правила безопасности
Перед началом эксплуатации инструмента обязательно прочтите брошюру
«Правила безопасности».

УВЕДОМЛЕНИЕ
Данное оборудование проверено и признано отвечающим требованиям класса В для цифровых устройств в соответствии с частью 15
Правил ФКС (Федеральная комиссия связи США). Эти требования разработаны с целью обеспечения соответствующей защиты от вред-
ных излучений при размещении в жилых помещениях. Данное оборудование генерирует, использует и может излучать высокочастотную
энергию и, в случае установки и использования не в соответствии с инструкцией, может вызвать вредное для радиосвязи излучение.
Однако отсутствует гарантия того, что данное излучение не может возникнуть при нестандартном способе установки. Если излучение
данного оборудования вызывает помехи во время приема радио- или телевизионных передач, фиксируемые в то время, когда обору-
дование находится во включенном состоянии, пользователь может попытаться уменьшить помехи с помощью одного или нескольких из
следующих средств:
• Переориентация приемной антенны или установки антенны в другом месте;
• Увеличение расстояния между оборудованием и приемником;
• Подключение оборудования и приемника к разным сетевым розеткам;
• Консультации с поставщиком или опытным радио-/телемастером.
ПРЕДУПРЕЖДЕНИЕ ФКС
Изменения или модификации, не одобренные в прямой форме стороной, ответственной за соответствие стандартам, могут явиться осно-
ванием для лишения пользователя прав пользования данным оборудованием.
Заявление о соответствии
Номер модели: CTK-4000/CTK-5000
Торговая фирма: CASIO COMPUTER CO., LTD.
Ответственная сторона: CASIO AMERICA, INC.
Адрес: 570 MT. PLEASANT AVENUE, DOVER, NEW JERSEY 07801
Телефон: 973-361-5400
Данное устройство отвечает требованиям части 15 Правил ФКС. Работа устройства должна соответствовать следующим двум условиям.
(1) Это устройство не должно вызывать недопустимых помех и (2) это устройство должно подавлять любые принимаемые помехи, включая
те, которые могут вызывать неправильное функционирование.

1
Внимание!
Прежде чем приступать к использованию данного изделия, ознакомьтесь со следующей информацией:
• Прежде чем приступить к использованию адаптера переменного тока (приобретается отдельно) для подачи питания на устройство, убе-
дитесь в отсутствии в адаптере каких бы то ни было повреждений. Тщательно проверьте шнур питания на наличие обрывов, надрезов,
оголенных проводов и других серьезных повреждений. Не позволяйте детям пользоваться серьезно поврежденным адаптером.
• Не пытайтесь перезаряжать батареи.
• Не используйте аккумуляторные батареи.
• Не используйте совместно старые и новые батареи.
• Используйте батареи рекомендованного типа или эквивалентные.
• При установке батарей соблюдайте полярность. Подключайте полюса (+) и (-) в соответствии с обозначениями около батарейного отсека.
• При первых же признаках разрядки как можно скорее заменяйте батареи.
• Не допускайте короткого замыкания полюсов батареи.
• Не допускайте к изделию детей младше 3 лет.
• Используйте только адаптер CASIO AD-5 (для CTK-4000) или AD-12 (для CTK-5000).
• Адаптер переменного тока – не игрушка!
• Перед тем как приступить к очистке изделия, отсоединяйте от него адаптер переменного тока.
Этот знак применяется только в странах Европейского Союза.
Производитель:
CASIO COMPUTER CO., LTD.
6-2, Hon-machi 1-chome, Shibuya-ku, Tokyo 151-8543, Japan
Ответственная сторона в странах Европейского Союза:
CASIO EUROPE GmbH
Bornbarch 10, 22848 Norderstedt, Germany
•
Названия компаний и продуктов, приводимые в данном руководстве, могут быть зарегистрированными торговыми марками других
организаций.
•
Любое воспроизведение содержимого данного руководства, полное или частичное, запрещено. Любое иное использование содер-
жимого данного руководства, помимо использования в ваших личных целях, без согласия компании CASIO запрещено законами об
охране авторских прав.
•
НИ ПРИ КАКИХ ОБСТОЯТЕЛЬСТВАХ КОМПАНИЯ CASIO НЕ НЕСЕТ ОТВЕТСТВЕННОСТИ ЗА ЛЮБОЙ УЩЕРБ (ВКЛЮЧАЯ (НО НЕ ОГ-
РАНИЧИВАЯСЬ ИМИ) УБЫТКИ ОТ УПУЩЕННОЙ ВЫГОДЫ, ПРЕРЫВАНИЯ ДЕЯТЕЛЬНОСТИ И ПОТЕРИ ДАННЫХ), ВОЗНИКАЮЩИЙ В
РЕЗУЛЬТАТЕ ИСПОЛЬЗОВАНИЯ ИЛИ НЕВОЗМОЖНОСТИ ИСПОЛЬЗОВАНИЯ ДАННОГО РУКОВОДСТВА ИЛИ ИЗДЕЛИЯ, ДАЖЕ ЕСЛИ
КОМПАНИЯ CASIO БЫЛА УВЕДОМЛЕНА О ВОЗМОЖНОСТИ ТАКОГО УЩЕРБА.
•
Содержание настоящего руководства может быть изменено без специального уведомления.

2
Общие сведения ………………………. 4
Использование цифровой клавиатуры (
Ƽ
)……………….. 6
Использование кнопки «FUNCTION» [Функция] (
28
28
) ……. 6
Подготовка к игре ……………………… 8
Установка подставки для нот …………………………………. 8
Электропитание …………………………………………………. 8
Игра на инструменте ………………….. 9
Включение питания и игра ……………………………………. 9
Использование наушников ……………………………………. 9
Изменение чувствительности клавиш к нажатию ……… 10
Регулировка контрастности дисплея ……………………… 10
Использование метронома …………………………………. 11
Управление звучанием
инструмента …………………………. 12
Выбор инструментального тембра ……………………….. 12
Наложение двух тембров ……………………………………. 13
Разделение клавиатуры между двумя разными
тембрами ……………………………………………………….. 13
Использование эффекта реверберации …………………. 14
Использование эффекта хорус …………………………….. 14
Использование педали ………………………………………. 15
Изменение высоты звучания
(транспонирование, настройка, сдвиг октавы) …………. 15
Использование колеса отклонения высоты звука
(только для CTK-500)…………………………………………. 16
Создание звуковых сэмплов
и использование их при игре ……….. 17
Подключение и подготовка …………………………………. 17
Создание звукового сэмпла и использование его
в качестве мелодического звука …………………………… 18
Включение звукового сэмпла в набор звуков
ударных инструментов ………………………………………. 20
Другие функции сэмплирования…………………………… 22
Воспроизведение встроенных песен … 25
Воспроизведение демонстрационных песен……………. 25
Воспроизведение определенной песни………………….. 26
Увеличение числа песен …………………………………….. 28
Содержание
Использование встроенных песен
для обучения игре на инструменте …. 29
Фразы …………………………………………………………… 29
Схема последовательности уроков ……………………….. 29
Выбор песни, фразы и партии, которые вы хотите
использовать для обучения …………………………………. 30
Уроки 1, 2 и 3 ………………………………………………….. 31
Настройки уроков …………………………………………….. 32
Использование автоматического переключения
уроков …………………………………………………………….34
Музыкальная игра …………………… 35
Использование
автоаккомпанемента ………………… 36
Воспроизведение только ритмической партии ………… 36
Воспроизведение всех партий ………………………………37
Использование всех возможностей
автоаккомпанемента …………………………………………. 39
Использование функции вызова настроек одним
нажатием …………………………………………………………40
Использование автогармонизации ……………………….. 41
Редактирование моделей
автоаккомпанемента ………………….42
Сохранение настроек инструмента
в регистрационной памяти ……………46
Сохранение настроек в регистрационной памяти……….47
Вызов настроек из регистрационной памяти …………….47
Запись игры на инструменте …………48
Запись и воспроизведение игры на инструменте ……… 48
Использование дорожек для записи
и микширования партий ………………………………………49
Запись двух или более песен и выбор одной
из них для воспроизведения ……………………………….. 51
Запись игры в реальном времени
при воспроизведении встроенной мелодии ……………. 51
Сохранение записанных данных на внешнем
устройстве ……………………………………………………… 52

Другие полезные функции инструмента, Использование карты памяти (только для ctk-5000), Подключение внешних устройств
Справочная информация, Карта внедрения midi Чат поддержки
- Изображение
- Текст
3
Другие полезные функции
инструмента …………………………. 53
Изменение строя инструмента …………………………….. 53
Использование предварительных настроек
инструмента ……………………………………………………. 56
Использование арпеджиатора ……………………………… 56
Удаление пользовательских песен ………………………….57
Удаление всех данных из памяти инструмента ………… 58
Использование карты памяти
(только для CTK-5000) ………………. 59
Меры предосторожности, касающиеся
карт памяти SD и слота для карты ………………………… 59
Загрузка и извлечение карты памяти SD ………………… 60
Форматирование карты памяти SD ……………………….. 60
Сохранение данных, созданных на инструменте,
на карте памяти SD …………………………………………… 61
Загрузка данных с карты памяти SD
в память инструмента ……………………………………….. 62
Удаление данных с карты памяти SD …………………….. 63
Воспроизведение данных с карты памяти SD ……………64
Сообщения об ошибках карты памяти SD ………………..64
Подключение внешних устройств ….. 65
Подключение компьютера ………………………………….. 65
Настройка параметров MIDI ………………………………… 66
Сохранение и загрузка содержимого
памяти инструмента ………………………………………….. 68
Подключение аудиоаппаратуры ……………………………. 69
Справочная информация ……………..70
Поиск и устранение неисправностей ………………………70
Технические характеристики ……………………………….. 72
Меры предосторожности при эксплуатации ……………..73
Сообщения об ошибках ……………………………………….74
Перечень встроенных песен …………………………………75
Карта внедрения MIDI
Содержание
Прилагаемые принадлежности
•
Подставка для нот
•
Сборник песен
•
Брошюры
• Правила безопасности
• Приложения
• Другие (гарантия и т.д.)
Компоненты, прилагаемые в качестве принадлежностей, могут быть
изменены без специального уведомления.
Дополнительно приобретаемые принадлежности
• О принадлежностях, поставляемых дополнительного для дан-
ного изделия CASIO, вы можете узнать из каталога клавишных
музыкальных инструментов, который имеется в наличии в
розничном магазине по продаже инструментов CASIO, а также
на веб-сайте CASIO по следующему адресу.
http://www.casio.ru/

4
• В данном руководстве термин «цифровой клавишный инструмент» означает CTK-4000/CTK-5000.
• На рисунках в данном руководстве показана модель WK-500.
• В данном руководстве кнопки и другие органы управления обозначаются номерами, показанными ниже.
Общие сведения

5
ᕡ Переключатель «POWER» [Питание] 9, 24, 44, 47, 49,
55, 68
· Дисковый регулятор «VOLUME» [Громкость] 9
» Кнопка «PRESET SCALE» [Предустановленный строй]
(CTK-4000)
Кнопка
«SCALE EDITOR» [Редактор строя] (CTK-5000)
53, 54, 55
¿ Кнопка «RECORDER» [Записывающее устройство]
48, 49, 50, 51, 52
´ Кнопка «RHYTHM EDITOR» [Редактор ритмов] 42, 43
² Кнопка «METRONOME» [Метроном], «BEAT» [Доля такта]
11
¶ Кнопка «INTRO» [Вступление], «REPEAT» [Повтор] 27,
32, 39, 42, 43
º Кнопка «NORMAL/FILL-IN» [Обычная модель/Вставка],
«REW» [Прокрутка назад]
26, 30, 36, 39, 42, 43
¾ Кнопка «VARIATION/FILL-IN» [Вариация/Вставка], «FF»
[Прокрутка вперед]
26, 30, 39, 42, 43
µ Кнопка «SYNCHRO/ENDING» [Синхронизация/Концовка],
«PAUSE» [Пауза]
26, 39, 40, 42, 43
¸ Кнопка «START/STOP» [Запуск/Остановка], «PLAY/STOP»
[Воспроизведение/Остановка]
25, 26, 28, 31, 32, 36, 48,
50, 51, 52, 64
¹ Кнопка «ACCOMP ON/OFF» [Включение/выключение
аккомпанемента], «CHORDS» [Аккорды], «PART SELECT»
[Выбор партии]
25, 28, 30, 32, 37, 41, 42, 43, 52, 67
Ƹ Кнопки «TEMPO» [Темп] 11, 27, 40
ƹ Кнопка «TONE» [Тембр], «MUSIC PRESET» [Пред-
варительные настройки]
9, 12, 18, 20, 21, 22, 24, 56
ƺ Кнопка «RHYTHM» [Ритм], «ONE TOUCH PRESET» [Вызов
настроек одним нажатием]
12, 19, 20, 22, 36, 40, 43, 47,
48, 51, 55
ƻ Кнопка «SONG BANK» [Банк песен] 26, 28, 30, 51
Ƽ Цифровые кнопки, кнопки [-]/[+] 6
ƽ Кнопка «BANK» [Банк], «CHORD/TR1» [Аккорд/Дорож —
ка 1], «LISTEN» [Прослушивание]
19, 31, 46, 47
ƾ Кнопка области 1, «TR2» [Дорожка 2], «WATCH» [Просмотр]
19, 31, 46, 47, 50, 55
ƿ Кнопка области 2, «TR3» [Дорожка 3], «REMEMBER»
[Запоминание]
19, 32, 46, 47, 50, 55
21
21
Кнопка области 3, «TR4» [Дорожка 4], «NEXT» [Следующий]
19, 30, 46, 47, 50, 55
22
22
Кнопка области 4, «TR5» [Дорожка 5], «AUTO» [Авто]
19, 34, 46, 47, 50, 55
23
23
Кнопка «STORE» [Сохранение], «TR6» [Дорожка 6], «MU-
SIC CHALLENGE» [Музыкальная игра]
19, 35, 47, 50, 55
24
24
Кнопка «SPLIT» [Разделение клавиатуры]
13, 14
25
25
Кнопка «LAYER» [Наложение тембров]
13, 16
26
26
Кнопка «AUTO HARMONIZE/ARPEGGIATOR» [Автогар-
монизация/Арпеджиатор], «TYPE» [Тип]
41, 56, 57
27
27
Кнопка «SAMPLING» [Сэмплирование]
18, 19, 20,
21, 60
28
28
Кнопка «FUNCTION» [Функция]
6
29
29
Кнопка «CARD» [Карта], «SAVE/LOAD» [Сохранение/
Загрузка] (только CTK-5000)
60, 61, 62, 63, 64
30
30
Динамики
31
31
Перечень музыкальных произведений банка песен
32
32
Перечень предварительных настроек
33
33
Дисплей
34
34
Перечень ритмов
35
35
Перечень тембров
36
36
Колесо «PITCH BEND» [Отклонение высоты звука] (только
CTK-5000)
16
37
37
Названия основных тонов аккордов
37
38
38
Перечень ударных инструментов
12
39
39
Слот для карты памяти SD (только CTK-5000)
60
Общие сведения
Порт USB
65
Гнездо «SUSTAIN/ASSIGNABLE JACK» [Сустейн-педаль/
Многофункциональное гнездо]
15
Гнездо «PHONES/OUTPUT» [Наушники/Выходной сигнал]
(CTK-4000)
Гнездо «PHONES» [Наушники] (CTK-5000)
9, 69
Гнездо «AUDIO IN» [Аудиовход]
17, 69
Гнездо «DC 9V» [9 В пост. тока] (CTK-4000)
Гнездо «DC 12V» [12 В пост. тока] (CTK-5000)
8
Гнездо «LINE OUT R, L/MONO» (только CTK-5000)
69

6
Используйте цифровые кнопки и кнопки [-] и [+] для изменения
установок параметров, отображаемых в верхнем левом углу
дисплея.
Цифровые кнопки
Используйте цифровые кнопки для ввода значений.
• Вводите то же число цифр, что и в текущем отображаемом зна-
чении.
Пример:
Для задания номера тембра 001 введите 0
p 0 p 1.
• Отрицательные значения не могут быть введены с использовани-
ем цифровых кнопок. Для этого используйте кнопки [-] (умень-
шение) и [+] (увеличение).
Кнопки [-] и [+]
Вы можете использовать кнопки [-] (уменьшение) и [+] (увеличение)
для изменения отображаемого значения.
• При удержании одной из кнопок в нажатом состоянии происхо-
дит прокрутка значений.
• Одновременное нажатие обеих кнопок восстанавливает перво-
начальную или рекомендованную установку для данного пара-
метра.
Вы можете использовать кнопку «FUNCTION» (
28
28
) для настройки
эффекта реверберации, удаления данных и для выполнения многих
других операций на цифровом клавишном инструменте.
Как выбрать функцию
1.
Нажмите
28
28
для отображения меню функций.
2.
Используйте кнопки [4] (
) и [6] (
) в секции
Ƽ (цифровая клавиатура) для отображения же-
лаемой функции.
• Вы можете выйти из меню функций путем нажатия
28
28
.
• После выбора одной из функций с 8 по 12 нажмите кнопку
[7] (ENTER [Ввод]) в секции
Ƽ (цифровая клавиатура)
для отображения подменю выбранного пункта меню.
Затем используйте кнопки [4] (
) и [6] (
) для выбора
пункта. Вы можете выйти из подменю функций путем
нажатия кнопки [9] (EXIT [Выход]) в секции
Ƽ (цифровая
клавиатура).
3.
Для получения подробной информации о каждой
функции смотрите указанные страницы данного
руководства.
Общие сведения
Использование цифровой клавиатуры
(
Ƽ)
Использование кнопки «FUNCTION»
[Функция] (
28
28
)
Установка

7
Функция
Индикация
на дисплее
Стра-
ница
1
Транспонирование
Trans.
15
2
Громкость аккомпанемента
AcompVol
40
3
Громкость песни
Song Vol
28
4
Чувствительность к нажатию
Touch
10
5
Настройка
Tune
15
6
Реверберация
Reverb
14
7
Хорус
Chorus
14
8
Сэмплирование
SAMPLING
Автоматический запуск сэмплирования
Автоматическая остановка сэмплирования
Защита звуковго сэмпла
AutoStrt
AutoStop
(Protect)
22
23
24
9
Система поэтапного обучения
LESSON
Голосовой указатель аппликатуры
Указатель нот
Оценка исполнения
Длина фраз
Speak
NoteGuid
Scoring
PhraseLn
32
33
33
33
10
Прочие настройки
OTHER
Задержка арпеджиатора
Эффект педали
Диапазон отклонения высоты звука
(только для CTK-5000)
Строй аккомпанемента
Контрастность ЖК-дисплея
ArpegHld
Jack
Bend Rng
AcompScl
Contrast
57
15
16
55
10
11
Параметры MIDI
MIDI
Канал клавиатуры
Навигационные каналы
Локальное управление
Выход сигналов аккомпанемента
Keybd Ch
Navi. Ch
Local
AcompOut
66
66
67
67
12
Удаление
DELETE
Удаление звукового сэмпла
Удаление пользовательского ритма
Удаление пользовательской песни
Удаление всех данных
(название тембра)
(название ритма)
(название песни)
All Data
23
45
57
58
ВНИМАНИЕ!
• Каждый раз при включении питания инструмента вос-
станавливаются первоначальные установки тембра и
других параметров (стр. 9).
Общие сведения

8
Электропитание этого цифрового клавишного инструмента может
осуществляться от адаптера переменного тока или от батарей. В
обычных условиях для электропитания инструмента рекомендуется
использовать адаптер переменного тока.
• Адаптер переменного тока не входит в комплект поставки циф-
рового клавишного инструмента. Его необходимо прибрести
дополнительно. Информация о принадлежностях инструмента
приведена на стр. 3.
Использование адаптера переменного тока
Используйте адаптер переменного тока для подключения цифрово-
го клавишного инструмента к розетке домашней электросети.
Предусмотренный адаптер переменного тока: AD-5 (CTK-4000)
AD-12
(CTK-5000)
ВНИМАНИЕ!
• Обязательно выключайте питание инструмента, прежде
чем устанавливать батареи.
• Приобретите 6 батарей типоразмера «D» для электропи-
тания инструмента. Не используйте батареи Oxyride или
другие батареи на основе никеля.
1.
Откройте крышку батарейного отсека на днище
цифрового клавишного инструмента.
2.
Установите в батарейный отсек 6 батарей типо-
размера «D».
Убедитесь в том, что положительный и отрицательный
полюса батарей установлены в правильном направлении, как
показано на рисунке.
3.
Вставьте язычки крышки батарейного отсека в
предусмотренные для них пазы по краям бата-
рейного отсека и закройте крышку.
Язычки
Индикация низкого уровня заряда батарей
Когда уровень заряда батарей становится низким, показанный ниже
индикатор начинает мигать, сообщая вам об этом. Замените бата-
реи новыми.
Подготовка к игре
Установка подставки для нот
Электропитание
Подставка для нот
ВНИМАНИЕ!
• Обязательно выключайте цифровой клавишный инстру-
мент перед подсоединением или отсоединением адап-
тера переменного тока.
Использование батарей
Индикатор низкого уровня
заряда батарей (мигает)
Адаптер переменного тока
Розетка домашней электросети
Гнездо «DC 9V» (CTK-4000)
Гнездо «DC 12V» (CTK-5000)

07:17
CASIO CTK-3500 — самый дешевый синтезатор с активной клавиатурой
15:52
Обзор синтезатора Casio CTK 3000
16:24
Обзор синтезатора CASIO CT-X3000
16:43
CASIO CTK-3000 (sound and styles demonstration) HiQ sound
13:33
Casio CT-X3000 — Продвинутый домашний синтезатор
07:08
Sampling on the Casio CTK-3000
01:48
Casio CTK-3000 Keyboard Demo HD
03:29
casio ctk 3000 como controlador MIDI
Нажмите на кнопку для помощи
Перейти к контенту
Синтезаторы, цифровые пианино Casio
- Размер инструкции: 2.13 Мб
- Формат файла: pdf
Если вы потеряли инструкцию от синтезатора, цифрового пианино Casio CTK-3000, можете скачать файл для просмотра на компьютере или печати.
Инструкция для синтезатора, цифрового пианино Casio CTK-3000 на русском языке. В руководстве описаны возможности и полезные функции, а также правила эксплуатации. Перед использованием внимательно ознакомьтесь с инструкцией.
Чтобы не читать всю инструкцию вы можете выполнить поиск по содержимому внутри инструкции и быстро найти необходимую информацию. Рекомендации по использованию помогут увеличить срок службы синтезатора, цифрового пианино Casio CTK-3000. Если у вас появилась проблема, то найдите раздел с описанием неисправностей и способами их решения. В нем указаны типичные поломки и способы их решения.
- Topics
- manualsbase, manuals,
- Collection
- manuals_casio; manuals; additional_collections
- Language
- English
- Item Size
- 5.6M
- Addeddate
- 2020-06-29 08:40:54
- Identifier
- manualsbase-id-79088
- Identifier-ark
- ark:/13960/t1sg1p02n
- Ocr
- ABBYY FineReader 11.0 (Extended OCR)
- Page_number_confidence
- 95.24
- Ppi
- 300
- Scanner
- Internet Archive Python library 1.9.3
plus-circle Add Review
plus-circle Add Review
comment
Reviews
There are no reviews yet. Be the first one to
write a review.
97
Views
DOWNLOAD OPTIONS
download 1 file
ABBYY GZ download
Temporarily Unavailable
DAISY
For users with print-disabilities
Temporarily Unavailable
EPUB
download 1 file
FULL TEXT download
download 1 file
ITEM TILE download
download 1 file
PAGE NUMBERS JSON download
download 1 file
PDF download
download 1 file
SINGLE PAGE PROCESSED JP2 ZIP download
download 1 file
TORRENT download
download 12 Files
download 6 Original
SHOW ALL
IN COLLECTIONS
Manuals: Casio
The Manual Library
Additional Collections
Uploaded by
chris85
on
Как использовать наш сайт инструкций OnlineManuals.ru
Наша цель состоит в том, чтобы предоставить вам быстрый доступ к содержанию инструкции для синтезатора, цифрового пианино Casio CTK-3000.
С помощью онлайн просмотра, Вы можете быстро просмотреть содержимое инструкции и найти решение проблемы с синтезатора, цифрового пианино Casio CTK-3000.
Для Вашего удобства
Если листать руководство пользователя синтезатора, цифрового пианино Casio CTK-3000 прямо на сайте, не очень удобно для Вас, есть два возможных решения:
• Просмотр в полноэкранном режиме — легко просмотреть руководство пользователя (без загрузки его на свой компьютер), Вы можете использовать режим полноэкранного просмотра.
Для просмотра инструкции пользователя синтезатора, цифрового пианино Casio CTK-3000 на полном экране, используйте кнопку «Открыть в Pdf-viewer».
• Загрузка на компьютер — Вы можете также скачать Инструкция синтезатора, цифрового пианино Casio CTK-3000 на свой компьютер и сохранить его в файлах.
Многие люди предпочитают читать документы не на экране, а в печатной версии.
Возможность печати руководства пользователя также была предусмотрена на нашем сайте,
и вы можете использовать ее, нажав на иконку «печать» в Pdf-viewer.
Нет необходимости печатать все руководство синтезатора, цифрового пианино Casio CTK-3000, можно выбрать только нужные страницы инструкции.